

Page 1
GHOST Appendix A A.1
GGHHOOSSTT
NNootteess FFoorr
MMaacchhiinnee CCoonnttrrooll
Appendix
A
Page 2

A.2 GHOST Appendix A
NNootteess ffoorr MMaacchhiinnee CCoonnttrrooll
PPrroottooccooll SSuuppppoorrtt
The following tape machines/protocols are supported:
Machine/Protocol Timecode source
MIDI Timecode master internal
MIDI Timecode slave MTC (Midi Time Code)
Fostex G series MTC (Midi Time Code)
Fostex R series MTC (Midi Time Code)
Fostex RD-8 LTC (Using Midi Machine Control )
Midi Machine Control MTC
Midi Machine Control LTC
MMC Open Loop MTC
LTC Timecode Master LTC
LTC Timecode Slave LTC
Akai DR4 LTC & MTC (Midi Time Code)
Alesis ADAT AI-2 (Midi Time Code)
Alesis BRC MTC (Midi Time Code)
Sony 9-Pin LTC
Sony 9-Pin P2 No Record LTC
Sony UVW 1800P / TascamDA-88 LTC
Tascam DA-88 LTC (Midi Time Code)
Tascam DA-88 MTC (Midi Time Code)
All Trademarks acknowledged.
Page 3

GHOST Appendix A A.3
TTiimmeeccooddee SSuuppppoorrtt
The console will display the last timecode value sent by the tape machine. This
means that, for some machines, when you rewind the tape the displayed timecode
will be that at which the tape was stopped. This will be displayed until the tape is
played again, at which point the display will update to the new value being sent.
To cope with tape dropout the SMPTE reader 'flywheels' for ten frames after
which the timecode stops.
CCoonnttrrooll BBuuttttoonn SSuuppppoorrtt
To provide feedback to the console transport control buttons the tape machine
should support 'tally' messages (i.e., feedback from the tape machine of its status).
If this is not provided the console tries to interpret any timecode being sent to
produce these 'tally' messages internally.
MMIIDDII TTiimmeeccooddee MMaasstteerr
The Ghost uses its own internal clock as a timecode reference for mixing. It also
sends out MIDI timecode. This mode would normally be used with sequencers
which can chase to MTC.
TTrraannssppoorrtt CCoonnttrroollss
Control timecode sent out by the Ghost.
LLooccaattee TToo TTiimmeeccooddee
Supported. (assuming all other devices will chase to MTC)
RReeccoorrdd EEnnaabbllee//RReehheeaarrssee
Not supported.
JJoogg//SShhuuttttllee
Shuttle not supported (Use FF or REW).
Jog mode supported.
SSeettuupp NNootteess
Connect MIDI cable from Ghost to sequencers etc.
MMIIDDII TTiimmeeccooddee SSllaavvee
The Automation slaves to incoming MIDI Timecode. The transport buttons on the
console indicate whether timecode is running, stopped etc. The console transport
controls have no effect on the tape machine.
TTrraannssppoorrtt CCoonnttrroollss
Display only, by using timecode values returned by the tape machine.
SSeettuupp NNootteess
Connect MIDI cable from external MIDI Timecode source to console.
Page 4

A.4 GHOST Appendix A
MMIIDDII MMaacchhiinnee CCoonnttrrooll ((MMTTCC))
This allows the Ghost to work with a tape machine which can be controlled using
the generic MIDI Machine Control (MMC) protocol and which also sends the
timecode as MIDI Timecode (MTC) on the same MIDI output as the MMC tallies.
TTrraannssppoorrtt CCoonnttrroollss
All supported, machine required to send back tallies.
LLooccaattee TToo TTiimmeeccooddee
Supported.
RReeccoorrdd EEnnaabbllee//RReehheeaarrssee
Supported
JJoogg//SShhuuttttllee
Not supported
SSeettuupp NNootteess
See tape machine manual
OOtthheerr NNootteess
Closed loop system required. Open loop users may wish to try the Alesis driver
(Alesis ADAT AI-2), or the MMC Open Loop Driver.
MMIIDDII MMaacchhiinnee CCoonnttrrooll WWiitthh LLTTCC
This allows the Ghost to work with a tape machine which can be controlled using
the generic MIDI Machine Control (MMC) protocol and which sends the timecode
as SMPTE Longitudinal Timecode (LTC).
TTrraannssppoorrtt CCoonnttrroollss
All supported, machine required to send back tallies.
LLooccaattee TToo TTiimmeeccooddee
Supported.
RReeccoorrdd EEnnaabbllee//RReehheeaarrssee
Supported
JJoogg//SShhuuttttllee
Not supported
SSeettuupp NNootteess
Connect SMPTE IN on the Ghost to the Timecode Output of the Tape Machine.
Connect MIDI cables from the Tape Machine MIDI Controller to the Ghost MIDI
IN.
OOtthheerr NNootteess
Closed loop system required.
Page 5

GHOST Appendix A A.5
MMMMCC OOppeenn LLoooopp
This allows the Ghost to work with a tape machine which can be controlled using
the generic MIDI Machine Control (MMC) protocol and which also sends the
timecode as MIDI Timecode (MTC).
TTrraannssppoorrtt CCoonnttrroollss
All supported.
LLooccaattee TToo TTiimmeeccooddee
Supported.
RReeccoorrdd EEnnaabbllee//RReehheeaarrssee
Not Supported
JJoogg//SShhuuttttllee
Not supported
SSeettuupp NNootteess
See tape machine manual
LLTTCC TTiimmeeccooddee ((SSllaavvee))
The Automation slaves to incoming SMPTE Timecode.
This mode would be used for a tape machine which has no interface for the Ghost
to control it, but which has SMPTE Timecode recorded on one track of the Tape
Machine.
TTrraannssppoorrtt CCoonnttrroollss
Display only, by using timecode values returned by the tape machine.The trans-
port buttons on the console indicate whether timecode is running, stopped etc.
SSeettuupp NNootteess
Connect tape machine SMPTE signal to SMPTE IN on the Ghost.
Page 6
A.6 GHOST Appendix A
AAkkaaii DDRR44
AAddddiittiioonnaall HHaarrddwwaarree RReeqquuiirreedd
IB-113M-V3.0 MIDI Interface Board
IB-112T-V3.0 SMPTE/EBU Timecode Interface Board (optional)
TTrraannssppoorrtt CCoonnttrroollss
All supported, except record.
LLooccaattee TToo TTiimmeeccooddee
Supported.
RReeccoorrdd EEnnaabbllee//RReehheeaarrssee
Not supported by the DR4
JJoogg//SShhuuttttllee
Not supported by the DR4
SSeettuupp NNootteess
See the DR4 user documentation.
MIDI INSMPTE OUT
MIDI IN
MIDI OUTSMPTE IN
MIDI OUT
AKAI
DR4
SMPTE lead is only
required if IB-112T
SMPTE interface board is
fitted to the DR4
Page 7
GHOST Appendix A A.7
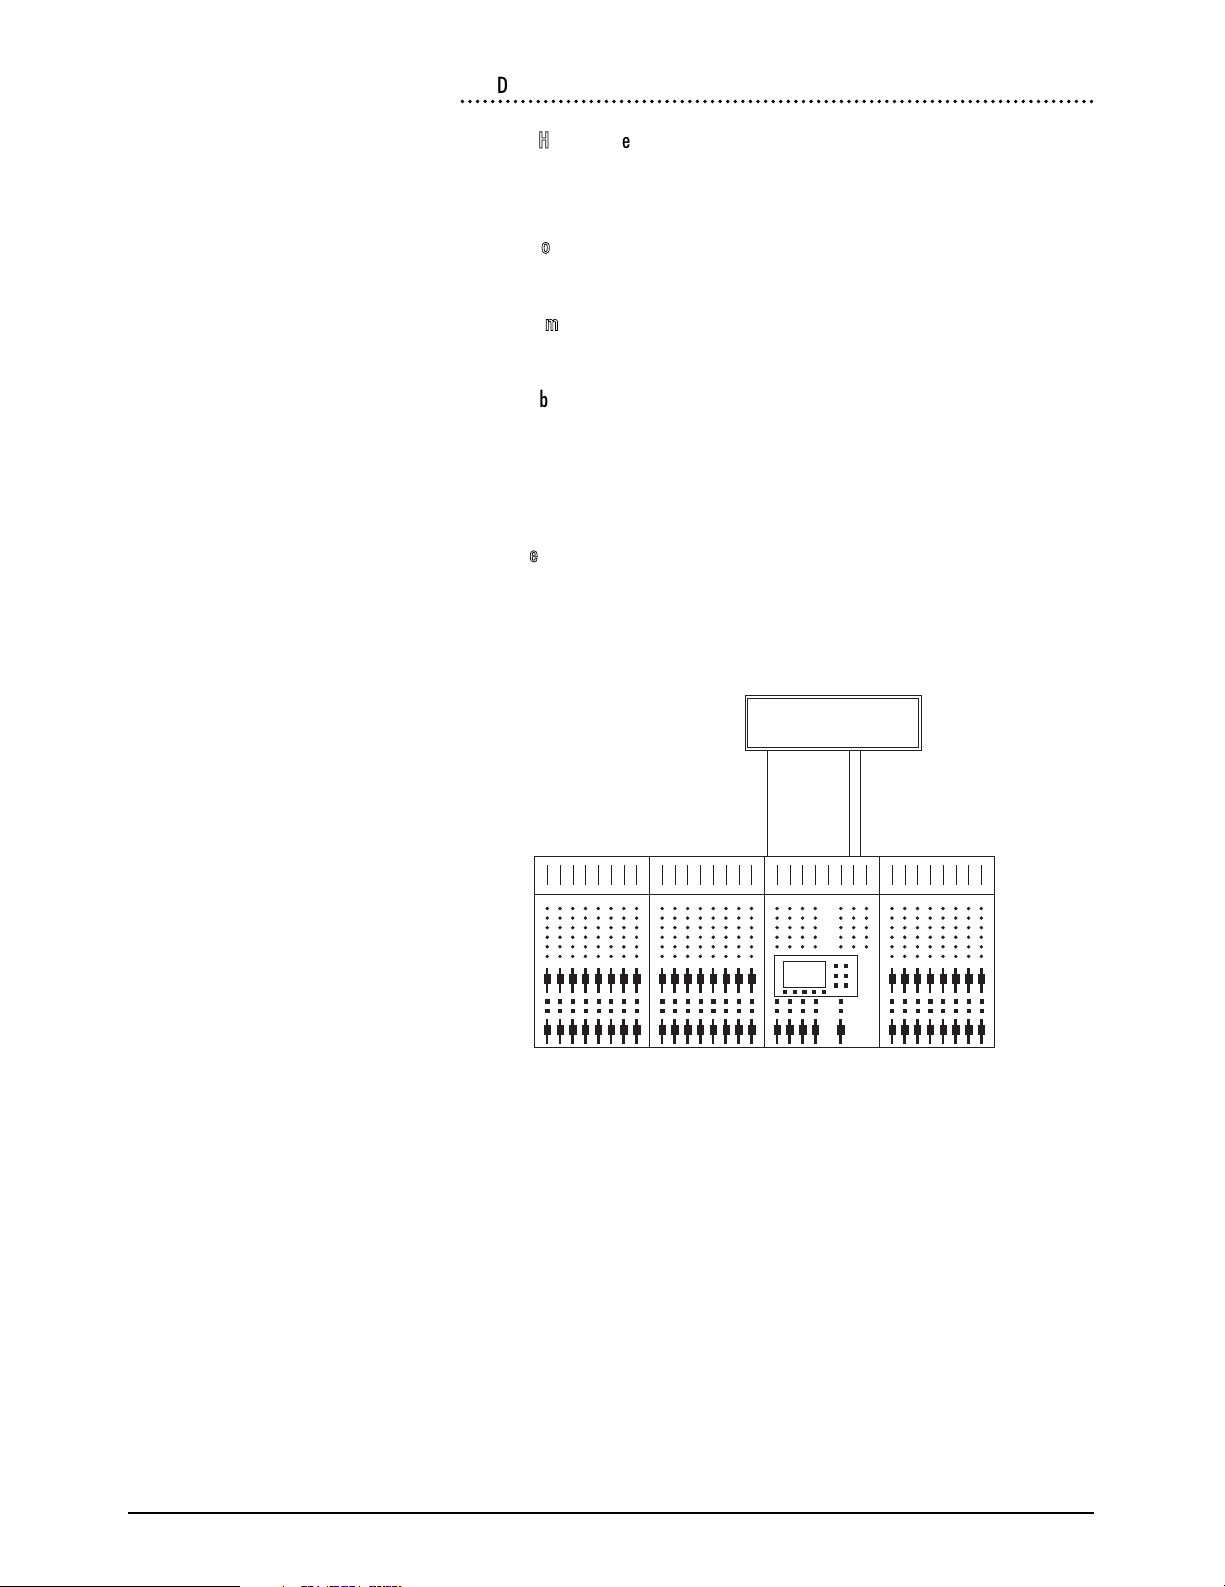
AAlleessiiss AADDAATT ((AAII--22))
AAddddiittiioonnaall HHaarrddwwaarree RReeqquuiirreedd
AI-2 Synchronisation Interface
TTrraannssppoorrtt CCoonnttrroollss
All supported, except record. Display tallies created from MTC fed to the Ghost.
LLooccaattee TToo TTiimmeeccooddee
Supported.
RReeccoorrdd EEnnaabbllee//RReehheeaarrssee
Not supported by the Al-2
JJoogg//SShhuuttttllee
Not supported by the Al-2
SSeettuupp NNootteess
The following parameters should be set-up on the AI-2 Menus.
Menu Submenu Option
Control Mode Auto
MIDI MTC ON
REFERENCE Input IntFix
REFERENCE GEN Play/Wind
REFERENCE GEN STILL ON
The following diagram shows how to connect the MIDI and sync cables.
Put the AI-2 on-line by pressing its ON-LINE switch.
OOtthheerr NNootteess
Open loop control system, uses MMC to control tape machine, may be useful on
other 'dumb' machines.
Page 8
A.8 GHOST Appendix A
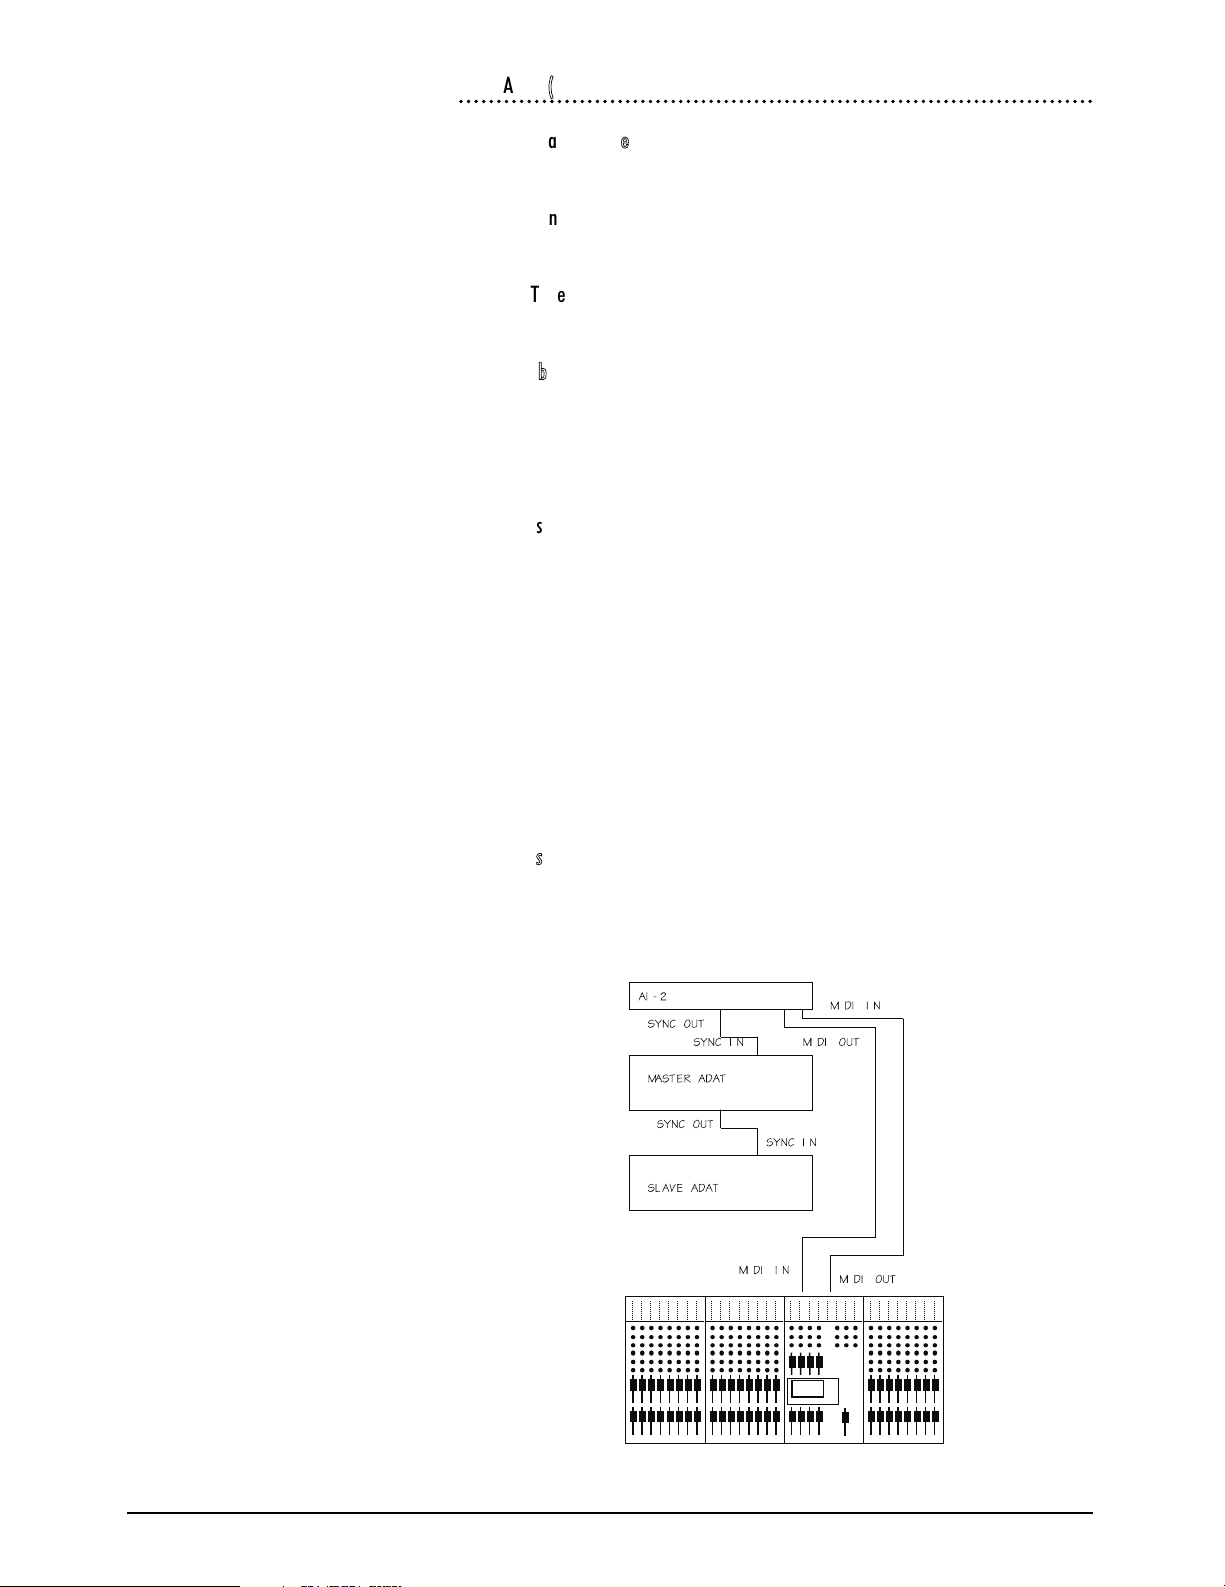
AAlleessiiss BBRRCC ((MMTTCC))
TTrraannssppoorrtt CCoonnttrroollss
All supported, BRC sends back tallies
LLooccaattee ttoo ttiimmeeccooddee
Supported
RReeccoorrdd EEnnaabbllee//RReehheeaarrssee
Supported.
JJoogg//SShhuuttttllee
This function is not supported by Alesis BRC.
SSeettuupp NNootteess
Use the MIDI/UTIL button on the BRC to select page 1 on the LCD display
[ 1. MIDI Echo ]
[ OFF ] Use the ¯ keys to select option to OFF.
Select page 8
[ 8. Output Rew/FF ]
[ SMPTE & MTC ON ] Use the ¯ keys to select option to ON.
Select page 9
[ 9. Sysex Output ]
[ Enable ] Use the ¯ keys to select option to Enable.
Enable the timecode output using the GEN SYNC button on the BRC.
MIDI IN
MIDI IN
MIDI OUT
MIDI OUT
Page 9
GHOST Appendix A A.9
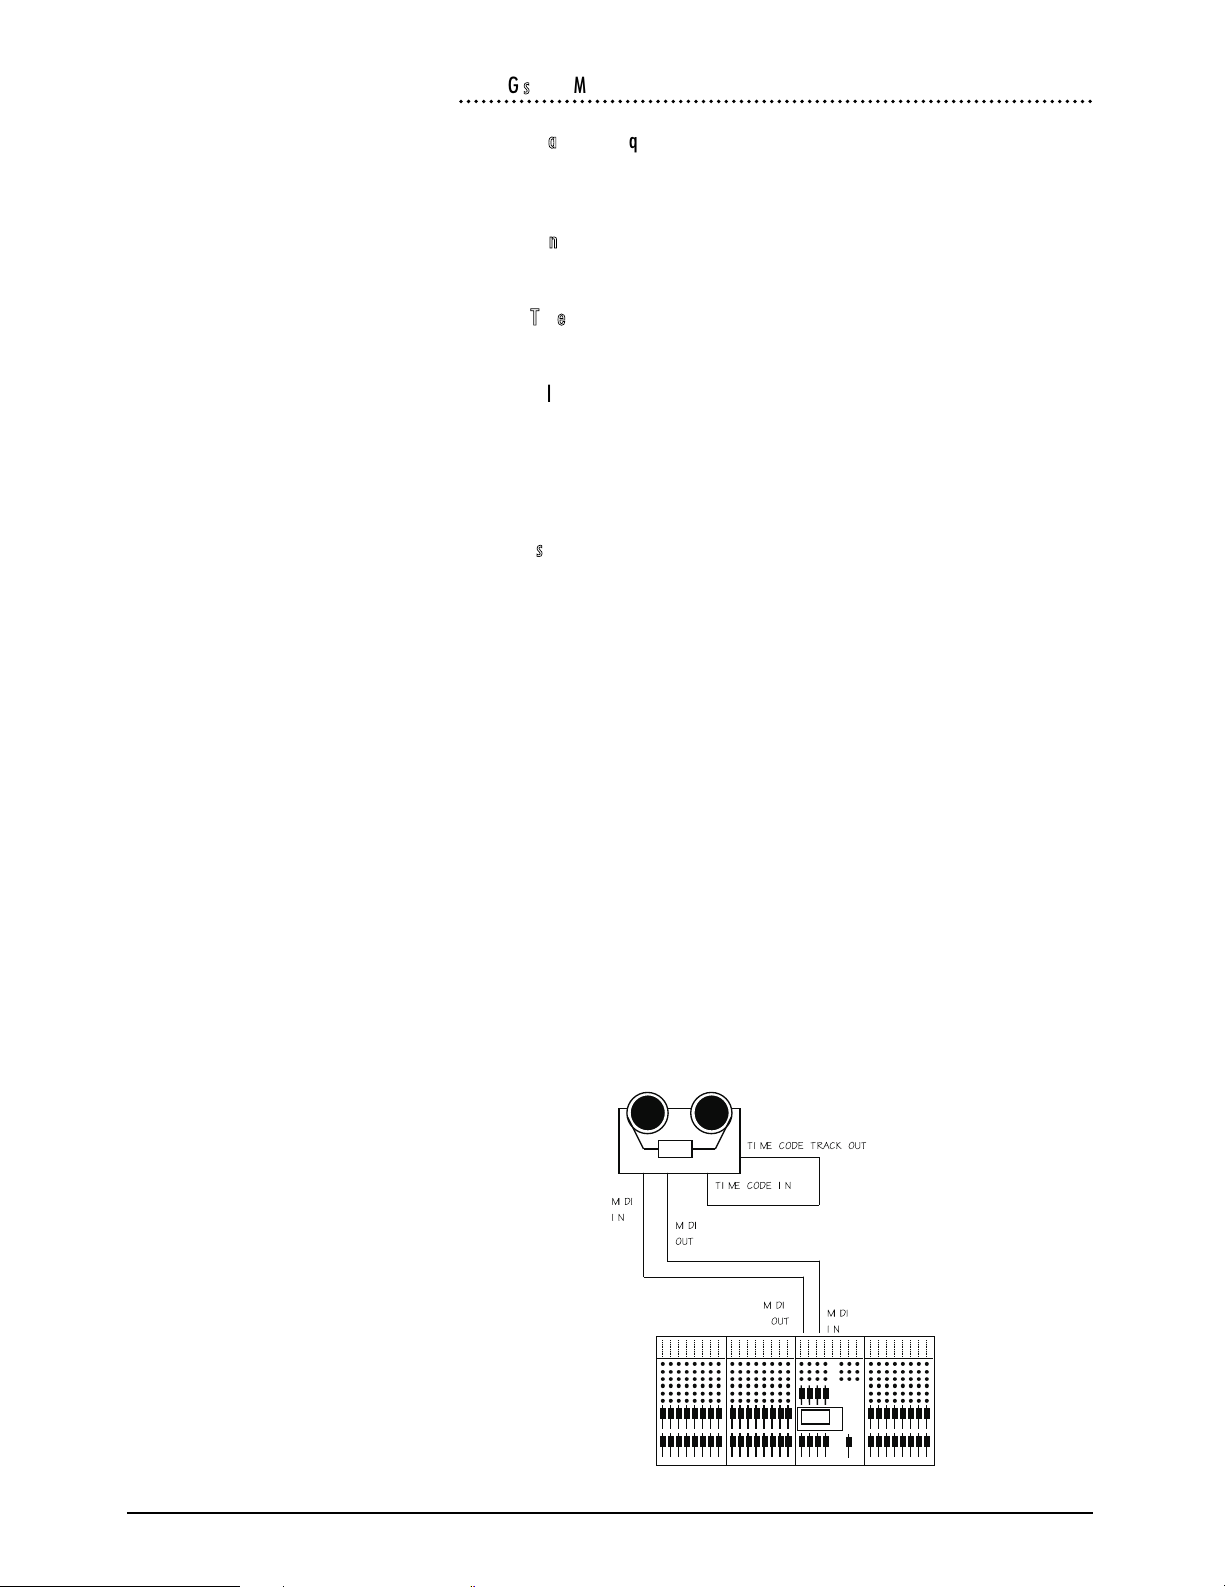
FFoosstteexx GG sseerriieess ((MMIIDDII))
AAddddiittiioonnaall HHaarrddwwaarree RReeqquuiirreedd
G series synchroniser card required, to be fitted to tape machine (Fostex Part no.
8330).
TTrraannssppoorrtt CCoonnttrroollss
All supported, machine sends back tallies.
LLooccaattee TToo TTiimmeeccooddee
Supported.
RReeccoorrdd EEnnaabbllee//RReehheeaarrssee
Supported.
JJoogg//SShhuuttttllee
Not supported by Fostex G series machines.
SSeettuupp NNootteess
The following procedure should be followed on the front panel of the G24 to set-
up the parameters on the synchroniser card.
Hold down RCL, while held down press STO
Type 60, use "." to change to SIO MIDI.
Press STO.
Hold down RCL, while held down press STO
Type 63. Type 01.
Press STO.
Hold down RCL, while held down press STO
Type 64, use "." to change to ADFr oF.
Press STO.
Hold down RCL, while held down press STO
Type 65, use "." to change to change to Chuc oF.
Press STO.
Don't forget to connect timecode output from the tape to CODE IN. See diagram
below.
Page 10
A.10 GHOST Appendix A
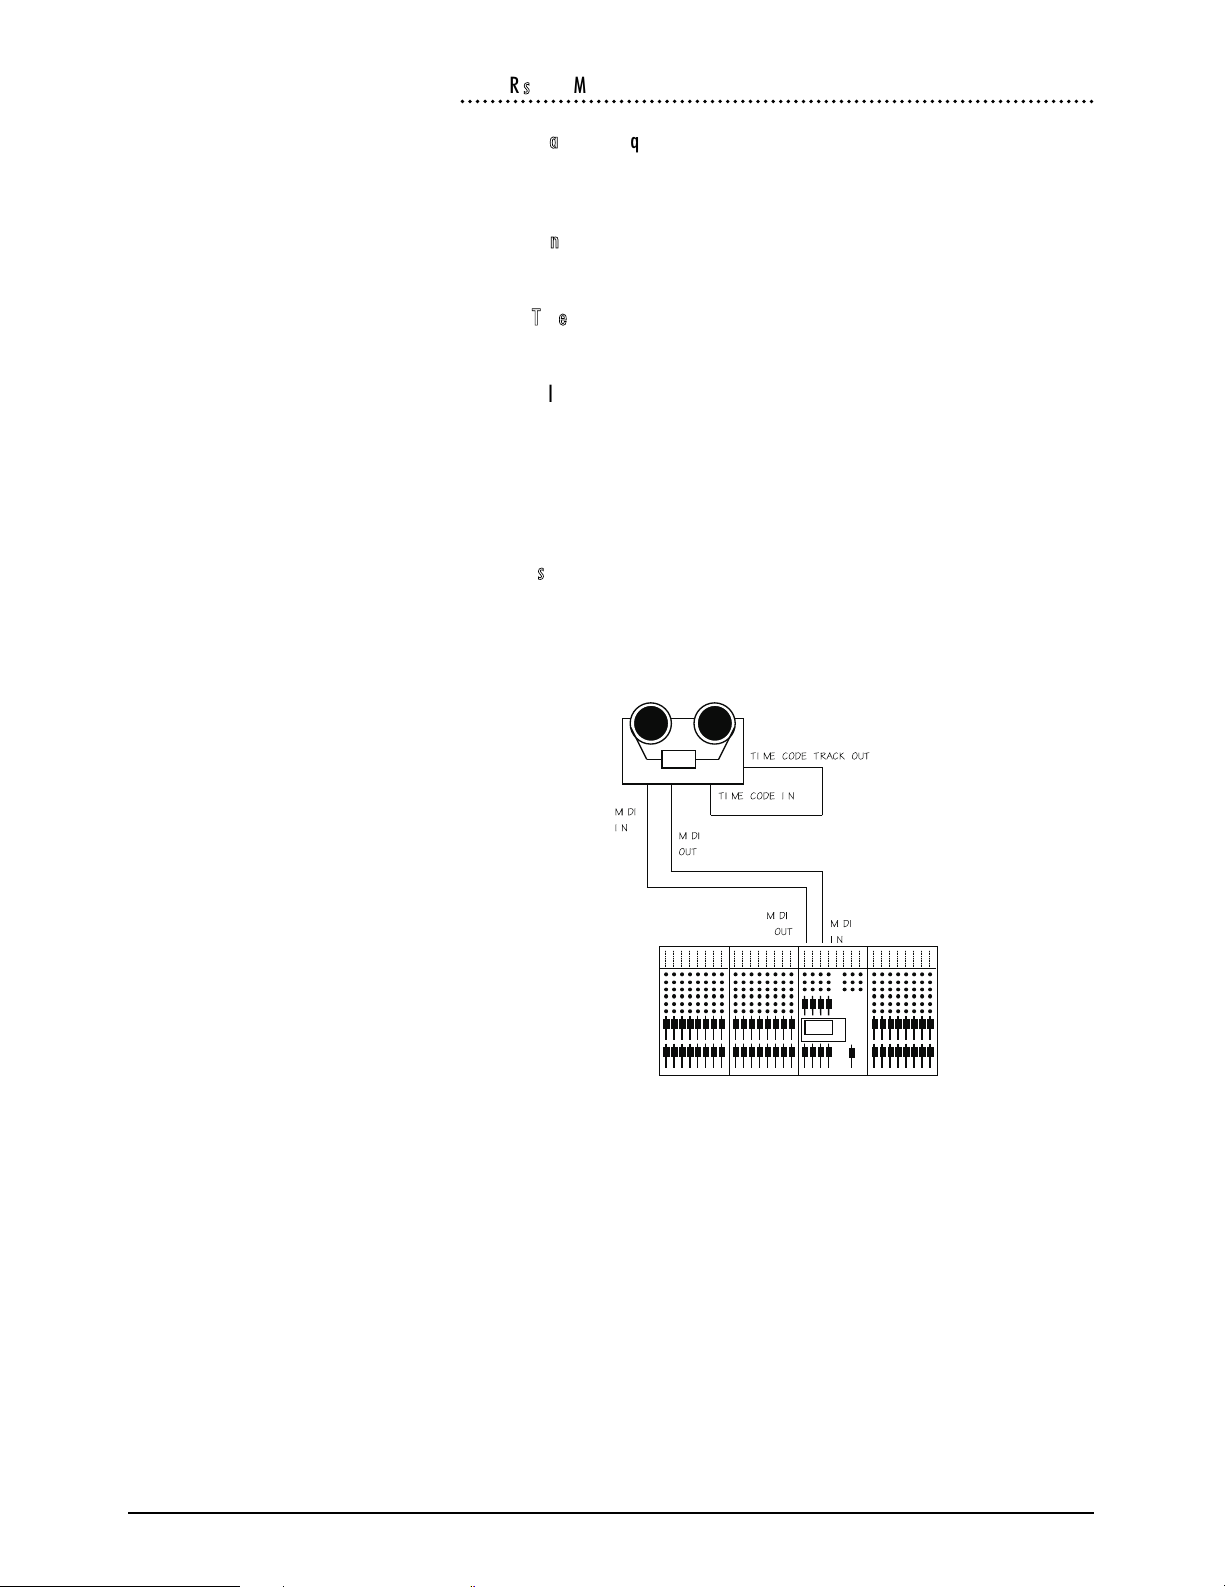
FFoosstteexx RR sseerriieess ((MMIIDDII))
AAddddiittiioonnaall HHaarrddwwaarree RReeqquuiirreedd
Fostex MTC-1 Interface (Software version greater than 1.3 required for full func-
tionality)
TTrraannssppoorrtt CCoonnttrroollss
All supported, machine sends back tallies
LLooccaattee TToo TTiimmeeccooddee
Supported.
RReeccoorrdd EEnnaabbllee//RReehheeaarrssee
Supported. Possible problem with old Fostex exclusive messages on machines ear-
lier than rom revision 1.4.
JJoogg//SShhuuttttllee
Not supported by Fostex R series machines.
SSeettuupp NNootteess
Remember to connect Timecode from tape track to MTC1. See diagram below.
Set dipswitch on back to all zeros except switches 8 & 6.
Page 11

GHOST Appendix A A.11
FFoosstteexx RRDD--88 ((LLTTCC))((MMiiddii MMaacchhiinnee CCoonnttrrooll ))
TTrraannssppoorrtt CCoonnttrroollss
All Supported, Tallies generated by LTC.
LLooccaattee ttoo TTiimmeeccooddee
Supported
RReeccoorrdd EEnnaabbllee//RReehheeaarrssee
This function is supported, but automatic drop-ins are not supported by the
Fostex RD-8 using MMC. (RD-8 Software version 1.04 ).
JJoogg//SShhuuttttllee
This function is not supported by Fostex RD-8.
SSeettuupp NNootteess
Using the buttons on the Fostex RD-8 the following setup is required.
Press button marked Edit Data followed by Remote/Local then F3. This will
select Remote In: Midi.
Deselect Edit Data
Using the Remote/Local Button select both modes ( RED and GREEN LED on).
Press Home button to access the main menu. Using the Next button select main
menu 3.
Press F3 to select TCFrame. If the Tape is striped with Timecode then Press or
¯ To select TCOut FR TAPE. If the tape has no Timecode on it then Press or ¯
To select TCOut FR 24, 25, 29.97df or 30.
Press Home button to access main menu. Using the Next button select main
menu 4.
Press F1 to select TCRew. Press or ¯ To select TC REW/FWD to ON.
Press Home to select Main menu 4. Using the Next button select main menu 6.
Select MMCOut by pressing F3. Press or ¯ To select MMC Output: to ON.
MIDI INSMPTE OUT
MIDI IN
MIDI OUTSMPTE IN
MIDI OUT
Fostex
RD-8
Page 12

A.12 GHOST Appendix A
SSoonnyy UUVVWW 11880000PP // DDAA--8888 (( LLTTCC))
On selecting this mode, the Tascam DA-88 is put into chase mode and will chase
in-coming timecode. The timecode from the Sony VTR is linked to both the time-
code input of the DA-88 and the SMPTE in of the Ghost. In this configuration the
Ghost sends all transport command to the Sony video machine, but sends record
command and the track record enables to the Tascam DA-88.
AAddddiittiioonnaall HHaarrddwwaarree RReeqquuiirreedd
SY-88 Card fitted to DA-88.
Ghost to Sony 9 Pin interface cable.
TTrraannssppoorrtt CCoonnttrroollss
Supported.
LLooccaattee ttoo TTiimmeeccooddee
Supported.
RReeccoorrdd EEnnaabbllee//RReehheeaarrssee
Record commands not sent to Sony. Command routed to Tascam DA-88.
JJoogg//SShhuuttttllee
Supported.
SSeettuupp NNootteess
For Tascam DA-88 see [TASCAM DA-88 (MTC) ]
Sony UWV 1800p (or any Sony 9p machine) must be set to remote.(9 pin
remote).
1
2
3
4
5
6
7
8
9
1
2
3
4
5
6
7
8
9
This end
connects to
Sony 9-Pin
Machine
Female ’D-Type’Male ’D-Type’
Gnd
Tx +
Tx Not used
Not used
Not used
Not used
Rx -
Rx +
This end
connects to
Ghost
Sony UVW 1800P
Tascam DA-88
9 Pin
Remote
Timecode out
Timecode
In
MIDI IN
MIDI OUT
PORT 3
SMPTE IN
MIDI OUT
MIDI IN
Page 13

GHOST Appendix A A.13
TTAASSCCAAMM DDAA--8888 ((LLTTCC))
AAddddiittiioonnaall HHaarrddwwaarree RReeqquuiirreedd
SY-88 card fitted to DA-88.
TTrraannssppoorrtt CCoonnttrroollss
All supported, machine sends back tallies
LLooccaattee TToo TTiimmeeccooddee
Supported.
RReeccoorrdd EEnnaabbllee//RReehheeaarrssee
Only supported on Master machine: the Tascam SY88 card currently only sup-
ports a single tape machine for Record Enable/Rehearse, therefore slave machines
require manual intervention.
JJoogg//SShhuuttttllee
Not supported by the DA-88 with its current software.
SSeettuupp NNootteess
TIMECODE OUT from the DA-88 should be connected to SMPTE IN on the
Ghost. See the diagram below.
Tapes must be formatted before use: this puts ABS-time onto the tape.
You may set the DA-88 to output timecode using the ABS -time or you may put a
timecode signal on the tape, in addition to the ABS-time, and use that instead.
Care must be taken in setting up timecode on the DA-88. There are two menus
which need to be set correctly. The ABS menu must be set to timecode(P.in = tc)
(even if there is no time code on the tape: the locate function will not work other-
wise), and the TC menu must be set to whichever code you are going to use
(t.out = ABS or t.out = tc). See the Tascam DA-88 and SY-88 manuals for more
details.
Page 14

A.14 GHOST Appendix A
TTAASSCCAAMM DDAA--8888 ((MMTTCC))
AAddddiittiioonnaall HHaarrddwwaarree rreeqquuiirreedd
SY-88 Card fitted to DA-88 (software version 2.03 or better)
TTrraannssppoorrtt CCoonnttrroollss
All supported, machine sends back tallies
LLooccaattee ttoo TTiimmeeccooddee
Supported.
RReeccoorrdd EEnnaabbllee//RReehheeaarrssee
Tascam SY88 card currently only supports a single machine for record
Enable/Rehearse, using the Midi machine Control protocol.
JJoogg//SShhuuttttllee
This Function is not supported by Tascam DA-88 via MMC (midi machine con-
trol).
SSeettuupp NNootteess
Tape must be formatted before use: this puts ABS-time onto the tape.
SY-88 Switch S1 #2: MIDI/9 PIN set to MIDI 0.
You may set the DA-88 to output timecode using the ABS-time or you may put a
timecode signal on the tape, in addition to the ABS-time, and use that instead.
Care must be taken in setting up timecode on the DA-88. There are two menus
that need to be set correctly. The ABS menu must be set to (P. In = tc)(even if
there is no timecode on the tape: the locate function will not work otherwise),
and the TC menu must be set to whichever code you are going to use (t. Out =
ABS or t. Out = tc). See Tascam DA-88 and SY-88 Manual for more details.
MIDI IN
MIDI IN
MIDI OUT
MIDI OUT
Tascam
DA-88
Page 15

GHOST Appendix A A.15
TTAASSCCAAMM DDAA--8888 RRSS--442222 ((LLTTCC)) ((UUssee SSoonnyy PP22 VVTTRR ))
AAddddiittiioonnaall HHaarrddwwaarree RReeqquuiirreedd
SY-88 Card fitted to DA-88
(Software version 2,03 or better)
Ghost to Sony 9-pin interface cable.
TTrraannssppoorrtt CCoonnttrroollss
All supported, machine sends back tallies.
LLooccaattee TToo TTiimmeeccooddee
Supported.
RReeccoorrdd EEnnaabbllee//RReehheeaarrssee
This function is supported by Ghost.
JJoogg//SShhuuttttllee
Supported.
SSeettuupp NNootteess
Tape must be formatted before use: this puts ABS-time onto the tape.
SY-88 Switch S1 #2: MIDI/9 PIN set to 9 PIN 1.
You may set the DA-88 to output timecode using the ABS-time or you may put a
timecode signal on the tape, in addition to the ABS-time, and use that instead.
Care must be taken in setting up timecode on the DA-88. There are two menus
that need to be set correctly. The ABS menu must be set to (P.in = tc)(even if
there is no timecode on the tape: the locate function will not work otherwise),
and the TC menu must be set to whichever code you are going to use (t.out =
ABS or t.out = Tc).See Tascam DA-88 and SY-88 Manual for more details.
Tascam
DA-88
PORT 3
SMPTE IN
Timecode outRS-422
1
2
3
4
5
6
7
8
9
1
2
3
4
5
6
7
8
9
This end
connects to
Sony 9-Pin
Machine
Female ’D-Type’Male ’D-Type’
Gnd
Tx +
Tx Not used
Not used
Not used
Not used
Rx -
Rx +
This end
connects to
Ghost
Page 16

A.16 GHOST Appendix A
Page 17

GHOST Appendix B B.1
GGHHOOSSTT
MMiiddii CCoonnttrroolllleerr
NNuummbbeerrss
Appendix
B
Page 18

B.2 GHOST Appendix B
CCoonnttrroolllleerr NNuummbbeerrss
Controller Number Controller Function
0 Undefined
1 Modulation wheel or lever
2 Breath Controller
3 Undefined
4 Foot Controller
5 Portamento Time
6 Data Entry MSB
7 Main Volume
8 Balance
9 Undefined
10 Pan
11 Expression Controller
12 - 15 Undefined
16 - 19 General Purpose Controllers (# 1 - 4)
20 - 31 Undefined
32 - 63 LSB for values 0 - 31
64 Damper Pedal (sustain)
65 Portamento
66 Sostenuto
67 Soft Pedal
68 Undefined
69 Hold 2
70 - 79 Undefined
80 - 83 General Purpose Controllers (#s 5 - 8)
84 - 90 Undefined
91 External Effects Depth
92 Tremolo Depth
93 Chorus Depth
94 Celeste (Detune) Depth
95 Phaser Depth
96 Data Increment
97 Data Decrement
98 Non-Registered Parameter Number LSB
99 Non-Registered Parameter Number MSB
100 Registered Parameter Number LSB
101 Registered Parameter Number MSB
102 - 120 Undefined
121 - 127 Reserved for Channel Mode Messages
Page 19

GHOST Appendix C C.1
GGHHOOSSTT
MMiiddii NNoottee NNuummbbeerrss
Appendix
C
Page 20

C.2 GHOST Appendix C
MIDI Note Number
MIDI Note Number
MIDI Note Number
0
1
2
3
4
5
6
7
8
9
10
11
12
13
50
40
30
14
51
41
31
15
52
42
32
16
53
43
33
17
54
44
34
18
55
45
35
19
56
46
36
20
21
57
47
37
22
23
24
25
26
27
28
29
59
60
61
62
63
49
39
58
48
38
Channe l 1 Mute
Channe l 13 Mute
Channe l 25 Mute
Channe l 2 Mute
Channe l 14 Mute
Channe l 26 Mute
Channe l 3 Mute
Channe l 15 Mute
Channe l 27 Mute
Channe l 4 Mute
Channe l 16 Mute
Channe l 28 Mute
Channe l 5 Mute
Channe l 17 Mute
Channe l 29 Mute
Channe l 6 Mute
Channe l 18 Mute
Channe l 30 Mute
Channe l 31 Mute
Channe l 32 Mute
Channe l 7 Mute
Channe l 19 Mute
Channe l 8 Mute
Channe l 20 Mute
Channe l 9 Mute
Channe l 21 Mute
Channe l 10 Mute
Channe l 22 Mute
Channe l 11 Mute
Channe l 23 Mute
Channe l 12 Mute
Channe l 24 Mute
Mix B 1 Mute
Mix B 13 Mute
Mix B 25 Mute
Mix B 2 Mute
Mix B 14 Mute
Mix B 26 Mute
Mix B 3 Mute
Mix B 15 Mute
Mix B 27 Mute
Mix B 4 Mute
Mix B 16 Mute
Mix B 28 Mute
Mix B 5 Mute
Mix B 17 Mute
Mix B 29 Mute
Mix B 6 Mute
Mix B 18 Mute
Mix B 30 Mute
Mix B 31 Mute
Mix B 32 Mute
Mix B 7 Mute
Mix B 19 Mute
Mix B 8 Mute
Mix B 20 Mute
Mix B 9 Mute
Mix B 21 Mute
Mix B 10 Mute
Mix B 22 Mute
Mix B 11 Mute
Mix B 23 Mute
Mix B 12 Mute
Mix B 24 Mute
Ghost Mute Switch
Ghost Mute Switch
Ghost Mute Switch
MMIIDDII NNoottee NNuummbbeerrss TToo MMuutteess CCoonnvveerrssiioonn CChhaarrtt
Page 21

GHOST Appendix C C.3
MMIIDDII NNoottee NNuummbbeerrss TToo EExxppaannddeerr MMuutteess CCoonnvveerrssiioonn CChhaarrtt
MIDI Note Number
MIDI Note Number
64
65
66
67
68
69
70
71
72
73
74
75
76
77
104
94
78
105
95
79
106
96
80
107
97
81
108
98
82
109
99
83
110
100
84
85
111
101
86
87
88
89
90
91
92
93
103
102
Channe l 1 Mute
Channe l 13 Mute
Channe l 2 Mute
Channe l 14 Mute
Channe l 3 Mute
Channe l 15 Mute
Channe l 4 Mute
Channe l 16 Mute
Channe l 5 Mute
Channe l 17 Mute
Channe l 6 Mute
Channe l 18 Mute
Channe l 7 Mute
Channe l 19 Mute
Channe l 8 Mute
Channe l 20 Mute
Channe l 9 Mute
Channe l 21 Mute
Channe l 10 Mute
Channe l 22 Mute
Channe l 11 Mute
Channe l 23 Mute
Channe l 12 Mute
Channe l 24 Mute
Mix B 1 Mute
Mix B 13 Mute
Mix B 2 Mute
Mix B 14 Mute
Mix B 3 Mute
Mix B 15 Mute
Mix B 4 Mute
Mix B 16 Mute
Mix B 5 Mute
Mix B 17 Mute
Mix B 6 Mute
Mix B 18 Mute
Mix B 7 Mute
Mix B 19 Mute
Mix B 8 Mute
Mix B 20 Mute
Mix B 9 Mute
Mix B 21 Mute
Mix B 10 Mute
Mix B 22 Mute
Mix B 11 Mute
Mix B 23 Mute
Mix B 12 Mute
Mix B 24 Mute
Expander Mute Switch
Expander Mute Switch
Page 22

C.4 GHOST Appendix C
MMIIDDII NNoottee NNuummbbeerrss BByy OOccttaavvee
Page 23

GHOST Appendix D D.1
GGHHOOSSTT
MMIIDDII IImmpplleemmeennttaattiioonn
CChhaarrtt
Appendix
D
Page 24

D.2 GHOST Appendix D
Page 25

GHOST Appendix E E.1
GGHHOOSSTT
UUppggrraaddiinngg TThhee
SSooffttwwaarree
Appendix
E
Page 26

E.2 GHOST Appendix E
UUppggrraaddiinngg TThhee SSooffttwwaarree
From time to time Soundcraft may make available new software releases for
Ghost. This may be in response to user feedback, or for bug fixes. The operating
software is stored in internal flash-RAM, and has to be loaded using an external PC
or Apple Mac computer. The serial port of the computer is connected to the
Ghosts 9-pin port which can be switched to accept the software download. The
program file which contains the consoles operating system is available on our
Internet Web site (http://www.soundcraft.com) under the Product Support sec-
tion, or from your local Soundcraft dealer or Distributor in the form of a 3.5" flop-
py disk.
If you have a Apple Mac computer, you will also need to obtain a serial communi-
cations program (we recommend ZTerm) which are available as shareware from
the Internet or an Apple software supplier. If you do not have a PC or Mac, please
contact your local Soundcraft dealer for advice.
The following pages give instructions for downloading new software from the fol-
lowing types of computer:
l PC running Windows 3.1/3.11
l PC running Windows 95
l Apple Mac with ZTerm and PC Exchange installed.
l Download Cable Details
You will need to make up a special interface cable (referred to in these instruc-
tions as the Download Cable) to connect the Ghost to the PC or Mac. The cable
connects from the Sony 9-pin port on the Ghost to the serial port or modem port
of the computer. The wiring information for these cables is shown below ( they
are also available ready made, the part numbers are, Ghost/PC RV3541 and
Ghost/Mac RV3691) :
(Note: All connectors shown below are viewed from the solder side).
Page 27

GHOST Appendix E E.3
SSooffttwwaarree DDoowwnnllooaadd ffrroomm PPCC rruunnnniinngg WWiinnddoowwss 33..11//33..1111
Start Windows and run the Terminal program, usually located in Accessories
group. Ensure the settings are correct, by choosing the Settings menu and select-
ing the Communications option. The settings should be as follows:
bits per sec: 19200
data bits: 8
parity: none
Stop bits: 1
Flow control: None
Locate the Ghost software program file (Ghost.abs) either on floppy disk or from
the Internet. In the latter case, save the file in a known location ( do not change
the filename!).
Switch off the Ghost console and connect the download cable (9-pin to 9-pin D-
type, see above for pin-out). from the Com 1 port on the PC to the 9-pin socket
on the Ghost rear panel.
Using a thin implement, push in and latch the hidden download switch on the
Ghost. This Is accessible via a small hole in the rear panel, next to the 9-pin socket.
Switch on the Ghost console. The console will not boot up as usual, but will either
display nothing on the timecode display, or all 8s, together with other flashing
lights on the CPU section -this is normal! A menu will be displayed on the
Terminal screen, as follows:
Boot code Version 1.00
? - display this help
e - erase flash program memory
x - initiate XMODEM transfer
i - diagnostic info
Press the e key on the PC; the screen will indicate that the flash memory is eras-
ing. (This will not erase the Ghosts snapshots and midi setup).
When the message done, press the x key to initiate the software download.
Open the Transfer menu and select Send Binary File.
Select the Ghost.abs file in the filename field, from the floppy drive or wherever
you put it on the hard drive.
The file transfer will now start, with a message at the bottom of the screen
informing you of the progress. (Note: if you take too long finding and selecting the
Ghost.abs file after pressing the x key, the Ghost may time-out, with the mes-
sage transfer unsuccessful. If this happens, power down the Ghost and power up
again to obtain the menu, then press x again and try again).
When the transfer is complete (it will take several minutes), the message
Transfer done! will appear. Turn off the Ghost console, disconnect the down-
load cable and unlatch the recessed download switch on the back of the console.
Power up the Ghost -the console should now boot up as normal, with the new
software version number displayed during the boot-up.
On the PC, exit the Terminal program, and choose Yes when prompted to save
the session. This will save the settings you chose at the beginning of the proce-
dure, for future use.
Page 28

E.4 GHOST Appendix E
SSooffttwwaarree DDoowwnnllooaadd ffrroomm PPCC RRuunnnniinngg WWiinnddoowwss 9955
From the Start menu choose Programs, then Accessories, then Hyperterminal.
Double-click the Hypertrm icon to open this program.
Enter the name Ghost Download and choose an icon then click OK. This will
enable you to return to the program easily on subsequent occasions with the cor-
rect parameter already setup for Ghost.
You will now get the phone number dialogue box. Leave the phone number field
blank, and set the connect using... parameter to direct to Com 1 (or whichever
serial port is accessible on the back of the PC)
You now get the Com 1 Properties dialogue box. Set up the parameters as fol-
lows:
bits per sec: 19200
data bits: 8
parity: none
Stop bits: 1
Flow control: None
Click OK. The blank Hyperterminal screen will now be displayed.
Locate the Ghost software program file (Ghost.abs) either on the floppy disk or
from the internet. In the latter case, save the file in a known location (do not
change the filename!).
Switch off the Ghost console and connect the download cable (9-pin to 9-pin D-
type, see above for pin-out) from the Com 1 port on the PC to the 9-pin socket
on the Ghost rear panel.
Using a thin implement, push in and latch the hidden download switch on the
Ghost. This is accessible via a small hole in the rear panel, next to the 9-pin socket.
Turn on the Ghost console. The console will not boot up as usual, but will either
display nothing on the timecode display, or all 8s, together with other flashing
lights on the CPU section -this is normal! A menu will now appear on the
Hyperterminal screen :
Boot code Version 1.00
? - display this help
e - erase flash program memory
x - initiate XMODEM transfer
I - diagnostic info
Press the e key on the PC; the screen will indicate that the flash memory is eras-
ing. (This will not erase the Ghosts snapshots and midi setup).
When the message done, press the x key to initiate the software download.
In Hyperterminal, open the Transfer menu and select Send File.
Select the Ghost.abs file in the filename field, from the floppy drive or wherever
you put it on the hard drive. Set the Protocol to X-Modem and click Send.
The file transfer will now start, with a dialogue box entitled File send for Ghost
Download informing you of the progress. (Note: if you take too long finding and
selecting the Ghost.abs file after pressing the x key, the Ghost may time-out,
with the message transfer unsuccessful. If this happens, power down the Ghost
and power up again to obtain the menu, then press x again and try again).
When the transfer is complete (it will take several minutes), the message
Transfer done! will appear. Turn off the Ghost console, disconnect the down-
load cable and unlatch the recessed download switch on the back of the console.
Power up the Ghost -the console should now boot up as normal, with the new
software version number displayed during the boot-up.
On the PC, exit the Hyperterminal program, and choose Yes when prompted to
save the session. This will give you the icon you chose at the beginning of the pro-
cedure, in the Hyperterminal window, for future use.
Page 29

GHOST Appendix E E.5
SSooffttwwaarree DDoowwnnllooaadd ffrroomm AAppppllee MMaacc
Make sure that you have the following programs loaded on you Mac: (They do not
always come as standard, so you may have to contact your Apple dealer for help,
or download the applications from a suitable Internet FTP site -e.g. sumex mir-
rors, mac.archive.umich.edu, or on Compuserve: Mac Communication Forum).
l PC Exchange
l ZTerm or another serial comms program. The instructions below refer
to ZTerm.
PPrroocceedduurree
Launch ZTerm from your desktop. From the Settings menu, choose Connection
You will now have a dialogue box displaying the terminal settings. Set these up as
follows:
Data Rate: 19200
Data Bits: 8
Parity: None
Local echo: off
Flow Control: off
Hardware handshake: off
From the Settings menu, choose Transfer Options.
In the Transfer Options dialogue box, set up as follows:
Send: Xmodem
Receive: Xmodem
From the Settings menu, choose Modem Preferences .Check that this is set up as
follows:
Serial Port = modem port
You should now have a blank terminal screen, set up with the necessary parame-
ters.
Locate the Ghost.abs program file, either on PC format floppy disk, or from the
Internet. In the latter case, save the file in a known location (do not change the
filename!). In the case of the floppy disk, if PC Exchange software is loaded, the
disk can be read by the Mac and will appear on the desktop in the normal way.
Switch off the Ghost console and connect the download cable (8-pin mini-DIN to
9-pin D-type, see above for pin-out) from the Modem port on the Mac to the 9-
pin socket on the Ghost rear panel.
Using a thin implement, push in and latch the hidden download switch on the
Ghost. This is accessible via a small hole in the rear panel, next to the 9-pin socket.
Turn on the Ghost console. The console will not boot up as usual, but will either
display nothing on the timecode display, or all 8s, together with other flashing
lights on the CPU section - this is normal! A menu will now appear on the Macs
ZTerm screen :
Boot code Version 1.00
? - display this help
e - erase flash program memory
x - initiate XMODEM transfer
I - diagnostic info
Press the e key on the Mac; the screen will indicate that the Ghosts flash memo-
ry is erasing. (This will not erase the Ghosts snapshots and midi setup).
When the message done appears, press the x key to initiate the software
download. (The message Please start XMODEM transfer now will be displayed
on the screen).
Page 30

E.6 GHOST Appendix E
From the File menu choose Send X-modem. This gives you a menu which allows
the required file to be selected. Select the Ghost.abs file from wherever you put it
on the floppy or hard drive. Click Open. A dialogue box will now appear to show
the progress of the download.
(Note: if you take too long finding and selecting the Ghost.abs file after pressing
the x key, the Ghost may time-out, with the message transfer unsuccessful. If
this happens, power down the Ghost and power up again to obtain the menu,
then press x again and try again).
When the transfer is complete (it will take several minutes), the message
Transfer done! will appear. Turn off the Ghost console, disconnect the down-
load cable and unlatch the recessed download switch on the back of the console.
Power up the Ghost -the console should now boot up as normal, with the new
software version number displayed during the boot-up.
Exit ZTerm on the Mac and close down.
Page 31

GHOST Appendix E E.7
SSooffttwwaarree DDoowwnnllooaadd TTrroouubblleesshhoooottiinngg
AA.. WWhheenn II sswwiittcchh oonn tthhee ccoonnssoollee,, tthhee ddoowwnnllooaadd mmeennuu ddooeess nnoott aappppeeaarr..
Check that the download lead is firmly connected the correct way around. Check
that the Download switch on the back of Ghost is latched in. Check that the
Terminal setup options are correct.
BB.. WWhheenn II sswwiittcchh oonn tthhee ccoonnssoollee,, ssppuurriioouuss cchhaarraacctteerrss aappppeeaarr..
Check that the download is connected the correct way around. Check that the
Terminal setup options are correct.
CC.. TThhee wwoorrddss BBaadd ccoommmmaanndd aappppeeaarr eevveerryy ttiimmee II pprreessss aa kkeeyy..
Check that Caps Lock is not on.
DD.. AAfftteerr pprreessssiinngg xx aanndd sseennddiinngg tthhee ffiillee uussiinngg tthhee TTeerrmmiinnaall pprrooggrraamm,, tthhee ddoowwnnllooaadd ddooeess
nnoott sseeeemm ttoo wwoorrkk..
Cancel the download from Terminal program.
Switch off the Ghost console, then switch back on.
Begin the transfer again.
(Downloads can be temperamental, and may need several attempts!)
Page 32

E.8 GHOST Appendix E
 Loading...