

Sony VPL-FH36,VPL-FH30VPL-FX37,VPL-FH35,VPL-FX30,VPL-FH31,VPL-FX35 User Manual
Data
Projector
4-186-248-07 (1)
簡易説明書 JP
Quick Reference Manual___ GB
VPL-FH36/FH35/FH31/FH30
VPL-FX37/FX35/FX30
お買い上げいただきありがとうございます。
電気製品は安全のための注意事項を守らないと、
火災や人身事故になることがあります。
この簡易説明書と付属の CD-ROM に入っている取扱説明書をよくお
読みのうえ、製品を安全にお使いください。お読みになったあとは、
いつでも見られるところに必ず保管してください。
© 2010 Sony Corporation
Guide de référence rapide _ FR
Manual de referencia rápida
Kurzreferenz _____________ DE
Guida rapida all’uso _______ IT
______________ CS
__ ES
安全のために
ソニー製品は安全に充分配慮して設計されています。
しかし、電気製品は、まちがった使いかたをすると、
火災や感電などにより死亡や大けがなど人身事故に
つながることがあり、危険です。
事故を防ぐために次のことを必ずお守りください。
安全のための注意事項を守る
注意事項をよくお読みください。
定期点検をする
5 年に 1 度は、内部の点検を、ソニーの相談窓口にご
相談ください(有料)。
故障したら使用を中止する
すぐに、ソニーの相談窓口にご連絡ください。
万一、異常が起きたら
・ 煙が出たら
・ 異常な音、においがしたら
・ 内部に水、異物が入ったら
・ 製品を落としたりキャビネットを破損したときは
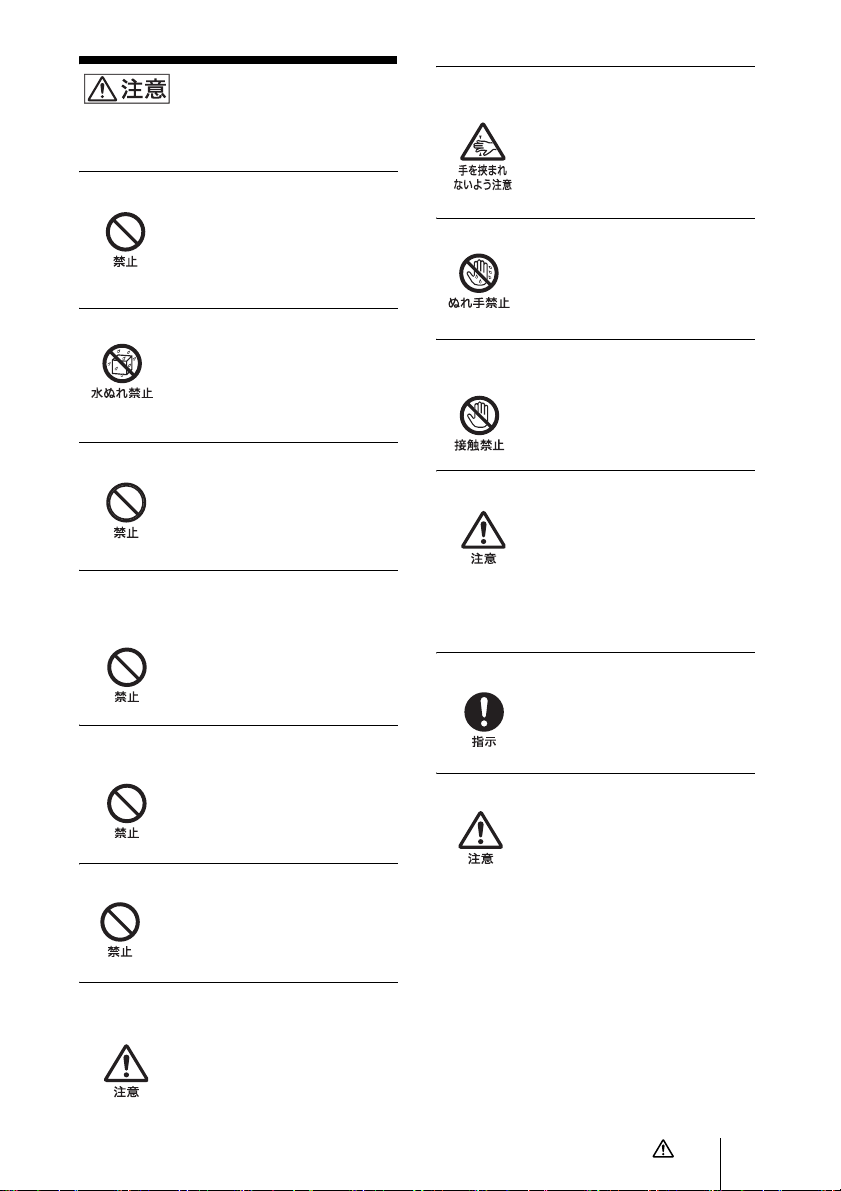
警告表示の意味
この説明書および製品で
は、次のような表示をして
います。表示の内容をよく
理解してから本文をお読み
ください。
この表示の注意事項を守ら
ないと、火災や感電などに
より死亡や大けがなど人身
事故につながることがあり
ます。
この表示の注意事項を守
らないと、感電やその他
の事故によりけがをした
り周辺の物品に損害を与
えることがあります。
注意を促す記号
m
1 電源を切る。
2 電源コードや接続コードを抜く。
3 ソニーの相談窓口に連絡する。
JP
2
安全のために
行為を禁止する記号
行為を指示する記号
警告
下記の注意事項を守らない
火災や感電により、
と、
死亡や大けがにつながる
ことがあります。
電源コードを傷つけない
電源コードを傷つけると、火災や感
電の原因となることがあります。
・ 設置時に、製品と壁やラック(棚)
などの間に、はさみ込んだりしな
い。
・ 電源コードを加工したり、傷つけ
たりしない。
・ 重いものをのせたり、引っ張った
りしない。
・ 熱器具に近づけたり、加熱したり
しない。
・ 電源コードを抜くときは、必ずプ
ラグを持って抜く。
万一、電源コードが傷んだら、ソ
ニーの相談窓口に交換をご相談く
ださい。
付属の電源コードを使う
付属の電源コードを使わないと、感
電や故障の原因となることがあり
ます。
容量の低い電源延長コードを使用しない
容量の低い延長コードを使うと、
ショートしたり火災や感電の原因
となることがあります。
お手入れの際は、電源を切って電源プラグ
を抜く
電源を接続したままお手入れをす
ると、感電の原因となることがあり
ます。
長時間の外出、旅行のときは、電源プラグ
を抜く
安全のため、必ず電源プラグをコン
セントから抜いてください。
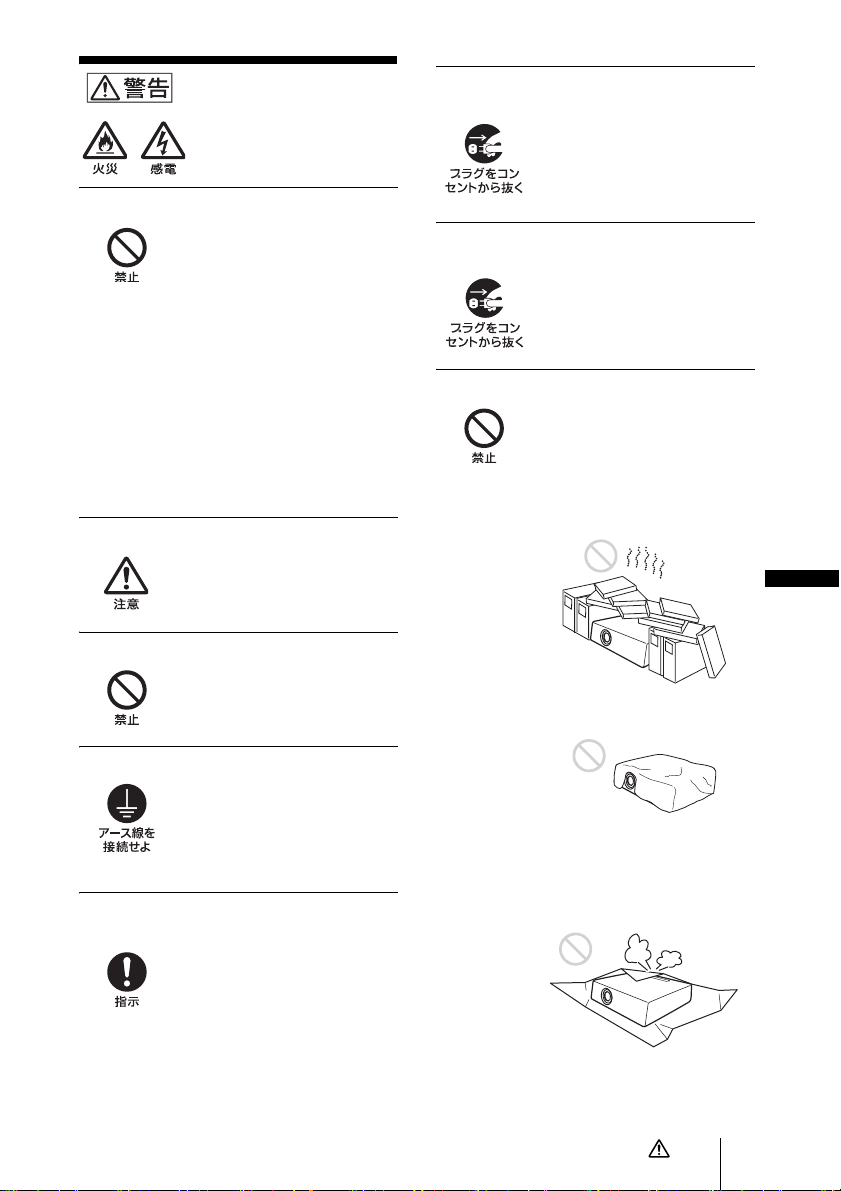
排気口、吸気口をふさがない
排気口、吸気口をふさぐと内部に熱
がこもり、火災や故障の原因となる
ことがあります。充分に通気ができ
るように以下の項目をお守りくだ
さい。
・ 周辺の壁や物から離して設置し
てください(9 ページ)。
JP
・ 吸排気口をふさぐような覆いや
カバーをしない。
安全アースを接続する
アースの接続は、必ず電源プラグを
電源コンセントへ接続する前に
行ってください。アースの接続をは
ずす場合は、必ず電源プラグを電源
コンセントから抜いてから行って
ください。
電源プラグおよびコネクターは突きあたる
まで差し込む
まっすぐに突きあたるまで差し込
まないと、火災や感電の原因となり
ます。
・ 出荷時に包装されているシート、
柔らかい布地、書類、毛足の長い
じゅうたん、小さい紙などの上に
設置しない。吸い上げられて、吸
気口がふさがれます。
JP
3
警告
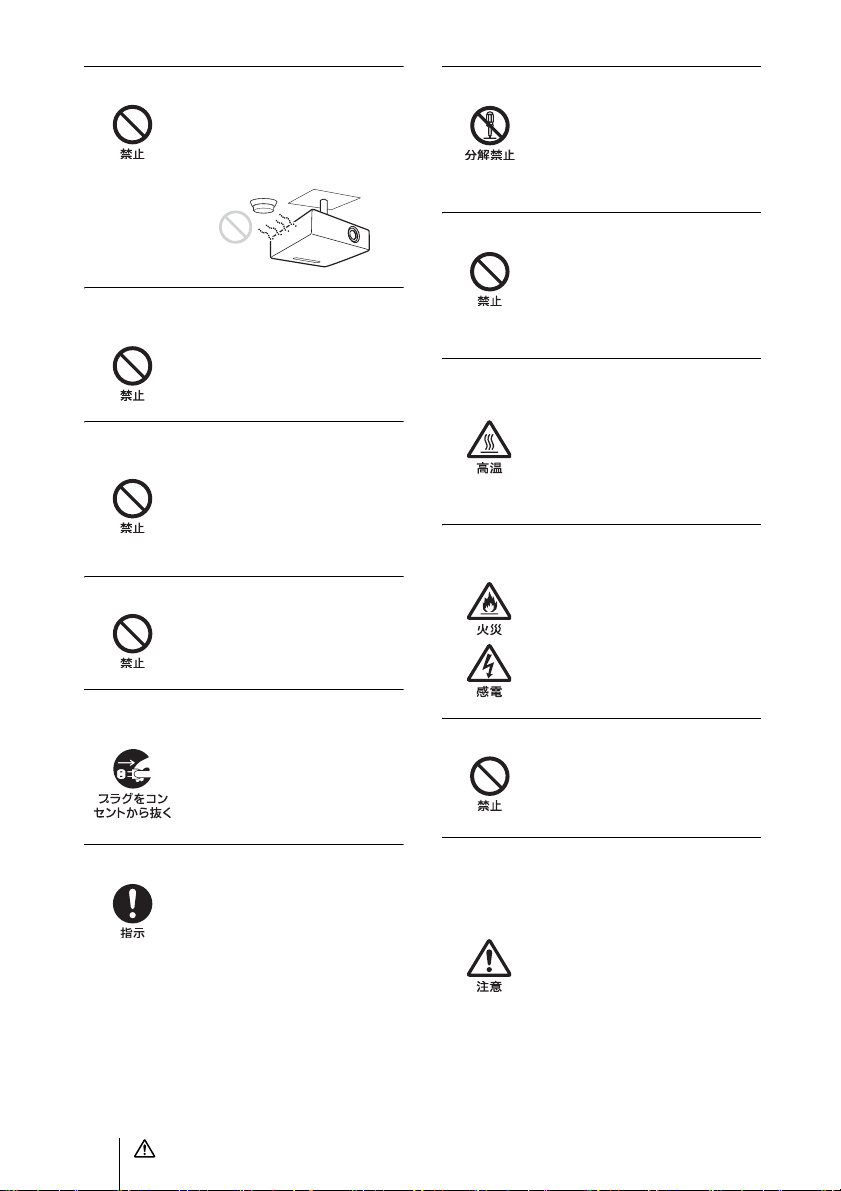
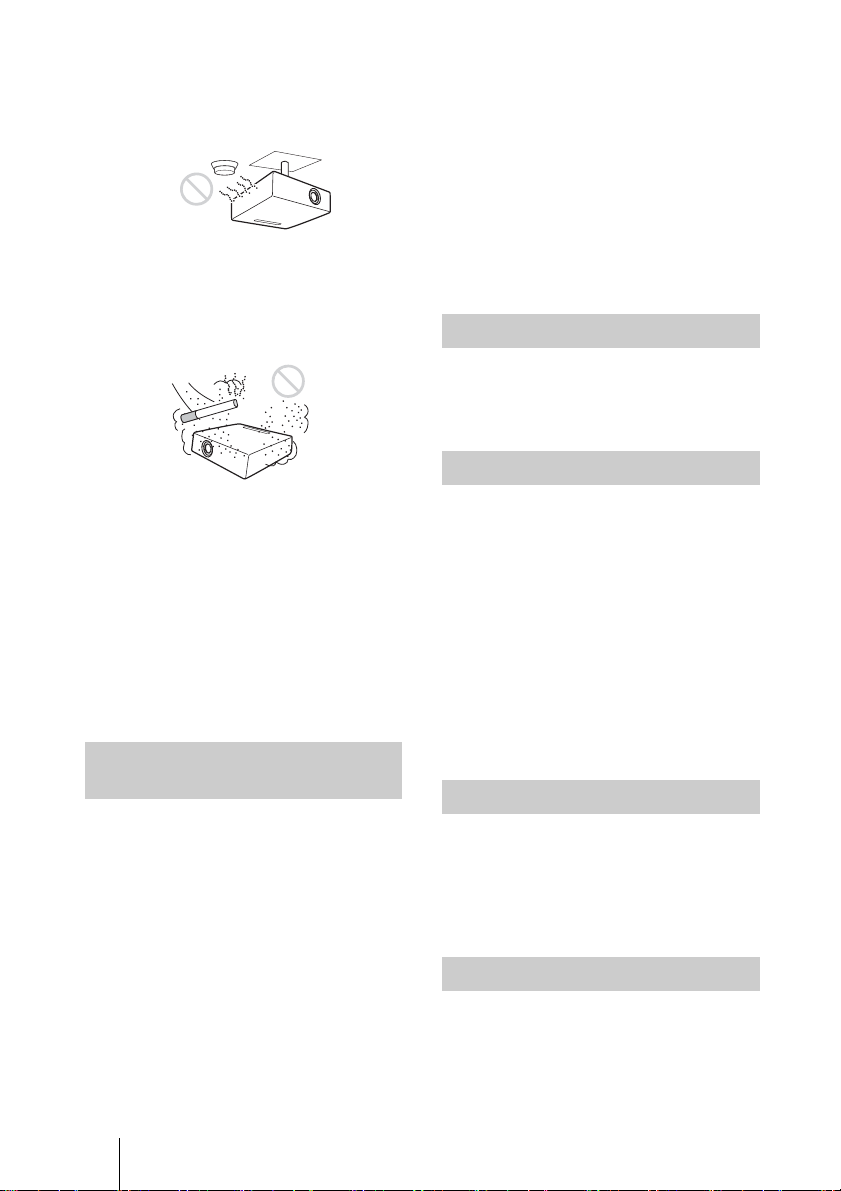
熱感知器や煙感知器のそばに設置しない
熱感知器や煙感知器のそばに設置
すると、排気の熱などにより、感知
器が誤動作するなど、思わぬ事故の
原因となることがあります。
床置き、または天井つり金具を使った天井
つり以外の設置をしない
それ以外の設置をすると火災や大
けがの原因となることがあります。
天井への取り付け、移動は絶対に自分でや
らない
天井への取り付けは必ずソニーの
相談窓口にご相談ください(有料)。
天井の強度不足、取り付け方法が不
充分のときは落下し、大けがの原因
となります。
天吊り状態でレンズ交換をしない
天吊り状態で作業をすると、レンズ
を取り落としたりして、けがや事故
の原因となります。
レンズ交換の際は、電源を切って電源プラ
グを抜く
レンズ交換時にあやまって強い光
が目に入ると目を傷める恐れがあ
ります。レンズ交換は、電源を切り、
電源プラグを抜いてから行ってく
ださい。
指定された部品を使用する
指定以外の部品を使用すると、火災
や感電および故障や事故の原因と
なります。ランプ、電池、フィルター
は指定されたものを使用してくだ
さい。
内部を開けない
内部には電圧の高い部分があり、
キャビネットや裏ぶたを開けたり
改造したりすると、火災や感電の原
因となることがあります。内部の調
整や設定、点検、修理はソニーの相
談窓口にご相談ください。
内部に水や異物を入れない
水や異物が入ると火災や感電の原
因となることがあります。
万一、水や異物が入ったときは、す
ぐに電源を切り、電源コードや接続
ケーブルを抜いて、ソニーの相談窓
口にご相談ください。
ランプ交換はランプが充分に冷えてから行
う
電源を切った直後はランプが高温
になっており、さわるとやけどの原
因となることがあります。ランプ交
換の際は、電源を切ってから1時間
以上たって、充分にランプが冷えて
から行ってください。
ランプ収納部に金属類や燃えやすい異物を
入れない
ランプを取りはずした後のランプ
の収納部に金属類や燃えやすい物
などの異物を入れないでください。
火災や感電の原因となります。ま
た、やけどの危険がありますので手
を入れないでください。
レンズをのぞかない
投写中にプロジェクターのレンズ
をのぞくと光が目に入り、悪影響を
与えることがあります。
電源コードのアース端子からはずした絶縁
キャップなどの小さな部品は、幼児が飲み
込む恐れがあるので、手の届かないところ
に保管する
万一誤って飲みこんだときは、窒息
する恐れがありますのでただちに
医師にご相談ください。
JP
4
警告
注意
下記の注意を守らないと、
けがをしたり周辺の物品
に損害を与えることがあり
ます。
不安定な場所に設置しない
ぐらついた台の上、あるいは傾いた
ところに設置すると、倒れたり落ち
たりしてけがの原因となることが
あります。また、設置・取り付け場所
の強度を充分にお確かめください。
水のある場所に置かない
水が入ったり、濡れたり、風呂場な
どで使うと、火災や感電の原因とな
ります。雨天や降雪中の窓際でのご
使用や、海岸、水辺でのご使用は特
にご注意ください。
製品の上にものを載せない
製品の上にものを載せると、故障や
事故の原因となります。特に、水が
入ったものをおくと内部に水が入
り、火災や感電の原因となることが
あります。
湿気やほこり、油煙、湯気の多い場所や虫
の入りやすい場所、直射日光が当たる場所、
熱器具の近くに置かない
火災や感電の原因となることがあ
ります。
スプレー缶などの発火物や燃えやすいもの
を排気口やレンズの前に置かない
火災の原因となることがあります。
本機を立てて置かない
保管や、一時的に立てておくと倒れ
て思わぬ事故の原因になり危険で
す。
設置の際、本機と設置部分での指挟みに注
意する
設置する際、本機と設置部分で指を
挟まないように慎重に取り扱って
ください。
ぬれた手で電源プラグにさわらない
ぬれた手で電源プラグの抜き差し
をすると、感電の原因となることが
あります。
落雷のおそれがあるときは、電源プラグに
触れない
感電の原因となります。
運搬・移動は慎重に
・ 床置きのプロジェクターを移動
させるとき、本体と設置面との間
に指を挟まないようにご注意く
ださい。
・ キャビネットのカバーを開けた
まま、電源を切らずに移動させな
いでください。感電の原因となる
ことがあります。
運搬するときは必ず左右側面を両手で持つ
運搬するときは、必ず左右側面を両
手で持ってください。他の部分を持
つとプロジェクターが壊れたり、落
としてけがをすることがあります。
本機を運搬するときは落下に注意する
本機を持ち運ぶときは落下にご注
意ください。落下するとプロジェク
ターが壊れたり、ケガの原因となり
ます。
電源コード / 接続ケーブルに足をひっかけ
ない
電源コードや接続ケーブルに足を
ひっかけると、プロジェクターが倒
れたり落ちたりしてけがの原因と
なることがあります。
注意
JP
5

天吊り状態でランプまたはフィルターを取
りはずす際は周りに人がいないことを確認
してから取りはずす
天吊りのままランプまたはフィル
ターを取りはずす際は落下に注意
しないと思わぬ事故の原因となり
ます。
定期的にエアーフィルターを掃除する
掃除を怠るとフィルターにごみが
たまり、内部に熱がこもって火災の
原因となることがあります。
盗難防止用バーを運搬や設置目的で使用し
ない
盗難防止用バーを使って持ち上げ
たり、吊下げなどの設置に使用した
りすると、落下してけがや故障の原
因となることがあります。
排気口付近に手やものを近付けない
排気口付近に手を近づけたり、変形
しやすいものを置くとやけどや変
形の原因になります。
梱包用のレンズ保護キャップを付けたまま
投写しない
投写する前に必ず梱包用のレンズ
保護キャップをはずしてください。
梱包用のレンズ保護キャップを付
けたまま投写すると、熱により
キャップが溶け出す場合がありま
す。
投写中にレンズのすぐ前で光を遮らない
遮光した物に熱による変形などの
影響を与えることがあります。
投写を一時的に中断するときには、
ピクチャーミューティング機能を
お使いください。
キャビネットのカバー類はしっかり固定す
る
天吊りの場合、カバー類が固定され
ていないと落下して、けがの原因と
なることがあります。
排気口をのぞかない
光が目に入り、悪影響を与えること
があります。
万一ランプが破裂した場合、ガラス
片が飛散する可能性があり、けがの
原因となることがあります。
ランプが破裂したときはすぐに交換を依頼
する
ランプが破裂した際には、プロジェ
クター内部やランプハウス内にガ
ラス片が飛散している可能性があ
ります。ソニーの相談窓口にランプ
の交換と内部の点検を依頼してく
ださい。また、排気口よりガスや粉
じんが出たりすることがあります。
ガスには水銀が含まれていますの
で、万が一吸い込んだり、目に入っ
たりした場合は、けがの原因となる
ことがあります。
ランプを傾けて持たない
ランプを傾けて持つと、ランプの破
損時にランプの破片が飛び、けがの
原因となることがありますので、水
平に持ってください。
使用済みランプを破棄する場合
本機のランプの中には水銀が含ま
れています。使用済みランプは、地
域の蛍光管の廃棄ルールに従って
廃棄してください。
前脚部(調整可)調整時に指を挟まない
前脚部の調整は慎重に行ってくだ
さい。前脚部に指を挟み、けがの原
因となることがあります。
JP
6
注意
特約店様へ
天井への取り付けには細心の注意をはらう
・ 天井への取り付け強度が不充分
だと、落下により死亡や大けがに
つながることがあります。必ずソ
ニー製のプロジェクターサスペ
ンションサポート PSS-610 を使
用してください。
・ 取り付けを安全に行うために、本
書、CD-ROM 内の取扱説明書お
よび PSS-610の取付説明書の注
意事項をお読みください。
・ 取り付けは、PSS-610の取付説明
書の手順に従い確実に行ってく
ださい。取り付けが不完全な場
合、落下する可能性があります。
また、取り付け時には手をすべら
せてプロジェクターを落下させ、
けがをすることのないようご注
意ください。
調整用工具を内部に入れない
調整中などに、工具を誤って内部に
落とすと火災や感電の原因となる
ことがあります。
万一、落とした場合は、すぐに電源
を切り、電源コードを抜いてくださ
い。
低い天井に天吊りしない
頭などをぶつけてけがをすること
があります。
警告 / 注意
JP
7
電池についての安全上のご
注意
ここでは、本機で使用可能な乾電池についての注
意事項を記載しています。
・ 機器の表示に合わせて 3 と # を正しく入れ
る。
・ 充電しない。
・ 火の中に入れない。ショートさせたり、分解、
加熱しない。
・ コイン、キー、ネックレスなどの金属類と一緒
に携帯、保管しない。
・ 水などで濡らさない。風呂場などの湿気の多い
場所で使用しない。
・ 液漏れした電池を使用しない。
・ 電池を使い切ったときや、長時間使用しないと
きは本体から取り出す。
・ 外装チューブをはがしたり、傷つけない。
・ 指定された種類の電池以外は使用しない。
・ 火のそばや直射日光が当たるところ、炎天下の
車中など、高温の場所で使用、保管、放置しな
い。
JP
8
電池についての安全上のご注意
使用上のご注意
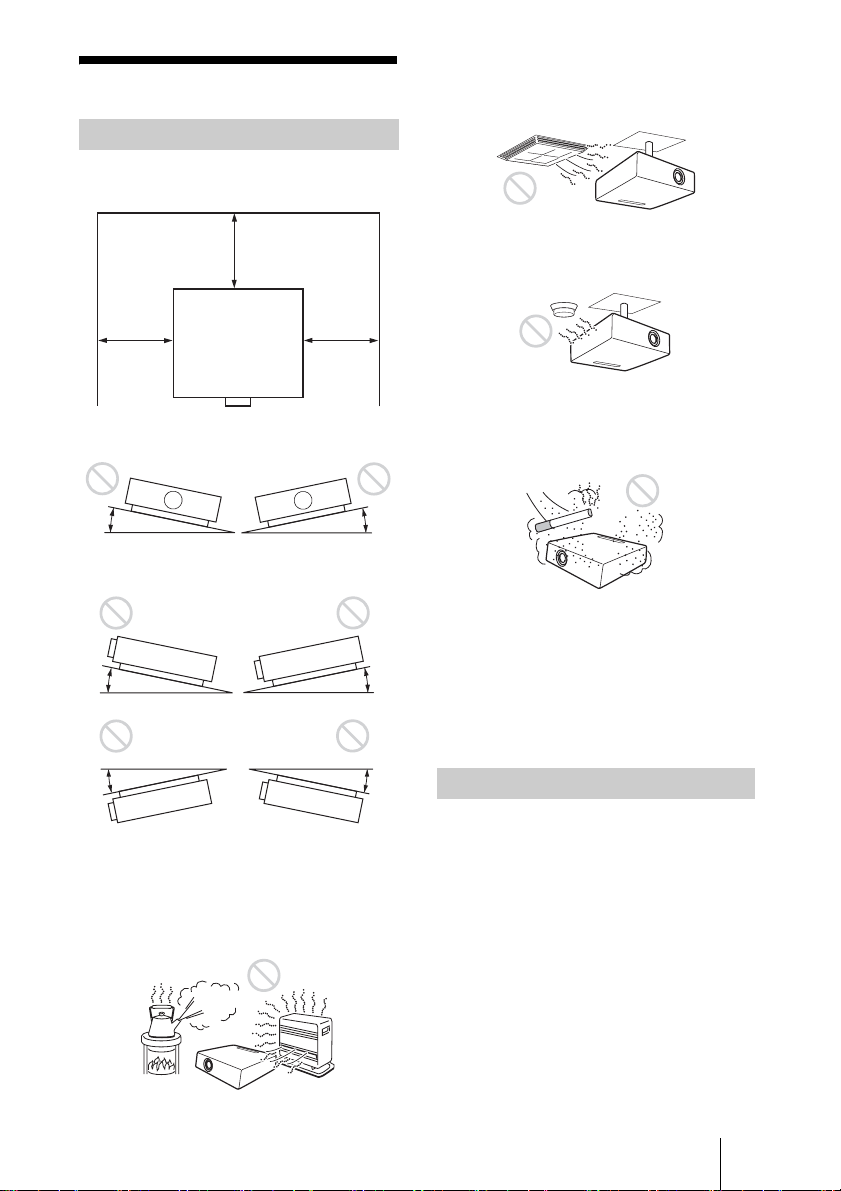
設置について
・ 図のように、周辺の壁や物から離して設置して
ください。
30cm 以上
・ 空調の冷暖気が直接当たる場所での使用は避け
てください。結露や異常温度上昇により、故障
の原因となることがあります。
・ 熱感知器や煙感知器のそばでの使用は避けてく
ださい。感知器が誤動作する原因となることが
あります。
30cm
以上
10cm
以上
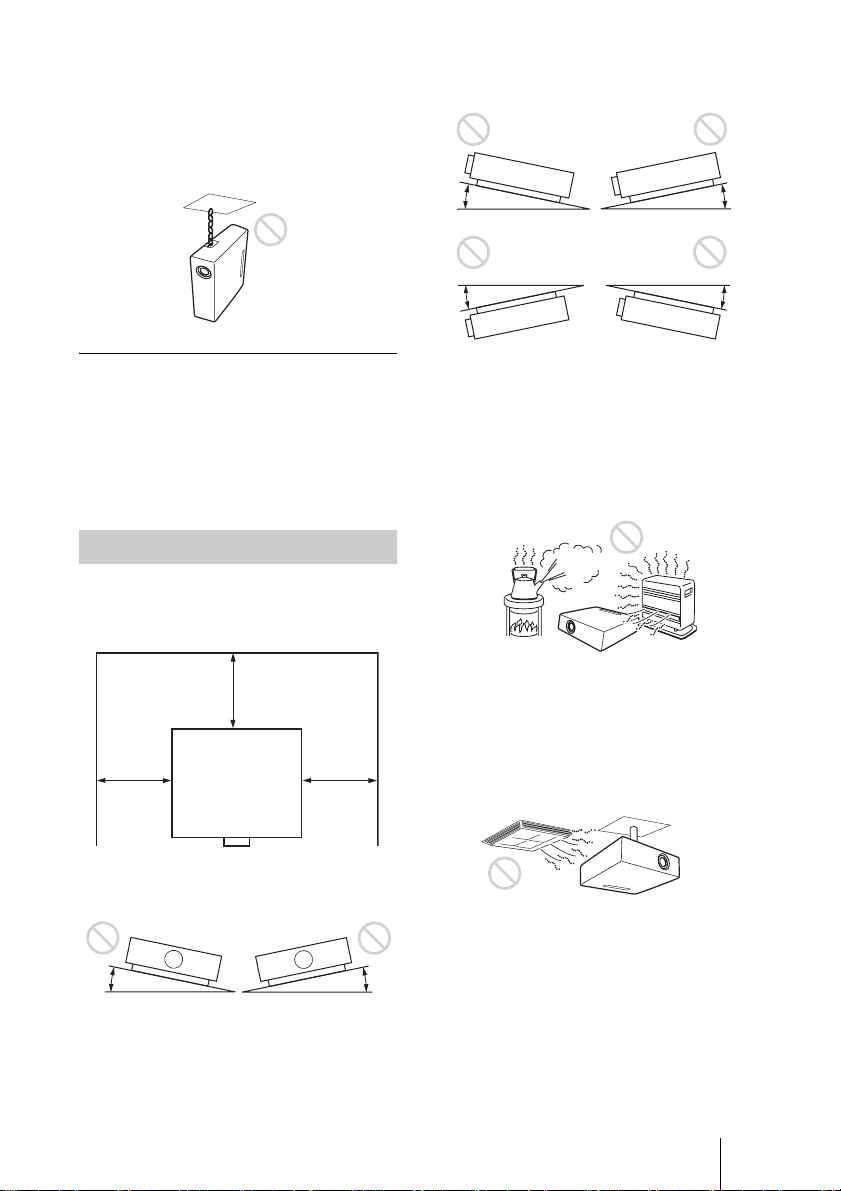
・ 左右に 15度以上傾けて使用しないでください。
15°
15°
・ 上下に 15度以上傾けて使用しないでください。
15°
15°
15°
15°
・ 床置きおよび天井つり以外の設置でお使いにな
ると、色むらやランプ寿命の劣化などの問題が
起こることがありますので避けてください。
・ 温度や湿度が非常に高い場所や温度が著しく低
い場所での使用は避けてください。
・ ほこりの多い場所、たばこなどの煙が入る場所
での使用は避けてください。この様な場所で使
用するとエアーフィルターがつまりやすくなっ
たり、故障の原因となることがあります。
・ 海抜 1500m以上でのご使用に際しては、設置設
定メニューの高地モードを「入」にしてくださ
い。誤った設定のままで使用すると、部品の信
頼性などに影響を与える恐れがあります。
・ 設置する角度に応じて設置設定メニューの設置
角度を正しく設定してください。誤った設定の
ままで使用すると、部品の信頼性などに影響を
与える恐れがあります。
レンズ、外装のお手入れ
・ 必ず電源コードを抜いてから行ってください。
・ 布にゴミが付着したまま強く拭いた場合、傷が
付くことがあります。
・ 殺虫剤のような揮発性のものをかけたり、ゴム
やビニール製品に 長時間接触させると、変質し
たり、塗装がはげたりすることがあります。
・ レンズを素手で触らないでください。
・ レンズ面のお手入れのしかた:
メガネ拭きなどの柔らかい布で軽く拭いてくだ
さい。汚れがひどいときは、水を少し含ませて
拭きとってください。アルコールやベンジン、
シンナー、酸性洗浄液、アルカリ性洗浄液、研
磨剤入洗浄剤、化学ぞうきんなどは絶対に使用
しないでください。
使用上のご注意
JP
9
・ 外装のお手入れのしかた:
柔らかい布で軽く拭いてください。汚れがひど
いときは、水で薄めた中性洗剤に柔らかい布を
浸し、固くしぼってから汚れを拭き取り、乾い
た布でから拭きしてください。アルコールやベ
ンジン、シンナーなどは使用しないでくださ
い。
部屋の照明について
美しく見やすい画像にするために、直射日光や室内
灯などで直接スクリーンを照らさないでください。
液晶プロジェクターについて
液晶プロジェクターは非常に精密度の高い技術で
作られていますが、黒い点が現われたり、赤と青、
緑の点が消えなかったりすることがあります。ま
た、すじ状の色むらや明るさのむらが見える場合
もあります。これらは、プロジェクターの構造に
よるもので、故障ではありません。また、複数台
の液晶プロジェクターを並べてスクリーンへ投写
する場合、プロジェクターごとに色合いのバラン
スが異なるため、同一機種の組み合わせであって
もそれぞれ色合いの違いが目立つ場合があります。
スクリーンについて
表面に凹凸のあるスクリーンを使用すると、本機
とスクリーン間の距離やズーム倍率によって、ま
れに画面上に縞模様が現れる場合があります。こ
れは本機の故障ではありません。
ファンの音について
プロジェクターの内部には温度上昇を防ぐために
ファンが取り付けられており、電源を入れると多
少の音が生じます。これらは、プロジェクターの
構造によるもので、故障ではありません。しかし、
異常音が発生した場合にはお買い上げ店またはソ
ニーの相談窓口にご相談ください。
ランプについて
・ 交換時期を越えると、破裂の可能性が高くなり
ます。
ランプ交換のメッセージが表示されたときに
は、ランプが正常に点灯している場合でも速や
かに新しいランプと交換してください。
この装置は、クラス A 情報技術装置です。この
装置を家庭環境で使用すると電波妨害を引き起こ
すことがあります。この場合には使用者が適切な
対策を講ずるよう要求されることがあります。
VCCI-A
本機は「高調波電流規格 JISC61000-3-2適合品」
です。
警告
設置の際には、容易にアクセスできる固定配線内
に専用遮断装置を設けるか、使用中に、容易に抜
き差しできる、機器に近いコンセントに電源プラ
グを接続してください。
万一、異常が起きた際には、専用遮断装置を切る
か、電源プラグを抜いてください。
ご注意
LAN 端子の接続について
安全のために、周辺機器を接続する際は、過大電
圧を持つ可能性があるコネクターをこの端子に接
続しないでください。
重要
機器の名称と電気定格は、底面に表示されていま
す。
警告
アースの接続は、必ず電源プラグを電源コンセン
トへ接続する前に行ってください。
アースの接続を外す場合は、必ず電源プラグを電
源コンセントから抜いてから行ってください。
注意
付属の電源コードは本機の専用品です。
他の機器には使用できません。
プロジェクターの光源には、内部圧力の高い水銀
ランプを使用しています。高圧水銀ランプには、
次のような特性があります。
・ 使用時間の経過によってランプの明るさが低下
します。
・ 衝撃やキズ、使用時間の経過による劣化などに
より大きな音をともなって破裂したり、不点灯
状態となって寿命が尽きたりすることがありま
す。
・ 個体差や使用条件によって、寿命に大きなバラ
ツキがあります。指定の時間内であっても破
裂、または不点灯状態になることがあります。
JP
10
使用上のご注意
付属品を確かめる
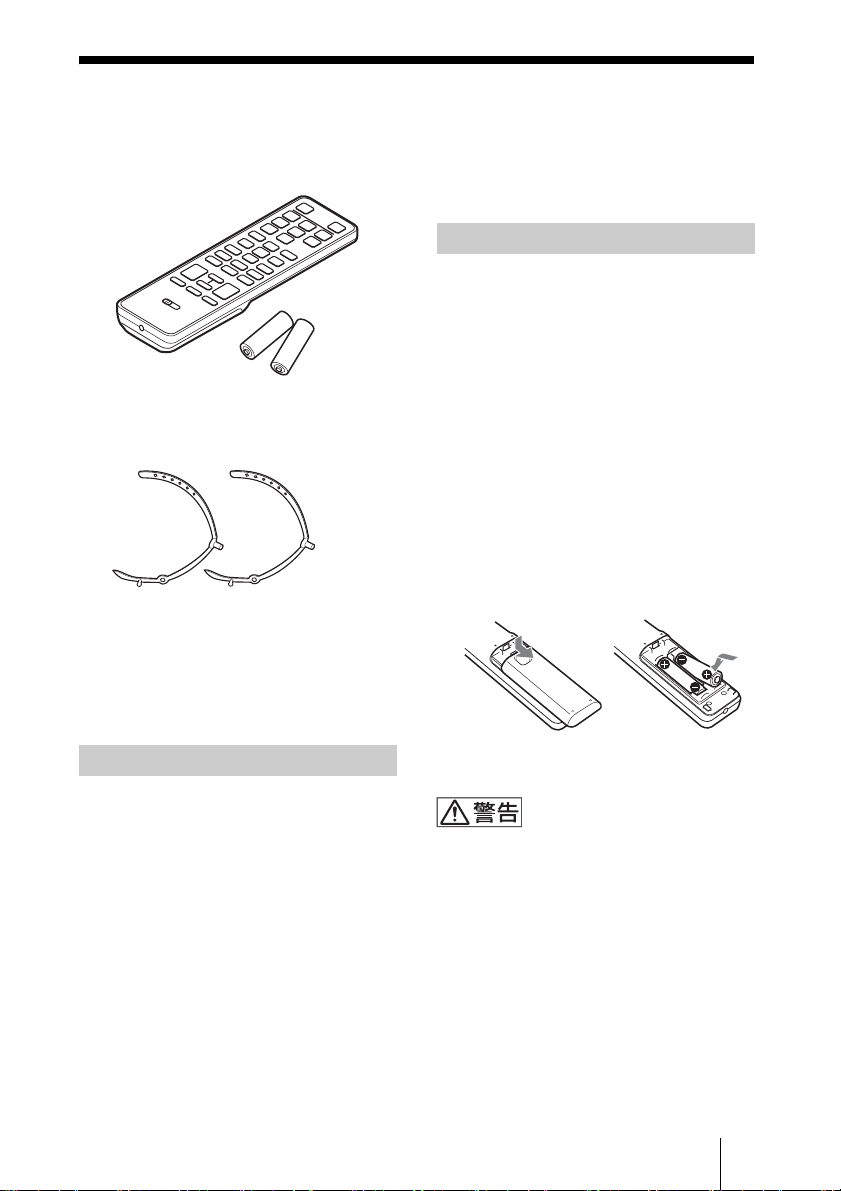
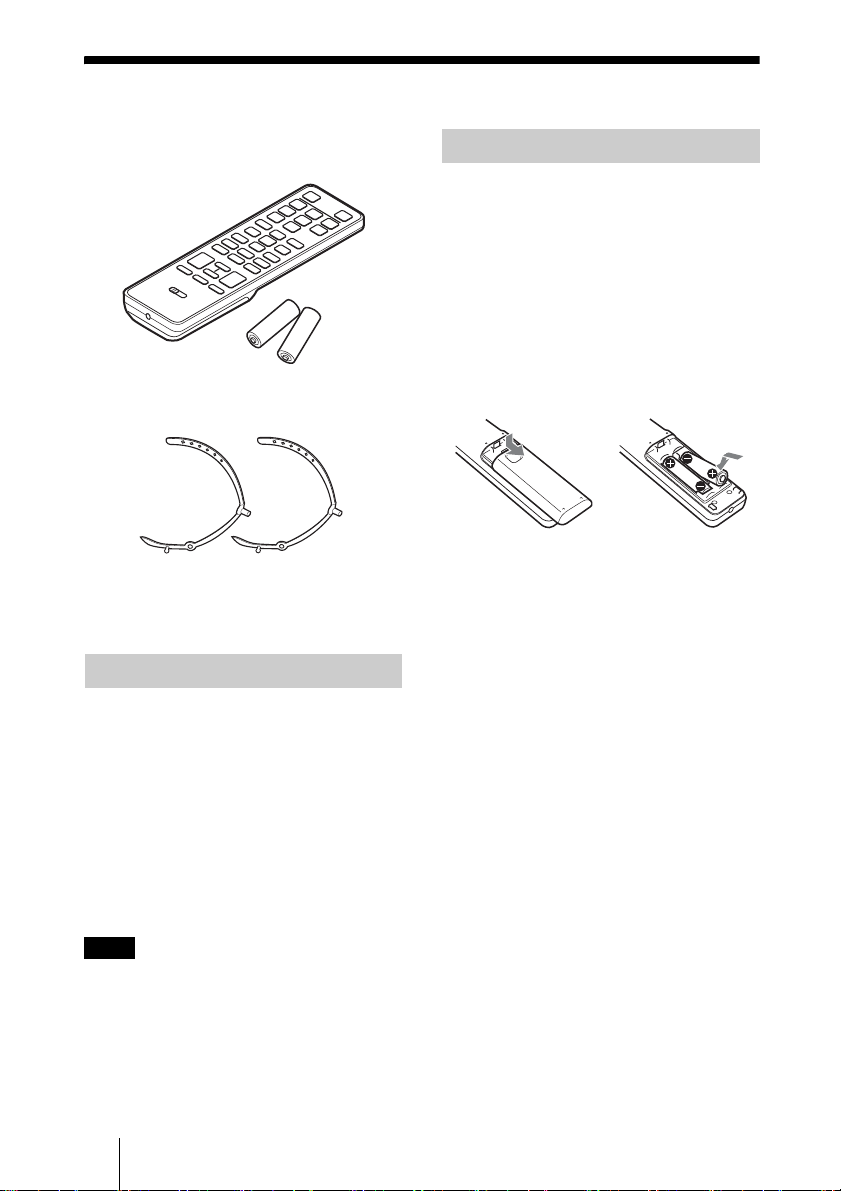
リモコン(RM-PJ19)(1 個)
単 3 形乾電池(2 個)
電源コード(1 本)
ケーブルクランプ(2 個)
簡易説明書(本書)(1 部)
保証書(1 部)
セキュリティラベル(1 枚)
取扱説明書(CD-ROM)(1 枚)
◆CD-ROM が破損または紛失した場合は、
お買い上げ店またはソニーのサービス窓
口経由で購入できます。
リモコンに電池を入れる
電池の使用について
リモコン(RM-PJ19)には、単 3 形乾
電池が 2 個必要です。
破裂の原因となりますので、マンガン
乾電池またはアルカリ乾電池以外は使
わないでください。
1 ふたをはずし、3と # の方向を
確認して単 3形乾電池 2個(付
属)を入れる。
上から押して
スライドさせる。
必ず # 極側から電池
を入れてください。
CD-ROM マニュアルの使いかた
AdobeReader がインストールされたコ
ンピューターで、取扱説明書を閲覧で
きます。
AdobeReader は、Adobe のウェブサ
イトから無償でダウンロードできます。
1 CD-ROM に収録されている
index.htm ファイルを開く。
2 読みたい取扱説明書を選択してク
リックする。
2 ふたを閉める。
電池については、「電池についての安全
上のご注意」をよくお読みください。
注意
指定以外の電池に交換すると、破裂する
危険があります。
必ず指定の電池に交換してください。
使用済みの電池は、国または地域の法令
に従って処理してください。
付属品を確かめる
11
JP
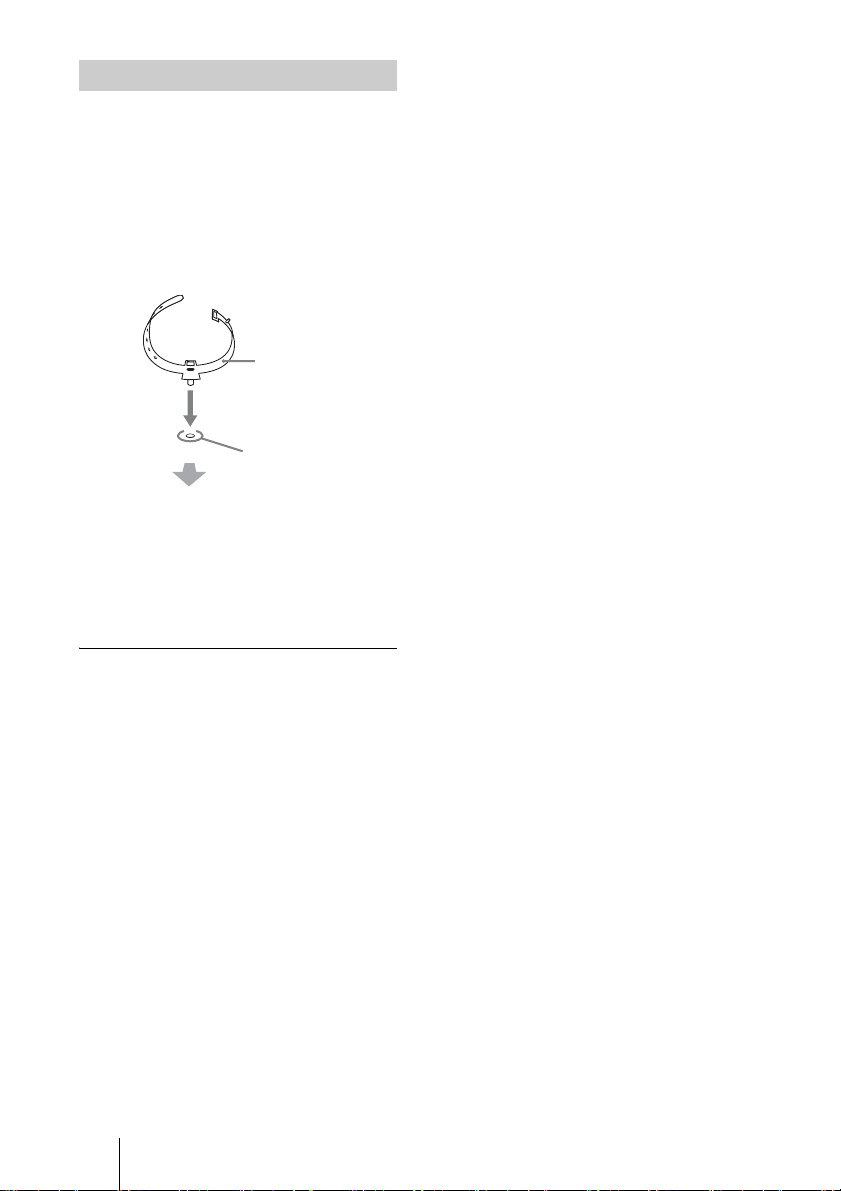
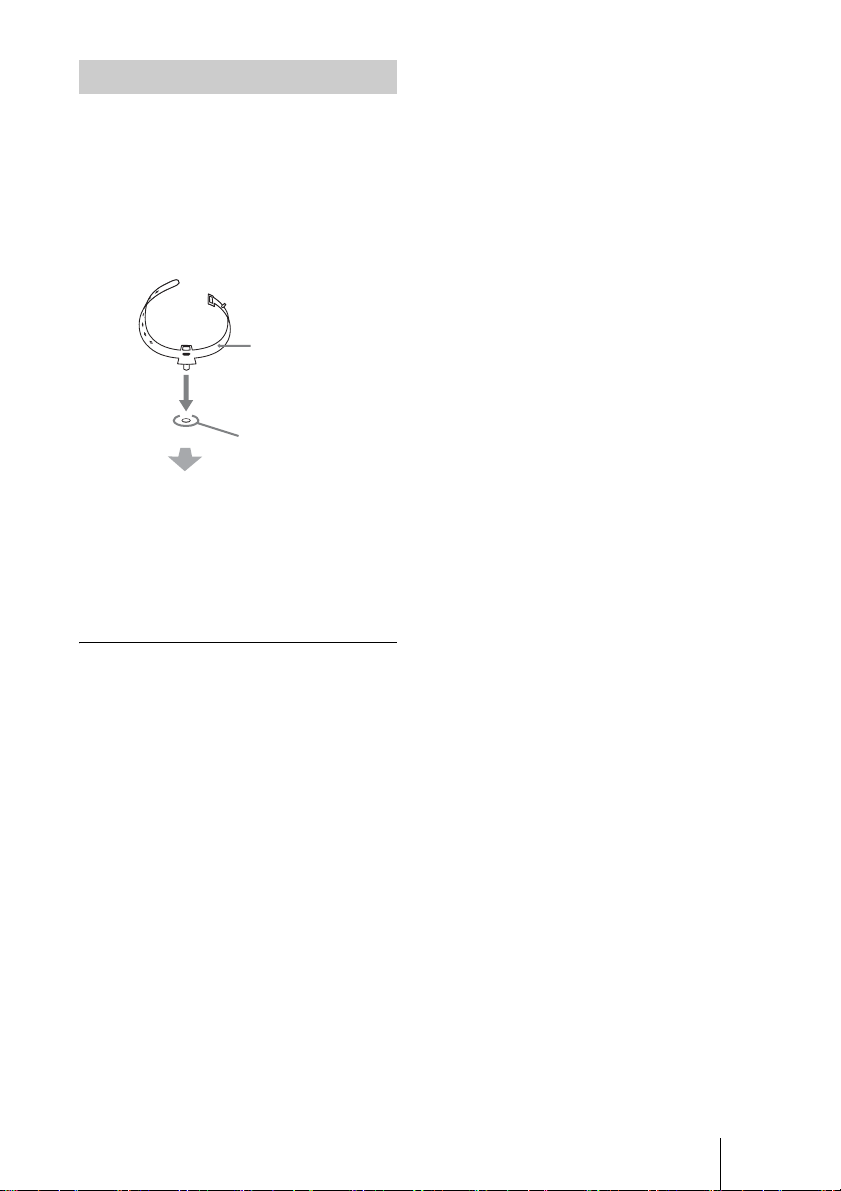
ケーブルクランプの使いかた
1 付属のケーブルクランプをプロ
ジェクターの正面に対して水平方
向に向け、本機の底面の穴に差し
込む。
「カチッ」と音がするまで、確実に
挿し込んでください。
ケーブルクランプ
底面の穴
プロジェクターの前方向
2 接続したケーブルやコードを、固
定したケーブルクランプで束ね
る。
ケーブルクランプを取りはずすとき
は
挿し込んだケーブルクランプを 90°回
転させると取りはずすことができます。
JP
12
付属品を確かめる
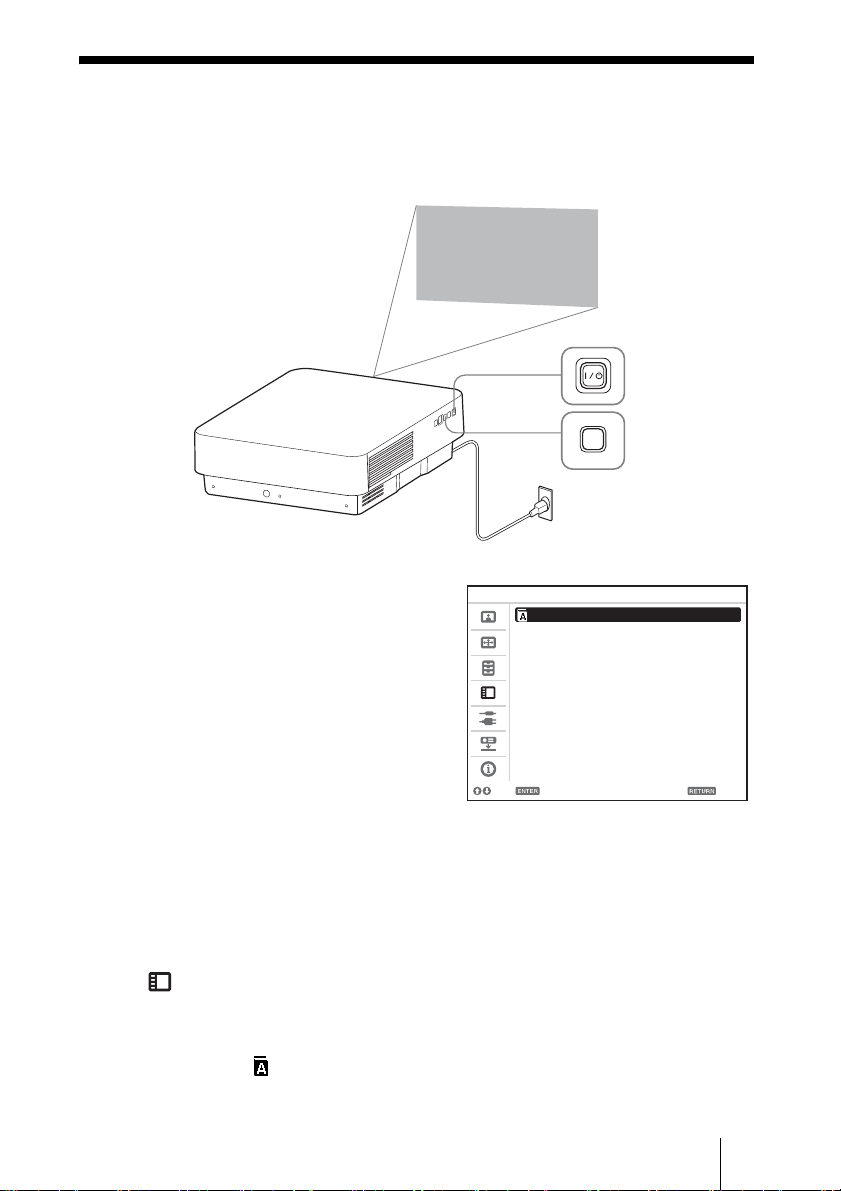
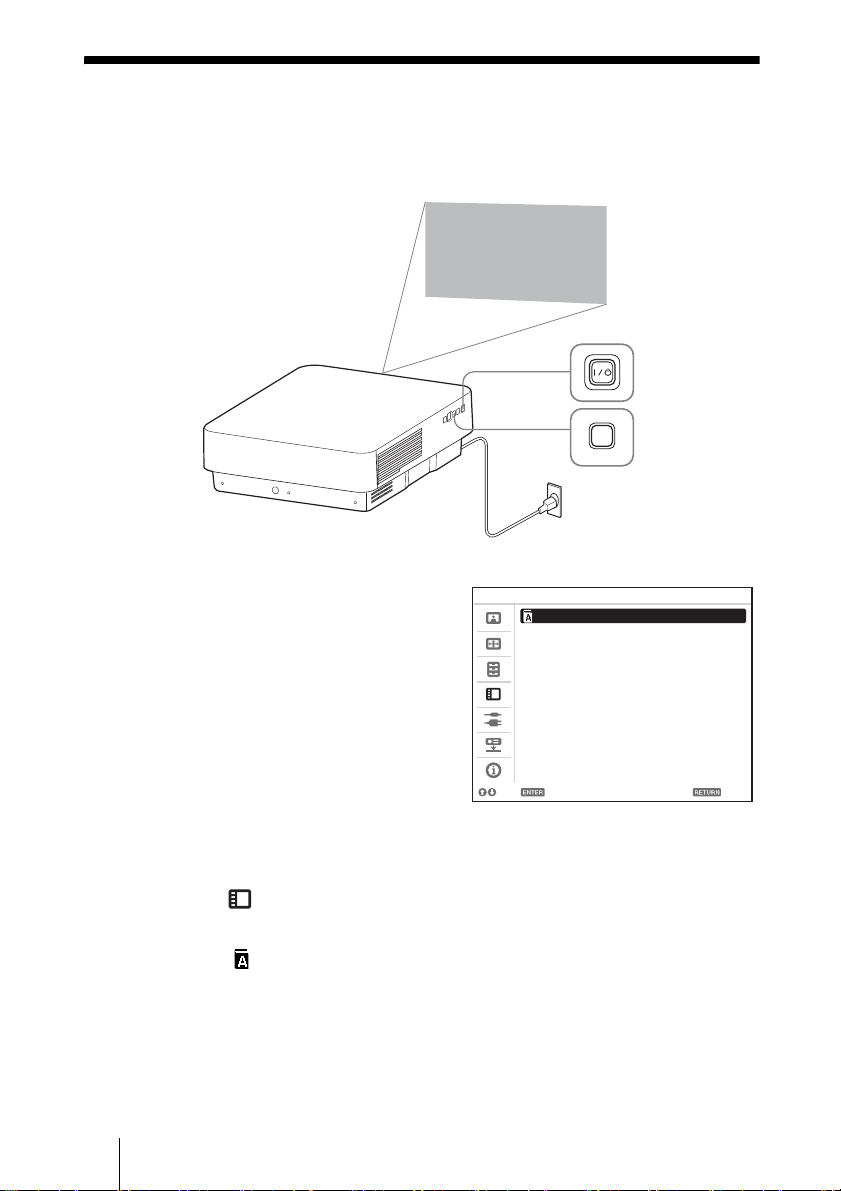
メニューの表示言語を切り換える
お買い上げ時は、メニュー画面やメッセージの表示言語が英語に設定されていま
す。以下の手順で変更してください。
2
MENU
3
1
1 電源コードをコンセントに差し込
む。
2 本機の電源を入れる。
本体の ?/1 ボタンまたはリモコン
の ? ボタンを押します。
3 MENU ボタンを押し、メニュー
画面を表示する。
見えにくい場合は、画面のフォーカ
ス、サイズ、位置を調整してくださ
い(15 ページ)。
4 表示言語を切り換える。
1 V または v を押して、Operation
( 操作設定)を選び、
ENTER ボタンを押す。
2 V または v を押して、
「Language」( 表示言語)を
選び、ENTER ボタンを押す。
Operation
Language EnglishReset
Menu Position Bottom Left
Status On
IR Receiver Front & Rear
ID Mode All
Security Lock Off
Panel Key Lock Off
Sel Set Back
3 V/v/B/b を押して、表示言語を
選び、ENTER ボタンを押す。
5 MENU ボタンを押し、メニュー
画面を消す。
メニューの表示言語を切り換える
13
JP
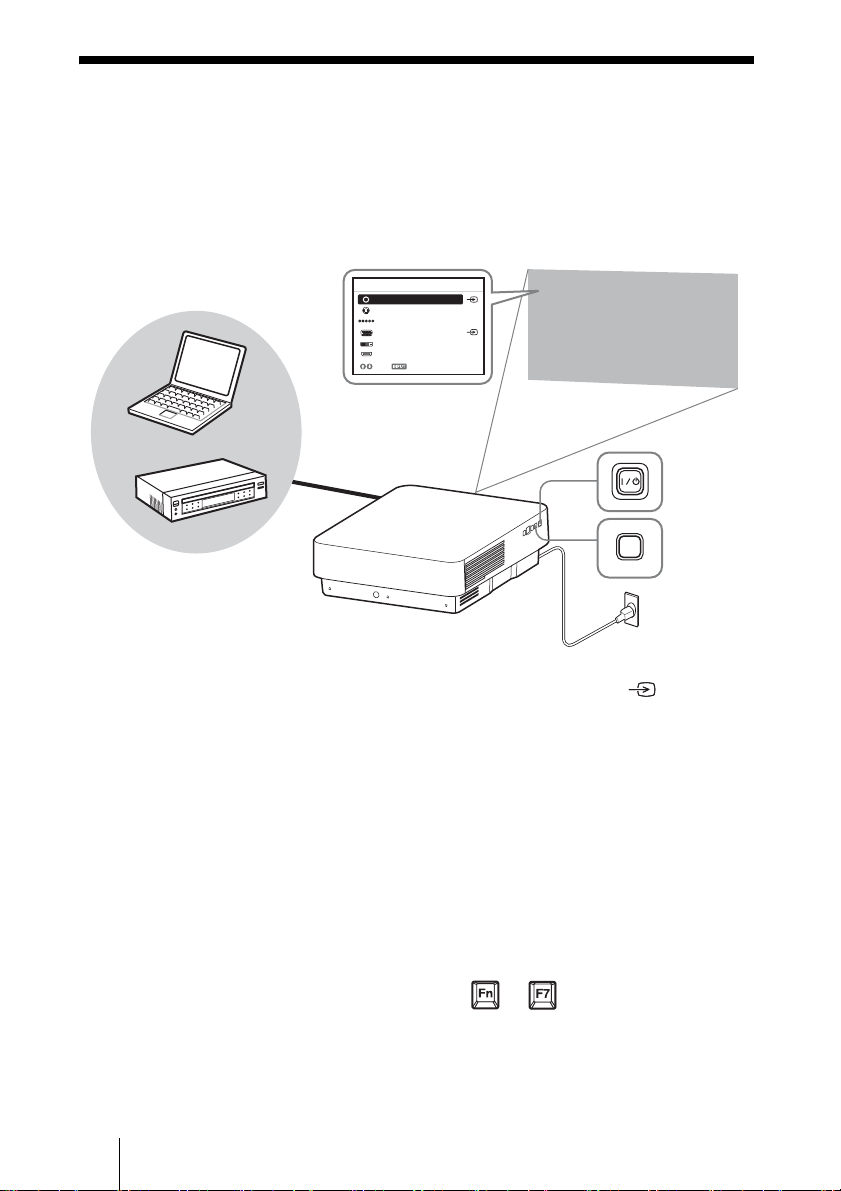
映像を投写する
入力切換パレット
プロジェクター( 本機 ) は、スクリーンまでの距離(投写距離)によって投写され
る映像の大きさが変わります。スクリーンサイズに合うように本機を設置してくだ
さい。投写距離と投写される映像の大きさについて詳しくは、「投写距離とレンズ
シフト量」をご覧ください。
入力端子
5
ビデオ
Sビデオo
4
6
コンピューター
入力 A
入力 B
入力 C
入力 D
選択 スキップ
2
ビデオ機器
1 電源コードをコンセントに差し込
む。
2 再生する機器と接続する。
3 本機の電源を入れる。
本体の ?/1 ボタンまたはリモコン
の ? ボタンを押します。
4 再生する機器の電源を入れる。
5 投写する映像を選ぶ。
本機の INPUT ボタンを押すと、ス
クリーンに入力切換パレットが表示
されます。INPUT ボタンをくり返
し押すか、または V/v ボタンを押
し、投写する映像を選びます。
3
5
INPUT
本体
1
電源コンセント
信号入力時は右側に が表示され
ます。
また、リモコンのダイレクト入力切
換ボタンでも切り換えることができ
ます。
6 コンピューター側で画面の出力先
を外部ディスプレイに変更する。
出力先の切り換えは、コンピュー
ターによって異なります。
(例)
+
7 画面のフォーカス、サイズ、位置
を調整する。
JP
14
映像を投写する
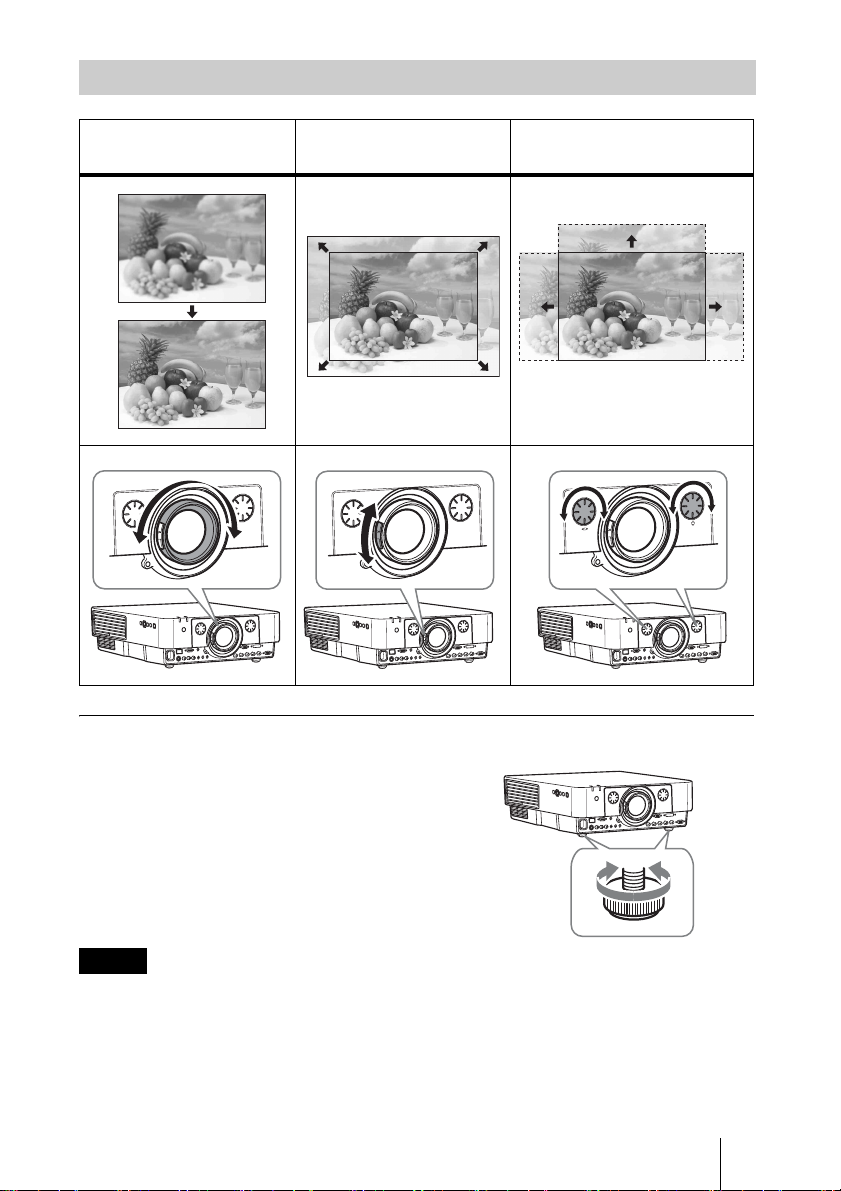
画面のフォーカス/サイズ/位置を調整する
画面のフォーカス
(フォーカス)
画面のサイズ
(ズーム)
画面の位置
(レンズシフト)
前脚部(調整可)による調整
投写位置が低すぎたり、台が水平でな
い場合には、前脚部(調整可)で調整
できます。台形になった投写画面を補
正したい場合はキーストーン補正機能
をご利用ください。
ご注意
・ 前脚部(調整可)を調整するときは、手をはさまないようにしてください。
・ 前脚部(調整可)を出した状態で、本機を上から強く押さえないでください。故障の
原因になります。
・ キーストーン補正は電子的な補正のため、画像が劣化する場合があります。
映像を投写する
15
JP

調整用パターンを表示する
リモコンの PATTERN ボタンを押す
と、投写画面上に調整用パターンを表
示することができます。もう一度
PATTERN ボタンを押すと、元の画面
に戻ります。
電源を切る
1 本体の ?/1 ボタンまたはリモコン
の 1 ボタンを押す。
本体の ?/1 ボタンを押した場合は、
確認のメッセージが表示されます。
メッセージに従って、もう一度本体
の ?/1 ボタンを押してください。
しばらくの間本体を冷やすために
ファンが回り続けます。
2 電源コードを抜く。
本機はファンの停止を待たずに電源
コードを抜いても問題ありません。
本体のボタンで確認のメッセージを
出さずに電源を切るには
本体の ?/1 ボタンを数秒間押し続けて
ください。
ご注意
電源を切った直後に本機を移動させる
場合は、必ずファンの停止を待ってか
ら電源コードを抜いてください。ファ
ンの停止を待たずに電源コードを抜い
て移動させると、故障の原因となりま
す。
確認のメッセージを消すには
本体の ?/1 ボタンまたはリモコンの 1
ボタン以外のボタンを押すか、しばら
くの間何もボタンを押さないでいると
消えます。
JP
16
映像を投写する
インジケーターの見かた
インジケーターの点灯により、本機の状態や異常の発生を確認することができま
す。異常が発生している場合は、表に従い対処してください。
ON/STANDBY インジケーター
状況 意味/対処のしかた
赤色に点灯 スタンバイ状態です。
緑色に点滅 本体に電源が入り、操作可能になるまでの間、または電源
を切ったあと、冷却している状態です。
緑色に点灯 電源が入っている状態です。
オレンジ色に点灯 パワーセービング(ランプオフ)状態です。
赤色に点滅 異常な状態です。点滅回数により症状が異なります。以下
の内容に従って対処してください。また、以下の対処を
行っても症状が再発する場合は、ソニーの相談窓口にご相
談ください。
2 回点滅 内部温度が高温になっています。以下を確認してくださ
い。
・ 排気口、吸気口が壁や物などでふさがれていないか。
・ エアーフィルターがつまっていないか。
・ 設置設定メニューの設置角度が正しく設定されている
か。
6 回点滅 電源コードを抜き、ON/STANDBY インジケーターが消
えるのを確認してからもう一度電源コードをコンセントに
差し込み、電源を入れてください。
その他の点滅回数 ソニーの相談窓口にご相談ください。
LAMP/COVER インジケーター
状況 意味/対処のしかた
赤色に点滅 点滅回数により症状が異なります。以下の内容に従って
対処してください。
2 回点滅 リアパネルまたはエアーフィルターユニットが確実に取
り付けられていません。
3 回点滅 ランプが高温になっています。電源を切り、ランプが冷
えてからもう一度電源を入れてください。
症状が再発する場合は、ランプの消耗が考えられます。
新しいランプに交換してください。
インジケーターの見かた
17
JP
ランプを交換する
投写画面にメッセージが表示された場合、またはインジケーターにランプ交換のお
知らせが表示された場合は、新しいランプに交換してください。
交換ランプは、プロジェクターランプ LMP-F230(VPL-FX30 の場合)(別売)、
LMP-F272(VPL-FH31/FH30、VPL-FX35 の場合)(別売)、LMP-F331(VPLFH36/FH35、VPL-FX37 の場合)(別売)をお使いください。
1 電源を切り、電源コードを抜く。
・ 電源を切った直後はランプが高温に
なっているため、触れるとやけどの
原因となります。ランプを充分に冷
やすため、本機の電源を切ったあと
1時間以上たってからランプを交換
してください。
・ ランプをはずしたあとのランプ収納
部に、金属類や燃えやすい物などの
異物を入れないでください。火災や
感電の原因となります。また、やけ
どの危険がありますので手を入れな
いでください。
・ ランプが破損している場合は、ご自
分でランプ交換を行わず、ソニーの
相談窓口にご相談ください。
・ ランプを取り出すときは、必ず指定
された箇所を持ち、ランプを傾けず
に水平にしたまま取り出してくださ
い。指定された箇所以外の部分に触
れるとけがややけどの原因となるこ
とがあります。また、ランプを傾け
ると、万一ランプが破損している場
合に破片が飛び出し、けがの原因と
なることがあります。
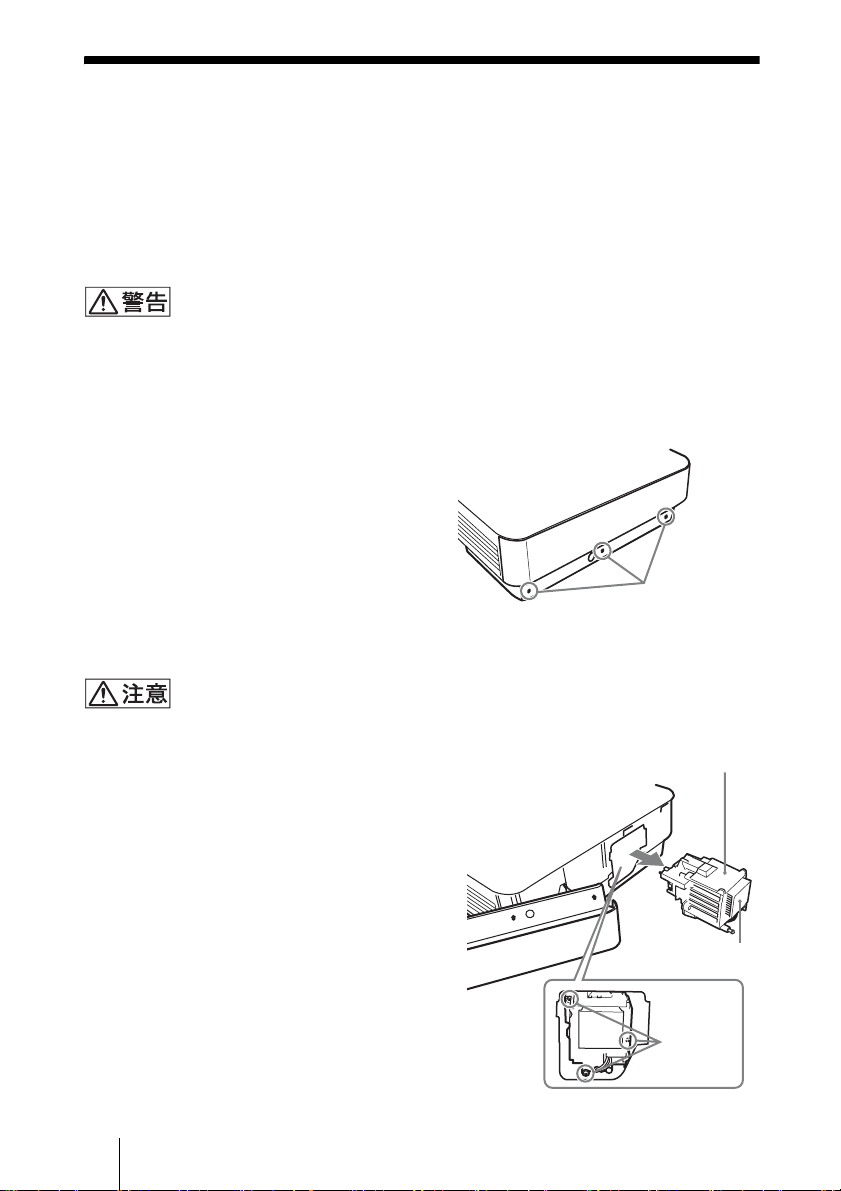
2 ランプが充分冷えてから、リアパ
ネルのネジ(3 本)をゆるめ、リ
アパネルを開く。
本体後面
ネジ
3 ランプのネジ(3 本)をゆるめ、
取っ手を持ってランプを取り出
す。
古いランプ
取っ手
ネジ
JP
18
ランプを交換する
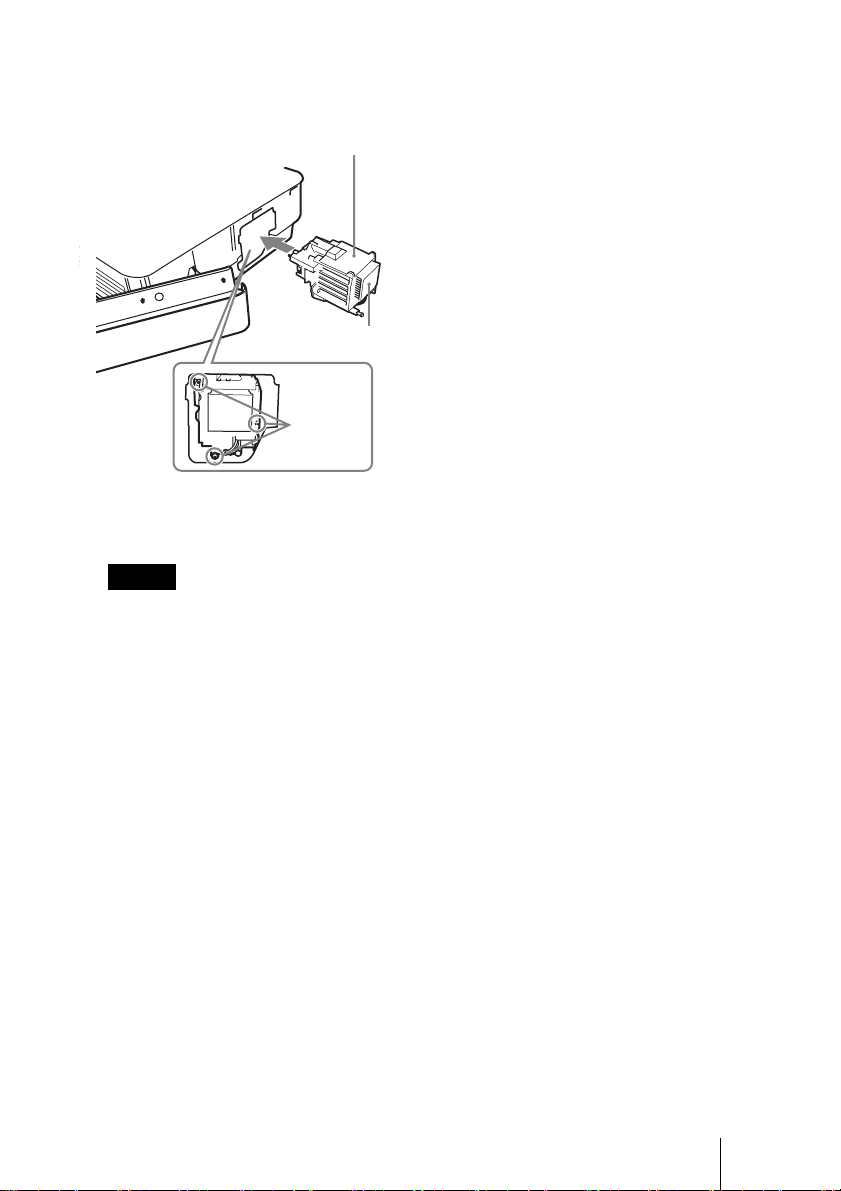
4 新しいランプを確実に奥まで押し
込み、ネジ(3 本)を締める。
新しいランプ
取っ手
ネジ
5 リアパネルを閉じ、ネジ(3 本)
を締める。
ご注意
ランプやリアパネルが確実に装着され
ていないと、電源が入りません。
6 電源コードを電源コンセントに差
し込み、電源を入れる。
7 ランプタイマーの初期化を行う。
次回の交換時期をお知らせするため
に、ランプタイマーを初期化しま
す。機能設定メニューから「ランプ
タイマー初期化」を選び、ENTER
ボタンを押すとメッセージが表示さ
れます。「はい」を選ぶとランプタ
イマーを初期化します。
ランプを交換する
19
JP
エアーフィルターを掃除する
投写画面に表示されるメッセージにエアーフィルター掃除のお知らせが表示された
場合は、エアーフィルターを掃除してください。
エアーフィルターを掃除しても汚れが落ちないときは、新しいエアーフィルターに
交換してください。新しいエアーフィルターについては、お買い上げ店またはソ
ニーの相談窓口にご依頼ください。
エアーフィルターの掃除を怠ると、ゴミがたまり、内部に熱がこもって、故障・火災の
原因となることがあります。
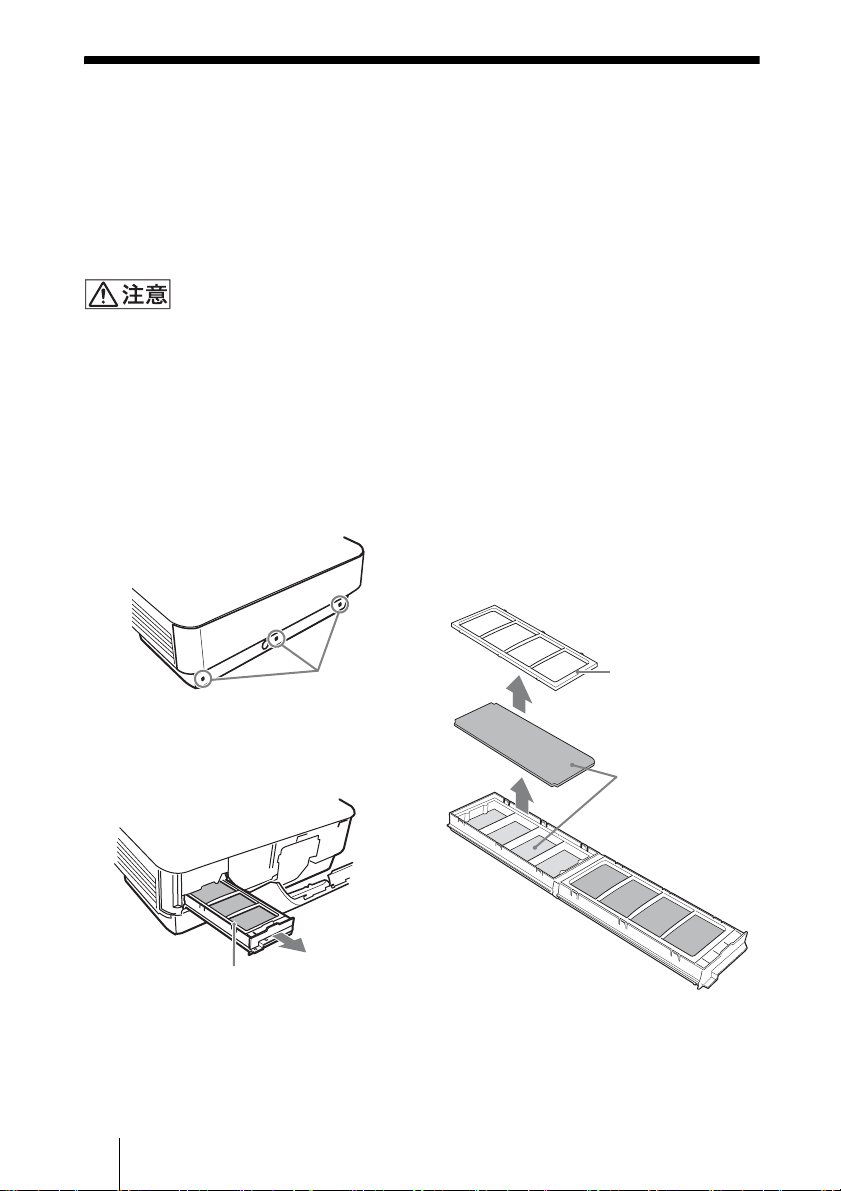
1 電源を切り、電源コードをコンセ
ントから抜く。
2 リアパネルのネジ(3 本)をゆる
め、リアパネルを開く。
ネジ
3 エアーフィルターユニットを引き
出す。
エアーフィルター
ユニット
4 掃除機でフィルターを掃除する。
図のようにカバーを取りはずし、エ
アーフィルター(4 枚)を掃除して
ください。エアーフィルターユニッ
ト底部にあるエアーフィルター(2
枚)は、エアーフィルターユニット
から取はずすことができません。
カバー
エアーフィルター
5 エアーフィルターを元に戻し、エ
アーフィルターユニットを取り付
ける。
JP
20
エアーフィルターを掃除する

6 リアパネルを閉じ、ネジ(3 本)
を締める。
ご注意
エアーフィルターユニットやリアパネ
ルが確実に装着されていないと、電源
が入りません。
エアーフィルターを掃除する
21
JP

Before operating the unit, please read this
manual thoroughly and retain it for future
reference.
WARNING
To reduce the risk of fire or electric
shock, do not expose this apparatus
to rain or moisture.
To avoid electrical shock, do not
open the cabinet. Refer servicing to
qualified personnel only.
WARNING
THIS APPARATUS MUST BE
EARTHED.
WARNING
When installing the unit, incorporate a
readily accessible disconnect device in the
fixed wiring, or connect the power plug to an
easily accessible socket-outlet near the unit.
If a fault should occur during operation of
the unit, operate the disconnect device to
switch the power supply off, or disconnect
the power plug.
CAUTION
About the LAN connector
For safety, do not connect the connector for
peripheral device wiring that might have
excessive voltage to this port.
WARNING: THIS WARNING IS
APPLICABLE FOR USA ONLY.
If used in USA, use the UL LISTED power
cord specified below.
DO NOT USE ANY OTHER POWER
CORD.
Plug Cap Parallel blade with ground pin
(NEMA 5-15P Configuration)
Cord Type SJT, three 16 or 18 AWG
wires
Length Minimum 1.5 m (4 ft 11 in), Less
than 4.5 m (14 ft 9 in)
Rating Minimum 10 A, 125 V
Using this unit at a voltage other than 120V
may require the use of a different line cord or
attachment plug, or both. To reduce the risk
of fire or electric shock, refer servicing to
qualified service personnel.
WARNING: THIS WARNING IS
APPLICABLE FOR OTHER
COUNTRIES.
1 Use the approved Power Cord (3-core
mains lead) / Appliance Connector / Plug
with earthing-contacts that conforms to
the safety regulations of each country if
applicable.
2 Use the Power Cord (3-core mains lead) /
Appliance Connector / Plug conforming
to the proper ratings (Voltage, Ampere).
If you have questions on the use of the above
Power Cord / Appliance Connector / Plug,
please consult a qualified service personnel.
IMPORTANT
The nameplate is located on the bottom.
For kundene i Norge
Dette utstyret kan kobles til et ITstrømfordelingssystem.
For the customers in the U.S.A.
This equipment has been tested and found to
comply with the limits for a Class A digital
device, pursuant to Part 15 of the FCC
Rules. These limits are designed to provide
reasonable protection against harmful
interference when the equipment is operated
in a commercial environment. This
equipment generates, uses, and can radiate
radio frequency energy and, if not installed
and used in accordance with the instruction
manual, may cause harmful interference to
radio communications. Operation of this
equipment in a residential area is likely to
cause harmful interference in which case the
user will be required to correct the
interference at his own expense.
You are cautioned that any changes or
modifications not expressly approved in this
manual could void your authority to operate
this equipment.
All interface cables used to connect
peripherals must be shielded in order to
comply with the limits for a digital device
pursuant to Subpart B of Part 15 of FCC
Rules.
GB
WARNING
2
This device complies with Part 15 of the
FCC Rules. Operation is subject to the
following two conditions: (1) this device
may not cause harmful interference, and (2)
this device must accept any interference
received, including interference that may
cause undesired operation.
For the customers in Canada
This Class A digital apparatus complies with
Canadian ICES-003.
For the customers in Europe,
Australia and New Zealand
WARNING
This is a Class A product. In a domestic
environment, this product may cause radio
interference in which case the user may be
required to take adequate measures.
For the customers in Europe
This product has been manufactured by or
on behalf of Sony Corporation, 1-7-1 Konan
Minato-ku Tokyo, 108-0075 Japan.
Inquiries related to product compliance
based on European Union legislation shall
be addressed to the authorized
representative, Sony Deutschland GmbH,
Hedelfinger Strasse 61, 70327 Stuttgart,
Germany. For any service or guarantee
matters, please refer to the addresses
provided in the separate service or guarantee
documents.
This apparatus shall not be used in the
residential area.
For the customers in Taiwan only
For the Customers in Brazil only
DESCARTE DE PILHAS E BATERIAS
Pilhas e Baterias não recarregáveis
Atenção:
Verifique as instruções de uso do aparelho
certificando-se de que as polaridades (+) e
(-) estão no sentido indicado. As pilhas
poderão vazar ou explodir se as polaridades
forem invertidas, expostas ao fogo,
desmontadas ou recarregadas.
Evite misturar com pilhas de outro tipo ou
com pilhas usadas, transportá-las ou
armazená-las soltas, pois aumenta o risco de
vazamento.
Retire as pilhas caso o aparelho não esteja
sendo utilizado, para evitar possíveis danos
na eventualidade de ocorrer vazamento.
As pilhas devem ser armazenadas em local
seco e ventilado.
No caso de vazamento da pilha, evite o
contato com a mesma.
Lave qualquer parte do corpo afetado com
água abundante.
Ocorrendo irritação, procure auxílio médico.
Não remova o invólucro da pilha.
Mantenha fora do alcance das crianças. Em
caso de ingestão procure auxílio médico
imediatamente.
GB
WARNING
GB
3
Precautions
On safety
• Check that the operating voltage of your
unit is identical with the voltage of your
local power supply. If voltage adaptation
is required, consult with qualified Sony
personnel.
• Should any liquid or solid object fall into
the cabinet, unplug the unit and have it
checked by qualified Sony personnel
before operating it further.
• Unplug the unit from the wall outlet if it is
not to be used for several days.
• To disconnect the cord, pull it out by the
plug. Never pull the cord itself.
• The wall outlet should be near the unit and
easily accessible.
• The unit is not disconnected from the AC
power source (mains) as long as it is
connected to the wall outlet, even if the
unit itself has been turned off.
• Do not look into the lens while the lamp is
on.
• Do not place your hand or objects near the
ventilation holes — the air coming out is
hot.
• Be careful not to catch your fingers by the
adjuster when you adjust the height of the
unit. Do not push hard on the top of the
unit with the adjuster out.
• Be sure to grasp both sides of the unit with
both hands when carrying the unit.
• Avoid using an extension cord with a low
voltage limited since it may cause the
short-circuit and physical incidents.
• Do not catch your finger between the unit
and surface of the floor when moving the
projector installed on the floor.
• Be careful not to catch your finger in the
cooling fan.
• Do not carry the projector with the cabinet
on and with its cover open.
• Do not install the unit in a location near
heat sources such as radiators or air ducts,
or in a place subject to direct sunlight,
excessive dust or humidity, mechanical
vibration or shock.
• Never mount the projector on the ceiling
or move it by yourself. Be sure to consult
with qualified Sony personnel (charged).
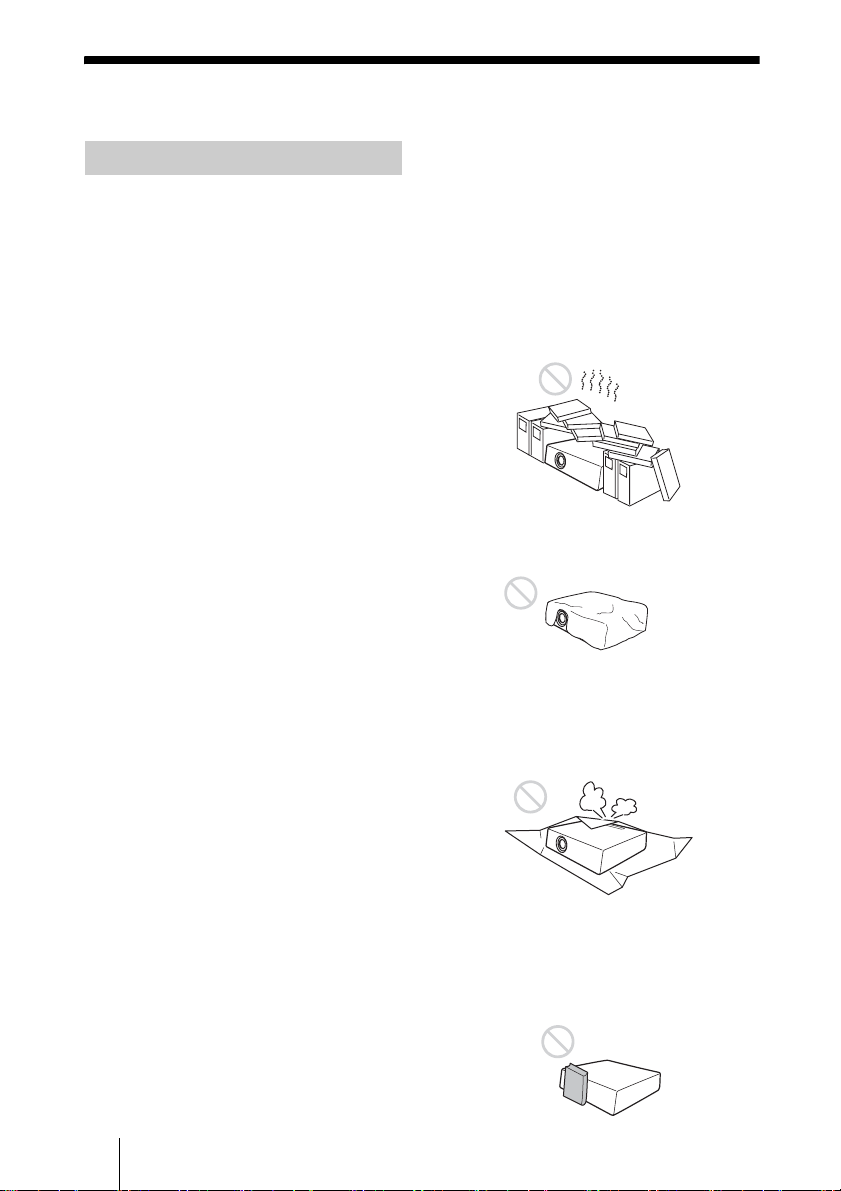
• If the ventilation holes are blocked,
internal heat builds up, and it may cause a
fire or damage the unit. To allow adequate
air circulation and prevent internal heat
build-up, follow the items below:
• Place the unit, leaving sufficient space
from walls or any objects (page 5).
• Avoid using something to cover the
ventilation holes (exhaust/intake).
• Do not place the unit on surfaces such as
an original packing sheet, soft cloth,
papers, rugs, or scraps of paper. The
ventilation holes may take in such
materials.
• Do not place any object just in front of the
lens that may block the light during
projection. Heat from the light may
damage the object. Use the picture muting
function to cut off the picture.
GB
4 Precautions
• Do not use the Security bar for the purpose
of preventing theft for transporting or
installing the unit. If you lift the unit by the
Security bar or hang the unit by this bar, it
may cause the unit to fall and be damaged,
and may result in personal injury.
• Avoid using if the unit is tilted more than
15 degrees vertically.
15° 15°
For dealers
• When the projector is mounted on the
ceiling, the Sony PSS-610 Projector
Suspension Support must be used for
installation.
• Be sure to secure the cabinet cover firmly
when installing to the ceiling firmly.
On Installation
• When installing the unit, leave space
between any walls, etc. and the unit as
illustrated.
More than 30 cm
13
(11
/16")
More than
30 cm
11 13/16")
(
More than
10 cm
15
(3
/16")
15°
15°
• Install the projector on the floor or ceiling.
Any other installation causes a
malfunction such as color irregularity or
shortening lamp life.
• Avoid using the unit in a location where
the temperature or humidity is very high,
or temperature is very low.
• Avoid installing the unit in a location
subject to direct cool or warm air from an
air-conditioner. Installing in such a
location may cause malfunction of the unit
due to moisture condensation or rise in
temperature.
• Avoid using if the unit is tilted more than
15 degrees horizontally.
15°
15°
Precautions
GB
5
• Avoid installing the unit in a location near
a heat or smoke sensor. Installing in such a
location may cause malfunction of the
sensor.
• Avoid installing the unit in a very dusty or
extremely smoky environment.
Otherwise, the air filter will become
obstructed, and this may cause a
malfunction of the unit or damage it.
solvent such as alcohol, benzene or
thinner, or acid, alkaline or abrasive
detergent, or a chemical cleaning cloth.
• On cleaning the cabinet:
Clean the cabinet gently with a soft cloth.
Stubborn stains may be removed with a
soft cloth lightly dampened with mild
detergent solution and wrung, followed by
wiping with a soft dry cloth. Never use
solvent such as alcohol, benzene or
thinner, or acid, alkaline or abrasive
detergent, or a chemical cleaning cloth.
On Illumination
To obtain the best picture, the front of the
screen should not be exposed to direct
lighting or sunlight.
On LCD Projector
• When using the unit at an altitude of 1,500
m or higher, set “High Altitude Mode” to
“On” in the Installation menu. Failing to
set this mode when using the unit at high
altitudes could have adverse effects, such
as reducing the reliability of certain
components.
• Set “Installation Attitude” on the
Installation menu correctly to suit to the
Installation angle. Continuing to use the
wrong setting may affect component
reliability.
On cleaning the lens and the
cabinet
• Be sure to disconnect the AC power cord
from the AC outlet before cleaning.
• If you rub on the unit with a stained cloth,
the cabinet may be scratched.
• If the unit is exposed to volatile materials
such as insecticide, or the unit is in contact
with a rubber or vinyl resin product for a
long period of time, the unit may
deteriorate or the coating may come off.
• Do not touch the lens with bare hands.
• On cleaning the lens surface:
Wipe the lens gently-with a soft cloth,
such as a glass cleaning cloth. Stubborn
stains may be removed with a soft cloth
lightly dampened with water. Never use
The LCD projector is manufactured using
high-precision technology. You may,
however, see tiny black points and/or bright
points (red, blue, or green) that continuously
appear on the LCD projector. This is a
normal result of the manufacturing process
and does not indicate a malfunction.
Also, when you use multiple LCD projectors
to project onto a screen, even if they are of
the same model, the color reproduction
among projectors may vary, since color
balance may be set differently from one
projector to the next.
On Screen
When using a screen with an uneven surface,
stripes pattern may rarely appear on the
screen depending on the distance between
the screen and the unit or the zooming
magnifications. This is not a malfunction of
the unit.
On Fan
Since the projector is equipped with a fan
inside to prevent internal temperature from
rising, there may be some noise. This is a
normal result of the manufacturing process
and does not indicate a malfunction. If,
GB
6 Precautions

however, in a case of abnormal noise,
consult with qualified Sony personnel.
On Lamp
The lamp used as a light source contains
mercury that has high internal pressure. A
high-pressure mercury lamp has the
following characteristics:
• Brightness of the lamp will be lowered as
the elapse of time used.
• The lamp may break with a loud noise as a
result of shock, damage, or deterioration
caused by the elapse of time. The lamp
may become unlit and may burn out.
• The lamp life varies with individual
differences or usage conditions of each
lamp. Therefore, it may break or will not
light even before the specified
replacement time.
• It may possibly break after the
replacement time has elapsed. Replace the
lamp with a new one as soon as possible if
a message displayed on the projected
image, even if the lamp normally lights.
Precautions
GB
7
Checking the Supplied Accessories
RM-PJ19 Remote Commander (1)
Size AA (R6) batteries (2)
AC power cord (1)
Cable ties (2)
Quick Reference Manual (this manual) (1)
Security label (1)
Operating Instructions (CD-ROM) (1)
Using the CD-ROM manual
The manual can be read on a computer with
Adobe Reader installed.
You can download Adobe Reader free from
the Adobe website.
Installing Batteries
Two size AA (R6) batteries are supplied for
RM-PJ19 Remote Commander.
To avoid risk of explosion, use size AA (R6)
manganese or alkaline batteries.
1 Remove the lid, then install the two
AA (R6) batteries (supplied) with the
correct polarity.
While pressing the lid,
slide it.
Be sure to install
the battery from the
# side.
2 Replace the lid.
CAUTION
Danger of explosion if battery is incorrectly
replaced.
Replace only with the same or equivalent
type recommended by the manufacturer.
When you dispose of the battery, you must
obey the law in the relative area or country.
1 Open the index.htm file in the CD-
ROM.
2 Select and click on the manual that
you want to read.
Note
If you have lost or damaged the CD-ROM, you
can purchase a new one from your Sony dealer
or Sony service counter.
GB
8 Checking the Supplied Accessories
Using the Cable Ties
1 Aim the supplied cable tie in a
horizontal direction with respect to the
front face of the projector then insert
the cable tie through the hole at the
bottom.
Be sure to insert the cable tie in fully
until it clicks.
Cable tie
Hole of bottom
Front direction
of the projector
2 Bundle the cables and cords with
attached cable tie.
When you remove the cable tie
Rotate 90 degrees the cable tie.
Checking the Supplied Accessories
GB
9
Selecting the Menu Language
The factory setting for the language for displaying menus, messages, etc. is English.
To change the on-screen language, proceed as follows:
2
MENU
3
1
1 Plug the AC power cord into a wall
outlet.
2 Turn on the projector.
Press the ?
? key on the Remote Commander.
/1 key on the main unit or the
3 Press the MENU key to display the
menu.
If the display cannot be properly seen,
adjust the focus, size, and position of the
projected image (page 12).
4 Select the menu language.
1
Press the V or v key to select the
Operation ( ) menu then press
the ENTER key.
2 Press the V or v key to select
“Language ( )” then press the
ENTER key.
GB
10 Selecting the Menu Language
Operation
Language EnglishReset
Menu Position Bottom Left
Status On
IR Receiver Front & Rear
ID Mode All
Security Lock Off
Panel Key Lock Off
Sel Set Back
3 Press the V/v/B/b key to select a
language, then press the ENTER
key.
5 Press the MENU key to turn off the
menu screen.
 Loading...