

Page 1

WARNING
Precautions
To prevent fire or shock hazard, do not expose the
unit to rain or moisture.
To avoid electrical shock, do not open the cabinet.
Refer servicing to qualified personnel only.
Do not install the appliance in a confined space,
such as a bookcase or built-in cabinet.
This equipment is intended for home entertainment
purposes only. The warranty shall be invalidated if
used in commercial environments such as
restaurants or in vehicles or ships, etc., even within
the warranty period.
On safety
• Do not disassemble the cabinet as this may result in
an electrical shock. Refer servicing to qualified
personnel only.
• Should any solid object or liquid fall into the cabinet,
unplug the amplifier and have it checked by
qualified personnel before operating it any further.
On power sources
• Before operating the amplifier, check that the
operating voltage of the amplifier is identical with
your local power supply. The operating voltage is
indicated on the nameplate at the rear of the
amplifier.
• The amplifier is not disconnected from the AC
power source as long as it is connected to the wall
outlet, even if the amplifier itself has been turned off.
• If you are not going to use the amplifier for a long
time, be sure to disconnect the amplifier from the
wall outlet. To disconnect the AC power cord, grasp
the plug itself; never pull the cord.
• AC power cord must be changed only at the
qualified service shop.
On placement
• Place the amplifier in a location with adequate
ventilation to prevent heat built-up and prolong the
life of the amplifier.
• Do not place the amplifier near heat sources, or in a
place subject to direct sunlight, excessive dust or
mechanical shock.
• Do not place anything on top of the cabinet that
might block the ventilation holes and cause
malfunctions.
On operation
Before connecting other components, be sure to turn off
and unplug the amplifier.
On cleaning
Clean the cabinet, panel and controls with a soft cloth
slightly moistened with a mild detergent solution. Do
not use any type of abrasive pad, scouring powder or
solvent such as alcohol or benzine.
On the prevention of howling
Do the following:
– keep the microphone away from the speakers
during use.
– lower the master volume.
– lower the microphone volume or echo level.
– turn off the microphone when connecting it.
– set the master volume and microphone volume as
low as possible before connecting the microphone.
Excessive howling might damage the speakers.
-EN
2
Introduction
TA-K800AV.3-810-853-11 (En, C1, C2)
Page 2

Operating voltage and AC plug
Table of contents
Operating voltage
Before operating the unit, make sure that the operating
voltage of your unit is identical with that of your local
power supply. If necessary, reset the voltage selector to
the voltage corresponding to your local power supply.
The voltage selector of this unit is originally set to 220
V AC.
For Set to
110 volts AC 110 V
220 volts AC 220 V
230 volts AC 230 V
To set the voltage selector, disconnect the AC power
cord and set the selector to the appropriate position
with a blade screwdriver.
VOLTAGE SELECTOR
110 V
220 V
230 V
Getting Started
4 Step 1: Unpacking
4 Step 2: Inserting batteries into the remote
commander
5 Step 3: Connecting the amplifier
Basic Operations
8 Before you start Karaoke play
10 Playing Karaoke
Additional Operations
12 Recording
Additional Information
13 Troubleshooting
14 Specifications
15 Index to parts and controls
18 Index
EN
Using the AC Plug adoptor
The AC plug adaptor is attached to the AC plug of the
power cord. If the AC plug adaptor does not fit into
the wall outlet, remove the AC plug adaptor.
If you have any questions or problems concerning your
unit, please contact your nearest Sony dealer.
Welcome!
Thank you for purchasing the Sony Karaoke AV
amplifier.
Before operating the unit, please read this manual
thoroughly and retain it for future reference.
The TA-K800AV, a Karaoke AV amplifier, enable you
to play karaoke in addition to conventional playback,
by connecting your audio/video components.
Features include:
• Up to three microphones (not supplied) enables you
to sing a song together with one or two other people.
• Digital Echo gives a high quality echo to your
singing.
• Karaoke Pon enables you to play karaoke using nonkaraoke discs or tapes. You can lower the volume of
the singer’s voice by pressing the KARAOKE PON
button. (KARAOKE PON does not work with some
music sources).
• You can select an acoustic atmosphere from among
three types of surround modes (Karaoke, Music and
Theater.)
Introduction
TA-K800AV.3-810-853-11 (En, C1, C2)
-EN
3
Page 3

Step 1
Unpacking
Check that you have the following items:
Step 2
• Remote commander
RMT-K800
• Two R6 (size AA) batteries
• AC plug adaptor (attached to the AC plug of
the power cord)
Inserting batteries into the remote commander
1 Turn the commander
over, and remove the
cover.
Notes
• With normal use, the batteries should last for approximately six months.
• Use two size R6 (AA) batteries.
• If you use the batteries incorrectly, they may leak or explode. See notes
below for correct usage.
–Insert the batteries with correct polarity as shown above.
–Do not use a new battery together with an old one.
–Do not use different types of batteries together.
–Do not recharge the batteries.
–If you are not going to use the remote commander for an extended period
of time, remove the batteries to avoid possible damage from battery
leakage.
–If battery leakage should occur, wipe off the leakage from the battery
compartment, then insert new batteries.
• Do not let direct sunlight or powerful artificial light fall directly on the
remote sensor on the front panel of the amplifier. Such light interferes with
the signals from the remote commander, causing the remote commander to
fail to operate correctly.
2 Check the polarities and
position two R6 (size
AA) batteries correctly.
3 Close the cover.
-EN
4
Getting Started
TA-K800AV.3-810-853-11 (En, C1, C2)
Page 4

Step 3
Connecting the amplifier
Hookup overview
The amplifier allows you to connect and control the following audio/video components.
Follow the hookup procedure indicated for each component that you want to connect.
Before you get started
• Turn off the power to all components before making any connections.
• Do not connect the AC power cords of the various components until all connections are
completed.
• Use the audio connecting cords supplied with each component for hooking up with the
amplifier.
Purchase and use optionally available cords as required.
• When connecting the cord, be sure to match the color-coded cord to the appropriate jacks
on the components: Yellow (video) to Yellow, Red (right) to Red and White (left) to White.
Be sure to make connections firmly to avoid hum and noise.
What cords will I need?
Audio connecting cord (not supplied) (6)
White
(L)
Red
(R)
White
(L)
Red
(R)
Getting Started
Audio and video connecting cord (not supplied) (3)
Yellow
(video)
White
(L)
Red
(R)
Yellow
(video)
White
(L)
Red
(R)
Video connecting cord (not supplied) (1)
Yellow
Yellow
Getting Started
-EN
5
TA-K800AV.3-810-853-11 (En, C1, C2)
Page 5

R
L
IN
REC OUT
TUNER
VCD/LD
MONITOR
TAPE MD CD
VCR
IN
REC OUT
IN ININ
OUT
AUDIO
IN
AUDIO
IN IN
OUT
VIDEO VIDEO
OUT
VIDEO
VCR
VCR AUDIO/
VIDEO IN
VCD/LD
AUDIO/VIDEO IN
MONITOR
VIDEO OUT
VCR AUDIO/
VIDEO OUT
VCD/LD player
TV
SPEAKERS
AC OUTLET
VOLTAGE SELECTOR
110 V
220 V
230 V
IIMPEDANCE USE 6 - 16 Ω
RL
+–+–
MAX 100 W UNSWITCHED
y
Step 3 Connecting the amplifier (continued)
Audio components hookups
This section describes how to connect your audio components to the amplifier.
MD recorder
MD REC OUT
TUNER
CD player
OUT
CD IN
SPEAKERS
RL
IIMPEDANCE USE 6- 16 Ω
AC OUTLET
+–+–
MAX 100 W UNSWITCHED
VOLTAGE SELECTOR
110 V
220 V
230 V
MD IN
MONITOR
VCR
VCD/LD
VIDEO VIDEO
VIDEO
IN IN
OUT
TUNER
TAPE MD CD
IN
REC OUT
IN
y
REC OUT
IN ININ
OUT
AUDIO
AUDIO
IN
L
R
TAPE INTAPE REC OUTTUNER IN
Tape deck
Video components hookups
This section describes how to connect your video components to the amplifier.
-EN
6
Getting Started
TA-K800AV.3-810-853-11 (En, C1, C2)
Page 6

Speaker system hookups
This section describes how to connect your speakers to the amplifier.
What cords will I need?
Speaker cord (not supplied) (1 for each speaker)
(+)
(+)
Getting Started
(–)
(–)
Twist the stripped ends of the cord about 15mm.
Hookups
SPEAKERS
+–+–
]}
RL
IIMPEDANCE USE 6- 16 Ω
Turn the speaker terminal knob counterclockwise and insert the stripped end of the speaker
cord into the hole of the speaker terminal. Fully turn the speaker terminal knob clockwise
and check that the speaker cord is inserted firmly.
Be sure to match the speaker cord to the appropriate terminal on the components: + to + and
– to –. If the cords are reversed, the sound will be distorted and will lack bass.
Note
Use speakers with a nominal impedance of 6 to 16 ohms.
]}
AC power cord hookups
Connect the AC power cords of the
amplifier and the various components to a
wall outlet.
AC OUTLET hookups
Since this amplifier has two UNSWITCHED
AC OUTLETs, you can connect the AC
power cords of your components to these
outlets. They supply the power to each
y
TUNER
IN
REC OUT
TAPE MD CD
IN
REC OUT
IN ININ
VCR
VIDEO VIDEO
OUT
AUDIO
OUT
VCD/LD
IN IN
AUDIO
IN
MONITOR
VIDEO
OUT
L
R
SPEAKERS
RL
IIMPEDANCE USE 6- 16 Ω
component whenever you press the power
switch of the connected component. Make
sure that the total power consumption of the
connected components does not exceed 100
W.
Note
Separate the AC power cord, audio connecting cords and speaker cords. Noise or sound
deterioration may occur when audio connecting cords are in contact with the AC power
cord, or when the AC power cord or speaker cords are placed near the tuner's loop aerial or
aerial wire.
AC power cord
AC OUTLET
+–+–
AC OUTLET
MAX 100 W UNSWITCHED
VOLTAGE SELECTOR
110 V
220 V
230 V
Getting Started
-EN
7
TA-K800AV.3-810-853-11 (En, C1, C2)
Page 7
Basic Operations
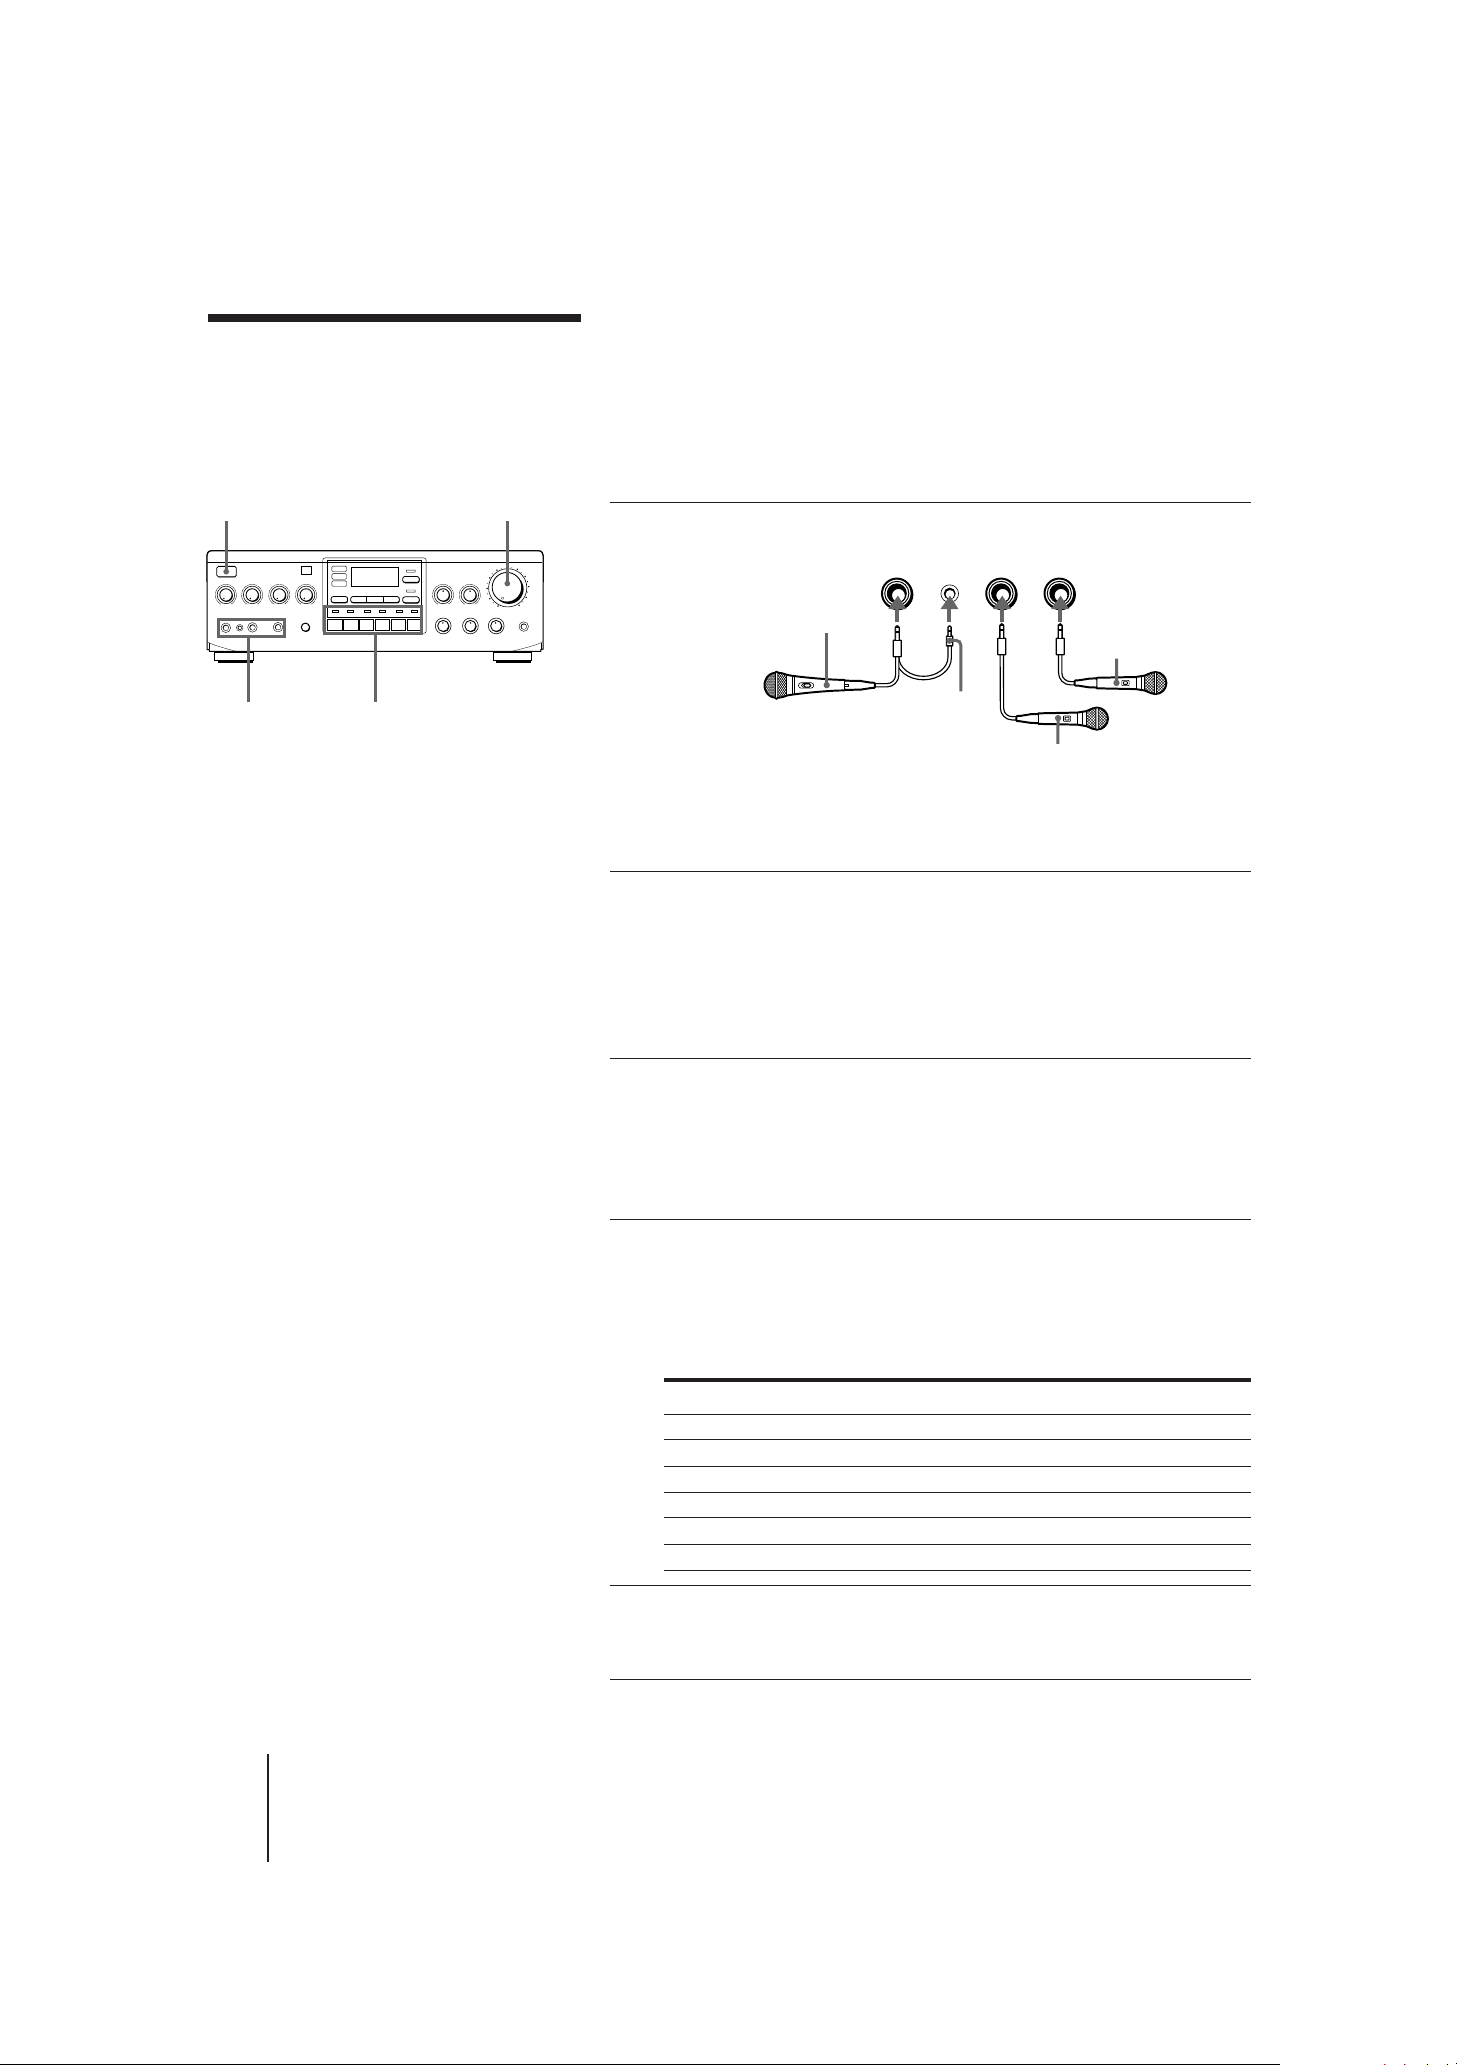
This section shows you how to set microphones and how to play a
program source.
Before you start Karaoke play
POWER
MIC 1, 2, 3/
MIC CONTROL
Notes
• To sing a duet, connect
microphones to two of the
three jacks (MIC 1, 2 and 3).
• If you use a karaoke
microphone such as FVK600 or F-KM1 (not
supplied) with its control
plug connected, you can
control the backup key from
the microphone while
singing (you cannot use the
Repeat function with this
amplifier).
• Any noise heard when
turning the power on is not
a malfunction.
• The setting of the input
selector is not erased even
when the power is turned
off.
Input selectors
and indicators
MASTER
VOLUME
Notes on the volume settings
Before you start, be sure to set the MASTER VOLUME control and
MIC VOL controls (MIC 1, 2 and 3) to the MIN position.
1 Connect the microphones.
MIC 1
Karaoke microphone
such as F-VK600 or F-KM1
(not supplied)
You can also connect a microphone
without a control plug to MIC 1.
MIC
CONTROL
Control
plug
MIC 2 MIC 3
Microphone
(not supplied)
Microphone
(not supplied)
2 Press POWER to turn on the amplifier.
The indicator on MASTER VOLUME
flashes and then lights up. In this state,
the N position of the KEY CONTROL
indicators and the previously selected
input indicator light up.
3 Turn on the program source you
want to listen to, and also turn on
the TV and set the input selector
on the TV to “Video” for watching
the picture of video sources.
4 Press the input selector (VCD/LD, VCR, CD,
MD, TAPE or TUNER) of the program
source to be played.
The indicator above the selector you
pressed lights up.
To play a Press
Video CD or Laser disc VCD/LD
Video tape VCR
CD CD
MD MD
Cassette tape TAPE
Radio broadcast TUNER
5 Start playing the program source
and adjust the volume with
MASTER VOLUME.
-EN
8
Basic Operations
TA-K800AV.3-810-853-11 (En, C1, C2)
Page 8

MIC 1, 2, 3 VOL controls
MIC 1, 2, 3/
MIC CONTROL
BALANCE
BASS
TREBLE
HEADPHONES
6 Turn on the microphones connected to the
MIC 1, 2 and 3 jacks.
7 Sing or speak into the microphones and
adjust the microphone volume level with
the MIC 1, 2 and 3 VOL controls.
Now you are ready to play Karaoke.
Note
• Even when mixing input
from several microphones,
the amplifier centers the
output.
Tone and balance adjustments of program sources
To adjust Turn
Bass BASS
Treble TREBLE
Balance BALANCE
When you want to reset the adjustment, turn the control to the center
position (click position).
Playing a program source without Karaoke effects
Perform procedures from 2 to 5 and make sure that KARAOKE PON or
MPX is turned off. In addition, MUSIC VOL should be set to the center
position to obtain the original sound.
If you want to add the surround effects to the program source, see
“Surround mode settings” on page 11.
To listen through the headphones
Connect the headphones to HEADPHONES jack. The sound from
speakers is cut off automatically.
Note on acoustic feedback (howling)
If acoustic feedback (howling) occurs:
– Keep the microphone away from the speakers during use.
– Lower the overall volume.
– Lower the microphone volume or echo level.
Basic Operations
9
TA-K800AV.3-810-853-11 (En, C1, C2)
-EN
Page 9

Playing Karaoke
KEY CONTROL
ECHO
and indicators
MIC 3 ECHO
ØON øOFF
Changing the backup key
Press KEY CONTROL n or ˜ repeatedly to find the backup key that
suits your voice.
To Press
Raise the key n
Lower the key ˜
Return to the original key N
The approximate setting is displayed on the KEY CONTROL indicators
on the front panel as shown below. There are four for n (upper)
adjustment, four for ˜ (lower) adjustment, and one for N (original)—9
indicators for 9 steps.
Notes
• When the power is turned
off, the KEY CONTROL
setting is returned to N
(original).
• If no sound is input for
about 2 seconds, the KEY
CONTROL setting is
returned to N (original).
Modulated degree
n
N
˜
If you use a karaoke microphone
If you use a karaoke microphone such as F-VK600 or F-KM1 (not
supplied) with its control plug connected, you can also adjust the
backup key from the microphone just as the amplifier.
n
N
˜
Applying echo
Since the echo effect is always applied to MIC 1 and 2, you can change
the echo level with the ECHO control.
For MIC 3, you can cut off the echo effect by setting the MIC 3 ECHO
switch to øOFF. To resume the echo effect, set the MIC 3 ECHO switch
to ØON.
10
-EN
Basic Operations
To Turn the control
increase the echo level towards “MAX”.
decrease the echo level towards “MIN”.
TA-K800AV.3-810-853-11 (En, C1, C2)
Page 10

SURROUND and indicators
KARAOKE PON and indicator
VOCAL VOL
MPX and indicator
Notes
• The surround mode settings are
not erased even when the
power is turned off.
• Karaoke Pon is effective if you
use a disc or tape recorded in
stereo. If you use music sources
recorded in monaural, the
sound may not be heard.
• The turning on/off of
KARAOKE PON and MPX are
not erased even when the
power is turned off.
• You cannot completely shut off
the vocals by using KARAOKE
PON. Even if the disc or tape is
recorded in stereo, the volume
of the singer’s voice may not be
lowered if the songs are folk
songs or classical music which
contain few instruments, songs
on which choir or echo is
dominant, or songs on which
the voice deviates from the
center.
• The adjustment of VOCAL VOL
may be the opposite of that
described in step 2, depending
on music sources.
MUSIC VOL
Surround mode settings
The amplifier has three surround settings. You can enjoy playing with
the desired acoustic atmosphere.
Each time you press SURROUND, the surround mode changes to
KARAOKE, to MUSIC, to THEATER and then returns to off.
Surround mode Atmosphere
KARAOKE Creates the effect of singing in a bar.
Gives your song a rich carrying tone.
MUSIC Suitable for listening to the music.
THEATER Simulates the resonance of a movie theater.
Emphasizes the bass and extends the
dynamic mid range.
To cancel the surround mode
Press SURROUND so that the surround mode indicator (KARAOKE,
MUSIC or THEATER) goes off.
Adjusting the vocal level and accompaniment level
You can use both karaoke source (multiplexed CD, tape, etc.) and nonkaraoke source.
1 Press MPX or KARAOKE PON according to
the program source.
When you play Press
karaoke source MPX
non-karaoke source KARAOKE PON
The corresponding indicator (MPX or KARAOKE PON) lights up.
When you press MPX or KARAOKE PON in KARAOKE
SURROUND mode, the sound you hear will have a simulated
stereo effect.
2 Adjust the vocal level with VOCAL VOL.
To Turn the control
increase the vocal level towards “MAX”.
decrease the vocal level towards “MIN”.
3 Adjust the accompaniment level with
MUSIC VOL.
To Turn the control
increase the accompaniment level towards “MAX”.
decrease the accompaniment level towards “MIN”.
To cancel MPX or KARAOKE PON
Press MPX or KARAOKE PON so that the corresponding indicator goes
off.
Basic Operations
11
-EN
TA-K800AV.3-810-853-11 (En, C1, C2)
Page 11

Additional Operations
This section shows you how to record the program source and your
karaoke play.
Recording
POWER
Input selectors
and indicators
Tip
• If the amplifier is connected
to recording components,
such as a tape deck or MD
recorder, you can record the
same source on both
components at the same
time.
MASTER
VOLUME
1 Press POWER to turn on the amplifier.
The indicator on MASTER VOLUME
flashes and then lights up. In this state,
the N position of the KEY CONTROL
indicators and the previously selected
input selector light up.
3 Turn on the program source you
want to record.
4 Press the input selector (VCD/LD, VCR, CD,
MD, TAPE or TUNER) of the program
source to be recorded.
The indicator above the selector you
pressed lights up.
To record a Press
Video CD or Laser disc VCD/LD
Video tape VCR
CD CD
MD MD
Cassette tape TAPE
Radio broadcast TUNER
5 Prepare the recording component
for recording, then start
recording.
Recording your karaoke play
When you sing into the microphone, your voice mixed with the music
accompaniment is output from all OUT jacks of the rear panel. Thus,
you can record your karaoke play with the recording component.
The following effects are also output:
MIC (1, 2, 3) VOL, ECHO, MUSIC VOL, SURROUND and KEY
CONTROL.
Your karaoke play using MPX and KARAOKE PON can also be
recorded.
12
Additional Operations
-EN
Basic Operations
TA-K800AV.3-810-853-11 (En, C1, C2)
Page 12

Additional Information
Troubleshooting
Power
Sound
Symptom
No power
No sound output.
No audio from one channel or
unbalanced speaker output.
Sudden loss of audio and the
indicator on MASTER VOLUME
flashes.
Weak bass or treble.
Distorted sound.
Lack of bass or ambiguity in
instrument positions.
Remedy
• Connect the AC power cord securely.
• Connect the audio connecting cords firmly.
• Connect the amplifier and other components correctly.
• Select the program source to be played by pressing the appropriate
input selector.
• Turn MASTER VOL clockwise to increase the volume.
• Turn MUSIC VOL clockwise to increase the accompaniment volume.
• Turn BALANCE to adjust the balance. Setting to the center position
(click position) reproduces the program sources as they are.
• Check the speaker and input connections of silent channel.
• The speaker cords have been shorted. Make sure they are connected
correctly.
• Turn off the power, then turn on the power again.
• Adjust BASS and TREBLE.
• Change speaker positions or room conditions to eliminate
obstructions in sound path.
• Improperly selected signal.
• Insufficient input capacity of speakers. Lower the volume.
• Speaker cord and terminal polarity are reversed. Reconnect the cords
with correct polarity.
Picture
Recording
Others
Hum or noise.
No sound from microphones.
No picture but play starts.
Cannot record.
Remote Commander does not
operate.
• Connect the audio connecting cords firmly.
• The amplifier is picking up interference from a TV set. Move the
amplifier away from the TV set or turn the TV set off.
• Microphones are turned off.
• Turn the MIC 1, 2 and 3 VOL controls clockwise.
• TV is turned off.
• The video component connections are incorrect.
• Input selection on TV or the amplifier is incorrect.
• Select the program source to be recorded by pressing the appropriate
input selector.
• Point the remote commander at the remote sensor on the amplifier.
• Remove any obstacles between the remote commander and the
sensor.
• Insert the batteries correctly.
• Replace both the batteries with new ones if they are weak.
Additional Information
Basic Operations
13
TA-K800AV.3-810-853-11 (En, C1, C2)
-EN
Page 13

Specifications
System
Maximum output power
125 W + 125 W/6 ohms (EIAJ)*
Total harmonic distortion
0.08% (at 8 ohms, 80 W output)
Speaker impedance
6 to 16 ohms
General
MIC CONTROL jack
Mini jack (for karaoke
microphone)
Key control
Variable range ± 2 whole steps
Variable step Per 1/2 whole
step
Frequency response
TUNER, TAPE, MD, CD, VCR,
VCD/LD: 10 Hz to 40 kHz ±3 dB
S/N
TUNER, TAPE, MD, CD, VCR,
VCD/LD: 82 dB
* Measured according to EIAJ (Electric
Industries Association of Japan)
standards.
Inputs
Input sensitivity and impedance
TUNER, TAPE, MD, CD, VCR,
VCD/LD: 150 mV, 10 kilohms
MIC 1/2/3 jacks
Standard jacks
1.4 mV
(Impedance below 1 kilohm)
Outputs
Power requirements
110/220/230 V AC, adjustable,
50/60 Hz
Power consumption
250 W
Dimensions
Approx. 430 × 145 × 404 mm
(w/h/d)
including projecting parts and
controls
Mass
Approx. 10.5 kg
Supplied accessories
Remote Commander RMT-K800 (1)
R6 (size AA) batteries (2)
AC plug adaptor (1)
Design and specifications are subject to
change without notice.
Output level/ impedance
REC OUT (TAPE, MD): 150 mV,
1 kilohm
HEADPHONES: 20 mW (at 8
ohms)
14
-EN
Additional Information
Basic Operations
TA-K800AV.3-810-853-11 (En, C1, C2)
Page 14

0
!¡
!™
!£
!¢
!∞
!§
!¶
!•
5
6
7
9
8
1
4
2
3
Index to parts and controls
Front
See the pages indicated in ( ) for details.
1 SURROUND button and indicators (11)
2 Remote sensor (4)
3 ECHO control (10)
4 MIC 1, 2 and 3 VOL controls (9)
5 POWER switch (8, 12)
6 MIC 1, 2 and 3 microphone jacks (standard jacks) (8)
7 MIC CONTROL jack (8)
8 MIC 3 ECHO ØON/øOFF switch (10)
9 Input selectors and indicators (8, 12)
0 KEY CONTROL buttons and indicators (10)
!¡ KARAOKE PON button and indicator (11)
!™ MPX button and indicator (11)
!£ VOCAL VOL control (11)
!¢ BALANCE control (9)
!∞ MASTER VOLUME control and indicator (8, 12)
!§ HEADPHONES jack (9)
!¶ MUSIC VOL control (11)
!• BASS/TREBLE controls (9)
Additional Information
TA-K800AV.3-810-853-11 (En, C1, C2)
Basic Operations
15
-EN
Page 15

Index to parts and controls
(continued)
Remote commander
See the pages indicated in ( ) for details.
+
–
1
2
3
4
5
6
1 SURROUND button (11)
2 KARAOKE PON button (11)
3 MPX button (11)
4 KEY CONTROL buttons (10)
5 INPUT SELECTOR buttons (8, 12)
6 MASTER VOLUME +/– buttons (8, 12)
16
Additional Information
-EN
Basic Operations
TA-K800AV.3-810-853-11 (En, C1, C2)
Page 16

7
8
9
0
!¡
!™
5
1
4
2
3
6
VOLTAGE SELECTOR
110 V
220 V
230 V
y
Rear
1 VCR VIDEO IN/OUT and AUDIO IN/OUT (6)
2 CD IN (6)
3 MD REC OUT/IN (6)
4 TAPE REC OUT/IN (6)
5 TUNER IN (6)
6 y (earth)
7 VCD/LD VIDEO IN/AUDIO IN (6)
8 MONITOR VIDEO OUT (6)
9 SPEAKERS (7)
0 AC OUTLET (7)
!¡ AC power cord (7)
!™ VOLTAGE SELECTOR (3)
Additional Information
Basic Operations
17
-EN
TA-K800AV.3-810-853-11 (En, C1, C2)
Page 17

Index
A
Accessories, supplied 4
Adjusting
accompaniment level 11
balance 9
echo 10
microphone level 9
tone 9
vocal level 11
volume 8
B
Backup key 10
Balance 9
C
Connecting
AC outlet 7
AC power cord 7
audio components 6
microphones 8
speaker system 7
video components 6
R
Recording
karaoke play 12
program source 12
Remote commander 4, 16
inserting batteries 4
S
Surround mode settings 11
T
Tone 9
Troubleshooting 13
Turning on the amplifier 8
V
Vocal level 11
Volume 8
E
Echo 10
I
Input selectors 8, 12
K, L, M
Karaoke
microphone 8, 10
source 11
non-karaoke source 11
Listening through the
headphones 9
Multiplexed CD, tape 11
P
Power
AC plug adaptor 3
turning on 8
voltage selector 3
18
-EN
Basic Operations
Additional Information
TA-K800AV.3-810-853-11 (En, C1, C2)
 Loading...