Sony ST-D777ES User Manual
4-228-705-12(1)
DAB/FM/AM Tuner
Operating Instructions |
GB |
Mode d’emploi |
FR |
Bedienungsanleitung |
DE |
Manual de Instrucciones |
ES |
ST-D777ES
2000 Sony Corporation

WARNING Precautions
To prevent fire or shock hazard, do not expose the unit to rain or moisture.
To avoid electrical shock, do not open the cabinet. Refer servicing to qualified personnel only.
On safety
Should any liquid or solid object fall into the unit, unplug the unit and have the unit checked by qualified personnel before operating it any further.
On power sources
•Before operating the unit, be sure that the operating voltage of your unit is identical with that of your local power supply.
•Unplug the unit from the wall outlet if it is not to be used for an extended period of time. To disconnect the cord, pull it out by grasping the plug. Never pull the cord itself.
•AC power cord must be changed only at the qualified service shop.
On placement
•Place the unit in a location with adequate ventilation to prevent heat buildup and prolong the life of its components.
•Do not place the unit near heat sources, or in a place subject to direct sunlight, excessive dust or mechanical shock.
•Do not place anything on top of the cabinet which might block the ventilation holes and cause malfunctions.
•Do not install the appliance in a confined space, such as a bookcase or built-in cabinet.
On cleaning the cabinet
Clean the cabinet, panels and controls with a soft cloth lightly moistened with a mild detergent solution. Do not use any type of abrasive pad, scouring powder or solvent such as alcohol or benzine.
On repacking
Do not throw away the carton and the packing material. This makes an ideal container when transporting the unit.
When shipping the unit, repack it as it was packed at the factory.
If you have any question or problem concerning your unit that is not covered in this manual, please consult your nearest Sony dealer.
2GB

Welcome!
Thank you for purchasing the Sony DAB/FM/AM Tuner. Before operating the unit, please read this manual thoroughly and retain it for future reference.
About This Manual
Convention
•Instructions in this manual describe the controls on the tuner.
You can also use the controls on the remote if they have the same or similar names as those on the tuner.
•The following icon is used in this manual:
ZIndicates that you can do the task using the remote.
zIndicates hints and tips for making the task easier.
Demonstration mode
You can start the demonstration by choosing “DEMONSTRATION” from MENU. If you want to cancel the demonstration mode, turn off the tuner, then turn on the tuner again.
TABLE OF CONTENTS
Getting Started
Unpacking 4
Hooking Up the System 4
Selecting the German Display 7
Storing DAB/FM Stations Automatically (Auto-betical Select) 8
Basic Operations
Receiving Preset Stations 9
Advanced Tuner Operations
Overview of DAB 10 |
|
|
Receiving Broadcasts 10 |
|
|
Storing Stations Manually |
11 |
|
Naming the Preset Stations |
12 |
|
Organizing the Preset Stations 13 |
GB |
|
Using the Radio Data System (FM RDS) 14
Monitoring traffic, news, or weather information programmes (RDS EON/DAB Announcement) 14
Locating a station by programme type (PTY) 15 Using the Digital Filter 16
Using the Display 17
About the Menu Entry System 18 Tips for Better FM Reception 18
Additional Information
Troubleshooting 19
Specifications 20
3GB

Getting Started
Unpacking
Check that you received the following items with the tuner:
•Audio cord (1)
•AM loop aerial (1)
•FM wire aerial (1)
•DAB wire aerial (1)
•Remote commander (1)
•R6 (size AA) batteries (2)
Inserting batteries into the remote
You can control this unit using the supplied remote. Insert two R6 (size AA) batteries by matching the + and – on the batteries. When using the remote, point it at the remote sensor on this unit.
zWhen replace batteries
With normal use, the batteries should last for about six months. When the remote no longer operates the tuner, replace all the batteries with new ones.
Notes
•Do not leave the remote in an extremely hot or humid place.
•Do not drop any foreign object into the remote casing, particularly when replacing the batteries.
•Do not expose the remote sensor to direct sunlight or lighting apparatuses. Doing so may cause a malfunction.
•If you will not use the remote for an extended period of time, remove the batteries to avoid possible damage from battery leakage and corrosion.
Hooking Up the System
Before you get started
•Turn off the power to all components before making any connections.
•Do not connect the mains lead until all of the connections are completed.
•Be sure to make connections firmly to avoid hum and noise.
•When connecting an audio cord, be sure to match the colour-coded pins to the appropriate jacks: White (left) to White; and Red (right) to Red.
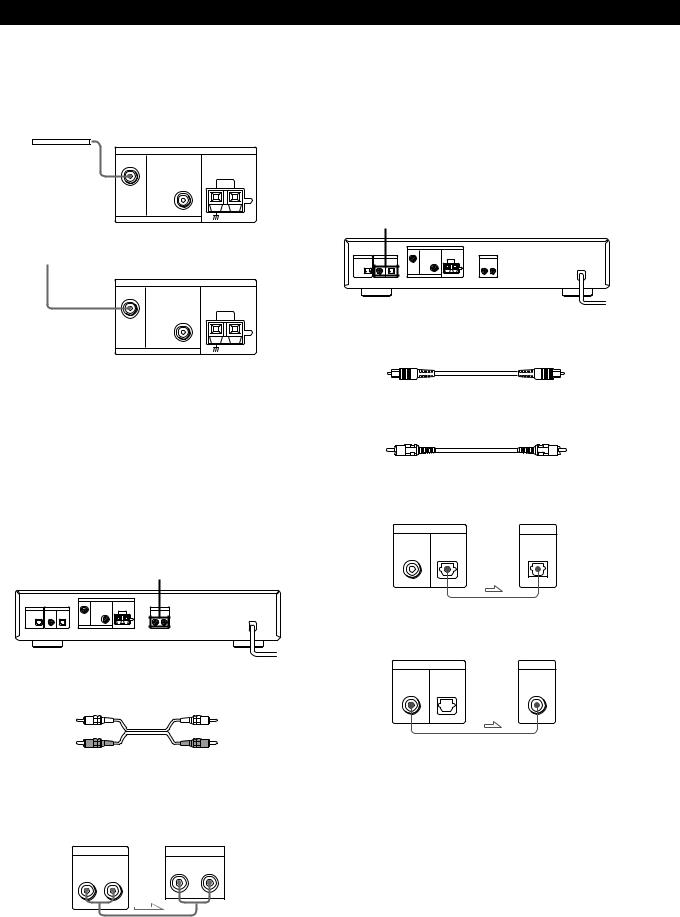
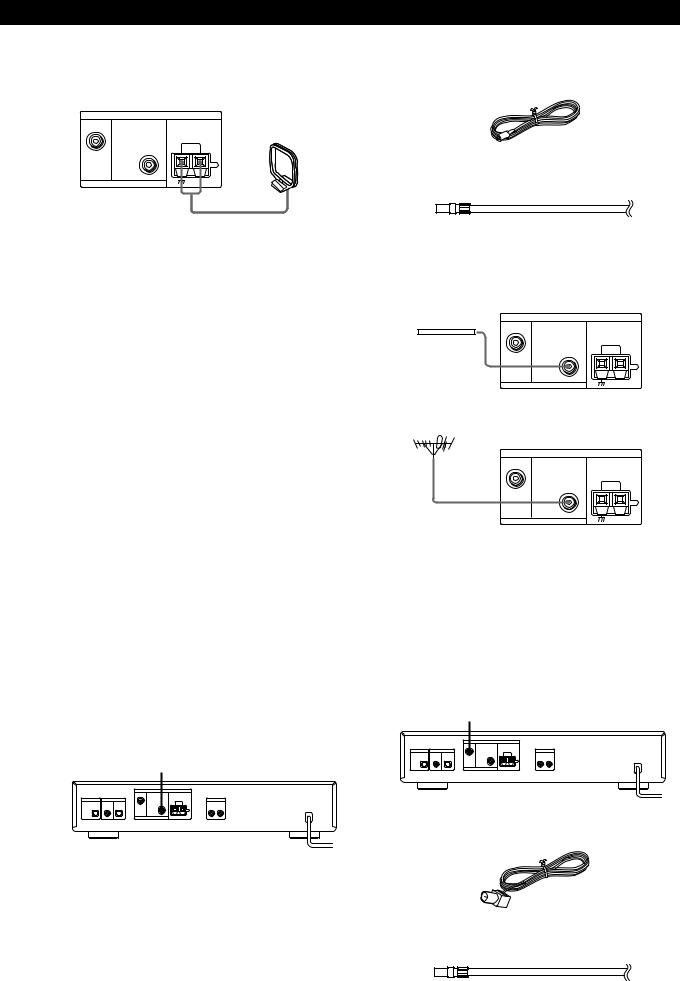
AM aerial hookups
This section describes how to connect the supplied AM loop aerial. For the specific location of the AM ANTENNA terminals, see the illustration below.
AM ANTENNA
What will I need?
• AM loop aerial (supplied) (1)
1Unwrap 2 lengths of the braided lead wire from around the frame of the aerial. Be careful to unwrap only the braided section of the lead wire. Do not unwrap more than 2 lengths of the lead wire. Also, be careful not to unbraid the lead wire.
2Assemble the supplied aerial as shown below.
4GB

Getting Started
3Connect the AM loop aerial to the AM terminals on the back of this unit.
ANTENNA
DAB
AM loop aerial
FM |
AM |
75Ω COAXIAL
4Adjust the aerial direction for the best reception. The AM loop aerial has a directivity which detects the signal from some angles more strongly than others. Set the aerial to the orientation which provides the best receiving condition.
If a high pitched noise (beat noise) occurs when recording AM broadcasts, adjust the position of the AM loop aerial so that the noise disappears.
If you live in a building constructed of reinforced concrete, or with a steel frame, you may not be able to achieve good reception since the radio waves become weaker indoors. In this case, we recommend connecting an optional aerial.
zFor stations that are difficult to receive
Try repositioning the loop aerial while tuning. Placing the supplied AM loop aerial near a window will help improve reception quality.
FM aerial hookups
With an FM outdoor aerial, you can obtain a higher FM broadcast sound quality. We recommend that you use the supplied FM wire aerial only temporarily until you install an FM outdoor aerial. For the specific location of the FM ANTENNA terminal, see the illustration below.
FM ANTENNA
What will I need?
•FM wire aerial (supplied) (1)
•FM outdoor aerial (not supplied) (1) and 75-ohm coaxial cable with IEC female type connector (not supplied) (1)
Connect the supplied FM wire aerial or an FM outdoor aerial (not supplied) to the FM terminal on the back of this unit.
FM wire aerial |
ANTENNA |
|
|
DAB |
|
|
FM |
AM |
75Ω COAXIAL
FM outdoor aerial
ANTENNA
DAB
FM |
AM |
75Ω COAXIAL
DAB aerial hookups
With an DAB outdoor aerial, you can obtain a higher DAB broadcast sound quality. We recommend that you use the supplied DAB wire aerial only temporarily until you install an DAB outdoor aerial. For the specific location of the DAB ANTENNA terminal, see the illustration below.
DAB ANTENNA
What will I need?
•DAB wire aerial (supplied) (1)
•DAB outdoor aerial (not supplied) (1) and 75-ohm coaxial cable with F male type connector (not supplied) (1)
5GB
Getting Started
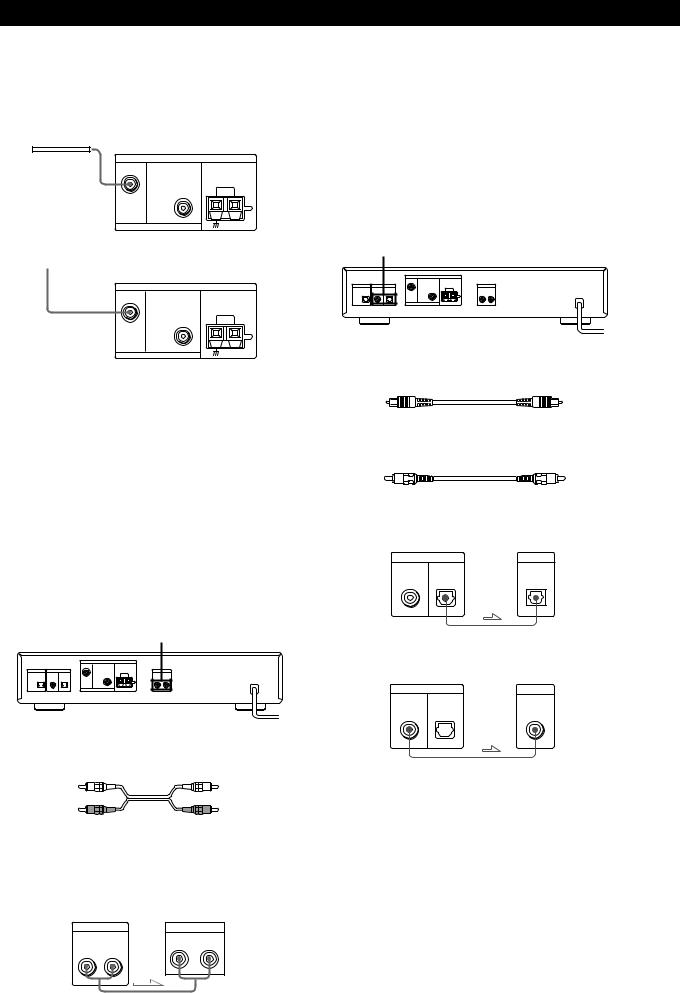
Connect the supplied DAB wire aerial or an DAB outdoor aerial (not supplied) to the DAB terminal on the back of this unit.
DAB wire aerial
ANTENNA
DAB
FM |
AM |
75Ω COAXIAL
to DAB outdoor aerial
ANTENNA
DAB
FM |
AM |
75Ω COAXIAL
MD/DAT Hookups
This section describes how to connect the tuner to a DAT deck or MD recorder for digital-to-digital recording. With this connection, you can obtain the highest possible sound quality when recording DAB digital broadcasts, even if you use the analog outputs for listening purposes. For specific locations of the jacks, see the illustration below.
DAB DIGITAL OUT
What cables will I need?
• Digital optical cable (not supplied) (1)
Connecting a ground wire
If you connect an outdoor aerial, be sure to connect a earth lead (not supplied) to the AM ANTENNA terminal with “U” indication (in addition to the AM loop aerial) for lightning protection.
Amplifier hookups
Connect the tuner to an amplifier. Be sure to turn off both components before connection. For the specific location of the terminals, see the illustration below.
ANALOG OUT
What cables will I need?
• Audio cord (supplied) (1)
Connect the white plugs to the white (L) jacks and the red plugs to the red (R) jacks. Insert the plugs completely into the jacks; incomplete connections may cause noise.
ST-D777ES Amplifier
ANALOG OUT |
TUNER IN |
R L
R L
• Digital coaxial cable (not supplied) (1)
Digital Optical
ST-D777ES |
DAT/MD |
DAB DIGITAL OUT |
DIGITAL IN |
COAXIAL OPTICAL |
OPTICAL |
|
Digital Coaxial
ST-D777ES |
DAT/MD |
DAB DIGITAL OUT |
DIGITAL IN |
COAXIAL OPTICAL |
COAXIAL |
|
Notes
•When you use MD recorders which do not support to input the 48kHz digital audio signal, you cannot play or record the digital signals from the DIGITAL OUT jacks.
•The OPTICAL jack has retractable cover. Insert the plug into the jack.
6GB

Mains lead hookup
Connect the mains lead to a wall outlet after completing all of the previous connections.
to a wall outlet
Getting Started
Selecting the German Display
You can select either an English or a German language display. The factory preset language is English. To change the display to German, follow the steps below.
POWER |
TUNING/SELECT |
MENU ENTER
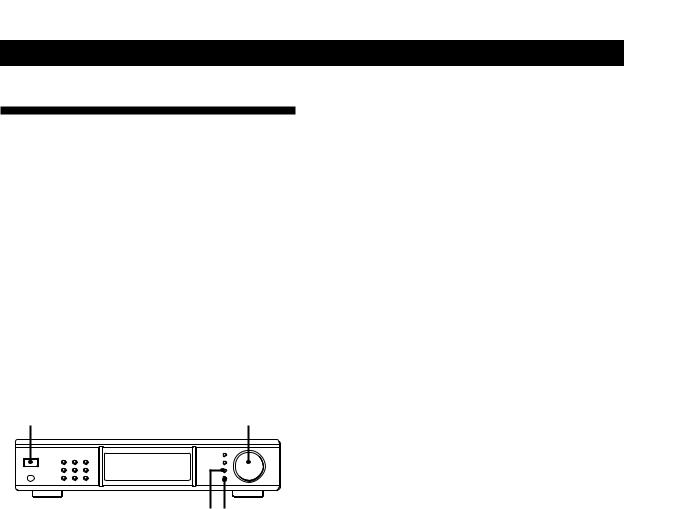
1Press POWER to turn on the tuner.
2Press MENU.
3Turn TUNING/SELECT so that “DISPLAY LANGUAGE to German” appears.
4Press ENTER.
“Deutsch gewählt” appears in the display.
To return to the English display
Select “AUSGABE SPRACHE English?” in step 3 above. Then press ENTER in step 4, “English Selected” appears in the display.
7GB
Getting Started
Storing DAB/FM Stations
Automatically (Auto-betical
Select)
With Auto-betical Select you can automatically store up to a combined total of 99 DAB and FM stations. At the same time, stations are stored in alphabetical order for each broadcast band without redundancy. Additionally, Auto-betical Select only stores the stations with the clearest signals. If you want to store DAB, FM or AM (MW and LW) stations one by one, see “Receiving Broadcasts” on page 10 and “Storing Stations Manually” on page 11.
Before you begin, make sure you have:
•connected DAB, FM and AM aerials to the tuner as indicated on pages 4 and 5.
POWER |
TUNING/SELECT |
MENU ENTER
1Tune down the volume on the amplifier, then turn on the amplifier and select the TUNER mode.
2Press POWER to turn on the tuner.
3Press MENU.
4Turn TUNING/SELECT so that “AUTOBETICAL Audio Only” appears.
5Press ENTER.
The tuner scans all the DAB and FM stations in the broadcast area.
While scanning, “Now AUTO-BETICAL” appears in the display.
For DAB and FM RDS stations, the tuner first checks for stations broadcasting the same programme, then stores only the one with the clearest signal. The selected DAB and FM RDS stations are sorted alphabetically by their Programme Service name, then assigned a number from 1 for each broadcast band. For more details on DAB and FM RDS, see page 10 (DAB) and 14 (FM RDS) .
Regular FM stations are also assigned preset numbers and stored after the FM RDS stations. You can store up to a combined total of 99 stations in all broadcast band.
When scanning finishes, “AUTO-BETICAL End” flashes in the display.
8GB
zTo change the location of, or erase, a preset station
See “Organizing the Preset Stations” on page 13.
zTo store stations with data broadcasts
Select “AUTO-BETICAL Audio & Data” in step 4 above. While receiving the data broadcast, the data is output only to the DAB RDI OUT connector.
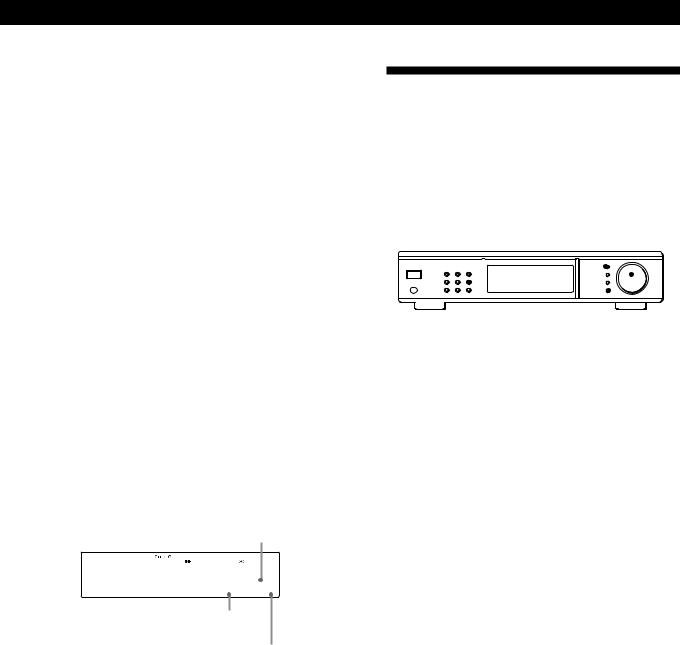
zTo confirm preset stations
1Press DAB, FM or AM whichever you want to confirm.
2Turn TUNING/SELECT.
You can receive the broadcasts of the preset station.
Notes
•DAB stations are sorted by ensemble frequency from low to high. In the ensemble, each service are
arranged by programme service name alphabetically.
•If you move to another area, repeat this procedure to store stations in your new area.
•For details on tuning stored stations, see page 9.
•Each FM station is stored with the following setting:
-ANTENNA ATTENUAT: OFF
-IF BAND WIDTH: WIDE
-FM mode (Auto stereo/Monaural): Auto Stereo
If you want to preset the diffrent setting for each FM station, change settings according to the procedures in “Tips for Better FM Reception” on page 18, then preset stations again.
•If you move the aerial after storing stations using Autobetical Select, the stored settings may no longer be valid. If this happens, store the stations again.
•There is no sound when you receive DAB data broadcasts.

Basic Operations
Receiving Preset Stations
This section shows you how to receive preset stations.
3 |
4 |
5 |
6 |
|||||||
|
|
|
|
|
|
|
|
|
|
|
|
|
|
|
|
|
|
|
|
|
|
|
|
|
|
|
|
|
|
|
|
|
|
|
|
|
|
|
|
|
|
|
|
|
|
|
|
|
|
|
|
|
|
|
|
|
|
|
|
|
|
|
|
|
|
|
|
|
|
|
|
|
|
|
|
|
zTo tune in a non-preset station
See “Receiving Broadcasts” on page 10.
zListening a secondary component of the DAB programme
When “SC” appears in the display while listening a DAB programme, the secondary component is contained in the current service.
Press MONO/SC so that the desired secondary component is received. You can also use the remote for this operation.
Notes
•When you tune the DAB broadcast, do not tune up the volume on the amplifier too loud. Since the DAB broadcast has a wide dynamic range, a loud sound will affect your ears or cause the amplifier or speakers to be damaged.
•When you tune the DAB broadcast and change the station, it may take a few second.
zWhen you directly specify a preset station numbered over 10
Press >10 first, then the corresponding number buttons.
To enter “0,” use button 10/0. Example: To tune the preset number 30
Press >10 first, then 3 and 10/0.
1 |
Make sure you’ve hooked up the tuner and preset stations. |
(See pages 4 - 7 for hookups and page 8 or 11 for presetting.) |
|
2 |
Tune down the volume on the amplifier, then turn on the |
amplifier and select the TUNER mode. |
|
|
|
3 |
Press POWER to turn on the tuner. |
|
|
4 |
Press DAB, FM or AM for the desired type of broadcast. |
|
|
5 |
Press TUNING MODE repeatedly so that “PRESET” appears in |
the display. |
|
|
|
6 |
Turn TUNING/SELECT. |
Each time you turn TUNING/SELECT, a preset station is |
|
|
received and the settings (preset number, frequency, and |
|
station name, etc.) appear in the display. |
|
|
7 |
Adjust the volume of the amplifier. |
To check the preset station by using the remote
Select the desired broadcast band by pressing the corresponding buttons on the remote, then specify the desired preset number using the number button on the remote.
You can also switch the next/previous preset number by pressing PRESET +/– instead of specifying the preset number directly.
EON
TA NEWS WEATHER
DAB
DAB, FM, AM
FM AM
PRESET
PTY AUTOTUNING
PRESET +/–
ENTER
Operations Basic
9GB
Advanced Tuner Operations
Overview of DAB
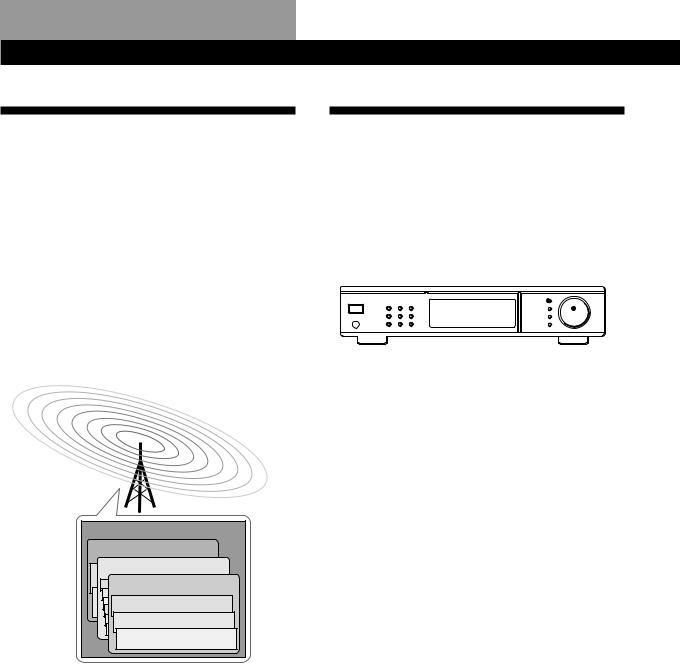
DAB (Digital Audio Broadcasting) is a new multimedia broadcasting system that transmits audio programmes with a quality which is comparable from the current AM broadcasts to that of CDs.
Each DAB station multiplex radio programmes (services) into an ensemble which it then broadcasts. Each service contains one or more components. All services and components are identified by name, so you can access any of them without having to know their frequencies.
Furthermore, additional information (called programme associated data) can be broadcast along with the services in the form of text.
Ensemble
Service
Service
Service
Component
Component
Component
Notes
•The status of the DAB broadcast depends on your country or region. It may be not broadcasted or may be in the test phase.
•DAB programmes are broadcast in Band-III (174 to 240 MHz) and/or L-Band (1,452 to 1,491 MHz), with each band divided into channels (41 in Band-III and 23 in L- Band). These channels have its own channel label. For details of the channel label and its frequency, see the list in the page 21. One ensemble is broadcast per channel by each DAB station.
Receiving Broadcasts
Receiving broadcasts by scanning stations (Automatic Tuning) Z
With automatic tuning you can quickly tune in a station without having to know its frequency.
DAB, FM, AM |
TUNING/SELECT |
|||||||||||||
|
|
|
|
|
|
|
|
|
|
|
|
|
|
|
|
|
|
|
|
|
|
|
|
|
|
|
|
|
|
|
|
|
|
|
|
|
|
|
|
|
|
|
|
|
|
|
|
|
|
|
|
|
|
|
|
|
|
|
|
|
|
|
|
|
|
|
|
|
|
|
|
|
|
|
|
|
|
|
|
|
|
|
|
|
|
|
|
|
|
TUNING MODE
1Press DAB, FM or AM for the desired type of broadcast.
2Press TUNING MODE so that “AUTO” appears in the display.
3Turn TUNING/SELECT slightly and release it when the frequency numbers start changing. Turn the control to the right for a higher frequency; turn it to the left for a lower frequency. When the tuner locates a station, it stops automatically. “TUNED” appears in the display.
4Repeat step 3 until you tune in the appropriate station.
To store the station, operate steps 4 to 5 in the “Storing Stations Manually” on this page 11.
Note
When you tune the DAB broadcast and change the station, it may take a few second.
10GB
Advanced Tuner Operations
If you cannot tune in the station you want (Manual Tuning)
With manual tuning you can search through all stations broadcasting on each band, and tune in stations with extremely weak signals that you might not be able to receive with automatic tuning.
1Press DAB, FM or AM for the desired type of broadcast.
2Press TUNING MODE so that neither “AUTO” nor “PRESET” appear in the display.
3Turn TUNING/SELECT until you tune in the station you want.
Turn the control to the right for a higher frequency; turn it to the left for a lower frequency.
zListening to a secondary component of the DAB programme Z
When “SC” appears in the display while listening to a DAB programme, a secondary component is contained in the current service.
Press MONO/SC so that the desired secondary component is received.
Display window while receiving the secondary component (automatic/manual tuning mode)
Current service number

 1 2 3 4 5 6 7 8 9 0 A B C D E F
G H I J K L M N O P Q 6 - _ 3 S
Number of services in the current ensemble
Indicates the secondary service. While receiving the primary service, “P” appears.
When you receive the secondary component in the preset tuning mode, the secondary service label appears in the display window.
Storing Stations Manually
This section shows you how to store up to 99 of your favorite DAB, FM or AM (MW and LW) stations manually onto preset numbers.
You can assign the preset number to the desired station from 1 for each broadcast band (DAB, FM and AM) up to a combined total of 99 stored stations.
DAB, FM, AM |
TUNING/SELECT |
|||||||||||||||
|
|
|
|
|
|
|
|
|
|
|
|
|
|
|
|
|
|
|
|
|
|
|
|
|
|
|
|
|
|
|
|
|
|
|
|
|
|
|
|
|
|
|
|
|
|
|
|
|
|
|
|
|
|
|
|
|
|
|
|
|
|
|
|
|
|
|
|
|
|
|
|
|
|
|
|
|
|
|
|
|
|
|
|
|
|
|
|
|
|
|
|
|
|
|
|
|
|
|
|
|
|
|
|
|
|
|
|
|
|
|
|
|
|
|
|
|
|
|
MEMORY TUNING MODE ENTER
1Press DAB, FM or AM for the desired type of broadcast.
2Press TUNING MODE repeatedly so that the tuner is set to automatic or manual tuning mode.
3Turn TUNING/SELECT to tune in the station you want to store.
4Press MEMORY.
“MEMORY” appears along with the lowest vacant number to indicate that the tuner is ready to store the station.
5Press ENTER.
The tuner stores the station at the preset number.
6Repeat steps 1 through 5 to store other stations.
If you want to preset the station to an already assigned number
Turn TUNING/SELECT so that the desired number appears after performing step 4 above. In this case, the previously preset station is replaced with the new one.
zDAB and RDS Station names are stored automatically
When you preset a DAB or RDS station that is broadcasting station name information, the station name is automatically stored at the station preset.
zIf you want to label the stations
Follow the procedure described in “Naming the Preset Stations” on page 12.
zWhen you tune in AM (MW and LW) stations
Adjust the direction of the AM loop aerial for optimum reception.
11GB

Advanced Tuner Operations
z If the STEREO indicator remains off
Press MONO/SC when an FM stereo broadcast is received.
zIf an FM stereo programme is distorted
Press MONO/SC to change to monaural (MONO). You will not have the stereo effect but the distortion will be reduced. To return to stereo mode, press this button again.
zWhen you preset a FM station, current settings of ANTENNA ATTENUAT, IF BAND WIDTH and FM mode are stored simultaneously
If you want to store other settings, change settings according to the procedures in “Tips for Better FM Reception” on page 18 after performing step 3, then perform step 4.
When you want to change the settings for the preset station, tune the station and change the setting. Then, press MEMORY and ENTER.
Note
You cannot preset the secondary component (SC) of a DAB broadcast. Store the service which contains the desired component, then switch the component by pressing MONO/ SC when you want to receive the component.
Naming the Preset Stations
You can assign a name of up to 16 characters long to each preset station except DAB and FM RDS stations. When the station is tuned in, the station name will appear.
MEMORY |
TUNING/SELECT |
CHARACTER |
ENTER |
1Tune in the preset station you want to name.
2Press CHARACTER.
The cursor flashes in the display.
3Turn TUNING/SELECT to select a character.
4When the character you want appears, press CHARACTER to move the cursor into position for the next character.
If you make a mistake
Press CHARACTER repeatedly until the character you want to change flashes (every time you press CHARACTER, the next character flashes). Then turn TUNING/SELECT to select a new character.
5Repeat steps 2 and 3 until the station name you want appears in the display.
6Press MEMORY.
“MEMORY” appears along with the preset number.
7Press ENTER.
“PRESET Memory OK” appears.
zWhen you name the station by Automatic tuning or Manual tuning
After the step 6 above, “MEMORY” appears along with the lowest vacant number to indicate that the tuner stores the station.
Notes
•The display returns to normal display mode if you stop assigning names for more than 60 seconds. If this happens, start again from the beginning.
•If you name a station which has a preset name already, the previous preset name is deleted.
•“No Name” appears when you display a preset station without the preset name.
•You cannot use “ ” (blank space) only for the preset name.
12GB
Advanced Tuner Operations
Organizing the Preset Stations
This tuner makes it easy to arrange preset stations in the order you prefer. You can arrange all the preset stations automatically, according to alphabetical order, or you can use the Move and Erase functions to move and erase specific preset stations.
DAB, FM, AM |
TUNING/SELECT |
||||||||||||||
|
|
|
|
|
|
|
|
|
|
|
|
|
|
|
|
|
|
|
|
|
|
|
|
|
|
|
|
|
|
|
|
|
|
|
|
|
|
|
|
|
|
|
|
|
|
|
|
|
|
|
|
|
|
|
|
|
|
|
|
|
|
|
|
|
|
|
|
|
|
|
|
|
|
|
|
|
|
|
|
|
|
|
|
|
|
|
|
|
|
|
|
|
|
|
|
|
|
|
|
|
|
|
|
|
|
|
|
|
|
|
|
|
|
|
|
|
|
|
|
|
|
|
|
|
|
|
|
MENU ENTER
1Press DAB, FM or AM for the desired type of broadcast.
2Press MENU.
3Turn TUNING/SELECT to select one of the following sorting methods:
Select |
To |
|
|
MOVE |
change the location of a specific preset |
PRESET |
(see this page). |
|
|
ERASE |
erase a specific preset (see this page). |
PRESET |
|
|
|
ALPHABETICAL |
sort all preset stations in alphabetical |
PRESET SORT |
order in every broadcast band, |
|
according to their preset names. |
|
Stations without preset names are |
|
arranged by frequency, from low to high. |
|
DAB stations are arranged by ensemble |
|
frequency from low to high. In the |
|
ensemble, each service and component |
|
is arranged alphabetically, by preset |
|
name. |
|
|
4Press ENTER.
The tuner sorts the stations.
Moving a preset station
You can also move a specific preset station.
1Follow steps 1 through 3 in “Organizing the Preset Stations” and select “MOVE PRESET” from the menu, then press ENTER.
2Turn TUNING/SELECT so that the preset number you want to move appears in the display and press ENTER.
3Turn TUNING/SELECT to select the new location for the preset number and press ENTER.
The preset station you selected is moved to the new location and the other preset stations
shift backwards to make room for the new preset.
Example: If you move FM4 to FM 1.
Preset |
FM1 |
FM2 |
FM3 |
FM4 |
FM5 |
FM6 |
FM7 |
FM8 |
|
|
|
|
|
|
|
|
|
Frequency |
89.5 |
94.5 |
96.5 |
98.0 |
100.5 |
103.0 |
104.5 |
106.0 |
|
|
|
|
|
|
|
|
|
|
|
|
|
|
|
|
|
|
Preset |
FM1 |
FM2 |
FM3 |
FM4 |
FM5 |
FM6 |
FM7 |
FM8 |
|
|
|
|
|
|
|
|
|
Frequency |
98.0 |
89.5 |
94.5 |
96.5 |
100.5 |
103.0 |
104.5 |
106.0 |
|
|
|
|
|
|
|
|
|
Erasing preset stations
You can erase preset stations one by one.
1Follow steps 1 through 3 in “Organizing the Preset Stations” and select “ERASE PRESET” from the menu, then press ENTER.
2Turn TUNING/SELECT so that the preset number you want to erase appears in the display and press ENTER.
The preset station you selected is erased from the preset memory and the other preset stations shift forward to fill in the blank space.
Example: If you erase FM1.
Preset |
FM1 |
FM2 |
FM3 |
FM4 |
FM5 |
FM6 |
FM7 |
FM8 |
|
|
|
|
|
|
|
|
|
Frequency |
89.5 |
94.5 |
96.5 |
98.0 |
100.5 |
103.0 |
104.5 |
106.0 |
|
|
|
|
|
|
|
|
|
|
|
|
|
|
|
|
|
|
|
|
|
|
|
|
|
|
|
Preset |
FM1 |
FM2 |
FM3 |
FM4 |
FM5 |
FM6 |
FM7 |
FM8 |
|
|
|
|
|
|
|
|
|
Frequency |
94.5 |
96.5 |
98.0 |
100.5 |
103.0 |
104.5 |
106.0 |
|
|
|
|
|
|
|
|
|
|
zIf you want to reset the preset stations to the factory preset setting
Turn off the tuner. Then, turn on the tuner again while holding down both ENTER and DAB.
All the settings of the tuner are reset to the factory preset setting.
13GB

Advanced Tuner Operations
Using the Radio Data System
(FM RDS)
What you can do with RDS
The Radio Data System (RDS) is a broadcasting service that allows radio stations to send additional information along with the regular radio programme signal. This tuner offers you three convenient RDS features: Displaying the RDS information; Monitoring traffic, news, or weather information programmes; and Locating a station by programme type. RDS is available only on FM stations.*
Note
RDS may not work properly if the station you tuned to is not transmitting the RDS signal properly or if the signal strength is weak.
*Not all FM stations provide RDS service, nor do they provide the same types of services. If you are not familiar with the RDS system, check with your local radio stations for details on RDS services in your area.
Receiving RDS broadcasts
Simply select a station from the FM band.
When you tune in a station that provides RDS services, the RDS indicator and the station name appears in the display.
Notes
•If there is an emergency announcement by governmental authorities, “ALARM” flashes in the display.
•If a station is not providing a particular RDS service, “NO...” (such as “NO PTY”) appears in the display.
Monitoring traffic, news, or weather information programmes (RDS EON/DAB Announcement) Z
Enhanced Other Networks (EON) and DAB announcement allows the tuner to automatically switch to a station broadcasting traffic, news, or weather information. After the programme ends, the tuner switches back to the station you were listening to. To use this function, be sure to store the stations beforehand.
EON
1Tune to a preset DAB or FM RDS station so that the RDS TP or EON indicators light in the display.
2Press EON so that the programme you want to monitor appears in the display.
Each time you press EON, the display changes as follows:
TA t NEWS t WEATHER t TA & NEWS t TA & WEATHER t NEWS & WEATHER t TA & NEWS & WEATHER t Off
When the tuner automatically tunes in a traffic, news or weather information programme, the respective indicator flashes. If you do not want to listen to the entire programme, press EON to switch back to the original station.
To stop monitoring the programme
Press EON while the tuner is in the respective EON standby mode and the indicator goes off.
zYou can monitor traffic, news or weather information using the remote
Press TA (traffic), NEWS, WEATHER so that the corresponding indicator appears in the display. To stop monitoring, press the button again.
14GB

Notes
•“Weak Signal” appears when the selected station has a weak signal. “Retune” appears when the tuner is trying to retune a station with a weak signal.
•Turn off the EON feature when you want to record a programme without interruptions, especially when you want to do timer recording.
•“No EON” appears in the display if you select an EON programme before tuning to an RDS station.
Locating a station by programme type (PTY) Z
When you receive preset DAB or FM RDS station, you can locate a station you want by selecting a programme type. The tuner tunes in the type of programmes currently being broadcast from the DAB or FM RDS stations stored in the tuner's preset memory.
1Press DAB or FM for the desired type of broadcast.
2Press PTY.
3Turn TUNING/SELECT to select the programme type you want. See the following table for the programme types you can select.
Programme type |
What you hear |
|
|
Alarm Test |
Used only for dynamic |
|
switching |
|
|
Alarm - Alarm! |
Emergency broadcasts |
|
|
Children’s Progs |
Programmes for the young |
|
|
Country Music |
Country music programmes |
|
|
Cultures |
Programmes about national or |
|
regional culture, such as |
|
language and social concerns |
|
|
Advanced Tuner Operations
Programme type |
What you hear |
Current Affairs |
Topical programmes that |
|
expand on current news |
|
|
Documentary |
Investigative features |
|
|
Drama |
Radio plays and serials |
|
|
Easy Listening |
Easy Listening (middle of the |
|
road music) |
|
|
Education |
Educational programmes, such |
|
as “how-to” and advice |
|
programmes |
|
|
Finance |
Stock market reports and |
|
trading, etc. |
|
|
Folk Music |
Folk music programmes |
|
|
Information |
Programmes offering |
|
information on a wide |
|
spectrum of subjects, including |
|
consumer affairs and medical |
|
advice |
|
|
Jazz Music |
Jazz programmes |
|
|
Leisure & Hobby |
Programmes on recreational |
|
activities such as gardening, |
|
fishing, cooking, etc. |
|
|
Light Classics M |
Classical music, such as |
|
instrumental, vocal, and choral |
|
works |
|
|
National Music |
Programmes featuring the |
|
popular music of the country |
|
or region |
|
|
News |
News programmes |
|
|
None PTY |
No programme type or |
|
undefined |
|
|
Oldies Music |
Programmes featuring oldies |
|
music |
|
|
Other Music |
Music that does not fit into any |
|
of the above categories, such |
|
as Rhythm & Blues and |
|
Reggae |
|
|
Phone In |
Programmes where members |
|
of the public express their |
|
views by phone or in a public |
|
forum |
|
|
Pop Music |
Popular music programmes |
|
|
Religion |
Programmes of religious |
|
content |
|
|
Rock Music |
Rock music programmes |
|
|
Science |
Programmes about the natural |
|
sciences and technology |
|
|
Serious Classics |
Performances of major |
|
orchestras, chamber music, |
|
opera, etc. |
|
|
Social Affairs |
Programmes about people and |
|
the things that affect them |
|
|
Sport |
Sports programmes |
15GB

Advanced Tuner Operations
Programme type |
What you hear |
Traffic |
Traffic announcements |
|
programmes |
|
|
Travel & Touring |
Programmes about travel. Not |
|
for announcements that are |
|
located by TP/TA |
|
|
Varied Speech |
Other types of programmes |
|
such as, celebrity interviews, |
|
panel games, and comedy |
|
|
Weather & Metr |
Weather information |
|
|
4Press ENTER.
The tuner starts searching the preset stations for the programme (“PTY Search” and the programme type are displayed).
When the tuner finds the programme you are looking for, it stops searching.
5When you want to receive the same type of programme of other stations, repeat steps 2 to 4.
zYou can locate a station by programme type using the remote
Press PTY +/– to select the desired programme in step 2 above, then press ENTER.
Notes
•When you do not preset any DAB or FM station, you cannot use the PTY function.
•If you do not perform any operation for 20 seconds after performing step 3, the tuner returns to the status before you press PTY. To resume the operation, perform from step 2 again.
Using the Digital Filter Z
When receiving DAB programmes, you can use the digital filter to match your listening environment and the music source.
TUNING/SELECT
MENU ENTER
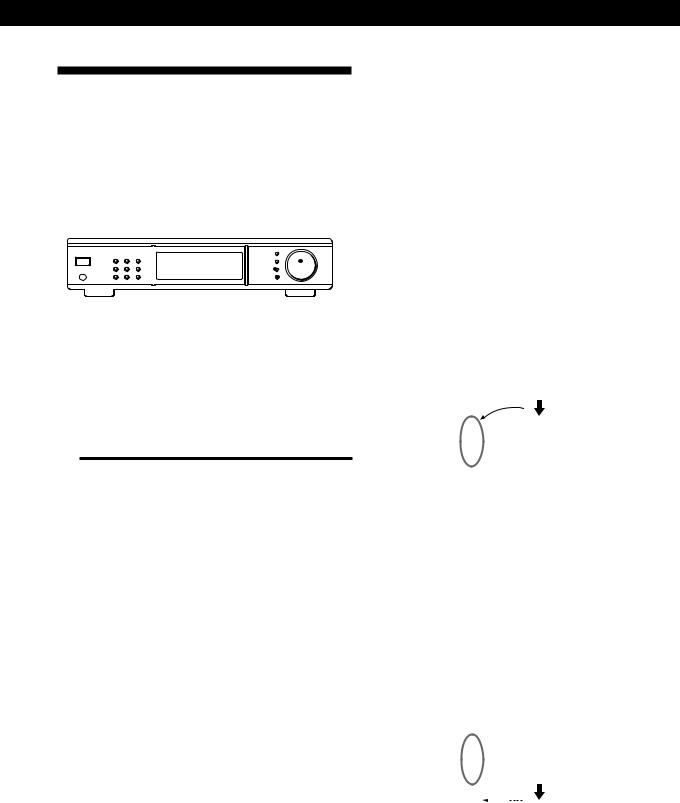
1Press MENU.
2Turn TUNING/SELECT so that “DIGITAL FILTER” appears.
3Press ENTER.
4Turn TUNING/SELECT to select the desired filter.
“*” indicates that the filter is currently selected.
5Press ENTER.
The selected filter is set to on.
Characteristics of each digital filter
The contents and characteristics of the digital filters are as follows:
STD: Standard (Sharp roll-off): provides a wide frequency range and spatial feeling, as it holds the most information among the four filters.
Suitable for classical music.
Type1: Clear (slow roll-off): provides smooth and powerful sound with clear image position.
Suitable for jazz band performances and jazz vocals.
Type2: Plain (slow roll-off): provides fresh and energetic sound with rich vocal expression. Suitable for vocal performances.
Type3: Fine (slow roll-off): provides well-balanced natural sound, with a large scale feel and rich reverberation.
Suitable for listening to any kind of music when you are relaxed.
zYou can also use the digital filter using the remote
Press DIGITAL FILTER on the remote.
Each time you press DIGITAL FILTER, the digital filter changes in the order as follows:
STD t Type1 t Type2 t Type3
16GB
Advanced Tuner Operations
Using the Display Z
DISPLAY DISPLAY MODE
Display Information
You can check the status of this tuner and the information about the programme using the display.
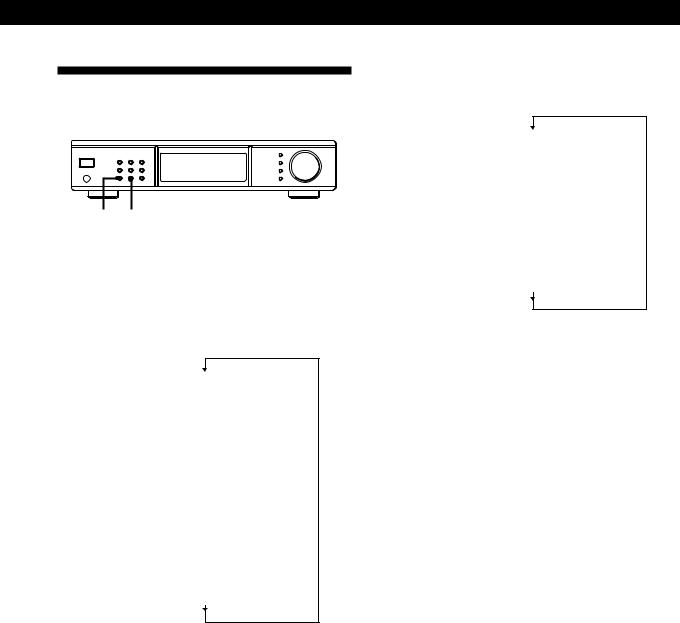
When you tune in the DAB station
Each time you press DISPLAY, the display changes as follows:
Preset number/Channel label (Normal display)
r
Ensemble label r
PTY r
Dynamic label (Radio Text) r
Clock time r
Frequency r
Component label 1)
1)Only when you tune in the secondary component. In this case, the normal display is set to component label.
zWhen “SC” appears in the display
You can tune in the secondary component or another service of the dual channel. For details, see page 11.
zWhen “STEREO” appears in the display
The current programme is broadcasted in the stereo/ joint (intensity) stereo mode.
When you tune in the FM or AM station
Each time you press DISPLAY, the display changes as follows:
Preset number/Frequency (Normal display)
r
PTY 2) r
Radio Text 2) r
Clock time 2) r
Signal Level
2) Only when you tune in a FM RDS station
Customizing the display
You can select the appearance of the display from one of the following four display modes.
Press DISPLAY MODE.
Each time you press DISPLAY MODE, the display changes as follows:
Full Display/Full Brightness t Full Display/Dimmed
t Minimal Display/Full Brightness t Minimal
Display/Dimmed
The setting remains in effect until you change it again. If you press one of the buttons on this unit, the minimal display changes to the full display with the selected brightness. After about 4 seconds, the display returns to the display mode you selected.
17GB

Advanced Tuner Operations
About the Menu Entry System
This tuner uses a menu entry system which allows you to operate various functions by following messages on the display. Use the following controls for menu operation.
TUNING/SELECT
|
MENU ENTER |
|
|
Use the |
To |
|
|
MENU button |
enter the menu mode. |
|
|
TUNING/SELECT control |
display different items or |
|
settings. |
|
|
ENTER button |
select the currently displayed |
|
item or setting. |
|
|
Switching the remote mode of this tuner
By switching the remote mode of this tuner, you can control some functions of this tuner from the remote for other equipment such as Sony tuner or amplifier.
1Press MENU.
2Turn TUNING/SELECT to display “COMMAND MODE to Expand”.
3Press ENTER.
To return the remote mode for the supplied remote only
Choose “COMMAND MODE to Exclusive” in step 2 above.
Notes
•Regardless of the remote mode, you can control all functions of this tuner using the supplied remote.
•Though you switch the remote mode to “Expand”, you cannot control some functions of this tuner without the supplied remote.
Tips for Better FM Reception
This tuner has various functions designed for better FM reception. First, try to receive stations with the standard settings. If the reception is not good, try altering the reception quality to obtain a clear signal. The tuner stores the following adjustments, together with the frequency when you make a station preset.
TUNING/SELECT
MONO/SC |
MENU ENTER |
Finding the best aerial attenuator
You can lowers the level of the input signal to receive broadcasts with extremely high signal levels.
1Press MENU.
2Turn TUNING/SELECT to display “ANTENNA ATTENUAT to ON”.
3Press ENTER.
When you turn off the antenna attenuator
Choose “ANTENNA ATTENUAT to OFF” in step 2 above.
Finding a best intermediate frequency band width
You can improve the selectivity and reduce interference to make broadcasts with weak signals easier to listen to.
1Press MENU.
2Turn TUNING/SELECT to display “IF BAND WIDTH to NARROW”.
3Press ENTER.
To tune in only the stations with high sound quality and low distortion
Choose “IF BAND WIDTH to WIDE” in step 2 above.
If an FM stereo programme is distorted
Press MONO/SC to change to monaural (MONO). You will not have the stereo effect but the distortion will be reduced. To return to stereo mode, press this button again.
18GB

|
|
|
|
Additional Information |
Additional Information |
|
|
|
Troubleshooting
If you experience any of the following difficulties while using the tuner, use this troubleshooting guide to help you remedy the problem. Should any problem persist, consult your nearest Sony dealer.
There’s no sound.
cConnect the aerials.
cSet the source setting on the amplifier to TUNER.
cThere is no sound while receiving the DAB data broadcast. In this case, “DATA” appears in the display.
cThe specified station has temporarily stopped broadcast.
You cannot tune in a frequency.
cAdjust the position of the aerial.
cConnect an external aerial for DAB/FM broadcasts.
cSet IF BAND to “NARROW”.
cPreset the stations again if you've moved.
There is severe hum and/or background noise.
cAdjust the position or direction of the aerial.
cTune to a correct frequency.
cConnect an external aerial for DAB/FM broadcasts.
cMove the tuner away from the source of the noise.
RDS isn‘t working.
cMake sure that you tune in an FM station.
cSelect a stronger FM station.
“EEPROM R/W ERROR” appears in the display.
cThere are some trouble with the internal microprocessor in the tuner. Preset stations again.
The station was interrupted by another station / The tuner automatically starts searching for stations.
cThe EON function is working. Turn off EON when you don't want the current programme interrupted.
The appropriate display or information does not appear.
cContact the radio station and find out whether or not they actually provide the service in question. The service may be temporarily out of order.
You cannot name the preset station.
c You cannot name DAB/FM RDS stations.
You cannot receive the DAB data broadcast
cConnect an external data receiver for DAB data broadcasts to the DAB RDI OUT connector.
cThe specified station has temporarily stopped the broadcast. Wait for the broadcast to resume.
The tuner malfunctions
cThe microprocessor in the tuner has malfunctioned. Turn off the tuner, then turn it on again.
There’s no sound from the DAB DIGITAL OUT connector, or you cannot record the programme.
cYou are receiving a DAB data broadcast. Receive an audio programme.
cMake sure that the digital connecting cable is properly connected.
cThe copy protection signal is included in the programme. Input the sound to the recorder, which is output from the ANALOG OUTPUT connector of the tuner.
cThe connected recorder does not support the 48kHz sampling frequency mode. Use a recorder that supports this mode.
cThe sound of the FM and AM programme is not output from the DIGITAL OUT connector of the tuner. Connect the recorder to the ANALOG OUT connector of the tuner.
19GB

Additional Information
Specifications
DAB tuner section
Frequency range |
174.928 (5A) - 239.200 (13F) MHz |
|
1452.960 (L1) - 1490.624MHz (L23) MHz |
|
For details, see “DAB frequency table” in |
|
page on page 21. |
Sensitivity |
6.9 µV/28 dBf |
Signal-to-noise ratio |
100dB |
THD+N |
0.005% (1kHz) |
Channel separation |
90dB (1kHz) |
Selectivity |
35 dB (at adjacent channel) |
Frequency response |
+0.2/–0.3 dB (5 Hz - 20 kHz) |
DA Converter |
Pulse D/A S-TACT128 |
Digital Filter |
VC24 (only for DAB analog output) |
Digital output |
Terminals: Coaxial and Optical |
|
Sampling frequency: 48kHz |
RDI output |
Optical |
Aerial terminal |
75Ω , F female |
FM tuner section
Frequency range |
87.5 - 108.0 MHz |
Sensitivity |
at 40kHz derivation |
|
at 26 dB quieting (mono) 0.9 µV/10.3 dBf |
|
at 46 dB quieting (stereo) 23 µV/38.5 dBf |
Signal-to-noise ratio |
at 40 kHz deviation |
|
80 dB (mono), 76 dB (stereo) |
THD+N |
1kHz, 40kHz deviation |
|
WIDE |
|
0.035% (mono), |
|
0.045% (stereo) |
Channel separation |
50 dB (1 kHz) WIDE |
Selectivity |
at 400 kHz |
|
WIDE 85 dB |
|
NARROW 90 dB |
Frequency response |
+0.2/–0.3 dB (30 Hz - 15 kHz) |
Aerial terminal |
75Ω , IEC male |
AM tuner section
Frequency range |
MW: 522 - 1,611 kHz |
|
(9 kHz step) |
|
LW: 144 - 288 kHz |
|
(1 kHz step: Manual tuning) |
|
(3 kHz step: Automatic tuning) |
Sensitivity |
(with AM loop aerial) |
|
MW: 200 µV/m |
|
LW: 700 µV/m |
Signal-to-noise ratio |
MW: 54 dB |
|
(50 mV/m, 999 kHz) |
|
LW: 50 dB |
|
(50 mV/m, 216 kHz) |
Harmonic distortion |
0.3% |
Selectivity |
50 dB |
Aerial terminal |
Push lever |
General
Power requirements |
230 V, |
|
AC 50/60 Hz |
Power consumption |
20 W |
Dimensions |
430 × 97.5 × 374 mm (w/h/d) |
Weight |
6.2 kg |
Remote control capability
IR
Station preset capacity max.99 (DAB, FM and AM total)
Supplied accessories See page 4.
Design and specifications are subject to change without notice.
20GB

Additional Information
DAB frequency table
Band-III (174 to 240 MHz)
Frequency |
Label |
Frequency |
Label |
|
|
|
|
174.928MHz |
5A |
209.936MHz |
10A |
|
|
|
|
176.640MHz |
5B |
211.648MHz |
10B |
|
|
|
|
178.352MHz |
5C |
213.360MHz |
10C |
|
|
|
|
180.064MHz |
5D |
215.072MHz |
10D |
|
|
|
|
181.936MHz |
6A |
210.096MHz |
10N |
|
|
|
|
183.648MHz |
6B |
216.928MHz |
11A |
|
|
|
|
185.360MHz |
6C |
218.640MHz |
11B |
|
|
|
|
187.072MHz |
6D |
220.352MHz |
11C |
|
|
|
|
188.928MHz |
7A |
222.064MHz |
11D |
|
|
|
|
190.640MHz |
7B |
217.088MHz |
11N |
|
|
|
|
192.352MHz |
7C |
223.936MHz |
12A |
|
|
|
|
194.064MHz |
7D |
225.648MHz |
12B |
|
|
|
|
195.936MHz |
8A |
227.360MHz |
12C |
|
|
|
|
197.648MHz |
8B |
229.072MHz |
12D |
|
|
|
|
199.360MHz |
8C |
224.096MHz |
12N |
|
|
|
|
201.072MHz |
8D |
230.784MHz |
13A |
|
|
|
|
202.928MHz |
9A |
232.496MHz |
13B |
|
|
|
|
204.640MHz |
9B |
234.208MHz |
13C |
|
|
|
|
206.352MHz |
9C |
235.776MHz |
13D |
|
|
|
|
208.064MHz |
9D |
237.488MHz |
13E |
|
|
|
|
|
|
239.200MHz |
13F |
|
|
|
|
L-Band (1,452 to 1,491 MHz)
Frequency |
Label |
Frequency |
Label |
|
|
|
|
1452.960MHz |
L1 |
1473.504MHz |
L13 |
|
|
|
|
1454.672MHz |
L2 |
1475.216MHz |
L14 |
|
|
|
|
1456.384MHz |
L3 |
1476.928MHz |
L15 |
|
|
|
|
1458.096MHz |
L4 |
1478.640MHz |
L16 |
|
|
|
|
1459.808MHz |
L5 |
1480.352MHz |
L17 |
|
|
|
|
1461.520MHz |
L6 |
1482.064MHz |
L18 |
|
|
|
|
1463.232MHz |
L7 |
1483.776MHz |
L19 |
|
|
|
|
1464.944MHz |
L8 |
1485.488MHz |
L20 |
|
|
|
|
1466.656MHz |
L9 |
1487.200MHz |
L21 |
|
|
|
|
1468.368MHz |
L10 |
1488.912MHz |
L22 |
|
|
|
|
1470.080MHz |
L11 |
1490.624MHz |
L23 |
|
|
|
|
1471.792MHz |
L12 |
|
|
|
|
|
|
21GB

AVERTISSEMENT Précautions
Afin d'éviter tout risque d'incendie ou d'électrocution, n'exposez pas cet appareil à la pluie ou à l'humidité.
Afin d'éviter tout risque d'électrocution, n'ouvrez pas le coffret. Ne confiez l'entretien de l'appareil qu'à un technicien qualifié.
Sécurité
Si du liquide ou un objet solide pénètre à l'intérieur de l'appareil, débranchez l'appareil et faites-le contrôler par un personnel qualifié avant de le remettre en service.
Sources d'alimentation
•Avant d'utiliser l'appareil, assurezvous que la tension de fonctionnement de votre appareil est identique à celle de l'alimentation électrique locale.
•Débranchez le cordon de la prise si vous prévoyez de ne pas utiliser l'appareil pendant une période prolongée. Pour débrancher le cordon, tirez sur la fiche. Ne tirez pas sur le cordon proprement dit.
•Le cordon d'alimentation ne peut être remplacé que dans un centre de service après-vente agréé uniquement.
Placement
•Placez l'appareil dans un endroit avec suffisamment d'air pour empêcher une accumulation de chaleur et prolonger la durée de vie de ses composants.
•N'installez pas l'appareil à proximité de sources de chaleur, ou à un endroit exposé au rayonnement direct du soleil, à de la poussière en excès ou à des chocs mécaniques.
•Ne placez rien sur le châssis qui pourrait bloquer les ouïes de ventilation et provoquer des dysfonctionnements.
•N'installez pas l'appareil dans un espace confiné, comme une bibliothèque ou une étagère fermée.
Nettoyage du châssis
Nettoyez le châssis, les panneaux et les commandes à l'aide d'un chiffon doux légèrement imbibé d'une solution détergente douce. N'utilisez pas de tampons abrasifs, de poudre à récurer ou de solvants tels que de l'alcool ou du benzène.
Remballage
Ne jetez pas le carton et le matériau d'emballage. Ceux-ci constitueront un conteneur parfait si vous devez transporter l'appareil. Pour transporter l'appareil, remballez-le comme il l'était en sortant d'usine.
Pour toute question ou problème concernant cet appareil qui n'est pas abordé dans ce manuel, consultez un revendeur Sony.
2FR

Bienvenue!
Nous vous remercions d’avoir fait l’acquisition de ce syntoniseur DAB/ FM/AM Sony. Avant de faire fonctionner cet appareil, lisez attentivement le présent manuel et conservez-le pour toute référence ultérieure.
TABLE DES MATIÈRES
Préparation
Déballage 4
Raccordement du système 4 Sélection de l’affichage en allemand 7
Sauvegarde automatique des stations DAB/FM (Auto-betical Select) 8
A propos de ce manuel
Convention
•Les instructions de ce manuel décrivent les commandes du syntoniseur.
Vous pouvez également utiliser les touches de la télécommande si elles présentent la même fonction ou une fonction semblable à celle du syntoniseur.
•Les icônes suivantes sont utilisées dans ce manuel:
ZIndique que vous pouvez utiliser la télécommande pour effectuer la
tâche.
zIndique les recommandations et les conseils pour réaliser la tâche
plus facilement.
Mode de démonstration
Vous pouvez lancer la démonstration en choisissant “DEMONSTRATION” dans le menu. Si vous souhaitez annuler le mode de démonstration, éteignez le syntoniseur, puis rallumez-le.
Opérations de base
Réception de stations de présélection 9
Opérations avancées du syntoniseur
Aperçu de DAB 10 |
|
|
|
Réception d’émissions 10 |
|
|
|
Sauvegarde manuelle des stations 11 |
|
|
|
Désignation des stations de présélection |
12 |
|
|
Organisation des stations de présélection |
13 |
|
|
Utilisation de FM RDS (Radio Data System) |
14 |
|
|
Surveillance des programmes d’information de trafic, de nouvelles ou de |
FR |
||
météo (Annonce RDS EON/DAB) 14 |
|
|
|
Localisation d’une station par type de programme (PTY) 15 |
|
||
Utilisation du filtre numérique 16 |
|
|
|
Utilisation de l’écran d’affichage 17 |
|
|
|
A propos du système d’accès au menu 18 |
|
|
|
Conseils pour une meilleure réception FM |
18 |
|
|
Informations complémentaires
Guide de dépannage 19
Spécifications 20
3FR
Préparation
Déballage
Vérifiez si vous avez reçu les éléments suivants avec le syntoniseur:
•Câble audio (1)
•Antenne boucle AM (1)
•Antenne filaire FM (1)
•Antenne filaire DAB (1)
•Télécommande (1)
•Piles R6 (AA) (2)
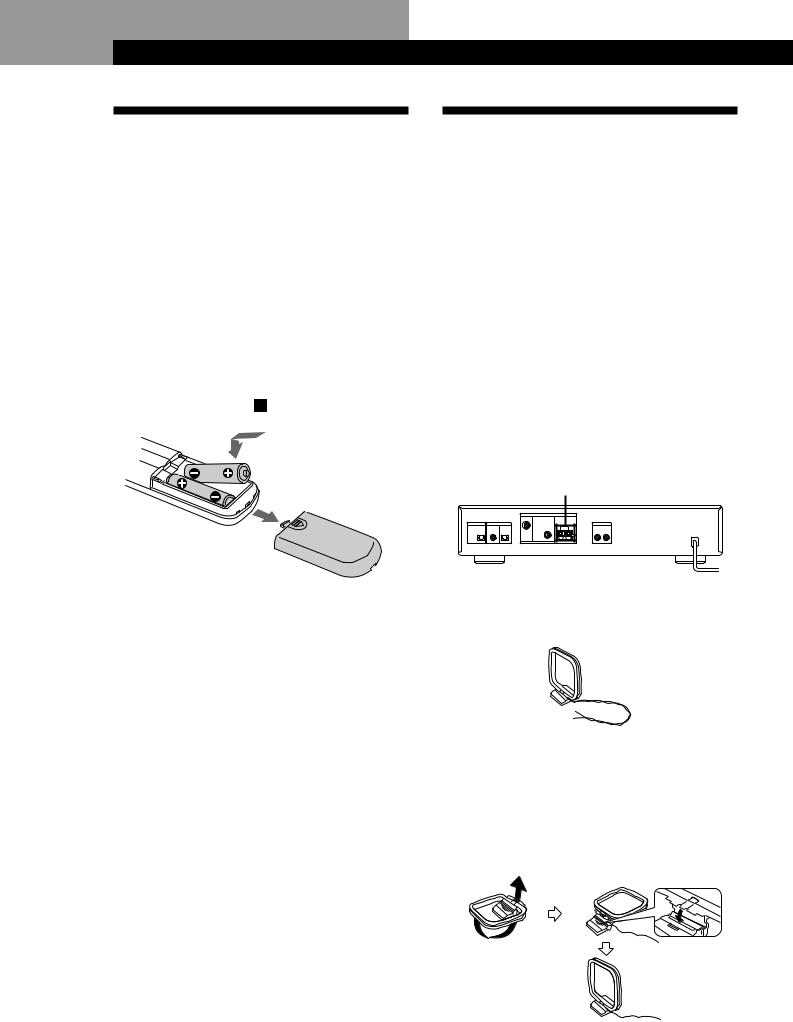
Installation des piles dans la télécommande
La télécommande fournie vous permet de contrôler cet appareil. Introduisez deux piles AA (R6) en faisant correspondre les polarités + et - des piles. Lors de l’utilisation d’une télécommande, orientez-la vers le capteur de télécommande de cet appareil.
zQuand remplacer les piles
En utilisation normale, les piles doivent durer environ six mois. Lorsque la télécommande ne commande plus le syntoniseur, remplacez toutes les piles par des neuves.
Remarques
•Ne laissez pas la télécommande dans un endroit extrêmement chaud et humide.
•Ne laissez pas pénétrer de corps étranger dans le boîtier de la télécommande, surtout lorsque vous remplacez les piles.
•N’exposez pas le capteur de télécommande aux rayons directs du soleil ou vers des éclairages. Vous risquez de provoquer un dysfonctionnement dans ces cas-là.
•Si vous n’utilisez pas la télécommande pendant une période prolongée, retirez les piles pour éviter des dégâts dus à une fuite des piles et à la corrosion.
Raccordement du système
Avant de commencer
•Mettez tous les composants hors tension avant d’effectuer toute connexion.
•Ne branchez pas la fiche secteur avant d’avoir effectué toutes les connexions.
•Veillez à réaliser les connexions correctement pour éviter un grondement et des parasites.
•Lors du raccordement d’un câble audio, veillez à faire coïncider les broches marquées par une couleur aux prises appropriées: blanc (gauche) sur blanc; et rouge (droite) sur rouge.
Raccordement de l’antenne AM
Cette section décrit comment raccorder l’antenne boucle AM fournie. Pour connaître l’emplacement spécifique des bornes AM ANTENNA, reportez-vous à l’illustration ci-dessous.
AM ANTENNA
De quoi ai-je besoin?
• Antenne boucle AM (fournie) (1)
1Déroulez 2 longueurs du fil torsadé du cadre de l’antenne. Veillez à ne dérouler que la section torsadée du fil. Ne déroulez pas plus de 2 longueurs de fil. De même, veillez à ne pas redresser le fil torsadé.
2Montez l’antenne fournie comme illustré cidessous.
4FR
Préparation
3Raccordez l’antenne boucle AM aux bornes AM à l’arrière de l’appareil.
ANTENNA |
Antenne |
DAB |
boucle AM |
|
|
FM |
AM |
75Ω COAXIAL
4Ajustez l’orientation de l’antenne pour la meilleure réception possible.
L’antenne boucle AM présente un gain qui détecte mieux le signal de certains angles que d’autres. Placez l’antenne dans le sens qui offre la meilleure réception possible.
Si des sons aigus (son de battement) se produisent lors de l’enregistrement d’émissions AM, réglez la position de l’antenne AM de sorte que le bruit disparaisse.
Si vous habitez dans un bâtiment en béton armé, ou avec une structure d’acier, il se peut que vous n’obteniez pas une bonne réception étant donné que les ondes radio sont plus faibles à l’intérieur. Dans ce cas, nous vous recommandons de raccorder une antenne en option.
zPour les stations difficiles à capter
Essayez de repositionner l’antenne boucle pendant que vous accordez la station. Positionner l’antenne boucle AM fournie près d’une fenêtre devrait améliorer la qualité de la réception.
Raccordement de l’antenne FM
Avec une antenne FM extérieure, vous pouvez obtenir une qualité sonore en FM supérieure. Nous vous recommandons d’utiliser l’antenne filaire FM fournie temporairement seulement jusqu’à ce que vous installiez une antenne FM extérieure. Pour connaître l’emplacement spécifique de la borne FM ANTENNA, reportez-vous à l’illustration ci-dessous.
FM ANTENNA
De quoi ai-je besoin?
•Antenne filaire FM (fournie) (1)
•Antenne extérieure FM (non fournie) (1) et câble coaxial de 75 ohms avec connecteur femelle IEC (non fourni) (1)
Raccordez l’antenne filaire FM fournie ou l’antenne FM extérieure (non fournie) à la borne FM à l’arrière de l’appareil.
Antenne filaire FM |
ANTENNA |
|
|
DAB |
|
|
FM |
AM |
75Ω COAXIAL
Antenne FM extérieure
ANTENNA
DAB
FM |
AM |
75Ω COAXIAL
Raccordement de l’antenne DAB
Avec une antenne DAB extérieure, vous pouvez obtenir une qualité sonore en DAB supérieure. Nous vous recommandons d’utiliser l’antenne filaire DAB fournie temporairement seulement jusqu’à ce que vous installiez une antenne DAB extérieure. Pour connaître l’emplacement spécifique de la borne DAB ANTENNA, reportez-vous à l’illustration ci-dessous.
DAB ANTENNA
De quoi ai-je besoin?
• Antenne filaire DAB (fournie) (1)
•Antenne extérieure DAB (non fournie) (1) et câble coaxial de 75 ohms avec connecteur mâle de type F (non fourni)
(1)
5FR
Préparation
Raccordez l’antenne filaire DAB fournie ou l’antenne DAB extérieure (non fournie) à la borne DAB à l’arrière de l’appareil.
Antenne filaire DAB
ANTENNA
DAB
FM |
AM |
75Ω COAXIAL
vers l’antenne DAB extérieure
ANTENNA
DAB
FM |
AM |
75Ω COAXIAL
Raccordement MD/DAT
Cette section décrit comment raccorder le syntoniseur à une platine DAT ou à un enregistreur de MD pour un enregistrement numérique à numérique. Grâce à cette connexion, vous pouvez obtenir la meilleure qualité sonore possible lors de l’enregistrement d’émissions numériques DAB, même si vous utilisez les sorties analogiques pour l’écoute. Pour connaître l’emplacement spécifique des prises, reportez-vous à l’illustration ci-dessous.
DAB DIGITAL OUT
De quels câbles ai-je besoin?
• Câble optique numérique (non fourni) (1)
Raccordement d’un fil de masse
Si vous raccordez une antenne extérieure, veillez à raccorder un fil de terre (non fourni) à la borne AM ANTENNA dotée de l’indication “U” (en plus de l’antenne boucle AM) pour une protection contre la foudre.
Raccordement de l’amplificateur
Raccordez le syntoniseur à un amplificateur. Veillez à mettre les deux composants hors tension avant d’effectuer le raccordement. Pour connaître l’emplacement spécifique des bornes, reportez-vous à l’illustration ci-dessous.
ANALOG OUT
De quels câbles ai-je besoin?
• Câble audio (fourni) (1)
Raccordez les fiches blanches aux prises blanches (L) et les fiches rouges aux prises rouges (R). Introduisez les fiches complètement dans les prises; une connexion incomplète risque de provoquer des parasites.
ST-D777ES Amplificateur
ANALOG OUT |
TUNER IN |
R L
R L
• Câble coaxial numérique (non fourni) (1)
Optique numérique
ST-D777ES |
DAT/MD |
DAB DIGITAL OUT |
DIGITAL IN |
COAXIAL OPTICAL |
OPTICAL |
|
Coaxial numérique
ST-D777ES |
DAT/MD |
DAB DIGITAL OUT |
DIGITAL IN |
COAXIAL OPTICAL |
COAXIAL |
|
Remarques
•Si vous utilisez un enregistreur MD qui ne supporte pas l’entrée de signaux audio numériques de 48 kHz, vous ne pouvez pas reproduire ni enregistrer de signaux numériques via les prises DIGITAL OUT.
•La prise OPTICAL présente un cache rétractable. Introduisez la fiche dans la prise.
6FR
 Loading...