

Page 1
3-048-656-12 (1)
Integrated Remote
Commander
Operating Instructions
RM-VL900
© 2000 Sony Corporation
Page 2

For the customers in the U.S.A.
WARNING
This equipment has been tested and found to comply with the limits for a
Class B digital device, pursuant to Part 15 of the FCC Rules.
These limits are designed to provide reasonable protection against
harmful interference in a residential installation. The equipment
generates, uses, and can radiate radio frequency energy and, if not
installed and used in accordance with the instructions, may cause
harmful interference to radio communications. However, there is no
guarantee that interference will not occur in a particular installation. If
this equipment causes harmful interference to radio or televison
reception, which can be determined by turning the equipment off and on,
the user is encouraged to try to correct the interference by one or more of
the following measures:
— Reorient or relocate the receiving antenna.
— Increase the separation between the equipment and receiver.
— Connect the equipment into an outlet on a circuit different from that
to which the receiver is connected.
— Consult the dealer or an experienced radio/TV technician for help.
You are cautioned that any changes or modifications not expressly
approved in this manual could void your authority to operate this
equipment.
2
Page 3

Features
The RM-VL900 Remote Commander provides centralized control of all
your AV components from a single remote commander and saves the
trouble of operating different AV components with different remote
control devices. The following are its main features.
Centralized control of Sony AV components with this one remote
commander
This Commander is preset at the factory to operate Sony brand
components, so you can use it out of the box as a control center for your
Sony A V components.
Remote control signals for non-Sony components are also preset
This Commander is preset for most major brands components including
Sony. You can remote control your components by setting their code
numbers (page 8).
Learning function for programming other remote control signals
you need
This Commander has a Learning function, to “learn” remote control
signals to operate non-preset components or functions (page 15).
In addition, the Commander can “learn” remote control signals (infrared
signals only) of non-Audio Visual components such as air-conditioners,
lights, etc. (some specific appliances or functions may not be available)
(page 35).
Reassigning new components
You can assign other Component Select buttons to freely operate other
components. This is useful when you have more than two of the same
kind of AV components (page 32).
System Control function allows one-touch operation to execute a
series of commands
You can program up to 16 consecutive operation steps to execute a series
of operations by pressing a single button (page 23).
Data can be transferred between remote commanders with the
mark
You can transfer the data such as “learned” signals and component code
settings between this Commander and another Sony remote commander
with the mark. It will save the trouble of performing the same
operations again for setting (page 38).
Channel Macro function allows you to select a channel with a
single key
Up to 4 key steps can be programmed on Macro keys. If you set the key
operations for entering a channel number on a Macro key, you can select
the channel by pressing that Macro key (page 43).
3
Page 4

Table of Contents
Getting Started
Installing the Batteries .................................................................................6
When to replace the batteries ............................................................................ 6
Location of Controls .....................................................................................7
Basic Operations
Setting the Code for Preset Audio and Visual Components .........................8
Setting a component code .................................................................................. 8
Checking if the code number works .............................................................. 10
Setting a component code by the Search function ....................................... 11
Operating Your Components with the Remote Commander ......................12
To control the volume....................................................................................... 13
Notes on operating your components ........................................................... 14
Using Unpreset Remote Control Operations — Learning Function............15
For accurate Learning ....................................................................................... 18
Changing or erasing the function of a “learned” button ............................ 19
Advanced Features
Controlling the Volume of Visual Components Connected to an Audio
System......................................................................................................21
Executing a Series of Commands — System Control Function ..................23
Programming a series of commands to the SYSTEM CONTROL
buttons ............................................................................................................. 24
Notes on System Control Operation .............................................................. 27
Programming a series of commands to the Component Select buttons ... 27
Changing the interval between operation steps ........................................... 29
Adding an Extra Function to the Component Select Buttons .....................30
Programming the Power-On Command of the Selected Component (for
Sony Components only)................................................................................ 30
Assigning Other Components to the Component Select Buttons ..............32
Copying the settings of a Component Select button to another button .... 34
Programming a Frequently Used Key Operation for SYSTEM CONTROL
Buttons.....................................................................................................35
Notes on the “learned” signals of an air-conditioner .................................. 37
Transferring Data between Remote Commanders......................................38
Transferring the data ........................................................................................ 38
Receiving the data ............................................................................................. 40
Selecting a Channel with a Single Button — Channel Macro Function .....43
4
Page 5

Using Other Functions
Locking the Controls — Hold Function.......................................................45
Additional Information
Precautions .................................................................................................46
Specifications..............................................................................................46
Troubleshooting..........................................................................................47
Appendix
Table of Preset Functions............................................................................50
TV ........................................................................................................................ 50
VCR ..................................................................................................................... 51
CBL (Cable box)................................................................................................. 51
SA T...................................................................................................................... 52
DVD .................................................................................................................... 52
VD (LD player) .................................................................................................. 53
CD ....................................................................................................................... 53
MD....................................................................................................................... 54
DAT..................................................................................................................... 54
DECK .................................................................................................................. 55
AMP .................................................................................................................... 55
Index ............................................................................................. Back cover
5
Page 6
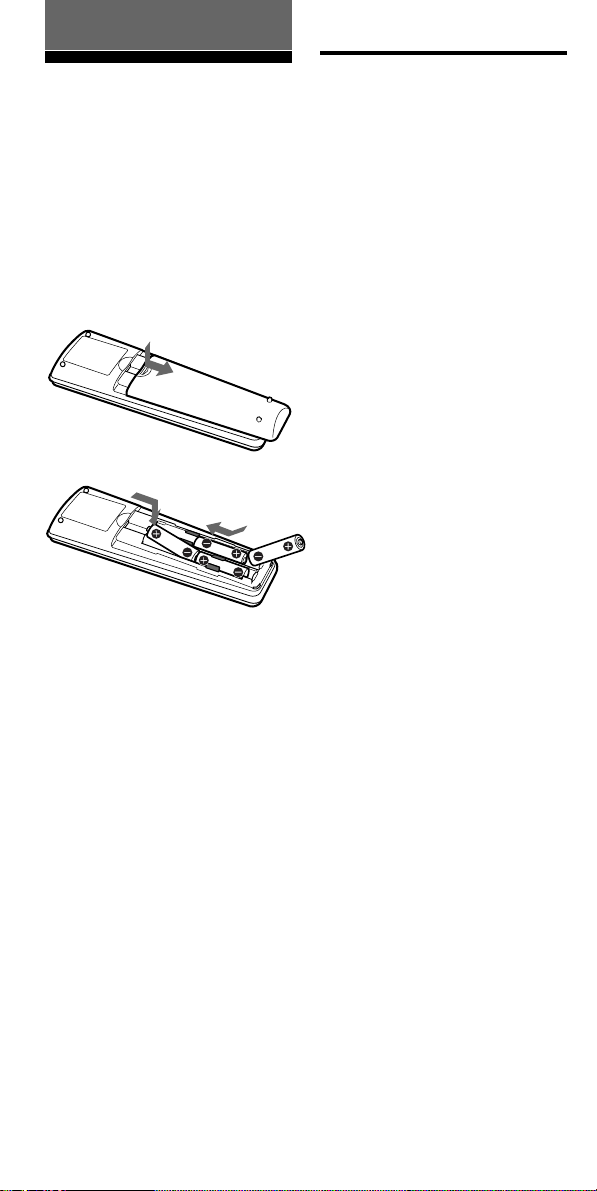
Getting Started
Installing the
Batteries
Slide open the battery
compartment lid and insert four
size AA(R6) batteries (not
supplied). Be sure to match up the
+ and – indications on the
batteries with the + and –
indications on the battery
compartment.
Insert the batteries negative-andfirst through the guide clamp
within each compartment as
shown above.
When to replace the
batteries
Batteries for remote control
operation (Four size AA (R6)
batteries)
Under normal conditions, the
batteries will last up to five
months. If the Commander does
not operate properly, the batteries
might be drained. When this
happens, replace the batteries with
new ones.
Note
Do not take more than one hour to
replace the batteries; otherwise, your
setting of the code numbers (page 8)
and “learned” remote control signals
(page 15) will be erased.
Notes on batteries
•Do not mix old batteries with new
ones or mix different types of
batteries together.
•If the electrolyte inside the battery
should leak, wipe the contaminated
area of the battery compartment with
a cloth and replace the old batteries
with new ones. To prevent the
electrolyte from leaking, remove the
batteries when you plan not to use
the Commander for a long period of
time.
6
Page 7
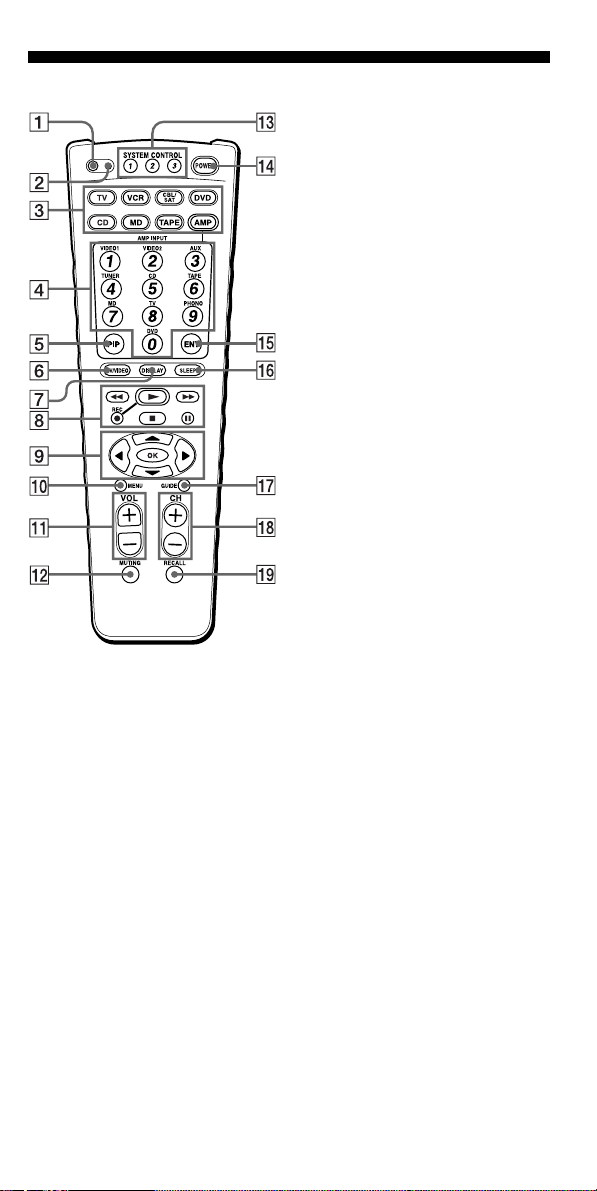
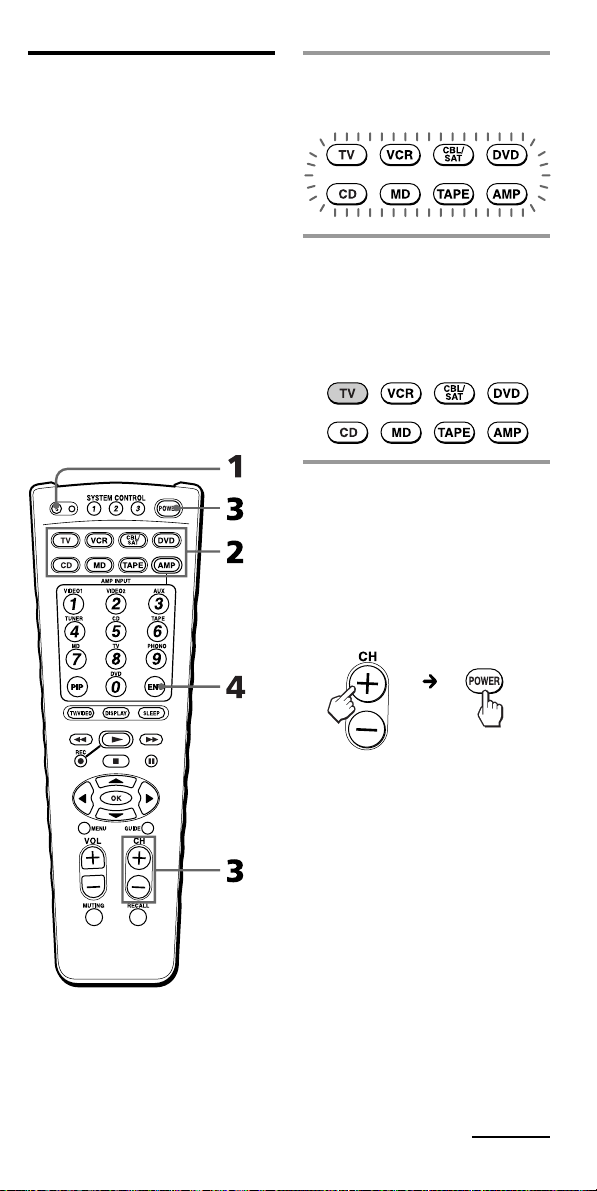
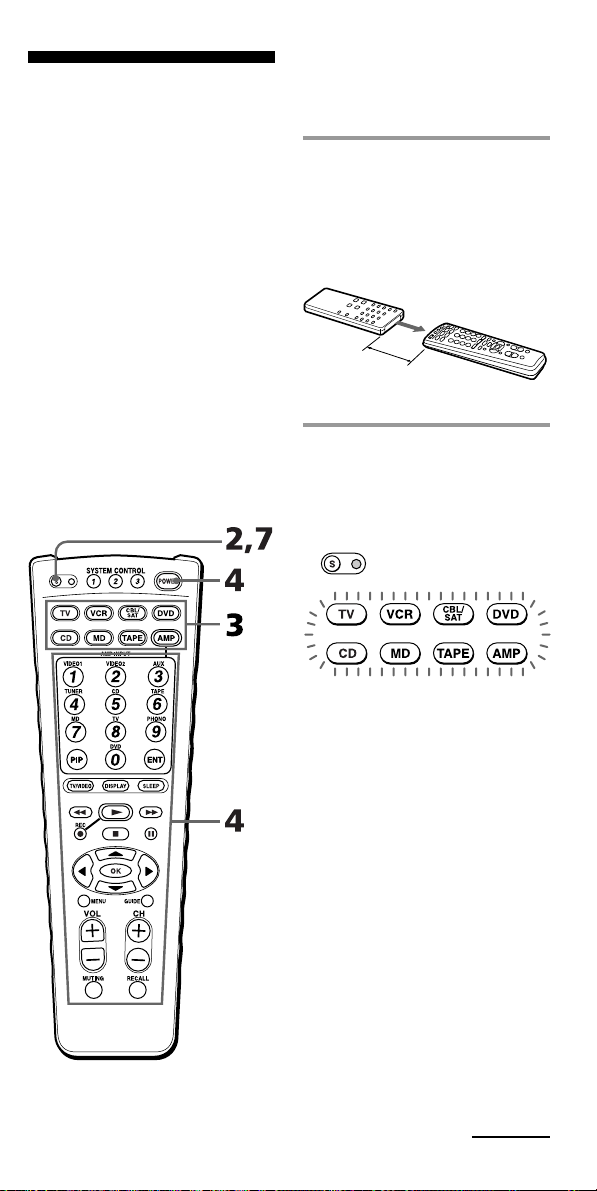
Location of Controls
1 S (set) button
2 Set indicator
3 Component Select buttons
Light or flash during operation.
4 Number buttons/AMP INPUT
select buttons
5 PIP button
6 TV/VIDEO button
7 DISPLAY button
8 Player Control buttons
9 Cursor Control & OK buttons
0 MENU button
qa VOL +/– buttons*
qs MUTING button*
qd SYSTEM CONTROL buttons
qf POWER button
qg ENT (enter) button
qh SLEEP button
qj GUIDE button
qk CH (channel) +/– buttons
ql RECALL button
* Note on the VOL +/– and
MUTING buttons
The Commander controls or mutes the
TV’s volume when you select a visual
component. The Commander controls
or mutes the amplifier’s volume when
you select an audio component.
You can change this setting also
(page 21).
NOTE
The function of control buttons vary depending on settings/operating modes.
“Table of Preset Functions” (page 50) shows how the Commander generally
operates for each component at preset mode.
These settings can be changed, and some buttons are used specifically in the setup
procedure as described in the following pages.
7
Page 8
Basic Operations
Setting the Code for
Preset Audio and
Visual Components
The Commander is preset at the
factory to operate Sony brand AV
components (see the table below).
If you are using the Commander
with a factory-set Sony
components, skip the following
procedures.
You can use the Commander with
other preset AV components also.
To use with other AV components,
you need to follow the procedures
to set the correct codes for each
component.
Component
Select Button
TV
VCR
CBL/SAT
DVD
CD
MD
TAPE
AMP
* Analog audio compact cassette deck
Preset
component(s)
TV
TV/VCR
Combo
VCR
Satellite
tuner (SAT)
DVD player
(DVD)
CD player
MD deck
Cassette
deck*
Amplifier
Factory setting
Sony TV
Sony VHS
VCR
Sony SAT
Sony DVD
player
Sony CD
player
Sony MD deck
Sony cassette
deck
Sony amplifier
Setting a component code
Example: To set up a Philips’ TV
1 See the tables in the
supplied “Component
Code Numbers”, and find
the three-digit code number
for the desired component.
If more than one code number
is listed, use the number that is
listed first.
For example, to set up a
Philips’ TV, you would use the
code number 056.
2 Press S (set).
All Component Select buttons
flash.
NOTE
CBL and VD can be set to any of the
above Component Select buttons, and
so can the others respectively.
See “Table of Preset Functions” (page
50) for the functions of buttons as for
each component.
8
Page 9
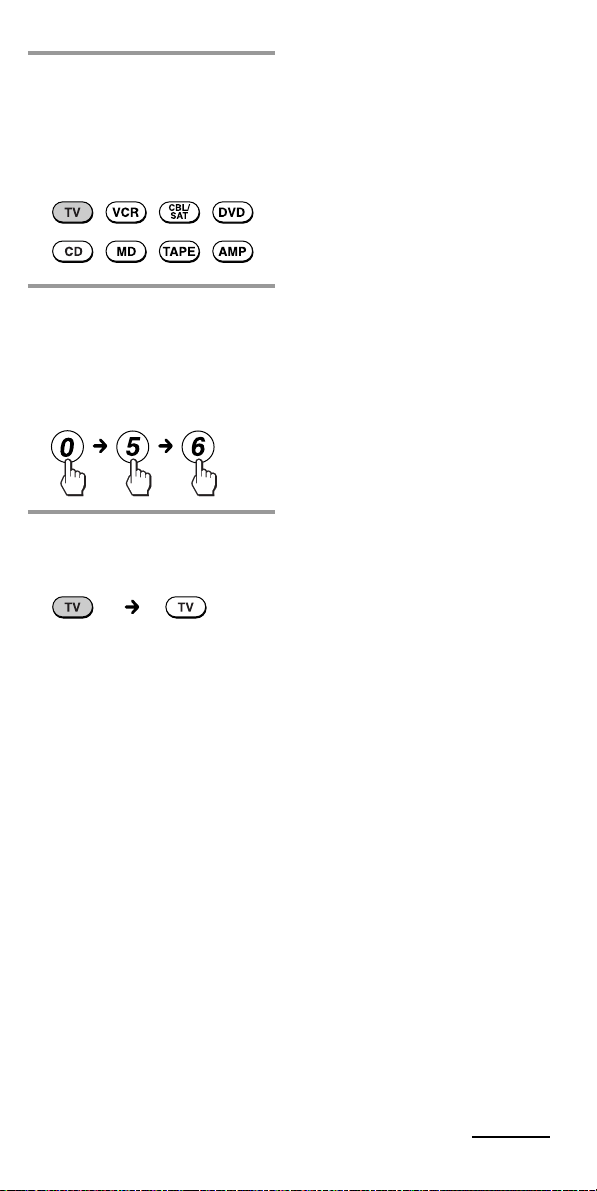
3 Press the Component Select
button for the desired
component.
The selected Component
button lights up, and all other
buttons turn off.
4 Press the Number buttons
to enter the three-digit
component code number.
The selected Component
button turns off each time you
press a Number button.
5 Press ENT.
The Component button turns
off.
Notes
• If you press a component code
number that is not on the table in the
supplied “Component Code
Numbers”, or if you press a button in
an improper order, the Component
button flashes five times, and then
turns off. Check the component code
number, and try setting again.
• If you don’t input anything into the
Commander for over 20 seconds
between each step, the setup
procedure will be canceled. To set the
code, start over from Step 2.
• If you press S (set) while setting the
component code, all code numbers
will be lost, and the setup procedure
will be canceled. Start over from Step
2.
To cancel setup, press S (set).
If the Component button
flashes five times before
turning off, it means that the
setup is incomplete. Start over
from Step 2.
Continued
9
Page 10
Setting the Code for Preset
Audio and Visual Components
(continued)
Checking if the code
number works
1 Press the corresponding
Component Select button
for the component you
have set up.
The Component button lights
up when you press it, and
turns off when you release it.
2 Power on the component
with its power switch.
If the Commander does not
seem to be working
Try repeating the setup procedures
using the other codes listed for your
components, or try setting the code
number using the Search function
(page 11).
Note on the VOL+/– and MUTING
buttons
When you operate a visual
component, the TV button lights
up to indicate that the
Commander is controlling or
muting the TV’s volume.
When you operate an audio
component, the AMP button lights
up to indicate that the
Commander is controlling or
muting the amplifier’s volume.
3 Aim the Commander at the
component and press
POWER.
The selected Component
button lights up when you
press a function button, and
turns off when you release it.
The component should power
off.
4 If you have succeeded,
check that the Commander
is operating the other
functions of your
component, such as channel
and volume control.
See page 50 for details.
It is recommended that you first
set the TV and AMP codes before
setting up any other components.
Note on buttons that have
already “learned” remote
control signals
If another signal has already been
programmed on that button using
the Learning function (page 15),
that “learned” signal will work
even after you set the component
code number. To use it as a preset
function button, first erase its
“learned” signal (page 19).
10
Page 11
Setting a component code
by the Search function
You can find a code number
available for a component that
doesn’t have one in the supplied
“Component Code Numbers”.
Before starting the Search
function
Set each component to the
following status so that the Search
function works effectively.
TV: Power-on
VCR, SAT, CBL, DVD, AMP:
Power-off
VD, CD, MD, TAPE: Power-on
with a playback source (disc,
cassette tape, etc.)
1 Press S (set).
All Component Select buttons
flash.
2 Press the Component Select
button for the desired
component.
The selected Component
button lights up, and all other
buttons turn off.
3 Press CH + or CH – and
POWER in turn until the
component reacts as
decribed in the following.
Powers off: TV
Powers on: VCR, SAT, CBL,
DVD, AMP
Plays back: VD, CD, MD, TAPE
Press CH + to go to the next
code number.
Press CH – to go back to the
previous code number.
The Component button flashes
three times after the numbers
have turned one cycle.
Note
Always be sure to first press CH+/before pressing POWER. Otherwise
the Search function does not work
properly.
Continued
11
Page 12
Setting the Code for Preset
Audio and Visual Components
(continued)
4 Press ENT.
The Component button turns
off.
5 Check if the code number
works by following the
instructions on page 10.
To cancel setup, press S (set).
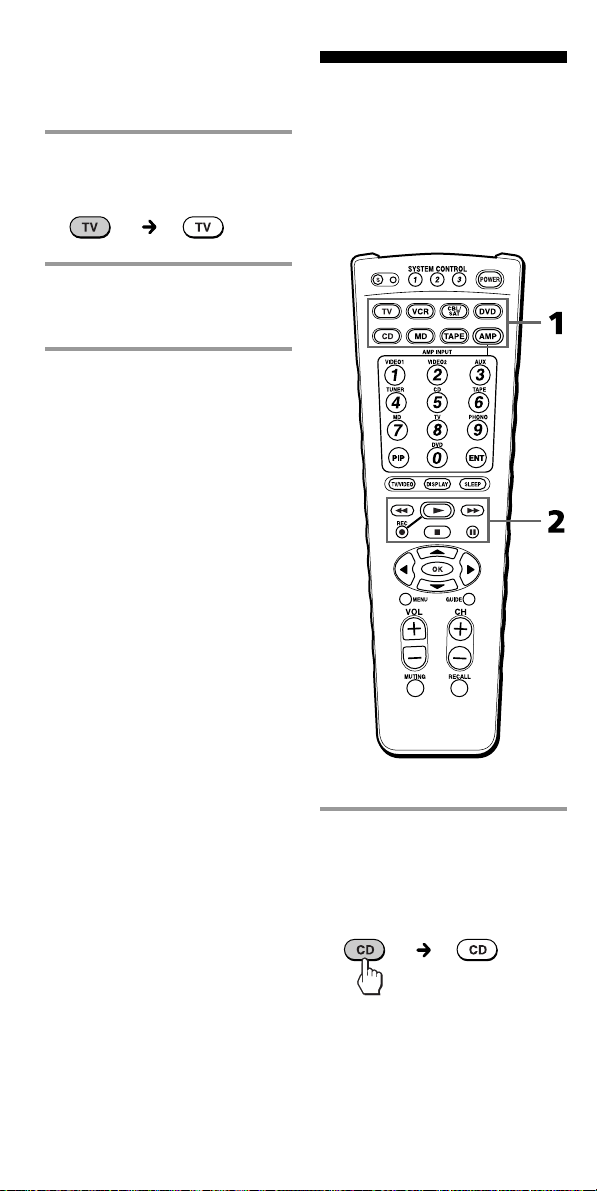
Operating Y our
Components with the
Remote Commander
When you operate a non-Sony
component, make sure you set the
component code first (page 8).
12
Example: To play a CD player
1 Press the desired
Component Select button.
The Component button lights
up when you press it, and
turns off when you release it.
Page 13

2 Press any Player Control
button.
See “Table of Preset Functions”
(page 50) for the functions of
buttons for each component.
Note
The remote control signals may be
different for some components or
functions. In this case, program the
remote control signals with the
Learning function (see page 15). Note,
however, that components and
functions that do not support the
remote control of infrared signals will
not work with this Commander.
To control the volume
Press VOL +/– to control the
volume, and MUTING to mute.
When you select a visual
component, the TV’s volume will
be controlled (the TV button lights
up), and when you select an audio
component, the amplifier’s
volume will be controlled (the
AMP button lights up). You can
change this setting also (page 21).
Notes
• If you have programmed any signal
on the VOL +/– or MUTING button
of any component by the Learning
function (page 15), that signal will be
transmitted instead of controlling the
volume of the TV or amplifier when
you select that component.
• If you have programmed any signal
on the VOL +/– or MUTING button
of TV or AMP by the Learning
function, that signal will be
transmitted only when you select TV
or AMP. When you select other
components, the preset volume
control signals for TV or AMP will be
transmitted.
• If you have assigned another
component to the TV or AMP button
(page 32), the volume of the TV or
amplifier cannot be controlled even
when you select other components.
Continued
13
Page 14

Operating Your Components
with the Remote Commander
(continued)
Notes on operating your
components
When you use a double cassette
deck
1 If the remote control for your
deck has a Deck A/B select
control, the RECALL button on
your Commander has the
corresponding function.
2 If you cannot select Deck A/B
with the RECALL button, first
set the number code for either
one of the decks, and
•set the function controls for
the other deck to other free
buttons (for example, the
Number buttons) using the
Learning function (page 15),
or
•assign the other deck to
another Component Select
button (page 32).
About the input select of a TV
Each time the TV/VIDEO button
is pressed, the input is changed in
order. It is also possible to select
directly as follows when you are
connecting more than two VCRs.
“TV/VIDEO” + “0” : TV tuner
“TV/VIDEO” + “1” : VIDEO1
“TV/VIDEO” + “2” : VIDEO2
“TV/VIDEO” + “3” : VIDEO3
“TV/VIDEO” + “4” : VIDEO4
“TV/VIDEO” + “5” : VIDEO5
“TV/VIDEO” + “6” : VIDEO6
If the above operations do not
work, program the remote control
signals of your component to the
Commander using the Learning
function (page 15).
About the input select of a VCR
Each time the TV/VIDEO button
is pressed, the input is changed in
order. It is also possible to select
directly as follows.
“TV/VIDEO” + “0” : Tuner
“TV/VIDEO” + “1” : LINE1
“TV/VIDEO” + “2” : LINE2
“TV/VIDEO” + “3” : LINE3
“TV/VIDEO” + “4” : LINE4
“TV/VIDEO” + “5” : DV in
When you use a Sony VCR, the
above commands are preset. For
other brands, it is possible to
“teach” the above sequential
button operations using the
Learning function (see page 15).
14
Page 15
Using Unpreset
Remote Control
Operations
— Learning Function
To operate unpreset components
or functions, use the following
Learning procedure to “teach” any
of the programmable buttons to
operate the functions of another
remote control. You can also use
the Learning function to change
the signals of individual buttons
after setting the component code
number (page 8).
It is recommended that you make
a note of the “learned” key
functions.
Note
Some specific remote control signals
may not be “learned”.
Example: To program the N
(Play) signal of your component
to the VCR N (Play) button of
the Commander
1 Place the RM-VL900 head
to head with your
component’s remote
control.
Remote control for
your component
about 2 – 4 inches
(5 – 10 cm) away
RM-VL900
2 Press and hold S (set) for
over 3 seconds.
The S (set) indicator lights up,
and all Component Select
buttons flash.
Continued
15
Page 16
Using Unpreset Remote Control
Operations
— Learning Function (continued)
3 Press the Component Select
button for the component
whose signals are to be
“learned”.
Both the S (set) indicator and
the selected Component button
light up, and all other buttons
turn off.
If another signal has already
been programmed on that
Component button, the
Component button of the
“learned” component remains
flashing. It stays that way until
you have changed the setting.
Example: If “CD” has been set
to VCR, VCR lights up and CD
flashes.
4 Press the button on the
Commander you want to
“teach”.
Both the S (set) indicator and
the Component button flash
(Learning function standby).
If another signal has already
been “learned” by that
button
The S (set) indicator flashes
twice, and the Commander
returns to its state in Step 3.
Either “teach” to another free
button, or clear the already
“learned” function (page 19)
and start over from the
beginning.
16
Page 17
5 Press and hold the button
on the other remote control,
until both the S (set)
indicator and the
Component button light up
again.
During data transfer, only the S
(set) indicator stays lit, and the
Component button turns off.
After data transfer is complete,
the Commander returns to its
state in Step 3.
remote control
of component
during data
transfer
data transfer
complete
Notes
• If you do not perform Learning steps
within 20 seconds at any point during
the process, Learning mode ends.
• If you do not perform Step 5 within
10 seconds after Step 4, Learning
mode ends.
To cancel setup, press S (set).
If the Commander does not
seem to be working
If the “learned” button does not
operate properly, “teach” once again.
(For example, if the volume becomes
very loud after pressing VOL+ only
once, noise may have interfered during
the Learning procedure.)
If you set a component code
after “learning” a signal
If you have programmed any signal on
a button by the Learning function, that
signal will work even after you set a
component code.
When you “teach” the signals
for a double cassette deck
Press RECALL to select Deck A
or B.
Note on the REC z signal
You can only “teach” to one button at
at time. Therefore you cannot teach a
sequential button operation (for
example REC z + B) to a single button
on your Commander.
6 Repeat Steps 4 to 5 to
“teach” functions to other
buttons.
To “learn” another
component’s remote control
signal
After positioning the two remote
commanders as in Step 1 on page
15, press the corresponding
Component Select button, and then
follow Steps 4 to 5 to perform
Learning.
7 Press S (set) to finish
setting.
Continued
17
Page 18

Using Unpreset Remote Control
Operations
— Learning Function (continued)
When you “teach” signals to the
VOL +/– or MUTING buttons
•If you have programmed any
signal on the VOL +/– or
MUTING button for components
other than TV and AMP using
the Learning function, that
signal will be transmitted only
when you select that component.
•If you have programmed any
signal on the VOL +/– or
MUTING button for TV or AMP
using the Learning function, that
signal will be transmitted only
after you select TV or AMP.
When you select other
components, the preset volume
control signals for TV or AMP
will be transmitted (for the
difference between visual
components and audio
components, see page 21). To use
the “learned” signal, you need to
program the VOL +/– or
MUTING button for each
component using the Learning
function.
To “teach” the signals for an airconditioner
See “Programming a Frequently
Used Key Operation for SYSTEM
CONTROL Buttons” on page 35.
For accurate Learning
•Do not move the remote units
during the Learning procedure.
•Be sure to keep holding down
the “learning” button until your
Commander reacts as described.
•Use fresh batteries in both
remote units.
•Avoid Learning in places under
direct sunlight or a strong
fluorescent light.
•The remote control detector area
may differ depending on each
remote unit. If Learning does not
work, try changing the positions
of the two remote control units.
•When you teach signals of an
interactive signal exchange
system remote control unit
(supplied with some of Sony’s
receivers and amplifiers) to the
Commander, the response signal
of the main unit may interfere
with the learning of the
Commander. In such a case,
move to a place where the
signals will not reach the main
unit (e.g. other rooms, etc.).
IMPORTANT
Be sure to place the
Commander out of the reach of
small children or pets.
Components such as air
conditioners, heaters, electric
appliances, and electric
shutters or curtains receiving
an infrared signal can be
dangerous if misused.
18
Page 19

Changing or erasing the
function of a “learned”
button
To change the “learned” function,
clear it first and perform Learning
again.
To clear the “learned” function
of a single button
Example: To erase the “learned”
function from the Number
button 1 in VCR mode.
1 Press and hold S (set) for
over 3 seconds.
The S (set) indicator lights up,
and all Component Select
buttons flash.
2 While holding the desired
Component Select button
pressed, press the button
you want to erase.
The S (set) indicator turns off,
and the selected Component
button lights up.
Note
Be sure to press both buttons at
once. If you release the Component
Select button, the Commander
changes to Learning mode.
3 Press S (set) to finish
setting.
Continued
19
Page 20

Using Unpreset Remote Control
Operations
— Learning Function (continued)
To clear all function signals
“learned” for a specific
component
2 While holding x pressed,
press the desired
Component Select button.
The S (set) indicator turns off,
and the selected Component
button lights up.
Note
Through this operation, you can
only erase the “learned” functions
of all buttons for a specific
component and the Channel Macro
function. The “learned” functions
for the Component Select buttons
cannot be changed here. You must
be sure beforehand of which
“learned” function you want to
erase.
3 Press S (set) to finish
setting.
Example: To erase all functions
“learned” by VCR button.
1 Press and hold S (set) for
over 3 seconds.
The S (set) indicator lights up,
and all Component Select
buttons flash.
20
Page 21

Advanced Features
Controlling the Volume
of Visual Components
Connected to an Audio
System
The Commander is factory preset
based on the assumption that you
hear the sound of your visual
components from your TV
speakers, and that you hear sound
of your audio components from
the loudspeakers connected to
your amplifier.
This feature enables you to control
the volume of your TV or
amplifier without having to select
TV or AMP each time you want to
control the volume.
For example, to control the
volume while using a VCR, you
don’t need to press the TV button
to control the TV volume.
The following table shows the
factory setting of which volume
would be controlled for each
component.
Component Select
button
TV
VCR
CBL/SAT
DVD
CD
MD
TAPE
AMP
Controls the volume of
TV
TV
TV
TV
amplifier
amplifier
amplifier
amplifier
However, if your visual
components are connected to an
audio system, you may want to
hear TV or VCR sound from the
loudspeakers via your amplifier,
not from your TV speakers. In this
case, you need to change the
factory preset so that you can
control the volume of your visual
components without first having
to switch to the amplifier.
To change the Factory Preset of
the Volume Control
Continued
21
Page 22

Controlling the Volume of Visual
Components Connected to an
Audio System (continued)
1 Press S (set).
All Component Select buttons
flash.
2 While holding MUTING
pressed, press VOL + or
VOL –.
To set all volume controls to
AMP
Press VOL+ while holding
MUTING pressed.
All Component Select buttons
light up when you press these
buttons, and then turn off
when you release them.
To set only the audio
components’ volume controls
to AMP
Press VOL– while holding
MUTING pressed.
Only the audio Component
buttons light up when you
press these buttons, and then
turn off when you release
them.
22
Visual components are:
TV, VCR, CBL/SAT, DVD
Audio components are:
CD, MD, TAPE, AMP
Page 23

Notes
• If you have already programmed the
VOL +/– or MUTING button for each
component with any signals using
the Learning function, the procedure
above will not change the function of
the VOL +/– and MUTING buttons.
• If you have programmed volume
control signals on VOL +/– or
MUTING buttons of TV or AMP, you
can only use that signal when you
select TV or AMP. For other
components, the preset volume
control signals for TV or AMP
(depending on the above setting
procedure) will be transmitted. To use
the new signals, you need to program
each button for each component by
the Learning procedure (page 15).
Executing a Series of
Commands
— System Control Function
With the System Control function,
you can program a series of
operating commands, and execute
them by pressing just one button.
For example, when you watch a
video, a series of operations like
that below would be necessary.
Example:
1 Power on the TV.
2 Power on the video (VCR).
3 Power on the amplifier.
4 Set the input selector of the
amplifier to VIDEO 1.
5 Set the input mode of the TV to
VIDEO.
6 Start video playback.
You can program up to 16
consecutive operation steps to
each of the SYSTEM CONTROL 1,
2 or 3 buttons.
A procedure that calls for pressing
2 buttons is counted as 2 steps.
Pressing a Component Select
button is also counted as 1 step.
If you have set the System Control
function on a Component Select
button (page 27), the execution of
the programmed commands
begins when you press the
Component Select button for more
than 2 seconds.
Continued
23
Page 24

Executing a Series of Commands
— System Control Function
(continued)
Programming a series of
commands to the SYSTEM
CONTROL buttons
Example: To program the
procedure for the video to the
SYSTEM CONTROL 2 button
1 Press S (set).
All Component Select buttons
flash.
If a series of commands is
already programmed on
that button
(At the factory, the SYSTEM
CONTROL 1 button is preset
with the System Power-Off
function for Sony components,
and the SYSTEM CONTROL 3
button is factory preset with
standard Power-On command
for nearly all Sony
components.)
To program a new series of
operations, clear the program
first (see page 26).
2 Press SYSTEM
CONTROL 2.
All Component Select buttons
light up.
3 Press the Component Select
button for the component
to operate.
The Component button lights
up when you press it, and
turns off when you release it.
24
Page 25

4 Press the button(s) for the
desired operation.
The selected Component
button lights up every time
you press a function button,
and turns off when you release
it.
5 Set the input mode of the TV
to VIDEO
5 Repeat Steps 3 and 4 to
program the buttons for the
series of operations.
In this example: Press the
following buttons.
1 Power on the TV
2 Power on the video
3 Power on the amplifier
4 Set the input mode of AMP
to VIDEO 1
6 Start video playback
6 When you have
programmed all function
keys, press S (set) to finish
setting.
Notes
• If you interrupt the procedure at any
point for over 10 seconds, the setting
mode ends and the series of
commands will be programmed to
that point. In this case, clear the
program (page 26) and start again
from Step 1 to set the entire program
from the beginning. You cannot
continue from where you let off.
• If a SYSTEM CONTROL button has
already “learned” a remote control
signal (see page 35), you cannot
program on this button. Clear the
“learned” contents first (see page 26).
• If you change the component code
number (page 8) or program a new
signal by Learning (page 15) on a
button that has been programmed in
the series of commands of the System
Control function, the new signal will
be transmitted when you press the
corresponding SYSTEM CONTROL
button.
• If you have programmed an incorrect
operation by mistake, press S (set) to
cancel setup and start again from
Step 1.
Continued
25
Page 26

Executing a Series of Commands
— System Control Function
(continued)
Tips for programming the
System Control function
The following information helps
you to program a consecutive
operation steps.
About the interval between
operation steps
You can change the interval between
operation steps (see page 29).
About the order of operation
steps
•Some of the components may not
accept consecutive remote control
signals. For example, a TV generally
does not react to a next signal right
after the Power-on signal. So, a series
of commands such as TV Power-on
and input select may not work
properly. In this case, insert other
signals like the example below;
TV Power-on t VCR Power-on
t VCR play back t TV input select
•By programming an often-used
component’s command as the final
step, you can save the step of
pressing a Component Select button
when you start operating that
component.
To clear programmed
commands
While holding S (set)
pressed, press one of the
SYSTEM CONTROL 1, 2, or
3 button.
All Component Select buttons
light up when you press these
buttons, and turn off when you
release them.
26
To set the SYSTEM CONTROL 1
or 3 button back to the factory
setting
At the factory, the SYSTEM
CONTROL 1 button is preset with
the System Power-Off function for
Sony components, and the
SYSTEM CONTROL 3 button is
factory preset with standard
power-on command for nearly all
Sony components. To reset them
to the factory settings, clear the
“learned” commands on the
SYSTEM CONTROL 1 or 3 button.
The System Control functions will
be restored.
Page 27

Notes on System Control
Operation
•If the remote control detectors of
the components are too far apart,
or if something is blocking them,
some of the components may not
operate consecutively even after
you press the SYSTEM
CONTROL button.
•If some of the components did
not operate correctly because of
the above or for any other
reason, always set all the
components back to the states
they were in before you pressed
the SYSTEM CONTROL button.
Failure to do this can result in
incorrect operation when you
press the SYSTEM CONTROL
button again.
•Some components may not
always be powered on by the
System Control function. This is
because the power of the
component gets on and off
alternatively when receiving the
power on/off signal. In this case,
check the operating component’s
power on/off state before using
the system control function.
•If the system control function
does not work correctly, see also
“Tips for programming the
System Control function” on
page 26.
Programming a series of
commands to the
Component Select buttons
Same as the SYSTEM CONTROL
buttons, you can also program a
series of operating commands on
the Component Select buttons (up
to 16 steps).
Example: To program the
procedure on page 23 to the
VCR button
1 Press S (set).
All Component Select buttons
flash.
2 Press and hold the desired
Component Select button
for more than 3 seconds.
The selected Component
button lights up and all other
button flash rapidly.
Continued
27
Page 28

Executing a Series of Commands
— System Control Function
(continued)
If a series of commands is
already programmed on
that button
To program a new series of
operations, clear the program first
(page 28).
3 Follow Steps 3 to 6 on
pages 24 and 25
To execute the series of
commands
Press and hold the programmed
Component button for more than
2 seconds.
Notes
•You can program the System Control
function on a Component Select
button on which the Power-On
function (page 30) has been
programmed. In this case, the PowerOn function is overwritten and
cannot be used. If you clear the
System Control function on the
button, the Power-On function is
resumed and you can use it again.
•You cannot program the System
Control function on a Component
Select button on which a signal has
been programmed by the Learning
function (page 15).
•You can program a signal on a
Component Select button by
Learning (page 15) on which the
System Control function has been
programmed. In this case, the System
Control function is overwritten and
cannot be used. If you clear the
“learned” signal on the button, the
System Control function is resumed
and you can use it again.
•You can program the Power-On
function (page 30) on a Component
Select button on which the System
Control function has been
programmed, but the Power-On
function cannot be used. If you clear
the System Control function on the
button, you can use the Power-On
function.
•If you interrupt the procedure at any
point for over 10 seconds, the setting
mode ends and the series of
commands will be programmed to
that point. In this case, clear the
program and start again from Step 1
to set the entire program from the
beginning. You can not continue from
where you let off.
•If you change the component code
number (page 8) or program a new
signal by Learning (page 15) on a
button that has been programmed in
the series of commands of the System
Control function, the new signal will
be transmitted when you press the
corresponding Component Select
button.
To clear the System Control
function programmed on the
Components Select buttons
Example: To clear the
programmed commands on the
VCR button
While holding S (set)
pressed, pr ess VCR.
The Component button lights
up when you press them, and
turns off when you release
them.
28
Page 29

Changing the interval
between operation steps
You can control the interval in 4
steps (approx. 127 ms, 408 ms, 708
ms, 974 ms).
For the SYSTEM CONTROL
buttons
1 Press S (set).
All Component Select buttons
flash.
2 While holding one of the
SYSTEM CONTROL
buttons (1, 2 or 3) whose
interval you want to change
pressed, press one of the
Number buttons (1 – 4) to
select the interval.
1: Approx. 127 ms (the
factory setting)
2: Approx. 408 ms
3: Approx. 708 ms
4: Approx. 974 ms
(ms: 1/1000 second)
All Component Select buttons
light up when you press these
buttons, and turn off when you
release them.
Note
If you press a Number button apart
from 1 – 4, the S (set) indicator
flashes twice, and the Commander
returns to its state in Step 1. Be sure
to select from 1 – 4.
Continued
29
Page 30

Executing a Series of Commands
— System Control Function
(continued)
For the Component Select
buttons
1 Press S (set).
All Component Select buttons
flash.
2 While holding one of the
Component Select buttons
whose interval you want to
change pressed, press one
of the Number buttons (1 –
4) to select the interval.
The Component Select button
lights up when you press these
buttons, and turns off when
you release them.
Adding an Extra
Function to the
Component Select
Buttons
Programming the Power-On
Command of the Selected
Component (for Sony
Components only)
When using Sony components,
you can program the Power-On
signal for each component on a
Component Select button. You can
select the desired component and
power it on by just pressing that
Component Select button.
Example: To program the TV
button
1 Press S (set).
All Component Select buttons
flash.
Note
If you press a Number button apart
from 1 – 4, the S (set) indicator
flashes twice, and the Commander
returns to its state in Step 1. Be sure
to select from 1 – 4.
30
Page 31

2 While holding POWER
pressed, press the desired
Component Select button.
When you first press POWER,
only the Component Select
buttons that have already been
set with the Power-On
command light up. These
buttons turn off when you
press another Component
button.
Example: If the Power-On
command has been
programmed on the VCR and
CD buttons, these buttons light
up when you first press
POWER.
To clear the Power-On command
Repeat the same procedure by
pressing the Component Select
button that lights up when you
press POWER.
Notes
• If the component code of a non-Sony
brand has been set on a Component
Select button, you cannot program
the Power-On function on it. The
selected Component button flashes
twice, and the Commander returns to
its state in Step 1.
• Even if you have programmed a
signal by the Learning function (page
15) or the System Control function
(page 27) on a Component Select
button, you can program the PowerOn function on that button but it
cannot be used. If you clear a
“learned” signal or the System
Control function on the button, you
can use the Power-On function.
• You can program a signal by the
Learning function (page 15) or the
System Control function (page 27) on
the Component Select button on
which the Power-On function has
been programmed. In this case, the
Power-On function is overwritten
and cannot be used. If you clear the
“learned” signal or the System
Control function on the button, the
Power-On function is resumed and
you can use it again. If you have
programmed both a signal by
Learning and the System Control
function on the button, the “learned”
signal overwrites the System Control
function.
31
Page 32

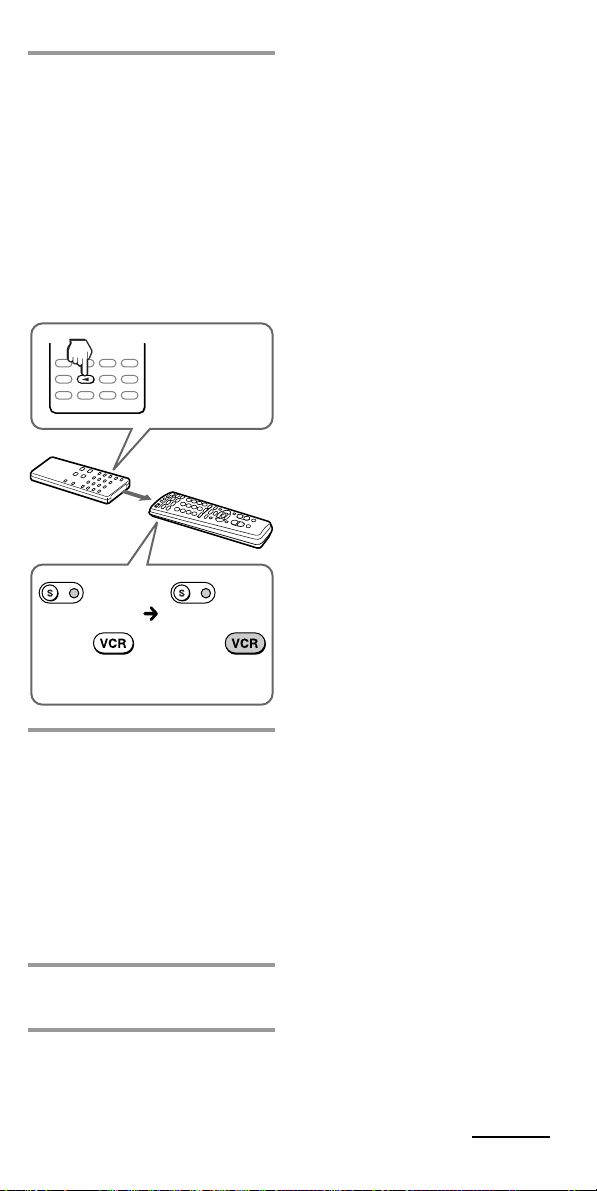
Assigning Other
Components to the
Component Select
Buttons
You can assign another
component to any of the
Component Select buttons.
Notes
•Once you assign another component
to a Component Select button, the
setting of the component code
number (page 8) will be erased. The
component code number will not
return even if you reset the newly
assigned component and turn back to
the original component.
•If you have assigned another
component to the TV or AMP button,
the volume of the TV or amplifier
cannot be controlled even when you
select other components.
Example: To assign a CD player
to the VCR button
1 Press S (set).
All Component Select buttons
flash.
2 Press the Component Select
button to which you want
to assign a function.
The selected Component
button lights up.
3 While holding N pressed,
press one of the following
Number buttons to select
the one to which you want
to assign the function.
The selected Component
button and the previously
assigned Component button
light up.
32
Page 33

In this example, press the
Number 5 button to select CD.
1: VCR 7: MD
2: VD 8: TV
3: SAT 9: CBL
4: AMP 0: DVD
5: CD
6: TAPE
Note
Only the function to this step is
assigned. Other “learned” functions
are not assigned.
4 •If you need to set the
component code, follow
the steps on pages 8 or 11.
•If you need to program
some signals by the
Learning function, follow
the Steps 1 and 3 to 7 on
pages 15 to 17.
To reset a Component Select
button to its original setting
1 Press and hold S (set) for
over 3 seconds.
The S (set) indicator lights up,
and all Component Select
buttons flash.
2 While holding x pressed,
press the desired
Component Select button.
The S (set) indicator turns off,
and the selected Component
button lights up.
Note
Through this operation, you can
only erase the “learned” functions
to all buttons on a specific
component and the Channel Macro
function. The “learned” functions to
the Component Select buttons
cannot be changed here. You must
be sure beforehand, of which
“learned” function you want to
erase.
3 Press S (set) to finish
setting.
Continued
33
Page 34

Assigning Other Components to
the Component Select Buttons
(continued)
Copying the settings of a
Component Select button
to another button
You can copy the entire settings of
a Component Select button to
another Component Select button.
The settings of the component
code (page 8), the Channel Macro
function (page 43), and the
“learned” function (page 15) are
copied to a new button.
Note
You cannot copy the settings to a
Component Select button on which any
“learned” function or Channel Macro
function has been programmed.
Example: To copy the settings of
the CD button to the VCR
button
1 Press S (set).
All Component Select buttons
flash.
2 Press and hold for over 3
seconds the desired
Component Select button to
which you want to copy a
setting from another
component.
The selected Component
button lights up, and all other
buttons flash rapidly.
3 Keep holding down this
Component button, and
press the Component
button that holds the
setting you want to copy.
Both Component buttons light
up when you press them, and
turn off when you release
them.
34
At this point, all settings for
CD are imported to VCR.
Page 35

Programming a
Frequently Used Key
Operation for
SYSTEM CONTROL
Buttons
In addition to their original
System Control functions (see
page 23), SYSTEM CONTROL 1, 2
or 3 buttons can be programmed
to “learn” any remote control
signal.
As they operate independently
from other buttons, SYSTEM
CONTROL 1, 2 or 3 buttons can
work as one-touch buttons
without any preceding operation
such as pressing a Component
Select button to select a
component.
This is useful if you prefer having
the SYSTEM CONTROL button as
a “one-touch” button for a single
operation rather than executing a
series of commands.
Note
Some specific remote control signals
may not be learned.
Example: To store the On/Off
signal of an air-conditioner to
the SYSTEM CONTROL 2 button
1 Place the Commander head
to head with the remote
control of the airconditioner.
Remote control of
your air-conditioner
about 2 – 4 inches
(5 – 10 cm) away
RM-VL900
2 Press and hold S (set) for
more than 3 seconds.
The S (set) indicator lights up,
and all Component Select
buttons flash.
Continued
35
Page 36

Programming a Frequently Used
Key Operation for SYSTEM
CONTROL Buttons (continued)
3 Press SYSTEM
CONTROL 2.
The S (set) indicator flashes
(Learning function standby).
If other functions have
already been “learned” by
that button
The S (set) indicator flashes twice,
and the Commander returns to its
state in Step 2.
Either “teach” to another SYSTEM
CONTROL button, or clear the
already “learned” function (page
37) and start over from the
beginning.
4 Press the ON/OFF button
on the remote control of the
air-conditioner until the
Commander reacts as
shown below.
During data transfer, only the S
(set) indicator stays lit and the
Component buttons turn off.
After data transfer is complete,
the Commander returns to its
state in Step 2.
remote control
of air-conditioner
during data transfer
data transfer complete
5 Press S (set) to finish
setting.
Note
You can program a remote control
signal for a SYSTEM CONTROL button
by “learning” for which the System
Control functions have been
programmed. In this case, the System
Control functions are overwritten and
cannot be used. If you clear the
“learned” signal from the button (page
37), the System Control functions are
restored, and you can use them again.
36
Page 37

To clear the “learned” remote
control signal
While holding S (set)
pressed, press one of the
SYSTEM CONTROL 1, 2 or
3 button.
The S (set) indicator and all
Component Select buttons light
up when you press these
buttons, and turn off when you
release them.
Notes on the “learned”
signals of an airconditioner
About seasonal adjustments
If you change the settings of the
air-conditioner for the season, you
have to program the remote
control signals of the new settings
on the Commander.
If the power-on/off operation
does not work correctly
The air-conditioner may not be
turned on or off properly with the
button of this Commander to
which you have programmed its
power-on/off signal.
If the Commander can operate
only “ON” with one button and
“OFF” with another, while your
air-conditioner’s remote control
can operate “ON/OFF” with a
single button, program the signal
on two buttons of the Commander
as follows.
1 Clear the “learned” power-on/
off signal.
(In the example on page 35,
clear the “learned” signal from
the SYSTEM CONTROL 2
button.)
2 Program the signal (transmitted
from the power-on/off button
of the air-conditioner’s remote
control) for the SYSTEM
CONTROL 2 button again.
3 Program the signal from the
same button of the remote
control for another button (for
example, the SYSTEM
CONTROL 3 button).
The two buttons of the
Commander have been
programmed with the power-on
signal and the power-off signal of
the air-conditioner respectively, so
that you can operate the airconditioner with the Commander.
37
Page 38

Transferring Data
between Remote
Commanders
You can transfer the data, such as
“learned” signals and component
code settings, between this
Commander and another Sony
RM-VL900 or a Sony RM-AV2100
remote commander.
2 Press and hold S (set) for
more than 3 seconds.
The S (set) indicator lights up,
and all Component Select
buttons flash.
If you want to exchange data
with a Sony RM-AV2100
Refer to “Data Transfer”
instructions in the RM-AV2000
manual for the necessary
procedures.
Note on remote commanders
Y ou can transfer data between remote
commanders with the
remote controls cannot be used to
transfer data.
mark. Other
Transferring the data
You can transfer all data of this
Commander or the data of a
Component Select button on this
Commander to another Sony
RM-VL900 or RM-AV2100.
To transfer all data of the
Commander
1 Place the RM-VL900 head
to head with another
remote commander.
Another remote
commander
3 While holding cursor v
pressed, press the Number
1 button.
The S (set) indicator flashes
and all Component Select
buttons light up.
about 2 – 4 inches
(5 – 10 cm) away
38
RM-VL900
Page 39

4 Confirm that the receiving
remote commander is ready
to receive data.
(To set the receiving
commander, follow the
procedure on page 40.)
Note
Be sure that the sending remote
commander is ready to transfer
data.
5 Press ENT (Start data
transfer).
As the data is transferred, the
corresponding Component
Select buttons turn off one by
one.
If data transfer has been
unsuccessful during or after
procedure, the S (set) indicator
and all Component Select
buttons flash five times, and
the Commander returns to its
state in Step 3.
Either try again from Step 5, or
press S (set) to cancel data
transfer.
Notes
• The data for the functions not
available with the RM-AV2100 cannot
be transferred. The System Control
functions cannot be transferred to
another kind of Commander even if it
has the
• Be sure that the receiving
Commander is ready to receive data.
mark.
To transfer the data of a
Component Select button
The data of a Component Select
button on this Commander (the
settings and “learned” signals
programmed on the buttons) can
be transferred to a Component
Select button on another Sony
RM-VL900 or RM-AV2100.
1~2 Perform Steps 1 to 2 on
page 38.
3 While holding cursor v
pressed, press the
Component Select button
whose data you want to
send.
The S (set) indicator flashes
and the selected Component
button lights up.
4 Confirm that the receiving
remote commander is ready
to receive data.
(To set the receiving
commander, follow the
procedure on page 42.)
Note
Be sure that the sending remote
commander is ready to transfer
data.
Continued
39
Page 40

Transferring Data between
Remote Commanders
(continued)
5 Press ENT (Start data
transfer).
After the data is transferred,
the Component Select button
turns off.
If data transfer has been
unsuccessful during or after
procedure, the S (set) indicator
and the selected Component
button flashes five times, and
the Commander returns to its
state in Step 3. Either try again
from Step 5, or press S (set) to
cancel data transfer.
Notes
•The data of the “learned” signal and
the System Control function
programmed on a Component Select
button cannot be transferred.
You can use the Learning function
(page 15) to program the “learned”
signal and the System Control
function programmed on a
Component Select button on another
remote commander.
•Be sure that the receiving remote
commander is ready to receive data.
Receiving the data
This Commander can receive the
data of another Sony RM-VL900 or
RM-AV2100.
To receive the all data from
another remote commander
1 Place the RM-VL900 head
to head with another
remote commander.
Another remote
commander
about 2 – 4 inches
(5 – 10 cm) away
RM-VL900
2 Press and hold S (set) for
more than 3 seconds.
The S (set) indicator lights up,
and all Component Select
buttons flash.
40
Page 41

3 While holding cursor V
pressed, press the Number
1 button.
The S (set) indicator flashes
and all Component Select
buttons light up.
4 Confirm that the sending
remote commander is ready
for data transfer.
(To set the sending
commander, follow the
procedure on page 38.)
Note
Be sure that the sending remote
commander is ready to transfer
data.
6 Press ENT (ENTER) on the
sending remote
Commander.
As the data is received, the
corresponding Component
Select buttons light up one by
one.
If data transfer has been
unsuccessful during or after
the procedure, the S (set)
indicator and all Component
Select buttons flash five times,
and the Commander returns to
its state in Step 5. Either try
again from Step 6, or press S
(set) to cancel data receival.
Note
If you do not perform Step 6 within 10
seconds, the S (set) indicator and all
Component Select buttons flash five
times, followed by a short pause, and
then flash again.
5 Press ENT.
The S (set) indicator lights up
and all Component Select
buttons turn off (data-reception
standby).
Continued
41
Page 42

Transferring Data between
Remote Commanders
(continued)
To receive the data of the
Component Select button from
another remote commander
1~2 Perform Steps 1 to 2 on
page 40.
5 Press ENT.
The S (set) indicator lights up
and the selected Component
button turns off (data-reception
standby).
3 While holding cursor V
pressed, pr ess the
Component Select button to
which want to set the data.
The S (set) indicator flashes,
and the selected Component
button lights up.
4 Confirm that the sending
remote commander is ready
for data transfer.
(To set the sending
commander, follow the
procedure on page 39.)
Note
Be sure that the sending remote
commander is ready to transfer
data.
6 Press ENT (ENTER) on the
sending remote
Commander.
After the data is received, the
Component Select button lights
up. If data transfer has been
unsuccessful during or after
the procedure, both the S (set)
indicator and the Component
button flash five times, and the
Commander returns to its state
in Step 5. Either try again from
Step 6, or press S (set) to cancel
data receival.
Note
If you do not perform Step 6 within 10
seconds, the S (set) indicator and the
Component Select button flash five
times, followed by a short pause, and
then flash again.
42
Page 43

Selecting a Channel
with a Single Button
— Channel Macro Function
You can program the Channel
Macro function on the buttons
listed below (macro keys).
If you program the operation of
entering 1, 2 and 3 on a macro key
button, you can select the channel
123 by pressing that single button.
Component Macro key
TV , CBL, SAT**: m, N, M,
REC z*, x, X
* You can program this function on
the single REC z button (not on the
REC z + B button for a doublepressing operation).
** You cannot program this function on
the REC z button for SAT.
Example: To assign TV channel
123 to the REW button
1 Press and hold S (set) for
more than 3 seconds.
The S (set) indicator lights up,
and all Component Select
buttons flash.
2 While holding REC z
pressed, press the desired
Component Select button.
The S (set) indicator and the
selected Component button
flash.
Continued
43
Page 44

Selecting a Channel with a
Single Button
— Channel Macro Function
(continued)
3 While holding the desired
macro key button pressed,
press the buttons for the
operation in order.
The selected Component
button lights up and stays lit
while you keep holding down
the macro key.
The S (set) indicator lights up
whenever you press one of the
above buttons, and flashes
again when you release it.
Note
If you enter more than four
keys, the last four keys are
programmed on the macro key.
If the macro key has been
successfully programmed, both
the S (set) indicator and the
Component button turn off.
If an error occured, both the S
(set) indicator and the
Component button flash five
times, and the Commander
returns to its state in Step 2.
Notes
•You cannot program the Channel
Macro function on a macro key that
has “learned” a signal. Try on other
macro keys, or clear the “learned”
signal (page 19) on the button and
program the Channel Macro function
on it.
•If you change the component code for
a button that has been programmed
in the Channel Macro function, the
new signal is transmitted when you
press the corresponding macro key.
•The Channel Macro function may not
work correctly for some components.
To clear the Channel Macro
function
1 Press and hold S (set) for over 3
seconds.
The S (set) indicator lights up,
and all Component Select
buttons flash.
2 While holding x pressed, press
the desired Component Select
button.
The S (set) indicator turns off,
and the selected Component
button lights up.
Note
Through this operation, you can
only erase the “learned” functions to
all keys on a specific component and
the Channel Macro function. The
“learned” functions to the
Component Select buttons cannot be
changed here. You must be sure
beforehand of which “learned”
function you want to erase.
3 Press S (set) to finish setting.
44
Page 45

Using Other Functions
Locking the Controls
— Hold Function
To prevent accidental operation,
you can lock all the buttons with
the Hold function.
When the function keys are
locked, all Component Select
buttons flash twice when you
press a control button.
(twice)
To unlock the control
Repeat the former procedure.
The S (set) indicator flashes twice,
and the Hold function is disabled.
(twice)
1 While holding POWER
pressed, press MUTING
and RECALL.
The S (set) indicator lights up
when you press these buttons,
and turns off when you release
them.
45
Page 46

Additional Information
Precautions
•Do not drop the unit or give a
shock to the unit, or it may cause
a malfunction.
•Do not leave the unit in a
location hear heat sources, or in
a place subject to direct sunlight,
excessive dust or sand, moisture,
rain or mechanical shock.
•Do not put foreign objects into
the unit. Should any liquid or
solid object fall into the unit,
have it checked by qualified
personnel before operating the
unit any further.
•Do not expose the remote control
detectors of your components to
direct sunlight or other strong
illumination. Too much light
there can interfere with remote
control operations.
•Be sure to place the Commander
out of the reach of small children
or pets. Components such as air
conditioners, heaters, electric
appliances, and electric shutters
or curtains receiving an infrared
signal can be dangerous if
misused.
Specifications
Operating distance
Approx. 32.8 ft. (10 m) (varies
depending on components of
different manufacturers)
Power requirements
Four size AA (R6) batteries
Battery life
Approx. 5 months (varies depending
on frequency of use)
Dimensions
Approx. 2 7/8 × 8 1/4 × 1 1/2 in. (72 ×
209 × 26 mm) (w × h × d)
Mass
5 oz (155 g) (not including batteries)
Design and specifications are subject to
change without notice.
The CE mark on the unit
is valid only for products
marketed in the
European Union.
46
Page 47

Troubleshooting
If you have problems setting up or using the Remote Commander, first
check the batteries (page 6), then check the items below.
Symptom
You cannot operate the
components.
You cannot control the
volume.
You cannot operate the
components even after
setting the component
code numbers.
The Commander fails to
learn the remote control
signals.
You cannot operate a
component even after
you programmed the
remote control signals
with the Learning
function.
Remedy
• Go closer to the component. The maximum operating
distance is approximately 32.8 ft. (10 m).
• Check that you are aiming the Commander directly at the
compoent, and that there are no obstructions between the
Commander and the component.
• Power on the components first, if necessary.
• Make sure you have pressed the correct Component Select
button. In case of CBL/SAT, DVD or TAPE, make sure the
desired component is selected.
• Check that the component has infrared remote capability. For
example, if your component didn’t come with a remote
commander, it probably isn’t capable of being controlled by a
remote commander.
• You have assigned a different component on the Component
Select button. Check the component assigned to that button
and the component code.
• If your visual components are connected to an audio system,
make sure you’ve set up the Commander as described in
“Controlling the Volume of Visual Components Connected to
an Audio System” (page 21).
• You have assigned another component on the TV or AMP
button (page 32). In this case, the volume cannot be controlled
when you select components other than TV or AMP.
• Set the component code correctly. If the code that is listed first
for your component doesn’t work, try all the codes for your
component in the order in which they are listed in the
supplied “Component Code Numbers”.
• Some features may not be preset. If some or all of the buttons
do not function correctly even after you have set the
component codes, then use the Learning function to program
the remote control signals for the component (page 15).
• The component may be operated with a code number that is
not listed in the “Component Code Numbers”. See “Setting a
component code by the Search function” (page 11) and try
setting a code number again with the Search function.
• When you teach signals of an interactive signal exchange
system remote control unit (supplied with some of Sony’s
receivers and amplifiers) to the Commander, the response
signal of the main unit may interfere with the learning of the
Commander. In such a case, move to a place where the
signals will not reach the main unit (e.g. other rooms, etc.).
• Make sure that the Remote Commander has “learned” the
correct signals. If not, see “For accurate Learning” (page 18)
and try the Learning procedure again (page 15).
Continued
47
Page 48

Troubleshooting (continued)
Symptom
The S (set) indicator or
the Component Select
buttons flash five times
All Component Select
buttons flash twice
during an operation
A System Control
program does not
function correctly.
All Component Select
buttons flash twice
Your Commander does
not work as expected
after Data Transfer
Remedy
• Learning has not succeeded. See “For accurate Learning”
(page 18) and try the Learning procedure again (page 15).
• The component codes cannot be set. See the supplied
“Component Code Numbers” and try setting the component
codes again (page 8).
• The data have not been transferred. See “Transferring the
data” (page 38) and try transferring the data again.
• The data have not been received. See “Receiving the data”
(page 40) and try receiving the data again.
• Clear infrequently used Learned functions (page 19), then
carry out learning operations.
• Signals have been programmed for that Component Select or
SYSTEM CONTROL button using the Learning function.
Clear the “learned” signals (pages 19, 26, 28) and try
programming the System Control function again.
• Signals have been programmed for that Macro key using the
Learning function. Clear the “learned” signals (page 19) and
try programming the Channel Macro function for the same
key again, or try with another Macro key.
• Make sure that you have programmed the commands in the
correct order (pages 24, 27).
• Try changing the orientation of the Commander. If that does
not help, try placing the components as close to each other as
possible.
• Check the status of the components and make sure that you
have set the components properly to receive commands (page
27).
• The component code is changed or a new signal is “learned”
on a button that has been programmed in the series of
commands. In this case, the new signal is transmitted when
the series of commands are executed.
• The interval may be too short. See “Changing the interval
between operation steps” (page 29) and set a longer interval.
• The Hold function is on. Unlock the Hold function (page 45).
• Data Transfer to/from a single button cannot transfer System
Control functions that are “learned” by Component Select
buttons. Either set up the “learned” Commander from the
start, or perform whole Data Transfer.
Note on Commanders with the mark
Data Transfer between Commanders with the
mark may not always be complete,
depending on their functions and keys, and some of the System Control function
data may be dropped.
48
Page 49

If none of the above have solved your problems, try the following before contacting
any Customer Support.
To reset the Commander to its factory settings
While holding POWER pressed, press TV/VIDEO and VOL –
until the Commander reacts as follows.
The S (set) indicator and all Component Select buttons light up.
Then the Component buttons turn off one by one, followed by the S
(set) indicator.
When all have turned off, all settings are cleared, and the Commander
returns to its original state (including the preset series of functions on
SYSTEM CONTROL 1 and 3).
For the customers in the U.S.A
Customer Support Information
After you have read through this manual, if you still cannot get the Remote
Commander to work properly, call the Sony Customer Support Helpline
at 1-800-822-2217.
49
Page 50

Appendix
Table of Preset
Functions
Note
There may be some components or
functions that cannot be operated with
this Commander.
TV
KEY DISPLAY
0POWER
1qa
1 – 9, 0, ENT
3TV/VIDEO
4DISPLAY
qsSLEEP
7MENU
FUNCTION
To turn on and off.
To change the channel.
For example, to change
to channel 5, press 0 and
5 (or, press 5 and ENT).
To change the input
mode.
To display the current
channel on TV.
To operate SLEEP
function on the TV
(works only for a TV
with SLEEP function).
To call up the MENU
display.
KEY DISPLAY
6v
6V
6B
6b
6OK
2PIP
5x
5X
5m
5REC z
5M
qfCH +/–
qgRECALL
8VOL +/–
9MUTING
FUNCTION
To move the cursor
upward.
To move the cursor
downward.
To move the cursor to
the right.
To move the cursor to
the left.
To enter the selection of
the MENU display.
To turn on/off the
“window” picture.*
To change the TV
channel + in the
“window” picture.
To change the TV
channel – in the
“window” picture.
To change the input
mode of the “window”
picture.
To freeze the “window”
picture.
To swap the “main”
picture and the
“window” picture.
Channel up: +
Channel down: –
To operate JUMP,
FLASHBACK or
CHANNEL RETURN
function on the TV
depending on the setting
of the TV’s
manufacturer.
Volume up: +
Volume down: –
To mute the volume on
the TV. Press again to
turn muting off.
* If the “window” picture does not turn
off this way, try pressing ENT while
pressing PIP.
50
Page 51

VCR
KEY DISPLAY
0POWER
1qa
1 – 9, 0, ENT
4DISPLAY
3TV/VIDEO
7MENU
6v
6V
6B
6b
6OK
5m
5N
5M
5REC z
5x
5X
qfCH +/–
**In order to avoid recording by
mistake, the REC z button does not
work by itself.
FUNCTION
To turn on and off.
To change the channel.
For example, to change
to channel 5, press 0 and
5 (or, press 5 and ENT).
To expose the on-screen
display.
To switch the antenna
output.
To call the MENU
display
To move the cursor
upward.
To move the cursor
downward.
To move the cursor to
the right.
To move the cursor to
the left.
To enter the selection of
the MENU display.
To rewind.
To play.
To fast-forward.
To record, press N
while pressing REC z**.
First release N, then
release REC z.
To stop.
To pause.
Channel up: +
Channel down: –
CBL (Cable box)
KEY DISPLAY
0POWER
1qa
1 – 9, 0, ENT
qfCH +/–
qgRECALL
FUNCTION
To turn on and off.
To change the channel.
For example, to change
to channel 5, press 0 and
5 (or , press 5 and ENT.)
Channel up :+
Channel down : –
To operate JUMP,
FLASHBACK or
CHANNEL RETURN
function.
Continued
51
Page 52

Table of Preset Functions
(continued)
SAT
KEY DISPLAY
0POWER
1qa
1 – 9, 0, ENT
3TV/VIDEO
4DISPLAY
2PIP
qsSLEEP
qdGUIDE
7MENU
6v
6V
6B
6b
6OK
qfCH +/–
qgRECALL
FUNCTION
To turn on and off.
To change the channel.
For example, to change
to channel 5, press 0 and
5 ( or, press 5 and ENT)
To switch the output of
the SAT receiver to the
TV. (When you connect
a TV cable or antenna to
the receiver, the output
switches between a TV
and SAT program.)
To turn on the display.
To use the “FAVORITE”
function.
To bring up the Station
Index.
To bring up Master
Guide.
To call up the MENU
display.
To move the cursor
upward.
To move the cursor
downward.
To move the cursor to
the right.
To move the cursor to
the left.
To bring up the Station
Index when a program
guide is not displayed.
To select the channel
that is highlighted.
Channel up : +
Channel down : –
To return to the last
tuned station
DVD
KEY DISPLAY
0POWER
11 – 9, 0
2PIP
qaENT
3TV/VIDEO
4DISPLAY
qdGUIDE
qgRECALL
5REC z
qsSLEEP
7MENU
6v
6V
6B
6b
6OK
5m
5N
5M
5x
5X
qfCH + (>)
qfCH – (. )
FUNCTION
To turn on and off.
Number buttons: To set
items selected from the
screen.
To select numbers 10
and above.
To enter the setting. To
set items selected from
the screen.
To change the sound.
To show the current play
status on the screen.
To clear the selected
characters from the
screen.
To return to the last
previous screen.
To display the title
menu.
To switch the subtitle.
To display the DVD
menu.
To move the cursor
upward.
To move the cursor
downward.
To move the cursor to
the right.
To move the cursor to
the left.
To execute items
selected from the screen.
To rewind.
To play.
To fast-foward
To stop.
To pause.
To proceed to the next
location or song.
To proceed to the
previous location or
song.
52
Page 53

VD (LD player)
KEY DISPLAY
0POWER
11 – 9, 0
2PIP
qaENT
4DISPLAY
5m
5N
5M
5x
5X
qfCH + (>)
qfCH – (.)
FUNCTION
To turn on and off.
To select the track
number. 0 selects track
10.
To select track numbers
above 10, see the
descriptions on the +10
button below.
To select numbers 10
and above.
To enter the setting.
To show the current play
status on the screen.
To rewind.
To play.
To fast-forward.
To stop.
To pause.
To proceed to the next
location or song.
To proceed to the
previous location or
song.
CD
KEY DISPLAY
0POWER
11 – 9, 0
2PIP
qaENT
qgRECALL
5m
5N
5M
5x
5X
qfCH + (>)
qfCH – (.)
FUNCTION
To turn on and off.
To select the track
number. 0 selects track
10.
To select track numbers
above 10, see the
descriptions on the +10
button below.
To select numbers 10
and above.
To enter the setting.
To select next disk.
To rewind.
To play.
To fast-forward.
To stop.
To pause.
To select the next track.
To select the previous
track.
Continued
53
Page 54

Table of Preset Functions
(continued)
MD
KEY DISPLAY
0POWER
11 – 9, 0
2PIP
qaENT
qgRECALL
4DISPLAY
5m
5N
5M
5REC z
5x
5X
qfCH + (>)
qfCH – (. )
FUNCTION
To turn on and off.
To select the track
number. 0 selects track
10.
To select track numbers
above 10, see the
descriptions on the +10
button below.
To select numbers 10
and above.
To enter the setting.
To select the next disc.
To switch the display
mode.
To rewind.
To play.
To fast-forward.
To record, press N
while pressing REC z.
First release N, then
release REC z.
To stop.
To pause.
To select the next track.
To select the previous
track.
DAT
KEY DISPLAY
0POWER
11 – 9, 0
qaENT
4DISPLAY
5m
5N
5M
5REC z
5x
5X
qfCH + (>)
qfCH – (. )
FUNCTION
To turn on and off.
To select a program
number.
To enter the setting.
To turn on/off the
display mode.
To rewind.
To play.
To fast-forward.
To record, press N
while pressing REC z.
First release N, then
release REC z.
To stop.
To pause.
To proceed to the next
song.
To proceed to the
previous song.
54
Page 55

DECK
KEY DISPLAY
0POWER
5m
5N
10
5M
5REC z
5x
5X
qgRECALL
FUNCTION
To turn on and off.
To rewind.
To play.
To reverse.
To fast-forward.
To record, press N
while pressing REC z.
First release N, then
release REC z.
To stop.
To pause.
To select the tape deck :
Deck A or B (dual
cassette deck only).
AMP
KEY DISPLAY
0POWER
11
12
13
14
15
16
17
18
19
10
7MENU
6v
6V
6B
6b
6OK
qgRECALL
qfCH +/–
8VOL +/–
9MUTING
FUNCTION
To turn on and off.
To select the input
source: VIDEO 1
To select the input
source: VIDEO 2
To select the input
source: AUX/VDP
To select the input
source: TUNER
To select the input
source: CD
To select the input
source: TAPE
To select the input
source: MD
To select the input
source: TV
To select the input
source: PHONO
To select the input
source: DVD
To call up the MENU
display.
To move the cursor
upward.
To move the cursor
downward.
To move the cursor to
the right.
To move the cursor to
the left.
To enter the selection of
the MENU display.
To shift band or preset
select
Presetting or tuning
frequency up: +
Presetting or tuning
frequency down: –
Volume up: +
Volume down: –
To mute the volume on
the AMP. Press again to
turn muting off.
55
Page 56

Index
A, B
Batteries 6
C, D
Changing
interval of the System Control
function 29
CH (CHANNEL) button 11
Channel Macro function 43
Clearing/Changing
Channel Macro function 44
learned signal 19, 20, 37
Power-On command 31
System Control function 26, 28
Code number 8, 11
Component Select buttons
assigning other components 32
copying settings 34
programming a signal 15
programming System Control
function 27
receiving data 42
setting Power-On function 30
transferring data 39
Copying
data to another commander 38
settings of Component Select
buttons 34
E
Erasing
See “Clearing/Changing”
F, G, H
Factory setting 26, 33, 49
I, J, K
Input select 14
L
Learning Function 15, 35
Locking control of Commander 45
M
MUTING button 10, 13, 18, 22, 45
N, O
Number buttons 9, 14, 29, 30, 32, 33,
38, 41, 44
P, Q
Power-On function
setting 30
SYSTEM CONTROL3 button 24
Power-Off function
See “System Power-Off function”
Preset components 8
R
Receiving data 40
S
SYSTEM CONTROL buttons
programming a signal 35
programming System control
function 24
System Control function
changing interval 29
clearing 26, 28
programming 24, 27
System Power-Off function
SYSTEM CONTROL1 button 24
T, U
Transferring data 38
Troubleshooting 47
V, W, X, Y, Z
VOL buttons 10, 13, 17, 18, 22, 49
Volume Control 10, 13, 21
Sony Corporation Printed in Malaysia
56
 Loading...