

Page 1
Integrated Remote Commander
Integrated
Remote
Commander
3-284-948-11(2)
RM-VL1400T
Operating Instructions
Manual de instrucciones
Manual de instruções
Bruksanvisning
GB
ES
PT
SE
RM-VL1400T
© 2007 Sony Corporation
Page 2
Disposal of Old Electrical &
Electronic Equipment
(Applicable in the European
Union and other European
countries with separate
collection systems)
This symbol on the product or on its packaging indicates
that this product shall not be treated as household waste.
Instead it shall be handed over to the applicable
collection point for the recycling of electrical and
electronic equipment. By ensuring this product is
disposed of correctly, you will help prevent potential
negative consequences for the environment and human
health, which could otherwise be caused by inappropriate
waste handling of this product. The recycling of
materials will help to conserve natural resources. For
more detailed information about recycling of this
product, please contact your local Civic Office, your
household waste disposal service or the shop where you
purchased the product.
Disposal of waste batteries
(applicable in the European
Union and other European
countries with separate
collection systems)
This symbol on the battery or on the packaging indicates
that the battery provided with this product shall not be
treated as household waste.
By ensuring these batteries are disposed of correctly, you
will help prevent potentially negative consequences for
the environment and human health which could
otherwise be caused by inappropriate waste handling of
the battery. The recycling of the materials will help to
conserve natural resources.
In case of products that for safety, performance or data
integrity reasons require a permanent connection with an
incorporated battery, this battery should be replaced by
qualified service staff only.
To ensure that the battery will be treated properly, hand
over the product at end-of-life to the applicable
collection point for the recycling of electrical and
electronic equipment.
For all other batteries, please view the section on how to
remove the battery from the product safely. Hand the
battery over to the applicable collection point for the
recycling of waste batteries.
For more detailed information about recycling of this
product or battery, please contact your local Civic Office,
your household waste disposal service or the shop where
you purchased the product.
Features
The RM-VL1400T Remote Commander provides
centralized control of all your A/V components from a
single Remote Commander and saves the trouble of
operating different A/V components with different
remote control devices. The following are its main
features.
Control up to 10 components
With the Remote Commander, you can control up to 10
components, including your TV, VCR, SAT, DVD, AMP,
CD, etc.
Centralized control of Sony A/V
components with this one Remote
Commander
The Remote Commander is preset at the factory to
operate Sony brand components, so you can use it out of
the box as a control centre for your Sony A/V
components.
Remote control signals for non-Sony
components are also preset
The Remote Commander also recognizes the preset
codes of components for most major brands, as well as
Sony. Just select the corresponding codes to control all
your A/V components.
Learning function for programming
various other remote control signals
This Remote Commander has a Learning function, to
learn remote control signals needed to operate other nonpreset components or functions.
In addition, the Remote Commander can learn remote
control signals (infrared signals only) of non-A/V
components such as air-conditioners, lights, etc. (some
specific appliances or functions may not be available)
Setting up to 10 series of commands
(Component Macros) of up to 32
consecutive steps
Up to 10 series of commands (Component Macros)
which provide up to 32 consecutive steps by pressing a
single button can be set.
Bright, easily readable organic EL
display and fully illuminated buttons
Embedded organic EL (electroluminescence) display and
fully illuminated buttons help you to operate easily in the
dark.
GB
2
Page 3

Table of Contents
Features ............................................................... 2
Getting Started
Unpacking ............................................................ 4
Installing the batteries ........................................4
Location and function of controls ..................... 5
Basic Operations
Setting operations of A/V components ............. 7
Setting A/V components which are not listed in
the Preset Code List ........................................ 8
Operating your A/V components with the
Remote Commander ........................................ 9
Selecting the desired A/V component ................ 9
Operating A/V components .............................. 10
Other Useful Functions .................................... 11
Operating the Remote
Commander in the dark ................................. 11
Locking the controls ......................................... 11
Checking the button function ........................... 11
Advanced Operations
Programming Signals of Another Remote
Control ............................................................. 12
Programming a signal on the COMPONENT
select button .................................................. 13
If the Remote Commander does not seem to
be working properly .......................................14
Changing or clearing the function of a
“learned” signal ............................................. 14
Changing the characters on the screen.......... 15
Changing the A/V component name ................ 16
Changing the function name of Label select
buttons ........................................................... 16
Changing the function labels ........................... 17
Using the Series of Commands (Component
Macro) .............................................................. 18
Programming a Component Macro .................. 18
Checking if a Component Macro is executed
properly .......................................................... 19
Clearing programmed steps of a Component
Macro .............................................................20
Setting the power-on command of a selected
A/V component ............................................... 21
Copying the settings of a COMPONENT
select button to another button .................... 22
Controlling the volume of visual components
connected to an audio component ............... 23
Others
Setting the button illumination ........................ 24
Setting the display ............................................ 26
Setting the beep ................................................ 27
Resetting the settings ...................................... 28
Resetting a COMPONENT select button or
Label select button ........................................ 28
Resetting all settings ........................................ 28
Additional Information
Precautions ....................................................... 30
Maintenance ...................................................... 30
Specifications .................................................... 30
Troubleshooting ................................................ 31
Table of Preset Functions ................................ 34
TV (Analogue) ................................................... 35
TV (Digital) ........................................................ 36
VCR (Video Cassette Recorder) ....................... 37
Analogue Satellite Receiver
Digital Satellite Receiver ................................ 38
Digital Satellite Receiver (No. 3201) ................. 39
DVD Player ....................................................... 40
Analogue Cable Box ........................................ 40
DVD Recorder
DVD/VCR Combo ........................................... 41
Home Theatre System/
DVD Player Combo ........................................42
Receiver/Amplifier ............................................ 43
CD Player ......................................................... 44
Cassette Deck ..................................................44
MD Deck ........................................................... 45
3
GB
Page 4
Getting Started
Unpacking
Check the contents of the package before using the
Remote Commander.
• Remote Commander RM-VL1400T (1)
• Operating Instructions (1)
• Preset Code List (1)
•Warranty Card (1)
• R6 (size AA) batteries (2)
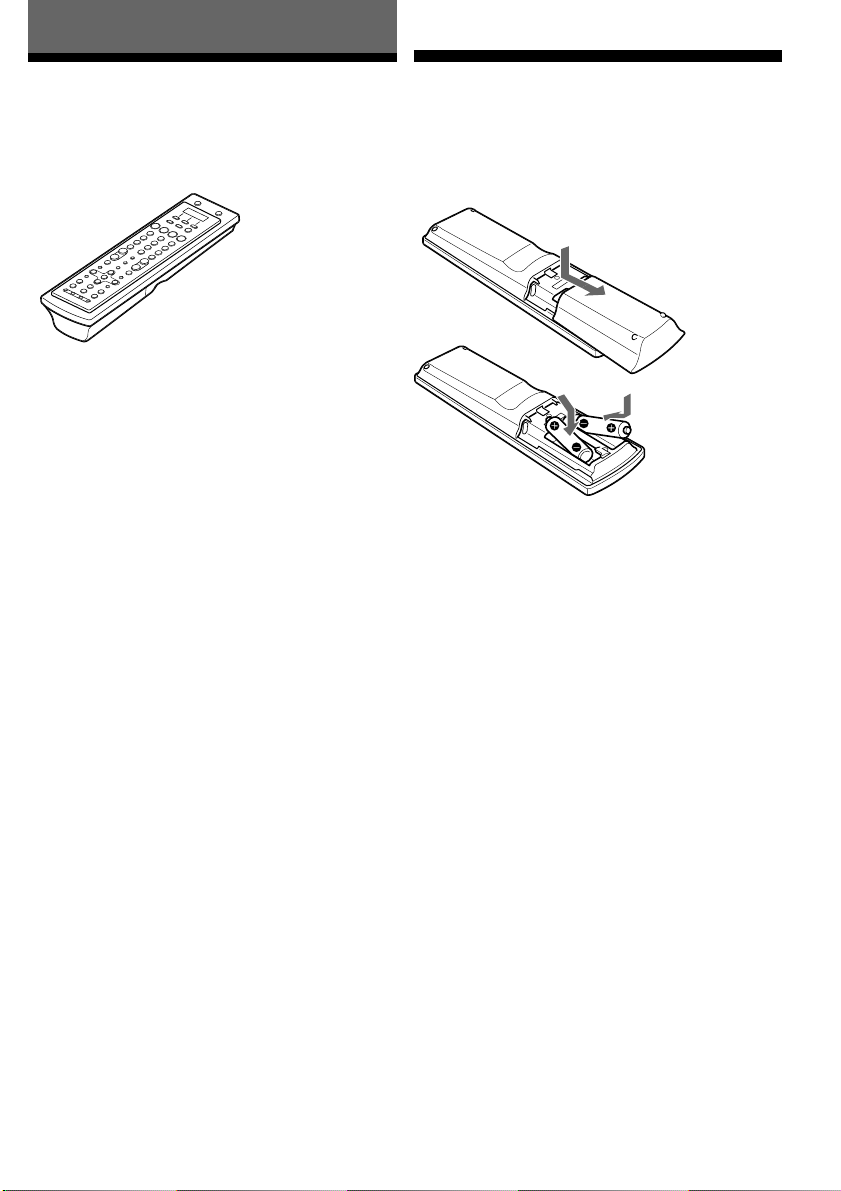
Installing the batteries
Slide and open the battery compartment lid and insert
two LR6 (size AA) alkaline batteries (not supplied). Be
sure to match the + and – indications of the batteries with
the + and – indications of the battery compartment.
When to replace the batteries
Under normal conditions, the alkaline batteries will last up to 5
months. If the Remote Commander does not operate properly, the
batteries are getting weak and “E” appears on the screen.
Notes on replacing the batteries
• Do not take more than one hour to replace the batteries.
Otherwise, your unit settings (page 24) will be initialized.
• Do not attempt to recharge dry batteries.
• Do not carry dry batteries together with coins or other metallic
objects. This can generate heat if the positive and negative
terminals of the batteries accidentally come into contact with
metallic objects.
•When you are not going to use the unit for a long time, remove
the batteries to avoid damage from battery leakage and
corrosion.
• Do not use different types of batteries at the same time.
•When you replace the batteries, replace them both with new
ones.
•The supplied manganese batteries are for testing purposes. We
recommend using commercially available alkaline batteries.
(Rechargeable batteries can not be used.)
GB
4
Page 5
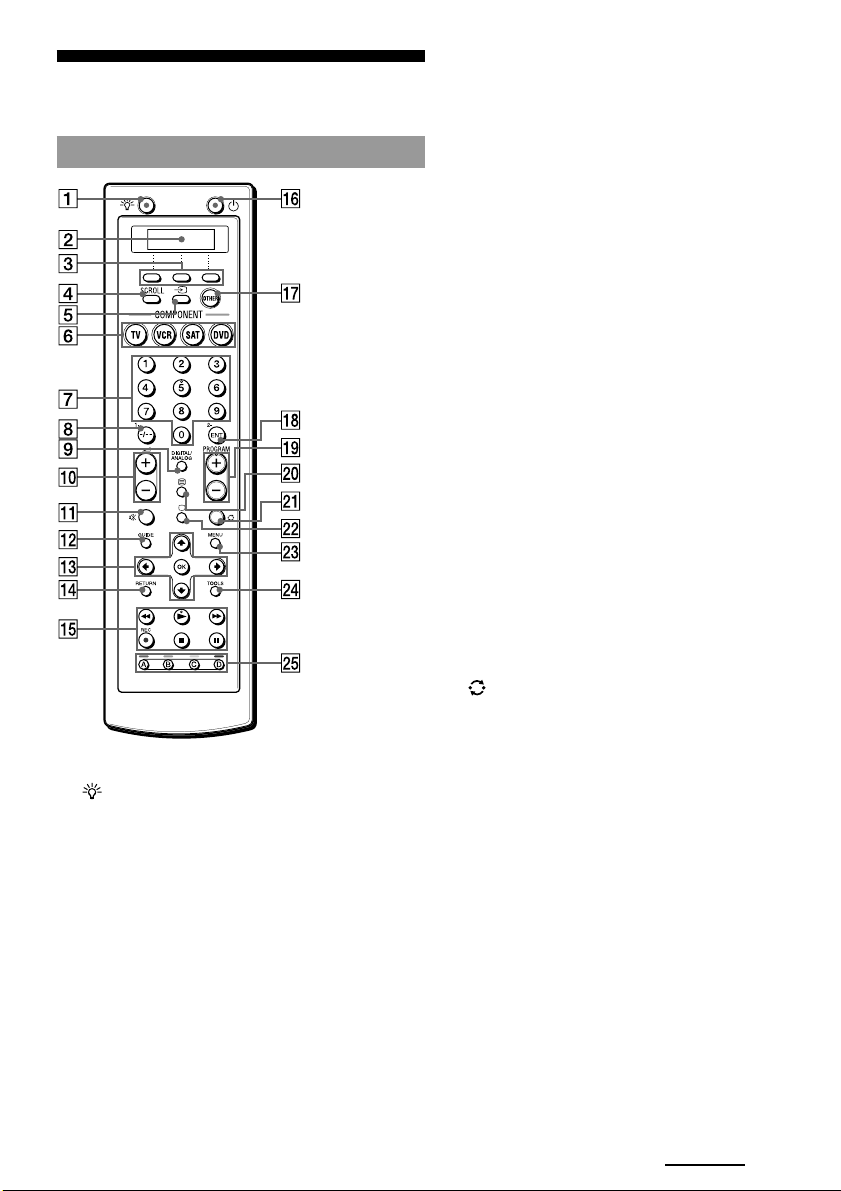
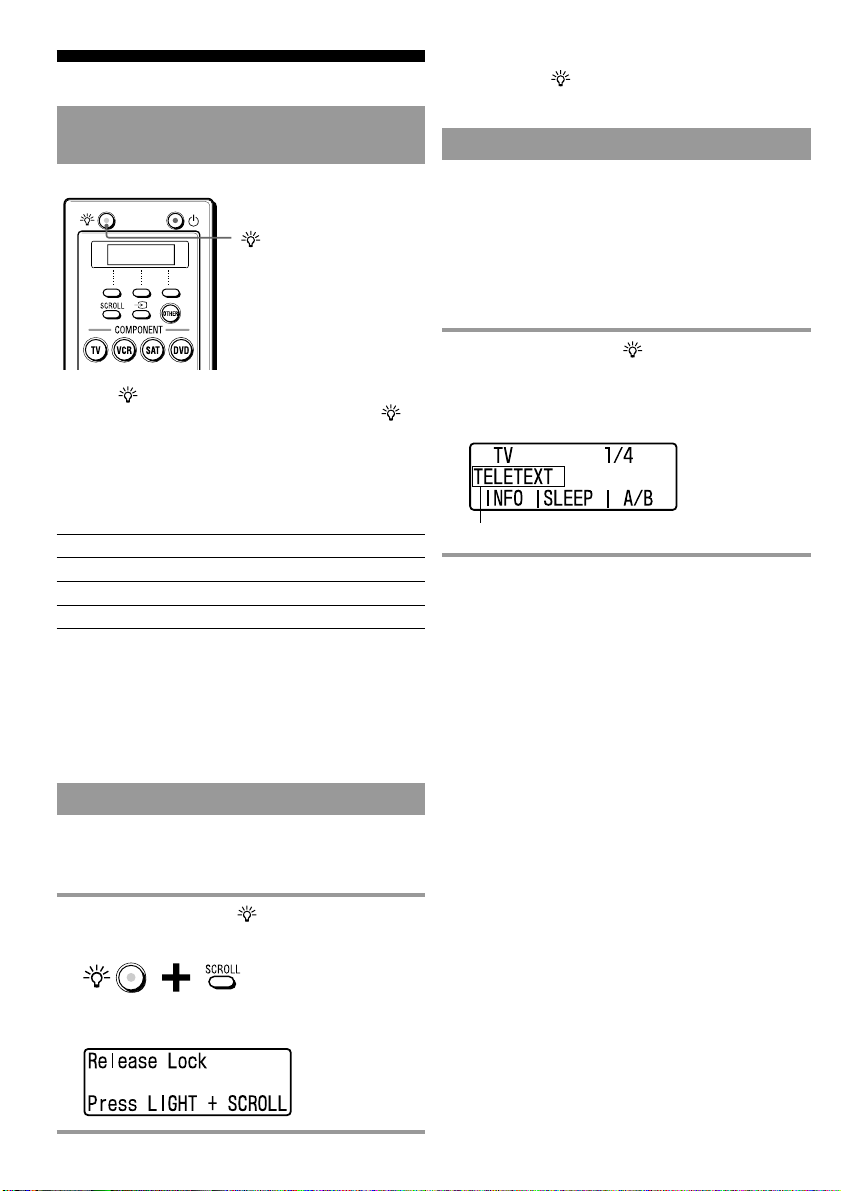
Location and function of
controls
Remote Commander
The PROGRAM +, number 5, and N buttons have a tactile dot.
1 (light) button (page 11, 24)
Used to brighten the button illumination in the dark.
Press the button once to turn on/off the button
illumination.
2 Organic EL display
Displays the functions, setting menu, transmission
icon, etc.
3 Label select buttons
Used to select the desired A/V component or
function on the screen.
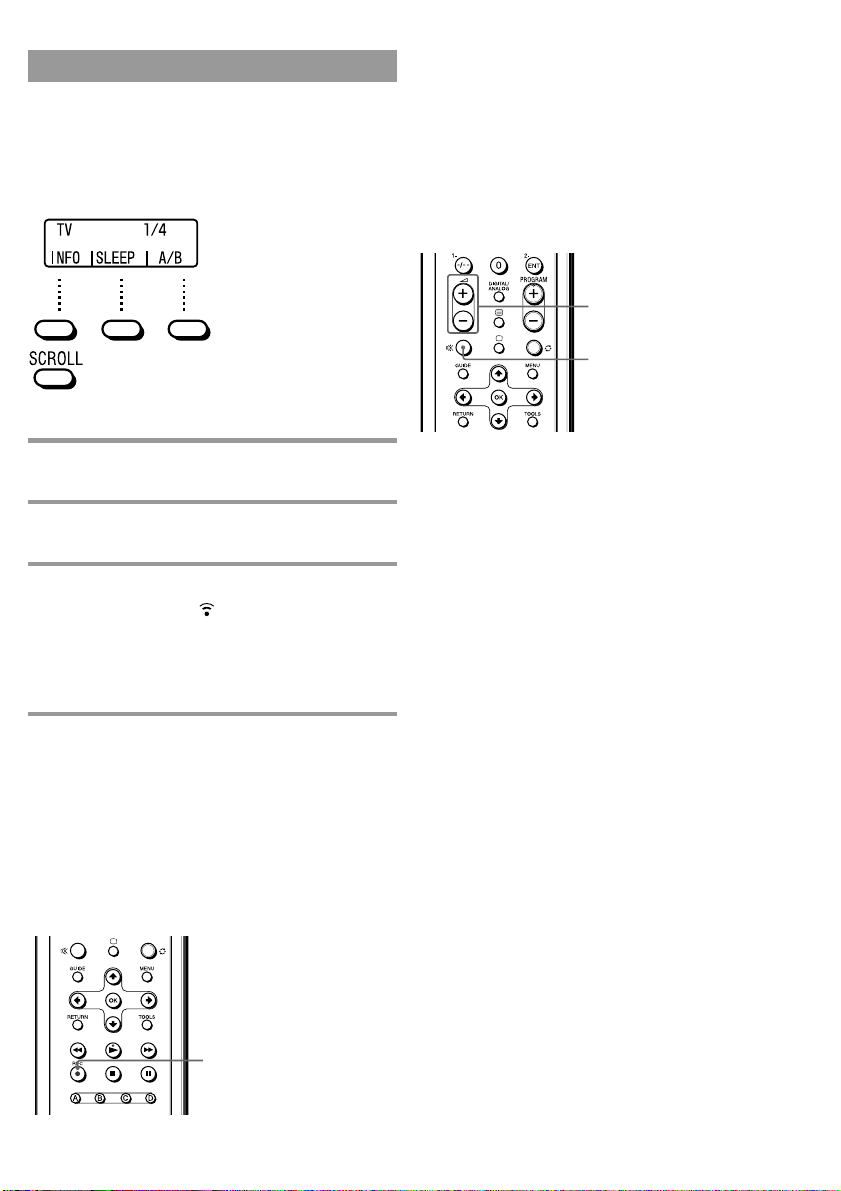
4 SCROLL button
Used to change the functions displayed on the screen
when controlling the A/V components. Press to
toggle among 4 pages.
5 t (input select) button
6
COMPONENT select (TV/VCR/SAT/DVD)
buttons (page 9)
Used to select the desired A/V component.
7 Number buttons
8 1-/- button
9 DIGITAL/ANALOG button
q; 2 (volume) +/– buttons* (page 10)
Adjusts the volume.
qa % (muting) button* (page 10)
Silences the sound. Press the button to silence, and
again to return to the previous volume level.
qs GUIDE button
qd OK and cursor (V/v/B/b) buttons
qf RETURN button
qg Player control (m/N/M/z/x/X)
buttons
qh 1 (power) button
qj OTHER button
Used to display A/V components that are not set to
the COMPONENT select buttons. Press to toggle
among between 2 pages.
qk 2-/ENT (enter) button
Selects the programme.
ql PROGRAM +/– buttons
Selects the programme.
w; / (teletext) button
(recall) button
wa
ws a (TV on) button
wd MENU button
wf TOOLS button
wg Colour (A (red)/B (green)/C (yellow)/D
(blue)) buttons
*
Note on the 2 +/–, and % buttons
When you select a visual component, the TV’s volume will
be controlled; when you select an audio component, the
amplifier’s volume will be controlled (page 23).
Note
The button function changes according to the setting of the
Remote Commander or the A/V component to be operated. For
details on button operation for each A/V component at the factory
preset, see “Table of Preset Functions” (page 34).
Continued
GB
5
Page 6

Display
1 Screen title
Displays the status of the Remote Commander.
2 Labelling function
When you press a button, its function appears in the
second line on the screen. The characters displayed
on the screen can be changed (page 15).
3 Display of A/V component/function
Displays the A/V components selectable by Label
select buttons, or the functions available for each A/V
component. The characters displayed on the screen can
be changed (page 15).
4 Page number
GB
6
Page 7
Basic Operations
Setting operations of A/V components
—Setting component code
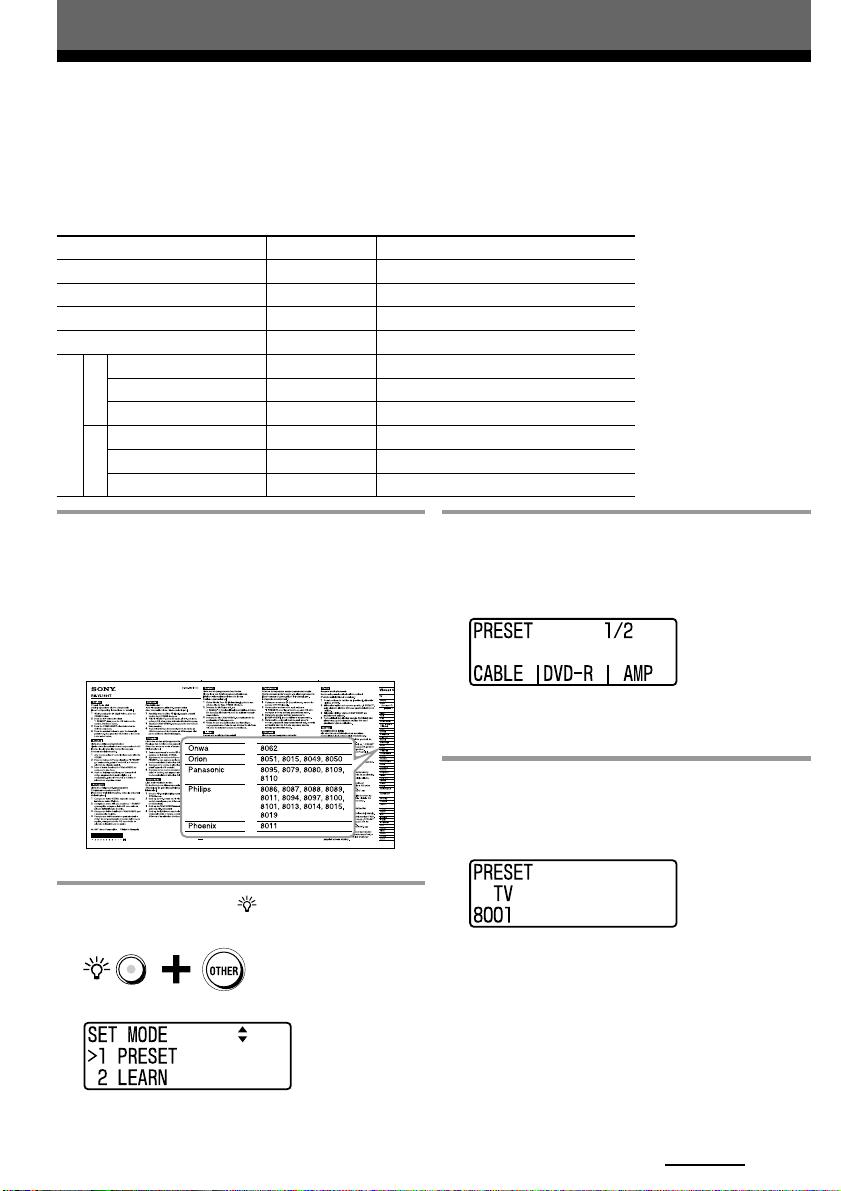
The Remote Commander is preset at the factory to operate Sony brand A/V components. (Refer to the table below.)
If you are using the Remote Commander with factory-set Sony components, skip the following procedures.
To use with other brand A/V components, or Sony A/V components which do not function with the Remote
Commander, you need to follow the procedures to set the component code.
Factory preset
COMPONENT select buttons
TV
VCR
SAT
DVD
Label select button-left
Label select button-centre
Page 1/2
Label select button-right
Label select button-left
OTHER
Label select button-centre
Page 2/2
Label select button-right
Screen title Preset A/V components
TV Sony TV (Analogue)
VCR Sony VCR (Video Cassette Recorder)
SAT Sony Analogue Satellite Receiver
DVD Sony DVD player
CABLE Analogue Cable box
DVD-R Sony DVD Recorder
AMP Sony Receiver/Amplifier
CD Sony CD player
MD Sony MD deck
TAPE Sony Cassette deck
1 Refer to the tables in the supplied “Preset
Code List” to find the four-digit preset
code for the desired A/V component.
If more than one code number is listed, use the
number that is listed first. For example, to set up a
Panasonic TV, you would use the code number 8095.
2 While pressing the (light) button, press
the OTHER button.
“SET MODE” appears as the screen title.
3 Press the V/v buttons to select
“1 PRESET”, then press the OK button or
the centre Label select button.
“PRESET” appears as the screen title.
Tip
If a number is displayed before the menu, you can select the
menu by pressing the number button.
4 Press the COMPONENT select button for
the desired A/V component.
The selected A/V component’s label and the preset
code currently set appear on the screen.
Tips
•To set A/V components which are not specified on the
COMPONENT select buttons, press the OTHER button
repeatedly, then press the Label select button
corresponding to the desired A/V component.
•
You can set components to the COMPONENT select buttons
or Label select buttons than those that are specified on each
other button or on the screen. Note however, that the TV
button can only be set a TV, and the Label select button (to
which an amplifier is set at the factory preset) can only be
set an amplifier or DVD player home theatre system.
Continued
GB
7
Page 8
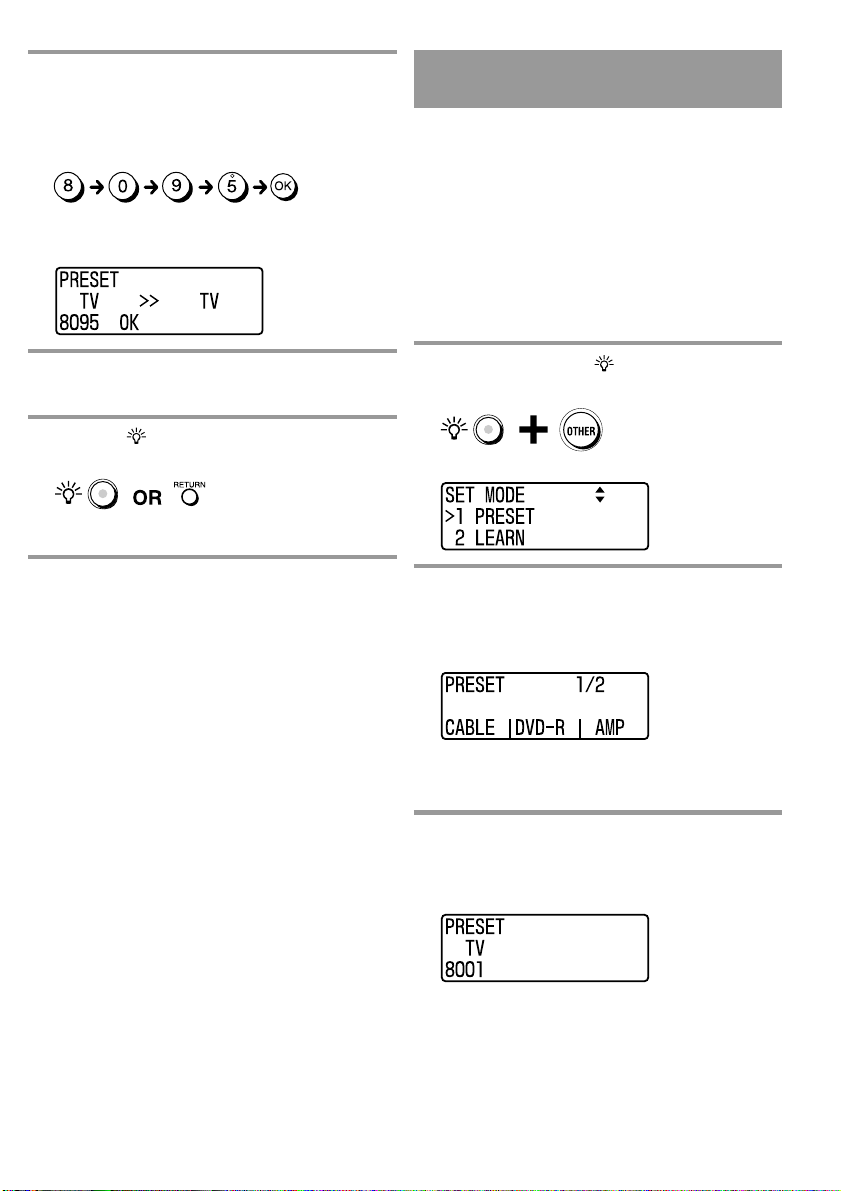
5 Press the number buttons to enter the four-
digit preset code, then press the OK button
or the centre Label select button.
Example: To enter “8095”
Press 8, 0, 9, 5 then the OK button.
Setting A/V components which are
not listed in the Preset Code List
—Search function
You can set A/V components which are not listed in the
supplied “Preset Code List” using the search function.
A beep sounds, and the four-digit preset code you
have set and “OK” appear on the screen, then the
display returns to the screen shown in step 3.
6 To set preset codes for other A/V
components, repeat steps 4 and 5.
7 Press the (light) button or the RETURN
button twice.
The set mode closes, and the Remote Commander
returns to standby for operating the A/V components.
Notes
• If you enter a preset code that is not on the table in the supplied
“Preset Code List” and press the OK button, a beep sounds five
times, and the entered four-digit number and “NG” appear on
the screen, then the display returns to the screen shown in step
4. Check the preset code, and try entering the code again.
• If you do not enter anything into the Remote Commander
within 60 seconds between each step, the setup procedure will
be cancelled and the set mode closes. Start over from the
beginning.
• The Remote Commander recognizes the A/V component type
when a preset code is entered in step 5, and the screen title
displayed when operating the A/V component is determined. If
the screen title does not correspond with the component you
have set, you can change the component label accordingly.
•You cannot set A/V components after you programme other
remote control signals using the Learning function (page 12),
programme a Component Macro (page 18), or change the label
(page 15). In such a case, reset the A/V component settings
(page 28), then set the A/V components again.
Before starting the search function
Set each A/V component to the following status so that
the search function works effectively.
TV, AMP: Power-on
CD player, MD deck, Casssette deck: Power-on with
a playback source.
Other component: Power-off
1 While pressing the (light) button, press
the OTHER button .
“SET MODE” appears as the screen title.
2 Press the V/v buttons to select
“1 PRESET”, then press the OK button or
the centre Label select button.
“PRESET” appears as the screen title.
Tip
If a number is displayed before the menu, you can select the
menu by pressing the number button.
3 Press the COMPONENT select button for
the desired A/V component.
The selected A/V component’s label and the preset
code currently set appear on the screen.
GB
8
Page 9
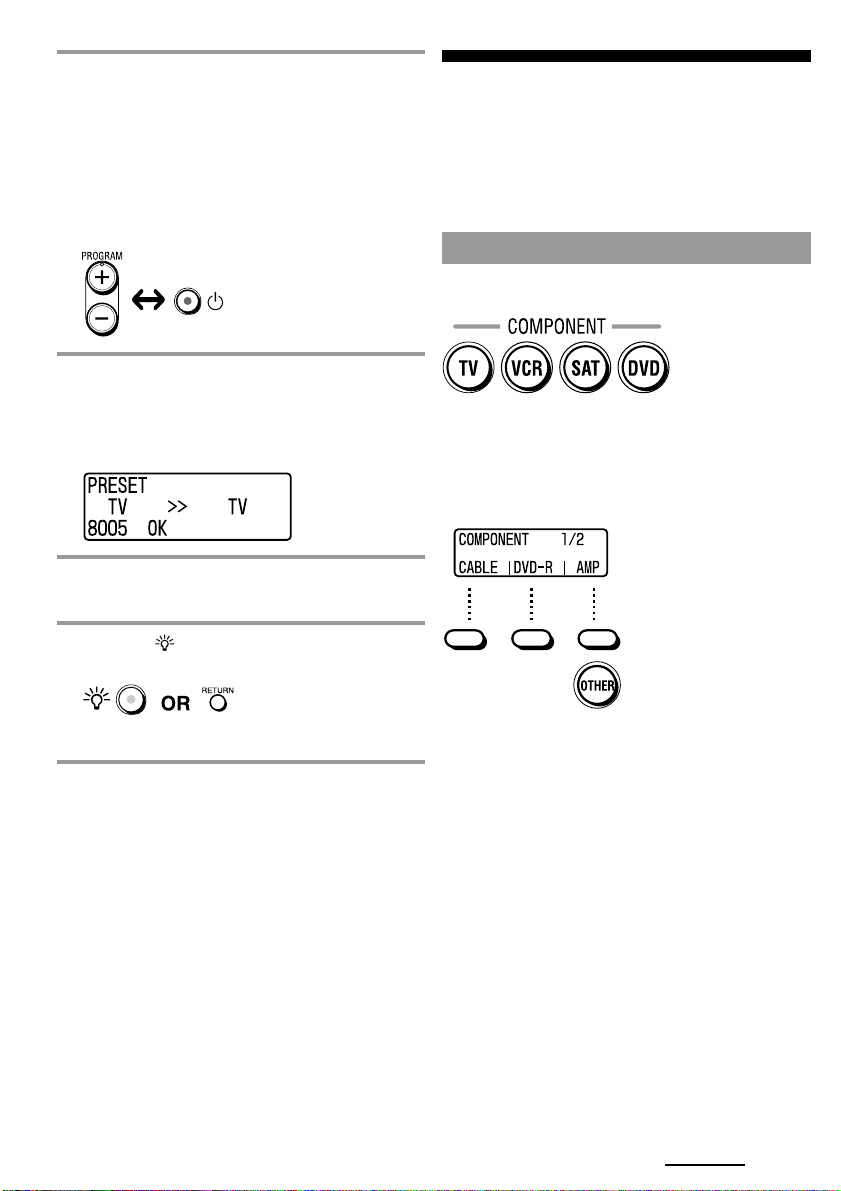
4 Press the PROGRAM + or PROGRAM –
button, then press the 1 (power) button
repeatedly until the A/V component reacts
as follows:
TV: Powers off.
Amplifier: Powers off or the volume turns up.
CD player, MD deck, Casssette deck: Powers off
or starts playing.
Other component: Powers on
5 Press the OK button or centre Label select
button.
A beep sounds, and the four-digit preset code you
have set and “OK” appear on the screen, then the
display returns to the screen shown in step 2.
6 To set other A/V components, repeat steps
3-5.
7 Press the (light) button or the RETURN
button twice.
Operating your A/V
components with the
Remote Commander
Select the desired A/V component by pressing the
COMPONENT select button on the Remote Commander,
then operate the A/V component.
Selecting the desired A/V component
Press the COMPONENT select button to select the
desired A/V component.
If you press the OTHER button, selectable A/V
components appear on the screen. Select the desired A/V
component by pressing the corresponding Label select
button. The A/V components displayed on the screen
change by pressing the OTHER button repeatedly.
The set mode closes, and the Remote Commander
returns to standby for operating the A/V components.
Continued
GB
9
Page 10
Operating A/V components
Press the appropriate buttons on the Remote Commander
to operate your A/V components.
You can select the functions displayed on the screen with
the Label select buttons corresponding to each function.
The functions displayed on the screen change by
pressing the SCROLL button repeatedly.
Example: To operate a TV
Adjusting the volume
Press the 2 (volume) +/– buttons to adjust the volume.
Press the % (muting) button to silence the sound
temporarily.
When you select a visual component, the TV’s volume
will be controlled; when you select an audio component,
the amplifier’s volume will be controlled.
To change the volume control setting, see “Controlling
the volume of visual components connected to an audio
component” on page 23.
2 (volume)
+/– buttons
% (muting)
button
1 Press the TV button.
The Remote Commander stands by for TV operation.
2 Press the 1 (power) button.
The TV turns on.
3 Press the buttons for the desired operation.
When a signal is sent, appears. You can also use
other buttons, such as the 2 (volume) +/–,
PROGRAM +/–, % (muting), cursor, and MENU
buttons. See also “Table of Preset Functions” (page
34) for the functions of buttons for each source
component.
Tip
If the Remote Commander does not work as intended, check the
function of the button using the Labelling function (page 11) or
programme signals using the Learning function (page 12).
About the z/REC (record) button
To avoid misoperation, the Remote Commander will
only transmit z/REC (record) button signals if the
button is pressed and held for over 2 seconds.
Note
If you programme remote signals on the TV or amplifier's
volume control buttons using the Learning function (page 12),
those buttons will also send the learned signal to control
components other than a TV or amplifier.
If you programme remote signals on the volume control buttons
of components other than a TV or amplifier, those buttons will
send the learned signal for controlling the A/V component
instead of controlling the TV or amplifier's volume.
10
z/REC
(record) button
GB
Page 11
Other Useful Functions
Operating the Remote Commander in
the dark
(light)
button
COMPONENT
Press the (light) button to turn on the button
illumination of the Remote Commander. Press the
(light) button again to turn off.
If no button is pressed for over 10 seconds, the button
illumination of the Remote Commander automatically
turns off.
To unlock the controls
While pressing the (light) button, press the SCROLL button.
Checking the button function
—Labelling function
When you press a button, its function appears in the
second line on the screen while transmitting the remote
control signals.
You can also display the function without transmitting
the remote control signals.
To change the characters displayed on the screen, see
“Changing the characters on the screen” (page 15).
1 While pressing the (light) button, press
the desired button.
The button function appears on the second line of the
screen. The remote control signals are not
transmitted.
Default button illumination settings
Off-time setting 10 seconds
Brightness Level 15 (maximum)*
Fade effect On
On-mode setting All buttons
*The Brightness level is preset to 15 (maximum) at the factory.
If you use the Remote Commander with this setting, battery
life may be shorter.
See “Setting the button illumination” (page 24) to change
the button illumination settings.
Locking the controls
—Hold function
To prevent accidental operation, you can lock all the
buttons with the Hold function.
1 While pressing the (light) button, press
the SCROLL button.
The following message appears on the screen and all
the buttons are locked.
Button function
11
GB
Page 12
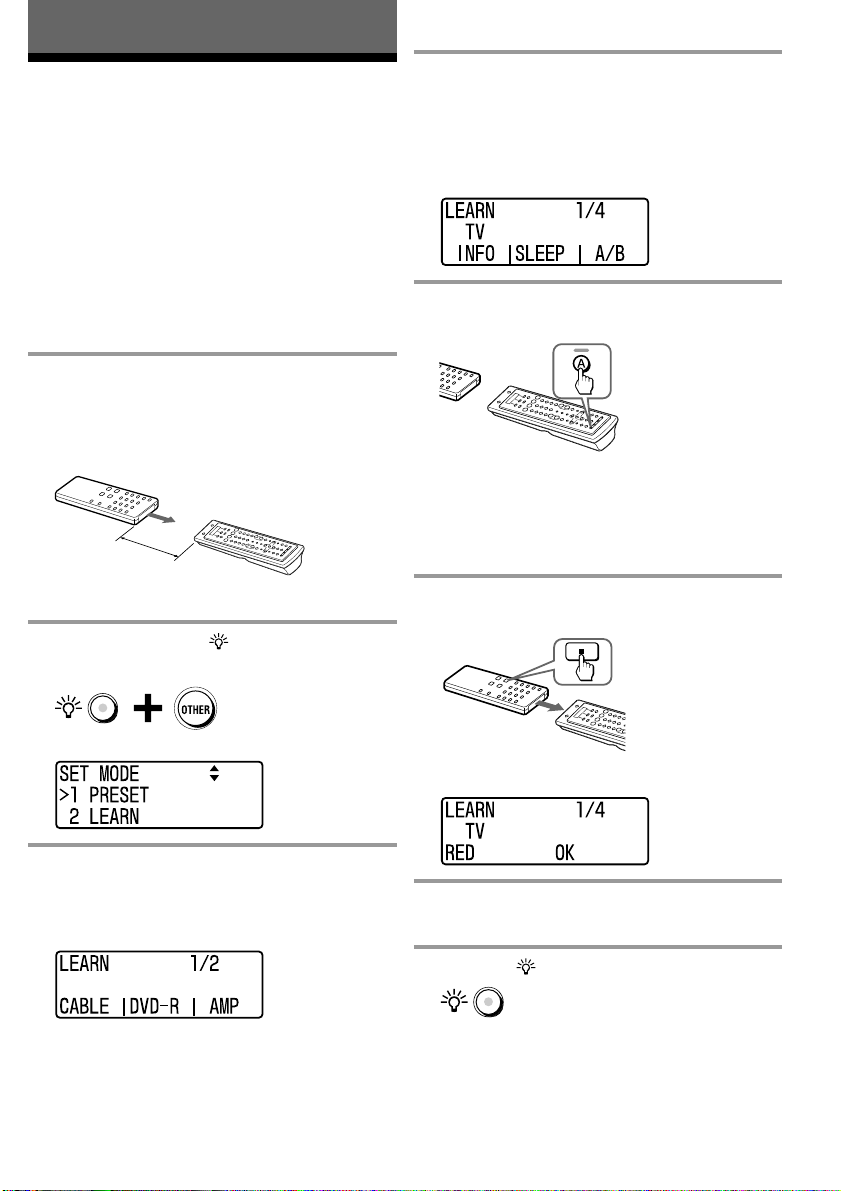
Advanced Operations
Programming Signals of
Another Remote Control
—Learning function
To operate non-preset A/V components or button
functions, use the following “learning” procedure to
“programme” any of the programmable signals on the
Remote Commander’s buttons.
You can also use the Learning function to change the
signal of individual buttons after setting the preset code
(page 7). You may find it useful to change the label (page
15) of the learned button.
Note
Some specific remote control signals may not be learned.
1 Place the Remote Commander head to
head with your A/V component’s remote
control.
Other remote control
about 2-4 inches
(5-10 cm) away
2 While pressing the (light) button, press
the OTHER button.
RM-VL1400T
4 Press the COMPONENT select button or
Label select button corresponding to the
A/V component you want the Remote
Commander to learn.
The selected A/V component’s label appears in the
second line on the screen.
5 Press the button on which you want to
programme the signal.
The display turns off and the Remote Commander
enters into the learning mode.
Tip
If you press and hold the button for over 2 seconds, you can
change the label. For details, see “Changing the characters
on the screen” (page 15).
6 Press and hold the button on the other
remote control until you hear a beep.
“SET MODE” appears as the screen title.
3 Press the V/v buttons to select “2
LEARN”, then press the OK button or the
centre Label select button.
“LEARN” appears as the screen title.
Tip
If a number is displayed before the menu, you can select the
menu by pressing the number button.
GB
12
A beep sounds and the learned button name and
“OK” appear in the third line on the screen.
7 To programme signals on other buttons,
repeat steps 5 and 6.
8 Press the (light) button.
The display returns to the screen shown in step 3.
Page 13
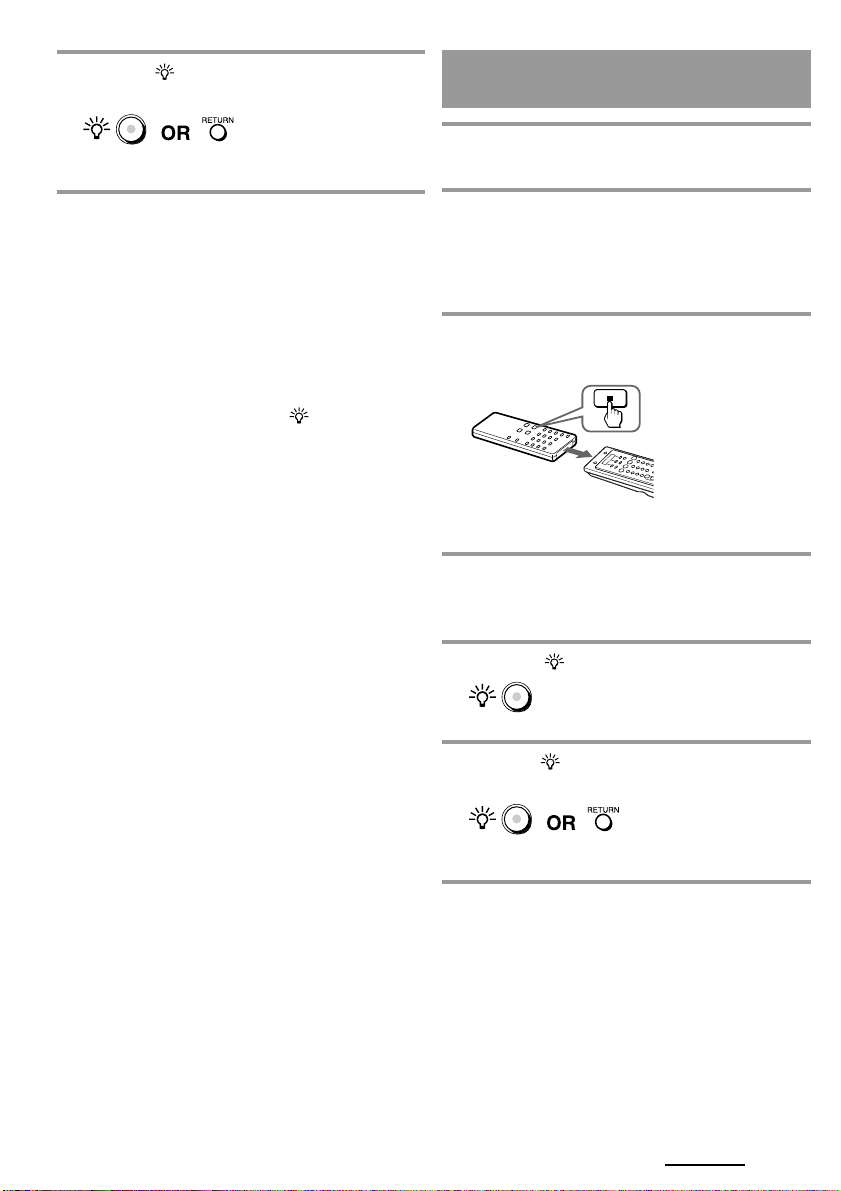
9 Press the (light) button or the RETURN
button twice.
Programming a signal on the
COMPONENT select button
The set mode closes, and the Remote Commander
returns to standby for operating the A/V components.
Notes
• If you do not input anything into the Remote Commander
within 60 seconds between each step, the setup procedure will
be cancelled and the set mode closes. Start over from the
beginning.
• If you do not perform step 6 within 10 seconds after
performing step 5, a beep sounds twice and the selected button
name and “NG” appear in the third line on the screen, then the
display returns to the screen shown in step 4. Start over from
step 5.
• If the Remote Commander learns signals incorrectly in step 6,
clear the learned signal by pressing the
pressing the button on which the incorrect signal was learned
(page 14). Start over from step 5.
• If you programme remote signals on the TV or amplifier’s
volume control buttons using the Learning function (page 12),
those buttons will also send the learned signal to control
components other than a TV or amplifier.
If you programme remote signals on the volume control
buttons of components other than a TV or amplifier, those
buttons will also send the learned signal to control other A/V
components instead of controlling the TV or amplifier’s
volume.
•To avoid misoperation, the Remote Commander will only
transmit z/REC (record) button signals if the button is pressed
and held for over 2 seconds. Therefore, if this button is used for
a learned operation, you must press and hold it for over 2
seconds.
(light) button while
1 Perform steps 1-3 of the learning
procedure (page 12).
2 Press and hold the COMPONENT select
button or Label select button on which you
want to programme the signal.
The display turns off and the Remote Commander
enters into the Learning mode.
3 Press and hold the button on the other
remote control until you hear a beep.
A beep sounds and the learned button name and
“OK” appear in the third line on the screen.
4 To programme signals on other
COMPONENT select buttons or Label
select button, repeat steps 2 and 3.
5 Press the (light) button.
“LEARN” appears as the screen title.
6 Press the (light) button or the RETURN
button twice.
The set mode closes, and the Remote Commander
returns to standby for operating the A/V components.
Continued
13
GB
Page 14
If the Remote Commander does not
seem to be working properly
If the learned button does not operate properly, clear the
learned signal first (page 14), then perform the learning
procedure from step 1 again. (For example, if the volume
becomes very loud after pressing the 2 (volume) +
button just once, noise may have interfered during the
learning procedure.)
For accurate learning
• Do not move the remote units during the learning
procedure.
• Be sure to press and hold the button of the other remote
control until you hear the confirmation beep.
• Use fresh batteries in both remote control units.
• Avoid learning in places under direct sunlight or strong
fluorescent light, or near a plasma display. (It may
cause noise interference.)
• The remote control signal direction may differ
depending on the remote control. If Learning does not
work, try changing the position of the remote control.
• When you programme the Remote Commander from a
remote control unit with an interactive signal exchange
system (supplied with some Sony receivers and
amplifiers), the response signal of the component may
interfere with the Learning of the Remote Commander.
In such a case, move to another room, etc., where
signals will not interfere.
IMPORTANT
Be sure to place the Remote Commander out of
the reach of small children or pets.
Also, set the Hold function to lock all the buttons on the
Remote Commander (page 11) when it is not used. Devices
such as air conditioners, heaters, electric appliances, and
electric shutters or curtains receiving an infrared signal can
be dangerous if misused.
Changing or clearing the function of
a “learned” signal
To change the “learned” function, clear it first and
perform the learning procedure again.
1 While pressing the (light) button, press
the OTHER button.
“SET MODE” appears as the screen title.
2 Press the V/v buttons to select “2
LEARN”, then press the OK button or the
centre Label select button.
“LEARN” appears as the screen title.
Tip
If a number is displayed before the menu, you can select the
menu by pressing the number button.
3 Press the COMPONENT select button or
Label select button you want to clear the
learned signal from.
The selected A/V component’s label appears in the
second line on the screen.
14
GB
4 While pressing the button on the Remote
Commander you want to clear the learned
signal from, press the (light) button.
A beep sounds and the cleared button name and
“OK” appear on the screen.
Tip
If you press again the button which you cleared the learned
signal from while pressing the
the button function and name will be initialized.
(light) button, the label of
5 To clear the learned signals from other
buttons, repeat steps 3 and 4.
Page 15
6 Press the (light) button.
The display returns to the screen shown in step 2.
7 Press the (light) button or the RETURN
button twice.
The set mode closes, and the Remote Commander
returns to standby for operating the A/V components.
Notes on programming the signals for
an air-conditioner
About seasonal adjustments
If you change the settings of the air-conditioner for the
season, you have to programme the remote control
signals of the new settings on the Remote Commander.
If the power-on/off operation does not work
correctly
If the Remote Commander can only operate “ON” with one
button and “OFF” with another, while your air-conditioner’s
remote control can operate “ON/OFF” with a single button,
programme the signal on two buttons of the Remote Commander
as follows.
1 Clear the “learned” power-on/off signal on the
programmed button.
2 Reprogramme only the power-on signal of the air-
conditioner on the button by following the steps of
“Programming Signals of Another Remote Control”
(page 12).
3 Programme the power-off signal of the air-conditioner
on another button.
The two buttons of the Remote Commander have been
programmed with the power-on signal and the
power-off signal of the air-conditioner respectively, so
that you can operate the air-conditioner with the Remote
Commander.
Changing the characters
on the screen
You can change the A/V component names or functions,
or button function (label) displayed on the screen.
Characters and digits are input as follows by pressing the
number buttons.
11 c , c - c . c : c ; c < c = c > c ? c @ c /
2A c B c C c a c b c c c 2 c À c Á c  c à c Ä c Å
c Æ c Ç c à c á c â c ã c ä c å c æ c ç
3D c E c F c d c e c f c 3 c È c É c Ê c Ë c è c é c ê
c ë
4G c H c I c g c h c i c 4 c Ì c Í c Î c Ï c ì c í c î c ï
5J c K c L c j c k c l c 5
6M c N c O c m c n c o c 6 c Ñ c Ò c Ó c Ô c Õ c
Ö c Ø c Œ c ñ c ò c ó c ô c õ c ö c ø c œ
7P c Q c R c S c p c q c r c s c 7 c ß
8T c U c V c t c u c v c 8 c Ù c Ú c Û c Ü c ù c ú c
û c ü
9W c X c Y c Z c w c x c y c z c 9 c ´Y c ´y c ÿ
00 c N c b c B c ?b c B? c x c X c T c t c R
c r
-/-- ! c " c # c $ c % c & c ' c ( c ) c * c +
(1-)
ENT (space) c [ c \ c ] c ^ c _ c { c | c } c ˜ c · c ¡ c ¨
(2-) c ª c ´ c ‚ c º c ¿
Characters and digits are input as follows by pressing the
V/ v buttons.
A c B c C c D c E c F c G c H c I c J c K c L c M
c N c O c P c Q c R c S c T c U c V c W c X c Y
c Z c a c b c c c d c e c f c g c h c i c j c k c l c m
c n c o c p c q c r c s c t c u c v c w c x c y c z c
1 c 2 c 3 c 4 c 5 c 6 c 7 c 8 c 9 c 0 c À c Á c  c
à c Ä c Å c Æ c Ç c È c É c Ê c Ë c Ì c Í c Î c Ï c
Ñ c Ò c Ó c Ô c Õ c Ö c Ø c Œ c Ù c Ú c Û c Ü c
´Y c ß c à c á c â c ã c ä c å c æ c ç c è c é c ê c ë c
ì c í c î c ï c ñ c ò c ó c ô c õ c ö c ø c œ c ù c ú c
û c ü c ´y c ÿ c (space) c N c b c B c ?b c B? c x
c X c T c t c R c r c ! c " c # c $ c % c & c ' c
( c ) c * c + c , c - c . c / c : c ; c < c = c > c ? c
@ c [ c \ c ] c ^ c _ c { c | c } c ˜ c · c ¡ c ¨ c ª c ´
c ‚ c º c ¿
Continued
15
GB
Page 16

Changing the A/V component name
Up to 6 characters or digits can be input.
1 While pressing the (light) button, press
the OTHER button.
“SET MODE” appears as the screen title.
2 Press the V/v buttons to select
“3 LABEL”, then press the OK button or
the centre Label select button.
“LABEL” appears as the screen title.
Tip
If a number is displayed before the menu, you can select the
menu by pressing the number button.
3
Press and hold the COMPONENT select button or
Label select button corresponding to the A/V
component you want to change for over 2 seconds.
The selected A/V component name and cursor (x)
appear on the screen and the Remote Commander is
on standby for input.
Changing the function name of Label
select buttons
Up to 6 characters or digits can be input.
1 While pressing the (light) button, press
the OTHER button.
“SET MODE” appears as the screen title.
2 Press the V/v buttons to select
“3 LABEL”, then press the OK button or
the centre Label select button.
“LABEL” appears as the screen title.
Tip
If a number is displayed before the menu, you can select the
menu by pressing the number button.
3 Press the COMPONENT select button or
Label select button on which the A/V
component with the function you want to
change is set.
The selected A/V component appears in the second
line on the screen.
4 Press the number buttons or V/v buttons
to input digits or characters.
Begin inputting digits or characters from the position
where the cursor (x) is displayed. Press the B/b
buttons or the left or right Label select button to
move the cursor (x).
5
Press the OK button or centre Label select button.
A beep sounds and the A/V component name is changed.
6 Press the (light) button or the RETURN
button twice.
The set mode closes, and the Remote Commander
returns to standby for operating the A/V components.
GB
16
4 Press the SCROLL button repeatedly, then
press the Label select button
corresponding to the function you want to
change.
The selected function and cursor (x) appear on the
screen and the Remote Commander is on standby for
input.
Page 17
5 Press the number buttons or V/v buttons
to input digits or characters.
Begin inputting digits or characters from the position
where the cursor (x) is displayed. Press the B/b
buttons or the left or right Label select button to
move the cursor (x).
6 Press the OK button or centre Label select
button.
A beep sounds and the function name is changed.
3 Press the COMPONENT select button or
Label select button on which the A/V
component with the function label you
want to change is set.
The selected A/V component appears in the second
line on the screen.
7 Press the (light) button.
The display returns to the screen shown in step 2.
8 Press the (light) button or the RETURN
button twice.
The set mode closes, and the Remote Commander
returns to standby for operating the A/V components.
Changing the function labels
—Labelling function
Up to 10 characters or digits can be input.
1 While pressing the (light) button, press
the OTHER button.
“SET MODE” appears as the screen title.
4 Press and hold the button of which you
want to change the function label for over
2 seconds.
The selected function label and cursor (x) appear on
the screen and the Remote Commander is on standby
for input.
5 Press the number buttons or the V/v
buttons to input digits or characters.
Begin inputting digits or characters from the position
where the cursor (x) is displayed. Press the B/b
buttons or the left or the right Label select button to
move the cursor (x).
6 Press the OK button or the centre Label
select button.
A beep sounds and the function label is changed.
7 Press the (light) button.
The display returns to the screen shown in step 2.
8 Press the (light) button or the RETURN
button twice.
2 Press the V/v buttons to select
“3 LABEL”, then press the OK button or
the centre Label select button.
“LABEL” appears as the screen title.
Tip
If a number is displayed before the menu, you can select the
menu by pressing the number button.
The set mode closes, and the Remote Commander
returns to standby for operating the A/V components.
GB
17
Page 18
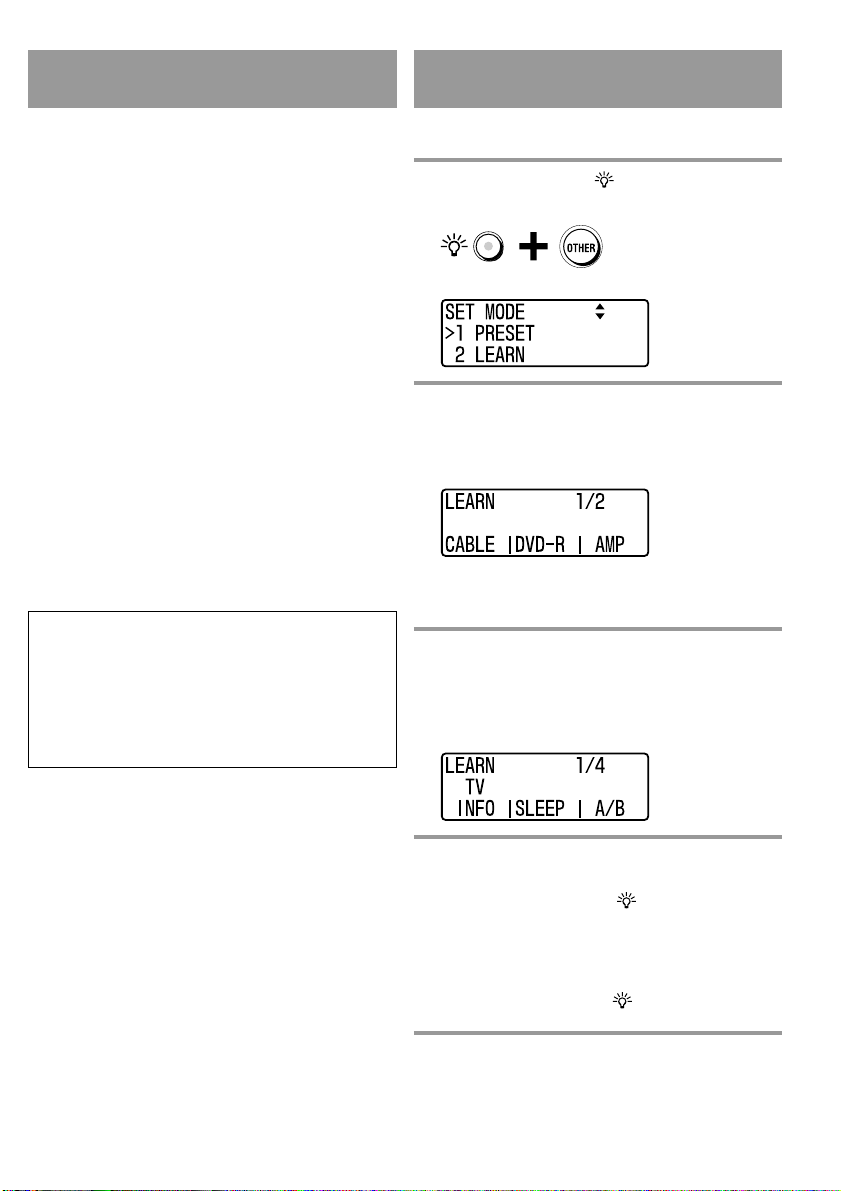
Using the Series of
Commands (Component
Macro)
You can set an operation programme consisting of up to
32 steps (Component Macro) on the COMPONENT
select button or Label select button corresponding to any
component.
For example, when you watch a DVD by connecting a
TV and DVD recorder to an amplifier, a series of
operations like the ones below are necessary.
1 Turn on the TV.
2 Turn on the DVD recorder.
3 Turn on the amplifier.
4 Select the appropriate video input on the TV to watch
the DVD.
5 Select the appropriate audio input on the amplifier to
watch the DVD.
6 Start playing the DVD recorder.
The Component Macro enables you to perform these
steps by holding down one of the COMPONENT select
buttons or Label select buttons for over 2 seconds.
2 Press the V/v buttons to select
“4 MACRO”, then press the OK button or
the centre Label select button.
“MACRO” appears as the screen title.
Tip
If a number is displayed before the menu, you can select the
menu by pressing the number button.
3 Press the DVD button.
“MACRO DVD” appears as the screen title.
Tip
To select A/V components which are not set to the
COMPONENT select buttons, press the OTHER button
repeatedly, then press the Label select button corresponding
to the desired A/V component displayed on the screen.
4 Press the TV button, then press the 1
(power) button.
5 Press the DVD button, the press the 1
(power) button.
Programming a Component Macro
Follow the procedure below to programme a Component
Macro. You can programme up to 32 consecutive actions.
Example: To programme the procedure
above to the DVD button
1 While pressing the (light) button, press
the OTHER button.
“SET MODE” appears as the screen title.
GB
18
6 Press the OTHER button repeatedly, press
the Label select button corresponding to
the amplifier, then press the 1 (power)
button.
7 Press the t (input select) button
repeatedly to select the appropriate video
input on the TV to watch the DVD.
8 Press the input select button on the
amplifier to select the appropriate audio
input to watch the DVD.
9 Press the DVD button, then press N.
10
Press the (light) button.
A beep sounds and programming is complete.
Page 19
11
Press the (light) button or the RETURN
button twice.
The set mode closes, and the Remote Commander
returns to standby for operating the A/V components.
Notes
• If the procedure is interrupted at any point for over 60 seconds,
programming is cancelled. You cannot continue from where
you left off.
• If you try to programme actions on a button that already has a
programmed Component Macro, a beep sounds twice to alert
you that you cannot programme a Component Macro on the
button. In such a case, clear the programmed Component
Macro (page 20), then start programming again from step 1.
•You cannot clear steps during the programming procedure. If
you make a mistake in programming actions, finish
programming once and clear the Component Macro (page 20),
then start again from step 1.
You can programme up to 32 consecutive operation actions.
•
When up to 32 steps are programmed, programming of the
Component Macro is full. To change the programmed steps, clear
the Component Macro (page 20), then start over from step 1.
Checking if a Component Macro is
executed properly
Follow the procedure below to check if the programmed
Component Macro works as intended.
To execute a Component Macro
1 Press and hold the COMPONENT select
button on which the desired Component
Macro has been programmed for over 2
seconds.
The signal transmission icon appears on the screen,
and the programmed Component Macro is executed.
Tip
While the signal transmission icon ( ) appears and the
Component Macro is executed, “CANCEL” appears in the third
line of the screen. You can cancel executing the Component
Macro by pressing the right Label select button.
To check the programmed steps of a
Component Macro and add a delay
action
Delay action allows you to set an interval between steps.
Delay time is set to 250 ms. (1/4 second) on the Remote
Commander.
If a Component Macro is not executed as intended, check
the programmed steps and try adding a delay to execute
the programme properly.
1 While pressing the (light) button, press
the OTHER button.
“SET MODE” appears as the screen title.
2 Press the V/v buttons to select
“4 MACRO”, then press the OK button or
the centre Label select button.
“MACRO” appears as the screen title.
Tip
If a number is displayed before the menu, you can select the
menu by pressing the number button.
Continued
19
GB
Page 20
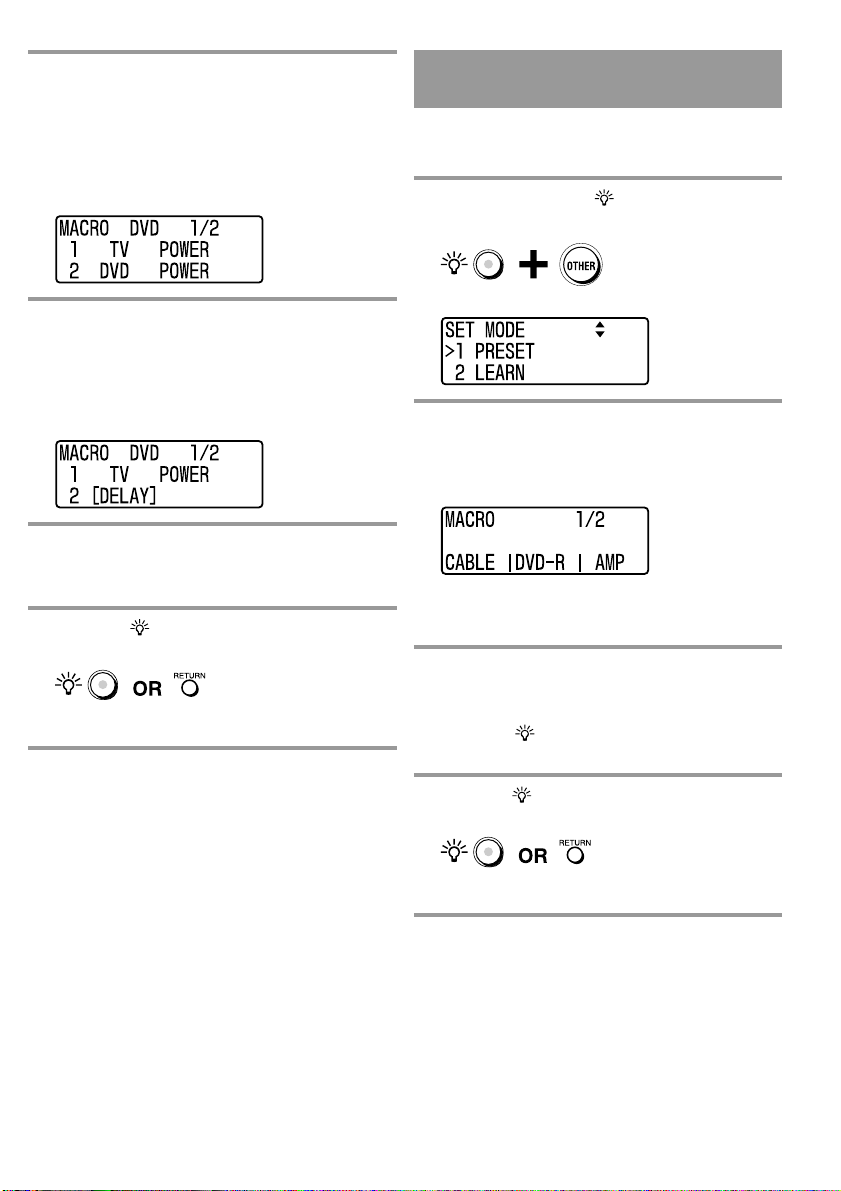
3 While pressing the SCROLL button, press
the COMPONENT select button or Label
select button to which the desired
Component Macro has been programmed.
“MACRO” and the selected A/V component name
appear on the first line and the programmed steps are
listed on the screen.
4 Press the V/v buttons so that the position
of the delay appears in the third line on the
screen, then press the SCROLL button.
Delay is added between the second line and the third
line on the screen, and “[DELAY]” appears in the
third line on the screen.
5 Press the OK button or centre Label select
button.
A beep sounds and programming is complete.
6
Press the (light) button or the RETURN
button twice.
The set mode closes, and the Remote Commander
returns to standby for operating the A/V components.
Clearing programmed steps of a
Component Macro
If you make a mistake in programming steps or you want
to programme a new Component Macro, follow the
procedure below to clear the Component Macro.
1 While pressing the (light) button, press
the OTHER button.
“SET MODE” appears as the screen title.
2 Press the V/v buttons to select
“4 MACRO”, then press the OK button or
the centre Label select button.
“MACRO” appears as the screen title.
Tip
If a number is displayed before the menu, you can select the
menu by pressing the number button.
3 While pressing the COMPONENT select
button or Label select button on which the
Component Macro has been programmed,
press the (light) button.
A beep sounds and the Component Macro is cleared.
Notes
• If remote sensors of A/V components are too far apart from
each other, or they are covered, consecutive operation steps
programmed on a Component Macro may not be executed.
• If a Component Macro is not executed properly for any reason,
such as mentioned above, be sure to set all the A/V components
to the status before the Component Macro was executed.
Otherwise, A/V components will not work properly next time
the Component Macro is executed.
• Because some A/V components are designed to turn on/off
each time they receive the power on/off signal, those
components may not be turned on with the Component Macro.
Check the power on/off status of the A/V components before
using the Component Macro.
GB
20
4 Press the (light) button or the RETURN
button twice.
The set mode closes, and the Remote Commander
returns to standby for operating the A/V components.
Page 21
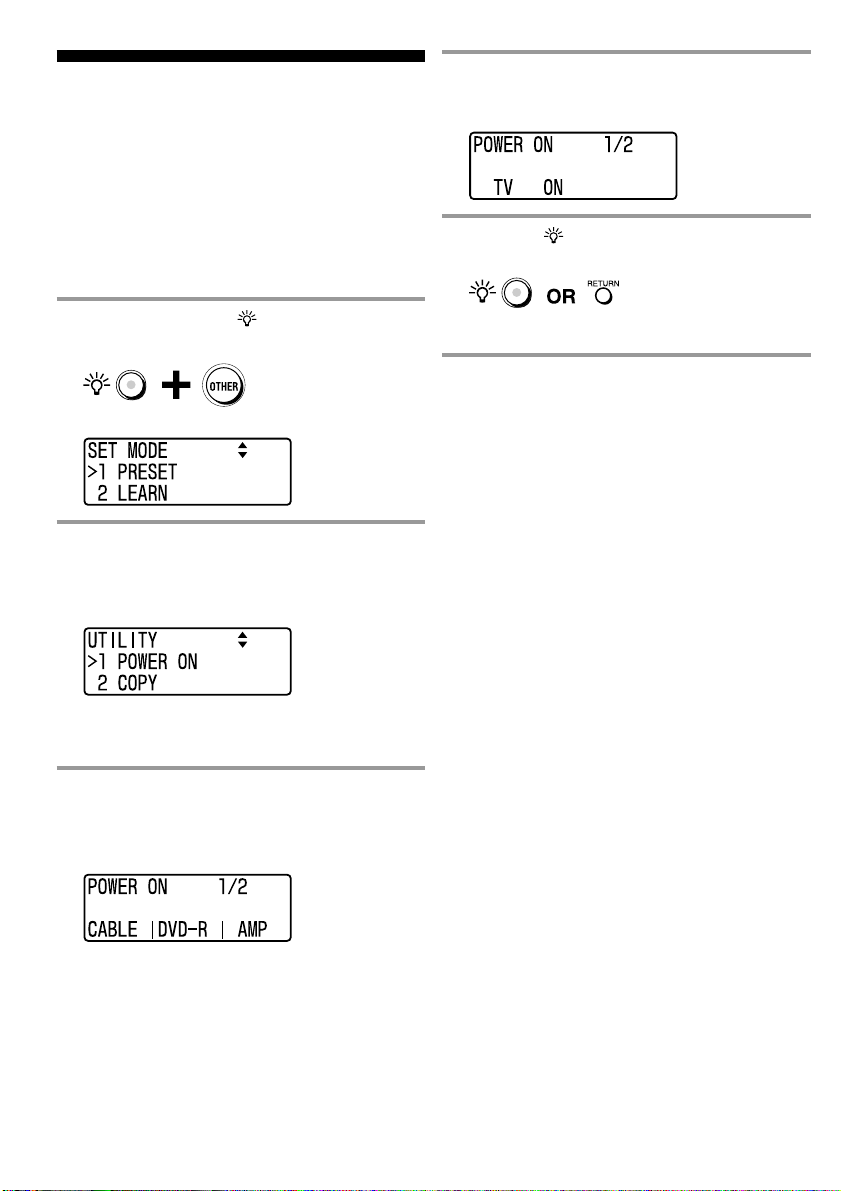
Setting the power-on
command of a selected A/V
component
(for Sony components only)
You can set A/V components to turn on when they are
selected.
This function is effective only for Sony components.
Example: To programme the power-on
function on the TV button
4 Press the TV button.
A beep sounds and “TV ON” appears in the third line
of the screen.
5
Press the (light) button or the RETURN
button three times.
1 While pressing the (light) button, press
the OTHER button.
“SET MODE” appears as the screen title.
2 Press the V/v buttons to select
“6 UTILITY”, then press the OK button or
the centre Label select button.
“UTILITY” appears as the screen title.
Tip
If a number is displayed before the menu, you can select the
menu by pressing the number button.
3 Press the V/v buttons to select “1 POWER
ON”, then press the OK button or centre
Label select button.
“POWER ON” appears as the screen title.
The set mode closes, and the Remote Commander
returns to standby for operating the A/V components.
To clear the power-on function
Press the TV button again in step 4. A beep sounds and
“TV OFF” appears in the third line of the screen, and the
setting will be cancelled.
Notes
• The power-on function can be programmed on the
COMPONENT select button or Label select button on which a
Component Macro has been programmed (page 18).
In this case, the A/V component will be turned on when you
press the COMPONENT select button or Label select button. If
you press and hold the button for over 2 seconds, the
programmed Component Macro will be executed.
• You can programme the power-on function on a COMPONENT
select button or Label select button on which a remote control
signal was programmed using the Learning function (page 12).
In this case, the learned signal will be transmitted when you
press the COMPONENT select button or Label select button,
then the A/V component will be turned on.
• You can programme the power-on function on a COMPONENT
select button or Label select button on which a learned signal
(page 12) and a Component Macro (page 18) are programmed.
In this case, the learned signal will be transmitted when you
press the COMPONENT select button or Label select button,
then the A/V component will be turned on. If you press and
hold the button for over 2 seconds, the programmed
Component Macro will be executed.
Tip
If a number is displayed before the menu, you can select the
menu by pressing the number button.
21
GB
Page 22
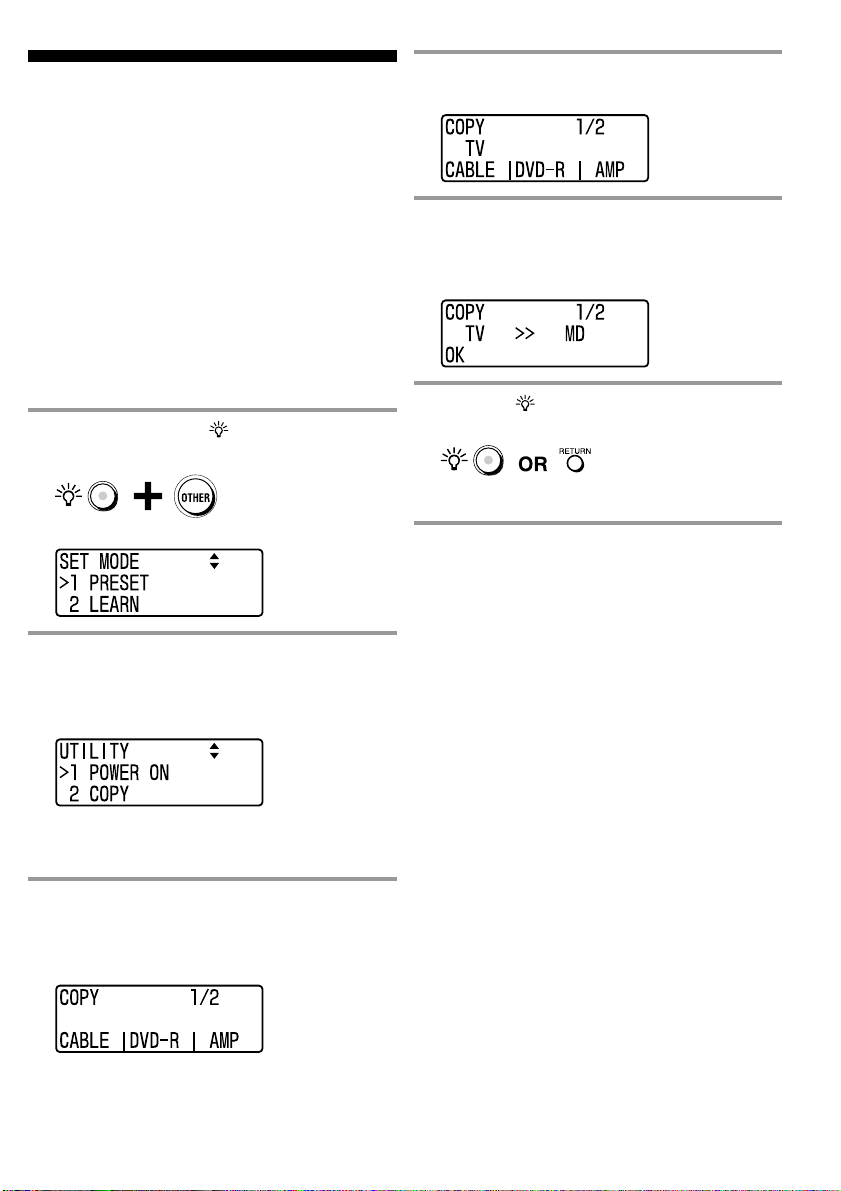
Copying the settings of a
COMPONENT select button
to another button
You can copy the entire settings of a COMPONENT
select button or Label select button to another
COMPONENT select button or Label select button.
Notes
•You cannot copy the settings to a COMPONENT select button
or Label select button on which any “learned” function (page
12) or Component Macro (page 18) has been programmed or
A/V component’s name or label has been changed. (A beep
sounds five times and “NG” appears on the screen.)
• Characters displayed when using the button will be also
replaced.
Example: To copy the settings on the
TV button to the MD button
1 While pressing the (light) button, press
the OTHER button.
“SET MODE” appears as the screen title.
4 Press the TV button.
“TV” appears in the second line of the screen.
5 Press the OTHER button repeatedly, then
press the centre Label select button (MD).
A beep sounds and “TV >> MD” appears in the
second line of the screen.
6
Press the (light) button or the RETURN
button three times.
The set mode closes, and the Remote Commander
returns to standby for operating the A/V components.
To reset the settings
Follow the procedure in “Resetting a COMPONENT select
button or Label select button” on page 28.
2 Press the V/v buttons to select “6
UTILITY”, then press the OK button or
the centre Label select button.
“UTILITY” appears as the screen title.
Tip
If a number is displayed before the menu, you can select the
menu by pressing the number button.
3 Press the V/v buttons to select “2 COPY”,
then press the OK button or centre Label
select button.
“COPY” appears as the screen title.
Tip
If a number is displayed before the menu, you can select the
menu by pressing the number button.
GB
22
Page 23
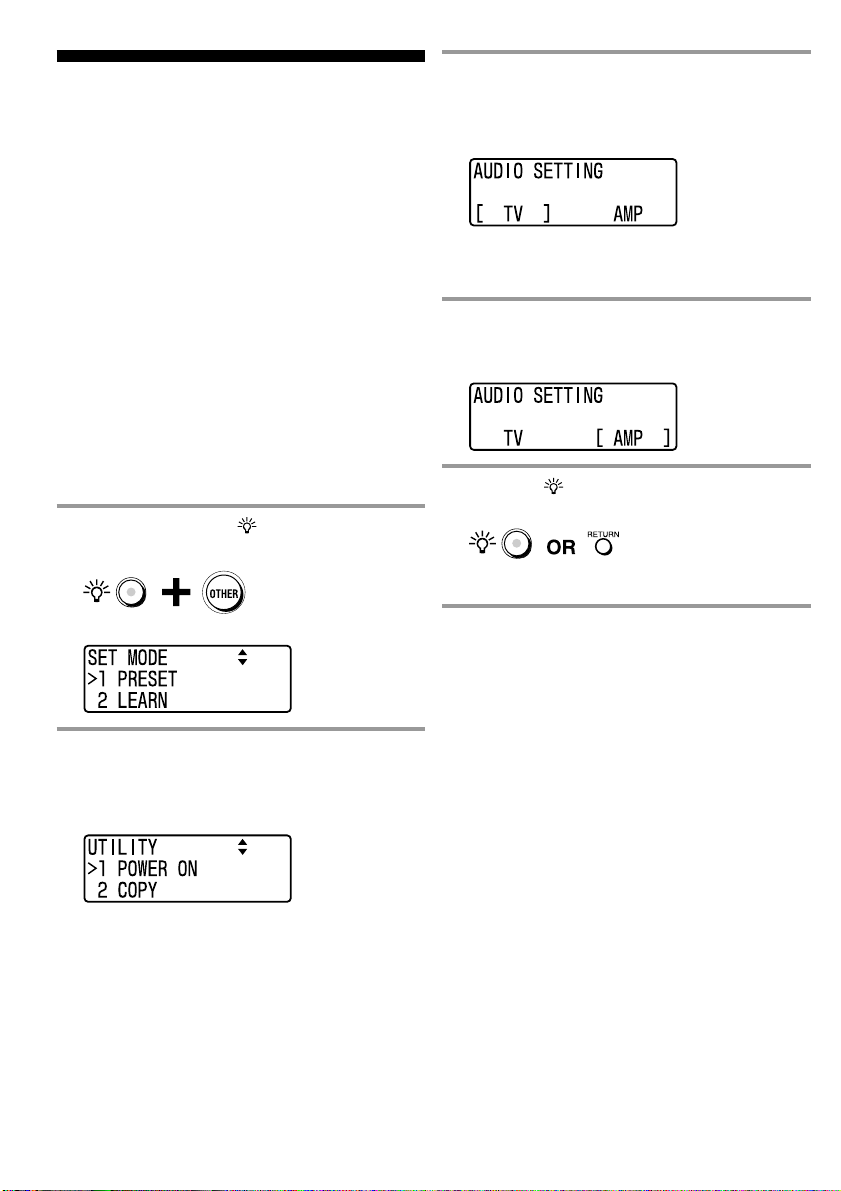
Controlling the volume of
visual components connected
to an audio component
The volume control buttons (2 +/- and %) of the
Remote Commander are factory preset to control the
volume based on the assumption that you hear the sound
of your visual components from your TV speakers, and
that you hear sound of your audio components from the
loudspeakers connected to your amplifier.
The remote control signal transmitted by pressing the
volume control buttons are factory preset as follows:
Visual component: Transmits the signal to control the
volume of a TV.
Audio component: Transmits the signal to control the
volume of an amplifier.
For example, to control the volume while using a DVD
player, you do not need to select the TV to control the
TV volume.
If an amplifier is connected to visual components,
change the volume control setting of all the visual
components to control the volume of the amplifier.
1 While pressing the (light) button, press
the OTHER button .
“SET MODE” appears as the screen title.
3 Press the V/v buttons to select “3 AUDIO
SETTING”, then press the OK button or
centre Label select button.
“AUDIO SETTING” appears as the screen title.
Tip
If a number is displayed before the menu, you can select the
menu by pressing the number button.
4 Press the b button or right Label select
button.
A beep sounds and “AMP” is shown inside the [ ].
5
Press the (light) button or the RETURN
button three times.
The set mode closes, and the Remote Commander
returns to standby for operating the A/V components.
To reset the settings
Press the B button or the left Label select button in step 4.
2 Press the V/v buttons to select
“6 UTILITY”, then press the OK button or
the centre Label select button.
“UTILITY” appears as the screen title.
Tip
If a number is displayed before the menu, you can select the
menu by pressing the number button.
23
GB
Page 24
Others
Setting the button
illumination
You can change the setting of the button illumination of
the Remote Commander. The button illumination is
preset at the factory to turn off automatically if you do
not operate within 10 seconds. You can also change the
brightness and fade effect (which adjusts the brightness
of the button illumination) of the button illumination and
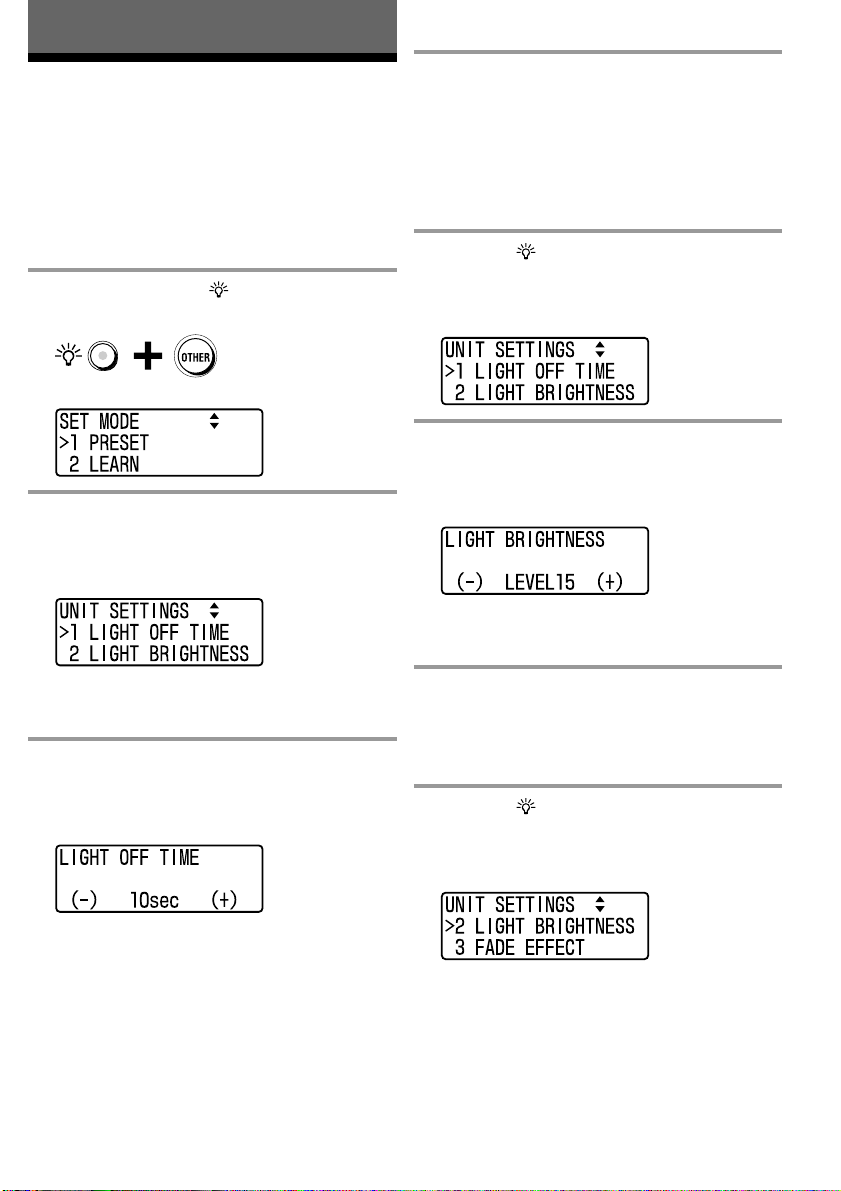
which buttons activate the button illumination.
1 While pressing the (light) button, press
the OTHER button.
“SET MODE” appears as the screen title.
2 Press the V/v buttons to select “5 UNIT
SETTINGS”, then press the OK button or
the centre Label select button.
“UNIT SETTINGS” appears as the screen title.
4 Press the B/b buttons or the left or right
Label select button.
You can set the automatic-off time from 1 to 60
seconds. Each time the button is pressed, the time
decreases/increases by 1 second.
Note
If you set the automatic-off time to longer than 10
seconds, the battery life may be shorter.
5 Press the (light) button, the centre
Label select button, the OK button, or the
RETURN button.
“UNIT SETTINGS” appears as the screen title.
6 Press the V/v buttons to select “2 LIGHT
BRIGHTNESS”, then press the OK button
or the centre Label select button.
“LIGHT BRIGHTNESS” appears as the screen title.
Tip
If a number is displayed before the menu, you can select the
menu by pressing the number button.
Tip
If a number is displayed before the menu, you can select the
menu by pressing the number button.
3 Press the V/v buttons to select “1 LIGHT
OFF TIME”, then press the OK button or
the centre Label select button.
“LIGHT OFF TIME” appears as the screen title.
Tip
If a number is displayed before the menu, you can select the
menu by pressing the number button.
GB
24
7 Press the B/b buttons or the left or right
Label select button.
You can set the brightness from 1 to 15. Each time
the button is pressed, the level decreases/increases by
1.
8 Press the (light) button, the centre
Label select button, the OK button, or the
RETURN button.
“UNIT SETTINGS” appears as the screen title.
Page 25
9 Press the V/v buttons to select “3 FADE
EFFECT”, then press the OK button.
“FADE EFFECT” appears as the screen title, and the
current setting is shown inside the [ ].
Tip
If a number is displayed before the menu, you can select the
menu by pressing the number button.
10
Press the B/b buttons or the left or right
Label select button.
Each time the setting changes, a beep sounds and [ ]
moves to the new setting.
ON: fade in/out the button illumination
OFF: normal button illumination
11
Press the (light) button, the centre
Label select button, the OK button, or the
RETURN button.
“UNIT SETTINGS” appears as the screen title.
12
Press the V/v buttons to select “4 LIGHT
ON MODE”, then press the OK button or
the centre Label select button.
“LIGHT ON MODE” appears as the screen title, and
the current setting is shown inside the [ ].
14
Press the (light) button or the RETURN
button three times.
The set mode closes, and the Remote Commander
returns to standby for operating the A/V components.
Tip
If a number is displayed before the menu, you can select the
menu by pressing the number button.
13
Press the B/b buttons or the left or right
Label select button.
Each time the setting changes, a beep sounds and [ ]
moves to the new setting.
ALL: The button illumination is activated by
pressing any button on the Remote Commander
except the 2 +/– and PROGRAM +/– buttons.
LIGHT: The button illumination is activated by
pressing the (light) button only.
25
GB
Page 26
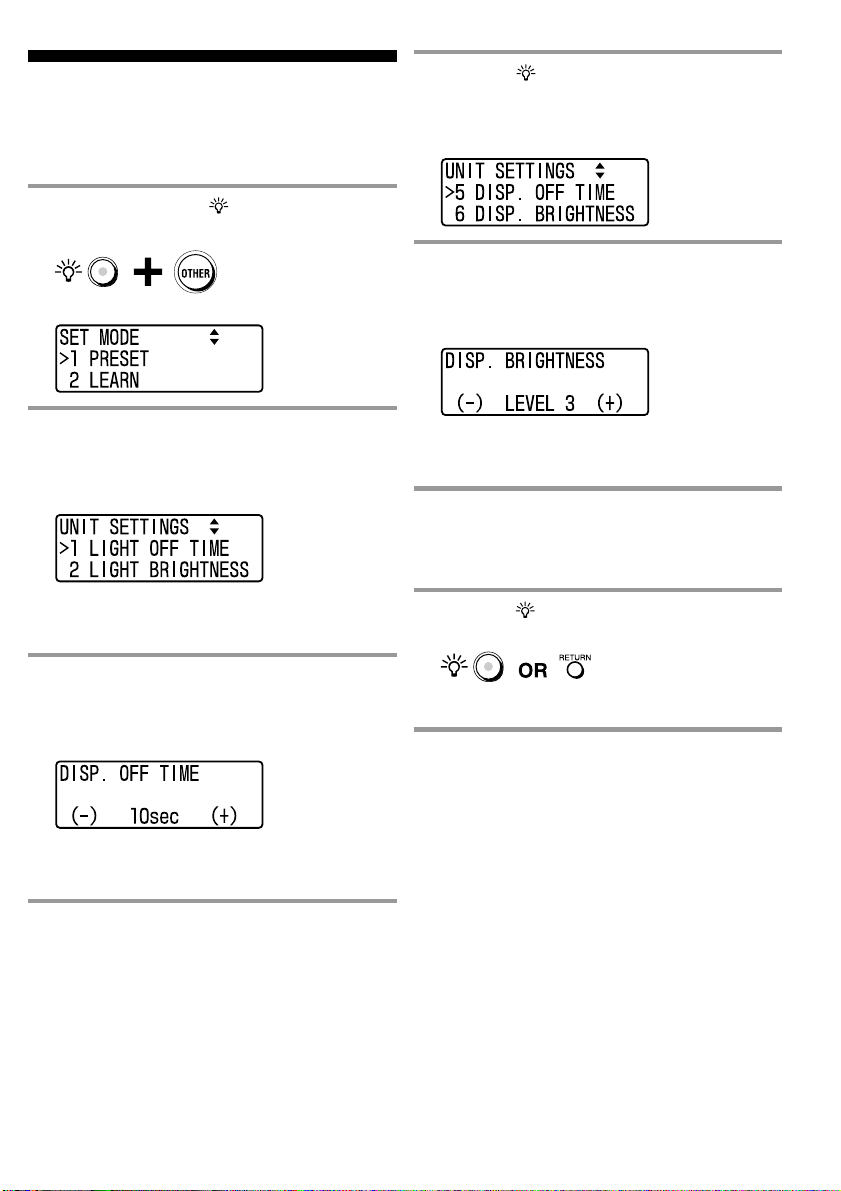
Setting the display
You can change the setting of the display. The Remote
Commander is preset at the factory to turn off the display
automatically if you do not operate it within 30 seconds.
You can also change the brightness of the display.
1 While pressing the (light) button, press
the OTHER button.
“SET MODE” appears as the screen title.
5 Press the (light) button, centre Label
select button, the OK button, or the
RETURN button.
“UNIT SETTINGS” appears as the screen title.
6 Press the V/v buttons to select “6 DISP.
BRIGHTNESS”, then press the OK button
or the centre Label select button.
“DISP. BRIGHTNESS” appears as the screen title.
2 Press the V/v buttons to select “5 UNIT
SETTINGS”, then press the OK button or
the centre Label select button.
“UNIT SETTINGS” appears as the screen title.
Tip
If a number is displayed before the menu, you can select the
menu by pressing the number button.
3 Press the V/v buttons to select “5 DISP.
OFF TIME”, then press the OK button or
the centre Label select button.
“DISP. OFF TIME” appears as the screen title.
Tip
If a number is displayed before the menu, you can select the
menu by pressing the number button.
4 Press the B/b buttons or the left or right
Label select button.
You can set the automatic-off time from 1 to 60
seconds. Each time the button is pressed, the time
decreases/increases by 1 second.
Tip
If a number is displayed before the menu, you can select the
menu by pressing the number button.
7 Press the B/b buttons or the left or right
Label select button.
You can set the brightness from 1 to 3. Each time the
button is pressed, the level decreases/increases by 1.
8
Press the (light) button or the RETURN
button three times.
The set mode closes, and the Remote Commander
returns to standby for operating the A/V components.
26
GB
Page 27
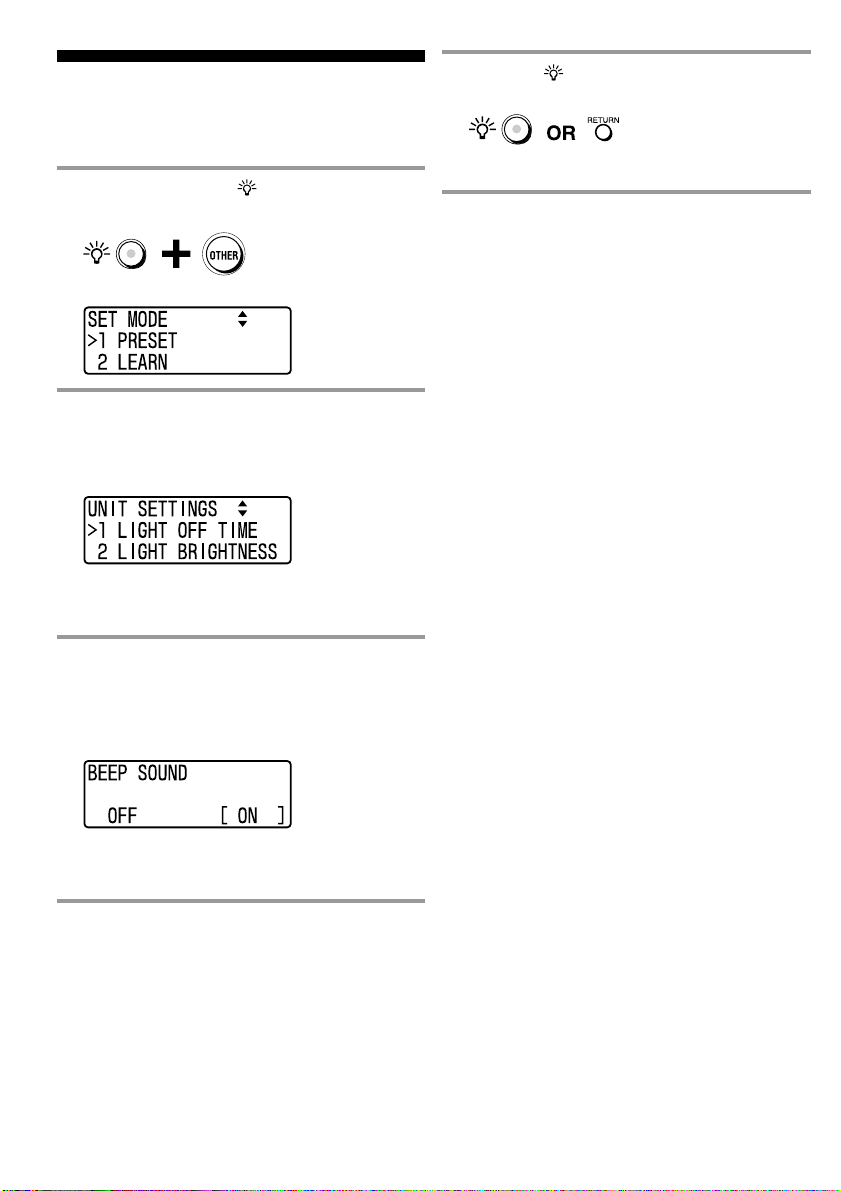
Setting the beep
The Remote Commander is preset at the factory with the
confirmation beep set to on. You can change the setting
to turn off the beep.
1 While pressing the (light) button, press
the OTHER button.
“SET MODE” appears as the screen title.
2 Press the V/v buttons to select “5 UNIT
SETTINGS”, then press the OK button or
the centre Label select button.
“UNIT SETTINGS” appears as the screen title.
Tip
If a number is displayed before the menu, you can select the
menu by pressing the number button.
5
Press the (light) button or the RETURN
button three times.
The set mode closes, and the Remote Commander
returns to standby for operating the A/V components.
Note
When making settings, a beep sounds even if the button beep is
set to off.
3 Press the V/v buttons to select “7 BEEP
SOUND”, then press the OK button or the
centre Label select button.
“BEEP SOUND” appears as the screen title, and the
current setting is shown inside the [ ].
Tip
If a number is displayed before the menu, you can select the
menu by pressing the number button.
4 Press the B/b buttons or the left or right
Label select button.
Each time the setting changes, a beep sounds and [ ]
moves to the new setting.
ON: Turns on the beep.
OFF: Tur ns off the beep.
27
GB
Page 28
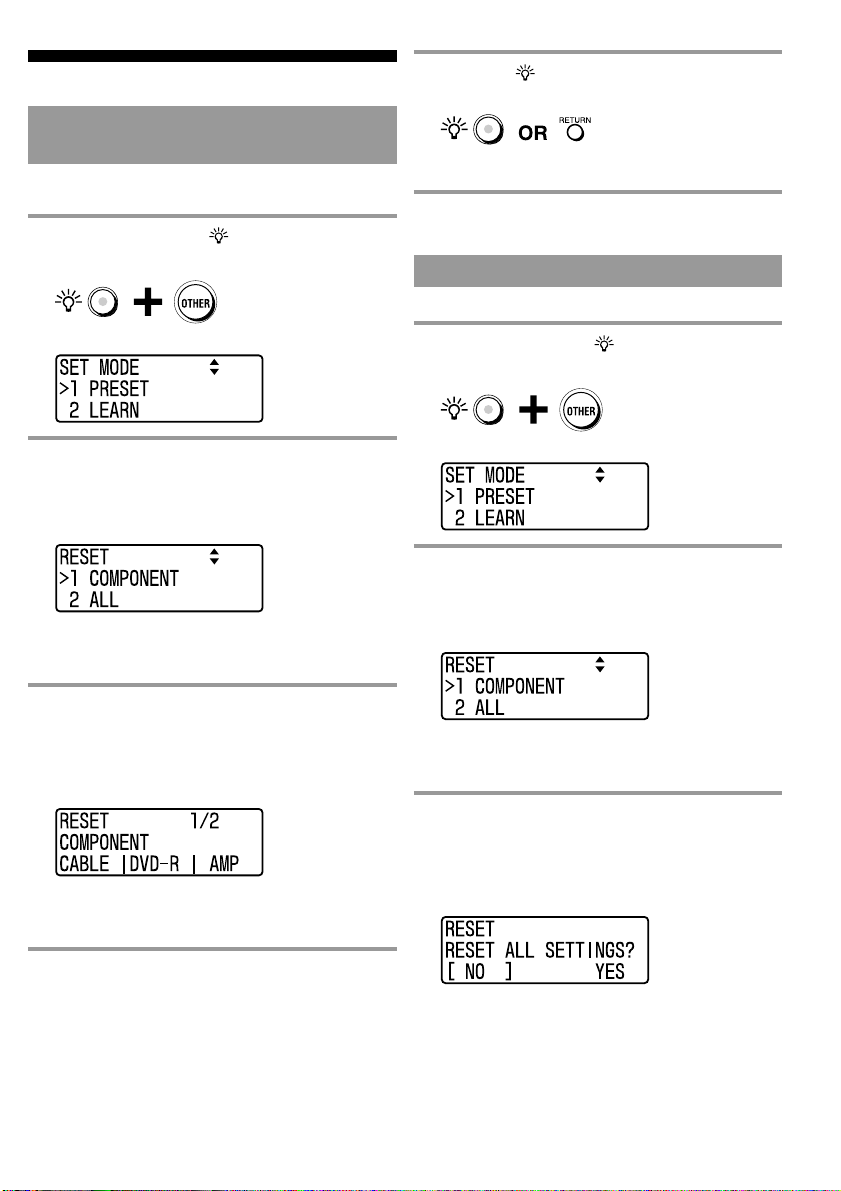
Resetting the settings
Resetting a COMPONENT select
button or Label select button
You can reset the A/V component settings to the factory
preset.
1 While pressing the (light) button, press
the OTHER button.
“SET MODE” appears as the screen title.
5
Press the (light) button or the RETURN
button three times.
Setting is complete and the Remote Commander
returns to the status before you started setting.
Resetting all settings
You can reset all settings to the factory preset.
1 While pressing the (light) button, press
the OTHER button.
2 Press the V/v buttons to select
“7 RESET”, then press the OK button or
the centre Label select button.
“RESET” appears as the screen title.
Tip
If a number is displayed before the menu, you can select the
menu by pressing the number button.
3 Press the V/v buttons to select
“1 COMPONENT”, then press the OK
button or the centre Label select button.
“COMPONENT” appears in the second line on the
screen.
Tip
If a number is displayed before the menu, you can select the
menu by pressing the number button.
4 Press the COMPONENT select button or
Label select button you want to reset.
A beep sounds and all the settings on the selected
component are reset to the factory settings.
“SET MODE” appears as the screen title.
2 Press the V/v buttons to select
“7 RESET”, then press the OK button or
the centre Label select button.
“RESET” appears as the screen title.
Tip
If a number is displayed before the menu, you can select the
menu by pressing the number button.
3 Press the V/v buttons to select “2 ALL”,
then press the OK button or the centre
Label select button.
“RESET ALL SETTINGS?” appears in the second
line on the screen, and “NO” is shown inside the [ ].
Tip
If a number is displayed before the menu, you can select the
menu by pressing the number button.
28
GB
Page 29

4 Press the b button or right Label select
button, then press the OK button or the
centre Label select button.
“REALLY?” appears in the second line of the screen,
and “NO” is shown inside the [ ].
Tip
If you select “NO” and press the OK button or the centre
Label select button, the display returns to the screen shown
in step 2.
5 Press the b button or the right Label select
button, then press the OK button or the
centre Label select button.
When resetting is complete, a beep sounds and all
settings return to the factory settings.
Tip
If you select “NO” and press the OK button or the centre
Label select button, the display returns to the screen shown
in step 2.
6
Press the (light) button or the RETURN
button twice.
The Remote Commander returns to status after the
factory preset TV button is pressed.
29
GB
Page 30

Additional Information
Precautions
• Do not drop the unit or give a shock to the unit, or it
may cause a malfunction.
• Do not leave the unit in a location near heat sources, or
in a place subject to direct sunlight, excessive dust or
sand, moisture, rain or mechanical shock.
• Do not put foreign objects into the unit. Should any
liquid or solid object fall into the unit, have it checked
by qualified personnel before operating the unit any
further.
• Do not expose the remote control detectors of your
components to direct sunlight or other strong
illumination. Too much light there can interfere with
remote control operations.
• Be sure to place the Remote Commander out of the
reach of small children or pets. Components such as air
conditioners, heaters, electric appliances, and electric
shutters or curtains receiving an infrared signal can be
dangerous if misused.
Maintenance
Clean the surface with a soft cloth slightly moistened
with water or a mild detergent solution. Do not use any
type of solvent such as alcohol, benzine or thinner as
they may damage the finish of the surface.
Specifications
Operating distance
Approx. 10 meters (32.8 ft.) (varies depending on
components of different manufacturers)
Power requirements
Two LR6 (size AA) alkaline batteries (not supplied)
Battery life
Approx. 5 months
• When using alkaline batteries.
• When turing on or off a Sony TV for approx. 300 times
per day using alkaline batteries.
• When adjusting the button illumination setting to
Brightness: 5 and Light on time: 10 seconds, and
adjusting the Display setting to Brightness: Level 1 and
Display on time: 30 seconds.
Dimensions
Approx. 60.4 × 227.5 × 29.4 mm
(w × h × d) (2
Mass
170 g (6 oz.) (not including batteries)
Learnable signals
Capacity per signal: up to 300 bits
Signal frequency range: 455 kHz and up to 300 kHz
Signal interval: up to 1 second
* Some signals cannot be learned by the Remote Commander,
even though the signals comply with these specifications.
Design and specifications are subject to change without
notice.
The validity of the CE marking is restricted to only those
countries where it is legally enforced, mainly in the
countries EEA (European Economic Area).
1
/2 × 9 × 1 3/16 in.)
*
30
GB
Page 31

Troubleshooting
If you have problems setting up or using the Remote Commander, first check the batteries (page 4), then check the
items below.
Problem
You cannot operate the
components.
You cannot operate the
components even after setting
the preset code.
You cannot control the volume.
The Remote Commander fails to
learn the remote control signals.
Solution
• Move closer to the component. The maximum operating distance is approximately
32.8 ft. (10 m).
• Check that you are aiming the Remote Commander directly at the component, and that
there are no obstructions between the Remote Commander and the component.
• Turn on the A/V components first, if necessary.
• Check that you are pressing the correct COMPONENT select button or Label select
button.
• Check that the component has infrared remote capability. For example, if your
component didn’t come with a remote commander, it probably isn’t capable of being
controlled by a remote commander.
•
You have assigned a different component to the COMPONENT select button or
component label. A corresponding component is determined by setting a preset code.
Therefore, the name of the component you have preset may be different from that of the
component label. In this case, it is recommended to preset again (page 7) and change the
component name on the label (page 15).
• Set the component code correctly. If the code that is listed first for your component
does not work, try all the codes for your component in the order they are listed in the
supplied “Preset Code List.”
• Some features may not be preset. If some or all of the buttons do not function correctly
even after you have set the component codes, then use the learning function to
programme the remote control signals for the component (page 12).
• The desired A/V component may not be operated by the preset code listed in the
“Preset Code List.” See “Setting A/V components which are not listed in the Preset
Code List”
• If your visual components are connected to an audio system, make sure you have set
up the Remote Commander as described in “Controlling the volume of visual
components connected to an audio component” (page 23).
• You have programmed remote control signals on the TV or amplifier’s volume control
buttons. In this case, the Remote Commander transmits the learned signals instead of
the volume control signals when you select a component other than a TV or amplifier.
• When learning, place the Remote Commander and your A/V component's remote
control at a distance of 5 -10 cm (2-4 inches) away from each other.
• Check that the battery power of your A/V component's remote control is sufficient. If
not, replace the battery with a new one.
•
Before learning, turn off other infrared devices, such as air-conditioners or headphones.
• Learning may not succeed near a plasma display. Try changing the position or turn off
a plasma display.
• Learning may not succeed under strong fluorescent light. Try changing the position.
• When you teach signals of an interactive signal exchange system remote control unit
(supplied with some of Sony’s receivers and amplifiers) to the Remote Commander,
the response signal of the main unit may interfere with the learning of the Remote
Commander. In such a case, move to a place where the signals cannot reach the main
unit (e.g. another room, etc.).
(page 8)
to set the preset code available for the A/V component.
Continued
31
GB
Page 32

Problem
You cannot operate a component
even after you programmed the
remote control signals with the
“learning” function.
“NG” appears in the third line
on the screen and a beep
sounds five times while setting
the preset code.
“NG” appears in the third line
on the screen and a beep sounds
five times while learning.
“FULL” appears in the third
line on the screen and a beep
sounds five times while
learning.
“NG” appears in the third line
on the screen and a beep sounds
five times when trying to copy
settings of a component label to
another component label.
A beep sounds twice while
setting the preset code.
A beep sounds twice while
learning.
A beep sounds twice while
programming a Component
Macro.
“NG” appears in the third line
on the screen and a beep sounds
twice while programming the
power-on function.
Solution
Make sure that the Remote Commander has learned the correct signals. If not, see
“Notes” on page 13 or “For accurate learning” (page 14), and try the learning procedure
again (page 12).
Preset code setting has not succeeded. Set the preset code again, referring to the
supplied “Preset Code List”.
• Learning has not succeeded. Try the learning procedure again (page 12), referring to
“For accurate learning” (page 14).
• While learning, you pressed the button other than the one on which you want to
programme the signal. Programme the signal on the correct button again (page 12).
Learned signal memory is full. Clear learned signals that are not frequently used (page
14), then programme the desired remote signal.
• Setting cannot be copied on COMPONENT select buttons or Label select buttons in
the following situations:
– A learned signal or Component Macro is programmed.
– The button’s component label has been changed.
– The button’s function label has been changed.
In this case, reset those settings (page 28) before copying.
• You are copying the settings of A/V components other than a TV or amplifier on the
Label select button assigned with a TV or amplifier. The TV button is assigned with
only TV and the Label select button to which an amplifier is preset is assigned with
only amplifier or DVD player home theatre system.
• The Remote Commander fails to copy the settings if the programmed signal data of the
button is too large. In this case, clear programmed signals that are not frequently used
(page 14), then copy the settings again.
The preset code cannot be set on the COMPONENT select button or Label select button
in the following situations:
– A learned signal or Component Macro is programmed.
– The button’s component label has been changed.
– The button’s function label has been changed.
In this case, reset those settings (page 28) before setting.
• See “For accurate learning” (page 14).
• Other remote signal has been programmed on the desired button. Clear the learned
signal (page 14) or programme the remote signal on another button (page 12).
• Learning standby time (10 seconds) has been exceeded. Start over from the beginning.
• You are assigning a Component Macro on the COMPONENT select button or Label
select button on which another Component Macro has been assigned. Clear the
Component Macro assigned to the button (page 20), then assign the desired
Component Macro.
• The programmed steps exceed 32 after adding delay while checking the Component
Macro. A maximum of 32 steps (including delay) can be programmed. Reprogramme
the Component Macro.
You are programming the power-on function (page 21) on the COMPONENT select
button or Label select button assigned with a preset code other than Sony’s. The poweron function can be programmed only on the button assigned with Sony’s preset code.
32
GB
Page 33

Problem
A Component Macro does not
function correctly.
The display turns off
automatically.
The set mode closes
unexpectedly while setting.
The confirmation beep does
not sound.
The confirmation beep sounds
even though beep sound is set
to off.
“E” appears in the screen.
The Remote Commander does
not enter set mode.
Solution
• When programming a Component Macro, programme the actions in the correct order
(page 18).
• Change the direction of the Remote Commander. If it does not improve, position the
Remote Commander closer to each A/V component.
• Check that the programmed A/V components are ready to receive the signals correctly
(page 18).
• If you changed the preset code or programmed remote signals after programming the
Component Macro, the new signal will be transmitted when executing the Component
Macro.
• The interval between programmed steps is too short. See “To check the programmed
steps of a Component Macro and add a delay action” (page 19) to extend the interval,
or change the order of the steps.
The Remote Commander is preset at the factory to turn off the display automatically if
you do not operate it for over 30 seconds (automatic-off time). You can change the
automatic-off time between 1-60 seconds (page 26).
The set mode closes if you do not operate the Remote Commander for over 60 seconds.
Perform the next step within 60 seconds.
Beep sound is set to off. Set it on (page 27).
A confirmation beep sounds during set mode, even if the beep sound is set to off.
The batteries are weak. Replace them with new ones.
If “E” appears on the screen, the Remote Commander cannot enter into the set mode.
Replace the batteries with new ones.
33
GB
Page 34

Table of Preset Functions
The Remote Commander memorizes major brands’ remote control signals.
Setting the preset code (page 7) enables the Remote Commander to operate each AV component.
The Remote Commander is preset at the factory to operate Sony brand A/V components. (Refer to the table below.)
Screen title Code No. Brand and component
TV 8001 Sony TV (Analogue)
VCR 1003 Sony VCR (Video Cassette Recorder)
SAT 3001 Sony Analogue Satellite Receiver
DVD 0001 Sony DVD Player
CABLE 9001 Analogue Cable Box
DVD-R 0203 Sony DVD Recorder
AMP 4001 Sony Receiver/Amplifier
CD 5001 Sony CD Player
MD 7001 Sony MD Deck
TAPE 6001 Sony Cassette Deck
The Remote Commander memorizes the remote control signal in accordance with Sony AV components. Therefore,
when another brand’s AV component is set, the function of a button may differ from its name. Refer to the following
tables for each button function. (Change the functions corresponding to Label buttons and function memos after
setting the preset code, if necessary.)
Component Screen title
TV (Analogue) TV
TV (Digital) TV
VCR (Video Cassette Recorder) VCR
Analogue Satellite Receiver SAT
Digital Satellite Receiver SAT
DVD Player DVD
Analogue Cable Box CABLE
DVD Recorder, DVD/VCR Combo DVD-R
Home Theatre System/DVD Player Combo DVD
Receiver/Amplifier AMP
CD Player CD
MD Deck MD
Cassette Deck TAPE
34
GB
Page 35

TV (Analogue)
Button/Display
1
t
1-9, 0, - (1-), ENT (2-)
2 +, –
%
PROGRAM +, –
Buttons
/
a
MENU
V, v, B, b
OK
RETURN
A (Red)
B (Green)
C (Yellow)
D (Blue)
Page 1/4 Page 2/4
INFO
SLEEP
(Label select buttons)
A/B
WIDE
Display
PIP
SWAP
Page 3/4
PIPCH+
PIPCH–
Label
POWER
INPUT
1-9, 0, -/--, ENTER
VOLUME+
VOLUME–
MUTING
PROGRAM+
PROGRAM–
RECALL
TELETEXT
TV ON
MENU
R, r, T, t
OK
RETURN
RED
GREEN
YELLOW
BLUE
INFO
SLEEP
DUAL SOUND
WIDE
PIP ON/OFF
PIP SWAP
PIP CH+
PIP CH–
Function
To turn the power on/off
To change the input mode
To change the programme. For example, to change the programme 5, press 0 and 5 (or,
press 5 and ENT).
Volume up: +
Volume down: –
To silence the sound on the TV. Press again to return to the previous volume level.
Programme up: +
Programme down: –
To operate JUMP, FLASHBACK or the CHANNEL RETURN function on the TV
depending on the setting of the TV’s manufacture
To switch to teletext
To turn on
To return from teletext to TV
To call up the MENU display
To move the cursor
To enter the selection of the MENU display
To exit the mode
Fastext button
Fastext button
Fastext button
Fastext button
To display the current programme on TV
To operate sleep function on the TV (works only for a TV with sleep function)
To switch the sound of the duplex broadcast
To switch to WIDE
To turn on/off the “window” picture
To swap the “window” picture
To change the TV programme in the “window” picture upwards
To change the TV programme in the “window” picture downwards
Continued
35
GB
Page 36

TV (Digital)
Button/Display
1
t
1-9, 0, - (1-), ENT (2-)
2 +, –
%
PROGRAM +, –
DIGITAL/ANALOG
/
Buttons
a
GUIDE
MENU
V, v, B, b
OK
RETURN
TOOLS
m
N
M
A (Red)
B (Green)
C (Yellow)
D (Blue)
Page 1/4 Page 2/4
(Label select buttons)
INFO
SLEEP
Display
A/B
2PICS
16:9
FREEZE
Label
POWER
INPUT
1-9, 0, -/--, ENTER
VOLUME+
VOLUME–
MUTING
PROGRAM+
PROGRAM–
RECALL
D/A MODE
TELETEXT
TV ON
EPG
MENU
R, r, T, t
OK
RETURN
TOOLS
VIDEO 1
VIDEO 2
VIDEO 3
RED
GREEN
YELLOW
BLUE
INFO
SLEEP
DUAL SOUND
TWIN PICS
16:9
FREEZE
Function
To turn the power on/off
To change the input mode
To change the programme. For example, to change the programme 5, press 0 and 5 (or,
press 5 and ENT).
Volume up: +
Volume down: –
To silence the sound on the TV. Press again to return to the previous volume level.
Programme up: +
Programme down: –
To operate JUMP, FLASHBACK or the CHANNEL RETURN function on the TV
depending on the setting of the TV’s manufacture.
To switch the digital/analogue mode
To switch to teletext
To turn on
To return from teletext to TV
To use the programme guide
To call up the MENU display
To move the cursor
To enter the selection of the MENU display
To exit the mode
To go into the OPTION setting mode
To change the VIDEO 1
To change the VIDEO 2
To change the VIDEO 3
Fastext button
Fastext button
Fastext button
Fastext button
To display the current programme on TV
To operate sleep function on the TV (works only for a TV with sleep function)
To switch the sound of the duplex broadcast
To divide the screen into two for watching two pictures simultaneously
To switch to WIDE
To display a frozen image of the current programme
36
GB
Page 37

VCR (Video Cassette Recorder)
Button/Display
1
t
1-9, 0, - (1-), ENT (2-)
PROGRAM +, –
/
a
Buttons
MENU
V, v, B, b
OK
RETURN
m
N
M
x
X
z (REC)*
Page 1/4 Page 2/4
CMSKIP
HS REW
PLAYx2
(Label select buttons)
QTIMER
SRCHT
Display
SRCHt
Page 3/4
CNTR
SP/LP
TV
Page 4/4
LINE1
LINE2
DV IN
Label
POWER
ANT/SW
1-9, 0, -/--, ENTER
PROGRAM+
PROGRAM–
DISPLAY
INPUT
MENU
R, r, T, t
OK
EXIT
m
N
M
x
X
z
CM SKIP
H.S.REW
PLAYx2
QUICKTIMER
SEARCHT
SEARCHt
COUNTER
SP/LP
TV TUNER
LINE1
LINE2
DV INPUT
Function
To turn the power on/off
To switch the aerial output
To change the programme. For example, to change the programme 5, press 0 and 5 (or,
press 5 and ENT).
Programme up: +
Programme down: –
To expose the on-screen display
To change the input mode
To call up the MENU display
To move the cursor
To enter the selection of the MENU display
To exit the mode
To rewind
To play
To fast-forward
To stop
To pause
To record
To skip over commercials
To rewind at high speed
To play at double speed
To select the recording time by 30 minutes and begin recording
REVIEW locked picture search
CUE locked picture search
To change the counter display
To switch the tape speed
To return to the TV (to reset the external input)
To select the input source: LINE 1
To select the input source: LINE 2
To select the input source: Digital Video input
*To avoid misoperation, the Remote Commander will only transmit z/REC (record) button signals if the button is pressed and held
for over 2 seconds.
Continued
37
GB
Page 38

Analogue Satellite Receiver
Digital Satellite Receiver
Button/Display
1
t
1-9, 0
- (1-)
PROGRAM +, –
DIGITAL/ANALOG
Buttons
/
a
GUIDE
MENU
V, v, B, b
OK
RETURN
TOOLS
A (Red)
B (Green)
C (Yellow)
D (Blue)
Page 1/4 Page 2/4
(Label select buttons)
HELP
FAVORT
Display
SERV
PILOT
PRSNL
A/B
Label
POWER
INPUT
1-9, 0
-/--
PROGRAM+
PROGRAM–
RECALL
INTRCTV
TELETEXT
BOX OFFICE
GUIDE
MENU
R, r, T, t
OK
EXIT
EPG
RED
GREEN
YELLOW
BLUE
HELP
FAVORITE
SERVICE
PILOT
PERSONAL
SAT A/B
Function
To turn the power on/off
To switch the output of the satellite receiver to the TV. (When you connect a TV cable
or aerial to the receiver, the output switches between a TV and satellite programme.)
To change the programmes
To select double-digit numbers
Works in the same way as your satellite tuner’s commander
Programme up: +
Programme down: –
To return to the last tuned station
To show the INTERACTIVE screen
To switch to teletext
To show the BOX OFFICE screen
To bring up master guide
To call up the MENU display
To move the cursor
To enter the selection of the MENU display
To exit the mode
To show or hide the EPG display
Fastext button
Fastext button
Fastext button
Fastext button
To show HELP
To switch up/down among the favourite programmes only
To perform the “PAY PER VIEW” or the “programme download” service function
To turn on/off the EPG display
To display the setting modes
To switch the twin receiver
38
GB
Page 39

Digital Satellite Receiver (No. 3201)
Button/Display
1
t
1-9, 0
- (1-)
PROGRAM +, –
DIGITAL/ANALOG
/
a
GUIDE
Buttons
MENU
V, v, B, b
OK
RETURN
m
N
M
x
X
z (REC)*
A (Red)
B (Green)
C (Yellow)
D (Blue)
(Label select
Page 1/4
HELP
buttons)
Display
SERV
Label
POWER
INPUT
1-9, 0
-/--
PROGRAM+
PROGRAM–
INTRCTIV
TELETEXT
BOX OFFICE
GUIDE
MENU
R, r, T, t
OK
EXIT
m
N
M
x
X
z
RED
GREEN
YELLOW
BLUE
HELP
SERVICE
Function
To turn the power on/off
To switch the output of the satellite receiver to the TV. (When you connect a TV cable
or aerial to the receiver, the output switches between a TV and satellite programme.)
To change the programmes
To select double-digit numbers
Works in the same way as your satellite tuner’s commander
Programme up: +
Programme down: –
To show the INTERACTIVE screen
To switch to teletext
To show the BOX OFFICE screen
To bring up master guide
To call up the MENU display
To move the cursor
To enter the selection of the MENU display
To exit the mode
To rewind
To play
To fast-forward
To stop
To pause
To record
Fastext button
Fastext button
Fastext button
Fastext button
To show HELP
To perform the “PAY PER VIEW” or the “programme download” service function
*To avoid misoperation, the Remote Commander will only transmit z/REC (record) button signals if the button is pressed and held
for over 2 seconds.
Continued
39
GB
Page 40

DVD Player
Button/Display
1
1-9, 0
- (1-)
ENT (2-)
PROGRAM +, –
/
a
Buttons
GUIDE
MENU
V, v, B, b
OK
RETURN
TOOLS
m
N
M
x
X
Page 1/4 Page 2/4
AUDIO
REPEAT
CLEAR
(Label select buttons)
ANGLE
SLOWT
Display
SLOWt
P.MODE
SRCHT
SRCHt
Page 4/4Page 3/4
EJECT
Label
POWER
1-9, 0
+10
ENTER
>
.
DISPLAY
SUBTITLE
TOP MENU
DVD MENU
R, r, T, t
OK
RETURN
SET UP
m
N
M
x
X
AUDIO
REPEAT
CLEAR
ANGLE
SLOWT
SLOWt
PLAY MODE
SEARCHT
SEARCHt
EJECT
Function
To turn the power on/off
Number buttons: To set items selected from the screen
To select numbers 10 and above
To enter the setting. To set items selected from the screen.
To proceed to the next location or song
To proceed to the previous location or song
To show the current play status on the screen
To switch the subtitle
To display the top menu
To display the DVD menu
To move the cursor
To execute items selected from the screen
To return to the last previous screen
To call up the setting up menu
To rewind
To play
To fast-forward
To stop
To pause
To change the sound
To go into the repeat mode
To clear the selected characters from the screen
To switch angle
Slow playback in the reverse direction
Slow playback in the forward direction
To change the playback mode
To search in the reverse direction
To search in the forward direction
To open or close the tray
Analogue Cable Box
Button/Display
1
1-9, 0
Buttons
ENT (2-)
PROGRAM +, –
GB
40
Label
POWER
1-9, 0
ENTER
PROGRAM+
PROGRAM–
RECALL
Function
To turn the power on/off
To change the programmes
To enter the programme
Programme up: +
Programme down: –
To operate JUMP, FLASHBACK or the CHANNEL RETURN function
Page 41

DVD Recorder
DVD/VCR Combo*
1
Button/Display
1
1-9, 0
- (1-)
ENT (2-)
PROGRAM +, –
/
a
GUIDE
Buttons
MENU
V, v, B, b
OK
RETURN
TOOLS
m
N
M
x
X
z (REC)*
A (Red)
D (Blue)
Page 1/4 Page 2/4
AUDIO
REPEAT
CLEAR
(Label select buttons)
ANGLE
SLOWT
Display
SLOWt
Page 3/4
P.MODE
SRCHT
SRCHt
Page 4/4
EJECT
R.MODE
Label
POWER
1-9, 0
+10
ENTER
PROGRAM+
PROGRAM–
DECKCHANGE
DISPLAY
SUBTITLE
TOP MENU
DVD MENU
R, r, T, t
OK
RETURN
SET UP
m
N
M
x
2
X
z
>
.
AUDIO
REPEAT
CLEAR
ANGLE
SLOWT
SLOWt
PLAY MODE
SEARCHT
SEARCHt
EJECT
REC MODE
Function
To turn the power on/off
Number buttons: To set items selected on the screen
To select numbers 10 and above
To enter a setting or to set items selected on the screen
Programme up: +
Programme down: –
To switch the deck
To show the current play status on the screen
To switch the subtitle
To display the top menu
To display the DVD menu
To move the cursor
To enter the selection of the menu display
To return to the last previous scree
To call up the setting up menu
To rewind
To play
To fast-forward
To stop
To pause
To record
To proceed to the next location or song
To proceed to the previous location or song
To change the sound
To go into the repeat mode
To clear the selected characters from the screen
To switch angle
Slow playback in the reverse direction
Slow playback in the forward direction
To change the playback mode
To search in the reverse direction
To search in the forward direction
To open or close the tray
To change the recording mode
*1The Remote Commander may not operate the video cassette recorder section of some DVD/VCR Combo, even though the preset
code is set. In such a case, program the VCR operations on free buttons using the Learning function, or assign the VCR section to
another COMPONENT Select button.
2
To avoid misoperation, the Remote Commander will only transmit z/REC (record) button signals if the button is pressed and held
*
for over 2 seconds.
Continued
41
GB
Page 42

Home Theatre System/DVD Player Combo
Button/Display
1
t
1-9, 0
- (1-)
ENT (2-)
2 +, –
%
PROGRAM +, –
Buttons
DIGITAL/ANALOG
/
a
GUIDE
MENU
V, v, B, b
OK
RETURN
TOOLS
m
N
M
x
X
Page 1/4 Page 2/4 Page 3/4
SFIELD
TUNER
(Label select buttons)
AUDIO
Display
REPEAT
CLEAR
ANGLE
EJECT
P.MODE
Label
POWER
INPUT
1-9, 0
+10
ENTER
VOLUME+
VOLUME–
MUTING
>
.
DISC SKIP
BAND
DISPLAY
SUBTITLE
TOP MENU
MENU
R, r, T, t
OK
RETURN
SET UP
m
N
M
x
X
SOUNDFIELD
TUNER
AUDIO
REPEAT
CLEAR
ANGLE
EJECT
PLAY MODE
Function
To turn the power on/off
To change the input mode
Number buttons: To set items selected on the screen
To select numbers 10 and above
To enter a setting or to set items selected on the screen
Volume up: +
Volume down: –
To silence the sound on the Home Theatre System/DVD Player Combo. Press again to
return to the previous volume level.
To proceed to the next location or song
To proceed to the previous location or song
To select next disc
To select the band
To show the current play status on the screen
To switch the subtitle
To display the top menu
To display the DVD menu
To move the cursor
To enter the selection of the menu display
To return to the last previous screen
To call up the setting up menu
To rewind
To play
To fast-forward
To stop
To pause
To turn on/off the sound field
To select the tuner band
To change the sound
To go into the repeat mode
To clear the selected characters from the screen
To switch angle
To open or close the tray
To change the playback mode
42
GB
Page 43

Receiver/Amplifier
Button/Display
1
t
1
2
3
4
5
6
7
Buttons
8
9
0
2 +, –
%
PROGRAM +, –
DIGITAL/ANALOG
/
Page 1/4 Page 2/4 Page 3/4
SFIELD
CENTR+
CENTR–
(Label select buttons)
GENRE
REAR+
Display
REAR–
T.TONE
WOOFR+
WOOFR–
Page 4/4
D.IN
Label
POWER
INPUT
1
2
3
4
5
6
7
8
9
0
VOLUME+
VOLUME–
MUTING
PRESET+
PRESET–
SHIFT
BAND
5.1INPUT
SOUNDFIELD
CENTER+
CENTER–
GENRE
REAR+
REAR–
TEST TONE
SUBWOOFER+
SUBWOOFER–
DIGITAL IN
Function
To turn the power on/off
To change the input select cyclically
To select the input source: VIDEO1
To select the input source: VIDEO2
To select the input source: AUX
To select the input source: TUNER
To select the input source: CD
To select the input source: TAPE
To select the input source: MD/DAT
To select the input source: TV
To select the input source: PHONO
To select the input source: DVD
Volume up: +
Volume down: –
To silence the sound on the Receiver/Amplifier. Press again to return to the previous
volume level.
Presetting or tuning frequency up: +
Presetting or tuning frequency down: –
To shift band or preset select
To select the tuner band
To change the multi-channel of 5.1ch and above
To turn on/off the sound field
To adjust the centre speaker level
To adjust the centre speaker level
To select a sound field genre
To adjust the rear speaker level
To adjust the rear speaker level
To output a test tone
To adjust the subwoofer level
To adjust the subwoofer level
To switch the digital input
Continued
43
GB
Page 44

CD Player
Button/Display
1
1-9, 0
- (1-)
ENT (2-)
PROGRAM +, –
Buttons
/
m
N
M
x
X
z (REC)*
Page 1/4 Page 2/4
(Label select buttons)
REPEAT
SHFFL
Display
FADER
EJECT
P.MODE
CLEAR
*To avoid misoperation, the Remote Commander will only transmit z/REC (record) button signals if the button is pressed and held
for over 2 seconds.
Label
POWER
1-9, 0
+10
ENTER
>
.
DISC SKIP
DISPLAY
m
N
M
x
X
z
REPEAT
SHUFFLE
FADER
EJECT
PLAY MODE
CLEAR
Function
To turn the power on/off
To select the track number
To select numbers 10 and above
To enter the setting
To select the next track
To select the previous track
To select the next disc
To switch the display of the CD player to turn on/off
To rewind
To play
To fast-forward
To stop
To pause
To record
To select repeat play mode
To play in random order
To toggle the fade-in/fadeout operation
To open/close
To change the playback mode
To clear the setting
Cassette Deck
Button/Display
1
- (1-)
ENT (2-)
V
v
B
Buttons
b
OK
RETURN
m
N
M
x
X
z (REC)*
Label
POWER
DECK Ab
DECK Bb
A/B
DECK BN
DECK Bx
DECK Bm
DECK BM
DECK BX
DECK Bz
DECK Am
DECK AN
DECK AM
DECK Ax
DECK AX
DECK Az
Function
To turn the power on/off
To reverse the deck A
To reverse the deck B
To select the deck: Deck A or B (dual cassette deck only)
To play the deck B
To stop the deck B
To rewind the deck B
To fast-forward the deck B
To pause the deck B
To record the deck B
To rewind the deck A
To play the deck A
To fast-forward the deck A
To stop the deck A
To pause the deck A
To record the deck A
*To avoid misoperation, the Remote Commander will only transmit z/REC (record) button signals if the button is pressed and held
for over 2 seconds.
GB
44
Page 45

MD Deck
Button/Display
1
1-9, 0
- (1-)
ENT (2-)
PROGRAM +, –
Buttons
/
m
N
M
x
X
z (REC)*
Page 1/4 Page 2/4
REPEAT
SHFFL
(Label select buttons)
FADER
Display
EJECT
P.MODE
CLEAR
Page 3/4
CDSYNC
DECK A
DECK B
Label
POWER
1-9, 0
+10
ENTER
>
.
DISC SKIP
DISPLAY
m
N
M
x
X
z
REPEAT
SHUFFLE
FADER
EJECT
PLAY MODE
CLEAR
CD SYNCRO
DECK A
DECK B
Function
To turn the power on/off
To select the track number
To select numbers 10 and above
To enter the setting
To select the next track
To select the previous track
To select the next disc
To change the display mode or turn the display on/off
To rewind
To play
To fast-forward
To stop
To pause
To record
To select repeat play mode
To play in random order
To toggle the fade-in/fadeout operation
To open/close
To change the playback mode
To clear the setting
To start synchronizing with the CD
To select a deck of the dual MD deck: A
To select a deck of the dual MD deck: B
*To avoid misoperation, the Remote Commander will only transmit z/REC (record) button signals if the button is pressed and held
for over 2 seconds.
45
GB
Page 46

Tratamiento de los equipos
eléctricos y electrónicos al
final de su vida útil
(aplicable en la Unión
Europea y en países
europeos con sistemas de
recogida selectiva de
residuos)
Este símbolo en el equipo o el embalaje indica que el
presente producto no puede ser tratado como residuos
domésticos normales, sino que debe entregarse en el
correspondiente punto de recogida de equipos eléctricos
y electrónicos. Al asegurarse de que este producto se
desecha correctamente, Ud. ayuda a prevenir las
consecuencias negativas para el medio ambiente y la
salud humana que podrían derivarse de la incorrecta
manipulación en el momento de deshacerse de este
producto. El reciclaje de materiales ayuda a conservar los
recursos naturales. Para recibir información detallada
sobre el reciclaje de este producto, póngase en contacto
con el ayuntamiento, el punto de recogida más cercano o
el establecimiento donde ha adquirido el producto.
Tratamiento de las baterías
al final de su vida útil
(aplicable en la Unión
Europea y en países
europeos con sistemas de
recogida selectiva de
residuos)
Este símbolo en la batería o en el embalaje indica que la
batería proporcionada con este producto no puede ser
tratada como un residuo doméstico normal.
Al asegurarse de que estas baterías se desechan
correctamente, Ud. ayuda a prevenir las consecuencias
negativas para el medio ambiente y la salud humana que
podrían derivarse de la incorrecta manipulación en el
momento de deshacerse de la batería. El reciclaje de
materiales ayuda a conservar los recursos naturales.
En el caso de productos que por razones de seguridad,
rendimiento o mantenimiento de datos, sea necesaria una
conexión permanente con la batería incorporada, esta
batería solo deberá ser reemplazada por personal técnico
cualificado para ello.
Para asegurarse de que la batería será tratada
correctamente, entregue el producto al final de su vida
útil en un punto de recogida para el reciclado de aparatos
eléctricos y electrónicos.
Para las demás baterías, vea la sección donde se indica
cómo quitar la batería del producto de forma segura.
Deposite la batería en el correspondiente punto de
recogida para el reciclado.
Para recibir información detallada sobre el reciclaje de
este producto o de la batería, póngase en contacto con el
ayuntamiento, el punto de recogida más cercano o el
establecimiento donde ha adquirido el producto.
ES
2
Características
El mando a distancia RM-VL1400T permite el control
centralizado de todos los componentes de A/V desde un
solo mando a distancia y evita el engorroso problema de
tener que utilizar varios mandos a distancia para los
diferentes componentes de audio y vídeo. A
continuación, se indican las principales características.
Control de hasta 10 componentes
Mediante el mando a distancia, es posible controlar hasta
10 componentes, incluido el televisor, la videograbadora,
el decodificador de satélite, la unidad de DVD, el
amplificador, el reproductor de CD, etc.
Control centralizado de componentes
de A/V Sony con este mando a
distancia
Este mando a distancia se ha programado en fábrica para
controlar componentes de la marca Sony, de modo que
podrá utilizarlo tal cual como centro de control de sus
componentes de A/V Sony.
También tiene programadas señales de
mando a distancia para componentes
que no sean Sony
El mando a distancia también reconoce los códigos
preestablecidos de los componentes de la mayoría de las
marcas, inclusive Sony. Simplemente seleccione los
códigos correspondientes para controlar todos sus
componentes de A/V.
Función de aprendizaje para programar
otras señales de mando a distancia
Este mando a distancia posee una función de aprendizaje
de las señales de mando a distancia necesarias para
utilizar otros componentes o funciones no programados.
Además, el mando a distancia puede aprender señales de
control remoto (únicamente señales de infrarrojos) de
componentes que no sean de A/V, como aparatos de aire
acondicionado, de iluminación, etc. (es posible que
algunos aparatos específicos o funciones no estén
disponibles).
Ajuste de hasta 10 series de comandos
(macros de componente) de hasta 32
pasos consecutivos
Es posible ajustar hasta 10 series de comandos (macros
de componente) que proporcionan hasta 32 pasos
consecutivos con la simple pulsación de un botón.
Pantalla electroluminiscente orgánica,
brillante y de fácil lectura, y botones
completamente iluminados
La pantalla EL (electroluminiscente) orgánica
incorporada y los botones completamente iluminados
permiten utilizar el dispositivo fácilmente en la
oscuridad.
Page 47

Tabla de contenido
Características .................................................... 2
Procedimientos Iniciales
Desembalaje ........................................................ 4
Colocación de las pilas ...................................... 4
Ubicación y funciones de los controles ........... 5
Operaciones básicas
Introducción de códigos para componentes de
audio y vídeo programados de otros
fabricantes ........................................................ 7
Ajuste de componentes de A/V que no figuran en
la lista de códigos programados .....................8
Control de los componentes de A/V con el
mando a distancia ............................................ 9
Selección del componente de A/V deseado ...... 9
Utilización de componentes de A/V ................. 10
Otras funciones útiles
Funcionamiento del mando a distancia en la
oscuridad .......................................................11
Bloqueo de los controles .................................. 11
Verificación de la función de los botones ........ 11
Operaciones avanzadas
Programación de señales de otro mando a
distancia .......................................................... 12
Programación de una señal en el botón de
selección COMPONENT ................................13
Si el mando a distancia parece no funcionar
correctamente ................................................ 14
Cambio o borrado de la función de una señal
“aprendida” .................................................... 14
Cambio de los caracteres de la pantalla ......... 15
Cambio del nombre del componente de A/V....
Cambio del nombre de la función de los botones
de selección de etiquetas ............................. 16
Cambio de las etiquetas de funciones ............. 17
Utilización de una serie de comandos
(macro de componente) ................................. 18
Programación de una macro de
componente ...................................................18
Comprobación de la correcta ejecución de una
macro de componente .................................. 19
Borrado de pasos programados de una macro
de componente .............................................. 20
16
Ajuste del comando de conexión de un
componente de A/V seleccionado ................ 21
Copia de los ajustes de un botón de selección
COMPONENT en otro botón ..........................22
Control del volumen de los componentes de
vídeo conectados a un componente de
audio ................................................................23
Otros
Ajuste de la iluminación de los botones ........ 24
Ajuste de la pantalla ......................................... 26
Configuración del pitido ................................... 27
Restablecimiento de los ajustes ..................... 28
Restablecimiento de un botón de selección
COMPONENT o un botón de selección de
etiquetas ........................................................ 28
Restablecimiento de todos los ajustes............. 28
Información adicional
Precauciones ..................................................... 30
Mantenimiento ................................................... 30
Especificaciones ...............................................30
Solución de problemas..................................... 31
Tabla de funciones programadas .................... 34
TV (analógico) .................................................. 35
TV (DIGITAL) .................................................... 36
VCR (videograbadora) ..................................... 37
Receptor de satélite analógico
Receptor de satélite digital ............................ 38
Receptor de satélite digital (N.° 3201) .............39
Reproductor de DVD ........................................ 40
Decodificador de cable analógico ................... 40
Grabadora de DVD
DVD/VCR Combo*1 ....................................... 41
Sistema de sala de cine doméstica/reproductor
DVD Combo ...................................................42
Receptor/amplificador ...................................... 43
Reproductor de CD ..........................................44
Pletina de casetes ............................................44
Pletina de MD ...................................................45
3
ES
Page 48

Procedimientos Iniciales
Desembalaje
Antes de utilizar el mando a distancia, compruebe el
contenido del paquete.
• Mando a distancia RM-VL1400T (1)
• Manual de instrucciones (1)
• Lista de códigos programados (1)
•Tarjeta de garantía (1)
• Pilas R6 (tamaño AA) (2)
Colocación de las pilas
Deslice y abra la tapa del compartimiento de las pilas e
inserte dos pilas alcalinas LR6 (tamaño AA) (no
suministradas). Asegúrese de hacer coincidir las
indicaciones + y – de las pilas con las del
compartimiento.
Sustitución de las pilas
En condiciones normales, las pilas alcalinas duran hasta 5 meses.
Si el mando a distancia no funciona correctamente, significa que
las pilas se están agotando y aparecerá una “E” en la pantalla.
Notas sobre cómo sustituir las pilas
• No tarde más de una hora en reemplazar las pilas. Si tarda más,
la configuración de la unidad se inicializará (página 24).
• No intente recargar pilas secas.
• No transporte las pilas secas junto con monedas u otros objetos
metálicos. Si los polos positivo y negativo de las pilas entran en
contacto accidentalmente con un objeto metálico, puede
generarse calor.
• Si no va a utilizar la unidad durante un período de tiempo
prolongado, retire las pilas para evitar que se produzcan daños
por fugas o corrosión.
• No utilice pilas de tipos distintos a la vez.
• Cuando sustituya las pilas, reemplace ambas por otras nuevas.
• Las pilas de manganeso suministradas sirven para realizar
pruebas. Es recomendable utilizar pilas alcalinas disponibles en
el mercado. (Las pilas recargables no pueden utilizarse).
ES
4
Page 49

Ubicación y funciones de
los controles
Mando a distancia
Los botones PROGRAM +, número 5 y N tienen un punto
táctil.
1 Botón (luz) (páginas 11, 24)
Se utiliza para aumentar la intensidad de la
iluminación de los botones en la oscuridad. Pulse el
botón una vez para activar o desactivar la
iluminación de los botones.
2 Pantalla EL orgánica
Muestra las funciones, el menú de configuración, el
icono de transmisión, etc.
3 Botones de selección de etiquetas
Se utilizan para seleccionar el componente de A/V o
la función que se desee en la pantalla.
4 Botón SCROLL
Se utiliza para cambiar las funciones que se muestran
en la pantalla al controlar los componentes de A/V.
Púlselo para alternar entre 4 páginas.
5 Botón t (selección de entrada)
6 Botones de selección COMPONENT
(TV/VCR/SAT/DVD) (página 9)
Se utilizan para seleccionar el componente de A/V
deseado.
7 Botones numéricos
8 Botón 1-/9 Botón DIGITAL/ANALOG
q; Botones 2 (volumen) +/–* (página 10)
Permiten ajustar el volumen.
qa Botón % (silenciamiento)* (página 10)
Permite silenciar el sonido. Pulse el botón para
desactivar el sonido y vuelva a pulsarlo para regresar
al nivel de volumen anterior.
qs Botón GUIDE
qd Botones OK y (V/v/B/b) de cursor
qf Botón RETURN
qg Botones (m/N/M/z/x/X) de control
del reproductor
qh Botón 1 (alimentación)
qj Botón OTHER
Se utiliza para visualizar componentes de A/V no
ajustados en los botones de selección
COMPONENT. Púlselo para alternar entre 2 páginas.
qk Botón 2-/ENT (introducir)
Permite seleccionar el programa.
ql Botones PROGRAM +/–
Permiten seleccionar el programa.
w; Botón / (Teletexto)
wa Botón
(recuperación)
ws Botón a (encendido del televisor)
wd Botón MENU
wf Botón TOOLS
wg Botones de color (A (rojo)/B (verde)/C
(amarillo)/D (azul))
*
Nota acerca de los botones 2, +/- y
Cuando seleccione un componente de vídeo, podrá controlar
el volumen del televisor. Cuando seleccione un componente
de audio, podrá controlar el volumen del amplificador
(página 23).
Nota
La función del botón cambia dependiendo del ajuste del mando a
distancia o del componente de A/V que se va a utilizar. Para
obtener más información acerca del funcionamiento de los
botones de cada componente de A/V en el modo preajustado de
fábrica, consulte “Tabla de funciones programadas” (página 34).
%
Continúa
ES
5
Page 50

Pantalla
1 Título de la pantalla
Muestra el estado del mando a distancia.
2 Función de etiquetado
Cuando pulse un botón, su función aparecerá en la
segunda línea de la pantalla. Es posible cambiar los
caracteres mostrados en la pantalla (página 15).
3 Visualización del componente de A/V o
función
Muestra los componentes de A/V que se pueden
seleccionar mediante los botones de selección de
etiquetas o las funciones disponibles para cada
componente de A/V. Es posible cambiar los
caracteres mostrados en la pantalla (página 15).
4 Número de página
ES
6
Page 51

Operaciones básicas
Ajustes de funcionamiento para componentes de A/V
—Introducción de códigos de componentes
El mando a distancia se ha programado en fábrica para controlar componentes de A/V Sony (consulte la tabla
siguiente). Cuando lo utilice con los componentes Sony programados de fábrica, salte los procedimientos siguientes.
También podrá utilizar el mando a distancia con otros componentes de AV programados de otras marcas importantes.
Para utilizarlo con otros componentes de A/V o componentes Sony que no funcionen con el mando a distancia,
necesitará seguir los procedimientos de ajuste de los códigos correctos para cada componente.
Predeterminado de fábrica
Botones de selección COMPONENT
TV
VCR
SAT
DVD
Botón de selección de etiquetas (izquierdo)
Botón de selección de etiquetas (central)
Botón de selección de etiquetas (derecho)
Página 1/2
Botón de selección de etiquetas (izquierdo)
OTROS
Botón de selección de etiquetas (central)
Botón de selección de etiquetas (derecho)
Página 2/2
Título de la pantalla Componentes de A/V programados
TV Televisor Sony (analógico)
VCR Videograbadora Sony
SAT Receptor satélite analógico Sony
DVD Reproductor de videodiscos digitales (DVD) Sony
CABLE Decodificador de cable analógico
DVD-R Grabadora de DVD Sony
AMP Receptor/amplificador Sony
CD Reproductor de discos compactos (CD) Sony
MD Pletina de minidiscos (MD) Sony
TAPE Pletina de casetes Sony
1
Consulte las tablas de la “Lista de códigos
programados” suministrada y busque el
código programado de cuatro dígitos que
corresponde al componente de A/V deseado.
Si hay más de un número de código en la lista, utilice
el primero de ellos. Por ejemplo, para un televisor
Panasonic, utilice el número de código 8095.
2 A la vez que pulsa el botón (luz), pulse
el botón OTHER.
“SET MODE” aparece como título de la pantalla.
3 Pulse los botones V/v para seleccionar “1
PRESET” y, a continuación, pulse el
botón OK o el botón de selección de
etiquetas central.
“PRESET” aparece como título de la pantalla.
Sugerencia
Si se muestra un número antes del menú, podrá pulsar el
botón numérico para seleccionar el menú.
4
Pulse el botón de selección COMPONENT
del componente de A/V que desee.
La etiqueta del componente de A/V seleccionado y el
código programado ajustado en estos momentos
aparecen en la pantalla.
Sugerencias
•
Para ajustar componentes de A/V no especificados en los
botones de selección COMPONENT, pulse el botón OTHER
varias veces y, a continuación, pulse el botón de selección de
etiquetas correspondiente al componente de A/V que desee.
•
Puede ajustar componentes en los botones de selección
COMPONENT o en los botones de selección de etiquetas
distintos de los especificados en cada botón o en la pantalla. Sin
embargo, tenga en cuenta que en el botón TV sólo es posible
ajustar un televisor, y en el botón de selección de etiquetas (en
el que se encuentra ajustado un amplificador de manera
predeterminada) sólo se puede ajustar un amplificador o un
reproductor de DVD con sistema de sala de cine doméstica.
Continúa
7
ES
Page 52

5
Pulse los botones numéricos para introducir
el código programado de cuatro dígitos y, a
continuación, pulse el botón OK o el botón
de selección de etiquetas central.
Ejemplo: Para introducir “8095”
Pulse los botones 8, 0, 9, 5 y, a continuación, pulse el
botón OK.
Ajuste de componentes de A/V que
no figuran en la lista de códigos
programados
—Función de búsqueda
Es posible ajustar componentes de A/V que no figuran en
la “Lista de códigos programados” mediante la función
de búsqueda.
Se oye un pitido y aparecen en la pantalla el código
programado de cuatro dígitos que ha ajustado y
“OK”. A continuación, vuelve a mostrarse la pantalla
del paso 3.
6 Para ajustar códigos programados para
otros componentes de A/V, repita los
pasos 4 y 5.
7 Pulse el botón (luz) o el botón
RETURN dos veces.
El modo ajustado se cierra y el mando a distancia
regresa al modo de espera para controlar los
componentes de A/V.
Notas
• Si introduce un código programado que no se encuentra en la
tabla de la “Lista de códigos programados” suministrada y
pulsa el botón OK, se escuchará un pitido cinco veces y el
número de cuatro dígitos introducido y “NG” aparecerán en la
pantalla. A continuación, volverá a mostrarse la pantalla del
paso 4. Compruebe el código programado e intente introducir
el código de nuevo.
• Si no introduce ningún carácter en el mando a distancia antes
de que transcurran 60 segundos entre cada paso, el
procedimiento de programación se cancelará y el modo
ajustado se cerrará. Vuelva a comenzar desde el principio.
• El mando a distancia reconoce el tipo de componente de A/V al
introducir un código programado en el paso 5 y se determina el
título de la pantalla mostrado al controlar el componente de A/
V. Si la pantalla del título no se corresponde con el componente
ajustado, podrá cambiar la etiqueta del componente según
corresponda.
• No es posible ajustar componentes de A/V después de
programar otras señales del mando a distancia mediante la
función de aprendizaje (página 12), programar una macro de
componente (página 18) o cambiar la etiqueta (página 15). En
tal caso, restablezca la configuración del componente de A/V
(página 28) y, a continuación, ajuste los componentes de A/V
de nuevo.
Antes de iniciar la función de búsqueda
Ajuste cada componente de A/V en el estado siguiente
para que la función de búsqueda funcione de manera
efectiva.
TV, AMP: encendido
Reproductor de CD, pletina de MD, pletina de
casete: encendido con una fuente de reproducción.
Otros componentes: apagados
1 A la vez que pulsa el botón (luz), pulse
el botón OTHER.
“SET MODE” aparece como título de la pantalla.
2 Pulse los botones V/v para seleccionar “1
PRESET” y, a continuación, pulse el
botón OK o el botón de selección de
etiquetas central.
“PRESET” aparece como título de la pantalla.
Sugerencia
Si se muestra un número antes del menú, podrá pulsar el
botón numérico para seleccionar el menú.
3 Pulse el botón de selección
COMPONENT del componente de A/V
que desee.
La etiqueta del componente de A/V seleccionado y el
código programado ajustado en estos momentos
aparecen en la pantalla.
ES
8
Page 53

4 Pulse el botón PROGRAM + o
PROGRAM – y, a continuación, pulse el
botón 1 (alimentación) varias veces hasta
que el componente de A/V reaccione del
modo siguiente:
TV: se apague.
Amplificador: se apague o aumente el volumen.
Reproductor de CD, pletina de MD o de casete:
se apague o se inicie la reproducción.
Otros componentes: se enciendan
5 Pulse el botón OK o el botón de selección
de etiquetas central.
Se oye un pitido y aparecen en la pantalla el código
programado de cuatro dígitos que ha ajustado y
“OK”. A continuación, vuelve a mostrarse la pantalla
del paso 2.
6 Para ajustar otros componentes de A/V,
repita los pasos del 3 al 5.
Control de los
componentes de A/V con el
mando a distancia
Seleccione el componente de A/V que desee mediante la
pulsación del botón de selección COMPONENT del
mando a distancia y, a continuación, haga funcionar el
componente de A/V.
Selección del componente de A/V
deseado
Pulse el botón de selección COMPONENT para
seleccionar el componente de A/V que desee.
Si pulsa el botón OTHER, se mostrarán en pantalla los
componentes de A/V que se pueden seleccionar. Pulse el
botón de selección de etiquetas correspondiente para
seleccionar el componente de A/V deseado. Los
componentes de A/V mostrados en la pantalla cambian al
pulsar el botón OTHER varias veces.
7 Pulse el botón (luz) o el botón
RETURN dos veces.
El modo ajustado se cierra y el mando a distancia
regresa al modo de espera para controlar los
componentes de A/V.
Continúa
ES
9
Page 54

Utilización de componentes de A/V
Pulse los botones correspondientes en el mando a
distancia para controlar el funcionamiento de los
componentes de A/V.
Es posible seleccionar las funciones mostradas en la
pantalla mediante los botones de selección de etiquetas
correspondientes a cada función.
Las funciones mostradas en la pantalla cambian al pulsar
el botón SCROLL varias veces.
Ejemplo: Para utilizar un televisor
1 Pulse el botón TV.
El mando a distancia entra en modo de espera para
controlar el televisor.
2 Pulse el botón 1 (alimentación).
Se enciende el televisor.
3 Pulse los botones correspondientes a la
operación deseada.
Cuando se envía una señal, aparece . También es
posible utilizar otros botones, como 2 (volumen)
+/–, PROGRAM +/–, % (silenciamiento), cursor y
MENU. Consulte asimismo la “Tabla de funciones
programadas” (página 34) para obtener información
acerca de las funciones de los botones de cada
componente de origen.
Ajuste del volumen
Pulse los botones 2 (volumen) +/- para ajustar el
volumen. Pulse el botón % (silenciamiento) para
silenciar el sonido temporalmente.
Cuando seleccione un componente de vídeo, podrá
controlar el volumen del televisor. Cuando seleccione un
componente de audio, podrá controlar el volumen del
amplificador.
Para cambiar el ajuste de control del volumen, consulte
“Control del volumen de los componentes de vídeo
conectados a un componente de audio” en la página 23.
Botones 2
(volumen) +/–
Botón %
(silenciamiento)
Nota
Si programa señales del mando a distancia en los botones de
control de volumen del televisor o del amplificador mediante la
función de aprendizaje (página 12), los botones también enviarán
la señal aprendida para controlar componentes distintos de un
televisor o un amplificador.
Si programa señales del mando a distancia en los botones de
control de volumen de componentes distintos de un televisor o un
amplificador, dichos botones enviarán la señal aprendida para
controlar el componente de A/V en lugar de controlar el volumen
del televisor o del amplificador.
Sugerencia
Si el mando a distancia no funciona del modo deseado,
compruebe la función del botón mediante la función de
etiquetado (página 11) o programe señales mediante la función
de aprendizaje (página 12).
Acerca del botón z/REC (grabación)
Para evitar un fallo de funcionamiento, el mando a
distancia sólo transmitirá señales del botón z/REC
(grabación) si éste se mantiene pulsado durante más de 2
segundos.
Botón z/REC
(grabación)
ES
10
Page 55

Otras funciones útiles
Funcionamiento del mando a
distancia en la oscuridad
Botón
(luz)
COMPONENT
Para desbloquear los controles
A la vez que pulsa el botón (luz), pulse el botón SCROLL.
Verificación de la función de los
botones
—Función de etiquetado
Cuando pulse un botón, su función aparecerá en la
segunda línea de la pantalla mientras se transmiten las
señales del mando a distancia.
También es posible visualizar la función sin transmitir las
señales del mando a distancia.
Para cambiar los caracteres visualizados en la pantalla,
consulte “Cambio de los caracteres de la pantalla”
(página 15).
Pulse el botón (luz) para activar la iluminación de los
botones del mando a distancia. Pulse el botón (luz)
de nuevo para desactivarla.
Si no pulsa ningún botón durante más de 10 segundos, la
iluminación de los botones del mando a distancia se
apagará automáticamente.
Configuración predeterminada de la
iluminación de los botones
Ajuste de desconexión automática 10 segundos
Nivel de brillo 15 (máximo)*
Efecto de fundido Activado
Ajuste de modo activado Todos los botones
* El nivel de brillo está preajustado de fábrica en 15 (máximo).
Si utiliza el mando a distancia con este ajuste, es posible que la
vida útil de la batería sea inferior.
Consulte “Ajuste de la iluminación de los botones” (página 24)
para cambiar la configuración de iluminación de los botones.
Bloqueo de los controles
—Función de bloqueo
Para evitar operaciones accidentales, es posible bloquear
todos los botones mediante la función de bloqueo.
1 A la vez que pulsa el botón (luz), pulse
el botón SCROLL.
1 A la vez que pulsa el botón (luz), pulse
el botón deseado.
La función del botón aparece en la segunda línea de
la pantalla. Las señales del mando a distancia no se
transmiten.
Función del botón
Aparecerá el siguiente mensaje en la pantalla y se
bloquearán todos los botones.
11
ES
Page 56

Operaciones avanzadas
Programación de señales
de otro mando a distancia
—Función de aprendizaje
Para controlar componentes de A/V no programados o
funciones de botones, utilice el siguiente procedimiento
de “aprendizaje” para “programar” cualquiera de las
señales programables de los botones del mando a
distancia.
También es posible utilizar la función de aprendizaje
para cambiar las señales de botones individuales después
de ajustar el código programado (página 7). Es posible
que le resulte útil cambiar la etiqueta (página 15) de la
función aprendida.
Nota
Es posible que algunas de las señales del mando a distancia
específicas no puedan aprenderse.
1 Oriente la parte superior del mando a
distancia hacia la parte superior del mando
a distancia del componente de A/V.
Otro mando a distancia
4
Pulse el botón de selección COMPONENT
o el botón de selección de etiquetas
correspondiente al componente de A/V que
desea que memorice el mando a distancia.
La etiqueta del componente de A/V seleccionado
aparece en la segunda línea de la pantalla.
5 Pulse el botón en el que desea programar
la señal.
La pantalla se apaga y el mando a distancia entra en
el modo de aprendizaje.
Sugerencia
Si mantiene pulsado el botón durante más de 2 segundos,
podrá cambiar la etiqueta. Para obtener más información,
consulte “Cambio de los caracteres de la pantalla” (página 15).
aproximadamente
de 5 a 10 cm de
distancia
RM-VL1400T
2 A la vez que pulsa el botón (luz), pulse
el botón OTHER.
“SET MODE” aparece como título de la pantalla.
3 Pulse los botones V/v para seleccionar “2
LEARN” y, a continuación, pulse el botón
OK o el botón de selección de etiquetas
central.
“LEARN” aparece como título de la pantalla.
Sugerencia
Si se muestra un número antes del menú, podrá pulsar el
botón numérico para seleccionar el menú.
ES
12
6
Mantenga pulsado el botón del otro mando
a distancia hasta que escuche un pitido.
Se escucha un pitido y aparecen en la tercera línea de
la pantalla el nombre del botón aprendido y “OK”.
7 Para programar señales en otros botones,
repita los pasos 5 y 6.
8 Pulse el botón (luz).
Vuelve a aparecer la pantalla mostrada en el paso 3.
Page 57

9 Pulse el botón (luz) o el botón
RETURN dos veces.
Programación de una señal en el
botón de selección COMPONENT
El modo ajustado se cierra y el mando a distancia
regresa al modo de espera para controlar los
componentes de A/V.
Notas
• Si no introduce ningún carácter en el mando a distancia antes
de que transcurran 60 segundos entre cada paso, el
procedimiento de programación se cancelará y el modo
ajustado se cerrará. Vuelva a comenzar desde el principio.
• Si no lleva a cabo el paso 6 antes de que transcurran 10
segundos después de efectuar el paso 5, se escuchará un pitido
dos veces y el nombre del botón seleccionado y “NG”
aparecerán en la tercera línea de la pantalla. A continuación,
volverá a mostrarse la pantalla del paso 4. Vuelva a empezar
desde el paso 5.
• Si el mando a distancia memoriza señales de manera incorrecta
en el paso 6, pulse el botón
pulsado el botón en el que se ha memorizado la señal
incorrecta (página 14) para borrar la señal aprendida. Vuelva a
empezar desde el paso 5.
• Si programa señales del mando a distancia en los botones de
control de volumen del televisor o del amplificador mediante la
función de aprendizaje (página 12), los botones también
enviarán la señal aprendida para controlar componentes
distintos de un televisor o un amplificador.
Si programa señales del mando a distancia en los botones de
control de volumen de componentes distintos de un televisor o
un amplificador, dichos botones enviarán también la señal
aprendida para controlar otros componentes de A/V en lugar de
controlar el volumen del televisor o del amplificador.
•Para evitar un error de funcionamiento, el mando a distancia
sólo transmitirá señales del botón z/REC (grabación) si se
mantiene pulsado el botón durante más de 2 segundos. Por
consiguiente, si se utiliza este botón para una operación
aprendida, deberá mantenerlo pulsado durante más de 2
segundos.
(luz) mientras mantiene
1 Lleve a cabo los pasos del 1 al 3 del
procedimiento de aprendizaje (página 12).
2 Mantenga pulsado el botón de selección
COMPONENT o el botón de selección de
etiquetas en el que desea programar la
señal.
La pantalla se apaga y el mando a distancia entra en
el modo de aprendizaje.
3 Mantenga pulsado el botón del otro
mando a distancia hasta que escuche un
pitido.
Se escucha un pitido y aparecen en la tercera línea de
la pantalla el nombre del botón aprendido y “OK”.
4 Para programar señales en otros botones
de selección COMPONENT o en un botón
de selección de etiquetas, repita los pasos
2 y 3.
5 Pulse el botón (luz).
“LEARN” aparece como título de la pantalla.
6 Pulse el botón (luz) o el botón
RETURN dos veces.
El modo ajustado se cierra y el mando a distancia
regresa al modo de espera para controlar los
componentes de A/V.
Continúa
13
ES
Page 58

Si el mando a distancia parece no
funcionar correctamente
Si la función aprendida no funciona correctamente, borre
primero la señal aprendida (página 14) y, a continuación,
vuelva a realizar el procedimiento de aprendizaje desde
el paso 1 (por ejemplo, si el volumen es muy alto
después de haber pulsado el botón 2 (volumen) + una
sola vez, es posible que se hayan producido
interferencias de ruido durante el procedimiento de
aprendizaje).
Cambio o borrado de la función de
una señal “aprendida”
Para cambiar la función “aprendida”, bórrela primero y, a
continuación, vuelva a realizar el procedimiento de
aprendizaje.
1 A la vez que pulsa el botón (luz), pulse
el botón OTHER.
Para lograr un aprendizaje preciso
• No mueva los mandos a distancia durante el
procedimiento de aprendizaje.
• Asegúrese de mantener pulsado el botón del otro
mando a distancia hasta que escuche un pitido de
confirmación.
• Utilice pilas nuevas en ambos mandos a distancia.
• Evite realizar la operación de aprendizaje en lugares
expuestos a la luz solar directa, iluminación
fluorescente intensa o cerca de una pantalla de plasma
(es posible que se produzcan interferencias de ruido).
• Es posible que la dirección de la señal del mando a
distancia varíe en función de cada mando. Si la función
de aprendizaje no funciona, intente cambiar la posición
del mando a distancia.
• Si programa el mando a distancia desde una unidad de
control remoto con un sistema de intercambio de
señales interactivo (suministrado con algunos
receptores y amplificadores Sony), la señal de
respuesta del componente podría interferir en el
aprendizaje del mando a distancia. En tal caso,
trasládese a otra sala, etc., donde no existan señales que
puedan producir interferencias.
IMPORTANTE
Asegúrese de colocar el mando a distancia
fuera del alcance de los niños o de animales
domésticos.
Asimismo, ajuste la función de bloqueo para bloquear todos
los botones del mando a distancia (página 11) cuando no lo
utilice. Los dispositivos como los aparatos de aire
acondicionado, calefacción, electrodomésticos y cortinas o
persianas eléctricas que reciban señales de infrarrojos pueden
resultar peligrosos si se utilizan de modo incorrecto.
“SET MODE” aparece como título de la pantalla.
2 Pulse los botones V/v para seleccionar “2
LEARN” y, a continuación, pulse el botón
OK o el botón de selección de etiquetas
central.
“LEARN” aparece como título de la pantalla.
Sugerencia
Si se muestra un número antes del menú, podrá pulsar el
botón numérico para seleccionar el menú.
3 Pulse el botón de selección
COMPONENT o el botón de selección de
etiquetas para borrar la señal aprendida.
La etiqueta del componente de A/V seleccionado
aparece en la segunda línea de la pantalla.
4 Mientras pulsa el botón del mando a
distancia del que desea borrar la señal
aprendida, pulse el botón (luz).
Se escucha un pitido y aparecen en la pantalla el
nombre del botón borrado y “OK”.
Sugerencia
Si pulsa de nuevo el botón del que ha borrado la señal
aprendida mientras pulsa el botón
la etiqueta de la función del botón y el nombre.
(luz), se inicializarán
14
5 Para borrar las señales aprendidas de otros
botones, repita los pasos 3 y 4.
ES
Page 59

6 Pulse el botón (luz).
Vuelve a aparecer la pantalla mostrada en el paso 2.
7 Pulse el botón (luz) o el botón
RETURN dos veces.
Cambio de los caracteres
de la pantalla
Es posible cambiar los nombres o funciones del
componente de A/V, o la función del botón (etiqueta)
mostrada en la pantalla.
Los caracteres y dígitos se introducen del modo siguiente
mediante la pulsación de los botones numéricos.
El modo ajustado se cierra y el mando a distancia
regresa al modo de espera para controlar los
componentes de A/V.
Notas sobre la programación de
señales de aparatos de aire
acondicionado
Acerca de los ajustes de las estaciones del año
Si cambia los ajustes del aparato de aire acondicionado
para una estación del año, deberá programar las señales
del mando a distancia de los nuevos ajustes del mando a
distancia.
Si la operación de conexión/desconexión de la
alimentación no funciona correctamente
Si el mando a distancia solamente puede controlar la
conexión (“ON”) con un botón y la desconexión (“OFF”)
con otro, mientras que el mando a distancia del aparato
de aire acondicionado puede controlar la conexión y
desconexión (“ON/OFF”) con uno solo, programe la
señal en dos botones del mando a distancia de la forma
siguiente.
1 Borre la señal de conexión/desconexión de la
alimentación “aprendida” del botón programado.
2 Siga los pasos indicados en “Programación de señales
de otro mando a distancia” (página 12) para volver a
programar únicamente la señal de activación de la
alimentación del aparato de aire acondicionado del
botón.
3 Programe la señal de desactivación de la alimentación
del aparato de aire acondicionado en otro botón.
Los dos botones del mando a distancia habrán quedado
programados con las señales de conexión y desconexión
de la alimentación, respectivamente, del aparato de aire
acondicionado para que pueda controlarlo con este
mando a distancia.
11 c , c - c . c : c ; c < c = c > c ? c @ c /
2A c B c C c a c b c c c 2 c À c Á c  c à c Ä c Å
c Æ c Ç c à c á c â c ã c ä c å c æ c ç
3D c E c F c d c e c f c 3 c È c É c Ê c Ë c è c é c ê
c ë
4G c H c I c g c h c i c 4 c Ì c Í c Î c Ï c ì c í c î c ï
5J c K c L c j c k c l c 5
6M c N c O c m c n c o c 6 c Ñ c Ò c Ó c Ô c Õ c
Ö c Ø c Œ c ñ c ò c ó c ô c õ c ö c ø c œ
7P c Q c R c S c p c q c r c s c 7 c ß
8T c U c V c t c u c v c 8 c Ù c Ú c Û c Ü c ù c ú c
û c ü
9W c X c Y c Z c w c x c y c z c 9 c ´Y c ´y c ÿ
00 c N c b c B c ?b c B? c x c X c T c t c R
c r
-/-- ! c " c # c $ c % c & c ' c ( c ) c * c +
(1-)
ENT (espacio) c [ c \ c ] c ^ c _ c { c | c } c ˜ c · c ¡ c ¨
(2-) c ª c ´ c ‚ c º c ¿
Los caracteres y dígitos se introducen del modo siguiente
mediante la pulsación de los botones V/ v.
A c B c C c D c E c F c G c H c I c J c K c L c M
c N c O c P c Q c R c S c T c U c V c W c X c Y
c Z c a c b c c c d c e c f c g c h c i c j c k c l c m
c n c o c p c q c r c s c t c u c v c w c x c y c z c
1 c 2 c 3 c 4 c 5 c 6 c 7 c 8 c 9 c 0 c À c Á c  c
à c Ä c Å c Æ c Ç c È c É c Ê c Ë c Ì c Í c Î c Ï c
Ñ c Ò c Ó c Ô c Õ c Ö c Ø c Œ c Ù c Ú c Û c Ü c
´Y c ß c à c á c â c ã c ä c å c æ c ç c è c é c ê c ë c
ì c í c î c ï c ñ c ò c ó c ô c õ c ö c ø c œ c ù c ú c
û c ü c ´y c ÿ c (espacio) c N c b c B c ?b c B? c
x c X c T c t c R c r c ! c " c # c $ c % c & c '
c ( c ) c * c + c , c - c . c / c : c ; c < c = c > c ? c
@ c [ c \ c ] c ^ c _ c { c | c } c ˜ c · c ¡ c ¨ c ª c ´
c ‚ c º c ¿
Continúa
15
ES
Page 60

Cambio del nombre del componente
de A/V
Pueden introducirse hasta 6 caracteres o dígitos.
Cambio del nombre de la función de
los botones de selección de etiquetas
Pueden introducirse hasta 6 caracteres o dígitos.
1 A la vez que pulsa el botón (luz), pulse
el botón OTHER.
“SET MODE” aparece como título de la pantalla.
2 Pulse los botones V/v para seleccionar “3
LABEL” y, a continuación, pulse el botón
OK o el botón de selección de etiquetas
central.
“LABEL” aparece como título de la pantalla.
Sugerencia
Si se muestra un número antes del menú, podrá pulsar el
botón numérico para seleccionar el menú.
3
Mantenga pulsado el botón de selección
COMPONENT o el botón de selección de
etiquetas correspondiente al componente de A/V
que desea cambiar durante más de 2 segundos.
El nombre del componente de A/V seleccionado y el
cursor (x) aparecen en la pantalla y el mando a distancia
se encuentra en modo de espera para la entrada.
1 A la vez que pulsa el botón (luz), pulse
el botón OTHER.
“SET MODE” aparece como título de la pantalla.
2 Pulse los botones V/v para seleccionar “3
LABEL” y, a continuación, pulse el botón
OK o el botón de selección de etiquetas
central.
“LABEL” aparece como título de la pantalla.
Sugerencia
Si se muestra un número antes del menú, podrá pulsar el
botón numérico para seleccionar el menú.
3 Pulse el botón de selección
COMPONENT o el botón de selección de
etiquetas correspondiente al componente
de A/V donde está ajustada la función que
desea cambiar.
El componente de A/V seleccionado aparece en la
segunda línea de la pantalla.
4 Pulse los botones numéricos o los botones
V/v para introducir dígitos o caracteres.
Comience a introducir dígitos o caracteres desde la
posición en la que se muestra el cursor (x). Pulse los
botones B/b o el botón de selección de etiquetas
izquierdo o derecho para mover el cursor (x).
5 Pulse el botón OK o el botón de selección
de etiquetas central.
Se escucha un pitido y cambia el nombre del componente de A/V.
6 Pulse el botón (luz) o el botón
RETURN dos veces.
El modo ajustado se cierra y el mando a distancia regresa
al modo de espera para controlar los componentes de A/V.
ES
16
4 Pulse el botón SCROLL varias veces y, a
continuación, pulse el botón de selección
de etiquetas correspondiente a la función
que desea cambiar.
La función seleccionada y el cursor (x) aparecen en
la pantalla y el mando a distancia se encuentra en
modo de espera para la entrada.
Page 61

5 Pulse los botones numéricos o los botones
V/v para introducir dígitos o caracteres.
Comience a introducir dígitos o caracteres desde la
posición en la que se muestra el cursor (x). Pulse los
botones B/b o el botón de selección de etiquetas
izquierdo o derecho para mover el cursor (x).
6 Pulse el botón OK o el botón de selección
de etiquetas central.
Se escucha un pitido y cambia el nombre de la función.
7 Pulse el botón (luz).
Vuelve a aparecer la pantalla mostrada en el paso 2.
8 Pulse el botón (luz) o el botón
RETURN dos veces.
El modo ajustado se cierra y el mando a distancia
regresa al modo de espera para controlar los
componentes de A/V.
Cambio de las etiquetas de funciones
—Función de etiquetado
Pueden introducirse hasta 10 caracteres o dígitos.
3 Pulse el botón de selección
COMPONENT o el botón de selección de
etiquetas correspondiente al componente
de A/V que dispone de la etiqueta de
función que desea cambiar.
El componente de A/V seleccionado aparece en la
segunda línea de la pantalla.
4 Mantenga pulsado el botón del que desea
cambiar la etiqueta de función durante
más de 2 segundos.
La etiqueta de función seleccionada y el cursor (x)
aparecen en la pantalla y el mando a distancia se
encuentra en modo de espera para la entrada.
5 Pulse los botones numéricos o los botones
V/v para introducir dígitos o caracteres.
Comience a introducir dígitos o caracteres desde la
posición en la que se muestra el cursor (x). Pulse los
botones B/b o el botón de selección de etiquetas
izquierdo o derecho para mover el cursor (x).
1 A la vez que pulsa el botón (luz), pulse
el botón OTHER.
“SET MODE” aparece como título de la pantalla.
2 Pulse los botones V/v para seleccionar “3
LABEL” y, a continuación, pulse el botón
OK o el botón de selección de etiquetas
central.
“LABEL” aparece como título de la pantalla.
Sugerencia
Si se muestra un número antes del menú, podrá seleccionar
pulsar el botón numérico para seleccionar el menú.
6 Pulse el botón OK o el botón de selección
de etiquetas central.
Se escucha un pitido y cambia el nombre de la
función.
7 Pulse el botón (luz).
Vuelve a aparecer la pantalla mostrada en el paso 2.
8 Pulse el botón (luz) o el botón
RETURN dos veces.
El modo ajustado se cierra y el mando a distancia
regresa al modo de espera para controlar los
componentes de A/V.
17
ES
Page 62

Utilización de una serie de
comandos (macro de
componente)
Es posible ajustar un programa de funcionamiento
compuesto por hasta 32 pasos (macro de componente) en
el botón de selección COMPONENT o el botón de
selección de etiquetas correspondiente a cualquier
componente.
Por ejemplo, si visualiza un DVD mediante la conexión
de un televisor y una grabadora de DVD a un
amplificador, es necesario llevar a cabo una serie de
operaciones, como las que se indican a continuación.
1 Encender el televisor.
2 Encender la grabadora de DVD.
3 Encender el amplificador.
4 Seleccionar la entrada de vídeo apropiada en el
televisor para visualizar el DVD.
5 Seleccionar la entrada de audio apropiada en el
amplificador para visualizar el DVD.
6 Iniciar la reproducción en la grabadora de DVD.
La macro de componente permite llevar a cabo estos
pasos mediante la pulsación de uno de los botones de
selección COMPONENT o de selección de etiquetas
durante más de 2 segundos.
2
Pulse los botones V/v para seleccionar “4
MACRO” y, a continuación, pulse el botón OK
o el botón de selección de etiquetas central.
“MACRO” aparece como título de la pantalla.
Sugerencia
Si se muestra un número antes del menú, podrá pulsar el
botón numérico para seleccionar el menú.
3 Pulse el botón DVD.
“MACRO DVD” aparece como título de la pantalla.
Sugerencia
Para seleccionar componentes de A/V no especificados en
los botones de selección COMPONENT, pulse el botón
OTHER varias veces y, a continuación, pulse el botón de
selección de etiquetas correspondiente al componente de
A/V deseado que aparezca en la pantalla.
4 Pulse el botón TV y, a continuación, pulse
el botón 1 (alimentación).
5 Pulse el botón DVD y, a continuación,
pulse el botón 1 (alimentación).
Programación de una macro de
componente
Siga el procedimiento que se describe a continuación
para programar una macro de componente. Puede
programar hasta 32 acciones consecutivas.
Ejemplo: Para programar el
procedimiento descrito anteriormente
en el botón DVD
1 A la vez que pulsa el botón (luz), pulse
el botón OTHER.
“SET MODE” aparece como título de la pantalla.
ES
18
6 Pulse el botón OTHER varias veces, pulse
el botón de selección de etiquetas
correspondiente al amplificador y, a
continuación, pulse el botón 1
(alimentación).
7 Pulse el botón t (selección de entrada)
varias veces para seleccionar la entrada de
vídeo adecuada en el televisor en el que
desea visualizar el DVD.
8
Pulse el botón de selección de entrada del
amplificador para seleccionar la entrada de
audio apropiada para visualizar el DVD.
9 Pulse el botón DVD y, a continuación,
pulse N.
10
Pulse el botón (luz).
Se escucha un pitido y la programación ha
finalizado.
Page 63

11
Pulse el botón (luz) o el botón
RETURN dos veces.
El modo ajustado se cierra y el mando a distancia
regresa al modo de espera para controlar los
componentes de A/V.
Notas
• Si el procedimiento se interrumpe en cualquier punto durante
más de 60 segundos, la programación se cancelará. No es
posible continuar desde el punto en el que se ha interrumpido
la programación.
• Si intenta programar acciones en un botón que ya dispone de
una macro de componente programada, se escuchará un pitido
dos veces para alertarle de que no puede programar una macro
de componente en el botón. En tal caso, borre la macro de
componente programada (página 20) y, a continuación,
comience de nuevo la programación desde el paso 1.
• No es posible borrar pasos durante el procedimiento de
programación. Si comete un error durante la programación de
acciones, finalícela y borre la macro de componente (página
20) y, a continuación, vuelva a comenzar desde el paso 1.
• Puede programar hasta 32 acciones de operación consecutivas.
Si se programan hasta 32 pasos, la programación de la macro
de componente estará llena. Para cambiar los pasos
programados, borre la macro de componente (página 20) y, a
continuación, vuelva a empezar desde el paso 1.
Comprobación de la correcta ejecución
de una macro de componente
Siga el procedimiento que se describe a continuación
para comprobar si la macro de componente programada
funciona del modo deseado.
Para ejecutar una macro de componente
1 Mantenga pulsado el botón de selección
COMPONENT en el que se ha
programado la macro de componente
deseada durante más de 2 segundos.
El icono de transmisión de señales aparece en la pantalla
y se ejecuta la macro de componente programada.
Sugerencia
Mientras aparece el icono de transmisión de señales ( ) y se
ejecuta la macro de componente, aparece “CANCEL” en la
tercera línea de la pantalla. Es posible cancelar la ejecución de la
macro de componente mediante la pulsación del botón de
selección de etiquetas derecho.
Para comprobar los pasos programados
de una macro de componente y añadir
una acción de retraso
La acción de retraso permite ajustar un intervalo entre los
pasos. El tiempo de retraso se ajusta en 250 ms (1/4 de
segundo) en el mando a distancia.
Si una macro de componente no se ejecuta del modo
deseado, compruebe los pasos programados e intente
añadir un retraso para ejecutar el programa correctamente.
1 A la vez que pulsa el botón (luz), pulse
el botón OTHER.
“SET MODE” aparece como título de la pantalla.
2 Pulse los botones V/v para seleccionar “4
MACRO” y, a continuación, pulse el
botón OK o el botón de selección de
etiquetas central.
“MACRO” aparece como título de la pantalla.
Sugerencia
Si se muestra un número antes del menú, podrá pulsar el
botón numérico para seleccionar el menú.
Continúa
19
ES
Page 64

3 Mientras mantiene pulsado el botón
SCROLL, pulse el botón de selección
COMPONENT o el botón de selección de
etiquetas en el que se ha programado la
macro de componente deseada.
“MACRO” y el nombre del componente de A/V
seleccionado aparecen en la primera línea y los pasos
programados aparecen en la pantalla.
4 Pulse los botones V/v para que la posición
del retraso aparezca en la tercera línea de
la pantalla y, a continuación, pulse el
botón SCROLL.
El retraso se añade entre la segunda y la tercera línea
de la pantalla, y “[DELAY]” aparece en la tercera
línea de la pantalla.
5 Pulse el botón OK o el botón de selección
de etiquetas central.
Se escucha un pitido y la programación ha finalizado.
6 Pulse el botón (luz) o el botón
RETURN dos veces.
El modo ajustado se cierra y el mando a distancia
regresa al modo de espera para controlar los
componentes de A/V.
Notas
• Si los sensores del mando a distancia de los componentes de
A/V están muy separados entre sí o están cubiertos, es posible
que los pasos operativos consecutivos programados en una
macro de componente no se ejecuten.
• Si una macro de componente no se ejecuta correctamente por
alguna razón, como se indica anteriormente, asegúrese de
ajustar todos los componentes de A/V en el estado en el que se
encontraban antes de ejecutar la macro de componente. De lo
contrario, los componentes de A/V no funcionarán
correctamente cuando vuelva a ejecutarse la macro de
componente.
•Debido a que algunos componentes de A/V están diseñados
para encenderse/apagarse cada vez que reciben señales de
conexión/desconexión de la alimentación, es posible que
dichos componentes no se enciendan con la macro de
componente. Compruebe el estado de la alimentación de los
componentes de A/V antes de utilizar la macro de componente.
ES
20
Borrado de pasos programados de
una macro de componente
Si comete un error en la programación de los pasos o
desea programar una nueva macro de componente, siga
el procedimiento que se indica a continuación para borrar
la macro de componente.
1 A la vez que pulsa el botón (luz), pulse
el botón OTHER.
“SET MODE” aparece como título de la pantalla.
2 Pulse los botones V/v para seleccionar “4
MACRO” y, a continuación, pulse el
botón OK o el botón de selección de
etiquetas central.
“MACRO” aparece como título de la pantalla.
Sugerencia
Si se muestra un número antes del menú, podrá pulsar el
botón numérico para seleccionar el menú.
3 Mientras mantiene pulsado el botón de
selección COMPONENT o el botón de
selección de etiquetas en el que se ha
programado la macro de componente
deseada, pulse el botón (luz).
Se escucha un pitido y se borra la macro de
componente.
4 Pulse el botón (luz) o el botón
RETURN dos veces.
El modo ajustado se cierra y el mando a distancia
regresa al modo de espera para controlar los
componentes de A/V.
Page 65

Ajuste del comando de
conexión de un
componente de A/V
seleccionado
(sólo para componentes Sony)
Es posible ajustar componentes de A/V para que se
enciendan al seleccionarse.
Esta función sólo es efectiva para los componentes Sony.
Ejemplo: Para programar la función de
conexión de la alimentación en el
botón TV
1 A la vez que pulsa el botón (luz), pulse
el botón OTHER.
“SET MODE” aparece como título de la pantalla.
2 Pulse los botones V/v para seleccionar “6
UTILITY” y, a continuación, pulse el
botón OK o el botón de selección de
etiquetas central.
“UTILITY” aparece como título de la pantalla.
Sugerencia
Si se muestra un número antes del menú, podrá pulsar el
botón numérico para seleccionar el menú.
3 Pulse los botones V/v para seleccionar “1
POWER ON” y, a continuación, pulse el
botón OK o el botón de selección de
etiquetas central.
“POWER ON” aparece como título de la pantalla.
4 Pulse el botón TV.
Se escucha un pitido y “TV ON” aparece en la
tercera línea de la pantalla.
5 Pulse el botón (luz) o el botón
RETURN tres veces.
El modo ajustado se cierra y el mando a distancia
regresa al modo de espera para controlar los
componentes de A/V.
Para borrar la función de conexión de
alimentación
Pulse el botón TV de nuevo en el paso 4. Se escuchará
un pitido, “TV OFF” aparecerá en la tercera línea de la
pantalla y el ajuste se cancelará.
Notas
• La función de conexión de la alimentación puede programarse
en el botón de selección COMPONENT o en el botón de
selección de etiquetas en el que se ha programado una macro
de componente (página 18).
En este caso, el componente de A/V se encenderá cuando pulse
el botón de selección COMPONENT o el botón de selección de
etiquetas. Si mantiene pulsado el botón durante más de 2
segundos, la macro de componente programada se ejecutará.
• Es posible programar la función de conexión de la
alimentación en un botón de selección COMPONENT o en un
botón de selección de etiquetas en el que se haya programado
una señal de control remoto mediante la función de aprendizaje
(página 12).
En tal caso, la señal aprendida se transmitirá cuando pulse el
botón de selección COMPONENT o el botón de selección de
etiquetas y, a continuación, el componente de A/V se
encenderá.
• Es posible programar la función de conexión de la
alimentación en un botón de selección COMPONENT o en el
botón de selección de etiquetas en el que se ha programado una
señal aprendida (página 12) y una macro de componente
(página 18). En este caso, la señal aprendida se transmitirá
cuando pulse el botón de selección COMPONENT o el botón
de selección de etiquetas. A continuación, el componente de A/
V se encenderá. Si mantiene pulsado el botón durante más de 2
segundos, la macro de componente programada se ejecutará.
Sugerencia
Si se muestra un número antes del menú, podrá pulsar el
botón numérico para seleccionar el menú.
21
ES
Page 66

Copia de los ajustes de un
botón de selección
COMPONENT en otro botón
Es posible copiar todos los ajustes de un botón de
selección COMPONENT o de un botón de selección de
etiquetas en otro botón de selección COMPONENT o
botón de selección de etiquetas.
Notas
• No es posible copiar los ajustes en un botón de selección
COMPONENT o en el botón de selección de etiquetas en el
que se ha programado una función “aprendida” (página 12) o
una macro de componente (página 18) o se ha cambiado el
nombre o la etiqueta de un componente de A/V (suena un
pitido cinco veces y “NG” aparece en la pantalla).
• Los caracteres mostrados al utilizar el botón también se
sustituirán.
Ejemplo: Para copiar los ajustes del
botón TV en el botón MD
1 A la vez que pulsa el botón (luz), pulse
el botón OTHER.
“SET MODE” aparece como título de la pantalla.
3 Pulse los botones V/v para seleccionar “2
COPY” y, a continuación, pulse el botón
OK o el botón de selección de etiquetas
central.
“COPY” aparece como título de la pantalla.
Sugerencia
Si se muestra un número antes del menú, podrá pulsar el
botón numérico para seleccionar el menú.
4 Pulse el botón TV.
“TV” aparece en la segunda línea de la pantalla.
5 Pulse el botón OTHER varias veces y, a
continuación, pulse el botón de selección
de etiquetas central (MD).
Se escucha un pitido y “TV >> MD” aparece en la
segunda línea de la pantalla.
2 Pulse los botones V/v para seleccionar “6
UTILITY” y, a continuación, pulse el
botón OK o el botón de selección de
etiquetas central.
“UTILITY” aparece como título de la pantalla.
Sugerencia
Si se muestra un número antes del menú, podrá pulsar el
botón numérico para seleccionar el menú.
ES
22
6 Pulse el botón (luz) o el botón
RETURN tres veces.
El modo ajustado se cierra y el mando a distancia
regresa al modo de espera para controlar los
componentes de A/V.
Para restaurar los ajustes
Siga el procedimiento indicado en “Restablecimiento de un botón
de selección COMPONENT o de un botón de selección de
etiqueta” en la página 28.
Page 67

Control del volumen de los
componentes de vídeo
conectados a un
componente de audio
Los botones de control del volumen (2 +/- y %) del
mando a distancia están preajustados de fábrica para
controlar el volumen según la suposición de que va a
escuchar el sonido de los componentes de vídeo a través
de los altavoces del televisor y el sonido de los
componentes de audio a través de los altavoces
conectados al amplificador.
La señal del mando a distancia transmitida mediante la
pulsación de los botones de control del volumen está
preajustada de fábrica del modo siguiente:
Componente de vídeo: transmite la señal que permite
controlar el volumen de un televisor.
Componente de audio: transmite la señal que permite
controlar el volumen de un amplificador.
Por ejemplo, para controlar el volumen mientras se
utiliza un reproductor de DVD, no es necesario
seleccionar el televisor para controlar el volumen del
televisor.
Si se conecta un amplificador a componentes de vídeo,
cambie el ajuste de control del volumen de todos los
componentes de vídeo para controlar el volumen del
amplificador.
3 Pulse los botones V/v para seleccionar “3
AUDIO SETTING” y, a continuación,
pulse el botón OK o el botón de selección
de etiquetas central.
“AUDIO SETTING” aparece como título de la
pantalla.
Sugerencia
Si se muestra un número antes del menú, podrá pulsar el
botón numérico para seleccionar el menú.
4 Pulse el botón b o el botón de selección
de etiquetas derecho.
Se escucha un pitido y “AMP” se muestra en el
interior de [ ].
5 Pulse el botón (luz) o el botón
RETURN tres veces.
1 A la vez que pulsa el botón (luz), pulse
el botón OTHER.
“SET MODE” aparece como título de la pantalla.
2 Pulse los botones V/v para seleccionar “6
UTILITY” y, a continuación, pulse el
botón OK o el botón de selección de
etiquetas central.
“UTILITY” aparece como título de la pantalla.
Sugerencia
Si se muestra un número antes del menú, podrá pulsar el
botón numérico para seleccionar el menú.
El modo ajustado se cierra y el mando a distancia
regresa al modo de espera para controlar los
componentes de A/V.
Para restaurar los ajustes
Pulse el botón B o el botón de selección de etiquetas izquierdo en
el paso 4.
23
ES
Page 68

Otros
Ajuste de la iluminación de
los botones
Puede cambiar el ajuste de la iluminación de los botones
del mando a distancia. La iluminación de los botones
está preajustada de fábrica para apagarse
automáticamente si no utiliza la unidad durante 10
segundos. También es posible cambiar el brillo y el
efecto de fundido (que ajusta el brillo de la iluminación
de los botones) de la iluminación de los botones y qué
botones la activan.
1 A la vez que pulsa el botón (luz), pulse
el botón OTHER.
“SET MODE” aparece como título de la pantalla.
2 Pulse los botones V/v para seleccionar “5
UNIT SETTINGS” y, a continuación,
pulse el botón OK o el botón de selección
de etiquetas central.
“UNIT SETTINGS” aparece como título de la
pantalla.
4 Pulse los botones B/b o el botón de
selección de etiquetas derecho o
izquierdo.
Puede ajustar el tiempo de la función de apagado
automático entre 1 y 60 segundos. Cada vez que se
pulsa el botón, el tiempo disminuye/aumenta en 1
segundo.
Nota
Si ajusta el tiempo de apagado automático en más de
10 segundos, es posible que la vida útil de la batería
se reduzca.
5 Pulse el botón (luz), el botón de
selección de etiquetas central, OK o
RETURN.
“UNIT SETTINGS” aparece como título de la
pantalla.
6 Pulse los botones V/v para seleccionar “2
LIGHT BRIGHTNESS” y, a
continuación, pulse el botón OK o el
botón de selección de etiquetas central.
“LIGHT BRIGHTNESS” aparece como título de la
pantalla.
Sugerencia
Si se muestra un número antes del menú, podrá pulsar el
botón numérico para seleccionar el menú.
3 Pulse los botones V/v para seleccionar “1
LIGHT OFF TIME” y, a continuación,
pulse el botón OK o el botón de selección
de etiquetas central.
“LIGHT OFF TIME” aparece como título de la
pantalla.
Sugerencia
Si se muestra un número antes del menú, podrá pulsar el
botón numérico para seleccionar el menú.
ES
24
Sugerencia
Si se muestra un número antes del menú, podrá pulsar el
botón numérico para seleccionar el menú.
7 Pulse los botones B/b o el botón de
selección de etiquetas derecho o
izquierdo.
Es posible ajustar el brillo en un nivel comprendido
entre 1 y 15. Cada vez que se pulsa el botón, el nivel
disminuye/aumenta en 1.
8 Pulse el botón (luz), el botón de
selección de etiquetas central, OK o
RETURN.
“UNIT SETTINGS” aparece como título de la
pantalla.
Page 69

9 Pulse los botones V/v para seleccionar “3
FADE EFFECT” y, a continuación, pulse
el botón OK
“FADE EFFECT” aparece como título de la pantalla
y el ajuste actual se muestra entre [ ].
Sugerencia
Si se muestra un número antes del menú, podrá pulsar el
botón numérico para seleccionar el menú.
10
Pulse los botones B/b o el botón de
selección de etiquetas derecho o
izquierdo.
Cada vez que se cambia el ajuste, se escucha un
pitido y [ ] muestra el nuevo ajuste.
ON: aumento gradual/desvanecimiento de la
iluminación de los botones
OFF: iluminación normal de los botones
11
Pulse el botón (luz), el botón de
selección de etiquetas central, OK o
RETURN.
“UNIT SETTINGS” aparece como título de la
pantalla.
13
Pulse los botones B/b o el botón de
selección de etiquetas derecho o
izquierdo.
Cada vez que se cambia el ajuste, se escucha un
pitido y [ ] muestra el nuevo ajuste.
ALL: la iluminación de los botones se activa al
pulsar cualquier botón del mando a distancia excepto
los botones 2 +/– y PROGRAM +/–.
LIGHT: la iluminación de los botones se activa
únicamente al pulsar el botón (luz).
14
Pulse el botón (luz) o el botón
RETURN tres veces.
El modo ajustado se cierra y el mando a distancia
regresa al modo de espera para controlar los
componentes de A/V.
12
Pulse los botones V/v para seleccionar “4
LIGHTON MODE” y, a continuación,
pulse el botón OK o el botón de selección
de etiquetas central.
“LIGHT ON MODE” aparece como título de la
pantalla y el ajuste actual se muestra entre [ ].
Sugerencia
Si se muestra un número antes del menú, podrá pulsar el
botón numérico para seleccionar el menú.
25
ES
Page 70

Ajuste de la pantalla
Es posible cambiar el ajuste de la pantalla. El mando a
distancia está preajustado de fábrica para que se apague
la pantalla automáticamente si no se utiliza durante 30
segundos. También puede modificar el brillo de la
pantalla.
1 A la vez que pulsa el botón (luz), pulse
el botón OTHER.
“SET MODE” aparece como título de la pantalla.
2 Pulse los botones V/v para seleccionar “5
UNIT SETTINGS” y, a continuación,
pulse el botón OK o el botón de selección
de etiquetas central.
“UNIT SETTINGS” aparece como título de la
pantalla.
Sugerencia
Si se muestra un número antes del menú, podrá pulsar el
botón numérico para seleccionar el menú.
3 Pulse los botones V/v para seleccionar “5
DISP. OFF TIME” y, a continuación,
pulse el botón OK o el botón de selección
de etiquetas central.
“DISP. OFF TIME” aparece como título de la
pantalla.
5 Pulse el botón (luz), el botón de
selección de etiquetas central, OK o
RETURN.
“UNIT SETTINGS” aparece como título de la
pantalla.
6 Pulse los botones V/v para seleccionar “6
DISP. BRIGHTNESS” y, a continuación,
pulse el botón OK o el botón de selección
de etiquetas central.
“DISP. BRIGHTNESS” aparece como título de la
pantalla.
Sugerencia
Si se muestra un número antes del menú, podrá pulsar el
botón numérico para seleccionar el menú.
7 Pulse los botones B/b o el botón de
selección de etiquetas derecho o
izquierdo.
Es posible ajustar el brillo en un nivel comprendido
entre 1 y 3. Cada vez que se pulsa el botón, el nivel
disminuye/aumenta en 1.
8 Pulse el botón (luz) o el botón
RETURN tres veces.
El modo ajustado se cierra y el mando a distancia
regresa al modo de espera para controlar los
componentes de A/V.
Sugerencia
Si se muestra un número antes del menú, podrá pulsar el
botón numérico para seleccionar el menú.
4
Pulse los botones
B/b
o el botón de
selección de etiquetas derecho o izquierdo.
Puede ajustar el tiempo de la función de apagado
automático entre 1 y 60 segundos. Cada vez que se
pulsa el botón, el tiempo disminuye/aumenta en 1
segundo.
ES
26
Page 71

Configuración del pitido
El mando a distancia está preajustado de fábrica con el
pitido de confirmación activado. Es posible cambiar el
ajuste para desactivar el pitido.
1 A la vez que pulsa el botón (luz), pulse
el botón OTHER.
“SET MODE” aparece como título de la pantalla.
2 Pulse los botones V/v para seleccionar “5
UNIT SETTINGS” y, a continuación,
pulse el botón OK o el botón de selección
de etiquetas central.
“UNIT SETTINGS” aparece como título de la
pantalla.
Sugerencia
Si se muestra un número antes del menú, podrá pulsar el
botón numérico para seleccionar el menú.
5 Pulse el botón (luz) o el botón
RETURN tres veces.
El modo ajustado se cierra y el mando a distancia
regresa al modo de espera para controlar los
componentes de A/V.
Nota
Al realizar ajustes, se escucha un pitido aunque éste se encuentre
desactivado.
3 Pulse los botones V/v para seleccionar “7
BEEP SOUND” y, a continuación, pulse
el botón OK o el botón de selección de
etiquetas central.
“BEEP SOUND” aparece como título de la pantalla
y el ajuste actual se muestra entre [ ].
Sugerencia
Si se muestra un número antes del menú, podrá pulsar el
botón numérico para seleccionar el menú.
4 Pulse los botones B/b o el botón de
selección de etiquetas derecho o
izquierdo.
Cada vez que se cambia el ajuste, se escucha un
pitido y [ ] muestra el nuevo ajuste.
ON: activa el pitido.
OFF: desactiva el pitido.
27
ES
Page 72

Restablecimiento de los
ajustes
5 Pulse el botón (luz) o el botón
RETURN tres veces.
Restablecimiento de un botón de
selección COMPONENT o un botón
de selección de etiquetas
Es posible restablecer la configuración preajustada de
fábrica del componente de A/V.
1 A la vez que pulsa el botón (luz), pulse
el botón OTHER.
“SET MODE” aparece como título de la pantalla.
2 Pulse los botones V/v para seleccionar “7
RESET” y, a continuación, pulse el botón
OK o el botón de selección de etiquetas
central.
“RESET” aparece como título de la pantalla.
Sugerencia
Si se muestra un número antes del menú, podrá pulsar el
botón numérico para seleccionar el menú.
El ajuste se ha completado y el mando a distancia
regresa al estado en el que se encontraba al iniciar el
ajuste.
Restablecimiento de todos los ajustes
Puede restablecer todos los ajustes predeterminados de
fábrica.
1 A la vez que pulsa el botón (luz), pulse
el botón OTHER.
“SET MODE” aparece como título de la pantalla.
2 Pulse los botones V/v para seleccionar “7
RESET” y, a continuación, pulse el botón
OK o el botón de selección de etiquetas
central.
“RESET” aparece como título de la pantalla.
3 Pulse los botones V/v para seleccionar “1
COMPONENT” y, a continuación, pulse
el botón OK o el botón de selección de
etiquetas central.
“COMPONENT” aparece como título de la pantalla.
Sugerencia
Si se muestra un número antes del menú, podrá pulsar el
botón numérico para seleccionar el menú.
4 Pulse el botón de selección
COMPONENT o el botón de selección de
etiquetas que desee restablecer.
Se escucha un pitido y se restablecen todos los
ajustes de fábrica del componente seleccionado.
ES
28
Sugerencia
Si se muestra un número antes del menú, podrá pulsar el
botón numérico para seleccionar el menú.
3 Pulse los botones V/v para seleccionar “2
ALL” y, a continuación, pulse el botón
OK o el botón de selección de etiquetas
central.
“RESET ALL SETTINGS” aparece como título de la
pantalla y “NO” se muestra entre [ ].
Sugerencia
Si se muestra un número antes del menú, podrá pulsar el
botón numérico para seleccionar el menú.
Page 73

4 Pulse el botón b o el botón de selección
de etiquetas derecho y, a continuación,
pulse el botón OK o el botón de selección
de etiquetas central.
“REALLY?” aparece en la segunda línea de la
pantalla y “NO” se muestra entre [ ].
Sugerencia
Si selecciona “NO” y pulsa el botón OK o el botón de
selección de etiquetas central, se volverá a mostrar la
pantalla del paso 2.
5 Pulse el botón b o el botón de selección
de etiquetas derecho y, a continuación,
pulse el botón OK o el botón de selección
de etiquetas central.
Una vez completado el restablecimiento, se escucha
un pitido y se restablecen todos los ajustes de fábrica.
Sugerencia
Si selecciona “NO” y pulsa el botón OK o el botón de
selección de etiquetas central, se volverá a mostrar la
pantalla del paso 2.
6 Pulse el botón (luz) o el botón
RETURN dos veces.
El mando a distancia regresa al estado en que se
encontraba después de pulsar el botón TV
preajustado de fábrica.
29
ES
Page 74

Información adicional
Precauciones
• No deje caer ni golpee la unidad, ya que podría
provocar un fallo de funcionamiento.
• No deje la unidad cerca de fuentes de calor, ni en
lugares expuestos a la luz solar directa, polvo o arena
excesivos, humedad, lluvia o golpes mecánicos.
• No inserte objetos extraños en la unidad. Si se
introduce algún objeto sólido o líquido en la unidad,
hágala revisar por personal especializado antes de
volver a utilizarla.
• No exponga los detectores de los mandos a distancia de
los componentes a la luz solar directa o a otras fuentes
de iluminación intensas. El exceso de luz podría
interferir en las operaciones del mando a distancia.
• Asegúrese de colocar el mando a distancia fuera del
alcance de los niños o de animales domésticos. Los
componentes como los aparatos de aire acondicionado,
calefacción, electrodomésticos y cortinas o persianas
eléctricas que reciban señales de infrarrojos pueden
resultar peligrosos si se utilizan de modo incorrecto.
Mantenimiento
Limpie superficie con un paño suave ligeramente
humedecido con agua o con una solución de detergente
poco concentrada. No use ningún tipo de disolvente
como alcohol, bencina o disolvente, ya que pueden dañar
el acabado de la superficie.
Especificaciones
Distancia de funcionamiento
Aproximadamente 10 metros (varía en función de los
componentes de los diferentes fabricantes)
Requisitos de alimentación
Dos pilas LR6 (tamaño AA) (no suministradas)
Duración de la pila
Aprox. 5 meses
• Cuando utilice pilas alcalinas.
• Si enciende y apaga un televisor Sony
aproximadamente 300 veces al día con pilas alcalinas.
• Si ajusta la iluminación de los botones en Brightness: 5
y Light on time: 10 segundos, y ajusta la pantalla en
Brightness: Level 1 y Display on time: 30 segundos.
Dimensiones
Aprox. 60,4 × 227,5 × 29,4 mm (an × al × prf)
Masa
170 g (sin incluir las pilas)
Señales que se pueden aprender
Capacidad por señal: hasta 300 bits
Gama de frecuencias de las señales: 455 kHz y hasta
300 kHz
Intervalo de las señales: hasta un 1 segundo
* El mando a distancia no puede aprender algunas señales
aunque éstas cumplan con estas especificaciones.
El diseño y las especificaciones están sujetos a cambios
sin previo aviso.
La validez de la marca CE se limita únicamente a
aquellos países en los que la legislación la impone,
especialmente los países de la EEE (Espacio Económico
Europeo).
*
30
ES
Page 75

Solución de problemas
Si experimenta problemas al configurar o utilizar el mando a distancia, compruebe primero las pilas (página 4) y, a
continuación, compruebe los elementos siguientes.
Problema
No puede utilizar los
componentes.
No puede utilizar los
componentes incluso después
de ajustar código programado.
No puede controlar el volumen.
El mando a distancia falla al
aprender las señales de mando
a distancia.
Solución
• Acérquese más al componente. La distancia máxima de funcionamiento es de
aproximadamente 10 m.
• Compruebe que orienta el mando directamente hacia el componente y que no hay
obstáculos entre el mando y el componente.
• Active primero la alimentación de los componentes, si fuera necesario.
• Compruebe que está pulsando el botón de selección COMPONENT o el botón de
selección de etiquetas correcto.
• Compruebe que el componente tiene capacidad para el control remoto por infrarrojos.
Por ejemplo, si el componente no venía con un mando a distancia, es posible que no
pueda controlarse mediante un mando a distancia.
• Ha asignado un componente distinto al botón de selección COMPONENT o a la
etiqueta de componente. Los componentes correspondientes se determinan mediante el
ajuste de un código programado. Por lo tanto, el nombre del componente preajustado
puede ser diferente del de la etiqueta de componente. En este caso, es recomendable
efectuar la programación de nuevo (página 7) y cambiar el nombre del componente en
la etiqueta (página 15).
• Ajuste correctamente el código de componente. Si el código del componente que
aparece primero en la lista no funciona, pruebe con todos los códigos correspondientes
al componente, siguiendo el orden en el que aparecen en la “Lista de códigos
programados”.
• Es posible que algunas funciones no estén programadas. Si no funciona correctamente
alguno o ninguno de los botones incluso después de haber ajustado los códigos de
componente, utilice la función de aprendizaje para programar las señales del mando a
distancia para el componente (página 12).
• Es posible que el componente de A/V deseado no se pueda utilizar mediante el código
programado que figura en la “Lista de códigos programados”. Consulte “Ajuste de
componentes de A/V que no figuran en la lista de códigos programados” (página 8)
para ajustar el código programado disponible para el componente de A/V.
•
Si los componentes de vídeo están conectados a un sistema de audio, asegúrese de
haber configurado el mando a distancia tal y como se describe en “Control del volumen
de los componentes de vídeo conectados a un componente de audio” (página 23).
• Ha programado señales de mando a distancia en los botones de control de volumen del
televisor o del amplificador. En este caso, el mando a distancia transmite las señales
aprendidas en lugar de las señales de control de volumen cuando selecciona un
componente distinto de un televisor o un amplificador.
• Para realizar el aprendizaje, separe el mando a distancia y el mando a distancia del
componente de A/V entre 5 y 10 cm.
• Compruebe que la pila del mando a distancia del componente de A/V disponga de
carga suficiente. Si no dispone de carga suficiente, sustituya la pila por una nueva.
• Antes de realizar el aprendizaje, desactive otros dispositivos de infrarrojos, como
aparatos de aire acondicionado o auriculares.
• Es posible que el aprendizaje no se pueda realizar correctamente si se realiza cerca de
pantallas de plasma. Intente cambiar de posición o apague la pantalla de plasma.
• Es posible que el aprendizaje no se pueda realizar correctamente bajo luces
fluorescentes potentes. Intente cambiar de posición.
• Si enseña al mando a distancia señales de una unidad de control remoto de sistema de
intercambio de señales interactivo (suministrado con algunos receptores y
amplificadores de Sony), la señal de respuesta de la unidad principal podría interferir
con el aprendizaje del mando a distancia. En tal caso, trasládese a un lugar en el que
las señales no alcancen a la unidad principal (por ejemplo, otra sala, etc.).
Continúa
31
ES
Page 76

Problema
No puede utilizar un componente
ni después de haber programado
las señales del mando a distancia
con la función de “aprendizaje”.
“NG” aparece en la tercera
línea de la pantalla y se escucha
un pitido cinco veces durante el
ajuste del código programado.
“NG” aparece en la tercera
línea de la pantalla y se
escucha un pitido cinco veces
durante el aprendizaje.
“FULL” aparece en la tercera
línea de la pantalla y se
escucha un pitido cinco veces
durante el aprendizaje.
“NG” aparece en la tercera
línea de la pantalla y se escucha
un pitido cinco veces al intentar
copiar los ajustes de una
etiqueta de componente en otra.
Se escucha un pitido dos veces
durante el ajuste del código
programado.
Se escucha un pitido dos veces
durante el aprendizaje.
Se escucha un pitido dos veces
durante la programación de
una macro de componente.
“NG” aparece en la tercera
línea de la pantalla y se escucha
un pitido dos veces durante la
programación de la función de
conexión de la alimentación.
Solución
Asegúrese de que el mando a distancia haya “aprendido” las señales correctas. De lo
contrario, consulte “Para lograr un aprendizaje preciso” (página 14) y realice de nuevo
el procedimiento de aprendizaje (página 12).
El ajuste del código programado no se ha realizado correctamente. Consulte la “Lista de
códigos programados” suministrada para ajustar el código programado de nuevo.
• El aprendizaje no se ha realizado con éxito. Consulte “Para lograr un aprendizaje
preciso” (página 14) para intentar llevar a cabo el procedimiento de aprendizaje de
nuevo.
• Durante el aprendizaje, ha pulsado un botón distinto del botón en el que deseaba
programar la señal. Vuelva a programar la señal en el botón correcto (página 12).
La memoria de señales aprendidas está llena. Borre las señales aprendidas que no se
utilicen frecuentemente (página 14) y, a continuación, programe la señal de mando a
distancia que desee.
• El ajuste no se puede copiar en los botones de selección COMPONENT ni en los
botones de selección de etiquetas en las siguientes situaciones:
– Si hay programada una señal aprendida o una macro de componente.
– Si se ha modificado la etiqueta de componente del botón.
– Si se ha modificado la etiqueta de función del botón.
En este caso, restablezca los ajustes (página 28) antes de realizar la copia.
• Está copiando los ajustes de componentes de A/V distintos de un televisor o un
amplificador en el botón de selección de etiquetas asignado a un televisor o a un
amplificador. El botón TV sólo está asignado al televisor y en el botón de selección de
etiquetas en el que se encuentra ajustado un amplificador se ha asignado un
amplificador o un reproductor de DVD con sistema de sala de cine doméstica.
• El mando a distancia no puede copiar los ajustes si los datos de la señal programada
del botón ocupan mucho espacio. En este caso, borre las señales programadas que no
se utilicen frecuentemente (página 14) y, a continuación, copie los ajustes de nuevo.
El código programado no se puede ajustar en el botón de selección COMPONENT ni en
el botón de selección de etiquetas en las siguientes situaciones:
– Si hay programada una señal aprendida o una macro de componente.
– Si se ha modificado la etiqueta de componente del botón.
– Si se ha modificado la etiqueta de función del botón.
En este caso, restablezca los ajustes (página 28) antes de realizar el ajuste.
• Consulte “Para lograr un aprendizaje preciso” (página 14).
•
Se ha programado otra señal de mando a distancia en el botón deseado. Borre la señal
aprendida (página 14) o programe la señal de mando a distancia en otro botón (página 12).
• Se ha superado el tiempo de espera del aprendizaje (10 segundos). Vuelva a comenzar
desde el principio.
• Está asignando una macro de componente al botón de selección COMPONENT o al
botón de selección de etiquetas al que se ha asignado otra macro de componente. Borre
la macro de componente asignada al botón (página 20) y, a continuación, asigne la
macro de componente que desee.
• Se han superado los 32 pasos programados después de añadir un retraso durante la
comprobación de la macro de componente. Sólo se puede programar 32 pasos como
máximo (incluido el retraso). Vuelva a programar la macro de componente.
Está programando la función de conexión de la alimentación (página 21) en el botón de
selección COMPONENT o en el botón de selección de etiquetas asignado a un código
programado distinto del de Sony. La función de conexión de la alimentación sólo puede
programarse en el botón asignado al código programado de Sony.
32
ES
Page 77

Problema
Una macro de componente no
funciona correctamente.
La pantalla se apaga
automáticamente.
El modo ajustado se cierra
inesperadamente durante el
ajuste.
El pitido de confirmación no
se escucha.
El pitido de confirmación se
escucha aunque el ajuste de los
pitidos esté desactivado.
“E” aparece en la pantalla.
El mando a distancia no
accede al modo ajustado.
Solución
• Cuando programe una macro de componente, programe las acciones en el orden
correcto (página 18).
• Cambie la orientación del mando a distancia. Si el problema no se resuelve, acerque el
mando a distancia a los componentes de A/V.
• Compruebe que los componentes de A/V programados están listos para recibir las
señales correctamente (página 18).
• Si ha cambiado el código programado o ha programado señales de mando a distancia
después de programar la macro de componente, la nueva señal se transmitirá al
ejecutar la macro de componente.
• El intervalo existente entre los pasos programados es demasiado corto. Consulte “Para
comprobar los pasos programados de una macro de componente y añadir una acción de
retraso” (página 19) para ampliar el intervalo o cambiar el orden de los pasos.
El mando a distancia está preajustado de fábrica para que se apague la pantalla
automáticamente si no se utiliza durante aproximadamente 30 segundos (tiempo de
apagado automático). Puede cambiar el tiempo de la función de apagado automático
entre 1 y 60 segundos (página 26).
El modo ajustado se cierra si no utiliza el mando a distancia durante más de 60
segundos. Lleve a cabo el siguiente paso antes de que transcurran 60 segundos.
El pitido está desactivado. Actívelo (página 27).
El pitido de confirmación se escucha en el modo ajustado, aunque el ajuste de los
pitidos esté desactivado.
Las pilas disponen de poca energía. Sustitúyalas por otras nuevas.
Si “E” aparece en la pantalla, el mando a distancia no podrá acceder al modo ajustado.
Sustituya las pilas por unas nuevas.
33
ES
Page 78

Tabla de funciones programadas
El mando a distancia memoriza las señales de mandos a distancia de las principales marcas.
Ajustar el código programado (página 7) permite al mando a distancia controlar todos los componentes de AV.
El mando a distancia se ha programado en fábrica para controlar componentes de A/V Sony (consulte la siguiente
tabla).
Título de la pantalla N.° de código Marca y componente
TV 8001 Televisor Sony (analógico)
VCR 1003 Videograbadora Sony
SAT 3001 Grabadora satélite analógica Sony
DVD 0001 Reproductor de DVD Sony
CABLE 9001 Decodificador de cable analógico
DVD-R 0203 Grabadora de DVD Sony
AMP 4001 Receptor/Amplificador Sony
CD 5001 Reproductor de discos compactos (CD) Sony
MD 7001 Pletina de minidiscos (MD) Sony
TAPE 6001 Pletina de casetes Sony
El mando a distancia memoriza la señal del mando a distancia de acuerdo con los componentes de AV Sony. Por ello,
al ajustar un componente de AV de otra marca, es posible que la función de un botón no se corresponda con su
nombre. Consulte las tablas siguientes para obtener información acerca de la función de cada botón. (Cambie las
funciones correspondientes a los botones de etiquetas y las notas de funciones después de ajustar el código
programado, si es necesario.)
Componente Título de la pantalla
TV (analógico) TV
TV (digital) TV
VCR (videograbadora) VCR
Receptor satélite analógico SAT
Receptor de satélite digital SAT
Reproductor de DVD DVD
Decodificador de cable analógico CABLE
Grabadora de DVD, DVD/VCR Combo DVD-R
Sistema de sala de cine doméstica/reproductor DVD Combo DVD
Receptor/amplificador AMP
Reproductor de CD CD
Pletina de MD MD
Pletina de casetes TAPE
34
ES
Page 79

TV (analógico)
Botón/visualización
1
t
1-9, 0, - (1-), ENT (2-)
2 +, –
%
PROGRAM +, –
Botón
/
a
MENU
V, v, B, b
OK
RETURN
A (Red)
B (Green)
C (Yellow)
D (Blue)
(botones de selección de etiquetas)
Página 1/4 Página 2/4
INFO
SLEEP
Visualización
A/B
WIDE
PIP
SWAP
Página 3/4
PIPCH+
PIPCH–
Nombre
POWER
INPUT
1-9, 0, -/--, ENTER
VOLUME+
VOLUME–
MUTING
PROGRAM+
PROGRAM–
RECALL
TELETEXT
TV ON
MENU
R, r, T, t
OK
RETURN
RED
GREEN
YELLOW
BLUE
INFO
SLEEP
DUAL SOUND
WIDE
PIP ON/OFF
PIP SWAP
PIP CH+
PIP CH–
Función
Para encender o apagar la alimentación
Para cambiar el modo de entrada
Para cambiar el canal. Por ejemplo, para cambiar el canal 5, pulse 0 y 5 (o bien pulse 5
y ENT).
Subir volumen: +
Bajar volumen: –
Para desactivar el sonido del televisor. Vuelva a pulsarlo para volver al nivel de
volumen anterior.
Canal siguiente: +
Canal anterior: –
Para utilizar las funciones JUMP, FLASHBACK o CHANNEL RETURN en el
televisor en función del ajuste del fabricante del televisor
Para cambiar al teletexto
Para encender la alimentación.
Para regresar del modo de teletexto al modo de televisión.
Para abrir la pantalla del menú (MENU)
Para mover el cursor
Para introducir la selección de la pantalla del menú (MENU)
Para salir del modo
Botón Fastext
Botón Fastext
Botón Fastext
Botón Fastext
Para mostrar el canal actual en el televisor
Para utilizar la función de desconexión automática del televisor (sólo funciona con los
televisores que disponen de función de desconexión automática)
Para cambiar el sonido de la emisión dúplex
Para cambiar a WIDE
Para activar o desactivar la imagen que aparece en pantalla.
Para cambiar la imagen que aparece en pantalla
Para cambiar al siguiente canal de televisión en la imagen que aparece en pantalla
Para cambiar al canal de televisión anterior en la imagen que aparece en pantalla
Continúa
35
ES
Page 80

TV (DIGITAL)
Botón/visualización
1
t
1-9, 0, - (1-), ENT (2-)
2 +, –
%
PROGRAM +, –
DIGITAL/ANALOG
/
Botón
a
GUIDE
MENU
V, v, B, b
OK
RETURN
TOOLS
m
N
M
A (Red)
B (Green)
C (Yellow)
D (Blue)
(botones de selección de etiquetas)
Página 1/4 Página 2/4
INFO
SLEEP
Visualización
A/B
2PICS
16:9
FREEZE
Nombre
POWER
INPUT
1-9, 0, -/--, ENTER
VOLUME+
VOLUME–
MUTING
PROGRAM+
PROGRAM–
RECALL
D/A MODE
TELETEXT
TV ON
EPG
MENU
R, r, T, t
OK
RETURN
TOOLS
VIDEO 1
VIDEO 2
VIDEO 3
RED
GREEN
YELLOW
BLUE
INFO
SLEEP
DUAL SOUND
TWIN PICS
16:9
FREEZE
Función
Para encender o apagar la alimentación
Para cambiar el modo de entrada
Para cambiar el canal. Por ejemplo, para cambiar el canal 5, pulse 0 y 5 (o bien pulse 5
y ENT).
Subir volumen: +
Bajar volumen: –
Para desactivar el sonido del televisor. Vuelva a pulsarlo para volver nivel de volumen
anterior.
Canal siguiente: +
Canal anterior: –
Para utilizar las funciones JUMP, FLASHBACK o CHANNEL RETURN en el
televisor en función del ajuste del fabricante del televisor.
Para cambiar el modo digital/analógico
Para cambiar al teletexto
Para encender la alimentación.
Para regresar del modo de teletexto al modo de televisión.
Para utilizar la guía de programas
Para abrir la pantalla del menú (MENU)
Para mover el cursor
Para introducir la selección de la pantalla del menú (MENU)
Para salir del modo
Para ir al modo de ajuste de opciones (OPTION)
Para cambiar a VIDEO 1
Para cambiar a VIDEO 2
Para cambiar a VIDEO 3
Botón Fastext
Botón Fastext
Botón Fastext
Botón Fastext
Para mostrar el canal actual en el televisor
Para utilizar la función de desconexión automática del televisor (sólo funciona con los
televisores que disponen de función de desconexión automática)
Para cambiar el sonido de la emisión dúplex
Para dividir la pantalla en dos y poder ver dos imágenes simultáneamente
Para cambiar a WIDE
Para mostrar una imagen congelada del canal actual
36
ES
Page 81

VCR (videograbadora)
Botón/visualización
1
t
1-9, 0, - (1-), ENT (2-)
PROGRAM +, –
/
a
Botón
MENU
V, v, B, b
OK
RETURN
m
N
M
x
X
z (REC)*
Página 1/4 Página 2/4
CMSKIP
HS REW
(botones de selección de etiquetas)
PLAYx2
QTIMER
Visualización
SRCHT
SRCHt
Página 3/4
CNTR
SP/LP
TV
Página 4/4
LINE1
LINE2
DV IN
Nombre
POWER
ANT/SW
1-9, 0, -/--, ENTER
PROGRAM+
PROGRAM–
DISPLAY
INPUT
MENU
R, r, T, t
OK
EXIT
m
N
M
x
X
z
CM SKIP
H.S.REW
PLAYx2
QUICKTIMER
SEARCHT
SEARCHt
COUNTER
SP/LP
TV TUNER
LINE1
LINE2
DV INPUT
Función
Para encender o apagar la alimentación
Para cambiar la salida de antena
Para cambiar el canal. Por ejemplo, para cambiar el canal 5, pulse 0 y 5 (o bien pulse 5
y ENT).
Canal siguiente: +
Canal anterior: –
Para visualizar las indicaciones en pantalla
Para cambiar el modo de entrada
Para abrir la pantalla del menú (MENU)
Para mover el cursor
Para introducir la selección de la pantalla del menú (MENU)
Para salir del modo
Para rebobinar
Para reproducir
Para avanzar rápidamente
Para detener
Para insertar una pausa
Para grabar
Para omitir la publicidad
Para rebobinar a gran velocidad
Para reproducir imágenes a velocidad doble
Para seleccionar el tiempo de grabación en 30 minutos e iniciar la grabación
Revisar la búsqueda de imágenes bloqueadas (REVIEW)
Poner en cola la búsqueda de imágenes bloqueadas (CUE)
Para cambiar la visualización del contador
Para cambiar la velocidad de la cinta
Para regresar al televisor (para restablecer la entrada externa)
Para seleccionar la fuente de entrada: LINE 1
Para seleccionar la fuente de entrada: LINE 2
Para seleccionar la fuente de entrada: Entrada de vídeo digital
*Para evitar errores de funcionamiento, el mando a distancia sólo transmitirá señales del botón z/REC (grabación) si mantiene
pulsado el botón durante más de 2 segundos.
Continúa
37
ES
Page 82

Receptor de satélite analógico
Receptor de satélite digital
Botón/visualización
1
t
1-9, 0
- (1-)
PROGRAM +, –
Botón
DIGITAL/ANALOG
/
a
GUIDE
MENU
V, v, B, b
OK
RETURN
TOOLS
A (Red)
B (Green)
C (Yellow)
D (Blue)
(botones de selección de etiquetas)
Página 1/4 Página 2/4
HELP
FAVORT
Visualización
SERV
PILOT
PRSNL
A/B
Nombre
POWER
INPUT
1-9, 0
-/--
PROGRAM+
PROGRAM–
RECALL
INTRCTV
TELETEXT
BOX OFFICE
GUIDE
MENU
R, r, T, t
OK
EXIT
EPG
RED
GREEN
YELLOW
BLUE
HELP
FAVORITE
SERVICE
PILOT
PERSONAL
SAT A/B
Función
Para encender o apagar la alimentación
Para cambiar la salida del receptor de satélite al televisor. (Cuando se conecta un cable
de televisión o una antena al receptor, la salida cambia entre un canal de televisión y
uno de emisión vía satélite.)
Para cambiar canales
Para seleccionar números de dos dígitos.
Funciona del mismo modo que el mando a distancia del sintonizador de recepción vía
satélite
Canal siguiente: +
Canal anterior: –
Para regresar a la última emisora sintonizada
Para mostrar la pantalla INTERACTIVE
Para cambiar al teletexto
Para mostrar la pantalla BOX OFFICE
Para abrir la guía maestra
Para abrir la pantalla del menú (MENU)
Para mover el cursor
Para introducir la selección de la pantalla del menú (MENU)
Para salir del modo
Para mostrar u ocultar la pantalla EPG
Botón Fastext
Botón Fastext
Botón Fastext
Botón Fastext
Para mostrar la ayuda
Para pasar a los canales favoritos anteriores y siguientes únicamente
Para ejecutar la función “PAY PER VIEW” o el servicio de “descarga de programas”
Para encender o apagar la pantalla EPG
Para visualizar los modos de ajuste
Para cambiar el receptor gemelo
38
ES
Page 83

Receptor de satélite digital (N.° 3201)
Botón/visualización
1
t
1-9, 0
- (1-)
PROGRAM +, –
DIGITAL/ANALOG
/
a
GUIDE
Botón
MENU
V, v, B, b
OK
RETURN
m
N
M
x
X
z (REC)*
A (Red)
B (Green)
C (Yellow)
D (Blue)
(botones de selección de etiquetas)
HELP
Nombre
POWER
INPUT
1-9, 0
-/--
PROGRAM+
PROGRAM–
INTRCTIV
TELETEXT
BOX OFFICE
GUIDE
MENU
R, r, T, t
OK
EXIT
m
N
M
x
X
z
RED
GREEN
YELLOW
BLUE
HELP
Función
Para encender o apagar la alimentación
Para cambiar la salida del receptor de satélite al televisor. (Cuando se conecta un cable
de televisión o una antena al receptor, la salida cambia entre un canal de televisión y
uno de emisión vía satélite.)
Para cambiar canales
Para seleccionar números de dos dígitos
Funciona del mismo modo que el mando del sintonizador de recepción vía satélite
Canal siguiente: +
Canal anterior: –
Para mostrar la pantalla INTERACTIVE
Para cambiar al teletexto
Para mostrar la pantalla BOX OFFICE
Para abrir la guía maestra
Para abrir la pantalla del menú (MENU)
Para mover el cursor
Para introducir la selección de la pantalla del menú (MENU)
Para salir del modo
Para rebobinar
Para reproducir
Para avanzar rápidamente
Para detener
Para insertar una pausa
Para grabar
Botón Fastext
Botón Fastext
Botón Fastext
Botón Fastext
Para mostrar la ayuda
Visualización
Página
1/4
SERV
*Para evitar errores de funcionamiento, el mando a distancia sólo transmitirá señales del botón z/REC (grabación) si mantiene
pulsado el botón durante más de 2 segundos.
SERVICE
Para ejecutar la función “PAY PER VIEW” o el servicio de “descarga de programas”
Continúa
39
ES
Page 84

Reproductor de DVD
Botón/visualización
1
1-9, 0
- (1-)
ENT (2-)
PROGRAM +, –
/
a
GUIDE
Botón
MENU
V, v, B, b
OK
RETURN
TOOLS
m
N
M
x
X
Página 1/4 Página 2/4
AUDIO
REPEAT
(botones de selección de etiquetas)
CLEAR
ANGLE
Visualización
SLOWT
SLOWt
Página 3/4
P.MODE
SRCHT
SRCHt
Página 4/4
EJECT
Nombre
POWER
1-9, 0
+10
ENTER
>
.
DISPLAY
SUBTITLE
TOP MENU
DVD MENU
R, r, T, t
OK
RETURN
SET UP
m
N
M
x
X
AUDIO
REPEAT
CLEAR
ANGLE
SLOWT
SLOWt
PLAY MODE
SEARCHT
SEARCHt
EJECT
Función
Para encender o apagar la alimentación
Botones numéricos: para ajustar elementos seleccionados de la pantalla
Para seleccionar el número 10 o superior
Para introducir el ajuste. Para ajustar elementos seleccionados de la pantalla.
Para pasar a la siguiente ubicación o canción
Para pasar a la ubicación o canción anterior
Para mostrar el estado actual de reproducción en la pantalla
Para cambiar los subtítulos
Para mostrar el menú principal
Para mostrar el menú del DVD
Para mover el cursor
Para ejecutar los elementos seleccionados de la pantalla
Para regresar a la pantalla anterior
Para abrir el menú de configuración
Para rebobinar
Para reproducir
Para avanzar rápidamente
Para detener
Para insertar una pausa
Para cambiar el sonido
Para acceder al modo de repetición
Para borrar los caracteres seleccionados de la pantalla
Para cambiar el ángulo
Reproducción a cámara lenta en dirección inversa
Reproducción a cámara lenta hacia delante
Para cambiar el modo de reproducción
Para realizar búsquedas en dirección inversa
Para realizar búsquedas hacia delante
Para abrir o cerrar la bandeja
Decodificador de cable analógico
Botón/visualización
1
1-9, 0
Botón
ENT (2-)
PROGRAM +, –
ES
40
Nombre
POWER
1-9, 0
ENTER
PROGRAM+
PROGRAM–
RECALL
Función
Para encender o apagar la alimentación
Para cambiar canales
Para introducir el canal
Canal siguiente: +
Canal anterior: –
Para utilizar la función JUMP, FLASHBACK o CHANNEL RETURN
Page 85

Grabadora de DVD
DVD/VCR Combo*
1
Botón/visualización
1
1-9, 0
- (1-)
ENT (2-)
PROGRAM +, –
/
a
GUIDE
MENU
Botón
V, v, B, b
OK
RETURN
TOOLS
m
N
M
x
X
2
z (REC)*
A (Red)
D (Blue)
Página 1/4 Página 2/4
AUDIO
REPEAT
(botones de selección de etiquetas)
CLEAR
ANGLE
Visualización
SLOWT
SLOWt
Página 3/4
P.MODE
SRCHT
SRCHt
Página 4/4
EJECT
R.MODE
Nombre
POWER
1-9, 0
+10
ENTER
PROGRAM+
PROGRAM–
DECKCHANGE
DISPLAY
SUBTITLE
TOP MENU
DVD MENU
R, r, T, t
OK
RETURN
SET UP
m
N
M
x
X
z
>
.
AUDIO
REPEAT
CLEAR
ANGLE
SLOWT
SLOWt
PLAY MODE
SEARCHT
SEARCHt
EJECT
REC MODE
Función
Para encender o apagar la alimentación
Botones numéricos: para ajustar elementos seleccionados en la pantalla
Para seleccionar el número 10 o superior
Para introducir un ajuste o para ajustar elementos seleccionados en la pantalla
Canal siguiente: +
Canal anterior: –
Para cambiar la pletina
Para mostrar el estado actual de reproducción en la pantalla
Para cambiar los subtítulos
Para mostrar el menú principal
Para mostrar el menú del DVD
Para mover el cursor
Para introducir la selección de la pantalla del menú
Para regresar a la pantalla anterior
Para abrir el menú de configuración
Para rebobinar
Para reproducir
Para avanzar rápidamente
Para detener
Para insertar una pausa
Para grabar
Para pasar a la siguiente ubicación o canción
Para pasar a la ubicación o canción anterior
Para cambiar el sonido
Para acceder al modo de repetición
Para borrar los caracteres seleccionados de la pantalla
Para cambiar el ángulo
Reproducción a cámara lenta en dirección inversa
Reproducción a cámara lenta hacia delante
Para cambiar el modo de reproducción
Para realizar búsquedas en dirección inversa
Para realizar búsquedas hacia delante
Para abrir o cerrar la bandeja
Para cambiar el modo de grabación
*1Es posible que el mando a distancia no controle la videograbadora de algunos DVD/VCR Combo, aunque se haya ajustado el
código programado. En tal caso, programe las operaciones de la videograbadora en botones libres mediante la función de
aprendizaje, o asigne la sección de la videograbadora a otro botón de selección COMPONENT.
2
Para evitar errores de funcionamiento, el mando a distancia sólo transmitirá señales del botón z/REC (grabar) si mantiene pulsado
*
el botón durante más de 2 segundos.
Continúa
41
ES
Page 86

Sistema de sala de cine doméstica/reproductor DVD Combo
Botón/visualización
1
t
1-9, 0
- (1-)
ENT (2-)
2 +, –
%
PROGRAM +, –
Botón
DIGITAL/ANALOG
/
a
GUIDE
MENU
V, v, B, b
OK
RETURN
TOOLS
m
N
M
x
X
Página 1/4 Página 2/4 Página 3/4
(botones de selección de etiquetas)
SFIELD
TUNER
AUDIO
Visualización
REPEAT
CLEAR
ANGLE
EJECT
P.MODE
Nombre
POWER
INPUT
1-9, 0
+10
ENTER
VOLUME+
VOLUME–
MUTING
>
.
DISC SKIP
BAND
DISPLAY
SUBTITLE
TOP MENU
MENU
R, r, T, t
OK
RETURN
SET UP
m
N
M
x
X
SOUNDFIELD
TUNER
AUDIO
REPEAT
CLEAR
ANGLE
EJECT
PLAY MODE
Función
Para encender o apagar la alimentación
Para cambiar el modo de entrada
Botones numéricos: para ajustar elementos seleccionados en la pantalla
Para seleccionar el número 10 o superior
Para introducir un ajuste o para ajustar elementos seleccionados en la pantalla
Subir volumen: +
Bajar volumen: –
Para desactivar el sonido del sistema de sala de cine doméstica/reproductor de DVD
Combo. Vuelva a pulsarlo para volver al nivel de volumen anterior.
Para pasar a la siguiente ubicación o canción
Para pasar a la ubicación o canción anterior
Para seleccionar el disco siguiente
Para seleccionar la banda
Para mostrar el estado actual de reproducción en la pantalla
Para cambiar los subtítulos
Para mostrar el menú principal
Para mostrar el menú del DVD
Para mover el cursor
Para introducir la selección de la pantalla del menú
Para regresar a la pantalla anterior
Para abrir el menú de configuración
Para rebobinar
Para reproducir
Para avanzar rápidamente
Para detener
Para insertar una pausa
Para conectar o desconectar el campo acústico
Para seleccionar la banda del sintonizador
Para cambiar el sonido
Para acceder al modo de repetición
Para borrar los caracteres seleccionados de la pantalla
Para cambiar el ángulo
Para abrir o cerrar la bandeja
Para cambiar el modo de grabación
42
ES
Page 87

Receptor/amplificador
Botón/visualización
1
t
1
2
3
4
5
6
7
Botón
8
9
0
2 +, –
%
PROGRAM +, –
DIGITAL/ANALOG
/
Página 1/4 Página 2/4 Página 3/4
SFIELD
CENTR+
(botones de selección de etiquetas)
CENTR–
GENRE
Visualización
REAR+
REAR–
T.TONE
WOOFR+
WOOFR–
Página 4/4
D.IN
Nombre
POWER
INPUT
1
2
3
4
5
6
7
8
9
0
VOLUME+
VOLUME–
MUTING
PRESET+
PRESET–
SHIFT
BAND
5.1INPUT
SOUNDFIELD
CENTER+
CENTER–
GENRE
REAR+
REAR–
TEST TONE
SUBWOOFER+
SUBWOOFER–
DIGITAL IN
Función
Para encender o apagar la alimentación
Para cambiar la selección de entrada de manera cíclica
Para seleccionar la fuente de entrada: VIDEO1
Para seleccionar la fuente de entrada: VIDEO2
Para seleccionar la fuente de entrada: AUX
Para seleccionar la fuente de entrada: TUNER
Para seleccionar la fuente de entrada: CD
Para seleccionar la fuente de entrada: TAPE
Para seleccionar la fuente de entrada: MD/DAT
Para seleccionar la fuente de entrada: TV
Para seleccionar la fuente de entrada: PHONO
Para seleccionar la fuente de entrada: DVD
Subir volumen: +
Bajar volumen: –
Para desactivar el sonido del receptor/amplificador. Vuelva a pulsarlo para volver al
nivel de volumen anterior.
Programación o sintonización de una frecuencia superior: +
Programación o sintonización de una frecuencia inferior: –
Para cambiar de banda o la selección programada
Para seleccionar la banda del sintonizador
Para cambiar el sonido multicanal de 5.1 canales y superior
Para conectar o desconectar el campo acústico
Para ajustar el nivel del altavoz central
Para ajustar el nivel del altavoz central
Para seleccionar un género de campo acústico
Para ajustar el nivel de los altavoces posteriores
Para ajustar el nivel de los altavoces posteriores
Para emitir un tono de prueba
Para ajustar el nivel del altavoz potenciador de graves
Para ajustar el nivel del altavoz potenciador de graves
Para cambiar la entrada digital
Continúa
43
ES
Page 88

Reproductor de CD
Botón/visualización
1
1-9, 0
- (1-)
ENT (2-)
PROGRAM +, –
Botón
/
m
N
M
x
X
z (REC)*
(botones de selección de etiquetas)
Página 1/4 Página 2/4
REPEAT
SHFFL
Visualización
FADER
EJECT
P.MODE
CLEAR
*Para evitar errores de funcionamiento, el mando a distancia sólo transmitirá señales del botón z/REC (grabación) si mantiene
pulsado el botón durante más de 2 segundos.
Nombre
POWER
1-9, 0
+10
ENTER
>
.
DISC SKIP
DISPLAY
m
N
M
x
X
z
REPEAT
SHUFFLE
FADER
EJECT
PLAY MODE
CLEAR
Función
Para encender o apagar la alimentación
Para seleccionar el número de pista
Para seleccionar el número 10 o superior
Para introducir el ajuste
Para seleccionar la pista siguiente
Para seleccionar la pista anterior
Para seleccionar el disco siguiente
Para conectar y desconectar la pantalla del reproductor de CD
Para rebobinar
Para reproducir
Para avanzar rápidamente
Para detener
Para insertar una pausa
Para grabar
Para seleccionar el modo de reproducción repetida
Para reproducir en orden aleatorio
Para cambiar entre las funciones de aumento gradual y desvanecimiento
Para abrir/cerrar
Para cambiar el modo de reproducción
Para borrar el ajuste
Pletina de casetes
Botón/visualización
1
- (1-)
ENT (2-)
V
v
B
Botón
b
OK
RETURN
m
N
M
x
X
z (REC)*
Nombre
POWER
DECK Ab
DECK Bb
A/B
DECK BN
DECK Bx
DECK Bm
DECK BM
DECK BX
DECK Bz
DECK Am
DECK AN
DECK AM
DECK Ax
DECK AX
DECK Az
Función
Para encender o apagar la alimentación
Para reproducir en sentido inverso la pletina A
Para reproducir en sentido inverso la pletina B
Para seleccionar la pletina: pletina A o B (sólo en aparatos con doble pletina para casete)
Para reproducir la pletina B
Para detener la pletina B
Para rebobinar la pletina B
Para avanzar rápidamente la pletina B
Para insertar una pausa en la pletina B
Para grabar en la pletina B
Para rebobinar la pletina A
Para reproducir la pletina A
Para avanzar rápidamente la pletina A
Para detener la pletina A
Para insertar una pausa en la pletina A
Para grabar en la pletina A
*Para evitar errores de funcionamiento, el mando a distancia sólo transmitirá señales del botón z/REC (grabación) si mantiene
pulsado el botón durante más de 2 segundos.
ES
44
Page 89

Pletina de MD
Botón/visualización
1
1-9, 0
- (1-)
ENT (2-)
PROGRAM +, –
Botón
/
m
N
M
x
X
z (REC)*
Página 1/4 Página 2/4
(botones de selección de etiquetas)
REPEAT
SHFFL
FADER
Visualización
EJECT
P.MODE
CLEAR
Página 3/4
CDSYNC
DECK A
DECK B
Nombre
POWER
1-9, 0
+10
ENTER
>
.
DISC SKIP
DISPLAY
m
N
M
x
X
z
REPEAT
SHUFFLE
FADER
EJECT
PLAY MODE
CLEAR
CD SYNCRO
DECK A
DECK B
Función
Para encender o apagar la alimentación
Para seleccionar el número de pista
Para seleccionar el número 10 o superior
Para introducir el ajuste
Para seleccionar la pista siguiente
Para seleccionar la pista anterior
Para seleccionar el disco siguiente
Para cambiar el modo de visualización o activar/desactivar la pantalla
Para rebobinar
Para reproducir
Para avanzar rápidamente
Para detener
Para insertar una pausa
Para grabar
Para seleccionar el modo de reproducción repetida
Para reproducir en orden aleatorio
Para cambiar entre las funciones de aumento gradual y desvanecimiento
Para abrir/cerrar
Para cambiar el modo de reproducción
Para borrar el ajuste
Para iniciar la sincronización con el CD
Para seleccionar una pletina de la pletina doble de MD: A
Para seleccionar una pletina de la pletina doble de MD: B
*Para evitar errores de funcionamiento, el mando a distancia sólo transmitirá señales del botón z/REC (grabación) si mantiene
pulsado el botón durante más de 2 segundos.
45
ES
Page 90

Tratamento de Equipamentos
Eléctricos e Electrónicos no
final da sua vida útil
(Aplicável na União Europeia
e em países Europeus com
sistemas de recolha
selectiva de resíduos)
Este símbolo, colocado no produto ou na sua
embalagem, indica que este não deve ser tratado como
resíduo urbano indiferenciado. Deve sim ser colocado
num ponto de recolha destinado a resíduos de
equipamentos eléctricos e electrónicos. Assegurandose
que este produto é correctamente depositado, irá prevenir
potenciais consequências negativas para o ambiente bem
como para a saúde, que de outra forma poderiam ocorrer
pelo mau manuseamento destes produtos. A reciclagem
dos materiais contribuirá para a conservação dos recursos
naturais. Para obter informação mais detalhada sobre a
reciclagem deste produto, por favor contacte o município
onde reside, os serviços de recolha de resíduos da sua
área ou a loja onde adquiriu o produto.
Características
O telecomando RM-VL1400T centraliza o controlo de
todos os componentes A/V num único aparelho
poupando-lhe o incómodo de ter de utilizar um
telecomando diferente para cada um dos componentes A/
V. As suas características principais são as seguintes.
Controlo de até 10 componentes
Com o telecomando, pode controlar até 10 componentes,
incluindo o televisor, videogravador, SAT, DVD, AMP,
CD, etc.
Controlo centralizado dos
componentes A/V da Sony apenas com
este telecomando
Este telecomando vem predefinido de fábrica para
comandar os componentes Sony e por isso pode utilizálo imediatamente como controlo centralizado para os
componentes A/V respectivos.
Tratamento de pilhas no
final da sua vida útil
(Aplicável na União Europeia
e em países Europeus com
sistemas de recolha
selectiva de resíduos)
Este símbolo, colocado na pilha ou na sua embalagem,
indica que estes produtos não devem ser tratados como
resíduos urbanos indiferenciados. Devem antes ser
colocados num ponto de recolha destinado a resíduos de
pilhas e acumuladores.
Assegurando-se que estas pilhas são correctamente
depositadas, irá prevenir potenciais consequências
negativas para o ambiente bem como para a saúde, que
de outra forma poderiam ocorrer pelo mau
manuseamento destas pilhas. A reciclagem dos materiais
contribuirá para a conservação dos recursos naturais.
Se, por motivos de segurança, desempenho ou protecção
de dados, os produtos necessitem de uma ligação
permanente a uma pilha integrada, esta só deve ser
substituída por profissionais qualificados.
Acabado o período de vida útil do aparelho, coloque-o no
ponto de recolha de produtos eléctricos/electrónicos de
forma a garantir o tratamento adequado da bateria integrada.
Para as restantes pilhas, por favor, consulte as instruções
do equipamento sobre a remoção da mesma. Deposite a
bateria num ponto de recolha destinado a resíduos de
pilhas e baterias.
Para informações mais detalhadas sobre a reciclagem
deste produto, por favor contacte o município onde
reside, os serviços de recolha de resíduos da sua área ou
a loja onde adquiriu o produto.
PT
2
Também estão predefinidos sinais de
comando à distância para
componentes que não sejam Sony
O telecomando também reconhece os códigos préprogramados dos componentes da maioria das principais
marcas, assim como os da Sony. Seleccione o código
respectivo para controlar todos os componentes A/V.
Função de aprendizagem para
programação de vários outros sinais de
comando à distância
Este telecomando tem uma função de aprendizagem dos
sinais de comando à distância necessários para utilizar
outros componentes ou funções que não venham
programados.
Para além disso, o telecomando pode utilizar sinais de
controlo à distância (apenas sinais infravermelhos) dos
componentes A/V como aparelhos de ar condicionado,
luzes, etc. (algumas aplicações ou funcionalidades
específicas podem não estar disponíveis.)
Programação de até 10 séries de
comandos (Macros de componentes)
de até 32 passos consecutivos
Até 10 séries de comandos (Macros de componentes)
que porporcionam até 32 passos consecutivos se carregar
num só botão.
Ecrã EL (electroluminescência)
orgânico, claro e de leitura fácil e com
botões totalmente iluminados
Com um ecrã EL (electroluminescência) orgânico
incorporado e botões totalmente iluminados para um
manuseamento mais fácil no escuro.
Page 91

Índice
Características .................................................... 2
Preparativos
Desembalar .......................................................... 4
Colocar as pilhas ................................................ 4
Localização e funções dos controlos ............... 5
Operações básicas
Programar componentes A/V.............................7
Programar componentes A/V que não se
encontram na Lista de códigos pré-
programados ................................................... 8
Utilizar os componentes A/V com o
telecomando ..................................................... 9
Seleccionar o componente A/V desejado .......... 9
Utilizar componentes A/V ................................. 10
Outras funções úteis ........................................ 11
Utilizar o telecomando no escuro ..................... 11
Bloquear os controlos ...................................... 11
Verificar a função do botão .............................. 11
Operações avançadas
Programar sinais de outro telecomando ........ 12
Programar um sinal no botão de selecção de
COMPONENT ................................................ 13
Se o telecomando parecer não funcionar
correctamente ................................................ 14
Alterar ou apagar a função aprendida por um
sinal ................................................................ 14
Alterar os caracteres no ecrã .......................... 15
Alterar o nome do componente A/V ................. 16
Alterar o nome da função dos botões de
selecção de identificação .............................. 16
Alterar as identificações de funções ................ 17
Utilizar as séries de comandos (Macro de
componente) ...................................................18
Programar uma Macro de componente ........... 18
Verificar se uma Macro de componente funciona
correctamente ................................................ 19
Apagar passos programados de uma Macro de
componente ...................................................20
Programar o comando ligar/desligar de um
componente A/V seleccionado ..................... 21
Copiar as programações de um botão de
selecção de COMPONENT para
outro botão...................................................... 22
Controlar o volume dos componentes de vídeo
ligados a um componente de áudio ............. 23
Outros
Programar a iluminação dos botões ...............24
Programar o visor ............................................. 26
Programar o sinal sonoro ................................ 27
Repor as programações ...................................28
Repor um botão de selecção de
COMPONENT ou um botão de selecção de
indentificação ................................................ 28
Repor todas as programações ........................ 28
Informações adicionais
Precauções ........................................................30
Manutenção ....................................................... 30
Características técnicas ...................................30
Solução de problemas ...................................... 31
Tabela das funções predefinidas..................... 34
TV (Analógica) .................................................. 35
TV (Digital) ........................................................ 36
VCR (Videogravador) ....................................... 37
Receptor de satélite analógico
Receptor de satélite digital ............................38
Receptor de satélite digital (N.° 3201) ............. 39
Leitor de DVD ................................................... 40
Caixa de cabo analógica ................................. 40
Gravador de DVD
Combo DVD/Videogravador .......................... 41
Combo Cinema em casa/Leitor de DVD .......... 42
Receptor/Amplificador ..................................... 43
Leitor de CD ..................................................... 44
Deck de cassetes ............................................. 44
Deck de MD ..................................................... 45
PT
3
Page 92

Preparativos
Desembalar
Ve rifique o conteúdo da embalagem antes de utilizar o
telecomando.
•Telecomando RM-VL1400T (1)
• Manual de instruções (1)
• Lista de códigos pré-programados (1)
• Cartão de garantia (1)
• Pilhas R6 (tamanho AA) (2)
Colocar as pilhas
Deslize e abra a tampa do compartimento das pilhas e
introduza duas pilhas LR6 (tamanho AA) alcalinas (não
fornecidas). Alinhe os pólos + e – das pilhas com as
marcas + e – do compartimento das pilhas.
Quando substituir as pilhas
Em condições normais, as pilhas alcalinas duram até 5 meses. Se
o telecomando não funcionar correctamente, as pilhas começam a
ficar fracas e aparece “E” no ecrã.
Notas sobre a substituição das pilhas
• Não demore mais de uma hora a substituir as pilhas. Caso
contrário, serão inicializadas as definições da unidade
(página 24).
• Não tente recarregar pilhas secas.
• Não transporte as pilhas secas com moedas ou outros objectos
metálicos. Pode gerar-se calor se os terminais positivo e
negativo das pilhas ficarem, acidentalmente, em contacto com
objectos metálicos.
• Se não tenciona utilizar o aparelho durante um período
prolongado, retire as pilhas para evitar danos provocados pelo
derramamento do líquido e consequente corrosão.
• Não utilize diferentes tipos de pilha simultaneamente.
• Substitua sempre as duas pilhas por novas.
• As pilhas de manganês fornecidas destinam-se apenas a testes.
Recomenda-se a utilização de pilhas alcalinas à venda no
mercado. (Não se recomenda a utilização de pilhas
recarregáveis.)
PT
4
Page 93

Localização e funções dos
controlos
Telecomando
Os botões PROGRAM +, número 5 e N têm um ponto em
relevo.
1 Botão (luz) (página 11, 24)
Utilizado para activar a iluminação dos botões no
escuro. Carregue uma só vez no botão para activar/
desactivar a iluminação dos botões.
2 Ecrã EL orgânico
Mostra as funções, o menu de definições, o ícone de
transmissão, etc.
3 Botões de selecção
Utilizados para seleccionar no ecrã o componente
A/V ou função.
4 Botão SCROLL
Utilizado para alterar as funções mostradas no ecrã
enquanto controla os componentes A/V. Carregue
para alternar entre as 4 páginas.
5 Botão t (selecção de entrada)
6 Botões de selecção de COMPONENT
(TV/VCR/SAT/DVD) (página 9)
Utilizado para seleccionar o componente A/V
desejado.
7 Botões numéricos
8 Botão 1-/9 Botão DIGITAL/ANALOG
q; Botões 2 (volume) +/–* (página 10)
Regula o volume.
qa Botão % (corte de som)* (página 10)
Corta o som. Carregue no botão para cortar o som e
de novo para voltar ao nível de volume anterior.
qs Botão GUIDE
qd (V/v/B/b) Botões OK e cursor
qf Botão RETURN
qg Botões (m/N/M/z/x/X) de controlo
do leitor
qh Botão 1 (ligar/desligar)
qj Botão OTHER
Utilizado para mostrar os componentes A/V que não
estão definidos nos botões de selecção de
COMPONENT. Carregue para alternar entre as 2
páginas.
qk Botão 2-/ENT (enter)
Selecciona o programa.
ql Botões PROGRAM +/–
Selecciona o programa.
w; Botão / (Teletexto)
wa Botão
(rechamar)
ws Botão a (TV ligada)
wd Botão MENU
wf Botão TOOLS
wg Botões coloridos (A (vermelho)/B
(verde)/C (amarelo)/D(azul))
*
Nota sobre os botões 2, +/- e
Quando seleccionar um componente de vídeo, controla o
volume do televisor; e quando seleccionar um componente
de áudio controla o volume do amplificador (página 23).
Nota
A função do botão é alterada de acordo com a definição do
telecomando ou do componente A/V para funcionar. Para
informações sobre o funcionamento dos botões para cada
componente A/V pela pré-programação de fábrica, consulte
“Tabela das funções predefinidas” (página 34).
%
Continua
PT
5
Page 94

Visor
1 Título de ecrã
Mostra o estado do telecomando.
2 Função de identificação
Quando carrega num botão, aparece a função
respectiva na segunda linha do ecrã. Os caracteres
mostrados no ecrã podem ser alterados (página 15).
3 Mostrar o componente/função A/V
Mostra os componentes A/V seleccionáveis pelos
botões de selecção de identificação ou as funções
disponíveis para cada componente A/V. Os caracteres
mostrados no ecrã podem ser alterados (página 15).
4 Número de página
PT
6
Page 95

Operações básicas
Programar componentes A/V
—Programar o código de um componente
Definir os códigos para os componentes de áudio e vídeo predefinidos que não sejam da Sony
O telecomando vem predefinido para controlar os componentes de A/V da marca Sony (consulte a tabela abaixo). Se estiver a
utilizar o telecomando com os componentes Sony predefinidos, salte os procedimentos a seguir.
Também pode utilizar o telecomando com a maioria das marcas de outros componentes de áudio/vídeo. Para o utilizar com outros
componentes de A/V ou componentes da Sony que não funcionem com o telecomando, tem de seguir os procedimentos para
programar os códigos correctos para cada componente.
Pré-programação de fábrica
Tecla de selecção de COMPONENT
TV
VCR
SAT
DVD
Botão de selecção de identificação - esquerdo
Botão de selecção de identificação - centro
Botão de selecção de identificação - direito
Página 1/2
Botão de selecção de identificação - esquerdo
OTHER
Botão de selecção de identificação - centro
Botão de selecção de identificação - direito
Página 2/2
Título de ecrã Componentes A/V pré-programados
TV TV (Analógica) da Sony
VCR VCR (Videogravador) da Sony
SAT Receptor de satélite analógico da Sony
DVD Leitor de DVD Sony
CABO Caixa de cabo analógica
DVD-R Gravador DVD da Sony
AMP Amplificador/Receptor da Sony
CD Leitor de CD Sony
MD Deck de MD da Sony
TAPE Deck de cassetes da Sony
1 Consulte as tabelas na “Lista de códigos
pré-programados” fornecida e procure o
código pré-programado de quatro dígitos
do componente A/V desejado.
Se houver mais do que um número de código na
lista, utilize o número que aparece em primeiro lugar.
Para, por exemplo, programar um televisor
Panasonic, teria de utilizar o número de código 8095.
2 Carregue no botão OTHER enquanto
carrega também no botão (luz).
Aparece “SET MODE” como título de ecrã.
3
Carregue nos botões
V/v
para seleccionar “1
PRESET” e, em seguida, carregue no botão OK ou
no botão de selecção de identificação do centro.
Aparece “PRESET” como título de ecrã.
Sugestão
Se é mostrado um número antes do menu, pode seleccionar o
menu se carregar no botão numérico.
4 Carregue no botão de selecção de
COMPONENT A/V desejado.
A identificação do componente A/V seleccionado e o
código pré-programado actual aparecem no ecrã.
Sugestões
•Para programar os componentes A/V que não estão
especificados nos botões de selecção de COMPONENT,
carregue várias vezes o botão OTHER e, em seguida,
carregue no botão de selecção de identificação que
corresponde ao componente A/V desejado.
• Pode programar componentes para os botões de selecção
de COMPONENT ou para os botões de selecção de
identificação, para além daqueles especificados em
qualquer outro botão ou no ecrã. Repare, no entanto, que o
botão de TV só pode ser programado para um televisor e o
botão de selecção de identificação (ao qual foi
programado um amplificador na pré-programação de
fábrica) só pode ser programado para um amplificador ou
para um sistema de cinema em casa leitor de DVD.
Continua
PT
7
Page 96

5 Carregue nos botões numéricos para
introduzir um código de pré-programação
de quatro dígitos e, em seguida, carregue
no botão OK ou no botão de selecção de
identificação ao centro.
Exemplo: Para introduzir “8095”
Carregue em 8, 0, 9 5 e depois no botão OK.
Programar componentes A/V que
não se encontram na Lista de
códigos pré-programados
—Função de procura
Pode programar componentes A/V que não se encontram
na “Lista de códigos pré-programados” fornecida,
utilizando a função de procura.
É emitido um sinal sonoro e o código de préprogramação de quatro dígitos fica activado e
aparece “OK” no ecrã e o visor volta ao ecrã
mostrado no passo 3.
6 Para definir os códigos pré-programados
para outros componentes A/V, repita os
passos 4 e 5.
7 Carregue duas vezes no botão (luz) ou
no botão RETURN.
O modo de programação fecha-se e o telecomando
volta ao modo de espera para funcionar com os
componentes A/V.
Notas
• Se introduzir um código pré-programado que não está na tabela
da “Lista de códigos pré-programados” fornecida e carregar no
botão OK, é emitido um sinal sonoro cinco vezes e aparece no
ecrã o número de quatro dígitos introduzido e “NG” e, em
seguida, o visor volta ao ecrã mostrado no passo 4. Verifique o
código pré-programado e tente introduzi-lo de novo.
• Se, entre cada passo, o telecomando não receber nenhuma
informação no período de 60 segundos, o procedimento de
programação é cancelado e o modo de programação fecha-se.
Recomece a partir do princípio.
•O telecomando reconhece o tipo de componente A/V quando
um código pré-programado é introduzido no passo 5 e é
mostrado o título de ecrã quando o funcionamento do
componente A/V é determinado. Se o título de ecrã não
corresponder ao componente que programou, pode alterar a sua
identificação de componente de acordo com o que pretende.
• Não pode programar componentes A/V depois de programar
outros sinais de controlo à distância utilizando a função de
aprendizagem (página 12), ou uma Macro de componente
(página 18), ou se tiver alterado a identificação (página 15). Se
tal acontecer, reponha as definições do componente A/V
(página 28) e volte a programar os mesmos.
OU
Antes de iniciar a função de procura
Para que a função de procura funcione com eficiência,
programe cada componente A/V para o estado indicado a
seguir.
TV, AMP: Alimentação ligada
Leitor de CD, deck de MD, deck de cassetes:
Alimentação ligada com uma fonte de reprodução.
Outro componente: Alimentação desligada
1 Carregue no botão OTHER enquanto
carrega também no botão (luz).
Aparece “SET MODE” como título de ecrã.
2 Carregue nos botões V/v para seleccionar
“1 PRESET” e, em seguida, carregue no
botão OK ou no botão de selecção de
identificação do centro.
Aparece “PRESET” como título de ecrã.
Sugestão
Se é mostrado um número antes do menu, pode seleccionar o
menu se carregar no botão numérico.
3 Carregue no botão de selecção de
COMPONENT A/V desejado.
A identificação do componente A/V seleccionado e o
código pré-programado actual aparecem no ecrã.
PT
8
Page 97

4 Carregue no botão PROGRAM + ou
PROGRAM – e, em seguida, carregue
várias vezes no botão 1 (ligar/desligar)
até que o componente A/V reaja da
seguinte forma:
TV: desliga-se.
Amplificador: desliga-se ou aumenta o volume.
Leitor de CD, deck de MD, deck de cassetes:
Desliga-se ou inicia a reprodução.
Outro componente: liga-se
5 Carregue no botão OK ou no botão de
selecção de identificação do centro.
É emitido um sinal sonoro e o código de préprogramação de quatro dígitos fica activado e
aparece “OK” no ecrã e o visor volta ao ecrã
mostrado no passo 2.
6 Para definir outros componentes A/V,
repita os passos 3 a 5.
Utilizar os componentes A/
V com o telecomando
Seleccione o componente A/V desejado carregando no
botão de selecção de COMPONENT no telecomando e,
em seguida, utilize o componente A/V.
Seleccionar o componente A/V
desejado
Carregue no botão de selecção de COMPONENT para
seleccionar o componente A/V desejado.
Se carregar no botão OTHER, aparecem no ecrã os
componentes A/V que podem ser seleccionados.
Selecciona o componente A/V desejado se carregar no
botão de selecção de identificação respectivo. Se carregar
várias vezes on botão OTHER, altera os componentes A/
V que aparecem no ecrã.
7 Carregue duas vezes no botão (luz) ou
no botão RETURN.
OU
O modo de programação fecha-se e o telecomando
volta ao modo de espera para funcionar com os
componentes A/V.
Continua
PT
9
Page 98

Utilizar componentes A/V
Carregue nos botões adequados do telecomando para
utilizar os componentes A/V.
Pode seleccionar as funções mostradas no ecrã com os
botões de selecção de identificação que correspondem a
cada função. Se carregar várias vezes o botão SCROLL,
altera as funções que aparecem no ecrã.
Exemplo: Para utilizar um televisor
Regular o volume
Carregue nos botões 2 (volume) +/- para regular o
volume. Carregue no botão % (cortar o som) para cortar
o som temporariamente.
Quando seleccionar um componente de vídeo, controla o
volume do televisor; e quando seleccionar um
componente de áudio controla o volume do amplificador.
Para alterar a programação do controlo de volume,
consulte “Controlar o volume dos componentes de video
ligados a um componente de áudio”, na página 23.
Botões 2 (volume) +/–
Botão % (cortar o som)
1 Carregue no botão TV.
O telecomando fica em modo de espera para utilizar
o televisor.
2 Carregue no botão 1 (ligar/desligar).
O televisor liga-se.
3 Carregue nos botões para a operação
desejada.
Aparece quando é enviado um sinal. Também
pode utilizar outros botões, como 2 (volume) +/–,
PROGRAM +/–, % (cortar o som), cursor e os
botões de MENU. Consulte também a secção
“Tabela das funções predefinidas” (página 34) para
obter mais informações acerca das funções dos
botões de cada component e-fonte.
Sugestão
Se o telecomando não funciona como desejado, verifique a
função do botão utilizando a função de identificação (página 11)
ou os sinais de programação, utilizando a função de
aprendizagem (página 12).
Acerca do botão z/REC (gravação)
Para evitar enganos no funcionamento, o telecomando só
transmite sinais do botão z/REC (gravação) se carregar
no mesmo sem soltar durante 2 segundos.
Nota
Se programar sinais à distância nos botões de controlo de volume
do televisor ou do amplificador com a função de aprendizagem
(página 12), esses botões também enviam os sinais introduzidos
para controlar outros componentes que não sejam o televisor e o
amplificador.
Se programar sinais à distância nos botões de controlo de volume
de componentes, que não sejam o televisor ou o amplificador,
esses botões também enviam os sinais introduzidos para controlar
o componente A/V, em vez de controlar o volume do televisor ou
do amplificador.
10
Botão z/REC
(gravação)
PT
Page 99

Outras funções úteis
Utilizar o telecomando no escuro
Botão (luz)
COMPONENT
Para desbloquear os controlos
Carregue no botão SCROLL enquanto carrega também no botão
(luz).
Verificar a função do botão
—Função de identificação
Quando carrega num botão, aparece a função respectiva
na segunda linha do ecrã, enquanto transmite os sinais de
controlo à distância.
Também pode mostrar a função sem transmitir os sinais
de controlo à distância.
Para alterar os caracteres mostrados no ecrã, consulte
“Alterar os caracteres no ecrã” (página 15).
Carregue no botão (luz) para activar a iluminação dos
botões do telecomando. Carregue de novo no botão
(luz) para desactivar.
Se não carregar em botão algum durante 10 segundos, a
iluminação dos botões do telecomando é desactivada
automaticamente.
Predefinições da iluminação dos botões
Desactivação automática 10 segundos
Nível de luminosidade 15 (máximo)*
Efeito de esbatimento Ligado
Definição de activação Todos os botões
*O nível de luminosidade vem pré-programado de fábrica para
15 (máximo).
Se utilizar o telecomando com esta definição, a vida útil das
pilhas pode ser menor.
Consulte “Porgramar a iluminação dos botões” (página 24)
para alterar as definições da iluminação dos botões.
Bloquear os controlos
—Função Hold
Para evitar o funcionamento acidental, pode bloquear
todas as teclas com a função Hold.
1 Carregue no botão SCROLL enquanto
carrega também no botão (luz).
1 Carregue no botão desejado enquanto
carrega também no botão (luz).
O botão de função aparece na segunda linha do ecrã.
Os sinais de controlo à distância não são
transmitidos.
Função do botão
Aparece a seguinte mensagem no ecrã e todos os
botões são bloqueados.
11
PT
Page 100

Operações avançadas
Programar sinais de outro
telecomando
—Função de aprendizagem
Para utilizar componentes A/V que não estejam préprogramados ou funções dos botões, utilize o
procedimento de “aprendizagem” para “programar”
quaisquer sinais nos botões do telecomando.
Também pode utilizar a função de aprendizagem para
alterar o sinal de botões individuais depois de definir o
código pré-programado (página 7). Pode ser-lhe útil
alterar a identificação (página 15) do botão utilizado.
Nota
Pode não conseguir utilizar alguns sinais de controlo à distância.
1 Coloque o telecomando virado para o
telecomando do componente A/V.
Outro comando à distância
afastados cerca de
5 a 10 cm
2 Carregue no botão OTHER enquanto
carrega também no botão (luz).
RM-VL1400T
4 Carregue no botão de selecção de
COMPONENT ou no botão de selecção
de identificação correspondente ao
componente A/V que deseja utilizar com o
telecomando.
A identificação do componente A/V seleccionado
aparece na segunda linha do ecrã.
5 Carregue no botão sobre o qual quer
programar o sinal.
O visor desliga-se e o telecomando entra no modo de
aprendizagem.
Sugestão
Se carregar sem soltar o botão por mais de 2 segundos, altera
a identificação. Para mais informações, consulte “Alterar os
caracteres no ecrã” (página 15).
6 Carregue sem soltar o botão no outro
telecomando, até ouvir um sinal sonoro.
Aparece “SET MODE” como título de ecrã.
3 Carregue nos botões V/v para seleccionar
“2 LEARN” e, em seguida, carregue no
botão OK ou no botão de selecção de
identificação do centro.
Aparece “LEARN” como título de ecrã.
Sugestão
Se é mostrado um número antes do menu, pode seleccionar o
menu se carregar no botão numérico.
PT
12
É emitido um sinal sonoro e o nome do botão
utilizado e “OK” aparecem na terceira linha do ecrã.
7 Para programar sinais noutros botões,
repita os passos 5 e 6.
8 Carregue no botão (luz).
O visor volta ao ecrã mostrado no passo 3.
 Loading...