


Remote Commander
RM-V310
Operating Instructions
Mode d’emploi (au verso)
© 2006 Sony Corporation Printed in China
English
Setting Up the Remote Commander
About Presetting the Commander
The Commander is preset at the factory to operate Sony brand
components.
If you’re using the Commander with a Sony component, you won’t
need to preset the Commander before you start using it.
To set up the Commander to use with other (non-Sony)
manufacturers’ components, or to use with a component that is not
preset at the factory, you’ll need to follow the instructions in this
manual to preset the Commander with the correct code number for
your components. (See the supplied “Component code numbers”
also.)
Component that can be preset
TV
Video cassette recorder/Analog
cable box/Digital cable box/Digital
satellite receiver/Receiver/CD
player/Tape deck/MD deck/DVD/
TV/VCR/Digital video recorder/
DAV (DVD/Receiver combo)
Notes
• The Commander can be set up to operate only one component per
button – unless their code numbers happen to be the same. For
example, you cannot set up the Commander to operate a Sony TV
and a Panasonic TV simultaneously (because they use different
code numbers).
• You may not be able to operate even a Sony brand component with
the factory presetting. In such a case, follow the procedure in
“Setting the Code.”
Button
TV
VCR
CBL
AMP
CD
SAT
DVD
Factory setting
Sony TV
Sony VHS VCR
analog cable box
Sony receiver
Sony CD player
Sony digital
satellite receiver
Sony DVD player
2-674-862-21(1)
Installing the Batteries
Before replacing the batteries, have new ones ready beforehand.
Slide open the battery compartment and insert two size AA (R6)
batteries (not supplied).
Be sure to line up the + and – on the batteries with the + and – on the
battery compartment.
12
When to replace the batteries
Under normal conditions, batteries will last up to six months. If the
Commander does not operate properly, the batteries might be worn
out. Replace the batteries with new ones.
Notes
• Replace both batteries with new ones.
• Do not take more than 20 minutes to replace the batteries;
otherwise, your setting of the code numbers will be erased.
Notes on Batteries
• Do not mix old batteries with new ones or mix different types of
batteries together.
• If the electrolyte inside the battery should leak, wipe the
contaminated area of the battery compartment with a cloth and
replace the old batteries with new ones. To prevent the electrolyte
from leaking, remove the batteries when you plan not to use the
Commander for a long period of time.
Setting the Code
Follow the steps 1 and 2 below for each component you plan to use
with the Commander.
Step 1: Entering the Code Number
1 See the supplied “Component code numbers”, and find the three-
digit code number for the desired component.
If more than one code number is listed, use the number that’s
listed first to complete the steps below.
For example, if you’re setting up a Philips’ VCR, you would use
the code number 035.
If your component isn’t listed, see “Searching for the Correct
Code.”
2 While pressing the SET button, press the
SET
POWER button.
3 Press the button of the component that
you want to set up.
Note
On the VCR, CBL, SAT, AMP, CD, and DVD buttons, “Video cassette
recorder”, “analog cable box”, “digital satellite receiver”, “receiver”,
“CD player”, and “DVD player” are assigned respectively at the
factory. But you can also assign other components on these buttons.
For details, see “Changing the Component Type on the VCR, CBL,
SAT, AMP, CD, and DVD buttons.”
POWER
DVDTV SAT
CDVCRCBL AMP
4 Enter the component’s code number.
For example, if you’re entering the code
for a Philips VCR, you would press
.
5 Press and release the ENT button to store
the code number in the Commander’s
0
35
Your Code Number
ENT
memory.
6 Go to “Step 2: Checking if the Code Number Works” to finish
setting up.
Step 2: Checking if the Code Number Works
1 Power on the component you want to set up.
2 Aim the Remote Commander at the component and press a button
to check if that button works.
For example, press the POWER button to see if it works on your
component .
3 Check that the other buttons of the Commander is operating the
corresponding functions of the component.
You can write down the code number on the label inside the
battery compartment lid.
If the Commander Doesn’t Seem to Be Working...
• First, try repeating these setup procedures using the other codes
listed for your component (see the supplied “Component code
numbers”).
• If – after trying all the codes listed for your component – you still
cannot get the Commander to work properly, try the search
method described in “Searching for the Correct Code.”
Searching for the Correct Code
If you’ve tried all the code numbers listed for your component and
you still cannot get the Commander to work (or if your component is
not listed in the “Component code numbers” tables), try these steps.
1 Power on the component you want to set up. Insert a tape or disc
if necessary.
2 While pressing the SET button, press the POWER button.
3 Press the button of the component on the Commander that you
want to set up.
4 Press and release the CH+ button. Then press and release the
POWER button.
5 Repeat step 4 until the correct code number is found.
Each time you press the CH+ button and then the POWER button,
a new code number will be transmitted.
Keep trying until your component operates by receiving the
transmitted signal from the Commander (e.g., the power turns off,
the CH+ function works, playback starts, etc.) Be patient as you do
this; it may take about 100 tries until the correct code number is
located.
6 When the correct code is found, press the ENT button to store the
code number in the Commander’s memory.
7 Check that the Commander is operating the other functions of
your component by pressing the corresponding buttons on the
Commander. If they seem to be working properly, you’re done
setting up the Commander.
If the component does not operate properly, repeat steps 1 to 6 and
search for another code.
If you still cannot get the Commander to work properly, see
“Troubleshooting.”
Changing the Component Type on the VCR,
CBL, SAT, AMP, CD and DVD buttons
At the factory, “video cassette recorder” is assigned on the VCR
button, “digital satellite receiver” on the SAT button, “analog cable
box” on the CBL button, “receiver” on the AMP button, “CD player”
on the CD button and “DVD player” on the DVD button. By
completing the following procedure, you can change this setting so
that you can set up any component on these buttons.
1 While pressing the SET button, press the POWER button.
2 Press the VCR, CBL, SAT, AMP, CD, or DVD button.
3 Press and release the x (stop) button.
4 Press and release one of the following buttons;
to assign a VCR
to assign a DAV (DVD/receiver combo)
to assign a digital satellite receiver, a digital cable box or a
digital video recorder
to assign a receiver
to assign a CD player
to assign a tape deck
to assign an MD deck
to assign a TV
to assign an analog cable box
to assign a DVD
5 Press and release the ENT button.
6 Enter the component’s code number by following steps 2 to 6 of
“Entering the Code Number”, or steps 1 to 7 of “Searching for the
Correct Code.”
Controlling the Volume of Video
Components Connected to an Audio
System
The Commander is factory preset based on the assumption that you
hear the sound of your video components from your TV’s speakers,
and that you hear the sound of your audio components from the
loudspeakers connected to your receiver (or amplifier).
Factory Setting:
Button
TV
VCR*, CBL*, SAT*, DVD*
AMP
CD*
* If you assign an audio component on the VCR, CBL, SAT, CD or DVD button,
you can control the volume of the receiver (or amplifier) on the AMP button.
If you assign video components on these buttons, you can control the volume
of the TV.
Thus you can control the volume of your TV or receiver (or
amplifier) while operating a video or audio component without first
having to press the TV or AMP button. For example, to control the
volume for your VCR channels, you don’t need to press the TV
button first.
However, if your video components are connected to an audio
system, you probably hear your TV’s or VCR’s sound from the
loudspeakers connected to your receiver (or amplifier), not from
your TV speakers. In this case, you need to change the factory setting
so that you can control the volume of your video components
without first having to switch to the receiver (or amplifier).
To change the factory setting for the volume control, follow the
procedures below.
Note
This feature is effective only when a receiver or amplifier is set up on
the AMP button. You cannot control the volume of a receiver (or
amplifier) set up on VCR, CBL, SAT, CD or DVD button while
operating a component of another button.
Changing the Factory Setting for the
Volume Control
1 While pressing the SET button, press the POWER button.
2 Press the AMP button.
3 Press the VOL+ button.
4 Press the ENT button.
The volume control setting is changed to “receiver/amplifier.” You
can control the volume of the receiver (or amplifier) of the AMP
button while selecting any component.
Controls the volume of
TV
TV
Receiver (or amplifier)
Receiver (or amplifier) on the AMP
button
Notes
• If you are using more than one receiver (or amplifier) and have set
it on the VCR, CBL, SAT, CD or DVD button, when selecting these
buttons you cannot control the volume of the receiver (or
amplifier) of the AMP button.
• If you change the setting of the AMP button to a component other
than a receiver or amplifier, the volume control setting of video
components will return to “TV” even if you have changed the
factory preset volume control. In this case, you will not be able to
control the volume from audio components other than a receiver
or amplifier.
To reset to factory preset volume control
In step 3 above, press VOL– instead.
Operating a Component
1 Press the button of the desired
component on the Commander.
2 Point the Commander directly at the
component.
3 Press the button for the function you want to use.
See “Remote Button Descriptions” for complete descriptions of the
buttons on the Commander.
Notes on Using the Remote Commander
Basically, use this Commander in the same way as the Commanders
supplied with your components.
• Using this Commander will not increase the functions of your
components. The functions of the Commander are limited to the
functions of the components themselves. For example, if your TV
does not have a MUTING function, the MUTING button on this
Commander will not function with your TV.
• Some functions of the component may not work with this
Commander.
• If your cable box can control volume, be sure to set its volume
switch to a medium position. If the volume on the cable box is
turned down completely, you will not be able to adjust your TV’s
volume with the Commander.
DVDTV SAT
CDVCRCBL AMP
Setting a channel with a single button
(Channel macro function)
You can program the Channel Macro function on any of the buttons
listed below (macro keys).
For example, instead of pressing , , and then the ENT button
to change the TV channel, you can perform these operations by
pressing only the N button.
The macro keys are:
N, m, M, x, X, and zREC.
(During TV, analog cable box, digital cable box, digital satellite
receiver or digital video recorder operations only.)
The series of operations that can be programmed must be consisted
of two to four sequential pressings of to buttons or ENT
button.
Note
The Channel Macro function may not work correctly for some
components.
To program a series of operations
1 Press the desired component select button.
(You can select “TV”, “analog cable box”, “digital cable box”
“digital satellite receiver” or “digital video recorder” only.)
2 While pressing the desired macro key, press the buttons required
for the operations in sequence.
For example, to program t t ENT on the N button,
hold down N first, press , , and ENT in sequence, and then
release N.
Notes
• Even if you try to program more than four operations and press the
corresponding buttons in step 2 above, only the first four buttons
that were pressed will be programmed.
• If you try to program only one operation on a macro key, the
setting operation will be rejected.
• You can program the Channel Macro function for up to three
components only. To program for the fourth component, first clear
all macro keys for a component.
To change or clear the program
When you want to change the setting or if you are no longer using
that programmed operation, follow the procedure below to
overwrite or clear the program.
1 Hold down the macro key that you want to change or clear.
2 After waiting for about three seconds, press the new sequence of
buttons, or, to clear the program, press and release , and then
press and release ENT.
3 Release the macro key.
Note
Be sure to wait for about three seconds in step 2 above. While you
are holding down the macro key and waiting, the programmed
signals are transmitted; therefore, if you are aiming the Commander
at your component, the programmed operations may be performed
before you go on with the procedure.
Troubleshooting
If you have problems setting up or using the Commander:
• When setting up the Commander, carefully go through the procedures
described in “Setting the Code.” If the code that’s listed first for your
component doesn’t work, try all the codes for your component - in the order
in which they’re listed. If all the codes fail to work (or if your component is
not listed in this manual), try using the procedures in “Searching for the
Correct Code.”
• Check that you’re aiming the Commander directly at the component, and that
there are no obstructions between the Commander and the component.
• Make sure the batteries you’re using are not worn out, and that they’re
inserted correctly.
• Check that the button of the TV, VCR, CBL, SAT, AMP, CD or DVD is pressed
to choose your desired component.
• Check that the component has infrared remote capability. For example, if
your component didn’t come with a remote commander, it probably isn’t
capable of being controlled by a remote commander.
• If your video components are connected to an audio system, make sure
you’ve set up the Commander as described in “Controlling the Volume of
Video Components Connected to an Audio System.”
• Should any problem persist, reset the Commander to the factory setting by
pressing the POWER, TV/VIDEO and VOL– buttons simultaneously.
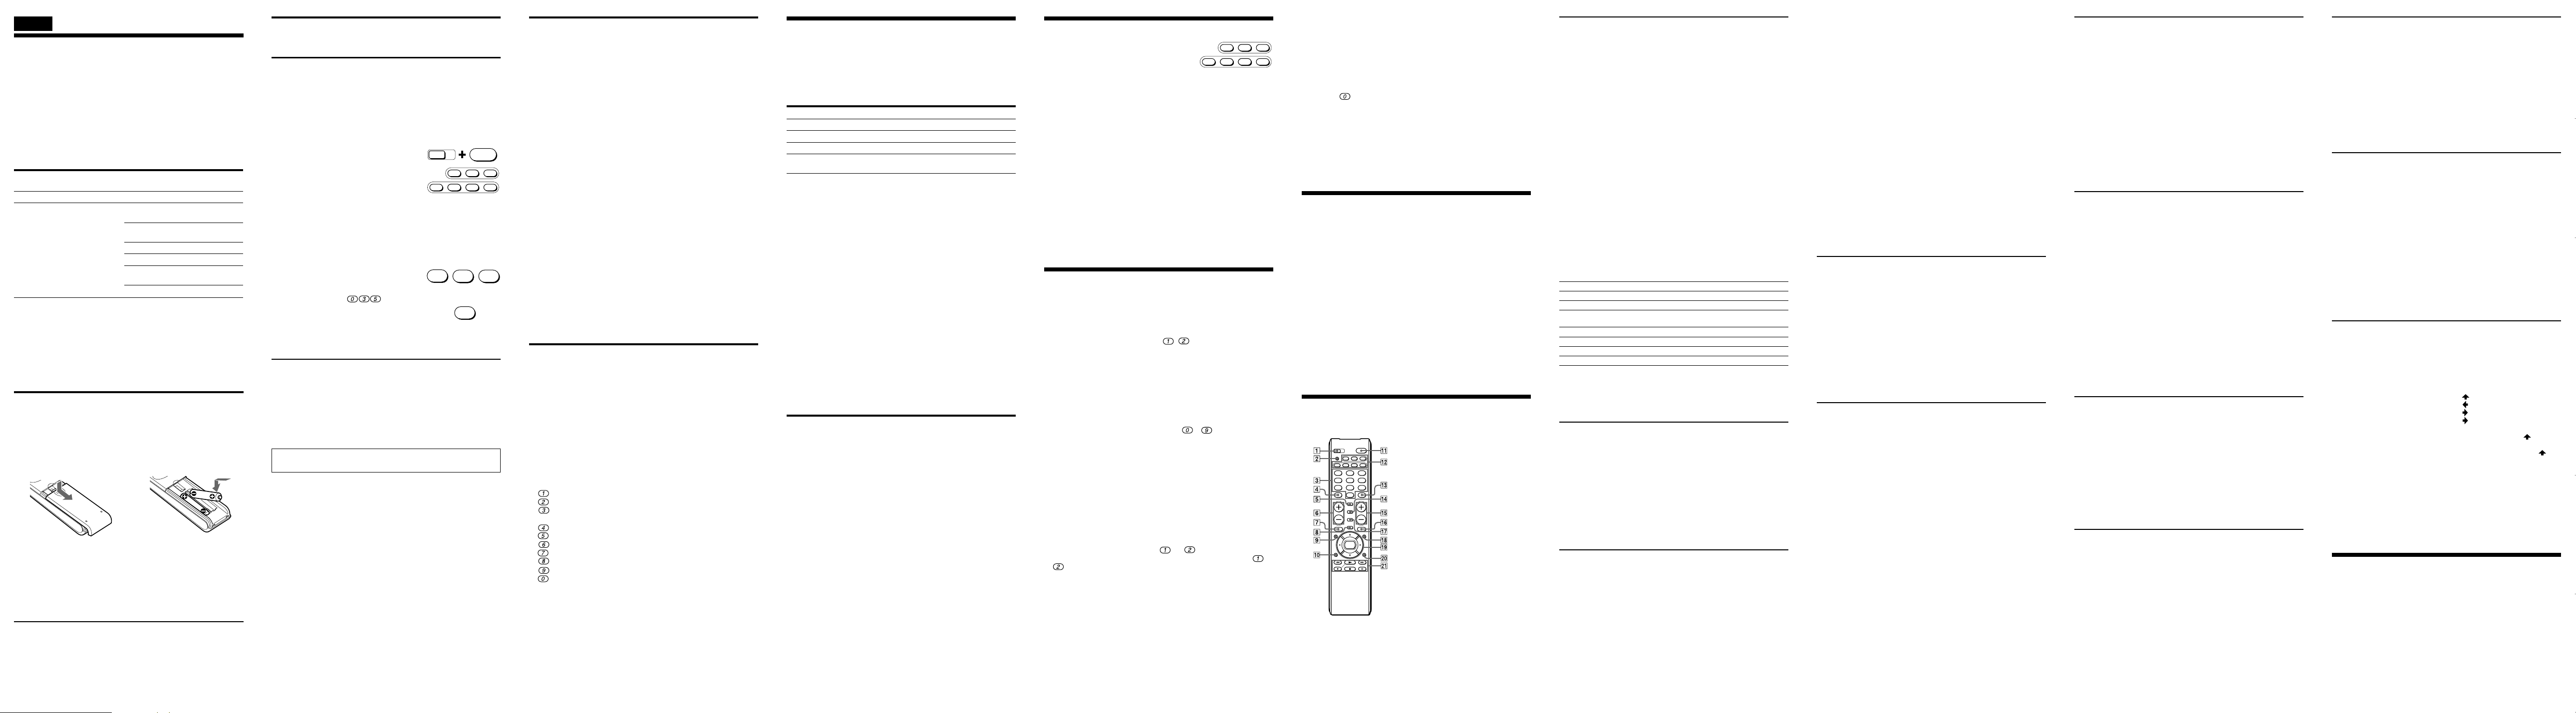
Remote Button Descriptions
POWER
SET
TV/VIDEO
DVDTV SAT
CDVCRCBL
AMP
VIDEO1
VIDEO23AUX
1
2
TUNER5CD6TAPE
4
PHONO
7MD8TV9
DVD
ENT
0
DIGITAL
VOL CH
/ANALOG
TWIN VIEW
SLEEP
INFO
RECALL
MUTING
GUIDE MENU
OK
EXIT
TOOLS
Operating a TV
2 To change the input mode.
3, 4 and qd
To change the channel. For
example, to change to channel
5, press 0 and 5 (or press 5 and
ENT).
8 To display the current channel
on TV.
qf To operate the Picture-in-
Picture function. Press each
button or combination of
buttons as described in the
table below.
qg CH+:
When setting the component code of a TV to “088” or “089”
(codes for a Sony TV)
5
q; EXIT
qf TWIN VIEW
w; OPTION
PIP operations
Press To
TWIN VIEW Turn on/off the “window” picture.
GUIDE Turn off the “window” picture.
m or M Change the TV channel in the “window” picture.
zREC Change the input mode of the “window” picture.
x Move the location of the “window” picture.
N Swap the “main” picture and the “window” picture.
X Freeze the “window” picture.
Note
If you have programmed the Channel Macro function for TV operation, the
button used as a macro key cannot be used for PIP operation.
Channel up.
CH–: Channel down.
To switch between digital
broadcast and analog broadcast.
Operating a VCR
2 To switch the antenna output.
8 To expose the on-screen
display.
qg CH+:
qj To change the input mode.
qk To call up the MENU display.
ql To move the cursor upward,
Channel up
CH–: Channel down
downward, to the left, or to the
right, or to enter the selection.
General
1 To set up the Commander,
press SET while pressing
POWER.
1
Volume up: +
6 *
Volume down: –
1
To mute the volume on TV or
7 *
receiver (amplifier).
qa To turn on and off the power of
the selected component.
qs Component select buttons. To
switch to the operations of each
component, press the button on
which that component is
assigned.
1
These buttons control the volume
*
of either TV or receiver
(amplifier). See “Controlling the
Volume of Video Components
Connected to an Audio System”
for details.
qh To operate JUMP, FLASHBACK
or CHANNEL RETURN function
on the TV depending on the
setting of the TV's
manufacturer.
qj To operate SLEEP function on
the TV. (Works only for a TV
with the SLEEP function.)
qk To call up the MENU display.
ql To move the cursor upward,
downward, to the left, or to the
right, or to enter the selection.
wa To select TV input source.
m: VIDEO 1
N: VIDEO 2
M: VIDEO 3
zREC:VIDEO 4
x: VIDEO 5
X: VIDEO 6
wa N: To play.
x: To stop.
m: To rewind.
M: To fast-forward.
zREC:To record, press N
while pressing z.
X: To pause.
Operating a DVR (Digital video recorder)
2
2 To switch the output of the SAT
receiver to the TV.
(When connecting a TV cable or
antenna to the receiver, the
output switches between a TV
and SAT program.)
2
THUMBS+)
(*
To select the desired recorded
program.
(It is necessary to have
recorded the desired program.)
3 and qd
To change the channel
For example, to change to
channel 5, press 0 and 5 (or,
press 5 and ENT).
8 To turn on the display.
2
THUMBS–)
(*
To select the desired recorded
program.
(It is necessary to have
recorded the desired program.)
9 To bring up Master Guide.
2
Live TV)
(*
To bring up Master Guide.
q; To clear the setting.
To exit the setting menu.
2
LIST)
qf (*
To call up the title of the
recorded program.
qg CH+: Channel up .
2
*
This key corresponds to Tivo service or the replay service. Refer to its
instruction manual for details.
2
PAGE+) Page up.
(*
CH–: Channel down.
(*2PAGE–) Page down.
qh (*
REPLAY)
To replay.
Or to go into REC/REVIEW
mode during play. (After about
5-second rewind, replay
begins.)
qk To call up the MENU display.
2
EPG)
(*
To access to all aspects of the
service.
ql To move the cursor upward,
downward, to the left, or to the
right.
ql OK: To bring up the Station
wa N: To play.
Index when a program
guide is not displayed.
To select the channel
that is highlighted.
m: To rewind.
M: To fast-forward.
zREC: To record, press N
while pressing zREC.
First release N, then
release zREC. To stop
recording, perform the
same procedure.
x: To stop.
X: To pause.
Operating an analog cable box
3 and qd
To change the channel. For
example, to change to channel
5, press 0 and 5 (or press 5 and
ENT).
qg CH+:
Notes
• There may be cases you may turn on/off the cable box by pressing the CH+ or
• If your cable box can control volume, be sure to set its volume control to a
Channel up.
CH–: Channel down.
CH– buttons on the Commander.
medium position. If the volume on the cable box is turned down completely,
you will not be able to adjust your TV’s volume with the Commander.
qh To operate JUMP, FLASHBACK
or CHANNEL RETURN function
on the TV depending on the
setting of the TV's
manufacturer.
Operating a digital cable box
2 To switch the output of the SAT
receiver to the TV. (When
connecting a TV cable or
antenna to the receiver, the
output switches between a TV
and SAT program.)
3 and qd
To change the channel
(for example, to change to
channel 5, press 0 and 5, or
press 5 and ENT).
8 To turn on the display.
9 To call up the title bar and
toggle the title bar on/off in
CABLE mode.
q; To exit the setting menu.
To use the “FAVORITE” function.
qf
qg CH+: Channel up.
CH–: Channel down.
qh To turn on the display of a
shortcut menu.
*3The operation of the built-in DVR or the video on demand.
qk To call up the MENU display.
ql To move the cursor upward,
downward, to the left, or to the
right.
ql OK: To bring up the Station
wa *
.
Index when a program
guide is not displayed.
To select the channel
that is highlighted.
3
N: To play.
*3m: To rewind.
*3M: To fast-forward.
3
zREC:
*
To record, press N
while pressing zREC.
First release N, then
release zREC. To stop
recording, perform the
same procedure.
3
x: To stop.
*
*3X: To pause.
Operating a digital satellite receiver
2 To switch the output of the
digital satellite receiver to the
TV. (When you connect a TV
cable or antenna to the receiver,
the output switches between a
TV and SAT program.)
3, 4 and qd
To change the channel. For
example, to change to channel
5, press 0 and 5 (or press 5 and
ENT).
5 To use the “FAVORITE”
function.
9 To bring up the Master Guide.
q; To exit the mode.
qg Channel up: +
Channel down: –
To page through the guide
when a program guide is
displayed.
qh To tune to the last tuned
station.
qj To bring up the Station Index.
qk To call up the MENU display.
ql To scroll through the Master
Guide.
ql OK: To select the channel
that's highlighted. To
bring up the Station
Index when a program
guide is not displayed.
Operating a DVD
2 To change the sound.
3 Number buttons : To set items
selected from the screen.
4 To select numbers 10 and
above. For example, to select
track 15, press PIP and then
press 5.
8 To show the current play status
on the screen.
9 To clear the selected characters
from the screen.
qd To enter the setting. To set
items selected from the screen.
qg CH+: To proceed to the next
location or song.
Channel up.
CH–: To proceed to the
previous location or
song.
Channel down.
qh To display the title menu.
qj To switch the subtitle.
qk To display the DVD menu.
ql To move the cursor upward,
downward, to the left, or to the
right.
ql OK: To execute items
wa N: To play.
selected from the screen.
m: To rewind.
M: To fast-forward.
x: To stop.
X: To pause.
zREC: To record, press N
while pressing zREC.
First release N, then
release zREC.
Operating a receiver/amplifier
2 To switch input source by each
pressing.
3 To select the input source:
1 selects VIDEO 1
2 selects VIDEO 2
3 selects AUX
4 selects TUNER
5 selects CD
6 selects TAPE
7 selects MD
8 selects TV
9 selects PHONO
0 selects DVD
qg Presetting frequency up: +,
down: –
Tuning frequency up: +,
down: –
qh To shift band (FM/AM).
wa Work as N, M, m, x, X
buttons of the CD player.
(When a CD player is set up on
the CD button.)
DAV (DVD/Receiver combo)
2 To change the input mode.
3 Number buttons: To set items
selected on the screen.
4 To select numbers 10 and
above.
8 To show the current play status
on the screen.
9 To change the sound.
qd To enter the setting.
qg CH+: To proceed to the
qh To display the Top Menu.
* To avoid accidental recording, the REC key does not work unless pressed for
previous location or
song.
CH–: To proceed to the next
location or song.
more than 1 second (factory setting).
qj To switch the subtitle.
qk To call up the MENU.
ql To move the cursor upward,
downward, to the left, or to the
right.
OK: To enter the selection of
wa N: To play.
.
the MENU display.
m: To rewind.
M: To fast-forward.
zREC*:
To record.
x: To stop.
X: To pause.
Operating a CD player
3 To select the track number. 0
selects track 10. To select track
numbers above 10, see the
descriptions on the • (DOT)
button above.
4 To select numbers 10 and
above. For example, to select
track 15, press • (DOT) and
then press 5.
8 To switch the display of the CD
player to on/off.
qd To enter the setting.
qg CH+: To select the next track.
CH–: To select the previous
track.
qh To select next disc.
qj To clear the setting.
wa N: To play.
m: To rewind.
M: To fast-forward.
x: To stop.
X: To pause.
Operating an MD deck
3 To select the track number. 0
selects track 10. To select track
numbers above 10, see the
descriptions on the • (DOT)
button above.
4 To select numbers 10 and
above. For example, to select
track 15, press • (DOT) and
then press 5.
8 To change the display mode or
turn the display on/off.
qd To enter the setting.
qg CH+: To select the next track.
CH–: To select the previous
track.
qh To select next disc.
qj To clear the setting.
wa N: To play.
m: To rewind.
M: To fast-forward.
x: To stop.
X: To pause.
zREC:To record, press N
while pressing zREC/
First release N, then
release zREC.
Operating a tape deck
4, and wa
Tape operation buttons.
For dual cassette decks,
operation buttons for Deck A
(for Sony-brand dual cassette
deck, buttons for Deck B).
• (DOT):
To reverse.
N: To play.
m: To rewind.
M: To fast-forward.
zREC: To record, press N
while pressing zREC.
First release N, then
release zREC.
x: To stop.
X: To pause
0, qd, ql and w;
Operation buttons for Deck B
(for Sony-brand dual cassette
deck, buttons for Deck A).
ENT: To reverse.
: To play.
: To rewind.
: To fast-forward.
: To stop.
EXIT: To record, press
while pressing MENU.
First release
release MENU.
TOOLS:
qh To select Deck A or Deck B
If your tape deck’s commander has
one set of tape operating buttons, and
has an A/B button for the deck
selection, use the RECALL button to
select Deck A or Deck B.
To pause.
(dual cassette deck only).
, and then
Specifications
Operable distance Approx. 7 m (23 ft) (varies depending of the
Power requirements Two size AA (R6) batteries (not supplied)
Battery life Approx. 1 year (varies depending on frequency of
Dimensions Approx. 53 × 220 × 29 mm (w/h/d)
Mass Approx. 132 g (4.6 oz.) (not including batteries)
Design and specifications are subject to change without notice.
The validity of the CE marking is restricted to only those countries
where it is legally enforced, mainly in the countries EEA (European
Economic Area).
component of each manufacturer)
button use - up to approx. 300 times per day.)
1
(2
/8 × 8 3/4 × 1 3/16 in.)
Français
Préréglage de la télécommande
Remarque sur le préréglage de la télécommande
La télécommande est préréglée en usine pour piloter des appareils
de marque Sony.
Si vous utilisez la télécommande avec un appareil Sony, vous
n’aurez pas besoin de prérégler la télécommande avant de l’utiliser
pour la première fois.
Pour prérégler la télécommande pour l’utiliser avec des appareils
d’autres fabricants (autres que Sony), ou avec un appareil qui n’a pas
été préréglé en usine, vous devrez suivre les procédures
d’enregistrement du code approprié décrites dans ce mode d’emploi
pour chaque appareil. (Voir aussi les tableaux « Codes d’appareils »
fournis.)
Appareil pouvant être
préréglé
Téléviseur
Magnétoscope/Décodeur
analogique/Décodeur
numérique/Récepteur satellite
numérique/Ampli-tuner/Lecteur
CD/Platine à cassette/Platine
MD/DVD/Téléviseur/
Magnétoscope/Magnétoscope
numérique/DAV (combiné DVD/
ampli-tuner)
Touche
TV
VCR
CBL
AMP
CD
SAT
DVD
Préréglage usine
Téléviseur Sony
Magnétoscope VHS
Sony
Décodeur analogique de
câblodistribution
Ampli-tuner Sony
Lecteur CD Sony
Récepteur satellite
numérique Sony
Lecteur DVD Sony
Remarques
• Cette télécommande ne peut être préréglée que pour un appareil
par touche, à moins que les codes soient identiques.
Par exemple, vous ne pouvez pas prérégler la télécommande pour
piloter un téléviseur Sony et un téléviseur Panasonic en même
temps, car leurs codes sont différents.
• Il est possible que vous ne puissiez pas piloter un appareil, même
de marque Sony, avec le préréglage usine. Dans ce cas, suivez la
procédure décrite dans « Enregistrement du code. »
Mise en place des piles
Avant de remplacer les piles, assurez-vous d’avoir les nouvelles à
portée de main.
Ouvrez le logement des piles et insérez deux piles AA (R6) (non
fournies).
Veillez à faire correspondre les bornes + et – des piles et les
indications + et – du logement.
12
Quand faut-il remplacer les piles ?
Dans des conditions normales d’utilisation, les piles durent environ
six mois. Si la télécommande ne fonctionne pas normalement, les
piles sont sans doute usées. Remplacez les deux piles par des neuves.
Remarques
• Remplacez en même temps les deux piles usées par des neuves.
• Remplacez les piles en moins de 20 minutes, sinon, les codes
préréglés seront effacés.
Remarques sur les piles
• N’insérez pas en même temps une pile usée et une pile neuve ou
deux piles de type différent.
• En cas de fuite de l’électrolyte des piles, essuyez l’intérieur du
logement avec un chiffon et remplacez les piles par des neuves.
Pour éviter que l’électrolyte des piles ne s’écoule, enlevez les piles
si vous prévoyez de ne pas utiliser la télécommande pendant un
certain temps.
Enregistrement du code
Effectuez les opérations 1 et 2 ci-dessous pour chaque appareil que
vous souhaitez utiliser avec la télécommande.
Etape 1: Entrée du code
1 Consultez les tableaux « Codes d’appareils » fournis, et trouvez le
code à trois chiffres correspondant à l’appareil souhaité.
Si plus d’un code est indiqué, utilisez d’abord le premier code de
la liste pour effectuer les opérations suivantes.
Par exemple, si vous voulez prérégler un magnétoscope Philips,
vous devez utiliser le code 035.
Si votre appareil n’est pas indiqué dans la liste, reportez-vous à
« Recherche du code correct. »
2 Tout en maintenant la touche SET
enfoncée, appuyez sur la touche
POWER.
3 Appuyez sur la touche correspondant à
l’appareil que vous souhaitez prérégler.
Remarque
Le « magnétoscope », le « décodeur analogique », le « récepteur
satellite numérique », l’« ampli-tuner », le « lecteur CD » et le
« lecteur DVD » sont affectés respectivement aux touches VCR, CBL,
SAT, AMP, CD et DVD en usine. Mais vous pouvez aussi affecter
d’autres appareils à ces touches. Pour plus de détails, voir
« Changement du type d’appareil sur les touches VCR, CBL, SAT,
AMP, CD et DVD ».
4 Entrez le code de l’appareil. Par
exemple, si vous voulez entrer le code
pour un magnétoscope Philips, vous
devrez appuyer sur .
5 Appuyez sur la touche ENT pour
enregistrer le code dans la mémoire de la
télécommande puis relâchez-la.
6 Passez à « Etape 2: Vérification du fonctionnement du code » pour
terminer la programmation.
Etape 2: Vérification du fonctionnement du code
1 Mettez l’appareil que vous souhaitez prérégler sous tension.
2 Pointez la télécommande vers l’appareil et appuyez sur une
touche pour vérifier si cette touche fonctionne.
Appuyez par exemple sur la touche POWER pour vérifier si elle
est effective avec votre appareil.
3 Vérifiez si les autres touches de la télécommande opèrent bien les
fonctions correspondantes de l’appareil.
Vous pouvez inscrire le numéro de code sur l’étiquette à
l’intérieur du volet du logement des piles.
Si la télécommande ne semble pas fonctionner...
• Essayez d’abord les autres codes de la liste indiqués pour votre
appareil (voir les tableaux « Codes d’appareils ») en répétant les
mêmes opérations.
• Si, après avoir essayé tous les codes indiqués pour votre appareil,
la télécommande ne fonctionne toujours pas correctement, essayez
la méthode décrite dans « Recherche du code correct. »
SET
DVDTV SAT
0
35
Numéro de code
ENT
POWER
CDVCRCBL AMP
Recherche du code correct
Si vous avez essayé tous les codes indiqués pour votre appareil et
que la télécommande ne fonctionne toujours pas (ou si vos appareils
ne sont pas mentionnés dans les tableaux « Codes d’appareils »),
effectuez les opérations suivantes.
1 Mettez l’appareil que vous souhaitez prérégler sous tension.
Insérez une cassette ou un disque si nécessaire.
2 Tout en maintenant la touche SET enfoncée, appuyez sur la touche
POWER.
3 Appuyez sur la touche de la télécommande correspondant à
l’appareil que vous souhaitez prérégler.
4 Appuyez sur la touche CH+, puis relâchez-la. Appuyez ensuite sur
la touche POWER, puis relâchez-la.
5 Répétez l’étape 4 jusqu’à ce que vous ayez trouvé le code
d’appareil correct.
A chaque pression sur la touche CH+ suivie d’une pression sur la
touche POWER, un nouveau code d’appareil sera transmis.
Continuez jusqu’à ce que votre appareil fonctionne quand il reçoit
le signal transmis par la télécommande (par exemple, l’appareil
est mis hors tension, la fonction CH+ est active, la lecture
commence, etc.). Soyez patient ; jusqu’à 100 essais peuvent être
nécessaires pour que le numéro de code correct soit localisé.
6 Quand le code correct est localisé, appuyez sur la touche ENT afin
d’enregistrer le code dans la mémoire de la télécommande.
7 Vérifiez si la télécommande active les autres fonctions de votre
appareil en appuyant sur les touches correspondantes de la
télécommande. Si la télécommande semble fonctionner
correctement, son préréglage est terminé.
Si le composant ne fonctionne pas correctement, répétez les étapes 1
à 6 et cherchez un autre code.
Si la télécommande ne fonctionne toujours pas normalement,
reportez-vous à « Guide de dépannage. »
Changement du type d’appareil sur les
touches VCR, CBL, SAT, AMP, CD et DVD
En usine, le « magnétoscope » est affecté à la touche VCR, le
« récepteur satellite numérique » à la touche SAT, le « décodeur
analogique » à la touche CBL, l’« ampli-tuner » à la touche AMP, le
« lecteur CD » à la touche CD et le « lecteur DVD » à la touche DVD.
En effectuant les opérations suivantes, vous pouvez changer ce
réglage et affecter n’importe quel appareil à chacune de ces touches.
1 Tout en maintenant la touche SET enfoncée, appuyez sur la touche
POWER.
2 Appuyez sur la touche VCR, CBL, SAT, AMP, CD, ou DVD.
3 Appuyez sur la touche x (arrêt), puis relâchez-la.
4 Appuyez sur une des touches suivantes, puis relâchez-la;
pour prérégler un magnétoscope
pour prérégler un DAV (combiné DVD/ampli-tuner)
pour prérégler un récepteur satellite numérique, un décodeur
numérique ou un magnétoscope numérique
pour prérégler un ampli-tuner
pour prérégler un lecteur CD
pour prérégler une platine à cassette
pour prérégler une platine MD
pour prérégler un téléviseur
pour prérégler un décodeur analogique
pour prérégler un DVD
5 Appuyez sur la touche ENT, puis relâchez-la.
6 Entrez les codes d’appareils en effectuant les étapes 2 à 6 de
« Entrée du code » , ou les étapes 1 à 7 de « Recherche du code
d’appareil correct. »
Contrôle du volume des appareils
vidéo raccordés à une chaîne audio
La télécommande a été réglée en usine en prenant l’hypothèse que le
son de vos appareils vidéo était fourni par les haut-parleurs du
téléviseur et que celui des appareils audio était fourni par les
enceintes via l’ampli-tuner (ou l’amplificateur).
Préréglage usine:
Touche
TV
VCR*, CBL*, SAT*, DVD*
AMP
CD*
* Si vous affectez des appareils audio à la touche VCR, CBL, SAT, CD ou DVD,
vous pourrez contrôler le volume de l’ampli-tuner (ou de l’amplificateur)
affecté à la touche AMP. Si vous affectez des appareils vidéo à ces touches,
vous pourrez contrôler le volume du téléviseur.
Vous pourrez ainsi contrôler le volume de votre téléviseur ou amplituner (ou amplificateur) tout en faisant fonctionner un appareil
vidéo ou audio sans avoir à appuyer d’abord sur la touche TV ou
AMP. Par exemple, pour contrôler le volume des canaux de votre
magnétoscope, vous n’avez pas besoin d’appuyer d’abord sur la
touche TV.
Néanmoins, si vos appareils vidéo sont raccordés à une chaîne
audio, vous écoutez probablement le son du téléviseur ou du
magnétoscope par les enceintes de l’ampli-tuner (ou l’amplificateur)
et le son n’est pas fourni par les haut-parleurs du téléviseur. Vous
devez donc changer le préréglage usine pour contrôler le volume des
appareils vidéo sans avoir d’abord à sélectionner l’ampli-tuner (ou
l’amplificateur).
Pour changer le préréglage usine du contrôle de volume, procédez
de la façon suivante.
Remarque
Cette fonction est effective seulement si un ampli-tuner ou un
amplificateur est affecté à la touche AMP. Vous ne pourrez pas
contrôler le volume d’un ampli-tuner ou d’un amplificateur affecté à
la touche VCR, CBL, SAT, CD ou DVD tout en faisant fonctionner un
appareil affecté à une autre touche.
Changement du préréglage usine du
contrôle de volume
1 Tout en maintenant la touche SET enfoncée, appuyez sur la touche
POWER.
2 Appuyez sur la touche AMP.
3 Appuyez sur la touche VOL+.
4 Appuyez sur la touche ENT.
Le réglage du contrôle de volume devient à « l’ampli-tuner/
amplificateur. » Vous pouvez contrôler le volume de l’ampli-tuner
(ou de l’amplificateur) affecté à la touche AMP tout en sélectionnant
un autre appareil.
Remarques
• Si vous utilisez d’autres ampli-tuners (ou amplificateurs) et affectés
aux touches VCR, CBL, SAT, CD ou DVD, vous ne pourrez pas
contrôler le volume de l’ampli-tuner (ou de l’amplificateur) affecté
à la touche AMP après avoir sélectionné ces touches.
• Si vous changez le réglage de la touche AMP en affectant un
appareil autre qu’un ampli-tuner ou amplificateur, le réglage du
contrôle de volume des appareils vidéo reviendra au « téléviseur »
même si vous avez changé le préréglage usine du contrôle de
volume. Dans ce cas, vous ne pourrez pas contrôler le volume des
appareils audio autres qu’un ampli-tuner ou un amplificateur.
Réinitialisation au préréglage usine du contrôle de
volume
A l’étape 3 ci-dessus, appuyez sur VOL –.
Contrôle du volume du
Téléviseur
Téléviseur
Ampli-tuner (ou amplificateur)
Ampli-tuner (ou amplificateur) assigné
à la touche AMP
Commande à distance d’un appareil
1 Appuyez sur la touche de la
télécommande correspondant à
l’appareil souhaité.
2 Dirigez la télécommande directement
vers l’appareil.
3 Appuyez sur la touche correspondant à la fonction que vous
voulez utiliser.
Voir « Description des touches de la télécommande » pour une
description complète des touches de la télécommande.
Remarques sur l’utilisation de la télécommande
Utilisez simplement cette télécommande comme vous le feriez avec
la télécommande fournie avec votre appareil.
• L’utilisation de la télécommande n’augmente pas le nombre de
fonctions des appareils. Les fonctions de la télécommande sont
limitées à celles des appareils. Par exemple, si un téléviseur n’a pas
de fonction MUTING (silencieux), la touche MUTING de la
télécommande n’aura aucun effet sur votre téléviseur.
• Certaines fonctions de l’appareil peuvent ne pas être activées par
cette télécommande.
• Si votre décodeur peut contrôler le volume, assurez-vous que sa
commande de volume est réglée sur une position moyenne. Si le
volume du décodeur est réglé au plus bas, vous ne pourrez pas
régler le volume de votre téléviseur avec la télécommande.
DVDTV SAT
CDVCRCBL AMP
Réglage d’une chaîne à l’aide d’une
touche unique (fonction macro de
chaîne)
Vous pouvez programmer la fonction macro de chaîne sur n’importe
laquelle des touches indiquées ci-dessous (touches macro).
Par exemple, au lieu d’appuyer sur , , puis sur la touche ENT
pour changer de chaîne, vous pouvez effectuer ces opérations en
appuyant simplement sur le bouton N.
Les touches de macro sont :
N, m, M, x, X, et zREC.
(Uniquement pour le fonctionnement avec un téléviseur, un
décodeur analogique, un décodeur numérique, un récepteur satellite
numérique ou un magnétoscope numérique.)
La série d’opérations pouvant être programmées doit être composée
d’une séquence de deux à quatre touches à ou de la touche
ENT.
Remarque
La fonction macro de chaîne peut ne pas fonctionner correctement
pour certains composants.
Pour programmer une série d’opérations
1 Appuyez sur les touches de sélection des composants voulus.
(Vous pouvez uniquement sélectionner « téléviseur » , « décodeur
analogique » , « décodeur numérique » , « récepteur satellite
numérique » ou « magnétoscope » .)
2 Tout en appuyant sur la touche macro choisie, appuyez sur la
séquence de touches nécessaires à l’opération.
Par exemple, pour programmer t t ENT sur le bouton
N, maintenez d’abord la touche N enfoncée, appuyez sur ,
, et sur ENT dans cet ordre, puis relâchez la touche N.
Remarques
• Même si vous essayez de programmer plus de quatre opérations et
que vous appuyez sur les touches correspondantes à l’étape 2 cidessous, seules les quatre premières touches seront programmées.
• Si vous essayez de ne programmer qu’une seule opération sur une
touche de macro, l’opération de programmation sera rejetée.
• Vous ne pouvez pas programmer la fonction macro de chaîne pour
plus de trois composants. Pour programmer le quatrième
composant, effacez d’abord toutes les touches de macro d’un
composant.
Pour modifier ou effacer le programme
Lorsque vous voulez changer le réglage, ou si vous n’utilisez plus
l’opération programmée, suivez la procédure décrite ci-dessous pour
écraser ou effacer le programme.
1 Gardez enfoncée la touche macro que vous voulez changer ou
effacer.
2 Après environ trois secondes d’attente, appuyez sur la nouvelle
séquence de touches, ou, pour effacer le programme, appuyez et
relâchez , puis appuyez sur la touche ENT et relâchez-la.
3 Relâchez ensuite la touche macro.
Remarque
Attention à bien attendre au moins trois secondes à l’étape 2 cidessous. Lorsque vous appuyez sur la touche macro, les signaux
programmés sont envoyés pendant que vous attendez et donc, si
vous dirigez la télécommande vers le composant, les opérations
programmées peuvent être effectuées avant la suite de la procédure
de programmation.
Guide de dépannage
Si vous ne parvenez pas à prérégler ou à utiliser la télécommande:
• Quand vous préréglez la télécommande, effectuez soigneusement toutes les
opérations décrites dans « Enregistrement de code. » Si le premier code de la
liste, correspondant à votre appareil ne fonctionne pas, essayez tous les codes
indiqués pour votre appareil – dans l’ordre dans lequel ils sont indiqués. Si
aucun de ces codes ne fonctionne (ou si votre appareil n’est pas indiqué dans
les listes), effectuez les opérations décrites dans « Recherche du code
correct. »
• Vérifiez que vous dirigez bien la télécommande vers l’appareil et qu’il n’y a
aucun obstacle entre la télécommande et l’appareil.
• Assurez-vous que les piles de la télécommande ne sont pas usées et qu’elles
sont insérées correctement.
• Vérifiez si la touche TV, VCR, CBL, SAT, AMP, CD ou DVD correspondant à
l’appareil souhaité a bien été enfoncée.
• Vérifiez si votre appareil peut bien être commandé par une télécommande
infrarouge. Par exemple, si votre appareil n’avait pas de télécommande lors
de l’achat, il ne pourra probablement pas être piloté par une télécommande.
• Si vos appareils vidéo sont reliés à une chaîne audio, assurez-vous que vous
avez préréglé la télécommande comme décrit dans « Contrôle du volume des
appareils vidéo raccordés à une chaîne audio. »
• Si le problème persiste, revenez aux préréglages usine en appuyant
simultanément sur les touches POWER, TV/VIDEO et VOL–.
Description des touches de la
télécommande
POWER
SET
TV/VIDEO
DVDTV SAT
CDVCRCBL
VIDEO1
VIDEO23AUX
1
2
TUNER5CD6TAPE
4
PHONO
7MD8TV9
DVD
0
DIGITAL
VOL CH
/ANALOG
TWIN VIEW
SLEEP
INFO
RECALL
MUTING
GUIDE MENU
OK
EXIT
AMP
ENT
TOOLS
Généralités
1 Pour régler la télécommande,
appuyez sur SET tout en
maintenant la touche POWER
enfoncée.
6 *Augmentation du volume: +
Diminution du volume: –
7 *Coupure du volume du
téléviseur ou de l’ampli-tuner
(amplificateur).
qa Mise sous et hors tension de
l’appareil sélectionné.
qs Touches de sélection des
composants. Pour passer au
fonctionnement de chaque
composant, appuyez sur la
touche à laquelle ce composant
est affecté.
* Contrôle le volume du téléviseur ou
de l’ampli-tuner (amplificateur).
Voir « Contrôle du volume des
appareils vidéo raccordés à la
chaîne audio » pour plus de détails.
Fonctionnement d’un téléviseur (TV)
2 Changement du mode d'entrée.
3, 4 et qd
Changement de chaîne. Par
exemple, pour sélectionner la
chaîne 5, appuyez sur 0 et 5 (ou
appuyez sur 5 et ENT).
8 Affichage de la chaîne
sélectionnée sur le téléviseur.
qf Utilisation de la fonction image
dans l’image. Appuyez sur
chaque touche ou combinaison
de touches comme décrit dans
le tableau ci-dessous.
qg CH+: Chaîne suivante
CH–: Chaîne précédente
Si vous réglez le code d’appareil du téléviseur à « 088 » ou
« 089 » (codes pour un téléviseur Sony)
5
Pour passer de la diffusion
numérique à la diffusion
analogique.
q; EXIT
qf TWIN VIEW
w; OPTION
Utilisation de la touche PIP (Image dans l’image)
Appuyez sur Pour
TWIN VIEW Activer/Désactiver l'image incrustée.
GUIDE Désactiver l'image incrustée.
m ou M Changer de chaîne de télévision dans l'image
zREC Changer le mode d’entrée de l'image incrustée.
x Changer la position de l'image incrustée.
N Echanger l’image principale et l'image incrustée.
X Figer l'image incrustée.
Remarque
Si la fonction macro de chaîne est programmée pour des opérations de
télévision, la touche utilisée comme touche macro ne peut pas être utilisée pour
des opérations PIP.
incrustée.
qh Utilisation de la fonction JUMP,
FLASHBACK ou CHANNEL
RETURN du téléviseur, selon le
réglage utilisé par le fabricant.
qj Contrôle du temporisateur
(SLEEP) du téléviseur.
(Fonctionne seulement pour un
téléviseur avec temporisateur.)
qk Affichage du MENU.
ql Pour déplacer le curseur vers le
haut, vers le bas, vers la gauche
ou vers la droite ou pour
valider la sélection.
wa
Pour sélectionner la source
d’entrée du téléviseur.
m : VIDEO 1
N : VIDEO 2
M : VIDEO 3
zREC :
VIDEO 4
x : VIDEO 5
X : VIDEO 6
Fonctionnement d’un magnétoscope (VCR)
2 Pour basculer le signal d'entrée
de l’antenne.
8 Affichage des indicateurs à
l’écran.
qg CH+ : Chaîne suivante
CH– : Chaîne précédente
qj Changement du mode d'entrée.
qk Affichage du MENU.
ql Pour déplacer le curseur vers le
haut, vers le bas, vers la gauche
ou vers la droite ou pour
valider la sélection.
wa N : Lecture.
x : Arrêt.
m : Rembobinage.
M : Avance rapide.
zREC :
Pour enregistrer,
appuyez sur N tout en
tenant zREC enfoncée.
X : Pause.
Fonctionnement d’un Magnétoscope numérique (DVR)
2 Commutation de la sortie du
récepteur satellite vers le
téléviseur (lors du
raccordement du câble ou
d’une antenne télé, la sortie
bascule entre les programmes
télévisés et de diffusion par
satellite).
2
THUMBS+)
(*
Sélection du programme
enregistré souhaité (il est
nécessaire d’avoir déjà
enregistré ce programme).
3 et qd
Changement de chaîne
Par exemple, pour passer à la
chaîne 5, appuyez sur 0 et 5 (ou
appuyez sur 5 et ENT).
8 Activation de l’affichage.
2
THUMBS–)
(*
Sélection du programme
enregistré souhaité
(il est nécessaire d’avoir déjà
enregistré ce programme).
9 Affichage du guide principal.
2
Live TV)
(*
Affichage du guide principal.
q; Suppression du réglage.
Sortie du menu de réglage.
2
LIST)
qf (*
Affichage du titre du
programme enregistré.
qg CH+ : Passage à la chaîne
qh (*
qk Affichage du menu.
*
suivante.
2
PAGE+) Page
(*
suivante.
CH– : Passage à la chaîne
précédente.
2
PAGE–) Page
(*
précédente.
2
REPLAY)
Reprise.
Permet également de passer au
mode d’enregistrement et de
revue pendant la lecture (la
reprise commence après
environ cinq secondes de
recul).
2
EPG)
(*
Accès à tous les éléments du
service.
2
Cette touche correspond au service Tivo ou au service de retransmission.
Reportez-vous au mode d’emploi correspondant pour plus d’informations.
ql Pour déplacer le curseur vers le
haut, vers le bas, vers la gauche
ou vers la droite.
ql OK : Affichage de l’index des
wa N : Lecture
chaînes lorsque le guide
de programme n’est pas
affiché Sélection de la
chaîne mise en
surbrillance.
m : Recul rapide.
M : Avance rapide.
zREC :
Pour enregistrer,
appuyez sur N tout en
tenant zREC enfoncée.
Relâchez d’abord N
puis zREC.
Pour interrompre
l’enregistrement, suivez
la même procédure.
x : Arrêt.
X : Pause.
Fonctionnement d’un décodeur analogique
3 et qd
Changement de chaîne. Par
exemple, pour sélectionner la
chaîne 5, appuyez sur 0 et 5 (ou
appuyez sur 5 et ENT).
qg CH+ : Chaîne suivante
CH– : Chaîne précédente
Remarques
• Il est possible, pour certaines raisons, que le décodeur se mette sous/hors
tension quand vous appuyez sur la touche CH+ ou CH– de la télécommande.
• Si votre décodeur peut contrôler le volume, assurez-vous que sa commande
de volume est réglée sur une position moyenne. Si le volume du décodeur est
réglé au plus bas, vous ne pourrez pas régler le volume de votre téléviseur
avec la télécommande.
Fonctionnement d’un
2 Commutation de la sortie du
récepteur satellite vers le
téléviseur (lors de la connexion
du câble ou d’une antenne de
téléviseur au récepteur, la sortie
est commutée entre la
télévision et la réception
satellite).
3 et qd
Changement de chaîne
Par exemple, pour passer à la
chaîne 5, appuyez sur 0 et 5 (ou
appuyez sur 5 et ENT).
8 Activation de l’affichage à
l’écran.
9 Activation de la barre de titres ;
en mode CABLE, activation et
désactivation de la barre de
titres.
q; Fermeture du menu de réglage.
qf Utilisation de la fonction de
chaînes favorites.
qg CH+ : Chaîne suivante.
CH– : Chaîne précédente.
qh Affichage d’un menu de
raccourcis.
*3Fonctionnement du magnétoscope numérique intégré ou de la télé à la carte
décodeur
qh Utilisation de la fonction JUMP,
FLASHBACK ou CHANNEL
RETURN du téléviseur, selon le
réglage utilisé par le fabricant.
numérique
qk Affichage du MENU.
ql Pour déplacer le curseur vers le
haut, vers le bas, vers la gauche
ou vers la droite.
ql OK : Affichage de l’index des
wa *
chaînes lorsqu’aucun
guide de programmation
n’est affiché.
Pour sélectionner la
chaîne qui est en
surbrillance.
3
N : Lecture
3
m : Recul rapide.
*
3
M : Avance rapide.
*
3
zREC :
*
Pour enregistrer,
appuyez sur N tout en
tenant zREC enfoncée.
Relâchez d’abord N
puis zREC.
Pour interrompre
l’enregistrement, suivez
la même procédure.
3
x : Arrêt.
*
3
X : Pause.
*
Fonctionnement d’un récepteur satellite numérique
2 Commutation des signaux de
sortie du récepteur satellite
numérique transmis au
téléviseur. (Si vous avez
raccordé un câble TV ou une
antenne de télévision au
récepteur, la sortie sera
commutée entre le programme
de télévision et le programme
SAT et vice-versa.)
3, 4 et qd
Changement de chaîne. Par
exemple, pour sélectionner la
chaîne 5, appuyez sur 0 et 5 (ou
appuyez sur 5 et ENT).
5 Pour utiliser la fonction
“FAVORITE”.
9 Affichage du guide principal.
q; Pour quitter le mode.
qg Chaîne suivante: +
Chaîne précédente: –
Pour parcourir le guide quand
un guide de programme est
affiché.
qh Accord de la dernière chaîne
accordée.
qj Appel de l‘index des stations.
qk Appel de l‘affichage MENU.
ql Défilement du guide principal.
ql OK: Sélection de la chaîne en
surbrillance. Appel de
l’index des stations
quand un guide de
programme n’est pas
affiché.
Fonctionnement d’un DVD
2 Pour changer le son.
3 Touches numériques : Pour
régler les paramètres
sélectionnés sur l’écran.
4 Sélection de 10 ou d’un nombre
supérieur. Par exemple, pour
sélectionner la plage 15,
appuyez sur PIP puis sur 5.
8 Pour indiquer le statut de
reproduction actuel à l’écran.
9 Pour effacer les caractères
sélectionnés sur l’écran.
qd Pour valider un réglage ou
régler les paramètres
sélectionnés sur l’écran.
qg CH+ : Pour passer à l’endroit
ou au morceau suivant.
Chaîne suivante.
CH– : Pour passer à l’endroit
ou au morceau
précédent.
Chaîne précédente.
qh Pour afficher le menu des titres.
qj Pour changer de sous-titres.
qk Pour afficher le menu DVD.
ql Pour déplacer le curseur vers le
haut, vers le bas, vers la gauche
ou vers la droite.
ql OK : Pour exécuter les articles
sélectionnés dans le
menu.
wa N : Lecture.
m : Rembobinage.
M : Avance rapide.
x : Arrêt
X : Pause.
zREC :
Pour enregistrer,
appuyez sur N tout en
tenant zREC enfoncée.
Relâchez d’abord N
puis zREC.
Fonctionnement d’un ampli-tuner/amplificateur
2 Pour changer de source
d’entrée à chaque pression.
3 Sélection de la source d’entrée:
1 sélectionne VIDEO 1
2 sélectionne VIDEO 2
3 sélectionne AUX
4 sélectionne TUNER
5 sélectionne CD
6 sélectionne TAPE
7 sélectionne MD
8 sélectionne TV
9 sélectionne PHONO
0 sélectionne DVD
qg Préréglage d’une fréquence
supérieure: +,
d’une fréquence inférieure: –
Accord d’une fréquence
supérieure: +,
d’une fréquence inférieure: –
qh Sélection de la gamme (FM/
AM).
wa Fonctionne comme les touches
N, M, m, x, X du lecteur
CD. (Si un lecteur CD est
affecté à la touche CD.)
DAV (combiné DVD/ampli-tuner)
2 Pour changer le mode d’entrée.
3 Touches numériques : pour
régler les paramètres
sélectionnés à l’écran.
4 Pour sélectionner 10 ou un
nombre supérieur.
8 Pour indiquer le statut de
reproduction actuel à l’écran.
Pour modifier le son.
9
qd Pour valider le réglage.
qg CH+ : pour passer à l’endroit ou
qh Pour afficher le menu principal.
* Pour éviter tout enregistrement accidentel, la touche REC est inactive si vous
au morceau précédent.
CH– : pour passer à l’endroit ou
au morceau suivant.
n’appuyez pas dessus pendant plus d’une seconde (réglage en usine).
qj Pour changer de sous-titres.
qk Pour afficher le MENU.
ql Pour déplacer le curseur vers le
haut, vers le bas, vers la gauche
ou vers la droite.
OK : Pour valider la sélection
ql N : lecture.
de l’écran MENU.
m : rembobinage.
M : avance rapide.
zREC* :
enregistrement.
x : arrêt.
X : pause.
Fonctionnement d’un lecteur CD
3 Pour sélectionner le numéro de
piste. 0 sélectionne la piste 10.
Pour sélectionner les numéros
de piste supérieurs à 10,
reportez-vous aux descriptions
de la touche • (DOT) ci-dessus.
4 Sélection de 10 ou d’un nombre
supérieur. Par exemple, pour
sélectionner la plage 15,
appuyez sur • (DOT) puis sur 5.
Pour activer/désactiver
8
l’affichage du lecteur CD.
qd Pour valider le réglage.
qg CH+ : Pour sélectionner la plage
suivante.
CH– : Pour sélectionner la plage
précédente.
qh Sélection du disque suivant.
qj Pour annuler le réglage.
wa N : Lecture.
m : Rembobinage.
M : Avance rapide.
x : Arrêt
X : Pause.
Fonctionnement d’une platine MD
3 Pour sélectionner le numéro de
piste. 0 sélectionne la piste 10.
Pour sélectionner les numéros
de piste supérieurs à 10,
reportez-vous aux descriptions
de la touche • (DOT) ci-dessus.
4 Sélection de 10 ou d’un nombre
supérieur. Par exemple, pour
sélectionner la plage 15,
appuyez sur • (DOT) puis sur 5.
Pour changer le mode d’affichage
8
ou activer/désactiver l’affichage.
qd Pour valider le réglage.
qg CH+ : Pour sélectionner la plage
suivante.
CH– : Pour sélectionner la plage
précédente.
qh Sélection du disque suivant.
qj
Pour annuler le réglage.
wa N : Lecture.
m : Rembobinage.
M : Avance rapide.
x : Arrêt
X : Pause.
zREC : Pour enregistrer,
appuyez sur N tout en
tenant zREC enfoncée/
Relâchez d’abord N
puis zREC.
Fonctionnement d’une platine à cassette
4 et wa
Touches de commande de
cassettes. Pour les platines à
double cassettes, touches de
commande pour la platine A
(pour les platines à double
cassette de marque Sony,
touches pour la platine B).
• (DOT) :
Pour la lecture arrière.
N : Lecture.
m :Rembobinage.
M :Avance rapide.
zREC :
Pour enregistrer,
appuyez sur N tout en
tenant zREC enfoncée.
Relâchez d’abord N
puis zREC.
x : Arrêt.
X :Pause.
0, qd, ql, et w;
Touches de commande pour la
platine B (pour les platines à
double cassette de marque
Sony, touches de commande
pour la platine A).
ENT : Pour la lecture arrière.
: Lecture.
:Rembobinage.
: Avance rapide.
:Arrêt.
EXIT : Pour enregistrer,
appuyez sur tout en
tenant MENU enfoncée.
Relâchez d’abord
puis MENU.
TOOLS :
qh Pour sélectionner la platine A
S’il y a un seul groupe de commandes
pour les deux platines et un sélecteur
A/B, utilisez la touche RECALL pour
sélectionner la platine A ou B.
Pause.
ou la platine B (double platine à
cassette seulement).
Spécifications
Portée Environ 7 m (23 pieds) (varie selon chaque appareil)
Alimentation Deux piles de format AA (R6) (non fournies)
Autonomie des piles Environ 1 an (selon la fréquence d’utilisation des
Dimensions Environ 53 × 220 × 29 mm (l/h/p)
Poids Environ 132 g (4,6 oz) (sans les piles)
La conception et les spécifications sont sujettes à modification sans préavis.
La marque CE est valable uniquement dans les pays où elle a force
de loi, c’est-à-dire principalement dans les pays de l’EEE (Espace
Economique Européen).
touches, soit environ jusqu’à 300 pressions par jour).
1
(2
/8 × 8 3/4 × 1 3/16 po)
 Loading...