

Page 1
Integrated Remote Commander
Integrated Remote
Commander
Operating Instructions
RM-NX7000
3-254-727-11(1)
RM-NX7000
©2004 Sony Corporation
Page 2

2
Page 3

•Memory Stick and are trademarks of Sony Corporation.
•Memory Stick Duo, and “Memory Stick PRO” are trademarks
of Sony Corporation.
•“TouchEngine” is a trademark of Sony Corporation.
•Microsoft and Windows are registered trademarks of Microsoft Corporation in
the United States and/or other countries.
•All other names of systems and products are trademarks or registered
trademarks of their respective owners. ™ and ® marks are omitted in this
manual.
•Microsoft® Windows® XP Professional and Microsoft® Windows® XP Home
Edition are mentioned as Windows XP in this manual.
•Microsoft
®
Windows® 2000 Professional is mentioned as Windows 2000 in this
manual.
®
•Microsoft
Windows® Millennium Edition is mentioned as Windows Me in
this manual.
•Microsoft® Windows® 98 Second Edition is mentioned as Windows 98 SE in
this manual.
•Copyright laws prohibit reproducing the software supplied with this Remote
Commander or the manual accompanying it in whole or in part, or renting
the software without the permission of the copyright holder.
•In no event will SONY be liable for any financial damages, or loss of profits,
including claims made by third parties, arising out of the use of the software
supplied with this Remote Commander.
•In the event a problem occurs with this product as a result of defective
manufacturing, SONY will replace it. However, SONY bears no other
responsibility.
•The software provided with this Remote Commander cannot be used with
equipment other than that which is so designated.
•Please note that, due to continued efforts to improve quality, the
specifications of the software supplied with this Remote Commander may be
changed without notice.
3
Page 4

WARNING
To prevent fire or shock hazard, do
not expose the unit to rain or
moisture.
To avoid electrical shock, do not
open the cabinet. Refer servicing to
qualified personnel only.
For the customers in the U.S.A.
Owner’s Record
The model number is located on the rear
panel.
The serial number is located next to the
Reset button inside the “Memory Stick”
slot cover.
Record these numbers in the spaces
provided below.
Refer to them whenever you call upon
your Sony dealer regarding this product.
Model No. RM-NX7000
Serial No.
You are cautioned that any changes or
modifications not expressly approved in
this manual could void your authority to
operate this equipment.
Note:
This equipment has been tested and found
to comply with the limits for a Class B
digital device, pursuant to Part 15 of the
FCC Rules. These limits are designed to
provide reasonable protection against
harmful interference in a residential
installation. This equipment generates,
uses and can radiate radio frequency
energy and, if not installed and used in
accordance with the instructions, may
cause harmful interference to radio
communications.
However, there is no guarantee that
interference will not occur in a particular
installation. If this equipment does cause
harmful interference to radio or television
reception, which can be determined by
turning the equipment off and on, the user
is encouraged to try to correct the
interference by one or more of the
following measures:
– Reorient or relocate the receiving
antenna.
– Increase the separation between the
equipment and receiver.
– Connect the equipment into an outlet on
a circuit different from that to which the
receiver is connected.
– Consult the dealer or an experienced
radio/TV technician for help.
If you have any questions about this
product, contact:
Sony Remote Support site
<http://www.sony.com/nxremotesupport>
or Sony Remote Support Line
1-(866)-922-7669
Declaration of Conformity
Trade Name SONY
Model No. RM-NX7000
Responsible Party Sony Electronics Inc.
Address 16450 W. Bernardo Dr, San Diego, CA 92127 USA
Telephone No. 858-942-2230
This device complies with Part 15 of the FCC Rules. Operation is subject to the
following two conditions: (1) This device may not cause harmful interference, and
(2) this device must accept any interference received, including interference that
may cause undesired operation.
4
Page 5
Table of Contents
Features ........................................................................................................................... 8
Getting Started
Unpacking .....................................................................................................................11
Preparing RM-NX7000................................................................................................ 12
Charging ....................................................................................................................... 14
Using the touch panel display ................................................................................... 16
Calibrating the touch panel display (ALIGNMENT) ................................................ 16
Location and Function of Controls ........................................................................... 17
Screen layout and elements ........................................................................................... 21
Setting up the Remote Commander using “NAVITUS Design” .......................... 25
Basic Operations
Basic Operations of the Remote Commander ......................................................... 37
Operating a component (Operation mode) ................................................................. 37
Entering the Set display (Setting mode)....................................................................... 39
Inputting letters (label setting) ...................................................................................... 40
Programming the preset codes of components (PRESET)..................................... 42
Default settings of Component keys ............................................................................ 42
Programming a preset code ........................................................................................... 43
Using the Direct Access buttons (DIRECT ACCESS) ............................................. 52
Setting the label of a Direct Access button................................................................... 52
Programming an action to skip to the desired page for a Direct Access button .... 55
Programming remote control signals for a key or button – Learning function
(LEARN) .................................................................................................................... 58
Deleting the learned remote control signal ................................................................. 64
Customizing the Display
Customizing the Home display (HOME EDIT) ...................................................... 67
Changing the assignment of a Component key (MOVE) .......................................... 69
Deleting a Component key (DELETE) ......................................................................... 72
Setting the skin (key appearance and color) and the label (name) of the
Component key (SKIN/LABEL) ................................................................................ 74
Copying a Component key (DUPLICATE) ................................................................. 77
Creating a new Component key (NEW) ...................................................................... 80
Creating an Alias Component key (ALIAS) ................................................................ 83
Adding/deleting a page of the Home display (PAGE) ............................................. 85
Continued
5
Page 6

Continued
Table of Contents
Customizing the Component display (COMPONENT EDIT).............................. 88
Changing the assignment of a function key (MOVE) ................................................ 89
Deleting a function key (DELETE)................................................................................ 92
Setting the skin (key appearance and color) and the label (name) of a function
key (SKIN/LABEL) ...................................................................................................... 97
Setting a function key of another component to a Component display (ALIAS)... 100
Setting a wallpaper (WALLPAPER)............................................................................ 103
Adding/deleting a page of the Component display (PAGE) ................................. 105
Assigning function keys of multiple AV components to a Component display ... 109
Convenient operations by programming a series of actions
(macro) for a key/button
Outline of a series of actions (macro).......................................................................113
What is a macro ?........................................................................................................... 113
Programming a series of actions (macro) for a key/button ................................. 115
Step 1: Selecting a key/button you want to program a macro for ......................... 115
Step 2: Setting a macro.................................................................................................. 120
Macro operation using the Timer function ............................................................ 127
About the edit display for the Timer program key .................................................. 127
Step 1: Creating a Timer program key........................................................................ 129
Step 2: Setting the time ................................................................................................. 132
Step 3: Programming a macro ..................................................................................... 135
Programming a series of actions (macro) for a Component
List
Outline of a Component List ................................................................................... 147
What is a Component List? .......................................................................................... 147
Programming a List element.................................................................................... 148
About the edit display for a List element .................................................................. 148
Step 1: Creating a List element .................................................................................... 150
Step 2: Programming a macro ..................................................................................... 154
Creating a User List (USER LIST)............................................................................ 157
About the edit display for a User List ........................................................................ 157
Creating a User List key ............................................................................................... 159
Adding an element to a User List ............................................................................... 164
Using the Component List ....................................................................................... 169
6
Page 7

Easy selection of a series of actions (macro) programmed
for Zapping (ZAPPING)
Outline of Zapping .................................................................................................... 172
What is Zapping? .......................................................................................................... 172
Editing the Zapping function .................................................................................. 174
About the edit display for Zapping ............................................................................ 174
Step 1: Creating a Zapping group ............................................................................... 176
Step 2: Creating a Zapping element............................................................................ 178
Step 3: Programming a macro ..................................................................................... 180
Step 4: Creating a Zapping viewer ............................................................................. 182
Using a “Memory Stick”
About a “Memory Stick” .......................................................................................... 198
Inserting a “Memory Stick” ......................................................................................... 200
Removing a “Memory Stick” ....................................................................................... 201
Reading data saved in a “Memory Stick” (READ) ............................................... 202
Saving Remote Commander data to a “Memory Stick” (SAVE) ........................ 207
Remote Commander’s Other Functions
Setting the Display Window .................................................................................... 212
Calibrating the touch panel display (ALIGNMENT) .............................................. 212
Setting the Backlight Automatic-Off time (BACK LIGHT) ..................................... 214
Setting the Automatic-Off time of the display window (OFF TIME) .................... 216
Adjusting the brightness of the display window’s backlight (BRIGHTNESS) .... 218
Setting the system clock (CLOCK) .......................................................................... 220
Setting the beep sound (BEEP) ................................................................................ 222
Locking the settings (LOCK).................................................................................... 223
Remote Commander information (ABOUT) ......................................................... 224
Setting to the recovery mode (RECOVERY).......................................................... 225
Using the application mode ..................................................................................... 226
Cleaning the Remote Commander ............................................................................. 226
Displaying image files set as wallpapers ................................................................... 227
Additional Information
Precautions ................................................................................................................. 229
Troubleshooting ......................................................................................................... 231
Specifications.............................................................................................................. 248
7
Page 8

Features
The multi functional remote control, RM-NX7000, allows you to control multiple
AV components, lighting equipment, and air-conditioners with one remote
control. The following features are provided.
Easy to use interface
65,536 color operation display
The Remote Commander is equipped
with a vividly clear 65,536 color TFT
LCD operation display for
comfortable operation.
High-speed performance
High-speed CPU for smooth
operation of the Remote Commander.
Computer Interface
The Remote Commander provides a
USB connector and a “Memory Stick”
slot, which allows you to exchange
data with your computer. The highspeed data transfer USB connection
allows for stress-free exchange of data
with your computer.
Tactile response panel
The Remote Commander is equipped
with the tactile response panel with
the TouchEngine™ technology
providing a realistic “click feel” to a
key when you press it.
Easy setting of the remote control
codes
The intelligent code setting system
simplifies a usually complicated code
setting process.
8
Extended functions of the
Remote Commander
Customizing of the operation
display
You can customize the operation
display according to your preference.
You can create your own personal
easy-to-use display by changing the
design, allocation of keys, etc.
Direct Access Buttons that call up
desired pages with just one button
You can program frequently usedpages, etc., for the Direct Access
Buttons, then the page is called up by
simply pressing a single button.
Macro function – A series of
operations at the touch of a button
A macro is a programmed series of
actions condensed into the function of
one button.
If you program several operations
(such as turning on the TV and
selecting a channel) for a key as a
macro, multiple remote control
signals are sent by pressing the one
key.
Component List for easy selection
of a CD or a channel
A Component List shows what
objects a component handles.
For example, if you register CDs in
the CD changer to a Component List,
you can play back a desired CD just
by selecting it from the list. The
Component List can be displayed by
category, such as by artist name,
genre, etc.
Page 9

Zapping function for easy selection
of a channel
Zapping is the function to call up
only desired channels sequentially,
making channel selection (from a
multitude of channels) easy.
For example, if you create a Zapping
group gathering only sports channels,
or movie channels, you can select a
desired channel from the Zapping
group.
Multi Component keys for
operating multiple components on
one display
You can assign function keys of
multiple components to a single
component display.
For example, when you watch a DVD
with a home theater system, if you
register several components used for
playing back a DVD to a key, you can
operate those components in one
display.
“NAVITUS Design” for setting the
Remote Commander more simply
and freely
The supplied software “NAVITUS
Design” allows you to set up the
Remote Commander on your
computer and download the settings
to the Remote Commander. Various
advanced settings can be made easily
on your computer. You also can
download the data from the web site
to program components, and import
a desired image from your computer
to customize the operation display.
Product registration
For customers who purchased this
product in the USA
Please register this product on line at
www.sony.com/ productregistration
<http://www.sony.com/productregistration>
Proper registration will enable us to
send you periodic mailings about
software upgrades, new products,
services and other important
announcements. Thank you.
If you have any questions about
this product, contact:
www.sony.com/nxremotesupport
or Sony Remote Support Line
1-(866)-922-7669
9
Page 10
Getting Started
10
Page 11
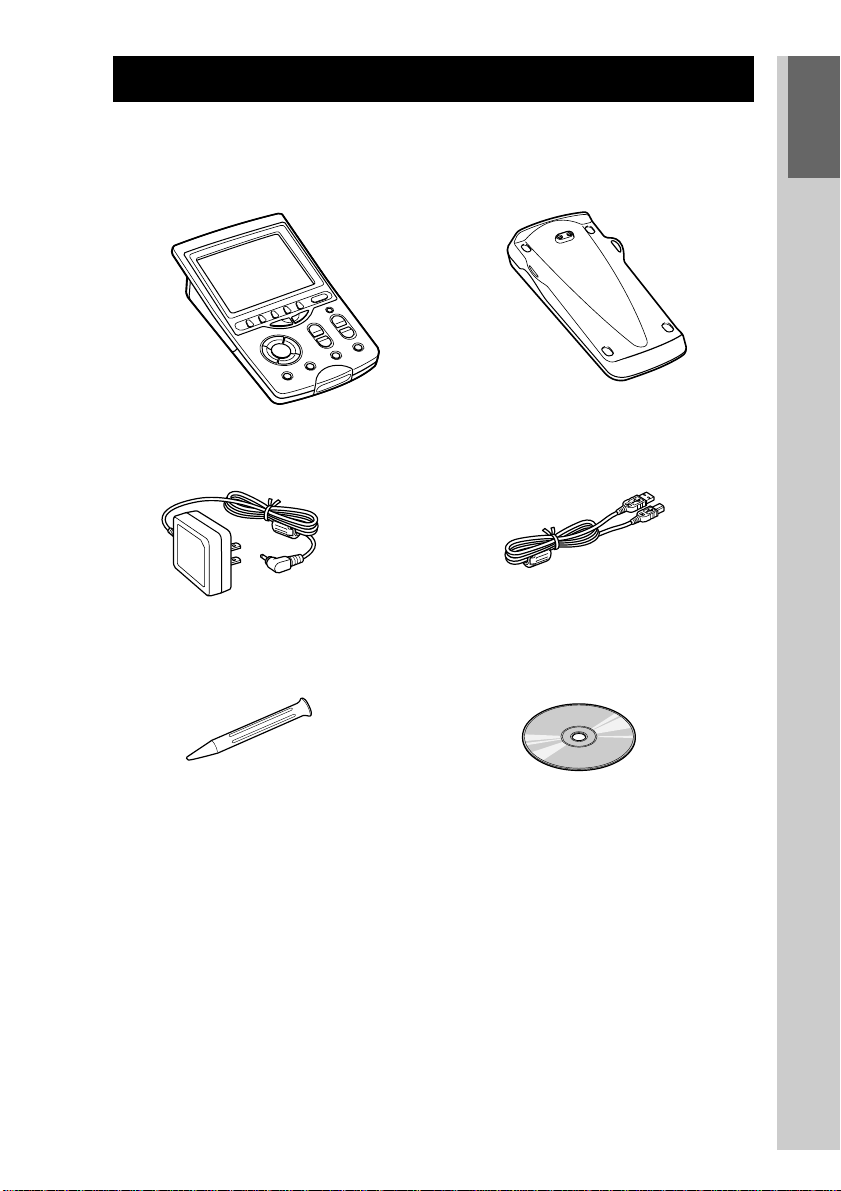
Unpacking
Check the accessories in the package before using the Remote Commander.
• Remote Commander RM-NX7000 (1)
•AC power adaptor (1)
•Stylus (1)
• Battery charging stand (1)
•USB cable (1)
•Installation CD-ROM (1)
Getting Started
•Operating Instructions (1, this manual)
•Brochure (1)
•Warranty Card (1)
•Other printed materials (1 set)
11
Page 12

Preparing RM-NX7000
After checking the contents of the package, start up the Remote Commander.
The procedure to start up the Remote Commander is explained here.
Charge the Remote Commander, connecting the supplied
AC power adaptor.
For details, see page 14.
Be sure to charge the Remote
Commander when using it for
the first time.
It takes about 60 minutes to
charge.
12
After about 60 minutes, the
“NAVITUS” logo appears.
Page 13
When the display for the alignment appears, calibrate the
touch key display.
For details, see page 16.
The Home display appears,
and the Remote Commander is
ready to operate.
Then, let’s start up the Remote Commander!Then, let’s start up the Remote Commander!
13
Page 14
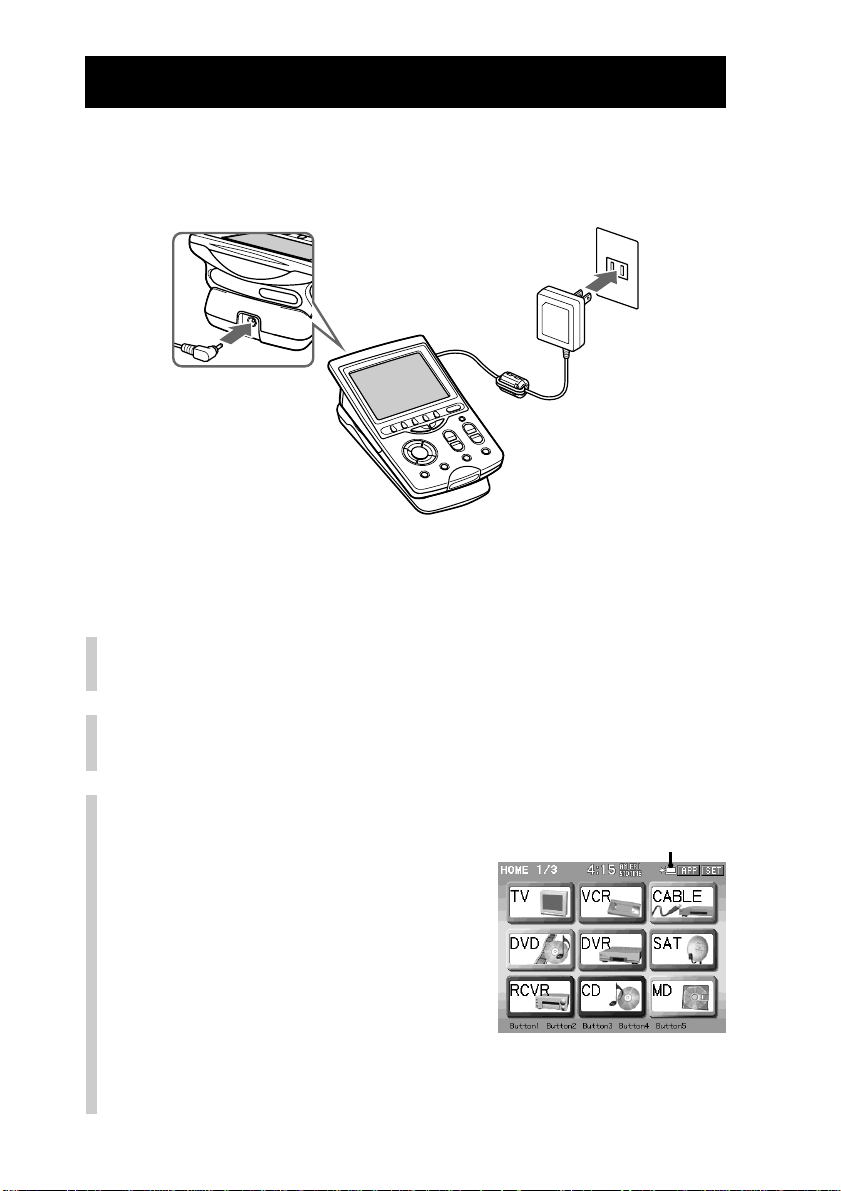
Charging
Charge the Remote Commander using the supplied Battery charging stand. The
Remote Commander can also be charged by connecting the supplied AC power
adaptor directly without using the Battery charging stand.
1
2
3
Notes
• Be sure to charge the Remote Commander when you use it for the first time.
• Use the supplied AC power adaptor. If an adaptor other than the supplied one is
connected to the Remote Commander, a beep may keep sounding.
Connect the supplied AC power adaptor to the
1
Battery charging stand.
Connect the AC power adaptor plug to the wall
2
outlet.
Place the Remote
3
Commander on the Battery
charging stand.
Charging starts. After about 60 minutes of
charging, the Remote Commander starts
up automatically and the display appears.
After starting up (after the “NAVITUS”
logo is displayed), the Remote
Commander enters calibrating mode.
Calibrate the touch panel display by
referring to page 16. When calibration is
complete, the Home display appears. be
disappears when charging is complete.
Charging indicator
14
Page 15
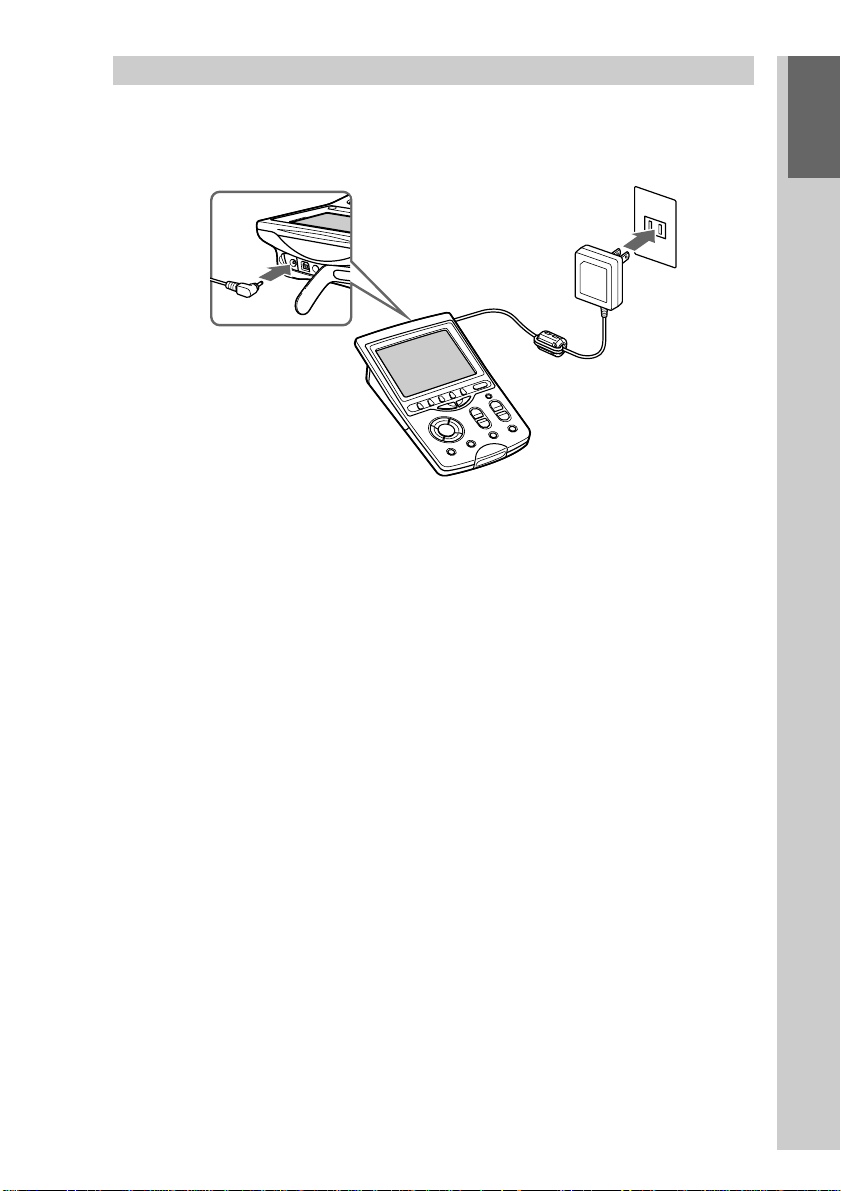
Charging without using the Battery charging stand
Connect the AC power adaptor directly to the DC IN jack of the Remote
Commander. You can operate the Remote Commander while charging it.
Notes
• After starting up, charging continues. Do not disconnect the AC power adaptor until
charging is complete and be disappears.
• While starting up (while the “NAVITUS” logo is displayed), do not disconnect the AC
power adaptor, as it may cause a malfunction.
• After charging starts, it takes a maximum of about 8 hours to complete charging.
Getting Started
z Tips
• If you charge the Remote Commander frequently, charging time will be reduced.
•When be is not shown in the display, charging is not necessary.
15
Page 16
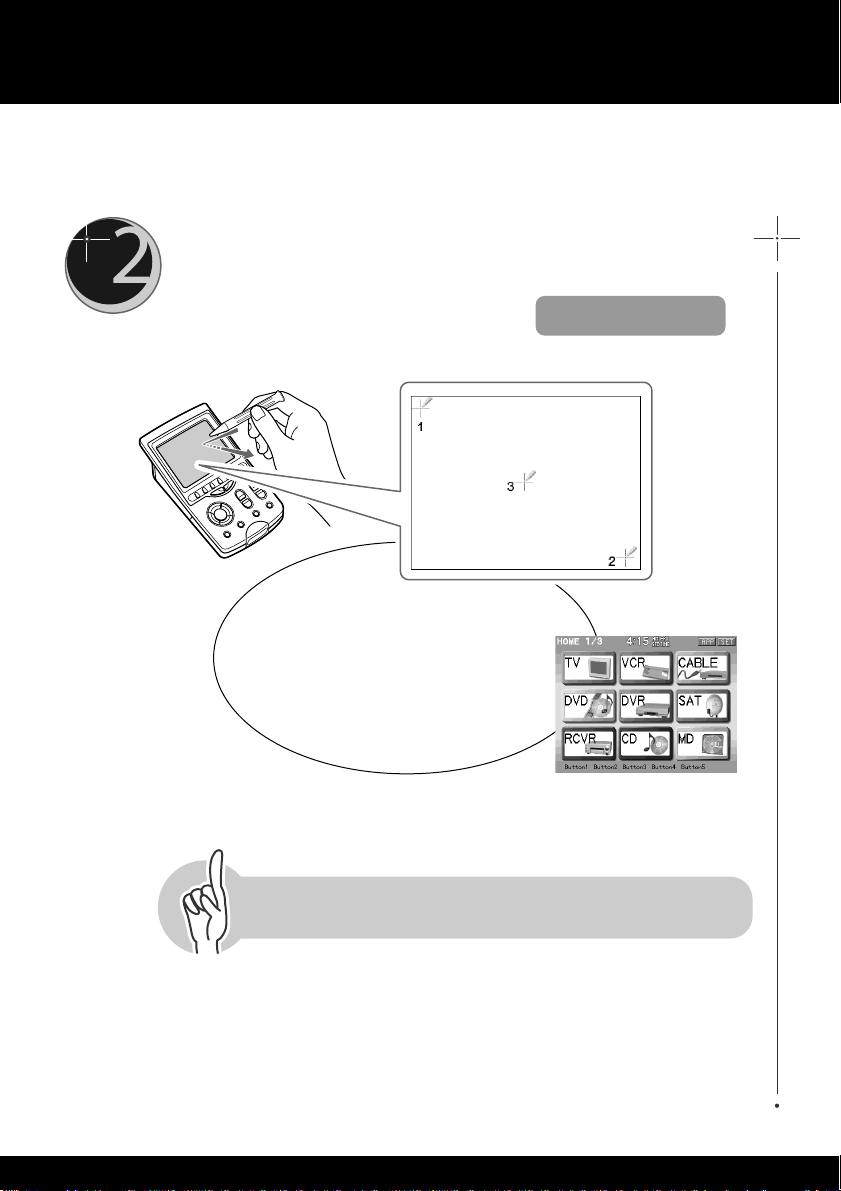
Using the touch panel display
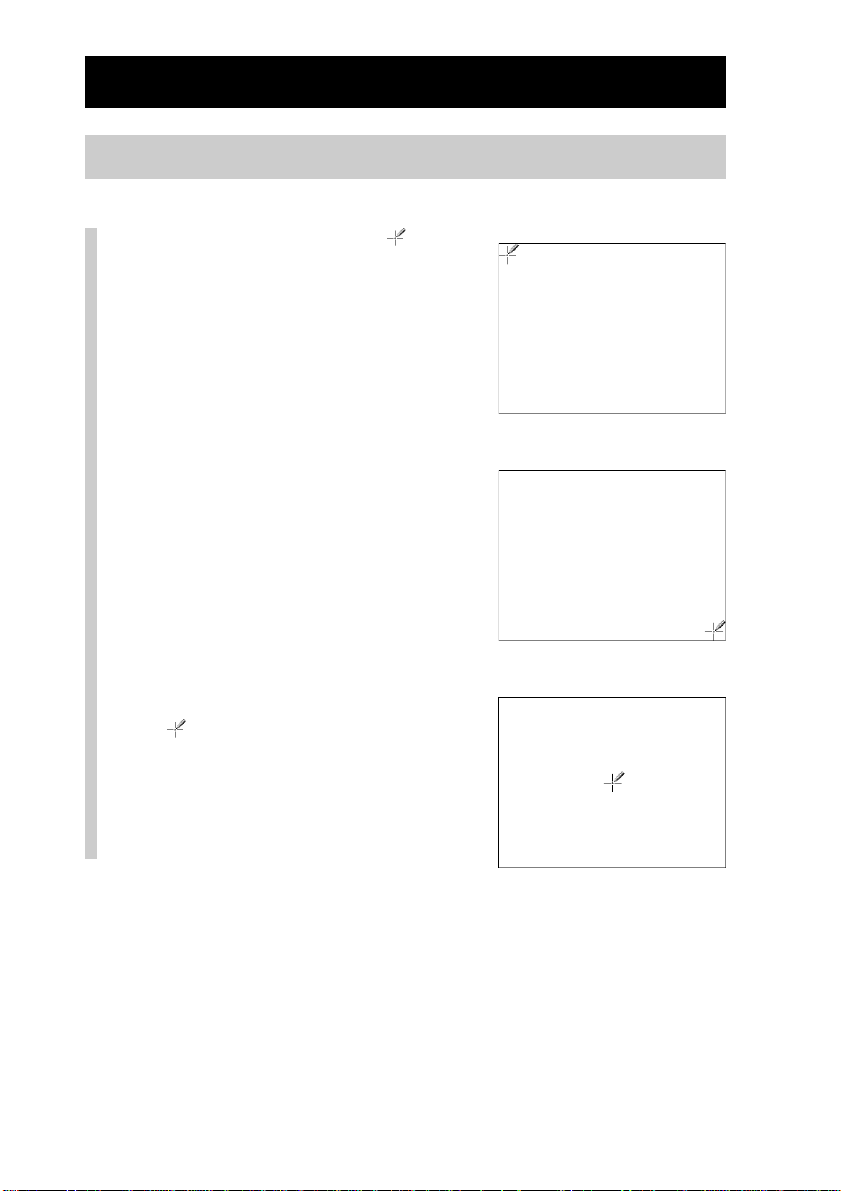
Calibrating the touch panel display (ALIGNMENT)
Tap the center of the
1
marks sequentially with the
supplied Stylus.
We say “tap” about pressing lightly on
the display with the Stylus.
When you tap the center of the display,
calibration of the display is complete and
the Home display appears.
m
Note
When calibrating, tap correctly the center of
the mark. If you do not tap the center, the
display in step 1 appears repeatedly until the
calibration is correctly performed.
z Tip
To calibrate the display again, see “Calibrating the touch panel display (ALIGNMENT)”
(page 212).
m
16
Page 17
Location and Function of Controls
In this section, names and functions of parts and controls on RM-NX7000 are
explained.
Software keys on the touch panel screen are called function keys, and hardware
buttons on the Remote Commander are called function buttons.
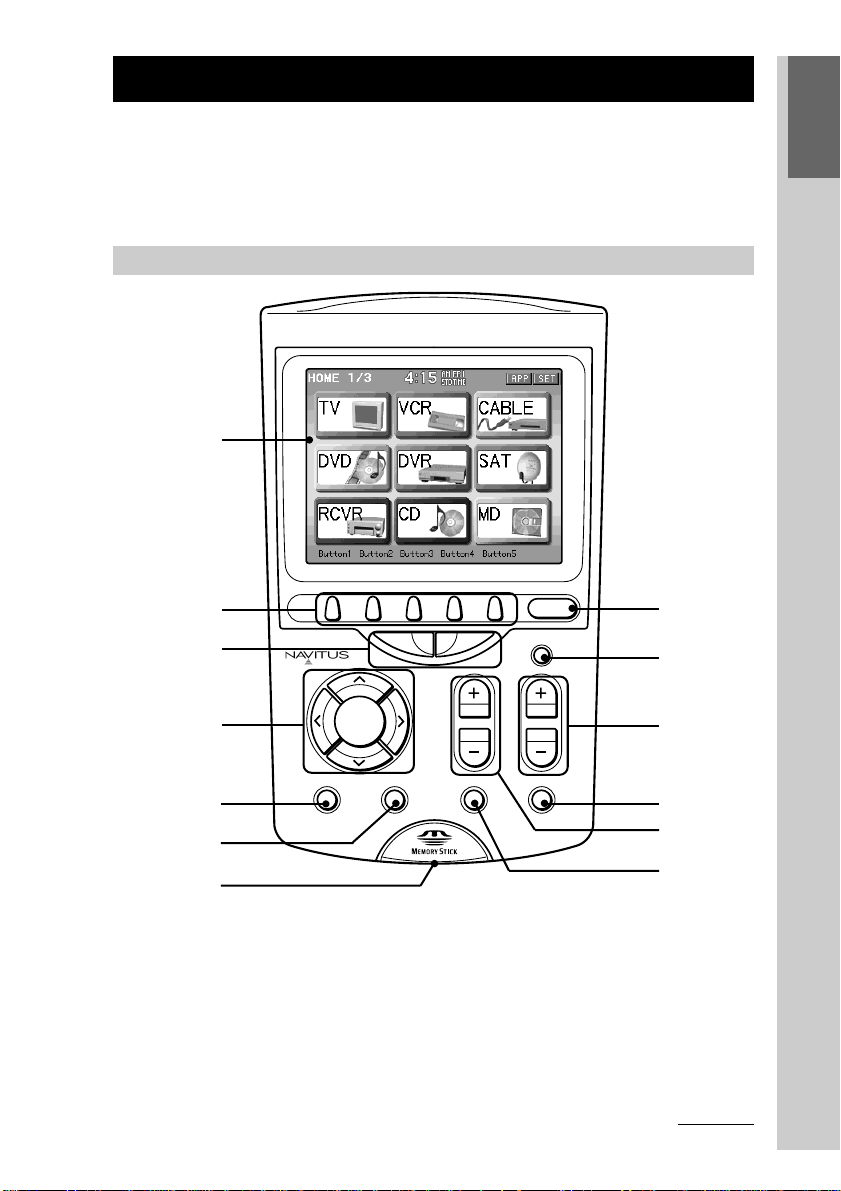
Remote Commander RM-NX7000 (front panel)
1
HOME
2
3
INTEGRATED
REMOTE COMMANDER
BACK NEXT
COMMANDER
OFF
8
9
Getting Started
4
5
6
7
OK
MENU EXIT MUTING RECALL
VOL CH
q;
qa
qs
qd
1 Touch panel display
Shows operation keys and various pieces of information. For details, see
“Screen layout and elements” (page 21).
2 Direct Access buttons (page 52)
Directly skips to the page that is programmed for the button.
3 NEXT/BACK buttons (page 38)
Change the page shown on the touch panel display. Press the NEXT button
to display the next page, or press the BACK button to display the previous
one.
Continued
17
Page 18

Continued
Location and Function of Controls
4 OK button and Cursor Control buttons
Used to operate the menu display of a component being controlled by the
Remote Commander.
5 MENU button
Shows the menu display of a component being controlled by the Remote
Commander.
6 EXIT button
Exits the menu of a component being controlled by the Remote Commander.
7 Memory Stick slot (page 200)
Used to insert a “Memory Stick.”
8 HOME button (pages 21, 37)
Returns to the first page of the Home display
9 COMMANDER OFF button (page 38)
Turns off the indication of the touch panel display.
If this button is pressed while a macro is executed, the macro procedure
stops.
q; CH +/– buttons
Select a channel.
qa RECALL button
The function of this button varies depending on the component being
controlled by the Remote Commander.
qs VOL +/– buttons
Adjust the volume.
qd MUTING button
Mutes the audio of a component being controlled by the Remote
Commander. Press the button once again to resume at the previous volume.
About the VOL +/– and MUTING buttons
The Remote Commander is factory-set to control the volume of a visual component on a
TV and the volume of an audio component on an amplifier.
To adjust the volume of the amplifier when controlling a visual component, or to adjust
the volume of the TV when controlling an audio component, see “Setting a function key of
another component to a Component display (ALIAS)” (page 100).
18
Page 19
About the Automatic-Off function of the display
If you do not use the Remote Commander for 10 minutes, indications on the display turn
off automatically even if you do not press the COMMANDER OFF button (Automatic-Off
function of the display). To turn on the display again, press any button except the
COMMANDER OFF, or the touch panel display. To change the length of time before the
Automatic-Off function works, see page 216.
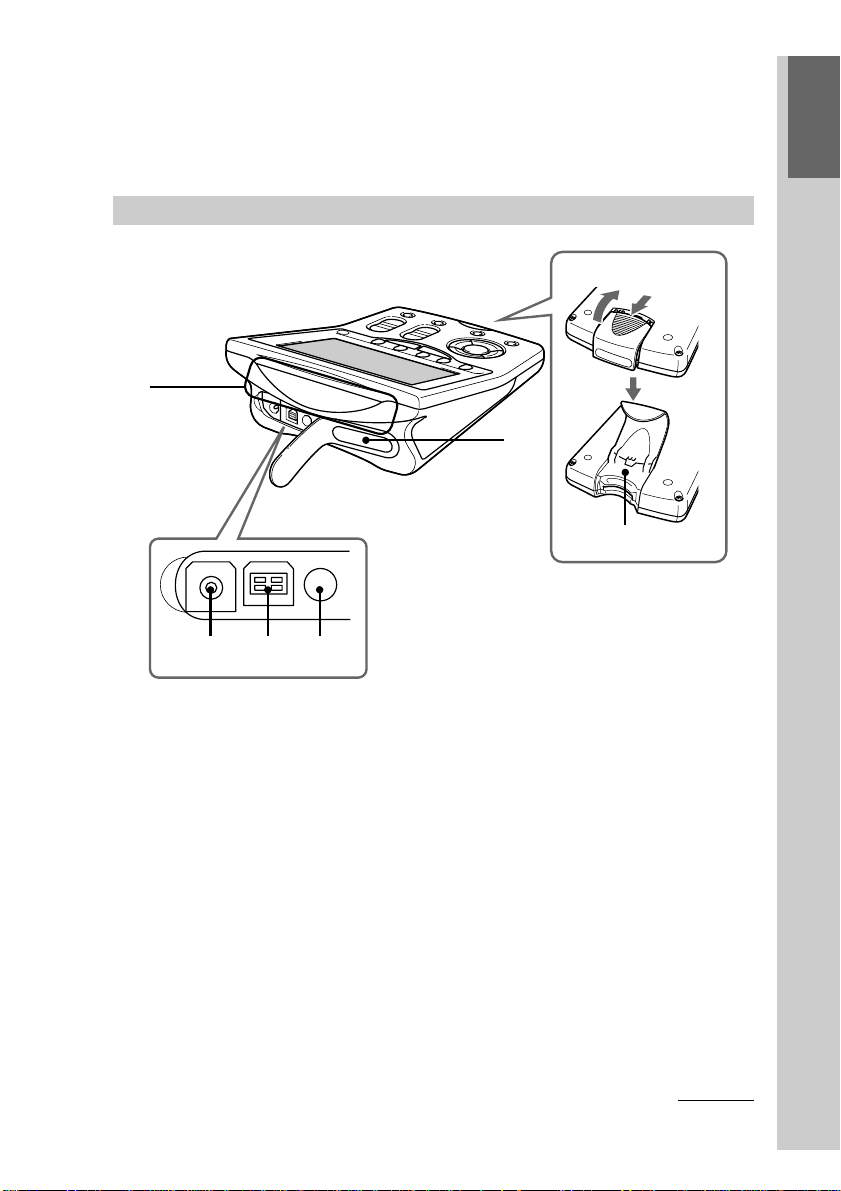
Remote Commander RM-NX7000 (upper and rear panel)
Rear
qk
qj
ql
Getting Started
qf qg qh
qf DC IN jack
Used to connect the supplied AC power adaptor. See also “About the DC IN
jack” (page 20).
qg USB connector
Used to connect the USB cable for computer connection. To set up the
Remote Commander using your computer, see “Setting up the Remote
Commander using “NAVITUS Design”” (page 25).
qh Stylus holder
Used to store the supplied Stylus.
qj Infrared detector/Infrared emitter
This is the area for receiving the component’s remote control signal or
transmitting the Remote Commander’s signal. Make sure not to obstruct this
area, as data will not be received or transmitted. Especially before presetting
(PRESET) (page 42) or learning (LEARN) (page 58), confirm that the emitter
of the component’s remote control is aimed directly at this area.
Continued
19
Page 20
Continued
Location and Function of Controls
qk Infrared emitter
ql RESET button
Used to restart the Remote Commander. Press this button with the supplied
Stylus when the Remote Commander does not work at all even if you press
the touch panel display. Make sure not to press this button when the touch
panel display works normally. The Remote Commander will be restarted
even while setting. When you restart the Remote Commander, be sure to
connect the supplied AC power adaptor. If the AC power adaptor is not
connected, the Remote Commander will not be restarted even if you press
the RESET button. After the Remote Commander is restarted, set the system
clock again.
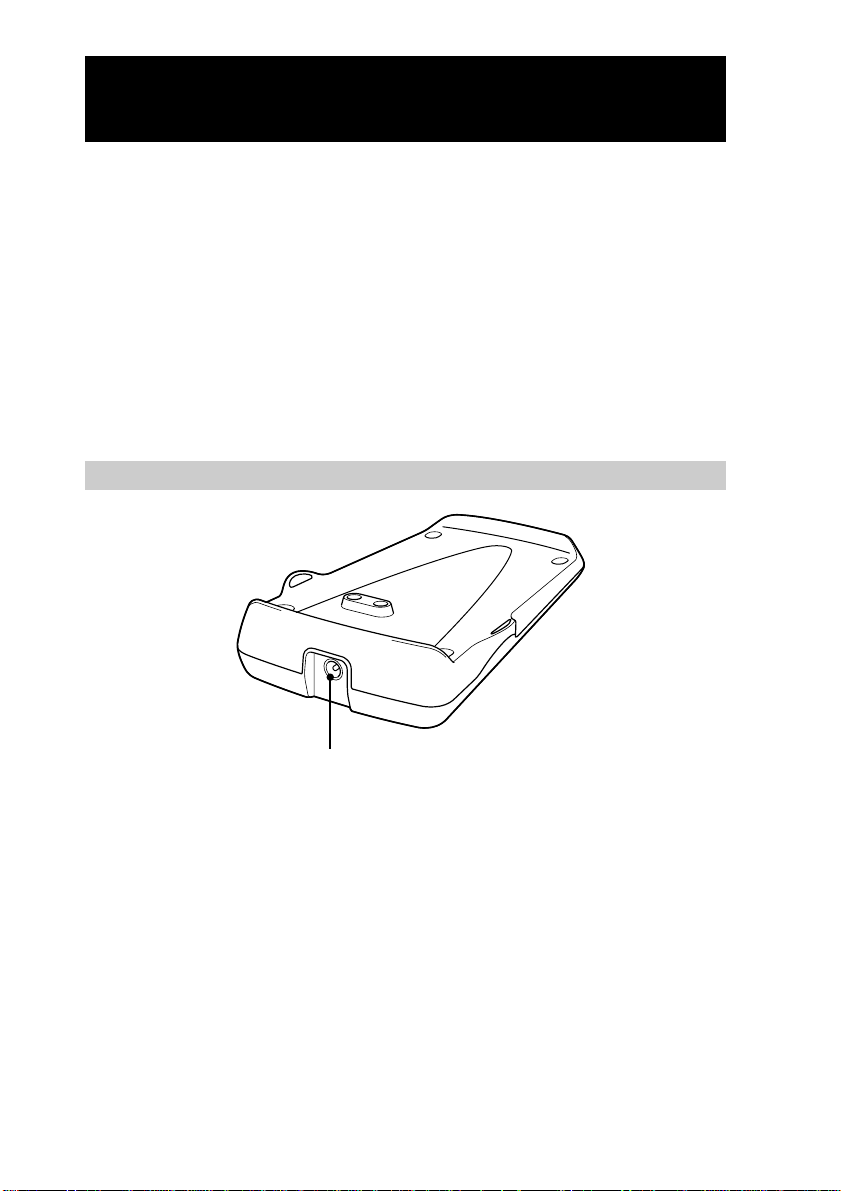
Battery charging stand
w;
w; DC IN jack
Used to connect the supplied AC power adaptor.
About the DC IN jack
The supplied AC power adaptor can be connected to the DC IN jack of the Remote
Commander or the DC IN jack of the Battery charging stand. You can charge and operate
the Remote Commander with either connected. It is recommended to connect the AC
power adaptor directly to the DC IN jack of the Remote Commander when importing/
exporting data with the supplied USB cable to prevent disconnecting the AC power
adaptor by mistake.
20
Page 21
Screen layout and elements
Operation mode display
This is the display used for operating your component. If you press a respective
Component key shown in the Home display, function keys for the selected
component appear.
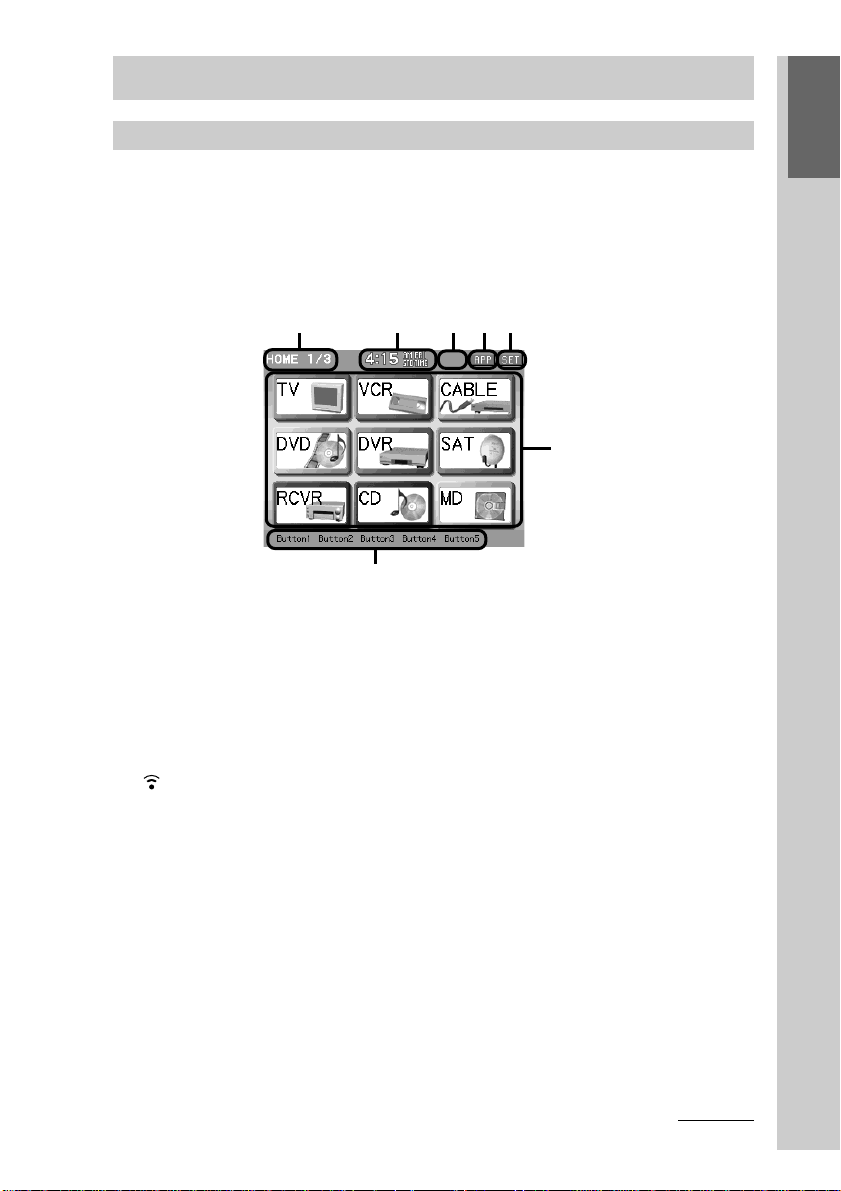
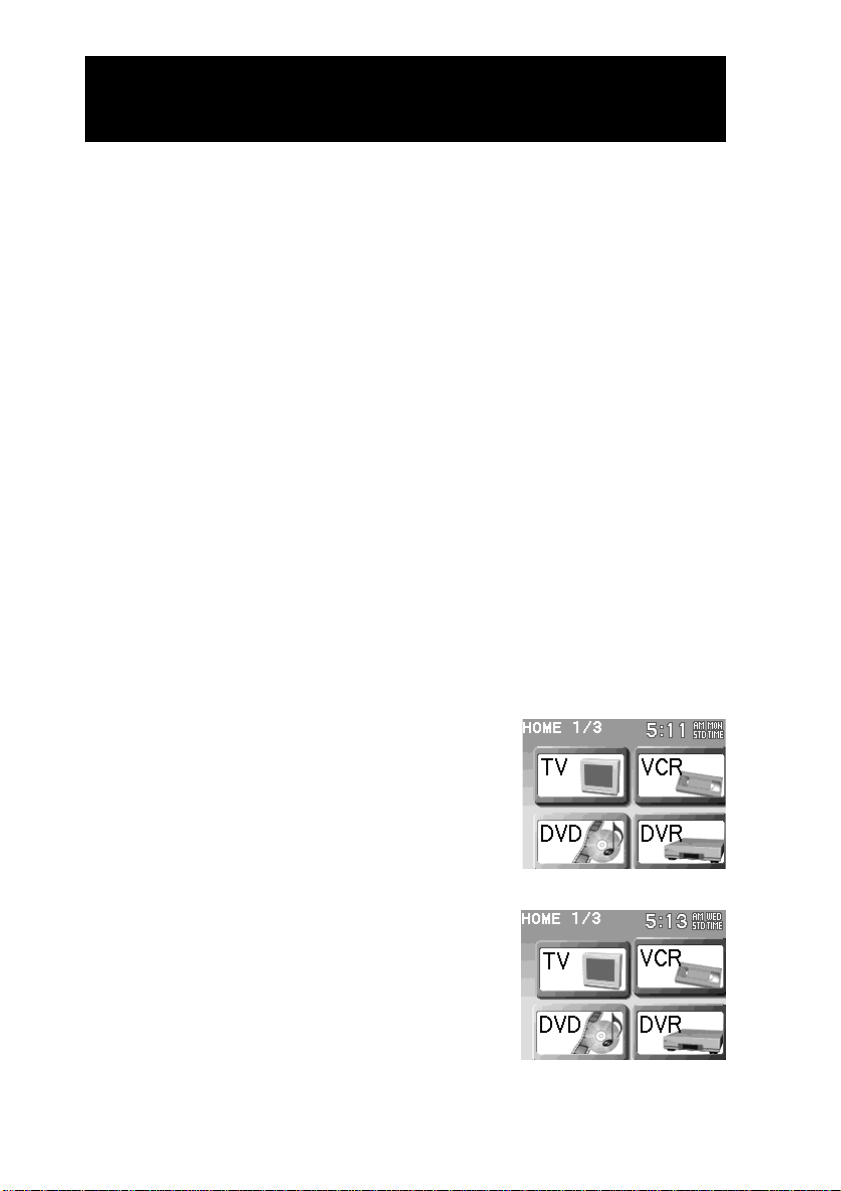
■ Home Display
The Home display appears when the HOME button is pressed.
12345
6
7
1 Display name/ Page number
The name of the currently shown display and the page number (current
page/total pages) are shown. To skip to another page, press the NEXT/
BACK button on the Remote Commander.
2 Clock
The clock is shown. Referring to page 220, set the clock before starting operation.
3 Mark indication
(transmission mark), be (charging mark), E (low battery) and c
(timer mark) are shown.
4 [APP] key
Press this key for 2 seconds or longer to enter the application mode (page
226).
5 [SET] key
Press this key for 2 seconds or longer to enter the Set display (pages 22, 39).
6 Component keys
A component to be controlled by the Remote Commander is assigned to
each Component key. Press any Component key, then the display for
operating the component (Component display) assigned to the key appears.
7 Direct Access button labels (page 52)
The names (label) of Direct Access buttons on the Remote Commander are
shown.
Continued
21
Getting Started
Page 22
Continued
Location and Function of Controls
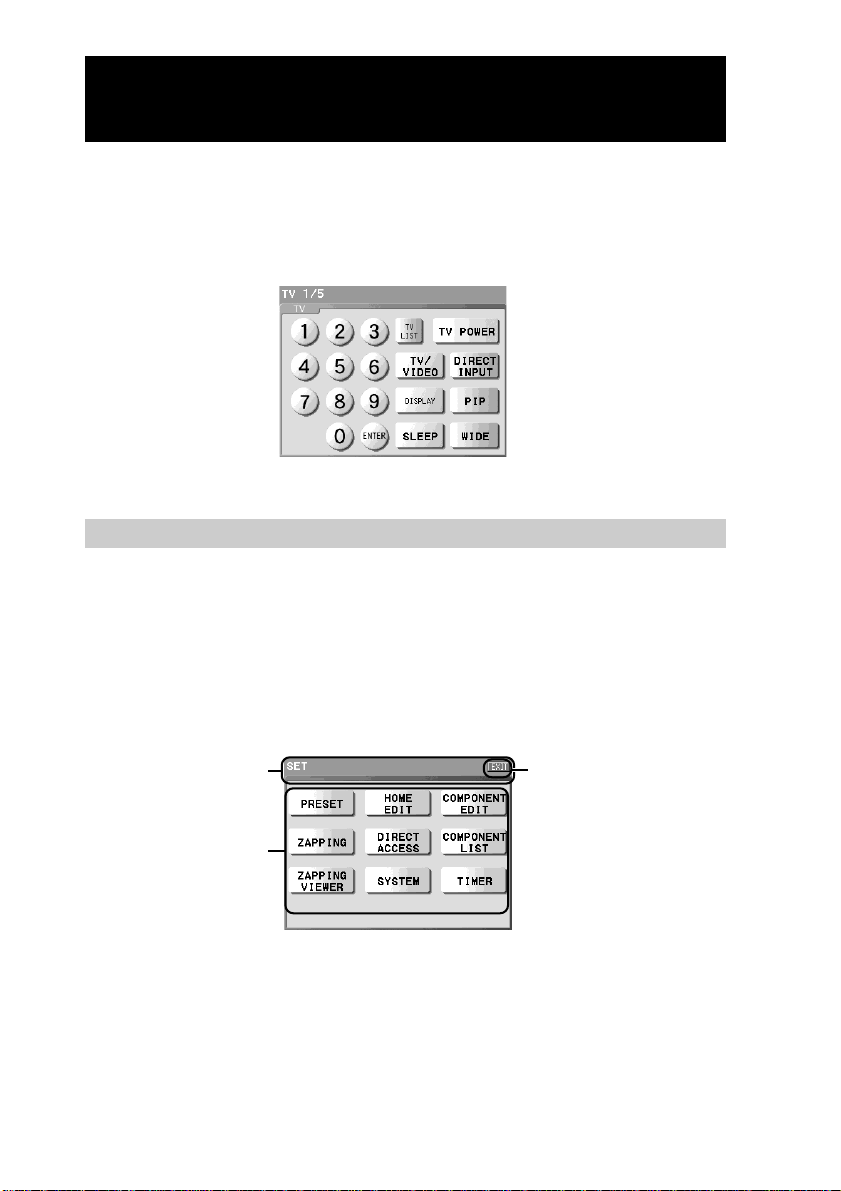
■ Component display
A Component display appears when a Component key in the Home display is
pressed.
Function keys to control the component are assigned to the Component display.
Component display of TV
Setting mode display
This is the display used for setting the Remote Commander. If you press the
[SET] key shown on the upper right-hand of the display for 2 seconds or longer,
the Set display for entering the setting mode appears.
■ Set display
Perform the respective setting by selecting the setting item key shown in the Set
display.
1
3
1 Item confirmation area
If you press this area (other than keys), the character string that indicates the
item being set up scrolls from right to left*.
* When programming a preset code, if you select [SOLUTION] and the display of the
standby mode for the remote control signal is shown, the character string does not
scroll even if you tap it.
2
22
Page 23

2 [EXIT] key
Press to return to the previous mode display.
3 Setting keys
Press to set up each setting.
[PRESET] key
Press to change a component preset code (page 43).
Setting items:
[SOLUTION] (page 45) [BRAND] (page 48)
[SEARCH] (page 50)
[HOME EDIT] key
Press to customize the Home display (page 67).
Setting items:
[NEW] (page 80) [ALIAS] (page 83)
[DELETE] (page 72) [SKIN/LABEL] (page 74)
[MOVE] (page 69) [DUPLICATE] (page 77)
[COMPONENT MACRO] (page 119) [MACRO VIEWER] (page 123)
[PAGE] (page 85)
[COMPONENT EDIT] key
Press to customize the Component display (page 88).
Setting items:
[LEARN] (page 58) [ALIAS] (page 100)
[DELETE] (page 92) [SKIN/LABEL] (page 97)
[MOVE] (page 89) [WALLPAPER] (page 103)
[SYSTEM MACRO] (page 116) [MACRO VIEWER] (page 123)
[PAGE] (page 105)
[ZAPPING] key
Press to set Zapping (page 176).
Setting items:
[DELETE] (page 184) [LABEL] (page 177)
[EDIT] (page 178)
[DIRECT ACCESS] key
Press to set the label and the macro for Direct Access buttons (page 52).
Setting items:
[LABEL] (page 53) [DIRECT ACCESS MACRO] (page 56)
[COMPONENT LIST] key
Press to set a list assigned to each component (page 150).
Setting items:
[ELEMENT EDIT] (page 150) [USER] (page 159)
[ZAPPING VIEWER] key
Press to set the viewer operation of a created Zapping Group to a
function key/button (page 182).
Setting items:
[ADD] (page 182) [DELETE] (page 192)
[ASSIGN] (page 194)
Getting Started
Continued
23
Page 24
Continued
Location and Function of Controls
[SYSTEM] key
Press to set the function of the Remote Commander (“Memory Stick”,
display indication, etc.) (pages 206, 212).
Setting items:
[MEMORY STICK] (page 206) [DISPLAY] (page 212)
[CLOCK] (page 220) [BEEP] (page 222)
[LOCK] (page 223) [ABOUT] (page 224)
[RECOVERY] (page 225)
[TIMER] key
Press to set the timer (page 129).
Setting items:
[PROGRAM EDIT] (page 129) [TIMER ON/OFF] (page 142)
z Tip
You cannot select a component being set up or certain keys depending on data set to the
keys though they are shown.
Keys that are not selectable appear pressed. If you press one of these keys, a beep sounds
twice.
Key appearance on the setting display
Press the keys shown in the display to set the Remote Commander.
There are two types of keys, selectable keys and not selectable keys depending on the data
set to the key.
Normal appearance : Selectable (you can set). If you
Pressed appearance: Not selectable (you cannot
press the key, you can go to
the next step.
set). If you press the key, a
beep sounds twice.
24
Page 25

Setting up the Remote Commander using “NAVITUS Design”
Installing “NAVITUS Design” software contained in the supplied CDROM on your computer, you can set up the Remote Commander with
your computer. “NAVITUS Design” makes complex settings such as
“Macro” (page 113) or “Zapping” (page 172) easy, and also provides
various convenient functions that can be set up only on the computer.
For details on using, see the manual (Help) provided in “NAVITUS
Design.”
“NAVITUS Design” system requirements
Operating systems:
Windows® XP Professional/Windows® XP Home Edition/
Windows® 2000 Professional/Windows® Millennium Edition/
Windows® 98 Second Edition (manufacturer installed)
CPU: Pentium II, 300 MHz or more
RAM: 64 MB or more (128 MB or more for Windows® XP)
Required hard disc capacity:
10 MB or more
Display: High (16 bits) Color or higher, 1,024 × 768 dots or better *
CD-ROM drive
USB port
(Memory Stick slot) *
2)
Getting Started
1)
*1)Does not operate with a display of under 1,024 × 768 dots.
*2)Only when using a “Memory Stick”
25
Page 26

Continued
Setting up the Remote Commander using “NAVITUS Design”
Installing “NAVITUS Design”
Follow the instructions below to install.
Notes
• Do not copy the “NAVITUS Design” folder in the supplied CD-ROM to a computer.
• On Windows 2000 Professional, or Windows XP, logon with the ID authorized as the
computer administrator when installing “NAVITUS Design.”
Close all software running on Windows.
1
Insert the supplied CD-ROM in the CD-ROM drive of the computer.
2
After a moment, “InstallShield Wizard” of “NAVITUS Design” appears.
Click [Next].
3
Follow the on-screen instructions and proceed with the installation.
The “InstallShield Wizard Complete” display appears when the installation
is complete.
z Tip
If the installation display is hidden behind other windows
“InstallShield Wizard” of “NAVITUS Design” may be sometimes hidden behind
other displays while the installation is in progress and you cannot operate the
installation. In this case, press the [Tab] key several times while pressing down the
[Alt] key. “InstallShield Wizard” of “NAVITUS Design” appears again.
Click [Finish].
4
The message telling you to restart the computer appears.
Click [OK].
5
The computer restarts, and installing of “NAVITUS Design” finishes.
After restarting the computer, install consecutively the USB driver.
Before installing the USB driver, confirm the operating system of your
computer, and then perform the procedure from step 4 in “Installing the
USB driver” that begins from the next page.
26
Page 27
Installing the USB driver
To connect a computer and the Remote Commander using the supplied
USB cable, installing the USB driver to the computer is necessary.
Follow the instructions below to install.
Notes
• If the AC power adaptor is not connected to the Remote Commander, USB cannot be
detected by the computer even if the USB cable is connected. Make sure to connect the
AC power adaptor before installing the USB driver.
Or, the USB communication is disconnected if the Remote Commander is unloaded from
the Battery charging stand. Make sure that the Remote Commander is securely loaded
on the Battery charging stand. Or it is recommended to connect the AC power adaptor
directly to the Remote Commander. If the USB communication is disconnected by
mistake, install the USB driver again from the beginning.
• Do not copy the USB driver in the supplied CD-ROM to the computer.
• On Windows 2000 Professional or Windows XP, logon with the ID authorized as the
computer administrator when installing “NAVITUS Design.”
• On Windows 2000 Professional or Windows XP, installing of the driver is required for
each USB port. Therefore, perform the installation for each USB port to which the
Remote Commander is to be connected.
• Messages other than those of the installation procedure of the USB driver described
below may appear depending on the computer. In this case, perform the installation
following the on-screen instructions.
For Windows XP users
Close all software running on Windows.
1
Insert the supplied CD-ROM in the CD-ROM drive of the computer.
2
After a moment, “InstallShield Wizard” of “NAVITUS Design” appears.
Getting Started
Click [Cancel] to close “InstallShield Wizard” of “NAVITUS Design.”
3
Connect a computer and the Remote Commander using the
4
supplied USB cable.
The “Found New Hardware” message appears in the Notification Area in
the lower right-hand of the display. After a moment, “Found New
Hardware Wizard” appears.
Continued
27
Page 28

Continued
Setting up the Remote Commander using “NAVITUS Design”
Select “Install the software automatically [Recommended]”,
5
then click [Next].
Installing of the USB driver starts.
The “Completing the Found New Hardware Wizard” display appears when
the installation is complete.
Click [Finish].
6
Installing of the USB driver finishes.
For Windows 2000 users
Close all software running on Windows.
1
Insert the supplied CD-ROM in the CD-ROM drive of the computer.
2
After a moment, “InstallShield Wizard” of “NAVITUS Design” appears.
Click [Cancel] to close “InstallShield Wizard” of “NAVITUS Design.”
3
Connect a computer and the Remote Commander using the
4
supplied USB cable.
The “Found New Hardware” message appears. After a moment, “Found
New Hardware Wizard” appears.
Click [Next].
5
The “Install Hardware Device Drivers” display appears.
Select “Search for a suitable driver for my device
6
[recommended]”, then click [Next].
The “Locate Driver Files” display appears.
Mark only the check box of “CD-ROM drives”, then click [Next].
7
The “Driver Files Search Results” display appears, and the found driver is
displayed.
Click [Next].
8
Installing of the USB driver starts. The “Completing the Found New
Hardware Wizard” display appears when the installation is complete.
28
Page 29

Click [Finish].
9
Installing of the USB driver finishes.
For Windows Millennium Edition users
Close all software running on Windows.
1
Insert the supplied CD-ROM in the CD-ROM drive of the computer.
2
After a moment, “InstallShield Wizard” of “NAVITUS Design” appears.
Click [Cancel] to close “InstallShield Wizard” of “NAVITUS Design.”
3
Connect a computer and the Remote Commander using the
4
supplied USB cable.
The “Found New Hardware” message appears. After a moment, “Add New
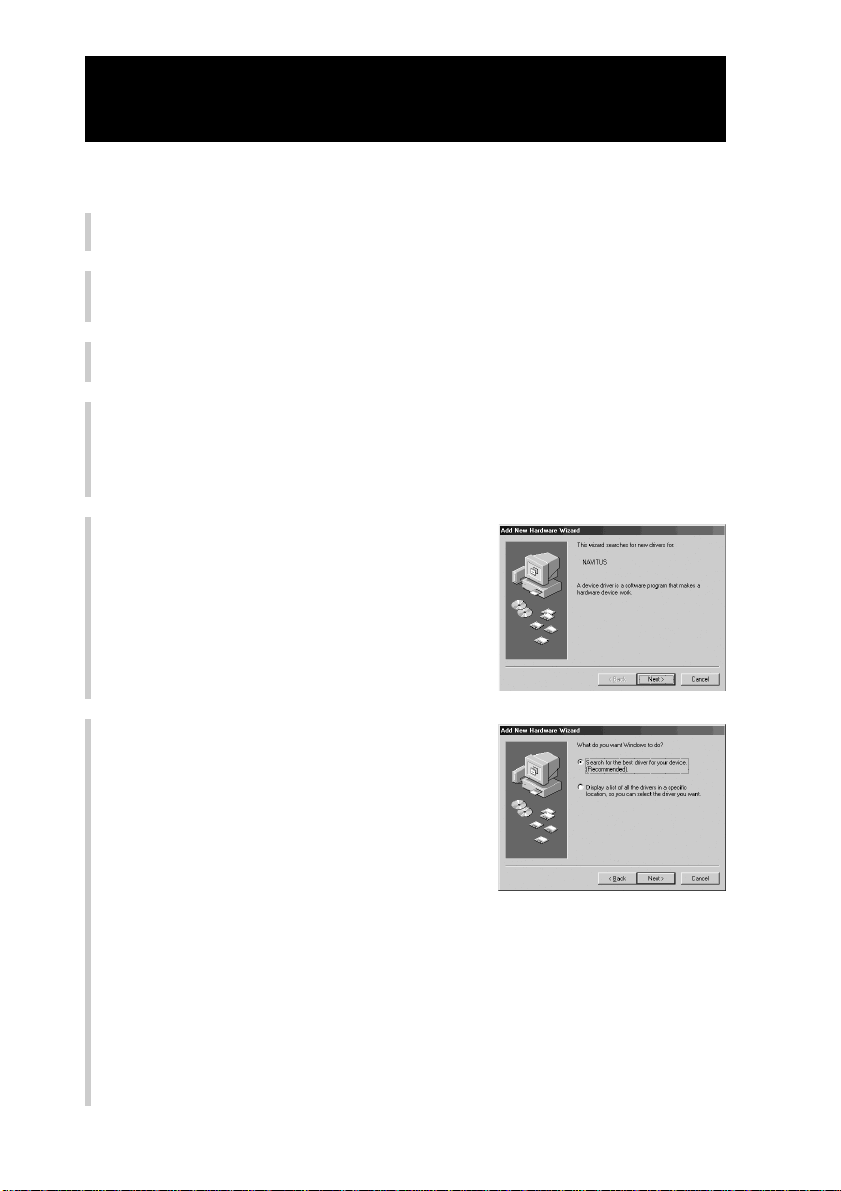
Hardware Wizard” appears.
Click [Next].
5
The display for selecting the search method of a driver appears.
Select “Search for the best driver for your device.
6
[Recommended]”, then click [Next].
The display for specifying a driver location appears.
Getting Started
Mark only the check box of “Specify a location” and input CD-ROM
7
drive name in the text box, then click [Next].
The search results of the driver files display appears, and the found driver is
displayed.
Click [Next].
8
Installing of the USB driver starts. The installation complete display appears
when the installation is complete.
Click [Finish].
9
Installing of the USB driver finishes.
Continued
29
Page 30
Continued
Setting up the Remote Commander using “NAVITUS Design”
For Windows 98 Second Edition users
Close all software running on Windows.
1
Insert the supplied CD-ROM in the CD-ROM drive of the computer.
2
After a moment, “InstallShield Wizard” of “NAVITUS Design” appears.
Click [Cancel] to close “InstallShield Wizard” of “NAVITUS Design.”
3
Connect a computer and the Remote Commander using the
4
supplied USB cable.
The “Found New Hardware” message appears. After a moment, “Add New
Hardware Wizard” appears.
Click [Next].
5
The display for selecting the search method
of a driver appears.
Select “Search for the best driver for
6
your device. [Recommended]”, then
click [Next].
The display for specifying a driver location
appears.
30
Page 31
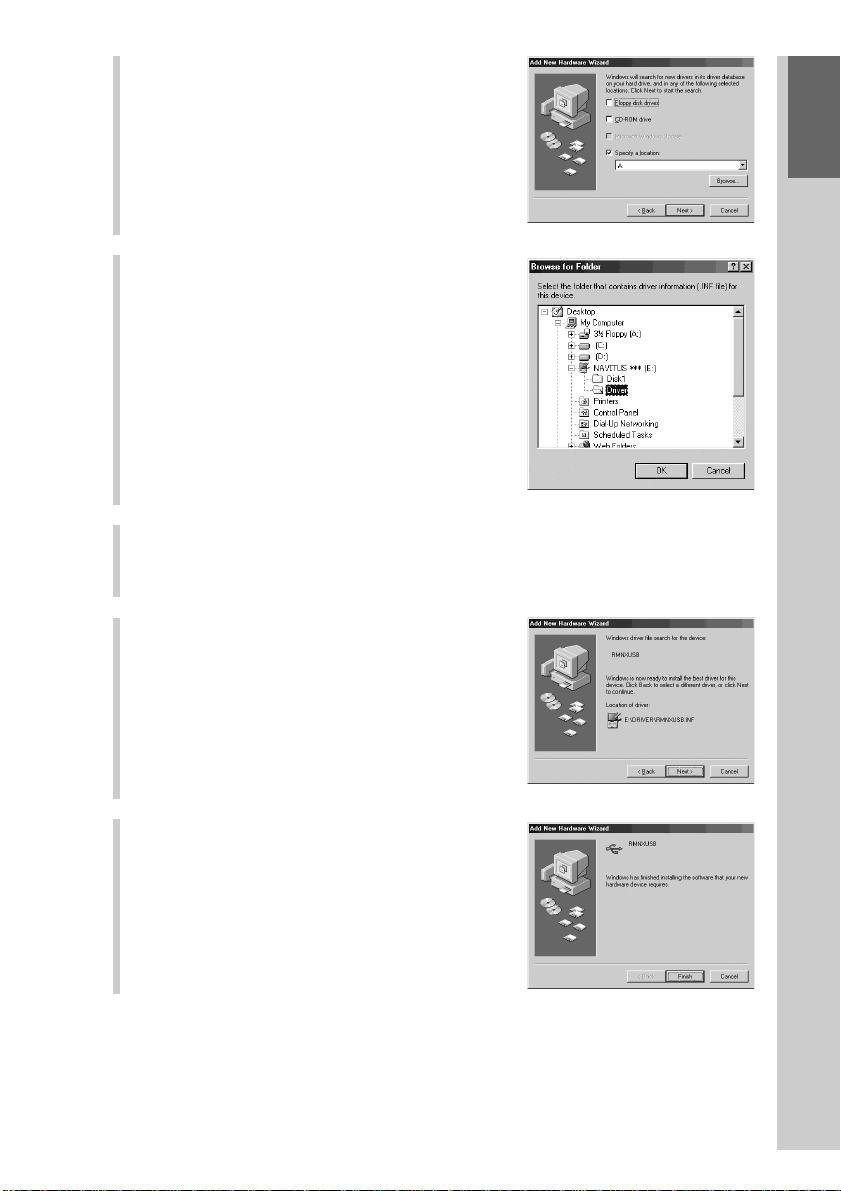
Mark only the check box of “Specify
7
a location”, then click [Browse].
The “browse for Folder” dialog box
appears.
Select the “Driver” folder in “CD-
8
ROM drive (NAVITUS)”, then click
[OK].
The display returns to the display for
specifying a driver location.
Click [Next].
9
The search results of the driver files display appears, and the found driver is
displayed.
Click [Next].
10
Installing of the USB driver starts. The
installation complete display appears when
the installation is complete.
Getting Started
Click [Finish].
11
Installing of the USB driver finishes.
z Tip
After clicking [Finish], restarting the computer may be required depending on the
computer. In this case, restart the computer following the on-screen instructions.
31
Page 32

Continued
Setting up the Remote Commander using “NAVITUS Design”
Starting up “NAVITUS Design 1.0”
On Windows XP
Click the [Start] button on Windows, and point to [All Programs]. Click [Sony
NAVITUS] then [NAVITUS Design 1.0].
“NAVITUS Design 1.0” display
On Windows other than XP
Click the [Start] button on Windows, and point to [Programs]. Click [Sony
NAVITUS] then [NAVITUS Design 1.0].
z Tips
• If (“NAVITUS Design 1.0” icon) is shown, you can also start up “NAVITUS Design
1.0” by double-clicking the icon.
• When exchanging data, connect the Remote Commander and the computer with the
supplied USB cable, and then start up “NAVITUS Design 1.0.” For details on connection
and data transfer, refer to the manual (Help) of “NAVITUS Design 1.0.”
32
Page 33

Using “NAVITUS Design”– Help
You can set up the Remote Commander by operating “NAVITUS
Design”, referring to the detailed instructions provided in Help.
Starting Help
Start up “NAVITUS Design”, then click [Help] on the menu bar and select
[NAVITUS Design help].
How to use Help
Click one of the tabs: [Contents], [Index] or
[Search], and check the information you need.
To search by contents (Contents)
You can find information relating to a specific subject by using the table of contents shown
on the “Contents” tab.
To search indexed information (Index)
You can find information from a list of predetermined keywords shown on the “Index”
tab.
To search using key words (Search)
You can submit a Keyword search on the “Search” tab by typing in your keyword(s).
Uninstalling “NAVITUS Design”
Follow the instruction below to uninstall “NAVITUS Design.”
Note
For Windows 2000/Windows XP users, logon with a user name, with “Computer
Administrator” as a privilege, and then follow the instructions below. Refer to the
operating instructions of your computer for details on logging on as an administrator.
Getting Started
For Windows XP users
Click [Start] then [Control Panel].
1
The “Control Panel” window appears.
Click [Add or Remove Programs].
2
The “Add/Remove Programs” dialog box appears.
Click [Change or Remove Programs].
3
Continued
33
Page 34

Continued
Setting up the Remote Commander using “NAVITUS Design”
Click [NAVITUS Design 1.0] in the “Currently Installed Programs”
4
list, then click [Change/Remove].
“InstallShield Wizard” of “NAVITUS Design” appears.
Select “Remove”, then click [Next].
5
The confirmation message of deleting the selected program (“NAVITUS
Design”) appears.
Click [OK].
6
The uninstallation of “NAVITUS Design” starts.
The display of completing the uninstallation appears when the
uninstallation is complete.
Click [Finish].
7
Uninstalling of “NAVITUS Design” finishes.
For Windows 2000 users
Click [Start], [Settings] then [Control Panel].
1
The “Control Panel” window appears.
Double-click [Add/Remove Programs].
2
The “Add/Remove Programs” dialog box appears.
Click [Change or Remove Programs].
3
Click [NAVITUS Design 1.0] in the “Currently Installed Programs”
4
list, and then click [Change/Remove].
“InstallShield Wizard” of “NAVITUS Design” appears.
Select “Remove”, then click [Next].
5
The confirmation message of deleting the selected program (“NAVITUS
Design”) appears.
Click [OK].
6
The uninstallation of “NAVITUS Design” starts.
The display of completing the uninstallation appears when the
uninstallation is complete.
34
Page 35

Click [Finish].
7
Uninstalling of “NAVITUS Design” finishes.
For Windows Millennium Edition/Windows 98 Second Edition users
Click [Start], [Settings] then [Control Panel].
1
The “Control Panel” window appears.
Double-click [Add/Remove Programs].
2
The “Add/Remove Programs Properties” dialog box appears.
Click [NAVITUS Design 1.0] in the list of programmes for
3
automatic removal, and then click [Add/Remove].
“InstallShield Wizard” of “NAVITUS Design” appears.
Select “Remove”, then click [Next].
4
The confirmation message of deleting the selected program (“NAVITUS
Design”) appears.
Click [OK].
5
The uninstallation of “NAVITUS Design” starts.
The display of completing the uninstallation appears when the
uninstallation is complete.
Click [Finish].
6
Uninstalling of “NAVITUS Design” finishes.
Getting Started
35
Page 36

Basic Operations
36
Page 37

Basic Operations of the Remote Commander
The basic operations of the Remote Commander in the operation mode, how to
enter the Set display used for setting the Remote Commander, and how to input
letters are explained here.
Operating a component (Operation mode)
Let’s operate a component by pressing keys shown in the display in the
operation mode.
z Tip
The Remote Commander is preset at the factory to control most Sony components. To use
certain Sony components or components other than Sony’s, see “Programming the preset
codes of components (PRESET)” (page 42) and program the component preset codes for
the Remote Commander.
Press the HOME button.
1
The Home display appears.
Basic Operations
Press a Component key of
2
the component you want to
operate.
For example, press the [TV] key.
The Component display assigned to the
pressed key appears.
Continued
37
Page 38

Continued
Basic Operations of the Remote Commander
Press a function key on the
3
Component display or a
button on the Remote
Commander.
For example, press the [TV POWER] key.
The remote control signal is sent to the
component you want to operate (in this
case, a TV), and the component functions.
To change the page of the display
Press the NEXT button on the Remote Commander to display the next page, or
press the BACK button to display the previous one.
z Tip
It is recommended that you turn off the display by pressing the COMMANDER OFF
button after using to save the battery charge.
To lock the operation mode (Operation Lock)
You can lock the keys and buttons on the Remote Commander to prevent
operation with the Remote Commander.
Lock the operation mode in the Home display.
Show the Home display.
1
While pressing the
2
and hold the
While pressing the above two
3
buttons consecutively, press the
button.
The operation mode is locked.
Operations cannot be performed if you press keys or buttons when the
operation mode is locked.
If you press any key or button, a beep sounds twice.
Note
Even if you connect the USB cable or insert a “Memory Stick” when the operation mode is
locked, the USB cable or a “Memory Stick” cannot be detected by the Remote Commander.
Before connecting the USB cable or inserting a “Memory Stick”, unlock the operation
mode.
To unlock the operation mode
Perform steps 2 and 3 described above. The operation mode is unlocked.
VOL–
button.
EXIT
button, press
EXIT
CH–
VOL– CH–
38
Page 39

Entering the Set display (Setting mode)
You can customize the Remote Commander’s display to your preference by
changing key design or programming complex operations for a single key. Each
setting can be performed in the corresponding setting mode.
As it is necessary to use the Set display for setting, how to enter the Set display
and how certain keys function in each setting display are explained here.
To display the Set display, press the [SET] key for 2 seconds or longer on the
upper right in the Home display. It is convenient to use the supplied Stylus
when pressing the [SET] key.
Press for 2 seconds
Home display Set display
or longer.
,
About the [OK]/[CANCEL]/[EXIT] keys
The [OK], [CANCEL] and [EXIT] keys, that are displayed in the upper right in
the display while setting the Remote Commander, function as follows.
Basic Operations
[OK]:To decide the setting. Press to decide
temporally the setting and go to the next
operation. Or press to decide all set
contents in current setting mode.
[CANCEL]:Press to cancel all contents being set and
return to the previous status. Or press to
return to the previous display.
[EXIT]:Press to return to the previous mode
display.
z Tip
It is convenient to use the supplied Stylus when pressing the keys shown on the upper
right in the display, such as [OK], [CANCEL] and [EXIT].
39
Page 40

Continued
Basic Operations of the Remote Commander
Inputting letters (label setting)
The basic operations to input letters is explained here. Letters can be input in the
label (name) setting display by pressing the keyboard using the supplied Stylus.
The label setting display appears when creating a new key or changing a key
label already set. Display the label setting display by following the procedure of
each chapter. How you can change [Button1] to [MOTHER] by following the
example of “Setting the label of a Direct Access button” (page 52) is explained
here.
Delete unnecessary letters
1
by pressing the [Backspace]
key.
Move the cursor to the right of a letter
you want to delete by pressing the NEXT
button, and press the [Backspace] key.
Each time you press the [Backspace] key,
you can delete a letter from the right. For
this example, press the NEXT button 7
times, and press the [Backspace] key 7
times to delete all letters.
Press to highlight the [Caps Lock] key, then input
2
letters in the order [M], [O], [T], [H], [E] and [R].
To input capital letters:Press to highlight the [Caps Lock] key, then
input letters. Press the [Caps Lock] key again
to release it.
To input symbols:Press the [Symbol] key to display a page for
symbols. There are 4 pages of symbols. Select
a page with the [Symbol] key. If you press the
[Symbol] key in the last page for symbols, the
page returns to the normal keyboard display.
To input a space:Press the [Space] key.
To start a new line:Press the [3] key.
To move the cursor:Press the NEXT/BACK button on the Remote
Commander.
40
Page 41

Notes
•You cannot use certain keys depending on the genre of label. Keys that cannot
be used appear pressed. If you press one of these keys, a beep sounds twice.
•You cannot set a label having no letters.
• If a label contains many letters, the letters may be partially hidden on the key
or on the Item confirmation area.
Press the [OK] key to decide the label setting.
3
Settings in the keyboard display
The following settings can be performed in the keyboard display in addition to
letter input.
[SIZE]: To select a size of letters.*
Press the [SIZE] key to display a selectable letter size in the order.
Select a letter size among [Large], [Medium] and [Small].
*1)Letters are displayed only in the small size in the letter input display.
The size you set is reflected and displayed in the actual display.
[COLOR]: To select a color of letters.*
Press the [COLOR] key to display a selectable letter color in the
order. Select a letter color of your preference.
*2)Letters are displayed only in black in the letter input display. The color
you set is reflected and displayed in the actual display.
[ALIGN]: To select a location of letters.*
Press the [ALIGN] key to display a selectable location in the order.
Select a location of letters between [Top Left] and [Center].
*3)Letters are displayed only in the [Top Left] location in the letter input
display. The location you set is reflected and displayed in the actual
display.
[Label]: To select whether to show or hide the label.*
Press the [Label] key to select ON/OFF (showing/hiding) of a
label.
If you set to OFF, a label is hidden in the display.
*4)Letters are shown in the letter input display even if you set [Label] to
OFF. The setting is reflected in the actual display.
Note
You cannot select certain setting items depending on the genre of label as the settings are
fixed. For further details, read the corresponding pages.
For setting the label for a Direct Access Button, see page 53.
For setting the label for a Component key, see page 76.
For setting the label for a function key, see page 99.
For setting the label for a Timer program key, see page 130.
For setting the label for a List element, see page 151.
For setting the label for a User List key, see page 160.
For setting a label for a Zapping group, see page 176.
For setting a label for a Zapping element, see page 179.
1)
2)
3)
4)
Basic Operations
41
Page 42

Programming the preset codes of components (PRESET)
You can register components to the Remote Commander by programming the
component brand preset codes.
Programming of the preset code is required in the following cases:
–To use a Sony component that is not registered to the Remote Commander by
the default setting
–To use a component other than Sony’s
New components can be registered to the Remote Commander by downloading their
preset codes from the web site and programming for the Remote Commander. For details,
refer to the manual (Help) of “NAVITUS Design.”
Default settings of Component keys
Component key Category of component Brand and type of component
TV TV Sony TV
VCR VCR Sony VHS VCR (VTR3)
CABLE • Analog cable
DVD DVD player Sony DVD player (DVD1)
DVR Hard disc video recorder Sony hard disc video recorder
SAT Digital satellite Sony digital satellite
RCVR Receiver Sony receiver
CD CD player Sony CD player
MD MD deck Sony MD deck
DSP Digital surround processor Sony digital surround processor
TAPE Cassette deck Sony cassette deck
DAT DAT deck Sony DAT deck
DVD RECORDER DVD recorder Sony DVD recorder
LD LD player Sony LD player
HDAR Hard disc audio recorder Sony hard disc audio recorder
LIGHT Light Light
to be controlled
• Digital cable Sony digital cable
42
Page 43
Programming a preset code
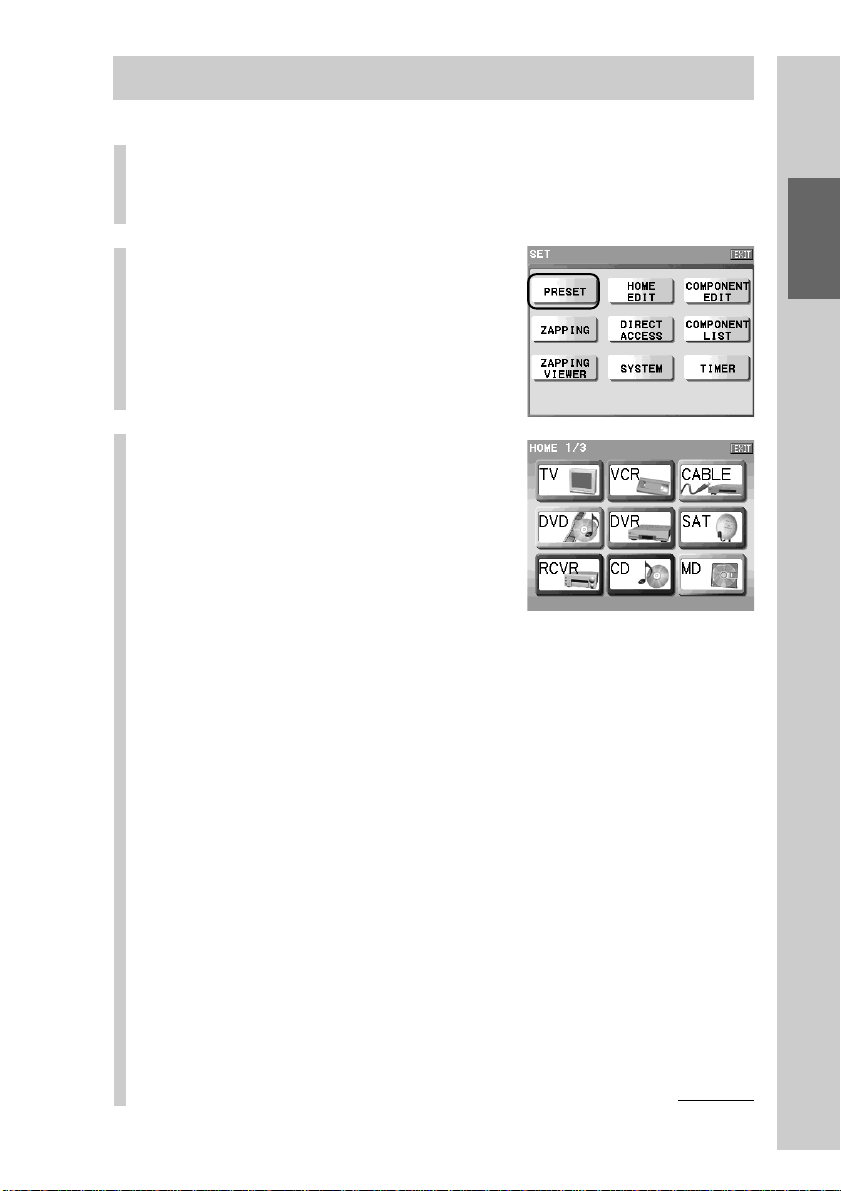
Press the [SET] key for 2 seconds or longer in the
1
Home display.
The Set display appears.
Press the [PRESET] key.
2
Press a Component key you
3
want to program a preset
code for.
The programming method selection
display appears.
Note
You cannot select a component being set up or certain keys depending on data set
to the keys though they are shown.
Keys that are not selectable appear pressed. If you press one of these keys, a beep
sounds twice.
Basic Operations
Continued
43
Page 44

Continued
Programming the preset codes of components (PRESET)
Press the [SOLUTION], [BRAND] or [SEARCH] key to
4
select a method of programming.
There are three methods to program the preset code. For details on each
method, go to the page indicated below. Try [SOLUTION] first. If the
preset code cannot be confirmed with [SOLUTION], try [BRAND], then
[SEARCH].
[SOLUTION]: Use the remote control supplied to the component to be
registered.
Place the Remote Commander head to head with the
remote control of the component to be registered as
illustrated below.
Remote control signals of the component to be registered
is received by the Remote Commander, then registering
can be simply performed by searching automatically a
preset code.
RM-NX7000
Remote control of
the component to be
registered
About 5 - 10 cm
(2 - 4 inches)
Infrared detector
Confirm the location of the detector of the Remote
Commander. When the AC power adaptor is connected to
the Remote Commander, make sure that the detector is not
shut off by the cord.
t Go to page 45.
[BRAND]: Program a preset code by selecting a component brand
from the brand list.
Even if there are multiple preset codes in the brand of the
component to be registered, you can confirm the preset
code by performing a test execution. After this, it will not
be necessary to set again.
t Go to page 48.
[SEARCH]:
Program a preset code by selecting a preset code from the
component code list and performing test execution one by one.
You can search a preset code with this method even when
you have not a remote control of the component to be
registered, or you cannot find a brand name of the
component to be registered in the brand list.
t Go to page 50.
44
Page 45

When programming of a preset code is complete
The display returns to the Component key selection display (step 3, page 43).
■ To program another component successively
Repeat the procedure from step 3 on page 43.
■ To perform other settings after finishing the setting of
programming a preset code
Press the [EXIT] key. The display returns to the previous mode display.
■ To finish all settings
Press the COMMANDER OFF button for 2 seconds or longer. The display
returns to the Home display. Or press the [EXIT] key repeatedly until the Home
display is shown.
Confirming whether the correct preset code is programmed
Operate the component using the Remote Commander. For details on operation,
see “Operating a component (Operation mode)” (page 37).
Programming a preset code using the remote control of a
component (SOLUTION)
The following steps are a continued from step 4 on page 44.
Place the Remote Commander head to head with the remote control of the
component to be registered to. While programming, do not disconnect or
connect the USB cable or the AC power adaptor, or do not remove or insert a
“Memory Stick”, as a malfunction may result.
Programming a preset code of a TV component is explained here.
Basic Operations
Press the [SOLUTION] key in
1
the programming method
selection display.
Instructions appear in the display and
the Remote Commander is set to the
standby mode for receiving the remote
control signal.
■ To cancel the standby mode
Press the COMMANDER OFF button.
The display returns to the programming method selection display.
Continued
45
Page 46

Continued
Programming the preset codes of components (PRESET)
Following the on-screen
2
instructions, press and hold
down the button of the
remote control of the AV
component to be registered
until a beep sounds.
The preset code found by the Remote
Commander appears in the display.
■ If a beep sounds five times
— The Remote Commander cannot find a preset code. Try
registering by other methods.
Press the [OK] key in the confirmation display that appears after the
error display, then the display returns to the programming method
selection display. See step 4 on page 44 and go to the procedure of
[BRAND] or [SEARCH].
— 20 seconds has passed before you press the button on the remote
control of the component to be registered.
Press the [SOLUTION] key again and register again, or go to the
procedure of [BRAND] or [SEARCH].
Note
When the display returns to the programming method selection display because
the remote control of the component does not have a key indicated in the display,
show the list of preset codes with the [LIST] key and select a preset code from the
expected preset codes (shown in red) if you can reduce the number of expected
codes. Or select [BRAND] or [SEARCH].
Press the button indicated on
this display.
Press the [OK] key.
3
The preset code is programmed for the
Remote Commander and the display
returns to the component selection
display (step 3 on page 43).
z Tip
If you press the [CANCEL] key, the preset
code will not be programmed and the display
will return to step 1 on page 45.
46
Page 47

■ When two or more preset codes are detected
The display on the right appears.
Program a preset code by performing
one of the following ways.
z Tip
If you press the [CANCEL] key, the preset
code will not be programmed and the display
will return to the programming method
selection display (step 1 on page 45).
◆ To reduce the number of expected codes by transmitting a
signal again.
1Press the [CONTINUE] key.
The display returns to step 2 and the instruction in the display asks
you to press a different button. Repeat this step until a preset code
appears in the display.
◆ To select a preset code from the list of preset codes
1Press the [LIST] key.
The list of preset codes appears and expected preset codes are
displayed in red.
2Press the [v] or [V] key to select
the preset code to be programmed,
and then press the [OK] key.
The selected preset code is
programmed for the Remote
Commander, and the display returns
to the component selection display
(step 3 on page 43).
z Tips
• Each time you press the [v] or [V] key, the cursor moves one line up or down
on the list. If you press the [v] or [V] key for 2 seconds or longer, the list in the
display scrolls.
• If you press the [CANCEL] key, the preset code will not be programmed and
the display will return to the previous one.
Basic Operations
To finish all settings, press the COMMANDER OFF
4
button for 2 seconds or longer.
The display returns to the Home display. Or press the [EXIT] key
repeatedly until the Home display is shown.
47
Page 48

Continued
Programming the preset codes of components (PRESET)
Programming a preset code using the list of brand preset
codes (BRAND)
The following steps are continued from step 4 on page 44.
Programming a preset code of a TV component is explained here.
Press the [BRAND] key in the
1
programming method
selection display.
Instructions for the preparation of the
component to be registered appear in the
display. Set the component to the status
as instructed.
Press the [OK] key.
2
The list of brand names and preset codes
appear in the display.
Press the [v] or [V] key to
3
select the brand of the
component by the cursor,
aim the Remote Commander
at the component to be
registered, and then press
the [TEST] key.
The Remote Commander transmits the remote control signal. If there are
two or more preset codes for a brand, select the first one and press the
[TEST] key.
■ When the component to be registered functions properly
The correct remote control signal was transmitted. Go to step 4.
48
Page 49

■ When the component to be registered does not function properly
The selected preset code may be incorrect. Select again the preset code by
pressing the [v] or [V] key, aim the Remote Commander at the component
to be registered, and then press the [TEST] key again.
z Tips
• Each time you press the [v] or [V] key, the cursor moves one line up or down on
the list. If you press the [v] or [V] key for 2 seconds or longer, the list in the display
scrolls.
• The name of the test key signal is displayed on the left of the [TEST] key. Each time
you press the [TEST] key, the test key signal assigned to the preset code selected by
the cursor is automatically changed. The test key signal names assigned to the
selected preset code will cycle automatically.
Press the [OK] key.
4
The preset code is programmed for the Remote Commander and the
display returns to the component selection display (step 3 on page 43).
z Tip
If you press the [CANCEL] key, the preset code will not be programmed and the
display will return to step 1 on page 48.
To finish all settings, press the COMMANDER OFF
5
button for 2 seconds or longer.
The display returns to the Home display. Or press the [EXIT] key
repeatedly until the Home display is shown.
Basic Operations
49
Page 50

Continued
Programming the preset codes of components (PRESET)
Programming a preset code using the list of component
preset codes (SEARCH)
The following steps are continued from step 4 on page 44.
Programming a preset code of a TV component is explained here.
Press the [SEARCH] key in
1
the programming method
selection display.
Instructions for the preparation of the
component to be registered appear in the
display. Set the component to the status
as instructed.
Press the [OK] key.
2
The list of preset codes appears in the
display. Make sure that the first preset
code is selected by the cursor.
Press the [v] or [V] key to
3
select a component preset
code by the cursor, aim the
Remote Commander at the
component to be registered,
and then press the [TEST]
key.
The Remote Commander transmits the
remote control signal. One test key signal
is assigned to a preset code. The name of
test key signal is displayed on the left of
the [TEST] key.
z Tip
Each time you press the [v] or [V] key, the cursor moves one line up or down on
the list. If you press the [v] or [V] key for 2 seconds or longer, the list in the
display scrolls.
50
Page 51

■ When the component to be registered does not function properly
The selected preset code may be incorrect. Select again the preset code by
pressing the [v] or [V] key, aim the Remote Commander at the component
to be registered, and then press the [TEST] key again. Repeat this operation
until the component to be registered functions properly.
■ When the component to be registered functions properly
The correct remote control signal was transmitted. Go to step 4.
Press the [OK] key.
4
The preset code is programmed for the Remote Commander and the
display returns to the component selection display (step 3 on page 43).
z Tip
If you press the [CANCEL] key, the preset code will not be programmed and the
display will return to step 1 on page 50.
To finish all settings, press the COMMANDER OFF
5
button for 2 seconds or longer.
The display returns to the Home display. Or press the [EXIT] key
repeatedly until the Home display is shown.
Basic Operations
51
Page 52

Using the Direct Access buttons (DIRECT ACCESS)
The Direct Access buttons are shortcuts to skip to given displays from the home
display. If you program a Direct Access button to jump to the desired page, the
page will appear by just pressing the Direct Access button. You can also change
the labels (names) of the Direct Access buttons.
Labels (names) of Direct Access
buttons
Direct Access buttons
The labels and programmed contents for the Direct Access buttons are as
follows in the default settings. The label names are [Button1],
[Button2]...[Button5] in the order from the left.
[Button1]: Jumps to the first page of the TV component.
[Button2]: Jumps to the first page of the SAT component.
[Button3]: Jumps to the first page of the DVD component.
[Button4]: Jumps to the first page of the VCR component.
[Button5]: Jumps to the first page of the RCVR component.
Setting the label of a Direct Access button
The label of a Direct Access button shown in the touch panel display can be
changed. As an example, let’s change [Button1] to [MOTHER] so that it will be a
mother’s own Direct Access button.
Press the [SET] key for 2 seconds or longer in the
1
Home display.
The Set display appears.
Press the [DIRECT ACCESS]
2
key.
The Direct Access display appears.
52
Page 53

Press the tag of a Direct
3
Access button you want to
set the label to.
For example, set the label by pressing the
[Button1] tag.
Note
You cannot select a tag, even if you press a
Direct Access button on the Remote
Commander.
Tags of the Direct Access buttons
Press the [LABEL] key.
4
The software keyboard appears in the
display.
Set the label of the Direct
5
Access button.
For inputting letters to the label, see
“Inputting letters (label setting)” (pages
40 - 41).
Specified settings to the label of the
Direct Access button besides the
information described on pages 40 - 41
are as follows.
Letter input: Up to 8 letters can be input.
Starting a new line: Not available.
Pictographs: Can be input. A pictograph is counted as 4 letters.
[SIZE]: Not selectable. The letter size is fixed to [Small].
[ALIGN]: Not selectable. The letter location is fixed to
[COLOR]: Select a letter color of your preference.
[Label]:Available.
Basic Operations
[Center].
Continued
53
Page 54

Continued
Using the Direct Access button (DIRECT ACCESS)
When the label setting is
6
complete, press the [OK]
key.
The label setting of the Direct Access
button is confirmed and the display
returns to step 3.
z Tip
If you press the [CANCEL] key, the label will
not be set and the display will return to step 3.
To finish all settings, press the COMMANDER OFF
7
button for 2 seconds or longer.
The display returns to the Home display. Or press the [EXIT] key
repeatedly until the Home display is shown.
54
Page 55

Programming an action to skip to the desired page for a Direct Access button
You can program a series of actions (macro) for the Direct Access buttons. If you
program an action to skip to the desired page for a Direct Access button, you
can jump to your favorite page just by pressing the button.
For example, let’s program an action to skip to the page that a mother often use
(the first page of the TV/DVD component) as you changed the [Button1] label to
the [MOTHER] label in “Setting the label of a Direct Access button” on page 52.
Press the [SET] key for 2
1
seconds or longer in the
Home display.
The Set display appears.
Press the [DIRECT ACCESS]
2
key.
The Direct Access display appears.
Basic Operations
Press the [MOTHER] tag.
3
The Direct Access button for which you
want to program an action to skip to the
desired page is decided.
Continued
55
Page 56

Continued
Press the [DIRECT ACCESS
4
MACRO] key.
A message for confirming of deleting a
macro appears.
If you press [YES] key, a macro that has
already been programmed will be
deleted, and a new macro will be
programmed. If you press the [NO] key,
the display returns to step 3.
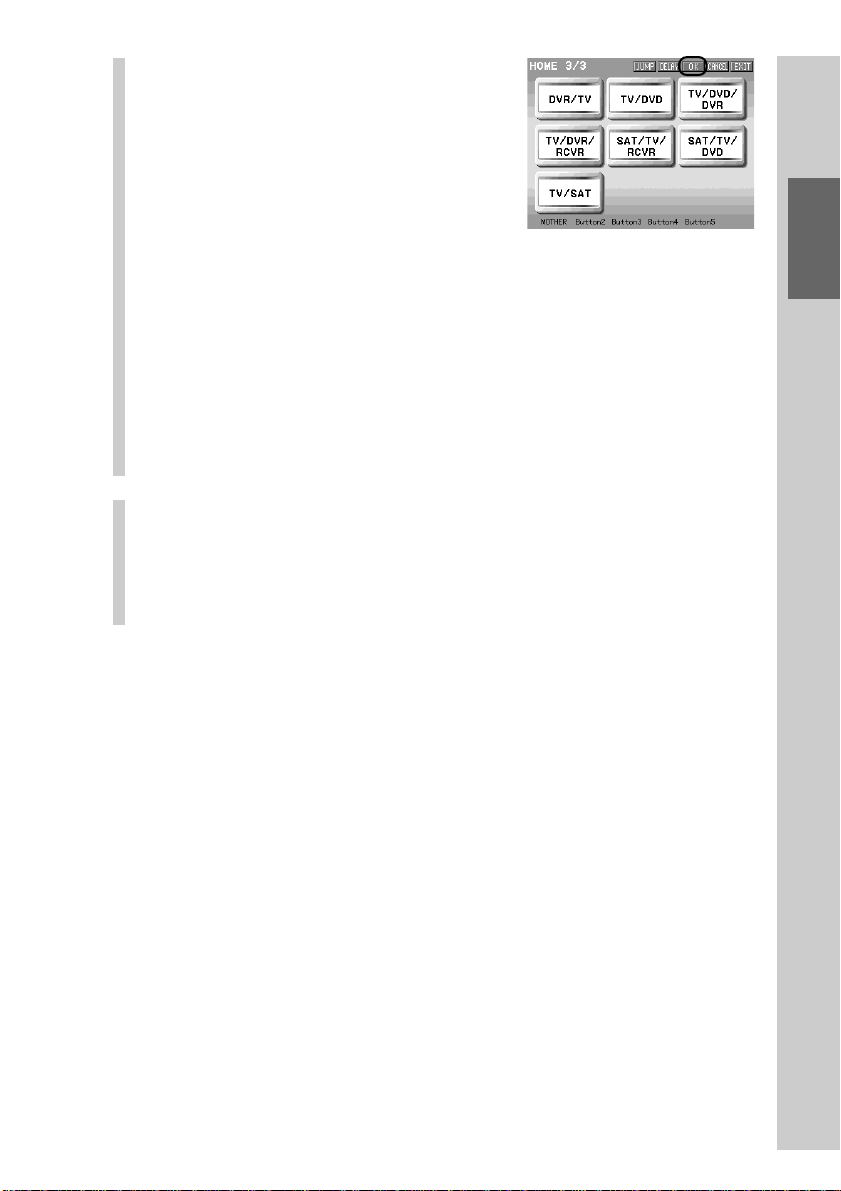
Press the NEXT button to
5
display the third page of the
Home display, and then
press the [TV/DVD] key.
The Component display appears.
Press the [JUMP] key.
6
In this example, the first page of the TV/
DVD component is stored as the
destination for jumping.
Using the Direct Access button (DIRECT ACCESS)
Press the [OK] key.
7
The display returns to step 5.
56
Page 57
Press the [OK] key.
8
The display returns to step 3.
The setting for jumping to the first page
of the TV/DVD component by pressing
the MOTHER button is programmed.
z Tips
• If you press the [CANCEL] key, the macro will not be set and the display will
return to step 3.
• In this chapter, how to change the [Button1] label to the [MOTHER] label and
how to program a simple macro for jumping to the first page of the TV/DVD
component are explained. You can also set a series of actions. In step 6, before
pressing the [JUMP] key, program a series of actions. For details on
programming a series of actions, see “Step 2: Setting a macro” (page 120) in
“Programming a series of actions (macro) for a key/button.”
•You can set a macro to a Direct Access button also from the Home Edit display.
For details, see “3 When programming a macro for a Component key or a
Direct Access button” (page 119).
To finish all settings, press the COMMANDER OFF
9
button for 2 seconds or longer.
The display returns to the Home display. Or press the [EXIT] key
repeatedly until the Home display is shown.
Basic Operations
57
Page 58
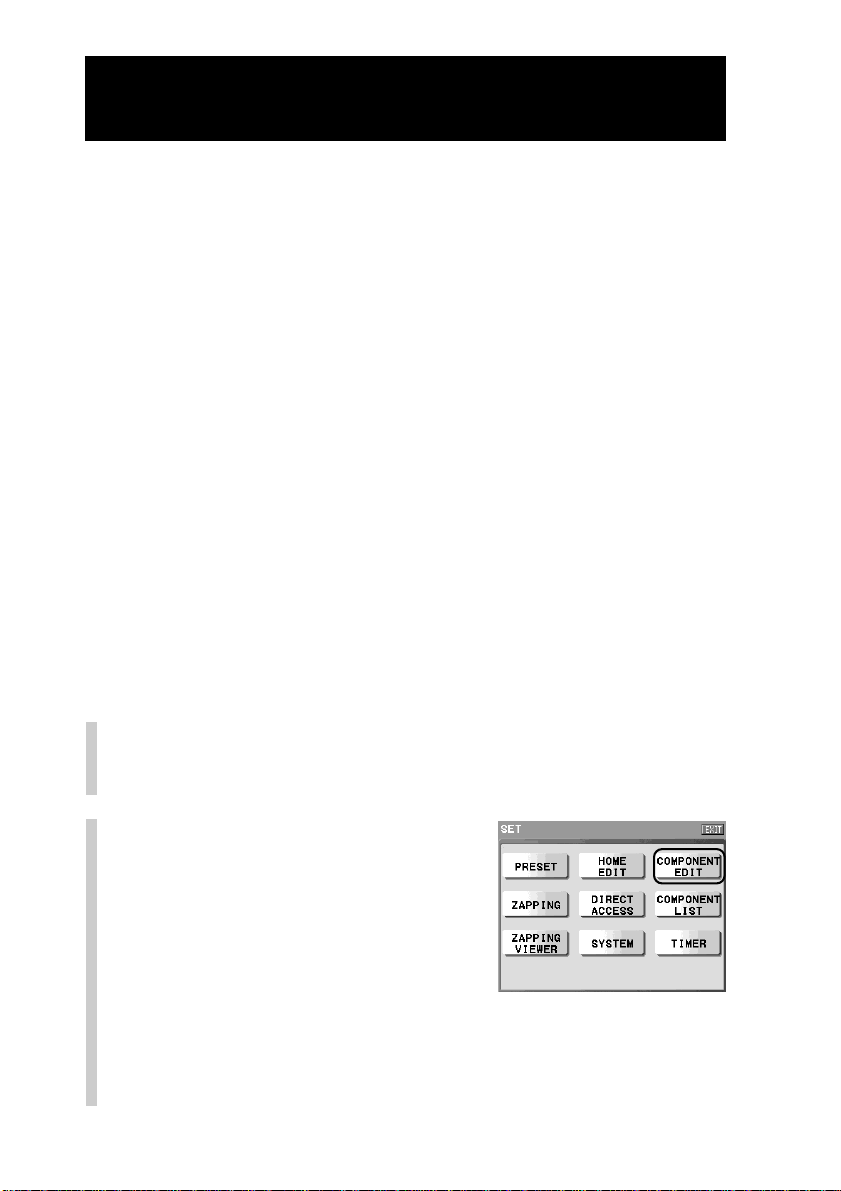
Programming remote control signals for a key or button – Learning function (LEARN)
You can teach remote control signals for an component to any of the
programmable function keys on the Component display, and buttons on the
Remote Commander.
Using this learning function, you can set the Remote Commander to operate
components or to have functions of components when they are not controllable
even if you have programmed the preset codes. You can also use the learning
function to change the function of individual keys and buttons after
programming the preset code.
Notes
• While learning, do not disconnect or connect the USB cable or the AC power adaptor, or
do not remove or insert a “Memory Stick”, as a malfunction may result.
• Certain remote control signals may not be learned depending on the remote control
signal of the component to be programmed.
• Before performing the learning function, install new batteries in the remote control of
the component whose signal is to be learned, and fully charge the Remote Commander
or connect the AC power adaptor to the Remote Commander. (When the E mark is lit,
you cannot use the learning function, as the Remote Commander cannot enter the
setting mode.
•Avoid performing the learning function in places under direct sunlight or strong
fluorescent light. (It may cause noise.)
•You cannot set learning signals to the Component keys or the buttons when the Home
display is shown.
•You cannot set learning signals to certain function keys or buttons. Function keys that
are not learnable appear pressed. If you press one of these keys, a beep sounds twice. If
you press a function button that is not learnable, a message appears.
Press the [SET] key for 2 seconds or longer in the
1
Home display.
The Set display appears.
Press the [COMPONENT EDIT]
2
key.
The Component edit display appears.
58
Page 59

Press the [LEARN] key.
3
Press the Component key
4
whose component display
includes the key you want
to teach.
For example, press the [TV] key.
Place the Remote Commander head to head with
5
the remote control of the component whose
signal is to be learned.
Remote control of
the AV component
About 5 - 10 cm
(2 - 4 inches)
Infrared detector
Basic Operations
RM-NX7000
Press the function key or
6
button to which you want
to teach a signal.
For example, press the [TV POWER] key.
The Remote Commander is set to the
standby mode for receiving the remote
control signal.
Go to step 7 on page 61.
Continued
59
Page 60

Continued
Programming remote control signals for a key or button – Learning function (LEARN)
Notes
• Function keys that are not learnable appear pressed. If you press one of these
keys, a beep sounds twice. Or if you select a function key which has already
learned a remote control signal, a function key for which a macro has been
programmed or a function key which has been set as the reference key for
Alias, a message appears according to the respective setting contents. In this
case, perform the learning procedure following the on-screen instructions.
• If you press a function button that is not learnable, a message saying that it is
not learnable appears. Press the [OK] key, and then select another function
button. Or if you select a function button which has already learned a remote
control signal, a function button for which a macro has been programmed or a
function button which has been set as the reference button for Alias, a message
appears according to the respective setting contents. In this case, perform the
learning procedure following the on-screen instructions.
• If no input signal is detected for 10 seconds, an error message appears, and a
beep sounds five times. Select the function key or button again.
z Tips
•You can change a page with the NEXT/BACK button. (The Trash can page
does not appear.)
• If you want to teach function keys or buttons of other components, press the
[CANCEL] key. The display returns to step 4.
• If you press the COMMANDER OFF button, you can exit the standby mode for
remote control signal reception. Then the display returns to step 6.
■ To create a new function key and teach a remote
control signal to it
1Press the [NEW] key.
2 Set the skin (key appearance and color) and the label of the
function key.
For details, see steps 6 and 7 in “Setting the skin (key appearance and
color) and the label (name) of a function key (SKIN/LABEL)” (page
97).
z Tip
A newly created function key is shown in the last page.
■ When you overwrite the key or button to which
learning signal has already been set
Keys to which a learning signal has already been set blink. If you press a
blinking key or a button to which a learning signal has already been set,
a message for confirmation of overwriting appears.
Press the [YES] key to overwrite the key or button with a new signal.
If you press the [NO] key, the display returns to the previous display.
60
Page 61

Note on when teaching a signal to an Alias key/button
An Alias key/button is set to refer to the setting contents of another key/button
and work the same as the reference key/button.
When you teach an Alias button, a message appears and prompts you to select
either the button you pressed or the reference key/button of the pressed button to
teach a signal to. To teach a signal to the Alias button you pressed, press the
[SELECTED KEY] key. To teach a signal to the reference key/button press the
[REFERENCE KEY] key.
If the reference key is not learnable, a message appears. If you press the [OK] key,
the display returns to step 6 on page 59.
When teaching an ALIAS key, the reference key will be learned.
For details on ALIAS, see “Setting a function key of another component to a
Component display (ALIAS)” (page 100).
Press and hold down the
7
button of the remote
control, whose signal you
want to teach to the key or
button, until a beep sounds.
The learned signal is set to the function
key or button. When learning is
complete, the display returns to step 6.
■ If a beep sounds five times
The Remote Commander did not successfully learn the signal
transmitted from the remote control of the component. Learn the remote
control signal again.
Basic Operations
Note
A beep also sounds five times when the button of the remote control is not pressed
within 10 seconds after the instruction is shown in the display.
To finish all settings, press the COMMANDER OFF
8
button for 2 seconds or longer.
The display returns to the Home display. Or press the [EXIT] key
repeatedly until the Home display is shown.
Continued
61
Page 62

Continued
Programming remote control signals for a key or button – Learning function (LEARN)
z Tips
• Operate the key or button that learned the signal, and check if the AV component
functions properly. If the AV component does not function properly, perform learning of
a remote control signal again.
•You cannot teach a remote control signal to the Direct Access buttons or Component
keys directly. To use the learned signal with these buttons/keys, first teach function keys
in the component, and then program the action of the learned key/button as a macro for
the Direct Access button or Component key. For details, see “Programming a series of
actions (macro) for a key/button” (page 115).
For accurate learning
•Do not move the remote control units during the learning procedure.
•Do not disconnect or connect the AC power adaptor or the USB cable while
learning. This may cause an incorrect learning procedure. It is recommended
to connect the AC power adaptor before learning.
•Press and hold down the button of the remote control whose signal you want
to teach until a beep sounds.
•Decide the position of two remote control units or the distance between them
according to the position of the infrared ray emitter.
•When you teach signals of an interactive signal exchange system remote
control unit (supplied with some Sony tuners, amplifiers and receivers) to the
Remote Commander, the response signal of the main unit may interfere with
learning of the Remote Commander. In this case, move to a place where the
signals will not reach the main unit (e.g. other rooms, etc.).
62
Page 63

Notes on learning the signals of an air-conditioner
About seasonal adjustments
If you change the seasonal settings of your air-conditioner, you have to teach the
remote control signals of the new settings to the Remote Commander.
If the power-on/off operation does not work correctly
If the Remote Commander operates only “ON” or “OFF”, but not both, with a
learned key or button, while your air-conditioner’s remote control can operate
both “ON” and “OFF” with a single button, teach the signal on two separate
keys or buttons of the Remote Commander as follows.
Delete the remote control signal from the key or button to
1
which you taught the air-conditioner’s power-on/off signal. For
details on deleting the remote control signal, see “Deleting the
learned remote control signal” (page 64).
Teach the power-on signal of the air-conditioner’s remote
2
control for a key or button on the Remote Commander to which
you want to teach the power-on signal of the air-conditioner.
Teach the power-off signal of the air-conditioner’s remote
3
control for a key or button on the Remote Commander to which
you want to teach the power-off signal of the air-conditioner.
Basic Operations
IMPORTANT
Be sure to place the Remote Commander out of the reach of small children or
pets.
Also set the Operation Lock function to lock the operation mode of the Remote
Commander (page 38) when it is not in use.
Components such as air conditioners, heaters and electric appliances may be operated
by infrared signals transmitted accidentally, and may cause a fire or a serious injury.
63
Page 64

Continued
Programming remote control signals for a key or button – Learning function (LEARN)
Deleting the learned remote control signal
You can delete the remote control signal that a key or button has learned. When
the learned signal is deleted, the key or button returns to the status before
learning.
Press the [SET] key for 2 seconds or longer in the
1
Home display.
The Set display appears.
Press the [COMPONENT EDIT] key.
2
The Component Edit display appears.
Press the [DELETE] key.
3
Press the Component key
4
that includes the key or
button whose learned signal
you want to delete.
■ To delete all learned signals programmed for keys
and buttons in a component
Press the Component key for 2 seconds or longer.
The deletion confirmation display appears.
64
Page 65
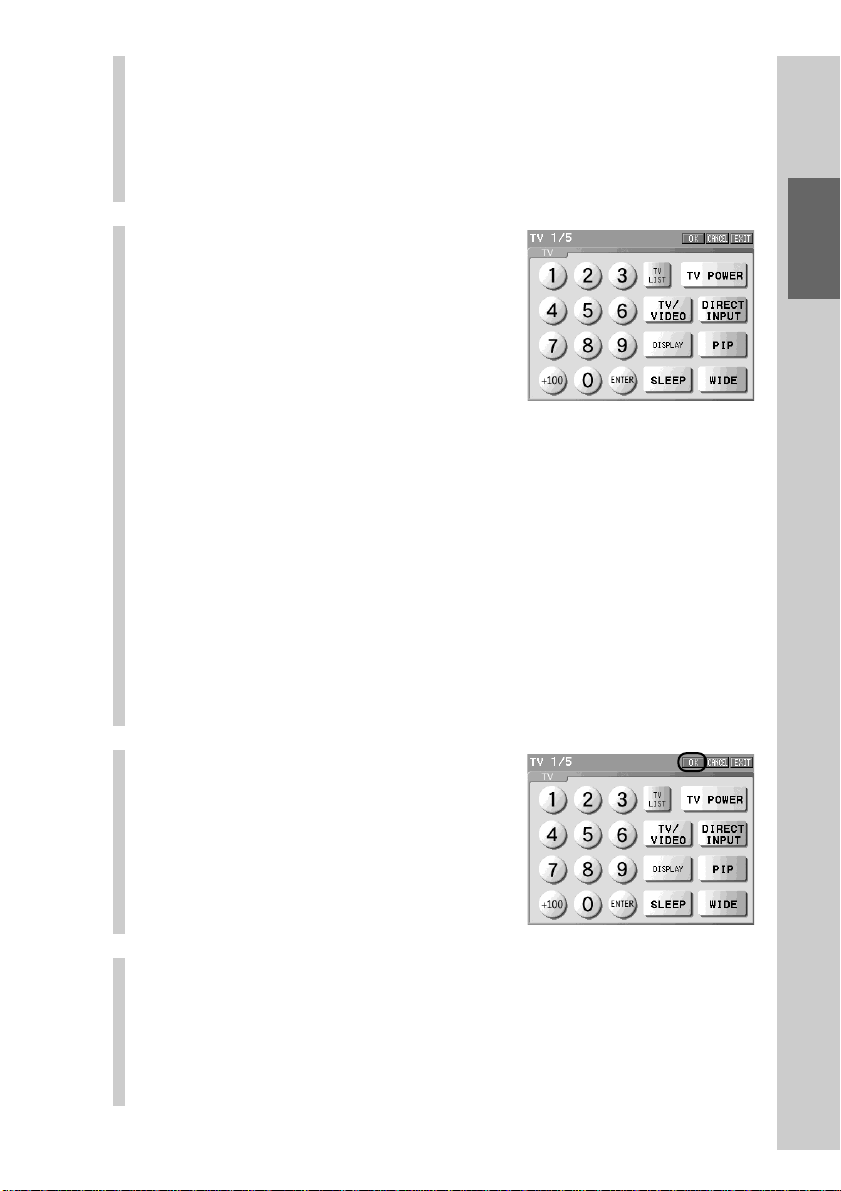
If you want to delete all learned data
Press the [YES] key. The data deleting message appears. When deletion is
complete, the display returns to step 4.
If you do not want to delete all learned data
Press the [NO] key. Learned data will not be deleted and the display will
return to the previous one.
Press the key or button
5
whose learned signal you
want to delete.
When deletion of the learned signal is
complete, the key stops blinking and
appears released (normal).
When the button that has learned the
remote control signal is pressed, the
deletion confirmation message appears.
If you want to delete the learned signal of the button
Press the [YES] key. The button will return to the default setting status,
and the display will return to the previous one.
If you do not want to delete the learned signal of the
button
Press the [NO] key. The learned signal will not be deleted and the display
will return to the previous one.
Basic Operations
z Tip
Using the NEXT/BACK button, you can select the page where you assigned the
key or button whose learned signal you want to delete.
Press the [OK] key.
6
The learned signal is deleted, and the
display returns to step 4.
To finish all settings, press the COMMANDER OFF
7
button for 2 seconds or longer.
The display returns to the Home display. Or press the [EXIT] key
repeatedly until the Home display is shown.
65
Page 66

Customizing the Display
66
Page 67

Customizing the Home display (HOME EDIT)
You can change the assignment of the Component keys in the Home display,
and the labels of the Component keys. Also, you can add a new page to the
Home display if necessary. Customize the Home display as you prefer.
,
Start editing of the Component keys or the Home display screen from the Home
Edit display.
Set display
Press the [HOME
EDIT] key.
Home Edit display
,
Editing functions for the Component keys
[MOVE]: Changes the assignment of Component keys.
[DELETE]: Deletes a Component key.
[SKIN/LABEL]: Sets the label and the skin (key appearance and color) shown
on a Component key.
[DUPLICATE]: Creates a new Component key by copying an existing
Component key. The programmed component can be
changed.
[NEW]: Creates a new Component key.
[ALIAS]: Creates an Alias Component key that refers to the setting of
other components.
Editing function for the Home display
[PAGE]: Adds a page to or deletes a page from the Home display.
Customizing the Display
Continued
67
Page 68

Continued
Customizing the Home display (HOME EDIT)
The Home display can also be customized easily with a computer by using the supplied
application “NAVITUS Design.” You can enjoy customizing the Home display screen by
importing pictures from the computer and set them to the keys, for example. “NAVITUS
Design” is especially useful when setting the function keys for two or more components to
one component (creating a Multi Component key).
68
Page 69

Changing the assignment of a Component key (MOVE)
The assignment of the Component keys can be changed. You can assign a
component you often use to the first page, or assign AV components used
together to nearby keys.
z Tip
It is recommended to add a new page using the [PAGE] function (page 85) before moving
a Component key, so that you can change the assignment of Component keys after empty
space is created by moving a Component key to an added page.
Press the [SET] key for 2 seconds or longer in the
1
Home display.
The Set display appears.
Press the [HOME EDIT] key.
2
The Home Edit display appears.
Press the [MOVE] key.
3
Press the Component key
4
you want to move.
The selected Component key appears
pressed.
Customizing the Display
Continued
69
Page 70

Continued
Customizing the Home display (HOME EDIT)
Press the position to which the Component key is
5
to be moved.
To move the Component key to another page of the Home display
Press the NEXT/BACK button to change the page, then press the position the
Component key is to be moved to.
For example, let’s change the position of the [RCVR] and [TV/SAT] key.
When selecting another
Component key position as the
destination
Press the [RCVR] key.
m
Press the [TV] key.
m
When selecting an empty
space as the destination
Press the [TV/SAT] key.
m
Press the empty space.
m
The [TV] key and the [RCVR]
key exchange the places.
70
The [TV/SAT] key is moved to
the empty space.
Page 71

z Tip
If you press the [CANCEL] key without pressing the position the Component key
is to be moved to, the display returns to step 4.
Note
If you press a position that cannot be specified as the position the Component key
is to be moved to (the Component key selected to be moved that appears pressed,
or positions except Component keys and empty space), a beep sounds twice.
To finish all settings, press the COMMANDER OFF
6
button for 2 seconds or longer.
The display returns to the Home display. Or press the [EXIT] key
repeatedly until the Home display is shown.
Customizing the Display
71
Page 72

Continued
Customizing the Home display (HOME EDIT)
Deleting a Component key (DELETE)
Unnecessary Component keys can be deleted from the Home display. Once a
Component key is deleted, all the programmed data and settings for the
component (the Component display, function keys, data on function buttons)
are deleted.
Perform a deletion if an existing Component key becomes unnecessary when
you purchase a new AV component, for example.
Note
If you delete a Component key set to be the reference key for Alias or a macro, keys and
buttons that refer to the Component key will not function properly.
Press the [SET] key for 2 seconds or longer in the
1
Home display.
The Set display appears.
Press the [HOME EDIT] key.
2
The Home Edit display appears.
Press the [DELETE] key.
3
Press the Component key
4
you want to delete.
The deletion confirmation display
appears.
72
Page 73

Press the [YES] key.
5
The selected Component key is deleted,
the display returns to step 4.
If you do not want to delete the
Component key, press the [NO] key. The
Component key will not be deleted, and
the display returns to step 4.
To finish all settings, press the COMMANDER OFF
6
button for 2 seconds or longer.
The display returns to the Home display. Or press the [EXIT] key
repeatedly until the Home display is shown.
Customizing the Display
73
Page 74
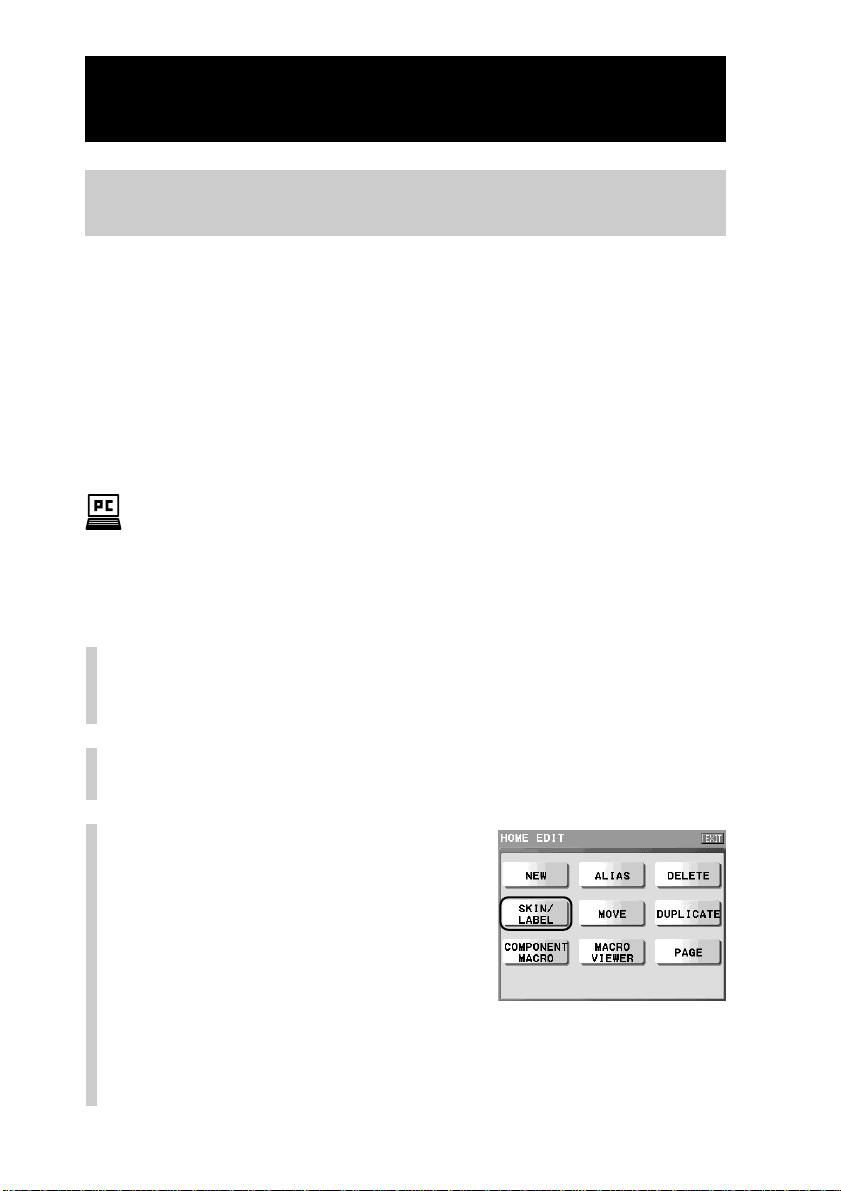
Continued
Customizing the Home display (HOME EDIT)
Setting the skin (key appearance and color) and the label (name) of the Component key (SKIN/LABEL)
You can set the skin (key appearance and color) and the label shown on the
Component key.
For the skin setting, select from the provided skins for the Component key.
For the label setting, you can set the letter size and color in addition to the label
name shown on the Component key.
z Tip
The label of the Direct Access buttons can be also set in the Home Edit display. For details
on the number of letters you can input, the letter size and color, see step 5 in “Setting the
label of a Direct Access button” (page 52).
With the supplied application “NAVITUS Design”, you can import image files to design
your own skin on your computer. For details on importing of image files for the skin, refer
to “Importing an image file for the skin” in the manual (Help) of “NAVITUS Design.”
Press the [SET] key for 2 seconds or longer in the
1
Home display.
The Set display appears.
Press the [HOME EDIT] key.
2
The Home Edit display appears.
Press the [SKIN/LABEL] key.
3
74
Page 75

Press a Component key whose skin (key
4
appearance and color) and label you want to set.
The display for the skin setting appears.
Component keys
Labels for the Direct Access buttons
z Tip
If you press the Direct Access button, you cannot set the skin. In this case, go to
the label setting in step 6.
Select a skin for the Component key from the
5
provided skins.
Set two kinds of skin: a skin that appears released (normal skin) and then
a skin that appears pressed (pressed skin).
1 Select a normal skin to be set.
Only one skin appears in the center of
the display. To display the next skin,
press the NEXT button on the Remote
Commander. To display the previous
skin, press the BACK button.
2Press the [OK] key.
3 Select a pressed skin to be set.
Only one skin appears in the center of
the display. To display the next skin,
press the NEXT button on the Remote
Commander. To display the previous
skin, press the BACK button.
4Press the [OK] key.
Press the Direct Access button to select it.
Normal skin
m
Customizing the Display
Pressed skin
Continued
75
Page 76

Continued
Customizing the Home display (HOME EDIT)
Set the label of the
6
Component key.
Input letters to the label in the label
setting display by pressing the keyboard
using the supplied Stylus.
For inputting letters to the label, see
“Inputting letters (label setting)” (pages
40 - 41).
Specified settings to the label of the Component key besides the
information described on pages 40 - 41 are as follows.
Letter input: Up to 32 letters can be input.
Starting a new line: Available. Starting a new line is counted as a
Pictographs: Can be input. A pictograph is counted as 4 letters.
Specified settings to the label of the Direct Access button are as follows.
Letter input: Up to 8 letters can be input.
Starting a new line: Not available.
Pictographs: Can be input. A pictograph is counted as 4 letters.
[SIZE]: Not selectable. The letter size is fixed to [Small].
[ALIGN]: Not selectable. The letter location is fixed to
Note
You cannot set the same label name as an existing Component key, regardless of
whether characters are upper or lowercase. If you try to set the same label name, a
message appears.
letter.
[Center].
When the label setting is complete, press the [OK]
7
key.
The skin and label are set and the display returns to step 4.
z Tip
If you press the [CANCEL] key, the label will not be set and the display will return
to step 5.
To finish all settings, press the COMMANDER OFF
8
button for 2 seconds or longer.
The display returns to the Home display. Or press the [EXIT] key
repeatedly until the Home display is shown.
76
Page 77
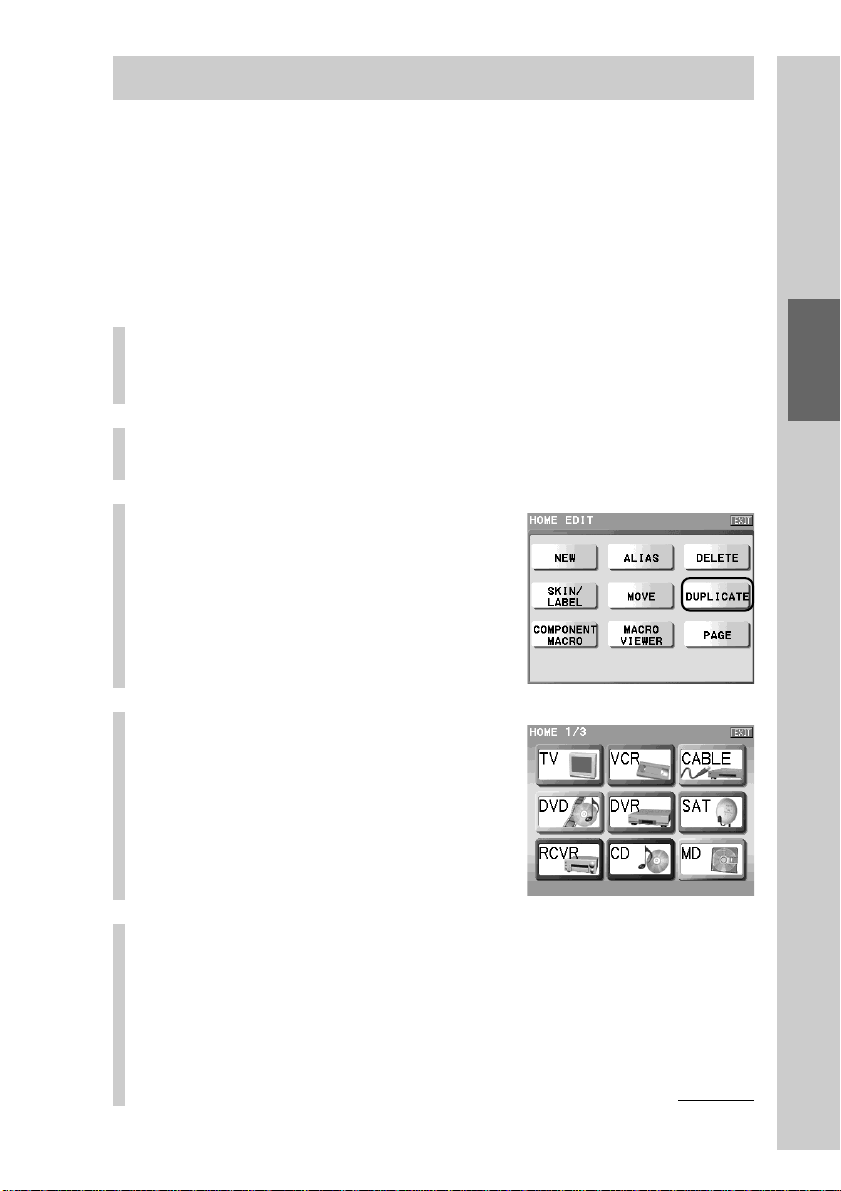
Copying a Component key (DUPLICATE)
You can create a new Component key by copying an existing Component key.
If you duplicate a Component key, a new Component key with the same preset
code and function buttons as an existing Component key is created. It is
convenient to create a new Component key by changing partially the setting
contents of an existing Component key.
z Tip
A new Component key created by copying is assigned on the last page of the Home
display.
Press the [SET] key for 2 seconds or longer in the
1
Home display.
The Set display appears.
Press the [HOME EDIT] key.
2
The Home Edit display appears.
Press the [DUPLICATE] key.
3
Customizing the Display
Press the Component key
4
you want to copy.
Component keys that cannot be copied
appear pressed and cannot be selected. If
you press one of them, a beep sounds
twice.
Select whether to change a component preset code
5
programmed for the Component key to be copied.
Continued
77
Page 78
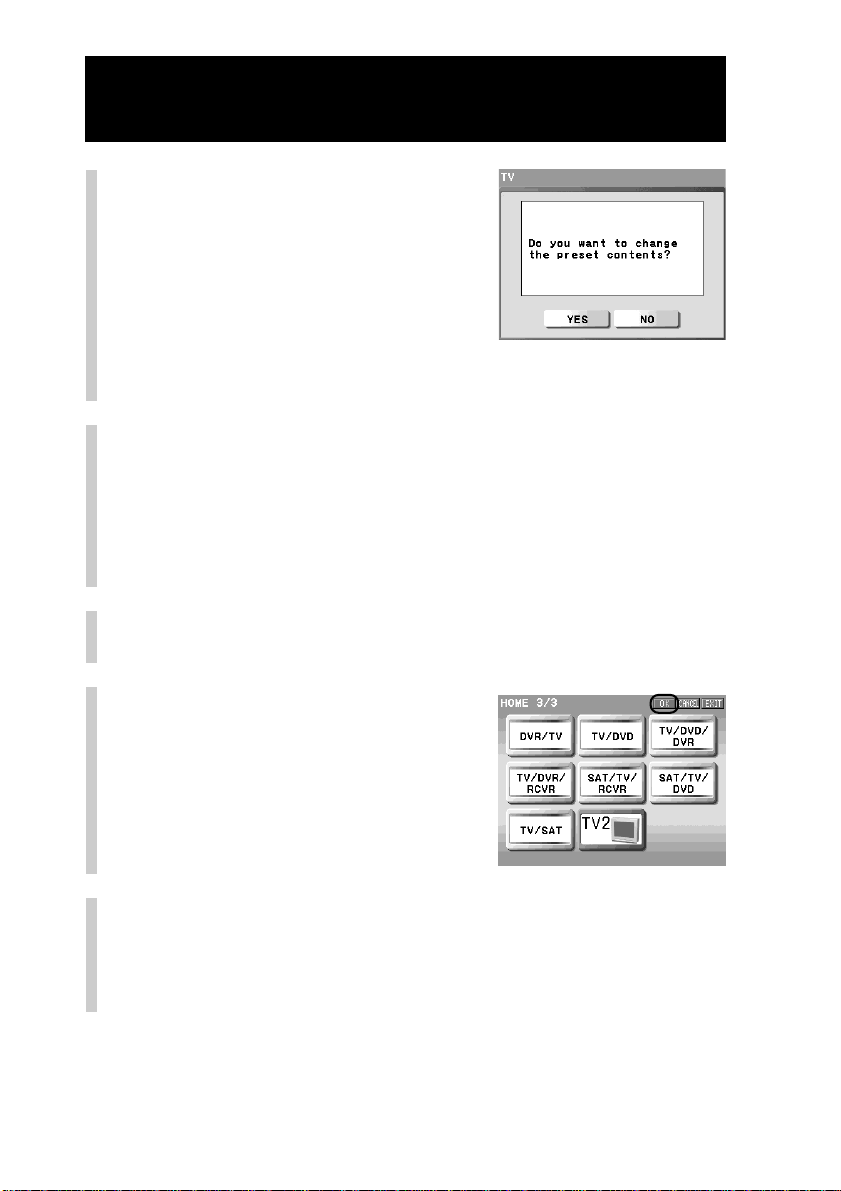
Continued
Customizing the Home display (HOME EDIT)
■ If you want to change a
component preset code
Press the [YES] key.
For details on programming of a preset
code, see “Programming the preset codes
of components (PRESET)” (page 42).
When the preset setting is complete, go
to step 6.
■ If you do not want to change a preset code
Press the [NO] key. Then go to step 6.
Set the label of the new Component key.
6
For details on setting the label, see “Inputting letters (label setting)”
(pages 40 -41).
Note
You cannot set the same label name as the copied Component key or another
existing Component key, regardless of whether characters are upper or lowercase.
If you try to set the same label name, a message appears.
When the label setting is complete, press the [OK] key.
7
A new Component key is displayed.
Confirm the copying of the
8
Component key, and then
press the [OK] key.
A new Component key created by copying
is assigned on the last page of the Home
display. The display returns to step 4.
If you press the [CANCEL] key, the
display returns to step 6.
To finish all settings, press the COMMANDER OFF
9
button for 2 seconds or longer.
The display returns to the Home display. Or press the [EXIT] key
repeatedly until the Home display is shown.
78
Page 79

z Tips
•A new Component key created by copying has the same skin as the copied Component
key. If you want to change the skin of a new Component key created by copying, set the
skin again. For details, see “Setting the skin (key appearance and color) and the label
(name) of the Component key (SKIN/LABEL)” (page 74).
•A new Component key created by copying is assigned on the last page of the Home
display. If there is no space to assign a new key on the last page, a new page will be
added, and a new key will be assigned to that page. You can create up to 63 pages for
the Home display. If you try to create a page over 63 pages, a message will appear. In
this case, press the [OK] key.
Customizing the Display
79
Page 80
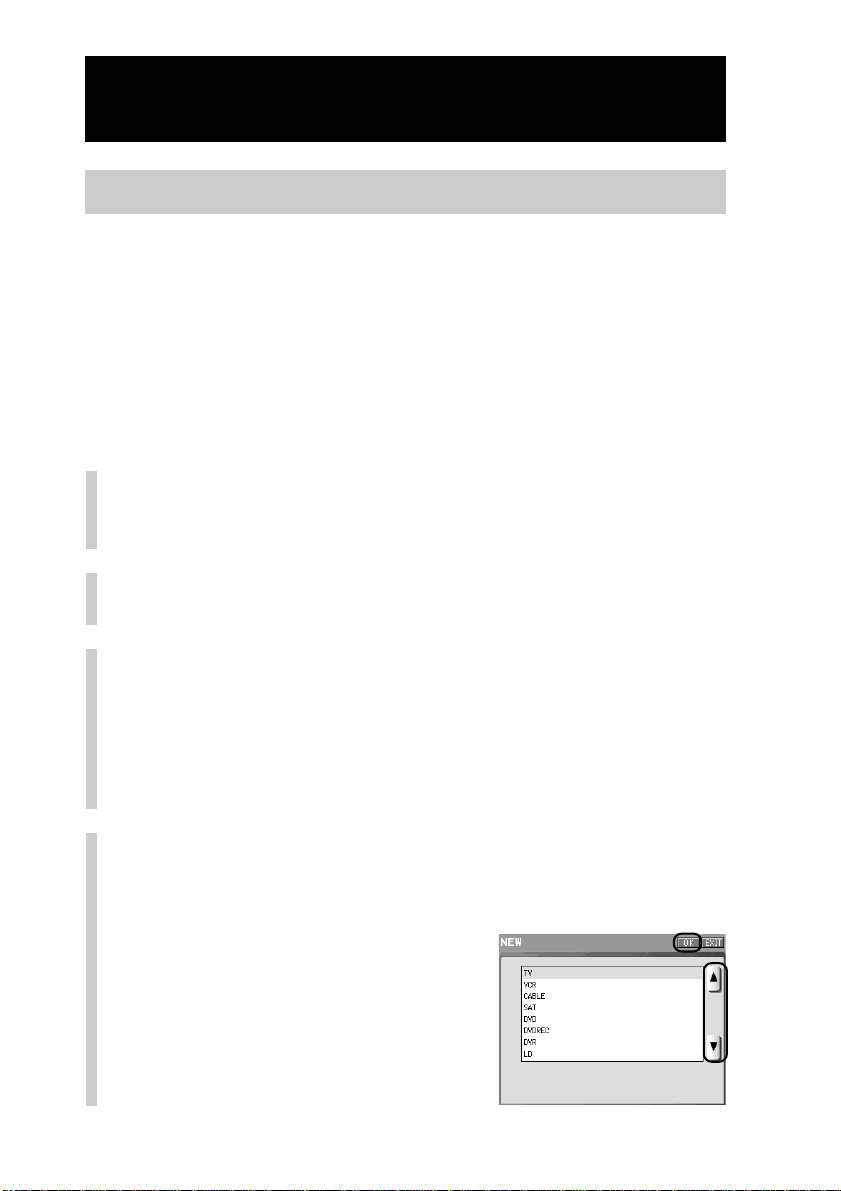
Continued
Customizing the Home display (HOME EDIT)
Creating a new Component key (NEW)
You can create a new Component key in the Home display.
There are two methods to create a new Component key.
•Create a key programmed with a preset code of a specific component
•Create an empty key without programming a preset code
If you create an empty Component key, program the Alias, macro and learning
settings to function keys in a component later.
z Tip
The created Component key is assigned on the last page of the Home display.
Press the [SET] key for 2 seconds or longer in the
1
Home display.
The Set display appears.
Press the [HOME EDIT] key.
2
The Home Edit display appears.
Press the [NEW] key.
3
z Tip
A new created Component key is assigned on the last page of the Home display. If
there is no space to assign a new key on the last page, a new page will be added,
and a new key will be assigned to that page. You can create up to 63 pages for the
Home display. If you try to create a page over 63 pages, a message will appear. In
this case, press the [OK] key.
Select a component category.
4
Select a component category to be programmed to the new Component key.
For example, select “TV.”
1Press the [v] or [V] key to select
the component category to be set
for the new Component key from
the AV component list in the
display.
2Press the [OK] key.
80
Page 81

■ To create a Component key without programming a
preset code of a component
Select “NONE” from the AV component list in the display and then go to step 6.
Select a method to program
5
a preset code (PRESET) for
the Component key, and
then program a preset code.
For details on programming of a preset
code, see “Programming the preset codes
of components (PRESET)” (page 42).
Set the skin for the
6
Component key.
Select the normal skin, and press the
[OK] key. Then select the pressed skin,
and press the [OK] key.
For details on setting the skin, see step 5
in “Setting the skin (key appearance and
color) and the label (name) of the
Component key (SKIN/LABEL)” (pages
74 - 76).
Set the label for the
7
Component key.
When the label setting is complete, press
the [OK] key.
For details on setting the label, see step 6
in “Setting the skin (key appearance and
color) and the label (name) of the
Component key (SKIN/LABEL)” (pages
74 - 76).
Note
You cannot set the same label name as an existing Component key, regardless of
whether characters are upper or lowercase. If you try to set the same label name, a
message appears.
Customizing the Display
After confirming that the
8
newly created Component
key is displayed, press the
[OK] key.
Creation of the Component key is
complete and the display returns to step 4.
If you press the [CANCEL] key, the
display returns to step 7.
Continued
81
Page 82

Continued
Customizing the Home display (HOME EDIT)
To finish all settings, press the COMMANDER OFF
9
button for 2 seconds or longer.
The display returns to the Home display.
repeatedly until the Home display is shown.
Or press the [EXIT] key
82
Page 83

Creating an Alias Component key (ALIAS)
An Alias Component key is a Component key that operates by referring to the
setting contents of another component.
For example, if you create an Alias key that refers to the TV Component key, you
can create a Component key having the same setting contents as the existing TV
Component key. If you customize the Component keys by creating an Alias key
named “TV Kids” only for children or “TV MOTHER” only for a mother, you
can create original keys for individual family members.
z Tips
•A created Alias Component key is assigned on the last page of the Home display.
• Using this Alias Component function, you can assign the function keys of various AV
components (alias keys) to one Component display. The Component key that has this
kind of function is called a Multi Component key.
For details on creating a Multi Component key, see “Assigning function keys of multiple
AV components to a Component display” (page 109).
Press the [SET] key for 2 seconds or longer in the
1
Home display.
The Set display appears.
Press the [HOME EDIT] key.
2
The Home Edit display appears.
Press the [ALIAS] key.
3
Customizing the Display
Press the Component key to
4
which the Alias Component
key refers.
Continued
83
Page 84

Continued
Customizing the Home display (HOME EDIT)
Set the label of the Alias
5
Component key to be
created.
For details on setting the label, see
“Inputting letters (label setting)” (pages
40 - 41).
Note
You cannot set the same label name as the reference Component key or another
existing Component key, regardless of whether characters are upper or lowercase.
If you try to set the same label name, a message appears.
When the label setting is complete, press the [OK]
6
key.
A created Alias Component key is displayed.
After confirming that the
7
created Alias Component
key is displayed, press the
[OK] key.
Creation of the Alias Component key is
complete and the display returns to step
4.
Note
The following keys will not be created as Alias keys when an Alias component is created.
• List key
• Zapping Viewer key
z Tips
• The skin of the reference key is applied to the Alias Component key.
•A created Alias Component key is assigned on the last page of the Home
display. If there is no space to assign a new key on the last page, a new page will
be added, and a new key will be assigned to that page. You can create up to 63
pages for Home display. If you try to create a page over 63 pages, a message will
appear. In this case, press the [OK] key.
To finish all settings, press the COMMANDER OFF
8
button for 2 seconds or longer.
The display returns to the Home display. Or press the [EXIT] key
repeatedly until the Home display is shown.
84
Page 85

Adding/deleting a page of the Home display (PAGE)
You can add or delete a page of the Home display.
You can add a page of the Home display, if there is no space to assign a key
when you want to create a Component key, or if you want to group Component
keys by page as you prefer.
You can delete an unnecessary page created by deletion of Component keys.
Note
You can delete only an empty page having no key. You cannot delete a page where
Component keys are assigned.
Adding a page to the Home display (ADD)
Press the [SET] key for 2 seconds or longer in the Home display.
1
The Set display appears.
Press the [HOME EDIT] key.
2
The Home Edit display appears.
Press the [PAGE] key.
3
Press the [ADD] key.
4
z Tip
You can create up to 63 pages in the Home display. If you try to create a page over
63 pages, a message will appear. After confirming a message, press the [OK] key.
The display returns to the previous one.
Customizing the Display
Continued
85
Page 86

Continued
Customizing the Home display (HOME EDIT)
Confirm that a page will be added,
5
and press the [OK] key.
A new page is not added yet here, and the
display returns to step 4.
Press the [OK] key.
6
A new page is added to the last of the
Home display, and the display returns to
step 3.
To finish all settings, press the COMMANDER OFF button for 2
7
seconds or longer.
The display returns to the Home display. Or press the [EXIT] key repeatedly
until the Home display is shown.
Deleting a page of the Home display (DELETE)
Perform steps 1 to 3 in “Adding a page to the Home display
1
(ADD)” (page 85).
Press the [DELETE] key.
2
86
Page 87

Press the NEXT button to select the
3
page you want to delete, and then
press the [OK] key.
Press the NEXT button to display the next
page, or press the BACK button to display
the previous one. All Component keys
appear pressed. Even if you press a
Component key, it does not function.
z Tip
If you press the [CANCEL] key, the display return to step 2 without deleting a page.
Note
You can delete only an empty page having no key. If you press the [OK] key on a
page having a key, a message appears. If you press the [OK] key after confirming a
message, the display returns to the previous one.
Confirm that a page will be deleted,
4
and press the [OK] key.
A page is not deleted yet here, and the
display returns to step 2.
Press the [OK] key.
5
Deletion of the page is complete and the
display returns to the Home Edit display
(step 3 on page 85).
To finish all settings, press the COMMANDER OFF button for 2
6
seconds or longer.
The display returns to the Home display. Or press the [EXIT] key repeatedly
until the Home display is shown.
Customizing the Display
87
Page 88

Customizing the Component display (COMPONENT EDIT)
You can change the assignment of function keys in a Component display, and
the labels of function keys. Also, you can add a new page to the Component
display if necessary. Customize the Component display as you prefer.
,
Start editing of function keys or the Component display screen from the
Component Edit display.
Press the [COMPONENT
Set display
EDIT] key.
Component Edit display
,
Editing functions for function keys
[MOVE]: Changes the assignment of function keys.
[DELETE]: Deletes a function key. Also, the setting programmed for
function buttons can be erased.
[SKIN/LABEL]: Sets the label and the skin (key appearance and color) shown
on a function key.
[ALIAS]: Creates an Alias function key that refers to the setting of other
function keys.
[WALLPAPER]: Sets a wallpaper for the Component display screen selecting
from the provided wallpapers.
Editing function for the Component display
[PAGE]: Adds a page to or deletes a page from the Component display.
88
Page 89

The Component display can also be customized easily with a computer by using the
supplied application “NAVITUS Design.” You can enjoy customizing the Component
display screen by importing pictures from the computer and set them to the keys or
wallpaper, for example.
Changing the assignment of a function key (MOVE)
The assignment of function keys can be changed. You can assign a function key
you often use to the first page, or assign keys used together to nearby keys.
Press the [SET] key for 2 seconds or longer in the
1
Home display.
The Set display appears.
Press the [COMPONENT EDIT] key.
2
The Component Edit display appears.
Press the [MOVE] key.
3
Customizing the Display
Press the Component key
4
that includes the key
function you want to move.
For example, press the [TV] key.
To change a page of the display
Press the NEXT button on the Remote Commander to display the next page, or
press the BACK button to display the previous one.
Continued
89
Page 90

Continued
Customizing the Component display (COMPONENT EDIT)
Press the key you want to
5
move.
For example, press the [DISPLAY] key.
The selected key appears pressed.
■ To move the key in the Trash
can page
Press the NEXT/BACK button on the
Remote Commander to display the Trash
can page. The Trash can page is assigned
on the last page of the Component
display. When the Trash can page is
displayed, press the function key you
want to move.
z Tip
If the Component display consists of 5 pages, for example, the number indication
of pages are shown as “1/5”, 2/5”, ... “5/5”, and the number indication of the
Trash can page starts from “6/5.” (“5” that indicates the total pages of the
Component display does not change even in the Trash can page.)
90
Page 91

Press the position you want to move the function
6
key to.
If the position you pressed has enough empty space to assign the
function key you want to move, the key moves there. To move other
function keys successively, repeat steps 5 and 6.
For example, select the space on the upper left in the page 2/5 of TV as
the destination.
The destination page
Before moving
The destination page
After moving
,
The page from where the key moved
After moving
Customizing the Display
z Tips
•To move a function key to another page of the same Component display, press
the NEXT/BACK button on the Remote Commander to change the page, and
then press the destination space.
• If you press the [CANCEL] key without pressing the destination space, the
display returns to step 5.
• When moving a key, if there is enough space in the destination place, tap the
center of the location where the key is to be moved to, and you can assign the
key in the proper location.
Notes
• Function keys cannot be moved to the Trash can page.
•A beep sounds twice when there is not enough space for the function key to be
assigned at the selected position. Press another space.
To finish all settings, press the COMMANDER OFF
7
button for 2 seconds or longer.
The display returns to the Home display. Or press the [EXIT] key
repeatedly until the Home display is shown.
91
Page 92

Continued
Customizing the Component display (COMPONENT EDIT)
Deleting a function key (DELETE)
You can delete a function key shown in the Component display. If there are any
unnecessary function keys after setting or customizing, you can delete them.
The deleted key is once stored in the Trash can page. To delete the function key
completely, delete the key in the Trash can page.
You can also erase the data programmed for a function button, or mass deletion
of the learned data programmed for all function keys for a component is also
possible.
Notes
• Note that, if you delete the reference key for an Alias, you cannot use the function of the
key you created so that it refers to the reference key.
• If you perform steps 1 to 6 below for a Zapping Viewer key, the key will not stored in
the Trash can page but will be deleted completely.
• If you perform steps 1 - 6 below for the function key for which the learned data is
programmed (blinking key), only the learned data is erased and the key remains in the
original position. To delete the function key, perform steps 1 - 6 again.
To delete a function key
Perform the procedure from step 1 on this page.
To erase the data programmed for a function button (learned signal,
macro, Zapping group)
See “Erasing the data programmed for a function button” (page 94).
To perform mass deletion of the learned data for a component
See “To erase all learned data set to the keys/buttons in a component” (page
96).
Press the [SET] key for 2 seconds or longer in the
1
Home display.
The Set display appears.
Press the [COMPONENT EDIT] key.
2
The Component Edit display appears.
92
Page 93
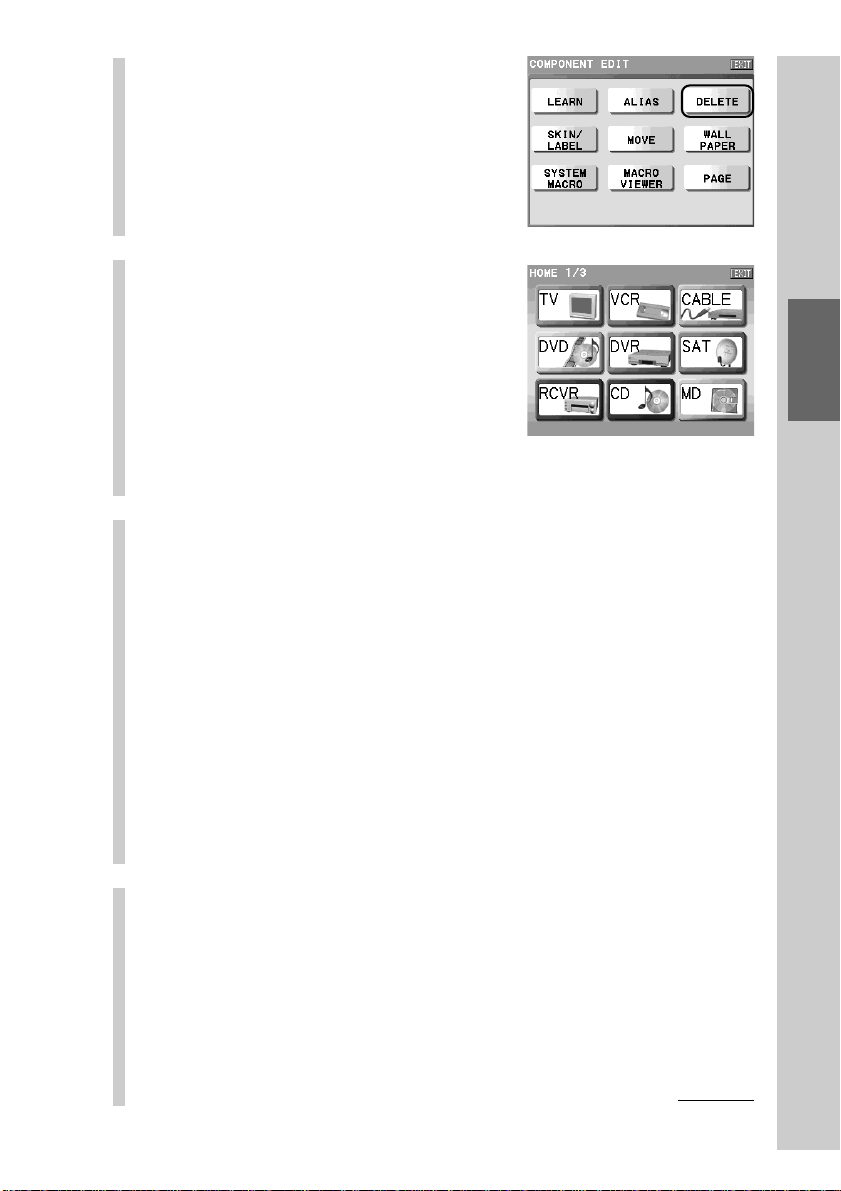
Press the [DELETE] key.
3
Press the Component key
4
that includes the function
key you want to delete.
Keys that can be deleted appear released
(normal appearance). Keys having
learned data blink indicating that the
learning signal can be deleted.
You can change a page of the display
with the NEXT/BACK button on the
Remote Commander.
Press the function key you want to delete.
5
The selected function key disappears from the display, and the key is
stored in the Trash can page. The setting contents are erased from the
deleted function key.
Customizing the Display
■ If you select a function key for which the learned
signal is programmed
Function keys for which the learned signal is programmed blink. If you
select a function key for which the learned signal is programmed, only
the learned data is erased and the key is not deleted. To delete the
function key, perform the procedure from step 4 again.
z Tip
A deleted function key can be used as a function key again by moving it to the
Component display. However, the data you have programmed before deleting the
key cannot be restored.
Press the [OK] key.
6
The selected function key is deleted, and the display returns to step 4.
■ To delete completely the key stored in the Trash can
page
Display the Trash can page in step 4 and press the function key you want
to delete.
Continued
93
Page 94

Continued
Customizing the Component display (COMPONENT EDIT)
To finish all settings, press the COMMANDER OFF
7
button for 2 seconds or longer.
The display returns to the Home display. Or press the [EXIT] key
repeatedly until the Home display is shown.
Erasing the data programmed for a function button
The data programmed for a function button (learned signal, macro, Zapping
group) can be erased, and the function button will return to its default setting.
Note
You cannot erase the data of function buttons that have no programmed actions (Empty
buttons), that have preset actions (Preset buttons) or that refer to other keys (Alias
buttons) .
Perform steps 1 to 3 in “Deleting a function key (DELETE)” (page
1
92).
Press the Component key that
2
includes the function button whose
data you want to erase.
Press the function button whose data you want to erase.
3
The confirmation display appears.
Press the [YES] key.
4
The programmed data will be erased, and
the function button will return to its default
setting. The display returns to step 3.
If you press the [NO] key, the display
returns to step 3 without deleting the
programmed data.
94
Page 95

To finish all settings, press the COMMANDER OFF button for 2
5
seconds or longer.
The display returns to the Home display. Or press the [EXIT] key repeatedly
until the Home display is shown.
Customizing the Display
95
Page 96

Continued
Customizing the Component display (COMPONENT EDIT)
To erase all learned data set to the keys/buttons in a
component
You can erase all learned data by specifying the component on the Remote
Commander. This operation erases all learned data you programmed to the
function keys/buttons for a specific component.
Note
Keys that refer to another key will not function properly if the reference key (for Alias or
macro) is deleted.
Perform steps 1 to 3 in “Deleting a function key (DELETE)” (page
1
92).
Press the Component key for 2
2
seconds or longer.
Press the Component key whose learned
data you want to erase for 2 seconds or the
confirmation display of erasing the remote
control signal appears.
Press the [YES] key.
3
The deletion of learned data begins. While
deleting learned data, a message appears.
When the deletion is complete, the display
returns to step 2.
If you press the [NO] key, the display
returns to step 2 without deleting.
To finish all settings, press the COMMANDER OFF button for 2
4
seconds or longer.
The display returns to the Home display. Or press the [EXIT] key repeatedly
until the Home display is shown.
96
Page 97

Setting the skin (key appearance and color) and the label (name) of a function key (SKIN/LABEL)
You can set the skin (key appearance and color) and the label displayed on a
function key.
For the skin setting, select from the provided skins for a function key.
For the label setting, you can set the letter size and color in addition to the label
name shown on a function key.
With the supplied application “NAVITUS Design”, you can import image files to design
your own skin on your computer. For details on importing of image files for the skin, refer
to “Importing an image file for the skin” in the manual (Help) of “NAVITUS Design.”
Press the [SET] key for 2 seconds or longer in the
1
Home display.
The Set display appears.
Press the [COMPONENT EDIT] key.
2
The Component Edit display appears.
Press the [SKIN/LABEL] key.
3
Press a Component key that
4
includes the key whose skin
(key appearance and color)
and label you want to set.
Customizing the Display
Continued
97
Page 98

Continued
Customizing the Component display (COMPONENT EDIT)
Press a function key whose
5
skin and label you want to
set.
The display for the skin setting appears.
z Tips
•You can change a page of the display with the NEXT/BACK button on the
Remote Commander.
• Function keys to which you cannot set the skin appear pressed and cannot be
selected. If you press one of these keys, a beep sounds twice.
Select a skin for the function key from the
6
provided skins.
Set two kinds of skin: a skin that appears released (normal skin) and then
a skin that appears pressed (pressed skin).
1 Select a normal skin to be set.
Only one skin appears in the center of
the display. To display the next skin,
press the NEXT button on the Remote
Commander. To display the previous
skin, press the BACK button.
2Press the [OK] key.
3 Select a pressed skin to be set.
Only one skin appears in the center of
the display. To display the next skin,
press the NEXT button on the Remote
Commander. To display the previous
skin, press the BACK button.
4Press the [OK] key.
Normal skin
m
Notes
•A skin is displayed from the provided skins only of the size that can be assigned
in the space selected in step 5.
•You cannot select a pressed skin of a different size from that of a normal skin.
Pressed skin
98
Page 99

Set the label to be displayed on the function key.
7
Input letters to the label in the label
setting display by pressing the keyboard
using the supplied Stylus.
For inputting letters to the label, see
“Inputting letters (label setting)” (pages
40 - 41).
Specified settings to the label of the
function key besides the information
described on pages 40 - 41 are as follows.
Letter input: Up to 32 letters can be input.
Starting a new line: Available. Starting a new line is counted as a
letter.
Pictographs: Can be input. A pictograph is counted as 4 letters.
When the label setting is complete, press the [OK]
8
key.
The skin and label of the function key are set and the display returns to
step 5.
To finish all settings, press the COMMANDER OFF
9
button for 2 seconds or longer.
The display returns to the Home display. Or press the [EXIT] key
repeatedly until the Home display is shown.
Notes on the Zapping Viewer key and List key
• The label and the skin (key appearance and color) cannot be set to the Zapping Viewer
key in the procedure above. The label of the Zapping Viewer key is set in the Zapping
Group attached to the Home display. For further details, see “Step 1: Creating a Zapping
group” (page 176).
• The List key cannot be edited in the steps above. For details on the List key, see
“Programming a series of actions (macro) for a Component List” (page 146).
About the skins imported with “NAVITUS Design”
For skins (imported) other than those set at the factory, only skins imported for a
project can be read to the Remote Commander and selected . You cannot read a
skin imported as the common skin for all projects.
When importing a skin image, you can select whether to import the skin for a
specified project, or import it as the common skin for all projects in the dialog
box of “Options” on “NAVITUS Design.”
For details, see “Changing the NAVITUS Design settings” of the “NAVITUS
Design” Help.
Customizing the Display
99
Page 100

Continued
Customizing the Component display (COMPONENT EDIT)
Setting a function key of another component to a Component display (ALIAS)
You can create an Alias key in the Component display.
The Alias key in created so that it refers to the setting contents of another
function key and works in the same way as the reference key. For example, if
you set a function key for TV as an Alias key in a DVD Component display, you
can perform remote control operation to see a DVD image on a TV just by
displaying a DVD operating display (Component display).
“Setting Alias” means “setting a function of a reference key to an Alias key.”
Alias can be set to function buttons on the Remote Commander in the same way.
We call the function button to which Alias is set the “Alias button.”
Press the [SET] key for 2 seconds or longer in the
1
Home display.
The Set display appears.
Press the [COMPONENT EDIT] key.
2
The Component Edit display appears.
Press the [ALIAS] key.
3
Press the Component key
4
that will include an Alias
key/button you want to
create.
For example, press the [DVD] key.
z Tip
You can change a page of the display with the
NEXT/BACK button on the Remote
Commander.
100
 Loading...