

Page 1

Features
AX Remote Editor is a software application that lets you edit the Remote Commander (RM-AX4000) settings on your PC. By following the
wizard, you can easily program the Remote Commander, including XPRESS function and AV component control setup.
Furthermore, AX Remote Editor gives you and easier way to set up and edit a macro (Action list) for a key/button. There is also a wide range
of customizable options which can only be set up with the software, such as changing the Timer and Air-Slide functions.
The wizard makes complicated settings simple
The first time you start up AX Remote Editor, the wizard helps you set up the Remote Commander. By following the wizard, you can program
complicated settings easily, such as setting the XPRESS function or setting up AV component commands.
Furthermore, the wizard allows you to easily change components and add new components and XPRESS functions even after the initial
setup.
Two modes for editing (Standard mode/Advanced mode)
AX Remote Editor has "Standard mode" and "Advanced mode."
Standard mode is for programming the basic settings of the Remote Commander, such as setting up AV component commands.
Advanced mode is for programming higher level functions on the Remote Commander, such as customizing the function of a key/button.
You can switch between modes whenever you want.
Intuitive programming of the Remote Commander
AX Remote Editor provides an easy to use GUI (Graphical User Interface) which looks like the front of the Remote Commander. This makes
programming easier, such as renaming or programming keys and buttons or editing a macro (Action list).
Editing macros (Action lists) is easier
With AX Remote Editor, it is easier to check/edit a macro (Action list), since the macro is displayed as a list.
Changing Timer and Air-Slide functions
You can change a Timer function or Air-Slide operation.
In Standard mode you can set up the Timer or Air-Slide to operate XPRESS function. In Advanced mode you can set up the Timer or Air-Slide
to operate a macro (Action list).
Testing the Remote Commander on your PC (Emulator)
AX Remote Editor includes an Emulator which helps you confirm that settings will work properly.
By connecting your PC to the Remote Commander with the USB mini cable, you can test the settings of an AV component by pressing the
keys/buttons on the Emulator.
Exchanging data between the Remote Commander and your PC with the USB mini cable
AX Remote Editor allows you to exchange data between the Remote Commander and your PC with the USB mini cable. This means it is
possible to download the AX Remote Editor settings to the Remote Commander, or to upload the Remote Commander settings to AX
Remote Editor and make a backup copy.
Saving multiple settings for the Remote Commander to your PC (Project)
You can save settings made on AX Remote Editor as a "project" on the hard disk drive of a PC.
You can create as many projects as necessary. For example, you can save several Remote Commander settings as different names. Or,
you can make a backup copy of the Remote Commander settings as a precaution against accidental data loss.
Updating the Remote Commander's firmware
The AX Remote Editor website (http://www.sony.com/remotesupport/) provides the latest version of AX Remote Editor. By downloading the
file from the website and installing it on your PC, you can update the Remote Commander's firmware to be compatible with the latest version
of AX Remote Editor, including updated codes.
Page 1
Page 2
About this Help
This section explains how to use AX Remote Editor.
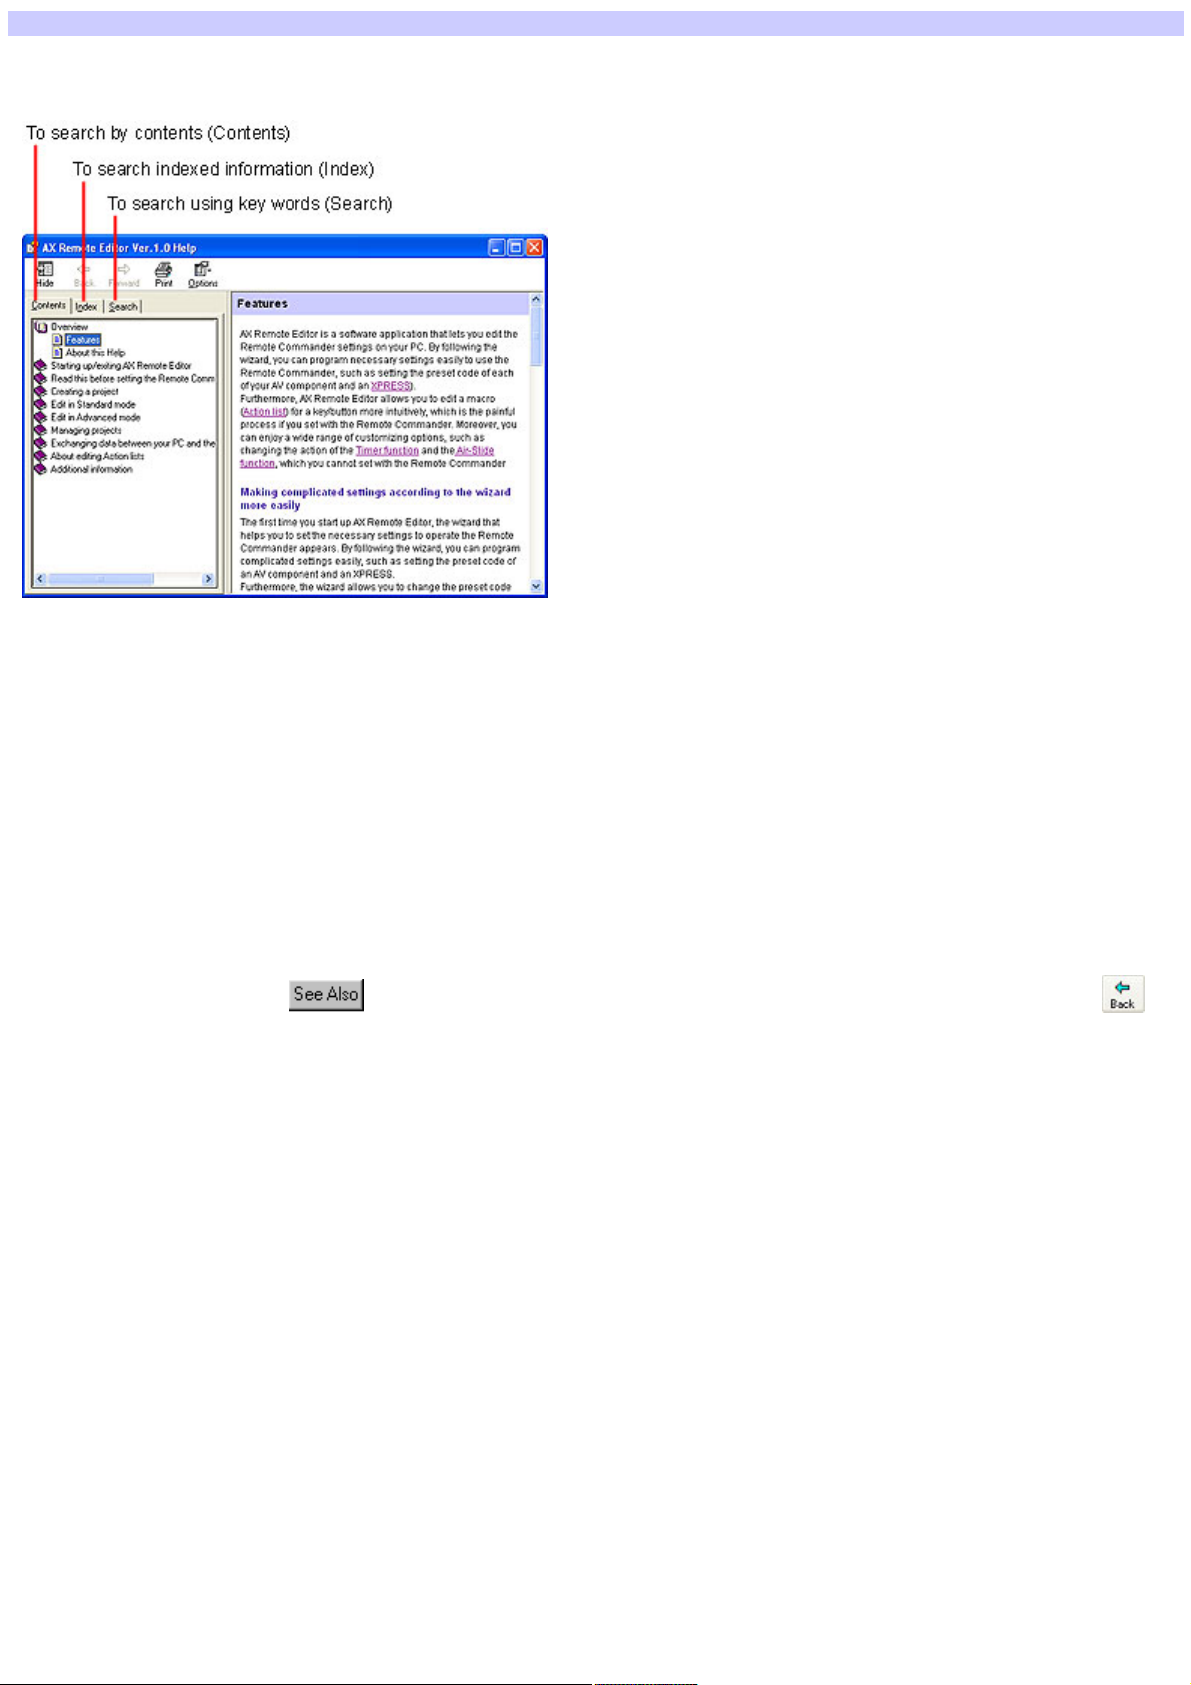
With Help, you can find information on a specific topic by clicking on the "Contents" tab, for the table of contents; or the "Index" tab, for an indexed list of
keyw ords; or the "Search" tab, for typing in keyw ord(s) to perform a search.
To search by contents (Contents)
When you select the "Contents" tab on the left side, the table of contents (Contents) w ill appear. The topic titles are listed on the left side (e.g., "Starting up AX
Remote Editor" and "Adding a component," etc.). When you click on a topic, an explanation of that topic appears to the right.
To search indexed information (Index)
When you click the "Index" tab, a list of keyw ords appears on the left side. You can type in the first few letters of a keyw ord in the "Type in the keyw ord to
find" field (or select a keyw ord from the list) then click "Display," and the explanation relating to the keyw ord is show n to the right.
To search using key words (Search)
When you click the "Search" tab, "Search" w ill be displayed on the left side. If you enter a w ord or phrase into the "Type in the keyw ord to find" field and click
"List Topics," a list of items containing the w ord(s) will appear on the left side. If you click an item on this list, the explanation w ill be show n to the right.
The entered w ord(s) is highlighted in the explanation.
To toggle between related information and the currently viewed explanation
When you click on underlined text or , you can see detailed information of the topic on the right side. To return to the previous screen, click at
the top of the w indow . The previous screen reappears.
Page 2
Page 3

Starting up AX Remote Editor
1.
Click the Window s "Start" button and point to "All Programs" - "Sony Rem ote AX," - "AX Re m ote Editor" and click.
AX Remote Editor starts up, and the last project appears.
The first time AX Remote Editor starts up, the "New Project" w izard appears. Follow ing the on-screen instructions, create a project.
Hints
If you are using an operating system other than Window s XP, click the "Start" button of Window s and point to "Programs" - "Sony Remote AX" - "AX Remote
Editor" and click to start up AX Remote Editor.
If (the shortcut icon of AX Remote Editor) is displayed on the desktop of Window s, double-click the icon to open it. (Depending on the setting,
Window s XP may delete icons from the desktop if they have not been used for a certain period of time. If is not displayed on the desktop, use the
"Start" button.)
Page 3
Page 4

Exiting AX Remote Editor
1.
Do one of the follow ing:
Click [Exit] in the low e r right of AX Re m ote Editor.
Click in the uppe r right corner of AX Rem ote Editor.
Click "File" on the m e nu bar, the n s e le ct "Exit."
AX Remote Editor closes.
Hint
If you try to exit AX Remote Editor w ithout saving the project you are editing, a dialog box appears asking you to confirm saving. To save the project you are
editing, click "Yes," otherw ise, click "No."
Page 4
Page 5
About Standard mode/Advanced mode
Tw o edit modes (Standard mode/Advanced mode)
Editing flow in Standard mode
Editing flow in Advanced mode
Editable contents in Standard mode/Advanced mode
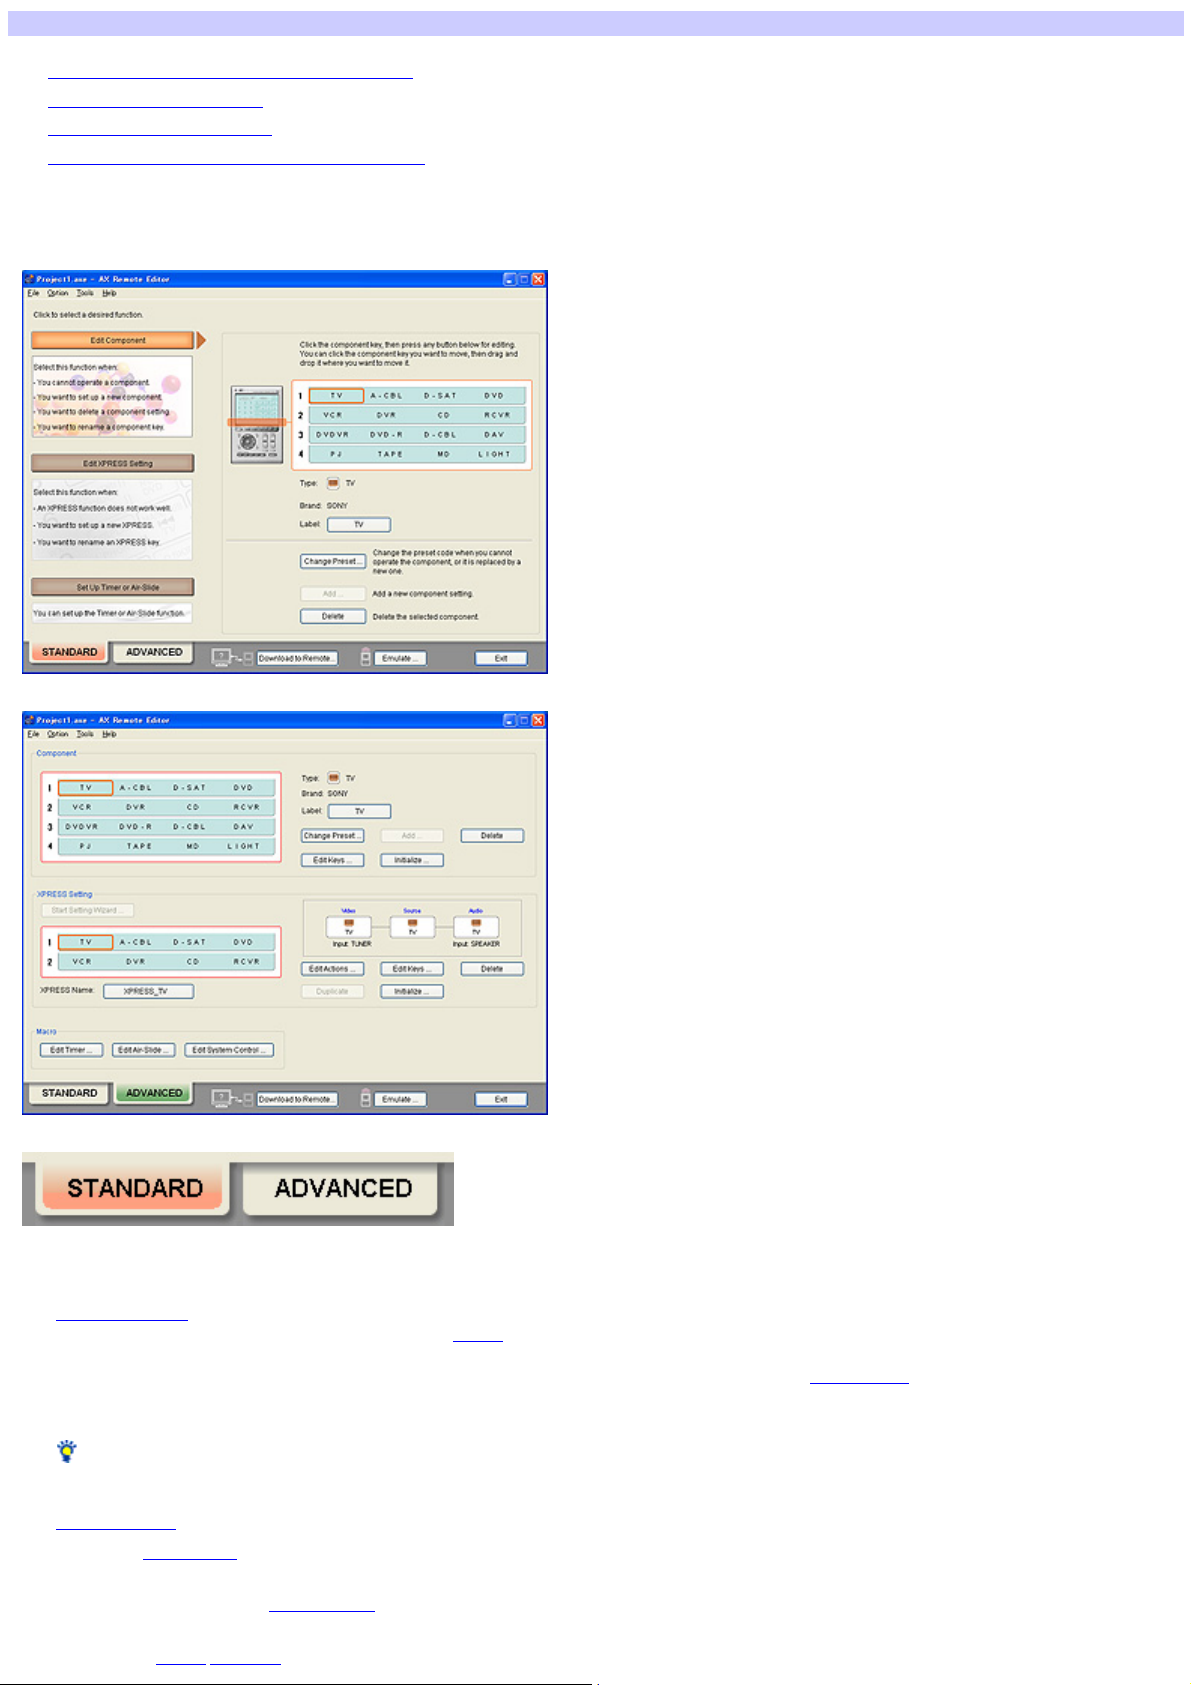
Two edit modes (Standard mode/Advanced mode)
AX Remote Editor has "Standard mode" and "Advanced mode."
Standard mode is for programming the basic settings of the Remote Commander, such as setting the preset code of a component.
Advanced mode is for programming higher level functions on the Remote Commander, such as customizing the function of a key/button.
You can sw itch betw een modes by clicking the tab in the low er left of the screen on AX Remote Editor.
Editing flow in Standard mode
Perform the follow ing steps to edit in Standard mode.
1.
Create a project.
To edit on AX Remote Editor, first you need to create a project.
In Standard mode, create a project follow ing the "New Project" w izard.
The w izard allow s you to make all the necessary settings, such as setting a project name, components, XPRESS keys, and dow nloading the settings to
the Remote Commander, so once you have finished w ith the "New Project" w izard, you can operate an AV component w ith the Remote Commander
(RM-AX4000) right aw ay.
Hint
The first time you start up AX Remote Editor, the "New Project" w izard appears.
2.
Edit the Re m ote Com m ande r setting.
Open the project you w ant to edit. When the project is displayed on the screen, set the follow ing as necessary.
Change com ponent s e ttings
o
You can add a new component setting and delete an unnecessary component, for example, w hen you buy a new AV component.
Change the s e ttings of XPRESS ke ys
o
You can add a new XPRESS key and delete an unnecessary XPRESS key, for example, w hen you add or replace a component in your AV system.
Change a Tim er/Air-Slide s e tting as ne ce s s ary
o
Page 5
Page 6

Change the setting w hen you w ant to:
Set an action (XPRESS procedure) to operate at a scheduled time w ith the Timer function.
Change the action of an Air-Slide pattern.
Hint
You can edit various other settings in Standard mode as w ell. For further details, see "Editable contents in Standard mode/Advanced mode."
3.
Check the s e tting on the Emulator
When you finished editing, connect the Remote Commander (RM-AX4000) to your PC and start the Emulator. When you press a key/button on the
Emulator, the Remote Commander sends a signal to the component so you can confirm the operation.
4.
Dow nload the s e ttings to the Re m ote Com m ander
When you finished checking, dow nload the settings to the Remote Commander (RM-AX4000). After dow nloading, you can use the Remote Commander
w ith the new setting.
Editing flow in Advanced mode
Perform the follow ing steps to edit in Advanced mode.
1.
Create a project.
To edit on AX Remote Editor, first you need to create a project.
A project in Advanced mode is set by default to operate Sony brand AV component. Change the Remote Commander preset code according to the AV
component.
Hint
The first time you start up AX Remote Editor, the "New Project" w izard appears and helps you create a project in Standard mode. In this case, after
creating a project follow ing the "New Project" w izard, sw itch to Advanced mode to edit a key/button.
2.
Edit the Re m ote Com m ande r setting.
Open the project you w ant to edit. When the project is displayed on the screen, set the follow ing as necessary.
Change com ponent s e ttings
o
First, change the preset codes according to your AV components, as necessary.
Second, delete any unnecessary components. If you have several AV components of the same category, or if you have an AV component w hose
category is not preset, add a component.
Lastly, change the assignment of components as you like.
Change the s e ttings of XPRESS ke ys
o
First, delete any XPRESS key(s) that no longer reflects your actual AV system, if necessary.
Second, add an XPRESS key(s) that reflects any addition(s) to your AV system. If you w ant to add an action for each XPRESS key, edit a Start
macro or Exit macro.
Lastly, change the assignment of each XPRESS key as you like.
Change a Tim er/Air-Slide /Sys te m Control s e tting as ne ce s s ary
o
Change the setting w hen you w ant to:
Set an action (XPRESS procedure) to operate at a scheduled time w ith the Timer function.
Change an action for an Air-Slide pattern.
Change an action (System Control macro) to be assigned to a System Control button/key.
Hint
You can edit other various settings in Advanced mode as w ell. For further details, see "Editable contents in Standard mode/Advanced mode."
3.
Check the s e tting on the Emulator.
When you finished editing, connect the Remote Commander (RM-AX4000) to your PC and start the Emulator. When you press a key/button on the
Emulator, the Remote Commander sends a signal to the component to confirm the operation.
4.
Dow nload the s e ttings to the Re m ote Com m ander.
When you finished checking, dow nload the settings to the Remote Commander (RM-AX4000). After dow nloading, you can use the Remote Commander
w ith the new setting.
Editable contents in Standard mode/Advanced mode
With AX Remote Editor you can edit the follow ing items in Standard mode/Advanced mode.
Editable contents Standard
m ode Advanced
m ode
Editing a component
Change the label of a component Editable Editable
Change the assignment of components
Editable Editable
Page 6
Page 7

Change the preset code of a component
*1
Editable Editable
Add a component
Change the key/button setting for a component
Delete a component
Initialize the key/button setting for a component
*1*2
Editing the settings of XPRESS keys
Editable Editable
- Editable
Editable Editable
- Editable
Change the label of an XPRESS key
Change the assignment of XPRESS keys
Add an XPRESS key
Edit a Start macro/Exit macro for an XPRESS key
Editable Editable
Editable Editable
Editable Editable
- Editable
Change the key/button setting for an XPRESS key
Copy an XPRESS key
- Editable
- Editable
Page 7
Page 8

Delete an XPRESS key
Editable Editable
Initialize the settings of an XPRESS key
- Editable
Setting a Timer/Air-Slide/System Control
Change the Timer function
Change an Air-Slide's settings
Change a System Control setting
*1 Standard mode sets a preset code by "SOLUTION preset" method (by reading the preset code from the remote control signal of your AV component).
Advanced mode sets a preset code by "SOLUTION preset," or by "BRAND preset" method (by selecting the manufacturer and the preset code).
*2 Only in Advanced mode, can you select "None" for a component that has no preset code.
*3 In Standard mode you can set an XPRESS procedure to operate at a scheduled time.
In Advanced mode you can set a macro (Action list) to operate at a scheduled time.
*4 In Standard mode you can set an XPRESS procedure for an Air-Slide pattern.
In Advanced mode you can set a macro (Action list) as an action for an Air-Slide pattern.
*3
*4
Editable Editable
Editable Editable
- Editable
Page 8
Page 9
Connecting the Remote Commander to your PC
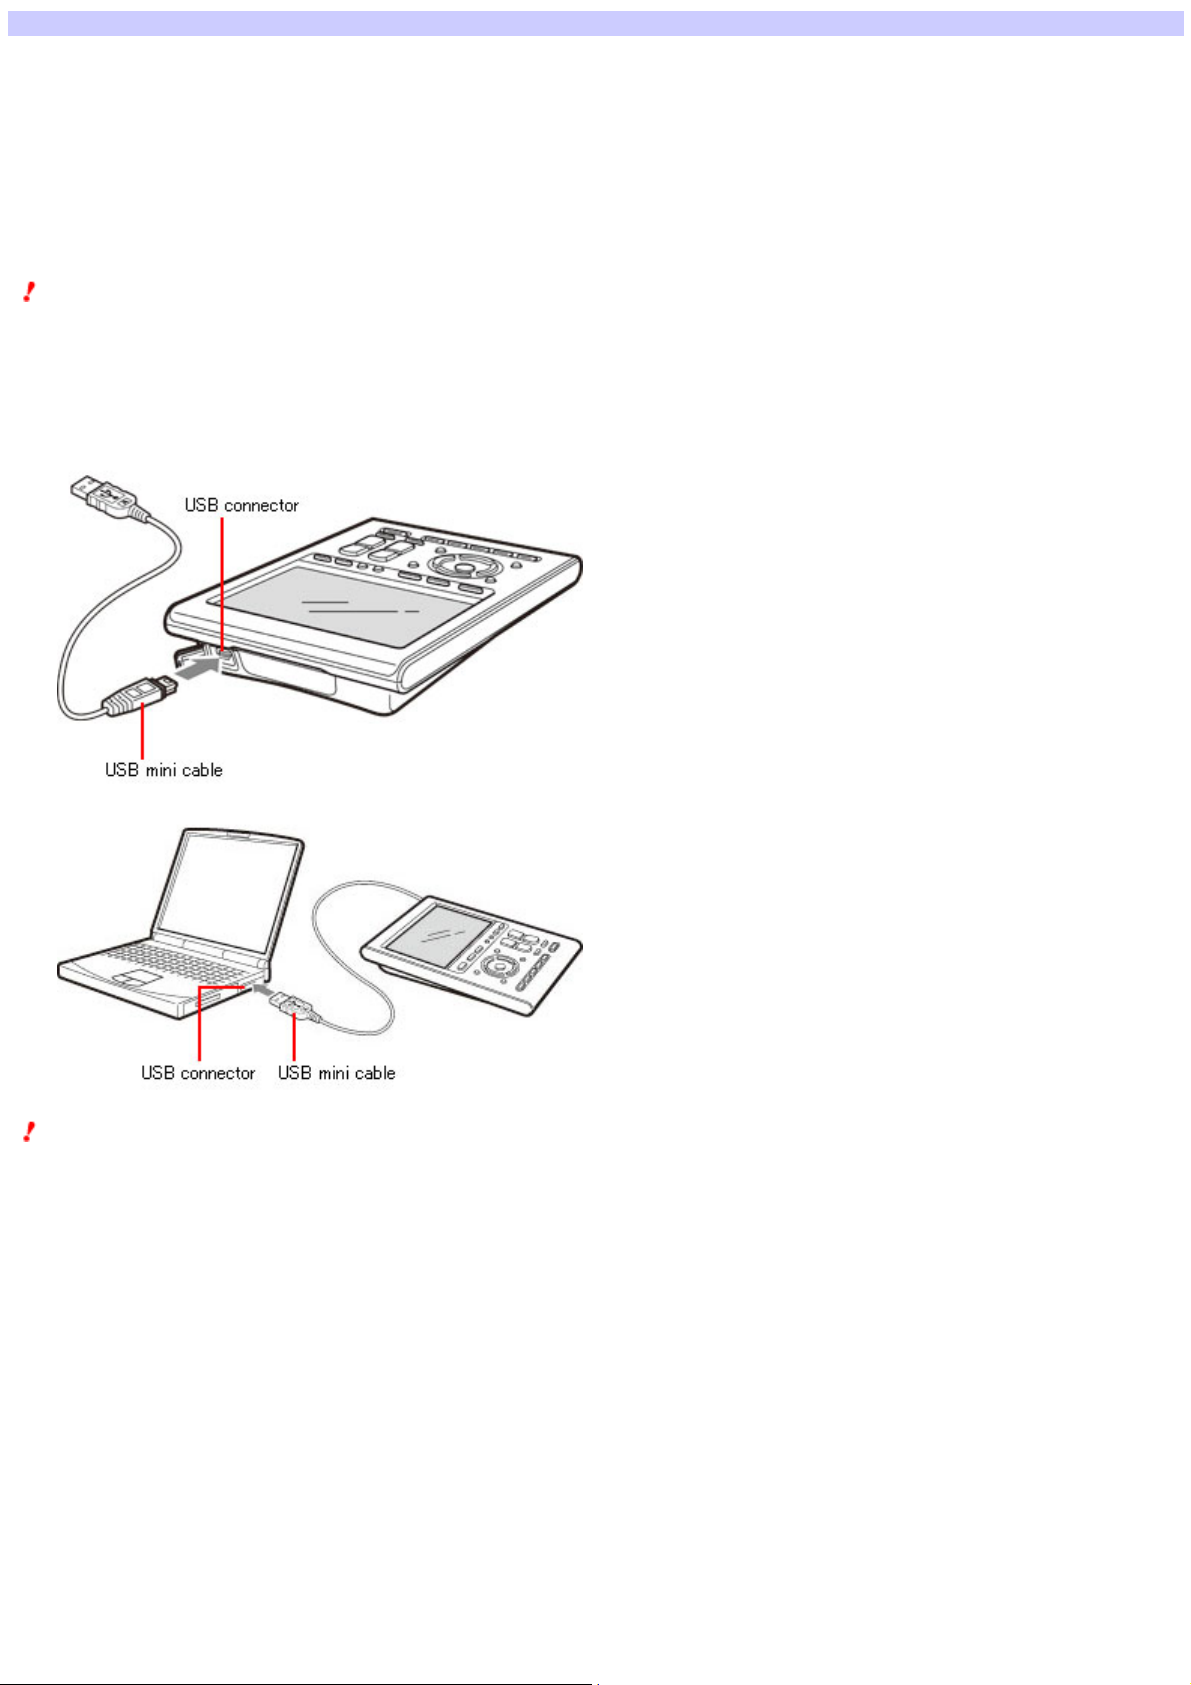
You can connect the Remote Commander (RM-AX4000) to your PC w ith the supplied USB mini cable. When you check the remote control signal of a macro
(Action list) programmed for a key/button, or w hen you exchange setting data betw een your PC and the Remote Commander, connect the Remote Commander
to your PC.
IMPORTANT
Do not keep the Remote Commander connected to the PC w hen the PC is in standby/hibernation, otherw ise, a malfunction could occur. Be sure to
disconnect the Remote Commander from the PC before standby/hibernation begins.
Furthermore, do not connect the Remote Commander to the PC w hile it is in standby/hibernation. Wait until the PC comes out of standby/hibernation before
connecting.
Notes
The Remote Commander uses the battery w hen connected to the PC. When you finish the setup, unplug from the USB connector.
Before connecting the Remote Commander to your PC, make sure that the battery charge is enough.
Do not disconnect the USB mini cable from your PC w hile your PC is communicating w ith the Remote Commander, otherw ise a malfunction may occur.
Only connect one Remote Commander to your PC at a time. Otherw ise, your PC w on't be able to communicate w ith the Remote Commander.
1.
Connect the USB m ini cable to the USB conne ctor of the Re m ote Com mander (RM -AX4000).
2.
Connect the USB m ini cable to the USB conne ctor of your PC.
Note
The first time you connect the Remote Commander (RM-AX4000) to your PC, the USB driver install w izard appears. For further installation details, refer to the
supplied operating instructions.
Page 9
Page 10

About projects
AX Remote Editor allow s you to manage the Remote Commander settings as a "project."
When you first install AX Remote Editor, there are no projects yet, so the "New Project" w izard appears asking you to create a project w hen you start up AX
Remote Editor. The on-screen instructions in this w izard guide you through the necessary procedures to create a project, such as setting a project name,
components, XPRESS keys, and dow nloading the settings to the Remote Commander.
When you create a project, a folder of the same name (project folder) as the project is created on your PC w here its settings file (AX Remote Editor file w ith
the file extension ".axe") is saved along w ith various other files for that project.
You can create as many projects as necessary. For example, you can save several Remote Commander settings as different projects, according to your
needs. Or, you can make a backup copy of the Remote Commander settings as a precaution against accidental data loss.
Note
Do not use Window s Explorer, etc., to move project folders and or the files w ithin. Doing so may make it impossible to edit the project on AX Remote Editor.
Project related topics
With AX Remote Editor you can:
Create a new project
Create a project in Standard mode (New Project Wizard)
Create a project in Advanced mode
Save a project
Open a project
Enter a user name and comments for a project
Page 10
Page 11
Creating a project in Standard mode (New Project Wizard)
Perform the follow ing steps to create a project in Standard mode follow ing the "New Project" w izard instructions.
Step 1: Set a project nam e
Enter a name for the project you w ant to create.
Step 2: Set com ponents
In this step, perform the follow ing steps to set various component settings.
1.
Select all the component types you w ant the Remote Commander to control.
2.
Check or change the label of components.
3.
Program the preset code of a component.
4.
Check if the preset code you programmed w orks.
5.
Repeat steps 3 to 4 for each component you are editing.
Step 3: Set XPRESS ke ys
In this step, perform the follow ing steps to set various settings of XPRESS keys.
1.
Select the "Purpose" and the "Source component" (that outputs images and sound) of all the XPRESS keys you w ant to program.
2.
Check or change the label of XPRESS keys.
3.
Select a video component (that outputs images from the source component).
4.
Select an audio component (that outputs sound from the source component).
5.
Set the follow ing items about the video component.
Select the type of pow er button on the video component's remote control.
o
Set the information about the input select button on the video component's remote control.
o
Make the Remote Commander (RM-AX4000) learn the video component's remote control signal.
o
6.
Set the follow ing items about the audio component.
Select the type of pow er button on the audio component's remote control.
o
Se the information about the input select button on the audio component's remote control.
o
Make the Remote Commander (RM-AX4000) learn the audio component's remote control signal.
o
7.
Set the follow ing items about the source component.
Select the type of pow er button on the source component's remote control.
o
Make the Remote Commander (RM-AX4000) learn the source component's remote control signal.
o
8.
Set a Start macro (action to be executed w hen operating an XPRESS key) and an Exit macro (action to be executed w hen sw itching to another XPRESS
display) of an XPRESS key.
9.
Repeat steps 3 to 8 for each XPRESS key you are setting.
Step 4: Dow nload the s e ttings to the Re m ote Com m ander
Dow nload the settings made on the w izard to the Remote Commander (RM-AX4000).
Hints
When you start up AX Remote Editor for the first time, the "New Project" w izard appears asking you to create a project. In this case, create a project
follow ing the above procedure.
If you w ant to exit the setting procedure at any point, click "Save and Exit" in the low er right of the screen. The setting is saved and AX Remote Editor
closes.
The next time you start AX Remote Editor, you can resume the setting from the point you stopped.
Page 11
Page 12
Setting a project name
You can create a project in Standard mode.
In the first step, set the project name.
1.
Click "File" on the m e nu bar, the n s e le ct "Ne w ."
The "New Project" dialog box appears.
Hint
If the project you are editing is not saved, a message box appears asking you to confirm saving before the "New Project" dialog box appears. To save
the project, click "Yes," otherw ise, click "No."
2.
Click "Standard," then click "OK."
The "New Project" w izard appears.
3.
Click "Ne xt."
The "Project Name" screen appears.
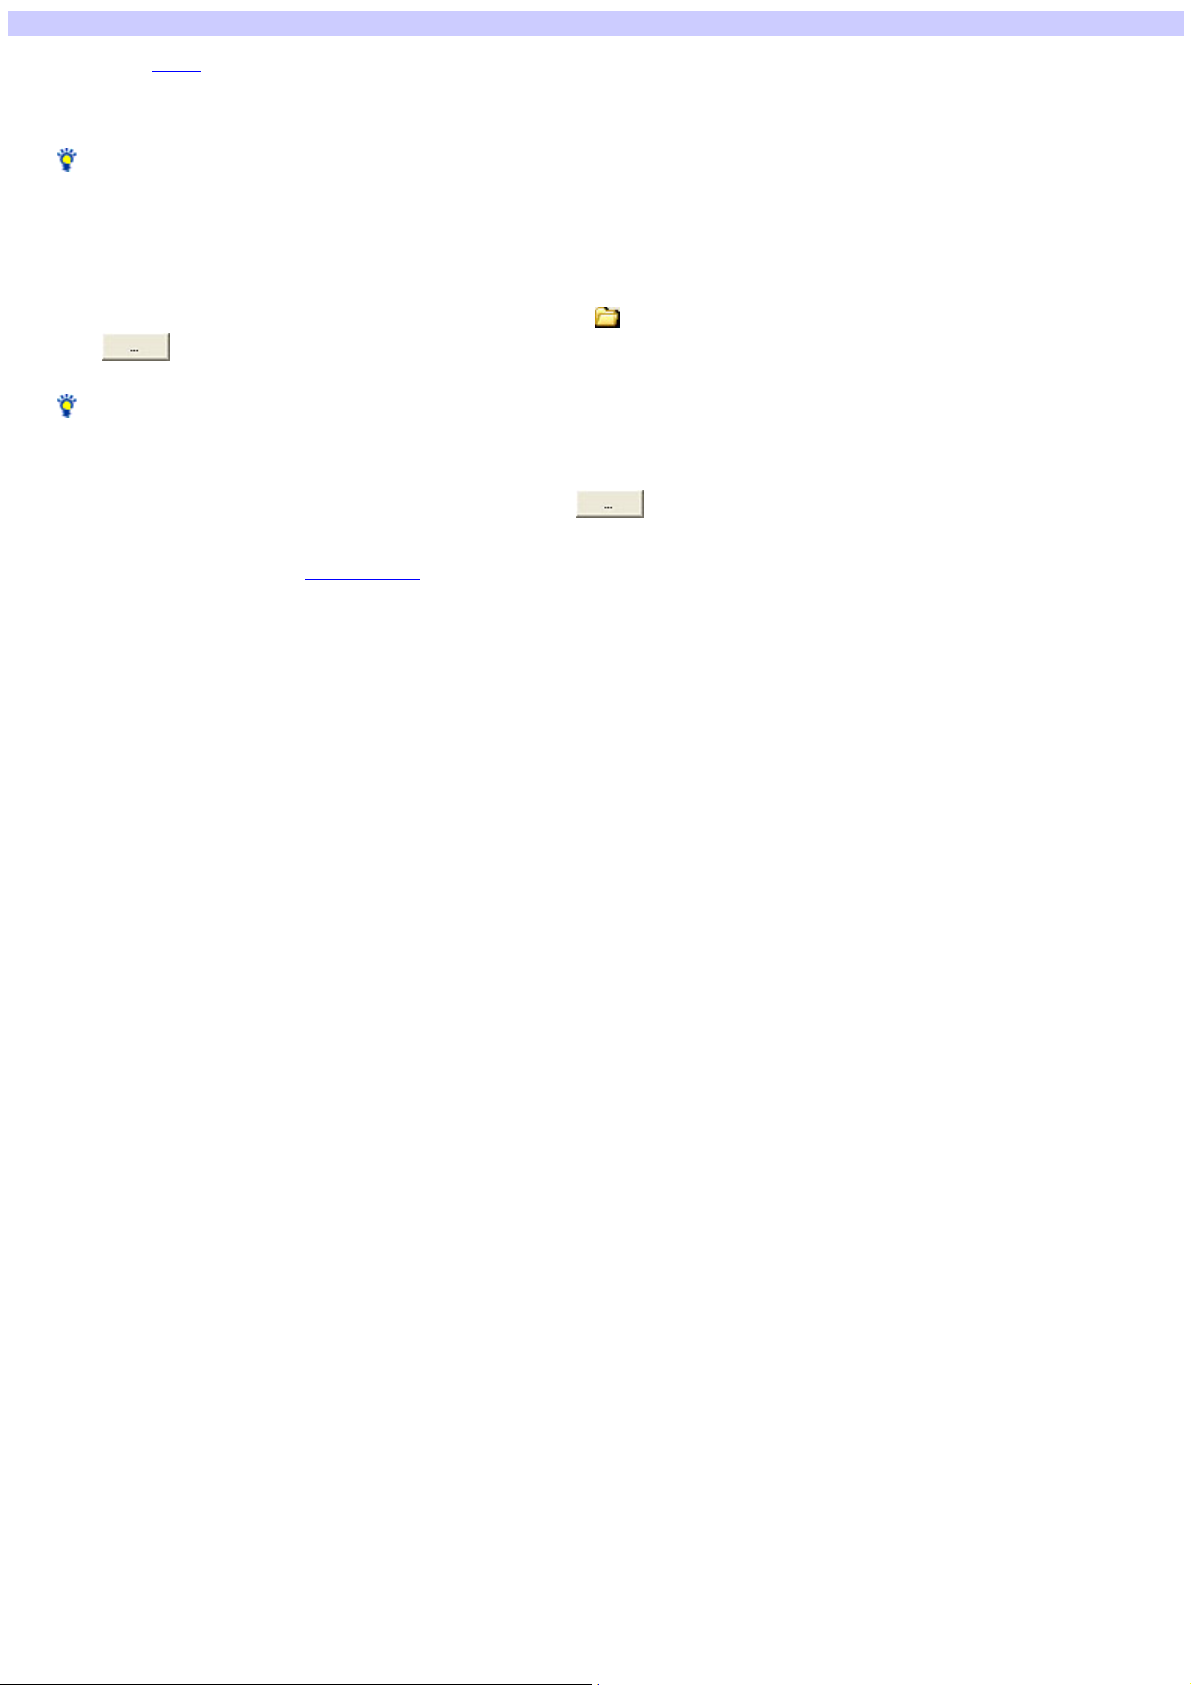
4.
Enter a proje ct nam e unde r "Input a project folder nam e," next to .
5.
Click under "Save the project folder in."
A dialog box appears for you to select a folder.
Hint
The "Save the project folder in" field show s the folder (location) in w hich you created a project or saved the project under a different name last time.
The first time you start AX Remote Editor, the field show s the Window s desktop.
6.
Sele ct the folder in w hich you w ant to create the project, then click "OK."
The dialog box closes, and the selected folder is displayed to the left of .
7.
Click "Ne xt."
The "Component Settings - Select Component" screen appears.
Follow ing the w izard instructions, set components.
Page 12
Page 13
Setting components
The "Component Settings" screen in the "New Project" w izard allow s you to make various settings for components.
Hint
You can save and exit the setting procedure at any point; just click "Save and Exit" in the low er right of the screen. The setting is saved and AX Remote Editor
closes.
The next time you start AX Remote Editor, you can resume the setting from the point you stopped.
1.
From the com ponent category list on the le ft s ide of the s creen, click the com ponent that you w ant the Re m ote Com m ande r to
control, then click "Se lect ->."
The selected component is added to the "Preview " area on the right side. Repeat to add other components to the "Preview " area.
Hints
You can add up to 16 components.
o
Click "Clear the Last Selected" to delete the last added component from the "Preview " area.
o
When you are not sure w hich component to select, see "About the component category" below . (Clicking "Help" on the "Component Settings - Select
o
Component" screen also displays the same information.)
2.
After adding the ne ce s s ary com ponents to "Pre vie w ," click "Ne xt."
The "Component Settings - Confirming the Label of a Component Key" screen appears. This screen allow s you to change the component's label
displayed on the Remote Commander.
3.
If you w ant to change the label, enter the ne w label in the te xt box to the right of "Label."
You can enter up to eight characters. The label preview in the center of the screen updates the information.
Hints
If you don't w ant to change the label, skip to step 4.
o
By clicking "Symbol," the "Symbol select" dialog box appears, allow ing you to enter symbols such as .
o
The "Label" text box allow s you to copy and paste characters by using the shortcut menu (right-click menu) or the shortcut keys.
o
Note
The label cannot be left blank. Be sure to enter at least one character.
4.
After e ntering the labe l, click "Ne xt."
The "Component Settings - Programming the Preset Codes of Components (SOLUTION)" screen appears. This screen allow s you to program the preset
code for each component. Preset code refers to the IR code of a component's remote control.
5.
Connect the Re mote Com mander (RM-AX4000) to your PC w ith the USB m ini cable.
6.
Follow ing the on-screen ins tructions, place the Re m ote Com m ander (RM -AX4000) he ad to he ad w ith the AV com pone nt's rem ote
control w hose pre set code you w ant to program.
7.
Click "Preset."
The "Preset" dialog box appears, and the Remote Commander (RM-NX4000) goes to standby mode.
8.
Operate the rem ote control according to the on-s creen ins tructions .
"The preset code of "component name" is programmed" appears w hen the programming is complete.
Hints
If 60 seconds passes in standby mode, or if the Remote Commander cannot define the preset code, a dialog box appears for you to confirm redoing
o
the operation. If you click "Yes," the Remote Commander (RM-AX4000) goes to standby mode again and you can redo the operation. If you click "No,"
the "Learn signal in Order" dialog box appears, allow ing you to make each of the keys/buttons learn the code of the selected component from its
remote control.
If "The Remote Commander is not connected or not responding." appears, the Remote Commander (RM-AX4000) may not be connected to your PC
o
properly. After checking the connection, click "Retry" to repeat the operation.
9.
Click "OK" in the m e s sage box.
The message box closes, and the screen returns to "Component Settings - Programming the Preset Codes of Components (SOLUTION)".
10.
Click "Ne xt."
The "Component Settings - Checking the Operations" screen appears. This screen allow s you to test the remote control signal of the preset code
programmed in steps 6 to 9.
11.
Aim the Re m ote Com m ander at the AV com pone nt you w ant to operate, then click "Em ulate."
The Emulator appears.
12.
One by one, pre s s the keys and buttons on the Em ulator to confirm the corre sponding action on the AV com ponent.
Note
Press the keys/buttons longer than usual.
13.
After che ck ing all the k e ys and buttons , click in the uppe r right of the Emulator.
The Emulator closes, and the screen returns to "Component Settings - Checking the Operations."
14.
Click "Ne xt."
Page 13
Page 14

The "Component Settings - Programming the Preset Codes of Components (SOLUTION)" screen reappears, and the second component setting starts.
Repeat steps 5 to 13 to finish all the component settings.
Hint
If only one component is added in step 1, the "Component Settings - Programming the Preset Codes of Components (SOLUTION)" screen does not
appear. In this case, go to step 15.
15.
Click "Ne xt."
A dialog box appears asking if you are sure you w ant to save the settings and continue.
16.
Click "Yes ."
The "XPRESS Settings - What is XPRESS?" screen appears.
Follow ing the w izard instructions, set XPRESS keys.
About the component category
When you select the component category (type) in the "New Project" w izard (for creating a project) or in the "New Component" w izard (for adding a
component), be careful of the follow ing:
A "DVD/Receiver Combo" is a Sony AV amplifier w ith a built-in DVD player.
A "DVR/DVD Combo" is a DVD recorder w ith a built-in hard disk drive.
Except the DVD/Receiver combo, the components w ith the built-in amplifier should be registered as Receiver. All the keys that are inoperative should be
registered by the learning function.
When you have a multi-component (such as a DVD/VCR combo), select only one of either component for the category.
For example, in the case of a DVD/VCR combo, select "DVD" or "VCR" for the category. If you select both components, the XPRESS function w ill not w ork
properly.
Only w hen you add a component in Advanced mode, can you select "None" (that has no preset code). When you cannot find an appropriate component
type, select "None."
Page 14
Page 15

Setting XPRESS keys
The "XPRESS Settings" screen in the "New Project" w izard allow s you to make various settings for XPRESS keys.
Hint
You can save and exit the setting procedure at any point; just click "Save and Exit" in the low er right of the screen. The setting is saved and AX Remote Editor
closes.
The next time you start AX Remote Editor, you can resume the setting from the point you stopped.
1.
After reading the introduction, click "Ne xt."
The "XPRESS Settings - Purpose and Source Component" screen appears.
Hint
Clicking "Help" on the "XPRESS Settings - What is XPRESS?" screen also displays the information about the XPRESS function.
2.
Set the follow ing:
Purpose
o
Select the purpose of the XPRESS key by clicking and selecting from the drop-dow n list. After selecting the purpose, the "Source component" can
o
be set in the same w ay.
Source com ponent
o
Select the source component (that outputs images and sound) for the XPRESS key by clicking and selecting from the drop-dow n list. After
o
selecting the component, the next line can be set in the same w ay to add another XPRESS key.
Repeat step 2 to set up other XPRESS keys.
Hint
You can set up to eight XPRESS keys.
3.
After e ntering each re quired XPRESS ke y, click "Ne xt."
The "XPRESS Settings - Confirming the Label of an XPRESS Key" screen appears. This screen allow s you to change the XPRESS key's label displayed
on the Remote Commander and its name.
4.
If you w ant to change the label and nam e , s e t the follow ing:
XPRESS Key
o
Enter the label (displayed on the Remote Commander). You can enter up to eight characters. The label preview in the center of the screen updates
o
the information.
XPRESS Name
o
Enter the name (w hich w ill appear on the XPRESS display as its title). You can enter up to 12 characters.
o
Hints
If you don't w ant to change the label or name, skip to step 5.
o
By clicking "Symbol," the "Symbol select" dialog box appears, allow ing you to enter symbols such as .
o
The "XPRESS Key" or "XPRESS Name" text box allow s you to copy and paste characters by using the shortcut menu (right-click menu) or the
o
shortcut keys.
Note
The label cannot be left blank. Be sure to enter at least one character.
5.
After e ntering the labe l and nam e, click "Ne xt."
A dialog box appears asking if you are sure you w ant to save the settings and continue.
6.
Click "Yes ."
The "XPRESS Settings - Video Component" screen appears.
7.
Sele ct a vide o com pone nt (that outputs im age s from the s ource com ponent), then click "Ne xt."
The "XPRESS Settings - Audio Component" screen appears.
8.
Sele ct an audio com pone nt (that outputs sound from the s ource com ponent), then click "Ne xt."
The "XPRESS Settings - Pow er Button on your Remote Control of the Video Component" screen appears.
9.
Sele ct the type of pow e r button on the video com ponent's re m ote control, then click "Ne xt."
The "XPRESS Settings - Input Select Button on your Remote Control of the Video Component" screen appears.
10.
Sele ct the type of input se le ct button on the vide o com ponent's rem ote control from the follow ing options, the n click "Ne xt."
I pres s a button repeate dly to cycle through the inputs. (Type A)
o
Select this if you change the input by pressing a button repeatedly, then go to step 14.
o
I pres s a button to directly select the desire d input. (Type B)
o
Select this if you change the input by pressing a particular button. Then enter the name of the source component button in the text box and go to step
o
15.
Others
o
Select this if you change the input on the menu display, then go to step 11.
o
11.
Sele ct the type of input se le ct button on the re m ote control from the follow ing options , the n click "Ne xt."
Type C
o
Select this if you change the input on the menu display by pressing the up/dow n button, then go to step 12.
o
Type D
o
Select this if you change the input on the menu display by pressing a particular button. In the text box, enter the name of the button you press after
o
the menu button to use the source component, then go to step 15.
Hint
For further details about the difference of "Type C" and "Type D," see "About the remote control's input select button type." (Clicking "Help" on the
"XPRESS Settings - Input Select Button on your Remote Control of the Video Component" screen also displays the same information.)
Page 15
Page 16

12.
Enter the follow ing inform ation regarding the input selection of the vide o com ponent, the n click "Ne xt".
What is the total num ber of inputs you can select from the on scree n m e nu?
o
Click and select the number.
o
Which input do you se le ct w hen you use "Source com pone nt nam e "?
o
Enter the input name in the text box.
o
In w hat orde r does your s ele ction (in [2]) appear on the list (1st, 2nd, 3rd, etc.)?
o
Select the order number by clicking .
o
13.
Sele ct w hich input is highlighte d w hen you press the input select button on the re m ote control, then click "Ne xt."
After this selection, go to step 15.
14.
Enter the follow ing inform ation regarding the input selection of the vide o com ponent, the n click "Ne xt".
What is the total num ber of inputs you can change by pres s ing the Input Select button?
o
Click and select the number.
o
Which input do you se le ct w hen you use "Source com pone nt nam e "?
o
Enter the input name in the text box.
o
Where does the input (in [2]) s tand from the initial input?
o
Select the order number by clicking .
o
15.
Follow ing the on-screen ins tructions, place the Re m ote Com m ander (RM -AX4000) he ad to he ad w ith the AV com pone nt's rem ote
control w hose pre set code you w ant to program.
Note
Make sure that the Remote Commander (RM-AX4000) is connected to your PC.
16.
Click "Learn."
The "Learn" dialog box appears, and the Remote Commander (RM-AX4000) goes to standby mode.
17.
Operate the rem ote control according to the on-s creen ins tructions .
"Learning is complete" appears w hen learning is successful. Keep follow ing the on-screen instructions.
The "Learning is complete" message box show s "OK" w hen learning is complete.
Hints
If "A time out error: 60 seconds has passed" appears, click [OK] and redo from step 16.
o
If "The Remote Commander is not connected or not responding." appears, the Remote Commander (RM-AX4000) may not be connected to your PC
o
properly. After checking the connection, click "Retry" to repeat the operation.
18.
Click "OK."
The message box closes and the screen returns to "XPRESS Settings - Learn."
19.
Click "Ne xt."
The "XPRESS Settings - Pow er Button on your Remote Control of the Audio Component" screen appears.
20.
Set the information regarding the audio com ponent's rem ote control in the sam e w ay as for the video com ponent (shown in steps 9
to18).
21.
When finis he d, then click "Ne xt."
The "XPRESS Settings - Pow er Button on your Remote Control of the Source Component" screen appears.
22.
Sele ct the type of pow e r button on the source com ponent's rem ote control, then click "Ne xt."
The "XPRESS Settings - Learn" screen appears.
23.
Mak e the Re mote Com mander learn the s ource com pone nt's rem ote control s ignal in the s am e w ay as for the video com ponent
(show n in steps 15 to18).
24.
When le arning is com plete, click "Ne xt."
The "XPRESS Settings - Options" screen appears.
25.
Set the follow ing options :
Option1: Start Macro
o
Select this to set additional actions (Start macro) to w ork w hen operating an XPRESS key. If an action is not necessary, uncheck the box.
o
Option2: Exit M acro
o
Select this to set additional actions (Exit macro) to w ork w henever you sw itch to another XPRESS display. If an action is not necessary, uncheck the
o
box.
26.
Click "Ne xt."
The "XPRESS Settings - Checking the Operations" screen appears. This screen allow s you to check if the Start macro added in step 25 w orks properly.
Note
Before checking, make sure that the Remote Commander (RM-AX4000) is connected to your PC.
27.
Aim the Re m ote Com m ander at the AV com pone nt you w ant to operate, then click "Test."
A message box appears.
28.
Follow ing the on-screen ins tructions, prepare the AV com pone nt you w ant to ope rate and click "OK."
The "Test" dialog box appears.
Page 16
Page 17
29.
Click "Send."
The signal programmed for the Remote Commander as a Start macro is sent to the AV component. Check if the AV component w orks properly.
30.
After the check ing, click "Cance l."
The "Test" dialog box closes and the screen returns to the "XPRESS Settings - Checking the Operations."
31.
Click "Ne xt."
A dialog box appears asking if you are sure you w ant to save the settings and continue.
32.
Click "Yes ."
The follow ing screen appears:
If you se t tw o or more XPRESS ke ys in s te p 2
o
The "XPRESS Settings - Video Component" screen reappears, and the second XPRESS key's setting starts. Repeat steps 7 to 32 to set all the
o
XPRESS keys.
If you se t only one XPRESS ke y in ste p 2, or otherwis e , w hen all the XPRESS ke y's s e ttings are com ple te
o
The "Data Dow nload to Remote" screen appears.
o
Follow ing the w izard instructions, dow nload the settings to the Remote Commander (RM-AX4000).
o
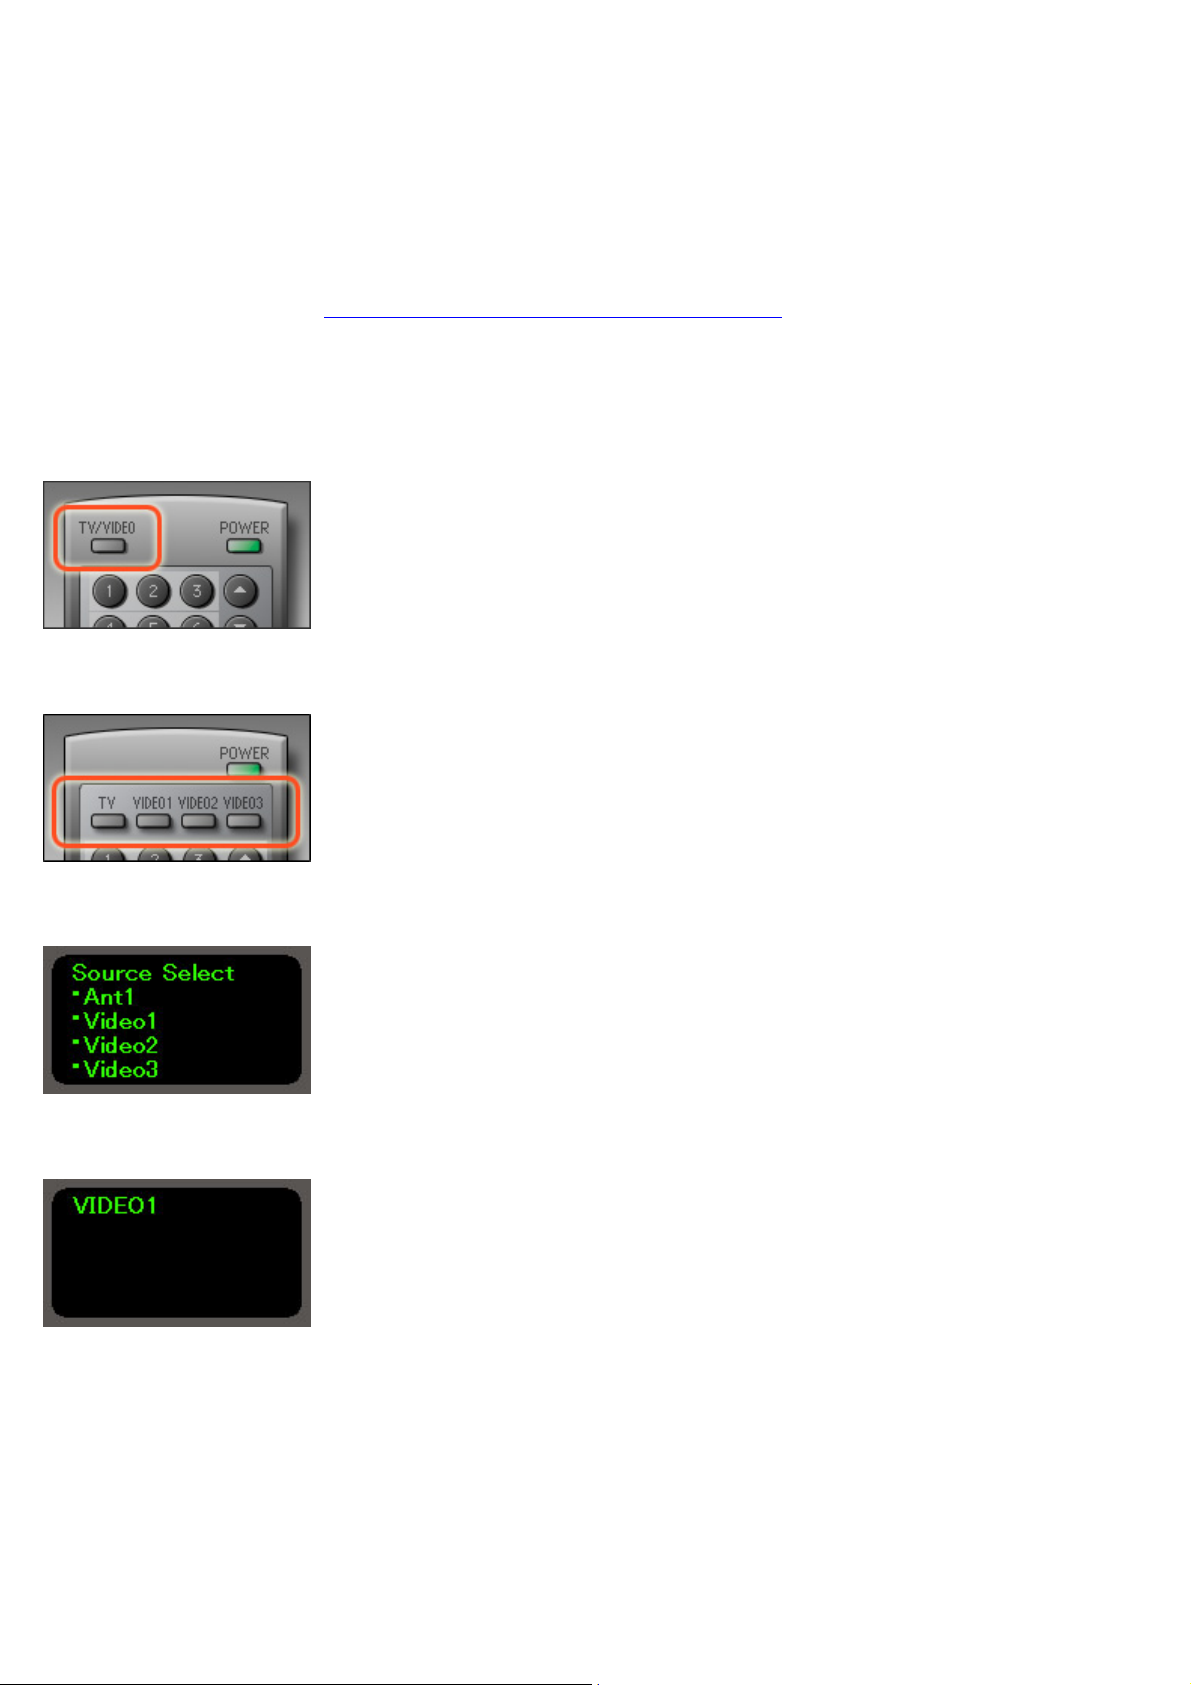
About the remote control's input select button type
Generally, there are four types of input select button on remote controls. See the follow ing:
Type A
Changes the input by pressing the button repeatedly.
In the above example, pressing the "TV/VIDEO" button repeatedly changes the input.
Type B
Changes the input by pressing a particular button.
In the above example, pressing the "TV" button changes the input to "TV;" the "VIDEO1" button is "VIDEO1."
Type C
Changes the input on the menu display by selecting w ith the up/dow n button.
In the above example, press the up/dow n button to select "Video1," and then select the button to decide the selection. The input is changed to "Video1."
Type D
Changes the input on the menu display by pressing a particular button.
In the above example, pressing the "VIDEO2" button changes the input to "VIDEO2."
In the above example, the current input (VIDEO1) is displayed on the menu display. Pressing the button for changing the input (such as Ch2, VIDEO2)
changes the input to "VIDEO2." (The button differs depending on the AV component.)
Page 17
Page 18

Downloading the settings to the Remote Commander
The "Data Dow nload to Remote" screen of the "New Project" w izard allow s you to dow nload the settings to the Remote Commander (RM-AX4000).
Hint
If you don't w ant to dow nload the settings to the Remote Commander, skip the follow ing steps. Just click "Finish" on the "Data Dow nload to Remote" screen.
1.
Mak e s ure that the Re m ote Com m ander (RM -AX4000) is conne cte d to your PC.
2.
Click "Dow nload."
The "Dow nload to Remote" dialog box appears.
3.
Click "Dow nload."
The settings are dow nloaded to the Remote Commander. When dow nloading is complete, a message box appears.
Notes
If the firmw are version of the Remote Commander is older than that of AX Remote Editor, a dialog box appears asking you to confirm updating the
o
firmw are w hen you click "Dow nload." By clicking "OK," the firmw are is updated.
If you update the firmw are, all the current settings of the Remote Commander are deleted. So proceed w ith caution, being careful not to delete
necessary data.
If the version of AX Remote Editor is older than the firmw are version of the Remote Commander, a message box appears asking you to update AX
o
Remote Editor w hen you click "Dow nload." In this case, after checking the firmw are version of the Remote Commander, dow nload the compatible
version of AX Remote Editor from the w ebsite.
If "The Remote Commander is not connected or not responding." appears, the Remote Commander (RM-AX4000) may not be connected to your PC
o
properly. After checking the connection, click "Retry" to repeat the operation.
4.
Click "OK."
The Standard mode screen of AX Remote Editor appears.
Now you have finished all the settings. After disconnecting the USB mini cable from the Remote Commander, try operating your AV components w ith
the Remote Commander.
Page 18
Page 19

Creating a project in Advanced mode
You can create a project in Advanced mode.
1.
Click "File" on the m e nu bar, the n s e le ct "Ne w ."
The "New Project" dialog box appears.
Hint
If the project you are editing is not saved, a message box appears asking you to confirm saving before the "New Project" dialog box appears. To save
the project, click "Yes," otherw ise, click "No."
2.
Click "Advanced," then click "OK."
The "New Project" w izard appears.
3.
Enter a proje ct nam e unde r "Input a project folder nam e," next to .
4.
Click under "Save the project folder in."
A dialog box appears for you to select a folder.
Hint
The "Save the project folder in" field show s the folder (location) in w hich you created a project or saved the project under a different name last time.
The first time you start AX Remote Editor, the field show s the Window s desktop.
5.
Sele ct the folder in w hich you w ant to create the project, then click "OK."
The dialog box closes, and the selected folder is displayed to the left side of .
6.
Click "OK."
The "New " dialog box closes, and the new project named in step 3 is created. The project is displayed in Advanced mode on the AX Remote Editor
screen.
Page 19
Page 20

Standard mode screen reference
The Standard mode of AX Remote Editor displays the follow ing items.
A Title bar
Displays the current project name as "Project name - AX Remote Editor."
B M e nu bar
Displays the AX Remote Editor menu.
C Edit Com ponent button
Sw itches the edit area on the right side of the screen to the Component edit pane.
D Edit XPRESS Setting button
Sw itches the edit area on the right side of the screen to the XPRESS edit pane.
E Se t Up Tim er or Air-Slide button
Sw itches the edit area on the right side of the screen to the Timer/Air-Slide edit pane.
F Edit area
One of the follow ing panes appears, depending on the button you click on the left pane.
When the Edit Compone nt button is clicke d
The Component edit pane opens.
When the Edit XPRESS Setting button is clicked
The XPRESS edit pane opens.
When the Se t Up Tim er or Air-Slide button is click e d
Page 20
Page 21

The Timer/Air-Slide edit pane opens.
G Minim ize button
Minimizes the AX Remote Editor screen and show s an icon on the Window s taskbar.
H Close button
Exits AX Remote Editor.
I ADVANCED tab
Sw itches to Advanced mode for more advanced programming of keys and buttons, such as macros (Action lists).
J Connection s tatus
Displays the connection status betw een your PC and the Remote Commander.
When appears
One Remote Commander is connected to the PC. You can send data.
When appe ars
Tw o or more Remote Commanders are connected to the PC. You cannot send data.
When appe ars
The Remote Commander is not connected to the PC. You cannot send data.
K Dow nload to Rem ote button
Dow nloads the settings you made on AX Remote Editor to the Remote Commander.
L Em ulate button
Starts the Emulator. By pressing the keys/buttons on the Emulator, the signal from the Remote Commander connected to your PC is sent to an AV
component to confirm that the settings made on AX Remote Editor w ill w ork properly.
M Exit button
Exits AX Remote Editor.
Page 21
Page 22
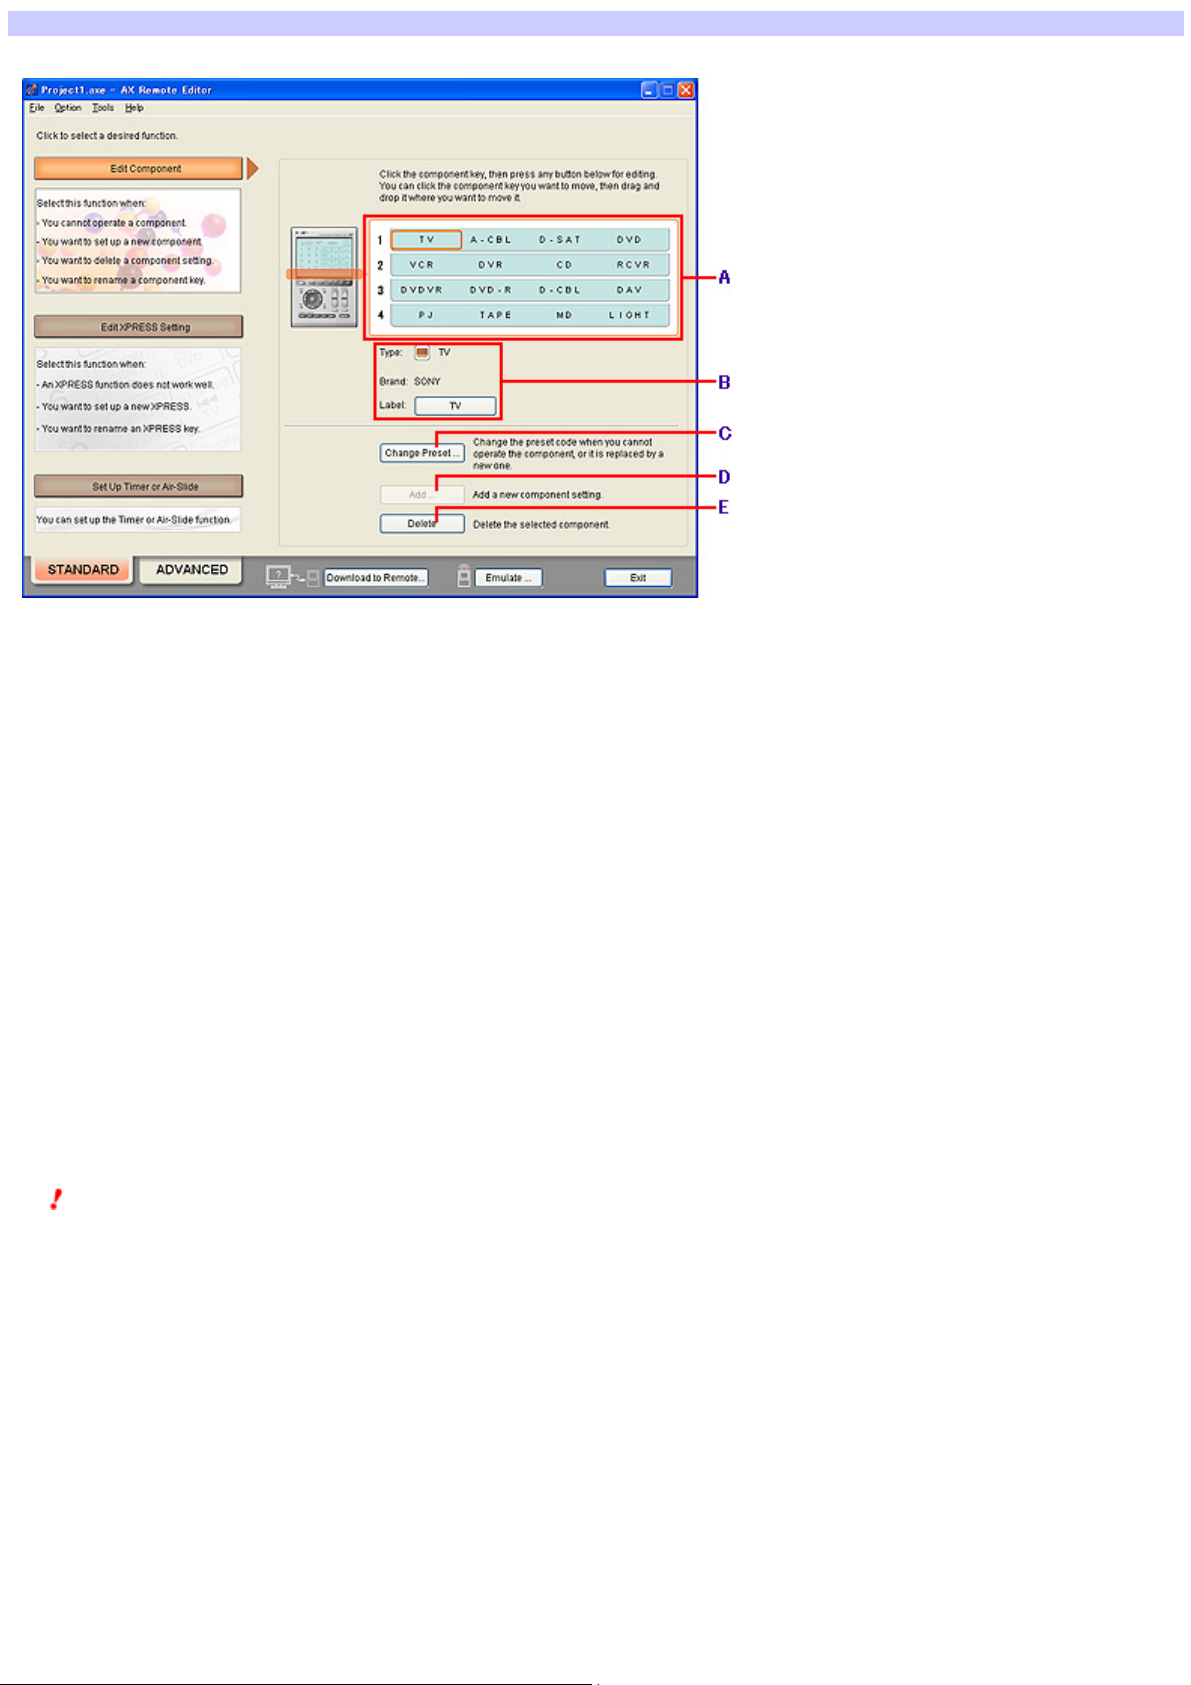
Changing the component settings (Standard mode)
The Component edit pane in Standard mode displays the follow ing items.
A Component lis t
Displays the programmed components on a list. Items on the top line of the list are Component keys of page 1 on the Remote Commander's display. You can
program up to four Component keys on each line (page), up to 16 Component keys on four lines (pages).
By clicking a Component key on a list, you can edit the component. You can also change the assignment of components on a list by dragging and dropping
the components you w ant to move.
B Component inform ation
Type:
Displays the selected component type (category).
Brand:
Displays the manufacturer of the selected component.
Label:
Displays a label of the selected component (Component key) on the button. By clicking the button, you can change the label of the Component key.
Note
If the component sets the preset code by "SOLUTION preset" (by reading the preset code from the remote control signal of your AV component),
manufacturer is not displayed in the "Brand" field.
C Change Pre s e t button
Changes the preset code of the selected component.
D Add button
Adds a component on an empty key position (w here no component is assigned) in the component list.
Page 22
Page 23

Note
You cannot add a component to the key position w here a component is already assigned or if 16 components are already programmed.
E De lete button
Deletes the selected component.
Page 23
Page 24
About editing components
About operating and editing of a component
Editable contents for a component
About operating and editing of a component
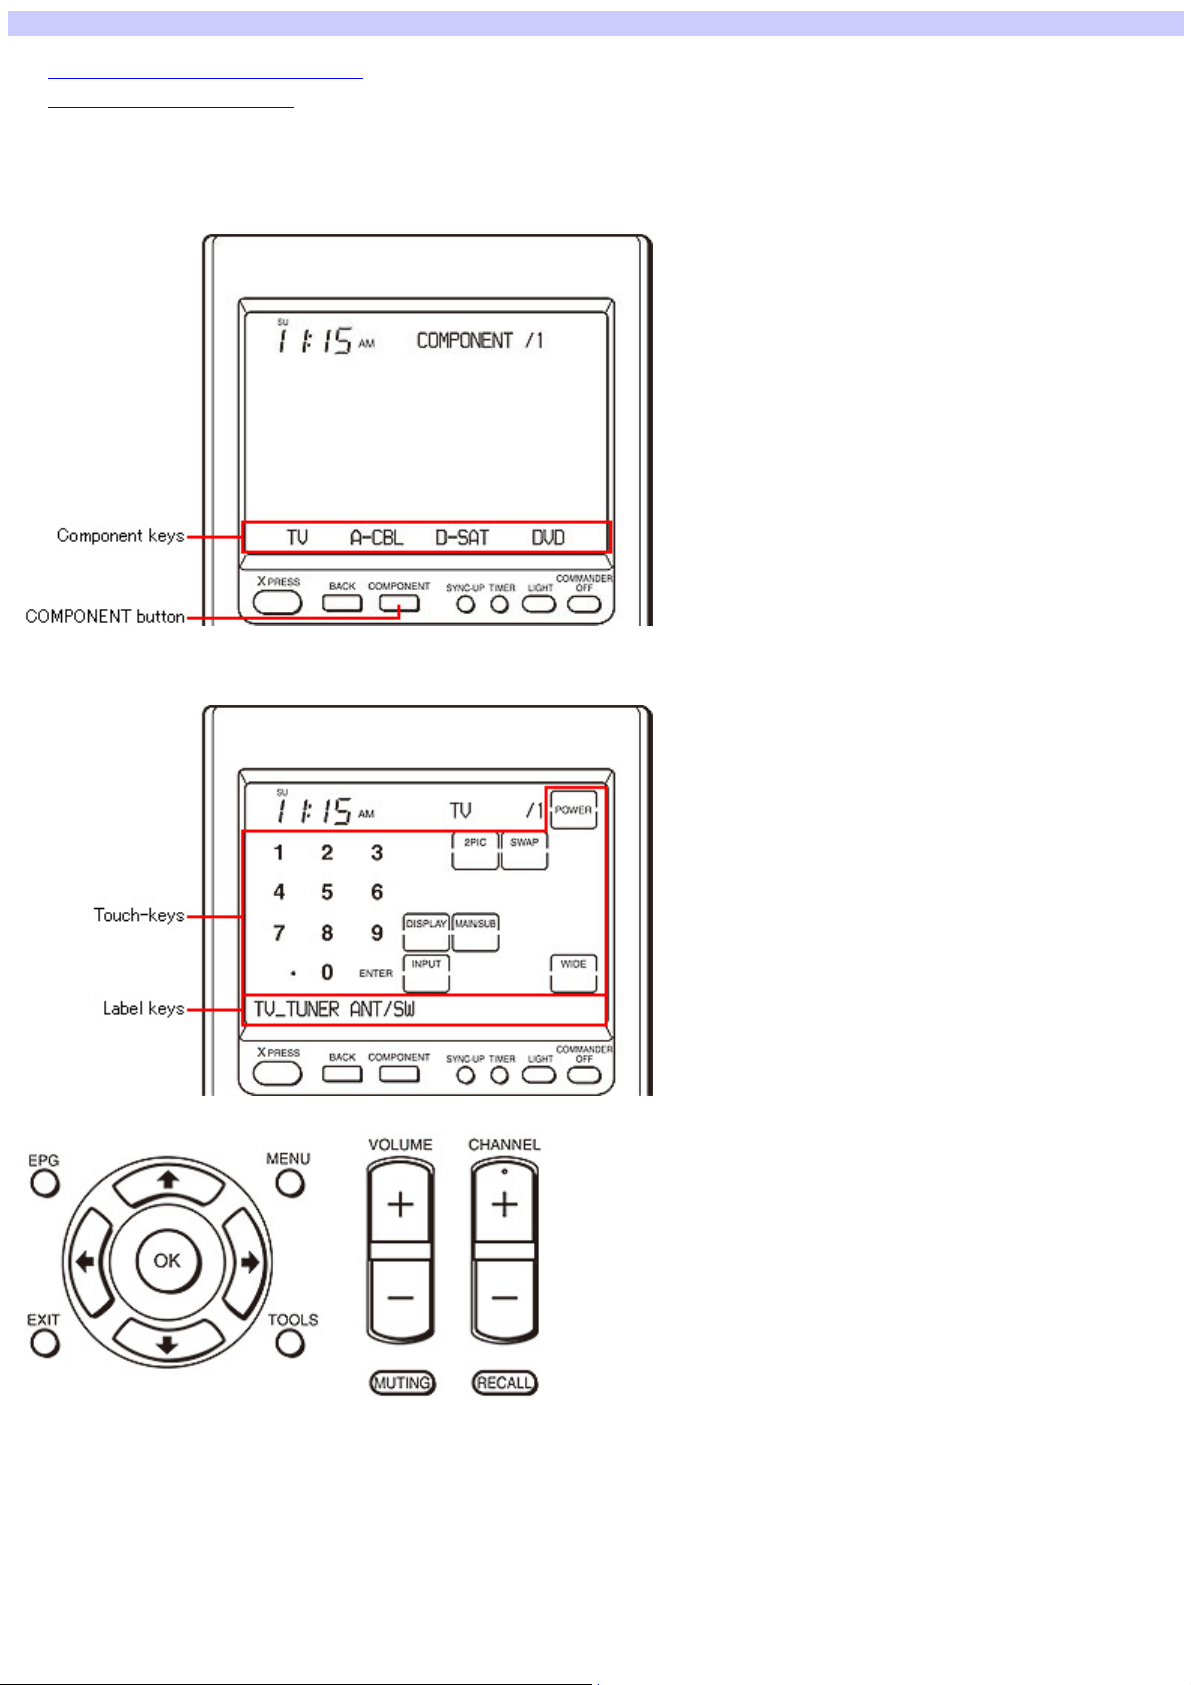
A "component" refers to an AV component that you w ant the Remote Commander to control.
When you press a COMPONENT button on the Remote Commander, keys show ing components, called "Component keys," appear at the bottom of the display.
You can create up to 16 Component keys.
When you press the Component key of the component you w ant to operate, the display to operate the component appears. This display is called "Component
display." Keys on the Component display are divided into tw o types--"Touch-keys" (w hose labels are already set) and "Label keys" (w hose label you can
enter). You can create up to 12 Label keys per component.
Furthermore, for each component, you can set different actions for each button on the Remote Commander.
Editable contents for a component
With AX Remote Editor you can edit the follow ing items for a component in Standard mode/Advanced mode.
Editing contents Standard
m ode Advanced
m ode
Page 24
Page 25

Change the label of a component
Editable Editable
Change the assignment of components
Change the preset code of a component
Add a component
Change the key/button setting for a component
*1*2
*1
Editable Editable
Editable Editable
Editable Editable
- Editable
Delete a component
Initialize the key/button setting for a component
*1 The Standard mode sets the preset code by "SOLUTION preset" (by reading the preset code from the remote control signal of your AV component).
The Advanced mode sets the preset code by "SOLUTION preset" or "BRAND preset " (by selecting the manufacturer and the preset code).
*2 Only in Advanced mode, can you select "None" for a component (that has no preset code).
Editable Editable
- Editable
Page 25
Page 26

Changing the label of a component (Standard mode)
You can change the label of a component (Component key).
1.
Click the "Standard" tab in the low er left of the s cre en to sw itch to Standard m ode.
2.
Click "Edit Com pone nt" in the upper left of the s cre en.
3.
Click the com ponent w hose label you w ant to change from the com pone nt lis t on the right.
4.
Click the button to the right of "Labe l."
The "Edit Key Label" dialog box appears.
5.
Enter the new labe l in the te xt box to the right of "Label."
You can enter up to eight characters. The label preview in the center of the screen updates the information.
Hints
By clicking "Symbol," the "Symbol select" dialog box appears, allow ing you to enter symbols such as .
o
The "Label" text box allow s you to copy and paste characters by using the shortcut menu (right-click menu) or the shortcut keys.
o
Note
The label cannot be left blank. Be sure to enter at least one character.
6.
Click "OK."
The "Edit Key Label" dialog box closes, and the label of the component selected in step 3 is changed.
Page 26
Page 27

Changing the assignment of components (Standard mode)
You can change the assignment of the components (Component keys) displayed on the Remote Commander.
1.
Click the "Standard" tab in the low er left of the s cre en to sw itch to Standard m ode.
2.
Click "Edit Com pone nt" in the upper left of the s cre en.
3.
Click the com ponent you w ant to move from the com ponent list on the right side , the n drag and drop it to the k e y pos ition w here
you w ant to m ove it.
If no component occupies that key, the component w ill move there.
If another component already occupies that key, the components w ill sw ap key positions.
Page 27
Page 28
Changing the preset code of a component (Standard mode)
You can change the preset code programmed for each component. In this topic, preset code refers to the IR code of a component's remote control.
Change the preset code of a component only w hen necessary, for example, w hen you buy a new AV component.
Notes
If you change the preset code of a component, all the learned key/button settings (Learn action and Learn+ action) for that component are deleted. So
proceed w ith caution, being careful not to delete necessary data.
If you change the preset code of a component, any XPRESS key w hich includes that component in its setting w ill also be deleted. So proceed w ith caution,
being careful not to delete necessary data.
1.
Click the "Standard" tab in the low er left of the s cre en to sw itch to Standard m ode.
2.
Click "Edit Com pone nt" in the upper left of the s cre en.
3.
Click the com ponent w ith the prese t code you w ant to change in the com ponent list on the right side .
4.
Click "Change Pre s e t."
A dialog box appears asking if you are sure you w ant to change the preset code.
5.
Click "Yes ."
The "Confirming the Label of a Component Key" screen in the "Component Setting" w izard appears.
6.
If you w ant to change the label, enter the ne w label in the te xt box to the right of "Label."
You can enter up to eight characters. The label preview in the center of the screen updates the information.
Hints
If you don't w ant to change the label, skip to step 7.
o
By clicking "Symbol," the "Symbol select" dialog box appears, allow ing you to enter symbols such as .
o
The "Label" text box allow s you to copy and paste characters by using the shortcut menu (right-click menu) or the shortcut keys.
o
Note
The label cannot be left blank. Be sure to enter at least one character.
7.
After e ntering the labe l, click "Ne xt."
The "Programming the Preset Codes of Components (SOLUTION)" screen appears.
8.
Connect the Re mote Com mander (RM-AX4000) to your PC w ith the USB m ini cable.
9.
Follow ing the on-screen ins tructions, place the Re m ote Com m ander (RM -AX4000) he ad to he ad w ith the AV com pone nt's rem ote
control w hose pre set code you w ant to program.
10.
Click "Preset."
The "Preset" dialog box appears, and the Remote Commander (RM-AX4000) goes to standby mode.
11.
Operate the rem ote control according to the on-s creen ins tructions .
"The preset code of "component name" is programmed." appears w hen the programming is complete.
Hints
If 60 seconds passes in standby mode, or if the Remote Commander (RM-AX4000) cannot define the preset code, a dialog box appears for you to
o
confirm redoing the operation. If you click "Yes," the Remote Commander goes to standby mode again and you can redo the operation. If you click
"No," the "Learn signal in Order" dialog box appears, allow ing you to make each of the keys/buttons learn the code of the selected component from
its remote control.
If "The Remote Commander is not connected or not responding." appears, the Remote Commander (RM-AX4000) may not be connected to your PC
o
properly. After checking the connection, click "Retry" to repeat the operation.
12.
Click "OK" in the m e s sage box.
The message box closes, and the screen returns to "Programming the Preset Codes of Components (SOLUTION)."
13.
Click "Ne xt."
The "Checking the Operations" screen appears. This screen allow s you to test the remote control signal of the preset code programmed in steps 9 to
12.
14.
Aim the Re m ote Com m ander at the AV com pone nt you w ant to operate, then click "Em ulate."
The Emulator appears.
15.
One by one, pre s s the keys and buttons on the Em ulator to confirm the corre sponding action on the AV com ponent.
Note
Press the keys/buttons longer than usual.
16.
After che ck ing all the k e ys and buttons , click in the uppe r right of the Emulator.
The Emulator closes and the screen returns to "Checking the Operations."
17.
Click "Finish."
The preset code of the component selected in step 3 is changed.
Page 28
Page 29
Adding a component (Standard mode)
When you buy a new compatible AV component, etc., you can add it to the Remote Commander's (RM-AX4000) control list using AX Remote Editor.
Note
If 16 components are already programmed, you cannot add another component.
1.
Click the "Standard" tab in the low er left of the s cre en to sw itch to Standard m ode.
2.
Click "Edit Com pone nt" in the upper left of the s cre en.
3.
Click an em pty k ey position in the com ponent list on the right s ide .
4.
Click "Add."
The "Select Component Category" screen in the "New Component" w izard appears.
5.
Click the com ponent type you w ant to add, then click "Ne xt."
The "Confirming the Label of a Component Key" screen appears.
Hint
When you are not sure w hich component to select, see "About the component category." (Clicking "Help" on the "Select Component Category" screen
also displays the same information.)
6.
If you w ant to change the label, enter the ne w label in the te xt box to the right of "Label."
You can enter up to eight characters. The label preview in the center of the screen updates the information.
Hints
If you don't w ant to change the label, skip to step 7.
o
By clicking "Symbol," the "Symbol select" dialog box appears, allow ing you to enter symbols such as .
o
The "Label" text box allow s you to copy and paste characters by using the shortcut menu (right-click menu) or the shortcut keys.
o
Notes
The label cannot be left blank. Be sure to enter at least one character.
7.
After e ntering the labe l, click "Ne xt."
The "Programming the Preset Codes of Components (SOLUTION)" screen appears. Preset code refers to the IR code of a component's remote control.
8.
Connect the Re mote Com mander (RM-AX4000) to your PC w ith the USB m ini cable.
9.
Follow ing the on-screen ins tructions, place the Re m ote Com m ander (RM -AX4000) he ad to he ad w ith the AV com pone nt's rem ote
control w hose pre set code you w ant to program.
10.
Click "Preset."
The "Preset" dialog box appears, and the Remote Commander (RM-AX4000) goes to standby mode.
11.
Operate the rem ote control according to the on-s creen ins tructions .
"The preset code of "component name" is programmed." appears w hen the programming is complete.
Hints
If 60 seconds passes in standby mode, or if the Remote Commander (RM-AX4000) cannot define the preset code, a dialog box appears for you to
o
confirm redoing the operation. If you click "Yes," the Remote Commander goes to standby mode again and you can redo the operation. If you click
"No," the "Learn signal in Order" dialog box appears, allow ing you to make each of the keys/buttons learn the code of the selected component from
its remote control.
If "The Remote Commander is not connected or not responding." appears, the Remote Commander (RM-AX4000) may not be connected to your PC
o
properly. After checking the connection, click "Retry" to repeat the operation.
12.
Click "OK" in the m e s sage box.
The message box closes, and the screen returns to "Component Settings - Programming the Preset Codes of Components (SOLUTION)."
13.
Click "Ne xt."
The "Checking the Operations" screen appears. This screen allow s you to test the remote control signal of the preset code programmed in steps 9 to
12.
14.
Aim the Re m ote Com m ander at the AV com pone nt you w ant to operate, then click "Em ulate."
The Emulator appears.
15.
One by one, pre s s the keys and buttons on the Em ulator to confirm the corre sponding action on the AV com ponent.
Note
Press the keys/buttons longer than usual.
16.
After che ck ing all the k e ys and buttons , click in the uppe r right of the Emulator.
The Emulator closes and the screen returns to "Checking the Operations."
17.
Click "Finish."
The new component is added to the place selected in step 3.
Page 29
Page 30

Deleting a component (Standard mode)
You can delete unnecessary components (Component key).
Delete a component w hen the existing component is no longer necessary, such as w hen you replace an AV component.
Note
If you delete a component, any XPRESS key that includes that component w ill also be deleted. So proceed w ith caution, being careful not to delete necessary
data.
1.
Click the "Standard" tab in the low er left of the s cre en to sw itch to Standard m ode.
2.
Click "Edit Com pone nt" in the upper left of the s cre en.
3.
Click the com ponent you w ant to dele te from the com pone nt list on the right side .
4.
Click "De le te" at the bottom of the screen.
A dialog box appears for you to confirm the deletion.
5.
Click "Yes ."
The component selected in step 3 is deleted.
Page 30
Page 31

Changing the settings of XPRESS keys (Standard mode)
The XPRESS edit pane in Standard mode displays the follow ing items.
A Start Setting Wizard
Adds an XPRESS key on an empty key position (w here no XPRESS key is assigned) in the XPRESS list.
Note
You cannot add an XPRESS key to the key position w here an XPRESS key is already assigned, or if eight XPRESS keys are already programmed.
B XPRESS list
Displays the programmed XPRESS keys on a list. Items on the top line of the list are XPRESS keys of page 1 on the Remote Commander's display. You can
program up to four XPRESS keys on each line (page), up to eight XPRESS keys on tw o lines (pages).
By clicking an XPRESS key on a list, you can edit it. You can also change the assignment of XPRESS keys on a list by dragging and dropping the XPRESS
keys you w ant to move.
C XPRESS information
XPRESS Name :
The name of the selected XPRESS key is displayed on this button. By clicking the button, you can change the name and label of the XPRESS key.
XPRESS structure:
Displays the components operated by a selected XPRESS function.
In the center is the source component that outputs images and sound, the left side is the video component that outputs images from the source component,
On the right side is the audio component that outputs sound from the source component.
The input (jack) name through w hich images and sound from the source component are sent appears below each illustration.
D De lete button
Deletes the selected XPRESS key.
Page 31
Page 32

Page 32
Page 33

About editing XPRESS keys
What is the XPRESS function?
About components that you can operate by XPRESS function (Source component/Video component/Audio component)
About operating and editing an XPRESS key
About a Start macro/Exit macro of an XPRESS key
Editable contents for an XPRESS key
What is the XPRESS function?
The XPRESS function is an executed series of actions that operate several AV components by pressing just one key (XPRESS key).
For example, you have to perform the follow ing operations sequentially to w atch a DVD using a TV, an amplifier/receiver, and a DVD player.
1.
Turn on the DVD player.
2.
Turn on the TV.
3.
Set the input selector of the TV to VIDEO1.
4.
Turn on the amplifier/receiver.
5.
Set the input selector of the amplifier/receiver to DVD.
6.
Start DVD playback.
By setting the above actions as an XPRESS key, you can w atch a DVD by simply pressing one key.
About components that you can operate by XPRESS function (Source component/Video component/Audio component)
When setting an XPRESS function, set the follow ing three components as a target of operating.
Source com ponent
The component that outputs image and sound signals.
You cannot select PJ (Projector) or LIGHT for the source component.
Video com ponent
The component that displays the images from the source component.
You can select TV or PJ (Projector) for the video component. Or, you can set an XPRESS key w ithout selecting the video component.
Audio component
The component that amplifies sound from the source component.
You can select TV, PJ (Projector), RCVR (Receiver), or DAV (DVD/Receiver Combo) for the audio component. Or, you can set an XPRESS key w ithout
selecting the audio component.
In the above example of "w atching a DVD," the source component, the video component, and the audio component are a DVD player, a TV, and an
amplifier/receiver, respectively.
The components that you can operate by XPRESS function are displayed on the AX Remote Editor screen as show n below .
Note
You cannot select a component that has no preset code ("None" component) as an XPRESS function target of operation.
About operating and editing an XPRESS key
When you press an XPRESS button on the Remote Commander, "XPRESS keys" appear at the bottom of the display. You can create up to eight XPRESS keys.
Page 33
Page 34

When you press an XPRESS key, the Action list (Start macro) programmed for that key is performed and a screen called "XPRESS display" appears. Keys on
the XPRESS display are divided into tw o types--"Touch-key" (w hose labels are already set) and "Label key" (that sw itch to the display of each component that
of the XPRESS function).
For each XPRESS key, different actions for each button on the Remote Commander are set (you can also change these settings).
About a Start macro/Exit macro of an XPRESS key
You can program a Start macro/Exit macro for each XPRESS key. A Start macro is a list of actions (macro) to be performed w hen an XPRESS key is pressed.
For example, you can program the follow ing actions as the Start macro of the XPRESS key to "w atch a DVD" using a TV, an amplifier/receiver, and DVD
player.
1.
Sw itch the display to the XPRESS display for DVD.
2.
Turn on the DVD player.
3.
Turn on the TV.
4.
Set the input selector of the TV to VIDEO1.
5.
Turn on the amplifier/receiver.
6.
Set the input selector of the amplifier/receiver to DVD.
7.
Start DVD playback.
By programming the above Start macro, you can perform the above actions by simply pressing the DVD XPRESS key.
An Exit macro is a list of actions (macro) to be performed w hen sw itching to another XPRESS display.
For example, you can program the follow ing actions as the Exit macro of the XPRESS key to "w atch a DVD."
1.
Stop DVD playback.
2.
Turn off the DVD player.
3.
Turn off the TV.
4.
Turn off the amplifier/receiver.
By programming the above Exit macro, you can perform the above actions after the DVD XPRESS operation, by simply pressing the TV XPRESS key.
You can program a Start macro/Exit macro by simply follow ing the w izard instructions in "Creating a project in Standard mode" and in "Adding an XPRESS
Page 34
Page 35

key."
Furthermore, you can edit a Start macro/Exit macro of the programmed XPRESS key in Advanced mode.
See als o
Creating a project in Standard mode
Adding an XPRESS key (Standard mode)
Adding an XPRESS key (Advanced mode)
Editing a Start macro/Exit macro for an XPRESS key
Editable contents for an XPRESS key
With AX Remote Editor you can edit the follow ing items for an XPRESS key in Standard mode/Advanced mode.
Editing contents Standard
m ode Advanced
m ode
Change the label of an XPRESS key
Change the assignment of XPRESS keys
Add an XPRESS key
Edit a Start macro/Exit macro for an XPRESS key
Editable Editable
Editable Editable
Editable Editable
- Editable
Change the key/button setting for an XPRESS key
Copy an XPRESS key
Delete an XPRESS key
Initialize the settings of an XPRESS key
Note
You cannot change the follow ing settings for the programmed XPRESS key.
The audio component's remote control setting (pow er button type/input select button type/learned setting)
o
The video component's remote control setting (pow er button type/input select button type/learned setting)
o
- Editable
- Editable
Editable Editable
- Editable
Page 35
Page 36

The source component's remote control setting (pow er button type/learned setting)
o
If an XPRESS key does not w ork properly, delete the XPRESS key and recreate a new XPRESS key.
Page 36
Page 37

Changing the label of an XPRESS key (Standard mode)
You can change the label of an XPRESS key.
1.
Click the "Standard" tab in the low er left of the s cre en to sw itch to Standard m ode.
2.
Click "Edit XPRESS Setting" on the le ft s ide of the scree n.
3.
Click the XPRESS key w hose label you w ant to change in the XPRESS list on the right side.
4.
Click the button to the right of "XPRESS Name ."
The "Rename XPRESS" dialog box appears.
This dialog box allow s you to set the follow ing:
XPRESS Name
o
Enter the name (w hich w ill appear on the XPRESS display as its title). You can enter up to 12 characters.
o
XPRESS Key
o
Enter the label (displayed on the Remote Commander). You can enter up to eight characters.
o
The label preview at the bottom of the screen updates the information.
o
Hints
By clicking "Symbol," the "Symbol select" dialog box appears, allow ing you to enter symbols such as .
o
The "XPRESS Key" or "XPRESS Name" text box allow s you to copy and paste characters by using the shortcut menu (right-click menu) or the
o
shortcut keys.
Notes
The label cannot be left blank. Be sure to enter at least one character.
5.
Click "OK."
The "Rename XPRESS" dialog box closes, and the label of the XPRESS key selected in step 3 is changed.
Page 37
Page 38

Changing the assignment of XPRESS keys (Standard mode)
You can change the assignment of the XPRESS keys displayed on the Remote Commander.
1.
Click the "Standard" tab in the low er left of the s cre en to sw itch to Standard m ode.
2.
Click "Edit XPRESS Setting" on the le ft s ide of the scree n.
3.
Click the XPRESS key you w ant to move from the XPRESS list on the right side, then drag and drop it to the k e y position w here you
w ant to m ove it.
If no XPRESS key occupies that key position, the XPRESS key w ill move there.
If another XPRESS key already occupies that key position, the XPRESS keys w ill sw ap key positions.
Page 38
Page 39

Adding an XPRESS key (Standard mode)
You can add an XPRESS key, for example, w henever you add or replace a component in your AV system.
Note
If eight XPRESS keys are already programmed, you cannot add another XPRESS key.
1.
Click the "Standard" tab in the low er left of the s cre en to sw itch to Standard m ode.
2.
Click "Edit XPRESS Setting" on the le ft s ide of the scree n.
3.
Click "Start Setting Wizard."
The "What is XPRESS?" screen in the "New XPRESS" w izard appears.
Hint
Clicking "Help" on the screen also displays the information about the XPRESS function.
4.
After reading the introduction, click "Ne xt."
The "Purpose and Source Component" screen appears.
5.
Set the follow ing:
Purpose
o
Select the purpose of the XPRESS key by clicking and selecting from the drop-dow n list. After selecting the purpose, the "Source component" can
o
be set in the same w ay.
Source com ponent
o
Select the source component (that outputs images and sound) for the XPRESS key by clicking and selecting from the drop-dow n list. After
o
selecting the component, the next line can be set in the same w ay to add another XPRESS key.
Repeat step 5 to set up other XPRESS keys.
Hint
You can set up to eight XPRESS keys.
6.
After e ntering each re quired XPRESS ke y, click "Ne xt."
The "Confirming the Label of an XPRESS Key" screen appears.
7.
If you w ant to change the label and nam e , s e t the follow ing:
XPRESS Key
o
Enter the label (displayed on the Remote Commander). You can enter up to eight characters. The label preview in the center of the screen updates
o
the information.
XPRESS Name
o
Enter the name (w hich w ill appear on the XPRESS display as its title). You can enter up to 12 characters.
o
Hints
If you don't w ant to change the label or name, skip to step 8.
o
By clicking "Symbol," the "Symbol select" dialog box appears, allow ing you to enter symbols such as .
o
The "XPRESS Key" or "XPRESS Name" text box allow s you to copy and paste characters by using the shortcut menu (right-click menu) or the
o
shortcut keys.
Note
The label cannot be left blank. Be sure to enter at least one character.
8.
After e ntering the labe l and nam e, click "Ne xt."
The "Video Component" screen appears.
9.
Sele ct a vide o com pone nt (that outputs im age s from the s ource com ponent), then click "Ne xt."
The "Audio Component" screen appears.
10.
Sele ct an audio com pone nt (that outputs sound from the s ource com ponent), then click "Ne xt."
The "Pow er Button on your Remote Control of the Video Component" screen appears.
11.
Sele ct the type of pow e r button on the video com ponent's re m ote control, then click "Ne xt."
The "Input Select Button on your Remote Control of the Video Component" screen appears.
12.
Sele ct the type of input se le ct button on the vide o com ponent's rem ote control from the follow ing options, the n click "Ne xt."
I pres s a button repeate dly to cycle through the inputs. (Type A)
o
Select this if you change the input by pressing a button repeatedly, then go to step 16.
o
I pres s a button to directly select the desire d input. (Type B)
o
Select this if you change the input by pressing a particular button. Then enter the name of the source component button in the text box and go to step
o
17.
Others
o
Select this if you change the input on the menu display, then go to step 13.
o
13.
Sele ct the type of input se le ct button on the re m ote control from the follow ing options , the n click "Ne xt."
Type C
o
Select this if you change the input on the menu display by pressing the up/dow n button, then go to step 14.
o
Type D
o
Select this if you change the input on the menu display by pressing a particular button. In the text box, enter the name of the button you press after
o
the menu button to use the source component, then go to step 17.
Hint
For further details about the difference of "Type C" and "Type D," see "About the remote control's input select button type." (Clicking "Help" on the "Input
Select Button on your Remote Control of the Video Component" screen also displays the same information.)
14.
Enter the follow ing inform ation regarding the input selection of the vide o com ponent, the n click "Ne xt".
Page 39
Page 40

What is the total num ber of inputs you can select from the on scree n m e nu?
o
Click and select the number.
o
Which input do you se le ct w hen you use "Source com pone nt nam e "?
o
Enter the input name in the text box.
o
In w hat orde r does your s ele ction (in [2]) appear on the list (1st, 2nd, 3rd, etc.)?
o
Select the order number by clicking .
o
15.
Sele ct w hich input is highlighte d w hen you press the input select button on the re m ote control, then click "Ne xt."
After this selection, go to step 17.
16.
Enter the follow ing inform ation regarding the input selection of the vide o com ponent, the n click "Ne xt".
What is the total num ber of inputs you can change by pres s ing the Input Select button?
o
Click and select the number.
o
Which input do you se le ct w hen you use "Source com pone nt nam e "?
o
Enter the input name in the text box.
o
Where does the input (in [2]) s tand from the initial input?
o
Select the order number by clicking .
o
17.
Follow ing the on-screen ins tructions, place the Re m ote Com m ander (RM -AX4000) he ad to he ad w ith the AV com pone nt's rem ote
control w hose pre set code you w ant to program.
Note
Make sure that the Remote Commander (RM-AX4000) is connected to your PC.
18.
Click "Learn."
The "Learn" dialog box appears, and the Remote Commander (RM-AX4000) goes to standby mode.
19.
Operate the rem ote control according to the on-s creen ins tructions .
"Learning is complete." appears w hen learning is successful. Keep follow ing the on-screen instructions.
The "Learning is complete." message box show s "OK" w hen learning is complete.
Hints
If "A time out error: 60 seconds has passed" appears, click [OK] and redo from step 18.
o
If "The Remote Commander is not connected or not responding." appears, the Remote Commander (RM-AX4000) may not be connected to your PC
o
properly. After checking the connection, click "Retry" to repeat the operation.
20.
Click "OK."
The message box closes and the screen returns to "Learn."
21.
Click "Ne xt."
The "Pow er Button on your Remote Control of the Audio Component" screen appears.
22.
Set the information regarding the audio com ponent's rem ote control in the sam e w ay as for the video com ponent (shown in steps
11 to 20).
23.
When finis he d, click "Ne xt."
The "Pow er Button on your Remote Control of the Source Component" screen appears.
24.
Sele ct the type of pow e r button on the source com ponent's rem ote control, then click "Ne xt."
The "Learn" screen appears.
25.
Mak e the Re mote Com mander learn the s ource com pone nt's rem ote control s ignal in the s am e w ay as for the video com ponent
(show n in steps 17 to 20).
26.
When le arning is com plete, click "Ne xt."
The "Options" screen appears.
27.
Set the follow ing options :
Option1: Start Macro
o
Select this to set additional actions (Start macro) to w ork w hen operating an XPRESS key. If an action is not necessary, uncheck the box.
o
Option2: Exit M acro
o
Select this to set additional actions (Exit macro) to w ork w henever you sw itch to another XPRESS display. If an action is not necessary, uncheck the
o
box.
28.
Click "Ne xt."
The "Checking the Operations" screen appears. This screen allow s you to check if the Start macro added in step 27 w orks properly.
Note
Before checking, make sure that the Remote Commander (RM-AX4000) is connected to your PC.
29.
Aim the Re m ote Com m ander at the AV com pone nt you w ant to operate, then click "Test."
A message box appears.
30.
Follow ing the on-screen ins tructions, prepare the AV com pone nt you w ant to ope rate and click "OK."
The "Test" dialog box appears.
31.
Click "Send."
Page 40
Page 41

The signal programmed for the Remote Commander as a Start macro is sent to the AV component. Check if the AV component w orks properly.
32.
After che ck ing, click "Cance l."
The "Test" dialog box closes, and the screen returns to "Checking the Operations."
33.
Do either of the follow ing:
If you se t tw o or more XPRESS ke ys in s te p 5
o
Click "Next."
o
The "Video Component" screen reappears, and the second XPRESS key's setting starts. Repeat steps 9 to 32 to set all the XPRESS keys.
o
If you se t only one XPRESS ke y in ste p 5, or otherwis e , w hen all the XPRESS ke y's s e ttings are com ple te
o
Click "Finish."
o
The XPRESS key(s) set in step 5 is added.
o
Page 41
Page 42

Deleting an XPRESS key (Standard mode)
You can delete unnecessary XPRESS keys.
Delete an XPRESS key w hen it is no longer necessary or w hen the programmed XPRESS key does not w ork properly.
1.
Click the "Standard" tab in the low er left of the s cre en to sw itch to Standard m ode.
2.
Click "Edit XPRESS Setting" on the le ft s ide of the scree n.
3.
Click the XPRESS key you w ant to dele te from the XPRESS list on the right side.
4.
Click "De le te" at the bottom of the screen.
A dialog box appears for you to confirm the deletion.
5.
Click "Yes ."
The XPRESS key selected in step 3 is deleted.
Page 42
Page 43

Changing the Timer/Air-Slide settings (Standard mode)
The Timer/Air-Slide edit pane in Standard mode displays the follow ing items.
A Edit Tim e r button
Sets an XPRESS procedure to operate at a scheduled time by the Timer function.
B Edit Air-Slide button
Sets a macro (Action list) to operate for an Air-Slide pattern.
Page 43
Page 44

About the Timer/Air-Slide/System Control function
About the Timer function
About the Air-Slide function
About the System Control function
About the Timer function
The Remote Commander (RM-AX4000) can perform a programmed action automatically at a scheduled time every day or on particular days. This is called a
"Timer function."
You can set up to eight Timer functions w ith the follow ing options.
Tim er ON/OFF
Sw itches ON/OFF each Timer function.
Ke y Label
When you press the TIMER button on the Remote Commander, "Timer keys" show ing a Timer function are displayed at the bottom of the display.
The default labels of each Timer key are show n as "PROG1" to "PROG8," w hich you can change.
Actions to be pe rform ed
In Standard mode you can set an XPRESS procedure to operate at a scheduled time. In Advanced mode you can set a "Timer macro" (Action list) to operate
at a scheduled time.
Tim e
Sets the operation time (hour, minute, AM/PM) for a Timer function.
Day
Sets the day for a Timer function to operate. The default setting is "Everyday."
See als o
Changing the Timer function (Standard mode)
Changing the Timer function (Advanced mode)
About the Air-Slide function
The Remote Commander (RM-AX4000) can perform a programmed action by sliding your finger across its display. This is called an "Air-Slide function."
The Air-Slide has the follow ing six patterns.
In Standard mode you can set each Air-Slide pattern to operate an XPRESS procedure. In Advanced mode you can set each Air-Slide pattern to operate a
macro (Action list). This is called an "Air-Slide macro."
See als o
Changing an Air-Slide's settings (Standard mode)
Changing an Air-Slide's settings (Advanced mode)
About the System Control function
The Remote Commander (RM-AX4000) has special buttons called "System Control buttons," and you can perform programmed actions by pressing these
buttons.
If you press the MORE button (rightmost System Control button), all keys sharing the same function as that System Control buttons are displayed at the bottom
of the display. These keys are called, "System Control keys."
Page 44
Page 45

Advanced mode allow s you to set a macro (Action list) for each of four System Control buttons and four System Control keys. This is called a "System Control
macro."
Note
You cannot set a System Control macro in Standard mode.
See als o
Changing a System Control setting (Advanced mode)
Page 45
Page 46

Changing the Timer function (Standard mode)
The Timer function allow s an XPRESS procedure to operate at a scheduled time. You can set up to eight Timer macros.
Note
You cannot set the Timer function w hen no XPRESS key is programmed.
1.
Click the "Standard" tab in the low er left of the s cre en to sw itch to Standard m ode.
2.
Click "Set Up Tim e r or Air-Slide r" in the low er le ft of the s creen.
3.
Click "Edit Tim er" on the right side.
The "Edit Timer" dialog box appears.
This dialog box allow s you to set the follow ing:
ON/OFF
o
Sw itches ON/OFF each Timer program.
o
o
o
o
o
o
o
o
o
o
o
o
o
o
o
o
4.
Click "OK."
The Timer program is changed and the "Edit Timer" dialog box closes.
: The Timer program is on. Click to deactivate the Timer program.
: The Timer program is off. Click to activate the Timer program.
Ke y Label
Makes a label for a Timer key. The default labels are show n as "PROG1" to "PROG8."
By clicking the Key Label button, the "Edit Label" dialog box appears. Enter a label and click "OK" to update the information.
Hints
You can enter up to eight characters. How ever, the label cannot be left blank. Be sure to enter at least one character.
By clicking "Symbol," the "Symbol select" dialog box appears. This dialog box allow s you to enter symbols such as .
The "Label" text box allow s you to copy and paste characters by using the shortcut menu (right-click menu) or the shortcut keys.
XPRESS
Sets an XPRESS key to operate by clicking and selecting from the drop-dow n list.
Tim e
Sets the operation time (hour, minute, AM/PM).
For the hour/minute setting, enter the digit or click . For the AM/PM setting, click and select from the drop-dow n list.
Day
Sets the day for the Timer macro to operate. The default setting is "Everyday."
Click the day setting button to display the "Edit Day" dialog box, w hich show s the follow ing options:
Eve ryday
Operates everyday.
Wee k day
Operates w eekdays.
Wee k e nd
Operates at the scheduled time on w eekends.
Sunday - Saturday
Operates at the scheduled time and day. Check only the box of the day w hen you w ant to operate the Timer program.
[Clear]
Returns to the initial setting.
Page 46
Page 47

Changing an Air-Slide's settings (Standard mode)
You can set each Air-Slide pattern to operate an XPRESS procedure.
Note
You cannot set the Air-Slide function w hen no XPRESS key is programmed.
1.
Click the "Standard" tab in the low er left of the s cre en to sw itch to Standard m ode.
2.
Click "Set Up Tim e r or Air-Slide " in the low er le ft of the s creen.
3.
Click "Edit Air-Slide " on the right side.
The "Edit Air-Slide" dialog box appears.
4.
Sele ct an XPRESS ke y you w ant to operate by click ing below the Air-Slide pattern and sele cting.
Hints
If you click "Clear," the setting for the Air-Slide pattern is cleared.
o
If you change an Air-Slide pattern in Advanced mode, the drop-dow n list for the Air-Slide pattern show s "Advanced."
o
5.
Click "OK."
The "Edit Air-Slide" dialog box closes, and the setting of the Air-Slide is changed.
Page 47
Page 48

Advanced mode screen reference
The Advanced mode of AX Remote Editor displays the follow ing items.
A Title bar
Displays the current project name as "Project name - AX Remote Editor."
B M e nu bar
Displays the AX Remote Editor menu.
C Component e dit are a
Displays the area for editing Component settings.
D XPRESS edit area
Displays the area for editing an XPRESS key.
E M acro e dit area
Displays the area for editing a Macro (Action list) for Timer/Air-Slide/System Control.
F M inim ize button
Minimizes the AX Remote Editor screen and show s an icon on the Window s taskbar.
G Close button
Exits AX Remote Editor.
Page 48
Page 49

H STANDARD tab
Sw itches the edit mode to Standard mode, allow ing more basic programming for components and XPRESS settings, etc.
I Connection s tatus
Displays the connection status betw een your PC and the Remote Commander.
When appears
One Remote Commander is connected to the PC. You can send data.
When appe ars
Tw o or more Remote Commanders are connected to the PC. You cannot send data.
When appe ars
The Remote Commander is not connected to the PC. You cannot send data.
J Dow nload to Rem ote button
Dow nloads the settings you made on AX Remote Editor to the Remote Commander.
K Emulate button
Starts the Emulator. By pressing the keys/buttons on the Emulator, the signal from the Remote Commander connected to your PC is sent to an AV
component to confirm that the settings made on AX Remote Editor w ill w ork properly.
L Exit button
Exits AX Remote Editor.
Page 49
Page 50

Changing the component settings (Advanced mode)
The component edit area in Advanced mode displays the follow ing items.
A Component lis t
Displays the programmed components on a list. Items on the top line of the list are Component keys of page 1 on the Remote Commander's display. You can
program up to four Component keys on each line (page), up to 16 Component keys on four lines (pages).
By clicking a Component key on a list, you can edit the component. You can also change the assignment of components on a list by dragging and dropping
the components you w ant to move.
B Component inform ation
Type:
Displays the selected component type (category).
Brand:
Displays the manufacturer of the selected component.
Label:
Displays a label of the selected component (Component key) on the button. By clicking the button, you can change the label of the Component key.
Note
If the component sets the preset code by "SOLUTION preset" (by reading the preset code from the remote control signal of your AV component),
manufacturer is not displayed in the "Brand" field.
C Add button
Adds a component on an empty key position (w here no component is assigned) in the component list.
Note
You cannot add a component to the key position w here a component is already assigned or if 16 components are already programmed.
D De lete button
Page 50
Page 51

Deletes the selected component.
E Change Preset button
Changes the preset code of the selected component.
F Initialize button
Returns each key/button for the component to the initial setting.
G Edit Ke ys button
Changes the key/button setting for the selected component.
Page 51
Page 52

About editing components
About operating and editing of a component
Editable contents for a component
About operating and editing of a component
A "component" refers to an AV component that you w ant the Remote Commander to control.
When you press a COMPONENT button on the Remote Commander, keys show ing components, called "Component keys," appear at the bottom of the display.
You can create up to 16 Component keys.
When you press the Component key of the component you w ant to operate, the display to operate the component appears. This display is called "Component
display." Keys on the Component display are divided into tw o types--"Touch-keys" (w hose labels are already set) and "Label keys" (w hose label you can
enter). You can create up to 12 Label keys per component.
Furthermore, for each component, you can set different actions for each button on the Remote Commander.
Editable contents for a component
With AX Remote Editor you can edit the follow ing items for a component in Standard mode/Advanced mode.
Editing contents Standard
m ode Advanced
m ode
Page 52
Page 53

Change the label of a component
Editable Editable
Change the assignment of components
Change the preset code of a component
Add a component
Change the key/button setting for a component
*1*2
*1
Editable Editable
Editable Editable
Editable Editable
- Editable
Delete a component
Initialize the key/button setting for a component
*1 The Standard mode sets the preset code by "SOLUTION preset" (by reading the preset code from the remote control signal of your AV component).
The Advanced mode sets the preset code by "SOLUTION preset" or "BRAND preset " (by selecting the manufacturer and the preset code).
*2 Only in Advanced mode, can you select "None" for a component (that has no preset code).
Editable Editable
- Editable
Page 53
Page 54

Changing the label of a component (Advanced mode)
You can change the label of a component (Component key).
1.
Click the "Advance d" tab in the low er le ft of the s creen to sw itch to Advanced m ode.
2.
Click the com ponent w hose label you w ant to change from the com pone nt lis t in the upper left of the s cre en.
3.
Click the button to the right s ide of "Label."
The "Edit Key Label" dialog box appears.
4.
Enter the new labe l in the te xt box to the right of "Label."
You can enter up to eight characters. The label preview in the center of the screen updates the information.
Hints
By clicking "Symbol," the "Symbol select" dialog box appears, allow ing you to enter symbols such as .
o
The "Label" text box allow s you to copy and paste characters by using the shortcut menu (right-click menu) or the shortcut keys.
o
Note
The label cannot be left blank. Be sure to enter at least one character.
5.
Click "OK."
The "Edit Key Label" dialog box closes, and the label of the component selected in step 2 is changed.
Page 54
Page 55

Changing the assignment of components (Advanced mode)
You can change the assignment of the Component keys displayed on the Remote Commander.
1.
Click the "Advance d" tab in the low er le ft of the s creen to sw itch to Advanced m ode.
2.
Click the com ponent you w ant to move from the com ponent list in the upper le ft of the s creen, the n drag and drop it to the k e y
position w here you w ant to move it.
If no component occupies that key, the component w ill move there.
If another component already occupies that key, the components w ill sw ap key positions.
Page 55
Page 56

Changing the preset code of a component (Advanced mode)
You can change the preset code programmed for each component. In this topic, preset code refers to the IR code of a component's remote control.
Change the preset code of a component only w hen necessary, for example, w hen you buy a new AV component.
Notes
If you change the preset code of a component, all the learned key/button settings (Learn action and Learn+ action) for that component are deleted. So
proceed w ith caution, being careful not to delete necessary data.
If you change the preset code of a component, any XPRESS key w hich includes that component in its setting w ill also be deleted. So proceed w ith caution,
being careful not to delete necessary data.
1.
Click the "Advance d" tab in the low er le ft of the s creen to sw itch to Advanced m ode.
2.
Click the com ponent w ith the prese t code you w ant to change in the com ponent list in the upper le ft of the s creen.
3.
Click "Change Pre s e t."
A dialog box appears asking if you are sure you w ant to change the preset code.
4.
Click "Yes ."
The "Confirming the Label of a Component Key" screen in the "Component Setting" w izard appears.
5.
If you w ant to change the label, enter the ne w label in the te xt box to the right of "Label."
You can enter up to eight characters. The label preview in the center of the screen updates the information.
Hints
If you don't w ant to change the label, skip to step 6.
o
By clicking "Symbol," the "Symbol select" dialog box appears, allow ing you to enter symbols such as .
o
The "Label" text box allow s you to copy and paste characters by using the shortcut menu (right-click menu) or the shortcut keys.
o
Note
The label cannot be left blank. Be sure to enter at least one character.
6.
After e ntering the labe l, click "Ne xt."
The "Selecting a Method to Program a Preset Code" screen appears.
7.
Sele ct the m e thod of setting the pre set code from the follow ing options:
SOLUTION (recom m e nded)
o
Reads the preset code from the remote control signal of the AV component. If you don't know the number, use this method.
o
BRAND
o
Selects the manufacturer and the preset code. Refer to the supplied "Preset code lists."
o
8.
Click "Ne xt."
One of the follow ing screens appears:
If you se le ct "SOLUTION" in s tep 7
o
The "Programming the Preset Codes of Components (SOLUTION)" screen appears. Go to step 9.
o
If you se le ct "Brand" in s te p 7
o
The "Programming the Preset Codes of Components (BRAND)" screen appears. Skip to step 15.
o
9.
Connect the Re mote Com mander (RM-AX4000) to your PC w ith the USB m ini cable.
10.
Follow ing the on-screen ins tructions, place the Re m ote Com m ander (RM -AX4000) he ad to he ad w ith the AV com pone nt's rem ote
control w hose pre set code you w ant to program.
11.
Click "Preset."
The "Preset" dialog box appears, and the Remote Commander (RM-AX4000) goes to standby mode.
12.
Operate the rem ote control according to the on-s creen ins tructions .
"The preset code of "component name" is programmed." appears w hen the programming is complete.
Hints
If 60 seconds passes in standby mode, or if the Remote Commander (RM-AX4000) cannot define the preset code, a dialog box appears for you to
o
confirm redoing the operation. If you click "Yes," the Remote Commander goes to standby mode again and you can redo the operation. If you click
"No," the "Learn signal in Order" dialog box appears, allow ing you to make each of the keys/buttons learn the code of the selected component from
its remote control.
If "The Remote Commander is not connected or not responding." appears, the Remote Commander (RM-AX4000) may not be connected to your PC
o
properly. After checking the connection, click "Retry" to repeat the operation.
13.
Click "OK" in the m e s sage box.
The message box closes, and the screen returns to "Programming the Preset Codes of Components (SOLUTION)."
14.
Click "Ne xt."
The "Checking the Operations" screen appears. Skip to step 18.
15.
Click of "Brand" and sele ct the m anufacturer.
Page 56
Page 57

16.
Click of "Pres e t Code " and s ele ct the 4-digit num ber.
17.
Click "Ne xt."
The "Checking the Operations" screen appears.
18.
Aim the Re m ote Com m ander at the AV com pone nt you w ant to operate, then click "Em ulate."
The Emulator appears.
19.
One by one, pre s s the keys and buttons on the Em ulator to confirm the corre sponding action on the AV com ponent.
Note
Press the keys/buttons longer than usual.
20.
After che ck ing all the k e ys and buttons , click in the uppe r right of the Emulator.
The Emulator closes and the screen returns to "Checking the Operations."
21.
Click "Finish."
The preset code of the component selected in step 2 is changed.
Page 57
Page 58

Adding a component (Advanced mode)
When you buy a new compatible component, etc., you can add it to the Remote Commander's control list using AX Remote Editor.
Note
If 16 components are already programmed, you cannot add another component.
1.
Click the "Advance d" tab in the low er le ft of the s creen to sw itch to Advanced m ode.
2.
Click an em pty k ey position in the com ponent list in the uppe r le ft of the screen.
3.
Click "Add."
The "Select Component Category" screen in the "New Component" w izard appears.
4.
Click the com ponent type you w ant to add, then click "Ne xt."
The "Confirming the Label of a Component Key" screen appears.
Hint
When you are not sure w hich component to select, see "About the component category." (Clicking "Help" on the "Select Component Category" screen
also displays the same information.)
5.
If you w ant to change the label, enter the ne w label in the te xt box to the right of "Label."
You can enter up to eight characters. The label preview in the center of the screen updates the information.
Hints
If you don't w ant to change the label, skip to step 6.
o
By clicking "Symbol," the "Symbol select" dialog box appears, allow ing you to enter symbols such as .
o
The "Label" text box allow s you to copy and paste characters by using the shortcut menu (right-click menu) or the shortcut keys.
o
Note
The label cannot be left blank. Be sure to enter at least one character.
6.
After e ntering the labe l, click "Ne xt."
The "Selecting a Method to Program a Preset Code" screen appears. Preset code refers to the IR code of a component's remote control.
7.
Sele ct the m e thod of setting the pre set code from the follow ing options:
SOLUTION (recom m e nded)
o
Reads the preset code from the remote control signal of the AV component. If you don't know the number, use this method.
o
BRAND
o
Selects the manufacturer and the preset code. Refer to the supplied "Preset code lists."
o
8.
Click "Ne xt."
One of the follow ing screens appears:
If you se le ct "SOLUTION" in s tep 7
o
The "Programming the Preset Codes of Components (SOLUTION)" screen appears. Go to step 9.
o
If you se le ct "BRAND" in s tep 7
o
The "Programming the Preset Codes of Components (BRAND)" screen appears. Skip to step 15.
o
9.
Connect the Re mote Com mander (RM-AX4000) to your PC w ith the USB m ini cable.
10.
Follow ing the on-screen ins tructions, place the Re m ote Com m ander (RM -AX4000) he ad to he ad w ith the AV com pone nt's rem ote
control w hose pre set code you w ant to program.
11.
Click "Preset."
The "Preset" dialog box appears, and the Remote Commander C goes to standby mode.
Note
The "Learn signal in Order" dialog box appears if you select "None" in step 4. This dialog box allow s you to make each of the keys/buttons learn the
preset code of the selected component from its remote control.
12.
Operate the rem ote control according to the on-s creen ins tructions .
"The preset code of "component name" is programmed." appears w hen the programming is complete.
Hints
If 60 seconds passes in standby mode, or if the Remote Commander (RM-AX4000) cannot define the preset code, a dialog box appears for you to
o
confirm redoing the operation. If you click "Yes," the Remote Commander goes to standby mode again and you can redo the operation. If you click
"No," the "Learn signal in Order" dialog box appears, allow ing you to make each of the keys/buttons learn the code of the selected component from
its remote control.
If "The Remote Commander is not connected or not responding." appears, the Remote Commander (RM-AX4000) may not be connected to your PC
o
properly. After checking the connection, click "Retry" to repeat the operation.
13.
Click "OK" in the m e s sage box.
The message box closes, and the screen returns to "Programming the Preset Codes of Components (SOLUTION)."
14.
Click "Ne xt."
The "Checking the Operations" screen appears. Skip to step 18.
Page 58
Page 59

15.
Click of "Brand" and sele ct the m anufacturer.
16.
Click of "Pres e t Code " and s ele ct the 4-digit num ber.
17.
Click "Ne xt."
The "Checking the Operations" screen appears.
18.
Aim the Re m ote Com m ander at the AV com pone nt you w ant to operate, then click "Em ulate."
The Emulator appears.
19.
One by one, pre s s the keys and buttons on the Em ulator to confirm the corre sponding action on the AV com ponent.
Note
Press the keys/buttons longer than usual.
20.
After che ck ing all the k e ys and buttons , click in the uppe r right of the Emulator.
The Emulator closes and the screen returns to "Checking the Operations."
21.
Click "Finish."
The new component is added to the place selected in step 2.
Page 59
Page 60

Changing the key/button setting for a component (Advanced mode)
You can change the setting of a key/button programmed for a component.
1.
Click the "Advance d" tab in the low er le ft of the s creen to sw itch to Advanced m ode.
2.
Click the com ponent w hose key/button you w ant to change from the com ponent list in the upper le ft of the s creen.
3.
Click "Edit Ke ys ."
The "Edit Keys" dialog box appears.
This dialog box allow s you to set the follow ing:
Status
o
Assigns a color code to keys/buttons based on their settings.
o
Show
Displays the follow ing colored coded frames around keys/buttons depending on their settings.
Blue (Prese t): A key/button for w hich only one preset action is programmed.
Pink (Learn): A key/button for w hich only one Learn action or Learn+ action is programmed.
Gree n (M acro): A key/button for w hich tw o or more effective actions are programmed or only one Jump action is programmed.
Purple (Alias ): A key/button for w hich only one Alias action is programmed.
Hide
Does not display the colored frame around a key/button.
Ke y/button list
o
Displays keys/buttons programmed for a component.
o
If you select a key/button you w ant to edit, you can confirm or change the setting for the key/button in "Properties" on the right side.
o
Note
If an Action list for a key/button includes an invalid action, the "X" indicator appears on the key/button.
[Learn Signal in Orde r]
o
If you click the button, the "Learn Signal in Order" dialog box appears. This dialog box allow s you to make each of the keys/buttons (for w hich no
o
action is programmed, and the "Display this key" box is on) learn the remote control's signal. For further details, see "Teaching the remote control's
signal in succession to keys/buttons that have no action ("Learn Signal in Order" dialog box)" below .
Dis play this k e y
o
This is displayed w hen a touch-key is selected. If you uncheck the box, the key is hidden on the Remote Commander.
o
Note
A touch-key for w hich no action is programmed is hidden on the Remote Commander; so in this case you cannot check the box.
Label
o
If a touch-ke y is s e lecte d:
o
Its label is displayed.
o
You can change the label by clicking and selecting from the drop-dow n list.
o
If a Label k ey is s ele cte d:
o
Its label is displayed.
o
If you click "Edit Label," the "Edit Label" dialog box appears. Entering the label and clicking "OK" allow s you to change the label.
o
Hints
You can enter up to eight characters. How ever, the label cannot be left blank. Be sure to enter at least one character.
By clicking "Symbol," the "Symbol select" dialog box appears, allow ing you to enter symbols such as .
The "Label" text box allow s you to copy and paste characters by using the shortcut menu (right-click menu) or the shortcut keys.
Action List
o
Displays the Action list programmed for the selected key/button. Clicking the "Edit Actions" allow s you to change the setting of the Action list.
o
[Edit Actions]
o
If you click this, the "Edit Actions" dialog box appears. This dialog box allow s you to add/change/delete the action in the Action list or change the
o
action order.
Ke y-press ed Tim e
o
Sets the length of time for w hich you need to press a key/button to execute the Action list by clicking and selecting from the drop-dow n list. The
o
Key-pressed time ranges from 0 to 2 (seconds).
Me m o
o
Enters a comment for the key/button such as the function.
o
4.
Click "OK."
The "Edit Keys" dialog box closes and the setting of the key/button is changed.
Teaching the remote control's signal in succession to keys/buttons ("Learn Signal in Order" dialog box)
The "Learn Signal in Order" dialog box allow s you to make each of the keys/buttons learn the remote control's signal.
Page 60
Page 61

After the "Learn Signal in Order" appears, perform the follow ing steps.
1.
Connect the Re mote Com mander (RM-AX4000) to your PC w ith the USB m ini cable.
Notes
Do not disconnect the USB mini cable from your PC w hile teaching the remote control signals, otherw ise a malfunction may occur.
Only connect one Remote Commander to your PC at a time. Otherw ise, teaching may not be successful.
2.
Confirm the selected key/button in the k e y/button list on the right side of the dialog box.
If you don't w ant to teach the signal to the selected key/button, click "Skip." The next possible key/button to be learned is selected.
3.
When the k e y/button you w ant to teach is s ele cte d, click "Le arn."
The "Learn" dialog box appears.
4.
Follow ing the on-screen ins tructions, place the Re m ote Com m ander (RM -AX4000) he ad to he ad w ith the AV com pone nt's rem ote
control w hose s ignal you w ant to teach.
5.
Click "Learn."
The Remote Commander (RM-NX4000) goes to standby mode.
Hint
If you check the "Save remote control signal as raw data" box, the remote control signal of the AV component is programmed as the raw -data onto the
Remote Commander. If the AV component does not w ork properly w hen a learned key is pressed, check this box to try the learning. In this case, the
learned data is larger than normal learning.
6.
Pres s and hold dow n the button on the remote control until "Le arning is com ple te ." appe ars.
If "Learning is complete." appear, learning w as successful.
Hints
If "A time out error: 60 seconds has passed" appears, click [OK] and redo from step 5.
If "The Remote Commander is not connected or not responding." appears, the Remote Commander (RM-AX4000) may not be connected to your PC
properly. After checking the connection, click "Retry" to repeat the operation.
7.
Click "OK" in the m e s sage box.
The screen returns to "Learn Signal in Order," and the next possible key/button to be learned is selected.
8.
Re peat steps 1 to 7 to continue to other ke ys /buttons you w ant to te ach.
When all the possible settings are finished, "Programming remote control signals of "component name" is complete." appears.
9.
Click "OK" in the m e s sage box.
The message box and the "Learn Signal in Order" dialog box close.
Page 61
Page 62

Deleting a component (Advanced mode)
You can delete unnecessary components (Component key).
Delete a component w hen the existing component is no longer necessary, such as w hen you replace an AV component.
Note
If you delete a component, any XPRESS key that includes that component w ill also be deleted. So proceed w ith caution, being careful not to delete necessary
data.
1.
Click the "Advance d" tab in the low er le ft of the s creen to sw itch to Advanced m ode.
2.
Click the com ponent you w ant to dele te from the com pone nt list in the upper le ft of the s creen.
3.
Click "De le te" in the upper right of the s cre en.
A dialog box appears for you to confirm the deletion.
4.
Click "Yes ."
The component selected in step 2 is deleted.
Page 62
Page 63

Initializing the key/button setting for a component (Advanced mode)
AX Remote Editor allow s each key/button for a component to return to the initial setting.
The settings and Action lists for a key/button edited in the "Edit keys" dialog box are cleared.
Note
If you initialize a component, any XPRESS key that includes that component w ill also be deleted. So proceed w ith caution, being careful not to delete necessary
data.
1.
Click the "Advance d" tab in the low er le ft of the s creen to sw itch to Advanced m ode.
2.
Click the com ponent w hose settings you w ant to return to default (initialize) from the com ponent lis t in the upper left of the s cre en.
3.
Click "Initialize" in the uppe r right of the s creen.
A dialog box appears for you to confirm initializing.
4.
Click "Yes ."
The setting of each key of the component selected in step 2 is initialized.
Page 63
Page 64

Changing the settings of XPRESS keys (Advanced mode)
The XPRESS edit area in Advanced mode displays the follow ing items.
A Start Setting Wizard
Adds an XPRESS key on an empty key position (w here no XPRESS key is assigned) in the XPRESS list.
Note
You cannot add an XPRESS key to the key position w here an XPRESS key is already assigned, or if eight XPRESS keys are already programmed.
B XPRESS list
Displays the programmed XPRESS keys on a list. Items on the top line of the list are XPRESS keys of page 1 on the Remote Commander's display. You can
program up to four XPRESS keys on each line (page), up to eight XPRESS keys on tw o lines (pages).
By clicking an XPRESS key on a list, you can edit it. You can also change the assignment of XPRESS keys on a list by dragging and dropping the XPRESS
keys you w ant to move.
C XPRESS Name
The name of the selected XPRESS key is displayed on this button. By clicking the button, you can change the name and label of the XPRESS key.
D XPRESS structure
Displays the components operated by a selected XPRESS function.
In the center is the source component that outputs images and sound, the left side is the video component that outputs images from the source component,
On the right side is the audio component that outputs sound from the source component.
The input (jack) name through w hich images and sound from the source component are sent appears below each illustration.
E Edit Actions button
Edits a Start macro/Exit macro of the selected XPRESS key.
Page 64
Page 65

F Edit Keys button
Changes the key/button setting of the selected XPRESS key.
G De lete button
Deletes the selected XPRESS key.
H Initialize button
Returns the selected XPRESS key to the initial setting.
I Duplicate button
Copies the selected XPRESS key to the empty key position (w here no XPRESS key is assigned).
Note
If eight XPRESS keys are already programmed, you cannot copy an XPRESS key.
Page 65
Page 66

About editing XPRESS keys
What is the XPRESS function?
About components that you can operate by XPRESS function (Source component/Video component/Audio component)
About operating and editing an XPRESS key
About a Start macro/Exit macro of an XPRESS key
Editable contents for an XPRESS key
What is the XPRESS function?
The XPRESS function is an executed series of actions that operate several AV components by pressing just one key (XPRESS key).
For example, you have to perform the follow ing operations sequentially to w atch a DVD using a TV, an amplifier/receiver, and a DVD player.
1.
Turn on the DVD player.
2.
Turn on the TV.
3.
Set the input selector of the TV to VIDEO1.
4.
Turn on the amplifier/receiver.
5.
Set the input selector of the amplifier/receiver to DVD.
6.
Start DVD playback.
By setting the above actions as an XPRESS key, you can w atch a DVD by simply pressing one key.
About components that you can operate by XPRESS function (Source component/Video component/Audio component)
When setting an XPRESS function, set the follow ing three components as a target of operating.
Source com ponent
The component that outputs image and sound signals.
You cannot select PJ (Projector) or LIGHT for the source component.
Video com ponent
The component that displays the images from the source component.
You can select TV or PJ (Projector) for the video component. Or, you can set an XPRESS key w ithout selecting the video component.
Audio component
The component that amplifies sound from the source component.
You can select TV, PJ (Projector), RCVR (Receiver), or DAV (DVD/Receiver Combo) for the audio component. Or, you can set an XPRESS key w ithout
selecting the audio component.
In the above example of "w atching a DVD," the source component, the video component, and the audio component are a DVD player, a TV, and an
amplifier/receiver, respectively.
The components that you can operate by XPRESS function are displayed on the AX Remote Editor screen as show n below .
Note
You cannot select a component that has no preset code ("None" component) as an XPRESS function target of operation.
About operating and editing an XPRESS key
When you press an XPRESS button on the Remote Commander, "XPRESS keys" appear at the bottom of the display. You can create up to eight XPRESS keys.
Page 66
Page 67

When you press an XPRESS key, the Action list (Start macro) programmed for that key is performed and a screen called "XPRESS display" appears. Keys on
the XPRESS display are divided into tw o types--"Touch-key" (w hose labels are already set) and "Label key" (that sw itch to the display of each component that
of the XPRESS function).
For each XPRESS key, different actions for each button on the Remote Commander are set (you can also change these settings).
About a Start macro/Exit macro of an XPRESS key
You can program a Start macro/Exit macro for each XPRESS key. A Start macro is a list of actions (macro) to be performed w hen an XPRESS key is pressed.
For example, you can program the follow ing actions as the Start macro of the XPRESS key to "w atch a DVD" using a TV, an amplifier/receiver, and DVD
player.
1.
Sw itch the display to the XPRESS display for DVD.
2.
Turn on the DVD player.
3.
Turn on the TV.
4.
Set the input selector of the TV to VIDEO1.
5.
Turn on the amplifier/receiver.
6.
Set the input selector of the amplifier/receiver to DVD.
7.
Start DVD playback.
By programming the above Start macro, you can perform the above actions by simply pressing the DVD XPRESS key.
An Exit macro is a list of actions (macro) to be performed w hen sw itching to another XPRESS display.
For example, you can program the follow ing actions as the Exit macro of the XPRESS key to "w atch a DVD."
1.
Stop DVD playback.
2.
Turn off the DVD player.
3.
Turn off the TV.
4.
Turn off the amplifier/receiver.
By programming the above Exit macro, you can perform the above actions after the DVD XPRESS operation, by simply pressing the TV XPRESS key.
You can program a Start macro/Exit macro by simply follow ing the w izard instructions in "Creating a project in Standard mode" and in "Adding an XPRESS
Page 67
Page 68

key."
Furthermore, you can edit a Start macro/Exit macro of the programmed XPRESS key in Advanced mode.
See als o
Creating a project in Standard mode
Adding an XPRESS key (Standard mode)
Adding an XPRESS key (Advanced mode)
Editing a Start macro/Exit macro for an XPRESS key
Editable contents for an XPRESS key
With AX Remote Editor you can edit the follow ing items for an XPRESS key in Standard mode/Advanced mode.
Editing contents Standard
m ode Advanced
m ode
Change the label of an XPRESS key
Change the assignment of XPRESS keys
Add an XPRESS key
Edit a Start macro/Exit macro for an XPRESS key
Editable Editable
Editable Editable
Editable Editable
- Editable
Change the key/button setting for an XPRESS key
Copy an XPRESS key
Delete an XPRESS key
Initialize the settings of an XPRESS key
Note
You cannot change the follow ing settings for the programmed XPRESS key.
The audio component's remote control setting (pow er button type/input select button type/learned setting)
o
The video component's remote control setting (pow er button type/input select button type/learned setting)
o
- Editable
- Editable
Editable Editable
- Editable
Page 68
Page 69

The source component's remote control setting (pow er button type/learned setting)
o
If an XPRESS key does not w ork properly, delete the XPRESS key and recreate a new XPRESS key.
Page 69
Page 70

Changing the label of an XPRESS key (Advanced mode)
You can change the label of an XPRESS key.
1.
Click the "Advance d" tab in the low er le ft of the s creen to sw itch to Advanced m ode.
2.
Click the XPRESS key w hose label you w ant to change in the XPRESS list on the le ft side of the scree n.
3.
Click the button to the right of "XPRESS Name ."
The "Rename XPRESS" dialog box appears.
This dialog box allow s you to set the follow ing:
XPRESS Name
o
Enter the name (w hich w ill appear on the XPRESS display as its title). You can enter up to 12 characters.
o
XPRESS Key
o
Enter the label (displayed on the Remote Commander). You can enter up to eight characters.
o
The label preview at the bottom of the screen updates the information.
o
Hints
By clicking "Symbol," the "Symbol select" dialog box appears, allow ing you to enter symbols such as .
o
The "XPRESS Key" or "XPRESS Name" text box allow s you to copy and paste characters by using the shortcut menu (right-click menu) or the
o
shortcut keys.
Note
The label cannot be left blank. Be sure to enter at least one character.
4.
Click "OK."
The "Rename XPRESS" dialog box closes, and the label of the XPRESS key selected in step 2 is changed.
Page 70
Page 71

Changing the assignment of XPRESS keys (Advanced mode)
You can change the assignment of the XPRESS keys displayed on the Remote Commander.
1.
Click the "Advance d" tab in the low er le ft of the s creen to sw itch to Advanced m ode.
2.
Click the XPRESS key you w ant to move from the XPRESS list on the le ft s ide of the scree n, then drag and drop it to the ke y position
w here you w ant to move it.
If no XPRESS key occupies that key position, the XPRESS key w ill move there.
If another XPRESS key already occupies that key position, the XPRESS keys w ill sw ap key positions.
Page 71
Page 72

Adding an XPRESS key (Advanced mode)
You can add an XPRESS key, for example, w henever you add or replace a component in your AV system.
Note
If eight XPRESS keys are already programmed, you cannot add another XPRESS key.
1.
Click the "Advance d" tab in the low er le ft of the s creen to sw itch to Advanced m ode.
2.
Click "Start Setting Wizard."
The "What is XPRESS?" screen in the "New XPRESS" w izard appears.
Hint
Clicking "Help" on the screen also displays the information about the XPRESS function.
3.
After reading the introduction, click "Ne xt."
The "Purpose and Source Component" screen appears.
4.
Set the follow ing:
Purpose
o
Select the purpose of the XPRESS key by clicking and selecting from the drop-dow n list. After selecting the purpose, the "Source component" can
o
be set in the same w ay.
Source com ponent
o
Select the source component (that outputs images and sound) for the XPRESS key by clicking and selecting from the drop-dow n list. After
o
selecting the component, the next line can be set in the same w ay to add another XPRESS key.
Repeat step 4 to set up other XPRESS keys.
Hint
You can set up to eight XPRESS keys.
5.
After e ntering each re quired XPRESS ke y, click "Ne xt."
The "Confirming the Label of an XPRESS Key" screen appears.
6.
If you w ant to change the label and nam e , s e t the follow ing:
XPRESS Key
o
Enter the label (displayed on the Remote Commander). You can enter up to eight characters. The label preview in the center of the screen updates
o
the information.
XPRESS Name
o
Enter the name (w hich w ill appear on the XPRESS display as its title). You can enter up to 12 characters.
o
Hints
If you don't w ant to change the label or name, skip to step 7.
o
By clicking "Symbol," the "Symbol select" dialog box appears, allow ing you to enter symbols such as .
o
The "XPRESS Key" or "XPRESS Name" text box allow s you to copy and paste characters by using the shortcut menu (right-click menu) or the
o
shortcut keys.
Note
The label cannot be left blank. Be sure to enter at least one character.
7.
After e ntering the labe l and nam e, click "Ne xt."
The "Video Component" screen appears.
8.
Sele ct a vide o com pone nt (that outputs im age s from the s ource com ponent), then click "Ne xt."
The "Audio Component" screen appears.
9.
Sele ct an audio com pone nt (that outputs sound from the s ource com ponent), then click "Ne xt."
The "Pow er Button on your Remote Control of the Video Component" screen appears.
10.
Sele ct the type of pow e r button on the video com ponent's re m ote control, then click "Ne xt."
The "Input Select Button on your Remote Control of the Video Component" screen appears.
11.
Sele ct the type of input se le ct button on the vide o com ponent's rem ote control from the follow ing options, the n click "Ne xt."
I pres s a button repeate dly to cycle through the inputs. (Type A)
o
Select this if you change the input by pressing a button repeatedly, then go to step 15.
o
I pres s a button to directly select the desire d input. (Type B)
o
Select this if you change the input by pressing a particular button. Then enter the name of the source component button in the text box and go to step
o
16.
Others
o
Select this if you change the input on the menu display, then go to step 12.
o
12.
Sele ct the type of input se le ct button on the re m ote control from the follow ing options , the n click "Ne xt."
Type C
o
Select this if you change the input on the menu display by pressing the up/dow n button, then go to step 13.
o
Type D
o
Select this if you change the input on the menu display by pressing a particular button. In the text box, enter the name of the button you press after
o
the menu button to use the source component, then go to step 16.
Hint
For further details about the difference of "Type C" and "Type D," see "About the remote control's input select button type." (Clicking "Help" on the "Input
Select Button on your Remote Control of the Video Component" screen also displays the same information.)
13.
Enter the follow ing inform ation regarding the input selection of the vide o com ponent, the n click "Ne xt".
What is the total num ber of inputs you can select from the on scree n m e nu?
o
Page 72
Page 73

Click and select the number.
o
Which input do you se le ct w hen you use "Source com pone nt nam e "?
o
Enter the input name in the text box.
o
In w hat orde r does your s ele ction (in [2]) appear on the list (1st, 2nd, 3rd, etc.)?
o
Select the order number by clicking .
o
14.
Sele ct w hich input is highlighte d w hen you press the input select button on the re m ote control, then click "Ne xt."
After this selection, go to step 16.
15.
Enter the follow ing inform ation regarding the input selection of the vide o com ponent, the n click "Ne xt".
What is the total num ber of inputs you can change by pres s ing the Input Select button?
o
Click and select the number.
o
Which input do you se le ct w hen you use "Source com pone nt nam e "?
o
Enter the input name in the text box.
o
Where does the input (in [2]) s tand from the initial input?
o
Select the order number by clicking .
o
16.
Follow ing the on-screen ins tructions, place the Re m ote Com m ander (RM -AX4000) he ad to he ad w ith the AV com pone nt's rem ote
control w hose pre set code you w ant to program.
Note
Make sure that the Remote Commander (RM-AX4000) is connected to your PC.
17.
Click "Learn."
The "Learn" dialog box appears, and the Remote Commander (RM-AX4000) goes to standby mode.
18.
Operate the rem ote control according to the on-s creen ins tructions .
"Learning is complete." appears w hen learning is successful. Keep follow ing the on-screen instructions.
The "Learning is complete." message box show s "OK" w hen learning is complete.
Hints
If "A time out error: 60 seconds has passed" appears, click [OK] and redo from step 17.
o
If "The Remote Commander is not connected or not responding." appears, the Remote Commander (RM-AX4000) may not be connected to your PC
o
properly. After checking the connection, click "Retry" to repeat the operation.
19.
Click "OK."
The message box closes and the screen returns to "Learn."
20.
Click "Ne xt."
The "Pow er Button on your Remote Control of the Audio Component" screen appears.
21.
Set the information regarding the audio com ponent's rem ote control in the sam e w ay as for the video com ponent (shown in steps
10 to19).
22.
When finis he d, click "Ne xt."
The "Pow er Button on your Remote Control of the Source Component" screen appears.
23.
Sele ct the type of pow e r button on the source com ponent's rem ote control, then click "Ne xt."
The "Learn" screen appears.
24.
Mak e the Re mote Com mander learn the s ource com pone nt's rem ote control s ignal in the s am e w ay as for the video com ponent
(show n in steps 16 to19).
25.
When le arning is com plete, click "Ne xt."
The "Options" screen appears.
26.
Set the follow ing options :
Option1: Start Macro
o
Select this to set additional actions (Start macro) to w ork w hen operating an XPRESS key. If an action is not necessary, uncheck the box.
o
Option2: Exit M acro
o
Select this to set additional actions (Exit macro) to w ork w henever you sw itch to another XPRESS display. If an action is not necessary, uncheck the
o
box.
27.
Click "Ne xt."
The "Checking the Operations" screen appears. This screen allow s you to check if the Start macro added in step 26 w orks properly.
Note
Before checking, make sure that the Remote Commander (RM-AX4000) is connected to your PC.
28.
Aim the Re m ote Com m ander at the AV com pone nt you w ant to operate, then click "Test."
A message box appears.
29.
Follow ing the on-screen ins tructions, prepare the AV com pone nt you w ant to ope rate and click "OK."
The "Test" dialog box appears.
30.
Click "Send."
The signal programmed for the Remote Commander as a Start macro is sent to the AV component. Check if the AV component w orks properly.
Page 73
Page 74

31.
After che ck ing, click "Cance l."
The "Test" dialog box closes, and the screen returns to "Checking the Operations."
32.
Do either of the follow ing:
If you se t tw o or more XPRESS ke ys in s te p 4
o
Click "Next."
o
The "Video Component" screen reappears, and the second XPRESS key's setting starts. Repeat steps 8 to 31 to set all the XPRESS keys.
o
If you se t only one XPRESS ke y in ste p 4, or otherwis e , w hen all the XPRESS ke y's s e ttings are com ple te
o
Click "Finish."
o
The XPRESS key(s) set in step 4 is added.
o
Page 74
Page 75

Editing a Start macro/Exit macro for an XPRESS key (Advanced mode)
You can edit an Action list (Start macro/Exit macro) programmed for an XPRESS key.
1.
Click the "Advance d" tab in the low er le ft of the s creen to sw itch to Advanced m ode.
2.
Click the XPRESS key you w ant to edit a Start m acro/Exit macro in the XPRESS list on the le ft s ide of the s creen.
3.
Click "Edit Actions " on the right side.
The "Edit Actions" dialog box appears.
This dialog box allow s you to confirm/edit a Start macro and Exit macro.
Start Macro
o
Displays a Start macro (Action list) programmed for an XPRESS key. If you click "Edit Start Macro," you can change the setting of the macro (Action
o
list).
[Edit Start Macro]
o
By clicking this, the "Edit Start Macro" dialog box appears. This dialog box allow s you to add/change/delete the action of a Start macro or change the
o
action order.
Exit M acro
o
Displays an Exit macro (Action list) programmed for an XPRESS key. If you click "Edit Exit Macro," you can change the setting of the macro (Action
o
list).
[Edit Exit M acro]
o
By clicking this, the "Edit Exit Macro" dialog box appears. This dialog box allow s you to add/change/delete an action of an Exit macro or change the
o
action order.
4.
Click "OK."
The ""Edit Actions" dialog box closes, and the Start macro/Exit macro of the XPRESS key selected in step 2 is changed.
Page 75
Page 76

Changing the key/button setting for an XPRESS key (Advanced mode)
You can change the setting of a key/button programmed for an XPRESS key.
1.
Click the "Advance d" tab in the low er le ft of the s creen to sw itch to Advanced m ode.
2.
Click the XPRESS key w hose key/button you w ant to change from the XPRESS list on the le ft s ide of the screen.
3.
Click "Edit Ke ys ."
The "Edit Keys" dialog box appears.
This dialog box allow s you to set the follow ing:
Status
o
Assigns a color code to keys/buttons based on their settings.
o
Show
Displays the follow ing colored coded frames around keys/buttons depending on their settings.
Gree n (M acro): A key/button for w hich tw o or more effective actions are programmed or only one Jump action is programmed.
Purple (Alias ): A key/button for w hich only one Alias action is programmed.
Hide
Does not display the colored frame around a key/button.
Ke y/button list
o
Displays keys/buttons programmed for an XPRESS key.
o
If you select a key/button you w ant to edit, you can confirm or change the setting for the key/button in "Properties" on the right side.
o
Dis play this k e y
o
This is displayed w hen a touch-key is selected. If you uncheck the box, the key is hidden on the Remote Commander.
o
Note
A touch-key for w hich no action is programmed is hidden on the Remote Commander; so in this case you cannot check the box.
Label
o
If a touch-ke y is s e lecte d:
o
Its label is displayed.
o
You can change the label by clicking and selecting from the drop-dow n list.
o
If a Label k ey is s ele cte d:
o
Its label is displayed. How ever, you cannot change the label.
o
Action List
o
Displays the Action list programmed for the selected key/button. Clicking the "Edit Actions" allow s you to change the setting of the Action list.
o
Note
You cannot edit the action for a Label key.
[Edit Actions]
o
If you click this, the "Edit Actions" dialog box appears. This dialog box allow s you to add/change/delete the action in the Action list or change the
o
action order.
Note
You cannot click "Edit Actions" w hen a Label key is selected.
Ke y-press ed Tim e
o
Sets the length of time for w hich you need to press a key/button to execute the Action list by clicking and selecting from the drop-dow n list. The
o
Key-pressed time ranges from 0 to 2 (seconds).
Me m o
o
Enters a comment for the key/button such as the function.
o
4.
Click "OK."
The "Edit Keys" dialog box closes and the setting of the key/button is changed.
Page 76
Page 77

Copying an XPRESS key (Advanced mode)
You can copy an XPRESS key.
By copying an XPRESS key, you can create another XPRESS key that includes the same settings as the original. This operation is useful to create a new
XPRESS key based on an existing XPRESS key's setting.
Note
If eight XPRESS keys are already programmed, you cannot copy an XPRESS key.
1.
Click the "Advance d" tab in the low er le ft of the s creen to sw itch to Advanced m ode.
2.
Click the XPRESS key you w ant to copy from the XPRESS list on the le ft s ide of the s creen.
3.
Click "Duplicate" on the right side .
A dialog box appears for you to confirm copying.
4.
Click "Yes ."
The copy of the XPRESS key selected in step 2 is created at the empty key position on the XPRESS list.
Page 77
Page 78

Deleting an XPRESS key (Advanced mode)
You can delete unnecessary XPRESS keys.
Delete an XPRESS key w hen it is no longer necessary or w hen the programmed XPRESS key does not w ork properly.
1.
Click the "Advance d" tab in the low er le ft of the s creen to sw itch to Advanced m ode.
2.
Click the XPRESS key you w ant to dele te from the com ponent list on the left side of the s cre en.
3.
Click "De le te" on the right side .
A dialog box appears for you to confirm the deletion.
4.
Click "Yes ."
The XPRESS key selected in step 2 is deleted.
Page 78
Page 79

Initializing the settings of an XPRESS key (Advanced mode)
You can return the settings of an XPRESS key to the initial settings.
The settings to be cleared are the follow ing:
The label of an XPRESS key
The settings and Action lists for the key/button edited in the "Edit Keys" dialog box
The settings of any Start macro/Exit macro edited in the "Edit Actions" dialog box.
1.
Click the "Advance d" tab in the low er le ft of the s creen to sw itch to Advanced m ode.
2.
Click the XPRESS key w hose settings you w ant to re turn to default (initialize) from the XPRESS lis t on the le ft s ide of the scree n.
3.
Click "Initialize" on the right s ide .
A dialog box appears for you to confirm initializing.
4.
Click "Yes ."
The settings selected in step 2 are initialized.
Page 79
Page 80

Changing the Timer/Air-Slide/System Control settings (Advanced mode)
The Macro edit area in Advanced mode displays the follow ing items.
A Edit Tim e r button
Sets a macro (Action list) to operate at a scheduled time by the Timer function.
B Edit Air-Slide button
Sets a macro (Action list) to operate for an Air-Slide pattern.
C Edit Sys tem Control button
Sets a macro (Action list) to operate for a System Control button/key.
Page 80
Page 81
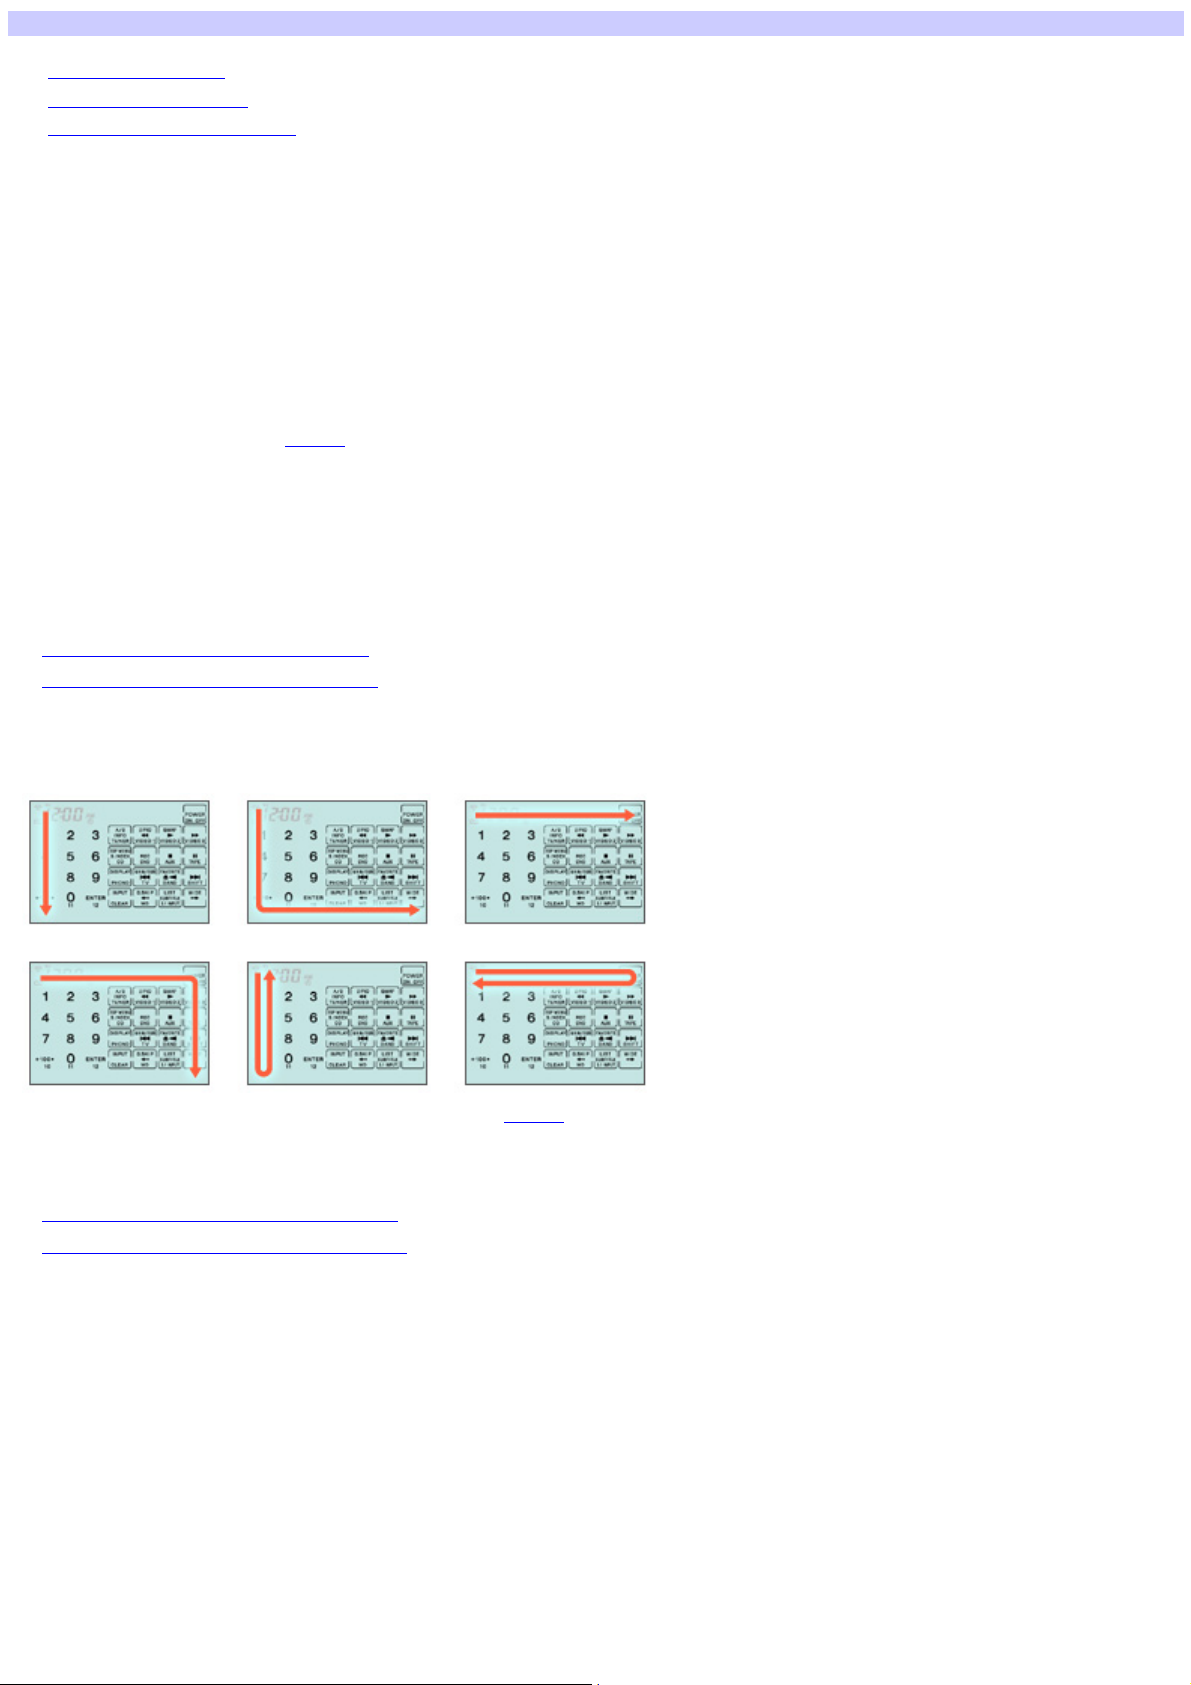
About the Timer/Air-Slide/System Control function
About the Timer function
About the Air-Slide function
About the System Control function
About the Timer function
The Remote Commander (RM-AX4000) can perform a programmed action automatically at a scheduled time every day or on particular days. This is called a
"Timer function."
You can set up to eight Timer functions w ith the follow ing options.
Tim er ON/OFF
Sw itches ON/OFF each Timer function.
Ke y Label
When you press the TIMER button on the Remote Commander, "Timer keys" show ing a Timer function are displayed at the bottom of the display.
The default labels of each Timer key are show n as "PROG1" to "PROG8," w hich you can change.
Actions to be pe rform ed
In Standard mode you can set an XPRESS procedure to operate at a scheduled time. In Advanced mode you can set a "Timer macro" (Action list) to operate
at a scheduled time.
Tim e
Sets the operation time (hour, minute, AM/PM) for a Timer function.
Day
Sets the day for a Timer function to operate. The default setting is "Everyday."
See als o
Changing the Timer function (Standard mode)
Changing the Timer function (Advanced mode)
About the Air-Slide function
The Remote Commander (RM-AX4000) can perform a programmed action by sliding your finger across its display. This is called an "Air-Slide function."
The Air-Slide has the follow ing six patterns.
In Standard mode you can set each Air-Slide pattern to operate an XPRESS procedure. In Advanced mode you can set each Air-Slide pattern to operate a
macro (Action list). This is called an "Air-Slide macro."
See als o
Changing an Air-Slide's settings (Standard mode)
Changing an Air-Slide's settings (Advanced mode)
About the System Control function
The Remote Commander (RM-AX4000) has special buttons called "System Control buttons," and you can perform programmed actions by pressing these
buttons.
If you press the MORE button (rightmost System Control button), all keys sharing the same function as that System Control buttons are displayed at the bottom
of the display. These keys are called, "System Control keys."
Page 81
Page 82

Advanced mode allow s you to set a macro (Action list) for each of four System Control buttons and four System Control keys. This is called a "System Control
macro."
Note
You cannot set a System Control macro in Standard mode.
See als o
Changing a System Control setting (Advanced mode)
Page 82
Page 83

Changing the Timer function (Advanced mode)
The Timer function allow s you to set the Remote Commander to operate a series of actions, called a macro (Action list), at a scheduled time. (Timer macro)
You can set up to eight Timer macros.
1.
Click the "Advance d" tab in the low er le ft of the s creen to sw itch to Advanced m ode.
2.
Click "Edit Tim er" in the low er le ft of the screen.
The 'Edit Timer" dialog box appears.
This dialog box allow s you to set the follow ing:
ON/OFF
o
Sw itches ON/OFF each Timer program.
o
o
o
o
o
o
o
o
o
o
o
o
o
o
o
o
3.
Click "OK."
The Timer program is changed and the "Edit Timer" dialog box closes.
: The Timer program is on. Click to deactivate the Timer program.
: The Timer program is off. Click to activate the Timer program.
Ke y Label
Makes a label for a Timer key. The default labels are show n as "PROG1" to "PROG8."
By clicking the button, the "Edit Label" dialog box appears. Enter a label and click "OK" to update the information.
Hint
You can enter up to eight characters. How ever, the label cannot be left blank. Be sure to enter at least one character.
By clicking "Symbol," the "Symbol select" dialog box appears. This dialog box allow s you to enter symbols such as .
The "Label" text box allow s you to copy and paste characters by using the shortcut menu (right-click menu) or the shortcut keys.
Tim er Macro
By clicking "Edit Actions," the "Edit Actions" dialog box appears. This dialog box allow s you to add/change/delete the action of a Timer macro or
change the action order.
Tim e
Sets the operation time (hour, minute, AM/PM) for a Timer macro.
For the hour/minute setting, enter the digit or click . For the AM/PM setting, click and select from the drop-dow n list.
Day
Set the day for the Timer macro to operate. The default setting is "Everyday."
Click the day setting button to display the "Edit Day" dialog box, w hich show s the follow ing options:
Eve ryday
Operates everyday.
Wee k day
Operates w eekdays.
Wee k e nd
Operates at the scheduled time on w eekends.
Sunday - Saturday
Operates at the scheduled time and day. Check only the box of the day w hen you w ant to operate the Timer macro.
[Clear]
Returns to the initial setting.
Page 83
Page 84

Changing an Air-Slide's settings (Advanced mode)
You can set a macro (Action list) for each pattern of an Air-Slide to operate. (Air-Slide macro)
1.
Click the "Advance d" tab in the low er le ft of the s creen to sw itch to Advanced m ode.
2.
Click "Edit Air-Slide " in the low er le ft of the s creen.
The "Edit Air-Slide" dialog box appears.
3.
Click "Edit Actions " under an Air-Slide pattern you w ant to edit.
The "Edit Actions" dialog box appears. This dialog box allow s you to add/change/delete an action of the macro for the Air-Slide, or change the action
order.
Hint
If you click "Clear," the setting for the Air-Slide pattern is cleared.
4.
Click "OK."
The "Edit Air-Slide" dialog box closes, and the setting of the Air-Slide is changed.
Page 84
Page 85

Changing a System Control setting (Advanced mode)
You can set a macro (Action list) for a System Control button/key to operate (System Control macro). You can set up to eight System Control macros.
1.
Click the "Advance d" tab in the low er le ft of the s creen to sw itch to Advanced m ode.
2.
Click "Edit Sys tem Control" at the bottom of the s creen.
The "Edit System Control" dialog box appears.
This dialog box allow s you to set the follow ing:
System Control button list/Sys tem Control key lis t
o
The System Control button list is in the upper left and the System Control key list is in the low er left.
o
Selecting a button/key you w ant to edit allow s you to confirm/change the label and macro (Action list) in the "Properties" area on the right side.
o
[Edit Label]
o
Sets the label of a System Control key. The default labels are show n as "SYSTEM5" to "SYSTEM8."
o
By clicking the key you w ant to edit and clicking "Edit Label," the "Edit Label" dialog box appears. Enter a label and click "OK" to update the information.
o
Hints
You can enter up to eight characters. How ever, the label cannot be left blank. Be sure to enter at least one character.
By clicking "Symbol," the "Symbol select" dialog box appears. This dialog box allow s you to enter symbols such as .
The "Label" text box allow s you to copy and paste characters by using the shortcut menu (right-click menu) or the shortcut keys.
Action List
o
Displays a macro (Action list) of the selected button/key. Click the "Edit Actions" to change the setting of the macro.
o
[Edit Actions ]
o
By clicking this, the "Edit Actions" dialog box appears. This dialog box allow s you to add/change/delete an action of a System Control macro or
o
change the action order.
3.
Click "OK."
The "Edit System Control" dialog box closes, and the setting of the System Control is changed.
Page 85
Page 86

About projects
AX Remote Editor allow s you to manage the Remote Commander settings as a "project."
When you first install AX Remote Editor, there are no projects yet, so the "New Project" w izard appears asking you to create a project w hen you start up AX
Remote Editor. The on-screen instructions in this w izard guide you through the necessary procedures to create a project, such as setting a project name,
components, XPRESS keys, and dow nloading the settings to the Remote Commander.
When you create a project, a folder of the same name (project folder) as the project is created on your PC w here its settings file (AX Remote Editor file w ith
the file extension ".axe") is saved along w ith various other files for that project.
You can create as many projects as necessary. For example, you can save several Remote Commander settings as different projects, according to your
needs. Or, you can make a backup copy of the Remote Commander settings as a precaution against accidental data loss.
Note
Do not use Window s Explorer, etc., to move project folders and or the files w ithin. Doing so may make it impossible to edit the project on AX Remote Editor.
Project related topics
With AX Remote Editor you can:
Create a new project
Create a project in Standard mode (New Project Wizard)
Create a project in Advanced mode
Save a project
Open a project
Enter a user name and comments for a project
Page 86
Page 87

Creating a project in Standard mode (New Project Wizard)
Perform the follow ing steps to create a project in Standard mode follow ing the "New Project" w izard instructions.
Step 1: Set a project nam e
Enter a name for the project you w ant to create.
Step 2: Set com ponents
In this step, perform the follow ing steps to set various component settings.
1.
Select all the component types you w ant the Remote Commander to control.
2.
Check or change the label of components.
3.
Program the preset code of a component.
4.
Check if the preset code you programmed w orks.
5.
Repeat steps 3 to 4 for each component you are editing.
Step 3: Set XPRESS ke ys
In this step, perform the follow ing steps to set various settings of XPRESS keys.
1.
Select the "Purpose" and the "Source component" (that outputs images and sound) of all the XPRESS keys you w ant to program.
2.
Check or change the label of XPRESS keys.
3.
Select a video component (that outputs images from the source component).
4.
Select an audio component (that outputs sound from the source component).
5.
Set the follow ing items about the video component.
Select the type of pow er button on the video component's remote control.
o
Set the information about the input select button on the video component's remote control.
o
Make the Remote Commander (RM-AX4000) learn the video component's remote control signal.
o
6.
Set the follow ing items about the audio component.
Select the type of pow er button on the audio component's remote control.
o
Se the information about the input select button on the audio component's remote control.
o
Make the Remote Commander (RM-AX4000) learn the audio component's remote control signal.
o
7.
Set the follow ing items about the source component.
Select the type of pow er button on the source component's remote control.
o
Make the Remote Commander (RM-AX4000) learn the source component's remote control signal.
o
8.
Set a Start macro (action to be executed w hen operating an XPRESS key) and an Exit macro (action to be executed w hen sw itching to another XPRESS
display) of an XPRESS key.
9.
Repeat steps 3 to 8 for each XPRESS key you are setting.
Step 4: Dow nload the s e ttings to the Re m ote Com m ander
Dow nload the settings made on the w izard to the Remote Commander (RM-AX4000).
Hints
When you start up AX Remote Editor for the first time, the "New Project" w izard appears asking you to create a project. In this case, create a project
follow ing the above procedure.
If you w ant to exit the setting procedure at any point, click "Save and Exit" in the low er right of the screen. The setting is saved and AX Remote Editor
closes.
The next time you start AX Remote Editor, you can resume the setting from the point you stopped.
Page 87
Page 88

Setting a project name
You can create a project in Standard mode.
In the first step, set the project name.
1.
Click "File" on the m e nu bar, the n s e le ct "Ne w ."
The "New Project" dialog box appears.
Hint
If the project you are editing is not saved, a message box appears asking you to confirm saving before the "New Project" dialog box appears. To save
the project, click "Yes," otherw ise, click "No."
2.
Click "Standard," then click "OK."
The "New Project" w izard appears.
3.
Click "Ne xt."
The "Project Name" screen appears.
4.
Enter a proje ct nam e unde r "Input a project folder nam e," next to .
5.
Click under "Save the project folder in."
A dialog box appears for you to select a folder.
Hint
The "Save the project folder in" field show s the folder (location) in w hich you created a project or saved the project under a different name last time.
The first time you start AX Remote Editor, the field show s the Window s desktop.
6.
Sele ct the folder in w hich you w ant to create the project, then click "OK."
The dialog box closes, and the selected folder is displayed to the left of .
7.
Click "Ne xt."
The "Component Settings - Select Component" screen appears.
Follow ing the w izard instructions, set components.
Page 88
Page 89

Setting components
The "Component Settings" screen in the "New Project" w izard allow s you to make various settings for components.
Hint
You can save and exit the setting procedure at any point; just click "Save and Exit" in the low er right of the screen. The setting is saved and AX Remote Editor
closes.
The next time you start AX Remote Editor, you can resume the setting from the point you stopped.
1.
From the com ponent category list on the le ft s ide of the s creen, click the com ponent that you w ant the Re m ote Com m ande r to
control, then click "Se lect ->."
The selected component is added to the "Preview " area on the right side. Repeat to add other components to the "Preview " area.
Hints
You can add up to 16 components.
o
Click "Clear the Last Selected" to delete the last added component from the "Preview " area.
o
When you are not sure w hich component to select, see "About the component category" below . (Clicking "Help" on the "Component Settings - Select
o
Component" screen also displays the same information.)
2.
After adding the ne ce s s ary com ponents to "Pre vie w ," click "Ne xt."
The "Component Settings - Confirming the Label of a Component Key" screen appears. This screen allow s you to change the component's label
displayed on the Remote Commander.
3.
If you w ant to change the label, enter the ne w label in the te xt box to the right of "Label."
You can enter up to eight characters. The label preview in the center of the screen updates the information.
Hints
If you don't w ant to change the label, skip to step 4.
o
By clicking "Symbol," the "Symbol select" dialog box appears, allow ing you to enter symbols such as .
o
The "Label" text box allow s you to copy and paste characters by using the shortcut menu (right-click menu) or the shortcut keys.
o
Note
The label cannot be left blank. Be sure to enter at least one character.
4.
After e ntering the labe l, click "Ne xt."
The "Component Settings - Programming the Preset Codes of Components (SOLUTION)" screen appears. This screen allow s you to program the preset
code for each component. Preset code refers to the IR code of a component's remote control.
5.
Connect the Re mote Com mander (RM-AX4000) to your PC w ith the USB m ini cable.
6.
Follow ing the on-screen ins tructions, place the Re m ote Com m ander (RM -AX4000) he ad to he ad w ith the AV com pone nt's rem ote
control w hose pre set code you w ant to program.
7.
Click "Preset."
The "Preset" dialog box appears, and the Remote Commander (RM-NX4000) goes to standby mode.
8.
Operate the rem ote control according to the on-s creen ins tructions .
"The preset code of "component name" is programmed" appears w hen the programming is complete.
Hints
If 60 seconds passes in standby mode, or if the Remote Commander cannot define the preset code, a dialog box appears for you to confirm redoing
o
the operation. If you click "Yes," the Remote Commander (RM-AX4000) goes to standby mode again and you can redo the operation. If you click "No,"
the "Learn signal in Order" dialog box appears, allow ing you to make each of the keys/buttons learn the code of the selected component from its
remote control.
If "The Remote Commander is not connected or not responding." appears, the Remote Commander (RM-AX4000) may not be connected to your PC
o
properly. After checking the connection, click "Retry" to repeat the operation.
9.
Click "OK" in the m e s sage box.
The message box closes, and the screen returns to "Component Settings - Programming the Preset Codes of Components (SOLUTION)".
10.
Click "Ne xt."
The "Component Settings - Checking the Operations" screen appears. This screen allow s you to test the remote control signal of the preset code
programmed in steps 6 to 9.
11.
Aim the Re m ote Com m ander at the AV com pone nt you w ant to operate, then click "Em ulate."
The Emulator appears.
12.
One by one, pre s s the keys and buttons on the Em ulator to confirm the corre sponding action on the AV com ponent.
Note
Press the keys/buttons longer than usual.
13.
After che ck ing all the k e ys and buttons , click in the uppe r right of the Emulator.
The Emulator closes, and the screen returns to "Component Settings - Checking the Operations."
14.
Click "Ne xt."
Page 89
Page 90

The "Component Settings - Programming the Preset Codes of Components (SOLUTION)" screen reappears, and the second component setting starts.
Repeat steps 5 to 13 to finish all the component settings.
Hint
If only one component is added in step 1, the "Component Settings - Programming the Preset Codes of Components (SOLUTION)" screen does not
appear. In this case, go to step 15.
15.
Click "Ne xt."
A dialog box appears asking if you are sure you w ant to save the settings and continue.
16.
Click "Yes ."
The "XPRESS Settings - What is XPRESS?" screen appears.
Follow ing the w izard instructions, set XPRESS keys.
About the component category
When you select the component category (type) in the "New Project" w izard (for creating a project) or in the "New Component" w izard (for adding a
component), be careful of the follow ing:
A "DVD/Receiver Combo" is a Sony AV amplifier w ith a built-in DVD player.
A "DVR/DVD Combo" is a DVD recorder w ith a built-in hard disk drive.
Except the DVD/Receiver combo, the components w ith the built-in amplifier should be registered as Receiver. All the keys that are inoperative should be
registered by the learning function.
When you have a multi-component (such as a DVD/VCR combo), select only one of either component for the category.
For example, in the case of a DVD/VCR combo, select "DVD" or "VCR" for the category. If you select both components, the XPRESS function w ill not w ork
properly.
Only w hen you add a component in Advanced mode, can you select "None" (that has no preset code). When you cannot find an appropriate component
type, select "None."
Page 90
Page 91

Setting XPRESS keys
The "XPRESS Settings" screen in the "New Project" w izard allow s you to make various settings for XPRESS keys.
Hint
You can save and exit the setting procedure at any point; just click "Save and Exit" in the low er right of the screen. The setting is saved and AX Remote Editor
closes.
The next time you start AX Remote Editor, you can resume the setting from the point you stopped.
1.
After reading the introduction, click "Ne xt."
The "XPRESS Settings - Purpose and Source Component" screen appears.
Hint
Clicking "Help" on the "XPRESS Settings - What is XPRESS?" screen also displays the information about the XPRESS function.
2.
Set the follow ing:
Purpose
o
Select the purpose of the XPRESS key by clicking and selecting from the drop-dow n list. After selecting the purpose, the "Source component" can
o
be set in the same w ay.
Source com ponent
o
Select the source component (that outputs images and sound) for the XPRESS key by clicking and selecting from the drop-dow n list. After
o
selecting the component, the next line can be set in the same w ay to add another XPRESS key.
Repeat step 2 to set up other XPRESS keys.
Hint
You can set up to eight XPRESS keys.
3.
After e ntering each re quired XPRESS ke y, click "Ne xt."
The "XPRESS Settings - Confirming the Label of an XPRESS Key" screen appears. This screen allow s you to change the XPRESS key's label displayed
on the Remote Commander and its name.
4.
If you w ant to change the label and nam e , s e t the follow ing:
XPRESS Key
o
Enter the label (displayed on the Remote Commander). You can enter up to eight characters. The label preview in the center of the screen updates
o
the information.
XPRESS Name
o
Enter the name (w hich w ill appear on the XPRESS display as its title). You can enter up to 12 characters.
o
Hints
If you don't w ant to change the label or name, skip to step 5.
o
By clicking "Symbol," the "Symbol select" dialog box appears, allow ing you to enter symbols such as .
o
The "XPRESS Key" or "XPRESS Name" text box allow s you to copy and paste characters by using the shortcut menu (right-click menu) or the
o
shortcut keys.
Note
The label cannot be left blank. Be sure to enter at least one character.
5.
After e ntering the labe l and nam e, click "Ne xt."
A dialog box appears asking if you are sure you w ant to save the settings and continue.
6.
Click "Yes ."
The "XPRESS Settings - Video Component" screen appears.
7.
Sele ct a vide o com pone nt (that outputs im age s from the s ource com ponent), then click "Ne xt."
The "XPRESS Settings - Audio Component" screen appears.
8.
Sele ct an audio com pone nt (that outputs sound from the s ource com ponent), then click "Ne xt."
The "XPRESS Settings - Pow er Button on your Remote Control of the Video Component" screen appears.
9.
Sele ct the type of pow e r button on the video com ponent's re m ote control, then click "Ne xt."
The "XPRESS Settings - Input Select Button on your Remote Control of the Video Component" screen appears.
10.
Sele ct the type of input se le ct button on the vide o com ponent's rem ote control from the follow ing options, the n click "Ne xt."
I pres s a button repeate dly to cycle through the inputs. (Type A)
o
Select this if you change the input by pressing a button repeatedly, then go to step 14.
o
I pres s a button to directly select the desire d input. (Type B)
o
Select this if you change the input by pressing a particular button. Then enter the name of the source component button in the text box and go to step
o
15.
Others
o
Select this if you change the input on the menu display, then go to step 11.
o
11.
Sele ct the type of input se le ct button on the re m ote control from the follow ing options , the n click "Ne xt."
Type C
o
Select this if you change the input on the menu display by pressing the up/dow n button, then go to step 12.
o
Type D
o
Select this if you change the input on the menu display by pressing a particular button. In the text box, enter the name of the button you press after
o
the menu button to use the source component, then go to step 15.
Hint
For further details about the difference of "Type C" and "Type D," see "About the remote control's input select button type." (Clicking "Help" on the
"XPRESS Settings - Input Select Button on your Remote Control of the Video Component" screen also displays the same information.)
Page 91
Page 92

12.
Enter the follow ing inform ation regarding the input selection of the vide o com ponent, the n click "Ne xt".
What is the total num ber of inputs you can select from the on scree n m e nu?
o
Click and select the number.
o
Which input do you se le ct w hen you use "Source com pone nt nam e "?
o
Enter the input name in the text box.
o
In w hat orde r does your s ele ction (in [2]) appear on the list (1st, 2nd, 3rd, etc.)?
o
Select the order number by clicking .
o
13.
Sele ct w hich input is highlighte d w hen you press the input select button on the re m ote control, then click "Ne xt."
After this selection, go to step 15.
14.
Enter the follow ing inform ation regarding the input selection of the vide o com ponent, the n click "Ne xt".
What is the total num ber of inputs you can change by pres s ing the Input Select button?
o
Click and select the number.
o
Which input do you se le ct w hen you use "Source com pone nt nam e "?
o
Enter the input name in the text box.
o
Where does the input (in [2]) s tand from the initial input?
o
Select the order number by clicking .
o
15.
Follow ing the on-screen ins tructions, place the Re m ote Com m ander (RM -AX4000) he ad to he ad w ith the AV com pone nt's rem ote
control w hose pre set code you w ant to program.
Note
Make sure that the Remote Commander (RM-AX4000) is connected to your PC.
16.
Click "Learn."
The "Learn" dialog box appears, and the Remote Commander (RM-AX4000) goes to standby mode.
17.
Operate the rem ote control according to the on-s creen ins tructions .
"Learning is complete" appears w hen learning is successful. Keep follow ing the on-screen instructions.
The "Learning is complete" message box show s "OK" w hen learning is complete.
Hints
If "A time out error: 60 seconds has passed" appears, click [OK] and redo from step 16.
o
If "The Remote Commander is not connected or not responding." appears, the Remote Commander (RM-AX4000) may not be connected to your PC
o
properly. After checking the connection, click "Retry" to repeat the operation.
18.
Click "OK."
The message box closes and the screen returns to "XPRESS Settings - Learn."
19.
Click "Ne xt."
The "XPRESS Settings - Pow er Button on your Remote Control of the Audio Component" screen appears.
20.
Set the information regarding the audio com ponent's rem ote control in the sam e w ay as for the video com ponent (shown in steps 9
to18).
21.
When finis he d, then click "Ne xt."
The "XPRESS Settings - Pow er Button on your Remote Control of the Source Component" screen appears.
22.
Sele ct the type of pow e r button on the source com ponent's rem ote control, then click "Ne xt."
The "XPRESS Settings - Learn" screen appears.
23.
Mak e the Re mote Com mander learn the s ource com pone nt's rem ote control s ignal in the s am e w ay as for the video com ponent
(show n in steps 15 to18).
24.
When le arning is com plete, click "Ne xt."
The "XPRESS Settings - Options" screen appears.
25.
Set the follow ing options :
Option1: Start Macro
o
Select this to set additional actions (Start macro) to w ork w hen operating an XPRESS key. If an action is not necessary, uncheck the box.
o
Option2: Exit M acro
o
Select this to set additional actions (Exit macro) to w ork w henever you sw itch to another XPRESS display. If an action is not necessary, uncheck the
o
box.
26.
Click "Ne xt."
The "XPRESS Settings - Checking the Operations" screen appears. This screen allow s you to check if the Start macro added in step 25 w orks properly.
Note
Before checking, make sure that the Remote Commander (RM-AX4000) is connected to your PC.
27.
Aim the Re m ote Com m ander at the AV com pone nt you w ant to operate, then click "Test."
A message box appears.
28.
Follow ing the on-screen ins tructions, prepare the AV com pone nt you w ant to ope rate and click "OK."
The "Test" dialog box appears.
Page 92
Page 93

29.
Click "Send."
The signal programmed for the Remote Commander as a Start macro is sent to the AV component. Check if the AV component w orks properly.
30.
After the check ing, click "Cance l."
The "Test" dialog box closes and the screen returns to the "XPRESS Settings - Checking the Operations."
31.
Click "Ne xt."
A dialog box appears asking if you are sure you w ant to save the settings and continue.
32.
Click "Yes ."
The follow ing screen appears:
If you se t tw o or more XPRESS ke ys in s te p 2
o
The "XPRESS Settings - Video Component" screen reappears, and the second XPRESS key's setting starts. Repeat steps 7 to 32 to set all the
o
XPRESS keys.
If you se t only one XPRESS ke y in ste p 2, or otherwis e , w hen all the XPRESS ke y's s e ttings are com ple te
o
The "Data Dow nload to Remote" screen appears.
o
Follow ing the w izard instructions, dow nload the settings to the Remote Commander (RM-AX4000).
o
About the remote control's input select button type
Generally, there are four types of input select button on remote controls. See the follow ing:
Type A
Changes the input by pressing the button repeatedly.
In the above example, pressing the "TV/VIDEO" button repeatedly changes the input.
Type B
Changes the input by pressing a particular button.
In the above example, pressing the "TV" button changes the input to "TV;" the "VIDEO1" button is "VIDEO1."
Type C
Changes the input on the menu display by selecting w ith the up/dow n button.
In the above example, press the up/dow n button to select "Video1," and then select the button to decide the selection. The input is changed to "Video1."
Type D
Changes the input on the menu display by pressing a particular button.
In the above example, pressing the "VIDEO2" button changes the input to "VIDEO2."
In the above example, the current input (VIDEO1) is displayed on the menu display. Pressing the button for changing the input (such as Ch2, VIDEO2)
changes the input to "VIDEO2." (The button differs depending on the AV component.)
Page 93
Page 94

Downloading the settings to the Remote Commander
The "Data Dow nload to Remote" screen of the "New Project" w izard allow s you to dow nload the settings to the Remote Commander (RM-AX4000).
Hint
If you don't w ant to dow nload the settings to the Remote Commander, skip the follow ing steps. Just click "Finish" on the "Data Dow nload to Remote" screen.
1.
Mak e s ure that the Re m ote Com m ander (RM -AX4000) is conne cte d to your PC.
2.
Click "Dow nload."
The "Dow nload to Remote" dialog box appears.
3.
Click "Dow nload."
The settings are dow nloaded to the Remote Commander. When dow nloading is complete, a message box appears.
Notes
If the firmw are version of the Remote Commander is older than that of AX Remote Editor, a dialog box appears asking you to confirm updating the
o
firmw are w hen you click "Dow nload." By clicking "OK," the firmw are is updated.
If you update the firmw are, all the current settings of the Remote Commander are deleted. So proceed w ith caution, being careful not to delete
necessary data.
If the version of AX Remote Editor is older than the firmw are version of the Remote Commander, a message box appears asking you to update AX
o
Remote Editor w hen you click "Dow nload." In this case, after checking the firmw are version of the Remote Commander, dow nload the compatible
version of AX Remote Editor from the w ebsite.
If "The Remote Commander is not connected or not responding." appears, the Remote Commander (RM-AX4000) may not be connected to your PC
o
properly. After checking the connection, click "Retry" to repeat the operation.
4.
Click "OK."
The Standard mode screen of AX Remote Editor appears.
Now you have finished all the settings. After disconnecting the USB mini cable from the Remote Commander, try operating your AV components w ith
the Remote Commander.
Page 94
Page 95

Creating a project in Advanced mode
You can create a project in Advanced mode.
1.
Click "File" on the m e nu bar, the n s e le ct "Ne w ."
The "New Project" dialog box appears.
Hint
If the project you are editing is not saved, a message box appears asking you to confirm saving before the "New Project" dialog box appears. To save
the project, click "Yes," otherw ise, click "No."
2.
Click "Advanced," then click "OK."
The "New Project" w izard appears.
3.
Enter a proje ct nam e unde r "Input a project folder nam e," next to .
4.
Click under "Save the project folder in."
A dialog box appears for you to select a folder.
Hint
The "Save the project folder in" field show s the folder (location) in w hich you created a project or saved the project under a different name last time.
The first time you start AX Remote Editor, the field show s the Window s desktop.
5.
Sele ct the folder in w hich you w ant to create the project, then click "OK."
The dialog box closes, and the selected folder is displayed to the left side of .
6.
Click "OK."
The "New " dialog box closes, and the new project named in step 3 is created. The project is displayed in Advanced mode on the AX Remote Editor
screen.
Page 95
Page 96

Saving a project
You can save the project you are editing on your PC.
Saving a project under a different name
Saving a project
Saving a project under a different name
You can save a project under a different name.
1.
Click "File" on the m e nu bar, the n s e le ct "Save as ."
The "Save as" dialog box appears.
2.
Enter a proje ct nam e unde r "Input a project folder nam e," next to .
3.
Click .
A dialog box appears for you to select a folder.
Hint
The "Save the project folder in" field show s the folder (location) in w hich you created a project or saved the project under a different name last time.
The first time you start AX Remote Editor, the field show s the Window s desktop.
4.
Sele ct the folder in w hich you w ant to save the project, then click "OK."
The display returns to the "Save as" dialog box, and the selected folder is displayed on the left side of .
5.
Click "OK."
The "Save as" dialog box closes, and the project is saved under the name entered in step 2.
Saving a project
You can save (overw rite) a project.
1.
Click "File" on the m e nu bar, the n s e le ct "Save ."
The project you are editing is saved.
Page 96
Page 97

Opening a project
You can open a saved project and display it on AX Remote Editor.
1.
Click "File" on the m e nu bar, the n s e le ct "Ope n."
The "Open" dialog box appears.
Hint
If the project you are editing is not saved, a message box appears asking you to confirm saving before the "Open" dialog box appears. To save the
project, click "Yes," otherw ise, click "No."
2.
Click of "Look in," the n s e le ct the project folder you w ant to ope n.
3.
Sele ct the AX Re m ote Editor file w ith the file e xte ns ion ".axe ," and click "Ope n."
The "Open" dialog box closes, and the selected project is displayed on AX Remote Editor.
Page 97
Page 98

Entering a user name and comments for a project
You can enter a user name and comments for the project you are editing.
1.
Click "File" on the m e nu bar, the n s e le ct "Prope rties."
The "Properties" dialog box appears, w hich allow s you to check/set the follow ing items:
Project
o
Displays the project name. You cannot change it.
o
Us e rnam e
o
Enter the user name for the project. You can enter up to 30 characters.
Comm ents
o
Enter the comments for the project. You can enter up to 60 characters, but cannot start a new line.
o
You can enter project information (overview , date saved, version, etc.).
o
2.
Click "OK."
The "Properties" dialog box closes, and the user name and comments are set for the project.
Page 98
Page 99

Checking the settings on the Emulator
You can confirm on the PC screen that the settings made on AX Remote Editor w ill w ork properly.
1.
Connect the Re mote Com mander (RM-AX4000) to your PC w ith the USB m ini cable.
Notes
Do not disconnect the USB mini cable from your PC until checking is complete, otherw ise a malfunction may occur.
o
Only connect one Remote Commander to your PC at a time. Otherw ise, you w on't be able to start the Emulator.
o
2.
Aim the Re m ote Com m ander at the AV com pone nt you w ant to operate, then click "Em ulate" in the low er right of the s cre en.
The Emulator appears.
Notes
If the firmw are version of the Remote Commander is older than that of AX Remote Editor, a dialog box appears asking you to confirm updating the
o
firmw are w hen you click "Emulate." By clicking "OK," the firmw are is updated.
If you update the firmw are, all the current settings of the Remote Commander are deleted. So proceed w ith caution, being careful not to delete
necessary data.
If "The Remote Commander is not connected or not responding." appears w hen you click "Emulate," the Remote Commander (RM-AX4000) may not be
o
connected to your PC properly. After checking the connection, click "Retry" to repeat the operation.
3.
One by one, pre s s the keys and buttons on the Em ulator to confirm the corre sponding action on the AV com ponent.
Notes
Press the keys/buttons longer than usual.
o
The Emulator cannot check the operations w hen the follow ing buttons are pressed.
o
SYNC-UP button
TIMER button
LIGHT button
COMMANDER OFF button
4.
After che ck ing all the k e ys and buttons , click in the uppe r right of the Emulator.
The Emulator closes.
Page 99
Page 100

Downloading the settings to the Remote Commander
You can send (dow nload) the settings you made w ith AX Remote Editor to the Remote Commander through the USB mini cable.
1.
Connect the Re mote Com mander (RM-AX4000) to your PC w ith the USB m ini cable.
Notes
Do not disconnect the USB mini cable from your PC until dow nloading is complete, otherw ise a malfunction may occur.
o
Only connect one Remote Commander to your PC at a time. Otherw ise, you w on't be able to dow nload the settings correctly.
o
2.
Click "File" on the m e nu bar, the n s e le ct "Dow nload to Rem ote."
The "Dow nload to Remote" dialog box appears.
Hints
If the project you are editing is not saved, a message box appears asking you to confirm saving before the "New Project" dialog box appears. To
o
save the project, click "Yes," otherw ise, click "No."
If you check the "Dow nload the Unit Setting data together w ith the project data" box in this dialog box, you can dow nload the unit settings of the
o
Remote Commander together w ith the project.
3.
Click "Dow nload."
A confirmation dialog box appears.
4.
Click "Yes ."
The settings dow nload to the Remote Commander starts. When dow nloading is complete, a message box appears.
Notes
If the data capacity to be dow nloaded from AX Remote Editor is larger than the memory capacity of the Remote Commander, an error message
o
appears w hen you click "Dow nload." In this case, decrease the data capacity by:
Deleting macros (Action lists).
Deleting learned settings from keys/buttons.
Hiding unnecessary keys.
If the firmw are version of the Remote Commander is older than that of AX Remote Editor, a dialog box appears asking you to confirm updating the
o
firmw are w hen you click "Dow nload." By clicking "OK," the firmw are is updated.
If you update the firmw are, all the current settings of the Remote Commander are deleted. So proceed w ith caution, being careful not to delete
necessary data.
If the version of AX Remote Editor is older than the firmw are version of the Remote Commander, a message box appears asking you to update AX
o
Remote Editor w hen you click "Dow nload." In this case, after checking the firmw are version of the Remote Commander, dow nload the compatible
version of AX Remote Editor from the w ebsite.
If "The Remote Commander is not connected or not responding." appears, the Remote Commander (RM-AX4000) may not be connected to your PC
o
properly. After checking the connection, click "Retry" to repeat the operation.
5.
Click "OK."
The message box closes.
Page 100
 Loading...