

Page 1

3-245-133-12(1)
Integrated Remote
Commander
Operating Instructions
RM-AV3000T
© 2002 Sony Corporation
Page 2

2
Page 3

Features
The RM-AV3000T Remote Commander
provides centralized control of all your
AV components from a single remote
commander and saves the trouble of
operating different AV components with
different remote control devices. The
following are its main features.
Customizing 258 labels of control
keys in the dot matrix
LCD with dot matrix makes label
customizing possible. A total of 258 labels
on the LCD, such as component labels,
macro labels, etc., can be customized. A
label of up to 8 letters with digits,
characters or symbols can be selected and
displayed.
Control of 18 components
Control of a maximum of 18 components
(TV, STB, VCR, DVD, CD, AMP, etc.) is
possible.
Components are selectable with 6
buttons on the Commander for the
components frequently used and 12 keys
on the LCD (displayed by pressing the
OTHER button). Component Select
buttons of light storage type are easy-tooperate and visible in the dark.
Setting a maximum of 45 macro
commands of a maximum of 32
successive steps
A maximum of 45 macro commands
which provide a maximum of 32
successive steps by pressing a single
button can be set (15 system control
macros, 18 component macros, and 12
timer macros). Macro execution speed is
changeable. All power on/off macro
commands for Sony components are
preset at the factory.
Clock display and timer function
Using a maximum of 12 timer macros,
timer control of automatic on/off and other
controls (such as recording, stopping, etc.)
of each component are possible.
Centralized control of Sony AV
components with this one remote
commander
This Commander is preset at the factory
to operate Sony brand components, so
you can use it out of the box as a control
centre for your Sony AV components.
Remote control signals for non-Sony
components are also preset
This Commander is preset for most major
brands components including Sony. You
can remote control your components by
setting their code numbers (page 12).
Learning function for programming
other remote control signals you need
This Commander has a learning function,
to learn remote control signals to operate
non-preset components or functions
(page 19).
In addition, the Commander can learn
remote control signals (infrared signals
only) of non Audio Visual components
such as air-conditioners, lights, etc. (some
specific appliances or functions may not
be available) (page 49).
Channel macro function allows you
to select a programme position with
a single key
Up to 5 key steps can be programmed on
macro keys (Label keys). If you set the
key operations for entering a programme
position number on a macro key, you can
select the programme position by
pressing that macro key (page 58).
Easy-to-operate touch key LCD with
blue back light
This Commander has a touch key LCD that
changes the key display according to the
selected component. The Commander is
easy to operate as only the keys necessary
to operate the selected component are
displayed. The display backlight allows
operation even in the dark.
3
Page 4

Table of Contents
Getting Started
Location and Function of Controls ....................................................................................... 6
Installing the Batteries ......................................................................................................... 7
When to replace the batteries.............................................................................................. 8
Setting the Clock .................................................................................................................. 8
Setting the clock for the first time after installing batteries............................................ 8
Adjusting the clock after setting the clock ...................................................................... 10
Basic Operations
Setting the Code for Preset Audio and Visual Components ............................................... 12
Setting a component code ................................................................................................. 12
Checking if the code number works ................................................................................ 15
Finding a component code with the Search function.................................................... 16
Operating Your Components with the Remote Commander .............................................. 18
To control the volume ........................................................................................................ 19
Using Non-Preset Remote Control Operations — Learning Function ................................ 19
For accurate learning ......................................................................................................... 25
Changing or erasing the function of a taught key or button ....................................... 25
Advanced Features
Controlling the Volume of Visual Components Connected to an Audio System................. 29
Executing a Series of Commands — System Control Functions......................................... 31
Programming a series of commands for the SYSTEM CONTROL buttons
or the Label keys .............................................................................................................. 32
Notes on System Control Operations .............................................................................. 37
Programming a series of commands for the Component Select buttons
or the Label keys .............................................................................................................. 38
Changing the interval between operation steps ............................................................ 40
To change the component macro executing time........................................................... 42
Adding an Extra Function to the Component Select Buttons............................................. 43
Programming the Power-On command of the selected component
(for Sony components only) ........................................................................................... 43
Adding a command that is required when selecting a component ............................ 45
Assigning Other Components to the Component Select Buttons or the Label keys .......... 47
Copying the settings of a Component Select button
or a Label key to another button or key ....................................................................... 47
Programming a Frequently Used Key Operation for SYSTEM CONTROL Buttons
or Label Keys.................................................................................................................... 49
Notes on learning the signals of an air-conditioner ...................................................... 52
Transferring Data between Commanders ........................................................................... 52
Transferring data ................................................................................................................ 52
4
Receiving the data ..............................................................................................................56
Page 5

Selecting a Programme position with a Single Key Press — Channel Macro Function...... 58
Setting the Timer ................................................................................................................ 61
Setting the new timer programme ................................................................................... 61
Changing the programme already set or changing another programme
that you select................................................................................................................... 65
Using Other Functions
Locking the Controls — Hold Function............................................................................... 71
Protecting your settings — Setting Lock Function............................................................. 72
Setting the Automatic-Off Time of the Display Window .................................................... 73
Adjusting the Backlight of the Display Window................................................................. 74
Setting the Key-Touch Beep ................................................................................................ 77
Adjusting the Contrast of the Display Window .................................................................. 78
Changing the Names of the Label Keys or the Component Names
on the Mode Display Key ................................................................................................. 79
Erasing All the Settings....................................................................................................... 81
Additional Information
Precautions ......................................................................................................................... 83
Maintenance ....................................................................................................................... 83
Specifications...................................................................................................................... 83
Troubleshooting .................................................................................................................. 84
Appendices
Table of Preset Functions.................................................................................................... 88
TV.......................................................................................................................................... 88
STB (Digital satellite, Analogue satellite, Digital terrestrial) ....................................... 89
VCR, VCR2, VCR3.............................................................................................................. 90
DVD, DVD2, DVD3............................................................................................................ 91
CD ......................................................................................................................................... 92
AMP...................................................................................................................................... 93
MD ........................................................................................................................................ 94
TAPE A, TAPE B ................................................................................................................. 95
CABLE (Cable box) ............................................................................................................ 95
LD (Laser disc player)........................................................................................................ 96
DAT....................................................................................................................................... 96
Quick Reference of Operations........................................................................................... 97
Full display.......................................................................................................................... 99
Index ......................................................................................................................Back cover
5
Page 6

Getting Started
Location and Function of Controls
1
2
3
4
5
TV STB VCR DVD CD AMP
qk
qj
qh
qg
SYSTEM CONTROL
OK
MENU EXIT
MORE321
1 Clock Display key (page 8)
Displays the clock, the transmission
mark, the battery mark and the timer
mark.
2 Mode Display key (page 8, 13, 20, 30,
32, 40)
Displays the status of the selected
mode.
Function of the key changes according
to the selected mode.
3 LCD touch key display
The keys used for operating each
component and setting the
Commander are displayed.
Note
Do not press the touch keys using sharp
objects such as pins or ballpoint pens.
OTHER
6
7
COMMANDER
TIMER
OFF
PROGRAM
8
9
0
qa
qs
qd
qf
4 Label keys (page 8, 13, 20, 23, 30,
32, 40, 79)
The selected modes (up to 8 characters
in each Label key) are displayed.
Labels change in the order from the
first stage to the third stage and come
back to the first, and so on, each time
you press the Mode Display key,
OTHER, MORE, or TIMER button
according to the selected mode.
5 Component Select buttons (page 12)
Select the component to control.
6 OTHER button (page 13)
Label keys change in the order from
the first stage to the third stage and
come back to the first, and so on, each
time you press the OTHER button
when the selected component name is
displayed on the Label keys.
7 TIMER button (page 68)
Used to set the timer programme, and
to set the timer programme on or off.
8 button (page 76)
Used to light up the LCD display in
the dark. Press the button once to turn
on the light, and once again to turn it
off.
9 COMMANDER OFF button
Turns the power of the Commander
off. Then all the display contents are
turned off.
0 PROGRAM +/– buttons (page 88, 89,
90, 91)
Select the programme position.
qa button (page 88)
qs 2 +/– buttons* (page 19, 29)
Adjust the volume.
qd % button* (page 19, 31)
Mutes the audio. Press the button
once again to resume at the previous
volume.
6
Page 7

qf EXIT button (page 89)
Used to exit the setting menu.
qg MENU button (page 88)
Calls up the menu display of the
buttons or keys that have menu
function.
qh OK button and Cursor Control
buttons (page 9, 64, 88)
qj SYSTEM CONTROL buttons (page 31)
You can programme up to 32
consecutive key operations to each of
the three SYSTEM CONTROL
buttons. You can automatically carry
out the entire programme by pressing
one button.
qk MORE button (page 32)
Label keys change in the order from
the first stage to the third stage and
come back to the first, and so on, each
time you press the MORE button in
the system mode.
* Note on the 2 +/– and % buttons
The Commander controls or mutes the TV’s
volume when you select a visual component.
The Commander controls or mutes the
amplifier’s volume when you select an audio
component.
You can change this setting also (page 29).
Note on the power on and off of the
display of the Commander
To turn on the display, press any button except
the COMMANDER OFF button.
To turn off the display, press COMMANDER
OFF, or if you don’t use the Commander, the
display automatically turns off after 10
minutes. This interval can also be changed
(page 74).
Installing the Batteries
Slide open the battery compartment lid
and insert four size AA (R6) alkaline
batteries (not supplied). Be sure to line
up the + and – on the batteries with the +
and – on the battery compartment.
Continued
7
Page 8

Installing the Batteries (continued)
Setting the Clock
When to replace the batteries
Batteries for remote control
operation and backlight (four
size AA (R6) batteries)
Under normal conditions, alkaline
batteries will last up to 5 months. If the
Commander does not operate properly,
alkaline batteries might be worn out and
E is displayed on the LCD touch panel.
When the display dims or the backlight
for the touch keys grows dim, replace the
alkaline batteries with new ones.
Notes on batteries
• Do not mix old batteries with new ones or
mix different types of batteries together.
• If the electrolyte inside the battery should
leak, wipe the contaminated area of the
battery compartment with a cloth and replace
the old batteries with new ones. To prevent
the electrolyte from leaking, remove the
batteries when you plan not to use the
Commander for a long period of time.
• After replacing batteries, set the clock (page
8).
Setting the clock for the first time after installing batteries
For the first time after installing batteries,
the Commander is in the clock setting
mode. “CLOCK” is displayed on the
Mode Display key, and “ –:– –” flashes on
the Clock Display key, and “STD TIME”
and “DS TIME” on the Label keys are
flashing.
1
Select STD TIME (standard time)
or DS TIME (daylight saving time).
If the summer time (daylight saving
time) is used in your area, press the
DS TIME key when it is in the
summer time. If not, press the STD
TIME key.
If the summer time is not used in your
area, press the STD TIME key.
or
The selected STD TIME or DS TIME
key lights.
“SET” and “SU” flash and “12:00 AM”
lights on the Clock Display key.
8
Page 9

2 Set the day of the week.
Select the day of the week by pressing
the or button.
Selected day of the week flashes.
SU : Sunday
MO : Monday
TU : Tuesday
WE : Wednesday
TH : Thursday
FR : Friday
SA : Saturday
3 Set the hour and AM (or PM) by
pressing the
The selected hour and AM (or PM)
flash.
button
or button.
button
button
Then press the button. The day of
the week is set.
“12”, “ AM” and “SET” flash.
Note
If you press the button, the day of the week
is set and setting mode skips to Step 4.
button
Then press the button. The hour
and AM (or PM) are set.
“00” (minute) and “SET” flash.
Note
If you press the button, the hour and AM
(or PM) are set and the setting mode
returns to Step 2.
Continued
9
Page 10

Setting the Clock (continued)
4 Set the minute by pressing the
or button.
button
The selected minute flashes.
Notes
• If you press the button, the minute is set
and the setting mode returns to Step 2.
• If you press the
and the setting mode returns to Step 3.
• If you want to finish the clock setting, go to
Step 5.
button
button, the minute is set
Adjusting the clock after setting the clock
TV STB VCR DVD CD AMP
SYSTEM CONTROL
MORE321
OK
MENU EXIT
OTHER
COMMANDER
TIMER
OFF
PROGRAM
1 While pressing COMMANDER
OFF, press %.
COMMANDER
OFF
“SET” appears on the Mode Display
key.
2
3
1
5 Press the SET key.
The clock starts from 0 second.
Note
If you press the SET key in any step above, the
clock is set then. The clock starts from 0
seconds.
10
2 Press the Mode Display key (SET)
twice.
Page 11

Each time the SET key is pressed, the
Label keys change as follows.
“CLOCK” appears and flashes on one
of the Label keys on the display.
To select STD TIME (standard
time) or DS TIME (daylight
saving time)
When the Commander enters the clock
setting mode when the clock is already
set, the time mode previously set (STD
TIME or DS TIME) stays lit and the other
time mode flashes, and the setting mode
goes to Step 4.
If you want to change the time mode,
press the flashing key (STD TIME or DS
TIME). The selected STD TIME or DS
TIME key lights, and the setting mode
goes to Step 4.
If you do not want to change the time
mode, press the or button. The
setting mode goes to Step 4.
4 To set the clock, follow Steps 2 - 5
on page 9-10.
3 Press the CLOCK key.
The Commander enters clock setting
mode.
“CLOCK” appears on the Mode Display
key, and the current time flashes.
Note
If you press the SET key in Step 3 or 4, the
clock is set then. The clock starts from 0 second.
11
Page 12

Basic Operations
Setting the Code for Preset Audio and Visual Components
The Commander is preset at the factory
to operate Sony brand AV components
(see the table below). If you are using the
Commander with a factory-set Sony
components, skip the following
procedures.
You can use the Commander with other
preset AV components also. To use with
other AV components, you need to follow
the procedures to set the correct codes for
each component.
Label key
DVD2
DVD3
DAT
CABLE
* Analogue audio compact cassette deck
Preset
component
DVD player
DVD player
DAT deck
Cable box
Factory setting
Sony DVD
player (DVD2)
Sony portable
DVD player
Sony DAT deck
Cable box
See “Table of Preset Functions” (page 88)
for the functions of keys and buttons as
for each component.
Setting a component code
12
Component Select
Button
TV
STB
VCR
DVD
CD
AMP
Label key
STB2
MD
TAPE A
TAPE B
VCR2
VCR3
STB3
LD
Preset
component
TV
Digital satellite
VCR
DVD player
CD player
Amplifier
Preset
component
Analogue
satellite
MD deck
Cassette deck*
Cassette deck*
VCR
VCR
Digital terrestrial
LD player
Factory setting
Sony TV
Sony digital
satellite
Sony VHS VCR
(VTR3)
Sony DVD
player (DVD1)
Sony CD player
Sony amplifier
Factory setting
Sony analogue
satellite
Sony MD deck
Sony cassette
deck
Sony cassette
deck
Sony 8mm VCR
(VTR2)
Sony Beta VCR
(VCR1)
Sony digital
terrestrial
Sony LD player
TV STB VCR DVD CD AMP
SYSTEM CONTROL
OK
MENU EXIT
TIMER
MORE321
PROGRAM
OTHER
COMMANDER
OFF
5
3
4
7
2
Page 13

Example: To set up a Philips’ TV
1 See the tables in the supplied
“Component Code Numbers,”
and find the four-digit code
number for the desired
component.
If more than one code number is
listed, use the number that is listed
first.
For example, to set up a Philips’ TV,
you would use the code number 8086.
The first digit of the component code
number means the component
category (TV, VCR, etc.). For further
details, see the tables in the supplied
“Component Code Numbers.”
2 While pressing COMMANDER
OFF, press %.
COMMANDER
OFF
“SET” appears on the Mode Display
key.
4 Select the desired component by
pressing the Component Select
button or the Label key.
TV
To change the Label keys, press the
OTHER button repeatedly. Each time
you press the OTHER button, the
display of the Label keys changes as
follows.
When the desired component is
selected, the component name
previously preset to the Component
Select button or the Label key (in this
case, TV), and the four-digit
component code number previously
set to the component are displayed.
“0” - “9,” “ENT,” “CLEAR” and
“POWER1” flash.
3 Press the PRESET key.
“PRESET” appears on the Mode
Display key.
Continued
13
Page 14

Setting the Code for Preset Audio
and Visual Components
(continued)
5 Press the four-digit component
code number followed by the
ENT key on the touch-key
display.
Example: To enter “8086”
Input “8,” “0,” “8,” “6,” and press
“ENT”.
If you press the CLEAR key during
inputting the digits
Input digits are cancelled. The fourdigit component code number
previously set is displayed, and the
cursor returns to the first digit.
When the setting of the code
succeeded
The selected component name, the
preset four-digit component code
number and “OK” light while a beep
sounds. And the display returns to
Step 3.
6 If you want to set a code for
another component, repeat Steps
4 and 5.
7 Press COMMANDER OFF.
COMMANDER
OFF
If you keep COMMANDER OFF
pressed for more than 2 seconds
The Commander turns off.
If you keep COMMANDER OFF
pressed for less than 2 seconds
The Commander returns to the
previous setting mode.
Notes
• If you press a component code number that is
not on the table in the supplied “Component
Code Numbers”, the Commander beeps five
times and “NG” flashes after you press the
ENT key. The setting returns to the previous
one. If this happens, check the component
code number, and try setting again.
• If you don’t input anything into the
Commander for over two minutes between
each step, the setup procedure will be
cancelled. To set the code, you must again
press % while pressing COMMANDER OFF.
• The first digit of the component code number
means the component category (TV, VCR,
etc.). The component corresponding to the
four-digit component code number is preset
in Step 5. If you preset the component of
which category is different from that preset
previously to the Component Select button or
the Label key, you can, if necessary, change
the component names on the Mode Display
key or the Label keys (see page 79).
• If you preset a component code after you
input character contents to the Mode Display
key (page 24) or the Label keys (page 23),
they are cleared and return to the original
display. Edit the characters after you decide
the component to be used by presetting a
code.
14
Page 15

Checking if the code number works
1 Press the corresponding
Component Select button or the
Label key for the component you
have set up.
To display and change the Label keys,
press the OTHER buttons repeatedly.
TV
The Commander turns on and the
touch-keys appear on the display.
2 Turn on the component by its
power switch.
3 Aim the Commander at the
component and press the
POWER1 key in the touch-key
display.
When the remote control signal is
sent, is shown on the display.
4 If you have succeeded, check that
the Commander is operating the
other functions of your
component, such as programme
position and volume control.
See page 18 for details.
5 Press COMMANDER OFF.
COMMANDER
OFF
If you keep COMMANDER OFF
pressed for more than 2 seconds
The Commander turns off.
If you keep COMMANDER OFF
pressed for less than 2 seconds
The Commander returns to the
previous setting mode.
If the Commander does not seem to
be working
Try repeating these setup procedures using the
other codes listed for your components (see
page 12).
Notes on keys which have
“learned” a remote control
signal already
If another signal has already been
programmed on that key or button by the
learning function (page 19), that
“learned” signal will apply even after
you set the component code number. To
use it as a preset component key or
button, first erase its learned signal (page
25).
The component should turn off.
Continued
15
Page 16

Setting the Code for Preset Audio
and Visual Components
(continued)
Finding a component code with the Search function
You can find a code number available for
a component that doesn’t have one in the
supplied “Component Code Numbers.”
Before starting the Search
function
Set each component to the following
status to enable the Search function.
TV, AMP: Power-on
CD, MD, TAPE, DAT: Power-on with a
playback source (disc, cassette tape, etc.)
Other components: Power-off
5
OTHER
COMMANDER
OFF
6
3
7
1
2
TV STB VCR DVD CD AMP
SYSTEM CONTROL
4
OK
MENU EXIT
TIMER
MORE321
PROGRAM
1 While pressing COMMANDER
OFF, press %.
COMMANDER
OFF
“SET” appears on the Mode Display
key.
2 Press the PRESET key.
“PRESET” appears on the Mode
Display key.
3 Select the desired component by
pressing the Component Select
button or the Label key.
TV
To change the Label keys, press the
OTHER button repeatedly. Each time
you press the OTHER button, the
display of the Label keys changes as
in Step 4 on page 13.
When the desired component is
selected, the component name
previously preset to the Component
Select button or the Label key (in this
case, TV) and the four-digit
component code number previously
set to the component is displayed.
16
Page 17

4
Press PROGRAM + or PROGRAM –
to search component code numbers
in the same category (in this case,
code numbers which begin with “8”).
Press PROGRAM + to go to the next
code number.
Press PROGRAM – to go back to the
previous code number.
PROGRAM
6 Press the ENT key.
A beep sounds, and the selected
component name, the preset fourdigit component code number and
“OK” light for 2 seconds. And the
display returns to Step 2.
Note
It is recommended to write down the code
number.
7 Press COMMANDER OFF.
COMMANDER
OFF
If you keep COMMANDER OFF
pressed for more than 2 seconds
The Commander turns off.
Note
To search component code numbers in
another category, return to Step 3, or input
a four-digit component code number of
another category (for example, a code
number which begins with “3”, “4”, etc.)
before Step 4.
5 Aim the Commander at the
component and press the
POWER1 key.
When the remote control signal is
sent, is shown on the display.
If it successfully works (power-off for
TV, AMP, playback for CD, MD, DAT,
TAPE and power-on for other
components), go to Step 6.
If it doesn’t, repeat Steps 4 to 5.
If you keep COMMANDER OFF
pressed for less than 2 seconds
The Commander returns to the
previous set mode.
17
Page 18
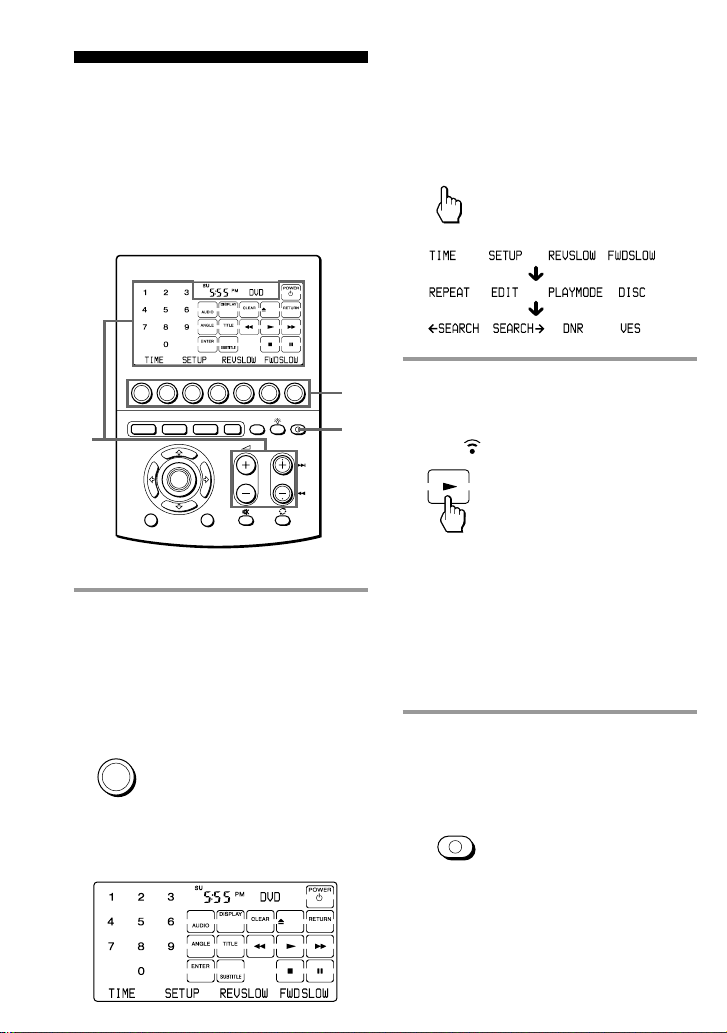
Operating Y our Components with the Remote Commander
When you operate a non-Sony
component, make sure you set the
component code first (page 12).
To change the Label keys, press the
Mode Display key (in this case, DVD)
repeatedly. Each time you press the
DVD key, the display of the Label
keys changes as follows.
DVD
TV STB VCR DVD CD AMP
SYSTEM CONTROL
2
MENU EXIT
MORE321
OK
OTHER
COMMANDER
TIMER
OFF
PROGRAM
Example: To play a DVD player
1 Press the corresponding
Component Select button or the
Label key for the component you
have set up.
To display and change the Label keys,
press the Mode Display key
repeatedly.
DVD
The Commander comes on and the
keys for operating the selected
component are displayed.
2 Press the desired key in the
1
3
touch-key display.
When the remote control signal is
sent, is displayed on the display.
If necessary, you can also use buttons
on the Commander, such as the
2 +/– buttons, the % button or the
PROGRAM +/– buttons, other than
LCD touch-keys.
See “Table of Preset Functions” (page
88) for the functions of keys and
buttons for each component.
3 When you are done using the
Commander, press
COMMANDER OFF to turn the
Commander off.
COMMANDER
OFF
18
Page 19
Note
The remote control signals may be different for
some components or functions. In this case,
programme the remote control signals with the
learning function (see page 19). Note, however,
that components and functions that do not
support the remote control of infrared signals
will not work with this Commander.
To control the volume
Press the 2 +/– buttons to control the
volume, and the % button to mute.
When you select a visual component, the
TV’s volume will be controlled, and
when you select an audio component, the
amplifier’s volume will be controlled.
You can change this setting also (page
29).
Notes
• If you have programmed any signal for the
2 or % button for any component using the
learning function (page 19), that signal will
be transmitted instead of controlling the
volume of the TV or amplifier once you select
that component.
• If you have programmed any signal for the
2 +/– buttons or the % button of TV or
AMP using the learning function, that signal
will be also transmitted when you select
another component. However, if you have
programmed any signal for the 2 +/–
buttons or the % button of another
component, that signal will be transmitted
only after you select that component.
• If you have assigned another component to
the TV or AMP button, the volume of the TV
or amplifier cannot be controlled even when
you select other components.
Using Non-Preset
Remote Control
Operations
— Learning Function
To operate non-preset components or
functions, use the following “learning”
procedure to “teach” any of the
programmable buttons and keys to
operate the functions of another remote
control. You can also use the learning
function to change the signal of
individual keys and buttons after setting
the component code number (page 12).
To “teach” to the Component Select
buttons or Label keys, see page 45.
To “teach” to the SYSTEM CONTROL
buttons or Label keys, see page 49.
Note
Some specific remote control signals may not
be learned.
TV STB VCR DVD CD AMP
SYSTEM CONTROL
MORE321
OK
MENU EXIT
OTHER
COMMANDER
TIMER
OFF
PROGRAM
5
3
4
8
2
Continued
19
Page 20

Using Non-Preset Remote Control
Operations
— Learning Function (continued)
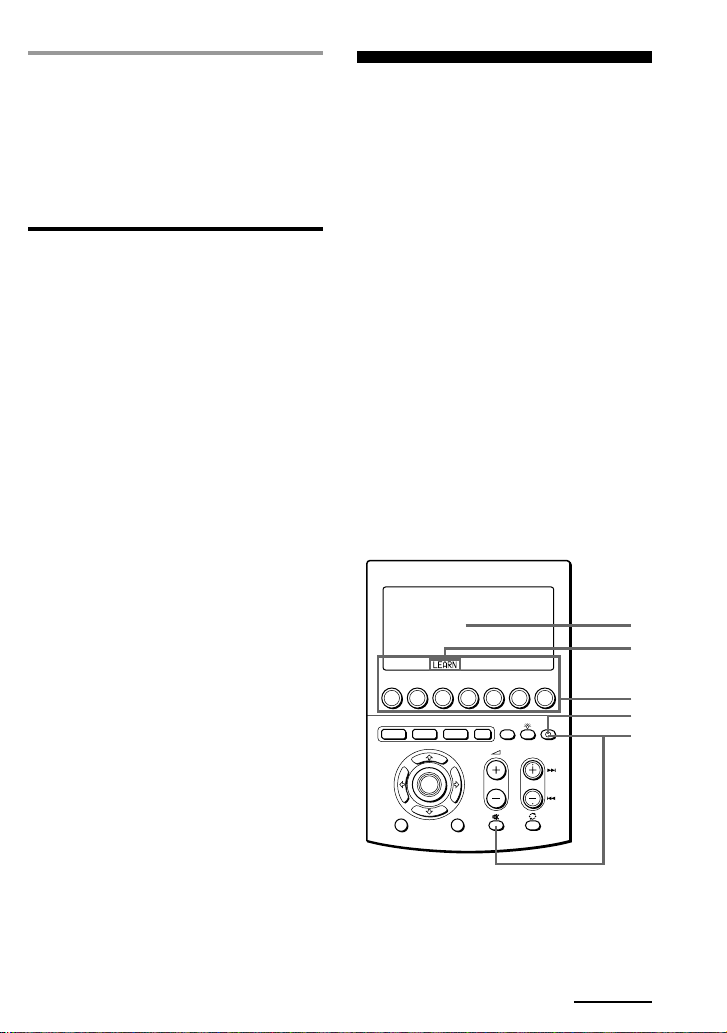
Example: To programme the N
(Play) signal of your component
to the VCR N (Play) key of the
Commander
1 Place the RM-AV3000T head to
head with your component’s
remote control.
Remote control for
your component
about 2 – 4 inches
(5 – 10 cm) away
RM-AV3000T
2 While pressing COMMANDER
OFF, press %.
COMMANDER
OFF
“SET” appears on the Mode Display
key.
3 Press the LEARN key.
LEARN
“LEARN” appears on the Mode
Display key.
4 Select the desired component of
which signals are to be learned by
pressing the Component Select
button or the Label key.
VCR
To change the Label keys, press the
OTHER button repeatedly. Each time
you press the OTHER button, the
display of the Label keys changes as
follows.
20
All the learnable keys flash.
Page 21

To change the Label keys, press the
Mode Display key (in this case, VCR)
repeatedly. Each time you press the
VCR key, the display of the Label keys
changes as follows.
VCR
Note on the flashing display
The keys or buttons that are already preset
for that component flash twice while those
that are not preset flash once.
To change the name of the Label
key
Follow the procedure on page 23.
To change the component name on
the Mode Display key
See page 24.
To change the function display of
the key
Follow the procedure on page 23.
5 Press the key or button on the
Commander you want to “teach.”
When teaching on the button that
is not on the LCD
Only “LEARN” flashes.
6 Press and hold down the button
on the other remote control until
you hear a beep.
(If you release the button before you
hear a beep, the signal may not be
learned correctly.)
“LEARN” stops flashing and stays lit.
When the command has been learned
successfully, the learned keys stay lit
and the other learnable keys flash.
If “NG” flashes on the display
Learning did not succeed. Try Steps 5 and 6
again.
7 Repeat Steps 5 and 6 to teach
functions to other keys or
buttons.
To learn another component’s
remote control signal
Select the component in Step 4, and then
follow Steps 5 and 6 to perform learning.
8 Press COMMANDER OFF.
COMMANDER
OFF
“LEARN” flashes and the only
pressed key remains on the display.
If you keep COMMANDER OFF
pressed for more than 2 seconds
The Commander turns off.
If you keep COMMANDER OFF
pressed for less than 2 seconds
The Commander returns to the
previously by set mode.
Continued
21
Page 22

Using Non-Preset Remote Control
Operations
— Learning Function (continued)
Notes
• If you do not perform learning steps within
2 minutes, learning mode ends.
• If you do not perform Step 6 within 10
seconds after Step 5, the display turns back to
the display in Step 4. (All the learnable keys
flash.) In this case, perform Step 5 again
while the display is flashing.
• If you touch a key by mistake in step 6, while
pressing the DEL key, press the mistaken key.
Then repeat from Step 5 to continue learning.
If the Commander does not seem to
be working
If the learned key or button does not operate
properly, teach once again. (For example, if the
volume becomes very loud after pressing the
2 + button only once, noise may have
interfered during the learning procedure.)
If you set a component code after
learning a signal
If you have programmed any signal for a key
or button using the learning function, that
signal will remain assigned to that key or
button even after you set a component code.
When you teach the REC (record)
signal
If you have to press two buttons at the
same time (for example, z and B) to start
recording on your cassette deck or VCR,
teach the REC signal in one of the
following ways.
To operate with two keys on the
Commander
In Step 5 (page 21), while pressing the REC key,
press the B key to display both keys. Then
press the two buttons on your component’s
remote control in Step 6.
To operate with one key on the
Commander
In Step 5 (page 21), press only the REC key.
Then press the two buttons on your
component’s remote control in Step 6.
When you teach signals to the
2 +/ – or % buttons
•If you have programmed any signal on
the 2 +/– or % button for components
other than TV and AMP using the
learning function, that signal will be
transmitted only when you select that
component.
•If you have programmed any signal for
the 2 +/– buttons or the % button of
TV or AMP using the learning function,
that signal will be also transmitted
when you select another component.
However, if you have programmed any
signal for the 2 +/– buttons or the %
button of another component, that
signal will be transmitted only after
you select that component.
When you teach the signals of an
air-conditioner
See the notes on page 52.
To display only the frequently
used keys
You can hide keys you do not use.
After Step 4 on page 20, while pressing
the DEL key, press the key you want to
hide (flashing). The pressed key changes
to slower flashing and will no longer be
displayed during remote control
operations.
To display it again, perform the same
procedure again.
Note
You cannot hide a key which has “learned” any
signal.
22
Page 23

To change the function display of
a key
You can select the most suitable function
display among all the displays the key
has, and set it to the key.
1 After Step 4 (page 20), while
pressing the Mode Display key
(in this case, VCR), press the key
you want to teach repeatedly.
VCR
Each time the key is pressed, the
display is changed in order.
Notes
• You can change the display of a key only
when you programme it using the learning
function. If you want to change the display of
the key that has learned a signal, clear the
signal first (page 25). Then teach the key
again using the above procedure to change its
display.
• If you don’t change the display of a key, the
default display is used.
• You cannot change the display of the area of
the numeric keys 1 to 9.
To change the name of the Label
key
You can change the display of the Label
key to the most suitable name using up
to 8 characters or digits.
1 After Step 4 (page 20), hold the
Label key of which name you
want to change (for example,
COUNTER) pressed for more
than 2 seconds.
COUNTER
2 When the desired display
appears, release the Mode
Display key.
3 Then follow Steps 6 to 8 (page
21).
The Commander enters the Label
Input mode.
Continued
23
Page 24

Using Non-Preset Remote Control
Operations
— Learning Function (continued)
2 Input digits or characters on the
Label key by pressing the number
keys (0 - 9), SYMBOL 1 key or
SYMBOL 2 key on the LCD
display.
The cursor flashes in the left end of
the Label key.
Begin inputting digits or characters
from the left. Press repeatedly the
number key until you obtain the
desired digit or character.
The digits or characters are assigned
to the keys as follows.
1: 1
2: A t B t C t a t b t c t 2
3: D t E t F t d t e t f t 3
4: G t H t I t g t h t i t 4
5: J t K t L t j t k t l t 5
6: M t N t O t m t n t o t 6
7: P t Q t R t S t p t q t r t
s t 7
8: T t U t V t t t u t v t 8
9: W t X t Y t Z t w t x t y
t z t 9
0: 0
SYMBOL 1 :!, &, /, ?, p, P, O, o, +, -, :,
,, ., ", ', ~, *, #, |, space
SYMBOL 2 :space, , 9, , , , ,
(, ), <, >, b, B, t, T, x,
W, X, x, $
3 Decide the digit or the character
you input by pressing the
button or another number key.
The cursor moves to the right.
When the button is pressed, the
cursor moves to the left. You can
input a digit or character to the place
where the cursor flashes.
4 Repeat Steps 2 and 3 until you
input a suitable name to the Label
key.
When the cursor reaches to the right
end, if the button or another
number key is pressed, the cursor
returns back to the left end.
5 Decide the display of the Label
key by pressing the RETURN key.
The LCD display goes to Step 5 on
page 21.
To change the component name
on the Mode Display key
When you programme a signal for a
Label key, you can also change the
component name on the Mode Display
key to the most suitable name using up
to 8 characters or digits (page 79).
24
If you make a mistake, move the
cursor to the digit or character you
want to correct by pressing the or
button, and input again.
If you press the CLEAR key, the Label
key returns to the previous display.
Page 25

For accurate learning
•Do not move the remote units during
the learning procedure.
•Be sure to keep holding down the
button of the other remote control until
you hear the confirmation beep.
•Use fresh batteries in both remote
control units.
•Avoid learning in places under direct
sunlight or strong fluorescent light.
•The remote control detector area may
differ depending on each remote unit. If
learning does not work, try changing
the positions of the two remote control
units.
•When you teach signals of an
interactive signal exchange system
remote control unit (supplied with
some of Sony’s receivers and
amplifiers) to the Commander, the
response signal of the main unit may
interfere with the learning of the
Commander. In such a case, move to a
place where the signals will not reach
the main unit (e.g. other rooms, etc.).
Changing or erasing the function of a taught key or button
To change the learned function, clear it
first and perform learning again.
To clear the learned function of a
single key or button
1 After Step 4 (page 20), while
pressing the DEL key, press the
key or button you want to erase.
The cleared key flashes together with
other learnable keys.
2 Press COMMANDER OFF.
COMMANDER
OFF
IMPORTANT
Be sure to place the Commander out
of the reach of small children or pets.
Also set the Hold function to lock the
all buttons on the Commander (page
71) when it is not used. Components
such as air conditioners, heaters,
electric appliances, and electric
shutters or curtains receiving an
infrared signal can be dangerous if
misused.
If you keep COMMANDER OFF
pressed for more than 2 seconds
The Commander turns off.
If you keep COMMANDER OFF
pressed for less than 2 seconds
The Commander returns to the
previously set mode.
Continued
25
Page 26

Using Non-Preset Remote Control
Operations
— Learning Function (continued)
To clear all signals learned for a
specific component
1 While pressing COMMANDER
OFF, press %.
COMMANDER
OFF
“SET” appears on the Mode Display
key.
2 Press the Mode Display key (SET)
once
“RESET” appears and flashes on one
of the Label keys on the display.
3 Press the RESET key.
RESET
“RESET” appears on the Mode
Display key.
4 Press the COMPO key.
COMPO
Component names appear on the
Label keys.
26
To change the Label keys, press the
OTHER button repeatedly. Each time
you press the OTHER button, the
display of the Label keys changes as
in Step 4 on page 13.
Page 27

5 Press the Component Select
button or the Label key of which
preset settings you want to erase.
The component name is displayed on
the left Label key.
7 Press COMMANDER OFF.
COMMANDER
OFF
If you keep COMMANDER OFF
pressed for more than 2 seconds
The Commander turns off.
If you keep COMMANDER OFF
pressed for less than 2 seconds
The Commander returns to the
previously set mode.
6 Press the YES key.
YES
During erasing, “c c ” stays lit. When
erasing finishes, “OK” is displayed
with a beep sound.
If you press the NO key
The display returns to Step 4.
If you want to erase the learned
signals for other Component
Select buttons or corresponding
Label keys
Repeat Steps 5 - 6.
To clear all signals learned for all
Component Select buttons or
corresponding Label keys
1 Follow Steps 1 - 3 on page 26.
2 While pressing the DEL key, press
the COMPO key.
COMPO
Continued
27
Page 28

Using Non-Preset Remote Control
Operations
— Learning Function (continued)
5 Press COMMANDER OFF.
COMMANDER
OFF
3 Press the YES key.
YES
“REALLY?” stays lit. “YES” and
“NO” flash.
If you press the NO key
The display returns to Step 1.
4 Press the YES key.
YES
While erasing, “c c c c” stays lit.
When all settings programmed for the
Component Select buttons and
corresponding Label keys are erased,
“OK” is displayed with a beep sound.
If you keep COMMANDER OFF
pressed for more than 2 seconds
The Commander turns off.
If you keep COMMANDER OFF
pressed for less than 2 seconds
The Commander returns to the
previous setting mode.
28
If you press the NO key
The display returns to Step 1.
Page 29

Advanced Features
Controlling the Volume of Visual Components Connected to an Audio System
The Commander is factory preset based
on the assumption that you hear the
sound of your visual components from
your TV speakers, and that you hear
sound of your audio components from
the loudspeakers connected to your
amplifier.
Label key
STB2
MD
TAPE A
TAPE B
VCR2
VCR3
STB3
LD
DVD2
DVD3
DAT
CABLE
Controls the volume of
TV
amplifier
amplifier
amplifier
TV
TV
TV
TV
TV
TV
amplifier
TV
This feature enables you to control the
volume of your TV or amplifier without
having to select TV or AMP each time
you want to control the volume.
For example, to control the volume while
using a VCR, you don’t need to press the
TV button to control the TV volume.
You can switch the volume of all the
visual components to the amplifier at the
same time.
The following table shows the factory
setting of which volume would be
controlled for each component.
Component
Select button
TV
STB
VCR
DVD
CD
AMP
Controls the volume of
TV
TV
TV
TV
amplifier
amplifier
However, if your visual components are
connected to an audio system, you
probably hear TV or VCR sound from the
loudspeakers via your amplifier, not
from your TV speakers. In this case, you
need to change the factory preset so that
you can control the volume of your
visual components without first having
to switch to the amplifier.
To change the Factory Preset of
the Volume Control
2
4
3
TV STB VCR DVD CD AMP
SYSTEM CONTROL
MORE321
OK
MENU EXIT
OTHER
COMMANDER
TIMER
PROGRAM
5
6
OFF
1
Continued
29
Page 30

Controlling the Volume of Visual
VOLUME
Components Connected to an
Audio System (continued)
1 While pressing COMMANDER
OFF, press %.
COMMANDER
OFF
“MODE” appears on the Mode
Display key.
“SET” appears on the Mode Display
key.
2 Press the Mode Display key (SET)
twice.
Each time the SET key is pressed, the
Label keys changes as in Step 2 on
page 11.
“MODE” appears and flashes on one
of the Label keys.
3 Press the MODE key.
4 Press the VOLUME key.
“VOLUME” appears on the Mode
Display key, and “AMP” flashes on
one of the Label key.
5 To change the volume control
setting of visual components (TV,
STB, STB2, STB3, VCR, VCR2,
VCR3, DVD, DVD2, DVD3, LD
and CABLE) press the AMP key.
With a beep sound, the volume
control setting of visual components
is switched to the amplifier.
30
MODE
To return the volume control setting
to “TV”, press the TV key.
Page 31

6 Hold COMMANDER OFF
pressed for more than 2 seconds
to turn the Commander off.
If you keep COMMANDER OFF
pressed for less than 2 seconds, the
display returns to the previous setting
mode.
COMMANDER
OFF
Notes
• If you have already programmed any signal
for the 2 or % button of each component by
“learning,” the procedure above will not
change the function of the 2 and % buttons.
• If you have programmed volume control
signals on 2 or % buttons of TV or AMP,
you can only use that signal when you select
TV or AMP. For other component, the preset
volume control signals for TV or AMP
(depending on the above setting procedure)
will be transmitted. To use the new signals,
you need to programme each button for each
component by the learning procedure (page
20).
Example:
1 Turn on the TV.
2 Turn on the video (VCR).
3 Turn on the amplifier.
4 Set the input selector of the amplifier
to VIDEO 1.
5 Set the input mode of the TV to VIDEO.
6 Start video playback
You can programme up to 32 consecutive
operation steps to each of the SYSTEM
CONTROL buttons (1-3) or the Label
keys (SYSTEM 4-15).
If you have set the System Control
function for a Component Select button
or a Label key (page 38), the execution of
the programmed commands begins
when you press the Component Select
button for more than 2 seconds.
The component macro executing time is
variable by changing the setting (page 42).
While executing the programmed
commands, at the same time that each
remote control signal is transmitted, the
corresponding key is displayed.
Executing a Series of
Commands
— System Control Functions
With the System Control function, you
can programme a series of operating
commands, and execute them by
pressing just one button.
For example, when you watch a video, a
series of operations like the ones below
are necessary.
Preset programs for the SYSTEM
CONTROL 1 and 3 buttons
The SYSTEM CONTROL 1 and 3 buttons
are preset at the factory to execute each
program as follows.
SYSTEM CONTROL 1 button:
Turn off all the Sony components that
could receive the signal from the
Commander at the same time.
SYSTEM CONTROL 2 button:
Turn on all the Sony components that
could receive the signal from the
Commander at the same time.
Continued
31
Page 32

Executing a Series of Commands
— System Control Functions
(continued)
Programming a series of commands for the SYSTEM CONTROL buttons or the Label keys
SET
5
3
TV STB VCR DVD CD AMP
SYSTEM CONTROL
OK
MENU EXIT
Example: To programme the
procedure above for the SYSTEM
CONTROL 2 button
TIMER
MORE321
PROGRAM
OTHER
COMMANDER
OFF
4
2 Press the SYSTEM key.
SYSTEM
“SYSTEM” appears on the Mode
Display key.
2
3 Select the system number by
7
1
pressing the SYSTEM CONTROL
button (in this case, SYSTEM
CONTROL 2) or the Label key.
To change label keys, press the MORE
button repeatedly until you obtain the
desired system number.
Each time you press the MORE
button, the display of the Label keys
changes as follows.
1 While pressing COMMANDER
OFF, press %.
COMMANDER
OFF
“SET” appears on the Mode Display
key.
32
The selected system number is
displayed on the Mode Display key.
Page 33

To program a new series of
COMMANDER
OFF
operations for the buttons which
have already been set
SYSTEM CONTROL 1 or 3 button:
Erase the factory preset program. See
page 37.
Other buttons:
Erase the program. See page 35.
4 Select the component to operate
by pressing the Component Select
button (in this case, TV) or the
Label key.
To change label keys, press the
OTHER button repeatedly until you
obtain the desired component name.
TV
The selected component name is
displayed on the Mode Display key,
and the keys for the selected
component flash.
5 Press the key(s) or button(s) for
the desired operation.
If you want to turn on the TV, press
the POWER1 key.
6 Repeat Steps 4 and 5 and
programme the buttons and keys
for the series of operations.
In this example, press the following
buttons and keys.
7 When you have programmed all
the keys and buttons, press
COMMANDER OFF.
With a beep sound, a series of
operating commands is registered and
displayed in order. When the display
of keys for the component of which
key you programmed last appears,
the System Control setting finishes.
If you keep COMMANDER OFF
pressed for more than 2 seconds
The Commander turns off.
When you have programmed the
buttons on the Commander
The names of buttons on the
Commander which are not on the
LCD touch key display (VOLUME
+/–, MUTING, PROGRAM +/–,
RECALL, MENU, OK, EXIT, , , ,
and ) are displayed on the right
Label key.
Continued
33
Page 34

Executing a Series of Commands
— System Control Functions
(continued)
Notes
• If you interrupt the procedure at any point
for over 2 minutes, the setting mode ends
and the series of commands will be
programmed to that point. In this case, clear
the programme (page 35) and start again
from Step 1 to set the entire programme from
the beginning. You cannot continue from
where you left off.
• If a SYSTEM CONTROL button or a Label
key has already “learned” a remote control
signal (page 49), “NG” flashes and you
cannot programme on this button. Clear the
learned contents first (page 51).
•If you change the component code number
(page 12) or programme a new signal by
learning (page 19) on a key or button that has
been programmed in the series of commands
of the System Control function, the new
signal will be transmitted when you press the
corresponding SYSTEM CONTROL button or
a Label key.
• During programming of a series of operating
commands, the DEL key is not displayed and
you cannot clear any operation step you have
programmed. If you have programmed an
incorrect operation by mistake, start again
from Step 1.
• If you try to programme more than 32 steps, the
System Control setting finishes, and the 32 steps
you have programmed are registered. If you
want to programme again, clear the programme
(page 35) and start again from Step 1.
• When programming a power-on command
for the System Control function, if you select
the Component Select button or the Label key
for which you programmed the Power-on
setting (page 43), the Power-on setting is also
available. So, the power of the selected
component turns off if the POWER1 key of
the component is programmed.
In this case, clear the Power-on setting, or do
not programme the POWER1 key of the
component.
About the interval between
operation steps
• You can change the interval between
operation steps (page 40).
• If you cannot receive signals successfully
during consecutive operation steps, programme
the interval between steps by pressing the
TIMER button between operation steps in Step
6 on page 33. This operation of programming an
34
interval is counted also as a step.
To change the display of the
component name on the Mode
Display key
When you programme a series of
operating commands, you can change the
display of the component name to the
most suitable name using up to 8
characters or digits.
After Step 3 (page 32), hold the Mode
Display key pressed for more than 2
seconds. Then follow the same procedure
as that for changing the name of the
Label key in “To change the display of
the Label key,” Steps 2 - 5 on page 24.
If you press the CLEAR key, the Label
key returns to the previous display.
About the order of operation steps
• Some of the components may not accept
consecutive remote control signals. For
example, a TV generally does not react to
next signal right after the Power-on signal.
So, a series of commands such as TV Poweron and input select may not work properly.
In this case, insert other signals like the
example below;
TV Power-on t VCR Power-on
t VCR play back t TV input select
• After the series of input commands is
executed, the Commander displays the
touch-keys of the component in the final step.
By programming an often-used component’s
command as the final step, you can save the
step of pressing a Component Select button
or a Label key when you start operating that
component. (In the example on page 33, the
touch-keys of TV are displayed.)
• If a series of commands is programmed for
the Component Select button or the Label
keys (page 38), the display of that component
is shown after the programme is executed.
Page 35

To clear programmed commands
YES
for a specific SYSTEM CONTROL
button or corresponding Label key
1 While pressing COMMANDER
OFF, press %.
COMMANDER
OFF
System numbers appear on the Label
keys.
“SET” appears on the Mode Display
key.
2 Press the Mode Display key (SET)
once to display “RESET” on one
of the Label keys on the display.
3 Press the RESET key.
RESET
“RESET” appears on the Mode
Display key.
To change Label keys, press the
MORE button repeatedly until you
obtain the desired system number.
Each time you press the MORE
button, the display of the Label keys
changes as in Step 3 on page 32.
5 Press the SYSTEM CONTROL
button (1, 2 or 3) or the Label key
(SYSTEM4 - SYSTEM15) of which
programmed commands you
want to erase.
The selected system number is
displayed on the left Label key.
6 Press the YES key.
4 Press the SYSTEM key.
SYSTEM
Continued
35
Page 36

Executing a Series of Commands
YES
YES
— System Control Functions
(continued)
2 While pressing the DEL key, press
the SYSTEM key.
If you press the NO key
The display returns to Step 4.
While erasing, “c c” stays lit. When
erasing finishes, “OK” is displayed
with a beep sound.
7 Press COMMANDER OFF.
COMMANDER
OFF
If you keep COMMANDER OFF
pressed for more than 2 seconds
The Commander turns off.
If you keep COMMANDER OFF
pressed for less than 2 seconds
The Commander returns to the
previous setting mode.
To erase all programmed
commands for all SYSTEM
CONTROL buttons and
corresponding Label keys
1 Follow Steps 1 - 3 in the left.
SYSTEM
3 Press the YES key.
“REALLY?” stays lit, and “YES” and
“NO” flash.
If you press the NO key
The display returns to Step 1.
4 Press the YES key.
While erasing, “c c c c” stays lit.
When all settings programmed for the
Component Select buttons and
corresponding Label keys are erased,
“OK” is displayed with a beep sound.
36
Page 37

If you press the NO key
The display returns to Step 1.
5 Press COMMANDER OFF.
COMMANDER
OFF
If you keep COMMANDER OFF
pressed for more than 2 seconds
The Commander turns off.
If you keep COMMANDER OFF
pressed for less than 2 seconds
The Commander returns to the
previous setting mode.
To erase the SYSTEM CONTROL 1
or 3 button
At the factory, the SYSTEM CONTROL 1
button is preset with a series of power-off
commands for Sony components and the
SYSTEM CONTROL 3 button with a
series of power-on commands for Sony
components.
To erase the programmed commands for
each button, follow the steps below.
1While pressing COMMANDER OFF,
press MUTING.
2 Press the SYSTEM key on the display.
3 While pressing the DEL key, press the
SYSTEM CONTROL 1 or 3 button.
The program for the selected button is
erased.
To set the SYSTEM CONTROL 1 or
3 button back to the factory
setting
To reset them to the factory settings,
follow the steps below.
1Clear the “learned” function (See “To
clear the learned function of a single
key or button,” page 25.) or the System
Control function (See “To clear
programmed commands for a specific
SYSTEM CONTROL button or
corresponding Label key,” page 35.)
programmed on SYSTEM CONTROL 1
or 3.
2 Clear again the System Control
function programmed on SYSTEM
CONTROL 1 or 3 (page 35).
Select SYSTEM CONTROL 1 or 3, in
Step 5 on page 35.
Note
The interval setting (page 40) is not reset to the
factory setting, even if you perform these steps.
Notes on System Control Operations
•If the remote control detectors of the
components are too far apart, or if
something is blocking them, some of
the components may not operate
consecutively even after you press the
SYSTEM CONTROL button or a Label
key.
•If some of the components did not
operate correctly because of the above
or for any other reason, always set all
the components back to the states they
were in before you pressed the SYSTEM
CONTROL button or a Label key.
Failure to do this can result in incorrect
operation when you press the SYSTEM
CONTROL button or a Label key again.
•Some components may not always be
powered on by the System Control
function. This is because the power of
the component goes on and off
alternatively when receiving the power
on/off signal. In this case, check the
operating component’s power on/off
state before using the system control
function.
Continued
37
Page 38

Executing a Series of Commands
— System Control Functions
(continued)
Example: To programme the
procedure on page 31 for the TV
button
Programming a series of commands for the Component Select buttons or the Label keys
As with the SYSTEM CONTROL buttons
or the Label keys, you can also programme
a series of operating commands for the
Component Select buttons (up to 32 steps).
To execute the commands programmed
on a Component Select button or a Label
key by the System Control function, press
the button or key for more than 2 seconds.
The component macro executing time is
variable by changing the setting (page
42).
Notes
• The programmed commands are executed
when you press a Component Select button
or a Label key for more than 2 seconds.
When you press the button or the Label key
for less than 2 seconds, it works as the
normal Component Select button or key, and
the corresponding touch-keys are displayed.
• See also “About the interval between
operation steps” on page 34 and “Notes on
System Control Operations” on page 37.
1 Follow Steps 1 and 2 on page 32.
If a series of commands is already
programmed for that button
The programmed operations are displayed
in order. To programme a new series of
operations, clear the programme first (page
39).
2 Press the Component Select
button for which you want to
programme a series of
commands.
TV
The selected component name
appears on the Mode Display key.
Other component names are
displayed on the Label keys.
You can select the Label key for
programming a series of commands
by pressing the desired Label key.
To change the component names of
the Label keys, press the OTHER
button repeatedly. Each time you
press the OTHER button, the display
of the Label keys changes as in Step 4
on page 13.
38
3 Follow Steps 4 to 7 on pages 33.
Page 39

Notes
• You can programme the System Control
functions for a Component Select button or a
Label key on which the Power-On function
(page 43) has been programmed. In this case,
the Power-On function is overwritten and
cannot be used. If you clear the System
Control functions for the button, the PowerOn function is resumed, and you can use it
again.
• You cannot programme the System Control
functions for a Component Select button or a
Label key for which a signal has been
programmed by “learning” (page 45). (“NG”
flashes on the display.)
• You can programme the Power-On function
(page 43) for a Component Select button or a
Label key for which a System Control
function has been programmed, but the
Power-On function cannot be used. If you
clear the System Control function from the
button, you can use the Power-On function.
• If you interrupt the procedure at any point
for over 2 minutes, the setting mode ends
and the series of commands will be
programmed to that point. In this case, clear
the programme and start again from Step 1 to
set the entire programme from the beginning.
You cannot continue from where you left off.
•If you change the component code number
(page 12) or programme a new signal by
learning (page 19) for a key or button that has
been programmed with the series of
commands of a System Control function, the
new signal will be transmitted when you
press the corresponding Component Select
button or a Label key.
To clear a System Control
function programmed for
Component Select buttons and
Label keys
1 Follow Steps 1-4 on page 26.
2 While pressing the DEL key, press
the Component Select button (or
Label key) of the System Control
function you want to clear.
To change the Label keys, press the
OTHER button repeatedly.
3 Press COMMANDER OFF.
COMMANDER
OFF
If you keep COMMANDER OFF
pressed for more than 2 seconds
The Commander turns off.
If you keep COMMANDER OFF
pressed for less than 2 seconds
The Commander returns to the
previous setting mode.
Continued
39
Page 40

Executing a Series of Commands
— System Control Functions
(continued)
Changing the interval between operation steps
You can control the interval from 100900ms in units of 50ms.
3,6
TV STB VCR DVD CD AMP
SYSTEM CONTROL
MORE321
OK
MENU EXIT
OTHER
COMMANDER
TIMER
OFF
PROGRAM
1 While pressing COMMANDER
OFF, press %.
COMMANDER
OFF
“SET” appears on the Mode Display
key.
2 Press the Mode Display key (SET)
twice to display “MODE” on one
of the Label keys on the display.
3 Press the MODE key.
“MODE” appears on the Mode
Display key.
2
4 Press the SYSDELAY key.
4
SYSDELAY
5
8
“SYSDELAY” is displayed on the
Mode Display key.
1
5 Select the system number, the
component name or the timer
programme number of the
interval you want to change by
pressing the SYSTEM CONTROL
button, the Component Select
button or the Label key.
To change the Label keys for system
numbers
Press the MORE button repeatedly.
To display and change the Label keys
for component names
Press the OTHER button repeatedly.
40
Page 41

To display and change the Label keys
for timer programme numbers
Press the TIMER button repeatedly. For
timer settings, see page 61.
8 Press COMMANDER OFF.
COMMANDER
OFF
When you select the Component name,
go to Step 6.
When you select the system number or
the timer programme number, go to Step
7.
6 Press the INTERVAL key.
The current interval setting stays lit,
and (+) and (–) flash.
7 Press the (+) or (–) key to change
the interval. You can control the
interval from 100 to 900ms in
units of 50ms.
Each time you the (+) key is pressed,
the interval increases by 50 ms.
Each time you the (–) key is pressed,
the interval decreased by 50 ms.
(ms: 1/1000 second)
If you keep COMMANDER OFF
pressed for more than 2 seconds
The Commander turns off.
If you keep COMMANDER OFF
pressed for less than 2 seconds
The Commander returns to the
previous setting mode.
Continued
41
Page 42

Executing a Series of Commands
— System Control Functions
(continued)
4 Press COMMANDER OFF.
COMMANDER
OFF
To change the component macro executing time
1 Follow the procedure of Steps 1 -
5 on page 40.
2 Press the TIME key.
The current component macro executing
time stays lit, and (+) and (–) flash.
3 Press the (+) or (–) key to change
the component macro executing
time. You can control the time
from 0 to 2 sec (seconds) in units
of 1 sec.
Each time you the (+) key is pressed,
the time increased by 1 sec.
Each time you the (–) key is pressed,
the time decreases by 1 sec.
If you keep COMMANDER OFF
pressed for more than 2 seconds
The Commander turns off.
If you keep COMMANDER OFF
pressed for less than 2 seconds
The Commander returns to the
previous setting mode.
42
Page 43

Adding an Extra Function to the Component Select Buttons
Example: To programme the TV
button
1 While pressing COMMANDER
OFF, press %.
COMMANDER
OFF
Programming the Power-On command of the selected component (for Sony components only)
When using Sony components, you can
programme the Power-on signal for each
component on a Component Select
button or a Label key. You can select the
desired component and turn it on by just
pressing that Component Select button or
a Label key.
3,4
TV STB VCR DVD CD AMP
SYSTEM CONTROL
MORE321
OK
MENU EXIT
OTHER
COMMANDER
TIMER
OFF
PROGRAM
“SET” appears on the Mode Display
key.
2 Press the Mode Display key (SET)
twice to display “MODE” on one
of the Label keys on the display.
3 Press the MODE key.
2
“MODE” appears on the Mode
Display key.
5
1
Continued
43
Page 44

Adding an Extra Function to the
Component Select Buttons
(continued)
4 Press the PowerON key.
PowerON
“PowerON” appears on the Mode
Display key.
To clear the Power-on command
Repeat the procedure above.
The following display appears.
6 Press COMMANDER OFF.
COMMANDER
OFF
If you keep COMMANDER OFF
pressed for more than 2 seconds
The Commander turns off.
The display of the component names
(preset by Sony) for which you can
programme the Power-on signal
flashes. The display of the other
components stays lit.
5 Select the desired component by
pressing the Component Select
button or the Label key. (To
change the Label keys, press the
OTHER button repeatedly.)
TV
The selected component name
appears on the Mode display key and
“POWER ON” appears on the display
with a beep sound.
44
If you keep COMMANDER OFF
pressed for less than 2 seconds
The Commander returns to the
previous setting mode.
Page 45

Notes
• If the component code of a non-Sony product
has been set for a Component Select button
or a Label key, you cannot programme the
Power-On function for it.
• Even if you have programmed a signal by
“learning” (See “Adding a command that is
required when selecting a component”, page
45) or a System Control function (page 38) for
a Component Select button or a Label key,
you can programme the Power-On function
for that button, but it cannot be used. If you
clear a “learned” signal or the System Control
function from the button or key, you can use
the Power-On function.
• You can programme a signal by “learning”
(page 45) or a System Control function (page
38) for a Component Select button for which
the Power-On function has been
programmed. In this case, the Power-On
function is overwritten and cannot be used. If
you clear the “learned” signal or the System
Control function from the button or key, the
Power-On function is resumed, and you can
use it again.
• You can set the learning function (page 46) or
the System Control function (page 31) to the
Component Select button or the Label key for
which you programmed the Power-on signal.
In this case, the Power-on setting is also
available and the Power-on signal is output.
So check the setting of Power-on signal
before setting the learning function or the
System Control function.
Adding a command that is required when selecting a component
In addition to the original function of
selecting the operating keys and buttons
of the desired component, the
Component Select button or the Label
key can have another remote control
signal by “learning.”
For example, if you always have to
change input select of the amplifier to CD
when listening to the CD player,
programme the signal of “changing the
amplifier’s input select” to the CD button
of this Commander. Then whenever you
press the CD button, it automatically
works as the original CD Component
Select button and changes also the
amplifier input select to CD. (In this case,
the amplifier should be turned on first.)
Note
Some specific remote control signals may not
be learned.
3
TV STB VCR DVD CD AMP
SYSTEM CONTROL
OK
MENU EXIT
TIMER
MORE321
PROGRAM
OTHER
COMMANDER
OFF
5
Continued
45
Page 46

Adding an Extra Function to the
Component Select Buttons
(continued)
Example : To programme the
input select signal of your
amplifier to the CD button
1 Place the RM-AV3000T head to
head with your component’s
remote control.
Remote control of
your component
about 2 – 4 inches
(5 – 10 cm) away
RM-AV3000T
2 Follow Steps 2 and 3 on page 20
in “Learning Function.”
3 While pressing the Mode Display
key (LEARN), press the
Component Select button or the
Label key you want to “teach,”
and release both keys.
(To change the Label keys, press the
OTHER button repeatedly.)
The selected component name
appears on the Mode Display key, and
“LEARN” begins to flash.
4 Press and hold down the button
on the component’s remote
control (amplifier in this example)
until you hear a beep.
(If you release the button before
you hear a beep, the signal may
not be learned correctly.)
46
“LEARN” stops flashing and stays lit.
If “NG” flashes on the display
Learning did not succeed. Try Steps 3 and
4 again.
Page 47

5 Press COMMANDER OFF.
COMMANDER
OFF
If you keep COMMANDER OFF
pressed for more than 2 seconds
The Commander turns off.
If you keep COMMANDER OFF
pressed for less than 2 seconds
The Commander returns to the
previously set mode.
To clear the learned function of
the Component Select button
1 Follow Steps 2 and 3 on page 20 in
“Learning Function.”
2 While pressing the DEL key, press the
Component Select button which you
want to clear.
Notes
• You can programme a signal by “learning”
for a Component Select button or a Label key
for which the Power-On function (page 43)
has been programmed. In this case, the
Power-On function is overwritten and cannot
be used. If you clear the “learned” signal
from the button, the Power-On function is
resumed, and you can use it again.
• You cannot programme a System Control
function (page 38) for a Component Select
button or a Label key for which a signal has
been programmed by “learning.”
• You can programme the Power-On function
for a Component Select button for which a
signal has been programmed by “learning,”
but then the Power-On function cannot be
used. If you clear a “learned” signal from the
button, you can use the Power-On function.
Assigning Other Components to the Component Select Buttons or the Label Keys
Copying the settings of a Component Select button or a Label key to another button or key
You can copy the entire settings of a
Component Select button or a Label key
to another Component Select button or a
Label key. The settings of the component
code (page 12), the channel macro
function (page 58), the learned functions
(page 19) and character contents are
copied to a new button or key.
Notes
• You cannot copy the settings to a Component
Select button or a Label key for which any
learning function or channel macro function
has been programmed. (“NG” flashes.)
• The character contents are overwritten to a
new button or key.
2
3
TV STB VCR DVD CD AMP
SYSTEM CONTROL
OK
MENU EXIT
TIMER
MORE321
PROGRAM
OTHER
COMMANDER
OFF
4,5
6
1
Continued
47
Page 48

Assigning Other Components to
the Component Select Buttons or
the Label Keys (continued)
Example: To copy the settings of
the DVD button to the VCR button
4 Press the Component Select
button or the Label button of
which contents are to be moved.
(To change the Label buttons press the
OTHER button.)
1 While pressing COMMANDER
OFF, press %.
COMMANDER
OFF
“SET” appears on the Mode Display
key.
2 Press the Mode Display key (SET)
once to display “COPY” on one of
the Label keys on the display.
3 Press the COPY key.
COPY
“COPY” appears on the Mode
Display key.
DVD
The component name of which
contents are to be moved appears on
the Mode Display key.
5 While pressing the Mode Display
key (in this case, DVD), press the
Component Select button or the
Label key to which the contents
are to be moved (in this case,
VCR).
(To change the Label keys, press the
OTHER button.)
48
Page 49

“COPY” appears on the Mode
Display key.
Programming a Frequently Used Key Operation for SYSTEM CONTROL Buttons or Label Keys
In this case, “DVD c c VCR” flashes
on the Label keys and moving finishes
with a beep sound. And the keys for
VCR appears.
6 Press COMMANDER OFF.
COMMANDER
OFF
If you keep COMMANDER OFF
pressed for more than 2 seconds
The Commander turns off.
If you keep COMMANDER OFF
pressed for less than 2 seconds
The Commander returns to the
previous setting mode.
To return to the original setting
Follow steps in “To clear all signals
learned for a specific component,” page
26.
In addition to their original System
Control functions (see page 31), SYSTEM
CONTROL 1, 2 or 3 buttons or SYSTEM 4
- 15 Label keys can be programmed to
“learn” any remote control signal.
As they operate independently from
other buttons, SYSTEM CONTROL 1, 2
or 3 buttons can work as one-touch
buttons without any preceding operation
such as pressing a Component Select
button to select a component.
This is useful if you prefer having the
SYSTEM CONTROL button as a “one-
touch” button for a single operation
rather than executing a series of
commands.
Note
Some specific remote control signals may not
be learned. Refer to the operating instructions
supplied to the specific remote control as well.
3
4
TV STB VCR DVD CD AMP
SYSTEM CONTROL
MORE321
OK
MENU EXIT
OTHER
COMMANDER
TIMER
OFF
6
PROGRAM
2
Continued
49
Page 50

Programming a Frequently Used
Key Operation for SYSTEM
CONTROL Buttons or Label Keys
(continued)
Example: To store the On/Off
signal of an air-conditioner to
the SYSTEM CONTROL 2 button
1 Place the Commander head to
head with the remote control of
the air-conditioner.
Remote control of
your air-conditioner
about 2 – 4 inches
(5 – 10 cm) away
RM-AV3000T
2 While pressing COMMANDER
OFF, press %.
COMMANDER
OFF
“SET” appears on the Mode Display
key.
3 Press the LEARN key.
LEARN
“LEARN” appears on the Mode
Display key.
If a signal has been learned on that
button, the display stays lit. If you
want to programme on that button,
clear the signal first (page 51).
4 Press the SYSTEM CONTROL
button (in this case, 2).
Or press the MORE button to display
the SYSTEM (4-15) Label keys. To
change the Label keys press the
MORE button repeatedly. Then press
the Label key you want to teach.
2
The display for the pressed SYSTEM
CONTROL button or Label key
appears on the Mode Display key.
“LEARN” flashes for 10 seconds, and
the Commander enters receiving
mode.
50
Page 51

5 Press and hold down the button
of the remote control until you
hear a beep.
(If you release the button before you
hear a beep, the signal may not be
learned correctly.)
While receiving the signal, “LEARN”
stays lit.
If “NG” flashes on the display and
“NG” sound is heard five times
Learning did not succeed. Try Steps 4 and
5 again.
To clear the learned remote
control signal
1 While pressing COMMANDER OFF,
press %.
2 Press the LEARN key.
“LEARN” appears on the Mode
Display key.
3 While pressing the DEL key, press the
SYSTEM CONTROL button or the
Label key of which learned signals are
to be cleared.
The learned signals are cleared.
4 Press COMMANDER OFF.
If you want to programme a new signal
for that button, follow Steps 4 to 6 in the
left column.
6 Press COMMANDER OFF.
COMMANDER
OFF
Note
You cannot programme a remote control signal
for a SYSTEM CONTROL button or a Label key
by “learning” for which the System Control
function have been programmed. If you want to
programme a remote control signal for that
button, clear programmed commands first
(page 35).
If you keep COMMANDER OFF pressed
for more than 2 seconds
The Commander turns off.
If you keep COMMANDER OFF pressed
for less than 2 seconds
The Commander returns to the previous
setting mode.
If you keep COMMANDER OFF pressed
for more than 2 seconds
The Commander turns off.
If you keep COMMANDER OFF pressed
for less than 2 seconds
The Commander returns to the previous
setting mode.
Continued
51
Page 52

Programming a Frequently Used
Key Operation for SYSTEM
CONTROL Buttons or Label Keys
(continued)
Transferring Data between Commanders
Notes on learning the signals of an air-conditioner
About seasonal adjustments
If you change the settings of the airconditioner for the season, you have to
programme the remote control signals of
the new settings on the Commander.
If the power-on/off operation
does not work correctly
The air-conditioner may not be turned on
or off properly with the button or key of
this Commander, for which you have
programmed its power-on/off signal.
If the Commander can operate only
“ON” with one button or key and “OFF”
with another, while your airconditioner’s remote control can operate
“ON/OFF” with a single button or key,
programme the signal on two buttons or
keys of the Commander as follows.
1 Clear the learned power-on/off signal.
(In the example on page 51, clear the
learned signal from the SYSTEM
CONTROL 2 button.)
2 Programme the signal (transmitted
from the power-on/off button of the
air-conditioner’s remote control) for
the SYSTEM CONTROL 2 button
again.
3 Programme the signal from the same
button of the remote control for
another button or key (for example,
the SYSTEM CONTROL 3 button).
The two buttons or keys of the
Commander have been programmed
with the power-on signal and the poweroff signal of the air-conditioner,
respectively so that you can operate the
air-conditioner with the Commander.
You can transfer data, such as learned
signals and component code settings,
between this Commander and another
Sony RM-AV3000T.
Transferring data
You can transfer all the data of this
Commander or the data of a Component
Select button or a Label key on this
Commander to another Sony
RM-AV3000T.
To transfer all the data of the
Commander
9
4,7
5
TV STB VCR DVD CD AMP
SYSTEM CONTROL
MENU EXIT
MORE321
OK
OTHER
COMMANDER
TIMER
OFF
PROGRAM
3
6
10
2
52
Page 53

1 Place the RM-AV3000T head to
head with another RM-AV3000T.
Another RM-AV3000T
about 2 – 4 inches
(5 – 10 cm) away
RM-AV3000T
2 While pressing COMMANDER
OFF, press %.
COMMANDER
OFF
“SET” appears on the Mode Display
key.
3 Press the Mode Display key (SET)
twice to display “MODE” on one
of the Label keys on the display.
4 Press the MODE key.
“MODE” appears on the Mode
Display key.
5 Press the “TRANSFER” key.
TRANSFER
“TRANSFER” appears on the Mode
Display key.
6 Press the X key.
X : Transfer data
x : Receive data
Continued
53
Page 54

Transferring Data between
Commanders (continued)
7 Press the ALL key.
ALL
Note
If “NG” appears while sending the data, go
back to Step 5 and continue the operation
or press COMMANDER OFF to stop the
operation.
10 Press COMMANDER OFF.
COMMANDER
OFF
ALL: All data of the Commander
COMPO: Data of a Component
“ALL X” appears on the Mode
Display key, and “ALL” appears on
the left Label key.
Select button or a Label key
8 Confirm that the receiving
Commander is ready for data.
(To set the receiving commander,
follow the procedure on page 56.)
9 Press the “ENTER” key.
During transferring the data,
“
c c c c
When the all data has been
c c c
successfully transferred, “END”
appears on the right Label key.
c
” flashes.
If you keep COMMANDER OFF
pressed for more than 2 seconds
The Commander turns off.
If you keep COMMANDER OFF
pressed for less than 2 seconds
The Commander returns to the
previous setting mode.
Note
Be sure that the receiving Commander is ready
to receive data.
To transfer the data of a
Component Select button or a
Label key
The data of a Component Select button or
a Label key on this Commander (the
settings and learned signals programmed
on the keys and buttons) can be
transferred to a Component Select button
or key on another Sony RM-AV3000T.
1 Follow Steps 1 to 6 on page 53.
2 Press the COMPO key.
54
COMPO
Page 55

“COMPO X” appears on the Mode
Display key, and the selected
component name appears on the left
Label key.
3 Press the Component Select
button of which data you want to
send.
Or press the Label key of which data
you want to send. (To change the
Label keys, press the OTHER button
repeatedly.)
TV
5 Press the “ENTER” key.
During transferring the data,
“
c c c c
When the data has been successfully
transferred, “END” appears on the
right Label key.
Note
If “NG” appears while sending the data, go
back to Step 6 and continue the operation
or press COMMANDER OFF to stop the
operation.
” flashes.
The component name of which
contents are to be transferred appears
on the left Label key.
4 Confirm that the receiving remote
commander is ready to accept
data.
(To set the receiving commander,
follow the procedure on page 56.)
6 Press COMMANDER OFF.
COMMANDER
OFF
If you keep COMMANDER OFF
pressed for more than 2 seconds
The Commander turns off.
If you keep COMMANDER OFF
pressed for less than 2 seconds
The Commander returns to the
previous setting mode.
Notes
• The data of the System Control function
programmed for a Component Select button
cannot be transferred.
• Be sure that the receiving Commander is
ready to receive data.
Continued
55
Page 56

Transferring Data between
Commanders (continued)
Receiving the data
This Commander can receive the data of
another Sony RM-AV3000T.
To receive all the data from
another remote commander
1 Follow Steps 1 to 5 on page 53.
2 Press the x key.
X : Transfer data
x : Receive data
3 Press the ALL key.
“ALL x” appears on the Mode
Display key, and “ALL” appears on
the left Label key.
4 Press the ENTER key.
During receiving the data,
“cccc cccc” flashes.
When all the data has been
successfully transferred, “ALL”
appears on the right Label key.
Notes
• If the Commander is not ready for
receiving the data, press the CLEAR key,
then press the RETURN key to clear all
the learned signals.
• If “NG” appears during data transfer, go
back to Step 3 and continue the operation
or press COMMANDER OFF to stop the
operation. If you continue the operation,
you have to set the sending Commander
again to send data.
56
ALL
ALL: All data of the Commander
COMPO: Data of a Component
Select button or a Label key
Page 57

5 Press COMMANDER OFF.
COMMANDER
OFF
If you keep COMMANDER OFF
pressed for more than 2 seconds
The Commander turns off.
If you keep COMMANDER OFF
pressed for less than 2 seconds
The Commander returns to the
previous setting mode.
To receive the data of a
Component Select button or key
from another remote
commander
1 Perform Steps 1 and 2 on pages
56.
3 Press the Component Select
button to which you want to
assign the data.
Or press the Label key to which you
want to assign the data. To change the
Label keys, press the OTHER button
repeatedly.
TV
The selected component name
appears on the left Label key.
4 Press the ENTER key.
2 Press the COMPO key.
COMPO
“COMPO x” appears on the Mode
Display key.
During receiving the data, “c
flashes.
When the data has been successfully
received, the selected component
name appears on the right Label key.
c c
Continued
c”
57
Page 58

Transferring Data between
Commanders (continued)
Notes
• If the Commander is not ready for
receiving the data, press the CLEAR key,
then press the RETURN key to clear the
learned signal on all or one of the
Component Select buttons.
• If “NG” appears during data transfer, go
back to Step 3 and continue the operation
or press COMMANDER OFF to stop the
operation. If you continue the operation,
you have to set the sending Commander
again to send data.
5 Press COMMANDER OFF.
COMMANDER
OFF
If you keep COMMANDER OFF
pressed for more than 2 seconds
The Commander turns off.
Selecting a Programme
with a Single Key Press
— Channel Macro Function
You can programme the Channel Macro
function of the components of which the
first digit of the four-digit preset
component code number is 3 (STB),
8 (TV) or 9 (CABLE).
And you can programme the Channel
Macro function for the macro keys (Label
keys) when the selected component name
is displayed on the Mode Display key in
Step 4, page 59.
If you programme the operation of
entering the 1, 2 and 3 keys for a macro
key (Label key), you can select
programme 123 by pressing that single
key.
58
If you keep COMMANDER OFF
pressed for less than 2 seconds
The Commander returns to the
previous setting mode.
2
3
6
5
4
TV STB VCR DVD CD AMP
SYSTEM CONTROL
MORE321
OK
MENU EXIT
OTHER
8
COMMANDER
TIMER
OFF
PROGRAM
1
Page 59

Example: To programme TV
programme 123 for the BLUE key
1 While pressing COMMANDER
OFF, press %.
COMMANDER
OFF
“SET” appears on the Mode Display
key.
2
Press the Mode Display key (SET)
once to display “CHMACRO” on
one of the Label keys.
3 Press the CHMACRO key.
4 Select the component by pressing
the Component Select button or
the Label key.
TV
The selected component name
appears on the Mode Display key.
The macro keys (Label keys) flash. To
change the Label keys, press the Mode
Display key (in this case, TV).
If you select the component name
for which the Channel Macro
function cannot be programmed
“NG” flashes twice and “NG” sound is
heard.
CHMACRO
“CHMACRO” appears on the Mode
Display key.
The component names on the Label
keys for which the Channel Macro
function can be programmed flash. To
change the Label keys, press the
OTHER button.
5 Select the macro key by pressing
the Label key.
BLUE
The selected label lights on the Label
key. The numeric keys flash.
Continued
59
Page 60

Selecting a Programme with a
Single Key Press — Channel Macro
Function (continued)
If you press the Label key for
which the Channel Macro function
cannot be programmed
“NG” flashes twice and “NG” sound is
heard.
To change the name of the macro
key (Label key)
Keep the macro key (Label key) pressed for
more than 2 seconds, and follow Steps 2 - 5,
page 24.
6 Press the keys for the operation in
order (1t 2 t 3).
Note
If you enter more than 5 keys, the last
5 keys are programmed for the macro
key.
7 Press the macro key (in this case,
BLUE).
“1,” “2,” and “3” appear twice.
Note
You cannot programme the Channel Macro
function for a macro key that has “learned” a
signal. Try again with another macro key, or
clear the “learned” signal (page 25) from the
button and programme the Channel Macro
function on it.
To clear the Channel Macro
function
1 While pressing COMMANDER OFF,
press %.
2 Press the SET key.
3 Press the CHMACRO key.
4 Select the component by pressing the
Component Select button or the Label
key.
5 While pressing the DEL key, press the
macro key.
Note
You can also clear the character contents you
input by following the procedure above
repeatedly.
8 Press COMMANDER OFF.
COMMANDER
OFF
If you keep COMMANDER OFF
pressed for more than 2 seconds
The Commander turns off.
If you keep COMMANDER OFF
pressed for less than 2 seconds
The Commander returns to the
previous setting mode.
60
Page 61

Setting the Timer
Up to 12 timer setting programmes can be
set on this commander. You can
programme the timer setting of the day of
the week, the hour, the minute and the
contents of the programme (Timer Macro).
You can set each programme of the timer to
be executed or not.
“SET” appears on the Mode Display
key.
There are two ways for the timer setting as
below.
- Setting the new timer programme
- Changing the programme already set or
changing another programme that you
select (page 65)
Setting the new timer programme
6,4
5
2,7
3
8
TV STB VCR DVD CD AMP
SYSTEM CONTROL
MORE321
OK
MENU EXIT
OTHER
COMMANDER
TIMER
PROGRAM
11
OFF
1
Example: To set the timer
programme at 7:30 AM on
Saturday to the PROG4 key
1 While pressing COMMANDER
OFF, press %.
COMMANDER
OFF
2 Press the TIMER key.
TIMER
“TIMER” appears on the Mode
Display key.
The programme numbers “PROG1” -
“PROG4” appears on the Label keys.
To change the Label keys, press the
TIMER button on the Commander
repeatedly.
The programme numbers having
timer setting programmes which are
set to be executed (stand-by mode)
stay lit.
The programme numbers having
timer setting programmes which are
set not to be executed flash.
The programme numbers without
timer setting programmes flash.
Continued
61
Page 62

Setting the Timer (continued)
SETUP
3 Select the programme number to
which you want to set the timer
by pressing the Label key.
PROG4
The selected programme number
appears on the Mode Display key. (If
the pressed Label key has character
contents you input, the character
contents appear on the Mode Display
key.)
“ON/OFF,” “TEST,” “SETUP,” and
“COPY” flash on the Label keys.
“SU” and “12:00 AM” are displayed
on the Clock Display key.
If the day of the week and the time for
the timer programme are set in this
setting mode, or if you try changing
the programme already set (page 65),
the set contents are displayed on the
Clock Display key.
4 Press the SETUP key.
“DAY,” “TIME” and “MACRO” flash
on the Label keys.
5 Press the DAY key, and set the
timer-on day(s) of the week by
pressing the
or button.
62
Page 63

Each time the or button is
pressed the display of day(s) of the
week changes as follows.
button
button
6 Press the TIME key.
Set the timer-on hour by pressing
or button. Then press the
the
button so that the minute
flashes.
(You can switch the mode
between the hour setting and the
minute setting by pressing the
or button.)
Set the minute by pressing the
or button. Then press the
ENTER key.
The time of the timer setting is
decided.
The display returns to step 4.
SU : Sunday
MO : Monday
TU : Tuesday
WE : Wednesday
TH : Thursday
FR : Friday
SA : Saturday
Then press the ENTER key to decide
the day(s).
The display returns to step 4.
7 Press the MACRO key.
The Commander enters the Timer
Macro setting mode.
Continued
63
Page 64

Setting the Timer (continued)
8 Press a Component Select button,
a SYSTEM CONTROL button, or
a Label key to programme the
information of that button or key
as a procedure to be executed by
the timer .
When selecting a Label key for a
component name, press the OTHER
button to change the Label keys.
When selecting a Label key for a
system number, press the MORE
button to change the Label keys.
If you select a component name
Function keys for the component are
displayed. Go to Step 9.
If you select a system number
Go to Step 10.
9 Press a button or a key of which
function you want to programme
as a step.
10
Repeat Steps 8 and 9.
When 32 steps are input, the Macro
step programming finishes with a
beep sound, and a series of Macro
procedure appears on the display
window.
And the display returns to step 3.
Notes
• You can input up to 32 steps for one timer
programme number.
• A System Macro can be input as a step.
• A macro programmed for the Component
Select button or the Label key is available as
the same setting as its output setting.
• The step of the TIMER button has an interval
of 250ms.
• The Mode Display key, the OTHER button,
button and the MORE button are not
the
counted as steps.
11
When you have programmed a
series of Timer Macro setting,
press COMMANDER OFF.
COMMANDER
OFF
With a beep sound, a series of Timer
Macro setting is registered and
displayed in order.
When you have programmed the
buttons on the Commander
The names of buttons on the
Commander which are not on the
LCD touch key display (VOLUME+/–
, MUTING, PROGRAM +/–,
RECALL, MENU, OK, EXIT, , , ,
and ) are displayed on the right
Label key.
The display returns to Step 3.
If you want to check the execution
of the timer setting or set the
timer programme to the standby
mode
See page 67.
If you keep COMMANDER OFF
pressed for more than 2 seconds
The timer setting of the programme is
decided, and the Commander turns
off. In this case, the timer programme
is not set to the standby mode.
Note
Some programmes cannot be executed at the
set time because the execution time of the
remote control output is different depending
on the contents of the timer execution. Or, if the
execution time arrives while the previous timer
programme is outputted, the timer programme
begins after the execution of the previous one.
In this case also, the programme cannot be
executed at the set time. So, set the timer
regarding the contents and the duration of the
timer execution.
64
Page 65

To change the programme name
on the Mode Display key
After Step 3, hold the Mode Display key
pressed for more than 2 seconds. The
Commander enter the Label Inputting
mode.
Then follow the same procedure as that
for changing the name of the Label key in
Steps 2 - 5 on page 24.
To change the interval between
timer operation steps
See page 40.
Notes
• When using the timer setting on this
Commander, only one setting can be assigned
to one programme. If you want to set the
timer to turn on at a programmed time, and
to set the timer to turn off at another time,
programme the two settings separately.
• If there are some programmes set to be
executed at the same time, they start in order
from the lowest programme number.
• According to the status of the component
operated by the timer programme, the next
programme might not function successfully.
When setting a timer programme, check
carefully the setting of other programmes.
Changing the programme already set or changing another programme that you select
1 Follow Steps 1 - 3 on page 61, 62.
2 Press the COPY key.
If you want to change the programme
already set, go to Step 6 without
pressing the COPY key.
The programme number appears on
the left Label key, and “COPY”
flashes on the right Label key.
3 Press the COPY key repeatedly
until the programme number of
which contents you want to
change appears. (Each time the
COPY key is pressed, the
programme number which has
the timer setting information
appears in order.)
Continued
65
Page 66

Setting the Timer (continued)
4 When the programme number of
which contents you want to
change appears on the left Label
key, press that Label key.
With a beep sound, the contents of
selected programme is copied to the
programme number on the Mode
Display key (in this case, PROG4).
The day of the week and the time for
the copied timer programme are
displayed on the Clock Display key.
“ON/OFF,” “TEST,” “SETUP,” and
“COPY” flash on the Label keys.
6 Press the key of which contents
you want to change.
DAY: See Step 5 on page 62.
TIME: See Step 6 on page 63.
MACRO: The display turns as below.
7 Press the YES key.
With a beep sound, the Timer Macro
setting is cleared, and the Commander
enters the Timer Macro setting mode
(Step 7 on page 63).
If you press the NO key
The display returns to Step 5.
5 Press the SETUP key.
“DAY,” “TIME,” and “MACRO” flash.
66
Note
You cannot change the Timer Macro
setting partially. If you want to change
the programme without clearing the
frequently used procedure, use the
System Control function (page 31).
For example, if Steps A to D are
frequently used when you want to
programme Steps A, B, C, D and E,
programme Steps A to D using the
system macro. Then programme Step
E in the Timer Macro adding to that
system macro.
Page 67

To check the execution of the
timer programme or set the
timer programme to the standby
mode
1 Follow Steps 1 - 3 on page 61, 62.
2 Press the TEST key or the ON/
OFF key.
TEST: You can check the timer
programme setting by transmitting
the Timer Macro signals.
ON/OFF: The display turns as below.
With a beep sound, “ON” appears,
and the Commander enters the timer
standby mode. The display returns to
Step 2 on page 61.
To reset the timer standby mode,
press the ON/OFF key again.
3 Press COMMANDER OFF.
COMMANDER
OFF
If you keep COMMANDER OFF
pressed for more than 2 seconds
The Commander turns off.
If you keep COMMANDER OFF
pressed for less than 2 seconds
The Commander returns to the
previous setting mode.
Continued
67
Page 68

Setting the Timer (continued)
To switch quickly the timer
standby mode to on or off using
the TIMER button
1 Press the TIMER button.
The programme numbers of which
timer programme is set to the standby
mode stay lit, and the other
programme numbers flash on the
Label keys.
To change the Label keys, press the
TIMER button repeatedly.
4 Keep COMMANDER OFF
pressed for more than 2 seconds
to turn the Commander off.
To reset the standby mode to off,
follow Steps 1 - 3 again.
Notes
• If the TEST key or the ON/OFF key is
pressed when the timer programme is not
set, the “NG” sound is heard twice and
“NG” flashes.
• When you finish the timer setting mode
after you set the timer standby mode,
“c” mark stays lit beside the clock. This
means that one or more timer
programmes are set to the timer standby
mode.
• The timer programme contents you have
set on this Commander repeat every
week until you set the timer standby
mode to OFF (weekly timer). If you want
to execute the timer programme once, set
the timer standby mode to OFF after the
execution of the timer programme.
2 Select the programme number of
which timer standby mode you
want to switch to on by pressing
the Label key.
If you select the programme number
which has no timer programme data,
the “NG” sound is heard and “NG”
flashes twice.
3 Press the ON OFF key.
With a beep sound, “c” mark lights
and the standby mode of the selected
timer programme is set to on. The
display returns to Step 1.
68
IMPORTANT
The timer function of this
Commander is designed for the timer
operation of AV components. Do not
use the timer function to operate an
air-conditioner or electrical
appliances. It may cause a fire or a
serious injury.
Page 69

To clear timer settings
programmed for a specific PROG
(1-12) Label key
“PROG1” - “PROG4” are displayed.
To change the Label keys, press the
TIMER button.
1 While pressing COMMANDER
OFF, press %.
2 Press the Mode Display key (SET)
once to display “RESET” on one
of the Label keys on the display.
3 Press the RESET key.
“RESET” appears on the Mode
Display key.
5 Press the Label key of which
timer settings you want to erase.
The selected programme number is
displayed on the left Label key.
6 Press the YES key.
During erasing, “c c” stays lit. When
erasing finishes, “OK” is displayed
with a beep sound.
If you press the NO key
The display returns to Step 4.
7 Press COMMANDER OFF.
COMMANDER
OFF
4 Press the TIMER button.
If you keep COMMANDER OFF
pressed for more than 2 seconds
The Commander turns off.
If you keep COMMANDER OFF
pressed for less than 2 seconds
The Commander returns to the
previously set mode.
Continued
69
Page 70

Setting the Timer (continued)
To clear all timer settings
programmed for all PROG (1 - 12)
Label keys
1 Proceed Steps 1 - 3 on page 69.
4 Press the YES key.
If you press the NO key
The display returns to Step 1.
2 While pressing the DEL key, press
the TIMER key.
3 Press the YES key.
“REALLY?” stays lit, and “YES” and
“NO” flash.
If you press the NO key
The display returns to Step 1.
During erasing, “c
When all timer settings programmed
for all PROG (1 - 12) Label keys are
erased, “OK” is displayed with a beep
sound.
c c
c” stays lit.
5 Press COMMANDER OFF.
COMMANDER
OFF
If you hold COMMANDER OFF
pressed for more than 2 seconds
The Commander turns off.
If you hold COMMANDER OFF
pressed for less than 2 seconds
The Commander returns to the
previous setting mode.
70
Page 71

Using Other Functions
Locking the Controls
— Hold Function
To prevent accidental operation, you can
lock all the buttons with the Hold
function. However, the timer functions
while the controls are locked.
TV STB VCR DVD CD AMP
SYSTEM CONTROL
MORE321
OK
MENU EXIT
1 While pressing the Clock Display
key, press COMMANDER OFF.
OTHER
COMMANDER
OFF
PROGRAM
COMMANDER
OFF
When the controls are locked
When you press a button on the
Commander, the “NG” sound is heard
twice, and “LOCK,” the clock, and “c”
mark (when the timer is set to be
executed) are displayed for a second.
To unlock the controls
Keep COMMANDER OFF pressed for
more than 2 seconds.
COMMANDER
OFF
With a key-touch sound, the display
returns to the status before setting of the
Hold function.
1
With a beep sound, “LOCK” appears
on the Mode Display key, and every
LCD display disappears except the
clock and “LOCK.”
After a second, every LCD display
disappears.
71
Page 72

Protecting your
Settings
— Setting Lock Function
You can lock the Commander so that you
cannot change, add, or clear any of your
data in each setting mode.
2 While pressing the LOCK key,
press the Label key on which the
setting mode you want to lock is
displayed. (To change the Label
keys, press the SET key.)
PRESET
PROGRAM
OTHER
COMMANDER
OFF
TV STB VCR DVD CD AMP
SYSTEM CONTROL
MORE321
OK
MENU EXIT
1 While pressing COMMANDER
OFF, press %.
COMMANDER
OFF
“SET” appears on the Mode Display
key, “LOCK” flashes and setting
modes flash on the Label keys.
2
The selected setting mode is locked
and the display of the locked setting
mode on the Label key stays lit.
To lock other setting modes, repeat
Step 2.
3
3 Press COMMANDER OFF.
1
COMMANDER
OFF
When the setting is locked
If you try to display the locked setting
mode by pressing the Label key, “NG”
will flash and the “NG” sound is heard
twice.
To unlock the setting
Follow Steps 1 and 2. And while pressing
the LOCK key, press the Label key on
which the setting mode you want to
unlock is displayed. (To change the Label
keys, press the SET key.) When the
setting is unlocked, the display of the
setting mode on the Label key flashes.
72
Page 73

Setting the AutomaticOff Time of the Display
Window
1 While pressing COMMANDER
OFF, press %.
COMMANDER
OFF
The Commander is preset at the factory
to turn off the LCD display window
automatically if you do not operate for
more than 10 minutes. (Then all the
display contents are turned off.) To
change this setting, perform the
following procedure.
You can adjust the Automatic-Off time of
the LCD display window (from 1 minute
to 30 minutes in units of 1 minute).
2,4
5
3
TV STB VCR DVD CD AMP
SYSTEM CONTROL
OK
MENU EXIT
MORE321
COMMANDER
TIMER
PROGRAM
6
OTHER
OFF
7
1
“SET” appears on the Mode Display
key.
2 Press the Mode Display key (SET)
twice to display “MODE” on one
of the Label keys.
3 Press the MODE key.
“MODE” appears on the Mode
Display key.
4 Press the Mode Display key
(MODE) once to display “DISP-
OFF” on one of the Label keys.
Each time you press the MODE key,
the Label keys changes as follows.
5 Press the DISP-OFF key.
“DISP-OFF” appears on the Mode
Display key.
Continued
73
Page 74

Setting the Automatic-Off Time of
the Display Window (continued)
6 Press the (+) or (–) key to change
the Automatic-Off time of the
LCD display window.
You can adjust from 1 minute to 30
minutes.
Each time the (+) key is pressed, the
minute increases by one.
Each time the (–) key is pressed, the
minute decreases by one.
For example, “2min” on the Label key
means 2 minutes.
Note
When you set the Automatic-Off time of the
display window longer than 10 minutes
(factory setting), the battery life may be
short.
Adjusting the Backlight of the Display Window
The Commander is preset at the factory
to brighten backlight, and to switch off
the backlight automatically if you do not
operate for more than 10 seconds. To
change this setting, perform the
following procedure.
You can adjust the backlight AutomaticOff time (from 1 second to 60 seconds in
the units of 1 second), the brightness
(bright or dim) and the setting of the
buttons to lighten the Display Window.
2
7 Press COMMANDER OFF.
COMMANDER
OFF
If you keep COMMANDER OFF
pressed for more than 2 seconds
The Commander turns off.
If you keep COMMANDER OFF
pressed for less than 2 seconds
The Commander returns to the
previous setting mode.
74
3
TV STB VCR DVD CD AMP
SYSTEM CONTROL
MORE321
OK
MENU EXIT
OTHER
COMMANDER
TIMER
OFF
PROGRAM
1 While pressing COMMANDER
OFF, press %.
COMMANDER
OFF
“SET” appears on the Mode Display
key.
4-9
10
1
Page 75

2 Press the Mode Display key (SET)
twice to display “LIGHT” on one
of the Label keys.
3 Press the LIGHT key.
“LIGHT” appears on the Mode
Display key.
4 Press the OFF TIME key.
The display becomes in the setting
mode of the Automatic-Off time of the
backlight.
5 Press the (+) or (–) key to change
the Automatic-Off time of the
backlight. Then press
COMMANDER OFF to decide the
Automatic-Off time of the
backlight. The display returns to
Step 3.
You can adjust from 1 second to 60
seconds.
Each time the (+) key is pressed, the
second increases by 1.
Each time the (–) key is pressed, the
second decreases by 1.
For example, “20sec” on the Label key
means 20 seconds.
Note
When you set the Automatic-Off time of the
backlight longer than 10 seconds (factory
setting), the battery life may be short.
If you hold COMMANDER OFF
pressed for more than 2 seconds
The setting is decided, and the
Commander turns off.
6 Press the LEVEL key.
The display becomes in the brightness
setting mode. The current setting
(BRIGHT or DIM) stays lit. The other
flashes.
Continued
75
Page 76

Adjusting the Backlight of the
Display Window (continued)
7 Press the BRIGHT or DIM key to
select the brightness. Then press
COMMANDER OFF to decide the
brightness.
The display returns to Step 3.
BRIGHT:bright
DIM: dark
8 Press the ON MODE key.
The commander enter the setting
mode to select the buttons to lighten
the display window. The current
setting (LIGHT or ALL) stays lit. The
other flashes.
9 Press the LIGHT or ALL key to
select the buttons on the
Commander to light the display
window.
If you press COMMANDER OFF, the
display returns to Step 3.
LIGHT: The Display Window is lit by
pressing the LIGHT button
only.
ALL: The Display Window is lit by
pressing any button on the
Commander except the 2 +/–,
%, PROGRAM +/–, and
COMMANDER OFF.
Note
If you use the Commander frequently with
the “ALL” position, the battery life may be
short. In this case, shorten the AutomaticOff time (page 73, 74).
10Press COMMANDER OFF.
COMMANDER
OFF
If you keep COMMANDER OFF
pressed for more than 2 seconds
The Commander turns off.
If you keep COMMANDER OFF
pressed for less than 2 seconds
The Commander returns to the
previously set mode.
76
Page 77

Setting the Key-Touch Beep
The Commander is preset at the factory
to turn on the key-touch confirmation
beep. You can turn on or off the keytouch confirmation beep.
3 Press the MODE key.
“MODE” appears on the Mode
Display key.
4 Press the Mode Display key
(MODE) once to display “BEEP”
on one of the Label keys.
5 Press the BEEP key.
3,5
TV STB VCR DVD CD AMP
SYSTEM CONTROL
MORE321
OK
MENU EXIT
OTHER
COMMANDER
TIMER
OFF
PROGRAM
1 While pressing COMMANDER
OFF, press %.
COMMANDER
OFF
“SET” appears on the Mode Display
key.
2 Press the Mode Display key (SET)
twice to display “MODE” on one
of the Label keys.
2,4
“BEEP” appears on the Mode Display
key.
6
7
6
Press the ON (or OFF) key. Each
1
time you press the key, the display
changes between “ON” and “OFF”
with a beep sound. The display of
the current setting flashes.
ON: Turns on the key-touch beep.
OFF: Turns off the key-touch beep.
7 Press COMMANDER OFF.
COMMANDER
OFF
If you keep COMMANDER OFF
pressed for more than 2 seconds
The Commander turns off.
If you keep COMMANDER OFF
pressed for less than 2 seconds
The Commander returns to the
previous setting mode.
77
Page 78

Adjusting the Contrast of the Display Window
3
TV STB VCR DVD CD AMP
SYSTEM CONTROL
MORE321
6
OK
MENU EXIT
1 While pressing COMMANDER
OFF, press %.
COMMANDER
OFF
OTHER
COMMANDER
TIMER
OFF
PROGRAM
4 Press the Mode Display key
(MODE) once to display
“CONTRAST” on one of the
Label keys.
5 Press the CONTRAST key.
2,4
“CONTRAST” appears on the Mode
Display key. “
5
Label key. The DVD display appears
on the other part of the display
window.
7
6 Press the PROGRAM + or
PROGRAM – button to adjust the
contrast of the display window.
Each time you press the button the
contrast changes as follows.
1
PROGRAM +:Deeper than the actual
PROGRAM –:Lighter than the actual
7 Press COMMANDER OFF.
COMMANDER
OFF
” appears on each
****
contrast setting
contrast setting
“SET” appears on the Mode Display
key.
2 Press the Mode Display key (SET)
twice to display “MODE” on one
of the Label keys.
3 Press the MODE key.
“MODE” appears on the Mode
Display key.
78
If you keep COMMANDER OFF
pressed for more than 2 seconds
The Commander turns off.
If you keep COMMANDER OFF
pressed for less than 2 seconds
The Commander returns to the
previously set mode.
Page 79

Changing the Names of the Label Keys or the Component Names on the Mode Display Key
1 While pressing COMMANDER
OFF, press %.
COMMANDER
OFF
You can change the display of the
Component names on the Mode Display
key or on the Label keys, the function
displays of components, the SYSTEM4 SYSTEM15 and PROG1 - PROG12 on the
Label keys to the most suitable name
using up to 8 characters or digits.
6
4
TV STB VCR DVD CD AMP
SYSTEM CONTROL
MORE321
OK
MENU EXIT
OTHER
COMMANDER
TIMER
OFF
PROGRAM
“SET” appears on the Mode Display
key.
2 Press the Mode Display key (SET)
once to display “LABEL” on one
of the Label keys on the display.
2
3
5
3 Press the LABEL key.
7
“LABEL” appears on the Mode
Display key.
1
Continued
79
Page 80

Changing the Names of the Label
Keys or the Component Names on
the Mode Display Key (continued)
4 Select the sort of Labels by
pressing the COMPO, SYSTEM or
TIMER key.
COMPO: Displays component
names. To change the
Label keys, press the
OTHER button.
Press the component select
button or the Label key of
which the name you want
to change.
To change the component name on
the Mode Display key
Keep the Mode Display key on which the
component name is displayed pressed for
more than 2 seconds. The Commander
enters the component name changing
mode.
Input the name on the Mode Display key.
Follow Steps 2-5, on page 24.
SYSTEM: Displays SYSTEM4 -
SYSTEM7. To change the
Label keys, press the
MORE button.
5 Press the Label key of which the
name you want to change.
The commander enters the Label
name changing mode.
COMPO:(Example : TV-GREEN)
SYSTEM:(Example : SYSTEM6)
TIMER:(Example : PROG10)
80
TIMER: Displays PROG1 - PROG4.
To change the Label keys,
press the TIMER button.
Page 81

6 Input the name of the Label key.
Follow Steps 2 - 5, on page 24.
Erasing All the Settings
7 Press COMMANDER OFF.
COMMANDER
OFF
If you keep COMMANDER OFF
pressed for more than 2 seconds
The Commander turns off.
If you keep COMMANDER OFF
pressed for less than 2 seconds
The Commander returns to the
previous setting mode.
You can erase all the settings to reset the
Commander to its factory settings.
3,5,6
TV STB VCR DVD CD AMP
SYSTEM CONTROL
OK
MENU EXIT
TIMER
MORE321
PROGRAM
1 While pressing COMMANDER
OFF, press %.
COMMANDER
OFF
“SET” appears on the Mode Display
key.
OTHER
COMMANDER
OFF
2
4
7
1
2 Press the Mode Display key (SET)
once to display “RESET” on one
of the Label keys on the display.
Continued
81
Page 82

Erasing All the Settings
(continued)
6 Press the YES key.
3 Press the RESET key.
“RESET” appears on the Mode
Display key.
4 Press the ALL key.
ALL
“ALL RESET?” stays lit, and “YES”
and “NO” flash.
During erasing, “ALL c
c
c” stays lit. When all the settings on
the Commander are erased, “OK” is
displayed with a beep sound. The
Commander is reset to its factory
settings.
If you press the NO key
The display returns to Step 3.
c c
7 Press COMMANDER OFF.
COMMANDER
OFF
If you keep COMMANDER OFF
pressed for more than 2 seconds
The Commander turns off.
If you keep COMMANDER OFF
pressed for less than 2 seconds
The Commander returns to the
previous setting mode.
c c c
5 Press the YES key.
“REALLY?” stays lit, and “YES” and
“NO” flash.
If you press the NO key
The display returns to Step 3.
82
Page 83

Additional Information
Precautions
•Do not drop the unit or give a shock to
the unit, or it may cause a malfunction.
•Do not leave the unit in a location hear
heat sources, or in a place subject to
direct sunlight, excessive dust or sand,
moisture, rain or mechanical shock.
•Do not put foreign objects into the unit.
Should any liquid or solid object fall
into the unit, have it checked by
qualified personnel before operating
the unit any further.
•Do not expose the remote control
detectors of your components to direct
sunlight or other strong illumination.
Too much light there can interfere with
remote control operations.
•Be sure to place the Commander out of
the reach of small children or pets.
Components such as air conditioners,
heaters, electric appliances, and electric
shutters or curtains receiving an
infrared signal can be dangerous if
misused.
Maintenance
Clean the surface with a soft cloth
slightly moistened with water or a mild
detergent solution. Do not use any type
of solvent such as alcohol, benzine or
thinner as they may damage the finish of
the surface.
Specifications
Operating distance
Approx. 32.8 ft. (10 metres) (varies depending
on components of different manufacturers)
Power requirements
Remote control and backlight: Four size AA
(R6) batteries
Battery life
Approx. 5 months (varies depending on
frequency of use)
Dimensions
Approx. 4 3/4 × 7 × 1 1/2 in. (w × h × d)
(120 × 175 × 38 mm)
Mass
13 oz. (380 g) (not including batteries)
Learnable signals*
Capacity par signal: up to 300 bit
Signal frequency range: up to 500 kHz
Signal interval: up to 1 second
* Some signals cannot be learned by the
Commander, even though the signals comply
with these specifications.
Design and specifications are subject to change
without notice.
The CE mark on the unit is
valid only for products
marketed in the European
Union.
83
Page 84

Troubleshooting
If you have problems setting up or using the Remote Commander, first check the
batteries (page 7), then check the items below.
Symptom
You cannot operate the
components.
You cannot operate the
components even after
setting the component
code numbers.
You cannot control the
volume.
The Commander fails to
learn the remote control
signals.
You cannot operate a
component even after
you programmed the
remote control signals
with the “learning”
function.
Remedy
• Go closer to the component. The maximum operating distance is
approximately 32.8 ft. (10 m).
• Check that you are aiming the Commander directly at the component,
and that there are no obstructions between the Commander and the
component.
• Turn on the component first, if necessary.
• Check that the component has infrared remote capability. For example,
if your component didn’t come with a remote commander, it probably
isn’t capable of being controlled by a remote commander.
• You have assigned a different component to the Component Select
button or Label key. A corresponding component is fixed by presetting
a component code number. Therefore, the name of component you have
preset may be different from that of the Component Select button or the
Label key. In this case, it is recommended to preset again (page 12) and
change the component name on the Mode Display key or the name of
the Label key (page 23, 24).
• Set the component code correctly. If the code that is listed first for your
component doesn’t work, try all the codes for your component in the
order in which they are listed in the supplied “Component Code
Numbers.”
• Some features may not be preset. If some or all of the keys do not
function correctly even after you have set the component codes, then
use the learning function to programme the remote control signals for
the component (page 19).
• If your visual components are connected to an audio system, make sure
you’ve set up the Commander as described in “Controlling the Volume
of Visual Components Connected to an Audio System” (page 29).
• You have assigned another component to the TV or AMP button (page
45, 46). In this case, the volume cannot be controlled when you select a
component other than TV or AMP.
• When you teach signals of an interactive signal exchange system remote
control unit (supplied with some of Sony’s receivers and amplifiers) to
the Commander, the response signal of the main unit may interfere with
the learning of the Commander. In such a case, move to a place where
the signals will not reach the main unit (e.g. other rooms, etc.).
• Make sure that the Remote Commander has learned the correct signals.
If not, see “For accurate learning” (page 25) and try the learning
procedure again (page 19).
84
Page 85

Symptom
“NG” flashes five times.
“NG” flashes twice.
Remedy
• Leaning has not succeeded. After checking the follows, try learning
procedure again (page 19).
- Change the distance between remote commanders.
- See “For accurate learning” (page 25).
• The component codes cannot be set. See the supplied “Component
Code Numbers” and try setting the component codes again (page 12).
• The data have not been transferred. See “Transferring data” (page 52)
and try transferring the data again.
• The data has not been received. See “Receiving the data” (page 56) and
try receiving the data again.
• Learned signals have been programmed for the button or key to which you
want to set the learning, System Control or Channel Macro function. Clear
the learned signals (page 35, 60) and try setting again.
• Learned signals or the Channel Macro function have been programmed for
the Component Select button or the Label key to which you want to copy
the settings of another Component Select button or the Label key using the
copying function (page 47). Clear the contents (page 25, 60) and try the
copying procedure again.
• The key for which you want to programme the Channel Macro function is
not a Channel Macro key. You can programme the Channel Macro function
only for the Label keys.
• You may try to clear the learned signals in the Channel Macro setting mode
(page 60). In this mode, only Channel Macro settings can be cleared by
pressing the macro key while keeping the DEL key pressed. To clear the
learned signals, see page 46.
• Learned signals have been programmed for the Label key to which you
want to set the Channel Macro function. Clear the learned signals (page 25)
and try setting again. Or set to another Label key.
• There are some keys, for which learned signals have been programmed, on
the display for the Component Select button or the Label key when the
Commander receives the data from another Commander. Clear the learned
signals using the CLEAR key and the RETURN key on the display of the
receiving mode (page 56). Or see “Changing or erasing the function of a
taught key or button” (page 25), and clear the learned signals.
• The programme contents you want to change are set to be executed by the
timer. Set the timer setting in which that programme is included not to be
executed (page 65), and edit the programme contents.
• You may try to programme the Power-On function (page 43) for a
Component Select button or the Label key to which the component code of
a non-Sony product has been set. This function is only for Sony
components.
• You may try to operate the preset function (page 12) after operating the
learning function (page 19). You cannot operate the preset function after
operationg the learning function. Preset after clearing the learned signals
(page 25), or preset to another Component Select button or Label key that is
not used.
Continued
85
Page 86

Troubleshooting (continued)
Symptom
“NG” appears during
learning.
“NG” flashes if you try to
copy the settings of the
Component Select button
or the Label key to another
Component Select button
or Label key.
A system control
programme does not
function correctly.
Your Commander does
not work as expected
after data transfer.
The component set to be
operated by the timer of
the Commander does not
function as expected.
The timer programme is
executed in the next
week though that
programme has been
already executed.
The character contents
you have input return to
the original display.
The character contents
you have input are not
displayed.
86
Remedy
• The memory is full. Clear infrequently used learned keys (page 25), then
carry out learning operations.
• There are some keys, for which learned signals or the Channel Macro
function have been programmed, on the display for the Component
Select button or the Label key. Copy the settings to another Component
Select button or the Label key, or clear the learned signals (page 25) or
the Channel Macro function (page 60).
• Make sure that you have programmed the commands in the correct
order (page 31).
• Try changing the orientation of the Commander. If that does not help,
try placing the components as close to each other as possible.
• Check the status of the components and make sure that you have set the
components properly to receive commands (page 37).
• The component codes are changed or a new signals have been learned
for a key or button that has been programmed with a series of
commands. In this case, the new signals are transmitted when the series
of commands is executed.
• The interval may be too short. See “Changing the interval between
operation steps” (page 40) and set a longer interval, or adjust the series
of commands by changing the order of buttons and keys. (When
programming the system control function, you can make an interval of
a while by pressing the TIMER button.)
• Data transfer to/from a single Component Select button or Label key
cannot transfer System Control functions set to each button or key.
Either set up the receiving Commander from the start, or perform whole
data transfer (page 52).
• The component could not receive the signal from the Commander
successfully. When using the timer, check the followings.
- Check that the timer macro programme functions correctly by pressing
the TEST key, after programming the timer (page 66).
- Check the location of the Commander.
• The status of each component is not suitable for operation. (For
example, you programme the power-on setting, assuming that power of
the component is off when the timer turns on. However, if power of the
component is on when the component receives the timer signal from the
Commander, the component will turn off.)
• The timer programme contents you have set on this Commander repeat
every week (weekly timer). If you want to execute the timer programme
once, set the timer standby mode to OFF after checking the execution of
the timer programme (page 67).
• If you preset a component code after inputting character contents, they
are cleared and return to the original display. Edit the characters after
you decide the component to be used by presetting a code.
• If you input characters to the Label keys which have no data (displayed
“
”), the input characters are not displayed. In this case, first input
****
data to the Label keys by learning function (page 19) and input
characters. However, the input characters are displayed during the
learning operation.
Page 87

Symptom
The display of the
Commander turns off by
itself.
E is displayed only
when transferring the
data and lighting the
LCD display window.
The Commander enters
the clock setting mode by
itself.
“LOCK” is displayed on
the LCD and the display
for operation does not
appear when you press a
button.
Helpline available
Remedy
• This Commander is preset at the factory to turn the display off
automatically if you do not operate for more than 10 minutes. You can
change the Automatic-Off time from 1 to 30 minutes (page 74).
• The batteries begin to be exhausted. Replace the batteries as early as
possible (page 7).
• The batteries might have been replaced, or the batteries are worn out.
Replace the batteries with new ones (page 7). After replacing the
batteries, the set contents remain. So, to use the Commander with the
previous set contents, you should only set the clock (page 8).
• The Hold function is on. Unlock the Hold function (page 71).
Customer Service
If you have any questions or problems concerning the Remote
Commander that are not covered in this manual, please call the
customer remote helpline. The number is mentioned in the
warranty card.
87
Page 88

Appendices
Table of Preset Functions
Note
There may be some components or functions
that cannot be operated with this Commander.
TV
KEY DISPLAY
POWER1
1 – 9, 0, 1-,-/--,
2-
INPUT
DISPLAY
SLEEP
MAIN/SUB
TELETEXT
TV ON
WIDE
EPG
SHIFT
MENU
OK
PIP ON/OFF
FUNCTION
To turn on and off
To change the programme
Also to turn on
To select double-digit
numbers
Works in same way as the
TV’s commander
To select a number between
20 and 29
To change the input mode
To display the current
programme on TV
To operate SLEEP function on
the TV(Works only for a TV
with SLEEP function)
To switch the sound of the
duplex broadcast
To switch to teletext
To turn on
To return from teletext to TV
To switch to WIDE
To turn on/off the
programme guide
To toggle between Key
functions
To call up the MENU display
To move the cursor upward
To move the cursor
downward
To move the cursor to the
right
To move the cursor to the left.
To enter the selection of the
MENU display
Turn on/off the ‘window’
picture
KEY DISPLAY
PIP CH+/–
PIP SWAP
PROGRAM +/–
2 +/–
%
RED, GREEN,
YELLOW,
BLUE
PIP TEXT
PIP MOVE
PIP STILL
PIP OFF
ZOOM
ZOOM+
CENTER
ZOOM–
Using Fastext
With Fastext you can access pages with one key
stroke.
When a Fastext pages with is broadcast, a
colour-coded menu will appear at the bottom
of the screen.
The colours of this menu correspond to the red,
green, yellow, and blue keys on the Remote
Commander.
Press the key which corresponds to the colourcoded menu.
The page will be displayed after some seconds.
FUNCTION
To change the TV programme
in the ‘window’ picture
To swap the ‘main’ picture
and the ‘window’ picture
Programme up : +
Programme down : –
To operate JUMP,
FLASHBACK or CHANNEL
RETURN function on the TV
depending on the setting of
the TV’s manufacturer
Volume up : +
Volume down : –
To mute the volume on the TV
Press again to turn muting off
Fastext buttons
To switch to teletext in the
‘window’ picture
To move the location of the
‘window’ picture
Freeze the ‘window’ picture.
Turn off the ‘window’
picture.
To zoom a picture
To scroll upward a picture
enlarged by the zoom
function
To centre the picture enlarged
by the zoom function
To scroll downward a picture
enlarged by the zoom
function
88
Page 89

STB (Digital satellite, Analogue satellite, Digital terrestrial)
KEY DISPLAY
POWER1
1-9,0, 1-,-/--
INPUT
GUIDE
INFO
TELETEXT
FAVORITE
A
B
C
D
E
MENU
OK
PROGRAM +/–
FUNCTION
To turn on and off
To change the programme
Also to turn on
To select double-digit numbers
Works in same way as the TV’s
commander.
To switch the output of the
SAT receiver to the TV (When
you connect a TV cable or
aerial to the receiver, the
output switches between a
TV and SAT programme)
To bring up Master Guide
To turn on/off the delailed
information of the GUI
(Graphic User Interface)
display related to the EPG
mode
To turn on/off the language
switching function for a
normal broadcast display
To switch to teletext
To switch up/down among
the favourite programmes
only
Option A of the GUIDE mode
Option B of the GUIDE mode
Option C of the GUIDE mode
Option D of the GUIDE mode
The help display which
explains in sequence how to
use the key display “A” to
“D”
To call up the MENU display
To move the cursor upward
To move the cursor
downward
To move the cursor to the
right
To move the cursor to the left
To enter the selection of the
MENU display
Programme up : +
Programme down : –
KEY DISPLAY
PILOT
PERSONAL
SERVICE
EPG
RED, GREEN,
YELLOW,
BLUE
FUNCTION
To operate JUMP,
FLASHBACK or CHANNEL
RETURN function on the TV
depending on the setting of
the TV’s manufacturer
To turn on/off the EPG
display
To display the setting modes
To perform the “PAY PER
VIEW” or the “programme
download” service function
To show or hide the EPG
display
Fastext buttons
Continued
89
Page 90

Table of Preset Functions
(continued)
VCR, VCR2, VCR3
KEY DISPLAY
POWER1
1 – 9, 0, 1-,-/--,
2-
INPUT
DISPLAY
ANT/SW
MENU
OK
m
N
M
REC
x
X
Z
PROGRAM +/–
COUNTER
Q.TIMER
TSEARCH
SEARCHt
COMMERCL
90
FUNCTION
To turn the power on/off
To change the programme
Also to turn on
To select double-digit
numbers
Works in same way as the
TV’s commander
To select a number between
20 and 29
To change the input mode
To activate the on-screen
display
To switch the aerial output
To call up the MENU display
To move the cursor upward
To move the cursor
downward
To move the cursor to the
right
To move the cursor to the left
To enter the selection of the
MENU display
To rewind
To play
To fast-forward
To record, press N while
pressing REC.*1 First release
N, then release REC.
To stop
To pause
To eject a cassette
Programme up: +
Programme down: –
To change the counter
display
To select the recording time
by 30 minutes and begin
recording
REVIEW locked picture
search
CUE locked picture search
To skip over commercials
KEY DISPLAY
SP/LP
H.S.REW
PLAY x2
LINE1
LINE2
DVin
TVTUNER
*1In order to avoid recording by mistake, the
REC key does not work by itself. You can
assign this operation (record) to a single key
using the learning function (page 19).
FUNCTION
To switch the tape speed
To rewind at high speed
To play at double speed
To select the input source:
LINE 1
To select the input source:
LINE 2
To select the input source: DV
To return to the TV (to reset
the external input)
Page 91

DVD, DVD2, DVD3
KEY DISPLAY
POWER1
1 – 9, 0
+10
ENTER
AUDIO
DISPLAY
ANGLE
CLEAR
RETURN
TITLE
SUB TITLE
MENU
OK
m
N
M
x
X
>
(PROGRAM +)
.
(PROGRAM –)
Z
TIME
SET UP
FUNCTION
To turn to the power on/off
Number buttons: To set items
selected from the screen
To select numbers 10 and
above
To enter a setting or to set
items selected from the screen
To change the sound
To show the current play
status on the screen
To switch angle
To clear the selected
characters from the screen
To return to the last previous
screen
To display the title menu
To switch the subtitle
To display the DVD menu
To move the cursor upward
To move the cursor
downward
To move the cursor to the
right
To move the cursor to the left
To execute items selected
from the screen
To rewind
To play
To fast-forward
To stop
To pause
To proceed to the next
location or song
To proceed to the previous
location or song
To open or close the tray
To change the time display
To call up the setting up
menu
KEY DISPLAY
REV SLOW
FWD SLOW
REPEAT
EDIT
PLAYMODE
DISC
SEARCHt
TSEARCH
DNR
VES
FUNCTION
Slow playback in the reverse
direction
Slow playback in the forward
direction
To go into the repeat mode
To switch the edit mode to
on/off
To change the playback mode
To change a disc
To search in the forward
direction
To search in the reverse
direction
To change the level of the
Digital Noise Reduction
To change the mode of the
Virtual Enhanced Surround
Continued
91
Page 92

Table of Preset Functions
(continued)
CD
KEY DISPLAY
POWER1
1 – 9, 0
+10
ENTER
D.SKIP
DISPLAY
CLEAR
m
N
M
x
X
Z
>
(PROGRAM+)
.
(PROGRAM–)
CONTINUE
SHUFFLE
PROGRAM
REPEAT
FUNCTION
To turn the power on/off
To select the track number (0
selects track 10)
To select track numbers
above 10, see the descriptions
on the +10 button below.
To select numbers 10 and
above
To enter the setting
To select next disc
To switch the display of the
CD player to on/off
To clear the setting
To rewind
To play
To fast-forward
To stop
To pause
To open/close
To select the next track
To select the previous track
To select continuous play
mode
To play in random order
To use for programme play
To select repeat play mode
KEY DISPLAY
DISC
TRACK
GROUP
EDIT
DSP MODE
DSP OFF
FADER
PLAYMODE
FUNCTION
To decide the numeric key
operation
To decide the numeric key
operation
To decide the numeric key
operation
To go into the setting mode of
automatic programme and
time fade
To toggle the mode of DSP
added to the CD
To turn the DSP off
To toggle the fade-in/fade-
out operation
To change the play mode
cyclically
92
Page 93

AMP
KEY DISPLAY
POWER1
1 - 9, 0
+10
ENTER
VIDEO 1
VIDEO 2
VIDEO 3
AUX
DVD
TV
CD
MD/DAT
TUNER
TAPE
PHONO
5.1 INPUT
MENU
OK
FUNCTION
To turn the power on/off
Keys to use the tuner directly
To select numbers 10 and above
To enter the setting
To select the input source:
VIDEO 1
To select the input source:
VIDEO 2
To select the input source:
VIDEO 3
To select the input source:
AUX
To select the input source: DVD
To select the input source: TV
To select the input source: CD
To select the input source: MD
To select the input source:
TUNER
To select the input source:
TAPE
To select the input source:
PHONO
To change the multi-channel of
5.1ch and above
To call up the MENU display,
or return to the previous
MENU
To move the cursor upward
To move the cursor downward
To move the cursor to the right
To move the cursor to the left
To enter the selection of the
MENU display
KEY DISPLAY
SHIFT
BAND
EXIT
PROGRAM
+/–
2 +/–
%
S.FIELD
GENRE
MODE
T.TONE
CENTER+
CENTER–
REAR+
REAR–
SUB
WOOFER+
SUB
WOOFER–
TD.INPUT
D.INPUTt
FUNCTION
To shift band or preset select
To select FM/AM
To return to the basic MENU
Presetting or tuning frequency
to a higher: +
Presetting or tuning frequency
to a lower: –
Volume up: +
Volume down: –
To mute the volume on the
AMP
Press again to turn muting off
To turn on/off the sound field
To select a sound field genre
To select a sound field mode
To output a test tone
To adjust the centre speaker
level: +
To adjust the centre speaker
level: –
To adjust the rear speaker level:
+
To adjust the rear speaker level:
–
To adjust the subwoofer level: +
To adjust the subwoofer level: –
To switch the digital input: T
To switch the digital input: t
Continued
93
Page 94

Table of Preset Functions
(continued)
MD
KEY DISPLAY
POWER1
1 – 9, 0
+10
ENTER
D.SKIP
DISPLAY
CLEAR
m
N
M
REC
x
X
Z
>
(PROGRAM+)
.
(PROGRAM–)
FUNCTION
To turn the power on/off
To select the track number (0
selects track 10)
To select track numbers
above 10, see the descriptions
on the +10 button below.
To select numbers 10 and
above
To enter the setting
To select the next disc
To change the display mode
or turn the display on/off
To clear the setting
To rewind
To play
To fast-forward
To record, press N while
pressing REC.
First release N, then release
REC.
To stop
To pause
To open/close
To select the next track
To select the previous track
KEY DISPLAY
CONTINUE
SHUFFLE
PROGRAM
REPEAT
DECK A
DECK B
RECMODE
CD-SYNC
FADER
SCROLL
FUNCTION
To select continuous play
mode
To play in random order
To use for programme play
To switch the repeat play of a
single or all track(s) to on/off
To select a deck of the dual
MD deck: A
To select a deck of the dual
MD deck: B
To toggle the recording mode
To start synchronizing with
the CD
To select the fade-in/fade-out
To display DISC NAME that
are not shown
94
Page 95

TAPE A, TAPE B
KEY DISPLAY
POWER1
1 – 9, 0
+10
ENTER
m
n
N
M
REC
x
X
DISPLAY
A/B
REW AMS
FF AMS
FADER
REC MUTE
DOLBY NR
REC LEVEL+
REC LEVEL–
C.RESET
C.MEMORY
PROGRAM
FUNCTION
To turn the power on/off
To select the track number
To select numbers 10 and
above
To enter the setting
To rewind
To reverse
To play
To fast-forward
To enter the record standby
mode, press REC.
To record, press N while
pressing REC.
To record in reverse, press n
while pressing REC.
To stop
To pause
To change the display mode
To select a tape deck: Deck A
or B (dual cassette deck only)
To search the beginning of a
track in the rewind direction
To search the beginning of a
track in the fast forward
direction
To stop after fading out and
fade in after starting
Record muting
To toggle the Dolby Noise
Reduction
To make the recording level
higher
To make the recording level
lower
To reset the tape counter
To switch the position
memory operation according
to the tape counter to on/off
To go into the programme
mode by first pressing, and
start programme play by
second pressing
CABLE (Cable box)
KEY DISPLAY
POWER1
1 – 9, 0, ENTER
PROGRAM +/–
FUNCTION
To turn the power on/off
To change the programme
(For example, to change to
programme 5, press 0 and 5
or, press 5 and ENTER)
Programme up :+
Programme down : –
To operate JUMP,
FLASHBACK or CHANNEL
RETURN function
Continued
95
Page 96

Table of Preset Functions
(continued)
LD (Laser disc player)
KEY DISPLAY
POWER1
1 – 9, 0
+10
ENTER
DISPLAY
CLEAR
ANT/SW
m
N
M
x
X
>
(PROGRAM+)
.
(PROGRAM–)
Z
SIDE A
SIDE B
x2/x3
PROGRAM
FUNCTION
To turn the power on/off
To select the track number (0
selects track 10)
To select track numbers
above 10, see the descriptions
on the +10 button below.
To select numbers 10 and
above
To enter the setting
To show the current play
status on the screen
To clear the selected
characters from the screen
To switch between the TV
and the video
To rewind
To play
To fast-forward
To stop
To pause
To proceed to the next
location or song
To proceed to the previous
location or song
To open or close the tray
To select disc side A, when
the side is selectable
To select disc side B, when
the side is selectable
To go into the double or triple
speed mode
To go into the programme
mode
DAT
KEY DISPLAY
POWER1
1 – 9, 0
DISPLAY
m
N
M
REC
x
X
Z
>
(PROGRAM+)
.
(PROGRAM–)
HIGH REV
HIGH CUE
FADER
REC MUTE
FUNCTION
To turn the power on/off
To select the track number (0
selects track 10)
To select track numbers
above 10, see the descriptions
on the +10 button below.
To change the display mode
or turn the display on/off
To rewind
To play
To fast-forward
To record, press N while
pressing REC.
First release N, then release
REC.
To stop
To pause
To open/close
To select the next track
To select the previous track
High speed review
High speed cue
To select the fade-in/fade out
Record muting
96
Page 97

Quick Reference of Operations
To
Enter the setting
mode
Enter the learning
mode
Enter the setting
mode of the System
Control function
Enter the timer
programme setting
mode
Input the character
contents to each
Label key for the
component
Input the character
contents to each
Label key for the
System Control
Input the character
contents to each
Label keys for the
timer programme
Programme the
Power-on command
Set the Channel
Macro function
Transfer/receive the
data
Change the volume
control setting
Copy the setting of a
Component
Press
COMMANDER OFF + %
(If you do not perform any step within 2 minutes, the
mode ends.)
COMMANDER OFF + Component Select
COMMANDER OFF + OTHER
COMMANDER OFF + SYSTEM CONTROL (1, 2, 3)
COMMANDER OFF + MORE
COMMANDER OFF + TIMER
COMMANDER OFF + MENU + Component Select
COMMANDER OFF + MENU + OTHER
COMMANDER OFF + MENU + MORE
COMMANDER OFF + MENU + TIMER
COMMANDER OFF + 2 – + Component Select
COMMANDER OFF + 2 – + OTHER
(To reset the command, repeat the procedure.)
COMMANDER OFF + PROGRAM+ + Component Select
COMMANDER OFF + PROGRAM+ + OTHER
COMMANDER OFF + 2 – + PROGRAM–
COMMANDER OFF + 2 + + 2 –
COMMANDER OFF +
For
details,
see
page 12
page 19
page 32
page 61
page 79
page 79
page 79
page 43
page 58
page 52
page 29
page 47
Continued
97
Page 98

Quick Reference of Operations (continued)
To
Set the interval
between operation
steps of the System
Control
Set the component
macro executing time
Adjust the contrast of
the LCD display
window
Turn the key-touch
beep on/off
Set the Automatic-Off
time of the LCD
display window
Set the Automatic-Off
time
Set the brightness of
the backlight
Select the buttons to
light the LCD display
window
Set the STD (standard)
time
Set the DS (daylight
saving) time
Set the clock
Lock the Remote
Commander
Unlock the Remote
Commander
Press
COMMANDER OFF + EXIT
COMMANDER OFF + OK
COMMANDER OFF + %
x
(ON) % + 2 +
(OFF) % + 2 –
COMMANDER OFF + 2 – + PROGRAM+
COMMANDER OFF +
COMMANDER OFF + + 2 +
COMMANDER OFF + + 2 –
Clock Display + PROGRAM–
Clock Display + PROGRAM+
Clock Display +
Clock Display + COMMANDER OFF
COMMANDER OFF
(Keep the button pressed for more than 2 seconds.)
For
details,
see
page
40, 42
page 78
page 77
page 73
page 74
page 74
page 74
page
8, 11
page
8, 11
page 10
page 23
page 71
98
Page 99

Full Display
99
Page 100

Index
A
Automatic-Off
of the backlight 74
of the display window
73
B
Backlight
adjusting 74
Automatic-Off 74
Batteries 7
C, D
Changing
component name on the
Mode display key 24
function display of keys
23
interval of the System
Control function 40
name of the Label key
23
PROGRAM button 6
Channel Macro function 58
Clearing/Changing
Channel Macro function
60
learned signal 25, 46, 51
System Control function
35, 39
timer setting 67, 70
Clock setting 8
DS time 8, 11
STD time 8, 11
Code number 13
Component Select buttons
assigning other
components 47
copying settings 47
programming a signal
43
programming System
Control function 38
receiving data 56
setting Power-On
function 43
transferring data 52
COMMANDER OFF button
6
Copying
settings of Component
Select buttons 47
E
Erasing
all the settings 81
See “Clearing/
Changing”
F, G
Factory setting 12, 29, 37
H
Hold Function 71
K
Key touch beep 77
L
LCD
brightness 74
full display 99
Learning Function 19, 45,
49
LIGHT button 6, 74
Locking
control of Commander
71
settings on Commander
72
M, N, O
MUTING button 6, 19, 22
P, Q
Power-On function
setting 43
SYSTEM CONTROL3
button 37
Power-Off function
See “System Power-Off
function”
Preset components 12
R
Receiving data 56
S
Setting Lock function 72
SYSTEM CONTROL
buttons 7
programming a signal
49
programming System
control function 31
System Control function
changing interval 40
clearing 35, 37, 39
System Power-Off function
SYSTEM CONTROL 1
button 37
T, U
Timer setting 61
Transferring data 52
Troubleshooting 84
V, W, X, Y, Z
VOLUME buttons 6, 19, 22
Volume Control 19, 29
Printed in Malaysia
100
 Loading...