

User Manual
English

PLEASE READ BEFORE USING GO!EXPLORE™
Please ensure that your PSP™ system has the correct date and time and time zone settings and system software
version 3.90 or higher. For further information on changing date and time settings or updating system software, please
refer to the PSP™ system Instruction Manual.
Your PSP™ system must be outdoors and stationary to locate your fi rst position. Before using Go!Explore™ for the fi rst
time, the GPS receiver will need to register its position. This can usually take between 5 and 15 minutes. Make sure that
you are stationary and in an open space where your view of the sky is not obscured by tall buildings or trees.
The GPS receiver requires an unobstructed view of the sky and must face towards the sky to receive the signal. When
used in a car it must be positioned at an angle that points away from the PSP™ system, with a clear view of the sky.
Sometimes the GPS signal may be lost if travelling between tall buildings or through a tunnel.
USEFUL TIPS
• When not using Go!Explore™ for a short period of time, leave the software running and put your PSP™ system into
Sleep Mode. This will make it quicker to gain a GPS signal when usage is resumed.
• To avoid interference with the GPS signal, always slide your PSP™ system’s WLAN switch to the OFF position.
• During initial set up, copy your map data to Memory Stick Duo™. This will speed up loading times.
• If you want to check your GPS reception status and quality, an overview can be found by selecting GPS from the
Settings Menu.
WELCOME TO GO!EXPLORE™
Thank you for choosing Go!Explore™ as your satellite navigation system. Read the Quick Start Guide fi rst to start using
Go!Explore™ right away; this document contains more detailed reference information and description of Go!Explore™’s
features. You can easily discover Go!Explore™ for yourself whilst on the go; however, reading this manual is still
recommended in order to fully understand the individual screens and features of Go!Explore™.
PLEASE NOTE: the information in this manual was correct at the time of publication, but some minor changes may
have been made late in the product’s development. Screenshots for this manual may have been taken from the English
version of this product and some screenshots might have been taken from pre-completion screens that differ slightly
from those in the fi nished product.

CONTENTS
1 Installing the GPS receiver
2 Warnings and safety information
3 Getting started
3.1 Using the PSP™ system
3.1.1 Using the smart keyboard
3.2 Using the map
3.2.1 Checking the details of a map location
3.2.2 Manipulating the map
3.2.3 Status information
3.2.4 Using the cursor (the selected map location)
3.2.5 Action Menu options
3.3 Go!Explore™ concepts
3.3.1 Smart Zoom
3.3.2 Position markers
3.3.2.1 Current GPS position and Lock-on-Road
3.3.2.2 Returning to normal navigation
3.3.2.3 Selected location (cursor)
3.3.3 Daytime and night colour schemes
3.3.4 Route calculation and recalculation
3.3.5 Itinerary
3.3.6 Track Logs
3.3.7 Route simulation
3.3.8 Places
3.3.9 Speed limit warning
4 Navigating with Go!Explore™
4.1 Selecting the destination of a route
4.1.1 Selecting a destination with the cursor
4.1.2 Entering an address or part of an address
4.1.2.1 Entering an address
4.1.2.2 Entering an address if house numbering is restarted
4.1.2.3 Selecting an intersection as the destination
4.1.2.4 Selecting a city centre as the destination
4.1.2.5 Finding an address with a post code
4.1.2.6 Tips on entering addresses quickly
4.1.3 Selecting a destination from your Favourites
4.1.4 Selecting a destination from Places
4.1.5 Selecting a destination with a saved Place search query
4.1.6 Selecting a destination from History
4.1.7 Selecting a destination using coordinates
4.1.8 Selecting Home as the destination
4.2 Creating a waypoint
4.3 Editing the route
4.4 Viewing the whole route (Fit to Screen)
4.5 Changing between 2D and 3D map views
4.6 Watching the simulation of the route
4.7 Enabling Safety Mode
4.8 Pausing the active route
4.9 Deleting the active route
4.10 Saving a route
4.11 Editing the saved route
4.12 Using Track Logs
5 Reference
5.1 The Main Menu
5.2 Find & Go Menu
5.3 The map screen
5.3.1 Next route events
5.3.2 Objects on the map
5.3.2.1 Streets and roads
5.3.2.2 3D object types
5.3.2.3 Elements of the active route
5.3.3 Action Menu
5.3.4 Route Menu
5.4 My Data Menu
5.4.1 Manage Favourites
5.4.2 Manage Places
5.4.3 Manage Saved Routes
5.4.4 Manage Saved Queries
5.4.5 Manage Track Logs
5.4.6 Manage Saved Data
5.5 Settings Menu
5.5.1 Visual settings
5.5.2 Audio settings
5.5.3 Regional settings
5.5.4 Route Planning options
5.5.5 Warning settings
5.5.6 GPS status
6 Glossary
7 Copyright notices
8 Terms of use
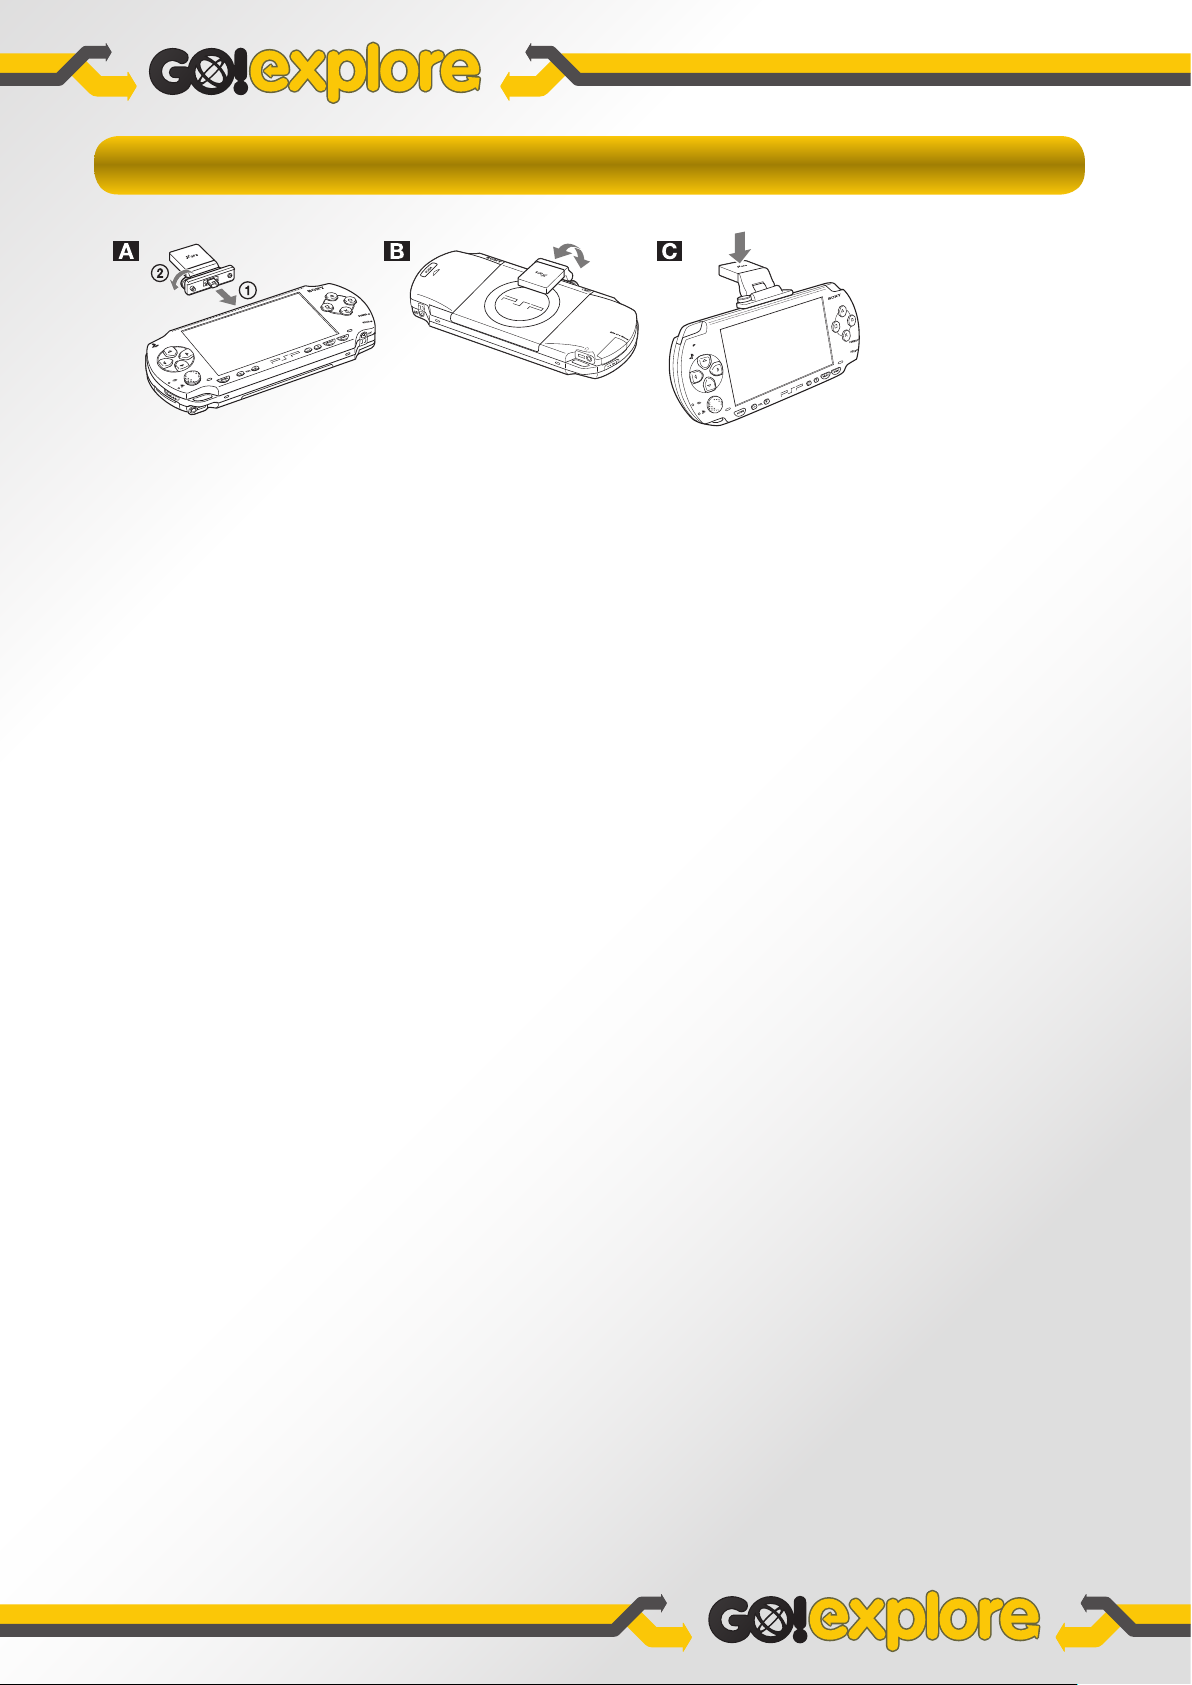
1 INSTALLING THE GPS RECEIVER
Before installing the GPS receiver, make sure the PSP™ (PlayStation®Portable) system is turned off.
1. Connect the GPS receiver to the USB connector on the top of the PSP™ system.
2. Tighten the screw to fi x it in place (Figure A).
For the best reception, position the GPS receiver at an angle that points away from the PSP™ system, with a clear view
of the sky.
Precautions
Before using this product, carefully read this manual and retain it for future reference. Also refer to the instructions for
your PSP™ system.
• Keep out of reach of small children to help prevent accidental swallowing.
• Do not use this product as the main navigation device on a ship or plane or when mountain climbing or skiing.
• Measurement errors may occur, or GPS positioning may not be possible because the PSP™ system may lose power,
as this could lead to accidents. When using the product in a car, it is recommended that the offi cial Car Adaptor
is used.
• Take extra care when using the PSP™ system while walking. Looking at the screen while walking may result in
an accident.
• When using Bicycle Mode, do not use this product whilst riding. Plot and refer to your route before setting off.
• When using the product with navigation software, disregard any unsafe, hazardous or illegal route suggestions.
• The PSP™ system should never be operated by a driver whilst the vehicle is in motion.
• When used in a vehicle, the PSP™ system and GPS receiver must be mounted in the offi cial In-car Cradle and in
accordance with cradle mounting instructions.
• The use of certain GPS features may be prohibited in some countries or areas. Users should check laws in country of
use and only operate device in conformity with any applicable rules.
• When driving it is recommended that the product’s “Safety Mode” feature is used. Accessed via the Settings Menu,
this feature prevents operation of the PSP™ system whilst the vehicle is moving.
Use and handling
• Do not use with products other than the PSP™ system.
• Do not allow small particles to get into this product.
• Do not expose this product to dust, smoke or steam.
• Do not expose this product to high or low temperatures, high humidity, condensation or direct sunlight. Do not leave
this product unattended in a vehicle, where it may become susceptible to these conditions and also a target for
thieves. Circular marks left on a vehicle’s window surfaces by suction cups may also attract thieves.
• Do not allow this product to come into contact with liquids.
• Do not place any objects on this product.
• Never disassemble or modify this product.
• Do not throw or drop this product, or physically damage it in any way.
• Do not allow this product to come into prolonged contact with rubber or vinyl products.
• Do not use solvents, other chemicals or a chemically-treated dust cloth to clean this product.
• Do not use excessive force on the connector, as doing so may cause the connector to bend or cause damage to the
internal part of the connector.

Limited Warranty
Where a 1-year warranty is supplied with your PSP™ system, such warranty also applies to this product. For details
please see the manual that came with your PSP™ system or call the PSP™ customer service helpline which can be
found within every PSP™ format software manual. Please also refer to the Terms Of Use at the end of this manual.
GPS
GPS (Global Positioning System) is a system that uses high-precision U.S. navigation satellites to enable you to identify
your location wherever you are on Earth. There are a total of around 30 GPS satellites positioned in six orbits at an
altitude of approximately 20,000 kilometres (approx. 12,400 miles). Wherever you are on Earth, there are generally at
least three satellites that can identify your location.
Positioning
The GPS receiver receives radio waves from the GPS satellites. The process of calculating a location from satellite orbit
information and radio wave transmission time data is known as “positioning”. Positioning requires that the receiver
receives signals from three to four GPS satellites.
When using the GPS receiver for the fi rst time on a given day
The initial positioning can usually take between 5-15 minutes as the GPS receiver is located. If it takes longer, ensure
that you are in an open place where your view of the sky is not obscured by tall buildings or trees. Also, when using the
GPS receiver again after several hours have passed, the locations of the GPS satellites will have changed, so positioning
will again take several minutes.
Issues with receiving GPS signals
In locations such as those listed below, the radio waves may not be received and there may be a difference between
the actual location and the positioning results. When positioning is diffi cult, try moving to a location in the open air away
from sheltering objects. The following objects/locations may obstruct positioning:
• Buildings
• Inside a tunnel
• Indoors or in the shadow of a building
• Between high-rise buildings
• In narrow streets between buildings
• Underground
• Among dense trees
• Under a bridge
• Near high-voltage electric wires or magnetic objects
• Near mobile phones operating in the 1.5 GHz range or objects emitting radio waves of the same frequency
• Behind heat-refl ecting glass
• It is also very important that the PSP™ system’s time, date and time zone settings are set correctly.
NOTE: depending on the locations of the satellites, positioning may take time or may not be possible.
Errors
GPS satellite errors
Errors made by the GPS satellites are approximately ±10 metres (33 feet), but depending on the surroundings, errors of
several hundred metres may occur. In some cases, positioning is possible with only three satellites, but accuracy may
be reduced.
Errors in receiving
Depending on the location and time, inaccuracies in the GPS positioning information may occur. In such cases, an
accurate position may not be displayed even with correct operation. This is not a malfunction.
Basic operations
Operating methods vary depending on the software in use. For details, refer to the instructions supplied with the software.
Hints
• The angle of the receiver can be changed (Figure B).
• To improve the conditions for receiving radio waves from the GPS satellites, adjust the angle of the receiver so that it
faces the sky (Figure C).
2 WARNINGS AND SAFETY INFORMATION
Go!Explore™ is a navigation system that helps you fi nd your way to a destination using a connected GPS receiver.
Go!Explore™ does not transmit your GPS position; others cannot track you.
It is important that you look at your PSP™ system’s screen only when it is safe to do so. Drivers must operate Go!Explore™
before commencing a journey; the PSP™ system should never be operated by a driver whilst the vehicle is in motion.
Plan the route before your departure and stop if you need to change something during the journey.
Go!Explore™ features a Safety Mode – if you turn Safety Mode on, you cannot adjust settings whilst the vehicle is
moving at a speed of 10 km/h (6 mph) or higher. Unless Go!Explore™ is being operated by a passenger, using Safety
Mode is strongly encouraged.
You must obey all traffi c signs and follow the rules of the road. If you deviate from the route that Go!Explore™ recommends,
a new route will be calculated and instructions amended accordingly.
Never place the PSP™ system where it obstructs the driver’s view, where it is in the deployment zone of an airbag or
where it might cause injuries in an accident.
3 GETTING STARTED
Go!Explore™ is optimised for in-car use but can also be used by pedestrians and cyclists. Go!Explore™ can plan routes
throughout the whole installed map set; if you have the relevant maps on your PSP™ system, you do not need to change
maps to navigate between map segments or countries.
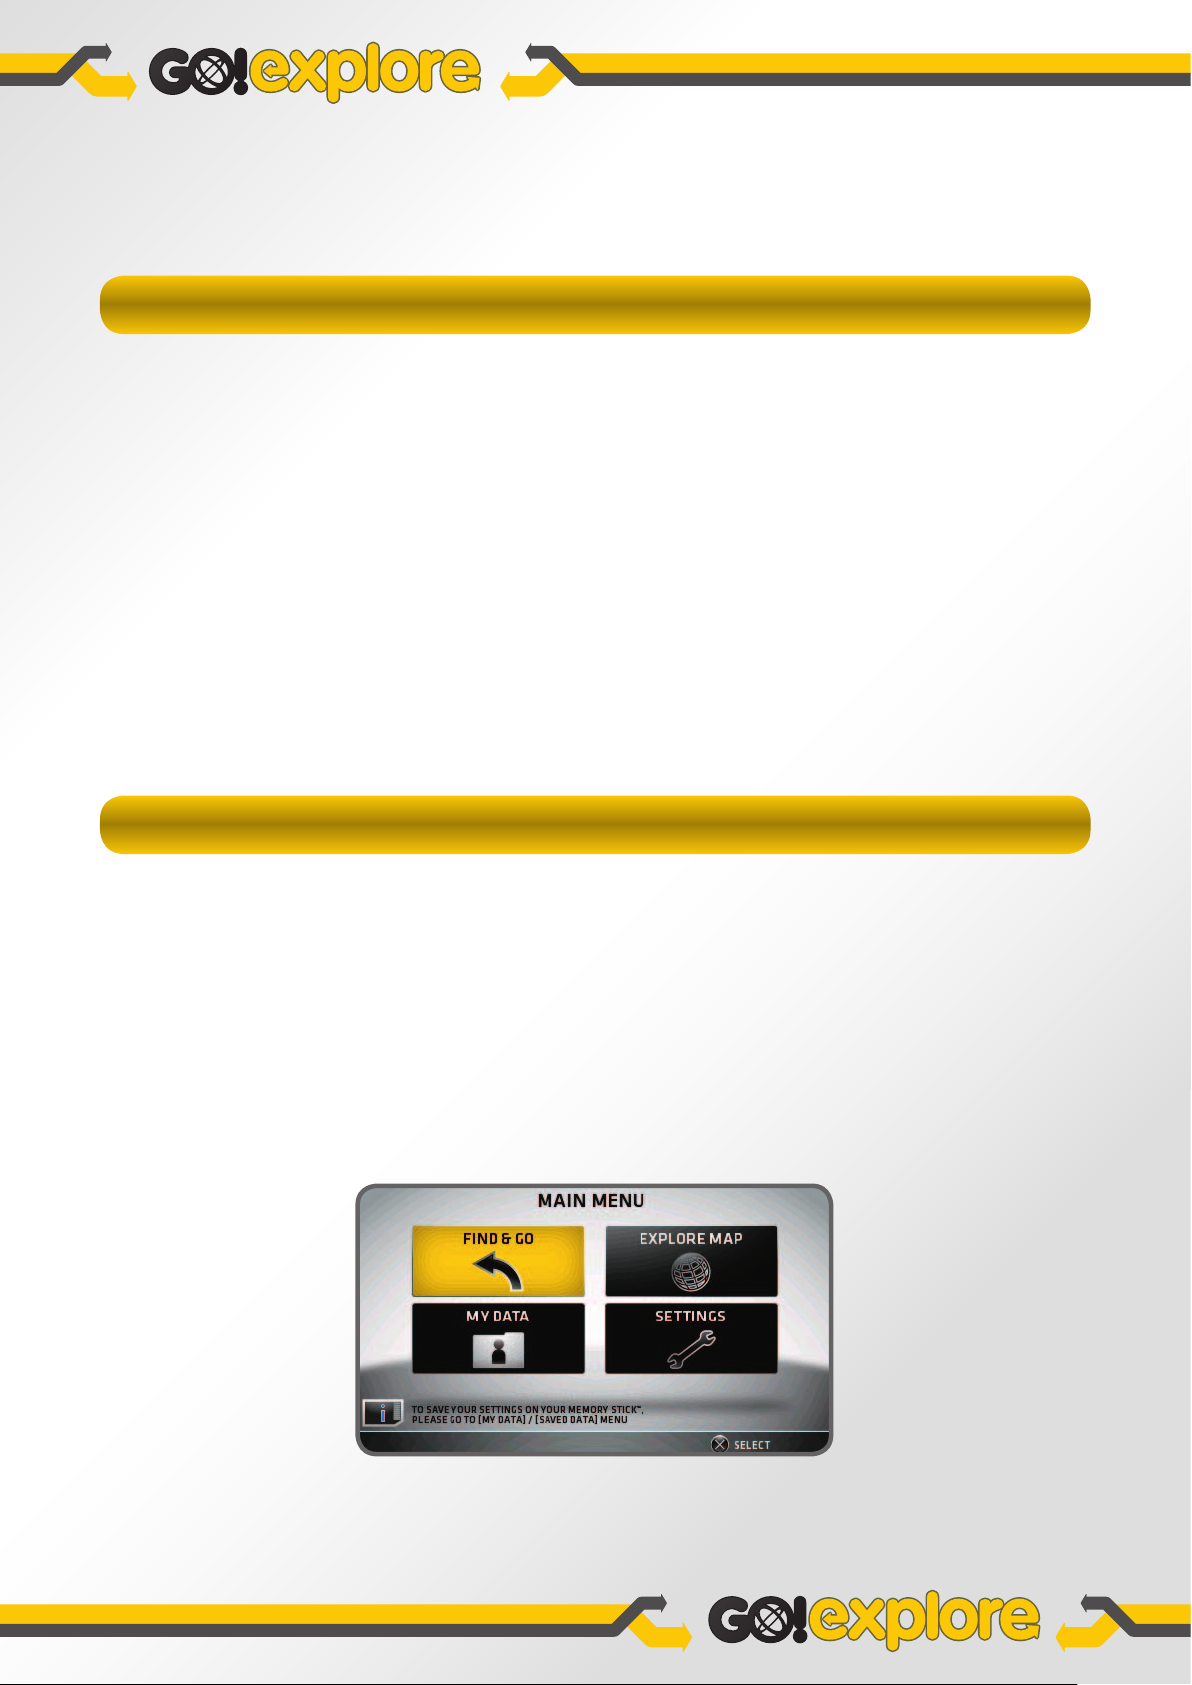
When Go!Explore™ is started for the fi rst time, you need to:
1. Select the on-screen language to be used. This can be readjusted later via the Settings Menu.
2. Select the language and speaker used for voice guidance messages. Again, you can change this later via the
Settings Menu if necessary.
3. Select whether to allow Go!Explore™ to automatically save program settings on the inserted Memory Stick Duo™.
This can be change later by choosing My Data from the Main Menu, then Saved Data.
After setting these options, the Main Menu will be displayed and you can start using Go!Explore™.
The simplest way of using Go!Explore™ is to choose Find & Go, pick a destination and start navigating towards it.
You can select your destination in the following ways:
• Use the selected location on the map (the cursor) – see section 4.1.1 of this manual for more information.
• Enter a full address or part of an address, for example a street name without a house number or the names of two
intersecting streets – see section 4.1.2 of this manual.
• Find an address with a post code.
• Use a previously saved location, either a Favourite, a Place, or a destination from the History of previously set
destinations and waypoints – see sections 4.1.3 to 4.1.6 of this manual.
• Use coordinates – see section 4.1.7 of this manual.
3.1 USING THE PSP™ SYSTEM
When your PSP™ system is switched off, Go!Explore™ does not calculate your GPS position and it does not update the
route or driving instructions. When the PSP™ system is turned on again, Go!Explore™ continues navigating as soon as
the GPS receiver has determined your position.
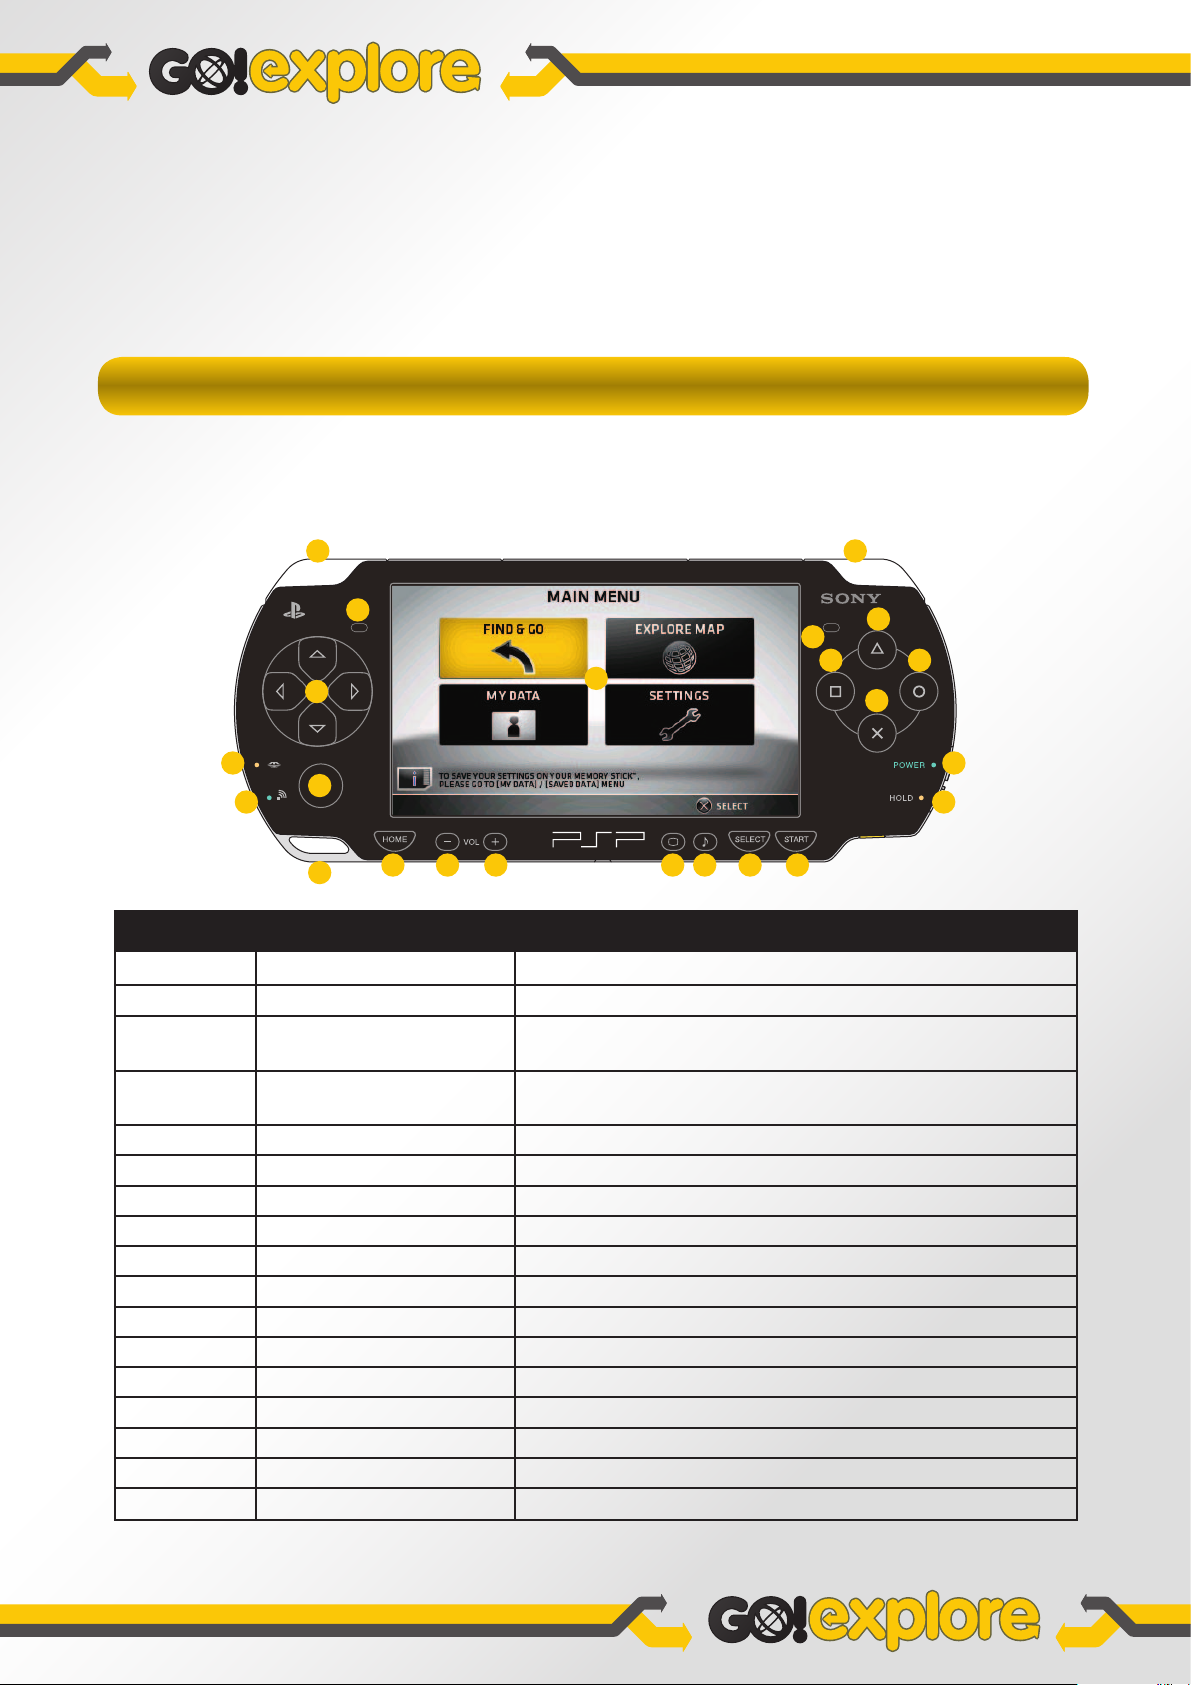
1
8
3
4
5 22
6
10
7
9
11 13 14 15 16
12
2
18
23
17 19
20
21
NUMBER COMPONENT NAME USAGE IN GO!EXPLORE™
1
2
3
< button
> button
CVZX
4 Memory Stick Duo™ access
indicator
5 WLAN access indicator No function. Go!Explore™ does not support Wireless (WLAN) features.
6 analog stick Moves the map in four directions.
7 strap holder
8 left speaker
9 HOME button Quits Go!Explore™ after confi rmation.
10 volume - button Turns the volume down.
11 volume + button Turns the volume up.
12 LCD screen
13 display button Adjusts screen brightness.
14 sound button Adjusts the tone.
15 SELECT button Change status information displayed on-screen.
16 START button Return to position.
17
F button
Zoom out when on the map screen.
Zoom in when on the map screen.
Navigate Menus/tilt and rotate the map when on the
map screen.
Lights up when saving and loading data.
Depends on the Go!Explore™ screen.
18
19
20
21 POWER indicator Lights up, fl ashes, or changes colour to indicate system status.
22 HOLD indicator Turns yellow when in hold mode.
23 right speaker
D button
A button
S
button
Depends on the Go!Explore™ screen.
Cancels the selected operation or returns to the previous Go!Explore™
screen.
Confi rms the selection that you made on the screen.
3.1.1 USING THE SMART KEYBOARD
Sometimes, you will need to enter letters and numbers (for example, when entering an address or post code) using the
smart keyboard. With the keyboard displayed, press
on the keyboard and press the
S button to select a character.
Using a different keyboard layout (ABC, QWERTY, AZERTY)
Select Change Keys. Go!Explore™ remembers your last keyboard layout choice and offers it the next time you need to
enter data.
Correcting a keyboard entry
Press the
F button or the < button to delete the last character entered. Press and hold the F button to delete the
entire input string.
C, V, Z or X to move the yellow highlight across the characters
Entering a space
Either press the > button or highlight the SPACE button on the smart keyboard and press the S button
Entering lower case or capital letters
Go!Explore™ will capitalise the fi rst letter of each word, leaving all other letters in lower case.
Using the smart keyboard to fi nd a location
As you enter characters on the keyboard, the number of results will decrease. When there are four or less potential
locations that match your text entry, the Select Location screen will be displayed, allowing you to pick your destination.
If searching for an address or a Place, you do not always need to fi nalise your input; whilst entering text, you can view
the results at any point – press the D button to view the Select Location screen then press the < button or Z and
the > button or X to scroll through the pages of results.
3.2 USING THE MAP
The map screen is the most frequently used screen and can be accessed from the Main Menu by selecting Explore Map.
For further information about the map screen, see section 5.3 of this manual.
3.2.1 CHECKING THE DETAILS OF A MAP LOCATION
Details of your current position during navigation are displayed in the top left corner of the map. The current street name
or location is always displayed.
You can check the details of any other location by selecting it on the map:
1. Use the analog stick to move the map.
2. The cursor moves as you move the analog stick. The city/town, street or address of the selected location (depends on
the zoom level) is displayed in the top left corner of the map.
To check the list of Places nearby:
1. Press the S button to open the Action Menu.
2. Highlight More Options and press the S button.
3. Highlight Nearby Places and press the S button.
4. Pick a category to see a list of the types of place you are looking for. Each category may be broken down further
into groups (subcategories) of specifi c types of place, for example, if you select Accommodation, facilities in the
area might be categorised as ‘Hotels or Motels’ or ‘Camping Grounds’ – if you are looking for a hotel, choose ‘Hotels
or Motels’ to view a list of places in the vicinity. Pick a hotel and its location will be displayed on the map. Whilst
searching for places, press the F button to View All, showing a list of all places in the vicinity. When within a category
or subcategory, selecting View All will display a list of local places relevant to that specifi c category or subcategory.
If you know the name of a place, press the D button and then use the smart keyboard to search for it.
3.2.2 MANIPULATING THE MAP
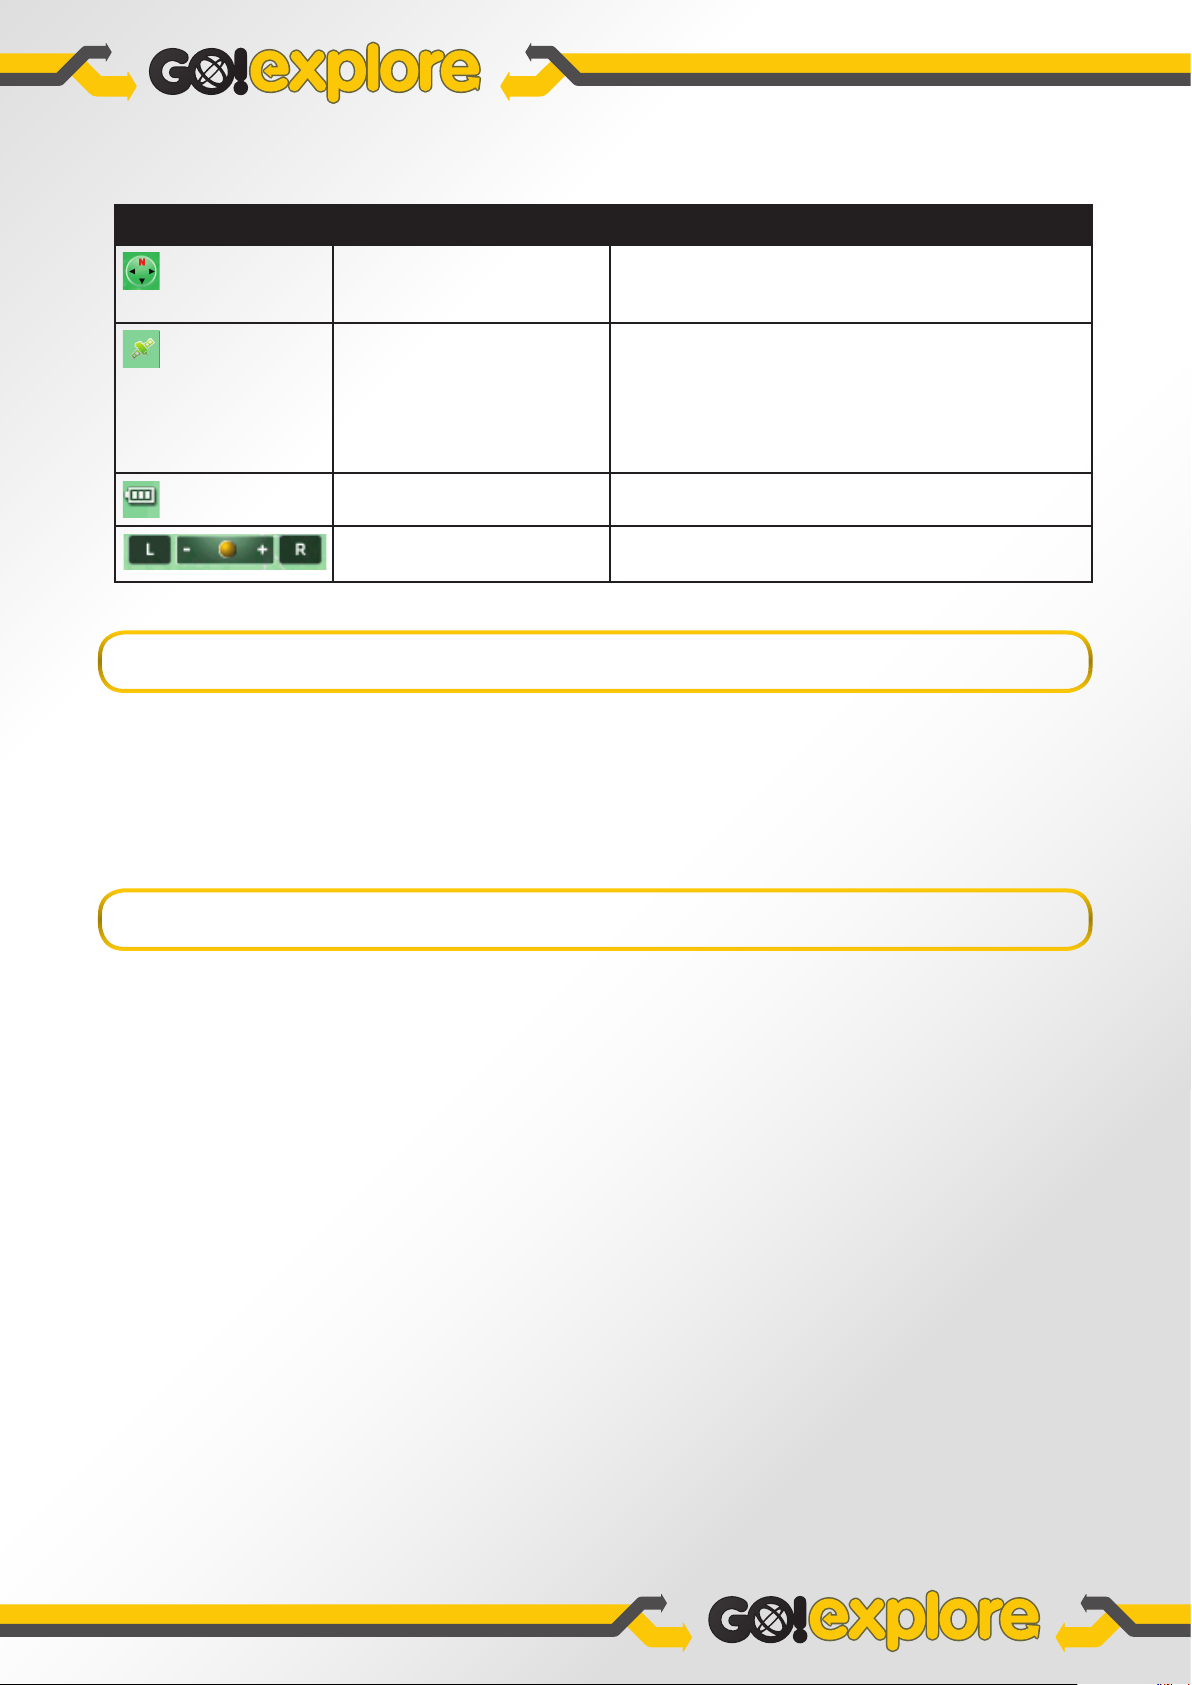
Position markers on the map:
Current GPS position
Last known GPS position
Selected location (cursor)
The following controls allow the map to be manipulated according to your needs.
ACTION CONTROLS DETAILS
Moving the map analog stick You can move the map in any direction. After moving the map,
press the START button to return to the GPS position or to the last
known GPS position if there is no valid GPS position.
Zooming in and out
Tilting up and down
Rotating left
and right
Viewing modes
Returning to normal
navigation
> button / < button
C / V
Z / X
F Button
(Change View)
START button Returns the map to the current GPS position (or the last
Changes how much of the map is displayed on the screen.
Go!Explore™ uses high-quality vector maps that let you see
the map at various zoom levels, always with optimised content.
It always displays street names and other text with the same
font size, never upside-down, and you only see the streets and
objects that you need.
Map scaling has different limits in 2D and in 3D map view
modes.
Changes the vertical view angle of the map in 3D mode.
Changes the horizontal view angle of the map in 3D mode.
When a GPS position is available, Go!Explore™ always rotates
the map so its top faces your direction of travel (Track-Up
orientation). You can turn away from Track-Up orientation by
pressing Z or X.
If you have rotated the map, press the START button to re-enable
the automatic map rotation.
Toggles between two map perspectives – classic top-down view
(2D) and perspective view (3D).
known GPS position). If the map has been rotated in 3D mode,
automatic map rotation is also re-enabled.
3.2.3 STATUS INFORMATION
In the top left corner of the map screen, a preview area provides information about the type and distance of the
next manoeuvre to be encountered on your route, for example, a turn or a roundabout. ‘Second manoeuvres’ are also
displayed in a smaller box alongside the next manoeuvre to give you advanced warning about the next manoeuvre.
If you don’t want to be informed of second manoeuvres, access the Map Settings Menu and turn ‘Display Second
Manoeuvre’ off.
If the GPS signal has been lost, a message ‘Waiting for GPS position’ will fl ash in the bottom right corner of the screen.
Messages will also fl ash if the GPS receiver is disconnected or if you stray from the current GPS position for too long
when exploring the map.
The following information can be seen in the three data fi elds shown on the map screen for an active route:
TYPE DETAILS
Time remaining The estimated time remaining to reach the destination.
Distance remaining Distance remaining to reach the destination.
Current speed The current speed.
There are also status icons on the right:
ICON STATUS
Compass Shows the direction of the map both when the map is
Satellite icon The colour of the satellite icon shows the strength of the GPS
Battery status This icon shows the status of the internal battery.
Current zoom level
automatically rotated (3D) and when the map is always facing
North (2D).
position.
Black – no GPS receiver attached/functioning.
Red – no GPS position detected.
Yellow – GPS position detected, but weak signal.
Green – GPS position detected, strong signal.
Press the < button or the > button to modify
the zoom level.
3.2.4 USING THE CURSOR (THE SELECTED MAP LOCATION)
Place the cursor at the desired map location with one of the following options:
• Use the Find & Go Menu to select a location. The map returns with the selected point (the cursor) in the middle, and
the Action Menu is displayed with the available options.
• Use the analog stick to place the cursor at the desired location, then press the S button to open the Action Menu.
3.2.5 ACTION MENU OPTIONS
Go! In the active route, head to the destination/point on the map indicated by the cursor.
Explore Opens the map screen with the cursor in the middle.
Save As Favourite Save the place currently highlighted by the cursor as a Favourite destination. Select the
desired position in the Favourites list, enter the name of the Favourite on the smart
keyboard, and fi nally press the S button to save the Favourite in the selected position.
More Options Opens a page of secondary Action Menu options:
Nearby Places Check the list of Places that are near the cursor.
Set As Start The cursor becomes the start point of the route. This means that the
route will not be started from the current GPS position.
Save This Place Save the cursor as a Place. Name the Place using the smart
keyboard, and press the
S button to save it as a Favourite.
Add Pin Mark the map with a Pin at the cursor. A Pin has no name or other
details, only a colour so you can tell one from another.
Insert Waypoint In the active route, the location currently marked by the cursor
will be used as a waypoint (an intermediate destination) preceding
the fi nal destination.
 Loading...