

Sony PSP-1008 Quick reference guide
PSP-1008
3-097-556-81(1)
Quick Reference
Краткий справочник
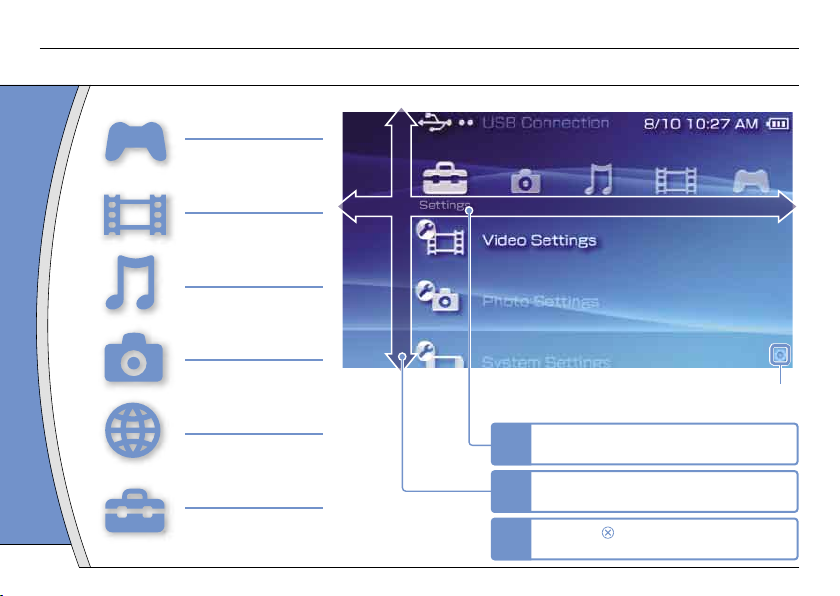
Using the Home Menu
Introduction
GAME
Playing games
VIDEO
Playing video
MUSIC
Playing music
PHOTO
Displaying images
NETWORK
Connecting to the
Internet
SETTINGS
Adjusting PSP™ system
settings
Busy icon:
This icon is displayed when a page is loading.
Category
1
Select a category using the left or right
button.
2
Select an item using the up or down
button.
3
Press the button to confirm the
selected item.
Item
2
DE
IT
NL
PT
GB
RU
POWER
HOLD
SELECT
HOME
VOL
START
This document describes basic operations of the PSP™ system. For detailed instructions, refer to the online user’s guide
( page 23).
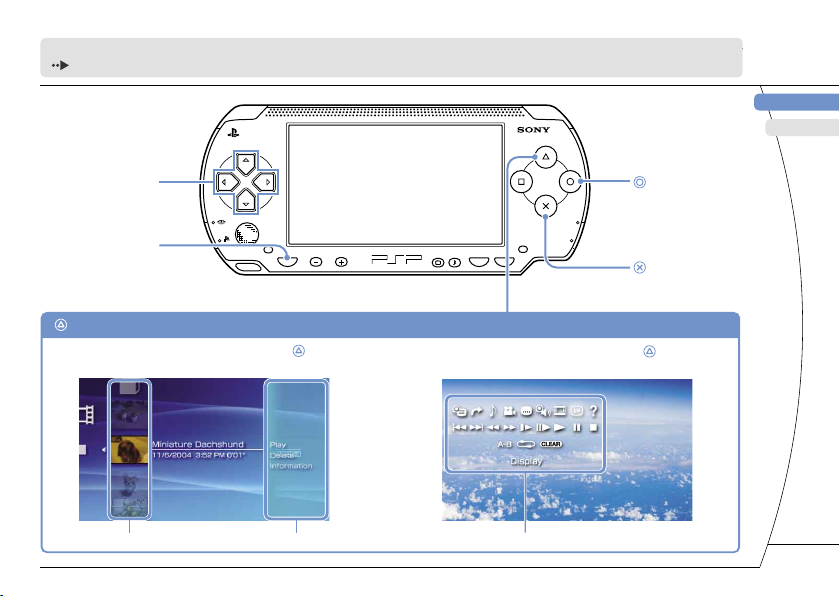
Directional buttons:
Used to select
categories/items
button:
Cancels selected
operations
button:
Confirms selected
items
HOME button:
Returns to the Home Menu
Select an icon, and then press the button
to display the options menu.
While playing content, press the button
to display the control panel.
button: Displays the options menu/control panel
Icons Options menu
Control panel
3
01
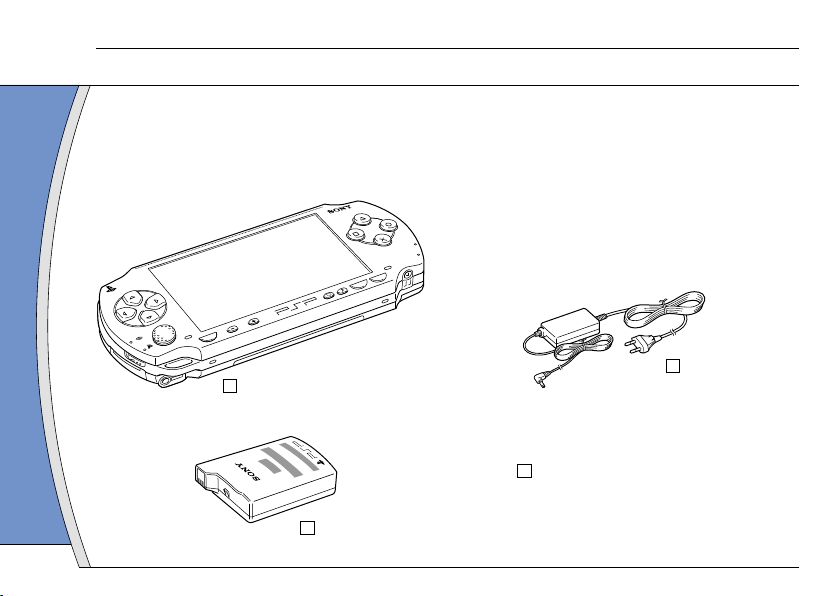
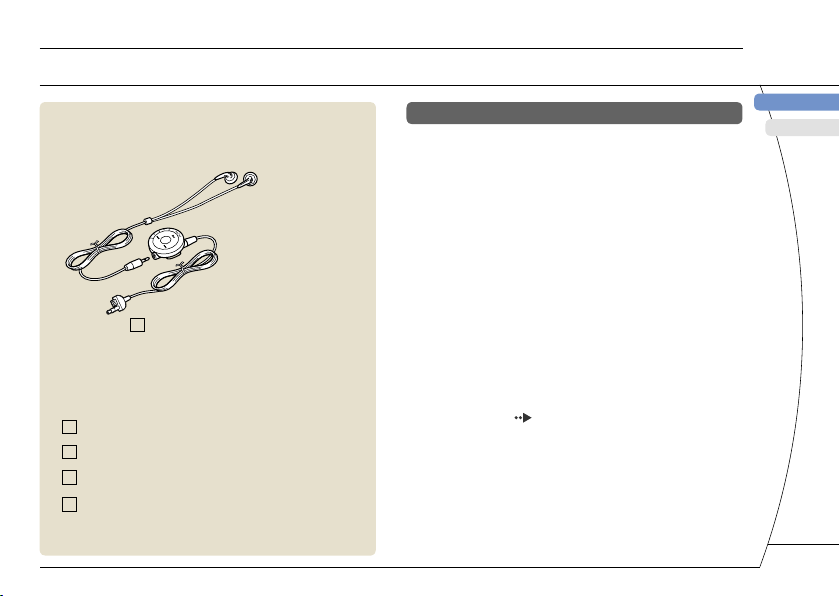
Checking the package contents
Preparation
Check that you have all of the following items.
If any items are missing, contact the appropriate PSP™ customer service helpline which can be found within
every PSP™ format software manual.
PSP™ (PlayStation®Portable) system
Battery Pack
AC Adaptor
Printed Materials
P
O
W
E
R
H
O
L
D
S
E
L
E
C
T
H
O
M
E
V
O
L
S
T
A
R
T
5
V
4
DE
IT
NL
PT
GB
RU
Preparation
Checking the package contents
Headphones with Remote Control
Memory stick Duo™ (32 MB)
Wrist Strap
Pouch
Cloth
Supplied with the Value Pack only
About the PSP™ system documentation
The PSP™ system documentation includes the
following:
• Safety and Support
Before using the product, carefully read this document first.
It contains safety information related to the use of the PSP™
system, troubleshooting, specifications and other
information.
• Quick Reference (this document)
This document contains information on basic hardware
operations of the PSP™ system.
• User’s Guide
(access from : eu.playstation.com/manuals)
This online document is accessed through the Internet and
contains detailed information related to the use of the PSP™
system software ( page 23).
5
02
Preparing the PSP™ system for use
Preparation
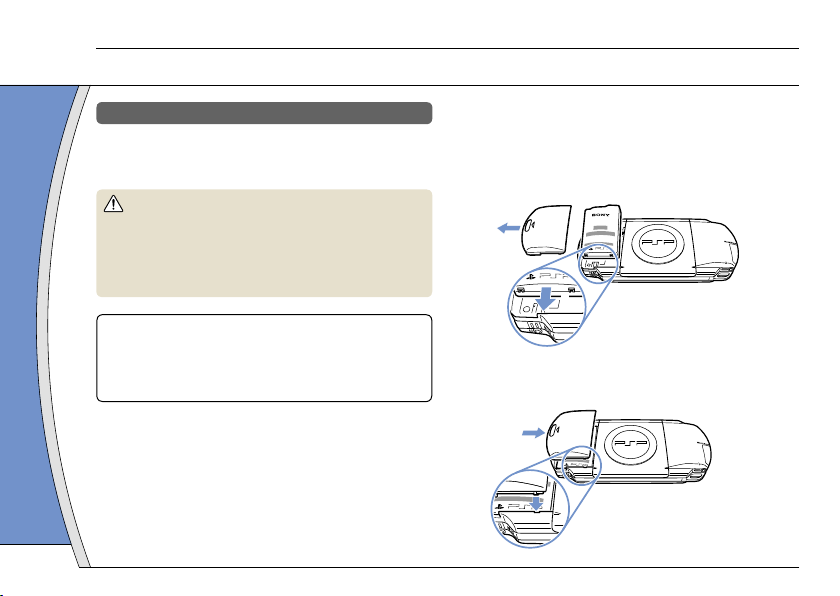
Charging the battery
Before using the PSP™ system for the first time after
purchase, you must follow these steps to charge the
battery.
Caution
• The socket-outlet shall be installed near the equipment
and shall be easily accessible.
• Do not plug the AC Power Cord for the PSP™ system into
an electrical outlet until you have made all other
connections.
Notice
Do not use the PSP™ system with the AC Adaptor when the
Battery Pack is not inserted in the system. If the AC
Adaptor is disconnected suddenly, it may result in damage
to the system.
1 Insert the Battery Pack.
While holding down the PUSH button, slide the battery
cover in the direction of the arrow. Align the bottom
surface of the Battery Pack with the system to attach the
battery.
UMD
P
U
S
H
P
U
1
2
Align the tabs, and then slide the cover in the direction of
the arrow until it locks firmly into place.
UMD
P
U
S
H
4
3
6
DE
IT
NL
PT
GB
RU
Preparation
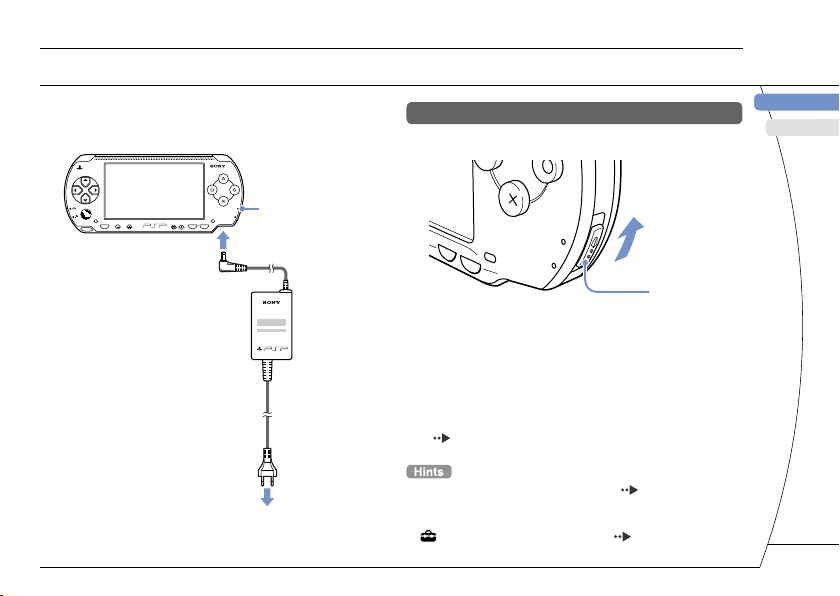
Preparing the PSP™ system for use
2 Attach the AC Adaptor to charge the
battery.
POWER
HOLD
SELECT
HOME
VOL
START
1
2
The POWER indicator lights up
in orange, indicating that
charging has begun. The
POWER indicator will turn off
when the battery is fully
charged.
POWER indicator
To electrical
outlet
Initial setup
1 Slide the POWER/HOLD switch up.
POWER/HOLD switch
P
O
W
E
R
H
O
L
D
S
T
A
R
T
S
E
L
E
C
T
The POWER indicator lights up in green, and the initial
setup screen is displayed.
2 Follow the on-screen instructions to
make settings for system language, time
zone, date and time and nickname.
When you have completed initial setup, the Home Menu
( page 2) is displayed.
• See "Using the on-screen keyboard" ( page 24) for
information on entering characters.
• Settings made during initial setup can be changed later in
(Settings). See the user’s guide ( page 23) for details.
7
03
Part names and functions
Preparation
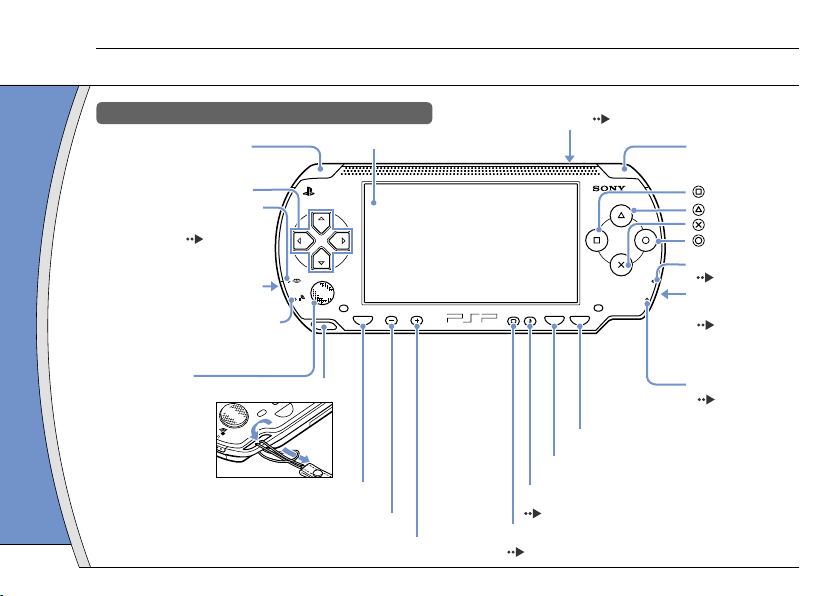
System
WLAN switch (left side)
POWER/HOLD
switch (right side)
( page 10)
OPEN latch (top) ( page 12)
HOLD indicator
( page 10)
POWER indicator
( page 10)
LCD screen
L button
Directional buttons
Memory Stick Duo™
access indicator
( page 13)
WLAN access indicator
Lights up when using the
wireless LAN feature
Analog stick
Strap holder
HOME button
Displays the Home Menu
Volume - button
Volume + button
START button
SELECT button
R button
button
button
button
button
Sound button
( page 9)
Display button
( page 9)
POWER
HOLD
SELECT
HOME
VOL
START
H
O
M
E
8
DE
IT
NL
PT
GB
RU
Using the sound button
Press and release
Each time you press the button, the tone
changes among HEAVY POPS
JAZZ UNIQUE OFF. *1
Press for more
than one second
The sound is muted. *2
*1 : The tone can be changed only when using headphones.
Also, the tone setting is temporarily set to “OFF” during
gameplay.
*2 : To clear muting, press the sound button again. You can
also clear by pressing the volume + or volume - button on
the system or on the Remote Control.
Using the display button
Press and release
Each time you press the button, the
display changes among three levels of
screen brightness. *1
Press for more
than one second
The backlight turns off and the screen
goes blank. *2
*1 : The highest level (level 4) can be selected only while the
PSP™ system is plugged in using the AC Adaptor.
*2 : To turn the backlight back on, press any of the PSP™
system buttons.
Preparation
Part names and functions
Headphones with Remote Control
The headphones with Remote Control are supplied
with the Value Pack and are also sold separately.
HOME
VOL
2
1
Headphones
Remote Control
9
04
Basic operations
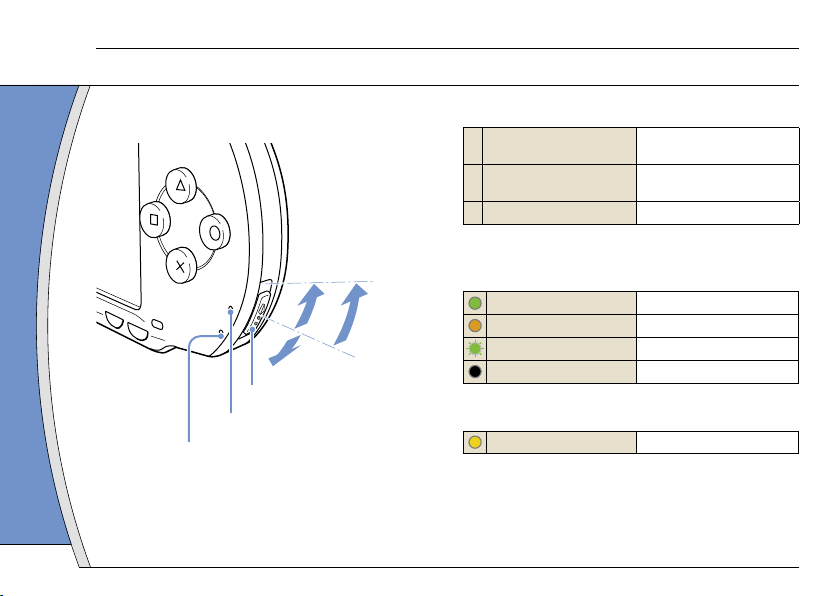
Use the POWER/HOLD switch to turn the system on
or off, or to put it into sleep or hold mode.
P
O
W
E
R
H
O
L
D
S
T
A
R
T
S
E
L
E
C
T
A
B
C
POWER/HOLD switch
POWER indicator
HOLD indicator
POWER/HOLD switch
A
Turning the system on /
Putting into sleep mode
Slide up
B Turning the system off
Slide up and hold for more
than three seconds
C Locking the system buttons*
Slide down
*All operations using system buttons are locked.
POWER indicator
Solid green
Power on
Solid orange
Charging
Flashing green
Charge level is low
Light off
Power off/in sleep mode
HOLD indicator
Solid yellow
In hold mode
Power and sleep mode functions
10
DE
IT
NL
PT
GB
RU
Basic operations
Sleep mode
If the PSP™ system is switched to sleep mode, the
software that is playing will be paused. When sleep
mode is cleared, you can begin playback from the
point where the system entered sleep mode.
• To clear sleep mode, slide the POWER/HOLD switch up
again. During video or audio playback, you can press the
button of the Remote Control to clear sleep mode.
• Some software may prevent the system from entering sleep
mode.
Power and sleep mode functions
11
05
Playing content on UMD® and Memory Stick Duo™ media
Basic operations
UMD® content
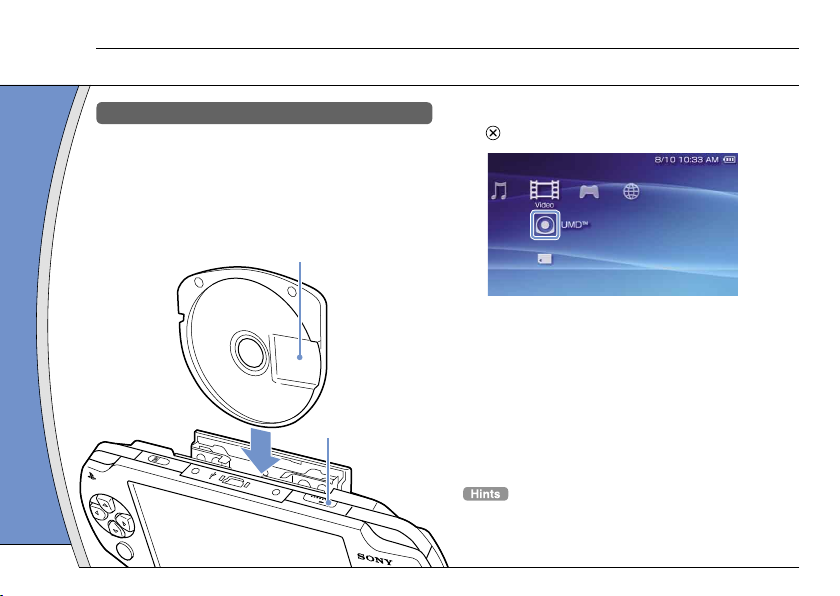
1 Slide the OPEN latch to open the disc
cover.
2 Insert a UMD
®
.
The icon is displayed in the Home Menu.
L
R
O
P
E
N
Do not touch the recorded surface.
OPEN latch
3 Select the icon, and then press the
button.
Playback begins.
• Press the HOME button to quit a game.
• To remove the UMD®, stop playback and then slide the
OPEN latch to open the disc cover.
12
DE
IT
NL
PT
GB
RU
Basic operations
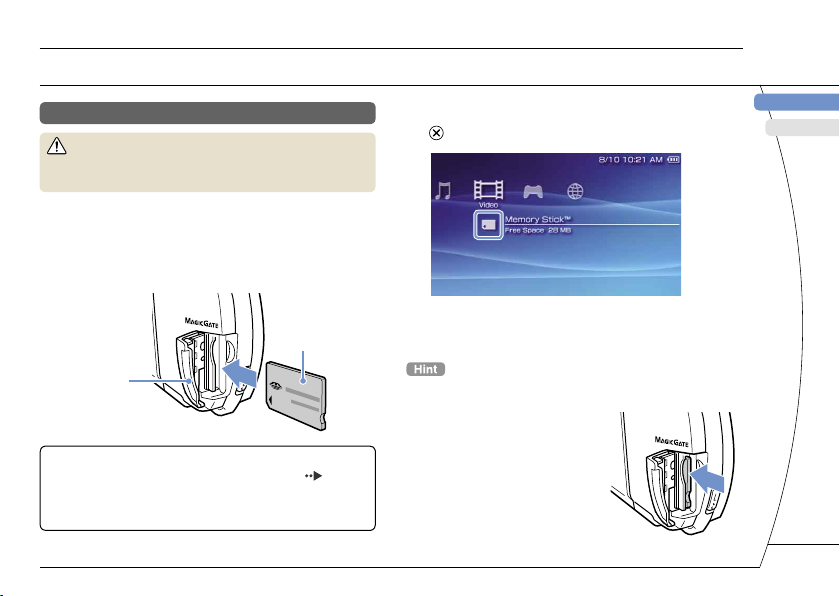
Playing content on UMD® and Memory Stick Duo™ media
Content on Memory Stick Duo™ media
Warning
Keep Memory Stick Duo™ media out of the reach of small
children, as the media could be swallowed by accident.
1 Open the slot cover.
2 Press the Memory Stick Duo™ media
until fully inserted.
The icon is displayed in the Home Menu.
Front side
Slot cover
Notice
When the Memory Stick Duo™ access indicator ( page 8)
is lit, do not eject the Memory Stick Duo™ media, turn off the
system, or put the system into sleep mode. Doing so may
cause data loss or corruption.
3 Select the icon, and then press the
button.
A list of contents that can be played is displayed.
To remove the Memory Stick Duo™ media, press the media
once in the direction of the arrow.
13
06
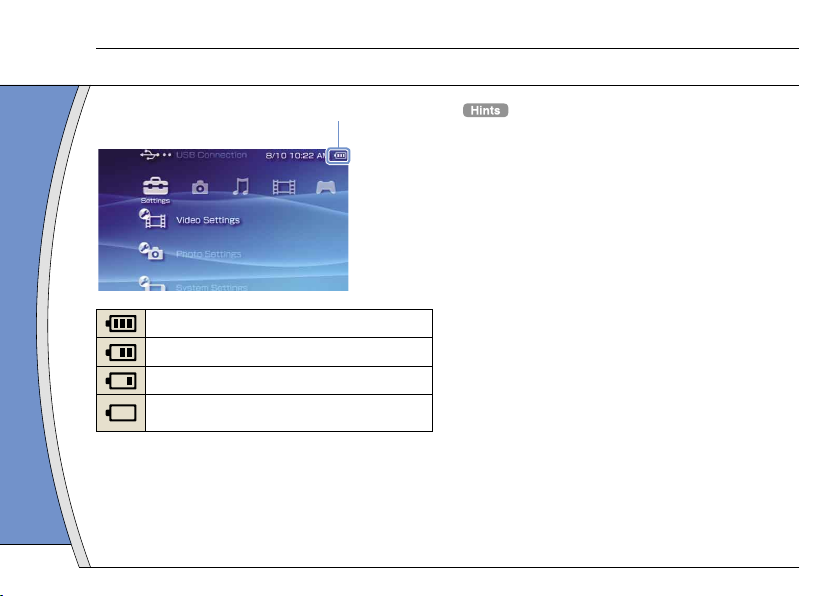
Checking the battery charge level
Basic operations
• If the POWER indicator flashes green, save game progress
and recharge the battery. If the battery runs out before you
save, game progress will be lost.
• Depending on the usage conditions and environmental
factors, the charge level display may vary from the actual
charge level.
• If the PSP™ system is left unused after the battery runs out,
the date and time settings may be reset. If this occurs, the
date and time setting screen will be displayed the next time
the system is turned on.
Battery charge level
There is plenty of power left.
The battery is getting low.
The battery has almost run out.
No battery power remains. The POWER indicator
flashes green. Recharge the battery.
14
DE
IT
NL
PT
GB
RU
07
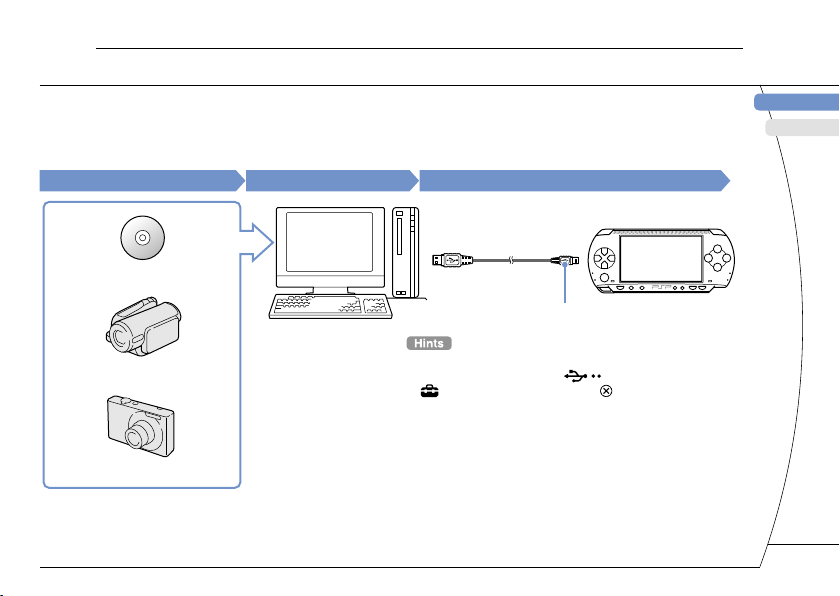
Copying music/videos/images
Basic operations
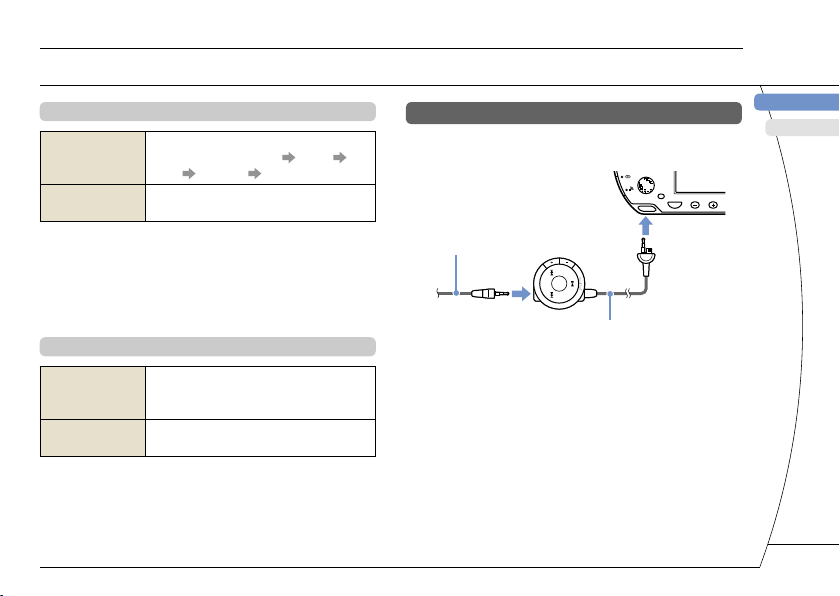
Copy music/video/image files to Memory Stick Duo™ media and play or view files on the PSP™ system.
Copy methods vary depending on the device and software in use as well as file type. The following instructions
are based on the most common copying methods.
Music/video/image source
To a PC
To a PSP™ system
Examples:
Audio CD
Digital video camera
Digital still camera
PC
USB cable
Mini-B (5-pin) type
• If using a USB cable, connect the cable to the PSP™
system and the PC, select (USB Connection) under
(Settings) and then press the button.
• You can connect to a PC with an operating system that
supports the USB mass storage class.
• Instead of a USB cable, you can use a Memory Stick USB
reader/writer (not included) or a PC with a Memory Stick™
slot.
15
Basic operations
Copying music/videos/images
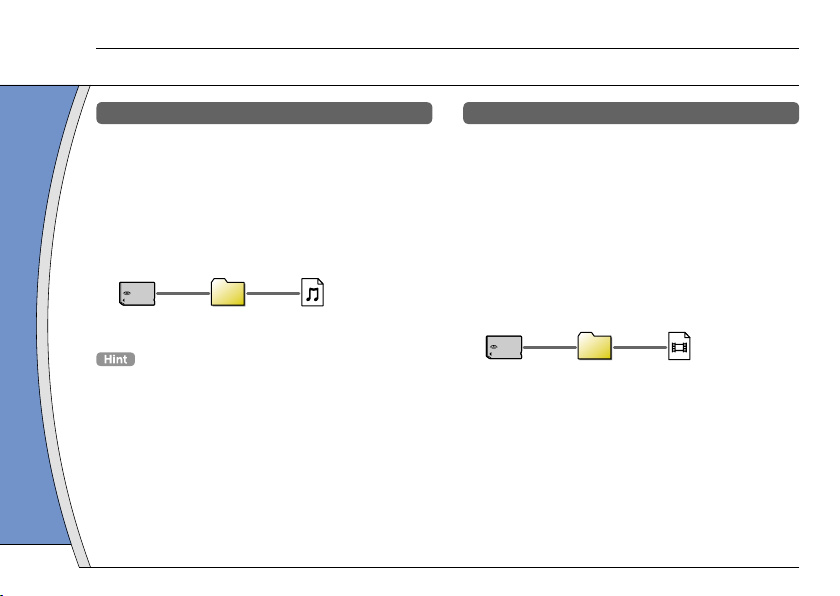
Copying music files
Example: Importing music tracks from an audio CD
1. Import
Use compatible software to import music tracks from an
audio CD to a PC.
2. Copy
Create a folder named "MUSIC" on Memory Stick Duo™
media using a PC, and then save music files in the folder.
MUSIC
File formats that can be played include MP3, AAC, and
ATRAC.
Copying video files
Example: Importing video from a digital video camera
1. Import
Import video to a PC.
Import methods vary depending on the device in use. For
details, refer to the instructions supplied with the device.
2. Convert/Copy
Use compatible software to convert the video to a file
format that can be played on the PSP™ system. Then,
create a folder named "VIDEO" on the Memory Stick
Duo™ media and save the video files in the folder.
VIDEO
16
DE
IT
NL
PT
GB
RU
Basic operations
Copying music/videos/images
Copying image files
Example: Importing images from a digital still camera
1. Import
Import images to a PC.
Import methods vary depending on the device in use. For
details, refer to the instructions supplied with the device.
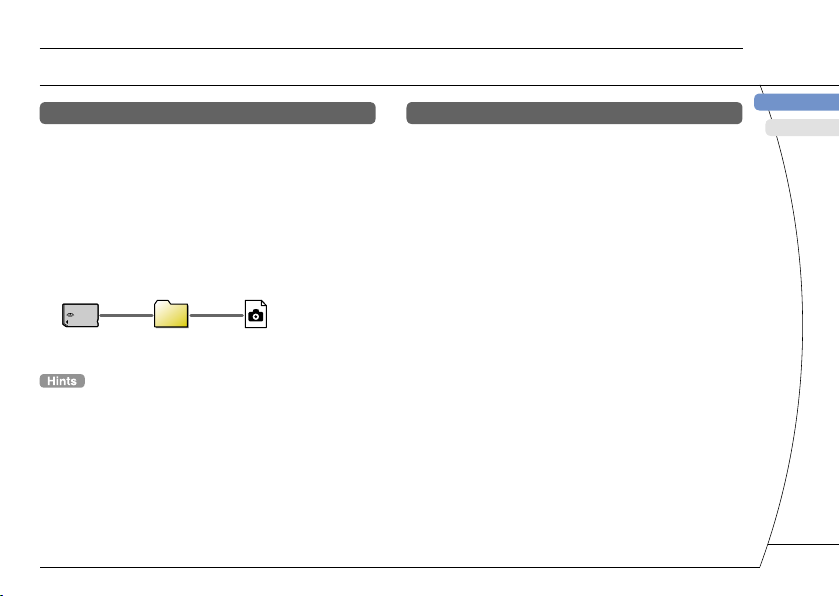
2. Copy
Create a folder named "PICTURE" on Memory Stick Duo™
media using a PC, and then save image files in the folder.
PICTURE
• If using a digital still camera that supports Memory Stick
Duo™ media, you can view images by inserting the media
from the camera directly into the PSP™ system.
• You can view image files in formats such as JPEG (DCF 2.0/
Exif 2.21 compliant), TIFF and GIF.
Conversion software
PC software such as the following*1 can be used to
copy files. When you use the following software to
copy files to Memory Stick Duo™ media, the
necessary folders are created automatically.
• Media Manager for PSP™ (PlayStation®Portable)
System*
2
You can use this software to convert music, video and
image files to the required formats.
• SonicStage*
2
You can use this software to import music files from an
audio CD to your PC.
• Image Converter*
3
You can use this software to convert video files to an MP4
format that can be played on the PSP™ system.
*1 All Sony products sold separately
*2 You must use this software to transfer music files in ATRAC
format. Also, the device that the Memory Stick Duo™ media
is connected to must be compatible with MagicGate™.
*3 Image Converter software version 1.5 or earlier is not
compatible with the PSP™ system.
17
Warning
Turn off the WLAN switch when in crowded places, such as
in a crowded train. If a person nearby is using a pacemaker,
it is possible that the radio waves could affect the
pacemaker.
Example of a network configuration
Network equipment connections and setup methods
vary depending on the equipment used.
Access point or
wireless router
Network device
such as a DSL or
cable modem
Connect to the network
through an access
point.
Internet
line
PC
Required items
The following items are generally required to set up
the system to connect to a network.
• Subscription to an Internet service provider
• A network device, such as a DSL or cable modem
• A WLAN access point or a wireless broadband
router
• Settings for the access point (SSID, WEP key, WPA
key, etc. as specified when the access point was
configured)
• An access point is a device used to connect to a wireless
network.
• A wireless broadband router is a device that includes both
router and access point functions. A router is required if you
are connecting a PC and the PSP™ system to one Internet
line at the same time.
• SSID, WEP and WPA keys are types of wireless network
information. They may be required when connecting to an
access point or a router. This information is generally set in
the access point or router using a PC. For details, refer to
the instructions supplied with the access point or router.
Network
Adjusting network settings
08
18
 Loading...