

Page 1
PSP-1006
PSP-1007
GB
CT
2-657-883-71(1)
Page 2

WARNINGS
Photosensitivity
A very small percentage of individuals may experience epileptic seizures when
exposed to certain light patterns or flashing lights. Exposure to certain patterns
or backgrounds on a television screen or while playing video games, including
games played on the PSP™ system, may trigger an epileptic seizure in these
individuals. Certain conditions may trigger previously undetected epileptic
symptoms even in persons who have no history of prior seizures or epilepsy. If
you, or anyone in your family, has an epileptic condition, consult your
physician prior to playing. If you experience any of the following symptoms
while playing a video game - dizziness, altered vision, eye or muscle twitches,
loss of awareness, disorientation, any involuntary movement or convulsions IMMEDIATELY discontinue use and consult your physician before resuming
play.
Radio waves
Radio waves may affect electronic equipment or medical devices (for example,
pacemakers), which may cause malfunctions and possible injuries.
• If you use a pacemaker or other medical device, consult your physician or the
manufacturer of your medical device before using the wireless networking
feature.
• Keep the PSP™ system at least 23 cm (9 inches) away from a pacemaker or
other medical devices when using the wireless networking feature.
• Do not use the wireless networking feature in the following locations:
– Areas where its use is prohibited, such as in airplanes or hospitals. Abide by
medical institution regulations when using the PSP™ system on their
premises. Additionally, you may be violating air safety regulations
punishable by fines by using the wireless networking feature in an airplane
or by using the PSP™ system during takeoff or landing.
– Crowded areas.
– Areas near fire alarms, automatic doors and other types of automated
equipment.
• Use caution when using the wireless networking feature in a vehicle, as radio
waves may affect electronic equipment in some vehicles.
2
WARNINGS
Page 3

GB
WARNINGS
3
Page 4
GAME page 40
• Playing games
• Managing saved data
VIDEO page 44
• Playing UMD™VIDEO
• Playing videos saved on a Memory Stick Duo™
MUSIC page 57
• Playing UMD™MUSIC
• Playing music saved on a Memory Stick Duo™
PHOTO page 70
• Displaying images saved on a Memory Stick
Duo™
• Playing slideshows
NETWORK page 84
• Connecting to the Internet
SETTINGS page 87
• Adjusting PSP™ system settings
• Creating video, photo or network settings
• Connecting to devices using the USB connector
4
Page 5
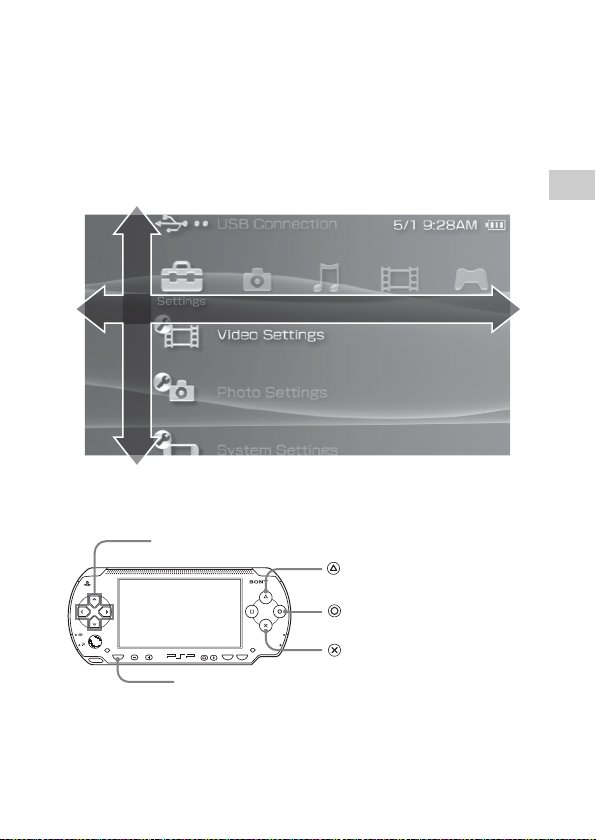
Using the home menu
The basic operation of the PSP™ system starts from the home menu. Press the
home button to display the home menu and use the directional buttons to
navigate the horizontal and vertical icon bars.
Select a category
Select an item
Basic button operations
Directional buttons:
HOME
VOL
Home button:
Used to select on-screen items
POWER
HOLD
SELECT
START
Displays the home menu
button:
Displays the options
menu for selected items
button:
Confirms selected items
button:
Cancels selected
operations
GB
5
Page 6

Table of contents
WARNINGS . . . . . . . . . . . . . . . . . . . . . . . . . . . . . . . . . . . . . 2
Precautions . . . . . . . . . . . . . . . . . . . . . . . . . . . . . . . . . . . . . . 9
Battery pack precautions . . . . . . . . . . . . . . . . . . . . . . . . . . 15
x Preparation
Checking the package contents . . . . . . . . . . . . . . . . . . . . . 16
Part names and functions . . . . . . . . . . . . . . . . . . . . . . . . . . 18
Preparing the PSP™ system for use . . . . . . . . . . . . . . . . . 23
Connecting the headphones with remote control . . . . . . . . 26
x Basic operations
Turning the PSP™ system on and off . . . . . . . . . . . . . . . . 27
Using sleep mode . . . . . . . . . . . . . . . . . . . . . . . . . . . . . . . . 29
Inserting a UMD™ . . . . . . . . . . . . . . . . . . . . . . . . . . . . . . . 31
Inserting a Memory Stick Duo™ . . . . . . . . . . . . . . . . . . . . . 32
Avoiding unintended operation of the PSP™ system . . . . . 33
Using the sound button . . . . . . . . . . . . . . . . . . . . . . . . . . . . 34
Using the display button . . . . . . . . . . . . . . . . . . . . . . . . . . . 36
Battery . . . . . . . . . . . . . . . . . . . . . . . . . . . . . . . . . . . . . . . . 37
x Game
Playing a game . . . . . . . . . . . . . . . . . . . . . . . . . . . . . . . . . . 40
Game options menu . . . . . . . . . . . . . . . . . . . . . . . . . . . . . . 42
Copying and deleting saved data . . . . . . . . . . . . . . . . . . . . 43
x Video
Watching a video . . . . . . . . . . . . . . . . . . . . . . . . . . . . . . . . 44
Using the control panel . . . . . . . . . . . . . . . . . . . . . . . . . . . . 46
Operating with PSP™ system buttons
or the remote control . . . . . . . . . . . . . . . . . . . . . . . . . . 53
Video options menu . . . . . . . . . . . . . . . . . . . . . . . . . . . . . . 54
Saving videos on a Memory Stick Duo™ . . . . . . . . . . . . . . 55
6
Table of contents
Page 7

x Music
Listening to music . . . . . . . . . . . . . . . . . . . . . . . . . . . . . . . 57
Using the control panel . . . . . . . . . . . . . . . . . . . . . . . . . . . 60
Operating with PSP™ system buttons
or the remote control . . . . . . . . . . . . . . . . . . . . . . . . . . 64
Music options menu . . . . . . . . . . . . . . . . . . . . . . . . . . . . . . 65
Transferring and saving music
on a Memory Stick Duo™ . . . . . . . . . . . . . . . . . . . . . . 67
x Photo
Viewing images . . . . . . . . . . . . . . . . . . . . . . . . . . . . . . . . . 70
Using the control panel . . . . . . . . . . . . . . . . . . . . . . . . . . . 71
Operating with PSP™ system buttons
or the remote control . . . . . . . . . . . . . . . . . . . . . . . . . . 75
Photo options menu . . . . . . . . . . . . . . . . . . . . . . . . . . . . . . 76
Playing slideshows . . . . . . . . . . . . . . . . . . . . . . . . . . . . . . . 78
Saving images on a Memory Stick Duo™ . . . . . . . . . . . . . 82
x Network
Connecting to the Internet . . . . . . . . . . . . . . . . . . . . . . . . . 84
x Settings
Settings for the PSP™ system . . . . . . . . . . . . . . . . . . . . . . 87
Video Settings . . . . . . . . . . . . . . . . . . . . . . . . . . . . . . . . . . 89
Photo Settings . . . . . . . . . . . . . . . . . . . . . . . . . . . . . . . . . . 90
System Settings . . . . . . . . . . . . . . . . . . . . . . . . . . . . . . . . . 91
Theme Settings . . . . . . . . . . . . . . . . . . . . . . . . . . . . . . . . . 94
Date & Time Settings . . . . . . . . . . . . . . . . . . . . . . . . . . . . . 95
Power Save Settings . . . . . . . . . . . . . . . . . . . . . . . . . . . . . 96
Sound Settings . . . . . . . . . . . . . . . . . . . . . . . . . . . . . . . . . . 98
Security Settings . . . . . . . . . . . . . . . . . . . . . . . . . . . . . . . . 99
USB Connection . . . . . . . . . . . . . . . . . . . . . . . . . . . . . . . . 102
Network Settings . . . . . . . . . . . . . . . . . . . . . . . . . . . . . . . 104
Network Update . . . . . . . . . . . . . . . . . . . . . . . . . . . . . . . . 111
How to use the keyboard . . . . . . . . . . . . . . . . . . . . . . . . . 114
GB
Table of contents
7
Page 8

x Additional information
PSP™ updates . . . . . . . . . . . . . . . . . . . . . . . . . . . . . . . . . 117
Compatible media . . . . . . . . . . . . . . . . . . . . . . . . . . . . . . . 119
Specifications . . . . . . . . . . . . . . . . . . . . . . . . . . . . . . . . . . 122
Troubleshooting . . . . . . . . . . . . . . . . . . . . . . . . . . . . . . . . 127
WARRANTY . . . . . . . . . . . . . . . . . . . . . . . . . . . . . . . . . . . 135
8
Table of contents
Page 9

Precautions
Before using this product, carefully read this manual and retain it for future
reference.
Safety
This product has been designed with the highest concern for safety. However,
any electrical device, if used improperly, has the potential for causing fire,
electrical shock or personal injury. To help ensure accident-free operation,
follow these guidelines:
• Observe all warnings, precautions and instructions.
• Regularly inspect the AC adaptor and AC power cord for damage and for dust
build-up around the mains power plug or electrical outlet.
• Stop use, unplug the AC power cord from the electrical outlet and disconnect
any other cables immediately if the device functions in an abnormal manner,
produces unusual sounds or smells or becomes too hot to touch.
• Call the PSP™ service line at the number listed on your warranty card if the
device does not operate properly.
Use and handling
• Use in a well-lit area and keep the screen a safe distance from your face.
• Avoid prolonged use of the PSP™ system. To help prevent eyestrain, take a
break of about 15 minutes during every hour of play.
• If you experience any of the following health problems, discontinue use of the
system immediately. If symptoms persist, consult with your physician.
– Dizziness, nausea, fatigue or symptoms similar to motion sickness
– Discomfort or pain in a part of the body, such as eyes, ears, hands or arms
• Keep the system and accessories out of the reach of small children.
Small children may swallow the Memory Stick Duo™ or wrap the cables/
straps around themselves, which may inflict injury or cause an accident or a
malfunction.
• Do not use the system while driving or riding a bicycle. Looking at the screen
or operating the system while driving an automobile or riding a bicycle may
result in a traffic accident.
• Take extra care when using the system while walking.
• Be careful not to pinch your fingers when closing the disc cover.
GB
Precautions
9
Page 10

• Do not use the system or accessories near water.
• Use only attachments/accessories specified by the manufacturer.
• Do not use the headphones if they cause discomfort to your skin.
If the supplied headphones cause discomfort to your skin, discontinue use
immediately. If symptoms do not subside even after discontinuing use, seek
medical attention.
• Do not expose the system or accessories to high temperatures, high humidity,
or direct sunlight.
• Do not leave the system or accessories in a car with the windows closed
(particularly in summer).
• Do not expose the system or accessories to dust, smoke or steam.
• Do not allow liquid or small particles to get into the system or accessories.
• Do not place the system or accessories on surfaces that are tilted, unstable or
subject to vibration.
• Do not throw or drop the system or accessories, or subject the devices to
strong physical shock. Handle the analog stick with care.
• Do not forcibly twist the PSP™ system or expose the system to strong
physical shock during gameplay, as doing so can damage the system or cause
the disc cover to open, ejecting the disc.
• Do not put heavy objects on the system or accessories.
• Do not touch or insert foreign objects into the connectors of the system or
accessories.
• Do not place the system close to items with a magnetic strip, such as credit
cards.
• Do not touch the system or AC adaptor for an extended period of time while
in use. Depending on the conditions of use, the system or AC adaptor may
reach temperatures of 40°C/104°F or more. Extended contact under these
conditions may cause low-temperature burns*.
* Low-temperature burns are burns that occur when the skin is in contact with objects of
relatively low temperatures (40°C or more/104°F or more) for an extended period of time.
AC adaptor and AC power cord use
• Do not touch the mains power plug of the AC power cord with wet hands.
• Do not touch the AC power cord, AC adaptor or the system, if connected to
an electrical outlet, during an electrical storm.
• Do not use a power source other than the supplied battery pack, AC adaptor
and AC power cord.
Precautions
10
Page 11

• Do not allow dust or forei gn matter to build up around the system or accessory
connectors. If there is dust or foreign matter on the system's connectors or the
AC power cord, wipe it off with a dry cloth before connecting. Dust or other
matter on the connectors can result in fire or electrical shock.
• Unplug the AC power cord from the electrical outlet and remove the battery
pack from the system before cleaning or when you do not intend to use the
system for an extended period of time.
• Protect the AC power cord from being walked on or pinched particularly at
plugs, convenience receptacles and the point where they exit from the system.
• When disconnecting the AC power cord, hold it by the plug and pull straight
out from the electrical socket. Never pull by the cord and do not pull at an
angle.
• Do not use the system to play games or video when the system is covered with
any type of fabric. If you want to pause or temporarily store the system while
playing games or video, put the system in sleep mode before placing it in the
pouch. Also do not use the AC adaptor when covered with fabric. This may
help to avoid overheating.
• Do not connect the AC power cord to a voltage transformer or inverter.
Connecting the AC power cord to a voltage transformer for overseas travel or
an inverter for use in an automobile may cause heat to build up in the AC
adaptor and may cause burns or a malfunction.
LCD screen
• Red, blue or green spots (bright spots) or black spots (dark spots) may appear
in certain locations on the LCD screen. The appearance of such spots is a
normal occurrence associated with LCD screens and is not a sign of a
malfunction. LCD screens are made using highly precise technology.
However, a very small number of dark pixels or continuously lit pixels exist
on each screen. Also, a distorted image may remain on the screen for several
seconds after the system has been turned off.
• Direct exposure to sunlight may damage the system's LCD screen. Be careful
when using the system outdoors or near a window.
• When using the system in a cold environment, you may notice shadows on
the graphics or the screen may appear darker than usual. This is not a
malfunction, and the screen will return to normal when the temperature goes
up.
• Do not leave still images displayed on the screen for an extended period of
time. This may cause a faint image to be left permanently on the screen.
GB
Precautions
11
Page 12
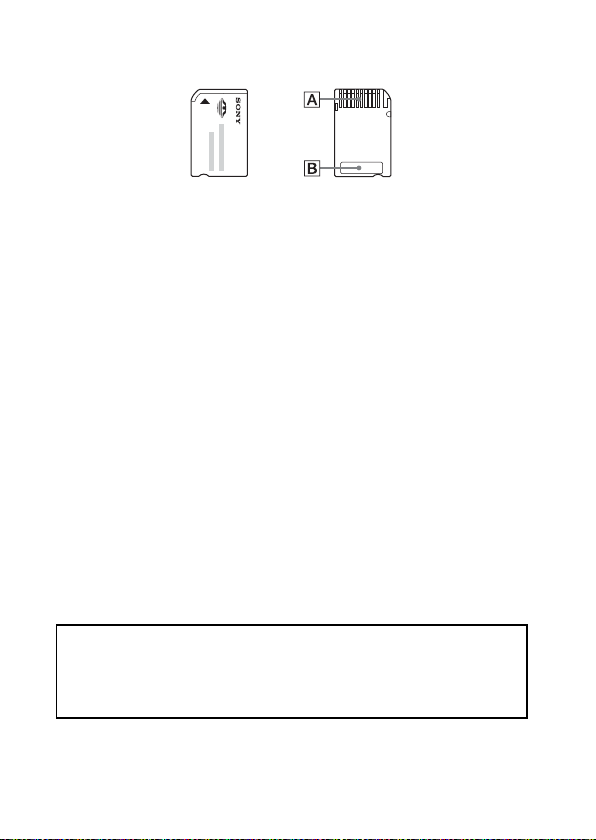
Memory Stick Duo™
For best results, follow these guidelines:
• Do not touch the connector area (A) with your hands or with metal objects.
• Do not press hard when writing on the memo area (B).
• Do not insert a Memory Stick Duo™ into a device designed to accept only
standard-size Memory Stick™ media.
• Do not use or store a Memory Stick Duo™ in the following:
– Places subject to high temperatures, such as in a hot vehicle
– Locations exposed to direct sunlight
– Locations that are very humid or conducive to corrosion
• Use the supplied case to carry or store the Memory Stick Duo™.
• When using Memory Stick Duo™ media without an erasure prevention
switch, take care not to overwrite or delete data by accident. If your Memory
Stick Duo™ media has an erasure prevention switch, you can prevent data
from being saved, edited, or deleted by setting the switch in the LOCK
position.
x Recorded data
Do not use the Memory Stick Duo™ in the following ways, as doing so may
result in data loss or corruption:
• Removing the Memory Stick Duo™ or turning off the system while it is
loading or saving data or being formatted.
• Using it in a location that is exposed to static electricity or electrical
interference.
If, for any reason, software or data loss or corruption occurs, it is usually
not possible to recover the software or data. It is recommended that you
regularly back up software and data. Sony Computer Entertainment Inc.
and its subsidiaries and affiliates will not be held liable for any damages or
injury in the case of software or data loss or corruption.
Precautions
12
Page 13

In accordance with copyright law, no recorded data may be used for
purposes other than personal enjoyment without permission from the
copyright holder.
Pouch
• If you want to pause or temporarily store the system while playing games or
video, put the system in sleep mode before placing it in the pouch. This may
help to avoid overheating.
• Put both the PSP™ system and the remote control in hold mode to help
prevent unintended operation.
Never disassemble the system or supplied accessories
Use the PSP™ system and accessories according to the instructions in this
manual. No authorization for the analysis or modification of the system, or the
analysis and use of its circuit configurations, is provided. Disassembling will
void the system warranty. Additionally, there is a risk of fire, electrical shock
or malfunction. The LCD screen, in particular, contains dangerous, highvoltage parts, and the laser beam for reading UMD™ may cause visual
impairment if exposed directly to the eyes.
Overseas use
Depending on the country, there are limitation s on the use of certain types of radio
waves. In some cases, use of the system may lead to a fine or other penalty.
Moisture condensation
If the PSP™ system or UMD™ is brought directly from a cold location to a
warm one, moisture may condense on the lens inside the system or on the
UMD™. Should this occur, the system may not operate properly. In this case,
remove the UMD™ and turn off and unplug the system. Do not put the UMD™
back in until the moisture evaporates (this may take several hours). If the
system still does not operate properly, contact the PSP™ service line at the
number listed on your warranty card for assistance.
GB
Precautions
13
Page 14

UMD™ handling
• Do not touch the opening on the rear of the disc (recorded surface of the disc)
with your fingers.
• Do not allow dust, sand, foreign objects or other types of dirt to get on the
disc.
• If the UMD™ becomes dirty, gently wipe the exterior and recorded surfaces
of the UMD™ using a soft cloth. Do not use solvents or other chemicals.
Cleaning
For safety reasons, unplug the AC power cord from the electrical outlet and
remove the battery pack from the system before cleaning.
x Cleaning the exterior surface
Wipe gently with a soft cloth. Do not use solvents or other chemicals to clean
the exterior of the PSP™ system.
x Cleaning the LCD screen
Wipe gently with a soft cloth.
x Cleaning the connectors
• Do not use when the connectors of the system, AC adaptor or the AC power
cord are not clean. Remove the dirt with a dry cloth or cotton swab. If used
when dirty, the flow of electrical current may be obstructed.
• If the headphones or remote con trol connectors become dirty, this could cause
noise or interruptions in sound. Wipe the connectors with a dry, soft cloth to
keep in clean condition.
14
Precautions
Page 15
Battery pack precautions
Warnings
Do not handle a damaged or leaking battery pack.
Contact with the material can result in injury or burns to the eyes or skin. Even
if foreign substances are not immediately visible, chemical changes in the
material can result in injuries occurring at a later time.
If you come into contact with material from a leaking battery pack, take the
following actions:
• If the material gets into the eyes, do not rub. Immediately flush the eyes
with clean water and seek medical attention.
• If the material comes into contact with the skin or clothes, immediately
rinse the affected area with clean water. Consult your physician if
inflammation or soreness develops.
Handle the battery pack with care.
The battery pack may explode or present a fire or chemical burn hazard if it is
not handled carefully.
• Do not allow the battery pack to come into contact with fire or subject it to
extreme temperatures such as in direct sunlight, in a vehicle exposed to the
sun or near a heat source.
• Do not cause the battery pack to short-circuit.
• Do not disassemble or tamper with the battery pack.
• Prevent damage to the battery pack. Do not carry or store the battery pack
with metal items such as coins or keys. If damaged, discontinue use.
• Do not throw or drop the battery pack or subject it to strong physical shock.
• Do not put heavy objects on or apply pressure to the battery pack.
• Do not allow the battery pack to come into contact with liquids. If it becomes
wet, discontinue use until it is completely dry.
• Keep the battery pack out of the reach of small children.
• If the PSP™ system will not be used for an extended period of time, remove
the battery pack and store it in a cool, dry place out of the reach of children.
• Use only the supplied battery pack or a replacement marked for use with the
PSP™ system.
• Use only the designated AC adaptor to charge the battery pack.
GB
Precautions
15
Page 16
Preparation
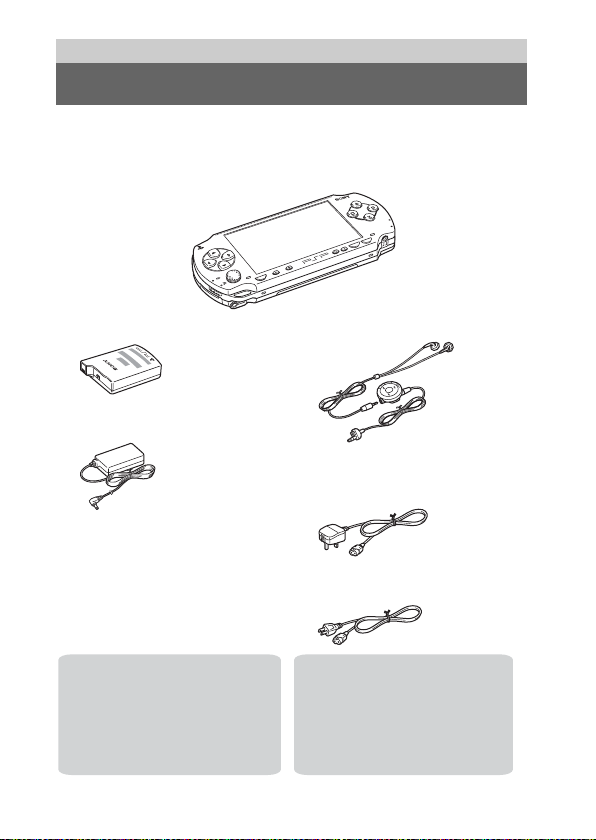
Checking the package contents
Check that you have all of the following items. If any items are missing, contact
the PSP™ service line at the number listed on your warranty card for assistance.
s PSP™ (PlayStation®Portable)
POWER
HOLD
5V
ART
T
S
SELECT
VOL
HOME
s Battery pack
s AC adaptor
s Pouch
s Cloth
s Printed materials
Supplied with the Value Pack:
s Memory Stick Duo™
(32 MB)
s Hand strap
Checking the package contents
16
s Headphones with remote control
s AC power cord (with 3-pin
converting adaptor attached)
(supplied with PSP-1006)
s AC power cord (supplied with
PSP-1007)
Supplied with the Giga Pack:
s Memory Stick PRO Duo™
(1GB)
s Stand
s USB cable
Page 17

Removing the 3-pin converting adaptor (PSP-1006 only)
Electrical outlet configuration may vary depending on the region of use. If the
plug on the supplied AC power cord does not match the electrical outlet, loosen
the screw and remove the converting adaptor.
3-pin converting adaptor
Mains power plug
GB
Preparation
Checking the package contents
17
Page 18
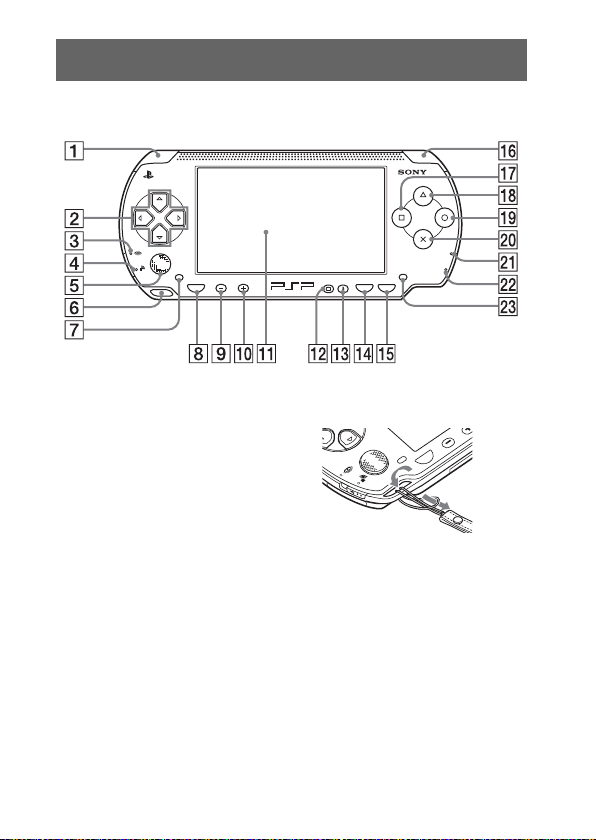
Part names and functions
System front
HOME
VOL
POWER
SELECT
HOLD
START
A L button
B Directional buttons
C Memory Stick Duo™ access
indicator
Lights up when saving and loading
data
D WLAN access indicator
Lights up when using the wireless
networking feature
E Analog stick
Can be used with games that
support analog operation
Part names and functions
18
F Strap holder
Attach as shown in the diagram.
VOL
HOME
G Left speaker
H Home button
Displays the home menu
I Volume - button
Turns the volume down
J Volume + button
Turns the volume up
Page 19
K LCD screen
L Display button
Adjusts screen brightness
( page 36)
M Sound button
Adjusts the tone ( page 34)
N Select button
O Start button
P R button
Q button
R button
S button
T button
U Power indicator
Lights up, flashes or changes color
to indicate system status
(page27)
V Hold indicator
Turns yellow when in hold mode
(page33)
W Right speaker
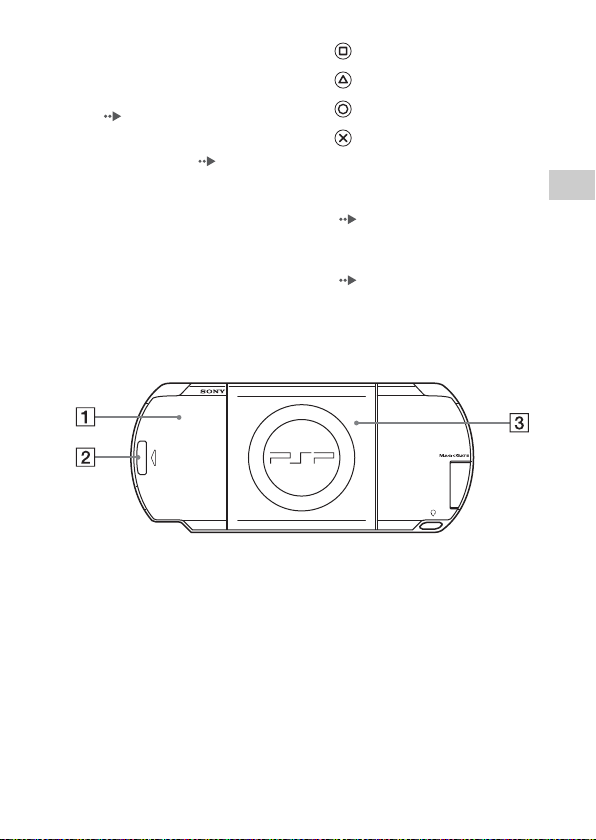
System rear
UMD
PUSH
A Battery cover C Disc cover
B Push button
GB
Preparation
Part names and functions
19
Page 20
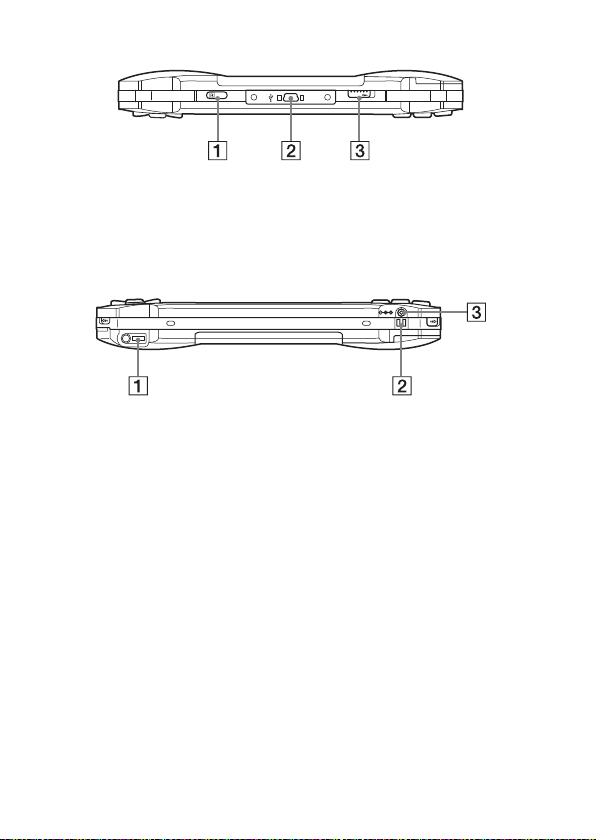
System top
L
OPEN
R
A IR port C Open latch
B USB connector
System bottom
5V
DC IN
A Headset connector C DC IN 5V connector
B Charging terminals
Part names and functions
20
Page 21
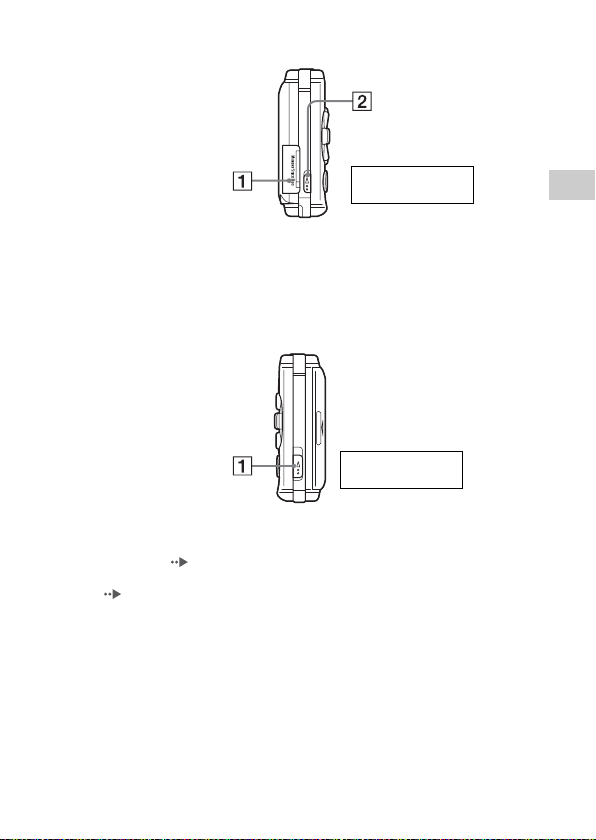
System left side
R:WLAN on
r:WLAN off
A Memory Stick Duo™ slot B WLAN switch
Turns on the wireless networking
feature
System right side
R:Power switch
r:Hold switch
A Power/hold switch
Turns the system on and off, puts in
sleep mode ( pages 27, 29) and
locks the system buttons
( page 33)
GB
Preparation
Part names and functions
21
Page 22
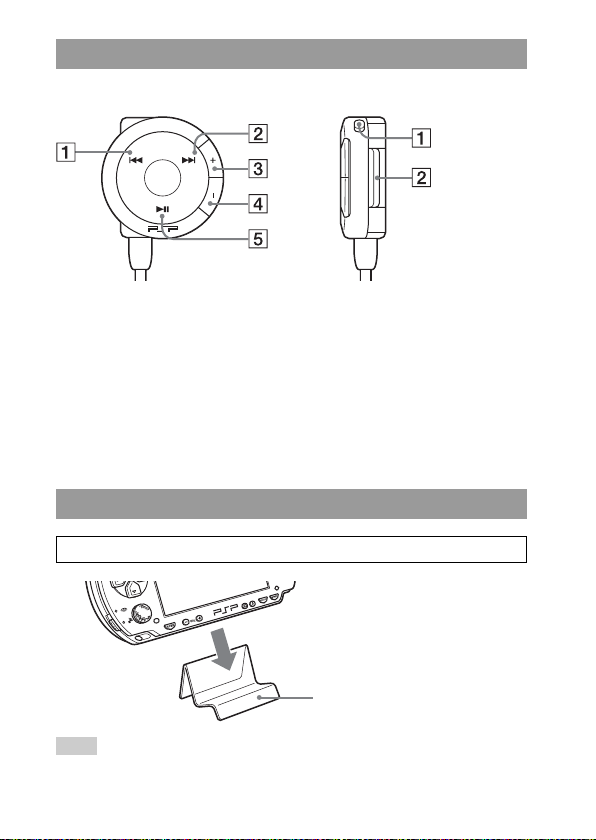
Headphones with remote control
Remote control front
A . button
B > button
C Volume + button
Turns the volume up
D Volume - button
Turns the volume down
E u button
Stand
The stand is supplied with the Giga Pack.
Remote control side
VOL
A Hold switch
Locks the operation of the remote
control. Note that this button does
not lock the buttons of the PSP™
system.
B Clip
Hint
Do not place the stand on unstable surfaces.
Part names and functions
22
Stand
Page 23
Preparing the PSP™ system for use
P
Before using the PSP™ system for the first time after purchase, you must
follow these steps to charge the battery.
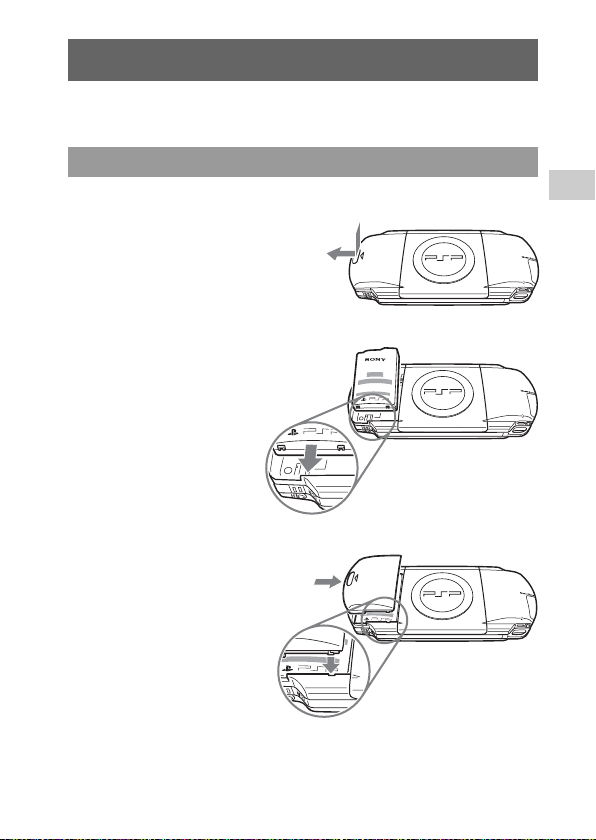
Getting started 1: Inserting the battery pack
1 Remove the battery cover.
Hold down the push button and slide
the battery cover open.
PUSH
UMD
2 Insert the battery pack.
Align the bottom surface of the
battery pack with the system to
attach.
PUSH
UMD
3 Replace the battery cover.
2 Slide the battery cover in the
direction of the arrow until it
locks firmly into place.
PUSH
UMD
GB
Preparation
1 Align the tabs.
Preparing the PSP™ system for use
23
Page 24
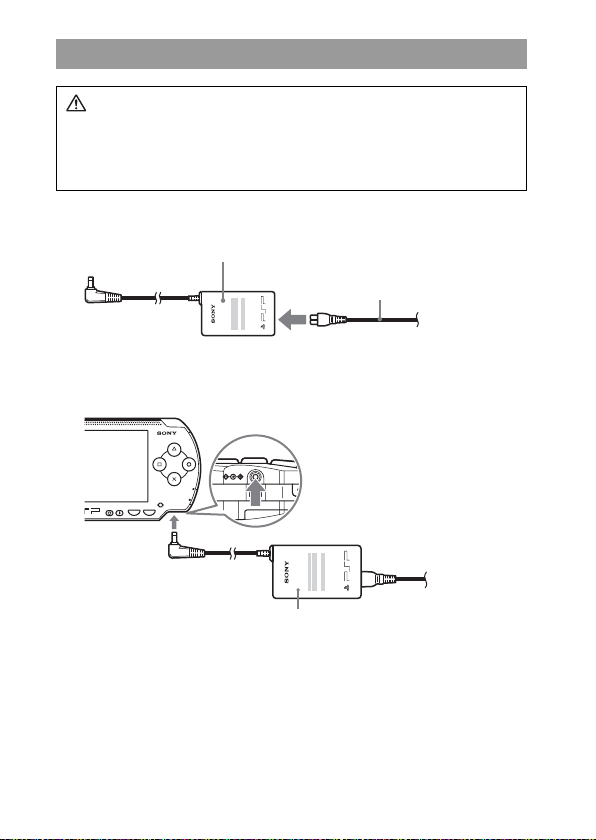
Getting started 2: Charging
DC IN
5V
Caution
• The socket-outlet shall be installed near the equipment and shall be
easily accessible.
• Do not plug the AC power cord for the PSP™ system into an electrical
outlet until you have made all other connections.
1 Plug the AC power cord into the AC adaptor.
AC adaptor
AC power cord
2 Connect the AC adaptor to the DC IN 5V connector on the
system bottom.
POWER
HOLD
SELECT START
AC adaptor
Preparing the PSP™ system for use
24
Page 25
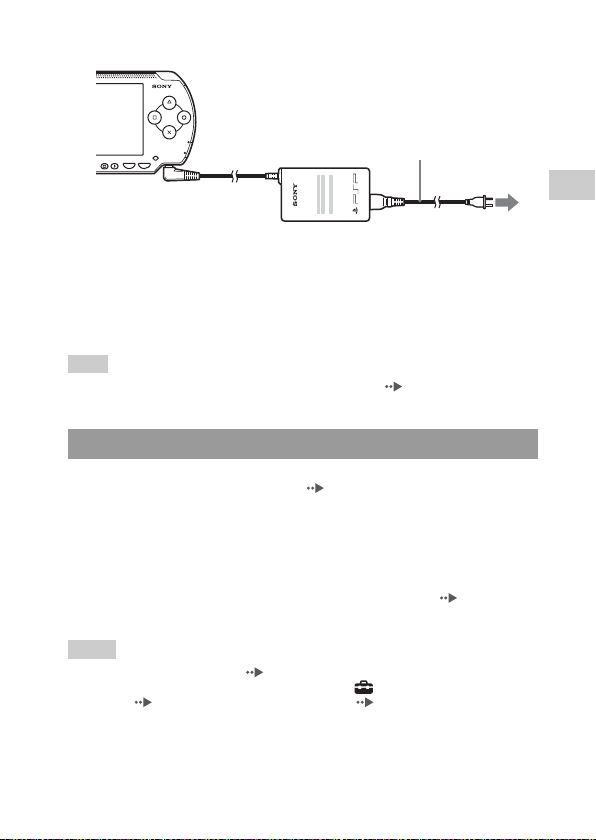
3 Plug the AC power cord into an electrical outlet.
POWER
HOLD
SELECT START
The power indicator lights up in orange, indicating that chargi ng has begun. The
power indicator will turn off when the battery is fully charged.
AC power cord
To electrical outlet
4 Unplug the AC power cord from the electrical outlet and
disconnect the AC adaptor from the system.
Hint
For information on how to charge the battery, see "Battery" ( page 37).
Getting started 3: Initial setup
1 Turn on the PSP™ system ( page 27).
The power indicator lights up in green, and the initial setup screen is
displayed.
2 Follow the on-screen instructions to make settings for
system language, time zone, date and time and nickname.
When you have completed initial setup, the home menu ( page 5) is
displayed.
Hints
• See "How to use the keyboard" ( page 114) for information on how to enter characters.
• Settings made during initial setup can be changed in (Settings). See "System
Settings" ( page 91) and "Date & Time Settings" ( page 95) for details.
GB
Preparation
Preparing the PSP™ system for use
25
Page 26
Connecting the headphones with remote
control
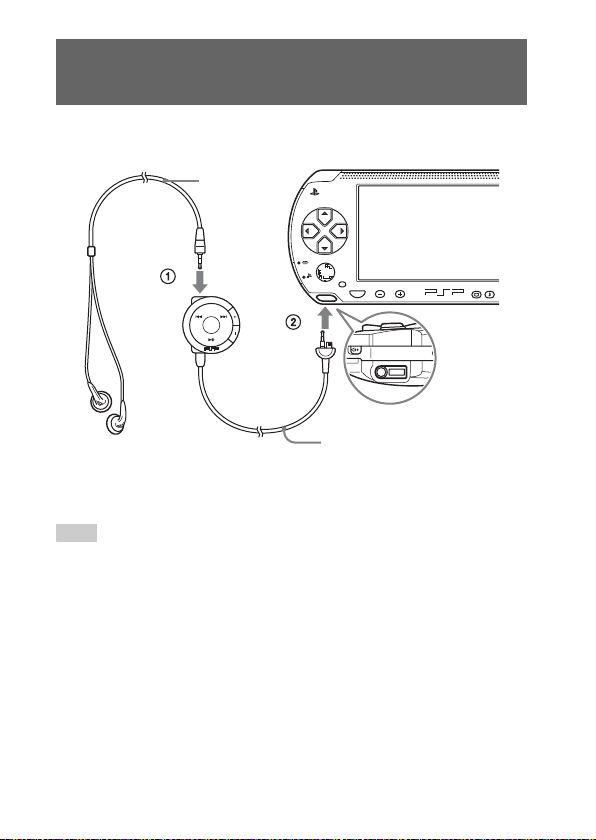
1 Connect the headphones to the PSP™ system.
Headphones
HOME
VOL
Remote control
1 Plug the headphones into the remote control.
2 Plug the headphones into the headset connector on the system bottom.
Hint
The remote control is exclusively for use with the PSP™ system and accessories made
exclusively for the PSP™ system. It cannot be used with other devices. Also, remote
controls supplied with other devices cannot be used to operate the PSP™ system.
Connecting the headphones with remote control
26
Page 27
Basic operations
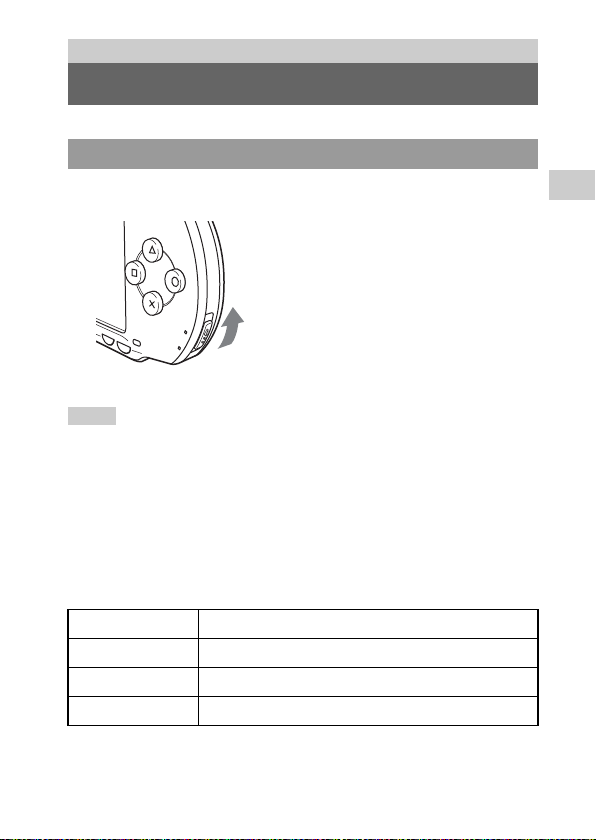
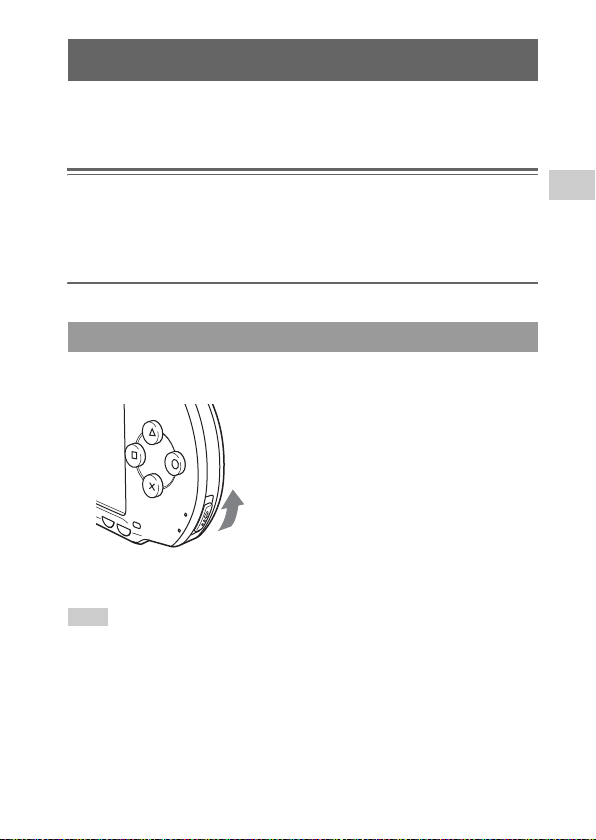
Turning the PSP™ system on and off
Turning the system on
1 Slide the power/hold switch up.
GB
Basic operations
SELECT
POWER
HOLD
START
The power indicator lights up in green, and the home menu is displayed.
Hints
• If the PSP™ system is turned on with a UMD™ inserted, the UMD™ will begin playback
automatically.
• The system can be used with the AC adaptor connected. In this case, charging will begin
automatically. The power indicator lights up in orange while charging.
• Do not use the PSP™ system with the AC adaptor when the battery pack is not inserted
in the system. If the AC adaptor is disconnected suddenly, it may result in damage to the
system.
Power indicator
The color and condition (solid or flashing) of the light indicates system status.
Solid green Power on
Solid orange Charging
Flashing green Charge level is low
Light off Power off/in sleep mode
Turning the PSP™ system on and off
27
Page 28

Turning the system off
1 Hold the power/hold switch in the up position for more than
three seconds.
The power indicator flashes and then turns off, indicating that the system
is turned off.
Turning the PSP™ system on and off
28
Page 29
Using sleep mode
If the PSP™ system is switched to sleep mode, the software that is playing will
be paused. When sleep mode is cleared, you can begin playback from the point
you entered sleep mode.
Notices
• Do not put the system into sleep mode while the Memory Stick Duo™ access indicator is
on. This may cause data loss or corruption.
• If the battery runs out while in sleep mode, when you clear sleep mode, the system will
not return to the screen that was displayed before entering sleep mode. It is recommended
that you save game data before you put the system into sleep mode.
Putting into sleep mode
1 With the system turned on, slide the power/hold switch up.
SELECT
The power indicator flashes and then turns off, and the system enters sleep
mode.
Hint
Some software cannot be put into sleep mode.
POWER
HOLD
START
GB
Basic operations
Using sleep mode
29
Page 30

Clearing sleep mode
1 Slide the power/hold switch up again.
Sleep mode is cleared.
Hints
• You can also clear sleep mode by pressing the u (play/pause) button of the remote
control, if the system was put into sleep mode during music or video playback.
• After clearing sleep mode with video or music content, you can res ume playback from the
point where the system entered sleep mode by following the steps below.
Video With the icon for the video selected, do any of the following:
Music saved on a
Memory Stick Duo™
- Press the start button or button
- Press the
u button of the remote control
- Select "Play" from the options menu ( page 54)
With the icon for the Memory Stick Duo™ selected, do any of
the following:
- Press the start button
- Press the
u button of the remote control
- Select "Play" from the options menu ( page 65)
30
Using sleep mode
Page 31

Inserting a UMD™
Notice
Do not eject a UMD™ during playback.
1 Slide the open latch on the PSP™ system top.
The disc cover opens.
2 Insert a UMD™.
With the disc label facing the s ystem rear, slide the UMD™ in the direction
of the arrow until it is fully inserted.
Do not touch the recorded
surface.
O
P
E
N
Open latch
R
L
3 Close the disc cover.
Ejecting the UMD™
Slide the open latch on the system top to open the disc cover.
Hint
When ejecting, hold the PSP™ system in an upright position (as shown in the diagram
above).
GB
Basic operations
Inserting a UMD™
31
Page 32

Inserting a Memory Stick Duo™
Warning
Keep Memory Stick Duo™ media out of the reach of small children, as the
media could be swallowed by accident.
1 Open the slot cover and insert the Memory Stick Duo™.
Front side
Open the slot cover in the
direction of the arrow.
Ejecting the Memory Stick Duo™
Open the slot cover and press the Memory Stick
Duo™ in the direction of the arrow to eject.
Notice
When the Memory Stick Duo™ access
indicator is lit, the PSP™ system is saving or
loading data. Do not eject the Memory Stick
Duo™, turn off the system or put the PSP™
system into sleep mode while the indicator is
lit. If you do, it may cause data loss or
corruption.
Inserting a Memory Stick Duo™
32
Press until fully inserted.
Memory Stick Duo™
access indicator
HOME
Page 33

Avoiding unintended operation of the PSP™
system
1 Slide the power/hold switch down.
GB
Basic operations
SELECT
POWER
HOLD
START
The switch locks
into place.
The hold indicator turns yellow, indicating that the system buttons are
locked.
Clearing hold mode
Slide the power/hold switch to its original position.
Avoiding unintended operation of the PSP™ system
33
Page 34

Using the sound button
The sound button is used to adjust the tone and to mute the sound for audio
playback and for key tones.
Adjusting the tone
1 Press the sound button.
POWER
HOLD
SELECT START
Each time you press the button, the tone changes as follows:
HEAVY Strengthens both bass and treble to produce an intense sound
POPS Strengthens the mid-range. Ideal for vocals
JAZZ Strengthens both bass and treble to produce a balanced sound
UNIQUE Strengthens bass, treble and mid-range sound
OFF Normal tone
Hint
Tone can only be adjusted when using the headphones. Also, note that the tone setting is
temporarily set to "OFF" during gameplay.
Turning off the sound (mute)
1 Hold down the sound button for more than one second.
The sound will be muted.
Using the sound button
34
Page 35

Clearing mute
Muting can be turned off by the following methods:
• Pressing the sound button.
• Pressing the volume + or volume - button on the system front or on the remote
control.
GB
Basic operations
Using the sound button
35
Page 36

Using the display button
The display button is used to adjust screen brightness.
Adjusting screen brightness
1 Press the display button.
POWER
HOLD
SELECT START
Each time you press the button, the display changes as follows:
Level 1
Level 2
Level 3
(Level 4)
Hint
Level 4 can be selected only while plugged in using the AC adaptor.
Turning off the backlight
Darker
Brighter
1 Hold down the display button for more than one second.
The backlight will turn off and the screen will go blank.
If you press any of the system buttons, the screen will be displayed again.
Using the display button
36
Page 37

Battery
Battery charge level
The battery charge level is displayed on the screen.
Battery charge
level
Estimating the remaining battery power
There is plenty of power left.
The battery is getting low.
The battery has almost run out.
No battery power remains. The power indicator flashes green. Recharge
the battery.
Hints
• If the power indicator flashes green, save game progress and recharge the battery. If the
battery runs out before you save, game progress will be lost.
• The charge level display may vary slightly from the actual charge level, depending on the
usage conditions and environmental factors, such as temperature. If the display is not
correct, use the battery pack until it is completely out of power and then recharge. Note
that the display may not be accurate in the following conditions:
– if the battery is used for extended periods in conditions of high temperature
– if the battery is not used for a long time after recharging
– if the battery has been recharged many times
GB
Basic operations
Battery
37
Page 38

• Battery charge level can also be checked in "Battery information" under "System
Settings" ( page 92).
• If the PSP™ system is left unused after the battery runs out, the date and time settings may
be reset. If this occurs, the date and time setting screen will be displayed the next time the
system is turned on.
• The battery cannot be recharged when the WLAN feature is in use.
Estimated battery duration
Game Approximately 3 - 6 hours*
Video playback Approximately 3 - 5 hours*
*1 Based on tests conducted using the supplied battery pack, with the system in single
player mode, with headphones with remote control in use, and with wireless LAN not in
use.
*2 Based on tests conducted using variables of system speakers versus headphones, volume
level and screen brightness level.
1
2
Hint
Battery duration may vary depending on the type of content being played or usage
conditions such as screen brightness and environmental factors. As battery ages, anticipate
lower battery duration.
Estimating the battery charge time
When using the supplied battery pack, it takes approximately 2 hours and 20
minutes to fully charge the battery using the AC adaptor after the battery has
run out.
Hints
• Charge in a temperature of 10° C to 30° C/50° F to 86° F. Charging may not be as
effective in other environments.
• Charging may take longer when the system is turned on during charging.
Battery pack life
The battery pack has a limited lifespan. Battery duration will decrease with
repeated usage and age. If the battery duration becomes extremely short, it may
be time to replace the battery pack.
38
Battery
Page 39

Hint
The battery pack lifespan varies depending on how it is stored, the conditions of use and
environmental factors, such as temperature.
Replacing the battery pack
For safety reasons, turn off the system and remove the power cord from the
electrical outlet before replacing the battery pack. Also read "Battery pack
precautions" ( page 15) before handling the battery pack.
Hint
If the system is left unused after the battery pack has been removed, the date and time
settings may be reset. If this occurs, the date and time setting screen will be displayed the
next time the PSP™ system is turned on.
Storing the battery pack
When the system will not be used for an extended period of time, remove the
battery pack from the system. Store the battery pack in a cool, dry place out of
the reach of children.
GB
Basic operations
Battery
39
Page 40

Game
Playing a game
1 Select from the home menu.
2 Insert a UMD™ ( page 31).
The UMD™ icon is displayed.
3 With the game icon selected, press the button.
The game starts.
Icons displayed under Game
In addition to playing games, the following features are available under Game.
Game Sharing
Saved Data Utility
UMD™
PSP™ Update
Memory Stick™
You can use ad hoc mode ( page 104) to receive
game data from another PSP™ system. For details,
refer to the software manual supplied with the game.
You can copy, delete or view information about saved
data on a Memory Stick Duo™ ( page 43).
You can play games. If you select the UMD™ icon, the
thumbnail for the game is displayed.
You can update the system software of the PSP™
system. This icon is displayed only when a UMD™
that contains update data is inserted ( page 117).
You can perform an update by accessing the update
data saved on a Memory Stick Duo™ ( page 117).
40
Playing a game
Page 41

Hints
• If (Restricted Content) is displayed when you select the (UMD™) icon, parental
control restrictions have been set on the system. You must enter the password as described
below to access the game. See "Parental Control Level" ( page 100) for details.
1 Select (Restricted Content), and then press the button.
2 Enter the 4-digit password using the directional buttons, and then press
the button.
• If you press the home button during gameplay, you can check the remaining battery
power.
• Title names and thumbnail images used in this manual are not of actual products.
Quitting a game
1 Press the home button while playing a game.
The message "Do you want to quit the game?" is displayed.
2 Select "Yes", and then press the button.
The game ends and the home menu is displayed.
GB
Game
Playing a game
41
Page 42

Game options menu
You can view game information or copy or delete saved data by displaying the
options menu.
1 Select an icon, and then press the button.
The options menu is displayed.
Icons Options menu
2 Select a menu item, and then press the button.
Closing the options menu
Press the button or the button.
List of options
The options menu items available vary depending on the icon selected.
Start Starts a game or update data
Copy
Delete Deletes the data on a Memory Stick Duo™
Information Displays information about the selected icon
Copies the saved data on a Memory Stick Duo™ to another Memory Stick
Duo™ ( page 43)
Game options menu
42
Page 43

Copying and deleting saved data
You can copy or delete saved game data that is saved on a Memory Stick Duo™
using the saved data utility.
Copying saved data
You can copy saved data to another Memory Stick Duo™. It is recommended
that important data be copied as a backup.
1 Select , and then press the button.
2 Select the saved data you want to copy, and then press the
button.
The options menu is displayed.
3 Select "Copy", and then press the button.
4 Follow the on-screen instructions.
If there is not enough space available
Delete data in the destination Memory Stick Duo™ or replace it with another
Memory Stick Duo™. If you display the options menu ( page 42), you can
delete saved data or check the amount of free space available.
Hint
Depending on the type of Memory Stick Duo™ used, the file size displayed for the same
data item may vary.
Deleting saved data
You can delete saved data on a Memory Stick Duo™ by selecting "Delete" in
step 3 of "Copying saved data".
GB
Game
Copying and deleting saved data
43
Page 44

Video
Watching a video
You can watch UMD™VIDEO and videos saved on a Memory Stick Duo™.
1 Select from the home menu.
2 Insert a UMD™ or Memory Stick Duo™ ( pages 31, 32).
An icon for the inserted media is displayed.
3 Select the icon, and then press the button.
UMD™VIDEO playback begins. If you select , icons for each video
data item will be displayed. Select the video that you want to play, and then
press the button.
Icons displayed under Video
44
UMD™
Memory Stick™ You can play video saved on a Memory Stick Duo™.
Watching a video
You can play UMD™VIDEO. If you select the icon, a
thumbnail for the video is displayed.
Page 45

Hints
• If (Restricted Content) is displayed when you select the (UMD™) icon, parental
control restrictions have been set on the system. Enter the password as described below
to access the video. See "Parental Control Level" ( page 100) for details about the
parental control feature.
1 Select (Restricted Content), and then press the button.
2 Enter the 4-digit password using the directional buttons, and then press
the button.
• If you press the home button or select button during video playback, the home menu will
be shown on the screen while the paused image of the video is displayed. If you press the
button again, the home menu is cleared.
• You can adjust the tone or mute the sound using the sound button ( page 34).
• For a list of file types that can be played on the PSP™ system, see "Files that can be
played" ( page 121).
Stopping playback
1 Press the button during video playback.
The video will stop.
Hint
In most cases, the next time you play the video, playback will resume from the previous
stopping point.
Playing a video from the beginning
If you want to play a UMD™VIDEO from the beginning, select "Play from
Beginning" in the options menu ( page 54), and then press the button.
GB
Video
Watching a video
45
Page 46

Using the control panel
You can perform the following operations using the on-screen control panel.
Notice
Depending on the UMD™VIDEO, playback conditions may be set in advance by the
software developer. In such cases, certain options may not be available, even if you follow
the instructions in this manual.
1 Press the button during video playback.
The control panel is displayed.
Control panel
2 Select an icon, and then press the button.
Clearing the control panel
Press the button or the button.
List of operations
The icons displayed when playing a UMD™VIDEO are different from those
displayed when playing a video saved on a Memory Stick Duo™.
Icon Description
Using the control panel
46
Menu Displays the UMD™VIDEO menu
Page 47

Icon Description
Go To Plays from a specified chapter* or time ( page 49)
Switches between available audio options for
Audio Options
Angle Options
Subtitle
Options
UMD™Video
Volume
Screen Mode
Display
Help
Previous
Return to
Beginning
Next Skips to the next chapter
Fast Reverse/
/
Fast Forward
Slow Motion Plays a scene in slow motion ( page 51)
Frame
Advance
Play Starts playback
UMD™VIDEO recorded with multiple audio tracks
Switches between Left, Right, and Left + Right audio
output for video saved on a Memory Stick Duo™
Switches between available viewing angles for
UMD™VIDEO recorded with multiple angles
Switches between available subtitle options for
UMD™VIDEO that include subtitles
Boosts the volume of the UMD™VIDEO ( page 50)
Changes the size of the image displayed on the screen
( page 49)
Displays the playback status and related information
( page 48)
Displays the functions that can be performed using the
PSP™ system buttons
Returns to the previous chapter of a UMD™VIDEO
during playback
Returns to the beginning of a video saved on a Memory
Stick Duo™ during playback
Accelerates playback (reverse or forward) on the screen
to help locate a particular scene ( page 50)
Plays a scene one frame at a time
GB
Video
*
Pause Pauses playback
Using the control panel
47
Page 48

Icon Description
Stop Stops playback
A-B Repeat Plays a specified section repeatedly ( page 52)
Repeat Plays the video repeatedly ( page 51)
Clear Clears the Repeat setting
* This operation cannot be performed during playback of video saved on a Memory Stick
Duo™.
Viewing playback status and related information
1 Select from the control panel during playback, and then
press the button.
The playback status of the video is displayed.
UpdatedTitle
Status icon Elapsed time/total timeChapter number
Clearing display
Select from the control panel, and then press the button.
Using the control panel
48
Page 49

Hint
The items displayed when playing a UMD™VIDEO are different from those displayed
when playing a video saved on a Memory Stick Duo™.
Changing the Screen Mode
Changes the size of the viewable image on the screen.
1 Select from the control panel, and then press the
button.
Each time the button is pressed, the Screen Mode will change as
follows:
Normal The image is adjusted to fit the PSP™ system's screen size.
Zoom
Full Screen
Original The image is shown in the original size.
4:3 An image recorded in 16:9 aspect ratio is displayed in 4:3.
Hint
Depending on the video being played, the Screen Mode may remain unchanged.
Playback from a selected scene
You can play from a specified chapter or time.
The image is shown at the full screen size without changing
proportions, while cutting off the top and bottom or left and
right areas.
The image is shown in the full screen size by changing
proportions and zooming in horizontally and vertically.
GB
Video
1 Select from the control panel, and then press the
button.
2 Using the directional buttons, specify the number for the
chapter or time and then press the button.
Using the control panel
49
Page 50

Chapter Specifies the chapter number*
XX:XX:XX Specifies the elapsed time
* You cannot use this feature when playing video saved on Memory Stick Duo™.
Adjusting the UMD™Video volume
The volume can be adjusted if the audio output level of the UMD™ is low.
1 Select from the control panel, and then press the
button.
Each time you press the button, the volume will change as follows:
+1 Raises the volume
+2 Raises the volume (maximum)
Normal Usually select this setting.
Hint
The volume setting will be cleared if the UMD™ is ejected. The volume can be permanently
set to a higher level under Video Settings ( page 89).
Fast Reverse/Fast Forward
1 During playback, select or from the control panel,
and then press the button.
Returning to normal playback
Select from the control panel, and then press the button.
Hint
While using Fast Reverse or Fast Forward, select or from the control panel, and
then press the button to switch between three speed options.
Using the control panel
50
Page 51

Slow playback
1 During playback, select from the control panel, and
then press the button.
Returning to normal playback
Select from the control panel, and then press the button.
Hint
Selecting or from the control panel while playback is paused, and then pressing the
button, will also start slow playback. If (Fast Forward) is selected, slow playback
will continue only as long as the button is held.
Playing repeatedly
You can play the entire disc or a chapter repeatedly.
1 Select from the control panel, and then press the
button.
Each time you press the button, the repeat mode changes as follows:
Disc Repeat Plays the entire disc repeatedly
Chapter Repeat Plays the specified chapter repeatedly
Repeat Off Ends repeat playback
Hints
• You can also stop repeated playback by pressing the button after selecting
from the control panel.
• The only repeat options for videos saved on a Memory Stick Duo™ are Repeat On and
Repeat Off.
GB
Video
Using the control panel
51
Page 52

Playing a section of video repeatedly
You can specify a section of video that you want to play repeatedly.
1 During playback, select from the control panel and
then press the button at the beginning of the section to
be repeated.
The starting point, point A, is set.
2 Press the button at the end of the section to be
repeated.
The ending point, point B, is set and the specified section begins to play
repeatedly.
Clearing A-B Repeat
Select or from the control panel, and then press the button.
Using the control panel
52
Page 53

Operating with PSP™ system buttons or the
remote control
You can operate the PSP™ system without using the control panel by using the
system buttons or the remote control.
System button
operation
Play
Pause Press the start button. Press the u button.
Display the UMD™VIDEO
menu
Stop Press the button. –
Play the previous chapter Press the L button.
Play the next chapter Press the R button.
Fast Reverse Press the left button.
Fast Forward Press the right button.
Slow
*1 This operation cannot be performed during playback of video saved on a Memory Stick
Duo™.
*2 If you press and hold the button, the video will play in Fast Reverse/Fast Forward/Slow
as long as the button is held down.
Press the button or start
button.
Press the button.
Press the right button
during pause.
*2
Hint
Some buttons cannot be operated while the control panel is displayed on the screen. In this
case, press the button to clear the control panel.
Remote control
operation
Press the u button.
*1
–
*1
Press the . button.
*1
Press the > button.
Press and hold the .
*2
button.
Press and hold the >
*2
button.
During pause, press and
hold the > button.
*1
*1
GB
Video
Operating with PSP™ system buttons or the remote control
53
Page 54

Video options menu
You can use the Video options menu to play a UMD™VIDEO or view
information or delete videos saved on a Memory Stick Duo™.
1 Select the icon, and then press the button.
The options menu is displayed.
Icons Options menu
2 Select a menu item, and then press the button.
Clearing the options menu
Press the button or the button.
Options list
The options menu items available vary depending on the icon selected.
Play
Play from Beginning Plays a UMD™VIDEO from the beginning
Delete Deletes a video saved on a Memory Stick Duo™
Information Displays information about the selected icon
Plays a UMD™VIDEO or a video saved on a Memory Stick
Duo™
54
Video options menu
Page 55

Saving videos on a Memory Stick Duo™
The following two methods can be used to save a video on a Memory Stick
Duo™.
Images or video recorded with a device that is
compatible with Memory Stick™
If you have a device that records video in a format* that can be played on the
PSP™ system, you can play the video simply by inserting the Memory Stick
Duo™ from the compatible device into the PSP™ system.
* For information on video file types that can be played on the PSP™ system,
see "Files that can be played" ( page 121).
http://www.memorystick.com/psp for more information about compatible devices.
Hint
A Memory Stick Duo Adaptor (model number MSAC-M2: a Sony product sold separately)
is required if your device can handle only a standard-size Memory Stick™.
GB
Video
Saving videos on a Memory Stick Duo™
55
Page 56

Transferring a video file from a PC to a Memory Stick
Duo™
You can convert motion video that was taken or recorded on another device into
a format that can be played on the PSP™ system and transfer it to a Memory
Stick Duo™ using compatible software.
* For full details, visit http://www.memorystick.com/psp
Files can be transferred using any of the following methods:
Convert with compatible
software
*
2
To a Memory Stick Duo™
inserted in the PSP™ system
1
Video file
1 Use a PC with a Memory Stick™ slot.
PC
*
2 Use a USB cable ( page 102).
3 Use a commercially available Memory Stick USB reader/writer.
* If the device can handle only the standard-size Memory Stick™, you will need a Memory
Stick Duo Adaptor (model number MSAC-M2: a Sony product sold separately).
Memory Stick Duo™
3
*
Hints
• See http://www.memorystick.com/psp for information on the formats that can be
converted.
• The PSP™ system cannot play video data converted at bit rates higher than 768 kbps.
• Chinese language filenames must be changed to English or numerals. The PSP™ system
cannot correctly display filenames written in Chinese.
Saving videos on a Memory Stick Duo™
56
Page 57

Music
Listening to music
You can listen to UMD™MUSIC and music saved on a Memory Stick Duo™.
1 Select from the home menu.
2 Insert a UMD™ or a Memory Stick Duo™ ( pages 31, 32).
An icon for the inserted media is displayed.
3 Select the icon, and then press the button.
Playback begins. When a list of groups or tracks is displayed, select the
item you want to listen to and then press the button.
Hint
UMD™MUSIC containing video content (such as music videos) are played in the same way
as UMD™VIDEO. For detailed instructions, see "Using the control panel" under "Video"
( page 46).
Icons displayed under Music
UMD™
Memory Stick™
You can play UMD™MUSIC. If you select the
icon, a thumbnail for the music is displayed.
You can play music saved on a Memory Stick
Duo™.
GB
Music
Listening to music
57
Page 58

Hints
• If the start button or the u button on the remote control is pressed in step 3, the first
track of the first group will begin playing.
• If the home button or select button is pressed during playback, the screen will return to
the home menu. If the button is pressed again, the music playback screen will be
displayed.
• You can adjust the tone or mute the sound using the sound button ( page 34).
• For a list of file types that can be played on the PSP™ system, see "Files that can be
played" ( page 121).
• Title names and thumbnail images used in this manual are not of actual products.
What is a Group?
A group is a collection of music data arranged in a certain order, such as by
album or by artist. When Group Mode is turned on, the PSP™ system can play
tracks in groups that were configured using a PC.
Track 1
Memory Stick Duo™
UMD™
Group 1
Group 2
Track 2
Track 3
Track 1
Track 2
Track 3
Group 3
Track 1
Track 2
Track 3
Hints
• The PSP™ system cannot be used to create or edit a group.
• "Track" represents a song.
• UMD™MUSIC containing video content such as music videos do not support usage of
the Group feature.
Listening to music
58
Page 59

Stopping playback
1 Press the button during playback.
Playback stops.
How to read the screen
Track number/total number of tracks
Album name Artist nameTrack name
Status icon Control panel
Track elapsed time/total time
Hints
• "Album name" and "Track number/total number of tracks" are shown on the screen only
while (Display) is turned on.
• The icon or icons displayed in the "Status icon" field will vary depending on the playback
mode selected.
• See "Playing with a selected codec" ( page 66) for details about codecs.
Codec
GB
Music
Listening to music
59
Page 60

Using the control panel
You can perform the following operations using the on-screen control panel.
1 Press the button during playback.
The control panel is displayed.
Control panel
2 Select an icon, and then press the button.
Hint
UMD™MUSIC containing video content (such as music videos) are played in the same way
as UMD™VIDEO. For detailed instructions, see "Using the control panel" under "Video"
( page 46).
Clearing the control panel
Press the button or the button.
List of operations
Icon Description
Using the control panel
60
Previous Group Returns to the beginning of the previous group
Next Group Skips to the beginning of the next group
Previous Track
Returns to the beginning of the track currently
playing or to the beginning of the previous track
Page 61

Icon Description
Next Track Skips to the beginning of the next track
Fast Reverse/
/
Fast Forward
Play Plays a track
Pause Pauses playback
Stop Stops playback
Group Mode Switches to Group Mode ( page 61)
Plays in fast reverse/fast forward*
GB
Music
A-B Repeat
Play Mode Switches to Play Mode ( page 62)
Clear
Display
Help
* If you press and hold the button, the music will play in Fast Reverse/Fast Forward as
long as the button is held down.
Specifies a part of a track, and then plays that part
repeatedly ( page 63)
Clears Group Mode, Play Mode and A-B Repeat
settings
Displays album name, track number and total
number of tracks
Displays the functions that can be performed using
the system buttons
Using Group Mode
Tracks can be played in groups. Playback stops after all tracks in the group have
been played.
1 During playback, select from the control panel, and
then press the button.
Group Mode is turned on, and then is displayed on the screen.
Using the control panel
61
Page 62

Clearing Group Mode
While Group Mode is on, select from the control panel, and then press the
button.
Using Play Modes (Repeat/Shuffle)
1 During playback, select from the control panel, and
then press the button.
Each time the button is pressed, the system switches between the
following functions:
Play Mode Description
Plays a track repeatedly
Plays all tracks repeatedly
Plays all tracks in a random order
Plays all tracks in a random order repeatedly
No icon
* If there is a group, tracks in the group are played in a random order. The order of the
groups will not change.
Clears Play Mode and plays through to the last track in
normal order
Hint
Play Modes can also be cleared by selecting from the control panel, and then
pressing the button.
*
Using the control panel
62
Page 63

Playing part of a track repeatedly
Specify and then play the part that you want to play repeatedly.
1 Select from the control panel during playback, and
then press the button at the point where you want the
repeated playback to begin.
The starting point (point A) is set.
2 Press the button at the point where you want the
repeated playback to end.
The ending point (point B) is set, and repeated playback of the specified
section begins.
Clearing A-B Repeat
Select or from the control panel, and then press the button.
The specified part is cleared, and normal playback resumes.
Hints
• The range for A-B Repeat can only be specified within a single track.
• If the ending point (point B) is not set, the end of the track will automatically become the
ending point (point B).
• If A-B Repeat is set while in a Play Mode, the Play Mode will be cleared.
GB
Music
Using the control panel
63
Page 64

Operating with PSP™ system buttons or the
remote control
You can operate the PSP™ system without using the control panel by using the
system buttons or the remote control.
System button operation Remote control operation
Play
Pause Press the start button. Press the u button.
Stop Press the button. –
Skip to the beginning
of the current track or
the previous track
Skip to the beginning
of the next track
Fast Reverse Press the left button.
Fast Forward Press the right button.
* If you press and hold the button, the m usic will play in Fast Reverse/Fast Forward as long
as the button is held down.
Hints
• Some buttons cannot be operated while the control panel is displayed on the screen. In
this case, press the button to clear the control panel.
• UMD™MUSIC containing video content (such as music videos) are played in the same
way as UMD™VIDEO. For detailed instructions, see "Using the control panel" under
"Video" ( page 46).
Press the button or start
button.
Press the L button.
Press the R button. Press the > button.
*
Press the u button.
Press the . button. Or,
press the . button as many
times as the number of tracks
you want to go back.
Press and hold the .
button.
Press and hold the >
*
button.
Operating with PSP™ system buttons or the remote control
64
Page 65

Music options menu
You can use the Music options menu to view information about or delete music
data saved on a Memory Stick Duo™.
1 Select an icon, and then press the button.
The options menu is displayed.
Icons Options menu
2 Select a menu item, and then press the button.
Clearing the options menu
Press the button or the button.
Options list
The options menu items available vary depending on the icon selected.
Play
Play from
Beginning
Select Codec Sets a file format or bit rate for music playback ( page 66)
Delete Deletes music data saved on a Memory Stick Duo™
Information Displays information about the selected icon
Plays UMD™MUSIC or music data saved on a Memory Stick
Duo™
Plays UMD™MUSIC from the beginning
GB
Music
Music options menu
65
Page 66

Playing with a selected codec
With UMD™MUSIC that has multiple file formats and bit rates recorded, you
can select from among these options for playback.
1 Select a group you want to listen to, and then press the
button.
2 Select "Select Codec", and then press the button.
The types of file formats and bit rates are displayed. The items displayed
in gray cannot be selected because they are of types that cannot be played
on the system.
3 Select the type of file format and bit rate that you want to
listen to, and then press the button.
4 Press the button.
The icons for groups are displayed.
5 After selecting a group, select the track you want to listen
to, and then press the button.
Playback begins.
Hint
Items such as "ATRAC3plus™" represent the type of file format, while items such as "256
kbps" represent the bit rate. As a general rule, the higher the bit rate, the better the sound
quality. See "Files that can be played" ( page 121) for details about file types.
Music options menu
66
Page 67

Transferring and saving music on a Memory
Stick Duo™
You can use the PSP™ system to play music data obtained in the following
ways:
1) Music imported from an audio CD.
2) Music purchased from a music download Web site.
See below for instructions regarding item 1).
See http://www.memorystick.com/psp for instructions regarding item 2).
Importing tracks from an audio CD in ATRAC3plus™
format
A PC and software* that supports ATRAC3plus™ are required to import tracks
from an audio CD.
* For full details, visit http://www.memorystick.com/psp
You can transfer the imported tracks to a Memory Stick Duo™ using either of
the following methods:
To a Memory Stick Duo™
2
inserted in the PSP™ system
Import using compatible
software
1
GB
Music
Audio CD
1 Use a PC with a Memory Stick™ slot that supports MagicGate™.
2 Use a USB cable ( page 102)
3 Use a commercially available Memory Stick USB reader/writer.
PC
*2
Transferring and saving music on a Memory Stick Duo™
3
Memory Stick Duo™
*1
*1*3
67
Page 68

*1 If the slot on the device can handle only standard-size Memory Stick™ media, a Memory
Stick Duo Adaptor (model number MSAC-M2: a Sony product sold separately) is
required.
*2 A PC with Windows
*3 A device that supports MagicGate™ such as model number MSAC-US30 (a Sony
product sold separately) is required.
® XP and SonicStage™ version 3.1 or later installed is required.
Hints
• For detailed information about importing tracks, see http://www.memorystick.com/psp
• With SonicStage™ software earlier than version 3.2, ATRAC3plus™ data cannot be
saved to or played from Memory Stick PRO Duo™. In this case, use MagicGatecompatible Memory Stick Duo™ media of types other than Memory Stick PRO Duo™
( page 119).
• The PSP™ system cannot play tracks that have a limitation of playback period or a limited
count of playbacks.
Importing tracks from an audio CD in MP3 format
A PC and compatible software are required to import tracks from an audio CD.
You can save imported tracks on a Memory Stick Duo™ using any of the
following methods:
To a Memory Stick Duo™
2
inserted in the PSP™ system
Import using compatible
software
1
Audio CD
1 Use a PC with a Memory Stick™ slot.
PC
*
2 Use a USB cable ( page 102).
3 Use a commercially available Memory Stick USB reader/writer.
* If the slot on the device can handle only standard-size Memory Stick™ media, a Memory
Stick Duo Adaptor (model number MSAC-M2: a Sony product sold separately) is
required.
Transferring and saving music on a Memory Stick Duo™
68
3
Memory Stick Duo™
*
Page 69

Hint
The method of importing tracks varies depending on the software. For details, refer to the
instructions supplied with the software.
Where to save music data
Create a folder named "PSP" directly on the Memory Stick Duo™, and then
create a folder named "MUSIC"* in the "PSP" folder. Save music data in the
"MUSIC" folder. The PSP™ system will not recognize data items saved
anywhere other than in this folder.
* The folder name does not need to be all capital letters.
GB
Music
Memory Stick
Duo™
PSP MUSIC
Data items
Folder Folder
1
Data items
2
Hints
• If a folder named "PSP" has already been created on the Memory Stick Duo™, create a
"MUSIC" folder within it.
• You can create folders within the "MUSIC" folder (Figure 1). The system will treat it as
a group.
• Folders created within sub-folders will not be recognized (Figure 2).
• If you want to specify the order of the tracks, create an m3u file specifying the order in
the folder. The system will display the file as an (m3u) icon, and treat it as a group.
• If a music file that is not of a supported file format is saved in the "MUSIC" folder, the
system will not recognize it.
• Chinese language filenames must be changed to English or numerals. The PSP™ system
cannot correctly display filenames written in Chinese.
• Music files in MP4(AAC) and WAV(Linear PCM) formats can be imported and played
in the same way as MP3 format files.
Transferring and saving music on a Memory Stick Duo™
69
Page 70

Photo
Viewing images
You can view images saved on a Memory Stick Duo™.
1 Select from the home menu.
2 Insert a Memory Stick Duo™ ( page 32).
is displayed.
3 Press the button while is selected.
Icons for Digital Camera Images, folders and images saved on the Memory
Stick Duo™ are displayed. Select the icon that you want to display, and
then press the button.
Icons displayed under Photo
Memory Stick™ You can view images saved on a Memory Stick Duo™.
Hints
• If you press the home button or select button while displaying an image, the screen will
return to the home menu while continuing to display the image. If you press the button
again, the screen will return to the image display screen.
• For a list of file types that can be played on the PSP™ system, see "Files that can be
played" ( page 121).
Viewing images
70
Page 71

Using the control panel
You can perform the following operations using the on-screen control panel.
1 Press the button while displaying an image.
The control panel is displayed.
Control panel
2 Select an icon, and then press the button.
Clearing the control panel
Press the button or the button.
List of operations
Icon Description
Send Sends an image ( page 77)
GB
Photo
Set as Wallpaper
View Mode
Display
Sets the currently displayed image as
wallpaper ( page 74)
Changes the size of the image displayed
( page 73)
Displays information about the image
( page 72)
Using the control panel
71
Page 72

Icon Description
Help
Clear Zoom
Zoom Out Zooms out from the image
Zoom In Zooms in on the image
Displays the functions that can be performed
using the PSP™ system buttons
Returns an image that has been zoomed in or
out to its original size
Rotates the image 90-degrees
counterclockwise
Moves the image to display any obscured
parts in cases such as when the image has been
zoomed on, or when View Mode is set to
Zoom
Automatically displays each image in order
( page 78)
/ /
/
Rotate Left
Rotate Right Rotates the image 90-degrees clockwise
Up/Down/Left/Right
Previous Displays the previous image
Next Displays the next image
Slideshow
Displaying image information
1 While displaying an image, select from the control
panel, and then press the button.
The image status is displayed.
Using the control panel
72
Page 73

Image name Image number/Total images Updated
Display Status
Clearing the display
Select from the control panel, and then press the button.
Adjusting image size
You can change the size of the image displayed on the screen.
1 While displaying the image, select from the control
panel, and then press the button.
Each time you press the button, the option switches as follows:
Normal
Zoom
Displays the image to fit the screen size without changing
proportions
Displays the image at the full screen size without changing
proportions. Portions of the image at the top and bottom or left
and right are cut off.
GB
Photo
Hint
Depending on the image being displayed, the View Mode may not change.
Using the control panel
73
Page 74

Setting an image as wallpaper
You can set the currently displayed image as wallpaper.
1 With an image displayed, select from the control panel,
and then press the button.
2 Select "Yes", and then press the button.
"Save completed" is displayed and the setting is complete.
Hints
• You can only save one image as wallpaper on the PSP™ system. If you have wallpaper
set and perform this setting, the existing image will be overwritten.
• If you have manipulated the image such as by zooming or rotating, the image will be
saved as wallpaper exactly as it appears on the screen.
• If you do not want to show wallpaper, you can change the setting in "Wallpaper"
( page 94) under "Theme Settings".
Using the control panel
74
Page 75

Operating with PSP™ system buttons or the
remote control
You can operate the PSP™ system without using the control panel by using the
system buttons or the remote control.
System button
operation
Play a slideshow Press the start button. Press the u button.
Cancel zoom in/out
Back Press the button. –
Display the previous image Press the L button. Press the . button.
Display the next image Press the R button. Press the > button.
Zoom in
Zoom out
Rotate (Left)
Rotate (Right)
*
Move
* Obscured parts of the image can be displayed in cases such as when you have zoomed in
on the image, or when the View Mode is set to Zoom.
Press the button when the
image has been zoomed in
or out.
Move the analog stick up
while holding down the
button.
Move the analog stick down
while holding down the
button.
Press the L button while
holding down the button.
Press the R button while
holding down the button.
Move the analog stick. –
Hint
Some buttons cannot be operated while the control panel is displayed on the screen. In this
case, press the button to clear the control panel.
Remote control
operation
–
–
–
–
–
GB
Photo
Operating with PSP™ system buttons or the remote control
75
Page 76

Photo options menu
When the Photo options menu is displayed, you can view information about or
delete images saved on a Memory Stick Duo™.
1 Select an icon, and then press the button.
The options menu is displayed.
Options menuIcons
2 Select a menu item, and then press the button.
Clearing the options menu
Press the button or the button.
Options list
The options menu items available vary depending on the icon selected.
Slideshow Automatically displays each image in order ( page 78)
Receive Receives an image ( page 77)
Display Displays images
Send Sends an image ( page 77)
Delete Deletes folders or images
Information Displays information about the selected icon
Photo options menu
76
Page 77

Sending and receiving images
You can transfer images with another PSP™ system using ad hoc mode
( page 104). The steps for the sender and the receiver are different.
Sender Receiver
1 Set up for ad hoc mode. (both sender and receiver)
1 Turn on the WLAN switch on the left side of the PSP™ system
( page 21).
2 Prepare to receive the image. (receiver)
1 Under , select the icon for the location where you want to save the
image, and then press the button.
2 Select "Receive", and then press the button.
The system is now ready to receive an image.
3 Send the image. (sender)
1 Select the image you want to send, and then press the button.
2 Select "Send", and then press the button.
The nicknames for PSP™ systems ready to receive an image are displayed.
3 Select the system to send to, and then press the button.
The system starts to send the image.
4 Save the image that you received. (receiver)
When the transfer is completed, the image that was received is displayed
on the screen.
1 With the image displayed, press the button.
A confirmation message is displayed.
2 Select "Yes", and then press the button.
Hints
• The location where an image is saved depends on your selection in step 2-1. Note that you
cannot save images in the Digital Camera Images folder.
• You can also transfer images from the on-screen control panel ( page 71).
GB
Photo
Photo options menu
77
Page 78

Playing slideshows
You can set the available images to be displayed in order.
1 Select the icon for a folder or media containing images,
and then press the start button.
The slideshow begins. The content displayed varies depending on the icon
selected.
Icon Description
Memory Stick™
Digital Camera
Images
Folder All images in the selected folder are displayed in order.
Images
Stopping a slideshow
Press the button.
Hints
• The display speed of the images can be adjusted. See "Photo Settings" ( page 90) for
details.
• The slideshow can also be started in the following ways:
– From the options menu ( page 76).
– From the image control panel ( page 71).
Using the control panel
All images saved on a Memory Stick Duo™ are displayed
in order.
All images in the Digital Camera Images folder are
displayed in order.
Images are displayed in order, starting from the selected
image.
1 Press the button during the slideshow.
The control panel is displayed.
Playing slideshows
78
Page 79

2 Select an icon, and then press the button.
Clearing the control panel
Press the button or the button.
List of Operations
Icon Description
Slideshow
Options
View Mode Changes the size of the image displayed on the screen
Display Displays image information
Switches the information displayed on the screen
( page 80)
Control panel
GB
Photo
Help
Previous Displays the previous image
Next Displays the next image
Play Starts the slideshow
Pause Pauses the slideshow
Stop Stops the slideshow
Displays the functions that can be performed using the
PSP™ system buttons
Playing slideshows
79
Page 80

Icon Description
Repeat Plays the slideshow repeatedly
Displaying slideshow options
1 During a slideshow, select from the control panel, and
then press the button.
Each time you press the button, the option switches as follows:
Image name and date of last update are displayed.
Image name and date of last update are displayed, together
with thumbnails of each image.
The display is cleared.
Operating with PSP™ system buttons or the remote
control
You can operate the PSP™ system without using the control panel by using the
system buttons or remote control.
System button
operation
Playing a slideshow Press the start button. Press the u button.
Pausing a slideshow Press the start button. Press the u button.
Stopping a slideshow Press the button. -
Displaying the previous
image
Displaying the next image Press the R button. Press the > button.
Displaying slideshow
options
Press the L button. Press the . button.
Press the button. -
Remote control
operation
80
Playing slideshows
Page 81

Hint
Some buttons cannot be operated while the control panel is displayed on the screen. In this
case, press the button to clear the control panel.
GB
Photo
Playing slideshows
81
Page 82

Saving images on a Memory Stick Duo™
The following two methods can be used to save images on a Memory Stick
Duo™.
Taking photos using a digital still camera
When using a digital still camera that is compatible with the Memory Stick
Duo™, photos can be displayed by inserting the Memory Stick Duo™ from the
camera directly into the PSP ™ system. Photos on the Memory Stick Duo™ will
be displayed in the system's "Digital Camera Images" folder.
Hint
You can use Memory Stick Duo™ media with a digital still camera that can handle only the
standard-size Memory Stick™ by using a Memory Stick Duo Adaptor (model number
MSAC-M2: a Sony product sold separately).
Saving image data items from a PC to a Memory Stick
Duo™
You can save images using any of the following methods:
To a Memory Stick Duo™ inserted
2
in the PSP™ system
1
PC
1 Use a PC with a Memory Stick™ slot.
3
Memory Stick Duo™
*
2 Use a USB cable ( page 102).
3 Use a commercially available Memory Stick USB reader/writer.
Saving images on a Memory Stick Duo™
82
*
Page 83

* A Memory Stick Duo Adaptor (model number MSAC-M2: a Sony product sold
separately) is required if the slot on the device you are using is able to handle only the
standard-size Memory Stick™.
Where to save image data
Create a folder named "PSP" directly on the Memory Stick Duo™, and then
create a folder named "PHOTO"* in the "PSP" folder. Save image data in the
"PHOTO" folder. The PSP™ system will not recognize data items saved
anywhere other than in this folder.
* The folder name does not need to be all capital letters.
GB
Photo
Memory Stick
Duo™
PSP
PHOTO
Data items
Folder
1
2
Folder
Data items
Hints
• If a folder named "PSP" has already been created on the Memory Stick Duo™, create a
"PHOTO" folder within it.
• You can create folders within the "PHOTO" folder (Figure 1).
• Folders created within sub-folders will not be recognized (Figure 2).
• It may not be possible to display some images, depending on the size of the image data.
• Images edited using a PC may not be viewable on the PSP™ system.
• Chinese language filenames must be changed to English or numerals. The PSP™ system
cannot correctly display filenames written in Chinese.
Saving images on a Memory Stick Duo™
83
Page 84

Network
Connecting to the Internet
You can connect to the Internet to view Web pages using the Internet browser.
Note that you must be in an Internet-accessible location to connect to the
Internet.
1 Check that you have completed network settings.
To connect to the Internet, you must first enter settings and save a
connection for infrastructure mode ( page 104).
2 Select under from the home menu, and then press
the button.
The Internet browser starts, and the menu is displayed.
Connecting to the Internet
84
Page 85

3 Using the up button, select the address bar, and then press
the button.
The on-screen keyboard is displayed.
Address bar
Menu bar
4 Enter the address for the Web page using the on-screen
keyboard ( page 114).
After you have entered the address, the PSP™ system will connect to the
Internet. While the page is loading, the busy icon is displayed in the lower
right corner of the screen. When a connection is successfully established,
the Web page will be displayed.
Busy icon
GB
Network
Connecting to the Internet
85
Page 86

5 Once the Web page is displayed, press the button to
hide the menu.
By pressing the button, you can switch between displaying and hiding
the menu. From the menu bar, you can access various features and settings
such as "Back" and "Close Page".
Hints
• If you try to open a Web page using the Internet browser when a connection to the Internet
has not been established, the system will automatically try to connect to the Internet.
• Usually, the most recently used connection will be automatically selected when
connecting to the Internet.
• The Internet Browser does not officially support Chinese language display.
For the latest information, visit
http://www.sceh.com.hk (Hong Kong, Southeast Asia)
http://www.sceh.com.tw (Taiwan)
For detailed instructions on how to use the Internet browser, refer to the
Web page for the Internet browser usage manual.
http://www.playstation.com/manual/psp/
Closing the Internet browser
1 With the Internet browser displayed, press the button.
The Internet browser closes.
Users are responsible for all actions taken in browsing the Web site as well
as playing and downloading files from the Internet. Except to the extent
prohibited by applicable laws, Sony Computer Entertainment Inc. and/or
any of its affiliates shall not be liable for any loss or damage to your
Internet Browser or PSP™ (PlayStation
deletion or damage to your saved data on Memory Stick Duo™, arising
out of your act of browsing websites and of playing, downloading, and
running files on the Internet.
®Portable) system, nor for any
Connecting to the Internet
86
Page 87

Settings
Settings for the PSP™ system
You can adjust the settings for the PSP™ system, as well as settings for
features, such as video, photo and network.
1 Select from the home menu.
Icons for various settings are displayed.
2 Select an icon, and then press the button.
A setting screen for the selected icon is displayed. For details, see the
instructions for each setting ( pages 88-113).
GB
Settings
Settings for the PSP™ system
87
Page 88

Icons displayed under Settings
Network Update
USB Connection
Video Settings
Photo Settings
System Settings
Theme Settings
Date & Time Settings
Power Save Settings
Sound Settings
Security Settings
Network Settings
Provides access to updates for the system
software ( page 111)
Allows for connection to a PC using a USB
cable ( page 102)
Includes settings for UMD™VIDEO Menu
Language, Audio Language and Subtitle
Language ( page 89)
Includes settings for adjusting the slideshow
speed ( page 90)
Includes settings for the System Language and
Nickname, and provides an option to format
Memory Stick Duo™ media ( page 91)
Allows the user to change the background color
and display an image as wallpaper ( page 94)
Allows the user to set the date and time, as well
as adjust for daylight saving time ( page 95)
Includes settings to automatically turn off the
backlight and put the system in sleep mode
( page 96)
Provides access to settings for AVLS
(Automatic Volume Limiter System) and Key
Tone ( page 98)
Allows the user to change the password and
adjust the level setting for the parental control
feature ( page 99)
Provides access to settings for connecting to a
wireless local area network (WLAN)
( page 104)
Settings for the PSP™ system
88
Page 89

Video Settings
You can set the UMD™VIDEO language or boost UMD™VIDEO volume.
Notice
Depending on the UMD™VIDEO, playback conditions may be set in advance by the
software developer. In such cases, certain options may not be available, even if you follow
the instructions in this manual.
Menu Language Select a language for the UMD™VIDEO menu.
Audio Language Select a language for the audio.
Subtitle Language Select a language for subtitles.
UMD™Video
Volume
Hint
The settings at the time of purchase are as follows:
– "Menu Language" and "Subtitle Language" are set to "English" (for PSP-1006 K) or
"Chinese" (for PSP-1007 K).
– "Audio Language" is set to "Original Language".
– "UMD™Video Volume" is set to "Normal".
Adjust the volume when UMD™VIDEO output level is low.
The volume increases in the following order: "Normal", "+1"
and "+2".
GB
Settings
Video Settings
89
Page 90

Photo Settings
You can set the Slideshow Speed.
Fast Displays images at a faster rate
Normal
Slow Displays images at a slower rate
The default setting for the menu item is underlined.
Displays images at normal speed
90
Photo Settings
Page 91

System Settings
You can adjust the settings for and display information about the PSP™ system,
or format a Memory Stick Duo™.
Nickname
The nickname you selected in the initial setup can be changed. Use the onscreen keyboard to enter a new nickname. For details on entering text, see "How
to use the keyboard" ( page 114).
System Language
Sets the language for system menus, such as the home menu.
Deutsch Displays messages in German
English
Español Displays messages in Spanish
Français Displays messages in French
Italiano Displays messages in Italian
Nederlands Displays messages in Dutch
Português Displays messages in Portuguese
Pyccкий Displays messages in Russian
The default setting for the menu item is underlined.
Displays messages in English
Displays messages in Japanese
Displays messages in Korean
GB
Settings
System Settings
91
Page 92

Character Set
You can set the character code to be applied to music and other types of files.
It usually is not necessary to adjust this setting.
For File Names Sets the character code to be used in music and other file names
For Text in Files Sets the character code for text in m3u and other types of files
Hint
The default setting is "Multilingual Latin 1 (850)".
Battery Information
You can display the following information about the system battery:
Charge Level Displays the battery charge level as a percentage
*
Hours Left
Power Source Displays the current source of power: "External" or "Battery"
Battery Status
* The number of hours as calculated by the system is shown as an estimate.
Hint
There may be a slight difference between the display information and actual battery
performance. This is due to variations in actual usage conditions and environmental factors
(such as temperature).
Displays the remaining hours of battery duration (except when
charging)
Displays the status of the battery: "In Use", "Charging" or
"Charge Complete"
Format Memory Stick™
You can format Memory Stick Duo™ media using the system. Follow the onscreen instructions to perform this operation.
System Settings
92
Page 93

Notice
When you format, all software and data stored on the Memory Stick Duo™ will be deleted
and cannot be recovered. Be careful not to accidentally erase important data.
Restore Default Settings
You can restore settings to the values as set at the time of purchase. Follow the
on-screen instructions to perform this operation.
Notices
• When the default settings are restored, the current settings will be lost and cannot be
recovered.
• After an update has been performed, this feature cannot be used to go back to a previous
version of the system software.
System Information
You can display information about the PSP™ system.
MAC Address Displays the MAC address
System Software Displays the version of the system software
Nickname Displays the nickname
About PSP™ (PlayStation®Portable)
Displays trademark and copyright information related to software used by the
PSP™ system.
GB
Settings
System Settings
93
Page 94

Theme Settings
You can change the theme for the PSP™ system screen or display an image as
wallpaper.
Theme
You can change the background color of the screen. Use the directional buttons
to select a background color, and then press the button to complete the
setting.
Original Changes automatically to a preset color each month
Color swatches Sets to the selected color
The default setting for the menu item is underlined.
Wallpaper
You can select between displaying and not displaying wallpaper.
Do Not Use Sets to not display wallpaper
Use
The default setting for the menu item is underlined.
Displays the image set as wallpaper under (Photo)
( page 74)
94
Theme Settings
Page 95

Date & Time Settings
You can set the date and time, time zone and daylight saving time for the PSP™
system. Set each item using the directional buttons and enter the setting by
pressing the button.
Date and Time
Date Format Sets the order of year, month and day displayed on the screen
Time Format Sets to use the 12-hour or 24-hour display format
Time Zone Sets the appropriate time zone
Daylight Saving
Hints
• When the time zone is changed, the date and time settings are automatically adjusted
based on the time difference between the old and new time zones.
• If "Theme" ( page 94) is set to "Original", when you change the month setting under
"Date & Time Settings", the background color will change automatically.
Sets the year, month, day, hour, minute and second (and AM/
PM setting if using a 12-hour time format)
Selects either "Standard" or "Daylight Saving" (Standard is the
default)
GB
Settings
Date & Time Settings
95
Page 96

Power Save Settings
You can conserve the power of the PSP™ system by setting the system to
automatically switch off the backlight or go into sleep mode.
Backlight Auto-Off
When the system remains idle for a certain period of time, it saves power by
automatically turning off the backlight on the LCD screen. When the backlight
is turned off, the screen goes blank.
Off The backlight does not turn off automatically.
2 minutes
5 minutes
10 minutes
The default setting for the menu item is underlined.
Turning on the backlight
When the backlight is turned off automatically, press any of the system buttons
to turn it back on.
Hint
The Backlight Auto-Off feature may not work during the following operations:
– During video playback
– While playing a slideshow
Turns the screen darker after one minute and turns off the backlight
after another minute
Turns the screen darker after one minute and turns off the backlight
after four more minutes
Turns the screen darker after one minute and turns off the backlight
after nine more minutes
Power Save Settings
96
Page 97

Auto Sleep
You can set the system to conserve power by automatically entering sleep mode
when it remains idle for a certain period of time. For details on clearing sleep
mode, see "Clearing sleep mode" ( page 30).
Off The system does not automatically go into sleep mode.
5 minutes Enters sleep mode after five minutes
10 minutes
15 minutes Enters sleep mode after fifteen minutes
The default setting for the menu item is underlined.
Enters sleep mode after ten minutes
Hint
The Auto Sleep feature may not work during the following operations:
– When connected using the AC adaptor
– While playing a game
– During video playback
– During music playback
– While playing a slideshow
WLAN Power Save
You can switch the power mode of the wireless networking feature. If you
select "On", the system will communicate with reduced power consumption.
Off Communications set to maximum power
On Communications set to power-save mode
The default setting for the menu item is underlined.
GB
Settings
Notice
If you set to "On", the system may not be able to communicate correctly in certain
environments. In such cases, change the setting to "Off".
Power Save Settings
97
Page 98

Sound Settings
You can turn off the key tone and limit the volume level.
AVLS (Automatic Volume Limiter System)
You can limit the maximum volume. This can help prevent sound escaping
from the headphones, as well as the possible danger resulting from being unable
to hear what is going on around you when wearing headphones.
Off Does not set a limit; allows for the volume to be adjusted manually
On Sets a limit on the volume
The default setting for the menu item is underlined.
Key Tone
You can turn off the key tone (the confirmation sound made when you press a
button).
Off Does not make a confirmation sound
On
The default setting for the menu item is underlined.
Makes a confirmation sound
98
Sound Settings
Page 99

Security Settings
You can adjust settings related to PSP™ system security features.
Change Password
Changes the 4-digit password. The password is required for the following
operations:
• To change the "Parental Control Level" or "Internet Browser Start Control"
settings
• To play a UMD™ that is restricted by the system's Parental Control Level
setting
• To start the browser when "Internet Browser Start Control" is set to "On"
• To change the password
Change Password
1 Select (Security Settings) under from the home
menu, and then press the button.
2 Select "Change Password", and then press the button.
The password entry screen is displayed.
3 Using the directional buttons, enter the current 4-digit
password, and then press the button.
When changing the password for the first time after purchase, you must
enter "0000".
4 Using the directional buttons, enter a new 4-digit
password, and then press the button.
5 Select "Yes", and then press the button.
The password is changed.
Hint
Make a record of your password for future reference.
GB
Settings
Security Settings
99
Page 100

Parental Control Level
Some UMD™ software have a preset parental control level based on the
content. You can set the parental control level on the system to restrict the
playback of a UMD™ with a level that is higher than that set on the system.
Parental Control Level
The parental control level of the system can be either turned off or set to one of
11 different levels.
Off Turns off parental control
11-1
The default setting for the menu item is "9".
The combination of the parental control levels of both the PSP™ system and
the UMD™ determine whether a UMD™ can be viewed or not. The
combination of the two levels is displayed in the table on page 101.
Example: If the parental control level of the system is set to "9", a UMD™ with
a level from "1" to "9" can be played on the system.
Sets the level of content to be restricted. A setting of "1" is the most
restrictive; "11" is the least restrictive.
100
Security Settings
 Loading...