

Sony PMW-100, PMW-150, PMW-200, PMW-160, PMW-300 Getting Started

PMW-100/200/150/160/300
Getting Started
This document describes the procedure for upgrading the
PMW-100/200/150/160/300 to the latest version. First
save the update data to an SxS memory card, and then use
the menu to perform the upgrade.
For details on using each camcorder, refer to the
Operating Instructions for the camcorder.
Checking the Current Version
You can use the update data to upgrade to the latest
version.
To check the unit version of the PMW-100/
200/150/160/300
Select “Version” from the OTHERS menu.
Note
The version upgrade data is different depending on the
unit version of the PMW-100. If the version name
includes “_1”, use the version upgrade data with the
machine name “PMW-100_1”. Otherwise, use the
version upgrade data with the machine name “PMW100”.
Saving the Update Data to an SxS
Memory Card
1
Use one of the following methods to enable data to be
saved from the computer to the SxS memory card.
• Use a computer with an SxS memory card slot.
• Connect an SBAC-US20 SxS Memory Card USB
Reader/Writer (not supplied) to the computer.
• Connect the camcorder to the computer using the
USB cable.
2
Format (initialize) the SxS memory card using the
camcorder.
Note
Make sure to format an SxS memory card on the
camcorder that is to be upgraded.
3
Insert the SxS memory card that you formatted in step
2 into the SxS memory card slot on the computer, the
SBAC-US20 (not supplied), or the camcorder.
4
Download the zip file containing the update data
(model name_Y.YY_XXXX-SxS.zip) from the
update-data download site, and save it to a desired
location in the computer (Y.YY: latest version
number).
To check the lens version of the PMW-100
If the unit version is 1.02 or later, the lens version is
displayed by selecting “Version (Lens)” from the
OTHERS menu.
To check the lens version of the PMW-150/
160
The lens version is displayed by selecting “Version
(Lens)” from the OTHERS menu.
Notes on Performing Upgrade
• For PMW-100/200/150/160, either use an AC power
source or a fully charged battery pack.
For PMW-300, use an AC power source. If the battery
pack is mounted, you can prevent possible power loss
when AC power is shut off.
For AC power supply, use a BC-U1/U2 Battery
Charger (usable as an AC adaptor).
• Use an SxS Pro or SxS-1 memory card. Operations are
not guaranteed with memory cards other than SxS PRO
and SxS-1.
Note
Check the model name and the version number of the
zip file, and download the file matching to your
camcorder.
5
Expand the zip file, and save the update data file
(model name_Y.YY_XXXX-SxS.f.bin) directly to
the root directory of the SxS memory card that you
inserted in step 3.
Note
Do not save any files on the SxS memory card other
than the update data.
©2012 Sony Corporation 4-443-252-14 (1)
Performing the Upgrade
Note
Do not do any of the following while performing the
upgrade. Doing so could interrupt the upgrade process, and
cause malfunctions.
• Eject or insert an SxS memory card
• Turn the power off
For details on using each camcorder, refer to the
Operating Instructions for the camcorder.
1
Insert the SxS memory card containing the update data
into the camcorder.
Note
Do not insert another SxS memory card in the other
slot.
2
To upgrade the PMW-100/200/150/160/300:
Select “Version Up” from the OTHERS menu,
and then select “Execute”.
Note
Do not rotate the camcorder’s LCD monitor
toward the lens during the upgrade process.
(Video reversing is disabled during the upgrade
process.)
The following message appears: “Connect DC Power
to DC IN Upgrade Version?”
3
Select “Execute”.
The message “Searching Package File” appears, and
the camcorder starts searching for the update data.
When the update data is found, the message “Version
VX.XX > VY.YY Upgrade” appears (X.XX: current
version number, Y.YY: latest version number).
If the update data is not found:
The message “Version Upgrade No File” appears.
The following are the possible causes.
• The update data is not saved to the root directory of
the SxS memory card.
• The update data for a different model is saved.
• The data could not be decoded correctly.
• The header information is incorrect.
Save the correct update data to an SxS memory card,
and restart the upgrade from step 1.
4
Select “Execute”.
The upgrade begins.
displayed during each phase, and the approximate time
they will take.
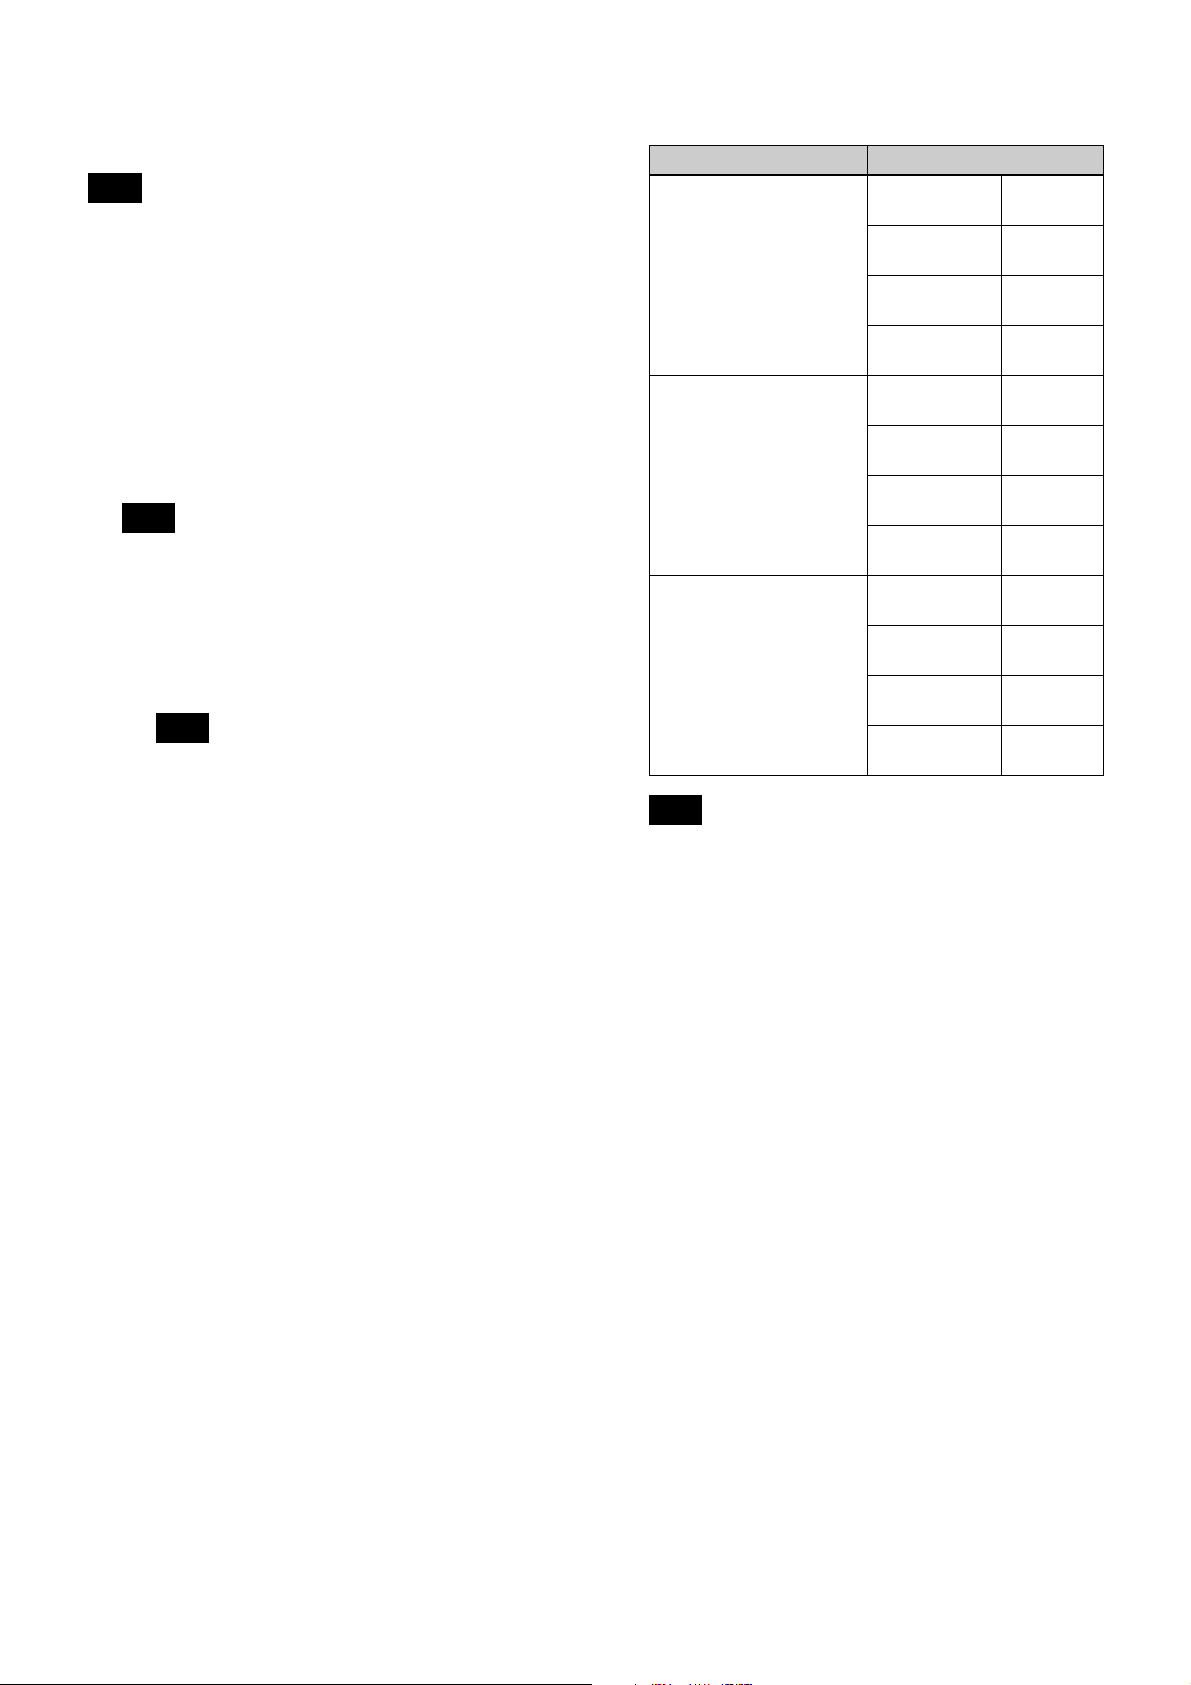
Message Approximate time
Version Upgrade Phase1
Executing… xxxx Secs
Elapsed
Version Upgrade Phase2
Executing… xxxx Secs
Elapsed
Version Upgrade Phase3
Executing… xxxx Secs
Elapsed
Note
PMW-100 About 7
minutes
PMW-200 About 5
minutes
PMW-150/160 About 4
minutes
PMW-300 About 4
minutes
PMW-100 About 6
minutes
PMW-200 About 3
minutes
PMW-150/160 About 4
minutes
PMW-300 About 14
minutes
PMW-100 About 15
minutes
PMW-200 About 11
minutes
PMW-150/160 About 11
minutes
PMW-300 About 10
minutes
During switchover between completion of Phase 1 to
2, and the start of Phase 2 to 3, no message appears,
although the process is still running. Do not turn off
the power.
When the upgrade is complete, the following message
appears: “Version Upgrade OK: Turn Power Off”.
If the upgrade was interrupted:
If there was an error in the update data, the following
message appears: “Version Upgrade NG: Cannot
Read. Power Off”. Restart the camcorder, save the
correct update data to an SxS memory card, and then
restart the upgrade from step 1.
If the upgrade failed:
The message “Version Upgrade Error!!” appears. Recheck the upgrade procedure, and restart the upgrade
from step 1.
If the upgrade still does not execute correctly, then
there may be a malfunction in the camcorder. Contact
your dealer or a Sony service representative.
5
Restart the camcorder.
6
Make sure that the version is now the latest (see
“Checking the Current Version”).
There are three phases to the upgrade, labeled “Phase
1” to “Phase 3”. Below are shown the messages
If the version is not the latest:
Re-check the upgrade procedure, and restart the
upgrade from step 1.
 Loading...