

Sony PEG-NZ90 User Manual
4-670-644-31
Checking the package contents
1
2
3
™
Sony CLIÉ
Charging your Sony
CLIÉ
Performing the initial
settings
handheld components
™
handheld
Read
This
First
Operating Instructions
Personal Entertainment Organizer
Basic operations of your
4
Sony CLIÉ™ handheld
Taking images/movies
5
Using your CLIÉ™ handheld
6
with your computer
Enjoying your CLIÉ™
handheld
Using applications
PEG-NZ90
© 2003 Sony Corporation

About this manual
This manual provides an overview of your CLIÉ™ handheld’s features including information
about setting up your CLIÉ
Checking the package
contents
™
handheld and what you can do with your CLIÉ™ handheld.
Page 9
Make sure that all the accessories are
supplied in the package.
Page 11
Sony CLIÉ™ handheld
components
Learn about the parts of your CLIÉ
handheld and other accessories.
Page 18
Charging your Sony
CLIÉ™ handheld
Be sure to charge your CLIÉ
handheld before you start using it
for the first time.
Page 22
Performing the initial
settings
Configure the initial settings before
operating your CLIÉ handheld.
Page 28
Basic operations of your
Sony CLIÉ™ handheld
Learn about the basic operations of
your CLIÉ handheld.
Taking images/movies
Using your CLIÉ™ handheld
with your computer
Enjoying your CLIÉ™
handheld
Using applications
2
Page 49
Learn about the basic operations of
your CLIÉ handheld.
Page 64
Use your CLIÉ handheld with your
computer.
Page 72
Learn about your CLIÉ handheld’s
features.
Page 85
Learn about the applications supplied
with your CLIÉ handheld.
Refer to the following together with this manual.
Handbook (A PDF file in the CD-ROM)
• When using CLIÉ handheld for the first time
The basic features and operations are explained in detail.
• CLIÉ handheld advanced operations
The convenient features and how to make full use of your CLIÉ handheld are
explained in detail.
CLIÉ Application Manual (HTML format: Start up on a
computer)
The manual explains about how to use the supplied applications in detail.
For details on using the manual, refer to “Using CLIÉ Application Manual” on page
85 in this manual.
Troubleshooting Q&A
The manual helps in solving problems that you may face while using your CLIÉ
handheld.
Getting Started booklet and Setup poster
Please read these documents at the beginning. They explain how to set up your
handheld for first use.
3

WARNING
To prevent fire or shock hazard, do
not expose the unit to rain or
moisture. To avoid electrical
shock, do not open the cabinet.
Refer servicing to qualified
personnel only.
Owner’s Record
The model number and serial number are
located on the back of the product. Record the
model number and the serial number in the space
provided below. Refer to them whenever you call
upon your Sony dealer regarding this product.
Model No._____________
Serial No.______________
The socket-outlet shall be installed near the
equipment and shall be easily accessible.
IN NO EVENT SHALL SONY BE LIABLE FOR
ANY INCIDENTAL, INDIRECT OR
CONSEQUENTIAL DAMAGES OR OTHER
DAMAGES INCLUDING WITHOUT
LIMITATION LOSS OF PROFITS, LOSS OF
REVENUE, LOSS OF DATA, LOSS OF USE OF
THE PRODUCT OR ANY ASSOCIATED
EQUIPMENT, DOWNTIME, AND
PURCHASER’S TIME RELATED TO OR
ARISING OUT OF THE USE OF THIS PRODUCT,
ITS HARDWARE AND/OR ITS SOFTWARE.
On the supplied oftware
• Copyright laws prohibit reproducing the
software or the software manual in whole or
in part or renting the software without the
permission of the copyright holder.
• In no event will SONY be liable for any
financial damage or loss of profits, including
claims made by third parties, arising out of
the use of the software supplied with this
product.
• In the event a problem occurs with this
software as a result of defective
manufacturing, SONY will replace it at
SONY’s option or issue a refund. However,
SONY bears no other responsibility.
• The software provided with this product
cannot be used with equipment other than
that which it is designated for use with.
• Please note that, due to continued efforts to
improve quality, the software specifications
may be changed without notice.
• The software library incorporated in CLIÉ
handheld is based in part on the work of the
Independent JPEG Group.
Program © 2003 Sony Corporation, © 2003 Palm,
Inc., or its subsidiaries. All rights reserved.
Documentation © 2003 Sony Corporation
CAUTION
Please contact your nearest Sony dealer regarding
any problems you are experiencing with your
Sony product.
Notes
• Sony does not support third-party add-on
applications. If you are having a problem
with a third-party application, please contact
the developer or publisher of that software.
• The illustrations in this manual may differ
from the actual software.
• Explanations in this manual assume that you
are familiar with basic operations of
®
Windows
and operating system, please refer to their
respective manuals.
Before using your CLIÉ handheld, be sure to read
the accompanying End-User’s License
Agreement.
Sony, CLIÉ, “Memory Stick”, “MagicGate
Memory Stick”, Jog Dial, PictureGear Studio and
their logos are trademarks of Sony Corporation.
Palm OS, Graffiti and HotSync are registered
trademarks of Palm, Inc. and its subsidiaries, and
Palm, Palm Powered, Palm Desktop, the Palm
logo, the Palm Powered logo, the HotSync logo
and Palm OS5 logo are trademarks of Palm, Inc
and its subsidiaries.
Microsoft and Windows are registered trademarks
of Microsoft Corporation.
Pentium is a registered trademark of Intel
Corporation.
Pumatech, the Pumatech logo, IntelliSync and
IntelliSync Lite are trademarks of Pumatech, Inc.,
that may be registered in some jurisdictions.
Adobe and Acrobat are trademarks of Adobe
Systems Incorporated.
Bluetooth is a trademark that is owned by the
proprietor and used by Sony under license.
QuickTime and the QuickTime logo are
trademarks of Apple Computer, Inc.
NetFront is a trademark of ACCESS CO, Ltd.
Picsel and the Picsel logo are trademarks of Picsel
Technologies, Ltd.
Contains Macromedia
technology by Macromedia, Inc.,
Copyright © 1995-2001 Macromedia, Inc. All
rights reserved.
Macromedia, Flash and Macromedia Flash are
trademarks or registered trademarks of
Macromedia, Inc. in the United States and
internationally.
This product includes fonts owned by TypeBank
Co., Ltd. under license.
CompactFlash is a U.S. registered trademark of
SanDisk Corporation.
All other trademarks are trademarks of their
respective owners.
. For how to use your computer
®
Flash™ Player
4
WARNING
• The Bluetooth™ function equipped with CLIÉ handheld is valid
only in those countries where CLIÉ handheld is sold.
• In some situations or environments, the use of the Bluetooth™ technology
might be restricted by the proprietor of the building or responsible
representatives of the organization, for example on board of airplanes, in
hospitals or in any other environment where the risk of interference with
other devices or services is perceived or identified as harmful.
• If you are uncertain about the policy applying to the use of Bluetooth™
technology in a specific organization or environment, you are encouraged to
first ask for authorization prior to switching it on.
• Consult your physician or the manufacturer of personal medical devices
(pacemakers, hearing aids, etc.) regarding any restrictions on the use of
Bluetooth™ technology.
• To disable the Bluetooth™ function, turn off your CLIÉ handheld
(page 30).
How to remove the Battery Pack
(Lithium-Ion battery)
Follow “Inserting/Replacing the battery” (page 18) to remove the battery.
How to remove a rechargeable button battery
1
Remove the screw from the side
of your CLIÉ handheld with a
Phillips screwdriver.
3
Pull the ribbon attached to the
button battery.
2
Remove the battery cover.
4
Pull the button battery and
disconnect it from your CLIÉ
handheld.
5

Table of Contents
Checking the package contents
. . . . . . . . . . . . . . . . . . . . . 9
Sony CLIÉ™ handheld
components. . . . . . . . . . . . 11
Locating the parts of your Sony CLIÉ
handheld . . . . . . . . . . . . . . . . . . 11
Changing the operating style . . . . . . 14
Locating cradle components . . . . . . 16
Locating the controls on the supplied
audio remote control. . . . . . . . . . 17
Charging your Sony CLIÉ™
handheld. . . . . . . . . . . . . . 18
Step 1: Inserting/
Replacing the battery . . . . . . . . . 18
Step 2: Charging the battery . . . . . . 20
Performing the initial settings
. . . . . . . . . . . . . . . . . . . . 22
Basic operations of your Sony
CLIÉ™ handheld. . . . . . . . . 28
Basic operations . . . . . . . . . . . . . . 28
Functions of parts . . . . . . . . . . . . . 30
Restarting your Sony CLIÉ handheld . 39
Locating the components of the initial
screen. . . . . . . . . . . . . . . . . . . . 42
Using applications . . . . . . . . . . . . . 46
Entering data. . . . . . . . . . . . . . . . . 48
Taking images/movies . . . . 49
Taking images. . . . . . . . . . . . . . . . 49
Recording movies . . . . . . . . . . . . . 60
Viewing/Playing back files
(CLIE Viewer). . . . . . . . . . . . . . . 62
Using your CLIÉ™ handheld
with your computer . . . . . . .64
Step 1: Install the software on your
computer. . . . . . . . . . . . . . . . . . 64
Step 2: Connect the cradle to your
computer. . . . . . . . . . . . . . . . . . 67
Step 3: Enter a user name for your CLIÉ
handheld. . . . . . . . . . . . . . . . . . 68
Synchronizing data between your CLIÉ
handheld and computer
(HotSync
®
) . . . . . . . . . . . . . . . . 70
Enjoying your CLIÉ™ handheld
. . . . . . . . . . . . . . . . . . . . .72
Using your CLIÉ handheld to view image
files and movie files taken with
“Memory Stick”-compliant
devices . . . . . . . . . . . . . . . . . . . 72
Using voice recorder . . . . . . . . . . . 73
Listening to music . . . . . . . . . . . . . 74
Managing schedules (Date Book). . . 75
Managing addresses and telephone
numbers (Address) . . . . . . . . . . . 77
Exchanging Date Book and Address data
between your CLIÉ handheld and
computer. . . . . . . . . . . . . . . . . . 78
Viewing computer documents on your
CLIÉ handheld
(Picsel Viewer for CLIE) . . . . . . . 79
Connecting to the Internet. . . . . . . . 80
Using the Bluetooth™ function . . . . 81
6

Using applications . . . . . . . 85
Troubleshooting . . . . . . . 101
Using CLIÉ Application Manual . . . . .85
Installing add-on applications on your
CLIÉ handheld . . . . . . . . . . . . . . .87
Introducing add-on applications . . . .88
Preventing problems . . . . . . . . . . . 101
Solving problems . . . . . . . . . . . . . 102
Getting Help. . . . . . . . . . . . . . . . . 103
Additional information . . . 104
Notes on use . . . . . . . . . . . . . . . . 104
Specifications . . . . . . . . . . . . . . . 107
INDEX. . . . . . . . . . . . . . . 112
Notes on this manual
• Screen pictures in this manual may be different from the actual displays in the supplied
software.
• Contents of this manual are written for users with knowledge of using Microsoft
Windows® operating system. For details about computer operation, refer to the manual
for the computer.
®
About display (LCD) and camera lens
The LCD of your CLIÉ handheld is designed with precision technology. However, some
pixels may not work or may light always in some cases. Also, brightness of the display
may be inconsistent depending on the angle of view. These are caused by the nature of
the LCD and do not indicate a malfunction.
Please note that Sony does not guarantee for replacement or return in cases like those.
Do not keep the LCD or camera lens directed toward the sun for long time. It may cause
a malfunction. Please be careful when you locate it at an outdoor environment or place
next to a window.
Testing for taking pictures/movies and recording voices
Prior to taking pictures/movies and recording voices, check that those files are normally
saved in your CLIÉ handheld or a “Memory Stick” media.
No guarantee for lost data or damaged data
Sony does not provide any guarantee for lost data or damaged data caused by improper
operations.
Copyrights
Television programs, films, video tapes, and other materials may be copyrighted.
Unauthorized recording of such materials may be contrary to the provision of the
copyright laws.
7

Safety Information
Opening the unit, for whatever reason, could lead
to damages that are not covered by the guarantee.
To avoid electri cal shock, do not open the cabinet.
Refer servicing to qualified personnel only.
Picture and/or sound distortion may occur if this
equipment is positioned in close proximity to any
equipment emitting electromagnetic radiation.
To prevent fire or shock hazard, do not expose
your CLIE handheld to rain or moisture.
Use your CLIE handheld only with the supplied
AC adapter.
Your handheld comes with two cables, a
continental one and a UK one. To connect your
handheld to the power, make sure you use the
appropriate cable.
To disconnect your handheld completely from the
mains, unplug the AC adapter.
Please make sure that the socket outlet is easily
accessible.
Regulatory Information
Sony hereby declares that this product is in
compliance with the essential requirements and
other relevant provisions of European Directive
1999/5/EC.
To obtain a copy of the declaration of conformity
(DoC) with the R&TTE Directive, please access
the following URL: http://
www.compliance.sony.de/
This product complies with EN 55022 Class B and
EN 55024 for use in the following areas:
residential, commercial and light industrial.
This product has been tested and found compliant
with the limits set out in the EMC Directive for
using connection cables not longer than 3 metres
(9.8 feet).
Disposal of batteries
This product contains two batteries : a main
lithium-ion polymer battery and a backup
manganese lithium button battery (for battery
removal procedures, refer to the manual of this
product).
Danger of explosion if a battery is incorrectly
replaced.
Do not handle damaged or leaking batteries.
Dispose of promptly and properly.
The battery pack used in this device may present a
fire or chemical burn hazard if mistreated. Do not
disassemble, heat above 60ÅãC (140ÅãF) or
incinerate. Dispose of used batteries promptly.
Keep away from children.
Dispose of properly at end-of-life.
In some areas the disposal of batteries in
households or business waste may be prohibited.
Please use the public collection system.
8
Checking the package contents
Please check the accessories in the package before you start.
CLIÉ handheld (1) Cradle (1)
AC power adapter (1) Earphones (1)
Checking the package contents
Stylus (1) Audio remote control (1)
The stylus is stored in your CLIÉ
handheld at the factory.
9
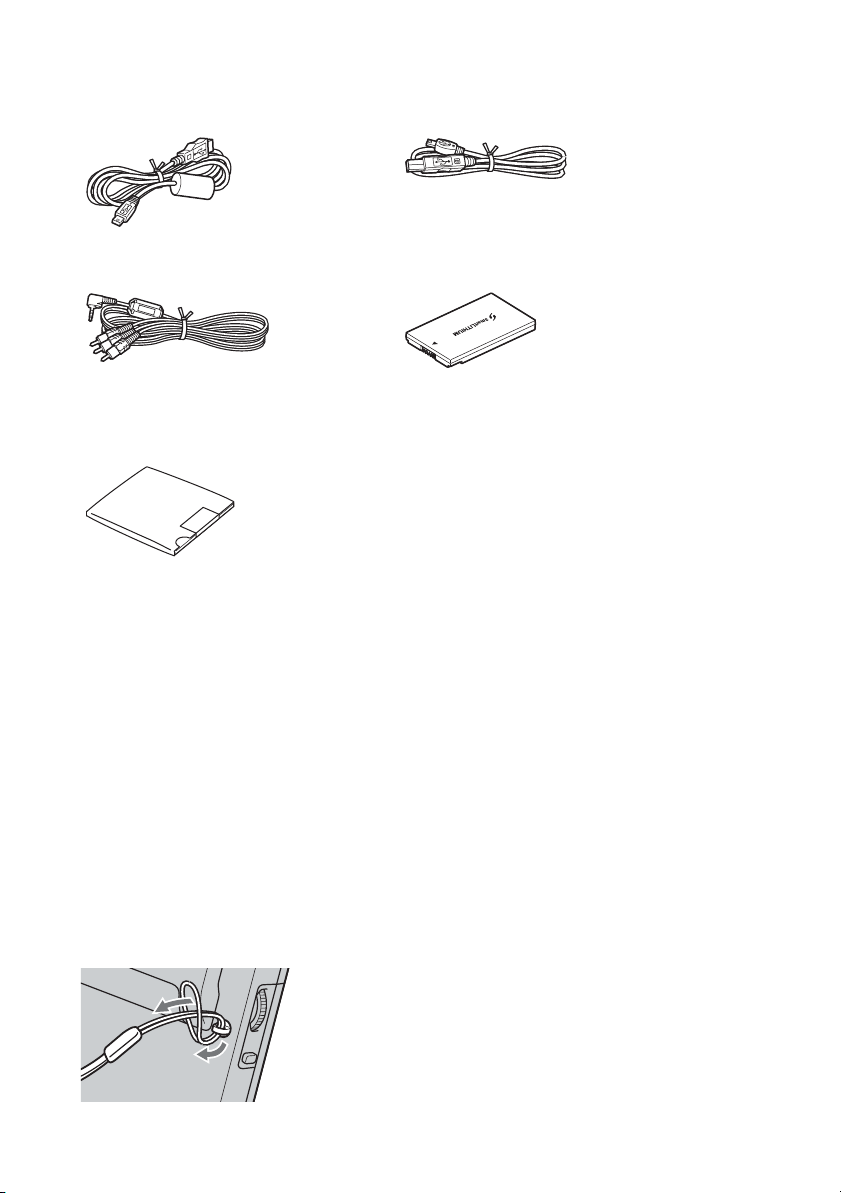
USB cable (1) Printer cable (1)
AV cable (1)
Installation CD-ROM
Battery Pack (1)
The battery pack is inserted into your
CLIÉ
handheld at the factory.
Strap (1)
Refer to the illustration below to attach the
strap.
Protection card (1)
The protection card is stored in your CLIÉ
handheld at the factory.
Read This First - Operating Instructions (1, this manual)
Troubleshooting Q&A (1)
Customer Registration Guide (1)
Customer Registration card (Warranty)
Graffiti label (1)
Software license agreement (1)
Other printed materials
Make sure that the package contains all of the listed accessories. If any item is missing,
contact http://www.clie-link.com.
Attaching the strap
10
Sony CLIÉ™
handheld
components
Each part of the CLIÉ handheld and the supplied accessories is explained in the following.
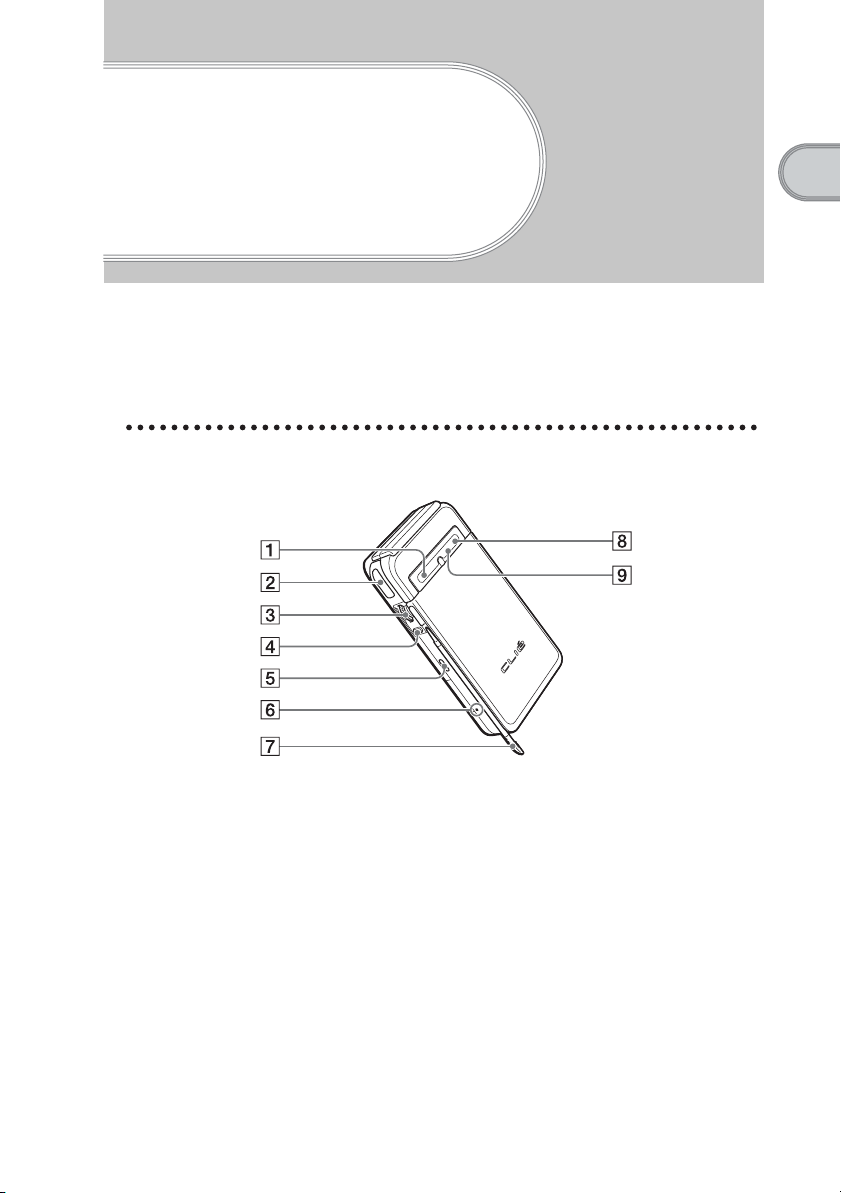
Locating the parts of your Sony CLIÉ handheld
Front panel
Sony CLIÉ™ handheld components
A POWER LED (Page 31)
B IR port (Page 34)
C Jog Dial™ navigator
(Page 29)
D BACK Button (Page 33)
E VOICE REC Button
(Page 32, 73)
F RESET Button (Page 39)
G Stylus (Page 28)
H Bluetooth LED (Page 81)
I “Memory Stick” LED
(Page 35)
11
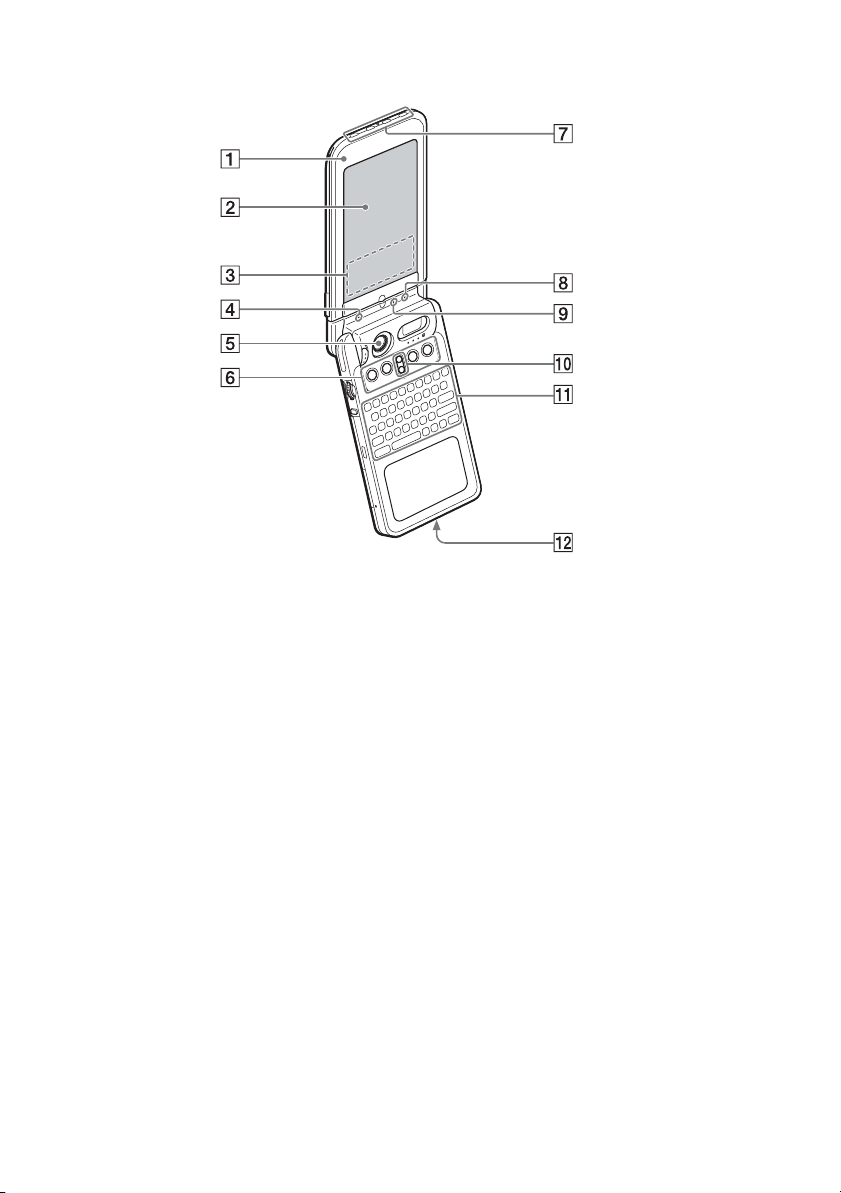
A Display Panel (Page 14)
B Screen (Page 42)
C Graffiti Writing Area
(Page 42)
D POWER LED (Page 31)
E Camera Lens Cover (Page 32)
F Application Buttons
(Page 47)
G Application Buttons
(Page 47)
Available only when your CLIÉ
handheld is set to the turned style.
12
H Bluetooth LED (Page 81)
I “Memory Stick” LED
(Page 35)
J Scroll Button (Page 34)
K Hardware Keyboard
(Page 36)
L Wireless Communication
Slot (Page 37)

Back panel
Sony CLIÉ™ handheld components
A Microphone (Page 73)
B Flash Photometric Sensor
C Flash (Page 57)
D CAPTURE Button
(Page 31, 49, 51, 61)
E Earphone Jack (Page 74)
F Battery Cover (Page 18)
G HOLD Switch (Page 33)
H POWER Switch (Page 30)
I “Memory Stick” Slot
(Page 35)
J REC LED (Page 32)
K Camera Lens (Page 32)
L Lens Cover Lever (Page 32)
M Strap Hook (Page 10)
N Interface Connector Cover
(Page 21)
O Speaker (Page 44)
13
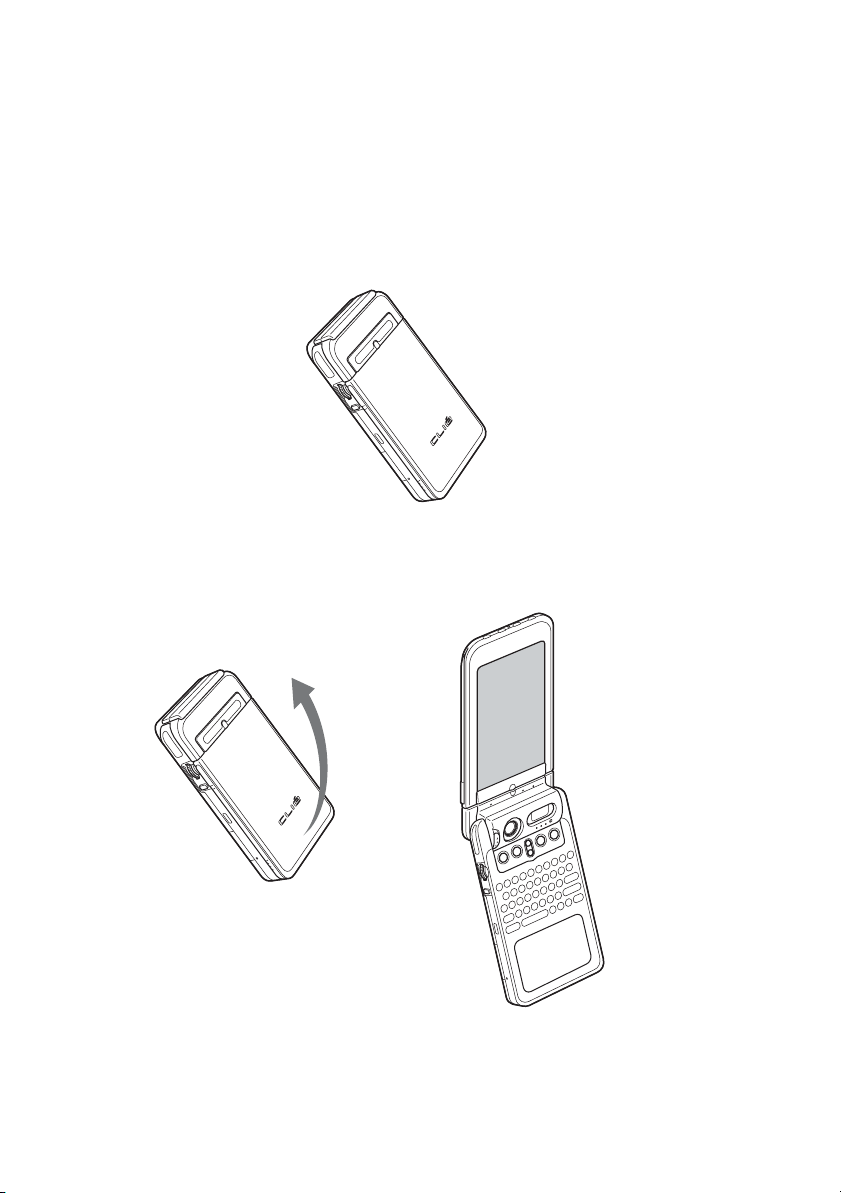
Changing the operating style
Your CLIÉ handheld can be used with the display panel set in three different
styles.
Carrying style
Set your CLIÉ handheld to the “carrying style,” when carrying it around in
your baggage or pocket to guard the screen from damage.
Opened style
Set your CLIÉ handheld to the “opened style,” when you enter data with the
hardware keyboard or take images/movies of yourself.
14
b
Open the display panel until it clicks into place.
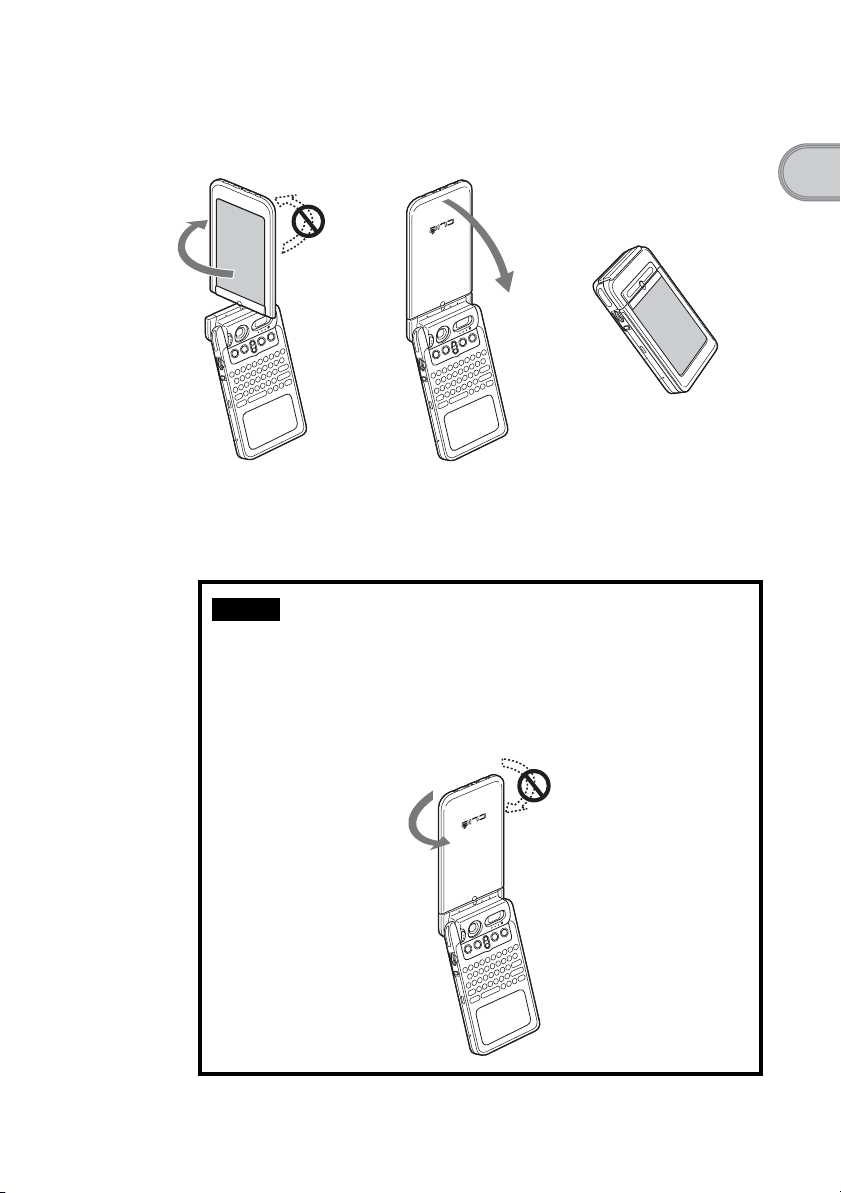
Turned style
Set your CLIÉ handheld to “turned style” to make it compact when you operate
it with the Stylus or use it in the Camera mode.
bb
Sony CLIÉ™ handheld components
Open the display and
rotate it as indicated by an
arrow until it clicks into
place
Note
Do not turn the display panel in any direction other than that specified and do not
apply too much force.
Fold the display over the
keyboard
Closing the display panel
Close the display panel by rotating it as indicated by an arrow.
15

Locating cradle components
A Interface Connector
(Page 21)
B AV output jack
You can connect the supplied AV
cable to view the screen of “CLIE
Album” with your television
(page 89).
C USB Cable Connector
You can connect the supplied USB
cable to connect the cradle and your
computer (page 67). You can also
connect the supplied printer cable to
print out the contents of the “CLIE
Album” screen or “CLIE Viewer”
screen with your printer.
D AC Adapter Connector
(Page 20)
E HotSync Button (Page 68, 71)
16
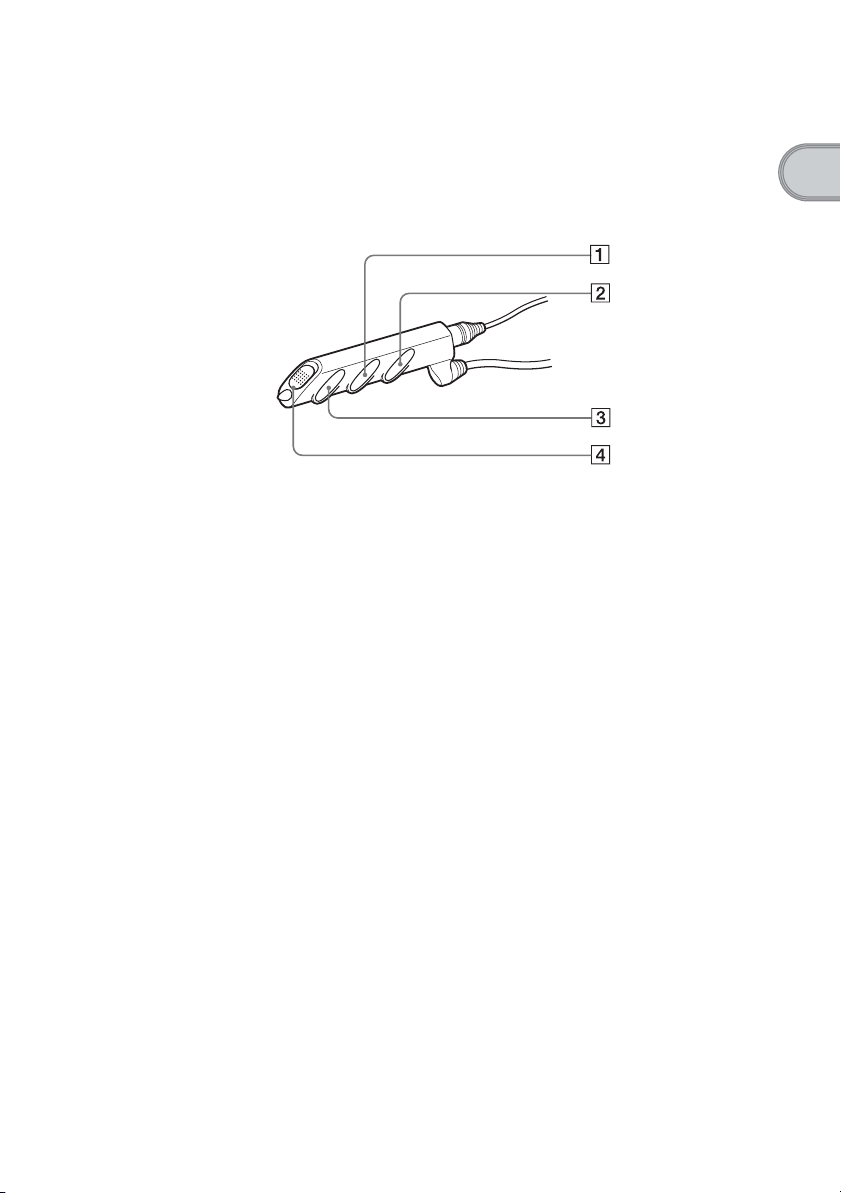
Locating the controls on the supplied audio remote control
You can use the audio remote control when you play back music or audio
movies with an application such as Audio Player or Movie Player.
Sony CLIÉ™ handheld components
A ./> Button
B Volume Control Button
For details on operating each application, refer to the “CLIÉ Application Manual”
b
installed on your computer.
C N/x Button
D HOLD Switch
17
Charging your
Sony CLIÉ™
handheld
Before you use your CLIÉ handheld for the first time,
be sure to charge the battery.
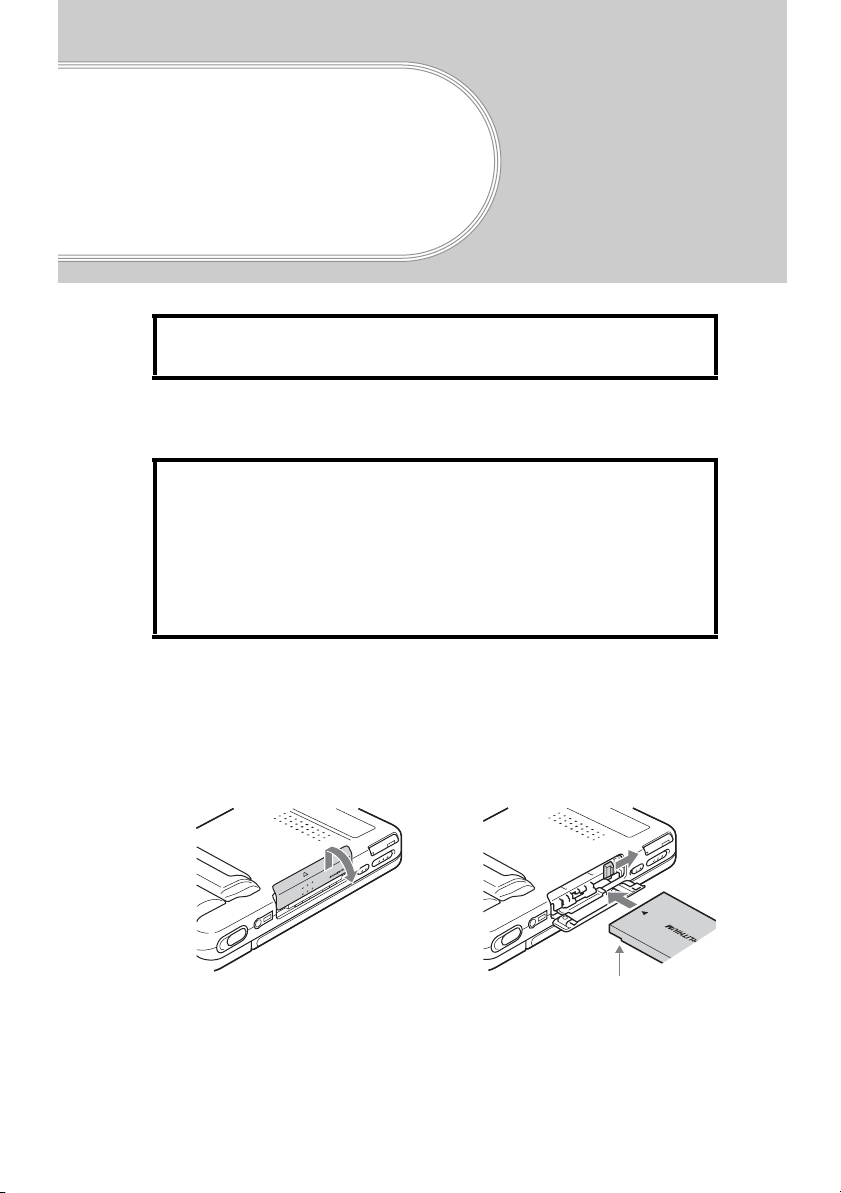
Step 1: Inserting/Replacing the battery
When you replace the battery, be sure to turn off your
CLIÉ handheld and check that the POWER LED and
“Memory Stick” LED are off prior to opening the
battery cover.
If you open the battery cover while the power is on,
data stored on your CLIÉ handheld or data being
recorded to a “Memory Stick” media may be deleted.
18
1
Open the battery cover.
2
Insert the battery.
You can easily insert the
battery by sliding the battery
release knob with the tip of the
battery.
Face the battery terminal
towards the display panel
side

3
Close the battery cover.
Verify that the battery is
completely inserted into the
slot and close the battery cover.
Removing the battery
Slide the battery release knob as directed by the arrow and remove the battery.
Tip
About the built-in rechargeable button battery
Your CLIÉ handheld uses the built-in rechargeable button battery to maintain data stored
in the built-in memory while replacing the Battery Pack.
The rechargeable button battery is automatically charged while you use your CLIÉ
handheld. However, the rechargeable button battery will be completely discharged in
approximately twelve hours if the power is not supplied from the Battery Pack. Make
sure you recharge the button battery before it gets completely discharged.
Charging your Sony CLIÉ™ handheld
How to charge the rechargeable button battery
• Place your CLIÉ handheld in the cradle while the Battery Pack is inserted.
• Turn off your CLIÉ handheld for 24 hours or more while the charged Battery Pack is
inserted.
19
About the Battery Pack
■ Supplied Battery Pack
The “Smart Lithium” function enables to exchange information about
battery conditions between your CLIÉ handheld and the Battery Pack.
Your CLIÉ handheld calculates the discharge rate according to the battery
condition and displays the battery’s remaining charge on the minute time
scale (page 43).
■ Remaining charge indicator
If the battery runs out quickly while sufficient remaining charge is read in
the display, recharge the battery fully to correct a misreading.
However, this operation may not work in the following cases.
• You use the battery at a high temperature for a long time.
• You leave the fully-charged battery for a long time.
• The battery has been worn-out .
■ Operating life
The efficiency of a battery is gradually reduced as the battery is charged or
time go on. If the operation time of your battery becomes shortened notably,
you may need a new one.
The operating life of your Battery Pack varies depending on storage
environments, operating environments, and battery model.
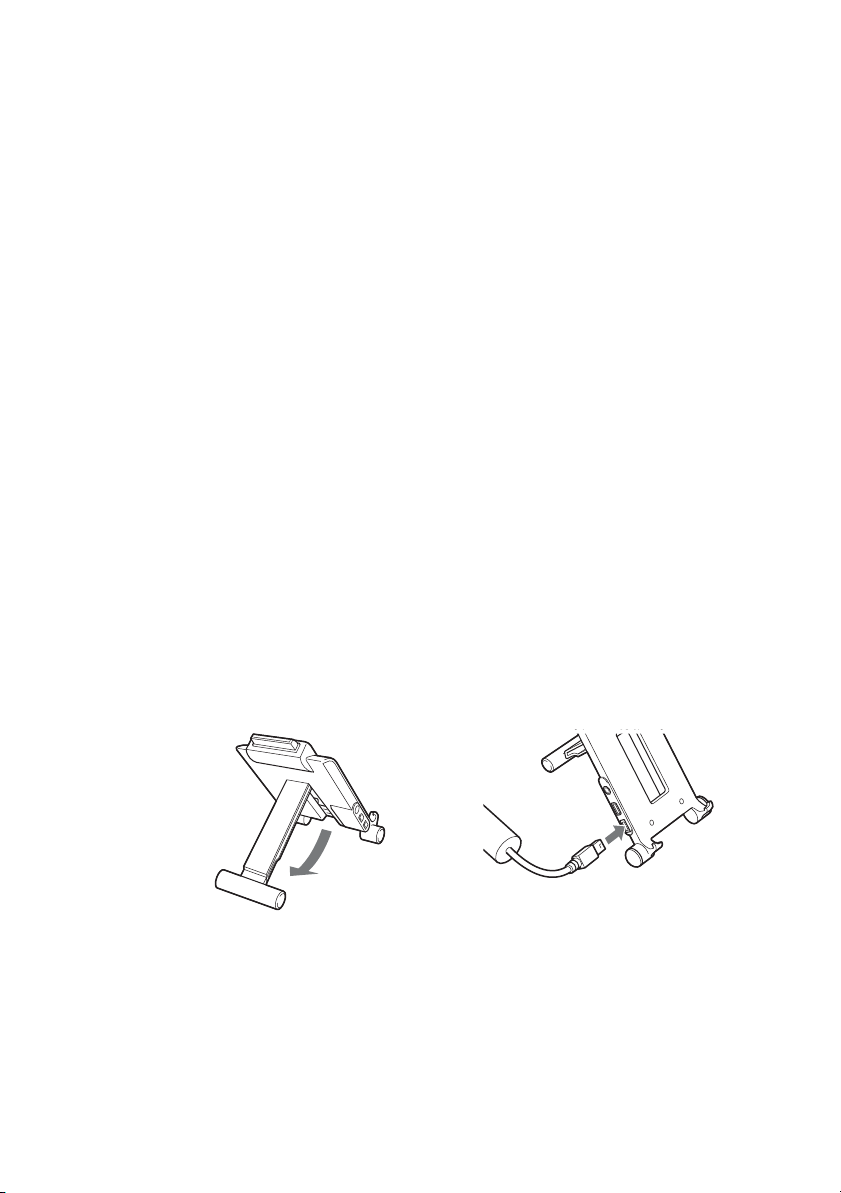
Step 2: Charging the battery
20
1
Set up the stand of the
cradle.
2
Connect the AC adapter
to the cradle.
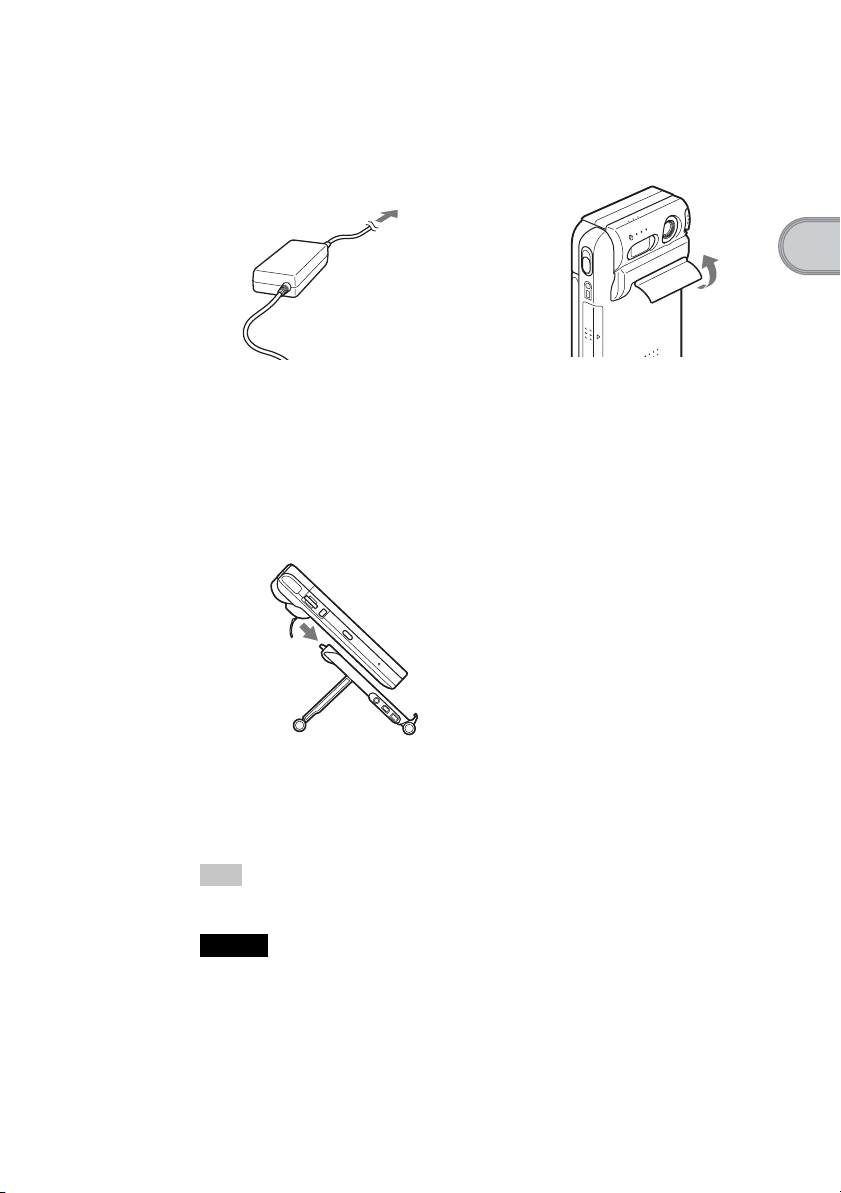
3
Connect the AC adapter
to a wall outlet.
To a wall outlet
5
Insert your CLIÉ
handheld at an angle
into the cradle and lay it
back to fit into place.
The POWER LED indicator of
your CLIÉ handheld turns on and
charging starts.
4
Open the interface
connector cover of your
CLIÉ handheld.
Charging your Sony CLIÉ™ handheld
It takes about four hours for your CLIÉ handheld to be fully charged for the
first time. The POWER LED indicator of your CLIÉ handheld turns off when
charging is completed.
Tip
If your CLIÉ handheld is charged frequently, subsequent charges will require less time.
Notes
• If the battery in your CLIÉ handheld is fully discharged, all data stored in the memory
on your CLIÉ handheld will be lost.
• Insert your CLIÉ handheld into the cradle completely until the POWER LED indicator
of your CLIÉ handheld turns on.
• When you remove your CLIÉ handheld from the cradle, hold the stand of the cradle.
21
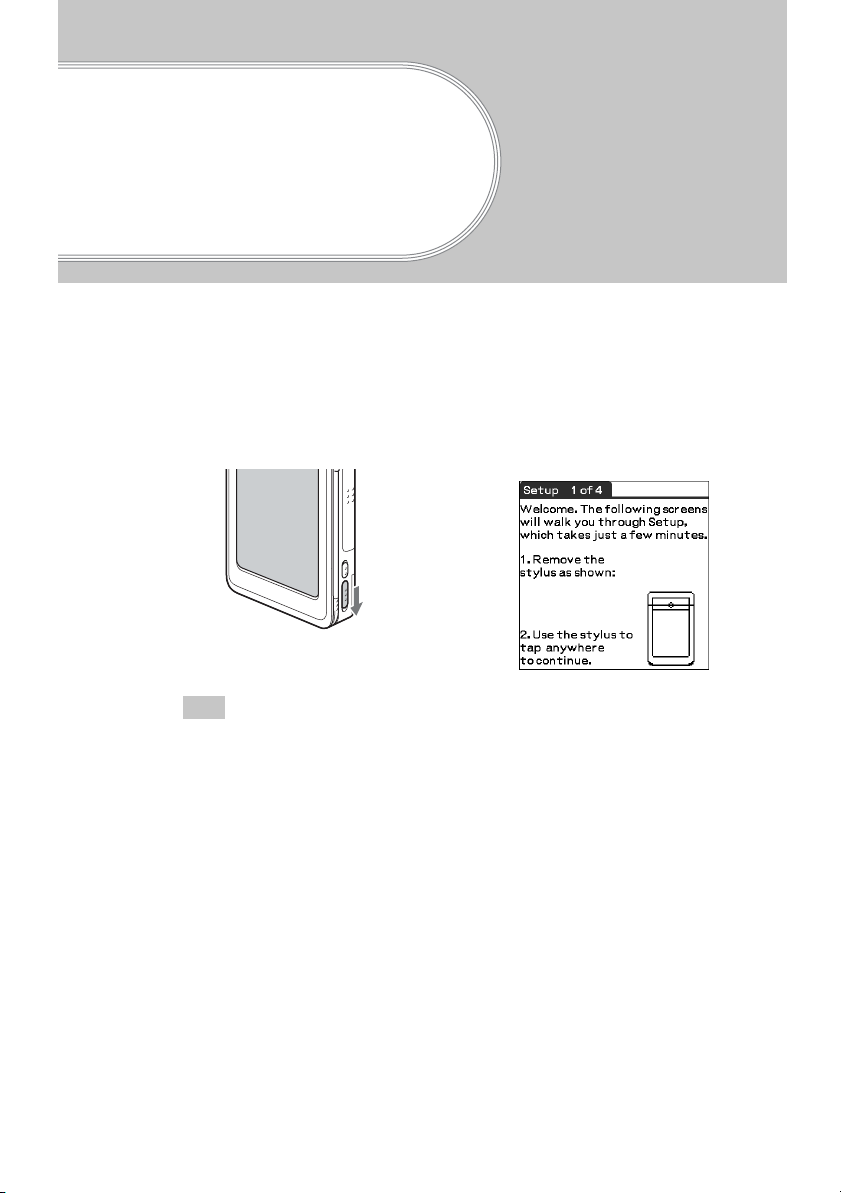
Performing the initial settings
The first time you turn on your CLIÉ handheld, you are required to make initial settings.
Follow the on-screen instructions to configure the initial settings and to get accustomed to
operations on your CLIÉ handheld.
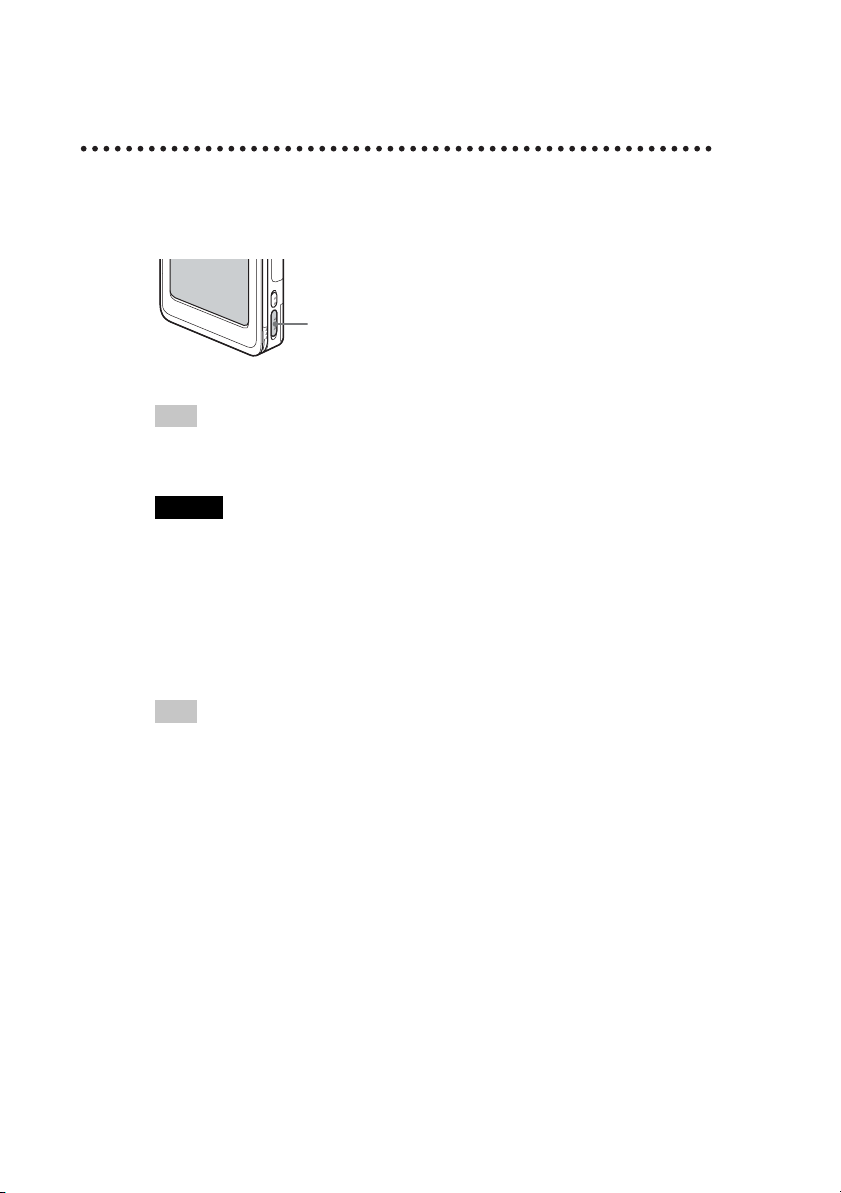
1
Slide the POWER switch.
Your CLIÉ handheld turns on, and the Welcome screen is displayed.
b
Slide the POWER switch
22
Tip
If you cannot turn on your CLIÉ handheld
• Is the HOLD switch (page 33) set to HOLD?
• Did you charge your CLIÉ handheld following the steps on page 18?
For details, refer to the supplied manual “Troubleshooting Q&A.”
b
• If you cannot turn on your CLIÉ handheld even after charging it, perform a soft
reset (page 39).
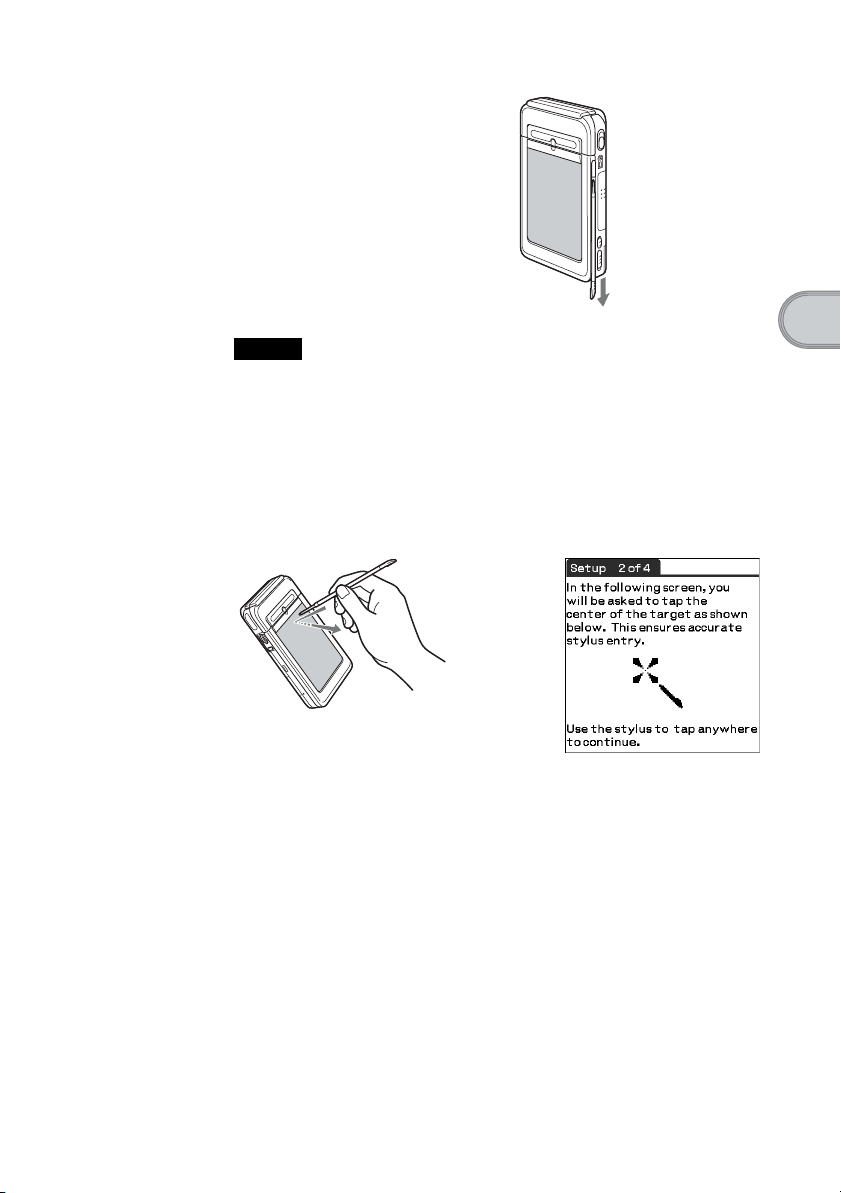
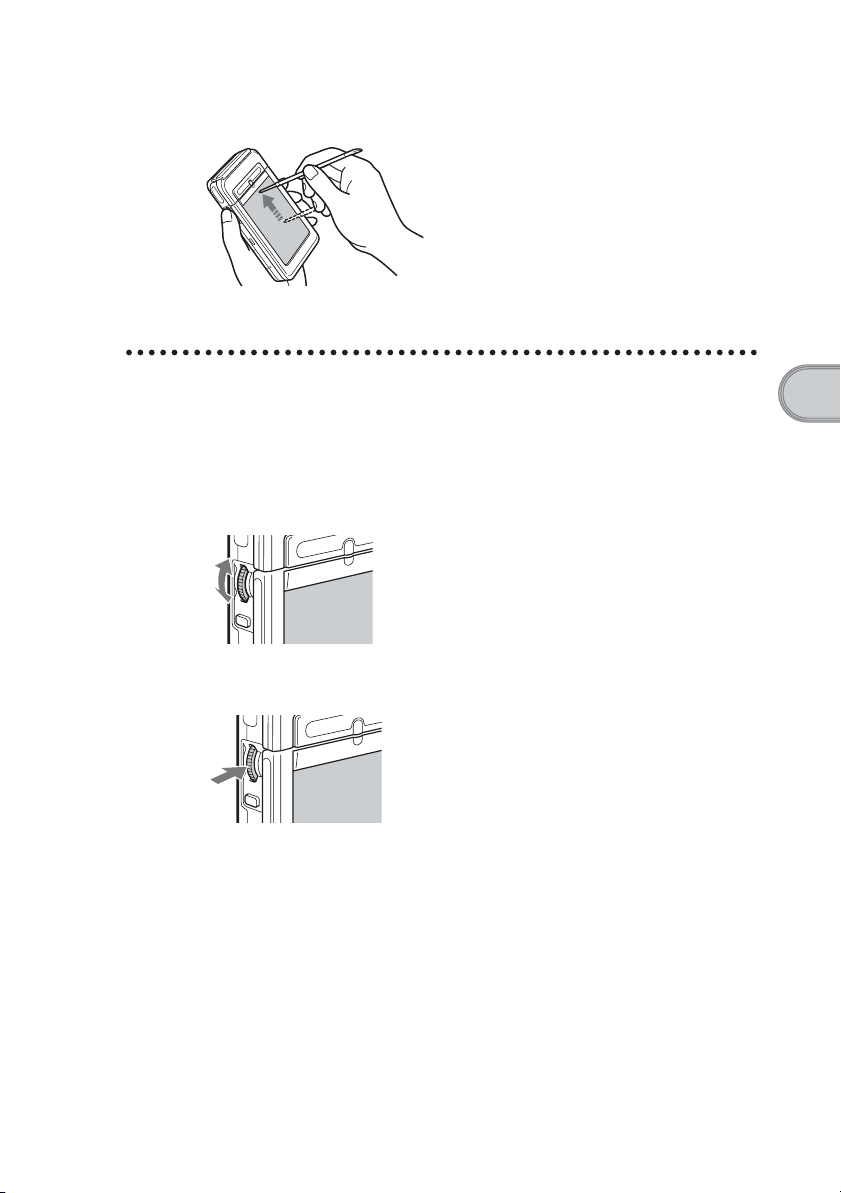
2
Take out the Stylus.
You can use the stylus to enter
data or to select applications.
Take out the Stylus
Notes
• Always use the point of the stylus for tapping or making strokes on the CLIÉ
handheld screen. Never use a real pen, pencil, or other sharp object to write on
the screen.
• When you put the stylus back in its holder, push it in until it clicks into place.
3
Press lightly on the screen with the stylus.
This action is called “tapping.”
The Setup screen for digitizer calibration is displayed.
b
Press lightly on the
screen (Tap)
Performing the initial settings
Continued on next page
• • • • • • • • • • • • • • • • • • • • • • • • • • •
23
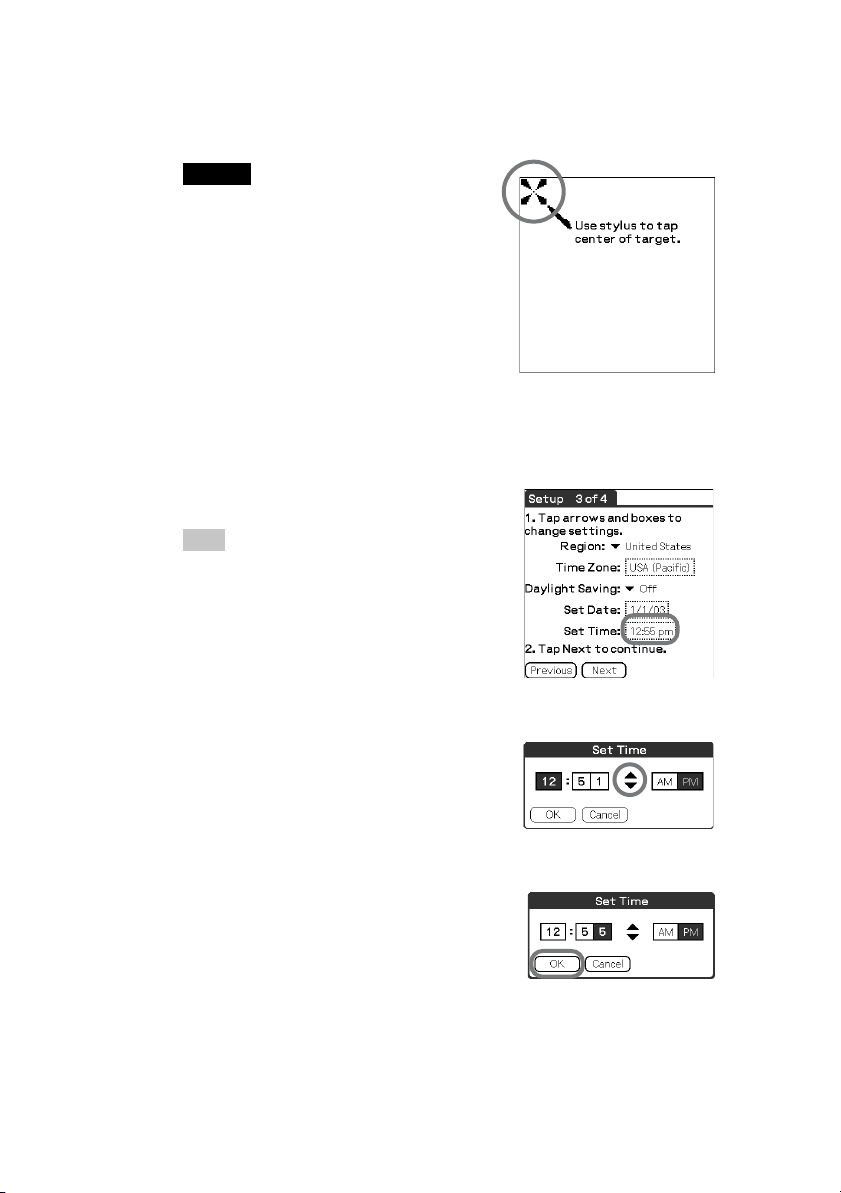
4
Following the on-screen instruction, tap the center of the
displayed mark.
Note
If the digitizer is not configured correctly, the
scroll bar may not operate properly, “tapping”
may not work as expected, or other problems
may occur. For re-configuring the digitizer, refer
to “Customizing your Sony CLIÉ handheld
(Preferences): Adjusting the digitizer” in the
“Handbook.”
After calibration is completed, a screen for setting the time and date
appears.
5
Tap the Set Time box.
The Set Time screen is displayed.
Tip
You can reconfigure the date and time settings in the
Preferences screen.
For details, refer to “Setting the Date & Time
b
preferences” in the “Handbook.”
24
6
Tap the arrow v or V to set the current time.
Tap each box to set the current
hour and minute.
7
Tap OK.
The current time is set and the
Setup screen is displayed.
8
Tap the Set Date box.
The Set Date screen is displayed.
9
Tap the arrow b or B next to the year to select the current
year.
10
Tap the current month and then tap the current date.
The Set Date screen closes.
11
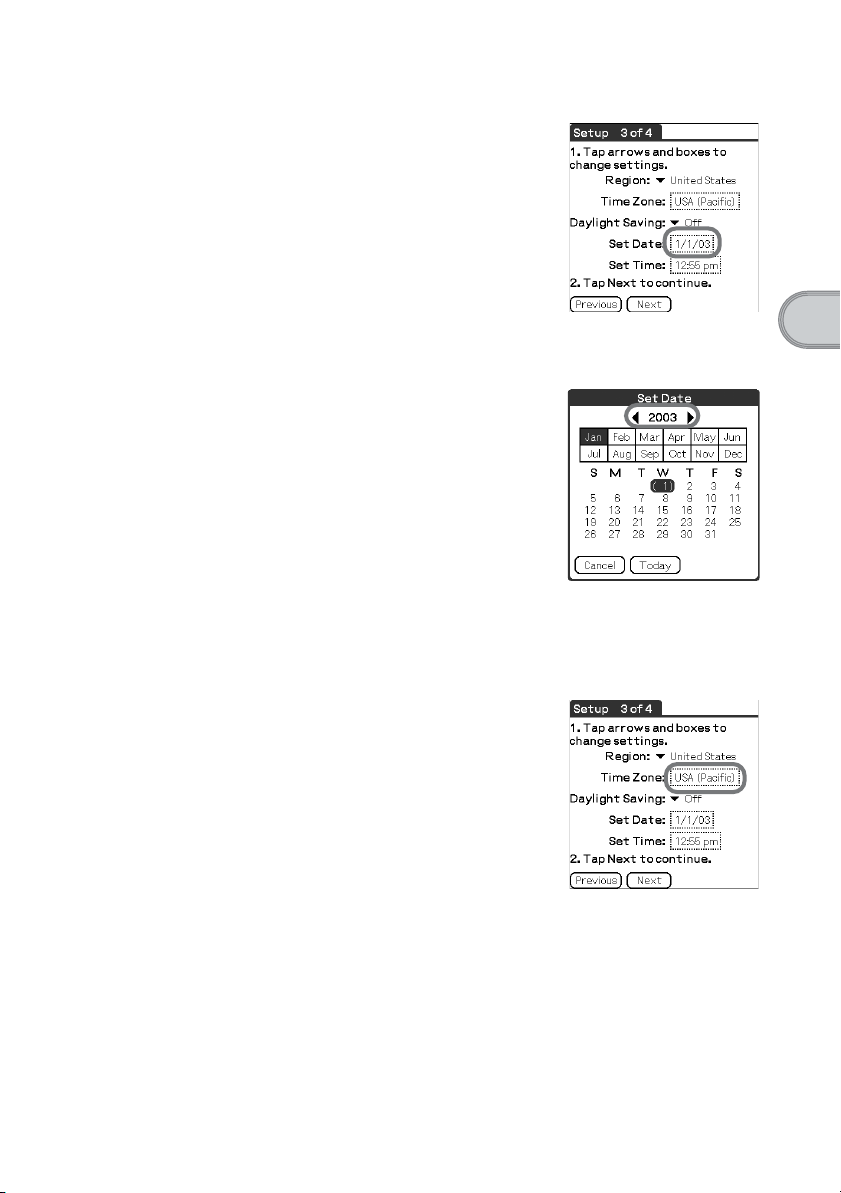
Tap the Time Zone box.
The Set Time Zone screen is displayed.
Performing the initial settings
Continued on next page
• • • • • • • • • • • • • • • • • • • • • • • • • • •
25
12
Tap the region to set the time zone and then tap OK.
13
Tap the arrow V next to Daylight Saving and select ON or
OFF.
14
Tap Next.
26

15
Tap Next and Done.
b
The initial settings are complete, and the
CLIE Launcher screen is displayed.
Initial settings are complete.
Performing the initial settings
27

Basic operations of
your Sony CLIÉ™
handheld
This chapter describes how to start applications, enter data, and perform other basic
operations.
Basic operations
Using the stylus
With your CLIÉ handheld, you can use the supplied stylus to enter characters
or specify an application you want to run.
Taking out the stylus
The stylus is stored in the holder on the
display panel of your CLIÉ handheld.
28
Note
To avoid losing the stylus, always put it
back in its holder after use.
Tapping
The action of pressing lightly on the
screen with the stylus is called
“tapping.”
Dragging
Just as you can drag the mouse to select
(and drag) text or move objects on your
computer, you can use the stylus to
drag an item on the screen of your
CLIÉ handheld. Press the stylus lightly
on the item, and move it along the
screen surface.
Using the Jog Dial™ navigator
Your CLIÉ handheld is equipped with a Jog Dial™ navigator, which allows
you to perform all major operations without the stylus. You can operate your
CLIÉ handheld using the Jog Dial™ navigator with just one hand.
Rotating the Jog Dial™ navigator
Rotate the Jog Dial™ navigator to
select various items or to select an
application to start.
Pressing the Jog Dial™ navigator
Press the Jog Dial™ navigator to
decide the selected item or to run the
selected application.
Rotating while holding down the Jog Dial™
navigator
Some applications support operations executed by rotating while pressing the
Jog Dial™ navigator.
Basic operations of your Sony CLIÉ™ handheld
29
Functions of parts
POWER Switch
Turning on your CLIÉ handheld
Tip
When you turn on your CLIÉ handheld for the first time, the Welcome screen is
displayed (page 22).
Note
If you cannot turn on your CLIÉ handheld, make sure that if the HOLD switch is not in
the HOLD position.
If you try to turn on your CLIÉ handheld while the HOLD switch is in the HOLD
position, the POWER LED indicator blinks green three times.
Turning off your CLIÉ handheld
Slide the POWER switch again.
POWER Switch
Slide the POWER switch.
Your CLIÉ handheld turns on and the
last screen you viewed is displayed.
When your CLIÉ handheld turns on,
the POWER LED (page 31) indicator
lights green.
30
Tip
You do not have to save data, quit an application, or perform any of the other shutdown
procedures that your computer requires.
Sliding the POWER switch for more than two
seconds
You can switch on/off the backlight of the LCD.
 Loading...