

Sony PCV-RS724G, PCV-RS710G Welcome Mat
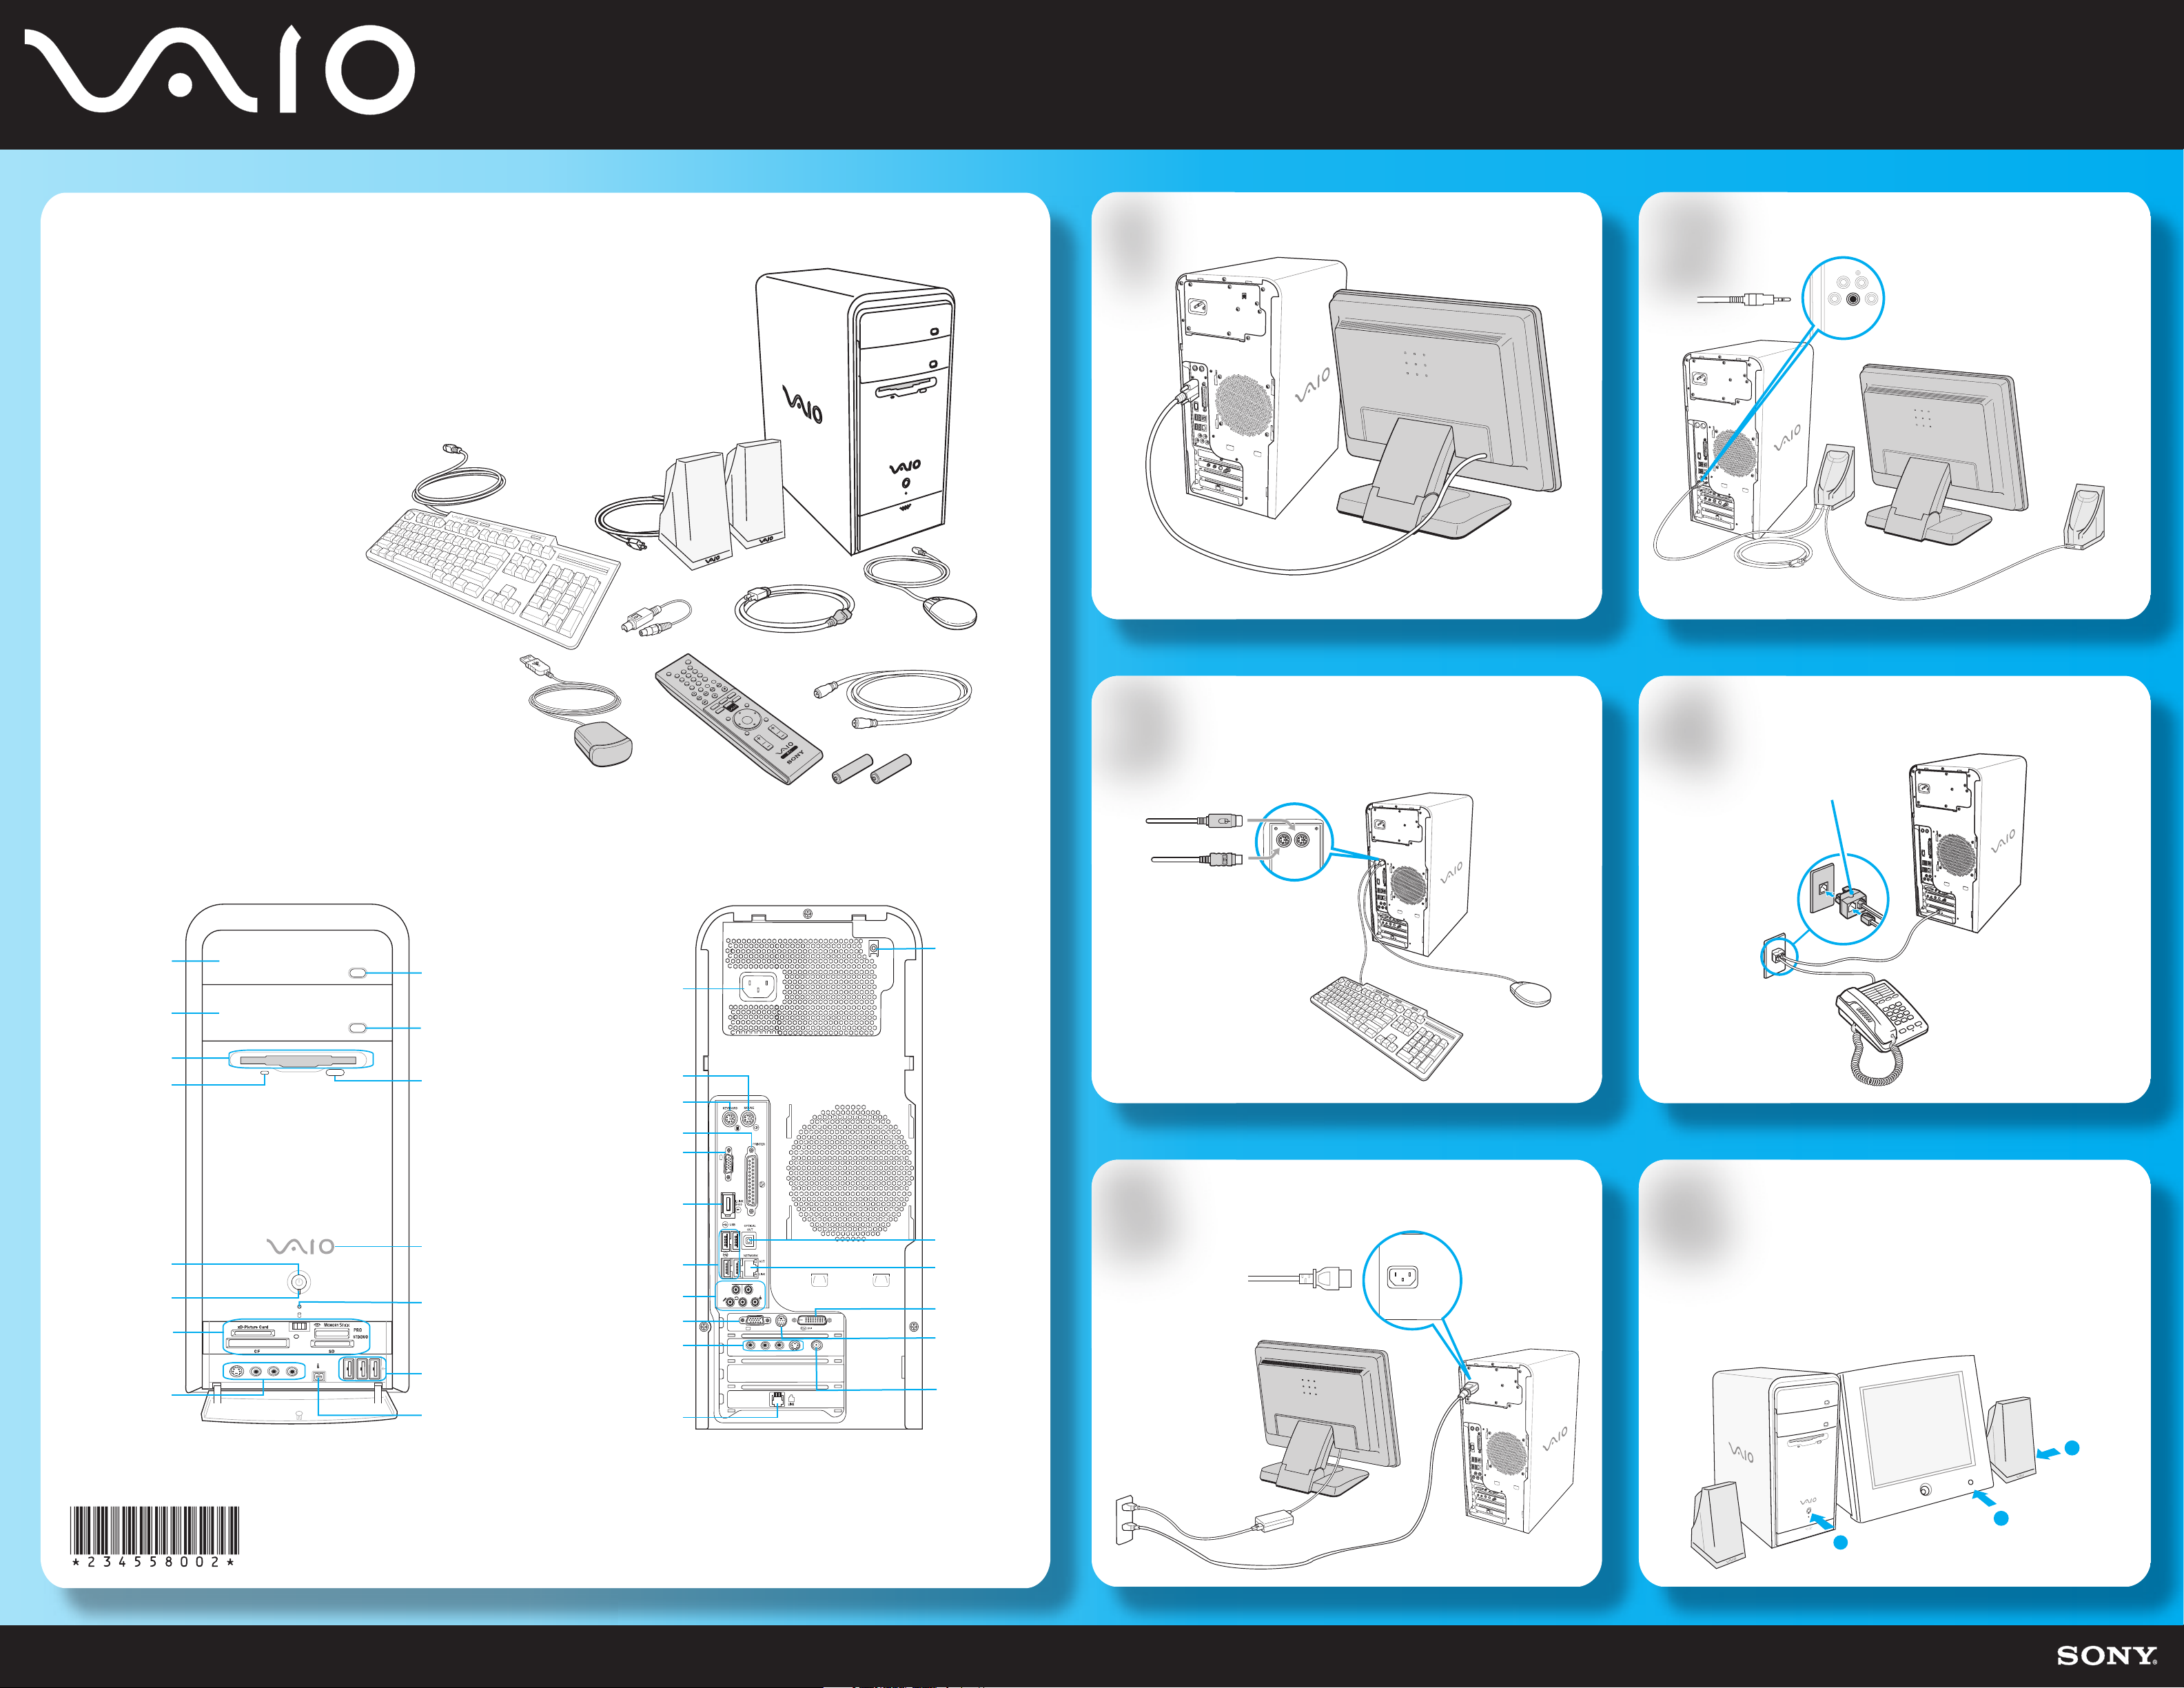
Meet your new
PCV-RS700 Series
Thank you for purchasing a Sony VAIO® computer!
The information provided here is designed to help
you to become familiar with your computer and
supplied accessories.
A
Display
1
Speakers
2
1 From the right speaker, plug the
jack connector into the
headphones jack.
2 From the right speaker, plug the
AC power cord into a grounded
AC wall outlet or surge suppressor.
A System unit
B Keyboard
C Speakers
D Power cord
E Video adapter*
F TV coaxial cable*
G Mouse
H Remote control*
I Infrared receiver*
J AA batteries (2)*
*Not available with all VAIO® computer models.
Your VAIO® computer is not supplied with System or Application Recovery CDs.
Use the VAIO Recovery Wizard utility program to recover your computer's operating system and preinstalled software.
B
I
C
E
H
D
F
G
The location and availability of the monitor ports may vary, depending
on the model purchased.
Keyboard & Mouse
J
3
Mouse
4
Telephone and Modem
"1-to-2" jack adapter
(splitter - optional)
Optical drive 1
Optical drive 2
Floppy disk drive
Floppy disk drive
access indicator
Power button
Standby indicator
Media card readers
and access indicator
Giga Pocket®
features*†
Front Panel
S400
Optical drive 1
eject button
Optical drive 2
eject button
Floppy disk eject
button
Power indicator
(VAIO)
Hard disk
and optical disc drive
access indicator
Universal Serial Bus
(USB 2.0) ports
i. LINK 4-pin S400
(IEEE 1394) port
AC input
port
Mouse port
Keyboard port
Printer port
Monitor port*
i.LINK 6-pin S400
port (IEEE 1394)
Universal Serial Bus
(USB 2.0 ports)
Audio jacks
Monitor port*
Giga Pocket®
features*†
Modem line
jack
Back Panel
M
ONIT
OR
USB
REAR
WOOFER
/CENTER
FRONT
MONITOR
VIDEO1 INPUT
VHF/UHF
S VIDEO
–
AUDIO AUDIO
COMPOSITE
–
Speaker DC
Out jack‡
S/PDIF Optical
Out port
Ethernet port
Monitor (DVI-D)
5
port*
TV Out
(S-Video/video)
jack*
VHF/UHF
port*†
Keyboard
Power Cord
5
Power On
6
1 Press the power button on the
computer to turn on the power.
2 Press the power button on the
display to turn on the power.
3 Press the power button, located on
the side of the right speaker, to turn
on the power.
* Not available with all VAIO® computer models.
† Details on Giga Pocket ports and jacks are located on the back.
‡ Not required for supplied speakers.
Part No. 2-345-580-02 © 2004 Sony Electronics Inc. All rights reserved. Printed in USA.
3
2
1
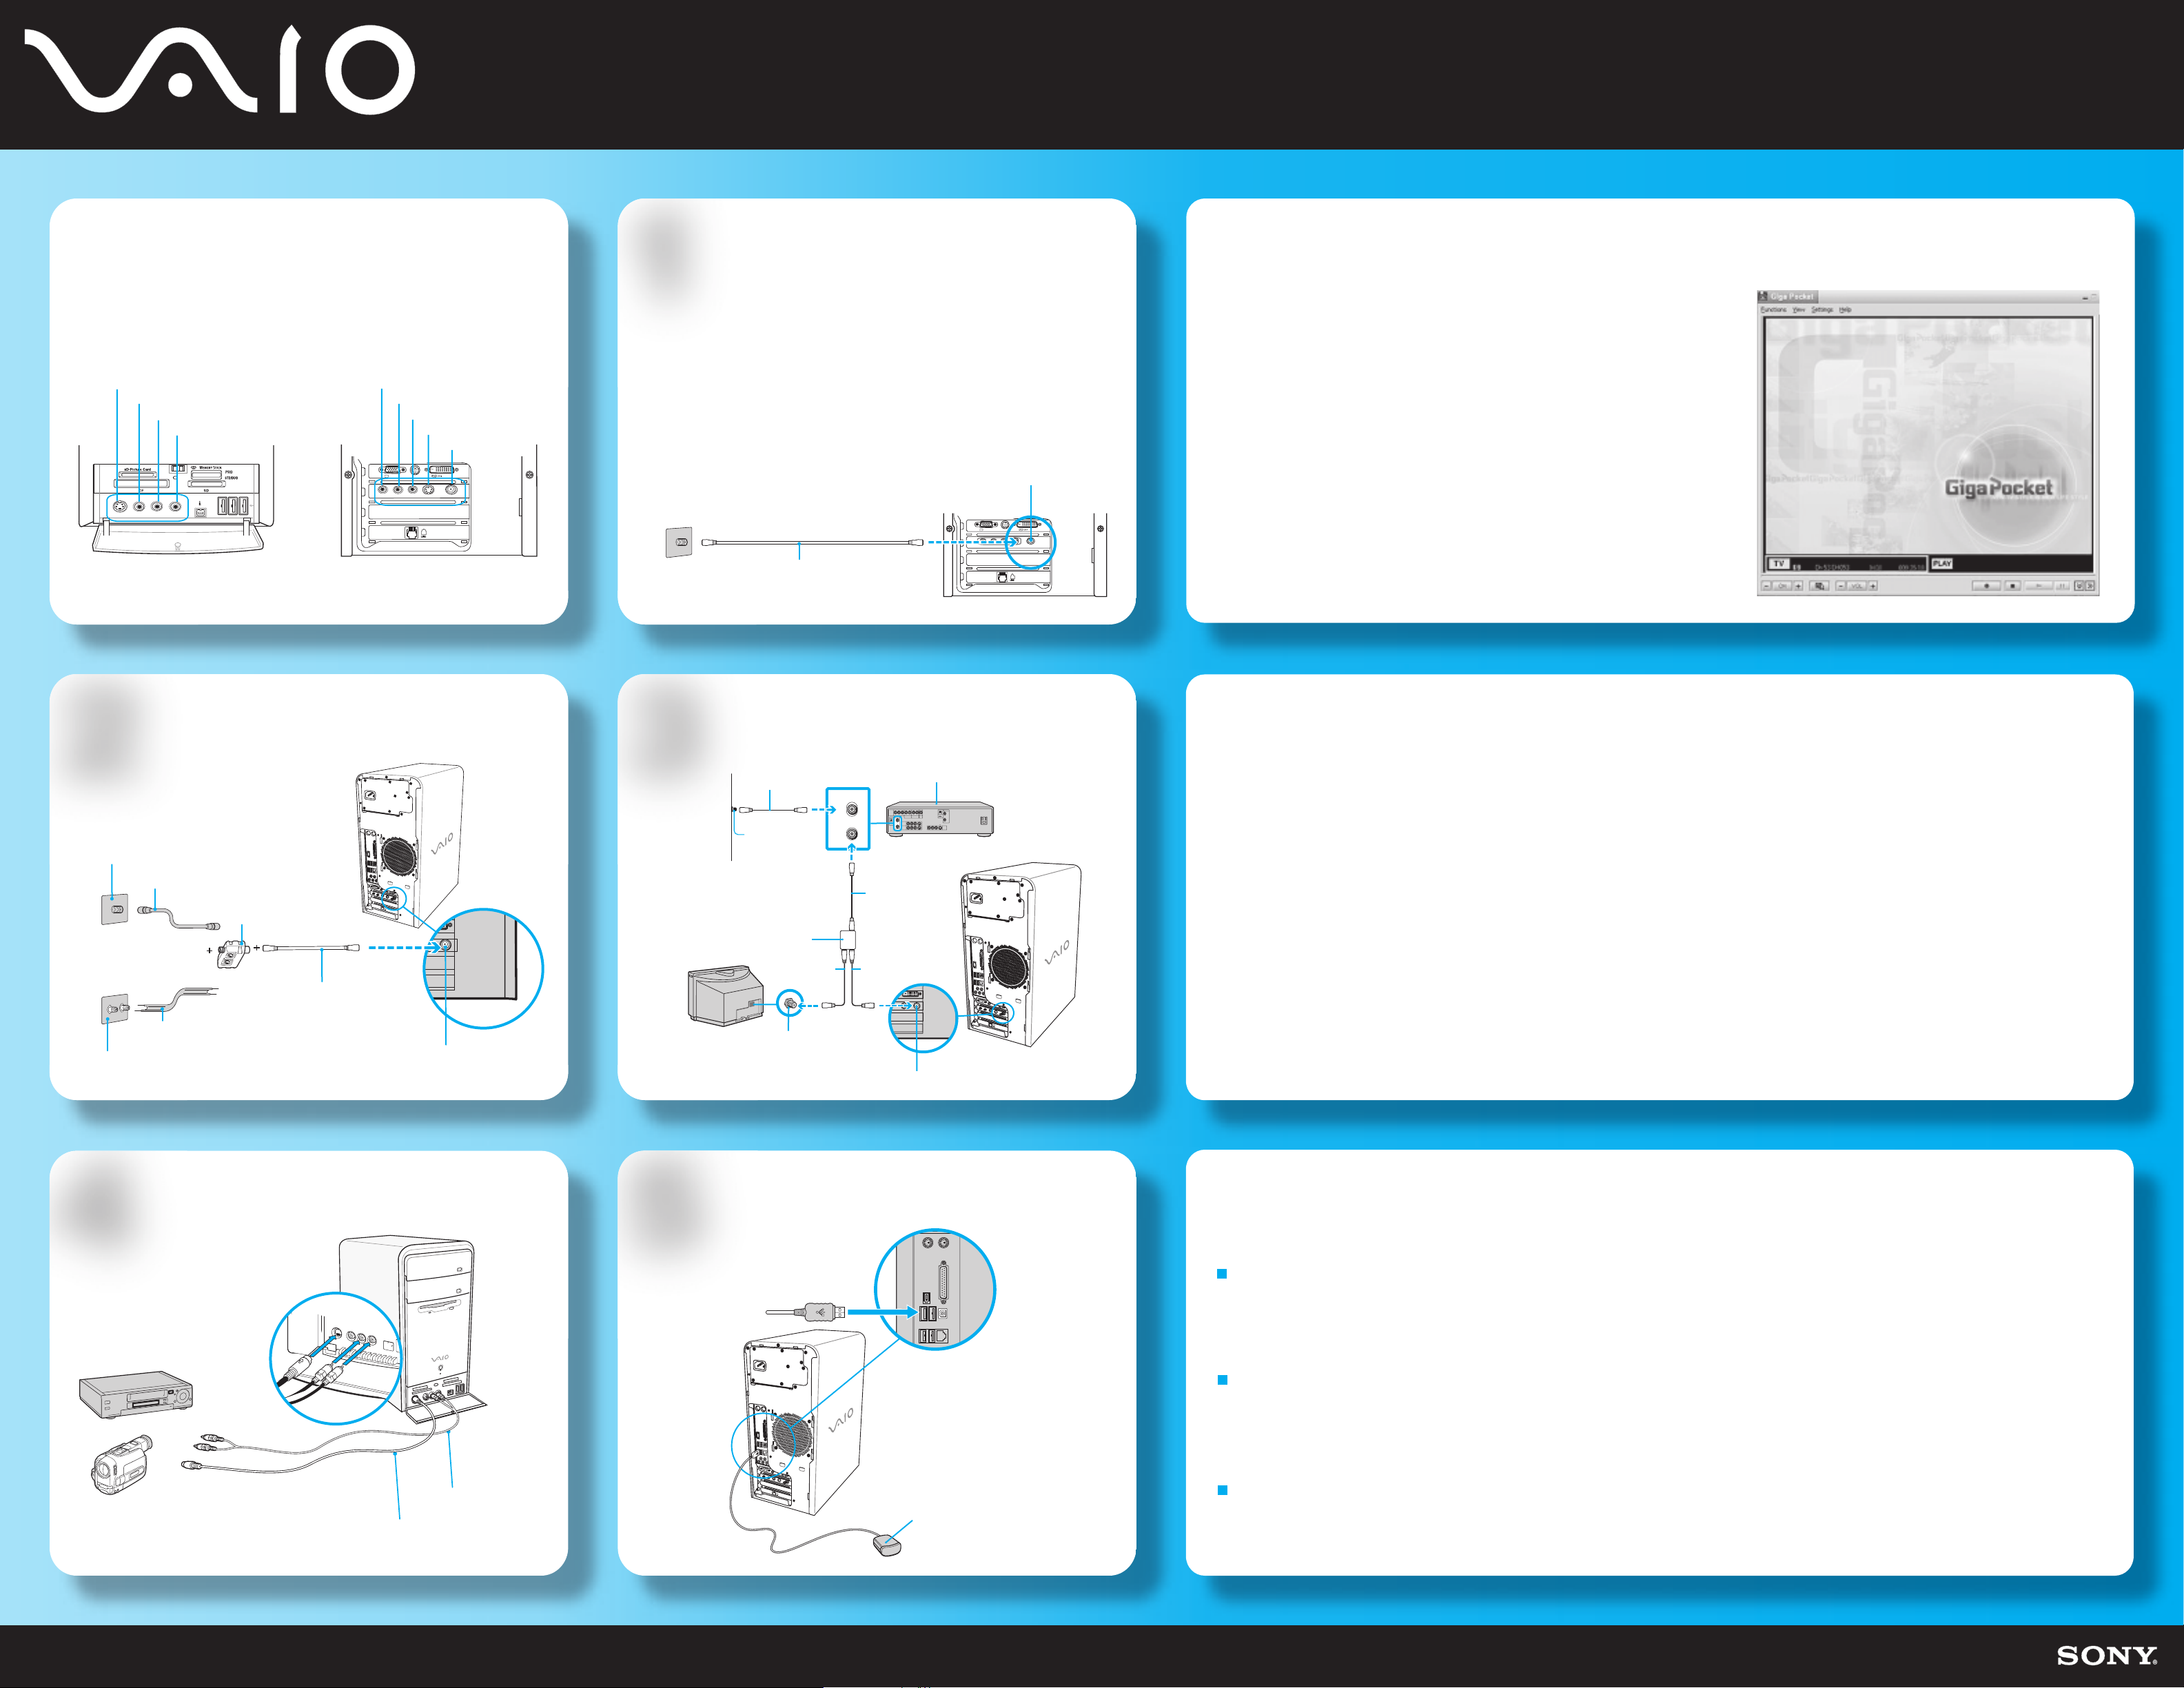
Giga Pocket
Standard cable access
Using
Giga Pocket
Giga Pocket® Personal Video Recorder is a unique set of tools that enhance
your VAIO® computer's capabilities. Giga Pocket gives you a wide range of
video recording, viewing, and playback capabilities.
S-video In jack
Composite video In jack
Composite audio L In jack
Composite audio R In jack
S400
Front Panel
Composite audio R In jack
Composite audio L In jack
Composite video In jack
S-video In jack
VHF/UHF port
MONITOR
COMPOSITE
AUDIO AUDIO
S VIDEO
VIDEO1 INPUT
VHF/UHF
–
–
Back Panel
1
The best method of connecting your computer and cable service access,
depends on the type of cable connection available in your home.
1 Connect one end of the TV coaxial cable (supplied) to your cable
service access.
2 Connect the other end of the TV coaxial cable to the VHF/UHF port
on the back panel of your computer.
VHF/UHF port
Cable service access
(wall outlet)
TV coaxial cable
(supplied)
MONITOR
AUDIO AUDIO
COMPOSITE
S VIDEO
–
–
VIDEO1 INPUT
Giga Pocket® Personal Video Recorder is a suite of interactive Sony audio and
video components that are designed to create, capture, and play back video files
derived from television and your personal videos.
Giga Pocket® enables you to watch a TV program on your computer display while
recording it onto your hard disk drive. Using the Giga Pocket Slip Play feature, you
can view a program from the beginning even while it is being recorded.
Starting Giga Pocket
1 Click Start > All Programs > Giga Pocket.
VHF/UHF
Standard antenna modes
2
Option 1
Antenna
system (Air)
Option 2
Antenna
system (Air)
TV coaxial cable
(optional)
300-ohm
Twin lead cable
(optional)
VHF/UHF RF
combiner/transformer
(optional)
TV coaxial cable
(supplied)
VHF/UHF port
Set-top box (STB) mode
3
TV coaxial cable
(optional)
Cable
service
access
(wall outlet)
Splitter (optional)
TV coaxial cable
(optional)
VHF/UHF port
VHF/UHF
IN
VHF/UHF
OUT
TV coaxial
cable (optional)
TV coaxial cable
(supplied)
Hard Disk Drive Recovery
Set-top box (STB)
Your computer is equipped with the VAIO Recovery Wizard, a utility program that recovers your computer's operating
system and preinstalled software to original factory installed settings.
For online information about hard disk recovery:
1 Click Start > Help and Support.
2 From the VAIO Help And Support Center menu, click VAIO Recovery Options.
You can create a VAIO Recovery Media Kit using CD-R, single layer DVD+R, or single layer DVD-R media on VAIO computers equipped with the
appropriate optical drive (a CD-RW, DVD-RW, or DVD±RW drive).
DVD+RW, DVD-RW, double layer DVD+R, and double layer DVD-R media (when it becomes available) cannot be used to create a VAIO
Recovery Media Kit.
VHF/UHF port
VCR or camcorder Infrared receiver
4
Video Cassette Recorder
(VCR)
Compatible camcorder
S-video cable
(optional)
Dual audio cable
(optional)
5
Infrared receiver
(supplied)
Support Options
If you have questions about your computer or the preinstalled programs, refer to the following sources for answers.
VAIO® Computer User Guide
The on-screen VAIO® Computer User Guide provides detailed information on how to maximize your computer capabilities and solve
common problems.
1 Click Start > Help and Support.
2 From the VAIO Help And Support Center menu, click VAIO User Guide.
VAIO® Recovery Options Guide
Provides information about restoring individual software programs, software drivers, drive partition(s), or your entire hard disk
drive to the original factory installed settings.
1 Click Start > Help and Support.
2 From the VAIO Help And Support Center menu, click VAIO Recovery Options.
Sony online Support
You can visit the Sony online support Web site at: http://www.sony.com/pcsupport. This Web site provides access to information on
commonly encountered problems.
 Loading...