

Page 1
4-156-541-83(1)
Linear PCM Recorder
Getting Started
Basic Operations
Other Recording Operations
Other Playback Operations
Editing Tracks
About the Menu Function
Utilizing Your Computer
Additional Information
Operating Instructions
PCM-M10/PCM-M10P
Troubleshooting
Index
© 2009 Sony Corporation Printed in China
Page 2

• The recorded music is limited to private use only.
Use of the music beyond this limit requires
permission of the copyright holders.
• Sony is not responsible for incomplete recording/
downloading or damaged data due to problems of
the PCM recorder or computer.
• Depending on the types of the text and characters,
the text shown on the PCM recorder may not be
displayed properly on device. This is due to:
– The capacity of the connected PCM recorder.
– The PCM recorder is not functioning normally.
– Content information is written in the language
or the character that is not supported by the
PCM recorder.
Notice for users
Program © 1999, 2000, 2001, 2002, 2003, 2004,
2005, 2006, 2007, 2008, 2009 Sony Corporation
Documentation ©2009 Sony Corporation
All rights reserved. This manual or the software
described herein, in whole or in part, may not be
reproduced, translated or reduced to any machine
readable form without prior written approval from
Sony Corporation.
IN NO EVENT SHALL SONY CORPORATION BE
LIABLE FOR ANY INCIDENTAL,
CONSEQUENTIAL OR SPECIAL DAMAGES,
WHETHER BASED ON TORT, CONTRACT, OR
OTHERWISE, ARISING OUT OF OR IN
CONNECTION WITH THIS MANUAL, THE
SOFTWARE OR OTHER INFORMATION
CONTAINED HEREIN OR THE USE THEREOF.
Sony Corporation reserves the right to make any
modification to this manual or the information
contained herein at any time without notice.
The software described herein may also be governed
by the terms of a separate user license agreement.
This software is for Windows and cannot be used for
Macintosh.
The supplied connecting cable is for the PCM-M10/
M10P linear PCM Recorder. You cannot connect
other linear PCM recorders.
GB
2
Page 3

Table of Contents
Techniques for Better Recording ..............6
Getting Started
Step 1: Checking the Contents of the
Package .....................................................9
Index to parts and controls .................10
Step 2: Inserting the Batteries .................12
When to replace batteries ...................13
To operate with an AC power
adaptor ................................................14
Step 3: Turning the PCM recorder On .... 15
Turning the power on .........................15
Turning the power off .........................15
Step 4: Setting the Clock ........................16
Setting the clock after inserting
batteries ...............................................16
Setting the clock using the menu ........16
Step 5: Setting the Language to Be
Used in the Display Window .................. 18
Preventing Accidental Operation –
HOLD .....................................................20
Locking the buttons of the
PCM recorder .....................................20
Unlocking the buttons of the
PCM recorder .....................................20
Basic Operations
Recording .............................................22
Listening ..............................................26
Deleting ................................................30
Other Recording Operations
Changing the Recording Method ............32
Recording using the remote
commander .........................................32
Manual recording ................................33
Recording a few seconds in advance –
the Pre-Recording function .................34
Recording on a memory card ..............36
Recording across memory media –
Cross-Memory Recording ..................39
Changing the Recording Settings ............41
Selecting the recording mode .............41
Setting the microphone sensitivity ......42
Cutting out low frequency –
the LCF function .................................43
Preventing sound distortion–
the LIMITER function ........................44
Recording via Other Devices ..................46
Recording with an external
microphone .........................................46
Recording from other equipment ........47
GB
3
Page 4

Other Playback Operations
Changing the Playback Method ..............49
Changing the display
during playback ..................................49
Listening the playback sounds
with the headphones or external
speakers ..............................................50
Quickly locating the point you wish
to start playback – Easy Search .........51
Selecting the playback mode ..............51
Playing back repeatedly ......................52
Changing the Playback Sounds ..............54
Adjusting the playback speed –
the DPC function ................................54
Adjusting the playback tones –
Key Control ........................................55
Reinforcing the bass sound –
Effect ..................................................56
Playback via Other Devices ....................58
Recording with other equipment ........58
Editing Tracks
Adding a Mark to a Track .......................60
Using a track mark ..............................60
Adding a “TAKE” or “KEEP” to
a file name ..........................................62
Protecting a track ................................64
Arranging Tracks ....................................65
Copying a track to the other memory ...65
Dividing a track into two ....................66
Deleting all tracks in a folder .............69
About the Menu Function
Making Settings for the Menu ................71
Menu settings ..........................................72
Utilizing Your Computer
Using the PCM recorder with Your
Computer .................................................83
Connecting the PCM recorder to
your computer .....................................84
Structure of folders and files ...............85
Copying Tracks from the PCM
recorder to Your Computer .....................87
Copying Files from Your Computer
to the PCM recorder and Playing
Them Back ..............................................88
Using the PCM Recorder as a USB
Memory – Data Storage Function ...........90
Disconnecting the PCM Recorder from
Your Computer .......................................91
GB
4
Page 5

Additional Information
Precautions ..............................................92
Specifications ..........................................95
System requirements ..........................95
Battery life ........................................100
Troubleshooting
Troubleshooting ....................................102
Error Messages .....................................108
System Limitations ...............................112
Display Window ...................................113
Index .....................................................116
Trademarks ...........................................119
What you record is for personal
enjoyment and use only. Copyright laws
prohibit other forms of use without the
permission of the copyright holders.
The use of Memory Stick™ media for
recording copyright-protected graphics or
other data is limited to the restrictions
specified under applicable copyright
laws. Any use beyond those restriction is
prohibited.
This product is compatible with
Memory Stick Micro™ (M2™) media.
M2™ is the abbreviated product name for
a Memory Stick Micro™.
In this booklet, M2™ is used to describe
Memory Stick Micro™ media.
GB
5
Page 6
Techniques for Better Recording
The PCM-M10/M10P linear PCM recorder allows you to enjoy high-quality recording in a
variety of situations. This section introduces easy recording setups for 6 typical music scenes.
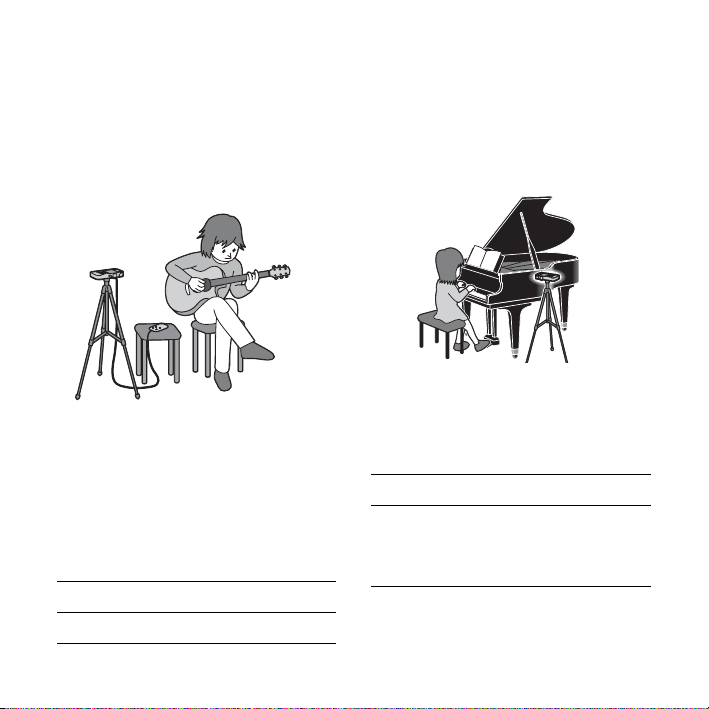
For recording a solo acoustic
guitar performance
z Tips for setup
• Use a tripod or other device to set the PCM
recorder about 1 meter from the guitar.
• Set the PCM recorder so that its built-in
microphones face the sound box of the
guitar.
• To start, stop recording, or add track marks
remotely, use the supplied remote
commander.
REC LEVEL AUTO
MIC SENS(ATT) HI
For recording a piano performance
z Tips for setup
• Use a tripod or other device to set the PCM
recorder level with the piano keyboard.
• Set the PCM recorder approximately 1.5
meters from the piano.
REC LEVEL AUTO
MIC SENS(ATT) • When recording near the
piano: LOW
• When recording far from
the piano: HI
GB
6
Page 7

For recording a jazz trio
performance
For recording a band performance
at a recording studio
z Tips for setup
• Use a tripod or other device to set the PCM
recorder as close to the lead instrument as
possible.
• While monitoring recording, move the PCM
recorder to the position where volume levels
from instruments are well-balanced.
REC LEVEL AUTO
MIC SENS(ATT) • When recording near the
instrument: LOW
• When recording far from
the instrument: HI
z Tips for setup
• Use a tripod or other device to set the PCM
recorder.
• Adjust the orientation and height of the PCM
recorder, so that the built-in microphones
face the vocalist.
• Adjust the positions of guitar amplifier and
base amplifier so that their volume levels are
well-balanced.
REC LEVEL AUTO
MIC SENS(ATT) LOW
GB
7
Page 8
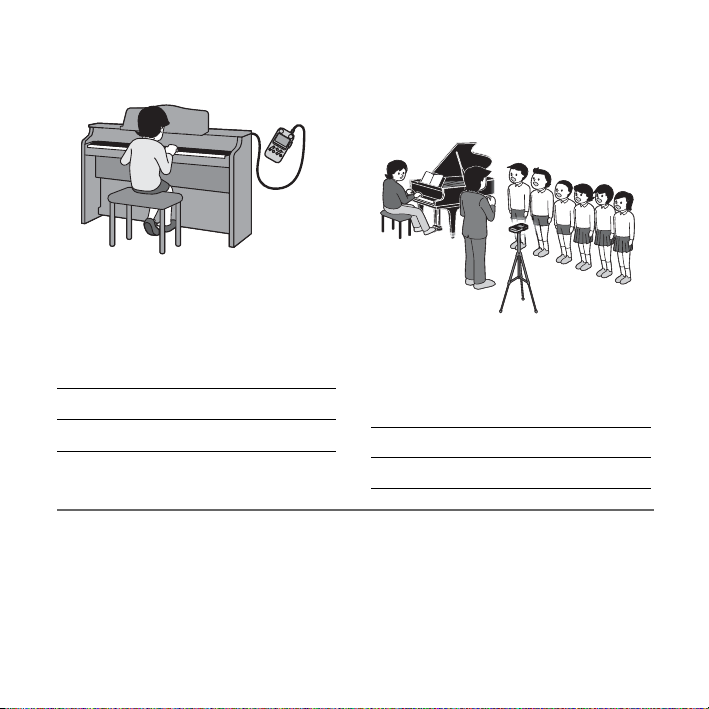
For recording an electronic piano
performance via a line connection
z Tips for setup
• Connect the line output jack of an electronic
piano to the LINE IN jack of the PCM
recorder with a cable (not supplied).
• Adjust the recording level to the optimum
with the REC LEVEL dial.
REC LEVEL MANUAL
LIMITER ON (menu setting)
For better recording
z
• For the most natural and dynamic recording,
manual recording is recommended.
(Adjustment using the REC LEVEL dial is
required.)
• To obtain the best recording results, perform
a trial recording in advance.
For recording a musical
performance of large number of
performers such as a children’s
chorus at a concert hall
z Tips for setup
• Set the PCM recorder as close to the
conductor or to the stage as possible.
• Set the PCM recorder so that the built-in
microphones face the performers.
REC LEVEL MANUAL
LIMITER ON (menu setting)
• The PCM recorder provides a level guide
function that displays an error message when
an excessive recording level is detected
during automatic recording.
GB
8
Page 9

Getting Started
Step 1: Checking the Contents of the Package
Linear PCM recorder (1)
Remove the film on the display window
before you use the PCM recorder.
Remote commander (1)
USB connecting cable (1)
LR6 (size AA) alkaline batteries (2)
Hand strap (1)
Carrying pouch (1)
Wind screen (PCM-M10P only)
CD-ROM (2)
• Sound Forge Audio Studio LE (1)
• Operating instructions as PDF files (1)
Operating Instructions
“Sound Forge Audio Studio LE” is a
software application that supports editing
and CD creation on your computer. For an
introduction to installation of the software,
see the “Sound Forge™ Audio Studio LE
Guide.”
You are cautioned that any changes or
modifications not expressly approved in this
manual could void your authority to operate
this equipment.
Getting Started
GB
9
Page 10
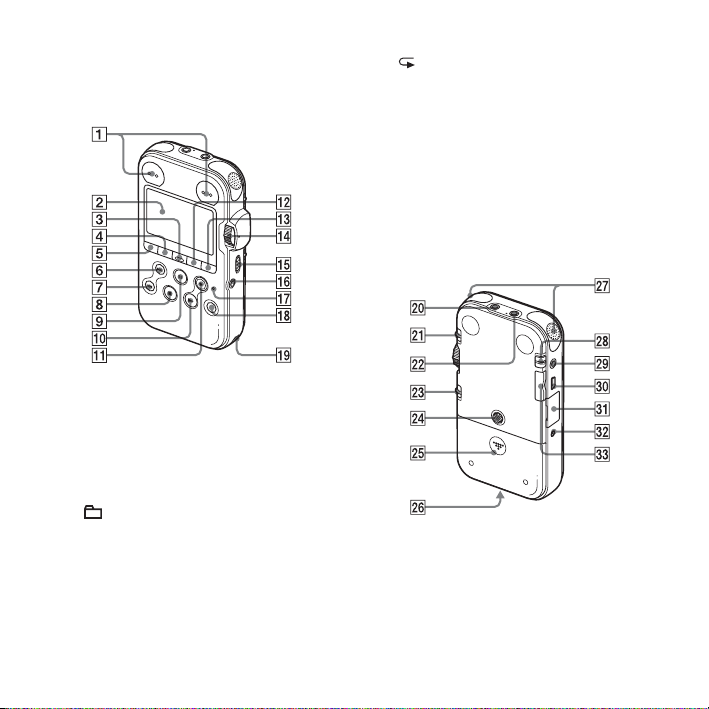
Index to parts and controls
Front
A Peak level L/R (-12 dB/OVER)
indicators
B Display window
C DELETE button
D MENU button
E (folder) button
> FF/ v (fast-forward/up) button
F
. FR/ V (fast-rewind/down) button
G
x STOP button
H
X PAUSE button/indicator
I
N PLAY/ENTER button/indicator*
J
z REC (record) button/indicator
K
GB
10
L (repeat) A-B button
M DISPLAY button
N REC LEVEL (recording level) dial
O POWER/HOLD switch
P REMOTE jack
Q ACCESS indicator
R T-MARK (track mark) button
S Strap hole
Rear
T LINE IN (line input) jack
U MIC SENS(ATT) (microphone
sensitivity (attenuator)) HI/LOW (high/
low) switch
V m (microphone) jack (Plug In Power
compatible)*
Page 11
W REC LEVEL (recording level)
MANUAL/AUTO switch
X Hole for attaching the tripod (not
supplied)
Y Battery compartment
Z Speaker (on the basement)
wj Built-in microphones (stereo)
wk DPC (SPEED CTRL) (speed control)
ON/OFF switch
wl i/LINE OUT (headphone/line output)
jack
e; USB connector
ea M2™/microSD memory card slot
es DC IN 3V jack
ed VOLUME (volume) +*/– button
* These buttons and jack have a tactile dot.
Use it as a reference point for operations, or
to identify each terminal.
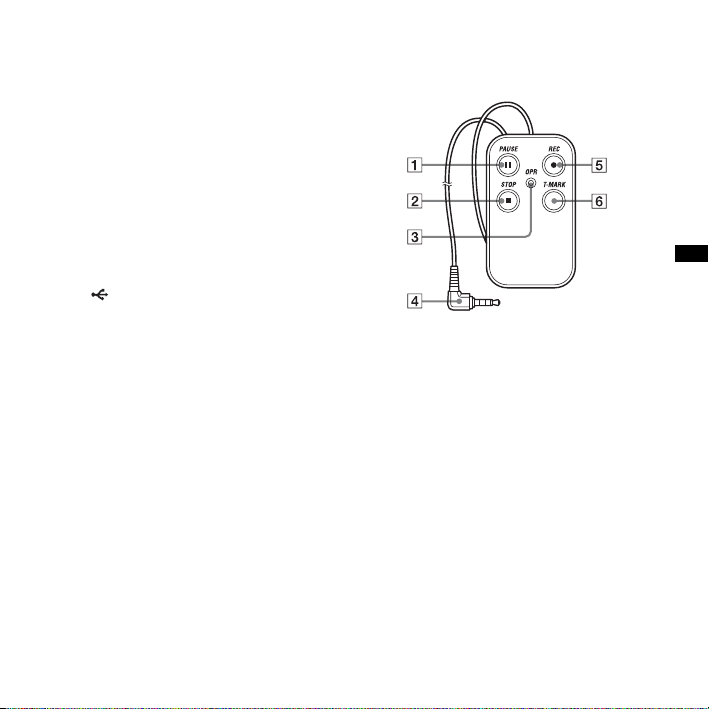
Remote commander (supplied)
1 X PAUSE button
x STOP button
2
3 OPR (Operation) indicator
4 Connecting plug
z REC button
5
6 T-MARK (track mark) button
Getting Started
11
GB
Page 12
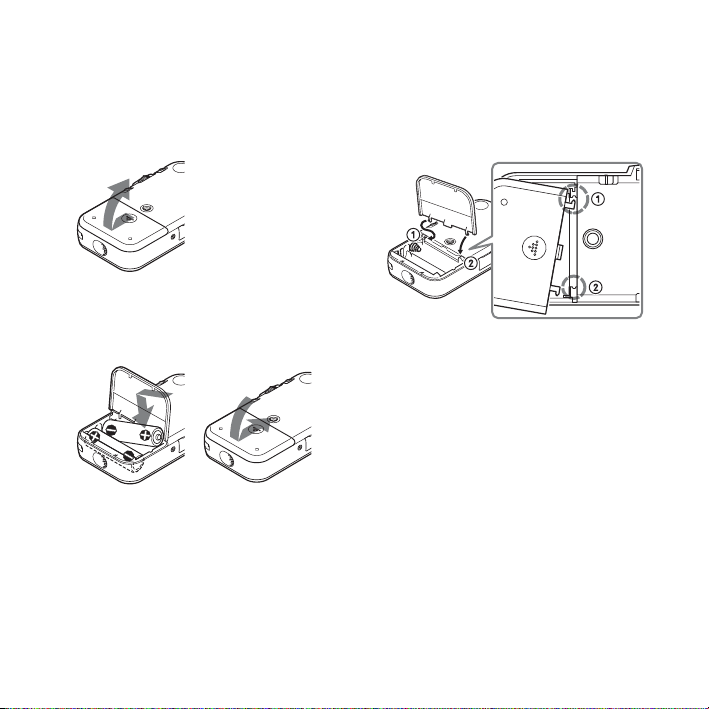
Step 2: Inserting the Batteries
1 Slide and lift the battery compartment lid
in the direction of the arrow.
2 Insert the two supplied LR6 (size AA)
alkaline batteries into the battery
compartment, and then close the lid.
Be sure to insert the batteries with the 3
and # ends in the right position.
GB
12
If the battery compartment lid is
detached
If you drop the PCM recorder or handle it
roughly, the battery compartment lid may
become detached.
If this occurs, insert a projected part at one
end of the battery compartment lid into the
opening on the PCM recorder (1), and
then align the other projected part of the lid
along the slit of the PCM recorder (2) as
illustrated above. Then stand up the lid and
push it down until the lid is attached to the
PCM recorder.
When using rechargeable
batteries
You can use rechargeable batteries with the
PCM recorder. To use rechargeable
Page 13

batteries, select “NiMH Battery” in the
“Battery Setting” submenu of the “Detail
Menu.” With this setting, the battery
remain indicator for the rechargeable
batteries will be displayed more precisely.
See “Making Settings for the Menu” on
page 71.
z Tips
• Even if fully-charged rechargeable batteries
are inserted, the battery indicator may not
show the full status.
• Use a charger to recharge batteries at room
temperatures.
• Use the following charger and rechargeable
batteries for the PCM recorder:
– Nickel metal hydride rechargeable battery:
NH-AA-B2K
– Quick battery charger for nickel metal
hydride rechargeable batteries:
BCG-34HS2K
When to replace batteries
When using batteries, the battery indicator
on the display shows the battery condition.
Battery remain indication
: “Low Battery Level” appears.
Replace two old batteries with new
ones soon.
m
: “Change Battery” appears and the
PCM recorder will stop operation.
z Tips
• Do not use manganese batteries for this PCM
recorder.
• When replacing the batteries, tracks
recorded are not deleted even when you
remove the batteries.
• When replacing batteries, the clock
continues moving for about 3 minutes after
you remove the batteries.
• When replacing batteries, turn off the power
of the PCM recorder.
• Do not mix different types of batteries.
Getting Started
13
GB
Page 14
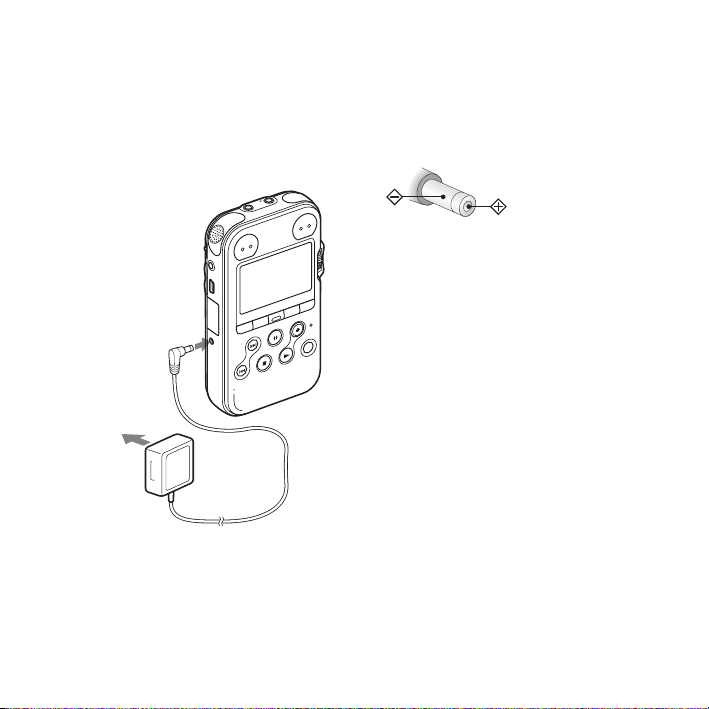
To operate with an AC power adaptor
Insert a commercially-available applicable
AC power adaptor securely into the DC IN
3V jack until it stops to the end.
to the DC IN
3V jack
to a wall
outlet
AC power
adaptor
You can use an AC power adaptor that
supports:
• Output voltage: DC3V
• Output current: 1A
• Polarity of the plug
P Note
Operations of not all AC power adaptors are
supported.
14
GB
Page 15

Step 3: Turning the PCM recorder On
Turning the power on
Slide the POWER/HOLD switch in the
direction of “POWER” for more than
1 second. The PCM recorder is turned on,
and an animation of “Accessing...” is
displayed.
Turning the power off
Slide the POWER/HOLD switch in the
direction of “POWER” for more than
2 seconds, and an animation of “See You!”
is displayed.
z Tips
• The PCM recorder is accessing memory
while “Accessing...” appears on the display
or the ACCESS indicator flashes. During
this time, do not remove or insert batteries
and do not disconnect a commerciallyavailable applicable AC power adaptor, or
the USB connecting cable. Doing so may
damage the data.
• Even if you do not use the PCM recorder, the
batteries are consumed slightly. When you
are not going to use the PCM recorder for an
extend period of time, it is recommended
that you turn the power off and remove the
batteries.
• When the PCM recorder remains turned on
and in the stop mode for about 10 minutes or
longer, the window display turns off
automatically and the PCM recorder enters
the sleep mode. You can operate the PCM
recorder by pressing a button.
15
Getting Started
GB
Page 16
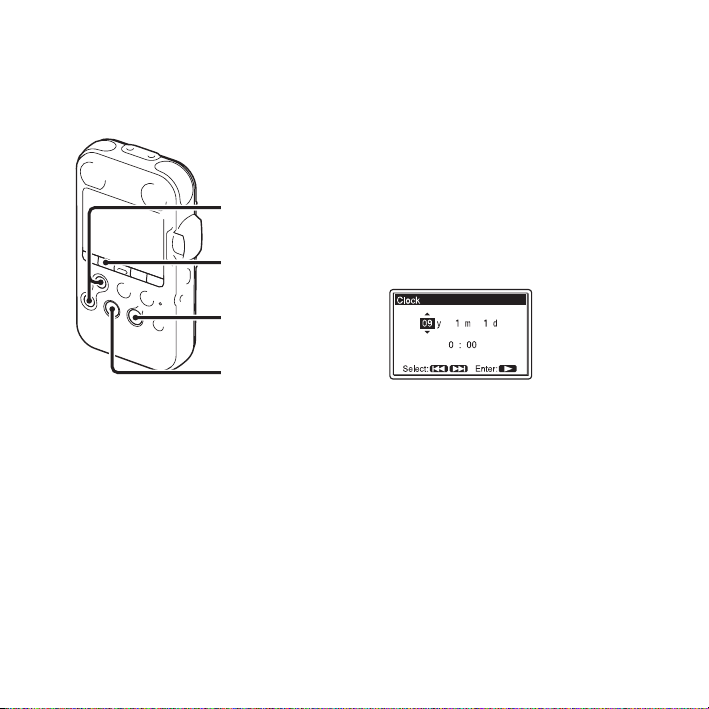
Step 4: Setting the Clock
Setting the clock after inserting batteries
> FF/ v,
. FR/ V
MENU
N PLAY/
ENTER
x
STOP
Recorded audio files (tracks) are named
using the date and time of the clock. By
setting the clock before recording, the
recording’s date and time will be correctly
saved.
When the PCM recorder is turned on before
the clock has been set, “Set Clock” appears
on the display. Then the “Clock” display of
the menu appears, and the year section
flashes in the display window.
GB
16
1 Press > FF/ v or . FR/ V to set the
year, and then press
Perform the same operations to set
month, day, hour, and minute in
sequence.
N PLAY/ENTER.
2 Press x STOP to return to the stop mode
display.
Setting the clock using the menu
While the PCM recorder is in the stop
mode, you can set the clock using the menu.
1 Select “Clock” in the menu in the stop
mode.
Page 17
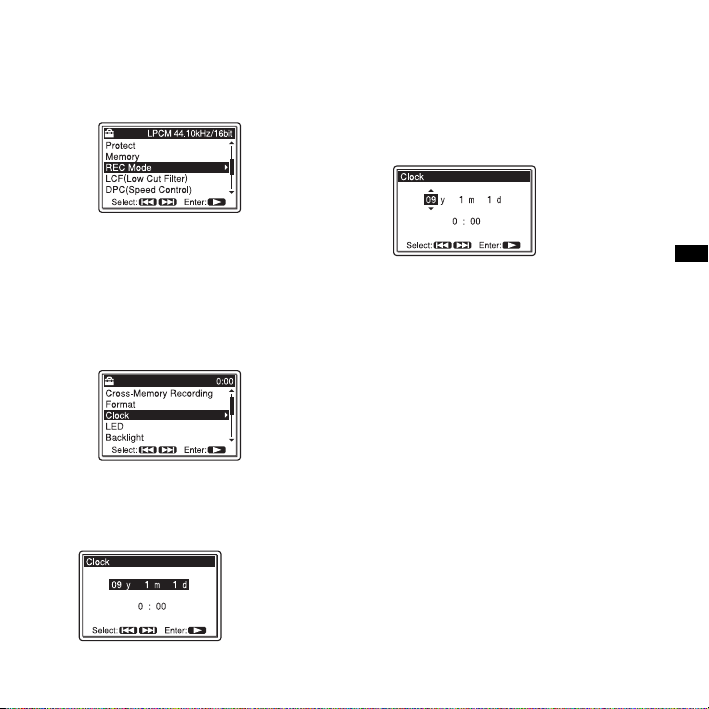
1 Press MENU to enter the menu mode.
The menu mode window will be
displayed.
2 Press > FF/ v or . FR/ V to
select “Detail Menu,” and then press
N PLAY/ENTER.
3 Press > FF/ v or . FR/ V to
select “Clock,” and then press
N
PLAY/ENTER.
2 Press > FF/ v or . FR/ V to select
the date, and then press
ENTER.
N PLAY/
3 Press > FF/ v or . FR/ V to set the
year, and then press
Perform the same operations to set
month, day, hour, and minute in
sequence.
N PLAY/ENTER.
4 Press x STOP to return to the stop mode
display.
P Notes
• If you do not press a button within 1 minute
of entering the clock setting data, the clock
setting mode is cancelled and the window
will return to the stop mode display.
• If you leave the PCM recorder for
approximately 3 minutes or longer, with no
batteries inserted, the clock is reset to the
default settings. In this case, set the clock
again.
Getting Started
17
GB
Page 18
Step 5: Setting the Language to Be Used in the Display Window
> FF/ v,
. FR/ V
MENU
N PLAY/
ENTER
STOP
x
You can select the language to be used for
tracks, menus, folder names, file names,
etc. from 11 languages.
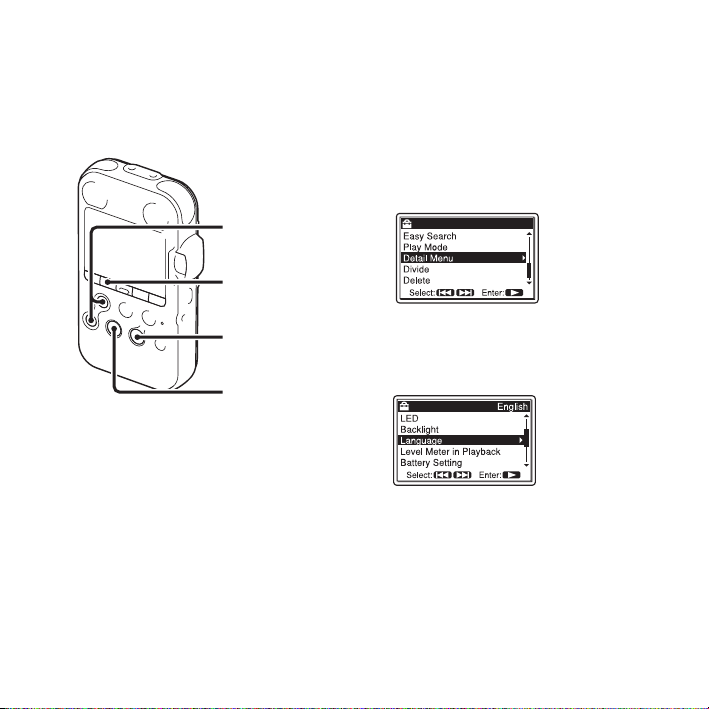
1 Press MENU to enter the menu mode.
The menu mode window will be displayed.
GB
18
2 Press > FF/ v or . FR/ V to select
“Detail Menu,” and then press
PLAY/ENTERT.
N
3 Press > FF/ v or . FR/ V to select
“Language,” and then press
ENTER.
N PLAY/
Page 19

4 Press > FF/ v or . FR/ V to select
the language that you want to use, and
then press
You can select the following languages.
Deutsch (German), English,
Español (Spanish), Français (French),
Italiano (Italian), Русский (Russian),
N PLAY/ENTER.
(Japanese), (Korean),
(Chinese), (Chinese),
(Thai).
5 Press x STOP to return to the stop mode
display.
Getting Started
19
GB
Page 20
Preventing Accidental Operation – HOLD
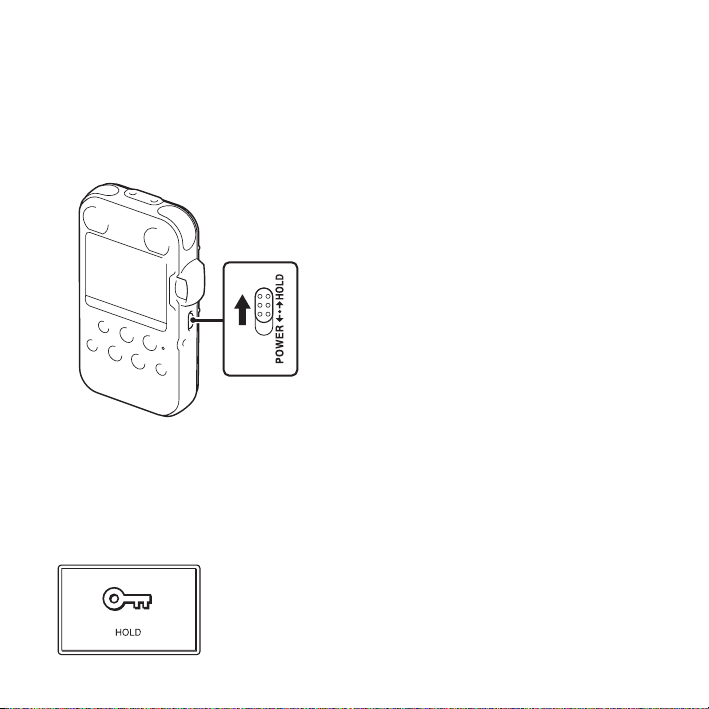
Locking the buttons of the PCM recorder
Slide the POWER/HOLD switch in the
direction of “HOLD.”
“HOLD” will appear for approximately 3
seconds and all the functions of the buttons
of the PCM recorder are locked.
GB
20
Unlocking the buttons of the PCM recorder
Slide the POWER/HOLD switch towards
the center so that all buttons will be
unlocked.
P Note
When the HOLD function is activated during
recording, all the functions of the buttons of
the PCM recorder are locked to prevent
accidental operation. To stop recording, cancel
HOLD function first.
the
Tip
z
Even if the HOLD function is activated, you
can start, pause, or stop recording, or add track
marks by using the remote commander
connected to the PCM recorder.
Page 21

21
Getting Started
GB
Page 22
Basic Operations
Recording
P Note
Before making a recording, turn on the power of the PCM recorder.
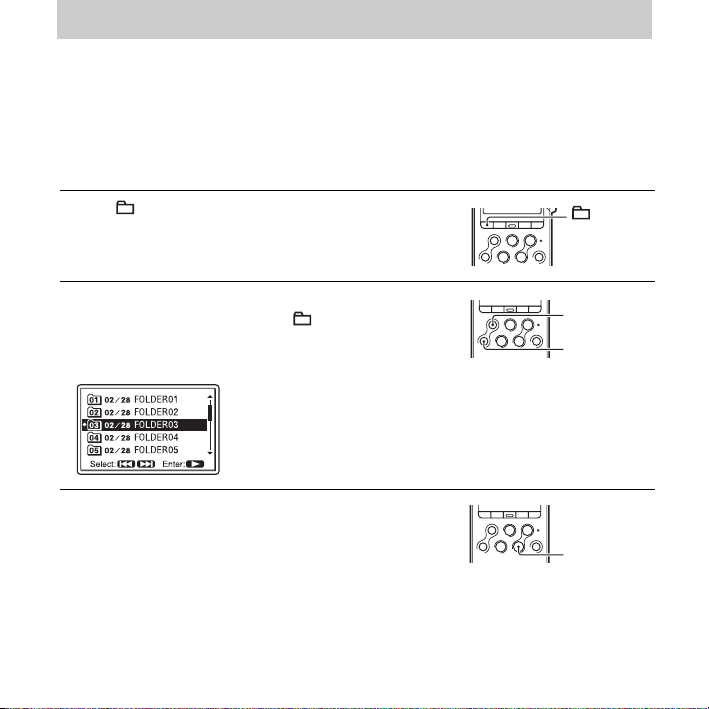
Selecting a folder
1 Press to display the folder selection window in the
stop mode.
2 Press > FF/ v or . FR/ V to select the folder in
which you want to record tracks ( FOLDER01-10).
When you purchase the PCM recorder, there are 10
folders already available.
3 Press N PLAY/ENTER.
GB
22
> FF/ v
.
FR/ V
N PLAY/
ENTER
Page 23
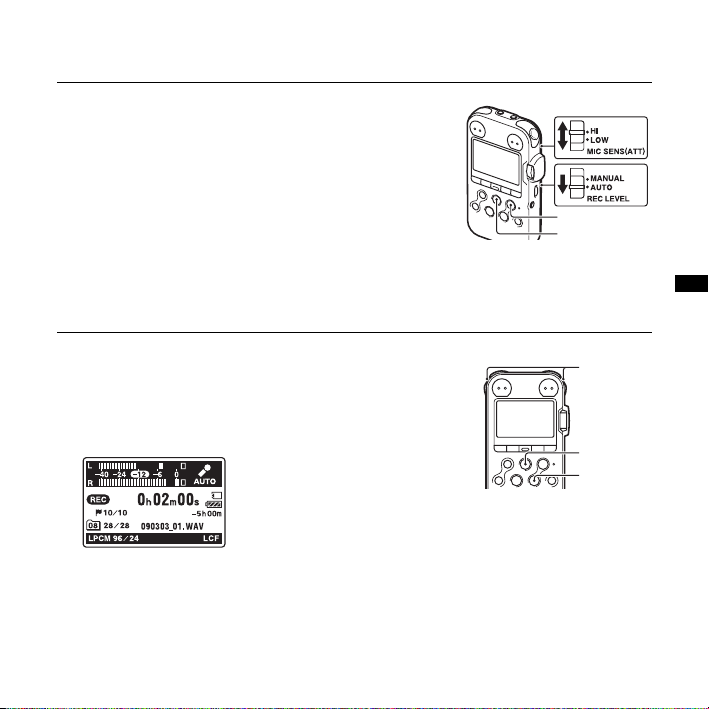
Starting recording (automatic recording)
1 Set the REC LEVEL switch to “AUTO,” and press
z REC in the stop mode to enter the recording standby
mode.
z REC indicator lights in red and the X PAUSE
The
indicator flashes in orange (Recording Standby mode).
When you select “AUTO,” the recording level will be
adjusted automatically.
The REC LEVEL dial adjustment is enabled when you
select “MANUAL.”
You can change the microphone sensitivity with the
MIC SENS(ATT) switch.
Basic Operations
z REC
X PAUSE
2 Turn the built-in microphones in the direction of the
source to be recorded, and press
N PLAY/ENTER.
Recording starts. The new track will be recorded at the
end in the selected folder.
X PAUSE, or
Built-in
micro-
L
R
phones
X PAUSE
N PLAY/
ENTER
23
GB
Page 24
To stop recording
Press x STOP.
The ACCESS indicator flashes in orange and the PCM
recorder stops at the beginning of the current recording.
x STOP
Note while accessing
The PCM recorder is recording data and saving it in memory when the ACCESS indicator flashes
in orange. While the PCM recorder is accessing data, do not remove the batteries, plug or unplug an
AC power adaptor or connecting cables. Doing so may damage the data.
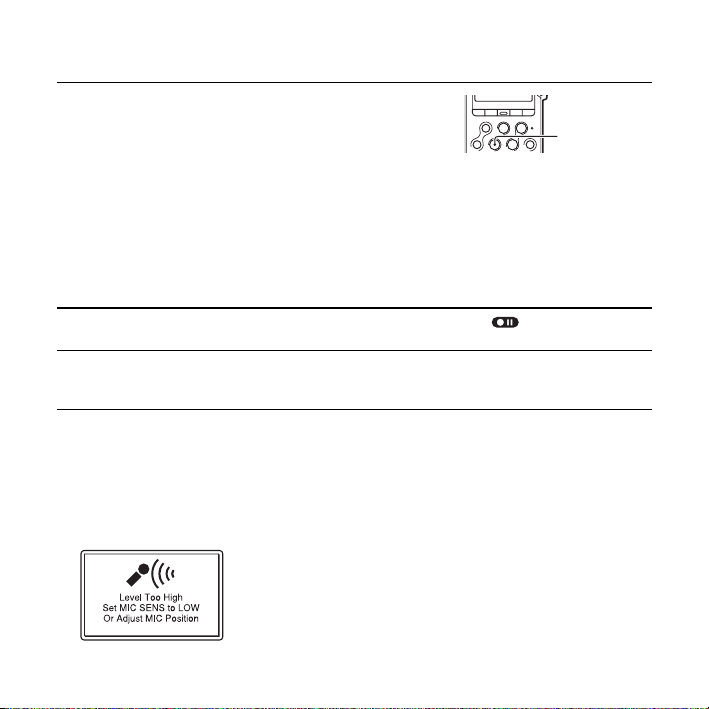
Other operations
pause recording Press X PAUSE. During recording pause, “ ” flashes in the
release pause and resume
recording
z Tips
• You can record up to 99 tracks in each folder.
• When an excessive recording level (exceeding –1 dB) is detected during the recording standby
mode, the peak level L/R OVER indicators light in red and the following level guide is displayed.
You may solve the problem by moving the PCM recorder far from the sound source, or setting the
MIC SENS(ATT) switch to “LOW.” If the problem persists, use manual recording (page 33).
display window.
X PAUSE again or press N PLAY/ENTER. Recording
Press
resumes from that point. (To stop recording after pausing recording,
press
x STOP.)
24
GB
Page 25
• When a memory card is being inserted, you can continue recording a track by changing the folder
to save the track from the internal memory to the memory card automatically after the internal
memory is full (Cross-Memory Recording)(page 39).
• When you connect the supplied wired remote commander to the PCM recorder, you can also
z REC, X PAUSE, and x STOP on the remote commander to perform recording
press
operations.
• Before you start recording, we recommend you make a trial recording first.
P Notes
• Operating or touch noises may be recorded if an object, such as your finger, etc., accidentally rubs
or scratches the PCM recorder during recording.
• You do not need to press and hold
z REC while recording.
• Before making a recording, be sure to check the battery indicator (page 13).
• In automatic recording, the REC LEVEL dial adjustment and the LIMITER setting will not work.
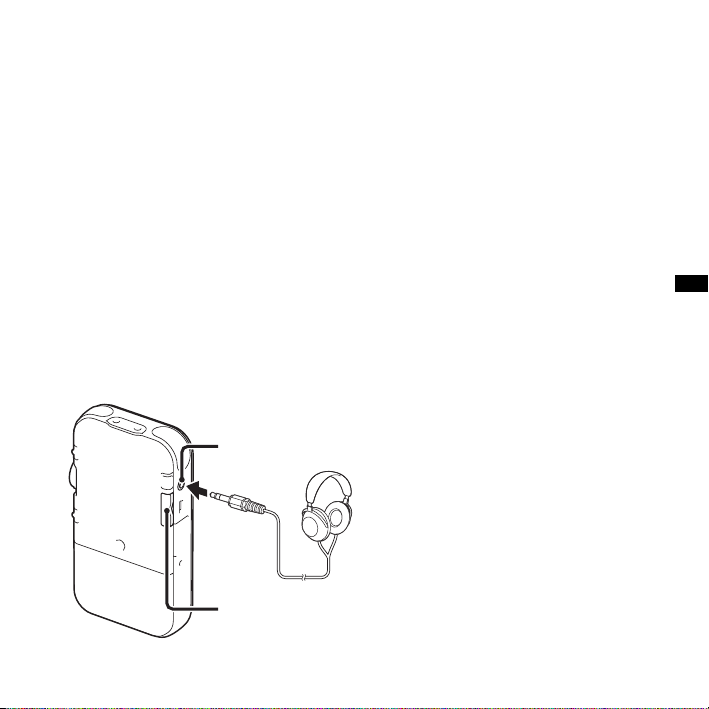
Listening the recording with headphones (not supplied) – Monitoring
If you connect headphones (not supplied) to the i/LINE OUT (headphone/line output) jack,
you can monitor the recording. You can adjust the monitoring volume by pressing VOLUME
+/–, but the recording level is fixed.
P Note
i/LINE OUT
(headphone/line
output) jack
VOLUME +/–
Make sure that “Audio Out” in the menu
is set to “Headphones.” If “LINE OUT” is
selected, do not connect headphones; the
playback sound from the headphones will
be very loud.
The “Audio Out” in the menu is set to
“Headphones,” when you purchase the
PCM recorder (page 58).
Basic Operations
25
GB
Page 26
Listening
P Note
Before the playback starts, turn on the power of the PCM recorder.
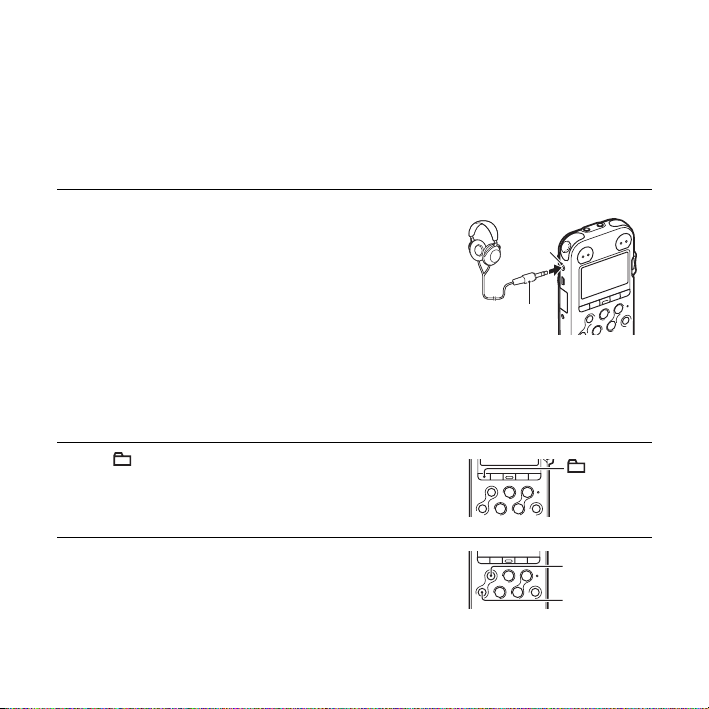
Before you start playback
Connect headphones (not supplied) to the i/LINE OUT
(headphone/line output) jack for better playback sound.
P Note
Make sure that “Audio Out” in the menu is set to
“Headphones.” If “LINE OUT” is selected, do not connect
headphones; the playback sound from the headphones will be
very loud.
The “Audio Out” in the menu is set to “Headphones,” when
you purchase the PCM recorder (page 58).
To start playback
1 Press in the stop mode.
2 Press > FF/ v or . FR/ V to select the folder.
GB
26
i/LINE
OUT jack
Headphones
plug
> FF/ v
FR/ V
.
Page 27
3 Press N PLAY/ENTER.
4 Press > FF/ v or . FR/ V to select the track you
want to play.
5 Press N PLAY/ENTER.
Playback will start soon, and the
indicator will light in green. (When “LED” is set to
“OFF” in the menu (page 79), the indicator does not
light.)
N PLAY/ENTER
6 Press VOLUME +/– to adjust the volume.
N PLAY/
ENTER
> FF/ v
FR/ V
.
N PLAY/
ENTER
VOLUME +/–
Basic Operations
27
GB
Page 28
To stop playback
Press x STOP.
The PCM recorder stops at the current position. To resume
playback from that point, press
N PLAY/ENTER.
x STOP
N PLAY/
ENTER
Other operations
stop at the current position
(Playback Pause function)
go back to the beginning of
the current track
go back to previous tracks Press . FR/ V repeatedly.*2
skip to the next track Press > FF/ v once.*
skip to the succeeding
tracks
Fast forward (Cue) Press and hold the > FF/ v during playback.*
Fast reverse (Review) Press and hold the . FR/ V during playback.*
*1 When a track mark is set, the PCM recorder goes backward or forward to the track mark before or
after the current point.
*2 These operations are for when “Easy Search” is set to “OFF” (page 77).
*3 In the continuous searching mode, the PCM recorder does not locate track marks.
*4 If you press and hold the button, the PCM recorder goes forward or backward slowly at first, and then
at gradually higher speed.
GB
28
Press X PAUSE. To resume playback from that point, press X
PAUSE again or press
During playback pause, “ ” flashes in the display window.
. FR/ V once.*
Press
(During the stop mode, keep the button pressed to go back the tracks
continuously.)
Press > FF/ v repeatedly.*
(During the stop mode, keep the button pressed to skip the tracks
continuously.)
3
*
3
*
N PLAY/ENTER.
1
1
2
4
4
Page 29
z Quickly locating the point you want to start playback (Easy Search)
By setting “Easy Search” to “ON” in the menu, you can go back approximately 3 seconds by
. FR/ V, or advance approximately 10 seconds during playback by pressing > FF/
pressing
v (page 51).
Tracks that the PCM recorder can play back
z
In addition to the tracks that the PCM recorder has recorded as LPCM (WAV) or MP3 files, the
PCM recorder can play back WMA, AAC-LC (m4a), MP3, and LPCM (WAV) files copied from
your computer or other external device.
To select a folder
The PCM recorder saves the tracks it has recorded and the files copied from your computer or
other external device in the following folder structure. There are two types of folders, which
can be distinguished by the folder indicators in the display window as follows:
Folder selection window
: Folder for tracks recorded using the
PCM recorder
(FOLDER01-FOLDER10) (They
MUSIC
Part of the folder structure of the
internal memory
have already been made when you
purchase the PCM recorder.)
: Folder copied from a computer
(These folders are displayed when
music files have been copied from a
computer.)
Basic Operations
29
GB
Page 30
Deleting
P Notes
• Once a track has been deleted, you cannot retrieve it.
• Before deleting the track, turn on the power.
Selecting a track and deleting it
1 Select the track you want to delete when the PCM
recorder is in the stop or playback mode.
2 Press DELETE.
“Delete?” appears with the track title.
3 Press > FF/ v or . FR/ V to select “Execute.”
4 Press N PLAY/ENTER.
“Deleting...” appears in the display window and the
selected track will be deleted.
When a track is deleted, the remaining tracks will
advance so that there will be no space between tracks.
GB
30
DELETE
> FF/ v
FR/ V
.
N PLAY/
ENTER
Page 31

To cancel deleting midway
Select “Cancel” in step 3 of “Selecting a track and deleting
it,” and then press
N PLAY/ENTER.
N PLAY/
ENTER
Deleting another track
Proceed with the steps 1 through 4 in “Selecting a track and deleting it.”
Deleting a part of a track
Use the Divide function in the menu to divide a track into two first, one you want to delete
and the other you do not want to delete. Then proceed with the steps 1 through 4 in “Selecting
a track and deleting it.”
31
Basic Operations
GB
Page 32

Other Recording Operations
Changing the Recording Method
Recording using the remote commander
to REMOTE
jack
You can use the supplied wired remote
commander to perform recorder operations
remotely. Insert the remote commander
plug securely into the REMOTE jack.
Press the appropriate buttons on the remote
commander to perform operations such as
GB
32
recording, pausing and stopping recording,
and adding track marks.
You can operate the PCM recorder even
while it is in the hold state.
z Using the remote commander for
better recorded sound
• By operating the PCM recorder using the
remote commander, you can prevent the
PCM recorder from picking up noises which
may be caused by accidentally pressing a
button, touching the case, or holding the
PCM recorder.
• By placing the PCM recorder at the most
suitable position for recording (e.g. at the
center of multiple players, or near the stage),
and by starting and stopping recording
remotely, you can obtain a more lively and
natural stereo sound recording.
Page 33

Manual recording
Built-in
microphones
REC LEVEL
z REC
N PLAY/ENTER
x STOP
> FF/ v,
. FR/ V
1 Set the REC LEVEL switch to
“MANUAL.”
2 Select a folder.
3 Press z REC.
The PCM recorder enters the recording
standby mode. When the microphones
pick up sound, the level meter in the
display window moves.
Other Recording Operations
When you set the REC LEVEL switch to
“MANUAL,” you can adjust the recording
level manually, according to the sound
source. If necessary, you can also utilize the
“LIMITER” (page 44) and “LCF(Low Cut
Filter)” (page 43) in the menu to reduce
sound distortion.
4 Adjust the recording level with the REC
LEVEL dial.
You can check the recording level with
both the peak meter of the display
window and the peak level indicators.
Adjust the level closer to –12 dB, into a
range that is appropriate for your sound
source.
33
GB
Page 34

If the peak level OVER indicator lights
in red when the recording level exceeds
–1 dB, or “ ” appears on the
display window, distortion may occur.
Reduce the recording level.
Recording a few seconds in
advance –
the Pre-Recording function
Adjust the
maximum level
of the sound to
about –12 dB.
OVER indication
5 Make other settings for recording, such
as “LIMITER” (page 44), “LCF(Low
Cut Filter)” (page 43), etc., in the menu.
6 To start recording, press X PAUSE or
N PLAY/ENTER.
7 To stop recording, press x STOP.
GB
34
MENU
z REC
N PLAY/
ENTER
x STOP
> FF/ v,
. FR/ V
The pre-recording function allows you to
record sound sources for approximately 5
seconds prior to the point when recording is
actually started.
This is useful for recording during
interviews or when making an open-air
recording so that you will not miss an
opportunity to start recording.
Page 35

Sounds for 5 seconds are
buffered in the memory
Press z REC to
enter the recording
standby mode.
Press X PAUSE or
N PLAY/ENTER.
Recording
starts.
1 Press MENU to enter the menu mode.
The menu mode window will be
displayed.
4 Press > FF/ v or . FR/ V to select
“ON,” and then press
ENTER.
N PLAY/
Other Recording Operations
2 Press > FF/ v or . FR/ V to select
“Detail Menu,” and then press
PLAY/ENTER.
N
3 Press > FF/ v or . FR/ V to select
“PRE REC,” and then press
ENTER.
N PLAY/
5 Press x STOP to exit the menu mode.
6 Select a folder.
7 Press z REC.
The PCM recorder enters the recording
standby mode. Pre-recording starts and
sounds for a maximum of the last 5
seconds are buffered in the memory.
Displays how
long the sound
is buffered in the
memory.
35
GB
Page 36

8 To start recording, press X PAUSE or
N PLAY/ENTER.
The standby for recording mode is
released, and recording continues from
the sound buffered in step 7.
Recording on a memory card
9 To stop recording, press x STOP.
P Notes
• If you start recording with the pre-recording
function using the built-in microphones, a
click noise may be recorded when you press
z REC. To record with the pre-recording
function, we recommend you use the
supplied wired remote commander or an
external microphone.
• When the remaining recordable time is less
than 10 seconds, the pre-recording function
is disabled. Before starting to use the prerecording function, delete unwanted files.
• If you stop recording before step 8, sounds
buffered in the memory will not be saved.
To cancel the pre-recording
function
Set “PRE REC” to “OFF” in step 4.
GB
36
> FF/ v,
. FR/ V
MENU
N PLAY/ENTER
Insert M2™ with the terminal side
facing toward you .*
*
when you are inserting
a memory card with
the back side of the
PCM recorder facing
toward you.
Insert microSD card with the label
side facing toward you.*
In addition to the built-in memory, you can
record a track on a memory card.
Page 37

About compatible memory cards
Memory cards that you can use with the
PCM recorder are as follows:
• Memory Stick Micro™ (M2™) media:
Up to16 GB is supported. For compatible
M2™, please refer to the Sony web site
(page 95).
• microSD card:
A microSD (FAT16) card smaller than
2 GB and a microSDHC (FAT32) card
from 4 GB to 16 GB are supported.
A memory card of 64 MB or less is not
supported.
The microSD/microSDHC cards that have
been operationally tested according to our
standards are as follows.
Supplier 1 GB 2 GB 4 GB 8 GB 16 GB
Toshiba aaaaa
Panasonic aaaaa
SanDisk aa aaa
a :Operation tested
– :Operation not tested
As of September 2009
For the PCM recorder, the operational tests
performed were using microSD/microSDHC
cards available as of September 2009.
In this manual, M2™ and microSD
memory cards are generally referred to as a
“memory card.”
The M2™/microSD card slot is referred to
as the “memory card slot.”
Due to the file system specifications of the
PCM recorder, you can record and play
back an LPCM file smaller than 2 GB, and
an MP3, AAC-LC, or WMA file smaller
than 1 GB using a memory card.
The maximum number of tracks you can
record on a memory card is 5,000.
P Note
Operations of all types of compatible memory
cards are not guaranteed.
Inserting a memory card
Before recording, be sure to copy all the
data saved on the memory card to your
computer and format the memory card on
the PCM recorder so it contains no data.
1 Open the cover of the memory card slot
in the stop mode.
2 Insert an M2™ or microSD card, in the
direction shown in the illustration on
page 36, securely to the end of the slot
until it clicks into place. Then close the
cover.
Other Recording Operations
37
GB
Page 38

To remove a memory card
Be sure that the ACCESS indicator is off,
and then push the memory card into the
slot. When it pops out, remove it from the
memory card slot.
On folder and track file structure
Ten folders are created in a memory card in
addition to those in the built-in memory.
The structure of folders and track files is
somewhat different from that of the built-in
memory (page 85).
P Notes
• Do not insert or remove a memory card
during recording/playback. Doing so may
cause a malfunction of the PCM recorder.
• Do not remove a memory card while
“Accessing...” appears on the display
window or the ACCESS indicator flashes in
orange. Doing so may damage the data.
• If a memory card is not recognized, remove
it and then insert it into the PCM recorder
again.
• Close the cover of the memory card slot
firmly. Also, do not insert any liquid, metal,
flammable or any object other than a
memory card into the slot. Doing so may
cause fire, electric shock, or malfunctions.
Using a memory card for
recording and playback (Memory
setting)
1 Press MENU to enter the menu mode.
The menu mode window will be
displayed.
2 Press > FF/ v or . FR/ V to select
“Memory,” and then press
ENTER.
N PLAY/
3 Press > FF/ v or . FR/ V to select
“Memory Card,” and then press
PLAY/ENTER.
N
4 Press x STOP to exit the menu mode.
To use the built-in memory
Select “Built-In Memory” in step 3.
38
GB
Page 39

To start recording
Select the folder and press z REC to enter
recording standby mode. Then press
PAUSE or
recording.
For automatic recording, see “Recording”
on page 22. For manual recording, see
“Manual recording” on page 33.
N PLAY/ENTER to start
X
recorder automatically switches its
destination to the other memory media and
continues recording (Cross-Memory
Recording).
1 Press MENU to enter the menu mode.
The menu mode window will be
displayed.
Other Recording Operations
Recording across memory
media –
Cross-Memory Recording
> FF/ v,
. FR/ V
MENU
N PLAY/
ENTER
STOP
x
When the memory currently being used
becomes full during recording, the PCM
2 Press > FF/ v or . FR/ V to select
“Detail Menu,” and then press
PLAY/ENTER.
N
3 Press > FF/ v or . FR/ V to select
“Cross-Memory Recording,” and then
N PLAY/ENTER.
press
39
GB
Page 40

4 Press > FF/ v or . FR/ V to select
“ON,” and then press
ENTER.
N PLAY/
5 Press x STOP to exit the menu mode.
To cancel Cross-Memory
Recording
Select “OFF” in step 4.
When the current memory media
becomes full during recording
The following message appears on the
display window. Recording continues as a
new track in a recordable folder of the
smallest folder number available for the
other memory media.
A new track is created with a new file
name.
When the recording stops, the PCM
recorder stops at the beginning of the new
track.
P Notes
• If the other memory media is also full, a
message is displayed and the PCM recorder
stops recording.
• When you play back the original track
recorded with Cross-Memory Recording, the
PCM recorder does not play the succeeding
track automatically.
• Before attempting Cross-Memory
Recording, check to see if the memory card
is detected in the “Memory” menu in
advance (page 38).
40
GB
Page 41

Changing the Recording Settings
Selecting the recording mode
> FF/ v,
. FR/ V
MENU
N PLAY/
ENTER
STOP
x
You can select the recording mode in the
menu when the PCM recorder is in the stop
mode.
About the recording modes
The PCM recorder is compatible with 2
types of recording modes: LPCM (Linear
PCM) and MP3. The features offered by
each are as follows.
• LPCM (Linear PCM): This is a WAV file
and you can record the sound without
compression, providing higher quality
than MP3. On the other hand, the file size
is large, it takes time to copy to a
computer, and the available recording
time in the PCM recorder is shorter than
MP3. We recommend this recording
mode for recording when the sound
quality is important.
• MP3: A standard method of sound
compression, which can be played back
using many different kinds of computers.
1 Press MENU to enter the menu mode.
The menu mode window will be
displayed.
2 Press > FF/ v or . FR/ V to select
“REC Mode,” and then press
ENTER.
N PLAY/
41
Other Recording Operations
GB
Page 42

3 Press > FF/ v or . FR/ V to select
the desired recording mode, and then
N PLAY/ENTER.
press
LPCM 22.05kHz/16bit
LPCM 44.10kHz/16bit*
LPCM 44.10kHz/24bit
LPCM 48.00kHz/16bit
LPCM 48.00kHz/24bit
LPCM 96.00kHz/16bit
LPCM (Not
compressed)
mode
You can
record with
higher sound
quality.
LPCM 96.00kHz/24bit
MP3
(compressed)
MP3 44.10kHz/64kbps
MP3 44.10kHz/128kbps
MP3 44.10kHz/320kbps
**
mode
You can
record with
higher sound
quality.
* default setting
** for a long-time recording
4 Press x STOP to exit the menu mode.
P Note
You cannot set the recording mode while
recording.
z
About the sampling frequency
and quantifying bit number
• Sampling frequency is a value that
represents how many times an analog signal
is converted into a digital signal (A/D
conversion) per second. The larger the value
of sampling frequency, the better the sound
quality, but also the larger the amount of
data.
• Quantifying bit number is a value that
represents the amount of data it takes for
1second of audio. The larger the value of the
bit number, the larger amount of data it takes
and the better the sound quality.
Setting the microphone sensitivity
42
GB
Page 43

You can set the sensitivity of the built-in
microphones and an external microphone
connected to the m (microphone) jack of
the PCM recorder. Switch the MIC
SENS(ATT) switch according to the
recording conditions or to suit your
purposes, when the PCM recorder is either
stopped or is recording.
HI (high)* Usually select this position.
LOW Select this position to record a
* The microphone sensitivity is set to “HI” when
you purchase the PCM recorder.
• The microphone attenuator is
set to “HI.” (In manual
recording)
• The microphone sensitivity is
set to high. (In automatic
recording)
sudden loud sound.
• The microphone attenuator is
set to “LOW.” (In manual
recording)
• The microphone sensitivity is
set to low. (In automatic
recording)
Cutting out low frequency –
the LCF function
> FF/ v,
. FR/ V
MENU
N PLAY/
ENTER
x
STOP
When you set the LCF(Low Cut Filter)
function to “ON” in the stop or recording
mode, you cut out a low frequency to
reduce the air conditioner noise, roaring
noise from wind, etc.; therefore you can
record a track more clearly.
1 Press MENU to enter the menu mode.
The menu mode window will be
displayed.
Other Recording Operations
43
GB
Page 44

2 Press > FF/ v or . FR/ V to select
“LCF(Low Cut Filter),” and then press
N PLAY/ENTER.
Preventing sound distortion–
the LIMITER function
> FF/ v,
. FR/ V
3 Press > FF/ v or . FR/ V to select
“ON,” and then press
ENTER.
The LCF function is set to “OFF” when
you purchase the PCM recorder.
N PLAY/
4 Press x STOP to exit the menu mode.
To cancel the LCF function
Set “LCF(Low Cut Filter)” to “OFF” in
step 3.
GB
44
MENU
N PLAY/
ENTER
x
STOP
During the stop or recording mode, you can
set the LIMITER function.
When the “LIMITER” is set to “ON,” the
input sound that is too loud is adjusted
automatically to the maximum input level
to prevent sound distortion.
1 Press MENU to enter the menu mode.
The menu mode window will be
displayed.
Page 45

2 Press > FF/ v or . FR/ V to select
“Detail Menu,” and then press
PLAY/ENTER.
N
3 Press > FF/ v or . FR/ V to select
“LIMITER,” and then press
ENTER.
N PLAY/
To cancel the LIMITER function
Set “LIMITER” to “OFF” in step 4.
P Notes
• When the REC LEVEL switch is set to
“AUTO,” the LIMITER function does not
work.
• When the “LIMITER” is set to “ON,” the
limiter function of the PCM recorder covers
the input from the maximum input level to
+12 dB. If the input exceeds this limit,
sounds may be distorted.
Other Recording Operations
4 Press > FF/ v or . FR/ V to select
“ON,” and then press
ENTER.
The LIMITER function is set to “OFF”
when you purchase the PCM recorder.
N PLAY/
5 Press x STOP to exit the menu mode.
45
GB
Page 46

Recording via Other Devices
Recording with an external microphone
Stereo
microphone
m (microphone) ja ck
> FF/ v,
. FR/ V
REC LEVEL
z REC
N PLAY/ENTER
X PAUSE
x STOP
GB
46
You can record from an external
microphone. When an external microphone
is connected, the built-in microphones and
the input from the LINE IN jack become
disabled.
1 Connect an external microphone to the
m (microphone) jack when the PCM
recorder is in the stop mode.
“Plug In Power” appears in the display
window.
If “Plug In Power” is not displayed, set it
in the menu (page 82).
2 Press> FF/ v or . FR/ V to select
“ON,” and then press
ENTER.
When a plug in power type microphone
is connected, power is automatically
supplied to the microphone from the
PCM recorder.
N PLAY/
Page 47

3 Press x STOP to exit the menu mode.
4 Set the REC LEVEL switch to “AUTO”
for automatic recording, or “MANUAL”
for manual recording.
5 Press z REC.
The PCM recorder enters the recording
standby mode. The built-in microphones
and input from the LINE IN are
automatically cut off.
You can adjust the microphone
sensitivity with the MIC SENS(ATT)
switch (page 42).
6 To start recording, press X PAUSE or
N PLAY/ENTER.
7 When “MANUAL” has been selected in
step 4, adjust the recording level with the
REC LEVEL dial.
8 To stop recording, press x STOP.
z Recommended microphones (not
supplied)
We recommend you use the Sony
ECM-MS957 electret condenser microphone.
Recording from other equipment
Tape recorder or CD
player
Audio
connecting
cable
LINE IN
REC LEVEL
z REC
N PLAY/ENTER
X PAUSE
x STOP
You can make music files without using the
computer by recording the sound from
other equipment connected to the PCM
recorder. When an external equipment is
Other Recording Operations
47
GB
Page 48

connected, the built-in microphones
become disabled.
1 Connect an external equipment to the
PCM recorder in the stop mode.
Connect the audio output jacks (stereo
minijack) of external equipment to the
LINE IN jack of the PCM recorder using
a Sony audio connecting cable (not
supplied).
2 Set the REC LEVEL switch to “AUTO”
for automatic recording, or “MANUAL”
for manual recording.
3 Press z REC.
The PCM recorder enters the recording
standby mode.
4 Start playback with the connected
external equipment.
5 To start recording, press X PAUSE or
N PLAY/ENTER.
6 When “MANUAL” has been selected in
step 2, adjust the recording level with the
REC LEVEL dial.
7 To stop recording, press x STOP.
z Recommended audio connecting
cable (not supplied)
We recommend you use Sony RK-G129 audio
connecting cable (not supplied).
P Note
When both m (microphone) jack and LINE IN
jack are connected with an external
microphone and an external device
respectively, the input from the m
(microphone) jack has the priority. When
using the input from the LINE IN jack, remove
an external microphone from the m
(microphone) jack.
48
GB
Page 49

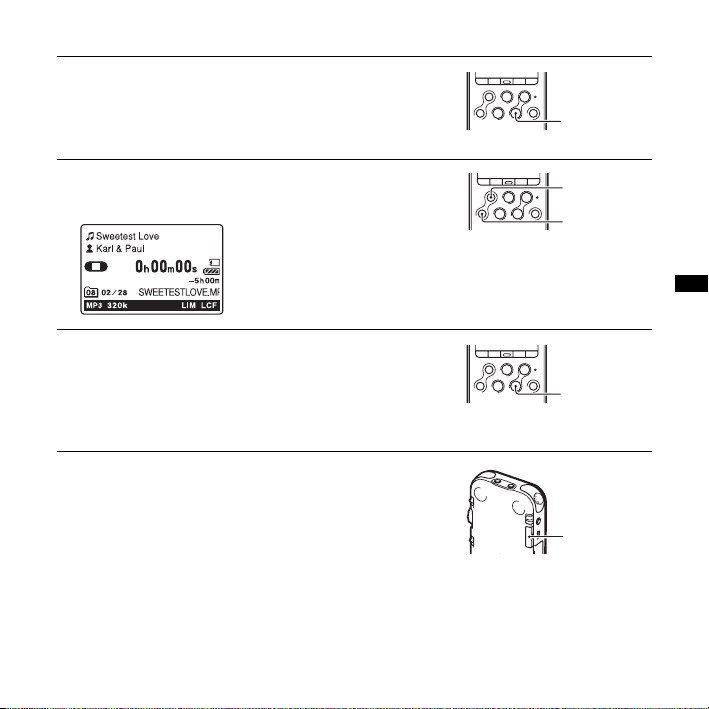
Other Playback Operations
Changing the Playback Method
Changing the display during playback
You can change the display during
playback between the file information
display and the level meter display.
• File information display
Title name
Artist name
File name
Current folder icon
A track recorded using the PCM recorder
is displayed as follows.
: Track title name: Date
(yymmdd)_file number (e.g.
090101_01)
: Artist name (e.g. My Recording)
File Name: Date (yymmdd)_file number
_file extension (e.g.
090101_01.wav)
: Current folder name: 01 (FOLDER
01) to 10 (FOLDER 10)
You can change the folder name, title,
artist name, and/or file name using your
computer.
• Level meter display
You can play back a track while checking
the recorded levels.
level meter
Selecting the level meter display
1 Press MENU to enter the menu mode.
The menu mode window will be
displayed.
2 Press > FF/ v or . FR/ V to select
“Detail Menu,” and then press
PLAY/ENTER.
N
49
Other Playback Operations
GB
Page 50

3 Press > FF/ v or . FR/ V to select
“Level Meter in Playback,” and then
N PLAY/ENTER.
press
4 Press > FF/ v or . FR/ V to select
“ON,” and then press
ENTER.
The Level Meter in Playback function is
set to “OFF” when you purchase the
PCM recorder.
N PLAY/
5 Press x STOP to exit the menu mode.
To display file information
Set “Level Meter in Playback” to “OFF in step
3.
Listening the playback sounds with the headphones or external speakers
• To listen with the headphones:
Connect stereo headphones (not supplied)
to the i/LINE OUT (headphone/line
output) jack. The built-in speaker will be
automatically disconnected. Adjust the
volume with the VOLUME +/– buttons.
• To listen from an external speaker:
Connect the speaker cord of the carrying
case speaker CKS-M10 (not supplied) to
the i/LINE OUT (headphone/line
output) jack of the PCM recorder. Adjust
the volume with the VOLUME +/–
buttons.
Or use a Sony audio connecting cable (not
supplied) to connect the microphone or
line input jack of an external active or
passive speaker (not supplied) with the i/
LINE OUT (headphone/line output) jack
of the PCM recorder.
P Notes
• Set “Audio Out” in the menu to
“Headphones” to use the i/LINE OUT
(headphone/line output) jack as a
headphone.
50
GB
Page 51

• When “Audio Out” in the menu is set to
“LINE OUT,” do not connect headphones;
the playback sound from the headphones
will be very loud.
Quickly locating the point
you wish to start playback –
Easy Search
When “Easy Search” is set to “ON” in the
menu, you can quickly locate the point at
which you wish to start playback by
> FF/ v or . FR/ V
pressing
repeatedly during playback (page 77). You
can go back approx. 3 seconds by pressing
. FR/ V once, or advance approx. 10
seconds by pressing
function is useful for locating a desired
point in a long recording, such as in a
recording of musical instruments.
z When tracks are played back to
the end of the last track
• When you play back or fast play back to the
end of the last track, “TRACK END” lights
up for approx. 5 seconds.
• When “TRACK END” goes off, the PCM
recorder will stop at the beginning of the last
track.
• If you press and hold
“TRACK END” is lit, the tracks are played
> FF/ v once. This
. FR/ V while
back rapidly, and normal playback will start
at the point you release the button.
• If the last track is long and you wish to start
playback at a later part of the track, press and
> FF/ v to go to the end of the track,
hold
and then press
END” is lit to go back to the desired point.
• For tracks other than the last one, go to the
beginning of the next track and play
backward to the desired point.
. FR/ V while “TRACK
Selecting the playback mode
> FF/ v,
. FR/ V
MENU
N PLAY/
ENTER
x
STOP
You can select the playback mode in the
menu.
Other Playback Operations
51
GB
Page 52

1 Press MENU to enter the menu mode
when the PCM recorder is in the stop or
playback mode.
The menu mode window will be
displayed.
2 Press > FF/ v or . FR/ V to select
“Play Mode,” and then press
ENTER.
N PLAY/
3 Press > FF/ v or . FR/ V to select
“1,” “ ,” “ALL,” “ 1,” “ ,” or
ALL,” and then press N PLAY/
“
ENTER.
1 A track is played back.
Tracks in one folder are played back
continuously.
ALL All the tracks are played back
continuously.
1 One track is played back repeatedly.
Tracks in one folder are played back
repeatedly.
ALL All the tracks are played back
repeatedly.
4 Press x STOP to exit the menu mode.
Playing back repeatedly
A-B
N PLAY/
ENTER
52
GB
Page 53

Playing back a track repeatedly
During playback, press and hold N PLAY/
ENTER until “ 1” appears. The selected
track will be played back repeatedly.
To resume normal playback, press
PLAY/ENTER again.
N
Playing back a specified section
repeatedly – A-B Repeat
1 During playback, press (repeat) A-B
to specify the starting point A.
“A-B B?” is displayed.
2 Press (repeat) A-B again to specify
the finishing point B.
“ A-B” is displayed and the specified
section is played back repeatedly.
Other operations
• To resume normal playback:
N PLAY/ENTER.
Press
• To stop A-B Repeat playback:
Press
x STOP.
• To change the segment specified for A-B
Repeat playback:
During A-B Repeat playback, press
(repeat) A-B again to specify a new
starting point A. Then specify a new
finishing point B, as in step 2.
Other Playback Operations
53
GB
Page 54

Changing the Playback Sounds
Adjusting the playback
speed – the DPC function
> FF/ v,
. FR/ V
MENU
N PLAY/
ENTER
STOP
x
When you slide the DPC (SPEED CTRL)
(Digital Pitch Speed Control) switch to
“ON,” you can adjust the playback speed
between +100% and –75% of normal speed
in the menu.
The track is played back in natural tones
thanks to the digital processing function.
GB
54
1 Slide the DPC (SPEED CTRL) switch to
“ON.”
2 Press MENU to enter the menu mode.
The menu mode window will be
displayed.
3 Press > FF/ v or . FR/ V to select
“DPC(Speed Control),” and then press
N PLAY/ENTER.
4 Press > FF/ v or . FR/ V to adjust
the playback speed.
> FF/ v to increase the speed, or
Press
. FR/ V to make it slower. Every time
the button is pressed, you can decrease
the speed by 5% for – from –75% to 0%,
and increase the speed by 10% for +
between 0% and 100%.
Page 55

5 Press N PLAY/ENTER to execute the
playback speed.
6 Press x STOP to exit the menu mode.
Adjusting the playback
tones – Key Control
> FF/ v,
. FR/ V
MENU
Other Playback Operations
7 Press N PLAY/ENTER to start
playback.
Tracks are played back at the selected
playback speed.
To resume normal playback
Slide the DPC (SPEED CTRL) switch to
“OFF.”
N PLAY/
ENTER
x
STOP
You can adjust the playback sounds in
semitones higher or lower, each in 6 step
(Key Control), whichever is best suited for
practicing songs to the recorded
accompaniment.
1 Press MENU to enter the menu mode.
The menu mode window will be
displayed.
2 Press > FF/ v or . FR/ V to select
“Key Control,” and then press
PLAY/ENTER.
N
55
GB
Page 56

3 Press > FF/ v or . FR/ V to adjust
the playback tone.
> FF/ v to adjust the sounds by
Press
a halftone higher (#1 to #6), or
V to adjust it by a halftone lower (21 to
26), each in 6 steps.
. FR/
4 Press N PLAY/ENTER to set the
playback tone.
5 Press x STOP to exit the menu mode.
Key control
setting
To resume normal playback
sounds
Select “0” in step 3.
Reinforcing the bass
sound – Effect
> FF/ v,
. FR/ V
MENU
6 Press N PLAY/ENTER to start
playback.
Tracks are played back at the selected
tone. The setting ( #1 to #6, 21 to 26) is
displayed on the display window.
GB
56
N PLAY/
ENTER
x
STOP
You can set the bass sound you want for the
playback in the menu.
Page 57

1 Press MENU to enter the menu mode
when the PCM recorder is in the stop or
playback mode.
The menu mode window will be
displayed.
2 Press > FF/ v or . FR/ V to select
“Effect,” and then press
ENTER.
N PLAY/
3 Press > FF/ v or . FR/ V to select
effect you want for the playback, and
then press
Bass1 Emphasizes the bass sound.
Bass2
OFF The Effect function does not work.
N PLAY/ENTER.
Emphasizes the bass sound even more.
4 Press x STOP to exit the menu mode.
5 Press N PLAY/ENTER to start
playback.
Tracks are played back with the selected
effect.
P Notes
• When you play back using the built-in
speaker, this setting does not work.
• When “LINE OUT” is selected in “Audio
Out” in the menu, the Effect function does
not work.
Other Playback Operations
57
GB
Page 58

Playback via Other Devices
Recording with other equipment
Tape recorder, etc.
i/LINE OUT
jack
Audio
connecting
cable
You can record the sound of the PCM
recorder with other equipment.
Before you start recording, we recommend
you to make a trial recording first.
x STOP
N PLAY/ENTER
1 Connect the i/LINE OUT (headphone/
line output) jack of the PCM recorder to
GB
58
the audio input connector (stereo
minijack) of other equipment using an
audio connecting cable.
2 Press MENU to enter the menu mode in
the stop mode.
The menu mode window will be
displayed.
3 Press > FF/ v or . FR/ V to select
“Detail Menu,” and then press
PLAY/ENTER.
N
4 Press > FF/ v or . FR/ V to select
“Audio Out,” and then press
ENTER.
N PLAY/
Page 59

5 Press > FF/ v or . FR/ V to select
“LINE OUT,” and then press
ENTER.
“Headphones” is selected when you
purchase the
PCM recorder.
N PLAY/
6 Press x STOP to exit the menu mode.
7 Press N PLAY/ENTER to start
playback and at the same time set the
connected equipment to the recording
mode.
A track from the PCM recorder will be
recorded on the equipment connected.
8 Press x STOP on the PCM recorder and
the connected equipment at the same
time to stop recording.
z Recommended audio connecting
cable (not supplied)
You can use Sony audio connecting cables
RK-G129 (not supplied).
P Notes
• To listen playback with the headphones, set
“Audio Out” to “Headphones” (page 50).
• If input from an external equipment is
distorted, select “Headphones” in step 5 and
adjust the volume with VOLUME +/–
buttons.
• When “LINE OUT” is selected, the Effect
function does not work.
• While the “LINE OUT” is selected, you
cannot adjust the output volume with the
VOLUME +/– buttons.
Other Playback Operations
59
GB
Page 60

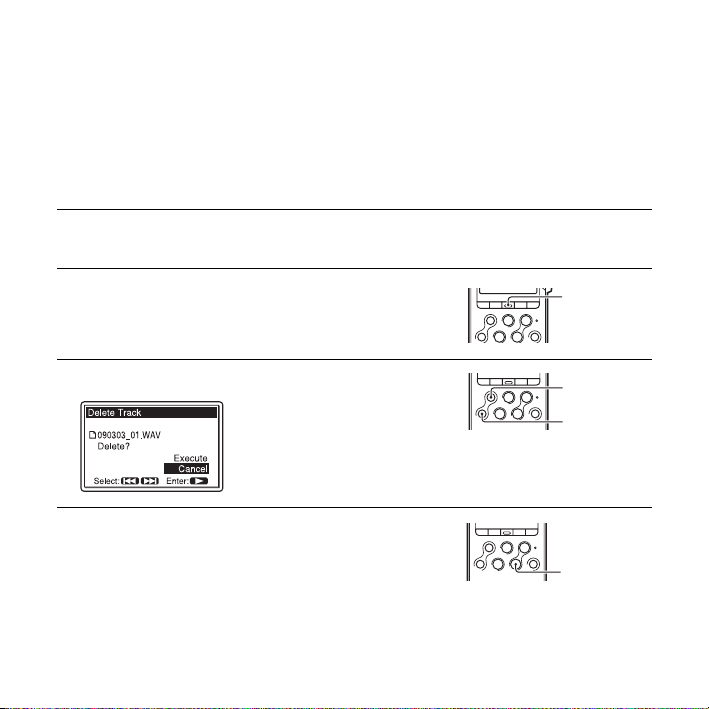
Editing Tracks
Adding a Mark to a Track
Using a track mark
> FF/ v,
. FR/ V
MENU
N PLAY/ENTER
T-MARK
x STOP
Adding a track mark
You can add a track mark at a point at
which you would like to divide a track later
or locate during playback.
You can add a maximum of 98 track marks
to each track.
During recording, playback, or pausing,
press the T-MARK button at the position
you want to add a track mark.
GB
60
The (track mark) icon flashes three
times, and a track mark is added.
z Using the remote commander
When the supplied remote commander is
connected, you can also press T-MARK button
on the remote commander to add a track mark.
P Notes
• You can add a track mark only to a track
recorded using the PCM recorder. You
cannot add a track mark to an MP3/WMA/
AAC-LC (m4a)/LPCM (WAV) file copied
from a computer.
• You cannot add a track mark at a point
within 0.5 seconds from another track mark.
• You cannot add a track mark at the very
beginning or at the very end of the track.
• If there are already 98 track marks in a track,
you cannot add any more track marks.
• When a track mark is added during
playback, the playback stops.
Page 61

Locating a track mark and
starting playback at the track
mark
In the stop mode, press > FF/ v or .
FR/ V. When the (track mark) icon
flashes once, press
N PLAY/ENTER
Dividing a track at all the track
mark positions
Select “Divide All T-MARK(Track
Marks)” from the Divide menu.
Deleting a track mark
1 Stop at a position after the track mark
you would like to delete.
2 Press MENU to enter the menu mode.
The menu mode window will be
displayed.
4 Press > FF/ v or . FR/ V to select
“Delete T-MARK(Track Mark),” and
then press
The message “Delete T-MARK(Track
Mark)?” is displayed.
N PLAY/ENTER.
5 Press > FF/ v or . FR/ V to select
“Execute,” and then press
ENTER.
A deletion animation and the message
“Deleting...” appear. The selected track
mark will be deleted.
N PLAY/
Editing Tracks
3 Press > FF/ v or . FR/ V to select
“Delete,” and then press
ENTER.
The Delete menu is displayed.
N PLAY/
61
GB
Page 62

Stop position
Adding a “TAKE” or “KEEP” to a file name
Delete T-Mark
The track mark just before the stop
position will be deleted.
6 Press x STOP to exit the menu mode.
Deleting all the track marks in
the selected track at one time
Select a track from which you would like to
delete the track marks, and then select
“Delete All T-MARK(Track Marks)” in
step 4. All the track marks will be deleted at
one time.
GB
62
> FF/ v,
. FR/ V
MENU
N PLAY/
ENTER
STOP
x
You can add a “TAKE” or “KEEP” to a file
name of a track, so that you can narrow
down your selections to only marked files.
This feature is useful when you want to
select one from many recordings, by adding
a “TAKE” to the ones most likely to be
selected, or adding a “KEEP” to the ones
that you would like to save just for possible
selection.
1 Display the track from which you would
like to add a “TAKE” or “KEEP” to the
file name.
Page 63

2 Press MENU to enter the menu mode.
The menu mode window will be
displayed.
3 Press > FF/ v or . FR/ V to select
“Add “TAKE”,” and then press
PLAY/ENTER.
N
4 Press > FF/ v or . FR/ V to select
“Add “TAKE”,” or “Add “KEEP”,” and
then press
A confirmation message is displayed.
N PLAY/ENTER.
5 Press > FF/ v or . FR/ V to select
“Execute,” and then press
ENTER.
N PLAY/
A suffix (“TAKE” or “KEEP”) is added
to the file name of the track.
6 Press x STOP to exit the menu mode.
Removing “TAKE” or “KEEP” from
the file name of a track
Select “Remove “TAKE/KEEP”” in step 4.
Editing Tracks
63
GB
Page 64

Protecting a track
> FF/ v,
. FR/ V
MENU
3 Press > FF/ v or . FR/ V to select
“Protect,” and then press
ENTER.
A confirmation message is displayed.
N PLAY/
N PLAY/
ENTER
STOP
x
To prevent a track from being accidentally
deleted or edited, you can protect an
important track. A protected track is
marked with the (protect) indicator and
is regarded as a read-only file you cannot
delete or edit.
1 Display the track which you would like
to protect.
2 Press MENU to enter the menu mode.
The menu mode window will be
displayed.
GB
64
4 Press > FF/ v or . FR/ V to select
“Execute,” and then press
ENTER.
The track is protected and added with a
(protect) indicator.
5 Press x STOP to exit the menu mode.
To release protection
Select the protected file, and then proceed
with the steps 1 through 5. The protection is
released.
N PLAY/
Page 65

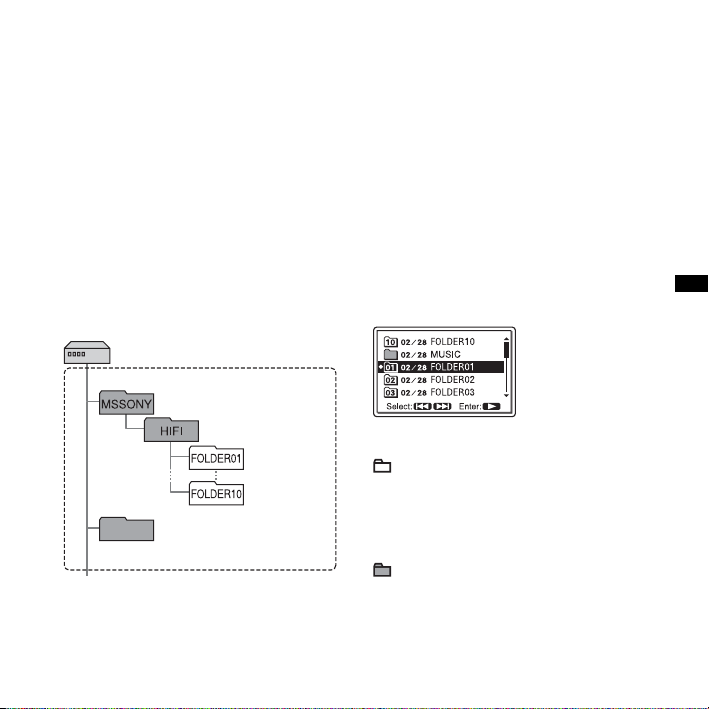
Arranging Tracks
Copying a track to the other memory
> FF/ v, .
FR/ V
MENU
N PLAY/ENTER
STOP
x
Memory card slot
You can copy tracks between the built-in
memory and a memory card, which is
useful in saving a backup. Before starting
the operation, insert a memory card to be
used for copying into the memory card slot.
P Notes
• You cannot copy a track that the PCM
recorder does not recognize.
• Before starting to copy the target track, make
sure to check the battery remain indication.
If the batteries are weak, you may not be
able to copy tracks (page 13).
• If the remaining memory capacity of the
destination memory is insufficient, you may
not be able to copy tracks.
1 Select the track you want to copy.
When you want to copy a track from a
memory card to the built-in memory, set
the “Memory” in the menu to “Memory
Card” (page 38).
2 Press MENU to enter the menu mode.
The menu mode window will be
displayed.
3 Press > FF/ v or . FR/ V to select
“File Copy,” and then press
ENTER.
The message “Copy to Memory Card
Select Folder” or “Copy to Built-In
N PLAY/
65
Editing Tracks
GB
Page 66

Memory Select Folder” is displayed and
the folder selection window is displayed.
4 Press > FF/ v or . FR/ V to select
the folder that you want to copy the track
into, and then press
“Copying...” is displayed and the track is
copied to the end in the destination
folder.
A file will be copied with the identical
file name. The artist name and other
settings will also be retained.
N PLAY/ENTER.
5 Press x STOP to exit the menu mode.
To cancel the copy operation
Press x STOP before step 4.
P Note
Do not remove or insert a memory card, or
turn off the PCM recorder while copying. Files
may be damaged.
Dividing a track into two
> FF/ v,
. FR/ V
MENU
N PLAY/
ENTER
STOP
x
You can divide a track during playback, so
that the track is divided into two parts, and
the respective tracks are suffixed with “_1”
and “_2.” You can also divide a track at
each and every track mark.
By dividing a track, you can easily find the
point from which you want to start
playback when you make a long recording.
66
GB
Page 67

You can divide a track until the total
number of tracks in the folder reaches 99.
Dividing a track at the current
position
1 Stop the track at the position where you
want to divide a track.
2 Press MENU to enter the menu mode.
The menu mode window will be
displayed.
3 Press > FF/ v or . FR/ V to select
“Divide,” and then press
ENTER.
The Divide menu is displayed.
N PLAY/
4 Press > FF/ v or . FR/ V to select
“Divide Current Position,” and then
press
N PLAY/ENTER.
A period for approximately 4 seconds
from the dividing point will be played
back repeatedly.
5 Adjust the position to be divided, if you
wish.
Press
> FF/ v to move the position
backward, or
forward.
You can adjust the position to be divided
by approximately 0.3 seconds in a period
approximately 6 seconds each, both
before and after the current position.
. FR/ V to move it
6 Press N PLAY/ENTER to execute the
position to be divided.
“Divide?” is displayed.
Editing Tracks
67
GB
Page 68

7 Press > FF/ v or . FR/ V to select
“Execute,” and then press
ENTER.
“Dividing...” appears, and the divided
tracks will be suffixed with a sequential
number (“_1” for the original track, and
“_2” for the new track).”
N PLAY/
• You can divide a track recorded using the
PCM recorder only. An MP3/WMA/
AAC-LC (m4a)/LPCM (WAV) file copied
from a computer cannot be divided.
• Once a track is divided, you cannot return it
to the original status again.
• If you divide a track at the position within
0.5 seconds from a track mark, the track
mark will be deleted.
• Because of the system limitations, you
cannot divide a track at the very beginning or
end of the track.
Dividing a track at all the track
mark positions
track 1 track 2 track 3
fA track is divided
track 1
A suffix made up of a sequential number is
added to each of the divided files.
v
track 2_1 track 2_2 track 3
.
8 Press x STOP to exit the menu mode.
P Notes
• You need a certain amount of free space in
the memory to divide a track. For details, see
“System Limitations” on page 112.
• When you divide a track with a title and
artist name, the new track has the same title,
and artist name.
GB
68
1 Perform steps 1 to 3 of “Dividing a track
at the current position” on page 67 to
display the Divide menu.
2 Press > FF/ v or . FR/ V to select
“Divide All T-MARK(Track Marks),”
and then press
“Divide All T-MARK(Track Marks)?” is
displayed.
N PLAY/ENTER.
Page 69

3 Press > FF/ v or . FR/ V to select
“Execute,” and then press
ENTER.
“Dividing...” appears, and the track is
divided at all the track mark positions.
The tracks divided from a single track
will be suffixed w ith a sequential number
(_1 and so on).
Track1
A track is divided.
Track1_1 Track1_2 Track1_3
A suffix made up of a sequential number is
added each of the divided files.
N PLAY/
4 Press x STOP to exit the menu mode.
To play a divided track
Press > FF/ v or . FR/ V to display
the track number, as the divided tracks now
each have different track numbers.
z Tip
To cancel division during the operation at all
the remaining track marks, press
The tracks that have been divided before the
cancellation remain divided.
x STOP.
Deleting all tracks in a folder
MENU
N PLAY/
ENTER
STOP
x
> FF/ v,
. FR/ V
P Note
If the selected folder contains a protected
track, you cannot delete the track.
Editing Tracks
69
GB
Page 70

1 Select the folder containing the tracks
you want to delete when the PCM
recorder is in the stop mode.
2 Press MENU to enter the menu mode.
The menu mode window will be
displayed.
5 Press > FF/ v or . FR/ V to select
“Execute,” and then press
ENTER.
“Deleting...” appears in the display
window and all tracks in the selected
folder will be deleted.
N PLAY/
3 Press > FF/ v or . FR/ V to select
“Delete,” and then press
ENTER.
The Delete menu is displayed.
N PLAY/
4 Press > FF/ v or . FR/ V to select
“Delete All,” and then press
ENTER.
A confirmation message is displayed.
GB
70
N PLAY/
6 Press x STOP to exit the menu mode.
To cancel deleting
Select “Cancel” in step 5, and then press
N PLAY/ENTER.
Page 71

About the Menu Function
Making Settings for the Menu
> FF/ v,
. FR/ V
MENU
N PLAY/
ENTER
x STOP
3 Press > FF/ v or . FR/ V to select
the setting that you want to set, and then
press
N PLAY/ENTER.
About the Menu Function
1 Press MENU to enter the menu mode.
The menu mode window will be
displayed.
2 Press > FF/ v or . FR/ V to select
the menu item for which you want to
make setting, and then press
ENTER.
N PLAY/
4 Press x STOP or MENU to exit the
menu mode.
P Note
If you do not press any button for 1 minute, the
menu mode is automatically cancelled and the
window will return to the normal display.
To return to the previous window
Press MENU during the menu mode.
To exit the menu mode
Press x STOP.
71
GB
Page 72

Menu settings
Menu items Settings Operation mode
a
: the setting can be made/
(
— : the setting cannot be made)
Stop
mode
Divide
Divide Current Position Execute, Cancel
Divide All T-MARK(Track
Marks)
Execute, Cancel
Delete
Delete All Execute, Cancel
Delete T-MARK(Track
Execute, Cancel
a
a
a
a
a
a
Mark)
Delete All T-MARK(Track
Marks)
Execute, Cancel
File Copy Execute, Cancel
Add “TAKE” Add “TAKE”, Add “KEEP”, Remove
“TAKE/KEEP”
Protect Execute, Cancel
Memory Built-In Memor y, Memory Card
REC Mode LPCM 22.05kHz/16bit, LPCM 44.10kHz/
a
a
a
a
a
a
16bit, LPCM 44.10kHz/24bit, LPCM
48.00kHz/ 16bit, LPCM 48.00k Hz/24bit,
LPCM 96.00kHz/16bit, LPCM 96.00kHz/
24bit, MP3 44.10kHz/64kbps, MP3
44.10kHz/128kbps, MP3 44.10kHz/320kbps
LCF(Low Cut Filter) ON, OFF
DPC(Speed Control) –75 % to +100%
GB
72
a
aa
Playback
Recording
mode
mode
——
——
——
——
——
——
——
——
——
——
——
——
—
a
—
Page 73

Menu items Settings Operation mode
a
: the setting can be made/
(
— : the setting cannot be made)
Stop
Playback
mode
mode
Effect Bass1, Bass2, OFF
Key Control
2
1 to 26, #1 to #6
Easy Search ON, OFF
Play Mode 1, , AL L, 1, , AL L
Detail Menu
Format Execute, Cancel
Clock _ _ y _ _ m _ _ d _ _ : _ _
LED ON, OFF
Backlight 10 SEC, 60 SEC, Always-ON, OFF
Language Deutsch (German), English,
Español (Spanish), Français (French),
Italiano (Italian),
Русский
(Japanese), (Korean),
(Chinese), (Chinese),
(Russian),
aa
aa
aa
aa
aa a
a
——
a
——
a
——
a
——
a
——
(Thai)
Level Meter in Playback ON, OFF
Battery Setting Alkaline Battery, NiMH Battery
LIMITER ON, OFF
PRE REC ON, OFF
Audio Out Headphones, LINE OUT
Plug In Power ON, OFF
Cross-Memory Recording ON, OFF
aa
a
——
a
—
a
——
a
——
a
——
a
——
Recording
mode
—
—
—
—
—
a
About the Menu Function
73
GB
Page 74

Menu items Settings (*: Initial setting) See page
Divide
Divide Current
Divide a track into two. 61, 66
A track will be divided into two at the current position.
Position
Divide All TMARK(Track
Marks)
Delete
Delete All
A track will be divided at all the track mark positions.
Delete tracks or track marks. 30, 61,
All tracks in the selected folder will be deleted.
Press to return to the folder window before deleting the
62, 69
tracks and select a folder from which all tracks are to be deleted,
and then go to the menu window and select “Execute.”
Delete TMARK(Track
Mark)
Delete All T-
The track mark just before the current position will be deleted.
All the track marks of the selected track will be deleted.
MARK(Track
Marks)
File Copy
Copy the selected track from the built-in memory to the desired
folder on a memory card, or from a memory card to the desired
folder in the built-in memory.
65
Before attempting to copy a track, select the track to be copied
and then go to the menu window.
Add “TAKE”
Add “TAKE” or “KEEP” to the file name of the selected track.
Add “TAKE”*:
62
Add “TAKE” to the file name of the selected track.
Add “KEEP”:
Add “KEEP” to the file name of the selected track.
Remove “TAKE/KEEP”:
Remove “TAKE” or “KEEP” from the file name of the
selected track.
74
GB
Page 75

Menu items Settings (*: Initial setting) See page
Protect
Protect the selected track to prevent the track from being deleted
64
or divided.
Execute:
Protect the selected track. If you specify a track which has
already been protected, cancel the protection.
Cancel*:
Protection or cancel protection is not executed.
Memory
Select the memory in which you want to save a track, or which
36
contains the track you want to play, edit, or copy.
Built-In Memory*:
The built-in memory of the PCM recorder is selected.
Memory Card:
The memory card inserted in the memory card slot is selected.
P Note
When no memory card is currently inserted in the PCM recorder,
the built-in memory is automatically selected.
About the Menu Function
75
GB
Page 76

Menu items Settings (*: Initial setting) See page
REC Mode
Set the sampling frequency and quantifying bit number for
41
recording:
LPCM 22.05kHz/16bit
LPCM (not compressed) mode
LPCM 44.10kHz/16bit*
LPCM 44.10kHz/24bit
LPCM 48.00kHz/16bit
LPCM 48.00kHz/24bit
LPCM 96.00kHz/16bit
LPCM 96.00kHz/24bit
You can record with higher sound
quality.
LCF(Low Cut Filter)
GB
76
MP3 44.10kHz/64kbps
(for a long-time recording)
MP3 44.10kHz/128kbps
MP3 44.10kHz/320kbps
z
About the sampling frequency and quantifying
MP3 (compressed) mo de
You can record with higher
sound quality.
bit number
• Sampling frequency is a value that represents how many times
an analog signal is converted into a digital signal (A/D
conversion) per second. The larger the value of sampling
frequency, the better the sound quality, but also the larger the
amount of data.
• Quantifying bit number is a value that represents the amount of
data it takes for one second of audio. The larger the value of the
bit number, the larger amount of data it takes and the better the
sound quality.
Set the LCF(Low Cut Filter) function to cut a low frequency to
reduce the roaring noise from wind or noises such as those of air
conditioner fans; therefore you can record a track more clearly.
ON:
The LCF function is activated.
OFF*:
The LCF function is cancelled.
43
Page 77

Menu items Settings (*: Initial setting) See page
DPC(Speed Control)
Set the DPC(Speed Control) function.
54
You can adjust the playback speed between +100% and –75% of
normal speed in the menu.You can set the speed by 5% for – from
–75% to 0%, 10% for + between 0% and 100%.
(–30%*)
Effect
Set the effect you want for the playback in the menu.
Bass1:
The bass sound is emphasized.
56
Bass2:
The bass sound is emphasized even more.
OFF*:
The Effect function does not work.
P Notes
• When playing back tracks using a built-in speaker, the Effect
function does not work.
• When “LINE OUT” is selected, the Effect function does not
work.
Key Control
Adjust the playback sounds in semitones higher or lower.
55
You can adjust from #1 to #6, and 21 to 26. (0*)
Easy Search
Set the easy search function.
ON:
You can go forward for about 10 seconds by pressing
v and go back for about 3 seconds by pressing . FR/ V.
This function is useful when attempting to locate desired point
in a long recording.
> FF/
51
OFF*:
The easy search function does not work. When you press
FR/ V or > FF/ v, a track will be moved forward or
.
backward.
About the Menu Function
77
GB
Page 78

Menu items Settings (*: Initial setting) See page
Play Mode
Set the playback mode.
51
1:
A track is played back.
*:
Tracks in one folder are played back continuously.
ALL:
All the tracks are played back continuously.
1:
One track is played back repeatedly.
:
Tracks in one folder are played back repeatedly.
ALL:
All the tracks are played back repeatedly.
Detail Menu
Format
Format the memory currently selected in “Memory” setting in the
menu, deleting all the data in the memory and resetting the folder
–
structure to its default status.
Execute:
“Formatting...” appears and the memory will be formatted.
Cancel*:
The memory will not be formatted.
P Notes
• Do not use your computer to format a memory card you use
with the PCM recorder. Format it with the formatting function
of the PCM recorder.
• Once the memory has been deleted, you cannot retrieve the data
that was deleted.
78
GB
Page 79

Menu items Settings (*: Initial setting) See page
Clock
Set the clock by setting year, month, day, hour, and minute in
16
sequence.
(09y01m01d 0:00*)
z
Tip
The clock is displayed in 24-hour system.
0:00 = midnight, 12:00 = noon
LED
Turn the operation of ACCESS indicator, peak level indicators,
–
z REC button, N PLAY/ENTER button, and X PAUSE button
on or off during operation.
ON*:
During recording or playback, the indicators light or flash.
OFF:
The operation indicator does not light or flash, even during
operation.
P Note
When the PCM recorder is connected to a computer, the
operation indicators light or flash even if “LED” is set to “OFF.”
About the Menu Function
79
GB
Page 80

Menu items Settings (*: Initial setting) See page
Backlight
Turn the backlight in the display window on or off.
–
10 SEC*:
The backlight in the display window lights up for approx. 10
seconds.
60 SEC: The backlight in the display window lights up for
approx. 60 seconds.
Always-ON:
The backlight in the display window lights up always.
OFF:
The backlight in the display window does not light, even
during operation.
P Note
When you select “Always-ON,” the batteries will be consumed
quickly. When you use the PCM recorder with batteries, we
recommend you select other options than “Always-ON.”
Language
Set the language to be used for messages, menus, folder names,
file names, etc.: Deutsch (German), English*, Español (Spanish),
18
Français (French), Italiano (Italian), Русский (Russian),
(Japanese), (Korean), (Chinese),
(Chinese), (Thai)
Level Meter in
Playback
Set whether the level meter is displayed on the display window
when a track is being played back.
49
ON: The level meter will be displayed.
OFF*: The artist name and title name of the track will be displayed.
Battery Setting
Set the battery type for the PCM recorder.
Alkaline Battery*:
12
Select this option to use alkaline batteries for the PCM
recorder.
NiMH Battery:
Select this option to use rechargeable batteries (not supplied)
for the PCM recorder.
80
GB
Page 81

Menu items Settings (*: Initial setting) See page
LIMITER
Set the input level automatically to prevent the sound distortion
44
that may occur when a too loud sound is input in Manual
recording.
ON:
The LIMITER function is activated.
OFF*:
The LIMITER function is cancelled.
P Note
This feature is effective only when REC LEVEL switch is set to
“MANUAL.”
On the limiter circuit
z
• The limiter circuit functions to keep the signal level below the
maximum input level. When a loud sound is input suddenly, the
excess part of the sound is automatically set within the range of
the maximum input level in order to prevent distortion.
• The limiter circuit of the PCM recorder does not compensate
for clipping when audio over 12 dB is input. In this case, sound
may be distorted.
PRE REC
Set the pre-recording function on and off. The pre-recording
function allows you to record sound sources for approximately 5
34
seconds prior to the point when the recording is started. Sounds
for approximately 5 seconds are buffered in the memory.
ON:
The pre-recording function is activated.
OFF*:
The pre-recording function is cancelled.
About the Menu Function
81
GB
Page 82

Menu items Settings (*: Initial setting) See page
Audio Out Set the output of the i/LINE OUT (headphone/line output) jack.
58
Headphones*: You can use the jack as a headphone jack. Select
this option to listen playback sound with the headphones (not
supplied) or an external speaker.
LINE OUT: You can use the jack as a line output jack. Select this
option to connect an external recorder such as a tape recorder
for recording playback sound of the PCM recorder.
P Notes
• If “LINE OUT” is selected, do not connect headphones; the
playback sound from the headphones will be very loud.
• If “LINE OUT” is selected, you cannot adjust output volume
with the VOLUME +/– buttons and cannot use the Effect
function.
Plug In Power Set the Plug In Power function on and off. When a microphone
–
compatible with the Plug In Power function is connected to the
m (microphone) jack of the PCM recorder, the PCM recorder
can supply power to the microphone.
ON*: The PCM recorder supplies power to the connected Plug In
Power type microphone.
OFF: The PCM recorder does not supply power to a connected
microphone.
Cross-Memory
Recording
Set the Cross-Memory Recording function on and off. When the
memory currently selected in the “Memory” setting in the menu
becomes full during recording, the PCM recorder automatically
39
switches its destination to the other memory media and continues
recording (Cross-Memory Recording). The new recording is
saved as another track.
ON: The Cross-Memory Recording function is activated.
OFF*: The Cross-Memory Recording function is disabled.
Recording stops when the memory currently being selected
becomes full.
82
GB
Page 83

Utilizing Your Computer
Using the PCM recorder with Your Computer
When the PCM recorder is connected to
your computer, it is recognized by the
computer, and you can transfer data
between them.
Copying tracks from the PCM
recorder to your computer to
save them (page 87)
You can copy the tracks recorded on the
PCM recorder to save them.
Copying music files from your
computer to the PCM recorder to
play them back (page 88)
You can copy WAV/MP3/WMA/AAC-LC
(m4a) files saved on your computer by a
simple drag and drop operation when you
connect the PCM recorder to your
computer. You can also play back the
copied files.
Using the PCM recorder as a
USB memory – data storage
function (page 90)
You can store image data or text data saved
on the computer temporarily in the PCM
recorder.
z System requirements for your
computer
See “System requirements” on page 95.
When you are using Windows®
z
2000 Professional
Install the driver using
“SonyRecorder_Driver.exe” in the PCM
recorder.
83
Utilizing Your Computer
GB
Page 84

Connecting the PCM recorder to your computer
Computer
To USB port
USB connecting
cable (supplied)
PCM recorder
To exchange tracks (files) between the
PCM recorder and your computer, connect
the PCM recorder to your computer.
1 Connect the USB connector of the
PCM recorder with the USB port of your
running computer with the supplied
USB connecting cable inserted into the
connectors securely until each plug stops
to the end.
2 Make sure the PCM recorder has been
recognized properly.
On the Windows screen; open “My
Computer” and make sure that “PCM
RECORDER” has been recognized.
On the Macintosh screen; make sure that
an “PCM RECORDER” drive is
displayed on the desktop.
While the PCM recorder is connected to the
computer, “Connecting” is displayed in the
display window of the PCM recorder.
P Notes
• If you connect more than two USB devices
to your computer, normal operation will not
be guaranteed.
• Use of this PCM recorder with a USB hub or
a USB extension cable other than the
supplied cable is not guaranteed.
• A malfunction may occur depending on the
USB devices connected at the same time.
• Before connecting the PCM recorder to the
computer, make sure that the batteries are
inserted in the PCM recorder.
• It is recommended that you disconnect the
PCM recorder from the computer when you
are not using the PCM recorder connected to
the computer.
84
GB
Page 85

Structure of folders and files
Built-In Memory and M2™
“PCM RECORD ER” or “MEMORY CA RD”
Folder for tracks
recorded using the
PCM recorder
*
4
microSD card
“MEMORY CARD”
4
*
Folder for tracks
recorded using the
PCM recorder
Utilizing Your Computer
Lesson
MUSIC
1
*
POP
*
3
J-POP
Folder copied
from your
computer
1
*
2
*
Lesson
MUSIC
Folder copied from
1
your computer
*
POP
J-POP
3
*
*
1
2
*
GB
85
Page 86

If you connect the PCM recorder to your
computer, you can see the structure of
folders and files of the built-in memory,
memory card (M2™ or microSD card) on
the computer screen.
The folders and files are displayed on the
computer screen as shown on the previous
page.
The folder indicators in the display window
of the PCM recorder are as follows:
: Folder for tracks recorded using the
PCM recorder (They have been
already made when you purchase
the PCM recorder.)
: Folder copied from a computer
(They are displayed when music
files have been copied from a
computer.)
P Note
You can record tracks in up to 10 folders
(FOLDER01-10), each for the built-in
memory and memory card, using the PCM
recorder.
1
The name of a folder in which music files
*
are stored will be displayed on the PCM
recorder as it is, so it is convenient if you
put an easy-to-remember name on the
folder in advance.
Folders shown in the illustration are
examples of folder names.
*2
The PCM recorder can recognize up to 8
levels of folders copied to the PCM
recorder.
3
If you copy music files separately, they are
*
classified as being in “No Folder.”
4
The volume label of the built-in memory is
*
“PCM RECORDER.” That of M2™
microSD cards is “MEMORY CARD.”
Tips
z
• You can rename a folder name, title, artist
name, and file name with your computer.
• The title or artist name, etc., registered in the
music files can be displayed on the PCM
recorder. It is useful if you input the ID3 tag
information using the software you use to
make the music files on your computer.
and
P Notes
• You cannot copy more than 511 folders or
files to the directory that is located
immediately below “MEMORY CARD” on
your computer. This is due to FAT file
system limitations.
• If no title, or artist name has been registered
in the ID3 tag information, “Unknown” will
be displayed.
86
GB
Page 87

Copying Tracks from the PCM recorder to Your Computer
z To copy a track or folder
(Drag and drop)
You can save tracks or folders by copying
them from the PCM recorder to your
computer.
When you wish to create a CD, you can use
“Sound Forge Audio Studio LE,” the
supplied software application, to create a
CD. For the details, see the “Sound Forge
Audio Studio LE Guide.”
1 Connect the PCM recorder to your
computer (page 84).
2 Copy tracks or folders you want to copy
to your computer.
Drag and drop the tracks or folders you
want to copy from “PCM RECORDER”
or “MEMORY CARD” to the local disc
on your computer.
1 Click and hold,
2 drag,
3 and then drop.
3 Disconnect the PCM recorder from your
computer (page 91).
P Note
If you remove a USB connecting cable while
the PCM recorder is transferring data to your
computer, data may be damaged. For how to
disconnect the PCM recorder, see page 91.
Utilizing Your Computer
87
GB
Page 88

Copying Files from Your Computer to the PCM recorder and Playing Them Back
2 Copy the folder in which the music files
are stored to the PCM recorder.
On the Windows screen using Explorer,
and on the Macintosh screen using
Finder, drag and drop the folder
containing the music files onto “PCM
RECORDER” or “MEMORY CARD.”
You can copy music or the other audio files
(LPCM/MP3/WMA/AAC-LC*) from your
computer to the PCM recorder by dragging
and dropping them, and you can play them
back using the PCM recorder.
You can make an LPCM/MP3/WMA/
AAC-LC file using either a player software
application, etc., installed on your
computer.
* For the file formats that can be played back
using the PCM recorder, see
“Specifications” (page 95).
1 Connect the PCM recorder to your
computer (page 84).
The PCM recorder can recognize up to
500 folders. You can copy up to 99 files
to one folder and up to 5,000 files in
total.
3 Disconnect the PCM recorder from your
computer.
4 Press .
5 Press > FF/ v or . FR/ V to select
the folder ( ) in which music files are
stored, and then press
ENTER.
N PLAY/
6 Press > FF/ v or . FR/ V to select
the music file you want to play.
88
GB
Page 89

7 Press N PLAY/ENTER to start
playback.
8 Press x STOP to stop playback.
The maximum playback time (tracks*),
when playing music files using the PCM
recorder, is as follows.
48 kbps 128 kbps 256 kbps
178hr.
55 min.
(2,683 tracks)
* In the case where tracks of 4 minutes each
are copied to the PCM recorder.
P Notes
• A music file copied from your computer can
be played back with the PCM recorder.
Dividing a track and setting a track mark,
however, may not be performed.
• If you have copied music files using your
computer, those files may not be copied in
order of copying because of the system
limitations. If you copy a music file one by
one to the PCM recorder, you can display
and play back tracks in order of copying.
• When removing the PCM recorder, see
“Disconnecting the PCM Recorder from
Your Computer” on page 91.
67 hr.
(1,005 tracks)
33 hr.
30 min.
(502 tracks)
• The fs/bit (sampling frequency and
quantifying bit number) information will not
be displayed for a WAV file copied from
your computer.
• The bit rate information will not be
displayed for a MP3/WMA/AAC-LC (m4a)
file copied from your computer.
Tip
z
You can use your computer to change a folder
name, track name, artist name, and file name
of a track.
To enjoy music files more
z
• Selecting the playback mode
You can select the playback mode, such as
playback of one music file, continuous
playback of music files in one folder,
continuous playback of all music files,
repeat playback of one music file, repeat
playback of music files in one folder and
repeat playback of all music files, in the
“Play Mode” menu (page 51).
• Adjusting the playback speed (DPC(Speed
Control))
You can adjust a playback speed between
+100% and –75% of normal speed
(page 54).
• Selecting a sound effect and tone (Key
Control, Effect)
You can reinforce bass sound by selecting a
sound effect from “Bass1” or “Bass2” for
playback in the “Effect” menu (page 56).
You can also adjust the playback tones in the
“Key Control” menu (page 55).
89
Utilizing Your Computer
GB
Page 90

Using the PCM Recorder as a USB Memory –
Data Storage Function
When the PCM recorder is connected to
your computer using a USB connecting
cable, image data or text data on the
computer, as well as tracks or files recorded
using the PCM recorder can be temporarily
stored in the PCM recorder.
Your computer must meet the operating
system requirements and port environment
to use the PCM recorder as a USB memory.
For details on the system requirements, see
page 95.
P Note
When you format the memory with the PCM
recorder, all the data temporarily stored in the
PCM recorder will be deleted. You cannot
restore the data.
90
GB
Page 91

Disconnecting the PCM Recorder from Your Computer
Follow the procedures below; otherwise,
data may be damaged.
1 Make sure that the PCM recorder is in
the stop mode.
2 Perform the following operation on your
computer.
On the Windows screen, left-click the
icon at the bottom of the desktop of the
computer.
t Left-click “Safely remove USB
Mass Storage Device.”
The icon can be different on different
operating systems.
On the Macintosh screen, drag the “PCM
recorder” on the desktop to “Trash” and
drop it there.
For details on disconnecting the PCM
recorder from your computer, refer to the
operating instructions supplied with your
computer.
3 Disconnect the PCM recorder from the
USB port of the computer.
91
Utilizing Your Computer
GB
Page 92

Additional Information
Precautions
On noise
• Noise may be heard when the unit is placed
near an AC power source, a fluorescent lamp
or a mobile phone during recording or
playback.
• Operation and touch noises may be recorded
when you press the button on the PCM
recorder, touch the case, or hold the PCM
recorder during recording. By using the
supplied remote commander, you can
perform recording operations without
touching the PCM recorder.
• Roaring noise from wind, or other noises
from electric fans, air conditioners, air
cleaners, or PC fans will also be recorded.
You can reduce the low frequencies noise by
setting the LCF(Low Cut Filter) function
(page 43). You can also reduce the roaring
noise from wind by using the wind screen
(supplied for PCM-M10P only).
On safety
Do not operate the unit while driving, cycling
or operating any motorized vehicle.
On the built-in microphones
The built-in microphones are highperformance electret condenser microphones.
Do not expose them to strong wind or water.
GB
92
On handling
• Do not subject the PCM recorder to strong
shock or vibration. Doing so may cause a
malfunction of the PCM recorder.
• Do not place the recorder in the following
locations:
– Anywhere extremely hot. Never expose it
to temperatures above 60ºC.
– Under direct sunlight or close to heaters
– In a sun-heated car with the windows
closed (especially in summer)
– In a humid place, such as in a bathroom
– Anywhere dusty
• Be careful not to allow water to splash on the
unit. The unit is not water-proof. In
particular, be careful in the following
situations.
– When you have the unit in your pocket and
go to the bathroom, etc.
– When you bend down, the unit may drop
into the water and may get wet.
– When you use the unit in an environments
where the unit is exposed to rain, snow, or
humidity.
– In circumstances where you get sweaty.
If you touch the unit with wet hands or if
you put the unit in the pocket of sweaty
clothes, the unit may get wet.
Page 93

• You may feel pain in your ears if you use the
headphones when the ambient air is very
dry. This is not because of a malfunction of
the headphones, but because of static
electricity accumulated in your body. You
can reduce static electricity by wearing nonsynthetic clothes that prevent the emergence
of static electricity.
• Should any solid object or liquid fall into the
unit, remove the batteries and have the unit
checked by qualified personnel before
operating it any further.
On maintenance
To clean the exterior, use a soft cloth slightly
moistened in water. Do not use alcohol,
benzine or thinner.
If you have any questions or problems
concerning your unit, please consult your
nearest Sony dealer.
Backup recommendations
To avoid potential risk of data loss caused
by accidental operation or malfunction of
the PCM recorder, we recommend that you
save a backup copy of your recorded tracks
on a tape recorder or to a computer, etc.
On using a memory card
• When formatting (initializing) a memory
card, make sure to use the PCM recorder to
format it. Memory cards formatted with
Windows or other devices may be
recognized as incompatible media and
cannot be used with the PCM recorder.
• If you format a memory card containing
recorded data, the recorded data will be
deleted. Be careful not to delete important
data.
• Do not leave a memory card within the reach
of small children. They might accidentally
swallow it.
• Do not remove or insert a memory card
while recording or playing back files.
• Do not remove a memory card while
“Accessing...” appears on the display
window or the ACCESS indicator is flashing
in orange. Otherwise, data may be damaged.
• We do not guarantee the operations of all
types of compatible memory cards with the
PCM recorder.
• M2™ card other than those manufactured by
Sony have not been demonstrated as
operable with the PCM recorder, and may
have problems when used with the PCM
recorder. For compatible M2™, please refer
to the Sony web site (page 95).
• “MagicGate™” is copyright protection
technology that uses encryption technology.
The PCM recorder does not support data
recording/playback that requires
MagicGate™ functions.
93
Additional Information
GB
Page 94

• The PCM recorder does not support parallel
data transfer.
• A ROM (read-only-memory) type or writeprotected memory card is for playback only.
You cannot record or edit data on the card.
• SonicStage will create a group on a Memory
Stick™ media. The group function,
however, cannot be used except with a
compatible device.
• Data may be corrupted in the following
cases:
– When a memory card is removed or the
PCM recorder is turned off during a read
or write operation.
– When a memory card is used in locations
subject to static electricity or electrical
noise.
• We assume no responsibility for any loss or
damage of recorded data.
• We recommend that you save a backup copy
of the important data.
• Do not touch the terminal of a memory card
with your hand or a metal object.
• Do not strike, bend or drop a memory card.
• Do not disassemble or modify a memory
card.
• Do not expose a memory card to water.
• Do not use a memory card under the
following conditions:
– Locations beyond the required operating
conditions, including locations such as the
hot interior of a car parked in the sun and/
or in the summer, the outdoors exposed to
direct sunlight, or a place near a heater.
– Humid locations or locations with
corrosive substances present.
• When using a memory card, make sure to
check the correct insertion direction into the
memory card slot.
94
GB
Page 95

Specifications
System requirements
Operating systems:
– Windows Vista® Ultimate Service Pack
1 or higher
– Windows Vista
or higher
– Windows Vista
Pack 1 or higher
– Windows Vista
Pack 1 or higher
– Windows
2005 Service Pack 3 or higher
– Windows
2004 Service Pack 3 or higher
– Windows
Service Pack 3 or higher
– Windows
3 or higher
– Windows
Pack 3 or higher
– Windows
Pack 4 or higher
– Mac OS X (v10.2.8-v10.5)
– Pre-Installed
®
Business Service Pack 1
®
Home Premium Service
®
Home Basic Service
®
XP Media Center Edition
®
XP Media Center Edition
®
XP Media Center Edition
®
XP Professional Service Pack
®
XP Home Edition Service
®
2000 Professional Service
Hardware environment:
– Port: USB port
– Sound board: Sound cards compatible
with any of the supported Microsoft
®
Windows
operating systems
P Notes
• Operation is not guaranteed if any operating
system other than those indicated on the left
(Windows
• 64 bit versions of Windows
supported.
• For the latest version information and
compatibility with your operating system,
please access the support home page for the
PCM recorder:
http://www.sony-asia.com/support
• The following systems are not supported:
– Operating systems other than the ones
– Personally constructed computers or
– Upgraded operating systems
– Multi-boot environment
– Multi-monitor environment
®
98 or Linux, etc.) is used.
indicated on the left
operating systems
®
®
XP are not
95
Additional Information
GB
Page 96

When you are using Windows®
2000 Professional
Install the driver using
“SonyRecorder_Driver.exe” in the PCM
recorder.
PCM recorder section
Capacity (User available capacity)
Built-In Memory:
4 GB (approx. 3.60 GB =
3,865,470,566 Byte)
A part of the memory capacity is used as a
management area.
Frequency range (in recording/
playback, LINE IN input)
•LPCM
96.00 kHz: 20 Hz – 40,000 Hz
(0 dB, –2 dB)
48.00 kHz: 20 Hz – 22,000 Hz
(0 dB, –2 dB)
44.10 kHz: 20 Hz – 20,000 Hz
(0 dB, –2 dB)
22.05 kHz: 20 Hz – 10,000 Hz
(0 dB, –3.5 dB)
•MP3
320 kbps: 50 Hz – 15,000 Hz (0 dB, –3 dB)
128 kbps: 50 Hz – 15,000 Hz (0 dB, –3 dB)
64 kbps: 50 Hz – 13,000 Hz (0 dB, –3 dB)
Recording modes
See page 41.
Bit rate and sampling frequencies for
MP3 files
Bit rate: 32 kbps – 320 kbps, VBR
Sampling frequencies:
File extension: .mp3
*1
1
*
16 kHz/22.05 kHz/24 kHz/32 kHz/
44.1kHz/48kHz
Not all encoders are supported.
Bit rate and sampling frequencies*2 for
WMA files
Bit rate: 32 kbps - 192 kbps , VBR
Sampling frequencies: 44.1 kHz
File extension: .wma
*2
WMA Ver. 9 is compatible, however, MBR
(Multi Bit Rate), Lossless, Professional,
and Voice are not supported.
Copyright-protected file cannot be played
back.
Not all encoders are supported
Bit rate and sampling frequencies
*3
for
AAC-LC (m4a) files
Bit rate: 16 kbps - 320 kbps, VBR
Sampling frequencies:
11.025 kHz/12 kHz/16 kHz/22.05 kHz/
24 kHz/32 kHz/44.1 kHz/48 kHz
File extension: .m4a
*3
Copyright-protected file cannot be played
back.
Not all AAC encoders are supported.
96
GB
Page 97

Signal-to-noise ratio (S/N)
(Input from the LINE IN jack and output from
LINE OUT jack when recording/playing back
LPCM)
87 dB (1 kHz IHF-A) (for 24 bit)
General
Speaker
Approx. 16 mm dia.
Input/Output
• Microphone jack (minijack, stereo), input for
plug in power
– Input impedance: 3.9 kΩ
– Minimum input level: 0.9 mV
– Rated input level: 2.5 mV
• LINE IN jack (minijack, stereo)
– Input impedance: 22 kΩ
– Minimum input level: 500 mV
– Rated input level: 2 V
• Headphone/LINE OUT jack (minijack,
stereo)
Headphone mode
– Load impedance: 16 Ω
– Output level: 20 mW + 20 mW
LINE OUT mode
– Load impedance: 22 kΩ
– Rated output level: 1 Vrms
• USB connector (mini-B jack, High-speed
USB, Mass Storage Class)
• REMOTE jack
• DC IN 3V jack
• Memory Stick Micro™ (M2™)/microSD
memory card slot
Playback speed control (DPC)
+100% to –75% (LPCM/MP3/WMA/AACLC)
Maximum power output
250 mW
Power requirements
DC 3.0 V: When using a commerciallyavailable applicable AC power adaptor
DC 3.0 V: LR6 (size AA) alkaline batteries
(supplied) (2)
DC 2.4 V: NH-AA nickel metal hydride
rechargeable batteries (not supplied) (2)
Operating temperature
5°C - 35°C
Dimensions (w/h/d) (not incl. projecting
parts and controls) (JEITA)
4
*
62.0 mm × 114.0 mm × 21.8 mm
Mass (JEITA)*
4
Approx. 187 g including 2 LR6 (size AA)
alkaline batteries
*4
Measured value by the standard of JEITA
(Japan Electronics and Information
Technology Industries Association)
Supplied accessories
See page 9.
Additional Information
97
GB
Page 98

Optional accessories
Stereo headphones MDR-7502,
MDR-7509HD, MDR-EX300SL,
MDR-EX500SL, MDR-V300
Electret condenser microphone ECM-MS957
Audio connecting cable RK-G129
Rechargeable battery NH-AA-B2K
Battery charger BCG-34HS2K
Carrying case speaker CKS-M10
Wind screen AD-PCM2
Tripod VCT-PCM1
Your dealer may not handle some of the above
listed optional accessories. Please ask the
dealer for detailed information.
Design and specifications are subject to
change without notice.
98
GB
Page 99

Maximum recording time*
5*6
The maximum recording time of all the folders is as follows (rounded figures by 5 minutes).
Recording modes Built-in
memory
4GB 1 GB 2 GB 4 GB 8 GB 16 GB
LPCM 96.00kHz/24bit 1 hr.
25 min. 55 min. 1 hr.
50 min.
LPCM 96.00kHz/16bit 2 hr.
45 min.
LPCM 48.00kHz/24bit 3 hr.
40 min.
LPCM 48.00kHz/16bit 5 hr.
30 min.
40 min. 1 hr.
25 min.
50 min. 1 hr.
55 min.
1hr.
20 min.
2hr.
50 min.
LPCM 44.10kHz/24bit 4 hr. 55 min. 2 hr.
5min.
LPCM 44.10kHz/16bit 6 hr. 1 hr.
25 min.
LPCM 22.05kHz/16bit 12 hr.
MP3 44.10kHz/320kbps
MP3 44.10kHz/128kbps
5min.
26 hr.
45 min.
67 hr.
5min.
MP3 44.10kHz/64kbps 134 hr.
2hr.
55 min.
6hr.
35 min.
16 hr.
30 min.
33 hr. 69 hr.
10 min.
3hr.
5min.
6hr.
15 min.
13 hr.
50 min.
34 hr.
45 min.
35 min.
Memory card
55 min.
2hr.
50 min.
3hr.
50 min.
5hr.
45 min.
4hr.
10 min.
6hr.
15 min.
12 hr.
35 min.
27 hr.
50 min.
69 hr.
40 min.
139 hr.
30 min.
(hr. : hours/min. : minutes)
3hr.
50 min.
5hr.
45 min.
7hr.
40 min.
11 hr.
35 min.
8hr.
25 min.
12 hr.
35 min.
25 hr.
20 min.
55 hr.
50 min.
139 hr.
45 min.
279 hr.
30 min.
7hr.
45 min.
11 hr.
35 min.
15 hr.
30 min.
23 hr.
15 min.
16 hr.
50 min.
25 hr.
20 min.
50 hr.
40 min.
111 hr.
55 min.
279 hr.
45 min.
559 hr.
35 min.
99
Additional Information
GB
Page 100

*5
When you are going to record continuously for a long time, you may have to replace the batteries
with new ones in the midst of recording. For details on the battery life, see the next table.
*6
The maximum recording time varies if you record tracks in mixed recording mode.
Battery life
*1
When using Sony LR6 (SG) (size AA) alkaline batteries
Recording modes
Recording
without
monitoring
Recording with
monitoring
Playback*2
through speaker
Playback using
the headphones
LPCM 96.00kHz/24bit 28 hr. 19 hr. 19 hr. 22 hr.
LPCM 96.00kHz/16bit 28 hr. 19 hr. 19 hr. 24 hr.
LPCM 48.00kHz/24bit 39 hr. 23 hr. 23 hr. 27 hr.
LPCM 48.00kHz/16bit 39 hr. 24 hr. 24 hr. 27 hr.
LPCM 44.10kHz/24bit 41 hr. 24 hr. 24 hr. 28 hr.
LPCM 44.10kHz/16bit 46 hr. 24 hr. 24 hr. 30 hr.
LPCM 22.05kHz/16bit 45 hr. 24 hr. 24 hr. 30 hr.
MP3 44.10kHz/320kbps 40 hr. 26 hr. 24 hr. 28 hr.
MP3 44.10kHz/128kbps 40 hr. 26 hr. 24 hr. 28 hr.
MP3 44.10kHz/64kbps 43 hr. 26 hr. 24 hr. 28 hr.
(hr. : hours/min. : minutes)
GB
100
 Loading...