

Page 1

Digital Audio
Recorder
3-861-322-11(2)
Operating Instructions page 2
Mode d’emploi page 2
F
EN
EN
F
PCM-M1
1997 by Sony Corporation
Page 2

WARNING
To prevent fire or shock
hazard, do not expose the
unit to rain or moisture.
For the customers in the U.S.A.
INFORMATION
This equipment has been tested and found to
comply with the limits for a Class B digital
device, pursuant to Part 15 of the FCC Rules.
These limits are designed to provide
reasonable protection against harmful
interference in a residential installation. This
equipment generates, uses, and can radiate
radio frequency energy and, if not installed
and used in accordance with the instructions,
may cause harmful interference to radio
communications. However, there is no
guarantee that interference will not occur in a
particular installation. If this equipment does
cause harmful interference to radio or
television reception, which can be determined
by turning the equipment off and on, the user
is encouraged to try to correct the interference
by one or more of the following measures:
— Reorient or relocate the receiving antenna.
— Increase the separation between the
equipment and receiver.
— Connect the equipment into an outlet on a
circuit different from that to which the
receiver is connected.
— Consult the dealer or an experienced
radio/TV technician for help.
This device complies with Part 15 of the FCC
Rules. Operation is subject to the following
two conditions: (1) This device may not cause
harmful interference, and (2) this device must
accept any interference received, including
interference that may cause undesired
operation.
You are cautioned that any changes or
modifications not expressly approved in this
manual could void your authority to operate
this equipment.
DISPOSAL OF NICKEL METAL HYDRIDE
BATTERY.
NICKEL METAL HYDRIDE BATTERY.
DISPOSE OF PROPERLY.
You can return your unwanted nickel metal
hydride batteries to your nearest Sony
Service Center.
Note: In some areas the disposal of nickel
metal hydride batteries in household or
business trash may be prohibited.
For the Sony Service Center nearest you call
1-800-222-SONY (United States only)
Caution: Do not handle damaged or leaking
nickel metal hydride batteries.
Notes on recording
• This recorder is not designed for business
or commercial use. Never attempt to
modify or tamper the recorder so that it
can be connected to other business or
commercial audio equipment. Do not use
this recorder for data storage.
• Check and make sure that the recording
operation is not malfunctioning prior to
recording important materials.
• Observe the relevant regulations on
copyright relating to your collection of
recordings. Unauthorized public
performance, broadcasting and duplication
of a recorded material for commercial
purposes are a violation of applicable laws.
IN NO EVENT SHALL SELLER BE
LIABLE FOR ANY DIRECT,
INCIDENTAL OR CONSEQUENTIAL
DAMAGES OF ANY NATURE, OR
LOSSES OR EXPENSES RESULTING
FROM ANY DEFECTIVE PRODUCT OR
THE USE OF ANY PRODUCT.
OWNER’S RECORD
The model and serial numbers are located on
the bottom of the unit.
Record the serial number in the space
provided below. Refer to them whenever you
call upon your Sony dealer regarding this
product.
Model No. PCM-M1 Serial No.
EN
Introduction2
Page 3

Welcome!
Welcome to the world of the DAT recorder!
Your DAT tape-corder has the following
features. They will be helpful for you to
enjoy it to the full.
• Superb DAT sound quality
with excellent frequency response, low
noise, and lack of distortion.
• Copy code adjustable
— You can adjust the copy code (ID6)
when, for example, you record your own
live performance.
• Supports input in IEC958 format
(copy code adjustable).
• Enhanced features for studio recording
— Start ID blank detection threshold
adjustable
— Semi-auto feature; write the first Start
ID automatically during Manual mode
— PEAK HOLD enables easy recognition
of maximum input level
• Long-time recording
using two Nickel metal hydride
rechargeable batteries. Aproximately 3.5
hours of continuous recording.
• High fidelity recording
with a high quality mic amplifier also
used in the Super Bit Mapping adaptor
(SBM-1).
• Adjustable (automatic/manual)
recording level
to suit every recording condition.
• MIC LIMITER
that automatically holds down sudden
large input signals to a certain level.
• Three sampling frequencies
Recording from digital sources such as
CDs, MDs, BS/CS is possible since the
recorder supports three sampling
frequencies (SP mode: 48kHz, 44.1 kHz
and 32 kHz / LP mode: 32 kHz). When
recording with a microphone or from
analog input, choose from SP (48 kHz or
44.1 kHz) or LP (32 kHz).
• After Recording function
that lets you write and erase Start IDs and
Program Numbers after recording.
• LCD with EL (electroluminescent)
illumination backlight
that indicates the current operating mode
and the battery power status in the dark.
• Remote control equipped with LCD
that indicates current operating mode.
EN
Introduction 3
EN
Page 4

Table of contents
Location of Controls ..........................................................................6
Inserting the Alkaline Batteries .....................................................12
Setting the Clock ..............................................................................13
Inserting the Cassette ......................................................................14
Recording..........................................................................................16
Playing Back .....................................................................................20
Recording
Connecting with Other Equipment for Recording ................................ 23
Recording from analog audio equipment with a LINE OUT jack....... 23
Recording from audio equipment with digital output ......................... 24
Adjusting the recording level manually — Manual recording.................. 25
Displaying maximum input level — PEAK HOLD............................... 26
Useful Recording Functions ............................................................................ 27
Recording in the Long Play mode — LP REC ........................................ 27
Recording blank segments— REC MUTING ......................................... 27
Adjusting the copy code (ID6) .................................................................. 28
Writing Start IDs......................................................................................... 30
Writing Start IDs during recording — Manual mode ........................... 30
Writing the first Start ID automatically — Semi-auto mode................ 31
Writing Start IDs automatically during recording — Auto mode ...... 32
Writing Start IDs during playback ........................................................... 33
Erasing Start IDs ......................................................................................... 34
Assigning Program Numbers ................................................................... 35
Playback
EN
Introduction4
Connecting with Other Equipment for Playback .................................. 36
Playback with an analog audio equipment ............................................ 36
Playback with an audio equipment with digital input ......................... 36
Useful Playback Functions........................................................................ 37
Using the AVLS function........................................................................... 37
Page 5

Power Sources
Using the unit on Nickel Metal Hydride Rechargeable Batteries ....... 38
Replacing the batteries .............................................................................. 40
Low-power Consumption Mode ............................................................. 41
Operating with the AC Power Adaptor or Car Battery........................ 42
Additional Information
Connecting with Other Equipment ......................................................... 43
Using the optional system adaptor kit RM-D100K................................ 43
Using the optional Super Bit Mapping adaptor SBM-1 ........................ 43
Serial Copy Management System (SCMS).............................................. 44
Message Display......................................................................................... 45
Troubleshooting ......................................................................................... 47
Precautions .................................................................................................. 49
On safety ...................................................................................................... 49
On power sources ....................................................................................... 49
On batteries.................................................................................................. 49
On tapes longer than 120 minutes............................................................ 49
On unevenly or tightly wound tapes....................................................... 49
On moisture condensation ........................................................................ 49
On installation ............................................................................................. 50
On headphones ........................................................................................... 50
Maintenance ................................................................................................ 51
Cleaning the cabinet ................................................................................... 51
Cleaning the head ....................................................................................... 51
Specifications .............................................................................................. 52
EN
Introduction 5
EN
Page 6
Location of Controls
Refer to the pages in ( ) for details.
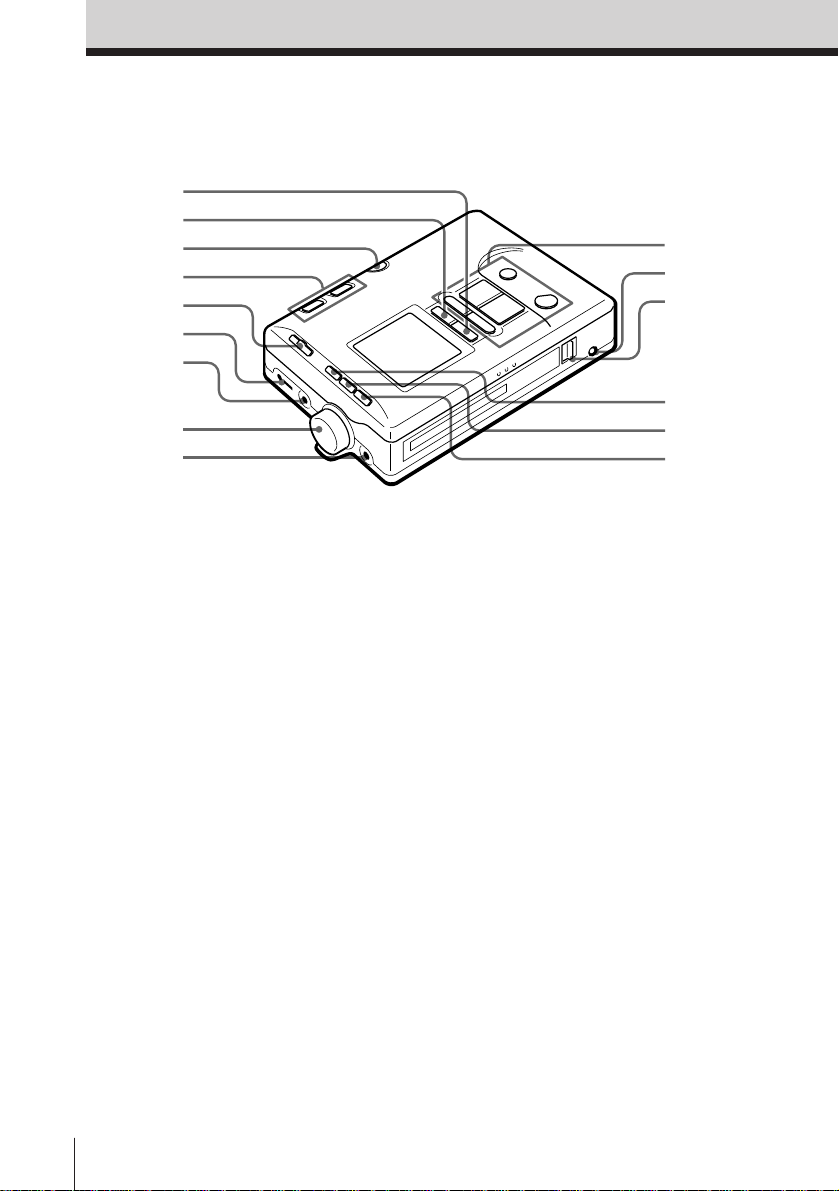
Main unit —front side
1
2
3
4
5
6
7
8
9
!º
!¡
!™
!£
!¢
!∞
1 START ID • MODE button (30 -
35)
2 START ID • ENTER button (30 -
35)
3 LIGHT button
Press to illuminate the display
when using the tape-corder in the
dark.
4 VOL +, – buttons (20, 37)
5 HOLD switch (15, 41)
Hold function does not lock the
CLOCK/SET, COUNTER • –,
RESET • + buttons (except for the
low-power consumption mode).
Slide the switch to HOLD in the
stop mode to enter the low-power
consumption mode.
6 REMOTE/2 (headphones) jack
(19, 20)
7 LINE OUT (line output) jack (19,
36)
8 REC LEVEL (recording level)
control (25)
9 MIC/LINE IN (microphone/line
input) jack (16, 23, 25, 27)
To use microphones with
monaural phono plugs, use the
microphone plug adaptor
(supplied only to the European
model).
0 Tape operation buttons: (18, 20)
= 0 (rewind/review • AMS)
button
p STOP button
( PLAY button
) + (fast-forward/cue •
AMS) button
r REC (record) button
P PAUSE button
!¡ DC IN 4.5V (external power input)
jack (42)
!™ OPEN switch (14)
!£ RESET • + button (10, 11, 13)
!¢ COUNTER • – button (10, 11, 13)
!∞ CLOCK/SET button (11, 13)
EN
6
Location of Controls
Page 7
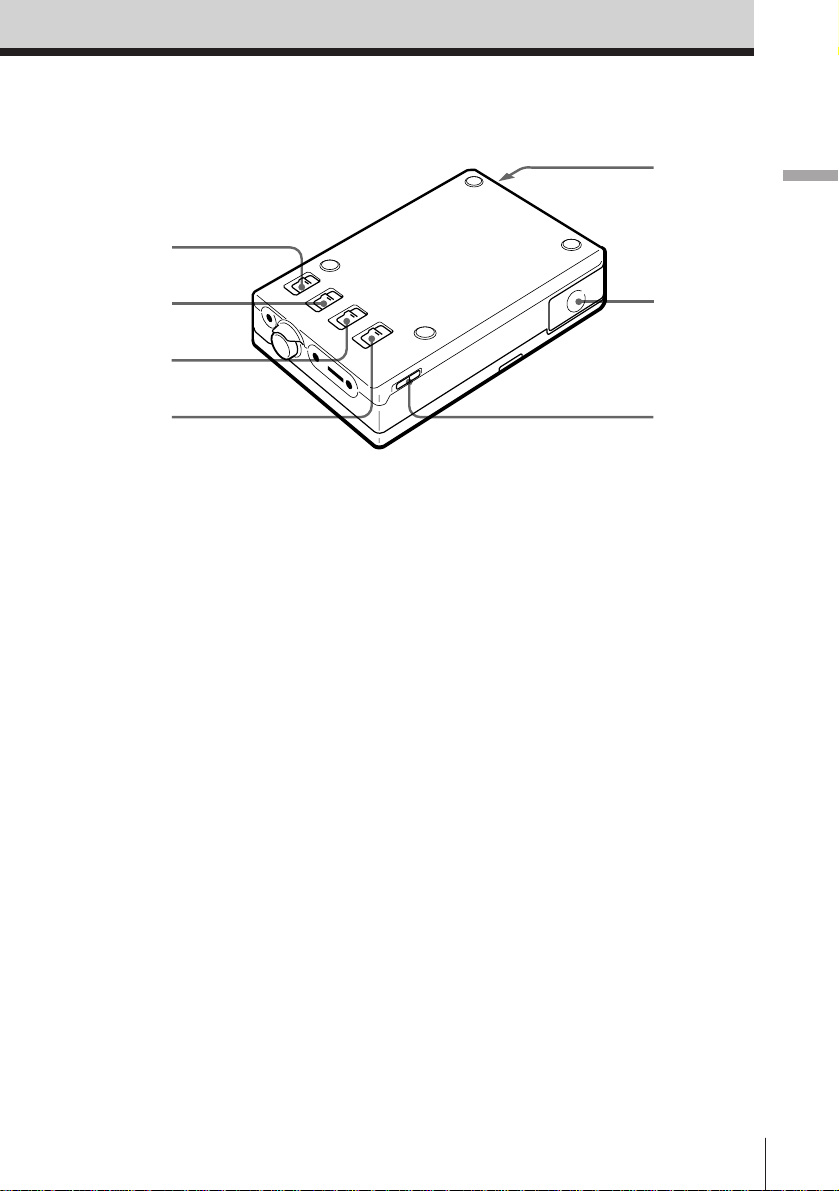
Main unit —back side
!§
@º
Location of Controls
!¶
!•
!ª @™
!§ MIC ATT (microphone sensitivity)
switch (17)
!¶ MIC/LINE IN (microphone/line
input) switch (17, 23)
!• MANUAL • MIC LIMITER •
AUTO (AGC) selector (17, 23, 25)
!ª SP • LP (standard play/long play
mode select) switch (17, 24, 27)
@¡
@º REMOTE • DIGITAL I/O (input/
output) jack (24, 36)
Connect equipment with digital
input/output using the connecting
cable POC-DA12P/DA12MP/
DA12SP or RK-DA10P, the
adaptor kit RM-D100K, the remote
control RMT-D100, or the super
bit mapping adaptor SBM-1, etc
(not supplied).
@¡ Battery compartment lid (12)
@™ AVLS (automatic volume limiter
system) switch (37)
Location of Controls
EN
7
Page 8
Location of Controls (continued)
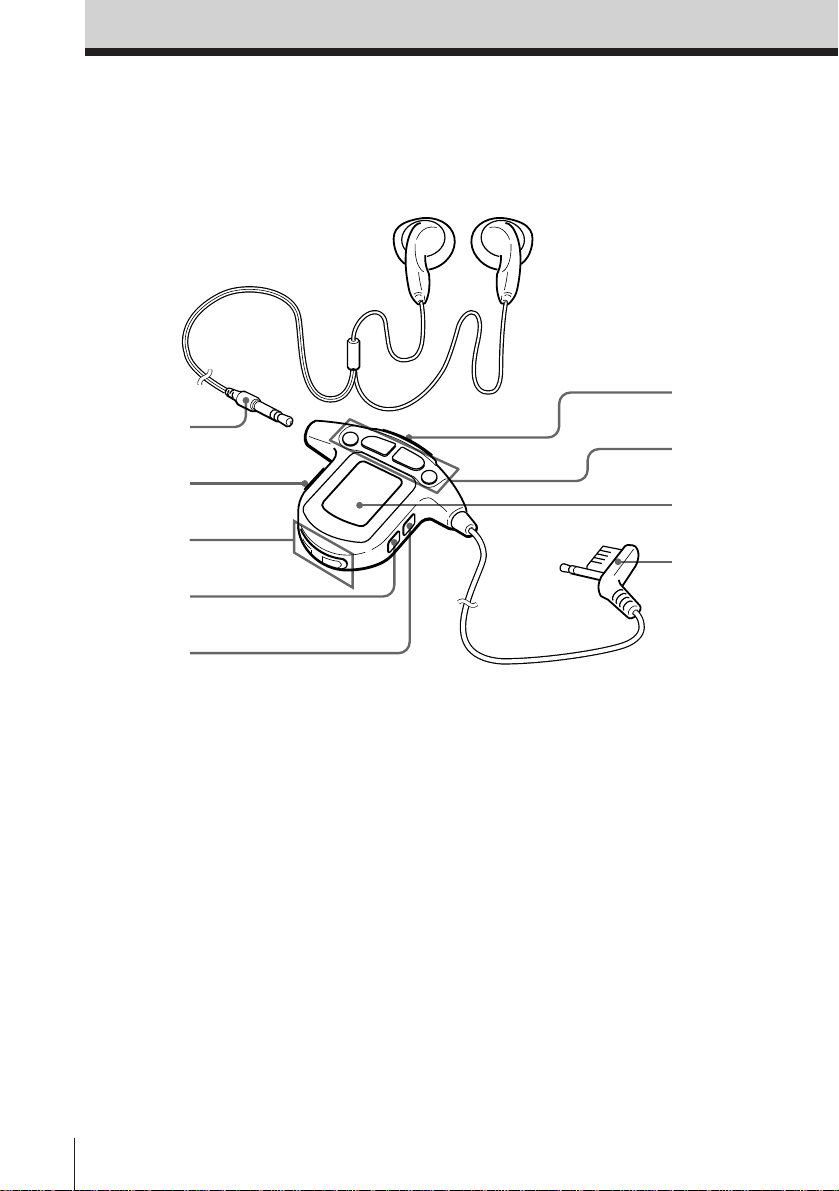
Headphones with Remote Control
(supplied only to the Euroean model)
1
2
3
4
5
6
7
8
9
1 Stereo mini plug
2 COUNTER MODE button (10)
3 VOL +, – (volume) button (20, 37)
4 CLOCK button (11)
5 AVLS button (37)
6 HOLD switch (15, 41)
When you slide it to the direction
of the arrow, the buttons on the
remote control will be locked. But
the COUNTER MODE, CLOCK
and the AVLS buttons will
operate.
EN
Location of Controls
8
7 TAPE operating buttons (20)
+ (Fast forward/cue • AMS)
button
( (play) button
p (stop) button
= (Rewind/review • AMS)
button
8 Display
9 Remote plug
Page 9
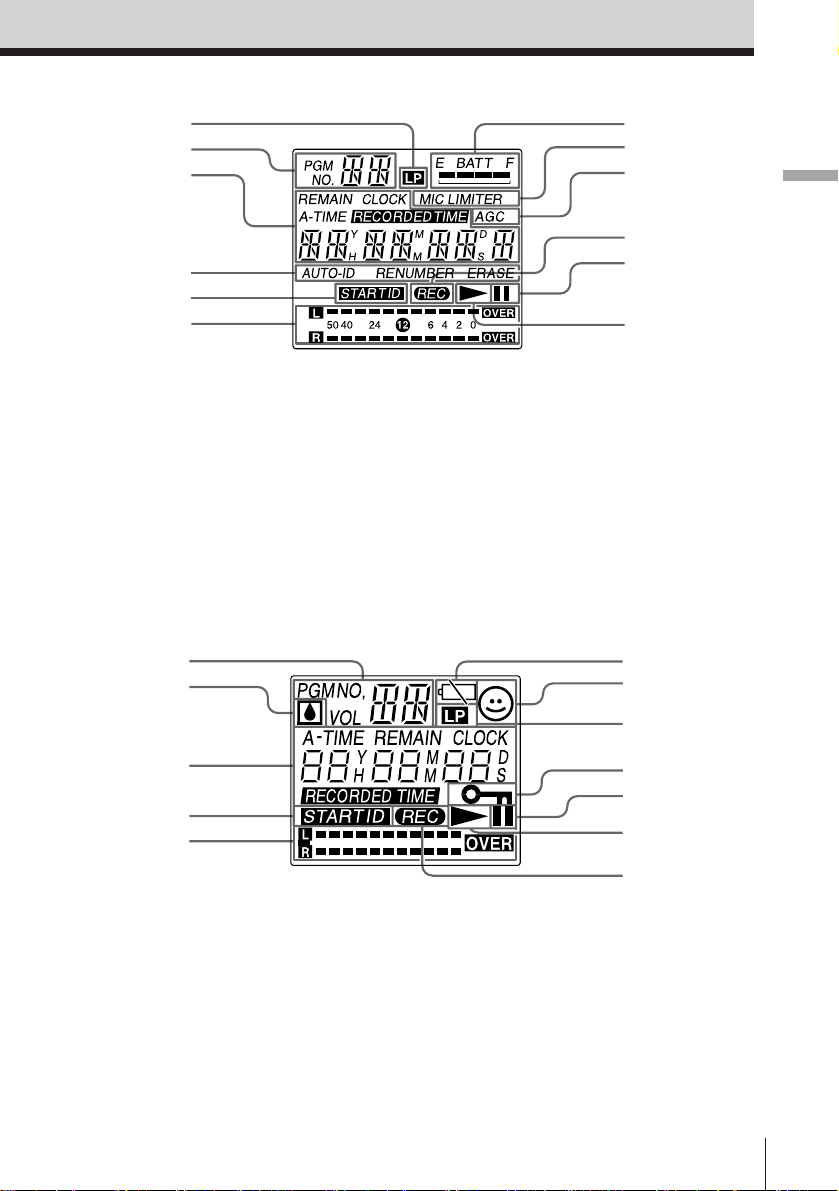
Display
Main unit
1
2
3
4
5
6
7
8
9
!º
!¡
-dB-
!™
Location of Controls
1 LP (Long Play) mode indicator
(27)
2 PGM.NO (program number)•day
•AM/PM indicator (13, 21)
3 Tape counter/clock/volume/
message indicator (10, 11, 37, 45)
4 START ID (automatic Start
ID•renumber•erase signal)
indicator (30 - 35)
6 Peak level indicator (25)
7 BATT (remaining battery power
status) indicator (40)
8 MIC LIMITER indicator
9 AGC indicator
!º REC (recording) indicator
!¡ P (pause) indicator
!™ ( (playback) indicator
5 START ID indicator (30 - 35)
Remote control (supplied only to the European model)
1
2
3
4
5
1 PGM.NO (program
number)•day•AM/PM•volume
indicator (13, 21)
2 Moisture condensation indicator
(49)
3 Tape counter/clock indicator (10,
11)
4 START ID indicator (30 - 35)
5 Peak level indicator (25)
6 i (battery power status)
indicator (40)
7 AVLS indicator (37)
8 LP (Long Play) mode indicator
(27)
9 HOLD indicator (15)
!º P (pause) indicator
!¡ ( (playback) indicator
!™ REC (recording) indicator
6
7
8
9
!º
!¡
!™
Location of Controls
EN
9
Page 10
Location of Controls (continued)
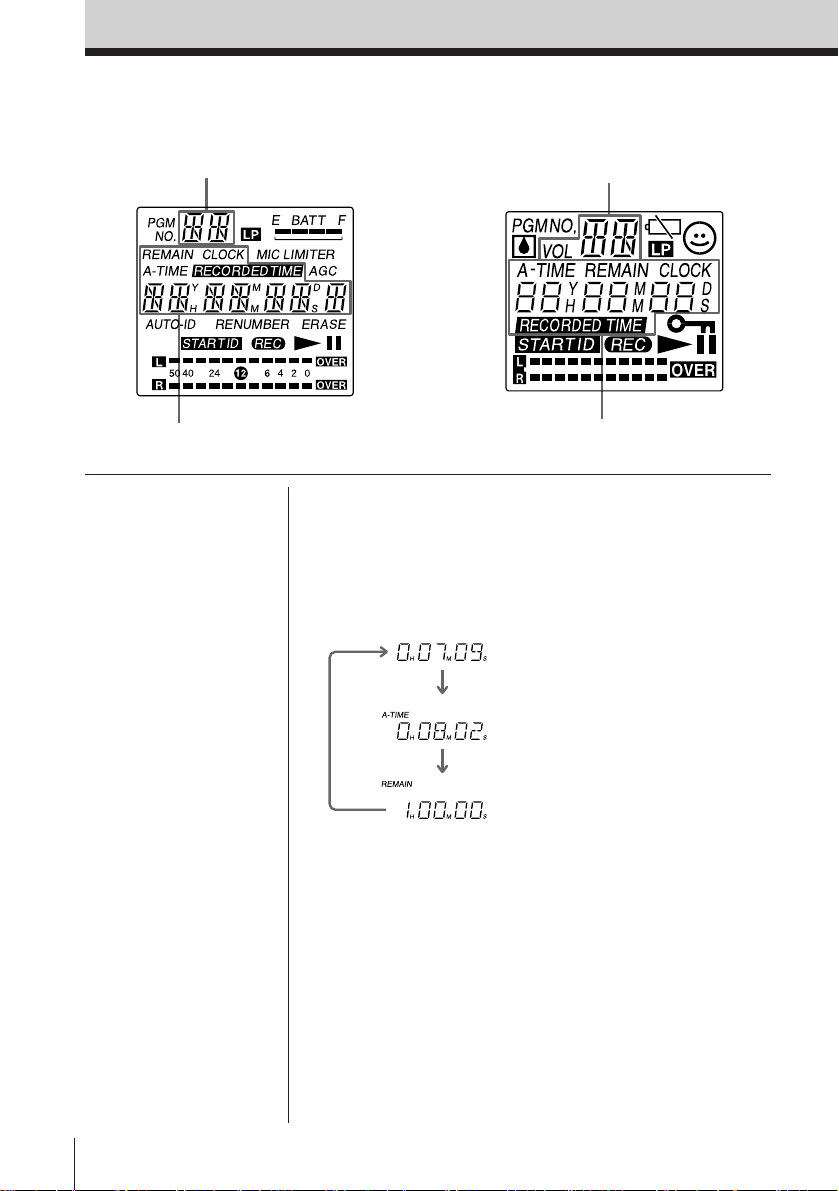
Using the display
Main unit
Day/AM/PM indicator
-dB-
Remote control
Day/AM/PM indicator
Tape counter/clock indicator,
function setting display
Note
The tape counter is
provided as a visual
guideline and is not a
clock. The value
displayed in the counter
is not an accurate
depiction of the actual
time. Therefore, do not
use the tape counter as a
clock.
Tape counter/clock indicator
Tape counter display
Each time the COUNTER button is pressed (on the
remote control, the COUNTER MODE button), the
display changes as follows:
Example: indication on the main unit
Tape counter (normal display)
Absolute time (absolute time
from the beginning of the tape)
Remaining time of the tape
To reset the tape counter (normal display) to
“0H00M00S”
Press the RESET button on the main unit when the tape
counter is displayed.
Remaining time of the tape
The remaining time of the tape appears normally after
about 16 seconds of commencing playback in the SP
mode. However, there may be a deviation in the
amount of time displayed depending on the tape.
EN
10
Location of Controls
Page 11
* The RECORDED TIME
is displayed while
playing back only.
Tips
• When the recorder
enters the recording,
recording monitor, or
pause mode while
RECORDED TIME is
indicated, the recorder
displays the current
time.
• To switch between 12hour or 24-hour clock
display, hold down
RESET • + for 2
seconds or longer.
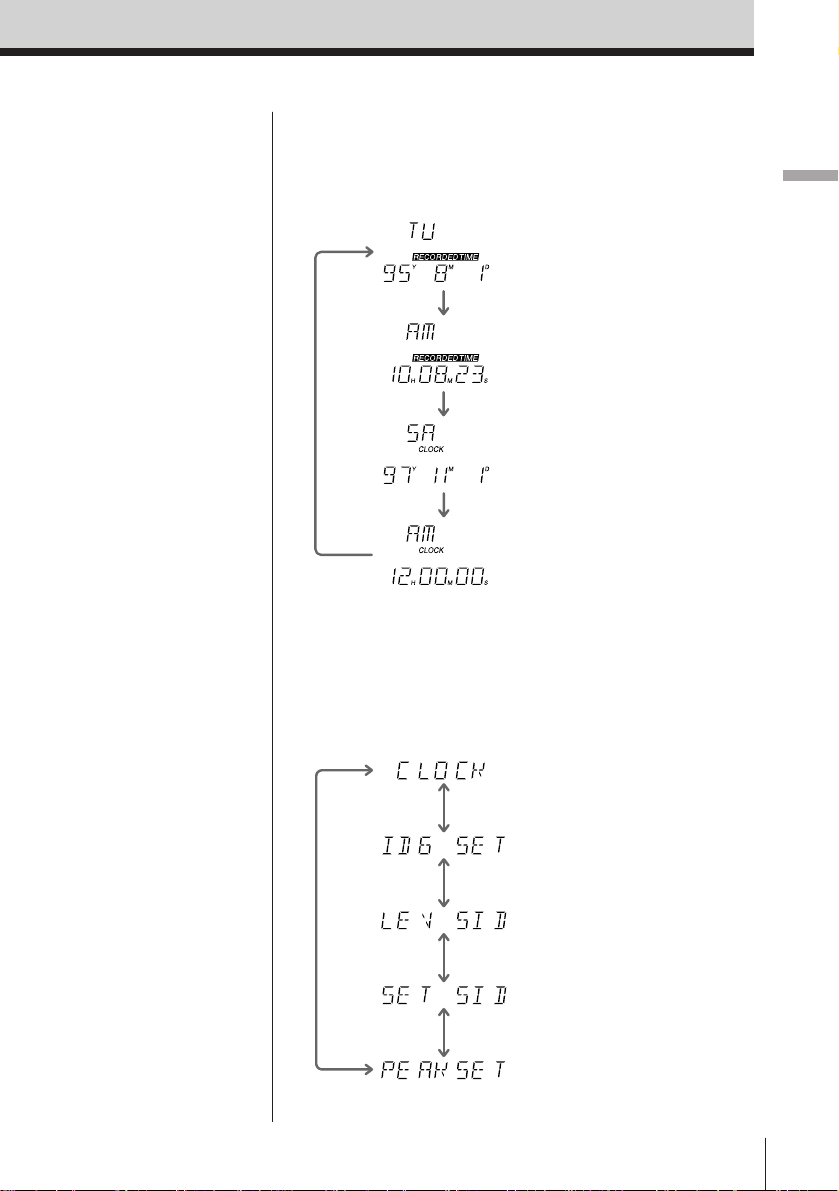
Message display
Refer to page 45, 46 for
“Message Display”.
Clock display
Each time the CLOCK/SET button is pressed (on the
remote control, the CLOCK button), the display
changes as follows:
RECORDED TIME*
(date of the recording)
RECORDED TIME*
(time of the recording)
Current date
(year, month, date)
Current time
(hour, minute, second)
Function setting display
To display the current setting for various functions,
hold down CLOCK/SET for 2 seconds or longer. Each
time RESET • + or COUNTER • – is pressed, the
display changes as follows:
Location of Controls
Clock setting (page 13)
Copy code status (page 28)
Start ID write threshold
setting (page 32)
Start ID on/off setting for
the beginning of recording
(page 30)
PEAK HOLD setting (page 26)
Location of Controls
11
EN
Page 12
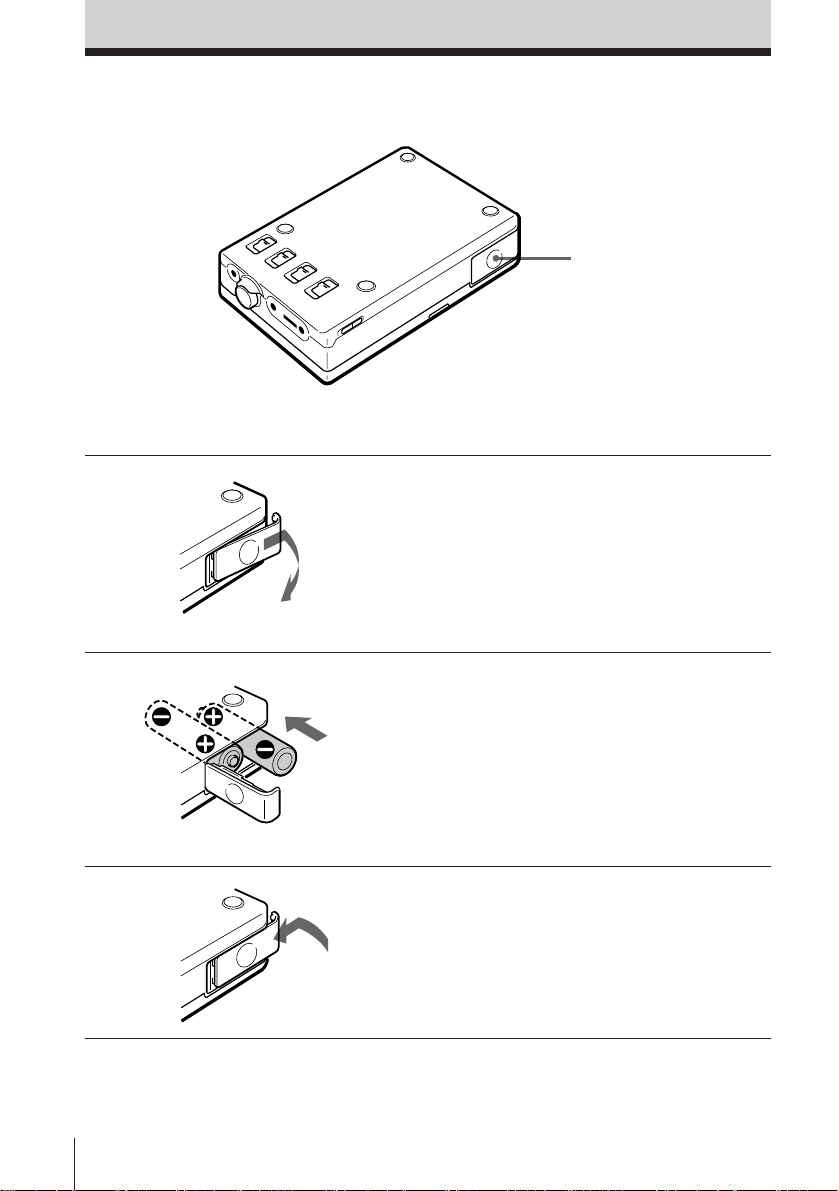
Inserting the Alkaline Batteries
Use two LR6 (size AA) alkaline batteries.
Battery compartment lid
You may also use the rechargeable battery or the house current. For more details see
“Power Sources”, page 38, 42.
1 Open the battery
compartment lid.
2 Insert two new alkaline
batteries (not supplied) into
the battery holder.
Make sure to insert them
with correct polarity.
3 Close the compartment lid.
EN
12
Inserting the Batteries
Page 13
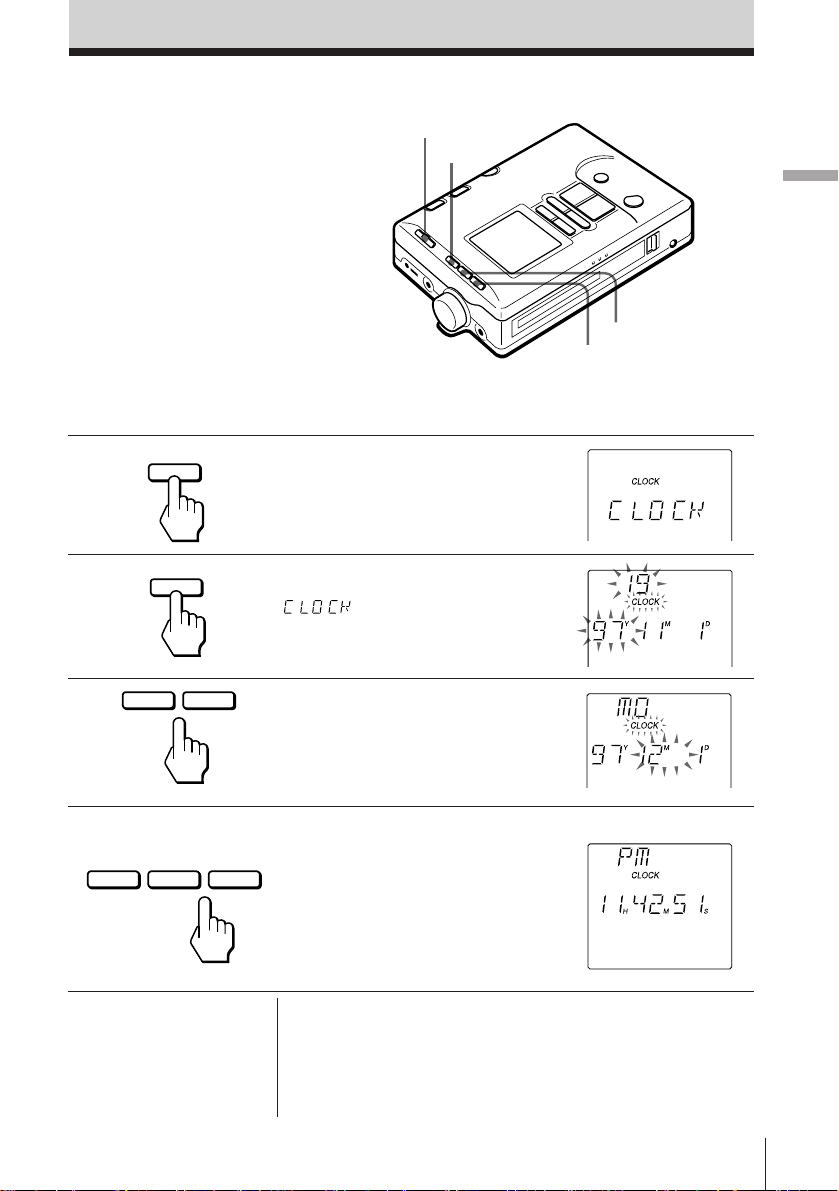
Setting the Clock
Set the clock before starting any
recording operations to stamp
the date and time. Otherwise,
you cannot get the correct date
and time.
The clock will return to its
default setting (SA/97Y11M
1D/AM12H00M00S) if the
batteries are removed from the
unit for a long time. In this case,
set the clock again.
Make sure that the tape-corder is in the stop mode and that the HOLD function is off.
HOLD
+
–
CLOCK/SET
Inserting the Batteries / Setting the clock
1 Press CLOCK/SET for 2 seconds
2 Press CLOCK/SET again while
3 Press + or – button to set the
CLOCK/SET
CLOCK/SET
– +
or longer.
”
display.
current year, then press the
CLOCK/SET button.
” is present in the
4 Repeat step 2 to set the current
CLOCK/SET
Tip
To set the clock accurately,
press CLOCK/SET at the
time of the tone in step 4.
month, date, hour, minute. For
seconds, pressing + or – will set it
+–
to “00”. Then press the CLOCK/
SET button.
The display stops flashing and
the clock operates.
To quit the clock setting
Press the p STOP button. The clock display will
return to the previous clock setting. However, if the
date is set , the year, month and date will be set and
will not be applicable for further cancellation.
Setting the Clock
13
EN
Page 14

Inserting the Cassette
When making an important
recording, be sure to use a tape
with enough recording time (up
to 120 minutes). Fast forward
the tape to the end first, and
then rewind it to the top before
recording.
HOLD
Make sure that the HOLD function is off.
1 Open the cassette compartment
lid.
1 Slide the OPEN switch.
2 Open the cassette
compartment lid when it
opens slightly.
2 Insert the cassette.
Insert the cassette with the
window facing up. If the cassette
is inserted upside down, it may
not be removed from the unit.
Cassette
compartment lid
OPEN
Window facing up.
3 Close the lid.
EN
14
Inserting the Cassette
The cassette is loaded
automatically.
Page 15
Notes
• The cassette holder will
not open if HOLD is
locked. Release HOLD
to insert a cassette.
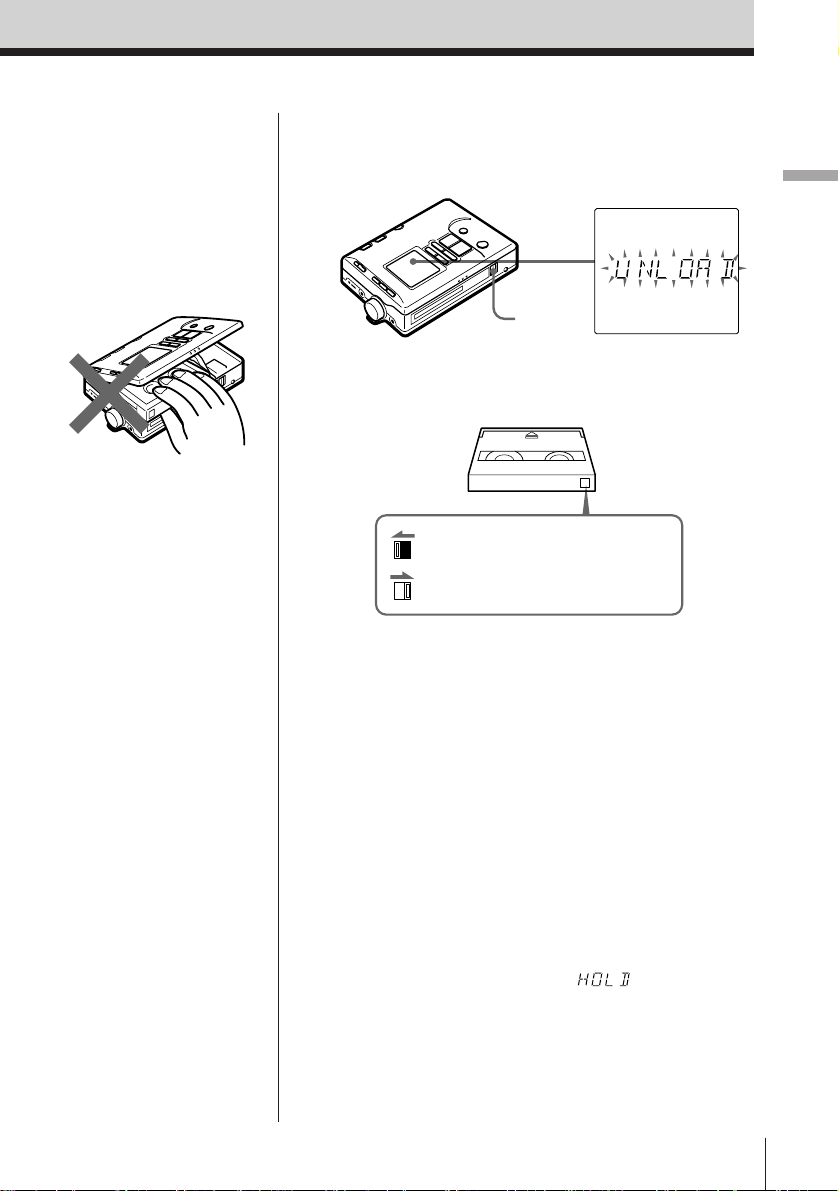
• When inserting or
taking out a cassette, do
not hold the cassette as
shown below. This may
lead to a malfunction.
• Make sure that the
cassette compartment
lid is closed and
“UNLOAD” or “LOAD”
is not displayed before
disconnecting the power
source. Otherwise, the
cassette compartment
lid may not close. In this
case, connect the power
source again.
To eject the cassette
While the recorder is in the stop mode, slide the OPEN
switch.
OPEN
To protect your recording
Slide open the record-protect shutter to record-protect
your tape.
If the shutter is open, you cannot
record on the tape.
If the shutter is closed, you can
record on the tape.
Notes on DAT cassettes
• Unlike conventional analog cassettes, playback and
recording are applicable on one side of the cassette
only.
• Under normal usage, the construction of the DAT
cassette prevents undesirable entry of dust and
foreign particles. Do not open the DAT cassette
unnecessarily.
• Do not insert items into the holes on the reverse side
of the DAT cassette.
Setting the Clock / Inserting the Cassette
Tip
While the recorder is in
the stop mode, slide the
HOLD switch on the main
unit to HOLD to enter the
low-power consumption
mode manually when
using the unit on batteries.
(See page 41.)
* You can set the display,
clock or AVLS.
To prevent accidental operations
— HOLD function
Main unit: Slide the HOLD switch until the yellow
hold mark shows. When a button is pressed
in the HOLD mode, “
3 seconds in the display and the buttons
will be locked*.
Remote control: Slide HOLD switch in the direction of
the arrow. “H” will light up in the display
and the buttons will be locked.
” will flash for
Inserting the Cassette
15
EN
Page 16
Recording
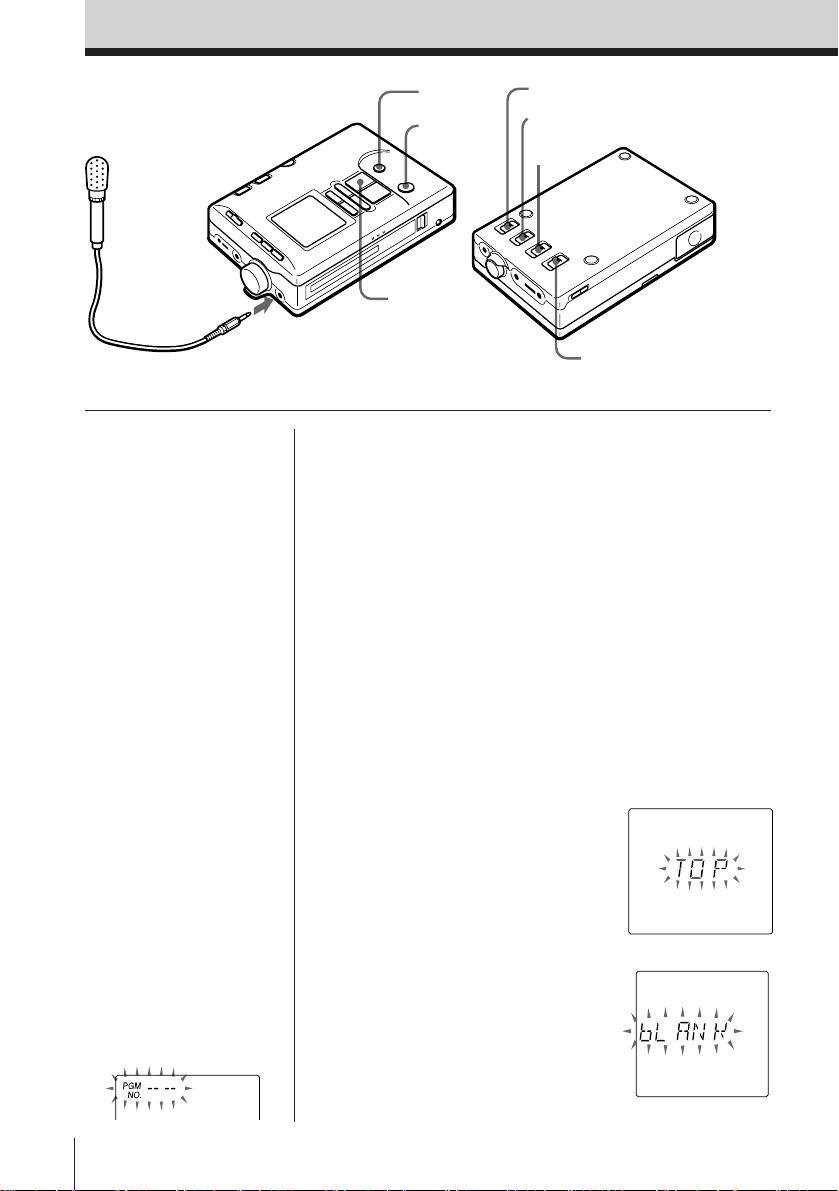
Microphone
(not supplied)
P PAUSE
r REC
( PLAY
to MIC/LINE IN
MIC ATT
MIC/LINE IN
MANUAL • MIC LIMITER • AUTO
(AGC)
SP • LP
Refer to page 23 for “Connecting with Other Equipment for Recording”.
Note
The absolute time may not
be written correctly in the
following cases.
• When recording on a
partially recorded tape
containing an
unrecorded segment
(i.e., a portion of the
tape that has never been
recorded).
• When recording on a
partially recorded tape
for which the absolute
time has not been
written originally.
Notes
• Do not press the p
STOP button when
“bLANK” is displayed.
If it is pressed, the
absolute time will
become “--H--M--S” and
will not be written
thereafter.
• “— —” indicates an
unrecorded segment.
Press the = 0
button to rewind the
tape until “— —” stops
flashing. Then, press the
) + button to
locate the end of the
previous recording.
Locating the point at which to begin
recording
The absolute time is automatically written
simultaneously while recording.
The absolute time is indicated as the length of time
from the beginning of the tape, and is useful in
determing the elapsed time from the beginning of the
tape. When recording on a partially recorded tape,
locate the end of the previous recording and start
recording from that point (this is to avoid creating an
unrecorded segement). Once the absolute time is
written, it cannot be erased.
If you wish to insert a four-second blank segment
automatically, refer to page 27 for “Recording blank
segment—REC MUTING”.
To record from the beginning of the tape
Press the = 0 button to
rewind the tape. “TOP” flashes
when the tape is rewound to the
beginning.
To record on a partially recorded tape
Press the ) + button to
locate the end of the previous
recording. “bLANK” appears
when the end of the previous
recording is located, and the
tape stops at the point.
16
EN
Recording
Page 17
Recording from a microphone
1 Insert a cassette and locate the
point at which to begin recording.
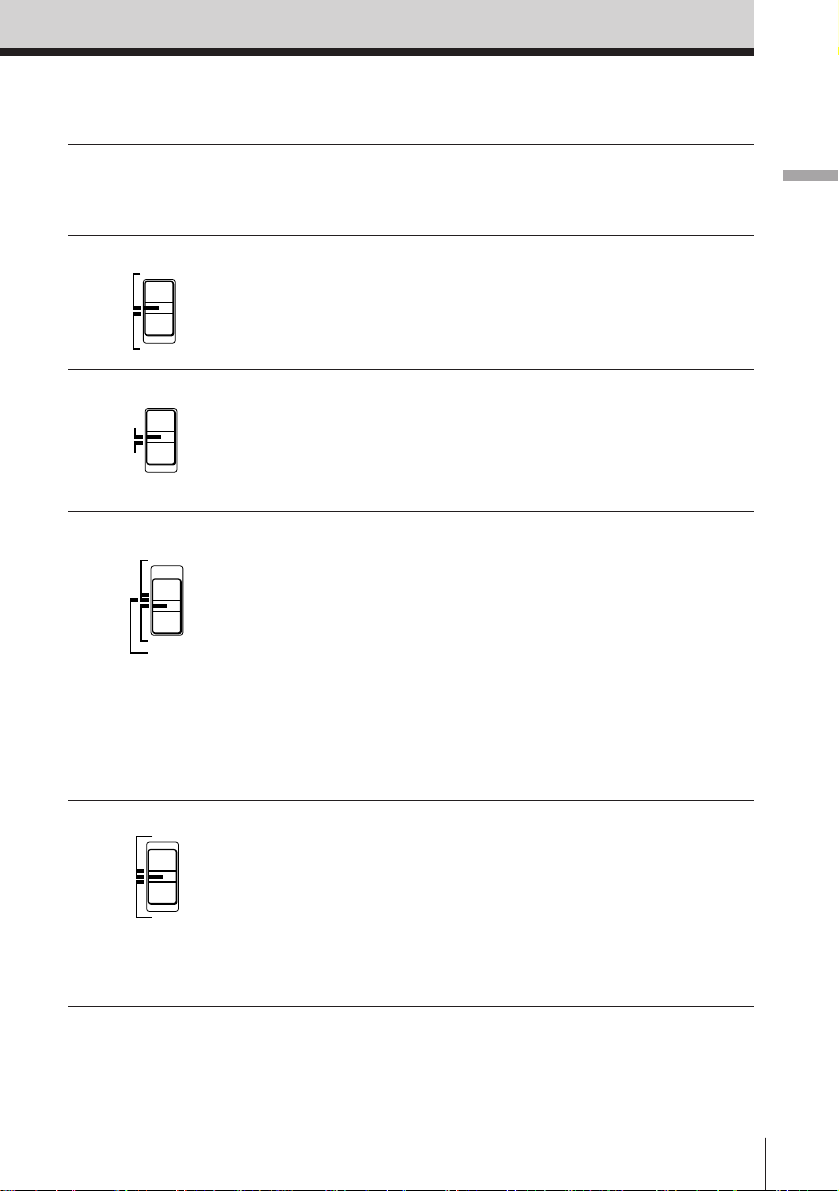
2 Set the MIC/LINE IN switch to
3 Set the MIC ATT switch.
MIC/LINE IN
MIC
LINE IN
MIC ATT
0dB
20dB
MIC.
0 dB: Normal
20 dB:For loud sound
4 Set the MANUAL • MIC
MANUAL
AUTO(AGC)
MIC LIMITER
LIMITER • AUTO (AGC) selector
to AUTO (AGC).
The recorder adjusts the
recording level automatically.
To adjust the recording level
manually, set the selector to
MANUAL or MIC LIMITER. (See
page 25.)
You can adjust the copy code. See
”Adjusting the copy code” (page
28).
Inserting the Cassette / Recording
5 Select the sampling frequency.
44.1kHz
48kHz
SP
Set the SP • LP switch to SP
(Standard Play mode 48 kHz or
LP
44.1 kHz).
To record in the Long Play mode,
set the switch to LP. (See page
27.)
Recording
17
EN
Page 18
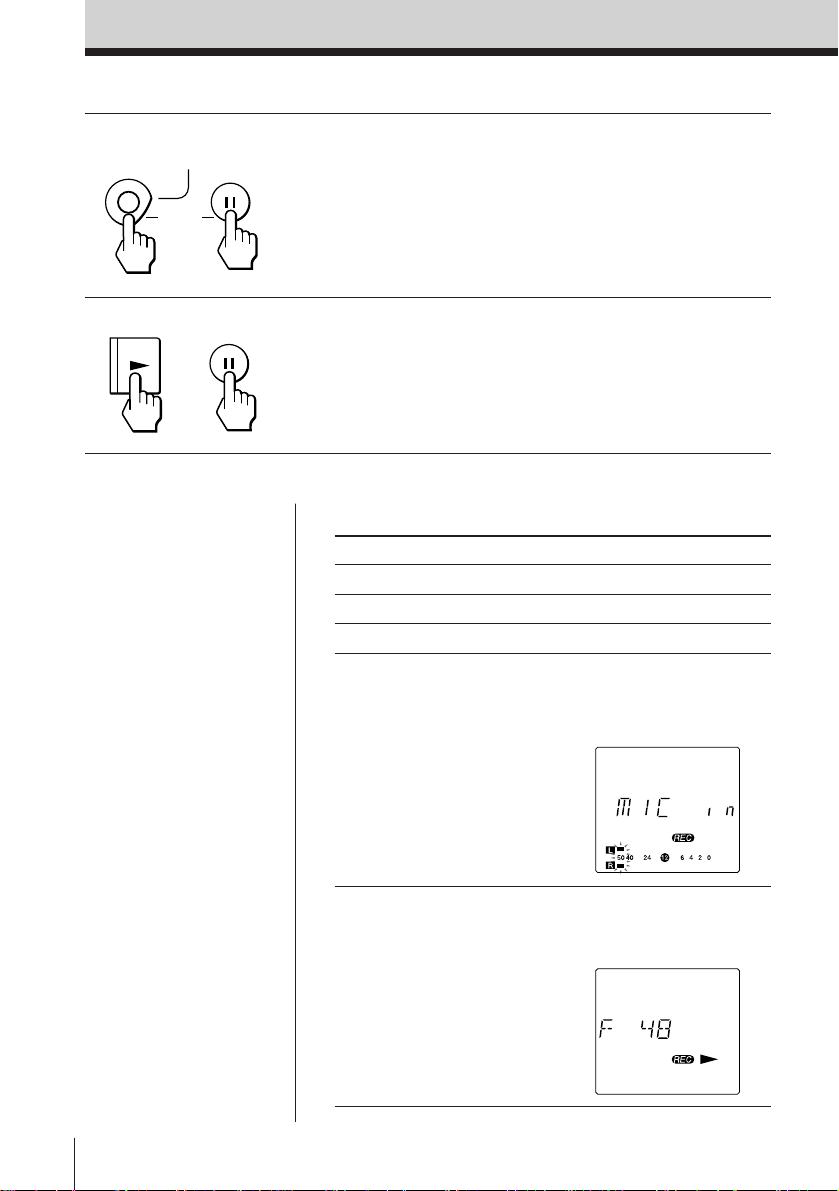
6 Press the r REC and P PAUSE
REC
REC MUTING
PAUSE
buttons.
The recorder enters the pause
mode. If only the r REC button is
pressed, the recorder enters the
recording monitor mode and
does not begin recording.
7 Press either the ( PLAY or
PLAY
Tips
• To begin recording
immediately, press the
( PLAY button while
pressing the r REC
button in the stop or
playback mode.
• The sampling frequency
is displayed when it is
changed during
recording. When it is
changed during
recording pause, it will
be displayed at the start
of the next recording.
• If the recorder remains
in the pause mode for
five minutes or longer,
the recorder will enter
the stop mode
automatically in order
to protect the head and
tape.
• If the recorder remains
in the stop mode for
three minutes or longer
while using the unit on
batteries, the recorder
will enter the lowpower consumption
mode automatically (see
page 41) to protect the
tape and to conserve the
battery.
EN
18
Recording
or
PAUSE
P PAUSE button.
The recording begins.
Other operations
To Press
Stop recording p STOP
Pause recording P PAUSE
Release pause P PAUSE or ( PLAY
Check the sound source
(The Start ID blank
detection threshold
flashes automatically.
see page 32)
Check the sampling ( PLAY in the recording
frequency mode until the sampling
r REC during recording,
recording monitor, or
recording pause until the
display appears.
frequency is displayed.
Page 19

Tip
When the recorder records
to the end of the tape, it
rewinds the tape
automatically to the
beginning and stops. (Autorewind function).
Notes
• The unit will not enter the
low-power consumption
mode during the
recording monitor mode,
even when using the unit
on batteries.
• Changing the sampling
frequency while
recording may cause
temporary sound dropout
to be recorded.
• Noise may be recorded if
you set the MIC/LINE IN
switch during recording.
• Noise may be recorded
when the display light is
turned on while
recording. In this case,
turn it off.
• If appears when
the recording mode is set
to AUTO (AGC), set the
MIC ATT to 20dB or
move the microphone
away from the sound
source.
To monitor sound during recording
Plug the headphones in the REMOTE/2 jack or stereo
unit to the LINE OUT jack on the recorder.
To record relatively low sounds
Lower the recording level (in the manual recording
mode) and move the microphone as close as possible
to the sound source and then adjust the recording
level. Clear and optimum recording with minimal
noise interferences will be achieved.
Choosing microphones for better recording
The recording is affected by and is dependent upon
the type of microphones used. For better recording,
use the optional ECM-MS957 or ECM-MS907
microphone.
Compatible microphones
• Optional plug-in power type microphones are
compatible for this recorder.
• Optional auto power supply type microphones are
not compatible for this recorder.
Recording
Recording
19
EN
Page 20
Playing Back
HOLD
+
(
=
HOLD
to REMOTE/2
Refer to page 36 for “Connecting with Other Equipment for Playback”.
1 Insert a cassette and connect the
headphones with remote control.
Release the Hold function.
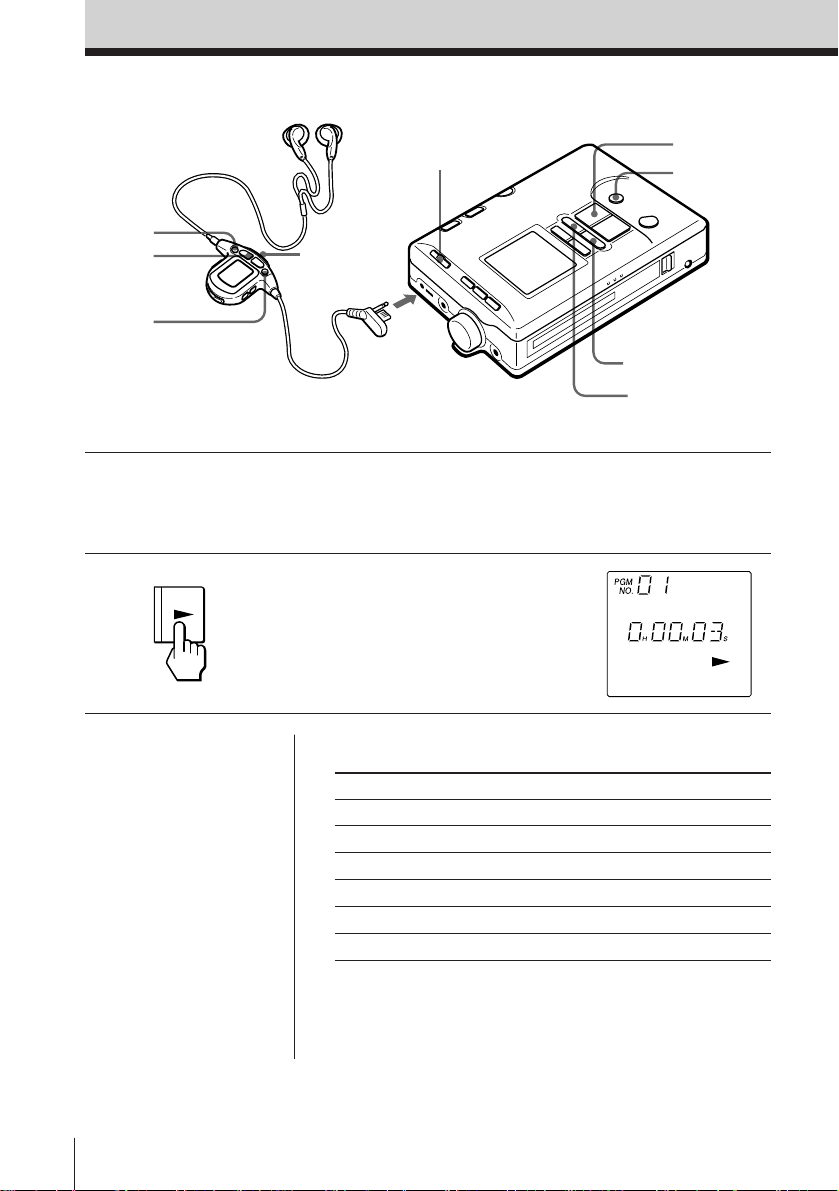
2 Press the ( PLAY button.
PLAY
The playback begins.
( PLAY
P PAUSE
= 0
) +
Tips
• The SP (Standard Play)
mode and LP (Long
Play) mode will be
detected automatically
for playback.
• When the recorder plays
back to the end of the
tape, it rewinds the tape
automatically to the
beginning and stops
(Auto-rewind function).
• The pause playback
cannot be operated with
the remote control.
EN
Playing Back
20
Other operations
To Press
Adjust the volume VOL +, – (VOL +, –)
Stop playback p STOP (p)
Pause playback P PAUSE
Release pause P PAUSE or ( PLAY (()
Fast forward ) + (+) in the stop mode
Rewind = 0 (= ) in the stop mode
( ) is indicated for the remote control.
Page 21
Tips
• If the recorder remains
in the pause mode for
five minutes or longer,
the recorder will
automatically enter the
stop mode in order to
protect the head and
tape.
• If the recorder remains
in the stop mode for
three minutes or longer
while using the unit on
batteries, the recorder
will enter the lowpower consumption
mode automatically (see
page 41) to protect the
tape and to conserve the
battery.
Notes
• If you set the volume
too high, the sound may
become distorted. Turn
down the volume in this
case.
• The AMS function will
not operate if the Start
IDs are not written. (See
page 30).
• The AMS function may
not operate properly
with a DAT cassette
recorded on other DAT
decks.
* Automatic Music Sensor
To fast-forward/rewind while monitoring the
sound
You can fast-forward (cue) or rewind (review) while
monitoring the sound.
Cue Press and hold ) + (+)
in the playback mode. When the
button is released, normal
playback resumes.
Review Press and hold = 0 ( =)
in the playback mode. When the
button is released, normal
playback resumes.
( ) is indicated for the remote control.
To high speed cue/review
This function can be operated only from the main unit.
High speed cue Press ( PLAY and ) +
during playback.
High speed review Press ( PLAY and = 0
during playback.
To locate the beginning of a track—AMS* function
You can locate the beginning of a track in the playback, fastforward/rewind, and stop modes.
Playback mode: Press ) + (+) or = 0 (=)
quickly.
Fast-forward/rewind mode:Press ) + (+) or =
0 (=) once.
Stop mode: Press ) + (+) or = 0 (=) twice.
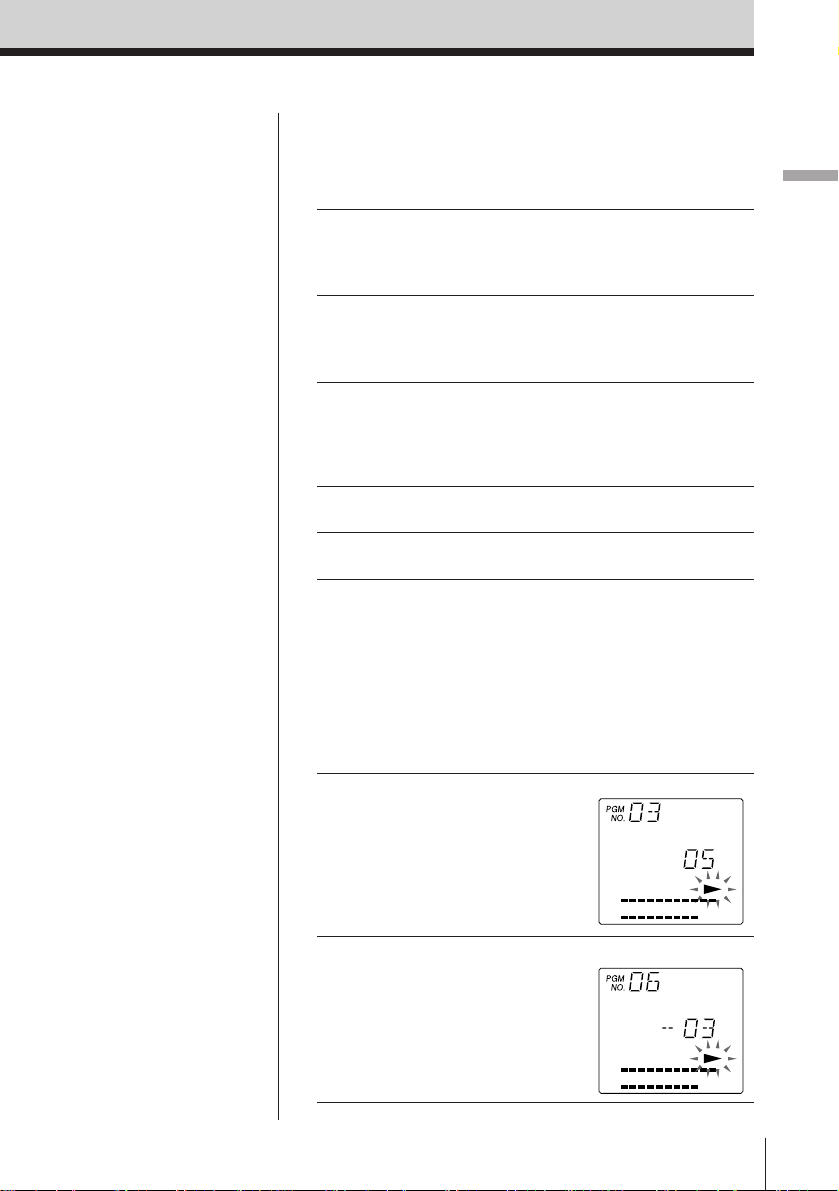
To locate the beginning Press ) + (+) once/
of the next/succeeding repeatedly
program (track)
E.g.: When locating the
beginning of the
fifth succeeding
program (track)
Playing Back
To locate the beginning Press = 0 (=) once/
of the current/previous repeatedly
program (track)
E.g.: When locating the
beginning of the
fourth previous track
including the current
program (track)
( ) is indicated for the remote control.
Playing Back
21
EN
Page 22

To check the sampling frequency
You can check the sampling frequency of the recorded
sound.
Press ( PLAY in the playback mode until the sampling
frequency is displayed.
Display during fast-forward/rewind (AMS function)
Peak level indicator (L) shows the tape transport
direction. Peak level indicator (R) shows the
remaining amount of tape.
Tape transport direction
to the right: fast-forward
to the left: rewind
Remaining amount
of tape
To play back the tape from the beginning
automatically—Auto-play function
This function can be operated only from the main unit.
Press the ( PLAY button while pressing the
= 0 button. Playback begins automatically when
the tape is rewound to the beginning.
Likewise, playback begins automatically when the
tape is rewound to the beginning of the previous
program (track) in the AMS function.
22
EN
Playing Back
Page 23
( Recording
Connecting with Other Equipment for
Recording
You can connect the recorder to other analog audio equipment or audio equipment
with digital output. Refer to page 16 for “Recording”.
Tip
When recording with
analog connection, you
can adjust the digital copy
code (ID 6) (see page 28).
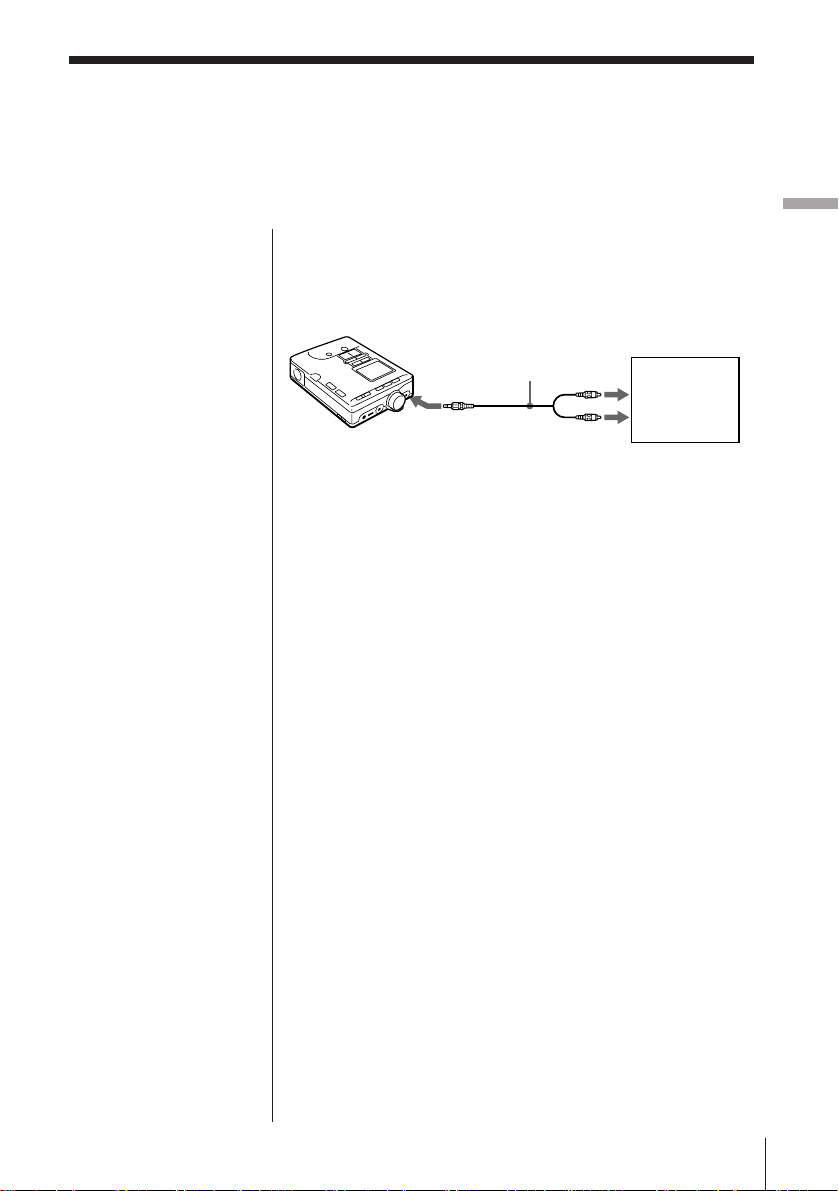
Recording from analog audio
equipment with a LINE OUT jack
(Analog connection)
PCM-M1
to MIC/LINE IN
Audio connecting cable
RK-G129
(not supplied)
to LINE OUT
Stereo unit
or mixer,
etc.
1 Set the MIC/LINE IN switch to LINE IN.
2 Select the recording mode using the MANUAL •
MIC LIMITER • AUTO (AGC) selector.
MANUAL: adjust recording level manually (see
page 25)
AUTO (AGC): recording level will be adjusted
automatically
3 Select sampling frequency using the SP • LP
switch.
SP (48kHz, 44.1kHz): normal recording mode.
LP: long continuous recording mode. Sampling
will be done by 32kHz. (see page 27)
4 Press the r REC and P PAUSE buttons.
5 Press either the ( PLAY or P PAUSE button to
begin recording. Then, begin playback of the
connected source.
Recording
Playing back / Recording
Recording
23
EN
Page 24
Notes
• Use only the
recommended digital
cable (not supplied).
(see page 53)
You cannot use the
POC-DA12/DA12M/
DA12S or RK-DA10
digital connecting
cables with this unit.
• Make sure to set the
INPUT SELECT switch
of the connecting cable
to DIGITAL before
recording. Switching it
during recording will
create a short blank in
the recording.
Tips
•In digital connection,
note the following:
– Setting the recording
mode is not required.
– The recording level is
set automatically to the
level of the source.
Manual adjustment is
not available in this
case.
• The recorder supports
input in IEC958 format.
Adjustment of the copy
code (ID 6) is possible
when recording input
in this format (page 28).
The recorder does not
support AES/EBU
format.
• Setting of the SP•LP
switch is applicable
when recording a 32 kHz
source only. (When set to
SP, the source is
recorded in the 32 kHz
SP mode. When set to
LP, the source is
recorded in the 32 kHz
LP mode.)
Other sources will be
automatically recorded
in its own sampling
frequency regardless of
the SP•LP switch.
EN
Recording24
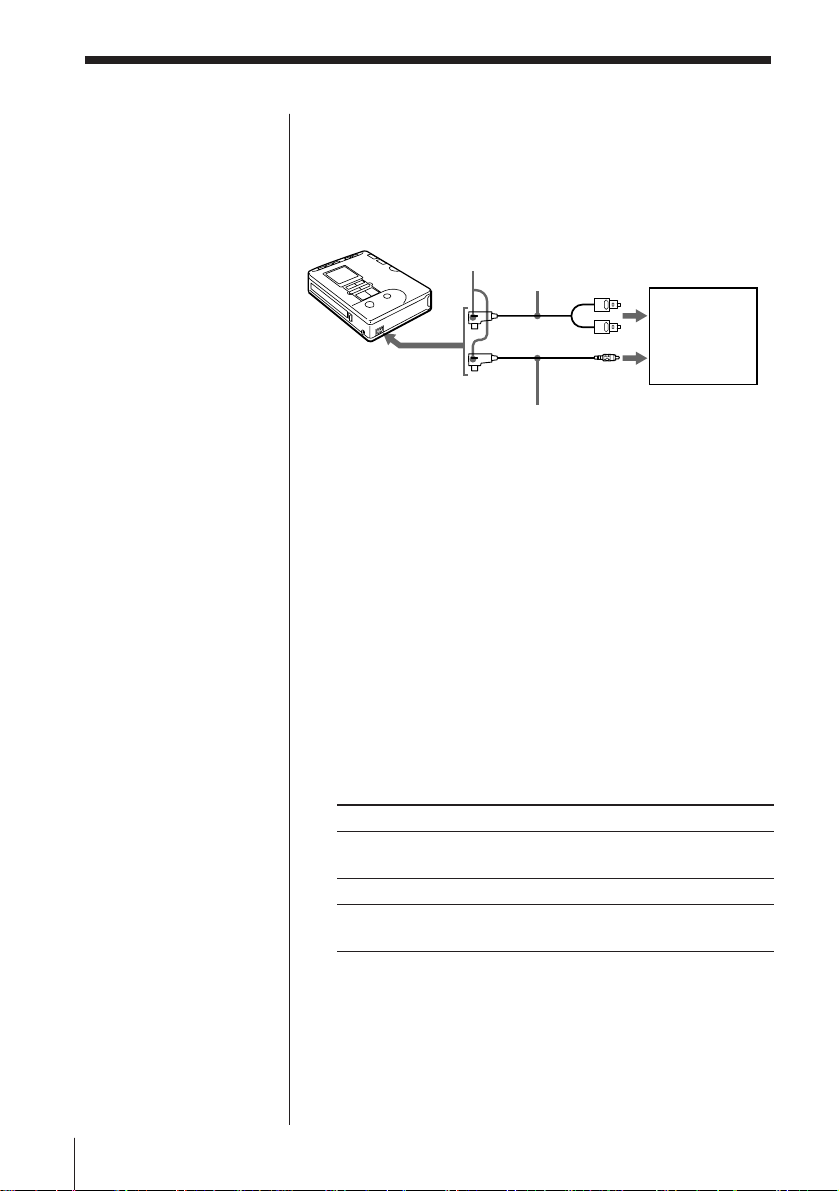
Recording from audio equipment with
digital output (Digital connection)
Optical cable
PCM-M1
to REMOTE
DIGITAL I/O
INPUT
SELECT
POC-DA12P
POC-DA12MP
POC-DA12SP
(not supplied)
or
Coaxial cable
RK-DA10P
(not supplied)
to (OPTICAL)
digital output
CD player,
BS tuner,
DAT deck,
MD deck,
etc.
to (COAXIAL)
digital output
1 Use and connect the optical cable or coaxial cable
according to the digital output jack of the
connected equipment.
2 Set the INPUT SELECT switch of the connecting
cable to DIGITAL.
3 Press the r REC and P PAUSE buttons.
4 Press either the ( PLAY or P PAUSE button to
begin recording. Then, begin playback of the
connected source.
Source and sampling frequency for recording
When recording with digital connection, the sources
will be automatically recorded in its own sampling
frequency shown below.
Source Sampling frequency
Broadcasting satellite B mode 48 kHz
audio, DAT SP mode
CD, MD, DAT SP mode 44.1 kHz
Broadcasting satellite A mode 32 kHz
audio, DAT LP mode
To make a digital backup copy
When you want to make backup copies of recordings
of your live performance etc., record with digital
connection on this recorder. Copying is possible
regardless of the copy code on the source. The copy
code on the backup is in accordance with SCMS
(pages 28, 44).
Page 25

Adjusting the recor ding level manually
— Manual recording
For optimum recording with
microphones or from analog
audio equipment, adjust the
recording level manually.
COUNTER • –
RESET • +
CLOCK/SET
Stereo unit,
mixer, etc.
( PLAY
P PAUSE
r REC
to MIC/
LINE IN
Recording
MANUAL
• MIC
LIMITER
• AUTO
(AGC)
REC
LEVEL
What’s the
MIC LIMITER?
The MIC LIMITER
automatically holds down
sudden large input
signals. Setting the
recording mode to MIC
LIMITER and setting the
recording level slightly
higher than the usual
level will give good
results when recording at
parties or conferences.
Note
Recording level is set
excessively high when
appears in the
right side of the peak
level indicator. Turn
down the recording level.
-dB-
If distortion still occurs
when is not
displayed, set the MIC
ATT switch to 20dB or
move the microphone
away from the sound
source.
1 Set the MANUAL • MIC LIMITER • AUTO (AGC)
switch to MANUAL or MIC LIMITER.
MANUAL: to record via analog connection or
microphones.
MIC LIMITER: to record via microphones.
2 Press the r REC button to enter the recording
monitor mode.
3 Begin playback of the source and turn the REC
LEVEL control to adjust the
recording level while
monitoring the sound.
Turn the REC LEVEL
control so that the peak
level indicators are
maintained around level !™.
Make sure that
does
not appear when there is a
-dB-
Peak level indicator
loud sound input.
4 Press the ( PLAY button while pressing the
r REC button to begin recording.
Recording
25
EN
Page 26
Tip
You can also set PEAK
HOLD during recording.
Press CLOCK/SET for 2
seconds or longer, and the
display will go directly to
”PEAK on” or ”PEAK
oFF” selection. Select with
RESET • + or COUNTER
• – and enter with
CLOCK/SET.
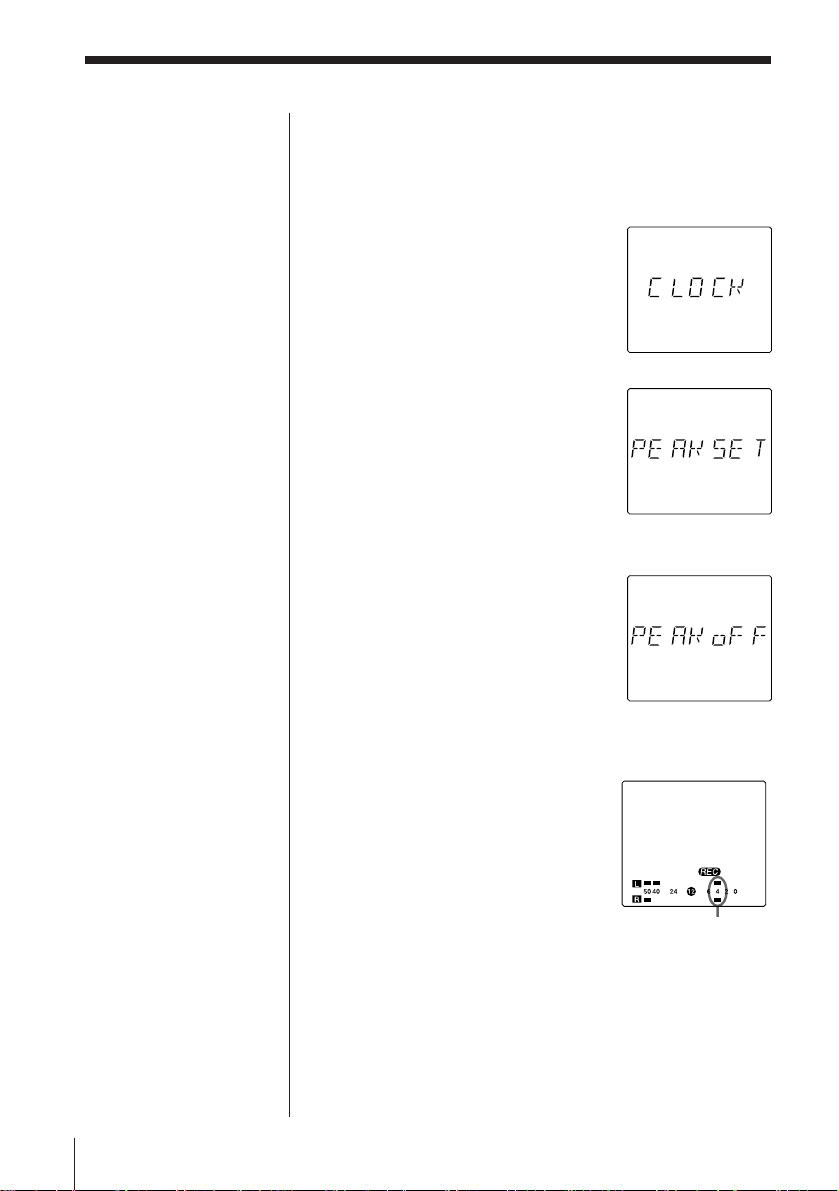
Displaying maximum input level —
PEAK HOLD
PEAK HOLD holds the maximum input level on the
peak level indicator for easy recognition.
1 Press CLOCK/SET for 2
seconds or longer. ”CLOCK”
will appear in the display.
2 Press RESET • + or
COUNTER • – repeatedly and
select ”PEAK SET”.
3 Press CLOCK/SET.
4 Press RESET • + or COUNTER • – repeatedly and
select ”PEAK on”.
5 Press CLOCK/SET.
The display returns to the clock.
The peak value display is replaced
with a new one whenever there is
a larger input.
To reset the peak value
Press RESET when the tape counter is not displayed. It
is also reset when the tape is removed.
EN
Recording26
Page 27
Useful Recording Functions
Record in the LP (Long Play)
mode to make long recordings.
Use REC MUTING to record
blank segments.
COUNTER • –
RESET • +
CLOCK/SET
( PLAY
P PAUSE
r REC
to MIC/
LINE IN
Stereo unit,
mixer, etc.
Recording
SP • LP
Notes
• A tape recorded in the
LP mode cannot be
played back on a DAT
deck which is not
equipped with the LP
mode function.
• A loud noise may be
heard during the
transition from the SP
mode to the LP mode
when a tape containing
a recording that has
been switched from the
SP mode to the LP
mode halfway is
played back on a DAT
deck which is not
equipped with the LP
mode function. In this
case, turn down the
volume or stop
playback.
Tip
To insert a blank segment
of 4 seconds or more,
press the P PAUSE
button while pressing the
r REC button, and then
hold down only the
P PAUSE button for 4
seconds or longer. When
the blank segment
exceeds four seconds,
“P” indicator will flash
quikly. The recorder reenters the pause mode
when the P PAUSE
button is released.
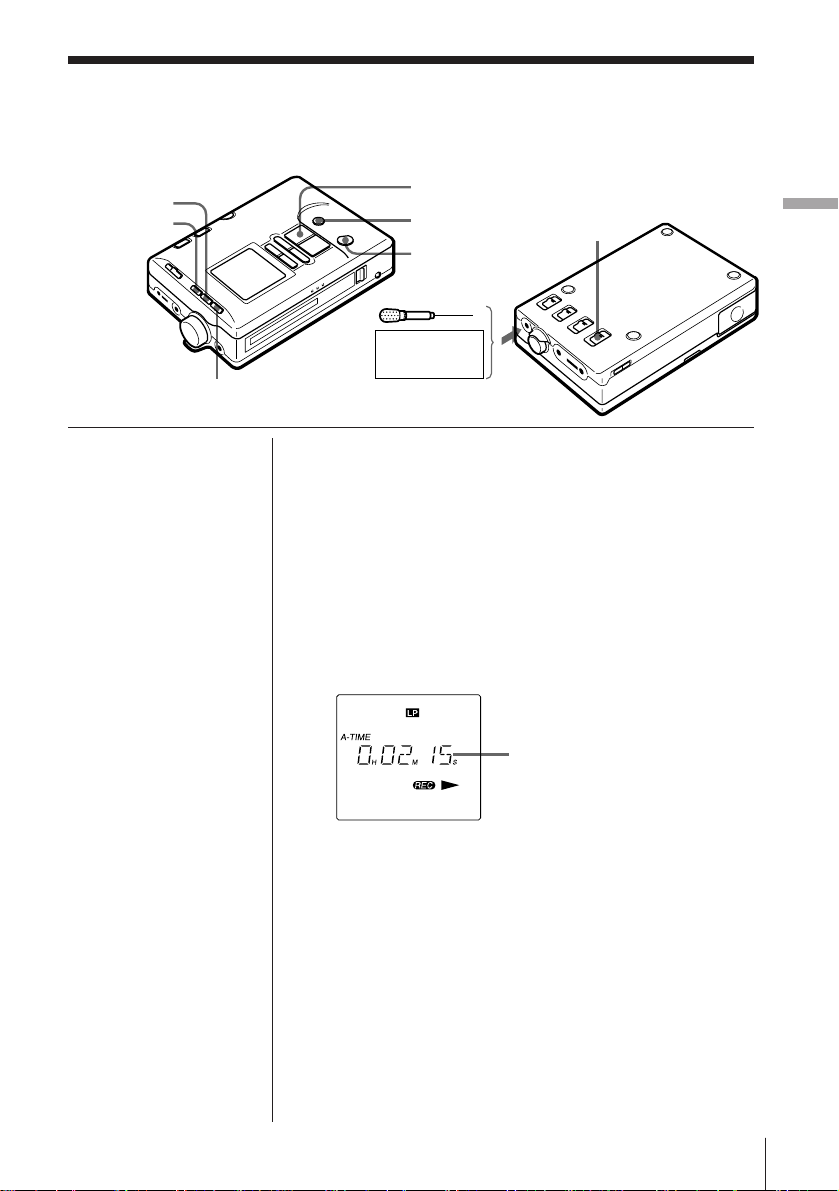
Recording in the Long Play mode—LP
REC
Set the SP • LP switch to LP to record twice the
recording time of conventional DAT cassettes.
Accordingly, a 60-minute DAT cassette recorded in
the LP mode enables recording of 120 minutes.
Tape counter display during LP mode
The absolute time and the remaining time of the tape
are based on the SP mode. Therefore, the actual time is
twice the amount of the value shown on the display.
The actual time during LP
mode is 4 and half
minutes.
Recording blank segments—REC
MUTING
A blank segment can be inserted at the beginning of
the track and between tracks. In this case, the Start ID
is not written.
1 Press the r REC button and the P PAUSE button
to enter the recording pause mode.
2 Press the P PAUSE button while pressing the
r REC button.
A four-second blank segment is inserted and the
unit returns to the recording pause mode
automatically.
Recording
27
EN
Page 28
Note
You cannot adjust ID6
while recording. Adjust it
before recording.
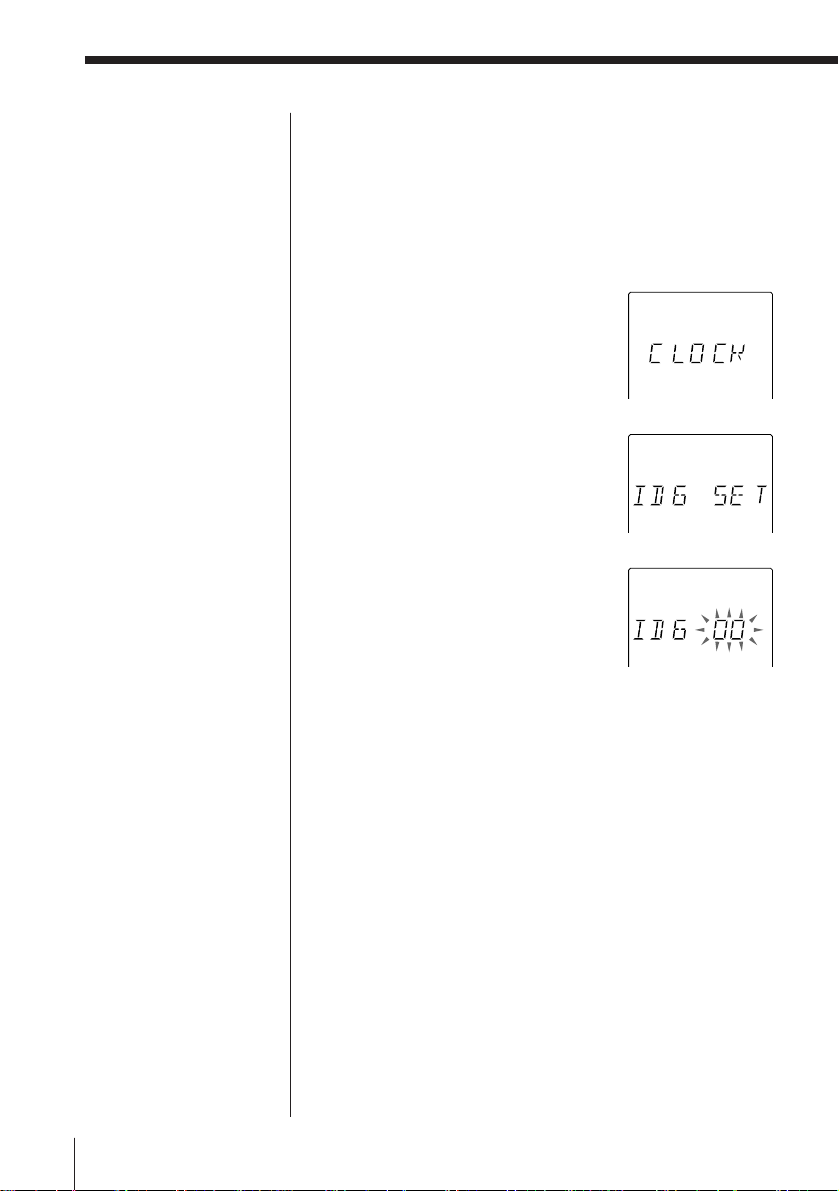
Adjusting the copy code (ID6)
When recording with analog connection (with a
microphone or from the LINE IN jack), or when
recording digital input in the IEC958 format, you can
adjust the copy code (ID6). The factory preset of ID6 is
”00”.
1 Press CLOCK/SET for 2
seconds or longer. ”CLOCK”
will appear in the display.
2 Press RESET • + repeatedly
and select ”ID6 SET”.
3 Press CLOCK/SET while ”ID 6
SET” is displayed.
4 Press RESET • + or COUNTER • – repeatedly and
select the copy code you want to give to this
recording.
ID6 00 : Digital duplication permitted an unlimited
number of times
ID6 10 : Cannot be copied digitally
ID6 11 : Can be copied digitally only once
5 Press CLOCK/SET.
The display returns to the clock.
EN
Recording28
Page 29

To display current ID6 setting
Hold down RESET • + and press COUNTER • – for 2
seconds or longer when the tape counter is not
displayed.
During recording,
recording monitor, or
Displays the copy code that
is written on the tape
recording pause
During playback or play
pause
During stop
Displays the copy code that
is to be written on the tape
Copy code is not written
yet
ID6 00: Digital copying is possible an unlimited
number of times.
ID6 10: Digital copying is not possible.
ID6 11: Digital copying is possible only once.
ID6 --: Copy code is not written yet (only during stop).
Recording
Recording
29
EN
Page 30
Writing Start IDs
A Start ID is a signal which
indicates the beginning of a
program (track). The tapecorder searches the Start IDs to
locate the beginning of a
program (track) with the AMS
(Automatic Music Sensor)
function.
Tape transport direction
track track
Tape
Start ID
START ID •
ENTER
COUNTER • –
RESET • +
START ID •
MODE
CLOCK/SET
Notes
• The existing program
(track) information of
the CD may not be
written properly as the
Start ID depending on
the CD player in use.
• The existing program
(track) information of
an MD is not written as
the Start ID.
Tips
• To write the Start ID
manually during
recording, press the
START ID • ENTER
button. The Start ID is
written at the point
where the START ID •
ENTER button is
pressed.
• The recorder switches
between manual and
automatic modes only
when START ID •
MODE is pressed
during recording,
recording monitor, or
recording pause.
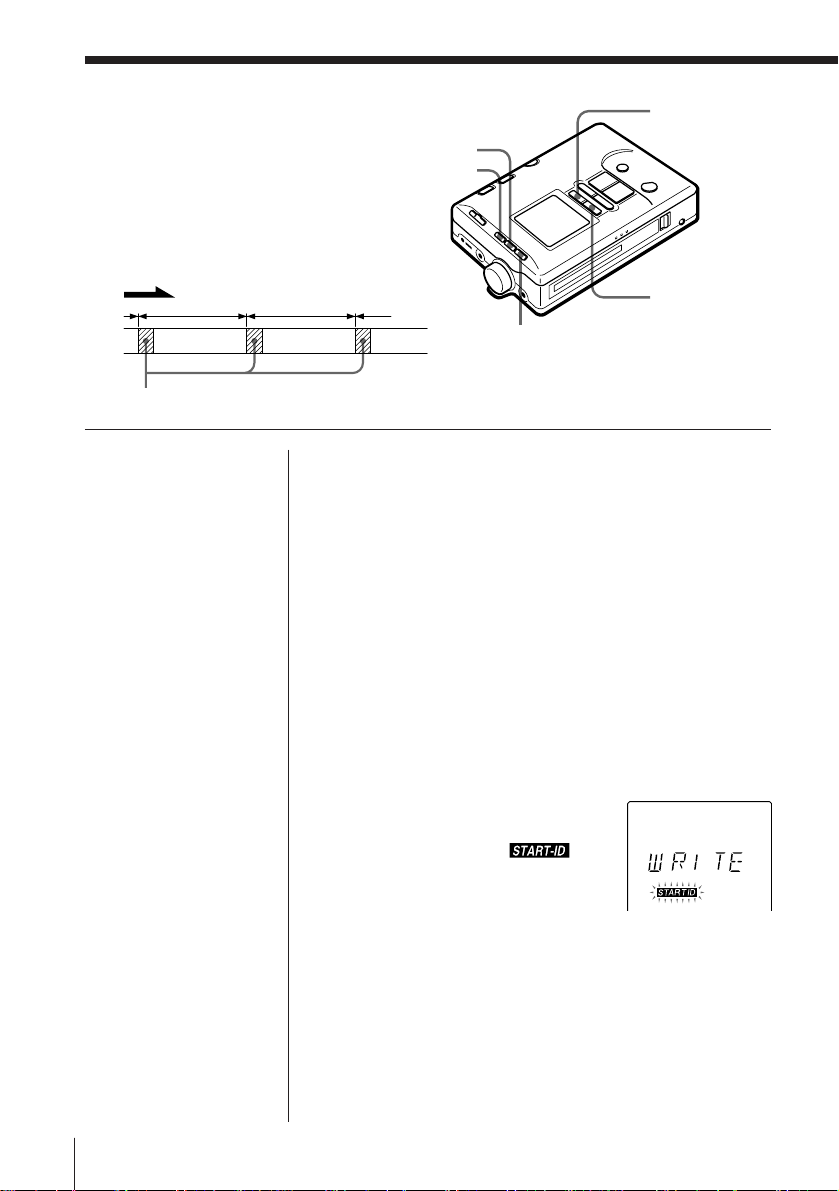
Writing Start IDs during recording —
Manual mode
A Start ID will be written
— when you started recording or released recording
pause (adjustable).
— when you pressed START ID • ENTER during
recording.
— at the same places as the source when recording a
DAT digitally.
— at the same places as the Q-cord (track information)
when recording a CD digitally.
1 If ”AUTO-ID” is present in the display, press
START ID • MODE so that the display disappears.
2 Start recording.
When a Start ID is written,
”WRITE” will light up
momentarily and
flash for about 9 seconds (18
seconds during the LP mode).
To adjust not to write the Start ID at the beginning
of recording
You can select whether or not to write the Start ID
written when you start recording or release recording
pause.
will
1 If ”AUTO-ID” is present in the display, press
START ID • MODE repeatedly until it disappears.
EN
Recording30
Page 31

Notes
• The buttons except the
p STOP button do not
work while
is flashing.
• When writing Start IDs
continuously, make
sure that there is an
interval of 9 seconds or
longer (18 seconds or
longer in the LP mode)
between the start IDs.
Otherwise, the tapecorder may not locate
the beginning of a track
correctly.
2 Press CLOCK/SET for 2
seconds or longer. ”CLOCK”
will appear in the display.
Recording
3 Press RESET • + or COUNTER
• – repeatedly and select ”SET
SID”.
4 Press CLOCK/SET.
5 Press RESET • + or COUNTER • – repeatedly and
select ”SID on” or ”SID oFF”.
SID on: The recorder will write a Start ID when
you start recording or release pause.
SID oFF: The recorder will not write a Start ID
when you start recording or release pause.
6 Press CLOCK/SET.
The display returns to the clock.
Writing the first Start ID automatically
— Semi-auto mode
The Semi-auto mode is a further option in the Manual
mode. The Semi-auto mode will write a Start ID
automatically at the first sound input during Manual
mode. Use this feature to write a Start ID for each take.
1 If ”AUTO-ID” is present in the display, press
START ID • MODE repeatedly until it disappears.
2 Hold down START ID • MODE
until ”AUTO-ID” flashes in the
display.
When you start recording, a Start ID will be
written automatically at the first sound input.
continued
Recording
31
EN
Page 32

To disable the Semi-auto mode
Hold down START ID • MODE until ”AUTO-ID”
disappears from the display.
Note
In the Auto mode, Start
IDs may not be written
properly if there is noise
in the sound source.
Tips
• To write the Start ID
manually during
recording, press the
START ID • ENTER
button. The Start ID is
written at the point
where the START ID •
ENTER button is
pressed.
• The recorder switches
between manual and
automatic modes only
when START ID •
MODE is pressed
during recording,
recording monitor, or
recording pause.
Tip
To display the detection
threshold, hold down
rREC during recording,
recording monitor, or
recording pause. The
recording level meter will
flash at the threshold
level.
Writing Start IDs automatically during
recording — Auto mode
The Start IDs will be written automatically according
to input level. A Start ID is written when
— you started recording or released recording pause
(when there is no sound input, the moment there is
sound input).
— there is sound input after a soundless segment or a
segment with very low recording level (factory
preset: - 50 dB) for 3 seconds or longer.
— you pressed START ID • ENTER during recording.
1 Press the START ID •
MODE button repeatedly
until “AUTO-ID”
appears.
2 Begin the recording. When the Start ID is written,
“WRITE” appears for a moment, and then
flashes for about 9 seconds (about 18
seconds in the LP mode).
Adjusting Start ID blank detection threshold
In the Auto mode, the recorder writes a Start ID at the
first sound input after every blank. The blank
detection threshold is the input level below which the
recorder recognizes as a blank
By adjusting the threshold, you can write Start IDs
automatically even when recording a live
performance, where there is constant low level input.
(factory preset is -50 dB).
1 Press CLOCK/SET for 2
seconds or longer. ”CLOCK”
will appear in the display.
EN
Recording32
Page 33

2 Press RESET • + or COUNTER
• – repeatedly and select ”LEV
SID”.
3 Press CLOCK/SET.
The current threshold
value and the peak
indication meter will
flash.
-dB-
4 Press RESET • + or COUNTER • – repeatedly and
select the threshold value of your choice. With
each press, the display will change as follows.
–
50 – 40 – 32 – 24 – 18 – 12
– 00 – 02 – 04 – 06 – 08
5 Press CLOCK/SET.
The display returns to the clock.
Recording
Note
Start IDs cannot be
written while is
flashing rapidly during
the Rehearsal function.
Writing Start IDs during playback
You can write a Start ID anywhere you want without
erasing the contents of the existing recording.
1 Press the START ID • MODE button on
the main unit repeatedly until “AUTO ID” appears
(to go into the auto mode) or disappears (to go into
the manual mode).
2 Press the START ID • ENTER button during
playback where you want to rewrite.
“REHRSAL” flashes when
you select the point for
Start ID. The recorder plays
back a 3 second segment
repeatedly, up to 16 times
(Rehearsal function).
Recording
33
EN
Page 34

3 Press the START ID • ENTER button during
Rehearsal function.
“WRITE” will appear for a moment. “
will flash and the Start ID will be written. During
this step the sound will be muted.
”
Note
Start IDs which were
written during recording
or written after the
selected point cannot be
moved.
To move the Start IDs,
rewrite it after erasing.
Note
If a Start ID is erased, the
program number which is
written on the same point
will be erased also.
To adjust the selected point
Each time you press the = 0 or ) + button,
the selected point shifts backwards or forwards in 0.3second steps, up to a maximum extent of about 10
seconds in either direction.
Selected point
0.3
0.3
Each time you press
the ) + button.
Tape
Each time you
press the
= 0 button.
Erasing Start IDs
You can erase the Start IDs without erasing the
contents of the existing recording.
Erasing the Start ID is possible only when the recorder
is in the stop or playback mode.
1 Press ) + or = 0 so that you are in the
track after the Start ID you want to erase.
2 Press the START ID • MODE button repeatedly
until “ERASE” appears in the display of the main
unit.
3 Press the START ID • ENTER button.
The tape will automatically
rewind to find the Start ID of
that program (track) and then
“
display and start to erase the
Start ID. During this step the
sound will be muted. Playback
will start when this mode is
done.
” will flash in the
EN
Recording34
Page 35

Note
Writing and renumbering
of the program number
may not be completed
successfully to a tape that
has been recorded on
other DAT decks and has
a Start ID at the
beginning.
Assigning Program Numbers
A program number is a signal which indicates the
number of the program (track). The program number
is written at the same time as the Start ID.
When recording from the beginning of the tape
The program number is written automatically from
number 1 in sequential order at the same time as the
Start ID.
When recording from the halfway of the tape
Press the ) + or = 0 button to display the
program number before you begin recording.
The program number is written in sequential order
from the following program at the same time the Start
ID is written.
Renumbering the program number
Renumbering is necessary for the following tapes:
• On which the Start ID was written during playback.
• Which has missing program numbers or duplicated
program numbers because the tape is recorded from
the halfway of it.
• Which has a missing program number because the
program number was erased at the same time a
Start ID was erased on the tape.
1 Press the START ID • MODE button repeatedly
until “RENUMBER” appears in the display of the
main unit.
2 Press the START ID • ENTER button when the
recorder is in the stop or playback mode.
The tape will automatically rewind to the
beginning of the program number that was written
with the Start ID and then starts to renumber the
program (tracks).
“
program number is renumbered
and “RENUM” and the tape
counter appears while the tape
is fast forwarding to the next
Start ID program (track).
When the renumbering
operation is completed, the recorder rewinds the
tape to the beginning and stops.
” flashes while the
Recording
Recording
35
EN
Page 36

( Playback
Connecting with Other Equipment for
Playback
You can connect the tape-corder to other analog audio
equipment and audio equipment with digital output.
Refer to page 20 for “Playing Back”.
Tip
The output level of the
LINE OUT jack and the
REMOTE • DIGITAL I/O
jack is fixed. The volume
cannot be adjusted with
the VOL buttons of this
recorder.
Note
Use only the
recommended optical
cable (not supplied)
(page 53).
You cannot use the
POC-DA12/DA12M/
DA12S digital
connecting cables with
this unit.
Playback with an analog audio
equipment (Analog connection)
PCM-M1
Begin playback and adjust the volume of the
connected equipment.
Audio connecting cable
RK-G129 (not supplied)
Stereo unit
or mixer,
etc.
to LINE OUT
to LINE IN
Playback with an audio equipment
with digital input (Digital connection)
Optical cable
PCM-M1
to REMOTE • DIGITAL I/O
Connect the digital audio equipment to this recorder
as shown. Begin playback and adjust the volume of
the connected equipment.
POC-DA12P
POC-DA12MP
POC-DA12SP
(not supplied)
DAT deck,
digital
amplifier,
etc.
EN
Playback36
Page 37

Useful Playback Functions
The AVLS* function is
operational when using the
headphones during
playback or in the recording
monitor mode.
The AVLS function keeps
down the maximum volume
to protect your ears.
VOL
AVLS
VOL
AVLS
Playback
to REMOTE/2
* Auto Volume Limiter
System
Note
You may operate the AVLS
function on both the main
unit or the remote control.
You can cancel AVLS by
pressing AVLS on the
remote control even if the
AVLS switch on the main
unit is set to LIMIT. “ ”
will disappear from the
remote display and AVLS
will be cancelled.
Using the AVLS function
Operational either from the main unit or the remote
control.
Main unit: Set the AVLS switch to LIMIT.
Remote control: Press AVLS on the remote control.
“
” will be displayed in the window of the
remote control.
AVLS switch Volume and display
LIMIT ( ) The maximum volume is restricted to
NORM (none) The volume control is set to normal.
a designated level.
“AVLS” appears followed by “VOL”
when the VOL button is pressed.
When the volume is turned to the
maximum level, “AVLS” flashes.
Each time you press the VOL
buttons, the volume level changes
accordingly and “VOL” appears.
When the volume is turned to the
maximum level, “MAX” appears.
( ) is indicated for the remote control.
Playback
37
EN
Page 38

( Power Sources
Using the unit on Nickel Metal Hydride
Rechargeable Batteries
You can use the Nickel Metal
Hydride rechargeagble batteries
NH-D100. Before using the nickel
metal hydride rechargeagble
batteries, be sure to charge it.
to the wall
outlet
AC power adaptor
AC-E45HG
Charging adaptor
BC-D100
CHARGE
lamps
If the CHARGE lamp does
not light up
Remove the rechargeable
batteries, then insert them
again.
Notes
• Use only the
recommended
rechargeable battery,
charging adaptor and
AC power adaptor for
charging.
If you use other types of
charging equipment,
this may lead to a
malfunction.
• When the CHARGE
lamp flashes a red light,
remove the rechargeable
battery and check the
polarity and the
conditon of the
batteries. If there is no
problem with the
battery, try to charge
them again. You cannot
charge a dry battery or a
fully-charged
rechargeable battery.
1 Connect the charging adaptor BC-D100 to the AC
power adaptor AC-E45HG and then connect the
AC power adaptor to a wall outlet.
2 Insert the nickel metal hydride rechargeable
batteries NH-D100 into the charging compartment.
The CHARGE lamp will light red during charging.
After the charging has been completed, the
CHARGE lamp will light green. Charging will take
about 2.5 hours. (The charging time may vary
depending on the temperature.)
3 Insert the charged batteries into the battery
compartment of the main unit.
Notes on charging
• The charging adaptor can charge either one battery
or two batteries at a time.
• Charge the battery just before using it.
• Charge the batteries that are completely exhausted
(when “bATTERy” starts to flash in the display of
the main unit).
• During the charging, the rechargeable batteries and
the AC power adaptor may emit some heat, but this
is not a malfunction.
• Charging may take longer than the average
charging time if you are charging it for the first time
or if you have not used the battery for a long time.
The charging time will become average after you
have charged it a few times.
38
EN
Power Sources
Page 39

Notes
• Remove the
rechargeable batteries
as soon as possible
from the charging
adaptor when
charging is finished.
If you leave the
rechargeable batteries
in the charging
adaptor for a long
period of time it may
decrease the battery
capacity.
• When carrying the
rechargeable
batteries, use the
supplied battery case.
Carrying them
without the case with
metallic objects such
as key chains in your
pocket may cause
short-circuiting and is
dangerous.
On rechargeable batteries
• When the battery life of a fully charged battery
becomes short, replace the rechargeable batteries
with new ones.
• Be sure to cover the poles of the used batteries with
elastic tape to insulate it and then dispose the used
batteries.
On battery placement
• Store the batteries in a cool, dry place.
Power Sources
Power Sources
39
EN
Page 40

Replacing the batteries
Display
Tips
• This tape-corder is not
equipped with a power
switch. As a result, the
LCD display will always
be turned on as long as
the batteries are
inserted. However,
power consumption is
minimal and negligible.
• The clock will return to
its default setting
(97Y11M1D/
AM12H00M00S) if the
batteries are removed
from the tape-corder for
a long time. In this case,
set the clock again.
Notes
• If “bATTERy” is still
displayed after
replacing the batteries
press any button to clear
this display.
• When using the unit on
batteries, do not use a
dry battery and a
rechargeable battery
together.
• The battery life may
shorten depending on
the temperature and the
type of the battery.
“bATTERy” or “i”
may not be displayed
depending on the type
of battery. Use the
recommended NH-D100
battery.
* When no plug is connected to
the LINE OUT, REMOTE/2
or the REMOTE • DIGITAL
I/O jacks and the display
backlight turned off.
EN
40
Power Sources
When to replace the batteries
Check the display of the main unit and the remote
control.
Display on the main unit
Battery full.
Replace both batteries with new
ones.
“bATTERy” flashes and the tapecorder stops when used beyond this
point.
Display on the remote control
The batteries are weak. Replace both
batteries with new ones.
The batteries are completely
exhausted.
Battery life
Battery Playback Recording
Sony nickel metal hydride 3:45 3 (3:30*)
rechargeable (NH-D100)
Sony alkaline LR6 (size AA) 2:30 1:30 (2:30*)
Values for battery life at 20°C and for long continuous playback or
recording.
Battery capacity decreases and battery life becomes shorter in low
temperatures.
(Approx. hours and minutes)
Page 41

Low-power Consumption Mode
If the recorder remains in
the stop mode for 3
minutes* or longer, it will
enter the low-power
consumption mode
automatically to conserve
the battery.
HOLD
Power Sources
p STOP
* The unit will enter the
low-power
consumption mode
when the cassette
holder is open for
about 30 seconds.
When the CLOCK
button, etc., is pressed
during a low-power
consumption mode, the
unit will re-enter the
low-power
consumption mode in
about 30 seconds.
Note
A digital cable connected
to the REMOTE •
DIGITAL I/O jack will
increase battery
consumption. Unplug it
when it is not used.
When the unit automatically switches to the lowpower consumption mode
The tape unloads automatically to protect the tape and
the recorder enters the low-power consumption mode
to conserve the battery when the tape-corder is in the
stop mode for 3 minutes* or longer. In the low-power
consumption mode, the display changes to the clock
and the backlight turns off. On the remote control the
display is turned off.
To enter the low-power consumption mode
manually
1 Make sure that the recorder is in the stop mode.
Press the p STOP button if the tape-corder is in the
pause mode.
2 Slide the HOLD switch on the main unit to show
the yellow hold mark.
The recorder enters the low-power consumption
mode.
When you press a button “HOLD” will flash for a
few seconds in the display.
Power Sources
41
EN
Page 42

Operating with the AC Power Adaptor or
Car Battery
AC power adaptor (supplied)
to DC IN 4.5V
Tips
• When the AC power
adaptor or the car
battery cord is
connected to the DC IN
4.5V jack of the tapecorder, the internal
batteries are
automatically
disconnected. Power is
automatically supplied
from the external
power source.
• When the AC power
plug or the car battery
cord is used for an
extended period of
time, the internal
temperature of the
recorder may rise. This
is not a malfunction.
• If the unit is in the stop
mode for more than 10
minutes while using
the house current or a
car battery. The set
functions will be
canceled and the tape
will be unloaded for
tape protection.
Using the AC power adaptor
Connect the supplied AC power adaptor to the DC IN
4.5V jack.
Notes on the AC power adaptor
• Use only the supplied AC power adaptor or the
optional AC-E45HG. Do not use any other AC
power adaptor.
Polarity of the plug
• Make sure that the cassette compartment lid is
closed before disconnecting the AC power adaptor
or removing the batteries. The cassette compartment
lid may not close if the power source is
disconnected or removed while the cassette
compartment lid is open. In this case, connect the
power adaptor or insert the batteries again.
Using the car battery
To operate the tape-corder with the car battery,
connect the car battery cord Sony DCC-E245 (not
supplied) to the DC IN 4.5V jack of the tape-corder.
For more details, refer to its Operating Instructions
manual.
42
EN
Power Sources
Page 43

( Additional Information
Connecting with Other Equipment
Connect other equipment to this tape-corder to enable
flexible use of the tape-corder.
Notes on using the
optional RM-D100K
• Operate this tapecorder with the AC
power adaptor.
Wireless remote control
functions and digital
input/output
connections may not
operate properly when
the unit is operating on
batteries.
• Do not leave the RMD100K in a place
subject to direct
sunlight, as this may
lead to a malfunction.
Note on using the
SBM-1
When operating the
optional SBM-1 with AC
power adaptor, the power
is supplied from this tapecorder if the power of the
SBM-1 is turned off.
When this tape-corder is
operated with batteries,
disconnect the AC power
adaptor from the SBM-1
to conserve the battery.
Using the optional system adaptor kit
RM-D100K
The optional RM-D100K functions as a relay unit
between an equipment with digital I/O jack and this
tape-corder.
The RM-D100K supports input/output of both optical
and coaxial cables. Connect according to the jack of
the digital audio equipment you wish to connect.
PCM-M1
to (OPTICAL) I/O
RM-D100K
to (COAXIAL) I/O
DAT deck,
CD, MD,
etc.
When the RM-D100K is connected
Combining the unit with a audio timer for timer
recording or playback, and using the Music Scan
function or Direct Search function on the supplied
remote commander are many of the noteworthy
features of the RM-D100K.
Using the optional Super Bit Mapping
adaptor SBM-1
The optional SBM-1 enables recording of higher
quality when connected to this tape-corder.
PCM-M1
Microphone
(not supplied)
SBM-1
The optional RMT-D100 can be connected to the
SBM-1 to enable remote control.
However, when operating the SBM-1 with the
batteries, the RMT-D100 is not operational if the
power of the SBM-1 is turned off. When operating the
SBM-1 with the AC power adaptor, the RMT-D100 is
operational regardless of whether the power of the
SBM-1 is turned on or off.
Additional Information
Power Sources / Additional Information
Additional Information 43
EN
Page 44

Serial Copy Management System (SCMS)
The Serial Copy Management System (SCMS) which is incorporated in the domestic
DAT equipments prevents repeated digital dubbing from one equipment to another.
However, this system lets you record at least one generation of digital prerecorded
software via digital connections.
Notes
• If the equipment used
for recording is not
protected with the
SCMS, these rules
may not apply.
* These source examples
may not apply to some
countries.
CD player
DAT Music tape
MD player
BS tuner audio
HD (High Definition)
TV audio
CS (Communication
Satellite)* audio
SBM-1
Microphone
Record player
Radio tuner
etc.
Digital
dubbing
is possible.
1st
generation
tape
Digital
dubbing
is possible.
1st
generation
tape
Recording
via analog
inputs
1st
generation
tape
Digital
dubbing is
not possible.
Digital
dubbing
is possible.
2nd
generation
tape
Digital
dubbing
is possible.
2nd
generation
tape
2nd
generation
tape
Digital
dubbing is
not possible.
3rd
generation
tape
Digital
dubbing is
not possible.
3rd
generation
tape
Additional Information44ENAdditional Information
Page 45

Message Display
The following messages will be displayed on the main unit while operating this unit.
Message Description
Appears when there is no tape inside the unit.
Flashes when the cassette compartment lid is open.
Flashes while loading a tape.
Flashes when unloading a tape.
Appears when the digital input signal is not received.
and appears alternately when the r REC
button is pressed or when writing/erasing a Start ID in the
playback mode using a tape whose record-protect shutter is
open.
Flashes for a moment when you set the HOLD switch to
HOLD on the main unit. Appears or flashes when you press
a button while the HOLD function is operating.
Flashes when the beginning of a tape*1 is reached.
Flashes when the end of the tape is reached.
Appears when the End ID*2 is detected.
Flashes when the unrecorded segment of a tape is detected
during playback or fast-forwarding.
Appears when the r REC button is held down during MIC
recording, recording pause, recording monitor modes.
Appears when the r REC button is held down during
recording pause or recording monitor modes while another
equipment is connected via the analog connection.
Appears when the r REC button is held down in the
recording pause or recording monitor modes while another
equipment is connected via the digital connection.
Appears when the Start IDs are being written.
Flashes when the Start ID is pressed during playback mode
in the rehearsal function.
Flashes when the Start IDs are being erased.
Flashes when the program numbers are being renumbered.
Appears when the AVLS is set to LIMIT, or when the AVLS
is operating and the VOL button is pressed.
Appears when volume is set to the maximum level.
Appears when volume is set to the minimun level.
Flashes when the batteries are weak.
Additional Information
Additional Information 45
EN
Page 46

During playback or play pause: Copy code written in the
tape
During recording or recording pause: Copy code to be
written in the tape
00:: Digital copying is possible as many times as you want.
10: Digital copying is not possible.
11: Digital copying is possible only once.
– –: Appears during stop
Appears when moisture condensation occurs inside the unit.
*1Flashes when a new (virgin) tape is used for the first time.
*2The End ID is a signal which indicates the position of a tape where the recording has ended.
You cannot register the End IDs with this unit, however the unit can play back the tapes
which are registered with the End IDs and detect them. When the unit detects an End ID
during fast forward, it stops there. You can only forward the tape by recording from that
point. When the unit detects an End ID during playback, it enters the auto-rewind mode.
Additional Information46ENAdditional Information
Page 47

Troubleshooting
Problem
The cassette
compartment lid
cannot be closed.
Operation buttons do
not function.
The unit does not
operate.
The tape does not
move.
Cannot record.
The sound picked up
is distorted.
Noise occurs during
recording.
Sound is not recorded
on the tape.
Cause
Power source is disconnected
from the unit while “LOAD” or
“UNLOAD” is flashing in the
display.
The Hold function is on.
The batteries are exhausted and
”bATTERy” appears.
The AC power adaptor is
connected incorrectly.
The safety system is activated
due to moisture condensation
(“DEW” appears).
Other causes.
P PAUSE button is activated
(the P indicator appears).
The tape is wound completely
to the end.
The Hold function is on.
The record-protect shutter on
the cassette is open.
Incorrect operation of the
connected equipment.
The sound source is too loud
when using the microphone.
The MIC/LINE IN switch is not
set.
The recording level is too loud.
When monitoring the recording
sound with headphones or external
speakers, they are placed too close to
the microphone.
Recording level control was set
to the minimum level when
recording via the analog input.
Solution
Connect the power source and
close the lid.
Cancel the Hold function.
Replace both batteries with new
ones or charge the rechargeable
batteries.
Connect the AC power adaptor
correctly.
Leave the unit for a while and
restart the unit by turning on the
power.
Disconnect the power source
from the unit, then connect it
again.
Press P PAUSE or ( PLAY
button to release pause mode.
(See pages 18 and 20.)
• Press the = 0 button to
rewind the tape.
• Replace the cassette.
Cancel the Hold function.
Close the shutter on the cassette.
(See page 15.)
See “Connecting with Other
Equipment for Recording” on
page 23 or refer to the Operating
Instructions manual of the
connected equipment.
• Set MIC ATT switch to 20dB.
• Move the microphone away
from the sound source.
Set the sound source and the
connections.
Adjust the recording level
(manual recording) (page 25).
Keep the microphone away
from them.
Adjust the recording level
correctly. (See page 25.)
Additional Information 47
Additional Information
EN
Page 48

Problem
Increase of noise or
deterioration of sound.
There is no sound.
The sound is distorted
through the
headphones.
The volume cannot be
adjusted.
Cannot rewind (AMS)
the tape.
The tape stops suddenly
during playback.
The clock displays
97Y11M1D/
AM12H00M00S.
Neither Start ID nor
PGM number can be
written.
The Start ID is written,
but the PGM number is
not written.
Operation buttons do
not work while the Start
ID is being written.
Absolute time cannot be
written.
The battery life has
become shorter
Charging does not start
(the CHARGE lamp does
not light up).
Cause
The head may be dirty.
Recording was not done
properly.
The volume is turned down
completely.
Incorrect operation of the
connected equipment.
The head may be dirty.
The volume is too loud.
The Hold function is on.
The Start ID is not written.
There is an unrecorded segment
on the tape.
The batteries were removed
from the unit for a long time.
The record-protect shutter on
the cassette is open.
When recording on a partially
recorded tape, the most recent
PGM number is not displayed
before recording.
While the Start ID is being
written, none of the buttons
except p STOP can be used.
Recording has been started
from an unrecorded segment of
the tape.
The battery life may shorten
excessively depending on the
temperature or the type of
battery.
You inserted the rechargeable
batteries in the battery charger
before plugging in the charger
to the wall outlet.
Solution
Clean the head with the cleaning
cassette.
•Clean the head with the
cleaning cassette and try again.
•Fast forward the tape to the
end first, and then rewind it to
the top before recording.
Press the + button of VOL to
adjust the volume.
Operate the connected
equipment as instructed in the
Operating Instructions manual.
Clean the head with the cleaning
cassette.
•Turn down the volume.
•Set AVLS to LIMIT (page 37).
Cancel the Hold function.
Write the Start IDs (page 30).
——
Set the clock again. (See page
13.)
Close the shutter on the cassette.
(See page 15.)
When recording on a partially
recorded tape, display the PGM
number before commencing
recording.
Press the buttons after the
indicator has stopped
flashing.
Rewind the tape to the
beginning, locate the end of the
previous recording and start
recording from that point. (See
page 16.)
Use the recommended NH-D100
battery.
Remove the rechargeable
batteries, then insert them again.
Additional Information48ENAdditional Information
Page 49

Precautions
On safety
• Should any solid object of liquid fall
into the unit, unplug the unit and
have it checked by qualified
personnel before operating it any
further.
• To unplug the AC power adadptor,
pull it out by grasping the plug.
Never pull the cord itself.
• Do not put any foreign object into
the DC IN 4.5 V (external power
input) jack.
On power sources
• For AC operation: Use only the
recommended AC power adaptor.
Do not use any other AC power
adaptor as it may damage the unit.
For the car battery operation: Use
the car battery cord DCC-E245 (not
supplied).
• When the unit is not to be used for
an extended period of time, be sure
to disconnect the power source
(batteries, AC power adaptor, car
battery cord etc.) from the unit.
• The unit is not disconnected from
the AC power source (mains) as long
as it is connected to the wall outlet,
even if the unit itself is turned off.
On batteries
• Do not charge the dry batteries.
• Do not carry the dry batteries with
coins or other metallic objects. It can
generate heat if the positive and
negative terminals of the batteries
are accidentally contacted by a
metallic object.
• When you are not going to use the
unit for a long time, remove the
batteries to avoid damage from
battery leakage and corrosion.
On tapes longer than 120
minutes
Do not use cassette tapes with playing
time of over 120 minutes to record
important material since such tapes
are subject to the following problems:
• Sound distortion.
• Unstable tape speed after repeated
AMS, rewinding, fast-forwarding,
cueing or reviewing operations.
• Incorrect writing and erasing of Start
IDs.
On unevenly or tightly
wound tapes
When making important recordings,
fast forward the tape to the end first,
and then rewind it to the top before
recording. Recording on an unevenly
wound tape or a tape wound
excessively tight may result in poor
recording.
On moisture condensation
If the unit is brought directly from a
cold to a warm location, moisture may
condense inside the unit. In such a
condition, the tape may adhere to the
head drum and can be damaged, or
the unit may not operate properly.
Although this unit has a safety device
to prevent damage from moisture
condensation, remove the DAT
cassette from the unit when “DEW”
flashes on the display of the main unit
or the { indicator flashes on the
display of the remote control. When
this indicator comes on, this unit
enters the low-power consumption
mode and “DEW” will appear in the
display. Leave the unit alone for a
while and then operate the unit as
described below:
Additional Information
Additional Information 49
EN
Page 50

On battery operation
Press an operation button to exit the
low-power consumption mode. When
the unit recovers from the moisture
condensation, “DEW” will disappear
from the display.
On house current
When the unit recovers from the
moisture condensation, “DEW” will
disappear from the display
automatically.
If the unit does not operate properly
within a few hours, please consult
your nearest Sony service center.
Always remove the DAT cassette from
the unit when the unit is not to be used
for an extended period of time.
On installation
• Do not install the unit in a location
near heat sources such as radiators
or air ducts, or in a place subject to
direct sunlight, excessive dust,
mechanical vibration of shock.
• Do not place anything on top of the
cabinet.
• If the unit causes interference to the
radio or television reception, turn off
the unit or move it away from the
radio or television.
On headphones
Road safety
Do not use headphones while driving,
cycling, or operating any motorized
vehicle. It may create a traffic hazard
and is illegal in some areas. It can also
be potentially dangerous to play your
headphones at high volume while
walking, especially at pedestrian
crossings. You should exercise extreme
caution or discontinue use in
potentially hazardous situation.
Preventing hearing damage
Avoid using headphones at high
volume.
Hearing experts advise against
continuous, loud and extended play. If
you experience a ringing in your ears,
reduce volume or discontinue use.
Caring for others
Keep the volume at a moderate level.
This will allow you to hear outside
sounds and to be considerate to the
people around you.
Additional Information50ENAdditional Information
Page 51

Maintenance
Cleaning the cabinet
Clean the cabinet and controls with a
soft cloth slightly moistened with a
mild detergent solution.
Do not use any type of abrasive pads,
scouring powders or solvents such as
alcohol or benzene.
Cleaning the head
Prolonged operation may cause the
head to become dirty. If the head is
dirty, it may cause sound dropouts
during playback. To make the best
possible recording and playback, we
recommend you to clean the head
after every ten hours of recording/
playback, using the supplied cleaning
cassette.
Likewise, when the unit has not been
used for a long period of time, clean
the head with the cleaning cassette
before use.
Using the supplied cleaning cassette
1 Insert the cleaning cassette as you
would a normal DAT cassette.
2 Press the ( PLAY button, then
press the p STOP button after
about 10 seconds.
3 Remove the cleaning cassette
without rewinding it.
4 Proceed with recording and
playback with a normal DAT
cassette and check the sound
quality.
Notes on the cleaning cassette
• The cleaning cassette cannot be used
for recording or playback.
• Do not clean the head with the
cleaning cassette more than five
times in succession. Cleaning the
head continuously for a long period
of time may cause wear to the head.
• Do not rewind the cleaning cassette
each time you use it. When the
cleaning cassette reaches the end of
the tape, rewind it to the beginning
and reuse it. The cleaning cassette
can be used approximately 200
times, with 10 seconds of cleaning
each time.
Additional Information
Additional Information 51
EN
Page 52

Specifications
Tape Digital audio tape
Recording time Standard: 120 minutes
Sampling frequency 48 kHz, 44.1 kHz, 32 kHz
Quantization Standard: 16-bit linear
Frequency response Standard: Fs 48 kHz 20-22,000 Hz (±1.0 dB) (LINE IN)
(during playback) Fs 44.1 kHz 20-20,000 Hz (±1.0 dB) (LINE IN)
Signal to noise ratio Standard: more than 87 dB
Dynamic range Standard: more than 87 dB
Total harmonic distortion Standard: less than 0.008% (1 kHz, 22 kHz LPF, LINE IN)
Wow and flutter Below measurable limit (less than ±0.001% W.PEAK)
Long-play mode: 240 minutes (with DT-120)
Long-play mode: 12-bit non linear
Fs 32 kHz 20-14,500 Hz (±1.0 dB) (LINE IN)
Long-play mode: Fs 32 kHz 20-14,500 Hz (±1.0 dB) (LINE IN)
Long-play mode: more than 87 dB
(1 kHz IHF-A, LINE IN)
(1 kHz IHF-A, LINE IN)
Long-play mode: less than 0.09% (1 kHz, 22 kHz LPF, LINE IN)
Input
MIC/LINE IN stereo minijack
Output
LINE OUT
REMOTE/2 stereo minijack 16 ohms 87mV 15 mW + 15 mW 16 ohms
Input/Output REMOTE•DIGITAL I/O jack (special jack)
Power requirements • Two R6 (size AA) alkaline batteries (not supplied)
Battery life See “Replacing the batteries” (page 40).
Power consumption 0.9 W
Dimension Approx. 80 x 117.3 x 29.2 mm (3
Mass Main unit: Approx. 290 g (10.3 oz.)
Jack type Impedance Rated output Maximum output level Load impedance
stereo
minijack
Jack type Impedance Rated input level Minimum input level
220 ohms 500 mV —
Digital input/output, remote control operation and timer-activated
operation is possible by connection with an adaptor kit to this jack.
• Two nickel metal hydride rechargeable battery (supplied)
DC IN 4.5 V jack accepts:
the Sony AC power adaptor AC-E45HG (supplied)
the car battery cord DCC-E245 (not supplied) for use with 12V/24V car
battery.
parts and controls
When using the main unit: Approx. 395 g (14 oz.) incl. headphones with
remote control, rechargeable batteries and a cassette
MIC MIC MIC
4.7 kilohms 1.4 mV 0.3 mV
LINE IN LINE IN LINE IN
47 kilohms 500 mV 120 mV
10 kilohms
1
⁄4 x 45⁄
x 13⁄16 in) (w/h/d) not incl. projecting
8
Additional Information52ENAdditional Information
Page 53

Supplied accessories
• AC power adaptor (1)
• Charger adaptor (1)
• Nickel Metal Hydride Rechargeable battery NH-D100 (2)
• Headphones with a remote control (1)*
• DAT cleaning cassette (1)
• Microphone plug adaptor (monaural phono jack x 2 n stereo miniplug) (1)*
• Optical cable (special jack ˜ rectangular-shaped optical input/output) (1)*
• Battery carrying case (1)
• Carrying case (1)
* Supplied only to the European model.
Design and specifications are subject to change without notice.
Optional accessories
• AC Adaptor AC-E45HG
• Nickel Metal Hydride Rechargeable battery NH-D100
• Battery adaptor kit NPA-D100K
• Car battery cord DCC-E245
• Car connecting pack CPA-9
• Wired remote commander RMT-D100
• System adaptor kit RM-D100K
• Digital cable POC-DA12P (rectangular-shaped optical plug), POC-DA12MP (optical
miniplug input), POC-DA12SP (optical miniplug output), RK-DA10P (coaxial)
• Audio connecting cord RK-G129
• Stereo microphone ECM-MS957, ECM-MS907, ECM-717 (plug-in power system)
• Stereo earphones MDR-E868, MDR-E888
• Stereo headphones MDR-D77, MDR-D55
• Active speaker system SRS-88
• Super Bit Mapping adaptor SBM-1
• DAT cleaning cassette
Your dealer may not handle some of the above listed accessories. Please consult your
dealer for more information.
Additional Information
Additional Information 53
EN
Page 54

Examples of digital connection using optional accessories
Rectangular optical input/output
CD player, etc., with
rectangular optical
output jack
to OPTICAL
OUTPUT
IN
to REMOTE •
DIGITAL I/O
(set INPUT SELECTOR
switch to DIGITAL)
DAT deck, etc., with
rectangular optical
input jack
to OPTICAL
INPUT
Optical mini input/rectangular optical output
to OPTICAL
Portable CD
player, etc.
DAT deck, etc., with
rectangular optical
input jack
(DIGITAL) LINE
OUTPUT
IN
to OPTICAL
INPUT
Optical mini input/output
to OPTICAL
Portable CD
player, etc.
MD WALKMAN*
MZ-R30/R50
(DIGITAL) LINE
OUTPUT
IN
to OPTICAL
(DIGITAL) LINE
INPUT
OUT
POC-DA12P
(supplied)
to REMOTE •
DIGITAL I/O
(set INPUT SELECTOR
switch to DIGITAL)
OUT
POC-DA12MP
to REMOTE •
DIGITAL I/O
(set INPUT SELECTOR
switch to DIGITAL)
OUT
POC-DA12SP
PCM-M1
PCM-M1
PCM-M1
Coaxial input
CD player, etc., with
coaxial digital output
jack
Additional Information54ENAdditional Information
to COAXIAL
OUTPUT
IN
RK-DA10P
to REMOTE •
DIGITAL I/O
(set INPUT SELECTOR
switch to DIGITAL)
PCM-M1
Page 55

Optical•coaxial input/output + remote controller
CD player, etc., with
rectangular optical
output jack
to OPTICAL OUTPUT
POC-5A/10A/15A/30A
to REMOTE •
DIGITAL I/O
DAT deck, etc., with
rectangular optical
input jack
to OPTICAL INPUT
POC-5A/10A/15A/30A
to COAXIAL
CD player, etc., with
coaxial digital output
jack
DAT deck, etc., with
coaxial digital input
jack
OUTPUT
VMC-10/20
to COAXIAL
INPUT
VMC-10/20
to OPTICAL INPUT
to OPTICAL OUTPUT
to COAXIAL INPUT
to COAXIAL OUTPUT
*”MD WALKMAN” is a trademark of Sony Corporation.
PCM-M1
set INPUT SELECTOR
switch to DIGITAL
RM-D100K
to audiotimer
Additional Information
Additional Information 55
EN
Page 56

Index
A
Absolute time .............. 16
AC power adaptor...... 42
AGC .............................. 17
AMS .............................. 21
Analog connection
Playback................. 36
Recording .............. 23
Auto mode ................... 32
Auto play ..................... 22
Auto rewind .......... 19, 20
AVLS ............................ 37
B
Backup copy ................ 24
Battery .......................... 12
Inserting ................. 12
Replacing ............... 40
Life .......................... 40
C
Car battery cord .......... 42
Charging ...................... 38
Charging adaptor . 38
Nickel hydride
rechargeable
battery .............. 38, 40
Cleaning cassette ........ 51
Clock
Display ................... 11
Adjusting ............... 13
Connection
Playback with analog
connection ............. 36
Recording with analog
connection ............. 23
Connecting other
equipment.............. 43
Examples of digital
connection ....... 54, 55
Playback with digital
connection ............. 36
Recording with digital
connection ............. 24
Copy code .................... 28
Counter ........................ 10
Cue ................................ 21
D
DAT cassette................ 15
Digital connection
Playback................. 36
Recording .............. 24
E
ERASE .......................... 34
F, G
Function setting
Blank detection
level .................. 32, 33
Copy code .............. 28
Clock setting.......... 13
PEAK HOLD ......... 26
Display ................... 11
Start ID on/off setting
at the beginning
of recording ..... 30, 31
H
HOLD ........................... 15
House current (AC) .... 42
I, J, K
ID 6................................ 28
L
LEV SID........................ 33
LCD................................. 9
LOAD ........................... 14
Long-time recording .. 27
Low-power consumption
mode ............................. 41
LP REC ......................... 27
M, N, O
Maintenance ................ 51
Manual mode .............. 30
Manual recording ....... 25
Messages ...................... 45
MIC LIMITER.............. 25
Microphone ................. 16
Moisture condensation ...
49
P, Q
Additional Information56ENAdditional Information
Page 57

PEAK HOLD ............... 26
Playback ....................... 20
Analog connection 36
Digital connection 36
With headphones . 20
Power sources
House current (AC) ..
Dry batteries.... 12, 40
Nickel hydride
rechargeable battery
........................... 38, 40
Program number......... 35
42
R
REC MUTING ............. 27
Record proctect tab..... 15
Recording..................... 16
Analog connection 23
Digital connection 24
With a microphone ...
Monitoring............. 19
Recording level
Automactically
adjusting ................ 17
Manually adjusting ..
................................. 25
Rehearsal function 33, 34
RENUMBER ................ 35
Renumbering............... 35
Review.......................... 21
RM-D100K ................... 43
RMT-D100.................... 43
17
S
Sampling frequency .......
............... 17, 22, 23, 24
SBM-1 ........................... 43
SCMS ............................ 44
Semi-auto mode .......... 31
SET SID ........................ 31
Start ID ......................... 30
Adjusting blank
detection level . 32, 33
Erasing ................... 34
Writing during
playback................. 33
Writing automatically
................................. 32
Writing manually . 30
Writing only the first
ID automatically ... 31
Not writing at the
beginning of
recording.......... 30, 31
T
Tapes longer than 120
minutes......................... 49
Trouble shooting......... 47
U, V, W, X, Y, Z
UNLOAD......... 15, 41, 42
Additional Information
Additional Information 57
EN
Page 58

AVERTISSEMENT
Pour éviter tout risque
d’incendie ou de choc
électrique, n’exposez pas
l’appareil à la pluie ni à
l’humidité.
Remarques sur
l’enregistrement
• Cet enregistreur n’est pas conçu pour un
usage professionnel ou commercial.
N’essayez jamais de le modifier ni de le
bricoler pour pouvoir le raccorder à un
enregistreur audio professionnel ou
commercial. N’utilisez pas cet enregistreur
pour sauvegarder des données.
• Vérifiez que l’opération d’enregistrement
s’effectue correctement avant de procéder à
un enregistrement important.
• Observez la réglementation relative aux
droits d’auteur pour votre collection
d’enregistrements. La représentation
publique, diffusion et duplication non
autorisées d’un matériau enregistré à des
fins commerciales constitue une infraction
à la loi.
EN AUCUN CAS, LE VENDEUR NE
POURRA ETRE TENU RESPONSABLE
DE TOUT DOMMAGE DIRECT OU
INDIRECT DE QUELQUE NATURE
QUE CE SOIT, OU DE TOUTE PERTE
OU DEPENSE RESULTANT D’UN
PRODUIT DEFECTUEUX OU DE
L’UTILISATION DE QUELQUE
PRODUIT QUE CE SOIT.
F
Introduction2
Page 59

Bienvenue !
Bienvenue dans le monde des enregistreurs
DAT !
Votre enregistreur DAT possède les
caractéristiques suivantes, qui vous permettront
de profiter au maximum de ses possibilités.
• Remarquable qualité sonore DAT
avec une excellente réponse en fréquence,
votre propre faible bruit et une absence de
distorsion.
• Code de copie réglable
— Vous pouvez désigner le code de copie
(ID6) pour enregistrer, par exemple, votre
propre concert en direct.
• Accepte le format d'enregistrement IEC958
(code de copie réglable).
• Meilleures caractéristiques pour
l’enregistrement en studio
— Seuil de détection de passages vierges
pour l’inscription d’ID de départ ajustable
— Mode semi-automatique - Le premier ID
de départ s’inscrit automatiquement inscrit
— Le maintien du niveau de crête (fonction
PEAK HOLD) permet de reconnaître
facilement le niveau d’entrée maximal
• Enregistrement longue durée
avec deux piles rechargeables Ni-hydrures
métalliques. Environ 3,5 heures
d’enregistrement continu.
• Enregistrement haute fidélité
avec un amplificateur de microphone de
haute qualité également utilisé dans
l’adaptateur SBM-1 (Super Bit Mapping).
• Niveau d’enregistrement réglable
(automatique/manuel)
qui s’adapte à toutes les conditions
d’enregistrement.
• Système MIC LIMITER
maintenant automatiquement à un certain
niveau les émissions subites de signaux trop
puissants.
• Trois fréquences d'échantillonnage
L'enregistrement d'une source numérique
comme un CD, MD, BS/CS est possible, car
l'enregistreur accepte trois fréquences
d'échantillonnage (Mode SP: 48 kHz, 44,1
kHz et 32 kHz/Mode LP: 32 kHz). Lors de
l'enregistrement par un microphone ou
l'entrée analogique, vous pouvez choisir SP
(48 kHz ou 44,1 kHz) ou LP (32 kHz).
• Fonction postenregistrement
permettant d’inscrire ou d’effacer les ID
de départ et les numéros de programme
après l’enregistrement.
• Afficheur LCD à rétro-éclairage EL
(électroluminescent)
indiquant le mode de fonctionnement en
cours, l'état des piles dans l'obscurité, etc.
• Télécommande à afficheur LCD
indiquant le mode de fonctionnement.
F
Introduction 3
F
Page 60

Table des matières
Emplacement des commandes ........................................................6
Mise en place des piles alcalines....................................................13
Réglage de l’horloge........................................................................14
Introduction d’une cassette ............................................................15
Enregistrement .................................................................................17
Lecture...............................................................................................21
Enregistrement
Connexion à un autre appareil en vue de l’enregistrement................. 24
Enregistrement à partir d’un appareil audio analogique avec
prise LINE OUT (Connexion analogique)............................................... 24
Enregistrement à partir d’un appareil audio avec sortie ..........................
numérique (Connexion numérique) ........................................................ 25
Réglage manuel du niveau d’enregistrement — Enregistrement
manuel ......................................................................................................... 26
Affichage du niveau d’entrée maximal — PEAK HOLD ..................... 27
Fonctions d’enregistrement pratiques..................................................... 28
Enregistrement en mode longue durée — LP REC ............................... 28
Enregistrement d’espaces blancs — REC MUTING.............................. 28
Réglage du code de copie (ID6) ................................................................ 29
Inscription d’ID de départ ........................................................................ 31
Inscription d’ID de départ pendant l’enregistrement
— Mode manuel.......................................................................................... 31
Inscription automatique du premier ID de départ
— Mode semi-automatique....................................................................... 32
Inscription automatique d’ID de départ pendant l’enregistrement
— Mode automatique ................................................................................ 33
Inscription d’ID de départ pendant la lecture ........................................ 34
Effacement d’ID de départ ........................................................................ 35
Attribution de numéros de programme .................................................. 36
Lecture
F
Introduction4
Connexion à un autre appareil en vue de la lecture ............................. 37
Lecture sur un appareil audio analogique (Connexion
analogique) .................................................................................................. 37
Lecture sur un appareil audio avec entrée numérique
(Connexion numérique)............................................................................. 37
Fonctions pratiques pour la lecture ......................................................... 38
Utilisation de la fonction AVLS ................................................................ 38
Page 61

Sources d’alimentation
Utilisation de l’enregistreur avec des piles rechargeables
Ni-hydrures métalliques.................................................................................. 39
Remplacement des piles .................................................................................. 41
Mode économique ............................................................................................ 42
Adaptateur secteur ou batterie de voiture .................................................... 43
Informations supplémentaires
Connexion à un autre appareil................................................................. 44
Utilisation du kit d’adaptation RM-D100K en option........................... 44
Utilisation de l’adaptateur Super Bit Mapping SBM-1 en option........ 44
Système de protection contre la copie abusive (SCMS)........................ 45
Affichage des messages............................................................................. 46
Guide de dépannage.................................................................................. 48
Précautions .................................................................................................. 50
Sécurité ......................................................................................................... 50
Sources d’alimentation............................................................................... 50
Piles ............................................................................................................... 50
Cassettes de plus de 120 minutes ............................................................. 50
Bandes trop ou pas assez tendues ............................................................ 50
Condensation .............................................................................................. 51
Installation ................................................................................................... 51
Casque .......................................................................................................... 51
Entretien ...................................................................................................... 52
Nettoyage du coffret................................................................................... 52
Nettoyage de la tête .................................................................................... 52
Spécifications .............................................................................................. 53
F
Introduction 5
F
Page 62

Emplacement des commandes
Pour les détails, reportez-vous aux pages indiquées entre parenthèses ( ).
Enregistreur - avant
1
2
3
4
5
6
7
8
9
!º
!¡
!™
!£
!¢
!∞
1 Touche de mode d’ID de départ
(START ID • MODE) (31 - 36)
2 Touche d’inscription d’ID de
départ (START ID • ENTER) (31 -
36)
3 Touche d’éclairage de l’afficheur
(LIGHT)
Appuyez sur cette touche pour
éclairer l’afficheur quand vous
utilisez l’enregistreur dans
l’obscurité.
4 Touches de réglage du volume
(VOL +, –) (21, 38)
5 Commutateur de blocage des
touches (HOLD) (16, 42)
La fonction HOLD ne verrouille
pas les touches CLOCK/SET,
COUNTER • – et RESET • + (sauf
en mode économique).
Réglez ce commutateur sur HOLD
quand l’appareil est à l’arrêt pour
commuter en mode économique.
6 Prise de télécommande/écouteurs
(REMOTE/2) (20, 21)
7 Prise de sortie de ligne (LINE
OUT) (20, 37)
8 Bouton de réglage du niveau
d’enregistrement (REC LEVEL)
(26)
9 Prise de microphone/entrée de
ligne (MIC/LINE IN) (17, 24, 26,
28)
Pour utiliser des microphones
équipés de jacks monophoniques,
utilisez l’adaptateur de fiche
microphone (fourni seulement
avec le modèle européen).
!º Touches de défilement de la bande:
(19, 21)
Touche de rembobinage/revue •
détection automatique de plage
(= 0)
Touche d’arrêt (p STOP)
Touche de lecture (( PLAY)
Touche d’avance rapide/repérage
• détection automatique de plage
() +)
Touche d’enregistrement (r REC)
Touche de pause (P PAUSE)
!¡ Prise d’entrée de courant continu
externe (DC IN 4.5V) (43)
!™ Commutateur d’ouverture du
logement de cassette (OPEN) (15)
!£ Touche de réinitialisation (RESET
• +) (11, 12, 14)
!¢ Touche de compteur (COUNTER
• –) (11, 12, 14)
!∞ Touche d’horloge/réglage de
l’heure (CLOCK/SET) (12, 14)
F
6
Emplacement des commandes
Page 63

Enregistreur - arrière
!§
@º
Emplacement des commandes
!¶
!•
!ª @™
!§ Commutateur de sensibilité du
microphone (MIC ATT) (18)
!¶ Commutateur de microphone/
entrée de ligne (MIC/LINE IN)
(18, 24)
!• Sélecteur de réglage manuel/
limitation du microphone/gain
automatique (MANUAL • MIC
LIMITER • AUTO (AGC) (18, 24,
26)
!ª Sélecteur de lecture standard/
longue durée (SP • LP) (18, 25, 28)
@¡
@º Prise de télécommande, entrée/
sortie numérique (REMOTE •
DIGITAL I/O) (25, 37)
Branchez-y un appareil muni
d’entrée/sortie numériques à
l’aide du câble de liaison POCDA12P/DA12MP/DA12SP ou
RK-DA10P, du kit d’adaptation de
système RM-D100K, de la
télécommande RMT-D100, ou de
l’adaptateur SBM-1, etc (non
fournis).
@¡ Couvercle du logement des piles
(13)
@™ Commutateur de limitation
automatique du volume AVLS
(38)
Emplacement des commandes
F
7
Page 64

Emplacement des commandes (suite)
Ecouteurs à télécommande (fournis seulement avec le modèle européen)
6
1
7
2
8
3
9
4
5
1 Minifiche stéréo
2 Touche de mode compteur
(COUNTER MODE) (11)
3 Touche de réglage du volume
(VOL+, –) (21, 38)
4 Touche de réglage de l’heure (12)
5 Touche de limitation du volume
(AVLS) (38)
6 Commutateur de blocage des
commandes (HOLD) (16, 42)
Quand vous le poussez dans le
sens de la flèche, les touches de la
télécommande sont bloquées,
mais les touches COUNTER
MODE, CLOCK et AVLS
fonctionnent.
F
8
Emplacement des commandes
7 Touches de défilement de la bande
(21)
Touche + (avance rapide/
repérage • AMS)
Touche ( (lecture)
Touche p (arrêt)
Touche = (rembobinage/
revue • AMS)
8 Afficheur
9 Fiche de télécommande
Page 65

Afficheur
Enregistreur
1
2
3
4
5
6
-dB-
1 Indicateur de mode longue durée
(LP) (28)
2 Indicateur de numéro de
programme
(PGM.NO)•jour•indicateur matin
(AM)/après-midi (PM) (14, 22)
3 Indicateur de compteur de bande/
horloge/volume/message (11, 12,
38, 46)
4 Indicateur d’ID de départ
automatique • renumérotation •
effacement (START ID) (31 - 36)
7
Emplacement des commandes
8
9
!º
!¡
!™
5 Indicateur d’ID de départ (START
ID) (31 - 36))
6 Crêtes-mètres (26)
7 Indicateur de l’état des piles
(BATT) (41)
8 Indicateur de limitation du
volume du microphone (MIC
LIMITER)
9 Indicateur de réglage automatique
du gain (AGC)
!º Indicateur d’enregistrement (REC)
!¡ Indicateur de pause (P)
!™ Indicateur de lecture (()
Emplacement des commandes
F
9
Page 66

Emplacement des commandes (suite)
Télécommande (fournie seulement avec le modèle européen).
1
2
3
4
5
1 Indicateur de numéro de
programme • jour • AM/PM,
volume (PGM.NO) (14, 22)
2 Indicateur de condensation
d’humidité (51)
3 Indicateur de compteur de bande/
heure (11, 12)
4 Indicateur d’ID de départ (31 - 36)
5 Crête-mètres (26)
6 Indicateur d’état des piles (i)
(41)
6
7
8
9
!º
!¡
!™
7 Indicateur de limitation du
volume (AVLS) (38)
8 Indicateur de mode longue durée
(LP) (28)
9 Indicateur de blocage des touches
(HOLD) (16)
!º Indicateur de pause (P)
!¡ Indicateur de lecture (()
!™ Indicateur d’enregistrement (REC)
F
10
Emplacement des commandes
Page 67

Utilisation de l’affichage
Enregistreur
Télécommande
Indicateur Jour/AM/PM
-dB-
Indicateur du compteur de bande/horloge/
affichage du réglage de fonction
Affichage du compteur de bande
Chaque fois que vous appuyez sur la touche
COUNTER (COUNTER MODE sur la télécommande),
l’affichage change comme suit:
Exemple: Indication sur l’enregistreur
Remarque
Le compteur de bande fait
office d’indicatif visuel.
Ce n’est pas une horloge.
La valeur affichée au
compteur n’est pas une
indication précise. En
conséquence, n’utilisez
pas le compteur de bande
comme horloge.
Indicateur Jour/AM/PM
Emplacement des commandes
Indicateur du compteur de bande/horloge
Compteur de bande (affichage
normal)
Temps absolu (temps absolu
depuis le début de la bande)
Temps de bande restant
Réinitialisation du compteur (affichage normal) à
“0H00M00S”
Appuyez sur la touche RESET de l’enregistreur quand
le compteur de bande est affiché.
Temps de bande restant
Le temps restant apparaît normalement 16 secondes
environ après le commencement de la lecture en mode
SP. Toutefois, en fonction de la bande, il peut y avoir
un décalage par rapport au temps affiché.
Emplacement des commandes
11
F
Page 68

* RECORDED TIME
(date/heure de
l’enregistrement)
n’apparaît que pendant
la lecture.
Affichage de l’horloge
Chaque fois que vous appuyez sur la touche CLOCK/
SET (sur la télécommande la touche CLOCK),
l’affichage change comme suit:
Conseils
• Lorsque l’enregistreur
entre en mode
d’enregistrement, de
contrôle
d’enregistrement ou de
pause alors que
RECORDED TIME est
affiché, l’heure actuelle
apparaît.
• Pour passer de
l’affichage de 12 heures
à celui de 24 heures,
tenez RESET • +
enfoncée pendant au
moins 2 secondes.
Affichage des messages
Pour l’“Affichage des
messages”, reportez-vous
aux pages 46, 47.
RECORDED TIME*
(date de l’enregistrement)
RECORDED TIME*
(heure de l’enregistrement)
Date actuelle
(année, mois, jour)
Heure actuelle
(heures, minutes, secondes)
Affichage du réglage des fonctions
Pour afficher le réglage actuel de diverses fonctions,
appuyez pendant au moins 2 secondes sur CLOCK/
SET. A chaque pression sur RESET • + ou COUNTER
• –, l’affichage change de la façon suivante:
Réglage de l’horloge
(page 14)
F
12
Emplacement des commandes
Réglage du code copie
(page 29)
Réglage du seuil
d’inscription de l’ID de
départ (page 33)
Réglage en/hors service de
l’ID de départ au début de
l’enregistrement (page 31)
Réglage du maintien de la
crête
(page 27)
Page 69

Mise en place des piles alcalines
Utilisez deux piles alcalines LR6 (format AA).
Couvercle du logement
des piles
Vous pouvez aussi utiliser la batterie rechargeable ou le courant secteur. Pour les
détails, voir “Sources d’alimentation”, pages 39 et 43.
1 Ouvrez le couvercle du
logement des piles.
2 Mettez deux piles
alcalines neuves (non
fournies) dans le portepiles.
Veillez à insérer les
piles en respectant la
polarité.
Emplacement des commandes / Mise en place des piles alcalines
3 Refermez le couvercle
du logement.
Mise en place des piles
13
F
Page 70

Réglage de l’horloge
Réglez l’horloge avant de
commencer tout enregistrement,
sinon vous ne pourrez pas
obtenir la date et l’heure
correctes.
L’horloge revient au réglage par
défaut (SA/97Y11M1D/
AM12H00M00S) si vous enlevez
les piles de l’enregistreur
pendant un certain temps. Dans
ce cas, remettez l’horloge à
l’heure.
Vérifiez que l’enregistreur est à l’arrêt et que la fonction HOLD est désactivée.
HOLD
+
–
CLOCK/SET
1 Appuyez pendant au moins 2
2 Appuyez de nouveau sur
3 Appuyez sur la touche + ou –
CLOCK/SET
secondes sur CLOCK/SET.
CLOCK/SET
CLOCK/SET quand “
est affiché.
– +
pour régler l’année, puis appuyez
sur la touche CLOCK/SET.
4 Recommencez l’opération 2 pour
CLOCK/SET
régler le mois, la date, les heures
et les minutes. Pour remettre les
+–
secondes à “00”, appuyez sur +
ou –. Appuyez finalement sur la
touche CLOCK/SET.
L’affichage cesse de clignoter et
l’horloge fonctionne.
”
Conseil
Pour régler précisément
l'heure, appuyez sur
CLOCK/SET en même
temps que le top horaire à
l'étape 4.
F
14
Réglage de l’horloge
Pour abandonner le réglage de l’horloge
Appuyez sur la touche p STOP. L’affichage de
l’horloge revient au réglage de l’horloge précédent.
Toutefois, si la date est sélectionnée, l’année, le mois,
la date et le jour seront réglés et ils ne seront plus
annulés.
Page 71

Introduction d’une cassette
Avant d’effectuer un
enregistrement important,
assurez-vous que la durée de la
cassette utilisée est suffisante
(120 minutes au maximum).
Bobinez la bande jusqu’à la fin
puis rembobinez-la jusqu’au
début avant
l’enregistrement.
HOLD
Assurez-vous d’abord que les touches sont débloquées (Fonction HOLD).
Couvercle du logement de
cassette
OPEN
1 Ouvrez le couvercle du logement
de cassette.
1 Appuyez sur le commutateur
OPEN.
2 Lorsque le couvercle du
logement de cassette
s’entrouvre, ouvrez-le.
Réglage de l’horloge / Introduction d'une cassette
2 Insérez la cassette.
Insérez la cassette avec la fenêtre
tournée vers le haut. Si la cassette
est insérée dans le mauvais sens,
vous ne pourrez pas la retirer.
Fenêtre tournée vers le
haut.
3 Refermez le couvercle.
La cassette se charge
automatiquement.
Introduction d’une cassette
15
F
Page 72

Remarques
• Le logement de la
cassette ne s’ouvre pas
quand les touches sont
bloquées. Désactivez le
blocage des touches
pour insérer une
cassette.
• Quand vous
introduisez ou sortez
une cassette, ne tenez
pas la cassette comme
indiqué ci-dessous. Un
mauvais
fonctionnement
pourrait s’ensuivre.
• Vérifiez que le
couvercle du logement
de cassette est bien
fermé et que
“UNLOAD” ou
“LOAD” ne sont pas
affichés avant de
débrancher la source
d’alimentation. Sinon,
le couvercle du
logement de cassette
risque de ne pas se
refermer. Dans ce cas,
raccordez la source
d’alimentation.
Conseil
Quand l’enregistreur est à
l’arrêt, bloquez les touches
avec le commutateur
HOLD pour mettre
l’enregistreur en mode
économique s’il fonctionne
sur piles. (Voir page 42.)
* Vous pouvez afficher le
compteur, l’heure ou
régler la fonction AVLS.
Ejection de la cassette
Quand l’enregistreur est à l’arrêt, poussez le
commutateur OPEN.
OPEN
Protection d’enregistrements
importants
Ouvrez l’obturateur de la cassette pour protéger vos
enregistrements.
Quand l’obturateur est ouvert, vous ne
pouvez pas enregistrer sur la bande.
Quand l’obturateur est fermé, vous
pouvez enregistrer sur la bande.
Remarques sur les cassettes DAT
• Contrairement aux cassettes analogiques classiques, la
lecture et l’enregistrement ne sont possibles que sur
une seule face de la cassette.
• Normalement, la construction de la cassette DAT
empêche toute pénétration de poussière et de particules
étrangères. N’ouvrez pas inutilement la cassette DAT.
• N’insérez pas d’objets dans les orifices au dos de la
cassette DAT.
Pour éviter toute manipulation
accidentelle—Fonction HOLD
Enregistreur: Poussez le commutateur HOLD de sorte
que le repère jaune soit visible. Quand
vous appuyez sur une touche en mode
HOLD, “
secondes sur l’afficheur et les touches de
l’enregistreur sont bloquées*.
Télécommande: Poussez le commutateur HOLD dans
le sens de la flèche. “H” est affiché
et les touches sont bloquées.
” clignote pendant 3
F
16
Introduction d’une cassette
Page 73

Enregistrement
Microphone
(non fourni)
vers MIC/LINE IN
P PAUSE
r REC
( PLAY
MIC ATT
MIC/LINE IN
MANUAL • MIC LIMITER • AUTO
(AGC)
SP • LP
Pour la “Connexion à un autre appareil en vue de l’enregistrement”, reportez-vous à
la page 24.
Introduction d’une cassette / Enregistrement
Remarque
Le temps absolu peut ne
pas s’inscrire correctement
dans les cas suivants.
• Lors d’un
enregistrement sur une
bande partiellement
enregistrée contenant un
passage non enregistré
(c-à-d. une partie de la
bande qui n’a jamais été
enregistrée).
• Lors d’un
enregistrement sur une
bande partiellement
enregistrée sur laquelle
le temps absolu n’a pas
été enregistré à l’origine.
Remarques
• N’appuyez pas sur la
touche p STOP quand
“bLANK” est affiché,
sinon le temps absolu sera
remplacé par “--H--M--S”
et il ne s’inscrira plus.
• “— —” indique un passage
non enregistré. Appuyez
sur la touche = 0 pour
rembobiner la bande
jusqu’à ce que “— —” cesse
de clignoter. Ensuite,
appuyez sur la touche )
+ pour rechercher la fin
de l’enregistrement
précédent.
Recherche du point où
l’enregistrement doit commencer
Le temps absolu s’inscrit automatiquement pendant
l’enregistrement.
Le temps absolu correspond au temps écoulé depuis le
début de la bande ; il est pratique pour déterminer le
temps écoulé depuis le début de la bande. Lors de
l'enregistrement sur une cassette en partie enregistrée,
localisez la fin de l'enregistrement précédent et
commencez l'enregistrement à partir de ce point afin
d'éviter qu'un passage reste vierge. Une fois que le
temps absolu est inscrit, il n’est plus possible de
l’effacer.
Si vous voulez insérer automatiquement un espace
blanc de quatre secondes, reportez-vous à la page 28
sur “Enregistrement d’espaces blancs—REC
MUTING”.
Enregistrement depuis le début de la bande
Appuyez sur la touche = 0
pour rembobiner la bande.
“TOP” clignote lorsque la bande
est complètement rembobinée.
Enregistrement sur une bande partiellement
enregistrée
Appuyez sur la touche ) +
pour localiser la fin de
l’enregistrement précédent.
“bLANK” apparaît lorsque la fin de
l’enregistrement précédent est
repérée, et la bande s’arrête à ce
point.
Enregistrement
17
F
Page 74

Enregistrement à partir d’un microphone
1 Introduisez une cassette et
recherchez le point où
l’enregistrement doit commencer.
MIC/LINE IN
2 Réglez le commutateur MIC/
MIC
LINE IN sur MIC.
LINE IN
3 Réglez le commutateur MIC ATT.
0dB
20dB
MIC ATT
0 dB: Normal
20 dB:Son puissant.
4 Réglez le sélecteur MANUAL •
MANUAL
AUTO(AGC)
MIC LIMITER
MIC LIMITER • AUTO(AGC) sur
AUTO(AGC).
Le niveau d’enregistrement est
automatiquement ajusté.
Pour ajuster le niveau
d’enregistrement manuellement
réglez le sélecteur sur MANUAL
ou MIC LIMITER. (Voir page 26.)
Vous pouvez régler le code de
copie numérique. Voir ”Réglage
du code de copie” (page 29).
5 Sélectionnez la fréquence
d’échantillonnage.
Réglez le commutateur SP•LP sur
SP (mode durée standard à
48 kHz ou 44,1 kHz).
Pour enregistrer en mode longue
durée, réglez le commutateur sur
LP. (Voir page 28.)
48kHz
44.1kHz
SP
LP
18
F
Enregistrement
Page 75

6 Appuyez sur les touches r REC
et P PAUSE.
PAUSE
REC
REC MUTING
L’enregistreur se met en pause. Si
vous appuyez uniquement sur la
touche r REC, l’enregistreur se
met en mode de contrôle
d’enregistrement et
l’enregistrement ne commence
pas.
Enregistrement
ou
PAUSE
ou sur la touche P PAUSE.
L’enregistrement commence.
Autres opérations
Pour Appuyez sur
Arrêter l’enregistrement p STOP
Effectuer une pause P PAUSE
d’enregistrement
Libérer la pause P PAUSE ou ( PLAY
Vérifier la source sonore
(Le seuil de détection des
passages vierges
pour l’inscription
d’ID clignote
automatiquement.
Voir page 33)
Vérifier la fréquence ( PLAY pendant
d’échantillonnage l’enregistrement jusqu’à
7 Appuyez sur la touche ( PLAY
PLAY
Conseils
• Pour commencer
l’enregistrement
immédiatement,
appuyez sur la touche
( PLAY tout tenant la
touche r REC enfoncée
pendant l’arrêt ou la
lecture.
• La fréquence
d’échantillonnage est
affichée si vous la
changez en cours
d’enregistrement. Si
vous la changez
pendant la pause
d’enregistrement, elle
apparaît au début de
l’enregistrement
suivant.
• Si l’enregistreur reste en
pause pendant cinq
minutes ou plus, il
s’arrête
automatiquement afin
de protéger la tête et la
bande.
• Si l’enregistreur reste à
l’arrêt pendant trois
minutes ou plus, quand
il fonctionne sur piles, il
se met automatiquement
en mode économique
(voir page 42) afin de
protéger la bande et
d’économiser les piles.
r REC pendant
l’enregistrement, le
contrôle d’enregistrement ou
la pause d’enregistrement,
jusqu’à ce que l’affichage
apparaisse.
ce que la fréquence
d’échantillonnage
apparaisse.
Enregistrement
19
F
Page 76

Conseil
• Quand toute la bande a
été enregistrée, elle se
rembobine
automatiquement et
l’enregistreur s’arrête
(Fonction de
rembobinage
automatique).
Remarques
• L’enregistreur ne se met
pas en mode économique
pendant le contrôle
d’enregistrement, même
s’il fonctionne sur piles.
• Le changement de la
fréquence
d’échantillonnage
pendant l’enregistrement
risque de provoquer une
perte temporaire du son
enregistré.
• Du bruit sera peut-être
enregistré si vous
changez de position le
commutateur MIC/LINE
IN pendant
l’enregistrement.
• Du bruit sera peut-être
enregistré si l’éclairage de
l’affichage est allumé
pendant l’enregistrement.
Dans ce cas, éteignez
l’éclairage.
• Si apparaît quand
le mode d’enregistrement
est réglé sur
AUTO(AGC), réglez le
commutateur MIC ATT
sur 20 dB ou éloignez le
microphone de la source
sonore.
Pour écouter le son pendant l'enregistrement
Branchez les écouteurs sur la prise REMOTE/2 ou
l’appareil stéréo sur la prise LINE OUT de
l’enregistreur.
Enregistrement de sons relativement faibles
Réduisez le niveau d’enregistrement (en mode
d’enregistrement manuel), rapprochez le plus possible
le microphone de la source sonore et ajustez le niveau
d’enregistrement. Vous obtiendrez ainsi un
enregistrement net et optimal, avec le minimum de
parasites.
Choix du microphone pour un enregistrement
L’enregistrement est affecté par et dépend du type de
microphone utilisé. Pour obtenir un enregistrement
optimal, utilisez le microphone en option ECM-MS957
ou ECM-MS907.
Microphones compatibles
• Il existe des microphones alimentés à l’enfichage
compatibles avec cet enregistreur.
• Il n’existe pas de microphones à auto-alimentation
compatibles avec cet enregistreur.
20
F
Enregistrement
Page 77

Lecture
( PLAY
P PAUSE
= 0
) +
+
(
=
HOLD
HOLD
vers REMOTE/2
Pour la “Connexion à un autre appareil en vue de la lecture”, reportez-vous à la page
37.
1 Introduisez une cassette et raccordez
les écouteurs à télécommande.
Désactivez la fonction HOLD.
2 Appuyez sur la touche ( PLAY.
PLAY
La lecture commence.
Enregistrement / Lecture
Conseils
• Le mode SP (durée
standard) et le mode LP
(longue durée) sont
détectés automatiquement
à la lecture.
• Quand toute la cassette a
été lue, la bande se
rembobine
automatiquement et
l’enregistreur s’arrête
(Fonction de rembobinage
automatique).
• Il n’est pas possible de
mettre l’enregistreur en
pause de lecture à partir
de la télécommande.
Autres opérations
Pour Appuyez sur
Régler le volume VOL +, – (VOL +, –)
Arrêter la lecture p STOP (p)
Effectuer une pause P PAUSE
Libérer la pause P PAUSE ou
( PLAY (()
Avancer rapidement la bande ) + (+) à l’arrêt
Rembobiner la bande = 0 (=) à l’arrêt
Les touches de la télécommande sont indiquées entre ( ).
Lecture
21
F
Page 78

Conseils
• Si l’enregistreur reste en
pause pendant cinq
minutes ou plus, il s’arrête
automatiquement afin
de protéger la tête et la
bande.
• Si l’enregistreur reste à
l’arrêt pendant trois
minutes au moins quand
il fonctionne sur piles, il
se met automatiquement
en mode économique
(voir page 42) afin de
protéger la bande et
d’économiser les piles.
Remarques
• Si vous réglez le volume
trop haut, le son risque
de présenter de la
distorsion. Réduisez le
volume dans ce cas.
• La fonction AMS n’opère
pas si aucun ID de départ
n'est inscrit. (Voir page 31.)
• La fonction AMS risque
de ne pas opérer
correctement avec une
cassette DAT enregistrée
sur une autre platine DAT.
* Détection automatique
de plage.
Avance rapide/rembobinage pendant le contrôle
du son
Il est possible d’avancer rapidement (repérage) ou de
rembobiner (revue) la bande tout en écoutant le son.
Repérage Maintenez ) + (+) enfoncée
pendant la lecture. Quand vous relâchez
la touche, la lecture normale se poursuit.
Revue Maintenez = 0 (=) enfoncée
pendant la lecture. Quand vous relâchez
la touche, la lecture normale se poursuit.
Les touches de la télécommande sont indiquées entre ( ).
Repérage/Revue rapides
Ces fonctions ne peuvent être utilisées qu’à partir de
l’enregistreur.
Repérage rapide Appuyez sur ( PLAY et
) + pendant la lecture.
Revue rapide Appuyez sur ( PLAY et
= 0 pendant la lecture.
Recherche du début d’une plage — Fonction AMS*
Il est possible de localiser le début d’une plage pendant la
lecture, l’avance rapide/rembobinage et l’arrêt.
Lecture : Appuyez brièvement sur ) + (+) ou sur
= 0 (=).
Avance rapide/rembobinage : Appuyez une fois sur )
+ (+) ou sur = 0 (=).
Arrêt : Appuyez deux fois sur ) + (+) ou sur =
0 (=).
Pour localiser le début Appuyez sur ) + (+)
de la (d’une) plage suivante une ou plusieurs fois.
22
F
Ex.: Pour localiser le
début du cinquième
programme (plage)
vers l’avant
Pour localiser le début Appuyez sur = 0 (=)
d’une plage en cours de une ou plusieurs fois.
lecture/précédente
Ex.: Pour localiser le début
de la quatrième plage
vers l’arrière, y compris
la plage en cours
Les touches de la télécommande sont indiquées entre ( ).
Lecture
Page 79

Vérification de la fréquence d’échantillonnage
Il est possible de vérifier la fréquence
d’échantillonnage du son enregistré.
Appuyez sur ( PLAY pendant la lecture jusqu’à ce que la
fréquence d’échantillonnage soit affichée.
Affichage pendant l’avance rapide/rembobinage
(fonction AMS)
Le crête-mètre de gauche (L) indique le sens du
défilement de la bande. Le crête-mètre de droite (R)
indique la longueur de bande restante.
Sens du défilement de la
bande
vers la droite: avance rapide
vers la gauche: rembobinage
Longueur de bande restante
Lecture
Lecture automatique de la bande depuis le début
Cette fonction ne peut être utilisée qu’à partir de
l’enregistreur.
Appuyez sur la touche ( PLAY tout en maintenant
la touche = 0 enfoncée. La lecture commence
automatiquement une fois que la bande a été
complètemente rembobinée.
De même, la lecture commence automatiquement une
fois que la bande a été rembobinée jusqu’au début du
programme (plage) précédent avec la fonction AMS.
Lecture
23
F
Page 80

( Enregistrement
Connexion à un autre appareil en vue de
l'enregistrement
Vous pouvez raccorder l’enregistreur à un autre appareil audio analogique ou à un
appareil audio avec sortie numérique. Pour l’“Enregistrement”, reportez-vous à la
page 17.
Conseil
Lors de l’enregistrement
avec la liaison analogique,
vous pouvez désigner le
code de copie numérique
(ID6) (voir page 29).
Enregistrement à partir d’un appareil
audio analogique avec prise LINE OUT
(Connexion analogique)
PCM-M1
Câble de liaison audio
RK-G129 (non fourni)
Appareil
stéréo ou
vers MIC/LINE IN
vers LINE OUT
mixeur, etc.
1 Réglez le commutateur MIC/LINE IN sur LINE
IN.
2 Sélectionnez le mode d’enregistrement avec le
sélecteur MANUAL • MIC LIMITER • AUTO
(AGC).
MANUAL: Le niveau d’enregistrement s’ajuste
manuellement (voir page 26).
AUTO (AGC): Le niveau d’enregistrement s’ajuste
automatiquement.
3 Sélectionnez la fréquence d’échantillonnage avec le
sélecteur SP • LP.
SP (48 kHz, 44,1 kHz): Mode d’enregistrement
normal.
LP: Mode d’enregistrement longue durée.
L’échantillonnage est effectué à 32 kHz. (Voir
page 28.)
4 Appuyez sur les touches r REC et P PAUSE.
5 Appuyez sur la touche ( PLAY ou P PAUSE
pour commencer l’enregistrement. Puis,
commencez la lecture de la source raccordée.
F
Enregistrement24
Page 81

Remarques
• Utilisez uniquement le
câble numérique
recommandé (non fourni)
(voir page 54).
Vous ne pouvez pas
utiliser les câbles de liaison
numérique POC-DA12/
DA12M/DA12S ni RKDA10 avec cet appareil.
• Veillez à régler le
commutateur INPUT
SELECT du câble de liaison
sur DIGITAL avant de
procéder à
l’enregistrement. Le
changement de position du
commutateur pendant
l’enregistrement créera un
bref passage vierge sur
l’enregistrement.
Conseils
•Lors de la liaison
numérique, notez les points
suivants:
– Il n’est pas nécessaire de
régler le mode
d’enregistrement.
– Le niveau d’enregistrement
se règle automatiquement
au niveau de la source. Le
réglage manuel n’est pas
possible dans ce cas.
• L'enregistreur accepte le
format d'enregistrement
IEC958. Le code de copie
(ID 6) peut être réglé pour
l'enregistrement dans ce
format (page 29). Par
contre, il ne peut pas
enregistrer dans le format
AES/EBU.
• Le réglage du sélecteur
SP•LP n’est possible que
pour l’enregistrement
d’une source de 32 kHz.
(Sur SP, la source sera
enregistrée en mode SP à
32 kHz. Sur LP, la source
sera enregistrée en mode
LP à 32 kHz.)
Les autres sources seront
automatiquement
enregistrées avec leur
propre fréquence
d’échantillonnage quelle
que soit la position du
commutateur SP•LP. Dans
Enregistrement à partir d’un appareil
audio avec sortie numérique
(Connexion numérique)
Câble optique
PCM-M1
INPUT SELECT
POC-DA12P
POC-DA12MP
POC-DA12SP
(non fourni)
vers la sortie
numérique
(OPTICAL)
Lecteur CD,
tuner BS,
ou
vers
REMOTE
DIGITAL I/O
Câble coaxial
RK-DA10P (non
platine DAT,
platine MD,
etc.
vers la sortie
numérique
(COAXIAL)
fourni)
1 Raccordez le câble optique ou le câble coaxial en
fonction de la prise de sortie numérique de
l’appareil raccorde.
2 Réglez le commutateur INPUT SELECT du câble
de liaison sur DIGITAL.
3 Appuyez sur les touches r REC et P PAUSE.
4 Appuyez sur la touche ( PLAY ou P PAUSE
pour commencer l’enregistrement. Puis,
commencez la lecture de la source raccordée.
Source d’enregistrement et fréquence d’échantillonnage
Les fréquences d’échantillonnage lors de
l’enregistrement numérique sont indiquées ci-dessous.
Source Fréquence
Son mode B de la radiodiffusion 48 kHz
satellite, Mode DAT SP
CD, MD, Mode DAT SP 44,1 kHz
Son mode A de la radiodiffusion 32 kHz
satellite, Mode DAT LP
Pour faire une copie numérique de réserve
Si vous voulez faire des copies numériques de réserve
de vos réprésentations en direct, par exemple,
enregistrez sur cet enregistreur en effectuant une
liaison numérique. La copie est possible quel que soit le
code de copie de la source. Le code de copie de la copie
de sauvegarde est conforme au système de protection
contre la copie abusive (SCMS) (pages 29 et 45).
d’échantillonnage
Enregistrement
Enregistrement
F
25
Page 82

Réglage manuel du niveau
d’enregistrement — Enregistrement manuel
Pour obtenir un
enregistrement optimal
avec un microphone ou à
partir d’une chaîne audio
analogique, réglez le
niveau d’enregistrement
manuellement.
COUNTER • –
RESET • +
CLOCK/SET
vers MIC/
LINE IN
( PLAY
P PAUSE
r REC
MANUAL
• MIC
LIMITER
• AUTO
(AGC)
Qu’est-ce que la fonction
MIC LIMITER?
La fonction MIC LIMITER
sert à maintenir à un
certain niveau les
émissions subites de
signaux trop puissants. Par
exemple, il est conseillé de
régler le niveau
d’enregistrement un peu
plus haut que la normale et
le mode d’enregistrement
sur MIC LIMITER pour
obtenir de bons résultats
lors de l’enregistrement de
conférences ou de fêtes.
Remarque
Le niveau d’enregistrement est réglé trop haut si
apparaît sur la
droite des crête-mètre.
Réduisez le niveau
d’enregistrement.
-dB-
Si le son est déformé bien
que ne soit pas
affiché, réglez le
commutateur MIC ATT sur
20 dB, ou éloignez le
microphone de la source
sonore.
F
Enregistrement26
Chaîne stéréo,
mixeur, etc.
1 Réglez le selecteur MANUAL • MIC LIMITER •
AUTO (AGC) sur MANUAL ou MIC LIMITER.
MANUAL: Pour l’enregistrement via la liaison
analogique ou avec un microphone.
MIC LIMITER: Pour l’enregistrement avec un
microphone.
2 Appuyez sur la touche r REC pour contrôler
l’enregistrement.
3 Commencez la lecture de la source et tournez le
bouton de réglage REC LEVEL
pour régler le niveau
d’enregistrement tout en
contrôlant le son.
Tournez le bouton de
réglage REC LEVEL de
façon que les crêtes-mètres
restent allumés aux alentours
du niveau !™ .
Assurez-vous que l’indicateur
pas lorsqu’un signal de crête est fourni.
4 Appuyez sur la touche ( PLAY tout en
maintenant la touche r REC enfoncée pour
commencer l’enregistrement.
REC
LEVEL
-dB-
Crête-mètres
n’apparaît
Page 83

Conseil
Vous pouvez aussi
utiliser la fonction PEAK
HOLD pendant
l’enregistrement.
Appuyez pendant au
moins 2 secondes sur
CLOCK/SET. L’affichage
indiquera directement
“PEAK on” ou PEAK
oFF”. Sélectionnez
l’option souhaitée avec
RESET • + ou COUNTER
• – et validez avec
CLOCK/SET.
Affichage du niveau d’entrée maximal
— PEAK HOLD
La fonction PEAK HOLD permet de maintenir le
niveau d’entrée maximal sur les crêtes-mètres pour
mieux le repérer.
1 Appuyez pendant au moins 2
secondes sur CLOCK/SET.
“CLOCK” apparaît sur
l’afficheur.
2 Appuyez de façon répétée sur
RESET • + ou COUNTER • –
et sélectionnez “PEAK SET”.
3 Appuyez sur CLOCK/SET.
Enregistrement
4 Appuyez de façon répétée sur RESET • + ou
COUNTER • – et sélectionnez “PEAK on”.
5 Appuyez sur CLOCK/SET.
L’heure réapparaît.
La valeur de crête est remplacée par la
nouvelle valeur dès qu’une entrée est
plus puissante.
Pour revenir à l’affichage de crête
Appuyez sur RESET quand le compteur de bande
n’est pas affiché. L’affichage de crête est aussi rétabli
quand vous enlevez la cassette.
Enregistrement
27
F
Page 84

Fonctions d’enregistrement pratiques
Enregistrez en mode LP (longue durée) pour faire un
enregistrement très long. Utilisez REC MUTING pour
enregistrer des passages vierges.
COUNTER • –
RESET • +
CLOCK/SET
( PLAY
P PAUSE
r REC
vers MIC/
LINE IN
Chaîne stéréo,
mixeur, etc.
SP•LP
Remarques
• Une bande enregistrée
en mode LP ne pourra
pas être lue sur une
platine DAT qui n’est
pas équipée de la
fonction LP.
• Un bruit puissant
risque d’être audible
pendant la transition
du mode SP au mode
LP lorsqu’une bande
renfermant un
enregistrement qui a
été commuté du mode
SP sur le mode LP est
lue sur une platine
DAT qui n’a pas de
fonction LP. Dans ce
cas, réduisez le volume
ou arrêtez la lecture.
Conseil
Pour insérer un espace
blanc de 4 secondes ou
plus, appuyez sur la touche
P PAUSE tout en appuyant
sur la touche r REC, puis
maintenez la touche
P PAUSE enfoncée
pendant au moins 4
secondes. Si le passage
vierge dure plus de
quatre secondes,
l’indicateur “P” clignote
rapidement. L’enregistreur
se remet en pause lorsque
vous relâchez la touche
P PAUSE.
F
Enregistrement28
Enregistrement en mode longue durée
— LP REC
Réglez le sélecteur SP • LP sur LP pour obtenir une
durée d’enregistrement double de la durée classique
des cassettes DAT. Ainsi, une cassette DAT de 60
minutes enregistrée en mode LP donnera 120 minutes
d’enregistrement.
Affichage du compteur de bande en mode LP
Le temps absolu et le temps de bande restant se
refèrent au mode SP. En conséquence, le temps réel est
le double de la valeur indiquée sur l’affichage en
mode LP.
Le temps réel en
mode LP est de 4
minutes et demie.
Enregistrement d’espaces vierges —
REC MUTING
Vous pouvez insérer un espace vierge au début d’une
plage et entre deux plages. Dans ce cas, l’ID de départ
ne s’inscrit pas.
1 Appuyez sur les touches r REC et P PAUSE pour
interrompre l’enregistrement.
2 Appuyez sur la touche P PAUSE tout en
maintenant la touche r REC enfoncée.
Un espace vierge de quatre secondes est inséré et
l’enregistreur revient automatiquement en pause
d’enregistrement.
Page 85

Remarque
Vous ne pouvez pas
régler le code ID6
pendant l’enregistrement.
Faites-le avant de
commencer
l’enregistrement.
Réglage du code de copie (ID6)
Lors de l'enregistrement par la liaison analogique (par
un microphone ou la prise LINE IN), ou lors de
l'enregistrement numérique dans le format IEC958,
vous pouvez régler le code de copie (ID6). Le
préréglage usine d’ID6 est “00”.
1 Appuyez pendant au moins 2
secondes sur CLOCK/SET.
“CLOCK” apparaît sur
l’afficheur.
2 Appuyez de façon répétée sur
RESET • + et sélectionnez “ID6
SET”.
3 Appuyez sur CLOCK/SET
quand “ID6 SET” est affiché.
4 Appuyez de façon répétée sur RESET • + ou
COUNTER • – et sélectionnez le code de copie que
vous souhaitez donner à cet enregistrement.
ID6 00: Copie numérique autorisée sans aucune
limite
ID6 10: Copie numérique impossible
ID6 11: Une seule copie numérique possible
5 Appuyez sur CLOCK/SET.
L’heure réapparaît.
Enregistrement
Enregistrement
29
F
Page 86

Pour afficher le code de copie numérique
Appuyez pendant au moins 2 secondes sur RESET • +
et COUNTER • – quand le compteur de bande n’est
pas affiché.
Pendant l’enregistrement, le contrôle
Affiche le code de copie qui
sera inscrit sur la cassette
d’enregistrement ou la
pause d’enregistrement
Pendant la lecture ou la
pause de lecture
Pendant l’arrêt
Affiche le code de copie qui
est inscrit sur la cassette
Le code de copie n’est pas
encore inscrit
ID6 00: Copie numérique autorisée sans aucune limite
ID6 10: Copie numérique impossible
ID6 11: Une seule copie numérique possible
ID6 --: Le code de copie n’est pas encore inscrit
(seulement pendant l’arrêt).
F
Enregistrement30
Page 87

Inscription d’ID de départ
L’ID de départ est un signal qui
indique le début d’un
programme (d’une plage).
A l’aide de la fonction AMS
(Détection du début des plages),
le début des programmes ou des
plages, marqué par un ID de
départ, peut être localisé.
Sens de défilement de la bande
plage
Bande
ID de départ
plage
COUNTER • –
RESET • +
START ID •
ENTER
Enregistrement
START ID •
MODE
CLOCK/SET
Remarques
• Les informations de
programme (plage)
existant sur le CD
peuvent ne pas être
inscrites correctement
comme ID de départ
avec certains lecteurs
CD.
• Les informations de
programme (plage)
existant sur un MD ne
s’inscrivent pas comme
ID de départ.
Conseils
• Pour inscrire un ID de
départ manuellement
pendant l’enregistrement, appuyez sur la
touche START ID •
ENTER. L’ID de départ
s’inscrit au point où
vous avez appuyé sur la
touche START ID •
ENTER.
• L'enregistreur passe du
mode manuel au mode
automatique seulement
quand vous appuyez
sur START ID • MODE
pendant
l'enregistrement, le
contrôle d'enregistrement ou la pause
d'enregistrement.
Inscription d’ID de départ pendant
l’enregistrement — Mode manuel
Un ID de départ est inscrit
— quand vous commencez l’enregistrement ou libérez
la pause d’enregistrement (ajustable).
— quand vous appuyez sur START ID • ENTER
pendant l’enregistrement.
— aux mêmes endroits que la source lors de
l'enregistrement numérique d'une cassette DAT.
— aux mêmes endroits que le code Q (information de
piste) lors de l'enregistrement numérique d'un CD.
1 Si “AUTO-ID” est affiché, appuyez sur START
ID•MODE pour le faire disparaître.
2 Commencez l’enregistrement.
Quand un ID de départ est
inscrit, “WRITE” s’allume
momentanément et
clignote pendant environ 9
secondes (18 secondes dans le
mode LP).
Pour ne pas inscrire d’ID de départ au début de
chaque enregistrement
Vous pouvez sélectionner de ne pas inscrire d’ID de
départ au début d’un enregistrement ou après la
pause d’un enregistrement.
1 Si “AUTO-ID” est affiché, appuyez de façon
répétée sur START ID • MODE pour le faire
disparaître.
Enregistrement
31
F
Page 88

Remarque
• Quand
clignote, seule la touche
p STOP est opérante.
• Quand vous inscrivez
des ID de départ de
façon continue, veillez
à laisser un intervalle
d'au moins 9 secondes
(18 secondes en mode
LP) entre deux ID de
départ. Sinon,
l’enregistreur risque de
ne pas localiser
correctement le début
d’une plage.
2 Appuyez pendant au moins 2
secondes sur CLOCK/SET.
“CLOCK” apparaît sur
l’afficheur.
3 Appuyez de façon répétée sur
RESET • + ou COUNTER • – et
sélectionnez “SET SID”.
4 Appuyez sur CLOCK/SET.
5 Appuyez de façon répétée sur RESET • + ou
COUNTER • – et sélectionnez “SID on” ou “SID
oFF”.
SID on: L’enregistreur inscrit un ID de départ
quand vous commencez l’enregistrement
ou libérez la pause.
SID oFF: L’enregistreur n’inscrit pas d’ID de
départ quand vous commencez
l’enregistrement ou libérez la pause.
6 Appuyez sur CLOCK/SET.
L’horloge réapparaît.
Inscription automatique du premier ID
de départ — Mode semi-automatique
Le mode semi-automatique est une autre option du
mode d’inscription manuelle de l’ID. Avec cette
fonction, un ID de départ est automatiquement inscrit
lors de la première entrée de son dans le mode
manuel. Utilisez cette fonction pour inscrire un ID de
départ au début de chaque prise de son.
1 Si “AUTO-ID” est affiché, appuyez de façon
répétée sur START ID • MODE pour le faire
disparaître.
2 Appuyez sur START ID •
MODE jusqu’à ce que “AUTOID” clignote sur l’afficheur.
Lorsque vous commencez un enregistrement, un
ID de départ s'inscrit automatiquement au premier
F
Enregistrement32
son fourni.
Page 89

Remarques
• Dans le mode
automatique, les ID de
départ peuvent ne pas
s'inscrire correctement
si la source sonore est
parasitée.
• Pour inscrire
manuellement un ID de
départ pendant
l’enregistrement,
appuyez sur la touche
START ID • ENTER.
L’ID de départ s’inscrit
au point où vous
appuyez sur la touche.
• L’enregistreur permute
les modes manuel et
automatique seulement
quand vous appuyez
sur la touche START ID
• MODE pendant
l’enregistrement, le
contrìle
d’enregistrement et la
pause d’enregistrement.
Pour désactiver mode semi-automatique
Appuyez sur START ID • MODE jusqu’à ce que
“AUTO-ID” disparaisse de l’afficheur.
Inscription automatique d’ID de
départ pendant l’enregistrement —
Mode automatique
L’ID de départ s’inscrit automatiquement en fonction
du niveau d’entrée. Un ID de départ s’inscrit quand
— vous commencez l’enregistrement ou libérez la
pause d’enregistrement (au moment où le son est
fourni aprés une absence de son).
— un son est fourni après un passage sans son ou un
passage à très faible niveau d’enregistrement
(préréglage usine: -50 dB) pendant au moins 3
secondes.
— vous appuyez sur START ID • ENTER pendant
l’enregistrement.
1 Appuyez de façon répétée
sur la touche
START ID • MODE jusqu’à ce
que “AUTO-ID”
apparaisse.
2 Commencez l’enregistrement. Lorsqu’un ID de
départ s’inscrit, “WRITE” apparaît un moment,
puis
secondes (environ 18 secondes en mode LP).
clignote pendant environ 9
Enregistrement
Conseil
Pour afficher le seuil de
détection, tenez rREC
enfoncée pendant
l'enregistrement, le
contrôle d'enregistrement
ou la pause
d'enregistrement. Les
crête-mètres
d'enregistrement
clignotent au niveau du
seuil.
Réglage du seuil de détection de passages vierges
pour l’inscription des ID de départ
Dans le mode automatique, un ID de départ s'inscrit
au premier son fourni après chaque passage vierge. Le
seuil de détection du passage vierge est le niveau
d’entrée en dessous duquel l’enregistreur reconnaît un
passage vierge (préréglage usine: -50 dB).
En ajustant le seuil, vous obtiendrez des ID de départ
même lors de l’enregistrement d’un concert en direct,
où le niveau d’entrée est constamment faible.
1 Appuyez pendant au moins 2
secondes sur CLOCK/SET.
“CLOCK” apparaît sur
l’afficheur.
Enregistrement
33
F
Page 90

Remarque
Il n’est pas possible
d’inscrire des ID de
départ lorsque
clignote rapidement
pendant la fonction de
répétition.
2 Appuyez de façon répétée sur +
ou – pour sélectionner “LEV
SID”.
3 Appuyez sur CLOCK/SET.
Le seuil actuel et les
crêtes-mètres se
mettent à clignoter.
-dB-
4 Appuyez de façon répétée sur + ou – et
sélectionnez le seuil souhaité. A chaque pression
l’affichage change de la façon suivante.
–
50 – 40 – 32 – 24 – 18 – 12
– 00 – 02 – 04 – 06 – 08
5 Appuyez sur CLOCK/SET.
L’horloge réapparaît.
Inscription d’ID de départ pendant la
lecture
Vous pouvez inscrire des ID de départ n’importe où
sans effacer le contenu de l’enregistrement.
1 Appuyez de façon répétée sur la touche START ID
• MODE sur l’enregistreur jusqu’à ce que “AUTOID” apparaisse (pour passer au mode automatique)
ou disparaisse (pour passer au mode manuel).
2 Appuyez sur la touche START ID • ENTER
pendant la lecture à l’endroit où vous voulez
réinscrire l’ID.
“REHRSAL” clignote lorsque
vous sélectionnez le point
d’inscription de l’ID de
départ. Un passage de 3
secondes est répété jusqu'à 16
fois (fonction de répétition).
F
Enregistrement34
Page 91

3 Appuyez sur START ID • ENTER pendant la
répétition.
“WRITE” apparaît un instant. “
et l’ID de départ est inscrit. Pendant cette
opération, le son est coupé.
” clignote
Enregistrement
Remarque
Les ID de départ qui sont
inscrits pendant un
enregistrement ou après
un point donné ne
peuvent pas être
déplacés. Réinscrivez-les
après les avoir effacés.
Remarque
Si un ID de départ est
effacé, le numéro de
programme qui est inscrit
au même point est
également effacé.
Ajustement du point sélectionné
Chaque fois que vous appuyez sur la touche = 0
ou ) + pendant la répétition, le point sélectionné
recule ou avance de 0,3 seconde, jusqu’à 10 secondes
dans l’un ou l’autre sens.
Point sélectionné
Bande
Appuyez sur la
touche = 0.
0.3
0.3
Appuyez sur la
touche ) +.
Effacement d’ID de départ
Vous pouvez effacer les ID de départ sans effacer le
contenu de l’enregistrement.
L’effacement des ID de départ n’est possible que
lorsque l’enregistreur est à l’arrêt ou en mode de
lecture.
1 Appuyez sur ) + ou = 0 pour être sur la
plage après l'ID de départ que vous voulez effacer.
2 Appuyez de façon répétée sur la touche START ID
• MODE jusqu’à ce que “ERASE” apparaisse sur
l’afficheur de l’enregistreur.
3 Appuyez sur la touche START ID • ENTER.
La bande est automatiquement
rembobinée jusqu’à l’ID de
départ de cette plage, puis
“
l’afficheur et l’ID de départ est
effacé.
Pendant cette opération le son
est coupé.
La lecture continue quand cette
opération est terminée.
” clignote sur
Enregistrement
35
F
Page 92

Remarque
L’inscription des numéros
de programme et la
renumérotation peuvent
ne pas s’effectuer
correctement sur une
bande qui a été
enregistrée sur une autre
platine DAT et dont le
début est indiqué par un
ID de départ.
F
Enregistrement36
Attribution de numéros de programme
Un numéro de programme est un signal qui indique la
position du programme (de la plage). Le numéro de
programme est inscrit en même temps que l’ID de
départ.
Enregistrement depuis le début de la bande
Le numéro de programme s’inscrit automatiquement
dans l’ordre séquentiel à partir du numéro 1 en même
temps que l’ID de départ.
Enregistrement à partir du milieu de la bande
Appuyez sur la touche ) + ou = 0 pour
afficher le numéro de programme avant de
commencer l’enregistrement. Le numéro de
programme s’inscrit dans l’ordre séquentiel à partir
du programme suivant, en même temps que l’ID de
départ.
Renumérotation des programmes
La renumérotation est nécessaire pour les bandes
suivantes :
• Bande sur laquelle un ID de départ a été inscrit
pendant la lecture.
• Bande qui a des numéros de programme manquants
ou des numéros de programme en double, parce
que la bande a été enregistrée à partir du milieu.
• Bande qui a un numéro de programme manquant
parce que le numéro de programme a été effacé de
la bande en même temps que l’ID de départ.
1 Appuyez de façon répétée sur la touche START ID
• MODE jusqu’à ce que “RENUMBER” apparaisse
sur l’afficheur de l’enregistreur.
2 Appuyez sur la touche START ID • ENTER quand
l’enregistreur est à l’arrêt ou en mode de lecture.
La bande est automatiquement rembobinée
jusqu’au numéro de programme qui a été inscrit
avec l’ID de départ et les programmes (plages)
sont renumérotés.
“
la renumérotation. “RENUM”
et le compteur de bande
apparaissent alternativement
quand la bande est bobinée
jusqu’au prochain programme
(plage) marqué par un ID de
départ. Lorsque la renumérotation est terminée, la
bande est rembobinée jusqu’au début, puis
l’enregistreur s’arrête.
” clignote pendant
Page 93

( Lecture
Connexion à un autre appareil en vue de la
lecture
Vous pouvez raccorder l’enregistreur à un autre appareil
audio analogique et à un appareil audio avec sortie
numérique. Pour la “Lecture”, reportez-vous à la page 21.
Conseil
Le niveau de sortie de la
prise LINE OUT et de la
prise REMOTE •
DIGITAL I/O est fixe. Le
volume ne pourra pas être
réglé avec les touches de
réglage VOL de
l’enregistreur.
Remarque
Utilisez uniquement le
câble optique
recommandé (non fourni)
(voir page 54).
Vous ne pouvez pas
utiliser les câbles de
liaison numérique POCDA12/DA12M/DA12S
avec cet appareil.
Lecture sur un appareil audio
analogique (Connexion analogique)
PCM-M1
vers LINE OUT
Commencez la lecture et réglez le volume de
l’appareil raccordé.
Câble de liaison audio
RK-G129 (non fourni)
Chaîne
stéréo ou
mixeur, etc.
vers LINE IN
Lecture sur un appareil audio avec
entrée numérique (Connexion
numérique)
Câble optique
PCM-M1
vers REMOTE • DIGITAL I/O
POC-DA12P
POC-DA12MP
POC-DA12SP
(non fourni)
Platine DAT,
amplificateur
numérique,
etc.
Enregistrement / Lecture
Raccordez l’appareil audio numérique comme
indiqué. Commencez la lecture et réglez le volume de
l’appareil raccordé.
Lecture
37
F
Page 94

Fonctions pratiques pour la lecture
La fonction AVLS* peut être
utilisée quand vous vous
servez des écouteurs ou en
mode de contrôle
d’enregistrement.
La fonction AVLS maintient
le volume à un faible niveau,
de façon à éviter toute
émission de son puissant qui
pourrait endommager l’ouïe.
VOL
AVLS
VOL
AVLS
vers REMOTE/2
* Limiteur automatique de
volume
Remarque
Vous pouvez sélectionner
la fonction AVLS à partir
de l’enregistreur ou de la
télécommande, et vous
pouvez annuler cette
fonction à partir de la
télécommande même si le
commutateur AVLS est
réglé sur LIMIT sur
l’enregistreur. “ ”
disparaît de l’afficheur de
la télécommande et la
fonction AVLS est annulée.
Utilisation de la fonction AVLS
Mise en service à partir de l’enregistreur ou de la
télécommande.
Enregistreur: Réglez le commutateur AVLS sur LIMIT.
Télécommande: Appuyez sur AVLS de la
télécommande. “
télécommande.
Commutateur AVLS Volume et affichage
LIMIT ( ) Le volume maximal est limité à un
NORM (rien) Le réglage de volume est normal.
Les indications dans l'afficheur de la télécommande sont
indiquées entre ( ).
” apparaît dans l’afficheur de la
niveau donné.
“AVLS” apparaît suivi de “VOL”
quand vous appuyez sur les touches
de réglage VOL.
Lorsque le volume est au niveau
maximum, “AVLS” clignote.
Chaque fois que vous appuyez sur
les touches de réglage VOL, le niveau
du volume change et “VOL”
apparaît.
Quand le volume est au niveau
maximum, “MAX” apparaît.
F
Lecture38
Page 95

( Sources d’alimentation
Utilisation de l’enregistreur avec des piles
rechargeables Ni-hydrures métalliques
Vous pouvez utiliser les piles
rechargeables Ni-hydrures
métalliques NH-D100. Avant
d’utiliser l’enregistreur,
rechargez les piles.
Adaptateur
secteur ACE45HG
Chargeur
BC-D100
Sources d’alimentation
Lecture / Sources d’alimentation
Si les témoins CHARGE
ne s'allument pas
Enlevez les piles
rechargeables puis
remettez-les en place.
Remarques
• Utilisez uniquement les
piles rechargeables, le
chargeur et
l’adaptateur secteur
fournis pour la
recharge.
Si vous utilisez d’autres
types de chargeurs, un
mauvais fonctionnement
peut s’ensuivre.
• Quand les témoins de
charge clignotent en
rouge, enlevez les piles
rechargeables et
vérifiez la polarité et
l’état des piles. Si tout
est normal, essayez de
recharger une nouvelle
fois les piles.
Vous ne pouvez pas
recharger les piles
ordinaires ou des piles
complètement
rechargées.
vers une
prise murale
1 Raccordez le chargeur BC-D100 à l’adaptateur
secteur AC-E45HG, puis l’adaptateur secteur à une
prise murale.
2 Insérez les piles rechargeables Ni-Hydrures
métalliques NH-D100 dans le compartiment de
recharge.
Les témoins de charge s’allument en rouge
pendant la recharge. Quand les piles sont
complètement rechargées, les témoins s’allument
en vert. Il faut environ 2,5 heures pour recharger
les piles, mais cela dépend de la température
ambiante.
3 Insérez les piles rechargées dans le logement des
piles de l’enregistreur.
Remarques sur la recharge
• Le chargeur permet de recharger une ou deux piles
à la fois.
• Chargez les piles juste avant de les utiliser.
• Chargez les piles quand elles sont complètement
épuisées (quand “bATTERy” se met à clignoter dans
l’afficheur de l’enregistreur).
• Pendant la recharge, l’adaptateur secteur et les piles
peuvent devenir chauds, mais c’est normal.
• La recharge peut durer plus longtemps que la
normale s’il s’agit d’une première charge ou si vous
n’avez pas utilisé les piles depuis longtemps. Après
plusieurs recharges successives, le temps sera
normal.
Témoins
de charge
Sources d’alimentation 39
F
Page 96

Remarques
• Enlevez les piles
rechargeables dès que
possible du chargeur
quand la recharge est
terminée.
Si vous les laissez trop
longtemps dans le
chargeur, leur capacité
risque d’être réduite.
• Utilisez le boîtier de
piles fourni pour
transporter les piles. Si
vous les transportez
sans le boîtier avec des
objets métalliques, par
exemple des chaînes,
dans votre poche, un
court-circuit risque de
se produire.
A propos des piles rechargeables.
• Quand l’autonomie d’un pile pleinement rechargée
est réduite, remplacez la pile par une neuve.
• Veillez à recouvrir les pôles des piles rechargeables
d’un morceau de ruban adhésif pour les isoler avant
de mettre les piles au rebut.
A propos du rangement des piles
• Rangez les piles rechargeables dans un endroit frais
et sec.
F
Sources d’alimentation40
Page 97

Remplacement des piles
Conseils
• L’enregistreur ne possède
pas d’interrupteur
d’alimentation. Par
conséquent, tant que les
piles sont dans
l’enregistreur, l’affichage
à cristaux liquides reste
allumé. Cependant, la
consommation électrique
est négligeable.
• L’horloge revient au
réglage par défaut
(97Y11M1D/AM12H00M
00S)
si vous retirez les
piles de l’enregistreur
pendant un certain temps.
Dans ce cas, remettez
l’horloge à l’heure.
Remarques
• Si l’indication
“bATTERy” reste affichée
après le remplacement
des piles, appuyez sur
une touche pour faire
disparaître cette
indication.
• Quand l’enregistreur
fonctionne sur piles,
n’insérez pas en même
temps un pile ordinaire et
une batterie rechargeable.
• L’autonomie des piles
varie en fonction de la
température et du type de
pile. “bATTERy” ou “i”
n’apparaîtront pas avec
certains types de piles.
Utilisez les piles
recommandées NH-D100.
* Quand aucune fiche n’est
insérée dans les prises LINE
OUT, REMOTE/2 ou
REMOTE • DIGITAL I/O,
le rétro-éclairage s’éteint.
Afficheur
Quand faut-il remplacer les piles
Vérifiez l’affichage sur de l’enregistreur et sur la
télécommande.
Affichage sur l’enregistreur
Pile pleine
Remplacez les deux piles par des
neuves.
“bATTERy” clignote et
l’enregistreur s’arrête si vous
continuez à l’utiliser.
Affichage sur la télécommande
Les piles sont faibles. Remplacez les
deux piles par des neuves.
Les piles sont épuisées.
Automie des piles
Piles Lecture Enregistrement
rechargeables 3:45 3 (3:30*)
Ni-hydrures
métalliques Sony
(NH-D100)
alcalines Sony LR6 2:30 1:30 (2:30*)
(format AA)
Automie à 20°C et pour un enregistrement ou une lecture longue
durée.
La capacité des piles diminue et leur automie est inférieure à
basses températures.
(Heures et minutes approx.)
Sources d’alimentation 41
Sources d’alimentation
F
Page 98

Mode économique
Si l’enregistreur reste à
l’arrêt pendant au moins 3
minutes*, il se met
automatiquement en mode
économique afin
d’économiser les piles.
HOLD
p STOP
* L’enregistreur se met
en mode économique si
le logement de la
cassette reste ouvert
environ 30 secondes. Si
vous appuyez sur la
touche CLOCK, etc.,
par exemple, en mode
économique,
l’enregistreur revient
dans les 30 secondes au
mode économique.
Remarque
Le raccordement d’un
câble numérique à la prise
REMOTE • DIGITAL I/O
augmente la
consommation d’énergie.
Débranchez le câble
lorsque vous n’en avez
pas besoin.
Si l’enregistreur se met automatiquement en mode
économique
Si l’enregistreur reste au moins 3 minutes* en mode
d’arrêt, la cassette est automatiquement éjectée pour
protéger la bande, et l’enregistreur se met en mode
économique pour préserver les piles.
En mode économique, l’heure est affichée et le rétroéclairage s’éteint. L’afficheur de la télécommande
s’éteint également.
Pour mettre manuellement l’enregistreur en mode
économique
1 Vérifiez que l’enregistreur est à l’arrêt.
Si l’enregistreur est en pause, appuyez sur la
touche p STOP.
2 Poussez le commutateur HOLD de l’enregistreur
de sorte que le repère jaune soit visible.
L’enregistreur se met en mode économique.
Quand vous appuyez sur une touche, “HOLD”
clignote pendant quelques secondes sur l’afficheur.
F
Sources d’alimentation42
Page 99

Adaptateur secteur ou batterie de voiture
Adaptateur
d’alimentation
secteur (fourni)
vers DC IN
4.5V
Sources d’alimentation
Conseils
• Lorsque le cordon de
l’adaptateur
d’alimentation secteur
ou le cordon allumecigares est raccordé à la
prise DC IN 4.5V de
l’enregistreur, les piles
sont automatiquement
déconnectées.
L’alimentation est
automatiquement
fournie par la source
d’alimentation externe.
• Si vous utilisez
l’adaptateur
d’alimentation secteur
ou le cordon allumecigares pendant
longtemps, la
température interne de
l’enregistreur risque
d’augmenter. C’est
normal.
• Si l’enregistreur reste
en mode d’arrêt
pendant plus de 10
minutes quand il
fonctionne sur le
courant secteur ou une
batterie de voiture, la
fonction sélectionnée
sera annulée et la
cassette éjectée pour
protéger la bande.
Utilisation de l’adaptateur
d’alimentation secteur
Raccordez l’adaptateur d’alimentation secteur
fourni à la prise DC IN 4.5V.
Remarques sur l’adaptateur d’alimentation secteur
• Utilisez exclusivement l’adaptateur d’alimentation
secteur fourni ou AC-E45HG (non fourni). N’utilisez
aucun autre type d’adaptateur d’alimentation
secteur.
Polarité de la fiche
• Vérifiez que le couvercle du logement de la cassette
est bien fermé avant de débrancher l’adaptateur
d’alimentation secteur ou de retirer les piles.
Le couvercle du logement de la cassette risque de ne
pas se refermer si vous débranchez ou retirez la
source d’alimentation alors qu’il est ouvert. Dans ce
cas, rebranchez l’adaptateur d’alimentation ou
réinsérez les piles.
Utilisation d’une batterie de voiture
Pour alimenter l’enregistreur sur une batterie de
voiture, branchez le cordon allume-cigares Sony DCCE245 (non fourni) sur la prise DC IN 4.5V de
l’enregistreur. Pour les détails, reportez-vous à son
mode d’emploi.
Sources d’alimentation 43
F
Page 100

( Informations supplémentaires
Connexion à un autre appareil
Raccordez un autre appareil à l’enregistreur pour
permettre une utilisation polyvalente de l’enregistreur.
Remarques sur
l'utilisation du
RM-D100K en option
• Alimentez
l’enregistreur sur le
secteur avec
l’adaptateur
d’alimentation secteur.
Quand l’enregistreur
fonctionne sur piles, les
fonctions
télécommandées et les
connexions d’entrée/
sortie numériques
risquent de ne pas
fonctionner
correctement.
• Afin d’éviter tout
problème de
fonctionnement ne pas
laisser le RM-D100K en
plein soleil.
Remarque sur
l'utilisation du SBM-1
Quand vous utilisez le
SBM-1 en option avec
l’adaptateur d’alimentation
secteur, l’alimentation est
fournie par l’enregistreur
lorsque le SBM-1 est
éteint. Si l’enregistreur est
alimenté par les piles,
débranchez l’adaptateur
d’alimentation secteur du
SBM-1 de façon à
économiser les piles.
F
Informations supplémentaires44
Utilisation du kit d’adaptation
RM-D100K en option
Le RM-D100K en option sert de relais entre un
appareil doté d’une prise d’entrée/sortie numérique et
l’enregistreur.
Le RM-D100K permet de raccorder des câbles
optiques et coaxiaux. Effectuez la connexion en
fonction de la prise de l’appareil audio numérique que
vous souhaitez raccorder.
PCM-M1
vers (OPTICAL) I/O
RM-
D100K
vers (COAXIAL) I/O
Platine DAT,
CD, MD,
etc.
Lorsque le RM-D100K est raccordé
Vous pouvez raccorder l’enregistreur à une minuterie
audio pour programmer la lecture ou
l’enregistrement. Le RM-D100K vous permet aussi
d’utiliser la fonction AMS (détection automatique du
début d’une plage) ou la recherche directe ainsi que de
nombreuses autres fonctions à partir de la
télécommande fournie.
Utilisation de l’adaptateur Super Bit
Mapping SBM-1 en option
Le SBM-1 en option permet un enregistrement de
qualité supérieure lorsqu’il est raccordé à
l’enregistreur.
PCM-M1
Microphone
(non fourni)
SBM-1
La telécommande RMT-D100 en option peut être
raccordée au SBM-1 pour la commande à distance.
Toutefois, si le SBM-1 est alimenté sur piles, la RMTD100 ne fonctionnera pas si le SBM-1 est éteint. Si le
SBM-1 est alimenté par l’adaptateur d’alimentation
secteur, la RMT-D100 fonctionnera, même si le SBM-1
est éteint.
 Loading...