

Page 1

Linear PCM
Recorder
Operating Instructions
3-277-770-13(1)
PCM-D50
© 2007 Sony Corporation
Page 2
Owner’s Record
The mo del nu mbe r i s l oca ted at th e rear
pan el and th e s eri al num ber is lo cat ed ins ide
the ba tte ry com par tme nt. Re cord the serial
num ber in th e s pac e p rovided below. Re fer
to the se num ber s w hen eve r y ou cal l u pon
you r S ony de ale r regardin g t his product.
Model No. PCM-D50
Serial No.
WARNING
To reduce the risk of fire o r e lec tri c s hoc k,
do not ex pos e t his ap par atu s t o r ain or
moi stu re.
Do not in sta ll the ap pli anc e i n a co nfi ned
spa ce, su ch as a b ook cas e o r b uil t-i n
cab ine t.
To reduce the risk of fire, do not co ver th e
ven til ati on of the ap par atu s w ith ne wsp ape rs,
tab lec lot hs, cu rta ins , e tc. An d d o n ot pla ce
lig hte d c and les on th e a ppa rat us.
To reduce the risk of fire o r e lec tri c s hoc k,
do not pl ace ob jec ts fil led wi th liq uid s, suc h
as vas es, on th e a ppa rat us.
Con nec t A C p owe r a dap ter to an ea sil y
acc ess ibl e A C o utl et. Sh oul d y ou not ice an
abn orm ali ty in AC pow er ada pte r, disconnect
it from the AC outlet immediately.
Cer tai n c oun tri es may regulate disposal
of the ba tte ry use d t o p owe r t his product.
Ple ase co nsu lt wit h y our lo cal au tho rit y.
You are c aut ion ed tha t a ny cha nge s o r
mod ifi cat ion s n ot exp ressly approv ed in thi s
man ual co uld vo id you r a uth ori ty to ope rat e
thi s e qui pme nt.
Notice for the customers: the following
information is only applicable to equipment
sold in the countries applying EU directives
The ma nuf act urer of this pro duc t i s S ony
Cor por ati on, 1- 7-1 , K ona n M ina to- ku
Tokyo, 10 8-0 075 Ja pan . T he Aut hor ize d
Rep resentative for EMC and prod uct sa fet y
is Son y D eut sch lan d G mbH , H ede lfi nge r
Str ass e 6 1, 703 27 Stu ttg art , G erm any. For
any se rvi ce or gua ran tee ma tte rs, pl eas e
refer to the addres ses gi ven in se par ate
ser vic e o r g uar ant ee doc ume nts .
Disposal of Old Electrical & Electronic
Equipment (Applicable in the European
Union and other European countries with
separate collection systems)
Thi s s ymb ol on the product or on
its pa cka gin g i ndi cat es tha t t his
product shall not be trea ted as
hou seh old wa ste . I nst ead it sh all
be han ded ov er to the ap pli cab le
col lec tio n p oin t f or the recycling
of ele ctr ica l a nd ele ctronic equipment. By
ens uri ng thi s p roduct is disposed of
cor rectly, y ou wil l h elp prevent potential
neg ati ve con seq uen ces fo r t he env ironment
and hu man he alt h, whi ch cou ld oth erw ise be
cau sed by in app ropriate waste handling of
thi s p roduct. The recy cli ng of mat eri als wi ll
hel p t o c ons erv e n atu ral resources . F or more
det ail ed inf orm ati on abo ut recycling of this
product, please contact your local Civic
Office, your household waste disposal
ser vic e o r t he sho p w here you purc has ed the
product.
Disposal of waste batteries (applicable in
the European Union and other European
countries with separate collection
systems)
Thi s s ymb ol on the ba tte ry or on
the pa cka gin g i ndi cat es tha t t he
bat ter y p rovided with this prod uct
sha ll not be treated as household
was te.
On cer tai n b att eri es thi s s ymb ol mig ht be
use d i n c omb ina tio n w ith a che mic al sym bol .
The ch emi cal sy mbo ls for me rcury (Hg) or
lea d ( Pb) are added if the battery contains
more than 0.0005% merc ury or 0. 004 %
lea d.
By ens uri ng the se bat ter ies are disposed of
cor rectly, y ou wil l h elp prevent potentially
neg ati ve con seq uen ces fo r t he env ironment
and hu man he alt h w hic h c oul d o the rwi se be
cau sed by in app ropriate waste handling of
the ba tte ry. The recy cli ng of the ma ter ial s w ill
hel p t o c ons erv e n atu ral resources .
In cas e o f p roducts that for safety,
per for man ce or dat a i nte gri ty reasons
require a per man ent co nne cti on wit h a n
inc orp ora ted ba tte ry, this battery should
be replaced by qualified service staff o nly.
Page 3

To ens ure that the battery will be treat ed
properly, ha nd ove r t he product at endof- lif e t o t he app lic abl e c oll ect ion po int fo r
the recycling of electrical and electron ic
equ ipm ent .
For al l o the r b att eri es, pl eas e v iew th e
sec tio n o n h ow to remove the battery fro m
the product safely. H and th e b att ery ov er
to the ap pli cab le col lec tio n p oin t f or the
recycling of waste batteries.
For mo re detailed information about
recycling of this prod uct or ba tte ry, please
con tac t y our lo cal Ci vic Office, your
hou seh old wa ste di spo sal se rvi ce or the
sho p w here you purc has ed the product.
For the customers in the United States
The fo llo win g F CC sta tem ent ap pli es onl y
to the ve rsi on of thi s m ode l m anu fac tured
for sa le in the US A. Oth er ver sio ns may no t
com ply wi th FCC te chn ica l regulations.
INFORMATION
Thi s e qui pme nt has be en tes ted an d f oun d
to com ply wi th the li mit s f or a C las s B di git al
dev ice , p urs uan t t o P art 15 of th e F CC
Rul es. Th ese li mit s a re designed to prov ide
reasonable prote cti on aga ins t h arm ful
int erf erence in a resi den tia l i nst all ati on.
Thi s e qui pme nt gen era tes , u ses an d c an
rad iat e r adi o f requency energy and, if not
ins tal led an d u sed in ac cordance with the
ins tru cti ons , m ay cau se har mfu l i nte rfe rence
to rad io com mun ica tio ns.
How eve r, there is no gua ran tee th at
int erf erence will not occur in a particular
ins tal lat ion . I f t his eq uip men t d oes ca use
har mfu l i nte rfe rence to radio or television
reception, which can be determined by
tur ning the equipment off a nd on, th e u ser is
enc our age d t o t ry to cor rect the interferen ce
by one or mo re of the following measures :
Reo rie nt or relocate the rec eiv ing an ten na.
Inc rease the separation between the
equ ipm ent an d receiver.
Con nec t t he equ ipm ent in to an out let on
a c ircuit different fro m t hat to wh ich th e
receiver is connected.
Con sul t t he dea ler or an ex per ien ced ra dio /
TV tec hni cia n f or hel p.
You are c aut ion ed tha t a ny cha nge s o r
mod ifi cat ion s n ot exp ressly approv ed in thi s
man ual co uld vo id you r a uth ori ty to ope rat e
thi s e qui pme nt.
If you ha ve any qu est ion s a bou t t his product,
you ma y c all : S ony Cu sto mer In for mat ion
Ser vic e C ent er 1-8 00- 222 -76 69 or
htt p:/ /ww w.sony.com /
Declaration of Conformity
Trade Name: SONY
Mod el: PC M-D 50
Res pon sib le Par ty: So ny Ele ctronics Inc.
Add ress: 165 30 Via Es pri llo ,
San Diego, CA
92127 USA
Teleph one Nu mbe r: 858 -94 2-2 230
Thi s d evi ce com pli es wit h p art 15 of th e
FCC Ru les . O per ati on is sub jec t t o t he
fol low ing tw o c ond iti ons : ( 1) Thi s d evi ce
may no t c aus e h arm ful in ter ference,
and (2 ) t his de vic e m ust ac cep t
any in ter ference re cei ved , i ncl udi ng
int erf erence that may cause undesired
ope rat ion .
Page 4

IMPORTANT
SAFEGUARDS
For yo ur protection, please rea d t hes e s afe ty
ins tru cti ons co mpl ete ly bef ore operating the
app lia nce , a nd kee p t his ma nua l f or fut ure
referen ce.
Carefully observe all warni ngs , p recautions
and in str uct ion s o n t he app lia nce an d i n t he
ope rat ing in str uct ion s, and ad here to them.
INSTALLATION
Water and Moisture – Do not use powerline
ope rat ed app lia nce s n ear wa ter – for
exa mpl e, nea r a ba tht ub, wa shb owl , k itc hen
sin k, or lau ndr y t ub, in a wet ba sem ent , o r
nea r a sw imm ing po ol, et c.
Heat – Do no t p lac e t he app lia nce ne ar or
ove r a ra dia tor or he at register, or wh ere it is
exp ose d t o d irect sunlight.
Ventilation – The slots and openings in
the ca bin et are pro vid ed for ne ces sar y
ven til ati on. To en sure re lia ble op era tio n
of the ap pli anc e, and to protect it from
ove rhe ati ng, th ese sl ots an d o pen ing s m ust
nev er be blo cke d o r c ove red.
Nev er cov er the sl ots an d o pen ing s w ith a
–
clo th or oth er mat eri als .
Nev er blo ck the sl ots an d o pen ing s b y
–
pla cin g t he app lia nce on a bed , s ofa , r ug
or oth er sim ila r s urf ace .
Nev er pla ce the ap pli anc e i n a co nfi ned
–
spa ce, su ch as a b ook cas e, or bui ltin cab ine t, unl ess proper ventilation is
provided.
Accessories – D o n ot pla ce the ap pli anc e
on an uns tab le car t, sta nd, tr ipo d, bra cke t,
or tab le. Th e a ppl ian ce may fa ll, ca usi ng
ser iou s i nju ry to a c hil d o r a n a dul t, and
ser iou s d ama ge to the ap pli anc e. Use
onl y a ca rt, st and , t rip od, br ack et, or ta ble
recommended by Sony.
USE
Power Source – This appliance should be
ope rat ed onl y f rom the type of power source
ind ica ted on th e m ark ing la bel . I f y ou are not
sure of the type of electrical power supplied
to you r h ome , c ons ult yo ur dea ler or lo cal
pow er com pan y. For those appliances
des ign ed to ope rat e f rom battery power,
or oth er sou rces, refe r t o t he ope rat ing
ins tru cti ons .
Grounding or Polarization – This appliance
is equ ipp ed wit h a po lar ize d A C p owe r c ord
plu g ( a p lug ha vin g o ne bla de wid er tha n t he
oth er) , o r w ith a three-wire grounding type
plu g ( a p lug ha vin g a th ird pin for grou ndi ng) .
Fol low th e i nst ruc tio ns bel ow:
For the appliance with a polarized AC
power cord plug:
Thi s p lug wi ll fit in to the po wer ou tle t
onl y o ne way. This is a safety feature.
If you are unable to insert the plug fully
int o t he out let , t ry reversing the plug. If
the pl ug sho uld st ill fa il to fit , c ont act
you r e lec tri cia n t o h ave a sui tab le out let
ins tal led . D o n ot def eat th e s afe ty pur pos e
of the po lar ize d p lug by fo rcing it in.
For the appliance with a three-wire
grounding type AC plug:
Thi s p lug wi ll onl y f it int o a grounding-type
pow er out let . T his is a saf ety fe atu re. If you
are unable to insert the plug into the outlet,
con tac t y our el ect ric ian to ha ve a s uit abl e
out let in sta lle d. Do not de fea t t he saf ety
pur pos e, of the grounding plug.
Overloading – D o n ot ove rlo ad wal l o utl ets ,
ext ens ion co rds or convenience rec ept acl es
bey ond th eir ca pac ity, since this can resu lt in
fire or electric shock.
When not in use – Unp lug th e p owe r c ord
of the ap pli anc e f rom the outlet when left
unu sed fo r a lo ng per iod of ti me.
To dis con nec t t he cord, pull it out by
gra spi ng the pl ug. Ne ver pu ll the pl ug out by
the co rd.
Page 5

Power-Cord Protection – Route the power
cord so that it is not likely to be walked on
or pin che d b y i tem s p lac ed upo n o r a gai nst
the m, pay ing pa rti cul ar att ent ion to th e
plu gs, receptacles, and the point where the
cord exits from the ap pli anc e.
Lightning – For ad ded protection for this
app lia nce du rin g a li ght nin g s tor m, or whe n
it is lef t u nat ten ded an d u nus ed for lo ng
per iod s o f t ime , u npl ug it from the wall outlet
and di sco nne ct the an ten na or cab le sys tem .
Thi s w ill prevent damage to the appliance
due to li ght nin g a nd pow erl ine su rge s.
Attachments – D o n ot use at tac hme nts no t
recommended by Sony, as the y m ay cau se
haz ards.
Cleaning – U npl ug the ap pli anc e f rom the
wal l o utl et bef ore cleaning or polishing it. Do
not us e l iqu id cle ane rs or aerosol cleaners.
Use a clo th lig htl y d amp ene d w ith wa ter
for cl ean ing th e e xte rio r o f t he app lia nce .
Cle an the ap pli anc e o nly as recommended
by Son y.
Object and Liquid Entry – N eve r p ush
obj ect s o f a ny kin d i nto th e a ppl ian ce
through openings as they may touch
dan gerous voltage points or short out
par ts tha t c oul d result in a fire or ele ctr ic
sho ck. Ne ver sp ill li qui d o f a ny kin d o n t he
app lia nce .
SERVICE
Damage Requiring Service – Unp lug th e
app lia nce from the wall outlet and re fer
ser vic ing to qu ali fie d s erv ice pe rso nne l u nde r
the fo llo win g c ond iti ons :
Whe n t he pow er cord or plug is damaged
–
or fra yed .
If liq uid ha s b een sp ill ed or obj ect s h ave
–
fal len in to the ap pli anc e.
If the ap pli anc e h as bee n e xpo sed to ra in
–
or wat er.
The ap pli anc e d oes no t a ppe ar to ope rat e
–
nor mal ly or exh ibi ts a m ark ed cha nge in
per for man ce. – Thi s i ndi cat es a n eed fo r
ser vic e.
If the ap pli anc e d oes no t o per ate no rma lly
–
whe n f oll owi ng the op era tin g i nst ruc tio ns,
adj ust on ly tho se con trols that are
spe cif ied in th e o per ati ng ins tru cti ons .
Imp roper adjustment of other controls ma y
result in damage and will often re qui re
ext ens ive wo rk by a q ual ifi ed tec hni cia n t o
restore th e a ppl ian ce to nor mal op era tio n.
If the ap pli anc e h as bee n s ubj ect to
–
exc ess ive sh ock by be ing dropped, or the
cab ine t h as bee n d ama ged .
Servicing – Do not at tem pt to ser vic e t he
app lia nce yo urs elf as op eni ng or removing
cov ers ma y e xpo se you to da nge rous
vol tag e o r o the r h aza rds. Refer all servicing
to qua lif ied se rvi ce per son nel .
Replacement parts – W hen replacement
par ts are req uired, be sure t he ser vic e
tec hni cia n h as use d replacement parts
spe cif ied by So ny tha t h ave th e s ame
cha rac ter ist ics as th e o rig ina l p art s.
Una uth ori zed su bst itu tio ns may result in fire,
ele ctr ic sho ck, or ot her ha zards.
Safety Check – Upo n c omp let ion of an y
ser vic e o r repairs to the appliance, ask the
ser vic e t ech nic ian to pe rfo rm routine safety
che cks (a s s pec ifi ed by Son y) to det erm ine
tha t t he app lia nce is in sa fe ope rat ing
con dit ion .
Page 6

Table of Contents
Overview
What you can do with the PCM-D50 .. ... .... ....... .... ....... .... ....... .... ....... .... ... .... ......9
Identifying parts and controls .... ....... .... ... .... .... ... .... ....... .... ....... .... ....... .... ... .... .... . 12
Getting Started
Checking the supplied accessories .. ... .... ....... .... ....... .... ....... .... ... .... .... ... .... ...... 17
Step 1: Preparing a power source . .... ....... .... ....... .... ....... .... ... .... .... ... .... ....... .... .. 17
Step 2: Setting the clock .. ... .... ....... .... ....... .... ....... .... ... .... .... ... .... ....... .... ....... .... ...... 19
Recording
Preparation before recording ..... .... ... .... ....... .... ....... .... ....... .... ... .... .... ... .... ....... .... . 21
Recording analog sound ......... .... ....... .... ....... .... ... .... .... ... .... ....... .... ....... .... ....... .... ... 23
Monitoring the recording .... ....... .... ....... .... ....... .... ... .... ....... .... ....... .... ....... .... ....... .... 26
Recording a few seconds in advance, before starting to record
(Pre-recording) ........ .... ... .... ....... .... ....... .... ....... .... ....... .... ... .... ....... .... ....... .... ....... ... 26
Recording with an external microphone .... .... ....... .... ... .... .... ... .... ....... .... ....... . 27
Recording from external equipment (Line Input) ..... .... ... .... .... ... .... ....... .... . 28
Digital recording ........ .... ... .... ....... .... ....... .... ....... .... ....... .... ... .... ....... .... ....... .... ....... .... ... 28
Recording digital signals from external equipment
(Optical Input) ...... ....... .... ....... .... ....... .... ... .... ....... .... ....... .... ....... .... ....... .... ... .... ....... 29
Synchronizing recording with playback (Digital Synchronized
Recording) .... ....... .... ....... .... ... .... .... ... .... ....... .... ....... .... ....... .... ... .... .... ... .... ....... .... ..... 30
Using the remote commander for recording ......... .... ....... .... ... .... ....... .... ...... 30
66
Page 7

Operations after Recording
Playing back recorded audio data (tracks) ..... .... ... .... .... ... .... ....... .... ....... .... .. 31
Quickly locating the point you wish to start playback
(Easy Search) .... .... ....... .... ... .... .... ... .... ....... .... ....... .... ....... .... ... .... .... ... .... ....... .... ...... 33
Adjusting the playback speed (DPC (the Digital Pitch Control
function)) ..... ....... .... ....... .... ....... .... ... .... .... ... .... ....... .... ....... .... ....... .... ... .... .... ... .... ....... 33
Connecting external equipment for playback ..... ....... .... ... .... ....... .... ....... .... 34
Playing back repeatedly ....... .... ....... .... ....... .... ... .... ....... .... ....... .... ....... .... ....... .... ... .. 34
Dividing a track ...... ....... .... ... .... .... ... .... ....... .... ....... .... ....... .... ... .... .... ... .... ....... .... ....... .... 35
Deleting tracks ..... .... ....... .... ... .... .... ... .... ....... .... ....... .... ....... .... ... .... .... ... .... ....... .... ....... .. 35
Storing tracks on a computer .... ....... .... ... .... .... ... .... ....... .... ....... .... ....... .... ... .... .... . 36
Getting StartedOverview Recording
On folder and track file structure ...... ... .... .... ... .... ....... .... ....... .... ....... .... ... .... .... ... 37
Playing back MP3 files copied from a computer .. ... .... .... ... .... ....... .... ....... 38
Menu Operations
Using the menu display ..... .... ... .... ....... .... ....... .... ....... .... ... .... .... ... .... ....... .... ....... .... .. 40
Menu items .... .... ....... .... ....... .... ....... .... ... .... .... ... .... ....... .... ....... .... ....... .... ... .... .... ... .... ...... 41
LED (Indicator lighting)
CLOCK (Date/time settings)
MEMORY (Recording/playback memory)
FORMAT )(Initializing memory)
DELETE ALL )(Deleting all tracks in a folder)
Continued on the next page
Recording Menu Operations Additional Information
77
Operations after
Page 8

Table of Contents (continued)
DELETE TRK (Deleting a track)
DPC (Digital Pitch Control function)
EASY SEARCH (Easy search function)
REC MODE (Sampling frequency/quantifying bit number)
LIMITER (Preventing distortion)
LCF (Low Cut Filter function)
SBM (Super Bit Mapping function)
PRE REC (Pre-recording function)
SYNC REC (Synchronized recording function)
PLUG IN PWR(Plug in power function)
Additional Information
Using a “Memory Stick” (not supplied) ..... .... ....... .... ....... .... ... .... .... ... .... ....... .. 45
Inserting a “Memory Stick” ..... .... ....... .... ....... .... ... .... .... ... .... ....... .... ....... .... ..... 45
Using the “Memory Stick” for recording/playback . .... ... .... ....... .... ..... 46
Maintenance ........ .... ....... .... ....... .... ... .... .... ... .... ....... .... ....... .... ....... .... ... .... .... ... .... ....... .... 47
Troubleshooting . ....... .... ... .... .... ... .... ....... .... ....... .... ....... .... ... .... .... ... .... ....... .... ....... .... .... 48
Error messages ..... ....... .... ... .... .... ... .... ....... .... ....... .... ....... .... ... .... .... ... .... ....... .... ..... 51
Specifications ....... .... ... .... .... ... .... ....... .... ....... .... ....... .... ... .... .... ... .... ....... .... ....... .... ....... .. 54
File Specifications ..... ... .... ....... .... ....... .... ....... .... ... .... .... ... .... ....... .... ....... .... ....... .... ... ... 56
Index . .... .... ... .... ....... .... ....... .... ....... .... ... .... .... ... .... ....... .... ....... .... ....... .... ... .... .... ... .... ....... .... . 58
88
Page 9

9
Overview
What you can do with the PCM-D50
For recording practice sessions
The bu ilt -in mi crophones of the PCM-D50
all ow you to record mu sic al per for man ces
eas ily wi tho ut com pli cat ed mic rophone
set up.
The DP C ( Dig ita l P itc h C ont rol) feature
provides quick or slow playback of a
mus ica l p erf orm anc e, whi ch is bes t s uit ed
for mo del ing yo ur pla yin g o n t he pla yba ck
on the record er. (Page 33)
The op tio nal remote commander (RMPCM 1) all ows yo u t o c ont rol the PCM-D50
ope rat ion s remotely: starting and stopping
recordi ng, di vid ing a tra ck, an d o the r b asi c
ope rat ion s.
You can attach the optional tripod (VCTPCM 1) to the record er.
Continued on the next page
Page 10

10
What you can do with the PCM-D50 (continued)
For outdoor recording
The hi ghl y-s ens iti vit y b uil t-i n m icrophones
ena ble ea sy and hi gh- qua lit y o utd oor
recordi ng.
You can also connect an exter nal
mic rophone to the stereo min i-p lug of th e
PCM -D5 0.
You can use an optional wind scre en (AD -
PCM 1) to reduce the noise caused by wind
or breath.
By con nec tin g t he opt ion al XLR
mic rophone adapter (XLR-1) to the
recorde r, you can use an exter nal
mic rophone via the XLR balance
con nec tio n.
The XL R-1 is ca pab le of pha nto m p owe r
sup ply op era tio n.
The pre-re cording feature all ows yo u t o
buffer sound source s f or a m axi mum of fi ve
sec ond s p rio r t o t he poi nt whe n t he but ton
for record ing is ac tua lly pressed. (Page 26)
Lon g b att ery li fe affordi ng you to record fo r
app roximately 12 hours with four LR6 (size
AA) al kal ine ba tte rie s.
The op tio nal ca rry ing ca se (CK L-P CMD 50)
is bes t s uit ed for ca rry ing PC M-D 50
out sid e. With the supplied belt strap, the
recorde r c an be att ach ed to the be lt.
Page 11
11
Overview
As a high-quality music player
The bu ilt -in hi gh- sen sit ivi ty hea dph one
amp lif ier ac hie ves we ll- bal anc ed and
pow erf ul out put th at cov ers bo th low an d
hig h f requency ranges.
The PC M-D 50 sup por ts dig ita l recordin g
from an externa l d evi ce, al low ing yo u t o
preserve your music library of DAT or MD
med ia jus t a s t hey are in the original digital
recordi ng. (P age 29 )
Lin e c onn ect ion ma kes it po ssi ble to
dig iti ze ana log so und so urces such as an
ana log record di sc or cas set te tap e. (Pa ge
28)
You can also transfer that digitized sound
dat a t o a co mpu ter to st ore them. (Page
36)
MP3 pl ayb ack is su ppo rte d.
The op tio nal ca rry ing ca se (CK L-P CMD 50)
is bes t s uit ed for ca rry ing th e P CM- D50
out sid e. With the supplied belt strap, the
recorde r c an be att ach ed to you r b elt .
Page 12
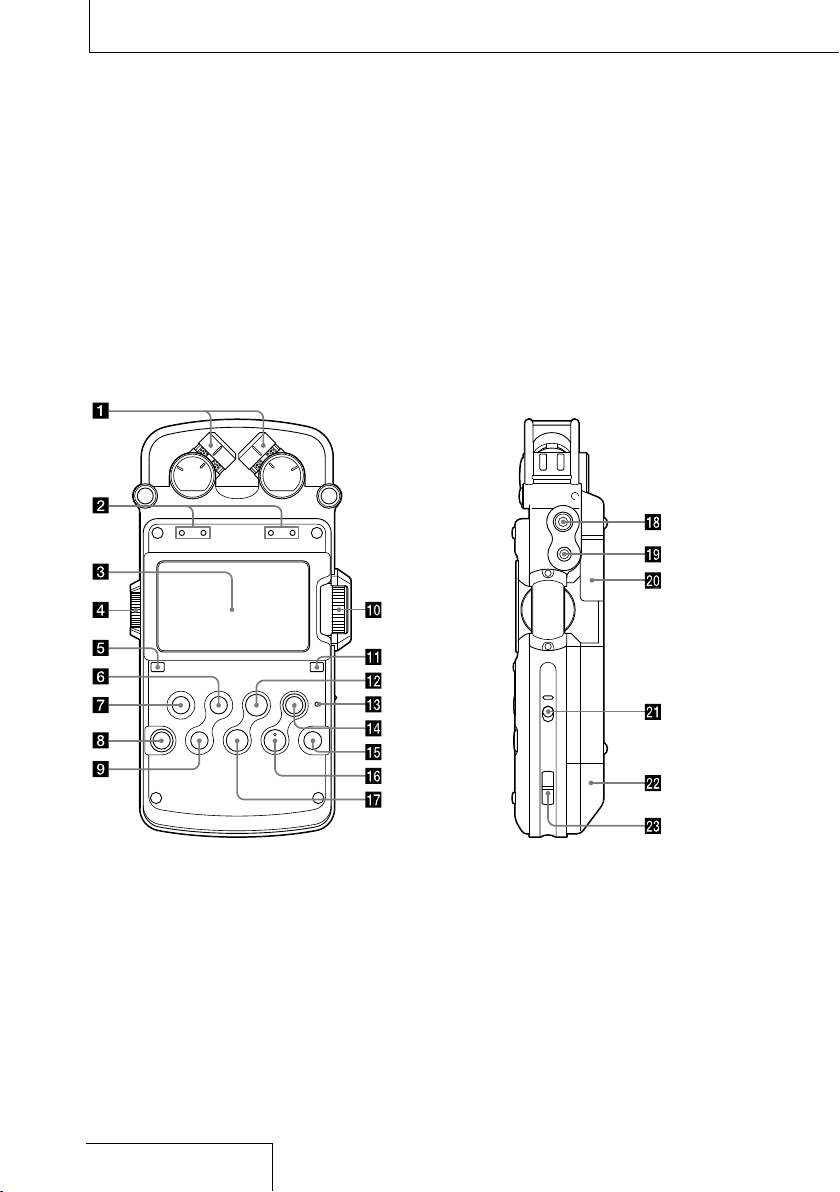
Identifying parts and controls
Front Right side
12
Page 13

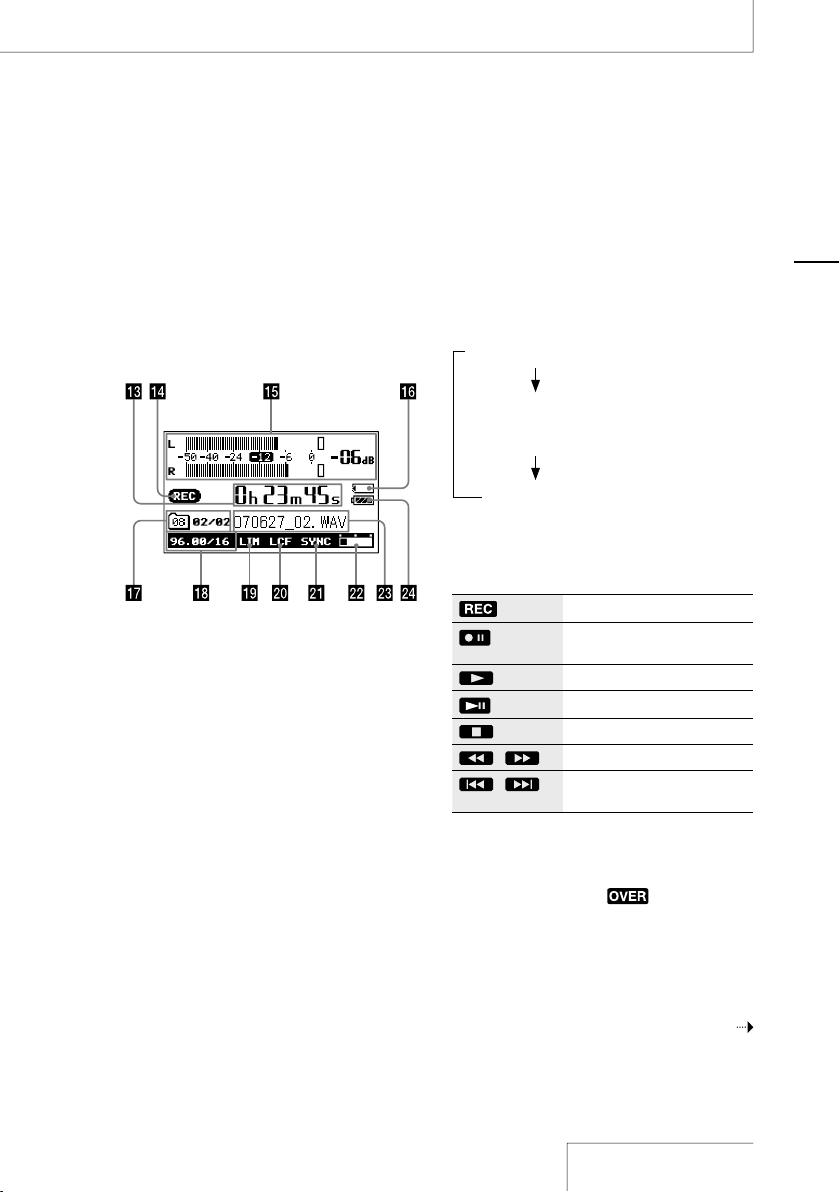
13
Overview
Continued on the next page
Built-in microphones (page 21)
Peak level lamps (L/R) (page 24)
Dis pla ys lef t a nd rig ht pea k l eve ls of an
aud io sig nal in put wi th -12 dB (green) and
OVE R ( red) lamps.
Display (page 15)
Volume dial (page 26)
Adj ust s t he pla yba ck vol ume by tu rning the
dia l t o s et the de sired level (0 to 10) to the
“•” po sit ion .
A-B (repeat A-B) button (page 34)
FF (fast-forward) / (up) button
(pages 19, 32)
(folder)/MENU button (pages 20, 23,
31, 40)
Whe n p ressed briefly, sw itc hes fo lde rs.
Whe n p ressed and held, displays the menu.
LIGHT button
Turns th e b ack lig ht of the di spl ay on or off.
FR (fast-rewind) / (down) button
(pages 19, 32)
REC LEVEL (recording level) dial (page 24)
Adj ust s t he recordi ng vol ume by tu rning the
dia l t o s et the de sired level (0 to 10) to the
“•” po sit ion .
DISPLAY button (page 15)
Swi tch es tim e i nfo rma tio n o n t he dis pla y.
PAUSE button/indicator (pages 24, 25,
32)
ACCESS indicator (pages 18, 45)
Fla she s w hen th e recorder is ac ces sin g
mem ory (e xce pt dur ing record ing ).
REC (recording) button/indicator
(page 24)
DIVIDE button (page 35)
PLAY/ENTER button/indicator
(pages 31)
STOP button (pages 25, 32)
(microphone) jack (page 27)
LINE IN (OPT) (line input (optical)) jack
(pages 28 - 30)
Memory Stick slot (page 45)
POWER switch (page 18)
Turns th e p owe r “ ON” or “O FF.”
Battery compartment lid (page 17)
Slot for a wrist strap
(A str ap is not su ppl ied .)
Page 14
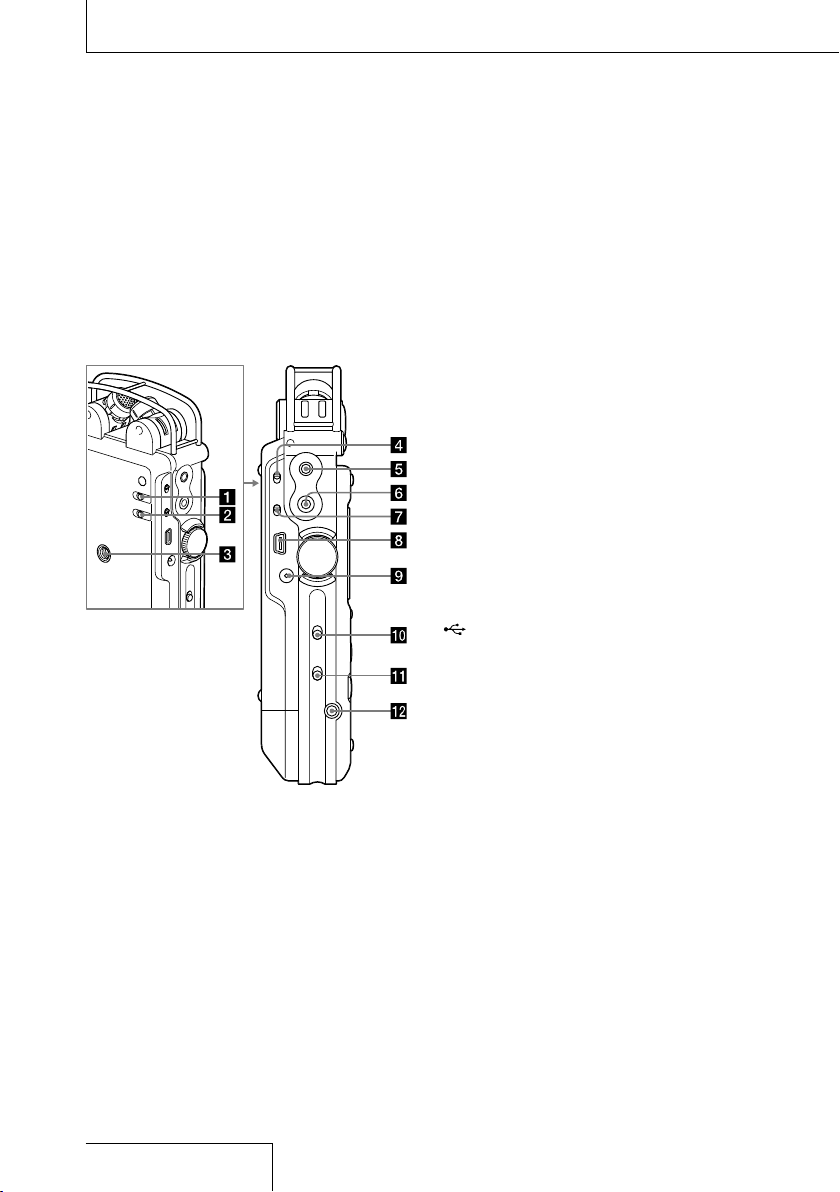
Identifying parts and controls (continued)
Left side
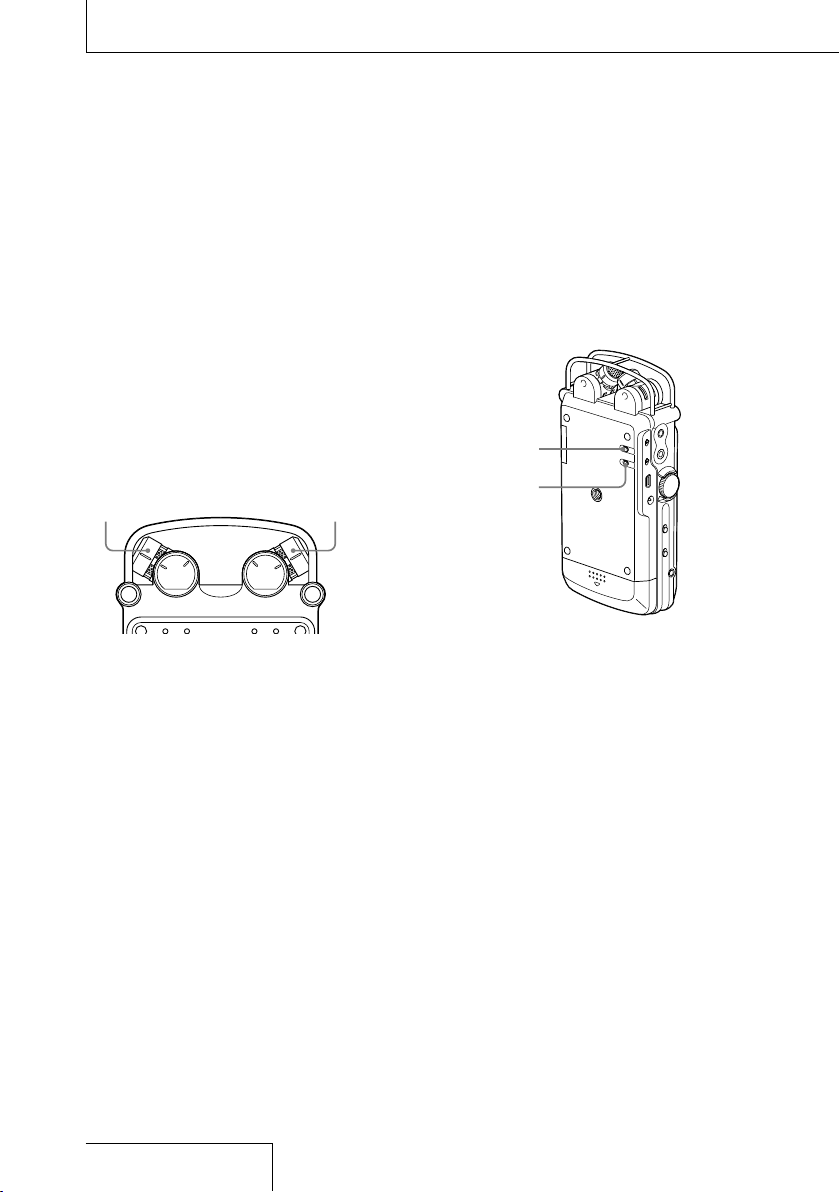
LIMITER switch (pages 22, 43)
LOW CUT FILTER switch (pages 22, 43)
Hole for attaching the tripod (not supplied)
INPUT switch (pages 23, 28, 29, 30)
Whe n s et to “” (m icrophone), reco rds an
aud io sig nal in put from the built-in
mic rophones or an extern al mic rophone that
is con nec ted to th e ja ck.
Whe n s et to “LI NE, ” records an aud io sig nal
out put from extern al equ ipm ent th at is
con nec ted to th e L INE IN (O PT) ja ck.
LINE OUT (OPT) (line output (optical)) jack
(page 34)
(headphone) jack (pages 26, 31)
MIC ATT (microphone attenuator) switch
(page 22)
USB connector (page 36)
DC IN 6V jack (page 19)
HOLD switch
Whe n s et to “ON ,” the bu tto ns on the
recorde r a re locked to pre ven t a cci den tal
ope rat ion . I t i s recommended that you set
thi s s wit ch to “ON ” d uri ng recordi ng and
pla yba ck. To un loc k t he con trols, set it to
“OF F.”
DPC (Digital Pitch Control) switch (pages
33, 42)
REMOTE jack (page 30)
14
Page 15
15
Overview
Display
Time information
Eac h t ime th e D ISP LAY b utt on is pressed,
the ti me inf orm ati on cha nge s a s f oll ows
(Fl ash es whe n t he recorde r i s p aus ed) :
Ela pse d recordin g/p lay bac k t ime
Rem ain ing record abl e t ime of th e
cur rent memory (During playback:
Rem ain ing ti me of the cu rrent track)
Rec orded date
(Du rin g recordin g: Rec ording start date)
Recording/playing status
Dis pla ys as fol low s a cco rding to the curren t
ope rat ion :
Recording
(Flashing)
Recording pause, standby for
recording
Playback
(Flashing)
Playback pause
Stop
/
Fast reverse/forward
/
Go to previous/succeeding
tracks
Level meter/peak values (page 24)
Dis pla ys the le vel me ter an d t he max imu m
val ue of the pe ak lev el. Wh en the le vel
exc eed s t he set va lue , ap pea rs.
Whi le an MP3 fi le is bei ng pla yed , d isp lay s
the ar tis t n ame an d t itl e i nfo rma tio n.
Continued on the next page
Page 16

Identifying parts and controls (continued)
Memory Stick indicator
Dis pla yed wh en the cu rrent memory is a
“Me mor y S tic k.”
Folder number, track numbers
Fol der s a re classified into ( a f old er for
recordi ng and pl ayb ack ) a nd (a fol der fo r
pla yba ck onl y) (pa ge 38) . Track numbers are
dis pla yed as “c urrent track number/total
num ber of tr ack s.”
Recording mode
Dis pla ys the record ing mo de cur rently
spe cif ied in th e m enu in th e s top mo de.
Dur ing pl ayb ack or record ing , d isp lay s t he
recordi ng mod e o f t he cur rent track.
Limiter setting
Dis pla yed wh en the LI MIT ER swi tch is se t t o
“ON .”
LCF setting
Dis pla yed wh en the LO W C UT FILTER switch
is set to “O N.”
SYNC REC setting
Dis pla yed wh en the “S YNC RE C” is set to
“ON .”
Remaining memory amount
Dis pla ys the remaining amount of current
mem ory (p age 25 ).
File information
Dis pla ys the fi le nam e o f t he tra ck.
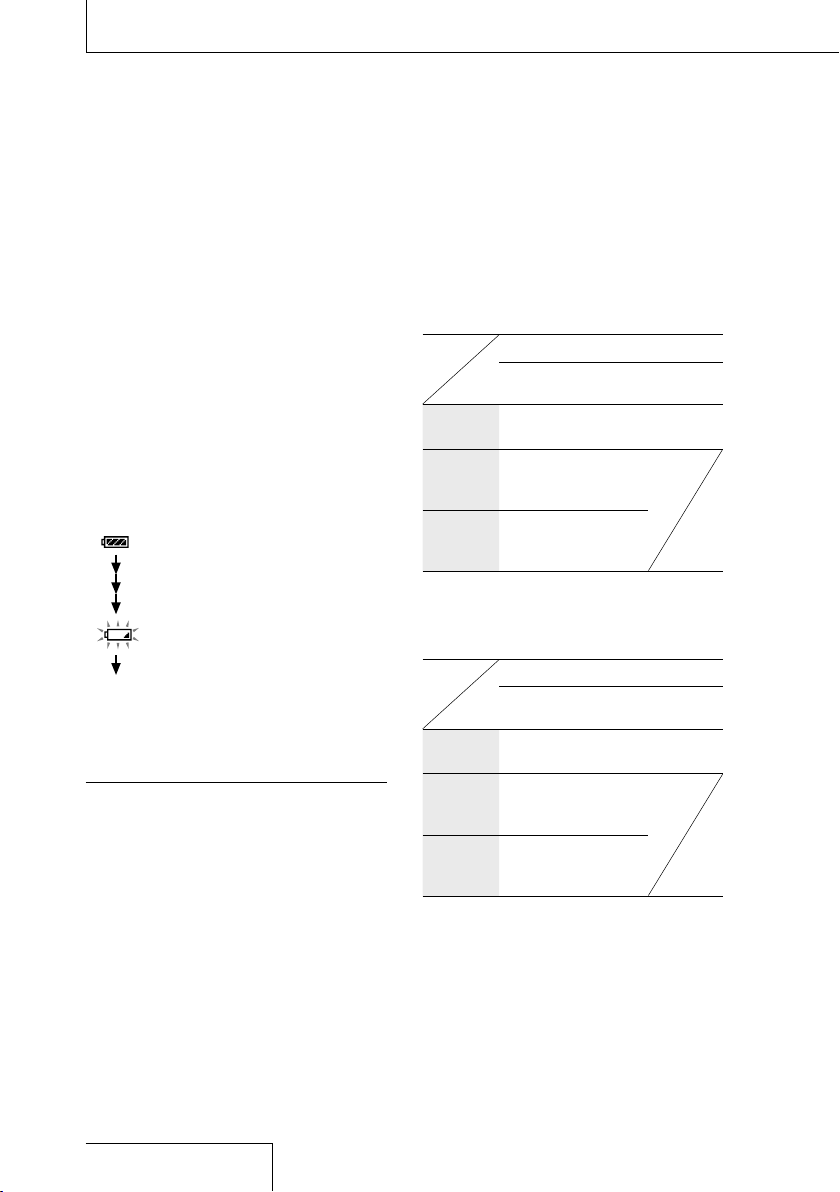
Remaining battery power (page 18)
16
Page 17
Getting Started
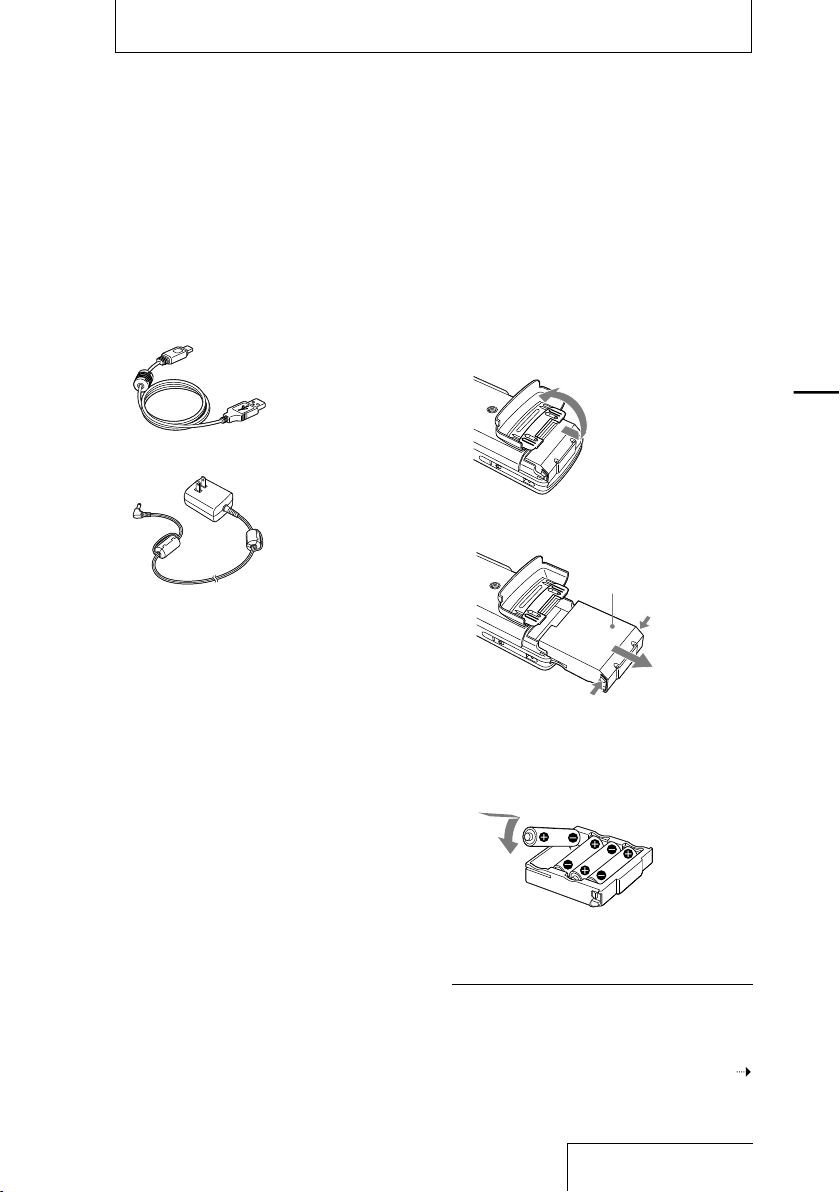
Checking the supplied accessories
USB ca ble (p age 36 )
AC pow er ada pte r ( 6V)1) (p age 19 )
Fou r L R6 (si ze AA) al kal ine ba tte rie s
CD- ROM (“ Sou nd For ge Aud io Stu dio LE ”)
Ope rat ing In str uct ion s ( thi s b ook )
Only fo r th e US an d Ca nad ian models
1)
Only fo r th e US, C anad ian , an d Europe an mode ls
2)
Step 1: Preparing a power source
Use th e s upp lie d L R6 (si ze AA) al kal ine
bat ter ies .
Ope n t he bat ter y c omp art men t l id on the
1
rear of the reco rder.
First slide t he lid
downward a nd then
open it.
Pul l o ut the ba tte ry cas e f rom the
2
recorde r.
2)
Push the butt ons
on both sides to pull it out.
Ins ert fo ur LR6 (s ize AA ) a lka lin e b att eri es
3
Battery case
int o t he bat ter y c ase .
Be sure to insert the batteries with the
and en ds in the ri ght po sit ion .
Getting Started
Ins ert th e b att ery ca se bac k i nto th e
4
recorde r, and close the battery
com par tme nt lid .
Note
Turn off the reco rder pow er befo re t akin g out t he
bat tery cas e.
Continued on the next page
17
Page 18
18
Getting Started (continued)
When you turn on the recorder for the first
time after purchasing
Whe n t he POW ER swi tch is se t t o t he “ON ”
pos iti on, “A CCE SSI NG MEM ORY... ” a ppe ars
on the di spl ay, and the ACCESS indicator
fla she s. Inf orm ati on require d f or ope rat ion is
read into the re corder’s built-in memory.
The n, the di spl ay cha nge s t o t he clo ck set
men u s inc e t he clo ck is not se t w hen yo u
purchase the rec order.
When to replace the batteries
Whe n u sin g b att eri es, th e remaining battery
pow er is ind ica ted on th e d isp lay.
The re is suff ici ent ba tte ry pow er.
Rep lac e a ll fou r b att eri es.
“CH ANG E B ATTER Y” app ear s o n t he
dis pla y; the re is no power left.
The record er wil l n ot ope rat e.
Notes on using rechargeable batteries
You ca n u se r echa rgea ble bat teri es with the
reco rder.
Eve n if ful ly- char ged rech arg eabl e ba tte ries are
ins erte d, t he batt ery ind icat or may not sho w th e fu ll
sta tus.
Use a recha rger to recharg e ba tte ries at room
tem pera ture s.
Use the fol low ing char ger and rec harg eab le
bat teri es f or the reco rder :
Nic kel meta l h ydri de r echa rge able bat ter y:
–
NH- AA-B 4F
Qui ck b atte ry char ger for nic kel met al h ydr ide
–
rech argeabl e ba tte ries : BC G-3 4HE
Battery life
Whe n u sin g S ony LR 6 ( siz e A A) alk ali ne
bat ter ies (s upp lie d)* :
Linear PCM MP3
96 kHz
24 bit
Playback Approx.
20 hours
Recording
while
Approx.
12 hours
44 kHz
16 bit
Approx.
20 hours
Approx.
14 hours
128 kbps
44.1 kHz
Approx.
26 hours
monitoring
Recording
without
Approx.
20 hours
Approx.
24 hours
monitoring
Whe n u sin g S ony ni cke l m eta l h ydr ide
rechargeable batteries NH-AA-B4F (not
sup pli ed) *:
Linear PCM MP3
96 kHz
24 bit
Playback Approx.
25 hours
Recording
while
Approx.
13 hours
44 kHz
16 bit
Approx.
25 hours
Approx.
15 hours
128 kbps
44.1 kHz
Approx.
27 hours
monitoring
Recording
without
Approx.
20 hours
Approx.
25 hours
monitoring
App roximate val ues for con tin uous rec ordi ng/
*
pla ybac k us ing the bui lt- in m emory a t an am bien t
room temper atur e wi th the LIMI TER swi tch set to
“OF F,” and “LED ” o f th e menu set to “OFF.” The
bat tery lif e m ay b ecom e s hort er depe ndin g o n th e
ope rati onal co ndit ions .
Page 19

19
Getting Started
To operate with the AC power adapter
(Only for the USA and Canada models)
Con nec t t he sup pli ed AC pow er ada pte r t o
the DC IN 6V ja ck.
to a wall
outlet
AC power
adapter
(supplied)
to the DC
IN 6V jack
Notes on the AC power adapter
Use on ly the su ppl ied AC
pow er ada pte r. Using any
oth er AC pow er ada pte r
may ca use a mal fun cti on.
Polarit y of the pl ug
Note
The recorder is acc essing memo ry whil e
“AC CESS ING MEM ORY...” ap pear s on th e di spla y
or the ACCE SS indi cato r f lash es. Dur ing thi s ti me,
do not remo ve o r i nser t ba tte ries and do not
dis conn ect or conn ect the AC power a dapt er, or th e
USB cab le. Doi ng s o ma y d amag e the d ata.
Step 2: Setting the clock
Rec orded audio files (tracks) are nam ed
usi ng the da te and ti me of the cl ock . B y
set tin g t he clo ck bef ore rec ording, the
recordi ng’s d ate an d t ime wi ll be cor rectly
sav ed.
1
Whe n t he recorde r i s t urned on before
the cl ock ha s b een se t, “SE T C LOC K”
app ear s o n t he dis pla y. After about 3
sec ond s, the me ssa ge dis app ear s
aut oma tic all y, and the “CLOCK” display
of the me nu app ear s.
2
Press the FF/ an d FR/ bu tto ns
to set th e y ear (y ), and th en press the
PLAY/ ENT ER but ton to fi x t he val ues .
3
Rep eat st ep 2 t o s et the mo nth (m ), day
(d) , h our, and minute. Then press th e
PLAY/ ENT ER but ton af ter se tti ng the
min ute to st art th e c loc k.
Continued on the next page
Page 20

Getting Started (continued)
To reset the clock
1 Whi le the record er is sto ppe d, press and
hol d t he /MEN U b utt on unt il the me nu
is dis pla yed .
2 Press the
to sel ect “C LOC K,” an d t hen press the
PL AY/EN TER bu tto n.
The “C LOC K” dis pla y a ppe ars .
3 Press the
to sel ect “y,” “m,” and “d,” or the time
dis pla y, and then pre ss the PL AY/
ENT ER but ton to fi x t he val ue.
4 Fol low st eps 2 and 3 of “St ep 2: Set tin g
the cl ock ” t o reset the clock.
Note
If you leav e t he r ecorder for app roximate ly s eve ral
wee ks w ith no batt erie s i nser ted, th e da te and time
cha nge to t he defa ult set ting s. In t his cas e, reset
the clo ck.
FF/ an d FR/ bu tto ns
FF/ an d FR/ bu tto ns
20
Page 21

21
Recording
Recording
Preparation before recording
Whe n y ou pos iti on the record er, place it so
tha t t he mic rophones point to the sound
sou rce. For accurate reco rding of left and
rig ht sou rces, place the rec order with its
front side facing upward (se e t he ill ust rat ion
bel ow) .
The pl ace men t o f t he recorde r a nd the
direction of the micro pho ne dep end on th e
sou nd sou rce, the microph one , t he set tin gs
of the record er, etc. It is recommended that
you tr y recordin g w ith th e recorder in va rio us
pos iti ons an d s ett ing s a fte r referring to the
ill ust rat ion be low an d t he cha rac ter ist ics of
the mi crophone.
Example: Placement when recording a
musical performance using the built-in
microphones
For be st results, place the rec order about 2
to 3 m (6 .56 to 9. 84 ft) from the sound
sou rce. Referring to the characteristics of
the bu ilt -in mi crophones, adjust dire cti on of
the record er and th e a ngl e o f t he
mic rophones.
Sound source
Approx. 2 to 3 m
(6.56 to 9.84 ft )
Place t he r ecor der with it s
fron t side faci ng upwa rd a nd
the bui lt-i n microphon es
pointin g at the so und sou rce.
Tripod (not sup plied)
On the characteristics of the built-in
microphones
The bu ilt -in mi crophones are un idi rectional.
You can change the direc tio ns of the
mic rophones.
When rotating both capsules of the
microphones to 90˚ to face inside (X-Y
position)
The mi crophone on the right gathers sound
from the left; the microp hon e o n t he lef t
records so und from the right.
You can obtain natural and pro fou nd ste reo
sou nd recordi ng. Th is pos iti on is
recommended for rec ording close-by sound
sou rces such as a solo performance or a
ses sio n o f t wo or three people.
How eve r, if you place the microph one s t oo
clo se to the so und so urce, please note that
the mi crophones may catch the sounds
reversely.
Records
sound f rom
the rig ht.
Records
sound f rom
the lef t.
Continued on the next page
Page 22
22
Recording (continued)
When rotating both capsules of the
microphones to 120˚ to face outside (Wide
stereo position)
The mi crophone on the right rec ords sound
from the right; the micro pho ne on the le ft
records so und from the left.
You can obtain dynamic stereo sou nd
recordi ng. Th is pos iti on is recommended for
recordi ng a remote sound source suc h a s a
cho rus , a n o rchestra, or other performance
of a l arg e n umb er of peo ple .
Records
sound f rom
the lef t.
Records
sound f rom
the rig ht.
To switch the microphone input sensitivity
Use th e M IC ATT s wit ch.
Usu all y s et it to the “0 ” p osi tio n. Whe n
recordi ng lou d s oun ds, se t i t t o t he “20 ”
pos iti on.
To record according to sound sources
You can change the LOW CUT FILTER
swi tch an d L IMI TER sw itc h s ett ing s
acc ording to the sound sourc es.
LIMITER switc h
LOW CUT FILTER
To reduce the noise caused by wind or
switch
breath, set the “LCF” fro m t he men u a nd
set th e L OW CUT FI LTER switch to “ON.”
To reduce the distortion that may be
cau sed by a sud den in put of lo ud sou nd,
set th e “ LIM ITE R” from the menu and set
the LI MIT ER swi tch to “O N.”
To position the recorder using the tripod
(not supplied)
By att ach ing an op tio nal tr ipo d ( VCT-PCM1)
to the ho le on the ba ck of the record er, you
can ad jus t t he ang les of th e recorder an d t he
mic rophones more precisely. This also
prevents noise caused when holding the
recorde r i n y our ha nd.
To use the wind screen (not supplied)
By fit tin g t he opt ion al win d s creen (ADPCM 1) to the bu ilt -in mi crophones, you can
reduce noise caused by wind or bre ath th at
hit s t he mic rophones dire ctl y.
Page 23

23
Recording
Recording analog sound
Thi s s ect ion ex pla ins ho w t o record a nal og
sou nd sig nal s f rom the line output of an
ext ernal device or by using the built-in or
ext ernal microp hon es.
Recording using the built-in microphones
Thi s s ub- sec tio n e xpl ain s h ow to record
sou nd sou rces in the built-in memory with
the bu ilt -in mi crophones.
To cha nge sa mpl ing frequency, quantifying
bit nu mbe r, or the memory drive for a
recordi ng, go to th e m enu di spl ay (pa ge 40) .
The de fau lt sam pli ng frequency and
qua nti fyi ng bit nu mbe r a re “44.10 kHz
16 bit .”
1
Pos iti on the record er and th e b uil t-i n
mic rophones refe rri ng to “Preparation
bef ore rec ording” (page 21).
2
Set th e I NPU T s wit ch to the “”
(mi crophones) position.
3
Press the /MEN U b utt on.
The sc reen used to select a folder is
dis pla yed .
Current ly selected fold er
Continued on the next page
PAUS E button/
indicator
REC LEVEL dia l
Volume d ial
INPUT switch
/MENU button
REC button/
indicator
PLAY/ENTER
button
STOP button
FR/ button
FF/ button
jack
LINE IN (OPT)
jack
Page 24

24
Recording (continued)
Press the FF/ an d FR/ bu tto ns
4
to sel ect th e d esi red folder, and press the
PL AY/EN TER bu tto n.
Fol der s 0 1 t o 1 0 a re for saving re corded
tra cks . You can reco rd a maximum of 99
tra cks in ea ch fol der
Press the RE C b utt on.
5
The record er sta nds by fo r recordin g, and
fl ash es on the di spl ay.
Turn the RE C L EVE L d ial to ad jus t t he
6
recordi ng lev el whi le referring to the
dis pla y.
You can check the rec ording level on
bot h t he pea k m ete r o f t he dis pla y a nd
the pe ak lev el lam ps. Ad jus t t he lev el
clo ser to –1 2dB , i nto an ap propriate
ran ge tha t i s s uit abl e f or you r s oun d
sou rce.
When checking the level on the peak
meter of the display
Whe n recordin g s oun d t hat ha s “ sha rp
att ack ” p art s s uch as pe rcussive sound,
use th e p eak me ter to ch eck th e l eve l.
If a ppe ars wh en the ma xim um
pea k v alu e i s o utp ut, di sto rti on may
occ ur.
Peak indicato r ( crest v alu e
of input sign al)
When checking the level on the peak level
lamps
The pe ak lev el lam ps for le ft and ri ght
cha nne ls lig ht acc ording to the input
sig nal le vel s.
If the “O VER ” l amp li ght s u p i n red (when
the record ing le vel ex cee ds –1d B),
dis tor tio n m ay occ ur.
Peak level la mps
-12 dB (green): Dis tortion will not oc cur.
(Record ing level is –12 to –1dB.)
OVER (red) : Recordin g level is mo re
than –1dB. Lo wer the level.
Note
Dur ing digi tal rec ording, the pea k le vel lam ps
do not ligh t.
Press PL AY/EN TER (o r PAUS E)
7
but ton .
The st and by for record ing is ma de
released, and re cording starts. The
lig hts on th e d isp lay wh ile record ing is in
progres s.
When recording level adjustment is
unnecessary
In ste p 5, p ress the PL AY/EN TER bu tto n
whi le pressing and holding the RE C
but ton . R eco rding starts immediately.
Maximum peak val ue
Page 25

25
Recording
To pause recording
Press the PAUSE bu tto n. The fl ash es
on the di spl ay. Press th e b utt on aga in to
restart re cording.
The record er doe s n ot sta rt recordi ng aga in
aut oma tic all y. Be sure t o p ress the PAUS E
but ton ag ain to restart reco rding.
To stop recording
Press the STO P b utt on.
Dividing a track during recording
Dur ing record ing , p ress the DIVIDE button at
the po int wh ere you want to divide a track.
Rec ording continues as a new track,
suc cee din g t he cur rent track. In the same
way as a new record ing , t he new tr ack wi ll
hav e a ne w n ame .
Note
Dep endi ng o n t he “ REC MOD E” s etting, you ma y no t
be able to div ide a tr ack eve n if rem ain ing reco rdin g
tim e is sev era l te ns o f s econ ds.
On the display of remaining recordable time
Whe n t he remaining rec ordable time
bec ome s l ess th an 10 min ute s, the
remaining rec ordable time flashes on the
dis pla y.
Re maining re cordabl e t ime*
Whe n t he remaining time runs out,
“ME MORY FULL” appears and re cording
sto ps.
Whe n th e re main ing recordab le time is more th an 1 0
min utes , th e i con that rep rese nts remaini ng m emo ry
amo unt appe ars . Wh en m emo ry i s unuse d, “ 100 %”
app ears .
Notes
Whi le i s li t o n th e di spl ay, do not rem ove the
bat teri es o r t he A C po wer ada pter. Doing s o ma y
dam age the dat a.
If the reco rder rem ains in sto p mo de for abou t 1 0
min utes or lon ger, t he r ecor der will en ter low- pow er
con sump tion mo de a utom ati call y. Pow er, ho wev er,
is cons umed du ring the lo w-po wer mod e. W hen you
are not goi ng t o u se t he r ecor der, p leas e turn off the
pow er.
Noi se m ay b e re cord ed if a n ob jec t, s uch as your
fin ger, e tc., acc ide ntal ly rubs or scratch es t he
reco rder dur ing rec ordi ng.
Do not conn ect the USB ca ble to the reco rder
dur ing reco rdin g. D oing so sto ps recording
aut omat ical ly (bec ause co nnec tion wi th a co mput er
has pri orit y).
For recordin g w ith a sampl ing freq uency o f 96 kH z,
we recommen d th at you will fo rmat the me mory
bef orehand in o rder to wri te d ata more eff ici entl y.
If the size of a t rack ex ceed s 2 GB duri ng recording ,
a n ew t rack is cre ated aut oma tica lly and the excess
por tion wil l b e re corded a s a new tra ck.
Continued on the next page
*
Page 26

26
Recording (continued)
Monitoring the recording
Con nec t o pti ona l h ead pho nes or ea rph one s
to the (h ead pho ne) ja ck of the record er to
mon ito r t he recordi ng sou nd. Th e v olu me of
mon ito red sound can be adjusted by turn ing
the vo lum e d ial .
The vo lum e o f m oni tored sound does not
affect the re cording volume.
Headphones
(not supplied )
to the
(headphone)
jack
Stereo
mini plug
Notes
If you tur n up the vo lume ex cess ivel y o r pl ace the
hea dpho nes nea r th e mi crop hon e wh ile mon itor ing
reco rdin g, t he micr opho ne m ay pick up the sou nd
from the he adph one s, c ausi ng acou stic fe edba ck
(ho wlin g so und ).
For bes t re sult s, use enca psu late d-ty pe
hea dpho nes, wh ich have le ss s ound le akag e.
Recording a few seconds in advance, before starting to record (Pre-recording)
The pre-re cording feature all ows yo u t o
record sou nd sou rces for a maximum of five
sec ond s p rio r t o t he poi nt whe n t he
recordi ng is sta rte d.
Sounds for 5
seconds are buffe red
in the memory
Press REC to enter
on the rec ording
standby mode.
Whi le the record er is sto ppe d, press and
1
hol d t he /MEN U b utt on unt il the me nu
is dis pla yed .
Press the FF/ an d FR/ bu tto ns
2
to sel ect “P RE REC ” ( pre-rec ording), and
press the PLAY/ENTER button.
The “P RE REC ” d isp lay ap pea rs.
Press the FF/ an d FR/ bu tto ns
3
to sel ect “O N,” a nd press the PLAY/
ENT ER but ton to fi x t he set tin g.
Fol low st eps 2 and 5 of “Re cording using
4
the bu ilt -in mi crophones” (pages 23 and
24) to ma ke the record er ready to reco rd.
Press PLAY (or
PAUS E).
Recordi ng
starts.
Page 27

27
Recording
The record er sta nds by fo r recordin g, and
ap pea rs on the di spl ay. Sounds for
the la st 5 s eco nds are buffe red in the
mem ory.
Number of sec ond s to be
buffered in the m emo ry
5
Press the PL AY/EN TER (o r PAUS E)
but ton
The st and by for record ing mo de is
released, and re cording starts. Sounds
are saved for the 5 seconds prior to the
poi nt the bu tto n i s p ressed.
Notes
Whe n th e re main ing recordab le time is les s th an 10
sec onds , th e p re-re cord ing fun ctio n is di sabl ed.
Dur ing digi tal rec ording, the pre- reco rdin g fu nct ion
is disa bled .
If it d oes not tak e 5 sec onds betwee n st eps 4 a nd
5, prere cord ing is done onl y f or t hese se cond s.
Recording with an external microphone
You can connect an optional externa l
mic rophone to the reco rder.
1
Con nec t a n e xte rnal microph one to th e
(m icrophone) jack of the re corder,
and ad jus t t he pos iti on of the
mic rophone. For the characteristics of the
mic rophone, refe r t o t he ope rat ing
ins tru cti ons su ppl ied wi th it.
E xte rna l m icropho ne
( not supplied)
to the
jack
Whe n y ou con nec t a n e xte rnal
mic rophone to the (m icrophone) jack
of the record er in sto p m ode , t he PLU G
IN PWR me nu is dis pla yed . To u se a p lug
in pow er mic rophone, select “ON.” If you
sel ect “O FF,” the plug in power function is
dis abl ed.
2
Fol low st eps 1 and 7 of “Re cording using
the bu ilt -in mi crophones” (pages 23 and
24) to st art record ing .
Notes
Whe n an ext ern al micro pho ne i s conne cted to the
(m icrophon e) j ack of the reco rder, the built-i n
mic rophones can not be used fo r re cording.
Whe n “P LUG IN PWR” is set to “ON, ” the reco rder
sup plie s po wer to a co nne cted plug-i n po wer
mic rophone.
Continued on the next page
Page 28
28
Recording (continued)
Recording from external equipment (Line Input)
You can connect an externa l d evi ce suc h a s
a C D p lay er, MD player, or DAT player to the
recorde r a nd record its pl ayb ack so und .
Con nec t t he aud io out put ja cks of th e
1
ext ernal equipment to the LINE IN (OPT)
jac k o f t he recorde r b y u sin g a n o pti ona l
aud io cab le.
CD/MD/DAT pl aye r
to the LINE
IN (OPT)
jack
Audio cable ( not
supplied)
Set th e I NPU T s wit ch to the “L INE ”
2
pos iti on.
Fol low st eps 3 and 7 of “Re cording using
3
the bu ilt -in mi crophones” (pages 23 and
24) .
Sta rt pla yba ck on the ex ter nal equipment.
4
Press the PL AY/EN TER (o r PAUS E)
5
but ton wh ere you want to start rec ording.
The st and by for record ing mo de is
released, and re cording starts.
Digital recording
Thi s s ect ion ex pla ins di git al recordi ng:
recordi ng dig ita l s oun d s ign als from an
ext ernal digital device such as a CD or DAT
pla yer.
When digital sig nals are i nput
Digital recording signals the recorder
supports
The record er sup por ts the fo llo win g d igi tal
sig nal s w hen a dig ita l d evi ce suc h a s a CD ,
MD or DAT p lay er is con nec ted to th e L INE
IN (OP T) jac k.
Whe n i nco mpa tib le sig nal s a re input,
“UN KNO WN DATA” is displayed and you
can not record th e s ign als .
Lin ear PC M 4 4.1 /48 .0/ 96 kHz di git al
sig nal s a re supported.
You cannot reco rd the copyrighted digital
sig nal s ( SCM S: Ser ial Co py Man age men t
Sys tem ). If suc h s ign als are input, “NO
DIG ITAL COP Y” is dis pla yed . S ome di git al
dev ice s o utp ut cop yri ght ed dig ita l s ign als .
For ex amp le, an MD or DAT med ia
con tai nin g c opy rig hte d recorded ma ter ial
out put s c opy rig hte d d igi tal si gna ls, wh ich
can not be record ed wit h t he recorde r.
Whe n t he sam pli ng qua nti fyi ng bit nu mbe r
is 16 bit s o r l ess , o r u nst abl e, it is
recorde d a t t he 16 bit ra te. Ot her wis e, it is
recorde d a t 2 4 b its .
Page 29

29
Recording
Notes
Dur ing digi tal rec ording, the fol lowi ng f eat ures
can not be u sed :
Set ting the rec ordi ng leve l/MI C ATT swi tch /LIM ITER
swi tch/ Sett ing the rec ordi ng m ode /LCF set tin g/SB M
set ting /pre -rec ordi ng
Whe n th e re main ing recordab le time is les s th an 10
sec onds , di git al r ecording may be dis able d.
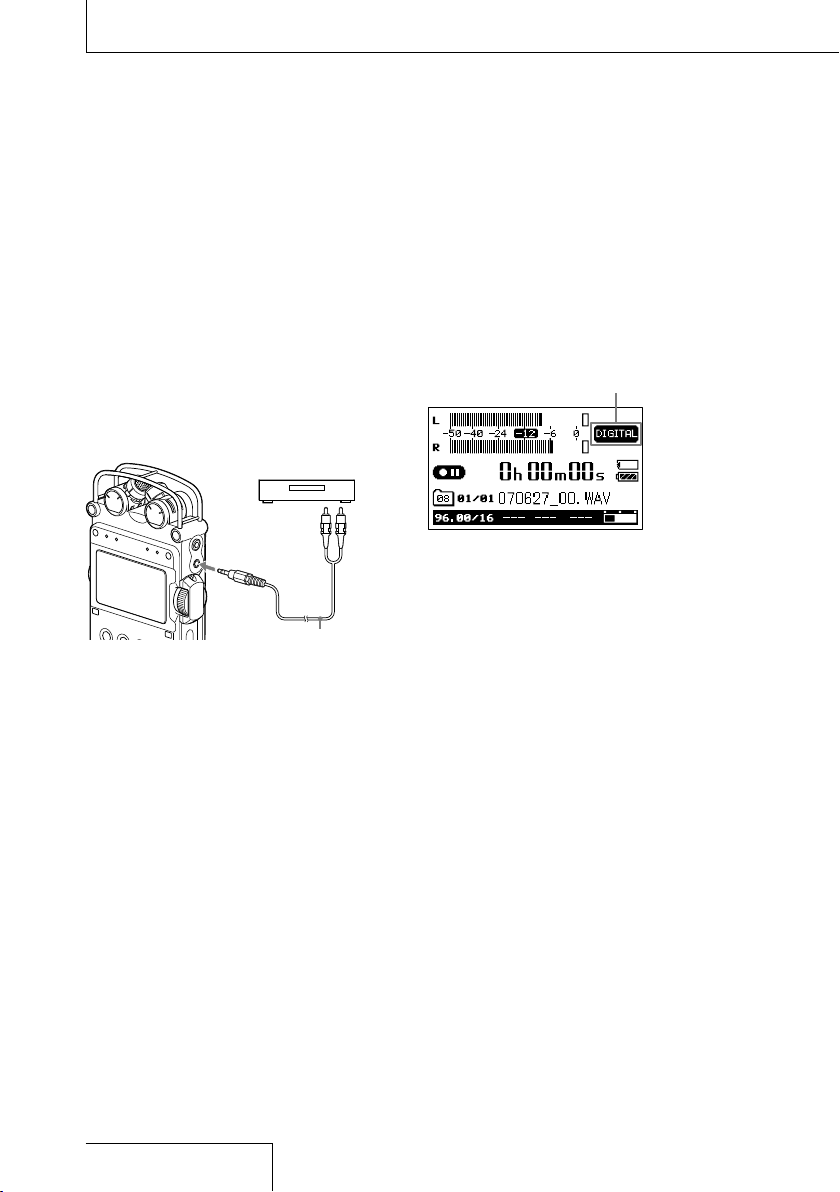
Recording digital signals from external equipment (Optical Input)
1
Con nec t t he aud io out put ja cks of
ext ernal digital equipment to the LINE IN
(OP T) jac k o f t he recorde r b y u sin g a n
opt ion al opt ica l d igi tal ca ble .
Optical digit al cable
(not supplied )
Digital audio pl ayer
to the LINE
IN (OPT)
jack
2
Set th e I NPU T s wit ch to the “L INE ”
pos iti on.
3
Whi le the record er is sto ppe d, press and
hol d t he /MEN U b utt on unt il the me nu
is dis pla yed .
4
Press the FF/ an d FR/ bu tto ns
to sel ect “S YNC RE C” (sy nch ronized
recordi ng) , a nd press the PLAY/
ENT ER but ton .
The “S YNC RE C” dis pla y a ppe ars .
5
Press the FF/ an d FR/ bu tto ns
to sel ect “O FF,” and pre ss the PLAY/
ENT ER but ton to fi x t he set tin g.
6
Fol low st eps 3 and 6 of “Re cording using
the bu ilt -in mi crophones” (pages 23 and
24) .
7
Sta rt pla yba ck on the ex ter nal equipment.
8
Press the PL AY/EN TER (o r PAUS E)
but ton wh ere you want to start rec ording.
The st and by for record ing mo de is
released, and re cording starts.
Tips
Dur ing reco rdin g, y ou can paus e re cord ing or divi de
a t rack .
To sta rt r ecor ding aut oma tica lly wit h tr ack
inf orma tion fro m a n ex ter nal device, see
“Sy nchroniz ing reco rdin g wi th play back (D igit al
Syn chronize d Re cord ing)” ( page 30 ).
Continued on the next page
Page 30

Recording (continued)
Synchronizing recording with playback (Digital Synchronized Recording)
Som e p ort abl e d igi tal de vic es suc h a s
por tab le CD/ MD/ DAT p lay ers do no t o utp ut
dig ita l s ign als wh ile pl ayb ack is st opp ed.
With the signals from th ose de vic es, yo u c an
sta rt recordi ng aut oma tic all y ( Dig ita l
Syn chronized Record ing ).
Con nec t t he aud io out put ja cks of th e
1
ext ernal digital equipment to the LINE IN
(OP T) jac k o f t he recorde r u sin g a n
opt ion al opt ica l d igi tal ca ble .
Set th e I NPU T s wit ch to the “L INE ”
2
pos iti on.
Whi le the record er is sto ppe d, press and
3
hol d t he /MEN U b utt on unt il the me nu
is dis pla yed .
Press the FF/ an d FR/ bu tto ns
4
to sel ect “S YNC RE C” (sy nch ronized
recordi ng) , a nd press the PLAY/
ENT ER but ton .
The “S YNC RE C” dis pla y a ppe ars .
Notes
Whe n a diff eren t di gital s igna l i s in put, it is reco rded
as a ne w tr ack sin ce d iffe rent si gnal s ca nno t be
sav ed i n a tra ck.
Dur ing digi tal rec ording, the cou nter dis pla y mi ght
sho w ap prox imat ely one sec ond lat er t han the
act ual reco rdin g.
Dur ing digi tal rec ording f rom a CD /MD/DAT p layer,
the recorder ma y fa il in s ynch roni zed reco rdin g
mod e de pend ing on the typ e of source dat a or
ope rati ons att empt ed.
We c annot g uara nte e th e op era tion of all typ es of
CD/ MD/D AT pl ayer s. S ome ext ern al d evi ces you
use may not op erat e pr oper ly.
Whe n th e re main ing recordab le time is les s th an 10
sec onds , yo u m ay n ot b e a ble to use sync hron ized
reco rdin g fu nct ion.
Whe n yo u ar e re cord ing soun d a s th e 99th trac k i n
a f olde r, the dig ita l sy nchroniz ed reco rding do es n ot
wor k an d re cord ing continu es a s t he 9 9th tra ck i n
the fol der.
Press the FF/ an d FR/ bu tto ns
5
to sel ect “O N,” a nd press the PLAY/
ENT ER but ton to fi x t he set tin g.
Fol low st eps 3 and 5 of “Re cording using
6
the bu ilt -in mi crophones” (pages 23 and
24) to ma ke the record er sta ndb y, ready
for record ing .
Sta rt pla yba ck on the ex ter nal equipment.
7
With track information from th e
con nec ted ex ter nal device, rec ording
sta rts au tom ati cal ly. When tracks of the
pla yba ck sig nal s s wit ch, record ing
con tin ues as a new tr ack .
Using the remote commander for recording
You can use the optional re mot e c omm and er
(RM -PC M1) to co ntrol reco rding operations.
Con nec t t he opt ion al remote commander
1
to the RE MOT E j ack of th e recorder.
To the
REMOTE
jack
Press the approp ria te but ton s o n t he
2
remote commander to control recorde r
ope rat ion s s uch as record ing , p aus ing
and st opp ing record ing , a nd div idi ng a
tra ck.
30
Page 31

31
Operations after
Recording
PAUS E button/
indicator
FR/ button
DIVIDE button
STOP button
PLAY/ENTER
button/indica tor
FF/ button
DPC switch
A-B button
Operations after Recording
Playing back recorded audio data (tracks)
To cha nge th e m emo ry and fo lde r u sed to
pla y b ack , g o t o t he men u d isp lay (p age 40 ).
1
Con nec t o pti ona l h ead pho nes or
ear pho nes to th e (he adp hon e) jac k o f
the record er.
Headphones
(not supplied )
to the
(headphone)
jack
Stereo
mini plug
2
Press the PL AY/EN TER bu tto n.
Pla yba ck sta rts from the first track of the
sel ect ed fol der or th e l ast po int at wh ich
you st opp ed pla yba ck.
The is li t o n t he dis pla y. All the
tra cks in th e f old er are played in track
num ber order.
To change a folder
1 Press the /MEN U b utt on.
The sc reen used to select a folder is
dis pla yed .
2 Press the
FF/ an d FR/ bu tto ns
to sel ect th e d esi red folder, and press the
PL AY/EN TER bu tto n.
Continued on the next page
Page 32

32
Operations after Recording (continued)
To change the memory drive
The record er sup por ts the us e o f “ Mem ory
Sti ck” in ad dit ion to th e b uil t-i n m emo ry.
You can switch the memory as follows.
Whe n y ou ins ert a “Me mor y S tic k,” ma ke
sure that the re corder is not re cording or
pla yin g a tr ack . Mak e s ure that it is
sto ppe d.
1 Whi le the record er is sto ppe d, press and
hol d t he /ME NU but ton un til th e m enu
is dis pla yed .
Press the FF/ an d FR/ bu tto ns
2
to sel ect “M EMO RY,” and pres s t he
PLAY/ ENT ER but ton .
The sc reen used to select the memory is
dis pla yed .
Press the FF/ an d FR/ bu tto ns
3
to sel ect th e d esi red memory, and press
the PLAY/ ENT ER but ton to fi x t he
set tin g.
Operations during playback
To
Stop playback
Pause playback
Fast forward
(Cue)
Fast reverse
(Review)
Go back to the
beginning of the
current track
Operation
Press the STOP button.
Press the PAUSE button.
flashes on the display.
To resume play after pausing,
press the PAUSE button
again.
Press and hold the FF/
button.*
Press and hold the
FR/ button.*
Press the FR/ button
once.
To
Go back to
previous tracks
Go to the
beginning of the
next track
Go to the
beginning of
succeeding
Operation
Press the FR/ button
repeatedly.**
Press the FF/ button
once.**
Press the FF/ button
repeatedly.
tracks
If you pres s an d h old the but ton, the rec orde r g oes
*
for ward or back ward slowly at fir st, and the n at
gra dual ly h igh er s peed .
** These ope rat ions are for wh en “ EASY SE ARCH ” is
set to “OFF.”
When tracks are played back to the end of
the last track
Whe n yo u pl ay back or fas t pl ay back to the end of
the las t tr ack , “T RACK EN D” l ights u p fo r 5
sec onds . Wh en “TRA CK E ND” goe s off, t he
reco rder wil l s top at the begi nni ng o f th e l ast trac k.
If you pres s an d h old the FR/ bu tton whi le
“TR ACK END” is lit , th e t rack s are pl aye d ba ck
rap idly, and norm al play back wi ll s tart at the po int
you release the bu tton .
If the last tr ack is l ong and you wi sh t o s tart
pla ybac k at a late r pa rt of t he trac k, p ress and ho ld
the F F/ bu tton to go to t he e nd of t he trac k
and the n pr ess the F R/ bu tton whi le “TRA CK
END ” is lit to go back to the desired po int.
For tra cks oth er t han the las t one, go t o t he
beg inni ng o f t he n ext tra ck a nd then fas t-re wind to
the des ired poi nt duri ng p lay back .
Note
Dur ing play bac k, d o no t re mov e th e ba tte ries or AC
pow er a dapt er. Do ing so may cau se n oise in aud io
out put from the LI NE O UT ( OPT ) ja ck a nd
(he adph one) ja ck.
Page 33

33
Operations after
Recording
Adjusting the playback speed (DPC (the Digital Pitch Control function))
You can adjust the playback speed between
+10 0% and –7 5% of nor mal sp eed in th e
men u. The tr ack is pl aye d b ack in na tur al
ton es tha nks to th e d igi tal processing
fun cti on.
1
Whi le the record er is sto ppe d, press and
hol d t he /ME NU but ton un til th e m enu
is dis pla yed .
2
Press the FF/ an d FR/ bu tto ns
to sel ect “D PC, ” a nd press the PLAY/
ENT ER but ton .
The “D PC” di spl ay app ear s.
3
Press the FF/ an d FR/ bu tto ns
to set th e d esi red playback speed
bet wee n + 100 % a nd –75 % o f n orm al
spe ed, an d p ress the PLAY/ENTER
but ton to fi x t he set tin g. Press the /
MEN U b utt on to exi t t he men u m ode .
4
Sli de the DP C s wit ch to “ON .”
The tr ack is pl aye d b ack at th e s pec ifi ed
spe ed. To resume normal playback, slide
the DP C s wit ch to “OF F.”
Continued on the next page
Playing back an MP3 file
You can play an MP3 file on the reco rder by
cop yin g i t f rom your PC or other device onto
the record er. For details, see page 38.
Quickly locating the point you wish to start playback (Easy Search)
Whe n “ EAS Y S EAR CH” is se t t o “ ON” in th e
men u, you ca n q uic kly lo cat e t he poi nt at
whi ch you wi sh to sta rt pla yba ck by pressing
the FF/ or FR/ bu tto n repeatedly
dur ing pl ayb ack or pl ayb ack pa use .
You can go back appro xim ate ly 3 s eco nds
by pressing the FR/ bu tto n o nce , o r
adv anc e a pproximately 10 seconds by
pressing the FF/ bu tto n o nce . T his
fun cti on is use ful fo r l oca tin g a de sired point
in a l ong record ing .
Page 34

34
Operations after Recording (continued)
Connecting external equipment for playback
To out put record ed tra cks from speakers of
ext ernal equipment, connect the audio input
jac k o r d igi tal in put ja ck of the ex ter nal
equ ipm ent to th e L INE OU T ( OPT ) j ack of th e
recorde r u sin g a n o pti ona l S ony au dio ca ble
or opt ica l d igi tal ca ble .
Connecting an analog device
AV amplifie r/p lay er (analog ty pe)
to the LINE
OUT (OPT)
jack
Audio cable ( not
supplied)
Connecting a digital device
AV amplifie r/p lay er (digital t ype )
to the LINE
OUT (OPT)
jack
)
Playing back repeatedly
Playing back a track repeatedly
Dur ing pl ayb ack , p ress and hold the
1
PLAY/ ENT ER but ton .
The repeat play mark ( 1) app ear s. The
sel ect ed tra ck wil l b e p lay ed bac k
repeatedly.
To exit the repeat play mode
To resume normal playback, pres s t he
PLAY/ ENT ER but ton ag ain . To stop at the
cur rent position, pres s t he S TOP bu tto n.
Playing back a specified section
repeatedly – A-B Repeat
Dur ing pl ayb ack , p ress the A- B b utt on
1
bri efl y t o s pec ify th e s tar tin g p oin t A .
“A- B B ?” is dis pla yed .
Press the A-B but ton br ief ly aga in to
2
spe cif y t he end ing po int B.
“ A-B” is displayed and the specified
sec tio n i s p lay ed bac k repeatedly.
Optical di git al cable
(not supplied )
To exit the A-B repeat play mode
To resume normal playback, pres s t he
PLAY/ ENT ER but ton ag ain . To stop at the
cur rent position, pres s t he S TOP bu tto n.
Page 35

35
Operations after
Recording
Dividing a track
You can divide a reco rded track. Note that
tra cks ca nno t b e c omb ine d o n t he recorde r
aft er the y h ave be en div ide d.
1
Dur ing pl ayb ack , p ress the DIVIDE
but ton .
“DI VID E?” is di spl aye d.
2
Press the DIVIDE button again.
The tr ack is di vid ed int o t wo at the po int
you pressed the button, and
“DI VID ING ... ” a ppe ars on th e d isp lay.
Track0 1 Track0 2 Track03
A track is di vid ed.
Notes
Div ided tra cks are nam ed a s f ollo ws:
“_0 ” is add ed to t he n ame of the ori gina l t rack ,
and “_1 ” is ad ded to t he name of the new tr ack.
How ever, if t he o rig inal track name is les s th an 8
byt es, unde r b ars “_” are add ed t o ma ke a 10 byt e na me. For exa mple , w hen dividin g a fil e
nam ed “ 123. WAV”, the tr acks are nam ed
“12 3___ ___0 .WAV” and “1 23__ ____ 1.WAV ”.
Tracks ca nnot be div ided if:
you press t he b utt on a t a poi nt w ithi n l ess than
0.5 sec ond from th e be ginn ing or the end of a
tra ck.
the tot al n umb er o f re cord ed t rac ks reach es a
max imum num ber of reco rdab le t rac ks ( page 51 ).
(“T RACK FUL L” appe ars on the display.)
the new tra ck name exc eed s a maximum num ber
of char acte rs.
You ca nno t di vide an MP3 file.
You ca nno t di vide a trac k if it s na me afte r di vis ion is
the sam e as an exi stin g f ile in the fold er.
–
–
–
–
Deleting tracks
Deleting tracks one by one
1 Whi le the record er is pla yin g t he tra ck
tha t y ou wan t t o d ele te or is sto ppe d,
press and hold the /ME NU but ton un til
the me nu is dis pla yed .
2 Press the
FF/ an d FR/ bu tto ns
to sel ect “D ELE TE TRK ,” and press the
P LAY/E NTE R b utt on.
The “D ELE TE TRK ” d isp lay ap pea rs.
3 Press the
FF/ an d FR/ bu tto ns
to sel ect “Y ES, ” a nd press the PLAY/
ENT ER but ton .
The tr ack is de let ed and tr ack nu mbe rs of
the fo llo win g t rac ks wil l b e d ecreased by
one .
Deleting all the tracks in a folder
1 Sel ect th e f old er con tai nin g t he tra cks
you wa nt to del ete , a nd press and hold
the /MENU button until the menu is
dis pla yed .
2 Press the
FF/ an d FR/ bu tto ns
to sel ect “D ELE TE ALL ,” and press the
P LAY/E NTE R b utt on.
The “D ELE TE ALL ” d isp lay ap pea rs.
3 Press the
FF/ an d FR/ bu tto ns
to sel ect “Y ES, ” a nd press the PLAY/
ENT ER but ton .
All th e t rac ks in the fo lde r a re deleted.
Note
Onc e a trac k h as b een era sed, you ca nnot ret rieve
it.
Continued on the next page
Page 36

36
Operations after Recording (continued)
Storing tracks on a computer
Con nec t t he recorde r t o a co mpu ter to sa ve
recorde d t rac ks on the ha rd disk drive of the
com put er.
Turn on the po wer of th e recorder.
1
Con nec t t he USB co nne cto rs of a
2
com put er and th e recorder us ing th e
sup pli ed USB co nne cti ng cab le.
“CO NNE CTI NG” ap pea rs on the di spl ay
of the record er, and it is recognized as a
USB Ma ss Sto rag e C las s d evi ce on the
com put er.
You cannot operate the reco rder while it
is con nec ted to th e c omp ute r.
Dur ing a USB co nne cti on, “D O N OT
POW ER OFF ” i s a lwa ys dis pla yed . D o n ot
dis con nec t t he pow er sou rce or turn the
POW ER swi tch to “O FF; ” i f y ou do so, th e
USB co nne cti on is forcibly terminated
and da ta may be da mag ed.
Computer
(not supplied )
to a US B
connect or
to the USB
connect or
USB connectin g
cable (suppli ed)
The record er is recognized on W ind ows
3
Exp lorer or Macintosh Desktop as a
removable storage device. Drag and drop
the tr ack fi le you wa nt to sto re on the
hard disk drive of the computer.
System requirements for the computer to
be connected to the recorder
Ope rat ing Sy ste ms* :
1)
Windows Vista® Ho me Bas ic
Windows Vista® Hom e P remium
Windows Vista® Bu sin ess
Windows Vista® Ul tim ate
Windows® XP Ho me Edi tio n S erv ice Pa ck
2 o r h igh er
Windows® XP Professional Service Pack 2
or hig her
Windows® XP Me dia Ce nte r E dit ion Se rvi ce
Pac k 2 or hi ghe r
Windows® XP Me dia Ce nte r E dit ion 20 04
Ser vic e P ack 2 or hig her
Windows® XP Me dia Ce nte r E dit ion 20 05
Ser vic e P ack 2 or hig her
Windows® 20 00 Professional Service Pack
4 o r h igh er
Mac OS X (v1 0.2 .8- v10 .5)
Pre-Installed
The ope rati ng syst ems oth er t han tho se l ist ed
*
abo ve a re n ot s upp orte d.
The 64b it O S i s no t su ppo rted .
*
The sle ep m ode of the Mac OS is not supp ort ed.
*
Hardware E nvi ronment:
Por t: USB po rt
–
Req uired wh en y ou save a r ecor ded WAV f ile on a
1)
PC via a US B c onne ctio n.
Notes
You ca nno t pl ay t he 24 b it trac ks r ecor ded usin g
thi s recorde r w ith the Window s Me dia Pla yer.
Do not use a c ompu ter to form at the buil t-i n
mem ory of t he reco rder or a “M emo ry S tick ” y ou
use wit h th e re cord er.
Page 37
37
Operations after
Recording
Notes
We d o not e nsur e tr oubl e-fr ee o per atio n of th e
sys tem susp end , sl eep, or hib ern atio n f unct ion on
all com pute rs. The fol low ing systems are not
sup port ed:
Ope rati ng s yst ems othe r t han those i ndic ate d on
“Op erat ing Sys tems .”
Per sona lly con stru cted co mput ers or oper ati ng
sys tems
Upg rade d OS
Mul ti-b oot env iron ment
Mul ti-m onit or envi ronm ent
Mic rosoft, Win dows , W indows Vist a, and Win dows
Med ia a re t rade mar ks o r re gist ered tradem arks of
Mic rosoft C orpo rat ion in t he Unit ed S tat es a nd/or
oth er c ount rie s.
Mac into sh a nd Mac OS a re t rad emar ks o f A pple
Inc . regist ered in the Uni ted Sta tes and/ or othe r
cou ntri es.
To use Windows 2000
Ins tal lat ion of th e s upp lie d d riv er is require d.
Ins tal l t he dri ver us ing “S ony Rec order_Driver.
exe ” i n t he recorde r.
–
–
–
–
–
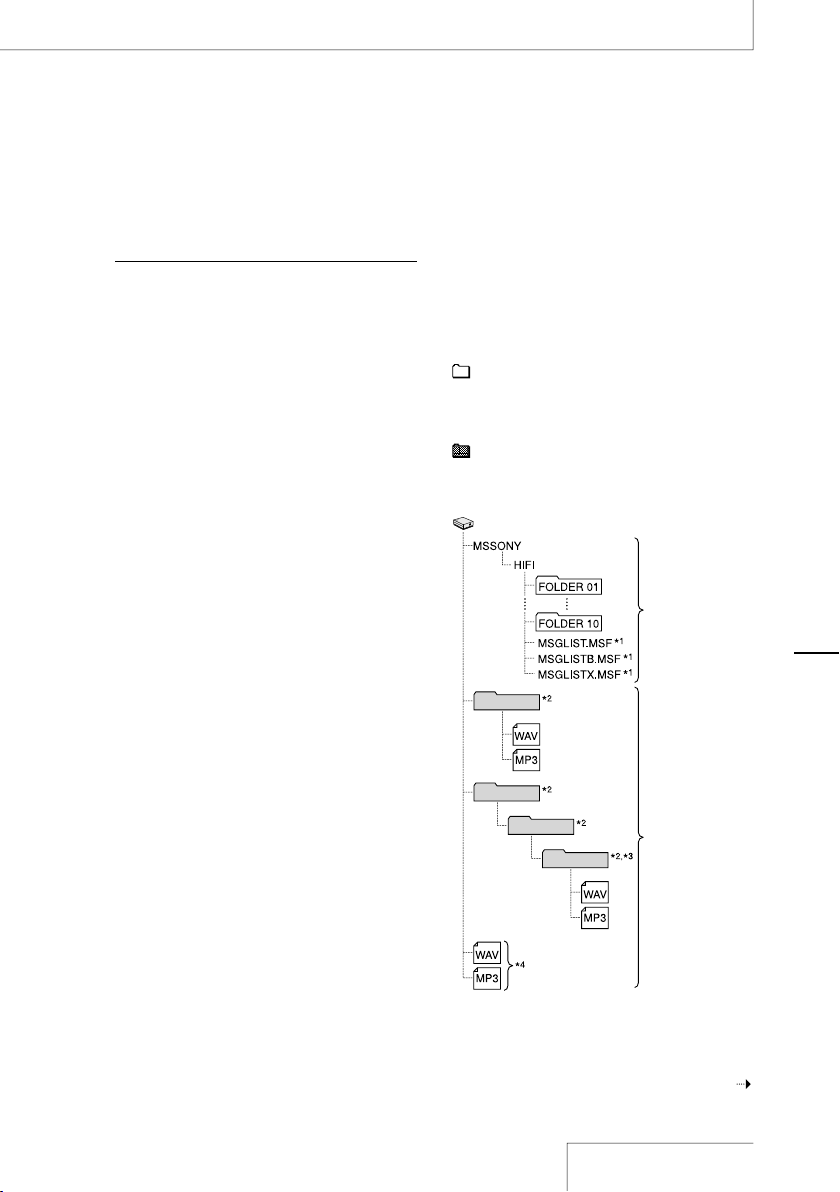
On folder and track file structure
The fo lde rs and fi les are displayed on the
com put er screen as shown below.
The fo lde r i ndi cat ors on th e d isp lay of th e
recorde r a re as follows:
: F old er in whi ch you ca n record a nd pla y
bac k t rac ks usi ng the record er (Th ey hav e
already been made when you purc has e t he
recorde r.)
: F old ers fo r p lay bac k o nly (T hey ap pea r
whe n M P3 or WAV f ile s h ave be en
tra nsf erred from a com put er.)
Folder A
Folder B
Folder C
Folder D
Removab le d isk
Folders in
which you can
record tracks
Folders for
playback
only
Continued on the next page
Page 38

38
Operations after Recording (continued)
Fil es c onta ini ng i nfor mat ion such as the ord er of
1)
fol ders , pl ayb ack orde r of au dio file s, reco rdin g da te
and tim e, e tc. Do not del ete or chan ge t hes e fi les.
The nam e of a fold er i n w hich files are stor ed w ill be
2)
dis play ed o n t he r ecorder as t he same fol der nam e
it had when it was cop ied on the com pute r. It is
con veni ent if you put an easy -to-con trol nam e on
the fol der in adva nce.
The recorder ca n re cogn ize a f ile saved i n a fol der
3)
wit hin thre e le vel s on the rem ova ble disk , t hat is,
Fol der D sh own in the fig ure.
If you copy fi les sepa rat ely, t hey are clas sif ied as
4)
bei ng i n “N O F OLDE R.”
On folders and files that the recorder can
recognize
: Folder in which you can record t rac ks
using the record er
The record er can recognize a maximum of
99 tra cks in a fol der, 10 folders and 990
tra cks on a dri ve.
: Folders for playback only
The record er can recognize a maximum of
99 tra cks in a fol der, 500 folders and 5,000
tra cks on a dri ve. A fol der wi tho ut a t rac k
sav ed, ca nno t b e recognized.
Note on folder name
Do not dele te or r enam e fold ers (“F OLDE R01” to
“FO LDER 10”) . I f yo u do so , th e folde rs w ill not be
reco gnized by t he recorder.
On title and artist names of an MP3 file
You can enter title name or artist name, etc.,
int o M P3 fil es as ID3 ta g i nfo rma tio n. The
recorde r c an dis pla y t he ID3 ta g i nfo rma tio n.
It is use ful if yo u i npu t t he ID3 ta g
inf orm ati on usi ng the so ftw are you use to
mak e t he MP3 fi les on yo ur com put er.
Note
If no t itle na me o r ar tis t na me has been en tered in to
the ID3 tag in form atio n, “Unk nown” w ill be disp laye d.
Playing back MP3 files copied from a computer
You can copy MP3 files from yo ur com put er
to the record er and pl ay the m b ack on th e
recorde r.
The ma xim um pla yba ck tim e ( tra cks *), wh en
pla yin g M P3 fil es usi ng the record er, is as
fol low s ( whe n u sin g t he bui lt- in mem ory ):
*
1
2
128 kbps 256 kbps
71 hr. 20 m.
(1,070 tracks)
In the case wh ere trac ks o f 4 min utes ea ch a re
tra nsfe rred to the recorder.
35 hr. 40 m.
(535 tracks)
Con nec t t he recorde r t o y our co mpu ter.
With Windows: O pen “M y Computer” and
mak e s ure that a re mov abl e d isk ha s
bee n n ewl y recognized.
On a Macintosh: Ma ke sure that a drive
nam ed “PC MRE COR DER ” o r
“ME MORYSTICK” is displayed on the
des k t op.
Note
The “ME MORY STIC K” disp lay app ears only w hen
a “ Memo ry S tic k” i s in ser ted in the reco rder.
Cop y t he fol der co nta ini ng MP3 fi les from
the co mpu ter on to the record er.
With Windows: U se the Ex plo rer to drag
and drop the folder containing MP3 files
ont o t he recorde r.
On a Macintosh: On th e d esk top , d rag
and drop the folder containing MP3 files
ont o t he recorde r.
The record er can recognize up to 500
fol der s. You can copy up to 99 tracks to
one fo lde r a nd up to 500 0 t rac ks in tot al.
Page 39

39
Operations after
Recording
3
Dis con nec t t he recorde r f rom the
com put er, and then press th e /MENU
but ton br ief ly, press th e FF/ an d
FR/ bu tto ns to sel ect th e d esi red
fol der, and then pres s t he PL AY/
ENT ER but ton .
4
Press the FF/ an d FR/ bu tto ns
to sel ect th e f ile th at you wa nt to pla y.
5
Press the PLAY/ENTER button to start
pla yba ck.
6
Press the STOP button to stop
pla yba ck.
Artist name a nd title informatio n
(up to 254 ch ara cters)
Fil e n ame
Page 40

Menu Operations
button/indica tor
/MENU button
FF/ button
PLAY/ENTER
STOP button
Using the menu display
You can make various adjustments and
set tin gs usi ng the me nu dis pla y.
Press the /ME NU but ton fo r m ore than
1
one se con d.
The me nu dis pla y a ppe ars . T he cur rently
sel ect ed ite m a nd opt ion are highlighted
and di spl aye d i n t he cen ter.
Select ed item and opti on
When you sele ct the item with in step
2, the confirmat ion display will ap pear.
40
FR/ button
Press the FF/ an d FR/
2
but ton s t o s ele ct an ite m, and press the
PL AY/EN TER bu tto n.
The cu rrent setting of the selected item
app ear s.
Example: When “R EC MODE” is sele cte d
Press the FF/ an d FR/
3
but ton s t o s ele ct an opt ion or op era tio n,
and press the PL AY/EN TER bu tto n.
The op tio n o r o per ati on is exe cut ed, an d
the me nu dis pla y a ppe ars ag ain .
Availab le
options
To return to the normal display
Press the ST OP but ton .
To return to the previous menu display
Press the /ME NU bu tto n.
Page 41

41
Menu Operations
Menu items
Whi le the record er is sto ppe d, all th e i tem s i n t he fol low ing ch art ap pea r. During recording,
recordi ng sta ndb y, or recording pause, only “LIMITER,” and “LCF” appear. During playback or
pla yba ck pau se, on ly “DE LET E T RK, ” “ DPC ” a nd “EA SY SEA RCH ” a ppe ar. During digital
recordi ng, yo u c ann ot ope rat e t he men u.
Item Options (Default settings are underlined.)
LED
(Indicator lighting)
The ACCESS indicator, peak level lam ps, REC indicator, PLAY/ENTER
indicator, and PAUSE indicator light up or flash to represent the
operational status of the recorder.
ON The indicators light up o r flash.
OFF The indicators do not lig ht up or flash.
CLOCK
(Date/time settings)
You can set the clock.
For details, refer to page 19.
MEMORY
1)
(Recording/playback
memory)
You can select the memory location w here the recorded tracks will be saved
and where the tracks to be played back are sav ed.
BUILT-IN The built-in memory of th e recorder is used.
MEMORY STICK An optional “Memory Stick” is used.
Note
“BU ILT-IN” is sel ected a utom ati call y on ce the “Mem ory Sti ck” is remo ved.
FORMAT
2)5)
(Initializing memory)
You can delete all data in current memory selected in “M EMORY” and
change the folder structu re (page 37) to the default setting.
Be sure to confirm whether the current memory is the built-in memory or
“Memory Stick” before selecting “YES.”
Do not format the built-i n memory or “Memory Stick” with your computer.
DELETE ALL
2)4)5)
(Deleting all tracks in a
folder)
You can delete all the tracks in a s elected folder.
Be sure to confirm the folder name of the tra cks to be deleted before
selecting “YES.”
For details about folder and track file structure, refer to page 37.
DELETE TRK
3)4)5)
(Deleting a track)
You can delete one selected track.
Be sure to confirm the track name to be delet ed before selecting “YES.”
For details about folder and track file structure, refer to page 37.
The set ting ca nnot be exe cute d when no o pti onal “Me mor y St ick” is ins erte d.
The fun ctio n d oes not wor k wh en the rema inin g batte ry p ower is low.
The fun ctio n d oes not wor k wh en a tr ack fil e is set to read-on ly.
The fun ctio n d oes not wor k wh en no t rack is sav ed i n a fol der.
Ple ase note th at t he d ata del eted ca nnot be recovere d.
Continued on the next page
1)
2)
3)
4)
5)
Page 42

Menu Operations (continued)
Item Options (Default settings are underlined.)
DPC
(Digital Pitch Control
function)
EASY SEARCH
(Easy search function)
REC MODE
6)7)
(Sampling frequency/ quantifying bit number)
Sets the DPC (Digital Pit ch Control) function .
The function becomes enab led when you set the DPC switch to “ON.”
Set the speed of the play back in a range from +100% to –75% by 10% for
the + setting and by 5% f or the – setting.
–30%
Sets the easy search function.
OFF The easy search function does not work. Whe n you press the
FF/ or FR/ button, the recorder will move to the next
or previous track.
ON You can go forward in the track for about 10 seconds by
pressing the FF/ button, and go back for about 3 seconds
by pressing the FR/ button.
You can select the sampling frequency and quantifying bi t number for
recording.
22.05 kHz 16 bit You can record for a longer time.
44.10 kHz 16 bit The default setting
44.10 kHz 24 bit
48.00 kHz 16 bit
48.00 kHz 24 bit You can record with higher sound qualit y.
96.00 kHz 16 bit
96.00 kHz 24 bit
Notes
Sam plin g fr eque ncy is a va lue tha t re pres ents ho w ma ny t ime s an ana log sig nal is
con vert ed i nto a d igit al sign al (A/D con ver sion ) pe r s econ d. T he larg er t he valu e of
sam plin g fr eque ncy, t he bett er t he soun d qu ali ty, bu t al so the larg er the amou nt of
dat a. S ound qu alit y of 44 .1 k Hz is e quiv ale nt t o th at of a CD, 48 kHz is equ ival ent
to that of a D AT, and 9 6 kH z i s eq uiva len t to DVD Au dio.
Qua ntif ying bi t nu mber is a v alue th at r epre sent s th e a moun t of da ta i t takes for
one sec ond of audi o. T he larg er the valu e o f th e bi t n umbe r, the lar ger amo unt of
dat a it tak es and the bet ter the sou nd q ual ity.
Your c omp uter mus t h ave software th at s uppo rts 24- bit aud io d ata to play ba ck, edit , e tc., sou nd with a
6)
qua ntif ying bi t nu mber of 24 bits.
In digi tal reco rdin g, this fun cti on d oes not wor k.
7)
42
Page 43

43
Menu Operations
Item Options (Default settings are underlined.)
LIMITER
7)
(Preventing distortion)
The recorder always reserves audio for the digital limiter, which is 12dB
lower than audio processed in the normal circu it. This compensates for
clipping that happens dur ing digital processi ng if audio is over-input.
When the LIMITER switch i s set to “ON,” the digital limiter circuit operates.
The following are the times required for recovery:
150ms The recorder re covers from the affects of the digital l imiter circuit
within approximately 150ms.
1 sec The recorder recovers f rom the affects of the digital limiter c ircuit
within approximately one second.
1 min The recorder recovers from the a ffects of the digital limiter circuit
within approximately one minute.
Notes
The lim iter ci rcui t fu ncti ons to keep th e si gnal le vel below t he m axi mum inpu t
lev el. When a loud sou nd is i nput su dden ly, th e e xces s pa rt of t he s oun d is
aut omat ical ly set with in the range o f th e m axim um i npu t le vel in orde r to pre vent
dis tort ion.
The lim iter ci rcui t of the rec orde r does not com pens ate for cli ppin g w hen audi o
ove r 12 dB i s i nput . In th is c ase, so und may be dist ort ed.
Whe n th e se tti ng i s “O N,” the peak v alue wi th t he l imi ter circ uit in oper atio n
app ears if the max imum pe ak v alue ex ceed s 0 dB.
LCF
7)
(Low Cut Filter function)
When the LOW CUT FILTER switch is se t to “ON,” the low cut filter is
activated so that audio u nder the following frequencies is filtered and is not
recorded. This function reduces noise caused by the flow of air-conditioning
equipment, outdoor air, etc.
75 Hz Audio under 75 Hz frequency is not recorded.
150 Hz Audio under 150 Hz frequency is not recorded.
SBM
7)8)
(Super Bit Mapping
function)
Super Bit Mapping reduces noise when the quan tifying bit number is set to
16 bit in “REC MODE.”
ON The super Bit Mapping functions to reduce noise.
OFF The super Bit Mapping doe s not function.
Note
Sup er B it M app ing sign ifi cant ly incre ase s th e dynam ic r ange ac oust ica lly by
redu cing no ise tha t is par tic ular ly e asy to hear wi thin the hu man aud ible ban d. In
orde r to im prov e th e audio qua lit y wh en c onv erti ng 2 0-b it d ata int o 16 bit, t he t op
4-b it a moun t o f in form ati on w ithin t he l owe r da ta, whi ch i s us ual ly t hrow n aw ay, is
int egra ted int o th e 16 -bi t da ta.
In digi tal reco rdin g, this fun cti on d oes not wor k.
The set ting ca nnot be exe cute d when the qua ntif ying bi t nu mber is set to 24 bit in “REC MOD E.”
Continued on the next page
7)
8)
Page 44

Menu Operations (continued)
Item Options (Default settings are underlined.)
7)
PRE REC
(Pre-recording function)
SYNC REC
9)
(Synchronized recording function)
PLUG IN PWR (Plug in power function)
In digi tal reco rdin g, this fun cti on d oes not wor k.
7)
Whe n recordi ng anal og inpu t si gna ls, this fu ncti on d oes not wor k.
9)
You can buffer sound for approximately 5 seconds in the memory when you
press the REC button and the recorder is in standby for recording mode.
When you press the PLAY/ENTER butt on or the PAUSE button to
start recording, recording actually starts 5 seconds prior to the point the
button is pressed (pre-recording fu nction).
ON The pre-recording function is activated. When you start
recording, the re corder starts recording sound 5 seconds prior to
the point where the button is pressed.
OFF The pre-reco rding function does not work. When you start
recording, recording starts at the po int where the button is
pressed.
You can start recording s imultaneously with the input playback signals from
the external device connected to the LINE IN (OPT) jack during digital
recording.
ON Synchronized recording is enabled.
OFF Synchronized recording is disabl ed. You can start recording by
pressing the
the
REC button and the PLAY/ENTER butt on or
PAUSE button.
When a plug in power type microphone is conne cted to the jack of the
recorder, the recorder can supply power to the microphone. You can tur n the
plug in power function on and off:
ON The recorder supplies power to the connected plug in power
type microphone.
OFF The recorder does not supply power to the connected plug in
power type jack.
44
Page 45

45
Additional Information
ACCESS
indicator
“Memory Sti ck”
Memory Stic k slot
Cover o f Me mory
Stick s lot
Using a “Memory Stick” (not supplied)
You can reco rd audio using a “Memory
Sti ck” in ste ad of the bu ilt -in me mor y o f t he
recorde r.
“Me mor y S tic k P RO- HG Duo ” a nd “Me mor y
Sti ck PRO Du o ( Hig h S pee d)” are the only
“Me mor y S tic k” mod els th at can be us ed for
the record er. Note that other kinds of
“Me mor y S tic k” are not guaranteed.
Inserting a “Memory Stick”
Bef ore rec ording, be sure to cop y a ll the
dat a s ave d i n t he “Me mor y S tic k” to a
com put er and fo rma t t he “Me mor y S tic k” on
the record er so it con tai ns no dat a.
1
Ope n t he cov er of the Me mor y S tic k s lot .
2
Ins ert th e “ Mem ory St ick ” i nto th e
Mem ory St ick sl ot fir mly un til it cl ick s, in
the di rection shown in the illustration on
the le ft, an d c los e t he cov er.
To use the “Memory Stick”
Sel ect “M EMO RY STICK” fro m t he
“ME MORY” item of the menu.
When you insert the “Memory Stick” into
the recorder
“AC CES SIN G M EMO RY...” ap pea rs on the
dis pla y, and the ACCESS indicator flashes.
Inf orm ati on require d f or ope rat ion is read
from the “Memory Stick.”
To remove the “Memory Stick”
Be sure that the ACCESS indicator light is
off, and then push the “Memory Stick” into
the record er. When it pops out, remove it
from the Memory Stick slot.
Continued on the next page
Page 46

46
Using a “Memory Stick” (not supplied) (continued)
Using the “Memory Stick” for recording/playback
Go to the me nu dis pla y, and set the
1
“ME MORY” setting to “MEMORY STICK”
(pa ge 41) .
Fol low th e s tep s o f “ Rec ording analog
2
sou nd” (p age 23 ), “Di git al recordi ng”
(pa ge 28) or “P lay ing ba ck recorde d
aud io dat a ( tra cks )” (pa ge 31) .
To store tracks on a computer
Con nec t t he recorde r w ith th e “ Mem ory
Sti ck” in ser ted to a com put er (pa ge 36) .
On folder and track file structure
Ten fo lde rs are cre ate d i n t he “Me mor y
Sti ck, ” s epa rat ely from the folders of the
bui lt- in mem ory. The structure of fo lde rs and
tra ck fil es are the same as those of the builtin mem ory (p age 37 ).
Removab le d isk
Folders in
the bui lt-i n
memory
Removab le d isk
Folders in the
“Memory
Stick”
For de tai ls abo ut the sp eci fic ati ons of fo lde r
and tr ack fi les , s ee pag e 3 7.
Notes
Do not inse rt or r emov e th e “ Memo ry S tic k” d uring
reco rdin g/pl ayb ack. Doing so m ay caus e a
mal func tion of the rec orde r.
If you use a “ Memo ry S tic k” f ormatte d wi th othe r
dev ice than th e re corder, yo u ca nnot rec ord trac ks
prop erly. Mak e su re t o us e a “Me mory St ick”
for matt ed w ith the rec orde r.
The recorder is acc essing memo ry whil e
“AC CESS ING MEM ORY...” ap pear s on th e di spla y
or the ACCE SS indi cato r f lash es. Dur ing thi s ti me,
do not remo ve t he “Mem ory Sti ck.” Doi ng so m ay
dam age the dat a.
Ope rati ons of a “M emor y S tick PRO-HG Duo ” a nd
“Me mory Sti ck PRO Duo (Hi gh S peed)” of u p t o 4
GB are chec ked on the reco rder, but this does n ot
gua rant ee o per atio ns o f a ll s eries o r mo del s of
“Me mory Sti ck. ” Be caus e t he S ony “Me mory St ick”
is the only “M emor y St ick ” th at has been
ope rati onal ly test ed o n t he r ecor der, “ Memo ry S tic k”
mod els of o the r ma kers ma y ca use a m alfu nct ion.
For the “Me mor y St ick” co mpat ibiliti es l ist , ac cess
the fol lowi ng web page :
htt p:// www.s ony.ne t/Pr oduc ts/ mssu ppor t
“Me mory Sti ck” , “M emor y S tick PRO-HG Duo ”,
“Me mory Sti ck PRO Duo (Hi gh S peed)” and
are tradema rks of Sony Cor por atio n.
“Ma gicG ate” is the gen era l na me of a cop yri ght
prot ection tech nol ogy deve lop ed b y So ny.
The recorder do es n ot supp ort par alle l da ta tran sfer.
Dat a ma y be da mage d on th e fo llowing occ asi ons:
The “Me mory St ick” is remo ved or the reco rder is
–
tur ned off dur ing a re ad o r w rite ope rat ion.
The “Me mory St ick” is use d in a loca tion su bjec t
–
to stat ic e lec tric ity or elec trical nois es.
We r ecom mend th at y ou save a b ack up o f an y
imp orta nt d ata .
Whe n yo u us e a “Me mory St ick” withou t a wri te-
prot ect swi tch, ma ke s ure not to edit or del ete data
by acci dent .
Page 47

47
Additional Information
Maintenance
On noise
Noi se may be he ard when the rec order is
pla ced ne ar an AC pow er sou rce, a
flu orescent lamp, or a mobile phone during
recordi ng or pla yba ck.
Noi se may be record ed whe n a n o bje ct,
suc h a s y our fi nge r, etc., rubs or scratches
the record er dur ing record ing .
On safety
Do not op era te the record er whi le dri vin g,
cyc lin g, or ope rat ing an y m oto riz ed veh icl e.
On handling
Do not su bje ct the record er to strong
sho ck or vib rat ion . D oin g s o m ay cau se a
mal fun cti on of the record er.
Do not pl ace th e recorder in th e f oll owi ng
loc ati ons :
Any whe re extreme ly hot . N eve r e xpo se it
to tem per atu res above 60ºC.
Und er direct sunlight or close to heaters
In a s un- hea ted ca r w ith th e w ind ows
clo sed (e spe cia lly in su mme r)
In a h umi d p lac e, suc h a s i n a ba throom
Any whe re dusty
On the built-in microphones
The bu ilt -in mi crophones are
hig h-p erf orm anc e e lec tret condenser
mic rophones. Do not expose them to stron g
win d o r w ate r.
–
–
–
–
–
On maintenance
Whe n t he ext eri or is dir ty, clean the surface
gen tly wi th a s oft cl oth sl igh tly mo ist ene d i n
wat er, and then wipe it again with a dry
clo th. Do no t u se alc oho l, ben zen e, or
thi nne r, etc., to avoid damaging the finish.
Backup recommendations
To avo id pot ent ial ri sk of dat a l oss ca use d b y
acc ide nta l o per ati on or mal fun cti on of the
recorde r, we recommend that you save a
bac kup co py of you r recorded tr ack s o n a
com put er.
Page 48

48
Troubleshooting
If you ex per ien ce trouble with your reco rder, try the following solutions.
Turn off the re corder completely by removing the batteries and the AC power adapter, an d
1
the n t urn it on again. Or use the re corder to initialize the built-in memory or the “Memory
Sti ck. ” ( Not e t hat in iti ali zin g w ill de let e a ll dat a i n t he mem ory or in th e “ Mem ory St ick .”)
Rea d t hrough the symptoms and solutions on pages 48 to 51 and messages on pages 51
2
to 53 to che ck you r recorder.
If the problem persists, consult with qualified Sony personnel (see the warranty for contact
3
inf orm ati on) .
Symptom Cause/Solution
The recorder does not
operate.
You cannot start
recording.
Digital Synchronized
Recording cannot be
performed.
The ACCESS indicator,
peak level lamps, or
REC / PLAY/
ENTER / PAUSE
indicators
do not light/flash.
The batteries have been i nserted with incorre ct +/– directions. Reinsert
them correctly (page 17).
The batteries are exhausted. Replace them wit h new ones (page 17).
The buttons are locked with the HOLD switch. Set the HOLD switch to the
“OFF” position (page 14).
The POWER switch is set t o the “OFF” position. Set it to the “ON” position.
The INPUT switch is in th e wrong position. Se t it to the “” (microphones)
position when using the b uilt-in microphones or an external microphone to
input audio for recording. Set it to the “LINE ” position when external
equipment is connected fo r recording (pages 23 , 28 - 30).
The memory is full, or a maximum number of tracks (page 38) have already
been recorded. Delete some of the tracks (page 35) or store the tr acks on
the hard disk of your computer (page 36), and then delete them from the
recorder. You can also use a “Memory Stick” with s ufficient capacity ( page
46).
99 tra cks have already been recorded in the selected folder and you canno t
record any more tracks. Select another folder (page 23) or delete some of
the tracks (page 35).
The write-protect switch on the inserted “Mem ory Stick” is set to “LOCK.”
Release the lock.
Check the “PLUG IN PWR” s etting of the menu when you use an external
microphone.
Digital Synchronized Recording cannot be perfo rmed when the connected
device outputs digital si gnals even when playback is stopped (page 30).
The “LED” item in the men u is set to “OFF.” Display the m enu and set it to
“ON” (page 41).
Page 49

49
Additional Information
Symptom Cause/Solution
You cannot erase a
track.
The write-protect switch on the inserted “Mem ory Stick” is set to “LOCK.”
Release the lock.
When you use a Windows computer, the track or the folder containing the
track is set to “Read-onl y” on the computer. Display the track or the folder
using Windows Explorer and remov e the check for “Read-only” under
“Properties.”
When you use a Macintosh computer, the track or the folder containing the
track is set to “Locked” on the computer. Display the track or the folder on
Macintosh Desktop and remove the check for “L ocked” under “GetInfo” of
“File.”
The remaining battery power is insufficient. C onnect the AC power adapter
to the recorder (page 19), or replace the batteries with new ones (page 17).
Noise is heard. An object, such as your f inger, etc. , accidentally rubbed or scratched the
recorder during recording so that n oise was recorded.
Noise may occur if many s mall-sized files are recorded in the current
memory. Save the tracks on the hard disk of your computer (page 36), a nd
then format the memory (p age 41).
The recorder was placed near an AC power source, a fluorescent lamp, or
a mobile phone during recording or playback.
Noise may occur if the pl ug of the connected exter nal mi crophone was
dirty when recording. Clean the plug.
Noise may occur if the pl ug of the connected headphones is dirty during
playback or monitoring th e recording sound. Cl ean the plug.
The sound picked up is
distorted.
The INPUT switch is in th e wrong position. Se t it to the position that
corresponds to the sound source and connection s (pages 23, 28 - 30).
Adjust the recording level to an appropriate range (page 24).
The sound source is too loud when recording with an external micro phone.
Set the MIC ATT switch to the “20” position (page 22), or move the
microphone away from the sound source.
The sound source has parts that are too loud. Adjust the value in
“LIMITER” in the menu dis play (page 43), and set the LIMITER switch to
“ON.”
Noise occurs during
recording.
When monitoring the recording sound with headp hones, they are too close
to the microphone. Decrease the sound level from the headphones or keep
the microphone away from them.
“--y--m--d --:--” is
displayed as the
recorded date.
Set the clock (page 19). The date and time of recording are displa yed after
the clock is set.
Continued on the next page
Page 50

50
Troubleshooting (continued)
Symptom Cause/Solution
There are fewer menu
items in the menu
display.
Some menu items are not displayed during play back or recording (pa ge
41).
A character in a folder
or track name is
displayed in unreadable
characters.
The “ACCESSING
MEMORY...” display
does not disappear.
You cannot record
tracks up to the
maximum recording
time noted on page 57.
The “Memory Stick” is
not recognized.
The recorder cannot support or display some sp ecial characters and
symbols that are entered on a computer using W indows Explorer or the
Macintosh Desktop.
If the recorder is required to process a large amount o f data, the message
may be displayed for an e xtended period of time. This is not a malfunction
of the recorder. Wait until the message disapp ears. In this case, do not
remove the batteries or AC power adapter.
If there are other formatted data (for example , images) saved in the
memory, you cannot record tracks up to the maximum.
A “Memory Stick” requires a minimum amount of memory, even when
recording very short tracks. As a result, the actual total recording time of
the “Memory Stick” may be shorter than the maximum recording time of
the recorder.
The maximum recording time indicated on page 5 7 is estimated. It varies
depending on the number o f tracks.
Due to the limitations of the recording system , the sum of the total
recorded time in the counter (elapsed time) an d the remaining time may be
shorter than the maximum recording time of the recorder.
Even when “MEMORY FULL” is displ ayed and the recorder stops
recording, the recorder has an extr a memory space for editing. This is not
a malfunction of the recorder.
If the recording data volume of one track requires over 2 GB, the
subsequent recording starts as a new track due to the specifications of the
recorder.
Since the “Memory Stick” may contain image data or other files, the
memory required for creating initial folders is insufficient. Use Window s
Explorer or other tools to delete unnecessary files or initialize the “Memory
Stick” on the recorder.
Select “MEMORY STICK” for the “ MEMORY” item of the menu.
Page 51

51
Additional Information
Symptom Cause/Solution
“.WAV” files cannot be
played back on the
recorder.
A file recorded in a frequency that the recorder does n ot support cannot be
played back.
The remaining memory
amount does not reach
100%.
Data may be damaged becau se the power source was removed during
recording. Initialize the memory using the recorder.
A file cannot be played
back.
Files other than those th e recorder supports m ay not be played back. For
details, see the specific ations (page 54).
Some character
information does not
appear.
You can scroll the title name for an MP3 file. File and artist names cannot
be displayed by scrolling.
Error messages
Message Meaning/Solution
SET CLOCK The clock is not set. Set it before operating the recorder (page 1 9).
16 bit ONLY The “SBM” item can be set to “ON” only when the quantifying bit number is
set to 16 bit. Change the quantifying bit number to 16 bit on “REC MODE” in
the menu display, and then set “SBM” again (page 43).
TRACK FULL The number of tracks save d in the current fol der has reached the maximum
(99 tracks), and you cann ot record or divide t racks. To reduce the number of
tracks, record new tracks in another folder, delete unnecessary tracks (page
35), or store some of the tracks on your comp uter (page 36).
MEMORY FULL There is no remain ing data space in the built-in memory or the “Memor y
Stick.” Delete unnecessar y tracks (page 35) or store some of the tracks on
your computer (page 36), and then erase the contents of the memory.
M.S. LOCKED The write -protect switch on t he inserted “Memory Stick” is set to “LOCK.”
Release the lock.
READ ONLY M.S. A read-only “Memory Stick” is inserted. Use t he “Memory Stick” that the
recorder supports.
Continued on the next page
Page 52

52
Troubleshooting (continued)
Message Meaning/Solution
ACCESS DENIED A “Memory Stic k” with an access control function is inserted. Func tions
M.S. TYPE ERROR An incompatible “Memory S tick” is inserted. Use a “Memory Stick” that the
UNKNOWN MEDIA The “Memory Stick” not suppo rted is inserted. Use a “Memory Stick” that
NO MEMORY STICK A “Memory Stick” is not inserted into the recorder. Insert a “Memory Stick”
FILE PROTECTED For W indows computers
UNKNOWN DATA The file you are trying to play back or record is an unsupported t ype of data
FILE DAMAGED The track you are trying to play back or edit is damaged. It cannot be
NO TRACK There is no track in the selected folder.
NEW TRACK The file size of the track being recorded exceeds 2 GB. A new track is
CHANGE FOLDER
BATTERY LO W The remaining battery power is insufficient. You cannot delete a track or
NO INPUT SIGNAL Duri ng digital recording, there are no digital signals input from the optical
including recording and playback are limited, and you cannot use i t with the
recorder. Use a “Memory S tick” that the record er supports.
recorder supports.
the recorder supports. We cannot guarantee operations with unknown
media.
that the recorder supports (page 45).
You cannot delete the track that is set to “Read-only” on the computer.
Display the track using W indows Explorer and remove the check for “Readonly” under “Properties.”
For Macintosh computers
You cannot delete the track that is set to “Locked” on the computer. Display
the track on the Macintos h Desktop and remove the check for “Locked”
under “GetInfo” of “File. ”
or a file of a different format. It cannot be played or recorded on the recorder.
played or edited on the recorder.
created and recording continues as a new file. (The maximum file s ize is 2
GB.)
Since all the tracks in a folder have been erased and there are no tracks
in the folder, you cannot use the fo lder. A folder without tracks will not be
displayed.
format the memory. Replace the batte ries with new ones (page 17), or
connect the AC power adap ter to the recorder ( page 19).
cable connected to the LI NE IN (OPT) jack of the recorder. Check the
connection.
Page 53

53
Additional Information
Message Meaning/Solution
NO DIGITAL COPY During digital recording, there is a copy-prohibit sound source being input
from the optical cable connected to the LINE IN (OPT) jack of the recorder.
Recording cannot be performed.
M.S. ERROR Insert the “Memory Stick” again. If this message appears again, the “Memory
Stick” may have a problem.
FORMAT ERROR Memory that has been init ialized on other equipment cannot be used in the
recorder. Initialize the memory using “FORMAT” in the menu display (page
41). Do not format the me mory using your computer or other equipment.
CANNOT OPERATE The track name has reached the maximum number of ch aracters. Shorten
the file name using a com puter.
The track cannot be divid ed. Check to see if the number of tracks in the
folder has not reached the maximum, or if the re is not a track bearing the
same file name in a folde r.
An MP3 file or a WAV f ile in a folder for playback only ( ) cannot be
divided. You can divide only a WAV file contained in a folder for saving
recorded tracks ( ).
CHANGE BATTERY The batteries are exhausted. Replace the batteries with new ones (page 17).
SYSTEM ERROR A system error has occurred. Remove the batter ies or the AC power adapter
to turn off the recorder completely, and then turn on th e recorder again. If
this message appears agai n, consult with qualified Sony personnel (see the
warranty for contact info rmation).
PROCESS ERROR A process error has occurred. Remove the batteries or t he AC power
adapter to turn off the recorder completely, and then turn on the recorder
again. If this message ap pears again, consult with qualified Sony personnel
(see the warranty for con tact information).
POWER PROBLEM An incompa tible AC power adapter is being used, which could c ause a
malfunction. Use only com patible batteries and AC power adapters.
HOLD You cannot operate the recorder since the HOLD switch is set to “ON.”
(However, you can control the recorder with the optional remote
commander.)
To operate the recorder, set the HOLD switch to “OFF.”
Page 54

54
Specifications
Rec ording media
Bui lt- in fla sh mem ory 4 GB, “M emo ry
Sti ck” (n ot sup pli ed) , L ine ar PCM
Ste reo rec ording
Cap aci ty
Part of the memory capacity is
all oca ted to da ta man age men t.
Actual usable capacity: Appro x. 3.8 3
GB (4, 116 ,61 1,0 72 byt es)
Max imu m recordin g t ime
Ref er to “Ma xim um recorda ble ti me”
on pag e 5 7.
Lin ear PC M
Quantization: 16-bit linear, 24-bit
lin ear
Frequ enc y r ang e ( Inp ut from the LINE
IN (OPT) jack when reco rding/
playing back) (0 to –2 dB):
Fs 22.05 kHz: 20 to 10,000 Hz
Fs 44.10 kHz: 20 to 20,000 Hz
Fs 48.00 kHz: 20 to 22,000 Hz
Fs 96.00 kHz: 20 to 40,000 Hz
MP3 co mpa tib le bit ra tes , s amp lin g
frequencies
MPEG Ver. 1 La yer 3:
32, 44.1, 48 kHz
32 to 320 kbps, VBR
MPEG Ver. 2 La yer 3:
16, 22.05, 24 kHz
32 to 160 kbps, VBR
Sig nal -to -no ise ra tio (S /N) (I npu t f rom the
LIN E I N ( OPT ) j ack wh en recordi ng/ pla yin g
bac k)
93 dB or above (1 kHz IHF-A)
(for 24 bit)
Total har mon ic dis tor tio n ( Inp ut from the
LIN E I N ( OPT ) j ack )
22. 05 kHz 16 bi t, 44. 10 kHz 16 /24 bi t:
0.01% or below (1 kHz, 22 kHz LPF)
48.00 kHz 16/24 bit, 96.00 kHz
16/24 bit: 0.01% or below
(1 kHz, 22 kHz LPF)
Wow and flutter
Bel ow mea sur abl e l imi t ( les s t han
±0. 001 % W.P EAK )
Input/output
(m icrophone) jack (stere o m ini ja ck)
Inp ut imp eda nce : 2 2k
Rat ed inp ut lev el: 2. 5mV
Min imu m i npu t l eve l: 0.7 mV
(h ead pho ne) ja ck (st ereo mini jack)
Rat ed out put le vel : 4 00m V
Max imu m o utp ut lev el:
25m W + 25 mW or more
Loa d i mpe dan ce: 16
LIN E I N ( OPT ) j ack
Inp ut imp eda nce : 4 0k
Rat ed inp ut lev el: 2. 0V
Min imu m i npu t l eve l: 450 mV
Input level: –24.5 to –14.5 dBm
(fo r o pti cal di git al inp ut)
Abs orp tio n w ave len gth :
630 to 69 0 n m
(fo r o pti cal di git al inp ut)
LIN E O UT (OP T) jac k
Out put im ped anc e:
1 k for Euro pea n m ode l/
220
DC IN 6V jac k
USB co nne cto r ( Hi- spe ed USB , M ass
Mem ory St ick sl ot
for other models
Rat ed out put le vel : 1 .7V
Loa d i mpe dan ce: 22 k
Out put le vel : – 21 to –15 dB m
(fo r o pti cal di git al out put )
Emi ssi on wav ele ngt h: 630 to 69 0 n m
(fo r o pti cal di git al out put )
Sto rag e C las s)
Page 55

55
Additional Information
General
Pow er require men ts
DC IN 6V
Fou r L R6 (si ze AA) al kal ine ba tte rie s
(su ppl ied )
Fou r n ick el met al hyd rid e
rechargeable batteries NH-AA (not
sup pli ed)
Pow er con sum pti on
0.7 5 W
Dim ens ion s
App rox. 72.0 × 154.5 × 32.7 mm
(27/8 × 61/8 × 15/
16
in che s) (w/ h/d )
(no t i ncl udi ng projecting parts and
con trols)
Mas s 365 g (12.88 oz) (including batteries)
Sup pli ed acc ess ori es
Ref er to “Ch eck ing th e s upp lie d
acc ess ori es” on pa ge 17.
Optional accessories*
“Me mor y S tic k P RO- HG Duo ”**
MS- EX4 G ( 4GB )
MS- EX2 G ( 2GB )
MS- EX1 G ( 1GB )
“Me mor y S tic k P RO Duo (H igh Sp eed )”
MSX -M2 GNU (2 GB)
MSX -M1 GNU (1 GB)
** For t he “Mem ory Sti ck” comp ati bili ties li st,
acc ess the fol lowi ng w eb page :
htt p:// www.s ony.ne t/Pr oduc ts/ mssu ppor t
Ste reo headphones
MDR -V9 00H D
MDR -V7 00D J
Aud io con nec tin g c abl e
RK- G12 9/G 129 CS
Opt ica l d igi tal ca ble
POC -10 B ( opt ica l m ini pl ug
opt ica l m ini pl ug)
POC -10 AB (op tic al min i p lug
rectangular-sh ape d o pti cal pl ug)
Ext ernal microp hon e E CM- MS9 57
AC pow er ada pto r ( for Eu ropean countries)
AC- E60 HG
Bat ter y c har ger fo r n ick el met al hyd rid e
rechargeable batteries BCG-34HE4
Rem ote co mma nde r RM-PCM1
Tripod VCT-PCM1
Car ryi ng cas e C KL- PCM D50
Wind scre en AD- PCM 1
Mic rophone adapter XLR-1
Ext ens ion ca ble fo r h ead pho nes
RK- G11 1S
Your d eal er m ay n ot hand le some of the abo ve
lis ted opti ona l ac cess ori es. Please ask the dea ler
for det aile d i nfor mati on.
Des ign an d s pec ifi cat ion s a re subject to
cha nge wi tho ut not ice .
*
Page 56

56
File Specifications
Onc e y ou record aud io in the bu ilt -in
mem ory or a “Me mor y S tic k,” th e 1 0 f old ers
use d f or sav ing tr ack s a re crea ted
aut oma tic all y i n e ach me mor y l oca tio n. One
“.WAV” f ile is created for each recordi ng.
For de tai ls abo ut the fo lde rs and tr ack fi le
str uct ure, re fer to pa ge 37.
Notes about folders and tracks
Bec aus e t he fol der na mes “F OLD ER 01” to
“FO LDE R 1 0” are fixed, do not change the
nam es on a c omp ute r. If they are cha nge d,
the record er can not recognize the folders.
The nu mbe r o f f old ers is fi xed at 10 fo r
eac h m emo ry typ e. If a f old er is del ete d o n
a c omp ute r, a new folder is creat ed in the
bui lt- in mem ory or “M emo ry Sti ck. ”
The ma xim um num ber of tr ack s t hat ca n
be sav ed in one fo lde r i s 9 9 t rac ks.
The ma xim um dat a c apa cit y t hat on e WAV
for mat tr ack ca n d eal wi th is 2 G B. If the
dat a a mou nt of one tr ack ex cee ds 2 G B
dur ing record ing , recordin g a s a ne w t rac k
sta rts au tom ati cal ly. In this case, the
ela pse d recordin g t ime di spl ay cha nge s t o
0 s eco nd, bu t t he con ten ts tha t h ave be en
recorde d u p t o t he 2 G B l imi t a re stored
nor mal ly.
Whi le recordi ng ana log au dio si gna ls, on e
tra ck is created even if rec ording is
sto ppe d r igh t a fte r recordin g i s s tar ted .
You can change a file name on your
com put er. If you use a character that the
recorde r d oes no t s upp ort , p lay bac k o r
oth er ope rat ion ma y b e d isa ble d. If thi s
occ urs , c han ge the fi le nam e a gai n. Whe n
you ch ang e a fi le nam e, the pl ayb ack order
may ch ang e.
If you us e 8 or fe wer al pha num eri c
cha rac ter s i n l owe r c ase fo r a fi le nam e,
the ch ara cte rs are displayed in upper case
on the record er. If you use 9 letters or
more, they are d isp lay ed in low er cas e.
Page 57

57
Additional Information
Maximum recordable time (Approximate)
The to tal ma xim um recorda ble ti me (ap proximate) of all the folders is as follows.
Built-in flash memory (4 GB)
Sampling frequency/
quantifying bit number
Maximum
recordable time *
22.05 kHz 16 bit 12 hrs 55 min.
44.10 kHz 16 bit 6 hrs 25 min.
44.10 kHz 24 bit 4 hrs 15 min.
48.00 kHz 16 bit 5 hrs 55 min.
48.00 kHz 24 bit 3 hrs 55 min.
96.00 kHz 16 bit 2 hrs 55 min.
96.00 kHz 24 bit 1 hr 55 min.
“Memory Stick PRO-HG Duo”
Sampling frequency/
quantifying bit number
Maximum recordable time *
1 GB 2 GB 4 GB
22.05 kHz 16 bit 3 hrs 5 min. 6 hrs 25 min. 12 hrs 50 m in.
44.10 kHz 16 bit 1 hr 30 min. 3 hrs 10 min. 6 hrs 25 min.
44.10 kHz 24 bit 1 hr 0 min. 2 hrs 5 min. 4 hrs 15 min.
48.00 kHz 16 bit 1 hr 25 min. 2 hrs 55 min. 5 hrs 55 min.
48.00 kHz 24 bit 55 min. 1 hr 55 min. 3 hrs 55 min.
96.00 kHz 16 bit 40 min. 1 hr 25 min. 2 hrs 55 min.
96.00 kHz 24 bit 25 min. 55 min. 1 hr 55 min.
* T he max imu m recordab le tim e v ari es dep end ing on record ing co ndi tio ns.
Page 58

Index
Symbols
(h eadp hone ) j ack ..... .... 2 6, 31
(m icrophon e) j ack ......... .. 2 7
/M ENU ... ... .... .... ... .... .... ... ...
20, 23, 29, 30 , 31 , 32 , 3 5, 4 0
A- B bu tton ..... ....... .... ... .. 34
FF / bu tton ...... ....... 1 9, 3 2
FR / bu tton but ton .. 1 9, 3 2
PAUS E bu tton/
ind icat or ....... .... ... .... .... ... 2 5, 3 2
PL AY/ENT ER butt on/
ind icat or ... ....... .... ... .... .... ... 31
RE C bu tton /in dica tor ...... ... 24
ST OP b utto n ..... .... ... ... 25 , 32
A
ACC ESS indi cat or .... ... .... 1 8, 45
AC powe r ad apt er ..... .... ... .... . 19
Alk alin e ba tte ries .... ....... .... .... 17
Ana log reco rdin g . .... .... ... .... ... 23
B
Bat tery cas e ..... .... ... .... .... ... .. 17
Bat tery com par tmen t li d ..... ... 17
Bat tery lif e .... ... .... .... ... .... ...... 18
Bui lt-i n mi crop hon es ... .... .... .. 2 1
C
Car ryin g ca se .. .... ... .... .... ... ... 10
Cha ngin g a fol der . ... .... ... 23, 3 1
Cha ngin g th e m emor y dr ive ... 32
CLO CK .. .... ... .... ....... .... .. 19 , 41
Com pute r .... ... .... .... ... .... .... ... 36
D
DC IN 6 V ja ck ..... ....... .... ... .... 19
DEL ETE ALL ..... .... ... .... .... ... .. 41
DEL ETE TRK . .... .... ... .... ....... . 41
Del etin g a tra ck .. ... .... .... ... .... 35
Dig ital lim ite r . ... .... .... ... .... .... .. 43
Dig ital rec ordi ng ..... .... .... ... .... 28
DIS PLAY b utton ...... .... ... .... ... 15
DIV IDE butt on ...... .... ... .... .... .. 3 5
DPC
(Di gita l Pi tch Con trol ) ... . 33, 42
E
Eas y Se arch ........ .... ....... .... .. 3 3
Ela psed rec ordi ng/
pla ybac k ti me ..... ... .... .... ... .. 15
Erro r messa ges ........ .... ... .... .. 5 1
Ext erna l m icro phon e ... .... .... .. 2 7
F
Fas t fo rwar ds.. .... ... .... .... ... .... 32
Fas t revers e . .... ... .... ....... .... ... 32
Fol der .. ... .... .... ... . 3 1, 37, 46, 56
FOR MAT... ... .... .... ... .... .... ... ... 41
G
Go to t he b egi nnin g of tr ack .. 32
H
HOL D sw itch ..... ....... .... ... .... . 14
I
INP UT s witc h ..... .. 23, 28, 29, 30
L
LED .... ... .... .... ... .... .... ... .... .... 41
LIG HT b utto n ..... .... ... .... .... ... . 13
LIM ITER ..... .... ... .... .... ... .. 22, 43
LIN E IN (OP T) jack .... 28, 29, 30
LIN E OU T (O PT) jac k .... .... ..... 34
LOW CUT FILTE R (L CF) ... 22, 43
M
Mai nten ance ..... .... ....... .... ..... 47
Max imum rec orda ble time... ... 57
MEM ORY .. ... .... .... ... .... ....... .. 4 1
Mem ory Stic k ...... .... ... .... 4 5, 4 6
Mem ory Stic k s lot ... .... .... ... ... 45
Men u di spla y .... .... .... ... .... .... . 40
MIC ATT s wit ch . ... .... ....... .... .. 2 2
Mon itor ing the rec ording...... .. 2 6
MP3 fil es ........ .... ... .... .... ... .... 38
58
Page 59

P
Pea k le vel lam ps ...... ....... .... .. 2 4
Pea k me ter ...... ... .... .... ... .... ... 24
Pla cing the bu ilt- in m icro pho nes
to face the so und sour ce ... . 21
Pla ying bac k .... ....... .... ... .... ... 31
Adj usti ng t he play back
spe ed ( DPC) ...... ... .... ... 33
Eas y Se arch ........ .... ... .... 33
MP3 fil es .... .... .... ... .... .... . 38
Pau se ..... ... .... ....... .... ... .. 32
Pre- reco rdin g ..... .... ... .... . 26
Rep eat play . ... .... .... ... .... . 34
Sto p ..... ... .... .... ... .... .... ... 32
PLU G IN PWR
(pl ug i n po wer ) .... .... .... ... .... 44
Pow er s ourc e ....... .... ... .... .... . 17
POW ER s witc h ... ... .... .... . 13, 18
Pre- reco rdin g... .... ... .... .... ... ... 26
Prep aration bef ore
reco rdin g ..... ... .... .... ... .... .... 21
PRE REC . .... .... ... .... .... ... . 26, 44
Q
Qua ntif ying bi t nu mber ..... .... . 42
R
REC LEV EL d ial ..... .... ... .... .... 24
REC MOD E... ....... .... ... .... .... .. 4 2
Rec ording . ....... .... ... .... .... ... ... 21
Dig ital rec ordi ng ... .... ...... 28
Dig ital Syn chro niz ed
Rec ording ..... .... .... ... .... 30
Pau se ..... ... .... ....... .... ... .. 25
Rec ording a nalo g
sou nd . ... .... .... ... .... ....... 23
Rec ording d igit al sign als from
ext erna l e quip ment
(Op tica l In put ) ...... .... ... . 29
Rec ording u sing th e bu ilt- in
mic rophones .. ... .... ....... 23
Sto p ..... ... .... .... ... .... .... ... 25
Rem aini ng b att ery powe r ..... .. 18
Rem aini ng m emo ry a moun t ... 25
Rem aini ng r ecor dabl e
tim e ......... .... ....... .... ... .. 15, 25
Rem aini ng t ime of the cur rent
tra ck ......... .... ... .... .... ... .... ... 15
Rem ote comm and ar ..... .... .... . 30
REM OTE jack .... .... ... .... ....... . 30
Rep eat play ...... .... ... .... .... ... .. 34
S
Sam plin g fr eque ncy ....... .... ... 42
SBM .... ... .... .... ... .... ....... .... ... 43
Slo t fo r a wri st s trap . .... ....... .. 1 3
Sup er B it M app ing .... ... .... .... . 43
Sup plie d ac ces sori es ... ....... .. 1 7
Syn chronizi ng d igi tal reco rdin g
wit h pl ayba ck ...... .... ... .... .... 30
SYN C RE C ..... ... .... .... ... .. 30, 44
Sys tem requ irem ents for a
com pute r ....... .... ... .... .... ... .. 36
T
Tim e i nfor mati on ..... ....... .... ... 15
TRA CK E ND ... .... ....... .... ... .... 32
Track fil e... .... ....... .... ... .... 3 7, 5 6
Tripod ....... .... ... .... .... ... .... .... . 22
Troubl esho oti ng .... .... ... .... .... . 48
U
USB con nect or .... ... .... .... ... ... 36
Usi ng t he m enu dis play ..... .... 40
V
Volum e d ial .... ... .... ....... .... ..... 26
W
Win d s creen ........ .... ... .... .... .. 2 2
Additional Information
59
Page 60

Printed in China
 Loading...