

Page 1
M-crew
4-230-574-11(1)
Operating Instructions
Mode d’emploi
Bedienungsanleitung
Manual de instrucciones
Gebruiksaanwijzing
Ansluten bruksanvisning
Istruzioni per l’uso
Manual de instruções
GB
FR
DE
ES
NL
SE
IT
PT
CT
PCLK-MN10
2000 Sony Corporation
Page 2

• Duplication of any or all of the contents of
this software and instruction manual or
lending of this software to third parties
without the express permission of the
copyright holder is strictly prohibited by
copyright law.
• Sony cannot be held liable in any way for
monetary losses, lost profits or claims from
third parties arising from the use of this
software.
• Should any manufacturing defects occur,
Sony’s responsibility shall be limited solely
to replacing said defective merchandise.
• This software is approved for use only with
the specified equipment.
• Sony reserves the right to change software
specifications without prior notice.
Program 2000 Sony Corporation
Documentation 2000 Sony
Corporation
2000 Sony Corporation All rights
reserved.
• M-crew, PictureGear and VAIO are the
registered trademarks of Sony Corporation.
• Microsoft, MS-DOS and Windows are the
registered trademarks of Microsoft
Corporation.
• IBM and PC/AT are the registered
trademarks of International Business
Machines Corporation.
• Macintosh is the registrated trademark of
Apple Computer Inc.
• Adobe and Adobe Acrobat Reader are
the trademarks of Adobe Systems
Incorporated.
• Other companies and product names are
the trademarks or the registered
trademarks of each company.
GB
2
Page 3

Table of contents
Getting started
Overview ..............................................4
System requirements .................. 5
Note ............................................... 5
Preparation
Checking the supplied items..............6
Connections .......................................... 7
Installing the USB driver ............ 8
Verifying the status of the
installed device..................10
Setting the multimedia
parameters on your
computer ............................ 11
About this manual .............................13
Using the on-line manual......... 13
Using Help .................................14
Installing the software ......................15
Installing M-crew ...................... 15
Installing PictureGear Label
Maker .................................. 18
Installing Acrobat
Reader 4.05 ......................... 19
Uninstalling the software ......... 20
Starting up the software ...................21
Starting up the software ...........21
Quitting the software................ 21
GB
Additional Information
Troubleshooting................................. 22
GB
3
Page 4

Getting started
Overview
M-crew (ver. 1.0E) allows you to control Sony system stereo
components equipped with a PC LINK jack. Through M-crew, you can
perform the functions listed below.
Playback
• Use the computer to operate the playback function on CD and MD
decks.
• Enjoy audio files stored on the computer.
• Play a CD in the CD-ROM drive (only when the connected system
stereo does not have any controls for the CD player)
• Tune in radio stations using the computer.
Recording/editing
• Input disc and track names from the computer keyboard.
• Edit MDs on the computer screen.
• Record from a CD to an MD through easy drag-and-drop operations.
• Record easily from a radio to an MD.
Other operations
• Create virtual media for the management of audio files.
• Keep track of played and recorded tracks through a Disc Library.
• Access related websites while enjoying tracks.
• Access related websites while enjoying radio programs.
• Set playback and recording timers.
• Print out MD labels.
Notes
• In this manual, the term “system stereo component” refers specifically to
component stereo systems (incorporating CD and MD decks) and discrete MD
decks that support PC-LINK connections.
• The M-crew functions that operate on your computer will depend on the
system stereo components connected to your computer.
• You can use this software to operate only system stereo components
connected directly to the computer.
GB
4
Page 5

System requirements
The following hardware and software are necessary to use the M-crew
(ver. 1.0E) software.
s IBM PC/AT or compatible (This software does not run on the Apple
s CPU*
s Video board and display driver:
s Hard disc space: 20 MB*
s CD-ROM drive
s USB port: 1 or more
s OS: Windows 98/Windows 98SE (This software does
s Media player: Windows Media Player (Before you can use the
s Video monitor: VGA (800 × 600 pixels), 65,536 colors or more.
*1The operation of M-crew is not guaranteed on some computers with Pentium-
*2Another 15 MB of hard disc space is required to install PictureGear Label
1
: Intel Pentium II 233 MHz/Celeron 300A or higher
compatible CPU chips, such as the AMD K6 (e.g., sound skipping may occur
during playing of an audio file).
Maker.
Macintosh.)
VGA (800 × 600 pixels), 65,536 colors or more.
2
or more (When installing both M-crew
and on-line manual.)
not run on Microsoft Windows 3.1, Windows 95
or Windows NT.)
M-crew software, you must first install Windows
Media Player (version 6.4 or higher) into your
computer.)
Note
The PC LINK connector is not compatible with a CONTROL A 1 or A 1
II, or CONTROL I connector. If your system stereo has a CONTROL A
1 or A 1 II connector, you must use the PCLK-MD2 Connecting kit (not
supplied).
GB
5
Page 6
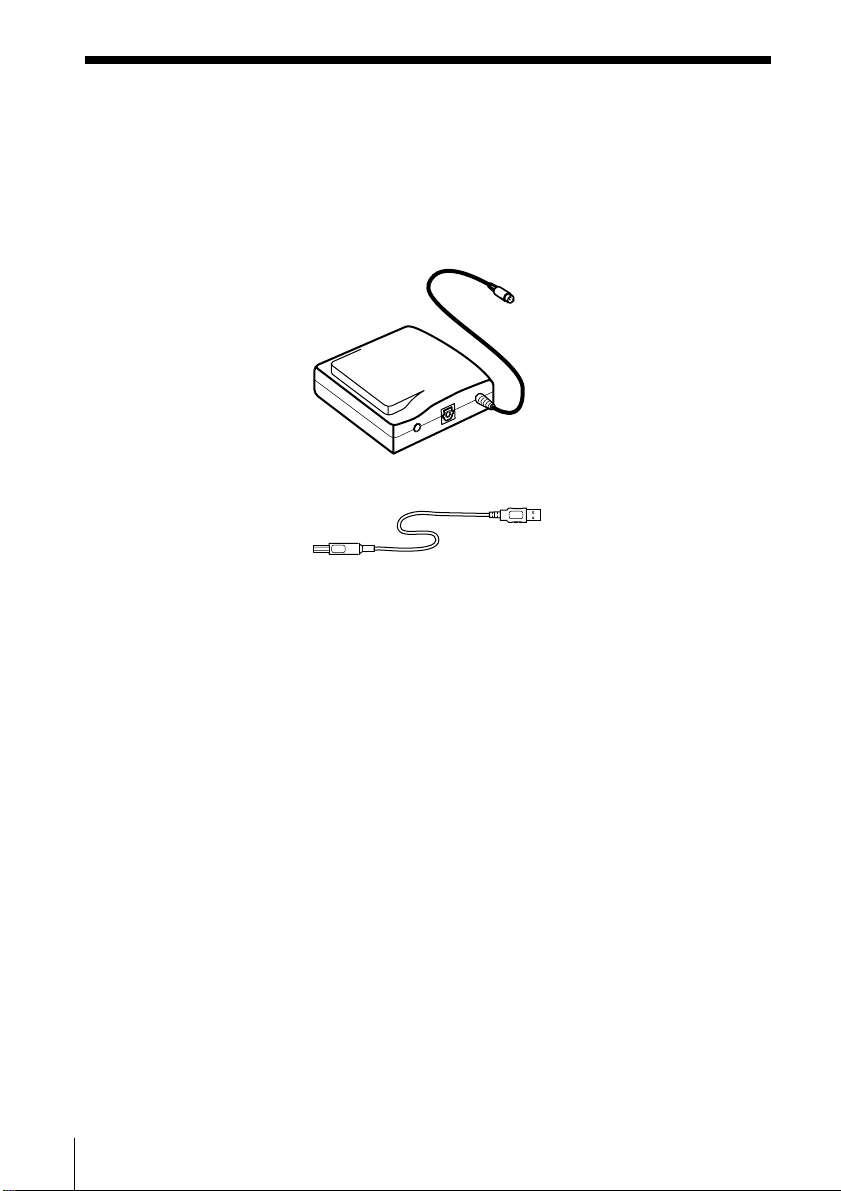
Preparation
Checking the supplied items
Make sure all of the following items are included with your
M-crew. If anything is missing, please contact the shop where you
purchased this unit or your nearest Sony dealer.
• PC connecting adaptor CAV-MN10 (1)
PC LINK (Mini DIN 6P)
connector
• USB cable (1)
• Optical digital connecting cable (1)
• M-crew CD-ROM (1)
• Operating instructions (1)
• Warranty card (1)
GB
6
Page 7
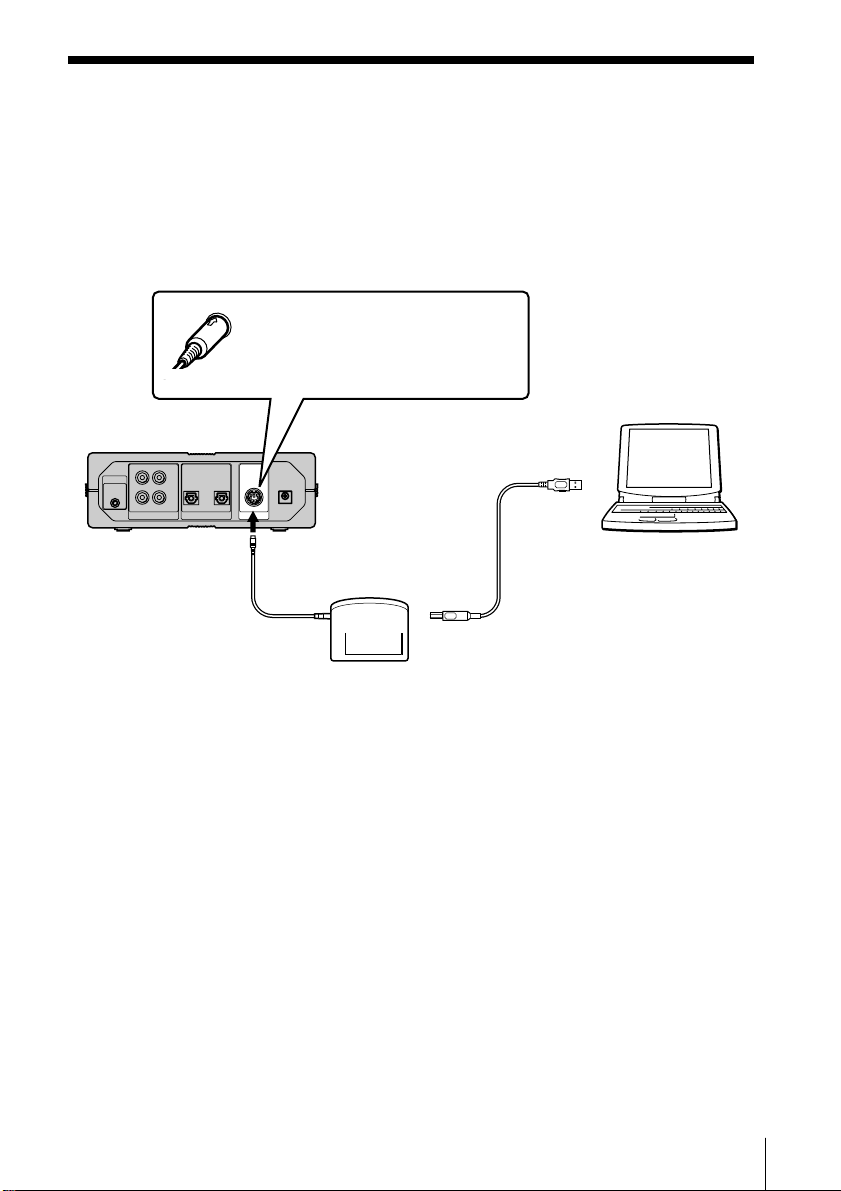
Connections
Connecting your personal computer with a system stereo component
Use the supplied PC connecting adaptor and USB cable to connect your personal
computer with a system stereo component.
The diagram below shows an example of the MDS-PC3 connected to a PC.
With the plug correctly oriented,
insert it fully into the jack.
Computer
MDS-PC3
To the PC LINK
jack
to a digital audio input
to an analog audio input
Notes
• Make sure the plug is straight when you insert it. Inserting it at an angle may
damage the connector parts.
• If you connect the digital audio output jack on the PC connecting adaptor to
the digital optical audio input connector on a system stereo component using
a digital connecting cable fitted with a rectangular connector, you will be able
to enjoy audio files stored on your computer’s hard disk or CDs in your
computer’s CD-ROM drive on the system stereo component. Refer to the
operating instructions supplied with the system stereo component for
connection details.
• By connecting an active speaker system to the analog audio output jack (stereo
mini-jack) provided on the PC connecting adaptor through an audio
connecting cord (not supplied), you can listen to the audio output from your
computer.
This jack, however, should not be connected to the analog input connector on
a system stereo component, since noise may be generated due to the
incompatibility between the components.
PC connecting
adaptor
b
b
To the computer’s
USB port
B
USB cable
b
To the USB
connector
GB
7
Page 8
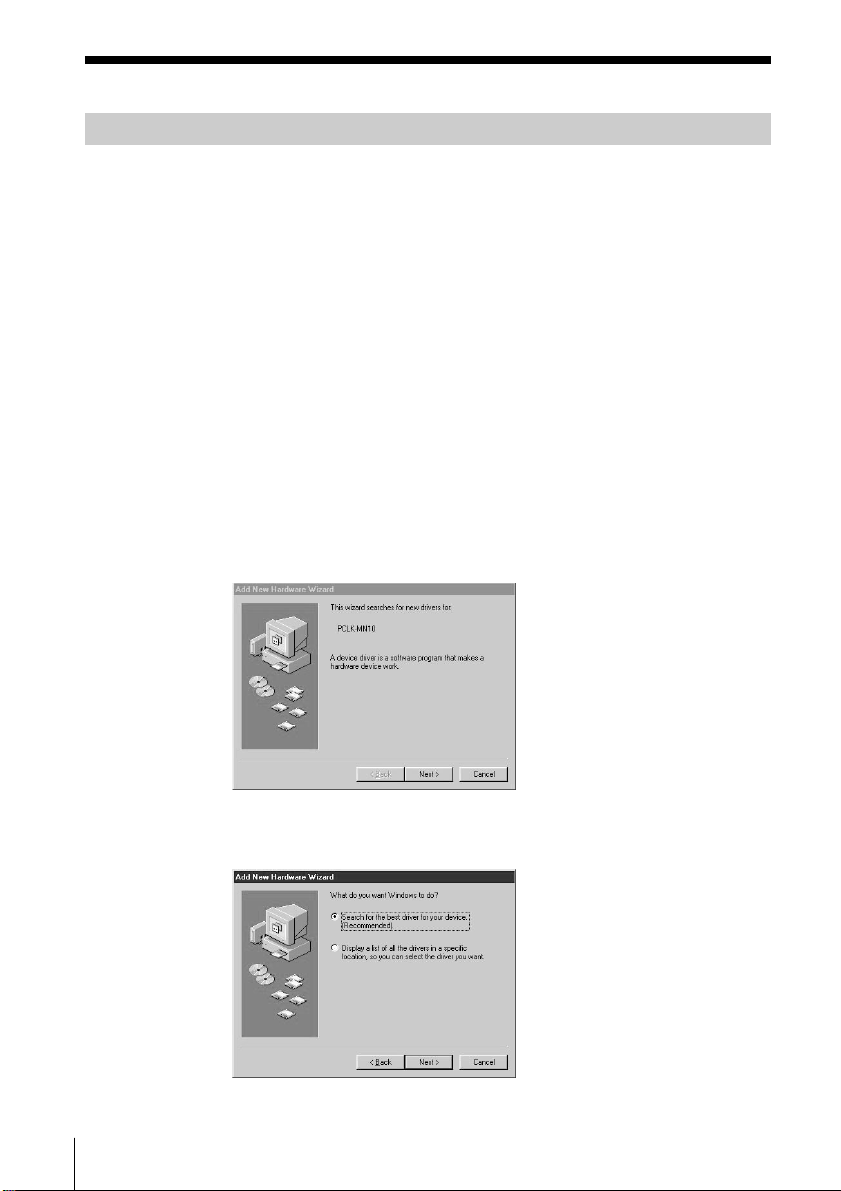
Installing the USB driver
When you have connected your personal computer to a system
component and turned on the computer, a Wizard will guide you
through the procedure for setting up your hardware in order to use
M-crew.
Installing the standard drivers supplied with Windows 98
When requested to do so by the wizard, insert the Windows 98 CDROM into the CD-ROM drive of your computer to begin the installation
of the drivers.
Installing the Sony link kit-dedicated drivers
Insert the supplied M-crew CD-ROM into the CD-ROM drive of your
computer, and then do the following steps.
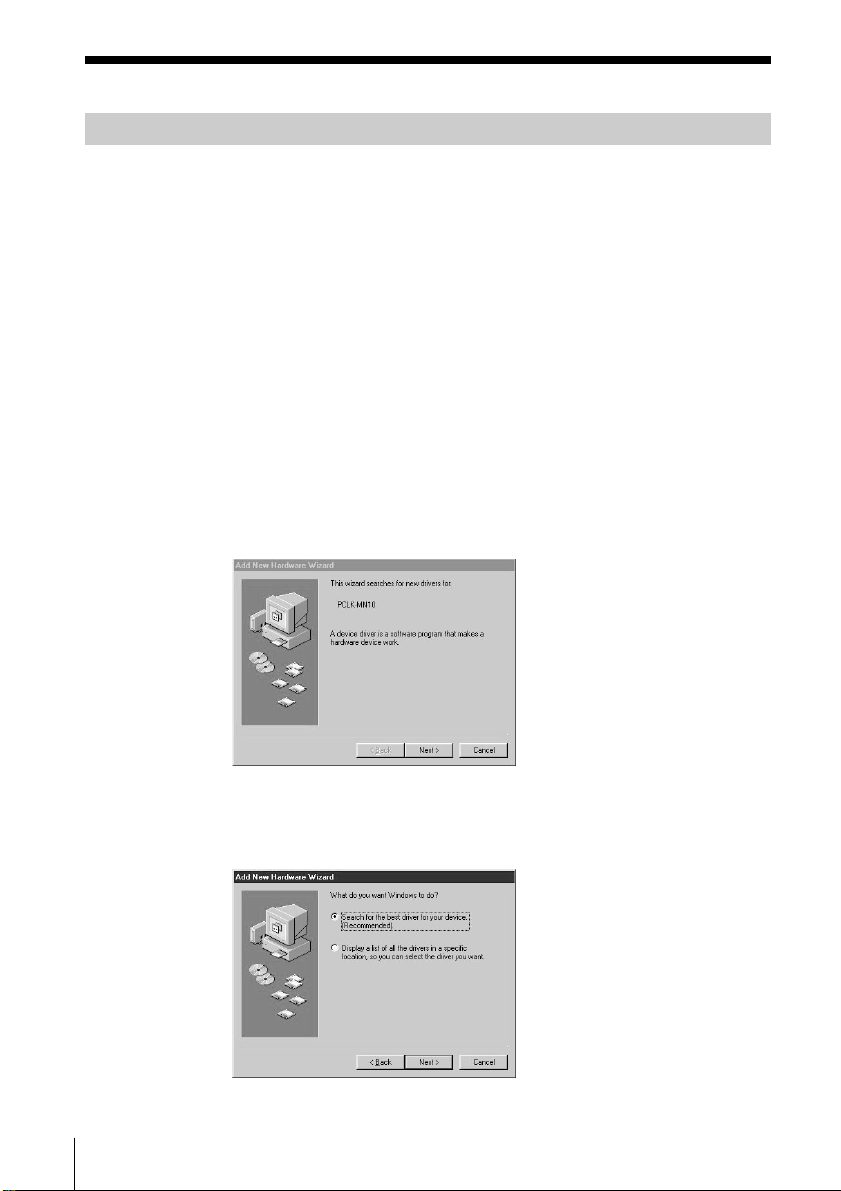
1 Hook up the system (page 7) and then turn on the personal
computer.
The “Add New Hardware” Wizard appears.
2 Click “Next.”
A dialog box for selecting the search method appears.
GB
8
Page 9
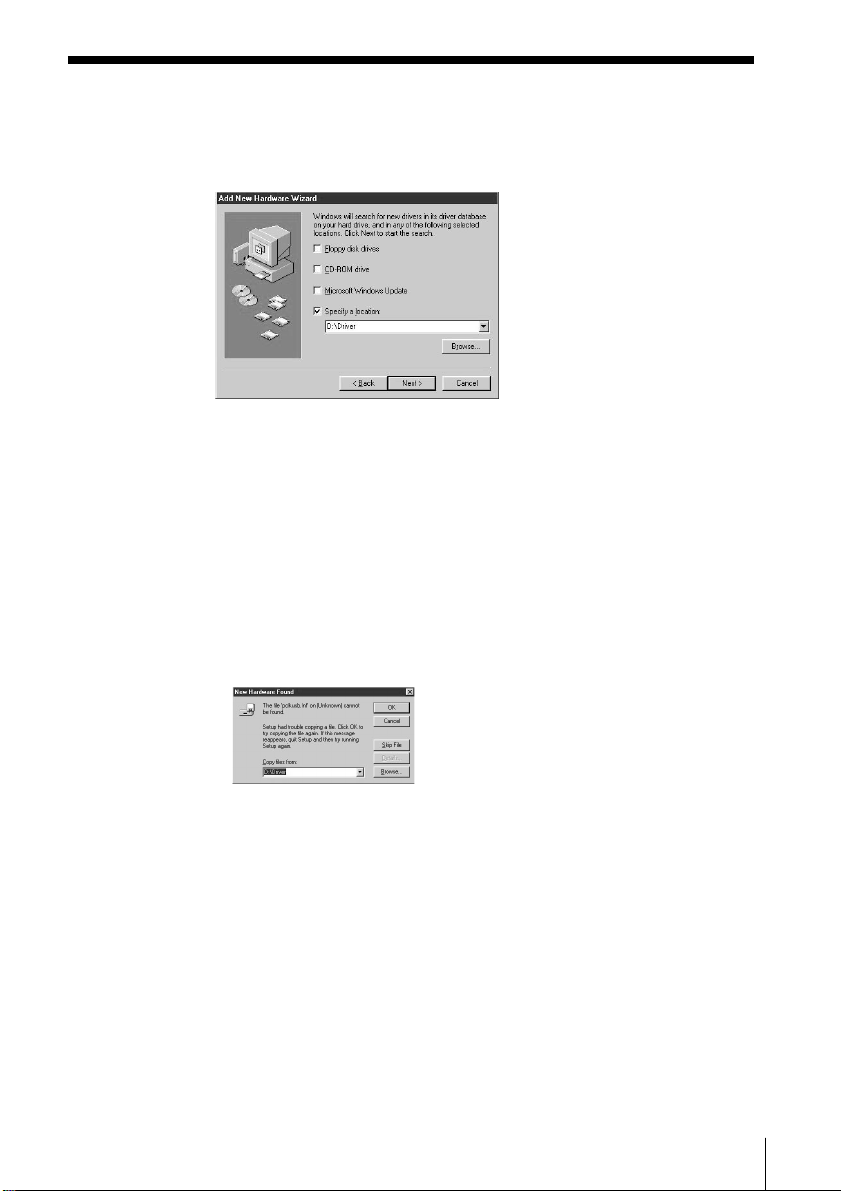
3 Select “Search for the best driver for your device. (Recommended)”
option and click “Next.”
A dialog box for selecting the search location appears.
4 Select “Specify a location:” and enter “D:\Driver”, and then click
“Next.”
A dialog box indicating that the installation has been completed
appears.
Notes
• The drive name (“D:” in step 4) depends on your computer’s
configuration.
Enter the name of the CD-ROM drive of your computer.
• During the installation of the USB driver, the following dialog box may
appear. In such a case, click “OK” and go to the next step.
5 Click “Finish.”
The installation is complete.
GB
9
Page 10
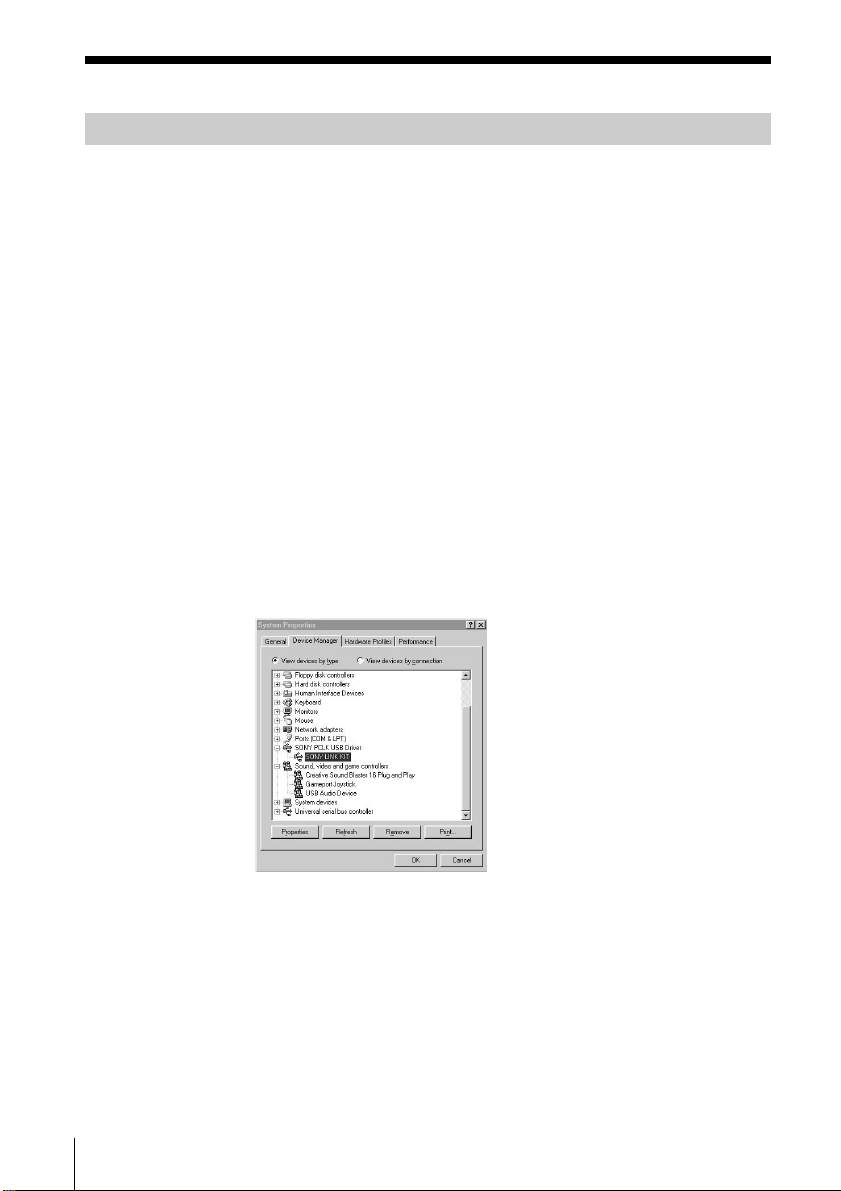
Verifying the status of the installed device
Be sure to check the status of the installed device after you have
installed it.
1 Open the Control Panel.
Point to “Settings,” click “Control Panel” from the Start menu.
2 Double-click System icon.
The “System Properties” dialog box appears.
3 Click the “Device Manager” tab.
Make sure that the following items are listed in the “Device
Manager” window.
— “SONY LINK KIT” under “SONY PCLK USB Driver”
— “USB Audio Device” under “Sound, video and game
controllers”
— “USB Human Interface Device” under “Human Interface
Devices”
— “USB Composite Device” and “Generic USB Hub” under
“Universal serial bus controller”
10
4 Click “OK” to close “System Properties” dialog box.
GB
Page 11
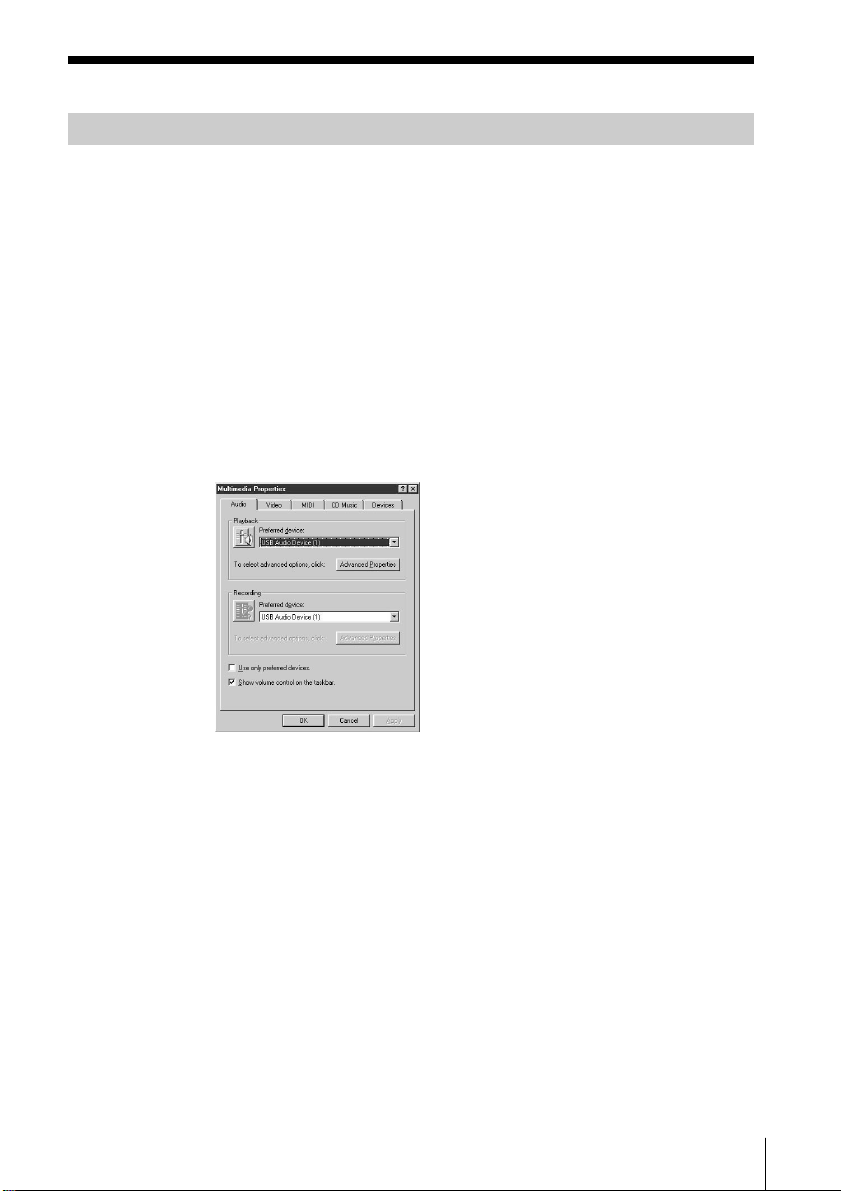
Setting the multimedia parameters on your computer
You must set the multimedia parameters on your computer before you
can output audio from a CD in your computer’s CD-ROM drive or a
MIDI file stored on your computer’s hard disk through the system
stereo component connected to your computer.
1 Open the Control Panel.
Point to “Settings,” and click “Control Panel” from the Start menu.
2 Double-click the Multimedia icon.
The “Multimedia Properties” dialog box appears.
3 Click the “Audio” tab, and then select “USB Audio Device (1)” in
“Preferred device:”
11
GB
Page 12
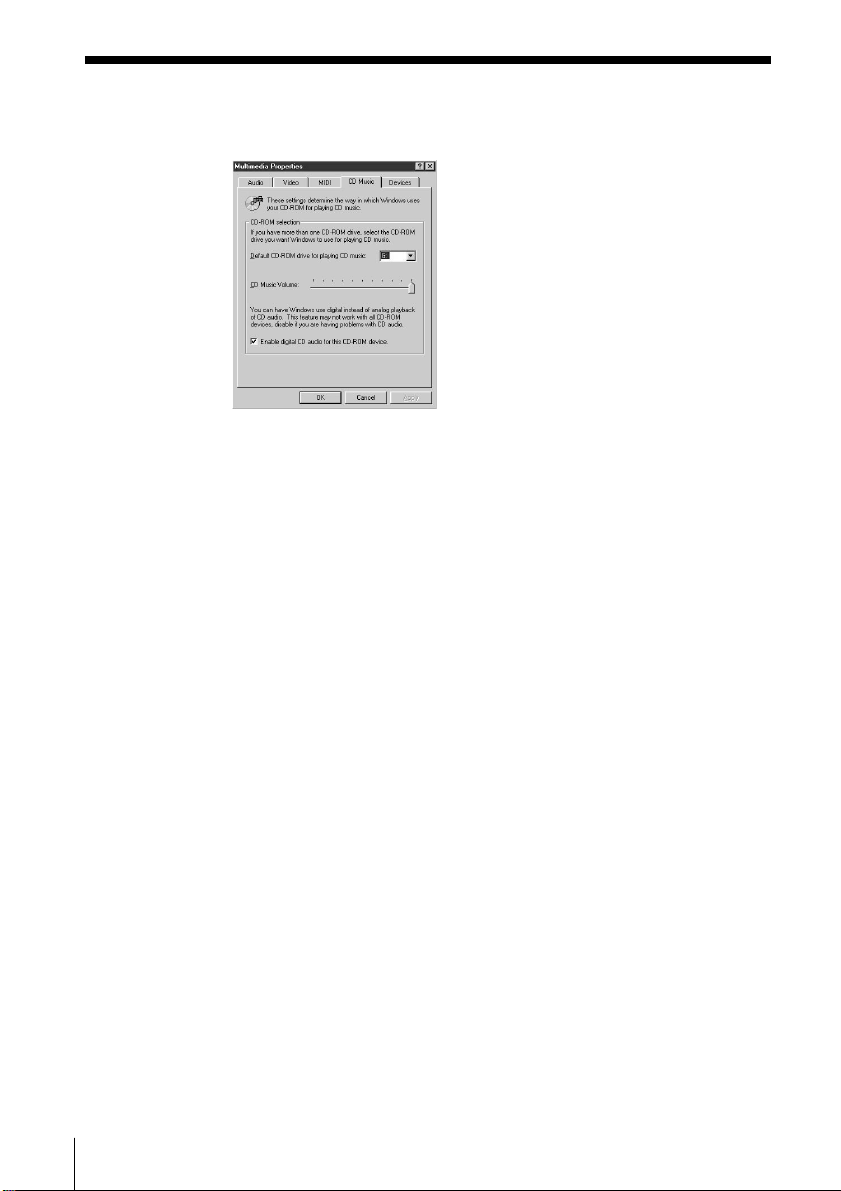
4 Click the “CD Music” tab, and then select the “Enable digital CD
audio for this CD-ROM device.” option.
Note
Depending on the version of Windows 98 (i.e., First Edition), this option
may be grayed out and therefore inaccessible. If this is the case, restart your
computer.
5 Click the “MIDI” tab, and then click “Microsoft GS Wavetable SW
Synth.”
6 Click “OK” to close the “Multimedia Properties” dialog box.
12
GB
Page 13
About this manual
This manual mainly explains the procedures for installing the M-crew
program. The use of the on-line manual and M-crew Help is explained
first.
The latest information about this software can be found in the
“Readme.txt” file on the supplied CD-ROM.
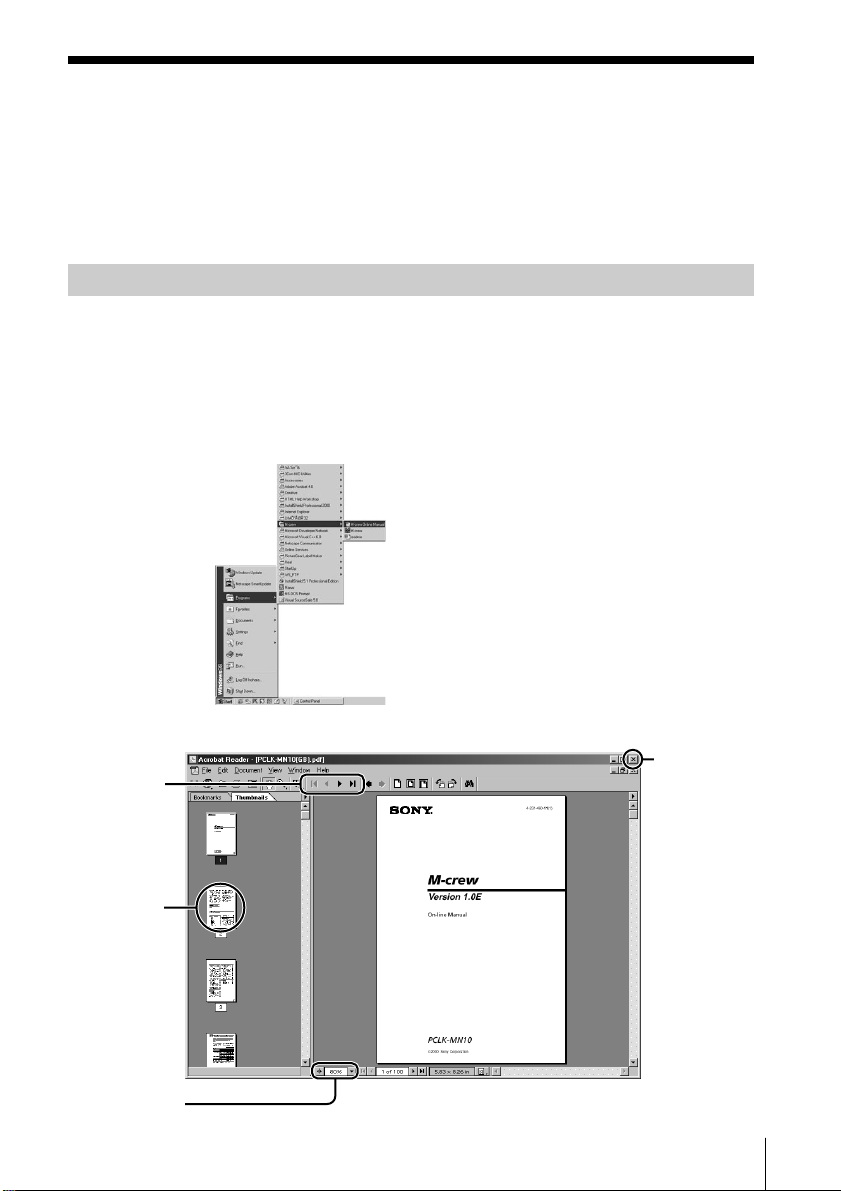
Using the on-line manual
Before you can use the on-line manual, Acrobat Reader 4.05 (supplied
by Adobe Systems Incorporated) must be installed in your computer. If
it is not, do the procedure “Installing Acrobat Reader 4.05” (on page
19).
, To open the on-line manual, point to “Program”and then
“M-crew.” Then click “On-line manual” from the Start menu.
Click to turn
the pages
Double-click
to display a
page
Click to change
the size of the
displayed page
The cover page appears in the display.
Click to exit
the on-line
manual
13
GB
Page 14
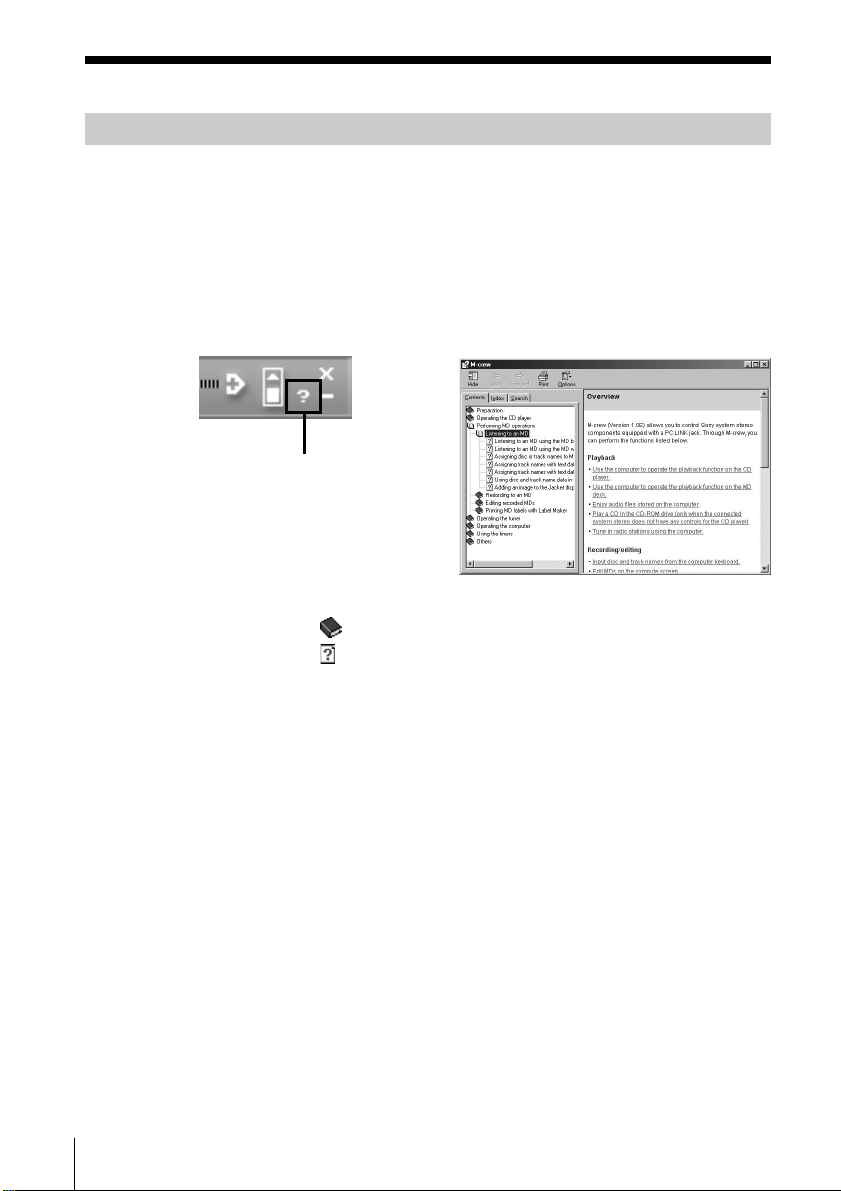
Using Help
Note
Help is provided only in English.
Operating instructions in other languages can be found in the on-line manual
(see step 1-3 on page 15).
Opening the Help table of contents
Click the Help button on the Main bar. The M-crew table of contents
will appear.
Click to open Help
14
GB
• Double-click
• Double-click
, and the titles of the items that it contains appear.
, and an explanation of the item is displayed.
• Click an underlined item in an explanation, and a related explanation
on another page is displayed.
Searching by Keyword
Click the “Index” tab in the above search topic dialog box, and the table
of contents disappears and a list of keywords is displayed.
To search for a keyword, enter the word that you want to search for or
scroll the list of keywords.
To view the explanation of a keyword, select the keyword from the list
of keywords and click “Display.”
Page 15
Installing the software
Use this procedure to install the M-crew software onto your computer’s
hard disk.
Installing M-crew
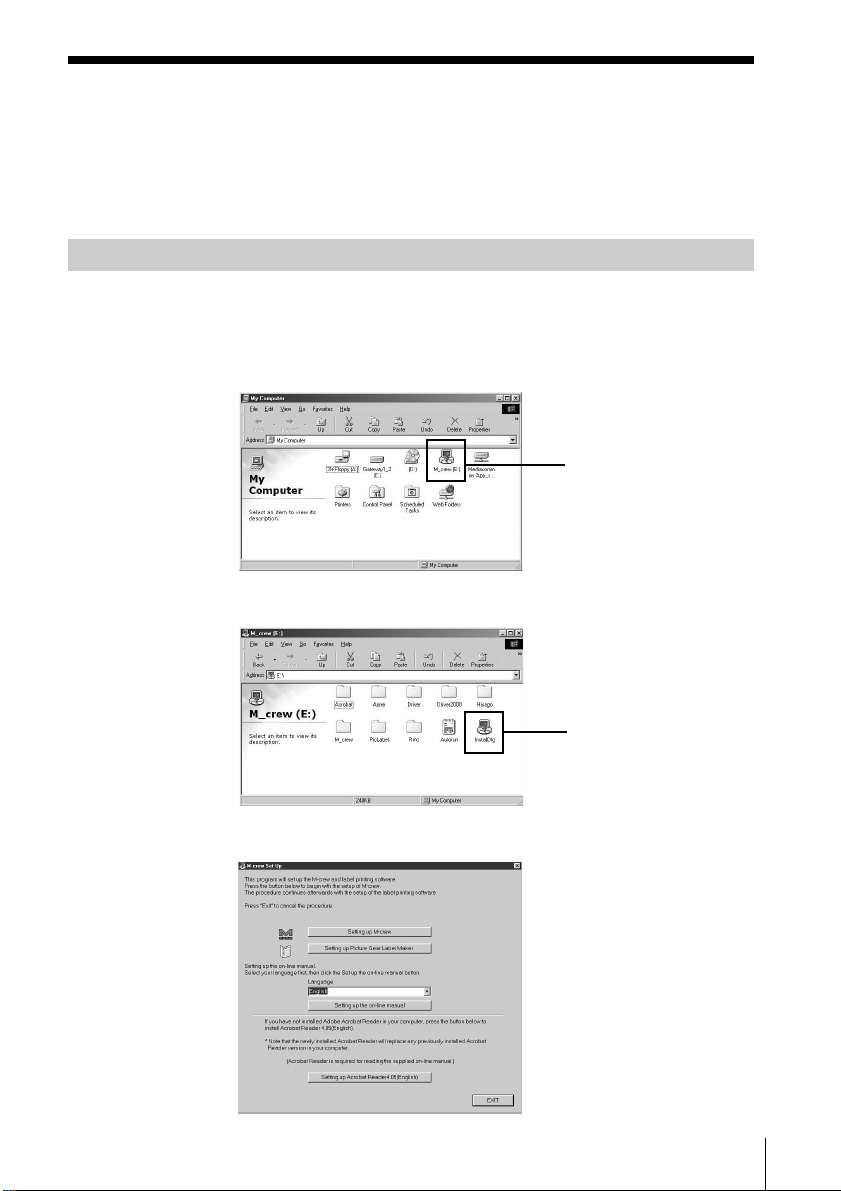
1 Insert the supplied M-crew CD-ROM into the CD-ROM drive of
your computer.
1 Double-click the My Computer icon on the desktop.
2 Double-click the CD-ROM icon.
CD-ROM icon
(This window appears when
you select “Large icons” from
the View menu.)
“InstallDlg” icon
3 Double-click “InstallDlg.”
If necessary, select your desired language in “Language” option.
15
GB
Page 16
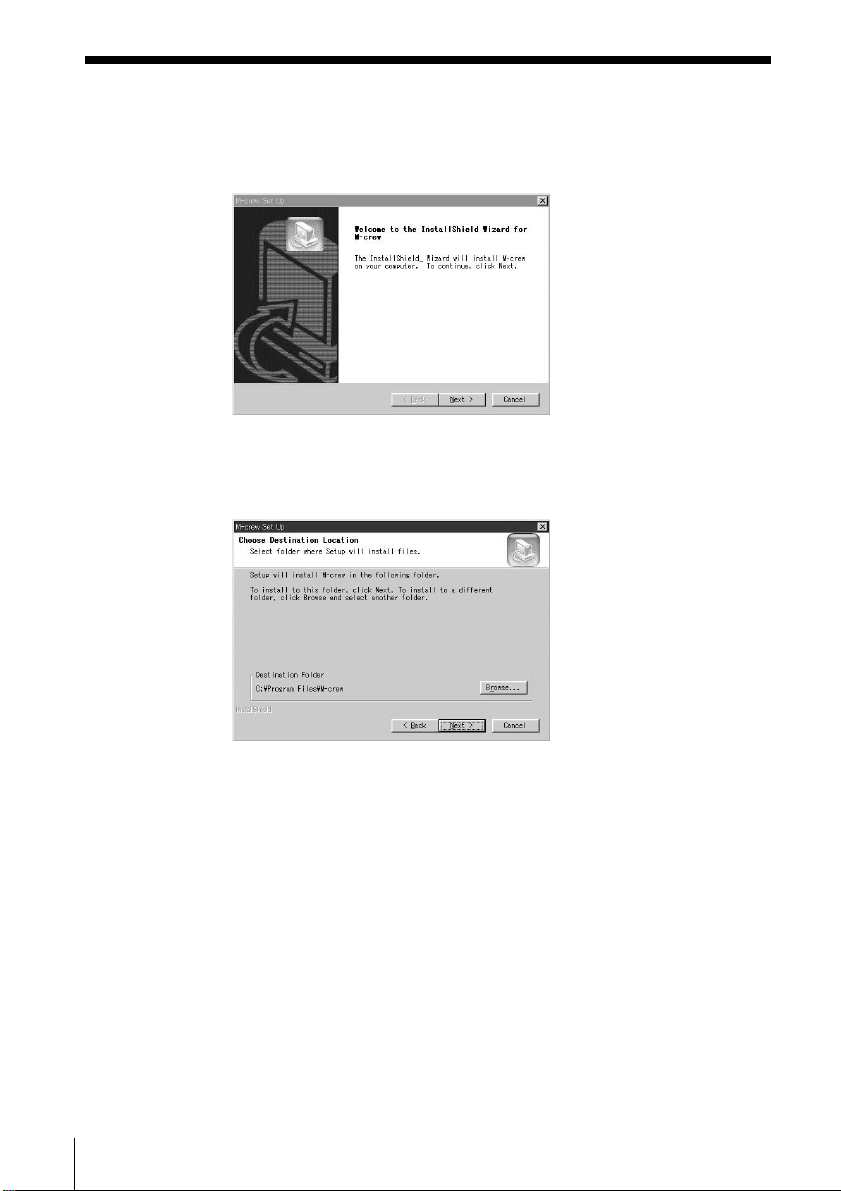
2 Click “Setting up M-crew” in the setup window.
The “M-crew Set Up” window appears, along with the Welcome
dialog box. Read the contents of the dialog box carefully.
3 Click “Next.”
A window for selecting the destination folder appears.
16
To choose another destination folder, click “Browse” and select the
folder where you want to install the software.
GB
Page 17
4 Click “Next.”
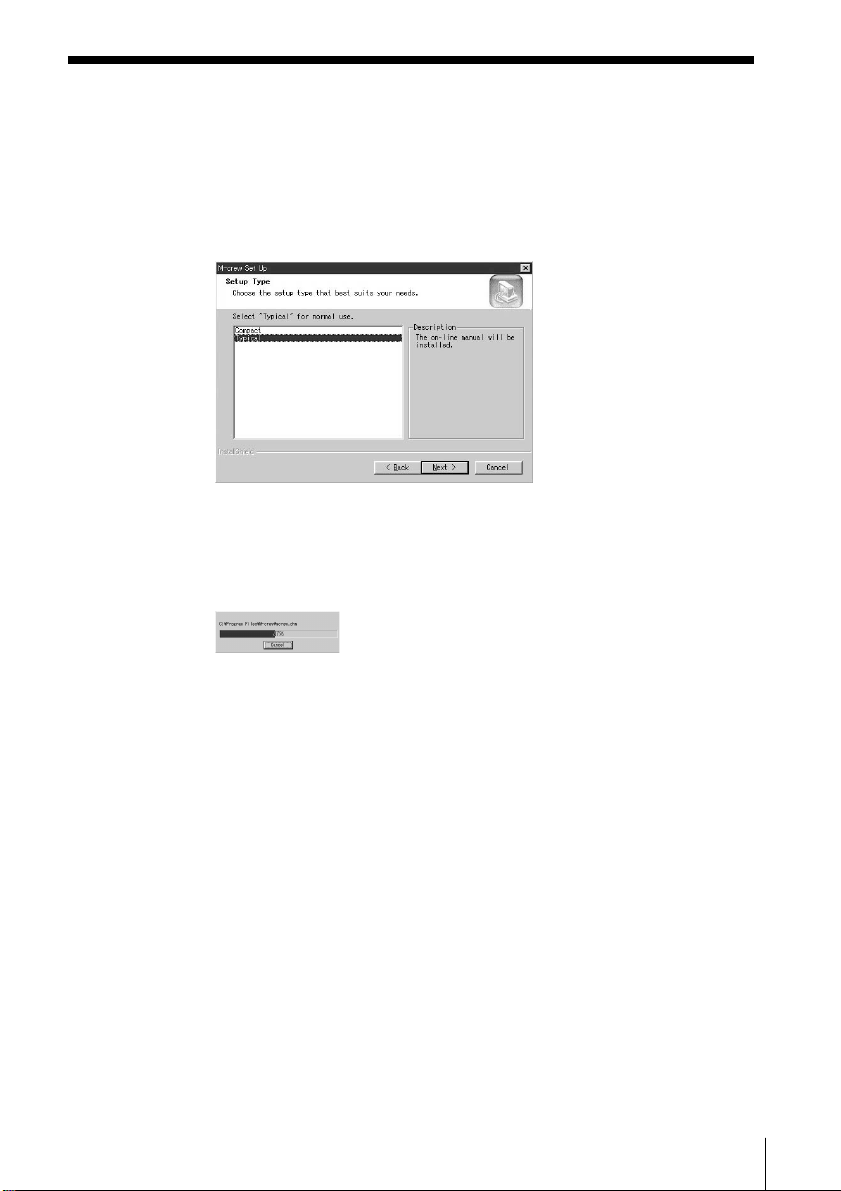
Select one of the installation options.
Typical: PDF files* are installed with M-crew.
Compact: Only M-crew is installed.
* These PDF files are on-line manuals for M-crew and PictureGear Label
Maker.
5 Click “Next.”
Installation begins.
An M-crew folder will be created in the folder that M-crew is
installed to.
6 Click “Finish.”
Installation is completed and a Readme.txt appears.
Depending on your computer, a dialog box may appear to prompt
you to restart your computer. If it does, restart your computer at
this time.
Note
A folder is created as a result of the installation. This folder is used by the
software. Do not erase, move, or change its contents.
17
GB
Page 18

Installing PictureGear Label Maker
Please note that when you install PictureGear Label Maker, any older
version of PictureGear Label Maker that exists on your computer will
be overwritten by the new version.
1 Click “Setting up PictureGear Label Maker” in the setup window
(see step 1-
3 on page 15).
2 Follow the instructions that appear to install the application.
18
GB
Page 19
Installing Acrobat Reader 4.05
You must install Acrobat Reader 4.05 onto your computer before you
can open up the on-line manual. After you have restarted your
computer after installing PictureGear Label Maker, open the setup
window again
(see step 1-
3 on page 15).
1 Click “Setting up Acrobat Reader 4.05 (English)” in the setup
window.
The “Acrobat Reader 4.05 Setup” window appears.
Carefully read the contents that are displayed in the window.
If you do not want to install Acrobat Reader 4.05, click “Cancel.”
Note
If you have already installed Adobe Acrobat Reader 3.0 in your computer,
“Warning” appears. If this happens, uninstall Adobe Acrobat Reader 3.0
and restart your computer. “Warning” will not appear, and you will be able
to continue the installation.
2 Follow the instructions that appear to install the software.
After you have completed installation, click “EXIT” and remove the
CD-ROM.
19
GB
Page 20

Uninstalling the software
If you do not need M-crew, PictureGear Label Maker, or Acrobat
Reader 4.05, uninstall the programs as follows:
1 Open the Control Panel.
Point to “Settings,” and then click “Control Panel” from the Start
menu.
2 Double-click the “Add/Remove Programs” icon.
The “Add/Remove Programs Properties” window appears.
3 Select and click “M-crew,” “PictureGear Label Maker 4.1,” or
“Acrobat Reader 4.05” in the program list.
4 Click “Add/Remove.”
Uninstaller is activated and the software selected in step 3 is
deleted automatically.
Notes
• When you uninstall PictureGear Label Maker, the PictureGear Label
Maker installed through M-crew is deleted, as well as any other
PictureGear Label Maker that exists on your computer.
• When you uninstall the PictureGear Label Maker installed through
M-crew, the label printing function in PictureGear will stop
functioning. If this happens, uninstall PictureGear, and then install
PictureGear again.
20
GB
Page 21
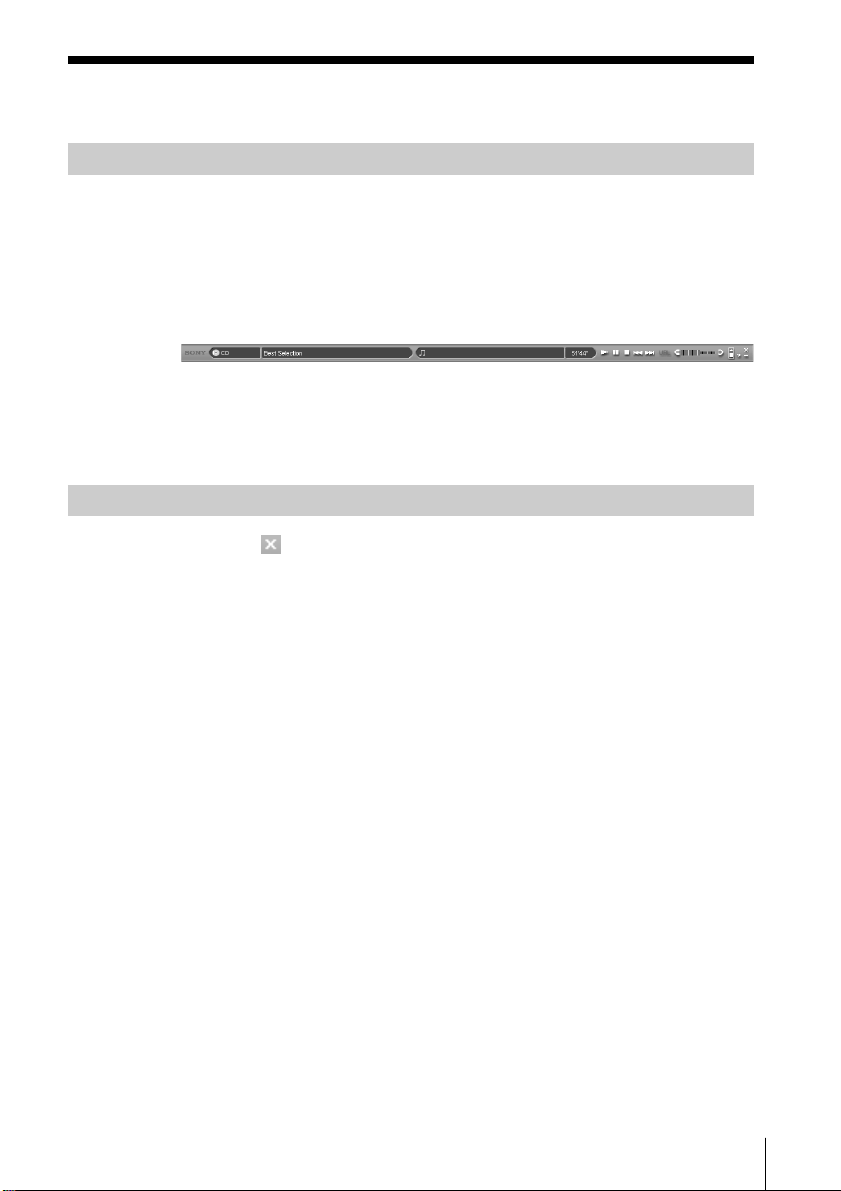
Starting up the software
Starting up the software
, Point to “Programs,” “M-crew,” and then click “M-crew”
from the Start menu.
The software starts up and the M-crew Main bar appears.
The bar below is displayed immediately after M-Crew is started up
(in this example, “CD” is selected as the system stereo function
(component)).
Note
During MD recording, a dialog box appears to prompt you to stop
recording or to start up M-crew.
Quitting the software
1 Click on the Main bar.
A dialog box for quitting the software appears.
2 Click “Do not shut off power.”
M-crew ends.
If you want to turn off the system stereo component as well, click
“Shut off power.”
21
GB
Page 22

Additional Information
Troubleshooting
If you experience any of the following difficulties while using this
software, use this troubleshooting guide to remedy the problem.
Should any problem persist, consult your nearest Sony dealer.
Please also refer to your computer’s manual, as well as the
“Readme.txt” file installed on the hard disc with the software.
Problem Cause/countermeasure
The message “The PCLK-MN10
does not respond. Please check
the connections.” appears.
No screen response or screen
error.
Text input, recording, editing
etc., cannot be done.
The USB connector on the PC connecting adaptor
is not properly connected to the USB port on the
computer.
t Check the USB connector connection.
t Try disconnecting the USB cable from the PC
connecting adaptor and from the computer,
and then connecting it again.
The PC LINK connector on the PC connecting
adaptor is not properly connected to the system
stereo component.
t Check the PC LINK connector connection.
t Check that the AC power cord of the system
stereo component is connected to an AC
outlet.
t Turn the power of the system stereo
component off and on, and then restart
M-crew.
t Try disconnecting the USB cable from the PC
connecting adaptor and from the computer,
and then connecting it again.
t Start up another often-used application and
verify that the computer functions properly.
t After uninstalling the software (page 20), try
re-installing it (page 15).
The disc’s protect tab may be set to write-protect.
t Slide the tab so that recording is possible.
The MD may be a commercial playback-only MD
(an MD with prerecorded tracks).
t Text input, recording, editing, etc., are not
possible on commercial playback MDs.
22
GB
Page 23

Problem Cause/countermeasure
The system stereo component
does not respond.
t Check that the connections have been made
properly (page 7).
t Disconnect the connecting cables and then
reconnect them.
t Try disconnecting the USB cable from the PC
connecting adaptor and from the computer,
and then connecting it again.
The displayed name of the MD or
CD does not match the disc’s
contents.
t Click the Reload button (pages 10 and 14 in
the on-line manual).
t Restart M-crew. Should the problem persist,
the data in the Disc Library may be corrupted.
Enter the names again.
The system sounds (warning
alarm/mail arrival notice) is not
heard.
t The system sounds have been specified not to
sound during M-crew startup, or the setting
may have changed to OFF when M-crew was
abnormally ended. To restore the sounds,
restart M-crew and then quit the program
normally. Or double-click the backup file
(reg0.reg to reg3.reg) in the M-crew folder and
follow the instructions to set up the program
again.
23
GB
Page 24

• La copie de tout ou partie de ce logiciel et
du mode d’emploi, ou le prêt de ce logiciel
à des tiers, sans l’autorisation expresse du
détenteur des droits d’auteur, sont
strictement interdits par la loi sur les droits
d’auteur.
• Sony n’assume aucune responsabilité, de
quelque nature que ce soit, pour les pertes
financières, les pertes de bénéfices ou les
plaines de tiers, émanant de l’utilisation de
ce logiciel.
• En cas de défaut de fabrication, la
responsabilité de Sony se limite
uniquement au remplacement de ladite
marchandise défectueuse.
• L’utilisation de ce logiciel n’est approuvée
qu’avec l’équipement spécifié.
• Sony se réserve le droit de modifier sans
préavis les spécifications de ce logiciel.
Programme 2000 Sony Corporation
Documentation 2000 Sony
Corporation
2000 Sony Corporation - Tous droits
réservés.
• M-crew, PictureGear et VAIO sont des
marques de fabrique déposées de Sony
Corporation.
• Microsoft, MS-DOS et Windows sont des
marques de fabrique déposées de Microsoft
Corporation.
• IBM et PC/AT sont des marques de
fabrique déposées d’International Business
Machines Corporation.
• Macintosh est une marque de fabrique
déposées d’Apple Computer Inc.
• Adobe et Adobe Acrobat Reader sont
des marques de fabrique d’Adobe Systems
Incorporated.
• Les autres noms d’entreprise ou de produit
sont des marques de fabrique ou marques
de fabrique déposées de chaque entreprise.
FR
2
Page 25

Table des matières
Préparatifs
Aperçu ................................................... 4
Exigences du système ................. 5
Remarque ..................................... 5
Préparatifs
Contrôle des articles dans la boîte.....6
Raccordements .....................................7
Installation du pilote USB .......... 8
Vérification de l’état du dispositif
installé.................................10
Réglage des paramètres
multimédia sur votre
ordinateur ..........................11
A propos de ce mode d’emploi .......13
Utilisation du manuel en
ligne.....................................13
Utilisation de l’aide (Help) ......14
Installation du logiciel ......................15
Installation de M-crew..............15
Installation de PictureGear
Label Maker .......................18
Installation d’Acrobat
Reader 4.05 ......................... 19
Désinstallation du logiciel........20
Lancement du logiciel .......................21
Démarrage du logiciel .............. 21
Sortie du logiciel ........................ 21
FR
Informations additionnelles
Guide de dépannage ......................... 22
FR
3
Page 26

Préparatifs
Aperçu
M-crew (ver. 1.0E) vous permet de contrôler des composants de
système stéréo Sony équipés d’une prise PC LINK. Les fonctions cidessous deviennent possibles par le biais de M-crew.
Lecture
• Opérer des platines CD et MD (lecture) à partir de votre ordinateur.
• Apprécier des fichiers audio stockés dans votre ordinateur.
• Lire un CD dans le lecteur CD-ROM (seulement quand le système
stéréo raccordé n’a pas de commandes pour le lecteur CD)
• Accorder des stations de radio à partir de votre ordinateur.
Enregistrement/édition
• Entrer des titres de disque et de plage au clavier de votre ordinateur.
• Editer des MD sur l’écran de votre ordinateur.
• Enregistrer d’un CD à un MD par des opérations de glisser-déposer
simples.
• Enregistrer facilement une station de radio sur un MD.
Autres opérations
• Créer un support visuel pour la gestion des fichiers audio.
• Conserver la trace des plages lues et enregistrées via une
Bibliothèque de disques.
• Accéder à des sites web concernés tout en écoutant des plages.
• Accéder à des sites web concernés tout en écoutant des programmes
de radio.
• Régler des minuteries de lecture et d’enregistrement.
• Imprimer des étiquettes de MD.
Remarques
• Dans ce mode d’emploi, le terme “composant stéréo de système” réfère
spécifiquement aux systèmes à composants stéréo (platines CD et MD y
compris) et aux platines MD discrètes assistant les raccordements PC-LINK.
• Les fonctions de M-crew opérantes sur votre ordinateur dépendront des
composants stéréo de système raccordés à votre ordinateur.
• Vous pouvez utiliser ce logiciel seulement pour opérer des composants stéréo
de système directement raccordés à votre ordinateur.
FR
4
Page 27

Exigences du système
Les éléments matériels et logiciels suivants sont requis pour l’emploi du
logiciel M-crew (ver. 1.0E).
s IBM PC/AT ou compatible (Ce logiciel ne fonctionne pas sur
s Unité centrale (CPU)*
s Carte vidéo et pilote d’affichage:
s Espace libre sur le disque dur:
s Lecteur CD-ROM
s Port USB: 1 ou plus
s Système d’exploitation:
s Lecteur de média: Windows Media Player (Avant d’utiliser le
s Moniteur vidéo: VGA (800 x 600 pixels), 65.536 couleurs ou plus.
Macintosh.)
1
:
Intel Pentium II 233 MHz/Celeron 300A ou plus
VGA (800 x 600 pixels), 65.536 couleurs ou plus
2
20 Mo*
ou plus (pour installer à la fois M-crew et
le manuel en ligne)
Windows 98/Windows 98SE (Ce logiciel ne
fonctionne pas sur Microsoft Windows 3.1,
Windows 95 ou Windows NT.)
logiciel M-crew, installez d’abord Windows
Media Player (version 6.4 ou supérieure) dans
votre ordinateur.)
Remarque
*1Le fonctionnement de M-crew n’est pas garanti sur certains ordinateurs avec
puces CPU compatibles Pentium, tels que AMD K6 (par ex. des sauts de son
peuvent survenir pendant la lecture d’un fichier audio).
*215 Mo d’espace de disque supplémentaires sont requis pour l’installation de
PictureGear Label Maker.
Le connecteur PC LINK n’est pas compatible avec le connecteur
CONTROL A 1 ou A 1 II, ou CONTROL I. Si votre système stéréo a un
connecteur CONTROL A 1 ou A 1 II, vous devrez utiliser le kit de
raccordement PCLK-MD2 (non fourni).
FR
5
Page 28

Préparatifs
Contrôle des articles dans la boîte
Vérifiez que tous les articles ci-dessous accompagnent votre M-crew. Si
l’un d’eux manque, contactez le magasin d’achat de cet appareil ou le
revendeur Sony le plus proche.
• Adaptateur de raccordement PC CAV-MN10 (1)
Connecteur PC LINK
(Mini DIN 6P)
• Câble USB (1)
• Câble de raccordement numérique optique (1)
• CD-ROM M-crew (1)
• Mode d’emploi (1)
• Carte de garantie (1)
FR
6
Page 29
Raccordements
Raccordement de votre ordinateur personnel à un composant stéréo de
système
Utilisez l’adaptateur de raccordement PC et le câble USB fournis pour raccorder votre
ordinateur personnel à un composant stéréo de système.
L’illustration ci-dessous donne l’exemple d’un MDS-PC3 raccordé à un PC.
Orientez correctement la fiche et
insérez-la à fond dans la prise.
Ordinateur
MDS-PC3
A la prise
PC LINK
A une entrée numérique
A une entrée analogique
Remarques
• Vérifiez que la fiche est droite lors du raccordement. L’insertion de biais
pourrait endommager des parties du connecteur.
• Si vous raccordez la prise de sortie audio numérique de l’adaptateur de
raccordement PC au connecteur d’entrée audio optique numérique d’un
composant stéréo de système avec un câble de raccordement numérique doté
d’un connecteur rectangulaire, vous pourrez écouter les fichiers audio stockés
dans le disque dur de votre ordinateur ou des CD dans le lecteur CD-ROM de
votre ordinateur sur le composant stéréo de système. Consultez le mode
d’emploi fourni avec le composant stéréo de système pour les détails des
raccordements.
• Raccorder un système d’enceintes actives à la prise (miniprise stéréo) de sortie
audio analogique de l’adaptateur de raccordement PC via un cordon de
raccordement analogique (non fourni) vous permettra de sortir le son de votre
ordinateur.
Cette fiche ne doit pas être raccordée au connecteur d’entrée analogique d’un
composant stéréo de système, car du bruit peut être produit à cause de
l’incompatibilité des composants.
Adaptateur de
raccordement PC
b
b
b
Au connecteur
USB
Au port USB de
l’ordinateur
Câble USB
B
FR
7
Page 30
Installation du pilote USB
Une fois votre ordinateur raccordé à un composant de système et mis
sous tension, un Wizard vous guidera pour la procédure
d’implantation de votre équipement matériel requise pour pouvoir
utiliser M-crew.
Installation des pilotes standard fournis avec Windows 98
Si le Wizard vous le demande, insérez le CD-ROM Windows 98 dans le
lecteur CD-ROM de votre ordinateur pour commencer l’installation des
pilotes.
Installation des pilotes dédiés du kit de liaison Sony
Insérez le CD-ROM M-crew fourni dans le lecteur CD-ROM de votre
ordinateur, puis procédez comme suit.
1 Raccordez le système (page 7) et mettez l’ordinateur sous tension.
Le Wizard “Add New Hardware” apparaît.
2 Cliquez sur “Next”.
Une boîte de dialogue de sélection de méthode de recherche
apparaît.
FR
8
Page 31

3 Sélectionnez l’option “Search for the best driver for your device.
(Recommended)” et cliquez sur “Next”.
Une boîte de dialogue pour la sélection de l’emplacement de
recherche apparaît.
4 Sélectionnez “Specify a location:” et entrez “D:/Driver”, puis
cliquez sur “Next”.
Une boîte de dialogue indiquant l’achèvement de l’installation
apparaît.
Remarques
• Le nom du lecteur (“D” à l’étape 4) dépend de la configuration de votre
ordinateur.
Entrez le nom du lecteur CD-ROM de votre ordinateur.
• La boîte de dialogue suivante peut apparaître pendant l’installation du
pilote USB. Dans ce cas, cliquez sur “OK” et passez à l’étape suivante.
5 Cliquez sur “Finish”.
L’installation est terminée.
FR
9
Page 32

Vérification de l’état du dispositif installé
N’oubliez pas de vérifier l’état du dispositif installé après son
installation.
1 Ouvrez Control Panel.
Pointez sur “Settings”, et cliquez sur “Control Panel” au menu
Start.
2 Double-cliquez sur l’icône System.
La boîte de dialogue “System Properties” apparaît.
3 Cliquez sur l’onglet “Device Manager”.
Vérifiez que les articles ci-dessous sont listés dans la fenêtre
“Device Manager”.
— “SONY LINK KIT” sous “SONY PCLK USB Driver”
— “USB Audio Device” sous “Sound, video, and game controllers”
— “USB Human Interface Device” sous “Human Interface
Devices”
— “USB Composite Device” et “Generic USB Hub” sous
“Universal serial bus controller”
10
4 Cliquez sur “OK” pour refermer la boîte de dialogue “System
Properties”.
FR
Page 33

Réglage des paramètres multimédia sur votre ordinateur
Vous devez régler les paramètres multimédia sur votre ordinateur
avant de pouvoir sortir le son d’un CD inséré dans le lecteur CD-ROM
de votre ordinateur ou d’un fichier MIDI sauvegardé sur le disque dur
de votre ordinateur via le composant stéréo de système à votre
ordinateur.
1 Ouvrez Control Panel.
Désignez “Settings” et cliquez sur “Control Panel” au menu Start.
2 Double-cliquez suur l’icône Multimedia.
La boîte de dialogue “Multimedia Properties” apparaît.
3 Cliquez sur l’onglet “Audio”, puis sélectionnez “USB Audio Device
(1)” dans “Preferred device:”.
11
FR
Page 34

4 Cliquez sur l’onglet “CD Music”, puis sélectionnez l’option
“Enable digital CD audio for this CD-ROM device.”.
Remarque
Selon la version de Windows 98 (par ex. First Edition), cette option peut être
grisée et donc inaccessible. Dans ce cas, redémarrez l’ordinateur.
5 Cliquez sur l’onglet “MIDI”, puis sur “Microsoft GS Wavetable SW
Synth”.
6 Cliquez sur “OK” pour refermer la boîte de dialogue “Multimedia
Properties”
12
FR
Page 35

A propos de ce mode d’emploi
Ce mode d’emploi explique principalement la procédure d’installation
du programme M-crew. L’emploi du manuel en ligne et de l’aide
M-crew est expliqué en premier.
Les dernières informations sur ce logiciel se trouvent dans le fichier
“Readme.txt” du CD-ROM fourni.
Utilisation du manuel en ligne
Avant d’utiliser le manuel en ligne, Acrobat Reader 4.05 (fourni par
Adobe Systems Incorporated) doit être installé dans votre ordinateur.
S’il ne l’est pas, suivez la procédure “Installing Acrobat Reader 4.05”
(page 19).
, Pour ouvrir le manuel en ligne, cliquez sur “Program”, puis sur
“M-crew”. Ensuite, cliquez sur “On-line manual” au menu Start.
Cliquez pour
tourner la
page.
Doublecliquez pour
afficher une
page.
Cliquez pour
modifier la
taille de la page
affichée.
La page de couverture s’affiche.
Cliquez
pour quitter
le manuel
en ligne.
13
FR
Page 36

Utilisation de l’aide (Help)
Remarque
Help est disponible seulement en anglais.
Le mode d’emploi dans les autres langues se trouve dans le manuel en ligne
(voir les étapes 1-3 à la page 15).
Ouverture de la table des matières Help
Cliquez sur le bouton Help sur la barre principale. La table des matières
M-crew apparaîtra.
Cliquez pour ouvrir Help.
14
• Double-cliquez sur
pour faire apparaître les titres des articles
contenus.
• Double-cliquez sur
pour obtenir l’explication de l’article affiché.
• Cliquez sur un article souligné dans une explication, et l’explication
correspondante sur une autre page s’affichera.
Recherche par mots clés
Cliquez sur l’onglet “Index” dans la boîte de dialogue de recherche de
rubriques ci-dessus pour faire disparaître la table des matières et
afficher la liste des mots clés.
Pour rechercher un mot clé, entrez le mot que vous souhaitez chercher
ou faites défiler la liste des mots clés.
Pour visionner l’explication d’un mot clé, sélectionnez-le dans la liste
des mots clés et cliquez sur “Display”.
FR
Page 37

Installation du logiciel
Procédez comme suit pour installer le logiciel M-crew sur le disque dur
de votre ordinateur.
Installation de M-crew
1 Insérez le CD-ROM M-crew dans le lecteur CD-ROM de votre
ordinateur.
1 Double-cliquez sur l’icône My Computer sur l’ordinateur de
bureau.
2 Double-cliquez sur l’icône CD-ROM.
Icône CD-ROM
(Cette fenêtre apparaît
quand vous sélectionnez
“Large icons” au menu
View.)
Icône “Install-Dlg”
3 Double-cliquez sur “InstallDlg.”
Si nécessaire, sélectionnez la langue souhaitée sous l’option
“Language”.
15
FR
Page 38

2 Cliquez sur “Setting up M-crew” dans le fenêtre d’implantation.
La fenêtre “M-crew Set Up” apparaît, ainsi que la boîte de dialogue
Welcome. Lisez attentivement le contenu de la boîte de dialogue.
3 Cliquez sur “Next”.
Une fenêtre pour la sélection du dossier de destination apparaît.
16
Pour choisir un autre dossier de destination, cliquez sur “Browse”
et sélectionnez le dossier où vous souhaitez installer le logiciel.
FR
Page 39

4 Cliquez sur “Next”.
Sélectionnez l’une des options d’installation,
Typical: Les fichiers PDF* sont installés avec M-crew.
Compact: Seul M-crew est installé.
* Ces fichiers PDF sont des manuels en ligne pour M-crew et PictureGear
Label Maker.
5 Cliquez sur “Next”.
L’installation commence.
Un dossier M-crew sera créé dans le dossier dans lequel M-crew a
été installé.
6 Cliquez sur “Finish”.
L’installation est terminée et Readme.txt apparaît.
Selon l’ordinateur, une boîte de dialogue peut apparaître pour vous
inviter à le redémarrer. Dans ce cas, redémarrez votre ordinateur.
Remarque
Un dossier est créé suite à l’installation. Il est utilisé par le logiciel. N’effacez pas,
ne déplacez pas et ne changez pas son contenu.
17
FR
Page 40

Installation de PictureGear Label Maker
Notez qu’à l’installation de PictureGear Label Maker, toute version plus
ancienne de PictureGear Label Maker existant dans votre ordinateur
sera écrasée par la nouvelle.
1 Cliquez sur “Setting up PictureGear Label Maker” dans le fenêtre
d’implantation (à l’étape 1-
3 de la page 15).
2 Suivez les instructions apparaissant pour installer l’application.
18
FR
Page 41

Installation d’Acrobat Reader 4.05
Vous devez installer Acrobat Reader 4.05 dans votre ordinateur pour
pouvoir ouvrir le manuel en ligne. Après le redémarrage de votre
ordinateur après l’installation de PictureGear Label Maker, ouvrez à
nouveau la fenêtre d’implantation (à l’étape 1-
1 Cliquez sur “Setting up Acrobat Reader 4.05 (English)” dans le
fenêtre d’implantation.
La fenêtre “Acrobat Reader 4.05 Setup” apparaît.
Lisez attentivement le contenu affiché dans la fenêtre.
Si vous ne souhaitez pas installer Acrobat Reader 4.05, cliquez sur
“Cancel”.
3 de la page 15).
Remarque
Si vous avez déjà installé Adobe Acrobat Reader 3.0 dans votre ordinateur,
“Warning” apparaît. Dans ce cas, désinstallez Adobe Acrobat Reader 3.0 et
redémarrez l’ordinateur. “Warning” disparaîtra, et vous pourrez continuer
l’installation.
2 Suivez les instructions affichées pour installer le logiciel.
L’installation terminée, cliquez sur “EXIT” et retirez le CD-ROM.
19
FR
Page 42

Désinstallation du logiciel
Si vous n’avez pas besoin de M-crew, PictureGear Label Maker ou
Acrobat Reader 4.05, désinstallez-les comme suit.
1 Ouvrez Control Panel.
Désignez sur “Settings”, puis cliquez sur “Control Panel” au menu
Start.
2 Double-cliquez sur l’icône “Add/Remove Programs”.
La fenêtre “Add/Remove Programs Properties” apparaît.
3 Sélectionnez et cliquez sur “M-crew”, “PictureGear Label Maker
4.1” ou “Acrobat Reader 4.05” dans la liste de programmes.
4 Cliquez sur “Add/Remove”.
Le désinstallateur est activé et le logiciel sélectionné à l’étape 3 est
automatiquement supprimé.
Remarques
• A la désinstallation de PictureGear Label Maker, le PictureGear Label
Maker installé via
M-crew est supprimé, ainsi que tout autre PictureGear Label Maker
existant dans votre ordinateur.
• Quand vous désinstallez le PictureGear Label Maker installé via Mcrew, la fonction d’impression d’étiquettes de PictureGear s’arrête de
fonctionner. Dans ce cas, désinstallez PictureGear, puis réinstallez-le.
20
FR
Page 43

Lancement du logiciel
Démarrage du logiciel
, Désignez “Programs”, “M-crew”, puis cliquez sur
“M-crew” au menu Start.
Le logiciel démarre et la barre principale de M-crew apparaît.
La barre ci-dessous s’affiche immédiatement après le démarrage de
M-crew (dans cet exemple, “CD” est sélectionné comme fonction
stéréo de système (composant)).
Remarque
Pendant l’enregistrement d’un MD, une boîte de dialogue apparaît
pour vous inviter à arrêter l’enregistrement ou à démarrer M-crew.
Sortie du logiciel
1 Cliquez sur sur la barre principale.
Une boîte de dialogue pour quitter le logiciel apparaît.
2 Cliquez sur “Do not shut off power”.
M-crew se termine.
Si vous souhaitez également couper le composant stéréo de
système, cliquez sur “Shut off power”.
21
FR
Page 44

22
Informations additionnelles
Guide de dépannage
Si vous rencontrez l’une des difficultés suivantes pendant l’utilisation
du logiciel, consultez ce guide de dépannage pour le résoudre. Si le
problème persiste, consultez le revendeur Sony le plus proche. Référezvous également au mode d’emploi de votre ordinateur, ainsi qu’au
fichier “Readme.txt” installé sur le disque dur avec le logiciel.
Problème Cause/solution
Le message “The PCLK-MN10
does not respond. Please check
the connections.” apparaît.
Aucune réponse sur écran ou
erreur d’écran.
Entrée de texte, enregistrement,
édition etc. sont impossibles.
FR
Le connecteur USB de l’adaptateur de
raccordement PC est mal raccordé au port USB de
l’ordinateur.
t Vérifiez le raccordement du connecteur USB.
t Essayez de déconnecter le câble USB de
l’adaptateur de raccordement PC et de
l’ordinateur, puis de le raccorder à nouveau.
Le connecteur PC LINK de l’adaptateur de
raccordement PC est mal raccordé au composant
stéréo de système.
t Vérifiez le raccordement du connecteur PC
LINK.
t Vérifiez que le cordon d’alimentation du
composant stéréo de système est raccordé à
une prise secteur.
t Mettez le composant stéréo de système sous
puis hors tension, puis relancez M-crew.
t Essayez de déconnecter le câble USB de
l’adaptateur de raccordement PC et de
l’ordinateur, puis de le raccorder à nouveau.
t Démarrez une autre application que vous
utilisez fréquemment et vérifiez que
l’ordinateur fonctionne correctement.
t Après désinstallation du logiciel (page 20),
essayez de le réinstaller (page 15).
Le taquet d’interdiction d’écriture du disque est
réglé pour la protection contre l’écriture.
t Faites glisser le taquet pour permettre
l’enregistrement.
Le MD est peut-être un MD disponible dans le
commerce uniquement prévu pour la lecture (un
MD avec plages préenregistrées).
t L’entrée de texte, l’enregistrement, l’édition
etc. sont impossibles sur les MD de lecture
disponibles dans le commerce.
Page 45

Problème Cause/solution
Le composant stéréo du système
ne répond pas.
t Vérifiez que les raccordements ont été faits
correctement (page 7).
t Déconnectez les câbles de raccordement, puis
reconnectez-les.
t Essayez de déconnecter le câble USB de
l’adaptateur de raccordement PC et de
l’ordinateur, puis de le raccorder à nouveau.
Le titre de MD ou CD affiché ne
correspond pas au contenu du
disque.
t Cliquez sur le bouton Reload (pages 10 et 14
dans le manuel en ligne).
t Redémarrez M-crew. Si le problème persiste,
les données dans la bibliothèque de disques
sont peut-être altérées. Réentrez les titres.
Le son du système (sonnerie
d’alarme/signal d’arrivée de
courrier) sont inaudibles.
t Les sons du système ont été spécifiés pour ne
pas retentir pendant le lancement de M-crew,
ou le réglage a peut-être été modifié à OFF
quand M-crew a été terminé anormalement.
Pour rétablir les sons, redémarrez M-crew,
puis quittez normalement le programme. Ou
double-cliquez sur le fichier de secours
(reg0.reg à reg3.reg) dans le dossier M-crew et
suivez à nouveau les instructions pour
l’implantation du programme.
23
FR
Page 46

• Die Vervielfältigung des Inhalts dieser
Software und der Bedienungsanleitung, ob
auszugsweise oder insgesamt, sowie das
Verleihen dieser Software an Dritte ohne
ausdrückliche Genehmigung des
Urheberrechtsinhabers verstößt gegen das
Urheberrecht und ist strafbar.
• Sony übernimmt keinerlei Haftung für
finanzielle Verluste, Gewinnverluste oder
Schadenersatzforderungen Dritter, die aus
dem Gebrauch dieser Software entstehen.
• Für den Fall von Herstellungsfehlern
beschränkt sich der Haftungsumfang der
Firma Sony ausschließlich auf den Ersatz
der defekten Ware.
• Diese Software ist nur für den Gebrauch
mit der vorgeschriebenen Hardware
zugelassen.
• Sony behält sich das Recht vor,
Änderungen an den
Softwarespezifikationen ohne
Vorankündigung vorzunehmen.
Programm © 2000 Sony Corporation
Dokumentation © 2000 Sony
Corporation
© 2000 Sony Corporation. Alle Rechte
vorbehalten.
• M-crew, PictureGear und VAIO sind
eingetragene Warenzeichen der Sony
Corporation.
• Microsoft, MS-DOS und Windows sind
eingetragene Warenzeichen der Microsoft
Corporation.
• IBM und PC/AT sind eingetragene
Warenzeichen der International Business
Machines Corporation.
• Macintosh ist ein eingetragenes
Warenzeichen der Apple Computer Inc.
• Adobe® und Adobe® Acrobat® Reader sind
eingetragene Warenzeichen der Adobe
Systems Incorporated.
• Andere Firmen- und Produktnamen sind
die Handelsmarken oder eingetragenen
Warenzeichen der jeweiligen Firma.
DE
2
Page 47

Inhaltsverzeichnis
Einstieg
Überblick............................................... 4
Systemvoraussetzungen............. 5
Hinweis......................................... 5
Vorbereitung
Überprüfung des Lieferumfangs auf
Vollständigkeit.............................6
Anschlüsse ............................................7
Installieren des USB-Treibers .... 8
Statusprüfung des installierten
Gerätes ................................10
Einstellen der Multimedia-
Parameter auf Ihrem
Computer ........................... 11
Zu dieser Anleitung ..........................13
Nutzung der Online-
Bedienungsanleitung........13
Nutzung des Hilfesystems.......14
Installieren der Software .................. 15
Installieren von M-crew ........... 15
Installieren von PictureGear
Label Maker .......................18
Installieren von Acrobat
Reader 4.05 ......................... 19
Deinstallieren der Software ..... 20
Starten des Programms..................... 21
Starten der Software..................21
Schließen des Programms ........21
DE
Zusätzliche Information
Störungssuche ....................................22
DE
3
Page 48

Einstieg
Überblick
Das Programm M-crew (Version 1.0E) ermöglicht Ihnen die
Ansteuerung von Sony System-Stereokomponenten, die mit einer
Buchse PC LINK ausgestattet sind. Das Programm M-crew bietet Ihnen
Zugriff auf die folgenden Funktionen.
Wiedergabe
• Ansteuerung von CD-Spieler und MD-Deck über den Computer.
• Abspielen von Audiodateien, die im Computer abgespeichert sind.
• Abspielen einer CD im CD-ROM-Laufwerk (nur wenn die
angeschlossene Stereoanlage keine Bedienungselemente zur
Ansteuerung eines CD-Spielers umfasst).
• Abstimmen von Rundfunksendern über den Computer.
Aufnehmen/Editieren
• Eingabe von Disc- und Titelnamen über die Computertastatur.
• Editieren von MDs auf dem Computerbildschirm.
• Einfaches Überspielen von CD auf MD durch „Drag & Drop“.
• Einfaches Aufnehmen von Rundfunksendungen auf MD.
Sonstige Operationen
• Erstellen von virtuellen Datenträgern zur Verwaltung von
Audiodateien.
• Überwachung der abgespielten und aufgenommenen Titel über ein
Disc-Archiv (Disc Library).
• Zugreifen auf zugehörige Webseiten während der Wiedergabe von
Titeln.
• Zugreifen auf zugehörige Webseiten während des
Rundfunkempfangs.
• Programmieren von Wiedergabe- und Aufnahme-Timer.
• Ausdrucken von MD-Etiketten.
Hinweise
• Der in dieser Anleitung verwendete Begriff „System-Stereokomponente“
bezieht sich konkret auf Stereo-Komponentenanlagen (einschließlich von CDSpielern und MD-Decks) sowie auf separate MD-Decks, die PC-LINKAnschlüsse unterstützen.
• Welche Funktionen des Programms M-crew an Ihrem Computer zur
Verfügung stehen, richtet sich im Einzelfall danach, welche SystemStereokomponenten an den Computer angeschlossen sind.
• Diese Software kann nur zur Ansteuerung von System-Stereokomponenten
genutzt werden, die direkt an den Computer angeschlossen sind.
DE
4
Page 49

Systemvoraussetzungen
Damit das Programm M-crew (Version 1.0E) auf Ihrem Computer läuft,
muss dieser die folgenden Mindestanforderungen erfüllen.
s IBM PC/AT oder kompatible Computer (Dieses Programm läuft
s Zentraleinheit*
s Grafikkarte und Bildschirmtreiber:
s Festplattenspeicherplatz:
s CD-ROM-Laufwerk
s USB-Port: 1 oder mehr
s Betriebssystem: Windows 98/Windows 98SE (Dieses Programm
s Media Player: Windows Media Player (Bevor Sie das Programm
s Monitor: VGA (800 × 600 Pixel), Farbtiefe von 65.536 oder
1
: Intel Pentium II 233 MHz/Celeron 300A oder
nicht auf Macintosh-Computern.)
schneller
VGA (800 × 600 Pixel), Farbtiefe von 65.536 oder
mehr Farben
2
20 MB*
oder mehr (bei gleichzeitiger Installation
von M-crew und Online-Bedienungsanleitung)
läuft nicht unter Microsoft Windows 3.1,
Windows 95 oder Windows NT.)
M-crew benutzen können muss Windows Media
Player (Version ab 6.4) auf Ihrem Computer
installiert sein.
mehr Farben
Hinweis
*1Bei bestimmten Computern mit Pentium-kompatiblen CPU-Chips, z.B. AMD
K6, ist kein einwandfreier Betrieb des Programms M-crew gewährleistet (d.h.,
während der Wiedergabe einer Audiodatei können Tonaussetzer auftreten).
*2Zur Installation des Programms PictureGear Label Maker sind weitere 15MB
Festplattenspeicherplatz erforderlich.
Die Buchse PC LINK ist nicht mit einer Buchse CONTROL A1 bzw. A1
II oder CONTROL I kompatibel. Wenn Ihre StereoKomponentenanlage mit einer Buchse CONTROL A1 bzw. A1 II
ausgestattet ist, muss der PC-Anschlusssatz PCLK-MD2
(Sonderzubehör) verwendet werden.
DE
5
Page 50

Vorbereitung
Überprüfung des Lieferumfangs auf
Vollständigkeit
Vergewissern Sie sich, dass die folgenden Teile im Lieferumfang des
Programms M-crew enthalten sind. Sollten Teile fehlen, so wenden Sie
sich bitte an den Bezugshändler bzw. den nächsten Sony-Händler.
• Adapter CAV-MN10 (1)
PC LINK-Steckverbinder
(6-pol DIN-Ministecker)
• USB-Kabel (1)
• Lichtleiterkabel (1)
• M-crew CD-ROM (1)
• Bedienungsanleitung (1)
• Garantiekarte (1)
DE
6
Page 51

Anschlüsse
Anschließen Ihres Personal Computers an eine SystemStereokomponente
Verwenden Sie den mitgelieferten PC-Anschlussadapter und das USB-Kabel, um
Ihren PC mit einer System-Stereokomponente zu verbinden.
Das folgende Diagramm zeigt ein Anschlussbeispiel mit dem MDS-PC3.
Den Stecker richtig ausgerichtet bis
zum Anschlag in die Buchse
einstecken.
Computer
MDS-PC3
An den USB-Port
des Computers
B
An die Buchse
PC LINK
an einen Analog-Audioeinsgang
an einen Digital-Audioeinsgang
Hinweise
• Führen Sie den Stecker gerade in die Buchse ein. Verkanten beim Einstecken
kann zu Beschädigung führen.
• Wenn die Digital-Audioausgangsbuchse des Adapters über ein
Lichtleiterkabel mit rechteckigem Steckverbinder an den optischen DigitalAudioeingang einer System-Stereokomponente angeschlossen wird, ist eine
Wiedergabe von Audiodateien, die auf der Festplatte des Computers
abgespeichert sind, sowie von CDs im CD-ROM-Laufwerk des Computers
über die System-Stereokomponente möglich. Näheres zu den Anschlüssen
finden Sie in der Bedienungsanleitung der betreffenden SystemStereokomponente.
• Durch Anschließen eines Aktivlautsprechers an den analogen Audioausgang
(Streo-Minibuchse) des PC-Anschlussadapters über ein Audiokabel (nicht
mitgeliefert) können Sie den Ton direkt am Computer hören.
Diese Buchse darf allerdings nicht mit dem Analogeingang einer SystemStereokomponente verbunden werden, weil ansonsten Rauschstörungen
aufgrund von Inkompatibilität zwischen den Komponenten.
Adapter
b
b
USB-Kabel
b
An die USB-Buchse
DE
7
Page 52

Installieren des USB-Treibers
Nachdem Sie den Computer an eine System-Stereokomponente
angeschlossen und eingeschaltet haben, führt Sie ein Wizard durch die
Prozuduren zum Einrichten der Hardware für M-crew.
Installieren des Standardtreibers von Windows 98
Wenn Sie bei der Installation dazu aufgefordert werden, legen Sie die
Windows 98 CD-ROM in das CD-ROM-Laufwerk Ihres Computers ein
und beginnen mit der Installation der Treiber.
Installieren der Treiber für Sony Link Kit
Legen Sie die mitgelieferte M-crew CD-ROM in das CD-ROMLaufwerk Ihres Computers ein und verfahren Sie dann wie folgt.
1 Stellen Sie zunächst die auf Seite 7 gezeigten Anschlüsse her und
schalten Sie dann den Computer ein.
Der „Hardware-Assistent“ erscheint.
2 Klicken Sie auf „Weiter“.
Daraufhin erscheint die Dialogbox zur Auswahl des
Suchverfahrens.
DE
8
Page 53

3 Wählen Sie die Option „Search for the best driver for your device
(Recommended)“ und klicken Sie dann auf „Next“.
Daraufhin erscheint die Dialogbox zur Wahl der Suchposition.
4 Wählen Sie „Specify a location:“, tippen Sie „D:\Driver“ ein und
klicken Sie dann auf „Weiter“.
Daraufhin erscheint eine Dialogbox mit der Meldung, dass die
Installation beendet ist.
Hinweise
• Der Name des Laufwerks („D:“ in Schritt 4) ist abhängig von der
Konfiguration Ihres Computers.
Geben Sie den Namen des CD-ROM-Laufwerks Ihres Computers ein.
• Während der Installation des USB-Treibers kann evtl. die folgende
Dialogbox erscheinen. Klicken Sie in einem solchen Fall „OK” und gehen
weiter auf den nächsten Schritt.
5 Klicken Sie auf „Fertig stellen“.
Damit ist die Installation abgeschlossen.
DE
9
Page 54

Statusprüfung des installierten Gerätes
Achten Sie nach der Installation darauf, den Status des installierten
Gerätes wie nachstehend beschrieben zu überprüfen.
1 Öffnen Sie die Systemsteuerung.
Klicken Sie auf „Start“, wählen Sie „Einstellungen“ und klicken Sie
dann auf „Systemsteuerung“.
2 Doppelklicken Sie auf das System-Symbol.
Die Dialogbox „Systemeigenschaften“ erscheint.
3 Klicken Sie auf das Register „Gerätemanager“.
Vergewissern Sie sich davon, dass die folgenden Posten im Fenster
„Gerätemanager“ aufgelistet sind.
— „SONY LINK KIT“ unter „SONY PCLK USB Driver“
— „USB Audio Device“ unter „Sound, video, and game
controllers“
— „USB Human Interface Device“ unter „Human Interface
Devices“
— „USB Composite Device“ und „Generic USB Hub“ unter
„Universal serial bus controller“
10
4 Klicken Sie auf „OK“, um die Dialogbox „System Properties“ zu
schließen.
DE
Page 55

Einstellen der Multimedia-Parameter auf Ihrem Computer
Zur Ausgabe des Tons einer CD im CD-ROM-Laufwerk Ihres
Computers oder einer MIDI-Datei auf der Festplatte Ihres Computers
über die System-Stereokomponente, die an den Computer
angeschlossen ist, müssen Sie vorher die Multimedia-Parameter auf
Ihrem Computer entsprechend einstellen.
1 Öffnen Sie die Systemsteuerung.
Klicken Sie auf „Start“, wählen Sie „Einstellungen“ und klicken Sie
dann auf „Systemsteuerung“.
2 Doppelklicken Sie auf das Multimedia-Symbol.
Die Dialogbox „Multimedia-Eigenschaften“ erscheint.
3 Klicken Sie auf das Register „Audio“ und wählen Sie dann „USB
Audio Device (1)“ unter „Preferred device:“
11
DE
Page 56

4 Klicken Sie auf das Register „CD Music“ und wählen Sie dann die
Option „Enable digital CD audio for this CD-ROM device.“.
Hinweis
Je nach der Version von Windows 98 (z.B. First Edition) ist diese Option
u.U. grau hinterlegt und steht nicht zur Verfügung. Starten Sie in einem
solchen Fall den Computer neu.
5 Klicken Sie auf das Register „MIDI“ und danach auf „Microsoft GS
Wavetable SW Synth“.
6 Klicken Sie auf „OK“, um die Dialogbox „Multimedia-
Eigenschaften“ zu schließen.
12
DE
Page 57

Zu dieser Anleitung
Diese Anleitung behandelt die Installation des Programms M-crew.
Zunächst wird die Nutzung der Online-Bedienungsanleitung und des
Hilfesystems erläutert.
Die aktuellsten Informationen zum Programm finden Sie in der Datei
„Readme.txt“ auf der mitgelieferten CD-ROM.
Nutzung der Online-Bedienungsanleitung
Als Voraussetzung zum Zugriff auf die Online-Bedienungsanleitung
muss das mitgelieferte Programm Acrobat Reader 4.05 (von Adobe
Systems Incorporated) in Ihrem Computer installiert sein. Ist dies nicht
der Fall, so nehmen Sie die Installation gemäß „Installieren von Acrobat
Reader 4.05 (auf Seite 19) vor.
, Zum Öffnen der Online-Bedienungsanleitung klicken Sie zunächst
auf „Start“ und wählen dann nacheinander „Programme“ und „Mcrew“; anschließend klicken Sie auf „On-line manual“.
Klicken, um
die Seiten zu
durchblättern.
Doppelklicken,
um eine Seite
aufzurufen.
Klicken, um
die Größe der
angezeigten
Seite zu
verändern.
Die Titelseite erscheint auf dem Display.
Klicken, um die
OnlineBedienungsanleitung
zu schließen.
13
DE
Page 58

Nutzung des Hilfesystems
Hinweis
Das Hilfesystem ist nur in englischer Sprache verfügbar.
Bedienungsanweisungen in anderen Sprachen finden sich in der OnlineBedienungsanleitung (siehe Schritt 1-3 auf Seite 15).
Öffnen der Liste mit den Hilfethemen
Klicken Sie auf das Hilfesymbol in der Hauptleiste, woraufhin das
Inhaltsverzeichnis von M-crew geöffnet wird.
Klicken, um das Hilfesystem
zu öffnen.
14
DE
• Doppelklicken Sie auf
, um die einzelnen Punkte des zugehörigen
Themenkomplexes anzuzeigen.
• Doppelklicken Sie auf
, um die Hilfe zu einem Thema aufzurufen.
• Klicken Sie auf einen unterstrichenen Textteil, um die Erläuterungen
zu diesem Textteil aufzurufen.
Suchen mit Schlüsselwörtern
Klicken Sie in der obigen Themendialogbox auf das Register „Index“.
Daraufhin verschwindet das Inhaltsverzeichnis, und statt dessen
erscheint eine Liste mit Schlüsselwörtern.
Geben Sie das gewünschte Schlüsselwort ein oder rollen Sie die Liste,
um das Schlüsselwort zu suchen.
Um den Erläuterungstext zum Schlüsselwort anzuzeigen, wählen Sie
das Schlüsselwort in der Liste und klicken dann auf „Display“.
Page 59

Installieren der Software
Machen Sie zunächst den Computer betriebsbereit und installieren Sie
dann das Programm M-crew gemäß dem nachstehend beschriebenen
Verfahren auf der Festplatte.
Installieren von M-crew
1 Legen Sie die mitgelieferte M-crew CD-ROM in das CD-ROM-
Laufwerk des Computers ein.
1 Doppelklicken Sie im Desktop auf das Symbol „Arbeitsplatz“.
2 Doppelklicken Sie auf das CD-ROM-Symbol.
CD-ROM-Symbol
(Dieses Fenster erscheint
nach Wahl von „Große
Symbole“ im Ansicht-Menü.)
„InstallDlg“-Symbol
3 Doppelklicken Sie auf „InstallDlg.“.
Wählen Sie ggf. die gewünschte Sprache in der Option
“Language”.
15
DE
Page 60

2 Klicken Sie im Setup-Fenster auf „Setting up M-crew“.
Daraufhin erscheint das Fenster „M-crew Set Up“ zusammen mit
der Dialogbox „Welcome“. Bitte lesen Sie den Inhalt dieser
Dialogbox sorgfältig durch.
3 Klicken Sie auf „Next“.
Daraufhin erscheint das Fenster zur Wahl des Zielordners.
16
Um einen anderen Zielordner zu wählen, klicken Sie auf „Browse“
und wählen dann den Ordner, in dem die Software installiert
werden soll, aus der Liste.
DE
Page 61

4 Klicken Sie auf „Next“.
Wählen Sie eine der folgenden Installationsoptionen:
Typical: PDF-Dateien* werden gemeinsam mit M-crew installiert.
Compact: Nur das Programm M-crew wird installiert.
* Bei diesen PDF-Dateien handelt es sich um die OnlineBedienungsanleitungen von M-crew und PictureGear Label Maker.
5 Klicken Sie auf „Next“.
Daraufhin startet die Installation.
Ein M-crew-Ordner wird in dem Ordner angelegt, in dem M-crew
installiert wird.
6 Klicken Sie auf „Finish“.
Damit ist die Installation abgeschlossen, und der Text der Datei
„Readme.txt“ erscheint auf dem Display.
Je nach Computer-Modell erscheint u.U. eine Dialogbox mit der
Aufforderung, Ihren Computer neu zu starten. Ist dies der Fall, tun
Sie das.
Hinweis
Beim Installieren des Programms wird ein neuer Ordner angelegt. Da das
Programm diesen Ordner benutzt, darf er nicht gelöscht, verschoben oder
inhaltlich verändert werden.
17
DE
Page 62

Installieren von PictureGear Label Maker
Falls beim Installieren der Version 4.0 von PictureGear Label Maker
bereits eine frühere Version dieses Programms im Computer existiert,
so wird diese durch Version 4.0 überschrieben.
1 Klicken Sie im Setup-Fenster auf „Setting up PictureGear Label
Maker“ (siehe Schritt 1-
3 auf Seite 15).
2 Gehen Sie zur Installation des Programms gemäß den
Anweisungen auf dem Display vor.
18
DE
Page 63

Installieren von Acrobat Reader 4.05
Zum Öffnen der Online-Bedienungsanleitung müssen Sie Acrobat
Reader 4.05 in Ihrem Computer installieren. Führen Sie nach beendeter
Installation von PictureGear Label Maker zunächst einen SystemNeustart aus und öffnen Sie dann erneut das Setup-Fenster (siehe
Schritt 1-
3 auf Seite 15).
1 Klicken Sie im Setup-Fenster auf „Setting up Acrobat Reader 4.05 “
(English).
Daraufhin erscheint das Fenster „Acrobat Reader 4.05 Setup“.
Bitte lesen Sie den Inhalt dieses Fensters sorgfältig durch.
Falls Sie Acrobat Reader 4.05 nicht installieren wollen, klicken Sie
auf „Cancel“.
Hinweis
Falls Adobe Acrobat Reader 3.0 bereits in Ihrem Computer installiert ist,
erscheint die Dialogbox „Warning“. In einem solchen Fall müssen Sie
zunächst Adobe Acrobat Reader 3.0 deinstallieren und dann einen SystemNeustart ausführen. Danach erscheint die Warnmeldung nicht mehr, und
Sie können mit der Installation fortfahren.
2 Gehen Sie zur Installation des Programms gemäß den
Anweisungen auf dem Display vor.
Nach beendeter Installation klicken Sie auf „EXIT“ und entfernen
die CD-ROM aus dem Laufwerk.
19
DE
Page 64

Deinstallieren der Software
Wenn M-crew, PictureGear Label Maker oder Acrobat Reader 4.05
nicht mehr benötigt wird, so deinstallieren Sie das betreffende
Programm wie folgt:
1 Öffnen Sie die Systemsteuerung.
Klicken Sie auf „Start“, wählen Sie „Einstellungen“ und klicken Sie
dann auf „Systemsteuerung“.
2 Doppelklicken Sie auf das Symbol „Hinzufügen/Entfernen von
Programmen“.
Das Fenster Symbol „Hinzufügen/Entfernen von Programmen“
erscheint.
3 Wählen Sie „M-crew“, „PictureGear Label Maker 4.1“ oder
„Acrobat Reader 4.05“ aus der Programmliste.
4 Klicken Sie auf „Hinzufügen/Entfernen“.
Das in Schritt 3 ausgewählte Programm wird nun automatisch
gelöscht.
Hinweise
• Beim Deinstallieren von PictureGear Label Maker werden sowohl das
über M-crew installierte Programm PictureGear Label Maker als auch
alle evtl. zusätzlich im Computer vorhandenen PictureGear Label
Maker-Programme gelöscht.
• Nach dem Deinstallieren von PictureGear Label Maker in einem
Computer mit bereits installiertem PictureGear-Programm ist auch
das Ausdrucken von Etiketten über PictureGear nicht mehr möglich.
In einem solchen Fall müssen Sie PictureGear zunächst deinstallieren
und dann erneut installieren.
20
DE
Page 65

Starten des Programms
Starten der Software
, Klicken Sie auf “Start”, wählen Sie “Programme” und
klicken Sie dann auf “M-crew”.
Daraufhin startet das Programm, und die Hauptleiste für M-crew
erscheint.
Unmittelbar nach dem Starten von M-crew erscheint die folgende
Leiste (in diesem Beispiel ist als System-Stereokomponente „CD“
ausgewählt).
Hinweis
Während einer MD-Aufnahme erscheint eine Dialogbox, in der Sie die
Aufnahme stoppen oder M-crew starten können.
Schließen des Programms
1 Klicken Sie auf in der Hauptleiste.
Daraufhin erscheint die Dialogbox zum Schließen des Programms.
2 Klicken Sie auf „Do not shut off power“.
Daraufhin wird M-crew geschlossen.
Wenn Sie die System-Stereokomponente ebenfalls ausschalten
wollen, klicken Sie auf „Shut off power“.
21
DE
Page 66

Zusätzliche Information
Störungssuche
Sollte bei der Nutzung der Software eine der nachstehend aufgeführten
Störungen auftreten, so versuchen Sie bitte zunächst, das Problem mit
Hilfe der folgenden Liste zu beheben. Ist eine Abhilfe auf diese Weise
nicht möglich, so wenden Sie sich bitte an Ihren
Sony-Händler.
Nehmen Sie bitte auch die Bedienungsanleitung Ihres Computers und
die auf der Festplatte installierte Datei „Readme.txt“ dieser Software zu
Hilfe.
Problem Ursache/Abhilfemaßnahme
22
Die Meldung „The PCLK-MN10
does not respond. Please check
the connections.“ erscheint.
Keine oder falsche Anzeige auf
dem Bildschirm.
Bedienvorgänge wie
Zeicheneingabe, Aufnahme und
Editieren sind nicht möglich.
DE
Der USB-Anschluss des Adapters ist nicht richtig
mit dem USB-Port des Computers verbunden.
t Den USB-Anschluss überprüfen.
t Das USB-Kabel vom PC-Anschlussadapter
und vom Computer trennen und wieder
anschließen.
Die Buchse PC LINK des Adapters ist nicht
richtig mit der System-Stereokomponente
verbunden.
t Den PC LINK-Anschluss überprüfen.
t Das Netzkabel der System-Stereokomponente
auf einwandfreien Anschluss an eine
Netzsteckdose überprüfen.
t Die Stromversorgung der
System-Stereokomponente aus- und wieder
einschalten, und dann M-crew erneut starten.
t Das USB-Kabel vom PC-Anschlussadapter
und vom Computer trennen und wieder
anschließen.
t Ein häufig verwendetes Programm starten
und prüfen, ob der Computer einwandfrei
arbeitet.
t Das Programm deinstallieren (Seite 20) und
anschließend erneut installieren (Seite 15).
Die Disc ist. u.U. schreibgeschützt.
t Den Schreibschutz der Disc deaktivieren.
Bei der Disc handelt es sich u.U. um eine nur für
Wiedergabe bestimmte (kommerziell
vorbespielte) MD.
t Bedienvorgänge wie Zeicheneingabe,
Aufnahme und Editieren sind mit
kommerziell vorbespielten MDs nicht
möglich.
Page 67

Problem Ursache/Abhilfemaßnahme
Die System-Stereokomponente
reagiert nicht.
t Die Kabel auf einwandfreien Anschluss
überprüfen (Seite 7).
t Die Kabel von den Buchsen abtrennen und
dann wieder anschließen.
t Das USB-Kabel vom PC-Anschlussadapter
und vom Computer trennen und wieder
anschließen.
Der angezeigte MD- oder
CD-Name stimmt nicht mit den
Discdaten überein.
t Die Aktualisiertaste (Seite 10 und 14 in der
Online-Bedienungsanleitung) anklicken.
t Das Programm M-crew erneut starten. Ist eine
Abhilfe auf diese Weise nicht möglich, sind
die Daten des Disc-Archivs u.U. defekt, so
dass die Namen erneut eingegeben werden
müssen.
Das Programm gibt keine
akustischen Signale
(Überhitzungs-Warnton/
E-Mail-Empfangston) ab.
t Das Programm ist so eingestellt worden, dass
beim Starten von M-crew keine akustischen
Signale abgegeben werden, oder die
Einstellung wurde bei einem abnormalen
Beenden von M-crew auf „OFF“ geändert. Um
die Abgabe der akustischen Signale wieder zu
aktivieren, M-crew erneut starten und dann
normal schließen. Als Alternative auf die
Backup-Datei (reg0.reg bis reg3.reg) im
M-crew-Ordner doppelklicken und gemäß den
Anweisungen auf dem Display vorgehen, um
das Programm erneut wunschgemäß
einzurichten.
23
DE
Page 68

• La duplicación parcial o total del contenido
de este software y manual de instrucciones
así como el prestar el software a terceros
sin el consentimiento expreso del
propietario de los derechos de autor está
estrictamente prohibido por las leyes de
derechos de autor.
• Bajo ninguna circunstancia Sony será
responsable por las pérdidas monetarias,
lucro cesante o reclamaciones de terceros
que pudieran surgir del uso de este
software.
• En el caso de que el producto tuviera
defectos de fabricación, la responsabilidad
de Sony estará limitada exclusivamente al
reemplazo del producto defectuoso.
• Este software ha sido aprobado para ser
utilizado sólo con el equipo especificado.
• Sony se reserva el derecho de hacer
cambios en las especificaciones del
software sin previo aviso.
Programa 2000 Sony Corporation
Documentación 2000 Sony
Corporation
2000 Sony Corporation Todos los
derechos reservados.
• M-crew, PictureGear y VAIO son marcas
registradas de Sony Corporation.
• Microsoft, MD-DOS y Windows son
marcas registradas de Microsoft
Corporation.
• IBM y PC/AT son marcas registradas de
International Business Machines
Corporation.
• Macintosh es una marca registrada de
Apple Computer Inc.
• Adobe y Adobe Acrobat Reader son
marcas comerciales de Adobe Systems
Incorporated.
• Los nombres de otras compañías y
productos son marcas comerciales o marcas
registradas de cada compañía.
ES
2
Page 69

Indice
Preparativos
Resumen general ................................. 4
Requisitos del sistema ................ 5
Nota ...............................................5
Preparativos
Comprobación de los itemes
suministrados...............................6
Conexiones ........................................... 7
Instalación del controlador de
USB........................................ 8
Verificación del estado del
dispositivo instalado ........10
Ajuste de los parámetros
multimedia en su
ordenador...........................11
Acerca de este manual ......................13
Utilización del manual en
línea ..................................... 13
Utilización de la ayuda............. 14
Instalación del software ....................15
Instalación del M-crew ............. 15
Instalación del PictureGear
Label Maker (Preparación
de etiquetas).......................18
Instalación del Acrobat Reader
4.05 ......................................19
Desinstalación del software .....20
Inicialización del software................21
Inicialización del software .......21
Salida del software ....................21
ES
Información adicional
Solución de problemas......................22
ES
3
Page 70

Preparativos
Resumen general
El M-crew (ver. 1.0E) permite controlar componentes estéreo del
sistema Sony equipados con una toma PC-LINK. Con el M-crew puede
utilizar las funciones en la lista a continuación.
Reproducción
• Utilice el ordenador para hacer funcionar la reproducción en los
decks de disco compacto y minidiscos.
• Disfrute de los archivos de audio memorizados en el ordenador.
• Reproduce un disco compacto en el controlador CD-ROM (sólo
cuando el estéreo del sistema conectado no tiene ningún control para
el tocadiscos de discos compactos)
• Sintonice emisoras de radio desde el ordenador.
Grabación/edición
• Entre los nombres de disco y canción con el teclado del ordenador.
• Edite los minidiscos en la pantalla del ordenador.
• Grabe de un disco compacto a un minidisco mediante un simple
movimiento con el ratón.
• Grabe fácilmente de la radio a un minidisco.
Otras operaciones
• Prepare soportes virtuales para la administración de los archivos de
audio.
• Mantenga un registro de las canciones reproducidas y grabadas en
una biblioteca de discos.
• Visite los sitios de Internet relacionados mientras disfruta de las
canciones.
• Visite los sitios de Internet relacionados mientras disfruta de los
programas de radio.
• Ajuste los temporizadores de reproducción y grabación.
• Imprima las etiquetas MD.
Notas
• En este manual, el término “componente estéreo del sistema” se refiere
específicamente al sistema estéreo de componentes (que incluyen decks de
discos compactos y minidiscos) y decks de minidiscos discretos que aceptan
las conexiones PC-LINK.
• Las funciones M-crew actúan en su ordenador según los componentes estéreo
del sistema conectados a su ordenador.
• Se puede utilizar este software para hacer funcionar sólo los componentes
estéreo del sistema conectados directamente al ordenador.
ES
4
Page 71

Requisitos del sistema
Los siguientes hardware y software son necesarios para utilizar el
software M-crew (ver. 1.0E).
s IBM PC/AT o compatibles (Este software no funciona con
s CPU*
s Tarjeta de video y controlador de pantalla:
s Espacio en el disco duro:
s Control de CD-ROM
s Terminal USB: 1 o más
s Sistema operativo :
s Reproductor del soporte:
s Monitor de video: VGA (800 x 600 pixeles), 65.536 colores o más.
1
: Intel Pentium II 233 MHz/Celeron 300A o
Macintosh de Apple.)
superior
VGA (800 x 600 pixeles), 65.536 colores o más.
2
20MB*
o más (Cuando se instalan ambos M-crew
y el manual en línea.)
Windows 98/Windows 98SE (Este software no
funciona con Microsoft Windows 3.1, Windows 95
o Windows NT.)
Media Player de Windows (Antes de que utilizar
el software M-crew, debe instalar primero el
Media Player de Windows (versión 6.4 o más alto)
en su ordenador.
Nota
*1El funcionamiento del M-crew no puede garantizarse en algunos ordenadores
con chips CPU compatibles con Pentium, como AMD K6 (por ejemplo, puede
saltar el sonido durante la reproducción de un archivo de audio).
*2Es necesario contar con 15 MB de espacio en el disco duro para instalar
PictureGear Label Maker.
El conector PC LINK no es compatible con un conector de CONTROL A
1 o A 1 II, o CONTROL I. Si su sistema estéreo tiene un conector
CONTROL A 1 o A 1 II deberá utilizar el kit de conexión PCLK-MD2
(no suministrado).
ES
5
Page 72

Preparativos
Comprobación de los itemes
suministrados
Compruebe que se han recibido los siguientes itemes suministrados con
su M-crew. Si falta algo, llame a la tienda donde compró esta unidad o
a su concesionario de Sony más cercano.
• Adaptador de conexión a PC CAV-MN10 (1)
Conector PC LINK
(Mini DIN 6 P)
• Cable USB (1)
• Cable de conexión digital óptico (1)
• CD-ROM M-crew (1)
• Manual de instrucciones (1)
• Tarjeta de garantía (1)
ES
6
Page 73

Conexiones
Conexión de su ordenador personal a un componente estéreo del
sistema
Utilice el adaptador de conexión a ordenador y el cable USB suministrados para
conectar su ordenador personal con un componente estéreo del sistema.
El siguiente diagrama muestra un ejemplo de MDS-PC3 conectado a un ordenador.
Con el enchufe orientado
correctamente, inserte a fondo
en la toma.
Ordenador
MDS-PC3
A la toma PC LINK
A una entrada de audio digital
A una entrada de audio analógico
Adaptador de
conexión a PC
b
b
b
Al conector
USB
Al terminal USB
del ordenador
B
Cable USB
Notas
• Compruebe que el enchufe está perpendicular al insertarlo. Si lo inserta en un
ángulo puede dañar las piezas del conector.
• Si se conecta la toma de salida de audio digital en el adaptador de conexión a
PC en el conector de entrada de audio óptico del componente estéreo del
sistema utilizando un cable de conexión digital encajado en un conector
rectangular, podrá disfrutar de los archivos de audio memorizados en el disco
duro del ordenador o discos compactos en el dispositivo de CD-ROM del
ordenador en el componente estéreo del sistema. Consulte el manual de
instrucciones que viene con el componente estéreo del sistema para más
detalles sobre la conexión.
• Mediante la conexión de un sistema de altavoz activo a la toma (minitoma
estéreo)de salida de audio analógico en el adaptador de conexión a ordenador
a través de un cable de conexión de audio (no suministrado), puede escuchar
la salida de audio de su ordenador.
Sin embargo esta toma no debe conectarse al conector de entrada analógico en
un componente estéreo del sistema debido a que puede generar ruido por
incompatibilidad entre los componentes.
ES
7
Page 74

Instalación del controlador de USB
Cuando se ha conectado su ordenador personal en un componente del
sistema y se conecta el ordenador, un Asistente (Wizard) le guiará por
el procedimiento de instalación de su equipo para poder utilizar el
M-crew.
Instalación de los controladores normales suministrados con
Windows 98
Cuando el asistente lo requiera, inserte el CD-ROM de Windows 98 en
la ranura CD-ROM de su ordenador para empezar la instalación de los
controladores.
Instalación de los controladores especiales del juego de
enlace Sony
Inserte el CD-ROM M-crew suministrado en la ranura CD-ROM de su
ordenador y realice los siguientes pasos.
1 Conecte el sistema (página 7) y conecte el ordenador personal.
Aparece el Asistente “Add New Hardware”.
2 Haga clic en “Next”
Aparece un cuadro de diálogo para seleccionar el método de
búsqueda.
ES
8
Page 75

3 Seleccione la opción “Search for the best driver for your device.
(Recommended)” y haga clic en “Next”.
Aparece un cuadro de diálogo para la selección del lugar de la
búsqueda.
4 Seleccione “Specify a location:” y entre “D:\Driver” y haga clic en
“Next”.
Aparece un cuadro de diálogo que indica que se ha completado la
instalación.
Notas
• El nombre de la ranura (“D” en el paso 4) depende de la configuración
del ordenador.
Entre el nombre de la ranura CD-ROM de su ordenador.
• Durante la isntalación del controlador de USB, puede aparecer el
siguiente recuadrod e diálogo. En este caso, pulse “OK” y vaya al
siguiente paso.
5 Haga clic en “Finish”.
Se completa la instalación.
ES
9
Page 76

Verificación del estado del dispositivo instalado
Asegúrese de comprobar el estado del dispositivo instalado después de
su instalación.
1 Abra el Panel de Control.
Apunte sobre “Settings”, haga clic en “Control Panel” del menú
Start.
2 Haga doble clic en el icono del Sistema
Aparece el cuadro de diálogo “System Properties”.
3 Haga clic en la ficha “Device Manager”.
Compruebe que los siguientes ítems están en la lista de la ventana
“Device Manager”.
— “SONY LINK KIT” dentro de “SONY PCLK USB Driver”
— “USB Audio Device” dentro de “Sound, video, and game
controllers”
— “USB Human Interface Device” dentro de “Human Interface
Devices”
— “USB Composite Device” y “Generic USB Hub” dentro de
“Universal serial bus controller”
10
4 Haga clic en “OK” para cerrar el cuadro de diálogo “System
Properties”.
ES
Page 77

Ajuste de los parámetros multimedia en su ordenador
Se deben ajustar los parámetros multimedia en su ordenador antes de
que pueda hacer salir el audio de un CD en la ranura CD-ROM del
ordenador o un archivo MIDI memorizado en el disco duro del
ordenador a través del componente estéreo del sistema conectado a su
ordenador.
1 Abra el Panel de Control.
Apunte a “Settings” y haga clic en “Control Panel” del menú Start.
2 Haga doble clic en el icono Multimedia.
Aparece el cuadro de diálogo “Multimedia Properties”.
3 Haga clic en la ficha “Audio” y seleccione “USB Audio Device (1)”
en “Preferred device:”
11
ES
Page 78

4 Haga clic en la ficha “CD Music” y seleccione la opción “Enable
digital CD audio for this CD-ROM device.”.
Nota
Según la versión de Windows 98 (es decir, Primera Edición), esta opción
puede estar en gris y no se podrá utilizar. En este caso, reinicialice su
ordenador.
5 Haga clic en la ficha “MIDI” y haga clic en “Microsoft GS
Wavetable SW Synth”.
6 Haga clicl en “OK” para cerrar el cuadro de diálogo “Multimedia
Properties”.
12
ES
Page 79

Acerca de este manual
Este manual explica básicamente los procedimientos para instalar el
programa M-crew. Se explica primero la utilización del manual en línea
y del Help en el M-crew.
La información más reciente sobre este software está en el archivo
“Readme.txt” del CD-ROM suministrado.
Utilización del manual en línea
Antes de utilizar el manual en línea, Acrobat Reader 4.05 (suministrado
por Adobe Systems Incorporated) debe instalarse en su PC. O realice el
procedimiento de “Instalación del Acrobat Reader 4.05” (de la página 19).
, Para abrir el manual en línea, apunte al “Program” y “M-crew”.
Haga clic en el “Manual en línea” del menú Start.
Haga clic para
dar vuelta la
página
Haga doble
clic para que
aparezca
una página
Haga clic para
cambiar el
tamaño de la
página que
aparece
Aparece la página de la tapa en la visualización.
Haga clic
para salir
del
manual
en línea
13
ES
Page 80

Utilización de la ayuda
Nota
La ayuda sólo existe en inglés.
El manual de instrucciones en otros idiomas está en el manual en línea (vea el
paso 1-3 de la página 15).
Para abrir el índice de la ayuda
Haga clic en el botón Help de la barra principal. Aparecerá el índice del
M-crew.
Haga clic para abrir la ayuda
14
• Haga doble clic en
y aparecerán los títulos de los itemes
suministrados.
• Haga doble clic en
para que aparezca una explicación de este ítem.
• Haga clic en el ítem subrayado en una explicación, y aparecen las
explicaciones relacionadas en otra página.
Búsqueda de palabras clave
Haga clic en la ficha “Index” del cuadro de diálogo del tópico de
búsqueda anterior y el índice desaparece, apareciendo en su lugar una
lista de palabras clave.
Para buscar una palabra clave, entre la palabra que desea buscar o
avance por la lista de palabras clave.
Para ver la explicación de una palabra clave, seleccione la palabra de la
lista de palabras clave y haga clic en “Display”.
ES
Page 81

Instalación del software
Utilice este procedimiento para instalar el software M-crew en el disco
duro de su ordenador.
Instalación del M-crew
1 Inserte el CD-ROM M-crew suministrado en la ranura CD-ROM de
su ordenador.
1 Haga doble clic en el icono My Computer en la pantalla inicial.
2 Haga doble clic en el icono CD-ROM.
Icono CD-ROM
(Esta ventana aparece
cuando se selecciona “Large
icons” del menú View.
Icono “Install-Dlg”
3 Haga doble clic en “InstallDlg.”
Si fuera necesario, seleccione el idioma deseado en la opción
“Lenguage”.
15
ES
Page 82

2 Haga clic en “Setting up M-crew” de la ventana de ajustes.
Aparece la ventana “M-crew Set Up” junto con el cuadro de
diálogo Welcome. Lea cuidadosamente el contenido del cuadro de
diálogo.
3 Haga clic en “Next”.
Aparece una ventana para seleccionar la carpeta de destino.
16
Para elegir otra carpeta de destino, haga clic en “Browse” y
seleccione la carpeta donde desea instalar el software.
ES
Page 83

4 Haga clic en “Next”.
Seleccione una de las opciones de instalación.
Típico: Los archivos PDF* se instalan con el M-crew.
Compacto: Sólo se instala el M-crew.
* Estos archivos PDF son manuales en línea para el M-crew y PictureGear
Label Maker.
5 Haga clic en “Next”.
Empieza la instalación.
Se creará una carpeta M-crew en la carpeta donde está instalado el
M-crew.
6 Haga clic en “Finish”.
Se completa la instalación y aparece Readme.txt.
Según el ordenador utilizado, puede aparecer un cuadro de diálogo
para avisarle que debe reincializar el ordenador. Si aparece,
reinicialice su ordenador en este momento.
Nota
Se crea una carpeta como resultado de la instalación. El software utiliza esta
carpeta. No borre, mueva o cambie su contenido.
17
ES
Page 84

Instalación del PictureGear Label Maker (Preparación de
etiquetas)
Recuerde que, cuando se instala el PictureGear Label Maker, las
versiones PictureGear Label Maker más viejas en su ordenador se
escribirán encima al instalar la nueva versión.
1 Pulse “Setting up PictureGear Label Maker” en la ventana de
ajustes (vea los pasos 1-
3 en la página 15).
2 Siga las instrucciones que aparecen, para instalar la aplicación.
18
ES
Page 85

Instalación del Acrobat Reader 4.05
Se debe instalar el Acrobat Reader 4.05 en su ordenador para poder
abrir el manual en línea. Cuando vuelva a conectar el ordenador
después de instalar el PictureGear Label Maker, abra nuevamente la
ventana de ajustes (vea los pasos 1-
1 Haga clic en “Setting up Acrobat Reader 4.05 (English)” en la
ventana de ajustes. Aparece la ventana “Acrobat Reader 4.05
Setup”.
Lea cuidadosamente el contenido que aparece en la ventana.
Si no desea instalar el Acrobat Reader 4.05, haga clic en “Cancel”.
Nota
Si ya se ha instalado Adobe Acrobat Reader 3.0 en su ordenador, aparece
“Warning”. En este caso, desinstale el Adobe Acrobat Reader 3.0 y vuelva a
conectar su ordenador. No aparece “Warning” y podrá continuar con la
instalación.
3 en la página 15).
2 Siga las instrucciones que aparecen para instalar el sfotware.
Después de completar la instalación, haga clic en “EXIT” y saque el
CD-ROM.
19
ES
Page 86

Desinstalación del software
Cuando ya no necesite el M-crew, PictureGear Label Maker o Acrobat
Reader 4.05, desinstálelos de la siguiente forma:
1 Abra el Panel de Control.
Apunte a “Settings” y haga clic en “Control Panel” del menú Start.
2 Haga clic dos veces en el icono “Add/Remove Program”.
Aparece la ventana “Add/Remove Programs Properties”.
3 Seleccione y haga clic en “M-crew”, “PictureGear Label Maker 4.1”
o “Acrobat Reader 4.05” en la lista de programas.
4 Haga clic en “Add/Remove”.
El desintalador está activado y el software seleccionado en el paso 3
se borra automáticamente.
Notas
• Cuando desinstale el PictureGear Label Maker, el PictureGear Label
Maker instalado con el
M-screw se borra y también los otros PictureGear Label Maker que
existen en su ordenador.
• Si se desinstala el PictureGear Label Maker instalado mediante el Mcrew, la función de impresión de etiqueta en Picture Gear deja de
funcionar. En este caso, desinstale Picture Gear y vuelva a instalar
Picture Gear.
20
ES
Page 87

Inicialización del software
Inicialización del software
, Apunte a “Programs”, “M-crew” y haga clic en “M-crew”
del menú Start.
Se inicia el software y aparece la barra principal de M-crew.
La siguiente barra aparece inmediatamente después de iniciar el
M-crew (en este ejemplo se selecciona “CD” como función
(componente estéreo del sistema).
Nota
Durante la grabación de minidisco, aparece un cuadro de diálogo que le
avisa que tiene que parar la grabación o iniciar el M-crew.
Salida del software
1 Haga clic en el de la barra principal.
Aparece un cuadro de diálogo para salir del software.
2 Haga clic en “Do not shut off power”.
Termina el M-crew.
Si desea desconectar también el componente estéreo del sistema,
haga clic en “Shut off power”.
21
ES
Page 88

22
Información adicional
Solución de problemas
Si experimenta cualquiera de las siguientes dificultades al utilizar este
software, utilice esta guía de solución de problemas para remediar el
problema. Si cualquier problema persiste, consulte con su concesionario
de Sony más cercano.
Consulte también el manual de instrucciones de su ordenador así como
el archivo “Readme.txt” instalado en el disco duro con el software.
Problema Causa/solución
Aparece el mensaje “The PCLKMN10 does not respond. Please
check the connections.”.
No hay respuesta de la pantalla o
error de la pantalla.
No puede entrar texto, grabar,
editar, etc.
ES
El conector USB en el adaptador de conexión a PC
no está bien conectado en el terminal USB del
ordenador.
t Compruebe la conexión del conector USB.
t Pruebe desconectando el cable USB del
adaptador de conexión de ordenador y del
ordenador, y volviendo a conectarlos.
El conector PC LINK en el adaptador de conexión
a PC no está correctamente conectado al
componente estéreo del sistema.
t Compruebe la conexión del conector PC LINK.
t Compruebe que el cable eléctrico de CA del
componente estéreo del sistema está conectado
al enchufe de CA.
t Desconecte y conecte la alimentación eléctrica
del componente estéreo del sistema y vuelva a
activar el M-crew.
t Pruebe desconectando el cable USB del
adaptador de conexión de ordenador y del
ordenador, y volviendo a conectarlos.
t Active otra aplicación de uso frecuente y
compruebe que no hay problemas en el
ordenador.
t Después de desinstalar el software (página 20),
pruebe a volver a instalar (página 15).
La lengüeta de protección del disco puede estar en
protección contra registro.
t Deslice la lengüeta para que pueda grabar.
El minidisco puede ser un minidisco de venta
comercial sólo para reproducción (un
minidisco con canciones grabadas de
antemano).
t La entrada de texto, edición de grabación, etc.
no es posible en los minidiscos de
reproducción comercial.
Page 89

Problema Causa/solución
El componente estéreo del
sistema no responde.
t Compruebe que las conexiones están bien
hechas (página 7).
t Desconecte los cables de conexión y vuelva a
conectarlos.
t Pruebe desconectando el cable USB del
adaptador de conexión de ordenador y del
ordenador, y volviendo a conectarlos.
El nombre visualizado del
minidisco o del disco compacto
no corresponde con el contenido
del disco.
No se escucha el sonido del
sistema (alarma de advertencia/
aviso de llegada de correo).
t Pulse el botón de recarga (páginas 10 y 14 en el
manual en línea).
t Vuelva a activar el M-crew. Si no puede
solucionar el problema, los datos en la
biblioteca de libros pueden contener errores.
Entre nuevamente los nombres.
t Los sonidos del sistema fueron especificados
para que no suenen durante el inicio del Mcrew o puede haberse cambiado el ajuste a
OFF en el caso de una terminación anormal.
Para recuperar los sonidos, vuelva a activar el
M-crew y salga el programa normalmente. O
haga doble clic en el archivo de reserva
(reg0.reg a reg3. reg) en la carpeta M-crew y
siga las instrucciones para ajustar nuevamente
el programa.
23
ES
Page 90

• Het geheel of gedeeltelijk kopiëren van dit
programma of de bijbehorende
gebruiksaanwijzing, of het verhuren van
het programma zonder voorafgaande
toestemming, is ten strengste verboden,
krachtens de wet op het auteursrecht.
• Sony aanvaardt geen enkele
aansprakelijkheid voor schade, verlies of
winstderving voortvloeiend uit het gebruik
van dit programma, noch voor
schadeclaims door derden.
• Indien er een fabricagefout zou blijken,
blijft de aansprakelijkheid beperkt tot het
vervangen van de defecte handelswaar.
• Dit programma is uitsluitend goedgekeurd
voor gebruik met de voorgeschreven
apparatuur.
• Sony behoudt zich het recht voor om de
specificaties van deze programmatuur te
wijzigen, zonder voorafgaande
kennisgeving.
Programma 2000 Sony Corporation
Documentatie 2000 Sony Corporation
2000 Sony Corporation. Alle rechten
voorbehouden.
• M-crew, PictureGear en VAIO zijn wettig
gedeponeerde handelsmerken van Sony
Corporation.
• Microsoft, MS-DOS en Windows zijn
wettig gedeponeerde handelsmerken van
Microsoft Corporation.
• IBM en PC/AT zijn wettig gedeponeerde
handelsmerken van International Business
Machines Corporation.
• Macintosh is het wettig gedeponeerde
handelsmerk van Apple Computer Inc.
• Adobe en Adobe Acrobat Reader zijn
handelsmerken van Adobe Systems
Incorporated.
• Andere namen van producten of bedrijven
zijn handelsmerken of wettig
gedeponeerde handelsmerken van de
betreffende ondernemingen.
NL
2
Page 91

Inhoudsopgave
Inleiding
Overzicht............................................... 4
Systeemvereisten .........................5
Opmerking ................................... 5
Voorbereidingen
Bijgeleverd toebehoren
controleren ................................... 6
Aansluitingen .......................................7
USB stuurprogramma
installeren ............................. 8
Toestand van het geïnstalleerde
apparaat controleren ........10
De multimedia-parameters
instellen op uw
computer ............................ 11
Omtrent deze handleiding ............... 13
Gebruik van de beeldscherm-
bedieningshandleiding ....13
Gebruik van de hulpfuncties ...14
Toepassingsprogramma’s
installeren ................................... 15
Installeren van M-crew.............15
Installeren van PictureGear
Label Maker .......................18
Installeren van Acrobat Reader
4.05 ......................................19
Programma’s verwijderen
(Uninstall) ..........................20
De programma’s starten ...................21
Het programma starten ............21
Programma’s sluiten .................21
NL
Aanvullende informatie
Verhelpen van storingen ..................22
NL
3
Page 92

Inleiding
Overzicht
Met het M-crew programma (versie 1.0E) kunt u Sony stereosysteemcomponenten via een PC LINK aansluiting bedienen. Het M-crew
programma biedt de volgende functies.
Afspelen
• Via de computer kunt u de weergave van compact discs en minidiscs
bedienen.
• Muziek- en audiobestanden afspelen die zijn opgeslagen op uw
computer.
• Muziek-CD’s afspelen in het CD-ROM station van uw computer
(alleen als het aangesloten stereosysteem geen bedieningsknoppen
voor de CD-speler heeft).
• Via de computer kunt u afstemmen op radiozenders.
Opnemen/bewerken
• U kunt disctitels en muziektitels invoeren via uw
computertoetsenbord.
• Geluidsopnamen op minidiscs precies aanpassen via het
computerbeeldscherm.
• Muziek van compact disc opnemen op minidisc via slepen-enneerzetten op het scherm.
• Radio-uitzendingen moeiteloos opnemen op minidisc.
Andere bedieningsfuncties
• U kunt virtuele media creëren voor het organiseren van uw
audiobestanden.
• De opgenomen en afgespeelde muziekstukken bijhouden via een
disc-overzicht.
• Tijdens weergave van muziek de bijbehorende Internet-websites
bezoeken.
• Tijdens radio-ontvangst de website van de zender bezoeken.
• Ook bij afwezigheid opnemen en afspelen met een schakelklok.
• Etiketten voor minidisc afdrukken.
Opmerkingen
• In deze gebruiksaanwijzing wordt de term stereosysteem-componenten
gebezigd voor de geïntegreerde geluidsapparatuur (inclusief CD-speler en
minidisc-recorder) en afzonderlijke minidisc-recorders die geschikt zijn voor
de vereiste PC-LINK aansluitingen.
• Welke geluidsbronnen en M-crew functies u kunt gebruiken via uw computer
hangt af van de stereosysteem-componenten die op de computer zijn
aangesloten.
• Dit programma werkt alleen voor de stereosysteem-componenten die direct
NL
4
zijn aangesloten op uw computer.
Page 93

Systeemvereisten
Voor het gebruik van het M-crew programma (versie 1.0E) dient u te
beschikken over de volgende apparatuur en programmatuur.
s IBM PC/AT of compatibele computer (Dit programma is niet
s Processor*
s Videokaart en schermbesturing:
s Ruimte op vaste schijf:
s CD-ROM station
s USB aansluiting: 1 of meer
s Besturingssysteem:
s Mediaspeler: Windows Mediaspeler (alvorens u het M-crew
s Beeldscherm: VGA (800 × 600 beeldpunten), met 65.536 of meer
1
: Intel Pentium II 233 MHz/Celeron 300A of sneller
model
VGA (800 × 600 beeldpunten), met 65.536 of meer
kleuren
geschikt voor Apple Macintosh computers.)
2
20 MB*
of meer (bij installeren van het M-crew
programma en de beeldschermhulp)
Windows 98/Windows 98 Tweede Editie (Dit
programma is niet geschikt voor Microsoft
Windows 3.1, Windows 95 of Windows NT.)
programma kunt gebruiken, zult u eerst het
Windows Mediaspeler programma (versie 6.4 of
recenter) op uw computer moeten installeren.)
kleuren.
*1De juiste werking van het M-crew programma is niet gegarandeerd voor
*2Daarnaast is er nog 15 MB meer ruimte op vaste schijf vereist voor het
Opmerking
De PC LINK aansluiting is niet geschikt voor of uitwisselbaar met een
CONTROL A 1, CONTROL A 1 II of CONTROL I aansluiting. Als uw
stereosysteem alleen een CONTROL A1 of A1 II aansluiting biedt, zult
u gebruik moeten maken van de PCLK-MD2-aansluitset (niet
bijgeleverd).
sommige computers met een andere Pentium-type processorchip, zoals een
AMD K6 (bij weergave van een audiobestand zou het geluid bijvoorbeeld wel
eens kunnen haperen).
installeren van het PictureGear Label Maker programma.
NL
5
Page 94
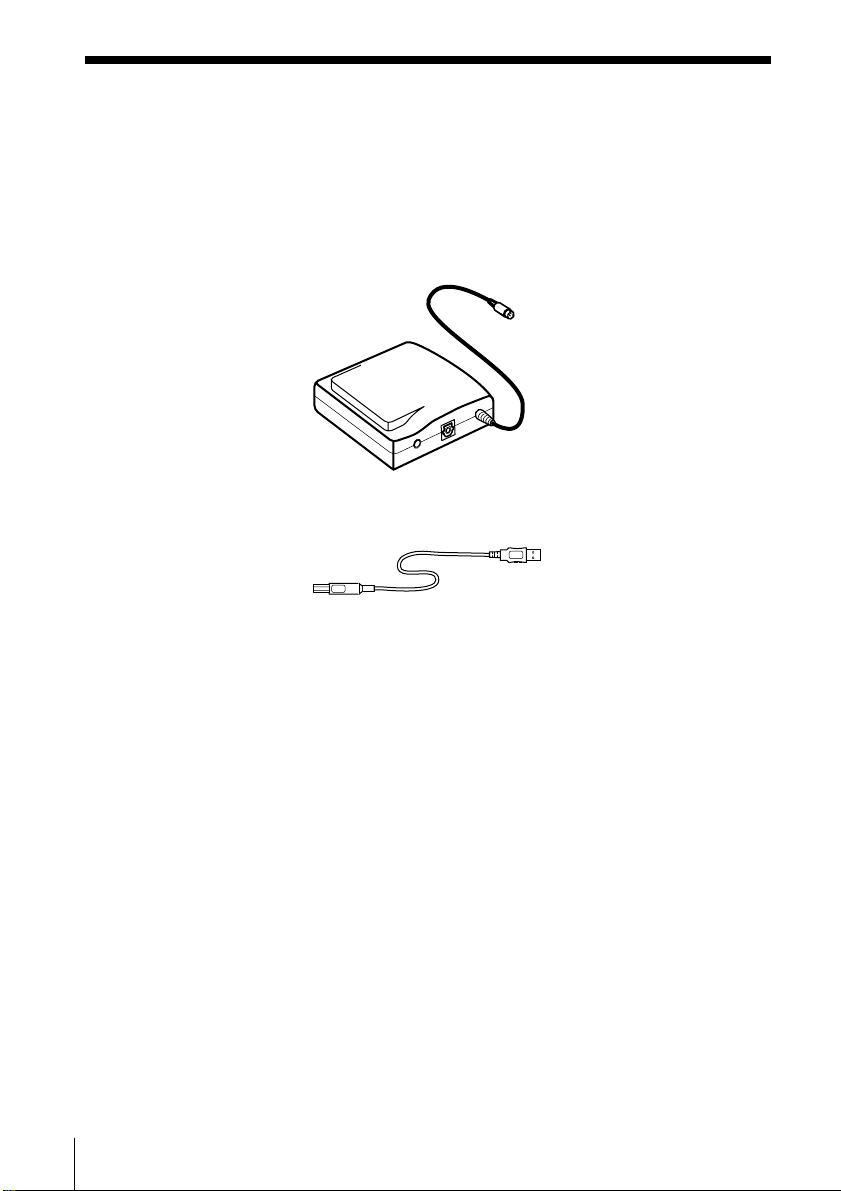
Voorbereidingen
Bijgeleverd toebehoren controleren
Controleer of alle onderstaande toebehoren in de verpakking van het
M-crew programma aanwezig zijn. Mocht er iets ontbreken, neemt u
dan a.u.b. contact op met de winkel waar u het pakket hebt gekocht of
met de dichtstbijzijnde Sony leverancier.
• PC-aansluitadapter CAV-MN10 (1)
PC LINK (6-polige mini-DIN)
stekker
• USB-kabel (1)
• Optisch digitaal aansluitsnoer (1)
• M-crew CD-ROM disc (1)
• Gebruiksaanwijzing (1)
• Garantiebewijs (1)
NL
6
Page 95

Aansluitingen
Uw personal computer aansluiten op een stereosysteem-component
Gebruik de bijgeleverde PC-aansluitadapter en USB-kabel om uw personal computer
als volgt aan te sluiten op een stereosysteem-component.
Het onderstaande aansluitschema toont als voorbeeld hoe u de MDS-PC3 component
kunt aansluiten op uw PC.
Draai de stekker in de juiste stand
en steek deze stevig in de
aansluitbus.
Computer
MDS-PC3
Naar de USB
stekkerbus van de
computer
B
Aansluiten op
de PC LINK
stekkerbus
naar een digitale audio-intgang
naar analoge audio-intgangen
Opmerkingen
• Steek elke stekker vooral recht in de stekkerbus. Als de stekker scheef zit, kan
dit kan de aansluitbus beschadigen.
• Als u de digitale audio-uitgangsaansluiting van de PC-aansluitadapter
verbindt met de optische digitale ingangsaansluiting van een
stereosysteem-component via een digitaal aansluitsnoer met rechthoekige
stekkers, zult u muziek-CD’s kunnen afspelen in het CD-ROM station van uw
computer met weergave via de stereosysteem-component, evenals de
audiobestanden die zijn opgeslagen op de vaste schijf van uw computer. Zie
de gebruiksaanwijzing van uw stereosysteem-component voor nadere
aanwijzingen over de aansluitingen.
• Als u een stel actieve luidsprekers aansluit op de analoge audiouitgangsaansluiting (stereo ministekkerbus) van de PC-aansluitadapter, via
een audio-aansluitsnoer (met stereo ministekkers, niet bijgeleverd), kunt u het
geluid van de computer ook via die luidsprekers beluisteren.
Deze uitgangsaansluiting mag echter niet worden verbonden met de analoge
ingangsaansluiting van een stereosysteem-component, want dan zou een
verkeerde aanpassing kunnen leiden tot storende bijgeluiden in de weergave.
PC-aansluitadapter
b
b
Aansluiten op
de USB
stekkerbus
b
USB-kabel
NL
7
Page 96

USB stuurprogramma installeren
Wanneer u de personal computer heb aangesloten op een
stereosysteem component en de computer hebt ingeschakeld, zal een
installatie-Wizard u laten zien hoe u de apparatuur verder moet
voorbereiden voor gebruik van het M-crew programma.
Installeren van de standaard stuurprogramma’s behorend bij
Windows 98
Wanneer de Wizard u vraagt om de Windows 98 CD-ROM, plaatst u
deze in het CD-ROM station van uw computer om de
stuurprogramma’s te installeren.
Installeren van de speciale Sony link-kit stuurprogramma’s
Plaats de bijgeleverde M-crew CD-ROM in het CD-ROM station van
uw computer en volg dan de onderstaande aanwijzingen.
1 Sluit het stereosysteem aan (zie blz. 7) en schakel uw personal
computer in.
Nu verschijnt de “Add New Hardware” op het scherm.
2 Klik op “Next”.
Er verschijnt een dialoogkader voor het kiezen van de
zoekmethode.
NL
8
Page 97

3 Kies de mogelijkheid “Search for the best driver for your device.
(Recommended)” en klik op “Next”.
Nu verschijnt een dialoogkader voor keuze van de zoeklocatie.
4 Kies voor “Specify a location:”, tik in “D:\Driver” en klik op
“Next”.
Even later verschijnt er een dialoogkader om te bevestigen dat de
installatie is voltooid.
Opmerkingen
• De juiste letter voor het installatiestation (“D:” in stap 4) is afhankelijk
van de configuratie van uw computer.
Gebruik de letter waaronder het CD-ROM station van uw computer
bekend is.
• Tijdens het installeren van het USB stuurprogramma kan het volgende
dialoogkader verschijnen. In dat geval klikt u op “OK” en gaat u door
met de volgende stap.
5 Klik op “Finish”.
Hiermee is de installatie compleet.
NL
9
Page 98

Toestand van het geïnstalleerde apparaat controleren
Controleer na afloop van het installeren altijd even de toestand van het
geïnstalleerde apparaat.
1 Open het Configuratiescherm.
Kies “Settings” en klik op “Control Panel” in het Start menu.
2 Dubbelklik op het Systeem-pictogram.
Het dialoogkader “System Properties” verschijnt.
3 Klik op het tabblad voor “Device Manager”.
Controleer nu of de volgende onderdelen staan vermeld in het
“Device Manager” venster.
— “SONY LINK KIT” onder “SONY PCLK USB Driver”
— “USB Audio Device” onder “Sound, video, and game
controllers”
— “USB Human Interface Device” onder “Human Interface
Devices”
— “USB Composite Device” en “Generic USB Hub” onder
“Universal serial bus controller”
10
4 Klik op “OK” om het dialoogkader “System Properties” te sluiten.
NL
Page 99

De multimedia-parameters instellen op uw computer
U zult eerst de multimedia-parameters moeten instellen op uw
computer, alvorens u het geluid van een CD die wordt afgespeeld in
het CD-ROM station van uw computer of van een MIDI bestand op de
vaste schijf van uw computer kunt weergeven via stereosysteemcomponenten die zijn aangesloten op uw computer.
1 Open het Configuratiescherm.
Kies “Settings” en klik op “Control Panel” in het Start menu.
2 Dubbelklik op het Multimedia-pictogram.
Het dialoogkader “Multimedia Properties” verschijnt.
3 Klik op het tabblad voor “Audio” en kies voor “USB Audio Device
(1)” onder “Preferred device:”
11
NL
Page 100

4 Klik op het “CD Music” tabblad en stel in op de optie “Enable
digital CD audio for this CD-ROM device.”.
Opmerking
Afhankelijk van uw versie van Windows 98 (zoals de Eerste editie) kan
deze optie wel eens grijs worden aangegeven, als niet beschikbaar. In dat
geval kunt u het best de computer opnieuw opstarten.
5 Klik op het “MIDI” tabblad en dan op “Microsoft GS Wavetable
SW Synth”.
6 Klik op “OK” om het dialoogkader “Multimedia Properties” te
sluiten.
12
NL
 Loading...