

Sony MJ-L1 MJ-L1A, MJ-L1A Operating Instructions Manual
1
Operating Instructions
3-810-991-32(1)
Flat Component
System
fT
MJ-L1
MJ-L1A
©1996 by Sony Corporation
2
English
WARNING
To prevent fire or shock hazard, do not
expose the unit to rain or moisture.
To avoid electrical shock, do not open the cabinet. Refer servicing to
qualified personnel only.
Do not install the appliance in a confined space, such as a bookcase
or built-in cabinet.
US and foreign patents licensed from Dolby Laboratories Licensing
Corporation.
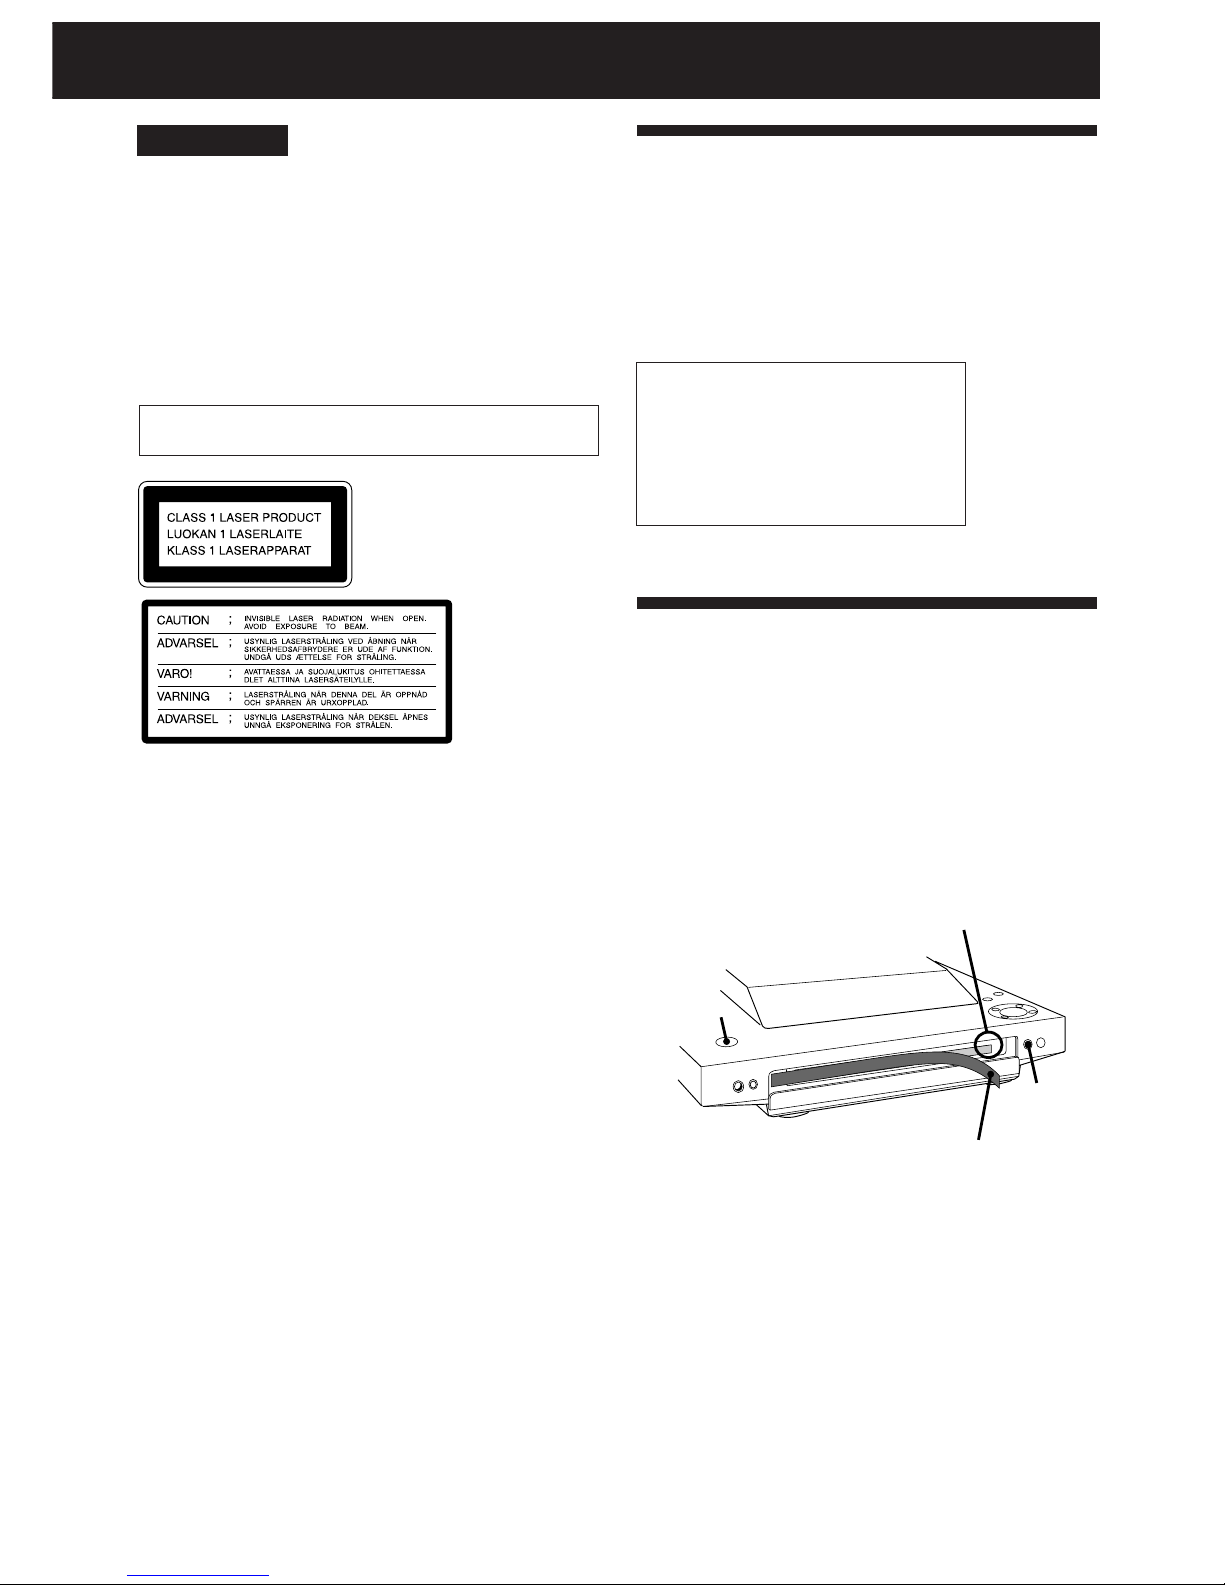
Laser component in this product is capable of emitting radiation
exceeding the limit for Class 1.
This appliance is classified as a
CLASS 1 LASER product. The
CLASS 1 LASER PRODUCT
MARKING is located on the rear
exterior.
This caution
label is located
inside the unit.
Welcome!
Thank you for purchasing the Sony Flat Component System. This
series is packed with fun features. Here are just a few:
•A preset feature, that lets you store and recall up to 30 of your
favourite radio stations
•A timer that lets you set the CD player, MD deck or radio to turn
on and off whenever you want
•An MD deck that lets you record from the radio or CD player
•A remote that lets you control your system from your seat
The MJ-L1/MJ-L1A consists of the following:
(MJ-L1)
-Main unit : HCD-MJ1
-Speaker System : SS-MJ1
-Remote Control : RM-SMJ1
(MJ-L1A)
-Main unit : HCD-MJ1A
-Remote Control : RM-SMJ1
MD §
POWER
Take out sheet
Remove tape
Before Using This Unit
Make sure to take out the sheet inside the
disc slot on the MD deck.
1 Connect the mains lead to the wall outlet and press POWER.
2 Press MD § to open the lid.
3 Remove the adhesive tape and take out the sheet inside the disc
slot.
The sheet may come out by itself when you remove the adhesive
tape.
Before setting up the system, press MD § to close the lid, press
POWER to turn off the power, and disconnect the mains lead.

3
Table of Contents
Chapter 1: Setting Up
Connecting the Stereo 4
Inserting the Battery 5
Setting the Clock 6
Chapter 2: the CD Player
Playing a CD (normal play) 7
Using the Display 8
Playing Tracks Repeatedly (repeat play) 8
Playing Tracks in Random Order (shuffle play) 9
Playing Tracks in the Desired Order
(programme play) 9
Assigning a Name to a CD (disc memo function) 10
Chapter 3: Playing MDs
Playing an MD (normal play) 11
Using the Display 12
Playing Tracks Repeatedly (repeat play) 12
Playing Tracks in Random order (shuffle play) 13
Playing Tracks in the Desired Order
(programme play) 13
Chapter 4: Recording on MDs
Before Recording 14
Recording a CD 15
Recording from the Radio 15
Recording on an MD Manually 16
Marking Track Numbers While Recording 16
Chapter 5: Editing Recorded MDs
Erasing Recordings (erase function) 18
Moving Recorded Tracks (move function) 19
Dividing Recorded Tracks (divide function) 19
Combining Recorded Tracks (combine function) 20
Labelling Recordings (title function) 20
Chapter 6: the Radio
Listening to the Radio 22
Presetting Radio Stations 23
Playing Preset Radio Stations 24
Chapter 7: Sound Adjustment
Adjusting the Sound 25
Chapter 8: Additional Features
Falling Asleep to Music 26
Waking Up to Music 26
Timer-Recording Radio Programmes 27
Connecting Optional Equipment 28
For Your Information
Precautions 29
Maintenance 29
Guide to the Serial Copy Management System 30
System Limitations of MD 31
MD Display Messages 31
Troubleshooting Guide 32
Specifications 33
Index to Parts and Controls 33
Index 35
Chapter 1: Setting Up
4
Chapter 1:
Setting
Up
Connecting the Stereo
Inserting the Battery
Setting the Clock
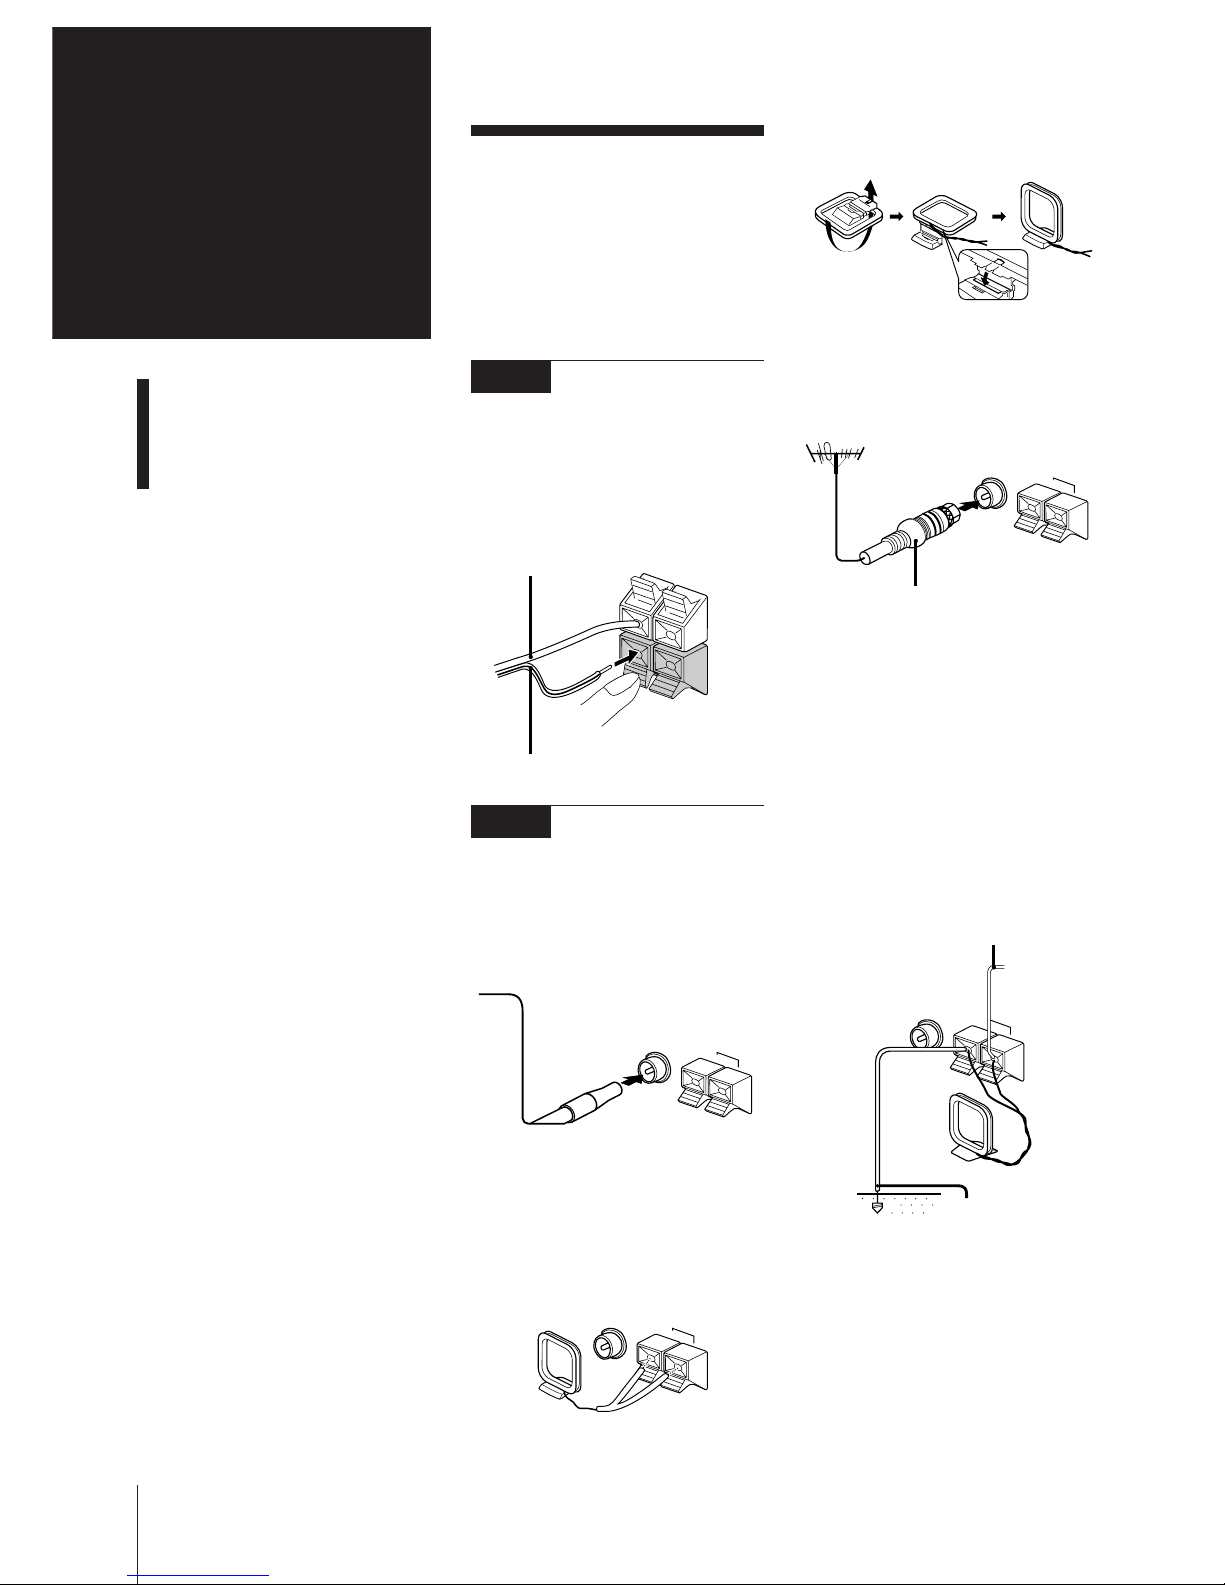
To set up the AM loop aerial
To improve the FM reception
Connect an outdoor FM aerial to the FM
75Ω terminal, using a 75-ohm coaxial cable
and IEC standard socket connector.
To improve the AM reception
After you connect the AM aerial, connect a
6- to 15-meter insulated wire to the AM
terminal. Connect the y terminal to earth.
Important
Ground the external aerial against lightning
from the y terminal.
To prevent a gas explosion, do not connect
the ground wire to a gas pipe.
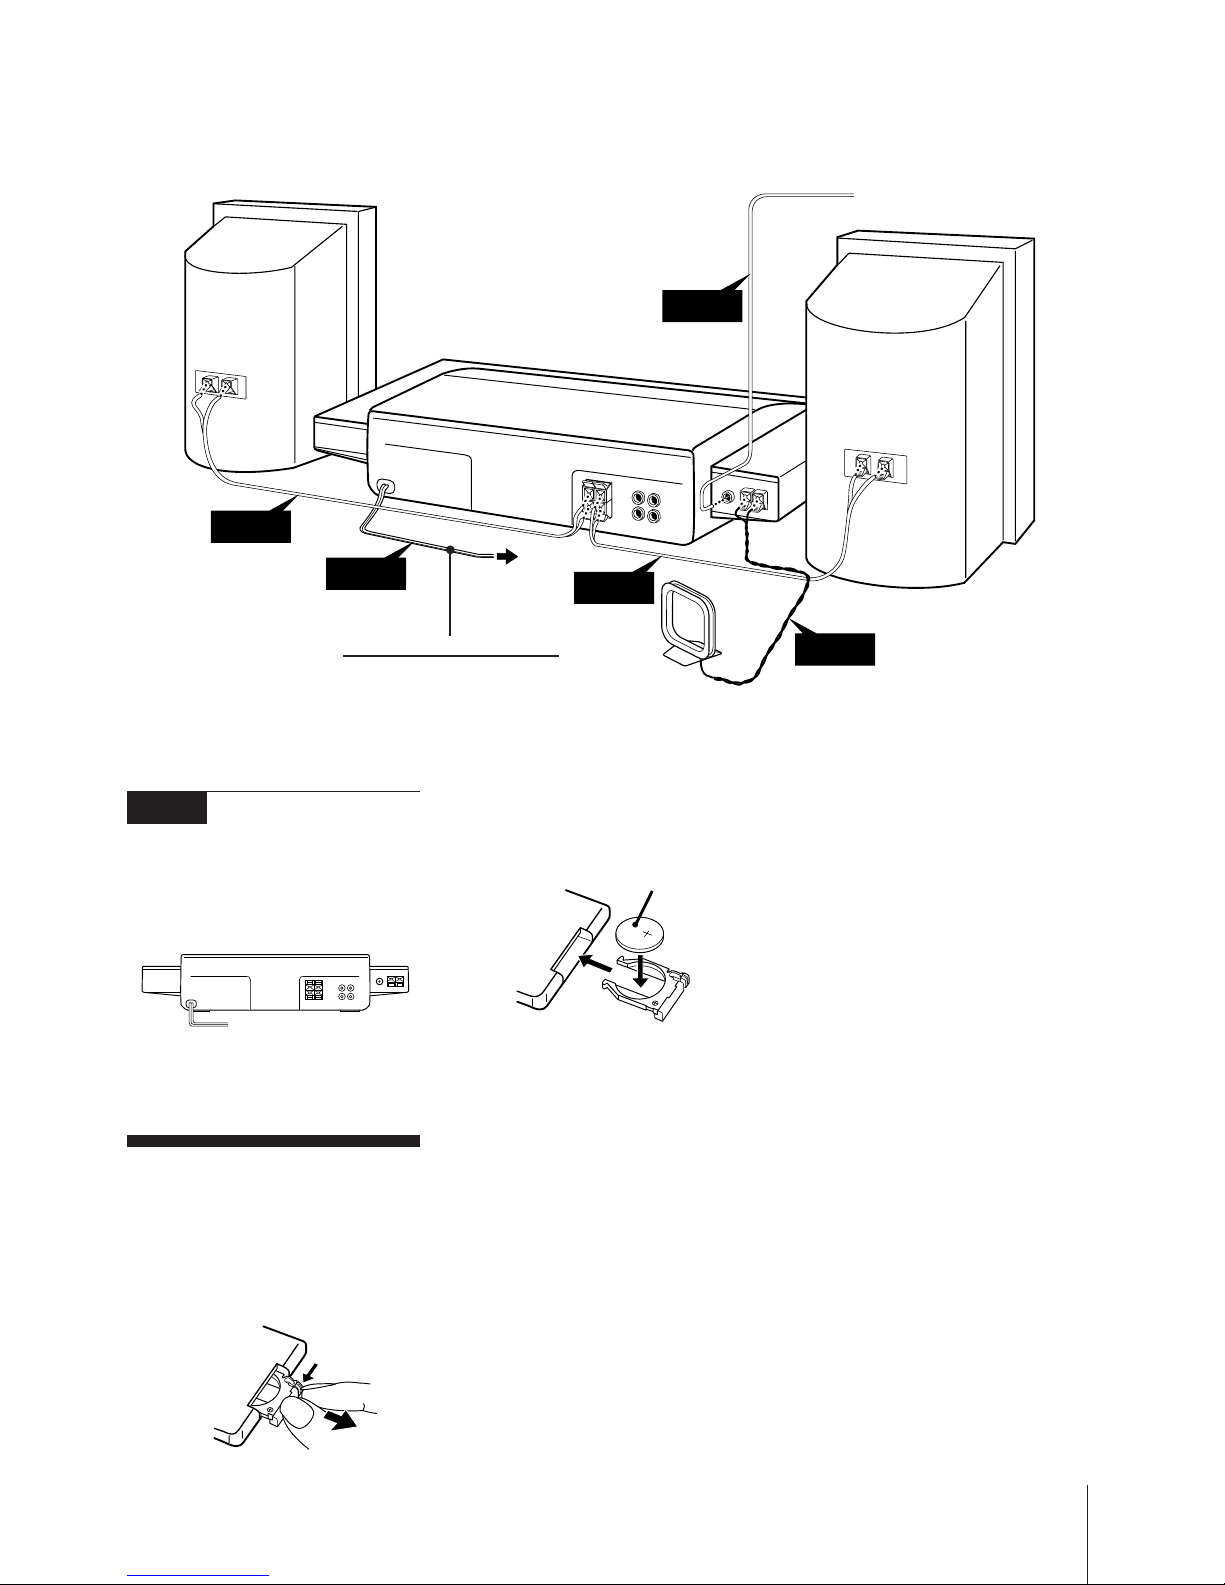
Connecting the
Stereo
Use the illustrations below to connect your
stereo.
If you want to connect any optional
components to the stereo, see “Connecting
Optional Equipment” in Chapter 8.
Connecting the
Speakers (For MJ-L1 only)
Connect the right speaker to the SPEAKER
R connectors and the left speaker to the
SPEAKER L connectors with the grey cord
to ‘ (grey) and the black-lined cord to ’
(black).
Connecting the
Aerials
FM lead aerial connection
Connect the supplied lead aerial to the FM
75Ω terminal.
AM loop aerial connection
Connect the supplied loop aerial to the AM
and the y terminals.
y
FM 75
Ω
AM
STEP 1
STEP 2
R
L
Grey cord to ‘
(grey)
Black-lined cord to ’
(black)
FM 75
Ω
AM
y
IEC standard socket connector
(not supplied)
FM 75
Ω
AM
y
Insulated wire
(not supplied)
Ground wire
(not supplied)
FM 75
Ω
y
AM
Chapter 1: Setting Up
5
Front
speaker (R) *
Front speaker
(L) *
AM loop aerial
(supplied)
!Do this connection last!
to a wall outlet
FM lead aerial
(supplied)
STEP 1
STEP 3
STEP 1
STEP 2
STEP 2
/
to a wall outlet
Connecting the
Power
Connect the main lead cord to a wall outlet
after you have made all the above
connections.
Inserting the
Battery
Install a lithium battery in the supplied
remote for remote control.
1 Slide out and remove the battery case.
STEP 3
To avoid battery leakage
If you are not going to use the remote for a
long time, remove the battery to avoid
damage caused by corrosion from battery
leakage.
Notes on lithium battery
•Keep the lithium battery out of the reach
of children.
Should the battery be swallowed,
immediately consult a doctor.
•Wipe the battery with a dry cloth to
assure a good contact.
•Be sure to observe the correct polarity
when installing the battery.
•Do not hold the battery with metallic
tweezers, otherwise a short-circuit may
occur.
2Insert a lithium battery CR2025 with the
+ side facing up.
3Insert the battery case.
CAUTION
Danger of explosion if battery is incorrectly
replaced.
Replace only with the same or equivalent
type recommend by the manufacturer.
Discard used batteries according to the
manufacturer's instructions.
Battery life
You can expect the remote to operate for
about six months (using a Sony CR2025
lithium battery) before the battery run
down. When the battery no longer operates
the remote, replace the battery with a new
one.
a lithium battery
CR2025
* Front speakers are supplied for MJ-L1 only.
Chapter 1: Setting Up
6
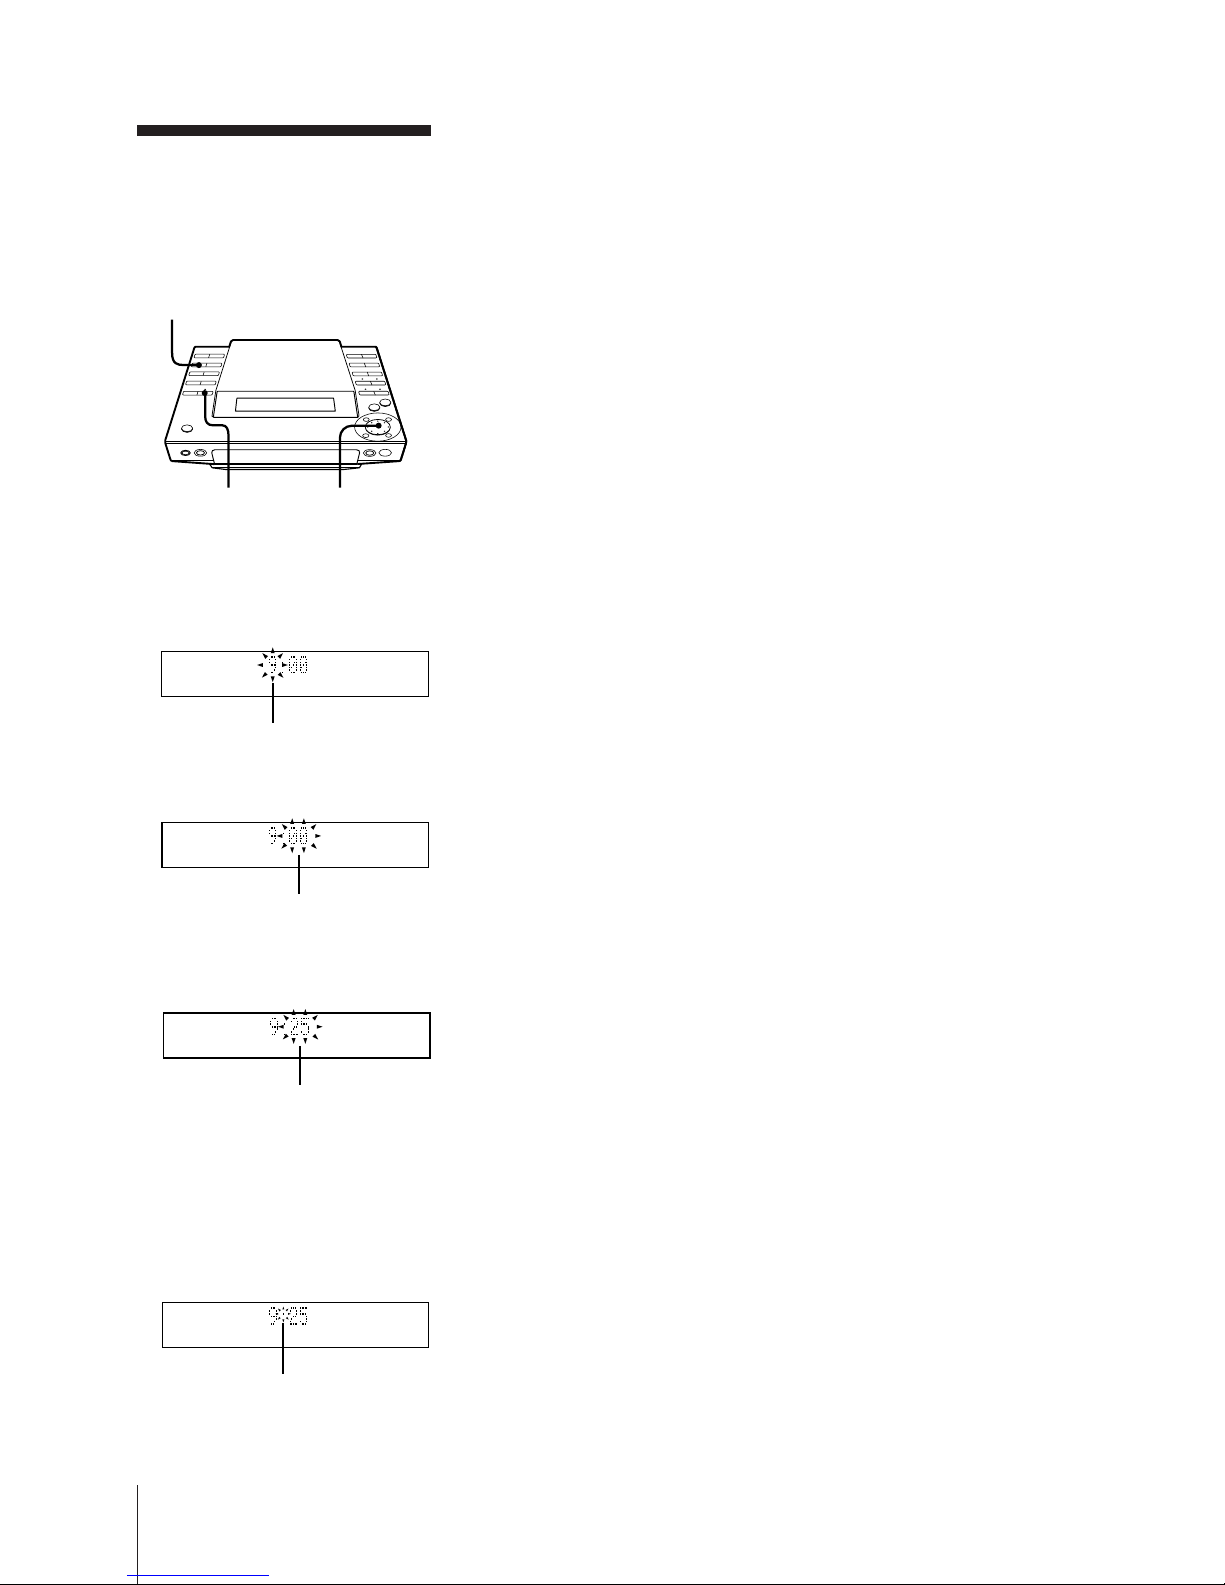
1
3,5
2,4
flashing
flashing
flashing
flashing
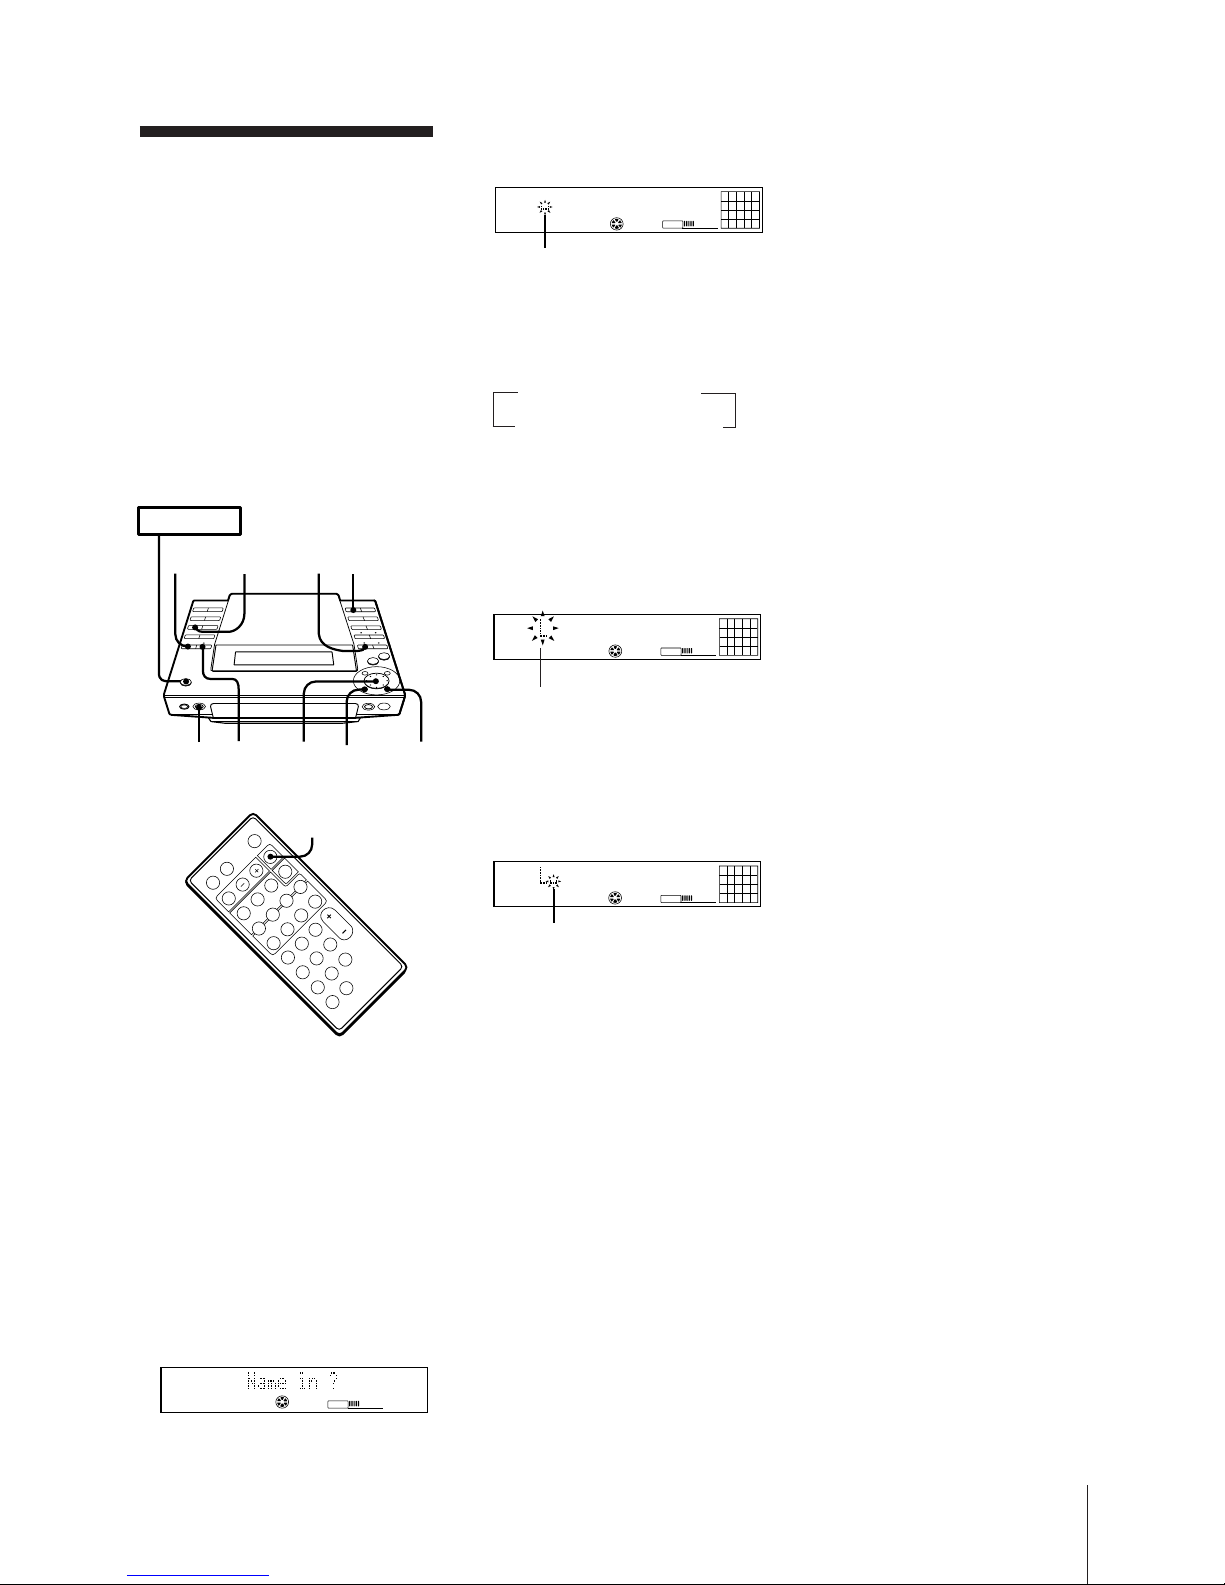
Setting the Clock
The built-in clock shows the time in the
display even when the power is off.
Use the buttons on the unit for this
operation.
1 Press CLOCK.
2 Set the current hour by turning the JOG
dial until the correct hour appears.
3 Press ENTER/YES.
The minute indication begins flashing.
4 Set the current minute by turning the
JOG dial until the correct minute
appears.
5 Press ENTER/YES.
The clock starts running and the upper
dot flashes. Use the time signal to set the
clock accurately.
The upper dot flashes for the first half of
a minute (0 to 29 seconds), and the
lower dot flashes for the last half of a
minute (30 to 59 seconds).
To check the time while power is on
Press CLOCK.
The current time is displayed for 4 seconds.
To correct the clock setting
With the power turned off, repeat steps 1
through 5.
With the power turned on, press CLOCK
twice and repeat steps 2 through 5.
Chapter 2: the CD Player
7
Playing a CD (normal play)
Using the Display
Playing Tracks Repeatedly
(repeat play)
Playing Tracks in Random
Order (shuffle play)
Playing Tracks in the
Desired Order
(programme play)
Assigning a Name to a CD
(disc memo function)
Chapter 2:
the CD
Player
Playing a CD
(normal play)
You can play a CD in four modes: normal,
repeat, shuffle, and programme. The mode
decides which tracks (songs) you will listen
to, in which order, and whether or not they
will repeat.
You can operate the stereo system from the
unit itself or from the supplied remote. You
can play either a 12 cm (5-inch) or 8 cm (3inch) CD. When you play an 8 cm CD, place
it on the inner circle of the disc tray. Do not
use a CD adapter.
Before you play the CD, decrease the sound
level by pressing VOLUME –, to prevent
damage to the speakers.
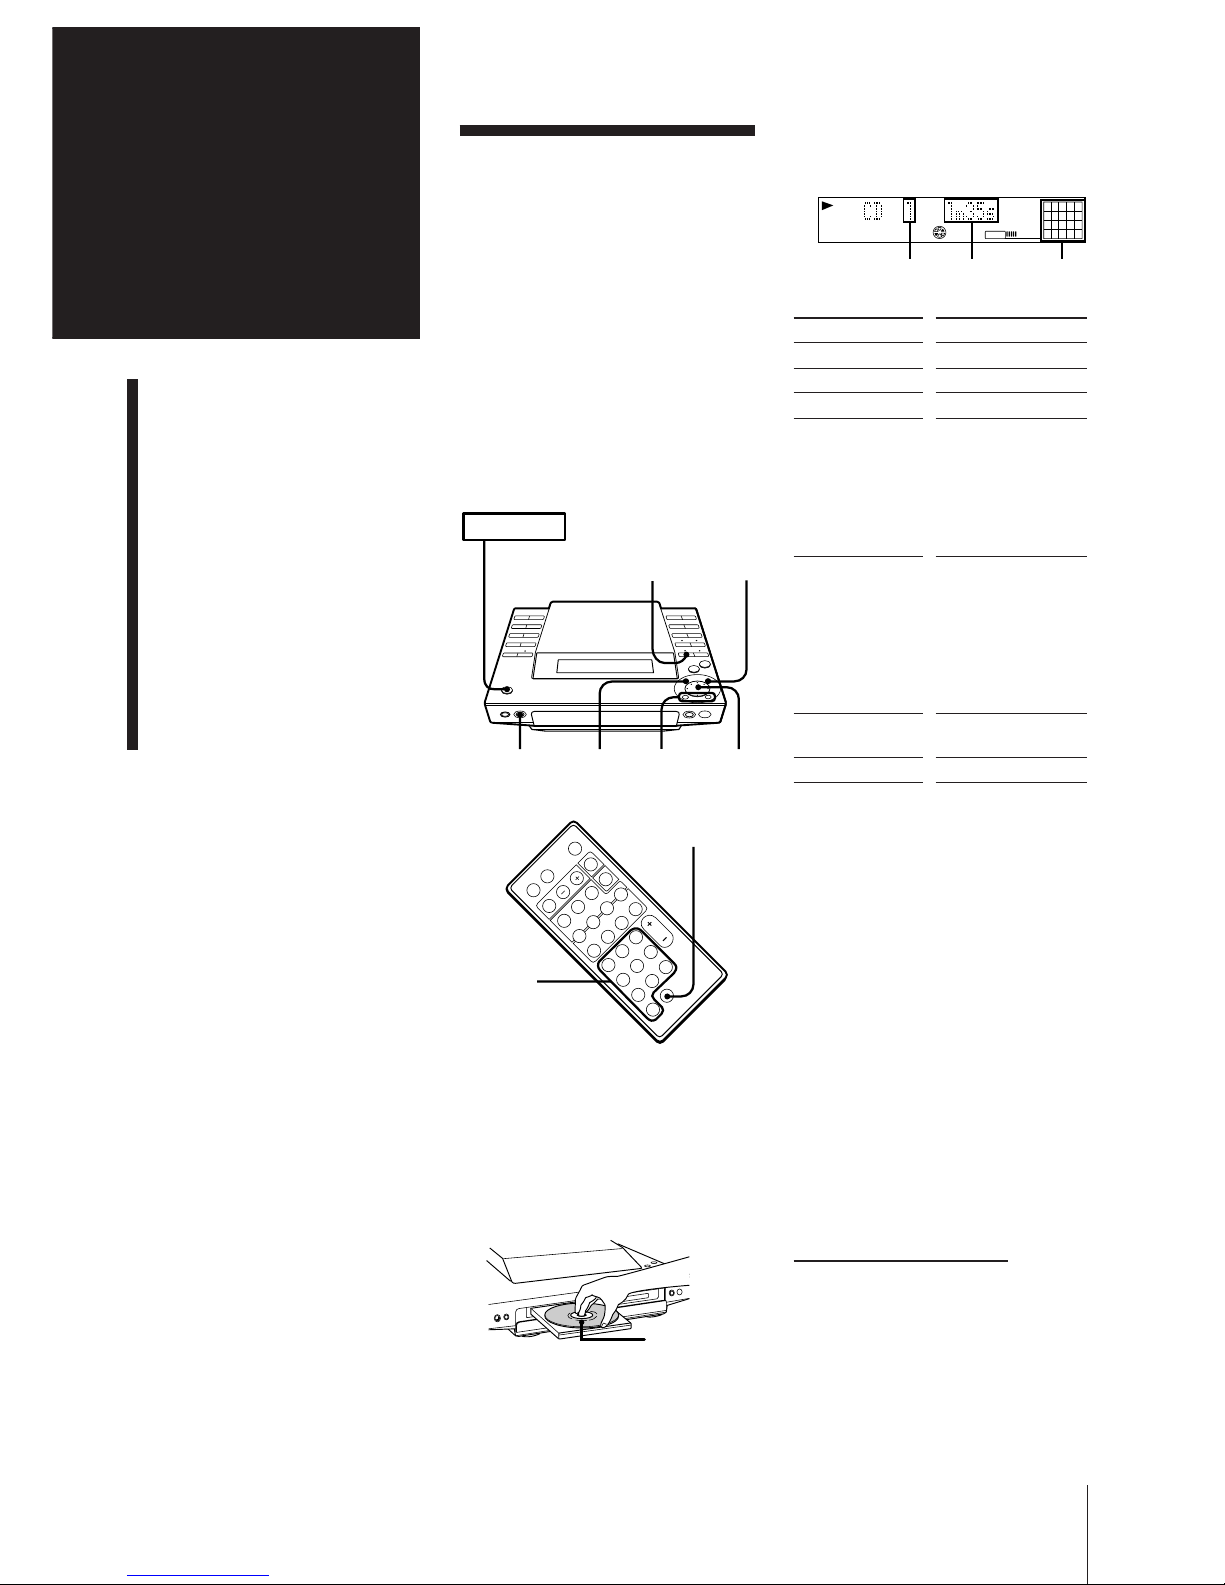
1 Press CD.
The unit enters the CD play mode.
2 Press CD § and place a CD (label side
facing up) on the disc tray.
3Press fl (or CD ( on the remote).
The disc tray closes and the first track
starts playing.
* Button on the remote
To directly locate a track numbered 11 or
more
Press >10 first, then enter the
corresponding digits.
Example: To locate track number 30, press
>10, 3, and 10 in this order.
One Touch Play feature
Press CD ( on the remote when the
power is off. If a CD is loaded in the player,
you will be able to listen to the CD without
pressing any other buttons.
When you press CD on the unit, power
turns on and function switches to CD
automatically.
You can start playback from a desired track
1 In step 2, turn the JOG dial until the
desired track number appears on the
display.
2 Press fl.
Label side up
To
Stop play
Pause
Resume play
Go forward to
another track
Go back to a
previous track
Locate a specific
track directly
Remove the CD
Press
(CD p*)
fl (CD P*)
fl (CD (* or P*)
During play or pause,
turn the JOG dial
clockwise. Release
when you reach the
track you desire.
Or use + on the
remote.
During play or pause,
turn the JOG dial
counterclockwise.
Release when you
reach the track you
desire.
Or use = on the
remote.
Number buttons on
the remote
CD §
continue to next page ➔
(
=
(
P
+
p
r
Pp
POWER m ON
1
32
>10
Numeric
buttons
„
0/)
JOG
TRACK
CD
1
6
11
2738495
10
VOLUME
Track
number
Playing
time
Music
calendar
Chapter 2: the CD Player
8
➔ continued
To find a point in a track
You can find a particular point in a track
while the track is playing or while it’s in
pause mode. Use the buttons on the unit to
operate this feature.
Using the Display
You can use the display on the unit to check
CD and track information such as the total
number of tracks, total playing time of the
CD, the time remaining on the CD, etc.
To
Go forward
quickly in a track
Go backwards
quickly in a track
Search quickly
without listening
Press
) on the unit and
release it at the desired
point.
0 on the unit and
release it at the desired
point.
During pause, 0 or
) on the unit and
release it at the desired
point.
Playing Tracks
Repeatedly
(repeat play)
You can choose between two different
repeat play modes. One repeats all the
tracks in the current play mode; the other
repeats a single track.
Repeating all the tracks
Press REPEAT repeatedly until “REPEAT”
appears in the display.
Repeating a single track (in normal
play mode only)
While the desired track is being played,
press REPEAT repeatedly until “REPEAT
1” appears in the display.
To cancel repeat play
Press REPEAT so that “REPEAT” or
“REPEAT 1” disappears from the display.
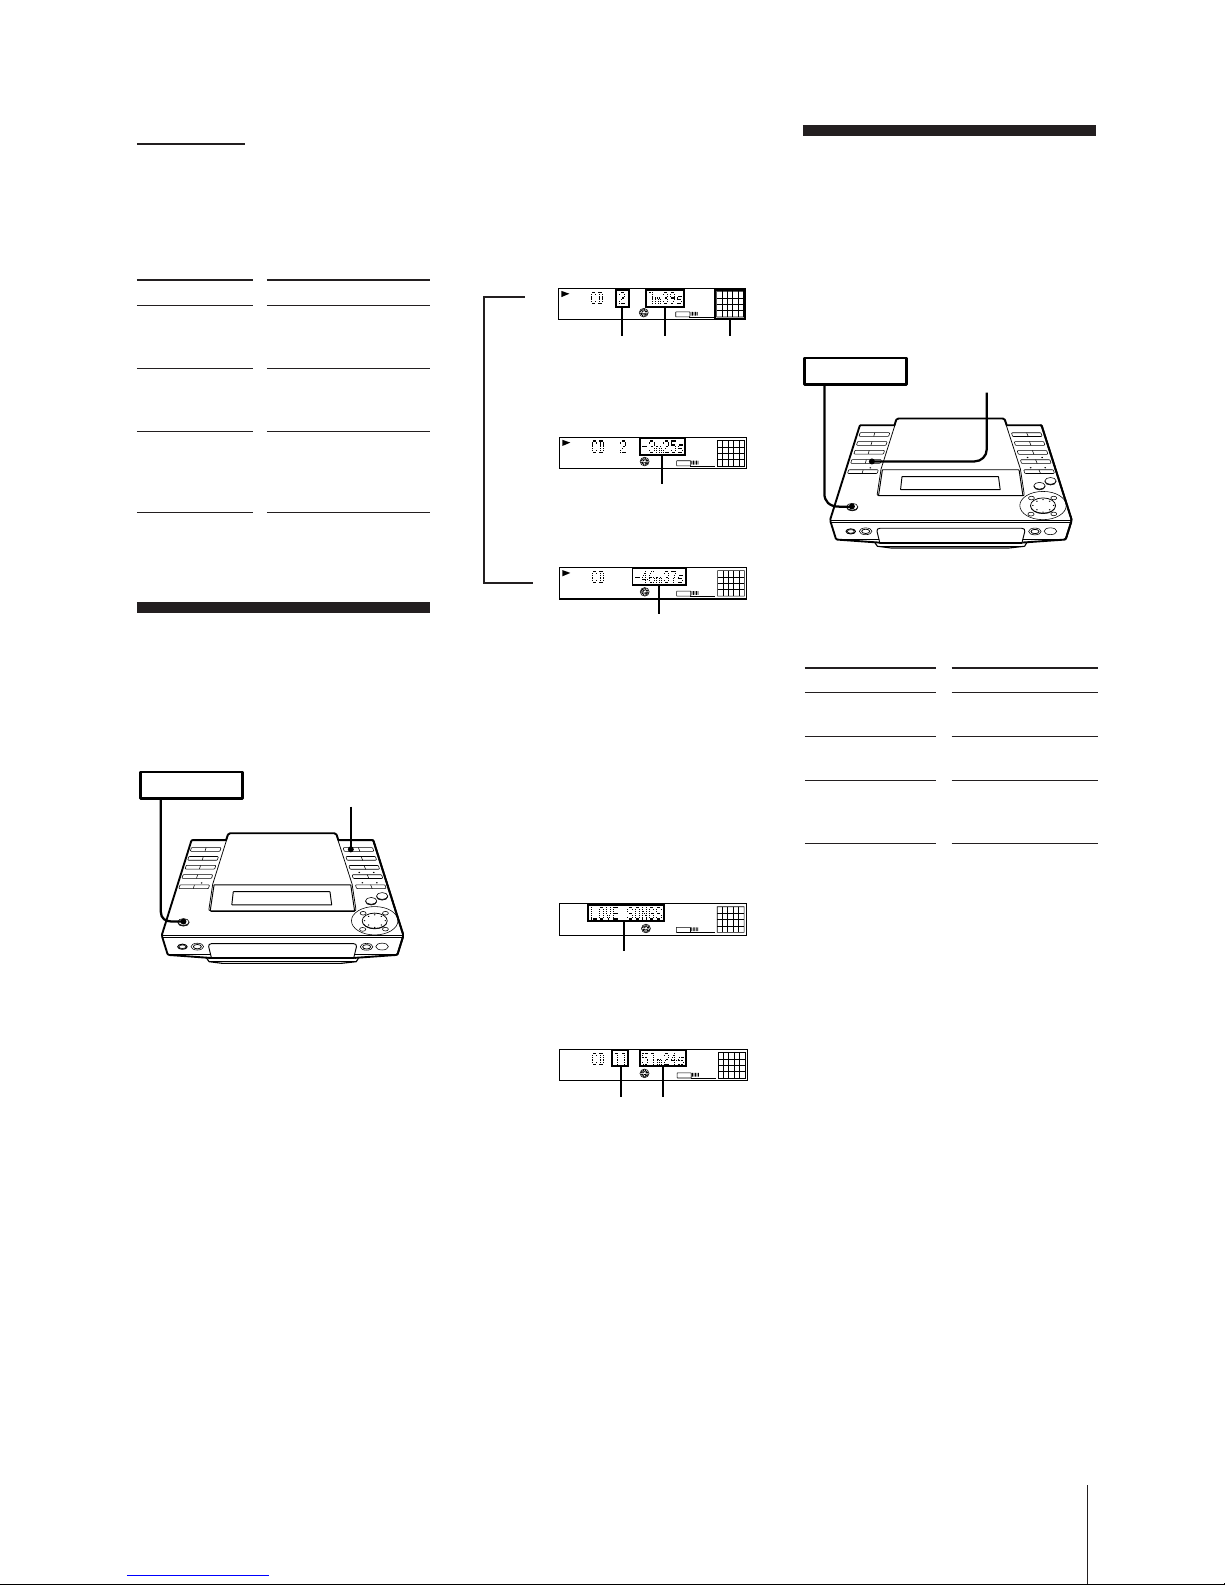
To check the remaining time during
playback
Press DISPLAY repeatedly.
Each time you press the button, the
display changes as follows:
m
µ
µ
* Remaining time in programme during
programme play
To check the disc memo, total
number of tracks and the total
playing time
Press DISPLAY in stop mode. If you stored
a name for the disc (see “Assigning a Name
to a CD”), the disc memo appears on the
display. Each time you press the button, the
display changes as follows:
<
* Appears only if you stored a disc memo.
The Music Calendar Display
This display lights according to the number
of tracks on the CD. As each track is
played, the corresponding number
disappears. Tracks numbered greater than
20 are not displayed.
CD
6
11
2738495
10
VOLUME
TRACK
Track
number
Playing
time
Music
calendar
CD
VOLUME
TRACK
6
11
2738495
10
Current track number and
remaining time on track
Remaining time
Current track number
and playing time
Remaining time
CD
2
VOLUME
TRACK
61173849510
Remaining time on CD*
VOLUME
1
DISC
CD
2
61173849510
Disc memo*
Total number of tracks and
total playing time
VOLUME
1
2
61173849510
CD
Disc memo
Total
number
of tracks
Total
playing
time
POWER m ON
DISPLAY
POWER m ON
REPEAT
Tracks played
Repeats all the tracks
on the CD.
All tracks on the CD
are reshuffled.
Repeats all the
programmes in their
programmed order.
Playing mode
Normal play
Shuffle play
Programme play
Chapter 2: the CD Player
9
Playing Tracks in the
Desired Order
(programme play)
You can programme up to 24 tracks to play
in any order you choose. To do this,
designate the tracks in the order you want
them to play.
1 Press CD.
The unit enters CD play mode.
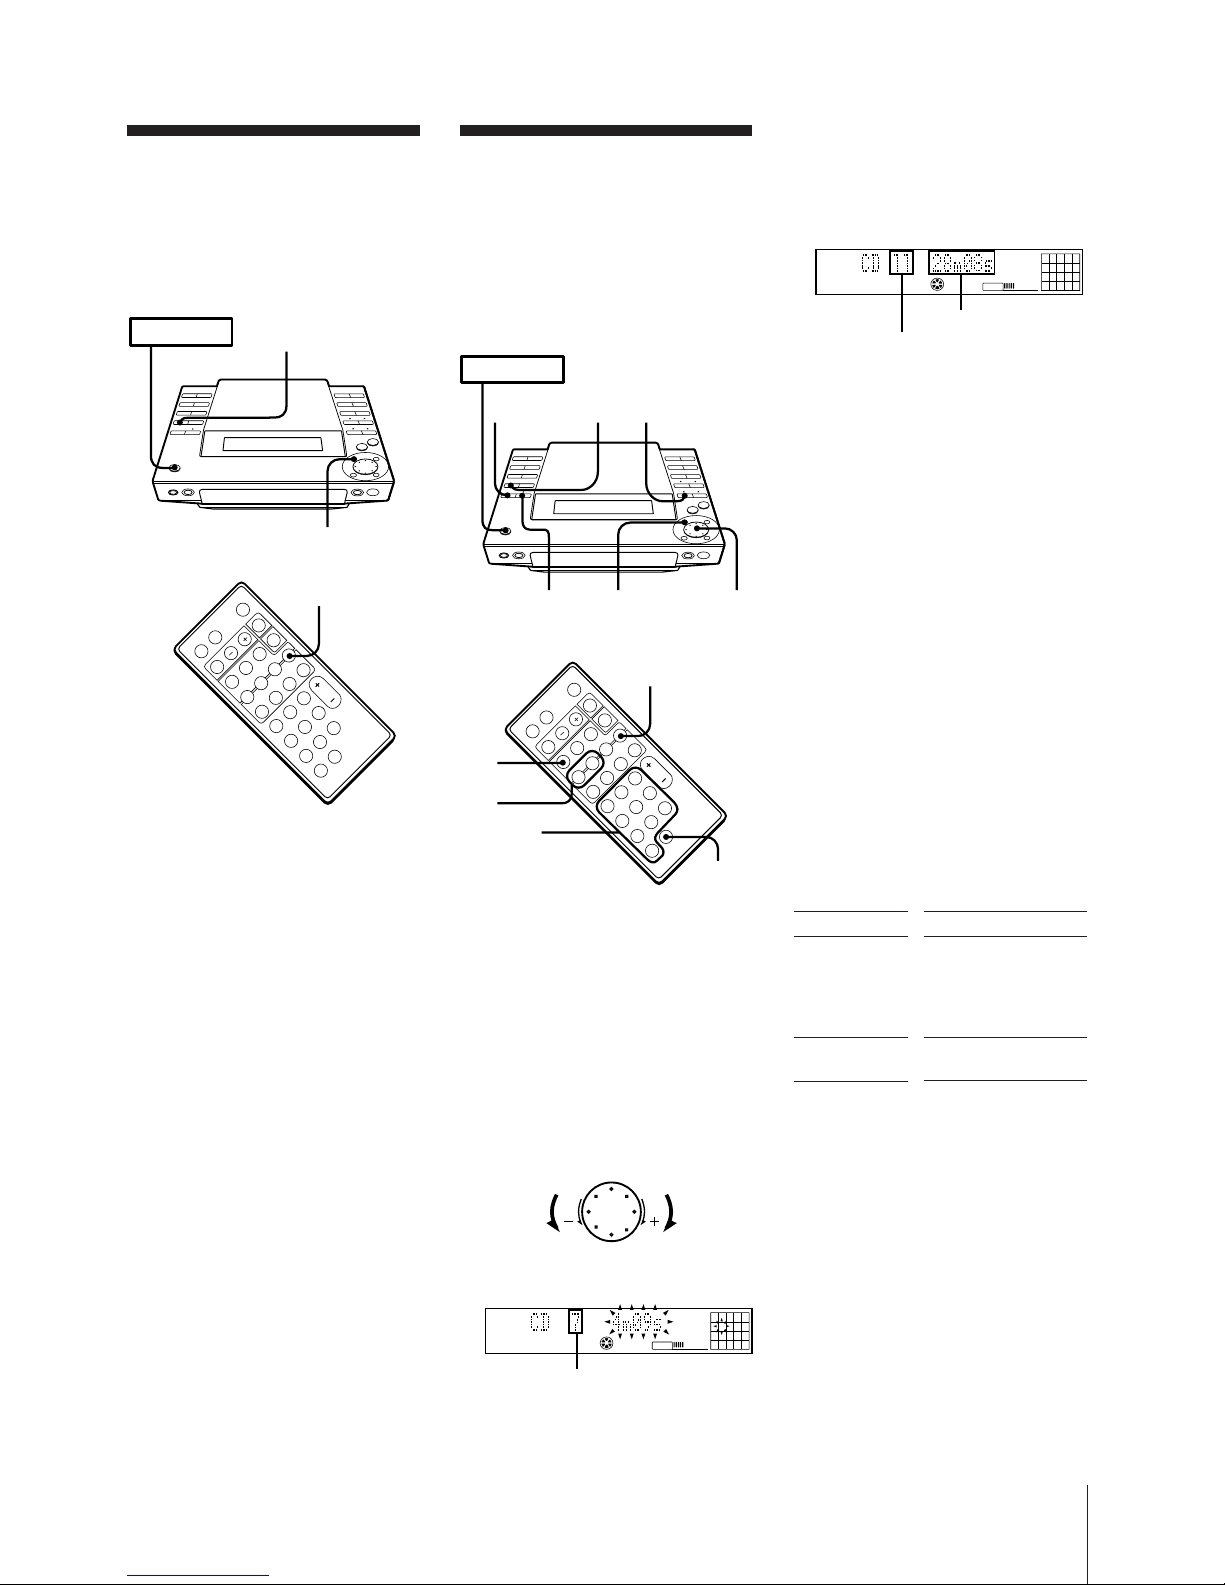
2 Press PLAY MODE (or P.MODE on the
remote) repeatedly until “PROGRAM”
appears in the display.
3 Turn the JOG dial (or press =/+
on the remote) to choose a track.
The track number and the total playing
time including the selected track flashes
in the display. (The programme is not
entered at this time.)
To
Add a track at
the end of the
programme
Erase the entire
programme
Playing Tracks in
Random Order
(shuffle play)
You can play all the tracks on the CD in
random order.
1 Press CD.
The unit enters CD play mode.
2 Press PLAY MODE (or P.MODE on the
remote) repeatedly until “SHUFFLE”
appears in the display.
3 Press fl.
“ J ” appears and then all the tracks
play in random order.
To play the tracks in original order
Press PLAY MODE repeatedly until
“SHUFFLE” and “PROGRAM” disappear
from the display. The tracks continue
playing in their original order.
To skip an undesired track
Turn the JOG dial clockwise (or press +
on the remote).
POWER m ON
2
3
(
=
(
P
+
p
rPp
2
(
=
(
P
+
p
rPp
POWER m ON
12
46 3
EDIT/NO
2
6
3
Numeric
buttons
>10
CD
VOLUME
7
PROGRAM
Track number
›–
Go to next
track
Go to previous
track
Operation
1.Turn the JOG dial
until the desired track
number appears in
the display.*
2.Press ENTER/YES.
During stop, press on
the player.
4 Press ENTER/YES.
The step number appears for about one
second, then the total playing time
appears. (This shows that the
programme has been entered.)
5 To programme additional tracks, repeat
steps 3 and 4.
6 Press fl.
All the tracks play in the order you
choose.
To play the tracks in original order
Press PLAY MODE repeatedly until
“PROGRAM” and “SHUFFLE” disappear
from the display. The tracks continue
playing in their original order.
To select tracks using the number
buttons on the remote
In step 3, press the number buttons in the
order you want to programme. Each time
you press a button, the track you selected is
programmed.
You don’t need to press ENTER/YES.
To programme a track with a number
greater than 10, press >10 first, then enter
the corresponding digits.
Example: To locate track number 30, press
>10, 3, and 10 in this order.
To change the programme
* You can also add a track during
playback when you select tracks with
the number buttons on the remote.
Notes
•The programme you made remains in
memory even after it has been played
back.
Press fl to play the same programme
again.
•If “--.--” appears instead of the total
playing time during programming, this
means the total playing time has exceeded
100 minutes. You can still select other
tracks.
CD
VOLUME
7
PROGRAM
111395
Total playing time
Last programmed
track number
Chapter 2: the CD Player
10
Assigning a Name to
a CD (disc memo
function)
You can assign names to your CDs.
Names may consist of uppercase and
lowercase letters, numbers and symbols (up
to 12 characters for each CD). You can store
a maximum of 20 names in the unit.
The name appears in the display when you
insert a CD or press DISPLAY in stop
mode. If you record the CD on a blank MD*
using “CD syncro recording”, the name is
stored on the MD automatically.
* A brand-new MD, or an MD which has been
erased using the “all erase function”
1 Press CD.
The unit enters CD play mode.
2 Press CD § and place a CD.
Be sure the total number of tracks and
total playing time appear in the display.
Note
You can assign names only when the
player is in stop mode and the play
mode is set to normal (SHUFFLE and
PROGRAM are not lit).
3 Press EDIT/NO repeatedly until “Name
in?” appears in the display.
VOLUME
1
6
11
2738495
10
DISC
CD
cursor
VOLUME
1
6
11
2738495
10
DISC
CD
flashing
VOLUME
1
6
11
2738495
10
DISC
CD
Next character
To check the name
Press DISPLAY in stop mode.
If you press DISPLAY again, the original
display returns.
Note
“No name” appears in the display if you
did not assign a name to the current disc.
To delete a name
1 Press EDIT/NO repeatedly until “Name
Erase?” appears in the display.
2 Press ENTER/YES.
Disc names appear in the display.
3 Turn the JOG dial until the disc name
you want to erase appears in the display.
4 Press ENTER/YES.
“Complete” appears in the display for
about two seconds and the selected disc
name is erased.
4Press ENTER/YES.
A cursor flashes in the display.
5Press CHARACTER repeatedly to select
the character type.
Each time you press the button, the
character changes as follows:
You can use the following symbols:
! " # $ % & ' ( ) * + , – . / : ; < = > ? @ _ `
(space)
6Turn the JOG dial until the desired
character appears in the display.
The selected character flashes.
To enter a space quickly
Press ) when the cursor is flashing.
7Press ) .
The cursor shifts to the right and stands
by for input of the next character.
8Repeat steps 5 and 7 to enter additional
characters until you have entered the
entire name.
If you want to enter the same type of
character, skip step 5.
If you entered the wrong character
Press ) or 0 until the character to
be corrected starts flashing, and repeat
steps 5 to 7 to enter the correct character.
To erase a character
Press ) or 0 until the character to
be erased starts flashing, then press
EDIT/NO.
9Press ENTER/YES.
This completes the labelling procedure.
nuppercasenlowercase
spaceNsymbolsNnumbers N
POWER m ON
(
=
(
P
+
p
rPp
351
2 4,9 6 7
DISPLAY
0
DISPLAY
CD
VOLUME
Chapter 3: Playing MDs
11
Chapter 3:
Playing
MDs
Playing an MD
(normal play)
Using the Display
Playing Tracks Repeatedly
(repeat play)
Playing Tracks in Random
Order (shuffle play)
Playing Tracks in the
Desired Order
(programme play)
* Button on the remote
To directly locate a track numbered 11 or
more
Press >10 first, then enter the
corresponding digits.
If the track number is 100 or more, press
>10 twice and enter the number.
Example:
To locate track number 30, press >10, 3,
and 10 in this order.
To locate track number 100, press >10,
>10, 1, 10 and 10 in this order.
One Touch Play feature
Press MD ( on the remote when the
power is off. If a MD is loaded in the
player, you will be able to listen to the MD
without pressing any other buttons.
When you press MD on the unit, power
turns on and function switches to MD
automatically.
You can start playback from a desired track
1 In step 2, turn the JOG dial until the
desired track number appears on the
display.
2 Press fl.
Playing an MD
(normal play)
You can play an MD in four modes: normal,
repeat, shuffle, and programme. The mode
decides which tracks (songs) you will listen
to, in which order, and whether or not they
will repeat.
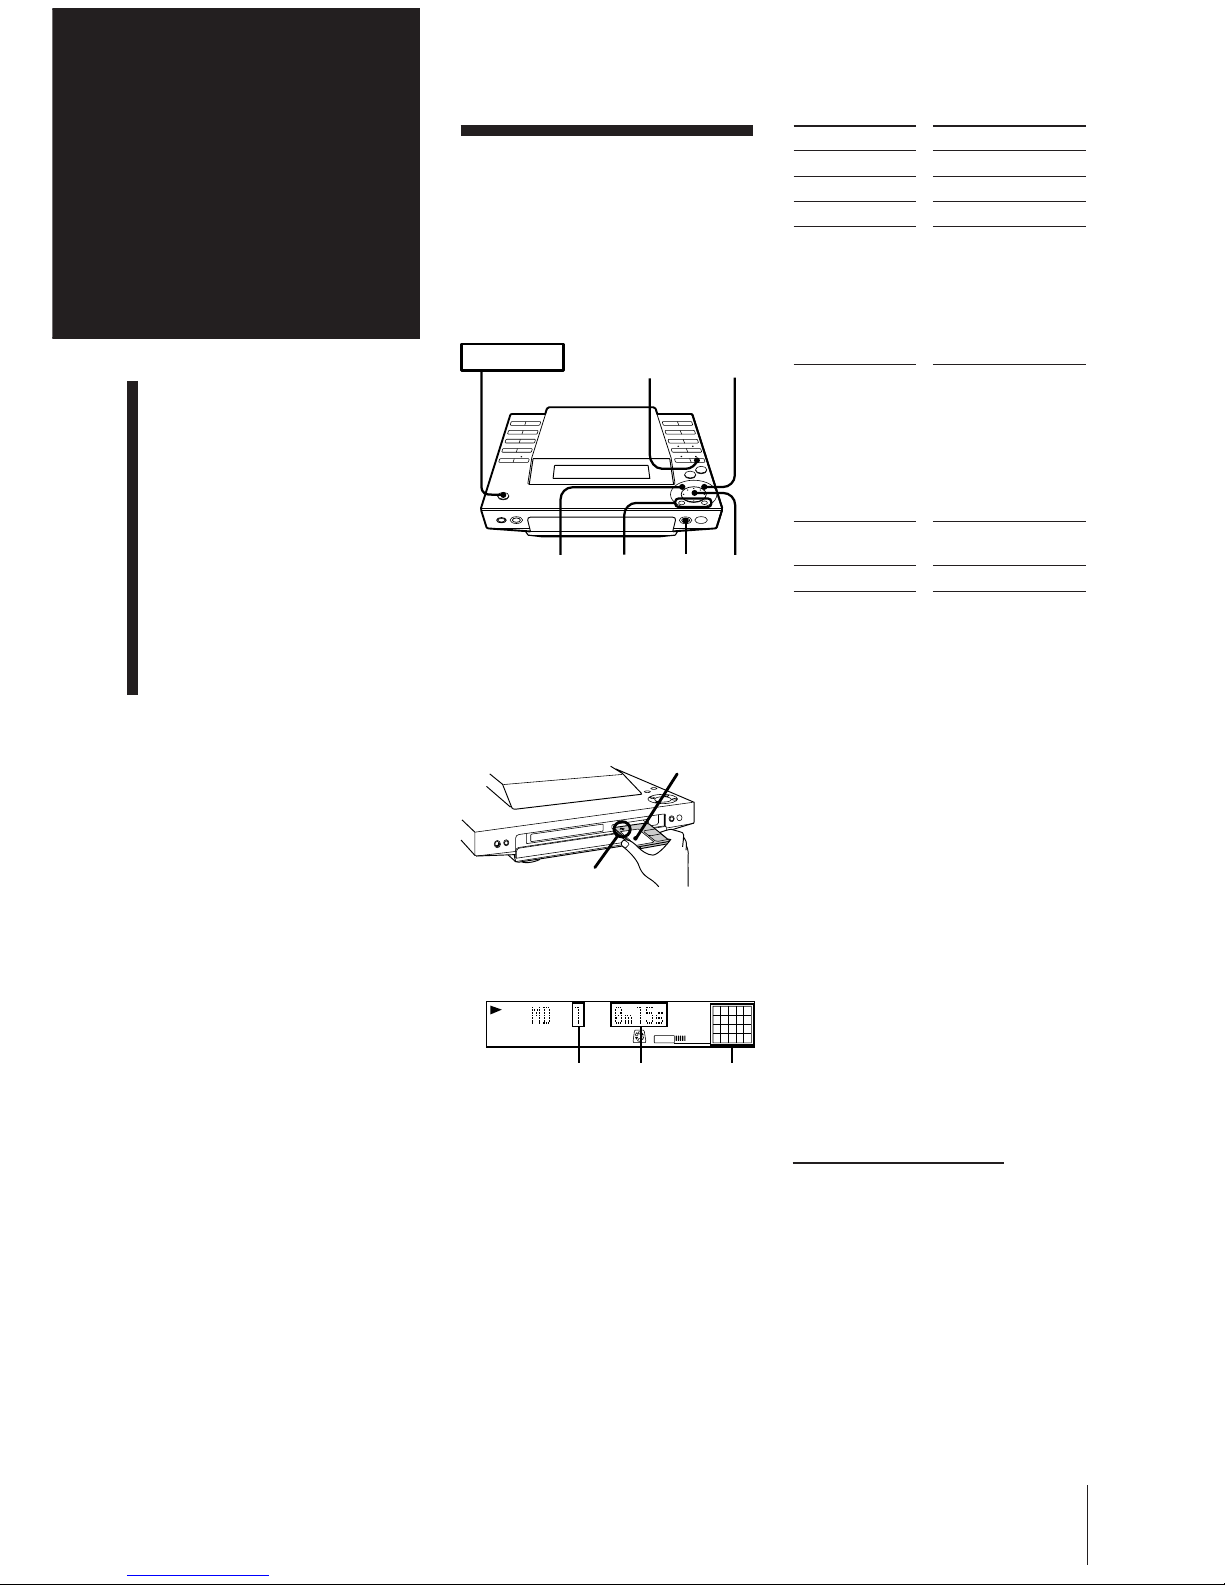
1 Press MD.
The unit enters MD play mode.
2 Press MD § and insert an MD.
3 Press fl (or MD ( on the remote).
The first track starts playing.
Arrow pointing
toward the MD
deck
TRACK
MD
1
6
11
2
7
12
38495
10
VOLUME
Track
number
Playing
time
Music
calendar
Label side up
To
Stop play
Pause
Resume play
Go forward to
another track
Go back to a
previous track
Locate a specific
track directly
Remove the MD
Press
(MD p*)
fl (MD P*)
fl (MD (* or P*)
During play or pause,
turn the JOG dial
clockwise. Release
when you reach the
track you desire.
Or use + on the
remote.
During play or pause,
turn the JOG dial
counterclockwise.
Release when you
reach the track you
desire.
Or use = on the
remote.
Number buttons on
the remote
MD §
continue to next page m
POWER m ON
1
3
„
0/)
JOG
2
 Loading...