

Page 1

VCLICK!
Table of contents
Getting started
Basic Operations
Using with your
computer
Using functions for
shooting
Using functions for
viewing
Customizing the settings
Viewing images on a TV
Handbook
Mobile HD Snap Camera
MHS-CM5
© 2010 Sony Corporation
Troubleshooting
Others
Index
4-167-124-11(1)
GB
Page 2
Notes on using your camera
Types of memory cards you can use with
your camera
• The memory cards that you can use with this
camera are “Memory Stick PRO Duo” media,
“Memory Stick PRO-HG Duo” media, SD
memory cards and SDHC memory cards. You
cannot use a MultiMediaCard.
• Memory cards of up to 32 GB have been
confirmed to operate correctly with this camera.
• “Memory Stick PRO Duo” media and “Memory
Stick PRO-HG Duo” are collectively called
“Memory Stick PRO Duo” media in this
manual.
• For recording movies, it is recommended that
you use “Memory Stick PRO Duo” media of
1 GB or larger marked with:
– * (“Memory Stick
PRO Duo” media)
– (“Memory Stick
PRO-HG Duo” media)
* Marked with Mark2 or not, either can be used.
• See page 39 for the recordable time of
“Memory Stick PRO Duo” media.
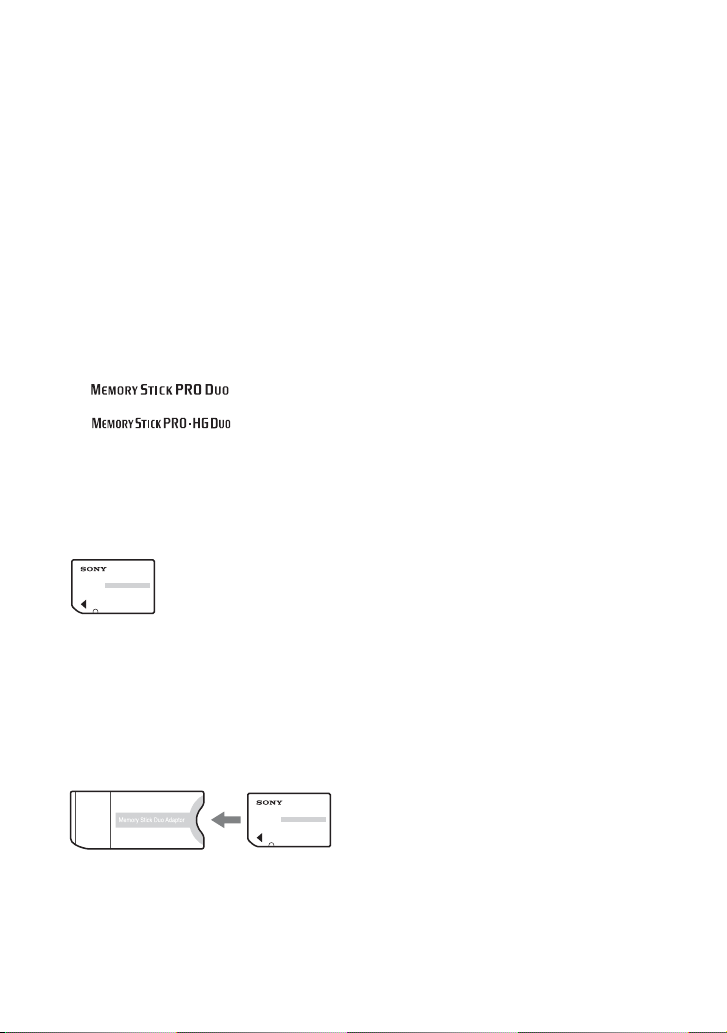
“Memory Stick PRO Duo”/“Memory Stick
PRO-HG Duo” media
When using “Memory Stick PRO Duo”
media with the standard size “Memory
Stick” media compatible slot
Be sure to insert the “Memory Stick PRO
Duo” media into the “Memory Stick Duo”
media adaptor.
“Memory Stick Duo” media adaptor
Notes on the battery
• Charge the battery before using the camera for
the first time.
• The battery can be charged even if it is not
completely discharged. Also, even if the battery
is not fully charged, you can use the partially
charged capacity of the battery as is.
• If you do not intend to use the camera for a long
time, use up the existing charge and store the
camera in a cool, dry place. This is to maintain
the battery functions.
• For details on the battery, see page 64.
No compensation for contents of the
recording
• The contents of the recording cannot be
compensated for if recording or playback is not
possible due to a malfunction of your camera or
recording media, etc.
Internal memory and memory cards
back up
• Do not turn off the camera or remove the
memory card while the access lamp is lit, or the
internal memory data or the memory card data
may be destroyed. Always protect your data by
making a back up copy.
About changing the language setting
• The on-screen displays in each local language
are used for illustrating the operating
procedures. Change the screen language before
using your camera if necessary (page 20).
Notes on recording/playback
• To ensure stable operation of the memory cards,
we recommend that you format the memory
card the first time you use it with this camera.
However, if you format the memory card, all the
data on the memory card will be deleted and you
cannot restore that data. So, be sure to store your
important data on the computer before
formatting the memory card.
• This camera is neither dust-proof, nor splashproof, nor water-proof.
• Before you record one-time events, make a trial
recording to make sure that the camera is
working correctly.
• Be careful not to get the camera wet. Water
entering the inside of the camera may cause
malfunctions which in some cases may not be
repairable.
• Do not aim the camera at the sun or other bright
light. This may cause irrecoverable damage to
your eyes. Or it may cause the malfunction of
your camera.
2
Page 3

Notes on using your camera
• Do not use the camera near a location that
generates strong radio waves or emits radiation.
The camera may not be able to record or play
back properly.
• Using the camera in sandy or dusty locations
may cause malfunctions.
• If moisture condensation occurs, turn off the
camera and leave it for about an hour before
using it.
• Do not shake or strike the camera. In addition to
malfunctions and an inability to record images,
this may render the recording medium unusable,
or cause image data breakdown, damage or loss.
• When inserting or ejecting the memory card, be
careful so that the memory card does not pop
out and drop.
• When connecting your camera to another device
with a cable, be sure to insert the connector plug
in the correct way. Pushing the plug forcibly
into the terminal will damage the terminal and
may result in a malfunction of your camera.
• Playback of movies other than those shot, edited
or composed on this camera is not guaranteed.
Notes on the LCD screen and the lens
• The LCD screen is manufactured using
extremely high-precision technology, so over
99.99% of the pixels are operational for
effective use. However, there may be some tiny
black points and/or bright points (white, red,
blue or green in color) that constantly appear on
the LCD screen. These points are normal in the
manufacturing process and do not affect the
recording in any way.
Black, white, red,
blue or green
points
• Exposing the LCD screen or the lens to direct
sunlight for long periods may cause
malfunctions. Be careful when placing the
camera near a window or outdoors.
• Do not press against the LCD screen. The screen
may be discolored and that may cause a
malfunction.
• Images may trail across on the LCD screen in a
cold location. This is not a malfunction.
Note on disposal/transfer
• When using software embedded in the camera,
personal information such as IDs and mail
addresses may be saved on the internal memory
of the camera. When transferring the camera to
others or on disposal, do so after deleting the
information input.
On image data compatibility
• This camera supports “MP4 format” as movie
file format. Therefore, movies recorded by this
camera cannot be played on devices that do not
support “MP4 format”.
• This camera does not support “AVCHD format”
and therefore is not compatible with the
playback and recording of movies in “AVCHD
format” like a Digital HD Video camera
recorder.
• Still images recorded by this camera are
compressed/recorded in JPEG
extension is “.JPG”.
• This camera conforms with DCF
standard established by JEITA
• Playback of still images/movies recorded with
your camera on other equipment and playback
*
1
format. The file
*
2
universal
*
3
.
of still images record ed or edited with other
equipment on your camera are not guaranteed.
*
1
Joint Photographic Experts Group
*
2
Design rule for Camera File system
*
3
Japan Electronics and Information
Technology Industries Association
On the overheat protection
• The power may go off automatically to protect
the camera depending on the temperature of the
camera or the battery pack. In this case, the
message appears on the screen before the power
goes off. If the message “Camera overheating
Allow it to cool” appears, the camera has been
overheating. The power will go off
automatically. Place the camera in a cool place
until the temperature of the camera grows
colder.
Warning on copyright
• Television programs, films, videotapes, and
other materials may be copyrighted.
Unauthorized recording of such materials may
be contrary to the provisions of the copyright
laws.
3
Page 4

Notes on using your camera
About this Handbook
• The photographs used as examples of pictures in
this Handbook are reproduced images, and are
not actual images shot using this camera.
• Design and specifications of recording media
and other accessories are subject to change
without notice.
4
Page 5
Enjoying the camera
Enjoying high definition images
The movies shot with this camera will be recorded in MPEG-4 AVC/H.264 Main Profile,
approximately 30 frames per second, Progressive, AAC LC, “MP4 format”.
– MPEG: Movie Picture Experts Group
– AVC: Advanced Video Codec
What is “MPEG-4 AVC/H.264”?
MPEG-4 AVC/H.264 is a standard of video camera, which uses highly efficient image
compression encoding technology to record HD (high definition) images. Compared
with the existing image compression encoding technology, MPEG-4 AVC/H.264 is
able to compress images even more effectively.
• In the MPEG-4 AVC/H.264, the camera supports high definition images with effective scanning
lines of 1080 or 720. The number of recorded image pixel is 1920×1080 or 1280×720, and the
image is recorded in progressive mode
Progressive playback
The camera supports progressive mode*, which is used in computers, and therefore is suited
for playing back images on computers.
Shooting movies in image quality suited for your purpose
The camera supports the common and widely used VGA (640×480) as well as HD (high
definition) image quality. Select VGA (640×480) image quality to upload the recorded images
on websites or to attach to mails without the need to convert the image quality.
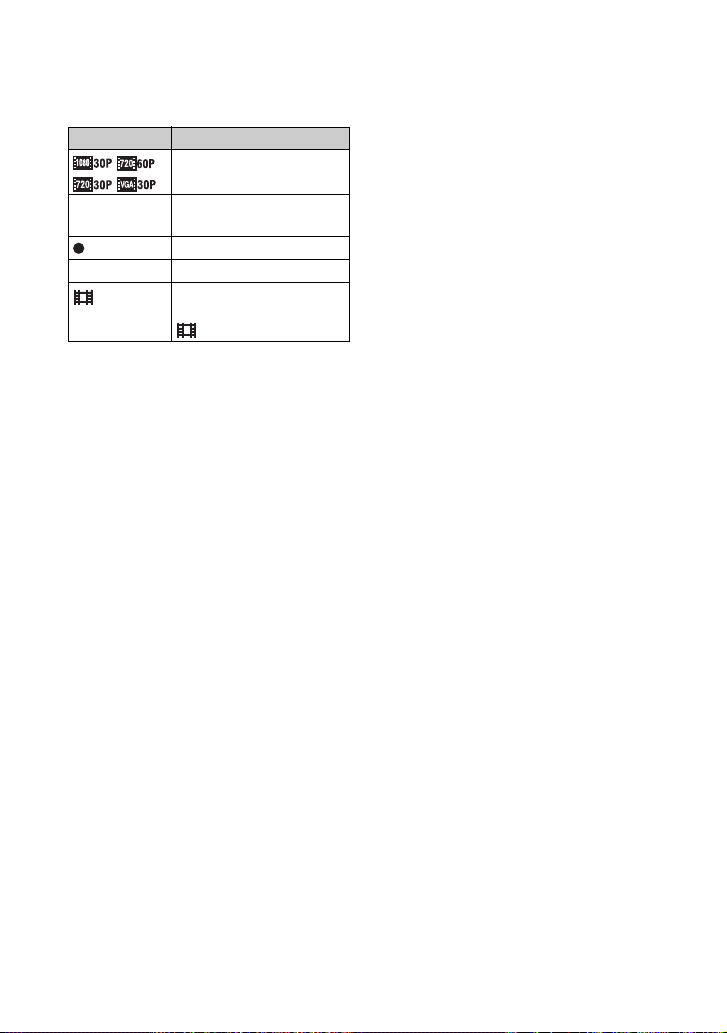
Movie Size you can select with this camera
Movie Size Usage guidelines
1920 × 1080 30P
1280 × 720 60P
1280 × 720 30P
640 × 480 30P
*
The progressive mode is a type of movie recording method, which reads out all image pixels at once.
Shoot HD (high definition) quality movies in sizes suited for display
on computer or high definition TV
Shoots the rapidly moving action scenes such as sports smoothly with
HD (high definition) quality
Shoot HD (high definition) quality movies in sizes suited for display
on computer
Shoot SD (standard definition) quality movies in sizes suited for
uploading on websites
*
.
5
Page 6
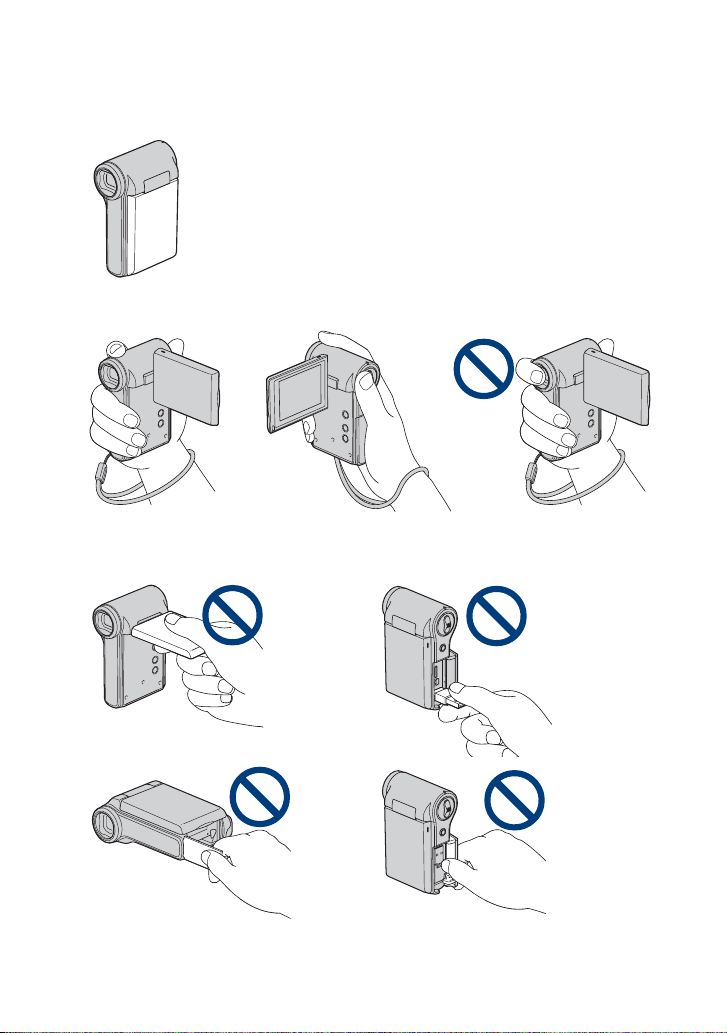
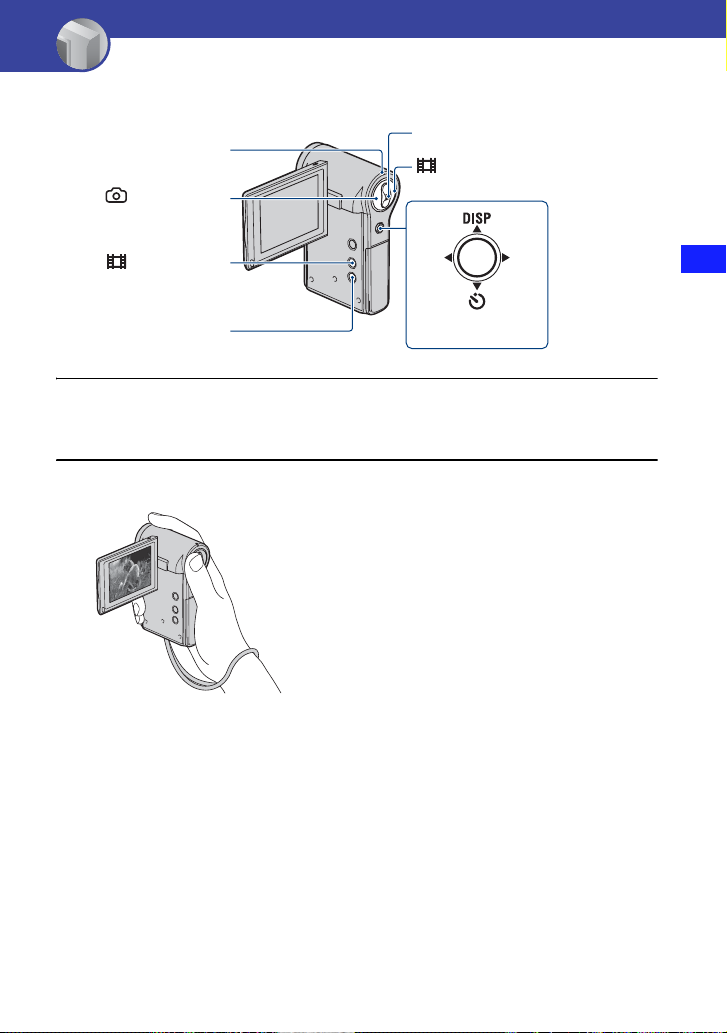
How to handle the camera
• When carrying the camera, close the LCD screen as illustrated.
• Be careful not to block the lens with your finger when shooting.
• Do not hold the camera by only holding the battery/memory card cover, USB jack, jack
cover or the LCD screen.
• See page 14 for how to attach the wrist strap.
6
Page 7

Table of contents
Notes on using your camera .....................................................................2
Enjoying the camera..................................................................................5
How to handle the camera ........................................................................6
Identifying parts.......................................................................................10
Indicators on the screen..........................................................................11
Getting started
Checking the accessories supplied.........................................................14
1 Preparing the battery pack ..................................................................15
2 Inserting the memory card ..................................................................18
3 Turning the camera on/setting the language and clock.......................19
Basic Operations
Shooting images......................................................................................21
Viewing images .......................................................................................25
Using the menu items..............................................................................27
Menu items..............................................................................................28
Using with your computer
Using with your computer........................................................................29
Connecting the camera to the computer .................................................31
Uploading videos and still images to media services..............................33
Using the software...................................................................................36
Using functions for shooting
Shooting menu ........................................................................................38
Photo Size: Selecting the photo size according to use
Movie Size: Selecting the movie size according to use
SteadyShot: Allows you to reduce camera shake when shooting images
Face Detection: Detects the faces of your subjects, and adjusts the focus and exposure
automatically
Setup: Selecting the shooting settings
7
Page 8

Table of contents
Using functions for viewing
Viewing menu ......................................................................................... 41
(Delete): Allows you to select and delete unwanted images
(Slideshow): Playing back a series of images
(Protect): Preventing accidental erasure
(Rotate): Rotating a still image
(Setup): Changing Setup items
Customizing the settings
Using Setup items................................................................................... 44
Shooting Settings.............................................................................. 45
Digital Zoom
Flicker Reduction
Main Settings 1/2 .............................................................................. 46
Beep
LCD Backlight
Display Color
Main Settings 2/2 .............................................................................. 47
LUN Settings
Video Out
Memory Card Tool ............................................................................ 48
Format
Copy
Internal Memory Tool........................................................................ 49
Format
Clock Settings...................................................................................50
Clock Settings
Language Setting
Initialize
Viewing images on a TV
Viewing images on a TV .........................................................................51
Troubleshooting
Troubleshooting....................................................................................... 54
Warning indicators and messages.......................................................... 60
8
Page 9

Table of contents
Others
On the “Memory Stick” media .................................................................62
On the battery .........................................................................................64
Precautions .............................................................................................65
Specifications ..........................................................................................66
Index
Index........................................................................................................67
9
Page 10
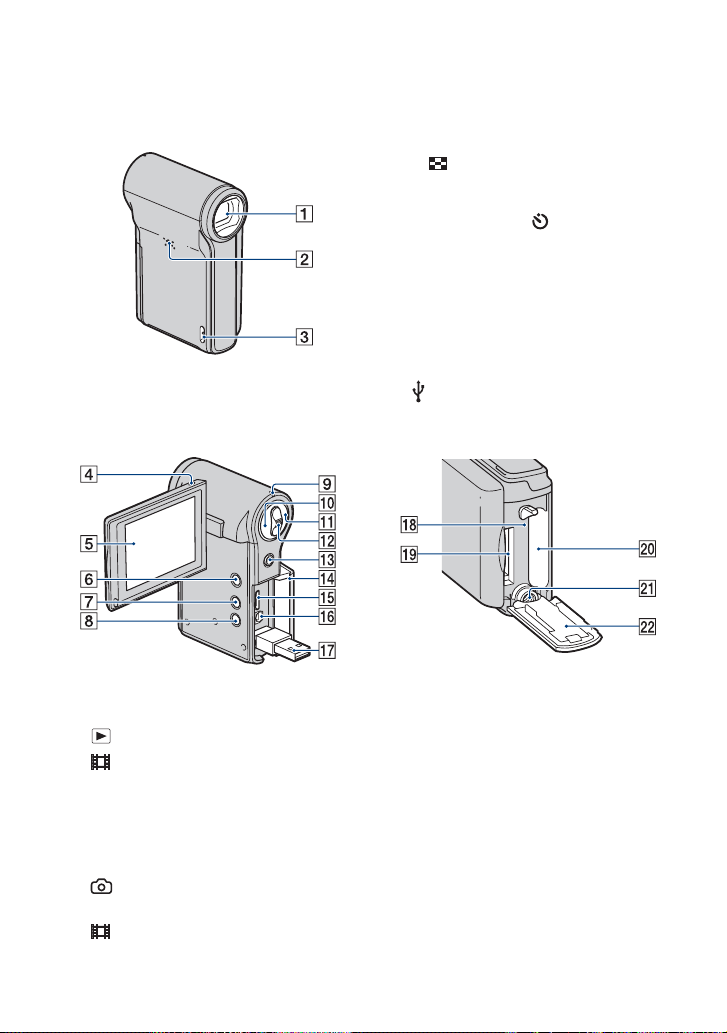
Identifying parts
See the pages in parentheses for details of
operation.
A Lens
B Speaker
C Hook for wrist strap (14)
D Microphone
E LCD screen (23)
F (Play) button (25)
G (Movie) button (21)
H MENU button (27)
I Power/Charge lamp (15)
• The Power/Charge lamp lights up in green
when the power is turned on, and lights up
in orange while charging the battery.
J (Photo) button (21)
• Shoots still images.
K (Movie) button (21)
• Starts/stops shooting movies.
L Zoom lever
For shooting: Zoom (W/T) (24)
For viewing: Playback zoom/
(Index) (26)
M Multi-selector
Menu on: v/V/b/B (27)
Menu off: DISP/ (24)
N Jack cover
O HDMI OUT jack (52)
• Used when connecting to a TV, etc. with an
HDMI cable (sold separately).
P A/V OUT jack (51)
• Used when connecting to a TV, etc. with an
A/V connecting cable.
Q (USB) jack (31)
• Used when connecting to a computer with a
USB connection support cable.
R Access lamp (18)
S Memory card slot
T Battery slot
U Tripod receptacle (bottom)
• Use a tripod with a screw length of less than
5.5 mm (7/32 inches). You will be unable to
firmly secure the camera to tripods having
screws longer than 5.5 mm (7/32 inches),
and may damage the camera.
V Battery/memory card cover (18)
10
Page 11

Indicators on the screen
When you tilt the multi-selector to v
(DISP) repeatedly, the display changes
(page 23).
Indicators on the screen disappear after
about 5 seconds with the default settings in
effect when you purchased this camera. If
you want to make indicators appear again,
carry out any operation other than those
using the zoom lever. The indicators appear
for only 5 seconds, however.
See the pages in parentheses for details of
operation.
When shooting still images
When recording movies
A
Display Indication
Battery remaining (16)
Low battery warning (60)
SteadyShot (40)
/
Zoom scaling
AF range finder frame (22)
Self-timer
(24)
B
Display Indication
[400] Remaining number of
z AE/AF lock (green) (22)
Image size
Information on the still
image settings appears near
the (Photo) icon.
recordable images (38)
(38)
C
Display Indication
Recording folder
• This does not appear when
using internal memory.
Recording Media
Face Detection (40)
11
Page 12
Indicators on the screen
D
Display Indication
[00:00:05]
Image size
Remaining recordable
(38)
time (38)
Movie recording (red)
01:23 Recording time (39)
Information on the movie
settings appears near the
(Movie) icon.
b
Note
• Indicators and their positions are approximate
and differ from what you actually see.
12
Page 13

Indicators on the screen
When playing back still images
When playing back movies
A
Display Indication
Battery remaining (16)
VOL. Volume
Image size
Protect (42)
Zoom scaling
Low battery warning (60)
(38)
(25)
B
Display Indication
Playback bar
00:00:00 Counter
2010-1-1
9:30 AM
BACK/
NEXT
VOLUME
Recorded date/time of the
playback image
Select images
Adjust volume
C
Display Indication
Playback folder
• This does not appear when
using internal memory.
12/12 Image number/Number of
b
Note
• Indicators and their positions are approximate
and differ from what you actually see.
images recorded in selected
folder
Playback Media
13
Page 14
Getting started
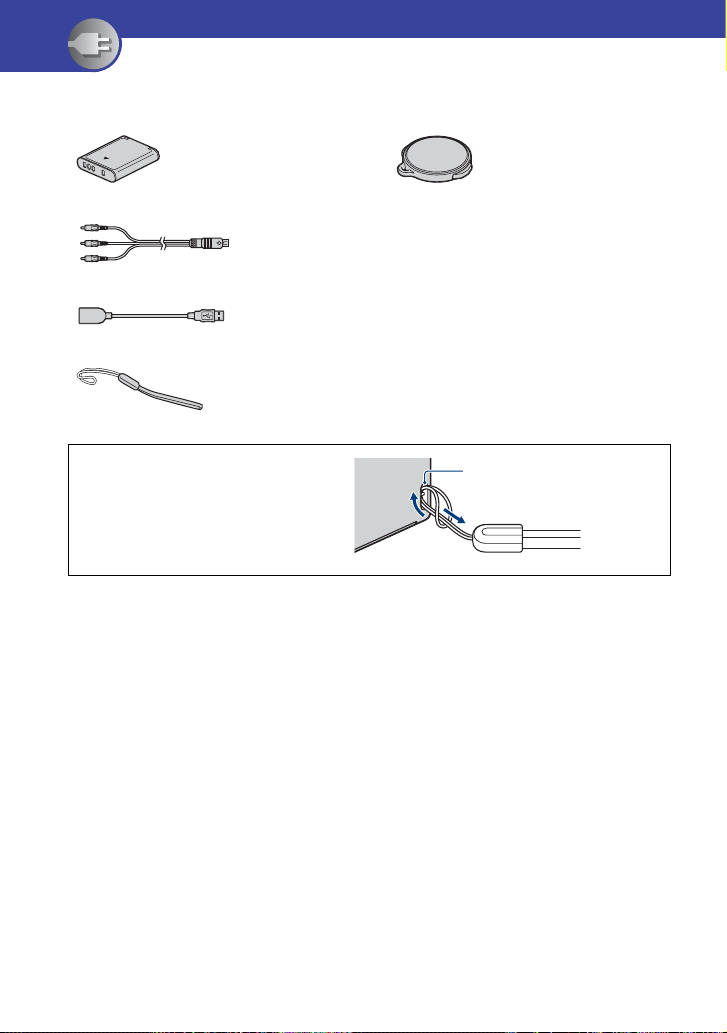
Checking the accessories supplied
• Rechargeable battery pack NP-BK1 (1)
• A/V connecting cable (1)
• USB connection support cable (1)
• Wrist strap (1)
Attach the strap and place your hand
through the loop to prevent the camera
from damage by being dropped, etc.
• Lens cap (1)
Mounted on the lens at factory.
•CD-ROM (1)
– “PMB” (software, including “PMB Help”)
– bloggie Handbook (PDF)
• Instruction Manual
• Important Notice
Hook
14
Page 15
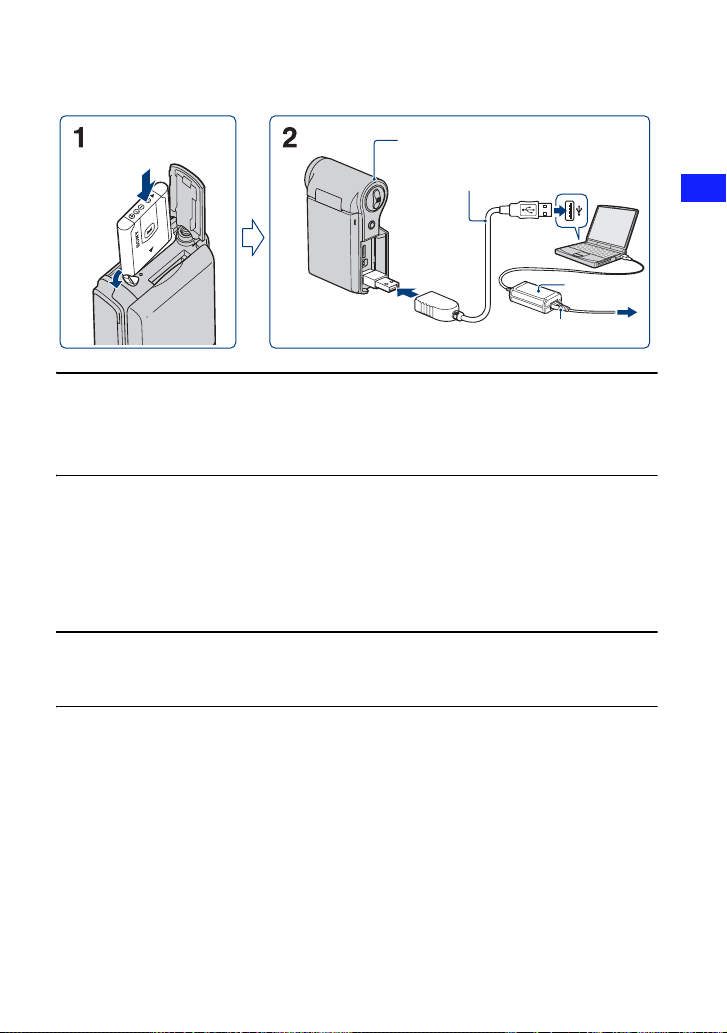
1 Preparing the battery pack
Power/Charge lamp
USB connection support cable
(supplied)
AC Adaptor
Power cord (Mains lead)
1 Open the battery/memory card cover and insert the battery pack into this
camera, then close the cover.
• Insert the battery pack as far as it will go, then press the back of the battery pack gently until it clicks.
2 Connect the camera to the computer that is turned on with the USB
connection support cable (supplied).
• The Power/Charge lamp lights up in orange, and charging starts.
• When the Power/Charge lamp turns off, charging is finished.
• The Power/Charge lamp may turn off when the temperature is outside of the recommended operating
temperature (10 to 30°C.)
Getting started
3 When charging is finished, disconnect the USB connection support cable
from the USB jack of your camera.
b Notes
• While the camera is connected to a computer, you cannot operate the camera. Be sure to disconnect the
camera before operation.
• Charging the battery with customized or hand-built computers is not guaranteed. Depending on the type of
USB device used, charging may not function properly.
• Do not apply force to the camera, when you connect the camera to a computer. This may cause damage to
the camera or the computer.
• When you connect the camera to a notebook computer that is not connected to an AC power source, the
battery of the notebook computer may be depleted rapidly. Do not leave the camera connected to the
computer for a long time.
• You cannot open the battery/memory card cover when a tripod is attached to the camera.
15
Page 16
1 Preparing the battery pack
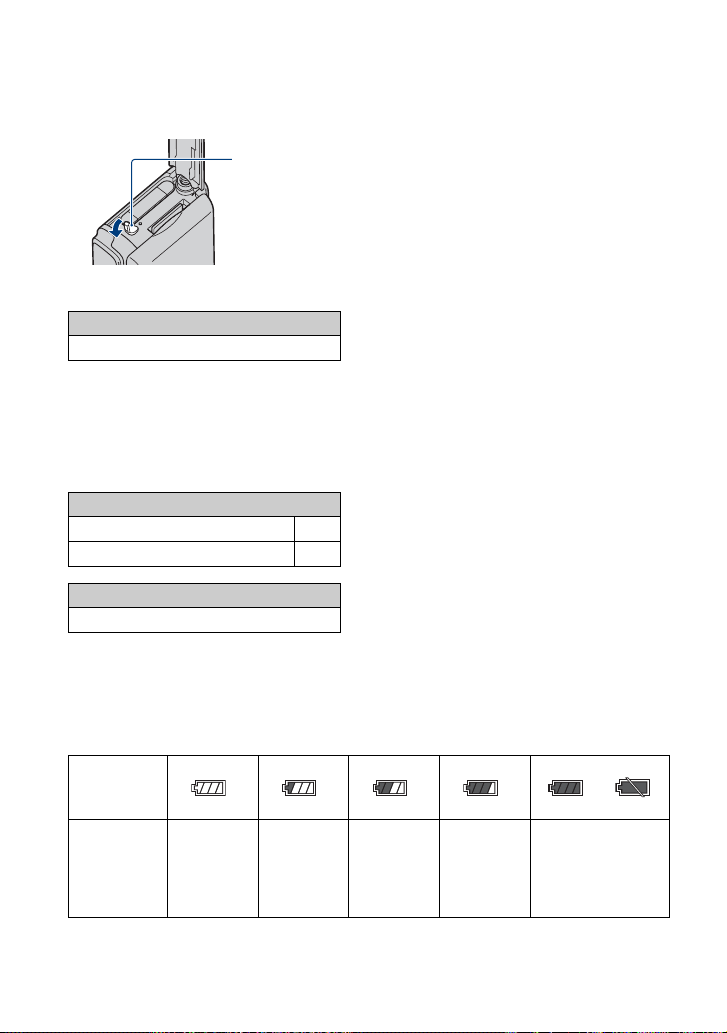
To remove the battery pack
Slide the battery eject lever.
Be sure not to drop the battery.
Charging time
Full charge time
Approx. 300 min.
• Time required to charge a fully depleted battery at a temperature of 25°C (77°F). Charging may take
longer under certain circumstances or conditions.
• See page 38 for the number of images that can be recorded.
• When charging is finished, disconnect the USB connection support cable from the computer.
Approximate recording/playback time (min.)
*
Recording time
1
Continuous recording time 105
*
Typical recording time
2
Playback time
50
150
*1
Shooting movies continuously with an image size of [1280 × 720 30P]
*2
Typical recording time shows the time when you repeat recording start/stop, turning the power on/off
and zooming.
To check the remaining battery time
Open the LCD screen to turn on and check the remaining battery on the LCD screen.
Battery
remaining
indicator
Battery
remaining
guidelines
Sufficient
power
remaining
Battery
almost fully
charged
Battery half
full
Battery low,
recording/
playback
Charge the battery.
(The warning
indicator flashes.)
will stop
soon.
16
Page 17

1 Preparing the battery pack
• It takes about one minute until the correct battery remaining indicator appears.
• The displayed battery remaining indicator may not be correct under certain circumstances.
• If the camera is running on battery power and you do not operate the camera for about five minutes, the
camera turns off automatically to prevent wearing down the battery (Auto power off function).
• The Language Setting screen appears when the camera is turned on for the first time (page 19).
Getting started
17
Page 18
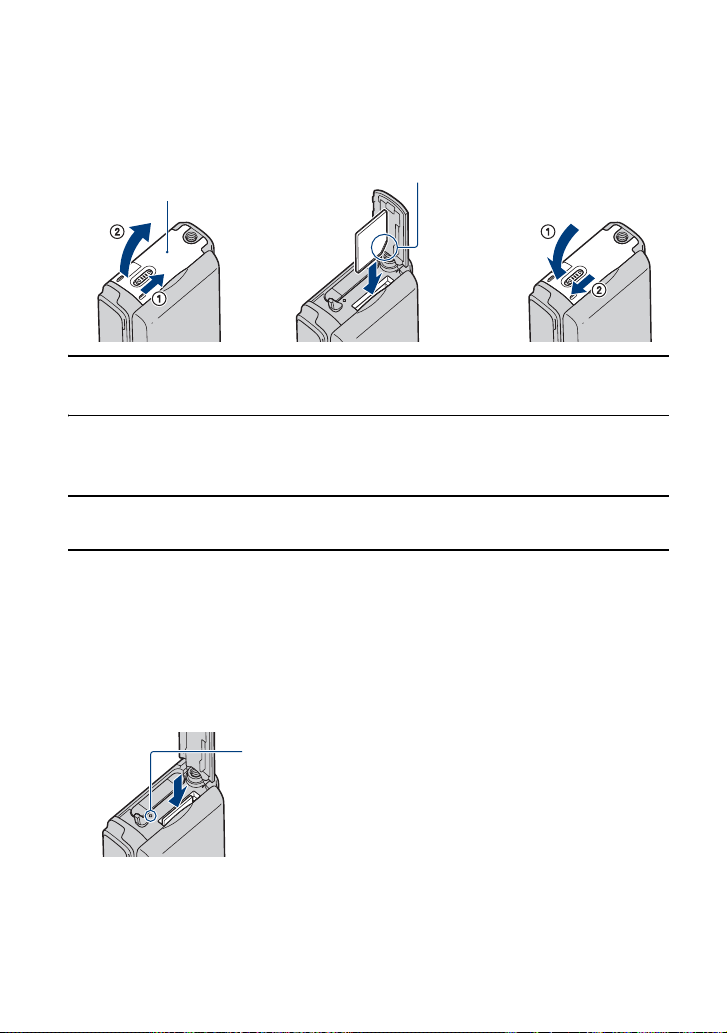
2 Inserting the memory card
12 3
Be careful of the direction of
Battery/memory
card cover
the notched corner.
1 Open the cover.
2 Insert the memory card all the way until it clicks, with its notched corner
directed downward as shown in the illustration.
3 Close the cover.
When there is no memory card inserted
The camera records/plays back images using the internal memory (approx. 26 MB).
When the movie size is set to [1920 × 1080 30P] or [1280 × 720 60P], you cannot record
movies, however.
To remove the memory card
Open the cover.
Make sure that the access lamp
is not lit, then push the memory
card in once.
• Never remove the memory card when the access lamp is lit. This may cause damage to data in the memory
card.
18
Page 19

3 Turning the camera on/setting the language and clock
Power/Charge lamp
LCD screen
Getting started
MENU button
Multi-selector
1 Open the LCD screen to turn the power on.
• The Power/Charge lamp lights up in green.
• Open the LCD screen up to a 90 degrees angle from the camera (1), then rotate it to the desired angle
(2).
2 270 degrees (max.)
1 90 degrees (max.)
2 Select the desired language with the multi-selector tilt to v/V, then press the
multi-selector.
19
Page 20
3 Turning the camera on/setting the language and clock
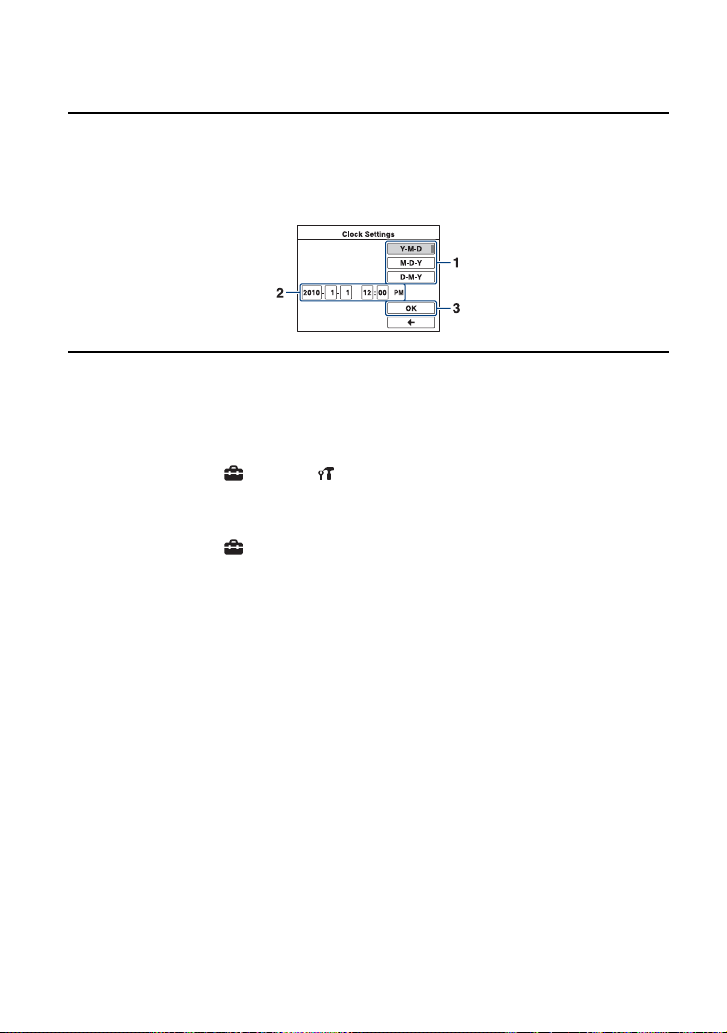
3 Set the clock with the multi-selector.
1 Select the date display format with v/V, then press the multi-selector.
2 Select each item with b/B and set the numeric value with v/V.
3 Select [OK] with B, then press the multi-selector.
To turn the power off
Close the LCD screen with it facing inside.
To change the language settings
Press MENU and select (Setup) t (Main Settings 1/2) t [Language Setting]
(page 46).
To change the date and time
Press MENU and select (Setup) t [Clock Settings] (page 50).
20
Page 21
Basic Operations
Shooting images
Power/Charge lamp
(Photo) button
You can use this button when
(Movie) button
you open the LCD screen.
MENU button
1 Open the LCD screen to turn the power on.
• The Power/Charge lamp lights up in green.
2 Confirm the composition.
Position the subject in the center
of the screen.
Zoom lever
(Movie) button
Basic Operations
Multi-selector
21
Page 22

Shooting images
3 Start shooting.
When shooting still images:
1 Press and hold (Photo) button halfway down to focus.
When the focus is set on the subject, the AF range finder frame (green) appears. A beep sound is
heard, and the z (AE/AF lock) indicator (green) lights on the lower center, little toward the left side
of the screen.
• The angle of view switches to the aspect ratio (4:3, 3:2 or 16:9) according to the shooting size of
the still image. Black bands may appear depending on the setting of the image size.
In standby In pressing
720
720
AE/AF lock indicator
2 Press (Photo) button fully down.
• You cannot shoot still images while shooting movies.
• When shooting still images, the angle of view may change from that in shooting standby.
• When a face is detected in shooting standby, a white frame appears. When multiple faces are detected,
multiple frames appear. If you press and hold (Photo) button halfway down, a white frame
becomes green and the image quality is optimized automatically.
When shooting movies:
Press (Movie) but ton.
• Start shooting movies.
To stop recording, press (Movie) button again.
(Photo) button halfway down
• Black bands appear on the top and bottom of the image when the image size is any of [1920 ×
1080 30P], [1280 × 720 60P] or [1280 × 720 30P].
• Continuous shooting is possible for approximately 29 minutes.
• You can also start/stop shooting movies pressing the (Movie) button that is exposed on the panel
when you open the LCD screen.
22
Page 23

Shooting images
Changing the screen display
v (DISP) (Screen
display) button
When you tilt the multi-selector to v (DISP) repeatedly, the display changes as follows.
Basic Operations
ONAUTO
• Indicators on the screen disappear after about 5 seconds with the default settings in effect when you
purchased the camera. The default setting is set to AUTO. If you want to make indicators appear again,
carry out either of the following operations.
– Tilt the multi-selector to v (DISP).
– Carry out any operation other than those using the zoom lever. The indicators appear for only 5 seconds,
however.
• By tilting to v (DISP) longer, you can increase the brightness of the LCD backlight. Tilt to v (DISP)
longer again to return the brightness of the LCD backlight to normal.
• If you view images in bright outside light, adjust the brightness of the LCD backlight up.
However, the battery power may decrease faster under such condition.
• The LCD screen will not display while the camera is connected to a TV.
OFF
23
Page 24

Shooting images
Useful functions for shooting
W/T Using the zoom
Slide the zoom lever toward T to zoom in, slide the zoom lever toward W to zoom out.
You can use the Digital Zoom function by pressing MENU and selecting (Setup)
(Shooting Settings)
t [Digital Zoom]. When the zoom scale exceeds 5×, the camera uses
the Digital Zoom function (page 45).
Using the self-timer
Tilt the multi-selector to V ().
• You can change settings with the multi-selector tilt to V ( ) repeatedly.
[00:28:25]
101
P
VGA
30
(Off): Not using the self-timer.
(10 sec): Shooting starts after a 10-second delay. Use this setting if you want to include
yourself in the image.
(2 sec): Shooting starts after a 2-second delay. This is to prevent blurring due to
unsteadiness when the shutter button is pressed.
If you press (Photo) button and (Movie) button, countdown timer is displayed, and
after rapid beep sounds are heard, the camera will shoot.
Recording in mirror mode
t
Open the LCD screen 90 degrees to the camera (1), then rotate it 270 degrees as shown in the
illustration (
• A mirror-image of the subject appears on the LCD screen, but the image will be normal when recorded.
• The same image as those recorded appears on the LCD screen instead of the mirror-image in playback
mode.
2).
24
Page 25

Viewing images
(Play) button
Power/Charge lamp
Zoom lever
MENU button
Multi-selector
1 Open the LCD screen to turn the power on.
• The Power/Charge lamp lights up in green.
2 Press (Play) button to set the camera to playback mode.
• Index screen appears.
3 Select the image you want to playback with the multi-selector tilt to v/V/b/B.
Still image:
Press the multi-selector.
• A still image is displayed.
Movie:
Press the multi-selector to pause and playback a movie.
Tilt to B to fast forward, b
playback.)
Tilt to V to display the volume control screen, then adjust the volume with b/B.
• When shooting movies of fast moving subjects, such as a sport scene, the movie may not be played
back smoothly.
• When the playback of the first movie ends, the playback of the next movie automatically starts. When
the playback of the last movie ends, playback of movies will end.
to rewind. (Press the multi-selector to return to normal
Basic Operations
25
Page 26

Viewing images
To view an enlarged image (playback zoom)
Slide the zoom lever toward T while displaying a still image.
To undo the zoom, slide the zoom lever toward W.
Adjust the position: v/V/b/B
Cancel playback zoom: Press the multi-selector.
To return to the index screen
Slide the zoom lever toward (Index) while displaying a still image or pausing the playback
of a movie.
To delete the images
Allows you to select unwanted images for deletion.
You can delete images from the MENU button (page 41).
26
Page 27

Using the menu items
MENU button
Multi-selector
1 Press MENU to display the menu.
• The menu will be displayed only during shooting and playback mode.
• Different items will become visible depending on the selected mode.
2 Select the desired menu item with the multi-selector tilt to v/V.
3 Select a setting with v/V, then press the multi-selector.
4 Press MENU to turn off the menu.
Basic Operations
27
Page 28

Menu items
The available menu items vary depending on the camera mode.
The shooting menu is available only in the shooting mode, and the viewing menu is available
only in the playback mode.
Only the available items are displayed on the screen.
Menu for shooting (page 38)
Photo Size Movie Size
SteadyShot Face Detection
Setup
Menu for viewing (page 41)
(Delete) (Slideshow)
(Protect) (Rotate)
(Setup)
28
Page 29

Using with your computer
Using with your computer
“PMB” and other applications are contained on the CD-ROM (supplied) to allow more
versatile use of images shot with your camera.
Recommended computer environment (Windows)
The following computer environment is recommended when using the supplied software
“PMB”or “PMB Portable” and importing images via a USB connection.
OS (pre-installed) Microsoft Windows XP*1 SP3/Windows Vista*2 SP2/Windows 7
Others CPU: Intel Pentium III 800 MHz or faster (For playing/editing the
*1
64-bit editions and Starter (Edition) are not supported.
Windows Image Mastering API (IMAPI) Ver. 2.0 or later is required to use the function for creating
discs.
*2
Starter (Edition) is not supported.
Recommended computer environment (Macintosh)
The following computer environment is recommended when using the supplied software,
“PMB Portable” and importing images via a USB connection.
High Definition movies: Intel Core Duo 1.66 GHz or faster/Intel Core
2 Duo 1.20 GHz or faster)
Memory: 512 MB or more (For playing/editing the High Definition
movies: 1 GB or more)
Hard Disk: Disk space required for installation—approximately
500 MB
Display: Screen resolution: 1,024 × 768 dots or more
Using with your computer
OS (pre-installed) USB Connection: Mac OS X (v10.3 to v10.6)
Notes
b
• Operation is not assured in an environment based on an upgrade of the operating systems described above
or in a multi-boot environment.
• If you connect two or more USB devices to a single computer at the same time, some devices, including
the camera, may not operate, depending on the types of USB devices you are using.
• Connecting the camera using a USB interface that is compatible with Hi-Speed USB (USB 2.0 compliant)
allows advanced transfer (high speed transfer), as the camera is compatible with Hi-Speed USB (USB 2.0
compliant).
• When your computer resumes activity from suspend or sleep mode, communication between the camera
and your computer may not recover at the same time.
PMB Portable: Mac OS X (v10.4 to v10.6)
29
Page 30

Using with your computer
Note on playback of movie files (MPEG-4 AVC/H.264)
To play back and editing movie files (MPEG-4 AVC/H.264) recorded by the camera, you need
to install the software compatible with MPEG-4 AVC/H.264 or “PMB” on your computer.
• Even under a PC environment where operations are guaranteed, sometimes images cannot be played back
smoothly due to dropped frames.
• Note that the transferred image itself is not affected.
• If you are using a notebook PC, be sure to use the PC with the AC adaptor plugged in. Sometimes normal
operations are not possible due to the power savings function of the PC.
b Note
• Operations are not guaranteed, even on computers fulfilling the above system requirements. For example,
other open or background applications currently running may limit product performance.
30
Page 31

Connecting the camera to the computer
Connect the camera as illustrated below.
1 Turn the power on.
USB connection support cable
(supplied)
3 To a USB jack of the computer2 To the USB jack
“PMB” allows you to easily import images.
For details on “PMB” functions, see the “PMB Help”.
Importing images to a computer (Windows)
Importing images to a computer without using “PMB”
When the AutoPlay Wizard appears after making a USB connection between the camera and a
computer, click [Open folder to view files]
desired images to the computer.
t [OK] t [DCIM] or [MP_ROOT] t copy the
Importing images to a computer (Macintosh)
1 Connect the camera to your Macintosh computer first. Double-click the
newly recognized icon on the desktop
where the images you want to import are stored.
t [DCIM] or [MP_ROOT] t the folder
2 Drag and drop the image files to the hard disk icon.
The image files are copied to the hard disk.
3 Double-click the hard disk icon t the desired image file in the folder
containing the copied files.
The image is displayed.
Using with your computer
31
Page 32

Connecting the camera to the computer
Deleting the USB connection
Perform the procedures from step 1 to 3 below before:
• Removing a memory card.
• Inserting a memory card into the camera after copying images from the internal memory.
• Turning off the camera.
1 Double-click the disconnect icon on the task tray.
Windows Vista
Windows XP
Disconnect icon
2 Click (USB Mass Storage Device) t [Stop].
3 Confirm the device on the confirmation window, then click [OK].
b Note
• Drag and drop the icon of the memory card or the drive icon to the “Trash” icon beforehand when you use
a Macintosh computer, and the camera is disconnected from the computer.
32
Page 33

Uploading videos and still images to media services
The application software “PMB Portable” is pre-installed on the camera.
You can do the following using “PMB Portable”.
• You can easily upload videos and still images to media services, such as a blog.
• You can upload your data via a computer connected to the Internet, even when you are away from home.
• You can add media services, such as a blog you frequently use.
For details, refer to help files of “PMB Portable”.
Starting up “PMB Portable” (Windows)
When you use the software for the first time, you must choose the language setting. Complete
the following procedure. Once the setting is made, you can skip steps 3 to 5 after the next
time.
1 Connect the camera to the computer using a USB connection.
1 The connection of the camera and the computer is established, the auto execution
wizard automatically starts.
2 Eliminate the unwanted drives with [×].
• If the auto execution wizard does not appear, click [Computer]([My Computer] in Windows XP) t
[PMBPORTABLE], then double-click [PMBP_Win.exe].
2 Click [PMB Portable].
• If [PMB Portable] does not appear on the auto execution wizard screen, Click [Computer] t
[PMBPORTABLE], then double-click [PMBP_Win.exe].
(In Windows XP, click [PMB Portable] t [OK].
On a Macintosh, double-click [PMBP_Mac] in the [PMBPORTABLE] folder.)
The “Choose Setup Language” screen appears.
Using with your computer
3 Select the desired language, then click [OK].
The area selection screen appears.
4 Select [Region] and [Country/Area].
The “License Agreement” screen appears.
5 Read the agreement carefully, then click [I Agree].
“PMB Portable” starts.
33
Page 34

Uploading videos and still images to media services
Starting up “PMB Portable” (Macintosh)
1 Make a USB connection between the camera and a computer.
When you connect the camera and your computer, [PMBPORTABLE] appears on the desktop.
Click [×] to close any unnecessary drives.
2 Click [PMBP_Mac] in the [PMBPORTABLE] folder.
The Region Selection screen appears.
3 Select the appropriate [Region] and [Country/Area], and then click [OK].
The User Agreement screen appears.
4 Read the agreement carefully. If you accept the terms of the agreement, click
[I Agree].
“PMB Portable” starts up.
b Notes
• Set [LUN Settings] to [Multi] in the menu setting on the camera.
• Be sure to connect the computer to the network whenever you are using [PMB Portable].
• Depending on the service provider you use, when you upload videos and still images via the Internet, the
cached data may be left on the computer. This may apply to this product, too.
• When problems occur with [PMB Portable], or you accidentally delete [PMB Portable], you can
download the [PMB Portable] installer from the Internet and restore the software.
Notes on “PMB Portable”
You can download the URLs of some websites from servers managed by Sony Corporation
(hereinafter called “the Sony server”) using “PMB Portable”.
Please note the following when you use image uploading services provided by these website
(hereinafter called “the Services”) using “PMB Portable”.
• Depending on the websites, you may have to pay for registration or you may be charged for the Services.
When you utilize the Services, follow the terms of any agreement prescribed by the websites.
• The Services may be discontinued or may be subject to change, depending on the circumstances of the
administrators of the web sites. Including these cases, Sony Corporation is not responsible for the disputes
between you and any third party, or damages you suffered in relation to the Services.
• Your requests for the websites are redirected by the Sony servers. You may not be able to access the
desired websites, depending on various circumstances, such as server maintenance.
34
Page 35

Uploading videos and still images to media services
• If we terminate the services provided by the Sony servers, we will notify you of the termination of the
service on the Sony website in advance.
• We may record the URLs to which you are redirected by the Sony servers, and utilize the collected
information for the improvement of the products or services offered by Sony. We never record personal
information, however.
Using with your computer
35
Page 36

Using the software
Installing “PMB (Picture Motion Browser)”
1 Turn on your computer, and insert the CD-ROM (supplied) into the CD-ROM
drive.
The installation menu screen appears.
• If it does not appear, double-click [Computer] (in Windows XP, [My Computer])
(SONYPMB).
• If the AutoPlay screen appears, select “Run Install.exe” and follow the instructions that appear on the
screen to proceed with the installation.
t
2 Click [Install].
The “Choose Setup Language” screen appears.
3 Select the desired language, then proceed to the following screen.
The “License Agreement” screen appears.
4 Carefully read the agreement, click the radio button ( t ) to accept the
terms of the agreement, and then click [Next].
5 Follow the instructions on the screen to complete the installation.
• To continue the installation, connect the camera to the computer halfway through this step (page 31).
• When the restarting confirmation message appears, restart the computer following the instructions on
the screen.
• DirectX may be installed depending on the system environment of your computer.
6 Remove the CD-ROM after the installation is complete.
7 Start up the software.
To start up “PMB”, click (PMB) on the desktop.
For the detailed operation method, click (PMB Help).
To start up “PMB” from the Start menu, select [Start]
36
t [All programs] t (PMB).
Page 37

Using the software
b Notes
• Log on as Administrator.
• When “PMB” is started up for the first time, the confirmation message of the Information tool appears on
the screen. Select [Start].
z Introduction to “PMB”
• “PMB” allows you to import images shot with the camera to a computer for display. Make a USB
connection between the camera and your computer, and click [Import].
• You can save and print images with the date.
• You can display images stored on a computer by shooting date in a calendar display.
• You can correct still images, and change the shooting date and time.
• You can create discs with CD or DVD disc-writing drive.
• You can upload images to media services. (An internet connection environment is required.)
• For other details, see (PMB Help).
Using with your computer
37
Page 38

Using functions for shooting
Shooting menu
The function in shooting mode using MENU button are described below. For details on how to
operate the menu, see page 27.
The default settings are marked with .
When the mode has been set to playback, switch it to shooting mode with (Play) button.
Photo Size: Selecting the photo size according to use
Image size
5M (2592×1944)
3:2 (2592×1728)
3M (2048×1536)
16:9 (1920×1080)
VGA (640×480)
Guidelines
For prints up to A4 (8×10")
3:2 aspect ratio as in photo prints and postcards
For prints up to 10×15 cm (4×6") or 13×18 cm (5×7")
For viewing on a high-definition TV
Shoot at a small image size for e-mail attachment
The approximate number of still images
(Units: Images)
Capacity
Size/
Quality
5M 6 390 770 1550 3100 6200 12400
3:2 10 550 1100 2200 4400 8800 17600
3M 17 620 1250 2500 5000 10000 20000
16:9 30 980 2000 4000 8000 16000 32000
VGA 110 6000 12000 23500 48000 96000 192000
• The number of still images may vary depending on the shooting conditions and the memory card.
• When the number of remaining shootable images is greater than 9,999, the “>9999” indicator appears.
• When images recorded using earlier Sony models are played back on this camera, the display may differ
from the actual image size.
• When measuring media capacity, 1 GB equals 1 billion bytes, a portion of which is used for data
management.
Internal
memory
Approx.
26 MB
Memory card formatted with this camera
1GB 2GB 4GB 8GB 16 GB 32 GB
38
Page 39

Shooting menu For details on the operation 1 page 27
Movie Size: Selecting the movie size according to use
Movie image size Usage guidelines
Shoot HD (high definition) quality movies in sizes suited
1920 × 1080 30P
1280 × 720 60P
1280 × 720 30P
640 × 480 30P
*
The range you can shoot is narrowed compared to [1280 × 720 30P] or [1280 × 720 60P].
• The movies shot with this camera will be recorded in MPEG-4 AVC/H.264 Main Profile, approximately
30 or 60 frames per second, Progressive, AAC LC, “MP4 format”.
– MPEG: Movie Picture Experts Group
– AVC: Advanced Video Codec
• The larger the image size, the higher the image quality.
*
for display on computer or high definition TV
Shoots the rapidly moving action scenes such as sports
smoothly with HD (high definition) quality
Shoot HD (high definition) quality movies in sizes suited
for display on computer
*
Shoot SD (standard definition) quality movies in sizes
suited for uploading on websites
The approximate recording time of movies
The table below shows the approximate maximum recording times. These are the total times
for all movie files. Continuous shooting is possible for approximately 29 minutes.
(Units: hour : minute : second)
Capacity
Size
1920 ×
1080 30P
1280 ×
720 60P
1280 ×
720 30P
640 ×
480 30P
• The number in ( ) is the minimum recording time.
• The length of time for movies may vary depending on the shooting conditions.
• Before the continuous shooting ends, the recording time indicator flashes, and after a while, the recording
will automatically stop.
Internal
memory
Approx.
26 MB
–
(–)
–
(–)
0:00:40
(0:00:25)
0:01:20
(0:01:00)
Memory card formatted with this camera
1GB 2GB 4GB 8GB 16 GB 32 GB
0:10:00
(0:06:00)
0:20:00
(0:10:00)
0:30:00
(0:15:00)
1:00:00
(0:40:00)
0:20:00
(0:12:00)
0:40:00
(0:20:00)
1:00:00
(0:30:00)
2:00:00
(1:20:00)
0:40:00
(0:25:00)
1:20:00
(0:40:00)
2:00:00
(1:00:00)
4:00:00
(2:40:00)
1:20:00
(0:50:00)
2:40:00
(1:30:00)
4:00:00
(2:10:00)
8:00:00
(5:30:00)
2:40:00
(1:40:00)
5:20:00
(3:10:00)
8:00:00
(4:20:00)
16:00:00
(11:00:00)
(22:00:00)
5:20:00
(3:20:00)
10:40:00
(6:20:00)
16:00:00
(8:40:00)
32:00:00
Using functions for shooting
39
Page 40

Shooting menu For details on the operation 1 page 27
Your camera uses the VBR (Variable Bit Rate) format to automatically adjust image quality
to suit the recording scene. This technology causes fluctuations in the recording time of the
memory card.
Movies containing quickly moving and complex images are recorded at a higher bit rate,
and this reduces the overall recording time.
SteadyShot: Allows you to reduce camera shake when shooting images
On
Off
• The camera shake reduction function works only in [640 × 480 30P] or [1280 × 720 30P] mode.
Activates the camera shake reduction function.
Does not activate the camera shake reduction function.
Face Detection: Detects the faces of your subjects, and adjusts the focus and exposure automatically
On
Off
Activates the Face Detection function.
Does not activate Face Detection function.
Setup: Selecting the shooting settings
You can change the settings on the (setup) screen.
40
Page 41

Using functions for viewing
Viewing menu
The function in viewing mode using MENU button are described below. For details on how to
operate the menu, see page 27.
When the mode has been set to REC, switch it to playback with (Play) button.
(Delete): Allows you to select and delete unwanted images
This Image
Multiple Images
Delete All Images
Deletes the currently displayed image in single-image mode.
Allows you to select and delete multiple images.
1 Select an image then press the multi-selector.
Repeat the above steps until there are no more images to be deleted.
Select an image with a mark again to release the mark.
2 MENU
Deletes all images at once except protected images.
Press [OK].
t [OK] t the multi-selector
(Slideshow): Playing back a series of images
1 Select the images you want to start slide show with the multi-selector tilt to v/V/b/B, then press
the multi-selector.
2 Press MENU to display the menu.
3 Select (Slideshow) with the multi-selector tilt to v/V, then press the multi-selector.
4 Select [Start] with v
/V, then press the multi-selector to start playback.
To stop the slideshow
Press the multi-selector.
• You cannot resume the slideshow from this status.
To change the setup
Before starting slideshow, you can change the settings using the multi-selector.
The default settings are marked with .
Using functions for viewing
41
Page 42

Viewing menu For details on the operation 1 page 27
Interval
1sec
Sets the slide show interval.
3sec
5sec
10 sec
Repeat
On
Off
Plays back images in a continuous loop.
After all the images have been played back, the slide show
ends.
(Protect): Preventing accidental erasure
Protects recorded images against accidental erasure.
The mark is displayed for registered images.
(This Image)
(Multiple
Images)
Protects the currently displayed image in single-image mode.
You can select and protect multiple images.
1 Select an image then press the multi-selector.
Repeat the above steps until there are no more images to be protected.
Select an image with a mark to release the mark.
2 MENU
t [OK] t the multi-selector
To cancel the protection
Select the image for which you want to cancel protection, and unlock it by pressing the multi-selector as the
same procedure to protect it.
The indicator disappears, and the protection is released.
(Rotate): Rotating a still image
Rotates a still image.
1 Press (Play) button to set the camera to playback mode.
2 Select the still image to rotate with the multi-selector tilt to v/V/b/B, then press the multi-
selector.
3 Press MENU to display the menu.
42
Page 43

Viewing menu For details on the operation 1 page 27
4 Select [Rotate] with v/V, then press the multi-selector.
5 Select [
6 Select [OK] with v/V, then press the multi-selector.
• You cannot rotate the following types of images.
–Movies
– Protected still images
• You may not be able to rotate images shot with other cameras.
• When viewing images on a computer, the image rotation information may not be reflected depending on
the software.
], then rotate the image with b/B.
(Setup): Changing Setup items
See page 44.
Using functions for viewing
43
Page 44

Customizing the settings
Using Setup items
You can change the default settings using the Setup screen.
MENU button
Multi-selector
1 Press MENU to display the menu.
2 Tilt the multi-selector to v/V to select (Setup).
3 Tilt to v/V/b/B to select the item you want to set.
The selected item is highlighted.
4 Tilt to B to enter the setting.
You can also enter the setting by pressing the multi-selector.
To turn off the Setup screen, press MENU.
To return to the menu from the Setup screen, tilt to b repeatedly.
To cancel the setting change
Select [Cancel] if it appears, then press the multi-selector. If it does not appear, select the
previous setting again.
• This setting is maintained even when the power is turned off.
44
Page 45

Shooting Settings
The default settings are marked with .
For details on the operation 1 page 44
Digital Zoom
Selects the digital zoom mode. The camera enlarges the image using optical zoom (up to 5×).
When the zoom scale exceeds 5×, the camera uses digital zoom. The camera enlarges up to the
total zoom scale of approximately 20×, including the optical zoom 5×.
On
Off
• The picture quality deteriorates when the zoom exceeds the optical zoom scale.
• When the movie is shot in either of the following conditions, the Digital Zoom will be set to [Off].
– The size of [1920 × 1080 30P].
– The camera is connected to a TV, etc. with the Component A/V cable at the same time.
Use the digital zoom.
Does not use the digital zoom.
Flicker Reduction
Curbs the flicker generated by fluorescent by using the electro-shutter.
On
Off
Use the Flicker Reduction.
Does not use the Flicker Reduction.
Customizing the settings
45
Page 46

Main Settings 1/2
The default settings are marked with .
For details on the operation 1 page 44
Beep
Selects the sound produced when you operate the camera.
On
Off
Turns on the beep sound when you press the multi-selector,
(Photo) button or
Turns off the beep sound.
(Movie) button.
LCD Backlight
Selects the brightness of the LCD backlight.
Bright
Normal
• You can change the setting by tilting the multi-selector v (DISP) longer.
• Selecting [Bright] uses up the battery charge faster.
Brightens the LCD screen.
Standard brightness.
Display Color
You can select the background color of the LCD monitor from 3 colors.
Language Setting
Selects the language to be used to display the menu items, warnings, and messages.
Initialize
Initializes the setting to the default setting. Even if you execute this function, the images
stored in the internal memory are retained.
1 Select [Initialize] with the multi-selector tilt to v/V, then press the multi-selector or tilt to B.
The message “Reset to default settings” appears.
2 Select [OK] with v, then press the multi-selector.
The settings are reset to the default setting.
To cancel the resetting
Select [Cancel] in step 2, then press the multi-selector.
• Be sure not to turn the power of the camera off while initializing.
46
Page 47

Main Settings 2/2
The default settings are marked with .
For details on the operation 1 page 44
LUN Settings
Allows you to select the settings for the display method of images on the recording media set
in a connected equipment, such as a computer, when the camera is connected to a computer or
AV equipment with a USB connection.
Multi
Single
Note
b
• Be sure to set [LUN Settings] to [Multi], while uploading videos and still images to media services using
“PMB Portable”.
Displays the images both on the memory card and in the
internal memory of the camera. Select this when you connect
the camera to a computer.
Displays only the images on the memory card when a
memory card is inserted, and displays the images in the
internal memory when a memory card is not inserted. Select
this when you connect the camera to equipment other than a
computer, and neither the images on the memory card nor the
images in the internal memory of the camera are displayed.
Video Out
Sets the video signal output according to the TV color system of the connected video
equipment. Different countries and regions use different TV color systems. If you want to
view images on a TV screen, check page 53 for the TV color system of the country or region
where the camera is used.
NTSC
PAL
Sets the video output signal to NTSC mode (e.g., for the
USA, Japan).
Sets the video output signal to PAL mode (e.g., for Europe,
China).
Customizing the settings
47
Page 48

Memory Card Tool
For details on the operation 1 page 44
This item appears only when the memory card is inserted in the camera.
Format
Formats the memory card.
To ensure stable operation of the memory cards, we recommend that you format the memory
card the first time you use it with this camera. However, if you format the memory card, all the
data on the memory card will be deleted and you cannot restore that data. So, be sure to store
your important data on the computer before formatting the memory card.
• Note that formatting irrevocably erases all data on the memory card, including even protected images.
1 Select [Format] with the multi-selector tilt to v/V/b/B, then tilt to B.
The message “All data on memory card will be erased” appears.
2 Select [OK] with v, then press the multi-selector.
The format is completed.
To cancel the formatting
Select [Cancel] in step 2, then press the multi-selector.
Copy
Copies all images in the internal memory to the memory card.
1 Insert the memory card.
2 Select [Copy] with the multi-selector tilt to v/V/b/B, then tilt to B.
The message “All data on internal memory will be copied” appears.
3 Select [OK] with v, then press the multi-selector.
Copying starts.
To cancel the copying
Select [Cancel] in step 3, then press the multi-selector.
• Charge the battery sufficiently. Copying image files when the remaining battery amount is low can cause
data transfer failure or damage the data due to battery exhaustion.
• You cannot copy individual images.
• The original images in the internal memory are retained even after copying. To delete the contents of the
internal memory, remove the memory card after copying, then execute the [Format] command in [Internal
Memory Tool] (page 49).
• When you copy the data in the internal memory to the memory card, a new folder is created. You cannot
choose a specific folder on the memory card as the destination for the data to be copied.
48
Page 49

Internal Memory Tool
This item appears only when the memory card is not inserted in the camera.
Format
Formats data stored in the internal memory.
• Note that formatting irrevocably erases all data in the internal memory, including even protected images.
1 Select [Format] with the multi-selector tilt to v/V/b/B, then tilt to B.
The message “All data on internal memory will be erased” appears.
2 Select [OK] with v, then press the multi-selector.
The format is completed.
To cancel the formatting
Select [Cancel] in step 2, then press the multi-selector.
For details on the operation 1 page 44
Customizing the settings
49
Page 50

Clock Settings
Clock Settings
Sets the date and time.
1 Select [Clock Settings] with the multi-selector tilt to v/V, then press the multi-selector or tilt to
B.
2 Select the date display format with v/V, then press the multi-selector.
3 Select each item with b/B and set the numeric value with v/V.
4 Select [OK] with v/V, then press the multi-selector.
To cancel the clock setting
Select [Cancel] in step 4, then press the multi-selector.
For details on the operation 1 page 44
50
Page 51

Viewing images on a TV
Viewing images on a TV
You can view images on a TV screen by connecting the camera to a TV.
The connection or the image quality (HD (high definition)/SD (standard definition)) varies
depending on the type of TV or input jacks the camera is connected to.
• When using your camera abroad, it may be necessary to switch the video signal output to match that of
your TV color system (page 47).
• Image will not be displayed on the LCD screen when an image signal is output to TV.
Connecting to a non-high-definition 16:9 (wide) or 4:3 TV
Images recorded with HD (high definition) quality is converted to SD (standard definition)
and played back. Images recorded with SD (standard definition) image quality are played back
with SD (standard definition) image quality.
VIDEO AUDIO
A/V OUT jack
A/V connecting cable
(supplied)
• During playback of a movie at HD (high definition) on SD (standard definition) TV, the movie is
displayed with black space on the upper and lower sides.
Yellow/White/Red
Viewing images on a TV
51
Page 52

Viewing images on a TV
Connecting to a high definition TV
Images recorded with HD (high definition) image quality are played back with HD (high
definition) image quality. Images recorded with SD (standard definition) image quality are
played back with SD (standard definition) image quality.
HDMI jack
HDMI OUT jack
Green/Blue/
Red
HDMI cable
(sold separately)
A/V OUT jack
• You cannot connect the HDMI cable and the component A/V cable at the same time.
Component A/V cable
(sold separately)
COMPONENT AUDIO
White/Red
When connecting with the component A/V cable (sold separately)
• If you connect only component video plugs, audio signals are not output. Connect the white
and red plugs to output audio signals.
• The output settings switches automatically according to the images played back. Therefore,
the image may be distorted when switching the mode on the connected TV.
• If you record movies in HD (high definition) image quality [1920 × 1080 30P], [1280 ×
720 60P], or [1280 × 720 30P] while connecting the camera to high definition TV with a
component cable, the image output to the TV is shown in SD image quality.
When connecting with the HDMI cable (sold separately)
• Do not connect the camera and equipment to be connected using output terminals. When the
camera and TV are connected using output terminals, no video and sound are produced.
Such a connection can also cause trouble of the camera and/or connected equipment.
• This function may not work properly with some HD TVs. For example, you may not be able
to view a video on your HD TV or hear sound from the HD TV.
• Use an HDMI Cable with the HDMI logo.
52
Page 53

Viewing images on a TV
When connecting to your TV via a VCR
Connect your camera to the LINE IN input on the VCR using the A/V connecting cable. Set
the input selector on the VCR to LINE (VIDEO 1, VIDEO 2, etc.).
When your TV is monaural (When your TV has only one audio input jack)
Connect the yellow plug of the A/V connecting cable to the video input jack and connect the
white (left channel) or red (right channel) plug to the audio input jack of your TV or VCR.
On TV color systems
If you want to view images on a TV screen, you need a TV with a video input jack and the
A/V connecting cable. The color system of the TV must match that of your camera. Check the
following lists for the TV color system of the country or region where the camera is used.
NTSC system
Bahama Islands, Bolivia, Canada, Central America, Chile, Colombia, Ecuador, Jamaica,
Japan, Korea, Mexico, Peru, Surinam, Taiwan, the Philippines, the U.S.A., Venezuela, etc.
PAL system
Australia, Austria, Belgium, China, Czech Republic, Denmark, Finland, Germany, Holland,
Hong Kong, Hungary, Italy, Kuwait, Malaysia, New Zealand, Norway, Poland, Portugal,
Singapore, Slovak Republic, Spain, Sweden, Switzerland, Thailand, United Kingdom, etc.
PAL-M system
Brazil
PAL-N system
Argentina, Paraguay, Uruguay
SECAM system
Bulgaria, France, Guiana, Iran, Iraq, Monaco, Russia, Ukraine, etc.
Viewing images on a TV
53
Page 54

Troubleshooting
Troubleshooting
If you experience trouble with your camera, try the following solutions.
1 Check the items on pages 55 to 59.
2 Turn the power off, and turn it on again after about one minute.
Consult your Sony dealer or local authorized Sony service facility.
3
When repairing the camera, we may check a minimum amount of data stored on the internal
memory in order to improve the condition. However, Sony dealer will neither copy nor save
your data.
Click one of the following items to jump to the page explaining the symptom and cause or the
appropriate corrective action.
Battery and power 55
Shooting still images/movies 56
Viewing images 57
Computers 58
Deleting/Editing images 58
Memory card 59
Internal memory 59
Others 59
54
Page 55

Troubleshooting
Battery and power
Cannot turn on the camera.
• The remaining battery is low or depleted.
– Connect the camera to a computer that is turned on, and charge the battery fully (page 15).
– If you cannot turn on the camera, even after you have charged the battery, remove the battery
once, then insert it into the camera again.
• Check whether the battery is inserted in the correct direction (page 15).
• If your camera turns off automatically, close the LCD screen by turning it to the inside, and
then open it again.
You cannot charge the camera.
• No indicators appears on the LCD screen in the charging mode.
– Close LCD screen and connect the camera to a computer using a USB connection support
cable (supplied).
– Confirm that the Power/Charge lamp (orange) is lit.
• The temperature of the battery pack is too low.
– Remove the battery pack and place it in a warm place.
• The temperature of the battery pack is too high.
– Remove the battery pack and place it in a cool place.
• The USB connection support cable is not properly connected to the computer.
– Disconnect the USB connection support cable and then connect it again.
– Be sure to use the USB connection support cable (supplied).
• The computer is not turned on.
– Turn on the computer.
• The computer is in the standby (sleep or hibernation) mode.
– Release the computer from sleep or hibernation status.
• You are using a USB hub.
– You may not charge the battery when using a USB hub. Connect the camera to the USB
connector of the computer directly.
The Power/Charge lamp does not light correctly while charging the battery
pack.
• The temperature may be outside of the recommended operating temperature. Charge the
battery pack in an recommended ambient temperature of between 10°C to 30°C (50°F to
86°F).
• For details, see page 64.
Troubleshooting
The battery life is short.
• The charging time is insufficient.
– Depending on the conditions of the computer, it may take some time to charge this camera.
Charge the camera until the icon shows the .
55
Page 56

Troubleshooting
The power turns off suddenly.
• If you do not operate the camera for about five minutes while the power is on, the camera
turns off automatically to prevent wearing down the battery. Turn on the camera again.
• The power may go off automatically to protect the camera depending on the temperature of
the camera or the battery pack. In this case, the message appears on the screen before the
power goes off.
The battery remaining indicator is incorrect.
• This phenomenon occurs when you use the camera in an extremely hot or cold location.
• The displayed battery remaining differs from the current one. Fully discharge and then charge
the battery to correct the display.
• The battery is discharged. Charge the battery.
The operation of the camera is unstable while it is connected to a computer.
• You are using a USB hub or using a USB cable other than the supplied USB connection
support cable.
– Be sure to connect the camera directly to the USB connector of the computer using the USB
connection support cable (supplied).
Shooting still images/movies
Your camera cannot record images.
• Check the free capacity of the internal memory or the memory card. If it is full, do one of the
following:
– Delete unnecessary images (pages 26, 41).
– Change the memory card.
• It is recommended that you use a memory card of 1 GB or larger for recording movies.
• Continuous shooting is possible for approximately 29 minutes.
• Press (Play) button and set the camera to recording mode to shoot a still image or a
movie.
• The memory card may be damaged. Exchange the memory card for another one.
• When the movie size is [1920 × 1080 30P] or [1280 × 720 60P], you cannot record movies on
the internal memory.
• The battery level is low.
The LCD screen does not display the still images or movies you are shooting.
• Your camera is set to the playback mode. Press (Play) button to change to the recording
mode (page 21).
The date and time are not displayed on LCD screen.
• While shooting, the date and time are not displayed. They are displayed only during playback.
• The date and time are displayed for 5 seconds after this camera is turned on.
56
Page 57

Troubleshooting
The recording date is not superimposed on an image.
• This camera does not have a feature for superimposing dates on images.
The screen is too dark or too bright.
• Adjust the brightness of the LCD backlight (page 46).
Dots appear and remain on the screen.
• This is not a malfunction. These dots are not recorded (page 3).
Viewing images
Your camera cannot playback images.
• Press (Play) button to change to the playback mode (page 25).
• The folder/file name has been changed on your computer.
• When an image file has been processed by a computer or when the image file was recorded
using a model other than that of your camera, playback on your camera is not guaranteed.
• The memory card may be damaged. Exchange the memory card for another one.
The date and time are not displayed.
• In the default settings in effect when you purchased the camera, DISP is set to AUTO. So
indicators on the screen disappear after about 5 seconds. If you want to make indicators
appear again, tilt the multi-selector to v (DISP) (page 23).
The image appears rough right after playback starts.
• The image may appear rough right after playback starts due to image processing. This is not a
malfunction.
The image does not appear on the TV screen.
• Check [Video Out] to see if the video output signal of your camera is set to the color system of
your TV (page 47).
• Check whether the connection is correct (page 51).
• If the USB connection support cable is connected to the camera and the computer, disconnect
it.
You cannot view the image or hear the sound on the TV.
• When you are using the component video plug, make sure the red and white plugs of the A/V
connecting cable are connected (pages 51, 52).
Troubleshooting
57
Page 58

Troubleshooting
The top, bottom, right, and left edges of images may be trimmed slightly when
you play back on a connected TV.
• The LCD screen of the camera can display recording images across the entire screen (full
pixel display). However, this may cause slight trimming of the top, bottom, right, and left
edges of images when played back on a TV which is not compatible with full pixel display.
When connecting to TV with A/V connecting cable, the image is displayed with
black space on the upper and lower sides.
• This happens when viewing an image recorded at HD (high definition) on a 4:3 TV. This is
not a malfunction.
The image recorded at HD (high definition) appears distorted.
• Set the wide mode of the TV to display the image recorded in the 16:9 mode correctly.
Computers
You cannot install “PMB”.
• Check the computer environment required to install “PMB”.
• Install “PMB” in an orderly manner (page 36).
After making a USB connection, “PMB Portable” does not start.
• Make the USB connection after the computer is turned on.
• Set [LUN Settings] to [Multi] (page 47).
• Connect the computer to the network.
“PMB” does not work correctly.
• Finish “PMB” and restart your computer.
Your camera is not recognized by the computer.
• Disconnect devices from the USB jack of the computer other than the keyboard, mouse, and
your camera.
• Disconnect the USB connection support cable from the computer and the camera, and restart
the computer, then connect the computer and your camera again in an orderly manner
(page 31).
• Make sure the media check tool of the computer activates. For details on the media check tool,
see “PMB Help” (page 36).
• Install “PMB” (page 36).
Deleting/Editing images
Your camera cannot delete an image.
• Cancel the protection (page 42).
58
Page 59

Troubleshooting
Memory card
Cannot insert a memory card.
• Insert it in the correct direction.
You have formatted a memory card by mistake.
• All the data on the memory card is deleted by formatting. You cannot restore it.
Internal memory
Cannot playback or record images using the internal memory.
• There is a memory card inserted in the camera. Remove it.
Cannot copy the data stored in the internal memory to the memory card.
• The memory card is full. Check the capacity.
Cannot copy the data on the memory card or the computer to the internal
memory.
• Data on the memory card or a computer cannot be copied to the internal memory.
Others
The lens gets fogged.
• Moisture condensation has occurred. Turn off the camera and leave it for about an hour before
using it.
The camera becomes warm when you use it for a long time.
• This is not a malfunction.
The Language Set screen appears when you turn on the camera.
• Set the language again (page 46).
You want to change the date or time.
• Set the date and time again (page 50).
Troubleshooting
59
Page 60

Warning indicators and messages
Messages
If the following messages appear, follow
the instructions.
• The battery level is low. Charge the
battery immediately.
For use with compatible
battery only
• The battery inserted is not an NP-BK1
(supplied) battery pack.
System error
• Turn the power off and then on again.
Camera overheating
Allow it to cool
• The camera temperature has risen. The
power may go off automatically, or you
may be unable to record movies. Leave
the camera in a cool location until the
temperature goes down.
Internal memory error
• Turn the power off and then on again.
Reinsert the memory card
• Insert the memory card correctly
(page 18).
• The inserted memory card cannot be
used in your camera (page 2).
• The memory card is damaged.
• The terminal section of the memory
card is dirty.
Cannot access memory card
Access denied
• You are using a memory card with the
access controlled.
Error formatting internal memory
• Format the internal memory again
(page 49).
Error formatting memory card
• Format the memory card again
(page 48).
memory card locked
• You are using the memory card with the
write-protect switch, and the switch is
set to the LOCK position. Set the switch
to the recording position.
No memory space on
internal memory
No memory space on
memory card
• Delete unnecessary images or files
(pages 26, 41).
Read only memory card
• Your camera cannot record or delete
images on this memory card.
No images
• No images that can be played back have
been recorded in the internal memory.
• No images that can be played back have
been recorded in this folder of the
memory card.
memory card type error
• The inserted memory card cannot be
used in your camera (page 62).
60
Folder error
• A folder with the same first three digit
number already exists on the memory
card (for example: 123MSDCF and
123ABCDE).
Page 61

Warning indicators and messages
Cannot create more folders
• The folder with a name beginning with
“999” exists on the memory card. You
cannot create any folders if this is the
case.
File error
• An error occurred while the image was
playing back.
File protected
• Release the protection (page 42).
Image size over limit
• You are playing back an image with size
that cannot be played back on your
camera.
Turn the power off and on again
• A problem with the lens caused an error.
Maximum number of
images already selected
• Up to 100 files can be selected when
using [Multiple Images].
Low battery power
• When copying a image recorded in the
internal memory to the memory card,
use a fully charged battery.
Operation cannot be executed
in unsupported files
• Processing and other editing functions
of the camera cannot be performed on
image files that have been processed
using a computer or images that were
recorded with other cameras.
• When you record movies for a long
time, the camera temperature rises. In
this case, stop recording movies.
Troubleshooting
Operation cannot be executed
for movie files
• You have selected a function that is not
available for movies.
61
Page 62

Others
On the “Memory Stick” media
“Memory Stick” media is a compact,
portable IC recording medium with a large
data capacity.
You can use the following types of
“Memory Stick” media listed below on this
camera. However, we do not guarantee the
operation of all types of “Memory Stick”
media on your camera. (See the list below
for more details.)
Types of “Memory Stick” media Recording/
“Memory Stick Duo” media
(with MagicGate)
“Memory Stick PRO Duo”
media
“Memory Stick PRO-HG Duo”
media
* Your camera does not support an 8-bit parallel
data transfer. A 4-bit parallel data transfer, as
same as “Memory Stick PRO Duo” media, is
supported.
• Your camera cannot record or play data that uses
“MagicGate” technology. “MagicGate” is a
copyright protection technology that records and
transfers the contents in an encrypted format.
• Your camera is compatible with “Memory Stick
Micro” (“M2”) media. “M2” is the abbreviation
for the “Memory Stick Micro”.
• “Memory Stick PRO Duo” media formatted by
a computer (Windows OS/Mac OS) does not
have guaranteed compatibility with your
camera.
• Data read/write speed may vary depending on
the combination of the “Memory Stick PRO
Duo” media and “Memory Stick PRO Duo”
media compliant product you use.
• Damaged or lost image data will not be
compensated for, and may occur in the
following cases:
– If you eject the “Memory Stick PRO Duo”
media or turn the power off on your camera
while your camera is reading or writing image
files on the “Memory Stick PRO Duo” media
(while the access lamp is lit or flashing).
– If you use the “Memory Stick PRO Duo”
media near magnets or magnetic fields.
Playback
—
a
a*
• It is recommended you make a back-up of
important data on the hard disk of a computer.
• Do not attach a label or the like on “Memory
Stick PRO Duo” media or a “Memory Stick
Duo” media adaptor.
• Do not touch, or allow metallic objects to come
into contact with the terminals.
• Do not bend, drop or apply strong force to the
“Memory Stick PRO Duo” media.
• Do not disassemble or modify the “Memory
Stick PRO Duo” media.
• Do not let the “Memory Stick PRO Duo” media
get wet.
• Be careful to keep “Memory Stick PRO Duo”
media out of the reach of small children. There
is danger that a child might swallow it.
• Do not insert anything other than “Memory
Stick PRO Duo” media into the “Memory Stick
Duo” media slot. Doing so may cause a
malfunction.
• Do not use or keep the “Memory Stick PRO
Duo” media in the following locations:
– Places subject to extremely high temperature,
such as a car parked outside in the summer.
– Places under direct sunlight.
– Places with extremely high humidity or
subject to corrosive gases.
62
Page 63

On the “Memory Stick” media
On the “Memory Stick Duo” media
adaptor
• When using “Memory Stick PRO Duo” media
with a “Memory Stick” media compliant device,
be sure to insert the “Memory Stick PRO Duo”
media into a “Memory Stick Duo” media
adaptor.
• When inserting “Memory Stick PRO Duo”
media into a “Memory Stick Duo” media
adaptor, make sure the “Memory Stick PRO
Duo” media is inserted facing in the correct
direction, then insert it all the way in. Note that
improper use may cause a malfunction. Also, if
you force the “Memory Stick PRO Duo” media
into the “Memory Stick Duo” media adaptor in
the wrong direction, it may be damaged.
• Do not insert a “Memory Stick Duo” media
adaptor without “Memory Stick PRO Duo”
media attached. Doing so may result in
malfunctions of the camera.
Notes on using “Memory Stick Micro”
media
• To use “Memory Stick Micro” media with this
camera, you need a Duo-sized M2 Adaptor.
Insert the “Memory Stick Micro” media into the
Duo-sized M2 Adaptor, then insert the adaptor
into the “Memory Stick Duo” media slot. If you
insert “Memory Stick Micro” media into this
camera without using a Duo-sized M2 Adaptor,
you might not be able to remove it from the
camera.
• Do not leave the “Memory Stick Micro” media
within the reach of small children. They might
accidentally swallow it.
On image data compatibility
• Image data files recorded on “Memory Stick
PRO Duo” media by your camera conform to
the “Design rule for Camera File system”
universal standard established by the JEITA
(Japan Electronics and Information Technology
Industries Association).
• On your camera, you cannot play back still
images recorded on other devices that do not
conform to the universal standard. (These
models are not sold in some regions.)
• If you cannot use “Memory Stick PRO Duo”
media that has been used with another device,
format it with your camera (page 48). Note that
formatting erases all information on the
“Memory Stick PRO Duo” media.
• You may not be able to play back images with
your camera:
– When playing back image data modified on
your computer.
– When playing back image data recorded with
other devices.
63
Others
Page 64

On the battery
On charging the battery
• We recommend charging the battery in an
ambient temperature of between 10°C to 30°C
(50°F to 86°F). You may not be able to
efficiently charge the battery outside of this
temperature range.
• You may not charge the battery pack, or the
Power/Charge lamp may not light in the
following.
– When the he temperature of the battery pack
is too low.
Remove the battery pack and place it in a
warm place.
– When the temperature of the battery pack is
too high.
Remove the battery pack and place it in a cool
place.
• For details, see page 15.
Effective use of the battery
• Battery performance decreases in low
temperature surroundings. So, the time that the
battery can be used is shorter in cold places. We
recommend the following to ensure longer
battery use:
– Put the camera in a pocket, etc. to warm it up
before using.
• The battery will run out quickly if you use the
zoom frequently.
• Avoid rough handling, disassembling,
modifying, physical shock, or impact such as
hammering, dropping or stepping on the battery
pack.
• Do not use a deformed or damaged battery pack.
How to store the camera
• If the camera is not to be used for a long time, to
maintain its function, fully charge the internal
battery and use it up at least once a year, then
store the camera in a dry, cool place.
• To use the battery up, leave your camera in slide
show (page 41) playback mode until the power
goes off.
On battery life
• The battery life is limited. Battery capacity
decreases little by little as you use it more and
more, and as time passes. If the battery
operating time seems shortened considerably, a
probable cause is that the battery has reached
the end of its life. Contact your Sony dealer or
local authorized Sony service facility.
• The battery life varies according to how it is
stored and the operating conditions and
environment.
On disposing the battery
• Contact the nearest Sony dealer when disposing
the battery.
On the internal rechargeable backup
battery
This camera has an internal rechargeable battery
for maintaining the date and time and other
settings regardless of whether the power is on or
off.
This rechargeable battery is continually charged
as long as you are using the camera. However, if
you use the camera for only short periods, it
discharges gradually, and if you do not use the
camera at all for about one week it becomes
completely discharged. In this case, be sure to
charge this rechargeable battery before using the
camera.
However, even if this rechargeable battery is not
charged, you can still use the camera, but the date
and time will not be indicated.
Charging method of the internal
rechargeable backup battery
Insert charged battery pack in the camera, and
then leave the camera for 24 hours or more with
the power off.
64
Page 65

Precautions
Do not use/store the camera in the
following places
• In an extremely hot, cold or humid place
In places such as in a car parked in the sun, the
camera body may become deformed and this
may cause a malfunction.
• Under direct sunlight or near a heater
The camera body may become discolored or
deformed, and this may cause a malfunction.
• In a location subject to rocking vibration
• Near strong magnetic place
• In sandy or dusty places
Be careful not to let sand or dust get into the
camera. This may cause the camera to
malfunction, and in some cases this malfunction
cannot be repaired.
On carrying
Do not sit down in a chair or other place with the
camera in the back pocket of your trousers or
skirt, as this may cause malfunction or damage the
camera.
On cleaning
Cleaning the LCD screen
Wipe the screen surface with an LCD cleaning kit
(sold separately) to remove fingerprints, dust, etc.
Cleaning the lens
Wipe the lens with a soft cloth to remove
fingerprints, dust, etc.
Cleaning the camera surface
Clean the camera surface with a soft cloth slightly
moistened with water, then wipe the surface with
a dry cloth. Do not use the following or they may
damage the finish or the casing.
• Chemical products such as thinner, benzine,
alcohol, disposable cloths, insect repellent,
sunscreen or insecticide, etc.
• Do not touch the camera with the above on your
hand.
• Do not leave the camera in contact with rubber
or vinyl for a long time.
On operating temperatures
Your camera is designed for use under the
temperatures between 0°C and 40°C (32°F and
104°F). Shooting in extremely cold or hot places
that exceed this range is not recommended.
On moisture condensation
If the camera is brought directly from a cold to a
warm location, moisture may condense inside or
outside the camera. This moisture condensation
may cause a malfunction of the camera.
If moisture condensation occurs
Turn off the camera and wait about an hour for the
moisture to evaporate. Note that if you attempt to
shoot with moisture remaining inside the lens, you
will be unable to record clear images.
Others
65
Page 66

Specifications
Camera
[System]
Image device: 7.13 mm (1/2.5 type) CMOS sensor
Total pixel number of camera:
Approx. 5 040 000 (2 592 × 1 944) pixels
Effective pixel number of camera:
Approx. 5 040 000 (2 592 × 1 944) pixels
(still images),
Approx. 2 073 600 pixles ([1920 × 1080 30P]
movie)
Lens: F3.3
f = 6.3 to 31.5 mm (1/4 to 1 1/4 inches)
When converted to a 35 mm still camera
For movies: 41 to 205 mm (1 5/8 to 8 1/8
inches) (16:9)
For still images: 38 to 190 mm (1 1/2 to 7 1/2
inches) (4:3)
Exposure control: Automatic exposure
File format:
Still images: JPEG (DCF Ver. 2.0, Exif
Ver. 2.21, MPF Baseline) compliant
Movies: MPEG-4 AVC/H.264 (.MP4)
Audio: MPEG AAC 2ch
Recording media: Internal Memory (approx.
26 MB), “Memory Stick PRO Duo” media,
SD memory card, SDHC memory card (Class
4, 6, 10)
[Input and Output connectors]
Multi use terminal (A/V-out
(SD/HD Component)):
Video output
Audio output
HDMI jack : HDMI mini Connector
USB jack : type A (built-in)
USB communication : Hi-Speed USB (USB 2.0
compliant)
[LCD screen]
LCD screen: 6 cm (2.5 type) TFT drive
Total number of dots: 230 400 (960 × 240) dots
[Power, general]
Power: Rechargeable battery pack NP-BK1, 3.6 V
Power consumption: 1.9 W (when the movie
image size is [1280 × 720 30P])
Operating temperature: 0 to 40°C (32 to 104°F)
Storage temperature: –20 to +60°C (–4 to +140°F)
Dimensions: Approx. 39.0 × 101.4 × 67.1 mm
(1 9/16 × 4 × 2 3/4 inches) (W/H/D, excluding
protrusions)
Mass (including NP-BK1 battery pack, memory
card): Approx. 196 g (6.9 oz)
Microphone: Monaural
Speaker: Monaural
Rechargeable battery pack NP-BK1
Used battery: Lithium-ion battery
Maximum output voltage: DC 4.2 V
Mean output voltage: DC 3.6 V
Maximum charge voltage: DC 4.2 V
Maximum charge current: 1.4 A
Capacity:
typical: 3.4 Wh (970 mAh)
minimum: 3.3 Wh (930 mAh)
Design and specifications are subject to change
without notice.
Trademarks
• “Memory Stick”, , “Memory Stick PRO”,
Duo”, , “Memory
Stick Micro”, “MagicGate”, and
Corporation.
• Microsoft, Windows, Windows Vista and
DirectX are either registered trademarks or
trademarks of Microsoft Corporation in the
United States and/or other countries.
• Macintosh, Mac OS, iMac, iBook, PowerBook,
Power Mac and eMac are trademarks or
registered trademarks of Apple Inc.
• Intel and Pentium are trademarks or registered
trademarks of Intel Corporation.
• SDHC logo is a trademark.
• MultiMediaCard is a trademark of the
MultiMediaCard Association.
In addition, system and product names used in this
manual are, in general, trademarks or registered
trademarks of their respective developers or
manufacturers. However, the ™ or ® marks are
not used in all cases in this manual.
, “Memory Stick Duo”,
, “Memory Stick PRO
are trademarks of Sony
66
Page 67

Index
Index
Numerics
4:3 TV...................................51
A
A/V connecting cable ...........51
A/V OUT jack.......................51
AE/AF lock indicator............22
AF range finder frame ..........22
B
Battery ..................................64
Beep ......................................46
C
CD-ROM ..............................29
Clock Settings .......................50
Computer ..............................29
Importing images...........31
Connecting
4:3 TV............................51
Computer.......................31
High definition TV ........52
Wide TV........................51
Copy......................................48
D
Date.......................................50
Delete....................................41
Digital Zoom.........................45
F
Face Detection......................40
Flicker Reduction..................45
Format.............................48, 49
H
HDMI jack............................52
High definition TV ...............52
How to handle the camera ......6
I
Identifying parts...................10
Index screen ......................... 25
Indicator ...............................11
Initialize ...............................46
Install.................................... 36
Internal Memory Tool.......... 49
L
Language Setting..................46
LCD Backlight.....................46
LUN Settings........................47
M
Macintosh computer.............29
Main Settings ....................... 46
Memory card..........................2
Memory Card Tool...............48
“Memory Stick PRO Duo”
media.............................62
Menu
Items.............................. 28
Shooting........................ 38
Viewing.........................41
Mirror mode.........................24
N
NTSC ...................................47
O
OS.........................................29
P
PAL....................................... 47
Playback zoom..................... 26
PMB ..................................... 36
Protect ..................................42
R
Rechargeable battery ......14, 66
Rotate....................................42
S
Screen
Indicator ........................11
LCD backlight...............46
Self-timer..............................24
Setup.....................................43
Shooting................................38
Movies...........................22
Still image .....................22
Shooting Setting ...................45
Slideshow..............................41
Software................................36
SteadyShot............................40
T
Troubleshooting.................... 54
V
VGA......................................38
Video Out..............................47
Viewing.................................41
Viewing images ....................25
Volume..................................25
W
Warning indicators and
messages........................60
Wide TV ...............................51
Windows computer...............29
Z
Zoom.....................................24
Index
67
Page 68

Index
Notes on the License
THIS PRODUCT IS LICENSED UNDER THE
AVC PATENT PORTFOLIO LICENSE FOR
THE PERSONAL AND NON-COMMERCIAL
USE OF A CONSUMER TO
(i) ENCODE VIDEO IN COMPLIANCE WITH
THE AVC STANDARD (“AVC VIDEO”) AND
/OR
(ii) DECODE AVC VIDEO THAT WAS
ENCODED BY A CONSUMER ENGAGED
IN A PERSONAL AND NON-COMMERCIAL
ACTIVITY AND/OR WAS OBTAINED
FROM A VIDEO PROVIDER LICENSED
TO PROVIDE AVC VIDEO. NO LICENSE IS
GRANTED OR SHALL BE IMPLIED FOR ANY
OTHER USE. ADDITIONAL INFORMATION
MAY BE OBTAINED FROM MPEG LA, L.L.C.
SEE <HTTP://MPEGLA.COM>
68
Page 69

Additional information on this product and answers
to frequently asked questions can be found at our
Customer Support Website.
 Loading...