

Page 1
FM/MW/LW MiniDisc Player
3-262-950-21 (1)
FM/MW/LW
MiniDisc Player
Operating Instructions
Bedienungsanleitung
Mode d’emploi
Istruzioni per l’ uso
Gebruiksaanwijzing
Wichtig!
Bitte nehmen Sie sich etw as Ze it, um den G erät e-Pass vollständig
auszufüllen. Dieser befindet sich auf der hinteren Umsc hlagseite dieser
Bedienungsanleitung.
GB
DE
FR
IT
NL
Si dichiara che l’apparecchio è stato fabbricato in conformità all’art. 2, Comma 1 del D.M. 28.08.
1995 n. 548.
For installation and connections, see the supplied installation/connections manual.
Zur Installation und zum Anschluss siehe die mitgelieferte Installations-/Anschlussanleitung.
En ce qui concerne l’installation et les connexions , consulter le manuel d’installation/
raccordement fourni.
Per l’installazione e i collegamenti, fare riferimento al manuale di istruzioni per
l’installazione e i collegamenti in dotazione.
Zie voor het monteren en aansluiten van het apparaat de bijgeleverde handleiding "Installatie
en aansluitingen".
MDX-F5800
© 2004 Sony Corporation
Page 2
Welcome !
Thank you for purchas ing this Sony MiniDisc
Player. You can enjoy its various features even
more with:
• Optional MD/CD units (both changers and
players)*
• CD TEXT informatio n (displayed w hen a CD
TEXT disc*
• Optional controller accessor i es
Card remote commander RM-X114
Rotary commander RM-X4S
*1 This unit works with Sony products only.
*2 A CD TEXT disc is an audio CD that includes
This label is located on the bottom of the
chassis.
1
.
2
in optional CD unit is played).
information such as the disc name, artist name,
and track names. This information is recorded on
the disc.
2
Page 3

Table of Contents
Location of controls . . . . . . . . . . . . . . . . . . . 4
Precautions . . . . . . . . . . . . . . . . . . . . . . . . . . 6
Notes on MDs . . . . . . . . . . . . . . . . . . . . . . . . 6
About the MD group function. . . . . . . . . . . . 7
Getting Started
Resetting the unit. . . . . . . . . . . . . . . . . . . . . . 8
Detaching the front panel . . . . . . . . . . . . . . . 8
Setting the clock . . . . . . . . . . . . . . . . . . . . . . 9
MD Player
MD/CD Unit (optional)
Playing a disc. . . . . . . . . . . . . . . . . . . . . . . . 10
Display items. . . . . . . . . . . . . . . . . . . . . . . . 11
Playing tracks repeatedly
— Repeat Play . . . . . . . . . . . . . . . . . . . . 11
Playing tracks in ra ndom order
— Shuffle Play . . . . . . . . . . . . . . . . . . . . 12
Labelling a CD
— Disc Memo*. . . . . . . . . . . . . . . . . . . . 12
Locating a di sc by name
— List-up* . . . . . . . . . . . . . . . . . . . . . . . 13
* Functions available with optional MD/CD unit
Radio
Storing stations automatically
— Best Tuning Memory (BTM). . . . . . . 14
Receiving the stored stations. . . . . . . . . . . . 14
Storing only the desired stations . . . . . . . . . 15
RDS
Overview of RDS . . . . . . . . . . . . . . . . . . . . 15
Automatic retuning for best reception results
— AF (Alternative Frequencies) . . . . . . 16
Receiving traffic an nouncements
— TA (Traffic Announcement)/
TP (Traffic Programme). . . . . . . . . . . . . 17
Presetting RDS stations with the AF and TA
setting. . . . . . . . . . . . . . . . . . . . . . . . . . . 17
Tuning in stations by programme type
— PTY (Programme types) . . . . . . . . . . 18
Setting the clock automatically
— CT (Clock Time). . . . . . . . . . . . . . . . 19
Other Functions
Using the rotary commander. . . . . . . . . . . . 19
Adjusting the sound characteristics . . . . . . 21
Quickly attenuating the sound . . . . . . . . . . 21
Changing the sound and display
settings . . . . . . . . . . . . . . . . . . . . . . . . . . 22
Setting the equalizer (EQ3). . . . . . . . . . . . . 23
Setting the Dynamic Soundstage Organizer
(DSO). . . . . . . . . . . . . . . . . . . . . . . . . . . 23
Additional Information
Maintenance . . . . . . . . . . . . . . . . . . . . . . . . 24
Removing the unit. . . . . . . . . . . . . . . . . . . . 25
Specifications . . . . . . . . . . . . . . . . . . . . . . . 26
Troubleshooting . . . . . . . . . . . . . . . . . . . . . 27
Error displays/Messages. . . . . . . . . . . . . . . 28
3
Page 4
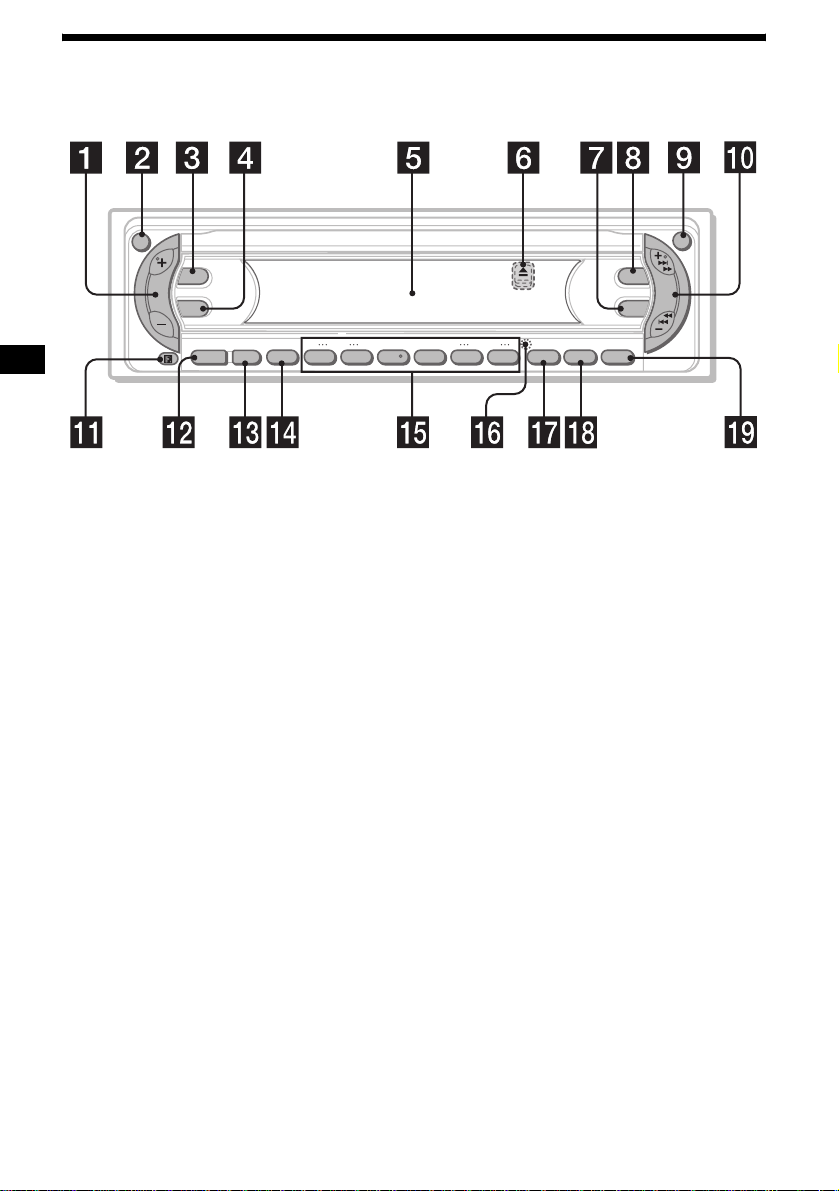
Location of controls
Refer to the pages listed for details.
ATT
DSPL
SEL
–+
DISC REP SHUF BTM LIST
SOURCE MODE
OFF
1 2 3 4 5 6
a Volume +/– button
b ATT (attenuate) button 21
c DSPL (dis play mode ch ange) button
9, 11, 13, 15, 22
d SEL (select) button
To select items.
e Display window
f Z (eject) button (located on the front sid e
of the unit, behind the front panel) 10
g EQ3 button 23
h DSO button 23
i OPEN button 8, 10
j SEEK +/– button
Radio:
To tune in stations automatically/find a
station manually.
MD/CD (MP3 files*
1
):
To skip tracks/fast-forward, reverse a track.
k Receptor for the card remote
commander
l SOURCE (Power on/Radio/MD/CD*2)
button
T o select the source.
m MODE button
To change operation.
n OFF (Stop/Power off) button*3 8, 10
OPEN
DSO
SEEK
EQ3
–+
GP/ALBM
AF/TA SENS PTY
LISTBTM
MDX-F5800
o Number buttons 22
Radio:
To store the desired station on each number
button.
MD/CD (MP3 files*
1
):
(1): DISC – 10
(2): DISC + 10
(3): REP 11
(4): SHUF 12
(5): GP*
4
/ALBM*1 – 10
(6): GP*4/ALBM*1 + 10
p RESET button (located on the front side of
the unit, behind the front panel) 8
q AF/TA button 16, 17
r SENS/BTM button 14, 15, 17
s PTY (programme type)/LIST button
12, 13, 18
*1 Available only when an optional CD unit with the
MP3 file control function is connected, and MP3 file
is played.
*2 When an optional CD unit is connected.
*3 Warning when installing in a car without
an ACC (accessory) position on the
ignition switch
After turning off the ignition, be sure to press
and hold (OFF) on the unit until the display
disappears.
Otherwise , the display do es n ot turn off and thi s
causes battery drain.
*4 Available only when an MD containing groups is
inserted in this unit and played.
4
Page 5
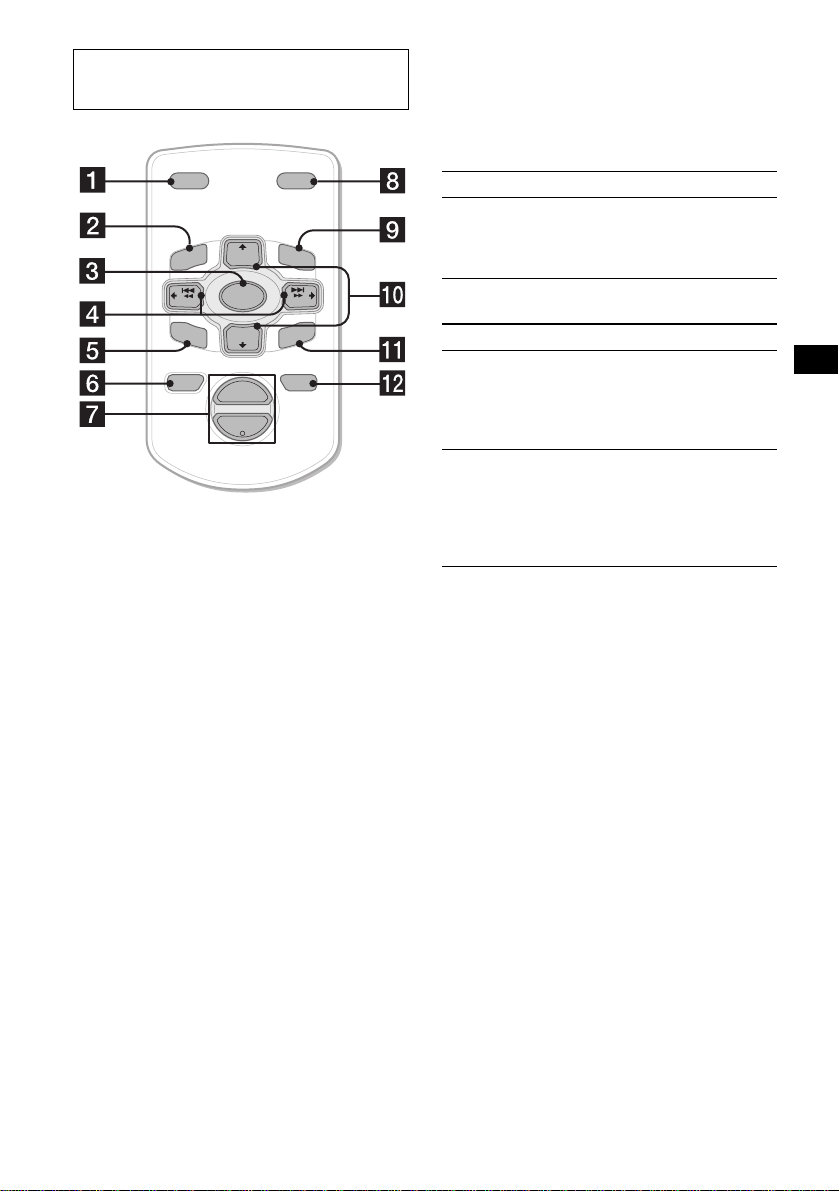
Card remote commander RM-X114
(optional)
Selecting a disc, group and album w ith
the card remote commander
Disc, group and al bum ca n be skipped using the
DISC (GP/ALBM)/PRESET (+/–) buttons on the
card remote commander.
DSPL MODE
+
PRESET
LIST
+
DISC
MENU
–
SEEK
SOUND
SOURCE
DISC
PRESET –
+
VOL
+
SEEK
–
ENTER
ATTOFF
–
The corresponding buttons of the card
remote commander control the same
functions as those on this unit.
a DSPL button
b MENU button*
c SOURCE button
d SEEK (–/+) buttons
e SOUND button
To adjust the sound characteristics.
f OFF button
g VOL (+/–) buttons
h MODE button
i LIST button
j DISC(GP/ALBM)/PRESET (+/–)
buttons
k ENTER button*
l ATT button
* Not available for this unit
Note
If the display disappears by pressing (OFF), it cannot
be operated with the card remote commander unless
(SOURCE) on the unit is pressed, or a disc is inserted
to activate the unit first.
Tip
For details on how to replace the battery, see
“Replacing the lithium battery” on page 25.
(With this unit)
To Press
Skip groups*
– Group selection
1
+ or – [once for e ach group]
To continuously skip
groups, pre ss and hold either
button.
(With optional unit)
To Press
Skip discs
–Disc selection
+ or – [once for e ach disc]
To continuously skip disc s,
press once and pres s again
within 2 second s ( and hold)
either button.
Skip albums*
– Album selection
2
+ or – [hold for a moment]
and release
To continuously skip
albums, press (an d hold)
within 2 seconds of first
releasing the button.
*1 Available only when an MD containing groups is
inserted in this unit and played.
*2 Available only when an optional CD unit with the
MP3 file control function is connected, and MP3 file
is played.
Skipping tracks continuous l y
Press once (SEEK) (+) o r ( SEEK) (–) on the
card remote commander, then press ag a in within
2 seconds and hold .
5
Page 6
Precautions
Notes on MDs
• If your car has bee n parked in direct sunl ight,
allow the unit to cool off before operating it.
• Power aerial will extend automatically while
the unit is operating.
If you have any questions or problems
concerning your unit that are not covered in this
manual, please co nsult your nearest Sony dealer.
Moisture condensation
On a rainy day or in a very damp area, moisture
condensation ma y occur inside the lenses and
display of the unit. Should this occur, the unit
will not operate properly. In such a case, remove
the disc and wait for about an hour until th e
moisture has evaporated.
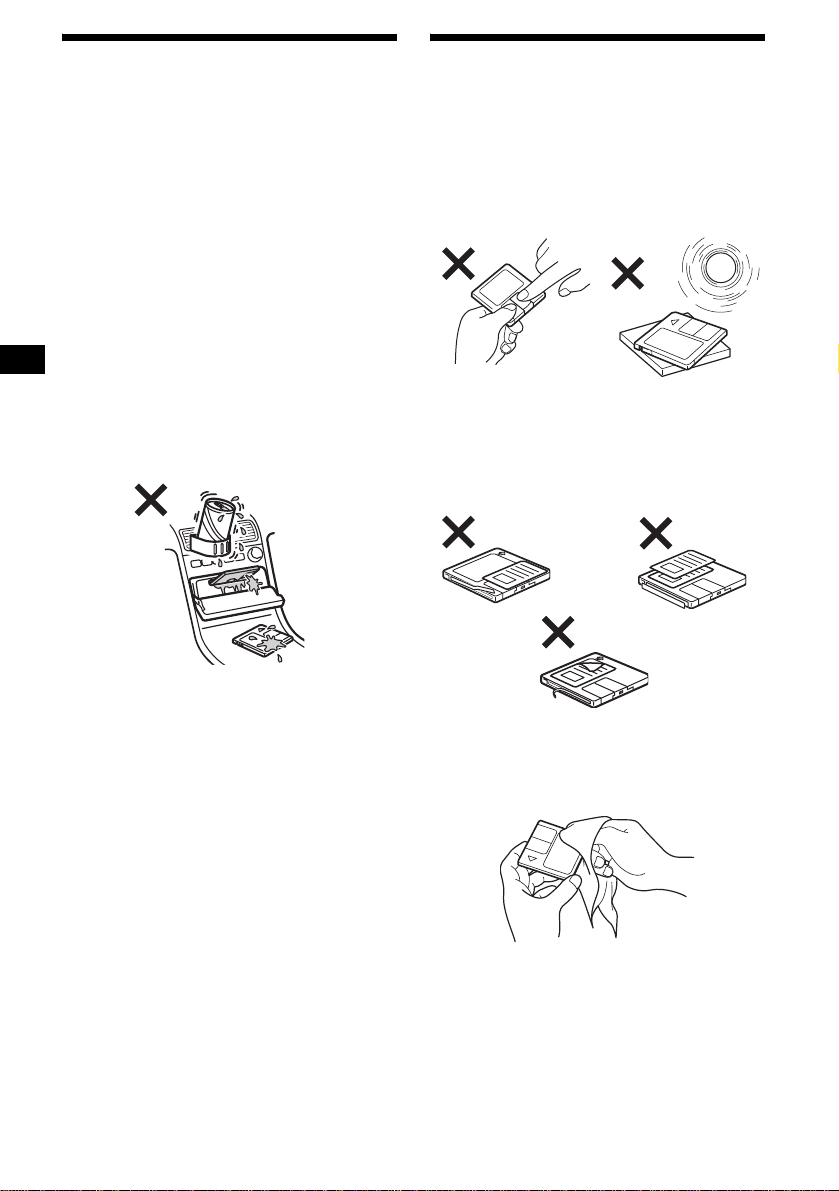
To maintain high sound quality
Be careful not to splash juice or other soft drinks
onto the unit or discs.
• Do not open the shutter of the cartridge
to expose the MD. Close immediately if
the shutter opens.
• Never touch the surface of the disc inside.
• Do not subjec t th e discs to heat/hig h
temperature. Avoid lea ving th em in pa rk ed cars
or on dashboards/rear trays.
Notes on attaching labels
To avoid MDs becoming stuck in the unit;
– Attach the label in a suitable position.
– Remove old labels before putt i ng new ones on.
– Replace labels t hat are peeling away.
Cleaning
Wipe the surface of the cartridge from time to
time with a soft, dry cloth.
6
Page 7
About the MD group function
The group function is convenient to lo ca te the
desired tracks wi th i n a gr oup from a large
number of tracks, or t ra cks that have been
recorded in M D LP (LP2/LP4 ) mode.
Notes on MD group settings
• This unit is fo r MD playback onl y. For MD
recording and group settings, refer to the
operating instructions of your MD recorder.
• The same group name can be registered more
than twice on the same MD.
• Maximum group number is 99, though the
actual group number depends on your M D
recorder.
• Depending on your MD recorder, MD group
settings may not be available.
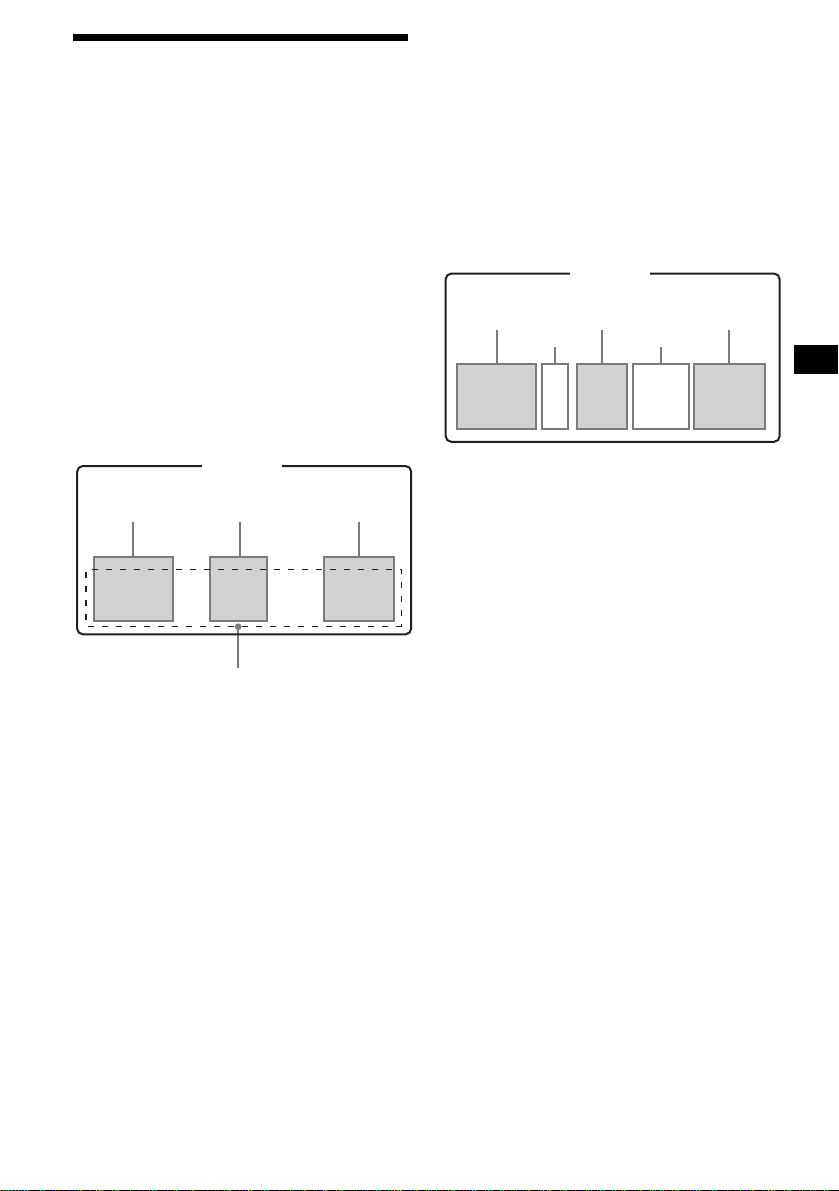
MD containing groups
GP (group) assumption on this unit
This unit recognizes single tracks and multiple
tracks between groups as groups (GP), even they
were not registered as such by your MD recorder.
The “GP” numbers are allotted to those tracks as
well as the registered groups. The indication of
“GP” number lights up in the display window, if
the group is changed on an MD during playback.
MD containing groups and allotted “GP”
numbers on thi s unit
MD
GP2
GP3
(Group2
*)
GP4
GP1
(Group1
*)
1234 56789
GP5
(Group3
10
*)
MD
Group2*Group1* Group3*
12 456789
3
Track number
* Groups: set by your MD recorder.
When you insert an MD in this unit, playback
starts automatically and follows track order.
10
* Groups: set by your MD recorder.
For using MD group fu nctio n, refe r to “Pla ying a
disc” (page 10), “Playing tracks repeatedly ”
(page 11), a nd “Playing tracks in ran dom order”
(page 12).
Note
The MD group function is a vailable only when an MD
containing groups is inserted in this unit and played.
7
Page 8
Getting Started
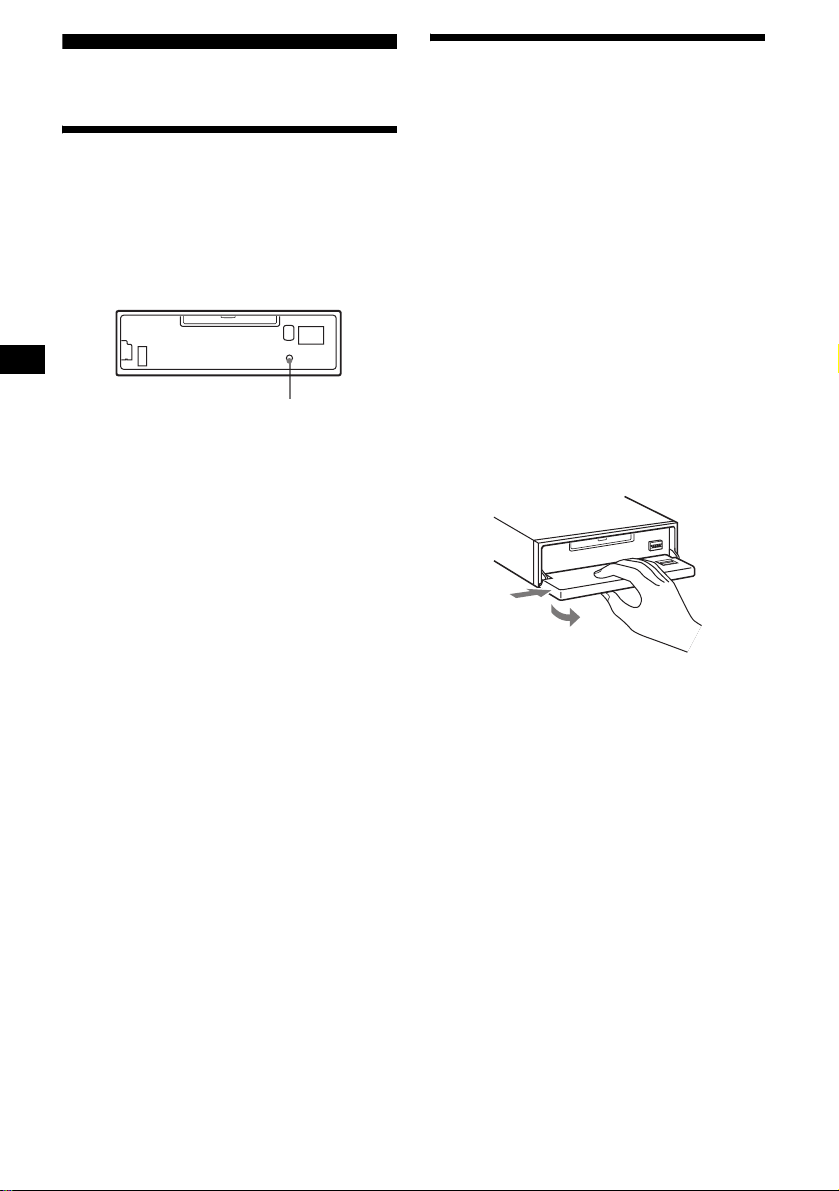
Detaching the front panel
You can detach the front panel of this unit to
protect the unit fr om being stolen.
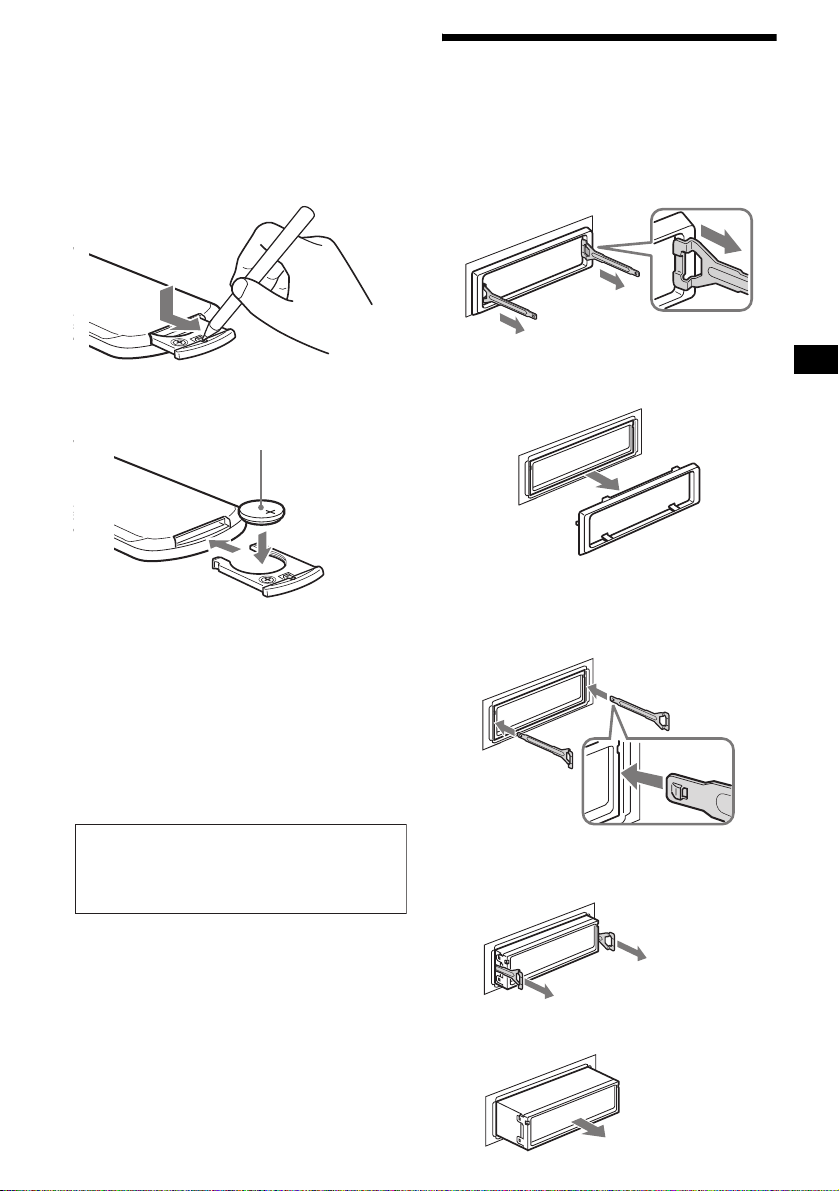
Resetting the unit
Before operating the unit for the first time, or
after replacing the car battery or chan ging the
connections, you must reset the unit.
Remove the front panel and pres s the RESET
button with a pointed o bject, such as a ballpoint
pen.
RESET button
Note
Pressing the RESET button will er ase the clock setting
and some stored contents.
Caution alarm
If you turn the ignition switch to the OFF
position withou t removing the front panel, t he
caution alarm will beep for a few seconds.
If you connect an optional amplifier and do not
use the built-in amplifier, the beep sound will be
deactivated.
1 Press (OFF)*.
MD/CD playbac k or radio reception s tops
(the key illumination an d display remain on) .
* If your car has no ACC (accessory) position on
the ignition switch, be sure to turn the unit off by
pressing (OFF) until the display disappears to
avoid car battery drain.
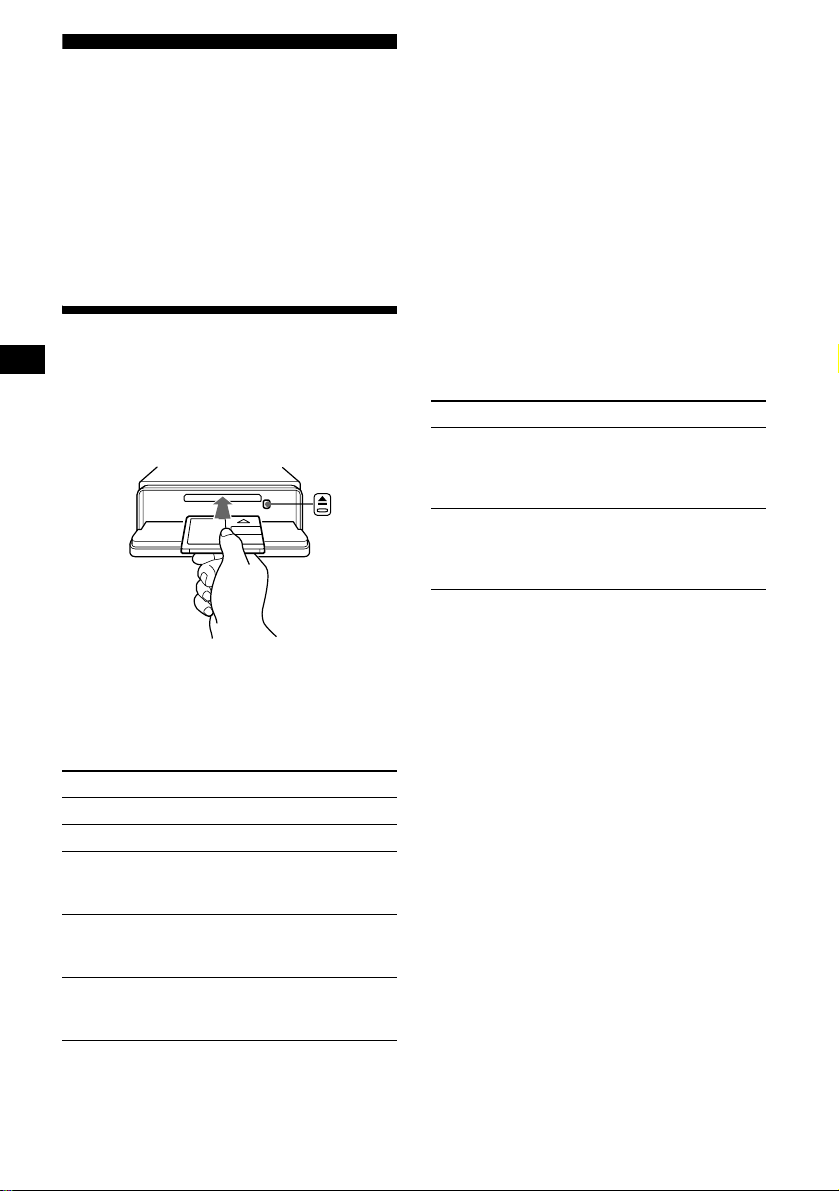
2 Press (OPEN), then slide the front
panel to the right, and gently pull out
the left end o f the front pa n e l.
1
2
Notes
• If you detach the panel while the unit is still turned
on, the power will turn off automatically to prevent
the speakers from being damaged.
• Do not drop or put excessive pressure on the front
panel and its display window.
• Do not subject the front panel to heat/high
temperature or moisture. Avoid leaving it in a parked
car or on a dashboard/rear tray.
Tip
When carrying the front panel with you, use the
supplied front panel case.
8
Page 9
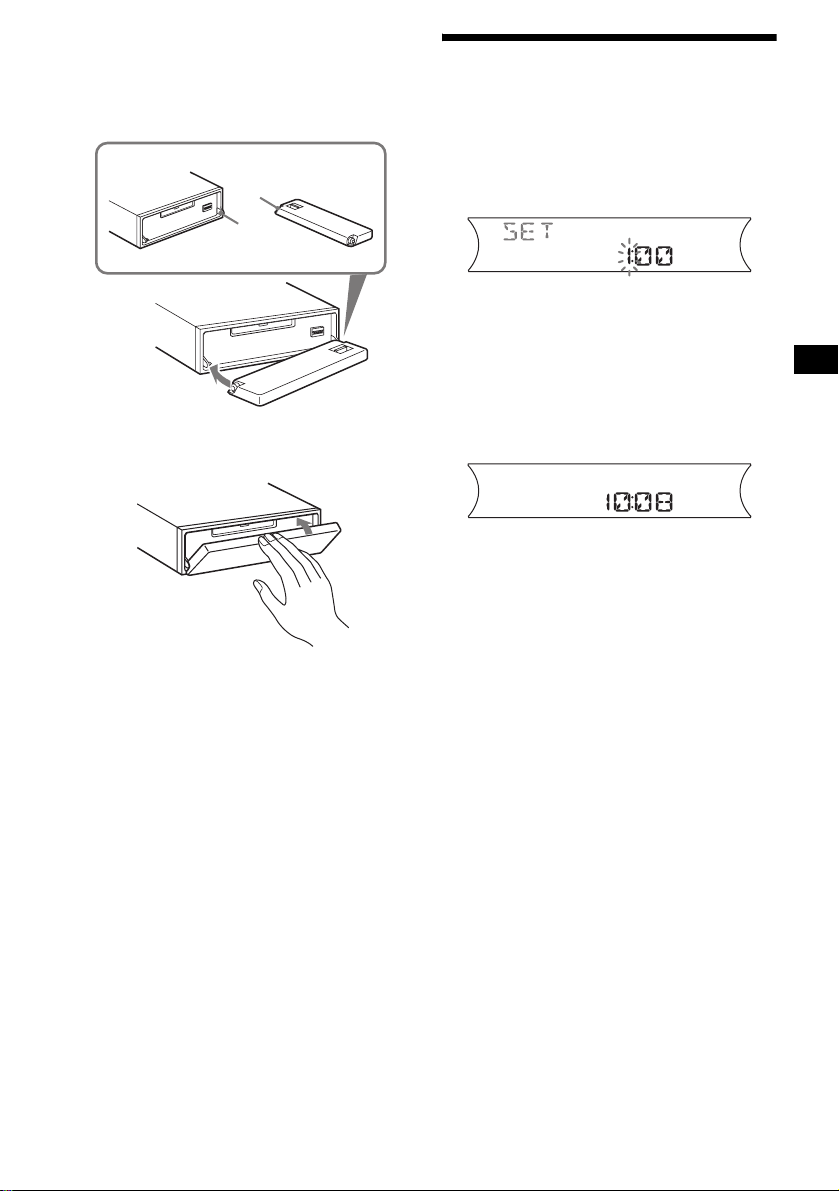
Attaching the front panel
Place hole A of the fr ont panel onto the spindle
B on the unit, then lightly push the left side in.
Press (SOURCE) on the unit (or insert an MD)
to operate the unit.
A
B
x
Note
Do not put anything on the inner surface of the front
panel.
Setting the clock
The clock uses a 24-hour digital indication.
Example: To set the clock to 10:08
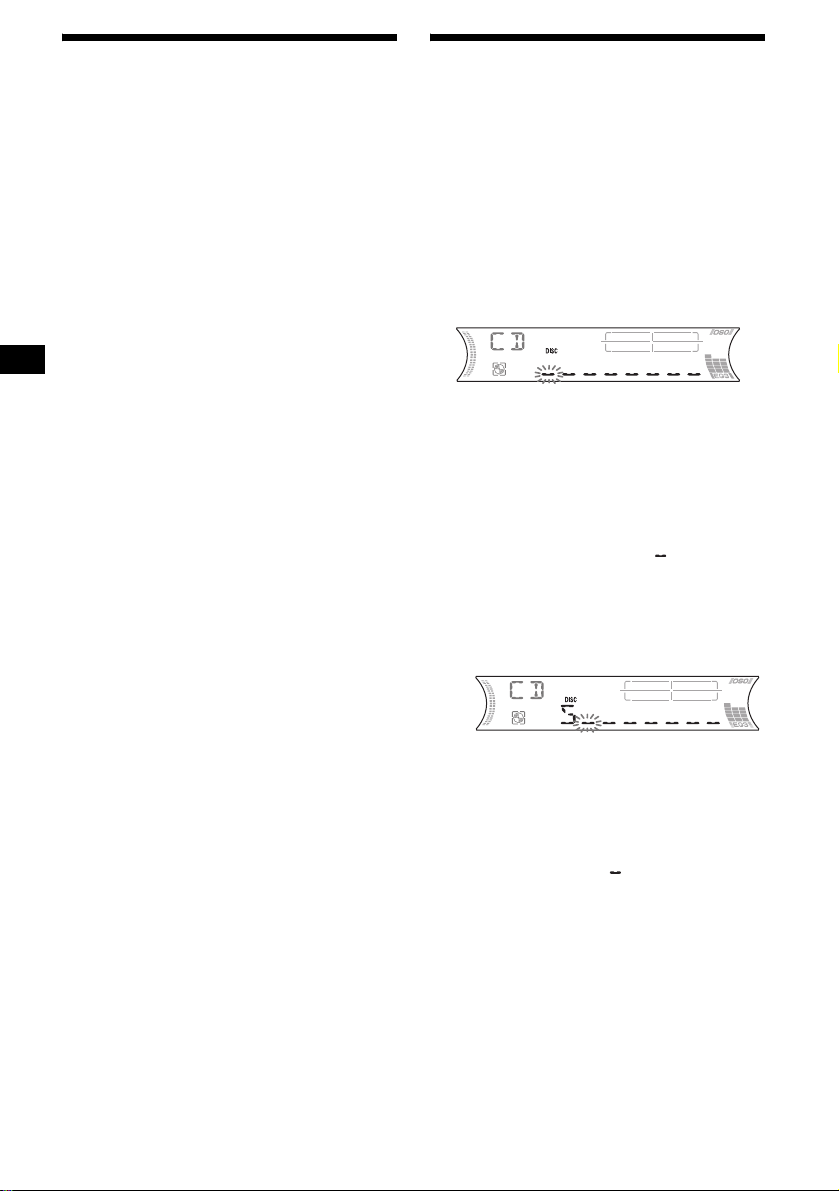
1 Press (DSPL) for 2 seconds.
The hour indication flashes.
1 Press the volume +/– button to set
the hour.
2 Press (SEL).
The minute indication flashes.
3 Press the volume +/– button to set
the minute.
2 Press (DSPL).
The clock starts. After the clock setting is
completed, the di splay returns to norm al play
mode.
Tip
You can set the clock automatically with the RDS
feature (page 19).
9
Page 10
MD Player
MD/CD Unit (optional)
In addition to playi ng an MD (MD having group
settings) with this unit, you can also control
external MD/CD (MP3 playable CD) units. If
you connect optional MP3 playable CD units
(eg., MP3 CD changer), you can play MP3 files;
compressed audi o files ( tr acks) with quality of
sound.
Playing a disc
(With this unit)
1 Press (OPEN) and inse rt the disc
(labelled side up).
2 Close the fron t p anel.
Playback starts automatically.
If a disc is already inserted, press (SOURCE)
repeatedly unti l “M D ” appears to start playback.
To Press
Stop playba ck (OFF)
Eject the disc (OPEN) then Z
Skip tracks
–Automatic
Music Sensor
Fast-forward/
reverse
–Manual Search
Skip GP*
–GP selection
* Available only when an MD containing groups is
inserted in this unit and played.
(SEEK) (–/+)
(./>)
[once for each tr ack]
(SEEK) (–/+)
(m/M)
[hold to desired po int]
(5)(GP–) or (6)(GP+)
[once for each g roup]
[hold to desired gr oup]
To skip tracks continuously, press (SEEK) (+) or
(SEEK) (–), then press again within 2 seconds
and hold.
Notes
• Depending on the condition of the disc, it may not
play back (page6).
• While the first/last track on the disc is playing, if
(SEEK) (–) or (SEEK) (+) is pressed, playback skips
to the last/first track of the disc.
• When the last track on the disc is over, playback
restarts from the first track of the disc.
(With optional unit)
1 Press (SOURCE) repeatedly to select
“MD (MS*
1
)” or “CD.”
2 Press (MODE) repeatedly until the
desired unit appears.
Playback starts.
To Press
Skip discs
–Disc selection
Skip albums*
–Albums selection
*1 MS: MG Memory Stick System-up Player MGS-X1
*2 Available only when an optional CD unit with the
MP3 file control function is connected, and MP3 file
is played.
Cautions when c onn ect in g M GS-X1 a nd MD un it( s )
This unit recognizes MGS-X1 as an MD unit.
• When you want to play MGS-X1, press (SOURCE) to
select “MD.” When “MD” appear s in the source
display, press (MODE) to select “MS,” to start
playback.
• When you want to play an MD unit, press (SOURCE)
to select “MD. ” If your desired MD unit appears in the
source display, it starts to play. If “MS” or another
MD unit appears in the source display, press
(MODE) to select your desired MD unit, to start
playback.
Notes when connecting MP3 playable CD unit(s)
• If a disc with no MP3 files (tracks) is inserted, “NO
MUSIC” appears in the display and playback of the
next disc starts.
• Before playing a track, this unit reads all track and
album information on the disc. Depend ing on the
track structure, it may take more than a minute
before playback begins. During this time, “READ” is
displayed. Play will automatically start when reading
is complete.
Note
With an optional unit connected, playback of the same
source will continue on to the optional MD/CD unit.
(1)(DISC–) or
(2)(DISC+)
[once for each disc ]
[hold to desired disc]
2
(5)(ALBM–) or
(6)(ALBM+)
[once for each album]
[hold to desire d album]
10
Page 11

Display items
When the disc/group/album/track changes, any
prerecorded title*
track is automatically displayed. (If the A.SCRL
(Auto Scroll) function is set to “ON,” names
exceeding 8 charac te rs will be scrolled
(page 22).)
Source
Displayable items
• Disc number/Track number/
•Disc name*
• Track (file) name*1*
•Clock
• Album (folder) name*
•ID3 tag*
To Press
Switch display item (DSPL)
1
of the new disc/group/alb um/
MDLP display*
LP2: LP2 playback
LP4: LP4 playback
Elapsed playing time
Artist name*
1
/Group name*3/
4
5
2
5
5
Playing tracks repeatedly
— Repeat Play
You can select:
(With this unit)
• REP-TRACK — to re peat the current tra ck.
•REP-GP*1 — to repeat tracks in the current
group.
(With optional units)
• REP-TRACK — to repeat the current track.
• REP-ALBM*2 — to repeat the tracks in the
current album.
• REP-DISC*3 — to repeat the tracks in the
current disc.
*1 Available only when an MD containing groups is
inserted in this unit and played.
*2 Available only when an optional CD unit with the
MP3 file control function is connected, and MP3 file
is played.
*3 Available only when one or more optional MD/CD
units are connected.
During playback, press (3) (REP)
repeatedly until the desired setting
appears in the display.
Repeat Play s t arts.
To return to normal play mode, select
“REP-OFF.”
*1 When pressing (DSPL), “NO NAME” indicates that
there is no Disc Memo (page 12) or no prerecorded
name to display.
*2 Available only when an MDLP disc is played.
*3 Available only when an MD containing groups is
inserted in this unit and played.
*4 Only for CD TEXT discs with the artist name.
*5 Only for MP3 files.
Only track name/artist name/album name in ID3
tag is displayed.
When pressing (DSPL), “NO ID3” indicates that
there is no ID3 tag to display.
Notes
• Some characters cannot be displayed. Characters
and signs which cannot be displayed appear as “ *.”
• For some CD TEXT discs or ID3 tags with very
many characters, information may not scroll.
• This unit cannot display the artist name for each
track of a CD TEXT disc.
Tips
• When the A.SCRL (Auto Scroll) function is set to
“OFF” and the disc/group/album/track is changed,
the disc/group/album/track name or ID3 tag does not
scroll.
• When an MD containing groups is played and the
group is changed, the new group number is
displayed. Likewise, when an MP3 file is play ed and
the album is changed, the new album number is
displayed.
11
Page 12
Playing tracks in random
order
— Shuffle Play
You can select:
(With this unit)
•SHUF-GP*1 — to play tracks in the current
group in random or der.
• SHUF-DIS C — to play the tracks on the
current disc in ra ndom order.
(With optional units)
•SHUF-ALBM*2 — to play the tracks in the
current album in random order.
• SHUF-DISC — t o play the tracks on the
current disc in ra ndom order.
• SHUF-CHGR*3 — to play the tracks in the
current optional MD (CD) c h anger in random
order.
• SHUF-ALL*4 — to play all the tracks in all th e
connected MD (CD) units (including thi s unit)
in random order.
*1 Available only when an MD containin g groups is
inserted in this unit and played.
*2 Available only when an optional CD unit with the
MP3 file control function is connected, and MP3 file
is played.
*3 Available only when one or more optional MD (CD)
changers are connected.
*4 Available only when one or more optional MD units,
or two or more optional CD units are connected.
During playback, press (4) (SHUF)
repeatedly until the desired se ttin g
appears in the display.
Shuffle Play starts.
To return to normal play mode, select
“SHUF-OFF.”
Note
“SHUF-ALL” will not shuffle tracks between MD units
and CD units.
Labelling a CD
— Disc Memo (For a CD unit with the
CUSTOM FILE function)
You can label each dis c w i th a custom name
(Disc Memo). You can enter up to 8 characters
for a disc. If you label a CD, you can locate the
disc by name (page 13).
1 Start playing the disc you want to label
in a CD unit with the CUSTOM FILE
function.
2 Press (PTY) (LIST) for 2 seconds.
The unit will repeat the disc during the
labelling procedure.
3 Enter the characters.
1Press the volume +/– button to
select the desired character.
A y B y C ... y 0 y 1 y 2 ...
y + y – y
*(blank space)
2Press (SEL) afte r l ocating the
desired character.
The next characte r flashes.
3Repeat steps 1 and 2 to enter the
entire name.
4 To return to normal play mode, press
(PTY) (LIST) for 2 second s.
Tips
• Simply overwrite or enter “ ” to correct or erase a
character.
• You can label CDs on a unit without the CUSTOM
FILE function if that unit is connected along with a
CD unit that has the function. The Disc Memo will be
stored in the memory of the CD unit with the
CUSTOM FILE function.
Note
REP-TRACK/SHUF play is suspended until the name
edit is complete.
... y * y A
*
12
Page 13

Viewing the Disc Memo
As a display item, the Disc Memo always takes
priority over any original CD TEXT information.
To Press
View (DSPL) during CD/CD
Tip
Other items can be displayed (page 11).
TEXT disc playback
Erasing the Disc Memo
1 Press (SOURCE) repeatedly to select
“CD.”
2 Press (MODE) repeatedly to select the
CD unit storing the Disc Memo.
3 Press (PTY) (LIST) for 2 seconds.
4 Press (DSPL) for 2 seconds.
The stored names will appear.
5 Press the volume +/– button
repeatedly to select the disc name you
want to erase.
6 Press (SEL) for 2 seconds.
The name is eras ed.
Repeat ste ps 5 and 6 if you want to erase
other names.
7 Press (PTY) (LIST) for 2 seconds.
The unit returns to normal play mode.
Notes
• When the Disc Memo for a CD TEXT disc is erased,
the original CD TEXT information is displayed.
• If you cannot find the Disc Memo you want to erase,
try selecting a different CD unit in step 2.
• If you have alrea dy erased all of the Dis c Mem o, the
unit returns to normal play mode in step 4.
Locating a disc by name
— List-up (For an MD unit, or a CD unit with
the CD TEXT/CU STOM FILE function)
Y ou can use this function for discs that have been
assigned custom names*
2
discs*
.
*1 Locating a disc by its custom name: when you
assign a name for an MD or a CD (page 12).
*2 Locating discs by the CD TEXT information: when
you play a CD TEXT disc on a CD unit with the CD
TEXT function.
1 During playback, press (PTY) (LIST).
The name assi gned to the curr ent disc app ears
in the display.
2 Press (PTY) (LIST) repeatedly until
you find the desired disc.
3 Press (SEEK) (+) or (SEEK) (–) to play
the disc.
Notes
• Once a disc name has been displayed for 5
seconds, the display goes back to its normal
playback mode.
• If there are no discs in the magazine, “NO DISC”
appears in the display.
• If a disc has not been assigned a custom file, “NO
NAME” appears in the display.
• If the disc information has not been read by the unit,
“NOT READ” appears in the display. To load the
disc, first press the number button, then choose the
disc that has not been loaded.
• The information appears only in upper case. There
are also some letters which cannot be displayed.
1
or for CD TEXT
13
Page 14

Radio
The unit can stor e up to 6 stations per band
(FM1, FM2, FM3, MW, and LW).
Caution
When tuning in stations while driving, use Best
Tuning Memory to prevent accidents.
Storing stations
automatically
— Best Tuning Memory (BTM)
The unit selects the stations with the strongest
signals within the selected band, and stores them
in the order of their frequency.
1 Press (SOURCE) repeatedly to select
the radio.
2 Press (MODE) repeatedly to select the
band.
3 Press (SENS) (BTM) for 2 seconds.
The unit stores stations in the order o f t hei r
frequencies on th e number buttons.
A beep sounds when the setting is stored.
Notes
• If only a few stations can be received due to weak
signals, some number buttons will retain their former
settings.
• When a number is indicated in the display, the unit
starts storing stations from the one currently
displayed.
Receiving the stored stations
1 Press (SOURCE) repeatedly to select
the radio.
2 Press (MODE) repeatedly to select the
band.
3 Press the number button ((1) to (6))
on which the desired station is stored.
If preset tuning does not work
— Automatic tuning/Local Seek Mode
Automatic tuning:
Press (SEEK) (+) or (SEEK) (–) to
search for the station.
Scanning stops when the unit receives a
station. Repeat the operation until the desired
station is received.
Local Seek Mode:
If the automatic tuning stops too
frequently, press (SENS) (BTM)
repeatedly until “LOCAL-ON” appears.
“LCL” indicator is displayed.
Only the stations with relatively strong
signals will be tuned in.
To cancel the local seek mode, press (S ENS)
(BTM) twice when receiving FM.
Note
When receiving MW or LW, to cancel the local seek
mode, press (SENS) (BTM) (“LOC AL- O F F” appea rs) .
Tip
If you know the frequency of the station you want to
listen to, press and hold (SEEK) (+) or (SEEK) (–) to
locate the approximate frequency, then press
(SEEK) (+) or (SEEK) (–) repeatedly to fine adjust to
the desired frequency (manual tuning).
14
Page 15
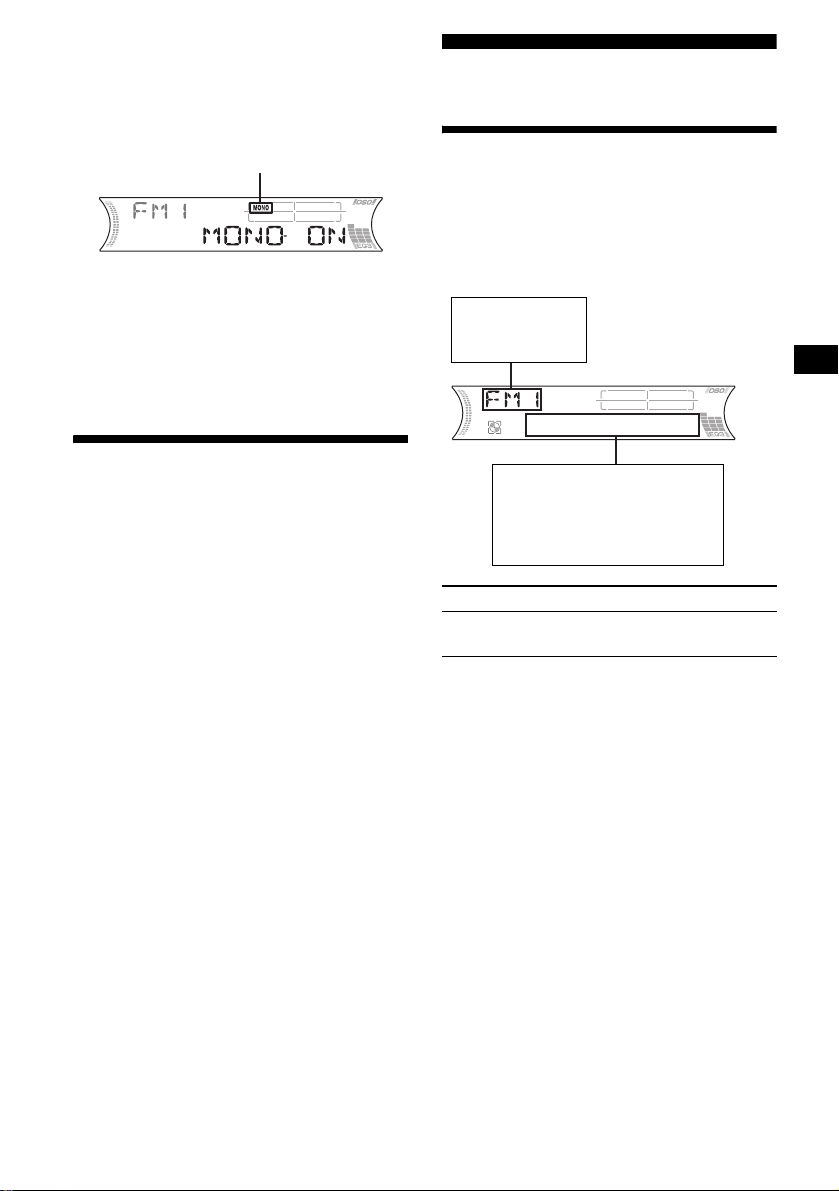
If FM stereo reception is poor
— Monaural Mode
During radio reception, press (SENS)
(BTM) repeatedly until “MONO-ON”
appears.
“MONO” indicator is displayed.
The sound improves, but becomes monaural
(“STEREO” disappears).
To return to n or mal radio recepti on mode, press
(SENS) (BTM) (“MO N O-OFF” appears).
Tip
If FM broadcasts are difficult to hear, set DSO to
“OFF” (page 23).
RDS
Overview of RDS
FM stations with Ra di o D ata System (RDS)
service send ina udible digital information along
with the regular radio programme signal. For
example, one of the following will be displayed
upon receiving a station w i th RD S capability.
Displayable items
• Radio band
• Function
Storing only the desired
stations
You can manually pre set the desired stations on
any chosen number button.
1 Press (SOURCE) repeatedly to select
the radio.
2 Press (MODE) repeatedly to select the
band.
3 Press (SEEK) (+) or (SEEK) (–) to tu ne
in the station that you want to store.
4 Press the desired number button ((1)
to (6)) for 2 seconds until “MEM”
appears.
The number button in di cation appears in the
display.
Note
If you try to store another station on the same number
button, the previously stored station will be erased.
Displayable ite m s
• Preset number/Station
name (frequency)
•Clock
• RDS data
To Press
Switch Clock/
Station name
(DSPL)
RDS services
RDS data offers you other conveniences, such as:
• Automatic ret uning of a programme, helpful
during long-distance dri v e s. — AF t page 16
• Receiving traffic announcements, even
when enjoying another programme/s our ce.
— TA t page 17
• Selecting stations by the type of
programme. — PTY t page 18
• Automatic clock time setting.
— CT t page 19
Notes
• Depending on the country/region, not all of the RDS
functions are available.
• RDS will not work properly if the signal strength is
too weak or if the station you are tuned to is not
transmitting RDS data.
15
Page 16
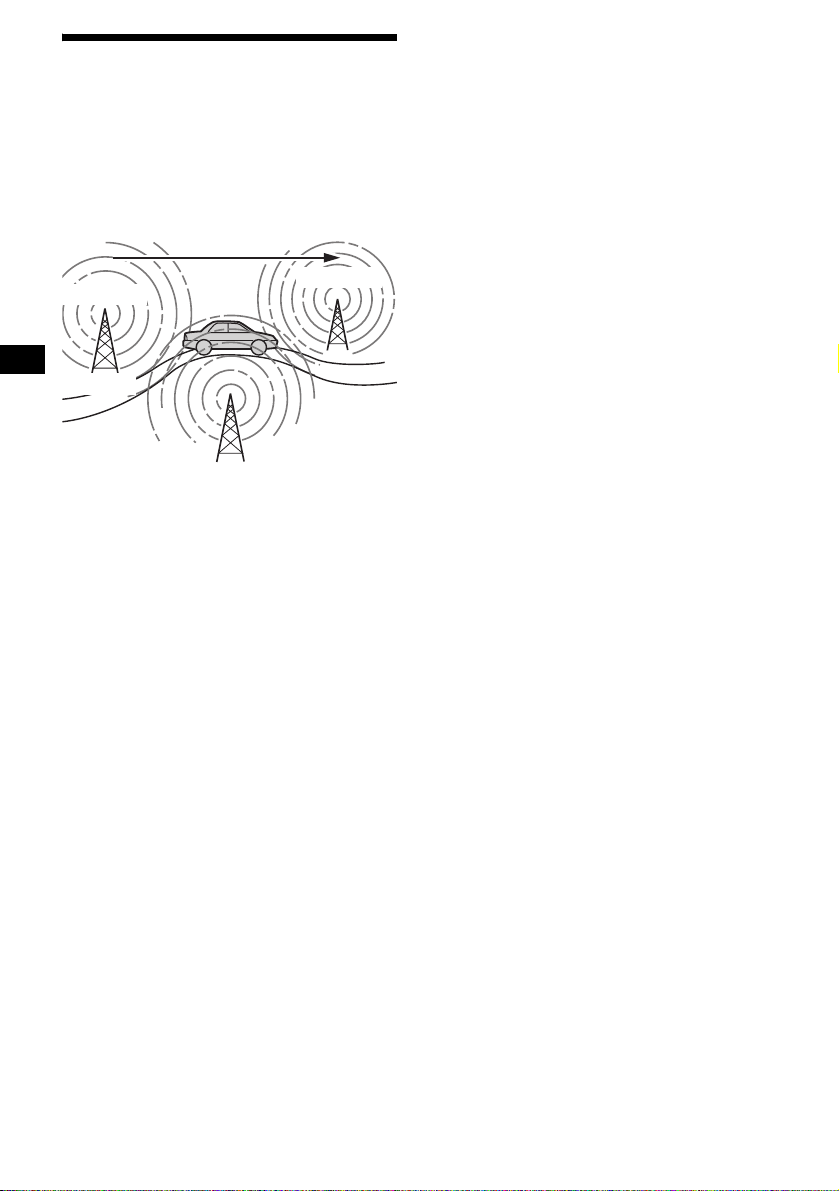
Automatic retuning for best
reception results
— AF (Alternative Frequencies)
The AF function allows the radio to always tune
into the area’s strongest signal for the station you
are listening to.
Frequencies change automatically.
For stations without alternative
frequencies
Press (SEEK) (+) or (SEEK) (–) while
the station name is flashing (within 8
seconds).
The unit starts searching for anothe r
frequency with the same PI (Programme
Identification) data (“PI SEEK” appears).
If the unit cannot find the same PI, the unit
returns to the previously selected frequency.
98.5 MHz
Station
96.0 MHz
102.5 MHz
1 Select an FM station (page 14).
2 Press (AF/TA) repeatedly until “AF-
ON” appears.
The unit starts searching for an alternative
frequency with a stronger signal in the same
network.
If “NO AF” flashes, the currently tuned
station does not have an alternative frequency.
To cancel the AF function, select “AF, TA-OFF.”
Tips
• If “AF-ON” is selected, traffic announcements are
cancelled. To activate the traffic announcements
with the AF function, select “AF, TA-ON.”
• If you want to change the on/off setting while playing
an MD, press (AF/TA).
Staying with one regional programme
When the AF function is on: this unit’ s factory
setting restr ic ts reception to a spec ific regi on, so
you will not be switched to another regional
station with a stronger frequency.
If you leave this regional program me’s reception
area or would like to take advantage of the whole
AF function, press (SEL) and (AF/TA)
simultaneously until “REG-OFF” appears.
Note
This function does not work in the United Kingdom
and in some other areas.
Local Link function
(United Kingdom only)
This function ena b les you to se lect other local
stations in the area, even if the y are not store d on
your number buttons.
1 Press the number button ((1) to (6))
that has a local station stored on it.
2 Within 5 seconds, press t he num ber
button of the local station again.
3 Repeat this procedure until the
desired local station is received.
16
Page 17

Receiving traffic
announcements
— TA (Traffic Announcement)/TP (Traffic
Programme)
By activating TA and TP, you can automatically
tune in an FM station broadcasting traffic
announcements. These settings func ti on
regardless of the current FM programme/source,
MD/CD; the unit switches back to the original
source when the bull et in is over.
Presetting RDS stations with
the AF and TA setting
When you preset RDS stations, the unit stor es
each station’s AF/TA setting (on/off) as well as
its frequency. You can select a different se tt i ng
(for AF, TA, or both) for individual p reset
stations, or the same setting for all preset
stations. If you preset stations with “AF , TA-ON”
the unit automatically stores stations with the
strongest radio signal.
Press (AF/TA) repeatedly until “TAON” appears.
The unit starts searching for traffic
information stations.
“TP” indicates reception of such s tatio ns, and
“TA” flashe s during an actua l tr affic
announcement. The unit will continue
searching for stations available with TP if
“NO TP” is indicated.
To cancel all tr affic announcements, select “AF,
TA-OFF.”
To Press
Cancel current
announcement
Tips
• If “TA-ON” is selected, the AF function is cancelled.
To activate the AF function with traffic
announcements, select “AF, TA-ON.”
• You can also cancel the current announcement by
pressing (SOURCE) or (MODE).
Presetting the volume of traffic
announcements
You can preset the volume level of the t ra ffic
announcements s o as not to miss hearing the m.
(AF/TA)
1 Press the volume +/– button to adjust
the desired volume level.
2 Press (AF/TA) for 2 seconds.
“TA” appear s and the setting is stored.
Presetting the same setting for all
preset stations
1 Select an FM band (page 14).
2 Press (AF/TA) repeatedly to select
“AF-ON”, “TA-ON” or “AF, TA-ON.”
Note that selecting “AF, TA-OFF” applies to
non-RDS stations as we ll as RDS stations.
3 Press (SENS) (BTM) until “BTM”
flashes.
Presetting different settings for each
preset station
1 Select an FM band, and tune in the
desired station (page 14).
2 Press (AF/TA) repeatedly to select
“AF-ON”, “TA-ON” or “AF, TA-ON.”
3 Press the desired number button ((1)
to (6)) until “MEM” appears.
Repeat from ste p 1 t o preset other statio ns.
Note
If you want to change the AF/TA setting while you are
playing an MD, press (AF/TA).
Receiving emergency annou nce men ts
If either AF or TA is on, the unit will switch to
emergency announceme nt s, if one comes in
while listening to an FM station or MD/CD.
17
Page 18

Tuning in stations by
programme type
— PTY (Programme types)
You can tune in a station by sel ecting the type of
programme you would like to listen to.
Programme types Display
News NEWS
Current Affairs AFFAIRS
Information INFO
Sports SPORT
Education EDUCATE
Drama DRAMA
Culture CULTURE
Science SCIENCE
Varied VARIE D
Popular Music POP M
Rock Music ROCK M
Easy Listening EASY M
Light Classical LIGHT M
Classical CLASSICS
Other Music Type OTHER M
Weather WEATHER
Finance FINANCE
Children’s Programmes CHILDREN
Social Affairs SOCIAL A
Religion RELIGION
Phone In PHONE IN
Travel TRAVEL
Leisure LEISURE
Jazz Music JAZZ
Country Musi c COU N TRY
National Music NATION M
Oldies Music OLDIES
Folk Music FOLK M
Documentary DOCUMENT
1 Press (PTY) (LIST) during FM
reception.
The current progra mme type name appea rs if
the station is transmitting the PTY data.
“--------” ap pears if the received station i s not
an RDS station, or if the RDS data is not
received.
2 Press (PTY) (LIST) repeatedly until the
desired programme type appears.
The programme types appear in the order
shown in the table.
“NONE” appears if the programme type is
not specified in the RDS data.
3 Press (SEEK) (+) or (SEEK) (–).
The unit starts searching for a statio n
broadcasting the selected programme type.
Note
Y ou cannot use this function in some countries/regions
where no PTY data is available.
18
Page 19
Setting the clock
automatically
— CT (Clock Time)
The CT data from the RDS transmission sets the
clock automatically.
Other Function s
You can also contr ol the unit (and optiona l M D /
CD units) with a rotary commander (optional).
Selecting “CT-ON”
During radio reception, press (SEL)
and (2) simultaneously.
The clock is set .
After one second, the display returns to
normal radio reception mode.
To select “CT-OFF,” press (SEL) and (2)
simultaneously again.
Notes
• The CT function may not work even though an RDS
station is being received.
• There might be a difference between the time set by
the CT function and the actual time.
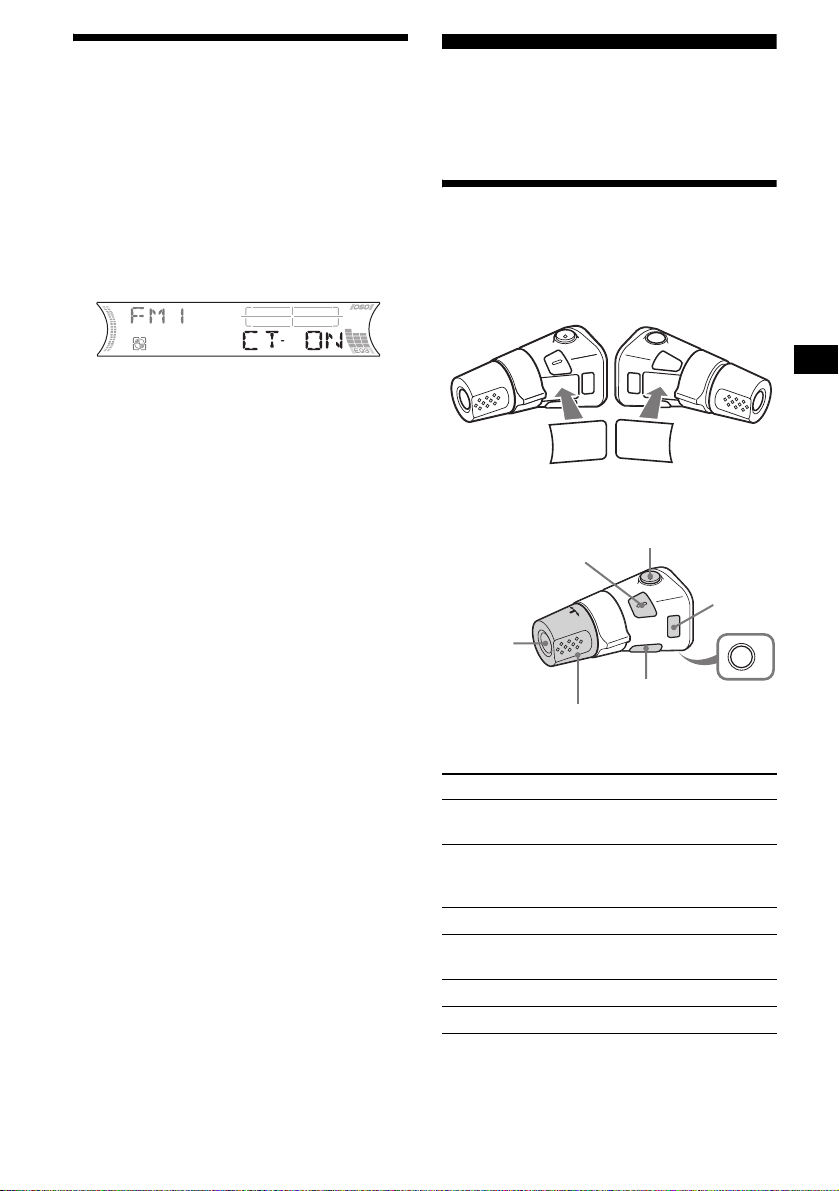
Using the rotary commander
First, attach the appropriate label depending on
how you want to mount the rotary commander.
The rotary comm ander works by pressing
buttons and/or rotating controls.
SEL
DSPL
By press ing buttons
(SEL)
(SOURCE)
Rotate the VOL control
to adjust the volume.
Press To
(SOURCE) Change the sour ce
(MODE) Change operation
(ATT) Attenuate the sound
2
(OFF)*
(SEL) Adjust and select
(DSPL) Change the displ ay i tem
DSPL
MODE
MODE
SEL
(ATT)
(DSPL)
(MODE)
(OFF)
(Radio/MD/CD*1)/Power on
(Radio band/MD unit*1/CD
1
unit*
)
Stop playback or radio
reception/Power off
OFF
continue to next page t
19
Page 20
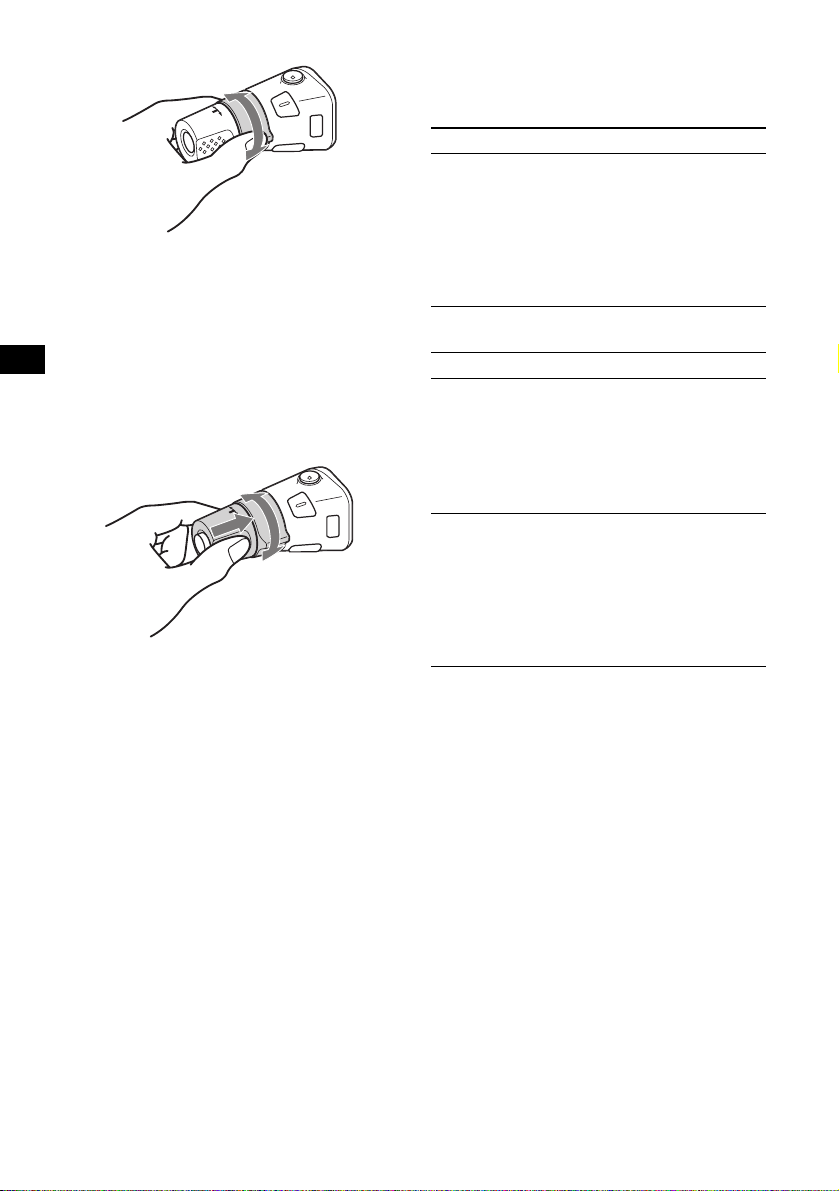
By rotating the control
SEEK/AMS
control
Rotate and release to:
– Skip tracks.
To continuous ly skip trac ks, rotate once and
rotate again within 2 seconds and hold the
control.
– Tune in stations automatica lly.
Rotate, hold, and release to:
– Fast-forw ard/reverse a track.
– Find a station manually.
By pushing in and rotating the control
PRESET/DISC
control
Push in and rotate the control to:
– Receiv e preset stations.
– Change discs duri ng MD (CD) playback*1.
– Change groups*3.
– Change albums*4.
When an MD con ta in i ng groups, or an MP3 file
is played, you can select a group (MD), or an
album (MP3 file) using the rotary commander.
(With this unit)
To Do this
Skip groups*
–Group selection
3
1 To ente r Gr oup selection
mode, push in, then rotate
and hold the control.
Withi n 2 seconds,
proceed to step 2.
2 Push in, then rotate
quickly and repeatedly, to
skip groups one by one.
(With optional unit)
To Do this
Skip discs
–Disc selection
Push in and rotate [once for
each disc] the c ont r o l .
To continuously skip discs,
push in and rotate once and
rotate again within 2
seconds (and hold) the
control.
Skip albums*
–Album selection
4
1 To enter Album selection
mode, push in, then rotate
and hold the control.
Withi n 2 seconds,
proceed to step 2.
2 Push in, then rotate
quickly and repeatedly, to
skip albums one by one.
*1 Only if the corresponding optional equipment is
connected.
*2 If your car has no ACC (accessory) position on the
ignition key switch, after turning off the ignition, be
sure to press and hold (OFF) until the display
disappears.
*3 Available only when an MD containing groups is
inserted in this unit and played.
*4 Available only when an optional CD unit with the
MP3 file control function is connected, and MP3 file
is played.
20
Page 21

Changing the operative direction
The operative direction of controls is factory-se t
as shown below.
To increase
To decrease
If you need to mount the rotary commander on
the right hand side of the steering column, you
can rev erse the operative direction.
Press (SEL) for 2 seconds while
pushing the VOL control.
Note
If you press (SEL) for 2 seconds while pushing the
VOL control, “NORM” or “REV” appears in the display.
– “NORM” is to use the rotary commander at the
factory-set position.
– “REV” is to use the rotary commander when it is
mounted on the right side of the steering column.
Adjusting the sound
characteristics
You can adjust the balance, fader, low pass filter
and subwoofer volume.
1 Press (SEL) repeatedly until “BAL,”
“FAD,” “LPF” or “SUB” appea rs.
Each time you press (SEL), the ite m changes
as follows:
1
LOW*
t MID*1 t HI*1 t
BAL (left-right) t FAD (front-rear) t
LPF (low pass filter)*
SUB (subwoofer volume)*
*1 When EQ3 is activated (page 23).
*2 When “SUB” is selected (page 22).
*3 The cut off frequency is adjustable to 78 Hz,
125 Hz, or OFF.
*4 The volume level is adjustable between –10
and +10 steps. (Below –10, “ATT” is displayed.)
2*3
t
2*4
2 Press the volume +/– button to adjust
the selected item.
Note
Adjust within 3 seconds after selecting the item.
Quickly attenuating the
sound
Press (ATT).
After “ATT-ON” momentarily appears,
“ATT” appears in the di splay.
To restore the previous volume level, press
(ATT) again.
Tip
When the interface cable of a car telephone is
connected to the ATT lead, the unit decreases the
volume automatically when a telephone call comes in
(Telephone ATT function).
21
Page 22

Changing the sound and
display settings
The following items can be set:
• REAR/SUB*1 — to switch the audi o output
REAR or SUB.
– Select “REAR” t o output to a power
amplifier.
– Select “SUB ” t o output to a subwoofer.
• CT (Clock Time) (page19)
• A.SCRL (Auto Scroll)*2 (page 11).
• M.DSPL (Motion Display) — to turn the
motion display on or off.
– Select “ON” to activate the motion display
(the moving pattern a ppears in the display ).
– Select “OFF ” t o deactivate the motion
display.
•DEMO*1 — to turn the demonstration display
on or off.
– Select “ON” to activate the demonstration
display (the demonstration starts a bout 10
seconds after the unit is turned off).
– Select “OFF ” t o deactivate the
demonstration display.
•BEEP*3 — to turn the beeps on or off.
• DIM (Dimmer) — to change the brightness of
the display.
– Select “ON” to dim the display.
– Select “OFF” to deactivate the Dimmer.
Switching the REAR/SUB*
1
Press (SEL) and then press the
volume + (REAR) or – (SUB) button.
After 3 seconds, the display returns to normal
play mode.
Selecting the desired item
Press (SEL) and the desired button
simultaneously.
(SEL) + (2): CT
(SEL) + (3): A.SCRL*
2
(SEL) + (4): M.DSPL
(SEL) + (4): DEM O *
(SEL) + (6): BEEP*
1
3
(SEL) + (DSPL): DIM
After the mode setting is completed, the display
returns to normal play mode.
To cancel the item, press (SEL) and the desired
button simultaneously again.
*1 When the unit is turned off.
*2 When MD or CD is played.
*3 The beep sound is output only when the built-in
amplifier is used.
22
Page 23
Setting the equalizer (EQ3)
You can select an eq ualizer curve for 7 music
types (XPLOD, VOCAL, CLUB, JAZZ, NEW
AGE, ROCK, CUSTOM, and OFF (equalizer
OFF)).
You can store a different e qualizer setting for
each source.
Selecting the equalizer curve
1 Press (SOURCE) to select a source
(Radio , MD or CD).
2 Press (EQ3) repeatedly to select the
desired equalizer cur ve.
Each time you pr ess (EQ3), the item
changes.
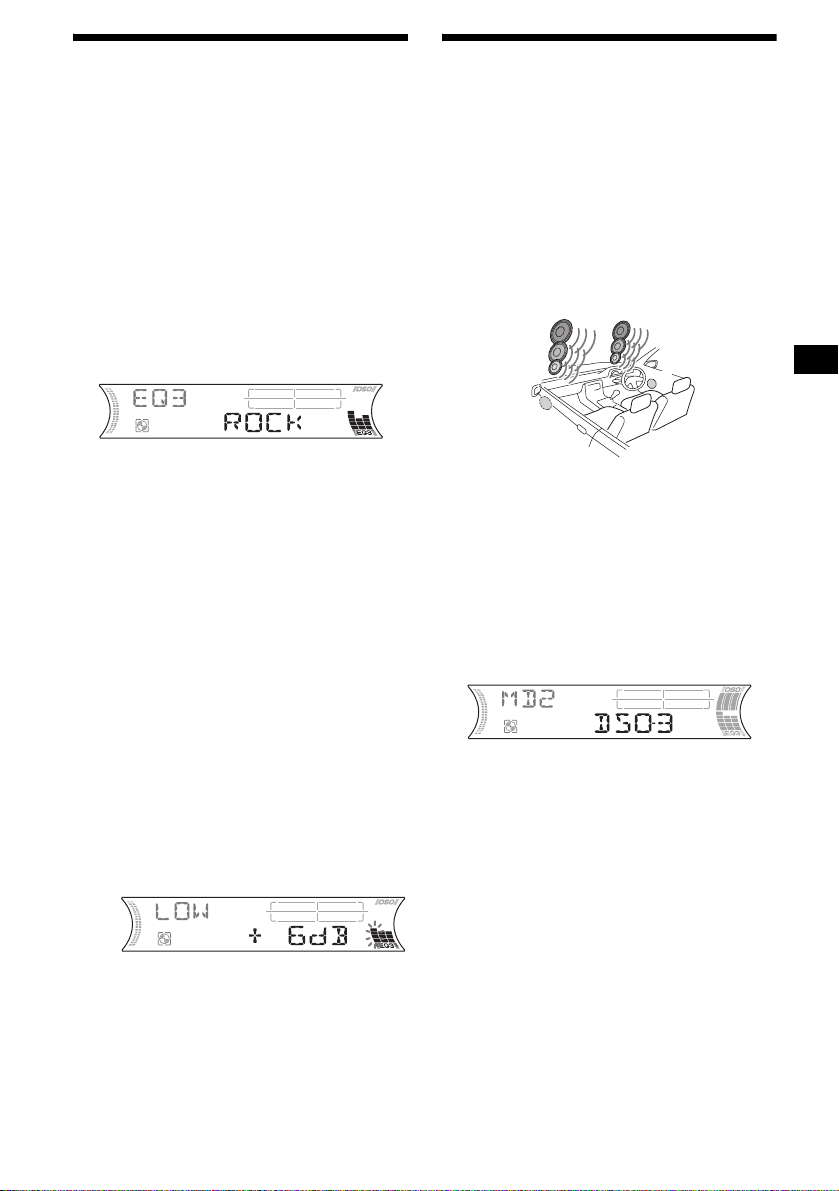
Setting the Dynamic
Soundstage Organizer (DSO)
If your speakers are installed into the lower part
of the doors, the sound will come from below
and may not be clear.
The DSO (Dynamic Soundstage Organizer)
function crea te s a more amb ien t s oun d as i f t he re
were speakers above the dashboard (virtual
speakers).
You can store the DSO setting for each source.
DSO mode and image of virtual speakers
*3
*2
*1
*4
*3
*2
*1
*4
To cancel the equalizing effect, select “O FF.”
Adjusting the equalizer curve
You can store and adj ust the equalizer se ttings
for different tone ranges.
1 Press (SOURCE) to select a source
(Radio , MD or CD).
2 Press (EQ3) repeatedly to select the
desired equalizer cur ve.
3 Adjusting the equalizer curve.
1 Press (SEL) repeatedly to select the
desired tone range.
Each time you press (SEL), the tone range
changes.
LOW t MID t HI (t BAL t FAD t
LPF t SUB)
2 Press the volume +/– button
repeatedly to adjust to the desired
volume level.
The volume level is adjustable by 1 dB
steps from –10 dB to +10 dB.
3 Repeat step 1 and 2 to adjust the
equalizer curve.
To restore the factory-set equalizer curve,
press (SEL) for 2 seconds.
After 1 second, the display returns to
normal play mode.
Note
When EQ3 is set to “OFF,” you cannot adjust the
equalizer settings.
*1 DSO-1
*2 DSO-2
*3 DSO-3
*4 DSO-OFF
1 Press (SOURCE) to select a source
(Radio, MD or CD).
2 Press (DSO) repeatedly until the
desired DSO setting appears.
Each time you press (DSO), the DSO setting
changes.
To cancel the DSO function, select “DSOOFF.” After 1 second, the display returns to
normal play mode.
Notes
• Depending on the type of car interior or type of
music, DSO may not have a desirable effect.
• If FM broadcasts are difficult to hear, set DSO to
“OFF.”
23
Page 24
Additional Information
Maintenance
Fuse replacement
When replacing th e fuse, be sure to use one
matching the amperage rating stated on the
original fuse. I f t he fuse blows, check the powe r
connection and replace the fuse. If the fuse blows
again after replacement, there may be an internal
malfuncti on . In such a case, consult your nearest
Sony dealer.
Cleaning the connectors
The unit may not function properly if the
connectors betw een the unit and the fr ont panel
are not clean. In order to prevent this, detach the
front panel (pa ge 8) and clean the connectors
with a cotton swab dipped in alcohol. Do not
apply too much force. Otherwise, the connectors
may be damaged.
Main unit
Fuse (10 A)
Warning
Never use a fuse with an amperage rating
exceeding the one supplied with the unit as this
could damage the un it.
Back of the front panel
Notes
• For safety, turn off the ignition before cleaning the
connectors, and remove the key from the ignition
switch.
• Never touch the connectors directly with your fingers
or with any metal device.
24
Page 25
Replacing the lithium battery
Under normal conditions, the battery will last
approximately 1 year. (The service life may be
shorter, depending on the co ndi tions of use.)
When the batt ery bec omes wea k, th e rang e of the
card remote commander becomes shorter.
Replace the battery with a new CR2025 lithium
battery. Use of any other battery may p resent a
risk of fire or explosion.
x
+ side up
Notes on lithium battery
• Keep the lithium battery out of the reach of
children. Should the battery be swallowed,
immediately consult a doctor .
• Wipe the battery with a dry cloth to assure a
good contact .
• Be sure to observe the correct polarity when
installing the battery.
• Do not hold the battery with metallic tweezers,
otherwise a short-circuit may occur.
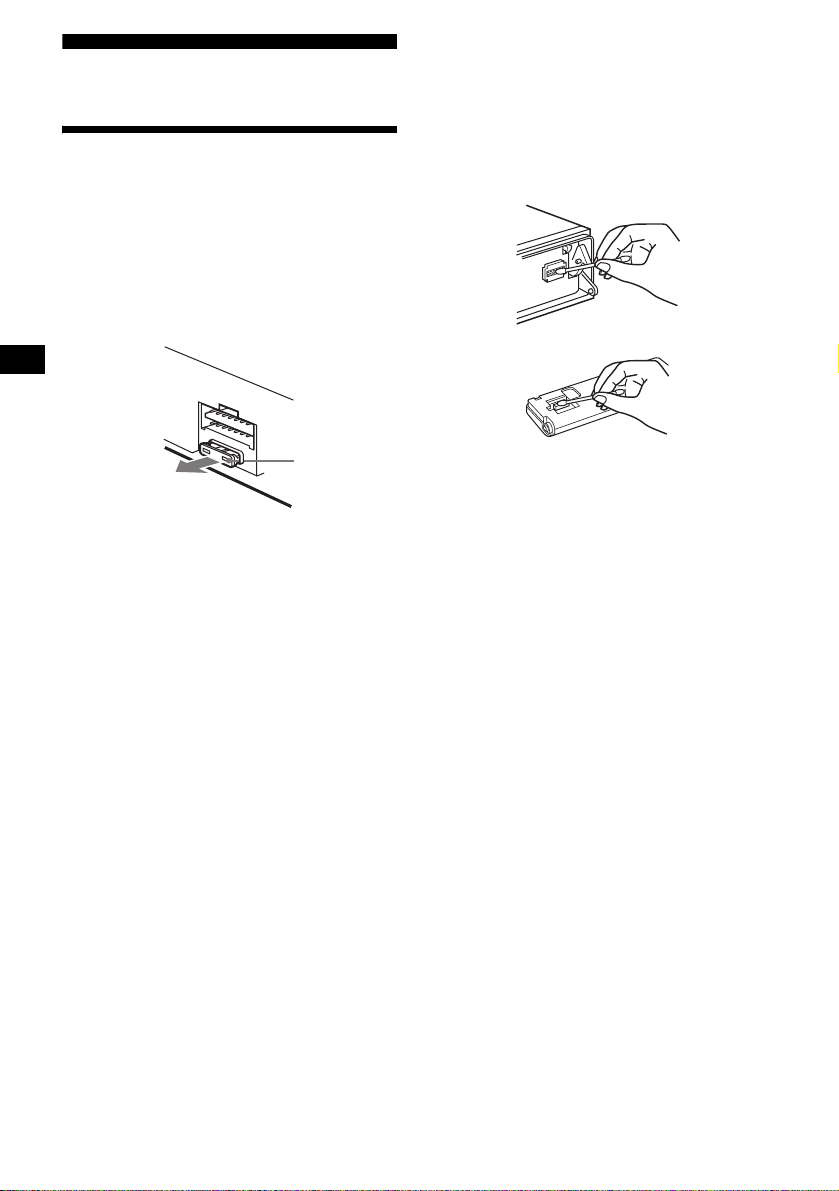
Removing the unit
1 Remove the protection collar.
1 Detac h the front panel (page 8).
2 Engage the rel ease keys together
with the protection collar.
Orient the release
key correctly.
3 Pull out the rele ase keys to remove
the protection collar.
2 Remove the unit.
1 Insert both release keys together
until t hey click.
Face the hook
inwards.
WARNING
Battery may explode if mistreated.
Do not recharge, disassemble, or dispose of
in fire.
2 Pull the release keys t o unseat the
unit.
3 Slide the unit out of the mounting.
25
Page 26

Specifications
MD Player section
Signal-to-noise ratio 90 dB
Frequency response 10 – 20,000 Hz
Wow and flutter Below measurable limit
Tuner section
FM
Tuning range 87.5 – 108. 0 MHz
Aerial terminal External aerial connector
Intermediate frequency 10.7 MHz/450 kHz
Usable sensitivity 9 dBf
Selectivity 75 dB at 400 kHz
Signal-to-noise ratio 67 dB (stereo),
Harmonic distortion at 1 kHz
Separation 35 dB at 1 kHz
Frequency response 30 – 15,000 Hz
69 dB (mono)
0.5 % (stereo),
0.3 % (mono)
MW/LW
Tuning range MW: 531 – 1,602 kHz
Aerial terminal External aerial connector
Intermediate frequency 10.7 MHz/450 kHz
Sensitivity MW: 30 µV
LW: 153 – 279 kHz
LW: 40 µV
Power amplifier section
Outputs Speaker out puts
Speaker impedance 4 – 8 ohms
Maximum power output 52 W × 4 (at 4 ohms)
(sure seal connectors)
General
Outputs Aud io output terminals
Inputs Telephone ATT cont ro l
Tone controls Low:
Power requirements 12 V DC car battery
Dimensions Approx. 178 × 50 × 181 mm
Mounting dimensions Approx. 182 × 53 × 161 mm
Mass Approx. 1.2 kg
Supplied accessories Parts for installation and
Optional accessories Card remote commander
Optional equipment CD changer (10 discs)
(front, rear/sub switchable)
Power aerial relay control
terminal
Power amplifier control
terminal
terminal
Remote controller input
terminal
BUS control input ter minal
BUS audio input terminal
Aerial input termi nal
±10 dB at 60 Hz (XPLOD)
Mid:
±10 dB at 1 kHz (XPLOD)
High:
±10 dB at 10 kHz (XPLOD)
(negativ e eart h )
(w/h/d)
(w/h/d)
connections (1 set)
Front panel case (1)
RM-X114
Rotary commander
RM-X4S
BUS cable (supplied with
an RCA pin cord)
RC-61 (1 m), RC-62 (2 m)
CDX-757MX
CD changer (6 discs)
CDX-T70MX, CDX-T69
MD changer (6 discs)
MDX-66XLP
Source selector
XA-C30
AUX-IN Selector
XA-300
26
US and foreign patents licensed from Dolby
Laboratories.
Note
This unit cannot be connected to a digital preamplifier
or an equalizer which is Sony BUS system compatible.
Design and specifications are subject to chan ge
without notice.
Page 27

Troubleshooting
The following checklist will help you remedy
problems you may encounter with your un it.
Before going t hrough the checklist below, check
the connection and operating procedures.
General
No sound.
• Press the volume + button to adjust the
volume.
• Cancel the ATT function.
• Set the fader control to the centre positio n for
a 2-speaker system.
• You may play an MDLP disc with an
optional MD chang er without the MDLP
function (“LP: ···” may appear in the
display).
t Insert the MDLP disc in the unit to play.
The contents of the memory have been
erased.
• The RESET button has been pressed.
t Store again into the memory.
• The power lead or battery has been
disconnected.
• The power connecting lead is not connected
properly.
No beep sound.
• The beep sound is c ancelled (page 22).
• An optional power amplifier is connected
and you are not using the built-in amplifier.
The display disappears from/does not
appear in the display window.
• The display disappears if you press and hold
(OFF).
t Press and hold (OFF) again until the
display appe ar s.
• Remove the front panel and clean the
connectors. For det ai ls, see “Cleaning th e
connectors” on page 24.
Stored stations and correct time are erased.
The fuse has blown.
Makes noise when the ignition key is in the
ON, ACC, or OFF position.
The leads are not matched correctly with the
car’s accessory power connec to r.
No power is bei ng supplied to the unit.
• Check the connection. If everything is in
order , check the fuse.
• The car does not ha ve an ACC position.
t Press (SOURCE) (or insert an M D ) to
turn on the unit.
The power is continuous ly supplied to the
unit.
The car does not have an ACC position.
t After turning off the ignition, be sure to
press and hold (OFF) on the unit until the
display disappears.
The power aerial does not extend.
The power aerial does not have a rel ay box.
MD playback
An MD cannot be loaded.
• Another MD i s already loaded.
• The MD has been forc ibly inserted upside
down or in th e wr ong way .
Playback does not begin.
Defective MD.
A disc is automatically ejected.
The ambient temp erature exceeds 50°C.
MD group function does not work.
• The inserted MD in this unit does not contain
any groups.
• The current l y pl aying track may not be in a
group set by your MD recorder.
• You may play an MD containing groups
inserted in an optional MD changer.
t Ins ert the MD containing groups in this
unit.
The operation buttons do not function.
MD will not be ejected.
Press the RESET button.
The sound skips from vibration.
• The unit is installed at an angle of more than
45°.
• The unit is not installed in a sturdy part of
the car.
The sound skips.
Dirty or defective disc.
Cannot turn off the “--------” indication.
You entered the name edit mode.
t Press (PTY) (LIST) for 2 seconds.
continue to next page t
27
Page 28

Radio reception
Preset tuning is not possible.
• Store the correct frequency in the memory.
• The broadcast si gnal is too weak.
The stations cannot be received.
The sound is hampered by noises.
• Connect a power aerial control lead (blue) or
accessory power suppl y lead (red) to the
power supply lead of a ca r’s aerial booster.
(Only when your car has built-in FM/MW/
L W ae rial in the rear/side gl ass.)
• Check the connection of the car aerial.
• The auto aerial will not go up.
t Check the connection of the power aer i al
control lead.
• Check the frequency.
• When the DSO mode is on, the sound is
sometimes hampered by noises.
t Set the DSO mode to “OFF” (page 23).
Automatic tuning is not possible.
• The local seek mod e is set to “O N.”
t Set the local seek mod e to “OFF”
(page 14).
• The broadcast si gnal is too weak.
t Perform manual tuning.
The “STEREO” indication flashes.
• Tune in the frequency accurately.
• The broadcast si gnal is too weak.
t Set the monaural reception mode to
“ON” (page 15).
A programme broadcast in stereo is heard
in monaural.
The unit is in monaural reception mode.
t Cancel monaural reception mode
(page 15).
RDS
The SEEK starts after a few seconds of
listening.
The station is non- TP or has weak signal.
t Press (AF/TA) repeatedly until “AF, TA-
OFF” appears.
No traffic announcements.
• Activate “TA.”
• The station does not broadcast any traffic
announcements de spite being TP.
t Tune in another station.
PTY displays “--------.”
• The current station is not an RDS station.
• RDS data has no t been received.
Error displays/Messages
Error displays
(For this unit and optional MD/CD changers)
The following indications will flash for about
5 seconds, and an alarm sound will be heard.
BLANK*
ERROR*
FAILURE
HI TEMP
NO DISC
NO MAG
NO MUSIC
NOTREADY
OFFSET
RESET
1
No tracks have been recor ded on an MD.*
2
t Play an MD with rec orded tracks on it.
1
• An MD is dirty or inser t ed upside down.*
2
t C l ean or insert the MD correctly.
• A MD/CD cann ot play because of some
problem.
t Insert another MD/CD.
The connection of speakers/amplifiers is
incorrect.
t See the installation guide manual of this
model to check the connection.
The ambient temperature is more than 50°C.
t Wait until the temperature goes down
below 50°C.
No disc is inserted in the MD/CD unit.
t Insert discs in the MD/CD unit.
The disc magazine is not inserted in the CD
unit.
t Insert the magazine in the CD unit.
A CD whic h is not a music file is inserted in
the MP3 playable CD unit.
t Insert a music CD in the MP3 playable CD
unit.
The lid of the MD unit is open or the MDs are
not inserted properly.
t Close the lid or insert the MDs properly.
There may be an internal malfunction.
t C heck the connection. If the error
indication remains on in the display,
consult your nearest Sony dealer.
The MD/CD unit ca nnot be operated becaus e
of some problem.
t Press the RESET butt o n on the un it.
28
*1 When an error occurs during playback of a MD or
CD, the disc number of the MD or CD does not
appear in the display.
*2 The disc number of the disc causing the error
appears in the display.
Page 29

If these solutions do not help improve the
situation, consult your nearest Sony de aler.
Messages
L.SEEK +/–
The loca l seek mode is on during autom a tic
tuning (page 14).
NO AF
There is no alt enati ve fr equenc y for the current
station.
“ ” or “ ”
You have reached the beginnin g or the end of
the disc and you cannot go any further.
29
Page 30
Willkommen!
Danke, dass Sie sich für diesen MiniDisc-Player
von Sony entschieden haben. Sie haben folgende
zusätzliche Möglichkeiten, um die vielfältigen
Funktionen des Ge räts noch besser nutz en zu
können:
• Gesondert er hältliche MD/CD-Geräte
(Wechsler und Player)*
• CD TEXT-Informationen (werden be i der
Wiedergabe einer CD mit CD TEXT*
einem gesondert er hältlichen CD-Ger ät
angezeigt).
• Gesondert erhältliches
Bedienungszubehör
Kartenfernbedienung RM-X114
Joystick RM-X4S
*1 Dieses Gerät arbeitet nur zusammen mit Sony-
Produkten.
*2 Eine CD mit CD TEXT ist eine Audio-CD, die
Informationen wie den Namen der CD, den Namen
des Interpreten und die Namen der Titel enthält.
Diese Daten sind auf der CD aufgezeichnet.
Dieses Etikett befindet sich an der Unterseite
des Gehäuses.
1
.
2
in
2
Page 31

Inhalt
Lage und Funktion der Tei l e und
Bedienelemente . . . . . . . . . . . . . . . . . . . . 4
Sicherheitsmaßnahmen . . . . . . . . . . . . . . . . . 6
Hinweise zu MDs . . . . . . . . . . . . . . . . . . . . . 6
Die MD-Gruppierungsfunktion. . . . . . . . . . . 7
Vorbereitungen
Zurücksetzen des Geräts . . . . . . . . . . . . . . . . 8
Abnehmen der Frontplatte. . . . . . . . . . . . . . . 8
Einstellen der Uhr . . . . . . . . . . . . . . . . . . . . . 9
MD-Player
MD/CD-Gerät (gesondert erhältlich)
Wiedergeben einer MD. . . . . . . . . . . . . . . . 10
Informationen im Display . . . . . . . . . . . . . . 11
Wiederholtes Wiedergeben von Titeln
— Repeat Play . . . . . . . . . . . . . . . . . . . . 12
Wiedergeben von Tit el n i n w i ll kürlicher
Reihenfolge
— Shuffle Play . . . . . . . . . . . . . . . . . . . . 13
Benennen einer CD
— Disc Memo*. . . . . . . . . . . . . . . . . . . . 13
Ansteuern eine r MD/CD anhand de s N amens
— List-up* . . . . . . . . . . . . . . . . . . . . . . . 15
* Funktionen, wenn ein zusätzlich erhältliches MD/
CD-Gerät angeschlossen ist
Radio
Automatisches Speichern vo n Radiosendern
— BTM (Best Tuning Memory). . . . . . . 15
Einstellen gespeicherter Sender. . . . . . . . . . 16
Speichern bestim m te r Radiosender . . . . . . . 16
RDS
Übersicht über RDS . . . . . . . . . . . . . . . . . . 1 7
Automatische s N eueinstellen von Se ndern für
optimale Empfangs qualität
— AF (Alternative Frequencies) . . . . . . 17
Empfangen von Ve rkehrsdurchsagen
— TA (Traffic Announcement)/
TP (Traffic Programme). . . . . . . . . . . . . 18
Speichern von RDS -S endern zusammen mit
der AF- und TA-Einstellung . . . . . . . . . 19
Einstellen von Sendern nach Programmtyp
— PTY (Programme Types) . . . . . . . . . 20
Automatisches Einstellen der Uhr
— CT (Clock Time). . . . . . . . . . . . . . . . 21
Weitere Funktionen
Der Joystick . . . . . . . . . . . . . . . . . . . . . . . . 21
Einstellen der Klangeigenschaften . . . . . . . 24
Schnelles Dämpfen des Tons . . . . . . . . . . . 24
Wechseln der Kla ng- und
Anzeigeeinstellungen. . . . . . . . . . . . . . . 24
Einstellen des Equalizers (EQ3). . . . . . . . . 25
Einstellen der DSO-Funktion (Dynamic
Soundstage Organizer) . . . . . . . . . . . . . . 26
Weitere Informationen
Wartung . . . . . . . . . . . . . . . . . . . . . . . . . . . 27
Ausbauen des Geräts. . . . . . . . . . . . . . . . . . 29
Technische Daten . . . . . . . . . . . . . . . . . . . . 30
Störungsbehebung. . . . . . . . . . . . . . . . . . . . 31
Fehleranzeigen/Meldungen. . . . . . . . . . . . . 33
3
Page 32

Lage und Funktion der Teile und Bedienelemente
Näheres finden Sie auf den angegebenen Seiten.
ATT
DSPL
SEL
–+
SOURCE MODE
OFF
a Lautstärketaste +/–
b Taste ATT (Dämpfen des Tons) 24
c Taste DSPL (Änder n des
Anzeigemodus) 9, 11, 14, 17, 25
d Taste SEL (Auswählen)
Auswählen von Optione n.
e Display
f Taste Z (Auswerfen) (bef indet sich an der
V orderseite des Geräts hinter der Frontplatte)
10
g Taste EQ3 25, 26
h Taste DSO 26
i Taste OPEN 8, 10
j Taste SEEK +/–
Radio:
Automatisches Einstellen von Sendern bzw.
manuelle Sender suche.
MD/CD (MP3-Dateien*
1
):
Überspringen von Titeln/Vorwärts- bzw.
Rückwärtssuchen in einem Titel.
k Empfänger für die
Kartenfernbedienung
l Taste SOURCE (Einschalten/Radio/
MD/CD*
2
)
Dient zum Auswählen der Tonquelle.
m Taste MODE
Dient zum Wechseln des Betriebsmodus.
n Taste OFF (Stopp/Ausschalten)*3
8, 10
4
DISC REP SHUF BTM LIST
1 2 3 4 5 6
–+
GP/ALBM
AF/TA SENS PTY
o Zahlentasten 25
Radio:
Speichern der gewünschten Sender auf den
einzelnen Za hlentasten.
MD/CD (MP3-Dateien*
(1): DISC – 11
(2): DISC + 11
(3): REP 12
(4): SHUF 13
(5): GP*
4
/ALBM*1 – 10, 11
(6): GP*4/ALBM*1 + 10, 11
p T aste RESET (befindet sic h a n der
V ordersei te des Geräts hinter d er Frontplatte)
8
q T aste AF/TA 17, 18, 19
r T aste SENS/BTM 15, 16, 19
s Taste PTY (Programmtyp)/LIST
13, 14, 15, 20
*1 Steht nur zur Verfügung, wenn ein gesondert
erhältliches CD-Gerät mit Steuerfunktionen für
MP3-Dateien angeschlossen ist und eine MP3Datei wiedergegeben wird.
*2 Wenn ein gesondert erhältliches CD-Gerät
angeschlossen ist.
*3 Warnhinweis zur Installation des Geräts
in einem Auto mit Zündschloss ohne
Zubehörposition ACC oder I
Nachdem Sie die Zündung ausgeschaltet
haben, halten Sie am Gerät unbedingt
(OFF) gedrückt, bis die Anzeige
ausgeblendet wird.
Andernfalls wird d ie Anze ige ni cht aus gesch altet
und der Autobatterie wird Strom entzogen.
*4 Nur verfügbar, wenn eine MD mit Gruppen in
dieses Gerät eingelegt und wiedergegeben wird.
LISTBTM
DSO
EQ3
1
):
OPEN
SEEK
MDX-F5800
Page 33

Kartenfernbedienung RM-X114
(gesondert erhältlich)
Auswählen einer MD/CD, einer Gruppe
und eines Albums mit der
Kartenfernbedienung
Mit den Tasten DISC (GP/ALBM)/PRESET
(+/–) auf der Kartenfern bedienung können Sie
MDs/CDs, Gruppen und Alben überspringen.
DSPL MODE
+
PRESET
LIST
+
DISC
MENU
–
SEEK
SOUND
SOURCE
DISC
PRESET –
+
VOL
+
SEEK
–
ENTER
ATTOFF
–
Die entsprechenden Tasten auf der
Kartenfernbedienung haben dies elbe
Funktion wie die Tasten an diesem Gerät.
a Taste DSPL
b Taste MENU*
c Taste SOURCE
d Tasten SEEK (–/+)
e Taste SOUND
Dient zum Einstell en der
Klangeigenschaften.
f Taste OFF
g Tasten V OL (+/–)
h Taste MODE
i Taste LIST
j Tasten DISC (GP/ALBM)/PRESET (+/–)
k Taste ENTER*
l Taste ATT
* Funktion bei diesem Gerät nicht verfügbar
Hinweis
Wenn Sie die Anzeige ausblenden, indem Sie (OFF)
drücken, können Sie das Gerät nicht mit der
Kartenfernbedienung bedienen. Drücken Sie zunächst
(SOURCE) am Gerät oder legen Sie eine MD ein, um
das Gerät zu aktivieren.
Tipp
Einzelheiten zum Austauschen der Batterie finden Sie
unter „Austauschen der Lithiumbatterie“ auf Seite 28.
Mit diesem Gerät:
Funktion Drücken Sie
Überspring en von
Gruppen*
1
–Gruppenauswahl
+ oder – [pro Gruppe
einmal]
Wenn Sie mehrere Gruppen
hintereinander überspringen
wollen, halten Sie eine der
Tasten gedrückt.
Mit einem gesondert erhältlichen
Gerät:
Funktion Drücken Sie
Überspring en von
MDs/CDs
–MD/CD-
Auswahl
+ oder – [pro MD/CD
einmal]
W enn Sie mehrere MDs/
CDs hinterein ander
überspringen wollen,
drücken Sie ei ne der T asten
einmal, drücken Si e si e
innerhalb von 2 Sekunden
erneut und halten Sie sie
gedrückt.
Überspring en von
2
Alben*
– Albumauswahl
+ oder – [einen Moment
gedrückt halten] und l as sen
Sie die Taste los
Wenn Sie mehrere Alben
hintereinander überspringen
wollen, dr ücke n Sie eine der
Tasten, drücken Sie sie
innerhalb von 2 Sekunden
nach dem Loslas sen erneut
und halten sie gedrückt.
*1 Nur verfügbar, wenn eine MD mit Gruppen in
dieses Gerät eingelegt und wiedergegeben wird.
*2 Steht nur zur Verfügung, wenn ein gesondert
erhältliches CD-Gerät mit Steuerfunktionen für
MP3-Dateien angeschlossen ist und eine MP3Datei wiedergegeben wird.
Überspringen mehrerer Titel
hintereinander
Drücken Sie einmal die Taste (SEEK) (+) oder
(SEEK) (–) auf der Kartenfernbedienung,
drücken Sie sie innerhalb von 2 Sekunden erneut
und halten Sie sie gedrückt.
5
Page 34

Sicherheitsmaßnahmen
Hinweise zu MDs
• Wenn das Fahrzeug längere Zeit in direk te m
Sonnenlicht gepa rkt war, lassen Sie das Gerät
etwas abkühlen, b evor Sie es einschalten.
• Motorantennen werden automatisch
ausgefahren, w enn das Gerät ein geschaltet
wird.
Sollten an Ihrem Gerät Probleme auftreten oder
sollten Sie Fragen haben, auf die in dieser
Anleitung ni cht eingegangen wird, wenden Sie
sich bitte an Ihre n Sony-Händler.
Feuchtigkeitskondensation
Bei Regen oder bei sehr hoher Luftfeuchtigkeit
kann sich auf den Linsen im Inneren des G eräts
und im Display Feuc ht igkeit niederschlagen. In
diesem Fall funktioniert das Gerät n ic ht mehr
richtig. Nehme n Si e di e MD heraus und wart en
Sie etwa eine Stunde, bi s die Feuchtigkeit
verdunstet ist.
So bewahren Sie die hohe Tonqualität
Achten Sie darauf, kein e Säfte oder anderen
zuckerhal t i gen Getränke auf das Gerät oder die
MDs zu verschütten.
• Öffnen Sie den Schutzschieber des MD-
Gehäuses nicht. Andernfalls ist der
Datenträge r un ge sc hü t zt . S c h lie ß en Si e
den Schutzschieber sofort, falls er sich
einmal geöffnet hat.
• Berühren Sie auf keinen Fall die Ober fl äche
einer MD im Inne ren des Gehäuses.
• Schützen Sie M D s vor Hitze bzw. hohen
Temperaturen. Lassen Sie sie nicht in
geparkten Autos, auf dem Armaturenbrett oder
auf der Hutablage liegen.
Hinweise zum Anbringen von
Aufklebern
Beachten Sie bitte folgende Punkte, damit MDs
nicht im Gerät stecken bleiben:
– Bringen Sie den Aufkl eb er an ei ner ge ei gn et en
Stelle an.
– Entfernen Sie alte Aufkleber, bevor Sie neue
anbringen.
– Entfernen Sie Aufk l eber, die si ch ablösen.
Reinigung
Reinigen Sie die O berfläche der MD -C artridge
von Zeit zu Zeit mit einem weichen, trockenen
Tuch.
6
Page 35

Die MDGruppierungsfunktion
Die Gruppierungsfunktion ist nützlich, wenn Sie
bei einer großen Anzahl von Titeln oder bei
Titeln, die im MDLP-Modus (LP2/LP4)
aufgezeichnet wurden, bestimmte T it el innerhalb
einer Gruppe sch nell ansteuern möch t en.
Hinweise zu MD-Gruppeneinstellungen
• Mit diesem Gerät können Sie MDs nur
wiedergeben. Erläuterungen zur Aufnahme auf
MDs sowie zu den Gruppeneinstellungen
finden Sie in der Bedienungsanleitung zu Ihrem
MD-Recorder.
• Auf einer MD kann ein Gruppennam e
mehrmals registriert sein.
• Maximal sind 99 Gruppen zulässig. Die
tatsächliche Anzahl an Gruppen hängt je doch
von Ihrem MD-Recorder ab.
• Je nach verwendetem MD-Recorder stehen die
MD-Gruppeneinstellungen möglicherweise
nicht zur Verfügung.
MD mit Gruppen
MD
Gruppe2*Gruppe1* Gruppe3*
12 456789
3
10
Zuweisung von GP-Num mern (Gruppe)
im Gerät
Dieses Gerät erkennt einzelne und mehrere Titel
zwischen Gruppen als Gruppen (GP), auch wenn
sie vom MD-Record er nicht als solche registriert
wurden. Dies en Titeln werden wie den
registrierten Gruppen „GP“-Nummern
zugewies en. Die „GP“-Nummer le uchtet im
Display auf, wen n Sie während der W i ed ergabe
einer MD die Gruppe wechseln.
MD mit Gruppen und in diesem Gerät
zugewiesenen „GP“-Nummern
MD
GP2
GP3
(Gruppe2
*)
GP4
GP1
(Gruppe1
*)
1234 56789
* Gruppen: vom MD-Recorder erstellt.
Näheres zur MD - G ruppierungsfun kt i on find en
Sie unter „Wiedergeben ei ner MD“ (Seite 10),
„Wiederholtes Wiedergeben von Titeln“
(Seite 12) und „Wiedergeben von Titeln in
willkürlicher Reihenfolge“ (Seite 13).
Hinweis
Die MD-Gruppierungsfunktion steht nur zur
Verfügung, wenn eine MD mit Gruppen in dieses
Gerät eingelegt und wiedergegeben wird.
GP5
(Gruppe3
10
*)
Titelnummer
* Gruppen: vom MD-Recorder erstellt.
Wenn Sie eine MD in dieses Gerät einlegen,
beginnt die Wiedergabe automati sch. Die
Wiedergabe erfolgt in der Reihenfolge der Titel.
7
Page 36

Vorbereitungen
Abnehmen der Frontplatte
Um einem Dieb stahl des Geräts vorzubeugen,
kann die Frontplatte abgenommen werden.
Zurücksetzen des Geräts
Bevor Sie das Gerät zum ersten Mal benutzen
oder wenn Sie die Autobatterie ausge t auscht
haben oder die V erbindungen wechseln, müssen
Sie das Gerät zurücksetzen.
Nehmen Sie die Fron tp la tte ab und drücken Sie
die Taste RESET mit einem spitzen Gegenstand,
wie z. B. einem Kugelschreiber.
Taste RESET
Hinweis
Wenn Sie die Taste RESET drücken, werden die
eingestellte Uhrzeit und einige weitere gespeicherte
Einstellungen gelöscht.
Warnton
Wenn Sie den Zündschlüssel in die Position OFF
stellen, ohne die Frontplatte abzunehmen, ertönt
einige Sekunden l ang ein Warnton.
W enn Sie einen gesondert er hältlichen Verstärker
anschließen und den integrierten Verstärker nicht
benutzen, wird der Signalton deakt iviert.
1 Drücken Sie (OFF)*.
Die MD/CD-Wiedergabe bzw. der
Radioempfang wird beendet. Die
Tastenbele uchtung und das Disp la y bl ei ben
eingeschaltet.
* Wenn Ihr Fahrzeug nicht über ein Zündschloss
mit Zubehörposition (ACC oder I) verfügt, halten
Sie zum Ausschalten des Geräts unbedingt
(OFF) gedrückt, bis die Anzeige ausgeblendet
wird. Andernfalls wird der Autobatterie weiterhin
Strom entzogen.
2 Drücken Sie (OPEN), schieben Sie
dann die Frontplatte nach rechts und
ziehen Sie sie an der linke n Sei te
vorsichtig heraus.
1
2
Hinweise
• Wenn Sie die Frontplatte bei eingeschaltetem Gerät
abnehmen, schaltet sich das Gerät automatisch aus,
um eine Beschädigung der Lautsprecher zu
vermeiden.
• L asse n Sie die Frontplatte nicht fallen und drücken
Sie nicht zu stark auf die Frontplatte und das
Display.
• Schützen Sie die Frontplatte vor Hitze bzw. hohen
Temperaturen und vor Feuchtigkeit. Lassen Sie sie
nicht in geparkten Autos, auf dem Armaturenbrett
oder auf der Hutablage liegen.
Tipp
Bewahren Sie die Frontplatte im mitgelieferten
Behälter auf, wenn Sie sie bei sich tragen.
8
Page 37

Anbringen der Frontplatte
Setzen Sie die Auss par ung A an der Frontplatte
am Stift B am Gerät an und drücken Sie dann
die linke Seite behutsam hinein.
Drücken Sie (SOURCE) am Gerät bzw. legen
Sie eine MD ein, um das Gerät einzusch alten.
A
B
x
Hinweis
Legen Sie auf der Innenseite der Frontplatte nichts ab.
Einstellen der Uhr
Die Uhr zeigt die Uhrzeit im 24-Stunden-Format
digital an.
Beispiel: Einstellen der Uhr auf 10:08
1 Drücken Sie 2 Sekunden lang (DSPL).
Die Stundenanzeig e bl i nkt.
1 Stellen Sie mit der Lautstärketaste
+/– die Stunden ein.
2 Drücken Sie (SEL).
Die Minutenanzei ge blinkt.
3 Stellen Sie mit der Lautstärketaste
+/– die Minuten ein.
2 Drücken Sie (DSPL).
Die Uhr beginnt zu lauf en. Wenn Sie die
Uhreinstellung vorgenom m en haben,
erscheint im Display wieder die Anzeige für
den normalen Wiedergabemodus.
Tipp
Mithilfe der RDS-Funktion können Sie die Uhr auch
automatisch einstellen lassen (Seite 21).
9
Page 38

MD-Player
MD/CD-Gerät (gesondert
erhältlich)
Sie können mit diesem Gerät nicht nur MDs
(MDs mit Gruppeneinstellungen) w ie dergeben,
sondern auch externe MD- und CD-Geräte
(MP3-fähig) steuern. Wenn Sie ein gesondert
erhältliches, MP3-fähiges CD-Gerät (z. B. einen
MP3-CD-Wechsler) anschließen, können Sie
MP3-Dateien, al so komprimierte Au diodateien
(Titel) mit guter Tonqualität, wiedergeben.
Wiedergeben einer MD
Mit diesem Gerät:
1 Drücken Sie (OPEN) und legen Sie
eine MD mit der beschrifteten Seite
nach oben ein.
Funktion Drücken Sie
Stoppen der
Wiedergabe
Auswerfen der MD(OPEN) und dann Z
Überspringen von
Titeln
–Automatischer
Musiksensor
Vorwärts-/
Rückwärtssuchen
–Manuelle Suche
Überspringen von
Gruppen*
–GP-Auswahl
* Nur verfügbar, wenn eine MD mit Gruppen in dieses
Gerät eingelegt und wiedergegeben wird.
Wenn Sie mehrere Titel hintereinander
überspringen wollen, drücken Sie die Taste
(SEEK) (+) oder (SEEK) (–), drücken Sie sie
innerhalb von 2 Se kunden erneut und ha lten Sie
sie gedrückt.
Hinweise
• Je nach dem Zustand der MD ist die Wiedergabe
eventuell nicht möglich (Seite 6).
• Wenn der erste oder letzte Titel auf einer MD
wiedergegeben wird und Sie (SEEK) (–) oder
(SEEK) (+) drücken, beginnt die Wiedergabe des
letzten bzw. ersten Titels auf der MD.
• Wenn der letzte Titel auf der MD abgespielt wurde,
startet die Wiedergabe wieder mit dem ersten Titel
der MD.
(OFF)
(SEEK) (–/+)
(./>)
[pro Titel einmal]
(SEEK) (–/+)
(m/M)
[bis zur gewünschten St elle
gedrückt halten]
(5)(GP–) oder (6)(GP+)
[pro Gruppe einmal]
[bis zur gewünschte n
Gruppe gedrückt halten]
2 Schließen Sie die Frontplatte.
Die Wiedergabe beginnt automatisch.
Wenn bereits eine MD eingelegt ist, drücken Sie
zum Starten der Wiedergabe (SOURCE) so oft,
bis „MD“ ersche int.
10
Page 39

Mit einem gesondert erhältlichen
Gerät:
Informationen im Display
1 Drücken Sie mehrmals (SOURCE), um
„MD (MS*
1
)“ oder „CD“ auszuwählen.
2 Drücken Sie (MODE) so oft, bis das
gewünschte Gerät angezeigt wird.
Die Wiedergabe beginnt.
Funktion Drücken Sie
Überspringen von
MDs/CDs
–MD/CD-
Auswahl
Überspringen von
2
Alben*
–Albumauswahl
*1 MS: MG Memory Stick System-up-Player MGS-X1
*2 Steht nur zur Verfügung, wenn ein gesondert
erhältliches CD-Gerät mit Steuerfunktionen für
MP3-Dateien angeschlossen ist und eine MP3Datei wiedergegeben wird .
Vorsicht beim Anschließen von MGS-X1 und MDGeräten
Dieses Gerät erkennt den MGS-X1 als ein MD-Gerät.
• Wenn die Wiedergabe über den MGS-X1 erfolgen
soll, wählen Sie mit (SOURCE) die Option „MD“ aus.
Wenn „MD“ als Tonquelle angezeigt wird, wählen
Sie mit (MODE) die Option „MS“ aus, um die
Wiedergabe zu starten.
• Wenn die Wiedergabe über ein MD-Gerät erfolgen
soll, wählen Sie mit (SOURCE) die Option „MD“ aus.
Wenn das gewünschte MD-Gerät als Tonquelle
angezeigt wird, beginnt die Wiedergabe. Wenn „MS“
oder ein anderes MD-Gerät als Tonquelle angezeigt
wird, wählen Sie mit (MODE) das gewünschte MDGerät aus, um die Wiedergabe zu starten.
Hinweise zum Anschließen vo n MP3-fähigen CDGeräten
• Wenn Sie eine CD einlegen, die keine MP3-Dateien
(Titel) enthält, erscheint „NO MUSIC“ im Display und
die Wiedergabe der nächsten CD beginnt.
• Bevor ein Titel wiedergegeben werden kann, muss
dieses Gerät alle Titel- und Albuminformationen auf
der CD einlesen. Je nach Titelstruktur kann es
deshalb über eine Minute dauern, bis die
Wiedergabe beginnt. Während dieser Zeit wird
„READ“ angezeigt. Sobald das Einlesen beendet ist,
beginnt die Wiedergabe automatisch.
Hinweis
Wenn ein gesondert erhältliches Gerät angeschlossen
ist, wird die Wiedergabe derselben Tonquelle auf dem
gesondert erhältlichen MD/CD-Gerät fortgesetzt.
(1)(DISC–) oder
(2)(DISC+)
[pro MD/C D einmal
drücken]
[bis zur gewünschte n MD/
CD gedrückt halten]
(5)(ALBM–) oder
(6)(ALBM+)
[pro Album einmal]
[bis zum gewünschten
Album gedrückt halten]
Wenn die MD/CD, die Gruppe, das Album bzw.
der Titel wechselt, wird der gespeicherte
1
Name*
, falls vorhanden, der neuen MD/CD, der
neuen Gruppe , des ne uen Alb ums b zw . de s neuen
Titels automatisc h angezei gt. Wenn die Funktion
A.SCRL (Auto Scroll) auf „ON“ gesetzt ist,
laufen Namen mit mehr als 8 Zeichen im Disp lay
durch (Seite 24).
MDLP-Anzeige*
2
LP2: LP2-Wiedergabe
Tonquelle
LP4: LP4-Wiedergabe
Anzeigbare Informat io nen
• MD/CD-Nummer/Titelnummer/
Verstrichene Spieldauer
•MD/CD-Name*
Interpretenname*
• Titelname (Dateinam e)*1*
•Uhrzeit
• A lbumname (Ordnername)*
•ID3-Tag*
1
/Gruppenname*3/
5
4
5
5
Funktion Drücken Sie
Wechseln der
(DSPL)
angezeigten
Informationen
*1 Wenn Sie (DSPL) drücken, wird mit „NO NAME“
angezeigt, dass kein Disc Memo (Seite 13) oder
gespeicherter Name zum Anzeigen vorhanden ist.
*2 Nur bei Wiedergabe einer MDLP-MD.
*3 Nur verfügbar, wenn eine MD mit Gruppen in
dieses Gerät eingelegt und wiedergegeben wird.
*4 Nur bei CDs, bei denen die C D TEXT-
Informationen den Namen des Interpreten
enthalten.
*5 Nur bei MP3-Dateien.
Nur die Titel-, Interpreten- und Albumnamen in
ID3-Tags werden angezeigt.
Wenn Sie (DSPL) drücken, wird mit „NO ID3“
angezeigt, dass kein ID3-Tag zum Anzeigen
vorhanden ist.
Fortsetzung auf der nächsten Seite t
11
Page 40

Hinweise
• Einige Zeichen können nicht angezeigt werden.
Buchstaben und andere Zeichen, die nicht
angezeigt werden können, erscheinen als „*“.
• Bei einigen CDs mit außergewöhnlich langem CD
TEXT oder langen ID3-Tags laufen die
Informationen unter Umständen nicht im Display
durch und werden daher nicht ganz angezeigt.
• Mit diesem Gerät kann der Name des Interpreten
nicht einzeln für jeden Titel einer CD mit CD TEXT
angezeigt werden.
Tipps
• Wenn die Funktion A.SCRL (Auto Scroll) auf „OFF“
gesetzt ist und die MD/CD, die Gruppe, das Album
bzw. der Titel wechselt, läuft der Name der MD/CD,
der Gruppe, des Albums oder Titels bzw. das ID3T ag nicht im Display durch und wird daher nicht ganz
angezeigt.
• Wenn bei der Wiedergabe einer MD mit Gruppen die
Gruppe gewechselt wir d, wird die neue
Gruppennummer ang ezeigt. Wenn bei der
Wiedergabe einer MP3-Datei das Album gewechselt
wird, wird die Nummer des neuen Albums
angezeigt.
Wiederholtes Wiedergeben
von Titeln
— Repeat Pla y
Sie haben folgende Möglichkeiten:
Mit diesem Gerät:
• REP-TRACK — zum wiederholten
Wiedergeben des aktuellen Titels.
•REP-GP*1 — zum wiederholt en Wiedergeben
der Titel in der aktuellen Gruppe.
Mit gesondert erhältlichen Geräten:
• REP-TRACK — zum wied erholten
Wiedergeben des aktuellen Titels.
• REP-ALBM*2 — zum wiederho lten
Wiedergeben der Titel im aktuellen Album.
• REP-DISC*3 — zum wiederholten
Wiedergeben der Titel auf der aktuellen MD/
CD.
*1 Nur verfügbar, wenn eine MD mit Gruppen in
dieses Gerät eingelegt und wiedergegeben wird.
*2 Steht nur zur Verfügung, wenn ein gesondert
erhältliches CD-Gerät mit Steuerfunktionen für
MP3-Dateien angeschlossen ist und eine MP3Datei wiedergegeben wird.
*3 Nur verfügbar, wenn mindestens ein gesondert
erhältliches MD/CD-Gerät angeschlossen ist.
Drücken Sie während der Wiedergabe
(3) (REP) so oft, bis die gewünscht e
Einstellung im Display erscheint.
Repeat Play beginnt.
12
Wenn Sie wieder in den normalen
Wiedergabemodus schalten möchten, wählen Sie
„REP-OFF“.
Page 41

Wiedergeben von Titeln in
willkürlicher Reihenfolge
— Shuffle Play
Sie haben folgende Mö gl i chkeiten:
Mit diesem Gerät:
•SHUF-GP*1 — zum Wiedergeben der Titel in
der aktuellen Gruppe in willkürlicher
Reihenfolge.
• SHUF-DISC — zum Wiedergeben der Titel auf
der aktuellen MD in willkürlicher Reihenfolge.
Mit gesondert erhältlichen Geräten:
•SHUF-ALBM*2 — zum Wieder g eben de r T it el
im aktuellen Album in willkürlicher
Reihenfolge.
• SHUF-DISC — zum Wiedergeben der Titel auf
der aktuellen MD/CD in willkürlicher
Reihenfolge.
• SHUF-CHGR*3 — zum Wiedergeben der Titel
im aktuellen gesondert erhältlichen MD/CDWechsler in willkürlicher Reihenfolge.
• SHUF-ALL*4 — zum Wiedergeben aller Titel
in allen angeschlossenen MD/CD-Geräten
(einschließlich dieses Geräts) in willkürlicher
Reihenfolge.
*1 Nur verfügbar, wenn eine MD mit Gruppen in
dieses Gerät eingelegt und wiedergegeben wird.
*2 Steht nur zur Verfügung, wenn ein gesondert
erhältliches CD-Gerät mit Steuerfunktionen für
MP3-Dateien angeschlossen ist und eine MP3Datei wiedergegeben wird .
*3 Nur verfügbar, wenn mindestens ein gesondert
erhältlicher MD/CD-Wechsler anges chl oss en ist.
*4 Nur verfügbar, wenn mindestens ein gesondert
erhältliches MD-Gerät bzw. mindestens zwei
gesondert erhältliche CD-Geräte angeschlossen
sind.
Drücken Sie während der Wiedergabe
(4) (SHUF) so oft, bis die gewünschte
Einstellung im Display erscheint.
Shuffle Play beginnt.
Wenn Sie wieder in den normalen
Wiedergabemodus schalten möchten, wählen Sie
„SHUF-OFF“.
Hinweis
Mit „SHUF-ALL“ werden nicht Titel von MD-Geräten
und CD-Geräten gemischt wiedergegeben.
Benennen einer CD
— Disc Memo (bei einem CD-Gerät mit
CUSTOM FILE- Funktion)
Sie können für jede CD einen individuellen
Namen speichern (Disc Memo ). Si e können pro
CD bis zu 8 Zeichen eingeben. Wenn Sie einen
Namen für eine CD eingeben, können Sie die CD
anhand des Name ns ansteuern (Seite 15).
1 Starten Sie die Wiedergabe der CD,
der Sie einen Namen geben m öchten,
in einem CD-Gerät mit CUSTOM FILEFunktion.
2 Drücken Sie 2 Sekunden lang (PTY)
(LIST).
Während Sie die CD benennen, wird sie vom
Gerät wiederholt w ie dergegeben.
3 Geben Sie die Zeichen für den Namen
ein.
1 Wählen Sie mi t de r Lautstärketaste
+/– das er ste Zeichen aus.
A y B y C ... y 0 y 1 y 2 ...
y + y – y
*(Leerzeichen)
2 Drücken Sie (SEL), wenn das
gewünsc hte Zeiche n angezeigt
wird.
Das nächste Ze i chen blinkt.
3 Wiederholen Sie Schritt 1 und 2,
bis Sie den ganzen Namen
eingegeben haben.
4 Wenn Sie wieder in den normalen
Wiedergabemodus schalten wollen,
drücken Sie (PTY) (LIST) erneut
2 Sekund en lang .
Fortsetzung auf der nächsten Seite t
... y * y A
*
13
Page 42

Tipps
• Sie können ein Zeichen korrigieren oder löschen,
indem Sie es einfach überschreiben oder „
eingeben.
• Sie können CDs in einem Gerät ohne CUSTOM
FILE-Funktion benennen, wenn dieses in
Kombination mit einem CD-Gerät angeschlossen ist,
das über diese Funktion verfügt. Das Disc Memo
wird in diesem Fall in dem CD-Gerät mit CUSTOM
FILE-Funktion gespeichert.
Hinweis
REP-TRACK/SHUF wird unterbrochen, bis das
Eingeben des Namens abgeschlossen ist.
“
Anzeigen des Disc Memo
Beim Anzeigen von Informationen hat das Disc
Memo immer Priorität vor einer ursprünglichen
CD TEXT-Information.
Funktion Drücken Sie
Anzeigen (DSPL) während der
Wiedergabe einer CD bzw.
CD mit CD TEXT
Tipp
Sie können weitere Informationen anzeigen lassen
(Seite 11).
Löschen des Disc Memo
1 Drücken Sie mehrmals (SOURCE), um
„CD“ auszuw ählen.
2 Drücken Sie mehrmals (MODE), um
das CD-Gerät auszuwählen, in dem
das Disc Memo gespeichert ist.
3 Drücken Sie 2 Sekunden lang (PTY)
(LIST).
4 Drücken Sie 2 Sekunden lang (DSPL).
Die gespeicherte n N am en werden angeze igt.
5 Drücken Sie mehrmals die
Lautstärketaste +/– und wählen Sie
den zu löschenden Namen aus.
6 Drücken Sie 2 Sekunden lang (SEL).
Der Name wird gelöscht.
Gehen Sie wie in Schritt 5 und 6 erläutert vor,
wenn Sie weitere Namen löschen wollen.
7 Drücken Sie 2 Sekunden lang (PTY)
(LIST).
Das Gerät schaltet wieder in den normalen
Wiedergabemodus.
Hinweise
• Wenn das Disc Memo einer CD mit CD TEXT
gelöscht wird, werden wieder die ursprünglichen CD
TEXT-Informationen angezeigt.
• Wenn Sie das zu löschende Disc Memo nicht finden
können, wählen Sie in Schritt 2 ein anderes CDGerät aus und versuchen es damit.
• Wenn bereits das gesamte Disc Memo gelöscht
wurde, wechselt das Gerät in Schritt 4 wieder in den
normalen Wiedergabemodus.
14
Page 43

Ansteuern einer MD/CD
anhand des Namens
— List-up (bei einem MD-Gerät oder einem
CD-Gerät mit CD TEXT-/CUSTOM FILEFunktion)
Sie können diese Funkt i on bei MDs/CDs
benutzen, für die Si e ei nen Namen eingegeben
1
haben*
, und bei CDs mit CD TEXT*2.
*1 Ansteuern einer MD/CD anhand des
eingegebenen Namens: wenn ein Name für eine
MD bzw. eine CD (Seite 13) gespeichert wurde.
*2 Ansteuern von CDs anhand der CD TEXT-
Informationen: wenn Sie eine CD mit CD TEXT auf
einem CD-Gerät mit CD TEXT-Funktion
wiedergeben.
1 Drücken Sie während der Wiedergabe
(PTY) (LIST).
Der Name der aktuellen MD/CD erschein t im
Display.
2 Drücken Sie (PTY) (LIST) so oft, bis
die gewünschte MD/CD angezeigt
wird.
3 Drücken Sie (SEEK) (+) oder (SEEK)
(–), um die Wie dergabe der MD /CD zu
starten.
Hinweise
• Der Name der MD/CD wird 5 Sekunden lang
angezeigt und danach erscheint im Display wieder
die Anzeige für den normalen Wiedergabemodus.
• Wenn sich keine MDs/CD s im Magazin befinde n,
erscheint „NO DISC“ im Display.
• Wenn einer MD/CD kein Name zugewiesen wurde,
erscheint „NO NAME“ im Display.
• Wenn die MD/CD- Informationen vom Gerät nicht
eingelesen wurden, ersc heint „NOT READ“ im
Display . Damit die MD/CD eingelesen wird, drücken
Sie die Zahlentaste und wählen Sie dann die
entsprechende MD/CD aus.
• Die Informa tion en werden aussch ließlic h in
Großbuchstaben angezeigt. Außerdem gibt es
einige Buchstaben, die nicht angezei gt werde n
können.
Radio
Für jeden Frequenzbereich (FM1 (UKW1), FM2
(UKW2), FM3 (U K W3), MW und LW) können
Sie bis zu 6 Sender speichern.
Achtung
Wenn Sie während der Fahrt Sender einstellen,
sollten Sie die BTM-Funktion verwenden.
Andernfalls besteht Unfallg efahr.
Automatisches Speichern
von Radiosendern
— BTM (Best Tuning Memory)
Das Gerät wählt im ausgewählten
Frequenzbere ich die Sender mit de n st ärksten
Signalen aus un d s p ei chert diese in der
Reihenfolge ihrer Frequenzen.
1 Drücken Sie mehrmals (SOURCE), um
das Radio auszuwählen.
2 Drücken Sie mehrmals (MODE), um
den Frequenzbereich auszuwählen.
3 Drücken Sie 2 Sekunden lang (SENS)
(BTM).
Das Gerät speichert die Sender in der
Reihenfolge ih rer Frequenzen auf den
Zahlentasten.
Ein Signalton ist zu hören und die Einstellung
wird gespeichert.
Hinweise
• Wenn aufgrund schwacher Signale nur wenige
Sender in guter Qualität zu empfangen sind, bleiben
auf einigen Stationstasten die vorher gespeicherten
Sender erhalten.
• Wird im Display eine Nummer angezeigt, beginnt
das Gerät beim Speichern von Sendern mit der
angezeigten Nummer.
15
Page 44

Einstellen gespeicherter
Sender
1 Drücken Sie mehrmals (SOURCE), um
das Radio auszuwählen.
2 Drücken Sie mehrmals (MODE), um
den Frequenzbereich auszuwählen.
3 Drücken Sie die Stationstaste ((1) bis
(6)), auf der der gewünschte Sen der
gespeichert ist.
Wenn das Einstellen gespeicherter
Sender nicht funktioniert
— Automatischer Sendersuc hlauf/lokaler
Suchmodus
Automatischer Sendersuchlauf:
Drücken Sie (SEEK) (+) oder (SEEK)
(–), um den Sender zu suchen.
Der Suchlauf stoppt, wenn ein Sende r
empfangen wird . Wiederhol en Sie diesen
Vo rgang, bis das Gerät den gewüns chten
Sender empfängt.
Lokaler Suchmodus:
Wenn der automatische
Sendersuchlauf zu oft stoppt, drücken
Sie (SENS) (BTM) so oft, bis „LOCALON“ erscheint.
Die Anzeige „LCL“ erscheint.
Jetzt werden nur noch die Sender mit den
stärksten Signalen eingestellt.
Drücken Sie während des UKW-Empfangs
(SENS) (BTM) zweimal, um den lokalen
Suchmodus zu dea kt ivieren.
Hinweis
Wenn Sie während des MW- oder LW-Empfangs den
lokalen Suchmodus deaktivieren möchten, drücken
Sie (SENS) (BTM). „LOCAL-OFF“ wird angezeigt.
Tipp
Wenn Sie die Frequenz des gewünschten Senders
kennen, halten Sie (SEEK) (+) oder (SEEK) (–)
gedrückt, bis die Frequenz annähernd erreicht ist, und
drücken Sie (SEEK) (+) oder (SEEK) (–) dann so oft,
bis die gewünschte Frequenz genau eingestellt ist
(manuelle Sendersuche).
Bei schlechtem UKW-Ste reoe mpfa ng
— monauraler Modus
Drücken Sie während des
Radioempfangs so oft (SENS) (BTM),
bis „MONO-ON“ erscheint.
Die Anzeige „MONO“ erscheint.
Die Tonqualität wird dadurch besser, der Ton
wird zugleich aber monaural (die Anzeige
„STEREO“ wird ausgeblendet).
Wenn Sie wieder zum normalen Radioem pfang
schalten möchten, drücken Sie (SENS) (BTM).
„MONO-OFF“ wird angezeigt.
Tipp
Wenn ein UKW-Sender schlecht zu hören ist, setzen
Sie DSO auf „OFF“ (Seite 26).
Speichern bestimmter
Radiosender
Sie können die gewünschten Sender manuell
unter einer bel i ebigen Stationstaste speichern.
1 Drücken Sie mehrmals (SOURCE), um
das Radio auszuwählen.
2 Drücken Sie mehrmals (MODE), um
den Frequenzbereich auszuwählen.
3 Drücken Sie (SEEK) (+) oder (SEEK)
(–), um den Sender einzustellen, den
Sie speichern wollen.
4 Drücken Sie 2 Sekunden lang die
gewünschte Stationstaste ((1) bis
(6)), bis „MEM“ erscheint.
Die Stationstastenanzeige erscheint im
Display.
Hinweis
Wenn Sie auf der gleichen Stationstaste eine n
anderen Sender speichern, wird der zuvor
gespeicherte Sender gelöscht.
16
Page 45

RDS
Übersicht über RDS
UKW-Sender, die RDS (Radio Data System)
unterstützen, strahlen zusammen mit den
normalen Radioprogrammsignalen nicht hörbare,
digitale Informationen aus. Beim Empfang eines
RDS-Sender s können beispiel sweise folgende
Informationen angezeigt wer den.
Anzeigbare Informatio ne n
• Radiofrequenzbereich
• Funktion
Automatisches Neueinstellen
von Sendern für optimale
Empfangsqualität
— AF (Alternative Frequencies)
Mit der AF-Funktion wird für den Se nder, den
Sie gerade hören, automatisch die Frequenz mit
den stärksten Sendesignalen eingestellt.
Die Frequenzen werden also
automatisch gewechselt.
98,5 MHz
Sender
96,0 MHz
Anzeigbar e Informatio nen
• Speichernummer/
Sendername (Frequenz)
•Uhrzeit
• RDS-Daten
Funktion Drücken Sie
Umschalten
zwischen Uhrz eit/
Sendername
(DSPL)
RDS-Funktionen
Mit RDS-Daten stehen Ihnen weitere nützl ic he
Funktionen zu r Verfügung, z. B.:
• Automatisches Neueinstellen eines
Senders, was vor allem bei langen Fahrten
über große Entfernungen hinweg hilfreich ist .
— AF t Seite 17
• Empfangen von Verkehrsdurchsagen, auch
wenn Sie einen anderen Sender oder eine
andere Tonquelle eingestellt haben.
— TA t Seite 18
• Auswählen ei nes Senders nach
Programmtyp. — PTY t Seite 2 0
• Automatisches Einstellen der Uhrzeit.
— CT t Seite 21
Hinweise
• Je nach Land bzw. Region stehen nicht alle RDSFunktionen zur Verfügung.
• Die RDS-Funktionen arbeiten nicht
ordnungsgemäß, wenn die Sendesignale zu
schwach sind oder wenn der eingestellte Sender
keine RDS-Daten ausstrahlt.
102,5 MHz
1 Wählen Sie einen UKW-Sender aus
(Seite 15).
2 Drücken Sie (AF/TA) so oft, bis „AF-
ON“ angezeigt wird.
Das Gerät beginnt, im sel ben Netzwerk nach
einer Alternativfrequenz mit stärkeren
Signalen zu suchen.
Wenn „NO AF“ blinkt, gibt es für den gerade
eingestellten Sender keine
Alternativfrequenz.
Zum Deaktivieren der AF-Funktion wählen Sie
„AF, TA-OFF“.
Tipps
• Wenn „AF-ON“ ausgewählt ist, werden
Verkehrsdurchsagen deaktiviert. Zum Aktivieren der
Verkehrsdurchsagen mit der AF-Funktion wählen
Sie „AF, TA-ON“.
• Wenn Sie die Funktion während der MDWiedergabe ein- (ON) bzw. ausschalten (OFF)
wollen, drücken Sie (AF/TA).
Fortsetzung auf der nächsten Seite t
17
Page 46

Bei Sendern ohne
Alternativfrequenzen
Drücken Sie (SEEK) (+) oder (SEEK)
(–), während der Sendername blinkt
(innerhalb von 8 Sek unden).
Das Gerät beginnt dann mit der Suche nach
einer Frequenz m it denselben PI-Daten
(Programme Identification Programmkennung). „PI SEEK“ wird
angezeigt.
W enn das Gerä t k eine Frequenz mit
denselben PI-Daten finden kann, wechselt das
Gerät wieder zur zuvor eingestellten
Frequenz.
Unveränderter Empfang eines
Regionalsenders
Wenn die AF-Funktion aktiviert ist: Der
Empfang wird bei diesem Gerät werkseitig auf
die Regionalsender einer bestimmten Region
beschränkt, so dass nicht zu einem anderen
Regionalsender mit einer stärkeren Frequenz
gewechselt wird.
Wenn Sie den Empfangsbereich eines
Regionalprogramms verlassen oder lieber die
gesamte AF-Funkt i on nutzen wollen, drücken
Sie gleichzeitig (SEL) und (AF/TA), bis „REGOFF“ ersc h eint.
Hinweis
Diese Funktion steht in Großbritannien und in einigen
anderen Regionen nicht zur Verfügung.
Lokalsenderfunktion
(nur Großbritannien)
Mithilfe dieser Funktion kön nen Sie andere
Lokalsende r auswählen, auch wenn diese zuvor
nicht unter einer Stationstaste gespeichert
wurden.
1 Drücken Sie eine der Stationstasten
((1) bis (6)), auf der ein Lo kalsender
gespeichert ist.
2 Drücken Sie innerhalb von
5 Sekunden erneut die Stationst aste
des Lokalsenders.
3 Wiederholen Sie diesen Vorgang, bis
das Gerät den gewünschten
Lokalsender empfängt.
Empfangen von
Verkehrsdurchsagen
— TA (Traffic Announcement)/TP (Traffic
Programme)
Wenn Sie die TA- (Verkehrsdurchsagen) und die
TP-Funktion (Verkehrsfunk) aktivieren, könne n
Sie automatisch einen UKW-Sender einstellen,
der Verkehrsdurchsagen ausstra hlt. Dabei ist es
unerheblich, welches UKW-Programm bzw.
welche Tonquelle (MD/CD) Sie gerade hören.
Das Gerät we chselt nach der Du rchsage zurück
zur vorherigen Tonquelle.
Drücken Sie (AF/TA) so oft, bis „TAON“ angezeigt wird.
Das Gerät beginnt, nach Verkehrsfunksendern
zu suchen.
„TP“ zeigt an, dass ein sol cher Sender
empfangen wird, und „TA“ blinkt während
einer Verkehrsdurchsage. Das Gerät setzt die
Suche nach Verkehrsfunksendern fort, wenn
„NO TP“ angezeig t wird.
Wenn Sie alle Ve rkehrsdurchsagen ausschalten
wollen, wählen Sie „AF, TA-OFF“.
Funktion Drücken Sie
Ausschalten der
aktuellen
Verkehrsdurchsage
Tipps
• Wenn „TA-ON“ ausgewählt ist, wird die AF-Funktion
deaktiviert. Zum Aktivieren der AF-Funktion mit den
Verkehrsdurchsagen wählen Sie „AF, TA-ON“.
• Eine laufende Verkehrsdurchsage können Sie auch
mit der Taste (SOURCE) oder (MODE) abbrechen.
(AF/TA)
18
Page 47

Speichern der Lautstärke von
Verkehrsdurchsagen
Sie können die Lau tstärke für die
V erkehrsdurchsagen voreinstellen, so dass Sie sie
nicht überhören.
1 Stellen Sie mit der Lautstärketaste +/–
den gewünschten Lautstärkepegel ein.
2 Drücken Sie 2 Sekunden lang (AF/TA).
„TA“ erscheint und die Einstellung wird
gespeichert.
Empfangen von
Katastrophenwarnungen
Wenn die AF- oder die TA-Funktion aktiviert ist
und während des Emp fang s ei nes UKW-Senders
oder der Wiedergabe einer MD/CD eine
Katastrophenwarnung ausges tr ah lt wird ,
wechselt das Gerät automatisch zur
Katastrophenwarnung.
Speichern von RDS-Sendern
zusammen mit der AF- und
TA-Einstellung
Wenn Sie RDS-Sender speichern, speichert das
Gerät zusammen mit der Frequenz auch die AF-/
TA-Einstellung (ein/aus) für jeden Sender. Sie
können für die einzelnen gespeicherten Sender
unterschiedliche Einstellungen (AF, TA oder
beides) oder für alle gespeicherten Sender
dieselbe Einstellung wählen. Wenn Sie Sender
mit „AF, T A-ON“ speicher n, werden automatisch
die Sender mit den stärksten Radiosignalen
gespeichert.
Speichern derselben Einstellung für
alle gespeicherten Sender
1 Wählen Sie einen UKW-
Frequenzbereich (Seite 15).
2 Drücken Sie mehrmals (AF/TA), um
„AF-ON“, „TA-ON“ oder „AF, TA-ON“
auszuwählen.
Beachten Sie bitte, dass die Auswahl von
„AF, TA-OFF“ nicht nur für RD S-Sender,
sondern auch für N ic ht -RDS-Sender gilt.
3 Drücken Sie (SENS) (BTM), bis „BTM“
blinkt.
Speichern unterschiedlicher
Einstellungen für die einzelnen
gespeicherten Sender
1 Wählen Sie einen UKW-
Frequenzbereich aus und stellen Sie
den gewünschten Sender ein
(Seite 15).
2 Drücken Sie mehrmals (AF/TA), um
„AF-ON“, „TA-ON“ oder „AF, TA-ON“
auszuwählen.
3 Drücken Sie die gewünschte
Stations t aste ((1) bis (6)), bis „MEM“
erscheint.
Weitere Sender können Sie wie in den
Schritten oben erläutert speichern.
Hinweis
Wenn Sie die AF/TA-Funktion während der MDWiedergabe ein- (ON) bzw. ausschalten (OFF) wollen,
drück en Sie (AF/TA).
19
Page 48

Einstellen von Sendern nach
Programmtyp
— PTY (Programme Types)
Sie können einen Send er einstellen, indem Sie
den Programmtyp auswählen, de n Sie hören
möchten.
Programmtypen Anzeige
Nachrichten NEWS
Aktuelles Zeitgeschehen AFFAIRS
Informationen INFO
Sport SPORT
Erziehun g und Bildung EDUCATE
Hörspiele DRAMA
Kultur CULTURE
Wissenschaft SCIENCE
Verschiedenes VARIED
Pop-Musik POP M
Rock-Musik ROCK M
Unterhaltungsmusik EASY M
Leichte Klassik LIGHT M
Klassik CLASSICS
Sonstige Musik OTHER M
Wetter WEATHER
Finanzberichte FINANCE
Kinderprogramme CHILDREN
Magazinsendungen SOCIAL A
Religion RELIGION
Hörertelefon PHONE IN
Reiseinformationen TRAVEL
Freizeitprogramm LEISURE
Jazz JAZZ
Country-Musik COUNTRY
Volks mus ik NATION M
Oldies OLDIES
Folk-Musik FOLK M
Dokumentarbeiträge DOCUMENT
1 Drücken Sie während des UKW-
Empfangs (PTY) (LIST).
Der Name des aktuellen Programmtyps
erscheint, wenn der Sender PTY-Daten
ausstrahlt.
„--------“ erscheint, wenn der eingestellte
Sender kein RDS-Sender ist oder wenn keine
RDS-Daten empfangen werden.
2 Drücken Sie (PTY) (LIST) so oft, bis
der gewünschte Programmtyp
angezeigt wird.
Die Programmtypen erscheinen in der
Reihenfolge, die in der T abe lle angege ben ist.
„NONE“ wird angezeigt, wenn der
Programmtyp in den RD S- D aten nicht
angegeben wird.
3 Drücken Sie (SEEK) (+) oder (SEEK)
(–).
Das Gerät beginnt, nach einem Se nd er zu
suchen, der den ausgewählten Programmtyp
ausstrahlt.
Hinweis
Sie können diese Funktion in Ländern/Regionen, in
denen keine PTY-Daten zur Verfügung stehen, nicht
verwenden.
20
Page 49

Automatisches Einstellen der
Uhr
— CT (Clock Time)
Mit den CT-Daten (Uhrzeitdaten), die von RDSSendern ausgestrahlt werden, lässt sich die Uhr
automatisch einstellen.
Weitere Funktionen
Sie können das Gerät sowie gesondert erhältliche
MD/CD-Geräte mit einem Joystick (gesondert
erhältlich) steuern.
Auswählen von „CT-ON“
Drücken Sie während des
Radioempfangs gleichzeitig (SEL) und
(2).
Die Uhr wird eingestellt.
Nach einer Sekunde erscheint im Display
wieder die Anzeige für den normalen
Radioempfang.
Wenn Sie „CT-OFF“ auswählen wollen, drücken
Sie erneut gleichze it i g ( SEL) un d (2).
Hinweise
• Die CT-Funktion steht möglicherweise nicht zur
Verfügung, auch wenn ein RDS-Sender empfangen
wird.
• Die mit der CT-Funktion eingestellte Uhrzeit ist nicht
immer korrekt.
Der Joystick
Bringen Sie zunächst je nach der Mon t age des
Joysticks den ent sprechenden Aufk leber an.
Der Joystick wi rd über T asten und/oder
Drehregler bedien t.
MODE
MODE
DSPL
SEL
SEL
DSPL
Fortsetzung auf der nächsten Seite t
21
Page 50

Drücken der Tasten Drehen des Reglers
(SEL)
(ATT)
(MODE)
(SOURCE)
(DSPL)
Stellen Sie durch Drehen des
Reglers VOL die Lautstärke ein.
Drücken Sie Funktion
(OFF)
(SOURCE) Wechseln der Tonquelle
(Radio/MD/CD*1)/
Einschalten
(MODE) Wechseln des Modus
(Radiofrequenzbereich/MD-
1
Gerät*
/CD-Gerät*1)
(ATT) Dämpfe n des Tons
2
(OFF)*
Stoppen der Wiedergabe
bzw. des Radioempfangs/
Ausschalten
(SEL) Einstellen und Aus w ählen
(DSPL) Wechseln der angezeigten
Informationen
OFF
Wenn Sie den Regler drehen und
loslassen, können Sie :
– Titel überspringen.
Wenn Sie mehrere Titel hintereinander
überspringen wollen, drehen Sie den Regler
einmal und innerhalb von 2 Sekunde n
nochmals und halte n ih n dann gedreht.
– Sender automatisch einstellen.
Wenn Sie den Regler drehen, halten und
loslassen, können Sie :
– in einem Titel vorwärts-/rückwärtssuc hen.
– einen Sender manuel l e instellen.
Drücken und Drehen des Reglers
Regler
SEEK/AMS
Regler
PRESET/DISC
22
Wenn Sie den Regler gleichzeitig
drücken und drehen, können Sie:
– gespeicherte Sender einstellen.
– MDs/CDs während der MD/CD-
Wiedergabe wechseln*
1
.
– Gruppen wechseln*3.
– Alben wechseln*4.
Page 51

Wenn eine MD mit Gruppen oder eine MP3Datei wiedergegeben wird, können Sie mit dem
Joystick eine Gruppe (MD) bzw. ein Album
(MP3-Datei) auswählen.
Mit diesem Gerät:
Funktion Vorgehen
Überspringen von
Gruppen*
3
–Gruppenauswahl
1 Wenn Sie in den
Gruppenauswahlmodus
wechseln wollen,
drücken und drehen Si e
den Regler und ha lten i hn
gedreht.
Führen Sie dann
innerhalb von
2 Sekunden Schritt 2
aus.
2 Drücken Sie den Regler
und drehen Sie ihn
mehrmals schnel l, um die
Gruppen nach einander zu
überspringen.
*1 Nur wenn die entsprechenden gesondert
erhältlichen Geräte angeschlossen sind.
*2 Wenn Ihr Fahrzeug nicht über ein Zündschloss mit
Position ACC oder I verfügt, drücken Sie nach dem
Ausschalten der Zündung unbedingt (OFF) so
lange, bis die Anzeige ausgeblendet wird.
*3 Nur verfügbar, wenn eine MD mit Gruppen in
dieses Gerät eingelegt und wiedergegeben wird.
*4 Steht nur zur Verfügung, wenn ein gesondert
erhältliches CD-Gerät mit Steuerfunktionen für
MP3-Dateien angeschlossen ist und eine MP3Datei wiedergegeben wird.
Wechseln der Drehrichtung
Die Drehrichtung der Regler ist werkseitig wie in
der folgenden A bbi l dung zu sehen eingestellt.
Erhöhen
Verringern
Mit einem gesondert erhältlichen
Gerät:
Funktion Vorgehen
Überspringen von
MDs/CDs
–MD/CD-
Auswahl
Drücken und drehen Sie den
Regler [pro MD/CD
einmal].
Wenn Sie mehrere MDs/
CDs hintereinander
überspringen wollen,
drücken und drehen Sie den
Regler ei nm al, drehen ihn
innerhalb von 2 Sekunden
erneut und halten ihn
gedreht.
Überspringen von
4
Alben*
–Albumauswahl
1 Wenn Sie in den
Albumauswahlmodus
wechseln wollen,
drücken und drehen Si e
den Regler und ha lten i hn
gedreht.
Führen Sie dann
innerhalb von
2 Sekunden Schritt 2
aus.
2 Drücken Sie den Regler
und drehen Sie ihn
mehrmals schnel l, um die
Alben nachei nander zu
überspringen.
Wenn Sie den Joystick rechts von der Lenksäule
anbringen, können Sie die Drehrichtung der
Regler ändern.
Halten Sie den Regler VOL gedrückt
und drücken Sie (SEL) 2 Sekunden
lang.
Hinweis
Wenn Sie den Regler VOL gedrückt halten und dann
(SEL) 2 Sekunden lang drücken, erscheint „NORM“
oder „REV“ im Display.
– Wählen Sie „NORM“, wenn die werkseitig
eingestellte Drehrichtung der Regler beibehalten
werden soll.
– Wählen Sie „REV“, wenn Sie den Joystick auf der
rechten Seite der Lenksäule anbringen.
23
Page 52

Einstellen der
Klangeigenschaften
Wechseln der Klang- und
Anzeigeeinstellungen
Sie können die Balan ce, den Fader, den
Niedrigpassfilter und die Lautstärke des
Tiefstto nla utsprechers einstellen.
1 Drücken Sie (SEL) so oft, bis „BAL“,
„FAD“, „LPF“ oder „SUB“ angezeigt
wird.
Mit jedem Tastendruck auf (SEL) wechselt
die Anzeige folgendermaßen:
1
LOW*
t MID*1 t HI*1 t
BAL (li nks-rechts) t
FAD (vorne-hinten) t
LPF (Niedrigpassfilter)*
SUB (Lautstärke des
Tiefsttonlautsprechers)*
*1 Wenn EQ3 eingeschaltet ist (Seite 25).
*2 Wenn „SUB“ ausgewählt ist (Seite 24).
*3 Die Grenzfrequenz lässt sich auf 78 Hz,
125 Hz oder OFF einstellen.
*4 Der Lautstärkepegel lässt sich schrittweise auf
einen Wert zwischen –10 und +10 einstellen.
Unter –10 wird „ATT“ angezeigt.
2*3
t
2*4
2 Stellen Sie mit der Lautstärketast e +/ –
die ausgewählte Option ei n.
Hinweis
Nachdem Sie eine Klangoption ausgewählt haben,
müssen Sie innerhalb von 3 Sekunden den
Einstellvorgang beginnen.
Schnelles Dämpfen des Tons
Drücken Sie (ATT).
„ATT-ON“ ers cheint kurz im Display und
danach wird „ATT“ angezeigt.
Sie könn en folgen de Optionen einstell e n:
•REAR/SUB*1 — Dient zum Wechseln der
Audioausgabe zwis chen REAR und SUB.
– Mit „REAR“ erfolgt die Aus gabe an einen
Endverstärker.
– Mit „SUB“ erfolgt die Ausgabe an einen
Tiefsttonlautsprecher.
• CT (Uhrzeit) (Seite 21)
• A.SCRL (Auto Scroll - Automatischer
Bildlauf)*
• M.DSPL (Mo t io n D i splay - Bewegte Anzeige)
— Dient zum Ein- oder Ausschalten der
bewegten Anzeige.
– Wählen Sie „ON“, um die bewegte Anzeige
– Mit „OFF“ wird die bew egte Anzeige
•DEMO*1 — Dient zum Ein- oder Ausschalten
der Demo-Anzei ge.
– Mit „ON“ wird die Demo-Anzeige aktiviert.
– Mit „OFF“ wird die Demo- A nzeige
• BEEP*3 — Dient zum Ein- oder Ausschalten
des Signalton s.
• DIM (Dimmer) — Dient zum Wechseln der
Helligkeit im Display.
– Mit „ON“ w ird das Display du nkler.
– Mit „OFF“ wird der Dimmer deaktiviert.
2
(Seite 11)
einzuschal ten (ein beweg t es Muster
erscheint im Display).
deaktiviert.
Die Demo startet et wa 10 Sekunden nach
dem Ausschalten des Geräts.
deaktiviert.
Wenn Sie wieder die vorherige Lautstärke
einstellen wollen, drücken Sie erneut (ATT).
Tipp
Wenn da s Schnittste llenkabel eines Autotelefons mi t
der ATT - Leitung verbunden ist und ein Telefonanruf
eingeht, senkt das Gerät die Lautstärke automatisch
(Stummschaltfunktion zum Telefonieren).
24
Page 53

Wechseln zwischen REAR/SUB*
Drücken Sie (SEL) und anschließend
die Lautstärketaste + (REAR) oder –
(SUB).
Nach 3 Sekunden e rs cheint im Display wi eder
die Anzeige für den normalen
Wiedergabemodus.
1
Auswählen der gewünschten Option
Drücken Sie gleichzeitig (SEL) und die
gewünschte Taste.
(SEL) + (2): CT
(SEL) + (3): A.SCRL*
(SEL) + (4): M.DSPL
(SEL) + (4): DEMO*
(SEL) + (6): BEEP*
(SEL) + (DSPL): DIM
Wenn Sie die Einstellung vorgenommen haben,
erscheint im Display wieder die Anzeige für den
normalen Wiedergabemodus.
Drücken Sie erneut gleichzeitig (SEL) und die
gewünschte Taste, um die Option zu
deaktivieren.
*1 Bei ausgeschaltetem Gerät.
*2 Bei der MD- oder CD-Wiedergabe.
*3 Der Signalton wird nur ausgegeben, wenn der
integrierte Verstärker verwendet wird.
2
1
3
Einstellen des Equalizers
(EQ3)
Sie können f ür 7 Musi ktyp en ( XPLOD, V OCAL ,
CLUB, JAZZ, NEW AGE, ROCK, CUSTOM)
eine spezielle Equalizer-Kurve auswählen oder
OFF (Equalizer AUS) einstelle n.
Sie können die Equa lizer-Einstellung für jede
Tonquelle getrennt speichern.
Auswählen einer Equalizer-Kurve
1 Wählen Sie mit (SOURCE) eine
Tonquelle (Radio, MD ode r C D) aus.
2 Drücken Sie mehrmals (EQ3), um die
gewünschte Equalizer-Kurve
auszuwählen.
Mit jedem Tastendruck auf (EQ3) wechselt
die Option.
Um den Equalizer-Effekt auszuschalten,
wählen Sie „OFF“.
Fortsetzung auf der nächsten Seite t
25
Page 54

Einstellen der Equalizer-Kurve
Sie können die Equaliz er-Eins t el lu ngen für
verschiedene Freque nz bereiche auswählen und
speichern.
1 Wählen Sie mit (SOURCE) eine
Tonquelle (Radio, MD oder CD) aus.
2 Drücken Sie mehrmals (EQ3), um die
gewünschte Equalizer-Kurve
auszuwählen.
3 Stellen Sie die Equalizer-Kurve ein.
1 Drücken Sie mehrmals (SEL), um
den gewünschten Frequenzbereich
auszuwählen.
Mit jedem Tastendruck auf (SEL)
wechselt der Frequenzbereic h .
LOW t MID t HI (t BAL t FAD t
LPF t SUB)
2 Drücken Sie mehrmals die
Lautstärketaste +/–, um den
gewünschten Lautstärkepegel
einzustellen.
Die Lautstärke lässt sich in Schritten von
1 dB auf einen Wert zwischen –10dB und
+10 dB einstelle n.
3 Gehen Sie wie in Schritt 1 und 2
vor, wenn Sie weitere
Frequenzbereiche der EqualizerKurve einstellen wollen.
Wenn Sie die werkseitig eingestellte
Equalizer-Kurve wieder herstellen wollen,
drücken Sie 2 Sekunden lang (SEL).
Nach 1 Sekunde erscheint im Display
wieder die Anzeige für den normalen
Wiedergabemodus.
Hinweis
Wenn EQ3 auf „OFF“ gesetzt ist, können Sie die
Equalizer-Einstellung en nicht vorne hme n.
Einstellen der DSO-Funktion
(Dynamic Soundstage
Organizer)
Wenn die Lautsprecher im unteren Teil der Türen
installiert sind, kommt de r Ton von unten und ist
unter Umständen nicht von zufrieden stellender
Qualität.
Die DSO-Funktion (Dynamic Soundstage
Organizer) verbessert di e Raumklangwirku ng
und erzeugt einen Klang, als befänden sich die
Lautsprecher über dem Armaturenbrett (v irtuell e
Lautsprecher).
Sie können die DSO-Ei nstellung für jede
T onquelle getrennt speichern.
DSO-Modus und Darstellung der virtuellen
Lautsprecher
*3
*2
*1
*4
*1 DSO-1
*2 DSO-2
*3 DSO-3
*4 DSO-OFF
1 Wählen Sie mit (SOURCE) eine
Tonquelle (Radio, MD oder CD) aus.
2 Drücken Sie (DSO) so oft, bis die
gewünschte DSO-Einstellung
angezeigt wird.
Mit jedem Tastendruck auf (DSO) wechselt
die DSO-Einstellung .
*3
*2
*1
*4
26
Zum Deaktivieren der DSO-Funktion wählen
Sie „DSO-OFF“. Nach 1 Sekunde erscheint
im Display wied er di e Anzeige für den
normalen Wiedergabemodus.
Hinweise
• Je nach dem Innenraum des jeweiligen Fahrzeugs
bzw. dem Musiktyp hat die DSO-Funktion
möglicherweise nicht die gewünschte Wirkung.
• Wenn ein UKW-Sender schlecht zu hören ist, setzen
Sie DSO auf „OFF“.
Page 55

Weitere Inform ationen
Wartung
Austauschen der Sicherung
Wenn Sie eine Sicherung austauschen, achten Sie
darauf, eine Ersa tz si cherung mit dem glei chen
Ampere-Wert wie die Originalsi cherung zu
verwenden. Dieser ist auf der Originalsicherung
angegeben. Wenn die Sicherung durchbrennt,
überprüfen Sie den Stromanschluss und tauschen
die Sicherung aus. Br ennt die neue Sicherun g
ebenfalls durch, kann eine interne Fe hl funktion
vorliegen. Wenden Sie sich in einem solchen Fall
an Ihren Sony-Händler.
Sicherung
(10 A)
Achtung
Verwenden Sie unter keinen Umstän den eine
Sicherung mit ein em höheren Ampere-Wert als
dem der Sicherung, die ursprünglich mit dem
Gerät geliefert wurde. Andernfalls kann es zu
Schäden am Gerät kommen.
Reinigen der Anschlüsse
Das Gerät funktioniert möglicherweise nicht
ordnungsgem äß, wenn die Anschlüsse zwischen
dem Gerät und der Frontplatte verschmutzt sind.
Um dies zu vermeiden, nehmen Sie die
Frontplatte ab (Seite8) und reinigen Sie die
Anschlüsse mit einem mit Alkohol
angefeuchteten Wattestäbchen. Dr ücken Sie
dabei nicht zu fest auf die Anschlüsse.
Andernfalls kö nnen sie beschädig t werden.
Hauptgerät
Rückseite der Frontplatte
Hinweise
• Schalten Sie aus Sicherheitsgründen vor dem
Reinigen der Anschlüsse die Zündung aus und
ziehen Sie den Schlüssel aus dem Zündschloss.
• Berühren Sie die Anschlüsse unter keinen
Umständen direkt mit den Händen oder einem
Metallgegenstand.
Fortsetzung auf der nächsten Seite t
27
Page 56

Austauschen der Lithiumbatterie
Unter normalen Bedingungen hält die Batterie
etwa 1 Jahr. Die Lebensdauer der Batterie kann
je nach Gebrauch des Geräts jedoch auch kürzer
sein. Wenn die Batterie schwächer wird, verkürzt
sich die Reichweit e der Kartenfernbe dienung.
Tauschen Sie die Batterie gegen eine neue
CR2025-Lithiumbatterie aus. Bei Verwendung
eines anderen Batt erietyps besteht F euer- bzw.
Explosionsgefahr.
Hinweise zur Lithiumbatterie
• Bewahren Sie die Lithiumbatterie außerhalb
der Reichweite von Kindern auf. Sollte eine
Lithiumbatterie verschluckt werden, ist
umgehend ein A rz t au fzusuchen.
• Wischen Sie die Batterie mit einem trockenen
Tuch ab, um einen guten Kontakt zwischen den
Batteriepolen und -anschlüssen si cherzustellen.
• Achten Sie beim Ei nlegen der Batterie au f di e
richtige Polarität.
• Halten Sie die Batterie nicht mit einer
Metallpinzette. Dies könnte zu einem
Kurzschluss führen.
VORSICHT
Die Batterie kann bei falscher Handhabung
explodieren!
Auf keinen Fall darf si e aufgeladen,
auseinander g enommen od er ins Feuer
geworfen werden
.
x
Mit der Seite + nach oben
Entsorgungshinweis: Bitte werfen Sie nur
entladene Batterien in die Sammelboxen beim
Handel oder den Kommunen. Entladen sind
Batterien in der Regel dann, wenn das Gerät
abschaltet und „Batterie leer“ signalisiert oder
nach längerer Gebrauchsdauer der B at terien
nicht mehr einwandfrei funktioniert.
Um sicherzugehe n, kleben Sie die Batter iepo le
z. B. mit ein em Klebestreifen ab oder geben S ie
die Batterien einzeln in einen Plastikbeutel.
28
Page 57

Ausbauen des Geräts
1 Entfernen Sie die Schutzumrandung.
1 Nehmen Sie die Frontplatte ab
(Seite 8).
2 Setzen Si e beide Löseschlüssel an
der Schutzumrandung an.
2 Nehmen Sie das Gerät heraus .
1 Setzen Sie beide Löseschlüssel ein,
so dass sie mit einem Klicken
einrasten.
Der Haken muss
nach innen we isen.
Richten Sie die
Löseschlüssel
richtig aus.
3 Ziehen Sie die Schutzum randung
mithilfe der Löseschlüsse l he raus.
2 Ziehen Sie an den Löseschlüsseln,
um das Gerät zu lösen.
3 Ziehen Sie das Ger ät aus der
Halterung.
29
Page 58

Technische Daten
y
MD-Player
Signal-Rauschabstand 90 dB
Frequenzgang 10 – 20.000 Hz
Gleichlaufschwankungen Unterhalb der Messgrenze
Tuner
UKW
Empfangsbereich 87,5 – 108,0 MHz
Antennenanschluss Anschluss für
Zwischenfrequenz 10,7 MHz/450 kHz
Nutzbare Empfindlichkeit 9 dBf
Trennschärfe 75 dB bei 400 kHz
Signal-Rauschabstand 67 dB (stereo),
Harmonische Verzerrung bei 1 kHz
Kanaltrennung 35 dB bei 1 kHz
Frequenzgang 30 – 15.000 Hz
Außenantenne
69 dB (mono)
0,5 % (stereo),
0,3 % (mono)
MW/LW
Empfangsbereich MW: 531 – 1.602 kHz
Antennenanschluss Anschluss für
Zwischenfrequenz 10,7 MHz/450 kHz
Empfindlichkeit MW: 30 µV
LW: 153 – 279 kHz
Außenantenne
LW: 40 µV
Endverstärker
Ausgänge Lautsprecherausgänge
Lautsprecherimpedanz 4 – 8 Ohm
Maximale Ausgangsleistung
(versiegelte Anschlüsse)
52 W × 4 (an 4 Ohm)
Allgemeines
Ausgänge Audioausgangsanschlüsse
Eingänge Steueranschluss für
Klangregler Bässe:
Betriebsspannung 12 V Gleichstrom,
Abmessungen c a . 178 × 50 × 181 mm
Einbaumaß ca. 182 × 53 × 161 mm
Gewicht ca. 1,2 kg
Mitgeliefertes Zubehör Montageteile und
Sonderzubehör Kartenfernbedienung
Zusätzliche Geräte CD- Wechsler (10 CDs)
(vorne, hinten/
Tiefsttonlautsprecher
umschaltbar)
MotorantennenSteueranschluss
Steueranschluss für
Endverstärker
Stummschaltung beim
Telefonieren
Fernbedienungseingang
BUS-Steuereingang
BUS-Audioeingang
Antenneneingang
±10 dB bei 60 Hz (XPLOD)
Mitten:
±10 dB bei 1 kHz (XPLOD)
Höhen:
±10 dB bei 10 kHz
(XPLOD)
Autobatterie
(negative Erdung)
(B/H/T)
(B/H/T)
Anschlusszubehör (1 Satz)
Behälter für Front p latte (1)
RM-X114
Joystick
RM-X4S
BUS-Kabel (mit einem
Cinchkabel geliefert)
RC-61 (1 m), RC-62 (2 m)
CDX-757MX
CD-Wechsler (6 CDs)
CDX-T70MX, CDX-T69
MD-Wechsler (6 MDs)
MDX-66XLP
Signalquellenwähler
XA-C30
AUX INSignalquellenwähler
XA-300
30
US-amerikanische Patente und Patente anderer
Länder lizenziert von Dolb
Hinweis
Dieses Gerät kann nicht an einen digitalen
Vorverstärker oder an einen Equalizer, der mit dem
Sony-BUS-System kompatibel ist, angeschlossen
werden.
Änderungen, die dem technischen Fortschritt dienen,
bleiben vorbehalten.
Labororatories.
Page 59

Störungsbehebung
Anhand der fol gen de n Ch ec kl is te könn e n Si e di e
meisten Probleme, die möglicherweise an Ihrem
Gerät auftreten , s el bst beheben.
Bevor Sie die folgende Checkl i st e durchgehen,
überprüfen Sie bi tte zunächst, ob Sie das Gerät
richtig angeschlossen und be dient haben.
Allgemeines
Es ist kein Ton zu hören.
• Stellen Sie mit der Lautstärketaste + die
Lautstärke ein.
• Schalten Sie die ATT- Funktion aus.
• Stellen Sie den Fader-Regler bei einem 2Lautsprecher-System in die mittlere
Position.
• Sie versuchen unter Umständen, eine
MDLP-MD mit einem gesondert erhältlichen
MD-Wechsler ohne MDLP-Funktion
wiederzugeben. Im Display erscheint
möglicherweise „LP: ···“.
t Legen Sie die MDLP-MD für die
Wiedergabe in dieses Gerät ein.
Der Speicherinhalt wurde gelöscht.
• Die Taste RESET wurde gedrückt.
t Speichern Sie die Einstellungen erneut.
• Das Stromversorgungskabel wurd e gelöst
oder die Verbindung zur Batterie besteht
nicht mehr.
• Das Stromversorgun gskabel ist nicht richt i g
angeschlossen.
Kein Signalt o n e rtönt.
• Der Signalton ist de aktiviert (Seite 24) .
• Ein gesondert erhältlicher Endverstärker ist
angeschlossen und Sie verwenden nicht den
integrierten Verstärker.
Die Anzeige wird ausgeblendet bzw.
erscheint nicht im Display.
• Die Anzeige wird a u s geblendet, wenn Sie
(OFF) gedrückt halten.
t H alten Sie (OFF) erneut gedrückt, bis
die Anzeige eingeblendet wird.
• Nehmen Sie die Frontplatte ab und reinigen
Sie die Anschlüsse . N äheres dazu finden Sie
unter „Reinigen der Anschlüsse“ auf
Seite 27.
Gespeicherte Sender und die korrekte
Uhrzeit werden gelöscht.
Die Sicherung ist dur chgebrannt.
Es kommt zu Störgeräuschen, wenn sich
der Zündschlüssel in der Po sit ion EIN (ON),
AUS (OFF) oder ACC bzw. I
(Zubehörposition) befindet.
Die Leitungen sind nicht korrekt an den
Anschluss für Zubehörgeräte angeschlossen.
Das Gerät wird nicht mit Strom versorgt.
• Überprüfen Sie die Kabelverbind ungen.
Wenn die Anschlüsse in Ordnung si nd,
überprüfen Sie die Sicherung.
• Das Auto hat keine Zubehörposition (ACC
bzw. I).
t Drücken Sie (SOURCE) bzw. legen Sie
eine MD ein, um das Gerät einzuschalten.
Das Gerät wird permanent mit Strom
versorgt.
Das Auto hat keine Zube hör position (ACC
bzw. I).
t N achdem Sie die Zündung ausgeschaltet
haben, halten Sie am G er ät unbedingt
(OFF) gedrückt, bis die Anzei ge
ausgeblendet wird.
Die Motorantenne wird nicht ausgefahren.
Die Motorantenne hat kein Relaiskästchen.
MD-Wiedergabe
Es lässt sich keine MD einlegen.
• Es ist bereits eine andere MD eingelegt.
• Die MD wurde mit Gewalt falsch herum
oder falsch eingelegt.
Die Wiedergabe startet nicht.
Die MD ist besc hädigt.
Die MD wird automatisch ausgeworfen.
Die Umgebungstemperatur ist höher als 50 °C.
Die MD-Gruppierungsfunktion arbeitet
nicht.
• Die in das Gerät eingelegte MD enthält k eine
Gruppen.
• Der Titel , der gera de wiede rge geben wi rd, ist
möglicherweise in keiner vom MD-Recorder
erstellten Gruppe enthalten.
• Sie versuchen unt er U m ständen, eine MD
mit Gruppen in einem gesondert erhältlichen
MD-Wechsler wiederzugeben.
t Legen Sie MDs mit Gruppen in dieses
Gerät ein.
Die Funktionstasten funktionieren nicht.
Die MD lässt sich nicht auswerfen.
Drücken Sie die Taste RESET.
Aufgrund von Vibrati o ne n kommt es zu
Tonsprüngen.
• Das Gerät ist in einem Winkel von mehr als
45° installiert.
• Das Gerät wurde nicht an einem stabilen Teil
des Fahrzeugs installiert.
Tonsprünge treten auf.
Die MD ist verschmutzt oder defekt.
Die Anzeige „--------“ lässt sich nicht
ausschalten.
Sie befinden sich im Benenn ungsmodus.
t D rü cken Sie 2 Sekunden lang (PTY)
(LIST).
Fortsetzung auf der nächsten Seite t
31
Page 60

Radioempfang
Gespeicherte Sender lassen sich nicht
einstellen.
• Speichern Sie de n/ di e Sender unter der
korrekten Frequenz ab.
• Das Sendesignal ist zu schwach.
Sender lassen sich nicht empfangen.
Der Ton ist stark gestört.
• Schließen Sie eine MotorantennenSteuerleitung (blau) oder eine
Stromver so rgungsleitun g für Zubehörgerä te
(rot) an die Stromversorgungsleitung für den
Antennenverstärker eines Fahrzeugs an (nur,
wenn das Fahrzeug mit einer in der Heck-/
Seitenfe n sterscheibe integr ierten UKW/
MW/LW-Antenne ausgestattet ist ).
• Prüfen Sie die Verbindung der Autoante nne.
• Die Autoantenne wird nicht ausgefahren.
t Prüfen Sie die Verbindung der
Motorantennen-Steuerleitung.
• Überprüfe n Si e die Frequenz.
• Wenn der DSO-Modus aktiviert ist, ist der
Ton manchm al gestört.
t Setzen Sie DSO auf „OFF“ (Seite 26).
Der automatische Sendersuchlauf
funktioniert nicht.
• Der lokale Suchmodus ist auf „ON“
eingestellt.
t Set zen Sie den lokalen Such m odus auf
„OFF“ (Seite 16).
• Das Sendesignal ist zu schwach.
t Ste ll e n Sie die Sender manuel l ei n.
Die Anzeige „STEREO“ blinkt.
• Stellen Sie die Frequenz genau ein.
• Das Sendesignal ist zu schwach.
t Set zen Sie den Mono-Em pfangsmodus
auf „ON“ (Seite 16).
Eine Stereosendung ist nur monaural zu
hören.
Das Gerät ist in den monauralen
Empfangsmodus geschaltet.
t Beenden Sie den monaurale n
Empfangsmodus ( S ei t e 16).
RDS
Der Sendersuchlauf (SEEK) startet nach ein
paar Sekunden Radioempfang.
Der Sender ist kein Verkehrsfunksender od er
die Sendesignale sind zu schwach.
t Drücken Si e (AF/TA) so oft, bis „AF, TA -
OFF“ angezeigt wird.
Es sind keine Verkehrsdurchsagen zu
hören.
• Aktivieren Sie „TA“.
• Der Sender sendet keine
Verkehrsdurchsagen, obwohl es sich um
einen Verkehrsfunksende r (TP -Sender)
handelt.
t Stellen Sie einen anderen Sender ein.
Bei der PTY-Funktion wird „--------“
angezeigt.
• Der aktuelle Sender ist kein RDS-Sender.
• Es wurden keine RDS-Daten empfangen.
32
Page 61

Fehleranzeigen/Meldungen
Fehleranzeigen
(Für dieses Gerät und für gesondert
erhältliche MD/CD-Wechsler)
Folgende Anzeigen bli nken etwa 5 Sekun de n
lang und ein Alarmto n i st zu hören.
BLANK*
ERROR*
FAILURE
HI TEMP
NO DISC
NO MAG
NO MUSIC
NOTREADY
OFFSET
1
Die MD enthält keine Titel.*
2
t Legen Si e eine MD ein, auf der Titel
aufgezeichn et sind.
1
• Eine MD ist verschmutzt oder falsch herum
eingelegt.*
2
t Reinigen Sie die MD bzw. legen Sie sie
korrekt ein.
• Eine MD/CD kann aufgrund e iner Störung
nicht wiedergegeben werden.
t Legen Sie eine andere MD/CD ein.
Die Lautsprecher-/Verstärkeranschlüsse sind
nicht korrekt.
t Schlagen Sie in der Installationsanleitung
nach, wie die Ansc hlüsse korrekt
vorgenommen werden müssen.
Die Umgebungstemperatur ist höher als 50 °C.
t Warten Si e, bis di e Temperatur unter 50°C
sinkt.
Es befindet sich keine MD/ C D im MD/CDGerät.
t Legen Si e MDs/CDs in das MD /CD-Gerät
ein.
Das CD-Magazin ist nicht in das CD-Gerät
eingelegt.
t Setzen Sie ein Magazin in das CD-Gerät
ein.
Eine CD, die keine Musikau fn ahmen enthält,
wurde in ein MP3-fähiges CD-Gerät eingelegt.
t Legen Sie eine Musik-CD in das MP3-
fähige CD-Gerät ein.
Der Deckel des MD-Geräts ist offen oder die
MDs wurden nicht korrekt eingelegt.
t Schließen Sie den Deck el bzw. legen Sie
die MDs korrekt ein.
Es liegt möglicherweise eine interne
Fehlfunktion vor.
t Überprüfen Sie die Kabelverbindungen.
Wenn die Fehleranzeige weiterhin im
Display ange zeigt w ird, w enden Si e sich an
einen Sony-Händler.
RESET
Das MD/CD-Gerät kann wegen einer Störung
nicht bedient werden.
t D rücken Sie die Taste RESET am Gerät.
*1 Wenn während der Wiedergabe einer MD oder CD
ein Fehler auftritt, wird die Nummer der MD bzw.
CD nicht im Display angezeigt.
*2 Die Nummer der MD/CD, die den Fehler
verursacht, erscheint im Display.
Wen n sich das Pr oblem mit diesen
Abhilfemaßna hm en nicht beheben läss t , wenden
Sie sich an einen Sony-Händler.
Meldungen
L.SEEK +/–
Beim automatischen Sendersuchlauf ist der
lokale Suchmodus aktiviert (S ei te16).
NO AF
Für den aktuellen Sender gibt es keine
Alternativfrequenz.
„ “ oder „ “
Sie sind am Anfang bzw. Ende der MD/CD
angelangt und können nicht weiter vorwärtsoder rückwärtssuchen.
33
Page 62

Félicitations !
Nous vous remercions d’avoir fait l’acquisition
de ce lecteur de MiniD is cs Sony. Vous pouvez
profite r enco re da v ant age des mu ltipl es fo ncti ons
de cet appareil grâce aux fonctions et accessoires
ci-dessous :
• Fonctionnement avec des lecteurs MD ou CD
en option (chang eurs et lecteurs)*
• Affichage des informations CD TEXT (pendant
la lecture d’un CD TEXT *
en option).
• Accessoires de commande en op tion
Mini-télécommande RM-X114
Satellite de commande RM-X4S
*1 Cet appareil fonctionne uniquement avec des
produits Sony.
*2 Un disque CD TEXT est un CD audio contenant
des informations telles que le nom du disque, le
nom de l’artiste et les noms des plages. Ces
informations sont enregistrées sur le disque.
Cette étiquette est située sur la partie inférieure
du châssis.
1
.
2
sur un lecteur CD
2
Page 63

Table des matières
Emplacement des commandes . . . . . . . . . . . 4
Précautions . . . . . . . . . . . . . . . . . . . . . . . . . . 6
Remarques sur les MD . . . . . . . . . . . . . . . . . 6
A propos de la foncti on groupe d’un
MiniDisc . . . . . . . . . . . . . . . . . . . . . . . . . . 7
Préparation
Réinitialisation de l’appareil . . . . . . . . . . . . . 8
Retrait de la façade . . . . . . . . . . . . . . . . . . . . 8
Réglage de l’horloge . . . . . . . . . . . . . . . . . . . 9
Lecteur MD
Lecteur MD ou CD (en option)
Lecture d’un disque. . . . . . . . . . . . . . . . . . . 10
Rubriques d’affichage . . . . . . . . . . . . . . . . . 12
Lecture de plages en boucle
— Lecture répétée. . . . . . . . . . . . . . . . . . 13
Lecture des plages dans un ordre aléatoire
— Lecture aléatoire . . . . . . . . . . . . . . . . 13
Identification d’un CD
— Fonction de mé m o de disque* . . . . . . 14
Recherche d’un dis que par son nom
— Affichage automatique des titres* . . . 15
* Fonctions disponibles avec le lecteur de MD/CD en
option
Radio
Mémorisation automatique des stations
— Mémorisat i on des meilleurs acc or ds
(BTM). . . . . . . . . . . . . . . . . . . . . . . . . . . 15
Réception des stations mémorisées . . . . . . . 16
Mémorisation des stations souhaitées
uniquement . . . . . . . . . . . . . . . . . . . . . . . 16
Fonction RDS
Présentation de la fonction RDS. . . . . . . . . 17
Resyntonisation automatique pour une
réception optimale
— AF (fréquence alternative) . . . . . . . . 17
Réception de messa ges de radioguidage
— TA (messages de radioguidage)/
TP (programmes de radioguidage). . . . . 18
Préréglage des stations RDS avec les réglages
AF et TA . . . . . . . . . . . . . . . . . . . . . . . . 19
Réglage d’une station en fonction du type
d’émission
— PTY (type d’émission) . . . . . . . . . . . 20
Réglage automa tique de l’horloge
— CT (heure). . . . . . . . . . . . . . . . . . . . . 21
Autres fonctions
Utilisation du satellite de commande . . . . . 21
Réglages des caractéristiques du son . . . . . 24
Atténuation rapide du son. . . . . . . . . . . . . . 24
Modificatio n des réglages du son et de
l’affichage . . . . . . . . . . . . . . . . . . . . . . . 24
Réglage de l’égaliseur (EQ3) . . . . . . . . . . . 25
Réglage du répartiteur dynamique du son émis
(DSO). . . . . . . . . . . . . . . . . . . . . . . . . . . 26
Informations complémentaires
Entretien . . . . . . . . . . . . . . . . . . . . . . . . . . . 27
Démontage de l’appareil. . . . . . . . . . . . . . . 29
Spécifications . . . . . . . . . . . . . . . . . . . . . . . 30
Dépannage . . . . . . . . . . . . . . . . . . . . . . . . . 31
Affichage des erreurs et messages . . . . . . . 3 3
3
Page 64

Emplacement des commandes
Pour plus de détails, reportez-vous aux numéros de pages indiqués.
ATT
DSPL
SEL
SOURCE MODE
OFF
a Touche de volume +/–
b Touche ATT (atténuation du son) 24
c Touche DSPL (changemen t de mo de
d’affichage) 9, 12, 14, 17, 25
d Touche SEL (sélection)
Pour sélectionner des paramèt res.
e Fenêtre d’afficha ge
f Touche Z (éjecter) (située à l’avant de
l’appareil, derrière la façade) 10
g Touche EQ3 25, 26
h Touche DSO 26
i Touche OPEN 8, 10
j Touche SEEK +/–
Radio :
Pour régler automatiquement des stations/
rechercher une station manuellement.
MD/CD (fichiers MP3*
1
):
Pour passer des plages/effectuer une avance
ou un retour rapide dans une plage.
k Récepteur de la mini-télécommande
l Touche SOURCE (Mise sous tension/
Radio/MD/CD*2)
Permet de sélectionner la source.
m Touche MODE
Permet de changer le mode de
fonctionnement.
n Touche OFF (Arrêt/Mise hors
tension)*3 8, 10
4
–+
DISC REP SHUF BTM LIST
1 2 3 4 5 6
–+
GP/ALBM
AF/TA SENS PTY
o Touches numériques 25
Radio :
Pour mémoris er la station souhaitée sur
chaque touche num érique.
MD/CD (fichiers MP3*
(1): DISC – 11
(2): DISC + 11
(3): REP 13
(4): SHUF 13
(5): GP*
4
/ALBM*1 – 10, 11
(6): GP*4/ALBM*1 + 10, 11
p Touche RESET (située à l’avant de
l’appareil, derrière la façade) 8
q Touche AF/TA 17, 18, 19
r Touche SENS/BTM 15, 16, 19
s Touche PTY (type d’émission)/LIST
14, 15, 20
*1 Disponible uniq ue men t lor squ ’un appareil CD
compatible MP3 en option est raccordé et qu’un
fichier MP3 est en lecture.
*2 Lorsqu’un appareil CD en option est raccordé.
*3 Avertissement en cas d’installation de
l’appareil dans un véhicule dont le
contact ne comporte pas de position
ACC (accessoires)
Après avoir coupé le moteur, maintenez
enfoncée (OFF) de l’appareil jusqu’à ce que
l’affichage soit désactivé.
Sinon, l’affichage n’est pas désactivé et la
batterie se décharge.
*4 Disponible uniq ue men t lors qu ’un MD conte na nt
des groupes est inséré dans cet appareil pour être
lu.
LISTBTM
1
DSO
EQ3
):
OPEN
SEEK
MDX-F5800
Page 65

Mini-télécommande RM-X114
(en option)
Sélection d’un disque, d’un groupe ou
d’un album via la mini-télécommande
Les touches DI SC ( G P/ALBM)/PRESET ( + / –)
de la mini-télécommande permettent de passer
d’un album à l’autre, d’ un groupe à l’autre ou
d’un disque à l’autre.
DSPL MODE
+
PRESET
LIST
+
DISC
MENU
–
SEEK
SOUND
SOURCE
DISC
PRESET –
+
VOL
+
SEEK
–
ENTER
ATTOFF
–
Les touches correspondantes de la m initélécommande comm andent les mêmes
fonctions que celles de l’appareil.
a Touche DSPL
b Touche MENU*
c Touche SOURCE
d Touches SEEK (–/+)
e Touche SOUND
Permet de régler les caractéristiques du son.
f Touche OFF
g Touches VO L (+/–)
h Touche MODE
i Touche LIST
j Touches DISC (GP/ALBM)/PRESET
(+/–)
k Touche ENTER*
l Touche ATT
* Non disponible pour cet appareil
Remarque
Si vous désactivez l’affichage en appuyant sur (OFF),
il ne peut pas être réactivé avec la minitélécommande, sauf si vous activez d’abord l’appareil
en appuyant sur (SOURCE) de l’appareil ou en
insérant un disque dans le lecteur.
Conseil
Pour obtenir des informations détaillées sur la façon
de remplacer la pile, reportez-vous à la section
« Remplacement de la pile au lithium » à la page 28.
(Avec cet appareil)
Pour Appuyez sur
Passer d’u n gr oupe
à l’autre*
1
– Sélection d’un
groupe
+ ou – [une fois pour chaque
groupe]
Pour sauter plus ie urs
groupes de suite, maintenez
l’une ou l’autre touche
enfoncée.
(Avec un appareil en option)
Pour Appuyez sur
Passer d’un disque
à l’autre
– Sélection d’un
disque
+ ou – [une fois pour chaque
disque]
Pour sauter plus ie urs
disques de suit e, appuyez
sur une des touches, puis
appuyez de nouveau s ur
cette touche dans les 2
secondes qui suivent et
maintenez-la enfoncée.
Passer d’un album
à l’autre*
2
– Sélection d’un
album
+ ou – [maintenez la touche
enfoncée brièvement] puis
relâchez
Pour sauter p lusieurs al bums
de suite, appuyez sur une
des touches, pui s appuyez
de nouveau sur la même
touche dans les 2 secondes
qui suivent et maintenez-la
enfoncée.
*1 Disponible uniquement lorsqu’un MD contenant
des groupes est inséré dans cet appareil pour être
lu.
*2 Disponible uniquement lorsqu’un appareil CD
compatible MP3 en option est raccordé et qu’un
fichier MP3 est en lecture.
Saut de plusieurs plages de suite
Appuyez une fois sur (SEEK) (+) ou sur
(SEEK) (–) de la mini-télécommande, pui s
appuyez de nouveau sur la même touche dans les
2 secondes qui suivent et maintenez-la enfoncée.
5
Page 66

Précautions
Remarques sur les MD
• Si votre véhicule est resté stationné en plein
soleil, laissez l’appareil refroidir avant de
l’utiliser.
• L’antenne électrique se déploie
automatiquement lorsque l’appareil est en
fonctionnement.
Si vous avez des questions ou des problèmes
concernant cet appareil qui ne sont pas abordés
dans ce mode d’emploi, consultez votre
revendeur Sony.
Condensation
Par temps de pluie ou dans des régions très
humides, de l’humi dité peut se condenser à
l’intérieur des lentilles et dans la fenêtre
d’affichage de l’appareil. Si cela se produit,
l’appareil ne fonct ionne pas correctem ent. Dans
ce cas, retirez le disque et attendez environ une
heure que l’humidité se soit évaporée.
Pour conserver un s on de hau te qualité
Veillez à ne pas re nverser de jus de fruit ou
d’autres boissons sucrées sur l’appareil ou sur les
disques.
• N’ouvrez pas le volet de la cartouche
pour exposer le MD. Refermez-le
immédiatement si le volet s’ouvr e.
• Ne touchez jamais la surface interne du disque.
• N’exposez pas les disques à des températures
élevées. Evitez de les l ai sser dans un véhicule
en stationnement, sur le tableau de bord ou la
plage arrière.
Remarques sur l’apposition
d’étiquettes
Pour éviter que des M D restent coincés dans
l’appareil :
– Fixez l’étiquette dans une position correcte.
– Retirez les anciennes étiquettes avant d’en
remettre de nouvelles.
– Remplacez les étiquettes qui se décollent.
Nettoyage
Essuyez la surfa ce de la cartouche de temps en
temps avec un chiffon doux et sec.
6
Page 67

A propos de la fonction
groupe d’un MiniDisc
La fonction gr oupe pe rmet de locali ser l es plag es
de votre choix à l’intérieur d’un groupe de très
nombreux morceaux ou de plages enregistrées en
mode MDLP (LP2/LP4).
Remarques sur la configuration des
groupes de MD
• Cet appareil es t destiné à la lecture de MD
uniquement. Si vous souhaitez en savoir plus
sur l’enregistrement et la configuration des
groupes de MD, r eportez-vous au mode
d’emploi de votre enregi st reur de MD.
• Le même nom de groupe peut être enregis t ré
plus de deux fois sur le même MD.
• Le nombre de groupes maximal est d e 99,
même si ce nombre dépend votre enregistreur
de MD.
• Selon votre enregistr eur de MD, il est possi ble
que la conf ig u rat io n des gr ou pes de MD ne soi t
pas disponibl e.
MD contenant des groupes
MD
Group2*Group1* Group3*
12 456789
3
10
Hypothèse d’un GP (groupe) sur cet
appareil
Cet appareil distingue les pla g es unique s et les
plages multiples entre groupes sous forme de
groupes (GP), même si elles n’ont pas été
enregistrées en t ant que groupes par votre
enregistreur MD. Les numéros « GP » sont
affectés à ces plages , ainsi qu’aux gro upes
enregistrés. Si vous changez de groupe sur un
MD en cours de le ct ure, l’indication du n um éro
« GP » s’allume dans la fenêtre d’affichage.
MD contenant des groupes et des numéros
« GP » affectés sur cet appareil
MD
GP2
GP3
(Group2
*)
GP4
GP1
(Group1
*)
1234 56789
* Groupes : définis par votre enregistreur de MD.
Pour savoir comment utiliser la fonction groupe
MD, reportez -vo us à « Lectur e d’ un disque »
(page 10) , « Lecture de plag es en boucle »
(page 13) et « Lecture des plages dans un ordre
aléatoire » (page 13).
Remarque
La fonction groupe MD est disponible uniquement
lorsqu’un MD contenant des groupes est in sér é dans
cet appareil pour être lu.
GP5
(Group3
10
*)
Numéro de plage
* Groupes : définis par votre enregistreur de MD.
Lorsque vous insérez un MD dans cet appareil, la
lecture démarre automatiquement et suit l’ord re
des plages.
7
Page 68

Préparation
Retrait de la façade
Vous pouvez retirer la façade de cet appareil pour
le protéger du vol.
Réinitialisation de l’appareil
Avant la p remière mise en service de l’app areil,
après avoir remplacé la batterie du véhicule ou
modifié les raccordements, vous devez
réinitialiser l’appareil.
Retirez la façade et appuyez sur la touche
RESET avec un objet pointu, comme un stylo à
bille.
To uche RESET
Remarque
Une pression sur la touche RESET remet l’heure à
zéro et efface certaines informations mémorisées.
Alarme d’avertissement
Si vous mettez la clé de contact en position OFF
sans ôter la façade , l’a larme d’avertissement
retentit pe ndant quelques sec ondes.
Si vous raccordez un ampl i ficate ur en option et
que vous n’utilisez pas l’amplificateur intégré, le
bip sonore est dé sa ctivé.
1 Appuyez sur (OFF)*.
La lecture du MD ou CD ou la réception radio
s’arrête (l’ éc la irag e de s touc he s et l’affichage
restent allumés).
* Si le contact de votre véhicule n’est pas doté
d’une position ACC (accessoires), veillez à
appuyer sur (OFF) jusqu’à ce que l’affichage
disparaisse pour éviter que la batterie du
véhicule ne se décharge.
2 Appuyez sur (OPEN), puis faites
glisser la façade v e rs la droite et ti re z
doucement sur le côté gauche de la
façade.
1
2
Remarques
• Si vous retirez la façade alors que l’appareil est sous
tension, l’alimentation est automatiquement coupée
de manière à éviter d’endommager les hautparleurs.
• Ne laissez pas tomber la façade et n’exercez pas de
pression excessive sur cette dernière ou sur la
fenêtre d’affichage.
• N’exposez pas la façade à des températures
élevées ou à l’humidité. Evitez de la laisser dans un
véhicule en stationnement, sur le tableau de bord ou
la plage arrière.
Conseil
Lorsque vous transportez la façade, glissez-la dans
l’étui fourni à cet effet.
8
Page 69

Installation de la façade
Placez l’orifice A de la façade sur la tige B du
lecteur, puis poussez légèrement sur le côté
gauche pour l’enclencher.
Appuyez sur (SOURCE) de l’appareil ou insérez
un MD pour faire fon ct i onner l’appareil.
A
B
x
Remarque
Ne posez rien sur la face interne de la façade.
Réglage de l’horloge
L ’horloge numérique fonctionne suivant un cycle
de 24 heures.
Exemple : P our régler l’horlog e sur 10:08
1 Appuyez sur (DSPL) pendant 2
secondes.
L’indication des heures clignote.
1 Appuyez sur la touche de volume
+/– pour régler l’heure.
2 Appuyez sur (SEL).
L’indication des minutes clignote.
3 Appuyez sur la touche de volume
+/– pour régler les minutes.
2 Appuyez sur (DSPL).
L’horloge démarre. Une fois le réglag e de
l’horloge terminé, la fenêtre d’affichage
revient au mode de lecture normal.
Conseil
Vous pouvez régler l’horloge automatiquement au
moyen de la fonction RDS (page 21).
9
Page 70

Lecteur MD
Lecteur MD ou CD (en
option)
Cet appareil perme t, en plus de la lecture d’un
MD (MD doté de groupes), de comman der des
lecteurs MD ou C D compatibles M P 3 externes.
Si vous raccordez un ou plusieurs lecteurs CD
compatibles MP3 e n opt i on (p. ex : un changeur
CD MP3), vous pouvez écouter des fichiers
MP3, c’est-à-d ire des fichiers audio (pl ages)
comprimés offrant un son de grande qualité.
Lecture d’un disque
(Avec cet appareil)
Pour Appuyez sur
Interrompre la
lecture
Ejecter le disque (OPEN), puis Z
Passer d’une plage
à l’autre
–Accès
automatique
aux titres
Avancer ou reculer
rapidement dans
une plage
–Recherche
manuelle
Passer d’un GP à
un autre*
–Sélection d’un
GP
(OFF)
(SEEK) (–/+)
(./>)
[une fois pour ch aque plage]
(SEEK) (–/+)
(m/M)
[maintenez la touche
enfoncée jusqu’au point
souhaité]
(5)(GP–) ou (6)(GP+)
[une fois pour ch aque
groupe]
[maintenez la touche
enfoncée jusqu’au groupe
souhaité]
1 Appuyez sur (OPEN) et insérez le
disque (côté imprimé vers le haut).
2 Fermez la façade.
La lecture commen ce automatiquemen t.
Si un disque se trouve déjà dans l’appareil,
appuyez plusieurs fois sur (SOURCE) jusqu’à ce
que l’indication « MD » apparaisse pour la ncer
la lecture.
* Disponible uniquement lorsqu’un MD contenant des
groupes est inséré dans cet appareil pour être lu.
Pour sauter des plages en continu, appuyez sur
(SEEK) (+) ou (SEEK) (–), puis appuyez de
nouveau sur la même touche dans les 2 secondes
qui suivent et maintenez-la enfoncée.
Remarques
• Selon l’état du disque, il se peut que sa lecture soit
impossible (page 6).
• Pendant la lecture de la première ou de la dernière
plage du disq ue, si vous app uyez sur (SEEK) (–) ou
(SEEK) (+), la lecture saute à la dernière ou à la
première plage du disque.
• Lorsque la dernière plage du disque est terminée, la
lecture reprend à partir de la première plage du
disque.
10
Page 71

(Avec un appareil en option)
1 Appuyez plusieurs fois sur (SOURCE)
pour sélectionner « MD (MS*
1
)» ou
«CD».
2 Appuyez plusieurs fois sur (MODE)
jusqu’à ce que l’appare il souhaité
s’affiche.
La lecture commence.
Pour Appuyez sur
Passer d’un disque
à l’autre
–Sélection d’un
disque
Passer d’un album
à l’autre*
2
–Sélection
d’albums
*1 MS : Lecteur MG Memory Stick System-up
MGS-X1
*2 Disponible uniquement lorsqu’un appareil CD
compatible MP3 en option est raccordé et qu’un
fichier MP3 est en lecture.
(1)(DISC–) ou
(2)(DISC+)
[une fois pour chaque
disque]
[maintenez la touche
enfoncée jusqu ’au disque
souhaité]
(5)(ALBM–) ou
(6)(ALBM+)
[une fois pour chaque
album]
[maintenir la to uche
enfoncée jusqu’à l’album
souhaité]
Précautions à prendre lors du raccordement
d’appareils MGS-X1 ou MD.
Cet appareil reconnaît le MGS-X1 comme étant un
appareil MD.
• Pour lancer la lecture sur un lecteur MGS-X1,
appuyez sur (SOURCE) pour sélectionner « MD ».
Lorsque « MD » s’affiche comme source, appuyez
sur (MODE) pour sélectionner « MS » et lancer la
lecture.
• Pour lancer la lecture sur un lecteur MD, appuyez
sur (SOURCE) pour sélectionner « MD ». Lorsque
l’appareil MD souhaité s’affiche comme source, la
lecture commence. Si « MS » ou un autre appareil
MD s’affiche comme source, appuyez sur (MODE)
pour sélectionner l’appareil MD souhaité et lancer la
lecture.
Remarques sur l e racc ordement d’un ou plus i eur s
lecteurs CD compatibles MP3
• Si le disque inséré ne contient pas de fichiers MP3
(plages), le message « NO MUSIC » apparaît dans
la fenêtre d’affichage et la lecture du disque suivant
démarre.
• Avant de lire une plage, ce lecteur lit toutes les
informations du disque relatives aux plages et aux
albums. En fonction de la structure des plages, il
peut se passer plus d’une minute avant que la
lecture ne commence. Pendant ce temps, « READ »
est affiché. La lecture commence automatiquement
lorsque la lecture des informations est terminée.
Remarque
Avec un appareil en option raccordé, la lecture de la
même source continue sur le lecteur MD ou CD en
option.
11
Page 72

Rubriques d’affichage
Lorsque le disque/le groupe/l’albu m/la plage
change, le titre éventuellement pré-enregistré*
du nouveau disque/groupe/album/de la nou vell e
plage est automati quement affiché. (Si le
défilement automatique (A.SCRL) est réglé sur
« ON », les noms de plus de 8 caractères défilent
dans la fenêtre d’affichage (page 24).)
Affic hage MDLP*
LP2 : lecture LP2
Source
LP4 : lecture LP4
Rubriques affichabl es
• Numéro de disque/Numéro de plage/
Temps de lecture écoulé
• Nom de disque*
Nom de l’artiste*
1
/Nom de groupe*3/
4
• Nom de la plage (du fichier)*1*
•Horloge
• Nom de l’album (du dossier)*
• Tag ID3*
5
Pour Appuyez sur
Passer d’une
(DSPL)
rubrique
d’aff ichage à
l’autre
1
2
5
5
Remarques
• Certains caractères ne peuvent pas être affichés.
Les caractères et signes qui ne peuvent pas être
affichés sont représentés par le symbole « * ».
• Pour certains disques CD TEXT ou étiquettes ID3
contenant un grand nombre de caractères, le
défilement automatique des informations peut être
inopérant.
• Cet appareil ne peut pas afficher le nom de l’artiste
de chaque plage d’un disque CD TEXT.
Conseils
• Lorsque le défilement automatique (A.SCRL) est
réglé sur « OFF » et que le disque, le groupe, la
plage ou l’album est modifié, le nom du disque, du
groupe, de la plage ou de l’album ou l’étiquette ID3
ne défile pas.
• Lors de la lecture d’un MD contenant des groupes, à
chaque changement de groupe, le numéro du
nouveau groupe s’affiche. De même, lors de la
lecture d’un fichier MP3, à chaque changement
d’album, le numéro du nouvel album s’affiche.
*1 Lorsque vous appuyez sur (DSPL), « NO NAME »
indique qu’il n’existe pas aucun mémo de disque
(page 14) ni de nom préenregistré à afficher.
*2 Disponible uniqu em ent lors de l a lectur e d’u n
disque MDLP.
*3 Disponible uniquement lorsqu’un MD contenant
des groupes est inséré dans cet appareil pour être
lu.
*4 Uniquement pour les disques CD TEXT contenant
le nom de l’artiste.
*5 Uniquement pour les fichiers MP3.
Dans une étiquette ID3, seuls le nom de la plage,
de l’artiste et de l’album sont affichés.
Lorsque vous appuyez sur (DSPL), le message
« NO ID3 » vous indique qu’il n’y a pas d’étiquette
ID3 à afficher.
12
Page 73

Lecture de plages en boucle
— Lecture répé tée
Vou s pouvez sélectionner :
(Avec cet appareil)
• REP-TRACK — pour lire en boucle la plage en
cours.
•REP-GP*1 — pour lire en boucle le s plages du
groupe en cours.
(Avec des appareils en option)
• REP-TRACK — pour lire en boucle la plage en
cours.
•REP-ALBM*2 — pour lire en boucle les plages
de l’album cours.
•REP-DISC*3 — pour lire en boucle le s pl ages
du disque en cour s.
*1 Disponible uniquement lorsqu’un MD contenant
des groupes est inséré dans cet appareil pour être
lu.
*2 Disponible uniquement lorsqu’un appareil CD
compatible MP3 en option est raccordé et qu’un
fichier MP3 est en lecture.
*3 Disponible uniquement lorsqu’un ou plusieurs
lecteurs MD ou CD en option sont raccordés.
En cours de lecture, app uyez
plusieu rs f ois sur (3) (REP) j usqu’ à ce
que le réglage souhaité apparaisse
dans la fenêtre d’affichage.
La lecture répétée commence.
Pour rétablir le mode de l ecture normal,
sélectionnez « REP-OFF ».
Lecture des plages dans un
ordre aléatoire
— Lecture aléatoire
Vous pouvez sélectionner :
(Avec cet appareil)
• SHUF-GP*1 — pour écouter les plages du
groupe en cours dans un ordre aléatoire.
• SHUF-DISC — pour écouter dans un ordre
aléatoire les plag es du disque en cours
d’utilisation.
(Avec des appareils en option)
• SHUF-ALBM*2 — pour écouter le s pl ages de
l’album en cours dans un ordre aléatoire.
• SHUF-DIS C — pour écouter le s pl ages du
disque en cours de le ct ure dans un ordre
aléatoire.
• SHUF-CHGR*3 — pour écouter les plages du
changeur MD (C D ) en option en cours de
lecture dans un ordre alé at oire.
• SHUF-ALL*4 — pour écouter toutes les plages
de tous les appar ei ls MD et CD raccordés (y
compris cet appa reil) dans un ordre al éatoire.
*1 Disponible uniquement lorsqu’un MD contenant
des groupes est inséré dans cet appareil pour être
lu.
*2 Disponible uniquement lorsqu’un appareil CD
compatible MP3 en option est raccordé et qu’un
fichier MP3 est en lecture.
*3 Disponible uniquement lorsqu’un ou plusieurs
changeurs MD ou CD en option sont raccordés.
*4 Disponible uniquement lorsqu’un ou plusieurs
lecteurs MD en option ou plusieurs lecteurs CD en
option sont raccordés.
En cours de lecture, appuyez
plusieurs fois sur (4) (SHUF) jusqu’à
ce que le réglage souhaité apparaisse
dans la fenêtre d’affichage.
La lecture aléatoire commence.
Pour rétablir le mode de lecture normal,
sélectionnez « SHUF-OFF ».
Remarque
La fonction « SHUF-ALL » ne passe pas de façon
aléatoire des plages de lecteurs MD aux plages de
lecteurs CD et vice versa.
13
Page 74

Identification d’un CD
— Fonction de mémo de disque (pour un
lecteur CD disp osant de la fonction CUSTOM
FILE)
Vous pouvez identifier chaque disque avec un
nom personnalisé ( m émo de disque). Vous
pouvez saisir jusqu’à 8 caractères pour un
disque. Lorsque vous identifiez un CD, vous
pouvez ensuite le retrouver grâce à son nom
(page 15).
Remarque
La lecture REP-TRACK/SHUF est interrompue jusqu’à
ce que l’édition du nom soit terminée.
Affichage du mémo de disque
En tant que rubrique d’affichage, le mémo de
disque est toujours prioritaire sur toutes les
informations CD TEXT d’origine.
Pour Appuyez sur
Afficher le mémo
de disque
(DSPL) en cours de lectur e
du disque CD/CD TEXT
1 Lancez la lecture du disque que vous
souhaitez identifier dans un lecteur
CD disposant de la fonction CUSTOM
FILE.
2 Appuyez sur (PTY) (LIST) pendant 2
secondes.
L ’appare il répè te la lect ure du d isque au cours
de la procédure d’identification.
3 Saisissez les caractères.
1 Appuyez sur la touche de volume
+/– pour sélectionne r l e car actère
souhaité.
A y B y C ... y 0 y 1 y 2 ...
y + y – y
*(espace)
2 Appuyez sur (SEL) lorsque vous
avez repéré le caractèr e souhaité.
Le caractère su ivant clign o t e.
3 Répétez l es étapes 1 et 2 pour
saisir le reste du nom.
... y * y A
*
4 Pour revenir au mode de lecture
normal, appuyez su r (PTY) (LIST)
pendant 2 secondes.
Conseils
• Pour corriger ou effacer un caractère, procédez par
réécriture ou saisissez «
• Vous pouvez identifier les CD d’un appareil ne
disposant pas de la fonction CUSTOM FILE si cet
appareil est raccordé à un lecteur CD disposant de
cette fonction. Le mémo de disque est alors
sauvegardé dans la mémoire du lecteur CD doté de
la fonction CUSTOM FILE.
».
14
Conseil
D’autres rubriques peuvent être affichées (page 12).
Suppression du mémo de disque
1 Appuyez plusieurs fois sur (SOURCE)
pour sélectionner « CD ».
2 Appuyez plusieurs fois sur (MODE)
pour sélectionner le lecteur CD
contenant le mémo de disque.
3 Appuyez sur (PTY) (LIST) penda nt 2
secondes.
4 Appuyez sur (DSPL) pendant 2
secondes.
Les noms mémorisés apparaissent.
5 Appuyez plusieurs fois sur la touche
de volume +/– pour sélectionner le
nom de disque que vous souhaitez
supprimer.
6 Appuyez sur (SEL) pend ant 2
secondes.
Le nom est effacé.
Répétez les étapes 5 et 6 pour effacer d’autres
noms.
7 Appuyez sur (PTY) (LIST) penda nt 2
secondes.
Le lecteur revient au mode de lecture normal.
Remarques
• Lorsque le mémo d’un disque CD TEXT est effacé,
les informations CD TEXT d’origine s’affichent.
• Si vous ne réussissez pas à trouver le mémo de
disque que vous souhaitez effacer, essayez de
sélectionner un autre lecteur CD à l’étape 2.
• Si vous avez déjà effacé tous les mémos de disque,
l’appareil revient au mode de lecture normal à
l’étape 4.
Page 75

Recherche d’un disque par
son nom
— Affichage automatique des titres (pour un
lecteur MD ou un lecteur CD disposant de la
fonction CD TEXT/CUSTOM FILE)
Vou s pouvez utiliser cette fonc t io n pour les
disques auxquels vous avez attribué des mémos*
ou pour les disques CD TEXT*
*1 Recherche d’un disque par son nom mémorisé :
lorsque vous avez attribué un nom au MD ou au
CD (page 14).
*2 Recherche d’un disque grâce aux informations CD
TEXT : lorsque vous écoutez un disque CD TEXT
sur un lecteur CD doté de la fonction CD TEXT.
1 En cours de lecture, appuyez sur
(PTY) (LIST).
Le nom attribué au disq ue en cours de lecture
apparaît dans la fenêtre d’affichage.
2 Appuyez plusieurs fois sur (PTY)
(LIST) pour sélectionner le disque
souhaité.
3 Appuyez sur (SEEK) (+) o u (SEEK) (–)
pour lancer la lecture du disque.
Remarques
• L’affichage revient au mode de lecture normal
lorsque le nom du disque est resté affiché pendant 5
secondes.
• S’il n’y a pas de disques dans le chargeur, le
message « NO DISC » s’affiche dans la fenêtre
d’affichage.
• Si aucun nom n’a été attribué au disque en lecture,
le message « NO NAME » s’affiche dans la fenêtre
d’affichage.
• Si l’appareil n’a pas lu les informations du disque, le
message « NOT READ » s’affiche dans la fenêtre
d’affichage. Pour charger le disque, appuyez
d’abord sur la touche numérique, puis choisissez le
disque que vous souhaitez charger.
• Les informations s’affichent uniquement en
majuscules. Certa ins caractè res ne peu vent pas
être affichés.
2
.
Radio
L’appareil peut mémoriser j usqu’à 6 stations
pour chaque bande de fréquences (FM1, FM2,
FM3, MW (PO) et LW (GO)).
Précaution
Pour sélectionner des stations pendant que vous
1
conduisez, utilisez la fonction « Mémorisation
des meilleurs accords (BTM) » de façon à
réduire les risques d’accident.
Mémorisation automatique
des stations
— Mémorisation des meilleurs accords
(BTM)
L’appareil sélectionne les stations émettant les
signaux les plus pui ssants pour la bande
sélectionnée et les mémorise selon l’ordre des
fréquences.
1 Appuyez plusieurs fois sur (SOURCE)
pour sélectionner la radio.
2 Appuyez plusieurs fois sur (MODE)
pour sélectionner la bande .
3 Appuyez sur (SENS) (BTM) pendant 2
secondes.
L’appareil en regi stre les stations sur les
touches numériques dans l’ordre des
fréquences.
Un bip retentit lo rsque le réglage es t
mémorisé.
Remarques
• Si quelques stations uniquement peuvent être
captées en raison de faibles signaux, certaines
touches numériques conservent leur réglage
précédent.
• Si un numéro est indiqué dans la fenêtre d’affichage,
l’appareil commence la mémorisation des stations à
partir de la station affichée.
15
Page 76

Réception des stations
mémorisées
1 Appuyez plusieurs fois sur (SOURCE)
pour sélectionner la radio.
2 Appuyez plusieurs fois sur (MODE)
pour sélectionner la bande.
3 Appuyez sur la touche numérique ((1)
à (6)) sur laquelle la station souhaitée
est mémorisée.
Si la fonction de réglage des
présélections ne fonctionne pas
— Syntonisation automatique/Mode de
recherche locale
Syntonisation automatique :
Appuyez sur (SEEK) (+) ou (SEEK) (–)
pour rechercher la station souhai t ée.
Le balayage s’interrompt lorsque l’appareil
capte une station. Répétez cette opération
jusqu’à ce que vous captiez la station
souhaitée.
Mode de recherche locale :
Si la fonction de recherche
automatiqu e de s st at ion s s’ ar rê te t r op
fréquemment, appuyez plusieurs fois
sur (SENS) (BTM) jusqu’à ce qu e
l’indication « LOCAL-ON » s’affiche.
L’indicateur « LCL » s’affiche.
Seules les statio ns ém ettant des signaux
relativeme nt puis sa nts sont captées.
Pour annuler le mode de recherche locale,
appuyez deux fois sur (SENS) (BTM) en
réception FM.
Remarque
En réception MW (PO) ou LW (GO), pour annuler le
mode de recherche local, appuyez sur (SENS) (BTM)
(« LOCAL-OFF » apparaît).
Conseil
Si vous connaissez la fréquence de la station que
vous souhaitez écouter, maintenez enfoncée
(SEEK) (+) ou (SEEK) (–) pour rechercher la
fréquence approximative, puis appuyez plusieurs fois
sur (SEEK) (+) ou (SEEK) (–) pour ajuster le réglage
de la fréquence souhaitée (recherche manuelle de la
fréquence).
Si la réception stéréo FM est mauvaise
— Mode mono
En cours de réception radio, appuyez
plusieurs fois sur (SENS) (BTM)
jusqu’à ce que l’indication « MONOON » s’af fiche.
L’indicateur « MONO » s’affiche.
La qualité sonore est améliorée, mais le son
est diffusé en mono (l’indication
« STEREO » disparaît).
Pour revenir en mode de réception radio no rm al,
appuyez sur (SENS) (BTM) (« MONO-OF F »
apparaît).
Conseil
Si les programmes de la bande FM sont difficilement
audibles, réglez DSO sur « OFF » (page 26).
Mémorisation des stations
souhaitées uniquement
Vo us pouvez présélectionner les stations
souhaitées manuellement sur les touches
numériques de votre choix.
1 Appuyez plusieurs fois sur (SOURCE)
pour sélectionner la radio.
2 Appuyez plusieurs fois sur (MODE)
pour sélectionner la bande.
3 Pour capter la station que vous
souhaitez mémoriser, appuyez sur
(SEEK) (+) ou (SEEK) (–).
4 Appuyez sur la touche numérique
souhaitée ((1) à (6)) pendant 2
secondes jusqu’à ce que l’indi cation
« MEM » apparaisse.
Le numéro de la touche apparaît dans la
fenêtre d’affichage.
Remarque
Si vous essayez de mémoriser une autre station sur la
même touche numérique, la station mémorisée
précédemment est effacée.
16
Page 77

Fonction RDS
Présentation de la fonction
RDS
Les stations FM disposant du sy st ème RDS
(Radio Data Sy st em ) transmettent des
informations numériques inaudibles en même
temps que le signal normal de leurs émissions
radio. Par exemple, l’une des info rm ations
suivantes s’affiche lors de la réception d’une
station disposant de la fonction RDS.
Rubriques affichables
•Bande radio
• Fonction
Rubriques affichables
• Numéro de présélection/Nom
de la station (fréquence)
•Horloge
• Données RDS
Pour Appuyez sur
Passer à la rubrique
Horloge ou au nom
de la station
Services RDS
Les données RDS offrent d’ autres services, tels
que :
•la resyntonisa tion au to m atiqu e d’une
émission, très pratique pour les longs trajets.
— AF t page 17
• la réception de m essages de
radioguidage, même si vous écoutez une
autre émission ou une autre source.
— TA t page 18
• la sélection de stations selon le type
d’émission. — PTY t page 2 0
• le réglage autom atique de heure.
— CT t page 21
Remarques
• Selon le pays ou la région où vous vous trouvez, il
est possible que les services RDS ne soient pas
tous disponibles.
• La fonction RDS peut ne pas fonctionner
correctement si le signal capté est faible ou si la
station sélectionnée ne diffuse pas de données RDS.
(DSPL)
Resyntonisation automatique
pour une réception optimale
— AF (fréquence alternative)
Lorsque la fonction AF est activée, l’appareil
recherche toujo u rs le sig nal le plu s pui ssa nt po ur
la station que vous écou te z dans la zone où vous
vous trouvez.
La fréquence change automatiquement.
98,5 MHz
Station
1 Sélectionnez une station FM (page 15).
2 Appuyez plusieurs fois sur (AF/TA)
jusqu’à ce que l’indication « AF-ON »
s’affiche.
L’appareil entame la recherche d’une
fréquence alter nat ive dont le s ignal est plus
puissant dans le mê m e réseau de
radiodiffusion.
Si l’indication « NO AF » clignote, la station
actuellement syn tonisée ne dispose pas de
fréquence alter native.
Pour annuler l a fonction AF, sélectionnez « AF,
TA-OFF ».
Conseils
• Si «AF-ON » est sélectionné, les messages de
radioguidage sont annulés. Pour activer les
messages de radioguidage avec la fonction AF,
sélectionnez « AF, TA-ON ».
• Si vous souhaitez changer le réglage on/off pendant
la lecture d’un MD, appuyez sur (AF/TA).
Suite à la page suivante t
96,0 MHz
102,5 MHz
17
Page 78

Pour les stations sans fréquence
alternative
Appuyez sur (SEEK) (+) ou (SEEK) (–)
pendant que le nom de la station
clignote (dans les 8 secondes).
L’appareil com m ence à rechercher une autre
fréquence avec les mêmes données
d’identification de programme (PI)
(l’indication «PI SEEK » apparaît).
Si l’appareil ne par vient pas à trouver la
même PI, il revient à la fréque nce réglée
précédemment.
Ecoute continue d’une émission
régionale
Lorsque la fonction AF est activée : ce réglage
par défaut restreint la réception à une région
spécifique, afin qu’une st at i on régionale ayant
une fréquence plus puissante ne soit pas captée.
Si vous quittez la zone de ré ception de cette
émission régionale ou si vous souhaitez profiter
pleinement de la fonction AF, appuyez sur
(SEL) et (AF/TA) simultanément jusqu’à ce que
« REG-OFF » s’affiche.
Remarque
Cette fonction est inopérante au Royaume-Uni et dans
certaines autres régions.
Fonction de liaison locale
(Royaum e-Uni uniq uem ent)
Cette fonction vous permet de sélectionn er
d’autres stations locales de la région, m êm e si
elles ne sont pas associées à vos touches
numériques.
1 Appuyez sur la touche numérique ((1)
à (6)) sur laquelle une station locale
est mémorisée.
2 Dans les 5 secondes qui suivent ,
appuyez de nouveau sur la tou che
numérique de la station locale.
3 Répétez l’opération jusqu’à ce que
vous captiez la station locale
souhaitée.
Réception de messages de
radioguidage
— TA (messages de radioguidag e)/TP
(programmes de radioguidage)
Les fonctions TA et TP permettent de régler
automatiquement une station FM diffusant des
messages de radi oguidage. Ces fonct io ns ne
tiennent pas compte de l’émission/de la source
FM ou du MD/CD e n cours d’écoute ; l’appareil
revient à la source d’origine lorsque le bulletin
d’information est terminé.
Appuyez plusieurs fois sur (AF/TA)
jusqu’à ce que l’indication « TA-ON »
s’affiche.
L’appareil comm ence à rechercher les
stations diffusant des m es sages de
radioguidage.
L’indication « TP » indi que la réception de
ces stations et l’indication « TA » clignote
pendant la diffusion d’un message de
radioguidage. L’appareil continue à
rechercher les stations diffusant des
programmes de radioguidage si l’indication
« NO TP » apparaît.
Pour annuler tous le s m essages de radiog ui dage,
sélectionnez « AF, TA-OFF ».
Pour Appuyez sur
Interrompre le
bulletin en cours
Conseils
• Si « TA-ON » est sélectionné, la fonction AF est
annulée. Pour activer la fonction AF avec les
messages de radioguidage, sélectionnez « AF, TAON ».
• Vous pouvez également interrompre le bulletin en
cours en appuyant sur (SOURCE) ou (MODE).
(AF/TA)
18
Page 79

Préréglage du volume sonore des
messages de radioguidage
Vous pouvez prérégler le niveau de volume des
messages de ra diog uida ge de f aço n à ne m anque r
aucune informat i on.
1 Appuyez sur la touche de volume +/–
pour régler le niveau de volume
souhaité.
2 Appuyez sur (AF/TA) pendant 2
secondes.
L’indication «TA » apparaît et le réglage est
mémorisé.
Réception de messages d’urgence
Lorsque la foncti on AF ou TA est activée,
l’appareil pass e aux messages d’u rgenc e reçus
pendant que vous écou te z une station FM, un
MD ou un CD.
Préréglage des stations RDS
avec les réglages AF et TA
Lorsque vous préséle ct i onnez des stations RDS ,
l’appareil mémorise le réglag e AF/T A (o n/of f) de
chaque station ainsi que sa fréquence. Vous
pouvez effectuer un réglage différent (pour AF,
TA ou les deux ) pour chaque station
présélection née ou vous pouvez effectuer le
même réglage pour toutes les stations
présélectionn ées. Si vous préréglez des stations
avec « AF, TA-ON », l’appareil mémorise
automatiquement les statio ns d o nt le signal radio
est le plus puissant.
Préréglage du même réglage pour
toutes les stations présélectionnées
1 Sélectionnez une bande FM (page 15).
2 Appuyez plusieurs fois sur (AF/TA)
pour sélectionner « AF-ON », « TAON » ou « AF, TA-ON ».
Notez que la sélection de « AF, TA-OFF »
s’applique aux stations RDS aussi bien
qu’aux stations ne disposant pas de cette
fonction.
3 Appuyez sur (SENS) (BTM) jusqu’à ce
que l’indication « BTM » clignote.
Préréglage de réglages différents pour
chaque station présélectionnée
1 Sélectionnez une bande FM et
sélectionnez la station souhaitée
(page 15).
2 Appuyez plusieurs fois sur (AF/TA)
pour sélectionner « AF-ON », « TAON » ou « AF, TA-ON ».
3 Appuyez sur l a to uc he nu mér iqu e ((1)
à (6)) souhaitée jusqu’à ce que
l’indication « MEM » apparaisse.
Répétez les opérations à partir de l’ét ape 1
pour prérégler d’autres stations.
Remarque
Si vous souhaitez changer le réglage AF/TA pendant
la lecture d’un MD, appuyez sur (AF/TA).
19
Page 80

Réglage d’une station en
fonction du type d’émission
— PTY (type d’émission)
Vous pouvez régler une stati o n en sélectionna nt
le type d’émissio n que vous souhaitez écou te r.
Types d’émissions Affichage
Actualités NEWS
Dossiers d’actualité AFFAIRS
Informations INFO
Sports SPORT
Programmes éd ucatifs EDUCATE
Théatre DRAMA
Culture CULTURE
Science SCIENCE
Divers VARI ED
Musique populaire POP M
Rock ROCK M
Musique légére EASY M
Musique classique légère LIGHT M
Musique classi que CLASSICS
Autres styles de musique OTHER M
Météo WEATHER
Finance FINANCE
Émissions pour enfants CHILDREN
Affaires sociales SOCIAL A
Religion RELIGION
Émissions ligne ou vert e PHONE IN
Voyages TRAVEL
Loisirs LEISURE
Jazz JAZZ
Musique country COUNTRY
Musique nati onale NATION M
Musique d’aut refois OLDIES
Musique folk FOLK M
Film documentaire DOCUMENT
1 Appuyez sur (PTY) (LIST) en cours de
réception FM.
Le nom du type d’émission diffusé s’affiche
si la station transmet des données PTY.
« -------- » apparaît si la station captée n’est
pas une station RDS ou si aucune données
RDS ne sont captées.
2 Appuyez plusieurs fois sur (PTY)
(LIST) jusqu’à ce que le type de
programme souhaité apparaisse.
Les types d’émissions apparaisse nt dans
l’ordre indiqué dans le ta bl eau.
« NONE » apparaît si le type d’émission n’est
pas spécifié dans les données RDS.
3 Appuyez sur (SEEK) (+) ou (SEEK) (–).
L ’appareil commence à rechercher une station
diffusant le type d’émission sélectionné.
Remarque
Cette fonction est inopérante dans certains pays ou
régions où les données PTY ne sont pas disponibles.
20
Page 81

Réglage automatique de
l’horloge
— CT (heure)
Les données CT (heu re) accompagnant la
transmission RDS assurent un réglage
automatique de l’horloge.
Autres fonctions
Vous pouvez également commander l’appareil
(et les lecteurs MD ou CD en option) avec un
satellite de commande (en opti on).
Sélection de « CT-ON »
Pendant la réception radio, appuyez
simultan ément sur (SEL) et (2).
L’horloge est réglée.
Après une sec onde, l’affichage revient en
mode de réception radio normal.
Pour sélectionner « CT-OFF », appuyez de
nouveau simultanément sur (SEL) et (2).
Remarques
• Il est possible que la fonction CT ne fonctionne pas,
même si une station RDS est captée.
• Il peut y avoir une différence entre l’heure réglée par
la fonction CT et l’heure réelle.
Utilisation du satellite de
commande
Commencez par apposer l’étiquette appropriée
suivant la position de montage du satellite de
commande.
Le satellite de commande fonctionne par
pression sur les touches et/ou par rotation des
commandes.
MODE
MODE
DSPL
SEL
SEL
DSPL
Suite à la page suivante t
21
Page 82

Par pression sur les touches Par rotation de la commande
(SEL)
(ATT)
(MODE)
(SOURCE)
Tournez la commande VOL
pour régler le volume.
Appuyez sur Pour
(DSPL)
(OFF)
(SOURCE) changer de source
(Radio/MD/CD*1)/Mettre
l’appareil sous te nsion
(MODE) ch anger le mode de
fonctionnement
(Bande radio/lecteur MD*1/
lecteur CD*
1
)
(ATT) atténuer le son
2
(OFF)*
interrompre la lect ur e d’un
disque ou la réce pt ion
radio/mettre l’appareil hors
tension
(SEL) régler et séle ct ionner
(DSPL) afficher une autre rubrique
d’affichage
OFF
Tournez la commande et relâchez-la
pour :
– passer d’une plage à l’autre ;
Pour sauter plusieurs plages de suite,
tournez une fois la commande rotative, puis
tournez-la de nouveau dans un délai de
2 secondes et maintenez-la.
– régler automatiq uement des stations de
radio.
Tournez la commande, maintenez-la et
relâchez-la pour :
– avancer ou reculer rapidement dans une
plage ;
– trouver une station m anuellement.
Par pression sur la commande et
rotation de celle-ci
Commande
SEEK/AMS
22
Commande
PRESET/DISC
Exercez une pression sur la commande
et tournez-la pour :
– recevoir les stations prés él ectionnées ;
– changer de disque en cours de lecture d’un
MD ou d’un CD*
1
.
– changer d’album*3.
– changer d’album*4.
Page 83

Lors de la lecture d’un MD contenant des
groupes ou d’un fichie r MP3, vous pouvez
sélectionner un groupe (MD) ou un album
(fichier MP3) à l’aide du satellite de commande.
(Avec cet appareil)
Pour Faites ceci
Passer d’un groupe
à l’autre*
3
–Sélection d’un
groupe
1 Pour en t re r dans le mode
sélection Grou pe,
appuyez sur la
commande, tournez-la et
maintenez-la enfoncée.
Dans les 2 secondes,
passez à l’étape 2.
2 Enfoncez la commande,
faites-la tourner
rapidement et pl us ie urs
fois pour sauter les
groupes l’un après
l’autre.
(Avec un appareil en option)
Pour Faites ceci
Passer d’un disque
à l’autre
–Sélection d’un
disque
Appuyez sur la commande
et tournez-la [une fois pour
chaque disque].
Pour sauter pl usieurs
disques de suite, appuyez
sur la commande et tournezla, puis renouvelez cett e
opération dans les 2
secondes qui suivent et
maintenez la commande
dans cette position.
Passer d’un album
à l’autre*
4
–Sélection d’un
album
1 Pour en t re r dans le mode
sélection Album,
appuyez sur la
commande, tournez-la et
maintenez-la enfoncée.
Dans les 2 secondes,
passez à l’étape 2.
2 Enfoncez la commande,
faites-la tourner
rapidement et pl us ie urs
fois pour sauter les
albums l’un après l’autre .
Modification du sens de
fonctionnement
Le sens de fonctionnement des commandes est
réglé par défaut comme indiqué sur l’illustration
ci-dessous.
Pour augmenter
Pour dimi nuer
Si vous devez monter le satellite de commande
du côté droit de la colonne de direction, vous
pouvez inverser le sens de fonctionnement.
Appuyez sur (SEL) pendant 2
secondes tout en maintenant la
commande VOL enfoncée.
Remarque
Si vous appuyez sur (SEL) pendant 2 secondes tout
en appuyant sur la commande VOL, l’indication
« NORM » ou « REV » s’affiche.
– L’indication « NORM » permet d’utiliser le satellite
de commande dans le sens par défaut.
– L’indication « REV » permet d’utiliser le satellite de
commande lorsque celui-ci est monté à la droite de
la colonne de direction.
*1 Uniquement si l’appareil en option correspondant
est raccordé.
*2 Si le contact de votre véhicule n’est pas doté d’une
position ACC (accessoires), après avoir coupé le
moteur, veillez à maintenir (OFF) enfoncé e jus qu’ à
ce que l’affichage disparaisse.
*3 Disponible uniquement lorsqu’un MD contenant
des groupes est inséré dans cet appareil pour être
lu.
*4 Disponible uniquement lorsqu’un appareil CD
compatible MP3 en option est raccordé et qu’un
fichier MP3 est en lecture.
23
Page 84

Réglages des
caractéristiques du son
Modification des réglages du
son et de l’affichage
Vous pouvez régler la balance gauche/droite,
l’équilibre avant/ arrière, le filt re passe-bas et le
volume du haut-parleur d’extrêmes graves.
1 Appuyez plusieurs fois sur (SEL)
jusqu’à ce que l’indication « BAL »,
«FAD», «LPF» ou «SUB»
apparaisse.
A chaque pressio n s ur (SEL), le paramètre
change comme sui t:
1
LOW*
t MID*1 t HI*1 t
BAL (gauche-droite) t
FAD (avant-arrière) t
LPF (filtre passe-bas)*
SUB (volume du haut-parleur
d’extrêmes graves)*
*1 Lorsque EQ3 est activé (page 25).
*2 Si « SUB » est sélectionné (page 24).
*3 La fréquence de coupure peut être réglée à
78 Hz, 125 Hz ou OFF.
*4 Le volume peut être réglé par incréments de
–10 et +10. (à moins de –10, « ATT » apparaît.)
2*4
2*3
t
2 Appuyez sur la touche de volume +/–
pour régler le paramètr e souhaité.
Remarque
Effectuez ce réglage dans les 3 secondes après avoir
sélectionné le paramètre.
Atténuation rapide du son
Appuyez sur (ATT).
Après le bref affichage de « ATT-ON »,
« ATT » apparaît dans la fenêtre d’affichage.
Les paramètres suivants peuvent être réglés :
•REAR/SUB*1 — pour faire basc ul er la sortie
audio sur REAR ou SUB.
– Sélectionnez « REAR » pour transmettre les
sons vers un amplificat eur de puissance.
– Sélectionnez « SUB » pour transmettre les
sons vers un haut-par l eur d’extrêmes graves.
• CT (heure) (page21)
• A.SCRL (défilement automatique)*2 (page 12).
• M.DSPL (affichage animé) — pour activer ou
désactiver l’affichage animé.
– Sélectionnez «ON » pour activer l’affichage
animé (le motif animé apparaît dans la
fenêtre d’affichage).
– Sélection ne z « OFF » pour désactiver la
fonction d’affichage ani m é.
•DEMO*1 — pour activer ou désactiver
l’affichage de démonstrat i on.
– Sélectionnez «ON » pour activer l’affichage
de démonstration (la démonstration démarre
enviro n 10 secondes après la mise hors
tension de l’appareil).
– Sélection ne z « OFF » pour désactiver
l’affichag e de démonstra tio n .
• BEEP*3 — pour activer ou désactiver le bip
sonore.
• DIM (régulat eur de luminosité ) — pour
modifier la luminosité de l’affichage.
– Sélectionnez « ON » pour assombrir
l’affichage.
– Sélection ne z « OFF » pour désactiver le
gradateur de luminosité.
Pour restaurer le niveau de volume précédent,
appuyez de nouveau sur (ATT).
Conseil
Lorsque le câble d’interface d’un téléphone embarqué
est raccordé au fil ATT, l’appareil réduit le volume
automatiquement lors d’un appel téléphonique entrant
(fonction ATT du téléphone).
24
Page 85

Basculer entre REAR/SUB*
1
Appuyez sur (SEL ), puis appuye z sur
la touche + (REAR) ou – (SUB).
Après 3 secondes, l’affichage revient en mode de
lecture normal.
Sélection du paramètre souhaité
Appuyez simultanément sur (SEL) et
sur la touche souhaitée.
(SEL) + (2) : CT
(SEL) + (3) : A.SCRL*
2
(SEL) + (4) : M.DSPL
(SEL) + (4) : DEMO*
(SEL) + (6) : BEEP*
1
3
(SEL) + (DSPL) : DIM
Une fois le réglage terminé, la fenêtre
d’affichage revient au mode de lecture normal.
Pour annuler le paramètre, appuyez de nouveau
simultanément sur (SEL) et sur la touche
correspondante.
*1 Lorsque l’appareil est hors tension.
*2 Lors de la lecture d’un MD ou d’un CD.
*3 Le bip sonore est émis uniquement lorsque
l’amplificateur intégré est utilisé.
Réglage de l’égaliseur (EQ3)
Vous pouvez sélectionner une courbe d’égaliseur
pour 7 types de musique (XPLOD, VOCAL,
CLUB, JAZZ, NEW A GE, R OCK, CUST OM, et
OFF (égaliseur désactivé)).
Vo us pouvez sauvegarder un ré gl age d’égaliseur
différent pour chaque source.
Sélection de la courbe d’égaliseur
1 Appuyez sur (SOURCE) pour
sélectionner une source (Radio, MD
ou CD).
2 Appuyez plus ieur s f ois s ur (EQ3) pour
sélectionner la courbe d’égaliseur
souhaitée.
A chaque pression sur (EQ3), le paramètre
change.
Pour annuler l’effet de l’éga liseur,
sélectionnez « OFF ».
Suite à la page suivante t
25
Page 86

Réglage de la courbe de l’égaliseur
Vous pouvez mémoriser et rég ler les paramètres
de l’égaliseur pour différentes gammes de
tonalité.
1 Appuyez sur (SOURCE) pour
sélectionner une source (Radio, MD
ou CD).
2 Appuyez plusieurs fois sur (EQ3) pour
sélectionner la courbe d’égaliseur
souhaitée.
3 Réglage de la courbe d’égaliseur.
1 Appuyez plusieurs fois sur (SEL)
pour sélectionner la plage de
tonalité souhaitée.
A chaque pression sur (SEL), la plage de
tonalité change.
LOW t MID t HI (t BAL t FAD t
LPF t SUB)
2 Appuyez plusieurs fois sur la
touche de volume +/– pour régler le
niveau de volume souhaité.
Le niveau de volume peut être réglé par
incréments de 1 dB, de –10 dB à +10 dB.
3 Répétez l es étapes 1 et 2 pour
régler la courbe de l’égaliseur.
Pour restaurer la courbe par défaut de
l’égaliseur, appuyez su r (SEL) pendant 2
secondes.
Après 1 seconde s, l ’affichage revient en
mode de lecture no rm al.
Remarque
Lorsque EQ3 est réglé sur « OFF », vous ne pouvez
pas régler les paramètres de l’égaliseur.
Réglage du répartiteur
dynamique du son émis
(DSO)
Si vos haut-parleur s sont installés dans l a partie
inférieure des portières, le son es t émis à un
niveau pr och e d u sol et i l se pe ut qu’i l n e so it pas
clair.
La fonction DSO (r épartiteur dynamique du son
émis) crée un son mieux réparti, comme s’il y
avait des haut-parleurs au-dessus du tableau de
bord (haut-pa rleurs virtuels).
Vo us pouvez enregistrer un réglage DSO pour
chaque source .
Mode DSO et image des enceintes virtuelles
créées
*3
*2
*1
*4
*1 DSO-1
*2 DSO-2
*3 DSO-3
*4 DSO-OFF
1 Appuyez sur (SOURCE) pour
sélectionner une source (Radio, MD
ou CD).
2 Appuyez plusieurs fois sur (DSO)
jusqu’à ce que le réglage DSO
souhaité s’affiche.
A chaque pression sur (DSO), le réglage
DSO change.
*3
*2
*1
*4
26
Pour désactiver la fonction DSO, sélectionnez
« DSO-OFF ». Après 1 secondes, l’affichage
revient en mode de lect ur e normal.
Remarques
• Selon l’intérieur de la voiture ou le type de musique,
la fonction DSO peut avoir un effet indésirable.
• Si les programmes de la bande FM sont difficilement
audibles, réglez DSO sur « OFF ».
Page 87

Informations
complémentaires
Entretien
Remplacement du fusible
Lorsque vous remplacez le fusible, veillez à
utiliser un fusible dont la capacité, en ampères,
correspon d à la valeur indi quée sur l’ancien
fusible. Si le fusible fond, vérifiez le
branchement de l’alimentation et remplacez le
fusible. Si le nouveau fusible fond également, il
est possible que l’appareil soit défect ue ux. Dan s
ce cas, consultez votre revendeur Sony le plus
proche.
Fusible (10 A)
Avertissement
Ne jamais utiliser de fusible dont la capacité en
ampères dépasse celle du fusible fourni avec
l’appareil, car vou s r is queriez d’endom m a ger
l’appareil.
Nettoyage des conn ecte urs
L’appareil peut ne pas fonctionner correcteme nt
si les connecteu rs entre l’apparei l e t l a façade
sont souillés. Pour éviter cette situation, enlevez
la façade (page 8) et nettoyez les connecteurs à
l’aide d’un coton-tige imbibé d’alcool. N’exercez
pas une pression trop forte, sinon les connecteurs
peuvent être endommagés.
Appareil principal
Arrière de la façade
Remarques
• Pour plus de sécurité, coupez le moteur avant de
nettoyer les connecteurs et retirez la clé du contact.
• Ne touchez jamais les connecteurs directement
avec les doigts ou avec un objet métallique.
Suite à la page suivante t
27
Page 88

Remplacement de la pile au lithium
Dans des conditions d’utilisation no rm ales, la
pile dure environ 1 an. (En fo nction des
conditions d’utilisation, sa durée de vie peut être
plus courte.) Lorsque la pile est faible, la portée
de la mini-télécommande dimin ue. Rempl acez l a
pile par une nouvelle pile au lit hi um CR2025.
L ’util isation de tout autre type de pi le entraîne un
risque d’incendi e ou d’explosion.
x
pôle + vers le haut
Remarques sur la pile au lithium
• Tenez la pile au lithium hors de la portée des
enfants. En cas d’ingestion de la pile, consultez
immédiatement un médecin.
• Essuyez la pil e a vec un ch if fon s ec pour assu rer
un bon contact.
• Veillez à respecter la polarité lors de
l’installation de la pile.
• Ne tenez pas la pi l e avec des pinces
métalliques, car cela pourrait entraîn e r un
court-circuit.
ATTENTION
Utilisée de façon incorrecte, la pile peut
exploser. Ne pas la recharger, la démonter ni
la jeter au feu.
28
Page 89

Démontage de l’appareil
1 Retirez le tour de protection.
1 Reti rez la façade (page 8).
2 Insérez le s clés de déblocage dans
le tour de protection.
2 Retirez l’appareil.
1 Insérez les deux clés de déblocage
jusqu’au déclic.
Tournez le crochet
vers l’intérieur.
Orientez
correctement la
clé de déblocage.
3 Tirez sur les clés de déblocage pour
retirer le tour de protection.
2 Tirez sur les clés de déblocage pour
extraire l’appareil.
3 Faites glisser l’appareil en dehors
de son support.
29
Page 90

Spécifications
y
Lecteur MD
Rapport signal/bruit 90 dB
Réponse en fréquence 10 à 20 000 Hz
Pleurage et scintillement En dessous du seuil
mesurable
Radio
FM
Plage de syntonisation 87,5 à 108,0 MHz
Borne d’antenne Connecteur d’antenne
Fréquence intermédiaire 10,7 MHz/450 kHz
Sensibilité utile 9 dBf
Sélectivité 75 dB à 400 kHz
Rapport signal/bruit 67 dB (stéréo),
Distorsion harmonique à 1 kHz
Séparation 35 dB à 1 kHz
Réponse en fréquence 30 à 15 000 Hz
externe
69 dB (mono)
0,5 % (stéréo),
0,3 % (mono)
MW (PO)/LW (GO)
Plage de syntonisation MW (PO) : 531 à 1 602 kHz
Borne d’antenne Connecteur d’antenne
Fréquence intermédiaire 10,7 MHz/450 kHz
Sensibilité MW (PO) : 30 µV
LW (GO): 153 à 279 kHz
externe
LW (GO): 40 µV
Amplificateur de puissance
Sorties Sorties de haut-parleurs
Impédance des haut-parleurs
Puissance de sortie maximale
(connecteurs de sécurité)
4 à 8 ohms
52 W × 4 (à 4 ohms)
Généralités
Sorties Bornes sorties audio
Entrées Borne de commande ATT
(commutables avant,
arrière/basses)
Borne de commande de
relais d’antenne électrique
Borne de commande
d’amplificateur de
puissance
téléphone
Borne d’entrée de
télécommande
Borne d’entrée de
commande BUS
Borne d’entrée audio BUS
Borne d’entrée de l’antenne
Commandes de tonalité Graves:
Alimentation requise Batterie de véhicule
Dimensions Environ 178 × 50 × 181 mm
Dimensions du support Environ 182 × 53 × 161 mm
Poids Environ 1, 2 kg
Accessoires fournis Composants destinés à
Accessoires en option Mini-télécommande
Appareils en option Changeur de CD
±10 dB à 60 Hz (XPLOD)
Médiums:
±10 dB à 1 kHz (XPLOD)
Aigus:
±10 dB à 10 kHz (XPLOD)
12 V CC (masse négative)
(l/h/p)
(l/h/p)
l’installation et au
raccordement (1 jeu)
Étui pour la façade (1)
RM-X114
Satellite de commande
RM-X4S
Câble BUS (fourni avec un
cordon à broche RCA)
RC-61 (1 m), RC-62 (2 m)
(10 disques)
CDX-757MX
Changeur de CD
(6 disques)
CDX-T70MX, CDX-T69
Changeur de MD
(6 disques)
MDX-66XLP
Sélecteur de source
XA-C30
Sélecteu r AUX-IN
XA-300
Brevets américains et internationaux sous licence
de Dolb
Remarque
Cet appareil ne peut pas être raccordé à un
préamplificateur numé r i qu e ou à un égali seu r
compatible avec le système BUS de Sony.
La conception et les spécifications sont sujettes à
modification sans préavis.
Laboratories.
30
Page 91

Dépannage
La liste de contrôle suivante vous aidera à
remédier aux problèmes que vous pourriez
rencontrer avec cet appareil.
Avant de passer en revue la liste de contrôl e ci dessous, vérifiez les procédures de raccordement
et d’utilisation.
Généralités
Aucun son.
• Appuyez sur la to uche de volume + pour
régler le volume.
• Désactivez la fonction ATT.
• Dans un système à 2 haut-parleu rs , r églez la
commande d’équilibre ava nt-arrière sur la
position médiane.
• Vous pouvez lancer la lect ure d’un disque
MDLP avec un changeur MD en option sans
la fonction MDLP ( l’i ndi cation « LP: ·· · »
peut s’afficher).
t Insérez le disque MDLP dans l’appareil
pour le lire.
Le contenu de la mémoire a été effacé.
• La touche RESET a été enfoncée.
t Recommencez la pr océdure
d’enregistrement dans la mémoire.
• Le cordon d’alimentation ou la batterie a été
déconnecté.
• Le cordon d’alimentation n’est pas raccordé
correctement.
Aucun bip ne se fait en tendre.
• Le bip est désact ivé (page 24).
• Un amplificateur de puissance en opt i on est
raccordé et vous n’utilisez pas
l’amplificateur intégré.
L’affichage disparaît de la fenêtre
d’affichage ou il ne s’affiche pas.
• L’affichage est désactivé si vous maintenez
(OFF) enfoncée.
t Maintenez de nouveau (OFF) enfoncée
jusqu’à ce que l’affichage apparaisse.
• Retirez la façade et nettoyez les connecteurs.
Pour plus de détails , reportez-vous à la
section « Nettoyage des connecteurs » à la
page 27.
Les stations mémorisées et l’heure sont
effacées.
Le fusible a fond u.
Emission de bruit lorsque la clé de c ontact
est en position ON, ACC ou OFF.
Les fils ne sont pas raccor dés correctement au
connecteur d’alimentation du véhicule destiné
aux accessoires.
L’appareil n’est pas alimenté.
• Vérifiez le ra ccordement. Si tout e st en
ordre, vérifiez le fusible.
• Le véhicule n’est pas équipé d’une position
ACC.
t Appuyez sur (SOURCE) (ou insérez un
MD) pour activ e r l’appareil.
L’appareil est alimenté en continu.
Le véhicule n’est pa s équipé d’une position
ACC.
t Après avoir coupé le moteur, maintenez
enfoncée (OFF) de l’appareil jusqu’à ce
que l’affichage soit désactivé.
L’antenne électrique ne se déploie pas.
L’antenne électrique ne dispose pas d’un
boîtier de relais.
Lecture d’un MD
Impossible d’introduire un MD.
• Un autre MD est déjà en place.
• Le MD a été in t r oduit de force à l’envers ou
dans le mauvais sens.
La lecture ne commence pas.
MD défectueux.
Un disque est automatiquement éjecté.
La température ambiante dépasse 50 °C.
La fonction groupe du MD est inopérante.
• Le MD inséré dans cet appareil ne contient
aucun groupe.
• Il est possib le que la plage en cou rs de
lecture n’appa rt i enne pas à un groupe cré é
par votre enregistreur MD.
• Le MD en cours de lecture contient peut-être
des groupes in sérés dans un cha ngeur MD en
option.
t Ins érez le MD contenant des groupes
dans cet appareil.
Les touches de commande sont
inopérantes.
Impossible d’éjecter le MD.
Appuyez sur la to uche RESET.
Le son est irrégulier en raison de vibrations.
• L’appareil est installé suivant un angle de
plus de 45°.
• L’appareil n’est pas installé à un e ndroit
suffisamment stable du vé hi cule.
Le son saute.
Le disque est encr assé ou défectueux .
Impossible de supprimer l’indication
« -------- ».
Vous êtes en mode d’édition du nom.
t Appuyez sur (PTY) (LIST) pendant 2
secondes.
Suite à la page suivante t
31
Page 92

Réception radio
Impossible de capter une présélection.
• Enregistrez la fréquence correc te dans la
mémoire.
• Le signal capté est trop faible.
Impossible de capter des stations.
Le son comporte des parasites.
• Raccordez un fil de commande d’ant enne
électrique (bleu) ou un fil d’alimentation
d’accessoire (rouge) au câble d’alime ntation
de l’amplificateur d’antenne de la voiture.
(Uniquement si votre voiture est équipée
d’une antenne FM/ M W (PO)/LW (GO)
intégrée dans la vitre arrière/latérale.)
• Vérifiez le raccordement de l’antenne du
véhicule.
• L’antenne au t om atique ne se déploie pas.
t Vé ri fiez le raccordement du câbl e de
commande de l’ant enne électrique.
• Vérifiez la fréquence.
• Lorsque le mode DSO est activé, le son peut
parfois compo r ter des parasites.
t Régl ez le mode DSO sur « OFF »
(page 26).
Le réglage automatique des stations est
impossible.
• Le mode de rech erche locale est réglé sur
«ON».
t Ré gl ez le mode de recherche locale sur
« OFF » (page 16).
• Le signal capté est trop faible.
t Réglez manuellement la fréquence.
L’indication « STEREO » clign ote.
• Réglez la fréque nce correctement .
• Le signal capté est trop faible.
t Régl ez le mode de réception mo no sur
« ON » (page 16).
Une émission stéréo est entendue en mono.
L’appareil es t en mode de réception mono.
t Dé sactivez le mode de réception mo no
(page 16).
Fonction RDS
Une recherche (SEEK) commence après
quelques secondes d’éc oute.
La station ne diffuse pas de pr ogrammes de
radioguidage (fonc t io n TP désactivée) ou le
signal capté est faib l e.
t Appuyez plusieurs fois sur (AF/TA)
jusqu’à ce que l’indication « A F, TAOFF » appa r ai ss e.
Aucun message de radioguidage.
•Activez «TA».
• La station n’émet pas de messages de
radioguidage, malgré l’indication TP.
t Réglez la fréquence pour capter une autre
station.
PTY affiche « -------- ».
• La station actu ellement captée n’ est pas une
station RDS.
• Les données RD S n’ont pas été reç ues.
32
Page 93

Affichage des erreurs et
messages
Affichage des erreurs
(pour cet appareil et les changeurs MD ou
CD en option)
Les indications suivantes clignotent pendant
environ 5secondes et une alarme retentit.
BLANK*
ERROR*
FAILURE
HI TEMP
NO DISC
NO MAG
NO MUSIC
NOTREADY
OFFSET
1
Aucune plage n’a été enreg istrée sur un MD.*
t Ins érez un MD contenant des plages
enregistrées.
1
• Un MD est sale ou inséré à l’envers.*
2
t Nettoyez le MD ou insérez-le
correctement.
• Un MD ou CD ne peu t pa s êt r e l u en raison
de certains problèmes.
t Insérez un autre MD ou CD.
Les haut-parleurs ou les amplificateurs ne sont
pas raccordés correctement.
t Reportez-vous au manuel d’installation de
ce modèle pour vér i fier les raccordements.
La température am bi ante dépasse 50 °C.
t Attendez que la température descende en
dessous de 50 °C.
Aucun disque n’a été inséré dans le lecteur
MD ou CD.
t Ins ér ez un disque dans le lecte ur MD ou
CD.
Le chargeur n’a pas été inséré dans le lecteur
CD.
t Insérez le chargeur dans le lecteur CD.
Un CD non enregistré au format audio a été
inséré dans un lecteur CD comp a tible MP3.
t Ins ér ez un CD audio dans le lecteur CD
compatible MP3.
Le couvercle du lecteu r MD est ouvert ou les
MD ne sont pas insér és correctement.
t Fe r mez le couvercle ou insérez
correctement les MD.
Il est possible qu’il y ait un problème de
fonctionnement.
t Vérifiez le raccordement. Si le message
d’erreur rest e affiché, consultez votr e
revend eur Sony le plus proc he.
RESET
Le lecteur MD ou CD ne fonctionne pas en
raison de certains pr oblèmes.
t Appuyez sur la touche RESET de
l’appareil.
*1 Lorsqu’une erreur se produit lors de la lecture d’un
MD ou d’un CD, le numéro de disque du MD ou du
CD ne s’affiche pas.
*2 Le numéro du disque qui a provoqué l’erreur
apparaît dans la fenêtre d’affichage.
Si ces solutions ne permettent pas d’améliorer la
2
situation, cons ul te z votr e revend eur Sony le plus
proche.
Messages
L.SEEK +/–
Le mode de recherche locale est activé en
cours de recher che automatique des
fréquences (page 16).
NO AF
Il n’existe aucune fréquence alternative pour la
station a ctuelle.
« » ou « »
Vous avez atteint le début ou la f in du disq ue et
vous ne pouvez pas aller plus loin.
33
Page 94

Congratulazioni!
Complimenti per l’acquisto del presente letto re
MiniDisc Sony. Utilizzando i seguenti accessori
sarà inoltre possibile usufruire di ulteriori
funzioni:
• Unità MD/CD opzionali (lettori e cambia MD/
1
CD)*
.
• Informazioni CD TEXT (visualizzate durante
la riproduzione di dischi CD TEXT*
CD opzionali).
• Accessori di controllo opzionali
Telecomando a scheda RM-X114
Telecomando a rotazione RM-X4S
*1 Questo apparecchio funziona unicamente con
prodotti Sony.
*2 Un disco CD TEXT è un CD audio che contiene
informazioni quali il nome del disco, dell’artista e
dei brani. Tali informazioni sono registrate sul
disco.
Questa etichetta è posta nella parte inferiore
esterna.
2
in unità
2
Page 95

Indice
Individuazione dei comandi . . . . . . . . . . . . . 4
Precauzioni . . . . . . . . . . . . . . . . . . . . . . . . . . 6
Note sugli MD. . . . . . . . . . . . . . . . . . . . . . . . 6
Informazioni sulla funzione di gruppo
MD . . . . . . . . . . . . . . . . . . . . . . . . . . . . . . 7
Operazioni preliminari
Azzeramento dell’apparecchio . . . . . . . . . . . 8
Rimozione del pannello anteriore . . . . . . . . . 8
Impostazione dell’orologio . . . . . . . . . . . . . . 9
Lettore MD
Unità MD/CD (opzionale)
Riproduzione di un disco. . . . . . . . . . . . . . . 10
Voci del display. . . . . . . . . . . . . . . . . . . . . . 11
Riproduzione ripetut a dei brani
— Riproduzione ripetuta . . . . . . . . . . . . 12
Riproduzione dei brani in ordine casuale
— Riproduzione in ordi ne casuale . . . . . 13
Assegnazione di un nome a un CD
— Funzione di promemoria disco* . . . . 13
Ricerca di un disco in b ase al nome
— Funzione di elenco*. . . . . . . . . . . . . . 14
* Funzioni disponibili con apparecchio MD/CD
opzionale
Radio
Memorizzazione automatica delle staz i oni
— BTM (Best Tuning Memory,
memorizzazione automatica delle emittenti
con sintonia migliore). . . . . . . . . . . . . . . 15
Ricezione delle sta zi o ni memorizzate . . . . . 15
Memorizzazione delle stazioni
desiderate . . . . . . . . . . . . . . . . . . . . . . . . 16
RDS
Presentazione della funzione RDS . . . . . . . 16
Risintonizzazione automatica per la ricezione
ottimale
— AF (Alternative Frequencies, frequenze
alternative) . . . . . . . . . . . . . . . . . . . . . . . 17
Ascolto dei notiziari sul traffico
— TA (Traffic Announcement, notiziari sul
traffico)/TP (Traffic Programme,
programma sul traffico) . . . . . . . . . . . . . 1 8
Preselezio ne di staz ioni RDS con impostazio ne
AF e TA . . . . . . . . . . . . . . . . . . . . . . . . . 18
Sintonizza zione d elle st azioni in base al t ipo di
programma
— PTY (Programme Ty pes, tipi di
programma) . . . . . . . . . . . . . . . . . . . . . . 19
Impostazione automatica dell’orologio
— CT (Clock Time, ora) . . . . . . . . . . . . 20
Altre funzioni
Uso del telecomando a rotazione . . . . . . . . 20
Regolazione delle car att eristiche
dell’audio . . . . . . . . . . . . . . . . . . . . . . . . 22
Attenuazione rapida dell’audio. . . . . . . . . . 22
Modifica delle impostazioni dell’audio e del
display . . . . . . . . . . . . . . . . . . . . . . . . . . 23
Impostazione del l ’equalizzatore (EQ3) . . . 24
Impostazione del l a f unzione DSO (Dyna m ic
Soundstage Organizer) . . . . . . . . . . . . . . 25
Informazioni aggiuntive
Manutenzione . . . . . . . . . . . . . . . . . . . . . . . 25
Rimozione dell’apparecchio. . . . . . . . . . . . 27
Caratteristiche tecniche . . . . . . . . . . . . . . . 28
Guida alla soluzione dei problemi . . . . . . . 29
Messaggi e indicazioni di errore. . . . . . . . . 31
3
Page 96

Individuazione dei comandi
Per ulteriori informazioni, fare riferimento alle pagine indicate.
ATT
DSPL
SEL
–+
SOURCE MODE
OFF
a Tasto volume +/–
b Tasto ATT (attenuazione audio) 22
c Tasto DSPL (modifica del modo del
display) 9, 11, 14, 16, 23
d Tasto SEL (selezione )
Per selezionare l e voci .
e Finestra del display
f Tasto Z (espulsione) (situato nella parte
anteriore dell’apparecchio, dietro al pannello
anteriore) 10
g Tasto EQ3 24
h Tasto DSO 25
i Tasto OPEN 8, 10
j Tasto SEEK +/–
Radio:
Per eseguire la sintonizzazione automatica
delle stazioni/ricercare manualmente le
stazioni.
MD/CD (file MP3*
1
):
Per saltare i brani/fa re avanzare rapidamente
un brano o farlo procedere all’indietro.
k Ricettore del telecomando a scheda
l Tasto SOURCE (accensione/radio/MD/
CD*
2
)
Per selezionare l a sorgente.
m Tasto MODE
Per cambiare oper azione.
n Tasto OFF (arresto/spegnim ent o) *3
8, 10
4
DISC REP SHUF BTM LIST
1 2 3 4 5 6
–+
GP/ALBM
AF/TA SENS PTY
o Tasti numerici 23
Radio:
Per assegnare la stazione desiderata a un
tasto numerico.
MD/CD (file MP3*
1
(1): DISC – 11
(2): DISC + 11
(3): REP 12
(4): SHUF 13
(5): GP*
4
/ALBM*1 – 10, 11
(6): GP*4/ALBM*1 + 10, 11
p Tasto RESET (situato nella parte anteriore
dell’apparecchio, dietro al pannello
anteriore) 8
q Tasto AF/TA 17, 18
r Tasto SENS/BTM 15, 16, 18
s Tasto PTY (tipo di programma)/LIST
13, 14, 19
*1 Disponibile esclusivamente se viene collegata
un’unità CD opzionale dotata della funzione di
controllo dei file MP3 e se viene riprodotto un file
MP3.
*2 Se è collegata un’unità CD opzionale.
*3 Avvertenza relativa all’installazione su
un’auto sprovvista della posizione ACC
(accessoria) sull’interruttore di
accensione
Dopo avere spento il motore, assicurarsi di
tenere premuto (OFF) sull’apparecchio
finché il display non scompare.
Diversamente, il display non viene di sattivato
causando lo scaricamento della batteria.
*4 Disponibile solo quando un MD contenente gruppi
è inserito e riprodotto nell’apparecchio.
OPEN
DSO
SEEK
EQ3
LISTBTM
MDX-F5800
):
Page 97

Telecomando a scheda RM-X114
(opzionale)
Selezione di un disco, un gruppo e un
album mediante il telecomando a
scheda
È possibile saltare i dischi, i gruppi e gli album
utilizzando i tasti DISC (GP/ALBM)/PRESET
(+/–) del telecomando a scheda.
DSPL MODE
+
PRESET
LIST
+
DISC
MENU
–
SEEK
SOUND
SOURCE
DISC
PRESET –
+
VOL
+
SEEK
–
ENTER
ATTOFF
–
I tasti del telecomando a scheda
corrispondenti a quelli dell’apparecchio
controllano le stesse funzion i.
a Tasto DSPL
b Tasto MENU*
c Tasto SOURCE
d Ta s ti SEEK (–/+)
e Tasto SOUND
Per regolare le caratteristiche dell’audio.
f Tasto OFF
g Ta s ti VOL (+/–)
h Tasto MODE
i Tasto LIST
j Tasti DISC (GP/ALBM)/PRESET (+/–)
k Tasto ENTER*
l Tasto ATT
* Non disponibile per questo apparecchio
Nota
Se il display viene disattivato premendo (OFF), non
sarà possibile farlo funzionare con il telecomando a
scheda a meno che non venga premuto (SOURCE)
sull’apparecchio o venga prima inserito un disco per
attivare l’apparecchio.
Suggerimento
Per ulteriori informazioni sulla sostituzione della
batteria, vedere “Sostituzione della batteria al litio” a
pagina 26.
Con il presente apparecchio
Per Premere
Saltare i gruppi*
– Selezione di
gruppi
1
+ o – [una volta per ogni
gruppo]
Per saltare i grup pi senza
interruzioni, tenere premuto
uno dei tasti.
Con un apparecchio opzionale
Per Premere
Saltare i dischi
– Selezione di
dischi
+ o – [una volta per ogni
disco]
Per saltare i dischi senza
interruzioni, p remere una
volta, quindi nuovamente
entro 2 secondi e t enere
premuto uno dei tast i.
Saltare gli album*
– Selezione di
album
2
+ o – [tenere premuto un
istante] e rilasciare
Per saltare gli album senza
interruzioni, premere il tasto
entro 2 secondi da l
momento in cui è stato
rilascia to e tenere premuto.
*1 Disponibile solo quando un MD contenente gruppi
è inserito e riprodotto nell’apparecchio.
*2 Disponibile esclusivamente se viene collegata
un’unità CD opzionale dotata della funzione di
controllo dei file MP3 e se viene riprodotto un file
MP3.
Per saltare più brani senza interruzioni
Premere una volta il tasto (SEEK) (+) o (SEEK)
(–) sul telecoma ndo a scheda, quindi premere di
nuovo entro 2 secondi e tener e pr emuto.
5
Page 98

Precauzioni
Note sugli MD
• Se l’auto è stata parcheggiata sotto l a l uce
diretta del sole, attendere che l’apparecchio si
raffreddi prima di utilizz ar lo.
• L’antenna elettrica si estende aut omaticamente
durante il funziona mento dell’apparecchio.
Per eventuali domande o problemi riguardanti
l’apparecchio no n tr at t ati nel presente manuale,
rivolgersi al più vicino rivenditore Sony.
Formazione di condensa
Nei giorni di pioggia o in zone molto umide, è
possibile che si formi della condensa all’interno
delle lenti e del display dell’apparecchio. D i
conseguenza, l’appa recchio potrebbe non
funzionare correttamente. In tal caso, rimuovere
il disco e attendere per circa un’ora fino a quando
l’umidità non sia evaporata completamente.
Per mantenere una qualità elevata del
suono
Fare attenzione a non v ersa re bib ite o a ltri l iq uidi
sull’apparecchio o sui dischi.
• Non aprire la chiusura della parte
esterna in modo che l’MD venga
esposto. Se la chiusura si apre,
chiuderl a i mmediatamente.
• Non toccare in nessun caso la superficie del
disco.
• Non esporre i dischi a calore o a te m perature
elevate. Evitare di lasciarli in un’auto
parcheggiata, sul cr uscotto/ripiano pos t eriore.
Note sull’applicazione delle etichette
Per evitare che gli MD rimangano incastrati
all’interno dell ’ a pparecchio, effettua re quanto
segue:
– Applicare l’etichetta in una posizione
appropriata.
– Rimuovere le etichette vecchie prima di
applicarne delle nuove.
– Sostituire le etichette non incollate
correttamente.
Pulizia
Pulire regolarmente la parte esterna utilizzando
un panno morbido e asciutto.
6
Page 99

Informazioni sulla funzione
di gruppo MD
La funzione di gruppo è utile per individuare i
brani desiderati all’interno di un gruppo creato a
partire da un nume ro superiore di brani op pure i
brani che sono stat i registrati nel modo M D LP
(LP2/LP4).
Note sulle impostazioni relative alla
funzione di gruppo MD
• Per gli MD, il presente apparecchio consente
esclusivamente la riproduzione. Per ulteriori
informazioni sulla registrazione di MD e sulle
impostazioni relative ai gruppi, consultare le
istruzioni per l’us o del registratore MD.
• È possibile registrare lo stes so nome di gruppo
più di due volte su un MD.
• Il numero mass i m o di gruppi è 99, sebbene il
numero effettivo dipenda dal registr at ore MD
in uso.
• A seconda del registratore MD in uso, potrebbe
non essere poss ib i le effettuare le imposta zi oni
relative alla funzione di gruppo MD.
MD contenente gruppi
MD
Gruppo2*Gruppo1* Gruppo3*
Assegnazione di GP (gruppo) nel
presente apparecchio
Il presente appa recchio riconosce come gruppi
(GP) i brani presenti tra gruppi, sebbene questi
non siano stati registrati come tali mediante il
registratore MD. I numeri “GP” vengono
assegnati a tali brani come ai gruppi registrati.
L’indicazione del numero “GP” si illumina nella
finestra del display se il gruppo vie ne modificat o
su un MD durante la riproduzione.
MD contenente gruppi e numeri “GP”
assegnati nel presente apparecchio
MD
GP2
GP3
(gruppo2
*)
GP4
GP1
(gruppo1
*)
1234 56789
* Gruppi: impo sta ti median te il regi strato re MD.
Per utilizzare la funzione di gruppo MD ,
consultare “Riproduzione di un disco ”
(pagina 10), “Riproduzione ripetuta dei brani”
(pagina 12) e “Riproduzione dei brani in ordine
casuale” (pagina 13).
Nota
La funzione di gruppo MD è disponibile
esclusivamente quando nel presente apparecchio
viene inserito e riprodotto un MD contenente gruppi.
GP5
(gruppo3
10
*)
12 456789
3
Numero del brano
* Gruppi: impostati mediante il registratore MD.
Quando un MD viene in serito nel presente
apparecchio, la riproduzione viene avviata
automaticamente e viene effettuata in base
all’ordine dei brani.
10
7
Page 100

Operazioni preliminari
Azzeramento
dell’apparecchio
Prima di utilizzare l’apparecchio per la prima
volta, dopo la sostituzione della batteria dell’auto
o dopo avere effettuato modifiche ai
collegamenti, è necessario azzerarlo.
Rimuovere il pannello ante riore, quindi preme re
il tasto RESET utilizzando un oggetto appuntito,
quale una penna a sfer a.
Tasto RESET
Nota
Premendo il tasto RESET verranno cancellate le
impostazioni dell’orologio e alcune funzioni
memorizzate.
Rimozione del pannello
anteriore
Per evitare il furto dell’apparecchio, è possibile
estrarne il pannello anteriore.
Segnale d i avvertimento
Se la chiave di accensione viene impostata sulla
posizione OF F senz a che i l pann ello anter iore sia
stato rimosso, viene emesso per alcuni secondi
un segnale acustico di avvertimento.
Se si collega un amplificator e di potenza
opzionale e non si utilizza l’ampl i ficatore
incorporato, il segnal e di avvertimento viene
disattivato.
1 Premere (OFF)*.
La riproduzione di MD/CD o la ricezion e
radio si interrompe (l’illumina zione dei ta sti e
il display rimangono attivi).
* Se l’interruttore di accensione dell’auto è
sprovvisto della posizione ACC (accessoria),
assicurarsi di spegnere l’apparecchio premendo
(OFF) finché il display non scompare, onde
evitare di scaricare la batteria dell’auto.
2 Premere (OPEN), fare scorrere il
pannello anteriore verso destra, quindi
estrarre l’estrem ità si ni st r a di tal e
pannello evitando di esercitare
eccessiva forza.
1
2
Note
• Se si estrae il pannello quando l’apparecchio è
acceso, l’alimentazione viene disattivata
automaticamente per evitare di danneggiare i
diffusori.
• Non fare cadere il pannello anteriore né esercitare
eccessiva pressione su quest’ultimo e sulla finestra
del display.
• Non esporre il pannello anteriore a calore,
temperature elevate o umidità. Evitare di lasciarlo
all’interno di auto parcheggiate e su cruscotti o
ripiani posteriori.
Suggerimento
Durante il trasporto, inserire il pan nello anteriore
nell’apposita custodia in dotazione.
8
 Loading...