

Page 1
FM/AM
MiniDisc Player
3-262-950-11(1)
Operating Instructi on s
Mode d’emploi
Manual de instrucciones
Owner’s Record
The model and serial numbers are located on the bot tom of the unit.
Record these numbers in the spa ce provided below.
Refer to these numbers whenever you call upon your Sony dealer regarding this produc t.
Model No. MDX-F5800 Serial No.
For installation and connections, see the supplied installation/connections manual.
En ce qui concerne l’installation et les connexions, consulter le manuel
d’installation/raccordement fourni.
Para obtener información sobre la instalación y las conexiones, consulte el ma nua l
de instalación/conexiones suministrado.
US
FR
ES
MDX-F5800
© 2004 Sony Corporation
Page 2

Warning
t
Welcome !
This equipment has been tested and found to
comply with the limits for a Class B digital
device, pursuant to Part 15 of the FCC Rules.
These limits are designed to provide reasonable
protection against harmful interference in a
residential installation. This equipment
generates, uses, and can radiate radio frequency
energy and, if not installed and used in
accordance with the instructions, may cause
harmful interference to radio communications.
However, there is no guarantee that interference
will not occur in a particular installation. If this
equipment does cause harmful interference to
radio or television reception, which can be
determined by turning the equipment off and on,
the user is encouraged to try to correct the
interference by one or more of the following
measures:
– Reorient or relocate the receiving antenna.
– Increase the separation between the equipment
and receiver.
– Connect the equipment into an outlet on a
circuit different from that to which the receiver
is connected.
– Consult the dealer or an experienced radio/TV
technician for help.
You are cautioned that any changes or
modifications not expressly approved in this
manual could void your authority to operate this
equipment.
Thank you for purchasing this Sony Mini D is c
Player. You can enjoy its various features even
more with:
• Optional MD/CD units (both changers and
players)*
• CD TEXT information (displayed when a CD
TEXT disc*
• Optional controller accessories
Card remote commander RM-X114
Rotary commander RM-X4S
*1 This unit works with Sony products only.
*2 A CD TEXT disc is an audio CD that includes
The “XM Ready” logo indicates that this product
will control a Sony XM tuner module (sold
separately).
Please see your nearest authorized Sony dealer
for details on the XM tuner module.
For instructions on XM tuner operation, please
refer to the XM tuner module’s included
instruction manual.
1
.
2
in optional CD unit is played).
information such as the disc name, artist name,
and track names. This information is recorded on
the disc.
CAUTION
The use of optical instruments with this produc
will increase eye hazard.
2
Page 3

Table of Contents
Location of controls . . . . . . . . . . . . . . . . . . . 4
Precautions . . . . . . . . . . . . . . . . . . . . . . . . . . 6
Notes on MDs . . . . . . . . . . . . . . . . . . . . . . . . 6
About the MD group function. . . . . . . . . . . . 7
Getting Started
Resetting the unit. . . . . . . . . . . . . . . . . . . . . . 8
Detaching the front panel . . . . . . . . . . . . . . . 8
Setting the clock . . . . . . . . . . . . . . . . . . . . . . 9
MD Player
MD/CD Unit (optional)
Playing a disc. . . . . . . . . . . . . . . . . . . . . . . . 10
Display items. . . . . . . . . . . . . . . . . . . . . . . . 11
Playing tracks repeatedly
— Repeat Play . . . . . . . . . . . . . . . . . . . . 11
Playing tracks in ra ndom order
— Shuffle Play . . . . . . . . . . . . . . . . . . . . 12
Labeling a CD
— Disc Memo*. . . . . . . . . . . . . . . . . . . . 12
Locating a di sc by name
— List-up* . . . . . . . . . . . . . . . . . . . . . . . 13
* Functions available with optional MD/CD unit
Radio
Storing stations automatically
— Best Tuning Memory (BTM) . . . . . . 14
Receiving the stored stations . . . . . . . . . . . 14
Storing only the desired stations . . . . . . . . . 15
Storing station names
— Station Memo . . . . . . . . . . . . . . . . . . 15
Tuning in a station thr ough a list
— List-up. . . . . . . . . . . . . . . . . . . . . . . . 16
Other Functions
Using the rotary commander. . . . . . . . . . . . 17
Adjusting the sound characteristics . . . . . . 19
Quickly attenuating the sound . . . . . . . . . . 1 9
Changing the sound and display
settings . . . . . . . . . . . . . . . . . . . . . . . . . . 19
Setting the equalizer (EQ3). . . . . . . . . . . . . 20
Setting the Dynamic Soundstage Organizer
(DSO). . . . . . . . . . . . . . . . . . . . . . . . . . . 21
Additional Information
Maintenance . . . . . . . . . . . . . . . . . . . . . . . . 21
Removing the unit. . . . . . . . . . . . . . . . . . . . 23
Specifications . . . . . . . . . . . . . . . . . . . . . . . 24
Troubleshooting . . . . . . . . . . . . . . . . . . . . . 25
Error displays/Messages. . . . . . . . . . . . . . . 26
3
Page 4
Location of controls
Refer to the pages listed for details.
ATT
DSPL
SEL
–+
DISC REP SHUF BTM LIST
SOURCE MODE
OFF
1 2 3 4 5 6
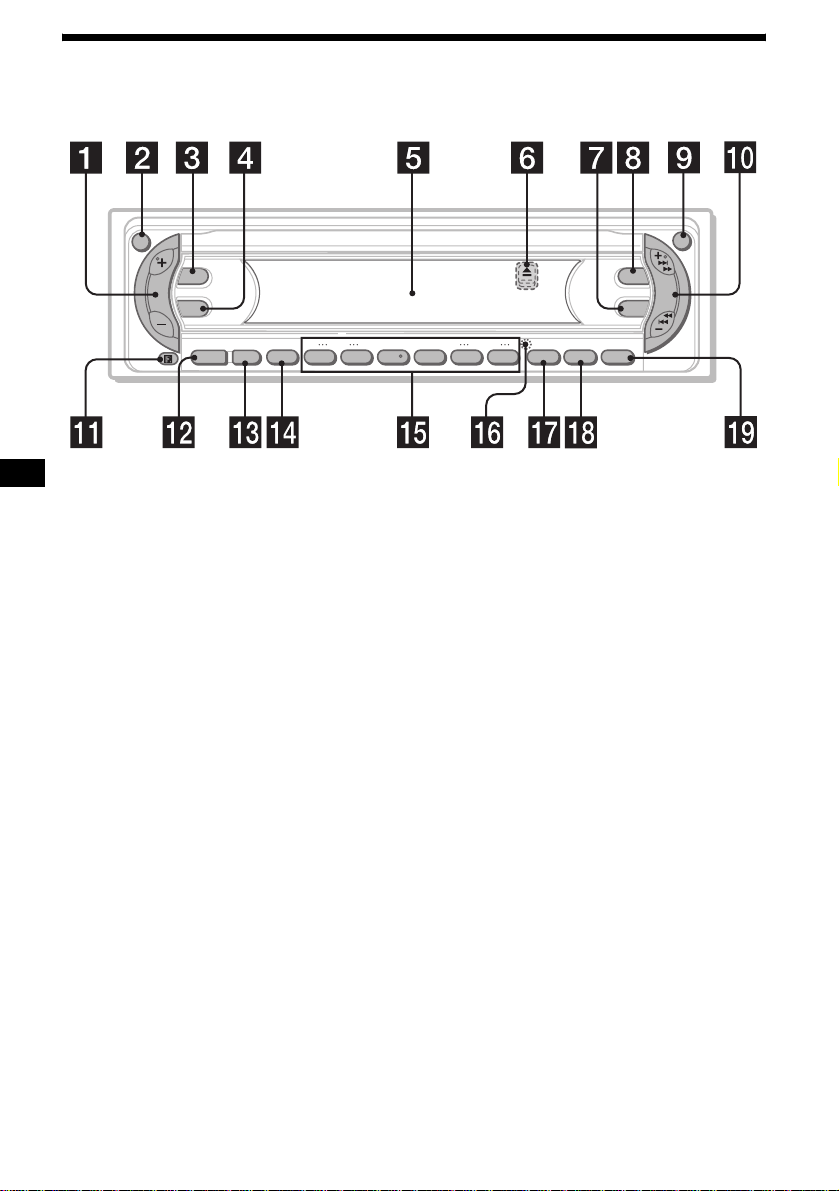
a Volume +/– button
b ATT (attenuate) button 19
c DSPL (dis play mode change) button
9, 11, 13, 16, 20
d SEL (select) button
To select items.
e Display window
f Z (eject) button (located on the front sid e
of the unit, behind the front panel) 10
g EQ3 button 20
h DSO button 21
i OPEN button 8, 10
j SEEK +/– button
Radio:
To tune in stations automatically/find a
station manually.
MD/CD (MP3 files*
1
):
To skip tracks/fast-forward, reverse a track.
k Receptor for the card remote
commander
l SOURCE (Power on/Radio/MD/CD*2)
button
T o select the source.
m MODE button
To change operation.
n OFF (Stop/Power off) button*3 8, 10
OPEN
DSO
SEEK
EQ3
–+
GP/ALBM
BTM SENS LIST
CAT
MDX-F5800
o Number buttons 20
Radio:
To store the desired station on each number
button.
MD/CD (MP3 files*
1
):
(1): DISC – 10
(2): DISC + 10
(3): REP 11
(4): SHUF 12
(5): GP*
4
/ALBM*1 – 10
(6): GP*4/ALBM*1 + 10
p RESET button (located on the front side of
the unit, behind the front panel) 8
q BTM button 14
r SENS button 14, 15
s LIST/CAT*5 button 12, 13, 15, 16
*1 Available only when an optional CD unit with the
MP3 file control function is connected, and MP3 file
is played.
*2 When an optional CD unit is connected.
*3 Warni ng whe n installing in a car without
an ACC (accessory) position on the
ignition switch
After turning off the ignition, be sure to press
and hold (OFF) on the unit until the display
disappears.
Otherwise , the display do es n ot turn off and this
causes battery drain.
*4 Available only when an MD containing groups is
inserted in this unit and played.
*5 The CAT button is available only when the XM
tuner is connected.
4
Page 5
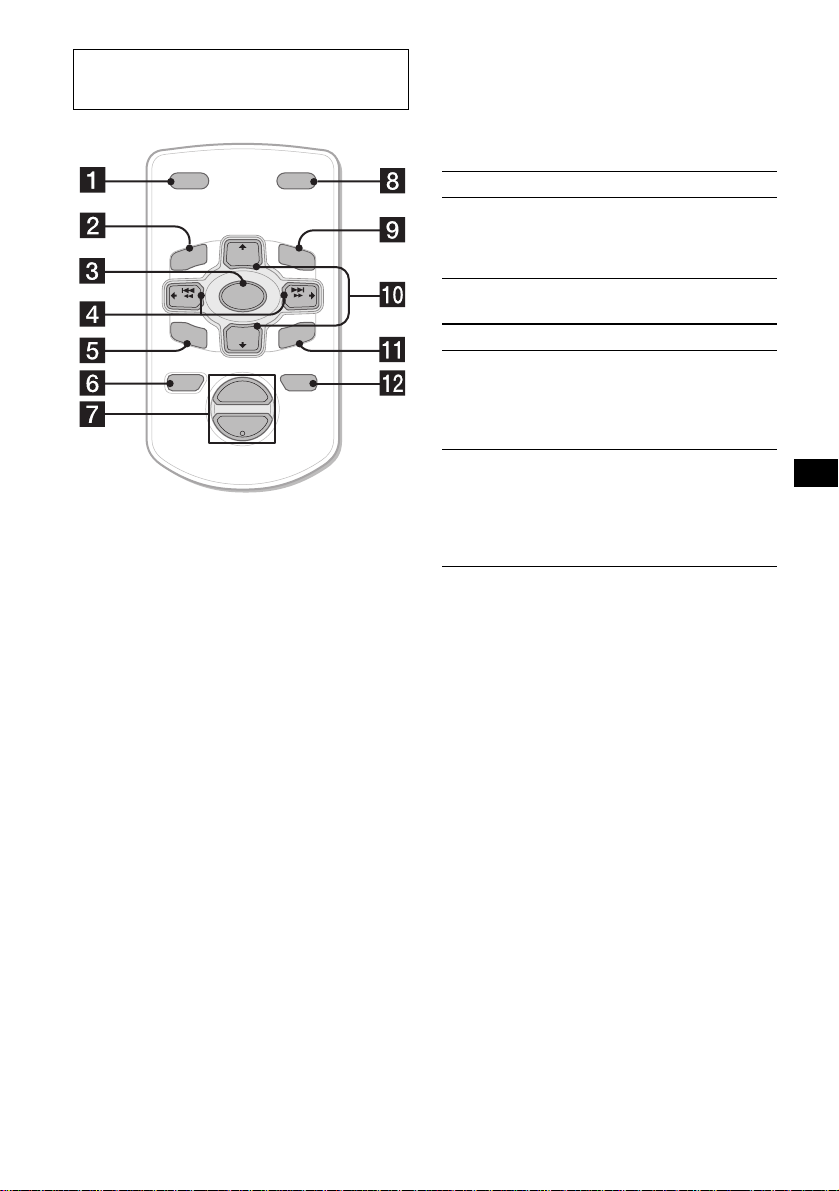
Card remote commander RM-X114
(optional)
Selecting a disc, group and album with
the card remote commander
Disc, group and al bum ca n be skipped using the
DISC (GP/ALBM)/PRESET (+/–) buttons on the
card remote commander.
DSPL MODE
+
PRESET
LIST
+
DISC
MENU
–
SEEK
SOUND
SOURCE
DISC
PRESET –
+
VOL
+
SEEK
–
ENTER
ATTOFF
–
The corresponding buttons of the card
remote commander control the same
functions as those on this unit.
a DSPL button
b MENU button*
c SOURCE button
d SEEK (–/+) buttons
e SOUND button
To adjust the sound characteristics.
f OFF button
g VOL (+/–) buttons
h MODE button
i LIST button
j DISC(GP/ALBM)/PRESET (+/–)
buttons
k ENTER button*
l ATT button
* Not available for this unit
Note
If the display disappears by pressing (OFF), it cannot
be operated with the card remote commander unless
(SOURCE) on the unit is pressed, or a disc is inserted
to activate the unit first.
Tip
For details on how to replace the battery, see
“Replacing the lithium battery” on page 22.
(With this unit)
To Press
Skip groups*
– Group selection
1
+ or – [once for e ach group]
To continuously skip
groups, pre ss and hold either
button.
(With optional unit)
To Press
Skip discs
–Disc selection
+ or – [once for e ach disc]
To continuously skip disc s,
press once and pres s again
within 2 second s ( and hold)
either button.
Skip albums*
– Album selection
2
+ or – [hold for a moment]
and release
To continuously skip
albums, press (an d hold)
within 2 seconds of first
releasing the button.
*1 Available only when an MD containing groups is
inserted in this unit and played.
*2 Available only when an optional CD unit with the
MP3 file control function is connected, and MP3 file
is played.
Skipping tracks continuous l y
Press once (SEEK) (+) o r ( SEEK) (–) on the
card remote commander, then press ag a in within
2 seconds and hold .
5
Page 6
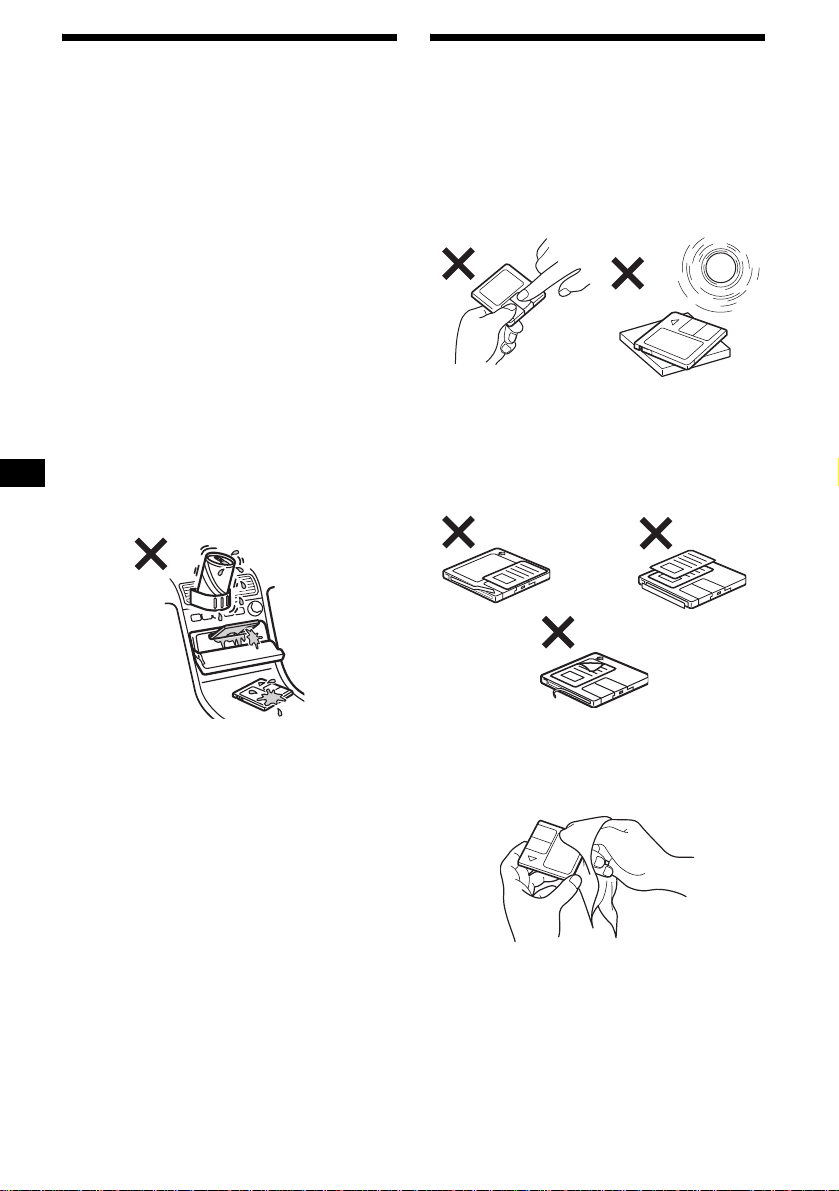
Precautions
Notes on MDs
• If your car has been parked in dire ct sunlight,
allow the unit to cool off before operating it.
• Power antenna will extend automatica l ly while
the unit is operating.
• While driving, do not use the CUSTOM FILE
feature or any other functions which may divert
your attention from the road.
If you have any quest ions or proble m s
concerning your unit that are not covered in this
manual, please co nsult your nearest Sony dealer.
Moisture condensation
On a rainy day or in a very damp area, moisture
condensation ma y occur inside the lense s and
display of the unit. Should this occur, the unit
will not operate properly. In such a case, remove
the disc and wait for about an hour until the
moisture has evaporated.
To maintain high sound quality
Be careful not to splash juice or other soft drinks
onto the unit or discs.
• Do not open the shutter of the cartridge
to expose the MD. Close immediately if
the shutter opens.
• Never touch the surface of the disc inside.
• Do not subject the discs to heat/high
temperature. Avoid le a ving th em in park ed cars
or on dashboards/rear trays.
Notes on attaching labels
To avoid MDs becoming st uc k in the unit;
– Attach the label in a suitable position.
– Remove old labels before putt i ng new ones on.
– Replace labels t hat are peeling away.
Cleaning
Wipe the surface of the cartridge from time to
time with a soft, dry cloth.
6
Page 7
About the MD group function
The group function is convenient to lo ca te the
desired tracks wi th i n a gr oup from a large
number of tracks, or t ra cks that have been
recorded in M D LP (LP2/LP4) mode.
Notes on MD group settings
• This unit is for MD playback only. For MD
recording and group settings, refer to the
operating instructions of your MD recorder.
• The same group name can be registered more
than twice on the same MD.
• Maximum group number is 99, though the
actual group number depends on your MD
recorder.
• Depending on your MD recorder, MD grou p
settings may not be available.
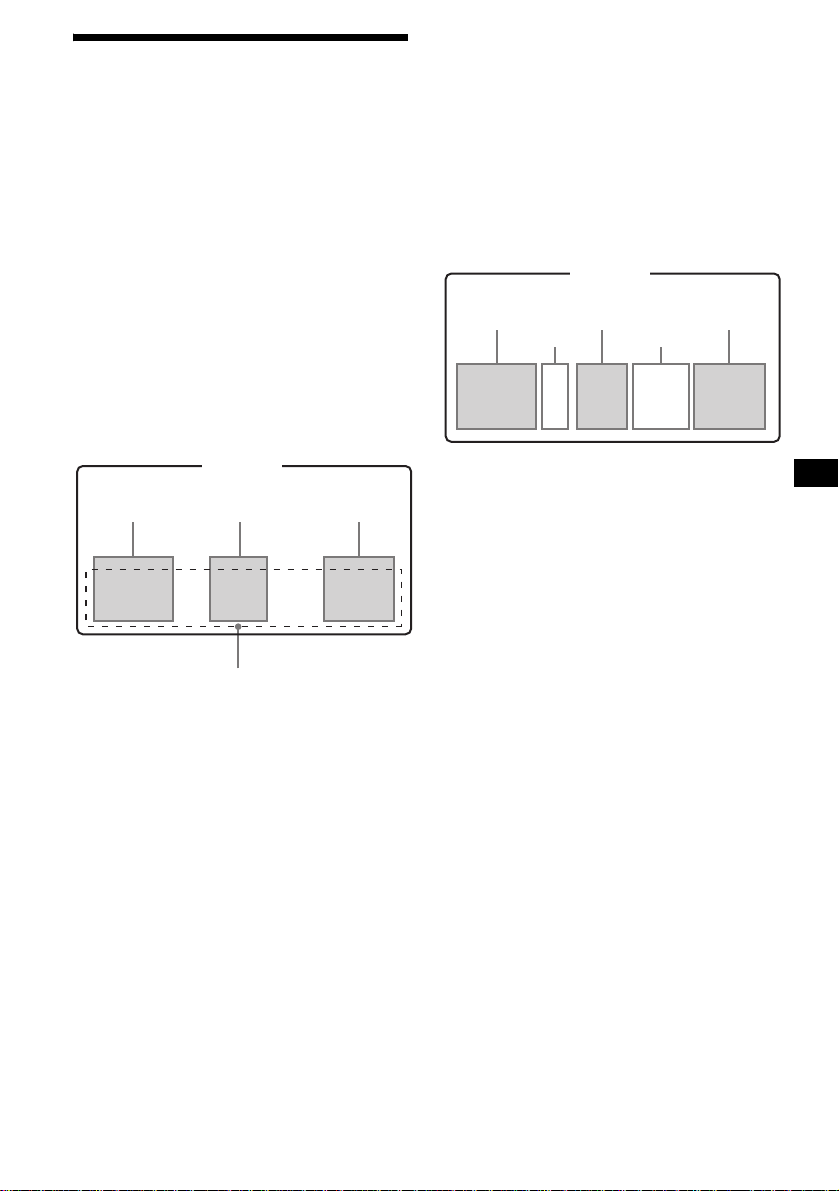
MD containing groups
GP (group) assumption on this unit
This unit recognizes single tracks and multiple
tracks between groups as groups (GP), even they
were not registered as such by your MD recorder.
The “GP” numbers are allotted to those tracks as
well as the registered groups. The indication of
“GP” number lights up in the display window, if
the group is changed on an MD during playback.
MD containing groups and allotted “GP”
numbers on thi s unit
MD
GP2
GP3
(Group2
*)
GP4
GP1
(Group1
*)
1234 56789
GP5
(Group3
10
*)
MD
Group2*Group1* Group3*
12 456789
3
Track number
* Groups: set by your MD recorder.
When you insert an MD in this unit, play back
starts automatically and follows track order.
10
* Groups: set by your MD recorder.
For using MD group fu nctio n, refe r to “Pla ying a
disc” (page 10), “Playing tracks repeat edly”
(page 11), a nd “Playing tracks in random order”
(page 12).
Note
The MD group function is available only when an MD
containing groups is inserted in this unit and played.
7
Page 8
Getting Started
Detaching the front panel
You can detach the front panel of this unit to
protect the unit fr om being stolen.
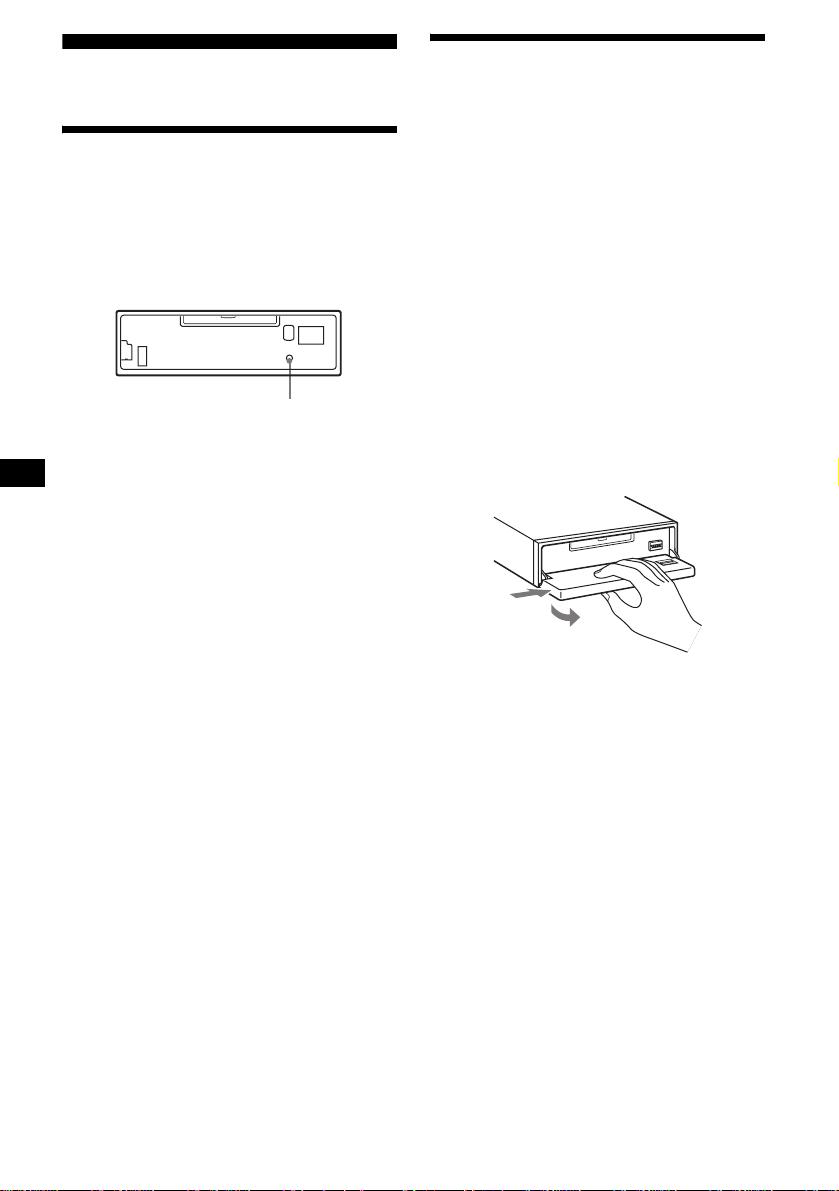
Resetting the unit
Before operating the unit for the first time, or
after replacing the car battery or chan gi ng the
connections, you must reset the unit.
Remove the front panel and pres s the RESET
button with a pointed object, such as a ball-point
pen.
RESET button
Note
Pressing the RESET button will er ase the clock setting
and some stored contents.
Caution alarm
If you turn the ignition switch to the OFF
position withou t removing the front panel, t he
caution alarm will beep for a few seconds.
If you connect an optional amplifier and do not
use the built-in amplifier, the beep sound will be
deactivated.
1 Press (OFF)*.
MD/CD playbac k or radio reception s to ps
(the key illumination an d display remain on).
* If your car has no ACC (accessory) position on
the ignition switch, be sure to turn the unit off by
pressing (OFF) until the display disappears to
avoid car battery drain.
2 Press (OPEN), then slide the front
panel to the right, and gently pull out
the left end o f the front pa n el.
1
2
Notes
• If you detach the panel while the unit is still turned
on, the power will turn off automatically to prevent
the speakers from being damaged.
• Do not drop or put excessive pressure on the front
panel and its display window.
• Do not subject the front panel to heat/high
temperature or moisture. Avoid leaving it in a parked
car or on a dashboard/rear tray.
Tip
When carrying the front panel with you, use the
supplied front panel case.
8
Page 9
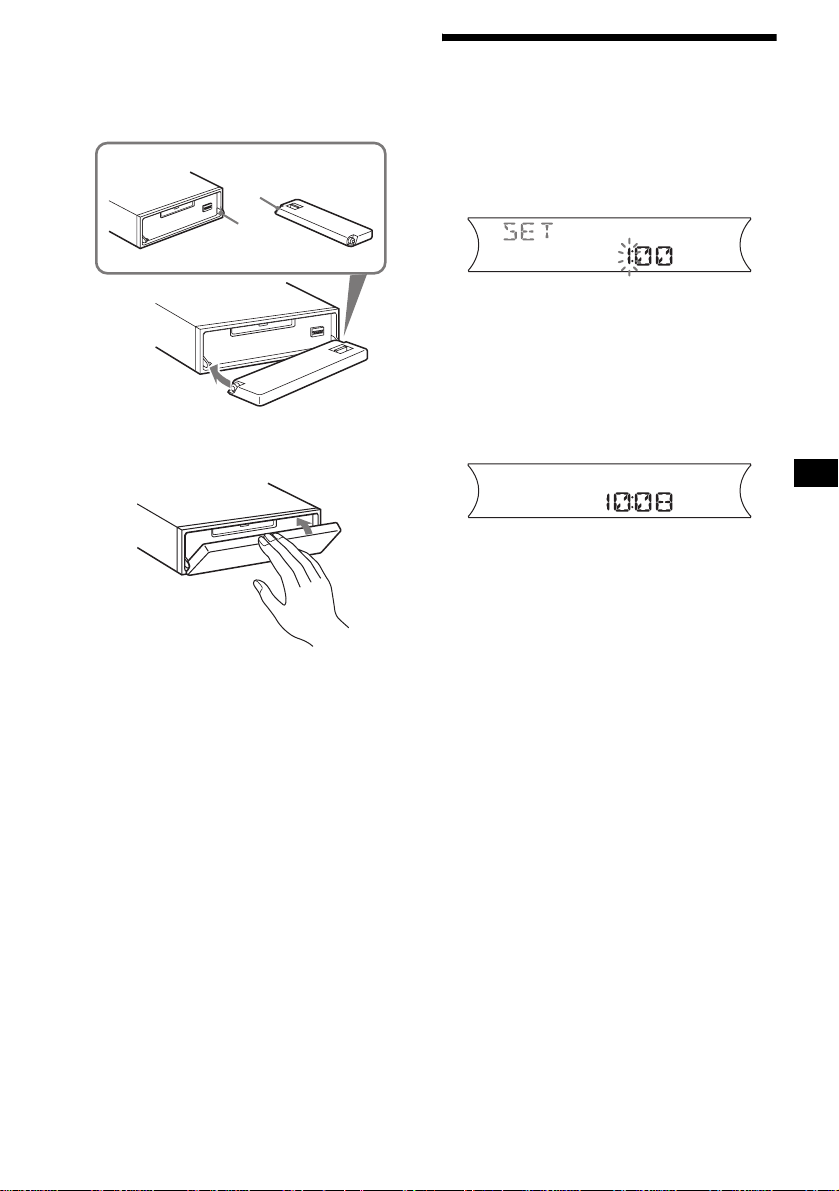
Attaching the front panel
Place hole A of the fr ont panel onto the spindle
B on the unit, then lightly push the left side in.
Press (SOURCE) on the unit (or insert an MD)
to operate the unit.
A
B
x
Setting the clock
The clock uses a 12-hour digital indication.
Example: To set the clock to 10:08
1 Press (DSPL) for 2 seconds.
The hour indication flashes.
1 Press the volume +/– button to se t
the hour.
2 Press (SEL).
The minute indication flashes.
3 Press the volume +/– button to se t
the minute.
2 Press (DSPL).
The clock starts. After the clock setting is
completed, the di splay returns to normal play
mode.
Note
Do not put anything on the inner surface of the front
panel.
9
Page 10
MD Player
MD/CD Unit (optional)
In addition to playi ng an MD (MD having group
settings) with this unit, you can also control
external MD/CD (MP3 playable CD) units. If
you connect optional MP3 playable CD units
(eg., MP3 CD changer), you can play MP3 files;
compressed audi o files ( tr acks) with quality of
sound.
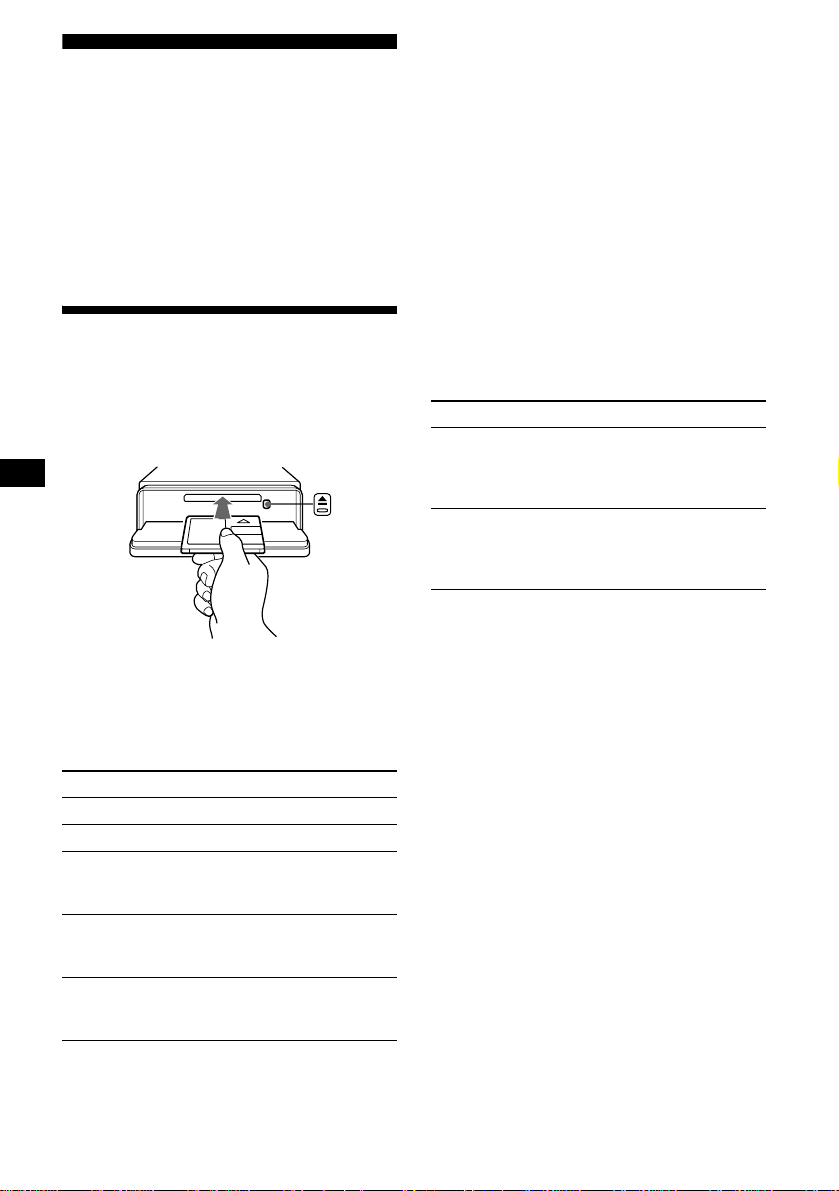
Playing a disc
(With this unit)
1 Press (OPEN) and inse rt the disc
(labeled side up).
2 Close the fron t p anel.
Playback starts automatically.
If a disc is already inserted, press (SOURCE)
repeatedly unti l “M D ” appears to start p layback.
To Press
Stop playba ck (OFF)
Eject the disc (OPEN) then Z
Skip tracks
–Automatic
Music Sensor
Fast-forward/
reverse
–Manual Search
Skip GP*
–GP selection
* Available only when an MD containing groups is
inserted in this unit and played.
(SEEK) (–/+)
(./>)
[once for each tr ack]
(SEEK) (–/+)
(m/M)
[hold to desired po int]
(5)(GP–) or (6)(GP+)
[once for each g roup]
[hold to desired gr oup]
To skip tracks continuously, press (SEEK) (+) or
(SEEK) (–), then press again within 2 seconds
and hold.
Notes
• Depending on the condition of the disc, it may not
play back (page 6).
• While the first/last track on the disc is playing, if
(SEEK) (–) or (SEEK) (+) is pressed, playback skips
to the last/first track of the disc.
• When the last track on the disc is over, playback
restarts from the first track of the disc.
(With optional unit)
1 Press (SOURCE) repeatedly to select
“MD (MS*
1
)” or “CD.”
2 Press (MODE) repeatedly until the
desired unit appears.
Playback starts.
To Press
Skip discs
–Disc selection
Skip albums*
–Albums selection
*1 MS: MG Memory Stick System-up Player MGS-X1
*2 Available only when an optional CD unit with the
MP3 file control function is connected, and MP3 file
is played.
Cautions when c onn ect in g M GS-X1 a nd MD un it( s )
This unit recognizes MGS-X1 as an MD unit.
• When you want to play MGS-X1, press (SOURCE) to
select “MD.” When “MD” appear s in the source
display, press (MODE) to select “MS,” to start
playback.
• When you want to play an MD unit, press (SOURCE)
to select “MD. ” If your desired MD unit appears in the
source display, it starts to play. If “MS” or another
MD unit appears in the source display, press
(MODE) to select your desired MD unit, to start
playback.
Notes when connecting MP3 playable CD unit(s)
• If a disc with no MP3 files (tracks) is inserted, “NO
MUSIC” appears in the display and playback of the
next disc starts.
• Before playing a track, this unit reads all track and
album information on the disc. Depending on the
track structure, it may take more than a minute
before playback begins. During this time, “READ” is
displayed. Play will automatically start when reading
is complete.
Note
With an optional unit connected, playback of the same
source will continue on to the optional MD/CD unit.
(1)(DISC–) or
(2)(DISC+)
[once for each disc ]
[hold to desired disc]
2
(5)(ALBM–) or
(6)(ALBM+)
[once for each album]
[hold to desire d album]
10
Page 11
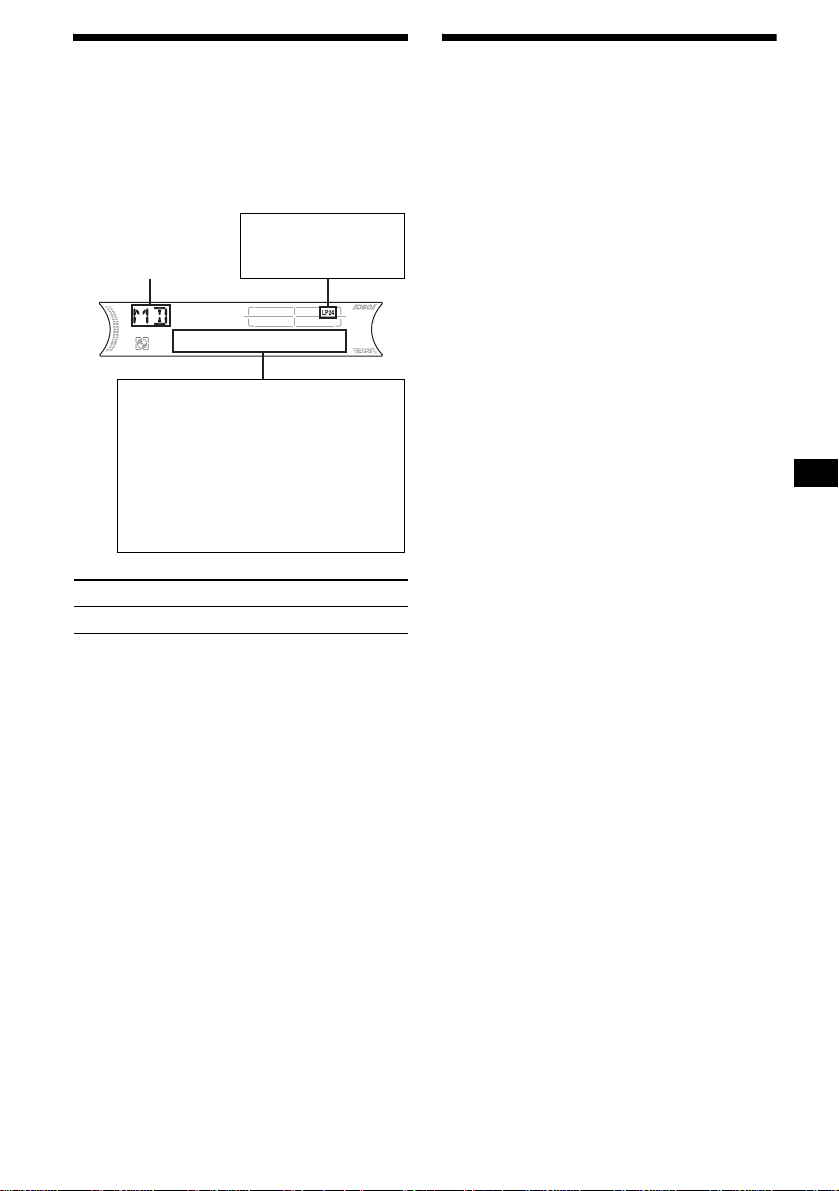
Display items
When the disc/group/album/track changes, any
prerecorded title*
track is automatically displayed. (If the A.SCRL
(Auto Scroll) function is set to “ON,” names
exceeding 8 charac te rs will be scrolled
(page 19).)
Source
Displayable items
• Disc number/Track number/
•Disc name*
• Track (file) name*1*
•Clock
• Alb um (folder) name*
•ID3 tag*
To Press
Switch display item (DSPL)
1
of the new disc/group/album/
MDLP display*
LP2: LP2 playback
LP4: LP4 playback
Elapsed playing time
Artist name*
1
/Group name*3/
4
5
2
5
5
Playing tracks repeatedly
— Repeat Play
You can select:
(With this unit)
• REP-TRACK — to repeat the current track.
•REP-GP*1 — to repeat tracks in the current
group.
(With optional units)
• REP-TRACK — to repeat the current track.
• REP-ALBM*2 — to repeat the tracks in the
current album.
• REP-DISC*3 — to repeat the tracks in the
current disc.
*1 Available only when an MD containing groups is
inserted in this unit and played.
*2 Available only when an optional CD unit with the
MP3 file control function is connected, and MP3 file
is played.
*3 Available only when one or more optional MD/CD
units are connected.
During playback, press (3) (REP)
repeatedly until the desired setting
appears in the display.
Repeat Play s t arts.
To return to normal play mode, select
“REP-OFF.”
*1 When pressing (DSPL), “NO NAME” indicates that
there is no Disc Memo (page 12) or no prerecorded
name to display.
*2 Available only when an MDLP disc i s played.
*3 Available only when an MD containing groups is
inserted in this unit and played.
*4 Only for CD TEXT discs with the artist name.
*5 Only for MP3 files.
Only track name/artist name/album name in ID3
tag is displayed.
When pressing (DSPL), “NO ID3” indicates that
there is no ID3 tag to display.
Notes
• Some characters cannot be displayed. Characters
and signs which cannot be displayed appear as “ *.”
• For some CD TEXT discs or ID3 tags with very
many characters, information may not scroll.
• This unit cannot display the artist name for each
track of a CD TEXT disc.
Tips
• When the A.SCRL (Auto Scroll) function is set to
“OFF” and the disc/group/album/track is changed,
the disc/group/album/track name or ID3 tag does not
scroll.
• When an MD containing groups is played and the
group is changed, the new group number is
displayed. Likewise, when an MP3 file is play ed and
the album is changed, the new album number is
displayed.
11
Page 12

Playing tracks in random
order
— Shuffle Play
You can select:
(With this unit)
•SHUF-GP*1 — to play tracks in the current
group in random or der.
• SHUF-DISC — to play the tracks on t he
current disc in ra ndom order.
(With optional units)
•SHUF-ALBM*2 — to play the tracks in the
current album in random order.
• SHUF-DISC — to play the tracks on the
current disc in ra ndom order.
• SHUF-CHGR*3 — to play the tracks in the
current optional MD (CD) c hanger in random
order.
• SHUF-ALL*4 — to play all the tracks in all th e
connected MD (CD) units (including this unit)
in random order.
*1 Available only when an MD contai ning groups is
inserted in this unit and played.
*2 Available only when an optional CD unit with the
MP3 file control function is connected, and MP3 file
is played.
*3 Available only when one or more optional MD (CD)
changers are connected.
*4 Available only when one or more optional MD units,
or two or more optional CD units are connected.
During playback, press (4) (SHUF)
repeatedly until the desired se ttin g
appears in the display.
Shuffle Play starts.
To return to normal play mode, select
“SHUF-OFF.”
Note
“SHUF-ALL” will not shuffle tracks between MD units
and CD units.
Labeling a CD
— Disc Memo (For a CD unit with the
CUSTOM FILE function)
You can label each disc with a cus t om name
(Disc Memo). You can enter up to 8 characters
for a disc. If you label a CD, you can locate the
disc by name (page 13).
1 Start playing the disc you want to label
in a CD unit with the CUSTOM FILE
function.
2 Press (LIST) (CAT) for 2 seconds.
The unit will repeat the disc during the
labeling procedure .
3 Enter the characters.
1Press the volume +/– button to
select the desired character.
A y B y C ... y 0 y 1 y 2 ...
y + y – y
*(blank space)
2Press (SEL) after l o cating the
desired character.
The next characte r flashes.
3Repeat steps 1 and 2 to enter the
entire name.
4 To return to normal play mode, press
(LIST) (CAT) for 2 seconds.
Tips
• Simply overwrite or enter “ ” to correct or erase a
character.
• You can label CDs on a unit without the CUSTOM
FILE function if that unit is connected along with a
CD unit that has the function. The Disc Memo will be
stored in the memory of the CD unit with the
CUSTOM FILE function.
Note
REP-TRACK/SHUF play is suspended until the name
edit is complete.
... y * y A
*
12
Page 13

Viewing the Disc Memo
As a display item, the Disc Memo always takes
priority over any original CD TEXT information.
To Press
View (DSPL) during CD/CD
Tip
Other items can be displayed (page 11).
TEXT disc playback
Erasing the Disc Memo
1 Press (SOURCE) repeatedly to select
“CD.”
2 Press (MODE) repeatedly to select the
CD unit storing the Disc Memo.
3 Press (LIST) (CAT) for 2 seconds.
4 Press (DSPL) for 2 seconds.
The stored names will appear.
5 Press the volume +/– button
repeatedly to select the disc name you
want to erase.
6 Press (SEL) for 2 seconds.
The name is eras ed.
Repeat ste ps 5 and 6 if you want to er ase
other names.
7 Press (LIST) (CAT) for 2 seconds.
The unit returns to normal play mode.
Notes
• When the Disc Memo for a CD TEXT disc is erased,
the original CD TEXT information is displayed.
• If you cannot find the Disc Memo you want to erase,
try selecting a different CD un it in step 2.
• If you have already er as e d al l of th e Dis c Mem o, the
unit returns to normal play mode in step 4.
Locating a disc by name
— List-up (For an MD unit, or a CD unit with
the CD TEXT/CU STOM FILE function)
Y ou can use this function for discs that have been
assigned custom names*
2
discs*
.
*1 Locating a disc by its custom name: when you
assign a name for an MD or a CD (page 12).
*2 Locating discs by the CD TEXT information: when
you play a CD TEXT disc on a CD unit with the CD
TEXT function.
1 During playback, press (LIST) (CAT).
The name assi gned to the curr ent disc app ears
in the display.
2 Press (LIST) (CAT) repeatedly until
you find the desired disc.
3 Press (SEEK) (+) or (SEEK) (–) to play
the disc.
Notes
• Once a disc name has been displayed for 5
seconds, the display goes back to its normal
playback mode.
• If there are no discs in the magazine, “NO DISC”
appears in the display.
• If a disc has not been assigned a custom file, “NO
NAME” appears in the display.
• If the disc information has not been read by the unit,
“NOT READ” appears in the display. To load the
disc, first press the number button, then choose the
disc that has not been loaded.
• The information appears only in upper case. There
are also some letters which cannot be displayed.
1
or for CD TEXT
13
Page 14

Radio
The unit can stor e up to 6 stations pe r band
(FM1, FM2, FM3, A M1, and AM2).
Caution
When tuning in stations while driving, use Best
Tuning Memory to prevent accidents.
Storing stations
automatically
— Best Tuning Memory (BTM)
The unit selects the stations with the strongest
signals within the selected band, and stores them
in the order of their frequency.
1 Press (SOURCE) repeatedly to select
the radio.
2 Press (MODE) repeatedly to select the
band.
3 Press (BTM) for 2 second s.
The unit stores stations in the order o f their
frequencies on th e number buttons.
A beep sounds when the setting is stored.
Notes
• If only a few stations can be received due to weak
signals, some number buttons will retain their former
settings.
• When a number is indicated in the display, the unit
starts storing stations from the one currently
displayed.
Receiving the stored stations
1 Press (SOURCE) repeatedly to select
the radio.
2 Press (MODE) repeatedly to select the
band.
3 Press the number button ((1) to (6))
on which the desired station is stored.
If preset tuning does not work
— Automatic tuning/Local Seek Mode
Automatic tuning:
Press (SEEK) (+) or (SEEK) (–) to
search for the station.
Scanning stops when the unit receives a
station. Repeat the operation until the desired
station is received.
Local Seek Mode:
If the automatic tuning stops too
frequently, press (SENS) repeatedly
until “LOCAL-ON” appears.
“LCL” indicator is displayed.
Only the stations with relatively strong
signals will be tuned in.
To cancel the local seek mode, press (S ENS)
twice when receiving FM.
Note
When receiving AM, to cancel the local seek mode,
press (SENS) (“LOCAL-OFF” appears).
Tip
If you know the frequency of the station you want to
listen to, press and hold (SEEK) (+) or (SEEK) (–) to
locate the approximate frequency, then press
(SEEK) (+) or (SEEK) (–) repeatedly to fine adjust to
the desired frequency (manual tuning).
14
Page 15
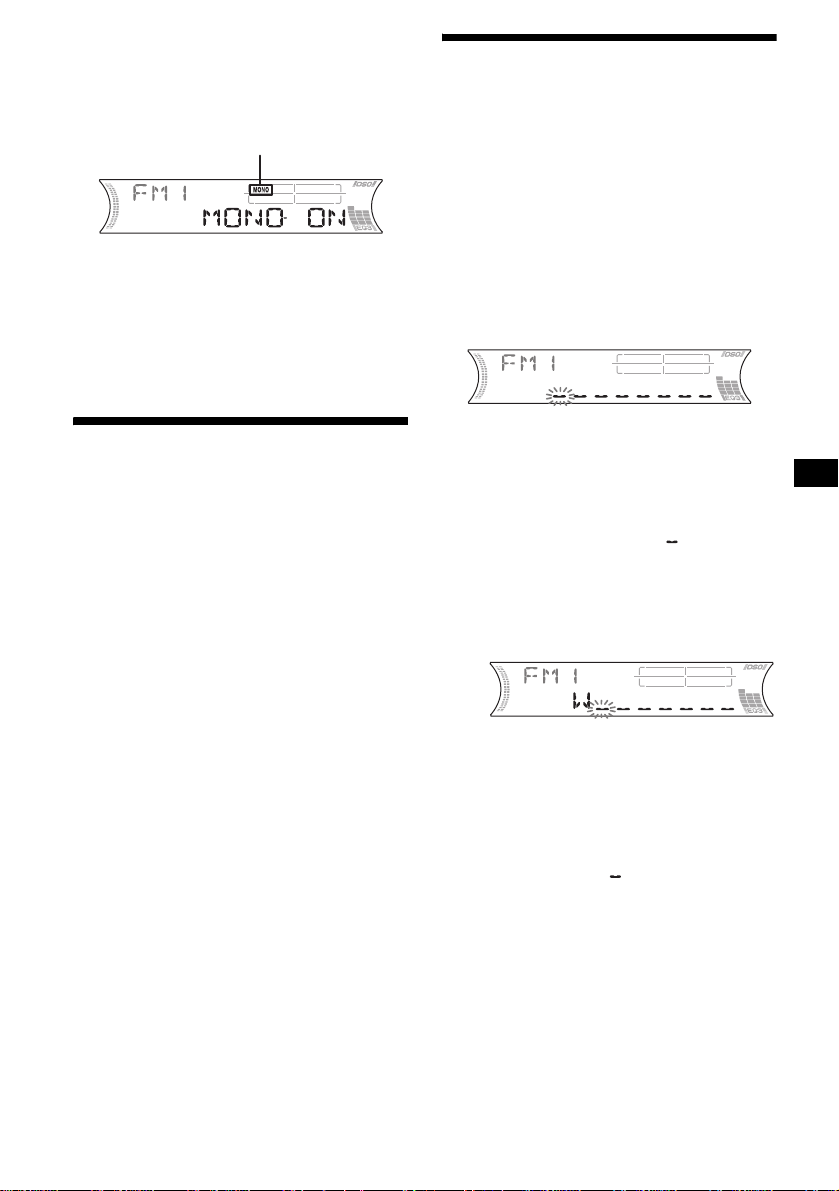
If FM stereo reception is poor
— Monaural Mode
During radio reception, press (SENS)
repeatedly until “MONO-ON” appears.
“MONO” indicator is displayed.
Storing station names
— Station Memo
You can assign a name to each radio station and
store it in memory. The name of the station
currently tuned in appears in the di splay. You can
assign a name usi ng up to 8 characters for a
station.
The sound improves, but becomes monaural
(“STEREO” disappears).
To return to nor mal radio recepti on m ode, press
(SENS) (“MONO-OFF” appears).
Tip
If FM broadcasts are difficult to hear, set DSO to
“OFF” (page 21).
Storing only the desired
stations
You can manually preset the desired stations on
any chosen number button.
1 Press (SOURCE) repeatedly to select
the radio.
2 Press (MODE) repeatedly to select the
band.
3 Press (SEEK) (+) or (SEEK) (–) to tu ne
in the station that you want to store.
4 Press the desired number button ((1)
to (6)) for 2 seconds until “MEM”
appears.
The number button in di cation appears in the
display.
Note
If you try to store another station on the same number
button, the previously stored station will be erased.
Storing the station names
1 Tune in a station whose name you
want to store.
2 Press (LIST) (CAT) for 2 seconds.
3 Enter the characters.
1 Press the volume +/– button to
select the desired chara ct er.
A y B y C ... y 0 y 1 y 2 ...
y + y – y
*(blank space)
2 Press (SEL) after locating the
desired character.
The next character fla shes.
3 Repeat steps 1 and 2 to enter the
entire name.
... y * y A
*
4 To return to normal radio reception
mode, press (LIST) (CAT) for 2
seconds.
Tip
Simply overwrite or enter “ ” to correct or erase a
character.
continue to next page t
15
Page 16

Erasing the station name
1 Press (SOURCE) repeatedly to select
the radio.
2 Press (MODE) repeatedly to select the
band.
3 Press (LIST) (CAT) for 2 seconds.
4 Press (DSPL) for 2 seconds.
The stored names will appear.
5 Press the volume +/– button
repeatedly to select the stati on na me
you want to erase.
6 Press (SEL) for 2 seconds.
The name is erased.
Repeat steps 5 and 6 if you want to erase
other names.
7 Press (LIST) (CAT) for 2 seconds.
The unit returns to no rmal radio recept io n
mode.
Note
If you have already erased all of the station names,
“NO DATA” appears in step 6.
Tuning in a station through
a list
— List-up
1 During radio reception, press (LIST)
(CAT).
The frequency or the name assigned to the
current station appears in the display.
2 Press (LIST) (CAT) repeatedly until
you find the desired station.
3 Press (SEEK) (+) or (SEEK) (–) to tune
in the desired station.
16
Page 17
Other Functions
You can also control the unit (and optional MD/
CD units) with a rotary commander (optional).
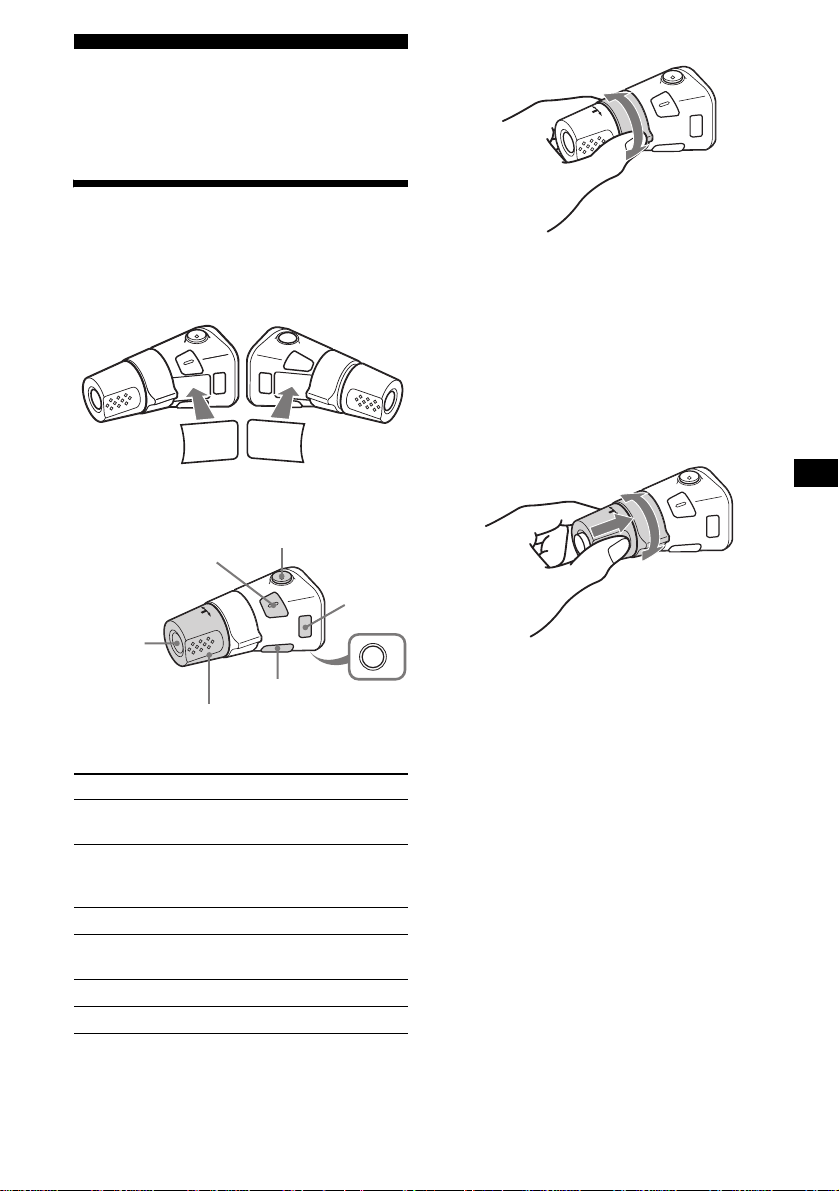
Using the rotary commander
By rotating the control
SEEK/AMS
control
First, attach the appropriate label depending on
how you want to mount the rotary commander.
The rotary commander works by pressin g
buttons and/or rotating controls.
MODE
MODE
DSPL
SEL
SEL
DSPL
By pressing buttons
(SEL)
(SOURCE)
Rotate the VOL control
to adjust the volume.
Press To
(ATT)
(DSPL)
(MODE)
(OFF)
(SOURCE) Change the source
(Radio/MD/CD*1)/Power on
(MODE) Change operation
(Radio band/MD unit*1/CD
1
unit*
)
(ATT) Attenuate the sou nd
2
(OFF)*
Stop playback or ra di o
reception/Power off
(SEL) Adjust and select
(DSPL) Change the display item
Rotate and release to:
– Skip tracks.
To continuously skip tracks , rotate onc e and
rotate again within 2 seconds and hold the
control.
– Tune in stations automatically.
Rotate, hold, and release to:
– Fast-forward/reverse a track.
– Find a station manually.
By pushing in and rotating the control
PRESET/DISC
control
OFF
Push in and rotate the control to:
– Receive preset stations.
– Change discs during MD (CD) playback *1.
– Change groups*3.
– Change albums*4.
continue to next page t
17
Page 18
When an MD contai ni ng groups, or an MP3 file
is played, you can se le ct a group (MD), or an
album (MP3 file) using th e rotary commander.
(With this unit)
To Do this
Skip groups*
–Group selectio n
3
1To enter Group selection
mode, push in, then rotate
and hold the control.
Within 2 seconds,
proceed to step 2.
2Push in, then rotate
quickly and re peatedly , to
skip groups one by one.
(With optional unit)
To Do this
Skip discs
–Disc selection
Push in and rota t e [once for
each disc] the cont rol.
To continuously skip discs,
push in and rotate on ce and
rotate again within 2
seconds (and hol d) the
control.
Skip albums*
–Album selection
4
1To enter Album selection
mode, push in, then rotate
and hold the control.
Within 2 seconds,
proceed to step 2.
2Push in, then rotate
quickly and re peatedly , to
skip albums one by one.
*1 Only if the corresponding optional equipment is
connected.
*2 If your car has no ACC (accessory) position on the
ignition key switch, after turning off the ignition, be
sure to press and hold (OFF) until the display
disappears.
*3 Available only when an MD contai ning groups is
inserted in this unit and played.
*4 Available only when an optional CD unit with the
MP3 file control function is connected, and MP3 file
is played.
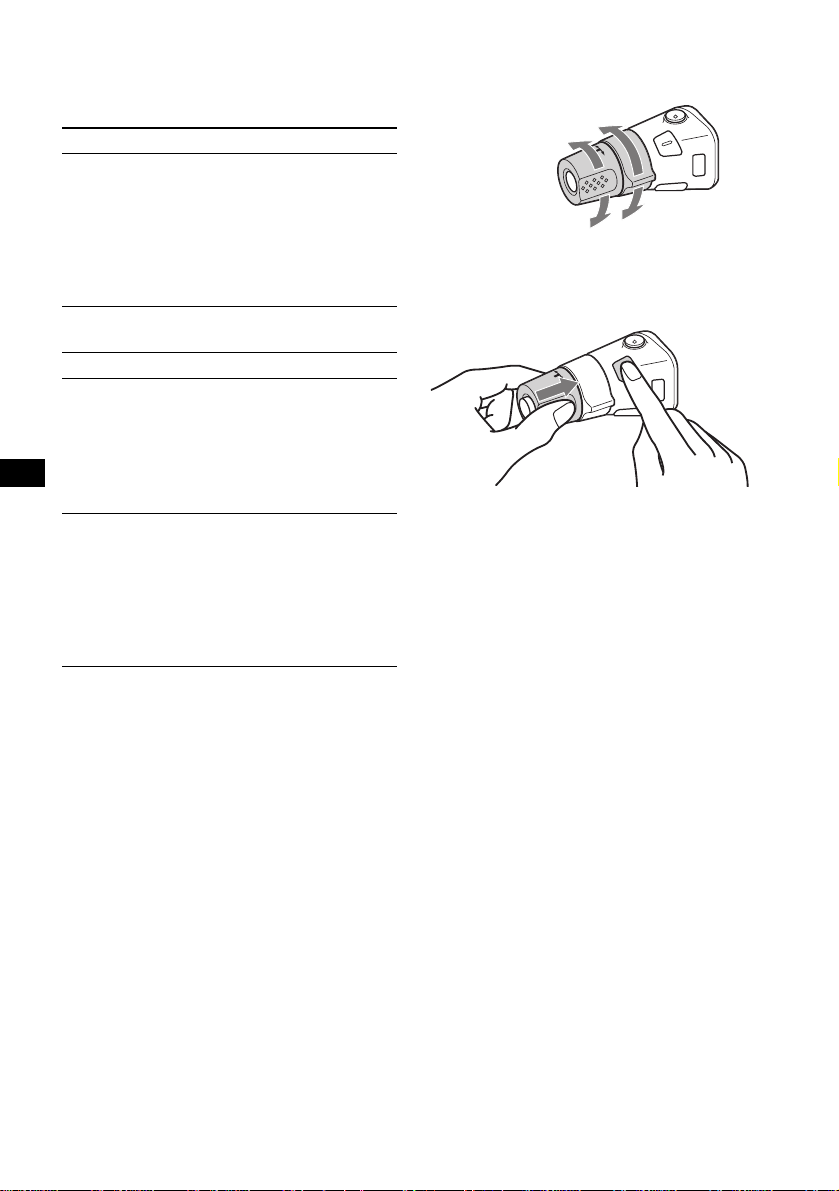
Changing the operative direction
The operative direction of controls is factory-se t
as shown below.
To increase
To decrease
If you need to moun t t he r otary commander o n
the right hand side of th e steering column, yo u
can reverse the operative direction.
Press (SEL) for 2 seconds while
pushing the VOL control.
Note
If you press (SEL) for 2 seconds while pushing the
VOL control, “NORM” or “REV” appears in the display.
– “NORM” is to use the rotary commander at the
factory-set position.
– “REV” is to use the rotary commander when it is
mounted on the right side of the steering column.
18
Page 19

Adjusting the sound
characteristics
Changing the sound and
display settings
You can adjust the balanc e, fader, low pass filter
and subwoofer volume.
1 Press (SEL) repeatedly until “BAL,”
“FAD,” “LPF” or “SUB” appears.
Each time you p re ss (SEL), the item changes
as follows:
1
LOW*
t MID*1 t HI*1 t
BAL (left-right) t FAD (front-rear) t
LPF (low pass filter)*
SUB (subwoo fe r volum e )*
*1 When EQ3 is activated (page 20).
*2 When “SUB” is selected (page 19).
*3 The cut off frequency is adjustable to 78 Hz,
125 Hz, or OFF.
*4 The volume level is adjustable between –10
and +10 steps. (Below –10, “ATT” is displayed.)
2*3
t
2*4
2 Press the volume +/– button to adjust
the selected item.
Note
Adjust within 3 seconds after selecting the item.
Quickly attenuating the
sound
Press (ATT).
After “ATT-ON” momentarily appears,
“ATT” appears i n t he display.
The following items can be set:
• REAR/SUB*1 — to switch the audio output
REAR or SUB.
– Select “REAR” to output to a power
amplifier.
– Select “SUB” to output to a subwoofer.
• A.SCRL (Auto Sc roll)*2 (page 11).
• M.DSPL (Motion Display) — to turn the
motion display on or off.
– Select “ON” to activate the motion display
(the moving pattern appears in the display).
– Select “OFF” to deactivate the motion
display.
•DEMO*1 — to turn the demonstration display
on or off.
– Select “ON” to activate the demonstration
display (the de monstration starts about 10
seconds after the unit is turned off).
– Select “OFF” to deactivate the
demonstrat i on display.
• BEEP*3 — to turn the beeps on or off.
• DIM (Dimmer) — to change the brightness of
the displ a y.
– Select “ON” to dim the display.
– Select “OFF” to deactivate the Dimmer.
continue to next page t
To restore the previous volume level, press
(ATT) again.
Tip
When the interface cable of a car telephone is
connected to the ATT lead, the unit decreases the
volume automatically when a telephone call comes in
(Telephone ATT function).
19
Page 20
Switching the REAR/SUB*
Press (SEL) and then press the
volume + (REAR) or – (SUB) button.
After 3 seconds, the display returns to no r m al
play mode.
1
Selecting the desired item
Press (SEL) and the desired button
simultaneously.
(SEL) + (3): A.SCRL*
(SEL) + (4): M.DSPL
(SEL) + (4): DEMO*
(SEL) + (6): BEEP*
(SEL) + (DSPL): DIM
After the mode setting is completed, the display
returns to normal play mode.
To cancel the item, press (SEL) and the desired
button simultaneously again.
*1 When the unit is turned off.
*2 When MD or CD is played.
*3 The beep sound is output only when the built-in
amplifier is used.
2
1
3
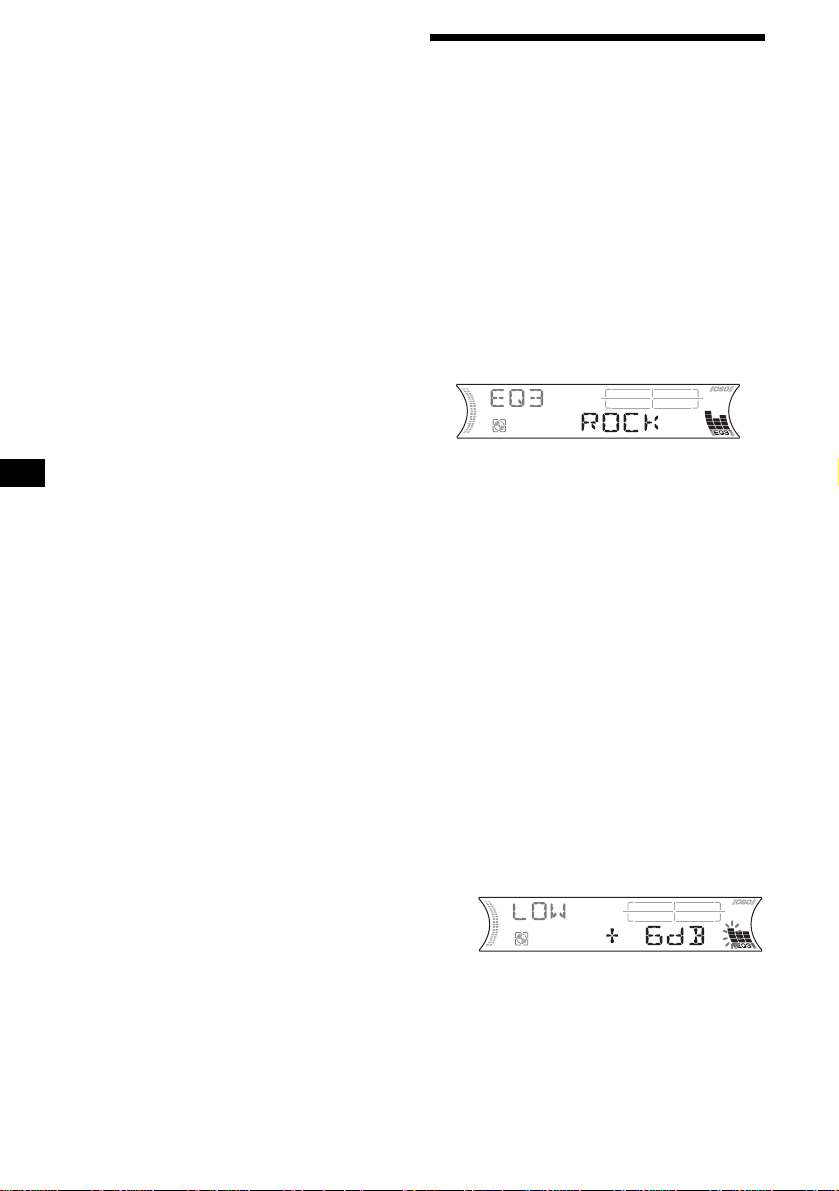
Setting the equalizer (EQ3)
You can select an equal i zer curve for 7 music
types (XPLOD, VOCAL, CLUB, JAZZ, NEW
AGE, ROCK, CUSTOM, and OFF (equalizer
OFF)).
You can store a different equalizer setting for
each source.
Selecting the equalizer curve
1 Press (SOURCE) to select a source
(Radio, MD or CD).
2 Press (EQ3) repeatedly to select the
desired equalizer curve.
Each time you press (EQ3), the item
changes.
To cancel the equalizing effect, select “OFF.”
Adjusting the equalizer curve
Yo u can store and adjust the equalizer settings
for different tone ranges.
1 Press (SOURCE) to select a source
(Radio, MD or CD).
2 Press (EQ3) repeatedly to select the
desired equalizer curve.
3 Adjusting the equalizer cur ve.
1Press (SEL) repeatedly to select the
desired tone range.
Each time you pr ess (SEL), the tone range
changes.
LOW t MID t HI (t BAL t FAD t
LPF t SUB)
2Press the volume +/– button
repeatedly to adjust to the desired
volume level.
The volume level is adjustable by 1 dB
steps from –10 dB to +10 dB.
20
3Repeat step 1 and 2 to adjust the
equalizer curve .
To restore the factory-set equali zer curve,
press (SEL) for 2 seconds.
After 1 second, the display returns to
normal play mode.
Note
When EQ3 is set to “OFF,” you cannot adjust the
equalizer settings.
Page 21
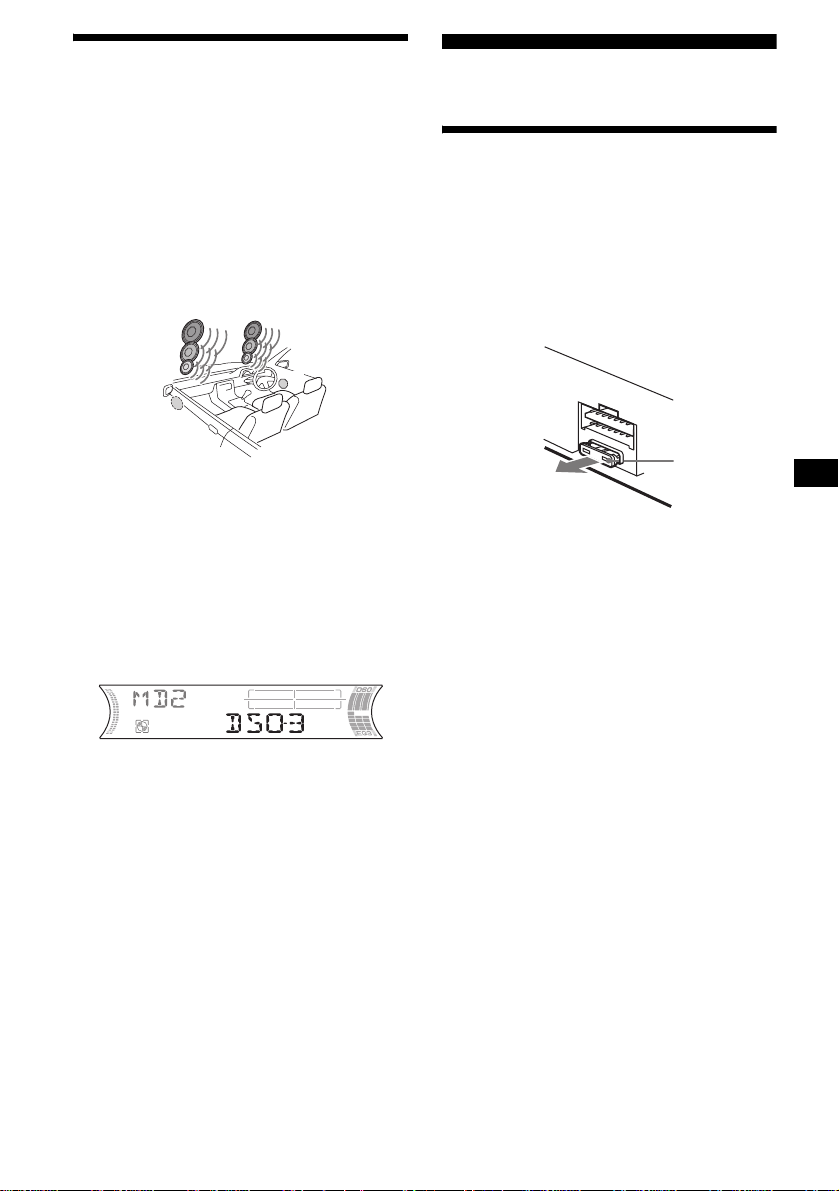
Setting the Dynamic
Soundstage Organizer (DSO)
If your speakers are installed into the lower part
of the doors, the so und will come from bel ow
and may not be clear.
The DSO (Dynamic So undstage Organizer)
function creates a more ambient sound as if there
were speakers above the da shboard (virtual
speakers).
You can store the DSO se tting for each source.
DSO mode and image of virtual speakers
*3
*2
*1
*4
*3
*2
*1
*4
Additional Information
Maintenance
Fuse replacement
When replacing the fuse, be sure to use one
matching the amperage rating stated on the
original fuse. If the fuse blows, check the power
connection and replace the fuse. If the fuse blows
again after replacement, there may b e an internal
malfunction. In such a case, consult your neares t
Sony dealer.
*1 DSO-1
*2 DSO-2
*3 DSO-3
*4 DSO-OFF
1 Press (SOURCE) to select a source
(Radio , MD or CD).
2 Press (DSO) repeatedly until the
desired DSO setting appears.
Each time you press (DSO), the DSO sett ing
changes.
To cancel the DSO function, select “D SOOFF.” After 1 second, the display returns to
normal play mode.
Notes
• Depending on the type of car interior or type of
music, DSO may not have a desirable effect.
• If FM broadcasts are difficult to hear, set DSO to
“OFF. ”
Fuse (10 A)
Warning
Never use a fuse with an amperage rating
exceeding the one supplied with the unit as this
could damage the unit.
continue to next page t
21
Page 22
Cleaning the connectors
The unit may not functi on pr operly if the
connectors between the unit and the front panel
are not clean. In order to prevent this, detach the
front panel (page 8) and clean the connectors
with a cotton swab dipped in alcohol. Do not
apply too much fo rce. Otherwise, the connectors
may be damaged.
Main unit
Back of the front panel
Notes
• For safety, turn off the ignition before cleaning the
connectors, and remove the key from the ignition
switch.
• Never touch the connectors directly with your fingers
or with any metal device.
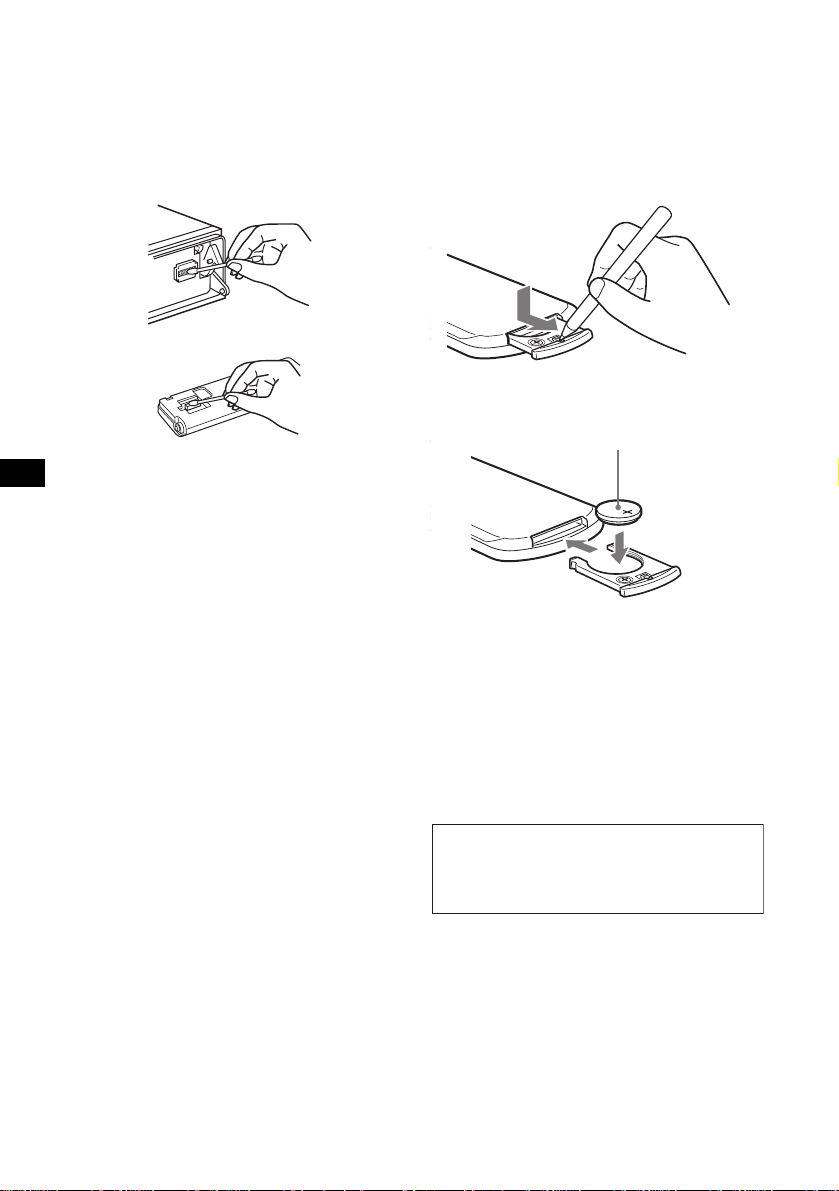
Replacing the lithium battery
Under normal conditions, the battery will last
approximately 1 y ear. (The servi ce life may be
shorter, depending on the conditions of use.)
When the batt ery bec omes wea k, the range o f the
card remote commander becomes shorter.
Replace the battery with a new CR2025 lithium
battery. Use of any other battery may present a
risk of fire or explosion.
x
+ side up
22
Notes on lithium battery
• Keep the lithium battery out of the reach of
children. Should the battery be swallowed,
immediately consult a doctor.
• Wipe the battery with a dry cloth to assure a
good contact.
• Be sure to observe the correct polarity when
installing the battery.
• Do not hold the battery with metal lic tweeze rs,
otherwise a short-circuit may occur.
WARNING
Battery may explode if mistreated.
Do not recharge, disassemble, or dispose of
in fire.
Page 23
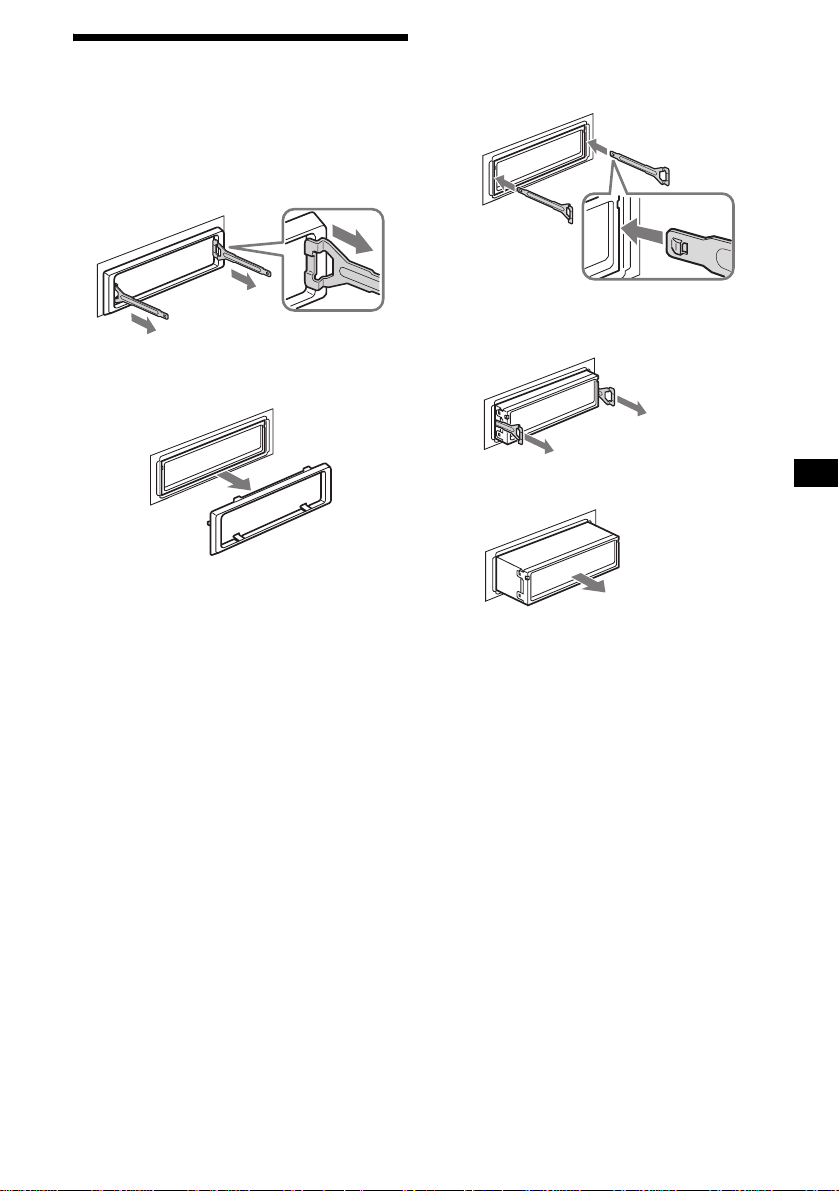
Removing the unit
1 Remove the protection collar.
1 Detach the front panel (page 8).
2 Engage the release keys togethe r
with the protection collar.
2 Remove the unit.
1 Insert both release keys together
until t hey click.
Face the hook
inwards.
Orient the release
key correctly.
3 Pull out the release keys to remove
the protection collar.
2 Pull the release keys t o unseat the
unit.
3 Slide the unit out of the mounting.
23
Page 24

Specifications
AUDIO POWER SPECIFICATIONS
POWER OUTPUT AND TOTAL HARMONIC DISTORTION
23.2 watts per channel minimum continuous average power into 4 ohms,
4 channels driven from 20 Hz to 20 kHz with no more than 5% total
harmonic distortion.
MD Player section
Signal-to-noise ratio 90 dB
Frequency response 10 – 20,000 Hz
Wow and flutter Below measurable limit
Tuner section
FM
Tuning range 87.5 – 107.9 MHz
Antenna terminal External antenna connector
Intermediate frequency 10.7 MHz/450 kHz
Usable sensitivity 9 dBf
Selectivity 75 dB at 400 kHz
Signal-to-noise ratio 67 dB (stereo),
Harmonic distortion at 1 kHz
Separation 35 dB at 1 kHz
Frequency response 30 – 15,000 Hz
69 dB (mono)
0.5 % (stereo),
0.3 % (mono)
AM
Tuning range 530 – 1,710 kHz
Antenna terminal External antenna connector
Intermediate frequency 10.7 MHz/450 kHz
Sensitivity 30 µV
Power amplifier section
Outputs Speaker outputs
Speaker impedance 4 – 8 ohms
Maximum power output 52 W × 4 (at 4 ohms)
(sure seal connectors)
General
Outputs Audio output terminals
Inputs Telephone ATT control
Tone controls Low:
(front, rear/sub switchable)
Power antenna relay control
terminal
Power amplifier control
terminal
terminal
Remote controller input
terminal
BUS control input terminal
BUS audio input terminal
Antenna input termina l
±10 dB at 60 Hz (XPLOD)
Mid:
±10 dB at 1 kHz (XPLOD)
High:
±10 dB at 10kHz (XPLOD)
Power requirements 12 V DC car battery
Dimensions Approx. 178 × 50 × 181 mm
Mounting dimensions Approx. 182 × 53 × 161 mm
Mass Approx. 1.2 kg
Supplied accessories Parts for installation and
Optional accessories Card remote commander
Optional equipment CD changer (10 discs)
(negative ground)
(7 1/8 × 2 × 7 1/4 in)
(w/h/d)
(7 1/4 × 2 1/8 × 6 3/8 in)
(w/h/d)
(2 lb 10 oz)
connections (1 set)
Front panel case (1)
RM-X114
Rotary commander
RM-X4S
BUS cable (supplied with
an RCA pin cord)
RC-61 (1 m), RC-62 (2 m)
CDX-757MX
CD changer (6 discs)
CDX-T69
MD changer (6 discs)
MDX-66XLP
XM Satellite Radio
Receiver
XT-XM1
Source selector
XA-C30
AUX-IN Selector
XA-300
US and foreign patents licensed from Dolby
Laboratories.
Note
This unit cannot be connected to a digital preamplifier
or an equalizer which is Sony BUS system compatible.
Design and specifications are subject to chan ge
without notice.
24
Page 25

Troubleshooting
The following checklist will help you remedy
problems you may encounter with your unit.
Before going t hrough the checkl ist belo w, check
the connection and operating procedur es.
General
No sound.
• Press the volume + button to adjust the
volume.
• Cancel the ATT function.
• Set the fader control to the center posi tion for
a 2-speaker system.
• You may play an MDLP disc with an
optional MD chang er without the MDLP
function (“LP: ···” may appear in the
display).
t Insert the MDLP disc in the unit to play.
The contents of the memory have been
erased.
• The RESET button has been pressed.
t Store again into the memory.
• The power lead or battery has been
disconnected.
• The power connecting lead is not connected
properly.
No beep sound.
• The beep sound is canceled (p age 19).
• An optional power amplifier is connected
and you are not using the built-in amplifier.
The display disappears from/does not
appear in the display window.
• The display di sappears if you press and hold
(OFF).
t Press and hold (OFF) again until the
display appe ar s.
• Remove the front panel and clean the
connectors. For det ai ls, see “Cleaning th e
connectors” on page 22.
Stored stations and correct time are erased.
The fuse has blown.
Makes noise when the ignition key is in the
ON, ACC, or OFF position.
The leads are not matched correctly with the
car’s accessory power connec to r.
No power is bei ng supplied to t h e unit.
• Check the connection. If everything is in
order , check the fuse.
• The car does not hav e an ACC position.
t Press (SOURCE) (or insert an MD ) to
turn on the unit.
The power is continuous ly supplied to the
unit.
The car does not have an ACC position.
t After turning off the ignition, be sure to
press and hold (OFF) on the unit until the
display disappears.
The power antenna does not extend.
The power antenna does not have a relay box.
Cannot turn off the “--------” indication.
You entered the name edit mode.
t Press (LIST) (CAT) for 2 sec onds.
MD playback
An MD cannot be loaded.
• Another MD is already loaded.
• The MD has been forcibly inserted upside
down or in th e wr ong way.
Playback does not begin.
Defective MD.
A disc is automatically ejected.
The ambient temp erature exceeds 50°C
(122°F).
MD group function does not work.
• The inserted MD in this unit does not contain
any groups.
• The currently playing track m ay not be in a
group set by your MD recorder.
• You ma y pl ay an MD containing gr oups
inserted in an optional MD changer.
t Ins er t the MD containing groups in this
unit.
The operation buttons do not function.
MD will not be ejected.
Press the RESET button.
The sound skips from vibration.
• The unit is installed at an angle of more than
45°.
• The unit is not installed in a sturdy part of
the car.
The sound skips.
Dirty or defective disc.
continue to next page t
25
Page 26

Radio reception
Preset tuning is not possible.
• Store the correct frequency in the memory.
• The broadcast signal is too wea k.
The stations cannot be received.
The sound is hampered by noises.
• Connect a power antenna control l ead (blue)
or accessory power supply lead (red) to the
power supply lead of a car’s antenna booster.
(Only when your car has built-in FM/AM
antenna in the rear/side glass.)
• Check the connection of the car antenna.
• The auto antenna will not go up.
t Chec k t he connection of the power
antenna control lead.
• Check the frequency.
• When the DSO mode is on, the so und is
sometimes hampered by noises.
t Set the DSO mode to “OFF” (page 21).
Automatic tuning is not possible.
• The local seek m o d e is set to “O N.”
t Set the local seek mode to “O FF”
(page 14).
• The broadcast signal is too wea k.
t Perform manual tuning.
The “STEREO” indication flashes.
• Tune in the frequency ac cur ately.
• The broadcast signal is too wea k.
t Set the monaural reception mode to
“ON” (page 15).
A program broadcast in stereo is heard in
monaural.
The unit is in monaural reception mode.
t Canc el monaural reception m ode
(page 15).
Error displays/Messages
Error displays
(For this unit and optional MD/CD changers)
The following indications will flash for about
5 seconds, and an alarm sound will be heard.
BLANK*
ERROR*
FAILURE (Illuminates until any button is
pressed.)
FAILURE (Illuminates for about 1 second.)
HI TEMP
NO DISC
NO MAG
1
No tracks have been recor ded on an MD.*
2
t Play an MD with recorded tracks on it.
1
• An MD is dirty or inserte d up side down.*
t Cl ean or insert the MD correctly.
• A MD/CD cannot play becaus e of some
problem.
t Insert another M D /CD.
The connection of speakers/amplifiers is
incorrect.
t See the installation guide manual of this
model to check the connection.
When the XM tune r i s connected, storing a n
XM radio channel into a preset failed.
t Be sure to receive the chan nel that you
want to store, then try it again.
The ambient temperature is more than 50°C
(122°F).
t Wait until the temperature goes down
below 50°C (122°F).
No disc is inserted in the MD/CD unit.
t Insert discs in the MD/CD unit.
The disc magazine is not inserted in the CD
unit.
t Insert the magazine in the CD unit.
2
26
Page 27

NO MUSIC
A CD which is not a music file is inserted in
the MP3 playable CD unit.
t Insert a music CD in the MP3 playable CD
unit.
NOTREADY
The lid of the MD unit is open or the MDs are
not inserted proper ly.
t Close the lid or insert the MDs properly.
OFFSET
There may be an internal malfunction.
t Check the connection. If the error
indication remains on in the display,
consult your near es t Sony dealer.
RESET
The MD/CD unit cannot be operat ed because
of some problem.
t Press the RESET button on the unit.
*1 When an error occurs during playback of a MD or
CD, the disc number of the MD or CD does not
appear in the display.
*2 The disc number of the disc causing the error
appears in the display.
If these solutions do not help improve the
situation, consult your nearest Sony de al er.
Messages
L.SEEK +/–
The loca l seek mode is on durin g a utomatic
tuning (page 14).
“ ” or “ ”
You have reached the beginning or th e end of
the disc and you cannot go any further.
27
Page 28

Félicitations !
r
Nous vous remercions d’avoir fait l’acquisition
de ce lecteur de MiniDisc Sony. Vous pouvez
profite r enco re da v ant age des mu ltipl es fo ncti ons
de cet appareil grâce aux fonctions et accessoires
cités ci-dessous :
• Fonctionnement avec des lecteurs MD ou CD
en option (chang eurs et lecteurs)*
• Aff ichage des informations CD TEXT (pendant
la lecture d’un CD TEXT *
• Accessoires de commande en option
Mini-télécommande RM-X114
Satellite de commande RM-X4S
*1 Cet appareil fonctionne uniquement avec des
produits Sony.
*2 Un disque CD TEXT est un CD audio contenant
des informations telles que le nom du disque, le
nom de l’artiste et les noms des plages. Ces
informations sont enregistrées sur le disque.
Le logo « XM Ready » indique que ce produit
commande un tuner XM Sony (vendu
séparément).
Consultez votre revendeur agréé Sony le plus
proche pour obtenir plus d
tuner XM.
Pour en savoir plus sur le fonctionnement du
tuner XM, reportez-vous au manuel utilisateu
fourni avec le tuner XM.
’informations sur le
1
.
2
).
2
Page 29

Table des matières
Emplacement des commandes . . . . . . . . . . . 4
Précautions . . . . . . . . . . . . . . . . . . . . . . . . . . 6
Remarques sur les MD . . . . . . . . . . . . . . . . . 6
À propos de la foncti on groupe d’un MD . . . 7
Préparation
Réinitialisation de l’appareil . . . . . . . . . . . . . 8
Retrait de la façade . . . . . . . . . . . . . . . . . . . . 8
Réglage de l’horloge . . . . . . . . . . . . . . . . . . . 9
Lecteur MD
Lecteur MD ou CD (en option)
Lecture d’un disque. . . . . . . . . . . . . . . . . . . 10
Rubriques d’affichage . . . . . . . . . . . . . . . . . 11
Lecture de plages en boucle
— Lecture répétée. . . . . . . . . . . . . . . . . . 12
Lecture des plages dans un ordre aléatoire
— Lecture aléatoire . . . . . . . . . . . . . . . . 13
Identification d’un CD
— Fonction de mé m o de disque* . . . . . . 13
Recherche d’un dis que par son nom
— Affichage automatique des titres* . . . 15
* Fonctions disponibles avec un lecteur MD ou CD en
option
Radio
Mémorisation automatique des stations
— Mémorisat i on des meilleurs accords
(BTM). . . . . . . . . . . . . . . . . . . . . . . . . . . 15
Réception des stations mémorisées. . . . . . . 16
Mémorisation des stations souhaitées
uniquement . . . . . . . . . . . . . . . . . . . . . . . 16
Mémorisation des noms de station
— Fonction de mé m oi re des stations . . . 17
Syntonisation d’un e s ta ti on à partir d’une liste
— Affichage automatique des titres . . . . 18
Autres fonctions
Fonctionnement du satellite de
commande . . . . . . . . . . . . . . . . . . . . . . . 18
Réglages des ca ractéristiques sonores . . . . 20
Atténuation rapide du son. . . . . . . . . . . . . . 20
Modificatio n des réglages du son et de
l’affichage . . . . . . . . . . . . . . . . . . . . . . . 21
Réglage de l’égaliseur (EQ3) . . . . . . . . . . . 2 2
Réglage du répartiteur dynamique du son émis
(DSO). . . . . . . . . . . . . . . . . . . . . . . . . . . 23
Informations complémentaires
Entretien . . . . . . . . . . . . . . . . . . . . . . . . . . . 23
Démontage de l’appareil. . . . . . . . . . . . . . . 25
Caractéristiques techniques . . . . . . . . . . . . 26
Dépannage . . . . . . . . . . . . . . . . . . . . . . . . . 27
Affichage des erreurs et messages . . . . . . . 28
3
Page 30

Emplacement des commandes
Pour obtenir des in formations plus détaillées, reporte z- vous aux numéros de page s i ndi qués.
ATT
DSPL
SEL
–+
DISC REP SHUF BTM LIST
SOURCE MODE
OFF
1 2 3 4 5 6
a Touche de volume +/–
b Touche ATT (atténuation du son) 20
c Touche DSPL (modification du mode
d’affichage) 9, 11, 14, 17, 21
d Touche SEL (sélection)
Sélection des param ètres.
e Fenêtre d’affichage
f Touche Z (éjecter) (située à l’a vant de
l’appareil, derrière la façade) 10
g Touche EQ3 (égaliseur) 22
h Touche DSO 23
i Touche OPEN 8, 10
j Touche SEEK +/–
Radio :
Sélection automatique de s stations/re cherche
manuelle d’une sta tion.
MD/CD (fichiers MP3*
1
) :
Saut de plages/avance rapide ou r et our dans
une plage.
k Récepteur de la mini-télécommande
l Touche SOURCE (Mise sous tension/
Radio/MD/CD*2)
Sélection de la source.
m Touche MODE
Changement du mo de de fonctionnemen t.
n Touche OFF (Arrêt/Mise hors
tension)*
3
8, 10
o T ouches numériques 21
Radio :
Mémorisation des stations souhaitées sur
chaque touche numé rique.
OPEN
DSO
SEEK
EQ3
–+
GP/ALBM
BTM SENS LIST
CAT
MDX-F5800
MD/CD (fichiers MP3*1) :
(1): DISC – 10
(2): DISC + 10
(3): REP 12
(4): SHUF 13
(5): GP*
(6): GP*
4
/ALBM*1 – 10
4
/ALBM*1 + 10
p Touche RESET (située à l’avant de
l’appareil, derrière la façade) 8
q Touche BTM 15
r Touche SENS 16
s Touche LIST/CAT*5 13, 14, 17, 18
*1 Disponible uniquement lorsqu’un l ecte ur CD en
option avec fonction MP3 est raccordé et qu’un
fichier MP3 est en cours de lecture.
*2 Lorsqu’un lecteur CD en option est raccordé.
*3 Avertissement en cas d’installation de
l’appareil dans un véhicule dont le
contact ne comporte pas de position
ACC (accessoires)
Après avoir coupé le moteur, n’oubliez pas
de maintenir (OFF) enfoncée sur l’appareil,
jusqu’à ce que l’affichage apparaisse.
Sinon, l’affichage n’est pas désactivé et la
batterie du véhicul e se dé charge.
*4 Disponible uniquement lorsqu’un MD conte na nt
des groupes est inséré dans cet appareil pour être
lu.
*5 La touche CAT est disponible uniquement lorsque
le récepteur XM est raccordé.
4
Page 31

Mini-télécommande RM-X114
(en option)
DSPL MODE
+
PRESET
LIST
+
DISC
MENU
–
SEEK
SOUND
SOURCE
DISC
PRESET –
+
VOL
+
SEEK
–
ENTER
ATTOFF
–
Les touches de la mini-télécommande
permettent de commander les mêmes
fonctions que les touches
correspondantes sur l’appare il.
a Touche DSPL
b Touche MENU*
c Touche SOURCE
d Touches SEEK (–/+)
e Touche SOUND
Permet de régler les caractéristiques sonores.
f Touche OFF
g Touches VO L (+/–)
h Touche MODE
i Touche LIST
j Touches DISC(GP/ALBM)/PRESET
(+/–)
k Touche ENTER*
l Touche ATT
* Non disponible sur cet appareil
Remarque
Si vous désactivez l’affichage en appuyant sur (OFF),
il ne peut pas être réactivé avec la
mini-télécommande, sauf si vous activez d’abord
l’appareil en appuyant sur (SOURCE) de l’appareil ou
si vous insérez un disque dans le lecte ur.
Conseil
Pour obtenir des informations plus détaillées s ur le
remplacement de la pile, reportez-vous à la section
« Remplacement de la pile au lithium » page 24.
Sélection d’un disque, d’un groupe ou
d’un album à l’aide de la
mini-télécommande
Les touches DI SC ( G P/ALBM)/PRE SET (+/–)
de la mini-télécommande permettent de passer
d’un disque, d’un gr oupe ou d’un album à
l’autre.
(Avec cet appareil)
Pour Appuyez sur
passer d’u n gr ou pe
à l’autre*
1
– Sélection d’un
groupe
+ ou – [une fois pour chaque
groupe]
Pour sauter plus ie urs
groupes de suite, maintenez
l’une ou l’autre touche
enfoncée.
(Avec un appareil en option)
Pour Appuyez sur
passer d’un disq ue
à l’autre
– Sélection d’un
disque
+ ou – [une fois pour chaque
disque]
Pour sauter plus ie urs
disques de suit e, appuyez
sur une des touches, puis
appuyez de nouveau s ur
cette touche dans les 2
secondes qui suivent et
maintenez-la enfoncée.
passer d’un album
à l’autre*
2
– Sélection d’un
album
+ ou – [maintenir un
moment], puis relâchez
Pour sauter p lusieurs al bums
de suite, appuyez sur une
des touches, pui s appuyez
de nouveau sur cette touche
dans les 2 secondes qui
suivent et maintenez-la
enfoncée.
*1 Disponible uniquement lorsqu’un MD contenant
des groupes est inséré dans cet appareil pour être
lu.
*2 Disponible uniquement lorsqu’un lecteur CD en
option avec fonction MP3 est raccordé et qu’un
fichier MP3 est en cours de lecture.
Saut de plusieurs plages de suite
Appuyez une fois sur (SEEK) (+) ou
(SEEK) (–) de la m ini-télécommande, puis
appuyez de nouveau sur cet t e t ouche dans les 2
secondes qui suivent et maintenez-la enfoncée.
5
Page 32

Précautions
Remarques sur les MD
• Si votre véhicule est resté stationné en plein
soleil, laissez refroidir l’appareil avant de
l’utiliser.
• L’ant enne électrique se déploie
automatiquement lorsque l’appare il fonctionne.
• N’utilisez pas la fonction CUSTOM FILE
pendant que vous cond ui sez, ni aucune autre
fonction susceptible de diminuer l’attention
portée à la route.
Si vous avez des questions ou des problèmes
concernant cet appareil qui ne sont pas abordés
dans ce mode d’emp loi, contactez votre
détaillant Sony.
Condensation
Par temps de pluie ou dans des régions très
humides, de la condensation peut se form er à
l’intérieur des lentilles et dans la fenêtre
d’affichage de l’appareil. Si cela se produit,
l’appareil ne fonct ionne pas correctem ent. Dans
ce cas, retirez le disque et attendez environ une
heure que l’humidité se soit évaporée.
Pour conserver un s on de hau te qualité
Veillez à ne pas renverser de jus de fruit ou de
boissons su crées sur l’appareil ou sur les disques.
• Ne jamais ouvrir le volet de la cartouche
pour exposer le MD. Refermez
immédiatement le volet si celui s’ou vr e.
• Ne jamais touc he r la surface du disque à
l’intérieur.
• N’exposez pas les disques à des températures
élevées. Évitez de les l ai sser dans un véhicule
en stationnement, sur le tableau de bord ou la
plage arrière.
Remarques sur le collage d’étiquettes
Pour éviter qu’un M D ne r es te coi ncé dans
l’appareil :
– fixez l’étiquette dans un endroit approprié ;
– retirez les anciennes étiquettes avant d’en
apposer une nouvelle ;
– remplacez les étiquettes qui se décollent.
Nettoyage
Essuyez régulièrement la surface de la cartouche
à l’aide d’un chiffon sec et doux.
6
Page 33

À propos de la fonction
groupe d’un MD
La fonction gr oupe pe rmet de locali ser l es plag es
de votre choix à l’intéri eu r d’un groupe de
nombreuses plag es ou de plages enregistrées en
mode MDLP (LP2/LP4).
Remarques sur le paramétrage des
groupes de MD
• Cet appareil est destiné à la le ct ure de MD
uniquement. S’agissant de l’enregist rement et
du paramétrag e des groupes de MD, rep o r t ezvous au mode d’emploi de votre enregistreur de
MD.
• Le même nom de groupe peut êt re enregistré
plus de deux fois sur le même MD.
• Le nombre de groupes maxim al es t de 99,
même si ce nombre dépend votre de
enregistreur de MD.
• Suivant votre enregistreur de MD, il est
possible que le pa ramétrage des grou pes de
MD ne soit pas disp onible.
MD contenant des groupes
MD
Groupe2*Groupe1* Groupe3*
12 456789
3
10
Hypothèse d’un GP (groupe) sur cet
appareil
Cet appareil reconnaît les plages simples et les
plages multiples entre groupes comme groupes
(GP), même si elle s n’ont pas été enregistr ées en
tant que groupes par votre enregistreur MD. Ce s
numéros « GP » sont affectés à ces plages, ainsi
qu’aux groupes enregistrés. Si vous chang ez de
groupe sur un MD en cours de lectur e,
l’indication du numéro « GP » s’allume dans la
fenêtre d’affichage.
MD contenant des groupes et des numéros
« GP » affectés sur cet appareil
MD
GP2
GP3
(Groupe2
*)
GP4
GP1
(Groupe1
*)
1234 56789
* Groupes : définis par votre enregistreur de MD.
Pour savoir comment utiliser la fonction groupe
MD, reportez -vous à « Lecture d’un disqu e »
(page 10) , « Lecture de plages en bouc le »
(page 12), e t « Le ct ur e des plages dans un ordre
aléatoire » (page 13).
Remarque
La fonction groupe MD est disponible uniquement
lorsqu’un MD contenant des groupes est in sér é dans
cet appareil pour être lu.
GP5
(Groupe3
10
*)
Numéro de plage
* Groupes : définis par votre enregistreur de MD.
Lorsque vous insérez un MD dans cet appareil, la
lecture démarre automatiquement et suit l’ord re
des plages.
7
Page 34

Préparation
Retrait de la façade
Vo us pouvez retirer la façade de cet appareil
pour éviter qu’il ne soit volé.
Réinitialisation de l’appareil
Avant la pre m ière mise e n service de l’ a ppareil,
après avoir remplacé la batterie du véhicule ou
modifié les raccordements, vous devez
réinitialiser l’appareil.
Retirez la façade, pui s appuyez sur la touche
RESET avec un objet pointu comme un sty l o à
bille.
Touche RESET
Remarque
Une pression sur la touche RESET remet l’heure à
zéro et efface certaines informations mémorisées.
Alarme d’avertissement
Si vous mettez la clé de contact en position OFF
sans ôter la façade , l’a larme d’avertissement
retentit pe ndant quelques secondes.
Si vous raccordez un ampl i ficate ur en option et
que vous n’utilisez pas l’amplificateur intégré, le
bip est désact ivé.
1 Appuyez sur (OFF)*.
La lecture du MD ou du CD ou la réception
radio s’arrête (l’éclairage des touches et
l’affichage restent al lu més).
* Si le contact de votre véhicule n’est pas doté
d’une position ACC (accessoires), veillez à
désactiver l’appareil en appuyant sur (OFF)
jusqu’à ce que l’affichage disparaisse pour éviter
que la batterie du véhicule ne se décharge.
2 Appuyez sur (OPEN), faites glisse r la
façade vers la droite, puis tirez
doucement vers vous l’extrémité
gauche de la façade.
1
2
Remarques
• Si vous retirez la façade alors que l’appareil est sous
tension, l’alimentation est automatiquement coupée,
de manière à éviter d’endommager les
haut-parleurs.
• N’exercez pas de pression excessive sur la façade
(y compris la fenêtre d’affichage) et ne la faites pas
tomber non plus.
• N’exposez pas la façade à une température ou à un
taux d’humidité élevé. Évitez de la laisser dans un
véhicule en stationnement ou sur le tableau de bord
ou la plage arrière.
Conseil
Lorsque vous transportez la façade, glissez-la dans
l’étui fourni à cet effet.
8
Page 35

Installation de la façade
Enfilez l’orifice A de la façade sur la tige B de
l’appareil, puis poussez doucement sur le côté
gauche pour l’engager en position.
Appuyez sur (SOURCE) sur l’appareil
(ou insérez un M D ) pour le faire fonctionner.
A
B
x
Réglage de l’horloge
L ’horloge numérique fonctionne suivant un cycle
de 12 heures.
Exemple : pour régl er l’ horloge à 10:08
1 Appuyez sur (DSPL) pendant 2
secondes.
L’indication des heures clignote.
1 Appuyez sur la touche de volume
+/– pour régler l’heure.
2 Appuyez sur (SEL).
L’indication des minutes clignote.
3 Appuyez sur la touche de volume
+/– pour régler les minutes.
2 Appuyez sur (DSPL).
L’horloge démarre. Une fois l e réglage de
l’horloge terminé, la fenêtre d’affichage
revient au mode de lecture normal.
Remarque
Ne posez rien sur la face interne de la façade.
9
Page 36

Lecteur MD
Lecteur MD ou CD (en
option)
Cet appareil vous permet, en plus de la lecture de
MD (MD doté de grou pes), de piloter des
lecteurs exte rnes MD ou CD (y compris les
lecteurs CD MP3 ). Si vous raccordez un lecteur
de CD compatible MP 3 en option (par ex. un
changeur CD MP3), vo us po uvez lir e des f i chie rs
MP3, des fichiers aud io (plages) comprimés
offrant un son de grand e qualité.
Lecture d’un disque
(Avec cet appareil)
1 Appuyez sur (OPEN) et insérez le
disque (côté imprimé vers le haut).
avancer
rapidement ou
reculer dans une
plage
–Recherche
manuelle
passer d’un GP à
un autre*
–Sélection d’un
GP
* Disponible uniquement lorsqu’un MD contenant des
groupes est inséré dans cet appareil pour être lu.
Pour sauter plusieurs plages de suite, appuyez sur
(SEEK) (+) ou (SEEK) (–), puis appuyez de
nouveau sur cette touche dans les 2 secondes qui
suivent et maintenez-la enfoncée.
Remarques
• Selon l’état du disque, il se peut que sa lecture soit
impossible (page 6).
• Si vous appuyez sur (SEEK) (–) ou (SEEK) (+), la
lecture saute à la dernière ou à la première plage du
disque lorsque celle-ci est en cours de lecture.
• Lorsque la dernière plage du disque est terminée, la
lecture reprend à partir de la première plage du
disque.
(SEEK) (–/+)
(m/M)
[maintenez la touche
enfoncée jusqu’au point
souhaité]
(5)(GP–) ou (6)(GP+)
[une fois pour ch aque
groupe]
[maintenez la touche
enfoncée jusqu’au groupe
souhaité]
(Avec un appareil en option)
2 Fermez la façade
La lecture commen ce automatiquemen t.
Pour commencer la lecture si un disque se trouve
déjà dans l’appareil, appuyez plu si eurs fois sur
(SOURCE) jusqu’à ce que l’indication « MD »
s’affiche.
Pour Appuyez sur
arrêter la lecture (OFF)
éjecter le disque (OPEN), puis sur Z
passer d’une plage
à l’autre
–Accès
automatique
aux plages
(SEEK) (–/+)
(./>)
[une fois par plage]
10
1 Appuyez plusieurs fois sur (SOURCE)
pour sélectionner « MD (MS*
« CD ».
1
) » ou
2 Appuyez plusieurs fois sur (MODE)
jusqu’à ce que l’appareil souhaité
s’affiche.
La lecture commence.
Pour Appuyez sur
passer d’un disque
à l’autre
–Sélection d’un
disque
passer d’un album
à l’autre*
–Sélection d’un
2
album
(1)(DISC–) ou
(2)(DISC+)
[une fois pour ch aque
disque]
[maintenez la touche
enfoncée jusqu’au disque
souhaité]
(5)(ALBM–) ou
(6)(ALBM+)
[une fois pour ch aque
album]
[maintenez la touche
enfoncée jusqu’à l’album
souhaité]
Page 37

*1 MS : Lecteur MG System-up à Memory Stick
MGS-X1
*2 Disponible uniquement lorsqu’un lecteur CD en
option avec fonction MP3 est raccordé et qu’un
fichier MP3 est en cours de lecture.
Précautions à prendre lors du raccordement
d’appareils MGS-X1 ou MD
Cet appareil reconnaît le MGS-X1 comme étant un
lecteur MD.
• Pour lancer la lecture sur un lecteur MGS-X1,
appuyez sur (SOURCE) pour sélectionner « MD ».
Lorsque l’affichage de la source indique « MD »,
appuyez sur (MODE) pour sélectionner « MS » et
commencer la lecture.
• Pour lancer la lecture sur un lecteur MD, appuyez
sur (SOURCE) pour sélectionner « MD ». Lorsque
l’affichage de la source indique le lecteur MD
souhaité, la lecture commence. Si l’affichage de la
source indique « MS » ou un autre lecteur MD,
appuyez sur (MODE) pour sélectionner le lecteur
MD souhaité et lancer la lecture.
Remarques sur le raccordement de lecteurs CD
compatibles MP3
• Si un disque sans fichiers (plages) MP3 est inséré,
l’indication « NO MUSIC » s’affiche à l’écran et la
lecture passe au disque suivant.
• Avant de lancer la lecture d’une plage, cet appareil
lit toutes les informations relatives aux plages et aux
albums du disque. Selon la structure des plages,
cette recherche d’informations peut durer plus d’une
minute avant que la lecture ne puisse commencer.
Pendant cette période, l’indication « READ »
s’affiche à l’écran. La lecture commence
automatiquement lorsque la lecture des informations
est terminée.
Remarque
Avec un appareil en option raccordé, la lecture de la
même source continue sur le lecteur MD ou CD en
option.
Rubriques d’affichage
Lorsque le dis qu e, le gr oup e, l ’ al b um ou la pl ag e
change, tout titre préenregistré*
disque, du nouveau groupe, du nouvel album ou
de la nouvelle plage est auto matiquement af fiché.
(Si la fonction de défilement automatique
(A.SCRL) est réglée à « ON », les noms de plus
de 8 caractères dé filent dans la fenêtre
d’aff ichage (page21). )
Source
Rubriques affichab l es
• Numéro du disque/Numéro de la
plage/Temps de lecture écoulé
• Nom du disque*
groupe*
3
/Nom de l’artiste*
• Nom de la plage (fichier)*1*
• Horloge
• Nom de l’album (dossier)*
• Étiquette ID3*
Pour Appuyez sur
passer d’une
(DSPL)
rubrique
d’afficha ge à
l’autre
1
du nouveau
Affichage MDLP*
LP2 : lecture LP2
LP4 : lecture LP4
1
/Nom du
5
4
5
5
2
*1 Lorsque vous appuyez sur (DSPL), l’indication
« NO NAME » indique qu’il n’existe pas de mémo
de disque (page 13) ou de nom préenregistré à
afficher.
*2 Disponible uniquement lors de la lecture d’un
disque MDLP.
*3 Disponible uniquement lorsqu’un MD contenant
des groupes est inséré dans cet appareil pour être
lu.
*4 Uniquement pour les disques CD TEXT contenant
le nom de l’artiste.
*5 Uniquement pour les fichiers MP3.
Dans une étiquette ID3, seuls le nom de la plage,
de l’artiste et de l’album sont affichés.
Lorsque vous appuyez sur (DSPL), l’indication
« NO ID3 » indique qu’il n’y a pas d’étiquette ID3 à
afficher.
Suite à la page suivantet
11
Page 38

Remarques
• Certains caractè res ne peu vent pas être affiché s.
Les caractères qui ne peuvent être affichés sont
remplacés par le symbole « * » à l'affichage.
• Pour certains disques CD TEXT ou étiquettes ID3
contenant un grand nombre de caractères, le
défilement automatique peut ne pas fonctionner.
• Cet appareil ne peut pas afficher le nom de l’artiste
de chaque plage d’un disque CD TEXT.
Conseils
• Lorsque le défilement automatique (A.SCRL) est
réglé à « OFF » et que le nom du disque, du groupe,
de la plage ou de l’album est modifié, ce nom ou
l’étiquette ID3 ne défile pas.
• Lorsque vous lisez un MD contenant des groupes et
que le groupe est modifié, le nouveau numéro de
groupe s’affiche. De même, lorsque vous lisez un
fichier MP3 et que l’album est modifié, le nouveau
numéro d’album s’affiche.
Lecture de plages en boucle
— Lecture répétée
Vous pouvez sélectionner :
(Avec cet appareil)
• REP-TRACK — pour répéter la plage en cours
de lecture.
•REP-GP*1 — pour répéter les plages du groupe
en cours de lectur e.
(Avec des appareils en option)
• REP -T R ACK — pour répéter la p l age en cours
de lecture.
• REP-ALBM*2 — pour répéter les plages de
l’album en cours de lec t ur e.
• REP-DISC*3 — pour répéter les p la ges du
disque en cours de lecture.
*1 Disponible uniquement lorsqu’un MD conte na nt
des groupes est inséré dans cet appareil pour être
lu.
*2 Disponible uniquement lorsqu’un l ecte ur CD en
option avec fonction MP3 est raccordé et qu’un
fichier MP3 est en cours de lecture.
*3 Disponible uniquement lorsqu’ un ou plusie urs
lecteurs MD ou CD en option sont raccordés.
En cours de lecture, appuyez
plusieurs fois sur (3) (REP) jusqu’à ce
que le réglage souhaité appa raisse
dans la fenêtre d’affichage.
La lecture répétée commence.
12
Pour revenir en mode de lecture normal,
sélectionnez « REP-OFF ».
Page 39

Lecture des plages dans un
ordre aléatoire
— Lecture aléato ir e
Vous pouvez sélectionner :
(Avec cet appareil)
•SHUF-GP*1 — pour écouter les p la ges du
groupe en cours de le cture dans un ordre
aléatoire.
• SHUF-DISC — pour écouter les plages du
disque en cours de lecture dans un ordre
aléatoire.
(Avec des appareils en option)
•SHUF-ALBM*2 — pour écouter les pla ges de
l’album en cours de lecture dans un ordre
aléatoire.
• SHUF-DISC — pour écouter le s plages du
disque en cours de lecture dans un ordre
aléatoire.
• SHUF-CHGR*3 — pour écouter dans un ordre
aléatoire les plages de l’appareil MD ou CD
(en option) uti l i sé.
• SHUF-ALL*4 — pour écou ter to ut es le s pl ag es
de tous les appareils MD et CD raccordé s
(y compris cet ap pare il) da ns un or dr e a léa toi r e.
*1 Disponible uniquement lorsqu’un MD contenant
des groupes est inséré dans cet appareil pour être
lu.
*2 Disponible uniquement lorsqu’un lecteur CD en
option avec fonction MP3 est raccordé et qu’un
fichier MP3 est en cours de lecture.
*3 Disponible uniquement lorsqu’un ou plusieurs
changeurs MD ou CD en option sont raccordés.
*4 Disponible uniquement lorsqu’un ou plusieurs
lecteurs MD en option ou plusieurs lecteurs CD en
option sont raccordés.
En cours de lecture, app uyez
plusieurs fois sur (4) (SHUF) jusqu’à
ce que le réglage souhaité apparaisse
dans la fenêtre d’af f ichage.
La lecture aléatoi re commence.
Identification d’un CD
— Fonction de m émo de disque (pour un
lecteur CD disposant de la fonction CUSTOM
FILE)
Vo us pouvez identifier chaque disque avec un
nom personna li s é (mémo de disque). Vous
pouvez saisir jusqu’à 8 caractères pour chaque
disque. Lorsque vous avez identi fié un C D , vous
pouvez ensuite le localiser par son nom
(page 15).
1 Commencez à écouter le disque que
vous souhaitez identifier dans un
lecteur CD disposan t de la fonction
CUSTOM FILE.
2 Appuyez sur (LIST) (CAT) pendant 2
secondes.
L’appareil répète la le ct ure du disque au
cours de la procédure d’identification.
3 Saisissez les caractères du nom
souhaité.
1 Appuyez sur la touche de volume
+/– pour sélectionner le caractère
souhaité.
A y B y C ... y 0 y 1 y 2 ...
y + y – y
*(insertion d’un espace)
2 Appuyez sur (SEL) lorsque vo us
avez repéré le caractère souhaité.
La caractère suivant clignot e.
... y * y A
*
Pour rev enir en mode de lect ure normal,
sélectionnez « SHUF-OFF ».
Remarque
La fonction « SHUF-ALL » ne passe pas de façon
aléatoire de la lecture de plages de lecteurs MD à la
lecture de plages de lecteurs CD.
3 Répétez les ét apes 1 et 2 pour
saisir le reste du nom.
4 Pour revenir au mode de lecture
normal, appuyez sur (LIST) (CAT)
pendant 2 secondes.
Suite à la page suivantet
13
Page 40

Conseils
• Pour corriger ou effacer un caractère, procédez
simplement par réécriture ou saisissez «
• Vous pouvez identifier les CD avec un appareil ne
disposant pas de la fonction CUSTOM FILE si cet
appareil est raccordé à un autre lecteur CD
disposant de cette fonction. Le mémo de disque est
alors sauvegardé dans la mémoire du lecteur CD
disposant de la fonction CUSTOM FILE.
Remarque
La lecture REP-TRACK/SHUF est suspendue jusqu’à
ce que la modification du nom soit terminée.
».
Affichage du mémo de disque
En tant que rubrique d’ affichage, le mémo de
disque est toujours affiché en priorité par rapport
aux informations CD TEXT d’origine.
Pour Appuyez sur
afficher le nom (DSPL) pendant la lecture
d’un disque CD ou CD
TEXT
Conseil
D’autres informations peuvent éga lem ent être
affichées (page 11).
Suppression du mémo de disque
1 Appuyez plusieurs fois sur (SOURCE)
pour sélectionner « CD ».
2 Appuyez plusieurs fois sur (MODE)
pour sélectionner le lecteur CD sur
lequel le mémo de disque est
mémorisé.
3 Appuyez sur (LIST) (C AT) pendant 2
secondes.
4 Appuyez sur (DSPL) pendant 2
secondes.
Les noms mémorisés apparaissent.
5 Appuyez plusieurs fois sur la touche
volume +/– pour sélectionner le nom
de disque que vous souhaitez effacer.
6 Appuyez sur (SEL) pend ant 2
secondes.
Le nom est supprimé .
Répétez les étapes 5 et 6 si vous souhaitez
effacer d’autres nom s.
7 Appuyez sur (LIST) (C AT) pendant 2
secondes.
Le lecteur revient en mode de lecture normal.
Remarques
• Lorsque le mémo d’un disque CD TEXT est effacé,
les informations CD TEXT d’origine s’affichent.
• Si vous ne réussissez pas à trouver le mémo de
disque que vous souhaitez effacer, essayez de
sélectionner un autre lecteur CD à l’étape 2.
• Si vous avez déjà effacé tous les mémos de disque,
l’appareil revient en mode de lecture normale à
l’étape 4.
14
Page 41

Recherche d’un disque par
son nom
— Affichage automatique des titres (pour un
lecteur MD ou un lecteur CD disposant de la
fonction CD TEXT ou CUSTOM FILE)
Vou s pouvez utiliser cette fonc t io n pour les
disques auxquels vous avez attri bué des noms*
et pour les disques CD TEXT*
*1 Recherche d’un disque par son nom : lorsque vous
avez attribué un nom au MD ou au CD (page13).
*2 Recherche d’un disque grâce aux informations CD
TEXT : lorsque vous écoutez un disque CD TEXT
sur un lecteur CD disposant de la fonction CD
TEXT.
1 En cours de lecture, appuyez sur
(LIST) (CAT).
Le nom attribué au disq ue en cours de lecture
s’affiche à l’écran.
2 Appuyez plusieurs fois (LIST) (CAT)
jusqu’à ce que vous ayez trouvé le
disque souhaité.
3 Appuyez sur (SEEK) (+) o u (SEEK) (–)
pour lancer la lecture du disque.
Remarques
• Une fois que le nom d’un disque s’est affiché
pendant 5 secondes, la fenêtre d’affichage revient à
son mode de lecture normal.
• Si le chargeur ne contient aucun disque, l’indication
« NO DISC » apparaît dans la fenêtre d’affichage.
• Si un fichier personnalisé n’a pas été affecté à un
disque, l’indication « NO NAME » apparaît dans la
fenêtre d’affichage.
• Si les informations du disque n’ont pas été lues par
l’appareil, l’indication « NOT READ » apparaît dans
la fenêtre d’affichage. Pour charger le disque,
appuyez d’abord sur la touche numérique, puis
sélectionnez le disque qui n’a pas été chargé.
• Les informations s’affichent en majuscules
uniquement. Par ailleurs, certaines lettres ne
peuvent pas s’afficher.
2
.
Radio
L’appareil peut mé m oriser jusqu’à 6 stations
pour chaque bande de fréquences (FM1, FM2,
FM3, AM1 et AM2).
Attention
Pour sélectionner des stations pe ndant que vous
1
conduisez, utilisez la fonction « Mémorisation
des meilleurs accords (BTM) » , de façon à
réduire les risques d’accident.
Mémorisation automatique
des stations
— Mémorisation des meilleurs accords
(BTM)
L’appareil sélectionne les stations ayant les
signaux les plus pui ssants dans la bande
sélectionnée et les mémorise dans l’ordre des
fréquences.
1 Appuyez plusieurs fois sur (SOURCE)
pour sélectionner la radio.
2 Appuyez plusieurs fois sur (MODE)
pour sélectionner la bande .
3 Appuyez sur (BTM) pendant 2
secondes.
L’appareil enregis tr e l es stations sur les
touches numériques dans l’ordre des
fréquences.
Un bip retentit lo rsque le réglage es t
mémorisé.
Remarques
• S’il n’est possible de capter que quelques stations
en raison de la faiblesse des signaux, certaines
touches numériques conservent leur réglage
précédent.
• Si un numéro est affiché à l’écran, l’appareil
commence la mémorisation des stations à partir de
la station affichée.
15
Page 42

Réception des stations
mémorisées
1 Appuyez plusieurs fois sur (SOURCE)
pour sélectionner la radio.
2 Appuyez plusieurs fois sur (MODE)
pour sélectionner la bande.
3 Appuyez sur la touche numérique
((1) à (6)) sur laquelle la st at i on
souhaitée est mémorisée.
Si la fonction de réglage des
présélections ne fonctionne pas
— Recherche autom a tiq ue des fréqu e nc es/
Mode de recherche loca le
Recherche automatique des fréquences :
Appuyez sur (SEEK) (+) ou (SEEK) (–)
pour rechercher la station souhai t ée.
Le balayage s’interrompt lorsque l’appareil
capte une station. Répétez ce t t e opération
jusqu’à ce que vous captiez la station
souhaitée.
Mode de recherche locale :
Si la recherche automatique des
fréquences s’arrête trop fréquemment,
appuyez plusieurs fois sur (SENS)
jusqu’à ce que « LOCAL-O N »
s’affiche.
L’indication « LCL » s’affiche.
Seules les statio ns ém ettant des signaux
relativeme nt puis sa nt s sont accordées.
Pour annuler le mode de recherche loca le,
appuyez deux fois sur (SENS) lors de la
réception FM.
Remarque
Lors de la réception AM, pour annuler le mode de
recherche locale, appuyez une fois sur (SENS)
(l’indication « LOCAL-OFF » apparaît).
Conseil
Si vous connaissez la fréquence de la station que
vous souhaitez écouter, maintenez enfoncée
(SEEK) (+) ou (SEEK) (–) pour rechercher la
fréquence approximative, puis appuyez plusieurs fois
sur (SEEK) (+) ou (SEEK) (–) pour ajuster le réglage
de la fréquence souhaitée (recherche manuelle de la
fréquence).
Si la réception stéréo FM est mauvaise
— Mode mono
En cours de réception radio, appuyez
plusieurs fois sur (SENS) jusqu’à ce
que « MONO-ON » s’ affiche.
L’indication « MONO » s’affiche.
La qualité sonore est améliorée, mais le son
est diffusé en mono (l’indication
« STEREO » disparaît).
Pour revenir au mode de réception radio norm al,
appuyez sur (SENS) (« MONO-OFF »
apparaît).
Conseil
Si vous avez de la difficulté à entendre les émissions
FM, réglez DSO à « OFF » (page 23).
Mémorisation des stations
souhaitées uniquement
Vo us pouvez présélection ner manuellement les
stations souhaitées sur les touches numériques de
votre choix.
1 Appuyez plusieurs fois sur (SOURCE)
pour sélectionner la radio.
2 Appuyez plusieurs fois sur (MODE)
pour sélectionner la bande.
3 Pour capter la station que vous
souhaitez mémoriser, appuyez sur
(SEEK) (+) ou (SEEK) (–) .
4 Appuyez sur la touche numérique
souhaitée ((1) à (6)) pendant 2
secondes jusqu’à ce que « M EM »
s’affiche.
Le numéro de la touche apparaît dans la
fenêtre d’affichage.
Remarque
Si vous essayez de mémoriser une autre station sur la
même touche numérique, la station mémorisée
précédemment est effacée.
16
Page 43

Mémorisation des noms de
station
— Fonction de mémoire de s stations
Vou s pouvez attribuer un nom à chaqu e station
de radio et le sauvegarder da ns la mémoire. Le
nom de la station écoutée apparaît alors dans la
fenêtre d’affichage. Vous pouvez attribuer un
nom de station com prenant jusqu’à 8 car act ères.
Mémorisation des noms de station
1 Réglez une station dont vous
souhaitez mémoriser le nom.
2 Appuyez sur (LIST) (CAT) pendant 2
secondes.
3 Saisissez les caractères du nom
souhaité.
1 Appuyez sur la touche de volume
+/– pour sélectionner le caractère
souhaité.
A y B y C ... y 0 y 1 y 2 ...
y + y – y
*(insertion d’un espace)
2 Appuyez sur (SEL) lorsque vous
avez repéré le caractère souhaité.
La caractère suivant clignote.
... y * y A
*
Suppression du nom de la station
1 Appuyez plusieurs fois sur (SOURCE)
pour sélectionner la radio.
2 Appuyez plusieurs fois sur (MODE)
pour sélectionner la bande .
3 Appuyez sur (LIST) (CAT) pendant 2
secondes.
4 Appuyez sur (DSPL) pendant 2
secondes.
Les noms mémorisés apparaissent.
5 Appuyez plusieurs fois sur la touche
volume +/– pour sélectionner le nom
de la station que vous souhaitez
effacer.
6 Appuyez sur (SEL) pendant 2
secondes.
Le nom est supprimé.
Répétez les étape s 5 et 6 si vous souhaitez
effacer d’autres noms.
7 Appuyez sur (LIST) (CAT) pendant 2
secondes.
L’appareil revient au mode de réc ep tio n ra dio
normal.
Remarque
Si vous avez déjà effacé tous les noms de station,
l’indication « NO DATA » s’affiche à l’étape 6.
3 Répétez les étape s 1 et 2 pour
saisir le reste du nom.
4 Pour revenir au mode de réception
radio normal, app u yez sur (LIST)
(CAT) pendant 2 secondes.
Conseil
Pour corriger ou effacer un caractère, procédez
simplement par réécriture ou saisissez «
».
17
Page 44

Syntonisation d’une station à
partir d’une liste
— Affichage automatique des titres
1 En cours de réception radio, appuyez
sur (LIST) (CAT ).
La fréquence ou le nom attribué à la station
actuelle s’affiche à l’écran.
2 Appuyez plusieurs fois (LIST) (CAT)
jusqu’à ce que vous trouviez la station
souhaitée.
3 Pour capter la station de votre choix,
appuyez sur (SEEK) (+ ) o u (SEEK) (–).
Autres fonctions
Vo us pouvez également com m ander l’appareil
(et les lecteurs MD ou CD en option) avec un
satellite de commande (en option).
Fonctionnement du satellite
de commande
Commencez par apposer l’étiquet t e appropriée
suivant la position de montage du satellite de
commande.
Le satellite de comm ande fonctionne p ar
pression sur les touches et/ou par r ot ation des
commandes.
18
MODE
MODE
DSPL
SEL
SEL
DSPL
Fonctionnement par pression sur les
touches
(SEL)
(SOURCE)
Tournez la commande VOL
pour régler le volume.
Appuyez sur Pour
(SOURCE) changer de source
(MODE) changer de mod e de
(ATT) atténuer le son
2
(OFF)*
(ATT)
(MODE)
(DSPL)
(Radio/MD/CD*1)/mettre
l’appareil sous tension
fonctionnement
(bande radio/l ect eur MD*1/
lecteur CD*
arrêter la lecture d’ un disque
ou la réception radio/mettre
l’appareil hors tension
1
)
(OFF)
OFF
Page 45

(SEL) régler et séle ct ionner
(DSPL) changer de rubrique
d’affichage
Lors de la lecture d’ un MD contenant des
groupes ou d’un fichi er MP3, vous pouvez
sélectionner un groupe (MD) ou un album
(fichier MP3) à l’aide du satellite de commande.
Fonctionnement par rotation de la
commande
Commande
SEEK/AMS
Tournez la commande et relâchez-la
pour :
– passer d’une plage à l’autre,
Pour sauter plusi eurs plages de suite,
tournez une fois la c ommande rotative, puis
tournez-la de no uveau dans les 2 secondes
qui suivent et maintenez-la.
– régler automatiquement des stations de
radio.
Tournez la commande, maintenez-la et
relâchez-la pour :
– avancer ou reculer rapidement dans une
plage ;
– trouver une station manuellement.
Fonctionnement par pression et
rotation de la commande
Commande
PRESET/DISC
Exercez une pression sur la commande
et tournez-la pour :
– régler les stations mémorisées ;
– changer de dis que pendant la lecture d’un
MD ou d’un CD*
1
.
– changer de groupe*3.
– changer d’album*4.
(Avec cet appareil)
Pour Procédez ainsi
passer d’u n gr ou pe
à l’autre*
3
– Sélection d’un
groupe
1 Pour passer e n m ode de
sélection d’un groupe,
appuyez sur la
commande, tournez-la,
puis maintenez-la en
place.
Passez à l’étape 2 dans
les 2 secondes qui
suivent.
2 Exercez une pression sur
la commande, puis
tournez-la rapidement et
à plusieurs reprises pour
sauter les groupe s un par
un.
(Avec un appareil en option)
Pour Procédez ainsi
passer d’un disq ue
à l’autre
– Sélection d’un
disque
Exercez une press ion sur la
commande et tournez-la
[une fois pour chaque
disque].
Pour sauter plus ie urs
disques de suit e, appuyez et
tournez, puis tournez de
nouveau la commande dans
les 2 secondes qui suivent et
maintenez-la en place.
passer d’un album
à l’autre*
4
– Sélection d’un
album
1 Pour passer e n m ode de
sélection d’un album,
appuyez sur la
commande, tournez-la,
puis maintenez-la en
place.
Passez à l’étape 2 dans
les 2 secondes qui
suivent.
2 Exercez une pression sur
la commande, puis
tournez-la rapidement et
à plusieurs reprises pour
sauter les albums un par
un.
Suite à la page suivantet
19
Page 46

*1 Uniquement si l’appareil en option correspondant
est raccordé.
*2 Si le contact de votre voiture n’est pas doté d’une
position ACC (accessoires), veillez à appuyer sur
(OFF) une fois le moteur coupé et à maintenir
cette touche enfoncée jusqu’à ce que l’affichage
disparaisse.
*3 Disponible uniquement lorsqu’un MD contenant
des groupes est inséré dans cet appareil pour être
lu.
*4 Disponible uniquement lorsqu’un lecteur CD en
option avec fonction MP3 est raccordé et qu’un
fichier MP3 est en cours de lecture.
Modification du sens de
fonctionnement
Le sens de fonctionnem ent des commande s es t
réglé par défaut comme indiqué dans
l’illustration ci -dessous.
Pour augmenter
Pour dimi nuer
Si vous devez monter le satellite de commande
du côté droit de la colonne de direction, vous
pouvez inverser le sens de foncti onnement.
Réglages des
caractéristiques sonores
Vo us pouvez régler la balan ce, l ’atténuateur, le
filtre passe-bas et le volume du caisson de
graves.
1 Appuyez plusieurs fois sur (SEL)
jusqu’à ce que l’indication « BAL »,
« FAD », « LPF » ou « SUB »
apparaisse.
Chaque fois que vous appuyez sur (SEL), la
rubrique change de l a façon suivante :
1
LOW*
t MID*1 t HI*1 t
BAL (gauche-droite) t
FAD (avant-arrière) t
LPF (filtre passe-bas)*
SUB (volume du caisson de
graves)*
*1 Lorsque EQ3 est activé (page 22).
*2 Lorsque « SUB » est sélectionné (page 21).
*3 La fréquence de coupure peut être réglée à
*4 Le volume est réglable par pas de –10
2*4
78 Hz, 125 Hz ou OFF.
à +10. (à moins de –10, l’indication « ATT »
s’affiche.)
2 Appuyez sur la touche de volume +/–
pour régler le paramètre souhaité.
Remarque
Effectuez ce réglage dans les 3 secondes après avoir
sélectionné le paramètre.
2*3
t
Appuyez sur (SEL ) pe nda nt 2
secondes tout en appuyant sur la
commande VOL.
Remarque
Si vous appuyez sur (SEL) pendant 2 secondes tout
en appuyant sur la commande VOL, l’indication
« NORM » ou « REV » s’affiche.
– L’indication « NORM » permet d’utiliser le satellite de
commande dans le sens par défaut.
– L’indication « REV » permet d’utiliser le satellite de
commande lorsque celui-ci est mont é à la droite de
la colonne de direction.
20
Atténuation rapide du son
Appuyez sur (ATT).
L’indication « ATT-ON » s’affiche
brièvement à l’écran, p ui s « ATT » s’affiche.
Pour rétablir le niveau de volume précédent,
appuyez de nouveau s ur (ATT).
Conseil
Lorsque le câble d’interface d’un téléphone de voiture
est raccordé au fil ATT, l’appareil réduit
automatiquement le volume lors d’un appel
téléphonique entrant (fonction ATT téléphone).
Page 47

Modification des réglages du
son et de l’affichage
Les réglages suivants sont disponibles :
• REAR/SUB*1 — pour commuter la sortie
audio à REAR ou SUB.
– Sélectionnez « RE AR » po ur é mett re vers un
amplificateur de pui ssance.
– Sélectionnez « SUB » pour émettre vers un
caisson de graves.
• A.SCRL (défilement automatique)*2 (page 11).
• M.DSPL (Motion Display) — pour activer ou
désactiver l’affichage animé.
– Sélectionnez « ON » pour activer l’affichage
animé (le motif animé apparaît dans la
fenêtre d’affich ag e).
– Sélectionnez « OFF » pour désactiver
l’affichage animé.
•DEMO*1 — pour activer ou désactiver
l’affichage de démonstration .
– Sélectionnez « ON » pour activer l’affichage
de démonstration (la démonstration dé marre
environ 10 secondes apr ès la m i se hors
tension de l’appareil).
– Sélectionnez « OFF » pour désactiver la
fonction d’affichage de démonstration.
•BEEP*3 — pour activer ou désactiver le bip.
• DIM (régulateur) — pour modifier la
luminosité de l’affichage.
– Sélection nez « ON » pour diminuer la
luminosité de la fenêtre d’affichage.
– Sélectionnez « OFF » pour désactiver le
régulateur de luminosité.
Commutation REAR/SUB*
1
Appuyez sur (SEL), puis sur la touche
de volume + (REAR) ou – (S UB).
Après 3 secondes, l’affichage revient en mode de
lecture norma l.
Sélection de l’option souhaitée
Appuyez simultanément sur (SEL) et
sur la touche souhaitée.
(SEL) + (3): A.SCRL*
2
(SEL) + (4): M.DSPL
(SEL) + (4): DEMO*
(SEL) + (6): BEEP*
1
3
(SEL) + (DSPL) : DIM
Une fois le réglage terminé, la fe nêtre
d’affichage revient au mode de lecture normal.
Pour annuler l’option sélectionnée, appuyez de
nouveau simultanément sur (SEL) et su r l a
touche souhaitée.
*1 Lorsque l’appareil est hors tension.
*2 Lors de la lecture d’un MD ou d’un CD.
*3 Le bip sonore est émis uniquement lorsque
l’amplificateur intégré est utilisé.
21
Page 48

Réglage de l’égaliseur (EQ3)
Vous pouvez sélectionner l’une des 7 courbes de
réglages de l’égalisateur, dont chacun correspond
à un type de musique (XPLOD, VOCAL, CLUB,
JAZZ, NEW AGE, ROCK, CUSTOM et OFF
(égaliseur éteint)).
Vous pouvez sauvegarder un réglage d’égaliseur
différ ent pour chaque source.
Sélection de la courbe d’égaliseur
1 Appuyez sur (SOURCE) pour
sélectionner une source (radio, MD ou
CD).
2 Appuyez plusieurs fois sur (EQ3) pour
sélectionner la courbe d’égaliseur
souhaitée.
Chaque fois que vous appuyez sur (EQ3), le
paramètre chan ge.
Pour annuler l’effet de l’égaliseur,
sélectionnez « OFF ».
Réglage de la courbe de l’égaliseur
Vous pouvez mémorise r et régler différentes
plages de tonalité pour l’égaliseur.
1 Appuyez sur (SOURCE) pour
sélectionner une source (radio, MD ou
CD).
2 Appuyez plusieurs fois sur (EQ3) pour
sélectionner la courbe d’égaliseur
souhaitée.
3 Réglage de la courbe d’éga lis eur.
1Appuyez plusi eurs fois s ur ( SEL )
pour sélectionner la plage de
tonalité souhaitée.
Chaque fois que vous appuyez sur (SEL),
la plage de tonalité change.
LOW t MID t HI (t BAL t FAD t
LPF t SUB)
2Appuyez plusieurs fois sur la
touche de volume +/– pour régler le
niveau de volume souhaité.
Le niveau de volume peut être rég lé par
incréments de 1 dB, de –10 dB à +10 dB.
3Répétez les étapes 1 et 2 pour
régler la courbe de l’égaliseur.
Pour restaure r la c ourbe par défaut de
l’égaliseur, appu yez sur (SEL) pendant 2
secondes.
Après 1 seconde, l’affichage revient en
mode de lecture normal.
Remarque
Lorsque EQ 3 es t r églé à « OFF », vo us ne pouvez pas
régler les paramètres de l’égaliseur.
22
Page 49

Réglage du répartiteur
dynamique du son émis
(DSO)
Si vos haut-parleurs sont installés dans la partie
inférieure des portières, le son est émis à un
niveau proche du sol et il se peut qu’il ne soit pas
clair.
La fonction DSO (réglage dynamique du son
émis) crée un son mieux réparti, comme s’il y
avait des haut-parleurs dans le tableau de bord
(haut-parleurs virtuels).
Vou s pouvez sauvegarder un réglage DSO pour
chaque source.
Représentation des haut-parleurs virtuels
en mode DSO
*3
*2
*1
*4
*1 DSO-1
*2 DSO-2
*3 DSO-3
*4 DSO-OFF
1 Appuyez sur (SOURCE) pour
sélectionner une source (radio, MD ou
CD).
2 Appuyez plusieurs fois sur (DSO)
jusqu’à ce que le réglage DSO
souhaité s’ affiche.
À chaque pression su r (DSO), le réglage
DSO change.
*3
*2
*1
*4
Informations
complémentaires
Entretien
Remplacement du fusible
Lorsque vous remplacez le fusible, veillez à
utiliser un fusible dont la capacité, en ampères,
correspond à la valeur in diquée sur l’ancien
fusible. Si le fusible fond, vérifiez le
branchement de l’alimentation et remplacez le
fusible. Si le nouvea u fusible fond égalem ent, il
est possible que l’ appareil soit défe ctueux. Dans
ce cas, contacte z votr e détaillant Sony le plus
proche.
Fusible (10 A)
Avertissement
Ne jamais utiliser de fusible dont la capacité en
ampères dépa sse celle du fusible fourni avec
l’appareil, car cela pourrait endommager
l’appareil.
Suite à la page suivantet
Pour annuler l a fonction DSO, sélectionnez
« DSO-OFF ». Après 1 seconde, l’affichag e
revient en mode de lecture normal.
Remarques
• Selon l’intérieur de la voiture ou le type de musique,
la fonction DSO peut avoir un effet indésirable.
• Si vous a ve z des diff icu ltés à en tendr e les ém issi ons
FM, réglez DSO à « OFF ».
23
Page 50

Nettoyage des connecteurs
L’appareil peut ne pa s f o nctionner correctement
si les connecteurs entre l’apparei l et l a façade
sont encrassés. Pour éviter cette situation, retirez
la façade (page 8) et nettoyez les connecteurs
avec un coton-tige imbibé d’alcool. N’exercez
pas une pression tr op forte, car les connecteurs
pourraien t être endommagés .
Appareil
Arrière de la façade
Remarques
• Pour plus de sécurité, coupez le moteur avant de
nettoyer les connecteurs et retirez la clé du contact.
• Ne touchez jamais les connecteurs directement
avec les doigts ou avec un objet métallique.
Remplacement de la pile au lithium
Dans des conditions d’utilisation normales , l a
pile dure environ 1 an. (En fonction des
conditions d’uti li s at ion, sa durée de vie peut êtr e
plus courte.) Lorsque la pile est faible, l a portée
de la mini-télécommande diminue. Remplacez la
pile par une nouvelle pile au lithium CR2025.
L’utilisation de tout autre type de pile pose un
risque d’incendie ou d’explosion.
x
pôle + vers le haut
24
Remarques sur la pile au lithium
• Tenez la pile au lithium hors de portée des
enfants. En cas d’ingestion de la pile, consultez
immédiatement un médecin.
• Essu yez l a pil e av ec un chiffon sec pour assurer
un bon contact.
• Veillez à respecter la polarité lors de
l’installation de la pile.
• Ne tenez pas la pile avec des pinces
métalliques, car cela peut entraîner un
court-circuit.
ATTENTION
Utilisée de façon incorrecte, la pile peut
exploser. Ne pas la recharger, la démonter ni
la jeter au feu.
Page 51

Démontage de l’appareil
1 Retirez le cadre de sûre té .
1 Retirez la façade (page 8).
2 Insérez le s clés de déblo cage
simultanément dans le cadre de
sûreté.
Orientez
correctement la
clé de déblocage.
3 Tirez sur les clés de déblocage pour
retirer le cadre de sûreté.
2 Retirez l’appareil.
1 Insérez les deux clés de déblocage
simultanément jusqu’au déclic.
To urne z le s cr oc he ts
vers l’intérieur.
2 Tirez sur les clés de déblocage pour
dégager l’appareil.
3 Faites glisser l’appareil en dehors
de son support.
25
Page 52

Caractéristiques techniques
y
Lecteur MD
Rapport signal/bruit 90 dB
Réponse en fréquence 10 à 20 000 Hz
Pleurage et scintillement En dessous du seuil
mesurable
Radio
FM
Plage de syntonisation 87,5 à 107,9 MHz
Borne d’antenne Connecteur d’antenne
Fréquence intermédiaire 10,7 MHz/450 kHz
Sensibilité utile 9 dBf
Sélectivité 75 dB à 400 kHz
Rapport signal/bruit 67 dB (stéréo),
Distorsion harmo nique à 1 kHz
Séparation 35 dB à 1 kHz
Réponse en fréquence 30 à 15 000 Hz
externe
69 dB (mono)
0,5 % (stéréo),
0,3 % (mono)
AM
Plage de syntonisation 530 à 1 710 kHz
Borne d’antenne Connecteur d’antenne
Fréquence intermédiaire 10,7 MHz/450 kHz
Sensibilité 30 µV
externe
Amplificateur de puissance
Sorties Sorties de haut-parleurs
Impédance des haut-parleurs
Puissance de sortie maximale
(connecteurs de sécurité)
4 à 8 ohms
52 W × 4 (à 4 ohms)
Généralités
Sorties Bornes de sortie audio
Entrées Fil de commande ATT
Commandes de tonalité Bas :
(commutables avant,
arrière/graves)
Borne de commande de
relais d’antenne électrique
Borne de commande
d’amplificateur de
puissance
téléphone
Borne d’entrée de
télécommande
Borne d’entrée de
commande BUS
Borne d’entrée audio BUS
Borne d’entrée de l’antenne
±10 dB à 60 Hz (XPLOD)
Moyen :
±10 dB à 1 kHz (XPLOD)
Haut :
±10 dB à 10 kHz (XPLOD)
26
Alimentation requise Batterie de véhicule
Dimensions Environ 178 × 50 × 181 mm
Dimensions du support Environ 182 × 53 × 161 mm
Poids Environ 1, 2 kg
Accessoires fournis Composants destinés à
Accessoires en option Mini-télécommande
Appareils en option Changeur CD (10 disques)
12 V CC (masse négative)
(7 1/8 × 2 × 7 1/4 po)
(l/h/p)
(7 1/4 × 2 1/8 × 6 3/8 po)
(l/h/p)
(2 lb 10 oz)
l’installation et au
raccordement (1 jeu)
Étui pour la façade (1)
RM-X114
Satellite de commande
RM-X4S
Câble BUS (fourni avec un
câble à broche RCA)
RC-61 (1 m), RC-62 (2 m)
CDX-757MX
Changeur CD (6 disques)
CDX-T69
Changeur MD (6 disques)
MDX-66XLP
Récepteur radio par satellite
XM
XT-XM1
Sélecteur de source
XA-C30
Sélecteu r AUX-IN
XA-300
Brevets américains et internationaux sous licence
de Dolb
Remarque
Cet appareil ne doit pas être branché à un
préamplificateur numérique ni à un égaliseur
compatible avec le système Sony BUS.
La conception et les caractéristiques techniques sont
sujettes à modification sans préavis.
Laboratories.
Page 53

Dépannage
La liste de contrôle suivante vous aidera à
remédier aux problèmes que vous pourriez
rencontrer avec cet appareil.
Avant de passer en revue la liste de contrôle cidessous, vérifiez les procédures de raccordement
et d’utilisation.
Généralités
Aucun son n’est émis.
• Appuyez sur la touche de volume + pour
régler le volume.
• Désactivez la fonction ATT.
• Pour un système à 2 haut-parleurs, réglez la
commande d’éq uilibre avant-arr i ère à la
position médiane.
• Vous pouvez lancer la lecture d’un disque
MDLP avec un changeur MD en option sans
la fonction MDLP (l’indication « LP: ··· »
peut s’afficher).
t Insérez le disque MDLP dans l’appareil
pour le lire.
Le contenu de la mémoire a été effacé.
• La touche RESET a été enfoncée.
t Recommencez la procédure
d’enregistrement dans la mémoire.
• Le câble d’alimentation ou la batterie a été
déconnecté.
• Le câble d’alimentation n’est pas raccordé
correctement.
Aucun bip n’est émis.
• Le bip est désactivé (page 21).
• Un amplificateur de puissanc e en option est
raccordé et vous n’utilisez pas
l’amplificateur intégré.
L’affichage disparaît de la fenêtre
d’affichage ou il ne s’affiche pas.
• L’affichage est désactivé si vous maintenez
(OFF) enfoncée.
t Maintenez de nouveau (OFF) enfoncée
jusqu’à ce que l’affichage apparaisse.
• Retirez la façade et nettoyez les connecteurs.
Pour plus de détails , reportez-vous à la
section « Nettoyage des conne ct eurs »
page 24.
Les stations mémorisées sont effacées et
l’heure est remise à zéro.
Le fusible a fond u.
Émission de bruits lorsque la clé de contact
est en position ON, ACC ou OFF.
Les câbles ne sont pas raccordés correctement
au connecteur d’alimentation du véhicule
destiné aux accessoires.
L’appareil n’est pas alimenté.
• Vérifiez le raccordement. S i tou t est en
ordre, vérifiez le fusible.
• Le véhicule n’est pas équipé d’une position
ACC (accessoires).
t Appuyez sur (SOURCE) (ou insérez un
MD) pour mettre l’appareil sous tension.
L’appareil est alimenté en permanence.
Le véhicule n’est pa s équipé d’une position
ACC (accessoires).
t Après avoir coupé le moteur, n’oubli ez pas
de maintenir (OFF) enfoncée sur
l’appareil jusq u’ à ce que l’affichage
disparaisse.
L’antenne électrique ne se déploie pas.
L’antenne électrique ne dispose pas d’un
boîtier de relais.
Impossible de désactiver l’indication
« -------- ».
Vous êtes en mode d’édition du nom.
t Appuyez sur (LIST) (CAT) pendant 2
secondes.
Lecture d’un MD
Impossible d’introduire un MD.
• Un autre MD est déjà en place.
• Le MD a été introduit de for ce à l’envers ou
dans le mauvais sens.
La lecture ne commence pas.
MD défectueux.
Un disque est automatiquement éjecté.
La température ambiante dépasse 50 °C
(122 °F).
La fonction groupe du MD est inopérante.
• Le MD inséré dans cet appareil ne contient
aucun groupe.
• Il se peut que la plage en cours de lecture
n’appartien ne pas à un groupe créé par votre
enregistreu r MD.
• Le MD en cours de lecture contient peut-être
des groupes in sérés dans un cha ngeur MD en
option.
t Ins ér ez le MD contenant de s gr oupes
dans cet appareil.
Les touches de commande ne fonctionnent
pas.
Impossible d’éjecter le MD.
Appuyez sur la to uche RESET.
Des sauts de lecture se produisent à cause
de vibrations.
• L’ appareil est installé suivant un angle de
plus de 45°.
• L’ appareil n’est pas ins t al lé à un endroit
suffisamment stable du vé hi cule.
Le son saute.
Le disque est sale ou défectueux.
Suite à la page suivantet
27
Page 54

Réception radio
Impossible de capter une présélection.
• Enregistrez la fréquence correcte dans la
mémoire.
• Le signal capté est trop faible.
Impossible de capter des stations.
Le son est parasité.
• Raccordez un fil de commande d’antenne
électrique (bleu) ou un fil d’alimentation
d’accessoire (rouge) au câble d’alime ntation
de l’amplificateur d’ant e nne du véhicule.
(Uniquement si votre véhicule est équipé
d’une antenne FM/AM intégrée dans la vitre
arrière/latérale.)
• Vérifiez le raccordement de l’an te nne du
véhicule.
• L’antenne automatique ne se déploie pas.
t Vérifiez le raccordement du fil de
commande de l’ant enne électrique.
• Vérifiez la fréquence.
• Lorsque le mode DSO est activé, le son peut
parfois être parasité.
t Réglez le mode DSO à « OFF »
(page 23).
Le réglage automatique des stations est
impossible.
• Le mode de recherche locale est réglé à
« ON ».
t Régl ez le mode de recherch e l o c ale à
« OFF » (page16).
• Le signal capté est trop faible.
t Réglez la fréquence manuellement.
L’indication « STEREO » clignote .
• Réglez la fréquence correctement.
• Le signal capté est trop faible.
t Réglez le mode de réception mo no à
« ON » (page 16).
Une émission en stéréo est entendue en
mode mono.
L’appareil est en mode de réception m ono.
t Dé sactivez le mode de réception mo no
(page 16).
Affichage des erreurs et
messages
Affichage des erreurs
(pour cet appareil et les changeurs MD ou
CD en option)
Les indications suivantes clignotent pendant
environ 5 seconde s et une alarme retentit.
BLANK*
ERROR*
FAILURE (Reste allumé jusqu’à ce que vous
appuyiez sur une to uc he.)
FAILURE (Reste allumé pendant 1 seconde
environ.)
HI TEMP
NO DISC
NO MAG
1
Aucune plage n’a été enre gistrée sur un MD.*
t I nsérez un MD conten ant des plages
enregistrées.
1
• Le MD est sale ou inséré à l’envers.*
2
t Nettoyez le MD ou insérez-le
correctement.
• Un MD ou un CD ne peut pas être lu en
raison de certains pr oblèmes.
t Insérez un autre MD ou CD .
Le raccordement des haut-parleurs ou des
amplificateurs est incorrect.
t Reportez-vous au guide d’ins ta lla tion de
cet appareil et vérifiez le raccordement.
Quand un récept eur XM est racc ordé, échec de
mémorisation d’une station radio XM sur un
numéro présélectionné.
t Vérifiez que vous recevez la stati on radio
que vous souhaitez mémoriser, puis
essayez de nouv eau.
La température ambiante est supérieure à
50 °C (122 °F).
t Attendez que la temp érature descende en
dessous de 50 °C (122 °F).
Aucun disque n’a été inséré dans le lecteur
MD ou CD.
t I nsérez un disque dans le lec teur MD ou
CD.
Le chargeur n’a pas été inséré dans le lecteur
CD.
t Insérez le chargeur dans le lecteur CD.
2
28
Page 55

NO MUSIC
Un CD ne comportan t pa s de fichiers de
musique a été insér é dans un lecteur de CD
avec fonction MP3.
t Ins ér ez un disque audio dans le l ecteur de
CD MP3.
NOTREADY
Le couvercle du lecteu r MD est ouvert ou les
MD ne sont pas insér és correctement.
t Fermez le couvercle ou in sérez
correctement les MD.
OFFSET
Il se peut que l’appareil soit défectueux.
t Vérifiez le raccordement. Si le message
d’erreur ne disparaît pas de l’affichage,
contactez votre détailla nt Sony l e pl us
proche.
RESET
Le lecteur MD ou CD ne peut pas fonctionner
en raison de certains problèmes.
t Ap puyez sur la touche RESET de
l’appareil.
*1 Lorsqu’une erreur se produit lors de la lecture d’un
MD ou CD, le numéro de disque du MD ou du CD
ne s’affiche pas.
*2 Le numéro du disque qui a provoqué l’erreur
s’affiche à l’écran.
Si ces solutions ne permettent pas d’am éliorer la
situation, contactez votre détaillant Sony le plus
proche.
Messages
L.SEEK +/–
Le mode de recher che locale est activé en
cours de recher che automatiqu e des
fréquences (pa ge 16).
« » ou « »
Vous avez atteint le début ou la fin du disque et
vous ne pouvez pas aller plus loin.
29
Page 56

Bienvenido
Gracias por adquir ir este reproductor de
MiniDisc de Sony. Disfrutará aún más de sus
distintas funciones con:
• Unidades de MD/CD opciona le s (cambiadores
y reproductores)*
• Información CD TEXT (se muestr a al
reproducir discos CD TEXT*
de CD opcional).
• Accesorios de controlador opcionales
Control remoto de tar je ta RM -X114
Mando rotatorio RM-X4S
*1 Esta unidad funciona solamente con productos
Sony.
*2 Un disco CD TEXT es un CD de audio que incluye
información como el nombre del disco, el nombre
del artista y los nombres de las pistas. Esta
información está grabada en el disco.
El logotipo “XM Ready” indica que este
producto controlará un módulo de sintonizador
Sony XM (se vende por separado).
Si desea obtener detalles sobre el módulo de
sintonizador XM, póngase en contacto con su
proveedor Sony más cercano.
Para obtener instrucciones sobre el
funcionamiento del sintonizador XM, consulte el
manual de instrucciones suministrado con el
módulo de sintonizador XM.
1
.
2
en una unidad
2
Page 57

Tabla de contenido
Ubicación de los controles . . . . . . . . . . . . . . 4
Precauciones . . . . . . . . . . . . . . . . . . . . . . . . . 6
Notas sobre los discos MD . . . . . . . . . . . . . . 6
Acerca de la función de grupo de MD. . . . . . 7
Procedimientos iniciales
Restauración de la unidad . . . . . . . . . . . . . . . 8
Extracción del panel frontal. . . . . . . . . . . . . . 8
Ajuste del reloj . . . . . . . . . . . . . . . . . . . . . . . 9
Reproductor de MD
Unidad de MD/CD (opcional)
Reproducción de discos. . . . . . . . . . . . . . . . 10
Elementos de la pantalla . . . . . . . . . . . . . . . 11
Reproducción repetida de pistas
— Reproducción repetida. . . . . . . . . . . . 12
Reproducción de pistas en orden aleatorio
— Reproducción aleatoria . . . . . . . . . . . 12
Etiquetado de CD
— Memorando del disco*. . . . . . . . . . . . 13
Localización de disc os por nombre
— Listado* . . . . . . . . . . . . . . . . . . . . . . . 14
* Funciones disponibles con una unidad opcional de
MD/CD
Radio
Almacenamiento automático de emisoras
— Memoria de la mejor sintonía
(BTM). . . . . . . . . . . . . . . . . . . . . . . . . . . 14
Recepción de las emisoras almacenadas . . . 15
Almacenamiento exclusivo de las emisoras
deseadas . . . . . . . . . . . . . . . . . . . . . . . . . 15
Almacenamiento de nombres de emisoras
— Memorando de emisoras . . . . . . . . . . 16
Sintonización de em i so ras mediante una lista
— Listado . . . . . . . . . . . . . . . . . . . . . . . . 17
Otras funciones
Uso del mando rotatorio . . . . . . . . . . . . . . . 17
Ajuste de las características del soni do. . . . 19
Atenuación rápida del sonido. . . . . . . . . . . 19
Cambio de los ajustes de sonido y
pantalla. . . . . . . . . . . . . . . . . . . . . . . . . . 20
Ajuste del ecualizador (EQ3) . . . . . . . . . . . 21
Ajuste del Organi zador de sonido de baja
frecuencia dinámico (DSO) . . . . . . . . . . 22
Información complementaria
Mantenimiento . . . . . . . . . . . . . . . . . . . . . . 22
Extracción de la unidad. . . . . . . . . . . . . . . . 24
Especificaciones . . . . . . . . . . . . . . . . . . . . . 25
Solución de problemas . . . . . . . . . . . . . . . . 2 6
Mensajes/indicaciones de error. . . . . . . . . . 27
3
Page 58

Ubicación de los controles
Consulte las páginas indicadas para obtener información detallada.
ATT
DSPL
SEL
–+
SOURCE MODE
OFF
a Botón volumen +/–
b Botón ATT (atenuación) 19
c Botón DSPL (cambio del modo de
visualización) 9, 11, 13, 16, 20
d Botón SEL (selección)
Para seleccionar elem entos.
e Pantalla
f Botón Z (expulsar) (ubicado en la par te
delantera de la unida d, detrás del panel
frontal) 10
g Botón EQ3 21
h Botón DSO 22
i Botón OPEN 8, 10
j Botones SEEK +/–
Radio:
Para sintonizar emisoras en forma
automática/loc al i zar una emisora en forma
manual.
MD/CD (archivos MP3*
1
):
Para omitir pistas/avanzar o retroceder una
pista en forma rápida.
k Receptor del control remoto de tarjeta
l Botón SOURCE (encendido/radio/MD/
CD*
2
)
Para seleccio na r l a fu en te.
m Botón MODE
Para cambiar la operación.
n Botón OFF (detener/apagado)*3 8, 10
o Botones numéricos 20
Radio:
Para almacenar la emisora deseada en cada
botón numérico.
4
DISC REP SHUF BTM LIST
1 2 3 4 5 6
–+
GP/ALBM
BTM SENS LIST
MD/CD (archivos MP3*1):
(1): DISC – 10
(2): DISC + 10
(3): REP 12
(4): SHUF 12
(5): GP*
(6): GP*
4
/ALBM*1 – 10
4
/ALBM*1 + 10
p Botón RESET (ubicado en la parte
delantera de la unidad, detrás del panel
frontal) 8
q Botón BTM 14
r Botón SENS 15
s Botón LIST/CAT*5 13, 16, 17
*1 Disponible únicamente cuando se conecta una
unidad de CD opcional con la función de control de
archivos MP3 y se reproduce un archivo MP3.
*2 Con una unidad de CD opcional conectada.
*3 Advertencia sobre la instalación de la
unidad en un aut om óv il que no disponga
de una posición ACC (accesorio) en el
interruptor de encendido
Tras apagar el motor, mantenga presionado
(OFF) en la unidad hasta que se apague la
pantalla.
De lo contrario, la pantalla no se desactivará y se
desgastará la batería.
*4 Disponible únicamente cuando se inserta y se
reproduce en esta unidad un MD que contiene
grupos.
*5 El botón CAT sólo está disponible cuando se
conecta un sintonizador XM.
CAT
DSO
EQ3
OPEN
SEEK
MDX-F5800
Page 59

Control remoto de tarjeta RM-X114
(opcional)
Selección de un disco, un grupo y un
álbum con el control remoto de tarjeta
Utilice los botones DISC (GP/ALBM)/PRESET
(+/–) del control remoto de tarjeta para omitir el
disco, el grupo y el álbum.
DSPL MODE
+
PRESET
LIST
+
DISC
MENU
–
SEEK
SOUND
SOURCE
DISC
PRESET –
+
VOL
+
SEEK
–
ENTER
ATTOFF
–
Los botones correspondientes del
control remoto de tarjeta controlan las
mismas funciones que los de esta
unidad.
a Botón DSPL
b Botón MENU*
c Botón SOURCE
d Botones SEEK (–/+)
e Botón SOUND
Para ajustar las caracterís ticas del sonido .
f Botón OFF
g Botones VOL (+/–)
h Botón MODE
i Botón LIST
j Botones DISC(GP/ALBM)/PRESET
(+/–)
k Botón ENTER*
l Botón ATT
* No disponible en esta unidad
Nota
Si la pantalla se apaga al presionar (OFF), no podrá
utilizarse mediante el control remoto de tarjeta a
menos que se presione (SOURCE) en la unidad o q ue
se inserte un disco para activarla primero.
Sugerencia
Si desea obtener información adicional sobre cómo
sustituir la pila, consulte “Sustitución de la pila de litio”
en la página 23.
(Con esta unidad)
Para Presione
Omitir grupos*
– Selección de
grupos
1
+ o – [una vez para cad a
grupo]
Para omitir grupos en forma
continua, mantenga
presionado cualqui era de l os
dos botones.
(Con una unidad opcional)
Para Presione
Omitir discos
– Selección de
discos
+ o – [una vez para cad a
disco]
Para omitir discos en forma
continua, presione una vez y
vuelva a presionar
cualquiera de los dos
botones antes de que
transcurran 2 segun dos
(debe mantenerlo
presionado).
Omitir álbumes*
– Selección de
álbumes
2
+ o – [mantenga pres io nado
durante un momento] y
suéltelo
Para omitir álbumes en
forma continua, presione
(y mantenga pres io nado) el
botón al menos 2 s egundos
después de haberlo soltado
por primera ve z.
*1 Disponible únicamente cuando se inserta y se
reproduce en esta unidad un MD que contiene
grupos.
*2 Disponible únicamente cuando se conecta una
unidad de CD opcional con la función de control de
archivos MP3 y se reproduce un archivo MP3.
Omisión continua de pistas
Presione una vez (SEEK) (+) o (SEEK) (–) en el
control remoto de tarjeta . A continua ción, vuelv a
a presionar este botón antes de que transcurran 2
segundos y manténgalo presionado.
5
Page 60

Precauciones
Notas sobre los discos MD
• Si est acionó el automóvil bajo la luz directa d el
sol, deje que la unidad se e nfrí e antes de usarl a.
• La antena motorizada se extenderá
automáticamente mientras la unidad se
encuentra en funci onamiento.
• Cuando maneje, no utilice la función
CUSTOM FILE ni cualq ui er otra función que
pueda distraer su atención de la carretera.
Si desea realizar alguna consulta o solucionar
algún problema rel at ivo a la unidad que no se
trate en este manual , póngase en contacto con el
distribuidor Sony más cercano.
Condensación de humedad
En días lluviosos o en zonas muy húmedas, es
posible que se condense humedad en el interior
de las lentes y la pantal la de l a unidad. Si esto
ocurre, la unidad no funcionará en for m a
correcta. En tal caso , extra i ga el disco y espere
una hora aproximadamente hasta que se haya
evaporado la humedad.
Para mantener una alta cal idad de
sonido
No derrame refrescos sobre la un idad o los
discos.
• No abra el obturador del cartucho para
exponer el M D. Si se abre, ciérrelo
inmediatamente.
• No toque la superficie del interior del disco.
• No someta los discos al calor ni a altas
temperaturas. Evite dejarlos en automóviles
estacionad os, o en tableros o bandejas tras eras.
Notas sobre la adhesión de etiquetas
Para evitar que los MD se at asquen en la unidad;
– Adhiera la etiqueta en una posición correcta.
– Quite las etiquetas antigu as antes d e colocar la s
nuevas.
– Sustituya las etiquetas que se están
despegando.
Limpieza
Limpie la superficie del cartucho de vez en
cuando con un paño suave y seco.
6
Page 61

Acerca de la función de
grupo de MD
La función de grupo se recomienda para localizar
las pistas deseadas dentro de un grupo con un
gran número de pis ta s, o pi stas que se han
grabado en modo MDLP (LP2/LP4).
Notas sobre los ajustes del grupo de
MD
• Esta unidad sólo se utiliza para la reproducción
de discos MD. Para lo s aj ustes de grupo y la
grabación de MD, c onsulte el manual de
instrucciones de l a gr abadora de MD.
• En un MD se puede registrar el mismo nombre
de grupo más de do s veces.
• El número de grup os máximo es de 99, aunque
el número de grupos real depende de la
grabadora de MD .
• Dependiendo de la grabadora de MD, es
posible que los ajustes del gru po de MD no
estén dispon i bles.
MD que contiene grupos
MD
Grupo2*Grupo1* Grupo3*
12 456789
3
10
Asunción de GP (grupo) en esta
unidad
Esta unidad reconoce las pistas que se
encuentran entr e gr upos como grupos (G P) ,
aunque la grabado ra d e M D no las haya
registrado como tal. Los números de “GP” se
asignan a dichas pistas así como a los grupos
registrad os. La indicación de núm ero de “GP” se
ilumina en la pantalla si se cambia el grupo de un
MD durante la rep ro ducción.
MD que contiene grupos y números de
“GP” asignados en esta unidad
MD
GP2
GP3
(Grupo2
*)
GP4
GP1
(Grupo1
*)
1234 56789
* Grupos: configurados por la grabadora de MD.
Para utilizar la f unción de gru po de MD, con sulte
“Reproducc ión de discos” (página 10),
“Reproducc ió n repetida de pistas ”
(página 12) y “Reproducción de pistas en orden
aleatorio” (pág i na 12).
Nota
La función de grupo de MD está disponible
únicamente cuando se inserta y se reproduce en esta
unidad un MD que contiene grupos.
GP5
(Grupo3
10
*)
Número de pista
* Grupos: configurados por la grabadora de MD.
Al insertar un MD en esta unidad, la
reproducción se inicia automáticamente y sigue
el orden de las pistas .
7
Page 62

Procedimientos iniciales
Extracción del panel frontal
Puede extraer el panel frontal de esta unidad para
evitar que la roben.
Restauración de la unidad
Antes de usar la unidad por primera vez, o
después de sustituir la b at er í a de l auto móv il o de
cambiar las conexiones, debe restaurarl a.
Extraiga el panel fron t al y presione el botón
RESET con un objeto puntiagudo como, por
ejemplo, un b olígrafo.
Botón RESET
Nota
Al presionar RESET, se borra el ajuste del reloj y
algunos contenidos almacenados.
Alarma de precaución
Si gira el interrupt o r de encendido hasta la
posición OFF si n haber extraído el panel fr ontal,
la alarma de precaución sonará durant e unos
segundos.
Si conecta un ampli ficador opcional y no utiliza
el incorporado, el p i tido se desactivará.
1 Presione (OFF)*.
La reproducción de MD/CD o la recepción de
la radio se detienen (la iluminación de las
teclas y la pantalla permanecen activas).
* Si el automóvil no tiene una posición ACC
(accesorio) en el interruptor de encendido,
asegúrese de apagar la unidad presionando
(OFF) hasta que se apague la pantalla para
evitar que se desgaste la batería del automóvil.
2 Presione (OPEN), deslice el panel
frontal hacia la derecha y tire en forma
suave de su extremo izquierdo.
1
2
Notas
• Si extrae el panel con la unidad encendida, la
alimentación se desactiva en forma automática para
evitar que se dañen los altavoces.
• No deje caer el panel frontal y su pantalla ni ejerza
excesiva presión sobre los mismos.
• No someta el panel frontal al calor, temperaturas
elevadas o humedad. Evite dejarlo en un automóvil
estacionado o sobre el tablero o la bandeja trasera.
Sugerencia
Al transportar el panel frontal, utilice el estuche
suministrado.
8
Page 63

Instalación del panel frontal
Coloque el orificio A del panel frontal en el eje
B de la unidad, y presione ligeramente el lado
izquierdo hacia ade ntro.
Presione (SOURCE) en la unidad (o i nserte un
MD) para operarla.
A
B
x
Ajuste del reloj
El reloj emplea un a in di cación digital de 12
horas.
Ejemplo: Para aju star el reloj a las 10:08
1 Presione (DSPL) durante 2 segundos.
La indicación de la hor a parpadea.
1 Presione el botón volumen +/– para
ajustar la hora.
2 Presione (SEL).
La indicación de los m in ut os parpadea.
3 Presione el botón volumen +/– para
ajustar los minutos.
2 Presione (DSPL).
El reloj se pone en fu ncionamiento. Al
finalizar el ajuste del reloj, la pantalla vuelve
al modo de reproducción normal.
Nota
No coloque nada sobre la superficie interior del panel
frontal.
9
Page 64

Reproductor de MD
Unidad de MD/CD
(opcional)
Con esta unidad, además de reproducir un MD
(un MD que conten ga aj us tes de gr up o) , tamb ié n
puede controlar unidades externas de MD /CD
(CD con capacidad para reproducir MP3). Si
conecta unidades d e CD opcionales con
capacidad para reproducir MP3 (como un
cambiador de CD MP3), podrá reproducir
archivos MP3, que so n arch ivos (pi st as) de au dio
comprimidos con cal idad de sonido.
Reproducción de discos
(Con esta unidad)
1 Presione (OPEN) e inserte el disco
(cara etiquetada hacia ar ri ba).
Omitir GP*
–Selección de GP
* Disponible únicamente cuando se inserta y se
reproduce en esta unidad un MD que contiene
grupos.
Para omitir pistas continuamente, presione
(SEEK) (+) o (SEEK) (–), vu el va a pres i o narlo
antes de que transcur r an 2 segundos y
manténgalo presi onado.
Notas
• Según el estado del disco, es posible que éste no se
reproduzca (página 6).
• Mientras se reproduce la primera o última pista del
disco, si presiona (SEEK) (–) o (SEEK) (+), la
reproducción saltará a la última pista o a la primera.
• Cuando finalice la última pista del disco, la
reproducción se reiniciará a partir de la primera
pista del mismo.
(5)(GP–) o (6)(GP+)
[una vez para cada grupo ]
[manténgalo presionado
hasta alcanzar el grupo
deseado]
(Con una unidad opcional)
1 Presione (SOURCE) varias veces para
seleccionar “MD (MS *
1
)” o “CD”.
2 Presione (MODE) varias veces hasta
que aparezca la unidad deseada.
Se inicia la reproducción.
2 Cierre el panel frontal.
La reproducción se inicia automáticamente.
Si ya hay un disco inse rtado, presione
(SOURCE) varias veces hasta que ap arezca
“MD” para iniciar la reproducción.
Para Presione
Detener la
reproducción
Expulsar el disco (OPEN) luego Z
Omitir pistas
–Sensor de música
automático
Avanzar/retroceder
en forma rápida
–Búsqueda
manual
(OFF)
(SEEK) (–/+)
(./>)
[una vez para cada pis ta ]
(SEEK) (–/+)
(m/M)
[manténgalo pres i onado
hasta alcanzar el punto
deseado]
10
Para Presione
Omitir discos
–Selección de
discos
Omitir álbumes*
–Selección de
álbumes
*1 MS: MG Memory Stick System-up Player MGS-X1
*2 Disponible únicamente cuando se conecta una
unidad de CD opcional con la función de control de
archivos MP3 y se reproduce un archivo MP3.
(1)(DISC–) o
(2)(DISC+)
[una vez para cada disc o]
[manténgalo presionado
hasta alcanzar el disco
deseado]
2
(5)(ALBM–) o
(6)(ALBM+)
[una vez para cada álbum]
[manténgalo presionado
hasta alcanzar el álbum
deseado]
Page 65

Precauciones al conectar unidades MGS-X1 y MD
Esta unidad reconoce MGS-X1 como una unidad de
MD.
• Si desea reproducir MGS-X1, presione (SOURCE)
para seleccionar “MD”. Cuando aparece “MD” en la
pantalla fuente, presione (MODE) para seleccionar
“MS” e iniciar la reproducción.
• Si desea reproducir una unidad MD, presione
(SOURCE) para seleccionar “MD”. Si la unidad MD
deseada aparece en la pantalla fuente, se inicia su
reproducción. Si en la pantalla fuente aparece “MS”
u otra unidad de MD, presione (MODE) para
seleccionar la unidad de MD deseada e iniciar la
reproducción.
Notas sobre la conexión de unidades de CD con
capacidad para reproducir MP3
• Si inserta un disco sin archivos MP3 (pistas),
aparece “NO MUSIC” en la pantalla y se inicia la
reproducción del disco siguiente.
• Antes de reproducir una pista, la unidad lee la
información de todas las pistas y álbumes del disco.
En función de la estructura de las pistas, es posible
que la reproducción tarde más de un minuto en
iniciarse. Durante este tiempo, aparece “READ” en
la pantalla. La reproducción se iniciará en forma
automática cuando finalice la lectura.
Nota
Con una unidad opcional conectada, la reproducción
de la misma fuente continuará en la unidad de MD/CD
opcional.
Elementos de la pantalla
Al cambiar el disco/grupo/álbum/pista, el título
pregrabado*
aparece autom áticament e. (Si la fu nción A.S CRL
(desplazamiento automát ico) está ajustada en
“ON”, los nombres con más de 8 caracteres se
desplazarán (p ágina 20)).
Para Presione
Cambiar el
elemento en
pantalla
1
del nuevo disco/grupo/álbum/pista
Pantalla MDLP*
2
LP2: reproducción LP2
Fuente
LP4: reproducci ón LP4
Elementos vis i bl es en pantalla
• Número de disco/Número de
pista/Tiempo de reproducción
transcurrido
• Nombre del disco*
grupo*
3
/Nombre del artista*
1
/Nombre del
4
• Nombre de la pista (archivo)*1*
•Reloj
• Nombre del álbum (carpeta)*
5
•ID3*
(DSPL)
5
5
*1 Al presionar (DSPL), “NO NAME” indica que no
hay ningún memorando de disco (página 13) o
nombre pregrabado para mostrar.
*2 Disponible únicamente cuando se reproduce un
disco MDLP.
*3 Disponible únicamente cuando se inserta y se
reproduce en esta unidad un MD que contiene
grupos.
*4 Sólo para discos CD TEXT con el nombre del
artista.
*5 Sólo para archivos MP3.
Sólo se muestra el nombre de la pista/nombre del
artista/nombre del álbum en el indicador ID3.
Al presionar (DSPL), “NO ID3” indica que no hay
ningún indicador ID3 para mostrar.
continúa en la página siguiente t
11
Page 66

Notas
• Algunos caracteres no pueden mostrarse. Los
caracteres y signos que no se pueden mostrar
aparecen como “ *”.
• Con algunos discos CD TEXT o indicadores ID3 que
contienen muchos caracteres, es posible que la
información no se desplace.
• Esta unidad no puede mostrar el nomb re del artista
de cada pista de un disco CD TEXT.
Sugerencias
• Si la función A.SCRL (desplazamiento automático)
está ajustada en “OFF” y se cambia el disco/grupo/
álbum/pista, el nombre de estos elementos o el
indicador ID3 no se desplazan.
• Cuando se reproduce un MD que contiene grupos y
se cambia de grupo, aparece el número del nuevo
grupo. Asimismo, cuando se reproduce un archivo
MP3 y se cambia de álbum, aparece el número del
nuevo álbum.
Reproducción repetida de
pistas
— Reproducción repetida
Es posible seleccionar:
(Con esta unidad)
• REP-TRACK — para repetir la pist a actual.
•REP-GP*1 — para repetir las pistas del grupo
actual.
(Con unidades opcionales)
• REP-TRACK — para repetir la pista actual.
•REP-ALBM*2 — para repetir las pistas del
álbum actu al.
•REP-DISC*3 — para repetir l as pis tas de l dis co
actual.
*1 Disponible únicamente cuando se inserta y se
reproduce en esta unidad un MD que contiene
grupos.
*2 Disponible únicamente cuando se conecta una
unidad de CD opcional con la función de control de
archivos MP3 y se reproduce un archivo MP3.
*3 Disponible únicamente cuando hay conectada una
o varias unidades de MD/CD opcionales.
Durante la reproducción, presione (3)
(REP) varias veces hasta que el ajuste
deseado aparezca en la pa nt al la.
Se inicia la reprodu cción repetida.
Reproducción de pistas en
orden aleatorio
— Reproducción aleatoria
Es posible seleccionar:
(Con esta unidad)
• SHUF-GP*1 — para reproducir las pistas del
grupo actual en orden aleatorio.
• SHUF-DISC — para reproducir las pistas del
disco actual en orden aleatorio.
(Con unidades opcionales)
• SHUF-ALBM*2 — para reproducir las pistas
del álbum actual en orden aleatorio.
• SHUF-DISC — para reproducir las pistas del
disco actual en orden aleatorio.
• SHUF-CHGR*3 — para reproducir las pistas
del cambiador actual de MD (CD) opcional en
orden aleato ri o.
• SHUF-ALL*4 — para reproducir todas las
pistas de todas las unidades de MD (CD )
conectadas (inclusive esta unidad) en or den
aleatorio.
*1 Disponible únicamente cuando se inserta y se
reproduce en esta unidad un MD que contiene
grupos.
*2 Disponible únicamente cuando se conecta una
unidad de CD opcional con la función de control de
archivos MP3 y se reproduce un archivo MP3.
*3 Disponible únicamente cuando hay conectados
uno o más cambiadores de MD (CD) opcionales.
*4 Disponible únicamente cuando hay conectadas
una o varias unidades de MD opcionales, o dos o
más unidades de CD opcionales.
Durante la reproducción, presione (4)
(SHUF) varias veces hasta que el
ajuste deseado aparezc a en la
pantalla.
Se inicia la reproducción aleatoria.
Para volver al modo de reproducción normal,
seleccione “SHUF-OFF”.
Nota
“SHUF-ALL” no reproduce las pistas en orden
aleatorio entre unidades de MD y de CD.
Para volver al modo de reproducción normal,
seleccione “REP-OFF”.
12
Page 67

Etiquetado de CD
— Memorando de l disco (Pa ra una un idad de
CD con función CUSTOM FILE)
Puede etiquetar l os discos con un nombr e
personalizado ( m em orando del disco). Puede
ingresar hasta 8 caracteres por disco . Si et i queta
un CD, podrá locali zarlo con el nombre
correspondiente (página 14 ).
1 Comience a reproducir el disco que
desee etiquetar en una unidad de CD
con la función CUSTOM FILE.
2 Presione (LIST) (CAT) durante 2
segundos.
La unidad repeti rá el disco dura nte el
procedimiento de etiquetado.
3 Ingrese los caracter es.
1 Presione el botón volumen +/– para
seleccionar el carácter deseado.
A y B y C ... y 0 y 1 y 2 ...
y + y – y
*(espacio en blanco)
2 Presione (SEL) una vez que haya
localizado el carácter deseado.
El siguiente carácter parpadea.
3 Repita los pasos 1 y 2 para
ingresar el nombre completo.
4 Para volver al modo de reproducción
normal, presione (LIST) (CAT) durante
2 segundos.
Sugerencias
• Para corregir o borrar un carácter, simplemente
sobrescríbalo o ingrese “
• Podrá etiquetar discos compactos en una unidad sin
la función CUSTOM FILE si la unidad está
conectada junto con una unidad de CD que
disponga de dicha función. El memorando del disco
se almacenará en la memoria de la unidad de CD
con la función CUSTOM FILE.
Nota
La reproducción aleatoria o REP-TRACK/SHUF se
suspende hasta completarse la edición de nombres.
... y * y A
*
”.
Visualización en pantalla del
memorando del disco
Como elemento de pantalla, el memorando del
disco siempre tiene prioridad sobre cualquier
información de CD TEXT original.
Para Presione
Ver (DSPL) durante la
Sugerencia
Pueden verse otros elementos en pantalla
(página 11).
reproducción de discos CD/
CD TEXT
Borrado del memorando del disco
1 Presione (SOURCE) varias veces para
seleccionar “CD”.
2 Presione (MODE) varias veces para
seleccionar la unidad de CD que
contenga el memorando del disco.
3 Presione (LIST) (CAT) durante 2
segundos.
4 Presione (DSPL) durante 2 seg undos.
Aparecerán los nombres almacenados.
5 Presione el botón volumen +/– varias
veces para seleccion ar e l disco cuyo
nombre desee borrar.
6 Presione (SEL) durante 2 segundos.
El nombre se borra.
Si desea borrar otros nombres, repita los
pasos 5 y 6.
7 Presione (LIST) (CAT) durante 2
segundos.
La unidad vuelve al modo de reproducción
normal.
Notas
• Cuando se borra el memorando de un disco CD
TEXT, aparece la información de CD TEXT original.
• Si no encuentra el memorando del disco que desea
borrar, inténtelo seleccionando una unidad diferente
de CD en el paso 2.
• Si ya ha borrado todo el memorando del disco, la
unidad vuelve al modo de reproducción normal en el
paso 4.
13
Page 68

Localización de discos por
nombre
— Listado (Para una unidad de MD o una
unidad de CD con la función CD TEXT /
CUSTOM FILE)
Puede usar esta funci ón c on discos a los que se
asignaron nombres personalizados*
CD TEXT*
*1 Localización de discos por su nombre
*2 Localización de discos por la información CD
2
.
personalizado: cuando asigna un nombre a un MD
o a un CD (página 13).
TEXT: cuando reproduce un disco CD TEXT en
una unidad de CD con la función CD TEXT .
1 Durante la reproducción, presione
(LIST) (CAT).
El nombre asig nado al d isco act ual apar ece en
pantalla.
2 Presione (LIST) (CAT) varias veces
hasta que encuentre el disco deseado.
3 Presione (SEEK) (+) o (SEEK) (–) para
reproducir el disco.
Notas
• Una vez que el nombre del disco se ha mostrado
durante 5 segundos, la pantalla vuelve al modo de
reproducción norm al.
• Si no hay di scos en el c arg ado r , ap are ce “NO DISC ”
en la pantalla.
• Si no se ha asignado un archivo personalizado a un
disco, “NO NAME” aparece en la pantalla.
• Si la unidad no ha leído la información del disco,
aparece “NOT READ” en la pantalla. Para cargar el
disco, presione primero el botón numérico y, a
continuación, elija el disco que no se ha cargado.
• La información sólo aparece en mayúsculas. Hay
algunas letras que no se pueden mostrar.
1
o con discos
Radio
La unidad puede almacenar hasta 6 emisoras por
banda (FM1, FM2, FM3, AM1 y AM2).
Precaución
Para sintonizar emisora s mientr as mane je, u tilice
la función Memoria de la mejor sintonía para
evitar ac cidentes.
Almacenamiento automático
de emisoras
— Memoria de la mejor sintonía (BTM)
La unidad seleccion a la s emisoras de señal más
intensa dentro de la banda seleccionada y las
almacena por or den de frecuenci a.
1 Presione (SOURCE) varias veces para
seleccionar la radio.
2 Presione (MODE) varias veces para
seleccionar la banda.
3 Presione (BTM) durante 2 segundos.
La unidad almacen a la s emisoras en el orden
de sus frecuencias en l os botones numéricos .
La unidad emite un piti do al almacenar el
ajuste.
Notas
• Si se reciben pocas emisoras debido a que las
señales son débiles, algunos botones numéricos
conservarán sus ajustes anteriores.
• Si la pantal la muestra un número, la unidad
comienza a almacenar emisoras a partir de éste.
14
Page 69

Recepción de las emisoras
almacenadas
1 Presione (SOURCE) varias veces para
seleccionar la radio.
2 Presione (MODE) varias veces para
seleccionar la banda.
3 Presione el botón numérico ((1) a (6))
en el que esté almacenada la emisora
deseada.
Si la sintonización programada no
funciona
— Sintonización automática/Modo de
búsqueda local
Sintonización automática:
Presione (SEEK) (+) o (SEEK) (–) para
buscar la emisora.
La búsqueda se detiene cuando la uni dad
recibe una emisora. Repita la operación hasta
recibir la emis ora deseada.
Modo de búsqueda local:
Si la sintonización autom ática se
detiene con demasiada frecuencia,
presione (SENS) varias veces hasta
que aparezca “LO CA L- O N ”.
Aparece el indicador “LCL”.
Sólo se sintonizan las emisoras con señales
relativamente intensas.
Para cancelar el modo de búsqueda local,
presione (SENS) dos veces cuando reciba FM.
Nota
Durante la recepción de AM, para cancelar e l modo
de búsqueda local, presione (SENS) (aparece
“LOCAL-OFF”).
Sugerencia
Si conoce la frecuencia de la emisora que desea
escuchar, mantenga presionado (SEEK) (+) o
(SEEK) (–) para l ocalizar la frecuencia aproximada y,
a continuación, presione (SEEK) (+) o (SEEK) (–)
varias veces para ajustar con más precisión la
frecuencia deseada (sintonización manual).
Si la recepción de FM en estéreo es de
mala calidad
— Modo monoaural
Durante la recepción de radio,
presione (SENS) varias veces hast a
que aparezca “MONO-ON”.
Aparece el indicador “MONO”.
El sonido mejora, aunque será monoaural
(“STEREO” desaparece).
Para volver al modo de recep ci ón de radio
normal, presi on e (SENS) (aparece “MONOOFF”).
Sugerencia
Si tiene dificultades para oír las emisiones de FM,
ajuste DSO en “OFF” (página22).
Almacenamiento exclusivo
de las emisoras deseadas
Puede programar manualmente las emisoras que
desee en cualquier botón numérico.
1 Presione (SOURCE) varias veces para
seleccionar la radio.
2 Presione (MODE) varias veces para
seleccionar la banda.
3 Presione (SEEK) (+) o (SEEK) (–) p ara
sintonizar la emisora que desee
almacenar.
4 Presione el botón numérico que desee
((1) a (6)) durante 2 segundos hasta
que aparezca “MEM”.
La indicación de botó n numérico aparece en
pantalla.
Nota
Si intenta almacenar otra emisora en el mis m o botón
numérico, se borrará la que estaba almacenada
previamente.
15
Page 70

Almacenamiento de nombres
de emisoras
— Memorando de emisor as
Es posible asignar un nombre a cada em is or a de
radio y almacenarlo en la memoria. El nombre de
la emisora sintonizada aparece en pantalla. Es
posible asignar un nombre con un máximo de 8
caracteres por emisora.
Almacenamiento de nombres de
emisoras
1 Sintonice la emisora cuyo nombre
desee almacenar.
2 Presione (LIST) (CAT) durante 2
segundos.
3 Ingrese los caracteres.
1 Presione el bot ón volumen +/– para
seleccionar el carácter deseado.
A y B y C ... y 0 y 1 y 2 ...
y + y – y
*(espacio en blanco)
2 Presione (SEL) una vez que haya
localizado el carácter de seado.
El siguiente caráct er parpadea.
... y * y A
*
Borrado del nombre de emisoras
1 Presione (SOURCE) varias veces para
seleccionar la radio.
2 Presione (MODE) varias veces para
seleccionar la banda.
3 Presione (LIST) (CAT) durante 2
segundos.
4 Presione (DSPL) durante 2 segundos.
Aparecerán los nombres almacenados.
5 Presione el botón volumen +/– varias
veces para selecciona r l a em i sor a de
radio cuyo nombre desee borrar.
6 Presione (SEL) durante 2 segundos.
El nombre se borra.
Si desea borrar otros nombres, r ep i t a los
pasos 5 y 6.
7 Presione (LIST) (CAT) durante 2
segundos.
La unidad vuelve al mod o normal de
recepción de radio.
Nota
Si ya ha borrado los nombres de todas las emisoras,
aparecerá “NO DATA” en el paso 6.
3 Repita los pasos 1 y 2 para
ingresar el nombre com p leto.
4 Para volver al modo normal de
recepción de radio, presione (LIST)
(CAT) durante 2 segundos.
Sugerencia
Para corregir o borrar un carácter, simplemente
sobrescríbalo o ingrese “
”.
16
Page 71

Sintonización de emisoras
mediante una lista
— Listado
1 Durante la recepción de radio,
presione (LIST) (CAT).
La frecuencia o el nombre asignado a l a
emisora actual aparece en pantalla.
2 Presione (LIST) (CA T) v arias veces
hasta que encuentre l a em i sor a
deseada.
3 Presione (SEEK) (+) o (SEEK) (–) para
sintonizar la emisora deseada.
Otras funciones
También puede controlar la unidad (y las
unidades de MD/CD opcionales) con un mando
rotatorio (opcional).
Uso del mando rotatorio
En primer lugar, adhiera la etiqueta adecuada
según desee mon t ar el mando rotatorio.
El mando rota to rio funciona al presionar los
botones o girar los controles.
MODE
DSPL
MODE
SEL
SEL
DSPL
Presión de botones
(SEL)
(SOURCE)
Gire el control VOL
para ajustar el volumen.
Presione Para
(ATT)
(DSPL)
(MODE)
(OFF)
(SOURCE) Cambiar la fuente
(radio/MD/CD*1)/encendido
(MODE) Cambiar el funcionamiento
(banda de radio/unidad de
1
MD*
/unidad de CD*1)
(ATT) Atenuar el sonido
2
(OFF)*
Detener la reproducción o la
recepción de la radio/
apagado
(SEL) Ajustar y seleccionar
(DSPL) Cambiar el elemento en
pantalla
continúa en la página siguiente t
OFF
17
Page 72

Giro del control
Control
SEEK/AMS
Gírelo y suéltelo para:
– Omitir pistas.
Para omitir pistas en forma continua, gírelo
una vez, vuélvalo a girar en menos de
2 segundos y no lo suelte.
– Sintonizar emis oras en forma automática.
Gírelo, manténgalo en esa posición y
suéltelo para:
– Avanzar o retroceder en forma rápid a una
pista.
– Buscar una emisora en forma manua l.
Si reproduce un MD que contiene grupos o un
archivo MP3, puede selec ci onar un grupo (MD)
o un álbum (archivo MP3) con el mando
rotatorio.
(Con esta unidad)
Para Realice lo siguiente
Omitir grupos*
–Selección de
grupos
3
1 Para pasar al modo de
selección de grupos,
presione el control y, a
continuación, gírel o y
manténgalo en esa
posición.
Antes de que tran scurran
2 segundos, realice el
paso 2.
2 Presione el control y, a
continuación, gírelo
rápidamente varias veces
para omitir los grupos de
uno en uno.
Presión y giro del control
Control
PRESET/DISC
Presione y gire el cont rol para:
– Recibir emisoras almacenadas en memoria.
– Cambiar discos durante la reproducc ió n de
MD (CD)*
1
.
– Cambiar grupos*3.
– Cambiar álbumes*4.
(Con una unidad opcional)
Para Realice lo siguiente
Omitir discos
–Selección de
discos
Presione y gire el con tr ol
[una vez para cada disc o] .
Para omitir discos en forma
continua, presione el
control, gírelo un a vez,
vuelva a girarlo antes de 2
segundos y manténgalo en
esa posición.
Omitir álbumes*
–Selección de
álbumes
4
1 Para pasar al modo de
selección de álbume s,
presione el control y, a
continuación, gírel o y
manténgalo en esa
posición.
Antes de que tran scurran
2 segundos, realice el
paso 2.
2 Presione el control y
gírelo rápidamente varias
veces para omitir
álbumes de uno en uno.
18
Page 73

*1 Sólo si el equipo opcional correspondiente está
conectado.
*2 Si el automóvil no tiene posición ACC (accesorio)
en el interruptor de la llave de encendido, después
de apagar el motor recuerde mantener presionado
(OFF) hasta que se apague la pantalla.
*3 Disponible únicamente cuando se inserta y se
reproduce en esta unidad un MD que contiene
grupos.
*4 Disponible únicamente cuando se conecta una
unidad de CD opcional con la función de control de
archivos MP3 y se reproduce un archivo MP3.
Cambio del sentido de funcionamiento
El sentido de funcionamiento de los cont roles
está ajustado de fábrica como se muestra a
continuación.
Para aumentar
Para disminuir
Si necesita montar el mando rotatorio en el lad o
derecho de la columna de la dirección, puede
invertir el sentido de funcionamiento.
Ajuste de las características
del sonido
Es posible ajustar el balance, el equilibrio, el
filtro de paso bajo y el volumen del altavoz
potenciado r de graves .
1 Presione (SEL) varias veces hasta que
aparezca “BAL”, “FAD”, “LPF” o
“SUB”.
Cada vez que presione (SEL), el elemento
cambiará de la siguiente forma:
1
LOW*
t MID*1 t HI*1 t
BAL (izquierdo-derecho) t
FAD (frontal-posterior) t
LPF (filtro de paso bajo)*
SUB (volumen del altavoz potenciador
de graves)*
*1 Si está activado EQ3 (página 21).
*2 Si se ha seleccionado “SUB” (página 20).
*3 La frecuencia de corte puede ajustarse en
78 Hz, 125 Hz u OFF.
*4 El nivel del volumen puede ajustarse en
intervalos de –10 a +10. (Por debajo de
–10 dB, aparece “ATT”.)
2*4
2 Presione el botón volumen +/– para
ajustar el elemento s el eccionado.
Nota
Realice el ajuste antes de que transcurran 3
segundos después de seleccionar el elemento.
2*3
t
Presione (SEL) durante 2 segundos
mientras presiona el co ntrol VOL.
Nota
Si presiona (SEL) durante 2 segundos mientras
presiona el control VOL, “NORM” o “REV” aparecen
en la pantalla.
– “NORM” permite usar el mando rotatorio en la
posición ajustada de fábrica.
– “REV” permite usar el mando rotatorio cuando se
monta en la parte derecha de la columna de la
dirección.
Atenuación rápida del sonido
Presione (ATT).
Aparece “ATT-ON” durante unos instant es y
luego aparece “ATT” en p ant alla.
Para recupera r el nivel de volu men anterior,
presione (ATT) de nuevo.
Sugerencia
Si el cable de interfaz de un teléfono para automóvil
está conectado al cable ATT, la unidad disminuirá el
volumen en forma automática cuando se reciba una
llamada telefónica (Función ATT de teléfono).
19
Page 74

Cambio de los ajustes de
sonido y pantalla
Es posible ajus tar los siguient es elementos:
• REAR/SUB*1 — para alternar la salida de
audio REAR y SUB.
– Seleccione “REAR” para emitir a un
amplificador de potencia.
– Seleccione “SUB” pa ra em itir a un altavoz
potenciador de graves.
• A.SCRL (desplazamiento automático)*2
(página 11).
• M.DSPL (desplaz ami ento de indica ciones)
— para activar o desactivar el desplazamiento
de indicaciones.
– Sele c cione “ON” para activar el
desplazamiento de indicaciones (el patrón de
movimiento aparec e en la pantalla).
– Seleccione “OFF” para desactivar el
desplazamiento de indicaciones.
•DEMO*1 — para activar o desactivar la
pantalla de demostración.
– Sele c cione “ON” para activar la pantalla de
demostración (la demostración se inicia
aproximadame nte 10 segundos después de
que se haya apagado l a unidad).
– Seleccione “OFF” para desactivar la pantalla
de demostr ación.
•BEEP*3 — para activar o desact ivar l os pitidos.
• DIM (ate nuador) — para cambia r el brillo de la
pantalla.
– Seleccione “ON” para que la pant alla se
atenúe.
– Seleccione “OFF” para desactivar el
atenuador.
Alternar REAR y SUB*
1
Presione (SEL) y, a continuación, el
botón de volumen + (REAR) o – (SUB).
Transcurridos 3 segundos, l a pantalla volverá al
modo de reproducción normal.
Selección del elemento deseado
Presione si multáneamente (SEL) y el
botón que desee.
(SEL) + (3): A.SCRL*
2
(SEL) + (4): M.DSPL
(SEL) + (4): DEM O *
(SEL) + (6): BEEP*
1
3
(SEL) + (DSPL): DIM
Al finalizar el ajuste del modo, la pantalla vuelve
al modo de reproducción normal.
Para cancelar el elemento, vuelva a presionar
(SEL) y el botón que desee simultáneament e.
*1 Cuando la unidad está apagada.
*2 Cuando se reproduce un MD o CD.
*3 El pitido sólo se emite cuando se usa el
amplificador incorporado.
20
Page 75

Ajuste del ecualizador (EQ3)
Puede seleccio nar una curva de ecualiza dor para
7 tipos de músic a (X P LO D , VOCAL, CLUB,
JAZZ, NEW AGE, ROCK, CUSTOM y OFF
(ecualizador O FF) ).
Puede almacenar un aj uste diferente del
ecualizador para cada fuente.
Selección de la curva de ecualizador
1 Presione (SOURCE) para seleccionar
una fuente (radio, MD o CD).
2 Presione (EQ3) varias veces para
seleccionar la curva de ecualizador
que desee.
Cada vez que presione (EQ3), el elem ento
cambiará.
Para cancelar el efect o de ecualización,
seleccione “OFF”.
Ajuste de la curva de ecualizador
Puede almace nar y definir los ajustes de l
ecualizador para distintos rangos de tono.
1 Presione (SOURCE) para seleccionar
una fuente (radio, MD o CD).
2 Presione (EQ3) varias veces para
seleccionar la curva de ecua liz ador
deseada.
3 Ajuste de la curva de ecualizador.
1 Presione (SEL) varias veces para
seleccionar el rango de tonos
deseado.
Cada vez que presione (SEL), el rango de
tonos cambiará.
LOW t MID t HI (t BAL t FAD t
LPF t SUB)
2 Presione el botón de volumen +/–
varias veces para ajustar el nivel de
volumen deseado.
El niv el de volume n puede ajustar se en
intervalos de 1 dB entre –10 y +10 dB.
3 Repita los pasos 1 y 2 para
ajustar la curva de ecualizador.
Para restaurar la curva de ecualizador
ajustada en fábrica, presione (SEL)
durante 2 segundos.
Transcurrido 1 segundo, la pantalla vuelve
al modo de reproducción normal.
Nota
Si ajusta EQ3 en “OFF”, no podrá ajustar los valores
del ecuali zador .
21
Page 76

Ajuste del Organizador de
sonido de baja frecuencia
dinámico (DSO)
Si los altavoces están instalados en la parte
inferior de las puertas, el sonido se recibirá desde
abajo y puede no ser ní tido.
La función DSO (Organizador de sonido de baja
frecuencia dinámico) crea un sonido más
ambiental, como si hubiera altavoces en el
tablero (altavoces virtuales) .
Puede almacenar el ajuste DSO para cada fuente.
Modo DSO e imagen de los altavoces
virtuales
*3
*2
*1
*4
*3
*2
*1
*4
Información
complementaria
Mantenimiento
Sustitución del fusible
Al sustituir el fus i bl e, asegúrese de utilizar uno
cuyo amperaje coincida con el especificado en el
original. Si el fusible se funde, verifique la
conexión de alimentación y sustitúyalo. Si el
fusible se funde de nuevo después de sustituirlo,
es posible que exista al guna falla de
funcionamiento interno. En tal caso, póngase en
contacto con el dist ribuidor Sony más cercano.
*1 DSO-1
*2 DSO-2
*3 DSO-3
*4 DSO-OFF
1 Presione (SOURCE) para seleccionar
una fuente (radio, MD o CD).
2 Presione (DSO) varias veces hasta
que aparezca el ajuste DSO deseado.
Cada vez que presione (DSO), el ajuste DSO
cambiará.
Para cancelar la función DSO, seleccione
“DSO-OFF”. Transcur ri do 1 segundo, la
pantalla vuelve al modo de reproducción
normal.
Notas
• Según el tipo de interior del automóvil o el tipo de
música, DSO puede no producir el efecto deseado.
• Si tiene dificultades para oír las emisiones de FM,
apague la función DSO.
Fusible (10 A)
Advertencia
Nunca use un fusible cuyo amperaje supere el del
suministrado con la unidad, ya que ésta podrí a
dañarse.
22
Page 77

Limpieza de los conectores
Es posible que la unidad no funcione en forma
correcta si los co nectores entre ella y el panel
frontal están sucios. Para evitarlo, extraiga el
panel frontal (página 8) y limpie los conectores
con un hisopo de algo dón humedecido en
alcohol. No apliq ue demasiada fuerza, ya que
podría dañar los co nectores.
Unidad principal
Parte posterior del panel frontal
Notas
• Por razones de seguridad, apague el motor antes de
limpiar los conectores y extraiga la llave del
interruptor de encendido.
• No toque nunca los conectores directamente con los
dedos ni con ningún dispositivo metálico.
Sustitución de la pila de litio
En condicione s normales, la pila dura
aproximadamente 1 año. (La duración puede ser
menor en función de las condiciones de uso.) El
alcance del control remoto de tarjeta disminuye a
medida que se agota la pila. Sustitúyala por una
pila de litio CR2025 nueva. El uso de cualquier
otra pila podría dar lugar a riesgos de i ncendio o
explosión.
x
Lado + hacia arriba
Notas sobre la pila de litio
• Mantenga la pila de litio fuera del al cance de
los niños. Si la pila se i ngiere, póngase en
contacto en forma inmediata con un médico.
• Limpie la pi la con un paño sec o para garantiz ar
un contacto óptimo.
• Asegúrese de observar la polari dad correcta al
instalar l a pila.
• No agarre la pila con pinzas metálicas, ya que
puede producirse un cortocircuito.
ADVERTENCIA
La pila puede explotar si no se emplea
adecuadamente.
No recargue la pila; tampoco la desmonte ni
la arroje al fuego.
23
Page 78

Extracción de la unidad
1 Extraiga el marco de protección.
1 Extraiga el panel frontal (página 8).
2 Fije las llaves de liberación al marco
de protección.
2 Extraiga la unidad.
1Inserte las dos llaves de liberación
a la vez hasta oír un “clic”.
Coloque el gancho
hacia adentro.
Oriente las llaves
de liberación en
la dirección
correcta.
3 Tire de las llaves de liberación para
extraer el marco de protección.
2Tire de las llaves de liberación para
extraer la unidad.
3Deslice la unidad para extraerla de
la montura.
24
Page 79

Especificaciones
y
Sección del reproductor de MD
Relación señal-ruido 90 dB
Respuesta de frecuencia de 10 a 20 000 Hz
Fluctuación y trémolo Inferior al límite medible
Sección del sintonizador
FM
Rango de sintonización de 87,5 a 107,9 MHz
Terminal de antena Conector de antena extern a
Frecuencia intermedia 10,7 MHz/450 kHz
Sensibilidad útil 9 dBf
Selectividad 75 dB a 400 kHz
Relación señal-ruido 67 dB (estéreo),
Distorsión armónica a 1 kHz
Separación 35 dB a 1 kHz
Respuesta de frecuencia de 30 a 15 000 Hz
69 dB (mono)
0,5 % (estéreo),
0,3 % (mono)
AM
Rango de sintonización de 530 a 1 710 kHz
Terminal de antena Conector de antena extern a
Frecuencia intermedia 10,7 MHz/450 kHz
Sensibilidad 30 µV
Sección del amplificador de potencia
Salidas Salidas de altavoz
Impedancia de altavoces de 4 a 8 ohm
Salida de potencia máxima
(conectores de sellado
seguro)
52 W × 4 (a 4 ohm)
Generales
Salidas Terminales de salida de
Entradas Terminal de control ATT de
Controles de tono Bajos:
audio (frontal, se puede
cambiar entre posterior y
potenciador de graves)
Terminal de control de relé
de la antena motorizada
Terminal de control del
amplificador de potencia
teléfono
Terminal de entrada de
controlador remoto
Terminal de entrada de
control BUS
Terminal de entrada de
audio BUS
Terminal de entrada de la
antena
±10 dB a 60 Hz (XPLOD)
Medios:
±10 dB a 1 kHz (XPLOD)
Altos:
±10 dB a 10 kHz (XPLOD)
Requisitos de alimentación
Dimensiones Aprox. 178 × 50 × 181 mm
Dimensiones de montaje Aprox. 182 × 53 × 161 mm
Peso Aprox. 1,2 kg
Accesorios suministrado s Componentes d e instalación
Accesorios opcionales Control remoto de tarjeta
Equipo opcional Cambiador de CD
Batería de automóvil de cc
12 V (masa negativa)
(7 1/8 × 2 × 7 1/4 pulgadas)
(an/al/prf)
(7 1/4 × 2 1/8 × 6 3/8
pulgadas)
(an/al/prf)
(2 libras 10 onzas)
y conexiones (1 juego)
Estuche para el panel frontal
(1)
RM-X114
Mando rotatorio
RM-X4S
Cable BUS (suministrado
con un cable con te rminales
RCA)
RC-61 (1 m), RC-62 (2 m)
(10 discos)
CDX-757MX
Cambiador de CD (6 discos)
CDX-T69
Cambiador de MD
(6 discos)
MDX-66XLP
Receptor de radio XM vía
satélite
XT-XM1
Selector de fuente
XA-C30
Selector AUX-IN
XA-300
Patentes de los EE.UU. y otros países usados con
licencia de Dolb
Nota
Esta unidad no puede conectarse a un
preamplificador digital ni a un ecualizador que sea
compatible con el sistema BUS de Sony.
El diseño y las especificaciones están sujetos a
cambios sin previo aviso.
Laboratories.
25
Page 80

Solución de problemas
La siguiente lista de comprobación le ayudará a
solucionar los problemas que puedan pr oducirse
con la unidad.
Antes de consultar la , revise lo s pr ocedimientos
de conexión y de funcion am i ento.
Generales
No se emite el sonido.
• Presione el botón volumen + para ajustar el
volumen.
• Cancele la función ATT.
• Ajuste el cont ro l de equilibrio en la posición
central para un si st ema de 2 altavoces.
• Puede reproducir un disco MDLP con un
cambiador de MD opcional sin la función
MDLP (“LP: ···” puede aparecer en la
pantalla).
t Ins er te el di sco MDLP en la unidad para
reproducirlo.
El contenido de la memoria se borró.
• Presionó el botón RESET.
t Vuelva a almacenar los datos en la
memoria.
• Se desconectó el cable de alime nt ación o la
pila.
• El cable de conexión de la alimentación no
está conectado en forma correcta.
No se emiten pitidos.
• El sonido de los pitidos está cancelado
(página 20).
• Hay conectado un amplificador de potencia
opcional y no está usando el amplificador
incorporado.
Las indicaciones desaparecen de la
pantalla o no aparecen en ella.
• La pantalla se apaga si mantiene pr es io nado
(OFF).
t Ma nt enga presionado (OFF)
nuevamente hasta que se ilum i ne la
pantalla.
• Extraiga el panel frontal y limpie los
conectores. Si desea obtener inform ación
adicional, consul te “Limpieza de los
conectores” en la p ági na 23.
Las emisoras almacenadas y la hora
correcta se borraron.
El fusible se fundió.
Se produce ruido cuando la llave de
encendido se encuentra en la posición ON,
ACC u OFF.
Los cables no se conectaron en forma correcta
al conector de alimentación auxiliar del
automóvil.
La unidad no recibe alimentación.
• Compruebe la conexión. Si todo está en
orden, compruebe el fusible.
• El automóvil no dispone de una posición
ACC.
t Presione (SOURCE) (o inserte un MD)
para encender la unidad.
La unidad recibe alimentación en forma
continua.
El automóvi l no di spo ne de un a posi ció n A C C.
t Después de apagar el m ot o r, asegúrese de
mantener presionado el bo t ón (OFF) de la
unidad hasta que se apague la pantalla.
La antena motorizada no se extiende.
La antena motoriza da no dispone de una caja
de relé.
No es posible desactivar la indicación
“--------”.
Entró en el modo de edici ón de nombres.
t Presione (LIST) (CAT) durante 2
segundos.
Reproducción de MD
No se puede cargar un MD.
• Ya hay otro MD cargad o.
• El MD se insertó a la fuerza al revés o de
forma incorrecta.
La reproducción no s e inic ia.
MD defectuoso.
El disco se expulsa en forma automática.
La temperatura ambiente es superior a 50 °C.
La función de grupo de MD no funciona .
• El MD insertado en esta uni dad no contiene
grupos.
• Puede que la pista que se está reproduciendo
no esté en un grupo configurado por la
grabadora de MD.
• Puede reproducir un MD que cont i ene
grupos insertado en un cambiado r de MD
opcional.
t Inserte el MD que contiene grupos en
esta unidad.
Los botones de operación no funcionan.
El MD no se expulsa.
Presione el botón RESET.
Se producen saltos de sonido debido a
vibraciones.
• La unidad se instaló en un ángul o s uperior a
45°.
• La unidad no se instaló en una parte firme
del automóvil.
Se producen saltos de sonido.
El disco está sucio o es defectuoso.
26
Page 81

Recepción de radio
No es posible utilizar la sintonización
programada.
• Almacene la frecuencia correcta en la
memoria.
• La señal de emisión es demasiado débil.
No es posible recibir las emisoras.
Hay ruidos que obstaculizan el sonido.
• Conecte un cable de control de antena
motorizada (azul) o un cable de fuente de
alimentación auxiliar (rojo) al cable de
suministro de alimentación de la señal de la
antena del automóvil. (Sólo si el automóvil
dispone de una ante na de FM/AM integrada
en el cris tal traser o/lateral.)
• Compruebe la conexión de la antena del
automóvil.
• La antena automática no se extiende.
t Compruebe la conexión del cable de
control de la antena motorizada.
• Compruebe la frecuencia.
• Cuando el modo DSO está activado, el
sonido se oye ocasio nal mente con ruido.
t Ajuste el modo DSO en “OFF”
(página 22).
No es posible utilizar la sintonización
automática.
• El modo de búsqueda local está aj us t ado en
“ON”.
t Ajuste el modo de búsqueda local en
“OFF” (página 15).
• La señal de emisión es demasiado débil.
t U se la sintonización manual.
La indicación “STEREO” parpadea.
• Sintonice la frecuencia con precisión.
• La señal de emisión es demasiado débil.
t A juste el modo de recepción monoaural
en “ON” (pág ina 15).
Un programa emitido en estéreo se oye en
monoaural.
La unidad se encuentra en el modo de
recepción mon oaural.
t Cancele el modo de recepción monoaura l
(página 15).
Mensajes/indicaciones de
error
Indicaciones de error
(Para esta unidad y los cambiadores de MD/
CD opcionales)
Las siguientes indicaciones parpadean durante
unos 5 segundos y se emite una alarma.
BLANK*
ERROR*
FAILURE (Se ilumina hasta que se presiona
algún botón.)
FAILURE (Se ilumina durante a proximada mente
1 segundo.)
HI TEMP
NO DISC
NO MAG
1
No hay pistas gr abadas en el MD.*
2
t Reproduzca un MD que tenga pistas
grabadas.
1
• El MD está sucio o insert ado al revés.*
2
t Límpielo o insértelo en forma correcta.
• El MD/CD no se reproduce debido a algún
problema.
t Inserte otro MD/CD.
La conexión de los altavoces y ampl i fica dor es
es incorrecta.
t Consulte el manual de instalación de este
modelo para comprobar la conexión.
Con el sintonizador XM conectado, no se pudo
almacenar una em i sora de radio XM en u na
emisora preestablecida.
t Co m pruebe que recibe la emisora que
desea almacenar e inténtelo de nuevo.
La temperatura ambiente es superior a 50 °C.
t Espere hasta que la temperatura descienda
por debajo de 50 °C.
No hay ningún disco insertado en la unidad de
MD/CD.
t Inserte discos en la unidad de MD/CD.
El cargador de discos no se ins er t ó en la
unidad de CD.
t Inserte el cargador en la unidad de CD.
continúa en la página siguiente t
27
Page 82

NO MUSIC
En la unidad de CD co n capacidad para
reproducir MP3 se insertó un CD que no
contiene ningún archivo de música.
t Inserte un CD de música en la unidad de
CD con capacidad pa ra reproducir MP3.
NOTREADY
La tapa de la unidad de MD está abierta o los
MD no se inse rt aron correctamente.
t Cierre la tapa o inserte los MD
correctamente.
OFFSET
Es posible que se haya producido una falla
interna.
t Com pr uebe la conexión. Si el indica dor de
error permanece en pantalla, póngase en
contacto con el di st ribuidor Sony más
cercano.
RESET
La unidad de MD/CD no puede utilizarse
debido a algún problema.
t Presi one el botón RESET de la unidad .
*1 Cuando se produce un error durante la
reproducción de un MD o CD, el número de disco
del MD o CD no aparece en pantalla.
*2 La pantalla muestra el número del disco que causa
el error.
Si estas soluciones no ayudan a mejorar la
situación, póngase en contacto con el distribuidor
Sony más cercano.
Mensajes
L.SEEK +/–
El modo de búsqueda local está activado
durante la sintonización automáti c a
(página 15).
“ ” o “ ”
Llegó al principio o al final del disco, por lo
que no es posible avanzar m ás.
28
Page 83

Page 84

• Lead-free solder is used for soldering certain parts.
• Halogenated flame retardants are not used in the certain printed wiring boards.
• Halogenated flame retardants are not used in cabinets.
• Paper is used for the packaging cushions.
Sony Corporation Printed in Thailand
 Loading...