

Page 1

MiniDisc Deck
3-862-517-11(1)
Operating Instructions
Mode d’emploi
EN
EN
F
MDS-JA20ES
1998 by Sony Corporation
Page 2
WARNING
To prevent fire or shock
hazard, do not expose the unit
to rain or moisture.
To avoid electrical shock, do
not open the cabinet. Refer
servicing to qualified
personnel only.
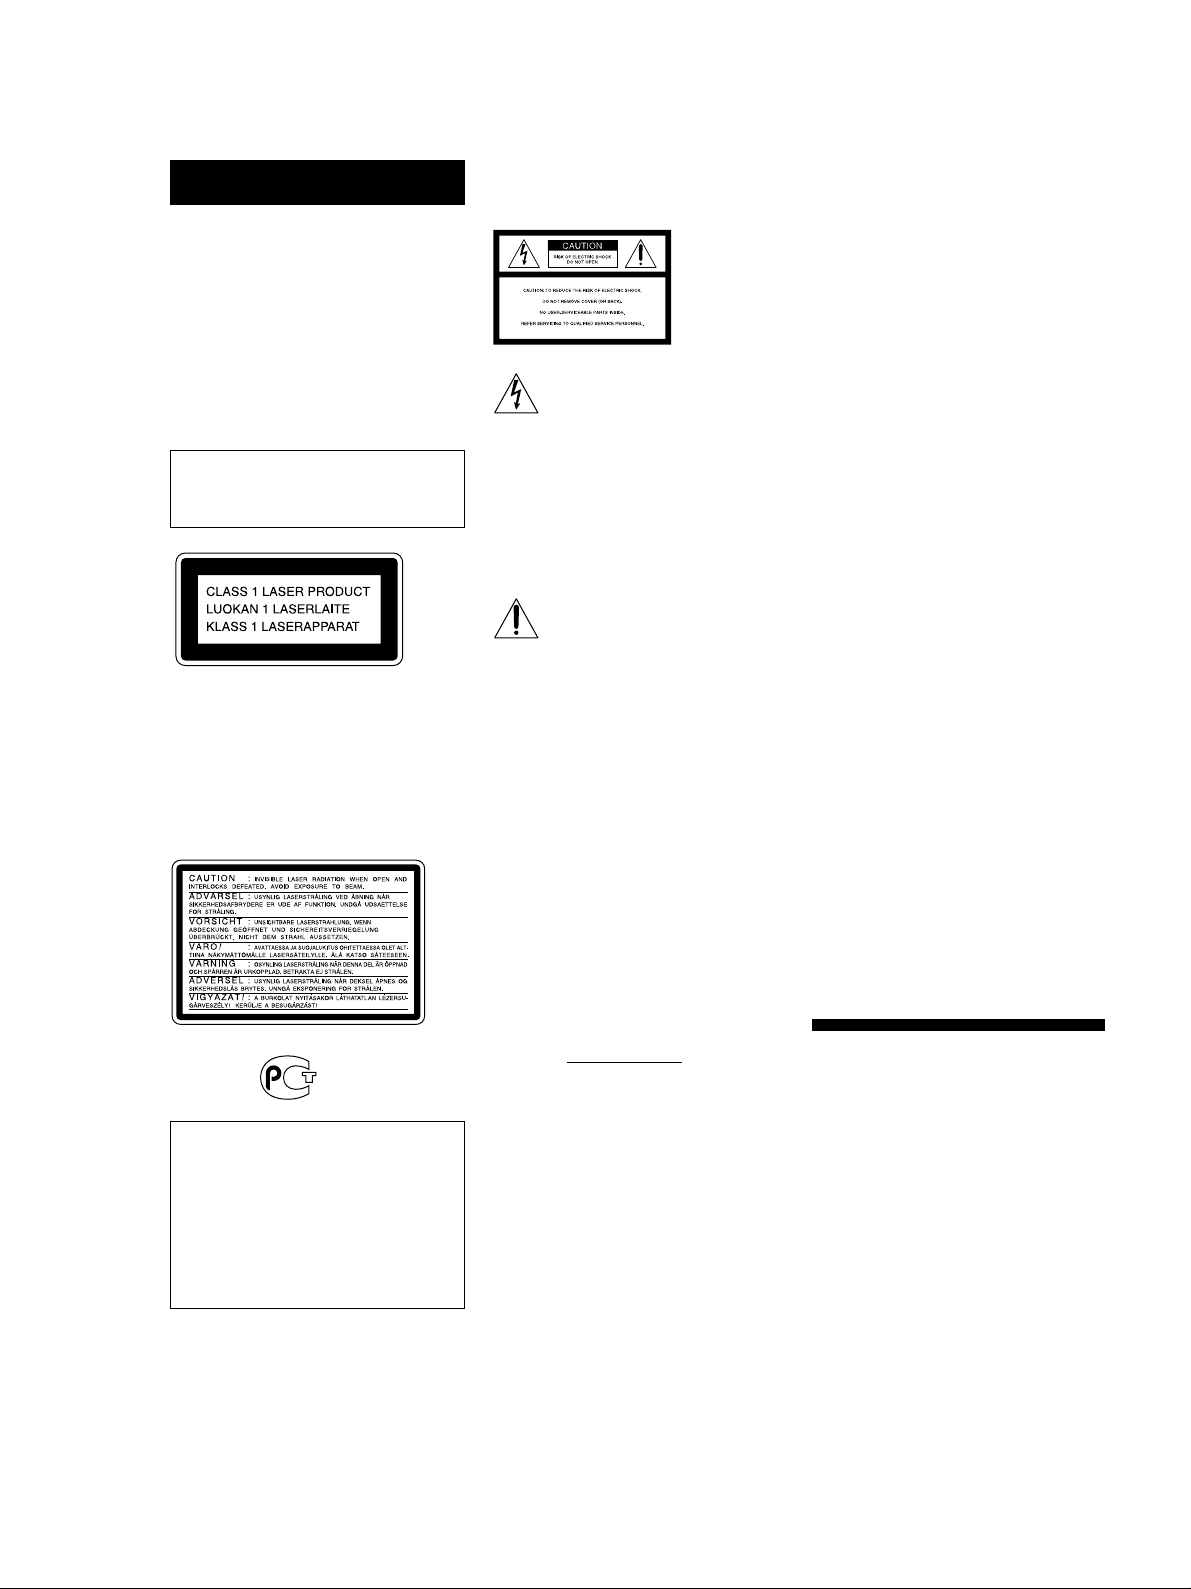
The laser component in this product
is capable of emitting radiation
exceeding the limit for Class 1.
This appliance is classified as a CLASS 1
LASER product. The CLASS 1 LASER
PRODUCT MARKING is located on the
rear exterior.
The following caution label is located
inside of the unit.
For the customers in the
United States
This symbol is intended to alert the user
to the presence of uninsulated
“dangerous voltage” within the
product’s enclosure that may be of
sufficient magnitude to constitute a risk
of electric shock to persons.
This symbol is intended to alert the user
to the presence of important operating
and maintenance (servicing)
instructions in the literature
accompanying the appliance.
CAUTION
The use of optical instruments with this
product will increase eye hazard.
Owner’s Record
The model and serial numbers are
located on the rear of the unit.
Record these numbers in the spaces
provided below. Refer to them
whenever you call upon your Sony
dealer regarding this product.
Model No. MDS-JA20ES
Serial No.
harmful interference to radio
communications. However, there is no
guarantee that interference will not
occur in a particular installation. If this
equipment does cause harmful
interference to radio or television
reception, which can be determined by
turning the equipment off and on, the
user is encouraged to try to correct the
interference by one or more of the
following measures:
– Reorient or relocate the receiving
antenna.
– Increase the separation between the
equipment and receiver.
– Connect the equipment into an outlet
on a circuit different from that to
which the receiver is connected.
– Consult the dealer or an experienced
radio/TV technician for help.
CAUTION
You are cautioned that any changes or
modifications not expressly approved in
this manual could void your authority
to operate this equipment.
For the customers in Canada
CAUTION
TO PREVENT ELECTRIC SHOCK, DO
NOT USE THIS POLARIZED AC PLUG
WITH AN EXTENSION CORD,
RECEPTACLE OR OTHER OUTLET
UNLESS THE BLADES CAN BE FULLY
INSERTED TO PREVENT BLADE
EXPOSURE.
Precautions
INFORMATION
IN NO EVENT SHALL SELLER BE
LIABLE FOR ANY DIRECT,
INCIDENTAL OR
CONSEQUENTIAL DAMAGES OF
ANY NATURE, OR LOSSES OR
EXPENSES RESULTING FROM
ANY DEFECTIVE PRODUCT OR
THE USE OF ANY PRODUCT.
EN
2
This equipment has been tested and
found to comply with the limits for a
Class B digital device, pursuant to Part
15 of the FCC Rules.
These limits are designed to provide
reasonable protection against harmful
interference in a residential installation.
This equipment generates, uses, and can
radiate radio frequency energy and, if
not installed and used in accordance
with the instructions, may cause
On safety
Should any solid object or liquid fall
into the cabinet, unplug the deck and
have it checked by qualified personnel
before operating it any further.
On power sources
• Before operating the deck, check that
the operating voltage of the deck is
Page 3

identical with your local power
supply. The operating voltage is
indicated on the nameplate at the rear
of the deck.
• The unit is not disconnected from the
AC power source (mains) as long as it
is connected to the wall outlet, even if
the unit itself has been turned off.
• If you are not going to use the deck
for a long time, be sure to disconnect
the deck from the wall outlet. To
disconnect the AC power cord, grasp
the plug itself; never pull the cord.
• AC power cord must be changed only
at the qualified service shop.
On operation
If the deck is brought directly from a
cold to a warm location, or is placed in a
very damp room, moisture may
condense on the lenses inside the deck.
Should this occur, the deck may not
operate properly. In this case, remove
the MD and leave the deck turned on
for about an hour until the moisture
evaporates.
On the MiniDisc cartridge
• Do not open the shutter to expose the
MD.
• Do not place the cartridge where it
will be subject to extremes of
sunlight, temperature, moisture or
dust.
On cleaning
Clean the cabinet, panel and controls
with a soft cloth slightly moistened with
a mild detergent solution. Do not use
any type of abrasive pad, scouring
powder or solvent such as alcohol or
benzine.
If you have any questions or problems
concerning your deck, please consult
your nearest Sony dealer.
Welcome!
Thank you for purchasing the Sony
MiniDisc Deck. Before operating the
deck, please read this manual
thoroughly and retain it for future
reference.
About This Manual
Conventions
TABLE OF CONTENTS
Getting Started
Unpacking .............................................................................................................................4
Hooking Up the System...................................................................................................... 4
About the CONTROL A1 Control System ...................................................................... 6
Basic Functions of the CONTROL A1 Control System ................................................. 7
Setting the Clock .................................................................................................................. 7
Recording on an MD........................................................................................ 9
Playing an MD.................................................................................................. 12
Recording on MDs
Notes on Recording .......................................................................................................... 13
Useful Tips for Recording ............................................................................................... 14
Adjusting the Recording Level....................................................................................... 16
Marking Track Numbers While Recording (Track Marking) ................................... 17
Starting Recording With 6 Seconds of Prestored Audio Data
(Time Machine Recording) .......................................................................................... 18
Synchro-Recording With Audio Equipment of Your Choice
(Music Synchro-Recording) ........................................................................................ 19
Synchro-Recording With a Sony CD Player ................................................................ 19
Fading In and Out (Fader)............................................................................................... 21
Recording the Current CD Track (REC-IT Function) ................................................. 22
Recording on an MD Using a Timer.............................................................................. 23
Playing MDs
Using the Display.............................................................................................................. 24
Locating a Specific Track ................................................................................................. 26
Locating a Particular Point in a Track ........................................................................... 27
Playing Tracks Repeatedly .............................................................................................. 27
Playing in Random Order (Shuffle Play)...................................................................... 28
Creating Your Own Program (Program Play) ............................................................. 29
Useful Tips When Recording From MDs to Tape....................................................... 30
Fading In and Out (Fader)............................................................................................... 31
Playing an MD Using a Timer ........................................................................................ 32
Falling Asleep to Music ................................................................................................... 33
Changing the Pitch (Pitch Control Function) .............................................................. 33
Setting the MD Deck Output .......................................................................................... 34
Playing Back With Different Tones (Digital Filter)..................................................... 35
Controlling a Separately Available Sony CD Changer
Hooking Up the System................................................................................................... 36
Controlling a CD Changer from the MD Deck (Mega CD Control Function) ....... 37
Controlling a CD Changer from the MD Deck to Make a Synchro Recording ..... 39
Editing Recorded MDs
Notes on Editing ............................................................................................................... 41
Erasing Recordings (Erase Function) ............................................................................ 41
Erasing a Part of a Track (A-B Erase Function) ........................................................... 43
Dividing Recorded Tracks (Divide Function) ............................................................. 44
Combining Recorded Tracks (Combine Function) ..................................................... 45
Moving Recorded Tracks (Move Function) ................................................................. 46
Labeling Recordings (Title Function) ............................................................................ 47
Undoing the Last Edit (Undo Function) ....................................................................... 51
Additional Information
Display Messages.............................................................................................................. 52
System Limitations ........................................................................................................... 52
Troubleshooting ................................................................................................................ 53
Specifications ..................................................................................................................... 54
Guide to the Serial Copy Management System........................................................... 55
Index .................................................................................................................................... 56
Table of Setup Menus....................................................................................................... 58
Self-Diagnosis Function ................................................................................................... 59
EN
EN
3
Page 4
Getting Started
Getting Started
Unpacking
Check that you received the following items:
• Audio connecting cords (2)
• Remote commander (remote) RM-D19M (1)
• R6 (size-AA) batteries (2)
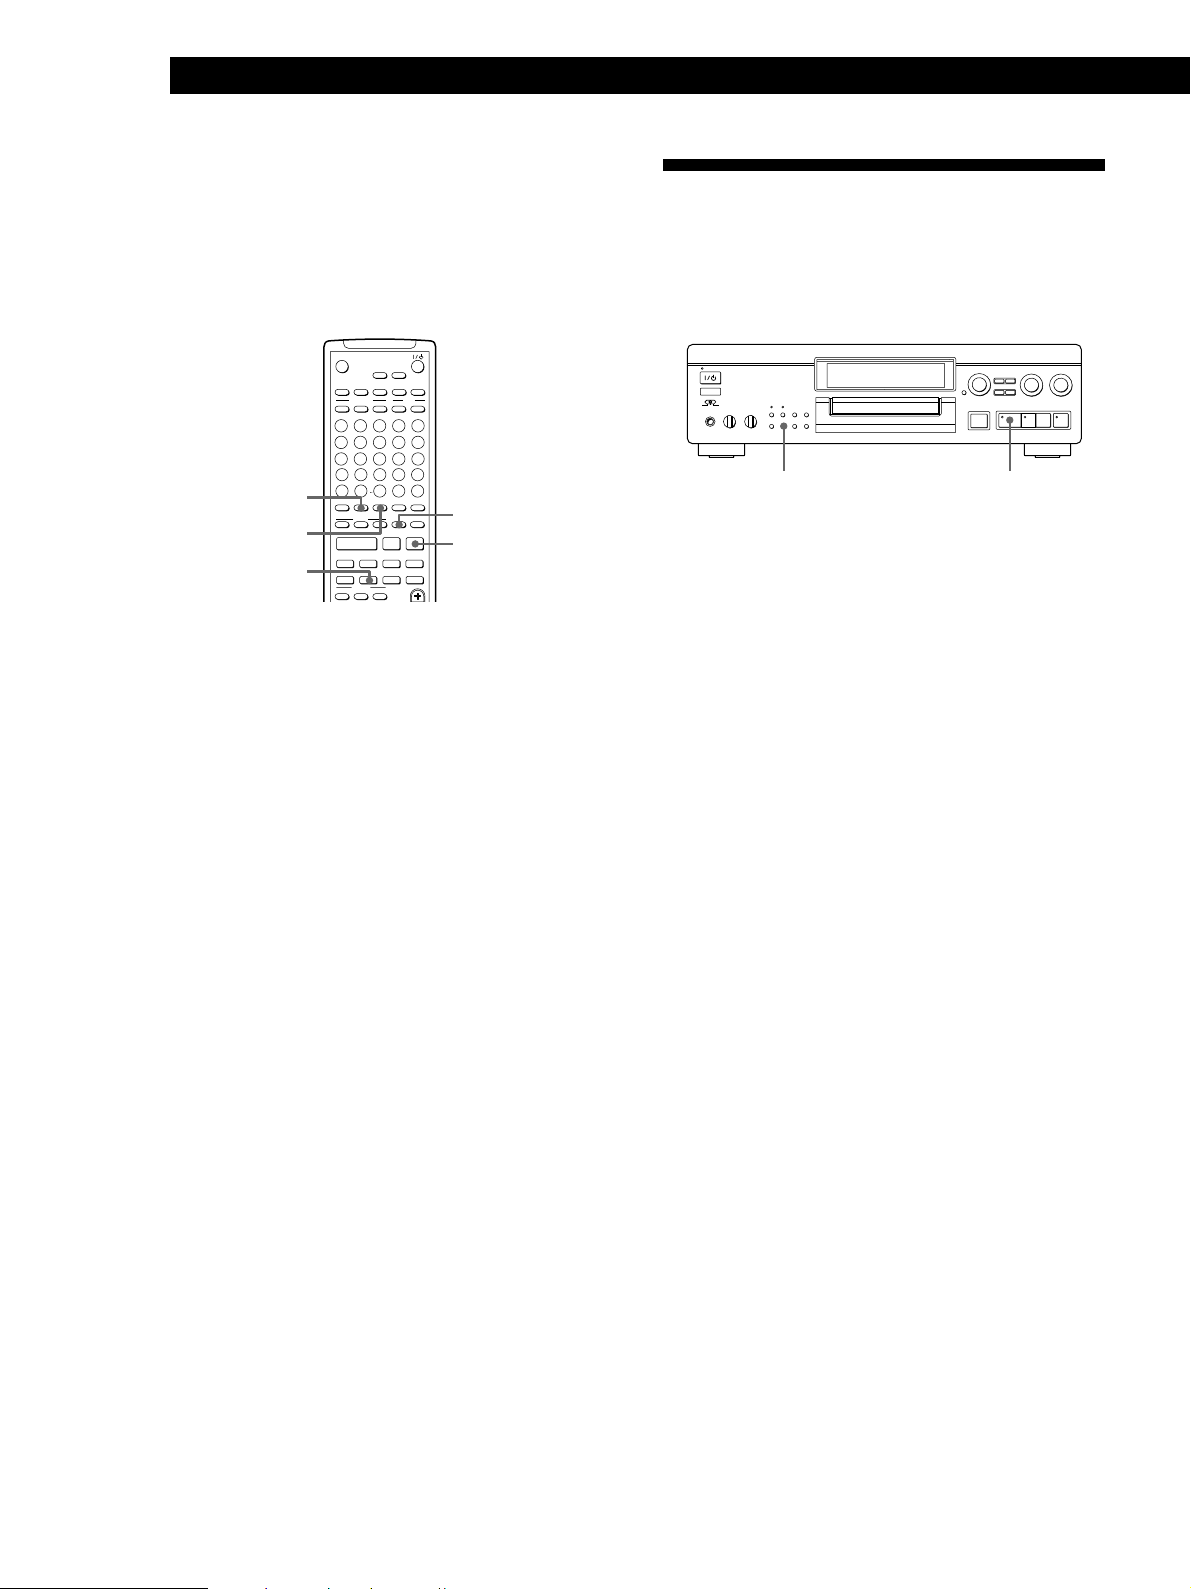
Inserting batteries into the remote
You can control the deck using the supplied remote.
Insert two R6 (size-AA) batteries by matching the +
and – on the batteries. When using the remote, point it
at the remote sensor g on the deck.
z When to replace batteries
With normal use, the batteries should last for about six
months. When the remote no longer operates the deck,
replace all the batteries with new ones.
Hooking Up the System
Overview
This section describes how to hook up the MD deck to
an amplifier or other components such as a CD player
or DAT deck. Be sure to turn off the power of each
component before connection.
S-LINK
LINE(ANALOG)
IN
R
ç
REC
OUT
Amplifier
OUT
LRL
ç
TAPE/MD
IN
DIGITAL
COAXIAL IN
COAXIAL
ç
CD player or
DAT deck, etc.
DIGITAL IN
ç
OPT2OPT1
DIGITAL OUT
CONTROL A1
OPTICAL
COAXIAL
ç
ç
DIGITAL
COAXIAL OUT
to a wall outlet
/
(or to a timer
during timer
recording or
playback)
Notes
• Do not leave the remote near an extremely hot or humid
place.
• Do not drop any foreign object into the remote casing,
particularly when replacing the batteries.
• Do not expose the remote sensor to direct sunlight or
lighting apparatuses. Doing so may cause a malfunction.
• If you don’t use the remote for an extended period of time,
remove the batteries to avoid possible damage from
battery leakage and corrosion.
DIGITAL
OPTICAL OUT
DIGITAL
OPTICAL IN
CD player, DAT deck,
or MD deck, etc.
çç
ç: Signal flow
çç
What cords will I need?
• Audio connecting cords (supplied) (2)
White
(L)
Red
(R)
• Optical cables (not supplied) (3)
• Coaxial digital connecting cables (not supplied) (2)
White
(L)
Red
(R)
EN
4
Page 5
Getting Started
Hookups
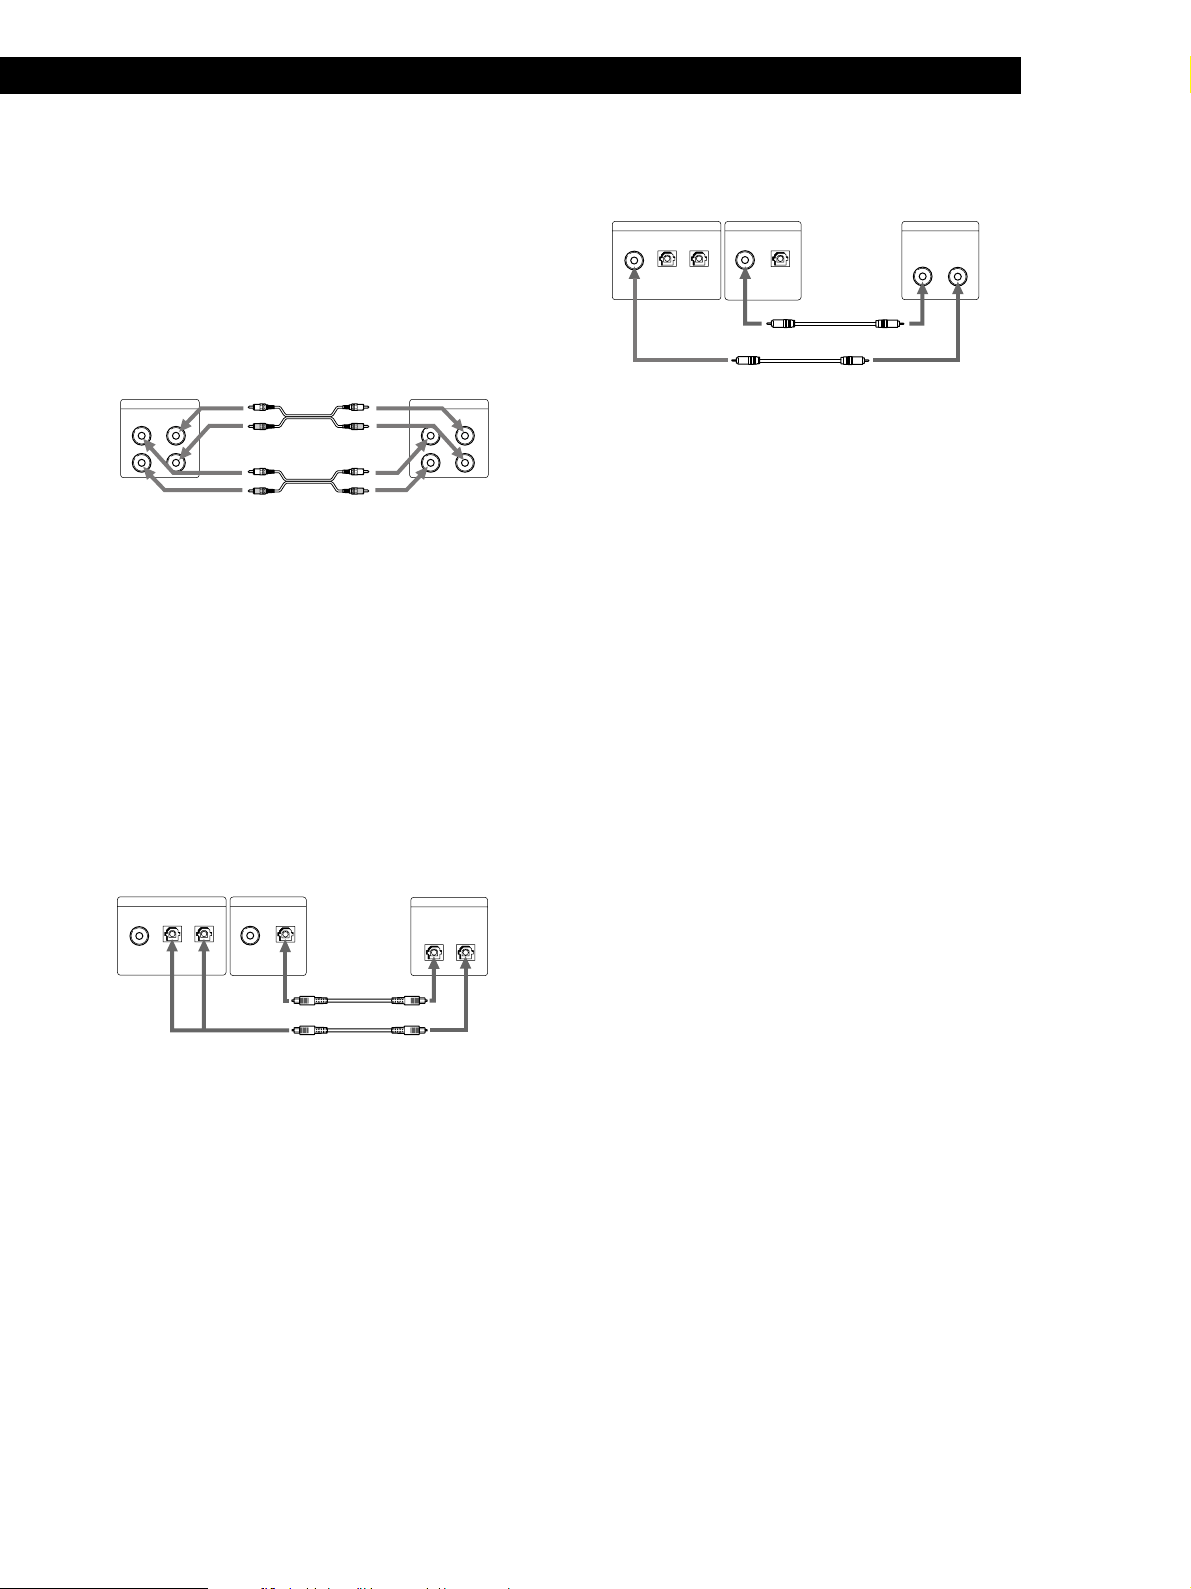
Connecting the deck to an amplifier
Connect the amplifier to the LINE(ANALOG) IN/OUT
jacks using the audio connecting cords (supplied),
making sure to match the color-coded cords to the
appropriate jacks on the components: red (right) to red
and white (left) to white. Be sure to make connections
firmly to prevent hum and noise.
MD deck
LINE(ANALOG)
OUT
IN
L
R
çç
ç: Signal flow
çç
L
R
ç
Ç
Connecting the deck to a digital component such as
a CD player, DAT deck, digital amplifier, or another
MD deck
Connect the component through the DIGITAL IN/
OUT connectors with two (or three) optical cables (not
supplied) and/or two coaxial digital connecting cables
(not supplied).
Amplifier
TAPE/MD
INOUT
L
R
When using the coaxial digital connecting cable
DIGITAL IN
COAXIAL OPT2OPT1
MD deck
DIGITAL OUT
COAXIAL
OPTICAL
Digital component
DIGITAL
COAXIAL
OUT
IN
Ç
Ç
çç
ç: Signal flow
çç
z If “Din Unlock” and “C71” appear in the display
Make sure the optical cable or the coaxial digital
connecting cable is connected properly.
z Automatic conversion of digital sampling rates
during recording
A built-in sampling rate converter automatically
converts the sampling frequency of various digital
sources to the 44.1 kHz sampling rate of your MD deck.
This allows you to record sources such as 32- and
48-kHz DAT or satellite broadcasts, as well as compact
discs and other MDs.
When using the optical cables
Take the caps off the connectors and then insert the plugs
parallelly until they click into place.
Be sure not to bend or tie together the optical cables.
DIGITAL IN
COAXIAL OPT2OPT1
MD deck
DIGITAL OUT
COAXIAL
OPTICAL
Digital component
DIGITAL
OPTICAL
OUTIN
ç
Ç
You can connect the optical cable
to either OPT1 or OPT2
çç
ç: Signal flow
çç
Note
If “Din Unlock” alternates with “C71”, or “Cannot Copy”
appears in the display, recording through the digital
connector is not possible. In this case, record the program
source through the LINE(ANALOG) IN jacks with the
INPUT set at ANALOG.
Connecting the AC power cord
Connect the AC power cord to a wall outlet or to the
outlet of a timer.
EN
5
Page 6
Getting Started
About the CONTROL A1 Control
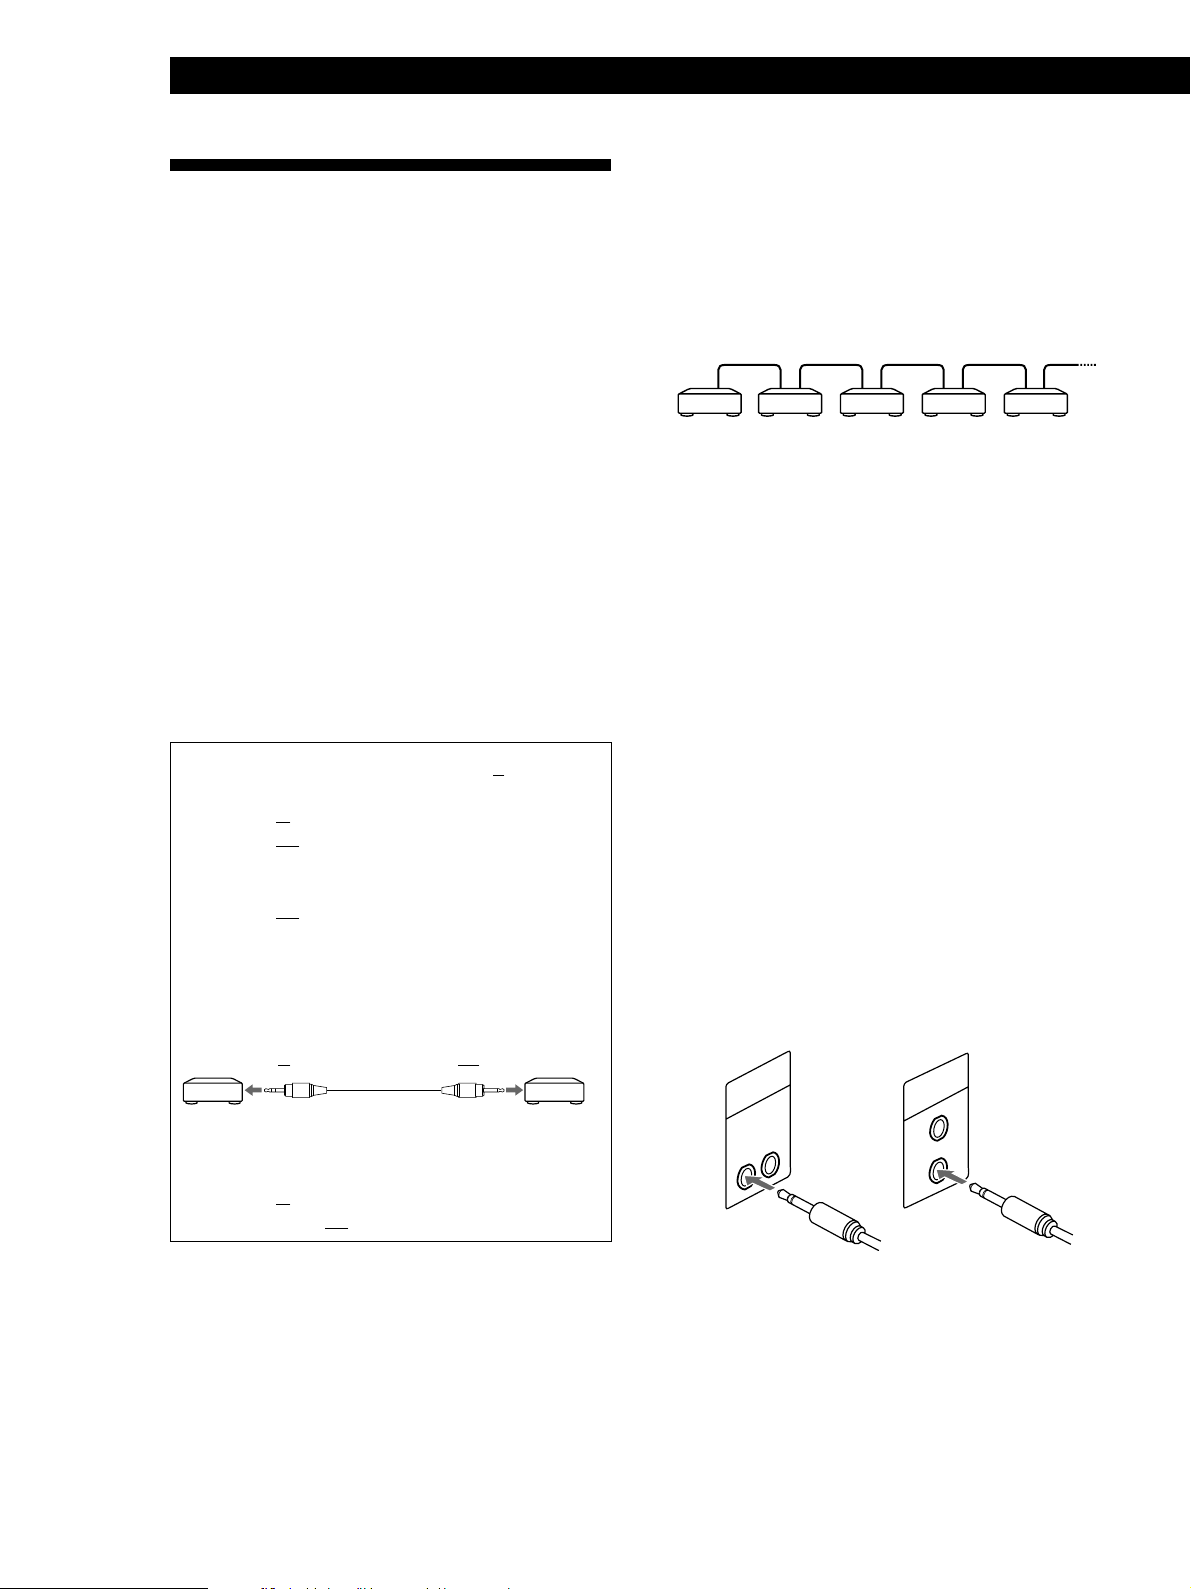
Connecting the CONTROL A1 Control
System
System
This MD deck is compatible with the CONTROL A1
Control System.
The CONTROL A1 Control System was designed to
simplify the operation of audio systems composed of
separate Sony components. CONTROL A1
connections provide a path for the transmission of
control signals which enable automatic operation and
control features usually associated with integrated
systems.
Currently, CONTROL A1 connections between a Sony
MD deck, CD player, amplifier (receiver), and cassette
deck provide automatic function selection and
synchronized recording.
Note
The CONTROL A1 Control System is designed to maintain
upward compatibility as the Control System is upgraded to
handle new functions. In this case, however, older
components will not be compatible with the new functions.
Compatibility with the former CONTROL A System
Although the CDP-CX153 is equipped with a
CONTROL
CONTROL
connecting cable*.
The CDP-CX151 however, cannot be connected to
CONTROL
* Use the Sony RK-G139HG (1 meter [39 3/8 in]) monaural
mini-plug ˜ stereo mini-plug connecting cable or a
similar cable (less than 2 meters [78 3/4 in] long with no
resistance).
To CDP-CX153
(CONTROL A)
A terminal, it can be connected to
A1 components using a special
A1.
To the CONTROL
A1 component
STEREO
MONO
• Connect the CONTROL A1 cables in series to the
CONTROL A1 jacks on the back of each component.
Be sure to connect a CONTROL A1 compatible
amplifier (receiver) to take advantage of the
automatic function selection feature.
Amplifier
(receiver)
MD
deck
CD
player
Tape
deck
Other
component
• The components can be connected in any order.
• You can connect up to ten CONTROL A1 compatible
components.
• The CONTROL A1 functions will work when the
component you want to operate is turned on, even if
all of the connected components are not turned on.
• As a rule, the CONTROL A1 remote control system
should not incorporate more than one of each type of
component (i.e., 1 MD deck, 1 CD player, 1 tape deck
and 1 receiver). You may, however, be able to
connect more than one of certain CD players. Refer
to the operating instructions supplied with the
respective component for details.
About the CONTROL A1 cable
• Use a commercially available 2P (mono) mini-plug cable
less than 2 meters (78 3/4 in) long, with a maximum outer
diameter no greater than 11 mm (7/16 in), and no
resistance. Some CONTROL A1 compatible components
are supplied with a CONTROL A1 cable as an accessory.
• If a component has more than one CONTROL A1 jack, you
can use either one, or connect a different component to
each jack.
S-LINK
CONTROL A1
S-LINK
CONTROL A1
Be sure to connect the STEREO mini-plug to the
CONTROL
to the CONTROL
A component and the MONO mini-plug
A1 component.
“S-LINK” is a general name for Sony’s Bus System, and
includes the CONTROL A1 Control System.
EN
6
Page 7
Getting Started
Basic Functions of the CONTROL A1 Control System
Automatic function selection
When you connect CONTROL A1 compatible Sony
components using CONTROL A1 cables, the function
selector on the amplifier (or receiver) automatically
switches to the correct input when you press the play
button on one of the connected components.
(If you press ( (play button) on the MD deck while
the CD is playing, the function selector on the amplifier
switches from CD to MD.)
Notes
• This function only works when the components are
connected to the amplifier (or receiver) inputs according
to the names on the function buttons. Certain receivers
allow you to switch the names of the function buttons. In
this case, refer to the operating instructions supplied with
the receiver.
• When recording, do not play any components other than
the recording source. It will cause the automatic function
selection to operate.
Setting the Clock
Once you set the MD deck’s internal clock, the MD
deck will automatically record the date and time of all
recordings. When playing a track, you can display the
date and time the track was recorded (see page 25).
Time on this deck is displayed on a 12-hour clock (USA
and Canadian models only) or a 24-hour clock
(European model only).
STANDBY SCROLL/CLOCK SET
g
OPEN/CLOSE
§
MENU/NO
YES
TIME D.O BIT
SCROLL
DISPLAY
PLAY MODE
PROGRAM
SHUFFLE PRESENTRECORDED
CONTINUE
C
B
A
D
H
G
F
I
3
2
1
4
M
L
K
N
8
7
6
9
R
Q
P
S
13
12
11
14
W
V
U
X
18
17
16
19
FILTER
DATE
E
J
5
O
10
T
15
Y
20
≠ AMS ±
0)
§
(
Pp r
DATE
PRESENT
Synchronized recording
This function lets you conduct synchronized recording
between the MD deck and selected source component.
1 Set the source selector on the amplifier (or
receiver) to the source component.
2 Set the source component to pause mode (make
sure both the ( and P indicators light together).
3 Set the deck to recording pause mode.
4 Press P on the deck.
The source component is released from the pause
mode, and recording begins shortly thereafter.
When playback ends from the source component,
recording stops.
Notes
• Do not set more than one component to the pause mode.
• This MD deck is equipped with a special synchronized
recording function that uses the CONTROL A1 Control
System (see “Making a synchro recording from a CD
player connected with a control A1 cable” on page 20).
You can also make a synchro recording using the Mega
CD Control Function via the CONTROL A1 Control
System (see “Controlling a CD Changer from the MD
Deck to Make a Synchro Recording” on page 39).
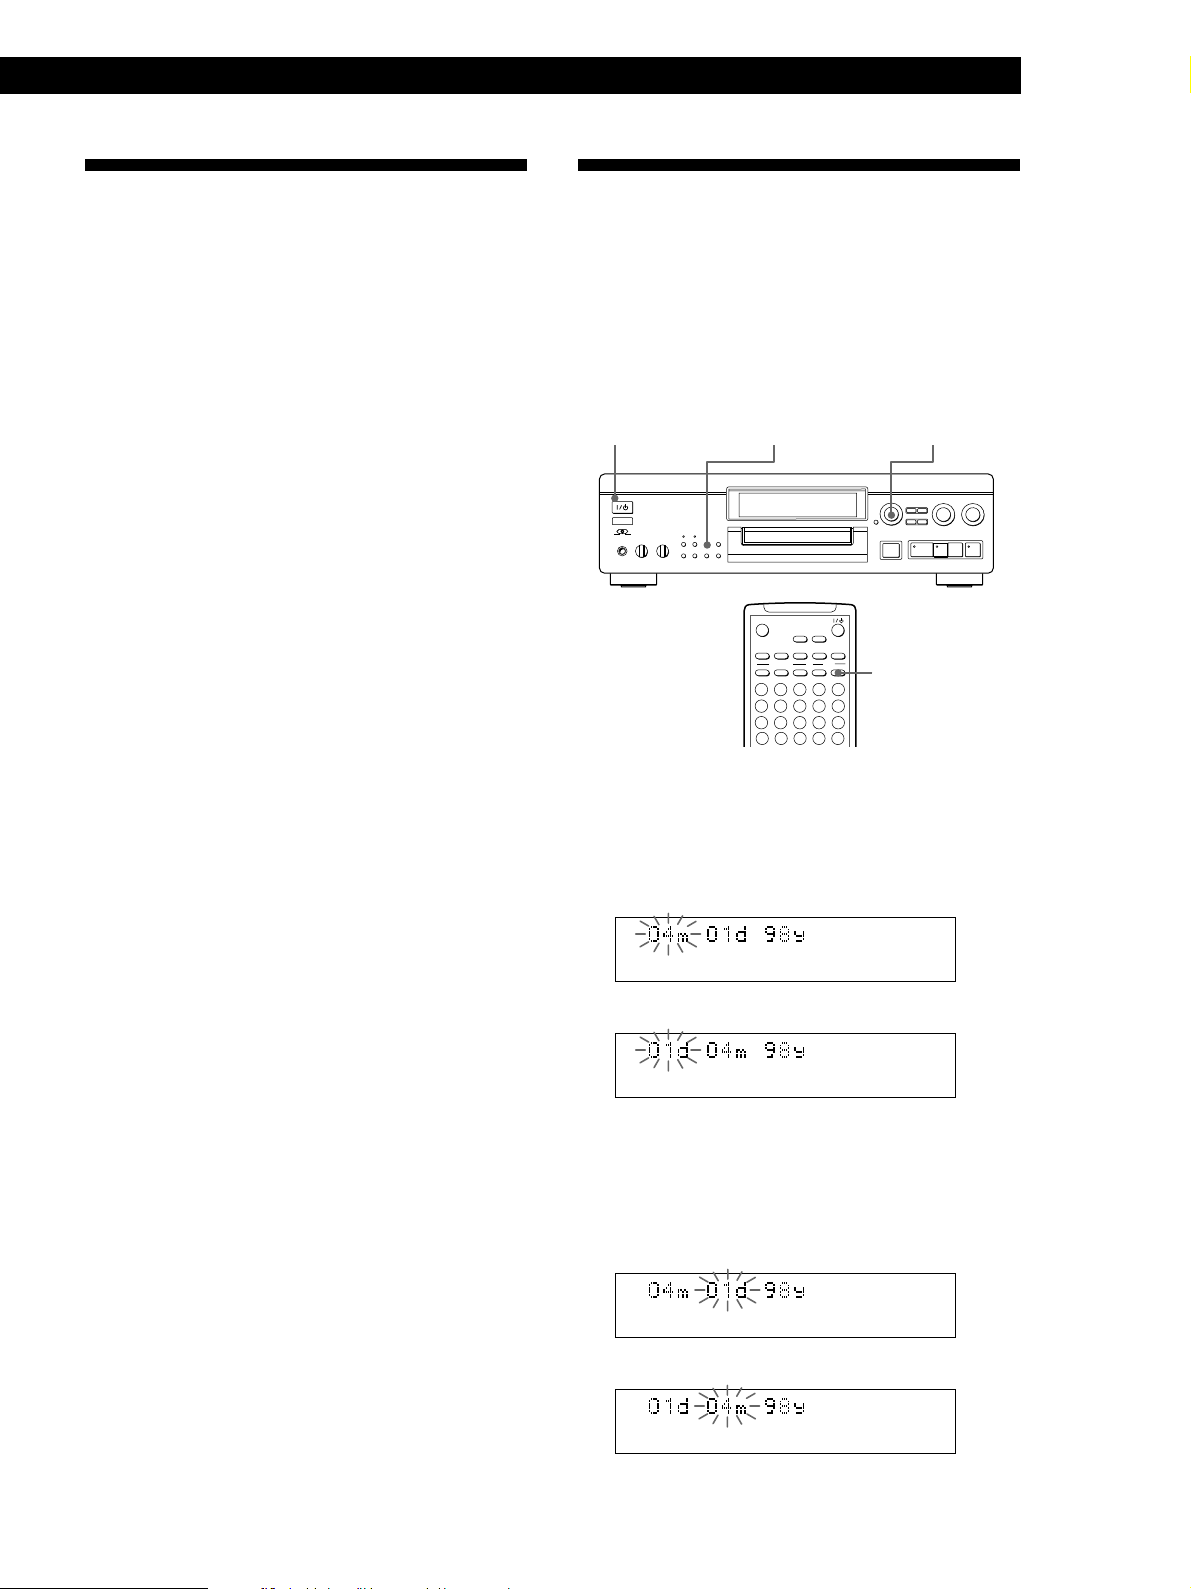
1 With the deck in standby status (the STANDBY
indicator lights red), press SCROLL/CLOCK SET
down for about 2 seconds until the month (or
day) indication in the display starts flashing.
USA and Canadian models
European model
2 Turn AMS to enter the current month (or day),
then press AMS.
The month (or day) indication stops flashing, and
the day (or month) indication starts flashing.
USA and Canadian models
European model
(Continued)
EN
7
Page 8
Getting Started
3 Repeat Step 2 to enter the month, day, year, hour,
and minute.
USA and Canadian models
European model
z For precise time and date stamping of recordings
Reset the time at least once a week.
Note
If the AC power cord is disconnected for a long time, the
memorized clock settings will disappear and “Standby” will
flash in the display the next time you plug in and turn on the
deck. If this happens, reset the clock.
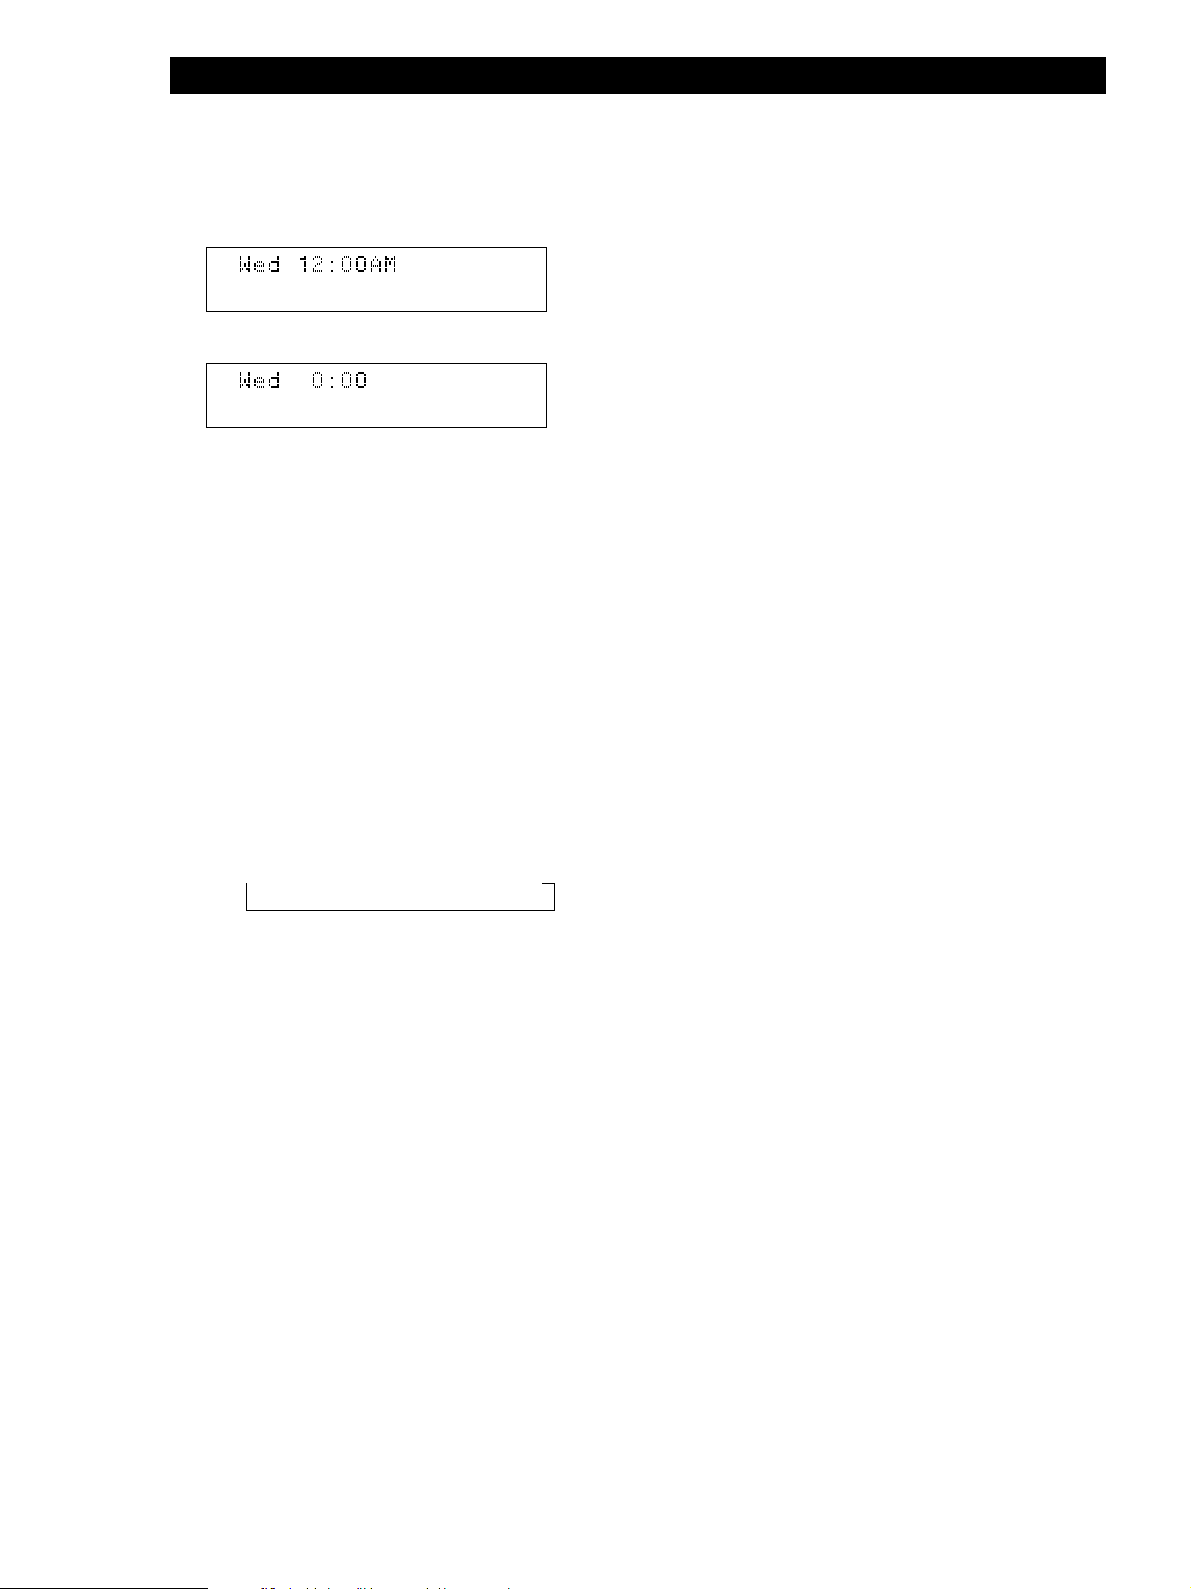
Displaying the current date and time Z
You can display the current date and time any time
even when the deck is in standby status.
Changing the date and/or time
With the deck in standby status (the STANDBY
1
indicator lights red), press SCROLL/CLOCK SET
down for about 2 seconds until the month (or
day) indication in the display starts flashing.
2 Press SCROLL/CLOCK SET or AMS repeatedly
until the item you want to change flashes.
3 Turn AMS to change the contents of the selected
item.
4 To complete the setting, press AMS repeatedly
until all items stop flashing.
Press DATE PRESENT.
Each press of the button changes the display as
follows:
n Current display n Date n Time
z You can display the current date and time with an
on-deck button
Press the SCROLL/CLOCK SET button. Each press of
the button changes the display in the same order as the
DATE PRESENT button on the remote does.
EN
8
Page 9
Basic Operations
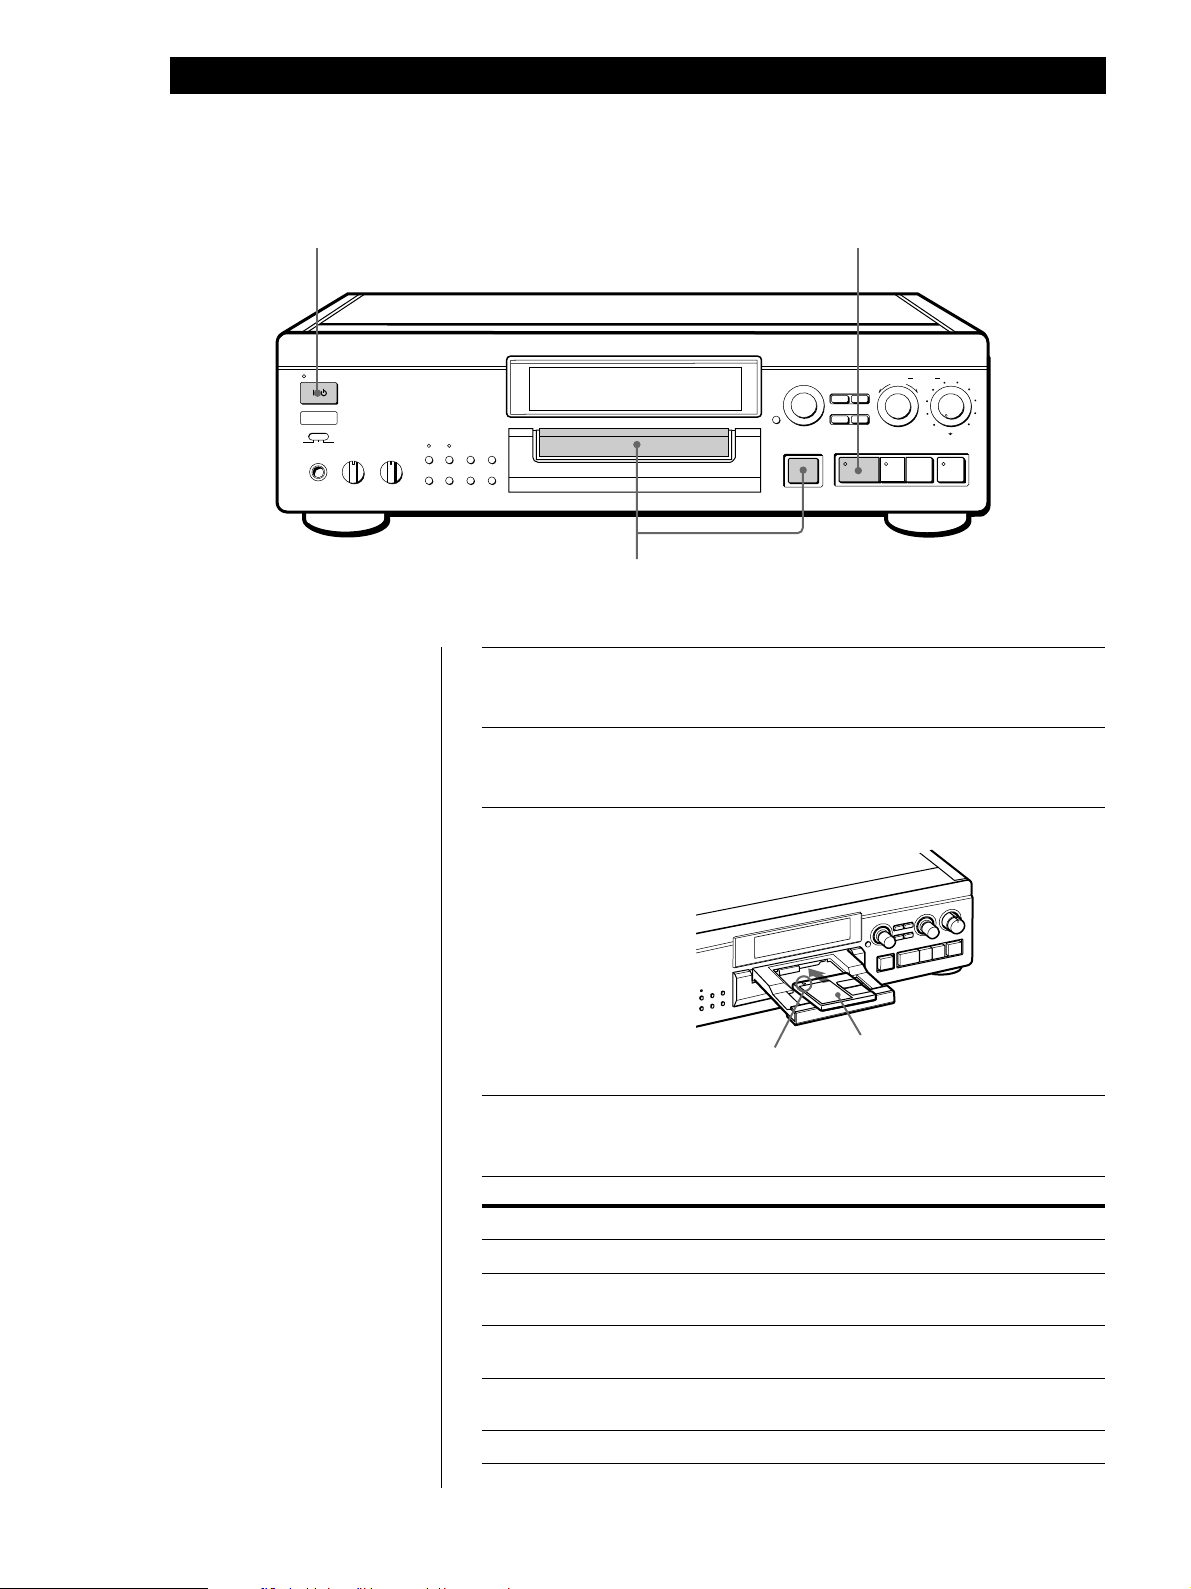
Recording on an MD
Basic Operations
2
STANDBY
g
TIMER
OFFREC PLAY
PHONES PHONE LEVEL
010
–
DIGITAL
10
ANALOG
REC LEVEL
456
3
+
2
1
0
r
REC
7
8
9
10
RL
Basic Operations
6,7 5,8
AMS
≠
±
MENU/NO
YES
CLEAR
DISPLAY/
SCROLL/
CHAR
•
ANALOG
MEGA CONTROL
FADER
FILTER
PLAY MODE
CLOCK SET
REPEAT
TIME
3
INPUT
OPT1
COAX
OPT2
•
•
•
4119
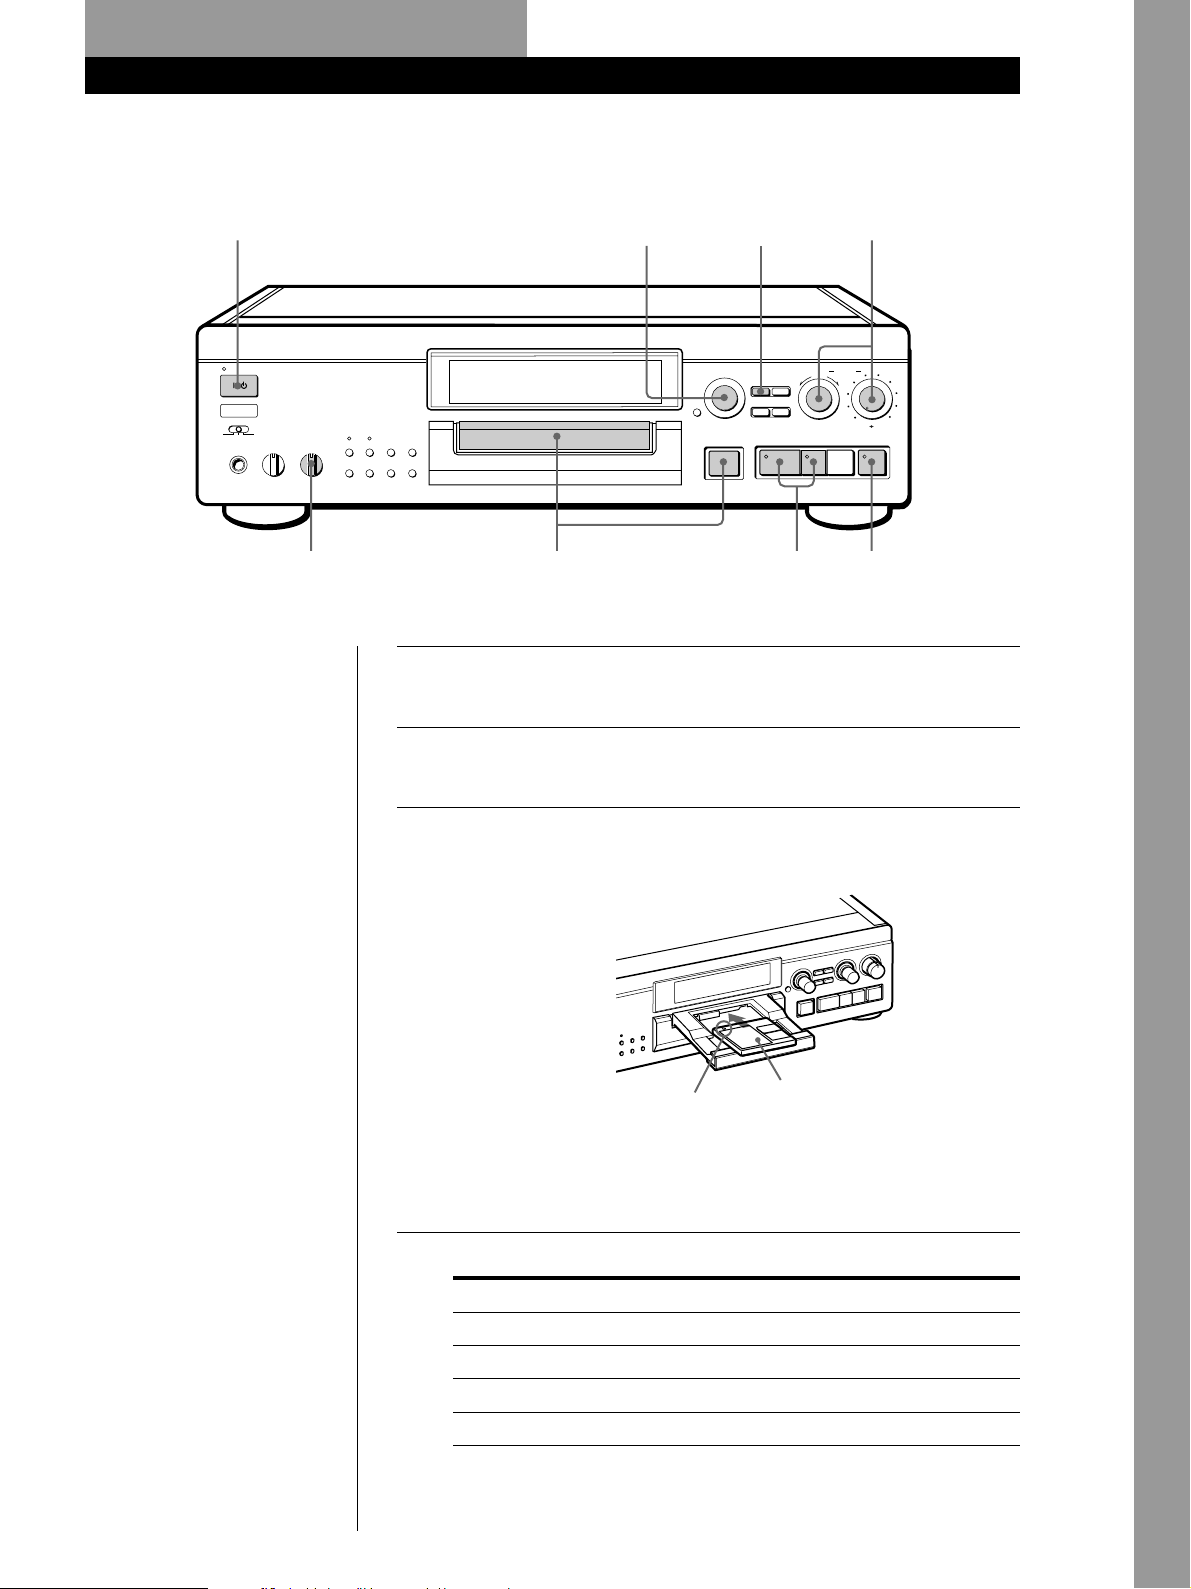
Turn on the amplifier and play the program source you want
1
to record.
PUSH ENTER
§
OPEN/CLOSE
0)
(Pp
Press 1/u.
2
The STANDBY indicator turns off.
Press § OPEN/CLOSE to open the disc tray, insert a
3
recordable MD, and then press the button again to close the
disc tray.
With the arrow pointing this way
With the label side up
If the MD has a recorded material on it, the deck will
automatically start recording from the end of the last recorded
track.
Set INPUT to the corresponding input connector.
4
To record through Set INPUT to
DIGITAL IN OPT1 OPT1
DIGITAL IN OPT2 OPT2
DIGITAL IN COAXIAL COAX
LINE(ANALOG) IN ANALOG
(Continued)
EN
9
Page 10

Basic Operations
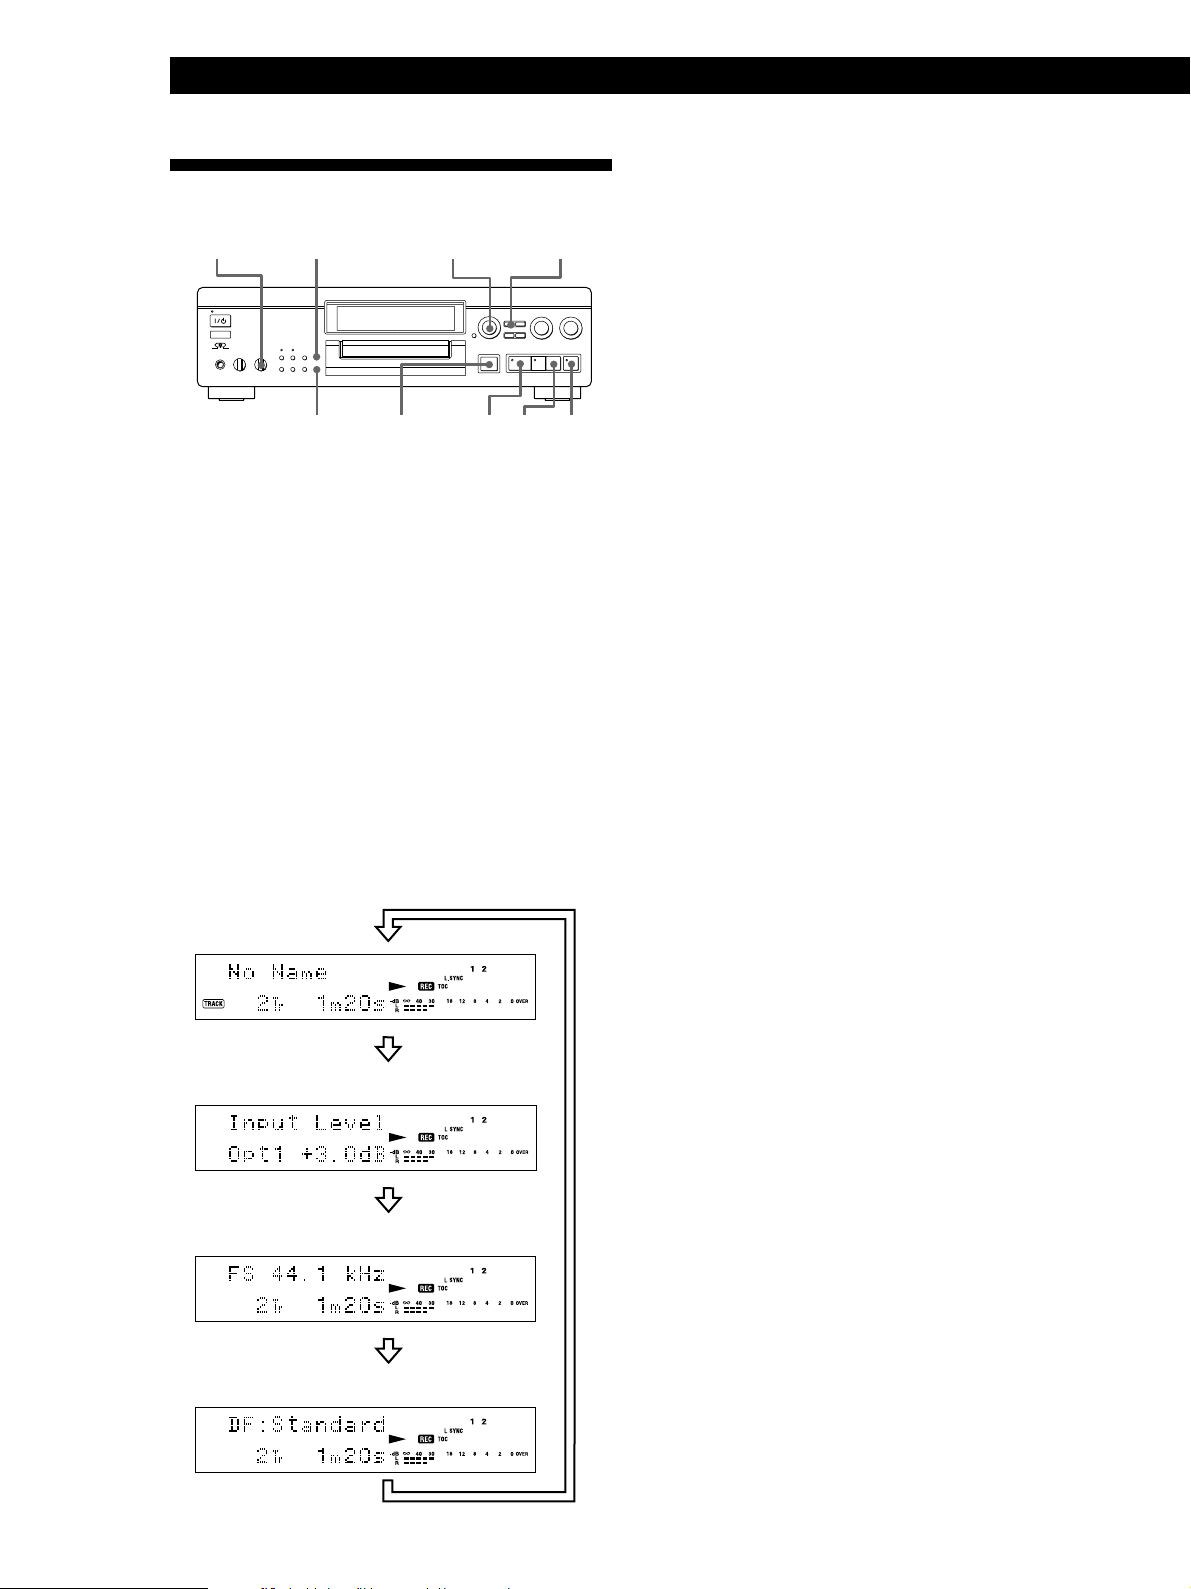
Press MENU/NO twice to display “Setup Menu”.
5
Turn AMS to select “Setup 16”, then press AMS.
6
Turn AMS to select the mode you want to record in, then press
7
AMS.
To record in Select*
Stereo sound Stereo Rec
Monaural sound*
*1You cannot select the mode during recording or recording pause.
*2In the monaural recording, you can record about two times longer than in
the stereo recording.
Press MENU/NO.
2
1
Mono Rec
8
Press r REC.
9
The deck becomes ready to record.
Adjust the recording level.
10
When recording through the DIGITAL IN (COAXIAL, OPT1, or
OPT2) connector
Adjust the DIGITAL REC LEVEL control so that the peak
level meter in the display is a maximum of 0 dB. For details,
see page 16.
When recording through the LINE(ANALOG) IN jacks
Setting the ANALOG REC LEVEL L/R controls at 4 is
satisfactory for most purposes. For details, see page 16.
Press ( or P.
11
Recording starts.
Start playing the program source.
12
10
EN
Page 11
Basic Operations
When “TOC Writing” flashes in
the display
The deck is currently updating the
Table Of Contents (TOC). Do not
move the deck or pull out the AC
power cord. Changes to an MD
made through recording are saved
only when you update the TOC by
ejecting the MD or changing the
deck to standby by pressing the
1/u switch.
Do not disconnect the deck from the power source immediately after
recording
If you do, recorded material may not be saved to the MD. To save the
material, after recording, press § OPEN/CLOSE to take out the MD or
change the deck to standby by pressing 1 /u . “TOC Writing” will flash in the
display at this time.
After “TOC Writing” stops flashing and goes out, you can pull out the AC
power cord.
To Press
Stop recording p
Pause recording* P. Press the button again or press ( to resume
recording.
Take out the MD § OPEN/CLOSE after stopping
* Whenever you pause recording, the track number increases by one. For example, if
you paused recording while recording on track 4, the track number increases by
one and recording continues on the new track when restarted.
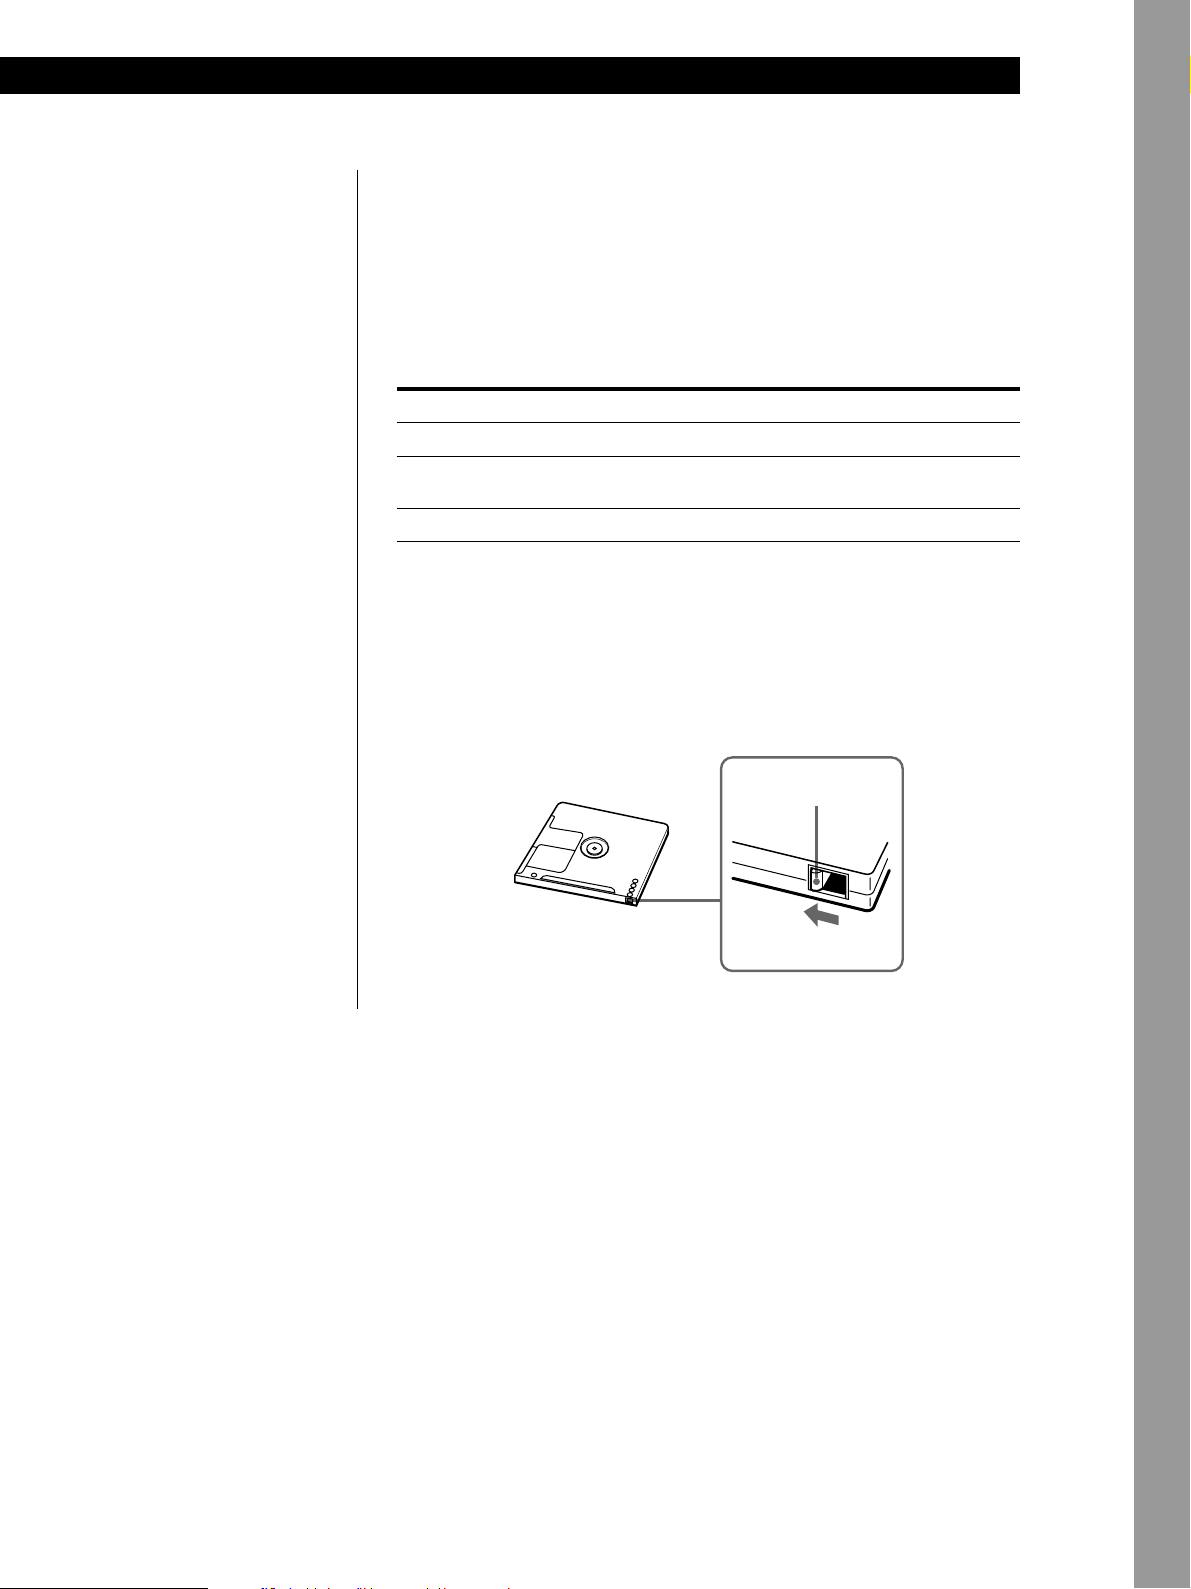
To protect an MD against accidental erasure
To make it impossible to record on an MD, slide the tab in the direction of
arrow, opening the slot. To allow recording, close the slot.
Basic Operations
Rear of the disc
Record-protect tab
Slide the tab in the
direction of arrow
11
EN
Page 12
Basic Operations
Playing an MD
24
STANDBY
g
TIMER
OFFREC PLAY
PHONES PHONE LEVEL
010
DIGITAL
ANALOG
AMS
≠
±
MENU/NO
CLEAR
DISPLAY/
SCROLL/
CHAR
•
ANALOG
MEGA CONTROL
FADER
FILTER
PLAY MODE
CLOCK SET
REPEAT
TIME
INPUT
OPT1
COAX
OPT2
•
•
•
PUSH ENTER
§
OPEN/CLOSE
0)
(Pp
REC LEVEL
YES
–
456
7
3
+
8
2
9
1
10
0
RL
r
REC
3
Turn on the amplifier and set the source selector to the position
1
for MD deck.
Press 1/u.
2
The STANDBY indicator turns off.
Insert an MD and close the disc tray.
3
12
With the label side up
z You can locate and play back
With the arrow pointing this way
a track while the deck is
stopped
1 Turn AMS (or press = or
+) until the number of the
track you want to play
appears.
2 Press AMS or (.
Press (.
4
The deck starts playing. Adjust the volume on the amplifier.
To Do the following:
Stop playing Press p.
z To use headphones
Connect them to PHONES jack.
Use PHONE LEVEL to adjust
the volume.
Pause playing Press P. Press the button again or press
resume playing.
Go to the next track Turn AMS clockwise (or press + on the
( to
remote).
z You can change the MD
playback speed
See “Changing the Pitch” on
page 33.
EN
Go to the current track Turn AMS counterclockwise (or press = on the
or the preceding track remote).
Take out the MD Press § OPEN/CLOSE after stopping playing.
Page 13

Notes on Recording
If “Protected” alternates with “C11” in the display
The MD is record-protected. Close the slot to record
on the disc (see “To protect an MD against accidental
erasure” on page 11).
If “Din Unlock” alternates with “C71” in the display
• The digital program source is not connected as you
set with the INPUT in Step 4 on page 9.
To continue, connect the program source properly.
• The program source is not on.
Turn on the program source.
Depending on the menu settings and source being
recorded, track numbers are marked in following
ways:
• When recording from a CD or MD with the INPUT
set at COAX, OPT1 or OPT2 and the source
connected through the respective digital connector:
The deck automatically marks track numbers in the
same sequence as the original. If, however, a track is
repeated two or more times (e.g. by single-track
repeat play) or two or more tracks with the same
track number (e.g. from different MDs or CDs) are
played, the track or tracks are recorded as part of a
single, continuous track with a single track number.
If the source is a CD, track numbers may not be
marked for tracks of less than 4 seconds.
• When recording from some CD players and multi
disc players connected through one of the digital
input connectors with the INPUT set at the
respective digital position:
The deck may not automatically mark track
numbers. In these cases, mark the track numbers
after recording, using the deck’s Divide Function (see
“Dividing Recorded Tracks” on page 44).
• When recording from a source connected through
the LINE(ANALOG) IN jacks with the INPUT set at
ANALOG or when recording from a DAT or satellite
broadcast connected through one of the digital input
connectors with the INPUT set at the respective
digital position and “T.Mark Off” selected in Setup
Menu 02:
The source will be recorded as a single track.
• Even while recording an analog source or a DAT or
satellite broadcast, you can mark track numbers if
“T.Mark LSyn” is selected in Setup Menu 02 (see
“Marking Track Numbers While Recording” on
page 17).
Recording on MDsRecording on MDs
• When recording from DAT or satellite broadcasts
with the INPUT set at the respective digital position,
the deck automatically marks a track number
whenever the sampling frequency of the input signal
changes regardless of the Setup Menu 02 setting.
z You can mark track numbers during or after
recording
For details, see “Marking Track Numbers While
Recording” (page 17) and “Dividing Recorded Tracks”
(page 44).
When “TOC Writing” flashes in the display
The deck is currently updating the Table Of Contents
(TOC). Do not move the deck or pull out the AC
power cord. Changes to an MD made through
recording are saved only when you update the TOC by
ejecting the MD or changing the deck to standby by
pressing the 1 /u switch.
The MD deck uses the SCMS (Serial Copy
Management System on page 55)
MDs recorded through digital input connector cannot
be copied onto other MDs or DAT tapes through the
digital output connector.
When the deck is recording or in recording pause,
digital signals input through one of the digital input
connectors are output to the respective digital
output connector with the same sampling rate
To change the digital input signal to another sampling
rate for output (without recording it to an MD), use
Input Monitor Function (see page 14).
13
EN
Page 14
Recording on MDs
Useful Tips for Recording
INPUT DISPLAY/CHAR
≠ AMS ±
Monitoring the input signal (Input Monitor)
Before starting recording, you can monitor the selected
input signal through the deck’s output connectors.
MENU/NO
1 Press § OPEN/CLOSE to remove the MD.
(
0)
§
(
Pp r
r REC
p
g
TIME
§ OPEN/CLOSE
Checking the remaining recordable time on
the MD
Press TIME.
• When you press the TIME button repeatedly while
the deck is stopped, the display alternates between
total disc playing time and remaining recordable
time on the MD (see page 24).
• When you press the TIME button repeatedly while
recording, the display alternates between the
recording time of the current track and the
remaining recordable time on the MD.
Changing the display while recording
Each time you press DISPLAY/CHAR (or DISPLAY)
while the deck is recording, you can change the display
as follows:
Normal display
Press
Recording level display
2 Set INPUT according to the input signal you want
to monitor.
When the INPUT is set at ANALOG
The analog signal input through the
LINE(ANALOG) IN jacks is output to the
respective DIGITAL OUT connector after A/D
conversion, and then to the LINE(ANALOG) OUT
jacks and the PHONES jack after D/A conversion.
When the INPUT is set at OPT1, OPT2 or COAX
After passing through the sampling rate converter,
the digital signal input through the respective
DIGITAL IN connector is output to the respective
DIGITAL OUT connector, and after D/A
conversion to the LINE(ANALOG) OUT jacks and
PHONES jack.
3 Press r REC.
If the INPUT is set at ANALOG, “AD-DA”
appears in the display.
If the INPUT is set at OPT1, OPT2 or COAX,
“-DA” appears in the display.
If “Auto Cut” appears in the display
(Auto Cut)
There has been no sound input for about 30 seconds
during recording. The 30 seconds of silence are
replaced by a blank of about 3 seconds and the deck
changes to recording pause.
If the deck continues pausing for about 10 minutes
after the Auto Cut Function activated, recording stops
automatically.
Note that this function does not activate even if there
has been no sound input for about 30 seconds when
the deck started recording from the blank portion.
14
Press
z You can turn off the Auto Cut Function
FS (sampling frequency) display
Press
DF (digital filter) display
Press
EN
For details, see “To turn off the Smart Space Function
and Auto Cut Function” on page 15. Note that when
you turn off the Auto Cut Function, the Smart Space
Function is turned off automatically.
Page 15

Recording on MDs
If “Smart Space” appears in the display
(Smart Space)
There has been an extended silence of 4 to 30 seconds
in length during recording. The silence is replaced
with a blank of about 3 seconds and the deck continues
recording. Note that new track numbers may not be
marked for portions recorded while this function is
activated. Also, the Smart Space Function does not
activate even if there has been an extended silence of 4
to 30 seconds in length when the deck started
recording from the blank portion.
To turn off the Smart Space Function and Auto Cut
Function
1 While the deck is stopped, press MENU/NO twice
to display “Setup Menu”.
2 Turn AMS to select “Setup 05”, then press AMS.
3 Turn AMS to select “S.Space Off”, then press AMS.
4 Press MENU/NO.
To turn on the Smart Space Function and Auto Cut
Function again
1 Do Steps 1 and 2 in “To turn off the Smart Space
Function and Auto Cut Function” above.
2 Turn AMS to select “S.Space On”, then press AMS.
3 Press MENU/NO.
Notes
• This function operates only for the digital signal input
through the digital input connector.
• The bit length is normally set to 20 bits, but you can select
from 24, 20 or 16 bits.
• If you switch the bit length during recording, the sound
drops out momentarily.
Playing back tracks just recorded
Do this procedure to immediately play back tracks that
have just been recorded.
Press ( immediately after stopping recording.
Playback starts from the first track of the material just
recorded.
To play from the first track of the MD after
recording
1 Press p again after stopping recording.
2 Press (.
Playback starts from the first track of the MD.
Recording Over Existing Tracks
Follow the procedure below to record over existing
material just as you would on an analog cassette tape.
Notes
• When you turn off the Smart Space Function, the Auto Cut
Function is also turned off automatically.
• The Smart Space Function and Auto Cut Function are
factory set to on.
• If you turn off the deck or disconnect the AC power cord,
the deck will recall the last setting (On or Off) of the Smart
Space and Auto Cut Functions the next time you turn on
the deck.
Switching the bit length
You can improve the recording quality by switching
the bit length to match the CD player, DAT deck or
other digital components connected to the digital input
connector.
1 While the deck is stopped, press MENU/NO
twice to display “Setup Menu”.
2 Turn AMS to select “Setup 12”, then press AMS.
3 Turn AMS to select the desired bit length, then
press AMS.
1 Do Steps 1 to 8 in “Recording on an MD” on
pages 9 and 10.
2 Turn AMS (or press = or +) until the
number of the track to be recorded over appears.
3 To record from the start of the track, continue
from Step 9 in “Recording on an MD” on page 10.
z While “Tr” flashes in the display
The deck is recording over an existing track, and stops
flashing when it reaches the end of the recorded
portion.
z To record from the middle of the track
1 After Step 2 above, press ( to start playback.
2 Press P where you want to start recording.
3 Continue from Step 9 in “Recording on an MD” on
page 10.
Note
You cannot record from the middle of an existing track when
the “PROGRAM” or “SHUFFLE” is on.
4 Press MENU/NO.
15
EN
Page 16
Recording on MDs
Adjusting the Recording Level
You can adjust the recording level before starting
recording.
≠ AMS ±
DIGITAL REC LEVEL
4 Stop playing the program source.
5 To start recording, do the procedure starting from
Step 11 in “Recording on an MD” on page 10.
z The Peak Hold Function freezes the level meter
display at the highest level reached by the input
signal
g
MENU/NO
W
V
U
18
17
16
–
Z
23
22
21
A˜B
REPEAT
!
?
/
>
25
WRITE CLEAR
NUM
CHAR
NAME
·
=
+ r
T.REC MUSIC SYNC
0
)
CD-SYNC
STANDBY=STARTPSTOP
CD PLAYER FADER
+
X
19
.
24
A.SPACE
(
P p
DIGITAL REC LEVEL
/ANALOG OUT LEVEL
ANALOG REC LEVEL L/R
Y
20
,
25
M.SCAN
)
P.HOLD
P.HOLD
REC-IT
DIGITAL REC LEVEL
/ANALOG OUT LEVEL +/–
0)
§
(
Pp r
Adjusting the digital recording level
You do not normally need to adjust the digital
recording level. The level is adjusted mainly when the
level of the source is low.
1 Do Steps 1 to 9 in “Recording on an MD” on
pages 9 and 10.
2 Play the portion of the program source with the
strongest signal level.
3 While monitoring the sound, turn DIGITAL REC
LEVEL (or press DIGITAL REC LEVEL/
ANALOG OUT LEVEL +/–) to adjust the
recording level so that the peak level meters reach
their highest point without turning on the OVER
indication. Occasional lighting of “OVER” is
acceptable.
To turn on the Peak Hold Function by Setup Menu 06
setting
1 While the deck is stopped, press MENU/NO twice to
display “Setup Menu”.
2 Turn AMS to select “Setup 06”, then press AMS.
3 Turn AMS to select “P.Hold On”, then press AMS.
4 Press MENU/NO.
To turn on the Peak Hold Function using the remote
Press P.HOLD to display “P.Hold On.”
To turn off the Peak Hold Function, select “P.Hold Off”
in Step 3 above. (Or press P.HOLD on the remote to
display “P.Hold Off”.)
Adjusting the analog recording level
1 Do Steps 1 to 9 in “Recording on an MD” on
pages 9 and 10.
2 Play the portion of the program source with the
strongest signal level.
3 While monitoring the sound, turn ANALOG REC
LEVEL L/R to adjust the recording level.
If the output level of the connected component is
too low, it may not be possible to set the
recording level to maximum.
4 Stop playing the program source.
5 To start recording, do the procedure starting from
Step 11 in “Recording on an MD” on page 10.
16
OVER indication
If the digital signal level of the source is too low,
it may not be possible to set the recording level to
maximum.
EN
Page 17
Marking T rack Numbers While
Recording on MDs
To select “T.Mark Off” or “T.Mark LSyn” in Setup
Menu 02, do the procedure below:
Recording (Track Marking)
You can mark track numbers either manually or
automatically. By marking track numbers at specific
points, you can quickly locate the points later using the
AMS Function, or use various Editing Functions.
≠ AMS ±r REC
g
Marking track numbers manually
(Manual Track Marking)
You can mark track numbers at any time while
recording on an MD.
Press r REC at the place you want to add a track mark
while recording.
Marking track numbers automatically
(Automatic Track Marking)
The deck adds track marks differently in the following
cases:
• When recording from CDs or MDs with the INPUT
set at OPT1, OPT2 or COAX:
The deck marks track numbers automatically.
However, the Automatic Track Marking Function
may not activate when recording from some CD
players and multi disc players.
• In all other cases:
If “T.Mark LSyn” is selected in Setup Menu 02, the
deck marks a new track number whenever the signal
drops to the specified level or below for about
1.5 seconds or longer, then rises to a specified level.
0)
§
(
MENU/NO
Pp r
1 While the deck is stopped, press MENU/NO
twice to display “Setup Menu”.
2 Turn AMS to select “Setup 02”, then press AMS.
3 Turn AMS to select “T.Mark Off” or “T.Mark
LSyn”, then press AMS.
“L.SYNC” lights up when you select “T.Mark
LSyn”.
4 Press MENU/NO.
z You can set the reference level that must pass
before a rise marks a new track number
In Automatic Track Marking, the input signal must
remain at or below a given reference level for
1.5 seconds or longer before a rise above the reference
level will mark a new track number.
Do the following procedure to specify the reference
level. Note that “T.Mark LSyn” should be selected in
Setup Menu 02.
1 While the deck is stopped, press MENU/NO twice to
display “Setup Menu”.
2 Turn AMS to select “Setup 03”, then press AMS.
3 Turn AMS to set the reference level.
You can set the reference level at –72 dB to 0 dB in
2 dB steps.
4 After selecting the reference level, press AMS.
5 Press MENU/NO.
Note
If you turn off the deck or disconnect the AC power cord, the
deck will recall the last settings of the Automatic Track
Marking Function (“T.Mark LSyn” or “T.Mark Off”) the next
time you turn on the deck.
17
EN
Page 18
Recording on MDs
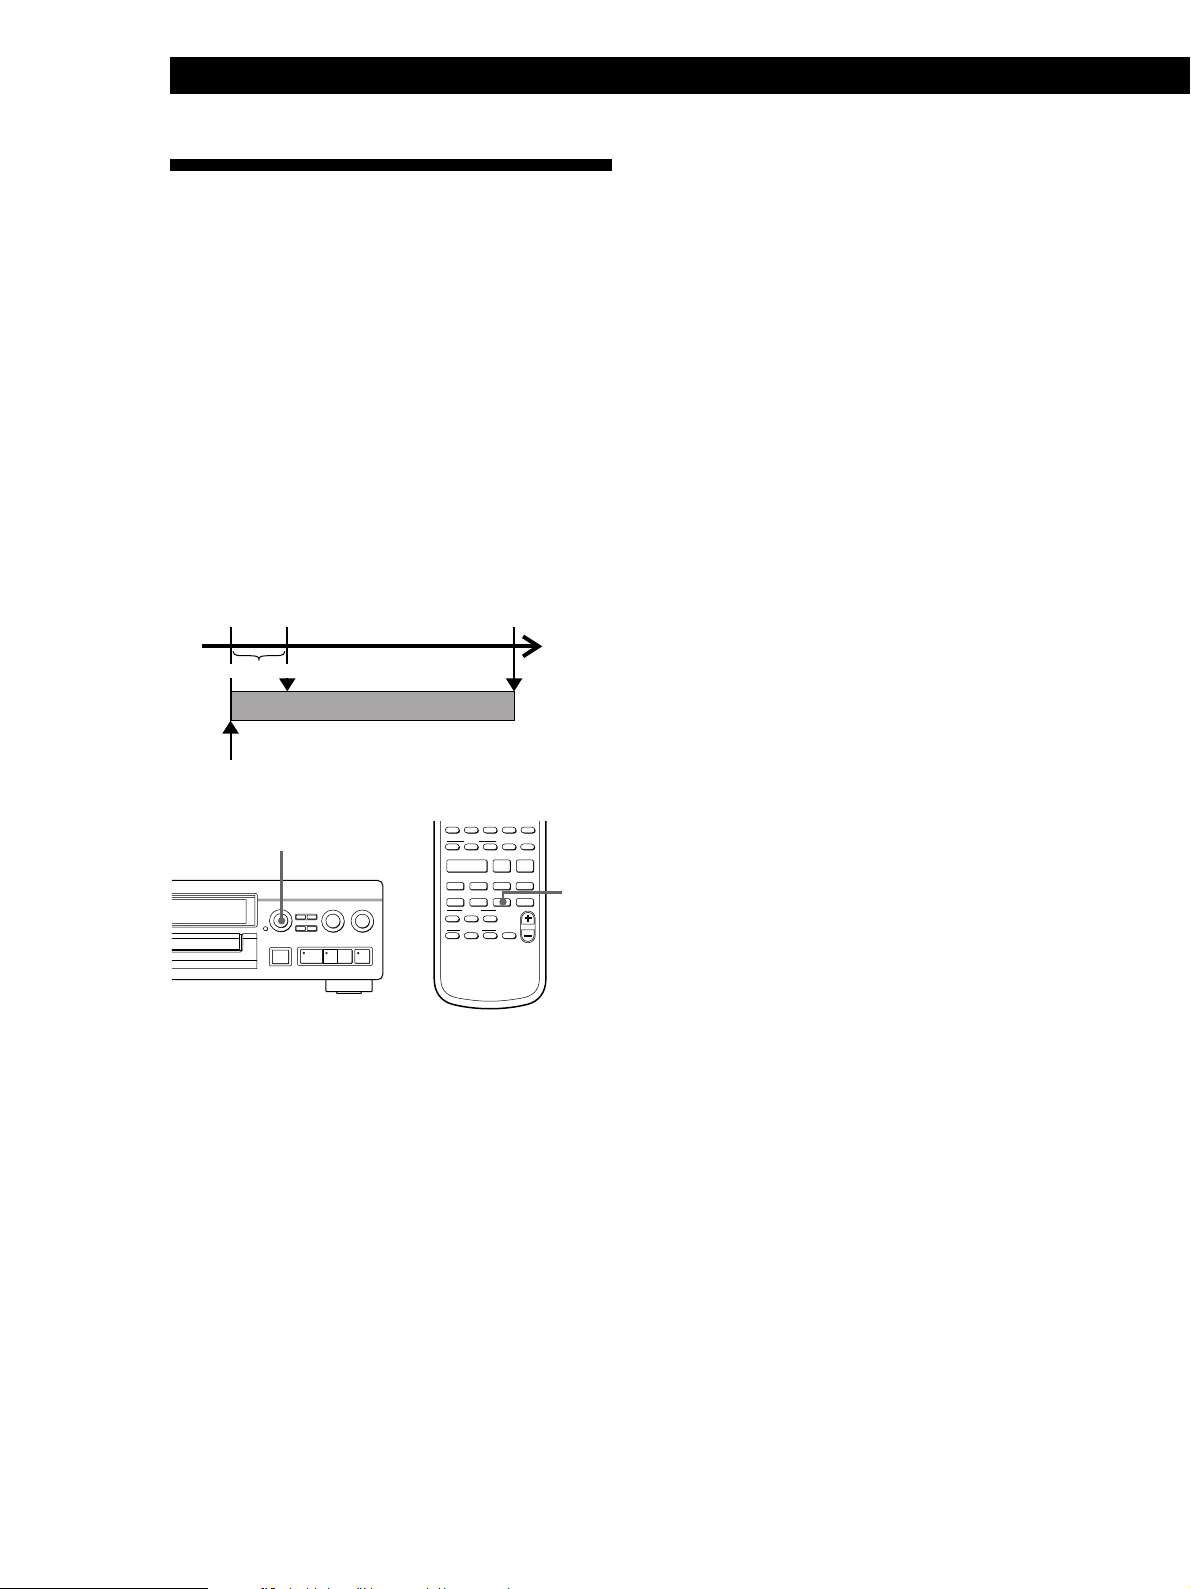
Starting Recording With
To stop Time Machine Recording
Press p .
6 Seconds of Prestored Audio
Data (Time Machine Recording)
When recording from an FM or satellite broadcast, the
first few seconds of material are often lost due to the
time it takes you to ascertain the contents and press the
record button. To prevent the loss of this material, the
Time Machine Recording Function constantly stores
6 seconds of the most recent audio data in a buffer
memory so that when you begin recording the
program source using this function, the recording
actually begins with the 6 seconds of audio data stored
in the buffer memory in advance as shown in the
illustration below.
When you press
AMS in Step 3
Audio data in 6-second buffer memory
Beginning of the program
source to be recorded
≠ AMS ±
0)
§
(
Pp r
End of the program
source to be recorded
Time
Recorded
portion
A˜B
REPEAT
A.SPACE
M.SCAN
!
?
/
(
WRITE CLEAR
NUM
CHAR
P p
·
+ r
T.REC MUSIC SYNC
)
CD-SYNC
STANDBY=STARTPSTOP
CD PLAYER FADER
+
)
P.HOLD
REC-IT
DIGITAL REC LEVEL
/ANALOG OUT LEVEL
T.REC
>
25
NAME
=
0
Note
The deck starts storing audio data when the deck is in
recording pause and you start playing the program source.
With less than 6 seconds of playing of the program source
and audio data stored in the buffer memory, Time Machine
Recording starts with less than 6 seconds of audio data.
18
1 Do Steps 1 to 9 in “Recording on an MD” on
pages 9 and 10.
The deck changes to recording pause.
2 Start playing the program source you want to
record.
The most recent 6 seconds of audio data is stored
in the buffer memory.
3 Press AMS (or T.REC) to start Time Machine
Recording.
Recording of the program source starts with the
6 seconds of audio data stored in the buffer
memory.
EN
Page 19
Recording on MDs
Synchro-Recording With Audio Equipment of Your Choice (Music Synchr o-Recording) Z
By using the MUSIC SYNC button, you can
automatically start recording in sync with the signal
input from the program source.
The method of marking track numbers differs,
depending on the program source being recorded and
the setting of the Setup Menu 02 (see “Notes on
Recording” on page 13).
–
Z
.
,
23
22
21
24
25
A˜B
REPEAT
A.SPACE
M.SCAN
!
?
/
(
WRITE CLEAR
NUM
CHAR
·
+ r
T.REC MUSIC SYNC
)
CD-SYNC
STANDBY=STARTPSTOP
CD PLAYER FADER
+
P p
DIGITAL REC LEVEL
/ANALOG OUT LEVEL
)
P.HOLD
REC-IT
MUSIC SYNC
>
25
NAME
=
0
1 Do Steps 1 to 8 in “Recording on an MD” on
pages 9 and 10.
Synchro-Recording With a Sony CD Player Z
By connecting your deck to a Sony CD player or Hi-Fi
Component System, you can easily dub CDs onto MDs
using the CD synchro buttons on the remote. If your
deck is connected to a Sony CD player by a digital
input cable, track numbers are automatically marked
as appear on the original even when “T.Mark Off” is
selected in Setup Menu 02. If your deck is connected to
a Sony CD player by audio connecting cords through
the LINE(ANALOG) IN jacks, track numbers are
automatically marked when you set Setup Menu 02 to
“T.Mark LSyn” (see page 17).
As the same remote controls both the CD player and
the deck, you may have trouble operating both units if
they are far from each other. If you do, place the CD
player close to this deck.
–
Z
.
,
23
22
21
24
25
A˜B
REPEAT
A.SPACE
M.SCAN
!
?
/
(
WRITE CLEAR
NUM
CHAR
P p
·
+ r
T.REC MUSIC SYNC
)
CD-SYNC
STANDBY=STARTPSTOP
CD PLAYER FADER
+
)
P.HOLD
REC-IT
DIGITAL REC LEVEL
/ANALOG OUT LEVEL
STANDBY
START
STOP
CD PLAYER P
>
25
NAME
=
0
2 Press MUSIC SYNC.
The deck changes to recording pause.
3 Start playing the program source you want to
record.
The deck starts recording automatically.
To stop Music Synchro-Recording
Press p .
Note
When Music Synchro-Recording, the Smart Space Function
and the Auto Cut Function turn on automatically regardless
of their setting (On or Off) and type of input (digital or
analog).
1 Set the source selector on the amplifier to CD.
2 Do Steps 2 to 8 in “Recording on an MD” on
pages 9 and 10 to prepare the deck for recording.
3 Insert a CD into the CD player.
4 Select the playback mode (Shuffle Play, Program
Play, etc.) on the CD player.
5 Press STANDBY.
The CD player pauses for playing and the deck
pauses for recording.
(Continued)
19
EN
Page 20

Recording on MDs
6 Press START.
The deck starts recording and the CD player starts
playback.
The track number and elapsed recording time of
the track appear in the display.
If the CD player does not start playing
Some CD player models may not respond when
you press START on the remote of the deck. Press
P on the remote of the CD player instead.
7 Press STOP to stop synchro-recording.
To pause recording
Press STANDBY or CD PLAYER P .
To restart recording, press START or CD PLAYER P .
A new track number is marked each time you pause
recording.
Notes
• When the deck’s remote controls the CD player with a
mode selector, set the selector to CD1.
• The deck may not automatically mark track numbers
when recording from some CD players.
z You can check the remaining recordable time on the
MD
Press TIME (see page 24).
z During synchro-recording, the deck copies CD text
information (CD text and disc memos) as it is to the
MD (Disc Memo Copy Function)
The Disc Memo Copy function operates when you make
a synchro-recording from a Sony CD player connected
with a control A1 cable to the MD deck.
Notes
• The Disc Memo Copy Function may not operate for
extremely short CD tracks.
• Text information may not be copied for some CDs.
Making a synchro recording from a CD
player connected with a control A1 cable
You can make a synchro recording from a Sony CD
player with a CONTROL A1 jack connected with a
control A1 cable to the MD deck.
1 Turn on the amplifier and set the source selector
to CD.
z You can use the remote of the CD player during
synchro-recording
When you press p, the CD player stops and the deck
pauses for recording.
When you press P, the CD player pauses and the deck
pauses for recording.
To restart synchro-recording, press ·.
z You can change CDs during synchro-recording
Do the following steps instead of Step 7 above.
1 Press p on the remote of the CD player.
The deck pauses for recording.
2 Change the CD.
3 Press · on the remote of the CD player.
Synchro-recording restarts.
z You can also do synchro-recording with a Sony video
CD player
Using the procedure for synchro-recording with a Sony
CD player, you can do synchro-recording with a Sony
video CD player also.
To select the video CD player, press button number 2
while pressing down the 1/u switch on the remote
before starting the procedure.
To select the CD player again, press button number 1
while pressing down the 1/u switch.
The deck is factory set to a CD player for synchrorecording.
2 Do Steps 2 to 8 of “Recording on an MD” on
pages 9 and 10.
3 Set the CD player to the play mode (e.g., Program
Play or Shuffle Play) you want to use to record to
the MD deck.
4 Set the CD player to playback pause mode.
(· and P both light up.)
5 Press r REC on the deck.
The MD deck stands by for recording.
6 Press P on the deck.
CD player pause is canceled and recording starts.
When CD play finishes, recording stops.
20
EN
Page 21
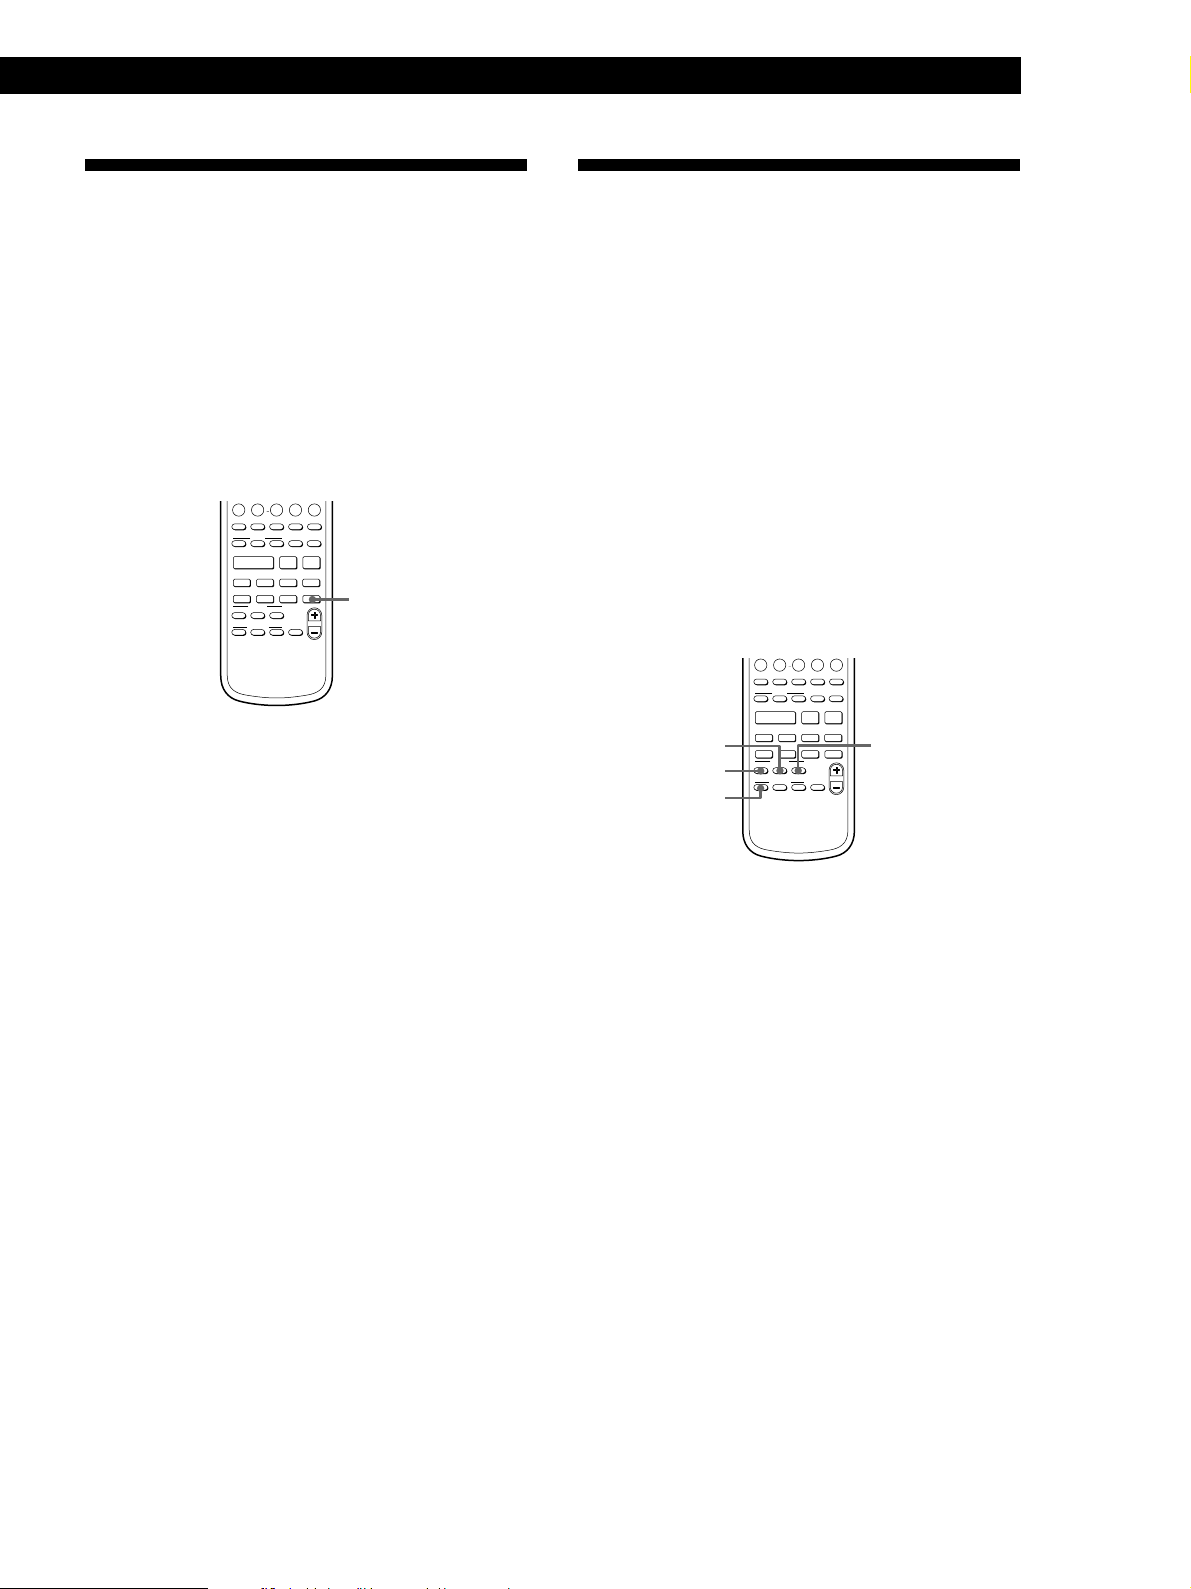
Fading In and Out (Fader)
You can gradually increase the recording level at the
beginning of a recording (fade-in recording) or
gradually decrease the recording level at the end of a
recording (fade-out recording).
This function is convenient when, for example, you
don’t want the track cut off abruptly when the disc
reaches to its end.
W
V
U
X
Y
18
17
16
19
23
22
A˜B
REPEAT
!
WRITE CLEAR
NUM
CHAR
+ r
)
STANDBY=STARTPSTOP
+
.
,
24
A.SPACE
M.SCAN
(
)
P.HOLD
P p
REC-IT
T.REC MUSIC SYNC
DIGITAL REC LEVEL
/ANALOG OUT LEVEL
20
25
FADER
–
Z
21
?
/
>
25
NAME
g
·
=
0
CD-SYNC
CD PLAYER FADER
FADER
Recording on MDs
z You can set the duration of fade-in and fade-out
recording independently
1 While the deck is stopped, press MENU/NO twice to
display “Setup Menu”.
2 To set the duration of fade-in recording:
Turn AMS to select “Setup 08”, then press AMS.
To set the duration of fade-out recording:
Turn AMS to select “Setup 09”, then press AMS.
3 Turn AMS to set the duration.
Both the fade-in and fade-out recording durations can
be set in 0.1 second steps.
4 After selecting the duration, press AMS.
5 Press MENU/NO.
Fade-in recording
During recording pause, press FADER at the position
where you want to start fade-in recording.
Z in “Fade Z 3.2s” flashes and the deck performs the
fade-in recording until the counter reaches “0.0s”.
Fade-out recording
During recording, press FADER at the position where
you want to start fade-out recording.
z in “Fade z 3.2s” flashes and the deck performs the
fade-out recording until the counter reaches “0.0s”.
The deck changes to recording pause when fade-out
recording finishes.
21
EN
Page 22

Recording on MDs
Recording the Current CD Track (REC-IT Function) Z
Notes
• The titles of the extremely short CD tracks may not be
copied to the MD.
• Text information may not be copied for some CDs.
This function lets you record a track on an MD while
listening to a CD.
This function operates only when you connect a Sony
CD player with a CONTROL A1 jack to the MD deck
using a control A1 cable. For details of CONTROL A1
connections, see page 6.
A˜B
REPEAT
A.SPACE
M.SCAN
!
?
/
(
WRITE CLEAR
NUM
CHAR
·
+ r
T.REC MUSIC SYNC
)
CD-SYNC
STANDBY=STARTPSTOP
CD PLAYER FADER
+
P p
DIGITAL REC LEVEL
/ANALOG OUT LEVEL
)
P.HOLD
REC-IT
REC-IT
>
25
NAME
=
0
1 Set the source selector on the amplifier to CD.
2 Do Steps 2 to 8 in “Recording on an MD” on
pages 9 and 10 to prepare the deck for recording.
3 Press · on the CD player.
4 Press REC-IT when you hear a track you want to
record.
Play returns to the start of the track and recording
starts. The MD deck stops at the end of the track,
but CD playback continues from the next track.
While “TOC Writing” is flashing
Do not move the deck or pull out the AC power cord to
ensure the complete recording. The deck is currently
updating the MD Table of Contents (TOC).
22
To stop recording
Press p on the deck.
z The deck copies CD text information as it is to the
MD
When the current CD has CD text, the track titles are
copied as the MD track titles.
z When “No Connect” appears in the display
Check the control A1 cable connection and make sure
the CD player mode selector is set to CD1.
EN
Page 23
Recording on an MD Using a Timer
By connecting a timer (not supplied) to the deck, you
can start and stop recording operations at specified
times. For further information on connecting the timer
and setting the starting and ending times, refer to the
instructions that came with the timer.
Recording on MDs
5 After you have finished using the timer, set
TIMER on the deck to OFF. Then place the deck
in standby status by plugging the AC power cord
of the deck into a wall outlet or set the timer to
continuous operation.
• If TIMER is left at REC, the deck will
automatically start recording the next time you
turn the deck on.
• If you do not change the deck to standby status
for more than a week after timer recording has
finished, the recorded contents may disappear.
g
TIMER
0)
§
(
Pp r
p
1 Do Steps 1 to 10 in “Recording on an MD” on
pages 9 and 10.
2 • If you want to specify the time for the start of
recording, press p.
• If you want to specify the time for the end of
recording, do Steps 11 and 12 in “Recording on
an MD” on page 10.
• If you want to specify the time for both start and
end of recording, press p.
3 Set TIMER on the deck to REC.
4 Set the timer as required.
• When you have set the time for the start of
recording, the deck turns off. When the
specified time arrives, the deck turns on and
starts recording.
• When you have set the time for the end of
recording, recording continues. When the
specified time arrives, the deck stops recording
and turns off.
• When you have set the time for both the start
and end of recording, the deck turns off. When
the starting time arrives, the deck turns on and
starts recording. When the ending time arrives,
the deck stops recording and turns off.
Make sure to change the deck to standby status
within a week after timer recording is completed
The TOC on the MD is updated and recorded contents
are written to the MD when you turn the deck on. If
the recorded contents have disappeared, “Standby”
flashes when you turn the deck on.
Notes
• It may take about 30 seconds after the deck is turned on
until recording starts. When recording at a specified time
using the timer, be sure to take this time into account
when setting the recording start time.
• During timer recording, new material is recorded from the
end of the recorded portion on the MD.
• Material recorded during timer recording will be saved to
the disc the next time you turn the deck on. “TOC” will
flash in the display at that time. Do not move the deck or
pull out the AC power cord while “TOC” is flashing.
• Timer recording will stop if the disc becomes full.
23
EN
Page 24
Playing MDs
Playing MDs
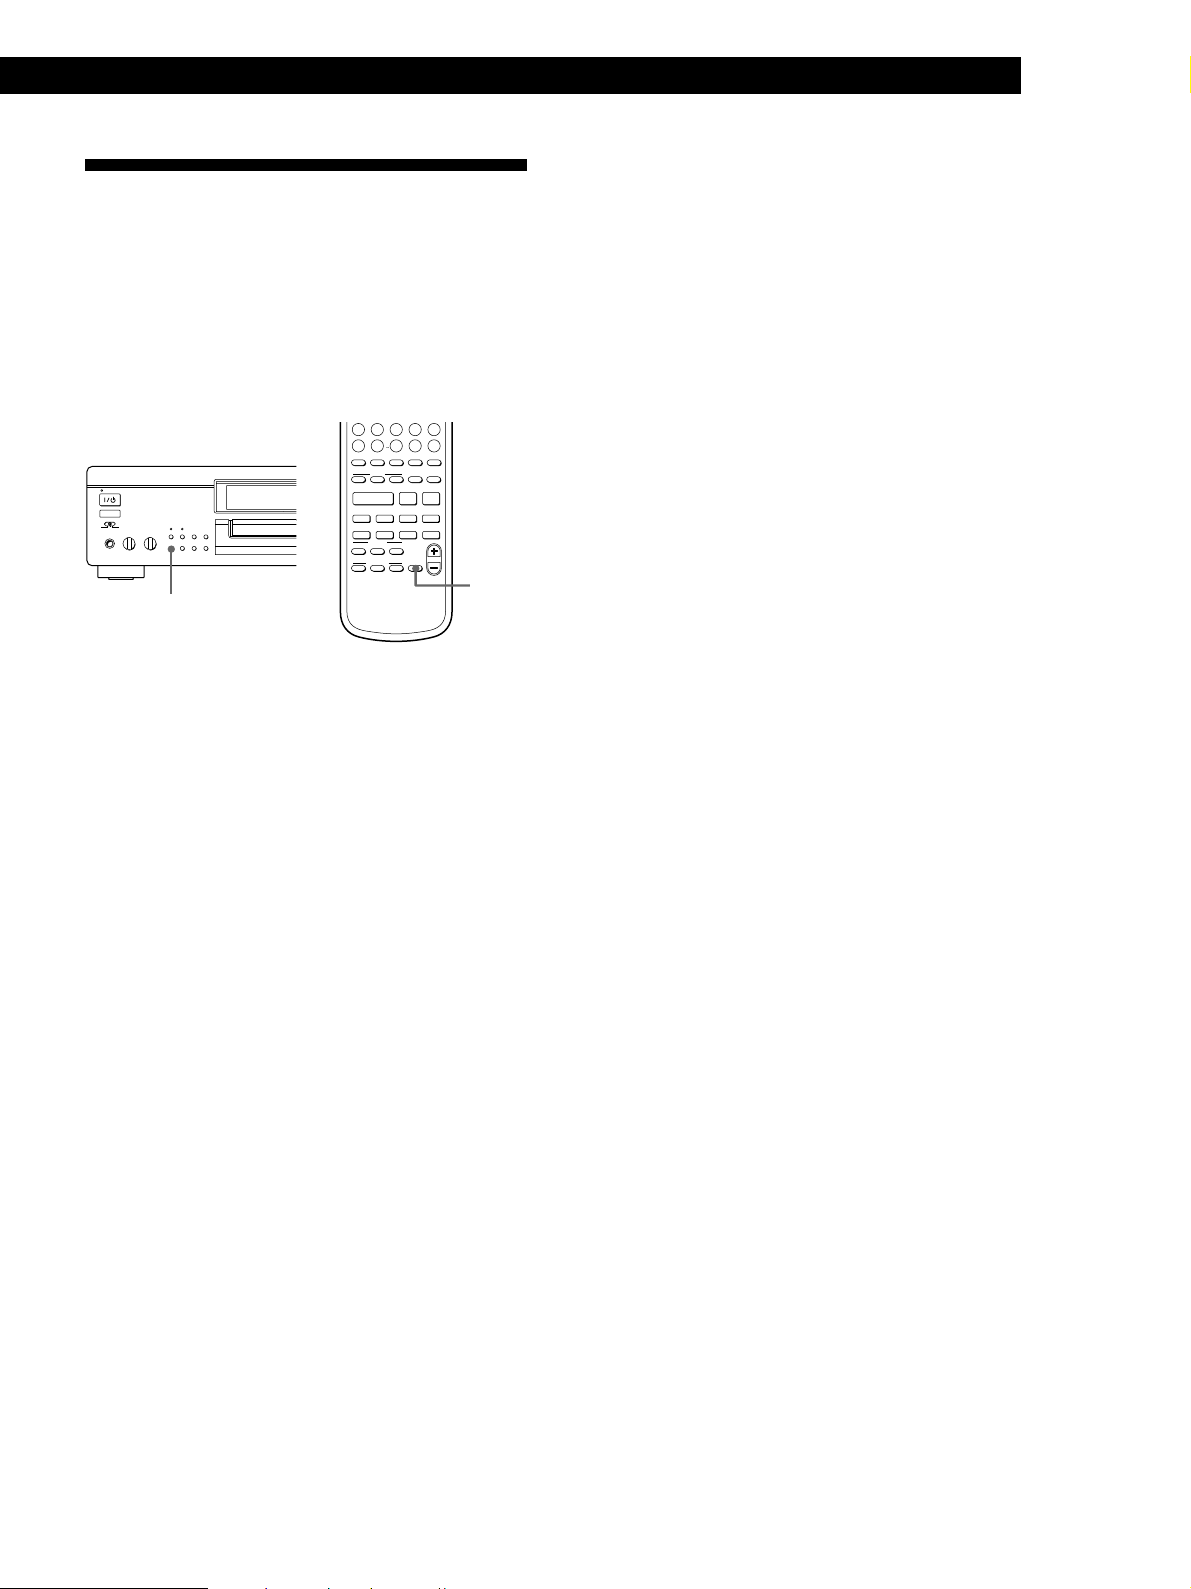
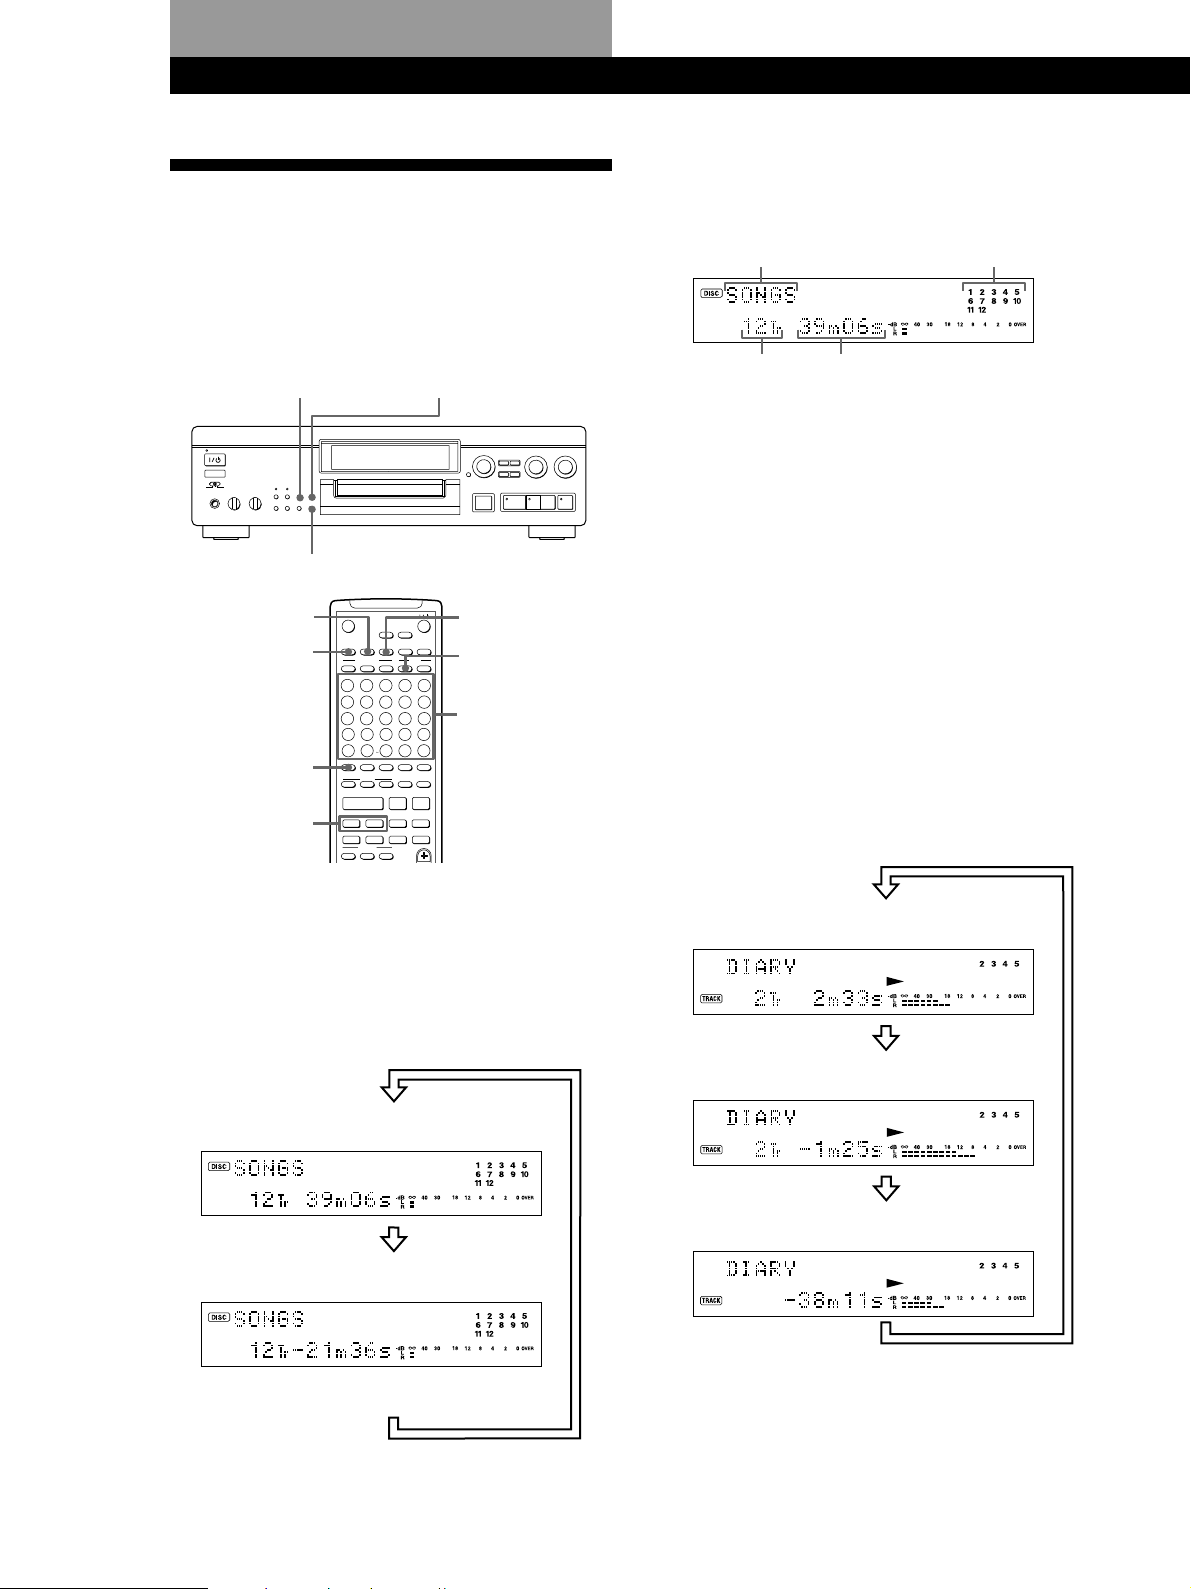
Using the Display
You can use the display to check disc and track
information such as the total track number, total
playing time of the tracks, remaining recordable time
of the disc, disc name, and the date when a track was
recorded.
SCROLL/CLOCK SET
g
DISPLAY/CHAR
0)
§
(
Pp r
When you insert an MD, the disc name, total number
of tracks, total disc playing time, and the music
calender appear in the display as follows:
Disc name
Total number
of tracks
Total disc
playing time
Music calendar
A music calendar shows all the track numbers within a
grid if the MD is a premastered disc, or without a grid
if the MD is a recordable disc.
If the total track number exceeds 15, z appears to the
right of number 15 in the music calendar.
TIME
SCROLL
DISPLAY
>25
=/+
OPEN/CLOSE
DISPLAY
CONTINUE
A
F
K
P
11
U
Z
/
NAME
§
1
6
16
21
>
25
=
0
MENU/NO
TIME D.O BIT
SCROLL
PLAY MODE
PROGRAM
SHUFFLE PRESENTRECORDED
C
B
D
H
G
I
3
2
M
L
N
8
7
R
Q
S
13
12
W
V
X
18
17
–
23
22
A˜B
REPEAT
!
?
(
WRITE CLEAR
NUM
CHAR
P p
·
+ r
T.REC MUSIC SYNC
)
CD-SYNC
STANDBYSTARTSTOP
YES
4
9
14
19
.
24
A.SPACE
FILTER
DATE
E
J
5
O
10
T
15
Y
20
,
25
M.SCAN
)
P.HOLD
REC-IT
TIME
DATE
RECORDED
Number
buttons
Checking the total track number, total disc
playing time and remaining recordable
time of the disc
Each time you press TIME while the deck is stopped,
you can change the display as follows:
Total track number and total playing time
of all recorded tracks
Note
When you insert a new MD or turn off the deck and turn it
on again, the last item displayed will reappear.
Checking the playing time, remaining time,
and track number
Each time you press TIME while playing an MD, you
can change the display as shown below. The track
numbers in the music calendar disappear after they are
played.
Track number and playing time of the
current track
Press
Track number and remaining time of the
current track
24
Press
Press
Remaining time of all recorded tracks
Remaining recordable time of the disc
(Recorded MDs only)
Press
The remaining recordable time of the disc is
not shown for premastered MDs.
Press
EN
Page 25
Playing MDs
z The track name and disc name are displayed as
follows:
The disc name appears whenever the deck is stopped,
and the name of the current track appears when the
track is playing. If no title is recorded, “No Name”
appears instead of a title.
To label a recordable disc and its tracks, see “Labeling
Recordings” on page 47.
z You can scroll a title of more than 12 characters
Press SCROLL/CLOCK SET (or SCROLL).
Since the display shows up to 11 characters at a time,
press SCROLL/CLOCK SET again to see the rest of the
title if the title has 12 characters or more.
Press SCROLL/CLOCK SET again to pause scrolling,
and again to continue scrolling.
Displaying the recording date Z
When the internal clock has been set, the deck
automatically records the recording date and time of
all recordings. You can then check the recording date
and time of a track.
1 Locate the track for which you want to check the
recording date and time.
When the deck is Press
stopped = or +
playing or on play pause =, +, or number buttons
2 Press DATE RECORDED.
“No Date” appears if the internal clock has not
been set or the track was recorded on another MD
deck without a date and time stamp function.
Changing the display
Each time you press DISPLAY/CHAR (or DISPLAY)
while the deck is stopped or playing, you can change
the display as follows:
Normal display
Press
The contents of a program (only when
“PROGRAM” lights up)
Press
Title (Disc name and track name)
Press
Output level (The recording level is displayed
while the deck is stopped.)
Press
Pitch display
Press
DF (digital filter) display
Press
25
EN
Page 26
Playing MDs
Locating a Specific Track
You can quickly locate any track while playing a disc
by using the AMS (Automatic Music Sensor) control,
= and + buttons, number buttons, or M.SCAN
button on the remote.
z You can extend the playing time during music scan
1 While the deck is stopped, press MENU/NO twice to
display “Setup Menu”.
2 Turn AMS to select “Setup 07”, then press AMS.
3 Turn AMS to select the playing time within a range of
6 to 20 seconds (in 1 second steps), then press AMS.
4 Press MENU/NO.
>25
·
OPEN/CLOSE
DISPLAY
CONTINUE
A
F
K
P
11
U
Z
/
NAME
§
1
6
16
21
>
25
=
0
SCROLL
PLAY MODE
SHUFFLE PRESENTRECORDED
B
G
2
L
7
Q
12
V
17
–
22
REPEAT
?
WRITE CLEAR
CHAR
·
+ r
)
CD-SYNC
≠ AMS ±
0)
§
(
(
Pp r
=/+
To locate Do the following:
The next or succeeding
tracks
The current or
preceding tracks
A specific track
directly Z
A specific track by
using AMS
By scanning each track
for 6 seconds (music
scan) Z
During playback, turn AMS clockwise
(or press + repeatedly) until you
find the track.
During playback, turn AMS
counterclockwise (or press =
repeatedly) until you find the track.
Press number buttons to enter the
track number.
1 Turn AMS until the track number
you want to locate appears while
the deck is stopped. (The track
number is flashing.)
2 Press AMS or (.
1 Press M.SCAN before you start
playing.
2 When you find the track you want,
press · to start playing.
MENU/NO
TIME D.O BIT
PROGRAM
C
H
M
R
13
W
18
23
A˜B
!
NUM
STANDBYSTARTSTOP
YES
D
I
3
N
8
S
14
X
19
.
24
A.SPACE
(
P p
T.REC MUSIC SYNC
z To pause playing at the beginning of a track
FILTER
DATE
E
J
4
5
O
9
10
Number
T
15
Y
buttons
20
,
25
M.SCAN
)
M.SCAN
P.HOLD
REC-IT
Turn AMS (or press = or +) after pausing
playback.
z To go quickly to the beginning of the last track
Turn AMS counterclockwise (or press =) while the
display shows the total track number, total disc playing
time or remaining recordable time of the disc
(recordable disc only), or disc name (see page 24).
26
z When you directly locate a track with a number over
25 Z
You must press >25 first, before entering the
corresponding digits.
Press >25 once if it is a 2-digit track number, and twice
if it is a 3-digit track number.
To enter “0”, press button 10.
Examples: • To play track number 30
Press >25 once, then 3 and 10.
• To play track number 100
Press >25 twice, then 1, 10 and 10.
EN
Page 27
Playing MDs
Locating a Particular Point in a Track
You can also use the 0 and ) buttons to locate a
particular point in a track during playback or playback
pause.
0/)
g
To locate a point Press
While monitoring the
sound
Quickly by observing
the display during
playback pause
) (forward) or 0 (backward) and
keep pressing until you find the point.
) or 0 and keep pressing until
you find the point. There is no sound
output during this operation.
z If “—Over—” appears while you are pressing )
during playback pause
The disc has reached to its end. Press 0 (or =) or
turn AMS counterclockwise to go back.
Notes
• If the disc reaches the end while you are pressing )
during sound monitoring, the deck stops.
• Tracks that are only a few seconds long may be too short
to scan using the search function. For such tracks, it is
better to play the MD at normal speed.
0)
§
(
Pp r
Playing T racks Repeatedly
You can play tracks repeatedly in any play mode.
g
REPEAT
Press REPEAT.
“REPEAT” appears in the display.
The deck repeats the tracks as follows:
When the MD is played in The deck repeats
Normal play (page 12) All the tracks
Shuffle Play (page 28) All the tracks in random order
Program Play (page 29) The same program
To cancel repeat play
Press REPEAT several times until “REPEAT”
disappears.
The deck returns to the original playing mode.
Repeating the current track
While the track you want to repeat is playing in
normal, Shuffle or Program Play, press REPEAT
several times until “REPEAT 1” appears in the display.
If you select “REPEAT 1” while the deck is stopped,
the deck repeats the next track to be played.
0)
§
(
Pp r
(Continued)
27
EN
Page 28
Playing MDs
Repeating a specific portion (A-B Repeat)
Z
You can play a specific portion of a track repeatedly.
This might be useful when you want to memorize
lyrics. Note that you can only repeat a portion within
the boundaries of a single track.
OPEN/CLOSE
§
MENU/NO
YES
TIME D.O BIT
SCROLL
REPEAT
A˜B
)
DISPLAY
PLAY MODE
CONTINUE
B
A
G
F
1
L
K
6
Q
P
11
V
U
16
–
Z
21
?
/
>
25
NAME
·
=
0
PROGRAM
SHUFFLE PRESENTRECORDED
C
D
H
I
3
2
M
N
8
7
R
S
13
12
14
W
X
18
17
19
.
23
22
24
A˜B
REPEAT
A.SPACE
!
(
WRITE CLEAR
NUM
CHAR
P p
+ r
T.REC MUSIC SYNC
)
CD-SYNC
STANDBYSTARTSTOP
FILTER
DATE
E
J
4
5
O
9
10
T
15
Y
20
,
25
M.SCAN
)
CLEAR
P.HOLD
p
REC-IT
1 While playing a disc, press A˜B at the starting
point (point A) of the portion to be played
repeatedly.
“REPEAT A-” appears and “B” flashes in the
display.
2 Continue playing the track or press ) until you
reach the ending point (point B), then press A˜B
again.
“REPEAT A-B” lights continuously. The deck
starts to play the specified portion repeatedly.
To cancel A-B Repeat
Press REPEAT, CLEAR or p.
Setting new starting and ending points
You can repeat the portion immediately after the
currently specified portion by changing the starting
and ending points.
1 Press A˜B while “REPEAT A-B” appears.
The current ending point B becomes the new
starting point A, “REPEAT A-” lights continuously,
and “B” flashes in the display.
2 Continue playing the track or press ) until you
reach the new ending point (point B), then press
A˜B again.
“REPEAT A-B” lights continuously and the deck
starts playing repeatedly the newly specified
portion.
Playing in Random Order (Shuffle Play)
You can have the deck “shuffle” tracks and play them
in random order.
g
PLAY MODE
1 Press PLAY MODE repeatedly (or SHUFFLE
once) until “SHUFFLE” appears in the display
when the deck is stopped.
2 Press ( to start Shuffle Play.
“—Shuffle—” and “J” appear in the display while
the deck is “shuffling” the tracks.
To cancel Shuffle Play
Press PLAY MODE repeatedly (or CONTINUE once)
when the deck is stopped until “SHUFFLE”
disappears.
z You can specify tracks during Shuffle Play
• To play the next track, turn AMS clockwise (or press
+).
• To play from the beginning of the current track again,
turn AMS counterclockwise (or press =). You
cannot use AMS (or =) to go to tracks that have
already been played.
0)
§
(
(
Pp r
28
EN
Page 29
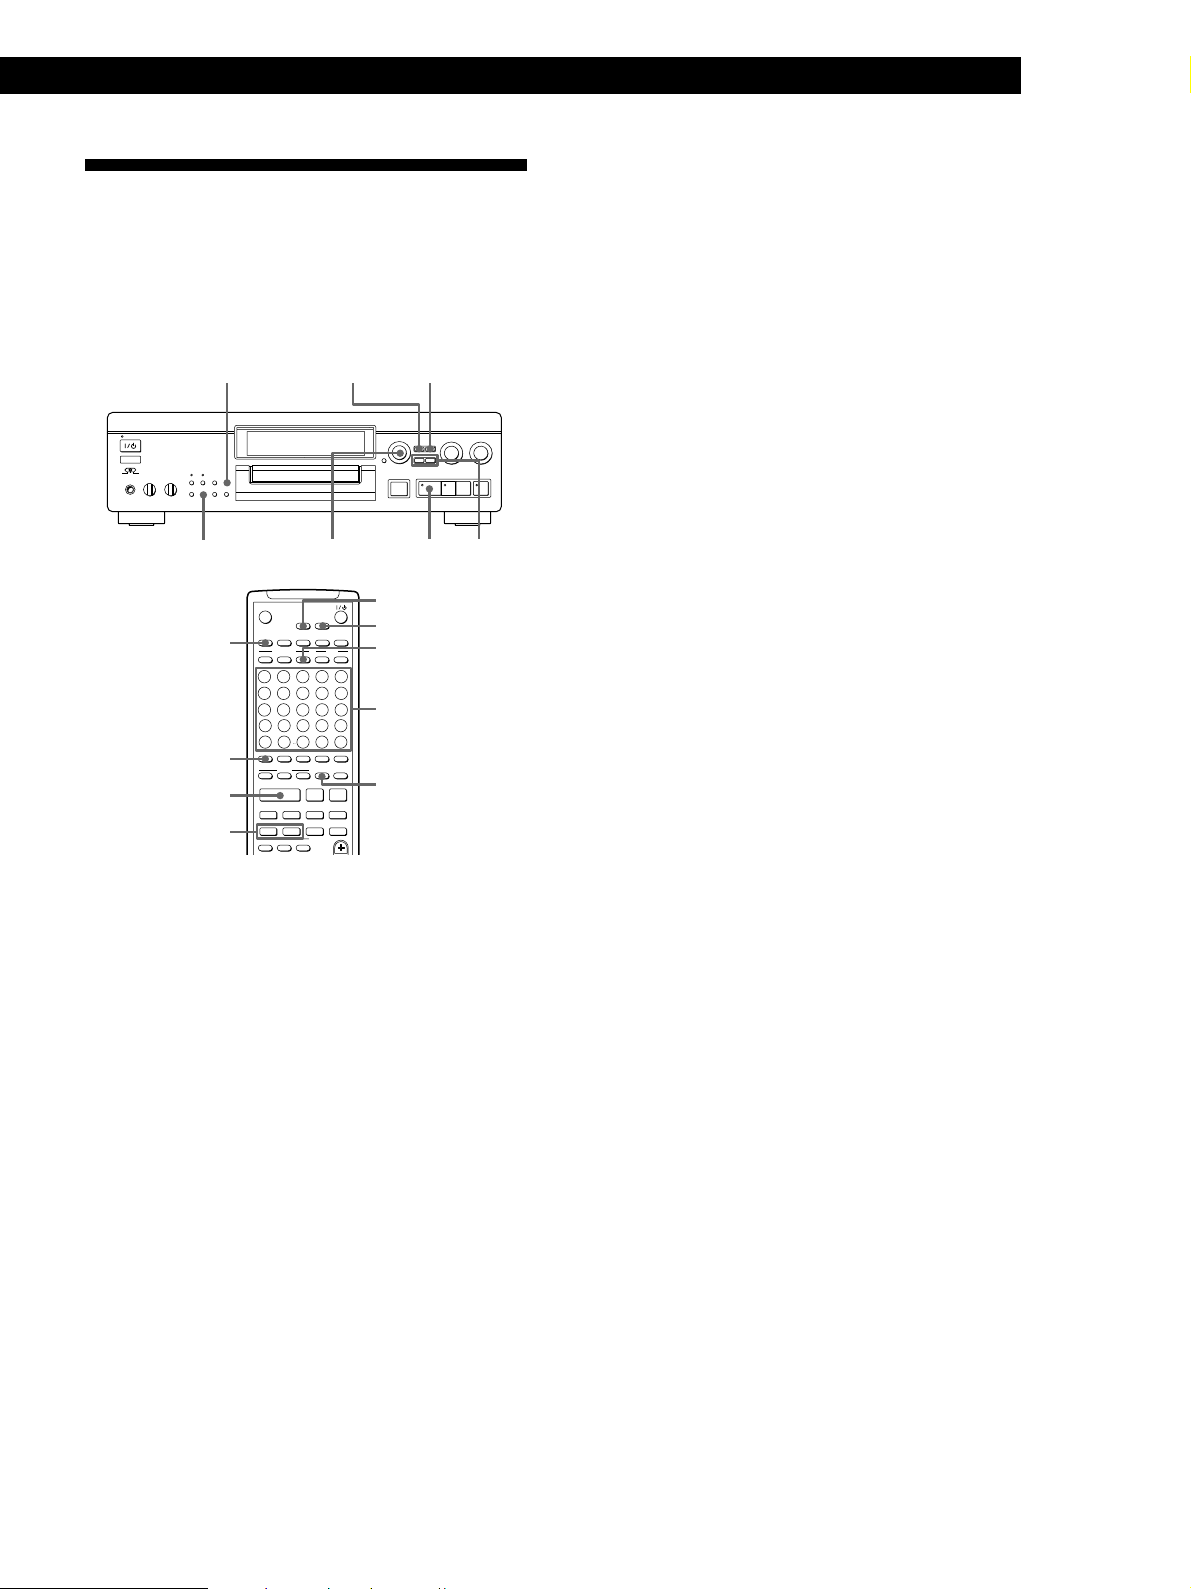
Cr eating Your Own Progr am (Program Play)
You can specify the playback order of the tracks on an
MD and create your own programs containing up to
25 tracks.
DISPLAY/CHAR
YESMENU/NO
Playing MDs
b) When using the remote
Press the number buttons to enter the tracks
you want to program in the order you want.
To program a track with a number over 25, use
the >25 button (see page 26).
If you enter the wrong track number
Press 0 or ) until the wrong track number
flashes, then enter the correct track number
with the number buttons.
If “0” flashes, press 0.
g
PLAY MODE
DISPLAY
0/)
>25
·
≠ AMS ±0/)
OPEN/CLOSE
§
MENU/NO
YES
TIME D.O BIT
SCROLL
DISPLAY
PLAY MODE
CONTINUE
B
A
G
F
1
L
K
6
Q
P
11
V
U
16
–
Z
21
?
/
>
25
NAME
·
=
0
CD-SYNC
PROGRAM
SHUFFLE PRESENTRECORDED
C
D
H
I
3
2
M
N
8
7
R
S
13
12
W
X
18
17
.
23
22
A˜B
REPEAT
A.SPACE
!
(
WRITE CLEAR
NUM
CHAR
P p
+ r
T.REC MUSIC SYNC
)
STANDBYSTARTSTOP
FILTER
DATE
E
J
4
5
O
9
10
T
14
15
Y
19
20
,
24
25
M.SCAN
)
P.HOLD
REC-IT
0)
§
(
(
MENU/NO
YES
PROGRAM
Number
buttons
CLEAR
Pp r
1 While the deck is stopped, press MENU/NO
twice to display “Setup Menu”.
2 Turn AMS to display “Program ?”, then press
AMS or YES.
4 Repeat Step 3 to enter other tracks.
The entered track is added to the location where
the “0” flashes.
Each time you enter a track, the total program time
is added up and appears in the display.
5 After finishing programming, press YES.
“Complete!!” appears and programming is
completed.
6 Press PLAY MODE repeatedly (or PROGRAM
once) until “PROGRAM” appears in the display.
7 Press ( to start Program Play.
To cancel Program Play
Press PLAY MODE repeatedly (or CONTINUE once)
when the deck is stopped until “PROGRAM”
disappears.
z The program remains even after Program Play ends
When you press (, you can play the same program
again.
3 Do either a) or b):
a)When using the controls on the deck
1 Turn AMS until the track number you want
appears in the display.
2 Press AMS.
If you enter the wrong track number
Press 0 or ) until the wrong track number
flashes, turn AMS to set the correct track
number, then press AMS.
If “0” flashes, press 0.
Notes
• The display shows “- -m - -s” instead of the total playing
time when the total playing time of the program exceeds
199 minutes.
• “ProgramFull” appears when you program over 25 tracks.
Erase the unnecessary tracks to enter other tracks.
(Continued)
29
EN
Page 30
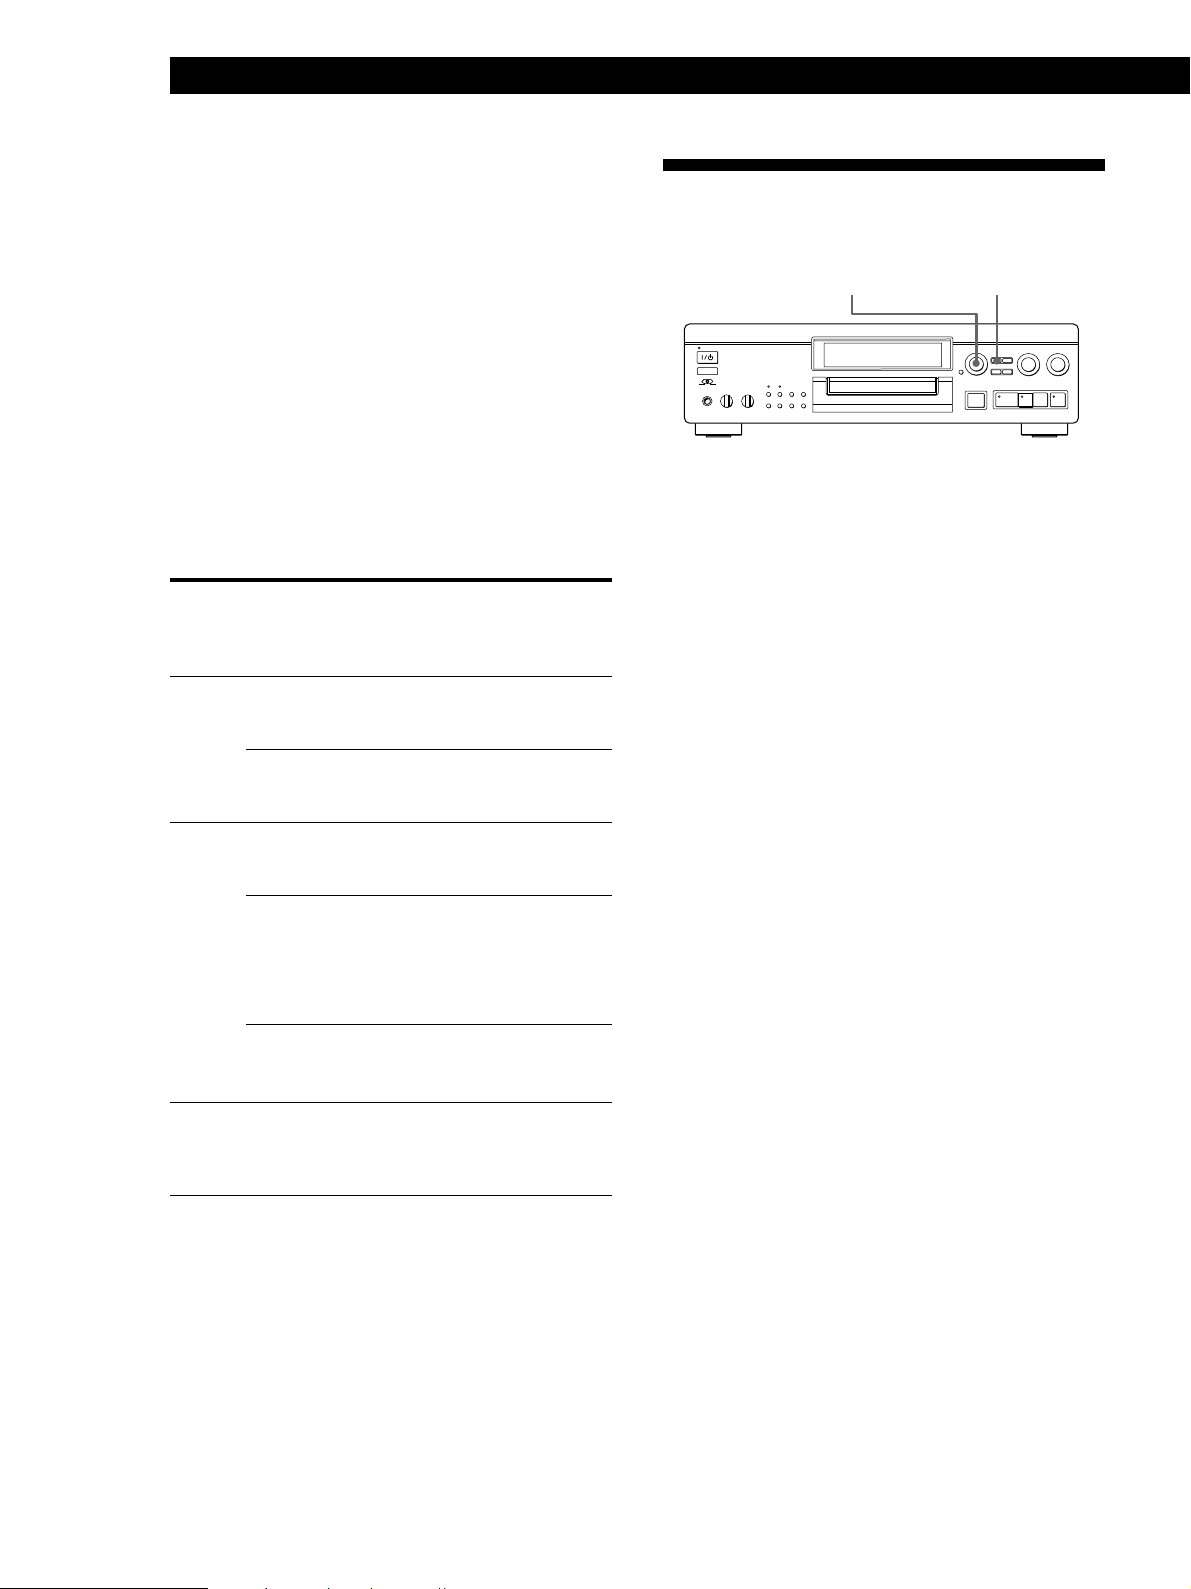
Playing MDs
Checking the track order
While the deck is stopped and “PROGRAM” is on,
press DISPLAY/CHAR (or DISPLAY) several times.
The track numbers appear in the order they were
programmed as follow:
“/3 / 5 / 8 / 1 / 2/”
Useful Tips When Recording From MDs to Tape
≠ AMS ±
MENU/NO
To check the rest of the track order
Turn AMS.
You can scroll the display to check all the track
numbers you programmed.
Changing the track order
You can change the order of the tracks in your
program before you start playing.
To Do the following procedure
after Steps 1 and 2 in
“Creating Your Own
Program”:
Erase
Add a
track
Change a track in the
program
a track
the whole
program
to the
beginning of
the program
in the middle
of the program
to the end of
the program
Press 0 or ) until the track
number you want to erase
flashes, then press CLEAR.
Keep pressing CLEAR until all
programmed track numbers
disappear.
1 Press 0 until “0” flashes at
the left of the first track.
2 Do Steps 3 to 5 on page 29.
1 Press 0 or ) until the
track which precedes the track
to be added flashes.
2 Press AMS so that “0” flashes,
then do Steps 3 to 5 on page
29.
1 Press 0 until “0” flashes at
the right of the last track.
2 Do Steps 3 to 5 on page 29.
1 Press 0 or ) until the
track number you want to
change flashes.
2 Do Steps 3 to 5 on page 29.
g
0)
§
(
Pp r
Inserting blank spaces while recording to
tape (Auto Space)
The Auto Space Function inserts a 3-second blank
space between each track while recording from MDs to
tapes, allowing you to use the AMS function during
later playback.
1 While the deck is stopped, press MENU/NO
twice to display “Setup Menu”.
2 Turn AMS to select “Setup 04”, then press AMS.
3 Turn AMS to select “Auto Space”, then press
AMS.
4 Press MENU/NO.
z You can turn on the Auto Space Function using the
remote Z
While the deck is stopped, press A.SPACE repeatedly
until “Auto Space” appears in the display.
To cancel Auto Space
Cancelling the function through menu operation on the
deck
1 Do Steps 1 and 2 in “Inserting blank spaces while
recording to tape” on this page.
2 Turn AMS to select “Auto Off”, then press AMS.
3 Press MENU/NO.
Cancelling the function using the remote Z
While the deck is stopped, press A.SPACE repeatedly until
“Auto Off” appears.
30
Note
If the Auto Space Function is on while recording a selection
containing multiple track numbers, (for example, a medley
or symphony), blank spaces will be inserted within the
selection whenever the track number changes.
EN
Page 31

Pausing after each track (Auto Pause)
When the Auto Pause Function is on, the deck pauses
after playing each track. Auto Pause is convenient
when recording single tracks or multiple,
nonconsecutive tracks.
Select “Auto Pause” instead of “Auto Space” in Step 3
on “Inserting blank spaces while recording to tape” on
page 30.
z You can turn on the Auto Pause Function using the
remote Z
While the deck is stopped, press A.SPACE repeatedly
until “Auto Pause” appears in the display.
To restart playback
Press ( or P.
To cancel Auto Pause
Cancelling the function through a menu operation on the
deck
Do Steps 1 to 3 in “To cancel Auto Space” on page 30.
Cancelling the function using the remote Z
While the deck is stopped, press A.SPACE repeatedly until
“Auto Off” appears.
Note
If you turn off the deck or disconnect the AC power cord, the
deck will recall the last setting of the Auto Space and Auto
Pause Functions the next time you turn on the deck.
Playing MDs
Fading In and Out (Fader)
You can gradually increase the playback level of the
signal output to the LINE(ANALOG ) OUT jacks and
the PHONES jack at the beginning of a playback (fadein playback) or gradually decrease the playback level
at the end of a playback (fade-out playback).
This function is convenient when, for example, you
want to start or end playback in the middle of the
track.
–
Z
.
,
23
22
21
24
25
A˜B
REPEAT
A.SPACE
M.SCAN
!
?
/
(
WRITE CLEAR
NUM
CHAR
·
+ r
T.REC MUSIC SYNC
)
CD-SYNC
STANDBY=STARTPSTOP
CD PLAYER FADER
+
P p
DIGITAL REC LEVEL
/ANALOG OUT LEVEL
)
P.HOLD
REC-IT
FADER
>
25
g
NAME
=
0
FADER
Fade-in playback
During playback pause, press FADER at the position
where you want fade-in playback to start.
Z in “Fade Z 3.2s” flashes and the deck performs fade-
in playback until the counter reaches to “0.0s”.
Fade-out playback
During playback, press FADER at the position where
you want fade-out playback to start.
z in “Fade z 3.2s” flashes and the deck performs fade-
out playback until the counter reaches “0.0s”.
The deck changes to playback pause when fade-out
playback finishes.
Note
The signal level output to the digital output connector does
not change.
z You can set the duration of fade-in and fade-out
playback independently
Do Steps 1 to 5 in “You can set the duration of the fadein and fade-out recording independently” on page 21.
31
EN
Page 32

Playing MDs
Playing an MD Using a Timer
6 After you have finished using the timer, set
TIMER on the deck to OFF.
By connecting a timer (not supplied) to the deck, you
can start and stop playback operations at specified
times. For further information on connecting the timer
or setting the starting and ending times, refer to the
instructions that came with the timer.
0)
§
(
(
Pp r
TIMER
g
PLAY MODE
1 Do Steps 1 to 3 in “Playing an MD” on page 12.
2 Press PLAY MODE repeatedly (or one of the
PLAY MODE buttons once) to select the play
mode you want.
To play only specific tracks, create a program (see
page 29).
3 • If you want to specify the time for the start of
playback, go to Step 4.
• If you want to specify the time for the end of
playback, press ( to start playback, then go to
Step 4.
• If you want to specify the time for both start and
end of playback, go to Step 4.
Note
You can select Program Play in Step 2. Note, however, that
programs eventually fade away when the standby status is
off, and therefore if you set the time too far in the future, the
program may be gone when the specified time arrives. If
this has occurred, the deck enters normal play mode at the
specified time and the tracks play in consecutive order.
4 Set TIMER on the deck to PLAY.
5 Set the timer as required.
• When you have set the time for the start of
playback, the deck turns off. When the specified
time arrives, the deck turns on and starts
playing.
• When you have set the time for the end of
playback, playback continues. When the
specified time arrives, the deck stops playing
and turns off.
• When you have set the time for both the start
and end of playback, the deck turns off. When
the starting time arrives, the deck turns on and
starts playing. When the ending time arrives,
the deck stops playing and turns off.
32
EN
Page 33

Playing MDs
Falling Asleep to Music
You can let the deck turn off at the specified time, so
you can sleep to the music.
You can specify the time to be turned off by
30 minutes.
≠ AMS ±
g
1 Press MENU/NO twice to display “Setup Menu”.
2 Turn AMS to select “Setup 14”, then press AMS.
3 Turn AMS to select the time.
The minutes display changes as follows:
30min ˜ 60min ˜ 90min ˜ 120min
4 Press AMS.
MENU/NO
0)
§
(
Pp r
Changing the Pitch (Pitch Control Function)
You can change the MD playback speed (pitch). The
tone rises at higher pitches, and falls at lower pitches.
≠ AMS ±
g
Setting the pitch automatically in steps
(Auto Step Control Function)
Each step changes the musical scale by a half-tone*.
You can increase the pitch by up to 2 half-tones or
lower the pitch by up to 48 half-tones.
* One octave equals 12 half-tones.
1 While the deck is playing, press MENU/NO twice
to display “Setup Menu”.
MENU/NO
0)
§
(
Pp r
5 Turn AMS to select “Setup 15”, then press AMS.
6 Turn AMS to select “Sleep On”, then press AMS.
“SLEEP” lights up in the display.
7 Press MENU/NO.
To change the time to turn off
Start over from Step 1 above.
To cancel the Sleep Timer Function
Select “Sleep Off” in Step 6 above, then press AMS.
2 Turn AMS to select “Setup 10”, then press AMS.
3 Turn AMS to select the desired pitch step, then
press AMS.
4 Press MENU/NO.
Notes
• When you change the pitch control step, the playback
sound drops out momentarily.
• The step control setting returns to the initial value (0)
when you turn off the deck or eject the MD.
• When a dot (.) appears to the right of the step value in the
step display as shown below, this indicates that you have
performed fine adjustment (see the next page) and the
pitch value is between steps. (The step and fine control
values are linked.)
(Continued)
33
EN
Page 34

Playing MDs
Finely controlling the pitch (Fine Control
Function)
You can fine control the playback speed in 0.1%
increments from –98.5% to +12.5%.
1 While the deck is playing, press MENU/NO twice
to display “Setup Menu”.
2 Turn AMS to select “Setup 11”, then press AMS.
3 Turn AMS to select the desired “Pfine”
percentage, then press AMS.
4 Press MENU/NO.
Notes
• The playback sound drops out momentarily when you
change the fine control value.
• The fine control setting returns to the initial value (0%)
when you turn off the deck or eject the MD.
• The step and fine control values are linked; changing one
value also changes the other.
Notes
• This function operates only for the digital signal output
through the digital output connector.
• You can select the desired bit length from 24, 20 or 16 bits.
• If you switch the bit length during playback or recording,
the sound drops out momentarily.
z
You can also switch the bit length with the remote Z
Press D.O BIT repeatedly during play or in stop mode
until the desired bit length is displayed.
Adjusting the playback level Z
You can adjust the playback level of the signal output
to the LINE(ANALOG) OUT jacks and the PHONES
jack.
A˜B
REPEAT
A.SPACE
M.SCAN
!
?
/
(
WRITE CLEAR
NUM
CHAR
P p
·
+ r
T.REC MUSIC SYNC
)
CD-SYNC
STANDBY=STARTPSTOP
CD PLAYER FADER
+
)
P.HOLD
REC-IT
DIGITAL REC LEVEL
/ANALOG OUT LEVEL +/–
DIGITAL REC LEVEL
/ANALOG OUT LEVEL
>
25
NAME
=
0
Setting the MD Deck Output
Switching the bit length
You can improve the output sound quality by
switching the bit length to match the MD deck, DAT
deck or other digital components connected to the
digital output connector.
≠ AMS ±
g
1 While the deck is stopped, press MENU/NO
twice to display “Setup Menu”.
2 Turn AMS to select “Setup 13”, then press AMS.
3 Turn AMS to select the desired bit length, then
press AMS.
MENU/NO
0)
§
(
Pp r
Press DIGITAL REC LEVEL/ANALOG OUT LEVEL
+/– during play.
(You cannot raise the level above 0 dB, or lower the
level below –20 dB.)
Note
The playback level setting returns to “0 dB” when you turn
off the deck or eject the MD.
34
4 Press MENU/NO.
EN
Page 35

Playing Back With Different Tones (Digital Filter)
This deck is equipped with the V.C. (Variable
Coefficient) filters to allow you adjust the tone to
match your audio system, listening environment, and
the source being played back.
Note
The digital filters are effective only on the analog signals
output from the LINE(ANALOG) OUT jacks and the
PHONES jack.
Playing MDs
z What is a V.C. (Variable Coefficient) filter?
A variable coefficient filter changes the sound
characteristics of a signal by applying specific frequency
cut-off conditions. Such filters are provided on digital
devices such as CD players and MD decks to remove
aliasing noise. Your deck comes with four or three
types of digital filters. A brief description is given
below of the sound characteristics of each filter.
Standard
This filter produces an expansive sound of wide range.
Spline (European model only)
This filter produces a sound that is clearly positioned
and smooth.
FILTER indicator
g
FILTER
0)
§
(
Pp r
1 Press FILTER.
The currently selected filter appears in the display.
2 Press FILTER repeatedly to select the filter that
you want.
Each press of the button changes the filter as
follows:
n
DF:Standard
* European model only
The FILTER indicator turns on when a setting
other than “Standard” is selected in DF (digital
filter) display.
n
DF:Spline*
n
DF:Plain
n
DF:Analog
Plain
This filter produces a fresh and powerful sound.
Analog
This filter produces a resonant and mellow sound.
Note
The change in sound characteristics caused by digital filters
occur mainly in the inaudible range, not the audible range as
in the case of an amplifier.
z You can select the filter using the remote
Press FILTER repeatedly until the filter that you want
appears in the display.
35
EN
Page 36

Controlling a Separately Available Sony CD Changer
ç
Ç
OUT
LINE(ANALOG)
IN
L
R
L
R
INOUT
L
R
TAPE/MD
OUT
DIGITAL
OPTICAL
Ç
COAXIAL OPT2OPT1
DIGITAL IN
OPTICAL
COAXIAL
DIGITAL OUT
Controlling a Separately Available Sony CD Changer
• Control A1 cable (not supplied) (1)
Hooking Up the System
When you connect a Sony CD changer with a
CONTROL A1 jack to the MD deck using a control A1
cable, you can operate the CD changer using the
controls on the MD deck or the supplied remote (Mega
CD Control Function).
Hook up the MD deck to an amplifier and a CD
changer as follows. Be sure to turn off the power of
each component before connection.
Notes
• You can use the Mega CD Control Function only when the
deck is connected to a CD changer. This function does not
support single-disc CD players.
• The displays and operations may differ depending on the
connected CD changer.
S-LINK
DIGITAL IN
DIGITAL OUT
CONTROL A1
OPTICAL
COAXIAL
OPT2OPT1
R
LINE(ANALOG)
IN
OUT
LRL
COAXIAL
Hookups
Connecting the MD deck and a CD changer to an
amplifier
Connect the amplifier to the LINE OUT jacks on the
CD changer and the LINE(ANALOG) IN/OUT jacks
on the MD deck using the audio connecting cords (only
two supplied).
Make sure to match the color-coded cords to the
appropriate jacks on the components: red (right) to red
and white (left) to white. Be sure to make connections
firmly to prevent hum and noise.
CD changer Amplifier
LINE
OUT
L
R
ç
CD IN
L
R
ç
ç
DIGITAL
ç
REC
OUT
Amplifier
ç
ç
TAPE/MD
IN
OPTICAL OUT
or
CD IN
COAXIAL OUT
LINE
OUT
DIGITAL
CONTROL
A1
CD changer
çç
ç: Signal flow
çç
What cords will I need?
• Audio connecting cords (only two supplied) (3)
White
(L)
Red
(R)
• Optical cable (not supplied) (1)
White
(L)
Red
(R)
/
MD deck Amplifier
çç
ç: Signal flow
çç
Connecting a digital cable to the CD changer and
MD deck
You can make a digital recording from a CD to an MD
by connecting the CD changer and MD deck with an
optical cable or a coaxial digital connecting cable.
When using the optical cable
Take the caps off the connectors and then insert the plugs
parallelly until they click into place.
Be sure not to bend or tie together the optical cable.
MD deck CD changer
You can connect the optical cable
to either OPT1 or OPT2
36
çç
ç: Signal flow
çç
• Coaxial digital connecting cable (not supplied) (1)
EN
Page 37

Controlling a Separately Available Sony CD Changer
§
18
W
23
C
PROGRAM
OPEN/CLOSE
TIME D.O BIT
NUM
!
A˜B
17
V
22
–
B
SHUFFLE PRESENTRECORDED
PLAY MODE
SCROLL
CHAR
?
REPEAT
WRITE CLEAR
16
U
21
Z
A
CONTINUE
DISPLAY
NAME
/
>
25
MENU/NO
19
X
24
.
D
(
P.HOLD
A.SPACE
20
Y
25
,
E
)
M.SCAN
YES
DATE
3
H
8
M
13
R
2
G
7
L
12
Q
1
F
6
K
11
P
4
I
9
N
14
S
5
J
10
O
15
T
FILTER
>25
When using the coaxial digital connecting cable
MD deck CD changer
DIGITAL IN
COAXIAL OPT2OPT1
DIGITAL OUT
COAXIAL
OPTICAL
DIGITAL
COAXIAL
OUT
Ç
çç
ç: Signal flow
çç
z If “Din Unlock” and “C71” appear in the display
Make sure the optical cable or the coaxial digital
connecting cable is connected properly.
Connecting a control A1 cable to the CD changer
and MD deck
This lets you perform CD synchro-recording and
operate the CD changer using the controls on the MD
deck or the supplied remote (Mega CD Control
Function). Be sure to make connections firmly.
If a component has more than one CONTROL A1 jack,
you can use either one.
Controlling a CD Changer from the MD Deck (Mega CD Control Function)
You can operate a Sony CD changer connected with a
control A1 cable using the controls on the MD deck or
the supplied remote.
MEGA CONTROL
indicator
g
MEGA CONTROLINPUT
≠ AMS ±
MENU/NO
0)
§
(
Pp r
MD deck CD changer
S-LINK
CONTROL A1
Ç
Ç
S-LINK
CONTROL A1
You can connect the cable
to either of the jacks
çç
ç: Signal flow
çç
Notes
• When the deck controls the CD changer with a mode
selector, set the selector to CD1.
• If the plugs are not inserted firmly, “No Connect” appears
in the display and you cannot use the Mega CD Control
Function.
Number
buttons
1 Turn on the amplifier and set the source selector
to CD.
2 Set INPUT on the deck to the digital input
connector to which the CD changer is connected.
3 Press MEGA CONTROL.
The MEGA CONTROL indicator lights up and the
deck is set to Mega CD Control mode.
4 Press MENU/NO.
The current CD disc number starts flashing in the
display.
5 Turn AMS until the disc number you want
appears, then press AMS (or press the number
buttons and/or >25).
The track number starts flashing.
(Continued)
37
EN
Page 38

Controlling a Separately Available Sony CD Changer
6 Turn AMS until the track number you want
appears, then press AMS (or press the number
buttons and/or >25).
The selected track starts playing.
To control the deck again
Press MEGA CONTROL.
The MEGA CONTROL indicator goes off and you can
control the deck.
z When “No Connect” appears in the display
Check the control A1 cable connection and make sure
the CD changer mode selector is set to CD1.
z You can perform the following operations in Mega
CD Control mode
( : Play
P : Pause
p : Stop
0/) : Backward/forward search
AMS (or =/+) : Select the disc number and track
number
Number buttons and/or >25 on the remote: Directly
select the disc number and track number
Using the display
You can use the display to check the disc and track
information of the CD such as the total number of
tracks, total playing time of the tracks, disc name and
track name.
While CD play is stopped
Disc nameDisc number
Total number
of tracks
While playing a CD
Disc number
Track number Playing time
Total disc
playing time
Track title
Notes
• If a CD is not loaded to the selected disc number, “No
Disc” appears in the display.
• You can activate Mega CD Control mode regardless of
whether or not an MD is loaded in the MD deck.
• Mega CD Control mode is deactivated when:
– You turn off the deck.
– You eject the MD.
The play mode (e.g., PROGRAM, SHUFFLE) and
repeat mode (e.g., REPEAT) shown in the display in
Mega CD Control mode indicate the status of the CD
changer.
z If the CD is not labeled, “ DISC-5 ” appears in the
display (when disc number “5” is selected)
z You can switch to the MD display while recording
Each time you press DISPLAY, the display switches
between CD display and MD display.
This feature is useful when you want to check the MD
track being recorded. The display automatically returns
to the CD display when CD play stops.
Note that the music calendar appears during recording
or recording pause even while the display is set to CD
display, letting you check the number of MD tracks.
38
EN
Page 39

Controlling a Separately Available Sony CD Changer
Controlling a CD Changer from the MD Deck to Make a Synchro Recording
You can easily make a synchro-recording from a CD
changer connected using a control A1 cable to the MD
deck. You can record all tracks on the CD or all tracks
from the desired track onward. To record only your
favorite CD tracks, program the CD changer in
advance and then start recording in Program Play stop
mode. See the operating instructions included with the
CD changer for details.
If the MD is partially recorded, recording starts after
the last recorded track.
MEGA CONTROL
indicator
g
≠ AMS ±
MEGA CONTROLINPUT
MENU/NO
0)
§
(
Pr REC
(
Pp r
5 Press MENU/NO.
The current CD disc number starts flashing in the
display.
6 Select the disc number and track number you
want to record.
The operations differ for recording all tracks on the
CD or all tracks from the desired track onward.
For details, see the table below.
To record Do the following:
All tracks 1 Turn AMS until the disc number
you want appears, then press
AMS (or press the number
buttons and/or >25).
The track number starts flashing.
2 Press AMS. (The selected disc
starts playing.)
3 Press p to stop play.
All tracks from 1 Turn AMS until the disc
the desired track number you want appears, then
onward press AMS (or press the number
buttons and/or >25).
The track number starts flashing.
2 Turn AMS until the track
number you want appears, then
press AMS (or press the number
buttons and/or >25).
The selected track starts playing.
OPEN/CLOSE
§
MENU/NO
YES
TIME D.O BIT
SCROLL
>25
DISPLAY
PLAY MODE
CONTINUE
B
A
G
F
1
L
K
6
Q
P
11
V
U
16
–
Z
21
REPEAT
?
/
>
25
NAME
PROGRAM
SHUFFLE PRESENTRECORDED
C
D
H
I
3
2
4
M
N
8
7
9
R
S
13
12
14
W
X
18
17
19
.
23
22
24
A˜B
A.SPACE
!
(
WRITE CLEAR
NUM
CHAR
FILTER
DATE
E
J
5
O
10
Number
T
15
buttons
Y
20
,
25
M.SCAN
)
P.HOLD
1 Turn on the amplifier and set the source selector
to CD.
2 Insert a recordable MD.
3 Set INPUT on the deck to the digital input
connector to which the CD changer is connected.
4 Press MEGA CONTROL.
The MEGA CONTROL indicator lights up and the
deck is set to Mega CD Control mode.
7 Press r REC on the deck.
The CD changer pauses at the start of the desired
track when recording all tracks from the desired
track onward, or at the start of the first track when
recording all tracks. The MD deck stands by for
recording.
8 Press ( or P on the deck.
CD play and MD recording start.
The CD changer and MD deck both stop when the
recording is completed. If you started recording
during CD play, play continues from the next
track.
(Continued)
39
EN
Page 40

Controlling a Separately Available Sony CD Changer
To stop recording
Press p on the deck.
The CD changer and MD deck both stop.
Note
If a CD is not loaded to the selected disc number, “No Disc”
appears in the display.
z The deck copies CD text information (CD text and
disc memos) as it is to the MD (Disc Memo Copy
Function)
When the current CD is labeled, the CD disc and track
titles are recorded as the MD titles. However, the disc
title is not copied if the MD is already labeled.
z When “No Connect” appears in the display
Check the control A1 cable connection and make sure
the CD changer mode selector is set to CD1. After
checking, turn the MD deck and CD changer off and
then on again, then reset the Mega CD Control mode.
z You can use the REC-IT Function in Mega CD Control
mode
You can record a track on an MD while listening to a
CD.
For details, see “Recording the Current CD Track” on
page 22.
Notes
• The MD deck stops automatically if the remaining time on
the MD runs out during the recording.
• The Disc Memo Copy Function may not operate for
extremely short CD tracks.
• Text information may not be copied for some CDs.
• If the control A1 cable becomes disconnected during
recording, turn the deck and CD changer off and on, reset
the Mega CD Control mode, and then start recording over
from the beginning.
While “TOC Writing” is flashing
Do not move the deck or pull out the AC power cord to
ensure the complete recording. The deck is currently
updating the MD Table of Contents (TOC).
40
EN
Page 41

Editing Recorded MDs
Editing Recorded MDs
Notes on Editing
You can edit the recorded tracks after recording, using
the following functions:
• Erase Function allows you to erase recorded tracks
simply by specifying the corresponding track
number.
• A-B Erase Function allows you to specify a portion
within a track to erase it.
• Divide Function allows you to divide tracks at
specified points so that you can quickly locate those
points afterwards, using the AMS function.
• Combine Function allows you to combine two tracks
into one.
• Move Function allows you to change the order of
tracks by moving a specific track to a track position
you want.
• Title Function allows you to create titles for your
recorded MDs and tracks.
• Undo Function allows you to cancel the last edit.
If “Protected” alternates with “C11” in the display
The deck could not edit because the record-protect slot
on the MD is open. Edit after closing the slot.
Erasing Recordings (Erase Function)
Do the procedures below to erase following:
• A single track
• All tracks
≠ AMS ±
g
Erasing a single track
You can erase a track simply by specifying the
respective track number. When you erase a track, the
total number of tracks on the MD decreases by one and
all tracks following the erased one are renumbered.
Since erasing merely updates the TOC, there is no need
to record over material.
MENU/NO YES
0)
§
(
Pp r
When “TOC” and “TOC Writing” flash in the display
Do not move the deck or pull out the AC power cord.
After editing, “TOC” lights continuously until you
eject the MD or turn off the deck. “TOC” and “TOC
Writing” flash while the deck is updating the TOC.
When the deck finishes updating the TOC, “TOC” goes
off.
z To avoid confusion when erasing multiple tracks,
you should proceed in order of high to low track
number to prevent the renumbering of tracks that
have not been erased yet.
Example: Erasing B
Track
number
Erasing
1
AB C
1
AC
2
2
3
B is erased
4
D
3
D
1 While the deck is stopped, playing, or pausing,
press MENU/NO to display “Edit Menu”.
2 Turn AMS until “Tr Erase ?” appears in the
display.
3 Press AMS or YES.
The display for erasing tracks appears and
playback of the displayed track starts.
(Continued)
41
EN
Page 42

Editing Recorded MDs
4 Turn AMS to select the track to be erased.
5 Press AMS or YES.
When the track selected in Step 4 has been erased,
“Complete!!” appears for a few seconds and the
total number of tracks in the music calendar
decreases by one.
The track following the erased track begins
playing. (If you erase the last track, the track
preceding the erased track starts playing.)
6 Repeat Steps 1 to 5 to erase more tracks.
To cancel the Erase Function
Press MENU/NO or p.
Note
If “Erase ???” appears in the display, the track was recorded
or edited on another MD deck and is record-protected. If
this indication appears, press AMS or YES to erase the track.
Erasing all tracks on an MD
Erasing a recordable MD deletes the disc name, all
recorded tracks, and titles.
1 While the deck is stopped, playing, or pausing,
press MENU/NO to display “Edit Menu”.
2 Turn AMS until “All Erase ?” appears in the
display.
3 Press AMS or YES.
“All Erase??” appears in the display and all tracks
in the music calendar start flashing.
4 Press AMS or YES.
When the disc name, all recorded tracks, and titles
on the MD have been erased, “Complete!!”
appears for a few seconds and the music calendar
disappears.
To cancel the Erase Function
Press MENU/NO or p to turn off the “All Erase ?” or
“All Erase??” indication.
z You can undo the Erase Function
Use the Undo Function immediately after you erased
the track (see page 51).
42
EN
Page 43

Erasing a Part of a Track (A-B Erase Function)
You can specify a portion within a track and erase the
portion with ease. It is convenient when erasing
unnecessary sections after recording satellite broadcast
or FM broadcast.
Example: Erasing a part of track A
Editing Recorded MDs
5 While monitoring the sound, turn AMS to find the
starting point of the portion to be erased (point
A).
You can select the unit by which the starting point
is shifted. Press the 0 or ) button to select
frame*, second, or minute.
For frame, the number of frames appears when
you turn the AMS control; for second and minute,
“s” or “m” flashes in the display.
* 1 frame is about 12 ms.
Track
number
Erasing
g
Point A
A
#1A#2A#3
1
A (#1+#3)
Point B
2
≠ AMS ±
2
B
3
B
MENU/NO YES
0)
§
0/)
(
31
C
C
Pp r
1 While the deck is stopped, playing, or pausing,
press MENU/NO to display “Edit Menu”.
2 Turn AMS until “A-B Erase ?” appears in the
display.
3 Press AMS or YES.
4 Turn AMS to select the number of the track, then
press AMS or YES.
“-Rehearsal-” and “Point A ok?” alternates in the
display while the deck plays back the selected
track from the beginning.
6 If the point A is still incorrect, repeat Step 5 until
it is correct.
7 Press AMS or YES if the position is correct.
“Point B set” appears in the display and playback
for setting the end point of the portion to be erased
(point B) starts.
8 Continue playback (or press 0 or )) until the
deck reaches point B, then press AMS or YES.
“A-B Ers” and “Point B ok?” alternates in the
display while the deck repeats a portion of a few
seconds before point A and after point B
successively.
9 Repeat Step 5 if point B is not correct.
10Press AMS or YES when the position is correct.
“Complete!!” appears for a few seconds and the
portion between point A and B is erased.
To cancel the A-B Erase Function
Press MENU/NO or p.
Note
If “Impossible” appears in the display, this means:
– You specified point B comes before point A.
Point B should be specified after point A.
– The specified portion cannot be erased.
This sometimes happens when you’ve edited the same
track many times, and is due to a technical limitation of the
MD system, not a mechanical error.
43
EN
Page 44

Editing Recorded MDs
Dividing Recorded Tracks (Divide Function)
With the Divide Function you can mark a track
number at places that you want to randomly access
afterwards. Use this function to add tracks to MDs
recorded from an analog source (and therefore contain
no track numbers), or to divide an existing track into
multiple portions for locating positions in the middle
of a track. When you divide a track, the total number
of tracks on the MD increases by one and all tracks
following the divided track are renumbered.
Example: Dividing track 2 to create a new track for C
4 While monitoring the sound, turn AMS to find the
point to divide the track.
You can select the unit by which the starting point
is shifted. Press the 0 or ) button to select
frame, second, or minute.
For frame, the number of frames appears when
you turn the AMS control; for second and minute,
“s” or “m” flashes in the display.
5 Press AMS or YES when the position is correct.
“Complete!!” appears for a few seconds and the
newly created track begins playing. The new
track will have no track title even if the original
track was labeled. The total number of tracks in
the music calender increases by one.
Track
number
Dividing
g
1
1
23
A
BC D
Track 2 is divided and a
new track is created for C
2
A
B
≠ AMS ±
3
4
DC
MENU/NO YES
0)
§
(
0/)
Pp r
Dividing a track after selecting the track
While the deck is stopped, playing, or pausing,
1
press MENU/NO to display “Edit Menu”.
2 Turn AMS until “Divide ?” appears in the display,
then press AMS or YES.
3 Turn AMS to select the track to be divided and
press AMS or YES.
“-Rehearsal-” appears in the display and the deck
plays back the selected track from the beginning.
To cancel the Divide Function
Press MENU/NO or p.
z You can undo the Divide Function
Use the Undo Function immediately after you divided
the track (see page 51).
z You can divide a track while recording
Use the Track Marking Function (see page 17).
Dividing a track after selecting the dividing
point
While playing the MD, press AMS at the point
1
where you want to create a new track.
“—Divide—” and “-Rehearsal-” alternate in the
display and playback continues from the position
you selected.
2 To make fine adjustment on the dividing position,
do Step 4 in “Dividing a track after selecting the
track” on this page.
3 Press YES.
“Complete!!” appears for a few seconds and the
newly created track begins playing.
To cancel the Divide Function
Press AMS, MENU/NO or p.
44
EN
Page 45

Combining Recorded Tracks (Combine Function)
Use the Combine Function to combine tracks on a
recorded MD. The two tracks to be combined need not
to be consecutive and the latter track to be combined
can be the track which comes before the former one in
the track number order. This function is useful for
combining several songs into a single medley, or
several independently recorded portions into a single
track. When you combine two tracks, the total number
of tracks decreases by one and all tracks following the
combined tracks are renumbered.
Example: Combining B and D
Track
number
Combining
123 4
BC
A
B and D are combined
1
AB D
into one track
2
D
3
C
Editing Recorded MDs
4 Turn AMS to select the first track of the two to be
combined and press AMS or YES.
The display for selecting the second track appears
and the deck repeats the portion where the two
tracks will join (i.e., the end of the first track and
the beginning of the succeeding track).
Succeeding track
First track Track number
after combining
5 Turn AMS to select the second track of the two to
be combined and press AMS or YES.
“Complete!!” appears for a few seconds and the
total number of tracks in the music calendar
decreases by one.
If both of the combined tracks have track titles, the
title of the second track is erased.
To cancel the Combine Function
Press MENU/NO or p.
≠ AMS ±
g
MENU/NO YES
0)
§
(
Pp r
1 While the deck is stopped, playing, or pausing,
press MENU/NO to display “Edit Menu”.
2 Turn AMS until “Combine ?” appears in the
display.
3 Press AMS or YES.
z You can undo the Combine Function
Use the Undo Function immediately after you combined
the tracks (see page 51).
Note
If “Impossible” appears in the display, the tracks cannot be
combined. This sometimes happens when you’ve edited the
same track many times, and is due to a technical limitation
of the MD system, not a mechanical error.
45
EN
Page 46

Editing Recorded MDs
Moving Recorded Tracks (Move Function)
Use the Move Function to change the order of any
track. After you move a track, the track numbers
between the new and old track positions are
automatically renumbered.
Example: Moving track C to track position 2
Track
number
123 4
AB C D
6 Press AMS or YES.
“Complete!!” appears for a few seconds and the
moved track begins playing back.
To cancel the Move Function
Press MENU/NO or p.
Moving
g
13
2
ACBD
≠ AMS ±
Track C moves to
track position 2
4
MENU/NO YES
0)
§
(
Pp r
1 While the deck is stopped, playing, or pausing,
press MENU/NO to display “Edit Menu”.
2 Turn AMS until “Move ?” appears in the display.
3 Press AMS or YES.
4 Turn AMS to select the track to be moved and
press AMS or YES.
46
5 Turn AMS until the new track position appears.
Track number
to be moved
EN
New track
position
Page 47

Labeling Recordings
Editing Recorded MDs
6 Press DISPLAY/CHAR to select the character
type as follows:
(Title Function)
You can create titles for your recorded MDs and tracks.
Titles — which may consist of uppercase and
lowercase letters, numbers and symbols for a
maximum of about 1,700 characters per disc — appear
in the display during MD operation. You can also use
the remote to label a track or an MD (see “Labeling
tracks and MDs with the remote” on page 49).
≠ AMS ±
g
DISPLAY/CHAR CLEAR
Use the following procedure to label a track or an MD.
You can label a track while it is playing, pausing or
recording. If the track is recording, be sure to finish
labeling before the track ends. If the track ends
before you’ve completed the labeling procedure,
the characters already entered are not recorded and
the track will remain unlabeled.
MENU/NO
0)
§
0/)
(
YES
Pp r
To select Press DISPLAY/CHAR repeatedly
until
Uppercase letters “A” appears in the display
Lowercase letters “a” appears in the display
Numbers “0” appears in the display
7 Turn AMS to select the character.
The selected character flashes.
Letters, numbers, and symbols appear in
sequential order as you turn AMS.
You can use the following symbols in titles:
! ” # $ % & ’ ( ) * + , – . / : ; < = > ? @ _ `
You can press DISPLAY/CHAR to change the
character type at any time during Step 7 (see
Step 6).
1 Press MENU/NO to display “Edit Menu”.
2 Turn AMS until “Name ?” appears in the display
and press AMS or YES.
Skip this step while recording.
3 Turn AMS until “Nm In ?” appears in the display,
then press AMS or YES.
4 Turn AMS to select “Disc” to label an MD, or to
specify the track to label.
While recording, go to Step 6.
5 Press AMS or YES.
A flashing cursor appears in the display.
8 Press AMS to enter the selected character.
The cursor shifts rightward and waits for the input
of the next character.
(Continued)
47
EN
Page 48

Editing Recorded MDs
9 Repeat Steps 7 and 8 until you have entered the
entire title.
If you entered the wrong character
Press 0 or ) until the character to be corrected
starts flashing, and repeat Steps 7 and 8 to enter
the correct character.
To erase a character
Press 0 or ) until the character to be erased
starts flashing, then press CLEAR.
To enter a space
Press AMS while the cursor is flashing.
10Press YES.
This completes the labeling procedure and the title
appears in the display.
To cancel labeling
Press MENU/NO or p.
Note
You cannot label a track or an MD while you are recording
over an existing track.
Copying a track or disc title
You can copy a track or disc title to use it as a title of
another track or the disc title within a disc.
1 Press MENU/NO to display “Edit Menu”.
2 Turn AMS until “Name ?” appears in the display
and press AMS or YES.
3 Turn AMS until “Nm Copy ?” appears in the
display.
4 Press AMS or YES.
5 Turn AMS to select “Disc” to copy the disc title, or
the track whose title you want to copy and press
AMS or YES.
If “No Name” appears in the display
The disc or the track has no name.
6 Turn AMS to select “Disc” for disc title or to
specify the track number to copy a title, and press
AMS or YES.
“Complete!!” appears for a few seconds to indicate
that the copying operation is completed.
If “Overwrite?” appears in the display
The disc or track you selected in Step 6 above has a
title. If you continue the title copying, press AMS
or YES.
To cancel title copying
Press MENU/NO or p.
48
EN
Page 49

Editing Recorded MDs
Labeling tracks and MDs with the remote Z
OPEN/CLOSE
§
MENU/NO
YES
TIME D.O BIT
SCROLL
NAME
CHAR
0/)
DISPLAY
PLAY MODE
CONTINUE
B
A
G
F
1
L
K
6
Q
P
11
V
U
16
Z
21
?
/
>
25
NAME
·
=
0
CD PLAYER FADER
–
CD-SYNC
PROGRAM
SHUFFLE PRESENTRECORDED
C
D
H
I
3
2
M
N
8
7
R
S
13
12
14
W
X
18
17
19
.
23
22
24
A˜B
REPEAT
A.SPACE
!
(
WRITE CLEAR
NUM
CHAR
P p
+ r
T.REC MUSIC SYNC
)
STANDBY=STARTPSTOP
+
FILTER
MENU/NO
DATE
E
J
4
5
O
9
10
Alphabet/number
T
15
buttons
Y
20
,
25
M.SCAN
)
P.HOLD
CLEAR
REC-IT
NUM
1 Press NAME repeatedly until a flashing cursor
appears in the display, then do the following:
To label Make sure that the deck is
A track Playing, pausing, recording the
An MD Stopped with no track number
track to be labeled, or stopped after
locating the track to be labeled
appearing in the display
2 Select the character type as follows:
To select Press
Uppercase letters CHAR repeatedly until “Selected
Lowercase letters CHAR repeatedly until “Selected
Numbers NUM repeatedly until “Selected
AB” appears in the display
ab” appears in the display
12” appears in the display
4 Repeat Step 3 until you have entered the entire
title.
If you entered the wrong character
Press 0 or ) until the character to be corrected
starts flashing.
Press CLEAR to erase the incorrect character, then
enter the correct one.
5 Press NAME again.
This completes the labeling procedure and the title
appears in the display.
To cancel labeling
Press MENU/NO or p.
Changing an existing title Z
Press NAME, then do the following:
1
To change Make sure that the deck is
A track title Playing, pausing the track whose
A disc name Stopped with no track number
title is to be changed, or stopped
after locating the track whose title
is to be changed
appearing in the display
2 Hold down CLEAR until the current title is
erased.
3 Enter the new title.
Do Steps 6 to 9 of “Labeling Recordings” on pages
47 and 48, or Steps 2 to 4 of “Labeling tracks and
MDs with the remote” on this page.
3 Press an alphabet/number button to enter a
character.
After you enter a character, the cursor shifts
rightward and waits for the input of the next
character.
You can change the character type at any time
during Step 3 (see Step 2).
4 Press NAME.
(Continued)
49
EN
Page 50

Editing Recorded MDs
Erasing a title on a disc (Name Erase)
Use this function to erase a title on a disc.
1 While the deck is stopped, playing, or pausing,
press MENU/NO to display “Edit Menu”.
2 Turn AMS until “Name ?” appears in the display
and press AMS or YES.
3 Turn AMS until “Nm Erase ?” appears in the
display and press AMS or YES.
4 Turn AMS to select “Disc” to erase the disc title,
or the track whose title you want to erase and
press AMS or YES.
“Complete!!” appears for a few seconds and the
title is erased.
To cancel Name Erase Function
Press MENU/NO or p.
Erasing all titles on a disc (Name All Erase)
Use this function to erase all titles on an MD
simultaneously.
To cancel the Name All Erase Function
Press MENU/NO or p.
z You can undo the Name All Erase Function
See “Undoing the Last Edit” on page 51.
z You can erase all recorded tracks and titles
See “Erasing all tracks on an MD” on page 42.
1 While the deck is stopped, playing, or pausing,
press MENU/NO to display “Edit Menu”.
2 Turn AMS until “Name ?” appears in the display
and press AMS or YES.
3 Turn AMS until “Nm AllErs?” appears in the
display and press AMS or YES.
“Nm AllErs??” appears in the display.
4 Press AMS or YES.
“Complete!!” appears for a few seconds and all
titles are erased.
50
EN
Page 51

Undoing the Last Edit (Undo Function)
Editing Recorded MDs
4 Press AMS or YES again.
“Complete!!” appears for a few seconds and the
contents of the MD are restored to the condition
that existed before the edit.
You can use the Undo Function to cancel the last edit
and restore the contents of the MD to the condition that
existed before editing was done. Note, however, that
you cannot undo an edit if you do any of the following
after the edit:
• Press the r REC button on the deck.
• Press the r button, the MUSIC SYNC button, or the
CD SYNC STANDBY button on the remote.
• Update the TOC by turning off the deck or ejecting
the MD.
• Disconnect the AC power cord.
≠ AMS ±
g
MENU/NO YES
0)
§
(
Pp r
1 With the deck stopped and no track number
appearing in the display, press MENU/NO to
display “Edit Menu”.
To cancel the Undo Function
Press MENU/NO or p.
2 Turn AMS until “Undo ?” appears in the display.
“Undo ?” does not appear if no editing has been
done.
3 Press AMS or YES.
One of the following messages appears in the
display, depending on the type of editing to be
undone:
Editing done: Message:
Erasing a single track
Erasing all tracks on an MD “Erase Undo?”
Erasing a part of a track
Dividing a track “DivideUndo?”
Combining tracks “CombinUndo?”
Moving a track “Move Undo?”
Labeling a track or an MD
Changing an existing title
Erasing all titles on an MD
Copying a title
“Name Undo?”
51
EN
Page 52

Additional Information
Additional Information
Display Messages
The following table explains the various messages that
appear in the display.
Also, the deck has a Self-Diagnosis Function (see page
59).
Message Meaning
Blank Disc A new (blank) or erased MD has been
Cannot Copy An attempt was made to make a second
Cannot Edit An attempt was made to edit the MD
Disc Full The MD is full (see “System Limitations”
Impossible The deck cannot do the specified editing
Name Full The titling capacity of the MD has reached
No Disc There is no MD in the deck.
Premastered An attempt was made to record on the
Standby (flashing)
No Connect The control A1 cable is not connected
TextProtect The CD text contains information that
inserted.
copy from a digitally dubbed MD (see
page 55).
during Program or Shuffle Play.
on this page).
operation.
its limit (about 1,700 characters).
premastered MD.
The contents recorded by timer have
disappeared over time and are not be
available for saving to disc, or Program
Play could not be activated since the
program has disappeared over time.
properly.
may not be copied to the MD.
System Limitations
The recording system in your MiniDisc deck is
radically different from those used in cassette and DAT
decks and is characterized by the limitations described
below. Note, however, that these limitations are due to
the inherent nature of the MD recording system itself
and not to mechanical causes.
“Disc Full” lights up even before the MD has reached the
maximum recording time (60 or 74 minutes)
When 255 tracks have been recorded on the MD, “Disc Full”
lights up regardless of the total recorded time. More than
255 tracks cannot be recorded on the MD. To continue
recording, erase unnecessary tracks or use another
recordable MD.
“Disc Full” lights up before the maximum number of
tracks is reached
Fluctuations in emphasis within tracks are sometimes
interpreted as track intervals, incrementing the track count
and causing “Disc Full” to light up.
The remaining recording time does not increase even
after erasing numerous short tracks
Tracks under 12 seconds in length are not counted and so
erasing them may not lead to an increase in the recording
time.
Some tracks cannot be combined with others
Track combination may become impossible when tracks are
edited.
The total recorded time and the remaining time on the
MD may not total the maximum recording time (60 or
74 minutes)
Recording is done in minimum units of 2 seconds each, no
matter how short the material. The contents recorded may
thus be shorter than the maximum recording capacity. Disc
space may also be further reduced by scratches.
52
Tracks created through editing may exhibit sound
dropout during search operations.
Track numbers are not recorded correctly
Incorrect assignment or recording of track numbers may
result when CD tracks are divided into several smaller tracks
during digital recording. Also, when the Automatic Track
Marking Function is activated during recording, track
numbers may not marked as in the original depending on
the program source.
EN
Page 53

Additional Information
“TOC Reading” appears for a long time
If the inserted recordable MD is brand new, “TOC Reading”
appears in the display longer than for MDs that have been
used.
Limitations when recording over an existing track
• The correct remaining recording time may not be
displayed.
• You may find it impossible to record over a track if that
track has been recorded over several times already. If this
happens, erase the track using the Erase Function (see
page 41).
• The remaining recording time may be shortened out of
proportion to the total recorded time.
• Recording over a track to eliminate noise is not
recommended since this may shorten the duration of the
track.
• You may find it impossible to label a track while
recording over it.
The correct recorded/playing time may not be displayed
during playback of monaural-format MDs.
The deck does not record.
/ The MD is record-protected (“Protected” alternates
with “C11” in the display).
Close the record-protect slot (see page 11).
/ The deck is not connected properly to the sound
source. Make connections properly to the sound
source.
/ The recording level is not adjusted properly. Adjust the
recording level properly (see page 16).
/ A premastered MD is inserted. Replace it with a
recordable MD.
/ There is not enough time left on the MD. Replace it
with another recordable MD with fewer recorded
tracks, or erase unnecessary tracks.
/ There has been a power failure or the AC power cord
has been disconnected during recording. Data
recorded to that point may be lost. Repeat the
recording procedure.
The deck does not work during synchro-recording.
/ The currently selected CD player type (CD player or
video CD player) does not match the CD player being
used. Reset the CD player type (see page 20).
If the CD player being used has a mode selector, set the
selector to CD1.
Troubleshooting
If you experience any of the following difficulties while
using the deck, use this troubleshooting guide to help
you remedy the problem. Should any problem persist,
consult your nearest Sony dealer.
The deck does not operate or operates poorly.
/The MD may be damaged (“Disc Error” appears).
Take the MD out and insert it again. If “Disc Error”
remains, replace the MD.
The deck does not play back.
/Moisture has formed inside the deck. Take the MD out
and leave the deck in a warm place for several hours
until the moisture evaporates.
/The deck is not on. Press 1/u to turn the deck on.
/The MD is inserted in the wrong direction. Slide the
MD into the disc slot with the label side up and the
arrow pointing towards the opening.
/The MD may not be recorded (the music calendar does
not appear). Replace the disc with one that has been
recorded.
You cannot use the Mega CD Control Function.
/ The control A1 cable is not connected properly. Insert
the plugs firmly.
/ Set the CD mode selector to CD1.
/ The deck is not recognizing the connected CD changer.
Turn the deck and CD changer off and on, and then
reset the Mega CD Control mode.
The sound has a lot of static.
/ Strong magnetism from a television or a similar device
is interfering with operations. Move the deck away
from the source of strong magnetism.
The three-digit display appears.
/ The Self-Diagnosis Function is on.
Check the table on page 59.
Note
If the deck does not operate properly even after you’ve
attempted the prescribed remedies, turn off the deck, then
reinsert the plug into the power outlet.
53
EN
Page 54

Additional Information
Specifications
System MiniDisc digital audio system
Disc MiniDisc
Laser Semiconductor laser (λ = 780 nm)
Emission duration: continuous
Laser output Less than 44.6 µW*
* This output is the value measured at a
distance of 200 mm from the objective
lens surface on the Optical Pick-up
Block with 7 mm aperture.
Laser diode properties Material: GaAlAs
Revolutions (CLV) 400 rpm to 900 rpm
Error correction Advanced Cross Interleave Reed
Solomon Code (ACIRC)
Sampling frequency 44.1 kHz
Coding Adaptive Transform Acoustic Coding
(ATRAC)
Modulation system EFM (Eight-to-Fourteen Modulation)
Number of channels 2 stereo channels
Frequency response 5 to 20,000 Hz ±0.3 dB
Signal-to-noise ratio Over 102 dB during playback
Wow and flutter Below measurable limit
General
Power requirements
Where purchased Power requirements
Continental Europe and UK 220 – 230 V AC, 50/60 Hz
U.S.A. and Canada 120 V AC, 60 Hz
Power consumption 18 W
Dimensions (approx.) (w/h/d) incl. projecting parts and controls
Mass (approx.) 7.8 kg (17 lb 3 oz)
Supplied accessories
See page 4.
Optional accessories
Recordable MDs MDW-60 (60 min), MDW-74 (74 min)
US and foreign patents licensed from Dolby Laboratories
Licensing Corporation.
Design and specifications are subject to change without
notice.
430 × 125 × 345 mm
(17 × 5 × 13
3
/4 in)
Inputs
LINE(ANALOG)
IN
DIGITAL IN
OPT1
DIGITAL IN
OPT2
DIGITAL IN
COAXIAL
Outputs
PHONES
LINE(ANALOG)
OUT
DIGITAL OUT
OPTICAL
DIGITAL OUT
COAXIAL
Jack
type
Phono
jacks
Square
optical
connector
jack
Square
optical
connector
jack
Phono
jack
Stereo
phone jack
Phono
jacks
Square
optical
connector
jack
Phono
jack
Input
impedance
47 kilohms
Optical wave
length:
660 nm
Optical wave
length:
660 nm
75 ohms
28 mW
2 Vrms
(at 50 kilohms)
–18 dBm
0.5 Vp-p
(at 75 ohms)
Rated
input
500 mVrms
Minimum
input
125 mVrms
——
—
0.5 Vp-p,
±20%
Load impedanceJack type Rated output
32 ohms
Over
10 kilohms
Optical wave
length:
660 nm
75 ohms
—
—
54
EN
Page 55

Guide to the Serial Copy Management System
This MD deck uses the Serial Copy Management
System, which allows only first-generation digital
copies to be made of premastered software via the
deck’s digital input jack. An outline of this system
appears below:
1 You can record from digital program sources (CDs, DATs
or premastered MDs) onto a DAT tape or recordable MD
via digital input jack on the DAT or MD deck.
You cannot, however, record from this recorded DAT tape
or MD onto another DAT tape or recordable MD via the
digital input jack on the DAT or MD deck.
CD player
Additional Information
2 You can record the digital input signal of a digital satellite
broadcast onto a DAT tape or recordable MD via the
digital input jack on the DAT or MD deck which is capable
of handling a sampling frequency of 32 kHz or 48 kHz.
You can then record the contents of this recorded DAT
tape or MD (first-generation) onto another DAT tape or
recordable MD via digital input jack on the DAT or MD
deck to create a second-generation digital copy.
Subsequent recording from the second-generation copy
onto another recordable DAT tape or MD is possible only
through the analog input jack on the DAT or MD deck.
Note, however, that on some BS/CS tuners, secondgeneration digital copying may not be possible.
Playing
Optical cable or
coaxial digital
connecting cable
BS/CS tuner
Digital output jack
Digital input jack
MD deckDAT deck
Playing
Optical cable or
coaxial digital
connecting cable
Recording
DAT or MD
Playback
Digital output jack Line (analog) output jacks
Optical cable or
coaxial digital
connecting cable
Digital input jack Line (analog) input jacks
DAT deck or
MD deck
DAT deck or
MD deck
Digital output jack
Digital input jack
First-generation
DAT tape or MD
recorded via
digital-to-digital
connection
Audio connecting
cord
Recording
DAT or MD
Playback
Optical cable or
coaxial digital
connecting cable
Recording
DAT or MD
Playback
DAT deck or
MD deck
First-generation
DAT tape or MD
recorded via
digital-to-digital
connection
DAT deck or
MD deck
Digital output jack
Digital input jack
DAT deck or
MD deck
Secondgeneration DAT
tape or MD
recorded via
digital-to-digital
connection
DAT deck or
MD deck
Recording
DAT deck or
MD deck
Digital output jack
Optical cable or
coaxial digital
connecting cable
Digital input jack Line (analog) input jacks
Recording
DAT deck or
Line (analog) output jacks
Audio connecting
cord
MD deck
(Continued)
55
EN
Page 56

Additional Information
3 You can record a DAT tape or MD recorded via the DAT
or MD deck’s analog input jack onto another DAT tape or
MD via the DAT or MD deck’s digital output jack. You
cannot, however, make a second-generation DAT tape or
MD copy via the DAT or MD deck’s digital output jack.
Turntable
CD playerTuner
Cassette deck DAT deck
Microphone
amplifier
Playing
Audio connecting cord
Recording
DAT or MD
Playback
Optical cable or
coaxial digital
connecting cable
Recording
DAT or MD
Playback
DAT deck or
DAT deck or
DAT deck or
DAT deck or
MD deck
MD deck
MD deck
MD deck
MD deck
Line (analog)
output jacks
Line (analog)
input jacks
DAT tape or MD
recorded via
analog-to-digital
connection
Digital output jack
Digital input jack
First-generation
DAT tape or MD
recorded via
digital-to-digital
connection
Index
A, B
A-B erase 43
A-B repeat 28
Adjusting
analog recording level 16
digital recording level 16
AMS (Automatic Music Sensor) 26
Audio connecting cord 4, 5, 36, 55, 56
Auto cut 14
Auto pause 31
Auto space 30
C
CD synchro-recording 19
Changing
an existing title 49
display 25
order of programmed tracks 30
Checking
order of programmed tracks 30
playing time 24
remaining time 14, 24
total number of tracks 24
track number 24
Cleaning 3
Clock setting 7
Coaxial digital connecting cable 4, 5, 36, 37, 55, 56
Combining 45
Control A1
basic functions 7
CONTROL A1 control system 6
hooking up 6, 36
synchro-recording on an MD 7, 20, 39
D
Digital filter 35
Display messages 52
Dividing
after selecting the dividing point 44
after selecting the track 44
E
Erasing
all titles 50
all tracks 42
a part of a track 43
a single track 41
a title 50
56
Digital output jack
Line (analog) output jacks
F, G
Fade-in
Optical cable or
coaxial digital
connecting cable
Digital input jack
Recording
EN
DAT deck or
Line (analog) input jacks
MD deck
Audio connecting
cord
playback 31
recording 21
Fade-out
playback 31
recording 21
Page 57

Additional Information
H
Hooking up
a digital component 5
an analog component 5
I, J, K
Input monitor 14
L
Labeling
an MD 47
a track 47
copying a title 48
with the remote 49
Locating
a particular point in a track
27
a specific track 26
M, N
MD
inserting 9, 12
premastered 24
recordable 9, 24
taking out 11, 12
Mega CD Control Function 37,
39
Moving 46
Music
scan 26
synchro-recording 19
O
Optical cable 4, 5, 36, 55, 56
Optional accessories 54
P, Q
Pausing
playback 12
recording 11
Pitch Control Function 33
Playing
changing the pitch 33
normal play 12
program play 29
repeat play 27
shuffle play 28
tracks just recorded 15
R
REC-IT Function 22
Recording
normal recording 9
over existing tracks 15
time machine recording 18
Recording date 25
Record-protect tab 11
Remote commander (remote) 4
S
Sampling frequency 5, 55
Sampling rate converter 5
SCMS (Serial Copy
Management System) 13, 55
Self-diagnosis Function 59
Setup menu 58
Smart space 15
Specifications 54
Supplied accessories 4
System limitations 52
T
Timer
playing 32
recording 23
sleep timer 33
Track marking
automatic track marking 17
manual track marking 17
Troubleshooting 53
U, V, W, X, Y, Z
Undoing the last edit 51
Names of controls
Buttons
A˜B 28
Alphabet/Number 24, 26, 29,
37, 39, 49
A.SPACE 30
CD PLAYER P 19
CD PLAYER =/+
CHAR 49
CLEAR 28, 29, 47, 49
CONTINUE 28, 29
DATE PRESENT 7
DATE RECORDED 24
DIGITAL REC LEVEL
/ANALOG OUT LEVEL +/–
16, 34
DISPLAY 24, 29
DISPLAY/CHAR 14, 24, 29, 47
FADER 21, 31
FILTER 35
MEGA CONTROL 37, 39
MENU/NO 10, 14, 17, 29, 30,
33, 34, 37, 39, 41, 43 to 47, 49,
51
M.SCAN 26
MUSIC SYNC 19
NAME 49
NUM 49
§ OPEN/CLOSE 9, 12, 14
P.HOLD 16
PLAY MODE 28, 29, 32
PROGRAM 29
r REC (recording) 10, 14, 17,
39, 51
REC-IT 22
REPEAT 27, 28
SCROLL 24
SCROLL/CLOCK SET 7, 24
SHUFFLE 28
STANDBY 19
START 19
STOP 19
TIME 14, 24
T.REC 18
YES 29, 41, 43 to 47, 51
( (play) 10, 12, 14, 26, 28, 29,
32, 38, 39
· (play) 26, 29
P (pause) 10 to 12, 38, 39
p (stop) 11, 12, 14, 23, 28, 38,
39
r (recording) 51
0/) (manual search)
27 to 29, 38, 43, 44, 47, 49
=/+ (AMS: Automatic
Music Sensor) 12, 24, 26, 38
>25 24, 26, 29, 37, 39
Connectors
DIGITAL IN/OUT 5, 9
Controls
≠ AMS ± 7, 10, 12, 14,
16 to 18, 26, 29, 30, 33, 34,
37 to 39, 41, 43 to 47, 51
ANALOG REC LEVEL L/R 10,
16
DIGITAL REC LEVEL 10, 16
INPUT 9, 13, 14, 37, 39
PHONE LEVEL 12
Indicators
FILTER 35
MEGA CONTROL 37, 39
STANDBY 7, 9, 12
Jacks
CONTROL A1 6, 37
LINE(ANALOG) IN/OUT
5, 9, 13, 31, 34
PHONES 12, 31
Switches
TIMER 23, 32
1/u (power) 9, 12
Others
Display 14, 24, 25, 38
Music calendar 24
TOC Writing 11, 13, 22, 40, 41
g 4
57
EN
Page 58

Additional Information
Table of Setup Menus
You can make various settings on this deck by using Setup Menus. Operation related to each menu were explained
in the previous sections. The table below outlines each menu, including the various parameters and initial settings.
Note
The menus you can use in stop mode, during play or while recording differ.
To enter the Setup Menu
While the deck is stopped, press MENU/NO twice to display “Setup Menu”,
or
press MENU/NO to display “Edit Menu” and turn AMS until “Setup ?” appears in the
display, then press AMS.
Menu number Function Parameters Initial setting See
01 Creates a program. page 29——
02 Sets the track marking function. T.Mark Off, T.Mark LSyn T.Mark LSyn
03 Sets the reference level of the input
signal when “T.Mark LSyn” is
selected in Setup Menu 02.
04 Turns the Auto Space and Auto
Pause Functions on and off.
05 Turns the Smart Space and Auto
Cut Functions on and off.
06 Turns the Peak Hold Function on
and off for the peak level meters.
07 Sets the playing time during music
scan.
LS(T) –72 to –0dB LS(T) –50dB page 17
Auto Off, Auto Space, Auto Pause Auto Off pages 30
S.Space Off, S.Space On S.Space On page 15
P.Hold On, P.Hold Off P.Hold Off page 16
M.Scan 6 to 20s M.Scan 6s page 26
page 17
and 31
08
09 Sets the duration of fade-out
10 Changes the playback speed by
11
12 Changes the bit length of the digital
13 Changes the bit length of the digital
14
15 Turns the Sleep Timer Function on
16 Sets the recording mode. Stereo Rec/Mono Rec Stereo Rec page 10
Sets the duration of fade-in
recording and playback.
recording and playback.
auto steps.
Fine controls the playback speed. Pfine –98.5% to +12.5% Pfine 0.0% page 34
input signal.
output signal.
Sets the duration of the Sleep Timer. Sleep 30 to 120min Sleep 60min page 33
and off.
F.in 1.0 to 15.0s
F.out 1.0 to 15.0s F.out 5.0s page 21
Pitch –48 to +2 Pitch 0 page 33
Din 24bit/20bit/16bit Din 20bit page 15
Dout 24bit/20bit/16bit Dout 20bit page 34
Sleep On, Sleep Off Sleep Off page 33
F.in 5.0s
page 21
To return the settings to the initial values
Press CLEAR.
58
EN
Page 59

Additional Information
Self-Diagnosis Function
The deck has a self-diagnosis display. This function shows a three-digit display (a combination of a letter and figures)
and the corresponding message alternately, so you can check the deck’s condition.
If such a display appears, check the following table in order to resolve the problem.
Should any problem persist, consult your nearest Sony dealer.
Self-diagnosis display
C11
Protected
Three-digit display/Message Cause/Remedy
C11/Protected The inserted MD is record-protected.
C13/REC Error The recording was not made properly.
C13/Disc Error The deck could not read the TOC of the MD properly.
C14/Disc Error The deck could not read the TOC of the MD properly.
C71/Din Unlock A moment’s lighting is due to the signals of the digital program being recorded.
/ Take out the MD, and close the record-protect tab (page 11).
/ Set the deck in a stable place, and repeat the recording procedure.
The inserted MD is dirty (with smudges, fingerprints, etc.), scratched, or not up to
standards.
/ Replace the disc, and repeat the recording procedure.
/ Take out the MD, and insert it again.
/ Insert another disc.
/ If possible, erase all tracks on the MD using the All Erase Function on page 42.
This does not affect the recorded material.
While recording from a digital component connected through the digital input
connector, the digital connecting cable was unplugged or the digital component
turned off.
/ Connect the cable or turn the digital component back on.
59
EN
Page 60

A VERTISSEMENT
Pour éviter tout risque
d’incendie ou d’électrocution,
ne pas exposer cet appareil à
la pluie ou à l’humidité.
Pour éviter tout choc
électrique, ne pas ouvrir le
coffret. Ne confier l’entretien
qu’à un technicien qualifié.
Le composant à laser de cet appareil
est susceptible d’émettre des
radiations dépassant la limite des
appareils de Classe 1.
Cet appareil fait partie des produits
laser de la CLASSE 1. L’étiquette CLASS
1 LASER PRODUCT est collée à l’arrière
de l’appareil.
L’étiquette suivante est collée à
l’intérieur de la platine.
LE REVENDEUR NE PEUT EN
AUCUN CAS ÊTRE TENU
RESPONSABLE DE DOMMAGES
DIRECTS, INDIRECTS OU
ACCIDENTELS, QUELLE QU’EN
SOIT LA NATURE, OU DE PERTES
OU DEPENSES RESULTANT D’UN
PRODUIT DEFECTUEUX OU DE
L’UTILISATION D’UN PRODUIT.
AVERTISSEMENT POUR LES
UTILISATEURS AU CANADA
ATTENTION
POUR PREVENIR LES CHOCS
ELECTRIQUES, NE PAS UTILISER
CETTE FICHE POLARISEE AVEC UN
PROLONGATEUR, UNE PRISE DE
COURANT OU UNE AUTRE SORITIE
DE COURANT, SAUF SI LES LAMES
PEUVENT ETRE INSEREES A FOND
SANS EN LAISSER AUCUNE PARTIE
A DECOUVERT.
Précautions
Sécurité
Si un solide ou un liquide tombait dans
le coffret, débranchez la platine et faitesla vérifier par un professionnel avant de
la remettre sous tension.
Sources d’alimentation
• Avant de mettre la platine sous
tension, vérifiez si sa tension de
fonctionnement correspond à celle du
secteur local. La tension de
fonctionnement est indiquée sur la
plaque signalétique à l’arrière de la
platine.
• La chaîne n’est pas isolée du secteur
tant qu’elle reste branchée à la prise
secteur, même lorsqu’elle est éteinte.
• Débranchez la platine si vous n’avez
pas l’intention de l’utiliser pendant
longtemps. Pour déconnecter le
cordon d’alimentation secteur, tirez
sur la fiche proprement dite. Ne
jamais tirer sur le cordon.
• Si le cordon d’alimentation (secteur) a
besoin d’être changé, faites-le changer
dans un centre de réparation qualifié
uniquement.
Fonctionnement
Si la platine est portée directement d’un
endroit froid dans une pièce chaude, ou
si elle est placée dans une pièce très
humide, de l’humidité risque de se
condenser sur les lentilles à l’intérieur
de la platine. Dans ce cas la platine ne
fonctionne pas correctement. Sortez le
minidisque et laissez la platine pendant
environ une heure allumée pour que
l’humidité s’évapore.
Cartouche du minidisque
• Ne pas ouvrir le volet et exposer le
minidisque.
• Ne pas poser la cartouche dans un
endroit exposé directement au soleil,
à des températures extrêmes, à
l’humidité ou à la poussière.
Nettoyage
Nettoyez le coffret, le panneau et les
commandes avec un chiffon doux
légèrement mouillé d’une solution
savonneuse douce. Ne pas utiliser de
tampon abrasif, de poudre à récurer ni
de solvant, comme l’alcool ou l’essence,
qui pourrait abîmer la finition.
Pour toute question ou problème
concernant votre platine, adressez-vous
au revendeur Sony le plus proche.
Bienvenue!
Merci d’avoir porté votre choix sur cette
platine MiniDisc Sony. Avant de la
mettre en service, veuillez lire le mode
d’emploi avec attention et le conserver
pour toute référence future.
Au sujet de ce mode
d’emploi
Conventions
• Les commandes mentionnées dans ce
mode d’emploi sont celles de la
platine ; elles peuvent être remplacées
par celles de la télécommande si elles
ont le même nom, mais elles seront
indiquées entre crochets, si le nom est
différent.
• Les symboles suivants sont utilisés
dans ce mode d’emploi.
Indique que vous pouvez aussi
Z
utiliser la télécommande.
Indique des suggestions et
z
conseils qui simplifient une
opération.
F
2
Page 61

TABLE DES MATIERES
Préparatifs
Déballage ............................................................................. 4
Raccordement du système................................................4
A propos du système de contrôle CONTROL A1 ........6
Fonctions de base du système de contrôle
CONTROL A1................................................................. 7
Réglage de l’horloge ..........................................................7
Enregistrement sur un MD.......................... 9
Lecture d’un MD........................................ 12
Enregistrement sur MD
Remarques sur l’enregistrement .................................. 13
Conseils utiles pour l’enregistrement.......................... 14
Réglage du niveau d’enregistrement........................... 16
Inscription des numéros de plage pendant
l’enregistrement (Marquage de plage) .................... 17
Début d’enregistrement avec mémorisation
préalable de 6 secondes de données audio
(Enregistrement avec préstockage) .......................... 18
Enregistrement synchronisé avec l’appareil audio de
votre choix (Enregistrement musical synchro) ...... 19
Enregistrement synchronisé avec un lecteur
CD Sony ........................................................................ 19
Entrée et sortie d’enregistrement en fondu
(Fondu).......................................................................... 21
Enregistrement de la plage d’un CD que vous
écoutez (fonction REC-IT).......................................... 22
Enregistrement programmé d’un MD......................... 23
Lecture de MD
Utilisation de l’affichage ................................................ 24
Localisation d’une plage donnée.................................. 26
Localisation d’un point donné sur une plage ............ 27
Lecture répétée de plages .............................................. 27
Lecture des plages dans un ordre aléatoire
(Lecture aléatoire) ....................................................... 28
Création d’un programme
(Lecture programmée)................................................ 29
Conseils utiles pour l’enregistrement d’un MD
sur une cassette............................................................ 30
Entrée et sortie en fondu (Fondu) ................................ 31
Lecture programmée d’un MD ..................................... 32
Pour vous endormir en musique.................................. 33
Changement de la vitesse (fonction de réglage
de vitesse) ..................................................................... 33
Réglage de la sortie de la platine MD.......................... 34
Variation du timbre lors de la lecture (Filtre
numérique) ................................................................... 35
Commande d’un changeur CD Sony
disponible séparément
Raccordement du système............................................. 36
Commande d’un changeur CD depuis la platine MD
(fonction Mega CD Control) ...................................... 37
Commande d’un changeur CD depuis la platine MD
pour un enregistrement synchronisé ....................... 39
Montage de MD enregistrés
Remarques sur le montage ............................................ 41
Effacement d’un enregistrement (Fonction Erase) .... 41
Effacement d’un passage d’une plage
(Fonction A-B Erase) ................................................... 43
Division d’une plage enregistrée
(Fonction Divide)......................................................... 44
Combinaison de plusieurs plages enregistrées
(Fonction Combine) .................................................... 45
Déplacement d’une plage enregistrée
(Fonction Move)........................................................... 46
Titrage d’un enregistrement (Fonction Title) ............. 47
Annulation du dernier montage (Fonction Undo) .... 51
Informations supplémentaires
Messages affichés ............................................................ 52
Limites du système ......................................................... 52
Guide de dépannage....................................................... 53
Spécifications ................................................................... 54
Système de protection contre la copie abusive .......... 55
Index .................................................................................. 56
Tableau des menus de réglage ...................................... 58
Fonction d’autodiagnostic ............................................. 59
EN
F
ES
P
F
3
Page 62

Préparatifs
Préparatifs
Déballage
Vérifiez si les articles suivants se trouvent dans
l’emballage :
• Cordons de liaison audio (2)
• Télécommande (infrarouge) RM-D19M (1)
• Piles R6 (format AA) (2)
Mise en place des piles dans la
télécommande
Vous pouvez piloter la platine avec la télécommande
fournie. Insérez deux piles R6 (format AA) en faisant
correspondre les pôles + et – des piles. Quand vous
utilisez la télécommande, dirigez-la vers le détecteur
de télécommande g sur la platine.
Raccordement du système
Aperçu
Cette section explique comment raccorder la platine
MD à un amplificateur ou à d’autres appareils, comme
un lecteur CD ou une platine DAT. Avant de la
raccorder, n’oubliez pas d’éteindre tous les appareils.
S-LINK
LINE(ANALOG)
IN
OUT
LRL
R
ç
ç
REC
OUT
TAPE/MD
Amplificateur
DIGITAL
COAXIAL IN
COAXIAL
ç
IN
DIGITAL IN
ç
OPT2OPT1
DIGITAL OUT
CONTROL A1
OPTICAL
COAXIAL
ç
vers une prise
ç
murale (ou une
minuterie pour la
lecture ou
l’enregistrement
programmé)
DIGITAL
COAXIAL OUT
/
z Quand faut-il remplacer les piles?
Les piles durent normalement environ 6 mois. Quand
vous ne pouvez plus piloter la platine à partir de la
télécommande, remplacez toutes les piles par des neuves.
Remarques
• Ne pas laisser la télécommande dans un endroit
extrêmement chaud ou humide.
• Ne rien laisser tomber dans le boîtier de la télécommande,
surtout lorsque vous remplacez les piles.
• Ne pas exposer le détecteur infrarouge au soleil ou à un
éclairage puissant, sinon la télécommande risque de ne
pas fonctionner.
• Si vous ne comptez pas utiliser la télécommande pendant
longtemps, enlevez les piles pour éviter des dommages
dus à l’électrolyte des piles et à la corrosion.
Lecteur CD ou platine
DAT, etc.
DIGITAL
OPTICAL OUT
DIGITAL
OPTICAL IN
Lecteur CD, platine
DAT ou MD, etc.
çç
ç: Sens du signal
çç
Quels cordons utiliser?
• Des cordons de liaison audio (fournis) (2)
Blanc (L)
(gauche)
Rouge (R)
(droite)
• Des câbles optiques (non fournis) (3)
• Des câbles coaxiaux de liaison numérique (non
fournis) (2)
Blanc (L)
(gauche)
Rouge (R)
(droite)
F
4
Page 63

Préparatifs
Raccordements
Raccordement de la platine à un amplificateur
Raccordez l’amplificateur aux prises LINE(ANALOG)
IN/OUT à l’aide des cordons de liaison audio (fournis)
en tenant compte de la couleur des cordons et de celle
des prises des deux appareils : les cordons rouges
correspondent aux prises rouges (droite) et les cordons
blancs aux prises blanches (gauche). Enfoncez les fiches
à fond dans les prises pour éliminer tout ronflement ou
bruit.
Platine MD Amplificateur
LINE(ANALOG)
OUT
IN
L
R
çç
ç: Sens du signal
çç
L
R
ç
Ç
Raccordement de la platine à un appareil numérique
tel qu’un lecteur CD, une platine DAT, un
amplificateur numérique ou une autre platine MD
Raccordez le composant par les prises DIGITAL IN/
OUT à l’aide de deux (ou trois) câbles optiques (non
fournis) et/ou deux câbles coaxiaux de liaison
numérique (non fournis).
TAPE/MD
INOUT
L
R
Quand vous utilisez un câble coaxial de liaison
numérique
DIGITAL IN
COAXIAL OPT2OPT1
Platine MD
COAXIAL
DIGITAL OUT
OPTICAL
Appareil numérique
DIGITAL
COAXIAL
IN
Ç
Ç
çç
ç: Sens du signal
çç
z “Din Unlock” et “C71” s’affichent
Assurez-vous que le câble optique ou le câble coaxial de
liaison numérique est correctement connecté.
z Conversion automatique de la fréquence
d’échantillonnage numérique pendant
l’enregistrement
Le convertisseur intégré convertit automatiquement la
fréquence d’échantillonnage des différentes sources en
fonction de la fréquence d’échantillonnage de 44,1 kHz
utilisée par la platine MD. Vous pouvez ainsi
enregistrer des sources de 32 et 48 kHz, comme les
cassettes DAT, les émissions de radiodiffusion satellite,
les disques compacts et bien sûr d’autres MD.
OUT
Quand vous utilisez des câbles optiques
Retirez les capuchons des prises, puis insérez les fiches
parallèlement jusqu’à ce qu’elles se verrouillent avec un
déclic.
Ne pliez pas les câbles optiques et ne les attachez pas
ensemble.
DIGITAL IN
COAXIAL OPT2OPT1
Platine MD
COAXIAL
DIGITAL OUT
OPTICAL
Appareil numérique
DIGITAL
OPTICAL
OUTIN
ç
Ç
Vous pouvez raccorder le câble
optique à OPT1 ou OPT2.
çç
ç: Sens du signal
çç
Remarque
L’enregistrement numérique par la prise numérique est
impossible, quand “Din Unlock”, “C71” ou “Cannot Copy”
apparaissent alternativement dans l’affichage. Dans ce cas,
raccordez la source de programme par les prises
LINE(ANALOG) IN et réglez INPUT sur ANALOG.
Raccordement du cordon secteur
Branchez le cordon d’alimentation secteur sur une
prise murale ou sur la prise d’une minuterie.
F
5
Page 64

Préparatifs
A propos du système de
Raccordement du système de contrôle
CONTROL A1
contrôle CONTROL A1
Cette platine MD est compatible avec le système de
contrôle CONTROL A1.
Le système de contrôle CONTROL A1 a été conçu pour
simplifier l’utilisation de systèmes audio, regroupant
des composants Sony séparés. Les branchements
CONTROL A1 assurent le passage des signaux de
commande qui vont permettre un fonctionnement et
un contrôle automatiques, des avantages réservés
normalement aux systèmes intégrés.
A l’heure actuelle, les branchements CONTROL A1
entre une platine MD, un lecteur CD, un amplificateur
(ampli-tuner) et une platine-cassette autorisent la
sélection automatique des fonctions et l’enregistrement
synchronisé.
Remarque
Le système de contrôle CONTROL A1 est étudié pour
préserver sa compatibilité future lorsqu’il aura à régir de
nouvelles fonctions. Notez toutefois que, dans ce cas, les
anciens composants ne seront pas compatibles avec les
nouvelles fonctions.
Compatibilité avec l’ancien système CONTROL A
Le CDP-CX153 est équipé d’une borne CONTROL
A, mais il peut aussi être raccordé à des appareils
ayant une borne CONTROL
liaison spécial*.
Toutefois le CDP-CX151 ne peut pas être raccordé à
une borne CONTROL
* Utilisez le cordon de raccordement à minifiche
monaurale ˜ minifiche stéréo Sony RK-G139HG
(1 m [39 3/8 in]) ou un cordon comparable (moins de
2 m [78 3/4 in] de long sans résistance).
Au CDP-CX153
(CONTROL A)
A1 avec un cordon de
A1.
Au composant
CONTROL A1
• Raccordez les cordons CONTROL A1 en série aux
jacks CONTROL A1 à l’arrière de chaque composant.
Veillez à raccorder un amplificateur (ampli-tuner)
compatible avec CONTROL A1 afin de tirer parti de
la sélection automatique des fonctions.
Amplificateur
(Ampli-tuner)
Platine
MD
Lecteur
CD
Platine-
cassette
Autre
composant
• L’ordre de branchement des composants est sans
importance.
• Vous pouvez raccorder jusqu’à dix composants
compatibles avec CONTROL A1.
• Les fonctions CONTROL A1 agiront pourvu que le
composant que vous souhaitez contrôler soit sous
tension, même si tous les autres composants
raccordés ne le sont pas.
• En règle générale, le système de télécommande
CONTROL A1 ne doit pas incorporer plus d’un
composant de chaque type (c.à.d. 1 platine MD, 1
lecteur CD, une platine-cassette et 1 ampli-tuner).
Toutefois, il sera parfois possible de brancher plus
d’un lecteur CD. Pour les détails, consultez le mode
d’emploi fourni avec chaque composant particulier.
A propos du cordon CONTROL A1
• Utilisez un cordon à minifiche (mono) 2P disponible dans
le commerce, mesurant moins de 2 mètres (78 3/4 in) de
long, ayant un diamètre extérieur d’au maximum 11 mm
(7/16 in) et sans résistance. Certains composants
compatibles CONTROL A1 sont livrés avec un cordon
CONTROL A1, fourni comme accessoire.
• Si un composant est doté de deux jacks CONTROL A1,
vous pouvez utiliser l’un ou l’autre ou brancher un
composant différent sur chacun.
MONOSTEREO
Veillez à raccorder la minifiche STEREO au
composant CONTROL
composant CONTROL
A et la minifiche MONO au
A1.
S-LINK
CONTROL A1
S-LINK
CONTROL A1
“S-LINK” est une dénomination générique pour Sony
Bus System et comprend le système de contrôle
CONTROL A1.
F
6
Page 65

Fonctions de base du système de contrôle CONTROL A1
Sélection automatique de fonction
Lorsque vous raccordez des composants Sony
compatibles avec CONTROL A1 à l’aide de cordons
CONTROL A1, le sélecteur de fonction de
l’amplificateur (ou de l’ampli-tuner) passe
automatiquement à l’entrée correcte lorsque vous
appuyez sur la touche de lecture d’un des composants
raccordés.
(Si vous appuyez sur ( (touche de lecture) de la
platine MD pendant la lecture d’un CD, le sélecteur de
fonction de l’amplificateur passe de CD à MD.)
Remarques
• Cette fonction agit uniquement quand les composants sont
raccordés aux entrées de l’amplificateur (ou de l’amplituner) selon le nom des touches de fonction. En effet,
certains amplis-tuners permettent de changer le nom des
touches de fonction. Dans ce cas, consultez le Mode
d’emploi fourni avec l’ampli-tuner en question.
• Lors de l’enregistrement, ne reproduisez aucune autre
source, sinon la sélection automatique de fonction se
déclenchera.
Préparatifs
Remarques
• Ne réglez pas plusieurs composants en mode de pause.
• Cette platine MD est dotée d’une fonction spéciale
d’enregistrement synchronisé, utilisant le système de
contrôle CONTROL A1 (voyez “Comment effectuer un
enregistrement synchronisé depuis un lecteur CD raccordé
avec un câble Control A1” à la page 20).
Le système CONTROL A1 vous permet également
d’effectuer un enregistrement synchronisé au moyen de la
fonction Mega CD Control (voyez “Commande d’un
changeur CD depuis la platine MD pour un
enregistrement synchronisé” à la page 39).
Réglage de l’horloge
Une fois que vous avez réglé l’horloge interne de la
platine, la platine MD inscrit automatiquement l’heure
et la date de tous vos enregistrements. Lorsque vous
écoutez une plage d’un minidisque, vous pouvez
afficher la date et l’heure de l’enregistrement (voir
page 25).
Avec cette platine, l’heure est indiquée sur 12 heures
(modèles pour les États-Unis et le Canada) ou sur
24 heures (modèle européen).
STANDBY SCROLL/CLOCK SET
≠ AMS ±
Enregistrement synchronisé
Cette fonction vous permet d’effectuer un
enregistrement synchronisé entre la platine MD et
un composant de source.
1 Sur l’amplificateur (ou l’ampli-tuner), réglez le
sélecteur de source sur le composant de source.
2 Réglez le composant de source sur le mode de
pause (vérifez que les témoins ( et P sont tous
deux allumés).
3 Réglez la platine sur le mode de pause
d’enregistrement.
4 Appuyez sur P de la platine.
Le mode de pause du composant de source est
libéré et l’enregistrement commence peu après.
Quand la lecture s’achève sur le composant de
source, l’enregistrement s’arrête.
g
OPEN/CLOSE
§
MENU/NO
YES
TIME D.O BIT
SCROLL
A
F
K
P
U
DISPLAY
CONTINUE
PLAY MODE
B
G
1
L
6
Q
11
V
16
PROGRAM
SHUFFLE PRESENTRECORDED
C
D
H
I
3
2
M
N
8
7
R
S
13
12
W
X
18
17
FILTER
DATE
E
J
4
5
O
9
10
T
14
15
Y
19
20
0)
§
(
DATE
PRESENT
Pp r
1 Quand la platine est en veille (l’indicateur
STANDBY est allumé en rouge), appuyez sur
SCROLL/CLOCK SET pendant environ
2 secondes jusqu’à ce que l’indication du mois
(ou du jour) se mette à clignoter dans l’afficheur.
Modèles pour les États-Unis et le Canada
Modèle européen
(voir page suivante)
F
7
Page 66

Préparatifs
2 Tournez AMS pour entrer le mois (ou le jour),
puis appuyez sur AMS.
L’indication du mois (ou du jour) cesse de
clignoter et l’indication du jour (ou du mois) se
met à clignoter.
Modèles pour les États-Unis et le Canada
Modèle européen
3 Répétez l’étape 2 pour entrer le mois, le jour,
l’année, l’heure et les minutes.
Modèles pour les États-Unis et le Canada
Modèle européen
Changement de l’heure et/ou de la date
Quand la platine est en veille, (le témoin
1
STANDBY est allumé en rouge), appuyez sur
SCROLL/CLOCK SET pendant environ
2 secondes jusqu’à ce que l’indication du mois (ou
du jour) se mette à clignoter.
2 Appuyez de façon répétée sur SCROLL/CLOCK
SET ou sur AMS jusqu’à ce que le paramètre que
vous voulez changer clignote.
3 Tournez AMS pour changer le paramètre
sélectionné.
4 Validez le réglage en appuyant de façon répétée
sur AMS jusqu’à ce que tous les paramètres
cessent de clignoter.
z Pour inscrire de manière précise l’heure et la date de
vos enregistrements
Remettez l’horloge chaque semaine à l’heure.
Remarque
Si le cordon d’alimentation secteur reste débranché pendant
longtemps, les réglages mémorisés seront effacés et
“standby”clignotera quand vous rebrancherez la platine et la
mettrez sous tension. Le cas échéant, vous devez remettre
l’horloge à l’heure.
Affichage de la date et de l’heure Z
Vous pouvez afficher l’heure et la date quand vous
voulez lorsque la platine est en veille.
Appuyez sur DATE PRESENT.
A chaque pression sur la touche, l’affichage change de
la façon suivante:
n Affichage actuel n Date n Heure
z Pour pouvez afficher la date et l’heure avec la
touche de la platine
Appuyez sur la touche SCROLL/CLOCK SET. A
chaque pression sur cette touche, l’affichage change de
la même façon qu’avec la touche DATE PRESENT de la
télécommande.
F
8
Page 67

Opérations de base
Opérations de base
Enregistrement sur un MD
2
STANDBY
g
TIMER
OFFREC PLAY
PHONES PHONE LEVEL
–
DIGITAL
10
ANALOG
REC LEVEL
456
3
+
2
1
0
r
REC
7
8
9
10
RL
6,7 5,8
AMS
≠
±
MENU/NO
YES
CLEAR
DISPLAY/
SCROLL/
CHAR
•
ANALOG
MEGA CONTROL
FADER
FILTER
PLAY MODE
CLOCK SET
REPEAT
TIME
3
INPUT
OPT1
COAX
OPT2
•
•
•
010
4119
PUSH ENTER
§
OPEN/CLOSE
0)
(Pp
Allumez l’amplificateur et reproduisez la source de
1
programme que vous voulez enregistrer.
Opérations de base
Appuyez sur 1/u.
2
Le témoin STANDBY s’éteint.
Appuyez sur § OPEN/CLOSE pour ouvrir le plateau de
3
disque, insérez un minidisque enregistrable, puis appuyez une
nouvelle fois sur la touche pour fermer le plateau.
avec la flèche dirigée
dans ce sens
avec la face imprimée
vers le haut
Si le minidisque contient un enregistrement, l’enregistrement
commencera automatiquement à partir de la fin de la dernière
plage enregistrée.
Réglez INPUT en fonction de la prise d’entrée utilisée.
4
Pour enregistrer par Réglez INPUT sur
DIGITAL IN OPT1 OPT1
DIGITAL IN OPT2 OPT2
DIGITAL IN COAXIAL COAX
LINE(ANALOG) IN ANALOG
(voir page suivante)
F
9
Page 68

Opérations de base
Appuyez deux fois sur MENU/NO pour afficher “Setup
5
Menu”.
Tournez AMS pour sélectionner “Setup 16”, puis appuyez sur
6
AMS.
Tournez AMS pour sélectionner le mode dans lequel vous
7
désirez effectuer l’enregistrement, puis appuyez sur AMS.
Pour enregistrer en Sélectionnez*
son stéréophonique Stereo Rec
son monophonique*
*1Vous ne pouvez pas sélectionner le mode pendant l’enregistrement ou une
pause d’enregistrement.
2
*
En mode mono, vous pouvez effectuer un enregistrement deux fois plus
long environ qu’en mode stéréo.
Appuyez sur MEMU/NO.
2
Mono Rec
8
1
Appuyez sur r REC.
9
La platine est maintenant prête pour l’enregistrement.
Réglez le niveau d’enregistrement.
10
Quand vous enregistrez par le connecteur DIGITAL IN (COAXIAL,
OPT1 ou OPT2)
Réglez la commande DIGITAL REC LEVEL de manière á ce
que l’indication du décibelmètre ne dépasse pas 0 dB sur
l’afficheur. Pour plus d’informations, voyez page 16.
Quand vous enregistrez par les prises LINE(ANALOG) IN
Dans la plupart des cas, vous pourrez régler les commandes
ANALOG REC LEVEL L/R sur 4. Pour plus d’informations,
voyez page 16.
Appuyez sur ( ou P.
11
L’enregistrement commence.
Démarrez la lecture de la source de programme.
12
10
F
Page 69

Opérations de base
Quand “TOC Writing” clignote
dans l’afficheur
La platine est en train de mettre à
jour le sommaire (TOC). Ne
déplacez pas la platine et ne
débranchez pas le cordon
d’alimentation secteur. Les
changements dus à
l’enregistrement ne sont
sauvegardés que lorsque le
sommaire a été mis à jour, soit par
l’éjection du minidisque ou la mise
en veille de la platine avec
l’interrupteur 1/u.
Ne débranchez pas la platine de la source d’alimentation immédiatement
après un enregistrement
Sinon l’enregistrement ne sera pas sauvegardé sur le MD. Pour sauvegarder
l’enregistrement qui vient d’être effectué, appuyez sur § OPEN/CLOSE pour
sortir le MD ou mettez la platine en veille en appuyant sur 1/u . “TOC
Writing” se met alors à clignoter dans l’afficheur.
Quand “TOC Writing” cesse de clignoter et s’éteint, vous pouvez débrancher
la platine.
Pour Appuyez sur
Arrêter l’enregistrement p
Faire une pause* P. Appuyer encore une fois sur la touche ou appuyer
sur ( pour poursuivre l’enregistrement.
Retirer le MD § OPEN/CLOSE après l’arrêt.
* Quand vous faites une pause, le numéro de plage augmente d’une unité. Si, par
exemple, vous faites une pause pendant l’enregistrement de la plage 4, le numéro
de plage augmente d’une unité et l’enregistrement se poursuit sur une nouvelle
plage.
Pour protéger un MD contre un effacement accidentel
Pour rendre tout enregistrement impossible sur un minidisque, poussez le
taquet de protection dans le sens de la flèche afin d’ouvrir la fente. Pour
permettre l’enregistrement, fermez la fente.
Opérations de base
Arrière du minidisque
Taquet de protection
d’enregistrement
Poussez le taquet dans
le sens de la flèche.
11
F
Page 70

Opérations de base
Lecture d’un MD
24
STANDBY
g
TIMER
OFFREC PLAY
PHONES PHONE LEVEL
010
DIGITAL
ANALOG
AMS
≠
±
MENU/NO
CLEAR
DISPLAY/
SCROLL/
CHAR
•
ANALOG
MEGA CONTROL
FADER
FILTER
PLAY MODE
CLOCK SET
REPEAT
TIME
INPUT
OPT1
COAX
OPT2
•
•
•
PUSH ENTER
§
OPEN/CLOSE
0)
REC LEVEL
YES
–
3
+
2
1
(Pp
456
0
r
REC
7
8
9
10
RL
3
Allumez l’amplificateur et choisissez la platine MD avec le
1
sélecteur de source.
Appuyez sur 1/u.
2
Le témoin STANDBY s’éteint.
Insérez un minidisque et fermez le plateau.
3
12
avec la flèche dirigée
dans ce sens
avec la face imprimée
vers le haut
z Vous pouvez localiser une
plage pour la reproduire
quand la platine est à
l’arrêt
1 Tournez AMS (ou appuyez
sur = ou +) jusqu’à ce
que le numéro de la plage
souhaitée apparaisse.
2 Appuyez sur AMS ou (.
z Pour utiliser un casque
Branchez-le sur la prise
PHONES et utilisez la
commande PHONE LEVEL
pour ajuster le volume.
Appuyez sur (.
4
La lecture du minidisque commence. Ajustez le volume sur
l’amplificateur.
Pour Vous devez :
Arrêter la lecture Appuyer sur p.
Faire une pause Appuyer sur P. Appuyer encore une fois ou
Passer à la plage suivante Tourner AMS vers la droite (ou appuyer sur
Revenir à la plage actuelle ou Tourner AMS vers la gauche (ou appuyer sur
à la plage précédente = de la télécommande).
Enlever le MD Appuyer sur § OPEN/CLOSE après avoir
appuyer sur ( pour poursuivre la lecture.
+ de la télécommande).
arrêté la lecture.
z Vous pouvez changer la
vitesse de lecture des MD
Voyez “Changement de la
F
vitesse” à la page 33.
Page 71

Remar ques sur l’enregistrement
Si “Protected” et “C11” apparaissent
alternativement dans l’afficheur
Le minidisque est protégé contre tout enregistrement.
Fermez la fente pour enregistrer (voir “Pour protéger
un MD contre un effacement accidentel” à la page 11).
Si “Din Unlock” et “C71” apparaissent
alternativement dans l’afficheur
• La source de programme numérique ne correspond
pas au réglage effectué avec INPUT à l’étape 4 de la
page 9.
Pour continuer, raccordez convenablement la source
de programme.
• La source de programme n’est pas allumée.
Allumez la source de programme.
Enregistrement sur MDEnregistrement sur MD
• Lors de l’enregistrement d’une source analogique,
d’une cassette DAT ou d’une émission de
radiodiffusion satellite, vous pouvez inscrire les
numéros de plage si vous sélectionnez le réglage
“T.Mark LSyn” sur le menu Setup 02 (voir
“Inscription des numéros de plage pendant
l’enregistrement” à la page 17).
• Lors de l’enregistrement d’une cassette DAT ou
d’une émission de radiodiffusion satellite avec
INPUT réglé sur la position numérique appropriée,
la platine inscrit automatiquement un numéro de
plage quand la fréquence d’échantillonnage du
signal d’entrée change, quel que soit le réglage sur le
menu Setup 02.
z Les numéros de plage peuvent être inscrits pendant
ou après l’enregistrement
Pour les détails, voir “Inscription des numéros de plage
pendant l’enregistrement” (page 17) et “Division d’une
plage enregistrée” (page 44).
Selon les réglages du menu et la source enregistrée,
les numéros de plage sont inscrits différemment :
• Lors de l’enregistrement d’un CD ou d’un MD avec
INPUT sur COAX, OPT1 ou OPT2 et la source
raccordée à la prise numériques appropriée :
La platine inscrit automatiquement les numéros de
plage dans le même ordre que la source, mais si une
plage est répétée deux ou plusieurs fois (par ex. lors
de la lecture répétée d’une plage), ou si deux ou
plusieurs plages ayant le même numéro (par ex. les
plages de différents CD ou MD) sont reproduites, la
plage ou les plages sont enregistrées sur une seule
plage continue avec un seul numéro de plage.
Si la source est un CD, les numéros des plages
durant moins de 4 secondes ne seront peut-être pas
marqués.
• Lors de l’enregistrement depuis certains lecteurs CD
et lecteurs multi-disque raccordés à l’un des
connecteurs d’entrée numérique avec INPUT sur la
position numérique correspondante :
Il se peut que la platine n’inscrive pas
automatiquement les numéros de plage. Dans ce cas,
inscrivez-les après l’enregistrement en utilisant la
fonction Divide (voir “Division d’une plage
enregistrée” à la page 44).
• Lors de l’enregistrement d’une source raccordée par
les prises LINE(ANALOG) IN avec INPUT réglé sur
ANALOG, ou lors de l’enregistrement d’une cassette
DAT ou d’une émission de radiodiffusion satellite
par une des prises d’entrée numérique, avec INPUT
réglé sur la position numérique appropriée et la
sélection de “T.Mark Off” sur le menu Setup 02 :
La source est enregistrée sur une seule plage.
Quand “TOC Writing” clignote dans l’afficheur
La platine est en train de mettre à jour le sommaire
(TOC). Ne déplacez pas la platine et ne débranchez pas
le cordon d’alimentation secteur. Les changements dus
à l’enregistrement ne sont sauvegardés que lorsque le
sommaire a été mis à jour, soit par l’éjection du
minidisque ou la mise en veille de la platine avec
l’interrupteur 1/u.
La platine MD utilise le système de protection
contre la copie abusive (SCMS) (page 55)
Les minidisques enregistrés par la prise d’entrée
numérique ne peuvent pas être copiés sur d’autres
minidisques ou sur des cassettes DAT, si vous utilisez
la prise de sortie numérique.
Quand la platine est en cours d’enregistrement ou
en pause d’enregistrement, les signaux numériques
fournis par l’une des prises d’entrée numérique sont
transmis à la prise de sortie numérique
correspondante avec la même fréquence
d’échantillonnage.
Pour choisir une autre fréquence d’échantillonnage
pour le signal de sortie (sans l’enregistrer sur un MD),
utilisez la fonction de contrôle d’entrée (voir page 14).
13
F
Page 72

Enregistrement sur MD
Conseils utiles pour l’enregistrement
INPUT DISPLAY/CHAR
≠ AMS ±
MENU/NO
Contrôle du signal d’entrée (Contrôle de
l’entrée)
Avant de commencer un enregistrement, vous pouvez
contrôler le signal de l’entrée sélectionnée passant par
les prises de sortie de la platine.
(
0)
§
(
Pp r
r REC
p
g
TIME
§ OPEN/CLOSE
Vérification du temps restant sur le MD
pour l’enregistrement
Appuyez sur TIME.
• Quand vous appuyez de façon répétée sur la touche
TIME quand la platine est arrêtée, le temps de lecture
total et le temps restant sur le MD pour
l’enregistrement sont successivement affichés (voir
page 24).
• Quand vous appuyez de façon répétée sur la touche
TIME en cours d’enregistrement, le temps
d’enregistrement de la plage actuelle et le temps
restant enregistrable sur le MD apparaissent
alternativement.
Changement de l’affichage lors de
l’enregistrement
Pendant l’enregistrement, vous pouvez changer
l’affichage comme suit par des pressions successives
sur DISPLAY/CHAR (ou DISPLAY) :
Affichage normal
Appuyez
Affichage du niveau d’enregistrement
Appuyez
1 Appuyez sur § OPEN/CLOSE pour enlever le
MD.
2 Réglez INPUT en fonction du signal d’entrée que
vous voulez contrôler.
Quand INPUT est réglé sur ANALOG
Le signal analogique passant par les prises
LINE(ANALOG) IN est transmis au connecteurs
DIGITAL OUT appropriée après conversion A/D,
puis aux prises LINE(ANALOG) OUT et à la prise
PHONES après conversion D/A.
Quand INPUT est réglé sur OPT1, OPT2 ou COAX
Après être passé par le convertisseur de fréquence
d’échantillonnage, le signal numérique fourni par
le connecteur DIGITAL IN appropriée est transmis
au connecteur DIGITAL OUT appropriée, et après
conversion D/A aux prises LINE(ANALOG) OUT
et à la prise PHONES.
3 Appuyez sur r REC.
Si INPUT est réglé sur ANALOG, “AD-DA”
apparaît dans l’afficheur.
Si INPUT est réglé sur OPT1, OPT2 ou COAX,
“-DA” apparaît dans l’afficheur.
Si “Auto Cut” apparaît dans l’afficheur
(Coupure automatique)
Aucun son n’a été fourni pendant 30 secondes environ
lors de l’enregistrement. Le passage silencieux de
30 secondes est remplacé par un espace blanc de
3 secondes environ et la platine se met en pause
d’enregistrement.
Si la pause se prolonge pendant une dizaine de
minutes après la mise en service de la fonction Auto
Cut, l’enregistrement s’arrête automatiquement.
Notez que lorsque l’enregistrement commence sur un
espace vierge de la bande, cette fonction ne se met pas
en service si aucun son n’a été fourni pendant
30 secondes environ.
14
Affichage FS (fréquence d’échantillonnage)
z Vous pouvez mettre la fonction Auto Cut hors
service
Pour les détails, voir “Pour mettre les fonctions Smart
Appuyez
Affichage DF (filtre numérique)
F
Appuyez
Space et Auto Cut hors service” à la page 15. Quand
vous arrêtez la fonction Auto Cut, la fonction Smart
Space est aussi automatiquement arrêtée.
Page 73

Enregistrement sur MD
Si “Smart Space” apparaît dans l’afficheur
(Réduction d’espace)
Il y a eu un silence prolongé de 4 à 30 secondes lors de
l’enregistrement. Ce silence est remplacé par un
passage blanc de 3 secondes et la platine continue
l’enregistrement. Notez que les nouveaux numéros de
plage risquent de ne pas être inscrits quand cette
fonction est en service. Lorsque l’enregistrement
commence sur un espace vierge de la bande, la
fonction Smart Space ne se met pas en service même si
le silence s’est prolongé pendant 4 à 30 secondes quand
la platine a commencé à enregistrer à partir du passage
blanc.
Pour mettre les fonctions Smart Space et Auto Cut
hors service
1 Appuyez deux fois sur MENU/NO avec la platine
arrêtée pour afficher “Setup Menu”.
2 Tournez AMS pour sélectionner “Setup 05”, puis
appuyez sur AMS.
3 Tournez AMS pour sélectionner “S.Space Off”, puis
appuyez sur AMS.
4 Appuyez sur MENU/NO.
Pour remettre les fonctions Smart Space et Auto Cut
en service
1 Répétez les étapes 1 et 2 de “Pour mettre les
fonctions Smart Space et Auto Cut hors service” cidessus.
2 Tournez AMS pour sélectionner “S.Space On”, puis
appuyez sur AMS.
3 Appuyez sur MENU/NO.
Remarques
• Cette fonction ne peut être utilisée que pour une entrée de
signaux numériques par le connecteur d’entrée
numérique.
• Le nombre de bits est normalement fixé à 20, mais vous
pouvez choisir 24, 20 ou 16 bits.
• Si vous changez le nombre de bits pendant
l’enregistrement, le son diminue momentanément.
Lecture des plages venant d’être
enregistrées
Procédez comme suit pour écouter immédiatement les
plages qui viennent d’être enregistrées.
Appuyez sur ( immédiatement après avoir arrêté
l’enregistrement.
La lecture commence à partir de la première plage qui
vient d’être enregistrée.
Lecture à partir du début du MD après
l’enregistrement
1 Appuyez encore une fois sur p après avoir arrêté
l’enregistrement.
2 Appuyez sur (.
La lecture commence à partir de la première plage
du minidisque.
Enregistrement sur des plages
préexistantes
Procédez comme suit pour enregistrer sur des plages
préexistantes, comme vous le faites avec des cassettes
analogiques.
Remarques
• Quand vous arrêtez la fonction Smart Space, la fonction
Auto Cut est automatiquement désactivée.
• Les fonctions Smart Space et Auto Cut ont été mises en
service en usine.
• Si vous éteignez la platine ou débranchez le cordon
d’alimentation secteur, la platine rappellera le dernier
réglage (en ou hors service) des fonctions Smart Space et
Auto Cut à la prochaine mise sous tension.
Sélection du nombre de bits
Vous pouvez améliorer la qualité d’enregistrement en
choisissant le nombre de bits pour qu’il corresponde à
celui du lecteur CD, de la platine DAT ou d’un autre
appareil numérique raccordé au connecteur d’entrée
numérique.
1 Avec la platine en mode d’arrêt, appuyez deux
fois sur MENU/NO pour afficher “Setup Menu”.
2 Tournez AMS pour sélectionner “Setup 12”, puis
appuyez sur AMS.
3 Tournez AMS pour sélectionner le nombre de bits
désiré, puis appuyez sur AMS.
4 Appuyez sur MENU/NO.
1 Effectuez les étapes de 1 à 8 de “Enregistrement
sur un MD”, aux pages 9 et 10.
2 Tournez AMS (ou appuyez sur = ou +)
jusqu’à ce que le numéro de la plage à enregistrer
apparaisse.
3 Pour enregistrer à partir du début de la plage,
continuez avec l’étape 9 de “Enregistrement sur
un MD”, à la page 10.
z Quand “Tr” clignote dans l’afficheur
C’est que la platine est en train d’enregistrer sur une
plage existante. Le clignotement cesse quand la fin du
passage enregistré est atteinte.
z Pour enregistrer à partir du milieu d’une plage
1 Après l’étape 2 ci-dessus, appuyez sur ( pour
démarrer la lecture.
2 Appuyez sur P à l’endroit où vous voulez
commencer l’enregistrement.
3 Continuez avec l’étape 9 de “Enregistrement sur un
MD”, à la page 10.
Remarque
Vous ne pouvez pas enregistrer à partir du milieu d’une
plage existante en mode “PROGRAM” ou “SHUFFLE”.
15
F
Page 74

Enregistrement sur MD
Réglage du niveau d’enregistrement
Vous pouvez régler le niveau d’enregistrement avant
de commencer à enregistrer.
≠ AMS ±
g
MENU/NO
W
V
U
X
Y
18
17
16
19
22
CHAR
+ r
)
23
A˜B
!
NUM
STANDBY=STARTPSTOP
+
.
,
24
A.SPACE
M.SCAN
(
)
P.HOLD
P p
REC-IT
T.REC MUSIC SYNC
DIGITAL REC LEVEL
/ANALOG OUT LEVEL
20
25
–
Z
21
REPEAT
?
/
>
25
WRITE CLEAR
NAME
·
=
0
CD-SYNC
CD PLAYER FADER
DIGITAL REC LEVEL
0)
§
(
Pp r
ANALOG REC LEVEL L/R
P.HOLD
DIGITAL REC LEVEL
/ANALOG OUT LEVEL +/–
4 Arrêtez la lecture de la source de programme.
5 Pour commencer l’enregistrement, effectuez à
partir de l’étape 11 les opérations mentionnées
dans “Enregistrement sur un MD”, à la page 10.
z La fonction Peak Hold immobilise le décibelmètre au
niveau le plus élevé atteint par le signal d’entrée
Pour activer la fonction Peak Hold avec l’option 06
de Setup Menu
1 Appuyez deux fois sur MENU/NO avec la platine
arrêtée pour afficher “Setup Menu”.
2 Tournez AMS pour sélectionner “Setup 06”, puis
appuyez sur AMS.
3 Tournez AMS pour sélectionner “P.Hold On”, puis
appuyez sur AMS.
4 Appuyez sur MENU/NO.
Pour activer la fonction Peak Hold à l’aide de la
télécommande
Appuyez sur P.HOLD pour afficher “P.Hold On”.
Pour désactiver la fonction Peak Hold, sélectionnez
“P.Hold Off” à l’étape 3 ci-dessus. (Ou appuyez sur
P.HOLD de la télécommande pour afficher “P.Hold
Off”.)
Réglage du niveau d’enregistrement
numérique
Il n’est généralement pas nécessaire de régler le niveau
d’enregistrement numérique. Un tel réglage s’effectue
principalement lorsque le niveau de la source est faible.
1 Effectuez les étapes 1 à 9 de “Enregistrement sur
un MD”, aux pages 9 et 10.
2 Reproduisez le passage de la source ayant le
niveau de signal le plus élevé.
3 Tout en écoutant le son, tournez la commande
DIGITAL REC LEVEL (ou appuyez sur DIGITAL
REC LEVEL/ANALOG OUT LEVEL +/–) de
manière à ce que l’indication des décibelmètres
soit maximale sans toutefois que “OVER”
s’allume. Si “OVER” s’allume parfois, ce n’est pas
grave.
Réglage du niveau d’enregistrement
analogique
1 Effectuez les étapes 1 à 9 de “Enregistrement sur
un MD”, aux pages 9 et 10.
2 Reproduisez le passage de la source ayant le
niveau le plus élevé.
3 Tout en écoutant le son, tournez la commande
ANALOG REC LEVEL L/R pour régler le niveau
d’enregistrement.
Il n’est pas toujours possible de régler le niveau
d’enregistrement au maximum, si le niveau de
sortie du composant raccordé est trop bas.
4 Arrêtez la lecture de la source de programme.
5 Pour commencer l’enregistrement, effectuez à
partir de l’étape 11 les opérations mentionnées
dans “Enregistrement sur un MD”, à la page 10.
16
Indication OVER
Si le niveau de signal numérique de la source est
trop bas, il se peut que vous ne puissiez pas régler
le niveau d’enregistrement au maximum.
F
Page 75

Inscription des numéros de plage pendant l’enregistr ement (Marquage de plage)
L’inscription des numéros de plage peut se faire
manuellement ou automatiquement. En inscrivant des
numéros à des points particuliers, vous pourrez
repérer rapidement ces points par la suite à l’aide de la
fonction AMS, ou utiliser les différentes fonctions de
montage.
≠ AMS ±r REC
g
Inscription manuelle des numéros de plage
(Marquage de plage manuellement)
Vous pouvez inscrire un numéro de plage sur un
minidisque quand vous le souhaitez en cours
d’enregistrement.
Appuyez sur r REC en cours d’enregistrement à
l’endroit où vous voulez marquer une plage.
Inscription automatique des numéros de
plage (Marquage de plage automatiquement)
La platine ajoute les repères de manière différente
selon le cas :
• Lors de l’enregistrement d’un CD ou MD avec
INPUT réglé sur une OPT1, OPT2 ou COAX :
La platine inscrit les numéros de plage
automatiquement.
Toutefois, la fonction d’inscription automatique des
numéros de plage ne se met pas en service lorsque
vous enregistrez depuis certains lecteurs CD et
lecteurs multi-disque.
• Dans les autres cas :
Si “T.Mark LSyn” est sélectionné dans le menu Setup
02, la platine inscrit un numéro de plage chaque fois
que le signal descend à un niveau donné, ou en
dessous de ce niveau pendant d’ l,5 secondes ou
plus, puis revient à un niveau donné.
0)
§
(
MENU/NO
Pp r
Enregistrement sur MD
Pour sélectionner “T.Mark Off” ou “T.Mark LSyn”
dans le menu Setup 02, effectuez les opérations
suivantes :
1 Appuyez deux fois sur MENU/NO avec la
platine arrêtée pour afficher “Setup Menu”.
2 Tournez AMS pour afficher le menu “Setup 02”,
puis appuyez sur AMS.
3 Tournez AMS pour sélectionner “T.Mark Off” ou
“T.Mark LSyn”, puis appuyez sur AMS.
“L.SYNC” s’allume quand vous sélectionnez
“T.Mark LSyn”.
4 Appuyez sur MENU/NO.
z Vous pouvez fixer le niveau de référence devant être
dépassé pour déclencher l’inscription d’un nouveau
numéro de plage
Pour l’inscription automatique, le signal d’entrée doit
rester à ou en dessous d’un certain niveau de réference
(1,5 secondes ou plus) pendant un temps donné, avant
que le dépassement du niveau fixé déclenche
l’inscription d’un nouveau repère.
Effectuez les opérations suivantes pour désigner le
niveau de référence. Notez que “T.Mark LSyn” doit être
sélectionné sur le menu Setup 02.
1 Appuyez deux fois sur MENU/NO avec la platine
arrêtée pour afficher “Setup Menu”.
2 Tournez AMS pour sélectionner “Setup 03”, puis
appuyez sur AMS.
3 Tournez AMS pour régler le niveau de référence.
Vous pouvez fixer le niveau de référence entre
–72 dB et 0 dB, par incréments de 2 dB.
4 Après avoir désigné le niveau de référence, appuyez
sur AMS.
5 Appuyez sur MENU/NO.
Remarque
Si vous arrêtez la platine ou débranchez le cordon
d’alimentation secteur, les derniers réglages de la fonction
d’inscription automatique des numéros de plage (“T.Mark
LSyn” ou “T.Mark Off”) seront rappelés à la prochaine mise
sous tension de la platine.
17
F
Page 76

Enregistrement sur MD
Début d’enregistrement avec
Pour arrêter cette fonction
Appuyez sur p.
mémorisation préalable de
6 secondes de données audio
(Enregistrement avec
préstockage)
Quand vous enregistrez une émission FM ou satellite,
les premières secondes de l’émission que vous voulez
enregistrer sont souvent perdues à cause du temps
qu’il faut pour s’assurer du contenu de l’émission et
pour appuyer sur la touche d’enregistrement. Pour
éviter cet inconvénient, la fonction d’enregistrement
avec préstockage permet de mémoriser continuellement
les 6 dernières secondes de données audio dans la
mémoire tampon. Ainsi quand vous démarrez
l’enregistrement en utilisant cette fonction,
l’enregistrement commence en fait par ces 6 secondes
déjà stockées dans la mémoire tampon, ce qui peut être
illustré de la façon suivante :
Quand vous appuyez
sur AMS à l’étape 3
6 secondes de données audio dans la mémoire tampon
Fin de la source de
programme à enregistrer
Temps
Remarque
La platine commence à mémoriser des données quand elle
est en mode de pause et que vous enclenchez la source de
programme. Si la lecture de la source dure moins de
6 secondes et si les données sont mémorisées dans la
mémoire tampon, l’enregistrement des données préstockées
sera lui aussi inférieur à 6 secondes.
Passage
enregistré
Début de la source à
enregistrer
A˜B
REPEAT
A.SPACE
M.SCAN
!
?
/
(
≠ AMS ±
0)
§
(
Pp r
>
25
NAME
=
0
WRITE CLEAR
NUM
CHAR
P p
·
+ r
T.REC MUSIC SYNC
)
CD-SYNC
STANDBY=STARTPSTOP
CD PLAYER FADER
+
)
P.HOLD
REC-IT
DIGITAL REC LEVEL
/ANALOG OUT LEVEL
T.REC
1 Effectuez les étapes 1 à 9 de “Enregistrement sur
un MD”, aux pages 9 à 10.
La platine se met en pause d’enregistrement.
2 Démarrez la source de programme que vous
voulez enregistrer.
Les 6 dernières secondes de données audio sont
stockées dans la mémoire tampon.
3 Appuyez sur AMS (ou T.REC) pour démarrer
l’enregistrement avec préstockage.
L’enregistrement de la source de programme
commence par les 6 secondes de données audio
mémorisées.
18
F
Page 77

Enregistrement sur MD
Enregistrement synchronisé avec l’appareil audio de votre choix (Enregistr ement musical synchro) Z
La touche MUSIC SYNC de la télécommande vous
permet de synchroniser le début de l’enregistrement
sur l’entrée du signal fourni par une autre source.
La méthode d’inscription des numéros de plage diffère
selon la source de programme qui est enregistrée et le
réglage du menu Setup 02 (voir “Remarques sur
l’enregistrement” à la page 13).
–
Z
.
,
23
22
21
24
25
A˜B
REPEAT
A.SPACE
M.SCAN
!
?
/
(
WRITE CLEAR
NUM
CHAR
·
+ r
T.REC MUSIC SYNC
)
CD-SYNC
STANDBY=STARTPSTOP
CD PLAYER FADER
+
P p
DIGITAL REC LEVEL
/ANALOG OUT LEVEL
)
P.HOLD
REC-IT
MUSIC SYNC
>
25
NAME
=
0
1 Effectuez les étapes 1 à 8 de “Enregistrement sur
un MD”, aux pages 9 et 10.
2 Appuyez sur MUSIC SYNC.
La platine se met en pause d’enregistrement.
Enregistrement synchronisé avec un lecteur CD Sony Z
En reliant votre platine à un lecteur CD Sony ou une
chaîne Hi-Fi, vous pourrez copier facilement des CD
sur des minidisques. Pour cela, utilisez les touches de
synchronisation CD de la télécommande. Si votre
platine est reliée à un lecteur CD Sony par un câble
d’entrée numérique, les numéros de plage sont
automatiquement inscrits dans le même ordre que
l’original, même si “T.Mark Off” est sélectionné sur le
menu Setup 02. Si votre platine est reliée à un lecteur
CD Sony par les prises LINE(ANALOG) IN avec des
cordons de liaison audio, les numéros de plage sont
automatiquement inscrits quand vous réglez le menu
Setup 02 sur “T.Mark LSyn” (voir page 17).
Comme la même télécommande contrôle le lecteur CD
et la platine, il peut être difficile de piloter les deux
appareils s’ils sont trop éloignés l’un de l’autre. Si tel
est le cas, rapprochez le lecteur CD de la platine.
–
Z
.
,
23
22
21
24
25
A˜B
REPEAT
A.SPACE
M.SCAN
!
?
/
(
WRITE CLEAR
NUM
CHAR
·
+ r
T.REC MUSIC SYNC
)
CD-SYNC
STANDBY=STARTPSTOP
CD PLAYER FADER
+
P p
DIGITAL REC LEVEL
/ANALOG OUT LEVEL
)
P.HOLD
REC-IT
STANDBY
START
STOP
CD PLAYER P
>
25
NAME
=
0
3 Démarrez la lecture de la source de programme
que vous voulez enregistrer.
L’enregistrement commence automatiquement.
Pour arrêter l’enregistrement musical synchro
Appuyez sur p.
Remarque
Lors de l’enregistrement musical synchro, les fonctions
Smart Space et Auto Cut sont automatiquement mises en
service, quels que soient leurs réglages (en ou hors service)
et le type d’entrée (numérique ou analogique).
1 Réglez le sélecteur de source sur la position du
lecteur CD sur l’amplificateur.
2 Effectuez les étapes 2 à 8 de “Enregistrement sur
un MD”, aux pages 9 et 10 pour préparer la
platine pour l’enregistrement.
3 Insérez un CD dans le lecteur CD.
4 Sélectionnez le mode de lecture (lecture aléatoire,
programmée, etc.) sur le lecteur CD.
5 Appuyez sur STANDBY.
Le lecteur CD se met en pause de lecture et la
platine en pause d’enregistrement.
(voir page suivante)
19
F
Page 78

Enregistrement sur MD
6 Appuyez sur START.
L’enregistrement commence sur la platine et la
lecture sur le lecteur CD.
Le numéro de la plage et le temps
d’enregistrement écoulé pour cette plage
apparaissent dans l’afficheur.
Si le lecteur CD ne se met pas en marche
Certains modèles de lecteur CD ne se mettent pas
en marche quand vous appuyez sur START de la
télécommande de la platine. Appuyez à la place
sur P de la télécommande du lecteur CD.
7 Appuyez sur STOP pour arrêter l’enregistrement
synchronisé.
Pour interrompre momentanément l’enregistrement
Appuyez sur STANDBY ou CD PLAYER P.
Pour reprendre l’enregistrement, appuyez sur START
ou CD PLAYER P.
Un nouveau numéro de plage est inscrit à chaque
pause d’enregistrement.
Remarques
• Pour commander un lecteur CD doté d’un sélecteur de
mode avec la télécommande de la platine, placez le
sélecteur sur CD1.
• Il se peut que la platine n’inscrive pas automatiquement
les numéros de plage lors d’un enregistrement depuis
certains lecteurs CD.
z Vous pouvez utiliser la télécommande du lecteur CD
pendant l’enregistrement synchronisé
Quand vous appuyez sur p, le lecteur CD s’arrête et la
platine se met en pause d’enregistrement.
Quand vous appuyez sur P, le lecteur CD fait une
pause et l’enregistrement est interrompu sur la platine.
Pour poursuivre l’enregistrement synchronisé, appuyez
sur ·.
z Vous pouvez changer le CD pendant l’enregistrement
synchronisé
Effectuez les étapes suivantes au lieu de l’étape 7 cidessus.
1 Appuyez sur p de la télécommande du lecteur CD.
La platine se met en pause d’enregistrement.
2 Changez le CD.
3 Appuyez sur · de la télécommande du lecteur CD.
L’enregistrement synchronisé se poursuit.
Pour revenir au lecteur CD, appuyez sur la touche
numérique 1 tout en tenant 1/u enfoncé.
La platine a été réglée en usine pour l’enregistrement
synchronisé avec le lecteur CD.
z Vous pouvez vérifier le temps restant sur le MD
Appuyez sur TIME (voir page 24).
z Durant l’enregistrement synchronisé, la platine copie
les informations de texte CD (texte CD et mémos de
disque) sur le MD (fonction de copie de mémo de
disque).
La fonction de copie de mémo de disque est activée
lorsque vous effectuez un enregistrement synchronisé
depuis un lecture CD Sony raccordé par un câble
Control A1 à la platine MD.
Remarques
• Il se peut que la fonction de copie de mémo de disque soit
inopérante pour des plages de CD très courtes.
• Pour certains CD, il se peut que les informations de texte
ne soient pas copiées.
Comment effectuer un enregistrement
synchronisé depuis un lecteur CD raccordé
avec un câble Control A1
Vous pouvez réaliser un enregistrement synchronisé
depuis un lecteur CD Sony lorsqu’une prise
CONTROL A1 est raccordée avec un câble Control A1
à la platine MD.
1 Allumez l’amplificateur et placez le sélecteur de
source sur CD.
2 Effectuez les opérations 2 à 8 décrites sous
“Enregistrement sur un MD” aux pages 9 et 10.
3 Placez le lecteur CD sur le mode de lecture
(lecture programmée ou aléatoire, par exemple)
que vous désirez utiliser pour l’enregistrement
sur la platine MD.
4 Placez le lecteur CD en mode de pause de lecture.
(· et P s’allument tous deux.)
5 Appuyez sur r REC de la platine.
La platine MD est placée en mode d’attente
d’enregistrement.
20
z Vous pouvez aussi faire un enregistrement
synchronisé avec un lecteur vidéo CD Sony
En utilisant la même méthode que pour
l’enregistrement synchronisé à partir d’un lecteur CD
Sony, vous pouvez aussi faire un enregistrement
synchronisé avec un lecteur vidéo CD Sony.
Pour sélectionner le lecteur vidéo CD, appuyez sur la
touche numérique 2 tout en tenant 1/u de la télé-
F
commande enfoncé pour commencer l’enregistrement.
6 Appuyez sur P de la platine.
Le lecteur CD quitte le mode de pause et
l’enregistrement commence.
A la fin de la lecture du CD, l’enregistrement
s’arrête.
Page 79

Entrée et sortie d’enregistrement en fondu (Fondu)
Le niveau d’enregistrement peut être progressivement
augmenté en début d’enregistrement (entrée en fondu
de l’enregistrement) ou diminué en fin d’enregistrement
(sortie en fondu de l’enregistrement).
Cette fonction est utile pour éviter, par exemple, les
coupures brusques en fin de disque.
A˜B
REPEAT
A.SPACE
M.SCAN
!
?
/
(
WRITE CLEAR
NUM
CHAR
·
+ r
T.REC MUSIC SYNC
)
CD-SYNC
STANDBY=STARTPSTOP
CD PLAYER FADER
+
P p
DIGITAL REC LEVEL
/ANALOG OUT LEVEL
)
P.HOLD
REC-IT
FADER
>
25
NAME
g
=
0
FADER
Enregistrement sur MD
z Vous pouvez régler séparément la durée de l’entrée
et de la sortie en fondu
1 Appuyez deux fois sur MENU/NO avec la platine
arrêtée pour afficher “Setup Menu”.
2 Réglez la durée de l’entrée en fondu :
Tournez AMS pour afficher le menu “Setup 08”, puis
appuyez sur AMS.
Réglez la durée de la sortie en fondu :
Tournez AMS pour afficher le menu “Setup 09”, puis
appuyez sur AMS.
3 Tournez AMS pour régler la durée.
La durée de l’entrée en fondu et celle de la sortie en
fondu peuvent être réglées par palier de 0,1 seconde.
4 Après avoir sélectionné la durée, appuyez sur AMS.
5 Appuyez sur MENU/NO.
Entrée en fondu de l’enregistrement
Pendant la pause d’enregistrement, appuyez sur
FADER à l’endroit où l’enregistrement doit commencer
en fondu.
“ de “Fade “ 3.2s ” clignote et la platine effectue un
fondu jusqu’à ce que le compteur atteigne “0.0s”.
Sortie en fondu de l’enregistrement
Pendant l’enregistrement, appuyez sur FADER à
l’endroit où l’enregistrement doit sortir en fondu.
” de “Fade ” 3.2s ” clignote et la platine effectue un
fondu jusqu’à ce que le compteur atteigne “0.0s”. La
platine se met en pause d’enregistrement quand le
fondu est terminé.
21
F
Page 80

Enregistrement sur MD
Enregistrement de la plage d’un CD que vous écoutez (fonction REC-IT) Z
Remarques
• Il se peut que les noms des plages très courtes du CD ne
soient pas copiés sur le MD.
• Sur certains CD, il se peut que les informations de texte ne
soient pas copiées.
Cette fonction vous permet d’enregistrer une plage
d’un CD sur un MD tout en l’écoutant.
Vous ne pouvez l’utiliser que si vous avez raccordé un
lecteur CD Sony muni d’une prise CONTROL A1 à la
platine MD à l’aide d’un câble Control A1. Pour plus
d’informations sur les raccordements CONTROL A1,
voir page 6.
A˜B
REPEAT
A.SPACE
M.SCAN
!
?
/
(
WRITE CLEAR
NUM
CHAR
P p
·
+ r
T.REC MUSIC SYNC
)
CD-SYNC
STANDBY=STARTPSTOP
CD PLAYER FADER
+
)
P.HOLD
REC-IT
DIGITAL REC LEVEL
/ANALOG OUT LEVEL
REC-IT
>
25
NAME
=
0
1 Placez le sélecteur de source de l’amplificateur sur
CD.
2 Effectuez les opérations 2 à 8 décrites sous
“Enregistrement sur un MD” aux pages 9 et 10
pour préparer la platine pour l’enregistrement.
3 Appuyez sur · du lecteur CD.
Quand “TOC Writing” clignote
Ne bougez pas la platine et ne débranchez pas le cordon
d’alimentation car l’enregistrement risquerait d’être
incomplet. La mise à jour du sommaire (TOC) du MD est en
cours.
4 Lorsque vous entendez la plage à enregistrer,
appuyez sur REC-IT.
La lecture reprend au début de la plage et
l’enregistrement commence. La platine MD s’arrête
à la fin de la plage, mais la lecture du CD se
poursuit.
Pour arrêter d’enregistrer
Appuyez sur p de la platine.
z La platine copie les informations texte CD sur le MD.
Si le CD actuel comporte du texte CD, les noms de plage
sont copiés comme noms de plage du MD.
z Si “No Connect” s’affiche
Vérifiez la connexion du câble Control A1 et assurezvous que le sélecteur de mode du lecteur CD se trouve
sur CD1.
22
F
Page 81

Enregistrement programmé d’un MD
Si vous reliez une minuterie (non fournie) à la platine,
vous pourrez programmer des enregistrements en
fonction d’horaires précis. Pour des informations
détaillées sur le raccordement d’une minuterie et le
réglage des heures de début et de fin d’enregistrement,
consultez le mode d’emploi de la minuterie.
Enregistrement sur MD
5 Quand vous n’utilisez plus la minuterie, réglez
TIMER de la platine sur OFF. Mettez ensuite la
platine en veille en branchant son cordon sur une
prise murale, ou réglez la minuterie sur le
fonctionnement continu.
• Si vous laissez TIMER sur REC, l’enregistrement
se déclenchera automatiquement la prochaine
fois que vous mettrez la platine sous tension.
• Si vous ne mettez pas la platine en veille
pendant la semaine qui suit l’enregistrement
programmé, le contenu de l’enregistrement
risque d’être effacé.
g
TIMER
0)
§
(
Pp r
p
1 Effectuez les opérations 1 à 10 de “Enregistrement
sur un MD”, aux pages 9 et 10.
2 • Si vous voulez désigner l’heure de début
d’enregistrement, appuyez sur p.
• Si vous voulez désigner l’heure de fin
d’enregistrement, effectuez les étapes 11 et 12 de
“Enregistrement sur un MD”, à la page 10.
• Si vous voulez désigner l’heure de début et de
fin d’enregistrement, appuyez sur p.
3 Réglez TIMER sur REC, sur la platine.
4 Réglez la minuterie.
• Si vous avez réglé l’heure de début
d’enregistrement, la platine s’éteint. A l’heure
préréglée, la platine se met sous tension et
l’enregistrement commence.
• Quand vous avez réglé l’heure de fin
d’enregistrement, l’enregistrement continue. A
l’heure préréglée, l’enregistrement s’arrête et la
platine s’éteint.
• Si vous avez réglé l’heure de début et de fin
d’enregistrement, la platine s’éteint. A l’heure
préréglée pour le début de l’enregistrement, la
platine se met sous tension et l’enregistrement
commence. A l’heure préréglée pour la fin de
l’enregistrement, l’enregistrement s’arrête et la
platine s’éteint.
N’oubliez pas de mettre la platine en veille dans la
semaine qui suit l’enregistrement programmé
Le sommaire (TOC) du MD est mis à jour et le contenu
de l’enregistrement est inscrit sur le MD quand la
platine est sous tension. Si l’enregistrement a été effacé,
“Standby” clignote à la prochaine mise sous tension de
la platine.
Remarques
• Il peut s’écouler une trentaine de secondes pour que
l’enregistrement commence après la mise sous tension de
la platine. Tenez-en compte lorsque vous spécifiez l’heure
de déclenchement d’un enregistrement programmé.
• Pendant l’enregistrement programmé, le nouveau
matériau est enregistré à partir de la fin de la dernière
plage enregistrée du MD.
• L’enregistrement qui a été programmé sera sauvegardé
sur le minidisque la prochaine fois que vous mettrez la
platine sous tension et “TOC” clignotera dans l’afficheur
à ce moment. Ne déplacez pas la platine et ne tirez pas le
cordon d’alimentation quand “TOC” clignote.
• L’enregistrement programmé s’arrête quand le minidisque
est plein.
23
F
Page 82

Lecture de MD
Lecture de MD
Utilisation de l’affichage
Vous pouvez vérifier dans l’afficheur les informations
concernant un minidisque ou une plage, telles que le
nombre de plages total, le temps de lecture total des
plages, le temps restant sur le minidisque pour
l’enregistrement, le titre du disque et la date
d’enregistrement.
SCROLL/CLOCK SET
DISPLAY/CHAR
Quand vous insérez un minidisque dans la platine, le
titre de ce disque, le nombre de plages total, le temps
de lecture total et le répertoire musical apparaissent
comme suit :
Titre du disque
Nombre de
plages total
Temps de
lecture total
Répertoire musical
g
0)
§
(
Pp r
TIME
SCROLL
DISPLAY
>25
=/+
OPEN/CLOSE
DISPLAY
CONTINUE
A
F
K
P
U
Z
/
§
1
6
11
16
21
>
25
NAME
=
0
MENU/NO
TIME D.O BIT
SCROLL
PLAY MODE
PROGRAM
SHUFFLE PRESENTRECORDED
C
B
D
H
G
I
3
2
M
L
N
8
7
R
Q
S
13
12
W
V
X
18
17
–
.
23
22
A˜B
REPEAT
!
?
(
WRITE CLEAR
NUM
CHAR
P p
·
+ r
T.REC MUSIC SYNC
)
CD-SYNC
STANDBYSTARTSTOP
YES
4
9
14
19
24
A.SPACE
FILTER
DATE
E
J
5
O
10
T
15
Y
20
,
25
M.SCAN
)
P.HOLD
REC-IT
TIME
DATE
RECORDED
Clavier
numérique
Vérification du nombre de plages total, du
temps de lecture total et du temps restant
pour l’enregistrement
A chaque pression sur TIME quand la platine est à
l’arrêt, l’affichage change de la façon suivante :
Le répertoire musical indique tous les numéros de
plage dans une grille s’il s’agit d’un minidisque
préenregistré ou sans grille s’il s’agit d’un minidisque
enregistrable.
Si le minidisque a plus de 15 plages, z apparaît à la
droite du nombre 15 dans le répertoire musical.
Remarque
Si vous insérez un nouveau minidisque ou éteignez la
platine et la rallumez, le dernier paramètre affiché
réapparaîtra.
Vérification du temps de lecture, du temps
restant et du numéro de la plage
Chaque fois que vous appuyez sur la touche TIME
pendant la lecture d’un minidisque, l’affichage change
comme suit. Les numéros dans le répertoire
disparaissent au fur et à mesure que les plages sont
reproduites.
Numéro et temps de lecture de la plage en cours
24
Nombre de plages total et temps de lecture total
de toutes les plages enregistrées
Appuyez
Numéro et temps restant de la plage en cours
Appuyez
Temps restant sur le disque pour
l’enregistrement (MD enregistrés seulement)
Appuyez
Temps restant de toutes les plages enregistrées
Le temps restant pour l’enregistrement n’est
pas indiqué pour les disques préenregistrés.
Appuyez
Appuyez
F
Page 83

Lecture de MD
z Le titre de la plage et celui du disque sont affichés
de la façon suivante :
Le titre du disque apparaît quand le disque est à l’arrêt
et le titre de la plage apparaît quand la plage est en
cours de lecture. Si aucun titre n’est enregistré, “No
Name” apparaît au lieu du titre.
Pour titrer un minidisque enregistrable et ses plages,
voir “Titrage d’un enregistrement” page 47.
z Vous pouvez faire défiler un titre contenant plus de
12 caractères
Appuyez sur SCROLL/CLOCK SET (ou SCROLL).
Comme 11 caractères seulement peuvent apparaître à la
fois dans l’afficheur, appuyez sur SCROLL/CLOCK
SET pour voir le reste d’un titre contenant 12 caractères
ou plus.
Appuyez une fois de plus sur SCROLL/CLOCK SET
pour arrêter le défilement du titre et encore une fois
pour continuer.
Affichage de la date d’enregistrement Z
Une fois que vous avez réglé l’horloge interne, la
platine inscrit automatiquement la date et l’heure
d’enregistrement des plages. Pour afficher ces
informations pendant la lecture, procédez comme suit.
1 Localisez la plage dont vous voulez vérifier la
date et l’heure d’enregistrement.
Changement de l’affichage
A chaque pression sur DISPLAY/CHAR (ou
DISPLAY) quand la platine est à l’arrêt ou en cours de
lecture, vous pouvez changer l’affichage de la façon
suivante :
Affichage normal
Appuyez
Contenu du programme (seulement quand
“PROGRAM” est allumé)
Appuyez
Titre (nom de disque et nom de plage)
Appuyez
Niveau de sortie (Le niveau d’enregistrement est
affiché lorsque la platine est en mode d’arrêt.)
Si la platine est Appuyez sur
à l’arrêt = ou +
en cours de lecture ou en pause =, +, ou sur le
clavier numérique
2 Appuyez sur DATE RECORDED.
“No Date” apparaît si l’horloge interne n’a pas été
réglée ou si la plage a été enregistrée sur une autre
platine MD n’inscrivant pas la date ni l’heure.
Appuyez
Affichage de vitesse
Appuyez
Affichage DF (filtre numérique)
Appuyez
25
F
Page 84

Lecture de MD
Localisation d’une plage donnée
Vous pouvez localiser rapidement une plage pendant
la lecture d’un minidisque avec la commande AMS
(Automatic Music Sensor), les touches = et +, le
clavier numérique ou la touche M.SCAN de la
télécommande.
>25
·
OPEN/CLOSE
§
DISPLAY
CONTINUE
A
F
1
K
6
P
11
U
16
Z
21
/
>
NAME
25
=
0
MENU/NO
TIME D.O BIT
SCROLL
PLAY MODE
PROGRAM
SHUFFLE PRESENTRECORDED
C
B
H
G
3
2
M
L
8
7
R
Q
13
12
W
V
18
17
–
23
22
A˜B
REPEAT
!
?
WRITE CLEAR
NUM
CHAR
·
+ r
T.REC MUSIC SYNC
)
CD-SYNC
STANDBYSTARTSTOP
YES
D
I
4
N
9
S
14
X
19
.
24
A.SPACE
(
P p
FILTER
DATE
E
J
5
O
10
T
15
Y
20
,
25
M.SCAN
)
P.HOLD
REC-IT
Clavier
numérique
M.SCAN
≠ AMS ±
0)
§
(
Pp r
(
=/+
Pour localiser Vous devez :
La ou les plages
suivantes
La plage courante ou
les plages précédentes
Directement une plage
donnée Z
Une plage particulière
en utilisant AMS
Pendant la lecture, tourner AMS vers
la droite (ou appuyer de façon répétée
sur +) jusqu’à ce que vous trouviez
la plage.
Pendant la lecture, tourner AMS vers
la gauche (ou appuyer de façon
répétée sur =) jusqu’à ce que vous
trouviez la plage.
Les touches du clavier numérique
pour entrer le numéro de la plage.
1 Tourner AMS jusqu’à ce que le
numéro de plage souhaité
apparaisse quand la platine est à
l’arrêt. (Le numéro de plage
clignote.)
2 Appuyez sur AMS ou (.
z Pour localiser directement un numéro de plage
supérieur à 25 Z
Appuyez sur >25, puis sur les touches correspondantes
du clavier numérique.
Appuyez une fois sur >25 avant d’entrer un numéro de
plage à deux chiffres et deux fois avant d’entrer un
numéro de plage à trois chiffres.
Pour entrer “0”, appuyez sur la touche 10.
Exemples : • Pour écouter la plage numéro 30
Appuyez une fois sur >25, puis sur 3 et
10.
• Pour écouter la plage numéro 100
Appuyez deux fois sur >25, puis sur 1, 10
et 10.
z Vous pouvez prolonger le temps de lecture pendant
le balayage des plages
1 Appuyez deux fois sur MENU/NO avec la platine
arrêtée pour afficher “Setup Menu”.
2 Tournez AMS pour afficher “Setup 07” et appuyez
sur AMS.
3 Tournez AMS pour sélectionner le temps de lecture
entre 6 et 20 secondes (par incréments de 1 seconde)
puis appuyez sur AMS.
4 Appuyez sur MENU/NO.
z Pour faire une pause au début d’une plage
Tournez AMS (ou appuyez sur = ou +) après avoir
mis la lecture en pause.
z Pour aller rapidement au début de la dernière plage
Tournez AMS vers la gauche (ou appuyez sur =)
quand l’affichage indique le nombre de plages total, le
temps de lecture total ou le temps restant sur le
minidisque pour l’enregistrement (disque enregistrable
seulement) ou le titre du disque (voir page 24).
26
En écoutant toutes les
plages pendant
6 secondes (balayage
des plages) Z
1 Appuyer sur M.SCAN avant de
démarrer la lecture.
2 Quand vous avez trouvé la plage
souhaitée, appuyez sur · pour
démarrer la lecture.
F
Page 85

Lecture de MD
Localisation d’un point donné sur une plage
Vous pouvez aussi utiliser les touches 0 et ) pour
localiser un point donné sur une plage pendant la
lecture ou la pause.
0/)
g
Pour localiser un point Appuyez sur
Tout en écoutant le son
Rapidement en
observant l’affichage
pendant la pause de
lecture
) (avant) ou 0 (arrière) en
continu jusqu’à ce que vous
trouviez le point souhaité.
) ou 0 en continu jusqu’à
ce que vous trouviez le point.
Dans ce cas, vous n’entendez
pas le son.
z Si “—Over—” apparaît dans l’afficheur quand vous
appuyez sur ) pendant la pause de lecture
Vous avez atteint la fin du minidisque. Appuyez sur
0 (ou =), ou tournez AMS vers la gauche pour
revenir en arrière.
0)
§
(
Pp r
Lecture répétée de plages
Vous pouvez écouter plusieurs fois de suite les mêmes
plages dans n’importe quel mode de lecture.
g
REPEAT
Appuyez sur REPEAT.
“REPEAT” apparaît dans l’afficheur.
La platine répète les plages comme suit :
Quand vous écoutez un La platine répète
MD en mode de
Lecture normale (page 12) Toutes les plages
Lecture aléatoire (page 28) Toutes les plages dans un
ordre aléatoire
Lecture programmée Le même programme
(page 29)
Pour annuler la lecture répétée
Appuyez plusieurs fois sur REPEAT jusqu’à ce que
“REPEAT” disparaisse.
La platine revient au mode de lecture d’origine.
0)
§
(
Pp r
Remarques
• Si vous atteignez la fin du disque en appuyant sur )
tout en contrôlant le son, la platine s’arrête.
• Les plages qui ne durent que quelques secondes peuvent
être trop courtes pour être localisées lors du balayage des
plages. Dans ce cas, il vaut mieux écouter le minidisque à
vitesse normale.
Répétition de la plage en cours
Pendant la lecture de la plage qui doit être répétée en
mode de lecture normale, aléatoire ou programmée,
appuyez plusieurs fois sur REPEAT jusqu’à ce que
“REPEAT 1” apparaisse dans l’afficheur.
Si vous sélectionnez “REPEAT 1” avec la platine
arrêtée, la platine répétera la prochaine plage qui sera
lue.
(voir page suivante)
27
F
Page 86

Lecture de MD
Répétition d’un passage donné (Répétition
A-B) Z
Vous pouvez écouter un passage particulier d’une
plage de façon répétée. Cette fonction est pratique si
vous voulez apprendre un texte. Le passage répété doit
cependant faire partie d’une seule plage.
OPEN/CLOSE
§
MENU/NO
YES
TIME D.O BIT
SCROLL
REPEAT
A˜B
)
DISPLAY
PLAY MODE
CONTINUE
B
A
G
F
1
L
K
6
Q
P
11
V
U
16
–
Z
21
?
/
>
25
NAME
·
=
0
PROGRAM
SHUFFLE PRESENTRECORDED
C
D
H
I
3
2
M
N
8
7
R
S
13
12
W
X
18
17
.
23
22
A˜B
REPEAT
A.SPACE
!
(
WRITE CLEAR
NUM
CHAR
P p
+ r
T.REC MUSIC SYNC
)
CD-SYNC
STANDBYSTARTSTOP
FILTER
DATE
E
J
4
5
O
9
10
T
14
15
Y
19
20
,
24
25
M.SCAN
)
CLEAR
P.HOLD
p
REC-IT
Lecture des plages dans un ordre aléatoire (Lecture aléatoire)
La platine peut mélanger les plages pour les reproduire
chaque fois dans un ordre différent.
g
PLAY MODE
1 Appuyez de façon répétée sur PLAY MODE (ou
une fois sur SHUFFLE) jusqu’à ce que
“SHUFFLE” apparaisse dans l’afficheur quand la
platine est à l’arrêt.
0)
§
(
(
Pp r
1 Pendant la lecture du minidisque, appuyez sur
A˜B au début du passage (point A) qui doit être
répété.
“REPEAT A-” apparaît et “B” clignote dans
l’afficheur.
2 Continuez la lecture de la plage ou appuyez sur
) jusqu’à la fin du passage (point B), puis
appuyez encore une fois sur A˜B.
“REPEAT A-B” apparaît. La platine commence la
lecture du passage spécifié et le répète.
Pour annuler la répétition A-B
Appuyez sur REPEAT, CLEAR ou p.
Réglage de nouveaux points de départ et de fin
Vous pouvez répéter le passage immédiatement après
le passage spécifié en changeant le début et la fin du
passage.
1 Appuyez sur A˜B quand “REPEAT A-B” est
allumé.
La fin du passage (point B) devient le début du
passage suivant (point A), “REPEAT A-” s’allume et
“B” clignote dans l’afficheur.
2 Continuez la lecture de la plage ou appuyez sur )
jusqu’à ce que vous atteignez la nouvelle fin (point
B), puis appuyez encore une fois sur A˜B.
“REPEAT A-B” apparaît et le nouveau passage
spécifié est reproduit de façon répétée.
2 Appuyez sur ( pour démarrer la lecture
aléatoire.
“—Shuffle—” et “J” apparaissent dans l’afficheur
quand la platine mélange les plages.
Pour annuler la lecture aléatoire
Appuyez de façon répétée sur PLAY MODE (ou une
fois sur CONTINUE) lorsque la platine est à l’arrêt
jusqu’à ce que “SHUFFLE” disparaisse.
z Vous pouvez spécifier des plages pendant la lecture
aléatoire
• Pour écouter la plage suivante, tournez AMS vers la
droite (ou appuyez sur +).
• Pour revenir au début de la plage en cours, tournez
AMS vers la gauche (ou appuyez sur =). Vous ne
pouvez pas utiliser la commande AMS (ou =) pour
revenir sur des plages que vous avez déjà écoutées.
28
F
Page 87

Création d’un progr amme (Lecture pr ogrammée)
Vous pouvez spécifier l’ordre dans lequel les plages
d’un MD seront lues et créer votre propre programme.
Un programme peut contenir jusqu’à 25 plages.
DISPLAY/CHAR
g
PLAY MODE
DISPLAY
>25
·
0/)
≠ AMS ±0/)
OPEN/CLOSE
§
MENU/NO
YES
TIME D.O BIT
SCROLL
DISPLAY
PLAY MODE
CONTINUE
B
A
G
F
1
L
K
6
Q
P
11
V
U
16
Z
21
?
/
>
25
NAME
=
0
PROGRAM
SHUFFLE PRESENTRECORDED
C
D
H
I
3
2
M
N
8
7
R
S
13
12
W
X
18
17
–
.
23
22
A˜B
REPEAT
A.SPACE
!
(
WRITE CLEAR
NUM
CHAR
P p
·
+ r
T.REC MUSIC SYNC
)
CD-SYNC
STANDBYSTARTSTOP
FILTER
DATE
E
J
4
5
O
9
10
T
14
15
Y
19
20
,
24
25
M.SCAN
)
P.HOLD
REC-IT
1 Appuyez deux fois sur MENU/NO avec la
platine arrêtée pour afficher “Setup Menu”.
2 Tournez AMS afficher “Program ?”, puis appuyez
sur AMS ou YES.
3 Procédez comme indiqué dans a) ou b) :
a)Si vous utilisez les commandes de la platine
1 Tournez AMS jusqu’à ce que le numéro de la
plage souhaitée apparaisse dans l’afficheur.
2 Appuyez sur AMS.
YESMENU/NO
0)
§
(
Pp r
(
MENU/NO
YES
PROGRAM
Clavier
numérique
CLEAR
Lecture de MD
b) Si vous utilisez la télécommande
Appuyez sur les claviers numériques des plages
que vous voulez programmer dans l’ordre
souhaité. Pour programmer une plage dont le
numéro est supérieur à 25, utilisez la touche >25
(voir page 26).
En cas d’erreur
Appuyez sur 0 ou ) jusqu’à ce que le
mauvais chiffre clignote, puis entrez le numéro
de plage correct par le clavier numérique.
Si “0” clignote, appuyez sur 0.
4 Répétez l’étape 3 pour entrer d’autres plages.
La nouvelle plage est ajoutée à l’endroit où “0”
clignote.
Chaque fois que vous entrez une plage, le temps
total du programme augmente et apparaît dans
l’afficheur.
5 Quand la programmation est terminée, appuyez
sur YES.
“Complete!!” apparaît et la programmation est
terminée.
6 Appuyez de façon répétée sur PLAY MODE (ou
une fois sur PROGRAM) jusqu’à ce que
“PROGRAM” apparaisse dans l’afficheur.
7 Appuyez sur ( pour démarrer la lecture
programmée.
Pour annuler la lecture programmée
Appuyez de façon répétée sur PLAY MODE (ou une
fois sur CONTINUE) quand la platine est à l’arrêt
jusqu’à ce que “PROGRAM” disparaisse.
z Le programme reste mémorisé même quand la
lecture programmée est terminée
Quand vous appuyez sur ( vous pouvez écouter
encore une fois le même programme.
En cas d’erreur
Appuyez sur 0 ou ) jusqu’à ce que le
mauvais chiffre clignote, tournez AMS pour le
corriger, puis appuyez sur AMS.
Si “0” clignote, appuyez sur 0.
Remarques
• L’affichage indique “- -m- -s” au lieu du temps total de
lecture quand le temps total programmé dépasse 199
minutes.
• Si vous programmez plus de 25 plages, “ProgramFull”
apparaît. Pour programmer d’autres plages, effacez les
plages inutiles.
(voir page suivante)
29
F
Page 88

Lecture de MD
Vérification de l’ordre des plages
Alors que la platine est arrêtée et que “PROGRAM” est
allumé, appuyez plusieurs fois sur DISPLAY/CHAR
(ou sur DISPLAY).
Les numéros de plage s’affichent dans l’ordre où ils ont
été programmés comme suit :
“/3 / 5 / 8 / 1 / 2/”
Conseils utiles pour l’enregistrement d’un MD sur une cassette
≠ AMS ±
MENU/NO
Pour vérifier l’ordre des plages restantes
Tourner AMS .
Un balayage de l’affichage permet de vérifier le
numéro de toutes les plages programmées.
Changement de l’ordre des plages
Vous pouvez changer l’ordre des plages programmées
avant de commencer la lecture.
Pour Après les étapes 1 et 2 de
“Création d’un programme”,
faites ceci :
Effacer une plage Appuyez sur 0 ou )
jusqu’à ce que le numéro de la
plage à effacer clignote.
Appuyez sur CLEAR.
tout le Appuyez continuellement sur
programme CLEAR jusqu’à ce que les
numéros de plage
programmés disparaissent.
Ajouter au début du 1 Appuyez sur 0 jusqu’à ce
une plage programme que “0” clignote à gauche de
la première plage.
2 Effectuez les opérations 3 à 5
de la page 29.
au milieu du 1 Appuyez sur 0 ou )
programme jusqu’à ce que la plage
précédant la plage à ajouter
clignote.
2 Appuyez sur AMS de sorte
que “0” clignote, puis
effectuez les opérations 3 à 5
de la page 29.
à la fin du 1 Appuyez sur 0 jusqu’à ce
programme que “0” clignote à droite de
la dernière plage.
2 Effectuez les opérations 3 à 5
de la page 29.
Changer une plage dans 1 Appuyez sur 0 ou )
le programme jusqu’à ce que le numéro de
plage que l’on désire
changer clignote.
2 Effectuez les opérations 3 à 5
de la page 29.
g
0)
§
(
Pp r
Insertion d’espaces blancs pendant
l’enregistrement sur une cassette
(Espacement automatique)
La fonction Auto Space sert à insérer un espace blanc
de 3 secondes entre les plages pendant la copie d’un
MD sur une cassette, et vous permet d’utiliser la
fonction AMS quand vous écoutez un minidisque.
1 Appuyez deux fois sur MENU/NO avec la
platine arrêtée pour afficher “Setup Menu”.
2 Tournez AMS pour afficher “Setup 04”, puis
appuyez sur AMS.
3 Tournez AMS pour sélectionner “Auto Space”,
puis appuyez sur AMS.
4 Appuyez sur MENU/NO.
z Vous pouvez mettre la fonction Auto Space en
service avec la télécommande Z
Quand la platine est à l’arrêt, appuyez de façon répétée
sur A.SPACE jusqu’à ce que “Auto Space” apparaisse
dans l’afficheur.
Pour annuler l’espacement automatique
Annulation par le menu de la platine
1 Effectuez les étapes 1 et 2 de “Insertion d’espaces blancs
pendant l’enregistrement sur une cassette” sur cette page.
2 Tournez AMS pour sélectionner “Auto Off”, puis appuyez
sur AMS.
3 Appuyez sur MENU/NO.
Annulation par la télécommande Z
Quand la platine est à l’arrêt, appuyez de façon répétée sur
A.SPACE jusqu’à ce que “Auto Off” apparaisse.
Remarque
Si la fonction Auto Space est en service lors de
l’enregistrement d’un morceau contenant plusieurs numéros
de plage, tel qu’un pot-pourri ou une symphonie, des
espaces blancs seront insérés dans le morceau chaque fois
que le numéro de plage changera.
30
F
Page 89

Pause après chaque plage (Pause automatique)
Quand cette fonction est en service, la platine fait une
pause après la lecture de chaque plage. La pause
automatique est pratique si vous voulez enregistrer des
plages uniques ou plusieurs plages qui ne se suivent
pas.
Sélectionnez “Auto Pause” au lieu de “Auto Space” à
l’étape 3 de “Insertion d’espaces blancs pendant
l’enregistrement sur une cassette” à la page 30.
z Vous pouvez mettre la fonction Auto Pause hors
service avec la télécommande Z
Quand la platine est à l’arrêt, appuyez de façon répétée
sur A.SPACE jusqu’à ce que “Auto Pause” apparaisse
dans l’afficheur.
Pour poursuivre la lecture
Appuyez sur ( ou P.
Pour annuler la pause automatique
Annulation par le menu de la platine
Effectuez les étapes 1 à 3 de “Pour annuler l’espacement
automatique” à la page 30.
Annulation par la télécommande Z
Quand la platine est à l’arrêt, appuyez de façon répétée sur
A.SPACE jusqu’à ce que “Auto Off” apparaisse.
Remarque
Si vous éteignez la platine ou débranchez le cordon
d’alimentation secteur, les derniers réglages des fonctions
Auto Space et Auto Pause seront rappelés à la prochaine
mise sous tension de la platine.
Lecture de MD
Entrée et sortie en fondu (Fondu)
Le niveau du signal fourni par les prises
LINE(ANALOG) OUT et la prise PHONES peut être
progressivement augmenté (entrée en fondu de la
lecture) au début de la lecture ou diminué en fin de
lecture (sortie en fondu de la lecture).
Cette fonction est utile si vous voulez arrêter ou
commencer la lecture au milieu d’une plage.
–
Z
.
,
23
22
21
24
25
A˜B
REPEAT
A.SPACE
M.SCAN
!
?
/
(
WRITE CLEAR
NUM
CHAR
·
+ r
T.REC MUSIC SYNC
)
CD-SYNC
STANDBY=STARTPSTOP
CD PLAYER FADER
+
P p
DIGITAL REC LEVEL
/ANALOG OUT LEVEL
)
P.HOLD
REC-IT
FADER
>
25
NAME
g
=
0
FADER
Entrée en fondu de la lecture
Pendant la pause de lecture, appuyez sur FADER à
l’endroit où la lecture doit commencer en fondu.
“ de “Fade “ 3.2s ” clignote et la platine effectue un
fondu jusqu’à ce que le compteur atteigne “0.0s”.
Sortie en fondu de la lecture
Pendant la lecture, appuyez sur FADER à l’endroit où
la lecture doit sortir en fondu.
” de “Fade ” 3.2s ” clignote et la platine effectue une
lecture en fondu jusqu’à ce que le compteur atteigne
“0.0s”.
La platine se met en pause de lecture quand le fondu
est terminé.
Remarque
Le niveau du signal de sortie au connecteur de sortie
numérique ne change pas.
z Vous pouvez régler séparément la durée de l’entrée
et de la sortie de la lecture en fondu
Effectuez les étapes 1 à 5 de “Vous pouvez régler
séparément la durée de l’entrée et de la sortie en fondu”
à la page 21.
31
F
Page 90

Lecture de MD
Lecture pr ogrammée d’un MD
Si vous raccordez une minuterie (non fournie), la
lecture d’un MD peut être déclenchée et arrêtée à une
heure précise. Pour des informations détaillées sur le
raccordement de la minuterie ou le réglage des heures
de début et de fin, consultez le mode d’emploi de la
minuterie.
Remarque
Vous pouvez sélectionner la lecture programmée à l’étape 2.
Notez cependant que ce programme risque d’être effacé si la
platine ne reste pas en veille, ou s’il a été programmé pour
une date lointaine, il risque d’être effacé entre-temps. Le cas
échéant, la platine se met en mode normal de lecture lors de
sa mise sous tension à l’heure préréglée et les plages sont
reproduites dans l’ordre consécutif.
0)
§
(
(
Pp r
TIMER
g
PLAY MODE
1 Effectuez les étapes 1 à 3 de “Lecture d’un MD”, à
la page 12.
2 Appuyez de façon répétée sur PLAY MODE (ou
une fois sur une des touches PLAY MODE) pour
sélectionner le mode de lecture souhaité.
Pour écouter seulement certaines plages, créez un
programme (voir page 29).
3 • Si vous voulez désigner l’heure de début de
lecture, allez à l’étape 4.
• Si vous voulez désigner l’heure de fin de lecture,
appuyez sur ( pour commencer la lecture, puis
allez à l’étape 4.
• Si vous voulez désignez l’heure de début et de
fin de lecture, allez à l’étape 4.
4 Réglez TIMER de la platine sur PLAY.
32
5 Réglez la minuterie comme nécessaire.
• Si vous avez réglé l’heure de début de lecture, la
platine s’éteint. A l’heure préréglée, la platine se
met sous tension et la lecture commence.
• Si vous avez réglé l’heure de fin de lecture, la
lecture continue. A l’heure préréglée, elle s’arrête
et la platine s’éteint.
• Si vous avez réglé l’heure de début et de fin de
lecture, la platine s’arrête. A l’heure préréglée
pour le début de la lecture, la platine se met sous
tension et la lecture commence. A l’heure
préréglée pour la fin de la lecture, la lecture
s’arrête et la platine s’éteint.
6 Quand vous n’utilisez plus la minuterie, réglez
TIMER de la platine sur OFF.
F
Page 91

Lecture de MD
Pour vous endormir en musique
Vous pouvez vous endormir au son d’un MD en
réglant la platine pour qu’elle s’éteigne après un
certain temps.
Vous pouvez régler la minuterie par tranches de
30 minutes.
≠ AMS ±
g
1 Appuyez deux fois sur MENU/NO pour afficher
“Setup Menu”.
2 Tournez AMS pour sélectionner “Setup 14”, puis
appuyez sur AMS.
3 Tournez AMS pour sélectionner le temps.
L’affichage des minutes change comme suit :
30min ˜ 60min ˜ 90min ˜ 120min
4 Appuyez sur AMS.
MENU/NO
0)
§
(
Pp r
Changement de la vitesse (fonction de réglage de vitesse)
Vous pouvez changer la vitesse de lecture du MD
(pitch). La hauteur tonale augmente à grande vitesse et
diminue à basse vitesse.
≠ AMS ±
g
Réglage automatique de la vitesse par pas
(fonction de réglage automatique par pas)
Chaque pas de réglage de vitesse change la gamme
d’un demi-ton*. Vous pouvez augmenter la hauteur
tonale de 2 demi-tons ou la diminuer de 48 demi-tons.
* Une octave équivaut à 12 demi-tons.
1 Avec la platine en mode de lecture, appuyez deux
fois sur la touche MENU/NO pour afficher
“Setup Menu”.
MENU/NO
0)
§
(
Pp r
5 Tournez AMS pour sélectionner “Setup 15”, puis
appuyez sur AMS.
6 Tournez AMS pour sélectionner “Sleep On”, puis
appuyez sur AMS.
“SLEEP” s’allume dans l’afficheur.
7 Appuyez sur MENU/NO.
Pour changer le temps de la minuterie d’arrêt
Recommencez depuis l’étape 1 ci-dessus.
Pour annuler la minuterie d’arrêt
Sélectionnez “Sleep Off” à l’étape 6 ci-dessus, puis
appuyez sur AMS.
2 Tournez AMS pour sélectionner “Setup 10”, puis
appuyez sur AMS.
3 Tournez AMS pour sélectionner le pas de réglage
de vitesse désiré, puis appuyez sur AMS.
4 Appuyez sur MENU/NO.
Remarques
• Lorsque vous changez le pas de réglage de vitesse, le
niveau du son diminue momentanément.
• Le réglage de pas reviennent à leur valeur initiale (0)
lorsque vous éteignez la platine ou que vous éjectez le
MD.
• Lorsqu’un point (.) s’affiche après la valeur du pas de
réglage comme sur la figure ci-dessous, ceci indique que
vous avez effectué un réglage fin (voyez page suivante) et
que la valeur du pas de réglage se trouve entre deux pas.
(Les valeurs de pas de réglage et de réglage fin sont liées.)
(voir page suivante)
33
F
Page 92

Lecture de MD
NUM
!
A˜B
CHAR
?
REPEAT
WRITE CLEAR
NAME
/
>
25
(
P.HOLD
A.SPACE
+
STANDBY=STARTPSTOP
T.REC MUSIC SYNC
REC-IT
)
M.SCAN
0
=
·
)
+ r
P p
CD-SYNC
CD PLAYER FADER
DIGITAL REC LEVEL
/ANALOG OUT LEVEL
DIGITAL REC LEVEL
/ANALOG OUT LEVEL +/–
Réglage fin de la vitesse (fonction de
réglage fin)
Vous pouvez régler finement la vitesse de lecture par
pas de 0,1% entre –98,5% et +12,5%.
1 Avec la platine en mode de lecture, appuyez deux
fois sur la touche MENU/NO pour afficher
“Setup Menu”.
2 Tournez AMS pour sélectionner “Setup 11”, puis
appuyez sur AMS.
3 Tournez AMS pour sélectionner le pourcentage
“Pfine” désiré, puis appuyez sur AMS.
4 Appuyez sur MENU/NO.
Remarques
• Il y a une baisse momentanée du niveau du son à la
lecture lorsque vous changez la valeur de réglage fin.
• Le réglage fin revient à sa valeur initiale (0%) lorsque vous
éteignez la platine ou que vous éjectez le MD.
• Les valeurs de pas de réglage et de réglage fin sont liées.
Si vous changez l’une, l’autre change également.
Remarques
• Cette fonction ne peut être utilisée que pour une sortie de
signal numérique par le connecteur de sortie numérique.
• Vous pouvez choisir le nombre de bits désiré 24, 20 ou 16
bits.
• Si vous changez le nombre de bits pendant la lecture ou
l’enregistrement, le son diminue momentanément.
z
V
ous pouvez également changer le nombre de bits
avec la télécommande Z
Appuyez plusieurs fois sur D.O BIT en mode de lecture
ou d’arrêt jusqu’à ce que le nombre de bits désiré
s’affiche.
Réglage du niveau de lecture Z
Vous pouvez régler le niveau de lecture de la sortie de
signal aux prises LINE(ANALOG) OUT et à la prise
PHONES.
34
Réglage de la sortie de la platine MD
Sélection du nombre de bits
Vous pouvez améliorer la qualité du son de sortie en
choisissant le nombre de bits pour qu’il corresponde à
celui de la platine MD, de la platine DAT ou d’un autre
appareil numérique raccordé au connecteur de sortie
numérique.
g
1 Avec la platine en mode d’arrêt, appuyez deux
fois sur MENU/NO pour afficher “Setup Menu”.
2 Tournez AMS pour sélectionner “Setup 13”, puis
appuyez sur AMS.
3 Tournez AMS pour sélectionner le nombre de bits
désiré, puis appuyez sur AMS.
4 Appuyez sur MENU/NO.
F
≠ AMS ±
MENU/NO
0)
§
(
Appuyez sur DIGITAL REC LEVEL/ANALOG OUT
LEVEL +/– pendant la lecture.
(Vous ne pouvez pas augmenter le niveau au-dessus
de 0 dB ou l’abaisser au-dessous de –20 dB.)
Remarque
Le réglage de niveau de lecture revient à “0 dB” lorsque
vous éteignez la platine ou éjectez le MD.
Pp r
Page 93

Variation du timbre lors de la lecture (Filtr e numérique)
Cette platine est équipée des filtres à coefficient
variable qui permettent d’ajuster le timbre en fonction
de la chaîne audio, de l’environnement et de la source
reproduite.
Lecture de MD
z Qu’est-ce qu’un filtre à coefficient variable ?
Un filtre à coefficient variable est un filtre permettant de
changer les caractéristiques du signal en appliquant des
conditions de coupure de fréquences précises. Ces
filtres se trouvent dans les appareils numériques,
lecteurs CD ou platines MD, pour éliminer la distorsion
due au repliement du spectre. Votre platine contient
quatre ou trois types de filtres numériques. Voici une
brève description des caractéristiques de chaque type de
filtre.
Remarque
Les filtres numériques ne sont efficaces que sur les signaux
analogiques fournis par les prises LINE(ANALOG) OUT et
la prise PHONES.
Témoin FILTER
g
FILTER
0)
§
(
Pp r
1 Appuyez sur FILTER.
Le filtre actuellement sélectionné apparaît dans
l’afficheur.
2 Appuyez de façon répétée sur FILTER pour
sélectionner le filtre souhaité.
A chaque pression sur la touche, le filtre change de
la façon suivante :
n
DF:Standard
n
DF:Spline*
n
DF:Plain
n
DF:Analog
Standard
Ce filtre produit un son étendu sur une large gamme.
Spline (Modèle européen seulement)
Ce filtre produit un son net et clairement positionné.
Plain
Ce produit un son frais et puissant.
Analog
Ce filtre produit un son résonnant et mélodieux.
Remarque
Le changement des caractéristiques du son, causé par les
filtres numériques se produit principalement dans la gamme
inaudible, comme dans le cas d’un amplificateur.
* Modèle européen seulement
Le témoin FILTER s’allume lorsqu’une option
autre que “Standard” est sélectionnée sur
l’affichage DF (filtre numérique).
z Vous pouvez sélectionner le filtre avec la
télécommande
Appuyez de façon répétée sur FILTER jusqu’à ce que le
filtre que vous souhaitez apparaisse dans l’afficheur.
35
F
Page 94

OUT
DIGITAL
OPTICAL
Ç
COAXIAL OPT2OPT1
DIGITAL IN
OPTICAL
COAXIAL
DIGITAL OUT
ç
Ç
OUT
LINE(ANALOG)
IN
L
R
L
R
INOUT
L
R
TAPE/MD
Commande d’un changeur CD Sony disponible séparément
Commande d’un changeur CD Sony disponible séparément
• 1 câble Control A1 (non fourni) (1)
Raccordement du système
Si vous raccordez un changeur CD Sony muni d’une
prise CONTROL A1 à la platine MD au moyen d’un
câble Control A1, vous pouvez le commander en
utilisant les commandes de la platine MD ou de la
télécommande fournie (fonction Mega CD Control).
Raccordez la platine MD à l’amplificateur et au
changeur CD comme il est indiqué ci-dessous. Avant
les raccordements, éteignez tous les composants.
Remarques
• Vous ne pouvez utiliser la fonction Mega CD Control que
si la platine est raccordée à un changeur CD. Cette
fonction ne prend pas en charge des lecteurs CD à un seul
disque.
• Les affichages et opérations peuvent différer selon le
changeur CD utilisé.
S-LINK
DIGITAL IN
DIGITAL OUT
CONTROL A1
OPTICAL
COAXIAL
OPT2OPT1
R
LINE(ANALOG)
IN
OUT
LRL
COAXIAL
Raccordements
Raccordement de la platine MD et du changeur CD à
un amplificateur
Raccordez l’amplificateur aux prises LINE OUT du
changeur CD et aux prises LINE(ANALOG) IN/OUT
de la platine MD à l’aide des cordons de liaison audio
(deux seulement sont fournis).
Branchez les fiches à des prises de même couleur :
rouge (droite) à rouge, et blanc (gauche) à blanc.
Enfoncez bien les fiches pour éviter un ronflement et
des parasites.
Changeur CD
LINE
OUT
L
R
ç
Amplificateur
CD IN
L
R
ç
ç
REC
OUT
ç
ç
ç
TAPE/MD
IN
Amplificateur
DIGITAL
OPTICAL OUT
ou
CD IN
COAXIAL OUT
LINE
OUT
DIGITAL
CONTROL
A1
Changeur CD
çç
ç: Sens du signal
çç
Quels cordons utiliser ?
• 3 cordons de liaison audio (deux seulement sont
fournis) (3)
Blanc (L)
(gauche)
Rouge (R)
(droite)
Blanc (L)
(gauche)
Rouge (R)
(droite)
/
Platine MD
çç
ç: Sens du signal
çç
Amplificateur
Raccordement d’un câble numérique au changeur
CD et à la platine MD
Vous pouvez effectuer un enregistrement numérique
d’un CD sur un MD en raccordant le changeur CD à la
platine MD à l’aide d’un câble optique ou d’un câble
de liaison numérique coaxial.
Quand vous utilisez un câble optique
Retirez les capuchons des prises, puis insérez les fiches
parallèlement jusqu’à ce qu’elles se verrouillent avec un
déclic.
Ne pliez pas les câbles optiques et ne les attachez pas
ensemble.
Platine MD
Changeur CD
36
F
• 1 câble optique (non fourni) (1)
• 1 câble coaxial de liaison numérique (non fourni) (1)
Vous pouvez raccorder le câble
optique à OPT1 ou OPT2.
çç
ç: Sens du signal
çç
Page 95

Commande d’un changeur CD Sony disponible séparément
§
18
W
23
C
PROGRAM
OPEN/CLOSE
TIME D.O BIT
NUM
!
A˜B
17
V
22
–
B
SHUFFLE PRESENTRECORDED
PLAY MODE
SCROLL
CHAR
?
REPEAT
WRITE CLEAR
16
U
21
Z
A
CONTINUE
DISPLAY
NAME
/
>
25
MENU/NO
19
X
24
.
D
(
P.HOLD
A.SPACE
20
Y
25
,
E
)
M.SCAN
YES
DATE
3
H
8
M
13
R
2
G
7
L
12
Q
1
F
6
K
11
P
4
I
9
N
14
S
5
J
10
O
15
T
FILTER
>25
Quand vous utilisez un câble coaxial de liaison
numérique
Platine MD Changeur CD
DIGITAL IN
COAXIAL OPT2OPT1
DIGITAL OUT
COAXIAL
OPTICAL
DIGITAL
COAXIAL
OUT
Ç
çç
ç: Sens du signal
çç
z Si “Din Unlock” et “C71” s’affichent
Assurez-vous que le câble optique ou le câble coaxial de
liaison numérique est correctement branché.
Raccordement d’un câble Control A1 au changeur
CD et à la platine MD
Ceci vous permet d’effectuer un enregistrement
synchronisé d’un CD et de faire fonctionner le
changeur CD à l’aide des commandes de la platine MD
ou de la télécommande fournie (Fonction Mega CD
Control). Assurez-vous que les fiches sont
complètement enfoncées.
Si un composant comporte plus d’une prise CONTROL
A1, vous pouvez utiliser n’importe laquelle.
Platine MD Changeur CD
S-LINK
CONTROL A1
S-LINK
CONTROL A1
Commande d’un changeur CD
depuis la platine MD (fonction
Mega CD Control)
Vous pouvez commander un changeur CD Sony
raccordé par un câble Control A1 en utilisant les
commandes de la platine MD ou de la télécommande
fournie.
Témoin MEGA
CONTROL
g
≠ AMS ±
MEGA CONTROLINPUT
MENU/NO
0)
§
(
Pp r
Clavier
numérique
Ç
Ç
Vous pouvez raccorder le câble
à l’une ou l’autre prise.
çç
ç: Sens du signal
çç
Remarques
• Si la platine commande le changeur CD avec un sélecteur
de mode, placez le sélecteur sur CD1.
• Si les fiches ne sont pas complètement enfoncées, “No
Connect” s’affiche et vous ne pouvez pas utiliser la
fonction Mega CD Control.
1 Allumez l’amplificateur et placez le sélecteur de
source sur CD.
2 Réglez INPUT de la platine sur la position
correspondant au connecteur d’entrée numérique
auquel est raccordé le changeur CD.
3 Appuyez sur MEGA CONTROL.
Le témoin MEGA CONTROL s’allume et la
platine est placée en mode Mega CD Control.
4 Appuyez sur MENU/NO.
Le numéro de disque du CD actuel clignote sur
l’afficheur.
5 Tournez AMS jusqu’a ce que le numéro de disque
recherché s’affiche, puis appuyez sur AMS (ou
appuyez sur les touches numériques et/ou >25).
Le numéro de plage clignote.
(voir page suivante)
37
F
Page 96

Commande d’un changeur CD Sony disponible séparément
6 Tournez AMS jusqu’à ce que le numéro de plage
recherché s’affiche, puis appuyez sur AMS (ou
appuyez sur les touches numériques et/ou >25).
La lecture de la plage sélectionnée commence.
Pour commander à nouveau la platine
Appuyez sur MEGA CONTROL.
Le témoin MEGA CONTROL s’éteint. Vous pouvez
alors contrôler la platine.
z Si “No Connect” s’affiche
Vérifiez la connexion du câble Control A1 et assurezvous que le sélecteur de mode du changeur CD se
trouve sur CD1.
z Vous pouvez effectuer les opérations suivantes en
mode Mega CD Control
( : Lecture
P : Pause
p : Arrêt
0/) : Recherche arrière/recherche avant
AMS (ou =/+) : Sélectionnez le numéro de disque
et le numéro de plage
Touches numériques et/ou >25 de la télécommande :
Sélectionnez directement le numéro de disque et le
numéro de plage.
Utilisation de l’afficheur
L’afficheur vous permet de vérifier des informations de
disque et de plage du CD telles que nombre total de
plages, temps de lecture total des plages, nom de
disque et nom de plage.
Quand le lecteur CD est arrêté
Numéro de
disque
Nombre total de
plages
Pendant la lecture d’un CD
Numéro de
disque
Numéro de
plage
Nom de
disque
Temps de lecture
total du disque
Nom de
plage
Temps de
lecture
Remarques
• Si un CD n’est pas en place sur la position du disque
sélectionné, “No Disc” s’affiche.
• Vous pouvez activer le mode Mega CD Control même s’il
n’y a pas de MD dans la platine MD.
• Le mode Mega CD Control est désactivé lorsque :
– vous éteignez la platine ;
– vous éjectez le MD.
Le mode de lecture (PROGRAM, SHUFFLE, par
exemple) et le mode de répétition (REPEAT, par
exemple) affiché en mode Mega CD Control indique
l’état du changeur CD.
z Si le CD n’est pas titré , “ DISC-5 ” s’affiche
(lorsque le numéro de disque “5” est sélectionné)
z Vous pouvez passer sur l’affichage MD pendant
l’enregistrement
A chaque pression sur DISPLAY, l’affichage CD et
l’affichage MD apparaissent alternativement.
Cette fonction vous permet de vérifier la plage du MD
dont l’enregistrement est en cours. L’affichage CD
réapparaît automatiquement à la fin de la lecture du
CD.
Notez que le répertoire s’affiche en mode
d’enregistrement ou de pause d’enregistrement, même
si l’affichage CD est actif. Ceci vous permet de vérifier
le nombre de plages du MD.
38
F
Page 97

Commande d’un changeur CD Sony disponible séparément
Commande d’un changeur CD depuis la platine MD pour un enregistr ement synchronisé
Vous pouvez facilement effectuer un enregistrement
synchronisé depuis un changeur CD raccordé par un
câble Control A1 sur la platine MD. Vous pouvez
enregistrer toutes les plages du CD ou toutes les plages
à partir d’une plage donnée. Pour n’enregistrer que des
plages choisies du CD, programmez d’abord le
changeur CD, puis lancez l’enregistrement en mode
d’arrêt de lecture programmée. Pour plus
d’informations, consultez le mode d’emploi du
changeur CD.
Si le MD est partiellement enregistré, l’enregistrement
commence à la fin de la dernière plage enregistrée.
Témoin MEGA
CONTROL
g
>25
MEGA CONTROLINPUT
≠ AMS ±
OPEN/CLOSE
§
MENU/NO
YES
TIME D.O BIT
SCROLL
DISPLAY
PLAY MODE
DATE
PROGRAM
SHUFFLE PRESENTRECORDED
CONTINUE
C
B
A
D
H
G
F
I
3
2
1
4
M
L
K
N
8
7
6
9
R
Q
P
S
13
12
11
14
W
V
U
X
18
17
16
19
–
Z
.
23
22
21
24
A˜B
REPEAT
A.SPACE
!
?
/
(
>
25
WRITE CLEAR
NUM
CHAR
NAME
FILTER
E
J
5
O
10
T
15
Y
20
,
25
M.SCAN
)
P.HOLD
MENU/NO
0)
§
(
Pp r
Pr REC
(
Clavier
numérique
5 Appuyez sur MENU/NO.
Le numéro de disque du CD actuel clignote sur
l’afficheur.
6 Sélectionnez le numéro de disque et le numéro de
plage que vous désirez enregistrer.
Les opérations à effectuer ne sont pas les mêmes
selon que vous enregistrez toutes les plages d’un
CD ou toutes les plages à partir d’une plage
donnée. Voyez le tableau ci-dessous.
Pour enregistrer Vous devez :
Toutes les plages 1 Tourner AMS jusqu’à ce que le
numéro de disque désiré s’affiche,
puis appuyer sur AMS (ou
appuyer sur les touches
numériques et/ou >25).
Le numéro de plage clignote.
2 Appuyez sur AMS. (La lecture du
disque choisi commence.)
3 Appuyez sur p pour arrêter la
lecture.
Toutes les plages à 1 Tourner AMS jusqu’à ce que le
partir d’une plage numéro de disque désiré s’affiche,
donnée puis appuyer sur AMS (ou
appuyer sur le clavier numérique
et/ou >25).
2 Tourner AMS jusqu’à ce que le
numéro de plage désiré s’affiche,
puis appuyer sur AMS (ou
appuyer sur les touches
numériques et/ou >25).
La lecture de la plage sélectionnée
commence.
7 Appuyez sur r REC de la platine.
Le changeur CD s’arrête au début de la plage
désirée lorsque vous enregistrez toutes les plages
à partir d’une plage donnée. Il s’arrête au début
de la première plage lorsque vous enregistrez
toutes les plages. La platine MD est placée en
mode d’attente d’enregistrement.
1 Allumez l’amplificateur et placez le sélecteur de
source sur CD.
2 Insérez un MD enregistrable.
3 Réglez INPUT de la platine sur la position
correspondant au connecteur d’entrée numérique
auquel est raccordé le changeur CD.
4 Appuyez sur MEGA CONTROL.
Le témoin MEGA CONTROL s’allume et la
platine est placée en mode Mega CD Control.
8 Appuyez sur ( ou P de la platine.
Le changeur CD et l’enregistrement du MD
commencent.
A la fin de l’enregistrement, le changeur CD et la
platine MD s’arrêtent tous deux. Si vous avez
commencé l’enregistrement pendant la lecture
d’un CD, la lecture se poursuit à partir de la plage
suivante.
(voir page suivante)
39
F
Page 98

Commande d’un changeur CD Sony disponible séparément
Pour arrêter d’enregistrer
Appuyez sur p de la platine.
Le changeur CD et la platine MD s’arrêtent tous deux.
Remarque
Si un CD n’est pas en place sur la position du disque
sélectionné, “No Disc” s’affiche.
z La platine copie les informations texte CD (texte CD
et mémos de disque) telles quelles sur le MD
(fonction de copie de mémo de disque)
Si le CD actuel est titré, les noms de disque et de plage
du CD sont enregistrés comme titres du MD. Toutefois,
si le MD est déjà titré, le nom de disque n’est pas copié.
z Si “No Connect” s’affiche
Vérifiez la connexion du câble Control A1 et assurezvous que le sélecteur de mode du changeur CD se
trouve sur CD1. Après la vérification, éteignez la platine
MD et le changeur CD, rallumez-les, puis repassez en
mode Mega CD Control.
z Vous pouvez utiliser la fonction REC-IT en mode
Mega CD Control
Vous pouvez enregistrer la plage d’un CD que vous
écoutez sur un MD.
Pour plus d’informations, reportez-vous à
“Enregistrement de la plage d’un CD que voús écoutez”
à la page 22.
Remarques
• La platine MD s’arrête automatiquement lorsqu’il n’y a
plus de place sur le MD pour l’enregistrement.
• Il se peut que la fonction de copie de mémo de disque soit
inopérante pour des plages de CD très courtes.
• Pour certains CD, il se peut que les informations de texte
ne soient pas copiées.
• Si le câble Control A1 se débranche pendant
l’enregistrement, éteignez la platine et le changeur CD,
rallumez-les, repassez en mode Mega CD Control, puis
recommencez l’enregistrement depuis le début.
Quand “TOC Writing” clignote
Ne bougez pas la platine et ne débranchez pas le cordon
d’alimentation car l’enregistrement risquerait d’être
incomplet. La mise à jour du sommaire (TOC) du MD est en
cours.
40
F
Page 99

Montage de MD enregistrés
Montage de MD enregistrés
Remar ques sur le montage
Vous pouvez effectuer des montages après
l’enregistrement en utilisant les fonctions suivantes.
• La fonction Erase permet d’effacer des plages
enregistrées en désignant simplement le numéro de
la plage.
• La fonction A-B Erase permet de désigner un
passage d’une plage pour l’effacer.
• La fonction Divide permet de diviser des plages à
des points précis pour faciliter la localisation
ultérieure avec la fonction AMS.
• La fonction Combine permet de combiner deux
plages en une seule.
• La fonction Move permet de changer l’ordre des
plages en déplaçant une plage et l’affectant à la
position souhaitée.
• La fonction Title permet de créer des titres pour les
MD et les plages.
• La fonction Undo permet d’annuler le dernier
montage.
Si “Protected” et “C11” apparaissent
alternativement dans l’afficheur
La platine n’a pas pu effectuer le montage, car la fente
de protection du minidisque est ouverte. Effectuez le
montage après avoir fermé la fente.
Effacement d’un enregistr ement (F onction Erase)
Procédez comme indiqué ci-dessous pour effacer :
• Une plage
• Toutes les plages
≠ AMS ±
g
Effacement d’une seule plage
Vous pouvez effacer une plage en spécifiant
simplement le numéro de cette plage. Quand vous
effacez une plage, le nombre de plages total sur le
minidisque diminue d’une unité et toutes les plages
qui suivent la plage effacée sont renumérotées.
Comme le TOC est réordonné après l’effacement, il
n’est pas nécessaire d’enregistrer sur un morceau
enregistré.
MENU/NO YES
0)
§
(
Pp r
Si “TOC” et “TOC Writing” clignotent dans
l’afficheur
Ne bougez pas la platine et ne débranchez pas le
cordon d’alimentation. Après le montage, “TOC” reste
allumé jusqu’à ce que vous éjectiez le minidisque ou
éteigniez la platine. Pendant que la platine met le
sommaire à jour, “TOC” et “TOC Writing” clignotent.
“TOC” s’éteint quand toutes les données ont été
enregistrées.
z Pour éviter toute confusion lors de l’effacement
de plusieurs plages, il vaut mieux effacer les
plages en commençant par les numéros les plus
grands, afin d’éviter une renumérotation inutile
des plages qui n’ont pas encore été effacées.
Exemple : Effacement B
Numéro
de plage
Effacement
123
AB C
B est effacé
1
AC
2
4
D
3
D
1 Alors que la platine est en mode d’arrêt, de
lecture ou de pause, appuyez sur MENU/NO
pour afficher “Edit Menu”.
2 Tournez AMS jusqu’à ce que “Tr Erase ?”
apparaisse dans l’afficheur.
3 Appuyez sur AMS ou YES.
L’affichage permettant d’effacer les plages apparaît
et la lecture de la plage affichée commence.
(voir page suivante)
41
F
Page 100

Montage de MD enregistrés
4 Tournez AMS pour sélectionner la plage à effacer.
5 Appuyez sur AMS ou YES.
Quand la plage sélectionnée à l’étape 4 est effacée,
“Complete!!” apparaît pendant quelques secondes
et le nombre de plages total dans le répertoire
musical diminue d’une unité.
La lecture de la plage suivant celle qui a été effacée
commence. (Si vous effacez la dernière plage, la
lecture de la plage précédant celle qui a été effacée
commence.)
6 Répétez les étapes 1 à 5 pour effacer d’autres
plages.
Pour annuler la fonction Erase
Appuyez sur MENU/NO ou sur p.
Remarque
Si “Erase ???” apparaît dans l’afficheur, c’est que la plage a
été enregistrée ou éditée sur une autre platine MD et qu’elle
est protégée. Si cette indication apparaît, appuyez sur AMS
ou YES et effacez la plage.
Effacement de toutes les plages d’un MD
Quand vous effacez un MD enregistrable, le titre du
disque, les plages enregistrées et leurs titres sont
effacés.
1 Alors que la platine est en mode d’arrêt, de
lecture ou de pause, appuyez sur MENU/NO
pour afficher “Edit Menu”.
2 Tournez AMS jusqu’à ce que “All Erase ?”
apparaisse dans l’afficheur.
3 Appuyez sur AMS ou YES.
“All Erase??” apparaît dans l’afficheur et toutes les
plages clignotent dans le répertoire musical.
4 Appuyez sur AMS ou YES.
Quand le titre du disque, les plages enregistrées et
leurs titres ont été effacés, “Complete!!” apparaît
pendant quelques secondes, puis le répertoire
musical disparaît.
Pour annuler la fonction Erase
Appuyez sur MENU/NO ou p pour éteindre
l’indication “All Erase ?” ou “All Erase??”.
z Vous pouvez annuler l’effacement
Utilisez la fonction Undo juste après avoir effacé la
plage (voir page 51).
42
F
 Loading...