

Page 1
MiniDisc
Recor der/Player
3-864-522-12(1)
Operating Instructions
Mode d’emploi
Bedienungsanleitung
GB
FR
DE
MDS-DRE1
1998 by Sony Corporation
Page 2
WARNING
Caution - The use of optical
instruments with this product
will increase eye hazard.
Do not install the appliance in a
confined space, such as a
bookcase or build-in cabinet.
For the customers in the United
States
This marking is located on the bottom of
the unit
CAUTION
You are cautioned that any changes or
modification not expressly approved in
this manual could void your authority to
operate this equipment.
Owner’s Record
The model and serial numbers are located
on the bottom of the unit. Record the serial
number in the space provided below. Refer
to them whenever you call upon your
Sony dealer regarding this product.
The nameplate is located on the
bottom exterior.
This appliance is classified as a CLASS 1
LASER product. The CLASS 1 LASER
PRODUCT MARKING is located on the
bottom exterior.
To prevent fire or shock hazard,
do not expose the unit to rain
or moisture.
IN NO EVENT SHALL SELLER BE
LIABLE FOR ANY DIRECT,
INCIDENTAL OR
CONSEQUENTIAL DAMAGES OF
ANY NATURE, OR LOSSES OR
EXPENSES RESULTING FROM
ANY DEFECTIVE PRODUCT OR
THE USE OF ANY PRODUCT.
This symbol is intended to alert the user to
the presence of uninsulated “dangerous
voltage” within the product’s enclosure
that may be of sufficient magnitude to
constitute a risk of electric shock to
persons.
This symbol is intended to alert the user to
the presence of important operating and
maintenance (servicing) instructions in the
literature accompanying the appliance.
INFORMATION
This equipment has been tested and found
to comply with the limits for a Class B
digital device, pursuant to Part 15 of the
FCC Rules.
These limits are designed to provide
reasonable protection against harmful
interference in a residential installation.
This equipment generates, uses, and can
radiate radio frequency energy and, if not
installed and used in accordance with the
instructions, may cause harmful
interference to radio communications.
However, there is no guarantee that
interference will not occur in a particular
installation. If this equipment does cause
harmful interference to radio or television
reception, which can be determined by
turning the equipment off and on, the user
is encouraged to try to correct the
interference by one or more of the
following measures:
– Reorient or relocate the receiving
antenna.
– Increase the separation between the
equipment and receiver.
– Connect the equipment into an outlet on
a circuit different from that to which the
receiver is connected.
– Consult the dealer or an experienced
radio/TV technician for help.
Model No. MDS-DRE1
Serial No.
For the customers in Canada
CAUTION
TO PREVENT ELECTRIC SHOCK, DO
NOT USE THIS POLARIZED AC PLUG
WITH AN EXTENSION CORD,
RECEPTACLE OR OTHER OUTLET
UNLESS THE BLADES CAN BE FULLY
INSERTED TO PREVENT BLADE
EXPOSURE.
Welcome!
Thank you for purchasing the Sony
MiniDisc Deck. Before operating the deck,
please read this manual thoroughly and
retain it for future reference.
About This
Manual
This manual explains how to operate the
MDS-DRE1 MiniDisc Recorder/Player.
Conventions
The following icon is used in this manual:
Indicates tips for making the task
z
easier and hints.
GB
2
Page 3

Table of Contents
Getting Started 4
Connections 4
Names and Functions of Parts 6
Controls 6
Display 9
Input and Output Jacks 10
DJ Performance Functions 11
Selecting a Track 11
Specifying Cue Points 12
Assigning Cue Points to Pads 13
Auto Pausing at the Beginning of a Track 14
Changing Speed and Pitch During Playback 15
Looping Part of a Track 16
Starting Tracks as Quickly as Possible
(Hot Start) 16
Other Playback Options 18
Using the Display 18
Playing Tracks Repeatedly (Repeat Play) 19
Playing Tracks in a Different Order
(Program Play) 20
Resuming Playback After Stopping
(Resume Play) 21
Editing a Recorded MD 27
Notes on Editing 27
Dividing a Track (Divide) 28
Combining Two Tracks (Combine) 29
Changing Track Numbers (Move) 30
Erasing a Track (Erase) 31
Erasing the Entire Disc (All Erase) 32
Naming Discs and Tracks (Name) 32
Undoing the Previous Edit Operation (Undo) 35
Additional Information 36
Precautions 36
Handling MDs 37
Display Messages 37
System Limitations 38
Troubleshooting 38
Specifications 39
Edit Menu Chart 40
Setup Menu Chart 40
Guide to the Serial Copy Management System 41
Index 43
GB
Recording on an MD 22
Notes on Recording 22
Recording an MD 23
Marking Track Numbers While Recording 24
Recording during Playback
(Backtrack recording) 25
GB
3
Page 4
Getting
Connections
Started
This chapter describes how to connect
this unit to other audio components.
Be sure to read this section carefully
before making any connections.
Unpacking
Check that you received the following :
• AC Power cord (1)
• Operating Instructions (1)
In the event that an item is missing, contact the dealer
where the unit was purchased or a Sony Service Center.
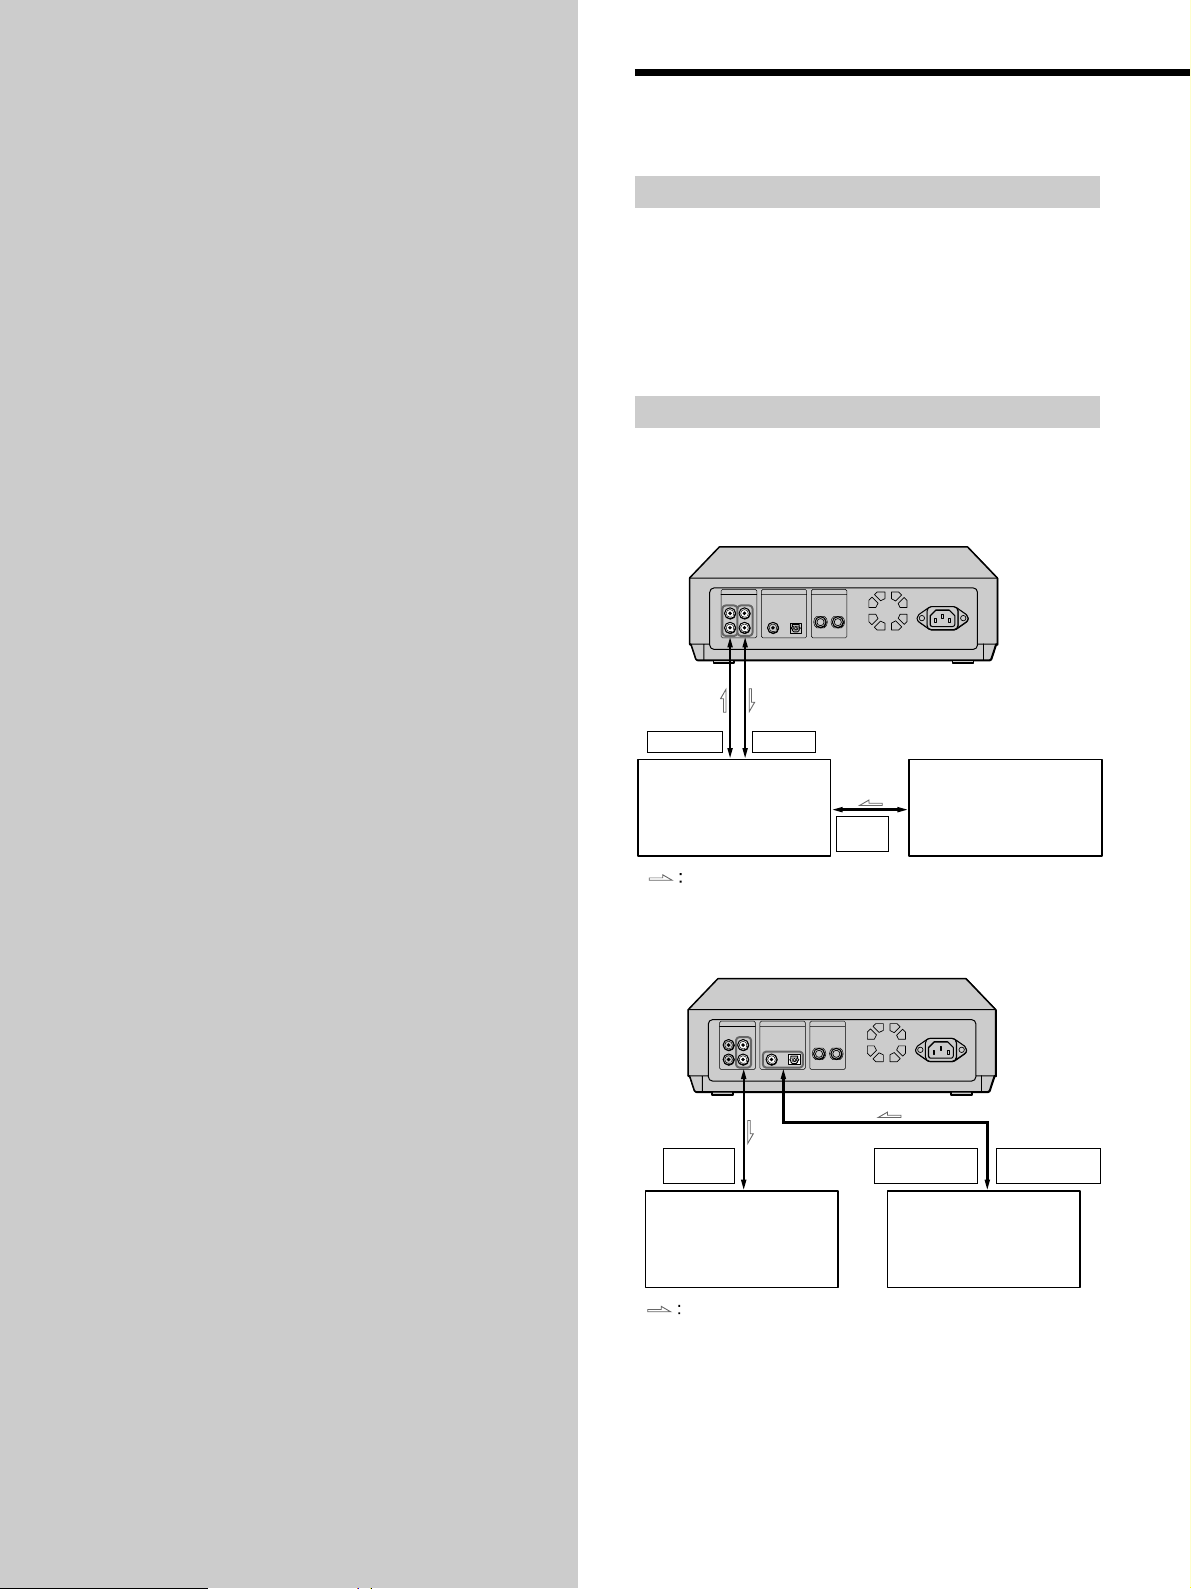
Connection Examples
p Connecting to a mixer
LINE OUT LINE IN
Mixer
Signal flow
p Connecting to a CD player (etc.)
TAPE/MD
IN
Amplifier
Signal flow
PHONO
IN
DIGITAL
COAXIAL OUT
Turntable
(Record player)
etc.
DIGITAL
OPTICAL OUT
CD player
etc.
GB
4
Page 5
Required cords
• Audio cords (not supplied) (2)
white white
Left (L) Left (L)
Right (R) Right (R)
red red
• Digital optical cable (not supplied) (1)
• Coaxial digital cable (not supplied) (1)
p Connecting digital components
(CD player, DAT deck, another MD deck, or an amplifier
with digital input jacks)
If you make connections to a CD player, MD deck, or DAT
deck (etc.) you can make digital recordings.
Connect using a digital optical cable (not supplied), or a
digital coaxial cable (not supplied).
• Using a digital optical cable
Remove the protective caps from the optical jacks,
then insert the plugs parallel to the jacks until they
click into place. Do not fold or tie digital optical cables.
This unit Digital component
DIGITAL
COAXIALINOPTICAL
IN
DIGITAL
OPTICAL
OUTIN
Getting Started
Making Connections
This section describes how to connect this unit to a mixer,
amplifier, and other components (like a CD player).
Be sure to turn off the power of all components before
making any connections.
p Connecting a mixer or amplifier
Connect the mixer or amplifier to the LINE (ANALOG)
IN /OUT jacks using audio cables (not supplied).
Connect the red plugs to the red (R) jacks and connect the
white plugs to the white (L) jacks. Be sure to make all
connections firmly to prevent hum and noise.
This unit Mixer or Amplifier (etc.)
LINE
(ANALOG)
OUTIN
L
R
Signal flow
TAPE / MD
INOUT
L
R
Signal flow
• Using coaxial digital cables
This unit Digital component
DIGITAL
COAXIALINOPTICAL
IN
DIGITAL
COAXIAL
OUTIN
Signal flow
z If “Din Unlock” and “C71” appear in the display
Check the digital optical cable or digital coaxial cable
connections. Also make sure the power of the connected
component is turned on.
z Automatic conversion of digital sampling rates
A built-in sampling rate converter automatically converts
digital signals with 32 kHz or 48 kHz sampling rates to the
MD sampling rate (44.1 kHz).
This allows you to make digital recordings from DAT (32 kHz
and 48 kHz) and satellite broadcasts (32 kHz and 48 kHz) in
addition to CD and MD program sources.
Note
If “Din Unlock”, “C71” or “Cannot Copy” appears in the
display, digital recording is not possible. In such cases,
connect the program source to the LINE (ANALOG) IN jacks,
set INPUT to ANLG, and make an analog recording.
p After completing all other connections, use the
AC power cord to connect this unit to a wall
outlet.
GB
5
Page 6

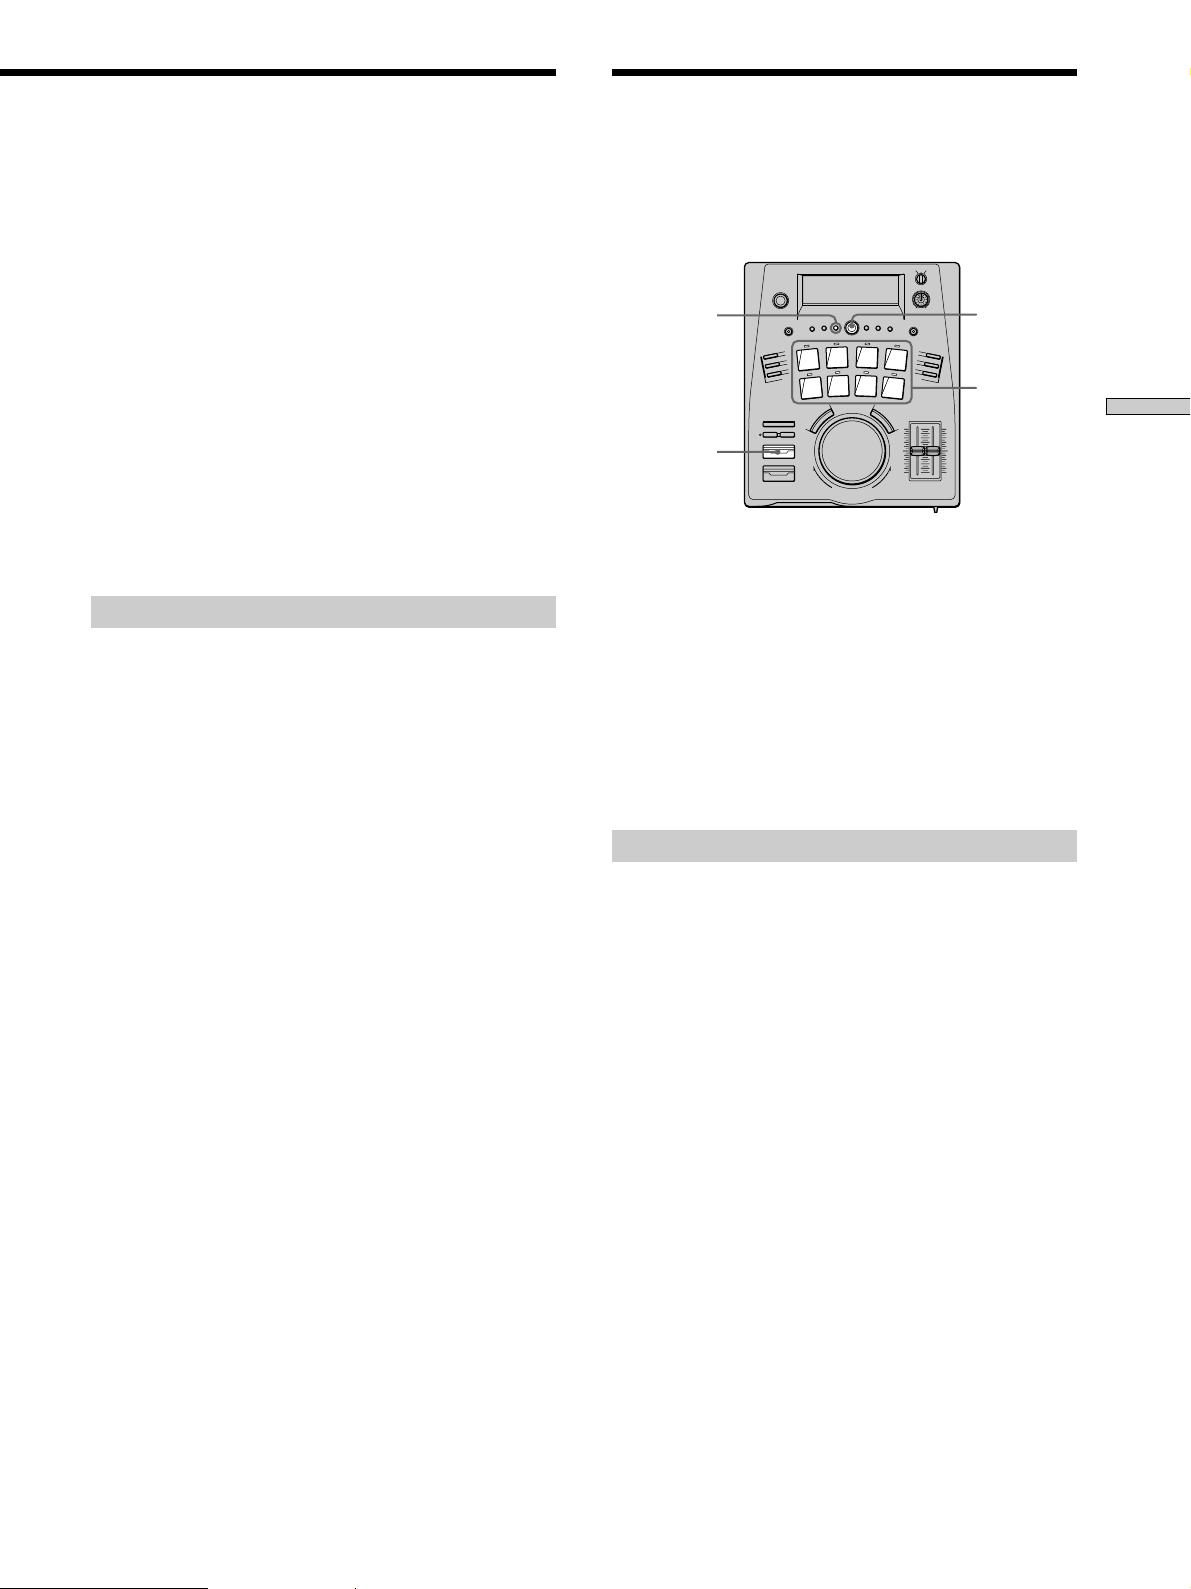
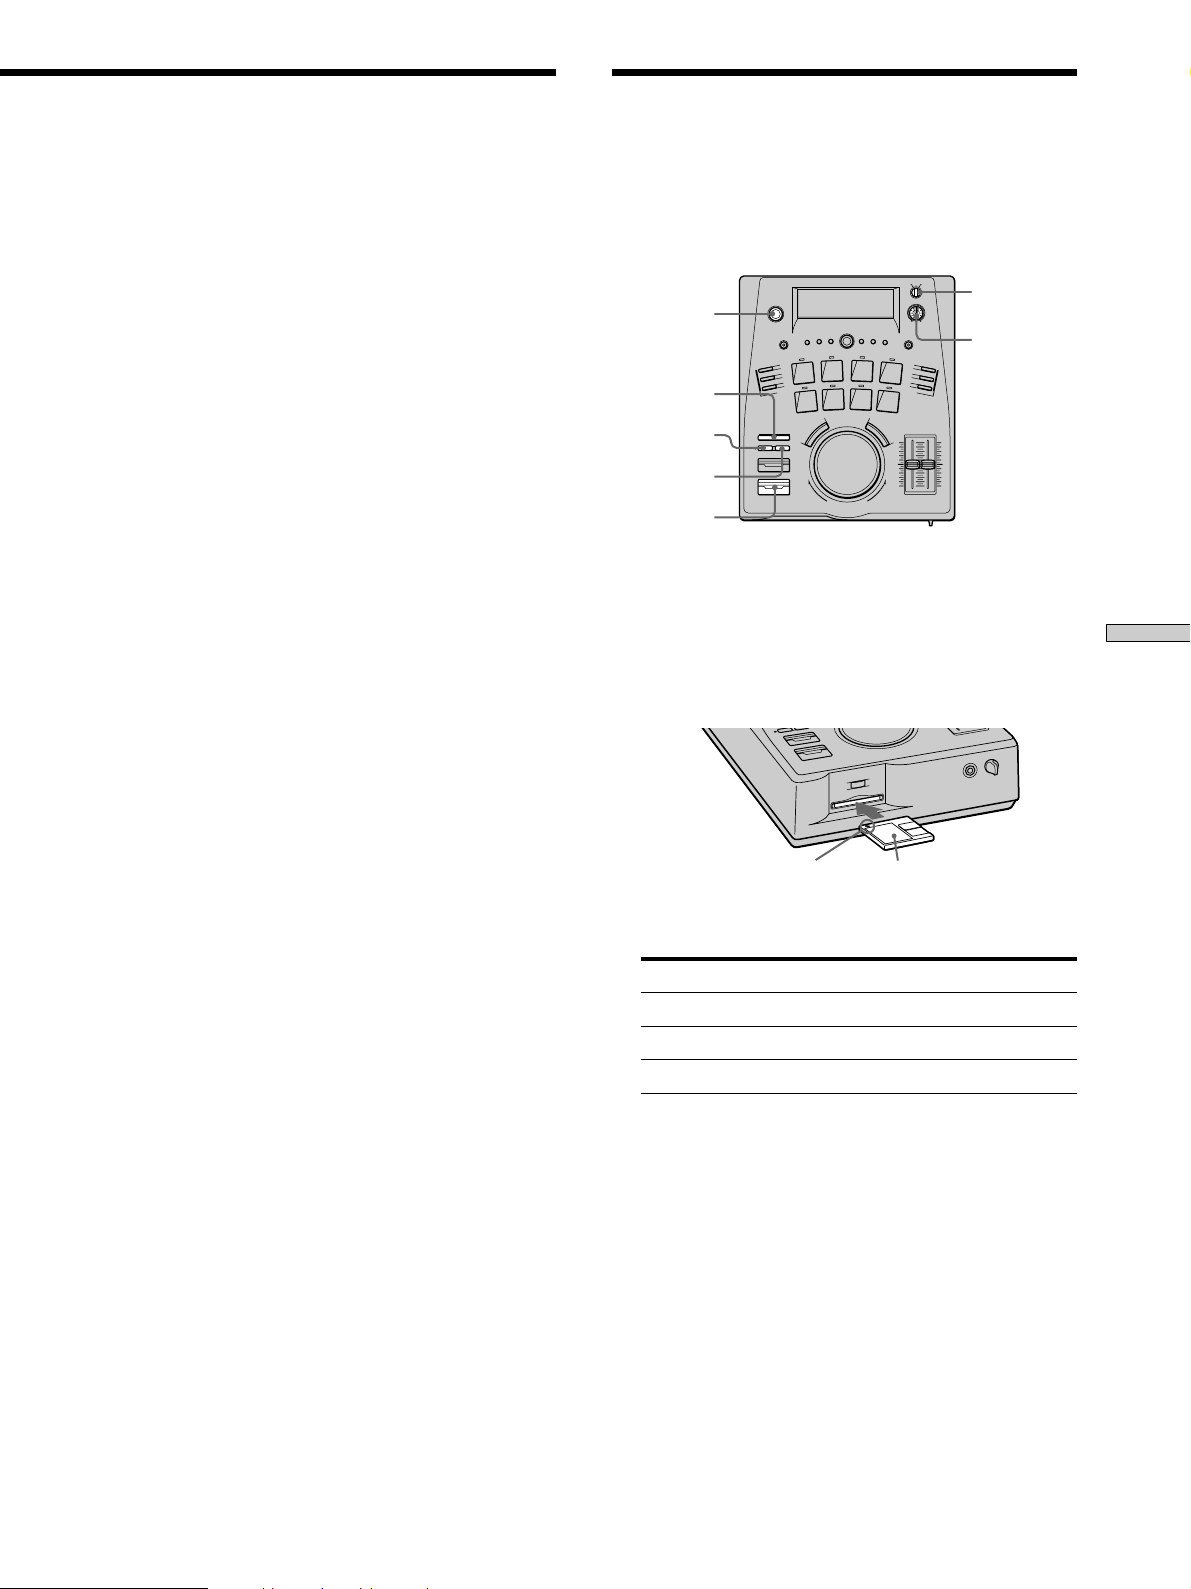
Names and
Functions of
Parts
Controls
This chapter explains the names of the
parts and their basic functions, as well
as some basic operations. The
numbers in parenthesis refer to pages
in this manual with detailed
explanations.
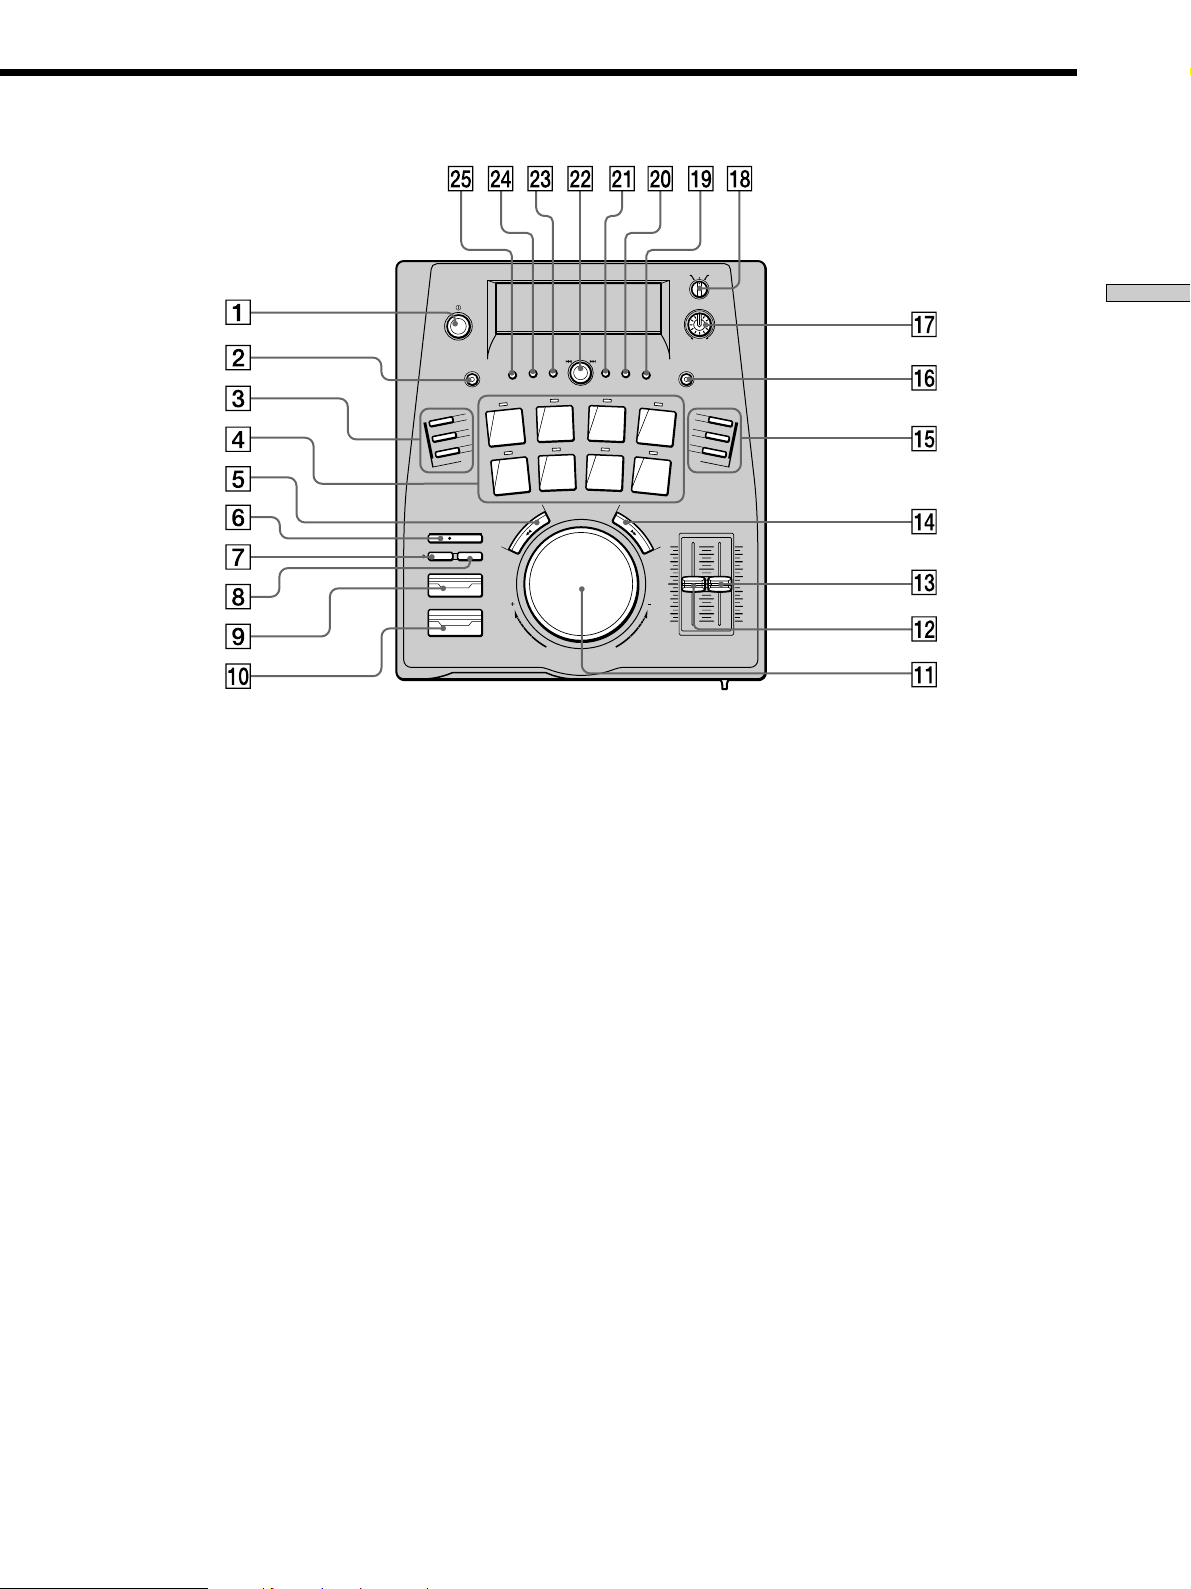
1 U (Power) switch (11, 23)
Press to turn the power of this unit on or off.
2 UNDO button (35)
Cancels the previous edit operation and restores the
MD data to its former state.
3 AUTO MODE buttons (14)
Use to set the unit to pause automatically before
playing a track.
AUTO CUE
Sets unit to skip over the blank space at the beginning
of each track and pause just before the sound begins.
AUTO PAUSE
Sets unit to pause at the beginning of each track.
AUTO OFF
Cancels the auto modes.
4 Pads / pad indicators (11, 13)
• When the pad indicators are green:
Press to start playback from the beginning of the
respective track. To switch between different groups
of tracks, press BANK.
• When the pad indicators are red:
Press to start playback from the previously assigned
cue point. To assign cue points, see “Assigning Cue
Points to Pads” on page 13.
5 0 button (12)
Hold down for fast reverse.
6 r REC button (23, 24, 25)
• Press during stop to enter the record standby mode.
• Press during playback or pause to enter backtrack
recording standby mode.
• Press during recording to manually mark a track
number.
7 REC PAUSE button / indicator (24, 25)
• Press during record pause or backtrack recording
standby mode to start recording.
• Press during (normal) recording to pause.
The indicator blinks during the record pause or
backtrack recording standby mode.
8 STOP button (12, 24)
Press to stop playback or recording.
9 CUE button / indicator (12)
Press to return to and pause at the last cue point (the
last point where playback was started).
Lights when paused at cue point.
GB
6
Page 7
CUE
PAUSE
OFF
AUTO MODE
INPUT
COAX ANLGOPT
REC VOL
SENGLE PLAY
8
4
010
DISPLAY
RELOOP
IN
OUT
LOOP
AMS
PLAY MODE
EDIT/NO
ENTER/YES
BANK
UNDO
1
5
PUSH ENTER
2
6
REPEAT
3
7
Names and Functions of Parts
REC
REC PAUSE STOP
CUE
PLAY/PAUSE
0PLAY/PAUSE button / indicator (12)
• Press during stop or pause to start playback.
• Press during playback to pause.
Lights during playback, blinks during pause.
!¡ Scrub dial (13)
• Turn during playback to change the playback speed.
• Turn during pause to play the MD in sync with the
dial movement.
• Turn while holding CUE to adjust the cue point.
!™ PITCH slider (15)
Adjusts the pitch.
!£ SPEED slider (15)
Adjusts the speed.
!¢ ) button (12)
Hold down for fast forward.
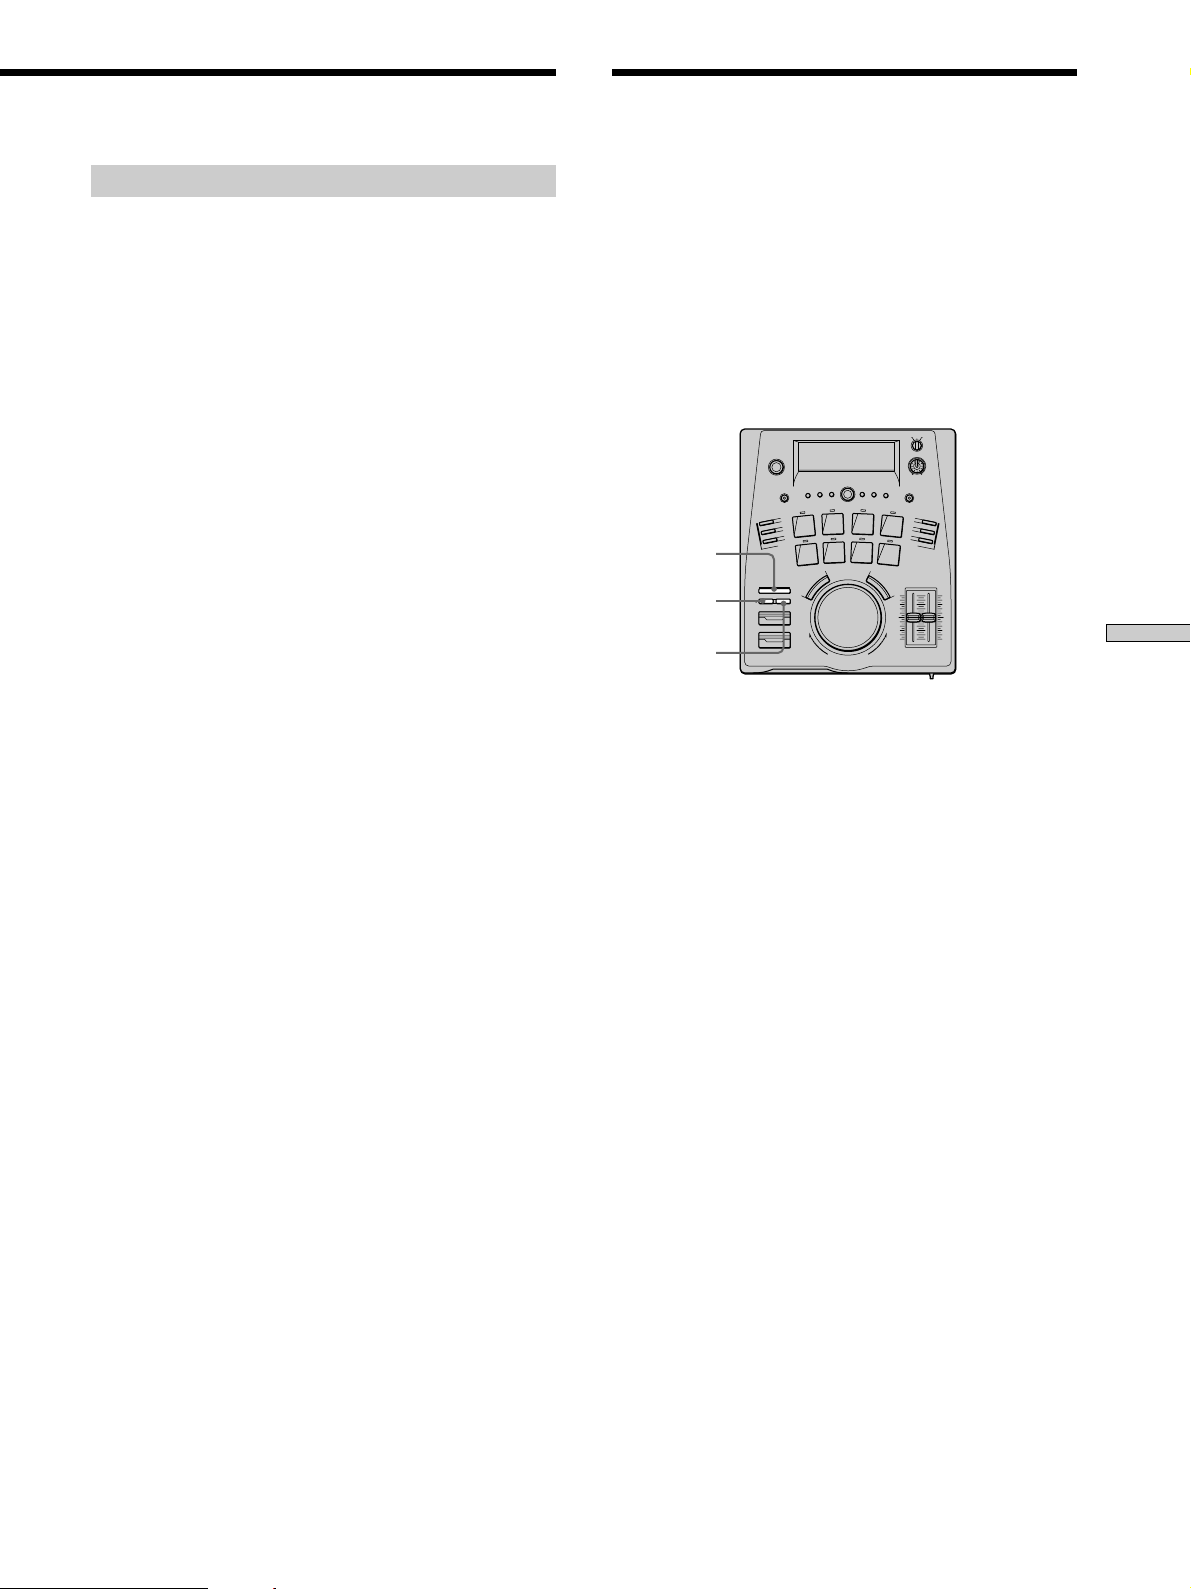
!∞ LOOP buttons (16)
Use to set a loop. The loop remains in memory after
you exit it, so you can quickly return to the same loop.
RELOOP button
Press after exiting the loop to return to the start point
of the memorized loop and resume looping.
LOOP IN button
Press to set the loop start point.
LOOP OUT button
Press to set the loop end point and start looping.
Press during the loop to exit.
SPEEDPITCH
!§ DISPLAY button (18, 33)
Press to switch the information shown in the display.
Each press changes the display mode as follows:
• Remaining time : The counter displays the time
remaining on the current track.
• Elapsed time : The counter displays the time
elapsed on the current track.
When the play mode is set to Program or Hot Start,
the following is also possible:
• Playback track : The numbers of the programmed
or hot start tracks are shown in the title area and the
track being played blinks. The counter displays the
time remaining on the current track.
!¶ REC VOL knob (24)
Use to adjust the level of the signal input from the
LINE IN jacks during analog recording. This function
only operates when INPUT is set to “ANLG.”
!• INPUT switch (23)
Use to select the input jack for the recording program
source.
!ª SINGLE PLAY button (15, 19)
• Press to set the unit to stop automatically after each
track.
• Press during repeat playback to select one of the
following repeat modes:
– Single repeat (repeats the current track).
– Disc repeat (repeats all tracks on the disc).
(continued)
GB
7
Page 8

Controls
@º REPEAT button (19)
Press to enable repeat playback. Press again to cancel.
@¡ PLAY MODE button (16, 20)
Press to change the play mode. Each press changes the
play mode as follows:
Names and Functions of Parts
• Normal play
• Program play (PROGRAM) : Pressing PLAY/PAUSE
plays tracks in the previously programmed order.
• Hot start play (HOT START) : Pressing a pad starts
playback quicker than normal. One track can be
assigned to each pad.
@™ AMS (≠ /± ) knob
• Turn to skip to the beginning of the next or previous
track.
• When using the Edit or Setup Menus, turn to
display or adjust the desired parameter (etc.), then
push to enter.
@£ EDIT/NO button
• Press to cancel selected operation.
• Press to enter or exit the Edit or Setup Menus.
For a list of the parameters available in the Edit and
Setup Menus, see the charts on page 40.
@¢ ENTER/YES button
• Press to execute selected operation.
• Press when the TOC indicator is lit to write the TOC
data to the MD and finalize recording or editing.
@∞ BANK button (12)
Press repeatedly to switches the group (BANK) of
tracks assigned to the pads.
GB
8
Page 9
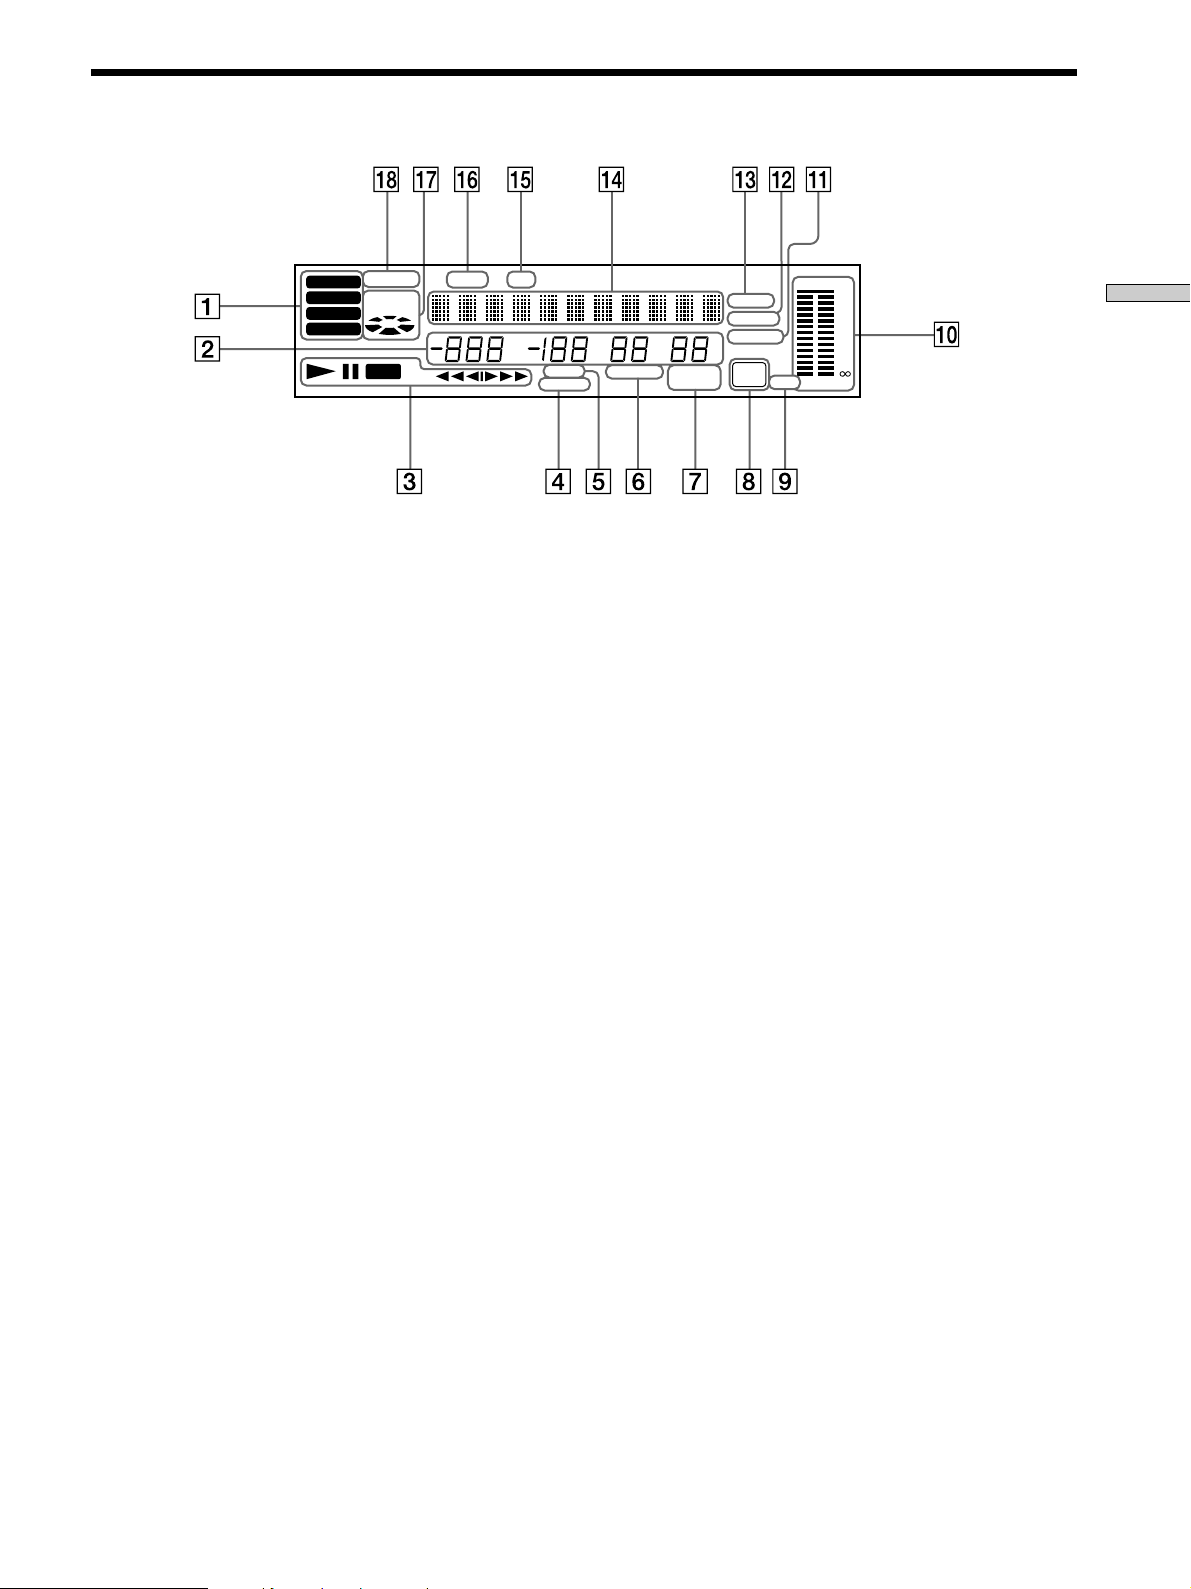
Display
REHEARSAL TRACK DISC
BANK 1
BACK TRACK
BANK 2
RECORDING
BANK 3
BANK 4
REC
TR
OVER
L.SYNC
PROGRAM
%
MSF
LOOP
RELOOP
REPEAT 1
A-B
A.CUE
A.PAUSE
HOT START
TOC
EDIT
MONO L R
0
4
8
12
20
40
-dB
Names and Functions of Parts
1 BANK indicators (12)
Light to display the current group (BANK) of tracks
assigned to the pads.
2 Track number and counter display
• During playback or recording, it displays the track
number and track time. The track time blinks when
there are less than 10 seconds left on the track
during playback.
• During stop, it displays the total number of tracks
and the disc time.
3 Status indicators
Light to display the current state of operation.
(Playback, record, pause, etc.)
4 RELOOP indicator (16)
Lights to indicate that a loop has been memorized.
5 LOOP indicator (16)
Blinks when a loop is being set. Lights when looping.
6 REPEAT indicators (19)
• Light during repeat playback.
“REPEAT” lights when set to repeat the entire disc.
“REPEAT 1” lights when set to repeat just one track.
• “1” lights when the unit is set to stop automatically
after each track.
7 Auto mode indicators (14)
Light during auto mode playback.
• “A.CUE” lights when the unit is set to skip over the
blank space at the beginning of each track and pause
just before the sound begins (AUTO CUE).
• “A.PAUSE” lights when the unit is set to pause at
the beginning of each track (AUTO PAUSE).
8 TOC indicators (23, 27)
• “TOC” lights to indicate the presence of TOC data
that has not been written to the disc. “TOC” blinks
when writing the TOC data.
• “TOC EDIT” lights during edit operations.
9 MONO indicator
Lights during playback of monaural audio signals.
(This unit is not capable of recording in monaural.)
0 Level meters
Display the audio signal levels during playback and
recording.
!¡ HOT START indicator (16)
Lights when the unit is set to the Hot Start play mode.
!™ PROGRAM indicator (20)
Lights when the unit is set to the Program play mode.
!£ L.SYNC indicator (24)
Lights when the unit is set to assign track numbers
automatically during analog recording.
!¢ Name display
Displays disc and track names, Edit Menu parameters,
and Setup Menu parameters (etc.).
!∞ DISC indicator
Lights when the disc name (etc.) is shown in the name
display.
!§ TRACK indicator
Lights when the track name (etc.) is shown in the
name display.
!¶ BACK TRACK RECORDING indicators (25)
“BACK TRACK RECORDING” lights and the disc
image rotates during backtrack recording.
When you stop recording, the indicator blinks as the
unit writes the recorded information to the disc.
If the disc image starts rotating faster and the indicator
blinks during recording, stop using the pad, scrub
dial, and loop functions until the disc image slows
down and the indicator lights steadily. Continuing to
use these functions may cause the unit to stop
recording.
!• REHEARSAL display (28)
Lights during rehearsal playback.
GB
9
Page 10

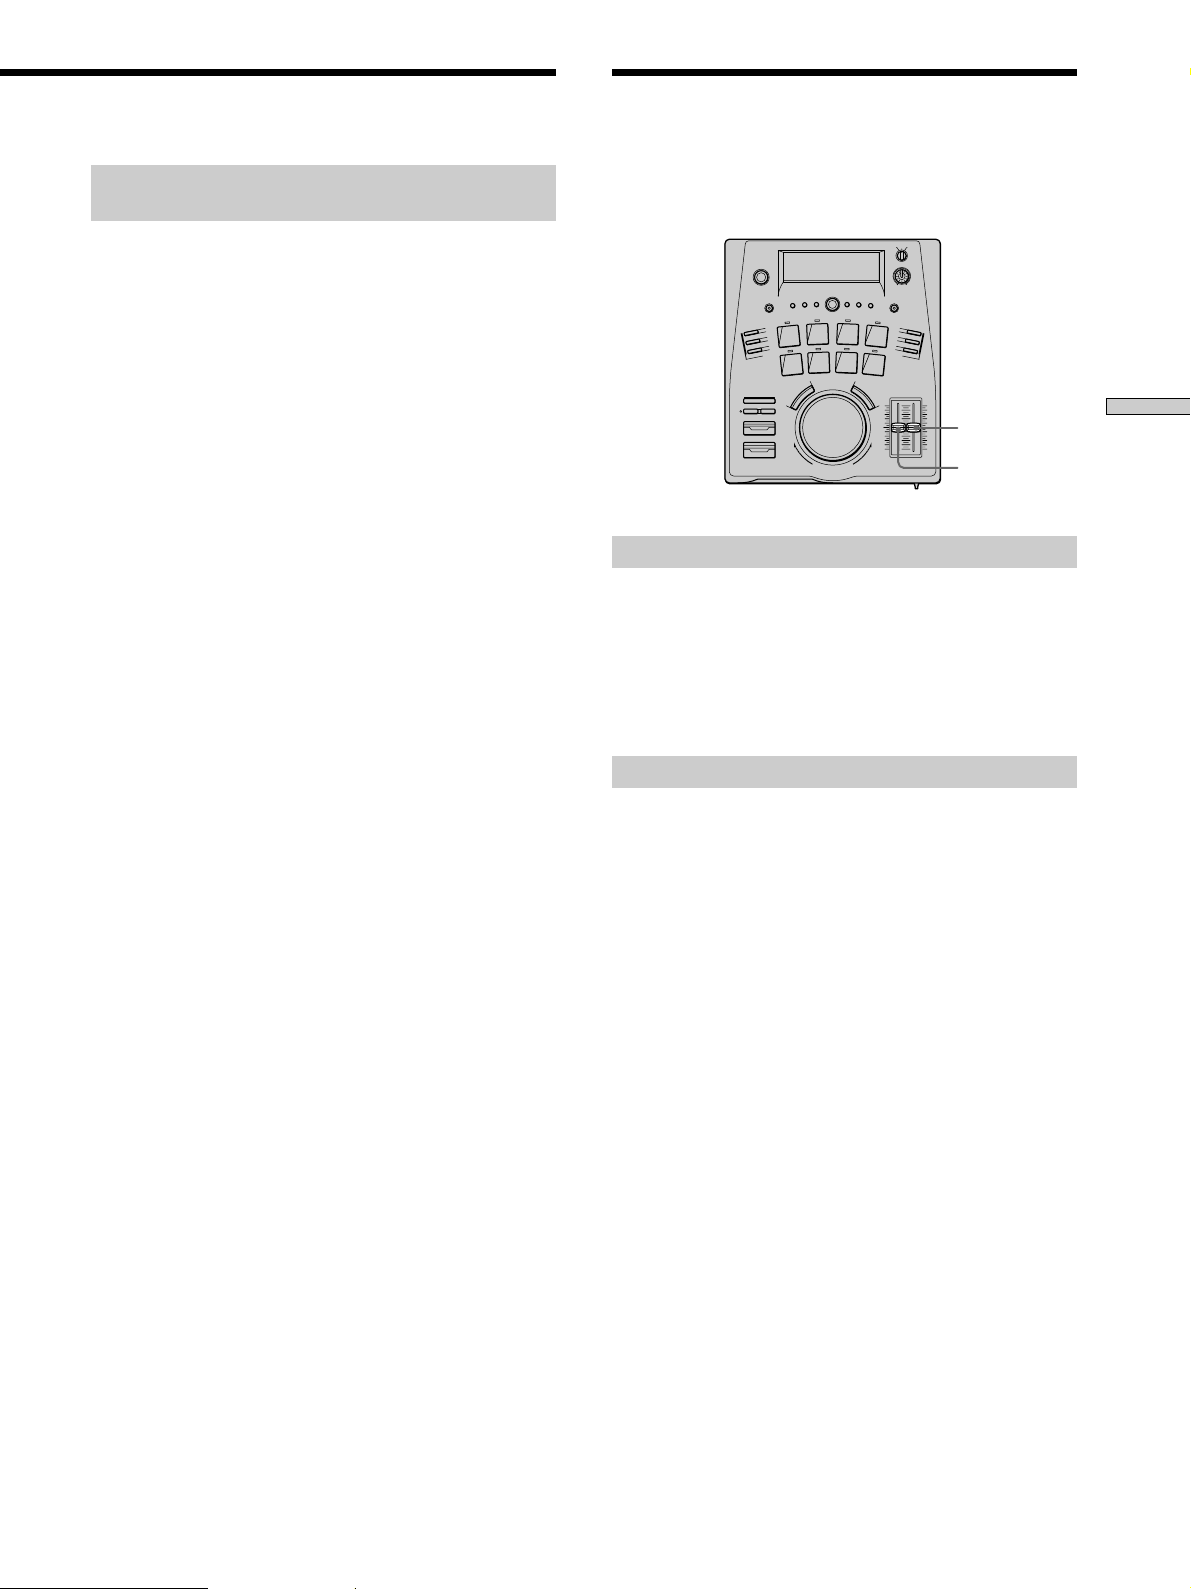
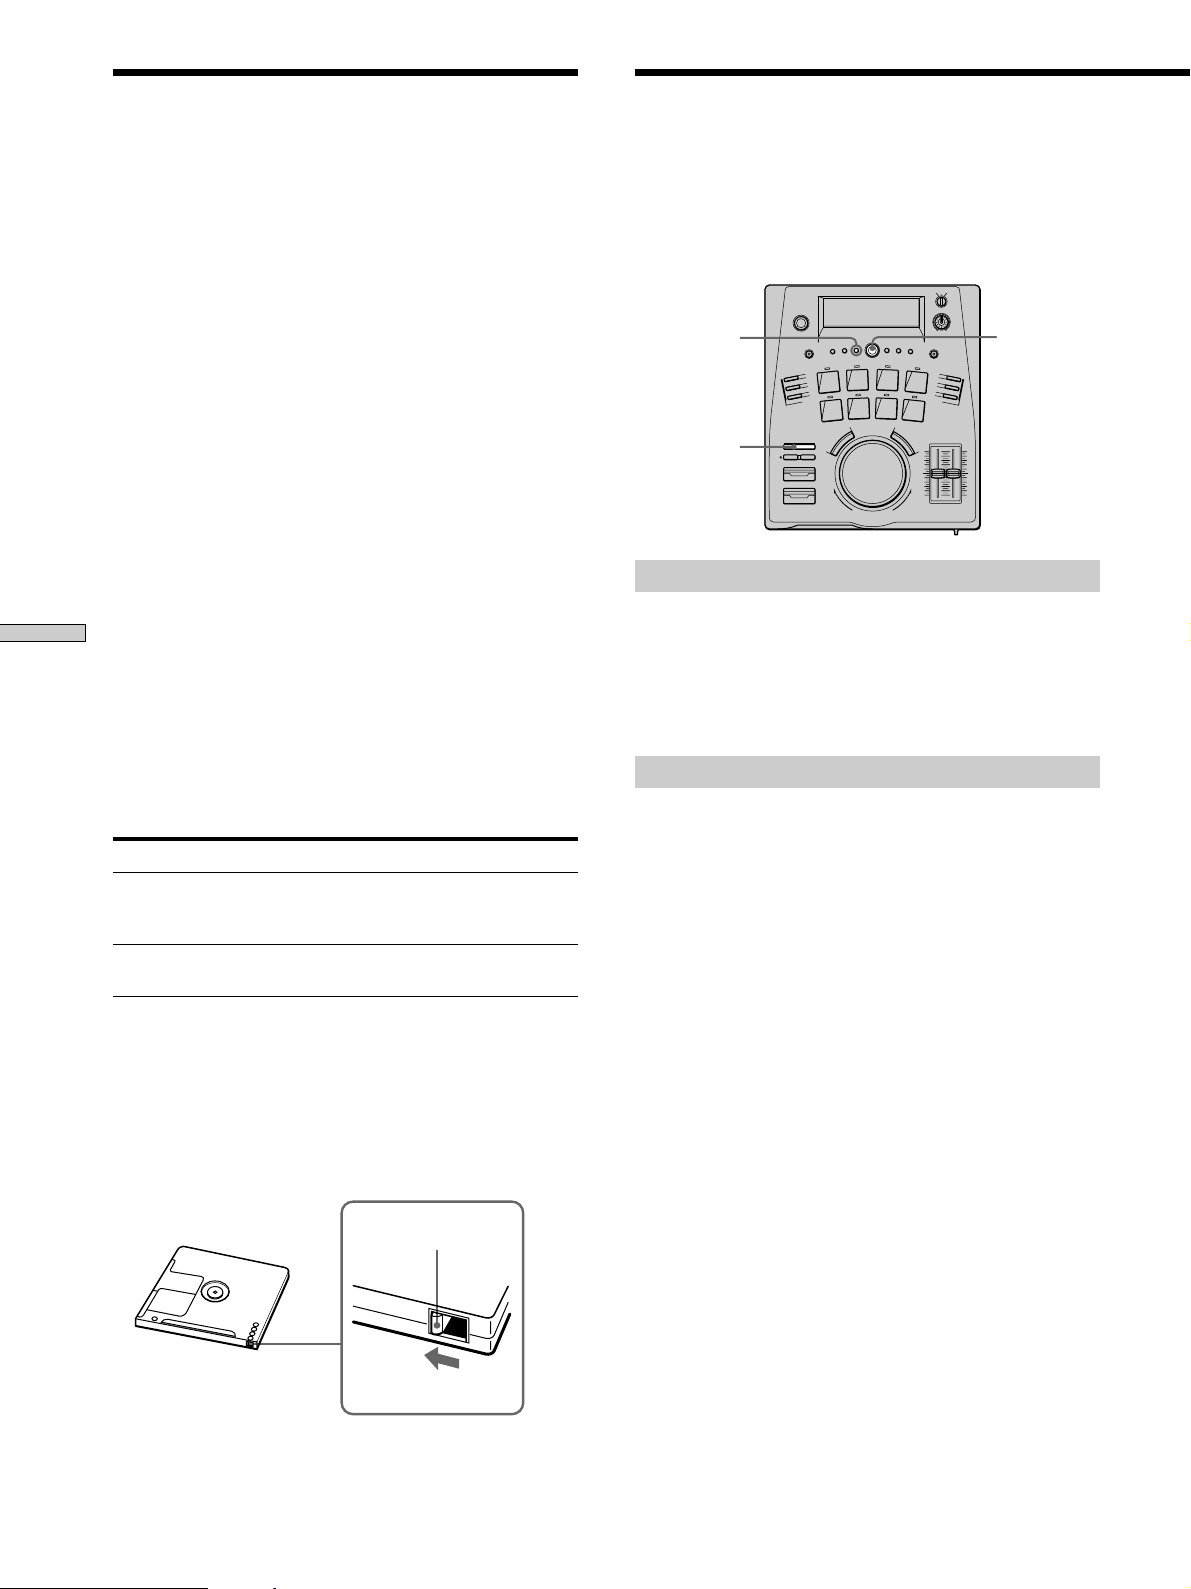
Input and Output Jacks
LINE
(ANALOG)
IN OUT
L
R
DIGITAL
COAXIALINOPTICAL
IN
FOOT SW
~AC IN
REC/
PAUSE
PLAY/
PAUSE
Front panel
Names and Functions of Parts
EJECT
1 § EJECT button (12)
Press during stop to eject the disc.
If there is TOC data that has not yet been written to
the MD (if the TOC indicator is lit), the unit writes the
TOC data to the MD before it is ejected.
2 Disc slot (11, 23)
Insert an MD into this slot.
3 PHONES jack
This is a standard phone jack for connecting stereo
headphones.
4 PHONE LEVEL knob
Use to adjust the headphone volume.
MIN MAX
PHONES PHONE LEVEL
Rear panel
1 LINE (ANALOG) IN jacks (5)
Use to input analog signals from other components.
2 LINE (ANALOG) OUT jacks (5)
Use to output analog signals to other components.
3 DIGITAL COAXIAL IN jack (5)
Connect a digital coaxial cable to input digital signals
from other components.
4 DIGITAL OPTICAL IN jack (5)
Connect a digital optical cable to input digital signals
from other components.
5 AC IN jack (5)
Connect the power cord.
6~7 FOOT SW jacks
Use to connect a SONY FS-A8 foot switch (sold
separately).
6 PLAY/PAUSE jack
Connect an external foot switch (etc.) to be used in
place of the PLAY/PAUSE button.
7 REC/PAUSE jack
Connect an external foot switch (etc.) to be used in
place of the REC PAUSE button.
10
GB
Page 11
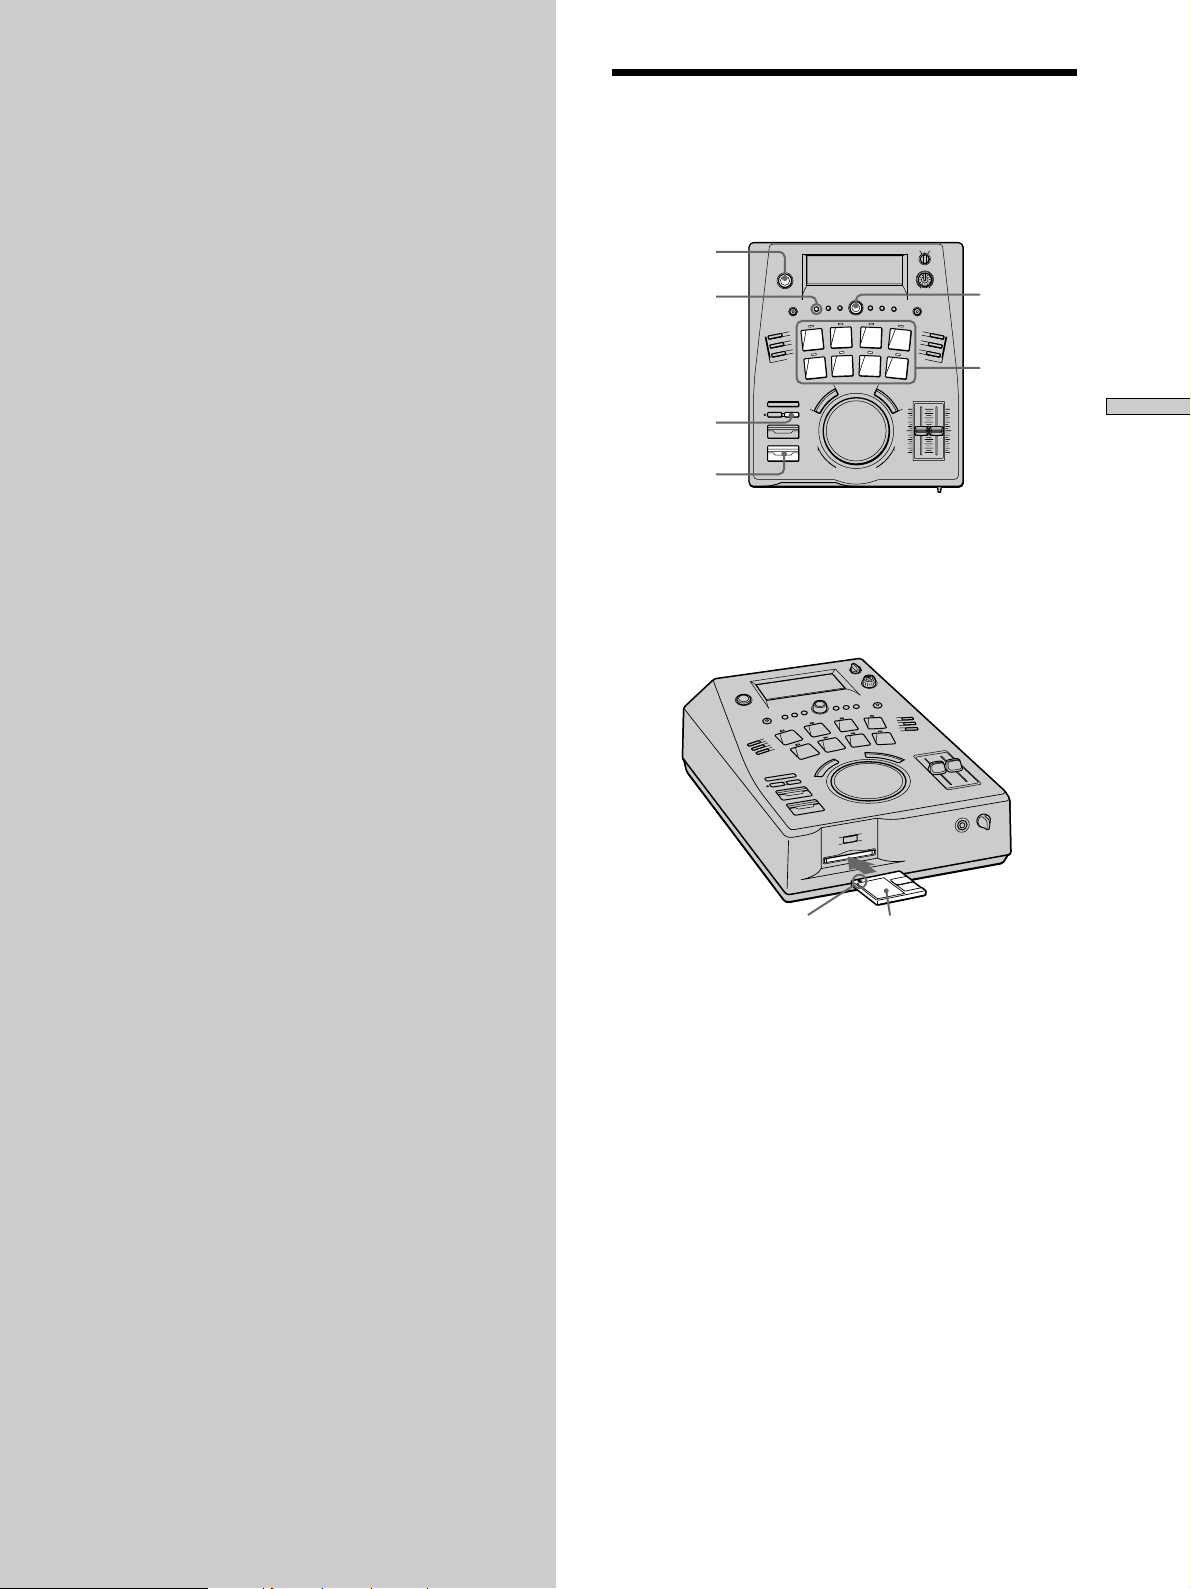
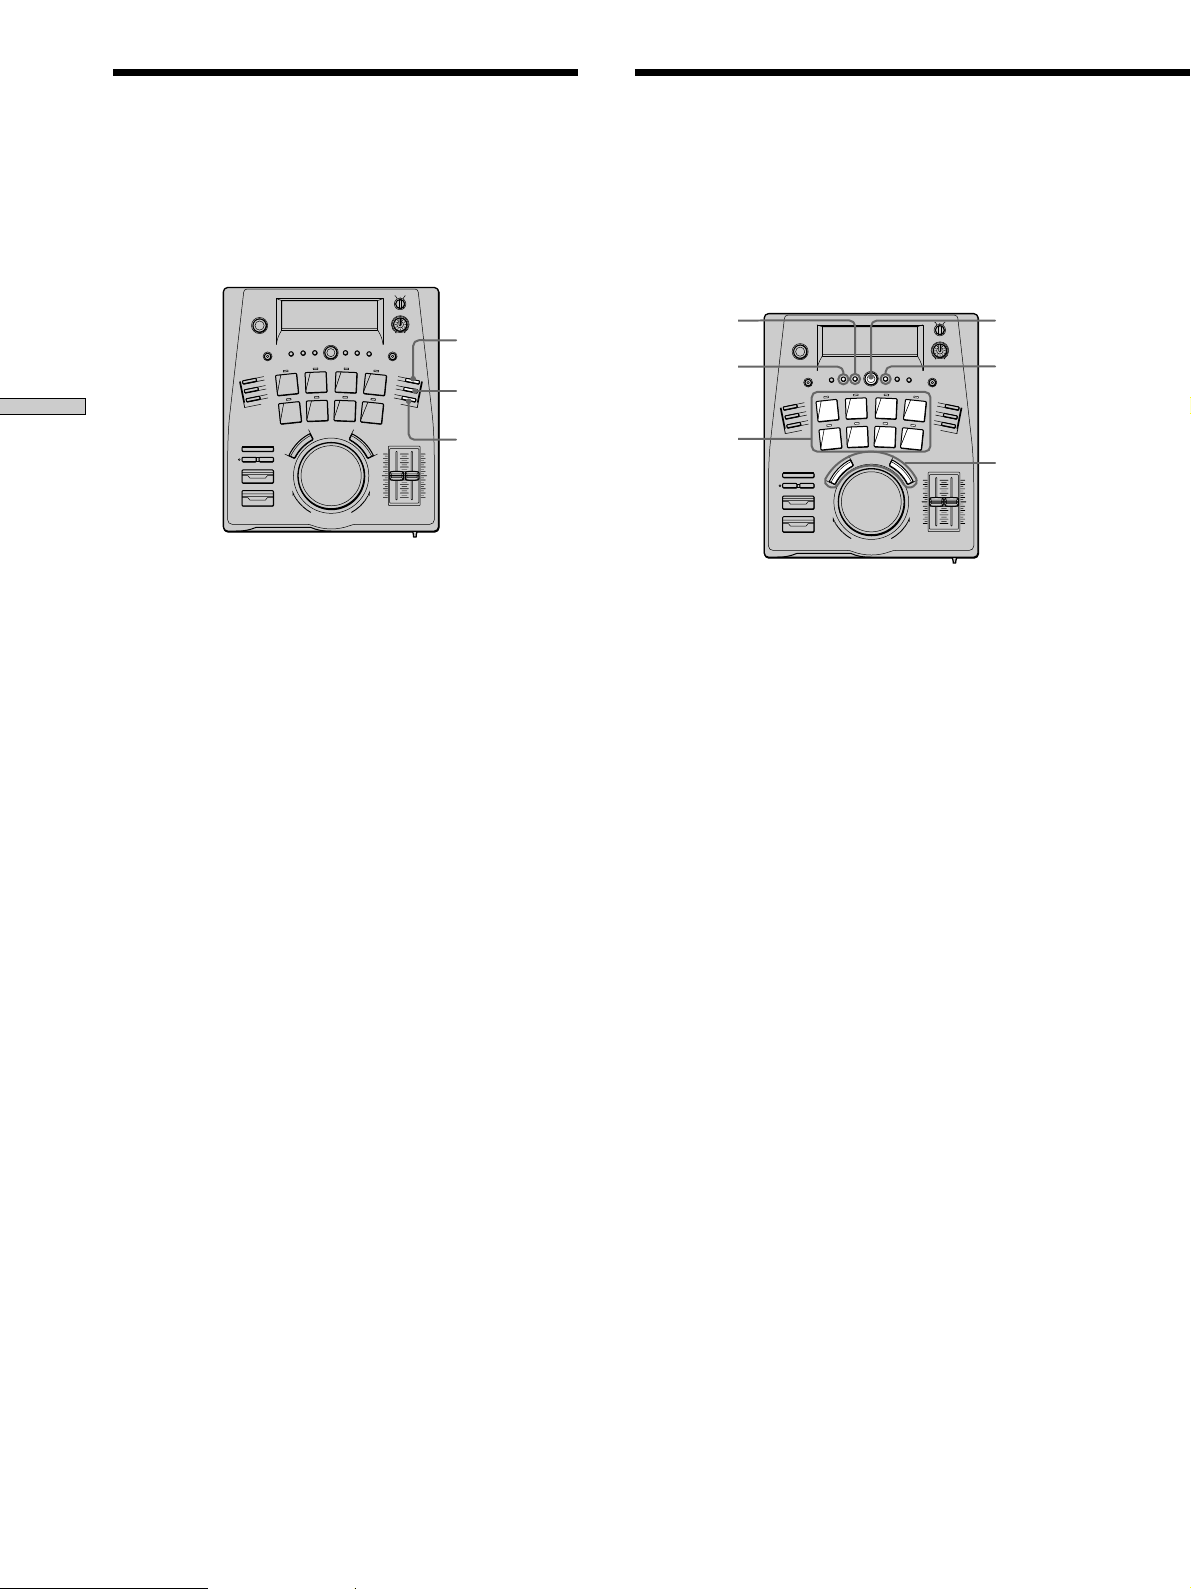
DJ
Selecting a Track
Performance
Functions
This chapter provides information
about the various play modes and
search functions designed for DJ style
performance.
Simply insert an MD and press the pad corresponding to
the track you want to play. Playback starts automatically.
U (power)
BANK
STOP
PLAY/PAUSE
AMS
Pads
1 Press U to turn on the power.
The display lights up. After a few seconds, “No Disc”
appears and the unit is ready for operation.
2 Insert an MD.
DJ Performance Functions
Insert in direction of arrow
“TOC Reading” is displayed momentarily.
The indicators above the pads corresponding to the
tracks on the MD light green (e.g., if there are six
tracks on the MD, pads 1 to 6 light green).
Label facing up
3 Press the pad for the track you want to play.
The PLAY/PAUSE indicator lights up and playback
starts from the selected track.
(continued)
11
GB
Page 12
Selecting a Track
Specifying Cue Points
To listen to tracks 9 through 32
Press BANK to switch to a different group (BANK) of
tracks before pressing a pad.
The current BANK number is shown in the display.
Each BANK assigns another group of 8 tracks to the pads:
BANK 1 n Tracks 1~8
(Track 1 = Pad 1, Track 2 = Pad 2, etc.)
BANK 2 n Tracks 9~16
(Track 9 = Pad 1, Track 10 = Pad 2, etc.)
BANK 3 n Tracks 17~24
DJ Performance Functions
(Track 17 = Pad 1, Track 18 = Pad 2, etc.)
BANK 4 n Tracks 25~32
(Track 25 = Pad 1, Track 26 = Pad 2, etc.)
z You can also start playback by pressing PLAY/PAUSE after
inserting the MD
In this case, playback starts from track 1.
To play other tracks, turn AMS.
To Do the following:
Stop playback Press STOP.
Pause playback Press PLAY/PAUSE. Press again
Skip to next track Turn AMS to the right.*
Skip back to beginning of Turn AMS to the left.*
current or previous track
Eject the MD Stop playback, then press
* In addition to skipping to the beginning of a track, you can also
set AMS to skip to any cue points you may have specified.
Use the Setup Menu to specify the AMS (JOG) mode.
For details, see “Specifying Cue Points” below.
To stop playback automatically at the end
of each track
Press SINGLE PLAY to light the “1” indicator.
Playback stops automatically at the end of each track.
To cancel the single play mode, and have playback
continue to the next track, press SINGLE PLAY again so
that the “1” indicator goes out.
to start playback again from the
point at which it was paused.
§ EJECT on the front panel.
A cue point is a temporary “index” you can use to locate a
specific point in a track. You can specify one cue point for
each track.
EDIT/NO
CUE
PLAY/PAUSE
AMS
0/)
Scrub dial
1 Start playing the track containing the desired
point.
To move quickly toward the desired point
Hold down 0 (fast reverse) or ) (fast forward) .
2 Press PLAY/PAUSE to pause at the desired point.
The PLAY/PAUSE indicator blinks.
To check the point
Hold down CUE.
The unit repeats a 3 second section starting from the point
playback was paused.
To adjust the point
• Hold down CUE and turn the scrub dial.
The beginning of the 3 second section moves in sync with
the motion of the scrub dial.
• Turn the scrub dial (without holding down CUE).
The sound plays in sync with the motion of the scrub dial.
(Sound may not be produced immediately when turning
the dial backwards.)
3 Press PLAY/PAUSE again to resume playback.
The PLAY/PAUSE indicator lights and the unit stores
the point specified in step 2 as a cue point.
Recalling the cue point
1 Press CUE recall the cue point.
CUE lights up, PLAY/PAUSE blinks, and the unit
immediately skips to and pauses at the previously
specified cue point.
12
2 Press PLAY/PAUSE to start playback from the cue
point.
GB
Page 13
z AMS can also be used to skip directly to cue points
1 Press EDIT/NO twice to display “Setup Menu”.
2 Turn AMS to display “JOG:”, then push AMS.
3 Turn AMS to display “JOG : Cue”, then push AMS.
4 Press EDIT/NO to exit the Setup Menu.
Now, in addition to skipping to the beginning of each track,
turning AMS will also skip to any cue points you may have
specified.
To set AMS to skip only to the beginning of each track, select
“JOG : Track” in step 3.
Note
If you press a pad to start playback, the cue point for the
respective track cannot be recalled by pressing CUE. In such
cases, use AMS to skip to the cue point (as described above).
z Cue points can be assigned to pads
See “Assigning Cue Points to Pads” on page 13.
Adjusting the cue point
1 Press CUE to recall the cue point.
2 Hold down CUE and turn the scrub dial to adjust
the cue point.
The unit repeats a 3 second section starting from the
point playback was paused. The beginning of the 3
second section moves in sync with the motion of the
scrub dial.
z For more precise adjustment of the cue point
Turn the scrub dial without holding down CUE.
The CUE indicator goes out and the sound is played back in
sync with the motion of the scrub dial. (Sound may not be
produced immediately when turning the dial backwards.)
3 Press PLAY/PAUSE to start playback from the cue
point.
Assigning Cue Points to
Pads
This function allows you to assign up to 8 cue points to
pads. Once you assign a cue point to a pad, you can skip
to it simply by pressing the respective pad.
EDIT/NO
CUE
1 Recall the cue point you want to assign to a pad.
For details, see “Recalling the cue point” on page 12.
2 Hold down CUE and press the pad corresponding
to the track number containing the cue point.
For example : If you recalled the cue point for track 3
in step 1, hold down CUE and press pad 3 (BANK 1).
“Memorizing” appears momentarily and the indicator
above the pad lights red to indicate that the cue point
has been assigned.
Erasing a cue point from a pad
1 Hold down STOP and press the pad containing the
cue point you want to erase.
“Pad Erase?” and “–Rehearsal–” alternate in the
display, and the unit repeats a 3 second section
starting from the cue point to be erased.
If you decide not to erase the cue point
Press EDIT/NO or STOP.
AMS
Pads
DJ Performance Functions
2 Press ENTER/YES or press the same pad again.
“Complete!!” appears in the display, and the pad
indicator lights green.
(continued)
13
GB
Page 14
Assigning Cue Points to Pads
z You can also erase cue points from pad memory using the
Setup Menu
1 Press STOP to stop playback.
2 Press EDIT/NO twice to display “Setup Menu”.
3 Turn AMS to display “PAD Erase?”, then push AMS.
“–Rehearsal–” blinks in the display and unit repeats a 3
second section starting from one of the cue points.
4 Turn AMS to select the cue point you want to erase.
5 Press AMS to erase the cue point.
“Complete!!” appears in the display, and the corresponding
pad indicator lights green.
DJ Performance Functions
Notes
• Only one cue point can be memorized per track. If you try to
assign another cue point to a pad that already has a memorized
cue point, “Over Mem?” appears in the display.
– To erase the previous cue point and assign the new one,
press ENTER/YES or the press the same pad again.
– To cancel the pad memory function, press EDIT/NO or
STOP.
• Cue points can only be assigned to pads which correspond to
their track numbers. For example, the cue point in track 2 can
only be assigned to pad 2 (BANK 1).
• To assign multiple cue points within a single song, first use the
Divide function (see page 28) to separate the song into different
tracks.
• After using a pad to start playback of a track, it is not possible
to use the 0/) buttons or the loop function. It is also not
possible to use the scrub dial during pause.
• The cue points are erased when the disc is ejected.
Auto Pausing at the
Beginning of a Track
You can set the unit to pause automatically at the
beginning of each track (Auto Pause). You can also set the
unit to skip the blank space at the beginning of the track
and pause right before the sound begins (Auto Cue).
EDIT/NO
AUTO CUE
AUTO PAUSE
AUTO OFF
1 During stop, press AUTO PAUSE or AUTO CUE.
• Press AUTO PAUSE to light the “A.PAUSE”
indicator and set the unit to pause at the beginning
of each track.
• Press AUTO CUE to light the “A.CUE” indicator
and set the unit to skip the blank space at the
beginning of the track and pause right before the
sound begins.
2 Start playback.
Playback pauses either at the beginning of a track or
right before sound begins on the track.
AMS
SINGLE
PLAY
To cancel AUTO PAUSE or AUTO CUE
Press AUTO OFF during stop.
z You can adjust the sound level Auto Cue defines as a blank
space and the timing of the pause that occurs once a blank
space has been detected.
1 Press STOP to stop playback.
2 Press EDIT/NO twice to display “Setup Menu”.
3 Turn AMS to select one of the following parameters, then
press AMS.
- To change the sound level defining a blank space : AC (T)
- To change the timing of the pause : AC (O)
4 Turn AMS (or scrub dial) to set the value you desire, then
press AMS.
5 Press EDIT/NO to exit the Setup Menu.
The settings are retained even if the power is turned off.
The adjustable range of each parameter is as follows. The
numbers in parenthesis are the default values.
AC (T) : –72 dB to 0 dB in 2 dB steps (–50 dB)
AC (O) : –9s85f to +9s85f in 1f steps (0s00f)
When AC (O) is set to a negative (–) value, the unit
pauses by counting backwards from the point where
it detected the blank space.
To cancel without completing the settings, press EDIT/NO. This
returns the unit to the factory settings.
14
GB
Page 15
Changing Speed and Pitch
During Playback
To stop playback automatically at the end
of each track
Press SINGLE PLAY to light the “1” indicator.
Playback stops automatically at the end of each track.
To cancel the single play mode, and have playback
continue to the next track, press SINGLE PLAY again so
that the “1” indicator goes out.
You can change the playback speed and the pitch
independently.
SPEED
PITCH
Changing the speed
Move the SPEED slider
Slide SPEED towards yourself to increase the speed, or
away to decrease the speed.
The current speed appears as a percentage in the display.
It can be changed from –12% to +12%.
DJ Performance Functions
Changing the pitch
Move the PITCH slider
Slide PITCH towards yourself to raise the pitch, or away
to lower the pitch.
The current pitch appears as a percentage in the display.
It can be changed from –12% to +12%.
15
GB
Page 16
Looping Part of a Track Starting Tracks as Quickly
as Possible (Hot Start)
Setting a loop allows you to play a certain part of the
current track repeatedly without any pauses or breaks.
In addition, the loop points are stored even after you exit
the loop, making it easy to return to the same loop.
DJ Performance Functions
1 During playback, press LOOP IN at a point where
you want the loop to start.
“LOOP” blinks in the display.
2 Press LOOP OUT at the point where you want the
loop to end.
“LOOP” lights steadily and the loop begins.
To exit the loop
Press LOOP OUT again.
Playback proceeds as normal when it reaches the loop out
point. “RELOOP” lights in the display to indicate that the
loop position has been stored.
To return to the previous loop
Press RELOOP.
Playback returns to the loop in point and starts looping.
Notes
• It is not possible to set a loop longer than 20 seconds. The loop
set mode deactivates automatically if you do not press LOOP
OUT within 20 seconds of pressing LOOP IN.
• Loops cannot span two (or more) tracks. The loop set mode
deactivates automatically if the track changes before you press
LOOP OUT.
• The loop position is erased when :
- You stop playback
- You set another loop
- Turn the scrub dial during pause
• The loop function is not possible if a pad with a red indicator
was used to start playback from a cue point.
• In some cases, when you try to set another loop, “Impossible”
is displayed and you will not be able to set another loop. If this
occurs, stop playback and then set the loop.
RELOOP
LOOP IN
LOOP OUT
The Hot Start function allows you specify up to 8 tracks.
You can store the beginning of a track in memory to
enable playback of that track to start quicker than normal
when you press the track’s pad.
You can specify any 8 tracks for use with this function.
EDIT/NO
ENTER/YES
Pads
AMS
PLAY MODE
0/)
1 During stop, press EDIT/NO twice to display “Setup
Menu”.
2 Turn AMS to display “Hot start ?”, then press AMS.
“/0/” blinks in the display.
3 Turn AMS to display the number of the track you
want to hot start, then press AMS.
The selected track number stops blinking and another
“0” appears to indicate that the unit is ready for
another track number.
If you make a mistake
Press 0 or ) repeatedly so that the mistaken track
number blink, turn AMS to change the track number,
then press AMS.
4 Repeat step 3 to specify up to 8 tracks.
“Multi Full!” appears when you enter the 8th track.
5 When you’ve finished, press ENTER/YES.
“Complete!!” is displayed and the hot start settings are
complete.
6 Press PLAY MODE repeatedly to display “HOT
START”.
“Memorizing” appears and the pad indicators blink
while the unit assigns the tracks to the respective pads.
E.g., if your hot start setting was “/2 n 8 n 5/”:
– Track 2 is assigned to Pad 1
– Track 8 is assigned to Pad 2
– Track 5 is assigned to Pad 3
The indicators above the corresponding pads light red.
16
GB
Page 17

7 Press the pad for the track you want to hot start.
Playback begins immediately.
To return to normal playback
Press PLAY MODE repeatedly until “HOT START”
disappears.
z In the Hot Start play mode, you can also use PLAY/PAUSE for
immediate playback of the hot start tracks
Pressing PLAY/PAUSE when the unit is stopped to immediately
play all the hot start tracks in the order that they were
programmed.
z The hot start settings remain available even after you exit
the Hot Start play mode.
Just press PLAY MODE repeatedly to display “HOT START” and
you can use the same hot start settings again.
z When using recordable MDs, the hot start settings remain
available even after you eject the MD
With recordable MDs, the hot start settings are written into TOC
data when the disc is ejected. The next time you load the MD,
you can use the same hot start settings simply by pressing PLAY
MODE repeatedly to display “HOT START”.
With commercial MD software, the hot start settings are erased
when you eject the disc.
Notes
• During Hot Start playback, it is not possible to use the 0/)
buttons or the loop function. It is also not possible to use the
scrub dial during pause.
• Hot start settings are erased when a track is edited.
Checking the hot start settings
Press DISPLAY repeatedly while “HOT START” is
displayed.
The hot start tracks appear in the order they were
programmed.
For example: “/3 n 5 n 8 n 1 n 2/”
Changing the hot start settings
The hot start settings can be changed before beginning
playback.
To Do this*
Erase one track Do steps 1~2, press 0/)
until the unwanted track blinks,
then press EDIT/NO.
all tracks Do steps 1~2, then press EDIT/
NO repeatedly.
Add a track at beginning 1 Do steps 1~2, then press 0
to display a blinking “0” before
the first track.
2 Do steps 3~5.
in middle 1 Do steps 1~2, then press
0/) until the track after
which you want to add the new
track blinks.
2 Press AMS to display a
blinking “0”.
3 Do steps 3~5.
to end 1 Do steps 1~2, then press )
to display a blinking “0” after
the last track.
2 Do steps 3~5.
Change a track 1 Do steps 1~2, then press
0/) repeatedly so that the
unwanted track blinks.
2 Do steps 3~5.
* See “Starting Tracks as Quickly as Possible (Hot Start)” for
details on steps 1~2 and 3~5.
DJ Performance Functions
17
GB
Page 18
Other Playback
Using the Display
Options
This chapter provides information
about the display and the repeat,
program, and resume play functions.
You can display the playback or remaining time on the
disc or track.
DISPLAY
Checking the disc time
Press DISPLAY repeatedly when the unit is stopped.
Each press changes the display as follows:
Remaining time (time available for recording)
BANK 1
Total playback time
BANK 1
DISC
TR M S F
DISC
TR M S F
12
20
40
-dB
LR
Press
12
20
40
-dB
LR
0
4
8
0
4
8
Press
Press
Program or Hot Start settings and total time
(Program or Hot Start play mode only)
BANK 1
DISC
TR M S F
PROGRAM
HOT START
LR
(One lights to indicate play mode)
0
4
8
12
20
40
-dB
18
GB
Page 19
Playing Tracks Repeatedly
(Repeat Play)
Checking the track time
Press DISPLAY repeatedly during playback.
Each press changes the display as follows:
Remaining time
BANK 1
Elapsed time
BANK 1
Program or Hot Start settings and total time
(Program or Hot Start play mode only)
BANK 1
Number of the track
being played blinks
When the track time blinks during playback
There are less than 10 seconds left on the track.
z Disc and track names
The disc name is displayed when the unit is stopped. Track
names are displayed during playback of the respective tracks.
If a disc or track is not named, “No Name” is displayed.
TRACK
TR M S F
TRACK
TR M S F
TRACK
Press
Press
PROGRAM
MSF
HOT START
(One lights to indicate
play mode)
12
12
12
Press
You can play an entire MD or just a single track
repeatedly. Repeat play can also be used with other play
modes, like Program and Hot Start.
REPEAT
SINGLE PLAY
Repeating an entire MD
Press REPEAT.
“REPEAT” lights up and the tracks repeat as follows.
Play mode Repeats
Normal play (page 11) All tracks as they are numbered
Hot-start play (page 16) The hot start tracks in the order in
Program play (page 20) The same program
To cancel repeat play
Press REPEAT so that “REPEAT” goes out.
which they were programmed
Other Playback Options
Repeating a single track
This function can also be used to repeat the current track
when using the Program or Hot Start play modes.
1 Press REPEAT.
“REPEAT” lights up in the display.
2 When playback reaches the song you want to
repeat, press SINGLE PLAY.
“REPEAT 1” lights up in the display.
To cancel single track repeat play
Press REPEAT so that “REPEAT” goes out, then press
SINGLE PLAY so that “1” goes out.
z In step 2, if you press SINGLE PLAY to light “REPEAT 1” while
playback is stopped
The unit repeats the next track you play.
19
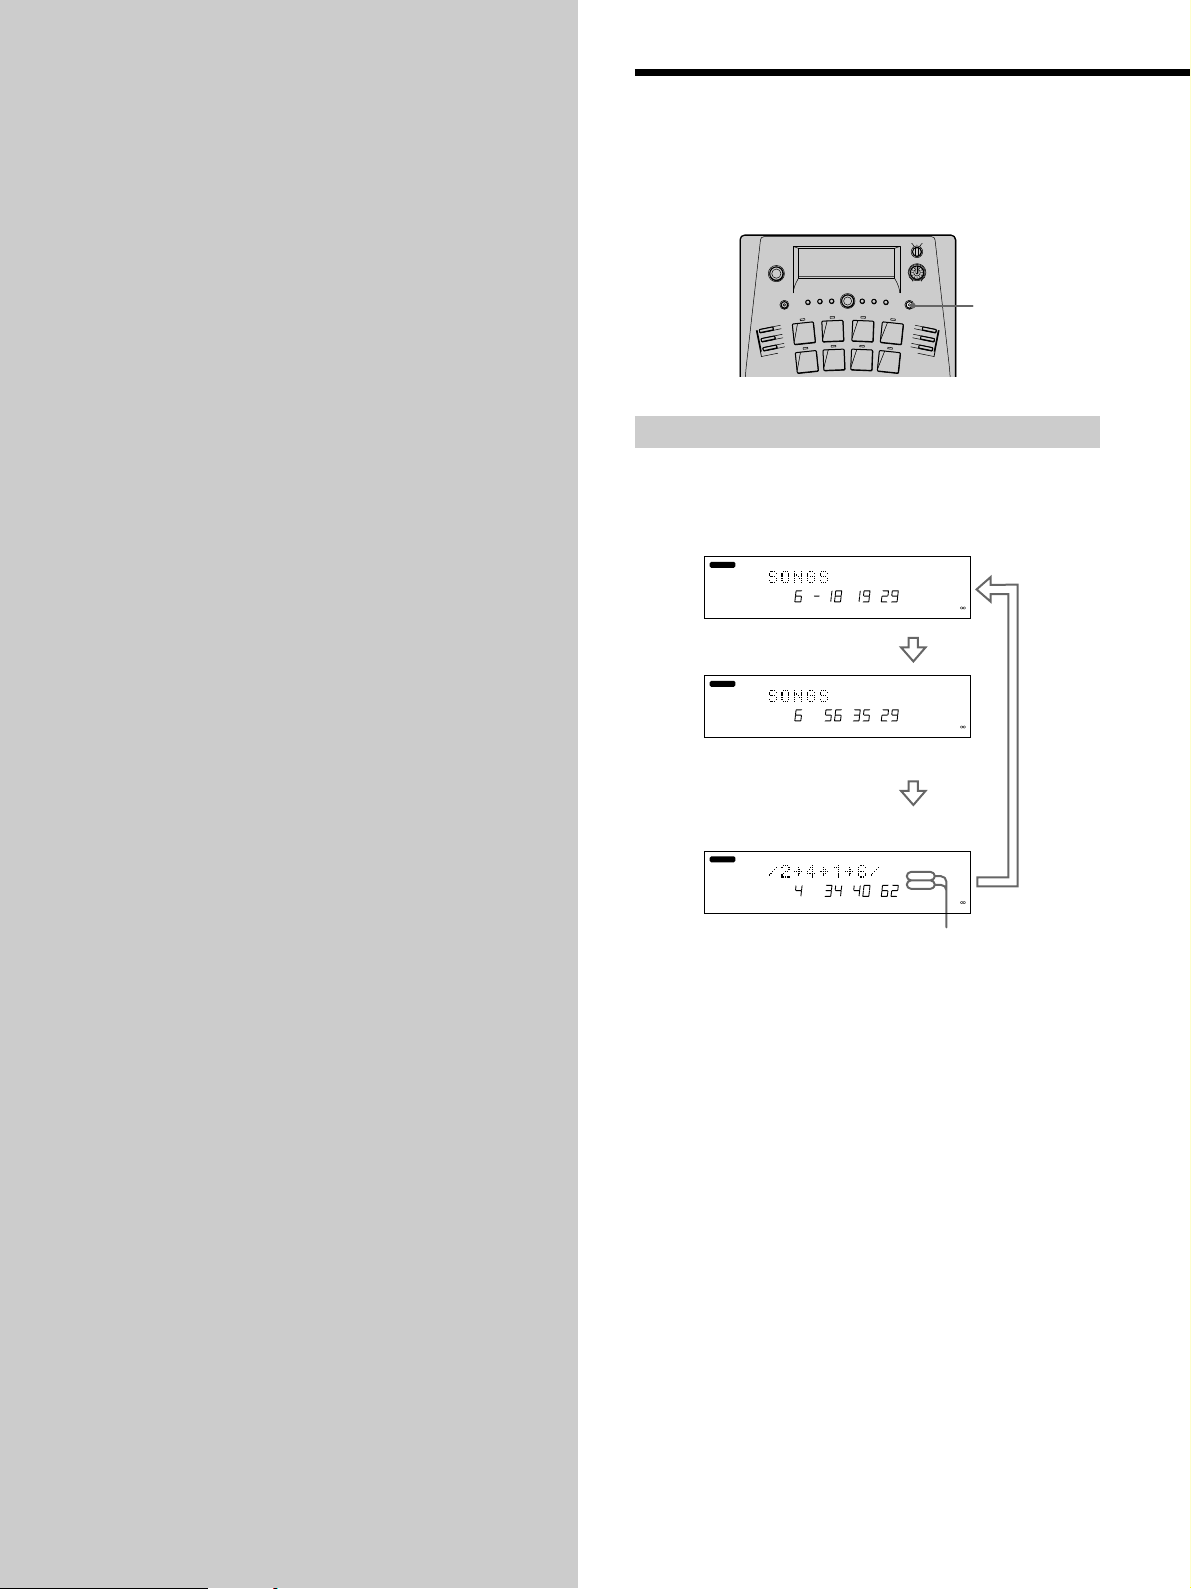
GB
Page 20
Playing Tracks in a Different Order (Program Play)
This function lets you playback tracks in any order by
creating programs containing up to 25 tracks.
EDIT/NO
ENTER/YES
PLAY/PAUSE
Other Playback Options
1 During stop, press EDIT/NO twice to display “Setup
Menu”.
2 Turn AMS to display “Program ?”, then press AMS.
“/0/” blinks in the display.
3 Turn AMS to display the number of the track you
want to program, then press AMS.
The selected track number stops blinking and another
“0” appears to indicate that the unit is ready for
another track number.
If you make a mistake
Press 0 or ) repeatedly so that the mistaken track
number blink, turn AMS to change the track number,
then press AMS.
4 Repeat Step 3 to program up to 25 tracks.
“ProgramFull” appears when you enter the 25th track.
Tracks are added in the location of the blinking “0”.
The total time of the program is displayed each time
you program a track.
AMS
PLAY MODE
0/)
To return to normal playback
Press PLAY MODE repeatedly until “PROGRAM”
disappears.
z You can also play the program by pressing the pads
Playback starts from the selected track and proceeds in the
programmed order. If you program more than 8 tracks, use
BANK to switch banks before pressing a pad.
z The program remains available even after you exit the
Program mode.
Press PLAY MODE repeatedly to display “PROGRAM” again
and you can play the same program.
z When using recordable MDs, the program remains available
even after you eject the MD
With recordable MDs, the program information is written into
TOC data when the disc is ejected. The next time you load the
MD, you can play the same program simply by pressing PLAY
MODE repeatedly to display “PROGRAM”.
With commercial MD software, program information is erased
when you eject the disc.
Notes
• The program is erased when a track is edited.
• Cue points cannot be set during Program playback.
Checking the program contents
Press DISPLAY repeatedly while “PROGRAM” is
displayed.
The programmed tracks appear in the order they were
programmed.
For example: “/3 n 5 n 8 n 1 n 2/”
5 When you’ve finished, press ENTER/YES.
“Complete!!” is displayed and the program is
complete.
6 Press PLAY MODE repeatedly to display
“PROGRAM”.
The unit assigns the tracks to the respective pads.
E.g., if your program was “/2 n 8 n 5/”:
– Track 2 is assigned to Pad 1
– Track 8 is assigned to Pad 2
– Track 5 is assigned to Pad 3
7 Press PLAY/PAUSE.
The tracks are played in the programmed order.
GB
20
Page 21
Resuming Playback After
Stopping (Resume Play)
Changing the program contents
The program contents can be changed before beginning
playback.
To Do this*
Erase one track Do steps 1~2, press 0/)
until the unwanted track blinks,
then press EDIT/NO.
all tracks Do steps 1~2, then press EDIT/
NO repeatedly.
Add a track at beginning 1 Do steps 1~2, then press 0
to display a blinking “0” before
the first track.
2 Do steps 3~5.
in middle 1 Do steps 1~2, then press
0/) until the track after
which you want to add the new
track blinks.
2 Press AMS to display a
blinking “0”.
3 Do steps 3~5.
to end 1 Do steps 1~2, then press )
to display a blinking “0” after
the last track.
2 Do steps 3~5.
Change a track 1 Do steps 1~2, then press
0/) repeatedly so that the
unwanted track blinks.
2 Do steps 3~5.
This function allows you to set the unit to memorize the
point where playback stopped, so you can resume
playback from the same point the next time you press
PLAY/PAUSE.
EDIT/NO
STOP
PLAY/PAUSE
AMS
1 Press EDIT/NO twice to display “Setup Menu”.
2 Turn AMS to display “Resume”, then press AMS.
The display starts blinking.
3 Turn AMS to display “Resume Play”, then press
AMS.
4 Press EDIT/NO to exit the Setup Menu.
This activates the resume play function.
5 Press STOP during playback to stop playback.
Other Playback Options
* See “Playing Tracks in a Different Order (Program Play)” for
details on steps 1~2 and 3~5.
6 Press PLAY/PAUSE.
Playback resumes from the point where it was stopped
in step 5.
To cancel the resume play function
Select “Resume Off” in step 3, press AMS, then proceed to
step 4.
Note
The resume point is erased when:
• The MD is ejected
• PLAY MODE is pressed
21
GB
Page 22

Recording on
Notes on Recording
an MD
This chapter explains how to record
onto an MD.
If “Protected” and “C11” appear in the display
The MD is record-protected. Close the record-protect slot
to enable recording (see “To protect an MD against
accidental erasure” on page 24).
If “Din Unlock” and “C71” appear in the display
• The digital program source selected with the INPUT
switch is not properly connected. Connect the program
source correctly.
• The program source is not turned on. Turn on the
program source.
Track numbers are marked differently depending
on the menu settings and the type of source
being recorded
• When recording from a CD or MD with this unit’s
INPUT switch set to “OPT” or “COAX”, track numbers
are automatically marked the same as the original
program source. However, in the following cases, a
section of a recording containing more than one track
may be marked with only a single track number:
– If the same track is recorded repeatedly (using the
single-track repeat function).
– If two or more tracks with the same track number
(from different MDs or CDs) are recorded in
sequence.
– When recording tracks less than four seconds long.
• Even though INPUT is set to “OPT” or “COAX”, this
unit may not be able to mark track numbers
automatically when recording from certain multi-disc
(and one-disc) CD players. In such cases, mark the track
numbers afterwards using the Divide Function (see
“Dividing a Track” on page 28).
• If the “L.Sync” parameter in the Setup Menu is set to
“L.Sync Off” when recording with INPUT set to
“ANLG”, or recording from a satellite broadcast or DAT
with INPUT set to “OPT” or “COAX”, this unit treats
the recorded section as a single track and only one track
number will be assigned to the recording.
• Set the “L.Sync” parameter in the Setup Menu to
“L.Sync On” when recording with INPUT set to
“ANLG”, or recording from a satellite broadcast or DAT
with INPUT set to “OPT” or “COAX”, to mark track
numbers automatically (see “Automatic track marking”
on page 24).
• When recording from a satellite broadcast or DAT with
INPUT set to “OPT” or “COAX”, this unit automatically
marks a new track number whenever the sampling
frequency of the input signal changes (regardless of the
setting of the “L.Sync” parameter in the Setup Menu).
22
GB
Page 23
Recording an MD
z You can mark track numbers manually at any time during or
after recording.
For details, see “Marking Track Numbers While Recording” on
page 24 and “Dividing a Track” on page 28.
When “TOC Writing” blinks in the display
The unit is storing the contents of the recording on the
MD. Do not turn off the power (U), pull out the AC
power cord, or move the unit. This may prevent correct
recording. Turning off the power (U) or pulling out the
AC power cord immediately after recording will prevent
the unit from storing the recording.
This unit complies with the Serial Copy
Management System
MDs recorded digitally cannot be further copied to other
digital media (MD, DAT, etc.) through this unit’s digital
output jacks (see page 41).
You can record on an MD from a variety of program
sources (including CD). Make sure the program source is
connected correctly before you begin. See page 5 for
details on connections.
INPUT
U (power)
REC VOL
r REC
REC PAUSE
STOP
PLAY/PAUSE
1 Turn on the program source you want to record.
2 Press U to turn on this unit.
The display lights up.
3 Insert a recordable MD.
Recording on an MD
Insert in direction of arrow
Label facing up
4 Set INPUT to the program source you want to
record.
If program source is connected to Set INPUT to
DIGITAL OPTICAL IN OPT
DIGITAL COAXIAL IN COAX
LINE (ANALOG) IN ANLG
5 Press r REC.
The unit enters record pause mode and the indicator
next to REC PAUSE starts blinking (recording has not
yet begun).
(continued)
23
GB
Page 24
Recording an MD
Marking Track Numbers
While Recording
6 Adjust the recording level.
• When recording a program source connected to
the LINE (ANALOG) IN jacks.
1 Play the loudest section of the program source
2 Turn REC VOL so that the peak level meters in
• When recording a program source connected to a
DIGITAL jack.
Adjustment is not necessary (proceed to step 7).
7 Press REC PAUSE or PLAY/PAUSE to start recording.
8 Start playing the program source.
To stop recording
Press STOP.
Recording on an MD
Do not turn off the power immediately after
recording
This may prevent proper recording. If you do, recorded
material may not be saved to the MD. When you eject the
disc or press ENTER/YES, “TOC Writing” blinks in the
display. Wait until “TOC Writing” has finished blinking
before pressing U or unplugging the AC power cord from
the wall outlet.
To Do this
Pause the recording Press PLAY/PAUSE or REC PAUSE.
Eject the MD Press § EJECT. The MD cannot be
* The song number changes if you pause during recording. For
example, if you pause while recording song 4, the portion
recorded after the pause is recorded as song 5.
To protect an MD against accidental erasure
To make it impossible to record on an MD, slide the tab in
the direction of arrow, opening the slot. To allow
recording, close the slot.
you want to record (the part with the highest
playback level).
the display just reach (but do not exceed) 0 dB.
To resume recording, press PLAY/
PAUSE or REC PAUSE again.
ejected during recording.
Record-protect tab
You can mark track numbers either manually or
automatically. By marking track numbers at specific
points, you can quickly locate the points later using the
AMS knob, and perform a variety of edit functions.
EDIT/NO
r REC
AMS
Manual track marking
You can mark a track number manually any time during
recording.
During recording, press r REC at the point where you
want to mark a track number.
Automatic track marking
The unit marks track numbers differently depending on
the source being recorded and the type of connections
being used.
• When recording from CDs or MDs with this unit’s
INPUT set to DIGITAL:
Track numbers are marked automatically.
However, this function may not work properly with
some multi disc (and one disc) CD players.
• In all other cases:
When “L.Sync” in the Setup Menu is set to “L.Sync
On”, if the input level drops below a certain level for
1.5 seconds, the unit marks a new track number the
next time it rises back above that level.
When “L.Sync” in the Setup Menu is set to “L.Sync
Off” the unit marks a track number when the
recording is started, but no track numbers are marked
during recording.
Back of disc
GB
24
Open
Page 25
To switch “L.Sync” in the Setup Menu
1 During stop, recording, or pause, press EDIT/NO
twice to display “Setup Menu”
2 Turn AMS to select “L.Sync”, then press AMS.
3 Turn AMS to select “L.Sync On” or “L.Sync Off”,
then press AMS.
When you select “L.Sync On”, the L.SYNC indicator
lights up.
4 Press EDIT/NO.
z You can determine how the unit will assign new track
numbers when you choose “L.Sync On” in the Setup Menu
When you choose “L.Sync On” in the Setup Menu, and the input
signal goes below a certain reference level for a certain amount of
time, the next time the input level rises above that level the unit
determines that the song has changed and marks a new track
number automatically.
You can adjust the following parameters using the Setup Menu:
– The reference level for the input signal.
– The length of time the input signal must remain below the
reference level.
– The length of time before the unit marks the new track
number once it determines that the song has changed.
1 During stop, record, or record-pause mode, press EDIT/NO
twice to display the Setup Menu.
2 Turn AMS to select one of the following parameters, then
press AMS.
– To change the reference level : LS (T)*
– To change the length of time the input signal must remain
below the reference level : LS (W)
– To change the length of time before a new track number is
marked once the unit determines the song has changed :
LS (O)*
3 Turn AMS (* or scrub dial) to set the value you desire, then
press AMS.
4 Press EDIT/NO.
The adjustable range of each parameter is as follows. The
numbers in parenthesis are the default values.
LS (T) : –72 dB to –0 dB in 2 dB steps (–50 dB)
LS (W): 0s to 9.5s in 0.5s steps (1.5s)
LS (O) : 0s00f to 9s85f in 1f steps (2s00f)
When LS (O) is a negative (–) value, the unit assigns
new track numbers by counting backwards from the
point where it determined that the song has changed.
Recording during Playback
(Backtrack recording)
This unit allows you to record on an MD (from CD, etc.)
while the MD is playing back. Alternatively, you could
connect this unit to a mixer, mix the sound of the MD with
the sound of another component, and simultaneously
record the mixed sound back to the same MD. During
playback, sound is recorded to the blank space on the MD.
Make sure the program source is connected and that this
unit’s INPUT is set correctly before you begin. See page 5
for details on connections and page 23 for details on the
INPUT switch.
r REC
REC PAUSE
STOP
1 Press r REC during playback or pause.
The BACK TRACK RECORDING and a disc image
indicators light up, the unit enters record standby
mode and the indicator next to REC PAUSE starts
blinking (recording has not yet begun).
2 Press REC PAUSE to start recording.
The disc image rotates during recording.
3 Start playing the program source.
To stop recording
Press STOP.
The BACK TRACK RECORDING and the disc image
indicators blink while the recording is written to the disc.
The unit stops once the recording has been written to the
disc. Stopping the recording creates a new track number.
Do not turn off the power immediately after
recording
This may prevent proper recording. If you do, recorded
material may not be saved to the MD. When you eject the
disc or press ENTER/YES, “TOC Writing” blinks in the
display. Wait until “TOC Writing” has finished blinking
before pressing U or unplugging the AC power cord from
the wall outlet.
Recording on an MD
(continued)
GB
25
Page 26

Recording during Playback
(Backtrack recording)
If the BACK TRACK RECORDING indicator starts
blinking during recording
Stop using the pad, scrub dial, and loop functions until
the indicator lights steadily. Continuing to use these
functions may cause the unit to stop recording. Also, once
the indicator lights steadily, wait a few seconds before
resuming pad, scrub dial, or loop operations.
Notes
• You can not monitor to the sound being recorded during
backtrack recording.
• When recording an analog source, you can turn REC VOL to
adjust the recording level but you cannot monitor the sound.
• During backtrack recording, the peak level meters in the
display indicate the playback level (not the recording level).
• Frequently repeating loop, pad, or scrub dial operations may
cause recording to stop.
• Track marking is not possible during back track recording.
• The 0/) buttons cannot be used during backtrack
recording.
Recording on an MD
• REC PAUSE can not be used to stop backtrack recording. Press
STOP to stop during backtrack recording.
• Recording will stop if the position of the INPUT switch is
changed during backtrack recording.
26
GB
Page 27

Editing a
Notes on Editing
Recorded MD
This chapter explains how to edit the
tracks on a recorded MD.
After recording an MD, you can use the editing functions
to divide tracks for instant access to any point on the disc
or combine any two tracks into a single track. You can also
erase tracks simply by specifying track numbers, name
the disc, and name individual tracks.
If “Protected” and “C11” appear in the display
The disc cannot be edited because its record-protect slot is
open. Close the record-protect slot before editing the disc.
After editing “TOC” blinks in the display
Eject the disc or press ENTER/YES. “TOC” and “TOC
Writing” blink in the display and the unit writes the edit
information to the disc. Do not press U to turn off the
power, pull out the AC power cord, or move the unit
while “TOC” and “TOC Writing” are blinking. This may
prevent the information from being stored.
Editing a Recorded MD
27
GB
Page 28
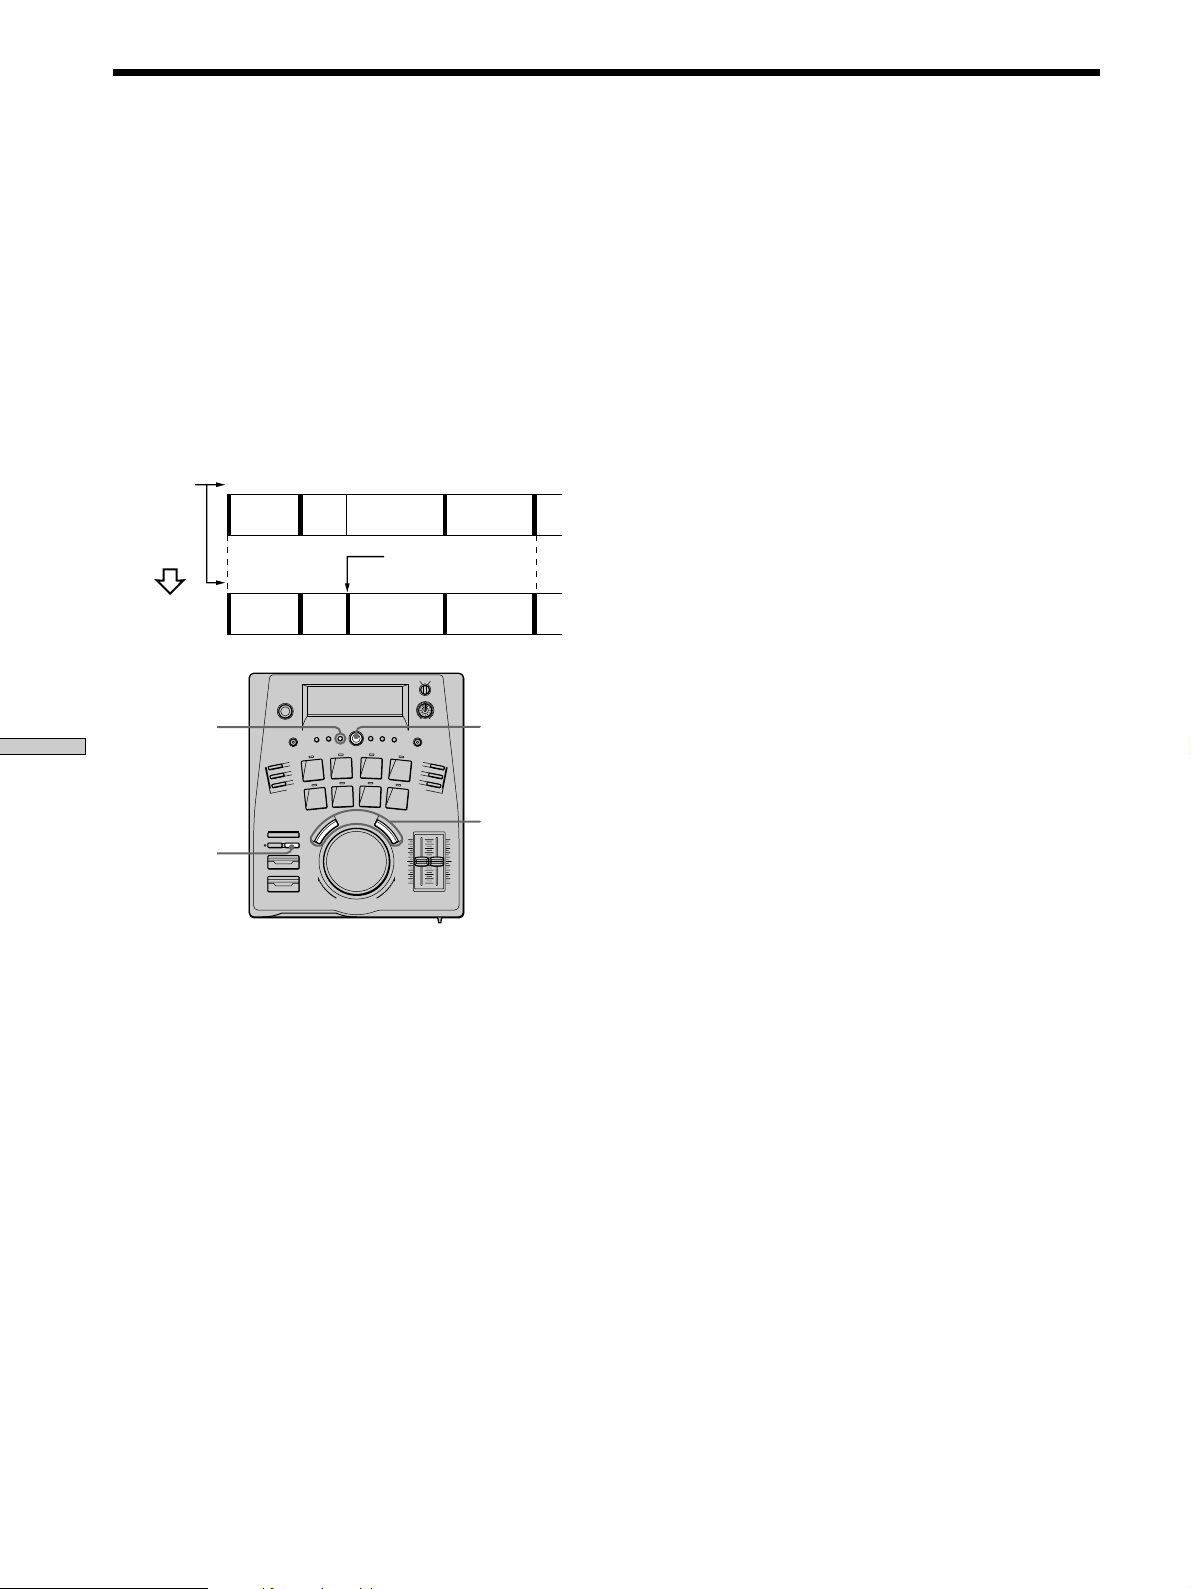
Dividing a Track (Divide)
Editing a Recorded MD
After recording, you can divide a track in two by marking
a new track number at any point you want to access. This
is especially useful when you record from an analog
source (etc.) and several songs are recorded as a single
track number, or when you want access to a certain point
in the middle of a track. When you divide a track, the total
number of tracks on the MD increases by one and all
tracks following the divided track are renumbered
automatically.
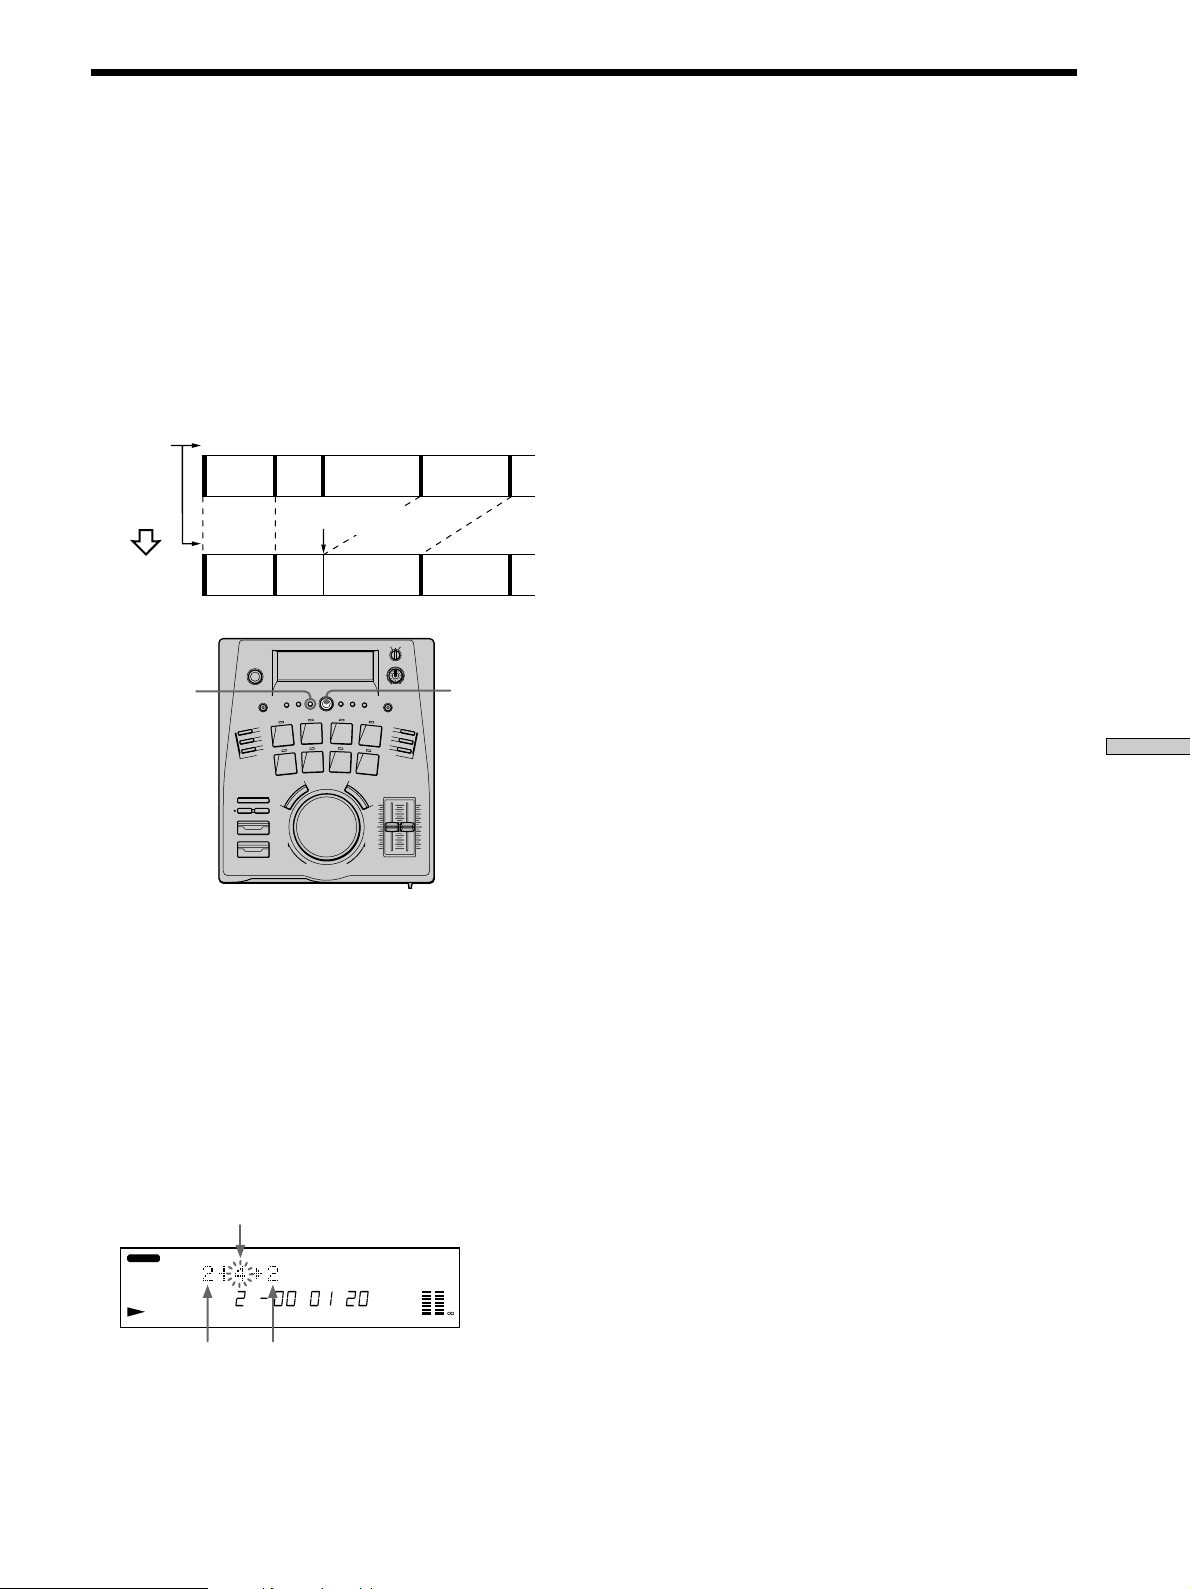
Example: Dividing track 2 to create individual track numbers
for B and C.
Track
numbers
DIVIDE
12 3
A
BC D
Divide B and C
12 43
A
EDIT/NO
BC D
AMS
5 Turn AMS while listening to the rehearsal to adjust
the position of the divide point.
After an adjustment, the rehearsal resumes from the
new position.
You can use AMS to adjust in minutes, seconds, or
frames by pressing 0 or ) to switch between the
different units. When adjusting by frames, “F” blinks
next to the frame numbers. When adjusting by
seconds, “S” blinks next to the seconds. When
adjusting by minutes, “M” blink next to the minutes.
6 Press AMS when the position is correct.
“Complete!!” appears for a few seconds and the track
is divided. Playback begins from the beginning of the
newly created track. The new track will not have a
track name, even if the original track was named.
To cancel without dividing the track
Press EDIT/NO or STOP.
z
You can undo the divide
Use the undo function immediately after dividing the track (see
page 35).
z
You can divide tracks while recording
Use the track marking function (see page 24).
0/)
STOP
1 During stop, play, or pause mode, press EDIT/NO to
display the Edit Menu.
2 Turn AMS to display “Divide ?”, then press AMS.
3 Turn AMS to display the track number of the track
you want to divide.
The REHEARSAL indicator lights up and the selected
track starts to play.
4 Listen to the track and press AMS at the point
where you want to divide the track.
“–Rehearsal–” is displayed and playback starts
repeating from the point where the track will be
divided (rehearsal playback).
z
You can adjust the length and interval of rehearsal playback
The following operations use the Setup Menu.
1 During stop, record, or record-pause mode, press EDIT/NO
twice to display the Setup Menu.
2 Turn AMS to select one of the following parameters, then
press AMS.
– To change the rehearsal playback length : RH (L)*
– To change the rehearsal playback interval : RH (I)
3 Turn AMS (* or scrub dial) to set the value you desire, then
press AMS.
4 Press EDIT/NO to exit the Setup Menu.
The settings are retained even if the power is turned off.
The adjustable range of each parameter is as follows. The
numbers in parenthesis are the default values.
RH (L): 0s00f to 9s85f in 1f steps (2s00f)
RH (I) : 0s to 8s in 0.5s steps (1.0s)
To cancel without completing the settings, press EDIT/NO. This
returns the unit to the factory settings.
Note
If “Impossible” is displayed, the track cannot be divided.
This may occur if one of the tracks has been edited many times.
This is due to a technical limitation of the MD system, it is not a
mechanical error.
28
GB
Page 29
Combining Two Tracks (Combine)
This function allows you to combine any two tracks into a
single track. The two tracks need not be consecutive, or
chronological. You can use this function to combine
several songs into a medley, or several independently
recorded sections into a single track.
When you combine two tracks, the total number of tracks
decreases by one and all tracks following the combined
tracks are renumbered.
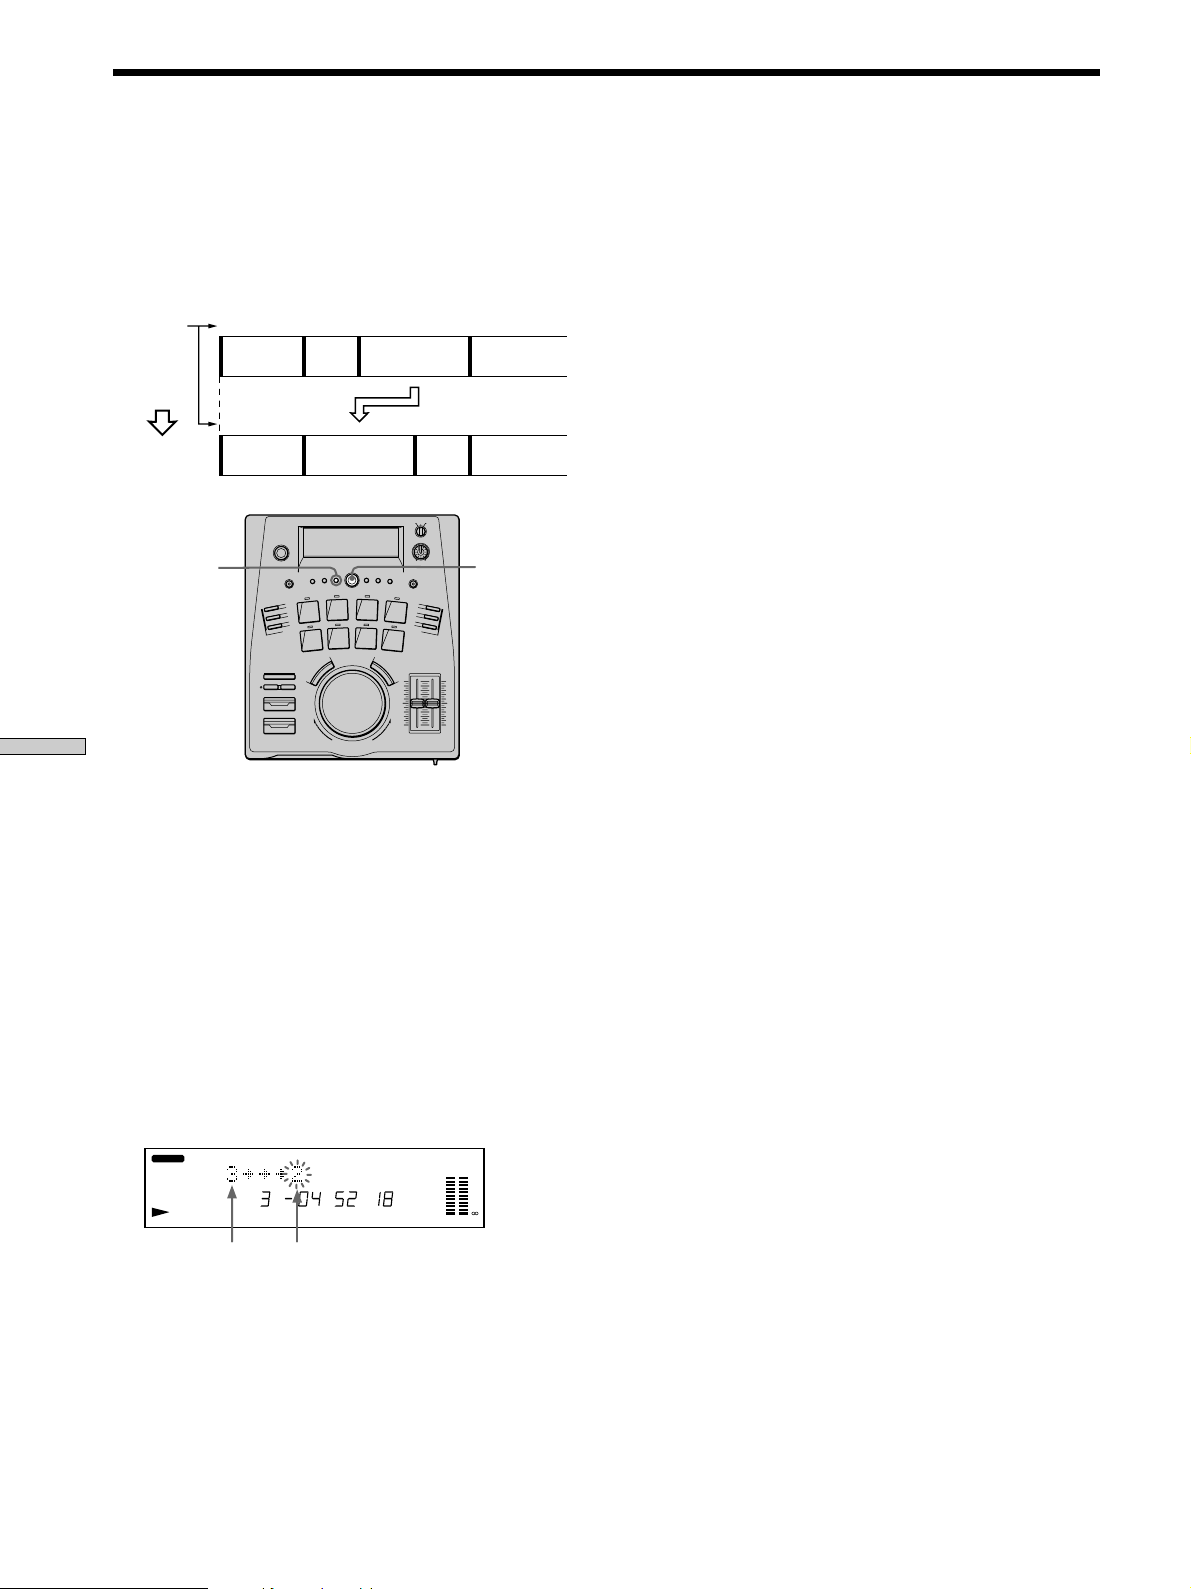
Example: Combining tracks B and D
Track
numbers
COMBINE
12 43
A
BC D
Combine B and D
12 3
A
EDIT/NO
BD C
AMS
4 Turn AMS to display the track number of the
second track, then press AMS.
“Complete!!” appears for a few seconds and the tracks
are combined.
If both tracks were named, the name of the second
track is discarded.
To cancel without combining the tracks
Press EDIT/NO or STOP.
z
You can undo the combine
Use the undo function immediately after combining the tracks
(see page 35).
z
You can adjust the length and interval of rehearsal playback
Make adjustments using the Setup Menu (see page 28).
Note
If “Impossible” is displayed, the two tracks cannot be combined.
This may occur if one of the tracks has been edited many times.
This is due to a technical limitation of the MD system, it is not a
mechanical error.
1 During stop, play, or pause mode, press EDIT/NO to
display the Edit Menu.
2 Turn AMS to display “Combine ?”, then press AMS.
3 Turn AMS to display the track number of the first
track, then press AMS.
The track number of the second track starts blinking
and the section to be combined (the end of the first
track and the beginning of the second track) begins
playing back repeatedly (rehearsal playback).
Second track number
REHEARSAL TRACK
BANK 1
TR M S F
LR
0
4
8
12
20
40
-dB
Editing a Recorded MD
First track
number
Resulting track number
(after combine)
29
GB
Page 30
Changing Track Numbers (Move)
This function lets you change the position (number) of
any track. After you move a track, the track numbers are
updated automatically.
Example: Changing song C to track number 2
Track
numbers
MOVE
123 4
A
BC D
Move C to track 2
12 43
A
EDIT/NO
CBD
AMS
6 Press AMS to select the track.
“Complete!!” appears for a few seconds and the track
is moved. Playback begins from the beginning of the
track that was moved.
To cancel without moving the track
Press EDIT/NO or STOP.
z
You can undo the move
Use the undo function immediately after moving the track (see
page 35).
Editing a Recorded MD
1 During stop, play, or pause mode, press EDIT/NO to
display the Edit Menu.
2 Turn AMS to display “Move ?”, then press AMS.
3 Turn AMS to display the track number of the track
you want to move.
The REHEARSAL indicator lights up and the selected
track starts to play.
4 Press AMS to select the track.
5 Turn AMS to display the destination track number.
REHEARSAL TRACK
BANK 1
Number of the
track to be moved
TR M S F
Number of the track’s destination
LR
0
4
8
12
20
40
-dB
30
GB
Page 31

Erasing a Track (Erase)
You can erase a track simply by specifying the respective
track number. When you erase a track, the total number of
tracks on the MD decreases by one and all tracks
following the one that was erased are renumbered
automatically.
For example, when you erase track 2, track 3 becomes the
new track 2.
(To avoid confusion when erasing more than one track,
start erasing from the last (highest numbered) track. This
will prevent renumbering of the tracks you plan to erase.)
This function allows you to erase tracks after recording, so
there is no need to record over previously recorded
material (as with cassette tapes).
Example: Erasing track B
Track
numbers
ERASE
123 4
A
12 3
A
BC D
Erase B
CD
To cancel without erasing the track
Press EDIT/NO or STOP.
z
You can undo the erase
Use the undo function immediately after erasing the track (see
page 35).
Note
If “Erase ???” appears in the display, the track was recordprotected on another MD deck. If you still wish to erase the track,
press AMS or ENTER/YES while “Erase ???” is displayed.
EDIT/NO
AMS
1 During stop, play, or pause mode, press EDIT/NO to
display the Edit Menu.
2 Turn AMS to display “Erase ?”, then press AMS.
3 Turn AMS to display the track number you want to
erase.
The REHEARSAL indicator lights up and the selected
track starts to play.
4 Press AMS to select the track.
“Complete!!” appears for a few seconds and the track
is erased. Playback begins from the track after the one
which was erased.
Editing a Recorded MD
5 To erase more tracks, repeat steps 1 to 4.
31
GB
Page 32

Erasing the Entire Disc
Naming Discs and Tracks
Editing a Recorded MD
(All Erase)
This function erases all of the information on the MD (all
recorded tracks, track names, and the disc name) in a
single operation.
EDIT/NO
1 During stop, play, or pause mode, press EDIT/NO to
display the Edit Menu.
2 Turn AMS to display “All Erase ?”, then press AMS.
“All Erase??” appears in the display.
3 Press AMS again to erase the MD.
“Complete!!” appears for a few seconds and the disc
name, all tracks, and all track names are erased.
To cancel without erasing the MD
Press EDIT/NO or STOP to exit the “All Erase ?” or “All
Erase??” display.
AMS
(Name)
You can create names for your recorded MDs and as well
as the individual tracks. Names can consist of uppercase
and lowercase letters, numbers and symbols and each disc
can store about 1,700 characters.
EDIT/NO
ENTER/YES
STOP
You can enter names during playback, pause, recording,
or stop mode.
When naming a track during recording, be sure to finish
before the track ends. If the track ends before you finish
the naming procedure, the characters you entered will be
discarded and the track will remain unnamed.
When naming a track during playback, the track will
repeat until you finish entering the name.
1 Press EDIT/NO to display the Edit Menu.
2 Turn AMS to display “Name ?”, then press AMS.
This step is not necessary during recording.
AMS
DISPLAY
0/)
Scrub dial
z
You can undo the erase
Use the undo function immediately after erasing the MD (see
page 35).
3 Turn AMS to display “Nm In ?”, then press AMS.
4 Turn AMS to specify whether you wish to label the
disc or track.
During recording, skip to step 6 (only the track can be
named).
• To label the disc, turn AMS to display “Disc”
• To label the track, turn AMS so that the track
number blinks in the display.
5 Press AMS.
“New Name In” appears in the display and the cursor
starts blinking.
REHEARSAL TRACK
BANK 1
TR M S F
LR
20
40
-dB
32
GB
Page 33

6 Press DISPLAY repeatedly to select a character type:
To select Press DISPLAY repeatedly until
Uppercase letters “A” appears in the display
Lowercase letters “a” appears in the display
Numbers “0” appears in the display
7 Turn AMS or the scrub dial to select the character.
The selected character blinks.
Characters appear in the following order:
Letters / numbers / symbols
You can use the following symbols:
! ” # $ % & ’ ( ) * + , – . / : ; < = > ? @ _ `
You can press DISPLAY to change the character type
(step 6) at any time.
8 Press AMS or ENTER/YES to enter the selected
character.
The character selected in step 7 lights steadily, and the
cursor shifts to the right, blinks, and waits for the
input of the next character.
REHEARSAL TRACK
BANK 1
TR M S F
LR
20
40
-dB
9 Repeat Steps 7 and 8 to enter the complete title.
If you entered the wrong character
Press 0 or ) until the character to be corrected
starts blinking, then repeat Steps 7 and 8 to enter the
correct character.
To erase a character
Press 0 or ) until the character to be erased starts
blinking, then press EDIT/NO. Pressing EDIT/NO
repeatedly allows you to erase several characters in
order.
To enter a space
Press AMS while the cursor is blinking.
10 Press ENTER/YES.
This completes the disc or track naming procedure.
The disc or track name appears in the display.
Copying a disc or track name (Name Copy)
You can copy a disc or track name and use it to name
another track within the same disc or the disc itself.
1 During stop, play, or pause mode, press EDIT/NO to
display the Edit Menu.
2 Turn AMS to display “Name ?”, then press AMS.
3 Turn AMS to display “Nm Copy ?”, then press AMS.
4 Turn AMS to specify whether you wish to copy the
disc or track name.
• To copy the disc name, turn AMS to display “Disc”
• To copy the track name, turn AMS so that the track
number with the name you want to copy blinks in
the display.
5 Press AMS.
If “No Name” is displayed, no name has been entered
for the disc or selected track number.
6 Turn AMS to specify where you want to copy the
name to.
• To copy the name as the disc name, turn AMS to
display “Disc”
• To copy the name as a track name, turn AMS so that
the track number you want to copy the name to
blinks in the display.
7 Press AMS.
“Complete!!” appears for a few seconds and the disc
or track name is copied.
If “Overwrite?” appears in the display
The disc or track you selected in step 6 already has a
name. To continue and replace the previous name with
the one selected in step 4, press AMS.
To cancel without copying the name
Press EDIT/NO or STOP.
Editing a Recorded MD
To cancel without labeling
Press STOP.
Notes
You cannot enter track names during backtrack recording.
33
GB
Page 34

Naming Discs and Tracks (Name)
Editing a Recorded MD
Erasing a disc or track name (Name Erase)
Use this function to erase the name of a disc or track.
1 During stop, play, or pause mode, press EDIT/NO to
display the Edit Menu.
2 Turn AMS to display “Name ?”, then press AMS.
This step is not necessary during recording.
3 Turn AMS to display “Nm Erase ?”, then press AMS.
4 Turn AMS to specify whether you wish to erase the
disc or track name.
• To erase the disc name, turn AMS to display “Disc”
• To erase the track name, turn AMS so that the track
number with the name you want to erase blinks in
the display.
5 Press AMS.
“Complete!!” appears for a few seconds and the name
is erased.
To cancel without erasing the name
Press EDIT/NO or STOP.
Erasing all the names on a disc (Name All
Erase)
This function erases all the track names and the disc name
in a single operation.
1 During stop, play, or pause mode, press EDIT/NO to
display the Edit Menu.
2 Turn AMS to display “Name ?”, then press AMS.
3 Turn AMS to display “Nm AllErs ?”, then press AMS.
“Nm All Ers??” appears in the display.
4 Press AMS again to erase the MD.
“Complete!!” appears for a few seconds and all of the
names on the disc are erased.
To cancel without erasing all the names
Press EDIT/NO or STOP.
z
You can undo the erase
Use the undo function immediately after erasing the MD (see
page 35).
z
To erase all of the contents of the MD (all tracks and titles)
See “Erasing the Entire Disc (All Erase)” on page 32.
34
GB
Page 35

Undoing the Previous Edit
Operation (Undo)
This function allows you to undo the previous edit
operation and restore the contents of the MD to the state
that existed before the edit operation. However, please
note that you cannot undo an edit operation if you
perform any of the following operations after the edit:
• Press r REC.
• Update the TOC by pressing ENTER/YES or ejecting
the MD.
• Turn off the power or disconnect the AC power cord.
ENTER/YES
UNDO
EDIT/NO
AMS
1 Press UNDO.
One of the following messages appears in the display
according to the type of edit operation you had
performed:
Previous edit operation: Message:
Divide track “DivideUndo?”
Combine tracks “CombinUndo?”
Move track “Move Undo?”
Erase track “Erase Undo?”
Erase disc
Name disc or track
Copy disc or track name
Erase disc or track name
Erase all names
“Name Undo?”
Editing a Recorded MD
2 Press AMS or ENTER/YES.
“Complete!!” appears for a few seconds and the disc is
restored to the state before the edit operation.
To cancel without undoing
Press EDIT/NO or STOP.
z
You can also undo the previous edit operation using the Edit
Menu
Select “Undo ?” from the Edit Menu.
35
GB
Page 36

Additional
Precautions
Information
On safety
Should any solid object or liquid fall into the cabinet, unplug the
unit and have it checked by qualified personnel before operating
it any further.
On power sources
• Before operating the unit, check that the operating voltage of
the unit is identical with your local power supply. The
operating voltage is indicated on the nameplate at the bottom
of the unit.
• The mains switch is located on the top exterior.
• The unit is not disconnected from the AC power source (mains)
as long as it is connected to the wall outlet, even if the unit
itself has been turned off.
• If you are not going to use the unit for a long time, be sure to
disconnect the unit from the wall outlet. To disconnect the AC
power cord, grasp the plug itself; never pull the cord.
• AC power cord must be changed only at the qualified service
shop.
On placement
Do not install the appliance in a confined space, such as a
bookcase or build-in cabinet.
On operation
If the unit is brought directly from a cold to a warm location, or is
placed in a very damp room, moisture may condense on the
lenses inside the unit. Should this occur, the unit may not operate
properly. In this case, remove the MD and leave the unit turned
on for about an hour until the moisture evaporates.
On the MiniDisc cartridge
• Do not open the shutter to expose the MD.
• Do not place the cartridge where it will be subject to extremes
of sunlight, temperature, moisture or dust.
On cleaning
Clean the cabinet, panel and controls with a soft cloth slightly
moistened with a mild detergent solution. Do not use any type of
abrasive pad, scouring powder or solvent such as alcohol or
benzine.
36
If you have any questions or problems concerning your unit,
please consult your nearest Sony dealer.
GB
Page 37

Handling MDs
Display Messages
The MD is enclosed in a cartridge to protect the disc from
debris or finger prints and make it easy to handle.
However, the presence of debris or a warped cartridge
may inhibit the disc from operating properly. To assure
that you can always listen to the highest quality music,
follow the precautions below.
Do not touch the internal disc directly
Forcing the shutter open may damage the MD.
shutter
cartridge
Where to keep MDs
Do not place the cartridge where it may be exposed to
direct sunlight or extremely high or heat and humidity.
Regular maintenance
Wipe dust and debris from the surface of the cartridge
with a dry cloth.
The following table explains the various messages that
appear in the display.
Message Meaning
Blank Disc A new (blank) or erased MD has been
Cannot Copy An attempt was made to make a second copy
Cannot Edit An attempt was made to edit the MD during
Disc Full The MD is full (see “System Limitations” on
Impossible The unit cannot do the specified editing
Din Unlock/C71 If shown for only a brief moment, it was
Name Full The titling capacity of the MD has reached its
Disc Error/C13/C14
No Disc There is no MD loaded in the unit.
Pre-mastered Recording is not possible because the loaded
Protected/C11 The disc is record protected to prevent
REC Error/C13 Recording was not successfully completed.
Standby The previously recorded contents were not
inserted.
from a digitally dubbed MD (see page 41).
Program playback.
page 38).
operation.
caused by the digital broadcast signal being
recorded. This does not effect the recording.
The digital cable was disconnected during
digital recording from the component
connected to a digital input jack, or the
connected component was turned off.
limit (about 1,700 characters).
The unit could not correctly read the disc
information.
disc is a pre-mastered commercial product.
accidental erasure.
The disc is extremely dirty (oily film,
fingerprints, etc.) or damaged, or the disc
does not conform to the MD specification.
correctly written to the MD, or this unit did
not store the previous playback modes.
Additional Information
37
GB
Page 38

System Limitations
Troubleshooting
The MD (MiniDisc) recording system is radically different
from those used in cassette and DAT decks and is
characterized by the limitations described below. Note,
however, that these limitations are due to the nature of the
MD recording system itself and are not mechanical
malfunctions.
“Disc Full” lights up even before the MD has reached the
maximum recording time (60 or 74 minutes)
When 256 tracks have been recorded on the MD, “Disc Full”
lights up regardless of the total recorded time. More than 256
tracks cannot be recorded on the MD. To continue recording,
erase unnecessary tracks or use another recordable MD.
“Disc Full” lights up before the maximum number of tracks is
reached
Fluctuations in emphasis within tracks are sometimes
interpreted as track intervals, incrementing the track count
and causing “Disc Full” to light up.
The remaining recording time does not increase even after
erasing numerous short tracks
Tracks under 12 seconds in length are not counted and so
erasing them may not lead to an increase in the recording
time.
Tracks cannot be combined
It may not be possible to combine tracks created through
editing.
The total recorded time and the remaining time on the MD may
Additional Information
not total the maximum recording time (60 or 74 minutes)
Recording is done in minimum units of 2 seconds each, no
matter how short the material. The contents recorded may
thus be shorter than the maximum recording capacity. Disc
space may also be further reduced by scratches.
Tracks created through editing may exhibit sound dropout during
search operations.
Track numbers are not recorded correctly
Depending on the contents of the CD being recorded, the CD
tracks may be divided into several smaller tracks during
digital recording. Also, depending on the program source,
activating the automatic track marking function “L.Sync On”
during recording may result in track numbers different from
the original.
“TOC Reading” appears for a long time
The first time you insert a newly purchased recordable MD,
“TOC Reading” is displayed longer than for MDs that have
been previously used.
The correct recorded/playing time may not be displayed during
playback of monaural-format MDs.
If you experience any of the following difficulties while
using the unit, use this troubleshooting guide to help you
remedy the problem. Should any problem persist, consult
your nearest Sony dealer.
Operation is not possible.
/ The MD is dirty or damaged (“Disc Error”
appears). Take the MD out and insert it again. If
“Disc Error” appears again, replace the MD.
Playback is not possible.
/ Moisture has formed inside the unit. Take the MD
out and wait several hours until the moisture
evaporates.
/ The unit is not on. Press U to turn it on.
/ The MD was inserted incorrectly. Slide the MD into
the disc slot with the label side up and the arrow
pointing towards the opening.
/ Nothing has been recorded on the MD (the music
calendar does not appear). Replace the disc with
one that has been recorded.
Recording is not possible.
/ The MD is record-protected (“Protected” and
“C11” are displayed). Close the record-protect slot.
/ The unit is not connected properly to the sound
source. Connect properly.
/ The recording level is too low. Adjust the recording
level properly (see page 24).
/ A pre-mastered MD is inserted. Replace it with a
recordable MD.
/ There is not enough time left on the MD. Replace it
with another recordable MD with fewer recorded
tracks, or erase unnecessary tracks.
/ There was a power failure or the AC power cord
was disconnected during recording. The data
recorded to that point may be lost. Record again
from the beginning.
Lots of static noise.
/ A strong magnetic force from a television (etc.) is
interfering with operations. Move the unit away
from the TV (etc.).
MD cannot be removed when partially inserted.
/ The lock function works to prevent a partially
inserted MD from being removed by pulling or
pressing § EJECT. Push the MD all the way into
the unit, then press § EJECT to remove the disc.
Note
If the unit does not operate properly even after you’ve attempted
the prescribed remedies, turn off the power, then reinsert the
plug into the power outlet.
38
GB
Page 39

Specifications
System MiniDisc digital audio
system
Disc MiniDisc
Laser Semiconductor laser
(λ = 780 nm)
Emission duration:
continuous
Laser output MAX 44.6 µW*
* This output is the value
measured at a distance of
200mm from the objective
lens surface on the Optical
Pick-up Block with 7mm
aperture.
Recording/Playback Time
74 min. maximum
(when using MDW-74)
Revolutions (CLV)400 r/min to 900 r/min
Error correction Advanced Cross Interleave
Reed Solomon Code
(ACIRC)
Sampling frequency 44.1 kHz
Coding Adaptive Transform
Acoustic Coding (ATRAC)
Method of Transformation
EFM
Number of channels
2 channel (stereo)
Inputs
LINE (ANALOG) IN
Jack type: Phono jacks
Impedance: 47 kilohms
Rated Input: 500 mVrms
Min. Input: 125 mVrms
DIGITAL OPTICAL IN
Jack type:
Optical wave length: 660 nm
Rated Input: –
Min. Input: –
DIGITAL COAXIAL IN
Jack type: Phono jacks
Impedance: 75 ohms
Rated Input: 0.5Vp-p ±20%
Min. Input: –
FOOT SW REC/PAUSE
Jack type: Standard
Impedance: –
Rated Input: –
Min. Input: –
FOOT SW PLAY/PAUSE
Jack type: Standard
Impedance: –
Rated Input: –
Min. Input: –
Outputs
Square optical
connector jack
monaural jack
monaural jack
Other
Power requirements
Where purchased Power requirements
U.S.A. and Canada 120 V AC, 60 Hz
Continental Europe 220-230 V AC, 50/60 Hz
and UK
Power consumption
28 W
Dimensions 300 × 121 × 356 mm
(117/8 × 47/8 × 141/8 in.)
including projecting parts
and controls
Mass (Approx.) 4.1 kg (9 lb 1 oz)
Optional accessories
Foot switch FS-A8
US and foreign patents licenced from
Dolby Laboratories Licensing
Corporation.
Design and specifications are subject
to change without notice.
Additional Information
Signal-to-Noise Ratio
Greater than 96 dB (during
playback)
Wow and Flutter Below measurable limit
(±0.001% W. PEAK)
PHONES Jack type: Standard stereo
jack
Voltage: 28 mW
Impedance: 32 ohms
LINE (ANALOG) OUT
Jack type: Phono Jacks
Voltage: 2Vrms
(at 50 kilohms)
Impedance: greater than
10 kilohms
39
GB
Page 40

Edit Menu Chart
You can perform various edit operations on this unit by
using the Edit Menu. In addition, the Setup Menu is also
located within the Edit Menu. Although each menu
operation was explained in previous sections, we have
included the chart at right for your reference.
Notes
• The available menu operations change according to the current
mode of operation (stop, playback, and recording).
• Certain menus may contain other additional menus.
To enter the Edit Menu
Press EDIT/NO.
Setup Menu Chart
You can make various settings on this unit by using the
Setup Menu. Operation related to each menu were
explained in the previous sections. The table below
outlines each menu, including the various parameters and
initial settings.
Display Function See page
Name? Name disc or track 32
Erase? Erase a track 31
Move? Change track number 30
Combine? Combine two tracks 29
Divide? Divide a track 28
All Erase? Completely erase the disc 32
Undo? Undo previous edit operation 35
Setup Menu? Enter the Setup Menu 40
To enter the Setup Menu
• Press EDIT/NO twice during stop mode.
• Press EDIT/NO once to display the Edit Menu, turn
AMS to display “Setup Menu?”, then press AMS.
Number
Additional Information
01
02
03
04
05
06
07
08
09
10
11
12
13
Function Parameters See page
To create a program – 20
To specify hot-start tracks –
Erases the track mark stored at the pad –
Determines the point at which playback will start
when AMS is rotated.
Turns resume play on or off Resume (Off / Play)
Determines whether the unit will assign track
numbers automatically when recording analog
sources.
Determines the reference input level to be used
with the L.Sync On setting.
Determines the low level length to be used with
the L.Sync On setting.
Determines the track number timing to be used
with the L.Sync On setting.
Determine the auto cue reference level AC(T) : (–72 dB ~ –0 dB)
Determine the auto cue interval AC(O) : (–9s85f ~ 9s85f) 14
Determines the rehearsal playback length. RH(L) : (0s00f ~ 9s85f)
Determines the rehearsal playback interval. RH(I) : (0s ~ 8.0s) 28
JOG : (Track / Cue)
L.Sync (Off / On)
LS(T) : (–72 dB ~ –0 dB) 25
LS(W) : (0s ~ 9.5s)
LS(O) : (–9s85f ~ 9s85f)
Initial setting
–
–
–
JOG : Track
Resume Off
L.Sync Off
LS(T) : –50 dB
LS(W) : 1.5s
LS(O) : 0s00f
AC(T) : –50 dB
LS(O) : 0s00f
RH(L) : 2s00f
RH(I) : 1.0s
16
13
14
21
25
25
25
14
28
40
GB
Page 41

Guide to the Serial Copy Management System
This MD deck uses the Serial Copy Management System,
which allows only first-generation digital copies to be
made of pre-mastered software via the unit’s digital input
jack. An outline of this system appears below:
1 You can record from digital program sources (CDs, DATs or
pre-mastered MDs) onto a DAT tape or recordable MD via
digital input jack on the DAT or MD deck.
You cannot, however, record from this recorded DAT tape or
MD onto another DAT tape or recordable MD via the digital
input jack on the DAT or MD deck.
CD player
DAT deck
Playing
Optical cable or
coaxial digital
connecting cable
Recording
DAT or MD
Playback
Digital output jack Line (analog) output jacks
Optical cable or
coaxial digital
connecting cable
Digital input jack Line (analog) input jacks
Recording
DAT deck or
MD deck
DAT deck or
MD deck
DAT deck or
MD deck
MD deck
Digital output jack
Digital input jack
First-generation
DAT tape or MD
recorded via
digital-to-digital
connection
Audio connecting
cord
2 You can record the digital input signal of a digital satellite
broadcast onto a DAT tape or recordable MD via the digital
input jack on the DAT or MD deck which is capable of handling
a sampling frequency of 32 kHz or 48 kHz. You can then record
the contents of this recorded DAT tape or MD (first-generation)
onto another DAT tape or recordable MD via digital input jack
on the DAT or MD deck to create a second-generation digital
copy. Subsequent recording from the second-generation copy
onto another recordable DAT tape or MD is possible only
through the analog input jack on the DAT or MD deck. Note,
however, that on some BS/CS tuners, second-generation digital
copying may not be possible.
Playing
Optical cable or
coaxial digital
connecting cable
Recording
DAT or MD
Playback
Optical cable or
coaxial digital
connecting cable
Recording
DAT or MD
Playback
BS/CS tuner
Digital output jack
Digital input jack
DAT deck or
MD deck
First-generation
DAT tape or MD
recorded via
digital-to-digital
connection
DAT deck or
MD deck
Digital output jack
Digital input jack
DAT deck or
MD deck
Secondgeneration DAT
tape or MD
recorded via
digital-to-digital
connection
DAT deck or
MD deck
Additional Information
Digital output jack
Optical cable or
coaxial digital
connecting cable
Digital input jack Line (analog) input jacks
Recording
DAT deck or
Line (analog) output jacks
Audio connecting
cord
MD deck
41
GB
Page 42

Guide to the Serial Copy Management
System
3 You can record a DAT tape or MD recorded via the DAT or MD
deck’s analog input jack onto another DAT tape or MD via the
DAT or MD deck’s digital output jack. You cannot, however,
make a second-generation DAT tape or MD copy via the DAT
or MD deck’s digital output jack.
Turntable
CD playerTuner
Cassette deck DAT deck
Microphone
amplifier
Playing
Audio connecting cord
Recording
DAT or MD
Additional Information
Playback
Optical cable or
coaxial digital
connecting cable
Recording
MD deck
Line (analog)
output jacks
Line (analog)
input jacks
DAT deck or
MD deck
DAT tape or MD
recorded via
analog-to-digital
connection
DAT deck or
MD deck
Digital output jack
Digital input jack
DAT deck or
MD deck
DAT or MD
Playback
Digital output jack
Optical cable or
coaxial digital
connecting cable
Digital input jack
Recording
GB
42
First-generation
DAT tape or MD
recorded via
digital-to-digital
connection
DAT deck or
MD deck
Line (analog) output jacks
Audio connecting
cord
Line (analog) input jacks
DAT deck or
MD deck
Page 43

Index
A, B
Adjusting
a cue point 13
the pitch 15
the recording level 24
the speed 15
Audio cords 5
AUTO CUE 14
AUTO PAUSE 14
C
Changing
display modes 18, 30
hot start tracks 17
program tracks 21
Checking
elapsed time 18
hot start tracks 17
program tracks 20
remaining time 18
Cleaning 36
Combining tracks 29
D
Display
messages 37
modes 18
parts 9
Dividing tracks 28
E, F, G
Editing 27
Edit Menu 40
Erasing
all names 34
all tracks and names 32
individual names 34
individual tracks 31
H, I, J, K
Hooking up 5
Hot Start 16
L
Labeling, see Naming
Locating
a particular point in a track 12
a specific track 11
M
Maintenance 37
Marking track numbers 24, 28
MD
loading 11, 23
pre-mastered 17, 20, 37, 38
recordable 17, 20
taking out 12
Moving tracks 30
M, N
Naming
an MD 32
a track 32
O
Optical cable 5
Optional accessories 39
P, Q
Pausing
playback 12
recording 24
Playback
Hot Start 16
normal 11
Program 20
repeat 19
R
Recording 23, 24
Record-protect tab 24
Repeating 19
one track 19
the entire disc 19
S
Sampling frequency 5, 39
Sampling rate converter 5
SCMS (Serial Copy Management
System) 41
Setup Menu 40
Specifications 39
Supplied accessories 39
System limitations 38
T
Track numbers
automatic marking 24
manual marking 24
Troubleshooting 38
U, V, W, X, Y, Z
Undoing the last edit 35
Additional Information
43
GB
Page 44

AVERTISSEMENT
Attention - L’utilisation
d’instruments optiques avec cet
appareil augmente le danger
pour les yeux.
N’installez pas l’appareil dans
un espace confiné comme dans
une bibliothèque ou un meuble
encastré.
La plaque signalétique est
située sous l’enregistreur.
Cet appareil fait partie des produits laser
de la classe 1. L’étiquette CLASS 1 LASER
PRODUCT est collée sous l’appareil.
Bienvenue!
Merci d’avoir porté votre choix sur cette
platine MiniDisc Sony. Avant de la mettre
en service, veuillez lire attentivement le
mode d’emploi et le conserver pour toute
référence future.
Au sujet de ce
mode d’emploi
Ce mode d’emploi décrit la façon d’utiliser
l’enregistreur/lecteur MiniDisc
MDS-DRE1.
Conventions
L’icône suivante est utilisée dans ce mode
d’emploi:
Indique des suggestions et conseils
z
qui simplifient une opération.
Pour éviter tout risque
d’incendie ou d’électrocution,
ne pas exposer cet appareil à la
pluie ou à l’humidité.
LE REVENDEUR NE PEUT EN
AUCUN CAS ÊTRE TENU
RESPONSABLE DE DOMMAGES
DIRECTS, INDIRECTS OU
ACCIDENTELS, QUELLE QU’EN
SOIT LA NATURE, OU DE PERTES
OU DEPENSES RESULTANT D’UN
PRODUIT DEFECTUEUX OU DE
L’UTILISATION D’UN PRODUIT.
FR
2
Page 45

Table des matières
Préparatifs 4
Raccordements 4
Nomenclature 6
Commandes 6
Afficheur 9
Prises d’entrée et de sortie 10
Fonctions DJ (disc-jockey) 11
Sélection d’une plage 11
Pour spécifier un point de localisation 12
Pour assigner des points de localisation aux touches
à effleurement 13
Pause automatique au début d’une plage 14
Changement de la vitesse et de la hauteur du son
pendant la lecture 15
Bouclage d’un passage d’une plage 16
Pour commencer la lecture des plages aussi
rapidement que possible (fonction Hot Start) 16
Autres options de lecture 18
Utilisation de l’afficheur 18
Pour lire des plages de façon répétée (lecture
répétée) 19
Lecture de plages dans un ordre différent (lecture
programmée) 20
Reprise de la lecture après un arrêt (fonction
Resume Play) 21
Montage de minidisques
enregistrés 27
Remarques sur le montage 27
Division d’une plage (fonction Divide) 28
Combinaison de deux plages (fonction
Combine) 29
Changement de numéros de plages (fonction
Move) 30
Effacement d’une plage (fonction Erase) 31
Effacement de toutes les plages d’un minidisque
(fonction All Erase) 32
Titrage de minidisques et de plages (fonction
Name) 32
Annulation du dernier montage (fonction
Undo) 35
Informations complémentaires 36
Précautions 36
Manipulation des minidisques 37
Messages affichés 37
Limites du système 38
Guide de dépannage 38
Spécifications 39
Tableau des fonctions du menu de montage 40
Tableau des fonctions du menu de réglage 40
Système de protection contre la copie abusive 41
Index 43
FR
Enregistrement sur un
minidisque 22
Remarques sur l’enregistrement 22
Enregistrement sur un minidisque 23
Inscription des numéros de plages pendant
l’enregistrement 24
Enregistrement pendant la lecture (enregistrement
Backtrack) 25
FR
3
Page 46

Préparatifs
Raccordements
Ce chapitre décrit la façon de
raccorder cet appareil à d’autres
appareils audio. Lisez attentivement
ce chapitre avant d’effectuer tout
raccordement.
Déballage
Vérifiez si les articles suivants se trouvent dans
l’emballage:
• Cordon d’alimentation secteur (1)
• Mode d’emploi (1)
S’il manque quelque chose, veuillez contacter le
revendeur chez qui vous avez effectué l’achat ou un
centre de service après-vente Sony.
Exemples de raccordements
p Raccordement à un mixeur
LINE OUT LINE IN
Mixeur
Sens du signal
p Raccordement à un lecteur CD, etc.
TAPE/MD
IN
Amplificateur
Sens du signal
PHONO
IN
COAXIAL OUT
tourne-disque,
DIGITAL
Lecteur CD,
Platine
etc.
DIGITAL
OPTICAL OUT
etc.
FR
4
Page 47

Cordons nécessaires
• Cordons de liaison audio (non fournis) (2)
Blanc Blanc
Gauche (L) Gauche (L)
Droite (R) Droite (R)
Rouge Rouge
p Raccordement à des appareils numériques
(Lecteur CD, platine DAT, autre platine MD ou
amplificateur avec prises d’entrée numériques)
Vous pourrez effectuer des enregistrements numériques si
vous raccordez l’appareil à un lecteur CD, à une platine
MD ou à une platine DAT, etc.
Raccordez l’appareil à l’aide d’un câble numérique
optique non fourni ou d’un câble numérique coaxial (non
fourni).
Préparatifs
• Câble numérique optique (non fourni) (1)
• Câble numérique coaxial (non fourni) (1)
Raccordements
Ce chapitre décrit la façon de raccorder cet appareil à un
mixeur, à un amplificateur ou à d’autres appareils (tels
qu’un lecteur CD). Veillez à mettre tous les appareils hors
tension avant d’effectuer un raccordement quelconque.
p Raccordement à un mixeur ou à un
amplificateur
Raccordez le mixeur ou l’amplificateur à LINE
(ANALOG) IN/OUT à l’aide de cordons de liaison audio
(non fournis).
Raccordez les fiches rouges aux prises rouges (R) et les
fiches blanches aux prises blanches (L). Enfoncez les
fiches à fond dans les prises pour éliminer tout ronflement
ou bruit.
Cet appareil Mixeur ou amplificateur (etc.)
LINE
(ANALOG)
OUTIN
L
R
Sens du signal
TAPE / MD
INOUT
L
R
• Utilisation d’un câble numérique optique
Enlevez les caches de protection des prises optiques,
puis insérez les fiches tout droit dans les prises jusqu’à
ce qu’elles s’encliquettent. Ne pas plier ni nouer les
câbles numérique optiques.
Cet appareil Appareil numérique
DIGITAL
COAXIALINOPTICAL
IN
DIGITAL
OPTICAL
OUTIN
Sens du signal
• Utilisation d’un câble de liaison numérique coaxial
Cet appareil Appareil numérique
DIGITAL
COAXIALINOPTICAL
IN
DIGITAL
COAXIAL
OUTIN
Sens du signal
z Si ”Din Unlock” et “C71” apparaissent sur l’afficheur
Vérifiez les connexions du câble numérique optique ou du
câble numérique coaxial. Assurez-vous aussi que l’appareil
raccordé est sous tension.
z Conversion automatique de la fréquence
d’échantillonnage
Un convertisseur de fréquence d’échantillonnage intégré
convertit automatiquement les signaux numériques dont la
fréquence d’échantillonnage est de 32 kHz ou 48 kHz en signaux
numériques MD (fréquence d’échantillonnage de 44,1 kHz).
Vous pouvez ainsi enregistrer des sources DAT (32 kHz et 48
kHz) et des émissions de radiodiffusion satellite (32 kHz et 48
kHz) en plus des sources de programme CD et MD.
Remarque
L’enregistrement numérique est impossible quand “Din
Unlock”, “C71” ou “Cannot Copy” apparaît sur l’afficheur.
Dans ce cas, raccordez la source de programme aux prises
LINE (ANALOG) IN, réglez INPUT sur ANLG, et effectuez
un enregistrement analogique.
p Après avoir fini tous les raccordements,
utilisez le cordon d’alimentation secteur pour
raccorder cet appareil à une prise murale.
FR
5
Page 48

Nomenclature
Ce chapitre décrit les parties de
l’appareil et leurs fonctions de base de
même que certaines opérations de
base. Les nombres entre parenthèses
renvoient aux pages de ce mode
d’emploi contenant des explications
détaillées.
FR
6
Commandes
1 Interrupteur d’alimentation (U) (11, 23)
Appuyez sur cet interrupteur pour allumer ou
éteindre l’appareil.
2 Touche d’annulation (UNDO) (35)
Pour annuler l’opération de montage précédente et
rétablir les données MD d’origine.
3 Touches de mode automatique (AUTO MODE) (14)
Utilisez ces touches pour obtenir une pause
automatique avant la lecture d’une plage.
AUTO CUE
Utilisez cette touche pour que l’appareil saute l’espace
vierge au début de chaque plage et se mette en mode
de pause juste avant le début du son.
AUTO PAUSE
Utilisez cette touche pour que l’appareil se mette en
mode de pause au début de chaque plage.
AUTO OFF
Utilisez cette touche pour annuler les modes automatiques.
4 Touches à effleurement / témoins de touches à
effleurement (11, 13)
•
Quand un témoin de touche à effleurement est vert:
Appuyez pour commencer la lecture à partir du début
de la plage correspondante. Pour commuter entre
différents groupes de plages, appuyez sur BANK.
•
Quand un témoin de touche à effleurement est rouge:
Appuyez pour commencer la lecture à partir du point de
localisation assigné précédemment. Pour assigner d’autres
points de localisation, voir “Pour assigner des points de
localisation aux touches à effleur ement” à la page 13.
5 Touche 0 (12)
Appuyez sur cette touche en maintenant la pression
pour revenir rapidement en arrière.
6 Touche d’enregistrement (r REC) (23, 24, 25)
• Appuyez sur cette touche à l’arrêt pour entrer en
mode d’attente d’enregistrement.
• Appuyez sur cette touche pendant la lecture ou la
pause pour entrer en mode d’attente
d’enregistrement Backtrack.
• Appuyez sur cette touche pendant l’enregistrement
pour enregistrer manuellement un numéro de plage.
7 Touche/témoin de pause d’enregistrement (REC
PAUSE) (24, 25)
•
Appuyez sur cette touche pendant une pause
d’enregistrement ou en mode d’attente d’enregistr ement
Backtrack pour commencer l’enregistrement.
• Appuyez sur cette touche pendant l’enregistrement
(normal) pour interrompre l’enregistrement.
Le témoin clignote pendant la pause d’enregistrement
ou en mode d’attente d’enregistrement Backtrack.
8 Touche d’arrêt (STOP) (12, 24)
Appuyez sur cette touche pour arrêter la lecture ou
l’enregistrement.
9 Touche/témoin de point de localisation (CUE) (12)
Appuyez sur cette touche pour revenir au dernier
point de localisation (le dernier point où la lecture
avait commencé) et marquer une pause.
Le témoin s’allume pendant la pause au point de localisation.
Page 49

INPUT
COAX ANLGOPT
REC VOL
SENGLE PLAY
8
DISPLAY
4
010
LOOP
RELOOP
OUT
IN
AMS
PLAY MODE
EDIT/NO
ENTER/YES
BANK
UNDO
CUE
PAUSE
OFF
AUTO MODE
1
5
PUSH ENTER
2
6
REPEAT
3
7
Nomenclature
REC
REC PAUSE STOP
CUE
PLAY/PAUSE
0
Touche / témoin de lecture/pause (PLAY/PAUSE) (12)
• Appuyez sur cette touche à l’arrêt ou pendant une
pause pour commencer la lecture.
• Appuyez sur cette touche pendant la lecture pour
interrompre la lecture.
S’allume pendant la lecture, clignote pendant une pause.
!¡ Molette (13)
• Tournez cette molette pendant la lecture pour
changer la vitesse de lecture.
•
Tournez cette molette pendant une pause pour reproduire le
minidisque en synchronisation avec le mouvement de la molette.
•
Tournez cette molette tout en maintenant la pression sur la
touche CUE pour régler la position du point de localisation.
!™ Curseur PITCH (15)
Permet de régler la hauteur du son.
!£ Curseur SPEED (15)
Permet de régler la vitesse.
!¢ Touche ) (12)
Appuyez sur cette touche en maintenant la pression
pour avancer rapidement.
!∞ Touches LOOP (16)
Utilisez ces touches pour créer une boucle. La boucle
reste mémorisée quand vous quittez cette boucle, de
telle sorte que vous pouvez facilement y revenir.
Touche RELOOP
Appuyez sur cette touche après avoir quitté la boucle pour revenir
au point de départ de la boucle mémorisée et reprendre le bouclage.
Touche LOOP IN
Appuyez sur cette touche pour régler le point de
départ de boucle.
Touche LOOP OUT
Appuyez sur cette touche pour régler le point de fin de
boucle et commencer le bouclage. Appuyez sur cette
touche pendant le bouclage pour sortir de la boucle.
SPEEDPITCH
!§ Touche d’affichage (DISPLAY) (18, 33)
Appuyez sur cette touche pour changer les informations
affichées. A chaque pression sur cette touche, vous
pouvez changer l’affichage de la façon suivante:
• Temps restant: Le compteur affiche le temps restant
sur la plage actuelle.
• Temps écoulé: Le compteur affiche le temps écoulé
sur la plage actuelle.
Quand le mode de lecture est réglé sur Program ou Hot
Start, il est aussi possible d’afficher l’indication suivante:
•
Plage de lecture: Les numéros des plages
programmées ou Hot Start sont indiqués dans la zone
de titre et la plage en cours de lecture clignote. Le
compteur affiche le temps restant sur la plage actuelle.
!¶ Bouton de réglage du volume (REC VOL) (24)
Utilisez ce bouton pour régler le niveau de l’entrée du
signal des prises LINE IN pendant l’enregistrement
analogique. Cette fonction est effective seulement
quand INPUT est réglé sur “ANLG”.
!• Touche de sélection d’entrée (INPUT) (23)
Utilisez cette touche pour sélectionner la prise d’entrée
pour la source de programme d’enregistrement.
!ª Touche de lecture simple (SINGLE PLAY) (15, 19)
• Appuyez sur cette touche pour régler l’appareil de
telle sorte qu’il s’arrête automatiquement après
chaque plage.
•
Appuyez sur cette touche pendant la lecture répétée
pour sélectionner un des modes de répétition suivants:
– Répétition simple (répétition de la plage actuelle).
– Répétition de minidisque (répétition de toutes les
plages du minidisque).
(voir page suivante)
FR
7
Page 50

Commandes
@º Touche de répétition (REPEAT) (19)
Appuyez sur cette touche pour la lecture répétée.
Appuyez de nouveau pour annuler.
@¡ Touche de sélection du mode de lecture (PLAY
MODE) (16, 20)
Nomenclature
Appuyez sur cette touche pour changer le mode de
lecture. A chaque pression, le mode de lecture change
de la façon suivante:
• Lecture normale
• Lecture programmée (PROGRAM): Appuyez sur la
touche PLAY/PAUSE pour reproduire les plages
dans l’ordre de programmation.
• Lecture immédiate (HOT START): Appuyez sur une
touche à effleurement pour commencer la lecture
plus rapidement. Une plage peut être assignée à
chaque touche à effleurement.
@™ Commande de recherche de plage (AMS (≠ /
± ))
• Tournez-la pour localiser le début de la plage
suivante ou précédente.
• Tournez-la quand vous utilisez les menus de
montage ou de réglage pour afficher ou sélectionner
le paramètre souhaité (etc.), puis appuyez dessus
pour valider le réglage.
@£ Touche de montage/non (EDIT/NO)
• Appuyez sur cette touche pour annuler l’opération
sélectionnée.
• Appuyez sur cette touche pour entrer ou sortir des
menus de montage ou de réglage.
Pour une liste des paramètres disponibles dans les
menus de montage ou de réglage, consultez les
tableaux de la page 40.
@¢ Touche de validation/oui (ENTER/YES)
• Appuyez sur cette touche pour exécuter l’opération
sélectionnée.
• Appuyez sur cette touche quand le témoin TOC est
allumé pour écrire les données du sommaire (TOC)
sur le minidisque et valider l’enregistrement ou le
montage.
@∞ Touche de sélection du groupe de plages (BANK)
(12)
Appuyez sur cette touche de façon répétée pour
changer le groupe (BANK) de plages assignées aux
touches à effleurement.
FR
8
Page 51

Afficheur
REHEARSAL TRACK DISC
BANK 1
BACK TRACK
BANK 2
RECORDING
BANK 3
BANK 4
REC
TR
OVER
L.SYNC
PROGRAM
%
MSF
LOOP
RELOOP
REPEAT 1
A-B
A.CUE
A.PAUSE
HOT START
TOC
EDIT
MONO L R
0
4
8
12
20
40
-dB
Nomenclature
1 Témoins de groupe (BANK) (12)
S’allument pour afficher le groupe de plages (BANK)
actuellement assignées aux touches à effleurement.
2 Affichage du numéro de plage et du compteur
• Indique le numéro de la plage et le temps de la
plage pendant la lecture ou l’enregistrement. Le
temps de plage clignote quand il reste moins de 10
secondes sur la plage pendant la lecture.
• Indique le nombre total de plages et le temps du
minidisque à l’arrêt.
3 Témoins de fonctionnement
S’allument pour afficher le mode de fonctionnement
actuel de l’appareil. (Lecture, enregistrement, pause, etc.)
4 Témoin d’enregistrement de boucle (RELOOP) (16)
S’allume pour indiquer qu’une boucle a été
mémorisée.
5 Témoin de boucle (LOOP) (16)
Clignote pendant le réglage d’une boucle. S’allume
pendant le bouclage.
6 Témoins de répétition (REPEAT) (19)
• S’allument pendant la lecture répétée.
“REPEAT” s’allume quand la répétition de tout le
minidisque est sélectionnée.
“REPEAT 1” s’allume quand la répétition d’une
seule plage est sélectionnée.
• “1” s’allume quand l’appareil est réglé pour s’arrêter
automatiquement après chaque plage.
7 Témoins de mode automatique (14)
S’allument pendant la lecture en mode automatique.
• “A.CUE” s’allume quand l’appareil est réglé pour
sauter l’espace blanc au début de chaque plage et
passer en mode de pause juste avant le début du son
(AUTO CUE).
• “A.PAUSE” s’allume quand l’appareil est réglé pour
passer en mode de pause au début de chaque plage
(AUTO PAUSE).
8 Témoins de sommaire (TOC) (23, 27)
•
“TOC” s’allume pour indiquer la présence de données de
sommaire qui n’ont pas été écrites sur le minidisque. “TOC”
clignote pendant l’écriture des données de sommaire.
•
“TOC EDIT” s’allume pendant les opérations de montage.
9 Témoin de reproduction monophonique (MONO)
S’allume pendant la lecture de signaux audio monophoniques.
(Cet appareil ne peut pas enregistrer en monophonie.)
0 Indicateurs de niveau
Affichent le niveau des signaux audio pendant la
lecture et l’enregistrement.
!¡ Témoin de lecture immédiate (HOT START) (16)
S’allume quand l’appareil est réglé sur le mode de
lecture “Hot Start”.
!™ Témoin de lecture programmée (PROGRAM) (20)
S’allume quand l’appareil est réglé sur le mode de
lecture programmée.
!£ Témoin de synchronisation (L.SYNC) (24)
S’allume quand l’appareil est réglé de façon à assigner
automatiquement des numéros de plages pendant
l’enregistrement analogique.
!¢ Affichage du titre
Indique les titres de plage et de minidisque, les
paramètres du menu de montage et les paramètres du
menu de réglage, etc.
!∞ Témoin de minidisque (DISC)
S’allume quand le titre du minidisque, etc. est indiqué
dans l’afficheur du titre.
!§ Témoin de plage (TRACK)
S’allume quand le titre de la plage, etc. est indiqué
dans l’afficheur du titre.
!¶ Témoins d’enregistrement en mode Backtrack
(BACK TRACK RECORDING) (25)
“BACK TRACK RECORDING” s’allume et l’image du
minidisque tourne pendant l’enregistrement Backtrack.
Quand vous arrêtez l’enregistrement, le témoin
clignote alors que l’appareil écrit les informations
enregistrées sur le minidisque.
Si l’image du minidisque tourne plus vite et
l’indicateur clignote pendant l’enregistrement, arrêtez
d’utiliser les touches à effleurement, la molette et les
fonctions de bouclage jusqu’à ce que l’image du
minidisque ralentisse et que le témoin soit allumé en
continu. Si vous continuez à utiliser ces fonctions,
l’appareil risque d’arrêter l’enregistrement.
!• Affichage de répétition (REHEARSAL) (28)
S’allume pendant la lecture avec répétition.
FR
9
Page 52

Prises d’entrée et de sortie
LINE
(ANALOG)
IN OUT
L
R
DIGITAL
COAXIALINOPTICAL
IN
FOOT SW
~AC IN
REC/
PAUSE
PLAY/
PAUSE
Panneau avant
Panneau arrière
Nomenclature
EJECT
1 Touche d’éjection (§ EJECT) (12)
Appuyez sur cette touche à l’arrêt pour éjecter le
minidisque.
Si des données de sommaire n’ont pas encore été
écrites sur le minidisque (si le témoin TOC est allumé),
l’appareil écrit les données de sommaire sur le
minidisque avant d’éjecter ce dernier.
2 Logement du minidisque (11, 23)
Insérez un minidisque dans le logement.
3 Prise de casque (PHONES)
Cette prise est une prise standard 6,35 mm pour le
branchement d’un casque stéréo.
4 Bouton de réglage du volume sonore du casque
(PHONE LEVEL)
Utilisez ce bouton pour ajuster le volume du casque.
MIN MAX
PHONES PHONE LEVEL
1 Prise d’entrée de ligne analogique (LINE (ANALOG)
IN) (5)
Utilisez cette prise pour l’entrée des signaux
analogiques provenant d’autres appareils.
2 Prise de sortie de ligne analogique (LINE (ANALOG)
OUT) (5)
Utilisez cette prise pour la sortie des signaux
analogiques vers d’autres appareils.
3 Prise d’entrée numérique coaxiale (DIGITAL
COAXIAL IN) (5)
Raccordez à cette prise un câble numérique coaxial
pour l’entrée des signaux numériques provenant
d’autres appareils.
4 Câble d’entrée numérique optique (DIGITAL
OPTICAL IN) (5)
Raccordez à cette prise un câble numérique optique
pour l’entrée des signaux numériques provenant
d’autres appareils.
5 Prise d’alimentation AC IN (5)
Branchez sur cette prise le cordon d’alimentation.
6~7 Prises de commande au pied (FOOT SW)
Utilisez ces prises pour raccorder une commande au
pied SONY FS-A8 (vendue séparément).
6 Prise de lecture/pause (PLAY/PAUSE)
Branchez une commande au pied extérieure (etc.) à
utiliser au lieu de la touche PLAY/PAUSE.
7 Prise d’enregistrement/pause (REC/PAUSE)
Branchez une commande au pied extérieure (etc.) à
utiliser au lieu de la touche REC PAUSE.
10
FR
Page 53

Fonctions DJ
Sélection d’une plage
(disc-jockey)
Ce chapitre fournit des
renseignements sur les différents
modes de lecture et fonctions de
recherche conçus pour un spectacle de
type disc-jockey.
Insérez simplement un minidisque et appuyez sur la
touche à effleurement correspondant à la plage que vous
souhaitez écouter. La lecture commence
automatiquement.
U (mise sous/
hors tension)
BANK
STOP
PLAY/PAUSE
AMS
Touches à
effleurement
1 Appuyez sur U pour mettre l’appareil sous tension.
L’afficheur s’allume. Après quelques secondes, “No
Disc” apparaît et l’appareil est prêt à fonctionner.
2 Insérez un minidisque.
Fonctions DJ (disc-jockey)
Insérez dans le sens de la flèche
“TOC Reading” est affiché pendant quelques
secondes.
Les témoins au-dessus des touches à effleurement
correspondant aux plages du minidisque s’allument
en vert (par exemple, s’il y a six plages sur le
minidisque, les voyants des touches à effleurement 1 à
6 s’allumeront en vert).
Étiquette tournée vers le
haut
3 Appuyez sur la touche à effleurement
correspondant à la plage que vous souhaitez
écouter.
Le témoin PLAY/PAUSE s’allume et le lecture
commence à partir de la plage sélectionnée.
(voir page suivante)
11
FR
Page 54

Sélection d’une plage
Pour spécifier un point de
localisation
Pour écouter les plages 9 à 32
Appuyez sur BANK pour passer à un groupe de plages
(BANK) différent avant d’appuyer sur une touche à
effleurement.
Le numéro de BANK est indiqué sur l’afficheur.
Chaque BANK assigne un autre groupe de 8 plages aux
touches à effleurement:
BANK 1 n Plages 1 à 8
(plage 1 = touche à effleurement 1, plage 2 =
touche à effleurement 2, etc.)
Fonctions DJ (disc-jockey)
BANK 2 n Plages 9 à 16
(plage 9 = touche à effleurement 1, plage 10 =
touche à effleurement 2, etc.)
BANK 3 n Plages 17 à 24
(plage 17 = touche à effleurement 1, plage 18 =
touche à effleurement 2, etc.)
BANK 4 n Plages 25 à 32
(plage 25 = touche à effleurement 1, plage 26 =
touche à effleurement 2, etc.)
z Vous pouvez aussi commencer la lecture en appuyant sur
PLAY/PAUSE après avoir inséré le minidisque
Dans ce cas, la lecture commence à partir de la plage 1.
Pour reproduire d’autres plages, tournez AMS.
Pour Vous devez:
Arrêter la lecture Appuyer sur STOP.
Interrompre la lecture Appuyer sur PLAY/PAUSE.
Passer à la plage suivante Tourner AMS vers la droite.*
Revenir au début de la plage Tourner AMS vers la gauche.*
actuelle ou de la plage
précédente
Éjecter le minidisque Arrêter la lecture, puis appuyer
* Vous pouvez non seulement passer au début d’une plage mais
aussi régler AMS de façon à omettre tous les points de
localisation que vous auriez pu spécifier.
Utilisez le menu de réglage pour spécifier le mode AMS (JOG).
Pour les détails, voir “Pour spécifier un point de localisation”
ci-dessous.
Appuyez de nouveau sur cette
touche pour recommencer la
lecture à partir du point où
l’appareil était entré en mode de
pause.
sur § EJECT du panneau avant.
Un point de localisation est un “index” temporaire que
vous pouvez utiliser pour localiser un point spécifique
d’une plage. Vous pouvez spécifier un point de
localisation pour chaque plage.
EDIT/NO
CUE
PLAY/PAUSE
AMS
0/)
Molette
1 Commencez la lecture de la plage contenant le
point souhaité.
Pour vous déplacer rapidement vers le point souhaité
Maintenez 0 (retour rapide) ou ) (avance rapide)
enfoncée.
2 Appuyez sur PLAY/PAUSE pour interrompre la
lecture au point souhaité.
Le témoin PLAY/PAUSE clignote.
Pour vérifier le point
Appuyez sur CUE en maintenant la pression.
L’appareil répète un passage de 3 secondes commençant au
point où la lecture a été interrompue.
Pour régler la position du point
• Maintenez CUE enfoncée et tournez la molette.
Le début du passage de 3 secondes se déplace en
synchronisation avec le mouvement de la molette.
• Tournez la molette (sans appuyer sur CUE).
Le son est reproduit en synchronisation avec le mouvement
de la molette. (Le son risque de ne pas être reproduit
immédiatement quand vous tournez la molette vers
l’arrière.)
3 Appuyez de nouveau sur PLAY/PAUSE pour
continuer la lecture.
Le témoin PLAY/PAUSE s’allume et l’appareil
enregistre le point spécifié à l’étape 2 comme point de
localisation.
Rappel du point de localisation
Pour arrêter automatiquement la lecture
à la fin de chaque plage
Appuyez sur SINGLE PLAY de telle façon que le témoin
“1” s’allume.
La lecture s’arrête automatiquement à la fin de chaque plage.
Pour annuler le mode de lecture de plage unique et continuer
avec la lecture de la plage suivante, appuyez de nouveau sur
SINGLE PLAY de telle façon que le témoin “1” s’éteigne.
FR
12
1 Appuyez sur CUE pour rappeler le point de
localisation.
CUE s’allume, PLAY/PAUSE clignote, et l’appareil
passe immédiatement au point de localisation spécifié
précédemment où il se met en mode de pause.
2 Appuyez sur PLAY/PAUSE pour commencer la
lecture à partir du point de localisation.
Page 55

z La commande AMS ne peut pas être utilisée pour passer
directement aux points de localisation
1 Appuyez deux fois sur EDIT/NO pour afficher “Setup Menu”
2 Tournez AMS pour afficher “JOG:”, puis appuyez sur AMS.
3 Tournez AMS pour afficher “JOG : Cue”, puis appuyez sur
AMS.
4 Appuyez sur EDIT/NO pour quitter le menu de réglage.
Vous pouvez maintenant non seulement passer directement au
début de chaque plage mais aussi omettre tous les points de
localisation que vous auvez spécifiés, en tournant AMS.
Pour régler AMS de telle façon que seul le début de chaque plage
soit omis, sélectionnez “JOG : Track” à l’étape 3.
Remarque
Si vous appuyez sur une touche à effleurement pour commencer
la lecture, le point de localisation pour la plage respective ne
pourra pas être rappelé par une pression sur CUE. Dans ce cas,
utilisez AMS pour passer directement au point de localisation
(comme décrit ci-dessous).
z Des points de localisation peuvent être assignés aux touches
à effleurement
Voir “Pour assigner des points de localisation aux touches à
effleurement” à la page 13.
Pour assigner des points de localisation
aux touches à effleurement
Cette fonction vous permet d’assigner jusqu’à 8 points de
localisation aux touches à effleurement. Une fois que vous
avez assigné un point de localisation à une touche à
effleurement, vous pouvez passer directement à ce point
en appuyant sur la touche à effleurement correspondante.
EDIT/NO
CUE
1 Rappelez le point de localisation que vous
souhaitez assigner à une touche à effleurement.
Pour les détails, voir “Rappel du point de localisation”
à la page 12.
AMS
Touches à
effleurement
Fonctions DJ (disc-jockey)
Réglage de la position du point de
localisation
1 Appuyez sur CUE pour rappeler le point de
localisation.
2 Appuyez sur CUE en maintenant la pression et
tournez la molette pour régler la position du point
de localisation.
L’appareil répète un passage de 3 secondes
commençant au point où la lecture avait été
interrompue. Le début du passage de 3 secondes se
déplace en synchronisation avec le mouvement de la
molette.
z Pour régler plus précisément le point de localisation
Tournez la molette sans tenir CUE enfoncée.
Le témoin CUE s’éteint et le son est reproduit en
synchronisation avec le mouvement de la molette. (Le son
risque de ne pas être reproduit immédiatement quand vous
tournez la molette vers l’arrière.)
3 Appuyez sur PLAY/PAUSE pour commencer la
lecture à partir du point de localisation.
2 Tout en maintenant CUE enfoncé, appuyez sur la
touche à effleurement correspondant au numéro
de plage contenant le point de localisation.
Par exemple: Si vous avez rappelé le point de
localisation pour la plage 3 à l’étape 1, appuyez sur la
touche à effleurement 3 (BANK 1) tout en maintenant
CUE enfoncée.
“Memorizing” sera affiché quelques secondes et le
témoin au-dessus de la touche à effleurement
s’allumera en rouge pour indiquer que le point de
localisation a été assigné.
Effacement d’un point de localisation
d’une touche à effleurement
1 Tout en maintenant STOP enfoncée, appuyez sur la
touche à effleurement contenant le point de
localisation que vous souhaitez effacer.
“Pad Erase?” et “–Rehearsal–” apparaissent
alternativement sur l’afficheur, et l’appareil répète un
passage de 3 secondes commençant au point de
localisation à effacer.
Si vous décidez de ne pas effacer le point de
localisation
Appuyez sur EDIT/NO ou STOP.
2 Appuyez sur ENTER/YES ou appuyez de nouveau
sur la même touche à effleurement.
“Complete!!” apparaît sur l’afficheur, et le témoin de la
touche à effleurement s’allume en vert.
(voir page suivante)
13
FR
Page 56

Pour assigner des points de localisation aux
touches à effleurement
z Vous pouvez aussi effacer des points de localisation de la
mémoire des touches à effleurement avec le menu de réglage
1 Appuyez sur STOP pour arrêter la lecture.
2 Appuyez deux fois sur EDIT/NO pour afficher “Setup
Menu”.
3 Tournez AMS pour afficher “PAD Erase?”, puis appuyez sur
AMS.
“–Rehearsal–” clignote sur l’afficheur et l’appareil répète un
passage de 3 secondes commençant à partir d’un des points
de localisation.
4 Tournez AMS pour sélectionner le point de localisation que
Fonctions DJ (disc-jockey)
vous souhaitez effacer.
5 Appuyez sur AMS pour effacer le point de localisation.
“Complete!!” apparaît sur l’afficheur et le témoin de la touche
à effleurement correspondante s’allume en vert.
Remarques
• Seul un point de localisation peut être mémorisé par plage. Si
vous essayez d’assigner un autre point de localisation à une
touche à effleurement qui possède déjà un point de localisation
dans sa mémoire, “Over Mem?” apparaîtra sur l’afficheur.
– Pour effacer le point de localisation précédent et en assigner
un nouveau, appuyez sur ENTER/YES ou appuyez de
nouveau sur la même touche à effleurement.
– Pour annuler la fonction de mémoire de la touche à
effleurement, appuyez sur EDIT/NO ou STOP.
• Les points de localisation peuvent être seulement assignés aux
touches à effleurement qui correspondent à leurs numéros de
plage. Par exemple, le point de localisation pour la plage 2 peut
seulement être assigné à la touche à effleurement 2 (BANK 1).
• Pour assigner plusieurs points de localisation à l’intérieur d’un
même morceau, utilisez d’abord la fonction de division (voir
page 28) pour séparer le morceau en plusieurs plages.
• Après avoir utilisé une touche à effleurement pour commencer
la lecture d’une plage, il est impossible d’utiliser les touches
0/) ou la fonction de bouclage. Il n’est pas possible non
plus d’utiliser la molette pendant une pause.
• Les points de localisation sont effacés quand le minidisque est
éjecté.
FR
14
Pause automatique au
début d’une plage
Vous pouvez régler l’appareil pour qu’il se mette en mode de
pause automatiquement au début de chaque plage (Auto
Pause). Vous pouvez aussi régler l’appareil pour qu’il omette
l’espace blanc au début de la plage et se mette en mode de
pause juste avant que le son soit audible (Auto Cue).
EDIT/NO
AUTO CUE
AUTO PAUSE
AUTO OFF
1 Quand l’appareil est à l’arrêt, appuyez sur AUTO
PAUSE ou AUTO CUE.
• Appuyez sur AUTO PAUSE de telle façon que le
témoin “A.PAUSE” s’allume et que l’appareil se
mette en mode de pause au début de chaque plage.
• Appuyez sur AUTO CUE de telle façon que le
témoin “A.CUE” s’allume et que l’appareil saute
l’espace blanc au début de chaque plage et se mette
en mode de pause juste avant le début du son.
2 Commencez la lecture.
La lecture est interrompue au début d’une plage ou
juste avant que le son de la plage soit audible.
Pour annuler AUTO PAUSE ou AUTO CUE
Appuyez sur AUTO OFF à l’arrêt.
z Vous pouvez régler le niveau sonore défini par la fonction
Auto Cue comme espace blanc et la durée de la pause qui
survient après l’identification d’un espace blanc.
1 Appuyez sur STOP pour arrêter la lecture.
2 Appuyez deux fois sur EDIT/NO pour afficher ”Setup
Menu”.
3 Tournez AMS pour sélectionner un des paramètres suivants,
puis appuyez sur AMS.
- Pour changer le niveau sonore servant à définir un espace
blanc : AC (T)
- Pour changer la durée de la pause : AC (O)
4 Tournez AMS (ou la molette) pour régler la valeur souhaitée,
puis appuyez sur AMS.
5 Appuyez sur EDIT/NO pour quitter le menu de réglage.
Les réglages sont conservés même si l’appareil est mis hors
tension.
La plage de valeurs pour chaque paramètre est indiquée ci-après.
Les nombres entre parenthèses sont les valeurs par défaut.
AC (T) : –72 dB à 0 dB par incréments de 2 dB (–50 dB)
AC (O) : –9s85f à +9s85f par incréments de 1f (0s00f)
Quand AC (O) est réglé sur une valeur négative (–),
l’appareil se met en mode de pause en comptant vers
l’arrière à partir du point où il a détecté l’espace blanc.
Pour annuler avant de terminer les réglages, appuyez sur EDIT/
NO. Les valeurs par défaut seront alors rétablies.
AMS
SINGLE
PLAY
Page 57

Changement de la vitesse et de la
hauteur du son pendant la lecture
Pour arrêter automatiquement la lecture
à la fin de chaque plage
Appuyez sur SINGLE PLAY de telle façon que le témoin
“1” s’allume.
La lecture s’arrête automatiquement à la fin de chaque
plage. Pour annuler le mode de lecture de plage unique et
continuer avec la lecture de la plage suivante, appuyez de
nouveau sur SINGLE PLAY de telle façon que le témoin
“1” s’éteigne.
Vous pouvez changer la vitesse de lecture et la hauteur du
son séparément.
SPEED
PITCH
Changement de la vitesse
Déplacez le curseur SPEED
Déplacez le curseur SPEED vers vous pour augmenter la
vitesse ou dans le sens contraire pour diminuer la vitesse.
La vitesse actuelle apparaît sous la forme d’un pourcentage
sur l’afficheur. Elle peut être changée de –12% à +12%.
Fonctions DJ (disc-jockey)
Changement de la hauteur du son
Déplacez le curseur PITCH
Déplacez le curseur PITCH vers vous pour augmenter la
hauteur du son ou dans le sens contraire pour diminuer la
hauteur du son.
La hauteur du son actuelle apparaît sous la forme d’un
pourcentage sur l’afficheur. Elle peut être changée de –12%
à +12%.
15
FR
Page 58

Bouclage d’un passage
Pour commencer la lecture des plages aussi
d’une plage
Le réglage d’une boucle vous permet de jouer une certaine
partie de la plage en cours de lecture à plusieurs reprises
sans pause ni coupure. De plus, les points d’entrée et de
sortie de boucle restent mémorisés même si vous quittez la
boucle, ce qui facilite le retour à la même boucle.
Fonctions DJ (disc-jockey)
1 Pendant la lecture, appuyez sur LOOP IN au point
où vous souhaitez que la boucle commence.
“LOOP” clignote sur l’afficheur.
2 Appuyez sur LOOP OUT au point où vous souhaitez
que la boucle s’arrête.
“LOOP” s’allume en continu et la boucle commence.
RELOOP
LOOP IN
LOOP OUT
rapidement que possible (fonction Hot Start)
La fonction de lecture immédiate vous permet de spécifier
jusqu’à 8 plages.
Vous pouvez mettre le début d’une plage en mémoire
pour que la lecture de cette plage puisse commencer plus
rapidement que d’habitude quand vous appuyez sur la
touche à effleurement correspondant à la plage.
Vous pouvez spécifier jusqu’à 8 plages à utiliser avec cette
fonction.
EDIT/NO
ENTER/YES
Touches à
effleurement
1 Quand l’appareil est à l’arrêt, appuyez deux fois
sur EDIT/NO pour afficher “Setup Menu”.
2 Tournez AMS pour afficher “Hot start ?”, puis
appuyez sur AMS.
“/0/” clignote sur l’afficheur.
AMS
PLAY MODE
0/)
Pour sortir de la boucle
Appuyez de nouveau sur LOOP OUT.
La lecture continue normalement quand le point de sortie
de boucle est atteint. “RELOOP” s’allume sur l’afficheur
pour indiquer que la position de la boucle a été
enregistrée.
Pour revenir à la boucle précédente
Appuyez sur RELOOP.
La lecture reprend à partir du point d’entrée de boucle et
la boucle commence.
Remarques
• Il n’est pas possible de régler une boucle de plus de 20
secondes. Le mode de réglage de boucle est automatiquement
annulé si vous n’appuyez pas sur LOOP OUT en l’espace de 20
secondes après une pression sur LOOP IN.
• Les boucles ne peuvent pas s’étendre sur deux plages (ou plus).
Le mode de réglage de boucle est automatiquement annulé si la
plage change avant que vous n’appuyiez sur LOOP OUT.
• La position de la boucle est effacée quand :
- Vous arrêtez la lecture
- Vous réglez une autre boucle
- Vous tournez la molette pendant une pause
• Le bouclage est impossible si une touche à effleurement avec
un témoin rouge a été utilisée pour commencer la lecture à
partir d’’un point de localisation.
• Dans certains cas, quand vous essayez de régler une autre
boucle, “Impossible” est affiché et vous ne pouvez pas régler
une autre boucle. Arrêtez alors la lecture, puis réglez la boucle.
FR
16
3 Tournez AMS pour afficher le numéro de la plage
que vous souhaitez écouter dans ce mode, puis
appuyez sur AMS.
Le numéro de plage sélectionné cesse de clignoter et
un autre “0” apparaît pour indiquer que l’appareil est
prêt pour un autre numéro de plage.
En cas d’erreur
Appuyez de façon répétée sur 0 ou ) de telle
façon que le numéro de la plage erronée clignote,
tournez AMS pour changer le numéro de plage, puis
appuyez sur AMS.
4 Répétez l’étape 3 pour spécifier jusqu’à 8 plages.
“Multi Full!” apparaît quand vous entrez la 8e plage.
5 Quand vous avez fini, appuyez sur ENTER/YES.
“Complete!!” est affiché et les réglages de lecture
immédiate sont validés.
6 Appuyez de façon répétée sur PLAY MODE pour
afficher “HOT START”.
“Memorizing” apparaît et les témoins de touche à
effleurement clignotent pendant que l’appareil assigne
les plages à leurs touches à effleurement respectives.
Par exemple, si votre réglage de lecture immédiate
était “/2 n 8 n 5/”:
– La plage 2 est assignée à la touche à effleurement 1
– La plage 8 est assignée à la touche à effleurement 2
– La plage 5 est assignée à la touche à effleurement 3
Les témoins au-dessus des touches à effleurement
correspondantes s’allument en rouge.
Page 59

7 Appuyez sur la touche à effleurement
correspondant à la plage dont vous souhaitez
commencer immédiatement la lecture.
La lecture commence immédiatement.
Changement des réglages Hot Start
Les réglages Hot Start peuvent être changés avant le
début de la lecture.
Pour revenir à la lecture normale
Appuyez de façon répétée sur PLAY MODE jusqu’à ce
que “HOT START” disparaisse.
z En mode de lecture Hot Start, vous pouvez aussi utiliser
PLAY/PAUSE pour commencer immédiatement la lecture des
plages ainsi programmées
Une pression sur PLAY/PAUSE quand l’appareil est arrêté
déclenche la lecture immédiate de toutes les plages Hot Start
dans l’ordre dans lequel elles ont été programmées.
z Les réglages de lecture immédiate restent disponibles même
après la sortie du mode de lecture Hot Start
Appuyez simplement de façon répétée sur PLAY MODE pour
afficher “HOT START” et vous pourrez utiliser de nouveau les
mêmes réglages Hot Start.
z Quand vous utilisez des minidisques enregistrables, les
réglages Hot Start restent disponibles même après l’éjection du
minidisque
Avec des minidisques enregistrables, les réglages Hot Start sont
écrits dans les données de sommaire quand le minidisque est
éjecté. La prochaine fois que vous insérerez le minidisque, vous
pourrez utiliser les mêmes réglages de lecture immédiate en
appuyant simplement de façon répétée sur PLAY MODE pour
afficher “HOT START”.
Avec des minidisques préenregistrés, les réglages Hot Start sont
effacés quand le minidisque est éjecté.
Remarques
• Pendant la lecture Hot Start, il est impossible d’utiliser les
touches 0/) ou la fonction de bouclage. Il n’est pas
possible non plus d’utiliser la molette pendant une pause.
• Les réglages Hot Start sont effacés quand une plage est éditée.
Vérification des réglages de lecture Hot
Start
Appuyez de façon répétée sur DISPLAY quand “HOT
START” est affiché.
Les plages Hot Start apparaissent dans l’ordre de leur
programmation.
Par exemple: “/3 n 5 n 8 n 1 n 2/”
Pour Vous devez*
Effacer une plage Effectuer les opérations 1 et 2,
appuyer sur 0/) jusqu’à ce
que les plages à supprimer
clignotent, puis appuyer sur
EDIT/NO.
toutes les Effectuer les opérations 1 et 2,
plages puis appuyer de façon répétée
sur EDIT/NO.
Ajouter une au début 1 Effectuer les opérations 1 et
plage 2, puis appuyer sur 0 pour
afficher un “0” clignotant avant
la première plage.
2 Effectuer les opérations 3 à 5.
au milieu 1 Effectuer les opérations 1 et
2, puis appuyer sur 0/)
jusqu’à ce que la plage après
laquelle vous souhaitez ajouter
la nouvelle plage clignote.
2 Appuyer sur AMS pour
afficher un “0” clignotant.
3 Effectuer les opérations 3 à 5.
à la fin 1 Effectuer les opérations 1 et
2, puis appuyer sur ) pour
afficher un “0” clignotant après
la dernière plage.
2 Effectuer les opérations 3 à 5.
Changer 1 Effectuer les opérations 1 et
une plage 2, puis appuyer de façon répétée
sur 0/) de telle façon que
la plage à remplacer clignote.
2 Effectuer les opérations 3 à 5.
* Voir “Pour commencer la lecture des plages aussi rapidement
que possible (fonction Hot Start)” pour les détails concernant
les étapes 1 et 2 et 3 à 5.
Fonctions DJ (disc-jockey)
17
FR
Page 60

Autres options
Utilisation de l’afficheur
de lecture
Ce chapitre fournit des informations
sur l’affichage et la lecture répétée,
programmée et avec reprise.
Vous pouvez afficher le temps de lecture ou le temps
restant sur le minidisque ou la plage.
DISPLAY
Vérification des temps d’un minidisque
Appuyez de façon répétée sur DISPLAY quand
l’appareil est arrêté.
Chaque pression change l’affichage de la façon suivante :
Temps restant (temps disponible pour
l’enregistrement)
BANK 1
Temps de lecture total
BANK 1
DISC
TR M S F
DISC
TR M S F
0
4
8
12
20
40
-dB
LR
Appuyez
0
4
8
12
20
40
-dB
LR
Appuyez
Appuyez
Réglages de lecture programmée ou Hot Start et temps total
(en mode de lecture programmée ou Hot Start seulement)
BANK 1
DISC
TR M S F
PROGRAM
HOT START
LR
0
4
8
12
20
40
-dB
(Un des témoins s’allume pour indiquer le mode de lecture)
18
FR
Page 61

Pour lire des plages de façon
répétée (lecture répétée)
Vérification des temps d’une plage
Appuyez de façon répétée sur DISPLAY pendant la
lecture.
Chaque pression change l’affichage de la façon suivante :
Temps restant
BANK 1
Temps écoulé
BANK 1
Réglages de lecture programmée ou Hot Start et temps total
(en mode de lecture programmée ou Hot Start seulement)
BANK 1
Le numéro de la
plage en cours de
lecture clignote
Quand le temps restant clignote pendant la
lecture
Il reste moins de 10 secondes sur la plage.
z Titres de minidisque et de plage
Le titre du minidisque est affiché quand l’appareil est arrêté. Les
titres des plages sont affichés pendant la lecture des plages
respectives. Si un minidisque ou une plage ne porte pas de titre,
“No Name” sera affiché.
TRACK
TR M S F
TRACK
TR M S F
TRACK
Appuyez
Appuyez
PROGRAM
MSF
HOT START
(Un des témoins
s’allume pour indiquer
le mode de lecture)
12
12
12
Appuyez
Vous pouvez reproduire un minidisque entier ou une
seule plage de façon répétée. La lecture répétée peut aussi
être utilisée avec d’autres modes de lecture, comme la
lecture programmée ou Hot Start.
REPEAT
SINGLE PLAY
Répétition d’un minidisque entier
Appuyez sur REPEAT.
“REPEAT” s’allume et la lecture des plages est répétée de
la façon suivante.
Mode de lecture Répétition
Lecture normale (page 11) De toutes les plages dans
Lecture Hot Start (page 16) Des plages Hot Start, dans
Lecture programmée (page 20) Du même programme
Pour annuler la lecture répétée
Appuyez sur REPEAT de telle façon que “REPEAT”
s’éteigne.
l’ordre de leurs numéros
l’ordre de leur programmation
Autres options de lecture
Répétition d’une seule plage
Cette fonction peut aussi être utilisée pour répéter la
lecture de la plage actuelle dans les modes de lecture
programmée ou Hot Start.
1 Appuyez sur REPEAT.
“REPEAT” s’allume sur l’afficheur.
2 Quand le morceau que vous souhaitez répéter est
atteint, appuyez sur SINGLE PLAY.
“REPEAT 1” s’allume sur l’afficheur.
Pour annuler la lecture répétée d’une plage
unique
Appuyez sur REPEAT de telle façon que “REPEAT”
s’éteigne, puis appuyez sur SINGLE PLAY de telle façon
que “1” s’éteigne.
z Si vous appuyez sur SINGLE PLAY pour allumer “REPEAT 1” à
l’étape 2 pendant que la lecture est arrêtée
L’appareil répétera la plage suivante.
19
FR
Page 62

Lecture de plages dans un ordre différent (lecture
programmée)
Cette fonction vous permet de reproduire les plages d’un
minidisque dans l’ordre de votre choix en créant des
programmes pouvant contenir jusqu’à 25 plages.
EDIT/NO
ENTER/YES
PLAY/PAUSE
Autres options de lecture
1 Quand l’appareil est à l’arrêt, appuyez deux fois
sur EDIT/NO pour afficher “Setup Menu”.
AMS
PLAY MODE
0/)
2 Tournez AMS pour afficher “Program ?”, puis
appuyez sur AMS.
“/0/” clignote sur l’afficheur.
3 Tournez AMS pour afficher le numéro de la plage
que vous souhaitez programmer, puis appuyez sur
AMS.
Le numéro de la plage sélectionnée cesse de clignoter
et un autre “0” apparaît pour indiquer que l’appareil
est prêt pour la programmation d’un autre numéro de
plage.
En cas d’erreur
Appuyez de façon répétée sur 0 ou ) de telle
façon que le numéro de la plage erronée clignote,
tournez AMS pour changer le numéro de plage, puis
appuyez sur AMS.
4 Répétez l’étape 3 pour programmer jusqu’à 25
plages.
“ProgramFull” apparaît quand vous entrez la 25e
plage. Des plages sont ajoutées à l’endroit
correspondant au “0” clignotant.
Le temps total du programme est affiché chaque fois
que vous programmez une plage.
5 Quand vous avez fini, appuyez sur ENTER/YES.
“Complete!!” est affiché et la programmation est terminée.
7 Appuyez sur PLAY/PAUSE.
Les plages sont reproduites dans leur ordre de
programmation.
Pour revenir à la lecture normale
Appuyez de façon répétée sur PLAY MODE jusqu’à ce
que “PROGRAM” disparaisse.
z Vous pouvez aussi reproduire le programme en appuyant sur
les touches à effleurement
La lecture commence à partir de la plage sélectionnée et continue
dans l’ordre de la programmation. Si votre programme comprend
plus de 8 plages, utilisez BANK pour changer de groupe de
plages avant d’appuyer sur une touche à effleurement.
z Le programme reste disponible même après que vous êtes
sorti du mode de lecture programmée
Appuyez de façon répétée sur PLAY MODE pour afficher de
nouveau “PROGRAM” et vous pourrez reproduire de nouveau le
même programme.
z Quand vous utilisez des minidisques enregistrables, le
programme reste disponible même après l’éjection du
minidisque
Avec les minidisques enregistrables, les informations concernant
le programme sont écrites dans les données de sommaire quand
le minidisque est éjecté. La prochaine fois que vous insérerez le
minidisque, vous pourrez reproduire le même programme en
appuyant simplement sur PLAY MODE de façon répétée pour
afficher “PROGRAM”.
Avec les minidisques préenregistrés du commerce, les
informations concernant le programme sont effacées quand le
minidisque est éjecté.
Remarques
• Le programme est effacé quand une plage est éditée.
• Les points de localisation ne peuvent pas être enregistrés
pendant la lecture programmée.
Vérification du contenu du programme
Appuyez de façon répétée sur DISPLAY quand
“PROGRAM” est affiché.
Les plages programmées apparaissent dans l’ordre de leur
programmation.
Par exemple: “/3 n 5 n 8 n 1 n 2/”
6 Appuyez de façon répétée sur PLAY MODE pour
afficher “PROGRAM”.
L’appareil assigne les plages à leurs touches à
effleurement respectives.
Par exemple, si votre programmation était “/2 n 8 n
5/”:
– La plage 2 est assignée à la touche à effleurement 1
– La plage 8 est assignée à la touche à effleurement 2
– La plage 5 est assignée à la touche à effleurement 3
FR
20
Page 63

Reprise de la lecture après un
arrêt (fonction Resume Play)
Changement du contenu du programme
Vous pouvez changer le contenu du programme avant de
commencer la lecture.
Pour Vous devez*
Effacer une plage Effectuer les opérations 1 et 2,
appuyer sur 0/) jusqu’à ce
que les plages à supprimer
clignotent, puis appuyer sur
EDIT/NO.
toutes les Effectuer les opérations 1 et 2,
plages puis appuyer de façon répétée
sur EDIT/NO.
Ajouter au début 1 Effectuer les opérations 1 et
une plage 2, puis appuyer sur 0 pour
afficher un “0” clignotant avant
la première plage.
2 Effectuer les opérations 3 à 5.
au milieu 1 Effectuer les opérations 1 et
2, puis appuyer sur 0/)
jusqu’à ce que la plage après
laquelle vous souhaitez ajouter
la nouvelle plage clignote.
2 Appuyer sur AMS pour
afficher un “0” clignotant.
3 Effectuer les opérations 3 à 5.
à la fin 1 Effectuer les opérations 1 et
2, puis appuyer sur ) pour
afficher un “0” clignotant après
la dernière plage.
2 Effectuer les opérations 3 à 5.
Changer 1 Effectuer les opérations 1 et
une plage 2, puis appuyer de façon
répétée sur 0/) de telle
façon que la plage à remplacer
clignote.
2 Effectuer les opérations 3 à 5.
* Voir “Lecture de plages dans un ordre différent (lecture
programmée)” pour les détails concernant les étapes 1 et 2 et 3
à 5.
Cette fonction vous permet de régler l’appareil de telle
façon qu’il mémorise le point où la lecture s’arrête. Vous
pouvez ainsi reprendre la lecture à partir de ce point
quand vous appuyez sur PLAY/PAUSE.
EDIT/NO
STOP
PLAY/PAUSE
AMS
1 Appuyez deux fois sur EDIT/NO pour afficher
“Setup Menu”.
2 Tournez AMS pour afficher “Resume”, puis
appuyez sur AMS.
L’affichage se met à clignoter.
3 Tournez AMS pour afficher “Resume Play”, puis
appuyez sur AMS.
4 Appuyez sur EDIT/NO pour quitter le menu de
réglage.
La fonction Resume Play est ainsi mise en service.
5 Appuyez sur STOP pendant la lecture pour arrêter
la lecture.
6 Appuyez sur PLAY/PAUSE.
La lecture reprend à partir du point où elle a été
arrêtée à l’étape 5.
Pour annuler la fonction Resume Play
Sélectionnez “Resume Off” à l’étape 3, appuyez sur AMS,
puis passez à l’étape 4.
Autres options de lecture
Remarque
Le point de reprise de la lecture est effacé quand:
• Le minidisque est éjecté
• Vous appuyez sur PLAY MODE
21
FR
Page 64

Enregistrement
sur un
minidisque
Remarques sur
l’enregistrement
Si “Protected” et “C11” apparaissent sur l’afficheur
Le minidisque est protégé à l’écriture. Refermez le taquet
de protection à l’écriture pour permettre l’enregistrement
(Voir “Pour protéger un minidisque contre un effacement
accidentel” à la page 24).
Ce chapitre décrit la façon
d’enregistrer sur un minidisque.
FR
22
Si “Din Unlock” et “C71” apparaissent sur l’afficheur
•
La source de programme numérique sélectionnée avec le
sélecteur d’entrée INPUT n’est pas raccordée correctement.
Raccordez correctement la source de programme.
• La source de programme n’est pas sous tension. Mettez-
la sous tension.
Les numéros de plages sont inscrits
différemment en fonction des réglages du menu
et du type de source enregistrée
•
Quand vous enregistrez à partir d’un CD ou d’un
minidisque avec le sélecteur de source d’entrée INPUT
réglé sur “OPT” ou “COAX”, les numéros de plages sont
automatiquement repris de la source de programme
originale. Néanmoins, dans les cas suivants, une partie
d’un enregistrement contenant plus d’une piste pourra
être identifiée par un numéro de plage unique:
– Si une même plage est enregistrée de façon répétée
(avec la fonction de répétition de plage unique).
–
Si deux plages ou plus portant le même numéro de plage
(de minidisque ou CD différents) sont enregistrées à la suite.
– Si vous enregistrez des plages de moins de quatre
secondes.
•
Même si INPUT est réglé sur “OPT” ou “COAX”, il est
possible que cet appareil ne puisse pas inscrire des numéros de
plage automatiquement pendant un enregistrement à partir de
certains lecteurs CD multidisque (ou à un disque). Dans ce cas,
inscrivez les numéros de plage plus tard en utilisant la fonction
Divide (voir “Division d’une plage” à la page 28).
•
Si le paramètre “L.Sync” du menu de réglage est réglé sur
“L.Sync Off”pendant un enregistrement avec INPUT réglé
sur “ANLG”, l’enregistrement d’une émission de
radiodiffusion satellite ou l’enregistrement d’une source
DAT avec INPUT réglé sur “OPT” ou “COAX””, cet appareil
traitera le passage enregistré comme une plage unique et un
numéro de plage seulement sera assigné à l’enregistrement.
•
Réglez le paramètre “L.Sync” du menu de réglage sur
“L.Sync On”pendant un enregistrement avec INPUT réglé
sur “ANLG”, l’enregistrement d’une émission de
radiodiffusion satellite ou l’enregistrement d’une source
DAT avec INPUT réglé sur “OPT” ou “COAX” pour inscrire
automatiquement des numéros de plage (voir “Inscription
automatique des numéros de plages” à la page 24).
•
Quand vous enregistrez une émission transmise par
satellite ou une source DAT avec INPUT réglé sur “OPT”
ou “COAX”, cet appareil inscrit automatiquement un
nouveau numéro de plage chaque fois que la fréquence
d’échantillonnage du signal d’entrée change (quel que soit
le réglage du paramètre “L.Sync” du menu de réglage).
Page 65

z Vous pouvez inscrire des numéros de plages manuellement à
n’importe quel moment pendant ou après l’enregistrement.
Pour les détails, voir “Inscription des numéros de plages pendant
l’enregistrement” à la page 24 et “Division d’une plage” à la page
28.
Enregistrement sur un
minidisque
Vous pouvez enregistrer sur un minidisque à partir de
sources variées (CD compris). Veillez à ce que la source
de programme soit raccordée correctement avant de
commencer. Voir la page 5 pour les détails sur les
raccordements.
Quand “TOC Writing” clignote sur l’afficheur
L’appareil est en train de stocker le contenu de
l’enregistrement sur le minidisque. Ne pas mettre
l’appareil hors tension (U), débrancher le cordon
d’alimentation secteur, ni déplacer l’appareil, sinon,
l’enregistrement risque de ne pas être effectué
correctement. Si vous mettez l’appareil hors tension (U)
ou débranchez le cordon d’alimentation secteur
immédiatement après l’enregistrement, l’enregistrement
risque de ne pas pouvoir être stocké dans l’appareil.
Ce appareil utilise le système de protection
contre la copie abusive (SCMS)
Les minidisques enregistrés numériquement ne peuvent
pas être recopiés sur d’autres supports numériques (MD,
DAT, etc.) par les prises de sortie numérique de cet
appareil (voir page 41).
INPUT
U (mise sous/
hors tension)
r REC
REC PAUSE
STOP
PLAY/PAUSE
REC VOL
1 Mettez la source de programme que vous
souhaitez enregistrer sous tension.
2 Appuyez sur U pour mettre l’appareil sous tension.
L’afficheur s’allume.
3 Insérez un minidisque enregistrable.
Enregistrement sur un minidisque
Insérez dans le sens de la flèche
Étiquette tournée vers le
haut
4 Réglez INPUT sur la source de programme que vous
souhaitez enregistrer.
Si la source de programme Réglez INPUT sur
est raccordée à
DIGITAL OPTICAL IN OPT
DIGITAL COAXIAL IN COAX
LINE (ANALOG) IN ANLG
5 Appuyez sur r REC.
L’appareil entre automatiquement en mode de pause
d’enregistrement et le témoin à côté de REC PAUSE se
met à clignoter (l’enregistrement n’a pas encore
commencé).
(voir page suivante)
23
FR
Page 66

Enregistrement sur un minidisque
Inscription des numéros de
plages pendant l’enregistrement
6 Réglez le niveau d’enregistrement.
•
Quand vous enregistrez une source de programme
raccordée aux prises LINE (ANALOG) IN.
1
Reproduisez le passage le plus bruyant de la source de
programme que vous souhaitez enregistrer (le passage
dont le niveau de signal est le plus élevé).
2 Tournez REC VOL de telle façon que les
décibelmètres de l’afficheur atteignent juste 0 dB
(mais sans dépasser ce niveau).
• Quand vous enregistrez une source de
programme raccordée à une prise DIGITAL.
Le réglage n’est pas nécessaire (passez à l’étape 7).
7 Appuyez sur REC PAUSE ou PLAY/PAUSE pour
commencer l’enregistrement.
8 Reproduisez la source de programme.
Pour arrêter l’enregistrement
Enregistrement sur un minidisque
Appuyez sur STOP.
Ne pas mettre l’appareil hors tension
immédiatement après l’enregistrement
L ’enregistrement pourrait ne pas être effectué correctement. Si
c’est le cas, le matériel enregistré risque de ne pas être
sauvegardé sur le minidisque. Quand vous éjectez le
minidisque ou appuyez sur ENTER/YES, “TOC W riting”
clignote sur l’afficheur . Attendez jusqu’à ce que “TOC Writing”
cesse de clignoter avant d’appuyer sur
cordon d’alimentation secteur de la prise murale.
Pour Vous devez
Interrompre Appuyer sur PLAY/PAUSE ou REC PAUSE.
l’enregistrement Pour continuer l’enregistrement, appuyez de
Éjecter le Appuyez sur § EJECT. Le minidisque ne
minidisque peut pas être éjecté pendant l’enregistrement.
* Le numéro de morceau change quand vous interrompez
l’enregistrement (pause). Par exemple, si vous interrompez
l’enregistrement du morceau 4, le passage enregistré après la
pause sera enregistré comme morceau 5.
Pour protéger un minidisque contre un
effacement accidentel
Pour rendre tout enregistrement impossible sur un
minidisque,poussez le taquet de protection dans le sens de la
flèche afin d’ouvrir la fente. Pour permettre l’enregistrement,
fermez la fente.
U
ou de débrancher le
nouveau sur PLAY/PAUSE ou REC PAUSE.
Taquet de protection
d’enregistrement
Vous pouvez inscrire manuellement ou automatiquement
des numéros de plages. En inscrivant des numéros de
plages à des points précis, vous pourrez facilement
localiser ces points plus tard avec le bouton AMS, et
utiliser diverses fonctions de montage.
EDIT/NO
r REC
AMS
Inscription manuelle d’un numéro de
plage
Vous pouvez inscrire un numéro de plage manuellement à
n’importe quel moment de l’enregistrement.
Pendant l’enregistrement, appuyez sur r REC au point
où vous souhaitez inscrire un numéro de plage.
Inscription automatique des numéros de
plages
Cet appareil inscrit les numéros de plages différemment
en fonction de la source actuellement enregistrée et du
type de raccordement utilisé.
• Quand vous enregistrez à partir de CD ou de
minidisques avec INPUT de cet appareil réglé sur
DIGITAL:
Les numéros de plages sont inscrits automatiquement.
Néanmoins, cette fonction peut ne pas être effective
avec certains lecteurs CD multidisque (ou à un
disque).
• Dans tous les autres cas:
Si “L.Sync” du menu de réglage est réglé sur “L.Sync
On”, quand le niveau d’entrée descend sous une
certaine limite pendant 1,5 seconde l’appareil inscrira
un nouveau numéro de plage la prochaine fois que le
niveau remontera au-dessus de cette limite.
Quand “L.Sync” du menu de réglage est réglé sur
“L.Sync Off”, l’appareil inscrit un numéro de plage
quand l’enregistrement commence, mais aucun
numéro de plage n’est inscrit pendant
l’enregistrement.
Arrière du
minidisque
FR
24
Ouvrez
Page 67

Pour changer le réglage de “L.Sync” du
menu de réglage
1 Pendant l’arrêt, l’enregistrement ou une pause,
appuyez deux fois sur EDIT/NO pour afficher
“Setup Menu”.
2 Tournez AMS pour sélectionner “L.Sync”, puis
appuyez sur AMS.
3 Tournez AMS pour sélectionner “L.Sync On” ou
“L.Sync Off”, puis appuyez sur AMS.
Quand vous sélectionnez “L.Sync On”, le témoin
L.SYNC s’allume.
4 Appuyez sur EDIT/NO.
Enregistrement pendant la lecture
(enregistrement Backtrack)
Ce appareil vous permet d’enregistrer sur un minidisque
(à partir d’un CD, etc.) pendant que le minidisque est
reproduit. Vous pouvez aussi raccorder cet appareil à un
mixeur, mixer le son du minidisque avec celui d’un autre
appareil, et enregistrer simultanément le son mixé sur le
même minidisque. Pendant la lecture, le son est enregistré
sur l’espace blanc du minidisque.
Veillez à ce que la source de programme soit raccordée et
que le sélecteur INPUT de cet appareil soit réglé
correctement avant de commencer. Voir la page 5 pour les
détails concernant les raccordements et la page 23 pour les
détails sur le sélecteur d’entrée INPUT.
z Vous pouvez déterminer comment l’appareil assignera de
nouveaux numéros de plages quand vous choisissez “L.Sync On”
dans le menu de réglage
Si vous choisissez “L.Sync On” dans le menu de réglage, et le
signal d’entrée descend au-dessous d’un certain niveau de
référence pendant un certain temps, la prochaine fois que le
signal d’entrée remontera au-dessus de ce niveau, l’appareil
déterminera que le morceau a changé et enregistrera un nouveau
numéro de plage automatiquement.
Vous pouvez régler les paramètres suivants avec le menu de
réglage:
– Le niveau de référence pour le signal d’entrée.
– Le temps pendant lequel le signal d’entrée doit rester au-
dessous du niveau de référence.
– Le temps avant que l’appareil inscrive le nouveau numéro
de plage une fois qu’il détermine que le morceau a changé.
1 Pendant l’arrêt, l’enregistrement ou une pause
d’enregistrement, appuyez deux fois sur EDIT/NO pour
afficher le menu de réglage.
2 Tournez AMS pour sélectionner un des paramètres suivants,
puis appuyez sur AMS.
– Pour changer le niveau de référence : LS (T)*
– Pour changer le temps pendant lequel le signal d’entrée
doit rester au-dessous du niveau de référence : LS (W)
– Pour changer le temps avant l’inscription d’un nouveau
numéro de plage une fois que l’appareil détermine que le
morceau a changé : LS (O)*
3 Tournez AMS (* ou la molette) pour régler la valeur souhaitée,
puis appuyez sur AMS.
4 Appuyez sur EDIT/NO.
La plage de valeurs pour chaque paramètre est indiquée ci-après.
Les nombres entre parenthèses sont les valeurs par défaut.
LS (T) : –72 dB à –0 dB par incréments de 2 dB (–50 dB)
LS (W): 0s à 9,5s par incréments de 0,5s (1,5 seconde)
LS (O) : 0s00f à 9s85f par incréments de 1f (2s00f)
Quand LS (O) est une valeur négative (–), l’appareil
assigne de nouveaux numéros de plages en comptant
vers l’arrière à partir du point où il détermine que le
morceau a changé.
r REC
REC PAUSE
STOP
1
Appuyez sur r REC pendant la lecture ou une pause.
BACK TRACK RECORDING et une image
représentant un disque s’allument, l’appareil entre en
mode d’attente d’enregistrement et le témoin à côté de
REC PAUSE se met à clignoter (l’enregistrement n’a
pas encore commencé).
2 Appuyez sur REC PAUSE pour commencer
l’enregistrement.
L’image représentant un disque tourne pendant
l’enregistrement.
3 Commencez la lecture de la source de programme.
Pour arrêter l’enregistrement
Appuyez sur STOP.
BACK TRACK RECORDING et l’image représentant un
disque clignotent pendant que l’enregistrement est écrit
sur le minidisque. L’arrêt de l’enregistrement entraîne la
création d’un nouveau numéro de plage.
Ne pas mettre l’appareil hors tension
immédiatement après l’enregistrement
L’enregistrement pourrait ne pas être effectué correctement.
Si c’est le cas, le son enregistré risque de ne pas être
sauvegardé sur le minidisque. Quand vous éjectez le disque
ou appuyez sur ENTER/YES, “TOC Writing” clignote sur
l’afficheur. Attendez jusqu’à ce que “TOC Writing” cesse de
clignoter avant d’appuyer sur
cordon d’alimentation secteur de la prise murale.
U
ou de débrancher le
Enregistrement sur un minidisque
(voire page suivant)
FR
25
Page 68

Enregistrement pendant la lecture
(enregistrement Backtrack)
Si le témoin BACK TRACK RECORDING se met à
clignoter pendant l’enregistrement
Cessez d’utiliser les touches à effleurement, la molette et
les fonctions de bouclage jusqu’à ce que le témoin resre
allumé sans clignoter. Si vous continuez à utiliser ces
fonctions, l’appareil risque de s’arrêter d’enregistrer. De
plus, une fois que le témoin est allumé en continu,
attendez quelques secondes avant d’utiliser une touche à
effleurement, la molette ou d’effectuer une opération de
bouclage.
Remarques
• Vous ne pouvez pas contrôler le son en cours d’enregistrement
pendant un enregistrement Backtrack.
• Quand vous enregistrez une source analogique, vous pouvez
tourner REC VOL pour ajuster le niveau d’enregistrement mais
vous ne pouvez pas contrôler le son.
• Pendant un enregistrement Backtrack, les décibelmètres de
l’afficheur indiquent le niveau de lecture (pas le niveau
d’enregistrement).
Enregistrement sur un minidisque
• Une utilisation répétée du bouclage, des touches à
effleurement, ou de la molette peut entraîner l’arrêt de
l’enregistrement.
• L’indexation des plages n’est pas possible pendant
l’enregistrement Backtrack.
• Les touches 0/) ne peuvent pas être utilisées pendant
l’enregistrement Backtrack.
• REC PAUSE ne peut pas être utilisé pour arrêter
l’enregistrement Backtrack. Appuyez sur STOP pour arrêter
l’enregistrement Backtrack.
• L’enregistrement s’arrêtera si la position du sélecteur d’entrée
INPUT est changée pendant l’enregistrement Backtrack.
26
FR
Page 69

Montage de
Remarques sur le montage
minidisques
enregistrés
Ce chapitre décrit la façon d’éditer les
plages d’un minidisque enregistré.
Après l’enregistrement sur un minidisque vous pouvez
utiliser les fonctions de montage pour diviser des plages
pour permettre l’accès instantané à un point quelconque
du disque ou combiner deux plages quelconques en une
seule. Vous pouvez aussi effacer des plages en spécifiant
simplement les numéros de plages, le titre du disque, et le
titre des plages individuelles.
Si “Protected” et “C11” apparaissent sur
l’afficheur
Le minidisque ne peut pas être édité car sa fente de
protection d’enregistrement est ouverte. Effectuez le
montage après avoir fermé la fente.
Si “TOC” clignote sur l’afficheur après le
montage
Éjectez le minidisque ou appuyez sur ENTER/YES.
“TOC” et “TOC Writing” clignotent sur l’afficheur et
l’appareil écrit les informations de montage sur le
minidisque. N’appuyez pas sur U pour mettre l’appareil
hors tension, ne débranchez pas le cordon d’alimentation
et ne déplacez pas l’appareil pendant que “TOC” et “TOC
Writing” clignotent. Les données pourraient ne pas être
mémorisées.
Montage de minidisques enregistrés
27
FR
Page 70

Division d’une plage (fonction Divide)
Montage de minidisques enregistrés
Après l’enregistrement, vous pouvez diviser une plage en
deux en inscrivant un nouveau numéro de plage en
n’importe quel point que vous souhaitez localiser
facilement. Cette fonction est particulièrement utile quand
vous enregistrez une source analogique, etc., et plusieurs
morceaux sont enregistrés sous un numéro de plage
unique, ou quand vous souhaitez localiser par la suite un
certain point au milieu d’une plage. Quand vous divisez
une plage, le nombre de plages total sur le minidisque
augmente d’une unité et toutes les plages qui suivent sont
renumérotées automatiquement.
Exemple: Division de la plage 2 pour créer deux numéros de
plages séparés pour B et C.
Numéros de
plages
DIVIDE
12 3
A
BC D
Division en B et C
12 43
A
EDIT/NO
BC D
AMS
5 Tout en écoutant le passage répétée, tournez AMS
pour décaler la position du point de division.
Après le décalage, la répétition reprend à partir de la
nouvelle position.
Vous pouvez utiliser AMS pour décaler le point après
avoir sélectionné une unité de mesure : minutes,
secondes ou cadres. Appuyez sur 0 ou ) pour
sélectionner l’unité. Pour les cadres, “F” clignote à côté
du nombre de cadres. Pour les secondes, “S” clignote à
côté des secondes. Pour les minutes, “M” clignote à
côté des minutes.
6 Appuyez sur AMS quand la position est correcte.
“Complete!!” est affiché pendant quelques secondes et
la plage est divisée. Le lecture commence à partir du
début de la plage nouvellement créée. Cette plage
n’est pas titrée, même si la plage originale l’était.
Pour annuler la fonction Divide
Appuyez sur EDIT/NO ou STOP.
z
Vous pouvez annuler la division de la plage
Utilisez la fonction d’annulation immédiatement après avoir
divisé la plage (voir page 35).
z
Vous pouvez diviser une plage pendant l’enregistrement
Utilisez la fonction d’inscription de numéros de plage (voir page
24).
0/)
STOP
1 Quand l’appareil est à l’arrêt, en mode de lecture
ou de pause, appuyez sur EDIT/NO pour afficher le
menu de montage.
2 Tournez AMS pour afficher “Divide ?”, puis
appuyez sur AMS.
3 Tournez AMS pour afficher le numéro de la plage
devant être divisée.
Le témoin REHEARSAL s’allume et la plage
sélectionnée est reproduite.
4 Tout en écoutant le son, appuyez sur AMS au point
où vous souhaitez diviser la plage.
“–Rehearsal–” est affiché et la lecture commence à
partir du point de division (mode de répétition).
z
Vous pouvez changer la longueur et l’intervalle de répétition
Les opérations suivantes utilisent le menu de réglage.
1 Quand l’appareil est à l’arrêt, en mode d’enregistrement ou de
pause d’enregistrement, appuyez deux fois sur EDIT/NO
pour afficher le menu de montage.
2 Tournez AMS pour sélectionner un des paramètres suivants,
puis appuyez sur AMS.
– Pour changer la longueur de répétition : RH (L)*
– Pour changer l’intervalle de répétition : RH (I)
3 Tournez AMS (* ou la molette) pour régler la valeur souhaitée,
puis appuyez sur AMS.
4 Appuyez sur EDIT/NO pour quitter le menu de réglage.
Les réglages sont conservés même si vous mettez l’appareil
hors tension.
La plage de valeurs pour chaque paramètre est indiquée ci-après.
Les nombres entre parenthèses sont les valeurs par défaut.
RH (L): 0s00f à 9s85f par incréments de 1f (2s00f)
RH (I) : 0s à 8s par incréments de 0,5s (1,0 seconde)
Pour annuler avant de terminer les réglages, appuyez sur EDIT/
NO. Les valeurs par défaut seront alors restaurées.
Remarque
Si “Impossible” est affiché, la plage ne pourra pas être divisée.
Ce problème se présente lorsqu’une même plage a subi plusieurs
opérations de montage; il est dû aux limites techniques du
système MD et n’est pas le signe d’une erreur mécanique.
28
FR
Page 71

Combinaison de deux plages (fonction Combine)
Cette fonction vous permet de combiner deux plages
quelconques pour créer une plage unique. Il n’est pas
nécessaire que les deux plages devant être combinées se
suivent sur le minidisque, ou aient été enregistrées à la suite.
Vous pouvez utiliser cette fonction pour combiner plusieurs
chansons et créer un pot–pourri, ou différents passages
enregistrés séparément pour obtenir une seule plage.
Quand vous combinez deux plages, le nombre de plages
total diminue d’une unité et toutes les plages qui suivent
les plages combinées sont renumérotées.
Exemple: Combinaison des plages B et D
Numéros de
plages
COMBINE
12 43
A
BC D
Combinaison de B et D
12 3
A
EDIT/NO
BD C
AMS
4 Tournez AMS pour afficher le numéro de plage de
la seconde plage à combiner, puis appuyez sur
AMS.
“Complete!!” est affiché pendant quelques secondes et
les plages sont combinées.
Si les deux plages combinées ont des titres, le titre de
la deuxième plage sera effacé.
Pour annuler la fonction Combine
Appuyez sur EDIT/NO ou STOP.
z
Vous pouvez annuler une combinaison de plages
Utilisez la fonction d’annulation immédiatement après avoir
combiné les plages (voir page 35).
z
Vous pouvez changer la longueur et l’intervalle de répétition
Utilisez le menu de réglage pour effectuer les réglages (voir page
28).
Remarque
Si “Impossible” est affiché, les deux plages ne pourront pas être
combinées. Ce problème se présente lorsqu’une même plage a
subi plusieurs opérations de montage; il est dû aux limites
techniques du système MD et n’est pas le signe d’une erreur
mécanique.
1 Quand l’appareil est à l’arrêt, en mode de lecture
ou de pause, appuyez sur EDIT/NO pour afficher le
menu de montage.
2 Tournez AMS pour afficher “Combine ?”, puis
appuyez sur AMS.
3 Tournez AMS pour afficher le numéro de plage de
la première plage à combiner, puis appuyez sur
AMS.
Le numéro de plage de la seconde plage se met à
clignoter et le passage où les deux plages vont se
rejoindre (fin de la première et début de la plage
suivante) est répété (mode de répétition).
Second numéro de plage
Montage de minidisques enregistrés
REHEARSAL TRACK
BANK 1
Premier numéro
de plage
TR M S F
Numéro de plage après
la combinaison
LR
0
4
8
12
20
40
-dB
FR
29
Page 72

Changement de numéros de plages (fonction Move)
Cette fonction vous permet de changer la position
(numéro) d’une plage quelconque. Quand une plage est
déplacée, les numéros de plages sont mis à jour
automatiquement.
Exemple: Déplacement de la plage C vers la position 2
Numéros de
plages
MOVE
123 4
A
BC D
Déplacement de C
vers la position 2
12 43
A
EDIT/NO
CBD
AMS
6 Appuyez sur AMS pour sélectionner la plage.
“Complete!!” est affiché pendant quelques secondes et
la plage est déplacée. La lecture commence à partir du
début de la plage déplacée.
Pour annuler la fonction Move
Appuyez sur EDIT/NO ou STOP.
z
Vous pouvez annuler un déplacement de plage
Utilisez la fonction d’annulation immédiatement après avoir
déplacé la plage (voir page 35).
Montage de minidisques enregistrés
1 Quand l’appareil est à l’arrêt, en mode de lecture
ou de pause, appuyez sur EDIT/NO pour afficher le
menu de montage.
2 Tournez AMS pour afficher “Move ?”, puis appuyez
sur AMS.
3 Tournez AMS pour afficher le numéro de plage de
la plage à déplacer.
Le témoin REHEARSAL s’allume et la plage
sélectionnée est reproduite.
4 Appuyez sur AMS pour sélectionner la plage.
5 Tournez AMS pour afficher la nouvelle position de
plage
REHEARSAL TRACK
BANK 1
TR M S F
LR
0
4
8
12
20
40
-dB
plage à déplacer
FR
30
Nouvelle position de la plageNuméro de la
Page 73

Effacement d’une plage (fonction Erase)
Vous pouvez effacer une plage en spécifiant simplement
le numéro de cette plage. Quand vous effacez une plage,
le nombre de plages total sur le minidisque diminue
d’une unité et toutes les plages qui suivent la plage
effacée sont renumérotées automatiquement.
Par exemple, quand vous effacez la plage 2, la plage 3
devient la nouvelle plage 2.
(Pour éviter toute confusion lors de l’effacement de
plusieurs plages, il est préférable d’effacer les plages en
commençant par les numéros les plus grands, afin
d’éviter une renumérotation inutile des plages qui n’ont
pas encore été effacées.)
Cette fonction vous permet d’effacer des plages après
l’enregistrement, il n’est donc pas nécessaire d’enregistrer
sur un morceau enregistré précédemment (comme c’est le
cas pour les cassettes audio).
Exemple: Effacement de la plage B
Numéros de
plages
ERASE
123 4
A
12 3
A
BC D
Effacement
de B
CD
Pour annuler la fonction Erase
Appuyez sur EDIT/NO ou STOP.
z
Vous pouvez annuler l’effacement d’une plage
Utilisez la fonction d’annulation immédiatement après avoir
effacé la plage (voir page 35).
Remarque
Si “Erase ???” est affiché, la plage a été protégée contre
l’enregistrement sur une autre platine MD. Si vous souhaitez
néanmoins effacer la plage, appuyez sur AMS ou ENTER/YES
pendant que“Erase ???” est affiché.
Montage de minidisques enregistrés
EDIT/NO
AMS
1 Quand l’appareil est à l’arrêt, en mode de lecture
ou de pause, appuyez sur EDIT/NO pour afficher le
menu de montage.
2 Tournez AMS pour afficher “Erase ?”, puis appuyez
sur AMS.
3 Tournez AMS pour afficher le numéro de plage de
la plage à effacer.
Le témoin REHEARSAL s’allume et la plage
sélectionnée est reproduite.
4 Appuyez sur AMS pour sélectionner la plage.
“Complete!!” est affiché pendant quelques secondes et
la plage est effacée. La lecture commence au début de
la plage suivant la plage effacée.
5
Pour effacer d’autres plages, répétez les étapes 1 à 4.
31
FR
Page 74

Effacement de toutes les plages
Titrage de minidisques et
Montage de minidisques enregistrés
d’un minidisque (fonction All Erase)
Cette fonction vous permet d’effacer toutes les
informations sur le minidisque (toutes les plages
enregistrées, leurs titres et le titre du disque) en une seule
opération.
EDIT/NO
1 Quand l’appareil est à l’arrêt, en mode de lecture
ou de pause, appuyez sur EDIT/NO pour afficher le
menu de montage.
2 Tournez AMS pour afficher “All Erase ?”, puis
appuyez sur AMS.
“All Erase??” apparaît sur l’afficheur.
3 Appuyez de nouveau sur AMS pour effacer le
contenu du minidisque.
“Complete!!” est affiché pendant quelques secondes et
le titre du minidisque, toutes les plages et tous les
titres de plages sont effacés.
AMS
de plages (fonction Name)
Vous pouvez créer des titres pour les minidisques et les
plages que vous avez enregistrés. Les titres peuvent
comprendre des lettres majuscules ou minuscules, des
chiffres ou des symboles, pour un maximum de 1700
caractères par minidisque.
EDIT/NO
ENTER/YES
STOP
Vous pouvez entrer des titres pendant la lecture,
l’enregistrement, la pause, ou à l’arrêt.
Quand vous titrez une plage pendant l’enregistrement,
veillez à enregistrer tout le titre avant que la plage ne se
termine. Si la plage se termine avant que le titrage ne soit
terminé, les caractères entrés ne seront pas enregistrés et
la plage restera sans titre.
Quand vous titrez une plage pendant la lecture, la plage
est reproduite de façon répétée jusqu’à ce que vous ayez
fini de titrer la plage.
1 Appuyez sur EDIT/NO pour afficher le menu de
montage.
AMS
DISPLAY
0/)
Molette
Pour annuler la fonction Erase
Appuyez sur EDIT/NO ou STOP pour quitter l’affichage
“All Erase ?” ou “All Erase??”.
z
Vous pouvez annuler l’effacement
Utilisez la fonction d’annulation immédiatement après avoir
effacé le contenu du minidisque (voir page 35).
2 Tournez AMS pour afficher “Name ?”, puis appuyez
sur AMS.
Cette étape n’est pas nécessaire pendant
l’enregistrement.
3 Tournez AMS pour afficher “Nm In ?”, puis appuyez
sur AMS.
4 Tournez AMS pour spécifier si vous souhaitez titrer
le minidisque ou la plage.
Pendant l’enregistrement, passez à l’étape 6 (seule la
plage peut être titrée).
• Pour titrer le disque, tournez AMS pour afficher
“Disc”
• Pour titrer la plage, tournez AMS de telle façon que
le numéro de la plage clignote sur l’afficheur.
5 Appuyez sur AMS.
“New Name In” apparaît sur l’afficheur et le curseur
se met à clignoter.
REHEARSAL TRACK
BANK 1
TR M S F
LR
20
40
-dB
32
FR
Page 75

6 Appuyez de façon répétée sur DISPLAY pour
sélectionner un type de caractère:
Pour sélectionner Appuyez de façon répétée sur
DISPLA Y jusqu’à ce que
Majuscules “A” apparaisse sur l’afficheur
Minuscules “a” apparaisse sur l’afficheur
Nombres “0” apparaisse sur l’afficheur
Copie du titre d’une plage ou d’un
minidisque (fonction Name Copy)
Vous pouvez copier le titre d’une plage ou d’un
minidisque et l’utiliser pour une autre plage du même
minidisque, ou pour titrer le minidisque lui-même.
1 Quand l’appareil est à l’arrêt, en mode de lecture
ou de pause, appuyez sur EDIT/NO pour afficher le
menu de montage.
7 Tournez AMS ou la molette pour sélectionner le
caractère.
Le caractère sélectionné clignote.
Les caractères apparaissent dans l’ordre suivant:
Lettres / nombres / symboles
Vous pouvez utiliser les symboles suivants:
! ” # $ % & ’ ( ) * + , – . / : ; < = > ? @ _ `
Vous pouvez appuyer sur DISPLAY pour changer de
type de caractère quand vous voulez à l’étape 6.
8 Appuyez sur AMS ou ENTER/YES pour entrer le
caractère sélectionné.
Le caractère sélectionné à l’étape 7 s’allume en
continu, et le curseur se déplace vers la droite et
clignote, en attendant que le caractère suivant soit
entré.
REHEARSAL TRACK
BANK 1
TR M S F
LR
20
40
-dB
9 Répétez les étapes 7 et 8 jusqu’à ce que tout le
titre soit entré.
En cas d’erreur
Appuyez sur 0 ou ) jusqu’à ce que le caractère à
changer se mette à clignoter, puis répétez les étapes 7
et 8 pour entrer le bon caractère.
Pour effacer un caractère
Appuyez sur 0 ou ) jusqu’à ce que le caractère
que vous souhaitez effacer se mette à clignoter, puis
appuyez sur EDIT/NO. Appuyez de façon répétée sur
EDIT/NO pour effacer plusieurs caractères à la suite.
Pour entrer un espace
Appuyez sur AMS quand le curseur clignote.
10 Appuyez sur ENTER/YES.
Le titrage de minidisque ou de plage est terminé et le
titre du minidisque ou de la plage apparaît sur
l’afficheur.
2 Tournez AMS pour afficher “Name ?”, puis appuyez
sur AMS.
3 Tournez AMS pour afficher “Nm Copy ?”, puis
appuyez sur AMS.
4 Tournez AMS pour spécifier si vous souhaitez
copier le titre du minidisque ou de la plage.
• Pour copier le titre du minidisque, tournez AMS
pour afficher “Disc”
• Pour copier le titre de la plage, tournez AMS de telle
façon que le numéro de la plage portant le titre que
vous souhaitez copier clignote sur l’afficheur.
5 Appuyez sur AMS.
Si “No Name” apparaît sur l’afficheur, aucun titre n’a
été entré pour le minidisque ou le numéro de la plage
sélectionnée.
6 Tournez AMS pour spécifier où vous souhaitez
copier le titre.
• Pour copier le titre comme titre de minidisque,
tournez AMS pour afficher “Disc”
• Pour copier le titre comme titre de plage, tournez
AMS de telle façon que le numéro de la plage que
vous souhaitez titrer clignote sur l’afficheur.
7 Appuyez sur AMS.
“Complete!!” est affiché pendant quelques secondes et
le titre de minidisque ou de plage est copié.
Si “Overwrite?” apparaît sur l’afficheur
Le minidisque ou la plage sélectionné à l’étape 6 porte
déjà un titre. Pour continuer et remplacer le titre
précédent par le nouveau sélectionné à l’étape 4, appuyez
sur AMS.
Pour annuler la fonction Name Copy
Appuyez sur EDIT/NO ou STOP.
Montage de minidisques enregistrés
Pour annuler la fonction Name
Appuyez sur STOP.
Remarque
Vous ne pouvez pas titrer une plage pendant l’enregistrement en
mode Backtrack.
33
FR
Page 76

Titrage de minidisques et de plages (fonction Name)
Montage de minidisques enregistrés
Effacement du titre d’un disque ou d’une
plage (fonction Name Erase)
Utilisez cette fonction pour effacer le titre d’un disque ou
d’une plage.
1 Quand l’appareil est à l’arrêt, en mode de lecture
ou de pause, appuyez sur EDIT/NO pour afficher le
menu de montage.
2 Tournez AMS pour afficher “Name ?”, puis appuyez
sur AMS.
Cette étape n’est pas nécessaire pendant
l’enregistrement.
3 Tournez AMS pour afficher “Nm Erase ?”, puis
appuyez sur AMS.
4 Tournez AMS pour spécifier si vous souhaitez
effacer le titre du minidisque ou de la plage.
• Pour effacer le titre du minidisque, tournez AMS
pour afficher “Disc”
• Pour effacer le titre de la plage, tournez AMS de
telle façon que le numéro de la plage portant le titre
que vous souhaitez effacer clignote sur l’afficheur.
5 Appuyez sur AMS.
“Complete!!” est affiché pendant quelques secondes, puis
le titre est effacé.
Pour annuler la fonction Name Erase
Appuyez sur EDIT/NO ou STOP.
Effacement de tous les titres d’un
minidisque (fonction Name All Erase)
Cette fonction vous permet d’effacer simultanément tous
les titres de plages ainsi que le titre de minidisque inscrits
sur un minidisque.
1 Quand l’appareil est à l’arrêt, en mode de lecture
ou de pause, appuyez sur EDIT/NO pour afficher le
menu de montage.
2 Tournez AMS pour afficher “Name ?”, puis appuyez
sur AMS.
3 Tournez AMS pour afficher “Nm AllErs ?”, puis
appuyez sur AMS.
“Nm All Ers??” apparaît sur l’afficheur.
4 Appuyez de nouveau sur AMS pour effacer les
titres du minidisque.
“Complete!!” est affiché pendant quelques secondes,
puis tous les titres sont effacés.
Pour annuler la fonction Name All Erase
Appuyez sur EDIT/NO ou STOP.
z
Vous pouvez annuler l’effacement des titres
Utilisez la fonction d’annulation immédiatement après avoir
effacé les titres du minidisque (voir page 35).
z
Vous pouvez effacer tout le contenu du minidisque (toutes
les plages et tous les titres)
Voir “Effacement de toutes les plages d’un minidisque (fonction
All Erase)” à la page 32.
34
FR
Page 77

Annulation du dernier
montage (fonction Undo)
Cette fonction vous permet d’annuler le dernier montage
effectué et de rétablir le contenu du minidisque, tel qu’il
était avant le montage. Vous ne pourrez cependant pas
annuler le montage si vous avez ensiute effectué les
opérations suivantes:
• Appuyé sur la touche r REC.
• Mis à jour le sommaire (TOC) en appuyant sur ENTER/
YES ou en éjectant le minidisque.
• Mis l’appareil hors tension ou débranché le cordon
d’alimentation.
ENTER/YES
UNDO
1 Appuyez sur UNDO.
Un des messages suivants apparaît sur l’afficheur,
selon le type de montage que vous avez effectué:
Montage effectué: Message:
Division d’une plage “DivideUndo?”
Combinaison de plages “CombinUndo?”
Déplacement d’une plage “Move Undo?”
Effacement d’une seule plage “Erase Undo?”
Effacement de toutes les
plages d’un minidisque
Titrage d’une plage ou d’un
minidisque
Copie d’un titre de
minidisque ou de plage
Effacement d’un titre de
minidisque ou de plage
Effacement de tous les titres
d’un minidisque
Name Undo?”
EDIT/NO
AMS
Montage de minidisques enregistrés
2 Appuyez sur AMS ou ENTER/YES.
“Complete!!” est affiché pendant quelques secondes et
le contenu du minidisque est rétabli, tel qu’il était
avant le montage.
Pour annuler la fonction Undo
Appuyez sur EDIT/NO ou STOP.
z
Vous pouvez aussi annuler l’opération de montage
précédente avec le menu de montage
Sélectionnez “Undo ?” dans le menu de montage.
35
FR
Page 78

Informations
Précautions
complémentaires
Sécurité
Si un objet solide ou un liquide tombait dans le coffret,
débranchez l’appareil et faites–le vérifier par un professionnel
avant de le remettre sous tension.
Sources d’alimentation
• Avant de mettre l’appareil en service, vérifiez si sa tension de
fonctionnement correspond à celle du secteur local. La tension
de fonctionnement est indiquée sur la plaque signalétique sous
l’appareil.
• L’interrupteur d’alimentation se trouve en haut de l’appareil.
• L’appareil reste raccordé à la source d’alimentation CA
(secteur) aussi longtemps qu’il reste branché sur une prise
murale, même s’il a été mis hors tension.
• Veillez à débranchez l’appareil de la prise murale si vous
n’avez pas l’intention de l’utiliser pendant longtemps. Pour
déconnecter le cordon d’alimentation secteur, tirez sur la fiche
proprement dite. Ne jamais tirer sur le cordon.
• Si le cordon d’alimentation secteur a besoin d’être changé,
faites-le changer dans un centre de service après-vente
uniquement.
Installation
N’installez pas l’appareil dans un espace confiné comme dans
une bibliothèque ou un meuble encastré.
Fonctionnement
Si l’appareil est transporté directement d’un endroit froid dans
une pièce chaude, ou s’il est placé dans une pièce très humide, de
l’humidité risque de se condenser sur les lentilles à l’intérieur de
l’appareil. Dans ce cas, l’appareil risque de ne pas fonctionner
correctement. Enlevez alors le minidisque et laissez l’appareil
allumé pendant environ une heure pour que l’humidité
s’évapore.
Cartouche du minidisque
• Ne pas ouvrir l’obturateur et exposer le minidisque.
• Ne pas poser la cartouche dans un endroit exposé directement
au soleil, à des températures extrêmes, à l’humidité ou à la
poussière.
Nettoyage
Nettoyez le coffret, le panneau et les commandes avec un chiffon
doux légèrement mouillé d’une solution savonneuse douce. Ne
pas utiliser de tampon abrasif, de poudre à récurer ni de solvant,
comme l’alcool ou la benzine.
36
Pour toute question ou tout problème concernant votre appareil,
consultez votre revendeur Sony.
FR
Page 79

Manipulation des
minidisques
Messages affichés
Le minidisque est enfermé dans une cartouche qui le
protége des débris ou des empreintes de doigts et facilite
sa manipulation.
Néanmoins, le présence de débris ou le gondolement de la
cartouche risquent d’empêcher le bon fonctionnement du
minidisque. Pour écouter de la musique dans les
meilleures conditions, suivez les instructions ci-dessous.
Ne pas toucher le minidisque intérieur avec les
doigts
Si vous essayez d’ouvrir l’obturateur en forçant, vous
risquez d’endommager le minidisque.
Obturateur
Cartouche
Rangement des minidisques
Ne pas poser la cartouche dans un endroit exposé
directement au soleil, à des températures extrêmes, à la
chaleur ou à l’humidité.
Nettoyage régulier
Essuyez la poussière et les débris à la surface de la
cartouche avec un chiffon sec.
Le tableau suivant décrit les divers messages qui
apparaissent sur l’afficheur.
Message Signification
Blank Disc Un minidisque neuf (vierge) ou effacé a été
Cannot Copy Vous essayez de faire une seconde copie d’un
Cannot Edit Vous essayez de faire un montage pendant la
Disc Full Le minidisque est plein (voir “Limites du
Impossible L’appareil ne peut pas effectuer l’opération
Din Unlock/C71 L’affichage de ce message pendant un court
Name Full La capacité maximale de titrage du
Disc Error/C13/C14
No Disc Il n’y a pas de minidisque dans l’appareil.
Pre-mastered L’enregistrement n’est pas possible parce que
Protected/C11 Le minidisque inséré est protégé contre les
REC Error/C13 L’enregistrement a échoué.
Standby Le contenu précédemment enregistré n’a pas
inséré.
minidisque copié numériquement (voir page
41).
lecture programmée.
système” voir page 38).
de montage spécifiée.
instant est provoqué par l’enregistrement
d’un signal diffusé numériquement. La
qualité de l’enregistrement n’est pas affectée.
Le câble numérique a été débranché d’un
appareil raccordé à la prise d’entrée
numérique pendant un enregistrement
numérique, ou l’appareil raccordé a été mis
hors tension.
minidisque est atteinte (environ 1700
caractères).
L’appareil n’a pas pu lire correctement les
informations de disque.
le minidisque en place dans l’appareil est un
disque pré-enregistré du commerce.
effacements accidentels.
Le minidisque est très sale (huile, empreintes
de doigts, etc.) ou endommagé, ou bien il
n’est pas conforme aux normes MD.
été écrit correctement sur le minidisque, ou
cet appareil n’a pas conservé les modes de
lecture précédents.
Informations complémentaires
37
FR
Page 80

Limites du système
Guide de dépannage
Informations complémentaires
Le système d’enregistrement de MD (MiniDisc) est
complètement différent de celui des cassettes audio et des
platines DAT. Il est caractérisé par les limites décrites cidessous. Ces limites sont liées au système
d’enregistrement MiniDisc et ne sont pas dues à des
défaillances mécaniques.
“Disc Full” s’allume avant que le temps d’enregistrement
maximal du minidisque (60 ou 74 minutes) ne soit atteint
Si vous avez enregistré 256 plages sur le minidisque, “Disc
Full” s’allumera, quel que soit le temps total
d’enregistrement. Vous ne pouvez pas enregistrer plus de 256
plages sur le minidisque. Pour continuer l’enregistrement,
effacez des plages inutiles ou utilisez un autre minidisque
enregistrable.
“Disc Full” s’allume avant que le nombre maximal de plages ne
soit atteint
Des fluctuations d’intensité entre les plages peuvent parfois
être interprétées comme des espaces interplages. Le nombre
total de plages augmente alors et “Disc Full” s’allume.
Le temps d’enregistrement restant n’augmente pas après
l’effacement de plusieurs plages courtes
Les plages de moins de 12 secondes ne sont pas comptées et
le temps n’augmente pas quand vous les effacez.
Certaines plages ne peuvent pas être combinées
La combinaison peut être impossible si les plages ont subi
plusieurs opérations de montage.
Le total du temps d’enregistrement et du temps restant sur le
minidisque ne correspond pas au temps d’enregistrement
maximal (60 ou 74 minutes)
L’enregistrement est effectué par unités de 2 secondes au
minimum, quelle que soit la longueur des plages; c’est
pourquoi le temps d’enregistrement peut être inférieur à la
capacité maximale. L’espace sur le minidisque peut
également être réduit par des rayures.
Les plages créées par montage peuvent présenter des pertes de
son pendant les opérations de recherche.
Si vous rencontrez un des problèmes suivants en cours
d’utilisation, reportez-vous à ce guide pour le résoudre. Si
vous n’y parvenez pas, consultez votre revendeur Sony.
Le fonctionnement est impossible.
/
Le minidisque est sale ou endommagé (“Disc Error”
apparaît). Sortez le minidisque et insérez-le de nouveau.
Si “Disc Error” est réaffiché, remplacez le minidisque.
La lecture est impossible.
/ De la condensation s’est formée dans l’appareil.
Sortez le minidisque et attendez quelques heures
que l’humidité s’évapore.
/ L’enregistreur est éteint. Appuyez sur U pour
l’allumer.
/ Le minidisque est inséré dans le mauvais sens.
Insérez le minidisque dans le logement avec la face
étiquetée tournée vers le haut et la flèche vers
l’ouverture.
/ Rien n’a été enregistré (le répertoire n’apparaît
pas). Remplacez le minidisque par un minidisque
enregistré.
L’enregistrement est impossible.
/ Le minidisque est protégé (“Protected” et “C11”
sont affichés). Fermez la fente de protection.
/ L’appareil n’est pas raccordé correctement à la
source sonore. Raccordez-le correctement.
/
Le niveau d’enregistrement est trop bas. Réglez
correctement le niveau d’enregistrement (voir page 24).
/ Un minidisque pré-enregistré a été inséré.
Remplacez-le par un minidisque enregistrable.
/
Il ne reste pas assez d’espace sur le minidisque.
Remplacez le minidisque par un autre sur lequel moins
de plages ont été enregistrées ou effacez des plages.
/ Il y a eu une panne d’électricité ou le cordon
d’alimentation a été débranché. Les données
enregistrées à ce moment ont peut-être été
perdues. Réenregistrez à partir du début.
Les numéros des plages ne sont pas enregistrés correctement
Suivant le contenu du CD enregistré, certaines plages d’un
CD peuvent être divisées en plusieurs plages plus petites
pendant un enregistrement numérique. De même, suivant la
source de programme, la mise en service de l’inscription
automatique des numéros de plages “L.Sync ON” pendant
l’enregistrement peut être à l’origine de différences entre les
numéros de plages originaux et ceux nouvellement inscrits.
“TOC Reading” reste longtemps affiché
Si le minidisque enregistrable inséré est neuf, “TOC Reading”
reste affiché plus longtemps que pour un minidisque qui a
déjà été utilisé.
Le temps correct d’enregistrement/lecture peut ne pas être
affiché pendant la lecture de minidisques monophoniques.
FR
38
Le son est très parasité.
/ Le magnétisme puissant d’un téléviseur ou d’un
appareil similaire gêne le fonctionnement. Éloignez
l’enregistreur de la source de magnétisme.
Le minidisque ne peut plus être sorti après son
insertion partielle.
/
La fonction de verrouillage est activée pour éviter
qu’un disque partiellement inséré puisse être sorti en
tirant dessus ou en appuyant sur
§
EJECT. Poussez
complètement le minidisque dans l’appareil, puis
appuyez sur
Remarque
Si après avoir essayé les solutions mentionnées ci-dessus,
l’appareil ne fonctionne toujours pas, mettez-le hors tension, puis
réinsérez la fiche dans la prise murale.
§
EJECT pour sortir le disque.
Page 81

Spécifications
Système Système audio numérique
MiniDisc
Disque Minidisque
Laser Laser à semiconducteur
(λ = 780 nm)
Durée d’émission: continue
Sortie du Laser MAX 44,6 µW*
* Cette sortie est la valeur
mesurée à une distance de
200 mm de la surface de la
lentille sur le capteur
optique avec une
ouverture de 7 mm.
Temps d’enregistrement/lecture
74 min. maximum (avec
MDW-74)
Vitesse de rotation
400 à 900 tr/mn (CLV)
Correction d’erreur
ACIRC (Code “Advanced
Cross Interleave Reed
Solomon”)
Fréquence d’échantillonnage
44,1 kHz
Codage ATRAC (Adaptative
Transform Acoustic Coding)
Système de modulation
EFM
Nombre de canaux
2 canaux stéréo
Entrées
LINE (ANALOG) IN
Type de prise : Prises cinch
Impédance : 47 kilohms
Entrée nominale :
Entrée minimale :
DIGITAL OPTICAL IN
Type de prise : Prise optique
Impédance : Longueur
Entrée nominale: –
Entrée minimale: –
DIGITAL COAXIAL IN
Type de prise : Prise Cinch
Impédance : 75 ohms
Entrée nominale : 0,5 Vc-c
Entrée minimale: –
FOOT SW REC/PAUSE
Type de prise : Jack 6,35 mm
Impédance: –
Entrée nominale: –
Entrée minimale: –
FOOT SW PLAY/PAUSE
Type de prise : Jack 6,35 mm
Impédance: –
Entrée nominale: –
Entrée minimale: –
500 mVrms
125 mVrms
carrée
d’onde optique : 660 nm
±20%
monophonique
monophonique
Autres
Alimentation
Lieu d’achat Alimentation
États-Unis et Canada 120 V, 60 Hz
Europe continentale Secteur 220-230 V,
et Royaume-Uni 50/60 Hz
Consommation
28 W
Dimensions 300 x 121 x 356 mm
(11 7/8 x 4 7/8 x 14 1/8 po.)
saillies et commandes
comprises
Poids (approx.) 4,1 kg (9 li. 1 on.)
Accessoires fournis
Interrupteur au pied
FS-A8
Licences américaines et étrangères
autorisées par Dolby Laboratories
Licensing Corporation.
La conception et les spécifications
peuvent être modifiées sans préavis.
Informations complémentaires
Rapport signal/bruit
Supérieur à 96 dB (pendant
la lecture)
Pleurage et scintillement
Non mesurable (±0,001%
W. PEAK)
Sorties
PHONES Type de prise : Jack 6,35 mm
stéréo
Tension : 28 mV
Impédance : 32 ohms
LINE (ANALOG) OUT
Type de prise : Prises Cinch
stéréo
Tension : 2 Vrms
(à 50 kilohms)
Impédance : Supérieure à 10
kilohms
39
FR
Page 82

Tableau des fonctions du menu de montage
Vous pouvez effectuer des opérations de montage variées
sur cet appareil à l’aide du menu de montage. De plus, le
menu de réglage est aussi situé à l’intérieur du menu de
montage. Bien que toutes les opérations du menu soient
décrites dans les chapitres précédents, nous avons inclus
le tableau à droite que vous pourrez consulter comme
référence.
Remarques
•
Les opérations du menu disponibles changent en fonction du
mode de fonctionnement actuel (arrêt, lecture et enregistrement).
•
Certains menus peuvent contenir d’autres menus supplémentaires.
Pour entrer dans le menu de montage
Affichage Fonction Voir page
Name? Titrage de minidisque ou de plage 32
Erase? Effacement d’une plage 31
Move? Changement d’un numéro de plage 30
Combine? Combinaison de deux plages 29
Divide? Division d’une plage 28
All Erase? Effacement complet du minidisque 32
Undo? Annulation de l’opération de 35
montage précédente
Setup Menu? Entrée dans le menu de réglage 40
Appuyez sur EDIT/NO.
Tableau des fonctions du menu de réglage
Vous pouvez effectuer des réglages variés sur cet appareil à
l’aide du menu de réglage. Les opérations relatives à
chaque menu ont été décrites dans les chapitres précédents.
Le tableau ci-dessous donne un aperçu de chaque menu, y
compris des divers paramètres et des réglages initiaux.
Pour entrer dans le menu de réglage
• Appuyez deux fois sur EDIT/NO en mode d’arrêt.
• Appuyez une fois sur EDIT/NO pour afficher le menu
de montage, tournez AMS pour afficher “Setup
Menu?”, puis appuyez sur AMS.
Informations complémentaires
Numéro
01
02
03
04
05
06
07
08
09
10
11
12
13
FR
40
Fonction Paramètres Voir page
Pour créer un programme – 20
Pour spécifier les plages Hot Start –
Efface le repère de plage assigné à la touche à
effleurement
Détermine le point où la lecture commencera quand
vous tournerez AMS.
Met en/hors service la fonction Resume Play Resume (Off / Play)
Détermine si l’appareil assignera automatiquement
des numéros de plages pendant l’enregistrement de
sources analogiques.
Détermine le niveau de référence du signal d’entrée
à utiliser avec le réglage L.Sync On.
Détermine la durée du signal de bas niveau avant
l’inscription d’un numéro de plage à utiliser avec le
réglage L.Sync On.
Détermine le temps avant l’inscription d’un numéro
de plage (après détection) à utiliser avec le réglage
L.Sync On.
Détermine le niveau de référence pour l’inscription
automatique des points de localisation
Détermine l’intervalle pour l’inscription
automatique des points de localisation
Détermine la longueur de la répétition lors du
montage
Détermine l’intervalle de la répétition lors du
montage
–
JOG : (Track / Cue)
L.Sync (Off / On)
LS(T) : (–72 dB ~ –0 dB) 25
LS(W) : (0s ~ 9.5s)
LS(O) : (–9s85f ~ 9s85f)
AC(T) : (–72 dB ~ –0 dB)
AC(O) : (–9s85f ~ 9s85f) 14
RH(L) : (0s00f ~ 9s85f)
RH(I) : (0s ~ 8.0s) 28
Réglage initial
–
–
–
JOG : Track
Resume Off
L.Sync Off
LS(T) : –50 dB
LS(W) : 1.5s
LS(O) : 0s00f
AC(T) : –50 dB
LS(O) : 0s00f
RH(L) : 2s00f
RH(I) : 1.0s
16
13
14
21
25
25
25
14
28
Page 83

Système de protection contre la copie abusive
Cette platine MiniDisc utilise le système de protection
contre la copie abusive (SCMS), qui autorise
l’enregistrement d’une première génération de copie
numérique par la prise d’entrée numérique de la platine.
Voici un aperçu de ce système :
1 Vous pouvez enregistrer des sources numériques (CD, DAT ou
MD préenregistrés) sur une cassette DAT ou un minidisque
enregistrable par la prise d’entrée numérique de la platine DAT
ou MD.
Vous ne pouvez cependant pas recopier la cassette DAT ou le
minidisque enregistré sur une cassette DAT ou un autre
minidisque enregistrable par la prise d’entrée numérique de la
platine DAT ou MD.
Lecteur CD
Platine MDPlatine DAT
Lecture
Câble optique ou
câble de liaison
numérique coaxial
Enregistrement
DAT ou MD
Lecture
Prise de sortie numérique
Platine DAT ou
Platine DAT ou
Prise de sortie
numérique
Prise d’entrée
numérique
MD
Première
génération de
cassette DAT ou
MD enregistré
via la liaison
numérique à
numérique
MD
Prises de sortie de ligne
(analogique)
2 Vous pouvez enregistrer le signal numérique d’une émission
radiosatellite sur une cassette DAT ou un MD enregistrable par
la prise d’entrée numérique d’une platine DAT ou MD, capable
de traiter les fréquences d’échantillonnage de 32 kHz ou 48
kHz. Vous pouvez ensuite enregistrer le contenu de la cassette
DAT ou du MD (première génération de copie) sur une autre
cassette DAT ou un autre minidisque enregistrable pour créer
une seconde génération de copie.
Les enregistrements suivant la seconde génération de copie sur
une cassette DAT ou un MD ne sont possibles que par les prises
d’entrée analogique de la platine DAT ou MD. Notez,
cependant, qu’une seconde génération de copie numérique
peut être impossible avec certains tuners BS/CS.
Lecture
Câble optique ou
câble de liaison
numérique coaxial
Enregistrement
DAT ou MD
Lecture
Câble optique ou
câble de liaison
numérique coaxial
Enregistrement
Tuner BS/CS
Prise de sortie
numérique
Prise d’entrée
numérique
Platine DAT ou MD
Première
génération de
cassette DAT ou
MD enregistré via
la liaison
numérique à
numérique
Platine DAT ou MD
Prise de sortie
numérique
Prise d’entrée
numérique
Platine DAT ou MD
Informations complémentaires
Câble optique ou
câble de liaison
numérique coaxial
Prise d’entrée numérique
Enregistrement
Platine DAT ou
Cordon de liaison
audio
Prises d’entrée de ligne
(analogique)
MD
DAT ou MD
Platine DAT ou MDLecture
Prise de sortie numérique
Câble optique ou
câble de liaison
numérique coaxial
Prise d’entrée numérique
Enregistrement
Platine DAT ou MD
Seconde
génération de
cassette DAT ou
MD enregistré
via la liaison
numérique à
numérique
Prises de sortie de ligne
(analogique)
Cordon de liaison
audio
Prises d’entrée de ligne
(analogique)
41
FR
Page 84

Système de protection contre la copie
abusive
3 Vous pouvez enregistrer une cassette DAT ou un MD par les
prises d’entrée analogique de la platine sur une autre cassette
DAT ou un MD par la prise de sortie numérique de la platine
DAT ou MD. Vous ne pouvez cependant pas faire une seconde
génération de copie de cassette DAT ou MD par la prise de
sortie numérique de la platine DAT ou MD.
Tourne-disque
Lecteur CDTuner
Platine à cassette Platine DAT
Informations complémentaires
Amplificateur de
microphone
Lecture
Cordon de liaison audio
Enregistrement
DAT ou MD
Lecture
Câble optique ou
câble de liaison
numérique
coaxial
Enregistrement
Platine DAT ou
Platine DAT ou
Platine DAT ou
Platine MD
Prises de sortie
de ligne
(analogique)
Prises d’entrée de
ligne (analogique)
MD
Cassette DAT ou
MD enregistré
via la liaison
analogique à
numérique
MD
Prise de sortie
numérique
Prise d’entrée
numérique
MD
DAT ou MD
Lecture
Prise de sortie numérique
Câble optique
ou câble de
liaison
numérique
coaxial
Cordon d’entrée
Enregistrement
FR
42
Platine DAT ou
numérique
Première
génération de
cassette DAT ou
MD enregistré
via la liaison
numérique à
numérique
MD
Prises de sortie de ligne
(analogique)
Cordon de liaison
audio
Prises d’entrée de
ligne (analogique)
Platine DAT
ou MD
Page 85

Index
A, B
Accessoires en option 39
Accessoires fournis 39
Affichage
des messages 37
des modes 18
parties 9
Annulation de la dernière
opération de montage 35
AUTO CUE 14
AUTO PAUSE 14
C
Câble optique 5
Changement
des plages Hot Start 17
des plages programmées 21
du mode d’affichage 18, 30
Convertisseur de fréquence
d’échantillonnage 5
Combinaison de plages 29
Cordons audio 5
D
Déplacement de plages 30
Division des plages 28
E
Effacement
de tous les titres et plages 32
d’un titre particulier 34
d’une plage particulière 31
simultané de tous les titres 34
Enregistrement 23, 24
Entretien 37
F
Fréquence d’échantillonnage 5,
39
G
Guide de dépannage 38
H
Hot Start (lecture immédiate) 16
I, J, K
Inscription des numéros de plage
24, 28
L
Lecture
immédiate (Hot Start) 16
normale 11
programmée 20
répétée 19
Limites du système 38
Localisation
d’une place spécifique 11
d’un point particulier dans
une plage 12
M
Menu de montage 40
Menu de réglage 40
Minidisque
enregistrable 17, 20
insertion 11, 23
pré-enregistré 17, 20, 37, 38
retrait 12
Montage 27
N, O
Nettoyage 36
Numéros de plages
inscription automatique 24
inscription manuelle 24
P, Q
Pause
de la lecture 12
de l’enregistrement 24
R
Raccordement 5
Réglage
de la hauteur du son 15
de la vitesse 15
du niveau d’enregistrement
24
d’un point de localisation 13
Répétition 9
d’une plage 8, 10
du disque entier 8, 10
S
SCMS (Système de protection
contre la copie abusive) 41
Spécifications 39
T, U
Taquet de protection de
l’enregistrement 9
Titrage
d’un minidisque 32
d’une plage 32
V, W, X, Y, Z
Vérification
des plages Hot Start 19
des plages programmées 20
du temps écoulé 18
du temps restant 18
Informations complémentaires
43
FR
Page 86

WARNUNG
Herzlichen
Zu dieser
Vorsicht: Bei Verwendung von
optischen Instrumenten in der
Nähe dieses Geräts besteht
Verletzungsgefahr für die
Augen.
Stellen Sie das Gerät nicht an
einem Ort auf, an dem
ausreichende Luftzufuhr nicht
gegeben ist, zum Beispiel in
einem engen Regalfach oder in
einem Einbauschrank.
Das Typenschild befindet sich an
der Unterseite.
Bei diesem Gerät handelt es sich um ein
Produkt der Laser-Klasse 1. Die Aufschrift
CLASS 1 LASER PRODUCT befindet sich
an der Unterseite des Geräts.
Glückwunsch!
Wir beglückwünschen Sie zu diesem Sony
MD-Deck. Lesen Sie vor der
Inbetriebnahme diese Anleitung gut durch,
und bewahren Sie sie zum späteren
Nachschlagen sorgfältig auf.
Anleitung
Diese Anleitung behandelt das MD-Deck
MDS-DRE1.
Hinweis
Folgendes Symbol wird in der Anleitung
verwendet:
Dieses Symbol kennzeichnet
z
Zusatzinformationen und Tips zur
Bedienungserleichterung.
Um Feuergefahr und die Gefahr
eines elektrischen Schlages zu
vermeiden, darf das Gerät
weder Regen noch Feuchtigkeit
ausgesetzt werden.
Der Verkäufer dieses Geräts
übernimmt keinerlei Haftung für
direkte Schäden, indirekte Schäden,
Folgeschäden und trägt keine
Verantwortung für finanzielle
Ausgaben, die durch ein
beschädigtes Produkt oder den
Gebrauch eines Produktes
entstehen.
DE
2
Page 87

Inhaltsverzeichnis
Vorbereitungen 4
Anschluß 4
Name und Funktion der
Bedienungselemente 6
Bedienungselemente 6
Display 9
Eingänge und Ausgänge 10
DJ-Zusatzfunktionen 11
Titelwahl 11
Festlegen eines Cue-Punktes 12
Belegung der Pads mit Cue-Punkten 13
Automatische Pause am Anfang der Titel 14
Ändern der Geschwindigkeit und der Tonlage
während der Wiedergabe 15
Passagen-Wiederholbetrieb (Loop) 16
Sofortstart eines Titels (Hot Start) 16
Zusätzliche
Widergabefunktionen 18
Die Anzeigen im Display 18
Wiederholspielbetrieb (Repeat) 19
Wiedergabe in programmierter Reihenfolge
(Program) 20
Fortsetzen der Wiedergabe an derselben Stelle nach
dem Stoppen (Resume Play) 21
Editieren einer bespielten MD 27
Hinweise zum Editieren 27
Unterteilen eines Titels (Divide) 28
Kombinieren von zwei Titeln (Combine) 29
Verschieben eines Titels (Move) 30
Löschen eines Titels (Erase) 31
Löschen der ganzen MD (All Erase) 32
Zuteilen von Disc- und Titelnamen (Name) 32
Rückgängigmachen des letzten Editiervorgangs
(Undo) 35
Zusatzinformationen 36
Zur besonderen Beachtung 36
Handhabung der MD 37
Meldungen im Display 37
Besonderheiten des MD-Systems 38
Störungsüberprüfungen 38
Technische Daten 39
Das Edit-Menü 40
Das Setup-Menü 40
Zum „Serial Copy Management System“ 41
Stichwortverzeichnis 43
DE
Aufnehmen auf die MD 22
Hinweise zum Aufnehmen 22
Aufnehmen auf die MD 23
Setzen von Titelnummern während der
Aufnahme 24
Aufnahme bei gleichzeitiger Wiedergabe (Backtrack
Recording) 25
DE
3
Page 88

Vorbereitungen
Anschluß
In diesem Abschnitt wird der
Anschluß von Audiogeräten
behandelt. Lesen Sie den Abschnitt
sorgfältig durch, bevor Sie Kabel
anschließen.
Nach dem Auspacken
Vergewissern Sie sich, daß die folgenden Teile vorhanden
sind:
• Netzkabel (1)
• Bedienungsanleitung (1)
Wenn ein Teil fehlt, wenden Sie sich an den Händler, bei
dem Sie das Gerät gekauft haben, oder an ein Sony
Service Center.
Anschlußbeispiele
p Anschluß eines Mischers
LINE OUT LINE IN
Mischer
Signalfluß
p Anschluß eines CD-Spielers usw.
TAPE/MD
IN
Verstärker
Signalfluß
PHONO
IN
DIGITAL
COAXIAL OUT
Plattenspieler
usw.
DIGITAL
OPTICAL OUT
CD-Spieler
usw.
DE
4
Page 89

Benötigte Kabel
• Audiokabel (nicht mitgeliefert) (2)
links (L) links (L)
rechts (R) rechts (R)
weiß weiß
rot rot
• Optisches Digitalkabel (nicht mitgeliefert) (1)
• Koaxiales Digitalkabel (nicht mitgeliefert) (1)
Anschlußverfahren
Im folgenden wird der Anschluß an einen Mischer, einen
Verstärker und an andere Digitalgeräte (wie
beispielsweise CD-Spieler) behandelt.
Schalten Sie alle Geräte aus, bevor Sie Anschlüsse
vornehmen.
p Anschluß eines Mischers oder Verstärkers
Schließen Sie den Mischer oder den Verstärker über
analoge Audiokabel (nicht mitgeliefert) an die LINE
(ANALOG) IN/OUT-Buchsen dieses Geräts an.
Stecken Sie die roten Stecker in die roten Buchsen (R) und
die weißen Stecker in die weißen Buchsen (L). Achten Sie
darauf, die Stecker fest einzustecken, um Brummen und
andere Störgeräusche zu vermeiden.
Dieses Gerät Mischer oder Verstärker usw.
LINE
(ANALOG)
OUTIN
L
R
Signalfluß
p Anschluß von Digitalgeräten
(CD-Spieler, DAT-Deck, anderes MD-Deck oder
Verstärker mit Digitaleingang)
Wenn Sie ein Zuspielgerät wie CD-Spieler, MD-Deck,
DAT-Deck usw. über ein optisches Digitalkabel (nicht
mitgeliefert) oder ein koaxiales Digitalkabel (nicht
mitgeliefert) anschließen, können Sie die Digitalsignale
dieser Geräte direkt aufnehmen.
TAPE / MD
INOUT
L
R
• Anschluß eines optischen Digitalkabels
Nehmen Sie die Schutzkappen von den optischen
Buchsen ab, und stecken Sie die Stecker richtig
ausgerichtet in die Buchsen ein, bis sie mit einem
Klicken einrasten. Das optische Digitalkabel darf nicht
geknickt sein.
Dieses Gerät Digitalgerät
DIGITAL
COAXIALINOPTICAL
IN
Signalfluß
DIGITAL
OPTICAL
OUTIN
• Anschluß eines koaxialen Digitalkabels
Dieses Gerät Digitalgerät
DIGITAL
COAXIALINOPTICAL
IN
DIGITAL
COAXIAL
OUTIN
Signalfluß
z Wenn „Din Unlock“ und „C71“ im Display erscheint
Überprüfen Sie den Anschluß des optischen bzw. koaxialen
Digitalkabels, und vergewissern Sie sich, daß das
angeschlossene Gerät eingeschaltet ist.
z Automatische Umwandlung der Abtastfrequenz
Digitale Zuspielsignale mit einer Abtastfrequenz von 32 kHz
oder 48 kHz werden vom eingebauten Konverter in die für
das MD-Deck erforderliche Abtastfrequenz von 44,1 kHz
umgewandelt.
So können Sie nicht nur eine CD- und MD-Zuspielquelle,
sondern auch die Signale eines DAT-Decks (32 kHz oder 48
kHz) und Satelliten-Empfangssignale (32 kHz bzw. 48 kHz)
digital aufnehmen.
Hinweis
Wenn „Din Unlock“, „C71“ oder „Cannot Copy“ im Display
erscheint, ist kein digitales Aufnehmen möglich. Schließen
Sie in einem solchen Fall die Zuspielquelle an die LINE
(ANALOG) IN-Buchsen an, und stellen Sie INPUT auf
ANLG, um ein analoges Zuspielsignal aufzunehmen.
p Wenn Sie alle Geräte angeschlossen haben,
schließen Sie dieses Gerät über das Netzkabel an
die Wandsteckdose an.
Vorbereitungen
DE
5
Page 90

Name und Funktion
der
Bedienungselemente
Bedienungselemente
1 U Netzschalter (Power) (11, 23)
2 UNDO-Taste (35)
Im folgenden Abschnitt sind die
Bezeichnungen und die
3 AUTO MODE-Tasten (14)
grundlegenden Funktionen der
Bedienungselemente
zusammengestellt. Einzelheiten
finden Sie auf den in Klammern
angegebenen Seiten.
4 Pads und Anzeigen (11, 13)
5 0-Taste (12)
6 r REC-Taste (23, 24, 25)
7 REC PAUSE-Taste und Anzeige (24, 25)
8 STOP-Taste (12, 24)
9 CUE-Taste und Anzeige (12)
DE
6
Zum Ein- und Ausschalten des Geräts.
Zum Rückgängigmachen des vorausgegangenen
Editiervorgangs. Die MD befindet sich anschließend
wieder im ursprünglichen Zustand.
Zum Ein- und Ausschalten des automatischen
Pausenmodus am Anfang eines Titels.
AUTO CUE
Die Leerstelle am Anfang jeden Titels wird übersprungen
und unmittelbar vor den Titelanfang auf Pause geschaltet.
AUTO PAUSE
Am Anfang jeden Titels wird auf Pause geschaltet.
AUTO OFF
Der automatische Pausenmodus ist ausgeschaltet.
• Bei grün leuchtenden Pad-Anzeigen:
Wenn Sie ein Pad drücken, beginnt die Wiedergabe
am betreffenden Titel. Durch Drücken von BANK
können Sie eine andere Titelgruppe wählen.
• Bei rot leuchtenden Pad-Anzeigen:
Wenn Sie ein Pad drücken, beginnt die Wieder gabe am
betreffenden Cue-Punkt. Zum Festlegen der Cue-Punkte
siehe „Belegung der Pads mit Cue-Punkten“ auf Seite
13.
Für Schnellrücklauf die Taste gedrückt halten.
• Wenn sich das Gerät im Stoppmodus befindet, schaltet
es bei Drücken dieser Taste auf Aufnahme-Bereitschaft.
• Wenn sich das Gerät im Wiedergabe- oder
Pausenmodus befindet, schaltet es bei Drücken
dieser Taste auf Backtrack-Aufnahme-Bereitschaft.
• Wenn sich das Gerät im Aufnahmebetrieb befindet,
kann durch Drücken dieser Taste manuell eine
Titelnummer gesetzt werden.
• Wenn sich das Gerät im Aufnahme-Pausenmodus oder
im Backtrack-Aufnahme-Bereitschaftsmodus befindet,
beginnt bei Drücken dieser Taste die Aufnahme.
• Wenn sich das Gerät im (normalen) Aufnahmemodus
befindet, schaltet es bei Drücken dieser Taste auf Pause.
Während der Aufnahme-Pause sowie im BacktrackAufnahme-Bereitschaftsmodus blinkt die Anzeige.
Zum Stoppen der Wiedergabe oder Aufnahme.
Durch Drücken dieser Taste kehrt das Gerät zum letzten
Cue-Punkt (d. h. zu dem Punkt, an dem die Wiedergabe
gestartet wurde) zurück und schaltet dort auf Pause.
Während sich das Gerät am Cue-Punkt im
Pausenmodus befindet, leuchtet die Anzeige.
Page 91

INPUT
COAX ANLGOPT
REC VOL
SENGLE PLAY
8
DISPLAY
4
010
LOOP
RELOOP
OUT
IN
AMS
PLAY MODE
EDIT/NO
ENTER/YES
BANK
UNDO
CUE
PAUSE
OFF
AUTO MODE
1
5
PUSH ENTER
2
6
REPEAT
3
7
Name und Funktion der Bedienungselemente
REC
REC PAUSE STOP
CUE
PLAY/PAUSE
0 PLAY/PAUSE-Taste und Anzeige (12)
• Wenn die Taste im Stopp- oder Pausenmodus
gedrückt wird, beginnt die Wiedergabe.
• Wenn die Taste im Wiedergabemodus gedrückt
wird, schaltet das Gerät auf Pause.
Während der Wiedergabe leuchtet die Anzeige,
während der Pause blinkt sie.
!¡ Einstellrad (13)
• Wenn das Rad während der Wiedergabe gedreht
wird, ändert sich die Wiedergabegeschwindigkeit.
• Wenn das Rad im Pausenmodus gedreht wird, erfolgt
die MD-Wiedergabe synchron zur Drehbewegung.
• Wenn das Rad bei gedrückt gehaltener CUE-Taste
gedreht wird, ändert sich die Position des Cue-Punktes.
!™ PITCH-Schieber (15)
Zum Variieren der Tonlage.
!£ SPEED-Schieber (15)
Zum Einstellen der Geschwindigkeit.
!¢ )-Taste (12)
Für schnellen Vorlauf diese Taste gedrückt halten.
!∞ LOOP-Tasten (16)
Zum Festlegen einer Wiederholpassage. Die Passage bleibt
auch nach Abschalten der Funktion gespeichert, so daß
auch später erneut ein Direktzugriff auf die Passage besteht.
RELOOP-Taste
Bei abgeschalteter Loop-Funktion kann durch Drücken
dieser Taste der gespeicherte Startpunkt angefahren und
die Passage erneut wiederholt werden.
LOOP IN-Taste
Durch Drücken dieser Taste wird der Startpunkt der
Wiederholpassage gespeichert.
SPEEDPITCH
LOOP OUT-Taste
Durch Drücken dieser Taste wird der Endpunkt der W iederholpassage
gespeichert und die Wiederholwiedergabe gestartet.
Durch Drücken während der Wiederholwiedergabe wird die
Funktion abgeschaltet.
!§ DISPLAY-Taste (18, 33)
Durch Drücken dieser Taste kann zwischen den
folgenden Display-Anzeigen umgeschaltet werden.
• Restzeit: Im Display wird die Restzeit des
momentanen Titels angezeigt.
• Verstrichene Zeit: Im Display wird die verstrichene
Spielzeit des momentanen Titels angezeigt.
Wenn der Programm- oder Hot Start-Modus aktiviert
ist, steht auch folgende Anzeige zur Verfügung:
• Wiedergegebener Titel: Die Nummern der programmierten
oder Hot Start-T itel erscheinen im Namens-Anzeigefeld,
wobei der momentan wiedergegebene Titel blinkt. Im Zähler-
Anzeigefeld erscheint die Restzeit des momentanen Titels.
!¶ REC VOL-Knopf (24)
Mit diesem Knopf kann bei der Analogaufnahme der Pegel
des Eingangssignals der LINE IN-Buchsen eingestellt werden.
Dies ist nur möglich, wenn INPUT auf „ANLG“ steht.
!• INPUT-Schalter (23)
Dieser Schalter dient zur Wahl der Eingangsbuchse
der Aufnahmequelle.
!ª SINGLE PLAY-Taste (15, 19)
• Wenn diese Taste gedrückt wird, schaltet das Gerät
automatisch nach jedem Titel in den Stoppmodus.
• Im Wiederholspielmodus dient diese Taste zum
Umschalten zwischen den folgenden beiden Betriebsarten:
– Wiederholen des momentanen Titels (Single Repeat)
– Wiederholen aller Titel der MD (Disc Repeat)
(Bitte wenden)
DE
7
Page 92

Bedienungselemente
@º REPEAT-Taste (19)
Durch Drücken dieser Taste wird der
Wiederholspielbetrieb aktiviert und durch erneutes
Drücken wieder abgeschaltet.
@¡ PLAY MODE-Taste (16, 20)
Name und Funktion der Bedienungselemente
Durch wiederholtes Drücken dieser Taste kann
zwischen den folgenden Wiedergabemodi
umgeschaltet werden:
• Normale Wiedergabe
• Programm-Wiedergabe (PROGRAM): Wenn
PLAY/PAUSE gedrückt wird, gibt das Gerät die
Titel in der programmierten Reihenfolge wieder.
• Hot Start-Wiedergabe (HOT START): Wenn ein Pad
gedrückt wird, beginnt die Wiedergabe schneller als
im normalen Modus. Jedes Pad kann mit einem Titel
belegt werden.
@™ AMS (≠ /± )-Knopf
• Durch Drehen dieses Knopfes kann zum Anfang des
nächsten oder des vorausgegangenen Titels
gesprungen werden.
• Im Edit- und Setup-Menü können mit diesem Knopf
die gewünschten Parameter usw. angezeigt und
eingestellt werden. Durch Drücken des Knopfes
wird die Einstellung gespeichert.
@£ EDIT/NO-Taste
• Durch Drücken dieser Taste wird die gewählte
Einstellung storniert.
• Durch Drücken der Taste wird das Edit- und SetupMenü aufgerufen bzw. verlassen.
Eine Liste der im Edit- und Setup-Menü
verfügbaren Parameter finden Sie auf Seite 40.
@¢ ENTER/YES-Taste
• Durch Drücken dieser Taste wird die gewählte
Option ausgeführt.
• Wenn die TOC-Anzeige leuchtet, wird bei Drücken
der Taste der TOC (Table of Contents,
Inhaltsverzeichnis) auf die MD geschrieben. Der
vorausgegangene Aufnahme- oder Editiervorgang
ist dann auf der MD gesichert.
@∞ BANK-Taste (12)
Durch wiederholtes Drücken dieser Taste kann
zwischen den Titelgruppen (BANK) der Pad-Belegung
umgeschaltet werden.
DE
8
Page 93

Display
REHEARSAL TRACK DISC
BANK 1
BACK TRACK
BANK 2
RECORDING
BANK 3
BANK 4
REC
TR
OVER
L.SYNC
PROGRAM
%
MSF
LOOP
RELOOP
REPEAT 1
A-B
A.CUE
A.PAUSE
HOT START
TOC
EDIT
MONO L R
0
4
8
12
20
40
-dB
Name und Funktion der Bedienungselemente
1 BANK-Anzeigen (12)
Zeigen die momentanen Titelgruppen (BANK) der
Pad-Belegung an.
2 Titelnummer- und Zähler-Anzeigefeld
• Während der Wieder gabe oder Aufnahme wird die
Titelnummer und die Titelspielzeit angezeigt. Wenn
bei der Wiedergabe die Restzeit des Titels kleiner als
10 Sekunden ist, beginnt die Titelspielzeit zu blinken.
• Im Stoppmodus erscheint die Gesamtanzahl der
Titel und die Spielzeit der MD.
3 Betriebsmodus-Anzeigen
Diese Anzeigen signalisieren den momentanen
Betriebsmodus (Wiedergabe, Aufnahme, Pause usw.).
4 RELOOP-Anzeige (16)
Leuchtet auf, wenn eine Wiederholpassage gespeichert
ist.
5 LOOP-Anzeige (16)
Blinkt während der Festlegung der Wiederholpassage,
leuchtet während der Passagen-Wiedergabe.
6 REPEAT-Anzeigen (19)
• Leuchtet während des Wiederholspielbetriebs.
Wenn „REPEAT“ leuchtet, wird die ganze MD
wiederholt wiedergegeben.
Wenn „REPEAT 1“ leuchtet, wird nur ein Titel
wiederholt wiedergegeben.
• Wenn „1“ leuchtet, schaltet das Gerät nach der
Wiedergabe jedes Titels automatisch in den
Stoppmodus.
7 Automatikmodus-Anzeigen (14)
Zeigen wie folgt den aktivierten Automatikmodus an:
•
Wenn „A.CUE“ leuchtet, überspringt das Gerät
Leerstellen am Anfang jedes Titels und schaltet
unmittelbar vor dem Titelanfang auf Pause (AUTO CUE).
• Wenn „A.PAUSE“ leuchtet, schaltet das Gerät am
Anfang jedes Titels auf Pause (AUTO PAUSE).
8 TOC-Anzeigen (23, 27)
• W enn „T OC“ leuchtet, ist der TOC (Table of Contents,
Inhaltsverzeichnis) der MD noch nicht aktualisiert
worden. Während die TOC-Daten auf die MD
geschrieben werden, blinkt die Anzeige „T OC“.
• Während des Editierbetriebs leuchtet die Anzeige
„TOC EDIT“.
9 MONO-Anzeige
Leuchtet bei der Wiedergabe von MonoAudiosignalen. (Es ist jedoch nicht möglich,
Monosignale mit diesem Gerät aufzunehmen.)
0 Pegelmeter
Zeigen den Audiosignalpegel bei der Wiedergabe und
Aufnahme an.
!¡ HOT START-Anzeige (16)
Leuchtet bei aktiviertem Hot Start-Wiedergabemodus auf.
!™ PROGRAM-Anzeige (20)
Leuchtet bei aktiviertem Programm-Wiedergabemodus auf.
!£ L.SYNC-Anzeige (24)
Wenn diese Anzeige leuchtet, setzt das Gerät bei der
Analogaufnahme automatisch Titelnummern.
!¢ Namens-Anzeigefeld
In diesem Feld erscheinen die Disc- und Titelnamen
sowie die Parameter des Edit- und Setup-Menüs usw.
!∞ DISC-Anzeige
Leuchtet auf, wenn das Namens-Anzeigefeld den
Discnamen usw. anzeigt.
!§ TRACK-Anzeige
Leuchtet auf, wenn das Namens-Anzeigefeld den
Titelnamen usw. anzeigt.
!¶ BACK TRACK RECORDING-Anzeigen (25)
„BACK TRACK RECORDING“ leuchtet auf und die DiscAnzeige dreht sich, wenn sich das Gerät im BacktrackAufnahmebetrieb (Aufnahme bei gleichzeitiger
Wieder gabe) befindet.
Wenn die Aufnahme gestoppt wird, blinkt die Anzeige, und
die Informationen werden auf die Disc geschrieben. Wenn
sich die Disc-Anzeige schneller dreht und die Anzeige
während der Aufnahme blinkt, nehmen Sie keine
Bedienung an den Pads, am Einstellrad und an den
Bedienungselementen der Loop-Funktion vor, da sonst die
Aufnahme möglicherweise stoppt. Erst wenn sich die
Anzeige langsamer dreht und die Anzeige von Blinken zu
Dauerleuchten übergegangen ist, können Sie die Pads, das
Einstellrad oder die Loop-Funktionstasten wieder
bedienen.
!• REHEARSAL-Anzeige (28)
Leuchtet während der Probe-Wiedergabe.
DE
9
Page 94

Eingänge und Ausgänge
LINE
(ANALOG)
IN OUT
L
R
DIGITAL
COAXIALINOPTICAL
IN
FOOT SW
~AC IN
REC/
PAUSE
PLAY/
PAUSE
Vorderseite
Name und Funktion der Bedienungselemente
EJECT
1 § EJECT-Taste (12)
Wenn diese Taste im Stoppmodus gedrückt wird, wird
die MD ausgeworfen.
Wenn der TOC (Table of Contents, Inhaltsverzeichnis)
der MD noch nicht aktualisiert worden ist (TOCAnzeige leuchtet), schreibt das Gerät die TOC-Daten
auf die MD, bevor sie ausgeworfen wird.
2 MD-Schacht (11, 23)
Zum Einschieben der MD.
3 PHONES-Buchse
Diese Standard-Klinkenbuchse dient zum Anschluß
eines Stereo-Kopfhörers.
4 PHONE LEVEL-Knopf
Zum Einstellen der Kopfhörer-Lautstärke.
PHONES PHONE LEVEL
Rückseite
MIN MAX
1 LINE (ANALOG) IN-Buchsen (5)
Zum Zuleiten von Analogsignalen eines anderen
Geräts.
2 LINE (ANALOG) OUT-Buchsen (5)
Diese Buchsen geben Analogsignale an andere Geräte
aus.
3 DIGITAL COAXIAL IN-Buchse (5)
Zur Zuleitung des Digitalsignals eines anderen Geräts
über ein koaxiales Digitalkabel.
4 DIGITAL OPTICAL IN-Buchse (5)
Zur Zuleitung des Digitalsignals eines anderen Geräts
über ein optisches Digitalkabel.
5 AC IN-Buchse (5)
Zum Anschluß des Netzkabels.
6~7 FOOT SW-Buchsen
Zum Anschluß des SONY Fußschalters FS-A8 (nicht
mitgeliefert).
6 PLAY/PAUSE-Buchse
An dieser Buchse kann ein externer Fußschalter usw.
zur Steuerung der PLAY/PAUSE-Funktion
angeschlossen werden.
7 REC/PAUSE jack
An dieser Buchse kann ein externer Fußschalter usw.
zur Steuerung der REC PAUSE-Funktion
angeschlossen werden.
10
DE
Page 95

DJ-
Titelwahl
Zusatzfunktionen
Im folgenden werden verschiedene
Wiedergabe- und SuchZusatzfunktionen behandelt, mit
denen Sie sich als Discjockie
betätigen können.
Legen Sie einfach die MD ein, und drücken Sie dann das
Pad des gewünschten Titels, um die Wiedergabe zu
starten.
U (Netzschalter)
BANK
STOP
PLAY/PAUSE
1 Drücken Sie U, um das Gerät einzuschalten.
Das Display leuchtet auf. Nach einigen Sekunden
erscheint „No Disc“, und das Gerät ist betriebsbereit.
2 Legen Sie die MD ein.
AMS
Pads
DJ-Zusatzfunktionen
In Pfeilrichtung einschieben
„TOC Reading“ erscheint kurzzeitig im Display, und
die Anzeigen über den betreffenden Pads leuchten
grün auf. (Falls die MD beispielsweise 6 Titel enthält,
leuchten die Anzeigen 1 bis 6.)
Aufkleber nach oben
3 Drücken Sie das Pad des gewünschten Titels.
Die PLAY/PAUSE-Anzeige leuchtet auf, und die
Wiedergabe des Titels beginnt.
(Bitte wenden)
11
DE
Page 96

Titelwahl
Festlegen eines CuePunktes
Zur Wiedergabe der Titel 9 bis 32
Schalten Sie durch Drücken von BANK auf eine andere
Titelgruppe (BANK), bevor Sie ein Pad drücken.
Die Bank-Nummer wird im Display angezeigt.
Jede Bank besteht aus 8 Titeln, die den Pads wie folgt
zugeordnet werden:
BANK 1 n Titel 1~8
BANK 2 n Titel 9~16
DJ-Zusatzfunktionen
BANK 3 n Titel 17~24
BANK 4 n Titel 25~32
z Nach dem Einlegen der MD kann die Wiedergabe auch durch
Drücken von PLAY/PAUSE gestartet werden.
In diesem Fall beginnt die Wiedergabe mit Titel 1.
Zum Wiedergeben anderer Titel drehen Sie den AMSKnopf.
Funktion Bedienung
Stoppen der Wiedergabe STOP drücken.
Umschalten auf Wiedergabe- PLAY/PAUSE drücken. Durch
Pause erneutes Drücken wird die
Sprung zum Anfang des AMS nach rechts drehen.*
nächsten Titels
Sprung zum Anfang des AMS nach links drehen.*
momentanen oder eines
vorausgegangenen Titels
Auswerfen der MD Die Wiedergabe stoppen, dann §
* Mit dem AMS-Knopf können Sie nicht nur zum Anfang eines
Titels springen, sondern auch einen Cue-Punkt ansteuern. Die
Wahl des AMS (JOG)-Modus erfolgt im Setup-Menü.
Einzelheiten finden Sie im nachfolgenden Abschnitt „Festlegen
eines Cue-Punktes“.
(Titel 1 = Pad 1, Titel 2 = Pad 2 usw.)
(Titel 9 = Pad 1, Titel 10 = Pad 2 usw.)
(Titel 17 = Pad 1, Titel 18 = Pad 2 usw.)
(Titel 25 = Pad 1, Titel 26 = Pad 2 usw.)
Wiedergabe an derselben Stelle
fortgesetzt.
EJECT an der Vorderseite
drücken.
In jedem Titel können Sie einen Indexpunkt (sogenannter
Cue-Punkt) festlegen. Dieser Punkt kann später durch
einfachen Tastendruck wieder angefahren werden.
EDIT/NO
CUE
PLAY/PAUSE
AMS
0/)
Einstellrad
1 Geben Sie den Titel wieder, in dem Sie einen Punkt
markieren wollen.
Zum schnelleren Aussuchen eines Punktes:
Halten Sie 0 (schneller Rücklauf) oder ) (schneller
Vorlauf) gedrückt.
2 Schalten Sie am gewünschten Punkt durch Drücken
von PLAY/PAUSE auf Pause.
Die PLAY/PAUSE-Anzeige blinkt.
Zum Überprüfen des Punktes
Halten Sie CUE gedrückt.
Ein 3sekündiger Teil, der an der Stelle beginnt, an der auf
Pause geschaltet wurde, wird nun wiederholt
wiedergegeben.
Zum Feineinstellen des Cue-Punktes
• Halten Sie CUE gedrückt, und drehen Sie das Einstellrad.
Der Anfang des 3sekündigen Teils verschiebt sich
entsprechend der Drehbewegung des Einstellrads.
• Drehen Sie das Einstellrad (ohne CUE gedrückt zu halten).
Die Wiedergabe erfolgt synchron zur Drehbewegung des
Einstellrads. (Wenn das Einstellrad nach links gedreht
wird, setzt die Wiedergabe manchmal etwas verzögert ein.)
3 Drücken Sie PLAY/PAUSE erneut, um die
Wiedergabe fortzusetzen.
Die PLAY/PAUSE-Anzeige leuchtet auf, und der im
Schritt 2 festgelegte Cue-Punkt wird gespeichert.
Zum automatischen Stoppen am Ende
jedes Titels
Drücken Sie SINGLE PLAY, so daß die Anzeige „1“
aufleuchtet.
Die Wiedergabe stoppt dann automatisch am Ende jedes
Titels. Zum Zurückschalten auf normale fortlaufende
Wiedergabe drücken Sie SINGLE PLAY erneut, so daß die
Anzeige „1“ erlischt.
DE
12
Aufrufen eines Cue-Punktes
1 Drücken Sie CUE.
CUE leuchtet auf, PLAY/PAUSE blinkt, und das Gerät
springt direkt zum Cue-Punkt und schaltet dort auf
Pause.
2 Drücken Sie PLAY/PAUSE, um die Wiedergabe am
Cue-Punkt zu starten.
Page 97

z Aufrufen eines Cue-Punktes mit dem AMS-Knopf
1 Drücken Sie EDIT/NO zweimal, so daß das Setup-Menü
angezeigt wird.
2 Drehen Sie den AMS-Knopf, bis „JOG“ erscheint, und
drücken Sie auf den Knopf.
3 Drehen Sie den AMS-Knopf, bis „JOG : Cue“ erscheint, und
drücken Sie auf den Knopf.
4 Drücken Sie EDIT/NO, um das Setup-Menü zu verlassen.
Mit dem AMS-Knopf können nun nicht nur die Titelanfänge,
sondern auch die von Ihnen gespeicherten Cue-Punkte
angefahren werden.
Wenn mit dem AMS-Knopf nur die Titelanfänge angefahren
werden sollen, wählen Sie im Schritt 3 die Option „JOG : Track“.
Hinweis
Wenn Sie die Wiedergabe durch Drücken eines Pads starten,
kann der Cue-Punkt des betreffenden Titels nicht mit der CUETaste aufgerufen werden. In diesem Fall müssen Sie den CuePunkt mit dem AMS-Knopf aufrufen (wie oben behandelt).
z Die Pads können auch mit Cue-Punkten belegt werden.
Siehe hierzu „Belegung der Pads mit Cue-Punkten“ auf Seite 13.
Verschieben des Cue-Punktes
1 Drücken Sie CUE, um den Cue-Punkt aufzurufen.
2 Halten Sie CUE gedrückt, und verschieben Sie den
Cue-Punkt dann durch Drehen des Einstellrades.
Ein 3sekündiger, am Anfang des Cue-Punktes
beginnender Teil wird nun wiederholt wiedergegeben.
Der Anfang des 3sekündigen Teils verschiebt sich
synchron zur Drehbewegung des Einstellrades.
Belegung der Pads mit CuePunkten
Auf den Pads können insgesamt 8 Cue-Punkte gespeichert
werden. Zum Aufrufen eines Cue-Punktes brauchen Sie
dann lediglich das betreffende Pad zu drücken.
EDIT/NO
CUE
1 Rufen Sie den Cue-Punkt, der auf das Pad
gespeichert werden soll, ab.
Einzelheiten hierzu finden Sie unter „Aufrufen eines
Cue-Punktes“ auf Seite 12.
2 Halten Sie CUE gedrückt, und drücken Sie das Pad
des Titels, in dem sich der Cue-Punkt befindet.
Beispiel: Wenn im Schritt 1 der Cue-Punkt von Titel 3
aufgerufen wurde, halten Sie CUE gedrückt, und
drücken Sie Pad 3 (BANK 1).
„Memorizing“ erscheint dann kurzzeitig, und die
Anzeige über dem Pad leuchtet rot auf. Der CuePunkt ist nun gespeichert.
Löschen des Cue-Punktes eines Pads
AMS
Pads
DJ-Zusatzfunktionen
z So können Sie den Cue-Punkt exakter einstellen
Drehen Sie das Einstellrad, ohne CUE zu drücken.
Bei erloschener CUE-Anzeige erfolgt die Wiedergabe
synchron zur Drehbewegung des Einstellrades. (Wenn das
Einstellrad nach links gedreht wird, setzt der Ton manchmal
etwas verzögert ein.)
3 Drücken Sie PLAY/PAUSE, um die Wiedergabe am
Cue-Punkt zu starten.
1 Halten Sie STOP gedrückt, und drücken Sie das Pad,
dessen Cue-Punkt gelöscht werden soll.
„Pad Erase?“ und „–Rehearsal–“ erscheinen
abwechselnd, und das Gerät gibt einen 3sekündigen
Teil, der in dem zu löschenden Cue-Punkt beginnt,
wiederholt wieder.
Wenn Sie den Cue-Punkt doch nicht löschen wollen
Drücken Sie EDIT/NO oder STOP.
2 Drücken Sie ENTER/YES oder drücken Sie dasselbe
Pad nochmals.
„Complete!!“ erscheint im Display, und die PadAnzeige leuchtet grün auf.
(Bitte wenden)
DE
13
Page 98

Belegung der Pads mit Cue-Punkten
z Die Cue-Punkte der Pads können auch im Setup-Menü
gelöscht werden:
1 Drücken Sie STOP, um die Wiedergabe zu stoppen.
2 Drücken Sie EDIT/NO zweimal, bis das Setup-Menü
erscheint.
3 Drehen Sie den AMS-Knopf, so daß „PAD Erase?“ erscheint,
und drücken Sie auf den Knopf.
„–Rehearsal–“ blinkt im Display, und das Gerät gibt einen
3sekündigen, an einem der Cue-Punkte beginnenden Teil
wiederholt wieder.
4 Wählen Sie mit dem AMS-Knopf den Cue-Punkt, den Sie
DJ-Zusatzfunktionen
löschen wollen.
5 Drücken Sie auf den AMS-Knopf, um den Cue-Punkt zu
löschen.
„Complete!!“ erscheint im Display, und die betreffende PadAnzeige leuchtet grün auf.
Automatische Pause am
Anfang der Titel
Bei aktivierter Auto Pause-Funktion schaltet das Gerät automatisch
am Anfang jedes Titels auf Pause. Bei aktivierter Auto Cue-Funktion
schaltet das Gerät ebenfalls an den Titelanfängen auf Pause,
überspringt zuvor jedoch noch die Leerstelle am Anfang des T itels.
EDIT/NO
AUTO CUE
AUTO PAUSE
AUTO OFF
AMS
SINGLE
PLAY
Hinweise
• In jedem Titel kann nur ein Cue-Punkt gespeichert werden.
Wenn Sie versuchen, noch einen weiteren Cue-Punkt auf ein
Pad zu speichern, erscheint die Anzeige „Over Mem?“ im
Display.
– Soll der alte Cue-Punkt durch den neuen überschrieben
werden, drücken Sie ENTER/YES oder drücken Sie dasselbe
Pad nochmals.
– Soll die Pad-Speicherfunktion abgeschaltet werden, drücken
Sie EDIT/NO oder STOP.
• Cue-Punkte können nur auf den Pads der betreffenden Titel
gespeichert werden. So kann beispielsweise ein im Titel 2
liegender Cue-Punkt nur auf Pad 2 (BANK 1) gespeichert
werden.
• Wenn Sie in einem Titel mehrere Cue-Punkte festlegen wollen,
müssen Sie den Titel zunächst mit der Divide-Funktion (siehe
Seite 28) unterteilen.
• Wenn Sie die Wiedergabe eines Titels durch Drücken eines
Pads gestartet haben, stehen die 0/)-Tasten und die LoopFunktion nicht zur Verfügung. Außerdem funktioniert
während der Pause auch das Einstellrad nicht.
• Beim Auswerfen der MD werden die Cue-Punkte gelöscht.
DE
14
1 Drücken Sie im Stoppmodus die Taste AUTO PAUSE
oder AUTO CUE.
• Bei Drücken von AUTO PAUSE leuchtet „A.PAUSE“
auf. Die Auto Pause-Funktion ist dann aktiviert, und
das Gerät schaltet am Anfang jedes Titels auf Pause.
• Bei Drücken von AUTO CUE leuchtet „A.CUE“ auf.
Die Auto Cue-Funktion ist dann aktiviert, und das
Gerät schaltet direkt am Titelanfang (d.h. direkt an
der Stelle, an der der Ton einsetzt) auf Pause.
2 Starten Sie die Wiedergabe.
Die Wieder gabe beginnt entweder am Anfang des Titels oder
unmittelbar an der Stelle, an der der T on des Titels einsetzt.
Zum Abschalten der AUTO PAUSE- oder AUTO
CUE-Funktion
Drücken Sie im Stoppmodus die Taste AUTO OFF.
z
So können Sie den Schwellpegel der Leerstellenerk ennung durch die Auto
Cue-Funktion und das Pausen-Timing bei Erkennen einer Leerstelle festlegen:
1 Drücken Sie STOP, um die Wiedergabe zu stoppen.
2
Drücken Sie EDIT/NO zweimal, so daß das Setup-Menü erscheint.
3 Wählen Sie mit dem AMS-Knopf eine der folgenden
Optionen, und drücken Sie auf den Knopf.
- Zum Ändern des Schwellpegels für die
Leerstellenerkennung: AC (T)
- Zum Ändern des Pausen-Timings: AC (O)
4 Stellen Sie mit dem AMS-Knopf (oder das Einstellrad) den
gewünschten Wert ein, und drücken Sie auf den Knopf.
5 Drücken Sie EDIT/NO, um das Setup-Menü zu verlassen.
Die Einstellungen bleiben auch bei ausgeschaltetem Gerät
gespeichert.
Die Einstellbereiche sind wie folgt (die werksseitigen
Voreinstellungen stehen in Klammern):
AC (T) : –72 dB bis 0 dB in 2-dB-Schritten (–50 dB)
AC (O) : –9s85f bis +9s85f in 1f-Schritten (0s00f)
Wenn für AC (O) ein negativer Wert (–) eingestellt
wird, erfolgt die Zählung für die Pause in
Rückwärtsrichtung, beginnend an der Stelle, an der
eine Leerstelle erkannt wurde.
Um eine Einstellung zu stornieren, drücken Sie EDIT/NO. Der
Wert wird dann auf die werksseitige Voreinstellung gesetzt.
Page 99

Ändern der Geschwindigkeit und der
Tonlage während der Wiedergabe
Zum automatischen Stoppen am Ende
jedes Titels
Drücken Sie SINGLE PLAY, so daß die Anzeige „1“
leuchtet.
Die Wiedergabe stoppt dann am Ende jedes Titels. Um
wieder auf normale kontinuierliche Wiedergabe zu
schalten, drücken Sie SINGLE PLAY erneut, so daß die
Anzeige „1“ erlischt.
Die Geschwindigkeit und die Tonlage der Wiedergabe
können unabhängig voneinander variiert werden.
SPEED
PITCH
Ändern der Geschwindigkeit
Schieben Sie den SPEED-Schieberegler nach oben oder
unten.
Wenn der Regler nach unten geschoben wird, erhöht sich
die Geschwindigkeit. Wird er nach oben geschoben,
verringert sie sich.
Die Abweichung gegenüber der Normalgeschwindigkeit
wird in Prozent angezeigt.
Der Einstellbereich beträgt –12% bis +12%.
DJ-Zusatzfunktionen
Ändern der Tonlage
Schieben Sie den PITCH-Schieberegler nach oben oder
unten.
Wenn der Regler nach unten geschoben wird, erhöht sich
die Tonlage. Wird er nach oben geschoben, verringert sie
sich.
Die Abweichung gegenüber der normalen Tonlage wird
in Prozent angezeigt. Der Einstellbereich beträgt –12% bis
+12%.
15
DE
Page 100

Passagen-Wiederholbetrieb
Sofortstart eines Titels (Hot
(Loop)
Mit der Loop-Funktion können Sie eine von Ihnen definierte
Passage ohne Pause wiederholt abspielen. Die Anfangs- und
Endpunkte der Wiederholpassage bleiben auch nach dem
Abschalten der Loop-Funktion gespeichert, so daß dieselbe
Passage später erneut wiederholt werden kann.
DJ-Zusatzfunktionen
1 Drücken Sie während der Wiedergabe LOOP IN am
gewünschten Anfangspunkt der Wiederholpassage.
„LOOP“ blinkt im Display.
2 Drücken Sie LOOP OUT am gewünschten Endpunkt
der Wiederholpassage.
„LOOP“ leuchtet ständig auf, und der PassagenWiederholbetrieb beginnt.
Zum Abschalten der Loop-Funktion
Drücken Sie LOOP OUT erneut.
Wenn der Endpunkt der Wiederholpassage erreicht ist, führt das
Gerät die normale Wiedergabe fort. Die Anzeige „RELOOP“
weist darauf hin, daß die Wiederholpassage noch gespeichert ist.
Zum erneuten Wiederholen der gespeicherten
Passage
Drücken Sie RELOOP.
Die Passagen-Wiederholwiedergabe beginnt erneut am
gespeicherten Anfangspunkt.
Hinweise
• Die Loop-Funktion erlaubt keine Wiederholpassage von mehr
als 20 Sekunden. Wenn Sie nach Drücken von LOOP IN nicht
innerhalb von 20 Sekunden LOOP OUT drücken, wird der
Loop-Einstellbetrieb automatisch abgeschaltet.
• Die Loop-Funktion erlaubt keine Wiederholpassage über zwei
(oder mehr) Titel. Wenn sich die Titelnummer ändert, bevor Sie
LOOP OUT gedrückt haben, wird der Loop-Einstellbetrieb
automatisch abgeschaltet.
• Anfangs- und Endpunkte der Passage werden gelöscht, wenn:
- Sie die Wiedergabe stoppen
- Sie eine andere Passage festlegen
- Sie das Einstellrad während der Pause drehen
• Die Loop-Funktion steht nicht zur Verfügung, wenn Sie ein Pad
mit rot leuchtender Anzeige gedrückt haben und die
Wiedergabe an einem Cue-Punkt begonnen hat.
•
Manchmal erscheint beim Festlegen einer anderen
Wiederholpassage die Anzeige „Impossible“ und die Passage kann
nicht festgelegt werden. Stoppen Sie in einem solchen Fall die
Wiedergabe, und legen Sie dann die Passage fest.
RELOOP
LOOP IN
LOOP OUT
Start)
Die Hot Start-Funktion ermöglicht eine Speicherung von
bis zu 8 Titelanfängen. Beim Drücken des betreffenden
Pads setzt die Wiedergabe dann unmittelbar ein.
Beliebige 8 Titel können für diese Funktion ausgewählt
werden.
EDIT/NO
ENTER/YES
Pads
1 Drücken Sie im Stoppmodus die Taste EDIT/NO
zweimal, so daß das Setup-Menü erscheint.
2 Wählen Sie mit dem AMS-Knopf die Anzeige „Hot
start ?“, und drücken Sie auf den Knopf.
„/0/“ blinkt im Display.
3 Wählen Sie mit dem AMS-Knopf die Nummer des
Titels, der für die Hot Start-Funktion vorgesehen
werden soll, und drücken Sie auf den Knopf.
Die gewählte Titelnummer hört auf zu blinken, und
eine weitere „0“ erscheint. Dadurch wird angezeigt,
daß noch ein weiterer Titel für die Hot Start-Funktion
vorgesehen werden kann.
Bei einem Fehler
Drücken Sie 0 oder ) wiederholt, bis die Nummer des
unerwünschten Titels blinkt, ändern Sie dann die Nummer
mit dem AMS-Knopf, und drücken Sie auf den Knopf.
4 Wiederholen Sie Schritt 3, um noch weitere Titel
(bis zu 8) zu wählen.
Wenn der 8te Titel gewählt worden ist, erscheint „Multi Full!“.
5 Drücken Sie ENTER/YES, um den Speicherbetrieb zu
beenden.
Die Anzeige „Complete!!“ bestätigt, daß die Hot StartEinstellungen beendet sind.
6 Drücken Sie PLAY MODE wiederholt, bis „HOT
START“ angezeigt wird.
Während das Gerät nun die Titel den betreffenden
Pads zuweist, erscheint „Memorizing“ und die PadAnzeigen blinken. Wenn Sie beispielsweise für Hot
Start „/2 n 8 n 5/“ eingegeben haben:
– Titel 2 wird Pad 1 zugewiesen
– Titel 8 wird Pad 2 zugewiesen
– Titel 5 wird Pad 3 zugewiesen
Die Anzeigen über den betreffenden Pads leuchten rot
auf.
AMS
PLAY MODE
0/)
16
DE
 Loading...