

Page 1

MD RECORDER
MDS-B5
OPERATION MANUAL
1st Edition (Revised 1)
Serial No. 800001 and Higher (UC)
Serial No. 600001 and Higher (CED)
[English]
Page 2
For the customers in U.S.A.
Owner’s Record
The model and serial numbers are located on the top of the
unit. Record the serial number in the space provided below.
Refer to them whenever you call upon your Sony dealer
regarding this product.
Model No. MDS-B5 Serial No.
WARNING
To prevent fire or shock hazard, do not
expose the unit to rain or moisture.
INFORMATION
This equipment has been tested and found to comply with
the limits for a Class A digital device, pursuant to Part 15 of
the FCC Rules. These limits are designed to provide
reasonable protection against harmful interference when the
equipment is operated in a commercial environment. This
equipment generates, uses, and can radiate radio frequency
energy and, if not installed and used in accordance with the
instruction manual, may cause harmful interference to radio
communications. Operation of this equipment in a
residential area is likely to cause harmful interference in
which case the user will be required to correct the
interference at his own expense.
You are cautioned that any changes or modifications not
expressly approved in this manual could void your authority
to operate this equipment.
The shielded interface cable recommended in this manual
must be used with this equipment in order to comply with
the limits for a digital device pursuant to Subpart B of Part
15 of FCC Rules.
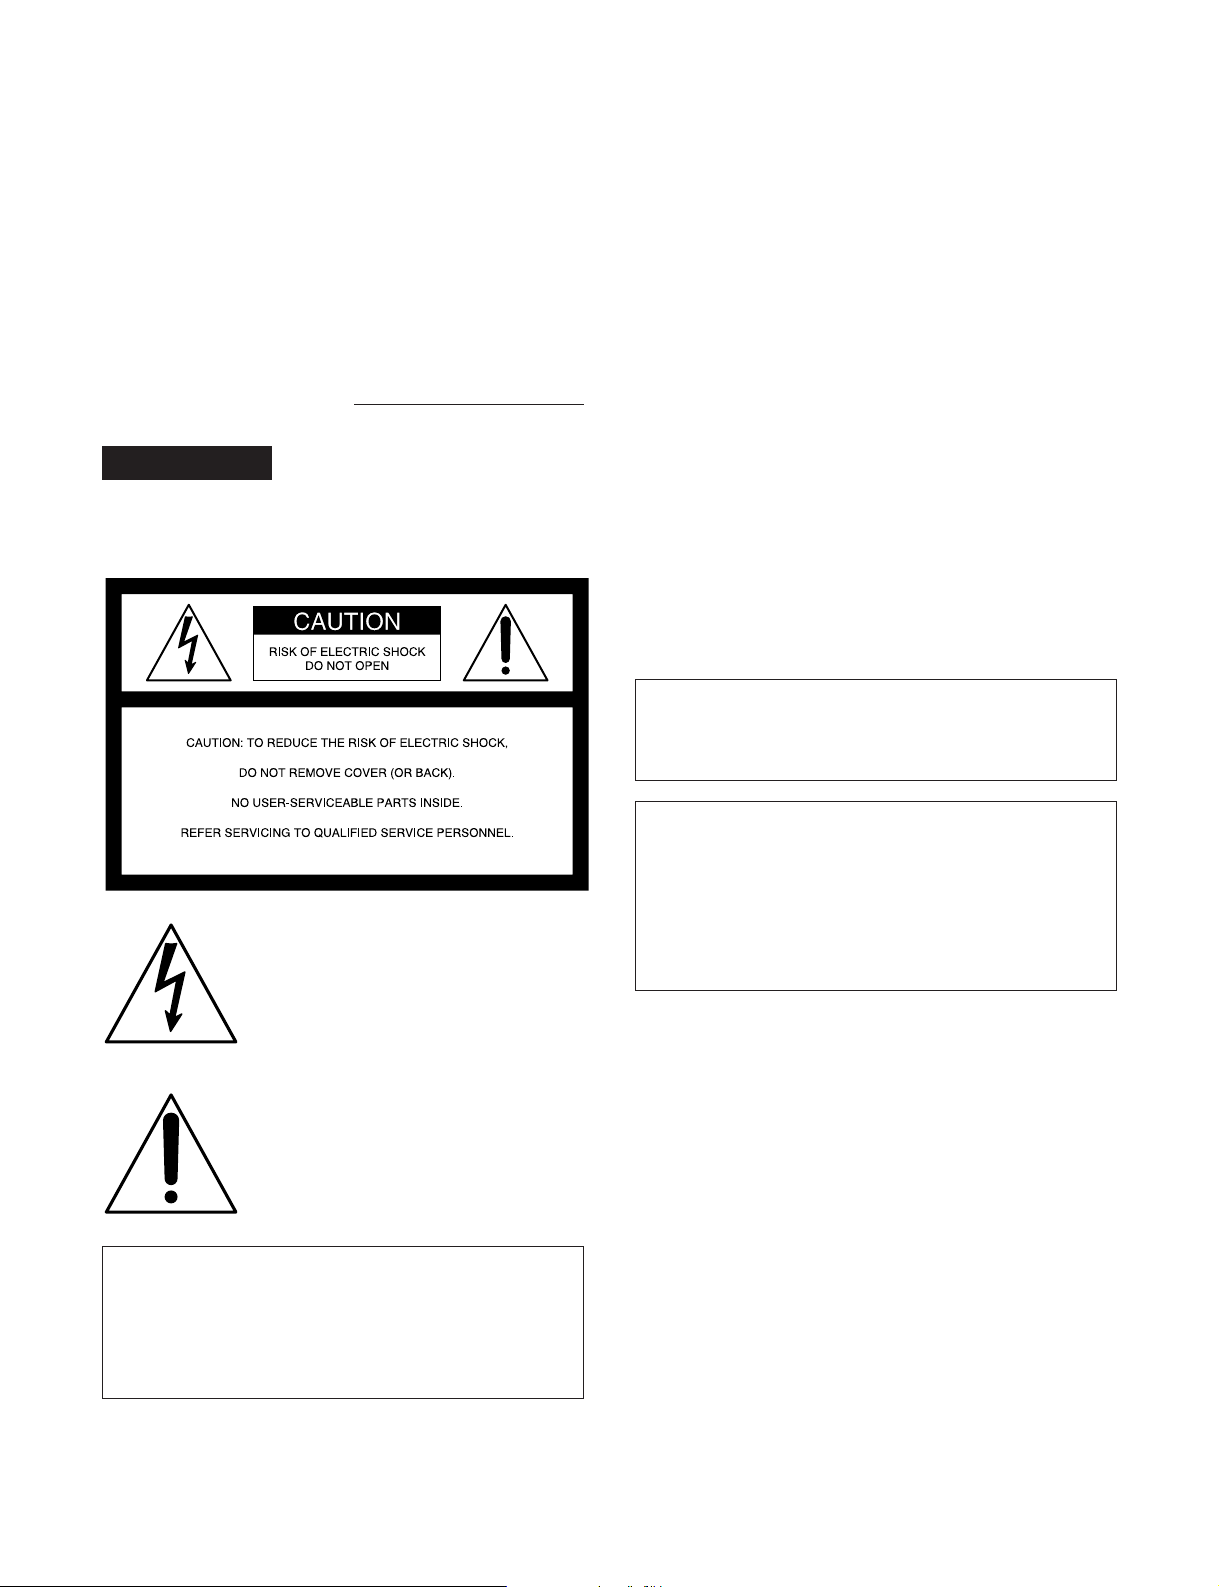
CAUTION
As the laser beam used in this MD deck is harmful to the
eyes, do not attempt to disassemble the cabinet. Refer
servicing to qualified personnel only.
This symbol is intended to alert the
user to the presence of uninsulated
“dangerous voltage” within the
product’s enclosure that may be of
sufficient magnitude to constitute a risk
of electric shock to persons.
This symbol is intended to alert the
user to the presence of important
operating and maintenance (servicing)
instructions in the literature
accompanying the appliance.
CAUTION
TO PREVENT ELECTRIC SHOCK, DO NOT USE THIS
POLARIZED AC PLUG WITH AN EXTENSION CORD,
RECEPTACLE OR OTHER OUTLET UNLESS THE
BLADES CAN BE FULLY INSERTED TO PREVENT
BLADE EXPOSURE.
Notes on shipping of the unit
When shipping the unit, make sure the following
conditions have been met:
• The unit is in shipping mode.
• The unit is packed in its original carton.
Please note that if these conditions are not met, any
damage that occurs to the unit during transport will not be
covered by the service warranty.
Page 3
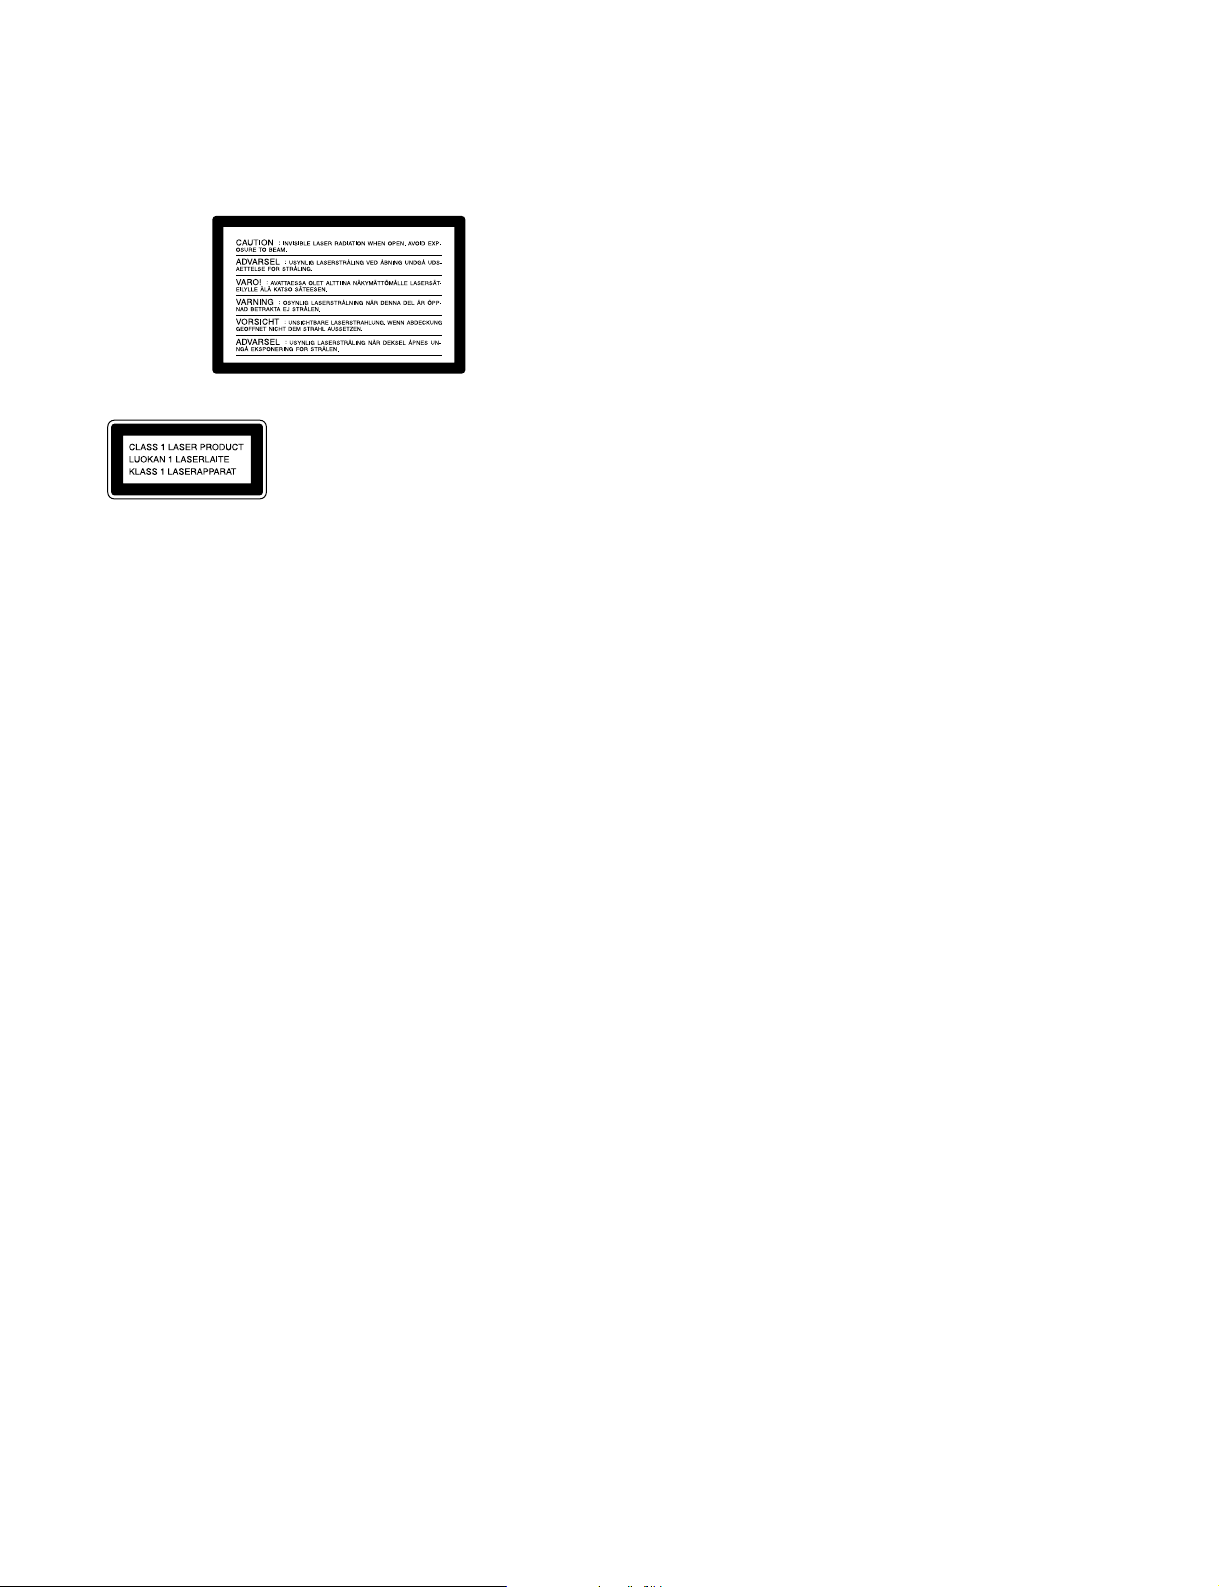
The following caution label is located inside the unit.
This appliance is classified as a
CLASS 1 LASER product.
The CLASS 1 LASER PRODUCT
MARKING is located on the side
of the unit.
For customers in Canada
This Class A digital apparatus meets all requirements of
the Canadian Interference-Causing Equipment
Regulations.
Pour les utilisateurs au Canada
Cet appareil numérique de la classe A respecte toutes les
exigences du Règlement sur le matériel brouilleur du
Canada.
For the customers in the United Kingdom
WARNING
THIS APPARATUS MUST BE EARTHED
IMPORTANT
The wires in this mains lead are coloured in accordance
with the following code:
Green-and-yellow: Earth
Blue: Neutral
Brown: Live
As the colours of the wires in the mains lead of this
apparatus may not correspond with the coloured markings
identifying the terminals in your plug proceed as follows:
The wire which is coloured green-and-yellow must be
connected to the terminal in the plug which is marked by
the letter E or by the safety earth symbol Y or coloured
green or green-and-yellow.
The wire which is coloured blue must be connected to the
terminal which is marked with the letter N or coloured
black.
The wire which is coloured brown must be connected to the
terminal which is marked with the letter L or coloured red.
Page 4

Page 5

Table of Contents
Chapter 1
Overview
Chapter 2
Function of Parts and
Controls
Chapter 3
Preparations
Chapter 4
Recording
1-1 Features ........................................................................................... 1-1
1-1-1 Features of the MiniDisc........................................................ 1-1
1-1-2 Operational Features .............................................................. 1-1
2-1 Front Panel...................................................................................... 2-1
2-2 Rear Panel ....................................................................................... 2-3
2-3 Remote Controller.......................................................................... 2-5
3-1 Precautions...................................................................................... 3-1
3-1-1 Installation Precautions.......................................................... 3-1
3-1-2 Handling Precautions ............................................................. 3-1
3-1-3 Shipping Precautions.............................................................. 3-1
3-2 Connections..................................................................................... 3-2
3-2-1 Precautions............................................................................. 3-2
3-2-2 Basic Connection Examples................................................... 3-2
3-2-3 Connection for Direct ATRAC Data Copying....................... 3-3
3-2-4 Connecting and Setting the Keyboard ................................... 3-4
3-3 Handling MiniDiscs........................................................................ 3-5
3-4 Setting the Analog Input and Output Reference Levels ............. 3-6
4-1 Selecting the Input Signal .............................................................. 4-1
4-2 Recording Procedure ..................................................................... 4-2
4-3 Display Information During Recording ....................................... 4-4
4-4 Adding Disc and Track Titles ....................................................... 4-5
4-5 Procedure of Direct ATRAC Data Copying ................................ 4-6
4-6 Restrictions on Digital Copying .................................................... 4-7
Chapter 5
Playback
(Continued)
5-1 Overview of Playback Procedures ................................................ 5-1
5-2 Playback Procedures...................................................................... 5-2
5-2-1 Playing From the First Track on the MD............................... 5-2
5-2-2 Locating a Specific Point (Search)......................................... 5-2
5-2-3 Playing a Single Track Only .................................................. 5-3
5-2-4 Rehearsal Playback ................................................................ 5-3
5-3 Locating a Track ............................................................................ 5-4
5-3-1 Locating a Specific Track ...................................................... 5-4
5-3-2 Locating the Beginning of a Track (AMS) ............................ 5-4
5-3-3 Preparing the Next Track During Playback ........................... 5-5
5-4 Display Information during Playback.......................................... 5-6
5-5 Playing Tracks Repeatedly ............................................................ 5-7
5-6 Program Play .................................................................................. 5-8
5-7 Playing Tracks in Random Order (Shuffle Play) ...................... 5-10
5-8 Starting Playback Instantly (Multi-Access Function)............... 5-11
5-9 Varying the Playback Speed (Variable-Speed Playback)......... 5-13
Table of Contents 1
Page 6

Table of Contents
Chapter 6
Editing Functions
Chapter 7
Setup Menu
6-1 Overview of Editing Functions...................................................... 6-1
6-1-1 Types of Editing Functions.................................................... 6-1
6-1-2 RAM Edit and Disc Edit........................................................ 6-1
6-1-3 Track Numbers After Editing Operations.............................. 6-2
6-1-4 Editing Operations During Rehearsal Playback..................... 6-2
6-1-5 Undo function ........................................................................ 6-2
6-2 Erasing Tracks (Erase Function).................................................. 6-3
6-3 Dividing a Recorded Track (Divide Function) ............................ 6-4
6-4 Combining Recorded Tracks (Combine Function)..................... 6-6
6-5 Moving Recorded Tracks (Move Function)................................. 6-7
6-6 Editing Titles................................................................................... 6-8
6-7 Marking the Cue Point ................................................................ 6-10
6-8 Trimming ...................................................................................... 6-12
6-8-1 Head Trimming.................................................................... 6-12
6-8-2 End Trimming...................................................................... 6-14
7-1 The Overview of the Setup Menu ................................................. 7-1
7-2 LevelSync Setting (Track Marking Function)............................. 7-2
7-3 Setting Up for Timer-Activated Function .................................... 7-3
7-4 Setting the Playback Resume Mode.............................................. 7-4
7-5 Setting the RS-232C Interface....................................................... 7-5
7-6 Setting the Auto Cue Function ...................................................... 7-6
7-7 Setting the Rehearsal Playback Function .................................... 7-7
7-8 Setting the EOM Function............................................................. 7-8
7-9 Reading the Hours Meter .............................................................. 7-9
7-10 Disabling the Buttons While Controlling Remotely................. 7-10
Chapter 8
Maintenance
Appendix
8-1 Cleaning and Reset Switch ............................................................. 8-1
8-2 Display Messages ............................................................................. 8-2
Menu Item List ..................................................................................... A-1
Pin Assignments for REMOTE (25P) connector ............................... A-3
RS-232C Protocol ................................................................................. A-5
RS-232C Protocol............................................................................ A-5
Specifications .................................................................................. A-5
Operating Method............................................................................ A-5
List of Commands ......................................................................... A-10
Command Descriptions...................................................................... A-11
Specifications....................................................................................... A-26
Index ........................................................................................................I-1
2 Table of Contents
Page 7

1-1 Features
Chapter 1 Overview
The MDS-B5 is a MiniDisc deck for professional use
in any kind of broadcasting, announcements, or
program production.
1-1-1 Features of the MiniDisc
ATRAC (Adaptive Transform Acoustic
Coding) data compression technology
By eliminating inaudible sound data to obtain a
compression ratio of 1:5, ATRAC data compression
technology enables the recording of sound information
of almost the same quality and quantity as a CD, but
on a smaller disc.
74 minutes of playback or recording
A single MD can be used to play back or record up to
74 minutes of sound information. In monoaural mode,
you can record and play back up to 148 minutes.
Direct track access
You can use the supplied wire-connected remote
controller or an IBM keyboard (not supplied) to
directly access any of the MD’s 255 tracks without the
long cueing time required for tape.
Various playback functions
Text entry
You can use the supplied wire-connected remote
controller or an IBM keyboard to enter titles for
recorded discs and tracks. Title data, which can total
1,792 characters per disc, appear in the display
window during playback.
Durability
Because MDs use a non-contact system like compact
discs, they are superior to cassette tape in durability.
1-1-2 Operational Features
Direct ATRAC data copy function
Multiple MDS-B5 decks can be daisy chained through
the DIRECT DUPLICATION LINK connectors,
allowing ATRAC compression data to be copied about
four times faster than normal dubbing speed. Up to ten
MDS-B5 decks can be daisy chained. When using this
function, the character information on the disc will
also be copied.
Instant playback function
The MDS-B5 can store the first part of up to 10
selected tracks into memory in order to begin instant
playback.
Chapter 1 Overview
The MDS-B5’s various playback functions include
repeat playback, programmed playback, and random
playback. You can also vary the playback speed
between ±12.5% of the normal speed.
Multiple editing functions
The MDS-B5’s editing functions allow you to divide,
combine, and move tracks on the MD. You can use
the rehearsal function to precisely position edit points
on a track as you monitor the sound.
Unlike tracks on an analog cassette or DAT tape,
specific MD tracks or an entire MD can be erased
instantly.
Two cueing modes
You can use the A.MODE button to select the
following two cueing modes.
AUTO PAUSE mode
AUTO PAUSE mode pauses the MD deck at the
beginning of a track, then starts playback when you
press the PLAY/PAUSE button. Use this mode to precue tracks during on-air broadcasting with multiple
MD decks.
Chapter 1 Overview 1-1
Page 8

1-1 Features
AUTO CUE mode
AUTO CUE mode pauses the MD deck when it detects
Chapter 1 Overview
a rise in the audio signal following the inaudible
portion before the start of a track. This mode is good
for playing special sound effects in theater
productions, etc.
NEXT TRACK SELECT function
During single-deck operations, you can specify the
next track to be played as you are playing another one.
Single track play
No matter what the cueing mode may be, you can
always play back single tracks. After playing a single
track, the deck stops rather than pauses, thus
preventing the mistaken playback of another track.
Playback display variations
RAM Edit function
You can do temporary editing, such as dividing,
combining, and moving the tracks on the MD, without
overwriting the TOC information. The results of the
RAM edit function will be lost when the MiniDisc is
ejected. You can use the RAM edit function on premastered MDs.
Program Play information recording
You can record the playback order of up to 25 tracks
for the Program Play function in the TOC on
recordable discs, even when the “PROGRAM”
indication does not appear in the display.
UNDO function
You can undo the last editing operation (e.g., when
you have mistakenly erased a track).
The MDS-B5 displays track information (playing time,
track title, etc.) for the current and the next tracks that
have been selected for playback. By pressing the
DISPLAY button, you can display the following track
information:
•Remaining playing time and title of the current track
•Elapsed time and title of the current track
•Remaining playing time of the current track and a list
of programmed tracks during Program Play or Instant
Playback.
•Playing time and title of the next track
Rehearsal function
You can play back a portion of a track repeatedly in
order to precisely determine points for cueing or track
division. You can also use the Setup menu to specify
the length of the portion to be repeated and the interval
between the end of one repeat and the start of another.
LevelSync function
The LevelSync function adds a track number whenever
the audio signal rises above a threshold level during
recording (except for digital recording from a CD or
MD).
You can use the Setup menu to define the length of an
inaudible portion and the threshold level. You can
also specify a margin between the threshold point and
the writing of the track number.
End-of-message (EOM) function
This function outputs a tally signal from the
REMOTE(25P) connector before the end of a track or
the disc.
You can use the Setup menu to specify how far in
advance of the end the tally signal is output.
Cue point function
1-2 Chapter 1 Overview
This function outputs a tally signal from the
REMOTE(25P) connector whenever a cue point is
detected during playback. Up to 255 cue points can be
marked per disc.
Page 9

Track trimming function
RS-232C interface
You can temporarily modify the starting and ending
points of a track. The head trimming edit allows you
to specify the starting point in accordance to the audio
rising point.
Digital time meter
The digital time meter displays the accumulated laser
diode recording time and spindle motor operation time.
Easy menu operations
The editing and setting operations on the MDS-B5 are
done using two types of menus: the Edit menu and the
Setup menu. Menu operations are easily done using
the AMS control, turning it to select items and
pressing it to select the setting.
Remote Controller
The supplied remote controller allows you to enter
titles and other text information easily.
The MDS-B5 can be controlled by a personal
computer or other external equipment connected to the
deck through the RS-232C interface.
Rack mounting compatibility
Two MDS-B5 decks can be mounted side by side in a
standard 19-inch EIA rack.
TOC data back-up function
If power to the MDS-B5 is suddenly cut off during
recording or editing, edited TOC data in the MDSB5’s RAM will be saved and maintained by an internal
back-up power supply for up to three days.
Notes
•TOC data may be lost if the power is cut at the
moment of the beginning or the end of recording or
editing operation.
•Due to the limited capacity of the RAM, cue points
and trimming point specifications are not saved.
Chapter 1 Overview
Keyboard operations
You can use the supplied keyboard template on any
IBM keyboard to operate the MDS-B5.
Remote control function
The MDS-B5 can be controlled by external control
signals input to the REMOTE(25P) connector on the
rear panel. You can select any of four pin assignments
for the REMOTE(25P) connector, depending on the
application.
When the deck is controlled by external control
signals, you can disable the operation buttons and
controls on the front panel by using the Kill Local
function.
Error check function
The MDS-B5 can play back a disc at four times
normal playback speed, allowing you to quickly verify
the integrity of tracks before a broadcast.
Chapter 1 Overview 1-3
Page 10

Page 11
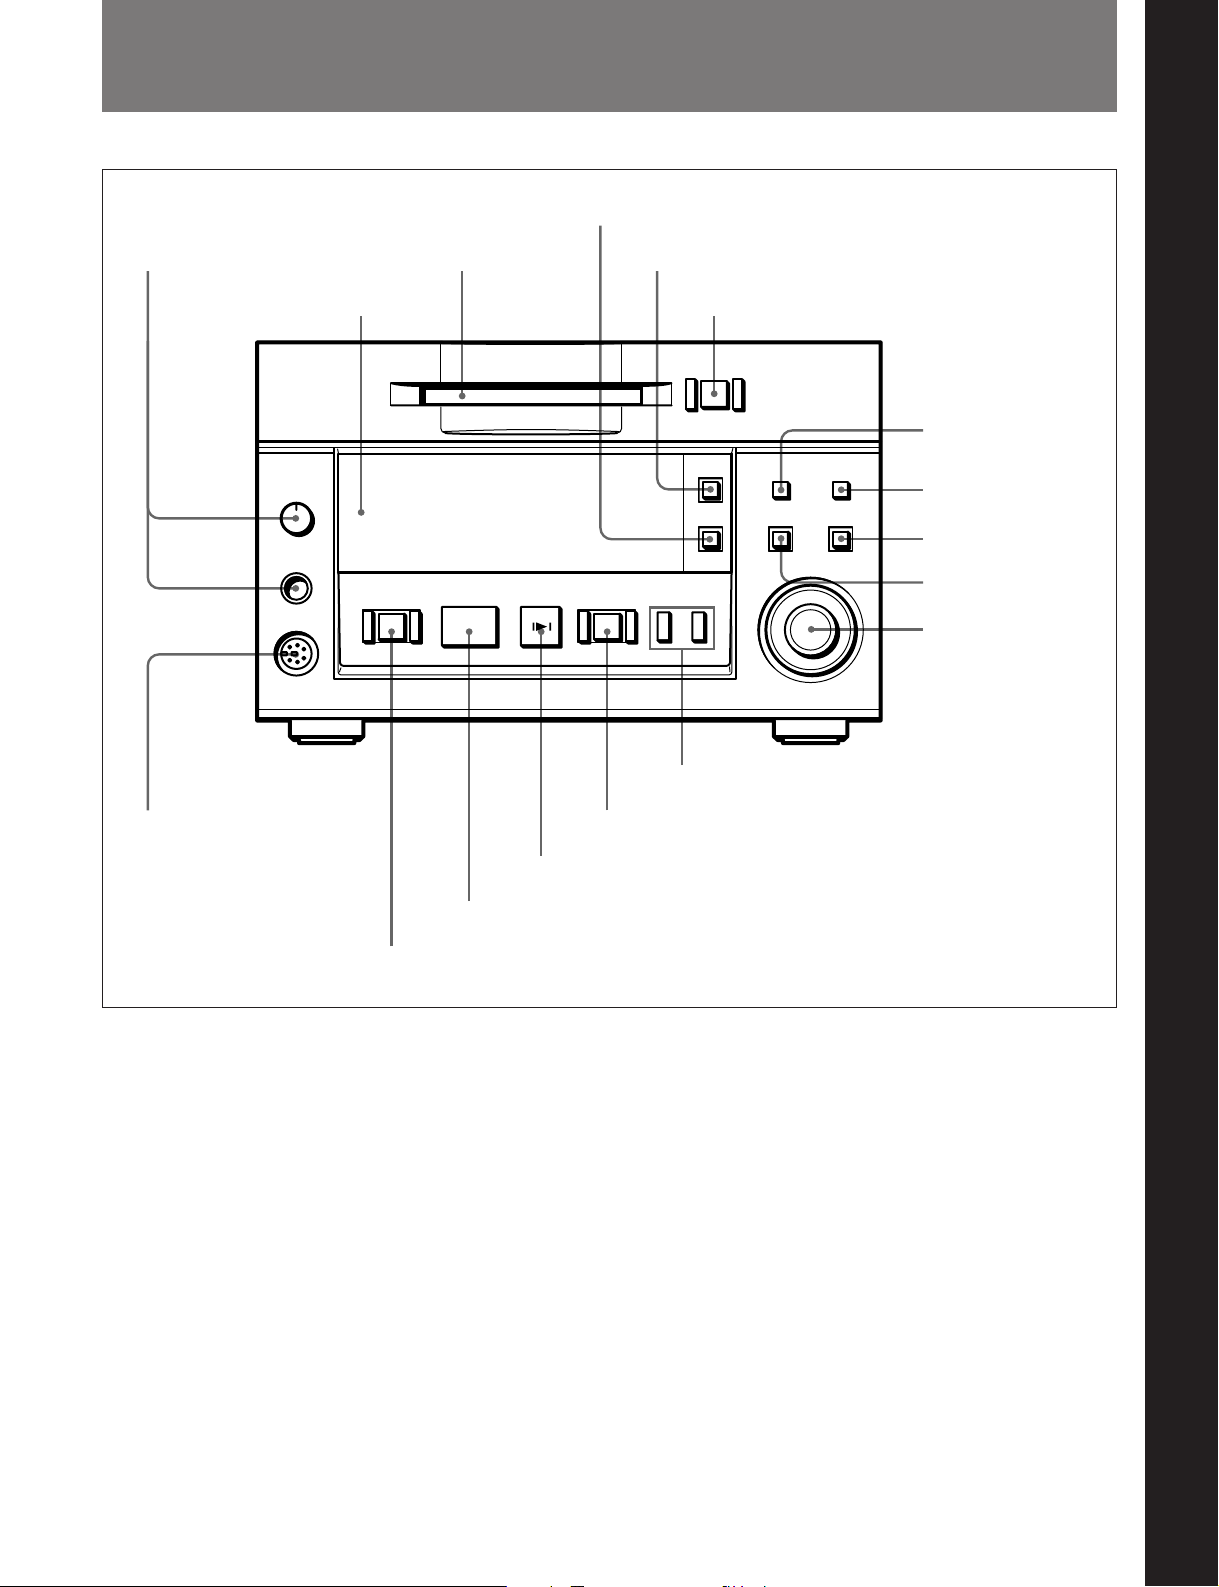
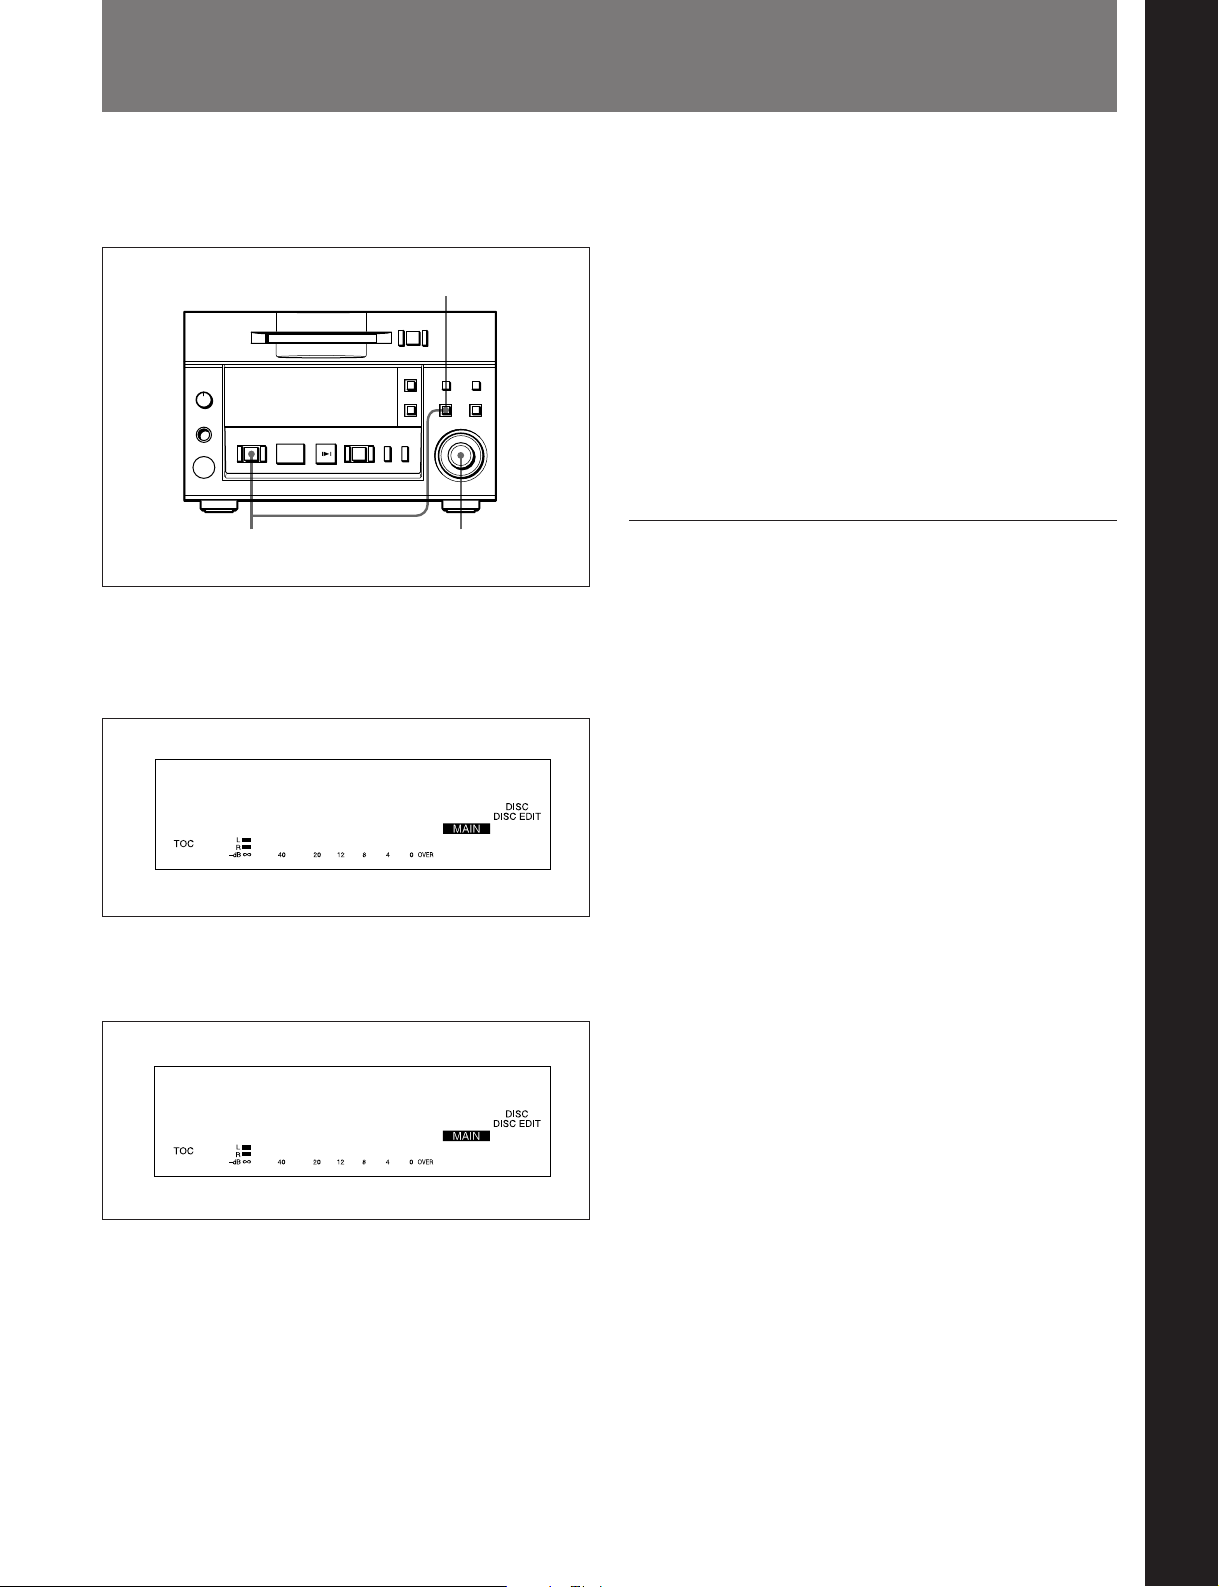
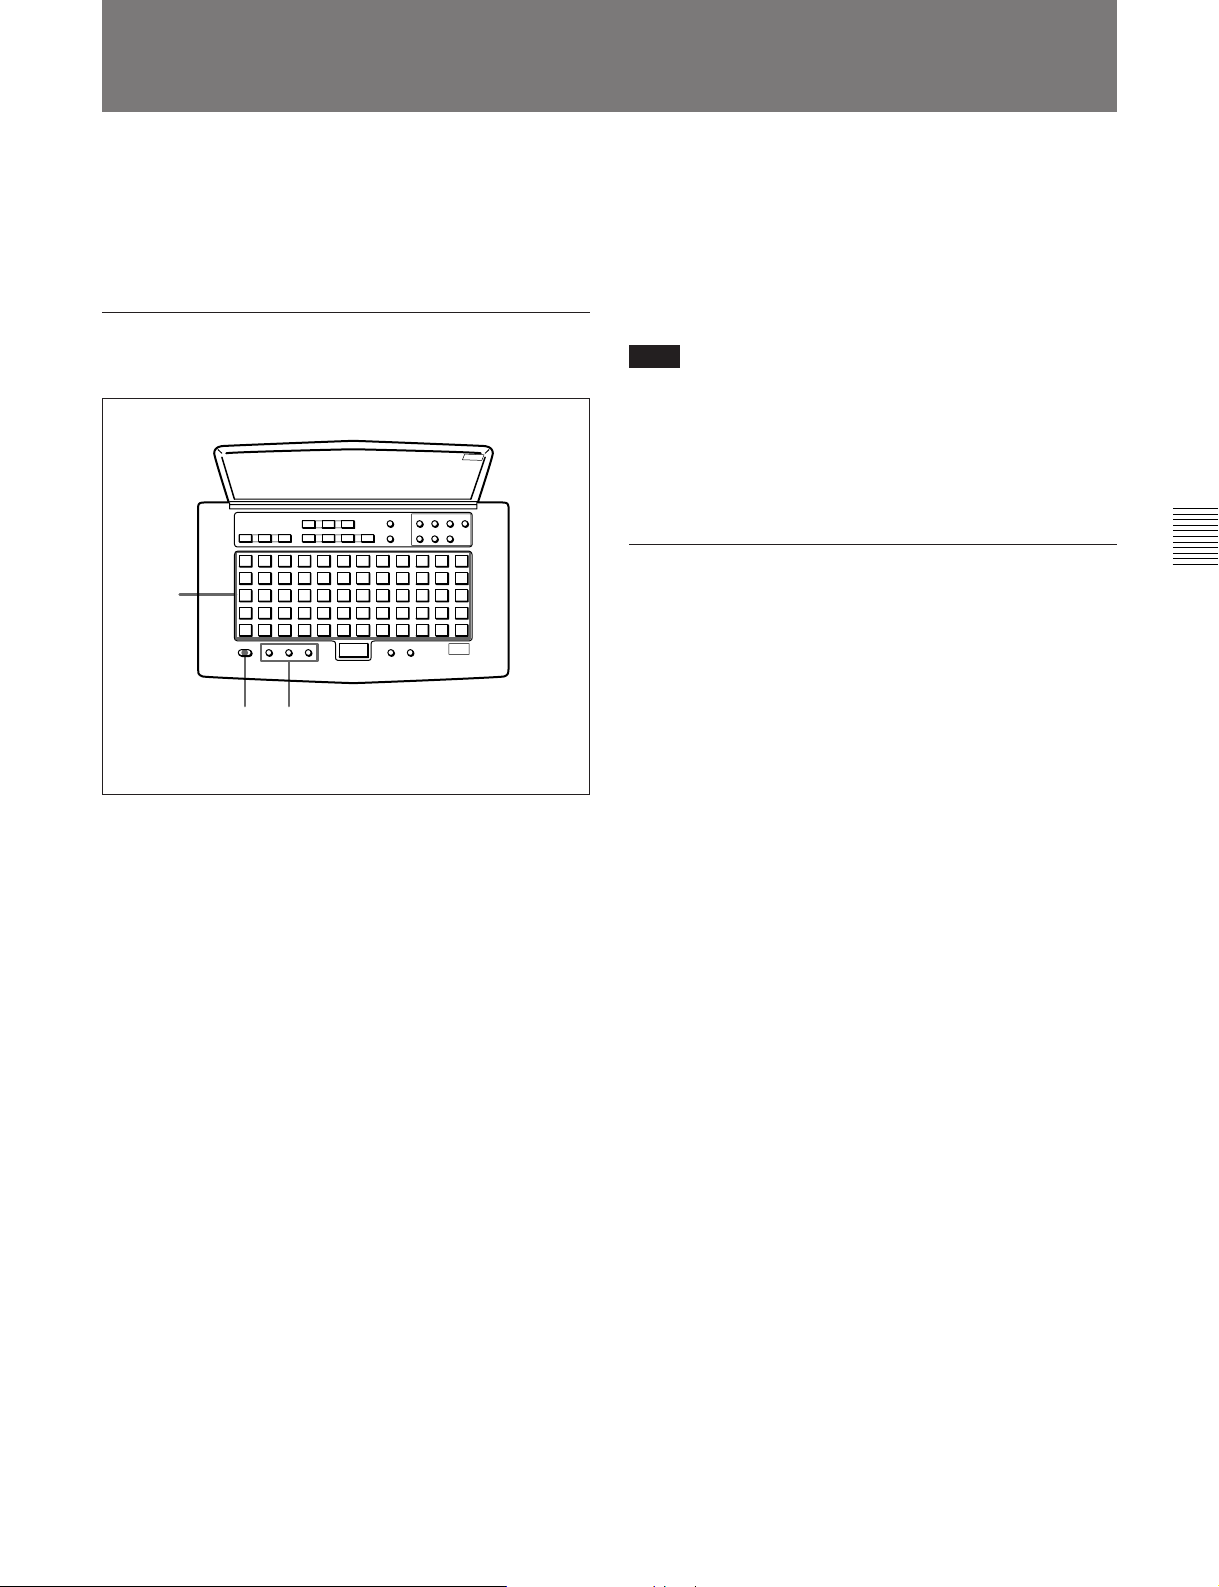
2-1 Front Panel
Chapter 2 Function of Parts and Controls
4 SINGLE button
1 PHONES jack and volume control
2 Display
window
!¶ KEY BOARD connector
3 Disc
compartment
p(P
5 A.MODE button
0)
r
!™ Search buttons
!£ REC button
6 EJECT button
=+
Chapter 2 Function of Parts and Controls
7 DISPLAY button
8 REHEARSAL button
9 ENTER/YES button
0 EDIT/NO button
!¡ AMS control
!¢ CUE/STDBY button
!∞ PLAY/PAUSE button
!§ STOP button
1 PHONES jack and volume control
Connects headphones. Use the volume control to
adjust the sound level of the PHONES jack.
2 Display window
Indicates the current MD deck operating status. While
the deck is stopped, the disc title, total track number,
and total recorded time are displayed. During
playback, the track title and time information of the
current track or the next track are displayed. When
using a menu, the menu number and menu item are
displayed.
3 Disc compartment
Automatically loads an inserted disc.
4 SINGLE button
Press to play only one track. “1” appears in the
display window.
5 A.MODE button
Selects the cueing mode. The following are selected in
sequential order each time you press this button.
OFF: The cueing function is disabled. Playback
starts when you press the PLAY/PAUSE button or
select a track using the AMS control.
A.PAUSE: When you press the PLAY/PAUSE
button or select a track using the AMS control, the
MD deck locates the beginning of the track and
pauses. Playback starts when you press the
PLAY/PAUSE button.
A.CUE: When you press the PLAY/PAUSE button
or select a track using the AMS control, the MD
deck pauses whenever the audio signal rises above
a specified threshold level. Playback starts when
you press the PLAY/PAUSE button.
Chapter 2 Function of Parts and Controls 2-1
Page 12

2-1 Front Panel
6 EJECT button
Press to eject the disc from the disc compartment.
7 DISPLAY button
During playback, press this button to select the
following display contents:
Chapter 2 Function of Parts and Controls
•Remaining playing time and title of the current track
•Elapsed time and title of the current track
•Remaining playing time of the current track and the
Program Play list during Program Play or the Instant
Playback function
•Playing time and title of the next track
8 REHEARSAL button
Press to play a portion of a track repeatedly. If you
press this button during playback, the portion starting
from that point is repeated. If you press the button
while the deck is stopped, the beginning of the first
track on the disc or the selected track is repeated.
During rehearsal playing, you can move the repeated
portion forward or backward by turning the AMS
control. Pressing the 0 or ) button changes the
unit for adjusting the start of Rehearsal Play.
After confirming the cue point or editing point using
the rehearsal function, press the CUE STDBY button
to pause the deck at the position where the rehearsal
started or press EDIT/NO button to execute an editing
function.
9 ENTER/YES button
Press to execute an editing function.
You can also execute editing functions by pressing the
AMS control.
!£ REC (recording) button
Press for recording standby (recording pause). To start
recording, press the PLAY/PAUSE button. The REC
button lights when recording is paused or taking place.
!¢ CUE/STDBY (standby) button
Press to return to the position where you last pressed
the PLAY/PAUSE button. After finding the position,
the MD deck enters playback pause. Use this button to
check or return to a cueing position.
!∞ PLAY/PAUSE button
Press to start playback or recording.
Press during playback to temporarily pause the MD
deck; press again to cancel pause.
The PLAY/PAUSE button lights during playback or
recording. It flashes while the MD deck is in playback
pause or recording pause.
!§ STOP button
Press to stop playback or recording.
!¶ KEYBOARD connector
Connects any IBM keyboard for control of the MD
deck using the supplied keyboard template.
This connector has a cap for protection. Remove the
cap only when connecting a keyboard.
Note
While using the keyboard, turning the MD deck off,
then turning it on again quickly may cause the
keyboard to malfunction. If this occurs, unplug the
keyboard cord and plug it again.
0 EDIT/NO button
Press to display the Edit menu or cancel an editing
function.
!¡ AMS control
Turn to locate the beginning of a track.
When using the Edit menu or the Setup menu, turn this
control to select the menu item and press it to select
the setting.
!™ Search buttons
0: Hold down this button during playback to scan
backward while monitoring the sound.
): Hold down this button during playback to scan
forward while monitoring the sound.
2-2 Chapter 2 Function of Parts and Controls
Page 13
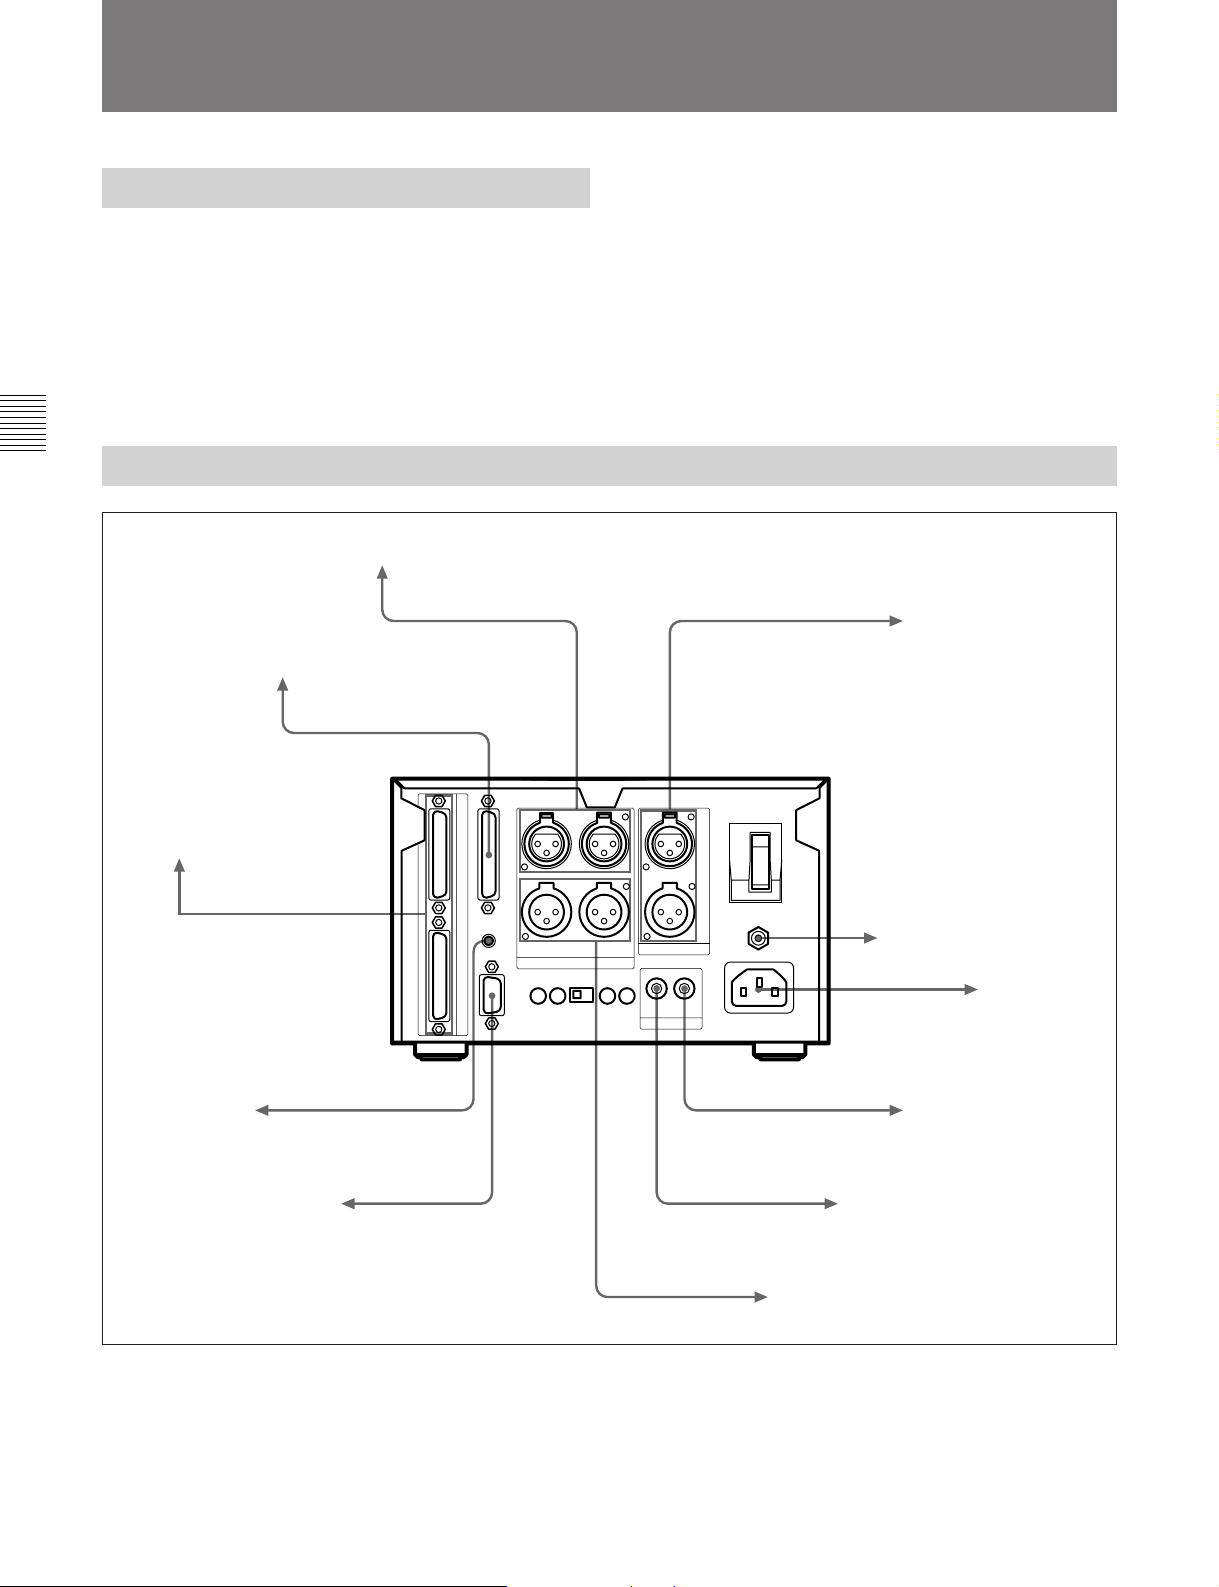
2-2 Rear Panel
1 DIRECT DUPLICATION LINK connector
2 REMOTE(25P) connector
3 ANALOG IN/OUT connectors
4 AES/EBU IN/OUT connectors
5 POWER switch
8 IEC(958) IN/OUT connectors
9 PLAYBACK/RECORD level controls and MODE switch
Chapter 2 Function of Parts and Controls
6 Ground connector
7 AC IN connector
0 RS-232C connector
!¡ REMOTE connector
1 DIRECT DUPLICATION LINK connector
Used for daisy chaining multiple MDS-B5 decks for
copying ATRAC compression data at the maximum of
about four times the normal recording rate. You can
copy the same data simultaneously on up to ten MDSB5 decks.
2 REMOTE (25P) connector
Connects to external equipment for remote control.
13 1
25 14
You can choose any of four pin assignments,
depending on the purpose.
See “Pin assignments for REMOTE (25P) connector” on
page A-3.
3 ANALOG IN/OUT connectors (XLR-type, 3-pin)
Input and output a two channels of analog audio
signals.
Pin assignment
Pin No. Signal
1 GND
2 HOT
3 COLD
23 1
OUTIN
13 2
4 AES/EBU IN/OUT connector (XLR-type)
Input and output two channels of digital audio signals
in AES/EBU format.
5POWER switch
Press to turn on the MD deck. Press again to turn the
MD deck off.
Chapter 2 Function of Parts and Controls 2-3
Page 14

2-1 Front Panel
2-2 Rear Panel
6 Ground connector
Connects directly to ground.
7 AC IN connector
Connects to an AC outlet with the supplied AC power
cord.
Chapter 2 Function of Parts and Controls
8 IEC(958) IN/OUT connector (RCA-type, phono)
Inputs digital audio signals for professional use
(IEC958-TYPE1) or consumer use (IEC958-TYPE2).
Outputs digital audio signals for consumer use
(IEC958-TYPE2).
9 PLAYBACK/RECORD level controls and
MODE switch
Adjust the analog input and output reference level
during recording or playback. Adjust the level of each
channel (CH-1(L)/CH-2(R)) by turning the control
with a flat screwdriver.
MODE switch
Selects monaural or stereo mode for the analog input/
output signal.
When MONO is selected during playback, the signals
of channel 1 and 2 are mixed and lowered to below –6
dB, then output from ANALOG OUT CH-1(L) and
CH-2(R).
When MONO is selected during recording, the signals
from ANALOG IN CH-1(L) and ANALOG IN CH2(R) are mixed and lowered to below –6 dB, then
recorded from both channels. The MODE switch just
mixes the input and output signals and has nothing to
do with the monoaural recording mode based on the
MiniDisc format.
0 RS-232C connector
15
69
You can use a personal computer connected to the
MDS-B5’s RS-232C connector to control the MDS-B5
including following operations:
•Button operations
PLAY/PAUSE, STOP, REC, EJECT, PREVIOUS,
NEXT, CUE STDBY
•Direct track access
•Selecting menu functions
Selecting the timing for the end-of-message (EOM)
tally signal output, setting the AUTO PAUSE and
AUTO CUE functions, setting the LevelSync
function, and selecting the input signal
•Displaying time and character data and messages on
an external computer
See “RS-232C Protocol” on page A-5 for details.
!¡ REMOTE connector
Connects the supplied remote controller.
For the monoaural recording mode, see “To record in
monoaural mode” on page 4-2.
Note
If a signal is recorded from only one ANALOG IN
connector in monaural mode, the recording level will
be –6 dB lower than that recorded in stereo mode. In
this case, use the PLAYBACK/RECORD level control
to bring the recording level up to that of stereo mode.
2-4 Chapter 2 Function of Parts and Controls
Page 15

2-3 Remote Controller
1 MD control buttons
Chapter 2 Function of Parts and Controls
2 Edit operation buttons
4 Title entry buttons
1 MD control buttons
A.MODE (Cueing mode)
SINGLE (Single-track playback)
REHEARSAL (Rehearsal playback)
^ (play/pause)
e (cueing/standby)
p (stop)
= (previous)
+ (next)
0 (rewind)
) (fast forward)
r (record)
T.REC (Time-Machine record)
2 Edit operation buttons
ERASE (erasing tracks)
DIVIDE (dividing tracks)
COMBINE (combining tracks)
MOVE (moving tracks)
UNDO (cancelling the last operation)
ENTER (ENTER/YES button)
CANCEL (EDIT/NO button)
3 Display buttons
SCROLL (viewing the rest of the title during
playback)
DISPLAY (changing the display mode)
3 Display buttons
4 Title entry buttons
NAME (entering title entry mode)
CAPS (uppercase letters, numbers, symbols)*
SML (lowercase letters, numbers, symbols)*
π (unmarked button; space button)
character/numeric buttons (60 buttons)
* The CAPS and SML buttons light up when activated.
Installing batteries in the remote controller
Insert two R6 (size-AA) batteries, making sure the
batteries are aligned with the + and – marks for proper
polarity.
Insert } end first.
}
]
When to replace batteries
The service life of the batteries are for about 6 months.
Replace the batteries when they run down and the
remote controller cannot control the MD deck any
more.
Chapter 2 Function of Parts and Controls 2-5
Page 16

Page 17

3-1 Precautions
Chapter 3 Preparations
3-1-1 Installation Precautions
Install the MD deck on a flat surface in a temperaturecontrolled room. Avoid using or storing the MD deck
at a location that is:
•extremely hot or cold.
•damp.
•subject to severe vibrations.
•subject to strong magnetic fields.
•subject to many hours of direct sunlight or close to
heating equipment.
3-1-2 Handling Precautions
•Check the MD deck’s operating voltage before you
plug it in. It must be identical with that of your local
power supply.
•If you drop any liquid or metal object inside the MD
deck, immediately stop using it, unplug the power
cord from the socket, and contact Sony service
personnel.
•If the MD deck will be unused for a long time, make
sure to unplug its power cord from the socket. When
unplugging the power cord, grasp it by the plug, not
the cord.
•Do not disassemble the MD deck. The laser light
used in the deck can cause damage to your eyes. If
the MD deck needs to be inspected, contact Sony
service personnel.
If trouble occurs
Should you detect an abnormal noise, smell, or smoke,
immediately turn off the power, unplug the power cord
from the socket, and contact Sony service personnel.
AC power cord
Do not use any power cord other than the one supplied
with the MD deck.
Chapter 3 Preparations
3-1-3 Shipping Precautions
When shipping the MD deck, make sure that the MD
deck is packed in its original carton. If not, any
damage that occurs to the MD deck during transport
will not be covered by the service warranty.
Caution
The use of optical instruments with this product will
increase eye hazard.
Condensation
Bringing in the MD deck from a cold place or turning
on the room heating may cause moisture to condense
on the lens within the MD deck, resulting in abnormal
operation. If this occurs, leave the power on. The
moisture will evaporate within an hour and the MD
deck will function normally again.
If the MD deck does not operate normally after a few
hours, contact Sony service personnel.
Chapter 3 Preparations 3-1
Page 18
3-2 Connections
3-2 Connections
3-2-1 Precautions
•Turn off all equipment before connecting or
disconnecting any cables.
•Insert all electrical plugs firmly since incomplete
connection may cause noise.
•Use a cord somewhat longer than needed to prevent
the plug from being pulled out when jarred or shaken.
Chapter 3 Preparations
3-2-2 Basic Connection Examples
MDS-B5
To the supplied
remote controller
To an analog mixing console or amplifier
To an external remote controller
Remote signal
Remote signal
Analog audio signals
AES/EBU digital signals
Digital audio signals
To audio/video equipment
for professional use
To ground
AC power cord
To an MD recorder or
other digital recording
device
120 V AC (for the
U.S. and Canada)
220 to 230 V AC
(for the European
countries)
To a personal computer
3-2 Chapter 3 Preparations
Remote signal
Digital audio signals
Analog audio signals
To a CD player, DAT
or MD recorder
To an analog mixing console
or tape recorder
Page 19
3-2-3 Connection for Direct ATRAC Data Copying
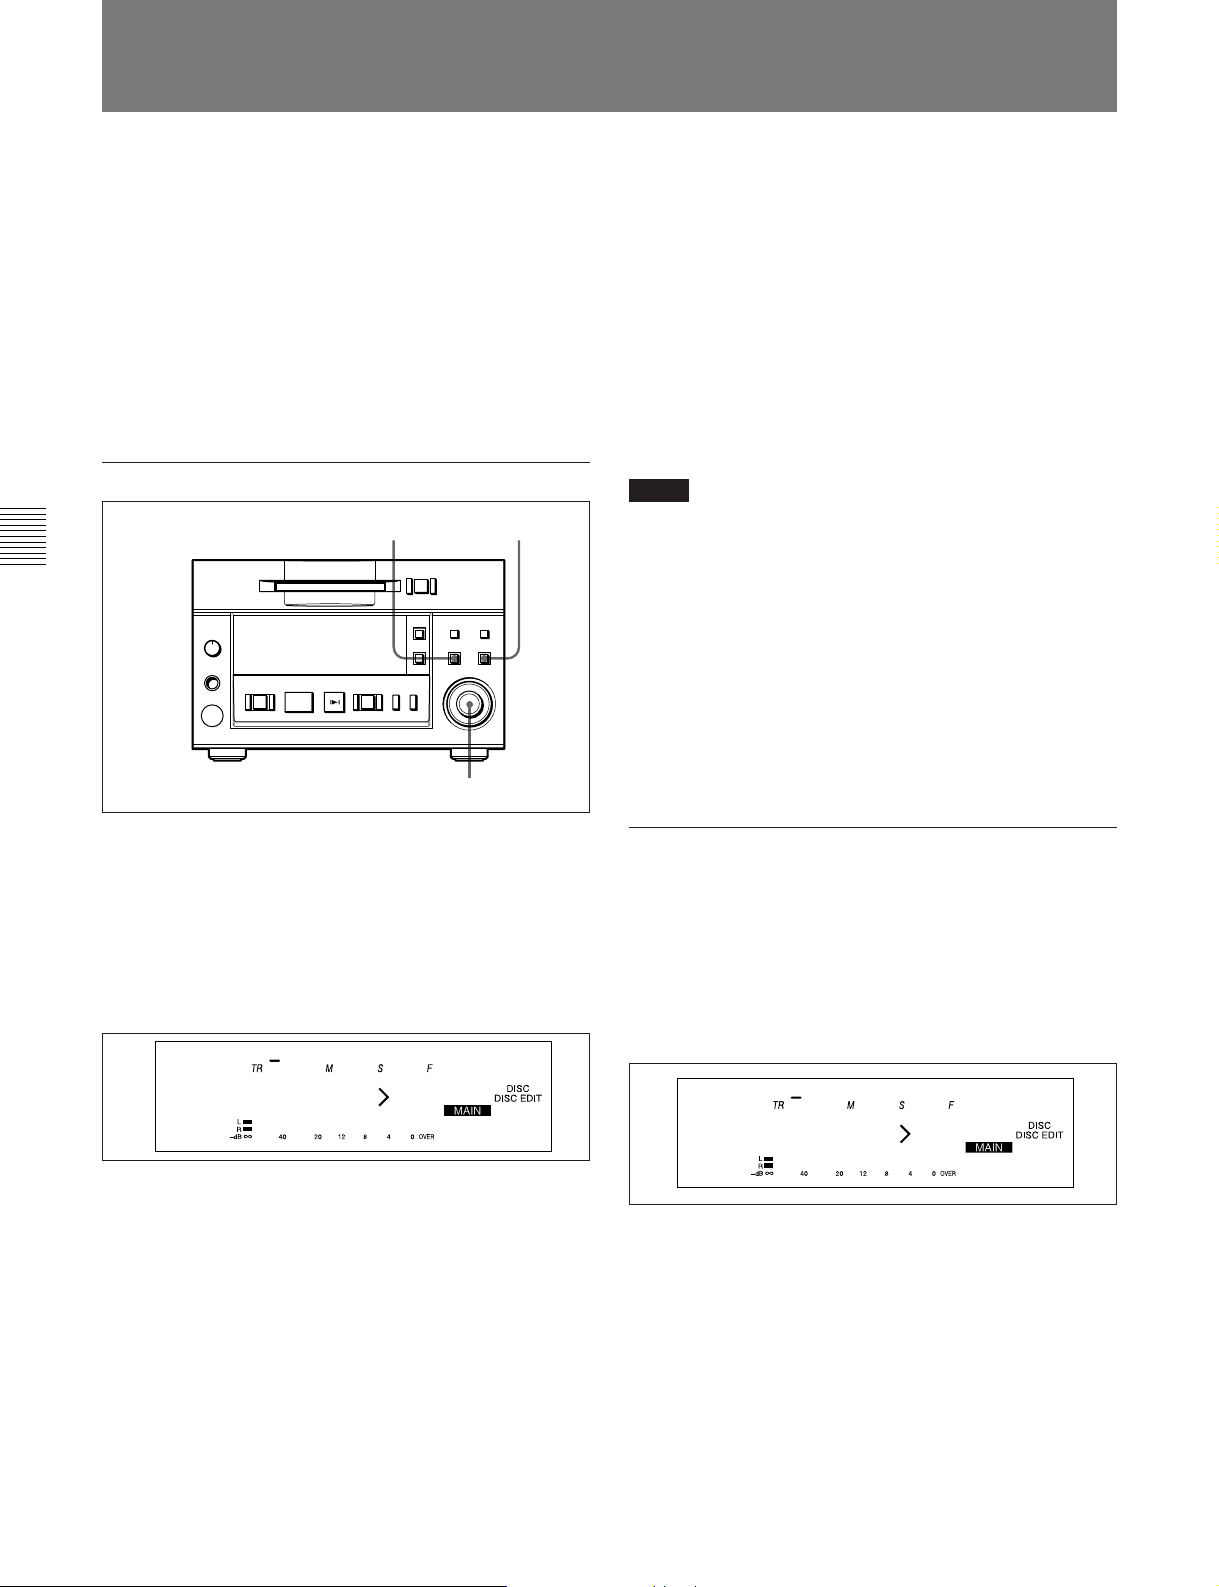
Specifying an MDS-B5 as the main, sub, or
end deck
You can daisy chain multiple MDS-B5 decks through
the DIRECT DUPLICATION LINK connectors to
copy the ATRAC compression data at about four times
the normal recording rate, as well as simultaneously on
up to ten MDS-B5 decks.
To use the direct ATRAC data copy function between
the main deck (which plays the original MD) and the
sub deck (which records the data), connect the
DIRECT DUPLICATION LINE OUT connector on
the main deck to the DIRECT DUPLICATION LINE
IN connector on the sub deck using the specified cable.
To make more than two copies of an MD using the
direct ATRAC data copy function, daisy chain the sub
decks using the DIRECT DUPLICATION LINE OUT
and DIRECT DUPLICATION LINE IN connectors on
each deck and the specified cables. The last sub deck
in the chain must be specified as the “end” deck in the
Setup menu.
The main deck
The sub deck
The end deck
To specify an MDS-B5 as the main, sub, or end deck
when using the direct ATRAC data copy function, do
the following Setup menu procedure.
5
=+
0)
p(P
1
r
2,3,4
1 Press the EDIT/NO button while holding down the
STOP button.
The Setup menu appears in the display window.
2 Turn the AMS control until the menu item F05
(“Dup Main”, “Dup Sub”, “Dup End”, or
“Dup Off”) appears in the window.
Chapter 3 Preparations
OUT
IN
OUT
IN
F05
Dup Main
3 Press the AMS control.
The item flashes and you can change the setting.
4 Turn the AMS control to the item to be set, and
press the AMS control to select it.
When using the direct ATRAC data copy function,
each MDS-B5 in the daisy chain should be
specified as one of the following units:
“Dup Main”: the main deck
“Dup Sub”: a sub deck
“Dup End”: the end deck
“Dup Off”: copy-disabled through the DIRECT
DUPLICATION LINK connector
5 Press the EDIT/NO button to exit from the Setup
menu.
Chapter 3 Preparations 3-3
Page 20

3-2 Connections
Main/sub deck indication
When you specify an MDS-B5 as a main, sub or end
deck, the status of the deck appears in the display
window. “MAIN” means the main deck and “SUB”
the sub or end deck.
Dup Main
Chapter 3 Preparations
Disabling operation buttons on a sub or end
deck
You can disable the operation buttons on a sub or end
deck to prevent mistaken operations during high-speed
dubbing.
See “7-10 Disabling the Buttons While Controlling
Remotely” on page 7-10 for details.
F05
Main/sub deck indication
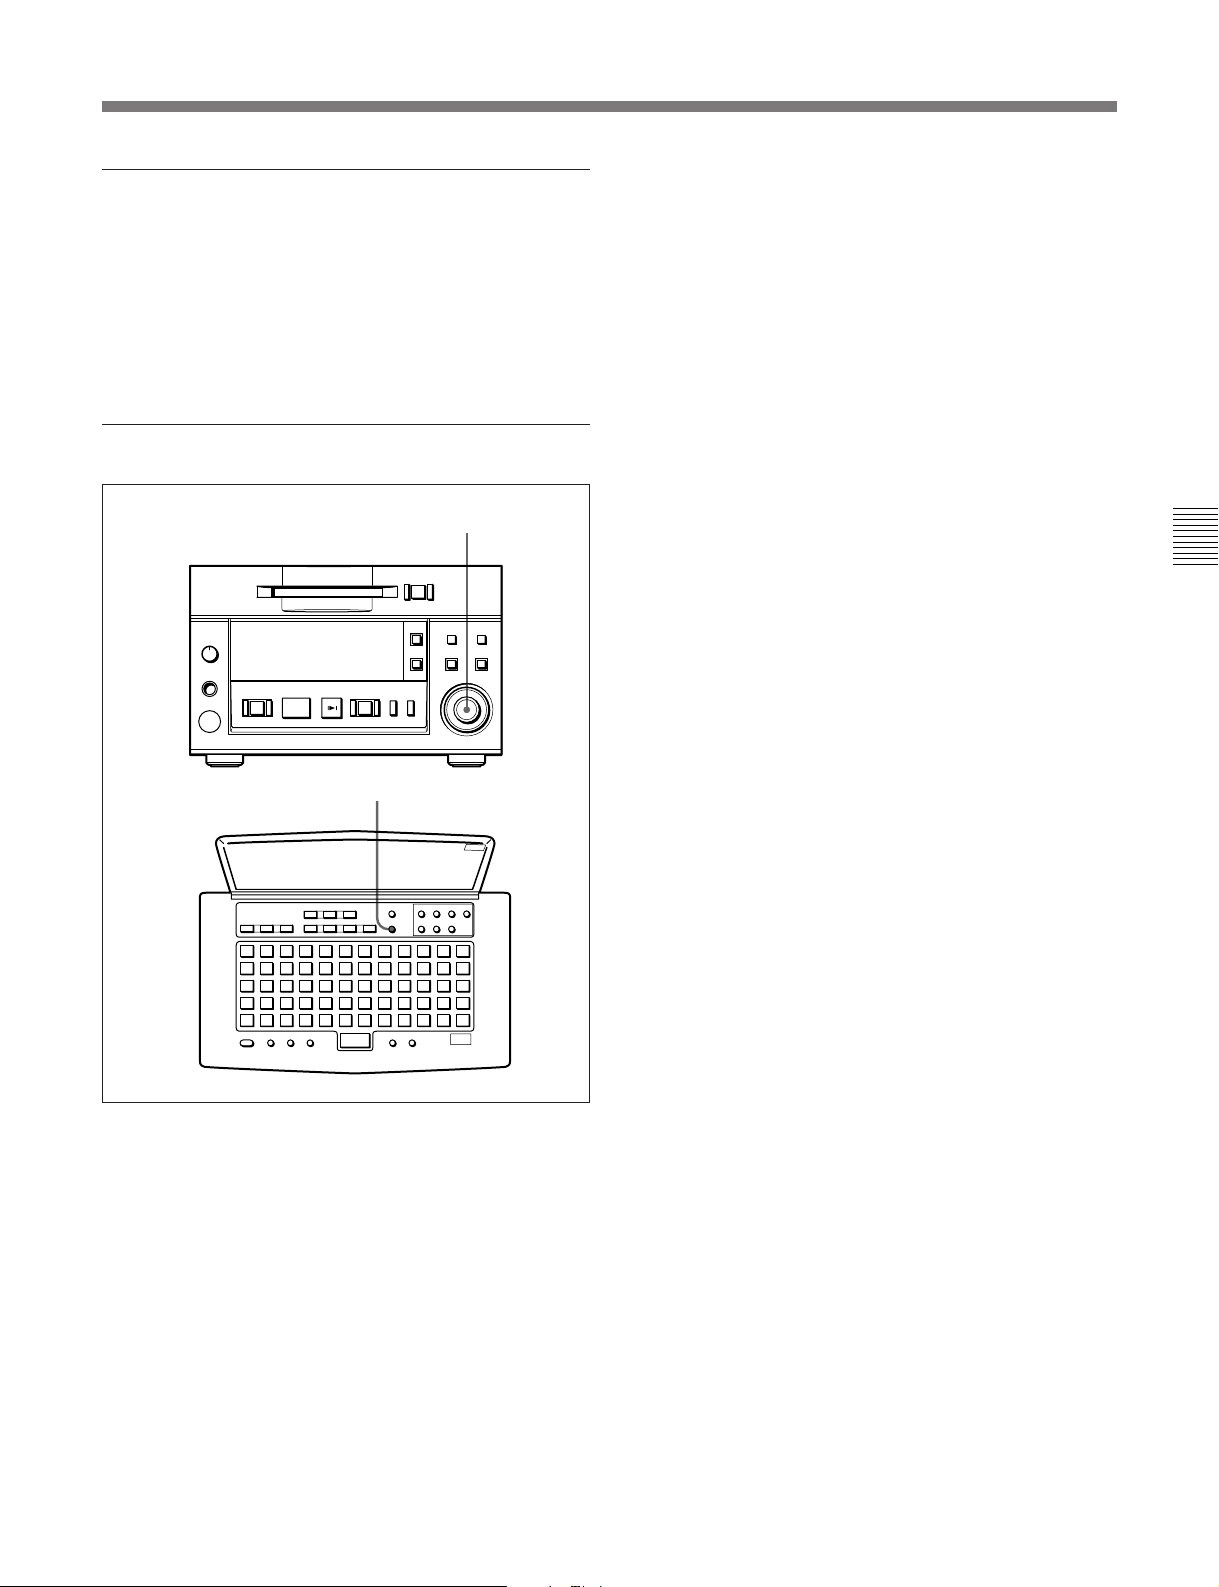
3-2-4 Connecting and Setting the Keyboard
You can use any IBM keyboard to control the MD
deck. The supplied keyboard template has the same
key indications found on the front panel of the deck.
Be sure to remove the cap from the KEY BOARD
connector when connecting a keyboard.
=+
0)
p(P
KEY BOARD connector
Specifying the keyboard type
r
Use the Setup menu to specify the keyboard type.
1 Press the EDIT/NO button while holding down the
STOP button.
The Setup menu appears in the display window.
2 Turn the AMS control to display the menu item
F12 (“KB ENG 101” or “KB JPN 106”) in the
window.
F12
KB ENG 101
3 Press the AMS control.
The indication flashes and you can change the
setting.
4 Turn the AMS control to select either “KB ENG
101” or “KB JPN 106.” Press the AMS control to
select the item.
3-4 Chapter 3 Preparations
5 Press the EDIT/NO button to exit from the Setup
menu.
Page 21
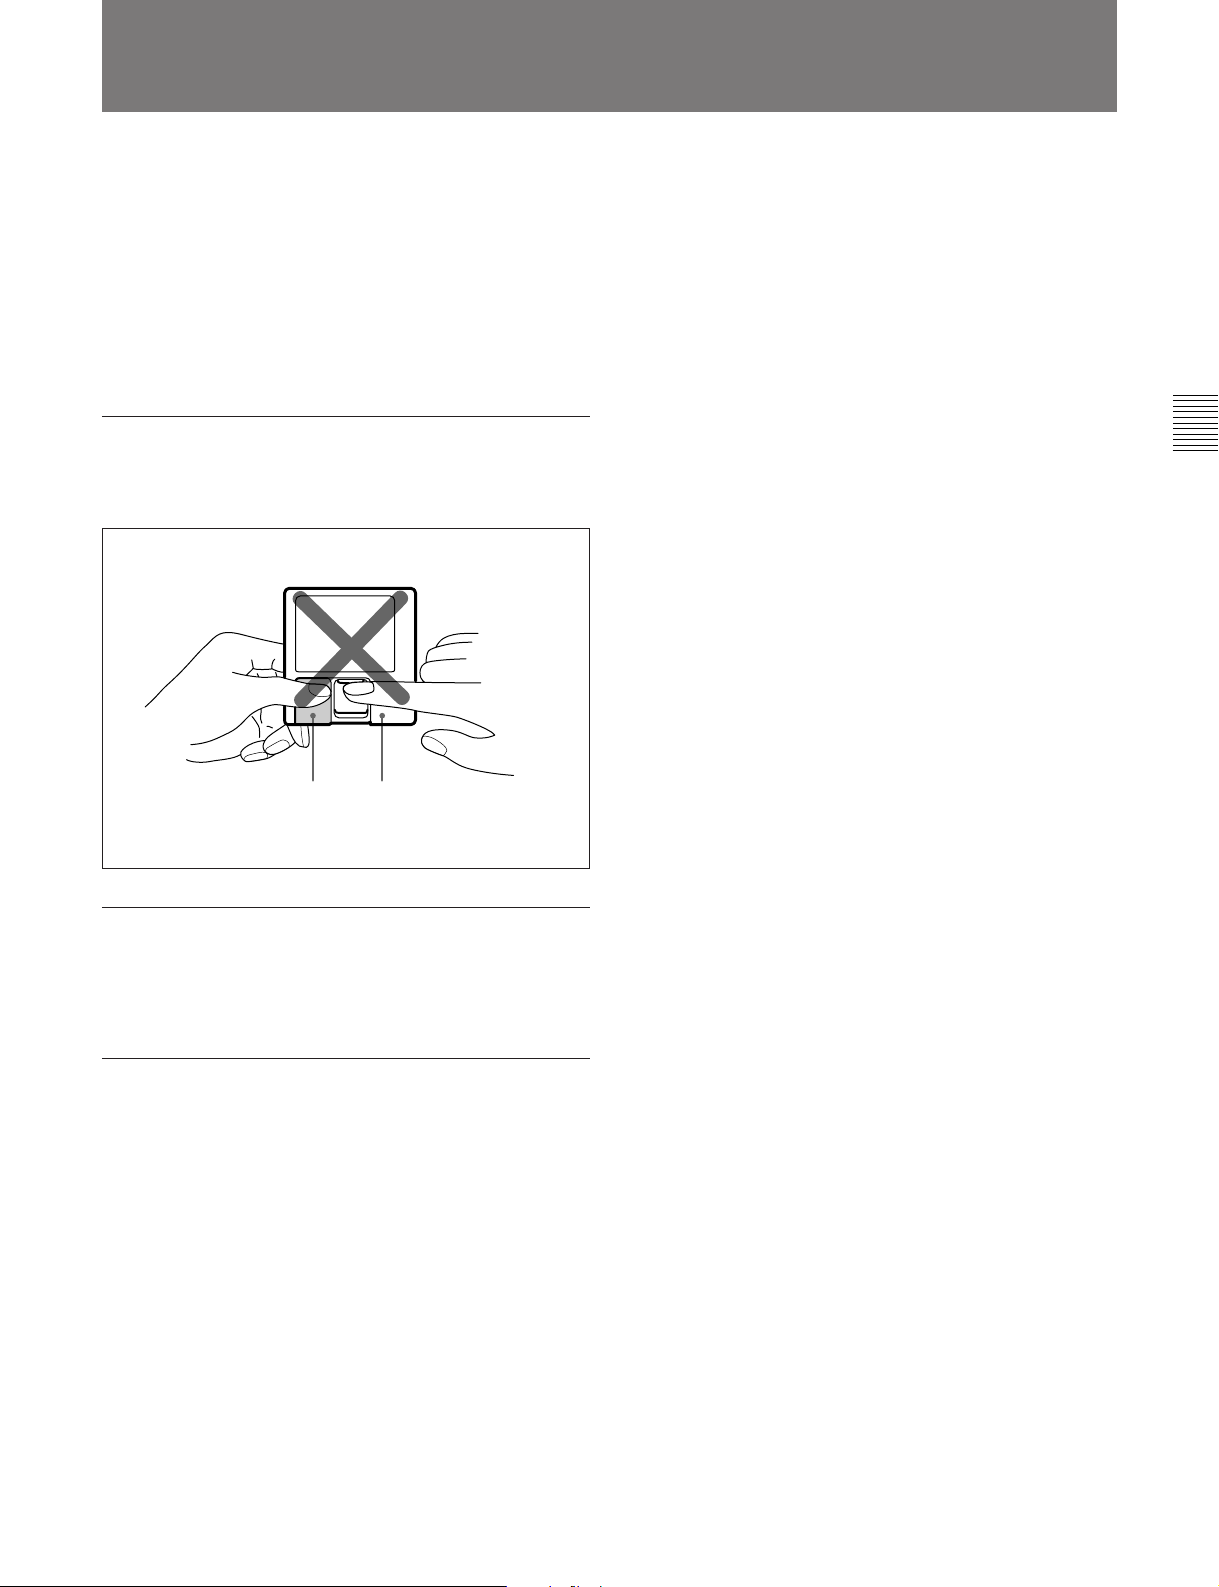
3-3 Handling MiniDiscs
Unlike CDs (Compact Discs), the Mini Disc is encased
within a hard plastic cartridge which allows you to
handle it without fear of dust or fingerprint
contamination. However, a MiniDisc that has been
contaminated or bent may cause the MD player to
malfunction. To prevent damage to the contents of a
disc and to enjoy clear sound permanently, take the
following precautions when handling a MiniDisc.
Do not open the shutter to expose the disc
If you do so, the data on the disc may be damaged.
Chapter 3 Preparations
Shutter Cartridge
Store MiniDiscs in a proper location
Do not place the cartridge where it will be subject to
extremes of sunlight, temperature, moisture or dust.
Cleaning the MiniDisc
Gently wipe the cartridge with a dry soft cloth to
remove dust.
Chapter 3 Preparations 3-5
Page 22
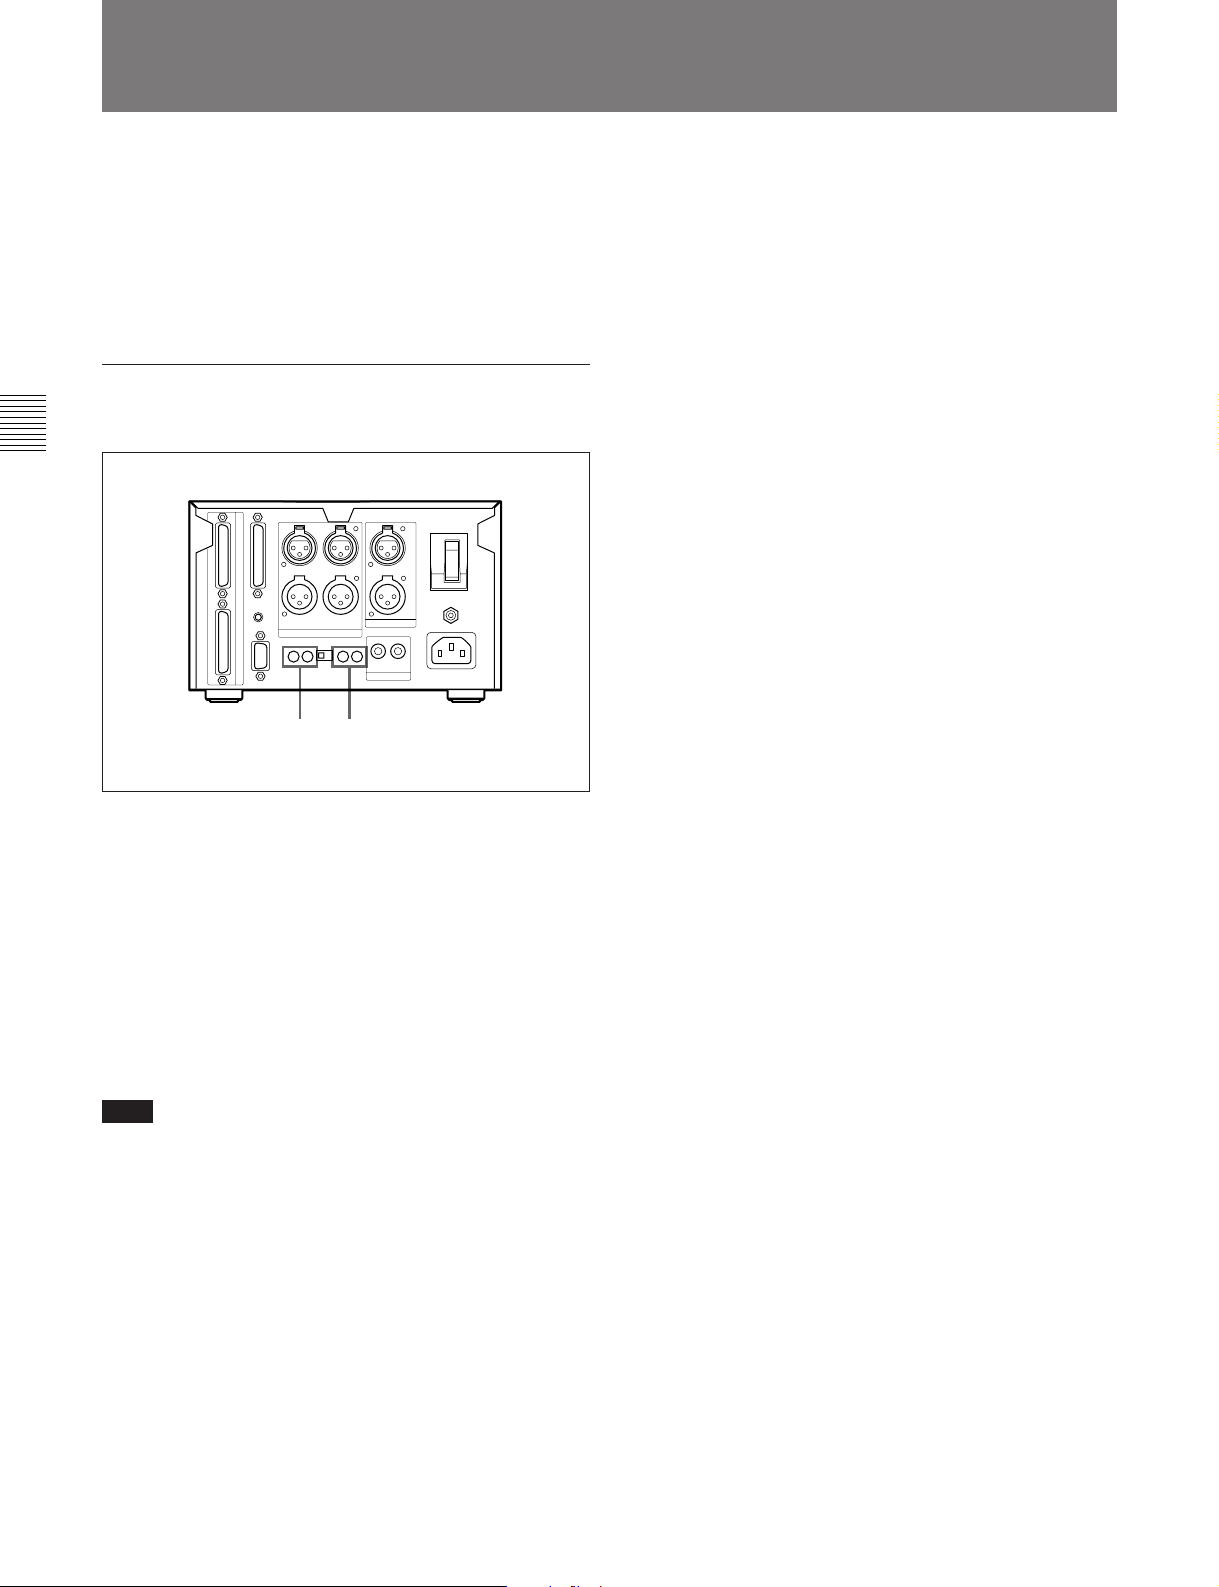
3-2 Connections
3-4
You can adjust the analog input and output reference
levels during recording or playback within a range of
+8 dB to –12 dB by turning the PLAYBACK and
RECORD level controls on the rear of the MD deck.
The analog input and output reference level is factory
set at +4 dB (at –20 dB from full bit).
Setting the analog input and output
reference levels
Chapter 3 Preparations
Setting the Analog Input and Output Reference Levels
1 2
1 Play back a disc recorded at –20 dB from the full
bit. Adjust the output level of the ANALOG OUT
connectors with the PLAYBACK (CH-1/CH-2)
level controls.
2 Input an audio signal to the ANALOG IN
connectors, and during recording or recording
pause adjust the output level for the ANALOG
OUT connectors with the RECORD (CH-1/CH-2)
level controls.
Note
Adjust the PLAYBACK and RECORD level controls
with a flat screwdriver. Do not use excessive force
when turning the screwdriver or touch the screwdriver
to any part other than the PLAYBACK and RECORD
level controls.
3-6 Chapter 3 Preparations
Page 23
4-1 Selecting the Input Signal
Chapter 4 Recording
To select the input signal for recording, do the
following Setup menu procedure.
5
=+
0)
p(P
1
r
2,3,4
1 Press the EDIT/NO button while holding down the
STOP button.
The Setup menu appears in the display window.
F26
Kill Almost
2 Turn the AMS control to display the F01: Analog
In menu indication.
4 Turn the AMS control to one of the following
items. Then press the AMS control to select the
item.
“Analog In”: Selects analog input from the
ANALOG IN connectors
“DIN AES/EBU”: Selects the digital input from
the AES/EBU connectors
“DIN Coaxial”: Selects digital input from the
SPDIF IN connectors
5 Press the EDIT/NO button to exit from the Setup
menu.
Recording track numbers automatically
During analog or AES/EBU signal input
Use the LevelSync function to automatically record a
track number whenever the deck detects an inaudible
portion.
To set the LevelSync function, see “7-2 LevelSync Setting
(Track Marking Function)” on page 7-2.
To set the input reference level, see “3-4 Setting the Analog
Input and Output Reference Level” on page 3-6.
During digital input from the IEC(958)
connectors
When recording from a consumer MD deck
*
player
B5 automatically records track numbers according to
the level and U-bit of the digital input signal,
regardless of the LevelSync setting.
, an MDS-B6P, or another MDS-B5, the MDS-
*
, a CD
Chapter 4 Recording
F01
Analog In
3 Press the AMS control.
The indication flashes and you can change the
setting.
..........................................................................................................................................................................................................
*An MD deck or a CD player that is able to output digital
signals with a Q-code added as a U-bit.
Chapter 4 Recording 4-1
Page 24
4-1 Selecting the Input Signal
4-2 Recording Procedure
If the inserted disc contains recorded material, the MD
deck will automatically record new material at the end
of the existing material and with a new track number.
Chapter 4 Recording
1 Select the input signal using the Setup menu (see
page 4-1).
2 Press the REC button.
The MD deck enters recording pause. (The REC
button lights up and the PLAY/PAUSE button
flashes.)
3 Press the PLAY/PAUSE button.
Recording starts. (The REC and PLAY/PAUSE
buttons light up.)
p(P
3 2
To eject the disc
Press the STOP button to stop the MD, then press the
EJECT button.
Preventing accidental erasure
Slide the record-protect tab to open the slot. To allow
recording again, slide the tab to close the slot.
=+
0)
r
Rear of the disc
Record-protect tab
Slide the tab in the
direction of arrow.
To record in monoaural mode
The monouaral recording mode allows you to record
about twice as much material on the same amount of
the tape than stereo recording mode. Use the Setup
menu to choose monouaral recording mode.
4 Play the sound source to be recorded.
The number of the track being recorded and
elapsed recording time appear in the display.
Note
When “VariSpeed On” is selected for menu item F07,
it will take about 10 seconds for the MD deck to enter
recording pause.
Recording a track number manually during
recording
Press the REC button at the place you want to add a
track number.
To stop recording
Press the STOP button.
To stop recording temporarily
Press the PLAY/PAUSE button.
To resume recording, press the PLAY/PAUSE button
again.
1 Press the EDIT/NO button while holding down the
STOP button.
The Setup menu appears in the display.
2 Turn the AMS control to select “F04:Stereo Rec.”
3 Press the AMS control.
The indication flashes and the display for setting
the recording mode appears.
4 Turn the AMS control clockwise to display
“F04:Monoral Rec,” then press the AMS control.
The “MONO” indication lights up.
5 Press the EDIT/NO button to exit from the Setup
menu.
4-2 Chapter 4 Recording
Page 25
About the sampling rate converter
A built-in sampling rate converter automatically
converts the sampling frequency of various digital
sources to the 44.1 kHz sampling rate of the MD deck.
This allows you to record sources such as 32- and 48kHz DAT or satellite broadcasts from the digital input
connectors.
Time-machine recording
AMS control
=+
0)
p(P
r
Chapter 4 Recording
T.REC button
To activate time-machine recording, press the AMS
control on the front panel or the T.REC button on the
remote controller while the deck is in recording pause
mode. Recording takes place starting with the first 6
seconds (maximum) of audio data that has been stored
in the buffer memory in advance.
Chapter 4 Recording 4-3
Page 26
4-1 Selecting the Input Signal
4-3 Display Information During Recording
Changing the information display during
recording
Each press of the DISPLAY button during recording
changes the information on the display as follows:
Remaining recording time on disc
001 00 25 21
MiniDisc! *
Chapter 4 Recording
Recorded time of the current track
001 00 09 45
MiniDisc! *
v
MD-related limitations
The recording system in your MD deck is radically
different from those used in cassette and DAT decks
and is characterized by the limitations described
below.
“Disc Full” lights up even before the disc has
reached the maximum recording time (60 or
74 minutes)
When 255 tracks have been recorded on the disc,
“Disc Full” lights up regardless of the total recorded
time. More than 255 tracks cannot be recorded on the
disc.
“Disc Full” lights up before the maximum
number of track is reached
Fluctuations in emphasis within tracks are sometimes
interpreted as track intervals, incrementing the track
count.
The total recorded time and the remaining
time on the disc may not equal the maximum
recording time (60 or 74 minutes)
Recording is done in minimum units of 2 seconds
each, no matter how short the material. The contents
recorded may thus be shorter than the maximum
recording capacity. Disc space may also be further
reduced by scratches.
“TOC Reading” indication appears for a long
time
If the inserted recorded disc is brand new, the “TOC
Reading” indication appears on the display longer than
for those that have been used.
Playback of a track of under 4 seconds may
be accompanied by sound dropout at the start
of the next track or mis-operation of the MD
deck.
4-4 Chapter 4 Recording
Page 27
4-4 Adding Disc and Track Titles
Use the title function to add titles to your own discs
and tracks using the character and numeric buttons on
the remote controller. The maximum number of
characters for all titles on a disc is 1,792.
Adding a disc or track title
3
1,5 2
5 Press the NAME button to record the title on the
disc.
To cancel the title entry process
Press the p button.
Note
If “Protected” appears in the display
The record-protection slot on the disc is open and titles
cannot be written to the disc. To add titles to the disc,
eject the disc and close the slot.
Erasing a disc or track title
Do the procedure below to erase a disc or track title
using the remote controller.
1 Press the NAME button while the deck is playing
or pausing on the track whose title is to be erased.
To erase the disc title, press the button while the
deck is stopped.
Chapter 4 Recording
1 Press the NAME button.
The display changes to title-entry mode.
To add a disc title
Enter a disc title while the MD deck is stopped.
To add a track title
You can add a track title when (1) the MD deck is
playing or recording a track; (2) when the MD
deck is in playback pause, or (3) when the MD
deck is stopped on the track to be entitled.
2 Press either CAPS (uppercase) or SML (lowercase)
to select the type of characters to be entered.
3 Enter the disc or track title with the character and
numeric buttons on the remote controller.
4 Repeat steps 2 and 3 until the entire title appears in
the display.
To change a character entry
Press the 0 or ) button to the character to be
changed. The character will flash. Press the
CANCEL button and repeat the step 2 and 3.
2 Hold down the CANCEL button.
3 Press the ENTER button when the last character of
the title has disappeared and the cursor remains.
Chapter 4 Recording 4-5
Page 28
4-1 Selecting the Input Signal
4-5 Procedure for Direct ATRAC Data Copying
You can daisy chain multiple MDS-B5 decks and copy
ATRAC compressed data through the DIRECT
DUPLICATION LINK connectors to perform dubbing
at maximum of about four times the normal dubbing
speed. Up to ten MDS-B5 decks can be daisy chained.
Do the procedure for direct ATRAC data copying on
the main deck.
For details on the settings for direct ATRAC data copying
and on specifying an MDS-B5 as a main deck, sub deck, or
end deck, see “3-2-3 Connection for Direct ATRAC Data
Copying” on page 3-3.
To do direct ATRAC data copy
Chapter 4 Recording
p(P
7 Press the AMS control or the PLAY/PAUSE
button.
“Duplicate” flashes and direct ATRAC data
copying starts.
If you selected the “ErrCheckOn” , the sub deck
and end deck automatically begin error checking
after direct ATRAC data copying finishes. When
error checking finishes, “DupComplete!” appears.
8 Press the AMS control or the ENTER/YES button.
The sub and end decks write the TOC information
onto the disc, then exit from the Edit menu.
Notes
ENTER/YES button
3
=+
0)
r
•Direct ATRAC data copying copies TOC-related
character data such as track titles and track numbers.
Note, however, that other TOC data, such as cue
points, trimmimg specifications, program lists, and
multi-access lists, are included only when copying all
tracks onto a blank disc in a sub or end deck.
•Do not press any of the operation buttons until direct
ATRAC data copying finishes and “DupComplete!”
appears on the display. “-Duplicate-” may continue
flashing for a few minutes as the TOC (Table Of
Contents) information is being written, even after the
time information has stopped.
2-8
1 Press the EDIT/NO button.
The Edit menu appears.
2 Turn the AMS control to select “015:Duplicate ?.”
3 Press the AMS control.
The display for selecting the track to be copied
using the direct ATRAC data copy function
appears.
001 00 34 65
Dup Tr1-
4 Turn the AMS control to display the track number
to be copied.
5 Press the AMS control.
“ErrCheckOff” appears.
If you want error checking to be done
automatically after dubbing is completed, turn the
AMS control to select “ErrCheckOn.”
6 Press the AMS control.
“Start: Yes” and “Cancel: No” alternate on the
display.
The sub deck and end deck automatically enter
recording pause, the REC button lights, and the
PLAY/PAUSE button flashes.
To perform error checking only
1 Press the EDIT/NO button.
The Edit menu appears.
2 Turn the AMS control to select “014:Err Check ?” .
3 Press the AMS control.
The display for selecting the track to begin error
checking appears.
001 00 34 65
Check Tr1-
4 Turn the AMS control to select the track number.
5 Press the AMS control.
Error checking starts.
After error checking finishes, the results are
displayed.
6 If any error is detected, press the AMS control
again.
7 Turn the AMS control to display up to ten
positions where error has occurred.
4-6 Chapter 4 Recording
Page 29
4-6 Restrictions on Digital Copying
Track mode data recorded to a disc during
recording
Track mode data consist of eight bits of information
recorded in the user TOC (Table Of Contents) area on
the disc indicating such disc-related conditions as
copyright status, digital copy restrictions, disc use, and
emphasis data.
Two track mode bits, d2 and d3, which indicate
copyright status and restrictions on digital copies, are
explained below.
Track mode
d1 d2 d3 d4 d5 d6 d7 d8
d2: Copyright status 0: Copyrighted
1: Uncopyrighted
Digital copy generation
d3:
When recording an input signal from the
ANALOG IN or AES/EBU connector or an
IEC958-TYPE1 digital input signal
(for professional use)
The disc will be completely copy-enabled by the Serial
Copy Management System. This status is indicated by
the track mode bit values of d2=1 and d3=1.
0: Original
1:
First-generation copy or later
An MD which contains analog signals recorded on a
consumer MD recorder can used to make a firstgeneration digital copy. No restrictions are placed on
digital copying of MD recordings made on
professional MD recorders, as long as the recording is
made on an MDS-B5. When copying analog signals,
you can use the LevelSync (track marking) function to
record track numbers automatically.
See “7-2 LevelSync Setting (Track Marking Function)” on
page 7-2.
The conditions for digital copying, as determined by
track mode bits d2 and d3, are shown below.
When using two MDS-B5s
MDS-B5 ç MDS-B5
IEC958
TYPE2
X11XXXXX n X11XXXXX Copy-enabled
X00XXXXX n X01XXXXX Copy-enabled
X01XXXXX n X01XXXXX Copy-enabled
When using a consumer MD recorder to make
a copy of a disc recorded on the MDS-B5
Chapter 4 Recording
When recording an IEC958-TYPE2 digital input
signal (for consumer use)
Three types of discs can be produced, depending on
the sub-code information included in the input signal.
Input signal
Category
code
Category
codes other
than that
below
General
ACTUAL A/D
Channel
status bit 2
1
(Uncopyrighted)
0
(Copyrighted)
–00
Track mode bit During digital
d2 d3
1 1 Copy-enabled
01
copying between
two consumer MD
recorders
Copy-disabled
First-generation
copy only
MDS-503 ç MDS-503
IEC958
TYPE2
X11XXXXX n X11XXXXX Copy-enabled
X00XXXXX n X01XXXXX
First-generation copy only
X01XXXXX n Copy-disabled
Chapter 4 Recording 4-7
Page 30

Page 31

5-1 Overview of Playback Procedures
Chapter 5 Playback
The MDS-B5 provides many playback functions that
can be used for a variety of purposes. This section
gives an overview of these functions and their
application.
Cueing before playback (AUTO mode)
With each press of the A.MODE button on the front
panel, you can select any one of the following AUTO
mode settings: AUTO PAUSE, AUTO CUE, or off.
AUTO mode indication
p(P
A.MODE button
0)
r
=+
To start playback instantly
You can memorize the beginning of selected tracks into
the MD deck’s built-in memory in order to begin playback
the instant you press the PLAY/PAUSE button.
See “5-8 Starting Playback Instantly (Multi-Access
Function)” on page 5-11.
To play a single track
To prevent the unintentional playback of the next
track, you can specify playback of one track at a time
when pressing the PLAY/PAUSE button.
See “5-2-3 Playing a Single Track Only” on page 5-3.
Checking the playback starting point (CUE
STDBY)
Pressing the PLAY/PAUSE button while playing a
track establishes that position as the cue point.
Press the PLAY/PAUSE button again to monitor the
playback. When you press the CUE STDBY button,
the MD deck rewinds to the cue point and pauses.
Chapter 5 Playback
AUTO PAUSE function
If you press the PLAY/PAUSE button while AUTO
PAUSE is on, the MD deck will cue to the beginning
of the selected track, then pause. To start playback,
press the PLAY/PAUSE button again. This function is
useful for setting up successive tracks for playback
when using multiple MD decks during a broadcast.
AUTO CUE function
If you press the PLAY/PAUSE button while AUTO
CUE is on, the MD deck will pause after the inaudible
portion before the beginning of the selected track at the
point where the signal level actually rises. To start
playback, press the PLAY/PAUSE button again. This
function is useful for playing sound effects in a theater.
Use the Setup menu to set the threshold level for
detecting the rise in signal level.
See “7-6 Setting the Auto Cue Function” on page 7-6.
When neither the AUTO PAUSE or AUTO CUE
function is selected
Pressing the PLAY/PAUSE button starts MD playback
immediately without cueing.
=+
0)
p(P
CUE STDBY button
r
Setting the cue point using the Rehearsal
function
When you press the REHEARSAL button during
playback, the MD deck begins playing the track section
from that position for the duration specified in the Setup
menu. While you monitor the sound, press the CUE
STDBY button at the place where you want to place the
cue point. The MD deck pauses at that point.
See “5-2-4 Rehearsal Playback” on page 5-3 and “7-7
Setting the Rehearsal Playback Function” on page 7-7.
Note
During shuffle play, the rehearsal playback function
operates only within the currently playing track, and
cannot be used to return to the position where you
pressed the PLAY/PAUSE button last time.
Chapter 5 Playback 5-1
Page 32

5-8 Starting Playback Instantly (Multi-Access Function)
5-2 Playback Procedures
5-2-1 Playing From the First Track on the MD
1 Insert the MD into the MD deck.
Insert the disc with the arrow pointing towards the
Chapter 5 Playback
MD deck. The deck grabs and loads the disc
automatically.
Disc title, total number of tracks, and total playing
time of the disc appear in the display window.
2 Press the PLAY/PAUSE button.
When both AUTO PAUSE and AUTO CUE are
off: The MD deck starts playing the MD.
When either AUTO PAUSE or AUTO CUE is on:
The MD deck enters playback pause after cueing to
the beginning of the first track. To start playback,
press PLAY/PAUSE button again.
Title, track number, and time information of the
current track appear in the display.
To stop playback
Press the STOP button.
p(P
2
1
5-2-2 Locating a Specific Point (Search)
To find a specific point on the MD, use the 0 and
) buttons during playback to quickly scan forward
or backward.
To forward scan the disc
Hold down the ) button during playback. Playback
will start again from the point at which you release the
=+
0)
r
button.
To backward scan the disc
Hold down the 0 button during playback. Playback
will start again from the point at which you release the
button.
=+
0)
p(P
Note
r
0/) buttons
Sound dropout may occur when scanning tracks
created by editing functions.
To stop playback temporarily
Press the PLAY/PAUSE button.
To resume playback, press the PLAY/PAUSE button
again.
To eject the disc
Press the STOP button to stop playback, then press the
EJECT button.
5-2 Chapter 5 Playback
Page 33

5-2-3 Playing a Single Track Only
5-2-4 Rehearsal Playback
In single-track-playback mode, the MD deck plays
only single track that you have selected. This prevents
unintentional playback of the next track.
In single-track-playback mode, the MD deck stops
when track playback ends, even if AUTO PAUSE or
AUTO CUE has been selected.
To select single-track-playback mode
Press the SINGLE button.
“1” appears in the display window.
To turn off single-track-playback mode, press the
SINGLE button again.
SINGLE button
=+
p(P
“1” (single-track-playback) indication
0)
r
Press the REHEARSAL button to play back a portion
of a track repeatedly. The rehearsal playback allows
you to accurately position a cue point or edit point.
Pressing the CUE STDBY or EDIT/NO button sets the
cue point or edit point.
If you press the REHEARSAL button during
playback
The MD deck plays the track starting from the point at
which you pressed the REHEARSAL button.
If you press the REHEARSAL button while the
MD deck is stopped
The MD deck locates the first track on the MD or the
beginning of the track you selected.
To change the playback portion during
rehearsal playback
Turn the AMS control.
You can change the time unit for adjusting the start of
rehearsal playback by pressing the 0/) buttons.
When you press the 0 or ) button, the time unit
flashes. Each press of the 0 button selects the next
time unit: “F (frame)”, “S (second)”, “M (minute).”
And each press of the ) button selects the unit in
reverse direction.
Chapter 5 Playback
To turn off rehearsal playback
Press the REHEARSAL button again.
Time information
p(P
REHEARSAL button
=+
0)
r
Use the Setup menu to set the duration for rehearsal
playback and the interval between repetitions.
See “7-7 Setting the Rehearsal Playback Function” on page
7-7.
Chapter 5 Playback 5-3
Page 34

5-8 Starting Playback Instantly (Multi-Access Function)
5-3 Locating a Track
5-3-1 Locating a Specific Track
You can access specific tracks instantly by entering
their track numbers with the numeric buttons on the
remote controller or a keyboard.
If AUTO PAUSE and AUTO CUE are off, the MD
deck begins playback immediately after locating the
specified track.
If either AUTO PAUSE or AUTO CUE is selected, the
MD deck changes to playback pause after cueing to the
beginning of the specified track.
To specify track numbers greater than 10
Press the > button, then press the respective numeric
buttons.
Example:
To locate the 15th track, press the > button once, then
press 1 and 5.
To locate the 115th track, press the > button twice,
Chapter 5 Playback
then press 1, 1, and 5.
Numeric buttons
5-3-2 Locating the Beginning of a Track (AMS)
During playback or playback pause, turn the AMS
(Automatic Music Sensor) control to quickly skip to
any track before or after the current one.
Turn the AMS control clockwise to go to a higher
track number, or turn it counterclockwise to go to a
lower track number.
If AUTO PAUSE and AUTO CUE are off, the MD
deck locates the beginning of the specified track and
starts playback.
If either AUTO PAUSE or AUTO CUE is on, the MD
deck locates the beginning of the specified track and
enters playback pause.
=+
0)
p(P
r
> button
Locating a specific track from the front
panel
To locate a specific track, turn the AMS control to
display the track number while the MD deck is
stopped. To start playback or to locate the beginning
of the specified track, press the PLAY/PAUSE button.
=+
0)
p(P
r
AMS control
Locating a specific track using the remote
controller
You can use the remote controller or the keyboard to
locate the beginning of a track. To do this, press the
= or + button during playback or playback
pause.
Each press of the + (or =) button increases
(decreases) the track number by one; holding it down
increases (decreases) the track number faster.
=/+ buttons
PLAY/PAUSE button
5-4 Chapter 5 Playback
AMS control
Page 35

5-3-3 Preparing the Next Track During Playback
In Next Play mode on a single MD deck, you can
locate the next track even during playback of the
current track. After specifying Next Play mode in the
Setup menu, track selection operations change from
the current track to those for the next track.
4 Turn the AMS control clockwise to change the
display to “NextPlayOn,” then press the AMS
control.
Turning the AMS control counterclockwise
changes the display back to “NextPlayOff.”
5 Press the EDIT/NO button to exit from the Setup
menu.
Specifying Next Play mode
5
=+
0)
p(P
1
r
2,3,4
1 Press the EDIT/NO button while holding down the
STOP button.
The Setup menu appears.
2 Turn the AMS control until “F08:NextPlayOff”
appears.
While you have selected the next track in Next
Play mode
The title and time information of the current track
temporarily changes to the that of the next track.
To keep the information on the next track
displayed
Press the DISPLAY button so that “NEXT TRACK”
appears.
Chapter 5 Playback
F08
NextPlayOff
3 Press the AMS control.
The indication flashes to show that you can change
the setting.
Chapter 5 Playback 5-5
Page 36

5-8 Starting Playback Instantly (Multi-Access Function)
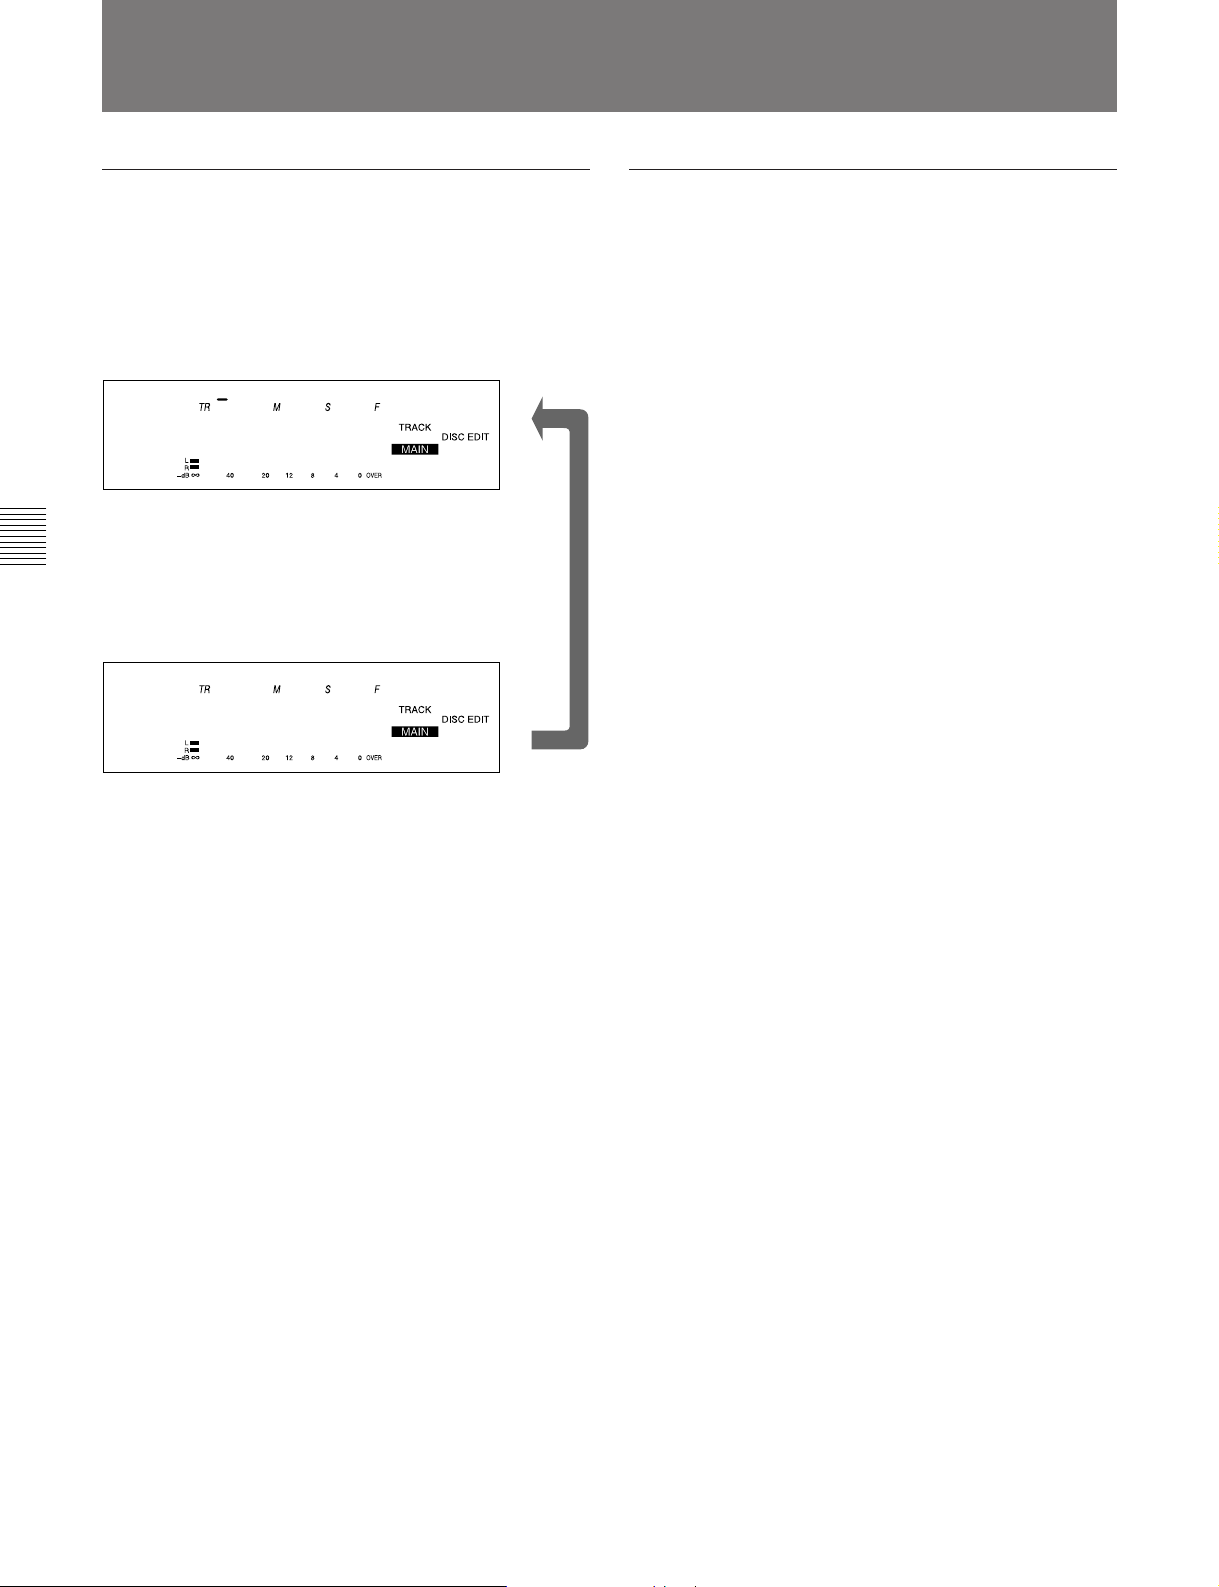
5-4 Display Information During Playback
Changing the display information during
playback
Each press of the DISPLAY button during playback
changes the information in the display as follows:
Remaining playing time and title of
the current track
001 00 25 21
MiniDisc! *
Elapsed playing time and title of the
current track
Chapter 5 Playback
001 00 09 45
MiniDisc! *
Display information during Program Play
and Instant Playback
During Program Play and Instant Playback, the MD
deck displays the program list before it displays the
next track’s information
Remaining playing time of the current track
and program list
002 00 34 65
/3-1-2-4-5-1
v
v
Playing time and title of the next track
002 00 00 05
MiniDisc! *
5-6 Chapter 5 Playback
Page 37

5-5 Playing Tracks Repeatedly
You can use the Setup menu to select Repeat Play
mode.
The Repeat Play mode can be used with all other
playback modes.
When either AUTO PAUSE or AUTO CUE is
activated during Repeat Play
The MD deck enters playback pause at the beginning
of the track (or when the audio signal rises).
To select Repeat Play mode
5
=+
0)
p(P
r
4 Turn the AMS control clockwise to display
“Repeat On”, then press the AMS control.
The “REPEAT” indication lights.
Turning the AMS control counterclockwise
changes the setting back to “Repeat Off.”
F03
Repeat On
“REPEAT” indication
5 Press the EDIT/NO button to exit from the Setup
menu.
Pressing the PLAY/PAUSE button starts the
repeated playback of tracks.
Chapter 5 Playback
To play only one track repeatedly
1
2,3,4
1 Press the EDIT/NO button while holding down the
STOP button.
The Setup menu appears in the display.
2 Turn the AMS control to display menu item F03
(“Repeat Off” or “Repeat On”).
F03
Repeat Off
3 Press the AMS control.
The indication flashes to show that you can change
the setting.
Press the SINGLE button during the Repeat Play
mode.
The “REPEAT1” indication lights.
F03
Repeat On
“REPEAT1” indication
Chapter 5 Playback 5-7
Page 38

5-8 Starting Playback Instantly (Multi-Access Function)
5-6 Program Play
Use the Program Play function to specify the playback
sequence of multiple tracks.
•To turn the Program Play function on, use the Setup
menu.
•To program tracks, use the Edit menu.
You can specify the playback sequence of up to 25
tracks. Program data may also be recorded to the TOC
on the disc.
When either AUTO PAUSE or AUTO CUE is
activated during Program Play
The MD deck enters playback pause at the beginning
of each track in the program (or when the audio signal
rises).
To select Program Play mode
Chapter 5 Playback
5
4 Turn the AMS control clockwise to display
“Program,” then press the AMS control.
“PROGRAM” lights up in the display.
Turning the AMS control clockwise displays
“Continue”, “Shuffle”, “Program”, and “Multi
Access” in sequence. Turning the control
counterclockwise displays the same items in
reverse sequence.
F02
Program
“PROGRAM” indication
5 Press the EDIT/NO button to exit from the Setup
menu.
After making a program, press the PLAY/PAUSE
button to start playing the program.
=+
0)
p(P
1
r
2,3,4
1 Press the EDIT/NO button while holding down the
STOP button.
The Setup menu appears in the display.
2 Turn the AMS control until menu item F02
(“Continue”, “Shuffle”, “Program”, or “Multi
Access”) appears.
F02
Continue
To play an entire program repeatedly
Select “F02:Program” and “F03:Repeat On” in the
Setup menu. The programmed selections will play
back repeatedly.
3 Press the AMS control.
The indication flashes to show that you can change
the setting.
5-8 Chapter 5 Playback
Page 39

To make a program
15
4 Turn the AMS control to select a track, then press
the AMS control.
The position for the second track begins flashing.
Repeat this step to program up to 25 tracks.
002 00 34 65
=+
0)
p(P
r
2,3,4
1 Press the EDIT/NO button.
The Edit menu appears.
2 Turn the AMS control until “011:Program ?”
appears.
3 Press the AMS control.
The display for programming tracks appears.
001 00 00 00
/0/
/3-0/
5 Press the ENTER/YES button to complete the
program.
To specify track numbers using the
numeric buttons
Chapter 5 Playback
In step 4, use the numeric buttons on the remote
controller or a keyboard to enter track numbers. After
entering a track number, the next track position begins
flashing immediately.
To change a part of the program
In step 3, press the 0 or ) button until the track
to be changed starts flashing. Use the numeric
button(s) of the remote controller or the keyboard to
change the track number, then press the ENTER
button. Press the 0 or ) button again to change
another track number.
To delete tracks from a program
Press the 0 or ) button until the track to be
deleted begins flashing, then press the EDIT/NO
button.
To change a programmed track number
Press the 0 or ) button until the track number to
be changed begins flashing, turn the AMS control to
change the track number, then press the ENTER/YES
button. Press the 0 or ) again to change another
track number.
To delete an entire program
Press the EDIT/NO button until all the tracks in the
program are deleted.
Chapter 5 Playback 5-9
Page 40

5-8 Starting Playback Instantly (Multi-Access Function)
5-7 Playing Tracks in Random Order (Shuffle Play)
You can play all the tracks on the MD in random
order.
Use the Setup menu to select Shuffle Play mode.
If the AUTO PAUSE or AUTO CUE function is
activated during Shuffle Play
The MD deck enters playback pause at the beginning
of each track (or when the audio signal rises).
To select Shuffle Play mode
Chapter 5 Playback
p(P
4 Turn the AMS control clockwise to display
“Shuffle,” then press the AMS control.
“SHUFFLE” lights up in the display.
Turning the AMS control clockwise displays
“Continue”, “Shuffle”, “Program”, and “Multi
Access” in sequence. Turning the control
counterclockwise displays the same items in
reverse sequence.
F02
Shuffle
5
“SHUFFLE” indication
=+
0)
r
5 Press the EDIT/NO button to exit from the Setup
menu.
Press the PLAY/PAUSE button to start Shuffle
Play.
1
2,3,4
1 Press the EDIT/NO button while holding down the
STOP button.
The Setup menu appears in the display.
2 Turn the AMS control until menu item F02
(“Continue”, “Shuffle”, “Program” or “Multi
Access”) appears.
F02
Continue
3 Press the AMS control.
The indication flashes to show that you can change
the setting.
To repeat Shuffle Play
Select “F02:Shuffle” and “F03:Repeat On” in the
Setup menu to play back all the tracks on the MD in
random order.
After the MD deck plays back each track on the MD in
random order, it plays them all again in random order.
5-10 Chapter 5 Playback
Page 41

5-8 Starting Playback Instantly
(Multi-Access Function)
You can memorize the beginning of a track in the MD
deck’s built-in memory to start playback the instant
you press the PLAY/PAUSE button.
•To turn the Multi-Access function on, use the Setup
menu.
•To specify the tracks for instant playback, use the
Edit menu.
You can memorize the beginning of up to 10 tracks.
The results of this procedure can also be recorded in
the TOC on the disc.
If the AUTO PAUSE or AUTO CUE function is
activated during Multi-Access playback
The AUTO PAUSE and AUTO CUE functions do not
work when you are using the Multi-Access function.
This is because tracks entered numerically are played
back instantly from the built-in memory, and thus the
A.MODE button is disabled.
To specify the Multi-Access function
5
3 Press the AMS control.
The indication flashes to show that you can change
the setting.
4 Turn the AMS control clockwise to display “Multi
Access,” then press the AMS control.
“MULTI-ACCESS” and “1” (single track play)
light up in the display.
Turning the AMS control clockwise displays
“Continue”, “Shuffle”, “Program”, and “Multi
Access” in sequence. Turning the control
counterclockwise displays the same items in
reverse sequence.
“MULTI-ACCESS” indication
F02
Multi Access
Chapter 5 Playback
“1” indication
=+
0)
p(P
1
r
2,3,4
1 Press the EDIT/NO button while holding down the
STOP button.
The Setup menu appears in the display.
2 Turn the AMS control until menu item F02
(“Continue”, “Shuffle”, “Program”, or “Multi
Access”) appears.
F02
5 Press the EDIT/NO button.
After “Memorizing” lights up, the MD deck exits
from the Setup menu.
To start Multi-Access playback
Enter the number of the track to be played with the
numeric button(s) on the remote controller or
keyboard.
Continue
Chapter 5 Playback 5-11
Page 42

5-8 Starting Playback Instantly (Multi-Access Function)
To specify tracks for Multi-Access
playback
1 Press the EDIT/NO button.
The Edit menu appears.
Chapter 5 Playback
2 Turn the AMS control to display “012:M-Access?”
3 Press the AMS control.
The display for specifying tracks appears.
p(P
15
=+
0)
r
2,3,4
4 Turn the AMS control to select a track, then press
the AMS control.
The position for the second track begins flashing.
Repeat this step to specify up to 10 tracks.
002 00 34 65
/3-0/
5 Press the ENTER/YES button to complete the
track specification procedure.
To specify track numbers using the
numeric buttons
In step 4 , use the numeric buttons on the remote
controller or a keyboard to enter track numbers. After
entering a track number, the next track position begins
flashing immediately.
001 00 00 00
/0/
To delete tracks from the track list for MultiAccess playback
Press the 0 or ) button until the track to be
deleted begins flashing, then press the EDIT/NO
button.
To change a track number
Press the 0 or ) button until the track number to
be changed begins flashing, turn the AMS control to
change the track number, then press the ENTER/YES
button. Press the 0 or ) button again to change
another track number.
To delete all tracks
Hold down the EDIT/NO button until all the tracks are
deleted.
To change a part of the track list
In step 3, press the 0 or ) button until the track
to be changed starts flashing. Use the numeric
button(s) of the remote controller or the keyboard to
change the track number, then press the ENTER
button.
Press the 0 or ) button again to change another
track number.
Storing the beginning of a track
The beginning of a track is stored in the built-in
memory when:
•you change the disc while the Multi-Access function
is selected.
•you specify a track for Multi-Access playback using
the Edit menu while the Multi-Access function is
selected.
•you select the Multi-Access function in the Edit menu
after specifying tracks for Multi-Access playback.
5-12 Chapter 5 Playback
Page 43

5-9 Varying the Playback Speed
(Variable-Speed Playback)
You can vary the playback speed in a range between
+12.5% and –12.5% of the normal speed.
•To select variable-speed playback, use the Setup
menu.
•To specify the playback speed, use the Edit menu.
To select variable-speed playback mode
5
=+
0)
p(P
1
r
2,3,4
1 Press the EDIT/NO button while holding down the
STOP button.
The Setup menu appears.
To select the playback speed
1
=+
0)
p(P
r
2 – 5
1 Press the EDIT/NO button.
The Edit menu appears.
2 Turn the AMS control until “013:Speed?” appears.
3 Press the AMS control.
The display for specifying the playback speed
appears.
Chapter 5 Playback
2 Turn the AMS control until menu item F07
(“VariSpeedOff”) appears.
3 Press the AMS control.
The indication flashes to show that you can change
the setting.
4 Turn the AMS control clockwise to change the
display to “VariSpeedOn,” then press the AMS
control.
“SPEED” lights in the display.
Turning the AMS control counterclockwise
changes the display back to “VariSpeedOff.”
F07
VariSpeedOn
“SPEED” indication
014 45 50 51
Speed 0.0%
4 Turn the AMS control to set the desired playback
speed.
Pressing the EDIT/NO button returns the setting to
“0.0%.”
5 Press the AMS control to exit from the Edit menu.
5 Press the EDIT/NO button to exit from the Setup
menu.
After selecting the playback speed, press the
PLAY/PAUSE button to start playback.
Chapter 5 Playback 5-13
Page 44

Page 45

6-1 Overview of Editing Functions
Chapter 6 Editing Functions
6-1-1 Types of Editing Functions
Use the Edit menu to select the editing functions.
Press the EDIT/NO button, then turn the AMS control
to display each edit function and its number one at a
time.
There are 10 editing functions.
•(001) Name ? — Recording the title of tracks and
discs
•(002) Erase ? — Erasing tracks
•(003) Move ? — Moving tracks
•(004) Combine ? — Combining tracks
•(005) Divide ? — Dividing tracks
•(006) All Erase ? — Erasing all tracks on a disc
•(007) Undo ? — Canceling the last editing operation
•(008) Cue Point ? — Setting cue points
•(009) Head Trim ? — Trimming the starting portion
of a track
•(010) End Trim ? — Trimming of ending portion of a
track
2 Turn the AMS control until menu item F09 (“Disc
Edit” or “Ram Edit”) appears.
F09
Disc Edit
3 Press the AMS control.
The indication flashes to show that you can change
the setting.
4 Turn the AMS control to select the editing mode.
Turning the control clockwise to select “Disc
Edit,” and counterclockwise to select “Ram Edit.”
5 Press the AMS control to exit from the Setup
menu.
6-1-2 RAM Edit and Disc Edit
There are two editing modes.
Disc Edit mode: In this mode, the results of editing
operations are recorded in the TOC on the disc.
RAM Edit mode: In this mode, editing is done
temporarily. This mode may be used to edit data
on record-protected or premastered discs.
To select an editing mode
=+
0)
p(P
r
1 2 – 5
The function of the ENTER/YES button during
editing operations
In Disc Edit mode, when you finish an editing
operation and press the ENTER/YES button with the
MD deck stopped, the MD deck writes the changes to
the TOC on the disc.
If you don’t press the ENTER/YES button after the
editing operation, the TOC data will be written on the
disc when you press the EJECT button or when you
press the ENTER/YES button after another editing
operation.
In Ram Edit mode, when you press the ENTER/YES
button with the MD deck stopped, “TOC Write?”
appears. Pressing the ENTER/YES button causes the
MD deck to write the changes to the TOC on the disc.
Pressing the EDIT/NO button at this time cancels the
writing of the changes to the TOC on the disc.
If you don’t press the ENTER/YES button after the
editing operation, “TOC Write?” appears when you
press the EJECT button. Pressing the EJECT button
again or the EDIT/NO button causes the MD deck to
eject the disc without writing the changes to the TOC
on the disc.
Chapter 6 Editing Functions
1 Press the EDIT/NO button while holding down the
STOP button.
The Setup menu appears.
Chapter 6 Editing Functions 6-1
Page 46

6-1 Overview of Editing Functions
6-1-3 Track Numbers After Editing Operations
If an editing operation results in the deletion or
addition of one or more tracks, the MD deck will
automatically renumber the affected tracks to reflect
that change. For example, if you erase track No. 2, all
succeeding tracks will be renumbered, starting with
track No. 3 (which becomes track No. 2).
If you do successive track erasures and relocations, it
is recommended that you monitor the results of each
operation by watching the titles and track numbers in
the display and through Rehearsal playback in order to
prevent editing errors.
6-1-4 Editing Operations During Rehearsal Playback
Pressing the REHEARSAL button during playback
starts Rehearsal playback from that point.
After locating the part to be edited, press the EDIT/NO
Chapter 6 Editing Functions
button to do select the editing function.
You can do the following editing functions during
Rehearsal playback.
•(005) Divide ? — Dividing tracks
•(008-01) CP In ? — Recording cue points
•(009-01) HT In ? — Trimming of the starting portion
of a track
•(010-01) ET In ? — Trimming of the ending portion
of a track
6-1-5 Undo Function
If you make a mistake in erasing or moving a track, the
Undo function allows you to cancel the results of the
last operation.
Note
You cannot cancel the last operation after the MD deck
wrote the TOC data onto the disc.
To undo the last editing operation
1
=+
0)
p(P
r
2,3,4
1 Press the EDIT/NO button.
The Edit menu appears.
2 Turn the AMS control until “007:Undo ?” appears.
This does not appear if the last operation was not
an editing operation.
p(P
6-2 Chapter 6 Editing Functions
REHEARSAL button
=+
0)
r
EDIT/NO button
007
Undo ?
3 Press the AMS control.
A message will appear asking whether you want to
cancel the last operation or not. For example,
“Erase Undo ?” appears if the last operation was an
erasure of a track.
4 Press the AMS control.
After “Complete!!” (i.e., the undoing of the last
operation) appears, and the MD deck exits from
the Edit menu.
Page 47

6-2 Erasing Tracks (Erase Function)
Use the erase function to erase a single track or all
tracks from a recorded disc.
To erase a single track
1
=+
0)
p(P
r
2 – 5
1 Press the EDIT/NO button while the MD deck is
stopped, playing back, or in playback pause.
The Edit menu appears.
2 Turn the AMS control until “002:Erase ?” appears.
To erase a single track using the remote
controller
You can use the remote controller or a keyboard to
erase a single track during playback or playback pause.
1 Press the ERASE button.
Rehearsal playback of the displayed track starts.
2 Enter the number of the track to be erased with the
numeric buttons.
3 Press the ENTER button.
“Complete!!” appears and the specified track is
erased.
To erase all tracks on an MD
You can erase all tracks on an MD using the buttons
on the front panel.
1 Press the EDIT/NO button while the MD deck is
stopped, playing back, or in playback pause.
The Edit menu appears.
Chapter 6 Editing Functions
3 Press the AMS control.
The display for erasing tracks appears and
Rehearsal playback of the displayed track starts.
001 00 10 85
Erase Tr1
4 Turn the AMS control to select the track to be
erased.
5 Press the AMS control.
“Complete!!” appears and the specified track is
erased.
2 Turn the AMS control until “006:All Erase ?”
appears.
3 Press the AMS control.
“All Erase ??” appears to ask whether you wish to
cancel the procedure or not.
To cancel the erasure of all tracks on an MD, press
the EDIT/NO or STOP button.
4 Press the AMS control.
“Complete!!” appears and all tracks on the MD are
erased. The MD deck then exits from the Edit
menu.
Chapter 6 Editing Functions 6-3
Page 48

6-1 Overview of Editing Functions
6-3 Dividing a Recorded Track (Divide Function)
To randomly access certain portions of a track, the
divide function allows you to create separate tracks for
each portion. You can also use the divide function to
erase selected portions of a track, by first specifying
the portion as a separate track, then erasing that track.
To divide a recorded track
1
=+
0)
p(P
r
2 – 7
6 Turn the AMS control to adjust the dividing
position.
The track will be divided at the top position of the
rehearsal playback.
Pressing the 0/) button allows you to change
the unit for shifting the top position of the
rehearsal playback. You can choose the unit from
“F” (frame), “S” (second), or “M” (minute).
Rehearsal playback
Dividing position
7 Press the AMS control.
“Complete!!” appears and the deck starts to play
back the divided track for confirmation.
1 Press the EDIT/NO button while the MD deck is
Chapter 6 Editing Functions
stopped, playing back, or in playback pause.
The Edit menu appears.
2 Turn the AMS control until “005:Divide ?”
appears.
3 Press the AMS control.
The display changes for dividing track and the
rehearsal playback of the currently displayed track
starts.
001 00 10 85
Divide Tr1
4 Turn the AMS control to select the track to be
divided.
To divide a recorded track using the
remote controller
While the track to be divided is played or in playback
pause, you can use the remote controller or the
keyboard for dividing operation.
1 Press the DIVIDE button.
The rehearsal playback starts from where you
pressed the button.
2 Adjust the dividing position using = or +
key.
Pressing the 0/) button allows you to change
the unit for shifting the top position of the
rehearsal playback. You can choose the unit from
“F” (frame), “S” (second), or “M” (minute).
3 Press the ENTER button.
“Complete!!” appears and the deck starts to play
back the divided track for confirmation.
5 Press the AMS control.
The rehearsal playback starts to locate the dividing
position.
6-4 Chapter 6 Editing Functions
Page 49

To divide a recorded track during
rehearsal playback
Locating the dividing position with the rehearsal
playback before using the divide function allows you
to skip the procedures for selecting the track to be
divided and locating the dividing position.
2
=+
0)
p(P
r
3,4
1 Locate the dividing position with the rehearsal
playback.
Chapter 6 Editing Functions
See “5-2-4 Rehearsal Playback” on page 5-3 for
details.
2 Press the EDIT/NO button.
3 Turn the AMS control until “005:Divide ?”
appears.
4 Press the AMS control.
“Complete!!” appears and the deck starts to play
back the divided track for confirmation.
Notes
•If “Impossible” indication appears, you can not
divide the track you specified. Repeating the division
of tracks may produce a track which cannot be
divided. This is the restriction on the MiniDisc
system and is not out of order.
•The original title for the divided track goes with the
former part of it. The latter part of the divided track
may be newly named.
Chapter 6 Editing Functions 6-5
Page 50

6-1 Overview of Editing Functions
6-4 Combining Recorded Tracks
(Combine Function)
Use the combine function to combine tracks on a
recorded disc.
The two tracks to be combined needs not to be
consecutive. And the latter track to be combined can
be the track which comes before the former one in
track number order.
To combine tracks
1
=+
0)
p(P
r
2 – 7
5 Press the AMS control.
The display changes for selecting the latter track to
be combined and the rehearsal playback of the
currently displayed track starts.
001 00 01 85
1+2-1
6 Turn the AMS control to select the latter track.
7 Press the AMS control.
“Complete!!” appears and the deck starts to play
back the combined track for confirmation.
To combine tracks using the remote
controller
Chapter 6 Editing Functions
1 Press the EDIT/NO button while the MD deck is
stopped, playing back, or in playback pause.
The Edit menu appears.
2 Turn the AMS control until “004:Combine ?”
appears.
3 Press the AMS control.
The display changes for selecting the former track
to be combined and the rehearsal playback of the
currently displayed track starts.
001 00 10 85
CombineTr1
4 Turn the AMS control to select the former track to
be combined.
When you play back the former track to be combined,
you can use the remote controller or the keyboard to
combine tracks.
1 Press the COMBINE button.
2 Specify the latter track using numeric button(s).
3 Press the ENTER button.
“Complete!!” appears and the deck starts to play
back the combined track for confirmation.
Notes
•If “Impossible” indication appears, you can not
combine the two tracks you specified. This is the
restriction on the MiniDisc system and is not out of
order.
•The track title after combined will be the one for the
former track to be combined.
•The track shorter than 8 seconds may not be
combined.
6-6 Chapter 6 Editing Functions
Page 51

6-5 Moving Recorded Tracks (Move Function)
Use the move function to change the order of specific
tracks.
To move tracks
1
=+
p(P
0)
r
2 – 78
1 Press the EDIT/NO button while the MD deck is
stopped, playing back, or in playback pause.
The Edit menu appears.
5 Press the AMS control.
The display changes for selecting the track number
where the track will be moved to.
002 00 14 85
2---3
6 Turn the AMS control to select the track number
where the track will be moved to.
The track moves to the track number you selected.
7 Press the AMS control.
“Complete!!” appears and the deck starts to play
back the moved track for confirmation.
8 After confirming, press the STOP button.
2 Turn the AMS control until “003:Move ?” appears.
3 Press the AMS control.
The display changes for selecting the track to be
moved and the rehearsal playback of the currently
displayed track starts.
002 00 07 44
Move Tr2
4 Turn the AMS control to select the track to be
moved.
To move tracks using the remote
controller
While the track you want to move is played, you can
use the remote controller or the keyboard to move
tracks.
1 Press the MOVE button.
2 Specify the track number where you want move
the track to with the numeric buttons.
3 Press the ENTER button.
“Complete!!” appears and the deck starts to play
back the moved track for confirmation.
4 After confirmation, press the STOP button.
Chapter 6 Editing Functions
Chapter 6 Editing Functions 6-7
Page 52

6-1 Overview of Editing Functions
6-6 Editing Titles
Use the Edit menu to enter or edit disc or track titles. A
single disc can store up to 1,792 characters of title
data. You can enter a title, erase a title, erase all titles
on the disc, or copy a title. Characters can be entered
and titles can be erased directly using the supplied
remote controller. You can also erase a title from the
remote controller.
For details on operations with the remote controller,
see “4-4 Adding Disc and Track Titles” on page 4-5.
To enter the title of a disc or track
Chapter 6 Editing Functions
1 Press the EDIT/NO button while the MD deck is
stopped, playing, or in playback pause.
The Edit menu appears.
2 Turn the AMS control until “001:Name ?”
indication appears.
3 Press the AMS control.
The display for selecting the title editing mode
appears. There are four title editing modes.
“Nm In ?”: Entering titles
“Nm Erase ?”: Erasing titles
“Nm All Ers?”: Erasing all titles on the disc
“Nm Copy ?”: Copying titles
4 Turn the AMS control to select “Nm In ?” then
press the AMS control.
The display for selecting the track to be entitled
appears.
p(P
1
DISPLAY button
0)
r
0/) buttons
ENTER/YES button
=+
2 – 7
5 Turn the AMS control to select “Disc” to enter a
disc name or the track number to enter a track title,
then press the AMS control.
The display for entering a title appears.
When a track number is selected, the track starts to
play repeatedly.
005 00 43 18
_
6 Turn the AMS control until the first character of
the title appears, then press the control to enter the
character.
Presse the AMS control to move, the cursor moves
to next character position.
To change the character type
Press the DISPLAY button to choose uppercase,
lowercase, or number.
To change an entered character
Press the 0 or ) button to until the character
you want to change begins flashing, then turn the
AMS control to select a new character.
To erase a character
Press the 0 or ) button until the character you
want to erase begins to flash, then press the EDIT/
NO button. Pressing the button repeatedly erases
successive characters.
To enter a space
Press the 0 or ) button until the character that
you want to enter a space before begins flashing,
then press the AMS control.
7 Repeat step 6 until you enter the entire title then
press the ENTER/YES button.
The title you entered is recorded on the disc.
“Complete!!” appears and then the title scrolls.
6-8 Chapter 6 Editing Functions
Page 53

To erase a title
To copy a title
1 Press the EDIT/NO button while the MD deck is
stopped, playing, or in playback pause.
The Edit menu appears.
2 Turn the AMS control until “001:Name ?” appears,
then press the AMS control.
3 Turn the AMS control to select “Nm Erase ?”, then
press the AMS control.
The display for selecting a title to be erased
appears. If you select a track number, the track will
begin playing back repeatedly.
4 Turn the AMS control to select “Disc” to erase a
disc title or a track number to erase a track title,
then press the AMS control.
The title you selected is erased. “Complete!!”
appears, followed by “No Name.”
To erase all titles on a disc
1 Press the EDIT/NO button while the MD deck is
stopped, playing, or in playback pause.
The Edit menu appears.
1 Press the EDIT/NO button while the MD deck is
stopped, playing, or in playback pause.
The Edit menu appears.
2 Turn the AMS control until “001:Name ?” appears,
then press the AMS control.
3 Turn the AMS control to select “Nm Copy ?”, then
press the AMS control.
The display for selecting the title to be copied
appears.
005 00 02 85
Nm Cpy Tr1
4 Turn the AMS control to select “Disc” to copy the
disc title, or the track whose title you want to copy,
then press the AMS control.
The display for specifying the location to be
copied to appears.
Chapter 6 Editing Functions
2 Turn the AMS control until “001:Name ?” appears,
then press the AMS control.
3 Turn the AMS control to select “Nm All Ers?”,
then press the AMS control.
”Nm ALL Ers??” appears to ask whether you want
to erase all titles on the disc.
4 Press the AMS control again.
All titles on the disc are erased. “Complete!!”
appears, followed by “No Name.”
005 60 12 02
Disc---1
If you select the track with no name, the “No
Name” indication appears.
5 Turn the AMS control to select “Disc” for disc title
or to specify the track number to copy to a track,
then press the AMS control.
The selected title is copied and “Complete!!”
appears.
Chapter 6 Editing Functions 6-9
Page 54

6-1 Overview of Editing Functions
6-7 Marking the Cue Point
You can mark the cue point anywhere on the track to
put out the tally signal from the REMOTE connector
(D-sub, 25-pin) during playback.
“CUE” appears in the display while the MD deck is
outputting the tally signal.
You can mark up to 255 cue points per disc.
To mark a cue point
1
=+
0)
p(P
r
2 – 7
6 Turn the AMS control to locate the cue point to be
marked.
The beginning of rehearsal playback will be the
cue point to be marked.
Pressing the 0/) button allows you to change
the unit for shifting the top position of the
rehearsal playback. You can choose the unit from
“F” (frame), “S” (second), or “M” (minute).
7 Press the AMS control.
“Complete!!” appears and the deck starts to play
back for confirming the cue point.
To mark a cue point during rehearsal
playback
Locating the marking position for the cue point with
the rehearsal playback in advance allows you to skip
the procedures for locating the marking position.
Chapter 6 Editing Functions
1 Press the EDIT/NO button while the MD deck is
stopped, playing back, or in playback pause.
The Edit menu appears.
2 Turn the AMS control until “008:Cue Point ?”
appears.
3 Press the AMS control to display “CP In ?.”
4 Press the AMS control.
The display changes for selecting the track to be
marked with a cue point and the rehearsal playback
of the currently displayed track starts.
001 00 04 85
CP In Tr1
2
=+
0)
p(P
r
3,4
1 Locate the marking position with the rehearsal
playback.
See “5-2-4 Rehearsal Playback” on page 5-3 for
details.
2 Press the EDIT/NO button.
3 Turn the AMS control to display “008-01:CP In ?.”
5 Turn the AMS control to select the track to be
marked with a cue point, then press the control.
The rehearsal playback starts for locating the
marking point.
6-10 Chapter 6 Editing Functions
4 Press the AMS control.
“Complete!!” appears and the deck starts to play
back for confirming the cue point.
Page 55

To erase a cue point
To erase all cue points
1
=+
0)
p(P
r
2 – 56
1 Press the EDIT/NO button while the MD deck is
stopped, playing back, or in playback pause.
The Edit menu appears.
2 Turn the AMS control until “008:Cue Point ?”
appears.
3 Press the AMS control and turn it until “CP Erase
?” appears.
The display changes for selecting the track whose
cue point you want to erase and the rehearsal
playback of the currently displayed track starts.
1
=+
0)
p(P
r
2,3,45
1 Press the EDIT/NO button while the MD deck is
stopped, playing back, or in playback pause.
The Edit menu appears.
2 Turn the AMS control until “008:Cue Point ?”
appears.
3 Press the AMS control and turn it until “CP All Ers
?” appears. Then press the AMS control.
“CP ALL Ers??” appears to ask whether you want
erase all cue points or not.
4 Press the AMS control.
“Complete!!” appears.
Chapter 6 Editing Functions
001 00 01 85
Cp Ers Tr1
4 Turn the AMS control to select the track whose
cue point you want to erase and then press the
AMS control.
The cue point number in the track you selected
appears and the rehearsal playback starts from that
cue point.
5 Turn the AMS control to select the cue point
number and then press the AMS control.
“Complete!!” appears and the deck starts to play
back for confirmation.
6 After confirmation, press the STOP button.
5 After confirmation, press the STOP button.
Chapter 6 Editing Functions 6-11
Page 56

6-8 T rimming
6-1 Overview of Editing Functions
6-8-1 Head Trimming
The head trimming function allows you to change the
beginning of a track temporarily without erasing the
actual data on the disc. You can specify the trimming
point for the beginning of a track by detecting the rise
in the audio signal according to the threshold level set
by the Autocue function in the Setup menu.
Using this function in conjunction with the Multiaccess function allows you to position the start of
playback more accurately.
“END” appears in the display when you select a track
with head-trimming specification.
To trim the beginning of a track
Chapter 6 Editing Functions
p(P
5 Press the AMS control.
Rehearsal playback starts from the rise in the audio
signal detected according to the Autocue threshold
level set in the Setup menu.
6 Turn the AMS control to specify the trimming
point.
The start of Rehearsal playback becomes the
trimming point. Pressing the 0/) button
allows you to select “F” (frame), “S” (second), or
“M” (minute) as the unit for adjusting the start of
Rehearsal Play.
Rehearsal playback
1
Trimming point will be the beginning of the track
7 Press the AMS control.
=+
0)
r
“Complete!!” appears and playback starts for
confirming the results of the operation.
2 – 7
1 Press the EDIT/NO button.
The Edit menu appears.
2 Turn the AMS control until “009:Head Trim ?”
appears.
3 Press the AMS control to display “HT In ?”, then
press the control.
The display for selecting the track to be trimmed
appears.
001 00 01 85
HT In Tr1
4 Turn the AMS control to select the track to be
trimmed.
When you want to trim all the tracks on the MD,
select the “HT In All” indication instead of a track
number.
6-12 Chapter 6 Editing Functions
To trim a track during Rehearsal playback
Locating the trimming position during Rehearsal
playback eliminates the need to use the Edit menu to
do the same thing.
2
=+
0)
p(P
r
3,4
1 Locate the trimming position through Rehearsal
playback.
For details, see “5-2-4 Rehearsal Playback” on page 5-3.
Page 57

2 Press the EDIT/NO button.
3 Turn the AMS control until “009-01:HT In ?”
appears.
4 Press the AMS control.
“Complete!!” appears and playback starts for
confirming the results of the operation.
To erase all head-trimming specifications
on a disc
1
To erase the trimming specification at the
beginning of a track
1
=+
0)
p(P
r
2 – 5
1 Press the EDIT/NO button while the MD deck is
stopped, playing, or in playback pause.
The Edit menu appears.
2 Turn the AMS control until “009:Head Trim ?”
appears.
=+
0)
p(P
r
2 – 5
1 Press the EDIT/NO button while the MD deck is
stopped, playing, or in playback pause.
The Edit menu appears.
2 Turn the AMS control until “009:Head Trim ?”
appears.
3 Press the AMS control, then turn the control to
display “HT All Ers ?.”
4 Press the AMS control.
“HT ALL Ers??” appears to ask whether you want
to erase all head-trimming specifications or not.
5 Press the AMS control.
“Complete!!” appears.
Chapter 6 Editing Functions
3 Press the AMS control, then turn the control to
display “HT Erase ?.”
4 Press the AMS control.
The display for selecting the track whose
specification is to be erased appears. The specified
track begins playing repeatedly.
5 Turn the AMS control to select the track, then
press the control.
“Complete!!” appears and playback starts for
confirming the results of the operation.
Chapter 6 Editing Functions 6-13
Page 58

6-1 Overview of Editing Functions
6-8 T rimming
6-8-2 End Trimming
By entering a trimming specification at the end of a
track, you can eliminate the ending position without
actually erasing sound data on the disc.
“END” appears in the display when you select a track
with end-trimming specification.
To trim the end of a track
Chapter 6 Editing Functions
1 Press the EDIT/NO button.
The Edit menu appears.
p(P
6 Turn the AMS control to specify the amount to be
trimmed.
Pressing the 0/) button allows you to select
“F” (frame), “S” (second)”, or “M” (minute) as the
unit for adjusting the end of Rehearsal playback.
Rehearsal playback
1
Trimming point will be set at the end of Rehearsal playback.
7 Press the AMS control.
“Complete!!” appears and playback starts for
confirming the results of the operation.
=+
0)
r
To trim the end of a track during
Rehearsal playback
2 – 7
Locating the trimming position during Rehearsal
playback eliminates the read to use the Edit menu to
do the same thing.
2
2 Turn the AMS control until “010:End Trim ?”
appears.
3 Press the AMS control to display “ET In ?”, then
press the control again.
The display for selecting the track to be trimmed
appears.
001 00 01 85
ET In Tr1
4 Turn the AMS control to select the track to be
trimmed.
5 Press the AMS control.
Rehearsal playback starts to allow you to specify
the trimming point.
=+
0)
p(P
r
3,4
1 Locate the trimming position through Rehearsal
playback.
For details, see “5-2-4 Rehearsal Playback” on page 5-3.
2 Press the EDIT/NO button.
3 Turn the AMS control until “010-01:ET In ?”
appears.
4 Press the AMS control.
“Complete!!” appears and playback starts for
confirming the results of the operation.
6-14 Chapter 6 Editing Functions
Page 59

To erase a trimming specification at the
end of a track
To erase all end-trimming specifications
on a disc
1
=+
0)
p(P
r
2 – 5
1 Press the EDIT/NO button while the MD deck is
stopped, playing, or in playback pause.
The Edit menu appears.
2 Turn the AMS control until “010:End Trim ?”
appears.
3 Press the AMS control, then turn the control to
display “ET Erase ?.”
1
=+
0)
p(P
r
2 – 5
1 Press the EDIT/NO button while the MD deck is
stopped, playing, or in playback pause.
The Edit menu appears.
2 Turn the AMS control until “010:End Trim ?”
appears.
3 Press the AMS control, then turn the control to
display “ET All Ers ?.”
Chapter 6 Editing Functions
4 Press the AMS control.
The display for selecting the track whose trimming
specification is to be erased appears. The specified
track begins playing repeatedly.
001 00 01 85
ET Ers Tr1
5 Turn the AMS control to select the track, then
press the control.
“Complete!!” appears and playback starts for
confirming the results of the operation.
4 Press the AMS control.
“ET ALL Ers ??” appears to ask whether you want
to erase all end-trimming position settings or not.
5 Press the AMS control.
“Complete!!” appears.
Chapter 6 Editing Functions 6-15
Page 60

Page 61

7-1 The Overview of the Setup Menu
Setting items of the setup menu
The Setup menu of the MDS-B5 includes the setting
items shown below. Each menu item has the item
number for your ease of setting.
Item
number Menu item Contents Setting values Page
F01 Input source Input signal selection Analog In, DIN AES/EBU, DIN Coaxial 4-1
F02 Play mode Playback mode selection Continue, Shuffle, Program, Multi Access 5-8
F03 Repeat Repeat play setting Repeat Off, Repeat On 5-7
F04 Rec mode Recording mode setting Stereo Rec, Monoral Rec 4-2
F05 Dup mode The MD deck setting for direct
F06 Levelsync LevelSync function setting LevelSyncOff, LevelSyncOn 7-2
F07 Varispeed Variable speed playback setting VariSpeedOff, VariSpeedOn 5-13
F08 NextPlay The next track select function setting NextPlayOff, NextPlayOn 5-5
F09 Edit mode Edit mode selection Disc Edit, Ram Edit 6-1
F10 Timer mode Timer mode setting Timer off, Timer Play, Timer Rec 7-3
F11 Resume mode Resume mode setting Resume off, Resume On, Resume Next 7-4
F12 Keyboard type Keyboard type setting KB JPN 106, KB ENG 101 3-4
F13 Baud rate Baud rate setting (RS-232C) 9600 baud, 4800 baud, 2400 baud, 1200 baud 7-5
F14 Parity bit Parity bit setting (RS-232C) Parity Even, Parity Odd, Parity Off 7-5
F15 Stop Bit Stop bit length setting (RS-232C) Stop Bit 1, Stop Bit 2 7-5
F16 Levelsync threshold Threshold level for LevelSync LS (T) –50 dB
F17 Levelsync width Detecting time for LevelSync LS (W) 1.5s
F18 Levelsync offset Margin setting for LevelSync LS (O) 0s00f
F19 Autocue threshold
F20 Autocue offset Margin setting for autocue function AC (O) 0s00f
F21 Rehearsal length Rehearsal playback time setting RH (L) 2s00f
F22 Rehearsal interval Interval for rehearsal playback RH (I) 1.0s
F23 Disc EOM Disc end message function D.EOM 5sec
F24 Track EOM Track end message function T.EOM 5sec
F25 Hours meter Digital hours meter S0000 L0000 7-9
F26 Kill Local Disabling the buttons on the deck
ATRAC data copy function
Detect threshold level for autocue function
during remote controlling
Dup Off, Dup Main, Dup Sub, Dup End
(adjustable range from –72 dB to 0 dB)
(adjustable range from 0.0s to 9.5s, 1 step = 0.5s)
(adjustable range from –9s85f to +9s85f, 1 step = 1f)
AC (T) –50 dB
(adjustable range from –72 dB to 0 dB)
(adjustable range from –9s85f to +9s85f, 1 step = 1f)
(adjustable range from 0s00f to 9s85f, 1 step = 1f)
(adjustable range from 0.0s to 8.0s, 1 step = 0.5s)
(adjustable range from 1 sec to 35 sec, 1 step = 1 sec)
(adjustable range from 1 sec to 35 sec, 1 step = 1 sec)
Kill Almost, Kill All 7-10
3-3
7-2
7-2
7-2
7-6
7-6
7-7
7-7
7-8
7-8
Chapter 7 Setup Menu
Chapter 7 Setup Menu
* The left most value of each item is the factory setting. Pressing the EDIT/NO button during using the Setup menu returns
the value to the factory setting.
Chapter 7 Setup Menu 7-1
Page 62

6-1 Overview of Editing Functions
7-2 LevelSync Setting (Track Marking Function)
LevelSync function adds track numbers automatically
at specified points where the rise in the audio signal is
detected during recording.
You can set the following items as well as turning on
and off of LevelSync function using the setup menu
for fitting your needs.
Turning on and off of the LevelSync function
(F06: Levelsync)
The factory setting is off.
Threshold level for the LevelSync function
(F16: Levelsync threshold)
You can adjust the threshold level for detecting as a
silence portion of audio signal. –50 dB (factory
setting) is the threshold level used to detect the rise in
audio signal from a silence portion. You can adjust
this level according to the input signal ranging from
–72 dB to 0 dB.
The minimum length of the silence portion to
be detected (F17: Levelsync width)
You can set the minimum length of the silence portion
to be detected. If the silence portion lasts longer than
1.5 second, this portion is regarded as a track, and the
track number will be marked when the following rise
in the audio signal comes. You can adjust the
minimum length to detect ranging from 0.0 second to
Chapter 7 Setup Menu
9.5 seconds with reference to the input signals.
LevelSync offset function (F18: Levelsync
offset)
The LevelSync offset function allows you to adjust the
margin between the position where the track number is
marked and the rise in the audio signal. You can tune
finely the starting point of playback using this
function.
You can shift up to 9 seconds 85 frames before or after
the rise in the audio signal regarded as 0 second 0
frame (factory setting). However, you cannot mark the
track number at the position before the silence portion
starts.
To set the items for the LevelSync
function
=+
0)
p(P
r
1 2 – 5
1 Press the EDIT/NO button while holding down the
STOP button.
The Setup menu appears.
2 Turn the AMS control until the item you want to
set is displayed.
F06: Levelsync
F16: Levelsync threshold
F17: Levelsync width
F18: Levelsync offset
3 Press the AMS control.
The indication flashes to show that you can change
the setting.
4 Turn the AMS control to select the setting values.
5 Press the AMS control to affect the selection and
exit from the Setup menu.
Silence portion
Minimum length of the
silence portion to be
detected
Track number is
marked here.
7-2 Chapter 7 Setup Menu
Margin between the
track number position
and the rise in the
audio signal
Page 63

7-3 Setting Up for Timer-Activated Function
Use the Setup menu to use the timer-activated
recording or playback function connecting the MDSB5 to the timer.
To an AC outlet
Timer
p(P
MDS-B5
Connecting a timer
=+
0)
r
To set the timer-activated function
=+
0)
p(P
r
1 2 – 5
1 Press the EDIT/NO button while holding down the
STOP button.
The Setup menu appears.
2 Turn the AMS control until the menu item F10
(“Timer off”, “Timer Play” or “Timer Rec”)
appears.
F10
Timer off
3 Press the AMS control.
The indication flashes to show that you can change
the setting.
4 Turn the AMS control to select the timer-activated
mode from the values below.
Timer off: Timer-activated function is disabled.
Timer Play: Timer-activated playback is set.
Timer Rec: Timer-activated recording is set.
5 Press the AMS control to affect the selection and
exit from the Setup menu.
Notes
•After a head- or end-trimming operation, be sure to
update the TOC before performing timer-activated
playback.
•In the case of premastered discs, head- or endtrimming will not take place during timer-activated
playback. You should thus divide the tracks to
specify the start and end of playback.
Chapter 7 Setup Menu
Chapter 7 Setup Menu 7-3
Page 64

6-1 Overview of Editing Functions
7-4 Setting the Playback Resume Mode
You can set how to resume playback when you press
the PLAY/PAUSE button after the deck was stopped
with the STOP button being pressed.
Note
When you use the shuffle play or Multi-Access
function, the playback resume mode setting will be
ignored.
To set the playback resume mode
=+
0)
p(P
r
4 Turn the AMS control to select the playback
resume mode from the values below.
Resume off: Turns the playback resume mode off.
Resume Play: Pressing the PLAY/PAUSE button
starts playback from where you stopped or
paused playback.
Resume Next: Pressing the PLAY/PAUSE button
starts playback from the beginning of the next
track which follows the one you stopped
playback.
5 Press the AMS control to affect the selection and
exit from the Setup menu.
1 Press the EDIT/NO button while holding down the
STOP button.
Chapter 7 Setup Menu
The Setup menu appears.
2 Turn the AMS control until the menu item F11
(“Resume off”, “Resume Play” or “Resume Next”)
appears.
Resume off
3 Press the AMS control.
The indication flashes to show that you can change
the setting.
1 2 – 5
F11
7-4 Chapter 7 Setup Menu
Page 65

7-5 Setting the RS-232C Interface
External equipment connected to the RS-232C
connector at the rear of the MDS-B5 can be used to
control the MDS-B5. Use the Setup menu to set the
baud rate, parity, and stop bit length of RS-232C
interface before using this interface.
Values for each setting item are as follows.
Baud rate setting (F13: Baud rate)
9600 baud: baud rate 9600
4800 baud: baud rate 4800
2400 baud: baud rate 2400
1200 baud: baud rate 1200
Parity bit setting (F14: Parity bit)
Parity Off: Use no parity
Parity Even: Use even parity
Parity Odd: Use odd parity
Stop bit length setting (F15: Stop Bit)
Stop Bit 1: Selects a stop bit length 1
Stop Bit 2: Selects a stop bit length 2
Note
The RS-232C interface becomes active only when
“Dup Off” is selected for menu F05.
To set up for RS-232C interface
=+
0)
p(P
r
1 2 – 5
1 Press the EDIT/NO button while holding down the
STOP button.
The Setup menu appears in the display window.
2 Turn the AMS control until the menu item you
want to set up appears.
F13: Baud rate
F14: Parity bit
F15: Stop Bit
3 Press the AMS control.
The indication flashes to show that you can change
the setting.
4 Turn the AMS control to select the value.
5 Press the AMS button to affect the selection and
exit from the Setup menu.
Chapter 7 Setup Menu
Chapter 7 Setup Menu 7-5
Page 66

6-1 Overview of Editing Functions
7-6 Setting the Auto Cue Function
Turning the AUTO CUE function on by pressing the
A.MODE button enables the MDS-B5 to locate the
beginning of a track by detecting the rise in the audio
signal.
You can adjust the detect level for the rise in the audio
signal to locate the beginning of a track more precisely
in accordance with input signal.
You can also shift the beginning of a track from the
rise in the audio signal.
Threshold level for AUTO CUE function (F19:
Autocue threshold)
You can adjust the threshold level for detecting as a
silence portion of audio signal. –50 dB (factory
setting) is the threshold level used to detect the rise in
audio signal from a silence portion. You can adjust
this level according to the input signal ranging from
–72 dB to 0 dB.
AUTO CUE offset function (F20: Autocue
offset)
The AUTO CUE offset function allows you to adjust
the margin between the position where the track
number is marked and the rise in the audio signal.
You can tune finely the starting point of playback
using this function.
You can shift up to 9 seconds 85 frames before or after
the rise in the audio signal regarded as 0 second 0
Chapter 7 Setup Menu
frame (factory setting).
Setting Up the AUTO CUE function
=+
p(P
0)
r
1 2 – 5
1 Press the EDIT/NO button while holding down the
STOP button.
The Setup menu appears in the display window.
2 Turn the AMS control until the menu item you
want to set up appears.
F19: Autocue threshold
F20: Autocue offset
3 Press the AMS control.
The indication flashes to show that you can change
the setting.
Silence portion
Adjustable
range
Position where
the track number
is marked
7-6 Chapter 7 Setup Menu
4 Turn the AMS control to select the value.
5 Press the AMS button to affect the selection and
exit from the Setup menu.
Adjustable
range
The rising point
of audio signal
Page 67

7-7 Setting the Rehearsal Playback Function
By pressing the REHEARSAL button, the MD deck
starts the rehearsal playback from the position you
pressed the REHEARSAL button for the specified
time.
You can change the time length and interval for
rehearsal playback using the setup menu.
See “5-2-4 Rehearsal Playback” on page 5-3 for details.
Rehearsal playback time setting (F21:
Rehearsal length)
You can set the rehearsal playback time in frame
ranging from 0 second 00 frame to 9 seconds 85
frames.
The factory setting is 2 seconds 00 frame.
Rehearsal playback interval setting (F22:
Rehearsal interval)
You can set the interval for rehearsal playback in 0.5
second ranging from 0.0 second to 8.0 seconds.
The factory setting is 1.0 second.
Setting the rehearsal playback function
=+
p(P
0)
r
1 2 – 5
1 Press the EDIT/NO button while holding down the
STOP button.
The Setup menu appear.
2 Turn the AMS control until the menu item you
want to set up appears.
Rehearsal playback
RH(L)
RH(I)
Rehearsal playback
RH(L)
F21: “RH (L) 2s00f” (Rehearsal playback time
setting)
F20: “RH (I) 1.0s” (Interval for rehearsal
playback)
3 Press the AMS control.
The indication flashes to show that you can change
the setting.
4 Turn the AMS control to set the value.
5 Press the AMS control to affect the setting and exit
from the Setup menu.
Chapter 7 Setup Menu
Chapter 7 Setup Menu 7-7
Page 68

6-1 Overview of Editing Functions
7-8 Setting the EOM Function
The EOM function enables the MD deck to put out the
tally signal which tells the current track or the disc is
getting closer to its end.
Use the Setup menu to set when the tally signal is put
out before the end of the current track or the disc.
You can set the offset time before the end in 1 second
ranging from 1 second to 35 seconds for the Disc
EOM function and ranging from 1 second to 35
seconds for the Track EOM function.
To set the EOM function
=+
0)
p(P
r
1 Press the EDIT/NO button while holding down the
Chapter 7 Setup Menu
STOP button.
The Setup menu appears.
2 Turn the AMS control until the menu item you
want to set up appears.
F23: “D.EOM 5sec” (Disc EOM function setting)
F24: “T.EOM 5sec” (Track EOM function
setting)
3 Press the AMS control.
The indication flashes to show that you can change
the setting.
4 Turn the AMS control to set the value.
5 Press the AMS control to affect the setting and exit
from the Setup menu.
1 2 – 5
7-8 Chapter 7 Setup Menu
Page 69

7-9 Reading the Hours Meter
This function allows you to display the accumulated
operating time of the laser diode (during recording
operations) and of the spindle motor. Use this
information as the basis for replacing the BU block.
To display the digital hours meter
3
=+
0)
p(P
1
r
2
1 Press the EDIT/NO button while holding down the
STOP button.
The Setup menu appears.
Note
When the BU block is replaced, a new EEP-ROM is
installed and the hours meter is zeroed. Since this
resets the other menu functions as well, you must
make the applicable settings again.
2 Turn the AMS control until the menu item F25.
F25
S0001 L0000
S: Accumulated spindle motor operating time
L: Accumulated laser diode operating time
3 After checking the meter, press the EDIT/NO
button to exit the Setup menu.
Chapter 7 Setup Menu
Chapter 7 Setup Menu 7-9
Page 70

6-1 Overview of Editing Functions
7-10
Disabling the Buttons While Controlling Remotely
When you control the MDS-B5 with the remote
controller or the keyboard or use the deck as a sub or
end deck during direct ATRAC data copying, you can
disable the buttons on the front panel of the MDS-B5
to avoid unintentional touch of the operation buttons
(Kill Local function). You can choose from two
setting modes (“Kill Almost” and “Kill All”).
For the connection when you use the direct ATRAC data
copy function, see “3-2-3 Connection for Direct ATRAC
Data Copying” on page 3-3.
Disabling the buttons on the front panel
=+
p(P
0)
r
4 Turn the AMS control to select the mode from the
values below.
Kill Almost: Only the STOP, EJECT, and
DISPLAY buttons are in effect.
Kill All: All the buttons on the front panel are
disabled.
5 Press the AMS control to affect the setting and exit
from the Setup menu.
Chapter 7 Setup Menu
1 Press the EDIT/NO button while holding down the
STOP button.
The Setup menu appears.
2 Turn the AMS control until the menu item F26
(“Kill Almost” or “Kill All”) appears.
Kill Almost
3 Press the AMS control.
The indication flashes to show that you can change
the setting.
1 2 – 5
F26
7-10 Chapter 7 Setup Menu
Page 71

8-1 Cleaning and Reset Switch
Use a soft cloth slightly moistened with a mild
detergent solution to clean the cabinet and panel
surface. Do not use solvents that may damage the
surface such as paint thinner, benzine, or alcohol.
About the reset switch
Removing the screws with a Phillips screwdriver from
both side of the MD deck (two screws on each side)
and the rear panel (one screw) allows you to open the
top panel of the MD deck. You may find the reset
switch on the internal board. Pressing the reset switch
allows you to reset the microcomputer.
Reset switch
Chapter 8 Maintenance
Note
Do not press the reset switch in usual operations. Use
the reset switch only when the microcomputer hangs to
cause the malfunction of the deck, when the any button
operations are not accepted, and the like.
Chapter 8 Maintenance
Chapter 8 Maintenance 8-1
Page 72

8-1
8-2 Display Messages
The following tables explain in the various messages
that appear in the display window.
Messages during specifying tracks for
program playback and multi-access
function
Message Meaning
Program Full! During specifying tracks for program
playback, an attempt was made to specify
more than 25 tracks.
During specifying tracks for multi-access
function, an attempt was made to specify
more than 10 tracks.
Messages during recording
Message Meaning
Cannot Copy An attempt was made to record from copy-
protected source by SCMS (Serial Copy
Management System).
DIN Unlock Connections on the digital input
connectors are inappropriate.
Disc Full!! The MD is full.
Premastered An attempt was made to record on the
disc only for playback.
Protected The inserted MD is record-protected.
Messages during editing the MD
Message Meaning
Cannot Edit An attempt was made under the condition*
you cannot edit the MD.
Cannot Undo The last operation is unable to cancel.
CP Full !! An attempt was made to specify more
than 255 cue points.
Impossible The edit operation was invalid because of
restriction on the system.
Name Full !! An attempt was made to enter more
characters than the restriction.
No Cue Point No cue point was specified for the
selected track.
No Head Trim No head trim setting was specified for the
selected track.
No End Trim No end trim setting was specified for the
selected track.
Premastered During the disc edit mode, an attempt was
made to edit the disc only for playback.
Protected The inserted MD is record-protected.
* The conditions under which you cannot edit the MD are as
follows:
• When using the program play, shufle play, or MultiAccess function
• When erasing, dividing, combining, or moving tracks
using the remote controller while the MD deck is
stopped.
Chapter 8 Maintenance
8-2 Chapter 8 Maintenance
Other messages
Message Meaning
No Name No title is specified for the track or the
disc.
No Disc There is no disc in the MD deck.
No Track The inserted MD has a disc title but no
tracks.
Disc Error The MD is scratched or missing a TOC.
Blank Disc A new (blank) or erased MD has been
inserted.
Page 73

Menu Item List
The Setup menu
Press the EDIT/NO button while holding down the STOP button to enter the Setup menu.
Number Menu item Setting Page
F01 Input source Selecting the input signal 4-1
F02 Play mode Selecting the playback mode 5-8
F03 Repeat Setting the repeat playback 5-7
F04 Rec mode Selecting the recording mode 4-2
F05 Dup mode Setting the direct ATRAC data copy function 3-3
F06 Levelsync Setting the LevelSync function 7-2
F07 Varispeed Turnning on and off of the variable speed playback 5-13
F08 NextPlay Setting the Next Play function 5-5
F09 Edit mode Selecting the edit mode 6-1
F10 Timer mode Setting the timer mode 7-3
F11 Resume mode Setting the resume mode 7-4
F12 Keyboard type Setting the keyboard type 3-4
F13 Baud rate Setting the baud rate 7-5
F14 Parity bit Setting the parity bit 7-5
F15 Stop Bit Setting the stop bit length 7-5
F16 Levelsync threshold Setting the threshold level for the LevelSync function 7-2
F17 Levelsync width Setting the silent portion length to be detected in the LevelSync function 7-2
F18 Levelsync offset Setting the offset for the LevelSync function 7-2
F19 Autocue threshold Setting the threshold level for the AUTO CUE function 7-6
F20 Autocue offset Setting the offset for the AUTO CUE function 7-6
F21 Rehearsal length Setting the length for the rehearsal playback 7-7
F22 Rehearsal interval Setting the interval for the rehearsal playback 7-7
F23 Disc EOM Setting the disc EOM function 7-8
F24 Track EOM Setting the track EOM function 7-8
F25 Hours meter Digital time meter 7-9
F26 Kill Local Setting for disabling the buttons on the deck during remote controlling 7-10
Appendix
Appendix A-1
Appendix
Page 74

Menu Item List
The Edit menu
Press the EDIT/NO button to enter the Edit menu.
Number Menu item Setting Page
001 Name ? Editing a title 6-8
Nm In ? Entering a title
Nm Erase ? Erasing a title
Nm All Ers? Erasing all titles on the disc
Nm Copy ? Copying a title
002 Erase ? Erasing a track 6-3
003 Move ? Moving a track 6-7
004 Combine ? Combine tracks 6-6
005 Divide ? Dividing a track 6-4
006 All Erase ? Erasing all tracks on the disc 6-3
007 Undo ? Canceling the last operation 6-2
008 Cue Point ? Editing the cue points 6-10
009 Head Trim ? Trimming the beginning of a track 6-12
010 End Trim ? Trimming the end of a track 6-14
011 Program ? Specifying the tracks for Program Play function 5-8
012 M-Access ? Specifying the tracks for multi-access playback function 5-11
013 Speed ? Setting the speed during the variable speed playback 5-13
014 Err Check ? Checking an error for recorded data 4-6
015 Duplicate ? Operating the direct ATRAC copy function 4-6
CP In ? Specifying a cue point
CP Erase ? Erasing a cue point
CP All Ers ? Erasing all cue points on the disc
HT In ? Specifying the trimming point for the head trim function
HT Erase ? Erasing a head trimming point
HT All Ers ? Erasing all the head trimming points on the disc
ET In ? Specifying the trimming point for the end trim function
ET Erase ? Erasing an end trimming point
ET All Ers ? Erasing all the end trimming points on the disc
Appendix
A-2 Appendix
Page 75

Pin Assignments for REMOTE (25P) connector
You can choose from following four types of pin
assignment when you control the MD deck by
inputting the external parallel remote signal to
REMOTE (25P) connector on the rear panel.
For front panel buttons
Pin number I/O Function
1 I REC
2 I CUE/STDBY
3IFF
4 I DISPLAY
5 O STOP STATUS
6 I NEXT (JOG+1)
7 I STOP
8 O DISC IN
9IHi
10 I Hi
11 I JOG PUSH
12 — —
13 O 5V
14 O REC STATUS
15 O CUE/STANDBY STATUS
16 O REW
17 O PLAY/PAUSE STATUS
18 O EOM
19 I PREVIOUS (JOG–1)
20 I PLAY/PAUSE
21 O ERROR STATUS
22 I Hi
23 I KILL LOCAL
24 — —
25 O GND
For auto signal output
Pin number I/O Function
1 I PLAY/STOP (play during
make)
2 I PAUSE
3 O PLAY STATUS
4 O CUE TALLY
5 O STOP STATUS
6 I NEXT (JOG+1)
7 I STOP
8 O DISC IN
9 I Low
10 I Hi
11 — —
12 — —
13 O 5V
14 I PLAY
15 O PAUSE STATUS
16 O LEVEL MONITOR
17 O DISC EOM
18 O EOM
19 I PREVIOUS (JOG–1)
20 I PLAY/PAUSE
21 O ERROR STATUS
22 I Hi
23 I KILL LOCAL
24 — —
25 O GND
Appendix
Appendix A-3
Page 76

Menu Item List
Pin Assignments for REMOTE (25P) connector
For instant playback
(Multi-Access
function)
Pin number I/O Function
1 I No.1 PLAY
2 I No.3 PLAY
3 I No.5 PLAY
4 I No.7 PLAY
5 I No.9 PLAY
6 I SELECT
7 I STOP
8 O DISC IN
9IHi
10 I Hi
11 I LOAD
12 — —
13 O 5V
14 I No.2 PLAY
15 I No.4 PLAY
16 I No.6 PLAY
17 I No.8 PLAY
18 I No.10 PLAY
19 O PLAY STATUS
20 I PAUSE
21 O ERROR STATUS
22 I Low
23 I KILL LOCAL
24 — —
25 O GND
For edit operations
Pin number I/O Function
1 I EDIT
2 I CUE/STANDBY
3IFF
4 I DISPLAY
5 O STOP STATUS
6 I NEXT (JOG+1)
7 I STOP
8 O DISC IN
9 I Low
10 I Hi
11 I JOG PUSH
12 — —
13 O 5V
14 I ENTER
15 O CUE/STANDBY STATUS
16 I REW
17 O PLAY/PAUSE STATUS
18 I REHEARSAL
19 I PREVIOUS (JOG–1)
20 I PLAY/PAUSE
21 O ERROR STATUS
22 I Low
23 I KILL LOCAL
24 — —
25 O GND
Appendix
A-4 Appendix
Page 77

RS-232C Protocol
RS-232C Protocol
The connection of MDS-B5 with an external personal
computer allows MDS-B5 to be controlled from
external equipment including the personal computer.
This section describes its operating method from a
viewpoint of electrical and software specifications.
Specifications
Format Serial
Electrical characteristics
RS-232C compatible (not
compatible with the 9-pin remote
(RS-422A) such as Sony VTR for
professional use)
Connector D-sub, 9-pin, male, inch screw
Pin assignment and I/O signals
Pin No. I/O Signal Description
1 — N. C. Not used.
2 I RxDATA Inputs reception data.
3 O TxDATA Outputs transmission data.
4 O DTR Notifies that the set is ready
for communication.
5 — GND Ground
6 I DSR Acknowledges that the
personal computer is ready
for communication.
7 O RTS Notifies that the set
requests data transmission.
8 I CTS Acknowledges that the
personal computer requests
data transmission.
9 — N. C. Not used.
Operating Method
Contents of menu set screen
Items Contents
Transmission rate 1200, 2400, 4800, 9600 (bauds)
Parity OFF, ODD, or EVEN
Stop bit length Stop bit1 or Stop bit 2
1 Press the EDIT/NO button on the deck while
holding down the STOP button.
The Setup menu appears in the display window.
2 Turn the AMS control to display the menu item
you want to set (F13: baud rate, F14: parity bit, or
F15: stop bit).
3 Press the AMS control.
4 Turn the AMS control to select the setting value.
5 Press the AMS control again to affect the selection.
The settings are saved even after the power is turned
off and on again.
Communication with the RS-232C
interface terminal on the personal
computer side
When connecting the RS-232C interface terminal of
MDS-B5 with that of the personal computer, perform
as follows:
Connect the DSR of MDS-B5 with DTR of the
personal computer, and DTR of the set with DSR of
the personal computer. These signals notify that both
the MDS-B5 and the personal computer are ready for
communication.
Also, connect the CTS of the MDS-B5 with RTS of
the personal computer. The MDS-B5 does not
transmit that data until the CTS is received (that is, the
personal computer is ready). Likewise, connect the
CTS of the personal computer with RTS of the MDSB5 so that the communication that meets the
processing capacity of the MDS-B5 can be made.
Appendix
Synchronous mode between MDS-B5 and
the personal computer
Adjust the transmission rate, bit length, parity and stop
bit length. The following provides a setting method.
Appendix A-5
Page 78

Menu Item List
RS-232C Protocol
Connection of connectors
MD deck side Personal computer side
Pin No.
Signal Signal Description
2 RxDATA N TxDATA Transmit Data
3 TxDATA n RxDATA Receive Data
4 DTR n DSR Data Set Ready
5 GND — GND Signal Ground
6 DSR N DTR Data Terminal Ready
7 RTS n CTS Clear To Send
8 CTS N RTS Request To Send
Timing chart
In transmitting data
CTS
TxRDY
WRITE
TxDATA
When the CTS becomes enabled, the TxRDY
(TxREADY) signal of the deck rises up and the deck
returns 1 byte of data.
Transmission rate
The deck can use the transmission rate of maximum
9,600 bauds. As for practical figures at the SMPTE
29.97 Hz:
9600 (bit/sec)/11 (bit)/29.97 (1/sec)=29.12 (byte)
1 (sec)/9600 (bit/sec)*11 (bit)=1.145 (msec)
Namely, in one frame, the maximum number of bytes
is 29 and its byte interval is 1.145 msec. Upon
reception of a command in one cycle, the set uses the
RTS/CTS of hardware handshake to deassert that RTS
(0) line so that it does not receive the next command
block for subsequent 30 msec. This means that if the
command blocks are transmitted at random, the
contents of transmission accumulate or they are
destroyed. Also, since the data is received by the
interrupt processing of CPU, the communication
ignoring handshake, transfer clock or transmission rate
allows the set to receive data precedently, causing
other processing not to be executed and resulting in
stop of operation. (The deck will be recovered if data
reception is canceled.) Thus, the above points should
be taken into consideration when making a software
using this interface.
Appendix
In receiving data
RxDATA
RxRDY
RTS
READ
Upon reception of data, the RxRDY (RxREADY)
signal of the MDS-B5 rises up and the set disables the
RTS to read that data, then it enables the RTS again.
A-6 Appendix
Page 79

Command transmission format
The command transmission format of the set is as
shown below.
All codes conform to the ASCII format. (Use
uppercase letters for A to F.) Add the line feed (L. F.)
and carriage return (C. R.) at the top and end of
command respectively. Also, the number of data “N”
is given in the ASCII code.
L. F. N cmd-1 cmd-2 data-1Ndata-2 C. R.
2 The following data is attached with this command.
DATA1 (10, 1) (*000-255, decimal number)
DATA2 (**, 100)
This specifies the track number to be played back (up
to 255 tracks in one disc can be set).
“10”: Second digit of the track number to be
specified
“1”: First digit of the track to be specified
“**”: Fourth digit of the track to be specified
(always set to zero)
“100”: Third digit of the track to be specified
Accordingly, the commands to specify the track
number 123 is “023H” and “the contents of DATA” as
shown below.
Note
The MDS-B5 does not support a command that gives
notice of data receive error.
Examples of command
Example 1: If PLAY command is sent
The playback is automatically starts when the PLAY
command is sent in the STOP or PAUSE status. The
code of this command is “011H” as given in the
command list starting from page A-11.
The “0” is added at the top of each command, which
means that if a command containing alphabets such as
“0FFH” is used, the “F” indicates hexadecimal “F” but
it is not an alphabet “F” of ASCII codes. Therefore,
this “0” may be ignored in actual code conversion.
This “011H” is sent in the specified command
transmission format, as shown below.
N=2 because total number of data is 2
“011H”
Line
N=2 1 1
Feed
vvvvv
00AH 032H 031H 031H 00DH
Example 2: If you specify the track number
123
For this purpose, two commands “TRACK No.
LOCATE POINT PRESET” and “TRACK No.
LOCATE” must be output.
1 The code of “TRACK No. LOCATE POINT
PRESET” is “023H” according to “List of
Commands” (see page A-10).
Carridge
Return
Converted into
ASCII code.
N=6 since the number of data is 6
Contents of the DATA=
“023H”
Line
N=6
Feed
vvvvvvvvv
00AH 036H 032H 033H 032H 033H 030H 031H 00DH
232301
track number 123
Fourth digit
First digit
Second digit
Converted into ASCII code
Carridge
Third digit
Return
3 The code of “TRACK No. LOCATE” is “01BH”
according to “List of Commands” (see page A-10).
This “01BH” is output in the specified command
transmission format, as shown below.
N=2 since the number of data is 2
“01BH”
Line
N=2 1 B
Feed
vvvvv
00AH 032H 031H 042H 00DH
Carridge
Return
Converted into
ASCII code
4 Under this condition, if the AUTO PAUSE
function is turned off, The MDS-B5 locates and
plays the track number 123 immediately. When
the AUTO PAUSE function is turned on, The
MDS-B5 locates the track and pauses at the
beginning of the track.
Appendix
Appendix A-7
Page 80

Appendix
Menu Item List
RS-232C Protocol
Primary RS-232C-controllable functions supported by the MDS-B5
1 Supported functions
Items
Basic
Operations
Mode settings
Status detection
Descriptions
RECORD STANDBY (pause standby for recording)
RECORD (recording)
TRACK RECORD (assigns track number at any point while recording)
STOP
PLAY(playback)
PAUSE ON/OFF (pauses/cancels pauses)
CUE STANDBY (returns to the point where the play started and pauses)
CUE (scans forward or backward in fast playback)
NEXT/PREVIOUS (locates tracks ahead of or before the current point)
TRACK LOCATE (plays the specified track)
Sets the track order for program play (changes the track order to be played temporarily)
and sensing the contents of the setting.
Sets or clears the program play data (program area).
EJECT (ejects a disc)
Switches the analog/digital input.
Turns on/off the level sync for recording (marks track number according to the input signal
level variation).
TIMER PLAY (starts play automatically when the power is turned on)
AUTO PAUSE (pauses after playing each track)/AUTO CUE (locates the rising point of the
sound at the beginning of the tracks)
Sets the duration for the EOM function (outputs the status of the end of a track/disc).
Turns on or off the AUTO DISPLAY (displays the track title and time information
alternately).
Misoperation prevention mode (disables most of the buttons and controls on the MDS-B5).
Detects the model name and the software version.
Detects that the power is turned on .
Detects that the disc is inserted or not, the type of the disc (pre mastered or recordable),
and the record-protect slot is open or closed.
Detects the total number of tracks and the total disc playing time.
Detects the operation status (recording, playing, stopped, pausing, cueing, or disc has
been ejected).
Detects the current program number.
Detects that the next track is located during playing.
Detects the setting of the EOM function.
Detects that an error message is output.
Detects that a caution is output.
Detects that an illegal message is output.
Reference
commands
013H
013H
013H
010H
011H
010H
010H
016H
01AH
01BH
024H
02CH
010H
038H
033H
034H
030H
032H
031H
04CH
08FH
074H
0D6H
0DDH
0D0H
0D5H
076H
076H
070H
071H
072H
A-8 Appendix
Page 81

Descriptions
Time
information
Character
information
Editing
functions
Detects the total operation time of the spindle motor and the laser pickup during playback.
Detects the elapsed time of the current track.
Detects the remaining time of the track being played or paused.
Detects the total remaining recordable time of the disc.
Detects the disc title.
Detects the title of the current track.
TRACK ERASE (Erases the current or specified track.)
ALL ERASE (Erases the contents of the disc at one time.)
DIVIDE (Divides a track.)
COMBINE (Combines tracks.)
MOVE (Change places of tracks.)
2 Functions not supported
•Inserting a disc (Disc insertion is performed only
through the manual operation.)
•Detection of the total elapsed time and total
remaining time of the disc.
•Displaying all the titles on the disc (Titles are
displayed only one at a time.)
Reference
commandsItems
05EH
0D8H
0DCH
0DBH
0D7H
0D9H
013H
013H
017H
018H
019H
Appendix A-9
Appendix
Page 82

Appendix
A-10
Appendix
Lower
digit
0
1
2
3
4
5
6
7
8
Upper
digit
0
1
STOP, PAUSE,
CUE,
STANDBY,
EJECT
PLAY
RECORD,
ERASE
CUE
DIVIDE
COMBINE
2
TRACK No.
LOCATE
POINT
PRESET
PGM TRACK
NO. PRESET
MULTI
ACCESS
PRESET
NEXT AMS
SET
3
AUTO PAUSE,
AUTO CUE
SELECT
AUTO
DISPLAY
SELECT
END OF
MESSAGE
TIME PRESET
LEVEL SYNC
RECORD
SELECT
TIMER PLAY
SELECT
AUDIO INPUT
SELECT
4
5
MECHA
STATUS
SENSE
TRACK No.
STATUS
SENSE
DISC STATUS
SENSE
DISC NAME
SENSE
CURRENT
TRACK TIME
SENSE
67
ERROR
SENSE
REQUEST
CAUTION
SENSE
REQUEST
ILLEGAL
SENSE
REQUEST
POWER ON
STATUS
MODE
CHANGE
STATUS
DISC NAME
IN
ERROR
SENSE
indicates that the data is attached to the command.
8
9A
AUTO PAUSE,
AUTO CUE
DISPLAY
MESSAGE
TIME RETURN
TRACK No.
LOCATE
RETURN
PGM TRACK
NO. RETURN
ACCESS
PRESET
RETURN
NEXT AMS
RETURN
POINT
MULTI
LEVEL SYNC
RECORD
RETURN
TIMER PLAY
RETURN
AUDIO INPUT
RETURN
B
RETURN
AUTO
RETURN
END OF
SELECT
C
D
MECHA
STATUS
RETURN
TRACK No.
STATUS
RETURN
DISC STATUS
RETURN
DISC NAME
RETURN
CURRENT
TRACK TIME
RETURN
EF
ERROR
SENSE
RETURN
List of Commands
RS-232C Protocol
9
A
B
C
D
E
F
INFORMATION
REQUEST
MOVE
TRACK
LOCATE
TRACK No.
LOCATE
PGM MODE
SET
MULTI
ACCESS SET
PLAY MODE
SELECT
REPEAT
MODE
SELECT
REC MODE
SELECT
KILL LOCAL
MODE
SELECT
SWITCH
ENABLE
SELECT
CURRENT
TRACK NAME
SENSE
CURRENT
TOTAL
REMAIN TIME
SENSE
CURRENT
TRACK
REMAIN TIME
SENSE
TOTAL TRACK
No., TOTAL
TIME SENSE
HOUR METER
SENSE
TRACK NAME
IN
CAUTION
SENSE
ERROR DATA
CLEAR
CAUTION
DATA CLEAR
ERROR
STATUS
RETURN
CUE POINT
STATUS
RETURN
INFORMATION
RETURN
PGM MODE
RETURN
MULTI
ACCESS SLOT
RETURN
PLAY MODE
RETURN
REPEAT
MODE
RETURN
REC MODE
RETURN
KILL LOCAL
MODE
RETURN
SWITCH
ENABLE
RETURN
CURRENT
TRACK NAME
RETURN
CURRENT
TOTAL
REMAIN TIME
RETURN
CURRENT
TRACK
REMAIN TIME
RETURN
TOTAL TRACK
No, TOTAL
TIME RETURN
HOUR METER
RETURN
CAUTION
SENSE
RETURN
Page 83

Command Descriptions
INFORMATION REQUEST
Command: 00FH
Function : Requests the information such as model
name and version of the MDS-B5.
Data: None
RETURN command: 08FH
STOP, PAUSE, CUE, ST ANDBY,
EJECT
Command: 010H
Function : Activates the STOP, PAUSE, CUE,
STANDBY or EJECT function.
•STOP function
Stops the motor and rotation of the disc. The
mechanism becomes completely stationary.
•PAUSE function
The MDS-B5 stores the audio signals in the
buffer memory while in the PAUSE mode,
therefore the audio signals are immediately
played without the time lag when the deck
changes to PLAY mode. Also, while pausing at
the beginning of a track, the silent portion at the
beginning of the track is skipped if the AUTO
CUE function is turned on. This enables the
playback starting exactly from the rising point of
the sound. Note that the AUTO PAUSE
function is automatically turned on when the
AUTO PAUSE function is turned on. For
details, see “AUTO PAUSE, AUTO CUE
SELECT” Command: 030H.
•CUE STANDBY function
When this command is output, the deck locates
the position where the playback started the last
time and pauses at the point. This function is
useful for relocating a certain point in a track
after confirming the point by listening.
•EJECT function
The deck ejects the disc. This command is
active only when the deck is stopped. There is
no command for inserting the disc since the disc
insertion is possible only through manual
operation. Therefore, you cannot insert the disc
once ejected by command operation using an
external remote controller.
Data: 1
DATA1
000H: STOP
001H: CUE STANDBY
002H: PAUSE ON
003H: PAUSE OFF
004H: EJECT (disc ejection only, active only
when the deck is stopped)
RETURN command: None
PLAY
Command: 011H
Function : Starts playback.
Note
Even when the deck is pausing, the deck starts
playback whenever the PLAY command is sent
without sending the PAUSE OFF command.
Data: None
RETURN command: None
RECORD, ERASE
Command: 013H
Function : Starts recording or erasing.
When the “002H: TRACK RECORD” is output
during recording, a new track number is
marked without interrupting recording.
When the “003H: TRACK ERASE” or “004H:
ALL ERASE” described below is output, the
current track or the entire contents of the disc
are erased in an instant.
Note
Before recording or erasing, make sure that the
disc is recordable, the record-protect slot is
closed to enable recording or erasing, and that
there is enough remaining time on the disc for
recording.
Data: 1 (3)
DATA1
000H: RECORD
001H: RECORD STANDBY (recording pause)
(See “Notes on the RECORD STANDBY
status” below.)
002H: TRACK RECORD (Marks a track
number during recording.)
003H: TRACK ERASE (Erases a specified
track.) (See “Note on the TRACK ERASE
command” below.)
004H: ALL ERASE (Erases all tracks on a
disc.)
RETURN command: None
Appendix
Appendix A-11
Page 84

Command Descriptions
Appendix
Notes on the RECORD STANDBY status
• Before outputting the REC PLAY command,
use the MECHA STATUS SENSE command
to make sure that the deck is in RECORD
STANBY status.
• It may take a few seconds until the deck
pauses after receiving the RECORD
STANDBY command.
• The deck starts recording immediately when it
receives the PLAY command while in
RECORD STANDBY status. When the deck
receives the RECORD command while in
STOP mode, the audio input of the first
several seconds may be cut off.
• To pause recording, send the PAUSE ON
command (data 002H of command 010H).
The deck does not accept the RECORD
STANDBY command (data 001H of
command 013H) during recording.
• To resume recording when the deck is in
RECORD STANDBY status, send the PLAY
command (data 003H of command 011H) or
PAUSE OFF command (data 003H of
command 010H). The deck does not accept
the RECORD command (data 000H of
command 013H) during recording pause.
Note on the TRACK ERASE command
Output this command only when the deck is
stopped or pausing. If it is output during
playback, confusion may occur due to deletion
of (a) track(s). The deck does not accept the
TRACK ERASE command (data 003H of
command 013H) during recording.
• When erasing a specific track while the deck
is stopped, send the following data after
sending DATA1 (003H): DATA2 (10, 1)
(*000—255 (in decimal number)), DATA3
(**, 100)
• When erasing a specific track while the deck
is pausing, send DATA1 (003H).
• The pitch of the playback sound does not
change. However, the playback sound is
chopped and you might not be able to
recognize the detail of the track.
• You cannot change the cueing speed.
• On the MDS-B5, cueing is performed by
holding the 0 or ) button while it is
playing.
Data: 1
DATA1
002H: fast forward scan
00AH: fast backward scan
RETURN command: None
DIVIDE
Command: 017H
Function : Divides a track. This command is accepted
in the PLAY or PAUSE mode.
DATA: 1
DATA1
000H: Divides a track at the position where the
deck is currently playing or pausing.
001H: Starts the rehearsal to divide a track at
the position where the deck is currently
playing or pausing.
002H: Shifts the rehearsal starting point in
forward direction.
003H: Shifts the rehearsal starting point in
reverse direction.
004H: Divides a track at the current rehearsal
starting point.
005H: Changes the unit for moving the
rehearsal starting point in the following order:
frame n Sec n Min.
Note
Sending this command in the PLAY mode could
change the track numbers, resulting in
confusion.
RETURN command: None
CUE
Command: 016H
Function : Starts cueing while monitoring the sound in
faster speed than normal playback.
Notes
• The cueing is possible only when the deck is
playing.
A-12 Appendix
COMBINE
Command: 018H
Function : Combines succeeding tracks. This
command is accepted in the STOP, PLAY or
PAUSE mode.
DATA: 1 (3)
DATA1
Page 85

000H: If there are no DATA2 and DATA3: A
track currently being played or paused and the
previous track are combined.
If there are DATA2 and DATA3: When in the
STOP mode, a track specified by the DATA2
and DATA 3 and the previous track are
combined.
001H: Starts rehearsal play for combining the
tracks at the position where the two tracks will
be joined. If there are DATA2 and DATA3,
the rehearsal playback at the position where
the track specified by DATA2 and DATA3
and the previous track will be joined starts.
002H: The tracks are combined at the rehearsed
position
DATA2 (10, 1)
DATA3 (**, 100)
Specify the track No. to be combined in the
STOP mode.
Note
Sending this command in the PLAY mode could
change the track numbers and may result in
confusion. Therefore, operation should be
performed in the PAUSE status.
RETURN command: None
MOVE
TRACK LOCATE
Command: 01AH
Function : Skips the tracks in forward or reverse
direction.
DATA: 1
DATA1
000H: NEXT
001H: PREVIOUS
RETURN command: None
TRACK No. LOCATE
Command: 01BH
Function : Locates a specific track. This command is
used together with the “TRACK No. LOCATE
POINT PRESET” (023H) command described
below to locate a track preset by the 023H
command.
Note
Although the deck does not provide this
function, the devices used for recording or
playback supports this function by operating the
10 keys on the remote controller.
DATA: None
RETURN command: None
Command: 019H
Function : Moves a specific track to the desired
position to change the order of play.
Issue this command in the STOP, PLAY or
PAUSE mode.
DATA: 2 (4)
DATA1 (10, 1)
DATA2 (**, 100) destination (001-255, decimal
number)
DATA3 (10, 1)
DATA4 (**, 100) the track to be moved (001-
255, decimal number)
Notes
• If the MOVE command is executed in the
PLAY or PAUSE mode, DATA: 2 is
required.
Sending this command in the PLAY mode
could change the track numbers and may
result in confusion.
• If the MOVE command is executed in the
STOP mode, DATA: 4 is required.
• This command is not accepted in the
RECORD mode.
RETURN command: None
TRACK No. LOCATE POINT
PRESET
Command: 023H
Function : Specifies the track to be located.
This command is used together with the “TRACK No.
LOCATE” (01BH) command listed above.
DATA: 2 (1)
DATA1 (10, 1) (*001 to 255, decimal number)
DATA2 (**, 100)
DATA1=0FFH: TRACK No. LOCATE POINT
SENSE
However, when DATA1 is 0FFH, TRACK No.
LOCATE POINT SENSE becomes active to
request the RETURN command 0A3H.
RETURN command: 0A3H
PGM TRACK No. PRESET
Command: 024H
Function : Selects the tracks for program play.
Appendix A-13
Appendix
Page 86

Command Descriptions
Appendix
The tracks can be set for each program area.
(program area 1-25).
In this case, set the track order and program
area.
DATA: 4 (2)
DATA1 (10, 1)
DATA2 (**, 100)
Track No. (001 to 255) (DATA1: 0FFH)
(DATA2: ** for PGM SENSE)
DATA3 (10, 1) track order (STEP) (01 to 25)
DATA4 (10, 1) program area (00 to 39)
Note
If DATA3 and DATA4 are omitted (DATA: 2),
the program area is 00, and the tracks are
assigned sequentially to the area where no track
number has been assigned.
RETURN command: 0A4H
MULTI ACCESS PRESET
Command: 025H
Function : Registers tracks for multi-access function
into the slot.
DATA: 3
DATA1 (10, 1)
DATA2 (**, 100) : (track number 001 to 255)
DATA3 (10, 1) : slot No. 1 to 10
DATA1 : 0FFH for sense
RETURN command: A5H
Notes
• Set from the slot No.1. If you set from other
than the slot No.1, Tr 1 is assigned to the slot
which has not assigned a track.
• If you set the slot which has already been
assigned a track, it will be overwritten and the
previous setting will be lost.
• This command overwrites only the specified
slot and the settings in the other slots remains.
If you want to set fewer slots than in the
previous setting, clear the slots using the
command 2DH before setting (see the
example below).
Example:
Previous setting: /1-2-3-4-5/
If you want to assign Tr 9, 8, and 7 to the slot 1,
2, and 3 respectively without clearing the slots
using the command 2DH, the slot No.1, 2, and 3
are overwritten and the slot No.4 and 5 remain,
resulting the setting of “/9-8-7-4-5/”. If you
clear the slots using the command 2DH before
setting, the setting results in “/9-8-7/.”
A-14 Appendix
NEXT AMS SET
Command: 026H
Function : Sets the Next AMS function.
DATA: 3
DATA1: (10, 1)
DATA2: (**, 100)
: Tr No. 001-255
: Tr No. 001-255 (when playback mode
is continuous play)
: slot No. 1-10 (when playback mode is
multi access play)
: step No. 1-25 (when playback mode is
program play)
DATA3: 000H : next AMS off
: 001H : next AMS on
DATA1: 0FFH for sense
RETURN command: A6H
Notes
• To set the Next AMS function, set the DATA1
or DATA2 to “Tr No. DATA3 = 01H.”
• To change the Tr No. setting, set the Tr No.
DATA3 to 01H you want to change to
DATA1 or DATA2.
• To turn the Next AMS off, set the DATA3 =
00H.
PGM MODE SET
Command: 02CH
Function : Sets the data in a specific program area for
program play.
DATA: 2 (1)
DATA1
000H : PROGRAM SET
001H : PROGRAM SET PAUSE
002H : PROGRAM SET PLAY (active only
when the AUTO PAUSE and AUTO CUE
functions are off)
0CCH : PROGRAM CLEAR (Program area
= 00, if there is no DATA2)
0EEH : PROGRAM MODE RESET
(There is no DATA2)
(This command is accepted in the STOP
mode only)
0FFH : PROGRAM MODE SENSE (There is
no DATA2)
DATA2 (10, 1)
Program area (00 to 39)
(In the case of PROGRAM CLEAR command,
the program area = 0AA means that all program
areas are cleared.)
Page 87

Note
In the PROGRAM SET, PAUSE, PLAY or
PROGRAM CLEAR mode, the program area is
00 if there is no DATA2.
RETURN command: 0ACH
MULTI ACCESS SET
Command: 02DH
Function: Plays, memorizes, and clears the track data
specified for multi-access function.
DATA: 1
DATA1: (10, 1): Instant playback of slot No.1-
10
DATA1: (10, 1): 0AAH: Loading the track
data into the memory
DATA1: (10, 1): 0CCH: Clearing the setting
DATA1: (10, 1): 0FFH: Used for sense to
show the slot number currently played.
RETURN command: ADH
Notes
• Merely presetting using the command 25H
will not set the track data into memory. The
DATA1: 0AAH of this command should be
executed to set the track data into memory
before instant playback.
• Clearing the track data in the memory using
0CCH must be done while the MD deck is
stopped.
• The sensing must be done during playback or
pause status.
AUTO PAUSE, AUTO CUE
SELECT
Command: 030H
Function:
•AUTO PAUSE function:
The PAUSE status is set at the beginning of next
track automatically when certain track is
finishes playing. This function is used when
you do not want continuous play or when you
want to locate a specific track but not to play it
immediately. Also, this function is active in
repeat play or program play operation.
Further, the use of TRACK No. LOCATE
command causes the PAUSE status to be set
when the specified track is located.
•AUTO CUE function:
When locating a track, if there is a silent part at
the beginning of track, this function skips that
part up to the sound rising part and pauses the
deck. This function is used in the PAUSE status
at the beginning of a track to adjust finely the
transmission of PLAY command with the sound
rising timing.
DATA: 1
DATA1
000H: AUTO PAUSE OFF
001H: AUTO PAUSE ON
002H: AUTO CUE ON
0FFH: sense
RETURN command: 0B0H
AUTO DISPLAY SELECT
Command: 031H
Function : Switches the display on the deck between
title display and the time display. Since the title
and time are displayed simultaneously at all
times, the deck does not respond to this
command.
DATA: 1
DATA1
0FFH: (always returns 001H = AUTO
DISPLAY ON)
RETURN command: 0B1H
END OF MESSAGE TIME
PRESET
Command: 032H
Function : This function outputs the status from RS-
232C connector when the remaining time up to
the end of track becomes several seconds
(settable range: 1 to 35 sec. in the Track EOM
and 1 to 10 sec. in the Disc EOM) during
playing of a certain track.
The use of this function enables control of other
external equipment, expecting the end of track.
Note
To turn off this function, set the EOM to 000H.
DATA: 1
DATA1
Appendix
Appendix A-15
Page 88

Command Descriptions
000H: EOM MODE OFF
If Track EOM is set:
(10, 1) {*000 to 035, decimal number}
If Disc EOM is set: (E, X)
X=0: one second before the end of the disc
X=1: two seconds before the end of the disc
: :
X=9: ten seconds before the end of the disc
0FFH: EOM SENSE
RETURN command: 0B2H
LEVEL SYNC RECORD SELECT
Command: 033H
Function : This function marks the track number
automatically at the silent part of input signal
during recording. The track number is marked
at the rising point of audio signal, if the input
level remains below –50 dB (default setting) for
more than 1.5 seconds. For example, the track
is marked by utilizing a no-sound part between
tracks.
DATA: 1
DATA1
000H: LEVEL SYNC OFF
001H: LEVEL SYNC ON
0FFH: LEVEL SYNC SENSE
RETURN command: 0B3H
Function : Selects the audio input.
The analog input and digital input can be
selected.
DATA: 1
DATA1
000H: ANALOG INPUT
001H: DIGITAL INPUT (AES/EBU)
002H: DIGITAL INPUT (coaxial)
0FFH: AUDIO INPUT SENSE
However, when DATA1 is 0FFH, the AUDIO
INPUT SENSE command is selected to request
the RETURN command 0B8H.
RETURN command: 0B8H
PLAY MODE SELECT
Command: 03AH
Function : Selects the play mode.
DATA: 1
DATA1
000H: CONTINUE
001H: SHUFFLE
002H: PROGRAM
003H: MULTI ACCESS
0FFH: sense
Note
Use this command while the MD deck is
stopped.
RETURN command: 0BAH
Appendix
TIMER PLAY SELECT
Command: 034H
Function : Starts playing automatically when the
power is turned on. This function expects a
simple control by an external timer device that
turns on/off the AC power supply.
DATA: 1
DATA1
000H: TIMER PLAY OFF
001H: TIMER PLAY ON
002H: TIMER PLAY RESUME PLAY
003H: TIMER PLAY RESUME NEXT
004H: TIMER REC
0FFH: sense
RETURN command: 0B4H
AUDIO INPUT SELECT
Command: 038H
REPEAT MODE SELECT
Command: 03BH
Function : Selects the repeat mode.
DATA: 1
DATA1
000H: REPEAT OFF
001H: REPEAT ON
0FFH: sense
Note
Use this command while the MD deck is
stopped.
RETURN command: 0BBH
REC MODE SELECT
Command: 03CH
Function : Selects the recording mode.
DATA: 1
DATA1
A-16 Appendix
Page 89

000H: STEREO REC
001H: MONORAL REC
0FFH: sense
Note
Use this command while the MD deck is
stopped.
RETURN command: 0BCH
TRACK No. STATUS SENSE
Command: 055H
Function : Demands to output current track number.
DATA: None
RETURN command: 0D5H
KILL LOCAL MODE SELECT
Command: 03DH
Function : Selects the Kill Local function mode.
DATA: 1
DATA1
000H: KILL ALMOST
001H: KILL ALL
0FFH: sense
Note
Use this command while the MD deck is
stopped.
RETURN command: 0BDH
SWITCH ENABLE SELECT (KILL
LOCAL function)
Command: 04CH
Function : Enables/disables operation buttons on the
front panel of the deck. Select the DISABLE
(KILL LOCAL function) when you want to
prevent misoperation. Also, the deck provides
the KILL LOCAL function in the parallel
remote control mode, and the function is active
if either RS-232C control or parallel control is
turned on.
DATA: 1
DATA1
000H: DISABLE
001H: ENABLE
0FFH: SWITCH ENABLE SENSE
RETURN command: 0CCH
DISC STATUS SENSE
Command: 056H
Function : Demands to output information including a
disc is inserted or not, if it is premastered or
recordable disc, and if the record-protect slot is
open or not.
DATA: None
RETURN command: 0D6H
DISC NAME SENSE
Command: 057H
Function : Demands to output the disc title (character
information).
DATA: 1, or none (in this case, DATA=000H)
DATA1
000H: 1 to 8 characters from the beginning
001H: 9 to 16 characters from the beginning
002H: 17 to 24 characters from the beginning
::
::
009H: 73 to 80 characters from the beginning
00AH: 81 to 88 characters from the
beginning
00BH: 89 to 96 characters from the
beginning
00CH: 97 to 100 characters from the
beginning
RETURN command: 0D7H
CURRENT TRACK TIME SENSE
Appendix
MECHA STATUS SENSE
Command: 050H
Function : Demands to output the status information
of mechanism.
For the description of statuses, see “MECHA
STATUS RETURN”: 0D0H.
DATA: None
RETURN command: 0D0H
Command: 058H
Function : Demands to output the elapsed thme of a
track in PLAY or PAUSE mode. The “minute/
second” and “minute/second/sub-second” can be
selected.
Note
The MD format of the deck does not contain the
time code. For this reason, the set does not
support the slave operation by means of external
cycle or phase modulation.
Appendix A-17
Page 90

Command Descriptions
Appendix
DATA: 1
DATA1
000H: Output of minute/second
001H: Output of minute/second/sub-second
RETURN command: 0D8H
CURRENT TRACK NAME SENSE
Command: 059H
Function : Demands to output the title (character
information) of the current track in PLAY or in
PAUSE mode.
DATA: 1, or none (in this case, DATA1=000H)
DATA1
000H: 1 to 8 characters from the beginning
001H: 9 to 16 characters from the beginning
002H: 17 to 24 characters from the beginning
::
::
009H: 73 to 80 characters from the beginning
00AH: 81 to 88 characters from the
beginning
00BH: 89 to 96 characters from the
beginning
00CH: 97 to 100 characters from the
beginning
RETURN command: 0D9H
CURRENT TO T AL REMAIN TIME
SENSE
Command: 05BH
Function : Demands to output the remaining
recordable time in the RECORD or RECORD
STANDBY mode.
Note
This function outputs the time in minute/second
only, and the sub-second time is not output.
DATA: None
RETURN command: 0DBH
CURRENT TRACK REMAIN TIME
SENSE
Command: 05CH
Function : Demands to output the remaining time
from current point in PLAY or PAUSE mode to
the end of track.
Note
This function outputs the time in minute/second
only, and the sub-second time is not output.
DATA: None
RETURN command: 0DCH
TO T AL TRACK No., TOT AL TIME
SENSE
Command: 05DH
Function : Demands to output the total number of
tracks and total time of a disc.
Note
This command is not accepted during recording.
DATA: None
RETURN command: 0DDH
HOUR METER SENSE
Command: 05EH
Function : Demands to output total operation hours of
spindle motor, and optical pick-up (during
recording).
Note
On the deck, the time is displayed in the MENU
mode.
DATA: 1
DATA1
000H: Operation hours of spindle motor
001H: Operation hours of optical pick-up
(during recording)
RETURN command: 0DEH
DISC NAME IN
Command: 067H
Function : Enters disc title.
DATA: 2 to 9
DATA1
000H: 1 to 8 characters from the beginning
001H: 9 to 16 characters from the beginning
002H: 17 to 24 characters from the beginning
::
::
009H: 73 to 80 characters from the beginning
00AH: 81 to 88 characters from the
beginning
00BH: 89 to 96 characters from the
beginning
A-18 Appendix
Page 91

00CH: 97 to 100 characters from the
beginning
0CCH: Erases the disc title.
DATA2: The first character set in DATA1
DATA3: The second character set in DATA1
DATA4: The third character set in DATA1
DATA5: The fourth character set in DATA1
DATA6: The fifth character set in DATA1
DATA7: The sixth character set in DATA1
DATA8: The seventh character set in DATA1
DATA9: The eighth character set in DATA1
Notes
• When you want to input a disc title fewer than
8 characters, decrease the number of DATA as
required. For example, if you want enter
“ABC”, set the number of DATA to four and
make each DATA as follows:
DATA1: 000H
DATA2: A
DATA3: B
DATA4: C
As the character part is ASCII data, the actual
data sent is as follows:
Line
N=7
Feed
00AH 037H 036H 037H 030H 030H 041H 042H 043H
“067H”
“00H”
ABC
• DATA1=0CCH erases the disc title and will
not be accepted during recording.
TRACK NAME IN
Command: 069H
Function : Enters track title.
DATA: 2 to 9
DATA1
000H: 1 to 8 characters from the beginning
001H: 9 to 16 characters from the beginning
002H: 17 to 24 characters from the beginning
::
::
009H: 73 to 80 characters from the beginning
00AH: 81 to 88 characters from the
beginning
00BH: 89 to 96 characters from the
beginning
00CH: 97 to 100 characters from the
beginning
0CCH: Erases a track title.
0AAH: Erases all titles (of both tracks and
disc) on the disc.
DATA2: The first character set in DATA1
Carridge
Return
00DH
DATA3: The second character set in DATA1
DATA4: The third character set in DATA1
DATA5: The fourth character set in DATA1
DATA6: The fifth character set in DATA1
DATA7: The sixth character set in DATA1
DATA8: The seventh character set in DATA1
DATA9: The eighth character set in DATA1
Notes
• When you want to input a track title fewer
than 8 characters, decrease the number of
DATA as required. For example, if you want
enter “ABC”, set the number of DATA to four
and make each DATA as follows:
DATA1: 000H
DATA2: A
DATA3: B
DATA4: C
As the character part is ASCII data, the actual
data sent is as follows:
N=7
“069H”
Line
Feed
00AH 037H 036H 039H 030H 030H 041H 042H 043H
“00H”
ABC
• During playback, pause, recording, or AMS
status, a track name will be entered to the
currently played or selected track.
• While the MD deck is stopped, a track name
will be entered to the track specified with the
command 023H (Track No. LOCATE POINT
PRESET). The command 023H have to be
issued before entering a track title.
• DATA1=0CCH erases a track title and will
not be accepted during recording.
• DATA1=0AAH erases all the track and disc
titles on the disc and will not be accepted
during recording.
ERROR SENSE REQUEST
Command: 070H
Function : The deck outputs this information to
indicate that an error (failure or trouble)
occurred within the deck.
If this information is output, the controller
should issue the “ERROR SENSE”: 078H
command to sense its contents.
DATA: None
RETURN command: 078H
Carridge
Return
00DH
Appendix
Appendix A-19
Page 92

Command Descriptions
CAUTION SENSE REQUEST
Command: 071H
Function : The deck outputs this information to
indicate that the it is in caution status (it cannot
operate any more due to external causes such as
interrupted digital input during recording). If
this information is output, the controller should
issue the “CAUTION SENSE”: 079H
command to sense its contents.
DATA: None
RETURN command: 079H
ILLEGAL SENSE REQUEST
Command: 072H
Function : The deck outputs this information to
indicate that the it is in illegal status (an illegal
command is received).
DATA: None
RETURN command: None
003H: TRACK/EOM STATUS CHANGE
The deck notifies that the track number has
changed and EOM was output. Issue the
“END OF MESSAGE TIME PRESET”:
032H.
Upon this request from the set, the controller
should issue the “TRACK No. STATUS
SENSE”: 055H.
Note
When the EOM function has been set, the status
is output twice at the beginning of the track and
at EOM point in one track.
RETURN command: ***
ERROR SENSE
Command: 078H
Function : Senses the type of error for the “ERROR
SENSE REQUEST”: 070H.
DATA: None
RETURN command: 0F8H
Appendix
POWER ON STATUS
Command: 074H
Function : The deck notifies that its power has been
turned on.
If this information is output, the controller
should issue various SENSE commands such as
00FH, 050H, 055H, 078H and 079H to sense the
deck, software version and other information
that are not checked periodically.
DATA: None
RETURN command: ***
MODE CHANGE STATUS
Command: 076H
Function : The deck notifies that the mode has
changed as indicated with DATA1.
DATA: 1
DATA1
000H: MECHA STATUS CHANGE
Upon this request from the deck, the controller
should issue the “MECHA STATUS SENSE”:
050H.
CAUTION SENSE
Command: 079H
Function : Senses the type of caution for the
“CAUTION SENSE REQUEST”: 071H.
DATA: None
RETURN command: 0F9H
ERROR DATA CLEAR
Command: 07AH
Function : Clears error data.
DATA: None
RETURN command: None
CAUTION DATA CLEAR
Command: 07BH
Function : Clears caution data.
DATA: None
RETURN command: None
ERROR STATUS RETURN
A-20 Appendix
Command: 07DH
Function : Outputs for the error status detection.
Page 93

DATA: None
REQUEST command: None
MULTI ACCESS PRESET
RETURN
CUE POINT STATUS RETURN
Command: 07EH
Function : Outputs for the cue point detection.
DATA: None
REQUEST command: None
INFORMATION RETURN
Command: 08FH
Function : Returns information for the
“INFORMATION REQUEST”: 00FH.
DATA: 2
DATA1: DEVICE TYPE
022H: Deck for recording/playing (MDS-B5)
023H: Deck for playing only (MDS-B6P)
DATA2: SOFTWARE VERSION (2 DIGIT
BCD)
REQUEST command: 00FH
TRACK No. LOCATE POINT
RETURN
Command: 0A5H
Function : Returns information for the “MULTI
ACCESS PRESET”: 025H.
DATA: 3
DATA1 (10, 1)
DATA2 (**, 100) track No. (001 to 255)
DATA3 (10, 1) slot No. (1-10)
REQUEST command: 025H
NEXT AMS RETURN
Command: 0A6H
Function : Returns information for the “NEXT AMS
SET”: 026H.
DATA: 3
DATA1 (10, 1)
DATA2 (**, 100) Track No. (001 to 255)
DATA3: 000H: NEXT AMS OFF
001H: NEXT AMS ON
REQUEST command: 026H
Note
DATA1 and DATA2 is undefined when the
NEXT AMS is turned off.
Command: 0A3H
Function : Returns information for the “TRACK No.
LOCATE POINT PRESET”: 023H. This
information is returned even in the PLAY or
PAUSE mode.
DATA: 2
DATA1 (10, 1) {*001 to 255, decimal number}
DATA2 (**, 100)
REQUEST command: 023H
PGM TRACK No. RETURN
Command: 0A4H
Function : Returns information for the “PGM TRACK
No. PRESET”: 024H.
DATA: 4
DATA1 (10, 1)
DATA2 (**, 100) track No. (001 to 255)
DATA3 (10, 1) track order (STEP) (01 to 25)
DATA4 (10, 1) program area (00 to 39)
REQUEST command: 024H
PGM MODE RETURN
Command: 0ACH
Function : Returns information for the “PGM MODE
SET”: 02CH.
DATA: 2
000H: PGM MODE OFF
001H: PGM MODE ON
REQUEST command: 02CH
MULTI ACCESS SLOT RETURN
Command: 0ADH
Function : Returns information for the “MULTI
ACCESS SET”: 02DH.
DATA: 1
DATA1: (10, 1): the slot currently played back
REQUEST command: 02DH
Appendix
Appendix A-21
Page 94

Command Descriptions
AUTO PAUSE, AUTO CUE
RETURN
Command: 0B0H
Function : Returns information for the ON/OFF of
AUTO PAUSE or AUTO CUE function.
DATA: 1
DATA1
000H: AUTO PAUSE OFF
001H: AUTO PAUSE ON
002H: AUTO CUE ON
003H: AUTO SPACE ON
REQUEST command: 030H
AUTO DISPLAY RETURN
Command: 0B1H
Function : Returns information for the ON/OFF of
AUTO DISPLAY function.
DATA: 1
DATA1
001H: AUTO DISPLAY ON
The deck always returns AUTO DISPLAY ON
(0001H).
REQUEST command: 031H
LEVEL SYNC RECORD RETURN
Command: 0B3H
Function : Returns information for the setting of
LEVEL SYNC RECORD function.
DATA: 1
DATA1
000H: LEVEL SYNC RECORD OFF
001H: LEVEL SYNC RECORD ON
REQUEST command: 033H
TIMER PLAY RETURN
Command: 0B4H
Function : Returns information for the setting of
TIMER PLAY function.
DATA: 1
DATA1
000H: TIMER PLAY OFF
001H: TIMER PLAY ON
002H: TIMER PLAY RESUME PLAY
003H: TIMER PLAY RESUME NEXT
004H: TIMER REC
REQUEST command: 034H
Appendix
END OF MESSAGE TIME
RETURN
Command: 0B2H
Function: Returns information for the setting of END
OF MESSAGE function.
Note
Set this to 000H to turn off the EOM function.
DATA1
000H: EOM MODE OFF
001H: EOM RETURN
When it is set at the end of track: (10, 1) {*000
to 035, decimal number}
When it is set at the end of disc: (E, X)
X=0: one second before the end of the track
X=1: two seconds before the end of the track
: :
X=9: ten seconds before the end of the track
REQUEST command: 032H
AUDIO INPUT SELECT RETURN
Command: 0B8H
Function : Returns information for selection of audio
input.
DATA: 1
DATA1
000H: ANALOG INPUT
DATA1: 001H: DIGITAL INPUT (AES/EBU)
DATA1: 002H: DIGITAL INPUT (coaxial)
REQUEST command: 038H
PLAY MODE RETURN
Command: 0BAH
Function : Returns information for the “PLAY MODE
SELECT”: 03AH.
DATA: 1
DATA1
000H: CONTINUE
001H: SHUFFLE
002H: PROGRAM
003H: MULTI ACCESS
REQUEST command: 03AH
A-22 Appendix
Page 95

REPEAT MODE RETURN
MECHA STATUS RETURN
Command: 0BBH
Function : Returns information for the “REPEAT
MODE SELECT”: 03BH.
DATA: 1
DATA1
000H: REPEAT OFF
001H: REPEAT ON
REQUEST command: 03BH
REC MODE RETURN
Command: 0BCH
Function : Return information for the “REC MODE
SELECT”: 03CH.
DATA: 1
DATA1
000H: STEREO REC
001H: MONORAL REC
REQUEST command: 03CH
KILL LOCAL MODE RETURN
Command: 0BDH
Function : Return information for the “KILL LOCAL
MODE SELECT”: 03DH.
DATA: 1
DATA1
000H: KILL ALMOST
001H: KILL ALL
REQUEST command: 03DH
SWITCH ENABLE RETURN (KILL
LOCAL function)
Command: 0CCH
Function : Returns information for the “SWITCH
ENABLE SELECT (KILL LOCAL function)”:
04CH.
DATA: 1
DATA1
000H: DISABLE
001H: ENABLE
REQUEST command: 04CH
Command: 0D0H
Function : Returns information for the “MECHA
STATUS SENSE”: 050H.
DATA: 1
DATA1
bit7: REC bit (in RECORD mode)
bit6: TOC WRITING (writing TOC on disc)
bit5: CUE bit (during fast forward scan)
bit4: STOP bit (in STOP mode)
bit3: REVERSE bit (during fast rewind scan)
001H: PLAY
010H: PAUSE ON
012H: STOP
013H: EJECT
014H: DISC OUT (disc has been ejected)
023H: CUE (during fast forward scan)
02BH: CUE (during fast rewind scan)
052H: TOC WRITING
080H: REC STANDBY, REC PAUSE
Note
Each “bitX” listed above expresses the DATA
definition listed under “bitX” in binary notation.
Therefore, the commands actually returned are
the DATA only such as “001H” and “023H”.
REQUEST command: 050H
TRACK No. STATUS RETURN
Command: 0D5H
Function : Returns information for the “TRACK No.
STATUS SENSE”: 055H.
DATA: 3
DATA1 bit0: EOM STATUS
DATA2 (10, 1) {*001 to 255, decimal number}
DATA3 (**, 100)
REQUEST command: 055H
DISC STATUS RETURN
Command: 0D6H
Function : Returns information for the “DISC
STATUS SENSE”: 056H.
DATA: 1
bit4: REC PROTECT (record protect status)
bit3: PRE RECORDED DISC (a premastered
disc is loaded)
bit0: DISC PRESENT (a disc is loaded)
REQUEST command: 056H
Appendix
Appendix A-23
Page 96

Command Descriptions
DISC NAME RETURN
Command: 0D7H
Function : Returns information for the “DISC NAME
SENSE”: 057H.
DATA: 9
DATA1
000H: 1 to 8 characters from the beginning
002H: 9 to 16 characters from the beginning
::
::
00BH: 89 to 96 characters from the
beginning
00CH: 97 to 100 characters from the
beginning
DATA2
First character set by DATA1
DATA3
Second character set by DATA1
DATA4
Third character set by DATA1
DATA5
Fourth character set by DATA1
DATA6
Fifth character set by DATA1
DATA7
Sixth character set by DATA1
DATA8
Seventh character set by DATA1
DATA9
Eighth character set by DATA1
REQUEST command: 057H
CURRENT TRACK NAME
RETURN
Command: 0D9H
Function : Returns information for the “CURRENT
TRACK NAME SENSE”: 059H.
DATA: 9
DATA1
000H: 1 to 8 characters from the beginning
002H: 9 to 16 characters from the beginning
::
::
00BH: 89 to 96 characters from the
beginning
00CH: 97 to 100 characters from the
beginning
DATA2
First character set by DATA1
DATA3
Second character set by DATA1
DATA4
Third character set by DATA1
DATA5
Fourth character set by DATA1
DATA6
Fifth character set by DATA1
DATA7
Sixth character set by DATA1
DATA8
Seventh character set by DATA1
DATA9
Eighth character set by DATA1
REQUEST command: 059H
Appendix
CURRENT TRACK TIME RETURN
Command: 0D8H
Function : Returns information for the “CURRENT
TRACK TIME SENSE”: 058H. The elapsed
time of the track in PLAY or PAUSE mode.
DATA: 3 (4)
DATA1
000H: Outputs minute/second
002H: Outputs minute/second/sub-second
DATA2
(Minute) 0 to 74
DATA3
(Second) 0 to 59
DATA4
(Sub-second) 0 to 85
REQUEST command: 058H
A-24 Appendix
CURRENT TO T AL REMAIN TIME
RETURN
Command: 0DBH
Function: Returns information for the “CURRENT
TOTAL REMAIN TIME SENSE”: 05BH.
DATA: 3
DATA1 (minute)
DATA2 (second)
REQUEST command: 05BH
Page 97

CURRENT TRACK REMAIN TIME
RETURN
Command: 0DCH
Function: Returns information for the “CURRENT
TRACK REMAIN TIME SENSE”: 05CH.
DATA: 2
DATA1 (minute)
DATA2 (second)
REQUEST command: 05CH
Note
Read the above case as *-**,*** (Example: 105, 2-50).
In case of no error:
DATA1 (0, 0)
DATA2 ( , 0)
REQUEST command: 078H
ERROR code:
1-04: An error occurred in RAM (Random
Access Memory: write/read memory).
TO T AL TRACK No., TOT AL TIME
RETURN
Command: 0DDH
Function : Returns information for the “TOTAL
TRACK No., TOTAL TIME SENSE”: 05DH.
DATA: 4
DATA1 (10, 1) TOTAL TRACK No.
DATA2 (**, 100) TOTAL TRACK No.
DATA3 (minute) TOTAL TIME
DATA4 (second) TOTAL TIME
REQUEST command: 05DH
HOUR METER RETURN
Command: 0DEH
Function: Returns information for the “HOUR
METER SENSE”: 05EH.
DATA: 4
DATA1
000H: Total operation hours of spindle motor
002H: Total operation hours of optical pick-
up (in RECORD mode)
DATA2 (10, 1)
DATA3 (1000, 100)
DATA4 (**, 10000)
REQUEST command: 05EH
CAUTION SENSE RETURN
Command: 0F9H
Function : Returns information for the “CAUTION
SENSE”: 079H.
DATA: 2
DATA1 (**, ***)
DATA2 ( , *)
Note
Read the above case as *-** ***.
In case of no caution:
DATA1 (0, 0)
DATA2 ( , 0)
REQUEST command: 079H
ERROR code:
1-05: Backup Data Clear
1-11: Digital IN Unlock
1-13: Protected (disc is record-protected)
1-14: Disc Full (no area remains for recording)
1-16: Retry (recording is retried because of
vibration and flaw in disc)
1-17: Disc Error (many flaws or no TOC in
disc)
1-18: Cannot Edit (editing is impossible)
1-19: Impossible or Sorry (editing is
impossible)
Appendix
ERROR SENSE RETURN
Command: 0F8H
Function : Returns information for the “ERROR
SENSE” : 078H.
DATA: 2
DATA1 (**, ***)
DATA2 ( , *)
Appendix A-25
Page 98

Specifications
Specifications
Appendix
General
Power requirements AC 120 V, 60 Hz (for the U.S.
and Canada),
AC 220 to 230V, 50/60 Hz (for
the European countries)
Power consumption 30 W
Operationg temperature
5°C to 35°C (41°F to 95°F)
Storage temperature –20°C to +55°C (–4°F to 131°F),
without moisture condensation
Dimentions (w/h/d) About 212 × 139 × 375 mm (8
3
× 5 1/2 × 14 7/8 inches)
Weight About 5 kg (11 lb)
Laser characteristics
Laser Semiconductor laser (λ=780 ηm)
Emission duration: continuous
Laser output power
Max. 44.6 µW
*
This output is the value measured at a distance of 200 mm
from the objective lens surface on the optical pick-up
block with 7 mm aperture.
*
Digital audio signal format
System MiniDisc digital audio system
Disc MiniDisc
Modulation format EFM (Eight to Fourteen
Modulation)
Digital audio channel 2 channels, 1 channel
Sampling frequency 44.1 kHz
Error correction ACIRC (Advanced Cross
Interleave Reed Solomon
Code)
Rotation mode CLV (about 400 to 900 r.p.m.)
Input connectors
Digital input (COAXIAL)
Connector RCA PHONO
Input impedance 75 ohms
Reference level 0.5 Vp-p
Digital input (AES/EBU)
Connector XLR-3, FEMALE
Input impedance 110 ohms, balanced
Output connectors
/8
Analog output (LINE)
Connector XLR-3, FEMALE
Output impedance Approx. 150 ohms, balanced
Reference level +4 dBs (factory setting)
(+4 dBs to –12dBs)
Maximum level +24 dBs
Load impedance More than 10 kilo ohms
Digital output (COAXIAL)
Connector RCA PHONO
Output impedance 75 ohms
Refefence level 0.5 Vp-p
Load impedance 75 ohms
Digital output (AES/EBU)
Connector XLR-3, MALE
Input impedance 20 ohms, balanced
Load impedance 110 ohms
Remote connectors
REMOTE (25P)
Connector D-SUB 25-pins (female)
Format Parallel
Input level L: ground short (less than 100
ohms)
H: open collector (high impedance)
Output level L: less than 0.8 V (Imax: 50 mA)
H: 10 k pull-up (5 V)
+5 V output Imax. 200 mA
*
Analog input
Connector XLR-3, FEMALE
Input impedance Approx. 10 kilohms, balanced
Reference level +4 dBs (factory setting)
(+4 dBs to –12dBs)
A-26 Appendix
*
When connecting the keyboard, the total value of the +5 V
output and keyboard power consumption must be lower
than Imax. 200 mA.
Page 99

RS-232C
Baud rate Max 9600 (1200 baud/2400 baud/
4800 baud/9600 baud,
changeable by button operation)
Word length 8 bits
Stop bit Stop bit 1/Stop bit 2, changeable by
button operation
Parity Parity Odd/Parity Even/Parity Off,
changeable by button operation
Audio characteristics
Frequency response 20 Hz to 20 kHz, ±0.5 dB
Signal-to-noise ratio More than 88 dB (with A-weight
filter, when playing back
recordable disc)
More than 95 dB (with A-weight
filter, when playing back
premastered disc)
Total harmonic distortion
Less than 0.05% (at reference
*
, 1 kHz, when playing back
level
recordable disc)
Less than 0.05% (at reference
*
, 1 kHz, when playing back
level
premastered disc)
Wow and flatter Below measurable limit
(±0.001%, W.Peak)
*
The reference level is the level at –20 dB from the full bit
on the peak level meter scale.
Supplied accessories
Wired remote controller (1)
Connecting cable (1)
Keyboard template (1)
AC power cord (1)
Operation manual (1)
US and foreign patents licensed from Dolby
Laboratories Licensing Corporation.
Design and specifications are subject to change
without notice.
Appendix
Appendix A-27
Page 100

 Loading...