

Page 1

SON'K
3-756-535-21(1)
MiniDisc
Recorder
Operating Instructions
M
DdIe
) 1993 by Sony Corporation
Page 2

WARNING
To prevent fire or shock hazard, do not expose the unit to rain or moisture.
CAUTION
RISK OF ELECTRIC SHOCK
DO NOT OPEN
CAUTION , TO REDUCE THE RISK OF ELECTRIC SHOCK,
DO NOT REMOVE COVER (OR BACK).
NO USER,SEHVICEABLE PARTS INSIDE.
REFER SERVICING TO QUALIFIED SERVICE PERSONNEL.
This symbol is intended to alert the
user to the presenoe of uninsulated
“dangerous voltage" within the
produet's enclosure that may be of
sufficient magnifode to constitute a risk
of electric shock to persons.
This symbol is intended to alert the
user to the presence of important
operating and maintenance (servicing)
instructions in the literature
accompanying the appliance.
Owner’s Record
The model and serial numbers are located on the rear of the
unit. Record the serial number in the space provided below.
Refer to them whenever you call upon your Sony dealer
regarding this product.
Model No. MDS-101 Serial No.
INFORMATION
This equipment has been tested and found to comply with
the limits for a Class B digital device, pursuant to Part 15 of
the FCC rules. These limits are designed to provide
reasonable protection against harmful interference in a
residential installation. His equipment generates, uses, and
can radiate radio frequency energy and, if not installed and
used in accordance with the instructions, may cause harmful
interference to radio communications. However, there is no
guarantee that interference will not occur in a particular
installation. If this equipment does cause harmful
interference to radio or television reception, which can be
determined by turning the equipment off and on, the user is
encouraged to try to correct the interference by one or more
of the following measures:
— Reorient or relocate the receiving antenna.
— Increase the separation between the equipment and the
receiver.
— Connect the equipment into an outlet on a circuit different
from that to which the receiver is connected.
— Consult the dealer or an experienced radio/TV technician ^
for help.
m
CAUTION
You are cautioned that any changes or modifications not ilM
expressly approved in this manual could void your authorityS
to operate this equipment.
For the customers in Canada CAUTION
TO PREVENT ELECTRIC SHOCK, DO NOT USE THIS
POLARIZED AC PLUG WITH AN EXTENSION CORD, '
RECEPTACLE OR OTHER OUTLET UNLESS THE
BLADES CAN BE FULLY INSERTED TO PREVENT BLAD„g|
EXPOSURE. 3
This apparatus complies with the Class B limits for radio -jS
noise emissions set out in Radio Interference Regulations. ■
IN NO EVENT SHALL SELLER BE LIABLE FOR ANY
DIRECT, INCIDENTAL OR CONSEQUENTIAL DAMAGES
OF ANY NATURE, OR LOSSES OR EXPENSES
RESULTING FROM ANY DEFECTIVE PRODUCT OR THE
USE OF ANY PRODUCT.
-n
Page 3

Table of Contents
Welcome!....................................................................4
What Is the MiniDisc?...................................................5
Preparations
Precautions..................................................................6
Unpacking
Looking at the Controls
Hooking Up the System
Setting the Clock........................................................15
Listening to a MiniDisc (MD)
Playing an MD (Normal Play).......................................16
Playing Tracks in Random Order (SHUFFLE Play)
Playing Tracks in a Specific Order (PROGRAM Play)
Playing Tracks Repeatedly
Scanning Tracks (Music Scan)
Inserting Spaces During Playback (Auto Space)............24
Recording a MiniDisc
Recording a Digital Source..........................................25
Recording From the Line (Analog) Input Jack
Recording From a Microphone.....................................29
Track Marking During Recording
CD Synchro-Recording................................................32
Editing a Recorded MiniDisc
Editing Functions for a Recorded MiniDisc
Erasing Recordings (ERASE Function)
Dividing Recorded Tracks (DIVIDE Function)
Combining Recorded Tracks (COMBINE Function)
Moving Recorded Tracks (MOVE Function)...................42
Labeling Recordings (TITLE Function)
...................................................................
Checking the supplied accessories............................7
Notes on installation................................................7
Checking the operating voltage
Installing batteries into the remote commander
Front panel.............................................................8
Remote commander................................................9
Before you begin...................................................10
Notes on the optical digital input/oulput jacks
Hooking up a Sony Mini Hi-Fi Component System
Hooking up other audio equipment
Hooking up a microphone......................................14
Playing an MD from the first track
Locating a desired track........................................ 17
Locating the beginning of a track (ÀMS)
Locating a desired position (Search).......................18
Displaying the title and remaining playing
time of a track
Displaying the recording date
Playing tracks repeatedly.......................................22
Playing a specified portion repeatedly (A-B Repeat)..23
Digital recording....................................................25
Playing back tracks just recorded
Analog recording...................................................27
Adjusting the recording level..................................28
To protect a MiniDisc against accidental erasure
Automatic track marking
Manual track marking
Erasing a single track
Erasing tracks successively
Erasing a disc
Erasing a part of a track
Labeling a track
Labeling a disc......................................................45
................................................
..............................................
.................................................
.......................................................
....................................................
................................
........................
..........................
................................
..........................................
.....................................
...........................
.................................
.......................................
...........................................
............................................
........................................
.........................
....................................
.........................
........
.........
.....
.................
.........
.......
...............
......
....................
...............
........
Additional Information
Specifications.............................................................47
Display Messages.......................................................48
System Limitations.....................................................48
Troubleshooting Guide
Guide to the Serial Copy Management System
7
Index
.............................................................
7
Note on procedures
7
Most of the procedures in this manual are performed
8
through the front panel controls. Procedures that require
use of the remote commander are marked "Remote
10
10
13
16
17
18
19
20
22
24
26
27
,28
31
31
31
34
36
36
37
38
38
39
41
44
44
commander operation only." When both sets of controls
are applicable but are represented by different marks, the
front panel control is shown first, followed by the
respective remote commander control in parentheses.
11
20
...............................................
.............
Back cover
49
50
Page 4

Welcome!
Welcome to the world of the MiniDisc! The Sony MiniDisc Recorder is the result of
Sony's on-going commitment to leadership in audio-video technology. Here are some
of the capabilities and features you’ll discover with the new MiniDisc Recorder.
CD-like performance
• Direct access to up to 25 tracks through your remote
commander, just like a CD player.
• A music calendar that shows at a glance which track is
being played back, recorded or edited. A grid display
function provides easy distinction between premastered
and recordable discs.
• Convenient playback functions such as shuffle play,
program play, music scan, and repeat (all tracks, a single
track or a specific portion),
• A digital peak meter for accurate signal level monitoring
during input and output.
An array of special features
• A title function for creating title of up to 100 characters for
recorded discs and fracks.
• Instant delete function for an entire disc or a single track.
• Multiple TOC-based editing functions that allow you to
divide, combine and move tracks with ease. Sound
monitoring during track division is also supported. ,
• Track marking function for automatic or manual addition
of track numbers while recording.
State-of-the-art technology
• ATRAC (Adaptive TRansform Acoustic Coding) data
compression technology with a compression ratio of
about 1:5, providing almost the same disc playing time as a
CD.
• Professional level memory start function for fast
playback resumption during play pause. Sound is output
from an internal memory rather than the disc to eliminate
delays due to disc rotation lag (of about 0.1 to 0.3
seconds).
• Automatic date and time stamp function for recordings.
Multi-purpose input and output jacks
• Digital I/O, analog I/O, and microphone input jacks to
accomodate a variety of sound sources. Connect digital
sound sources for direct, adjustment-free playback or
dubbing of digital sound.
Audio (AU) bus interface for connection with future Sony
Mini Hi-Fi Component Systems supporting CD synchrorecording and other automatic functions.
4
Page 5
What Is the MiniDisc?
How MiniDiscs work
MiniDiscs (MD) come in two types: premastered
(prerecorded) and recordable (blank). Premastered MOs,
recorded at music studios, can be played back almost
endlessly. However, they can’t be recorded on or over like
cassette tapes. To record, you use a ‘‘recordable MD”.
Premastered MDs
Premastered MDs are recorded and played like regular CDs.
A laser beam focuses on the pits in the surface of the MD
and reflects the data back to the lens in the recorder. The
recorder then decodes the signals and plays them back as
music.
Recordable MDs
Recordable MDs, which use magneto-optical (MO)
technology, can be recorded again and again. The laser
inside the recorder applies heat to the MD, demagnetizing
the magnetic layer of the MD. (See illustration below.) The
recorder then applies a magnetic field to the layer. This
magnetic field corresponds exactly to the audio signals
generated by the connected source. (The north and south
polarities equate to digital “1" and “0”.) The demagnetized
MD adopts the polarity of the magnetic field, resulting in a
recorded MD.
■ Recording Mechanism
Head Drive Signal
ih П П
Recording Head
tTttttttttttt Magnetic Field
О I-
Cross-Se ctional View
Recorded Pattern
Move direction New
n(s( N ( S~~T^S~(n (
Recorded Pattern
ЕЕЕПЗЕХНН:
Laser Beam
Old
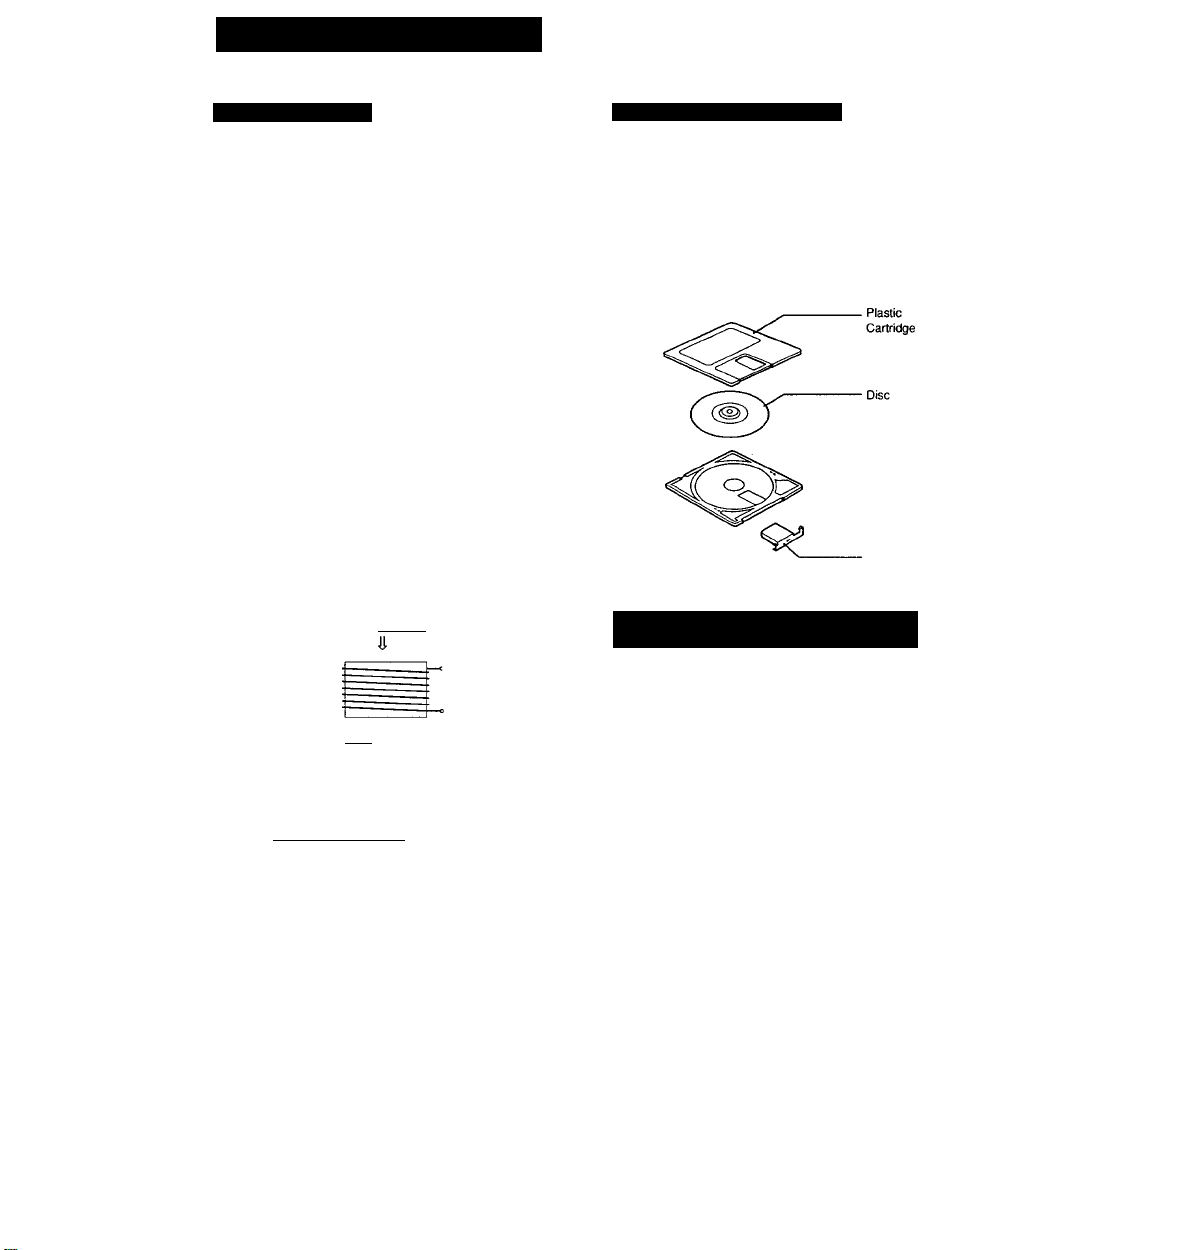
How the MiniDisc got so small
The 2.5-inch MiniDisc, encased in a plastic cartridge that
looks like a 3.5-inch diskette (see Illustration below), uses a
new digital audio compression technology called ATRAC
(Adaptive TRansform Acoustic Coding). To store more sound
In less space, ATRAC extracts and encodes only those
frequency components actually audible to the human ear.
■ Parts Making Up a MiniDisc
Shutter
How Quick Random Access and the TOC systems work
Like CDs, MDs offer instantaneous random access to the
beginning of any music track. Premastered MDs are
recorded with location addresses corresponding to each
music selection. Recordable MDs are manufactured with a
"User TOC* Area” to contain the order of the music. The
TOC system is similar to the “directory management system"
of floppy disks. In other words, starting and ending
addresses for all music tracks recorded on the disc are
stored in this area. This lets you randomly access the
beginning of any track as soon as you enter the track
number (AMS), as well as label the location with a track
name as you would a file on a diskette.
* TOC is the acronym for Table of Contents.
Page 6

What Is the MiniDisc?
Precautions
How the Shock-Resistant Memory works
One major drawback of optical read systems is that they can
skip or mute when subjected to vibration. The MD system
resolves this problem by using a buffer memory that stores
up to 10 seconds of audio data. This is possible because of a
1 second lag between the time audio data is picked up and
when it is decoded (see illustration below). Should the optical
pickup be jarred out of position, the correct audio data plays
from the buffer memory. Using a concept called “sector
repositioning,” the optical pickup has the ability to within 13
milliseconds identify the disruption and resume reading from
the correct point. As long as the optical pickup returns to the
correct position within about 10 seconds, you never
experience mistracking or muting.
■ Shock-Resistant Memory System
When playing
normally
Optical
pickup
“1^ TL
Mill
•••••
Buffer
•••••
•••••
memory
•••••
••••• •••••
ATRAC
Û
decoder
II I I I
ccooo
ATRAC
When subjected
to vibration
Optical
pickup
Flow of
data stops
Buffer
••
memory
•••••
decoder |______________|
11111
ooooo
On safety
• As the laser beam used in this unit is harmful to the eyes,
do not attempt to disassemble the cabinet. Refer servicing
to qualified personnel only.
• Should any solid object or liquid fall into the unit, unplug
the unit and have it checked by qualified personnel before
operating it any further.
On power sources
• Unplug the unit from the wall outlet when it is not to be
used for an extended period of time.
On operation
• If the unit is brought directly from a cold to a warm location,
or Is placed in a very damp room, moisture may condense
on the lenses inside the MiniDisc recorder, causing the
MiniDisc recorderto operate improperly. Should this occur,,
remove the disc and wait about an hour for the moisture to
evaporate.
On the MiniDisc cartridge
• Do not open the shutter to expose the disc. '"-i
• Do not place the cartridge where it will be subject to
extremes of sunlight, temperature, moisture or dust.
On cleaning '
• Clean the casing with a soft cloth slightly moistened with’’^
water or a mild detergent solution. Do not use any typepf |
abrasive pad, scouring powder or solvent such as alcoholl
or benzene as it may mar the finish of the casing.
If you have any questions or problems concerning your
unit,I
please consult your nearest Sony dealer.
Page 7
Unpacking
Checking the supplied accessories
Take the recorder out of the box and make sure that the
following accessories have been included:
• Remote commander {1)
• Sony SUM-3 (NS) batteries (2)
• Audio connecting cords (2)
• Audio (AU) bus cable (1)
• Recordable MD (60-minute) (1)
Notes on installation
• Place the unit with the front panel facing you in a location
with adequate air circulation to prevent the unit from
overheating.
• Do not place the unit;
— near heat sources such as radiators or air ducts.
— in places subject to direct sunlight, excessive dust,
mechanical vibration or shock.
— in an inclined position.
— on a rug or other soft surface that would block the
ventilation holes on the bottom of the unit.
Do not throw away the carton and the packing material
They will come in handy when transporting the unit or
shipping it for servicing.
Checking the operating voltage
• Operate the unit only on 120 V AC, 60 Hz.
• Before operating the unit, be sure that the operating voltage
of your unif is identical with that of your local power supply.
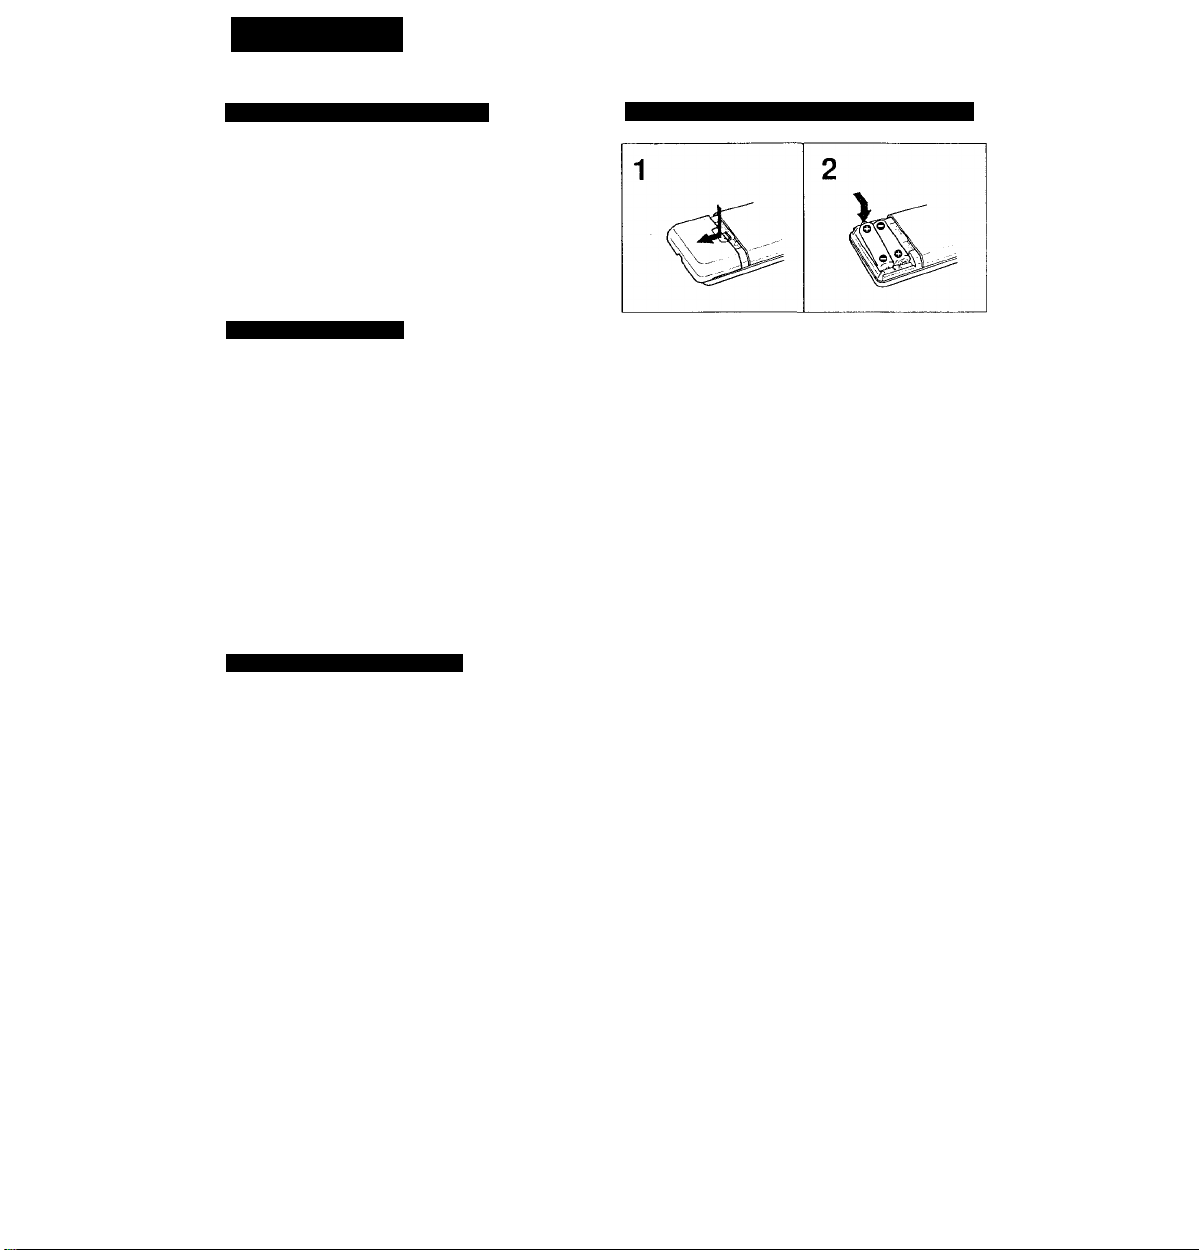
Installing batteries into the remote commander
1 Open the remote commander cover. 2 Insert two Sony SUM-3 (NS) batteries with correct
polarity.
On battery life
• About half a year of normal operafion can be expected
when using the Sony SUM-3 (NS) batteries.
• When the batteries are run down, the remote commander
will not operate the unit. In this case, replace both batteries
with new ones.
On handling
• Keep the commander away from extremely hot or humid
places.
• Avoid dropping any foreign objecfs into the commander
casing, particularly when replacing the batteries.
• Avoid exposing the remote sensor to direct sunlight or
lighting apparatus. Such exposure can cause a malfunction.
• To avoid damage caused by battery leakage and corrosion,
remove the batteries when the commander will not be used
for a long time.
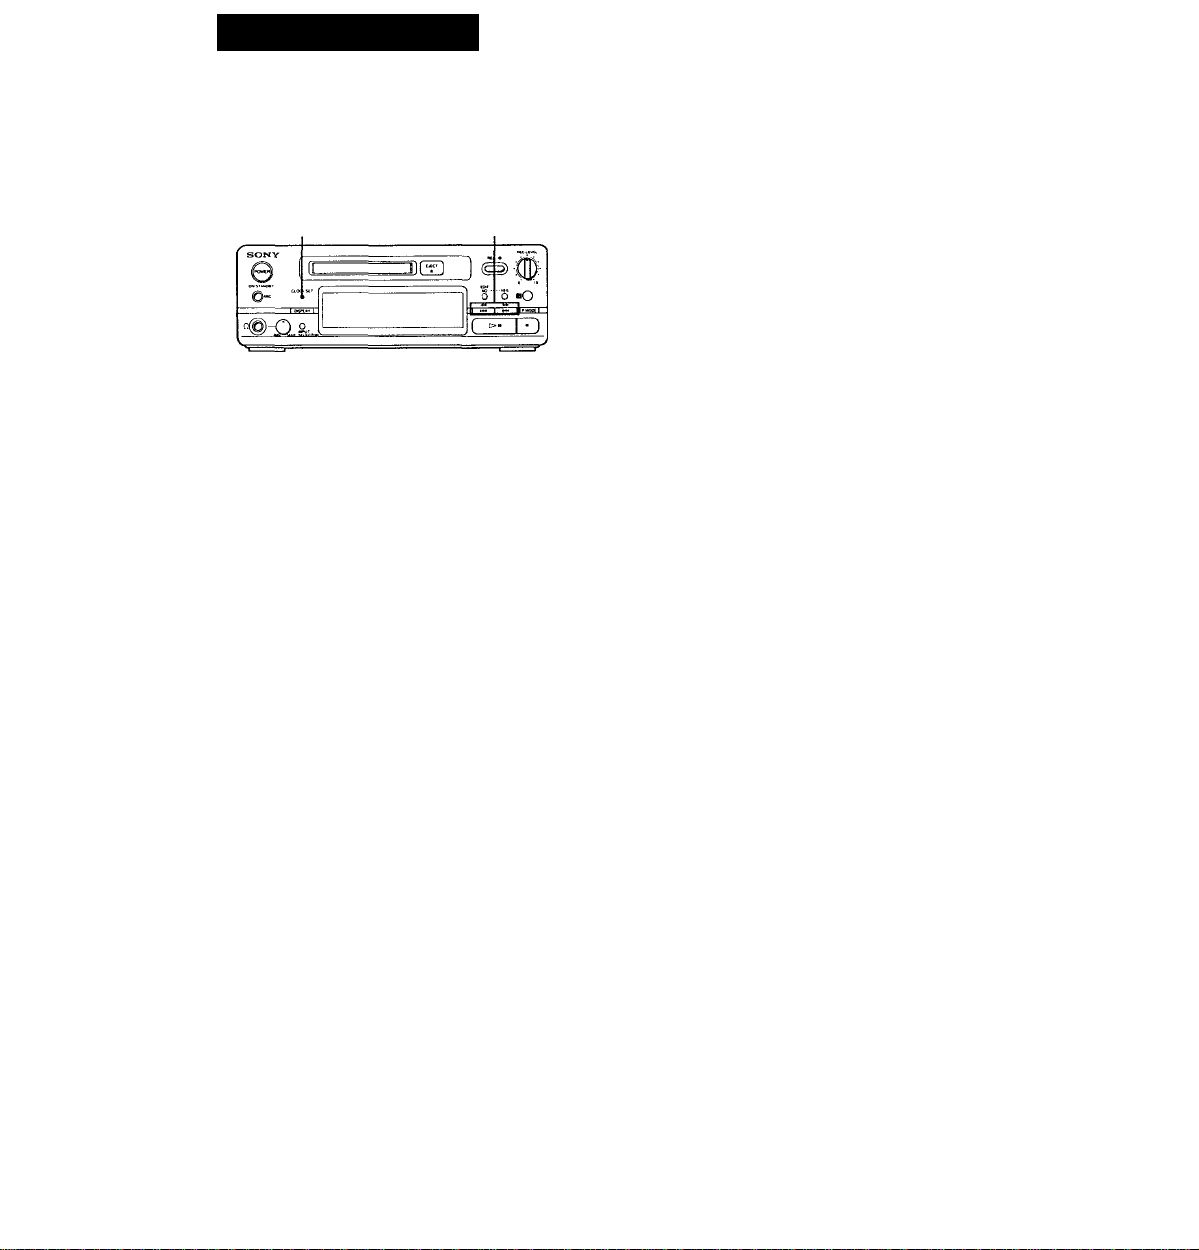
Page 8
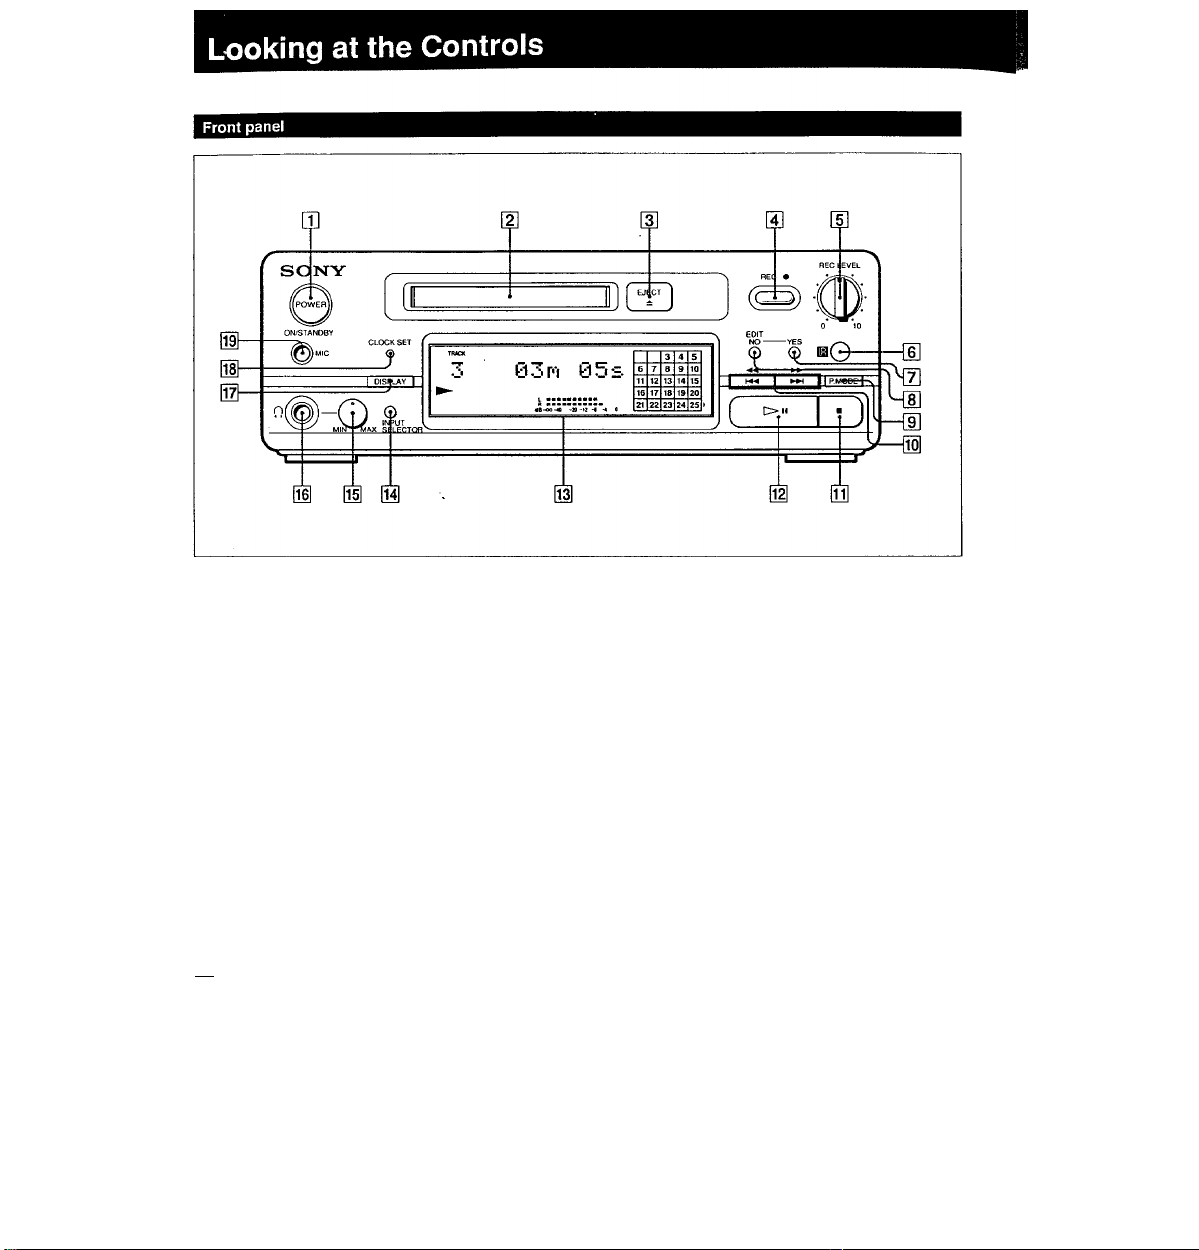
Q] POWER switch
Press to turn on the unit; press again to change to stand-
by.
[2] Disc compartment
Automatically loads an inserted disc.
[3] EJECT ± button
Press to eject the disc from the disc compartment.
[4] REC (record) • button
Press once to activate recording pause. Press ► U to
start recording. Used also for track marking.
[5] REC (recording) LEVEL control
Turn to adjust the recording level when recording from
analog sources.
[6] Remote sensor
Accepts commands from the remote commander.
[7] YES button
Press to perform editing functions (i.e., erasing, dividing,
combining, and moving).
[8] button
Press to specify or cancel the various editing functions.
[g P.MODE button
Press to select playback modes (i.e., CONTINUE,
SHUFFLE, and PROGRAM).
tiol ^ (AMSVsearch) button
Press to find the desired point within a track or the
beginning of a track.
[0] ■ (Stop) button
Press to stop playback or recording, or to cancel program
play.
8
¡2| (Play/Pause) button
Press to start playback or recording. Press during
playback or recording to temporarily stop the MD; press
again to cancel pause.
¡I Display window
Indicates the current operating status.
INPUT SELECTOR button
Press to select the input signal to be recorded. Press
while the unit is stopped to select “Analog in" to record
through the LINE IN (analog) jack. Press to select “Digital
in" to record through the DIGITAL IN jack.
H Headphones level control
Turn to adjust the volume of the headphones.
iH Headphones jack
Connect headphones with a stereo mini-plug here.
j7] DISPLAY button
Press to display the name of the current track and the
remaining playing time on the MD.
M CLOCK SET button
Press to set the clock.
MIC (microphone) jack
Connect a microphone with a stereo mini-plug here.
' AMS: Automatic Music Sensor
Page 9
Remote commander
m— rnrm
gj— p
rYi m m rri fr1
Up Œ1 rn Q3 Q53
rm QD 03 023 Dp
17T~~ riTi nri rm rm rm
[~2p (213 CSl QO
m —Q
a —13
GaBSÿg —{3]
fgn nn m
H]—
[H POWER switch
Press to turn on the unit; press again to turn off (change
to stand-by).
DATE buttons
DATE RECORDED button
Press to display the recording date of a track during
playback.
DATE PRESENT button
Press to display the current time and date.
[3] Repeat/Auto space buttons
REPEAT button
Press for repeated playback.
A-B button
Press for repeated playback of specific portions of a
track.
A.SPACE button
Press for automatic insertion of 3-second blank
spaces between tracks during playback.
M.SCAN button
Press to scan the beginning of each track in
succession.
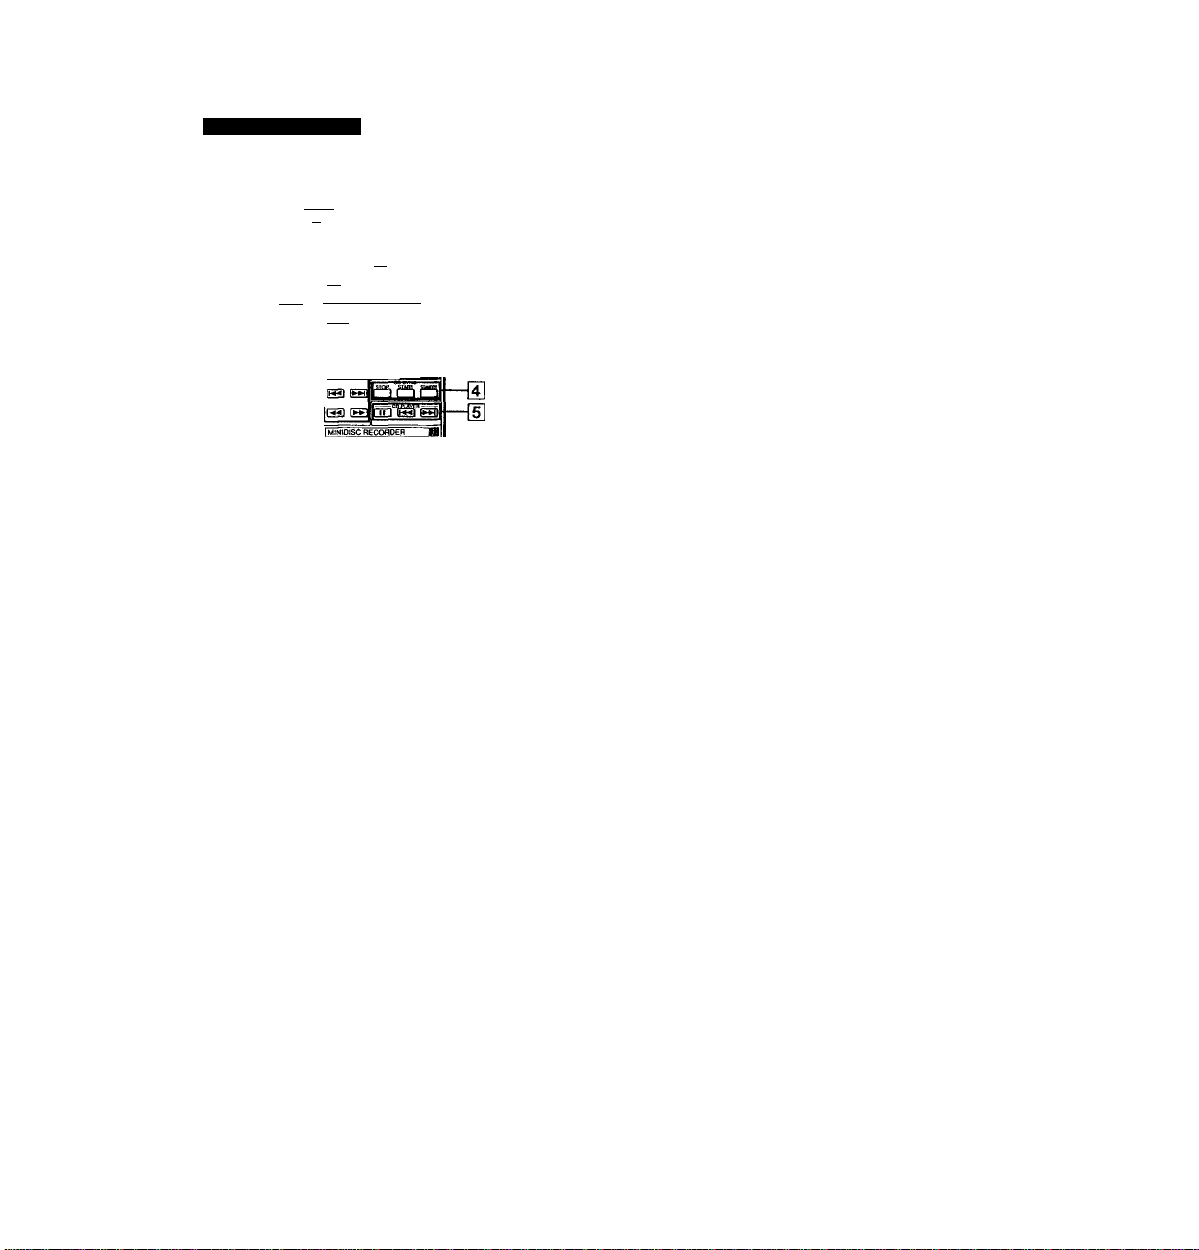
[4] CD SYNCHRO operation buttons
(for synchronized recording with a Sony CD player)
STANDBY button
Press to activate recording pause mode prior to CD
synchro recording.
START button
Press to start CO synchro recording.
STOP button
Press to stop CD synchro recording.
[5] CD player operation buttons
(Use to control Sony CD players)
II (Pause) button
Press to temporarily stop playback; press again to
resume playback.
(AMS) buttons
Press to find the beginning of a desired track.
[6] Operation buttons
► (Play) button
Press tor playback.
II (Pause) button
Press to temporarily stop playback or recording: press
again to resume playback or recording.
■ (Stop) button
Press to stop playback or recording. Press to cancel
program play.
• (Record) button
Press once to activate recording pause. Press or
II to start recording. Use also for track marking.
M-4»+H(AMS) buttons
Press to find the beginning of a desired track.
■ « ► ► (Search) buttons
Press to find a desired point within a track.
[3 Character/Numeric buttons
Alphabet/Numeric buttons
Use to specify tracks for immediate playback or to
create programs during program play. Use also for
entering disc and track titles.
WRITE/CAPS, WRITBNUM buttons
Press to select the character mode.
WRITE/NAME button
Press to apply a title.
CLEAR button
Press to erase a track name, disc name or
programmed track.
H] Play mode buttons
CONTINUE button
Press during shuffle or program play to resume
normal playback.
SHUFFLE button
Press to activate shuffle play.
PROGRAM button
Press to activate program play.
[S Display buttons
DISPLAY button
Press to display the track name or the remaining
playing time during MD playback.
SCROLL button
Press to scroll titles longer than 12 characters.
Page 10
Hooking Up the System
Before you begin
• Turn off the power to all the equipment to be connected
before making any connections.
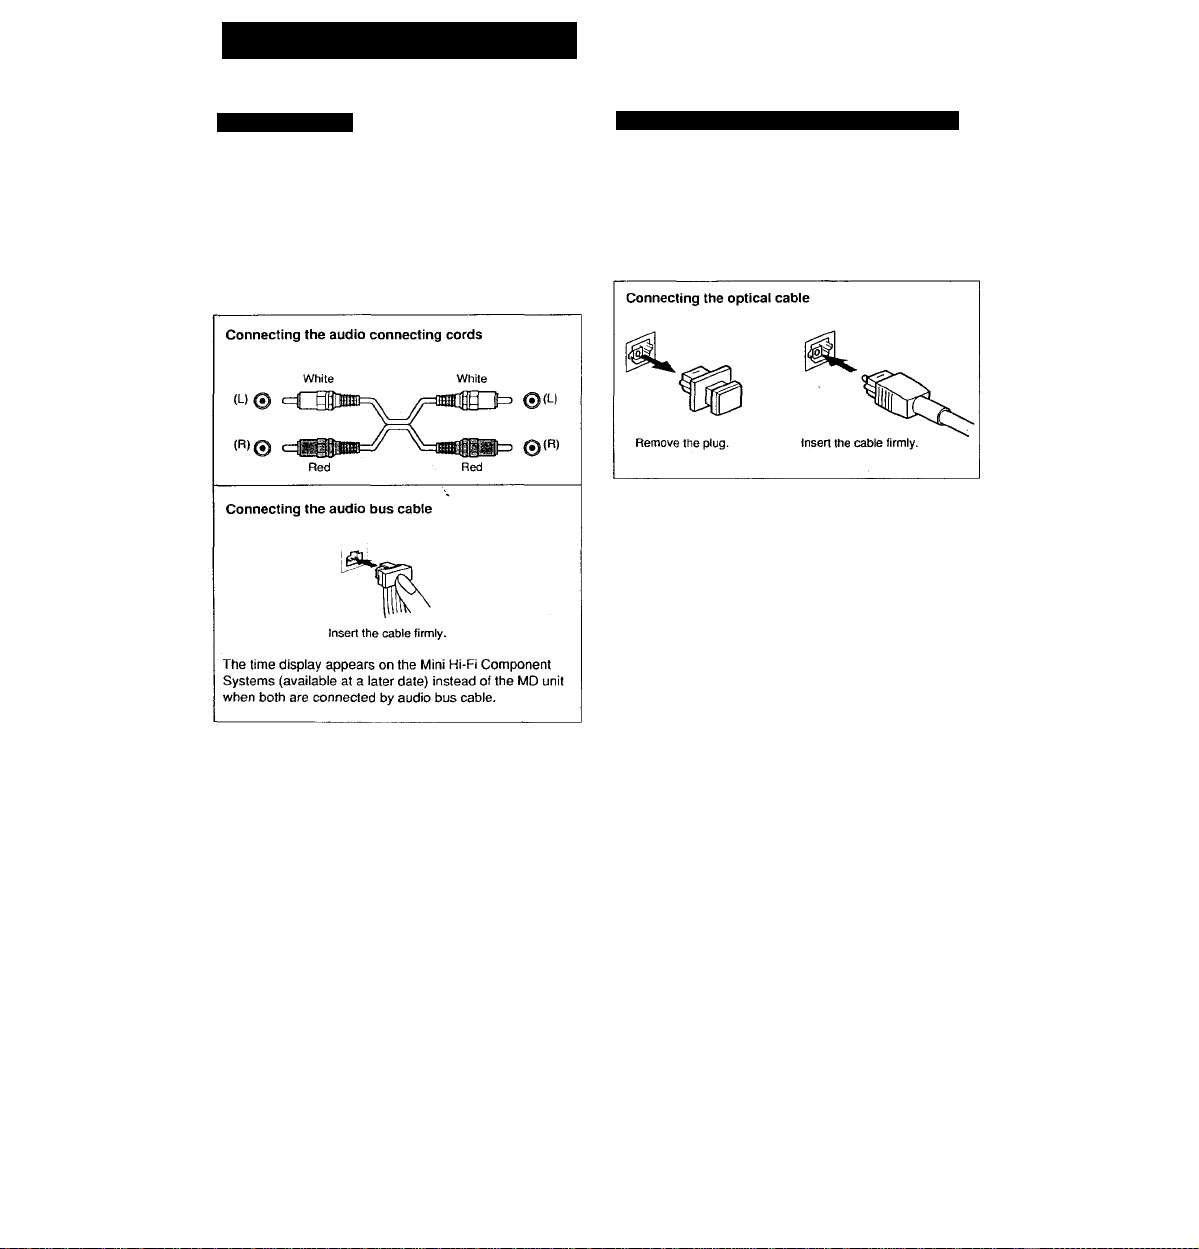
• Note that the red plug of the supplied audio connecting cord
is for right*channel (R) connection and the white plug for
left-channel (L) connection. If another connecting cord is
necessary, use the optional RK-C515HG cord.
• The connecting cords should be fully inserted into the jacks.
A loose connection may cause hum pickup.
• Pull out the cords by grasping the plug, not the wire.
Notes on the optical digital input/output jacks
Use the optional POC-15SP optical cable to connect digital
devices with a sampling frequency of 44.1 kHz (i.e., DAT
decks, amplifiers with digital inputs, DA converter units, etc.)
to the optical digital input and output jacks. Recording level
adjustment is not necessary when recording through the
POC-15SP optical cable from a digital source since the
output level is fixed.
Digital sources with a different sampling frequencies
cannot be recorded through the digital input jack
Only CD, MO (premastered) and DAT sources with a
sampling frequency of 44.1 kHz can be recorded through the
digital input jack. “Din Unlock" appears In the display window
when an attempt is made to record digital sources with a
sampling frequency different from that of the MD (such as
32- or 48- kHz DAT or BS).
10
Page 11
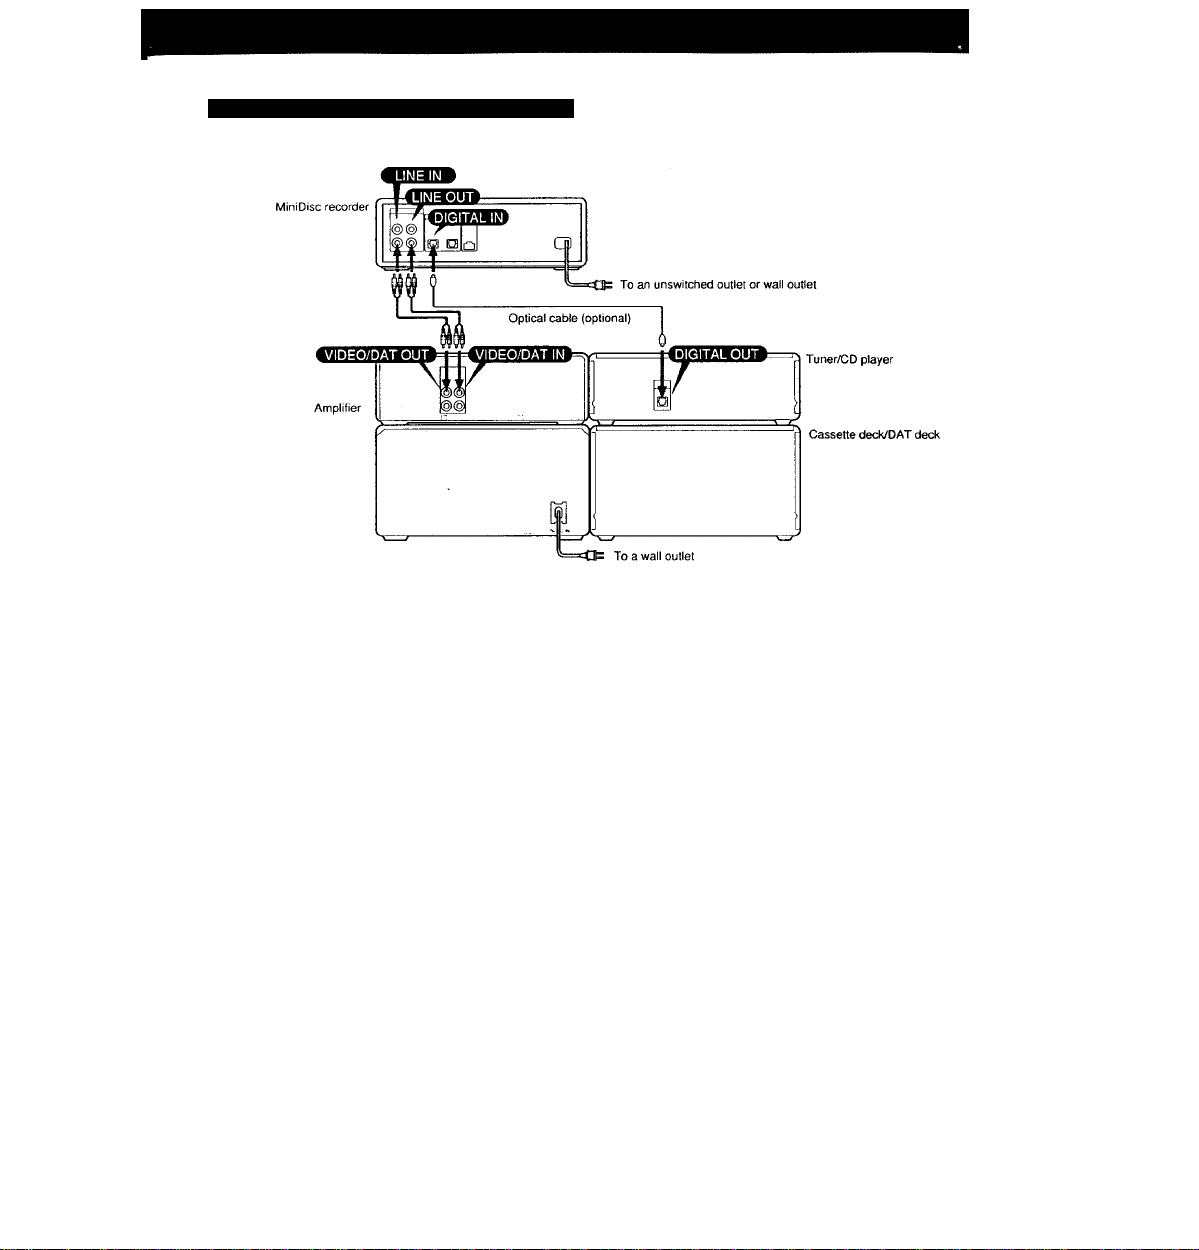
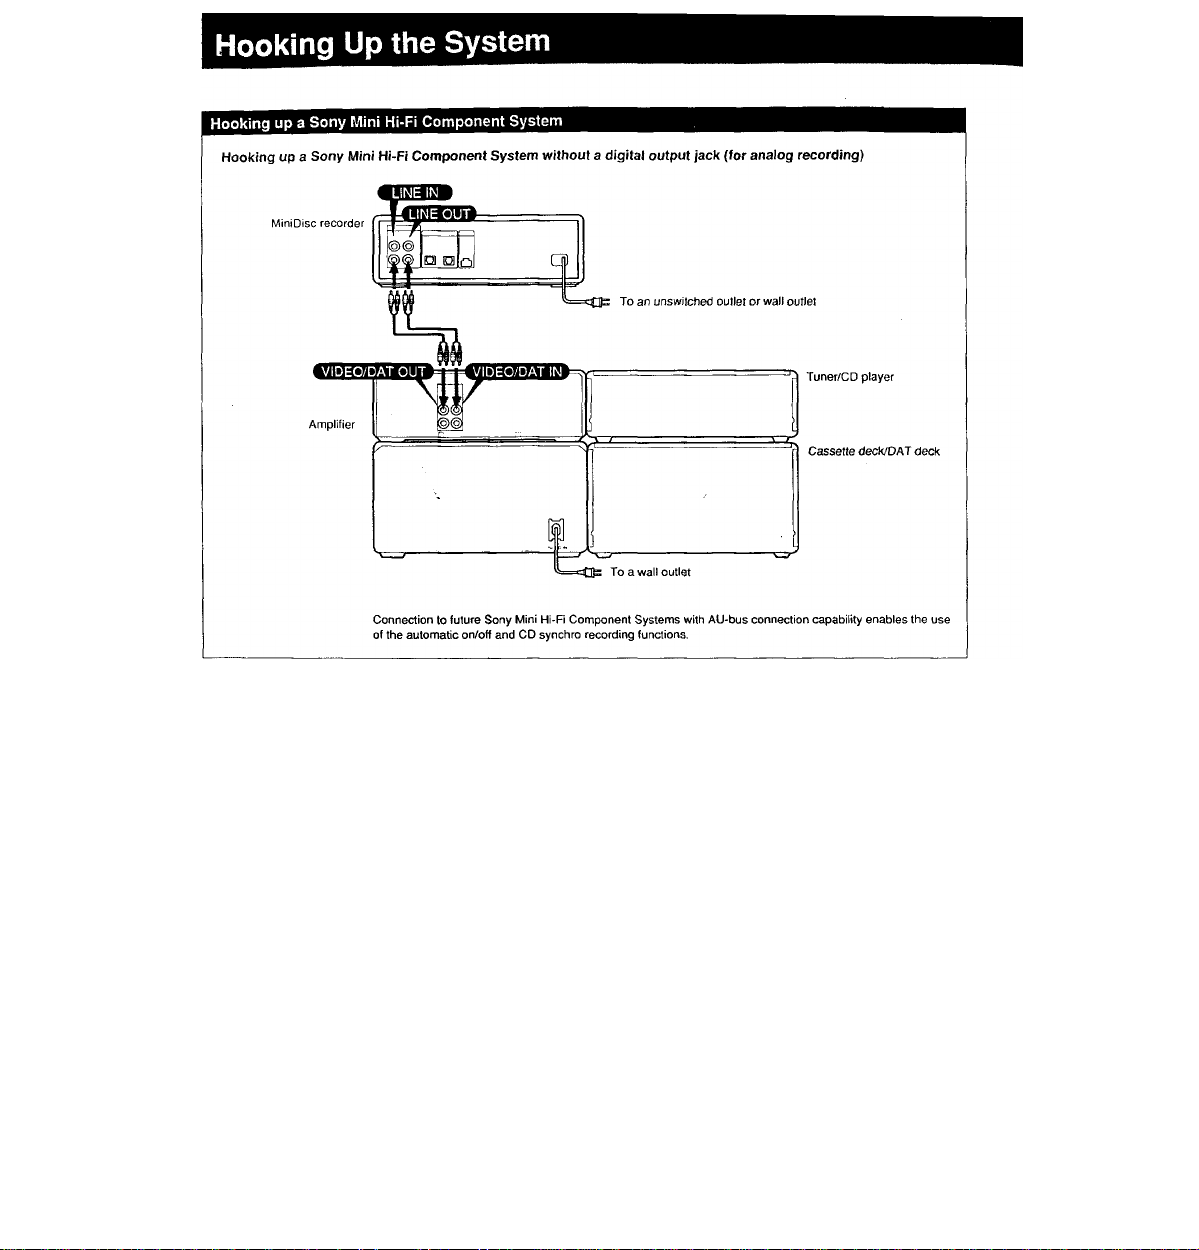
Hooking up a Sony Mini Hi-Fi Component System
Hooking up a Sony Mini Hi-Fi Component System through the digital output jack (for digital recording)
Connection to future Sony Mini Hi-Fi Component System s with AU-bus connection capability enables the use
of the automatiC'On/off and CD synchro recording functions.
11
Page 12
12
Page 13

Hooking up other audio equipment
Hooking up other audio equipment with digital output (for digital recording)
f
^ o
MiniDisc recorder
a.
Optical cable (optional)
PP
To an unswifched outlet or wall outlet
(BOS»
boDd
©©
@@
if
pdodi
Amplifier
Hooking up other audio equipment without digital output (for analog recording)
1 I
MiniDisc
reco rder
@®
o o
—
a
Cl
|(0]
Ip
CO player etc.
To an AC outlet
To a wall outlet
To an unswitched outlet
or w all outlet
1=
CD player etc.
To an AC outlet
If no REC OUT selector
is provided on the
amplifier, connect the
TAPE IN line input.
m
Tl ^
■■ ■ Doioa
Amplifier
Hooking up an amplifier with digital input, DAT deck or another MiniDisc recorder
Connect the respective equipment to the digital output of your unit.
1 r
boDd
IID
|[M]
\m
1 r
To a wall outlet
13
Page 14
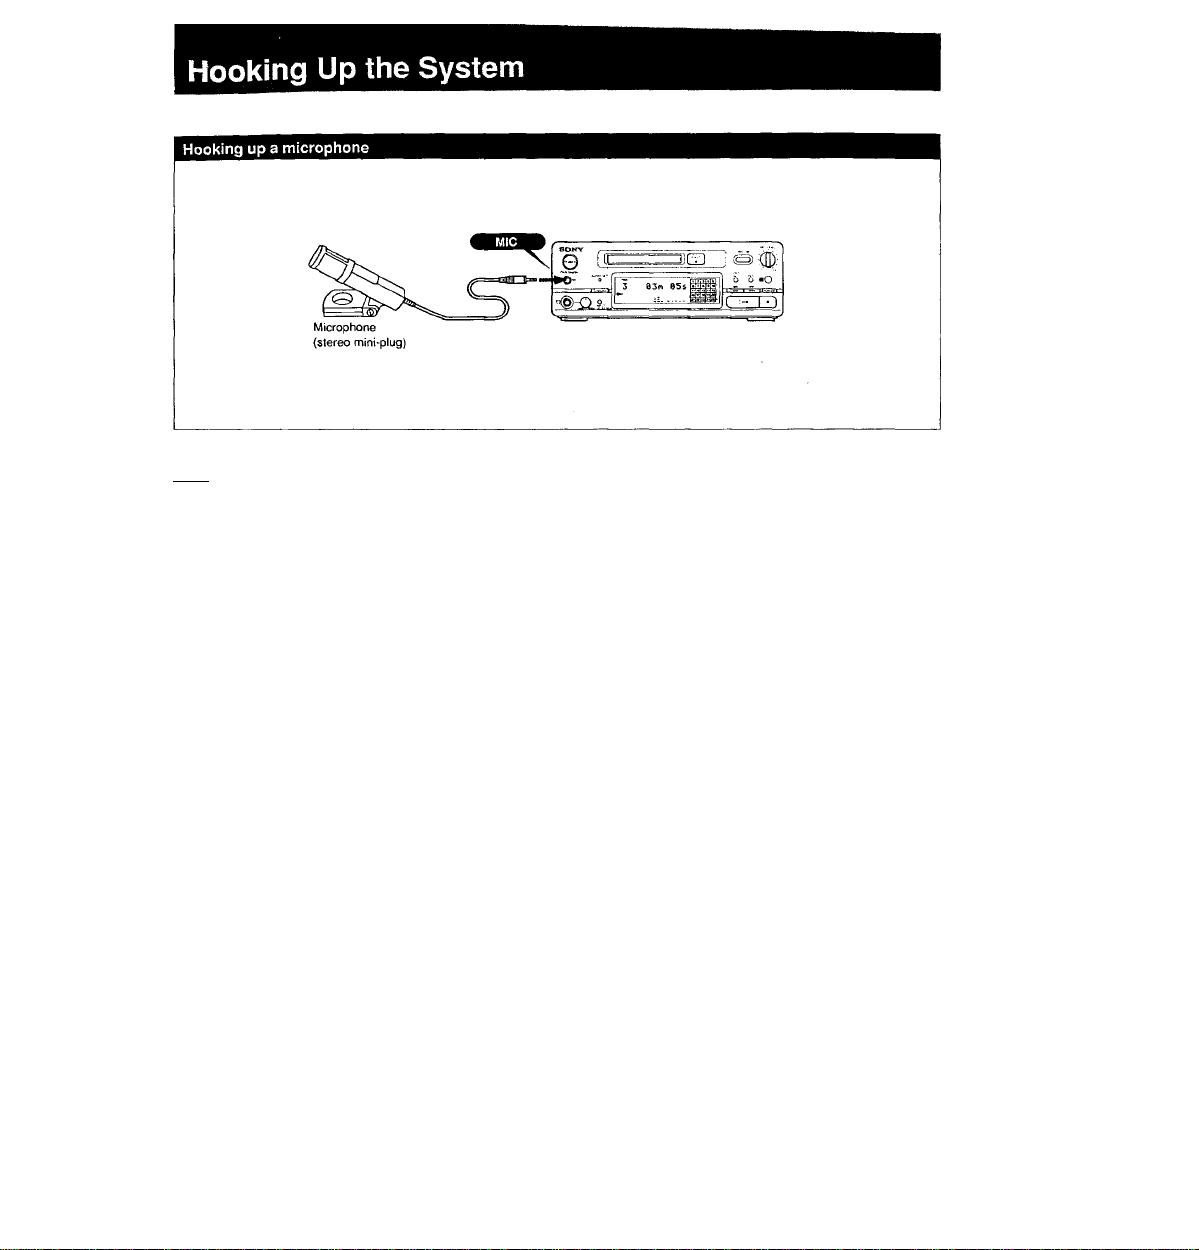
I Note I
Connecting a microphone to the MIC jack disables all other source inputs
Make sure that the microphone is disconnected from the MIC jack when not in use.
14
Page 15
Setting the Clock
To stamp the time and date on recordings, set the built-in
clock. When playing back the recorded disc, the date and
time of the recording will appear in the display window.
Example: Setting the clock to 1993, April 23, 9:10 PM.
Enter the day by pressing tti .
After entering the day, press CLOCK SET.
04n 23d 93y
1-5 2-6
Keep pressing CLOCK SET for about 2
seconds until the year starts to flash.
CLOCK SET
o
01 n 01 di 935"
Enter the current year by pressing ffi °r I'T. ■
Pressing ^ increases the year and pressing
decreases the year. Holding down the respective
button increases or decreases the year faster.
After entering the year, press CLOCK SET.
The month flashes.
)li3- 01d 93y
O
FRI-JflM 12^-00
The day of the week automatically appears and the
hour flashes.
Enter the hour by pressing or .
After entering the hour, press CLOCK SET.
The minutes flash.
FRI PM 09T0'0>
Enter the minutes by pressing K| or .
7 Press CLOCK SET in synchronization with the
time signal.
0411 23d 93y
O
FRI PM 09:10
Enter the month by pressing or .
After entering the month, press CLOCK SET.
The day flashes.
0 4 hl-î 0 1 d" 9 3 y
The clock setting is displayed in order of date, then
time.
To display the current date and time
Press the CLO CK SET button on the front panel once to display the dale, then
again to display the time. When using the remote com mander, press the DATE
PRESENT button. The date, then the time are displayed in sequence.
To change the display while the unit is off
Your unit can display either “STAND BY” or the current time when it is off (in standby
mode). Choose one or the other by pressing the DISPLAY button.
For more precise time stam ping of recordings
It is recommended that you set the clock once a week.
15
Page 16
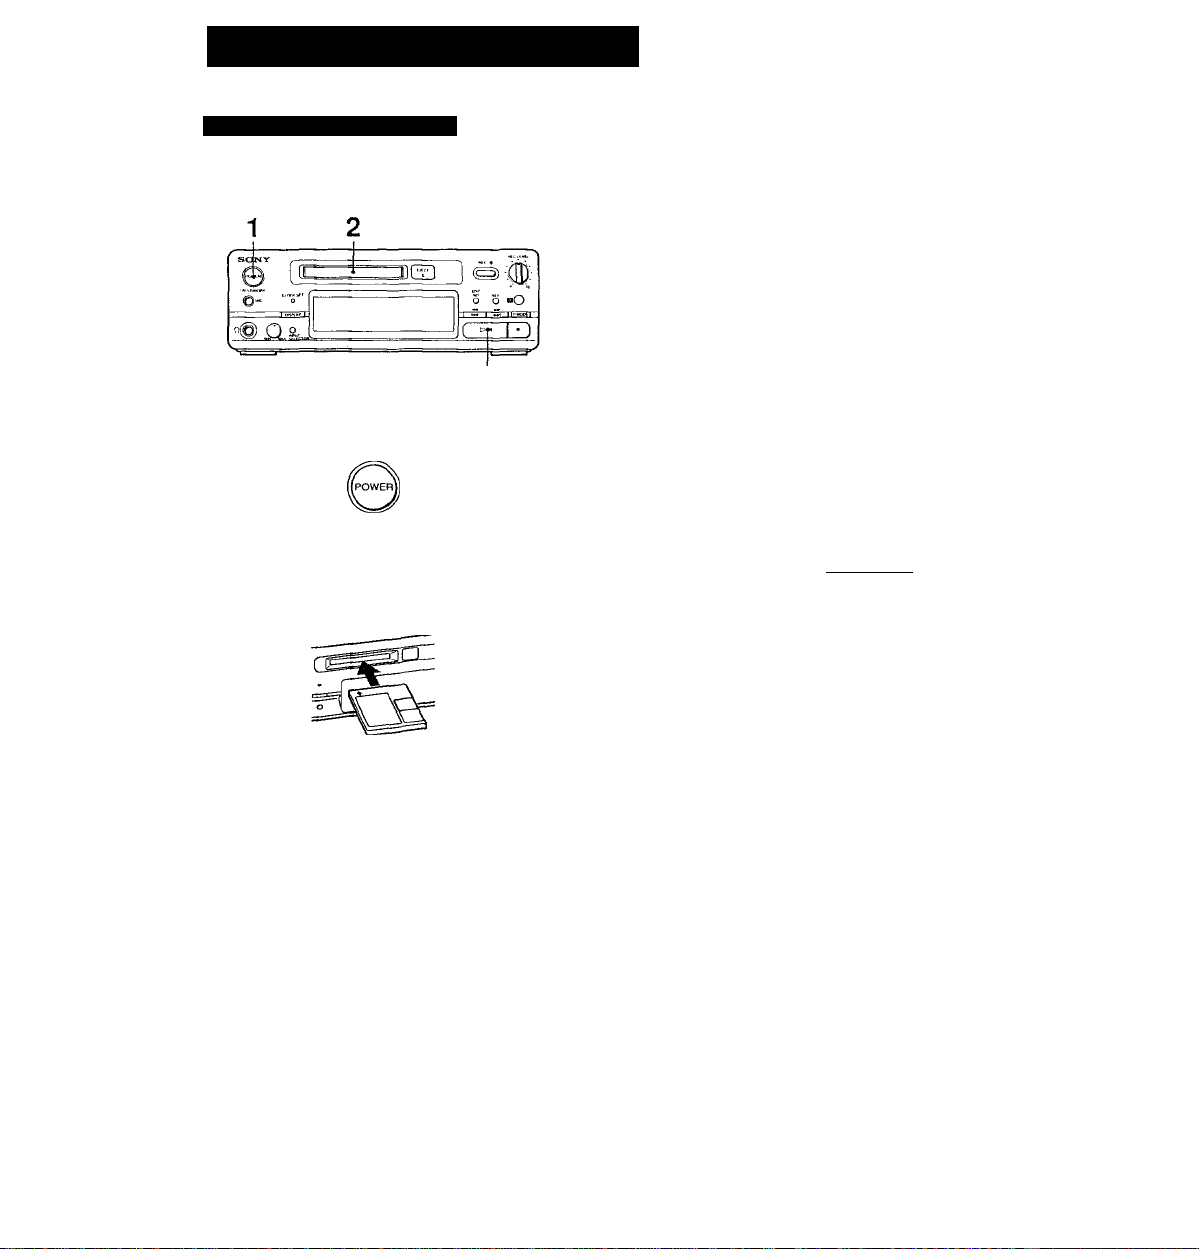
Playing an MD (Normal Play)
Playing an MD from the first track
Follow the procedure below to listen to an MD.
Press POWER.
ON/STANDBY
With the label side up and the arrow pointing
toward the opening, slide the MD into the disc
compartment until the recorder grips it.
The disc name appears, followed by the total
number of tracks (Tr) and total disc playing time. A
music calendar showing all the track numbers
appears within a grid if a premastered disc is
inserted, or without a grid if a recordable disc is
inserted. If the total track number exceeds 25,
appears to the right on number 25 in the music
calendar.
Press ► !! (► ).
The MD starts playing.
The current track number (minus the Tr irxfication),
track title (if labeled), and elapsed playing time of
the current track light up in the display window.
EN
O
EMOTION
o
^ hi. ,1 i ®
09^10 7s 157ie|9)io)
To Stop play momentarily
Press (II) once while the disc is playing.
To cancel pause mode, press ► !! (► or II) again.
To stop play
Press ■ .
To eject the disc
>
Press EJECT ±.
16
SONGS
O
15Tr bSr'i0?s
Page 17

Locating a desired track
Use the remote commander to enter the number of the
desired track for immediate playback.
Example: To playback the third track
m
H
Example: To playback the 26th track
[>11] 0 LO 0 CO
/ G K
Example: To playback the 100th track
0
J
□□ 0 CjO 0 QO
Locating the beginning of a track (AMS)
Use the or buttons to quickly find the beginning of a
desired track.
Press to go to —)- I »>t — Press to go to
previous succeeding
tracks. tracks.
Press 1^ () once to go to the beginning of the
current track.
Press the respective buttons repeatedly to go to the
beginning of successive tracks.
If the unit is in pause mode, it will remain in pause
mode as it locates the beginning of the desired track.
When the beginning of a labeled track is located, the
title appears in the display window.
To go quickly to the beginning of the last track on the
MD
Press ^ ) immediately after inserting the disc, or
while the disc is in stop mode.
17
Page 18

Playing an MD (Normal Play)
Locating a desired position (Search)
You can quickly scan an MD either forward or backward
during playback to looate a desired position.
To forward scan the disc
Hold down tf, (► ► ) during playback.
To backward scan the disc
Hold down (•«) during playbaoR.
Releasing the button causes the unit to play back
normally from the desired location.
To go forward or backward quickly
Hold down Ki m3 () 'h pause mode. No
sound is output at this time.
Displaying the titie and remaining playing time
of a track
Press the DISPLAY button while playing an MD to display
the title and remaining playing time of the current track. (“No
Name” is displayed for tracks with no title.) To label a
recordable disc and its tracks, see “Labeling Recordings" on
page 44.
DISPLAY
Press DISPLAY while the current track is playing.
Each press of DISPLAY cycles the display in the
following order: remaining track playing time track
name elapsed playing time
[Normal display]
18
The display window shows up to 12 characters at a
time. To see a title of 13 characters or more, press
SCROLL on the remote commander.
If no title is recorded, “No Name" is displayed, followed
by the elapsed playing time.
Each press of DISPLAY while the unit is s’topped
cycles the displaying in the following order:
For premastered discs:
Total disc playing time disc name
For recorded discs:
Total recorded time remaining disc playing time
disc name
Page 19

Displaying the recording date
If you have set the built-in clock, the date and time of all
recordings are recorded and automatically displayed when
the disc is played back.
Remote commander operation only
1 Locate the desired track.
Press or while the unit is stopped to
locate the desired track.
If the unit is playing or in pause, press to enter the
track number through the numeric buttons, or
or to display the desired track.
Press DATE RECORDED.
O
“No Date” is displayed if the built-in clock has not
been set or the track was recorded on another unit
without a date and time stamp function.
The previous display reappears when you press
the DATE RECORDED button again or after a few
seconds have passed.
19
Page 20

Playing Tracks in Random Order
(SHUFFLE Play)
Playing Tracks in a Specific Order
(PROGRAM Play)
Use shuffle play fo play back all tracks on an MD in random
order.
Press P.MODE (SHUFFLE) repeatedly while
the unit is stopped until “SHUFFLE” lights up.
I P.MODE I
14Tr 42r'-i 27s
2 Press ► HI ( ► ).
Shuffle play starts.
Oil
Program play allows you to specify the playback order of up
to 25 tracks.
■ a)'
la o. kn
ryi cp Cp Cp QE
CpGpCpCpOp
|r^ Cp (p Cp tp
C2Q GD C53
Iraai ggi
1““
^ a
csaa
ECORDEH_B
1
Press P.MODE (PROGRAM) repeatedly while
the unit is stopped until “PROGRAM” lights
up.
rP.MODE I
1 2 3 4 5
a) When using the remote commander:
Enter the desired track number using the
numeric buttons.
The entered track number is stored.
To program the third track, for example, press 3.
The display shows the track number, the order of
the specified track, then the total program play
time.
To go to the beginning of the track during shuffle play
Press ^ ) during shuffle play. The current track
stops playing and the next randomly selected track
begins.
Press ) to begin playing from the beginning of
the current track. Previously played backs cannot be
selected again by pressing ).
To stop shuffle play
Press■ .
To cancel shuffle play
Press P.MODE (CONTINUE) until “SHUFFLE" goes off.
20
CXI
01
o
0 3 FI 0 8 S
Page 21

When programming tracks 26 to 99, press >25 once
before pressing the numeric buttons.
When programming tracks 100 and above, press >25
twice.
Example: To program the 26th track
To monitor total program time while programming tracks
Perform the following in the place of step 2 above.
1 Press ,53 () or ) to select the track.
The total program time appears.
0rm ¿C.S
/ G K
Example: To program the 100th track
^ 0 cu 0 CO
Ш 0 ою 0 oa
(Press “10” to enter a zero)
b) When using the front panel:
1 Press ,53 Kt desired track
number lights up.
I I
03n 0Si
2 Press P. MODE.
The seiected track number is stored.
( P.MOOE I
03m 08s
2 Press P.MODE (PROGRAM).
The selected track is programmed.
Checking the order of entered tracks
Press ,53 (Ki () while the unit is in
playback or pause mode.
To erase programmed tracks
By pressing CLEAR, you can erase one track at a time
starting from the end of the program.
To stop program play
Press ■ .
To cancel program play
Press P.MOOE (CONTINUE) until “PROGRAM" disappears.
To erase a programmed track just entered
Press CLEAR, then repeat the programming procedure from
step 2 on the previous page.
To erase all the programmed tracks
Press ■ while the unit is stopped, then repeat the
programming procedure from step 2 on the previous page.
Repeat step 2 to enter other tracks.
Each time you enter a track, the total program time
is displayed. Up to 25 tracks can be programmed.
4 Press »HI (► ).
Program play starts from the first track of the
program.
Oil
EMOTION
21
Page 22

Playing Tracks Repeatedly
Playing tracks repeatedly
The repeat function can be used for repeated playback in
normal, shuffle or program play mode.
Rem ote commander o peration only
'Ü.C1
H
o'q c>
qD CD DDCp CD
rri rp rp rp
CpD CS CS op
rp nji qp
rp nn rm Q2
REPEAT-
««nàcaca
'rafftiTSil ' à
n=n m rri
..
m
Press REPEAT repeatedly until “REPEAT” lights up.
All tracks play again.
10 0'4i''i ISs
To play back the current track repeatedly, press
REPEAT twice.
“REPEAT 1" lights up.
To play tracks repeatedly during shuffle or program play
Press REPEAT while in the respective playing mode.
To stop repeated playback
Press■ .
To cancel the repeat function
Press REPEAT until “REPEAT" disappears.
The unit returns to the previous playing mode.
22
10 04pi 18s
Page 23

Playing a specified portion repeatedly (A-B Repeat)
By Specifying starting and ending points within a track, you
can play back a specified pgrtion repeatedly.
Remote commander operation only
O O pfttp’Ol
cp CD m mcp
ryi i~7~i m rp nsi
CQ qp 0^
np frn np rp CT3
nn rm rm im nn
While the MD is playing, press A-B at the start
(point A) of the portion to be repeated.
Point A is stored.
Changing the specified portion
Press A-B. Ending point B (point B) changes to starting point
A (point A). Repeat step 2 to specify the new ending point
(point B).
To cancel A-B repeat playback
Press REPEAT to turn off the "REPEAT” indicator.
Continue playing the track or press ► ► to the
end of the desired portion (point B), then
press A-B.
Point B is stored, and the specified portion
between A and B is played back repeatedly.
O
23
Page 24

fertili 111 IH» I
(Music Scan)
VJ
(Auto Space)
The music scan function automaticaliy plays back the
beginning of each track in succession for 6,10 or 20
seconds, allowing you to quickly check the contents of the
MD.
Remote commander operation only
M.SCAN
While the unit is stopped, press M.SCAN.
When the scanning time appears, each press of
M.SCAN changes the scanning time to 6, 10, or 20
seconds.
Scanning time
By using the auto space function, a three-second blank
space can be inserted after each track to allow the AMS
function to work on tapes dubbed from the MD.
Remote commander operation only
Press A.SPACE once.
“A.SPACE” lights up.
12 41 n 21s
24
To cancel the auto space function
Press A.SPACE again to turn off the ‘‘A.SPACE’’ indicator.
Sound cut-off may occur at the start of new tracks
II the auto space tunction is activated during material without space between tracks,
such as symp honies, the insertion ol a three-second blank may partially erase
material at the start of a new track.
Page 25

Recording a Digitai Source
Digital recording
Digital sources connected to the unit through the digital input
jack can be recorded onto a recordable MD. When recording
from a CD, track numbers on the original are automatically
recorded in the original sequence. When recording from
other digital sources than a CD, you can add track marks
automatically or manually {see page 31).
If the inserted disc already contains recorded material, the
unit will automatically record the new material at the end of
the existing material.
Press POWER.
ON/STANOBY
With the label side up and the arrow pointing
toward the opening, slide the recordable MD
into the disc compartment until the unit grips
It.
3 Press INPUT SELECTOR until “Digital in”
lights up.
The previous display appears again after a few
seconds.
O
INPUT
SELECTO R
Digital in
Press REC#(«).
The unit enters recording pause.
(Q)
4 REC Ready
os
If nothing is connected to the digital input jack, the
"Din Unlock" indication appears.
Press^ll(^orll).
Recording pause is canceled and recording
starts.
¡>H
The total number of recorded tracks (Tr) and total
time appear. A music calendar showing all
recorded track numbers appears without a grid.
ISr-i
Play the sound source (CD player, etc.) to be recorded.
The track number being recorded and elapsed
recording time appear.
00n01S
■ ' II " goes off.
7 Press ■ to stop recording.
Recording stops.
25
Page 26

Recording a Digital Source
To check the remaining time on the disc
Press DISPLAY.
If pressed while the unit is stopped, each press changes the
display as follows: total recorded time, remaining time on the
disc, disc name.
if pressed while the unit is in recording pause mode ("REC
Ready” lights up): the remaining time on the disc appears for
a few seconds, followed by the "REC Ready" indication.
If pressed while the unit is in recording mode: the remaining
time on the disc appears.
Press again to display the elapsed recording time.
To stop recording temporarily
Press Ml (II).
Press ^41 (► or II) again to restart recording.
Whenever recording is restarted, the track number increases
by one. For example, if you stopped recording temporarily
while recording the 4th track, recording continues on the 5th
track when restarted.
To eject the disc
Press EJECT ±.
1 Notesl
if "Protected” app ears in the display window
The disc is write-protected. Close the slot to record on the disc (see page 28).
MD recording and the Serial Copy Management Syste m
Since your unit uses the SCMS (Serial Copy Management System), MOs recorded
through the digital input jack canno t be used to make subsequent copies onto other
MDs (see page 50).
When "TOC” flash es in the display window
Oo not jog the unit or pull out the power cord.
When recording starts
PROGRAM or SHUFFLE play is canceled.
When recording from a Sony portable M O player or other digital source
Press ■ on your M D unit to stop recording before stopping playback
on the other unit.
If you stop playback on the other unit - or disconnect the optical
cable - without stopping the recording first, the contents recorded to
that point will not be affected; however, playback on your MD unit
will be disabled after the recording is stopped.
If this should occur, reinsert the recorded MD into your MD unit to
reactivate the playback function.
Playing back tracks just recorded
Tracks that have just been recorded can be played back
immediately.
Playing back from the first track of the disc after you
have finished recording
1 Press ■ to stop recording.
2 Press ■ again.
3 Press ► 1I(^-or II).
Playback starts from the first track of the disc.
26
I Notes I
When recording from digital so und sources
Track numbers are automatically recorded in the same sequence as the sound
source (i.e., based on changes in the emphasis data).
When dubbing another MiniOisc
Track numbers are automatically recorded in the same sequence as the source
disc. However, if the same (rack is recorded repeatedly (i.e., when played back
repeatedly during program play or single-track repeat play), the same track number
is recorded each time.
Page 27

Recording From the Line (Analog) Input Jack
Analog recording
If you use a recordable MD that already contains recorded
material, the unit will automatically record new material at the
end of the existing material, eliminating the need for time-
consuming searches.
3 Press INPUT SELECTOR until “Analog in"
light up.
The previous display appears again after a few
seconds.
O
INPUT
SELECTO R
flna 1o9 in
Press REC«(«).
The unit enters recording pause.
4 REC Ready
► II OS
Play the sound source (CD player, cassette
deck, etc.) to be recorded.
While monitoring through the headphones,
adjust the recording level using the REC
LEVEL control (see page 28).
Set to the position show below when recording
from a Sony OAT deck, CD player or cassette
deck.
Stop the sound source to be recorded.
Press (► - or II).
8
Recording pause is canceled and recording
starts.
f Oil
(Continued on next page.)
27
Page 28

Recording From the Line (Analog) Input Jack
(Continued from previous page.)
Restart the sound source to be recorded.
The track number being recorded and elapsed
recording time (in minutes and seconds) appear.
00r<i0 1 £.
“II "goes off.
10 Press ■ to stop recording.
Recording stops.
To check the remaining time on the disc
See page 26.
To stop recording temporarily
Press Ml (II).
Press ► ll (► or II ) again to restart recording.
To eject a disc
Press EJECT ±.
\ Notes I
if “Protected'’ appears in the display window
The disc is write-protected. Close the slot to record on the disc (see “To protect a
MiniDisc against accidental erasure’ on this page).
When “TOC” flashes in the display window
Do not jog the unit or pull out the power cord.
When recording starts
PROGRAM or SHUFFLE play is canceled.
Adjusting the recording level
When recording sound sources through the line (analog)
input jack or microphone, the recording level must be
adjusted to achieve the optimum recording level.
1 Press REC • {•) to put the unit into
recording pause.
Play the sound source to be recorded.
While monitoring the sound through the
headphones, adjust the recording level using
the REC LEVEL control.
Adjust the recording level so the peak level meter
reaches its highest point with the least intrusion
into the red (OVER) zone.
4 REC Ready
► II /SS\
Press I ( ^ or 11 ) to start recording.
To protect a MiniDisc against accidental erasure
Record-protect tab
28
Open the slot to prevent recording.
Close the slot to allow recording.
Page 29

Recording From a Microphone
Follow the procedure below to record from a microphone with a stereo mini-plug.
3 Press INPUT SELECTOR until “Analog in”
lights up.
finalo9 in
Press REC • (•).
Press POWER.
ON/STANDBY
With the label side up and the arrow pointing
toward the opening, slide the recordable MD
into the disc compartment until the unit grips
it.
4
The unit enters recording pause.
O
INPUT
SELECTO R
4 REC Ready
II CS
The total number of recorded trackes (Tr) and total
time appear. A music calendar showing ail
recorded track numbers appears without a grid.
3tr lSn36s
5 Use the microphone to pick up the desired
sound.
Monitoring through the headphones, adjust
the recording level with the REC LEVEL
control (see page 28).
(Continued on next page.)
29
Page 30

Recording From a Microphone
(Continued from previous page.)
7 Press {► or II) to cancel recording
pause mode.
Recording starts.
The track number being recorded and elapsed
recording time (in minutes and seconds) appear.
Oil
00M01S
“ II" goes off.
8 Press ■ to stop recording.
Recording stops.
To check the remaining time on the disc
See page 26.
To stop recording temporarily
Press ► 11(11).
Press ► HI (► - or II) again to restart recording.
To eject a disc
Press EJECTS.
I Notes I
When you flnish recording
Disconnect the microphone. The line input jacks on the rear of the unit will not work
as tong as the microphone is connected to the MIC jack.
When you are recording from a microphone
Press INPUT SELECTOR until “Level Sync OFF" lights up. It “Level Sync ON"
remains on w hile you are recording from a m icrophon e, the track numbers w ill be
excessively in crem ented due to the frequent breaks in sound input.
if “Protected" app ears in the display window
The disc is write-protected. Close the slot to record on ther disc (see page 28).
When “TOC" flash es in the display w indow
Do not jog the unit or puli out the power cord.
When recording starts
PROGRAM or SHUFFLE play Is canceled.
■ i
30
Page 31

Track Marking During Recording
Track marking Is essentially adding tracks while recording.
By adding a track mark (new track number) at desired points,
you can quickly locate those points afterwards using the
AMS function. Track marks can be added automatically or
manually: (1) automatically by the system at points of low
signal level, and (2) manually at the points you want.
Automatic track marking
Press INPUT SELECTOR while the unit is in
recording or recording pause mode to display
“Level Sync ON”.
Level Sync UM
► II БШ
Manuai track marking
1 Press INPUT SELECTOR while the unit is in
recording or recording pause mode to display
“Level Sync OFF”.
While recording, press REC # (#) at the
point you want to add a track mark.
The track number increases by one, and
recording on the new track begins (the elapsed
recording time indication restarts from zero).
4 05n20s
TOC i;
о
5 00fl0 1 S
»>-11 Ш
After a track has been recorded, you can divide it further into
more tracks to enable material to be quickly located using
the AMS function (see “Dividing Recorded Tracks" on page
39).
31
Page 32

CD Synchro-Recording
By connecting your MiniOisc recorder to a Sony CD player or Mini Hi-Fi Component
System, you can easily dub CDs onto MDs using the CO synchro buttons on the
remote commander. If your unit is connected to a Sony CD player by the optional
optical cable through the digital input terminal, tracks are automatically recorded in
the same sequence onto the MD regardless of whether “Level Sync ON" or “Level
Sync OFF" is on.
For digital recording, press INPUT SELECTOR
Cn (23 C3D □□ Œ3
Πcp Π^
rp qp np
CÇ3C
Set the amplifier function selector to CD.
until "Digital In" lights up.
o
INPUT
SELECTOR
With the label side up and the arrow pointing
toward the opening, slide the recordable MO
into the disc compartment untii the unit grips
it.
The total number of recorded trackes (Tr) and total
time appear. A music calendar showing all
recorded track numbers appears without a grid.
3îr
ISreSSs,
ii- H .
For analog recording, press INPUT
SELECTOR until "Analog In" lights up, then
adjust the REC LEVEL control to the position
shown below.
Insert a CO into the CO player.
5 Select the playback mode (shuffle play,
program play, etc.) on the CD player.
32
Page 33

Press CD-SYNC/STANOBY.
The CD player enters pause, and MO recorder
enters recording pause.
4 REC Ready
^11 G^-svnc
Press CD-SYNC/START.
The MD recorder starts recording and the CD
player starts playback.
The track number being recorded and elapsed
recording time appear.
^yU-air^.-
START
4 00M01S
-C|)E
" II " goes off.
Press CD-SYNC/STOP to stop recording.
8
Recording stops.
-----
CO-SYTiC.
-
Q
i Notes 1
Place the CD player close to this unit
As txith the CD player and the unit are controlled by the same remote commander,
you may have trouble operating the unit if the units are far from each other.
When “TOC” flashes in the display window
Do rrot jog the unit or puH out the power cord.
When recording starts
PROGRAM or SHUFFLE j^ay is canceled.
If the CD player does not start playing in step 7
Some CD player models will not start playing when CO-SYNC/START is pressed.
Press CD PUYER/11 instead.
To temporarily stop recording
Press CD-SYNC/STANDBY or CD PLAYER/11.
Press CD-SYNC/START or CD PLAYER/ II to restart
recording.
To check the remaining time on the disc.
See page 26.
Successive CD synchro>recording of another CD
Follow the procedure below in place of step 8.
1 Press ■ on the remote commander of the CD player.
2 Change the CD.
3 Press ► " on the remote commander of the CD.
Synchfo-rocordir^g restarts.
33
Page 34

Editing Functions for a Recorded MiniDisc
The editing functions available with your unit allow you to erase, divide, combine and
move tracks that have been recorded on an MD.
A brief introduction to each function is given on pages 34 and 35.
Erasing recordings (ERASE Function) (see page 36)
The erase function allows you to erase tracks from a
recorded MD easily and instantly. Since erasing merely
updates the table of contents (TOC), there is no need to
record over existing material as in the case of cassette
tapes. Note, however, that once erased, a track cannot be
recovered.
After a specific track is erased, the total number of tracks
decreases by one, and the remaining tracks are
renumbered.
Example: Erasing B
Track 1
num ber
Erasing
2 3
urn
r- i - i
f
---------
B is erased.
Since tracks following an erasure are renumbered,
multiple track erasures should be performed in order of
larger to smaller track numbers to prevent the
renumbering of tracks not yet erased.
For example, when erasing track 2 and 4, erase track 4
before track 2.
Dividing recorded tracks (DIVIDE Function) (see page 39)
The MD unit records sound sources through the line
(analog) input or microphone as a single track on the disc.
To randomly access individual tracks or portions within
this track, the divide function allows you to create
separate tracks for each song or portion. When a track is
divided, the total number of tracks increments by one, and
the remaining tracks are renumbered.
Additional tracks can also be added while recording
through the digital input jack (see “Track Marking During
Recording" on page 31).
Example: Dividing track 2 to create a new track tor C
Track
num ber
Dividing
o
¡1
1 2 3
B
2 3
B
c
c
Track 2 is divided and a
new track is created for C.
° 1
° 1
34
Page 35

Use the title function to create titles for your recorded
discs and tracks. Titles — which may consist of
uppercase and lowercase letters, numbers, symbols and
spaces — appear in the display window during operation.
35
Page 36

Erasing Recordings (ERASE Function)
If your recorded MD has been divided into tracks, you can use the procedure
belo w to erase specific tracks easily and instantly. Note, however, that once
erased, a track cannot be recovered.
Erasing a single track
You can erase a track while the unit is in stop, playback or
pause mode simply by specifying its respective track
num ber.
Press YES.
"Complete” lights up for a few seconds then
disappears, and the specified track is erased.
The music calendar decreases by one.
—YES
O
•^5
-m-t, -
6 7 a ft 10
11 13 13 14 IS
W 17
Complete
When erasing a track durin g playback, the
following track begins playing after the erasure is
made.
To cancel the ERASE Function
Press . 43 . or to restore the norm a) display.
I
Notes I
If the following indication goes on
4 Erase!!
The track has been recorded or edited on another unit and is w rite-protected. If this
indication appears, press YES to erase the track.
If the ’’Protected" indication lights up
The record-protect slot on the disc is open and the specified track cannot be
erased. Erase the track after closing the slot.
When "TOC” flashes in the display window
Do not jog the unit or pull out the power cord. After the contents of the recording
have been updated, “TOC" lights up. II any changes have been made to an M D. the
“TOC" indicator lights up. When EJECT or POWER is pressed at this time, the
“TOC" indicator flashes and the actual contents of the MD are updated.
36
Page 37

Erasing tracks successively
Use the procedure below while the unit is in stop, playback
or pause mode to erase consecutive tracks one by one.
Press or or numeric
buttons) until the first track to be erased
lights up. ^ ^
r !■«■« I I
Example: Erasing track 4
To erase the next track, press until “Erase?" lights up.
EDIT
NO —
O
•MX
4 Erase ?
-m-v - -
9 7 8 d 10
Press YES.
"Complete" lights up for a few seconds then
disappears, and the specified track is erased.
The music calendar decreases by one.
—YES
o
CoriP 1 ete
IS ii. .
6 7 6 9 10
11 12 13 14 IS
16
01n 23s
6 7 • 4 10
Press until “Erase?” lights up.
EDIT
NO —
O
KMI
4 Erase ?
►
ISI ii. ....
6 7 « 9 10
Press YES.
"Complete" lights up for a few seconds then
disappears, and the specified track is erased.
The music calendar decreases by one.
—YES
O
CofiP 1 ete
IMI ii. ....
The track following the one just erased starts
playing if the unit is in playback mode.
6 7 • 9 10
11 12 13 14 IS
16 17
Repeat steps 4 and 5 to erase other successive tracks.
To cancel the ERASE Function
Press ^f5(f or ■ to restore the normal display.
I Notes I
If the "Protected" indication lights up
TTie record-protect slot on the disc is open and the specified track cannot be
erased. Erase the track alter closing the slot.
When "TOC” flashes in the display window
Do not jog the unit or pull out the power cord. After the contents of the recording
have been updated, “TOC" lights up. If any changes have been made to an MD, tl
“TOC” indicator lights up. When EJECT or POWER is pressed at this time, the
“TOC" indicator flashes and the actual contents of the MD are updated.
37
Page 38

Erasing a recordable MD deletes all recorded tracks. Note,
however, that once erased, a track cannot be recovered.
By using the dividing, erasing and combining functions, you
can erase specific portions of a track.
Example: Erasing a part of selection A
Track , Partto^rased. ^
Dividing
o
___
A A
#2
/2 3 /4
A
#3
t
____
1 ^
Erasing
OL
Combining
o
I Notes I
if the ■'Protected" indication lights up
The record-protect slot on the disc is open and the specified track cannot be edited.
Edit the track after dosing the slot.
When "TOC" flashes in the display w indow
Do not jog the unit or pull out the power cord. After the contents of the recording
have been updated, “TOC lights up. If any changes have been made to an MO, the
TOC indicator lights up. When EJECT or POWER Is pressed at this time, the
TOC indicator flashes and the actual contents of the M D are updated.
__
1
L£ _
1
1 A{#1+#3) B
- A is divided
into 3 parts.
B c
#3
B C
— #2 is
erased.
2 3
C
' #1 and #3 are combined.
To cancel the ERASE Function
Press or ■ to restore the normal display.
38
Page 39

Dividing Recorded Tracks (DIVIDE Function)
To be able to randomly access certain portions of a track, you must use the
divide function during playback to create separate tracks for each portion.
If the starting portion is Incorrect, press ^(5<f.
(If it is okay, go to step 7.)
EDIT
NO~
O
While playing the MD, press ^^Ito
temporarily stop playback at the point where
a new track is to be created.
On
Press until “Divide?” lights up.
EDIT
NO-
O
Example: Dividing track 4
4 D i o i d e* ? «
3 Press YES when you want to divide the track.
The starting portion of the new track plays back
repeatedly.
—YES
O
PL4Sh . 7 « 4 »
Il 17 13 1« 15
While monitoring the sound, press or ►
to find the starting point of the new track.
The starting portion of the new track is piayed
back repeatedly.
I hM I
± 0 2
ii:
Rehearsal i.3.'i"
Allernating displays.
Position ok?
► K 17 1«
O
6 T 0 S 10
ts IT 1*
7*C»
Rehearsa1
(Ml l-l-m -m-
Alternating displays.
Position o k ? *
► , t< ir w
IP ¿i.
______
If the starting portion is still Incorrect, repeat
steps 5 until the correct portion is found.
The starting position can be moved within a range
of -128 to +127 steps of about 0.06 second each.
(Continued on next page.)
39
Page 40

Dividing Recorded Tracks (DIVIDE Function)
(Continued from previous page.)
Press YES when the correct position is found.
"Complete" lights up for a few seconds then
disappears, and the track is divided.
After track division, the newly created track
begins playing. The new track will have no track
title even if the original track was labeled.
O
I 2 9^4 S.T
Conp1ete
To cancel the DIVIDE Function
Press or ■ to restore the normal display.
To undo a track division
Combine the tracks again (see “Combining Recorded
Tracks" on page 41) then redivide the tracks if necessary.
Changing the step interval in step 5
When “Rehearsal” lights up in step 5, press P.MODE to
select ±1 for a step interval of ±0.06 second, or ±2 for a step
Interval of ±0.12 second.
6 7 S i'lO
II 12 12 14 IS
16 17 It
[Notes (
If the "Protected" indication lights up
The record-protect slot on the disc is open and the specified track cannot be
devided. Divide the track after closing th e slot.
When “TOC" flash es in the display w indow
Do not jog the unit or pull out the power cord. After the contents of the recording
have been updated, TOC’ lights up. If any changes have been m ade to an MD. the
TOC " indicator lights up. W hen EJECT or POW ER is pressed at this time, the
TOC " indicator flashes and the actual contents of the MD are updated.
40
Page 41

Combining Recorded Tracks (COMBINE Function)
The combine function allows you to combine consecutive tracks on a recorded disc
during stop, playback or pause mode.
Press YES.
The portion where the two tracks will join (i.e., the
end of the first track and the beginning of the
second track) repeatedly plays back.
-YES
O
R e h e a r s a 1 ' « V«'«
_______
Press |33 or ^ until the second track of the
two to be combined lights up.
Example; Combining tracks 3 and 4
IMI JJi., -..^n ^.
Alternating displays.
Track ok?
IMI H..B < .. .
_____
■Z.3 4^
S 7 i’t W
II 12 13 14 IS
01n
Press until “Combine?” lights up.
EDIT
NO-
O
4 Corrib ine? 678«
____
1« 17 tS
4 Verify the tracks, then press YES.
"Complete" lights up for a few seconds then
disappears, and the tracks are combined.
The music calendar decreases by one.
If both of the combined tracks have track titles, the
title of the second track is erased (as well as other
information such as the recording date).
-YES
o
' »
CofiP 1 ete
►
ISl ... H .
To cancel the COMBINE Function
Press ^,5^^ ' *. restore the normal display.
To undo a track combination
Divide the tracks again {see “Dividing Recorded Tracks” on
page 39). then repeat the combine function with the correct
tracks if necessary.
6 7 é 9 10
41
Page 42

Combining Recorded Tracks
(COMBINE Function)
I fi r.Vi I IT. ■ ■ I W LVl
(MOVE Function)
iNotes^i
If the following indication lights up
Sorr*=i ‘
^ 16 17 IS
_______
IS^I —-n ■ « -. «
The specified tracks cannot be combined. Extensive editing of the same track may
render it impossible to combine with another track. This is due to the technical
limitation of the MD system and is not a mechanical error.
If the "Protected” indication tights up
The record-protect slot on the disc Is open and the sp ecified track cannot be
com bined. Combine the frack after dosing the slo t.
When ”TOC” flashes in the display window
Do not jog the unit or pull out the power cord. After the contents ol the recording
have been updated, “TOC" lights up. If any changes have been made to an M D, the
‘TOC indicator lights up. When EJECT or POW ER is pressed at this
TOC " indicator flashes and the actual contents of the MD are updated.
_____
time, the
Use this function to change the order of specific tracks during
stop, playback or pause mode.
After moving a track, track numbers following the new track
position increment by one.
Example: Moving track 3 to track position 5
1,4
Press or ^ or numeric
buttons) until the track to be moved lights up.
Number of track to be moved lights up.
I I
l^l -m-n - ■
42
Press until “Move?” lights up.
EDIT
NO-
O
Page 43

Press YES.
The number of the track to be moved and the
new track position lights up.
—YES
O
3*^-^ 1
4 Press (
Press ,43 K i or numeric
buttons) to specify the new track position.
Press YES.
"Complete" lights up for a few seconds then
disappears, and the moving procedure is
completed.
The moved track begins playing back if the unit is
in playback mode.
To cancel the MOVE Function
press ■ button to restore the normal display.
If the “Protected" indication lights up
The record-protect slot on the disc is open and the specified track cannot be
moved. Move the track after dosing the slot.
When "TOC" flashes in the display w indow
Oo not jog the unit or pull out the power cord. After the contents of the recording
have been updated. TOC" lights up. H any changes have been made to an MD. the
“TOC” indicator lights up. When EJECT or POWER is pressed at Ihis time, the
TOC ’ indicator flashes and the actual contents of the MD are updated.
-YES
Comp 1ete
►
m ¿1^
O
s
6 7 ■
43
Page 44

Labeling Recordings (TITLE Function)
Use the title function to create titles for your recorded discs and tracks. Titles —
which may consist of up to 100 uppercase and lowercase letters, numbers and
symbols for a maximum of about 1,700 characters per disc — appear in the display
window during MD operation.
Labeling a track
Use this function during playback, pause or recording mode
to label a track.
Repeat step 2 until you have entered the
entire title.
Press NAME again.
The entered title appears on the left side of the
display window and the labeling procedure is
completed.
iNAMEt
DIflRV
Entering lowercase letters
1 Press CAPS until “Selected abc” lights up.
2 Enter the desired characters.
Entering uppercase letters
1 Press CAPS until “Selected ABC” lights up.
2 Enter the desired characters.
Entering numbers
1 Press NUM until “Selected 123" lights up.
2 Enter the desired numbers.
Entering uppercase or lowercase letters again
1 Press CAPS or NUM until “Selected ABC" or
“Selected abc" lights up.
2 Enter the desired characters.
Entering symbols ( *.?,¥, etc.)
1 Press or ► ► on the remote commander to select the
desired character.
2 Press tfc (► ► •)•
44
Page 45

If you enter the wrong character
1 Press or ► » to move the flashing cursor under the
character to be corrected.
2 Press CLEAR to erase the incorrect character, then enter
the correct letter.
To cancel the title function
Press ■ .
Making a correction after entering a title
1 Press NAME while playing back or pausing the respective
track. The current track title lights up.
2 To enter an entirely new title, hold down CLEAR until the
current track title is erased, then enter the new track title.
To correct a part of the track title, use the same procedure
described In “If you make a mistake" above.
3 Press NAME.
Erasing all track titles on a disc
1 Hold down on the unit for about one second while
the unit is stopped until "All Erase?" lights up.
2 Press again until "Name Erase?" lights up.
3 Press YES.
Labeling a disc
2
3
1 Insert the disc to be labeled.
2 Press NAME while the unit is stopped.
A flashing cursor appears.
I name)
I Notes I
If the "Protected” indication lights up
The record-protect slot on the disc is open and the specified track cannot be
labeled. Label the track after dosing the slot.
When "TOC" flashes in the display window
Do not jog the unit or puli out the power cord. After the contents of the recording
have been updated, TOC' lights up. If any dianges have been made to an MO, tl
TOC indicator lights up. When EJECT or POW ER is pressed at this tim e, the
TOC indicator flashes and the actual contents of the M D are updated.
Enter one character at a time.
CDcpcpqjcp
ryi 1*7^ rp rp rp
Cp CS3 □□
S3 00I
Entering the letter “D”
(Continued on next page.)
45
Page 46

Labeling Recordings (TITLE Function)
(Continued from previous page.)
Repeat step 3 until you have entered the
4
entire title.
lUE SONGS^y^c ii i V “
Press NAME again.
The entered title appears from the leftside of the
display window and the disc labeling procedure is
completed.
[nam^
DR I ME SOHGS
16 17 It
Entering iowercase ietters
1 Press CAPS until "Selected abc" lights up.
2 Enter the desired characters.
Entering uppercase ietters
1 Press CAPS until “Selected ABC" lights up.
2 Enter the desired characters.
Entering numbers
1 Press NUM until “Selected 123” lights up.
2 Enter the desired numbers.
Entering uppercase or lowercase letters again
1 Press CAPS or NUM until “Selected ABC" or
“Selected abc” lights up.
2 Enter the desired characters.
Entering symbols { »,?,¥, etc.)
1 Press or ► ► on the remote commander to select the
desired character.
2 Press i
The following symbols can be used on your unit: I ”#$%&’
()* + ,-./:;< = >?@[¥)''_-{ 1)~
However, the display of the ( ¥ J { |) ~ symbols may not be
supported on certain models of MD player units.
If you enter the wrong character
1 Press or to move the flashing cursor under the
character to be corrected.
@ 1^
2 Press CLEAR to erase the incorrect character, then enter
the correct letter.
To cancel the title function
Press ■ .
Making a correction after entering a title
1 Press NAME while the unit is stopped. The current disc
title lights up.
2 To enter an entirely new disc title, hold down CLEAR until
the current track title is erased, then enter the correct disc
title.
To correct a part of the disc title, use the same procedure
described in “If you make a mistake” above.
3 Press NAME.
I Notes I
if the "Protected” indication lights up
The record-protect slot on the disc is open and the disc cannot be labeled. Label
the disc after closing the slot.
When “TOC” flashes in the display window
Do not jog the unit or pull out the power cord. After the contents of the recording
have been updated, “TOC" lights up. If any changes have been made to an M D, the
“TOC" indicator lights up. When EJECT or POWER is pressed at this time, the
"TOC" indicator flashes and the actual contents of the MD are updated.
46
Page 47

Specifications
MD recorder section
System
Disc
Laser:
Wavelength:
Laser diode properties
Revolutions
Error correction
Sampling frequency
Modulation system
Number of channels
Frequency response
Wow and flutter
Inputs
Jack type
MIC
LINE IN
DIGITALINSquare
Stereo
mini-jack
Phono
jack
optical
connector
jack
Outputs
Jack type
HEAD
PHONES
LiNE OUT
DIGITAL
OUT
Stereo minijack
Phono
jack
Square optical
connector jack
MiniDisc digital audio system
MiniDisc
Semiconductor laser
780—790nm
Material: GaAIAs
Emission duration: continuous
Laser output: less than 44.6 pW
(This output is the value measured
at a distance of 200 mm from the
lens surface on the optical pick-up
block.)
400 rpm to 900 rpm (CLV)
Advanced Cross Interleave Reed
Solomon Code (ACIRC)
44.1 kHz
EFM (EighHo-Fourteen Modulation)
2 stereo channels
5 to 20,000 Hz ±0.5 dB
Below measurable limit
Input
impedance
600 ohms
More than
47 kilohms
Optical
wave
lenghth
660 nm
Rated
input
0.8 mVrms
500 mVrms
Rated output
28 mW 32 ohms
2 Vrms at a
toad
impedance of
50 kilohms
-18 dBm
Minimum
input
0.3 mVrms
158 mVrms
- —
Load
impedance
More than
10 kilohms
Optical
wave
lenghth
660 nm
General
Power requirements
Power consumption
Dimensions
Mass
120 VAC. 60 Hz
22 W
Approx. 225 X 75 X 285 mm (w/h/d)
(8Ve X 3 X 11’/4 inches)
incl. projecting parts
Approx. 2.9 kg
(6 lb 6 oz)
Supplied accessories
• Remote commander RM-D1M (1)
• Sony SUM-3 (NS) batteries (2)
• Audio connecting cords (pin-jack x 2 pin-jack x 2) (2)
• Audio (AU) bus cable (1)
• Recordable MD: MDW-60 (1)
Optional accessories
• Optical cable: POC-15SP
• Recordable MDs: MDW-60 (60 min.), MDW-74 (74 min.)
(available spring 1993)
Design and specifications are subject to change without
notice.
47
Page 48

Display Messages
System Limitations
The following table explains the various messages that
appear in the display window.
Message
Blank Disc
Cannot Copy An attempt was made to make a second
Cannot EDIT An attempt was made to edit the disc during
Disc Error
Disc Full The disc Is full (see “System Limitations").
Impossible An attempt was made to combine tracks
Name Full The titling capacity of the disc has reached
No Disc There is no disc in the unit.
No Track The inserted disc has a disc title but no
Protected
Retry
Sorry
TOC Reform?
Meaning
A new (blank) or erased disc has been
inserted.
copy from a digitally dubbed MD (see page
50).
PROGRAM or SHUFFLE play or the
Inserted disc contains Japanese ideograms.
The disc is abnormal (scratched or missing
a TOC).
while playing back the first track.
its iimit (about 1,792 characters).
tracks.
The inserted disc is record-protected.
The first recording attempt failed due to a
disturbance or scratch on the MD, and a
second recording is being made.
An attempt was made to combine tracks
that cannot be combined.
The TOC has become almost full due to
repeated editing operations.
Press YES to reform the TOC for a possible
increase in recording time. Press ^¿t
bypass the reform process and turn off the
message.
The recording system in your MiniDisc recorder is radically
different from those used in cassette and DAT decks and is
characterized by the limitations described below. Note,
however, that these limitations are due to the inherent nature
of the MD recording system itself and not to mechanical
causes.
“Disc Full" lights up even before the disc has reached
the maximum recording time (60 or 74 minutes*)
When 255 tracks have been recorded on the disc, “Disc Full"
lights up regardless of the total recorded time. More than 255
tracks cannot be recorded on the disc.
“Disc Full” lights up before the maximum number of
tracks is reached
Fluctuations in emphasis within tracks are sometimes
interpreted as track intervals, incrementing the track count
and causing the “Disc Full" indication to light up.
The remaining recording time does not increase even
after erasing numerous short tracks
Tracks of under 8 seconds in length are not counted and so
erasing them may not lead to an increase in the recording
time.
Some tracks cannot be combined with others
Track combination may become impossible when tracks are
edited.
The total recorded time and the remaining time on the
disc may not totai the maximum recording time (60 or 74
minutes*)
Recording is done in minimum units of 2 seconds each, no
matter how short the material. The contents recorded may
thus be shorter than the maximum recording capacity. Disc
space may also be further reduced by scratches.
Tracks created through editing may exhibit sound
dropout during search operations.
Track numbers are not recorded correctly
Incorrect assignment or recording of track numbers may.
result {1) when CD tracks are divided into several smaller
tracks during digital recording, or (2) when certain CDs are
recorded with both the "LevelSync ON" indication and
automatic track marking function on.
“TOC Reading" indication appears for a long time
If the inserted recordable disc is brand new, the “TOC
Reading” indication appears on the display longer than those
that have been used.
Your MiniDisc recorder is designed as a Hi-Fi stereo
system and cannot be used to piay back-monaurai
format MDs.
* Seveniy-four-minute recordable discs will be available in the spring of 1993.
48
Page 49

Troubleshooting Guide
If you experience any of the following difficulties while using your unit, use this
troubleshooting guide as an aid to remedy the problem.
If the problem persists, consult your nearest Sony ser^^ice factlity.
Symptom
The unit does not operate or operates
poorly.
The unit does not play back.
The unit does not record.
The sound has a lot of static.
The dock loses time.
Cause
The disc may be damaged (“Disc
Error” appears).
Moisture has formed Inside the unit.
The unit is not on. Press POWER to turn the unit on.
The disc is inserted in the wrong
direction.
The disc may not be recorded (the
music calendar does not appear).
The disc is record-protected
(“Protected" appears).
The unit is not connected properly to
the sound source.
The recording level is not adjusted
properly (in case of line input or
microphone input).
A premastered disc is inserted.
There is not enough time left on the
disc.
There has been a power failure or the
power cord has been disconnected.
Recording pause mode is
automatically canceled after a few
minutes.
strong magnetism from a television or
a similar device is interfering with
operations.
There may have been a power failure
or the power cord may have been
disconnected.
Take the disc out and insert it again. If
'Disc Error" remains, replace the disc.
Take the MD out and leave the unit in
a warm place for several hours until
the moisture evaporates.
Slide the MD into the disc
compartment with the label side up
and the arrow pointing toward the
opening until the unit grips it.
Replace the disc with one that has
been recorded.
Close the record-protect slot.
Make connections properly to the
sound source.
Turn the REC LEVEL control to adjust
the recording level properly.
Replace it with a recordable disc.
Replace it with another recordable disc
with fewer recorded tracks.
Data recorded to that point may be
lost. Repeat the recording procedure.
Press REC • again.
Move the unit away from the source of
strong magnetism.
Set the clock again.
Remedy
If the unit does not operate properly even after attempting the prescribed
remedies, turn off the power, then reinsert the plug into the power outlet.
49
Page 50

Guide to the Serial Copy Management System
Since your MD unit uses the Serial Copy Management System (SCMS), MDs
recorded through the digital input jack cannot be used to make subsequent copies to
other MDs through the digital output jack. The following diagram shows a system for
making copies through the digital or analog terminals.
1 You can record digital sources (CD, prerecorded MD,
and DAT equipment with a sampling frequency of
44.1 kHz) to a recordable MD through the digital input
jack.
CD player
//
DAT deck
(with a sampling frequency
of 44.1 kHz)
■ ?ICT
o'®
,.oO
■ ¡(zESdb
y Digital Digital
^ output jack inp ut jack
Optical cable
Playback
Audio connecting cord
However, you cannot make subsequent copies from the
recordable MD to other recordable MDs through the digital
output jack. Subsequent copies can only be made through
analog output jack.
O ‘O
o
A recordable MD recorded through the digital Input jack
o<D)
0 0 O
50
Page 51

2 A recordable MD with materia! recorded from analog
sources (analog records or FM programs, etc.)
through the line input jack can be copied to another
recordable MD through the digital output jack.
Record player fC
However, you cannot make subsequent copies from the
recordable MD to other recordable MDs through the digital
output jack. Subsequent copies can only be made through
analog output jack.
Tuner
Cassette deck
Microphone 1^» o«.
amplifier
CO player
MD recorder
f
Piayback
MD recorder '
Playback.
Line
(analog)
output jack
Digital
output jack
Audio connecting cord
t
Optical cable
o
MD recorder
Line
(analog)
input jack
O III .10
0 0 0 0
MOj_
J
A recordable MD recorded through the analog
input jack
MD recorder
Digital
input jack
A recordable MD recorded through the digital
input jack
( 1 )
Recording
Recording
MD recorder
Optical cable
..
0>‘
Page 52

Index
AMS (Automatic Music Sensor) 17
ATRAC (Adaptive TRansform Acoustic Coding) 5
Auto space 24
B
Labeling
a disc 45
a track 44
Backward scanning 18
Cables
audio (AU) bus 10,11,12
line 10,11,12,13
optical 10,11,13
Canceling
A-B repeat playback 23
auto space function 24
combine function 41
divide function 40
erase function 36, 37, 38
program play 21
repeat function 22
shuffle play 20
title function 45,46
CD synchrO’recording 32
Checking
order of entered tracks 21
Cleaning 6
Combining 35,41
Displaying
recording date 19
remaining playing time 18
track title 18
Dividing 34, 39
Ejecting
a disc 16
Erase function 34, 36
Erasing
a disc 38
a part of a track 38
a single track 36
programmed tracks 21
tracks successively 37
Forward scanning 18
MiniDisc
premastered (prerecorded) 5
recordable (blank) 5
Moving 35, 42
Music scan 24
Optional accessories 47
Pausing (stopping momentarily) 16
Playing an MD
A-B repeat 23
normal play 16
program play 20
repeat play 22
shuffle play 20
Premastered MO 5
Program play 20
Recordable MD 5
Recording
a digital source 25
from the line (analog) input jack 27
from a microphone 29
Recording level 28
Record-protect tab 28
Remote commander 7, 9
Sampling frequency 10
SCMS (Serial Copy Management System) 50
Setting the clock 15
Shock-resistant memory 6
Shuffle play 20
Specifications 47
Supplied accessories 7, 47
m- ■
Title function 35, 44
TOC (Table Of Contents) 5
Track marking 31
Troubleshooting Guide 49
Hooking up
analog 12, 13,14
digital 11,13
CD
Inserting an MD 16, 25, 27, 29, 32
Corporation Printed in Japan
 Loading...