

Page 1
3-865-048-14(1)
Digital Surround
Headphone
System
Operating Instructions
Mode d’emploi
Bedienungsanleitung
Manual de instrucciones
GB
FR
DE
ES
MDR-DS5000
©1998 by Sony Corporation
Page 2

WARNING
NOTICE FOR THE CUSTOMERS IN THE
U.S.A.
To prevent fire or shock
hazard, do not expose the unit
to rain or moisture.
To avoid electrical shock, do
not open the cabinet. Refer
servicing to qualified
personnel only.
WARNING
You are cautioned that any changes or
modifications not expressly approved in
this manual could void your authority to
operate this equipment.
For the customers in the USA
Owner’s Record
The model number is located on the back
of the processor and on the headphone
housing.
The serial number is located at the
bottom of the processor and the inner
side of the battery compartment.
Record these numbers in the spaces
provided below. Refer to them whenever
you call upon your Sony dealer
regarding this product.
NOTE
This equipment has been tested and found to
comply with the limits for a Class B digital
device, pursuant to Part 15 of the FCC Rules.
These limits are designed to provide
reasonable protection against harmful
interference in a residential installation. This
equipment generates, uses, and can radiate
radio frequency energy and, if not installed
and used in accordance with the instructions,
may cause harmful interference to radio
communications. However, there is no
guarantee that interference will not occur in a
particular installation. If this equipment does
cause harmful interference to radio or
television reception, which can be determined
by turning the equipment off and on, the user
is encouraged to try to correct the interference
by one or more of the following measures:
– Reorient or relocate the receiving antenna.
– Increase the separation between the
equipment and receiver.
– Connect the equipment into an outlet on a
circuit different from that to which the
receiver is connected.
– Consult the dealer or an experienced radio/
TV technician for help.
You are cautioned that any changes or
modifications not expressly approved in this
manual could void your authority to operate
this equipment.
Model No. MDR-DS5000
Processor DP-IF5000
Headphones MDR-IF5000
Serial No.
Processor
Headphones
GB
2
Page 3

For the customers in the USA and
Canada
Table of Contents
RECYCLING NICKEL-CADMIUM BATTERIES
Nickel Cadmium batteries
are recyclable. You can help
preserve our environment
by returning your unwanted
batteries to your nearest
point for collection,
recycling or proper disposal.
Note: In some areas the disposal of nickel
cadmium batteries in household or
business trash may be prohibited.
RBRC (Rechargeable Battery Recycling
Corporation) advises you about spent battery
collection by the following phone number.
Call toll free number: 1-800-822-8837
(United States and Canada only)
Caution: Do not handle damaged or leaking
nickel-cadmium batteries.
Headphone System ..................... 5
Checking the Product and
Accessories ................................ 8
Connecting the Headphone
System ....................................... 9
General ................................................. 9
Connecting with audio and video
components ......................................
Plugging into the wall outlet...........14
Charging the batteries ...................... 14
Inserting the batteries in the
headphones ....................................
Connecting the digital surround
processor with corded
headphones (sold separately)......
17
19
Listening to the Sound of
a Connected Component ....... 20
Troubleshooting......................... 26
Precautions................................. 28
Specifications ............................. 29
9
GB
GB
3
Page 4
Main features
The MDR-DS5000 is a digital surround headphone system using infrared
transmission. You can enjoy the multichannel surround sound with headphones by
simply connecting the digital surround processor to a DVD player with the supplied
optical digital connecting cable.
• Compatible with Dolby
• Signal processing by DSP (digital signal processors) creates surround sound for the
headphones that simulates a movie theater.
• Cordless headphones using infrared transmission system resistant to external noise
and interference.
• Wide infrared reception range of up to 10 m.
• Self adjusting mechanism eliminating the need for headband adjustment.
• Auto Power On/Off Function to automatically turn on the headphones when they
are put on and to turn them off when they are taken off.
• VOL control for adjusting both the right and left volume of the headphones.
The left and right audio output level is adjustable using the BALANCE control.
• Equipped with a headphone jack to connect corded open-air headphones (such as
MDR-F1 or MDR-605LP, sold separately).
• Rechargeable Ni-Cd batteries (supplied and sold separately) or R6 (size AA) drycell batteries (sold separately) can be used to power the headphones.
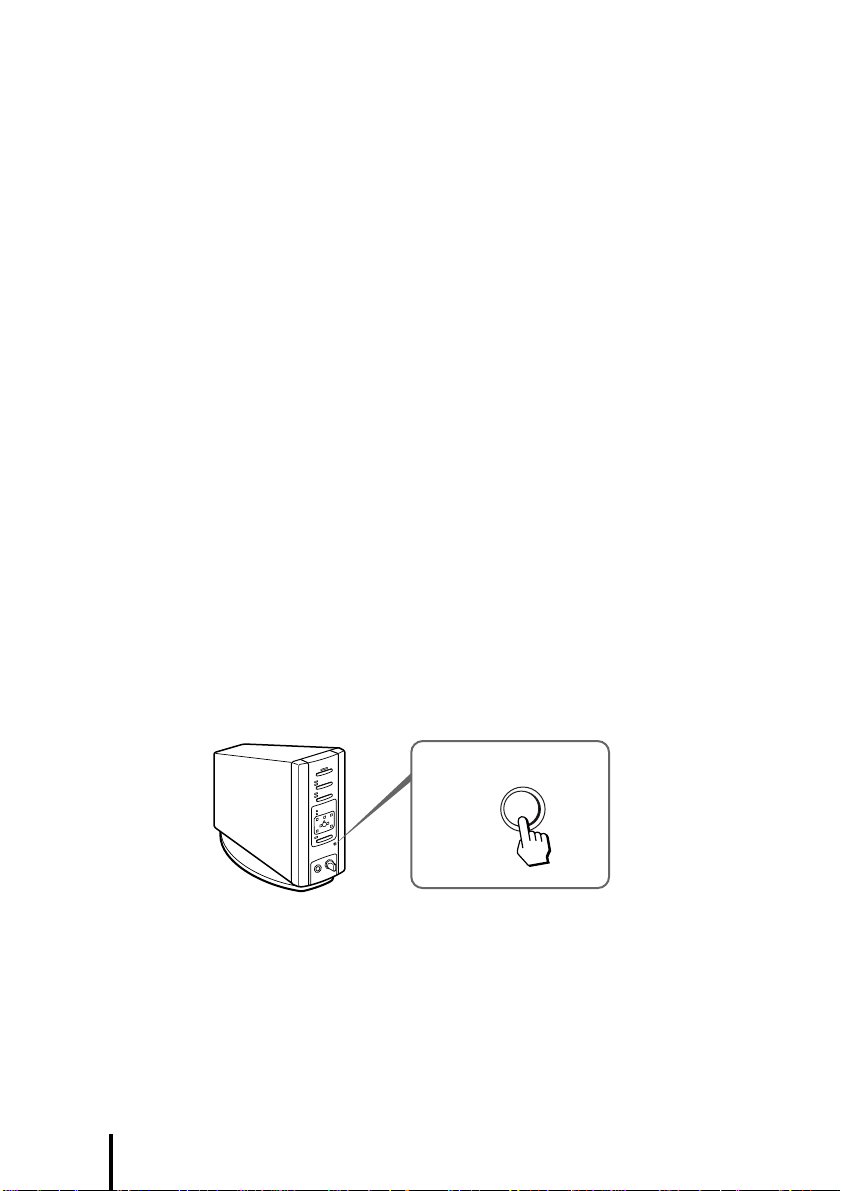
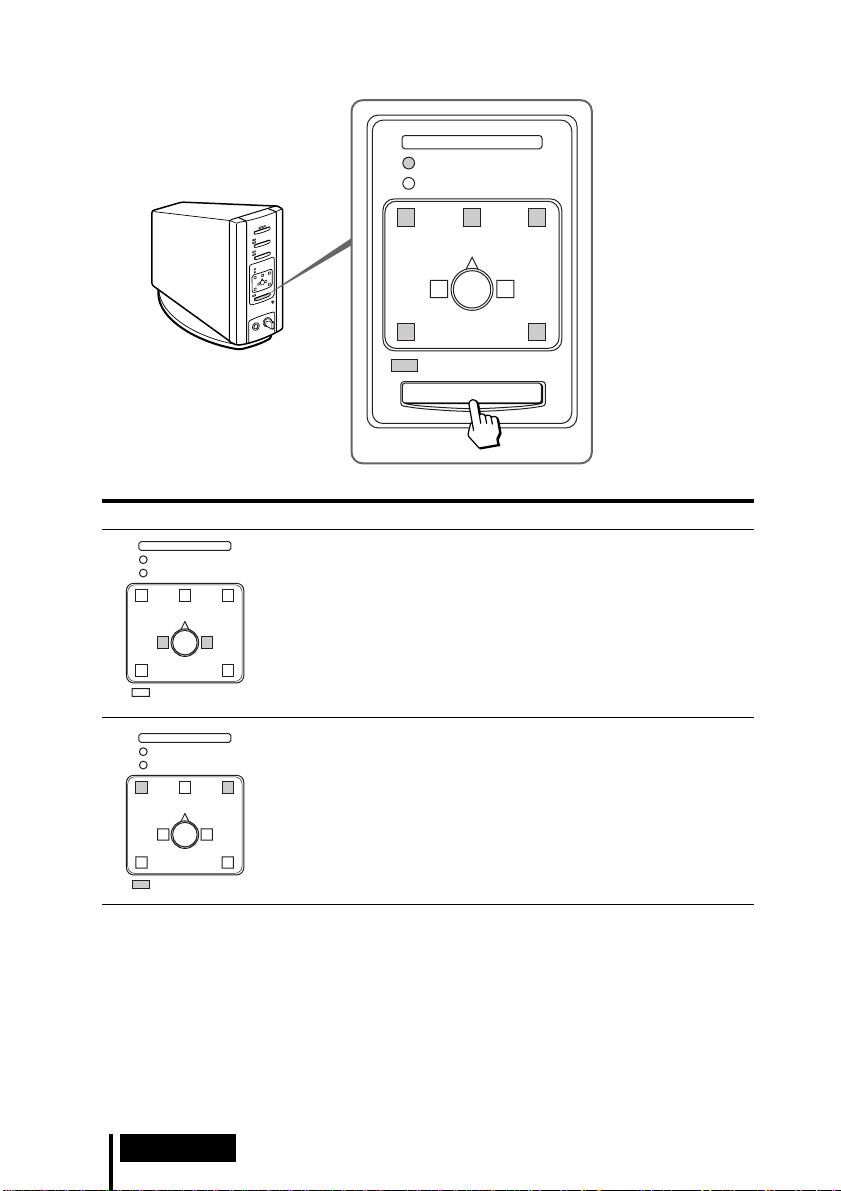
Setting to DEMO mode
Turn on the digital surround processor, and then press DEMO.
A test tone can be heard from the headphones, and the indicators for the
corresponding virtual speakers light one at a time. This allows you to experience
5.1ch virtual surround sound even if a DVD player is not connected. Press DEMO
again to cancel DEMO mode.
* Digital (AC-3) and Dolby Surround (Pro Logic).
DEMO
* The digital surround processor for this system incorporates the Dolby Digital (AC-3)
decoder.
Manufactured under license from Dolby Laboratories Licensing Corporation.
DOLBY, the double-D symbol a, “PRO LOGIC”, “Dolby Digital (AC-3)”, and “VIRTUAL
DOLBY DIGITAL” are trademarks of Dolby Laboratories Licensing Corporation.
CE mark
The CE mark is valid for products marketed in the European Union only.
GB
4
Page 5

¡ Preparation
Headphone System
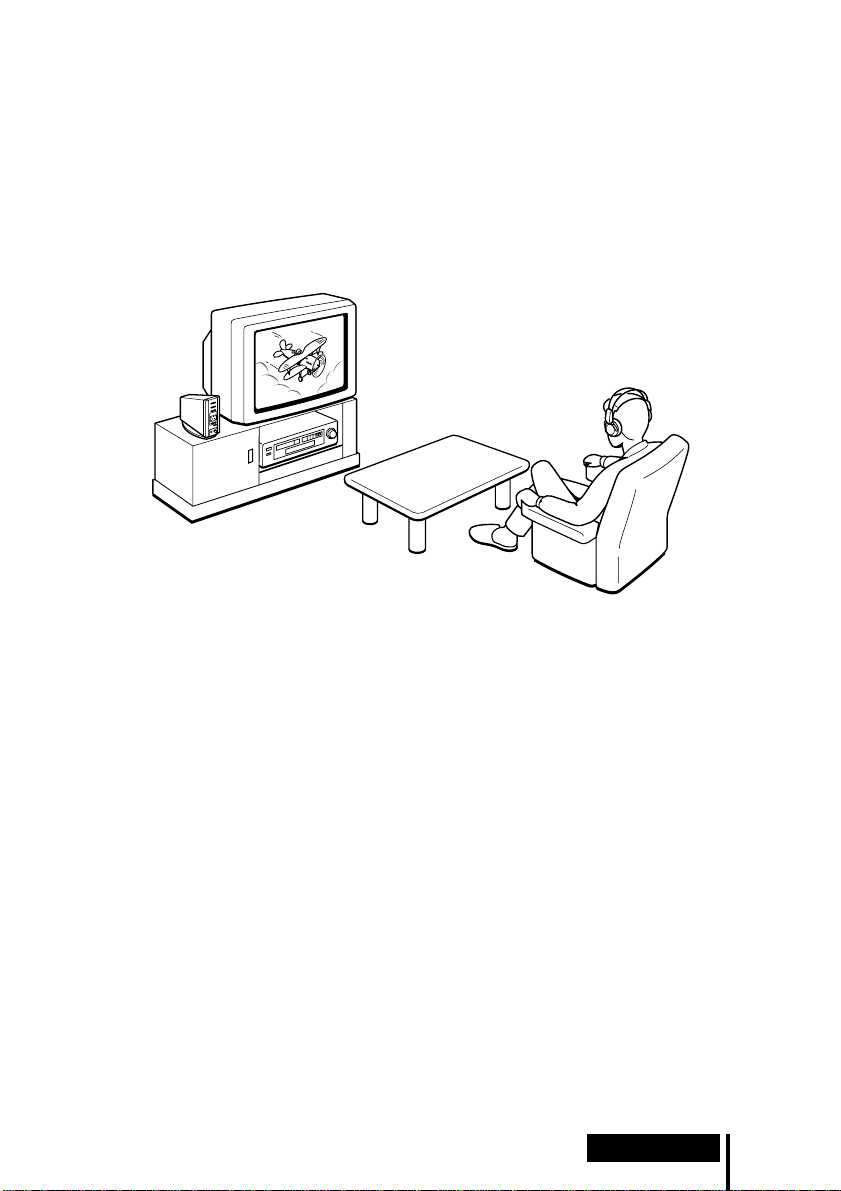
The MDR-DS5000 digital surround headphone system is a headphone system
incorporating a visual sound perspective. This system represents the future of audio
and video technology. With this system, you can enjoy sound virtually identical to the
playback from a 5.1ch surround speaker system. You can now enjoy the sound of a
movie theater right in your own home.
MDR-DS5000 digital surround headphone system
This is a new type of cordless headphone system which reproduces Dolby Digital and
Dolby Pro Logic multichannel sound images outside of the listener’s head using
“Virtualphones Technology”
the DVD player to the system, you can enjoy virtual surround sound just like a movie
theater.
The system uses a high-speed DSP for real-time digital conversion and processing of
all signals to produce a clear sound with virtually no distortion.
* “Virtualphones Technology” is a trademark of Sony Corporation.
System features
Compatible with Dolby Digital and Dolby Pro Logic
The system incorporates a surround decoder and Logic 3D processor to reproduce the
sound field for a room having a 5.1ch speaker system using headphones. Since the
signals are processed by the digital surround processor according to the input signals,
you can enjoy the surround sound field with not only DVD but also digital satellite
tuners, video cassettes and other analog and digital audio and video sources.
* developed exclusively by Sony. By simply connecting
(Continued)
Preparation
GB
5
Page 6

Sound reproduction outside the listener’s head
R
L
DSP
DSP
DSP
DSP
With the Logic 3D processor, headphone playback does not confine the sound to a
fixed position in the listener’s head, but creates the sensation of 360-degree natural
sound field with spatial orientation. This allows simulation of the surround sound
field from speaker playback when using not only DVD, but all audio and video
sources.
3-D sound field using “Virtualphones Technology” 3-D sound field of conventional headphones
R
SW
C
L
Typical sound field when listening to speakers
(2 channels)
Inside the room
Speaker
RS
LS
MDR-DS5000
playback sound
field Playback sound field of
conventional headphones
Sound field when listening to the MDR-DS5000
(2 channels)
Logic 3D processor
R
Speaker
L
Direct
sound
Reflected
sound
L : Left LS : Left Surround
C: Center SW : Subwoofer
R: Right RS : Right Surround
Open-air headphones with ring supports
Newly developed headphones provide comfortable listening and a natural sound
field. They do not cover the ears, and allow listening without pressure or discomfort.
Moreover, additional MDR-IF5000 headphones (sold separately) can be purchased,
allowing more than one person to enjoy surround sound at the same time within the
infrared transmission area (page 13).
GB
6
Preparation
Page 7
Headphone system configuration
This headphone system consists of a digital surround processor which decodes and
converts the multichannel input signals and infrared cordless headphones. By simply
connecting the digital surround processor to a DVD player, VCR, or other audio and
video component, you can enjoy Dolby Digital or Dolby Pro Logic surround sound.
This system can be used with any audio and video component having an optical
digital output jack, line (audio) output jack, or headphone jack. (See pages 11 and 29
for the connecting cables (sold separately).)
Notes
• Install the digital surround processor in a location where there are no obstructions between the
processor and headphones when used.
• Do not install the digital surround processor in unstable locations, such as on top of the TV. If
the processor falls down, it could cause an injury or be damaged.
Preparation
GB
7
Page 8
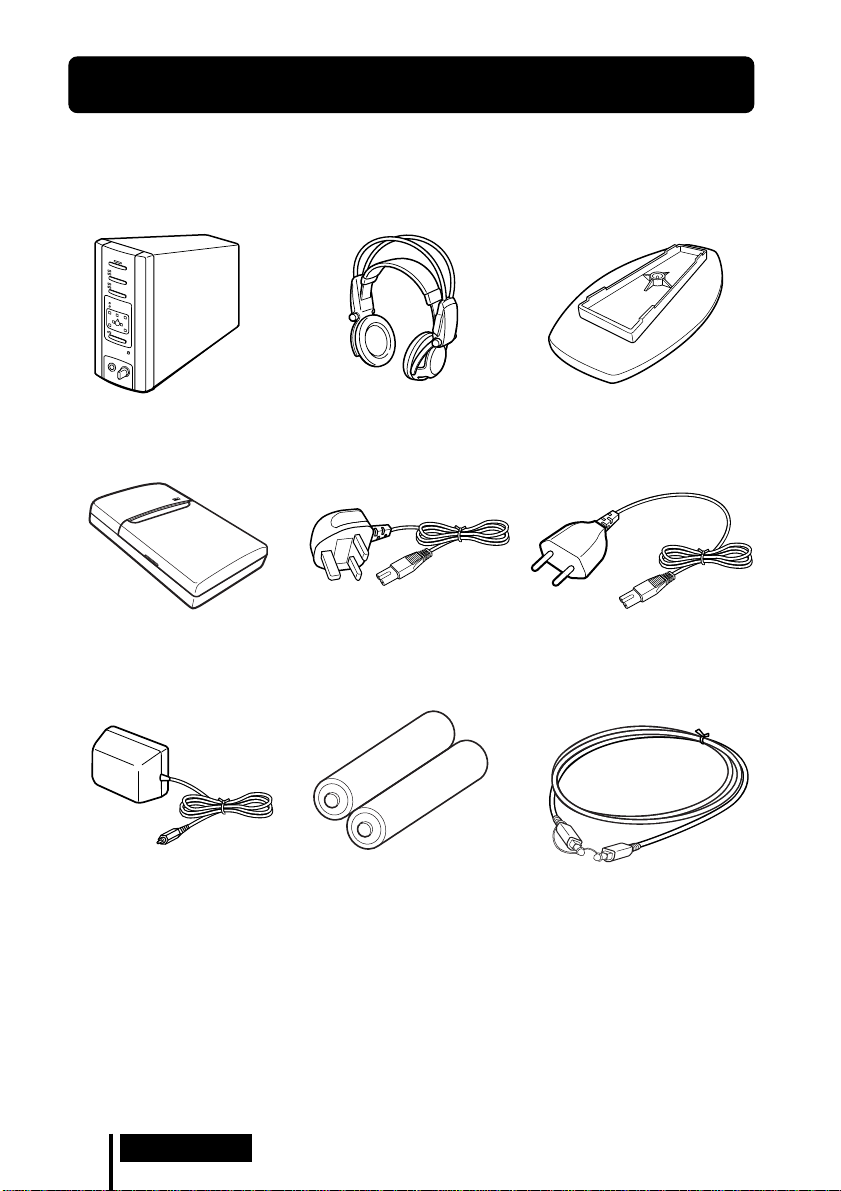
Checking the Product and Accessories
Before setting up the system, check that all of the components are included.
Digital surround processor (1)
Battery charger (1) Charging plug (for battery
AC power adapter (1)
Cordless stereo headphones (1)
charger, 1)
(CEK and HK4 Versions
Rechargeable Ni-Cd batteries
NC-AA (2)
* only)
Stand (for digital surround
processor, 1)
Charging plug (for battery
charger, 1)
(CED and E13 Versions
Optical digital connecting cable
(rectangular type, 1)
* only)
Note
Use the charging plug that matches the outlet in your home.
* The charging plug supplied with this system varies depending on the system version. To check
the version, refer to the version code printed on the box.
GB
8
Preparation
Page 9
Connecting the Headphone System
General
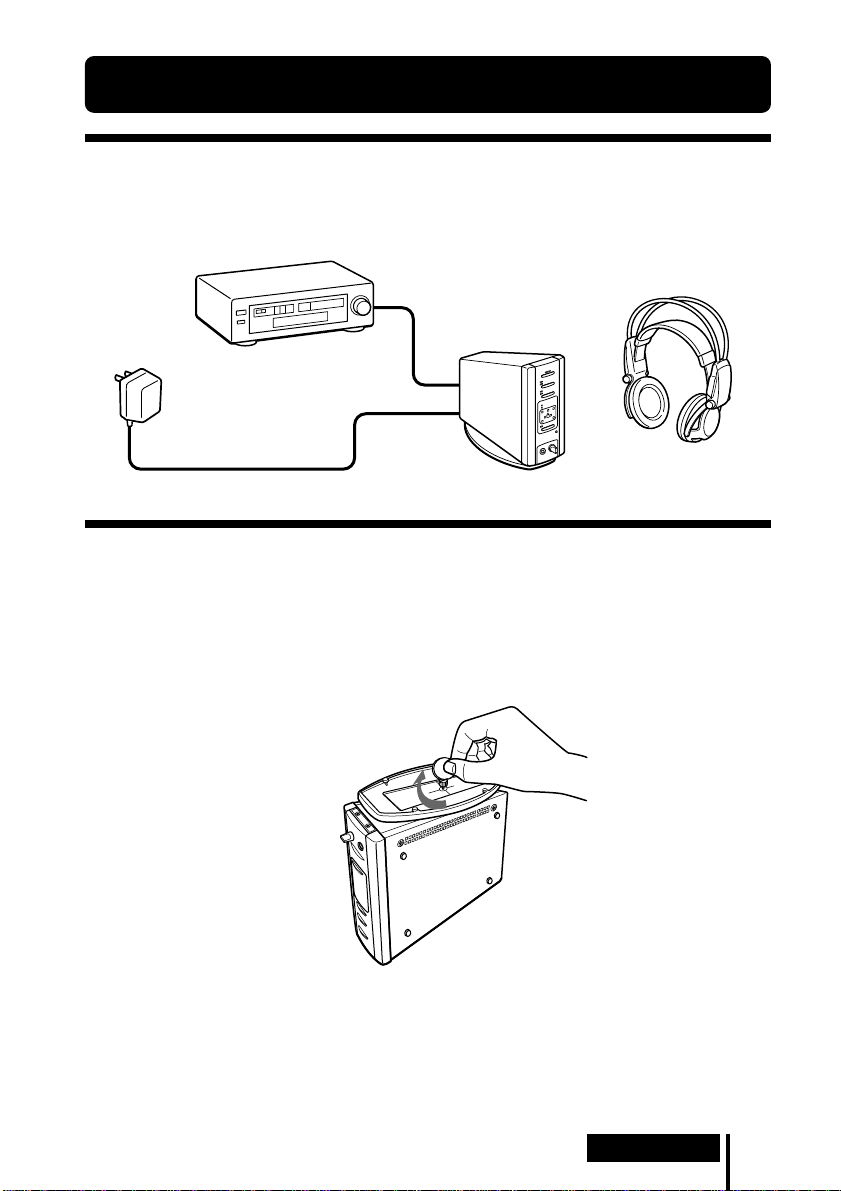
Connect the headphone system as shown in the illustration below.
DVD player, VCR, or
other component
Cordless stereo
headphones
AC power
adapter
Digital surround
processor
Connecting with audio and video components
Setting up the digital surround processor
To use in an upright position:
Use a coin to attach the supplied stand to the bottom of the digital surround
processor.
(Continued)
Preparation
GB
9
Page 10
To use on its side:
Place the digital surround processor so that the four rubber supports are on the
bottom.
/
Rubber supports
Notes
• If the digital surround processor is placed on its side, the full infrared transmission range may
not be obtained for some installation conditions.
• Place the digital surround processor as shown in the illustration. Do not place the digital
surround processor on the side not having the rubber supports.
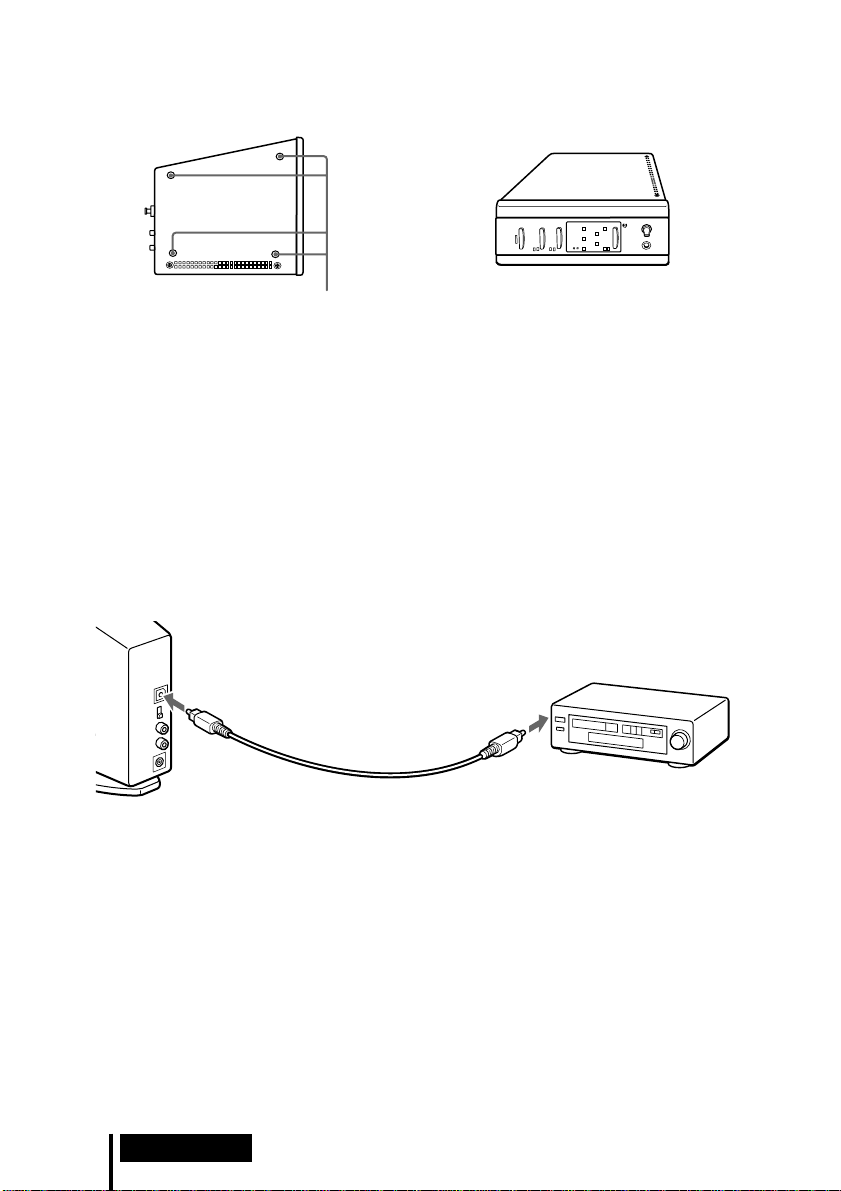
Connecting the digital surround processor with digital
components
Use the supplied optical digital connecting cable to connect the optical digital output
jack on a DVD player (or LD player), digital satellite tuner, or other digital component
to the DIGITAL IN jack of the digital surround processor.
Digital surround
processor
To DIGITAL IN jack
To optical digital
output jack
DVD player, LD player, digital
satellite tuner, or other digital
component having an optical
digital output jack
Optical digital connecting cable (supplied)
Take off the cap on the jack, match the orientation of the plug
with the jack, and then insert until the plug fits into place.
Notes
• The optical digital connecting cable is an extremely high-precision device and is sensitive to
jolts and external pressure. Therefore, be careful when inserting and removing the cable plug.
• This system is not compatible with the AC-3 RF jacks on LD players.
• The digital input for the digital surround processor does not support sampling frequencies of
96 kHz. Set the digital output setting for the DVD player at 48 kHz when using this system.
Noise may be heard when a 96-kHz digital signal is input.
• The digital input for the digital surround processor is not compatible with the DTS* format.
Noise may be heard when DTS-format signals are input.
* DTS is a trademark of Digital Theater Systems (USA).
GB
10
Preparation
Page 11
Connecting cables (sold separately)
Use the POC-5AB cable (mini-plug ˜ rectangular plug) when connecting the optical digital
output mini-jack on portable DVD players, portable CD players, or other digital components to
the DIGITAL IN jack.
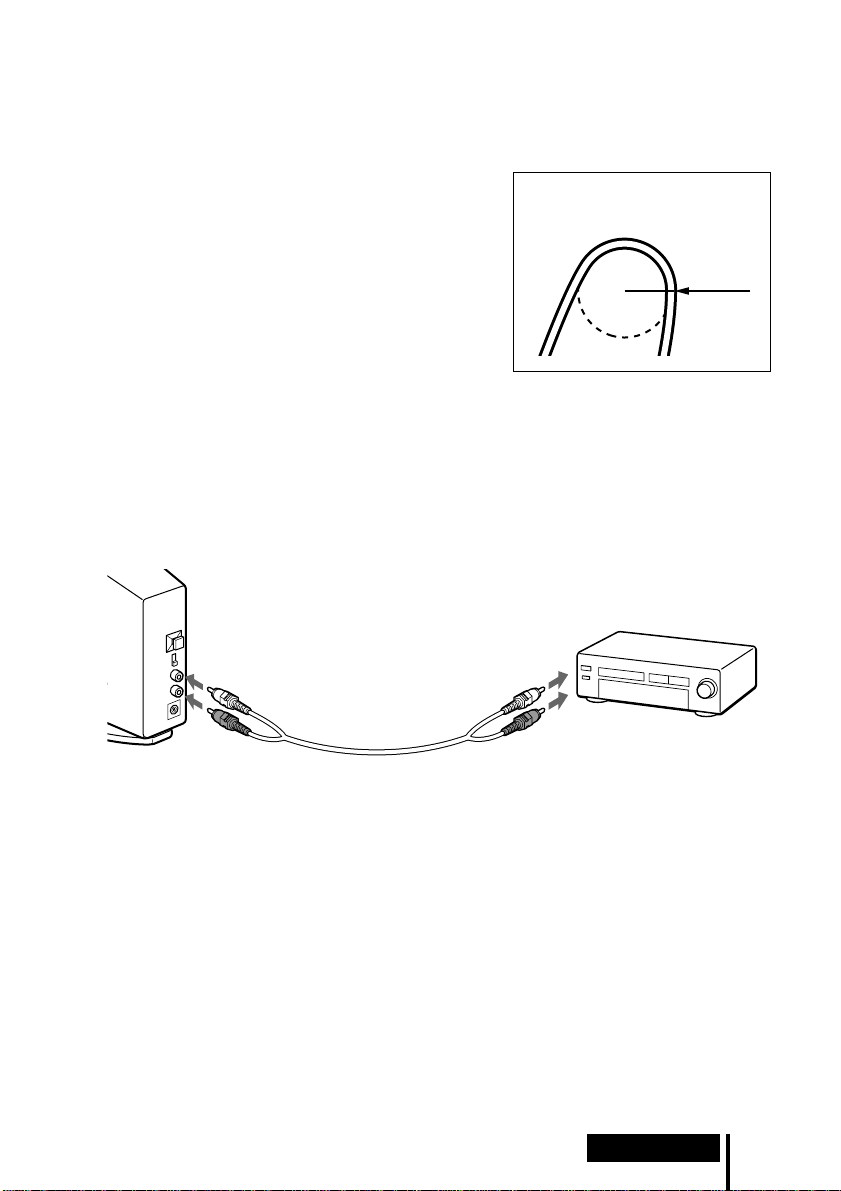
Notes on optical digital connecting cable
• Do not drop objects on the optical digital connecting
cable or expose the cable to shocks.
• Grasp the plug to connect or disconnect the cable.
The bend radius of the optical
digital connecting cable should be
at least 25 mm.
• Be sure that the ends of the optical digital connecting
cable are kept clean. Dust at the ends of the cable can
degrade performance.
25 mm
• When storing the system, attach the cap to the end of the
plug and be careful not to fold or bend the optical digital
connecting cable with a bend radius less than 25 mm.
Connecting the digital surround processor with analog
components
Use an audio cord (sold separately) to connect the audio output jacks on the VCR, TV,
or other component to the LINE INPUT (L/R) jacks on the digital surround processor.
Digital surround
processor
VCR, TV, or other
To LINE INPUT jacks
To audio output jacks
component
Audio left (L, white) Audio left (white)
Audio cord
(sold separately)
Audio right (R, red)
Audio right (red)
Connecting cables (sold separately)
Use the RK-G129 cable (stereo mini-plug ˜ pin plug x 2) when connecting the stereo mini-jack
(line out jack or headphones jack) to the LINE INPUT jacks.
(Continued)
Preparation
11
GB
Page 12
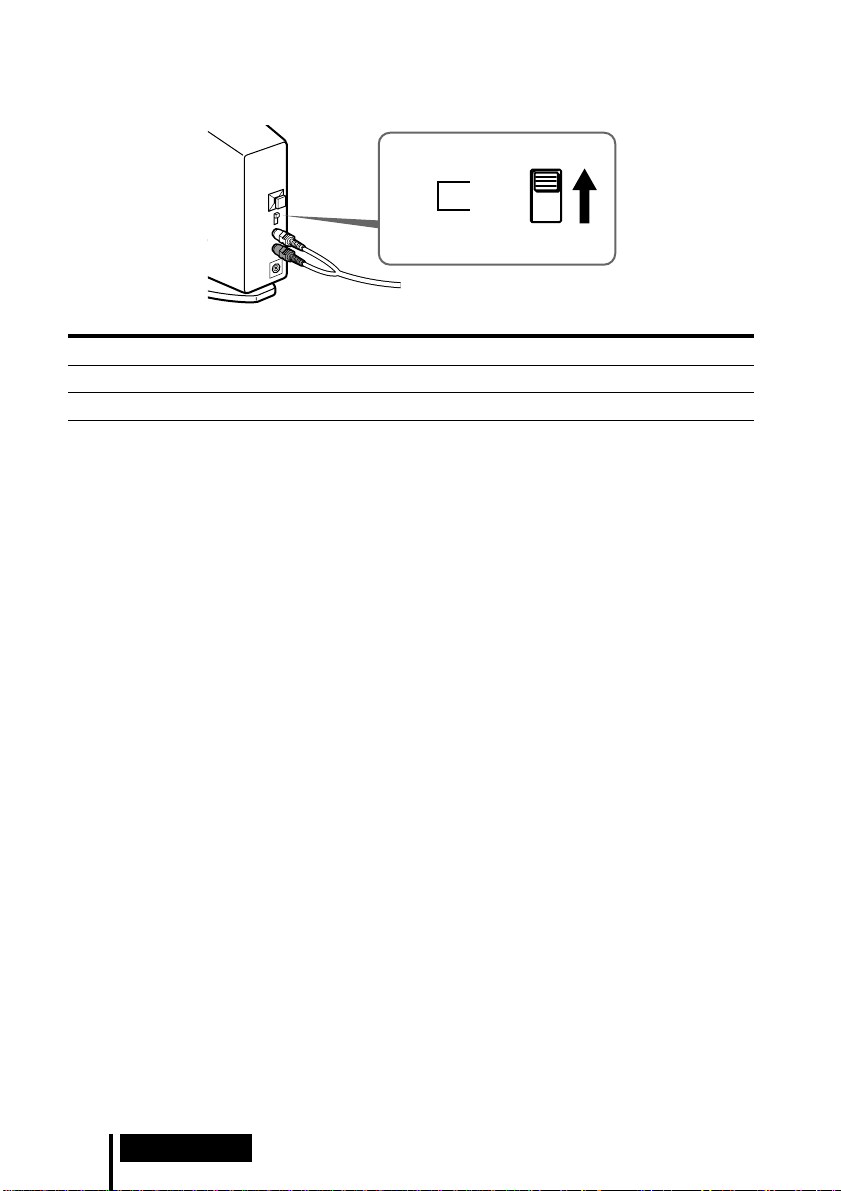
Setting the input level
If the volume is low using analog input, set the ATT (attenuator) switch to “0dB”.
ATT
0dB
–6dB
Setting Connected components
0dB TV, portable components, and other components with a low output level
–6dB Other components (initial settings)
Notes
• If the audio input to LINE INPUT jacks is distorted, set the ATT (attenuator) switch to “–6dB”.
• Be sure to lower the volume before setting the ATT (attenuator) switch.
12
GB
Preparation
Page 13
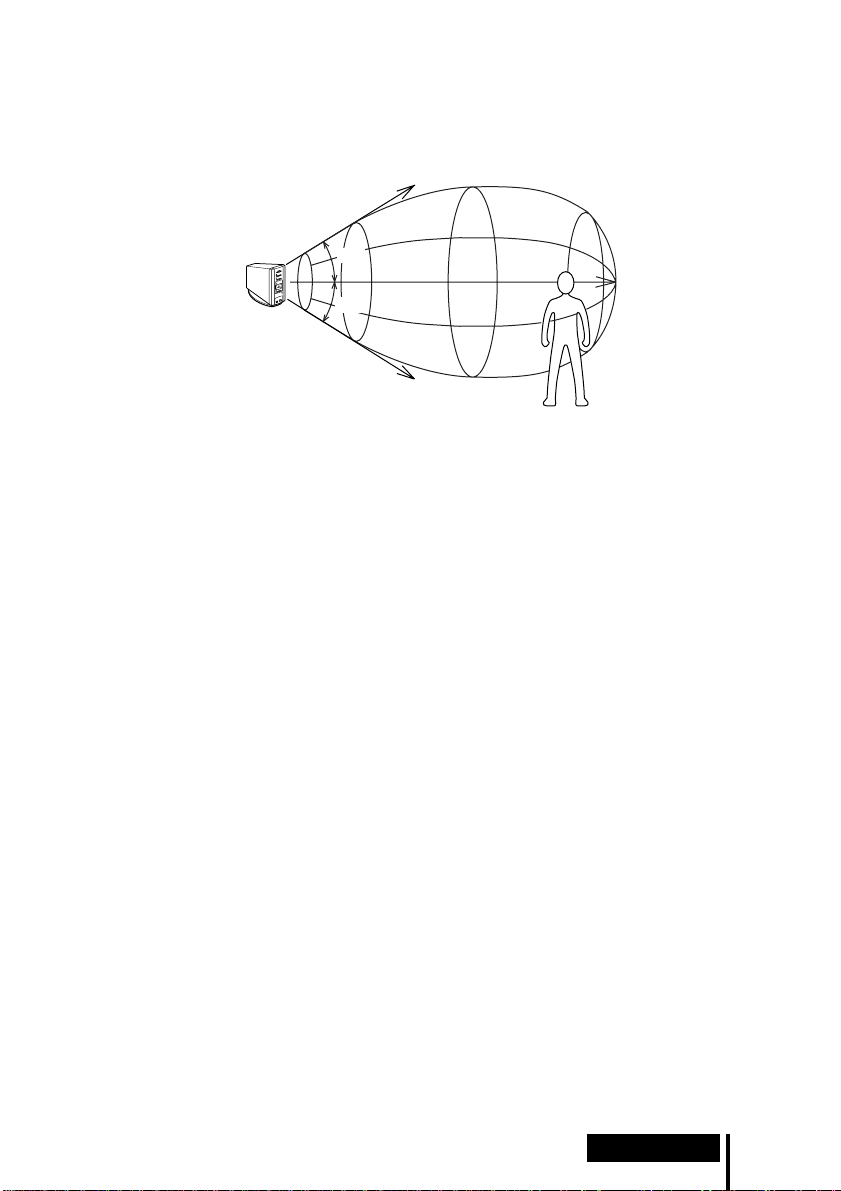
Infrared transmission area
The approximate infrared transmission area from the digital surround processor is
shown in the illustration below.
Infrared beams
Approx.
Digital surround
processor
Notes
• Because this system uses infrared beams, even if the headphones are within the transmission
area shown above, electrical noise (hissing noises) may increase as the headphones get farther
away from the digital surround processor. Also, if the infrared beams are blocked, the sound
may be interrupted or noise may be heard. This is due to the infrared beam characteristics and
is not a malfunction.
• Do not cover the infrared beam sensor with your hand or hair.
• As long as the headphones are in the transmission area shown in the illustration above, the
headphones can have any orientation with respect to the digital surround processor (facing,
turned 90°, or turned 180°).
• The sound may differ depending on the digital surround processor position and conditions in
the room. It is recommended that you place the digital surround processor in the location
which produces the clearest sound.
• Mixed signals may result if the digital surround processor is used with other processors or
transmitters.
4 m
Approx.
4 m
45°
45°
Approx.
10 m
(Continued)
Preparation
13
GB
Page 14
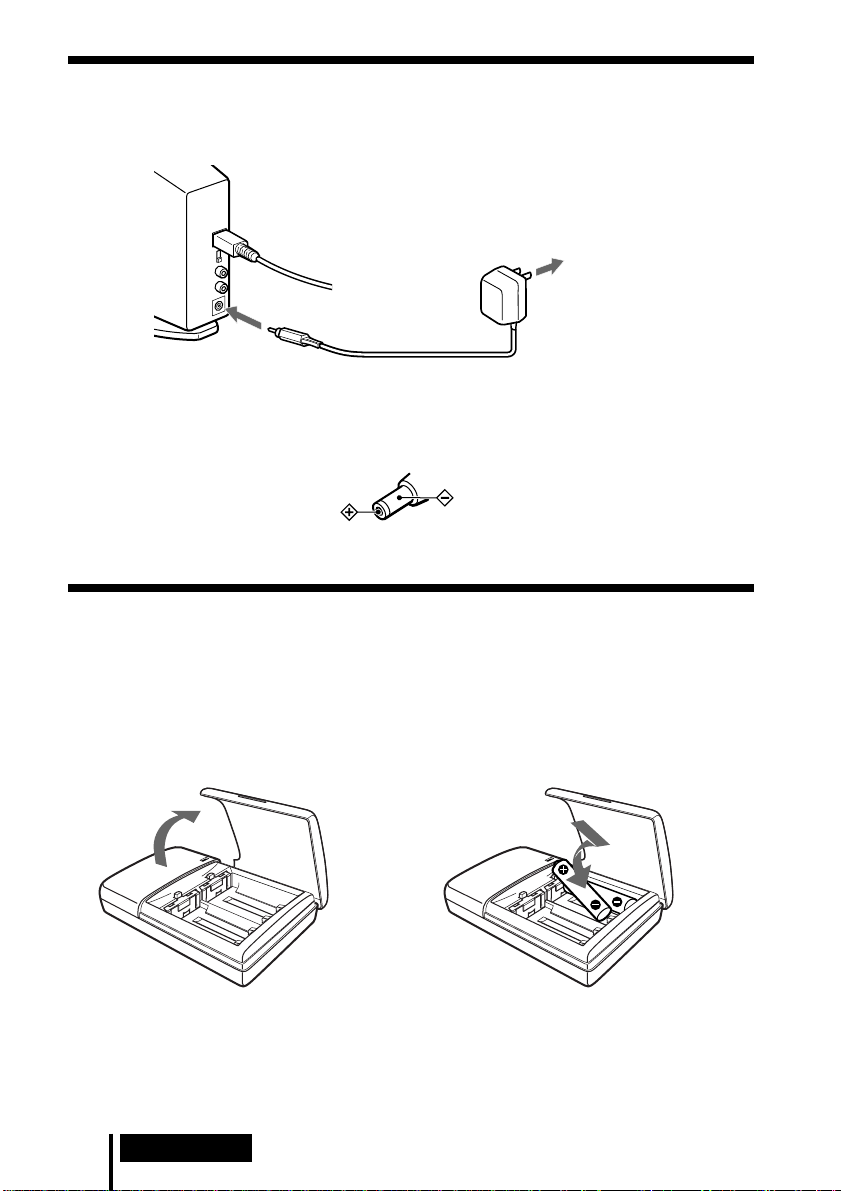
Plugging into the wall outlet
Digital surround
processor
AC power
adapter
To the wall outlet
To DC IN jack
Note
Be sure to use the supplied AC power adapter. Using products with different plug polarity or
other characteristics can cause product failure.
Unified polarity plug
Charging the batteries
Be sure to use the supplied battery charger. Up to four batteries can be charged at
once.
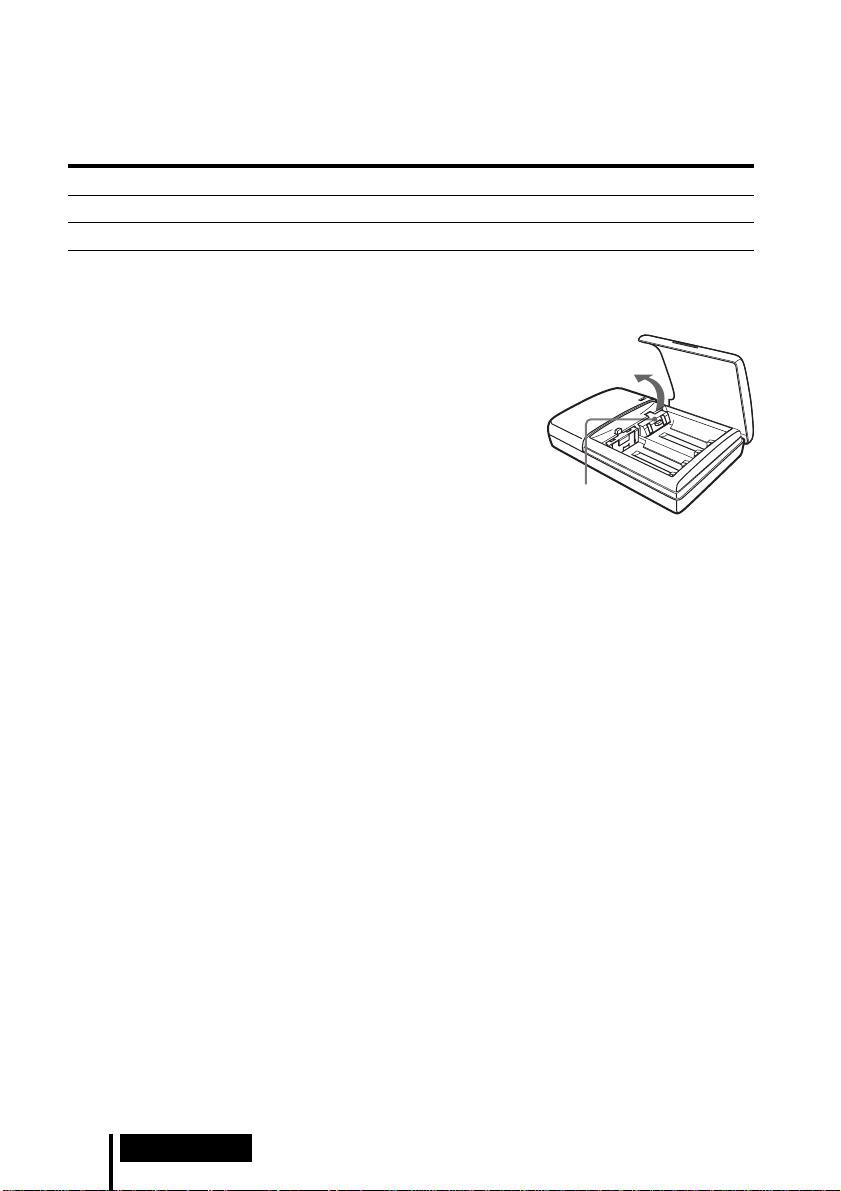
Inserting the batteries into the battery charger
1 Open the lid.
Note
Press the rechargeable Ni-Cd batteries into the charger until they fit into place. After inserting
the batteries, close the lid firmly. The batteries will not be charged unless the lid is closed.
GB
14
Preparation
2 Insert the two supplied rechargeable Ni-Cd
batteries NC-AA with the ‘ and ’ ends in the
correct direction.
Page 15

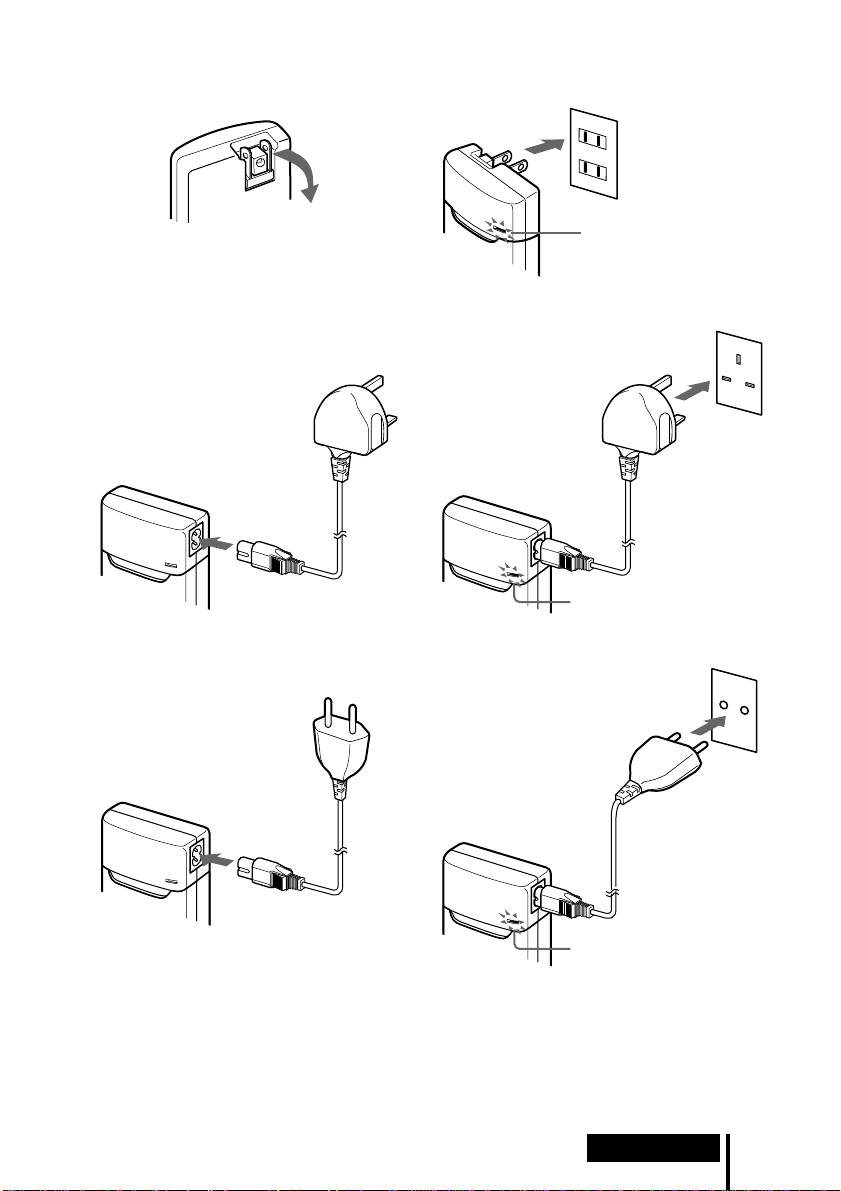
Charging (U2, CA2 and E92 Versions* only)
1 Pull out the charging plug. 2 Insert into the wall outlet.
Charge indicator
lights up.
Charging (CEK and HK4 Versions* only)
1 Attach the charging plug to the battery charger. 2 Insert into the wall outlet.
Charge indicator
lights up.
Charging (CED and E13 Versions* only)
1 Attach the charging plug to the battery charger. 2 Insert into the wall outlet.
Charge indicator
lights up.
Note
Use the charging plug that matches the outlet in your home.
* The charging plug supplied with this system varies depending on the system version. To check
the version, refer to the version code printed on the box.
(Continued)
Preparation
15
GB
Page 16
When charging is finished
Unplug the charger from the outlet, and take out the rechargeable Ni-Cd batteries.
Standard charging times and usage times for the supplied rechargeable batteries
Charging time Usage time
Approx. 1 hour Approx. 6 hours
Approx. 6 hours* Approx. 30 hours
* Time to fully charge the battery when it is completely drained.
Notes
• The charging time for the batteries is the same regardless of
the number of batteries.
• During charging, the charger and the batteries become slightly
warm. This is not a malfunction.
• Be sure to unplug the charger when it is not being used.
• Do not use or leave the charger near heating components, hot
areas exposed to direct sunlight, or damp areas.
• The batteries will not be charged if the adjuster on the charger
is pushed down. Set the adjuster back in the direction of the
arrow shown in the illustration at the right before charging.
• If batteries which have not been completely discharged are
charged, the charge indicator may go out sooner than the
charging times noted above.
Adjuster
16
GB
Preparation
Page 17
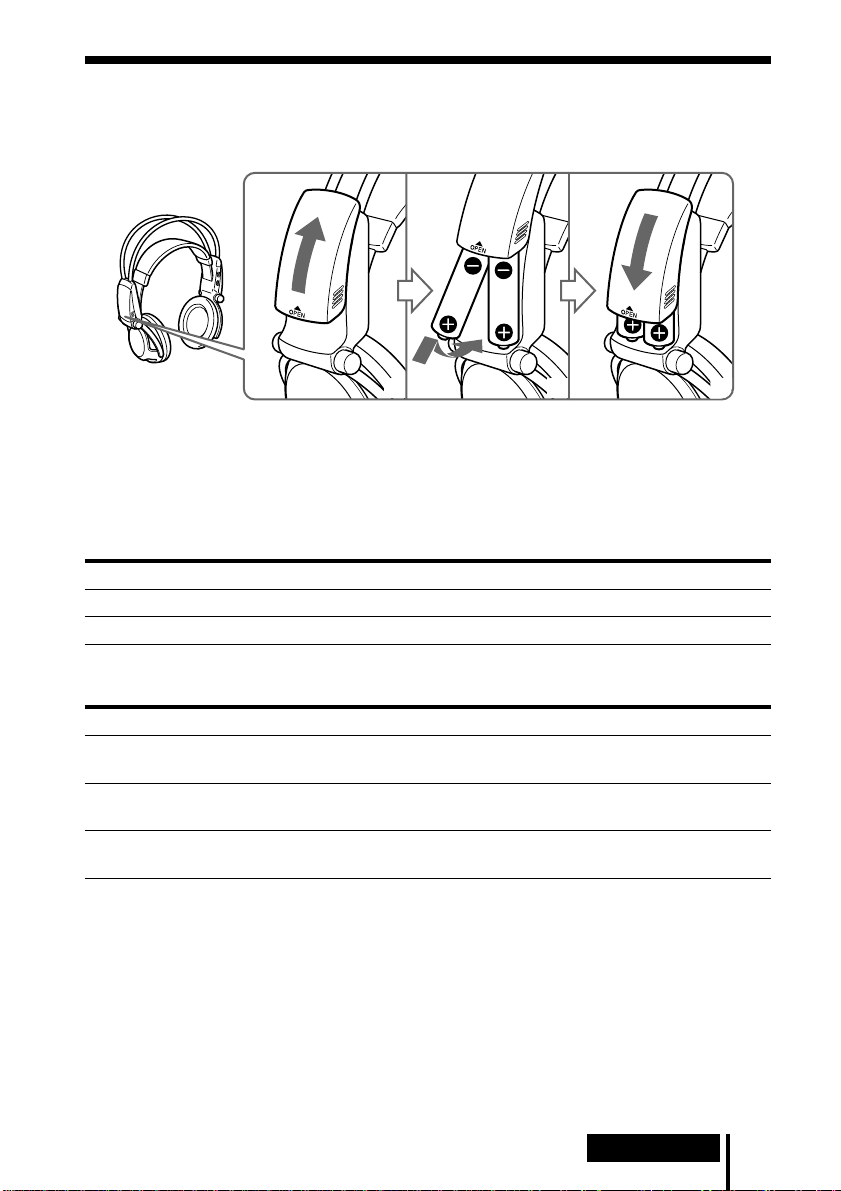
Inserting the batteries in the headphones
As shown in the illustration below, insert the two supplied rechargeable Ni-Cd
batteries with the ‘ and ’ ends in the correct direction.
12 3
When using optional batteries
You can use R6 (size AA) dry-cell batteries, Sony R6 (size AA) Ni-Cd batteries
(NC-AA, NC-AAS), and R6 (size AA) nickel-hydrium batteries (NH-AA) with the
headphones. Insert the batteries as shown above.
Usage times for dry-cell batteries
Battery type Usage time
Sony Alkaline Battery LR6/AM3 (N) Approx. 90 hours
Sony Manganese Battery R6P/SUM-3 (NS) Approx. 45 hours
Usage times and charging times for Sony rechargeable batteries (sold
separately)
Battery type Usage time Charging time*
Sony R6 (size AA) Ni-Cd Battery
NC-AA (700 mAh)
Sony R6 (size AA) Ni-Cd Battery
NC-AAS (1000 mAh)
Sony R6 (size AA) Nickel-hydrium Battery
NH-AA (1450 mAh)
Approx. 30 hours Approx. 6 hours
Approx. 40 hours Approx. 9 hours
Approx. 60 hours Approx. 10 hours
* Time to fully charge the battery when it is completely drained.
(Continued)
Preparation
17
GB
Page 18
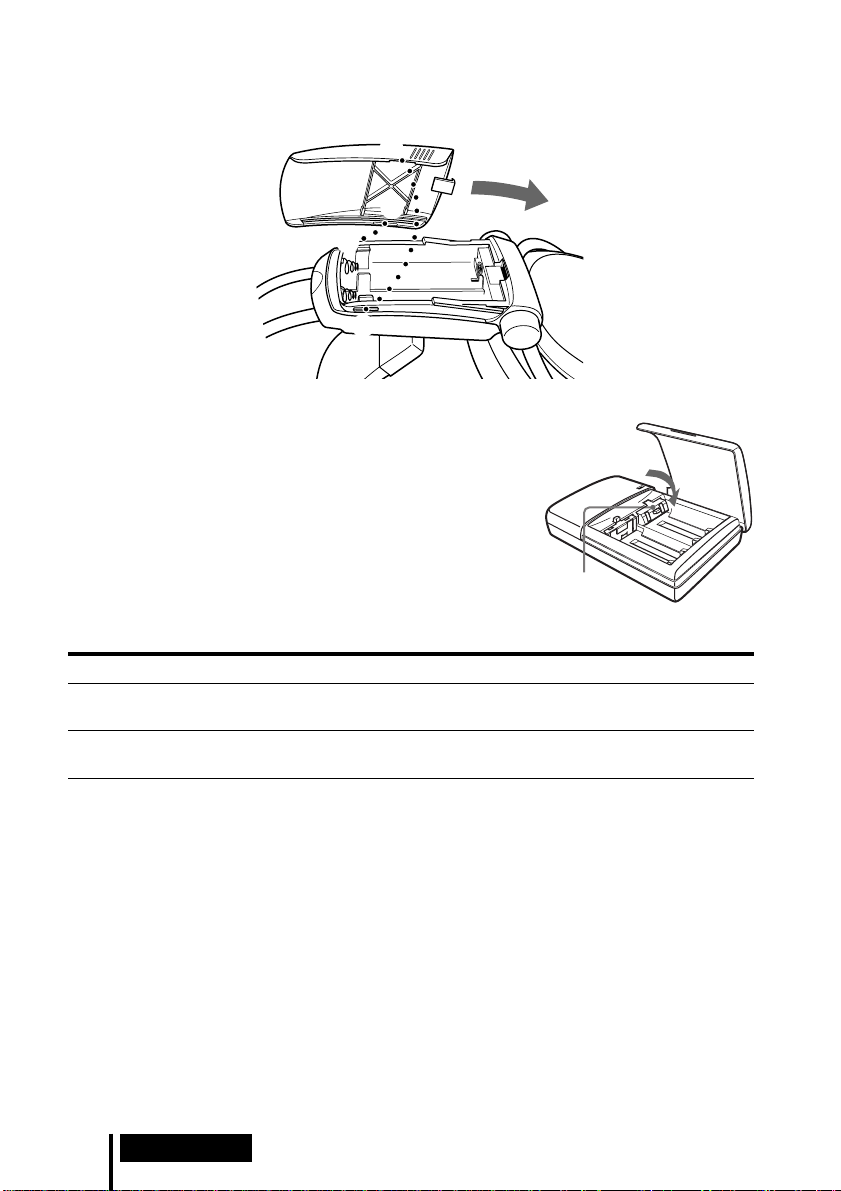
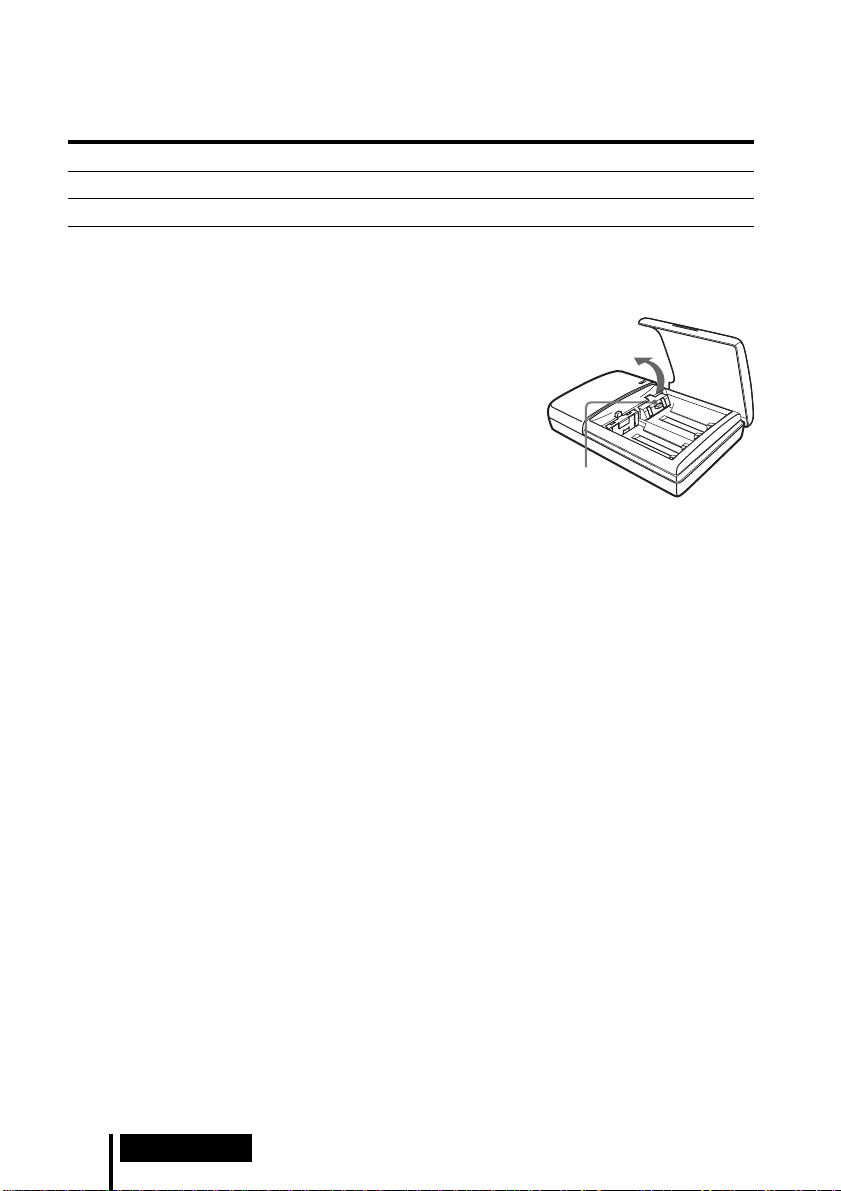
How to attach the battery cover when it has come off
As shown in the illustration, align A with A, and B with B, and then attach the
cover in place.
A
B
B
A
When charging R03 (size AAA) batteries
The supplied battery charger can also charge Sony
R03 (size AAA) Ni-Cd batteries (NC-AAA) and R03
(size AAA) nickel-hydrium batteries (NH-AAA).
When charging R03 (size AAA) batteries, push down
the adjuster on the battery charger.
When charging R6 (size AA) batteries, flip up the
adjuster.
Charging times for R03 (size AAA) rechargeable batteries
Battery type Charging time*
Sony R03 (size AAA) Ni-Cd Battery
NC-AAA (250 mAh)
Sony R03 (size AAA) Nickel-hydrium Battery
NH-AAA (650 mAh)
Approx. 5 hours
Approx. 10 hours
Adjuster
* Time to fully charge the battery when it is completely drained.
Notes
• The supplied battery charger can charge Sony R6 (size AA) Ni-Cd batteries (NC-AA, NC-AAS)
and Sony R6 (size AA) nickel-hydrium batteries (NH-AA). Never attempt to charge other
types of rechargeable batteries or dry-cell batteries.
• Do not use Sony R6 (size AA) Ni-Cd batteries (NC-AA (HJ)).
• The Ni-Cd batteries should be replaced with new ones when they last only half the expected
time when fully charged. Purchase either Sony R6 (size AA) Ni-Cd batteries (NC-AA,
NC-AAS) or Sony R6 (size AA) nickel-hydrium batteries (NH-AA). You can order the batteries
from the store where you made the purchase or at your nearest Sony dealer.
• Some battery types may not be available in certain areas.
GB
18
Preparation
Page 19
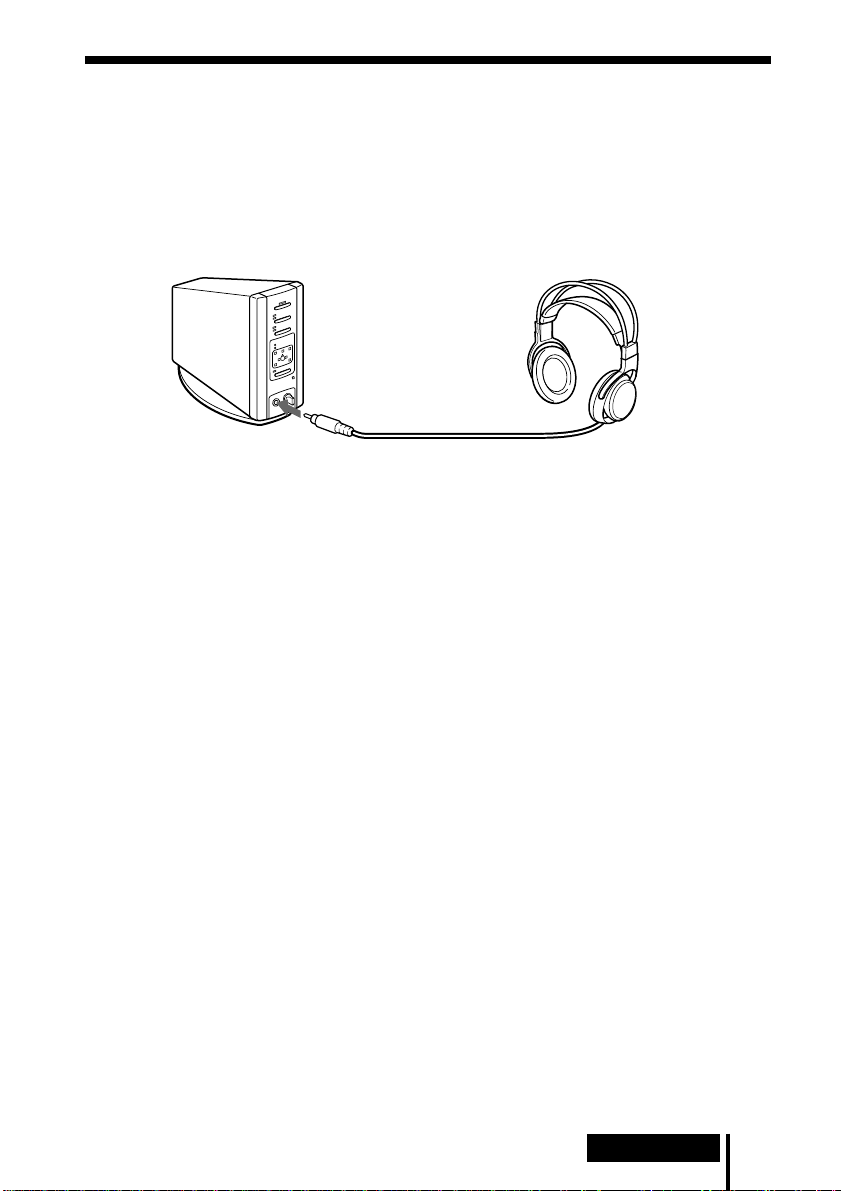
Connecting the digital surround processor
with corded headphones (sold separately)
Connect your corded open-air headphones (such as MDR-F1 or MDR-605LP) to the
PHONES jack on the digital surround processor. To obtain sufficient surround sound
effect, use of MDR-IF5000 cordless stereo headphones is recommended.
Digital surround
processor
To PHONES jack
Notes
• When removing the headphones from the PHONES jack, always grip the plug. Never pull on
the cord.
• This system has been designed for optimum effect when used with the supplied MDR-IF5000
cordless stereo headphones. Additional MDR-IF5000 cordless stereo headphones are also
available separately. A satisfactory surround sound effect may not be obtained with other
headphones.
Corded open-air headphones
(sold separately)
Preparation
19
GB
Page 20
¡ Operation
Listening to the Sound of a Connected
Component
Before starting operation, be sure to read “Preparation”
and make the proper connections.
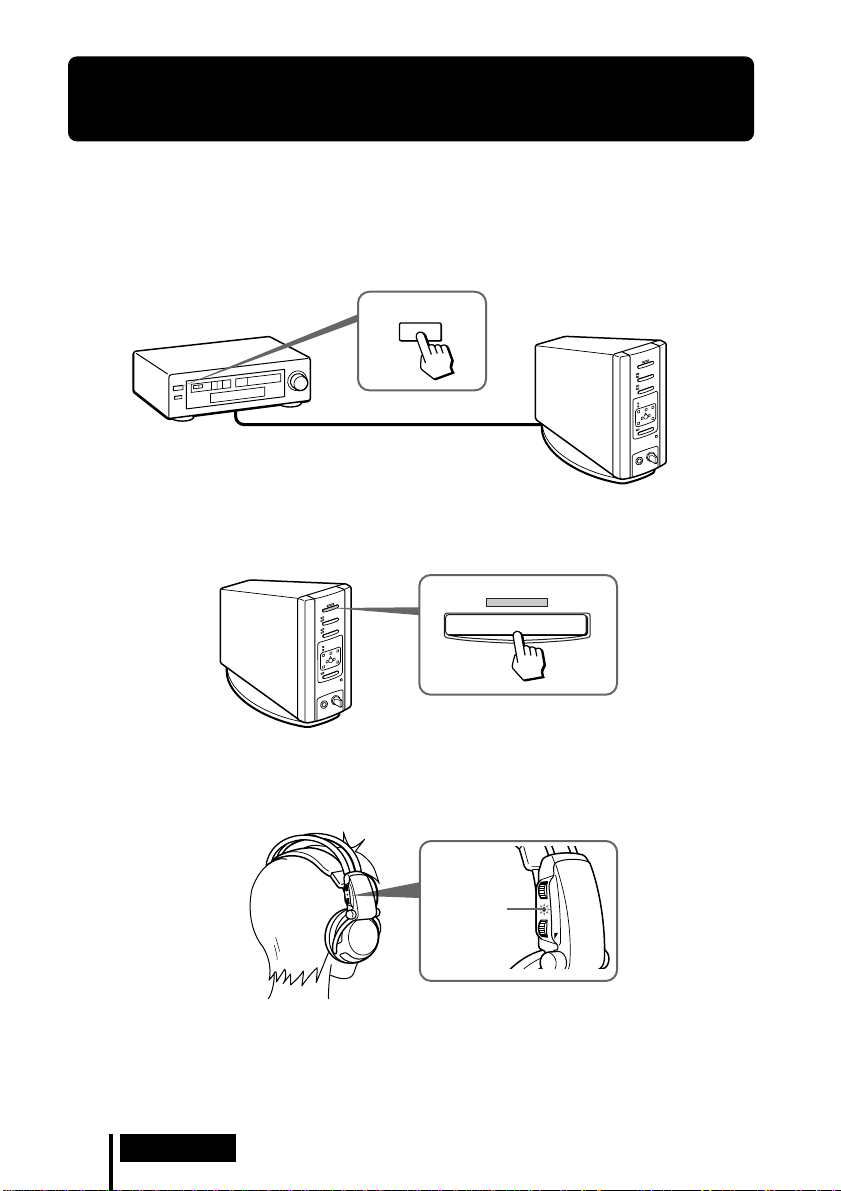
1 Turn on the component connected to the digital surround processor.
DVD player or other audio
and video component
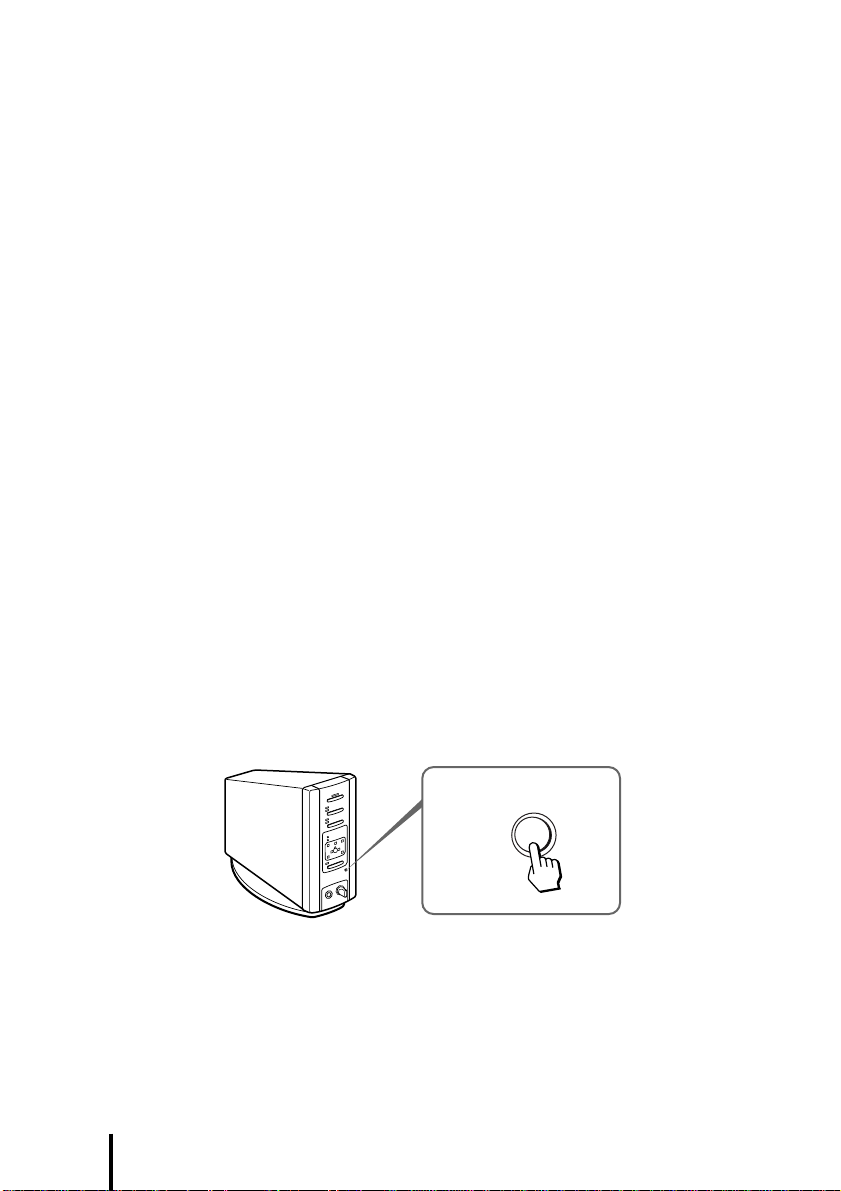
2 Press POWER to turn on the digital surround processor.
The POWER indicator lights green.
POWER
POWER
3 Put on the headphones.
The POWER indicator lights red, and the headphones automatically turn on.
BALANCE
POWER
VOL
20
GB
POWER
indicator
Operation
Page 21
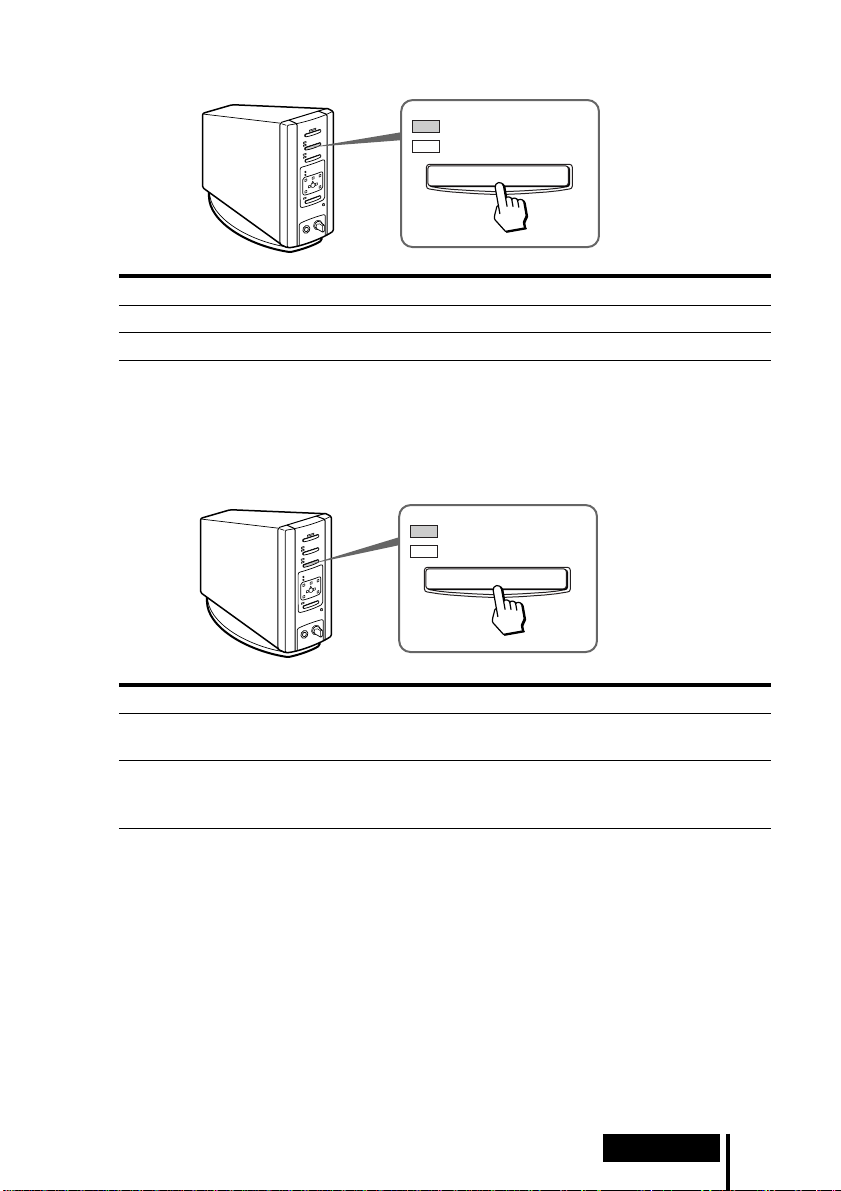
4 Press INPUT to select the component you want to listen to.
DIGITAL
ANALOG
INPUT
Indicator light Selected sound source
DIGITAL Sound of the component connected to DIGITAL IN jack
ANALOG Sound of the component connected to LINE INPUT jacks
Note
To listen to dual audio (MAIN/SUB) sound sources, connect to the LINE INPUT jacks, and
then select the sound source you want to listen to on the player, TV, or other component.
5 Press EFFECT to select the desired sound field.
DOLBY VIRTUAL
MUSIC
EFFECT
Indicator light Sound field and suitable sound source
DOLBY VIRTUAL Mode which reproduces the sound field of a movie theater.
This mode is suitable for movie sound sources.
MUSIC Mode which reproduces the sound field of a listening room with
good acoustic environment.
This mode is suitable for music sources.
(Continued)
Operation
21
GB
Page 22
6 Press OUTPUT to select the output mode (surround effect).
DECODE MODE
DOLBY DIGITAL
DOLBY SURROUND
L
C
LS
VIRTUAL
OUTPUT
Indicator light Output mode (surround effect)
DECODE MODE
DOLBY DIGITAL
DOLBY SURROUND
C
L
LS
VIRTUAL
DECODE MODE
DOLBY DIGITAL
DOLBY SURROUND
C
L
R
RS
R
OFF
Regular headphone playback.
VIRTUAL FRONT
Virtual effect where the sound seems to be coming from two
speakers (right and left) located in front of you.
R
RS
22
GB
LS
VIRTUAL
Operation
RS
Page 23
Indicator light Output mode (surround effect)
VIRTUAL SURROUND
DECODE MODE
DOLBY DIGITAL
DOLBY SURROUND
C
L
LS
VIRTUAL
R
RS
Virtual surround effect where the sound seems to be coming from
not only two front speakers (right and left), but also from one center
speaker, two rear speakers (right and left), and a subwoofer (when
DOLBY DIGITAL is lit).
The digital surround processor automatically identifies and
processes according to the format of the input audio signal.
When DOLBY DIGITAL indicator is on: Audio recorded in Dolby
Digital 5.1ch format is being processed.
When DOLBY SURROUND indicator is on: Audio recorded in Dolby
Surround (Pro Logic) format is being processed.
Note
During Dolby Digital input, monaural sound sources which cannot be processed with the
surround effect are automatically identified and played back through two channels (left and
right), even when VIRTUAL SURROUND mode is selected. In this case, both the DOLBY
DIGITAL and DOLBY SURROUND indicators are turned off.
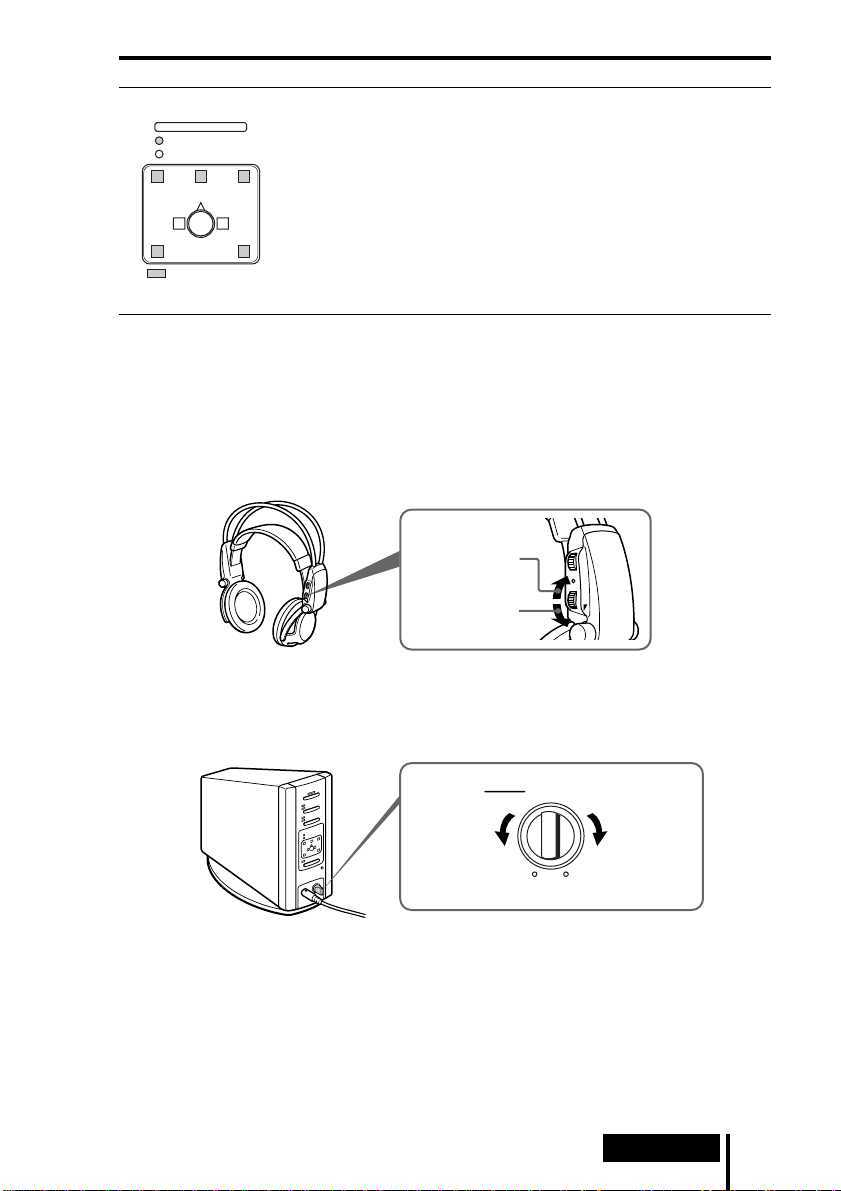
7 Adjust the volume.
Raise the
volume
Lower the
volume
BALANCE
POWER
VOL
To adjust the volume of headphones (sold separately) connected to the
PHONES jack
Turn PHONES—LEVEL to adjust the volume.
MIN
LEVEL
Raise the
volume
MAX
PHONES
Lower the
volume
(Continued)
Operation
23
GB
Page 24

8 Adjust the balance.
The right side
becomes louder.
The left side
becomes louder.
BALANCE
POWER
VOL
The headphones automatically turn off when they are taken off
— Auto Power On/Off Function
When not using the headphones, be sure
that the self-adjusting band is no longer
Self-adjusting
band
pulled up. The power stays on when the
self-adjusting band is pulled up.
To check the remaining battery power
Pull up the self-adjusting band and check
the POWER indicator. The batteries can be
used when the POWER indicator lights red.
Charge the batteries or use dry-cell
batteries if the POWER indicator is faint,
the sound is distorted, or increased noise
occurs.
POWER
indicator
After using the headphone system
Turn off the digital surround processor first before turning off the component
connected to the digital surround processor. If you turn off the connected component
first, the infrared beam is cut off and noise may be emitted (this is not a malfunction).
Do not hang the headphones on the digital surround processor or other components.
The Auto Power On Function may be inadvertently activated, using up the batteries.
Transition time between modes
When pressing buttons on the digital surround processor to change to new modes,
the transition time between modes may vary. This is due to differences in program
transmission between modes.
GB
24
Operation
Page 25

Mute Function
The Mute Function is automatically activated so that sound output from the
headphones is cut off whenever the headphones are outside the infrared transmission
area, the infrared beams are interrupted, or the noise increases. The Mute Function is
automatically cancelled when you get closer to the digital surround processor or there
is no longer anything in the way of the infrared beams.
If an audio signal is not input for 10 minutes
Emission of the infrared beams from the infrared transmitter in the digital surround
processor automatically stops when an audio signal is not input for 10 minutes. The
infrared beams are automatically emitted when an audio signal is input again. In
some cases, the infrared beams from the infrared transmitter may stop when an
extremely low sound is emitted for about 10 minutes during analog input. If this
happens, raise the volume of the connected audio and video component and lower
the volume of the headphones.
Notes
• There may be differences in brightness of the infrared transmitter on the digital surround
processor. However, this does not affect the transmission area of the infrared beams.
• The headphones should be used within the infrared transmission area (see “Infrared
transmission area” on page 13).
• Do not use the digital surround processor in areas exposed to direct sunlight or strong light.
The sound may be cut off.
• These open-type headphones are designed so that the sound also flows outside the
headphones. Be careful not to turn up the volume so high that it bothers the people around
you.
• Use a suitable volume level so that you do not harm your hearing and to ensure that you can
still hear surrounding sounds.
• The surround sound effect may not be obtained for sound sources which do not incorporate
video, such as music CDs.
• This system simulates the HRTF* for an average person. However, the effect can differ from
person to person since the HRTF can vary between individuals.
* Head Related Transfer Function
Operation
25
GB
Page 26

¡ Additional Information
Troubleshooting
If you run into any problem using this headphone system, use the following checklist.
Should any problem persist, consult your nearest Sony dealer.
Symptom Cause and remedy
No sound
Distorted sound
/ Turn on the digital surround processor.
/ Check that the AV component and AC power adapter are connected to the
digital surround processor and that they are plugged into the power outlet.
/ Turn on the AV component connected to the digital surround processor, and
start the program (playback).
/ Use the INPUT button to check whether the AV component you want to listen
to is properly selected.
/ If the AV component headphone jack is connected to the digital surround
processor, raise the volume level on the connected AV component.
/ Raise the headphone volume.
/ Check the position of the BALANCE control on the headphones.
/ The Mute Function is on.
• Check that there is nothing blocking the path from the digital surround
processor to the headphones.
• Try to use the headphones as close as possible to the digital surround
processor.
• Change the position or angle of the digital surround processor.
/ The POWER indicator on the headphones is faint or out. This indicates that
the battery power is low. If you are using rechargeable batteries, recharge the
batteries. If you are using dry-cell batteries, replace with new ones. If the
indicator is still out, consult your nearest Sony dealer.
/ Set the ATT (attenuator) switch on the digital surround processor to “–6dB”.
/ The POWER indicator on the headphones is faint or out. This indicates that
the battery power is low. If you are using rechargeable batteries, recharge the
batteries. If you are using dry-cell batteries, replace with new ones. If the
indicator is still out, consult your nearest Sony dealer.
/ If the AV component headphone jack is connected to the digital surround
processor, lower the volume level on the connected AV component.
26
GB
Additional Information
Page 27

Symptom Cause and remedy
High noise level/
Low sound
The surround
sound effect is
not obtained
The DOLBY
DIGITAL indicator
does not turn on
The batteries
cannot be
charged
/ Use the headphones near the digital surround processor. The amount of noise
increases as the headphones become farther from the digital surround
processor. This is due to the characteristics of the infrared beams and is not a
malfunction.
/ Check that there is nothing blocking the path from the digital surround
processor to the headphones.
/ Check that your hand or hair is not covering the infrared sensor on the
headphones.
/ If direct sunlight is entering the room from a window near the digital
surround processor or headphones, close the curtain or blinds so that no direct
sunlight is let in. Or, use in a location not exposed to direct sunlight.
/ Change the position or angle of the digital surround processor.
/ Set the ATT (attenuator) switch on the digital surround processor to “0dB”.
/ The POWER indicator on the headphones is faint or out. This indicates that
the battery power is low. If you are using rechargeable batteries, recharge the
batteries. If you are using dry-cell batteries, replace with new ones. If the
indicator is still out, consult your nearest Sony dealer.
/ If the AV component headphone jack is connected to the digital surround
processor, raise the volume level on the connected AV component.
/ Press the OUTPUT button to select VIRTUAL SURROUND mode (page 23).
/ The audio for the chapter being played is not a multichannel signal.
The surround effect does not work for monaural and other sound sources
which have not been processed for surround sound.
/ The audio digital output setting for the DVD player may be set to “PCM”.
Refer to the instruction manual supplied with the DVD player, and change to
the setting (such as “Dolby Digital/PCM” or “Dolby Digital”) for usage with
components having built-in Dolby Digital (AC-3) decoders.
/ You are trying to play DVD software not compatible with Dolby Digital 5.1ch.
/ The audio for the chapter being played is not a multichannel signal.
/ Dry-cell batteries are being used.
Insert the supplied or optional rechargeable batteries (page 17).
/ Rechargeable batteries other than supplied or optional batteries are being
used.
Insert the supplied or optional rechargeable batteries (page 17).
Additional Information
27
GB
Page 28

Precautions
On safety
• Do not drop, hit, or otherwise expose the
digital surround processor or headphones
to strong shocks of any kind. This could
cause a breakdown.
• Do not disassemble or attempt to open any
parts of the system.
On power sources and placement
• If you are not going to use the system for a
long time, unplug the AC power adapter
cord from the outlet. When removing the
cord, grip the plug. Do not pull on the cord.
• Do not place the system at any of the
following locations.
– Location exposed to direct sunlight, near
a heater, or other extremely high-
temperature location
– Dusty location
– On an unsteady or inclined surface
– Location exposed to large amounts of
vibrations
– Bathroom or other high-humidity
locations
On headphones
To protect your ears
Listening to sounds at a high volume over
long periods of time can harm your hearing.
To protect your ears, do not listen with the
volume raised too high.
Act considerately
When the volume is too high, the sound flows
outside the headphones. Be careful not to
raise the volume so high that it bothers the
people around you.
There is a tendency to raise the volume when
using in places with lots of noise. However,
the volume should be kept at a level where
you can respond if called while listening to
the headphones.
On ear pads
The ear pads may become worn over long
periods of use and storage. To replace the ear
pads, consult your nearest Sony dealer.
On cleaning
Use a soft cloth slightly moistened with mild
detergent solution. Do not use solvents such
as thinner, benzene or alcohol as these may
damage the surface.
When a malfunction or breakdown
occurs
• If a malfunction or breakdown occurs or if a
foreign object gets inside the unit,
immediately turn off the power and consult
your nearest Sony dealer.
• When taking the system to Sony dealer, be
sure to take both the headphones and
digital surround processor.
28
GB
Additional Information
Page 29

Specifications
Digital surround processor (DP-IF5000)
Modulation System Frequency modulation
Carrier wave frequency Right channel 2.8 MHz
Transmission distance Approx. 10 m
Frequency response 20 – 20,000 Hz
Distortion rate 1% or less (1 kHz)
Audio inputs Optical input
Power requirements DC 9 V (from the
Dimensions (w/h/d) Approx. 85 × 190 ×
Mass Approx. 1.0 kg
Left channel 2.3 MHz
(square-type) × 1
Analog input (pin jack
left/right) × 1
supplied AC power
adapter)
180 mm (3
7 1/8 inch)
(1,000 g) (2 lb 30 oz)
3
/8 × 7 1/2 ×
Cordless stereo headphones
(MDR-IF5000)
Frequency response 12 – 24,000 Hz
Power requirements Rechargeable Ni-Cd
Mass Approx. 280 g (10 oz)
batteries (supplied) or
R6 (size AA) batteries
(dry-cell or
rechargeable, sold
separately)
(including the
supplied rechargeable
Ni-Cd batteries)
Supplied accessories
Stand for digital surround
processor (1)
AC power adapter (1)
Rechargeable Ni-Cd
batteries (2)
Battery charger (1)
Charging plug for battery
charger (1) (CED, CEK, HK4
and E13 Versions
Optical digital connecting
cable (1)
Operating Instructions (1)
Product Information (1)
* only)
Recommended accessories
Connecting cables RK-C310, RK-C315,
Optical digital selector SB-D30
Optical digital connecting cable
Design and specifications are subject to
change without notice.
RK-C320, RK-C330
(pin plug × 2 ˜ pin
plug × 2)
RK-G129 (stereo miniplug ˜ pin plug × 2)
POC-5A, POC-10A,
POC-15A
rectangular plug ˜
optical rectangular
plug)
POC-5AB, POC-10AB,
POC-15AB
rectangular plug ˜
optical mini-plug)
(optical
(optical
* The charging plug supplied with this
system varies depending on the system
version. To check the version, refer to the
version code printed on the box.
Additional Information
29
GB
Page 30

AVERTISSEMENT
Pour les utilisateurs aux Etats-Unis et
au Canada
Pour éviter tout risque
d’incendie ou d’électrocution,
n’exposez pas cet appareil à la
pluie ni à l’humidité.
Pour éviter tout choc
électrique, n’ouvrez pas le
coffret. Ne confiez les
réparations qu’à un technicien
qualifié.
AVERTISSEMENT
Tout changement ou modification non
expressément approuvé dans le présent
manuel risque d’annuler votre autorité à
utiliser cet appareil.
RECYCLAGE DES BATTERIES AU NICKELCADMIUM
Les batteries au nickelcadmium sont recyclables.
Vous pouvez contribuer à
préserver l’environnement
en rapportant les batteries
usées dans un point de
ramassage, recyclage ou
retraitement.
Remarque: Dans certain pays, il est interdit de
jeter les batteries au nickelcadmium avec les ordures
ménagères ou dans les poubelles
de bureau.
Questionnez chez RBRC (Rechargeable
Battery Recycling Corporation) pour les
batteries usées.
Le numéro est: 1-800-822-8837
(Etats-Unis et Canada uniquement)
Avertissement: Ne pas utiliser des batteries
au nickel-cadmium qui sont
endommagées ou qui fuient.
FR
2
Page 31

Table des matières
Système de casque d’écoute....... 5
Vérification du produit et des
accessoires................................. 8
Raccordement du système de
casque d’écoute........................ 9
Généralités ........................................... 9
Raccordement à des composants
audio et vidéo ..................................
Branchement à la prise murale ....... 14
Charge de la batterie......................... 14
Mise en place des batteries dans
le casque d’écoute .........................
Raccordement du processeur
d’ambiance numérique à un
casque d’écoute avec fil (vendu
séparément)....................................
Ecoute du son d’un composant
raccordé................................... 20
Guide de dépannage ................. 26
17
19
9
FR
Précautions................................. 28
Spécifications ............................. 29
FR
3
Page 32
Principales caractéristiques
Le MDR-DS5000 est un système d’écoute d’ambiance numérique utilisant une
transmission par infrarouge. Vous pouvez profiter d’un champ sonore d’ambiance
multicanal en raccordant simplement le processeur d’ambiance numérique à un
lecteur DVD au moyen du câble de raccordement numérique optique fourni.
• Compatible Dolby
• Le traitement du signal par des processeurs de signal numériques DSP fournit au
casque d’écoute un champ sonore d’ambiance simulant une salle de cinéma.
• Le casque d’écoute sans fil à transmission par infrarouge résiste au bruit extérieur et
aux interférences.
• Zone de réception infrarouge étendue, jusqu’à 10 mètres.
• Mécanisme de réglage automatique du bandeau de casque.
• Fonction de mise sous/hors tension automatique alimentant automatiquement le
casque lorsqu’il est porté et l’éteignant lorsqu’il est enlevé.
• Réglage du volume de gauche et de droite du casque d’écoute au moyen de VOL.
Le niveau de sortie audio de gauche et de droite se règle au moyen de BALANCE.
• Prise pour le raccordement d’un casque d’écoute plein-air (tel que MDR-F1 ou
MDR-605LP, vendu séparément).
• Le casque d’écoute peut être alimenté par des batteries Ni-Cd rechargeables
(fournies et vendues séparément) ou par des piles sèches R6 (format AA) (vendues
séparément).
Réglage du mode de démonstration DEMO
Allumez le processeur d’ambiance numérique, puis appuyez sur DEMO.
Une tonalité d’essai se fait entendre dans le casque d’écoute et les témoins des
enceintes virtuelles correspondantes s’allument, un à la fois. Cela vous permet
d’entendre un champ sonore d’ambiance virtuel 5.1ch, même si un lecteur DVD n’est
pas raccordé. Appuyez à nouveau sur DEMO pour annuler le mode DEMO.
* Digital (AC-3) et Dolby Surround (Pro Logic).
DEMO
* Le processeur d’ambiance numérique de ce système comporte le décodeur Dolby Digital
(AC-3).
Fabriqué sous licence de Dolby Laboratories Licensing Corporation.
DOLBY, le symbole double-D a, PRO LOGIC, Dolby Digital (AC-3) et VIRTUAL DOLBY
DIGITAL sont des marques de Dolby Laboratories Licensing Corporation.
Symbole CE
Le symbole CE n’est valide que pour des produits commercialisés dans l’Union Européenne.
FR
4
Page 33

¡ Préparation
Système de casque d’écoute
Le système de casque d’écoute d’ambiance numérique MDR-DS5000 possède une
perspective de champ sonore visuel. Ce système représente l’avenir de la technologie
audio et vidéo. Grâce à lui, vous profiterez d’un son virtuellement identique à celui
d’enceintes d’ambiance 5.1ch. Vous pouvez ainsi obtenir chez vous le son d’une salle
de cinéma.
Système de casque d’écoute d’ambiance numérique
MDR-DS5000
Ce nouveau type de système à casque d’écoute sans fil reproduit des images sonores
Dolby Digital et Dolby Pro Logic à canaux multiples autour de la tête de l’utilisateur
au moyen de la “Virtualphones Technology”
En raccordant simplement le lecteur DVD au système, vous bénéficiez d’une sonorité
d’ambiance virtuelle comme au cinéma.
Ce système utilise un DSP ultra-rapide permettant de convertir et de traiter
numériquement tous les signaux en temps réel pour fournir un son clair et
pratiquement exempt de distorsion.
* “Virtualphones Technology” est une marque de fabrique de Sony Corporation.
Caractéristiques du système
Compatibilité Dolby Digital et Dolby Pro Logic
Le système comporte un décodeur d’ambiance et un processeur Logic 3D afin de
restituer au moyen d’un casque d’écoute le champ sonore d’une pièce équipée
d’enceintes 5.1ch. Les signaux étant traités par le processeur d’ambiance numérique
en fonction des signaux d’entrée, vous bénéficiez d’un champ sonore d’ambiance non
seulement avec le DVD, mais aussi avec des tuners de satellite numériques, des
vidéocassettes et d’autres sources audio et vidéo analogiques ou numériques.
* développée exclusivement par Sony.
(Suite page suivante)
Préparation
5
FR
Page 34

R
L
DSP
DSP
DSP
DSP
Reproduction du son autour de la tête de l’auditeur
Avec le processeur Logic 3D, la reproduction au casque ne confine pas le son sur une
position fixe dans la tête de l’auditeur, mais elle crée la sensation d’un champ sonore
naturel sur 360 degrés avec une orientation spatiale. Cela autorise la simulation du
champ sonore d’ambiance d’une reproduction par enceintes en utilisant non
seulement le DVD, mais aussi toutes les sources audio et vidéo.
Champ sonore 3-D utilisant “Virtualphones
Technology”
R
SW
C
L
Champ sonore type lors de l’écoute avec deux
enceintes (2 canaux)
A l’intérieur de la pièce
Enceinte
RS
Champ sonore
reproduit par le
MDR-DS5000
LS
R
Enceinte
L
Son direct Son réfléchi
Champ sonore 3-D d’un casque d’écoute
conventionnel
Champ sonore restitué par
un casque d’écoute
conventionnel
Champ sonore lors de l’écoute avec le
MDR-DS5000 (2 canaux)
Processeur Logic 3D
L : Gauche LS : Ambiance gauche
C : Central SW : Subwoofer
R : Droit RS : Ambiance droite
Casque d‘écoute plein-air avec supports en couronne
Le casque d’écoute nouvellement conçu procure une écoute confortable avec un
champ sonore naturel. Il ne recouvre pas les oreilles et autorise une écoute sans
pression ni gêne. De plus, il est possible d’acquérir des casques d’écoute MDR-IF5000
supplémentaires (vendus séparément) pour permettre à plusieurs personnes de
profiter simultanément du son d’ambiance dans la zone de transmission infrarouge
(page 13).
FR
6
Préparation
Page 35

Configuration du système de casque d’écoute
Ce système de casque d’écoute se compose d’un processeur d’ambiance numérique
qui décode et convertit les signaux d’entrée multicanaux et d’un casque d’écoute sans
fil à infrarouge. En raccordant simplement le processeur d’ambiance numérique à un
lecteur DVD, à un magnétoscope ou à d’autres composants audio et vidéo, vous
pouvez profiter d’un son d’ambiance Dolby Digital ou Dolby Pro Logic. Ce système
est utilisable avec n’importe composant audio et vidéo équipé d’une prise de sortie
numérique optique, d’une prise de sortie de ligne (audio) ou d’une prise de casque.
(Voir pages 11 et 29 pour les câbles de raccordement (vendus séparément).)
Remarques
• Installez le processeur d’ambiance numérique à un endroit ne présentant pas d’obstruction
entre le processeur et le casque d’écoute lorsque de l’utilisation.
• N’installez pas le processeur d’ambiance numérique à un endroit instable, comme sur le
téléviseur. Si le processeur tombe, il risque de provoquer une blessure ou de s’endommager.
Préparation
FR
7
Page 36

Vérification du produit et des
accessoires
Avant d’installer le système, vérifiez la présence de tous les éléments.
Processeur d’ambiance
numérique (1)
Chargeur de batterie (1)
Adaptateur d’alimentation
secteur (1)
Casque d’écoute stéréo sans fil
(1)
Fiche de chargeur (pour chargeur
de batterie, 1)
(versions* CEK et HK4
uniquement)
Batteries Ni-Cd rechargeables
NC-AA (2)
Support (pour processeur
d’ambiance numérique, 1)
Fiche de chargeur (pour chargeur
de batterie, 1)
* CED et E13
(versions
uniquement)
Câble de raccordement numérique
optique (type rectangulaire, 1)
Remarque
Utilisez la fiche de charge correspondant à votre prise secteur.
* La fiche de charge fournie avec la chaîne varie en fonction de la version de la chaîne. Pour
vérifier la version, reportez-vous au code de version imprimé sur la boîte.
FR
8
Préparation
Page 37

Raccordement du système de casque
d’écoute
Généralités
Raccordez le système de casque d’écoute comme illustré ci-dessous.
Lecteur DVD, magnétoscope
ou autre composant
Casque d’écoute
stéréo sans fil
Adaptateur
d’alimentation
secteur
Processeur d’ambiance
numérique
Raccordement à des composants audio et
vidéo
Installation du processeur d’ambiance numérique
Utilisation en position verticale:
Utilisez une pièce de monnaie pour fixer le support fourni sur le fond du processeur
d’ambiance numérique.
(Suite page suivante)
Préparation
9
FR
Page 38

Utilisation en position latérale:
Placez le processeur d’ambiance numérique de façon que les quatre pieds en
caoutchouc soient sur le fond.
/
Pieds en caoutchouc
Remarques
• Si le processeur d’ambiance numérique est placé en position latérale, la zone de transmission
infrarouge intégrale risque de ne pas être obtenue dans certaines conditions d’installation.
• Placez le processeur d’ambiance numérique comme indiqué sur l’illustration. Ne placez pas le
processeur d’ambiance numérique en position latérale sans qu’il soit muni de ses pieds en
caoutchouc.
Raccordement du processeur d’ambiance numérique à des
composants numériques
Utilisez le câble de raccordement numérique optique fourni pour raccorder la prise de
sortie numérique optique du lecteur DVD (ou du lecteur LD), du tuner de satellite
numérique ou d’un autre composant numérique, à la prise DIGITAL IN du
processeur d’ambiance numérique.
Processeur d’ambiance
numérique
Vers la prise DIGITAL IN
Vers la prise de sortie
numérique optique
Lecteur DVD, lecteur LD, tuner de
satellite numérique ou autre
composant numérique équipé d’une
prise de sortie numérique optique
Câble de raccordement numérique optique (fourni)
Retirez le capuchon de la prise, alignez la fiche sur la prise,
puis insérez la fiche jusqu’à ce qu’elle soit bien en place.
Remarques
• Le câble de raccordement numérique optique est un élément de très haute précision, sensible
aux secousses et à la pression extérieure. Par conséquent, insérez et retirez la fiche du câble
avec soin.
• Ce système n’est pas compatible avec les prises AC-3 RF des lecteurs LD.
• L’entrée numérique du processeur d’ambiance numérique ne prend pas en charge la fréquence
d’échantillonnage de 96 kHz. Lors de l’utilisation de ce système, réglez la sortie numérique du
lecteur DVD à 48 kHz. Des parasites peuvent apparaître en présence d’un signal numérique à
96 kHz.
• L’entrée numérique du processeur d’ambiance numérique n’est pas compatible avec le format
DTS*. Des parasites peuvent apparaître en présence de signaux au format DTS.
* DTS est une marque de fabrique de Digital Theater Systems (USA).
FR
10
Préparation
Page 39

Câbles de raccordement (vendus séparément)
Utilisez le câble POC-5AB (mini-fiche ˜ fiche rectangulaire) pour raccorder la mini-prise de
sortie numérique optique d’un lecteur DVD portable, d’un lecteur CD portable ou d’autres
composants numériques à la prise DIGITAL IN.
Remarques sur le câble de raccordement numérique optique
• Ne laissez pas tomber d’objets sur le câble de
raccordement numérique optique et n’exposez pas le
câble à des chocs.
• Saisissez la fiche pour brancher ou débrancher le câble.
Le rayon de courbure du câble de
raccordement numérique optique
doit être supérieur à 25 mm.
• Vérifiez la propreté des extrémités du câble de
raccordement numérique optique. La présence de
25 mm
poussière aux extrémités du câble peut dégrader les
performances.
• Pour ranger le système, fixez le capuchon à l’extrémité
de la fiche et prenez soin de ne pas plier ou courber le
câble de raccordement numérique optique avec un
rayon de courbure inférieur à 25 mm.
Raccordement du processeur d’ambiance numérique à des
composants analogiques
Utilisez un câble audio (vendu séparément) pour raccorder les prises de sortie audio
d’un magnétoscope, d’un téléviseur ou d’un autre composant aux prises LINE INPUT
(L/R) du processeur d’ambiance numérique.
Processeur d’ambiance
numérique
Magnétoscope, téléviseur
ou autre composant
Vers les prises LINE INPUT
Audio gauche (L, blanc)
Câble audio
(vendu séparément)
Audio droite (R, rouge)
Vers les prises de sortie audio
Audio gauche (blanc)
Audio droite (rouge)
Câbles de raccordement (vendus séparément)
Utilisez le câble RK-G129 (mini-fiche stéréo ˜ connecteur à fiche x 2) pour raccorder la miniprise stéréo (prise de sortie de ligne ou prise de casque) aux prises LINE INPUT.
(Suite page suivante)
Préparation
11
FR
Page 40

Réglage du niveau d’entrée
Si le volume est trop faible avec l’entrée analogique, réglez le commutateur ATT
(atténuateur) sur “0dB”.
ATT
0dB
–6dB
Réglage Composants raccordés
0dB Téléviseur, composants portables et autres composants à faible niveau de sortie
–6dB Autres composants (réglage initial)
Remarques
• Si l’entrée audio vers les prises LINE INPUT présente de la distorsion, réglez le commutateur
ATT (atténuateur) sur “–6dB”.
• Prenez soin de baisser le volume avant de régler le commutateur ATT (atténuateur).
12
FR
Préparation
Page 41

Zone de transmission infrarouge
La zone de transmission infrarouge approximative générée par le processeur
d’ambiance numérique est illustrée ci-dessous.
Rayons infrarouges
4 m
environ
Processeur d’ambiance
numérique
Remarques
• Ce système utilisant des rayons infrarouges, même si le casque d’écoute se trouve dans la zone
de transmission illustrée ci-dessus, les parasites électriques (souffle) risquent d’augmenter
lorsque le casque d’écoute s’éloigne du processeur d’ambiance numérique. De plus, si les
rayons infrarouges sont bloqués, le son risque d’être interrompu et du bruit peut être entendu.
Ceci découle des caractéristiques des rayons infrarouges et ce n’est pas le signe d’un mauvais
fonctionnement.
• Ne recouvrez pas le capteur de rayons infrarouges avec les mains ou les cheveux.
• Tant que le casque d’écoute se trouve dans la zone de transmission illustrée ci-dessus, il peut
être orienté dans n’importe quelle direction par rapport au processeur d’ambiance numérique
(de face, tourné de 90° ou tourné de 180°).
• Le son peut varier en fonction de la position du processeur d’ambiance numérique et des
conditions dans la pièce. Il est recommandé de placer le processeur d’ambiance numérique à
un endroit produisant le son le plus clair.
• L’utilisation du processeur d’ambiance numérique avec d’autres processeurs ou émetteurs
peut générer des signaux mélangés.
4 m
environ
45°
45°
10 m
environ
(Suite page suivante)
Préparation
13
FR
Page 42

Branchement à la prise murale
Processeur d’ambiance
numérique
Adaptateur
d’alimentation
secteur
Vers la prise murale
Vers la prise DC IN
Remarque
Prenez soin d’utiliser l’adaptateur d’alimentation secteur fourni. L’utilisation de produits avec
des polarités de fiche différente ou des caractéristiques différentes peut provoquer une panne du
produit.
Fiche à polarité unifiée
Charge de la batterie
Prenez soin d’utiliser le chargeur de batterie fourni. Jusqu’à quatre batteries peuvent
être chargées simultanément.
Mise en place des batteries dans le chargeur de batterie
1 Ouvrez le couvercle. 2 Insérez les deux batteries Ni-Cd rechargeables
Remarque
Enfoncez les batteries Ni-Cd rechargeables dans le chargeur jusqu’à ce qu’elles soient bien en
place. Après la mise en place des batteries, fermez soigneusement le couvercle. Les batteries ne
seront pas chargées si le couvercle n’est pas fermé.
FR
14
Préparation
NC-AA fournies en dirigeant correctement leurs
polarités ‘ et ’.
Page 43
Charge (versions* U2, CA2 et E92 uniquement)
1 Sortez la fiche de charge. 2 Branchez à la prise murale.
Le témoin de charge
s’allume.
Charge (versions* CEK et HK4 uniquement)
1 Branchez la fiche de charge au chargeur de
batterie.
2 Branchez à la prise murale.
Le témoin de charge
s’allume.
Charge (versions* CED et E13 uniquement)
1 Branchez la fiche de charge au chargeur de
batterie.
2 Branchez à la prise murale.
Le témoin de charge
s’allume.
Remarque
Utilisez la fiche de charge correspondant à votre prise secteur.
* La fiche de charge fournie avec la chaîne varie en fonction de la version de la chaîne. Pour
vérifier la version, reportez-vous au code de version imprimé sur la boîte.
(Suite page suivante)
Préparation
15
FR
Page 44
Lorsque la charge est terminée
Débranchez le chargeur de la prise et sortez les batteries Ni-Cd rechargeables.
Durées de charge et d’utilisation standard pour les batteries rechargeables
fournies
Durée de charge Durée d’utilisation
1 heure environ 6 heures environ
6 heures* environ 30 heures environ
* Durée pour la charge complète d’une batterie entièrement épuisée.
Remarques
• La durée de charge des batteries est indépendante du
nombre de batteries.
• Le chargeur et les batteries s’échauffent légèrement pendant
la charge. Ce n’est pas le signe d’un mauvais
fonctionnement.
• Prenez soin de débrancher le chargeur lorsqu’il n’est pas
utilisé.
• N’utilisez pas et ne laissez pas le chargeur à proximité
d’appareils de chauffage, de zones chaudes exposées au
rayonnement solaire direct, ou dans des endroits humides.
• Les batteries ne seront pas chargées si l’organe de réglage du
chargeur est abaissé. Avant de procéder à la charge, remettez
l’organe de réglage dans la direction de la flèche illustrée à
droite.
• Si vous rechargez des batteries qui ne sont pas complètement
déchargées, il se peut que l’indicateur de charge s’éteigne
avant l’expiration des durées de charge indiquées ci-dessus.
Organe de
réglage
16
FR
Préparation
Page 45

Mise en place des batteries dans le casque
d’écoute
Comme illustré ci-dessous, insérez les deux batteries Ni-Cd rechargeables fournies en
dirigeant correctement leurs polarités ‘ et ’.
12 3
Utilisation de batteries optionnelles
Vous pouvez utiliser des piles sèches R6 (format AA), des batteries Ni-Cd
rechargeables Sony R6 (format AA) (NC-AA, NC-AAS) et des batteries à l’hydrure de
nickel R6 (format AA) (NH-AA) pour le casque d’écoute. Insérez les batteries comme
illustré ci-dessus.
Durées d’utilisation pour les piles sèches
Type de pile Durée d’utilisation
Pile alcaline Sony LR6/AM3 (N) 90 heures environ
Pile au manganèse Sony R6P/SUM-3 (NS) 45 heures environ
Durées d’utilisation et de charge pour les batteries rechargeables Sony (vendues
séparément)
Type de batterie Durée d’utilisation Durée de charge*
Batterie Ni-Cd Sony R6 (format AA)
NC-AA (700 mAh)
Batterie Ni-Cd Sony R6 (format AA)
NC-AAS (1000 mAh)
Batterie à l’hydrure de nickel Sony
R6 (format AA) NH-AA (1450 mAh)
30 heures environ 6 heures environ
40 heures environ 9 heures environ
60 heures environ 10 heures environ
* Durée pour la charge complète d’une batterie entièrement épuisée.
(Suite page suivante)
Préparation
17
FR
Page 46

Mise en place du couvercle de batterie enlevé
Comme illustré, alignez A avec A et B avec B, puis fixez le couvercle en place.
A
B
B
A
Charge de batteries R03 (format AAA)
Le chargeur de batterie fourni peut aussi charger des
batteries Ni-Cd Sony R03 (format AAA) (NC-AAA) et
des batteries à l’hydrure de nickel Sony R03 (format
AAA) (NH-AAA).
Pour la charge de batteries R03 (format AAA),
abaissez l’organe de réglage du chargeur de batterie.
Pour la charge de batteries R6 (format AA), relevez
l’organe de réglage.
Durées de charge pour les batteries rechargeables R03 (format AAA)
Type de batterie Durée de charge*
Batterie Ni-Cd Sony R03 (format AAA)
NC-AAA (250 mAh)
Batterie à l’hydrure de nickel Sony
R03 (format AAA) NH-AAA (650 mAh)
5 heures environ
10 heures environ
Organe de
réglage
* Durée pour la charge complète d’une batterie entièrement épuisée.
Remarques
• Le chargeur de batterie fourni peut charger des batteries Ni-Cd Sony R6 (format AA) (NC-AA,
NC-AAS) et des batteries à l’hydrure de nickel Sony R6 (format AA) (NH-AA). Ne tentez
jamais de charger d’autres types de batteries rechargeables ou de piles sèches.
• N’utilisez pas de batteries Ni-Cd Sony R6 (format AA) (NC-AA (HJ)).
• Les batteries Ni-Cd doivent être remplacées par des neuves lorsqu’elles ne durent plus que la
moitié du temps prévu à pleine charge. Achetez soit des batteries Ni-Cd Sony R6 (format AA)
(NC-AA, NC-AAS), soit des batteries à l’hydrure de nickel Sony R6 (format AA) (NH-AA).
Vous pouvez commander les batteries dans le magasin où vous avez acheté votre appareil, ou
auprès du revendeur Sony le plus proche.
• Certains types de batteries peuvent ne pas être disponibles dans certaines régions.
FR
18
Préparation
Page 47

Raccordement du processeur d’ambiance
numérique à un casque d’écoute avec fil
(vendu séparément)
Raccordez un casque d’écoute plein-air avec fil (tel que MDR-F1 ou MDR-605LP) à la
prise PHONES du processeur d’ambiance numérique. Afin d’obtenir un effet
d’ambiance suffisant, il est recommandé d’utiliser le casque d’écoute stéréo sans fil
MDR-IF5000.
Processeur d’ambiance
numérique
Vers la prise PHONES
Remarques
• Saisissez le câble par sa fiche pour débrancher le casque d’écoute de la prise PHONES. Ne tirez
jamais sur le câble lui-même.
• Ce système a été conçu pour fournir un effet optimum lorsqu’il est utilisé avec le casque
d’écoute stéréo sans fil MDR-IF5000 fourni. Des casques d’écoute stéréo sans fil MDR-IF5000
supplémentaires sont aussi disponibles séparément. D’autres casques d’écoute risquent de ne
pas fournir un effet sonore d’ambiance satisfaisant.
Casque d’écoute plein-air avec fil
(vendu séparément)
Préparation
19
FR
Page 48

¡ Utilisation
Ecoute du son d’un composant raccordé
Afin l’utilisation, lisez la partie “Préparation” et réalisez les
raccordements appropriés.
1 Allumez le composant raccordé au processeur d’ambiance numérique.
Lecteur DVD ou autre
composant audio et vidéo
POWER
2 Appuyez sur POWER pour allumer le processeur d’ambiance numérique.
Le témoin POWER s’allume.
POWER
3 Mettez le casque d’écoute.
Le témoin POWER s’allume en rouge et le casque d’écoute s’allume
automatiquement.
20
FR
Utilisation
Témoin
POWER
BALANCE
POWER
VOL
Page 49

4 Appuyez sur INPUT pour sélectionner le composant à écouter.
DIGITAL
ANALOG
INPUT
Témoin allumé Source sonore sélectionnée
DIGITAL Son du composant raccordé à la prise DIGITAL IN
ANALOG Son du composant raccordé aux prises LINE INPUT
Remarque
Pour écouter des sources sonores à double audio (MAIN/SUB), raccordez aux prises LINE
INPUT puis sélectionnez la source sonore à écouter sur le lecteur, le téléviseur ou un autre
composant.
5 Appuyez sur EFFECT pour obtenir le champ sonore désiré.
DOLBY VIRTUAL
MUSIC
EFFECT
Témoin allumé Champ sonore et source sonore adaptée
DOLBY VIRTUAL Mode reproduisant le champ sonore d’un cinéma.
Ce mode est adapté aux sources sonores des films.
MUSIC Mode reproduisant le champ sonore d’une salle d’écoute dotée d’une
bonne acoustique.
Ce mode est adapté aux sources de musique.
(Suite page suivante)
Utilisation
21
FR
Page 50

6 Appuyez sur OUTPUT pour sélectionner le mode de sortie (effet d’ambiance).
DECODE MODE
DOLBY DIGITAL
DOLBY SURROUND
L
LS
C
R
RS
VIRTUAL
OUTPUT
Témoin allumé Mode de sortie (effet d’ambiance)
DECODE MODE
DOLBY DIGITAL
DOLBY SURROUND
C
L
LS
VIRTUAL
DECODE MODE
DOLBY DIGITAL
DOLBY SURROUND
C
L
R
RS
R
OFF
Reproduction par casque d’écoute conventionnel.
VIRTUAL FRONT
Effet virtuel dans lequel le son semble provenir de deux enceintes
(gauche et droite) situées devant-soi.
22
FR
LS
VIRTUAL
Utilisation
RS
Page 51

Témoin allumé Mode de sortie (effet d’ambiance)
VIRTUAL SURROUND
DECODE MODE
DOLBY DIGITAL
DOLBY SURROUND
C
L
R
Effet virtuel dans lequel le son semble provenir non seulement de
deux enceintes avant (gauche et droite), mais aussi d’une enceinte
centrale, de deux enceintes arrière (gauche et droite) et d’un
subwoofer (lorsque DOLBY DIGITAL est allumé).
Le processeur d’ambiance numérique identifie et traite
LS
RS
VIRTUAL
automatiquement le signal en fonction du format du signal audio
d’entrée.
Témoin DOLBY DIGITAL allumé : traitement en cours d’un signal
audio enregistré au format Dolby Digital 5.1ch.
Témoin DOLBY SURROUND allumé : traitement en cours d’un
signal audio enregistré au format Dolby Surround (Pro Logic).
Remarque
Lors d’une entrée Dolby Digital, les sources sonores monophoniques ne pouvant pas être
traitées avec l’effet d’ambiance sont automatiquement identifiées et reproduites à travers
deux canaux (gauche et droite), même si le mode VIRTUAL SURROUND est sélectionné.
Dans ce cas, les deux témoins DOLBY DIGITAL et DOLBY SURROUND sont éteints.
7 Réglez le volume.
Pour augmenter
le volume
Pour diminuer
le volume
BALANCE
POWER
VOL
Pour régler le volume d’un casque d’écoute (vendu séparément) raccordé à
la prise PHONES
Tournez PHONES—LEVEL pour ajuster le volume
MIN
LEVEL
MAX
Pour
augmenter
le volume
PHONES
Pour
diminuer
le volume
(Suite page suivante)
Utilisation
23
FR
Page 52

8 Régler l’équilibrage.
Le côté droit
devient plus fort.
Le côté gauche
devient plus fort.
BALANCE
POWER
VOL
Le casque d’écoute s’éteint automatiquement lorsqu’il est retiré
— Fonction de mise sous/hors tension automatique
Lorsque vous n’utilisez plus le casque
d’écoute, vérifiez que le bandeau à réglage
automatique n’est plus tiré. L’alimentation
reste allumée tant que le bandeau à réglage
Bandeau à
réglage
automatique
automatique est tiré.
Contrôle de l’énergie à disposition dans la batterie
Tirez le bandeau à réglage automatique
vers le haut et vérifiez le témoin POWER.
Les batteries sont utilisables lorsque le
témoin POWER est allumé en rouge.
Chargez les batteries ou utilisez des piles
sèches si le témoin POWER faiblit, si le son
est déformé ou si les parasites augmentent.
Témoin
POWER
Après l’utilisation du système de casque d’écoute
Eteignez d’abord le processeur d’ambiance numérique avant d’éteindre le composant
raccordé au processeur d’ambiance numérique. Si le composant raccordé est éteint en
premier, le rayon infrarouge est coupé et du bruit peut être émis (ceci n’est pas le
signe d’un mauvais fonctionnement).
Ne suspendez pas le casque d’écoute au processeur d’ambiance numérique ni à
d’autres composants. La fonction de mise hors tension automatique risque d’être
activée par inadvertance, en provoquant l’usure des batteries.
Durée de transition entre modes
Lorsque les touches du processeur d’ambiance numérique sont pressées pour passer à
de nouveaux modes, la durée de transition entre les modes peut varier. Cela dépend
des différences de transmission de programme entre les modes.
FR
24
Utilisation
Page 53

Fonction de silencieux (Mute)
La fonction Mute est automatiquement activée pour couper la sortie du son du casque
d’écoute chaque fois que ce dernier sort de la zone de transmission infrarouge, que les
rayons infrarouges sont interrompus ou que le niveau de bruit augmente. La fonction
Mute est automatiquement annulée lorsque vous vous rapprochez du processeur
d’ambiance numérique ou si les rayons infrarouges ne sont plus interrompus.
Si aucun signal audio n’est généré pendant 10 minutes
L’émission des rayons infrarouges de l’émetteur infrarouge du processeur d’ambiance
numérique s’arrête automatiquement si aucun signal audio n’est généré pendant
10 minutes. Les rayons infrarouges sont automatiquement émis lorsqu’un signal
audio est généré à nouveau. Dans certains cas, les rayons infrarouges de l’émetteur
infrarouge peuvent s’interrompre si un son extrêmement faible est émis pendant
environ 10 minutes avec l’entrée analogique. Dans ce cas, augmentez le volume du
composant audio et vidéo raccordé et diminuez le volume du casque d’écoute.
Remarques
• Il peut exister des différences de luminosité de l’émetteur infrarouge sur le processeur
d’ambiance numérique. Toutefois, ceci n’affecte pas la zone de transmission des rayons
infrarouges.
• Le casque d’écoute doit être utilisé à l’intérieur de la zone de transmission des rayons
infrarouges (voir “Zone de transmission infrarouge”, page 13).
• N’utilisez pas le processeur d’ambiance numérique dans des endroits exposés au rayonnement
solaire direct ou à forte lumière. Le son risquerait d’être coupé.
• Ce casque d’écoute de type ouvert est conçu pour que le son s’échappe aussi vers l’extérieur
du casque. Faites attention de ne pas régler le volume trop fort pour ne pas incommoder les
personnes autour de vous.
• Utilisez un niveau d’écoute approprié pour ne pas endommager votre ouïe et pour pouvoir
encore entendre les sons ambiants.
• L’effet sonore d’ambiance risque de ne pas être obtenu avec des sources de son ne comportant
pas de vidéo, comme les CD de musique.
• Ce système simule la fonction HRTF* d’une personne moyenne. Toutefois, l’effet peut varier
d’une personne à l’autre car la fonction HRTF varie entre les individus.
* Head Related Transfer Function (Fonction de transfert relative à la tête)
Utilisation
25
FR
Page 54

¡ Information supplémentaire
Guide de dépannage
Si vous rencontrez un problème en utilisant ce système de casque d’écoute, utilisez la
liste de contrôle suivante. Si le problème persiste, consultez votre revendeur Sony le
plus proche.
Symptôme Cause et remède
Pas de son
Distorsion du son
/ Allumez le processeur d’ambiance numérique.
/ Vérifiez que le composant AV et l’adaptateur d’alimentation secteur
soient raccordés au processeur d’ambiance numérique et qu’ils soient
branchés à une prise secteur.
/ Allumez le composant AV raccordé au processeur d’ambiance
numérique et lancez le programme (lecture).
/ Utilisez la touche INPUT pour contrôler si le composant AV à écouter
est correctement sélectionné.
/ Si la prise de casque du composant AV est raccordée au processeur
d’ambiance numérique, augmentez le volume du composant AV
raccordé.
/ Augmentez le volume du casque d’écoute.
/ Vérifiez la position du bouton BALANCE du casque d’écoute.
/ La fonction Mute est enclenchée.
• Vérifiez que rien ne bloque le trajet entre le processeur d’ambiance
numérique et le casque d’écoute.
• Essayez d’utiliser le casque d’écoute aussi près que possible du
processeur d’ambiance numérique.
• Changez la position ou l’inclinaison du processeur d’ambiance
numérique.
/ Le témoin POWER du casque d’écoute est faible ou éteint. Cela
indique que la batterie est épuisée. Si vous utilisez des batteries
rechargeables, rechargez les batteries. Si vous utilisez des piles sèches,
remplacez-les par des neuves. Si le témoin reste éteint, consultez
votre revendeur Sony le plus proche.
/ Réglez le commutateur ATT (atténuateur) du processeur d’ambiance
numérique sur “–6dB”.
/ Le témoin POWER du casque d’écoute est faible ou éteint. Cela
indique que la batterie est épuisée. Si vous utilisez des batteries
rechargeables, rechargez les batteries. Si vous utilisez des piles sèches,
remplacez-les par des neuves. Si le témoin reste éteint, consultez
votre revendeur Sony le plus proche.
/ Si la prise de casque du composant AV est raccordée au processeur
d’ambiance numérique, diminuez le volume du composant AV
raccordé.
26
FR
Information supplémentaire
Page 55

Symptôme Cause et remède
Niveau de bruit élevé/
Son faible
Pas d’effet d’ambiance
Le témoin DOLBY
DIGITAL ne s’allume
pas.
Les batteries ne
peuvent pas être
chargées.
/ Utilisez le casque d’écoute à proximité du processeur d’ambiance
numérique. La quantité de bruit augmente lorsque le casque d’écoute
s’éloigne du processeur d’ambiance numérique. Cela découle des
caractéristiques des rayons infrarouges et ce n’est pas le signe d’un
mauvais fonctionnement.
/ Vérifiez que rien ne bloque le trajet entre le processeur d’ambiance
numérique et le casque d’écoute.
/ Vérifiez que vos mains ou vos cheveux ne recouvrent pas le capteur de
rayons infrarouges du casque d’écoute.
/ Si la lumière du soleil pénètre directement dans la pièce à travers une
fenêtre à côté du processeur d’ambiance numérique, fermez le rideau
ou le store de façon à empêcher la lumière du soleil de pénétrer
directement. Ou utilisez un emplacement non exposé au rayonnement
solaire direct.
/ Changez la position ou l’inclinaison du processeur d’ambiance
numérique.
/ Réglez le commutateur ATT (atténuateur) du processeur d’ambiance
numérique sur “0dB”.
/ Le témoin POWER du casque d’écoute est faible ou éteint. Cela indique
que la batterie est épuisée. Si vous utilisez des batteries rechargeables,
rechargez les batteries. Si vous utilisez des piles sèches, remplacez-les
par des neuves. Si le témoin reste éteint, consultez votre revendeur
Sony le plus proche.
/ Si la prise de casque du composant AV est raccordée au processeur
d’ambiance numérique, augmentez le volume du composant AV
raccordé.
/ Appuyez sur OUTPUT pour sélectionner le mode VIRTUAL
SURROUND (page 23).
/ Le signal de la partie en cours de lecture n’est pas multicanal.
L’effet d’ambiance n’est obtenu pas à partir de sources monophoniques
ou de sources qui n’ont pas été préparées pour le son d’ambiance.
/ Le réglage de sortie audio numérique du lecteur DVD est peut-être sur
“PCM”.
Reportez-vous au mode d’emploi fourni avec le lecteur DVD et
modifiez le réglage (comme “Dolby Digital/PCM” ou “Dolby Digital”)
pour l’utilisation avec des composants comportant un décodeur Dolby
Digital (AC-3) incorporé.
/ Vous essayez de reproduire un logiciel DVD incompatible avec le Dolby
Digital 5.1ch.
/ Le signal de la partie en cours de lecture n’est pas multicanal.
/ Des piles sèches sont utilisées.
Insérez les batteries rechargeables fournies ou optionnelles (page 17).
/ Des batteries rechargeables autres que celles fournies ou optionnelles
sont utilisées.
Insérez les batteries rechargeables fournies ou optionnelles (page 17).
Information supplémentaire
27
FR
Page 56

Précautions
Sécurité
• Ne laissez pas tomber et ne heurtez pas le
processeur d’ambiance numérique ou le
casque d’écoute, et ne les exposez pas à des
chocs violents d’aucune sorte. Cela pourrait
provoquer une panne.
• Ne démontez pas et n’ouvrez aucune partie
du système.
Sources d’alimentation et placement
• Si le système ne doit pas être utilisé
pendant une période prolongée,
débranchez l’adaptateur d’alimentation
secteur de la prise murale. Saisissez le câble
par sa fiche pour le débrancher. Ne tirez
pas sur le câble lui-même.
• Ne placez pas le système dans les endroits
suivants :
– Endroit exposé au rayonnement solaire
direct, près d’un chauffage ou endroit
extrêmement chaud.
– Endroit poussiéreux.
– Surface instable ou inclinée.
– Endroit exposé à une grande quantité de
vibrations.
– Salle de bain ou autre endroit très
humide.
Casque d’écoute
Protection des oreilles
L’écoute de sons à volume élevé pendant de
longues périodes peut endommager l’ouïe.
Afin de vous protéger les oreilles, n’utilisez
pas un volume trop élevé.
Etiquette
Lorsque le volume est trop élevé, le son se
propage hors du casque d’écoute. Faites
attention de ne pas utiliser un volume trop
élevé afin de ne pas incommoder les
personnes autour de vous.
Dans des endroits très bruyants, la tendance
est d’augmenter le volume. Toutefois, le
volume doit être conservé à un niveau
permettant d’être appelé pendant l’écoute au
casque.
Oreillettes
Après de longues périodes d’utilisation ou de
rangement, les oreillettes peuvent s’user.
Pour le remplacement des oreillettes,
consultez votre revendeur Sony le plus
proche.
Nettoyage
Utilisez un chiffon doux légèrement imbibé
d’un détergent neutre. N’utilisez pas de
solvants, tels que diluant, benzène ou alcool,
car ils risqueraient d’endommager la surface.
En cas de mauvais fonctionnement ou
de panne
• En cas de mauvais fonctionnement ou de
panne, ou si un corps étranger pénètre dans
l’appareil, coupez immédiatement
l’alimentation et consultez votre revendeur
Sony le plus proche.
• Si vous apportez votre système au
revendeur Sony, prenez soin de prendre à
la fois le casque d’écoute et le processeur
d’ambiance numérique.
28
FR
Information supplémentaire
Page 57

Spécifications
Processeur d’ambiance numérique
(DP-IF5000)
Système de modulation Modulation en
Fréquence de l’onde porteuse
Distance de transmission
Réponse en fréquence 20 à 20 000 Hz
Taux de distorsion Inférieur à 1% (1 kHz)
Entrées audio Entrée optique (type
Alimentation électrique 9 V CC (de
Dimensions (l/h/p) 85 × 190 × 180 mm
Poids 1,0 kg (1 000 g)
fréquence
Canal de droite
2,8 MHz
Canal de gauche
2,3 MHz
10 m environ
carré) × 1
Entrée analogique
(connecteur à fiche
gauche/droite) × 1
l’adaptateur
d’alimentation secteur
fourni)
3
(3
/8 × 7 1/2 × 7 1/8
po) environ
(2 lb 30 oz) environ
Casque d’écoute stéréo sans fil
(MDR-IF5000)
Réponse en fréquence 12 à 24 000 Hz
Alimentation électrique Batteries Ni-Cd
Poids 280 g (10 oz) environ
rechargeables
(fournies) ou batteries
R6 (format AA) (piles
sèches ou batteries
rechargeables,
vendues séparément)
(y compris batteries
Ni-Cd rechargeables
fournies)
Accessoires fournis
Support pour processeur
d’ambiance numérique (1)
Adaptateur d’alimentation
secteur (1)
Batteries Ni-Cd rechargeables
(2)
Chargeur de batterie (1)
Fiche de chargeur pour
chargeur de batterie (1)
(versions
E13 uniquement)
Câble de raccordement
numérique optique (1)
Mode d’emploi (1)
Information produit (1)
* CDE, CEK, HK4 et
Accessoires recommandés
Câbles de raccordement RK-C310, RK-C315,
Sélecteur numérique optique
Câble de raccordement numérique optique
La conception et les spécifications peuvent
être modifiées sans préavis.
RK-C320, RK-C330
(connecteur à fiche × 2
˜ connecteur à fiche
× 2)
RK-G129 (mini-fiche
stéréo ˜ connecteur
à fiche × 2)
SB-D30
POC-5A, POC-10A,
POC-15A (fiche
optique rectangulaire
˜ fiche optique
rectangulaire)
POC-5AB, POC-10AB,
POC-15AB (fiche
optique rectangulaire
˜ mini-fiche
optique)
* La fiche de charge fournie avec la chaîne
varie en fonction de la version de la chaîne.
Pour vérifier la version, reportez-vous au
code de version imprimé sur la boîte.
Information supplémentaire
29
FR
Page 58

WARNUNG
Um Feuer- und
Stromschlaggefahr zu
vermeiden, darf das Gerät
weder Regen noch Feuchtigkeit
ausgesetzt werden.
Um einen elektrischen Schlag
zu vermeiden, darf das
Gehäuse nicht geöffnet
werden. Überlassen Sie
Wartungsarbeiten
grundsätzlich einem Fachmann.
WARNUNG
Wir weisen darauf hin, daß Änderungen
oder Umbauten, die nicht ausdrücklich
in dieser Anleitung genehmigt werden,
Ihre Befugnis zur Benutzung dieses
Gerätes nichtig machen können.
Entsorgungshinweis: Bitte werfen Sie
nur entladene Batterien in die
Sammelboxen beim Handel oder den
Kommunen. Entladen sind Batterien in
der Regel dann, wenn das Gerät
abschaltet und signalisiert “Batterie leer”
oder nach längerer Gebrauchsdauer der
Batterien “nicht mehr einwandfrei
funktioniert”. Um sicherzugehen, kleben
Sie die Batteriepole z.B. mit einem
Klebestreifen ab oder geben Sie die
Batterien einzeln in einen Plastikbeutel.
DE
2
Page 59

Inhaltsverzeichnis
Kopfhörersystem ......................... 5
Überprüfen des
Lieferumfangs........................... 8
Anschluß des
Kopfhörersystems .................... 9
Allgemeines ......................................... 9
Anschluß an Audio- und
Videokomponenten ........................
Netzanschluß .....................................14
Laden der Batterien .......................... 14
Einlegen der Batterien in den
Kopfhörer .......................................
Anschluß eines Kabel-Kopfhörers
(getrennt erhältlich) an den
digitalen Surround-Prozessor .....
Wiedergabe des Tons einer
angeschlossenen
Komponente ........................... 20
Störungssuche ........................... 26
17
19
9
DE
V orsichtsmaßnahmen................ 28
Technische Daten ....................... 29
DE
3
Page 60

Hauptmerkmale
Beim MDR-DS5000 handelt es sich um ein digitales Surround-Kopfhörersystem, das
mit Infrarot-Übertragung arbeitet. Durch einfachen Anschluß des digitalen SurroundProzessors an einen DVD-Spieler über das mitgelieferte optische
Digitalanschlußkabel können Sie den Mehrkanal-Surroundklang mit dem Kopfhörer
genießen.
• Kompatibel mit Dolby
• Die Signalverarbeitung durch DSP (Digitalsignalprozessoren) erzeugt im Kopfhörer
einen Surroundklang, der dem eines Kinos ähnlich ist.
• Schnurloser Kopfhörer mit rausch- und störfester Infrarot-Übertragung.
• Breiter Infrarot-Empfangsbereich von bis zu 10 m.
• Selbstnachstellmechanismus erübrigt Verstellen des Kopfbands.
• Ein-/Ausschalt-Automatik schaltet den Kopfhörer beim Aufsetzen automatisch ein,
und beim Abnehmen automatisch aus.
• VOL-Regler zum Einstellen der Lautstärke für den rechten und linken Kanal des
Kopfhörers. Die Ausgangspegelbalance zwischen dem linken und rechten Kanal
kann mit dem BALANCE-Regler eingestellt werden.
• Ausstattung mit einer Kopfhörerbuchse zum Anschluß eines offenen KabelKopfhörers (wie z.B. MDR-F1 oder MDR-605LP, getrennt erhältlich).
• Aufladbare Ni-Cd-Batterien (mitgeliefert und getrennt erhältlich) oder
Trockenzellen des Typs R6 (Größe AA) (getrennt erhältlich) können zur
Stromversorgung des Kopfhörers verwendet werden.
Einstellung auf DEMO-Modus
Schalten Sie den digitalen Surround-Prozessor ein, und drücken Sie dann DEMO.
Der Kopfhörer gibt dann einen Testton wieder, und die Anzeigen für die
entsprechenden virtuellen Lautsprecher leuchten nacheinander auf. Dadurch können
Sie virtuellen 5.1ch-Surroundklang erleben, selbst wenn kein DVD-Spieler
angeschlossen ist. Drücken Sie DEMO erneut, um den DEMO-Modus wieder
abzuschalten.
* Digital (AC-3) und Dolby Surround (Pro Logic).
DEMO
* Der digitale Surround-Prozessor dieses Systems verfügt über einen Dolby Digital (AC-3)-
Decoder.
Hergestellt unter Lizenz von Dolby Laboratories Licensing Corporation.
DOLBY, das doppel D Symbol a, PRO LOGIC, Dolby Digital (AC-3) und VIRTUAL DOLBY
DIGITAL sind Warenzeichen der Dolby Laboratories Licensing Corporation.
CE-Prüfzeichen
Das CE-Prüfzeichen ist nur für Produkte gültig, die in der Europäischen Gemeinschaft
vermarktet werden.
DE
4
Page 61

¡ Vorbereitung
Kopfhörersystem
Beim MDR-DS5000 handelt es sich um ein digitales Surround-Kopfhörersystem mit
räumlicher Klangperspektive. Dieses System stellt die Zukunft der Audio- und
Videotechnik dar. Mit diesem System können Sie einen Klang genießen, der praktisch
mit dem einer 5.1ch-Surround-Lautsprecheranlage identisch ist. Jetzt können Sie bei
sich zu Hause ein Klangfeld wie in einem Kino erleben.
Digitales Surround-Kopfhörersystem MDR-DS5000
Dies ist ein neuartiges schnurloses Kopfhörersystem, das mit Hilfe der eigens von
Sony entwickelten “Virtualphones Technology”
Mehrkanal-Klangbilder außerhalb des Zuhörerkopfes erzeugt. Durch einfachen
Anschluß eines DVD-Spielers an das System kommen Sie in den Genuß von
virtuellem Surroundklang wie in einem Kino.
Der ultraschnelle DSP des Systems ermöglicht Echtzeit-Digitalumwandlung und
-verarbeitung aller Signale, um einen praktisch verzerrungsfreien und klaren Klang
zu erzeugen.
* “Virtualphones Technology” ist ein Warenzeichen der Sony Corporation.
Systemmerkmale
Kompatibel mit Dolby Digital und Dolby Pro Logic
Das System besitzt einen Surround-Decoder und Logic 3D-Prozessor, um mit Hilfe
des Kopfhörers das Klangfeld eines Raums mit einer 5.1ch-Lautsprecheranlage zu
reproduzieren. Da der digitale Surround-Prozessor zwischen den Eingangssignalen
unterscheidet, können Sie das Surround-Klangfeld nicht nur mit einem DVD-Spieler,
sondern auch mit digitalen Satellitentunern, Videorecordern und anderen analogen
und digitalen Audio- und Videosignalquellen genießen.
* Dolby Digital- und Dolby Pro Logic-
(Fortsetzung auf der nächsten Seite)
Vorbereitung
5
DE
Page 62

R
L
DSP
DSP
DSP
DSP
Virtuelles Klangfeld außerhalb des Zuhörerkopfes
Mit dem Logic 3D-Prozessor wird der Klang bei Kopfhörerwiedergabe nicht auf einen
festen Punkt im Kopf des Zuhörers fixiert, sondern das Erlebnis eines natürlichen 360Grad-Klangfelds mit räumlicher Orientierung erzeugt. Dadurch wird die Simulation
des Surround-Klangfelds einer Lautsprecher-Wiedergabe nicht nur mit DVD, sondern
mit allen Audio- und Videosignalquellen ermöglicht.
3-D-Klangfeld mit “Virtualphones Technology” 3-D-Klangfeld eines herkömmlichen Kopfhörers
R
SW
C
L
Typisches Klangfeld beim Hören mit Lautsprechern
(2 Kanäle)
Im Raum
Lautsprecher
RS
LS
WiedergabeKlangfeld mit
MDR-DS5000 Wiedergabe-Klangfeld eines
herkömmlichen Kopfhörers
Klangfeld beim Hören mit dem MDR-DS5000
(2 Kanäle)
Logic 3D-Prozessor
R
Lautsprecher
L
Direktschall Reflektierter
Schall
L : Links LS : Links Surround
C : Mitte SW : Subwoofer
R : Rechts RS : Rechts Surround
Offener Kopfhörer mit Verstärkungsringen
Der neuentwickelte Kopfhörer bietet großen Tragekomfort und ein natürliches
Klangfeld. Da der Kopfhörer die Ohren nicht einkapselt, gestattet er druckfreies und
angenehmes Hören. Darüber hinaus können zusätzliche MDR-IF5000-Kopfhörer
(getrennt erhältlich) verwendet werden, so daß mehrere Personen gleichzeitig den
Surroundklang innerhalb des Infrarot-Übertragungsbereichs erleben können
(Seite 13).
DE
6
Vorbereitung
Page 63

Kopfhörersystem-Konfiguration
Dieses Kopfhörersystem besteht aus einem digitalen Surround-Prozessor, der die
Mehrkanal-Eingangssignale decodiert und umwandelt, und einem schnurlosen
Infrarot-Kopfhörer. Durch einfachen Anschluß des digitalen Surround-Prozessors an
einen DVD-Spieler, Videorecorder oder eine andere Audio- oder Videokomponente
kommen Sie in den Genuß von Dolby Digital- oder Dolby Pro Logic-Surroundklang.
Dieses System kann mit jeder Audio- oder Videokomponente verwendet werden, die
mit einer optischen Digitalausgangsbuchse, Audio-Ausgangsbuchsen oder einer
Kopfhörerbuchse ausgestattet ist. (Näheres zu den Anschlußkabeln (getrennt
erhältlich) finden Sie auf den Seiten 11 und 29.)
Anmerkungen
• Stellen Sie den digitalen Surround-Prozessor so auf, daß sich bei Benutzung keine Hindernisse
zwischen dem Prozessor und dem Kopfhörer befinden.
• Stellen Sie den digitalen Surround-Prozessor nicht auf eine instabile Unterlage, z.B. auf ein TV-
Gerät. Falls der Prozessor herunterfällt, kann er Verletzungen verursachen oder beschädigt
werden.
Vorbereitung
7
DE
Page 64

Überprüfen des Lieferumfangs
Vergewissern Sie sich vor der Einrichtung des Systems, daß alle Komponenten
vollzählig vorhanden sind.
Digitaler Surround-Prozessor (1)
Ladegerät (1)
Netzadapter (1)
Schnurloser Stereo-Kopfhörer (1)
Gerätestecker (für Ladegerät, 1)
(nur Versionen CEK und HK4
Aufladbare Ni-Cd-Batterien
NC-AA (2)
*)
Ständer (für digitalen SurroundProzessor, 1)
Gerätestecker (für Ladegerät, 1)
(nur Versionen CED und E13
Optisches Digitalanschlußkabel
(Rechteckstecker, 1)
*)
Anmerkung
Verwenden Sie den für Ihre Netzsteckdose passenden Ladestecker.
* Der mit diesem System gelieferte Ladestecker ist je nach der Systemversion unterschiedlich.
Die Version kann anhand des auf der Verpackung aufgedruckten Versionscodes festgestellt
werden.
DE
8
Vorbereitung
Page 65

Anschluß des Kopfhörersystems
Allgemeines
Schließen Sie das Kopfhörersystem gemäß der nachstehenden Abbildung an.
DVD-Spieler, Videorecorder
oder andere Komponente
Digitaler
Netzadapter
Surround-Prozessor
Anschluß an Audio- und Videokomponenten
Aufstellung des digitalen Surround-Prozessors
Senkrechte Aufstellung:
Befestigen Sie den mitgelieferten Ständer mit Hilfe einer Münze an der Unterseite des
digitalen Surround-Prozessors.
Schnurloser
Stereo-Kopfhörer
(Fortsetzung auf der nächsten Seite)
Vorbereitung
9
DE
Page 66

Waagerechte Aufstellung:
Stellen Sie den digitalen Surround-Prozessor auf die vier Gummifüße.
/
Gummifüße
Anmerkungen
• Bei waagerechter Aufstellung des digitalen Surround-Prozessors wird je nach den
Gegebenheiten nicht der volle Infrarot-Übertragungsbereich erzielt.
• Stellen Sie den digitalen Surround-Prozessor so auf, wie in der Abbildung gezeigt. Stellen Sie
ihn nicht auf die Seite ohne Gummifüße.
Anschluß des digitalen Surround-Prozessors an digitale
Komponenten
Verbinden Sie die optische Digitalausgangsbuchse eines DVD-Spielers (oder LDSpielers), eines digitalen Satellitentuners oder einer anderen digitalen Komponente
über das mitgelieferte optische Digitalanschlußkabel mit der Buchse DIGITAL IN des
digitalen Surround-Prozessors.
Digitaler
Surround-Prozessor
An die Buchse DIGITAL IN
An die optische
Digitalausgangsbuchse
DVD-Spieler, LD-Spieler, digitaler
Satellitentuner oder andere
digitale Komponente mit
optischer Digitalausgangsbuchse
Optisches Digitalanschlußkabel (mitgeliefert)
Die Kappe von der Buchse abnehmen, den Stecker auf die
Buchse ausrichten, und dann bis zum Anschlag einführen.
Anmerkungen
• Das optische Digitalanschlußkabel ist ein stoß- und druckempfindliches Hochpräzisionsteil.
Gehen Sie daher beim Anschließen und Abziehen des Kabelsteckers sorgfältig vor.
• Dieses System ist nicht mit den AC-3 RF-Buchsen an LD-Spielern kompatibel.
• Der Digitaleingang des digitalen Surround-Prozessors unterstützt keine Abtastfrequenz von
96 kHz. Stellen Sie den Digitalausgang des DVD-Spielers bei Anschluß an dieses System auf
48 kHz ein. Bei Einspeisung eines 96-kHz-Digitalsignals kann Rauschen hörbar sein.
• Der Digitaleingang des digitalen Surround-Prozessors ist nicht mit dem DTS-Format*
kompatibel. Bei Einspeisung von Signalen des DTS-Formats kann Rauschen hörbar sein.
* DTS ist ein Warenzeichen von Digital Theater Systems (USA).
DE
10
Vorbereitung
Page 67

Anschluß von Kabeln (getrennt erhältlich)
Verwenden Sie das Kabel POC-5AB (Ministecker ˜ Rechteckstecker), um die optische DigitalMini-Ausgangsbuchse an tragbaren DVD-Spielern, CD-Spielern oder anderen digitalen
Komponenten mit der Buchse DIGITAL IN zu verbinden.
Anmerkungen zum optischen Digitalanschlußkabel
• Keine Gegenstände auf das optische
Digitalanschlußkabel fallenlassen, und das Kabel keinen
Stößen aussetzen.
Der Biegeradius des optischen
Digitalanschlußkabels sollte
mindestens 25 mm betragen.
• Zum Anschließen oder Abziehen des Kabels stets den
Stecker fassen.
• Die Enden des optischen Digitalanschlußkabels stets
25 mm
sauberhalten. Staub auf den Kabelenden kann die
Leistung verschlechtern.
• Zur Aufbewahrung des Kabels die Kappe auf den
Stecker schieben. Das optische Digitalanschlußkabel darf
nicht geknickt oder mit einem Biegeradius von weniger
als 25 mm gebogen werden.
Anschluß des digitalen Surround-Prozessors an analoge
Komponenten
Verbinden Sie die Audio-Ausgangsbuchsen eines Videorecorders, TV-Gerätes oder
einer anderen Komponente über ein Audiokabel (getrennt erhältlich) mit den
Buchsen LINE INPUT (L/R) des digitalen Surround-Prozessors.
Digitaler
Surround-Prozessor
Videorecorder,
TV-Gerät oder andere
An die Buchsen LINE INPUT
Audio links (L, weiß)
An Audio-Ausgangsbuchsen
Audio links (weiß)
Komponente
Audiokabel
(getrennt erhältlich)
Audio rechts (R, rot)
Audio rechts (rot)
Anschluß von Kabeln (getrennt erhältlich)
Verwenden Sie das Kabel RK-G129 (Stereo-Ministecker ˜ Cinch-Stecker x 2), um die StereoMinibuchse (Ausgangsbuchse oder Kopfhörerbuchse) mit den Buchsen LINE INPUT zu
verbinden.
(Fortsetzung auf der nächsten Seite)
Vorbereitung
11
DE
Page 68

Einstellung des Eingangspegels
Falls die Lautstärke bei Verwendung des Analogeingangs zu niedrig ist, stellen Sie
den Schalter ATT (Dämpfung) auf “0dB”.
ATT
0dB
–6dB
Stellung Angeschlossene Komponenten
0dB TV-Gerät, tragbare Geräte und andere Komponenten mit niedrigem
Ausgangspegel
–6dB Andere Komponenten (Ausgangsstellung)
Anmerkungen
• Falls bei Signaleingabe in die Buchsen LINE INPUT Verzerrungen auftreten, stellen Sie den
Schalter ATT (Dämpfung) auf “–6dB”.
• Die Lautstärke muß vor der Umstellung des Schalters ATT (Dämpfung) verringert werden.
12
DE
Vorbereitung
Page 69
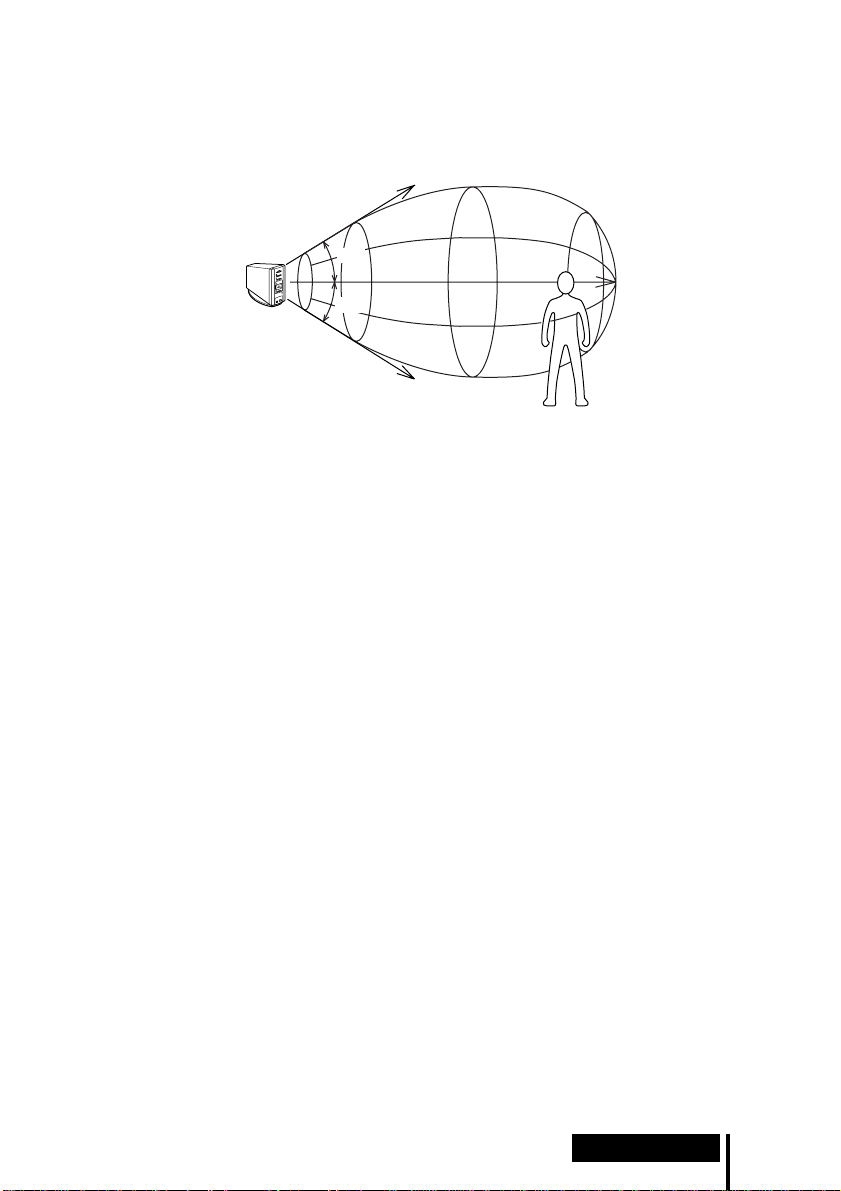
Infrarot-Übertragungsbereich
Die nachstehende Abbildung zeigt den ungefähren Infrarot-Übertragungsbereich des
digitalen Surround-Prozessors.
Infrarotstrahlen
Digitaler
Surround-Prozessor
Anmerkungen
• Da dieses System Infrarotstrahlen verwendet, kann elektrostatisches Rauschen (zischendes
Geräusch) zunehmen, je größer die Entfernung zwischen Kopfhörer und digitalem SurroundProzessor ist, selbst wenn sich der Kopfhörer im oben gezeigten Übertragungsbereich
befindet. Außerdem kann es bei einer Blockierung der Infrarotstrahlen zu Tonaussetzern oder
Rauschen kommen. Dies ist auf die Eigenschaften der Infrarotstrahlen zurückzuführen und
stellt keine Funktionsstörung dar.
• Verdecken Sie den Infrarotlichtsensor nicht mit Ihren Händen oder Haaren.
• Solange sich der Kopfhörer in dem oben gezeigten Übertragungsbereich befindet, kann er eine
beliebige Orientierung in bezug auf den digitalen Surround-Prozessor haben (zugewandt, um
90° gedreht, oder um 180° gedreht).
• Je nach der Position des digitalen Surround-Prozessors und der Raumverhältnisse kann es zu
Klangunterschieden kommen. Es ist empfehlenswert, den digitalen Surround-Prozessor so
aufzustellen, daß eine optimale Klangwiedergabe erzielt wird.
• Wird der digitale Surround-Prozessor gemeinsam mit anderen Prozessoren oder InfrarotSendegeräten verwendet, kann es zu einer Signalmischung kommen.
ca. 4 m
ca. 4 m
45°
45°
ca. 10 m
(Fortsetzung auf der nächsten Seite)
Vorbereitung
13
DE
Page 70

Netzanschluß
Digitaler
Surround-Prozessor
Netzadapter
An eine
Netzsteckdose
An die Buchse DC IN
Anmerkung
Verwenden Sie unbedingt den mitgelieferten Netzadapter. Werden Produkte mit abweichender
Steckerpolarität oder anderen Leistungsdaten verwendet, kann es zu einer Beschädigung
kommen.
Stecker mit vereinheitlichter Polarität
Laden der Batterien
Verwenden Sie unbedingt das mitgelieferte Ladegerät. Bis zu vier Batterien können
gleichzeitig geladen werden.
Einlegen der Batterien in das Ladegerät
1 Den Deckel öffnen.
Anmerkung
Drücken Sie die aufladbaren Ni-Cd-Batterien in das Ladegerät, bis sie richtig sitzen. Nach dem
Einlegen der Batterien den Deckel fest schließen. Die Batterien werden nicht geladen, wenn der
Deckel nicht richtig geschlossen ist.
DE
14
Vorbereitung
2 Die zwei mitgelieferten aufladbaren Ni-Cd-
Batterien NC-AA mit korrekt ausgerichteten Polen
‘ und ’ einlegen.
Page 71

Laden (nur Versionen U2, CA2 und E92*)
1 Den Ladestecker herausziehen.
2 In eine Netzsteckdose stecken.
Laden (nur Versionen CEK und HK4*)
2 In eine Netzsteckdose stecken.1 Den Gerätestecker in das Ladegerät stecken.
Laden (nur Versionen CED und E13*)
2 In eine Netzsteckdose stecken.1 Den Gerätestecker in das Ladegerät stecken.
Die Ladekontrollampe
leuchtet auf.
Die Ladekontrollampe
leuchtet auf.
Die Ladekontrollampe
leuchtet auf.
Anmerkung
Verwenden Sie den für Ihre Netzsteckdose passenden Ladestecker.
* Der mit diesem System gelieferte Ladestecker ist je nach der Systemversion unterschiedlich.
Die Version kann anhand des auf der Verpackung aufgedruckten Versionscodes festgestellt
werden.
(Fortsetzung auf der nächsten Seite)
Vorbereitung
15
DE
Page 72

Wenn der Ladevorgang beendet ist
Trennen Sie das Ladegerät von der Netzsteckdose, und nehmen Sie die aufladbaren
Ni-Cd-Batterien heraus.
Durchschnittliche Lade- und Benutzungszeiten für die mitgelieferten Batterien
Ladezeit Benutzungszeit
ca. 1 Stunde ca. 6 Stunden
ca. 6 Stunden* ca. 30 Stunden
* Zeit zum vollständigen Laden bei völlig erschöpfter Batterie.
Anmerkungen
• Die Ladezeit ist ohne Rücksicht auf die Anzahl der Batterien
immer gleich.
• Während des Ladevorgangs erwärmen sich Ladegerät und
Batterien etwas. Dies ist kein Anzeichen für eine
Funktionsstörung.
• Trennen Sie das Ladegerät unbedingt vom Netz, wenn es nicht
benutzt wird.
• Vermeiden Sie Benutzung oder Lagerung des Ladegerätes in
der Nähe von Heizkörpern, an heißen Orten mit direkter
Sonnenbestrahlung, oder an feuchten Orten.
• Die Batterien werden nicht geladen, wenn der Einsteller am
Ladegerät nach unten gedrückt wird. Ziehen Sie den Einsteller
vor dem Laden in Pfeilrichtung zurück, wie in der rechten
Abbildung gezeigt.
• Werden Batterien, die noch nicht vollkommen entladen sind,
wieder aufgeladen, kann die Ladeanzeige vor Ablauf der oben
angegebenen Ladezeiten ausgehen.
Einsteller
16
DE
Vorbereitung
Page 73

Einlegen der Batterien in den Kopfhörer
Legen Sie die zwei mitgelieferten aufladbaren Ni-Cd-Batterien mit korrekt
ausgerichteten Polen ‘ und ’ ein, wie in der nachstehenden Abbildung gezeigt.
12 3
Bei Verwendung gesonderter Batterien
Sie können R6-Trockenzellen, Sony R6-Ni-Cd-Batterien (NC-AA, NC-AAS) und R6Nickel-Hydrium-Batterien (NH-AA) der Größe AA mit dem Kopfhörer verwenden.
Legen Sie die Batterien wie oben gezeigt ein.
Benutzungszeiten für Trockenzellen
Batterietyp Benutzungszeit
Sony Alkali-Batterie LR6/AM3 (N) ca. 90 Stunden
Sony Mangan-Batterie R6P/SUM-3 (NS) ca. 45 Stunden
Benutzungs- und Ladezeiten für aufladbare Sony-Batterien (getrennt erhältlich)
Batterietyp Benutzungszeit Ladezeit*
Sony R6-Ni-Cd-Batterie (Größe AA)
NC-AA (700 mAh)
Sony R6-Ni-Cd-Batterie (Größe AA)
NC-AAS (1000 mAh)
Sony R6-Nickel-Hydrium-Batterie (Größe AA)
NH-AA (1450 mAh)
ca. 30 Stunden ca. 6 Stunden
ca. 40 Stunden ca. 9 Stunden
ca. 60 Stunden ca. 10 Stunden
* Zeit zum vollständigen Laden bei völlig erschöpfter Batterie.
(Fortsetzung auf der nächsten Seite)
Vorbereitung
17
DE
Page 74

Wiederanbringen des abgenommenen Batteriefachdeckels
Richten Sie A auf A, und B auf B aus, wie in der Abbildung gezeigt, und schieben
Sie dann den Deckel zu.
A
B
B
A
Laden von R03-Batterien (Größe AAA)
Das mitgelieferte Ladegerät kann auch Sony R03-NiCd-Batterien (NC-AAA) und R03-Nickel-HydriumBatterien (NH-AAA) der Größe AAA laden.
Zum Laden von R03-Batterien (Größe AAA) drücken
Sie den Einsteller am Ladegerät nach unten.
Zum Laden von R6-Batterien (Größe AA) klappen Sie
den Einsteller nach oben.
Ladezeiten für aufladbare R03-Batterien (Größe AAA)
Batterietyp Ladezeit*
Sony R03-Ni-Cd-Batterie (Größe AAA)
NC-AAA (250 mAh)
Sony R03-Nickel-Hydrium-Batterie (Größe AAA)
NH-AAA (650 mAh)
Einsteller
ca. 5 Stunden
ca. 10 Stunden
* Zeit zum vollständigen Laden bei völlig erschöpfter Batterie.
Anmerkungen
• Das mitgelieferte Ladegerät kann Sony R6-Ni-Cd-Batterien (NC-AA, NC-AAS) und Sony
R6-Nickel-Hydrium-Batterien (NH-AA) der Größe AA laden. Versuchen Sie niemals, Batterien
oder Trockenzellen anderer Typen zu laden.
• Verwenden Sie keine Sony R6-Ni-Cd-Batterien (NC-AA (HJ)) der Größe AA.
• Die Ni-Cd-Batterien müssen durch neue ersetzt werden, wenn ihre Benutzungsdauer bei
voller Ladung nur noch die Hälfte des ursprünglichen Wertes beträgt. Kaufen Sie entweder
Sony R6-Ni-Cd Batterien (NC-AA, NC-AAS) oder Sony R6-Nickel-Hydrium-Batterien
(NH-AA) der Größe AA. Sie können die Batterien bei Ihrem Fachgeschäft oder beim nächsten
Sony-Händler bestellen.
• Manche Batterietypen können in bestimmten Gebieten nicht erhältlich sein.
DE
18
Vorbereitung
Page 75
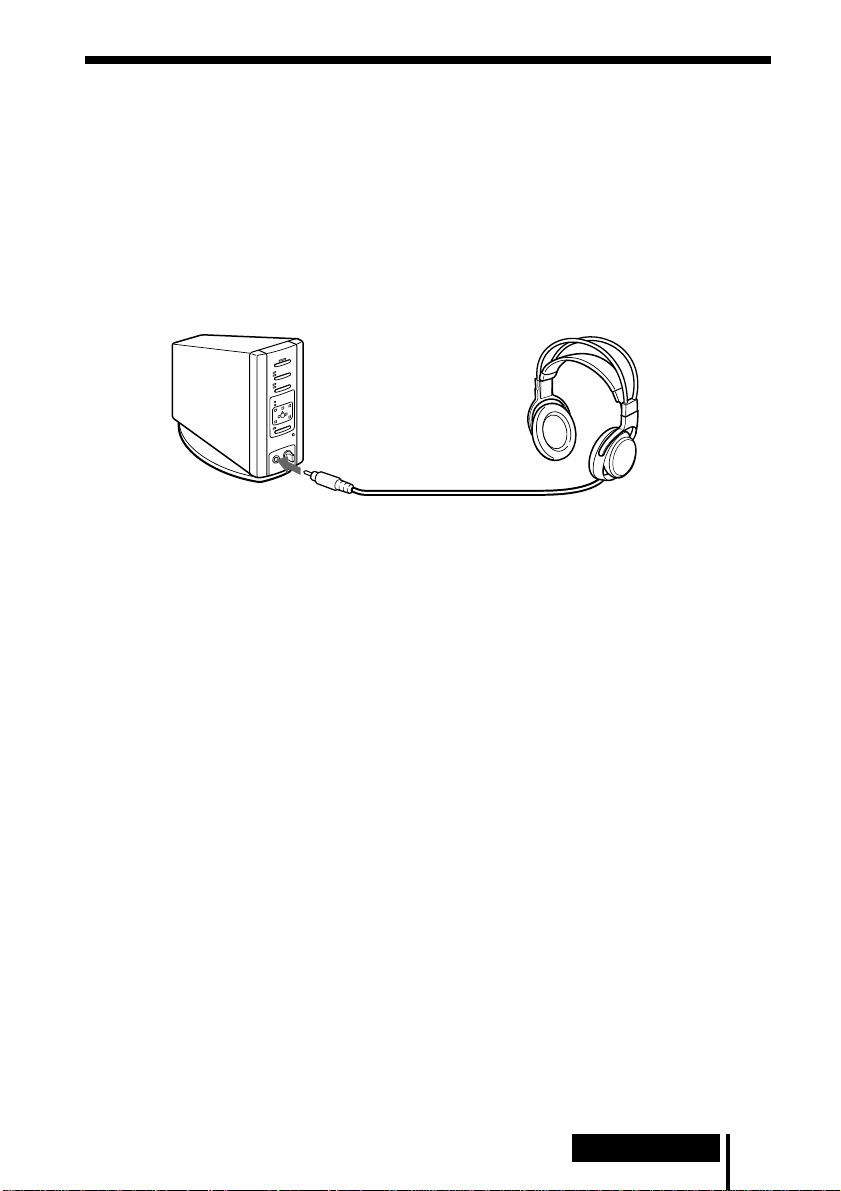
Anschluß eines Kabel-Kopfhörers (getrennt
erhältlich) an den digitalen SurroundProzessor
Schließen Sie einen offenen Kabel-Kopfhörer (z.B. MDR-F1 oder MDR-605LP) an die
Buchse PHONES des digitalen Surround-Prozessors an. Um einen
zufriedenstellenden Surround-Klangeffekt zu erhalten, ist die Verwendung des
schnurlosen Stereo-Kopfhörers MDR-IF5000 zu empfehlen.
Digitaler
Surround-Prozessor
An Buchse PHONES
Anmerkungen
• Fassen Sie stets den Stecker zum Trennen des Kopfhörers von der Buchse PHONES. Niemals
am Kabel ziehen.
• Dieses System entfaltet seine optimale Wirkung nur in Verbindung mit dem mitgelieferten
schnurlosen Stereo-Kopfhörer MDR-IF5000. Zusätzliche schnurlose Stereo-Kopfhörer
MDR-IF5000 sind getrennt erhältlich. Mit anderen Kopfhörern wird möglicherweise kein
zufriedenstellender Surround-Klangeffekt erzielt.
Offener Kabel-Kopfhörer
(getrennt erhältlich)
Vorbereitung
19
DE
Page 76

¡ Bedienung
Wiedergabe des Tons einer
angeschlossenen Komponente
Lesen Sie vor der Inbetriebnahme den Abschnitt
“Vorbereitung” durch, und nehmen Sie die korrekten
Anschlüsse vor.
1 Schalten Sie die an den digitalen Surround-Prozessor angeschlossene
Komponente ein.
DVD-Spieler oder andere
Audio- und Video-Komponente
POWER
2 Schalten Sie den digitalen Surround-Prozessor durch Drücken von POWER
ein.
Die Anzeige POWER leuchtet grün.
POWER
3 Setzen Sie den Kopfhörer auf.
Die Anzeige POWER leuchtet rot, und der Kopfhörer schaltet sich automatisch
ein.
20
DE
Bedienung
Anzeige
POWER
BALANCE
POWER
VOL
Page 77

4 Drücken Sie INPUT zur Wahl der gewünschten Komponente.
DIGITAL
ANALOG
INPUT
Anzeigeleuchte Angewählte Signalquelle
DIGITAL Tonsignal der an die Buchse DIGITAL IN angeschlossenen
Komponente
ANALOG Tonsignal der an die Buchsen LINE INPUT angeschlossenen
Komponente
Anmerkung
Zur Wiedergabe von Zweikanal-Audiosignalquellen (MAIN/SUB) nehmen Sie den
Anschluß an die Buchsen LINE INPUT vor, und wählen Sie dann die gewünschte
Signalquelle am Gerät (Disc-Spieler, TV-Gerät oder andere Komponente).
5 Drücken Sie EFFECT zur Wahl des gewünschten Klangfelds.
DOLBY VIRTUAL
MUSIC
EFFECT
Anzeigeleuchte Klangfeld und geeignete Signalquelle
DOLBY VIRTUAL Dieser Modus reproduziert das Klangfeld eines Kinos und eignet
sich für Filmtonquellen.
MUSIC Dieser Modus reproduziert das Klangfeld eines Hörraums mit guten
akustischen Eigenschaften und eignet sich für Musikquellen.
(Fortsetzung auf der nächsten Seite)
Bedienung
21
DE
Page 78

6 Drücken Sie OUTPUT zur Wahl des Ausgangsmodus (Surroundeffekt).
DECODE MODE
DOLBY DIGITAL
DOLBY SURROUND
L
LS
C
R
RS
VIRTUAL
OUTPUT
Anzeigeleuchte Ausgangsmodus (Surroundeffekt)
DECODE MODE
DOLBY DIGITAL
DOLBY SURROUND
C
L
LS
VIRTUAL
DECODE MODE
DOLBY DIGITAL
DOLBY SURROUND
C
L
R
RS
R
OFF
Wiedergabe über regulären Kopfhörer.
VIRTUAL FRONT
Virtueller Effekt, bei dem der Ton von zwei vor dem Hörer
befindlichen Lautsprechern (rechts und links) zu kommen scheint.
22
DE
LS
VIRTUAL
Bedienung
RS
Page 79

Anzeigeleuchte Ausgangsmodus (Surroundeffekt)
VIRTUAL SURROUND
DECODE MODE
DOLBY DIGITAL
DOLBY SURROUND
C
L
R
Virtueller Surroundeffekt, bei dem der Ton nicht nur von den zwei
Frontlautsprechern (rechts und links), sondern auch von einem
Centerlautsprecher, zwei Rücklautsprechern (rechts und links) und
einem Subwoofer (wenn DOLBY DIGITAL leuchtet) zu kommen
scheint.
Der digitale Surround-Prozessor erkennt und verarbeitet die Signale
LS
RS
automatisch entsprechend dem Format des eingespeisten
Audiosignals.
VIRTUAL
Wenn die Anzeige DOLBY DIGITAL leuchtet: Im Dolby Digital
5.1ch-Format aufgezeichnete Audiosignale werden verarbeitet.
Wenn die Anzeige DOLBY SURROUND leuchtet: Im Dolby
Surround (Pro Logic)-Format aufgezeichnete Audiosignale werden
verarbeitet.
Anmerkung
Während der Dolby Digital-Signaleingabe werden monaurale Signalquellen, die nicht mit
dem Surroundeffekt verarbeitet werden können, automatisch identifiziert und über zwei
Kanäle (links und rechts) wiedergegeben, selbst wenn der Modus VIRTUAL SURROUND
gewählt wurde. In diesem Fall erlöschen die Anzeigen DOLBY DIGITAL und DOLBY
SURROUND.
7 Stellen Sie die Lautstärke ein.
Lautstärke
erhöhen
Lautstärke
verringern
BALANCE
POWER
VOL
Zum Einstellen der Lautstärke eines an die Buchse PHONES angeschlossenen
Kopfhörers (getrennt erhältlich)
Drehen Sie PHONES—LEVEL zum Einstellen der Lautstärke.
MIN
LEVEL
Lautstärke
erhöhen
MAX
PHONES
Lautstärke
verringern
(Fortsetzung auf der nächsten Seite)
Bedienung
23
DE
Page 80

8 Stellen Sie die Balance ein.
Rechte Seite
wird lauter.
Linke Seite
wird lauter.
BALANCE
POWER
VOL
Der Kopfhörer schaltet sich beim Abnehmen automatisch aus
— Ein-/Ausschalt-Automatik
Wenn Sie den Kopfhörer nicht benutzen,
vergewissern Sie sich, daß das
selbstnachstellende Band nicht mehr
hochgezogen wird. Die Stromversorgung
bleibt eingeschaltet, wenn das
selbstnachstellende Band hochgezogen
wird.
Zum Überprüfen der Batterie-Restspannung
Ziehen Sie das selbstnachstellende Band
hoch, und prüfen Sie die Anzeige POWER.
Die Batterien können weiterverwendet
werden, wenn die Anzeige POWER rot
leuchtet. Laden Sie die Batterien, oder
verwenden Sie Trockenzellen, falls die
Anzeige POWER schwach leuchtet, oder
der Ton verzerrt oder stark verrauscht ist.
Selbstnachstellendes
Band
Anzeige
POWER
Nach dem Gebrauch des Kopfhörersystems
Schalten Sie zuerst den digitalen Surround-Prozessor aus, bevor Sie die an den
Prozessor angeschlossene Komponente ausschalten. Wird die angeschlossene
Komponente zuerst ausgeschaltet, kommt es zu einer Unterbrechung des
Infrarotstrahls und zu einer möglichen Abgabe von Rauschen (was jedoch keine
Funktionsstörung darstellt). Hängen Sie den Kopfhörer nicht am digitalen SurroundProzessor oder an anderen Komponenten auf. Dies könnte zu einer ungewollten
Aktivierung der Einschalt-Automatik und zu unnötigem Batteriestromverbrauch
führen.
Übergangszeit zwischen den Betriebsarten
Werden Tasten am digitalen Surround-Prozessor zum Wechseln der Betriebsart
gedrückt, können verschieden lange Übergangszeiten zwischen den Betriebsarten
entstehen. Dies ist auf Unterschiede in der Programmübertragung zwischen den
Betriebsarten zurückzuführen.
DE
24
Bedienung
Page 81

Stummschaltung
Die Stummschaltung wird automatisch aktiviert, um die Tonausgabe des Kopfhörers
abzuschalten, sobald der Kopfhörer den Infrarot-Übertragungsbereich verläßt, die
Infrarotstrahlen unterbrochen werden, oder das Rauschen einen bestimmten
Schwellenwert überschreitet. Die Stummschaltung wird automatisch deaktiviert,
wenn der Kopfhörer dem digitalen Surround-Prozessor nähergebracht oder die
Behinderung der Infrarotstrahlen beseitigt wird.
Wenn 10 Minuten lang keine Audiosignaleingabe erfolgt
Die Abgabe der Infrarotstrahlen vom Infrarotsender des digitalen SurroundProzessors wird automatisch unterbrochen, wenn 10 Minuten lang keine
Audiosignaleingabe erfolgt. Sobald wieder ein Audiosignal eingegeben wird, werden
die Infrarotstrahlen automatisch ausgestrahlt. In manchen Fällen wird die Abgabe der
Infrarotstrahlen vom Infrarotsender unterbrochen, wenn der Signalpegel während
der Analogsignaleingabe etwa 10 Minuten lang extrem niedrig ist. Erhöhen Sie in
diesem Fall die Lautstärke der angeschlossenen Audio- oder Videokomponente, und
verringern Sie die Lautstärke des Kopfhörers.
Anmerkungen
• Es können Helligkeitsschwankungen des Infrarotsenders am digitalen Surround-Prozessor
auftreten. Dies hat jedoch keine Auswirkung auf den Übertragungsbereich der
Infrarotstrahlen.
• Der Kopfhörer sollte innerhalb des Infrarot-Übertragungsbereichs benutzt werden (siehe
“Infrarot-Übertragungsbereich” auf Seite 13).
• Benutzen Sie den digitalen Surround-Prozessor nicht an Orten, die direktem Sonnenlicht oder
einer starken Lichtquelle ausgesetzt sind. Es kann sonst zu Tonaussetzern kommen.
• Dieser offene Kopfhörer ist so konstruiert, daß der Schall auch nach außen abgegeben wird.
Stellen Sie daher die Lautstärke nicht so hoch ein, daß umstehende Personen gestört werden.
• Verwenden Sie einen angemessenen Lautstärkepegel, damit Sie Ihr Gehör nicht schädigen und
Umgebungsgeräusche noch wahrnehmen können.
• Bei manchen Signalquellen, die keine Videosignale enthalten, wie z.B. Musik-CDs, wird
möglicherweise kein Surround-Klangeffekt erzielt.
• Dieses System simuliert HRTF* für eine durchschnittliche Person. Der Effekt kann jedoch
unterschiedlich sein, da HRTF von Person zu Person verschieden ist.
* Head Related Transfer Function (Kopfbezogene Übertragungsfunktion)
Bedienung
25
DE
Page 82

¡ Zu Ihrer Information
Störungssuche
Falls Probleme bei der Benutzung dieses Kopfhörersystems auftreten, gehen Sie bitte
die folgende Checkliste durch. Sollte ein Problem bestehen bleiben, wenden Sie sich
bitte an Ihren Sony-Händler.
Symptom Ursache und Abhilfe
Kein Ton
Tonverzerrungen
/ Schalten Sie den digitalen Surround-Prozessor ein.
/ Prüfen Sie, ob die AV-Komponente und der Netzadapter an den digitalen
Surround-Prozessor und an eine Netzsteckdose angeschlossen sind.
/ Schalten Sie die an den digitalen Surround-Prozessor angeschlossene AV-
Komponente ein, und starten Sie dann das Programm (Wiedergabe).
/ Prüfen Sie durch Drücken der Taste INPUT, ob die gewünschte AV-
Komponente korrekt angewählt ist.
/ Wenn die Kopfhörerbuchse der AV-Komponente mit dem digitalen Surround-
Prozessor verbunden ist, den Lautstärkepegel an der angeschlossenen AVKomponente erhöhen.
/ Erhöhen Sie die Kopfhörer-Lautstärke.
/ Überprüfen Sie die Stellung des Reglers BALANCE am Kopfhörer.
/ Die Stummschaltung ist aktiviert.
• Prüfen Sie, ob ein Hindernis den Strahlengang zwischen dem digitalen
Surround-Prozessor und dem Kopfhörer blockiert.
• Benutzen Sie den Kopfhörer möglichst nahe am digitalen SurroundProzessor.
• Verändern Sie die Position oder Lage des digitalen Surround-Prozessors.
/ Die Anzeige POWER am Kopfhörer ist schwach oder erloschen. Das deutet
auf niedrige Batteriespannung hin. Bei Verwendung von aufladbaren
Batterien die Batterien laden. Bei Verwendung von Trockenzellen die
Batterien durch neue ersetzen. Falls die Anzeige noch immer nicht leuchtet,
wenden Sie sich an Ihren Sony-Händler.
/ Stellen Sie den Schalter ATT (Dämpfung) am digitalen Surround-Prozessor
auf “–6dB”.
/ Die Anzeige POWER am Kopfhörer ist schwach oder erloschen. Das deutet
auf niedrige Batteriespannung hin. Bei Verwendung von aufladbaren
Batterien die Batterien laden. Bei Verwendung von Trockenzellen die
Batterien durch neue ersetzen. Falls die Anzeige noch immer nicht leuchtet,
wenden Sie sich an Ihren Sony-Händler.
/ Wenn die Kopfhörerbuchse der AV-Komponente mit dem digitalen Surround-
Prozessor verbunden ist, den Lautstärkepegel an der angeschlossenen AVKomponente verringern.
26
DE
Zu Ihrer Information
Page 83

Symptom Ursache und Abhilfe
Hoher Rauschpegel/
Niedrige Lautstärke
Es wird kein
Surround-Klangeffekt
erzeugt
Die Anzeige DOLBY
DIGITAL leuchtet
nicht auf
Die Batterien können
nicht geladen werden
/ Bringen Sie den Kopfhörer näher an den digitalen Surround-Prozessor
heran. Der Rauschpegel nimmt zu, je weiter der Kopfhörer vom digitalen
Surround-Prozessor entfernt ist. Dies ist auf die Eigenschaften der
Infrarotstrahlen zurückzuführen und stellt keine Funktionsstörung dar.
/ Prüfen Sie, ob ein Hindernis den Strahlengang zwischen dem digitalen
Surround-Prozessor und dem Kopfhörer blockiert.
/ Vergewissern Sie sich, daß der Infrarotsensor am Kopfhörer nicht von Ihrer
Hand oder Ihren Haaren verdeckt wird.
/ Falls direktes Sonnenlicht durch ein Fenster in der Nähe des digitalen
Surround-Prozessors oder Kopfhörers in den Raum fällt, ziehen Sie die
Vorhänge oder Jalousien zu, um den Lichteinfall zu blockieren. Oder
verwenden Sie das System an einem Ort, der keinem direkten Sonnenlicht
ausgesetzt ist.
/ Verändern Sie die Position oder Lage des digitalen Surround-Prozessors.
/ Stellen Sie den Schalter ATT (Dämpfung) am digitalen Surround-Prozessor
auf “0dB”.
/ Die Anzeige POWER am Kopfhörer ist schwach oder erloschen. Das deutet
auf niedrige Batteriespannung hin. Bei Verwendung von aufladbaren
Batterien die Batterien laden. Bei Verwendung von Trockenzellen die
Batterien durch neue ersetzen. Falls die Anzeige noch immer nicht leuchtet,
wenden Sie sich an Ihren Sony-Händler.
/ Wenn die Kopfhörerbuchse der AV-Komponente mit dem digitalen
Surround-Prozessor verbunden ist, den Lautstärkepegel an der
angeschlossenen AV-Komponente erhöhen.
/ Drücken Sie die Taste OUTPUT zur Wahl des Modus VIRTUAL
SURROUND (Seite 23).
/ Das Tonsignal des wiedergegebenen Kapitels ist kein Mehrkanalsignal.
Der Surroundeffekt funktioniert nicht bei monauralen und anderen
Signalquellen, die nicht für Surroundklang aufbereitet sind.
/ Der Audio-Digitalausgang des DVD-Spielers ist möglicherweise auf “PCM”
eingestellt.
Schalten Sie den DVD-Spieler gemäß den Angaben in der
Bedienungsanleitung auf die Funktion (wie z.B. “Dolby Digital/PCM” oder
“Dolby Digital”) für den Anschluß an Komponenten mit eingebautem Dolby
Digital (AC-3)-Decoder.
/ Sie haben versucht, DVD-Software abzuspielen, die nicht mit Dolby Digital
5.1ch kompatibel ist.
/ Das Tonsignal des wiedergegebenen Kapitels ist kein Mehrkanalsignal.
/ Es werden Trockenzellen verwendet.
Legen Sie die mitgelieferten oder gesonderten aufladbaren Batterien ein
(Seite 17).
/ Es werden andere aufladbare Batterien als die mitgelieferten oder
gesonderten verwendet.
Legen Sie die mitgelieferten oder gesonderten aufladbaren Batterien ein
(Seite 17).
Zu Ihrer Information
27
DE
Page 84

Vorsichtsmaßnahmen
Zur Sicherheit
• Achten Sie darauf, daß Sie den digitalen
Surround-Prozessor oder Kopfhörer nicht
fallenlassen, anstoßen oder sonstwie
starken Erschütterungen aussetzen. Dies
könnte zu einem Versagen führen.
• Versuchen Sie nicht, irgendwelche Teile des
Systems zu zerlegen oder zu öffnen.
Zu Stromquellen und Aufstellung
• Wenn Sie das System voraussichtlich
längere Zeit nicht benutzen werden, sollten
Sie das Kabel des Netzadapters von der
Netzsteckdose abziehen. Fassen Sie stets
den Stecker beim Abziehen des Kabels.
Niemals am Kabel ziehen.
• Vermeiden Sie die Aufstellung des Systems
an folgenden Orten.
– Orte, die direktem Sonnenlicht, der
Wärme eines Heizkörpers oder extrem
hohen Temperaturen ausgesetzt sind
– Staubige Orte
– Wacklige oder schiefe Unterlagen
– Orte, die starken Vibrationen ausgesetzt
sind
– Badezimmer oder andere Orte mit hoher
Luftfeuchtigkeit
Zum Kopfhörer
Zum Schutz Ihres Gehörs
Fortgesetzte Benutzung des Kopfhörers bei
hohem Lautstärkepegel kann zu
Gehörschäden führen. Um Ihr Gehör zu
schützen, sollten Sie die Lautstärke nicht zu
hoch einstellen.
Rücksichtnahme auf andere
Bei zu hoher Lautstärke gibt der Kopfhörer
Schallwellen auch nach außen ab. Stellen Sie
daher die Lautstärke nicht so hoch ein, daß
umstehende Personen gestört werden.
Bei Verwendung an lauten Orten besteht die
Tendenz, die Lautstärke zu erhöhen. Sie
sollten die Lautstärke jedoch auf einem Pegel
halten, bei dem Sie während der Benutzung
des Kopfhörers auch Anrufe noch
wahrnehmen können.
Zu den Ohrpolstern
Die Ohrpolster unterliegen Verschleiß bei
häufiger Benutzung und längerer Lagerung.
Um die Ohrpolster auszuwechseln, wenden
Sie sich an Ihren Sony-Händler.
Zur Reinigung
Verwenden Sie ein weiches Tuch, das Sie mit
einer milden Waschmittellösung angefeuchtet
haben. Lösungsmittel wie Verdünner, Benzol
oder Alkohol sollten nicht verwendet
werden, weil diese die Oberfläche angreifen.
Im Falle einer Störung oder eines
Versagens
• Falls eine Störung oder ein Versagen
auftritt oder ein Fremdkörper in das Gerät
gelangt, schalten Sie sofort die
Stromversorgung aus, und wenden Sie sich
an Ihren Sony-Händler.
• Wenn Sie das System zu einem SonyHändler bringen, nehmen Sie sowohl den
Kopfhörer als auch den digitalen SurroundProzessor mit.
28
DE
Zu Ihrer Information
Page 85

Technische Daten
Digitaler Surround-Prozessor
(DP-IF5000)
Modulationssystem Frequenzmodulation
Trägerwellenfrequenz Rechter Kanal
2,8 MHz
Linker Kanal 2,3 MHz
Übertragungsentfernung
ca. 10 m
Frequenzgang 20 – 20.000 Hz
Klirrfaktor maximal 1% (1 kHz)
Audio-Eingänge Optischer Eingang
(Rechtecktyp) × 1
Analoger Eingang
(Cinch-Buchse links/
rechts) × 1
Stromversorgung 9 V Gleichspannung
(vom mitgelieferten
Netzadapter)
Abmessungen (B/H/T) ca. 85 × 190 × 180 mm
Gewicht ca. 1,0 kg (1.000 g)
Schnurloser Stereo-Kopfhörer
(MDR-IF5000)
Frequenzgang 12 – 24.000 Hz
Stromversorgung Aufladbare Ni-Cd-
Batterien (mitgeliefert)
oder R6-Batterien
(Größe AA)
(Trockenzellen oder
aufladbare, getrennt
erhältlich)
Gewicht ca. 280 g
(einschl. der
mitgelieferten
aufladbaren Ni-Cd-
Batterien)
Mitgeliefertes Zubehör
Ständer für digitalen
Surround-Prozessor (1)
Netzadapter (1)
Aufladbare Ni-Cd-Batterien (2)
Ladegerät (1)
Gerätestecker für Ladegerät (1)
(nur Versionen CED, CEK,
HK4 und E13
Optisches
Digitalanschlußkabel (1)
Bedienungsanleitung (1)
Produktinformation (1)
*)
Empfohlenes Zubehör
Anschlußkabel RK-C310, RK-C315,
Optischer Digitalselektor
Optisches Digitalanschlußkabel
Änderungen, die dem technischen Fortschritt
dienen, bleiben vorbehalten.
RK-C320, RK-C330
(Cinch-Stecker × 2 ˜
Cinch-Stecker × 2)
RK-G129 (StereoMinistecker ˜ CinchStecker × 2)
SB-D30
POC-5A, POC-10A,
POC-15A (optischer
Rechteckstecker ˜
optischer
Rechteckstecker)
POC-5AB, POC-10AB,
POC-15AB (optischer
Rechteckstecker ˜
optischer Ministecker)
* Der mit diesem System gelieferte
Ladestecker ist je nach der Systemversion
unterschiedlich. Die Version kann anhand
des auf der Verpackung aufgedruckten
Versionscodes festgestellt werden.
Zu Ihrer Information
29
DE
Page 86

ADVERTENCIA
Para clientes en EE UU. y Canadá
RECICLAJE DE PILAS DE NÍQUEL-CADMIO
Para evitar incendios o el
riesgo de electrocución, no
exponga la unidad a la lluvia ni
a la humedad.
Para evitar descargas
eléctricas, no abra la unidad.
En caso de avería, solicite los
servicios de personal
cualificado solamente.
ADVERTENCIA
Se le advierte que cualquier cambio o
modificaciones que haga sin estar
expresamente aprobada en este manual
podrá invalidar su permiso para utilizar
este equipo.
Las pilas de níquel-cadmio
son reciclables. Puede
ayudar a conservar el medio
ambiente devolviendo las
pilas que no desee al punto
de recogida o de reciclaje
más próximo.
Nota: En ciertas zonas, el desecho de pilas de
níquel-cadmio en contenedores
domésticos o industriales puede estar
prohibido.
La RBRC (Rechargeable Battery Recycling
Corporation) le aconsejará sobre la recogida
de pilas usadas en el siguiente número de
teléfono:
Llamada gratuita: 1-800-822-8837
(sólo Estados Unidos y Canadá)
Aviso: No maneje pilas de níquel-cadmio
dañadas o con fugas.
ES
2
Page 87

Índice
Sistema de auriculares ................ 5
Confirmación del producto y
accesorios .................................. 8
Conexión del sistema de
auriculares................................. 9
General ................................................. 9
Para conectar el sistema a
componentes de audio y vídeo .....
Para enchufar el sistema a una
toma de corriente de la pared......
Para cargar las pilas .......................... 14
Inserción de las pilas en los
auriculares ......................................
Para conectar al procesador
envolvente digital unos
auriculares alámbricos (vendidos
por separado) .................................
Escucha del sonido de un
componente conectado.......... 20
Solución de problemas.............. 26
14
17
19
9
ES
Precauciones .............................. 28
Especificaciones ......................... 29
ES
3
Page 88

Características principales
El MDR-DS5000 es un sistema de auriculares de sonido envolvente digital que utiliza
transmisión por infrarrojos. Usted podrá disfrutar del sonido envolvente multicanal
con los auriculares conectando simplemente el procesador envolvente digital a un
reproductor DVD con el cable de conexión digital óptico suministrado.
• Compatible con Dolby
• El procesamiento de señal con el DSP (procesador de señal digital) crea para los
auriculares un sonido envolvente que simula el entorno de una sala de cine.
• Auriculares inalámbricos con sistema de transmisión por infrarrojos resistentes a
los ruidos externos e interferencias.
• Amplio alcance de recepción por infrarrojos de hasta 10 m.
• El mecanismo autoajustable elimina la necesidad de tener que ajustar la banda de
cabeza.
• La función de conexión/desconexión automática de la alimentación conecta
automáticamente los auriculares cuando se los pone y la desconecta cuando se los
quita.
• Control VOL para ajustar tanto el volumen izquierdo como el derecho de los
auriculares. El nivel de salida de audio izquierdo y derecho se ajusta con el control
BALANCE.
• Equipado con una toma de auriculares para conectar auriculares alámbricos
abiertos (tales como el MDR-F1 o MDR-605LP, vendidos por separado).
• Para alimentar los auriculares se pueden usar pilas de níquel-cadmio recargables
(suministradas y vendidas por separado) o pilas secas R6 (tamaño AA) (vendidas
por separado).
* Digital (AC-3) y Dolby Surround (Pro Logic).
Ajuste del modo DEMO
Encienda el procesador envolvente digital, y después presione DEMO.
Por los auriculares se escuchará un tono de prueba, y los indicadores correspondientes
a los altavoces virtuales se encenderán por turnos. Esto le permite sentir un sonido
envolvente de 5.1 canales virtuales aunque no haya conectado un reproductor DVD.
Presione otra vez DEMO para cancelar el modo DEMO.
DEMO
* EL procesador envolvente digital de este sistema incorpora el decodificador Dolby
Digital (AC-3).
Fabricado bajo licencia de Dolby Laboratories Licensing Corporation.
DOLBY, el símbolo de la doble D a, PRO LOGIC, Dolby Digital (AC-3) y VIRTUAL DOLBY
DIGITAL son marcas de Dolby Laboratories Licensing Corporation.
Marca CE
La marca CE es válida solamente para productos comercializados en la Unión Europea.
ES
4
Page 89

¡ Preparación
Sistema de auriculares
El sistema de auriculares envolvente digital MDR-DS5000 es un sistema de sonido
envolvente que incorpora una perspectiva de sonido visual. Este sistema representa el
futuro de la tecnología de audio y vídeo. Con este sistema, usted podrá disfrutar del
sonido de forma prácticamente idéntica a la reproducida por un sistema de altavoces
ambientales de 5.1 canales. Ahora podrá disfrutar del sonido de una sala de cine en su
propio hogar.
Sistema de auriculares envolvente digital MDR-DS5000
Este es un nuevo tipo de sistema de auriculares inalámbricos que produce imágenes
de sonido multicanal Dolby Digital y Dolby Pro Logic fuera de la cabeza del oyente
usando la tecnología “Virtualphones Technology”
Sony. Conectando simplemente el reproductor DVD al sistema, usted podrá disfrutar
de sonido envolvente virtual igual que en una sala de cine.
El sistema emplea un DSP (procesador de señal digital) de alta velocidad para
convertir y procesar digitalmente en tiempo real las señales, y producir un sonido
claro prácticamente sin ningún tipo de distorsión.
* “Virtualphones Technology” es una marca comercial de Sony Corporation.
Características del sistema
Compatible con Dolby Digital y Dolby Pro Logic
El sistema incorpora un decodificador envolvente y un procesador Logic 3D para
reproducir con los auriculares el campo de sonido de una habitación que tuviera un
sistema de altavoces de 5.1 canales. Dado que las señales son procesadas por el
procesador envolvente digital de acuerdo con las señales de entrada, usted podrá
disfrutar del campo de sonido envolvente no sólo con DVD, sino también con
sintonizadores digitales de recepción vía satélite, videocassetes y otras fuentes de
audio y vídeo analógicas y digitales.
* desarrollada exclusivamente por
(continúa)
Preparación
ES
5
Page 90
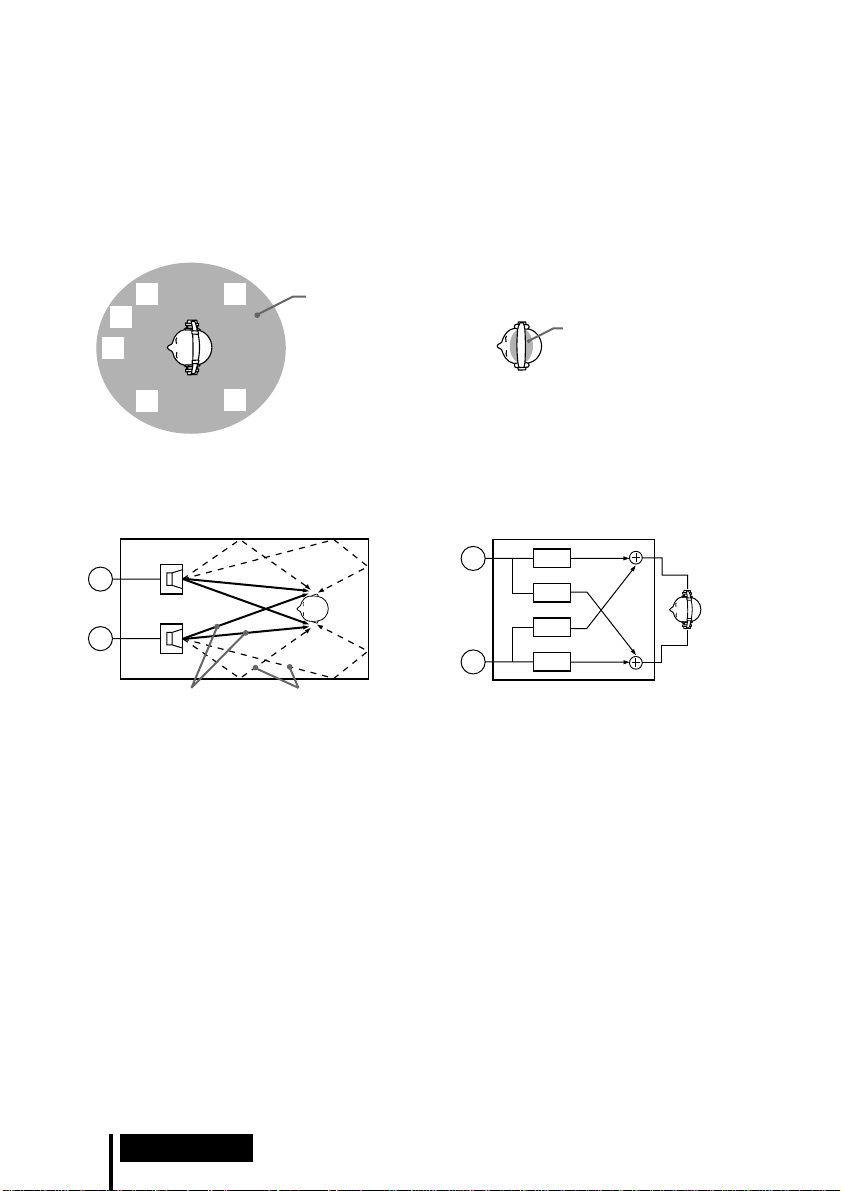
Reproducción del sonido fuera de la cabeza del oyente
R
L
DSP
DSP
DSP
DSP
Con el procesador Logic 3D, la reproducción de los auriculares no confina el sonido a
una posición fija en la cabeza del oyente, sino que crea una sensación de campo de
sonido natural de 360 grados con orientación espacial. Esto permite la simulación del
campo de sonido envolvente reproducido por los altavoces cuando se utiliza no sólo
DVD, sino también todas las fuentes de audio y vídeo.
Campo de sonido 3-D usando la tecnología
“Virtualphones Technology”
R
SW
C
L
Campo de sonido típico cuando se escucha por
altavoces (2 canales)
Dentro de la habitación
Altavoz
RS
LS
Campo de sonido
reproducido con
el MDR-DS5000
R
Altavoz
L
Sonido
directo
Sonido
reflejado
Campo de sonido 3-D de auriculares
convencionales
Campo de sonido
reproducido con
auriculares convencionales
Campo de sonido cuando se escucha con el
MDR-DS5000 (2 canales)
Procesador Logic 3D
L : Izquierdo LS : Envolvente izquierdo
C : Central SW : Subwoofer
R : Derecho RS : Envolvente derecho
Auriculares abiertos con soportes circulares
Los auriculares recientemente desarrollados ofrecen una escucha cómoda y un campo
de sonido natural. No cubren los oídos, y permiten escuchar sin presión ni molestias.
Además, usted podrá adquirir auriculares MDR-IF5000 adicionales (vendidos por
separado) para disfrutar del sonido envolvente más de una persona al mismo tiempo,
dentro del área de transmisión de infrarrojos (página 13).
ES
6
Preparación
Page 91

Configuración del sistema de auriculares
Este sistema de auriculares consiste en un procesador envolvente digital que
descodifica y convierte las señales de entrada multicanal y en unos auriculares
inalámbricos por infrarrojo. Conectando simplemente el procesador envolvente
digital a un reproductor DVD, videograbadora u otro componente de audio y vídeo,
usted podrá disfrutar del sonido envolvente Dolby Digital o Dolby Pro Logic.
Este sistema podrá utilizarse con cualquier componente de audio y vídeo dotado de
una toma de salida digital óptica, toma de salida de línea (audio), o toma de
auriculares. (Para los cables de conexión (vendidos por separado), consulte las
páginas 11 y 29.)
Notas
• Instale el procesador envolvente digital en un lugar en el que no haya ninguna obstrucción
entre el mismo y los auriculares cuando los utilice.
• No instale el procesador envolvente digital en lugares inestables, tales como sobre un televisor.
Si el procesador se cayera, podría ocasionar heridas o dañarse.
Preparación
7
ES
Page 92

Confirmación del producto y accesorios
Antes de instalar el sistema, compruebe que no falte ningún componente.
Procesador envolvente digital (1) Auriculares estéreo inalámbricos
Cargador de pilas (1) Clavija de carga (para el cargador
Adaptador de alimentación
de CA (1)
(1)
de pilas, 1)
(Sólo las versiones
Pilas de níquel-cadmio NC-AA
recargables (2)
* CEK y HK4)
Soporte (para el procesador
envolvente digital, 1)
Clavija de carga (para el cargador
de pilas, 1)
(Sólo las versiones
Cable de conexión digital óptico
(tipo rectangular, 1)
* CED y E13)
Nota
Utilice la clavija de carga que encaje en la toma de corriente de su hogar.
* La clavija de carga suministrada con este sistema varía dependiendo de la versión del sistema.
Para comprobar la versión, consulte el código de versión impreso en la caja.
ES
8
Preparación
Page 93

Conexión del sistema de auriculares
General
Conecte el sistema de auriculares como se muestra en la ilustración de abajo.
Reproductor DVD, videograbadora,
u otro componente
Procesador envolvente
Adaptador de
alimentación de CA
digital
Para conectar el sistema a componentes de
audio y vídeo
Instalación del procesador envolvente digital
Para utilizarlo en posición vertical:
Fije el soporte suministrado a la parte inferior del procesador envolvente digital
empleando para ello el canto de una moneda.
Auriculares estéreo
inalámbricos
(continúa)
Preparación
ES
9
Page 94

Para utilizarlo en posición horizontal:
Coloque el procesador envolvente digital de forma que sus cuatro apoyos de goma
queden hacia abajo.
/
Apoyos de goma
Notas
• Si coloca el procesador envolvente digital en posición horizontal, en algunas condiciones de
instalación podrá no obtenerse el alcance completo de transmisión de infrarrojos.
• Coloque el procesador envolvente digital como se muestra en la ilustración. No lo coloque
sobre el lado que no tiene apoyos de goma.
Para conectar el procesador envolvente digital a
componentes digitales
Utilice el cable de conexión digital óptico suministrado para conectar la toma de
salida digital óptica de un reproductor DVD (o reproductor LD), sintonizador digital
de recepción vía satélite, u otro componente digital a la toma DIGITAL IN del
procesador envolvente digital.
Procesador envolvente
digital
A la toma DIGITAL IN
A la toma de salida
digital óptica
Reproductor DVD, reproductor LD,
sintonizador de recepción vía
satélite, u otro componte digital
dotado de toma de salida digital
óptica
Cable de conexión digital óptico (suministrado)
Quite el tapón de la toma, haga coincidir la orientación de la clavija con
la toma, y después inserte la clavija hasta que encaje en posición.
Notas
• El cable de conexión digital óptico es un dispositivo de extraordinaria precisión y por ello
sensible a las sacudidas y a la presión externa. Por consiguiente, tendrá que tener cuidado al
insertar y extraer la clavija del cable.
• Este sistema no es compatible con las tomas AC-3 RF de los reproductores LD.
• La entrada digital del procesador envolvente digital no soporta frecuencias de muestreo de
96 kHz. Ponga el ajuste de salida digital del reproductor DVD a 48 kHz cuando utilice este
sistema. Si la señal digital de entrada es de 96 kHz tal vez se escuche ruido.
• La entrada digital del procesador envolvente digital no es compatible con el formato DTS*. Si
la señal de entrada es de formato DTS tal vez se escuche ruido.
*
DTS es una marca comercial de Digital Theater Systems (Estados Unidos).
ES
10
Preparación
Page 95

Cables de conexión (vendidos por separado)
Cuando quiera conectar la minitoma de salida digital óptica de reproductores DVD portátiles,
reproductores de CD portátiles, o de otros componentes digitales a la toma DIGITAL IN, utilice
el cable POC-5AB (miniclavija ˜ clavija rectangular).
Notas sobre el cable de conexión digital óptico
• No deje caer objetos sobre el cable de conexión digital
óptico ni lo exponga a golpes.
• Para conectar o desconectar el cable, agárrelo por la
El radio de doblez del cable de
conexión digital óptico deberá ser
de 25 mm por lo menos.
clavija.
• Asegúrese de mantener limpios los extremos del cable
de conexión digital óptico. El polvo adherido en los
25 mm
extremos del cable puede reducir su rendimiento.
• Cuando vaya a guardar el sistema, ponga el tapón al
extremo de la clavija y tenga cuidado de no doblar ni
torcer el cable de conexión digital óptico con un radio
inferior a 25 mm.
Para conectar el procesador envolvente digital a
componentes analógicos
Para conectar las tomas de salida de audio de una videograbadora, televisor, u otro
componente a las tomas LINE INPUT (L/R) del procesador envolvente digital, utilice
un cable de audio (vendido por separado).
Procesador envolvente
digital
Videograbadora,
televisor, u otro
A las tomas LINE INPUT
Audio izquierdo (L, blanco)
Audio derecho (R, rojo)
Cable de audio
(vendido por separado)
A las tomas de salida
de audio
Audio izquierdo
(blanco)
Audio derecho (rojo)
componente
Cables de conexión (vendidos por separado)
Cuando quiera conectar la minitoma estéreo (toma de salida de línea o toma de auriculares) a las
tomas LINE INPUT, utilice el cable RK-G129 (miniclavija estéreo ˜ enchufe macho x 2).
(continúa)
Preparación
11
ES
Page 96

Ajuste del nivel de entrada
Si cuando se utilice la entrada analógica el volumen es bajo, ajuste el conmutador ATT
(atenuador) a “0dB”.
ATT
0dB
–6dB
Ajuste Componentes conectados
0dB Televisor, componentes portátiles, y otros componentes con bajo nivel de
salida
–6dB Otros componentes (ajustes iniciales)
Notas
• Si la entrada de audio a las tomas LINE INPUT se distorsiona, ajuste el conmutador ATT
(atenuador) a “–6dB”.
• Asegúrese de bajar el volumen antes de ajustar el conmutador ATT (atenuador).
12
ES
Preparación
Page 97

Área de transmisión de infrarrojos
La ilustración de abajo muestra el área aproximada de transmisión de infrarrojos
desde el procesador envolvente digital.
Rayos infrarrojos
4 m
aprox.
Procesador envolvente
digital
4 m
aprox.
Notas
• Como este sistema utiliza rayos infrarrojos, podrá aumentar el ruido eléctrico (ruidos de
silbido) a medida que los auriculares sean alejados del procesador envolvente digital, aunque
los mismos se encuentren dentro del área de transmisión mostrada en la ilustración de arriba.
Además, si se bloquean los rayos infrarrojos, se podrá interrumpir el sonido o escucharse
ruido. Esto se debe a las características de los rayos infrarrojos y no a un defecto de
funcionamiento.
• No cubra el sensor de rayos infrarrojos con la mano ni con el cabello.
• En tanto que los auriculares se encuentren dentro del área de transmisión mostrada en la
ilustración de arriba, podrá orientarlos en cualquier dirección en relación con el procesador
envolvente digital (hacia el frente, girados a 90°, o girados a 180°).
• El sonido podrá variar dependiendo de la posición y condiciones del procesador envolvente
digital en la habitación. Se recomienda que coloque el procesador envolvente digital en el
lugar que ofrezca el sonido más claro posible.
• Si utiliza el procesador envolvente digital con otros procesadores o transmisores podrá ocurrir
que las señales se mezclen.
45°
45°
10 m
aprox.
(continúa)
Preparación
13
ES
Page 98

Para enchufar el sistema a una toma de
corriente de la pared
Procesador envolvente
digital
Adaptador de
alimentación de CA
A una toma de corriente
de la pared
A la toma DC IN
Nota
Asegúrese de utilizar el adaptador de alimentación de CA suministrado. Si utiliza adaptadores
con clavija de polaridad diferente u otras características podrá ocasionar fallos en el sistema.
Clavija de polaridad unificada
Para cargar las pilas
Asegúrese de utilizar el cargador de pilas suministrado. Podrá cargar hasta cuatro
pilas al mismo tiempo.
Inserción de las pilas en el cargador de pilas
1 Abra la tapa.
Nota
Presione las pilas de níquel-cadmio en el cargador hasta que encajen en sus posiciones. Después
de insertar las pilas, cierre firmemente la tapa. Las pilas no se cargarán a menos que la tapa esté
cerrada.
ES
14
Preparación
2 Inserte las dos pilas de níquel-cadmio NC-AA
recargables suministradas orientando los extremos
‘ y ’ en la dirección correcta.
Page 99

Carga (Sólo las versiones* U2, CA2 y E92)
1 Saque la clavija de carga. 2 Enchufe en una toma de corriente de la pared.
Se encenderá el
indicador de carga.
Carga (Sólo las versiones* CEK y HK4)
1 Enchufe la clavija de carga en
el cargador de pilas.
2 Enchufe en una toma de
corriente de la pared.
Se encenderá el
indicador de carga.
Carga (Sólo las versiones* CED y E13)
1 Enchufe la clavija de carga en
el cargador de pilas.
2 Enchufe en una toma de
corriente de la pared.
Se encenderá el
indicador de carga.
Nota
Utilice la clavija de carga que encaje en la toma de corriente de su hogar.
* La clavija de carga suministrada con este sistema varía dependiendo de la versión del sistema.
Para comprobar la versión, consulte el código de versión impreso en la caja.
(continúa)
Preparación
15
ES
Page 100

Cuando haya finalizado la carga
Desenchufe el cargador de pilas de la toma de corriente de la pared, y extraiga las
pilas de níquel-cadimio recargables.
Tiempos estándar de carga y de uso de las pilas recargables suministradas
Tiempo de carga Tiempo de uso
1 hora aprox. 6 horas aprox.
6 horas aprox.* 30 horas aprox.
* Tiempo para cargar completamente las pilas cuando están totalmente agotadas.
Notas
• El tiempo empleado para cargar las pilas será el mismo
independientemente del número de pilas que cargue de una
vez.
• Durante la carga, el cargador y las pilas se calentarán
ligeramente. Esto no es un defecto de funcionamiento.
• Asegúrese de desenchufar el cargador cuando no lo esté
utilizando.
• No utilice ni deje el cargador cerca de aparatos de calefacción,
lugares calientes expuestos a la luz solar directa, ni lugares
húmedos.
• Las pilas no se cargarán si el regulador del cargador está
empujado hacia abajo. Antes de cargar, vuelva a poner el
regulador en la posición indicada por la flecha en la ilustración
a mano derecha.
• Si carga pilas que todavía no se hayan descargado
completamente, el indicador de carga podrá apagarse antes
que los tiempos de carga indicados arriba.
Regulador
16
ES
Preparación
 Loading...