

Page 1

2-893-070-11(1)
Quick Start Guide
Guide de mise en route
Kurzanleitung
Guida introduttiva
Guía de inicio rápido
LocationFree™ Base Station
-
LocationFree™ Player
©2006 Sony Corporation
GB
FR
DE
IT
ES
LF-PK1
Printed in Japan
LocationFree Support Web Site
http://www.sony.net/Products/LocationFree/Support/
Printed on 70% or more recycled paper
using VOC (Volatile Organic Compound)
-free vegetable oil based ink.
Page 2

AT/BE/CH/DE/DK/ES/FI/FR/
GB/IE/IT/LU/NL/NO/PT/SE
English
Hereby, Sony Corporation declares that this LF-B1 is in compliance with the essential requirements and other relevant provisions of
Directive 1999/5/EC. For details, please access the following URL: http://www.compliance.sony.de/
Français
Par la présente Sony Corporation déclare que l’appareil LF-B1 est conforme aux exigences essentielles et aux autres dispositions
pertinentes de la directive 1999/5/CE. Pour toute information complémentaire, veuillez consulter l’URL suivante :
http://www.compliance.sony.de/
Deutsch
Hiermit erklärt Sony Corporation dass sich diese LF-B1 in Übereinstimmung mit den grundlegenden Anforderungen und den anderen
relevanten Vorschriften der Richtlinie 1999/5/EG befindet. Weitere Informationen erhältlich unter: http://www.compliance.sony.de/
Español
Por medio de la presente Sony Corporation declara que el LF-B1 cumple con los requisitos esenciales y cualesquiera otras
disposiciones aplicables o exigibles de la Directiva 1999/5/CE. Para mayor información, por favor consulte la siguiente URL:
http://www.compliance.sony.de/
Nederlands
Hierbij verklaart Sony Corporation dat het toestel LF-B1 in overeenstemming is met de essentiële eisen en de andere relevante
bepalingen van richtlijn 1999/5/EG. Nadere informatie kunt u vinden op: http://www.compliance.sony.de/
Page 3

Svenska
Härmed intygar Sony Corporation att denna LF-B1 står i överensstämmelse med de väsentliga egenskapskrav och övriga relevanta
bestämmelser som framgår av direktiv 1999/5/EG. För ytterligare information gå in på följande hemsida:
http://www.compliance.sony.de/
Italiano
Con la presente Sony Corporation dichiara che questo LF-B1 è conforme ai requisiti essenziali ed alle altre disposizioni pertinenti
stabilite dalla direttiva 1999/5/CE. Per ulteriori dettagli, si prega di consultare il seguente URL: http://www.compliance.sony.de/
Português
Sony Corporation declara que este LF-B1 está conforme com os requisitos essenciais e outras provisões da Directiva 1999/5/CE. Para
mais informações, por favor consulte a seguinte URL: http://www.compliance.sony.de/
Suomi
Sony Corporation vakuuttaa täten että LF-B1-tyyppinen laite on direktiivin 1999/5/EY oleellisten vaatimusten ja sitä koskevien
direktiivin muiden ehtojen mukainen. Halutessasi lisätietoja, käy osoitteessa: http://www.compliance.sony.de/
Dansk
Undertegnede Sony Corporation erklærer herved, at følgende udstyr LF-B1 overholder de væsentlige krav og øvrige relevante krav i
direktiv 1999/5/EF. For yderligere information gå ind på følgende hjemmeside: http://www.compliance.sony.de/
Norsk
Sony Corporation erklærer herved at utstyret LF-B1 er i samsvar med de grunnleggende krav og øvrige relevante krav i direktiv
1999/5/EF. Hvis du vil har mer informasjon skal du gå til denne URL-adresse: http://www.compliance.sony.de/
Page 4

Page 5

GB
1 (GB)
Continued
Contacting Sony
If, after reading these operating instructions, you have additional
questions related to the use of your Sony LocationFree Base Station,
contact Sony Customer Information Centre. For more contact information,
refer to the EUROPEAN GURANTEE INFORMATION DOCUMENT.
http://www.sony.net/Products/LocationFree/support/
Important Safety Instructions
1) Read these instructions.
2) Keep these instructions.
3) Heed all warnings.
4) Follow all instructions.
5) Do not use this apparatus near water.
6) Clean only with dry cloth.
7) Do not block any ventilation openings. Install in accordance with the
manufacturer’s instructions.
8) Do not install near any heat sources such as radiators, heat registers,
stoves, or other apparatus (including amplifiers) that produce heat.
9) Protect the power cord from being walked on or pinched particularly
at plugs, convenience receptacles, and the point where they exit from
the apparatus.
10) Only use attachments/accessories specified by the manufacturer.
11) Use only with the cart, stand, tripod, bracket, or table specified by
the manufacturer, or sold with the apparatus. When a cart is used, use
caution when moving the cart/apparatus combination to avoid injury
from tip-over.
12) Unplug this apparatus during lightning storms or when unused for
long periods of time.
13) Refer all servicing to qualified service personnel. Servicing is
required when the apparatus has been damaged in any way, such as
power-supply cord or plug is damaged, liquid has been spilled or
objects have fallen into the apparatus, the apparatus has been exposed
to rain or moisture, does not operate normally, or has been dropped.
14) Please make sure that the socket outlet is easily accessible.
15) If you use a pacemaker or other medical device, consult your
physician or the manufacturer of your medical device before using the
wireless LAN function.
16) Do not connect inappropriate network or phone lines to the LAN port.
Connect only 100BASE-TX/10BASE-T cables to the LAN port. For
help on connecting to a network, see your network administrator.
17) TO REDUCE THE RISK OF ELECTRIC SHOCK, DO NOT
REMOVE COVER (OR BACK).
NO USER-SERVICEABLE PARTS INSIDE.
REFER SERVICING TO QUALIFIED SERVICE PERSONNEL.
Important Safeguards
Page 6

2 (GB)
18) Do not let this unit get wet. Never spill liquid of any kind on the unit.
If any liquid or solid object fall through the unit, do not operate the
unit. It may result in electric shock or damage to the unit.
19) No naked flame sources, such as lighted candles, should be placed on
the apparatus.
20) This equipment should be installed and operated with minimum
distance at least 20cm between the radiator and persons body
(excluding extremities: hands, wrist, feet and legs).
* This transmitter must not be co-located or operating in conjunction
with any other antenna or transmitter.
21) You are cautioned that any changes or modifications not expressly
approved in this manual could void your authority to operate this
equipment.
Notice: Co-location with other electromagnetic
devices
This product could be affected by strong electromagnetic interference,
resulting in audio and video distortion. If you experience problems,
ensure the following:
− Check if there is a device causing electromagnetic interference, such as
a microwave oven or cordless phone.
− Reorient or relocate the device or the Base Station.
− Increase the distance between the device and the Base Station.
Notice for customers in the United Kingdom and
Republic of Ireland
A mold pulg complying with BS1363 is fitted to this equipment for your
safety and convenience. Should the fuse in the plug supplied need to
be replaced, a 5AMP fuse approved by ASTA or BSI to BS1362, (i.e.,
marked with or mark) must be used. If the plug supplied with this
epuipment has a detachable fuse cover, be sure to attach the fuse cover
after you change the fuse. Never use the plug without the fuse cover. If
you should lose the fuse cover, please contact your nearest Sony service
station.
Notice for customers in France
The RLAN feature of LF-B1 shall be exclusively used inside
buildings. Any use of the RLAN with the power of above 10mW in
the full frequency range of 2400-2483, 5MHz outside of the buildings
is prohibited on the French territory (including French overseas
departments). (ART Decision 2002-1009 as amended by ART Decision
03-908, relating to radio-frequencies use restrictions).
Notice for customers in Italy
Usage or the above mentioned device is regulated under Italian law:
− D. Lgs 1.8.2003, n.259, art. 104 (activity subject to general
authorization) and art. 105 (free usage), and for private usage;
− D.M. 28/5/03, as amended, for providing to the general public access
to R-LAN networks and services.
Notice for customers in Norway
Use of this radio equipment is not allowed in the geographical area within
a radius of 20 km from the centre of Ny-Ålesund, Svalbard.
Disposal of Old Electrical & Electronic Equipment
(Applicable in the European Union and other European countries with
separate collection systems)
This symbol on the product or on its packaging indicates
that this product shall not be treated as household
waste. Instead it shall be handed over to the applicable
collection point for the recycling of electrical and
electronic equipment. By ensuring this product is disposed
of correctly, you will help prevent potential negative
consequences for the environment and human health,
which could otherwise be caused by inappropriate waste
hadling of this product. The recycling of materials will
help to conserve natural resources. For more detailed
information about recycling of this product, please contact
your local Civic Office, your household waste disposal
service or the shop where you purchased the product.
Page 7

GB
3 (GB)
Important Safeguards ....................................................................... 1
Table of Contents .............................................................................. 3
For PC ................................................................................................ 4
Setup Summary .......................................................................................................... 5
STEP1 Unpack and Install the Software ..................................................................... 7
STEP2 Setup to Watch Video at Home ..................................................................... 11
STEP3 Setup to Watch Video On the Go .................................................................. 17
For PSP™ System .......................................................................... 19
Setup Summary (You need to do this setup before you go out.) .............................. 20
STEP1 Prepare the PSP™ System and the Base Station .......................................... 22
STEP2 Setup to Watch Video at Home ..................................................................... 23
STEP3 Setup to Watch Video On the Go .................................................................. 29
“SONY” is a registered trademark of Sony Corporation.
“LocationFree” is a trademark of Sony Corporation.
“PlayStation” and “PSP” are trademarks or registered trademarks of Sony Computer Entertainment Inc.
“Memory Stick Duo” is a trademark of Sony Corporation.
Microsoft and Windows are registered trademarks of Microsoft Corporation in the United States and/or other countries.
All other names of systems, products, and services are trademarks of their respective owners.
The symbols for ™ and ® for some products are omitted in these instructions.
Table of Contents
Page 8

4 (GB)
For PC
* For details, refer to the “Operating Instructions” from the “Start” menu in Windows.
If you have additional questions related to the use of this product after reading this Quick Start Guide and the Operating Instructions,
please contact Sony Customer Information Centre. For more contact information, refer to EUROPEAN GUARANTEE
INFORMATION DOCUMENT.
Also, see the LocationFree Support web site at http://www.sony.net/Products/LocationFree/support/ for more support information and
the latest version of the on-screen remote control data.
Page 9

GB
5 (GB)
Setup Summary
Continued
• Make easy setup settings for the Base Station with your computer.
STEP 3
Setup to Watch Video On the Go
(See page 17.)
• Connect your computer to the Base Station.
• Put the Base Station into setup mode.
• Connect your computer to the Base Station to watch video.
• Make video settings with the LocationFree Player.
STEP 2
Setup to Watch Video at Home
(See page 11.)
• Unpack.
• Connect to your external devices and the Internet, and turn on the Base Station.
• Install LocationFree Player software on your computer.
STEP 1
Unpack and Install the Software
(See page 7.)
Setup Is Completed
Watch video on your computer at home or On the Go.
Page 10

6 (GB)
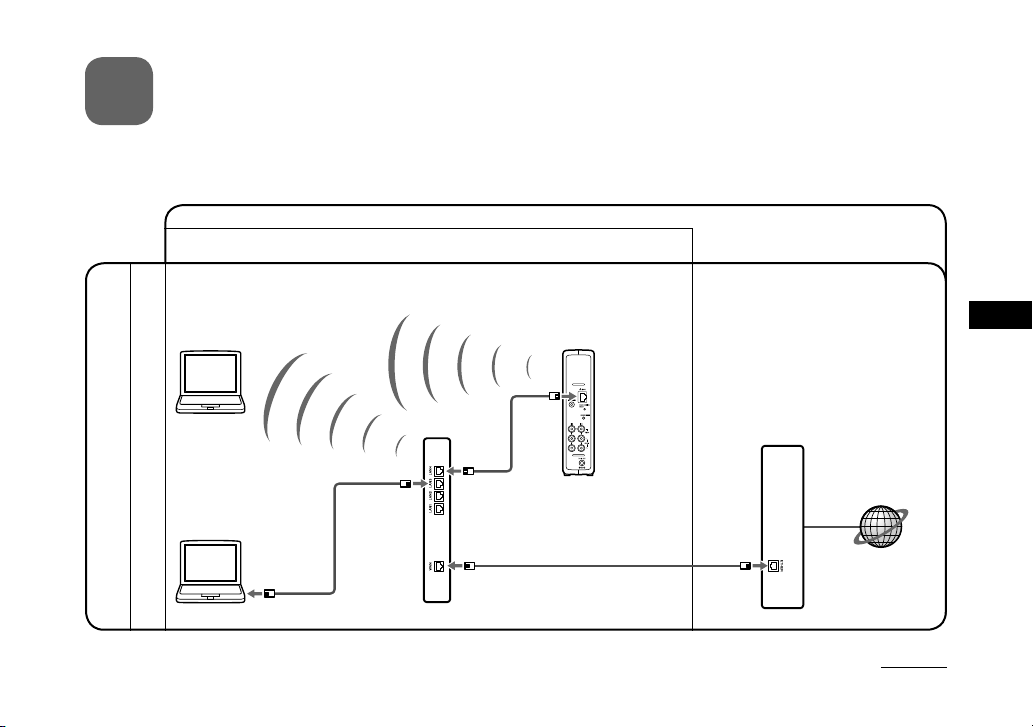
STEP2, 3
Home
On the Go
External device Base Station Router
Computer* Computer*
Computer*
Computer*
STEP1
* Computer with LocationFree Player.
Page 11

GB
7 (GB)
STEP
1
Unpack and Install
the Software
Unpack
Check that your package includes the following:
• Base Station (LF-B1)
• LocationFree Player software CD-ROM (includes
LocationFree Player software*1, Operating Instructions*2,
Dynamic DNS Terms of Use Agreement and License)
(LFA-PC2)
*1 One Serial Key for LocationFree Player is supplied.
*2 “Operating Instructions” written in the languages other than
English, German, French, Italian, and Spanish are inside the
CD-ROM.
• AC power adapter (AC-LX1B)
• Mains lead
• IR Blaster (VM-50)
• Scart to A/V cable
• A/V cable (RCA pin cable)
• Base Station stand
• Quick Start Guide
•
EUROPEAN GUARANTEE INFORMATION DOCUMENT
Page 12

8 (GB)
Connect to Your External Devices
and the Internet, and Turn On the
Base Station.
1
Attach the Base Station stand.
Claws“FRONT” mark
Holes
Stand
2
Connect to external devices (such as DVD
players, etc.).
Scart to A/V cable
(supplied)
TV
Scart cable
(not supplied)
Cable outlet
External device (STB, PVR, etc.)
Page 13

GB
9 (GB)
3
Connect the IR Blaster so it faces the remote
sensor on the external devices.
5
Connect the mains lead to the Base Station.
6
Turn on the power.
Base Station rear panel
IR Blaster
(supplied)
Infrared
transmitter
Remote sensor
AC-LX1B AC power
adapter (supplied).
Mains lead
(supplied)
Lights
POWER LED
4
Connect the
LAN cable
(not supplied).
For details, see
the connection
examples in
STEP 2
(page 11).
A/V cable (RCA pin
cable, supplied)
or
Type BF
Type C-6
External device (STB, PVR, etc.)
Page 14

10 (GB)
Install LocationFree Player Software
on Your Computer.
1
Insert the LocationFree Player software CD-
ROM into the CD-ROM drive of your computer.
The installation screen appears.
2
Select your language, and then click [Next].
3
Click [Next].
4
Read the license agreement, select [I have read
the terms in the license agreement], and then
click [Next].
5
Enter the Serial Key printed on the sticker, and
then click [Next].
6
Confirm the installation folder, and then click
[Next]. If you want to modify the installation
folder, click [Change] and select a folder.
7
Click [Install].
Installation starts.
8
Click [Finish] when the installation is
completed.
Shortcuts for the LocationFree Player, the Operating
Instructions (PDF file)*1, and “LocationFree RC_DATA”*2
appear on your computer’s desktop after installation.
*1 “Operating Instructions” written in the languages other than
English, German, French, Italian, and Spanish are inside the CDROM.
*2 Shortcut “LocationFree RC_DATA” is used for Additional Remote
Control Data. For details, see page 15.
Page 15
GB
11 (GB)
STEP
2
Setup to Watch Video at Home
Connect Your Computer to the Base Station
To connect your computer to the Base Station with a router
Modem without router function
Connection to watch video at home
Connection to watch video away
from home
* To determine the type of your modem, check with your Internet service provider.
• Connect either to the router or to the Base Station by wireless
Router (UPnP Compatible)
Base Station
• Connect to the
router by wired LAN
to LAN port
to the Internet
Continued
DSL or cable modem*
Page 16

12 (GB)
To connect your computer to the Base Station with a router
• Connect either to the router or to the Base Station by wireless
Connection to watch video at home
Connection to watch video away
from home
Modem with internal router
• Connect to the
router by wired LAN
to LAN port
DSL or cable modem with internal
router (UPnP compatible)*
to the Internet
Base Station
* To determine the type of your modem, check with your Internet service provider.
Page 17

GB
13 (GB)
Check the Base Station NETWORK LED.
Check whether the Base Station NETWORK LED is turned on.
When not turned on:
Make sure the router power is turned on and the LAN cable is
connected correctly.
Put the Base Station into Setup
Mode (Registration Possible)
Keep pressing the SETUP MODE button on the rear
panel of the Base Station until the SETUP MODE
LED starts blinking.
Tip
Make all settings up to “Connect Your Computer to the Base
Station to Watch Video” (page 14) while the SETUP MODE LED is
blinking.
Note
The Setup Mode (registration possible) is available for 5 minutes. If
the SETUP MODE LED stops blinking, keep pressing the SETUP
MODE button again until the SETUP MODE LED starts blinking.
Page 18

14 (GB)
Connect Your Computer to the Base
Station to Watch Video
1
Double click the icon on the desktop to
start LocationFree Player.
2
While the SETUP MODE LED is blinking, select
a Base Station from the list, choosing one with
a green icon, and then click [Connect].
Green icon
Note
If your Base Station does not appear on the [Base Station Selection]
screen, your security software or browser may be blocking the
communication between the LocationFree Player and the Base
Station. Refer to the instruction manuals of your security software
or the online help of your browser to configure them not to block the
communication.
3
If the SETUP MODE LED is not blinking, press
the SETUP MODE button again to switch to
Setup Mode (registration possible).
When the message “Registration completed. Select [OK] to
connect to the Base Station and start watching Video.”
appears, click [OK].
Note
Make sure that the external device is turned on. Otherwise, you
may see no picture.
Page 19

GB
15 (GB)
Make Video Settings with the
LocationFree Player
■ Configure the on-screen remote control
for video
(For the connection to external devices in STEP 1
on page 8)
1
Click anywhere inside the window, and then
click [Settings] at the bottom right of the
window.
[Settings]
Tip
[Settings] at the bottom right of the window appears only
when you are connected to the Base Station. When you are
not connected, click [Connect] at the bottom left, select the
Base Station you want to set up from the list that appears, click
[Properties], and then click [Video Settings].
2
Select [Video Settings], [Remote Settings],
and then [Video 1] or [Video 2], then select
the make and type of the connected external
device.
Tip
You can also use “Additional Remote Control Data”
downloadable from the LocationFree Support website at
http://www.sony.net/Products/LocationFree/support/.
If you cannot find the on-screen remote control data of your
external device in the current [Remote Settings] list, try above.
[Power] Select the make.
Select
the type.
If the configuration above is correct, each time you click
[Power], your external device should turn on or off.*
* After clicking [Power], it takes five seconds or more for the
external device to respond. If it does not respond, make sure
that the make and type are correct, and then try again.
Continued
Page 20

16 (GB)
Notes
• Even if the power turns on and off correctly with [Power],
other buttons may not be enabled. If this happens, select
[Video 1] or [Video 2] from the Index. With the on-screen
remote control, confirm that the buttons are enabled.
• Try all items of the type in [Type] box to select the most
suitable on-screen remote control for the connected devices.
• The button names or button numbers of the on-screen remote
control may differ from those of the remote supplied with
your device.
• For the latest version of the on-screen remote control data,
see the LocationFree Support web site at http://www.sony.
net/Products/LocationFree/support/.
3
Click [OK] to close the [Settings] window.
Click anywhere inside the window, then click the type of
the connected external device. Click [Remote], then the onscreen remote control appears.
■ Configure the colour system for video
(For watching PAL/SECAM/PAL60/NTSC video)
1
Click anywhere inside the window, and then
click [Settings] at the bottom right of the
window.
2
Select [Video Settings] and then [Colour
System Settings].
Select the colour system.
3
Select a colour system, and then click [OK].
After you change the colour system settings, the NetAV
connection will be disconnected and then it will be
reconnected automatically.
Page 21

GB
17 (GB)
STEP
3
Setup to Watch Video
On the Go
* Be sure to make the settings before leaving home.
Make Easy Setup Settings for the
Base Station with Your Computer
If you are already connected via NetAV, disconnect before
making the following settings.
1
To connect your computer to the Base Station
with a router, put the Base Station into Setup
Mode (See page 13).
2
Start LocationFree Player, and then click
[Base Station Settings] in the [Base Station
Selection] window.
Your web browser starts, and the [Base Station Settings]
page opens.
3
Click [Enter].
4
Enter the user name and password, and then
click [OK].
User name : lfx
Initial password: WebPassword printed on the label affixed
to the side of the Base Station.
Continued
Page 22

18 (GB)
5
Click [Easy Setup] in the settings menu page.
Tip
Click [Deutsch], [English], [Español], [Françias] or [Italiano]
to choose your language.
* Follow the on-screen instructions to proceed to the NetAV
check. Read the Dynamic DNS Terms of Use Agreement in
the Operating Instructions, and then, in the [NetAV Setup]
page, select the radio button and click [Next].
6
If [Success] appears in the [NetAV Check]
page, click [Exit Setup].
The setup is complete.
Tips
• If [Setup Incomplete] appears in the [NetAV Check] page,
read the explanation on the NetAV check page, and then
make the necessary settings.
• If you want to register your computer at the remote site
via the Internet, follow the instructions in “Registering
LocationFree Devices on the Base Station via the Internet”
in “Advanced Base Station Settings” of the “Operating
Instructions”, and then follow the instructions in “Registering
LocationFree Devices on the Base Station via the Internet” in
“Watching Video on LocationFree Player”.
• For detailed information on [Advanced Settings], refer to the
“Operating Instructions” from the “Start” menu in Windows.
Afterwards
Use the LocationFree Player to watch video.
For details on settings and operation of the LocationFree Player,
refer to the supplied Operating Instructions (included on the
supplied CD-ROM).
* You can view the Operating Instructions from the [Start] menu in
Windows.
Page 23

GB
19 (GB)
For PSP™ System
If you have any further questions related to the use of this product after reading this Quick Start Guide and the Operating Instructions,
please contact Sony Customer Information Centre. For more contact information, refer to the EUROPEAN GUARANTEE
INFORMATION DOCUMENT or the following web site.
LocationFree Support web site
http://www.sony.net/Products/LocationFree/support/
For details on settings and operation of the PSP™ system, refer to “Setting and Usage Guide for PSP™ (PlayStation®Portable)
System”. You can download this guide (PDF file) from the LocationFree Support web site at
http://www.sony.net/Products/LocationFree/support/.
Page 24

20 (GB)
Setup Summary (You need to do this setup before you go out.)
• Make easy setup settings for the Base Station with your PSP™
system.
STEP 3
Setup to Watch Video On the Go
(See page 29.)
• Check the Network Setup for the Base Station.
• Register your PSP™ system with the Base Station.
• Configure the video settings.
STEP 2
Setup to Watch Video at Home
(See page 23.)
• Check the version of your PSP™ system software.
• Connect to your external devices and the Internet, and turn on the Base Station.
STEP 1
Prepare the PSP™ System and the
Base Station (See page 22.)
Setup Is Completed
Watch video on your PSP™ system at home or On the Go.
Page 25

GB
21 (GB)
STEP2
STEP3
Home
On the Go
External device Base Station Router
PSP™
system
PSP™ system
STEP1
Page 26

22 (GB)
STEP
1
Prepare the PSP™
System and the Base
Station
Check the version of your PSP™
system software
To check the version of your PSP™ system
software, select “System Settings” under
from the home menu, and then select “System
Information”. If your system software version is not
2.70 or higher, perform the update.
To use this product with your PSP™ system, version 2.70 or
higher is required. For details of the system software update, see
(http://www.yourpsp.com/).
Connect to Your External Devices
and the Internet, and Turn On the
Base Station. (see page 8)
Page 27

GB
23 (GB)
STEP
2
Setup to Watch Video at Home
Check the Network Setup for the Base Station
To download remote control data or perform a software version update of the Base Station, you must connect the Base Station to the
Internet.
Connection to watch video at home
Connection
to watch video
away from home
Modem without router function
Router (UPnP Compatible)
Base Station
DSL or cable modem*
to the Internet
to LAN port
* To determine the type of your modem, check with your Internet service provider.
Continued
Page 28

24 (GB)
Connection to watch video at home
Connection
to watch video
away from home
Modem with internal router
DSL or cable modem with internal
router (UPnP compatible)*
Base Station
to LAN port
to the Internet
* To determine the type of your modem, check with your Internet service provider.
Page 29

GB
25 (GB)
Register your PSP™ system with the
Base Station
1
Turn on the PSP™ system, and then turn on
the wireless LAN switch of the PSP™ system.
2
Select under from the home menu.
The setting screen for use of LocationFree Player is
displayed. Press the right button to go to the next screen.
3
Select [Start], and then press the button.
4
Press the SETUP MODE button on the rear of
the Base Station.
With the Base Station turned on, press and hold the button
until the SETUP MODE LED starts to blink.
SETUP
MODE LED
Wait until the registration with the Base Station and
network settings for establishing a connection from the
PSP™ system with the Base Station are completed. This is
an automatic process.
Notes
• If more than 5 minutes pass from when the SETUP MODE
LED starts to blink, the LED will go from blinking to fully
lit and the Base Station will no longer register the PSP™
system. In this case, press the SETUP MODE button on the
rear of the Base Station again and hold the button down until
the LED starts to blink.
• If a message stating “Base Station update required” is
displayed, you must perform a software version update. For
details, refer to the Operating Instructions of the LF-PK1.
Continued
Page 30

26 (GB)
7
The video screen is displayed.
When a connection to the Base Station is established, the
video screen will be displayed.
Note
Make sure that the external device is turned on.
Otherwise, you may see no picture.
• If you cannot complete the registration of your PSP™
system with the Base Station, update your PSP™
system software. For more details, refer to “Setting
and Usage Guide for PSP™ (PlayStation®Portable)
System”. You can download this guide (PDF file) from
the LocationFree Support web site at
http://www.sony.net/Products/LocationFree/support/.
5
Check the setting list.
Press the button to finish the settings. A network
settings list is displayed.
6
Connect to the Base Station.
Select [LocationFree AP], and then press the
button. A connection to the Base Station is
established.
Page 31

GB
27 (GB)
5
After downloading, reconnect to the Base
Station.
6
Perform Step 1 to 3 again.
7
Select the manufacturer of the connected
external device, and then press the right
button.
8
Select the product type of the connected
external device, and then press the right
button.
9
Test the remote control to make sure it works,
and then press the right button.
By selecting [Power] and then pressing the button, you
can turn the external device on and off.
In some cases it may take as long as 5 seconds for the
external device to turn on after you press the button.
10
Save your settings.
Press the button to save settings on the PSP™ system.
Notes
• Even if the power turns on and off correctly with [Power], other
buttons may not be enabled. If this happens, select [Video 1] or
[Video 2] from the Index. With the on-screen remote control,
confirm that the buttons are enabled.
• Try all the models that appear on the screen to select the most
suitable on-screen remote control for the connected devices.
Configure the video settings
■ Configure the on-screen remote control
for video
(For connecting to external devices, as
instructed in 3 of STEP 1 on page 9)
You can adjust settings for the on-screen remote control that will
be used to operate external devices such as STB or PVR that are
connected to the Base Station. To adjust these settings, Memory
Stick Duo™ media is required.
1
Press the button during video playback.
Select from the LocationFree Player
control panel, and then press the button.
2
Select [Remote Control Settings], and then
press the button.
3
Select [Video 1] or [Video 2] for the connected
external device you want to use the remote
control for, and then press the button.
4
A message appears indicating that you need
to download remote control data. Select [Yes],
and then press the button.
Follow the on-screen instructions to download remote
control data onto Memory Stick Duo™ media.
Continued
Page 32
28 (GB)
• The button names or button numbers of the on-screen remote
control may differ from those of the remote control supplied with
your device.
■ Configure the colour system for video
(For watching video in PAL, SECAM, PAL60, NTSC,
etc.)
1
Press the button during video playback.
Select from the LocationFree Player
control panel, and then press the button.
2
Select [Advanced Settings], and then press the
button.
3
Select [Video Signal Settings], and then press
the button.
4
Select a colour system, and then press the
button.
5
Select [OK], and then press the button.
To enable the change of the colour system settings, you
need to disconnect the NetAV connection once, and then
reconnect it.
Page 33

GB
29 (GB)
Continued
STEP
3
Setup to Watch Video
On the Go
Make Easy Setup Settings for
the Base Station with Your PSP™
System
1
Check that the Base Station is turned on.
2
Press the button during video playback.
Select from the LocationFree Player
control panel, and then press the button.
3
Select [Base Station Settings], and then press
the button.
4
Select [Enter], and then press the button.
5
Enter the user name and password, select
[OK], and then press the button.
User name : lfx (lowercase letters)
Initial password: WebPassword printed on the sticker of the
Base Station.
Page 34

30 (GB)
6
Select [Easy Setup], and then press the
button.
Tip
Select [Deutsch], [English], [Español], [Françias] or [Italiano]
to choose your language.
* Follow the on-screen instructions to proceed to the NetAV
check. Read the Dynamic DNS Terms of Use Agreement in
the Operating Instructions, and then, in the [NetAV Setup]
page, select the radio button and click [Next].
7
If [Success] appears in the [NetAV Check]
screen, select [Menu], and then press the
button.
The display will return to the initial screen. Select [Exit
Setup], press the button, and then close the Internet
browser by pressing the button.
Tip
If [Setup Incomplete] appears in the [NetAV Check] screen,
select [Details] and press button. Read the explanation on
that screen and make the necessary settings.
Page 35

FR
1 (FR)
Suite
Contacter Sony
Si, après la lecture de ce mode d’emploi, vous avez d’autres questions
liées à l’utilisation de votre Station de base Sony LocationFree, contactez
votre Service consommateur Sony local. Pour plus d’informations sur les
contacts, reportez-vous au EUROPEAN GURANTEE INFORMATION
DOCUMENT.
http://www.sony.net/Products/LocationFree/support/
Consignes de sécurité importantes
1) Lisez les instructions suivantes.
2) Conservez ces instructions.
3) Tenez compte de tous les avertissements.
4) Respectez toutes les instructions.
5) N’utilisez pas cet appareil à proximité d’un point d’eau.
6) Nettoyez l’appareil uniquement avec un chiffon sec.
7) Ne bloquez pas les ouvertures de ventilation. Installez l’appareil
conformément aux instructions du fabricant.
8) N’installez pas l’appareil à proximité d’une source de chaleur,
telle qu’un radiateur, un poêle, une cuisinière ou d’autres appareils
(notamment des amplificateurs) qui dégagent de la chaleur.
9) Protégez le cordon d’alimentation afin d’éviter qu’il soit piétiné ou
pincé, en particulier au niveau des fiches, des prises multiples et du
point de sortie de l’appareil.
10) Utilisez uniquement des options/accessoires spécifiés par le fabricant.
11) Utilisez l’appareil uniquement avec le chariot, le socle, le trépied, le
support ou la table spécifiés par le fabricant ou vendus avec l’appareil.
Si vous utilisez un chariot, soyez prudent lors du déplacement de
l’ensemble chariot/appareil afin d’éviter de vous blesser lors du
transport.
12) Débranchez l’appareil pendant les orages ou lorsque vous ne l’utilisez
pas pendant des périodes prolongées.
13) Tout entretien ne peut être effectué que par un technicien qualifié.
Un entretien est nécessaire si l’appareil a été endommagé
d’une quelconque manière, par exemple si le cordon ou la fiche
d’alimentation est endommagé, si du liquide a pénétré dans l’appareil
ou si des objets sont tombés à l’intérieur de celui-ci, s’il a été exposé
à la pluie ou à l’humidité, s’il ne fonctionne pas normalement ou s’il a
subi une chute.
14) Veillez à ce que l’accès à la prise secteur soit aisé.
15) Si vous utilisez un stimulateur cardiaque ou un autre appareil
médical, consultez votre médecin ou le fabricant de cet appareil avant
d’employer la fonction Réseau sans fil.
16) Ne raccordez pas de lignes réseau ou téléphoniques inappropriées
au port LAN. Ne raccordez que de câbles 100BASE-TX/10BASE-T
au port LAN. Pour obtenir de l’aide sur la connexion à un réseau,
consultez votre administrateur réseau.
Consignes de sécurité importantes
Page 36

2 (FR)
17) POUR REDUIRE LES RISQUES D’ELECTROCUTION, NE
RETIREZ PAS LE CAPOT (OU LE PANNEAU ARRIERE).
CET APPAREIL NE CONTIENT AUCUNE PIECE SUSCEPTIBLE
D’ETRE REPAREE PAR L’UTILISATEUR.
TOUTE INTERVENTION DOIT ETRE CONFIEE A UN
TECHNICIEN QUALIFIE.
18) Veillez à ce que l’appareil ne soit jamais humide. Ne renversez jamais
de liquide sur l’appareil. Si du liquide ou un objet solide pénètre à
l’intérieur de l’appareil, cessez de l’utiliser. Cela pourrait entraîner
l’électrocution ou endommager l’appareil.
19) Aucune source de flamme nue, notamment une bougie allumée, ne
doit être placée sur l’appareil.
20) Cet appareil doit être installé et utilisé à une distance minimale de 20
cm entre le radiateur et une personne (à l’exception de ses extrémités :
mains, poignets, pieds et jambes).
*
Cet émetteur ne doit pas se trouver à proximité d’un autre émetteur ou
d’une autre antenne, ou encore être utilisé en même temps que ceux-ci.
21) N’oubliez pas que toute modification non expressément approuvée
dans ce manuel peut annuler votre droit à utiliser cet appareil.
Avis: Installation avec d’autres appareils
électromagnétiques
Ce produit peut être affecté par des interférences électromagnétiques
puissantes engendrant de la distorsion du son et de la vidéo. Si vous
rencontrez de tels problèmes, procédez aux vérifications suivantes :
−
Vérifiez la présence d’un appareil générant des interférences
électromagnétiques, notamment un four à micro-ondes ou un téléphone sans fil.
− Réorientez ou repositionnez l’appareil ou la Station de base.
− Augmentez la distance entre l’appareil et la Station de base.
Avis à l’attention des clients au Royaume-Uni et
en République d’Irlande
Pour votre sécurité et votre facilité, cet appareil est équipé d’une fiche
moulée conforme à la norme BS1363.
Si vous devez remplacer le fusible de la fiche fournie, vous devez utiliser
un fusible de 5 A approuvé ASTA ou BSI conformément à la norme
BS1362, (autrement dit, un fusible portant l’indication ou ).
Si la fiche fournie avec cet appareil possède un fusible à couvercle
amovible, n’oubliez pas de replacer le couvercle après avoir remplacé le
fusible. N’utilisez jamais la fiche sans le couvercle du fusible. Si vous
deviez perdre le couvercle du fusible, contactez le point de service aprèsvente Sony le plus proche.
Avis à l’attention des clients en France
La fonction RLAN du LF-B1 doit être utilisée exclusivement à l’intérieur
des bâtiments. Toute utilisation de cette fonction avec une puissance
supérieure à 10 mW sur l’ensemble de la plage de fréquences de 2 4002 483, 5 MHz à l’extérieur des bâtiments est interdite sur le territoire
français (y compris dans les départements français d’outre-mer).
(Décision de l’ART 2002-1009 amendée par la Décision de l’ART 03-908
relative aux limitations de l’utilisation des hautes fréquences.)
Avis à l’attention des clients en Italie
L’utilisation de l’appareil ci-dessus est régie par la législation italienne.
− D. Lgs 1.8.2003, n.259, art. 104 (activité soumise à une autorisation
générale) et art. 105 (utilisation libre), et pour un usage privé ;
− D.M. 28/5/03, tel qu’amendé, pour offrir au public en général l’accès
aux services et réseaux R-LAN.
Avis à l’attention des clients en Norvège
L’utilisation de cet équipement radio n’est pas autorisée dans la zone
géographique située dans un rayon de 20 Km autour du centre de NyÅlesund, Svalbard.
Traitement des appareils électriques et
électroniques en fin de vie
(Applicable dans les pays de l’Union Européenne et aux autres pays
européens disposant de systèmes de collecte sélective)
Ce symbole, apposé sur le produit ou sur son emballage,
indique que ce produit ne doit pas être traité avec les
déchets ménagers. Il doit être remis à un point de collecte
approprié pour le recyclage des équipements électriques
et électroniques. En s’assurant que ce produit est bien mis
au rebut de manière appropriée, vous aiderez à prévenir les
conséquences négatives potentielles pour l’environnement
et la santé humaine. Le recyclage des matériaux aidera à
préserver les ressources naturelles. Pour toute information
supplémentaire au sujet du recyclage de ce produit, vous
pouvez contacter votre municipalité, votre déchetterie ou
le magasin où vous avez acheté le produit.
Page 37

FR
3 (FR)
Consignes de sécurité importantes ................................................ 1
Table des matières ............................................................................ 3
Pour PC .............................................................................................. 4
Résumé de la configuration ........................................................................................ 5
ETAPE1 Déballez et installez le logiciel ...................................................................... 7
ETAPE2 Configurez l’appareil pour regarder des vidéos à domicile ........................ 11
ETAPE3 Configurez l’appareil pour regarder des vidéos en déplacement .............. 17
Pour système PSP™ ....................................................................... 19
Résumé de la configuration
(Vous devez effectuer cette configuration avant de partir.) ................................ 20
ETAPE1 Préparez le système PSP™ et la Station de base ....................................... 22
ETAPE2 Configurez l’appareil pour regarder des vidéos à domicile ........................ 23
ETAPE3 Configurez l’appareil pour regarder des vidéos en déplacement .............. 29
« SONY » est une marque déposée de Sony Corporation.
« LocationFree » est une marque commerciale de Sony Corporation.
« PlayStation » et « PSP » sont des marques commerciales ou des marques déposées de Sony Computer Entertainment Inc.
« Memory Stick Duo » est une marque commerciale de Sony Corporation.
Microsoft et Windows sont des marques déposées de Microsoft Corporation aux Etats-Unis et/ou dans d’autres pays.
Tous les autres noms de systèmes, produits et services sont des marques commerciales de leurs propriétaires respectifs.
Les symboles ™ et ® de certains produits sont omis dans ce mode d’emploi.
Table des matières
Page 38

4 (FR)
Pour PC
* Pour plus d’informations, reportez-vous au « Mode d’emploi » accessible à partir du menu
« Démarrer » de Windows.
Si vous avez d’autres questions liées à l’utilisation de ce produit après la lecture de ce Guide de mise en route et du Mode d’emploi,
contactez le Service consommateur Sony local. Pour plus d’informations sur les contacts, reportez-vous au EUROPEAN
GUARANTEE INFORMATION DOCUMENT.
Visitez également le site Web du Support clientèle LocationFree à l’adresse http://www.sony.net/Products/LocationFree/support/ pour
plus d’informations de support et pour obtenir la dernière version des données de la télécommande virtuelle.
Page 39

FR
5 (FR)
Résumé de la configuration
Suite
• Définissez les paramètres de Configuration facile de la Station de
base à l’aide de votre ordinateur.
ETAPE 3
Configurez l’appareil pour regarder
des vidéos en déplacement
(Reportez-vous à la page 17).
• Connectez votre ordinateur à la Station de base.
• Mettez la Station de base en mode Configuration (SETUP MODE).
• Connectez votre ordinateur à la Station de base pour regarder des vidéos.
• Définissez les paramètres vidéo à l’aide de LocationFree Player.
ETAPE 2
Configurez l’appareil pour regarder
des vidéos à domicile (Reportezvous à la page 11).
• Procédez au déballage.
• Connectez-vous à vos dispositifs externes, ainsi qu’à Internet et mettez la Station de base
sous tension.
• Installez le logiciel LocationFree Player sur votre ordinateur.
ETAPE 1
Déballez et installez le logiciel
(Reportez-vous à la page 7).
La configuration est
terminée
Regardez des vidéos sur votre ordinateur à domicile ou en déplacement.
Page 40

6 (FR)
ETAPES2, 3
A domicile
En déplacement
Dispositif
externe
Station de
base
Routeur
Ordinateur* Ordinateur*
Ordinateur*
Ordinateur*
ETAPE1
* Ordinateur équipé de LocationFree Player.
Page 41

FR
7 (FR)
ETAPE
1
Déballez et installez
le logiciel
Procédez au déballage
Assurez-vous que votre coffret renferme les éléments suivants :
• Station de base (LF-B1)
• CD-ROM du Logiciel LocationFree Player (comprend le
logiciel LocationFree Player*1, le Mode d’emploi*2, le
Contrat d’utilisation de DNS dynamique et la Licence)
(LFA-PC2)
*1 Une Serial Key est fournie pour LocationFree Player.
*2 Les « Modes d’emploi » rédigés dans des langues autres que
l’anglais, l’allemand, le français, l’italien et l’espagnol figurent
sur le CD-ROM.
• Adaptateur secteur (AC-LX1B)
• Cordon d’alimentation
• IR Blaster (VM-50)
• Câble Péritel-A/V
• Câble A/V (câble à broches RCA)
• Support de la Station de base
• Guide de mise en route
•
EUROPEAN GUARANTEE INFORMATION DOCUMENT
Page 42

8 (FR)
Connectez-vous à vos dispositifs
externes, ainsi qu’à Internet et
mettez la Station de base sous
tension.
1
Fixez le support de la Station de base.
CrochetsIndication
« FRONT »
Orifices
Support
2
Connectez-vous à des dispositifs externes (par
exemple des lecteurs de DVD, etc.).
Câble Péritel-A/V
(fourni)
Téléviseur
Câble Péritel
(non fourni)
Prise pour câble
Dispositif externe (décodeurs,
enregistreurs vidéo personnels, etc.)
Page 43

FR
9 (FR)
3
Connectez l’IR Blaster en l’orientant vers le
capteur de télécommande des dispositifs
externes.
5
Connectez le cordon d’alimentation à la Station
de base.
6
Mettez l’appareil sous tension.
Panneau arrière de la Station de base
IR Blaster
(fourni)
Emetteur
infrarouge
Capteur de
télécommande
Adaptateur secteur
AC-LX1B (fourni)
Cordon
d’alimentation
(fourni)
Témoins
Témoin POWER
4
Connectez
le câble LAN
(non fourni).
Pour plus
d’informations,
reportez-vous
aux exemples
de connexion de
l’ETAPE 2
(page 11).
Câble A/V (câble
à broches RCA,
fourni)
ou
Type BF
Type C-6
Dispositif externe (décodeur, enregistreur vidéo
personnel, etc.)
Page 44

10 (FR)
Installez le logiciel LocationFree
Player sur votre ordinateur.
1
Insérez le CD-ROM du logiciel LocationFree
Player dans le lecteur de CD-ROM de votre
ordinateur.
L’écran d’installation s’affiche.
2
Sélectionnez votre langue, puis cliquez sur
[Suivant].
3
Cliquez sur [Suivant].
4
Lisez le contrat de licence, sélectionnez [J’ai
lui les modalités de l’accord de licence], puis
cliquez sur [Suivant].
5
Saisissez la Serial Key imprimée sur
l’autocollant, puis cliquez sur [Suivant].
6
Confirmez le dossier d’installation, puis cliquez
sur [Suivant]. Si vous souhaitez modifier le
dossier d’installation, cliquez sur [Modifier] et
sélectionnez un dossier.
7
Cliquez sur [Installation].
L’installation démarre.
8
Cliquez sur [Terminer] lorsque l’installation est
terminée.
Les raccourcis de LocationFree Player, le Mode d’emploi
(fichier PDF)*1 et « LocationFree RC_DATA »*2
s’affichent sur le bureau de votre ordinateur après
l’installation.
*1 Les « Mode d’emploi » rédigés dans des langues autres que
l’anglais, l’allemand, le français, l’italien et l’espagnol figurent sur
le CD-ROM.
*2 Raccourci de « LocationFree RC_DATA » utilisé pour les Codes
de télécommande supplémentaires. Pour plus d’informations,
reportez-vous à la page 15.
Page 45

FR
11 (FR)
ETAPE
2
Configurez l’appareil pour regarder des vidéos à
domicile
Connectez votre ordinateur à la Station de base
Pour connecter votre ordinateur à la Station de base avec un
routeur
Modem sans fonction de routeur
Connexion pour regarder des vidéos à domicile
Connexion pour regarder des videos
en déplacement
* Pour déterminer le type de votre modem, consultez votre fournisseur de services Internet.
• Connectez-vous au routeur ou à la Station de base sans fil
Routeur (compatible UPnP)
Station de base
• Connectez-vous au
routeur par réseau
câblé
vers port LAN
vers Internet
Suite
Modem DSL ou câble
*
Page 46

12 (FR)
Pour connecter votre ordinateur à la Station de base avec un
routeur
• Connectez-vous au routeur ou à la Station de base sans fil
Connexion pour regarder des vidéos à domicile
Connexion pour regarder des videos
en déplacement
Modem avec routeur interne
• Connectez-vous au
routeur par réseau
câblé
vers port LAN
Modem DSL ou câble avec routeur
interne (compatible UPnP)
*
vers Internet
Station de base
* Pour déterminer le type de votre modem, consultez votre fournisseur de services Internet.
Page 47

FR
13 (FR)
Vérifiez le témoin NETWORK de la Station de base.
Vérifiez si le témoin NETWORK de la Station de base est
allumé. S’il n’est pas allumé :
Vérifiez que le routeur est sous tension et que le câble LAN est
correctement raccordé.
Mettez la Station de base en mode
Configuration (SETUP MODE)
(Enregistrement possible)
Maintenez enfoncée la touche SETUP MODE du
panneau arrière de la Station de base jusqu’à ce
que le témoin SETUP MODE commence à clignoter.
Astuce
Définissez tous les paramètres jusqu’à l’ « Connectez votre
ordinateur à la Station de base pour regarder des vidéos » (page 14)
alors que le témoin SETUP MODE clignote.
Remarque
Le mode Configuration (SETUP MODE) (enregistrement possible)
est disponible pendant 5 minutes. Si le témoin SETUP MODE
cesse de clignoter, maintenez à nouveau la touche SETUP MODE
enfoncée jusqu’à ce que le témoin SETUP MODE commence à
clignoter.
Page 48

14 (FR)
Connectez votre ordinateur à la
Station de base pour regarder des
vidéos
1
Sur le bureau double-cliquez sur l’icône
permettant de lancer LocationFree Player.
2
Alors que le témoin SETUP MODE clignote,
sélectionnez dans la liste une Station de base
accompagnée d’une icône verte, puis cliquez
sur [Connexion].
Icône verte
Remarque
Si votre Station de base n’apparaît pas dans l’écran [Sélection
de la Station de base], votre logiciel de sécurité ou votre
navigateur empêchent peut-être toute communication entre le
LocationFree Player et la Station de base. Reportez-vous aux
modes d’emploi de votre logiciel de sécurité ou à l’aide en
ligne de votre navigateur afin de les configurer pour qu’ils ne
bloquent pas la communication.
3
Si le témoin SETUP MODE ne clignote pas,
appuyez à nouveau sur la touche SETUP
MODE pour passer en mode Configuration
(SETUP MODE) (enregistrement possible).
Lorsque le message « L’enregistrement est terminé.
Sélectionnez [OK] pour vous connecter à la Station de base
et commencer à regarder la vidéo » s’affiche, cliquez sur
[OK].
Remarque
Vérifiez que le dispositif externe est sous tension. Sinon,
l’image risque de ne pas s’afficher.
Page 49
FR
15 (FR)
Définissez les Paramètres vidéo à
l’aide de LocationFree Player
■ Configurez la télécommande virtuelle
pour la vidéo
(Pour la connexion à des dispositifs externes
comme décrit au point 3 de l’ETAPE 1 de la page 8)
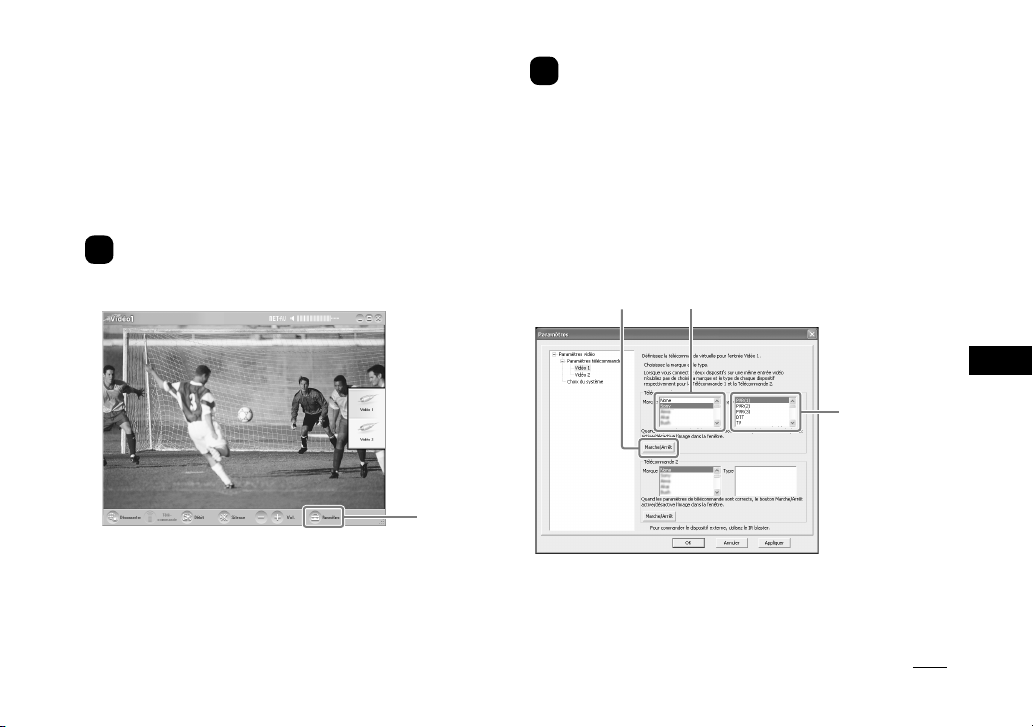
1
Cliquez n’importe où à l’intérieur de la fenêtre,
puis sélectionnez [Paramètres] dans le coin
inférieur droit de la fenêtre.
[Paramètres]
Astuce
Le bouton [Paramètres] situé dans le coin inférieur droit de la
fenêtre ne s’affiche que si vous êtes connecté à la Station de
base. Si ce n’est pas le cas, cliquez sur [Connecter] dans le coin
inférieur gauche, sélectionnez la Station de base à configurer dans
la liste qui s’affiche, cliquez sur [Propriétés], puis sur [Paramètres
vidéo].
2
Sélectionnez [Paramètres vidéo], [Paramètres
télécommande], puis [Vidéo 1] ou [Vidéo 2],
et choisissez la marque ainsi que le type du
dispositif externe connecté.
Astuce
Vous pouvez aussi utiliser des « Codes de télécommande
supplémentaires » que vous pouvez télécharger sur le site Web de
support LocationFree à l’adresse
http://www.sony.net/Products/LocationFree/support/.
Si vous ne trouvez pas les données relatives à la télécommande
virtuelle de votre dispositif externe dans la liste [Paramètres
télécommande] en cours, essayez l’adresse ci-dessus.
[Marche/Arrêt] Sélectionnez la marque.
Sélectionnez le
type.
Si la configuration ci-dessus est correcte, chaque fois que
vous cliquez sur [Marche/Arrêt], votre dispositif externe se
met sous tension ou hors tension.*
Suite
Page 50

16 (FR)
*
Après un clic sur [Marche/Arrêt], le dispositif externe peut prendre
cinq secondes ou davantage pour répondre. S’il ne répond pas,
vérifiez que la marque et le type sont corrects, puis réessayez.
Remarques
•
Même si le dispositif se met correctement sous tension et
hors tension à l’aide du bouton [Marche/Arrêt], il se peut
que les autres boutons ne soient pas activés. Si tel est le cas,
sélectionnez [Vidéo 1] ou [Vidéo 2] dans l’index. A l’aide de la
télécommande virtuelle, vérifiez que les boutons sont activés.
• Essayez tous les éléments du même type figurant dans la zone
[Type] pour sélectionner la télécommande virtuelle la mieux
adaptée.
• Les noms et numéros des touches de la télécommande
virtuelle peuvent différer de ceux de la télécommande fournie
avec votre appareil.
• Pour obtenir la dernière version des données de la
télécommande virtuelle, visitez site Web du Support clientèle
LocationFree à l’adresse
http://www.sony.net/Products/LocationFree/support/.
3
Cliquez sur [OK] pour fermer la fenêtre
[Paramètres].
Cliquez n’importe où dans la fenêtre, puis sur le type du
dispositif externe connecté. Cliquez sur [Télécommande]
afin d’afficher la télécommande virtuelle.
■ Configurez le système de couleurs pour
la vidéo
(Pour regarder une vidéo PAL/SECAM/PAL60/
NTSC)
1
Cliquez à l’intérieur de la fenêtre, puis sur
[Paramètres] dans le coin inférieur droit de la
fenêtre.
2
Sélectionnez [Paramètres vidéo], puis [Choix
du système].
Sélectionnez un système de couleurs
3
Sélectionnez un système de couleurs, puis
cliquez sur [OK].
Lorsque vous avez modifié les paramètres du système de
couleurs, la connexion NetAV est interrompue, puis rétablie
automatiquement.
Page 51

FR
17 (FR)
ETAPE
3
Configurez l’appareil
pour regarder des
vidéos en
déplacement
* Veillez à définir les paramètres avant de quitter votre domicile.
Définissez les paramètres de
Configuration facile de la Station de
base à l’aide de votre ordinateur
Si vous êtes déjà connecté via NetAV, déconnectez-vous avant de
définir les paramètres suivants.
1
Pour connecter votre ordinateur à la Station de
base à l’aide d’un routeur, mettez-la en mode
Configuration (SETUP MODE) (Reportez-vous à
la page 13).
2
Démarrez LocationFree Player, puis cliquez
sur [Régl. Station de base] dans la fenêtre
[Sélection de la Station de base].
Votre navigateur Web démarre et la page [Régl. de la
Station de base] s’ouvre.
3
Cliquez sur [Entrée].
4
Saisissez votre ID utilisateur et le mot de
passe, puis cliquez sur [OK].
Votre ID utilisateur (Nom d’utilisateur) : lfx
Mot de passe initial : WebPassword imprimé sur l’étiquette
apposée sur le côté de la Station de
base.
Suite
Page 52

18 (FR)
5
Cliquez sur [Configuration facile] dans la page
du menu des paramètres.
Astuce
Cliquez sur [Deutsch], [English], [Español], [Françias] ou
[Italiano] pour choisir votre langue.
* Pour passer au Test NetAV, suivez les instructions affichées à
l’écran. Lisez le Contrat d’utilisation de DNS dynamique dans
le Mode d’emploi, puis dans la page [Configuration NetAV],
sélectionnez la case d’option et cliquez sur [Suivant].
6
Si [Succès] s’affiche dans la page [Test NetAV],
cliquez sur [Quitter].
La configuration est terminée.
Astuces
• Si [Configuration incomplète] s’affiche dans la page [Test
NetAV], lisez l’explication fournie sur la page de vérification
NetAV, puis définissez les paramètres nécessaires.
• Si vous souhaitez enregistrer votre ordinateur sur le site
distant via Internet, suivez les instructions de la section
« Enregistrement d’appareils LocationFree sur la Station de
base via Internet » sous « Paramètres avancés de la Station de
base » dans le « Mode d’emploi », puis suivez les instructions
de la section « Enregistrement d’appareils LocationFree sur
la Station de base via Internet » sous « Visionnage de vidéos
à l’aide de LocationFree Player ».
• Pour des informations détaillées sur les [Paramètres avancés],
reportez-vous au « Mode d’emploi » accessible à partir du
menu « Démarrer » de Windows.
Ensuite
Utilisez LocationFree Player pour regarder des
vidéos.
Pour plus d’informations sur les paramètres et l’utilisation de
LocationFree Player, reportez-vous au Mode d’emploi fourni
(disponible sur le CD-ROM).
* Vous pouvez afficher le Mode d’emploi à partir du menu
[Démarrer] de Windows.
Page 53

FR
19 (FR)
Pour système PSP™
Si vous avez d’autres questions liées à l’utilisation de ce produit après la lecture de ce Guide de mise en route et du Mode d’emploi,
contactez le Centre de service après-vente Sony. Pour plus d’informations sur les contacts, reportez-vous au EUROPEAN
GUARANTEE INFORMATION DOCUMENT ou au site Web ci-dessous.
Sites Support Web LocationFree
http://www.sony.net/Products/LocationFree/support/
Pour plus d’informations sur les paramètres et l’utilisation du système PSP™, reportez-vous au « Guide de configuration et
d’utilisation du système PSP™ (PlayStation®Portable) ». Vous pouvez télécharger ce guide (fichier PDF) sur le site Support Web
LocationFree à l’adresse http://www.sony.net/Products/LocationFree/support/
Page 54

20 (FR)
Résumé de la configuration
(Vous devez effectuer cette configuration avant de partir.)
• Définissez les paramètres de Configuration facile de la Station de
base à l’aide de votre système PSP™.
ETAPE 3
Configurez l’appareil pour regarder
des vidéos en déplacement
(Reportez-vous à la page 29).
• Vérifiez la configuration réseau de la Station de base.
• Enregistrez votre système PSP™ auprès de la Station de base.
• Configurez les paramètres vidéo.
ETAPE 2
Configurez l’appareil pour regarder
des vidéos à domicile (Reportezvous à la page 23).
• Vérifiez la version du logiciel de votre système PSP™.
• Connectez-vous à vos dispositifs externes, ainsi qu’à Internet et mettez la Station de base
sous tension.
ETAPE 1
Préparez le système PSP™ et la
Station de base (Reportez-vous à la
page 22).
La configuration est
terminée
Regardez des vidéos sur votre système PSP™ à domicile ou en déplacement.
Page 55

FR
21 (FR)
ETAPE2
ETAPE3
A domicile
En déplacement
Dispositif externe Station de base Routeur
Système
PSP™
Système
PSP™
ETAPE1
Page 56

22 (FR)
ETAPE
1
Préparez le système
PSP™ et la Station
de base
Vérifiez la version du logiciel de
votre système PSP™
Pour vérifier la version du logiciel de votre système
PSP™, sélectionnez « System Settings » sous
dans le menu d’accueil, puis sélectionnez
« System Information ». Si vous ne disposez pas de
la version 2.70 ou supérieure du logiciel système,
procédez à la mise à jour.
Pour utiliser ce produit avec votre système PSP™, la version
2.70 ou supérieure est nécessaire. Pour plus d’informations sur
la mise à jour du logiciel système, visitez le site Web suivant :
(http://www.yourpsp.com/).
Connectez-vous à vos dispositifs
externes, ainsi qu’à Internet et
mettez la Station de base sous
tension. (reportez-vous à la page 8)
Page 57

FR
23 (FR)
ETAPE
2
Configurez l’appareil pour regarder des vidéos à
domicile
Vérifiez la configuration réseau de la Station de base
Pour télécharger les données de la télécommande ou mettre à jour la version du logiciel de la Station de base, vous devez la connecter
à Internet.
Connexion pour regarder des vidéos à domicile
Connexion pour regarder des vidéos en
déplacement
Modem sans fonction
de routeur
Routeur (compatible UPnP)
Station de base
Modem DSL ou câble*
vers Internet
vers port LAN
* Pour déterminer le type de votre modem, consultez votre fournisseur de services Internet.
Suite
Page 58

24 (FR)
Connexion pour regarder des vidéos à domicile
Connexion pour regarder des vidéos en
déplacement
Modem avec routeur
interne
Modem DSL ou câble avec routeur
interne (compatible UPnP)*
Station de base
vers port LAN
vers Internet
* Pour déterminer le type de votre modem, consultez votre fournisseur de services Internet.
Page 59
FR
25 (FR)
Enregistrez votre système PSP™
auprès de la Station de base
1
Mettez le système PSP™ sous tension, puis
possitionnez son commutateur du réseau sans
fil sur ON.
2
Sélectionnez sous dans le menu
d’accueil.
L’écran des paramètres d’utilisation de LocationFree Player
s’affiche. Appuyez sur la touche droite pour passer à
l’écran suivant.
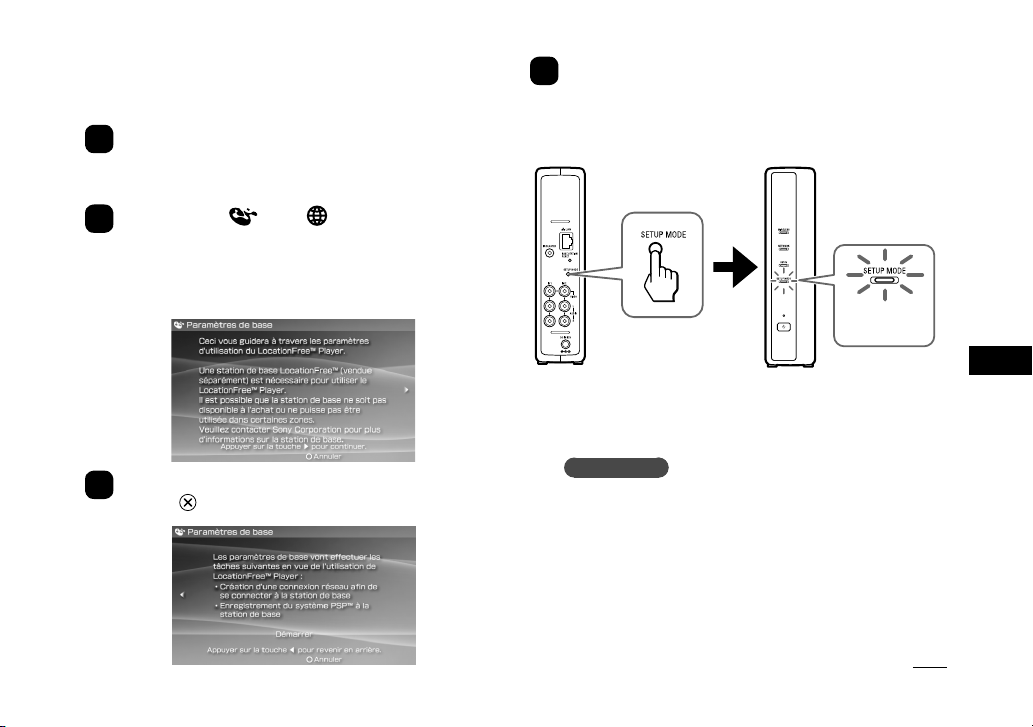
3
Sélectionnez [Démarrer], puis appuyez sur la
touche .
4
Appuyez sur la touche SETUP MODE située à
l’arrière de la Station de base.
Mettez la Station de base sous tension et maintenez la
touche enfoncée jusqu’à ce que le témoin SETUP MODE
commence à clignoter.
Témoin
SETUP MODE
Attendez que soient terminés l’enregistrement auprès de la
Station de base et l’activation des paramètres réseau
permettant d’établir une connexion entre le système PSP™
et la Station de base. Il s’agit d’une procédure automatique.
Remarques
• Lorsque le témoin SETUP MODE a clignoté pendant plus
de 5 minutes, il reste allumé et la Station de base abandonne
l’enregistrement du système PSP™. Dans ce cas, appuyez à
nouveau sur la touche SETUP MODE située à l’arrière de la
Station de base et maintenez-la enfoncée jusqu’à ce que le
témoin commence à clignoter.
• Si le message « Mise à jour de la Station de base requise »
s’affiche, vous devez mettre à jour la version du logiciel. Pour
plus d’informations, reportez-vous au mode d’emploi du LFPK1.
Suite
Page 60

26 (FR)
7
L’écran vidéo s’affiche.
Lorsque la connexion à la Station de base est établie,
l’écran vidéo apparaît.
Remarque
Vérifiez que le dispositif externe est sous tension. Sinon,
l’image risque de ne pas s’afficher.
•
Si vous ne parvenez pas à enregistrer votre système
PSP™ auprès de la Station de base, mettez à jour le
logiciel du système PSP™. Pour plus d’informations,
reportez-vous au « Guide de configuration et d’utilisation
du système PSP™ (PlayStation®Portable) ». Vous
pouvez télécharger ce guide (fichier PDF) sur le site
Support Web LocationFree à l’adresse
http://www.sony.net/Products/LocationFree/support/.
5
Vérifiez la liste des paramètres.
Appuyez sur la touche pour terminer le
paramétrage. La liste des paramètres réseau
s’affiche.
6
Connectez-vous à la Station de base.
Sélectionnez [LocationFree AP], puis appuyez sur la
touche . La connexion à la Station de base est
établie.
Page 61

FR
27 (FR)
5
Après le téléchargement, reconnectez-vous à
la Station de base.
6
Exécutez à nouveau les étapes 1 à 3.
7
Sélectionnez le fabricant du dispositif externe
connecté, puis appuyez sur la touche droite.
8
Sélectionnez le type de produit du dispositif
externe connecté, puis appuyez sur la touche
droite.
9
Testez la télécommande pour vérifier qu’elle
fonctionne, puis appuyez sur la touche droite.
Vous pouvez sélectionner [Mise sous tention] et appuyer
sur la touche pour mettre le dispositif externe sous
tension et hors tension.
Dans certains cas, la mise sous tension du dispositif externe
peut prendre jusqu’à 5 secondes après l’appui sur la touche
.
10
Enregistrez vos paramètres.
Appuyez sur la touche pour enregistrer les paramètres
dans le système PSP™.
Configurez les paramètres vidéo
■ Configurez la télécommande virtuelle
sur écran pour la vidéo
(pour la connexion à des dispositifs externes,
comme décrit au point 3 de l’ETAPE 1 à la page 9)
Vous pouvez définir les paramètres de la télécommande virtuelle
sur écran qui seront utilisés pour contrôler des dispositifs
externes tels que des décodeurs ou des enregistreurs vidéo
personnels connectés à la Station de base. Pour définir ces
paramètres, un support Memory Stick Duo™ est nécessaire.
1
Appuyez sur la touche pendant la lecture
d’une vidéo. Sélectionnez dans le panneau
de commande de LocationFree Player, puis
appuyez sur la touche .
2
Sélectionnez [Paramètres de la télécommande],
puis appuyez sur la touche .
3
Sélectionnez [Vidéo 1] ou [Vidéo 2] pour le
dispositif externe connecté que vous souhaitez
piloter à l’aide de la télécommande, puis
appuyez sur la touche .
4
Un message vous indique que vous devez
télécharger les données de la télécommande.
Sélectionnez [Oui], puis appuyez sur la touche
.
Pour télécharger les données de la télécommande sur un
Memory Stick Duo™, suivez les instructions affichées à
l’écran.
Suite
Page 62

28 (FR)
Remarques
• Même si le dispositif se met correctement sous tension et
hors tension à l’aide du bouton [Mise sous tention], il se peut
que les autres boutons ne soient pas activés. Si tel est le cas,
sélectionnez [Vidéo 1] ou [Vidéo 2] dans l’index. A l’aide
de la télécommande virtuelle, vérifiez que les boutons sont
activés.
• Essayez tous les modèles affichés à l’écran pour sélectionner
la télécommande virtuelle la mieux adaptée aux dispositifs
connectés.
• Les noms et numéros des touches de la télécommande
virtuelle peuvent différer de ceux de la télécommande fournie
avec votre appareil.
■ Configurez le système de couleurs pour
la vidéo
(Pour regarder une vidéo en PAL, SECAM, PAL60,
NTSC, etc.)
1
Appuyez sur la touche pendant la lecture
d’une vidéo. Sélectionnez dans le panneau
de commande de LocationFree Player, puis
appuyez sur la touche .
2
Sélectionnez [Paramètres avancés], puis
appuyez sur la touche .
3
Sélectionnez [Paramètres signal vidéo], puis
appuyez sur la touche .
4
Sélectionnez un système de couleurs, puis
appuyez sur la touche .
5
Sélectionnez [OK], puis appuyez sur la touche
.
Pour activer la modification des Paramètres signal vidéo,
vous devez débrancher la connexion NetAV, puis la
rebrancher.
Page 63

FR
29 (FR)
ETAPE
3
Configurez l’appareil
pour regarder des
vidéos en
déplacement
Définissez les paramètres de
Configuration facile de la Station de
base à l’aide du système PSP™
1
Vérifiez que la Station de base est sous
tension.
2
Appuyez sur la touche pendant la lecture
d’une vidéo. Sélectionnez dans le panneau
de commande de LocationFree Player, puis
appuyez sur la touche .
3
Sélectionnez [Paramètres de la Station de
base], puis appuyez sur la touche .
4
Sélectionnez [Entrée], puis appuyez sur la
touche .
5
Saisissez votre ID utilisateur et votre mot de
passe, sélectionnez [OK], puis appuyez sur la
touche .
Votre ID utilisateur (Nom d’utilisateur) : lfx (en
minuscules)
Mot de passe initial : WebPassword imprimé sur
l’autocollant de la Station de base.
Suite
Page 64

30 (FR)
6
Sélectionnez [Configuration facile], puis
appuyez sur la touche .
Astuce
Sélectionnez [Deutsch], [English], [Español], [Françias] ou
[Italiano] pour choisir votre langue.
* Pour passer au Test NetAV, suivez les instructions affichées
à l’écran. Lisez le Contrat d’utilisation de DNS dynamique
dans le Mode d’emploi, puis dans la page [Configuration
NetAV], sélectionnez la case d’option et cliquez sur
[Suivant].
7
Si [Succès] s’affiche dans l’écran [Test NetAV],
sélectionnez [Menu], puis appuyez sur la
touche .
L’affichage revient à l’écran initial. Sélectionnez [Quitter],
appuyez sur la touche , puis fermez le navigateur Internet
en appuyant sur la touche .
Astuce
Si [Configuration incomplète] s’affiche dans l’écran [Test
NetAV], sélectionnez [Détails] et appuyez sur la touche . Lisez
l’explication fournie sur cet écran et définissez les paramètres
nécessaires.
Page 65

DE
1 (DE)
Kontaktieren von Sony
Wenn Sie weitere Fragen zur Verwendung der LocationFree Basisstation
von Sony haben, auf die in der Bedienungsanleitung nicht eingegangen
wird, wenden Sie sich bitte an das Sony Kunden Informations Zentrum.
Weitere Kontaktinformationen finden Sie im EUROPEAN GUARANTEE
INFORMATION DOCUMENT.
http://www.sony.net/Products/LocationFree/support/
Wichtige Sicherheitshinweise
1) Lesen Sie die Anleitung sorgfältig durch.
2) Bewahren Sie die Anleitung gut auf.
3) Beachten Sie alle Warnhinweise.
4) Befolgen Sie alle Anweisungen.
5) Halten Sie dieses Gerät von Wasser fern.
6) Reinigen Sie das Gerät ausschließlich mit einem trockenen Tuch.
7) Blockieren Sie die Lüftungsöffnungen nicht. Stellen Sie das Gerät
gemäß den Anweisungen des Herstellers auf.
8) Stellen Sie das Gerät nicht in der Nähe von Wärmequellen, wie z.
B. Heizkörpern, Öfen oder anderen Wärme erzeugenden Geräten
(einschließlich Verstärkern), auf.
9) Achten Sie darauf, dass niemand auf das Netzkabel treten kann und
dass es nicht eingeklemmt wird. Dies ist besonders wichtig in der
Nähe von Steckern, Gerätesteckdosen und direkt am Gerät.
10) Verwenden Sie nur vom Hersteller angegebene Zubehörteile.
11) Verwenden Sie nur vom Hersteller angegebene bzw. mit dem Gerät
verkaufte Wagen, Ständer, Stative, Halterungen oder Tische. Seien Sie
besonders vorsichtig, wenn sich das Gerät auf einem Wagen befindet
und Sie diesen verschieben. Das Gerät bzw. der Wagen könnte kippen
und Verletzungen verursachen.
12) Ziehen Sie den Netzstecker des Geräts bei Gewittern oder längerem
Nichtgebrauch aus der Steckdose.
13) Überlassen Sie Wartungsarbeiten stets qualifiziertem Fachpersonal.
Wartungsarbeiten werden erforderlich, wenn das Gerät in irgendeiner
Weise beschädigt wurde, beispielweise wenn das Netzkabel oder der
Netzstecker beschädigt ist, Flüssigkeit auf dem Gerät verschüttet
wurde, Fremdkörper in das Gerät gelangt sind oder das Gerät Regen
oder sonstiger Feuchtigkeit ausgesetzt wurde, nicht ordnungsgemäß
funktioniert oder fallen gelassen wurde.
14) Achten Sie bitte darauf, dass die Netzsteckdose leicht zugänglich ist.
15)
Wenn Sie einen Herzschrittmacher oder ein anderes medizinisches Gerät
tragen, fragen Sie bitte beim Arzt oder beim Hersteller des medizinischen
Geräts nach, bevor Sie die Wireless-LAN-Funktion nutzen.
16) Schließen Sie keine ungeeigneten Netzwerk- oder Telefonleitungen
an den LAN-Anschluss an. Schließen Sie ausschließlich 100BASETX/10BASE-T-Kabel an den LAN-Anschluss an. Wenn Sie
Informationen zum Anschließen an ein Netzwerk benötigen, wenden
Sie sich an Ihren Netzwerkadministrator.
17) UM DIE GEFAHR EINES ELEKTRISCHEN SCHLAGS ZU
VERRINGERN, NEHMEN SIE DIE ABDECKUNG BZW.
RÜCKWAND NICHT AB.
Wichtige Sicherheitsinformationen
Fortsetzung
Page 66

2 (DE)
IM INNEREN BEFINDEN SICH KEINE TEILE, DIE SIE SELBST
REPARIEREN KÖNNEN.
ÜBERLASSEN SIE WARTUNGSARBEITEN STETS
QUALIFIZIERTEM FACHPERSONAL.
18) Schützen Sie dieses Gerät vor Feuchtigkeit. Achten Sie darauf, dass
keinerlei Flüssigkeit in das Gerät gelangt. Wenn Flüssigkeiten oder
Fremdkörper in das Gerät gelangt sind, dürfen Sie es nicht mehr
benutzen. Andernfalls kann es zu einem elektrischen Schlag kommen
und das Gerät kann beschädigt werden.
19) Stellen Sie keine Gegenstände mit offenen Flammen, wie z. B.
brennende Kerzen, auf das Gerät.
20) Dieses Gerät muss mit einem Abstand von mindestens 20 cm
zwischen dem Sender und Personen (nicht Gliedmaßen wie Händen,
Handgelenken, Beinen und Füßen) installiert und betrieben werden.
* Dieser Sender darf nicht in unmittelbarer Nähe oder zusammen
mit einer anderen Antenne oder einem anderen Sender eingesetzt
werden.
21) Alle Änderungen am Gerät, die in dieser Anleitung nicht ausdrücklich
als zulässig beschrieben sind, können dazu führen, dass die
Genehmigung zur Inbetriebnahme dieses Geräts erlischt.
Hinweis: Interferenzen durch andere
elektromagnetische Geräte
Dieses Produkt kann durch starke elektromagnetische Interferenzen
beeinträchtigt werden, so dass Ton- und Bildstörungen auftreten. Bei
Problemen gehen Sie bitte folgendermaßen vor:
–
Überprüfen Sie, ob sich ein Gerät in der Nähe befindet, das
elektromagnetische Interferenzen verursacht, z. B. ein Mikrowellenherd oder
ein schnurloses Telefon.
–
Richten Sie das Gerät oder die Basisstation neu aus oder stellen Sie die
Geräte an einen anderen Ort.
–
Stellen Sie das Gerät und die Basisstation weiter entfernt voneinander auf.
Hinweis für Kunden in Großbritannien und der
Republik Irland
Dieses Gerät ist aus Sicherheitsgründen mit einem Kunststoffstecker nach
BS1363 ausgestattet. Sollte es erforderlich werden, die Sicherung im
mitgelieferten Stecker auszutauschen, ist eine 5-AMP-Sicherung nach ASTA
oder BSI bis BS1362 (mit dem Zeichen oder ) zu verwenden.
Wenn die Sicherungsabdeckung an dem mit diesem Gerät gelieferten Stecker
abgenommen werden kann, muss die Sicherungsabdeckung nach dem
Austauschen der Sicherung unbedingt wieder angebracht werden. Verwenden Sie
den Stecker nie ohne die Sicherungsabdeckung. Sollte die Sicherungsabdeckung
verloren gehen, wenden Sie sich bitte an den Sony-Kundendienst.
Hinweis für Kunden in Frankreich
Die RLAN-Funktion der LF-B1 darf ausschließlich innerhalb von
Gebäuden verwendet werden. Jegliche Verwendung von RLAN mit einer
Leistung von über 10 mW im gesamten Frequenzbereich von 2.400-
2.483,5 MHz außerhalb von Gebäuden ist auf französischem Territorium
(einschließlich französischer Übersee-Departements) nicht gestattet (ART
Decision 2002-1009 ergänzt durch ART Decision 03-908 in Bezug auf
Einschränkungen im Gebrauch von Radiofrequenzen).
Hinweis für Kunden in Italien
Die Verwendung des oben genannten Geräts unterliegt den Gesetzen Italiens.
–
D. Lgs 1.8.2003, Nr. 259, Art. 104 (Aktivität unterliegt allgemeiner
Autorisierung) und Art. 105 (freier Gebrauch) sowie für privaten Gebrauch;
–
D.M. 28.5.03, wie ergänzt, für die Gewährung von Zugang zu R-LANNetzwerken und -Diensten für die Öffentlichkeit.
Hinweis für Kunden in Norwegen
Die Verwendung dieses Funkgeräts ist in einem Umkreis von 20 km um
das Zentrum von Ny-Ålesund, Svalbard, nicht erlaubt.
Entsorgung von gebrauchten elektrischen und
elektronischen Geräten
(anzuwenden in den Ländern der Europäischen Union und anderen
europäischen Ländern mit einem separaten Sammelsystem für diese Geräte)
Das Symbol auf dem Produkt oder seiner Verpackung
weist darauf hin, dass dieses Produkt nicht als normaler
Haushaltsabfall zu behandeln ist, sondern an einer
Annahmestelle für das Recycling von elektrischen und
elektronischen Geräten abgegeben werden muss. Durch Ihren
Beitrag zum korrekten Entsorgen dieses Produkts schützen
Sie die Umwelt und die Gesundheit Ihrer Mitmenschen.
Umwelt und Gesundheit werden durch falsches Entsorgen
gefährdet. Materialrecycling hilft, den Verbrauch von
Rohstoffen zu verringern. Weitere Informationen über das
Recycling dieses Produkts erhalten Sie von Ihrer Gemeinde,
den kommunalen Entsorgungsbetrieben oder dem Geschäft,
in dem Sie das Produkt gekauft haben.
Page 67

DE
3 (DE)
Wichtige Sicherheitsinformationen ................................................. 1
Inhalt .................................................................................................. 3
Für PC ................................................................................................ 4
Konfigurationsübersicht .............................................................................................. 5
SCHRITT 1 Auspacken und Installieren der Software ................................................ 7
SCHRITT 2 Konfigurieren des Systems zum Anschauen von Videos zu Hause ...... 11
SCHRITT 3
Konfigurieren des Systems zum Anschauen von Videos unterwegs ......17
Für PSP™-System .......................................................................... 19
Konfigurationsübersicht (Diese Konfiguration müssen Sie vornehmen,
bevor Sie das Haus verlassen.) .......................................................................... 20
SCHRITT 1 Vorbereiten des PSP™-Systems und der Basisstation .......................... 22
SCHRITT 2 Konfigurieren des Systems zum Anschauen von Videos zu Hause ...... 23
SCHRITT 3 Konfigurieren des Systems zum Anschauen von Videos unterwegs ..... 29
„SONY“ ist ein eingetragenes Markenzeichen der Sony Corporation.
„LocationFree“ ist ein Markenzeichen der Sony Corporation.
„PlayStation“ und „PSP“ sind Markenzeichen oder eingetragene Markenzeichen der Sony Computer Entertainment Inc.
„Memory Stick Duo“ ist ein Markenzeichen der Sony Corporation.
Microsoft und Windows sind eingetragene Markenzeichen der Microsoft Corporation in den USA und/oder anderen Ländern.
Alle anderen Namen von Systemen, Produkten und Diensten sind Markenzeichen der entsprechenden Eigentümer.
In dieser Anleitung sind nicht alle Produkte mit ™ bzw. ® gekennzeichnet.
Inhalt
Page 68
4 (DE)
Für PC
* Weitere Informationen finden Sie in der „Bedienungsanleitung“, auf die Sie über das WindowsMenü „Start“ zugreifen können.
Wenn Sie weitere Fragen zur Verwendung dieses Systems haben, auf die in dieser Kurzanleitung und in der Bedienungsanleitung nicht
eingegangen wird, wenden Sie sich bitte an das Sony Kunden Informations Zentrum. Weitere Kontaktinformationen finden Sie im
EUROPEAN GUARANTEE INFORMATION DOCUMENT.
Außerdem finden Sie weitere Informationen und die neueste Version für die Fernbedienung auf dem Bildschirm auf der LocationFree
Support-Website unter http://www.sony.net/Products/LocationFree/support/.
Page 69

DE
5 (DE)
Konfigurationsübersicht
Fortsetzung
• Schnellkonfiguration der Basisstation über den Computer.
SCHRITT 3
Konfigurieren des Systems zum
Anschauen von Videos unterwegs
(siehe Seite 17).
• Verbinden von Computer und Basisstation.
• Schalten der Basisstation in den Konfigurationsmodus (SETUP MODE).
• Verbinden von Computer und Basisstation für die Videoanzeige.
• Vornehmen von Videoeinstellungen mit LocationFree Player.
SCHRITT 2
Konfigurieren des Systems zum
Anschauen von Videos zu Hause
(siehe Seite 11).
Konfiguration
abgeschlossen
Nun können Sie am Computer zu Hause oder unterwegs Videos anschauen.
• Auspacken.
• Herstellen einer Verbindung zu den externen Geräten und zum Internet und Einschalten
der Basisstation.
• Installieren der LocationFree Player-Software auf dem Computer.
SCHRITT 1
Auspacken und Installieren der
Software (siehe Seite 7).
Page 70

6 (DE)
SCHRITT2, 3
Zu Hause
Unterwegs
Externes Gerät Basisstation Router
Computer* Computer*
Computer*
Computer*
SCHRITT1
* Computer mit LocationFree Player.
Page 71

DE
7 (DE)
SCHRITT
1
Auspacken und
Installieren der
Software
Auspacken
Überprüfen Sie, ob Folgendes mitgeliefert wurde:
• Basisstation (LF-B1)
• CD-ROM mit LocationFree Player-Software (enthält
LocationFree Player-Software*1, Bedienungsanleitung*2,
Nutzungsbedingungen für dynamisches DNS und Lizenz)
(LFA-PC2)
*
1
Ein „Serial Key“ für LocationFree Player wird mitgeliefert.
*
2
Die „Bedienungsanleitung“ in anderen Sprachen als Englisch,
Deutsch, Französisch, Italienisch und Spanisch finden Sie auf der
CD-ROM.
• Netzteil (AC-LX1B)
• Netzkabel
• IR Blaster (IR Sender) (VM-50)
• Scart-A/V-Kabel
• A/V-Kabel (Cinchkabel)
• Ständer der Basisstation
• Kurzanleitung
•
EUROPEAN GUARANTEE INFORMATION DOCUMENT
Page 72

8 (DE)
Herstellen einer Verbindung zu den
externen Geräten und zum Internet
und Einschalten der Basisstation
1
Bringen Sie den Ständer an der Basisstation
an.
HakenMarkierung
„FRONT“
Bohrungen
Ständer
2
Schließen Sie die externen Geräte (DVD-Player usw.) an.
Scart-A/V-Kabel
(mitgeliefert)
Fernsehgerät
Scart-Kabel
(nicht mitgeliefert)
Anschlussdose
Externes Gerät (Set-Top-Box,
Personal Video Recorder usw.)
Page 73

DE
9 (DE)
3
Schließen Sie den IR Blaster an, so dass er auf den
Fernbedienu
ngssensor an den externen Geräten
weist.
5
Schließen Sie das Netzkabel an die
Basisstation an.
6
Schalten Sie das Gerät ein.
Rückseite der Basisstation
IR Blaster
(mitgeliefert)
Infrarotsender
Fernbedienungssensor
Netzteil AC-LX1B
(mitgeliefert)
Netzkabel
(mitgeliefert)
Leuchtet
POWER-Anzeige
4
Schließen
Sie ein LANKabel (nicht
mitgeliefert) an.
Erläuterungen
dazu finden
Sie in den
Anschlussbeispielen in
SCHRITT 2
(Seite 11).
A/V-Kabel (Cinchkabel,
mitgeliefert)
oder
Typ BF
Typ C-6
Externes Gerät (Set-Top-Box,
Personal Video Recorder usw.)
Page 74

10 (DE)
Installieren der LocationFree PlayerSoftware auf dem Computer
1
Legen Sie die CD-ROM mit der LocationFree
Player-Software in das CD-ROM-Laufwerk am
Computer ein.
Der Installationsbildschirm erscheint.
2
Wählen Sie die gewünschte Sprache aus und
klicken Sie auf [Weiter].
3
Klicken Sie auf [Weiter].
4
Lesen Sie den Lizenzvertrag, wählen Sie [Ich
habe die Bestimmungen des Lizenzvertrags
gelesen] und klicken Sie auf [Weiter].
5
Geben Sie den „Serial Key“ auf dem Aufkleber
ein und klicken Sie auf [Weiter].
6
Akzeptieren Sie den Installationsordner und
klicken Sie auf [Weiter]. Oder wählen Sie einen
anderen Installationsordner, indem Sie auf
[Ändern] klicken und einen Ordner wählen.
7
Klicken Sie auf [Installation].
Die Installation beginnt.
8
Klicken Sie auf [Fertigstellen], wenn die
Installation abgeschlossen ist.
Nach der Installation erscheinen auf dem ComputerDesktop Verknüpfungen für LocationFree Player, die
Bedienungsanleitung (PDF-Datei)*1 und „LocationFree
RC_DATA“*2.
*
1
Die „Bedienungsanleitung“ in anderen Sprachen als Englisch,
Deutsch, Französisch, Italienisch und Spanisch finden Sie auf der CDROM.
*
2
Über die Verknüpfung „LocationFree RC_DATA“ erreichen Sie den
zusätzliche Fernbedienungscodes. Einzelheiten dazu finden Sie auf
Seite 15.
Page 75

DE
11 (DE)
SCHRITT
2
Konfigurieren des Systems zum Anschauen von
Videos zu Hause
Verbinden von Computer und Basisstation
Verbinden von Computer und Basisstation über einen Router
Modem ohne Router-Funktion
Verbindung zum Anschauen von Videos zu Hause
Verbindung zum Anschauen von Videos
außer Haus
* Wenn Sie den Typ Ihres Modems nicht kennen, fragen Sie bei Ihrem Internet-
Service-Provider nach.
• Stellen Sie eine Funkverbindung zum Router oder zur Basisstation her.
Router (UPnP-kompatibel)
Basisstation
• Stellen Sie die
Verbindung zum
Router über ein
Kabelne tzwerk her.
an
LAN-Anschluss
ans Internet
Fortsetzung
DSL- oder Kabelmodem*
Page 76

12 (DE)
Verbinden von Computer und Basisstation über einen Router
• Stellen Sie eine Funkverbindung zum Router oder zur Basisstation her.
Verbindung zum Anschauen von Videos zu Hause
Verbindung zum Anschauen von Videos
außer Haus
Modem mit internem Router
• Stellen Sie die
Verbindung zum
Router über ein
Kabelne tzwerk her.
an
LAN-Anschluss
DSL- oder Kabelmodem mit
internem Router (UPnP-kompatibel)*
ans Internet
Basisstation
* Wenn Sie den Typ Ihres Modems nicht kennen, fragen Sie bei Ihrem Internet-Service-Provider nach.
Page 77

DE
13 (DE)
Überprüfen Sie die NETWORK-Anzeige an der
Basisstation.
Überprüfen Sie, ob die NETWORK-Anzeige an der Basisstation
leuchtet. Wenn sie nicht leuchtet:
Vergewissern Sie sich, dass der Router eingeschaltet und das
LAN-Kabel korrekt angeschlossen ist.
Schalten der Basisstation in den
Konfigurationsmodus (SETUP
MODE) (Registrierung möglich)
Halten Sie den SETUP MODE-Knopf an der
Rückseite der Basisstation gedrückt, bis die
SETUP MODE-Anzeige zu blinken beginnt.
Tipp
Nehmen Sie alle Einstellungen bis „Verbinden von Computer und
Basisstation für die Videoanzeige (Seite 14)“ bei blinkender SETUP
MODE-Anzeige vor.
Hinweis
Der Konfigurationsmodus (SETUP MODE) (Registrierung möglich)
besteht 5 Minuten lang. Wenn die SETUP MODE-Anzeige zu
blinken aufhört, halten Sie den SETUP MODE-Knopf nochmals
gedrückt, bis die SETUP MODE-Anzeige wieder zu blinken beginnt.
Page 78

14 (DE)
Verbinden von Computer und
Basisstation für die Videoanzeige
1
Doppelklicken Sie zum Starten von
LocationFree Player auf das Desktop-Symbol
.
2
Wählen Sie bei blinkender SETUP MODE-
Anzeige eine Basisstation aus der Liste, und
zwar eine mit einem grünen Symbol, und
klicken Sie auf [Verbinden].
Grünes Symbol
Hinweis
Wenn Ihre Basisstation nicht auf dem Bildschirm [Auswahl der
Basisstation] erscheint, blockiert Ihre Sicherheitssoftware oder
der Browser möglicherweise die Kommunikation zwischen
LocationFree Player und der Basisstation. Schlagen Sie in
der Bedienungsanleitung zur Sicherheitssoftware bzw. in der
Online-Hilfe zum Browser nach oder konfigurieren Sie sie so,
dass die Kommunikation nicht blockiert wird.
3
Wenn die SETUP MODE-Anzeige nicht
blinkt, drücken Sie den SETUP MODE-Knopf
nochmals, um in den Konfigurationsmodus
(SETUP MODE) zu wechseln (Registrierung
möglich).
Wenn die Meldung „Registrierung abgeschlossen. Wählen
Sie [OK], um eine Verbindung zur Basisstation herzustellen
und Videos anzuschauen.“ erscheint, klicken Sie auf [OK].
Hinweis
Vergewissern Sie sich, dass das externe Gerät eingeschaltet ist.
Andernfalls ist kein Bild zu sehen.
Page 79

DE
15 (DE)
Vornehmen von Videoeinstellungen
mit LocationFree Player
■ Konfigurieren der Fernbedienung auf
dem Bildschirm für Video
(für die Verbindung zu externen Geräten in
SCHRITT 1 auf Seite 8)
1
Klicken Sie auf eine beliebige Stelle im Fenster
und dann auf [Einstellungen] unten rechts im
Fenster.
[Einstellungen]
Tipp
[Einstellungen] erscheint nur dann untenr echts im Fenster,
wenn eine Verbindung zur Basisstation besteht. Ist dies nicht
der Fall, klicken Sie auf [Verbinden] unten links, wählen
Sie die zu konfigurierende Basisstation in der daraufhin
angezeigten Liste aus, klicken Sie auf [Eigenschaften] und
dann auf [Videoeinstellungen].
2
Wählen Sie [Videoeinstellungen],
[Fernbedienung], [Video 1] oder [Video 2] und
wählen Sie dann Hersteller und Modell des
angeschlossenen externen Geräts aus.
Tipp
Sie können auch den „zusätzliche Fernbedienungscodes“ auf
der LocationFree Support-Website unter http://www.sony.
net/Products/LocationFree/support/ nutzen.
Wenn Sie die Daten der Fernbedienung auf dem Bildschirm für
das externe Gerät in der aktuellen Liste [Fernbedienungseinstel
lungen] nicht finden können, versuchen Sie sie von der Website
herunterzuladen.
[Ein/Aus] Wählen Sie den Hersteller.
Wählen Sie
das Modell.
Ist die Konfiguration korrekt, schaltet sich das externe
Gerät bei jedem Klicken auf [Ein/Aus] ein bzw. aus.*
Fortsetzung
Page 80

16 (DE)
* Nach dem Klicken auf [Ein/Aus] dauert es mindestens fünf
Sekunden, bis das externe Gerät reagiert. Wenn es nicht
reagiert, vergewissern Sie sich, dass Hersteller und Modell
korrekt sind, und versuchen Sie es noch einmal.
Hinweise
•
Auch wenn sich das Gerät mit [Ein/Aus] wie gewünscht einbzw. ausschalten lässt, werden andere Tasten möglicherweise
nicht aktiviert. Wählen Sie in diesem Fall [Video 1] oder
[Video 2] aus dem Index. Überprüfen Sie mit der
Fernbedienung auf dem Bildschirm, ob die Tasten aktiviert sind.
• Probieren Sie alle Gerätetypen im Feld [Modell] aus, um für
die angeschlossenen Geräte die geeignetste Fernbedienung
auf dem Bildschirm auszuwählen.
• Die Tastennamen und –nummern der Fernbedienung auf
dem Bildschirm können sich von denen der mit dem Gerät
gelieferten Fernbedienung unterscheiden.
• Die neueste Version für die Fernbedienung auf dem
Bildschirm finden Sie auf der LocationFree Support-Website
unter http://www.sony.net/Products/LocationFree/support/.
3
Klicken Sie auf [OK], um das Fenster
[Einstellungen] zu schließen.
Klicken Sie auf eine beliebige Stelle im Fenster und dann
auf das Modell des angeschlossenen externen Geräts.
Klicken Sie auf [Fernbedienung], so dass die
Fernbedienung auf dem Bildschirm erscheint.
■ Konfigurieren des Farbsystems für
Videos
(zum Anschauen von PAL-/SECAM-/PAL60-/NTSCVideos)
1
Klicken Sie auf eine beliebige Stelle im Fenster
und dann auf [Einstellungen] unten rechts im
Fenster.
2
Wählen Sie [Videoeinstellungen] und dann
[Farbsystemeinstellungen].
Wählen Sie das Farbsystem.
3
Wählen Sie ein Farbsystem aus und klicken Sie
auf [OK].
Wenn Sie die Farbsystemeinstellungen geändert haben,
wird die NetAV-Verbindung getrennt und anschließend
automatisch wiederhergestellt.
Page 81

DE
17 (DE)
SCHRITT
3
Konfigurieren des
Systems zum
Anschauen von
Videos unterwegs
* Diese Einstellungen müssen Sie vornehmen, bevor Sie das Haus
verlassen.
Schnellkonfiguration der
Basisstation über den Computer
Wenn eine NetAV-Verbindung besteht, trennen Sie diese, bevor
Sie die folgenden Einstellungen vornehmen.
1
Um den Computer über einen Router mit der
Basisstation zu verbinden, schalten Sie die
Basisstation in den Konfigurationsmodus
(SETUP MODE) (siehe Seite 13).
2
Starten Sie LocationFree Player und klicken
Sie auf [Einst. Basisstation] im Fenster
[Auswahl der Basisstation].
Der Webbrowser startet und die Seite [Einst. Basisstation]
wird geöffnet.
3
Klicken Sie auf [Eingabe].
4
Geben Sie Benutzername und Kennwort ein
und klicken Sie auf [OK].
Benutzername: lfx
Anfängliches Kennwort: WebPassword auf dem Aufkleber
an der Seite der Basisstation.
Fortsetzung
Page 82

18 (DE)
5
Klicken Sie im Einstellungsmenü auf
[Schnellkonfiguration].
Tipp
Wählen Sie durch Klicken auf [Deutsch], [English], [Español],
[Français] oder [Italiano] die gewünschte Sprache.
* Gehen Sie nach den Anweisungen auf dem Bildschirm vor,
bis Sie zur NetAV-Prüfung gelangen.
Lesen Sie in der Bedienungsanleitung die
Nutzungsbedingungen für dynamisches DNS, wählen Sie
dann auf der Seite [NetAV-Konfiguration] das Optionsfeld
aus und klicken Sie auf [Weiter].
6
Wenn [Erfolgreich] auf der Seite [NetAV-
Prüfung] angezeigt wird, klicken Sie auf
[Beenden].
Damit ist die Konfiguration abgeschlossen.
Tipps
• Wenn [Konfiguration unvollständig] auf der Seite [NetAVPrüfung] angezeigt wird, lesen Sie bitte die Erläuterungen
auf der NetAV-Prüfungsseite und nehmen Sie die nötigen
Einstellungen vor.
•
Wenn Sie den Computer an einem fernen Standort über
das Internet registrieren wollen, gehen Sie wie in den
Anweisungen unter „Registrieren von LocationFree
Geräten bei der Basisstation über das Internet“ unter
„Weitere Einstellungen für die Basisstation“ in der
„Bedienungsanleitung“ erläutert vor. Anschließend befolgen
Sie die Anweisungen unter „Registrieren von LocationFree
Geräten bei der Basisstation über das Internet“ unter
„Anschauen vonVideos mit LocationFree Player“.
• Ausführliche Informationen zu [Erweiterte Konfiguration]
finden Sie in der „Bedienungsanleitung“, auf die Sie über das
Windows-Menü „Start“ zugreifen können.
Im Anschluss
Nun können Sie mit LocationFree Player Videos
anschauen.
Erläuterungen zu den Einstellungen und zum Betrieb von
LocationFree Player finden Sie in der mitgelieferten
Bedienungsanleitung (auf der mitgelieferten CD-ROM
enthalten).
* Sie können die Bedienungsanleitung über das Windows-Menü
[Start] aufrufen.
Page 83

DE
19 (DE)
Für PSP™-System
Wenn Sie weitere Fragen zur Verwendung dieses Systems haben, auf die in dieser Kurzanleitung und in der Bedienungsanleitung nicht
eingegangen wird, wenden Sie sich bitte an das Sony Kunden Informations Zentrum. Weitere Kontaktinformationen finden Sie im
EUROPEAN GUARANTEE INFORMATION DOCUMENT auf der folgenden Website.
LocationFree Support-Website
http://www.sony.net/Products/LocationFree/support/
Erläuterungen zu den Einstellungen und zum Betrieb des PSP™-Systems finden Sie im Handbuch „Konfigurations- und
Gebrauchsanleitung für PSP-system (PlayStation®Portable)“. Sie können dieses Handbuch (PDF-Datei) von der LocationFree
Support- Website unter http://www.sony.net/Products/LocationFree/support/ herunterladen.
Page 84

20 (DE)
Konfigurationsübersicht
(Diese Konfiguration müssen Sie vornehmen, bevor Sie das Haus verlassen.)
• Schnellkonfiguration der Basisstation über das PSP™-System.
SCHRITT 3
Konfigurieren des Systems zum
Anschauen von Videos unterwegs
(siehe Seite 29)
• Überprüfen der Netzwerkkonfiguration für die Basisstation.
• Registrieren Ihres PSP™-System bei der Basisstation.
• Vornehmem von Videoeinstellungen.
SCHRITT 2
Konfigurieren des Systems zum
Anschauen von Videos zu Hause
(siehe Seite 23)
• Überprüfen der Softwareversion Ihres PSP™-Systems.
• Herstellen einer Verdindung zu den externen Garäten und zum Internet und Einschalten
der Basisstation.
SCHRITT 1
Vorbereiten des PSP™-Systems und
der Basisstation (siehe Seite 22)
Konfiguration
abgeschlossen
Nun können Sie am PSP™-System zu Hause oder unterwegs Videos
anschauen.
Page 85

DE
21 (DE)
SCHRITT 2
SCHRITT 3
Zu Hause
Unterwegs
Externes Gerät Basisstation Router
PSP™System
PSP™-system
SCHRITT 1
Page 86

22 (DE)
SCHRITT
1
Vorbereiten des
PSP™-Systems und
der Basisstation
Überprüfen der Softwareversion
Ihres PSP™-Systems
Zum Anzeigen der Softwareversion Ihres
PSP™-Systems wählen Sie „SystemEinstellungen“ unter im Home-Menü und
anschließend „Systeminformation“. Wenn Ihre
Systemsoftwareversion nicht 2.70 oder höher ist,
führen Sie eine Aktualisierung durch.
Wenn Sie dieses Produkt mit dem PSP™-System einsetzen
wollen, ist Version 2.70 oder höher erforderlich. Einzelheiten
zum Aktualisieren der Systemsoftware finden Sie unter
(http://www.yourpsp.com/).
Herstellen einer Verbindung zu den
externen Geräten und zum Internet
und Einschalten der Basisstation.
(siehe Seite 9).
Page 87

DE
23 (DE)
SCHRITT
2
Konfigurieren des Systems zum Anschauen von
Videos zu Hause
Überprüfen der Netzwerkkonfiguration für die Basisstation
Wenn Sie Fernbedienungsdaten herunterladen oder die Softwareversion der Basisstation aktualisieren wollen, müssen Sie die
Basisstation mit dem Internet verbinden.
Verbindung zum Anschauen von Videos zu Hause
Verbindung zum Anschauen von Videos außer
Haus
Modem ohne Router-Funktion
Router (UPnP-kompatibel)
Basisstation
DSL- oder Kabelmodem*
ans Internet
an LAN-Anschluss
* Wenn Sie den Typ Ihres Modems nicht kennen, fragen Sie bei Ihrem Internet-Service-Provider nach.
Fortsetzung
Page 88

24 (DE)
Verbindung zum Anschauen von Videos zu Hause
Verbindung zum Anschauen von Videos außer
Haus
Modem mit internem Router
DSL- oder Kabelmodem mit internem
Router (UPnP-kompatibel)*
Basisstation
an LAN-Anschluss
ans Internet
* Wenn Sie den Typ Ihres Modems nicht kennen, fragen Sie bei Ihrem Internet-Service-Provider nach.
Page 89

DE
25 (DE)
Registrieren Ihres PSP™-Systems
bei der Basisstation
1
Schalten Sie das PSP™-System und dann den
Wireless-LAN-Schalter des PSP™-Systems ein.
2
Wählen Sie unter im Home-Menü.
Der Einstellungsbildschirm für die Verwendung von
LocationFree Player wird angezeigt. Drücken Sie die
Rechts-Taste, um zum nächsten Bildschirm zu schalten.
3
Wählen Sie [Starten] und drücken Sie die
-Taste.
4
Drücken Sie den SETUP MODE-Knopf an der
Rückseite der Basisstation.
Halten Sie den Knopf bei eingeschalteter Basisstation
gedrückt, bis die SETUP MODE-Anzeige zu blinken
beginnt.
SETUP
MODE-Anzeige
Warten Sie, bis die Registrierung bei der Basisstation
abgeschlossen ist und die Netzwerkeinstellungen für die
Verbindung zwischen dem PSP™-System und
der Basisstation vorgenommen wurden. Dies erfolgt
automatisch.
Hinweise
• Wenn die SETUP MODE-Anzeige nach mehr als 5
Minuten nicht mehr blinkt, sondern stetig leuchtet, wurde
die Registrierung des PSP™-Systems bei der Basisstation
abgebrochen. Drücken Sie in diesem Fall erneut den SETUP
MODE-Knopf an der Rückseite der Basisstation und halten
Sie den Knopf gedrückt, bis die Anzeige wieder zu blinken
beginnt.
Fortsetzung
Page 90

26 (DE)
7
Der Videobildschirm wird angezeigt.
Wenn eine Verbindung zur Basisstation hergestellt wurde,
wird der Videobildschirm angezeigt.
Hinweis
Vergewissern Sie sich, dass das Externe Gerät
eingeschaltet ist. Andernfalls ist kein Bild zu sehen.
•
Wenn die Meldung „Basisstation muss aktualisiert
werden“ angezeigt wird, müssen Sie die Softwareversion
aktualisieren. Einzelheiten dazu finden Sie in der
Bedienungsanleitung zum LF-PK1.
•
Wenn Sie die Registrierung des PSP™-Systems bei der
Basisstation nicht abschließen können, aktualisieren
Sie die Software des PSP™-Systems. Einzelheiten
dazu finden Sie im Handbuch „Konfigurationsund Gebrauchsanleitung für PSP-system
(PlayStation®Portable)“. Sie können dieses Handbuch
(PDF-Datei) von der LocationFree Support-Website unter
http://www.sony.net/Products/LocationFree/support/
herunterladen.
5
Überprüfen Sie die Liste mit den
Einstellungen.
Drücken Sie die -Taste, um die Einstellungen
abzuschließen. Eine Liste mit den
Netzwerkeinstellungen wird angezeigt.
6
Stellen Sie eine Verbindung zur
Basisstation her.
Wählen Sie [LocationFree AP] und drücken Sie die
-Taste. Eine Verbindung zur Basisstation wird
hergestellt.
Page 91

DE
27 (DE)
5
Nach dem Herunterladen stellen Sie die
Verbindung zur Basisstation wieder her.
6
Führen Sie Schritt 1 bis 3 erneut aus.
7
Wählen Sie den Hersteller des
angeschlossenen externen Geräts aus und
drücken Sie die Rechts-Taste.
8
Wählen Sie den Produkttyp des
angeschlossenen externen Geräts aus und
drücken Sie die Rechts-Taste.
9
Testen Sie, ob die Fernbedienung funktioniert,
und drücken Sie die Rechts-Taste.
Wenn Sie [Power] wählen und dann die -Taste drücken,
können Sie das externe Gerät ein- und ausschalten.
In einigen Fällen kann es bis zu 5 Sekunden dauern, bis
sich das externe Gerät nach dem Drücken der -Taste
einschaltet.
10
Speichern Sie die Einstellungen.
Drücken Sie die -Taste, um die Einstellungen am PSP™System zu speichern.
Vornehmen von Videoeinstellungen
■ Konfigurieren der Fernbedienung auf
dem Bildschirm für Video
(für die Verbindung zu externen Geräten, wie in 3
unter SCHRITT 1 auf Seite 9 erläutert)
Sie können Einstellungen für die Fernbedienung auf dem
Bildschirm vornehmen und dann externe Geräte wie eine SetTop-Box oder einen Personal Video Recorder, die an die
Basisstation angeschlossen sind, bedienen. Zum Vornehmen
dieser Einstellungen ist ein Memory Stick Duo™ erforderlich.
1
Drücken Sie während der Videowiedergabe die
-Taste. Wählen Sie auf dem LocationFree
Player-Kontrollmenü und drücken Sie die
-Taste.
2
Wählen Sie [Fernbedienung-Einstellungen] und
drücken Sie die -Taste.
3
Wählen Sie [Video 1] oder [Video 2] für das
angeschlossene externe Gerät, das Sie mit der
Fernbedienung steuern wollen, und drücken
Sie die -Taste.
4
Eine Meldung erscheint, dass Sie
Fernbedienungsdaten herunterladen müssen.
Wählen Sie [Ja] und drücken Sie die -Taste.
Befolgen Sie die Anweisungen auf dem Bildschirm und
laden Sie die Fernbedienungsdaten auf den Memory Stick
Duo™ herunter.
Fortsetzung
Page 92

28 (DE)
Hinweise
• Auch wenn sich das Gerät mit [Power] wie gewünscht einbzw. ausschalten lässt, werden andere Tasten möglicherweise
nicht aktiviert. Wählen Sie in diesem Fall [Video 1]
oder [Video 2] aus dem Index. Überprüfen Sie mit der
Fernbedienung auf dem Bildschirm, ob die Tasten aktiviert
sind.
• Probieren Sie alle auf dem Bildschirm angezeigten Modelle
aus, um für die angeschlossenen Geräte die geeignetste
Fernbedienung auf dem Bildschirm auszuwählen.
• Die Tastennamen und –nummern der Fernbedienung auf
dem Bildschirm können sich von denen der mit dem Gerät
gelieferten Fernbedienung unterscheiden.
■ Konfigurieren des Farbsystems für
Videos
(zum Anschauen von Videos im PAL-, SECAM-,
PAL60-, NTSC-Format usw.)
1
Drücken Sie während der Videowiedergabe die
-Taste. Wählen Sie auf dem LocationFree
Player-Kontrollmenü und drücken Sie die
-Taste.
2
Wählen Sie [Erweiterte Einstellungen] und
drücken Sie die -Taste.
3
Wählen Sie [Videosignaleinstellungen] und
drücken Sie die -Taste.
4
Wählen Sie ein Farbsystem aus und drücken
Sie die -Taste.
5
Wählen Sie [O.K.] und drücken Sie die -Taste.
Um die geänderten Farbsystemeinstellungen zu aktivieren,
müssen Sie kurz die NetAV-Verbindung trennen und dann
wieder herstellen.
Page 93

DE
29 (DE)
SCHRITT
3
Konfigurieren des
Systems zum
Anschauen von
Videos unterwegs
Schnellkonfiguration der
Basisstation über das PSP™-System
1
Vergewissern Sie sich, dass die Basisstation
eingeschaltet ist.
2
Drücken Sie während der Videowiedergabe die
-Taste. Wählen Sie auf dem LocationFree
Player-Kontrollmenü und drücken Sie die
-Taste.
3
Wählen Sie [Einstellungen für Basisstation]
und drücken Sie die - Taste.
4
Wählen Sie [Eingabe] und drücken Sie die
-Taste.
5
Geben Sie Benutzername und Passwort ein,
wählen Sie [O.K.] und drücken Sie die -Taste.
Benutzername: lfx (Kleinbuchstaben)
Anfängliches Kennwort: Web-Passwort auf dem Aufkleber
an der Basisstation
Fortsetzung
Page 94
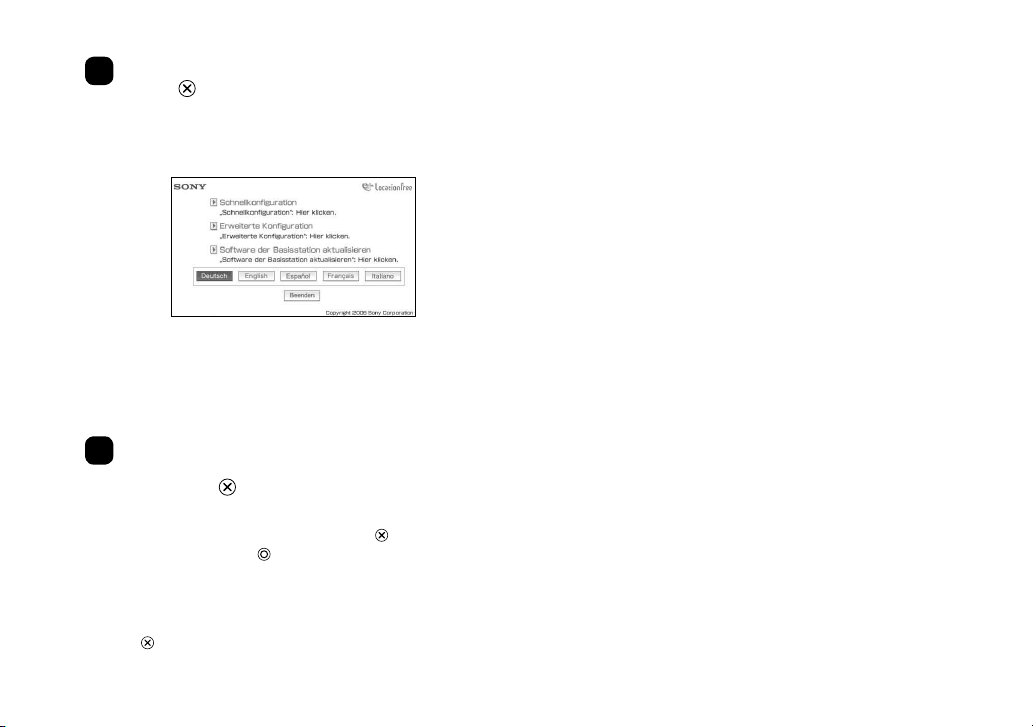
30 (DE)
6
Wählen Sie [Schnellkonfiguration] und drücken
Sie die -Taste.
Tipp
Wählen Sie mit [Deutsch], [English], [Español], [Français]
oder [Italiano] die gewünschte Sprache.
* Gehen Sie nach den Anweisungen auf dem Bildschirm
vor, bis Sie zur NetAV-Prüfung gelangen. Lesen Sie in
der Bedienungsanleitung die Nutzungsbedingungen für
dynamisches DNS, wählen Sie dann auf der Seite [NetAVKonfiguration] das Optionsfeld aus und klicken Sie auf
[Weiter].
7
Wenn [Erfolgreich] auf dem Bildschirm [NetAV-
Prüfung] erscheint, wählen Sie [Menü] und
drücken die -Taste.
Der ursprüngliche Bildschirm wird wieder angezeigt.
Wählen Sie [Beenden], drücken Sie die -Taste und
schließen Sie mit der -Taste den Internet-Browser.
Tipp
Wenn [Konfiguration unvollständig] auf dem Bildschirm
[NetAV-Prüfung] erscheint, wählen Sie [Details] und drücken
die -Taste. Lesen Sie die Erläuterungen auf dem Bildschirm
und nehmen Sie die erforderlichen Einstellungen vor.
Page 95

IT
1 (IT)
Contattare Sony
Dopo la lettura di queste istruzioni per l’uso, se si desidera porre
altre domande legate all’uso dell’Unità Base Sony LocationFree,
rivolgersi all’ufficio consumatori Sony. Per ulteriori informazioni
sui contatti, consultare il DOCUMENTO INFORMATIVO SULLA
GARANZIA EUROPEA (EUROPEAN GUARANTEE INFORMATION
DOCUMENT).
http://www.sony.net/Products/LocationFree/support/
Istruzioni importanti per la sicurezza
1) Leggere queste istruzioni.
2) Conservare queste istruzioni.
3) Prestare attenzione a tutte le avvertenze.
4) Seguire tutte le istruzioni.
5) Non utilizzare questo dispositivo vicino all’acqua.
6) Effettuare la pulizia soltanto con un panno asciutto.
7) Non ostruire le prese d’aria. Effettuare l’installazione in conformità
alle istruzioni del produttore.
8) Non installare il dispositivo in prossimità di fonti di calore quali
termosifoni, condotti d’aria calda, fornelli o altri apparecchi
(compresi gli amplificatori) che generano calore.
9) Proteggere il cavo di alimentazione in modo che non venga calpestato
o schiacciato, soprattutto in corrispondenza delle spine, delle prese a
muro e dei punti di uscita dal dispositivo.
10) Utilizzare soltanto prolunghe/accessori specificati dal produttore.
11) Utilizzare soltanto su carrelli, supporti, treppiedi, staffe o tavoli
specificati dal produttore o venduti insieme al dispositivo. Se viene
utilizzato un carrello, prestare attenzione durante lo spostamento
della combinazione carrello/dispositivo per evitare infortuni causati
dal rovesciamento.
12) Disconnettere il dispositivo durante i temporali o se si prevede di non
utilizzarlo per lunghi periodi di tempo.
13) Per le operazioni di manutenzione, rivolgersi esclusivamente a
personale qualificato. L’intervento del personale qualificato è
richiesto in qualsiasi caso di danneggiamento del dispositivo, ad
esempio se il cavo o la spina di alimentazione risultano danneggiati,
se è stato versato del liquido sul dispositivo o se degli oggetti sono
penetrati al suo interno, se il dispositivo è stato esposto alla pioggia o
all’umidità, se non funziona correttamente o se è caduto.
14) Accertarsi che la presa di rete sia facilmente accessibile.
15) Se si utilizza un pacemaker o un altro dispositivo medico, rivolgersi
al proprio medico curante o al produttore del dispositivo medico
prima di utilizzare la funzione LAN wireless.
16) Non connettere alla porta LAN linee telefoniche o di rete non
appropriate. Connettere alla porta LAN solo cavi 100BASE-TX/
10BASE-T. Per informazioni sulla connessione a una rete, rivolgersi
all’amministratore di rete.
17) PER RIDURRE IL RISCHIO DI SCOSSE ELETTRICHE, NON
RIMUOVERE IL COPERCHIO O LA PARTE POSTERIORE.
Precauzioni importanti
Continua
Page 96

2 (IT)
ALL’INTERNO NON SONO PRESENTI PARTI CHE L’UTENTE
PUÒ RIPARARE. PER LA MANUTENZIONE, RIVOLGERSI A
PERSONALE QUALIFICATO.
18) Evitare che l’unità si bagni. Non versare liquidi di alcun tipo
sull’unità. Se eventuali liquidi od oggetti solidi cadono all’interno
dell’unità, non utilizzarla. Si potrebbero subire scosse elettriche o
provocare danni all’unità.
19) Evitare di posizionare sull’apparechio, candele accese o accessori in
grado di creare fiamme pericolose.
20) Questo dispositivo deve essere installato e utilizzato a una distanza
minima di 20 cm dal trasmettitore e dalle persone (compresi gli arti,
quali mani, polsi, piedi e gambe).
* Il trasmettitore non deve essere posizionato in prossimità di altre
antenne o trasmettitori, né cooperare con essi.
21) Si avverte che eventuali modifiche non espressamente approvate nel
presente manuale possono annullare l’autorizzazione all’uso di questo
dispositivo.
Avviso: collocazione dell’apparecchio vicino ad
altri dispositivi elettromagnetici
È possibile che questo apparecchio venga influenzato da forti interferenze
elettromagnetiche che potrebbero provocare distorsioni audio e video. In
caso di problemi, attenersi alle seguenti indicazioni:
–
Controllare che non vi sia un dispositivo che provochi interferenze
elettromagnetiche, come forni a microonde o telefoni cordless.
–
Modificare l’orientamento o la posizione del dispositivo o dell’Unità Base.
–
Aumentare la distanza tra il dispositivo e l’Unità Base.
Avviso per i clienti nel Regno Unito e nella
Repubblica d’Irlanda
Per maggiore sicurezza e praticità, il dispositivo è stato dotato di spina
con fusibile conforme alla norma BS1363. In caso di sostituzione
del fusibile nella spina in dotazione, utilizzare un fusibile da 5 AMP
approvato da ASTA o BSI in conformità a BS1362 (ad esempio
contrassegnato con o ). Se la spina in dotazione con il dispositivo
dispone di un coperchio del fusibile rimovibile, assicurarsi di riapplicare
il coperchio dopo aver sostituito il fusibile.
Non utilizzare mai la spina priva del coperchio del fusibile. In caso di
smarrimento del coperchio del fusibile, rivolgersi al centro di assistenza
Sony più vicino.
Avviso per i clienti in Francia
La funzionalità RLAN di LF-B1 deve essere utilizzata esclusivamente
all’interno di edifici. Qualsiasi uso di RLAN con una potenza superiore
a 10 mW nell’intera gamma di frequenza 2400-2483, 5 MHz all’esterno
degli edifici è proibito sul territorio francese (compresi i possedimenti
francesi d’oltremare). Decisione ART 2002-1009, rettificata dalla
Decisione ART 03-908, relativa alle limitazioni d’uso delle frequenze
radio.
Avviso per i clienti in Italiana
L’utilizzo del dispositivo sopra citato è disciplinato dalla legislazione
italiana.
–
D. Lgs 1.8.2003, n. 259, art. 104 (attività soggetta ad autorizzazione
generale) e art. 105 (libero uso) e per uso privato;
–
D.M. 28/5/03, e relative modifiche, per fornire accesso pubblico ai servizi e
alle reti R-LAN.
Avviso per i clienti in Norvegia
L’utilizzo del presente dispositivo radio non è consentito nell’area
geografica compresa entro un raggio di 20 km dal centro di Ny-Ålesund,
Svalbard.
Trattamento del dispositivo elettrico od
elettronico a fine vita
(applicabile nei paesi dell’Unione Europea e in altri paesi europei con
sistema di raccolta differenziata)
Questo simbolo sul prodotto o sulla confezione indica che
il prodotto non deve essere considerato come un normale
rifiuto domestico, ma deve invece essere consegnato a un
punto di raccolta appropriato per il riciclo di apparecchi
elettrici ed elettronici. Assicurandovi che questo prodotto sia
smaltito correttamente, contribuirete a prevenire potenziali
conseguenze negative per l’ambiente e per la salute che
potrebbero altrimenti essere causate dal suo smaltimento
inadeguato. Il riciclaggio dei materiali aiuta a conservare
le risorse naturali. Per informazioni più dettagliate sul
riciclaggio di questo prodotto, potete contattare l’ufficio
comunale, il servizio locale di smaltimento rifiuti oppure il
negozio dove l’avete acquistato.
Page 97

IT
3 (IT)
Precauzioni importanti ..................................................................... 1
Indice ................................................................................................. 3
Per PC ................................................................................................ 4
Riepilogo delle impostazioni ....................................................................................... 5
PUNTO 1 Disimballaggio e installazione del software ................................................ 7
PUNTO 2 Impostazione per la visione di video a casa ............................................ 11
PUNTO 3 Impostazione per la visione di video in viaggio ........................................ 17
Per il sistema PSP™ ....................................................................... 19
Riepilogo delle impostazioni (questa configurazione deve essere
effettuata prima di mettersi in viaggio). .............................................................. 20
PUNTO 1 Preparare il sistema PSP™ e l’Unità Base ................................................ 22
PUNTO 2 Impostazione per la visione di video a casa ............................................ 23
PUNTO 3 Impostazione per la visione di video in viaggio ........................................ 29
“SONY” è un marchio di fabbrica registrato di Sony Corporation.
“ LocationFree” è un marchio di fabbrica di Sony Corporation.
“PlayStation” e “PSP” sono marchi di fabbrica o marchi di fabbrica registrati di Sony Computer Entertainment, Inc.
“Memory Stick Duo” è un marchio di fabbrica di Sony Corporation.
Microsoft e Windows sono marchi di fabbrica registrati di Microsoft Corporation negli Stati Uniti e/o in altri paesi.
Tutti gli altri nomi di sistemi, prodotti e servizi sono marchi di fabbrica dei rispettivi proprietari.
I simboli ™ e ® per alcuni prodotti sono stati omessi nelle presenti istruzioni.
Indice
Page 98

4 (IT)
Per PC
* Per ulteriori informazioni, consultare le “Istruzioni per l’uso” nel menu “Start” di Windows.
Per ulteriori domande sull’uso di questo prodotto, dopo la lettura della presente Guida introduttiva e delle Istruzioni per l’uso,
rivolgersi al centro per le informazioni alla clientela Sony. Per ulteriori informazioni sui contatti, consultare il documento
DOCUMENTO INFORMATIVO SULLA GARANZIA EUROPEA (EUROPEAN GUARANTEE INFORMATION DOCUMENT).
Vedere anche su Internet il sito Supporto per LocationFree all’indirizzo http://www.sony.net/Products/LocationFree/support/, per
ulteriori informazioni di supporto e per ottenere la versione più recente dei dati del telecomando a schermo.
Page 99

IT
5 (IT)
Riepilogo delle impostazioni
Continua
• Eseguire Impostazione rapida per l’Unità Base connessa al computer.
PUNTO 3
Impostazione per la visione di video
in viaggio (vedere pagina 17)
• Connettere il computer all’Unità Base.
• Attivare la modalità di configurazione dell’Unità Base.
• Connettere il computer all’Unità Base per la visione di video.
• Configurare le impostazioni video con LocationFree Player.
PUNTO 2
Impostazione per la visione di video
a casa (vedere pagina 11)
• Rimuovere l’imballaggio.
• Effettuare la connessione ai dispositivi esterni e a Internet, quindi accendere l’Unità Base.
• Installare il software LocationFree Player sul computer.
PUNTO 1
Disimballaggio e installazione del
software (vedere pagina 7)
Installazione
completata
Guardare video sul computer di casa o in viaggio.
Page 100

6 (IT)
PUNTO2, 3
Abitazione
In viaggio
Dispositivo
esterno
Unità Base Router
Computer* Computer*
Computer*
Computer*
PUNTO1
* Computer con LocationFree Player.
 Loading...