

Page 1

LCD Colour TV/PDP Colour TV KLV-L32M1/KE-P42M1
LCD Colour TV
PDP Colour TV
Quick Start Guide
Operating Instructions
Before operating the TV, please read the “Safety Information” section of this manual.
Retain this manual for future reference.
Anleitung zur schnellen Inbetriebnahme
Bedienungsanleitung
Lesen Sie vor der Inbetriebnahme des Fernsehgeräts bitte den Abschnitt
„Sicherheitsinformationen“ in dieser Anleitung. Bewahren Sie die Anleitung zum
späteren Nachschlagen auf.
2-021-809-14(1)
GB
DE
Guide de mise en route
Mode d’emploi
Avant d’utiliser le téléviseur, lisez la section « Consignes de sécurité » de ce mode
d’emploi. Conservez ce mode d’emploi pour vous y référer ultérieurement.
Beknopte gebruiksgids
Gebruiksaanwijzing
Lees het hoofdstuk "Veiligheidsinformatie" van deze gebruiksaanwijzing alvorens de TV
in gebruik te nemen. Bewaar deze gebruiksaanwijzing zodat u ze achteraf nog kunt
raadplegen.
KLV-L32M1
KE-P42M1
2004 Sony Corporation
FR
NL
Page 2

Page 3

Quick Start Guide
Operating Instructions
GB
1
Page 4

NOTICE FOR CUSTOMERS IN THE UNITED KINGDOM
A moulded plug complying with BS1363 is fitted to this equipment for your safety and convenience.
Should the fuse in the plug supplied need to be replaced, a 5 AMP fuse approved by ASTA or BSI to BS 1362 (i.e. marked with
or ) must be used.
When an alternative type of plug is used it should be fitted with a 5 AMP FUSE , otherwise the circuit should be protected by a 5
AMP FUSE at the distribution board.
If the plug supplied with this equipment has a detachable fuse cover, be sure to attach the fuse cover after you change the fuse.
Never use the plug without the fuse cover. If you should lose the fuse cover, please contact your nearest Sony service station.
FUSE
How to replace the fuse
Open the fuse compartment with a blade screwdriver, and replace the fuse.
IMPORTANT
If the plug supplied is not suitable for the socket outlets in your home, it should be cut off and an appropriate plug fitted in
accordance with the following instructions:
The wires in this mains lead are coloured in accordance with the following code:
Green-and-yellow Earth
Blue Neutral
Brown Live
As the colours of the wires in the mains lead of this apparatus may not correspond with the coloured markings identifying the
terminals in your plug, proceed as follows:
The wire which is coloured green-and-yellow must be connected to the terminal in the plug which is marked by the letter E or by
the safety earth symbol I or coloured green or green-and-yellow. The wire which is coloured blue must be connected to the
terminal which is marked with the letter N or coloured black. The wire which is coloured brown must be connected to the terminal
which is marked with the letter L or coloured red.
WARNING
• To prevent the risk of electric shock, do not insert the plug cut off from the mains lead into a socket outlet. This plug cannot be
used and should be destroyed.
• To prevent the risk of fire or electric shock, do not expose the unit to rain or moisture.
• Dangerously high voltages are present inside the unit. Do not open the cabinet. Refer servicing to qualified personnel only.
Introduction
Thank you for choosing this Sony LCD/PDP Colour Television.
Before operating the TV, please read this manual thoroughly and retain it for future reference.
Symbols used in the manual
........Important information.
........Information on a feature.
, 2.......... Sequence of instructions.
......Shaded buttons on the remote control show you the
buttons you have to press to follow the sequence of
instructions.
.........Informs you of the result of instructions followed.
The illustrations used in this manual are of the KLV-L32M1 unless otherwise stated.
2
Page 5

Table of Contents
Quick Start Guide ......................................................................................................................................4
Operating Instructions .......................................................................................................13
Safety Information ...............................................................13
Precautions ................................... ...... ...... ....... ... ...... ...... ...... 18
Overview
Overview of the TV Buttons and Indicators ........................ 21
Overview of the Remote Control Buttons ........................... 23
Installation
Inserting Batteries into the Remote Control ........................ 25
Connecting an Aerial and a VCR ........................................ 26
Preventing the TV from Falling Down ....................... .........29
First Time Operation
Switching On the TV and Tuning the TV Automatically ...30
Menu System
Introducing and Using the Menu System ............................ 32
Picture Adjustment ..............................................................33
Sound Adjustment ...............................................................34
Screen Control ..................................................................... 36
Features .............................. ................ ............. ............... ...... 38
Set Up ..................................................................................40
Other Functions
Sleep Timer Function .................. .........................................44
Picture Off Function (KE-P42M1 only) ..............................44
Screen Memo Function ........................................................45
Teletext ................................................................................46
NexTView ................................ ................... ...................... ... 47
Additional Information
Connecting Optional Equipment .........................................50
Using Optional Equipment ..................................................57
Remote Control Configuration for VCR/DVD . ... ... .... .........58
Specifications ........................... ................................... ......... 60
Troubleshooting .................... ............................................... 61
Television Channel Number Guide
for the United Kingdom ................................................64
GB
Table of Contents
3
Page 6

Quick Start Guide
Thank you for purchasing this Sony product.
After following this step by step guide you will be able to:
– Insert batteries into the remote control.
– Connect an aerial, VCR, and mains lead to your TV.
– Select the language of the menu screens.
– Select the country/region in which you want to operate your TV.
– Tune your TV.
– Change the broadcast channels into a different order.
1
Remote Control
RM-Y1102 (KLV-L32M1) (1) or
RM-Y1002 (KE-P42M1) (1):
Mains Lead
(Type
KLV-L32M1
KE-P42M1 KE-P42M1
Cleaning Cloth (KE-P42M1 only) (1)
Clamp screws (2)
Plug Holder
Checking the Accessories Supplied
Size AA Batteries
(R6 Type) (2):
C-6
) (1):
Use this mains lead if you use the
unit outside the United
Kingdom.
(KE-P42M1 only)
Mains Lead
(Type BF) (1):
KLV-L32M1
(1)
• Use this mains lead if you use
the unit in the United Kingdom.
• Refer to “NOTICE FOR
CUSTOMERS IN THE
UNITED KINGDOM” on
page 2 when using this mains
lead.
• This mains lead may not be
supplied depending on the
country.
Coaxial Cable (1):
Do not remove ferrite cores.
4
Quick Start Guide
Page 7

2
Inserting Batteries into the Remote Control
• Make sure you insert the supplied batteries observing the correct polarity.
• Always remember to dispose of used batteries in an environmentally friendly way.
• Do not use different types of batteries together or mix old and new batteries.
GB
Quick Start Guide
(continued)
Quick Start Guide
5
Page 8
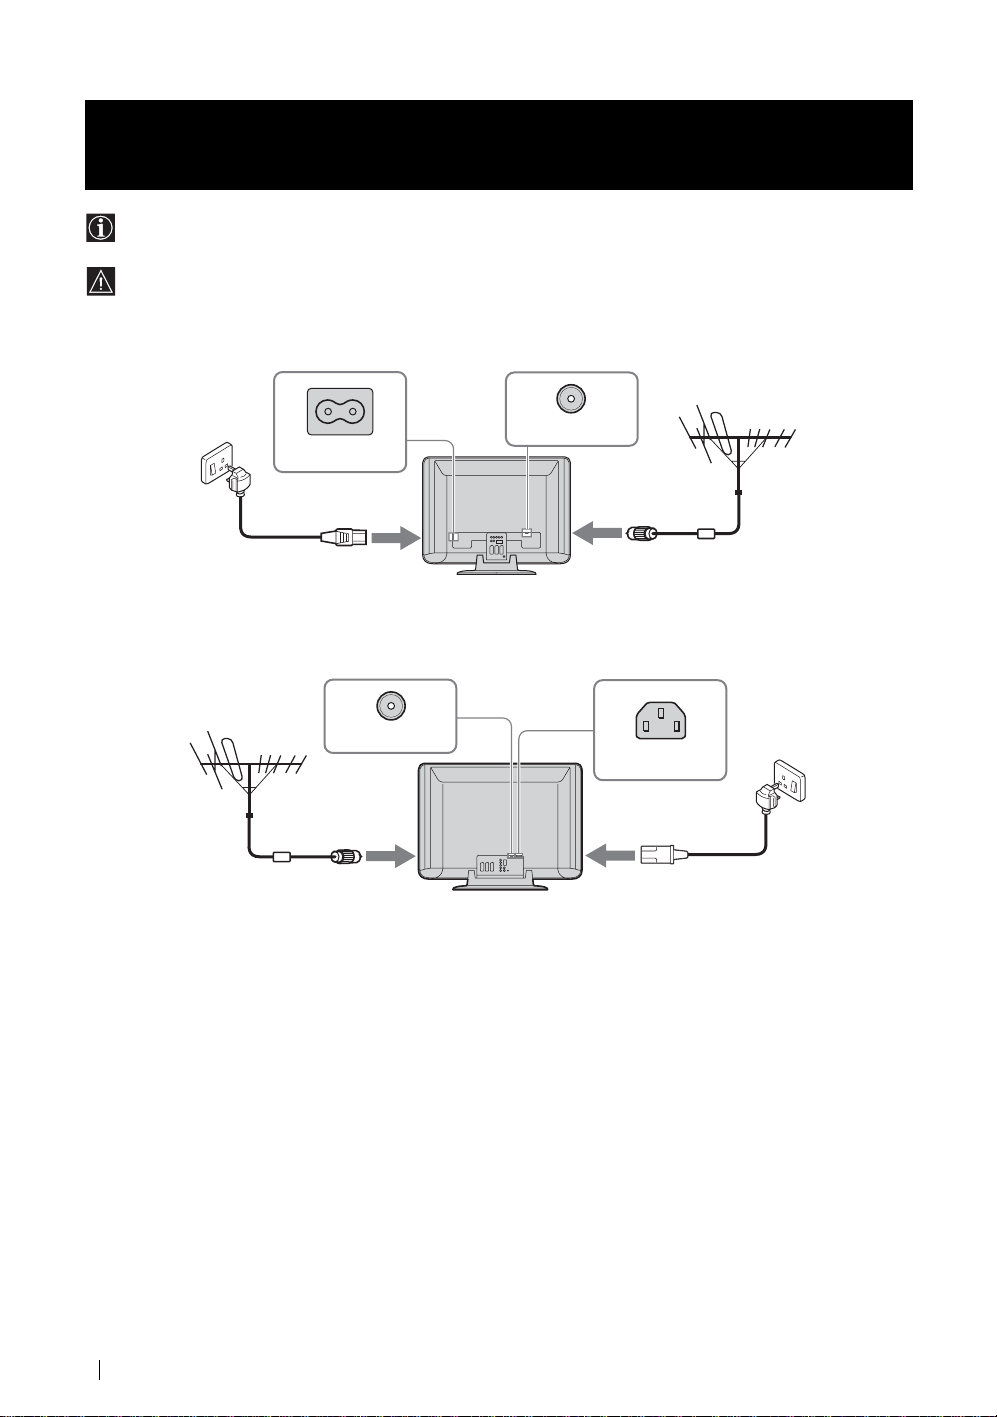
Connecting an Aerial, VCR, and Mains Lead to the
3
Connecting an aerial
TV
• Use the supplied mains lead (Type C-6 or Type BF, see page 4).
• Use the supplied coaxial cable for aerial connection.
Do not connect to the mains before all connections are complete.
KLV-L32M1
KE-P42M1
Connect the supplied mains
lead (Type C-6 or Type BF).
Connect the supplied
coaxial cable.
Connect the supplied
coaxial cable.
Connect the supplied mains
lead (Type C-6 or Type BF,
with safety earth).
6
Quick Start Guide
Page 9

Connecting a VCR with an aerial
KLV-L32M1
Connect the supplied
mains lead (Type C-6
or Type BF).
(SMARTLINK)
3
/
KE-P42M1
VCR
OUT IN
Scart lead is optional.
GB
Quick Start Guide
Connect the supplied
mains lead (Type C-6
or Type BF, with safety
earth).
VCR
OUT IN
/
3
(SMARTLINK)
Scart lead is optional.
• For more details regarding VCR connection, refer to “Connecting Optional Equipment” on page 50.
• Note that some Scart leads may not fit into the connector on the TV.
(continued)
Quick Start Guide
7
Page 10
4
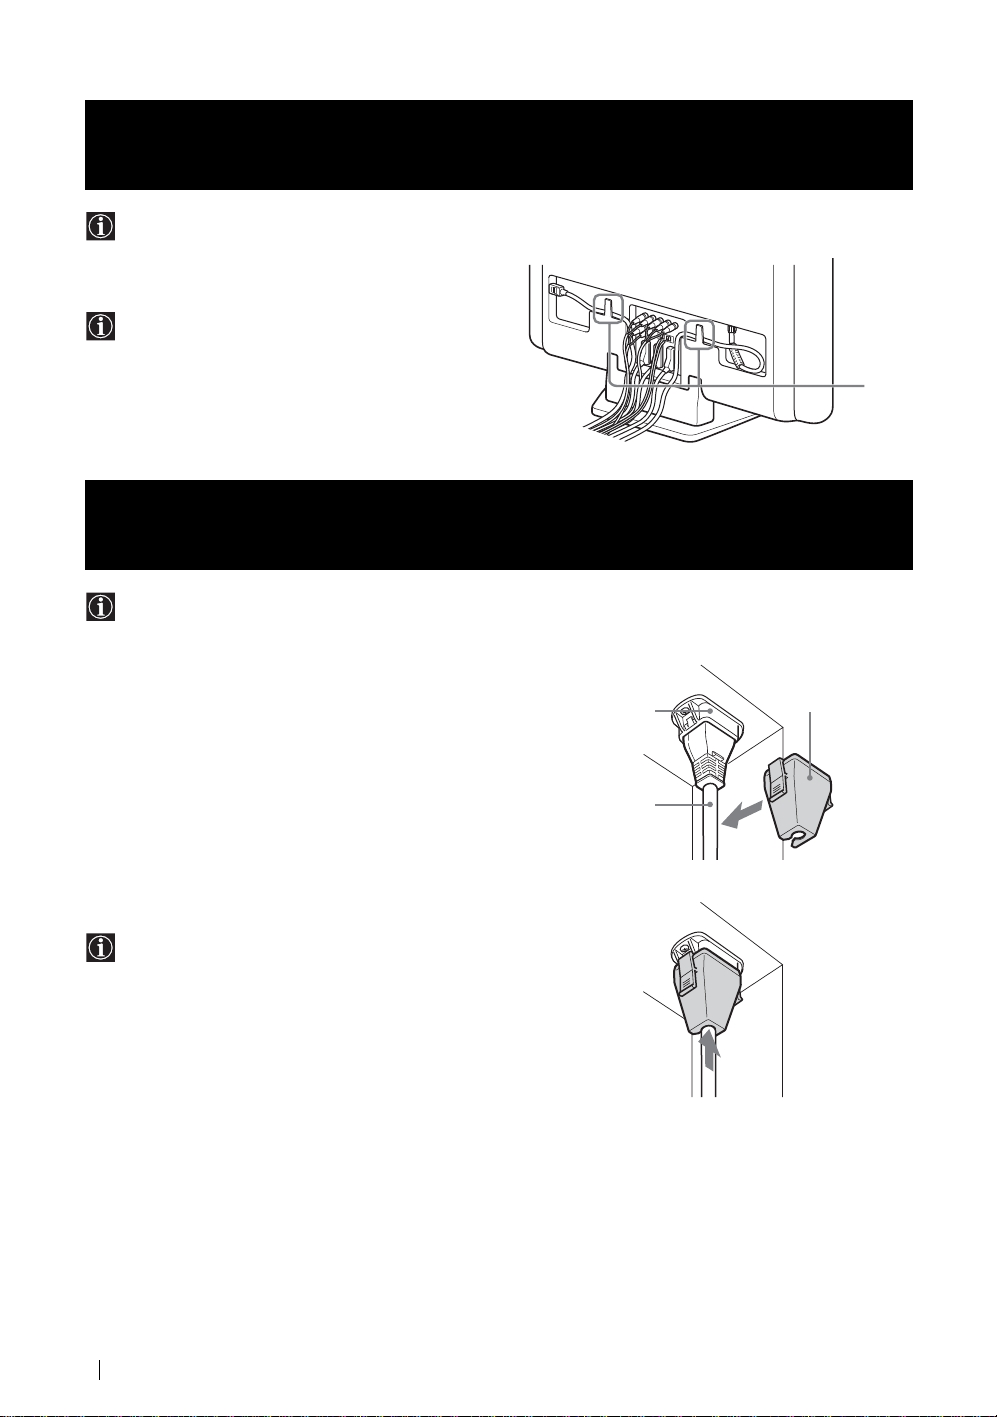
Bundle the mains lead and the coaxial cable and secure them with
the clips on the TV.
Bundling the Cables (KLV-L32M1 only)
You can store the cables in the back of the TV.
When you install the coaxial cable, loop it as shown in the
illustration.
Clips
4
1 Attach the mains plug holder (supplied) to the mains lead.
2 Clip on the AC IN jack until you hear a click.
Securing the mains plug (KE-P42M1 only)
You must secure the mains plug to the TV’s AC IN jack.
To unplug the mains lead pull down the plug holder while
pushing on both sides of the holder, then pull out the plug.
AC IN (power supply
input) jack of the TV
Mains lead
(supplied)
Plug holder
(supplied)
8
Quick Start Guide
Page 11

5
1 Connect the TV to the mains (220–240 V AC, 50 Hz).
2 Press the (Power) switch on the TV to switch it on.
Switching On the TV
GB
Quick Start Guide
(continued)
Quick Start Guide
9
Page 12
Selecting the Language of the Menu Screens and
6
This TV works with menu screens. By following the instructions below, you can select the desired language of the menu screens,
and the country/region in which you want to operate the TV.
the Country/Region
Language
Select Language
English
Nederlands
Français
Italiano
Deutsch
Türkçe
Ελληνικά
Español
Português
Polski
Česky
Magyar
Русский
Бьлгарски
Suomi
Dansk
Svenska
Norsk
automatically on the screen (Auto Startup).
1 Press / / or on the remote control to select the
language, then press OK to confirm your selection.
From now on, all the menus will appear in the selected language.
2 The Country menu appears automatically on the screen.
Press or to select the country/region in which you will
operate the TV, then press OK to confirm your selection.
The first time you switch on the TV, the Language menu appears
m
Country
Select Country
–
United Kingdom
Ireland
Nederland
België/Belgique
Luxembourg
France
Italia
Schweiz/Suisse/Svizzera
Deutschland
Österreich
If the country/region in which you want to use th e TV does
not appear in the list, select “–” instead of a country/region.
The Auto Tuning menu appears automatically on the screen.
m
Do you want to start
automatic tuning ?
Yes No
To perform Auto Startup later, press 0 on the rear panel of the TV.
10
Quick Start Guide
KLV-L32M1
23
(SMARTLINK)
/
KE-P42M1
Y
PB/
C
PR/
C
L/G/
S/I
R/D/
D/D
CENTRE SPEAKER
B
R
L/G/S/I
R/D/D/D
IN
180W (6 ) MAX
Page 13

7
Tuning the TV Automatically
You must tune the TV to receive channels (TV Broadcast). If you follow the instructions below, the TV automatically searches and
stores all available broadcast channels.
Do you want to start
automatic tuning ?
Yes No
m
Auto Tuning
Programme :
System :
Channel :
m
Programme Sorting
Select Channel
01
TVE
02
TVE2
03
TV3
04
C33
05
C27
06
C58
07
S02
08
S06
09
S08
10
S12
11
S14
01
I
C23
Searching...
Exit:
1 Press OK to select Yes.
2 The TV starts searching and storing all available broadcast
channels.
• This procedure could take some minutes. Please be
patient and do not press any buttons, otherwise the auto
tuning will not be completed properly.
• If no channels are found during the auto tuning process, a
new menu appears automatically on the screen asking
you to connect the aerial. Please connect the aerial (see
page 6) and press OK. The auto tuning process will start
again.
When the auto tuning is finished, the Programme Sorting menu
appears automatically on the screen.
MENU
GB
Quick Start Guide
(continued)(continued)
Quick Start Guide
11
Page 14
Changing the Programme Order of the Broadcast
8
By following the instructions below, you can rearrange the order in which the broadcast channels appear on the screen.
Channels
A) If you want to keep the broadcast channels in the tuned order
Programme Sorting
Select Channel
01
02
03
04
05
06
07
08
09
10
11
B) If you want to store the broadcast channels in a different order
Programme Sorting
Select Channel
Press MENU to exit and return to the normal TV screen.
TVE
TVE2
TV3
C33
C27
C58
S02
S06
S08
S12
S14
MENU
Exit:
1 Press or to select the programme number with the channel
01
TVE
02
TVE2
03
TV3
04
C33
05
C27
06
C58
07
S02
08
S06
09
S08
10
S12
11
S14
MENU
Exit:
you want to rearrange, then press .
2 Press or to select the new programme number position for
your selected channel, then press .
The selected channel now moves to its new programme position
and the other channels move accordingly.
m
Programme Sorting
Select new position
TVE
01
TVE2
02
TV3
03
C33
04
C27
05
C58
06
S02
07
S06
08
S08
09
S12
10
S14
11
01 TVE
MENU
Exit:
3 Repeat steps 1 and 2 if you want to change the order of the other
channels.
4 Press MENU to exit and return to the normal TV screen.
12
Quick Start Guide
Your TV is now ready for use.
Page 15

Operating Instructions
Safety Information
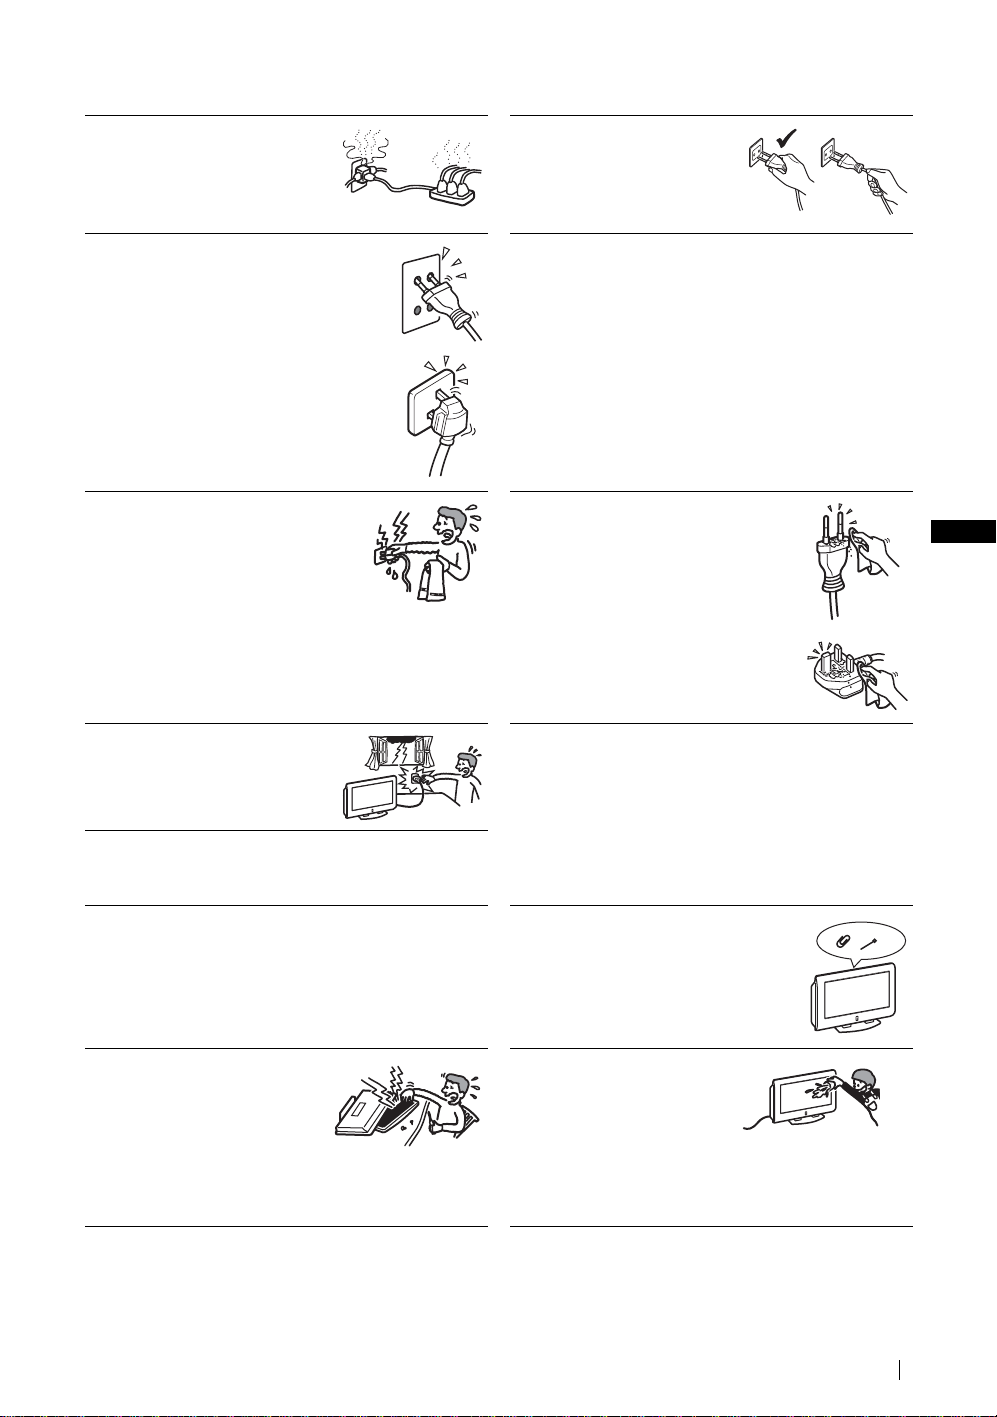
For Safety
Mains lead
Unplug the mains lead when
moving the unit. Do not
move the unit with the mains
lead plugged in. It may
damage the mains lead and
result in fire or electric
shock. If the unit has been
dropped or damaged, have it
checked immediately by qualified service personnel.
Installation
Installation of the unit on the wall
should be carried out by qualified
servicemen. Improper installation may
render the unit unsafe.
Medical institutions
Do not place this unit in a place where
medical equipment is in use. It may
cause malfunction of medical
instruments.
Carrying
• Before carrying the unit, disconnect all
the cables from the unit.
• When you carry the unit by hand, hold the
unit as illustrated on the right. As the rea r
cover comes off easily, the unit may fall
and be damaged or cause serious injury.
• When transporting it, do not subject the unit to shocks or
excessive vibration. The unit may fall and be damaged or cause
serious injury.
• When you carry the unit in for repair or when yo u move it, p ack
it using the original carton and packing material.
• Carrying the unit requires two or more people.
GB
(continued)
Safety Information
13
Page 16

Installation and Moving
Ventilation
Never cover the ventilation holes in the
cabinet. It may cause overheating and
result in fire. Unless proper ventilation is
provided, the unit may gather dust and get
dirty. For proper ventilation, observe the
following:
• Do not install the unit turned backwards or sideways.
• Do not install the unit turned over or upside down.
• Do not install the unit on a shelf or in a closet.
• Do not place the unit on a rug or bed.
• Do not cover the unit with cloth, such as cur ta ins , or it em s such
as newspapers, etc.
Vehicle or ceiling
Do not install this unit in a vehicle. The
motion of the vehicle may cause the
unit to fall down and cause injury. Do
not hang this unit from the ceiling.
Water and moisture
Do not use this unit near water – for
example, near a bathtub or shower room.
Also do not expose to rain, moisture or
smoke. This may result in fire or electric
shock. Do not use this unit where insects may enter.
Optional accessories
Observe the following when installing the unit
using a stand or wall-mount bracket. If you do not
do so, the unit may fall and cause serious injury.
• Be sure to follow the instructions supplied
with your stand or wall-mount bracket when installing the unit.
• Be sure to attach the brackets supplied with your stand.
Outdoor use
Do not install this unit outdoors. If the
unit is exposed to rain, it may result in
fire or electric shock. If the unit is
exposed to direct sunlight, the unit may
heat up and this may result in damage to
the unit.
Ships and other vessels
Do not install this unit on a ship or
other vessel. If the unit is exposed to
seawater, it may cause fire or damage
the unit.
To prevent the unit from falling
Place the unit on a secure, stable stand. Do not
hang anything on the unit. If you do, the unit may
fall from the stand or wall-mount bracket, causing
damage or serious injury.
Do not allow children to climb on the unit.
14
Safety Information
Page 17
Power Sources
Overloading
This unit is designed to opera te on a 220–
240 V AC supply only. Take care not to
connect too many appliances to the same
mains socket as this could result in fire or
electric shock.
Mains
Do not use a poor fitting mains socket. Insert the
plug fully into the mains. If it is loos e, it may cause
arcing and result in fire. Contact your electrician to
have the mains socket changed.
Moisture
Do not touch the mains lead with a wet hand.
If you plug/unplug the mains lead with a wet
hand, it may cause electric shock.
Mains lead protection
Pull out the mains lead by the plug. Do
not pull on the mains lead itself.
Wiring
Unplug the mains lead when wiring cables. Be sure to unplug the
mains lead for your safety, when hooking up.
Cleaning
Clean the mains plug regularly. If the plug is
covered with dust and it picks up moisture, its
insulation may deteriorate and result in fire.
Unplug the mains plug and clean it regularly.
GB
Lightning storms
For your own safety, do not touch any
part of the unit, mains lead, or aerial lead
during lightning storms.
Use
Damage requiring service
If the surface of the unit cracks, do not touch it until you have
unplugged the mains lead. Otherwise electric shock may result.
Servicing
Do not open the cabinet. Entrust the
unit to qualified service personnel
only.
Ventilation holes
Do not insert anything in th e ventilation holes . If
metal or something flammable is inserted in
these holes, it may result in fire or electric shock.
Moisture and flammable objects
• Do not let this unit get wet. Never
spill liquid of any kind on the
unit. If any liquid or solid objec t
does fall through openings in the
cabinet, do not operate the unit . It
may result in electric shock or damage to the unit.
Have it checked immediately by qualified se rv ic e personnel.
• To prevent fire, keep flammable objects or naked lights (e.g.
candles) away from the unit.
(continued)
Safety Information
15
Page 18
Additional Safety Information
Electric shock
Do not touch the unit with wet hands . Doing so may cause electric
shock or damage the unit.
Broken glass
Do not throw anything at the unit. The screen
glass may explode by the impact and cause
serious injury.
Protruding location
Do not install the unit in locations where it may protrude. If you
install the unit in the following locations , it may result in injury.
• Do not install the unit in a location where the unit pr otrudes, such
as on or behind a pillar.
• Do not install the unit in a location where you might bump your
head on it.
Placement
Never place the unit in hot, humid or
excessively dusty places. Do not install the
unit where insects may enter. Do not inst all
the unit where it may be exposed to
mechanical vibration.
Accessories
Secure the unit properly.
If the unit is not secured properly, it may fal l and cause injury. Ta ke
measures to prevent this by using a stand or other apparatus on the
floor or wall in the specified manner, referring to the operating
instructions supplied with you r stand.
Disposal of the unit (KLV-L32M1 only)
• Do not dispose of the unit with general household waste.
• The LCD contains a small amount of liquid crystal and me rcury.
The fluorescent tube used in this un it also contains mercury.
Follow your local ordinances and regulations for disposal.
Oils
Do not install this unit in resta urants that use oil. Dus t absorbing oil
may enter the unit and damage the unit.
Corrosion
If you use this unit near the seashore, salt may corrode metal parts
of the unit and cause internal dama ge or fire. It may al so shorten the
life of the unit. Steps should be taken to reduce the humidity and
temperature of the area where the unit is located.
Cleaning
Unplug the mains lead when cleaning this unit. If you do not do so,
it may result in electric shock.
Recommended place for the unit
Place the unit on a stable, level surface.
Otherwise, the unit may fall and cause injury.
16
Safety Information
Page 19

LCD Screen (KLV-L32M1 only)
• Although the LCD screen is made with high-preci sion
technology and 99.99% or more of the pixels are effective, black
dots may appear or bright points of light (red, blue, or gree n)
may appear constantly on the LCD screen. This is a structural
property of the LCD panel and is not a malfunction.
• Do not expose the LCD screen surface to the sun. Doing so may
damage the screen surface.
• Do not push or scratch the front filter, or place objects on top of
this unit. The image may be uneven or the LCD panel may be
damaged.
• If this unit is used in a cold place, a smear may occur in the
picture or the picture may become dark.
This does not indicate a failure. These phenomena disappear as
the temperature rises.
• Ghosting may occur when still pictures are displ ayed
continuously. It may disappear after a few moments.
• The screen and cabinet get warm when this unit is in use. This is
not a malfunction.
Fluorescent lamp (KLV-L32M1 only)
This unit uses a special fluorescen t lamp as its light source. If the
screen image becomes dark, flickers, or does not appear, the
fluorescent lamp has run down and should be replaced. For
replacement, consult qualified service personnel.
Heat
Do not touch the surface of the unit. It remains hot, even after the
unit has been turned off for some time.
Cleaning the screen surface
The screen surface is finished with a special coating to prevent
strong light reflections. Be sure to observe the following
precautions to avoid damagin g the finish.
• To remove dust from the screen surface, wipe gently with a soft
cloth. If dust is persistent, wipe with a soft cloth slightly
moistened with a diluted mild detergent s olution. You can wash
and repeatedly use the soft cloth.
• Never use any type of abrasive pad, alkaline/acid cleaner,
scouring powder, or strong solvent such as alcohol, benzine or
thinner.
Mains lead
If you damage the mains lead, it may
result in fire or electric shock.
• Do not pinch, bend, or twist the mains
lead excessively. The core lines may
be exposed or cut, causing a shortcircuit which may induce fire or
electric shock.
• Do not convert or damage the mains
lead.
• Do not put anything heavy on the
mains lead. Do not pull the mains
lead.
• Keep the mains lead away from heat sources.
• Be sure to grasp the plug when disconnecting the mains lead.
If the mains lead is damaged, stop using it and ask your dealer or
Sony service centre to exchange it.
When not in use
For environmental and safety
reasons, it is recommended that the
unit be switched off when not in
use – not left in standby mode.
Disconnect it from the mains.
Cable wiring
Take care not to catch your feet on the cables. It may damage the
unit.
Installation
Do not install optional components too close to the unit. Keep
optional components at least 30 cm away from the unit. If a VCR is
installed in front of the unit or beside the unit, the picture may
become distorted.
GB
Safety Information
17
Page 20

Precautions
Precautions concerning ventilation
Leave space around the unit. Otherwise, adequate air-circulation may be blocked causing overheating, which may cause fire or
damage to the unit.
When installing the unit on the wall
30 cm
10 cm
When installing the unit using a stand
30 cm
10 cm
Never install the unit as follows:
Air circulation is blocked.
10 cm
Leave at least this much space.
10 cm
10 cm
Leave at least this much space.
Air circulation is blocked.
18
Precautions
Wall
Wall
Page 21

Viewing the TV comfortably
• To view the TV comfortably, the recommended viewing position is from four to seven times the screen’s vertical length away
from the TV.
• View the TV in moderate light, as viewing the TV in poor light taxes your eyes. Watching the screen continuously for long
periods of time can also tax your eyes.
Installing the unit
Use the specified wall-mount bracket or stand.
• Do not install the unit in places subject to extreme temperature, for example in direct sunlight, or near a radiator, or heating vent.
If the unit is exposed to extreme temperature, the unit may heat up and this may cause deformation of the casing or cause the
unit to malfunction.
• To obtain a clear picture, do not expose the screen to direct illumination or direct sunlight. If possible, use spot lighting directed
down from the ceiling.
• The unit is not disconnected from the mains when the unit is switched off. To disconnect the unit completely, pull the plug from
the mains.
Volume adjustment
• Adjust the volume so as not to trouble your neighbours. Sound carries very easily at night time. Therefore, closing the windows
or using headphones is suggested.
• When using headphones, adjust the volume so as to avoid excessive levels, as hearing damage may result.
Handling the remote control
• Handle the remote control with care. Do not drop or step on it, or spill liquid of any kind onto it.
• Do not place the remote control in a location near a heat source, or in a place subject to direct sunlight, or in a damp room.
Handling and cleaning the screen surface of the unit
To avoid screen degradation, follow the advice given below. Do not push on the screen or scratch it with hard objects, or throw
anything at it. The screen may be damaged.
• Be sure to unplug the mains lead before cleaning the unit.
• Do not touch the display panel after operating the unit continuously for a long period as the display panel becomes hot.
• We recommend that the screen surface be touched as little as possible.
• Clean the screen with a soft cloth.
• Never use any type of abrasive pad, scouring powder, or solvent, such as alcohol or benzine. Using such materials may result in
damage to the screen surface.
Cleaning the cabinet
• Be sure to unplug the mains lead before cleaning the cabinet.
• Clean the cabinet with a soft cloth.
• Note that ma terial de terioration or screen coating degradation may occur if the unit is exposed to a volatile solvent, such as
alcohol, thinner, benzine or insecticide, or if prolonged contact is maintained with rubber or vinyl materials.
• The ventilation holes can accumulate dust over a period of time. To ensure proper ventilation, we recommend removing the dust
periodically (once a month) using a vacuum cleaner.
GB
(continued)
Precautions
19
Page 22

On the PDP (Plasma Display Panel) (KE-P42M1 only)
On image
• Please note that the PDP screen is made with high-precision technology. However, black points or bright points of light (red,
blue, or green) may appear constantly on the PDP screen, and irregular coloured stripes or brightness may appear on the PDP
screen. This is not a malfunction.
• With extensive use of this TV set in 4:3 mode, the 4:3 screen area might become darker within a 16:9 panel. To avoid this
problem, the “Smart” picture mode should be used (see page 37).
On image retention
• If the following images are displayed for an extended period time, image retention (afterimage) in areas of the screen may result
due to the characteristics of the Plasma Display Panel.
– Black bars at the top and bottom that appear with a wide video source (Letterbox picture).
– Black bars to the left and right that appear with a 4:3 video source (conventional TV broadcasts).
– Video game sources
– DVD on-screen menu displays
– On-screen menus, channel numbers, etc., of connected equipment such as Set top box, Cable modem, VCR, etc.
The risk of this is higher if the set is in “Live” mode or has a high contrast setting. This image cannot be removed once burnt
onto the screen. To avoid the risk of image retention do not leave the TV set operating on such a picture, or programme for a
long time, use the “Screen Saver” function (page 39) or lower the contrast setting. Repeated extended daily usage of the same
image, or programme can also result in this occurrence. IMAGE RETENTION IS NOT COVERED BY THE SONY
WARRANTY.
• To reduce image retention, this TV set has the “Screen Saver” function. The default setting of the “Orbit” function in “Screen
Saver” is “On” (page 39).
• The “Screen Saver” function prevents and reduces image retention. For more details, see page 39.
On altitude
When used at an altitude of greater than 1900m or 6248 feet (air pressure less than 800hPa), this Plasma Display Panel may generate
a low buzzing sound as a result of the difference between the interior and exterior air pressure of the panels. This is not considered
a defect and is not covered under by the Sony Warranty. This buzzing sound is an inherent characteristic of any Plasma Display
Panel.
20
Precautions
Page 23

Overview
Overview of the TV Buttons and Indicators
To open the drop-down panel of your TV, push up the
panel door just under the mark until you hear a click,
then the panel door will open.
KLV-L32M1
Remote control sensor
(Sleep) indicator
(Power) switch and
(Power/Standby)
indicator
TV Front Panel
(Input Select) button
2 (Volume) +/– buttons
GB
PROG (Channel) +/– buttons
PROG
Remote control sensor
(Sleep) indicator
(Picture Off) indicator
(Power) switch and
(Power/Standby)
indicator
KE-P42M1
(continued)
Overview
21
Page 24

Status of the indicators
(Power/Standby) indicator lights up in green
The power of the TV is on.
(Power/Standby) indicator lights up in red
The TV is in the standby mode.
(Power/Standby) indicator flashes in red
The TV is receiving remote control signals.
(Power/Standby) indicator flashes in red repeatedly
There is a problem with the TV. For more details, refer to “Self-diagnosis function” on page 61.
(Sleep) indicator lights up in red
The Sleep Timer function is on when the TV is turned on. For more details, refer to “Sleep Timer Function” on page 44.
(Picture Off) indicator lights up in blue (KE-P42M1 only)
The picture is switched off. Only the picture is switched off (the sound remains unchanged). Press again to cancel. For more details,
refer to “Picture Off Function (KE-P42M1 only)” on page 44.
For the connectors on the rear panel of the TV, refer to “Connecting Optional Equipment” on page 50.
22
Overview
Page 25

Overview of the Remote Control Buttons
a Switching the TV to the standby mode:
Press this button to temporarily turn off the TV and switch it to the standby
mode (the (Power/Standby) indicator on the TV lights up in red). Press it
again to switch on the TV from the standby mode.
*
* Remote
control of the
KE-P42M1
To save energy, we recommend switching the TV off completely when the TV
is not in use.
If no signal is received or no operation is performed in the TV mode for
10 minutes, the TV automatically switches to the standby mode.
b Switching the VCR or DVD on/off:
Press this button to switch your VCR or DVD on or off.
c Selecting the VCR, TV or DVD (Media Selector):
With this remote control you can operate not only this TV but also the main
functions of your VCR or DVD.
Switch on the equipment you want to operate and press this button repeatedly
to select VCR, TV, or DVD. The green light just above the selected equipment
lights up momentarily.
An initial setup is required to synchronise this remote control to your
VCR or DVD. This setup depends on the manufacturer. For more
details, refer to “Remote Control Configuration for VCR/DVD” on
page 58.
d Selecting the input source:
Press this button repeatedly until the input symbol of the desired source appears
on the screen.
e Turning on the Sleep Timer function:
Press this button to set the TV to automatically switch to the standby mode after
a specified time period. For more details, refer to “Sleep Timer Function” on
page 44.
GB
f Selecting channels:
Press this button to select channels.
For double-digit programme numbers, enter the second digit within 2.5 seconds.
g a) If the TV is selected:
Press this button to watch the last channel selected (the last channel watched for at least five seconds).
b) If the VCR is selected:
For Sony’s VCR double-digit programme numbers, e.g. 23, press this button first then press the 2 and 3 buttons.
h Selecting a sc reen format:
Press this button repeatedly to change the screen format. For more details, refer to “Screen Control” on page 36.
i Programming the remote control:
Use this button to programme the remote control to operate your VCR or DVD. For more details, refer to “Remote Control
Configuration for VCR/DVD” on page 58.
j Selecting Teletext:
Press this button to switch on Teletext. For more details, refer to “Teletext” on page 46.
k / / / /OK buttons
a) If the TV is selected:
• When the menu is displayed, use these buttons to operate the menu system. For more details, refer to “Introducing and Using
the Menu System” on page 32.
• When the menu is turned off, press OK to show an overview of all TV channels. Then press or to select the channel
and press OK to watch the selected channel.
b) If the VCR or DVD is selected:
Use these buttons to control the main functions of your VCR or DVD.
l Displaying the menu system:
Press this button to display the menu on the screen. Press it again to remove the menu display from the screen.
m Displaying NexTView :
For more details, refer to “NexTView” on page 47.
(continued)
Overview
23
Page 26
n Selecting channels:
Press these buttons to select the next or previous channel.
o Adjusting the TV volume:
Press these buttons to adjust the volume of the TV.
p Recording programmes on your VCR:
If the VCR is selected, press this button to record programmes.
q Selecting the TV mode:
Press this button to switch off Teletext or video input.
r Selecting a pictur e mode:
Press this button repeatedly to change the picture mode. For more details, refer to “Picture Adjustment” on page 33.
s Selecting a sound effect:
Press this button repeatedly to change the style of sound used by your TV. For more details on the styles available, refer to
“Sound Adjustment” on page 34.
t Displaying on-screen information:
Press this button to display all on-screen indicators. Press it again to cancel.
u Turning on the Screen Memo function:
Press this button to temporarily freeze the picture on the screen. For more details, refer to “Screen Memo Function” on page 45.
v (KLV-L32M1)
Turning on the Power Saving function:
Press this button to turn on the Power Saving function. “Power Saving” appears on the screen for a few seconds. Press this
button again to cancel. For more details, refer to “Features” on page 38.
(KE-P42M1)
Switching off the picture:
Press this button to switch off the picture. Only the picture is switched off; the sound remains on. Press this button again to
cancel. For more details, refer to “Picture Off Function (KE-P42M1 only)” on page 44.
* Thi s button is marked with on the remote control of the KE-P42M1.
w Muting the sound:
Press this button to mute the sound from the TV. Press it again to restore the sound.
In addition to the TV functions, the coloured buttons (except for the TV &/and VIDEO &/ buttons) are used for Teletext
operations. The buttons with green symbols (except for the button) are also used. For more details, refer to “Teletext”
on page 46.
24
Overview
Page 27
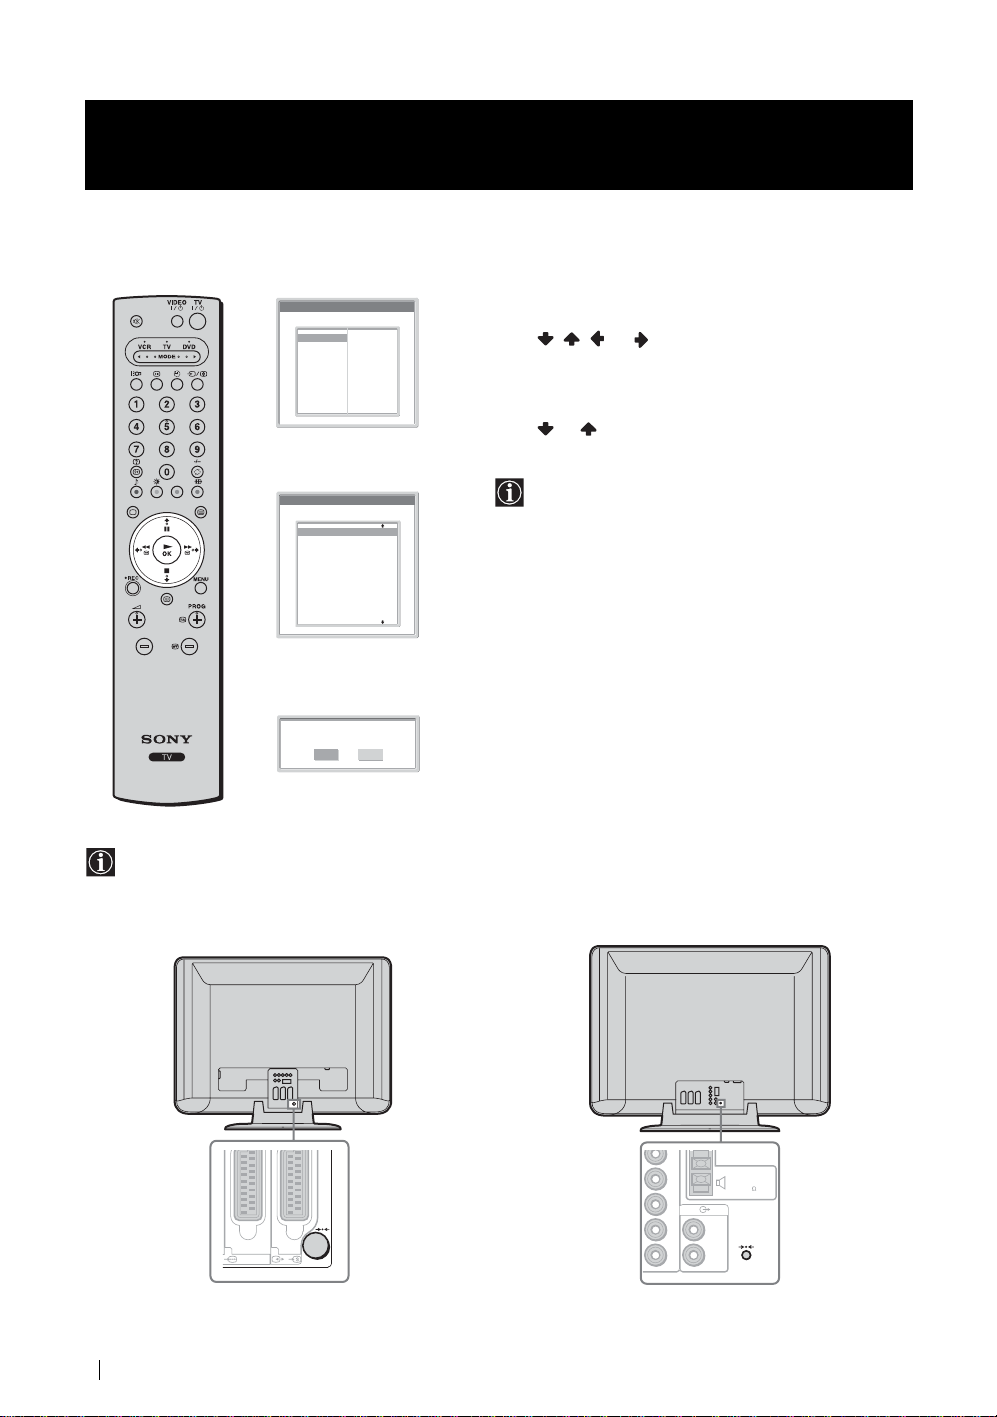
Installation
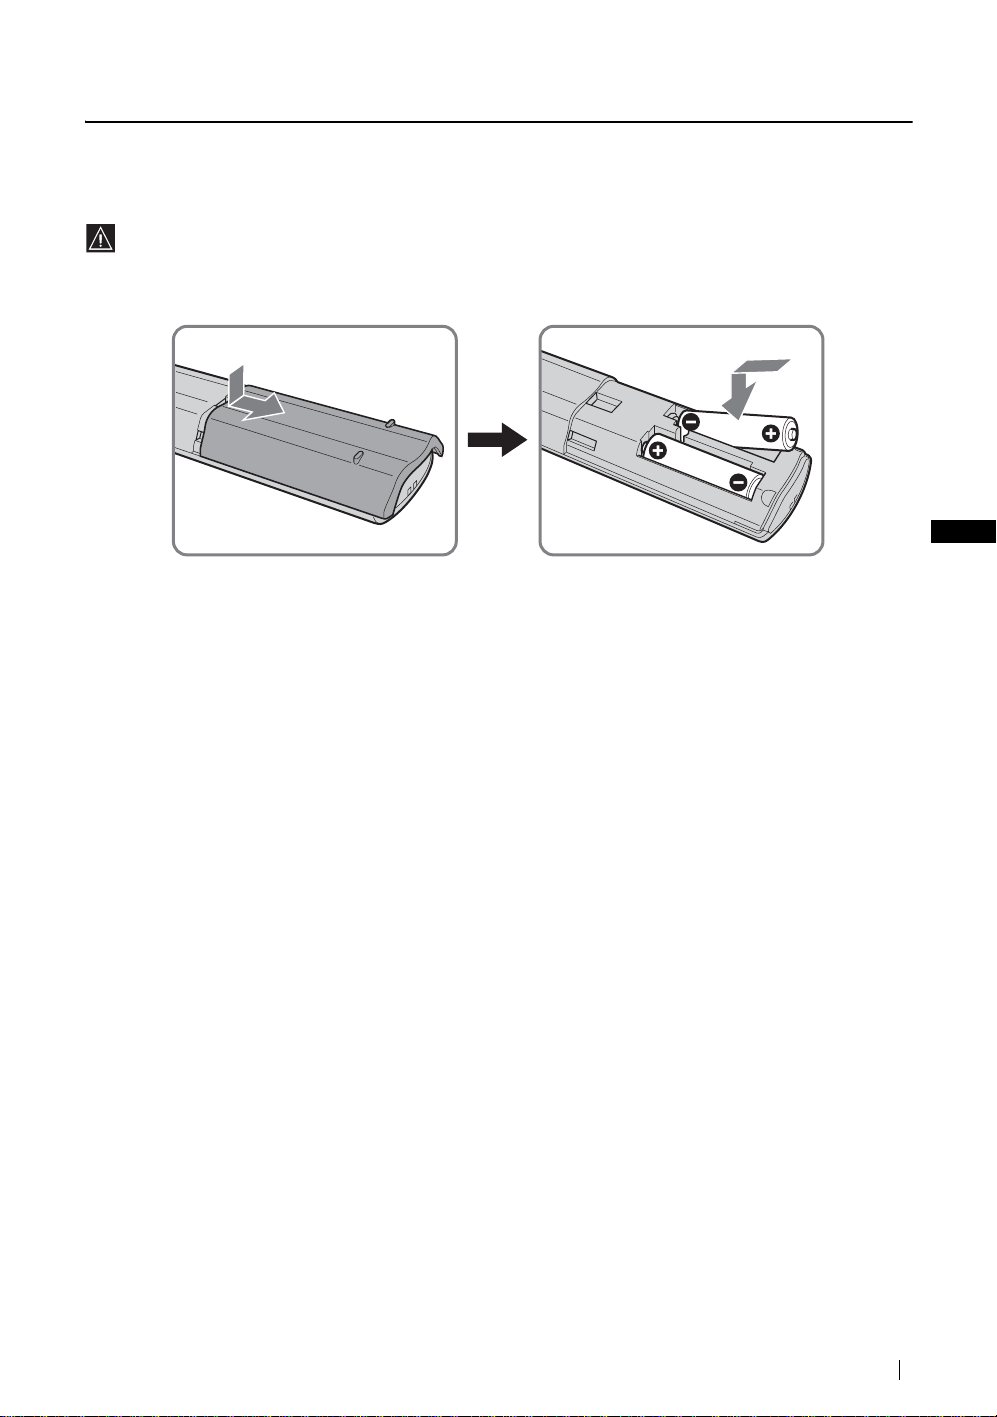
Inserting Batteries into the Remote Control
• Make sure you insert the supplied batteries observing the correct polarity.
• Always remember to dispose of used batteries in an environmentally friendly way.
• Do not use different types of batteries together or mix old and new batteries.
GB
Installation
25
Page 28

Connecting an Aerial and a VCR
• Use the supplied mains lead (Type C-6 or Type BF, see page 4).
• Use the supplied coaxial cable for aerial connection.
Do not connect to the mains before all connections are complete.
Connecting an aerial
KLV-L32M1
KE-P42M1
Connect the supplied mains
lead (Type C-6 or Type BF).
Connect the supplied
coaxial cable.
Connect the supplied
coaxial cable.
Connect the supplied mains
lead (Type C-6 or Type BF,
with safety earth).
26
Installation
Page 29
Connecting a VCR with an aerial
KLV-L32M1
Connect the supplied
mains lead (Type C-6
or Type BF).
(SMARTLINK)
3
/
VCR
OUT IN
Scart lead is optional.
GB
KE-P42M1
Connect the supplied
mains lead (Type C-6
or Type BF, with safety
earth).
VCR
OUT IN
/
3
(SMARTLINK)
Scart lead is optional.
• For more details regarding VCR connection, refer to “Connecting Optional Equipment” on page 50.
• Note that some Scart leads may not fit into the connector on the TV.
(continued)
Installation
27
Page 30

Bundling the cables (KLV-L32M1 only)
You can store the cables in the back of the TV.
Bundle the mains lead and the coaxial cable and secure them with
the clips on the TV.
Install the coaxial cable (shown on the right) when you
store the coaxial cable with the clip.
Securing the mains plug (KE-P42 M 1 o nl y)
You must secure the mains plug to the TV’s AC IN jack.
Clips
1 Attach the mains plug holder (supplied) to the mains lead.
2 Clip on the AC IN jack until you hear clicking.
To unplug the mains lead pull down the mains plug holder
by pushing in both sides of the holder, then pull out the
plug.
AC IN (power supply
input) jack of the TV
Mains lead
(supplied)
Plug holder
(supplied)
28
Installation
Page 31
Preventing the TV from Falling Down
After aerial and other equipment connections are completed, be sure to attach the supplied clamp screws to the rear of the
TV, and thread a sturdy cord or chain through it and attach it to a wall or pillar.
1 Remove one of the two screws on the rear of the TV, then install the supplied clamp screw in the screw hole.
KLV-L32M1
Attached
screw
clamp screw
(supplied)
KE-P42M1
2 Repeat step 1 to install the other clamp screw.
3 Attach a sturdy cord or chain securely to each clamp screw, and attach the cord or chain to a wall or pillar.
GB
Installation
29
Page 32

First Time Operation
Switching On the TV and Tuning the TV Automatically
The first time you switch on your TV, a sequence of menu screens appear on the TV enabling you to: 1) choose the language
of the menu screen, 2) choose the country/region in which you want to operate the TV, 3) search and store all available
channels (TV Broadcast), and 4) change the order in which the channels (TV Broadcast) appear on the screen.
However, if you need to change any of these settings at a later date, you can do so by selecting the appropriate option in the
“Set Up” menu (see page 40).
1 Connect the TV to the mains (220–240 V AC, 50 Hz).
2 Press the (Power) switch on the TV to switch it on.
The first time you switch on the TV, the Language menu
appears automatically on the screen (Auto Startup).
To perform Auto Startup later, press 0 on the rear panel
of the TV.
3 Press / / or on the remote control to select the
language, then press OK to confirm your selection.
From now on, all the menus will appear in the selected
language.
4 The Country menu appears automatically on the screen.
Press or to select the country/region in which you
will operate the TV, then press OK to confirm your selection.
If the country/region in which you want to use the TV does
not appear in the list, select “–” instead of a country/region.
5 The Auto Tuning menu appears automatically on the screen.
Press OK to select Yes.
Language
Select Language
English
Nederlands
Français
Italiano
Deutsch
Türkçe
Ελληνικά
Español
Português
Country
Select Country
–
United Kingdom
Ireland
Nederland
België/Belgique
Luxembourg
France
Italia
Schweiz/Suisse/Svizzera
Deutschland
Österreich
Do you want to start
automatic tuning ?
Yes No
Polski
Česky
Magyar
Русский
Бьлгарски
Suomi
Dansk
Svenska
Norsk
30
First Time Operation
Page 33

6 The TV starts searching and storing all available broadcast
channels.
• This procedure could take some minutes. Please be
patient and do not press any buttons, otherwise the auto
tuning will not be completed properly.
• If no channels are found during the auto tuning process,
a new menu appears automatically on the screen asking
you to connect the aerial. Please connect the aerial (see
page 26) and press OK. The auto tuning process will
start again.
Auto Tuning
Programme :
System :
Channel :
01
I
C23
Searching...
No channel found.
Please connect aerial
Confirm
7 When the auto tuning is finished, the Programme Sorting
menu appears automatically on the screen.
A) If you want to ke ep the broadcast channels in the tuned
order, go to step 8.
B) If you want to store the broadcast channels in a different
order:
1 Press or to select the programme number
with the channel you want to rearrange, then press
.
2 Press or to select the new programme
number position for your selected channel, then press
.
The selected channel now moves to its new
programme position and the other channels
move accordingly.
3 Repeat steps 1 and 2 if you want to change the order
of the other channels.
8 Press MENU to turn off the menu.
Programme Sorting
Select Channel
01
TVE
02
TVE2
03
TV3
04
C33
05
C27
06
C58
07
S02
08
S06
09
S08
10
S12
11
S14
Programme Sorting
Select new position
TVE
01
TVE2
02
TV3
03
C33
04
C27
05
C58
06
S02
07
S06
08
S08
09
S12
10
S14
11
01 TVE
MENU
Exit:
GB
MENU
Exit:
Your TV is now ready for use.
First Time Operation
31
Page 34

Menu System
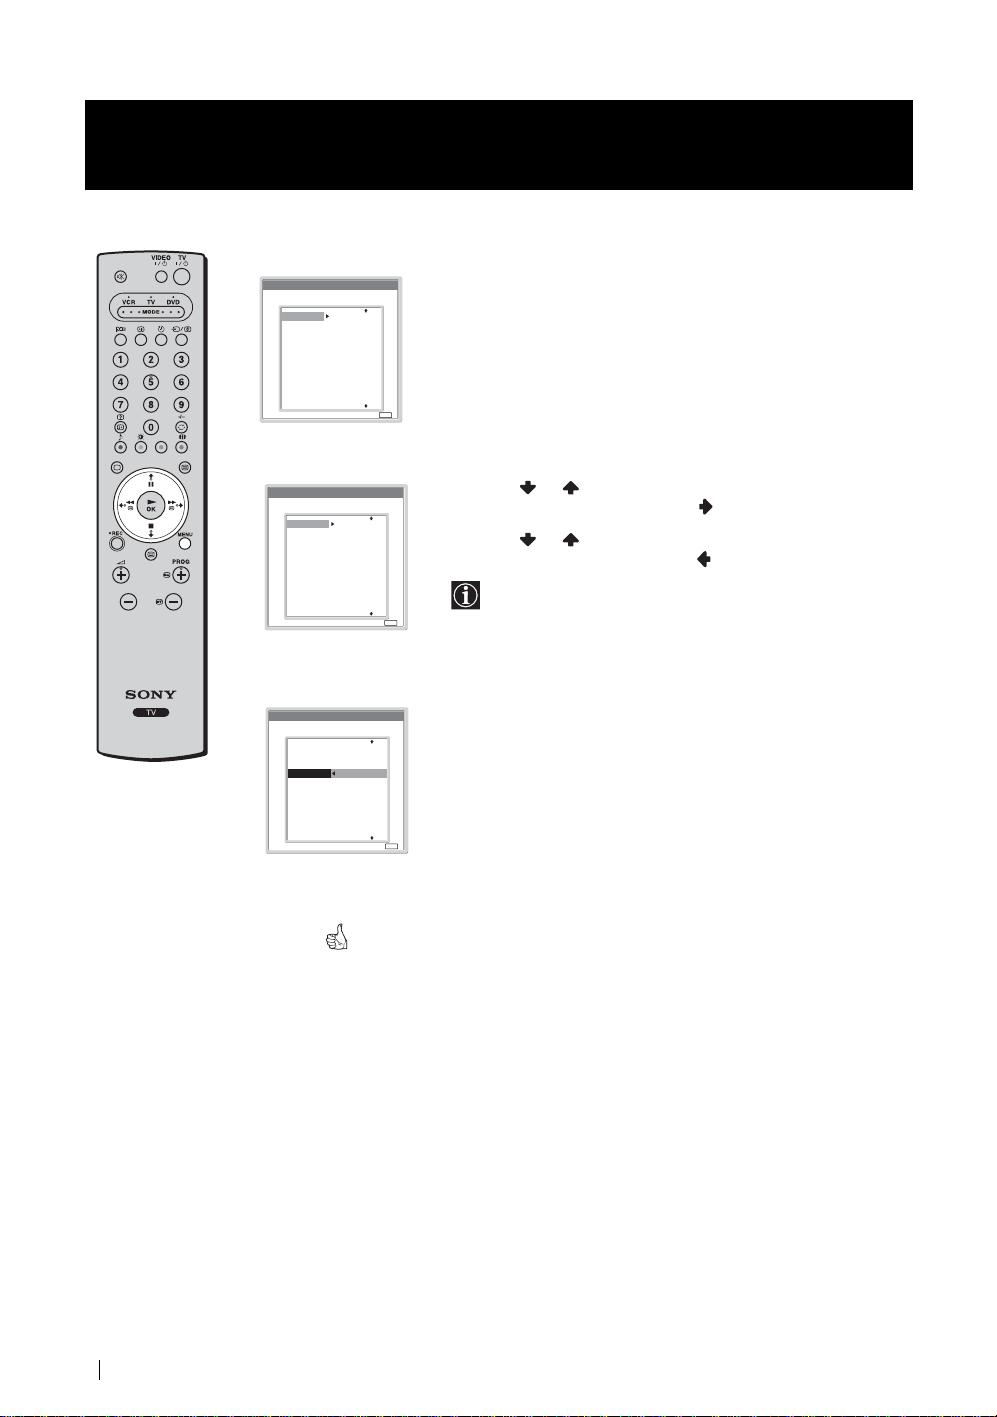
Introducing and Using the Menu System
Your TV uses an on-screen menu system to guide you through the operations. Use the following buttons on the remote
control to operate the menu system.
1 Press MENU to switch the first level menu on.
2 Do the following to operate the menu.
• To highlight the desired menu or option, press or .
• To enter the selected menu or option, press OK.
• To return to the last menu or option, press .
• To alter the settings of your selected option, press / / or .
• To confirm your selection, press OK.
3 Press MENU to turn off the menu.
32
Menu System
Page 35

Picture Adjustment
Picture Adjustment
Mode :
Contrast :
Brightness :
Colour :
Hue :
Sharpness :
Backlight :
NR :
Dynamic Picture :
Colour Tone :
Reset
Select: Set: End:
OK
Personal
50
50
25
0
25
5
Auto
On
Cool
,
MENU
Picture Adjustment
Mode :
Contrast :
Brightness :
Colour :
Hue :
Sharpness :
Backlight :
NR :
Dynamic Picture :
Colour Tone :
Reset
Select: Set: Back:OKEnd:
Personal
50
50
25
0
25
5
Auto
On
Cool
Mode Live
For enhanced picture contrast and sharpness.
Movie
For a finely detailed picture.
Personal
For your own custom settings.
Contrast Press or to reduce picture contrast.
Press or to enhance picture contrast.
Brightness Press or to darken the picture.
Press or to brighten the picture.
Colour Press or to decrease colour intensity.
Press or to increase colour intensity.
Hue Press or to decrease the green tones.
Press or to increase the green tones.
Hue can only be adjusted for an NTSC colour signal (e.g. U.S.A. video tapes).
Sharpness Press or to soften the picture.
Press or to sharpen the picture.
Backlight
(KLV-L32M1 only)
Press or to darken the backlight.
Press or to brighten the backlight.
NR (Noise Reduction) Auto/Off
Select to reduce the noise level.
NR (Noise Reduction) cannot be adjusted for an input signal from the Y, P
Dynamic Picture On/Off
Select to enhance the picture contrast.
Colour Tone Cool/Normal/Warm
Select to give bright colours a red tint (setting is variable from Cool to Warm).
Reset Cancel/OK
Select OK to reset the picture to the factory preset levels.
The “Picture Adjustment” menu allows you to alter the
picture adjustments.
To do this:
After selecting the item you want to alter, press OK,
then press / / or repeatedly to adjust it.
This menu also allows you to customise the picture
MENU
quality for the “Personal” mode based on the
programme you are watching.
B/CB, PR/CR jacks of 4.
GB
Only “Mode,” “Contrast,” and “Reset” can be adjusted when “Mode” is set to “Live” or “Movie.”
Menu System
33
Page 36

Sound Adjustment
Picture Adjustment
Mode :
Contrast :
Brightness :
Colour :
Hue :
Sharpness :
Backlight :
NR :
Dynamic Picture :
Colour Tone :
Reset
Select: Set: End:
Sound Adjustment
Effect :
Treble :
Bass :
Balance :
Auto Volume :
Dual Sound :
Volume :
Dual Sound :
Reset
Select: Set: End:
m
Personal
50
50
25
0
25
5
Auto
On
Cool
OK
Dolby Virtual
0
0
0
On
Stereo
50
Stereo
OK
MENU
,
MENU
Sound Adjustment
Effect :
Treble :
Bass :
Balance :
Auto Volume :
Dual Sound :
Volume :
Dual Sound :
Reset
Select: Set: Back:OKEnd:
Dolby Virtual
0
0
0
On
Stereo
50
Stereo
The “Sound Adjustment” menu allows you to alter the
sound adjustments.
To do this:
After selecting the item you want to alter, press OK,
then press / / or repeatedly to adjust it.
MENU
Effect
Off
No effect.
Natural
Enhances clarity, detail and presence of sound by using the “BBE High Definition
Sound system.”
Dynamic
Intensifies clarity and presence of sound for better intelligibility and musical realism by
using the “BBE High Definition Sound system.”
*
Dolby Virtual
Uses the TV speakers to simulate the surround effect produced by a multi channel
system.
• If you set “Auto Volume” to “On” when Dolby Virtual is selected, the Effect option automatically changes
to Natural.
• The sound from the headphones is not effected when the Effect option is set to Natural, Dynamic or Dolby
Virtual.
Licensed by BBE Sound, Inc. under USP4638258, 4482866. “BBE” and BBE symbol are trademarks of BBE
Sound, Inc.
* Manufactured under licence from Dolby Laboratories. “Dolby,” “Pro Logic,” and the double-D symbol are
trademarks of Dolby Laboratories.
Treble Press or to decrease higher-frequency sounds.
Press or to increase higher-frequency sounds.
Bass Press or to decrease lower-frequency sounds.
Press or to increase lower-frequency sounds.
Balance Press or to emphasise the left speaker.
Press or to emphasise the right speaker.
Auto Volume On/Off
Volume level of the channels will stay the same, independent of the broadcast signal
(e.g. in the case of advertisements).
If you set “Effect” to “Dolby Virtual,” Off is selected automatically.
When the “Speaker” option in the “Features” menu is set to “Centre in,” the options in the “Sound Adjustment” menu cannot
be adjusted.
34
Menu System
Page 37

Dual Sound Stereo/Mono
If you select other equipment connected to the TV, set the Dual Sound option to Stereo, A, or B.
For a stereo broadcast, select Stereo or Mono.
A/B/Mono
For a bilingual broadcast, select A for sound channel 1, B for sound channel 2, or Mono
for a mono channel, if available.
i Volume Press or to turn the volume of the headphones down.
Press or to turn the volume of the headphones up.
Even if headphones are connected to the TV, you can hear the sound from the TV speakers.
i Dual Sound Select the “Dual Sound” option of the headphones.
Stereo/Mono
For a stereo broadcast, select Stereo or Mono.
A/B/Mono
For a bilingual broadcast, select A for sound channel 1, B for sound channel 2, or Mono
for a mono channel, if available.
• If you select other equipment connected to the TV, set the i Dual Sound option to Stereo, A, or B.
• i Dual Sound works in conjunction with “Dual Sound.”
Reset Cancel/OK
Select OK to reset the sound to the factory preset.
Only “Treble,” “Bass,” and “Balance” are restored to the factory settings when you reset the sound.
GB
Menu System
35
Page 38

Screen Control
Picture Adjustment
Mode :
Contrast :
Brightness :
Colour :
Hue :
Sharpness :
Backlight :
NR :
Dynamic Picture :
Colour Tone :
Reset
Select: Set: End:
OK
Personal
50
50
25
0
25
5
Auto
On
Cool
MENU
The “Screen Control” menu allows you to alter the
screen adjustments.
m
Screen Control
Auto Format :
Screen Format :
Screen Shift
Select: Set: End:
On
Smart
,
OK
MENU
Auto Format The “Auto Format” option allows you to automatically change the aspect ratio of the
• Even if you have selected On or Off in the Auto Format option, you can always modify the format of the
screen by pressing repeatedly on the remote control.
• Auto Format is available for PAL signal and SECAM signal only.
Screen Control
Auto Format :
Screen Format :
Screen Shift
Select: Set: Back:OKEnd:
On
Smart
MENU
screen.
To do this:
1 After selecting this option, press OK.
2 Press or to select On (if you want the TV to automatically switch the screen
format according to the video input signal) or Off (if you want to keep your
preference).
36
Menu System
Page 39

Screen Format The “Screen Format” option allows you to modify the format of the screen.
To do this:
1 After selecting this option, press
OK.
2 Press or to select the desired screen format and press OK.
Smart
Imitation of the wide screen effect for a
4:3 broadcast.
Smart
4:3
Conventional 4:3 picture size, full
picture information.
4:3
14:9
Compromise between 4:3 and 16:9
picture size.
14:9
Zoom
Wide screen format for letterbox
movies.
Zoom
Wide
For a 16:9 broadcast.
Wide
You can adjust the position of the image when Smart, 14:9, or Zoom is selected. If parts of the top and bottom
of the screen are cut off, press or to move the image up or down (e.g. to read subtitles).
Screen Shift The “Screen Shift” option allows you to adjust the position of the picture for each screen
format.
To do this:
1 After selecting this option, press OK.
2 Press or to select the desired option and press OK. Th en press / /
or
to adjust the position of the picture.
V Shift (Vertical Shift)
Press to move the screen up.
Press to move the screen down.
H Shift (Horizontal Shift)
Press to move the screen to the left.
Press to move the screen to the right.
Reset
Select OK to reset to the factory settings.
When “Screen Format” is set to “4:3” or “Wide,” V Shift (Vertical Shift) cannot be adjusted.
GB
Menu System
37
Page 40

Features
Picture Adjustment
Mode :
Contrast :
Brightness :
Colour :
Hue :
Sharpness :
Backlight :
NR :
Dynamic Picture :
Colour Tone :
Reset
Select: Set: End:
OK
Personal
50
50
25
0
25
5
Auto
On
Cool
MENU
m
Features
Power Saving :
Speaker :
Phase
AV3 Output :
Select: Set: End:
OK
Standard
Centre in
Normal
Auto
,
MENU
Power Saving The “Power Saving” option allows you to reduce the power consumption of the TV.
If you switch the TV off then on again when the Power Saving option is set to Reduce, the setting remains
unchanged.
Speaker The “Speaker” Option allows you to select if you want to listen the TV from the TV
Phase The “Phase” option allows you to adjust the phase of sound when using the TV’s
Phase can be adjusted only when the “Speaker” option is set to “Centre in.”
Features
Power Saving :
Speaker :
Phase:
AV3 Output :
Select: Set: Back:OKEnd:
Standard
Centre in
Normal
Auto
To do this:
1 After selecting this option, press
2 Press or to select Reduce.
speakers or from an external audio equipment connected to the audio output jacks .
To do this:
1 After selecting this option, press
2 Press or to select the desired output.
Main:
The sound of the TV is output through the TV’s speakers.
Centre in:
When an external amplifier is connected to the TV’s CENTRE SPEAKER IN
terminals, the centre speaker sound from the external amplifier is output through the
TV’s speakers.
Off:
The sound of the TV is output through the external audio equipment.
If you have selected Centre in, the volume of the centre speaker can be altered
by pressing the 2 +/– buttons of the remote control. If you have selected Off,
the volume of the external equipment can be altered by pressing the 2 +/–
buttons of the remote control. In either case, when the volume buttons are
pressed, the % will appear indicating that the volume you are altering is from
external equipment.
speakers as the centre speaker. If sound from the TV’s speaker (as centre speaker) sound
unnatural, adjust the “Phase” option.
To do this:
1 After selecting this option, press
2 Press or to select Reverse. Sound from the TV’s speakers is phase-reversed.
The “Features” menu allows you to alter various
adjustments of the TV.
MENU
OK.
OK.
OK.
38
Menu System
Page 41

Screen Saver
(KE-P42M1 only)
The “Screen Saver” option allows you to reduce image retention.
If the following images are displayed for an extended period time, image
retention (afterimage) in areas of the screen may result due to the characteristics
of the Plasma Display Panel.
• Black bars at the top and bottom that appear with a wide video source (Letterbox
picture).
• Black bars to the left and right that appear with a 4:3 video source (conventional
TV broadcasts).
• Video game sources
• DVD on-screen menu displays
• On-screen menus, channel numbers, etc., of connected equipment such as Set
top box, Cable modem, VCR, etc.
To do this:
1 After selecting this option, press OK.
2 Press or to select the following option and press OK.
Then press or to move the picture position (Orbit), or turn the screen to
white (All White) to reduce image retention.
All White: Select On to turn the screen to white.
Orbit: Select On to move the position.
• All White function finishes automatically after 30 minutes. If image retention
is still present, repeat the above.
• To cancel All White function halfway, press any buttons (except the sound-
related buttons) on the remote.
AV3 Output The “AV3 Output” option allows you to select the source to be output from the Scart
connector / 3. You can record from this Scart any signal coming from the TV
S
or from external equipment connected to the other connectors.
If your VCR supports SmartLink, this procedure is not necessary.
GB
To do this:
1 After selecting this option, press OK.
2 Press or to select the desired output signal: Auto, TV, AV1, AV2 or AV5.
• If you select Auto, the output signal will always be the same one that is displayed on the screen.
• If you have connected a decoder to the Scart connector / 3 or to a VCR connected to this Scart, please
S
remember to set AV3 Output to TV for correct unscrambling.
•Even if AV3 Output is set to Auto, signals input through Y, P
Scart connector / 3.
S
B/CB, PR/CR jacks of 4 are not output from
Menu System
39
Page 42

Set Up
Picture Adjustment
Mode :
Contrast :
Brightness :
Colour :
Hue :
Sharpness :
Backlight :
NR :
Dynamic Picture :
Colour Tone :
Reset
Select: Set: End:
Set Up
Language :
Country :
Auto Tuning
Programme Sorting
Programme Labels
AV Preset
Manual Programme Preset
Select: Set: End:
m
OK
OK
Personal
50
50
25
0
25
5
Auto
On
Cool
English
–
The “Set Up” menu allows you to alter various options
on the TV.
MENU
Set Up
Language :
Country :
Auto Tuning
Programme Sorting
,
MENU
Programme Labels
AV Preset
Manual Programme Preset
Select: Set: Back:OKEnd:
English
–
MENU
Language The “Language” option allows you to select the language that the menus are displayed
in.
To do this:
1 After selecting this option, press OK.
2 Follow step 3 of “Switching On the TV and Tuning the TV Automatically” on
page 30.
Country The “Country” option allows you to select the country/region in which you want to
operate the TV.
To do this:
1 After selecting this option, press OK.
2 Follow step 4 of “Switching On the TV and Tuning the TV Automatically” on
page 30.
Auto Tuning The “Auto Tuning” option allows you to automatically search and store all available
channels (TV Broadcast).
To do this:
1 After selecting this option, press OK.
2 Follow steps 5 and 6 of “Switching On the TV and Tuning the TV Automatically”
on page 30.
Programme Sorting The “Programme Sorting” option allows you to ch ange the order in which the chann els
(TV Broadcast) appear on the screen.
To do this:
1 After selecting this option, press OK.
2 Follow step 7 B) of “Switching On the TV and Tuning the TV Automatically” on
page 31.
40
Menu System
Page 43

Programme Labels The “Programme Labels” option allows you to name a channel using up to five
AV Preset The “AV Preset” option (A-B) allows you to:
characters (letters or numbers).
To do this:
1 After selecting this option, press OK.
2 Press
3 Press / / or to select the character, then press OK.
4 When you have finished, press / / or to select the word “End” on the
• If you input a wrong character, select the character using or on the screen.
Then press / / or to select the correct character and press OK.
• For a blank, select on the screen and press OK.
or to select the programme number with the channel you want to n ame,
then press OK.
screen and press OK to exit the character input screen.
A) Designate a name for any external equipment you have connected to the TV.
To do this:
1 After selecting this option, press OK.
2 Press or to select the input source you want to name, then press OK.
3 A label automatically appears in the label column.
a) If you want to use one of the predefined labels, press or
desired label: AV1/AV2/AV3/AV4/AV5, VIDEO, DVD, CABLE, GAME,
CAM or SAT, then press OK.
b) If you want to set a different label, select Edit and press OK. Then with the first
element highlighted, press / / or to select the character, then press
OK.
When you have finished, press / / or to select the word “End” on
the screen and press OK to exit the character input screen.
• If you input a wrong character, select the character using or on the screen.
Then press / / or to select the correct character and press OK.
• For a blank, select on the screen and press OK.
to select the
B) Skip any input sources that are not connected to any equipment, when you select the
input source with the / buttons.
To do this:
1 After selecting this option, press OK.
2 Press or to select the input source you want to skip, then press OK.
3 Press or to select Skip, then press OK.
When an input signal is detected at Scart connectors / 1, /
2 and / 3, the Skip setting is automatically cancelled.
S
GB
(continued)
Menu System
41
Page 44

Manual Programme Preset The “Manual Programme Preset” option (A–E) allows you to:
A) Preset channels, one by one, in the programme order of your choice.
To do this:
1 After selecting this option, press OK.
2 Highlight the Programme option and press OK.
3 Press or to select a programme number for which you want to preset the
channel, then press . If you do not want to preset other options for the channel,
press OK instead of and go to step 8.
4 After selecting the System option, press OK.
Depending on the country/region you have selected in the “Country” option,
this option may not be available (see page 40).
5 Press or to select the TV Broadcast system (B/G for western European
countries/regions, D/K for eastern European countries/regions, I for the United
Kingdom, or L for France), then press . If you do not want to preset other options
for the channel, press OK instead of and go to step 8.
6 After selecting the Channel option, press OK.
7 Press or to select the type of channel to be tuned (S for cable channels or C
for terrestrial channels), then press .
After that, press the number buttons to enter the channel number of the TV
Broadcast directly. If you do not know the channel number, press or to
search for it.
When you have tuned the desired channel, pres s OK.
8 Highlight the Confirm option and press OK. Then press to select OK and
finally press OK to store your channel selection.
Repeat all the above steps to tune and store other channels.
B) Label a channel using up to five characters (letters or numbers).
To do this:
1 Press PROG +/– to select the programme number with the channel you want to
name.
You cannot select the programme number set to skip in the “Skip” option
(see step D on page 43).
2 When the programme you want to name appears on the screen, select the Label
option and press OK.
3 Press / / or to select the first character, then press OK.
4 When you have finished, press / / or to select the word “End” on the
screen and press OK to exit the character input screen.
5 Highlight the Confirm option and press OK. Then press to select OK and
finally press OK to store your choice.
• If you input a wrong character, select the character using or on the screen.
Then press / / or to select the correct character and press OK.
• For a blank, select
on the screen and press OK.
42
Menu System
Page 45

C)
Normally the automatic fine tuning (AFT) option will give the best possible picture,
however you can manually fine-tune the TV to obtain a better picture if the picture
is distorted.
To do this:
1 Press PROG +/– to select the programme number with the channel you want to fine-
tune manually.
You cannot select the programme number set to skip in the “Skip” option
(see step D on page 43).
2 When the programme you want to fine-tune appears on the screen, select the AFT
option and press OK.
3 Press or to adjust the fine tuning between –15 and +15 and press OK.
4 Highlight the Confirm option and press OK. Then press to select OK and
finally press OK to store your choice.
To restore automatic fine tuning, select On in step 3 above.
D) Skip any unwanted programme numbers when they are selected with the
PROG +/– buttons.
To do this:
1 Highlight the Programme option and press OK. Then press or to select the
programme number you want to skip.
2 When the programme you want to skip appears on the screen, select the Skip option
and press OK.
3 Press or to select Yes and press OK.
4 Highlight the Confirm option and press OK. Then press to select OK and
finally press OK to store your choice.
To cancel this function afterwards, select No instead of Yes in step 3 above.
E) View and record scrambled channels when using a decoder connected to the Scart
connector / 3 either directly or via a VCR.
Depending on the country/region you have selected in the “Country” option, this
option may not be available (see page 40).
To do this:
1 Press PROG +/– to select the programme number with the scrambled channel you
want to view.
You cannot select the programme number set to skip in the “Skip” option
(see step D on page 43).
2 When the programme you want to view appears on the screen, select the Decoder
option and press OK.
3 Press or to select On and press OK.
4 Highlight the Confirm option and press OK. Then press to select OK and
finally press OK to store your choice.
To cancel this function afterwards, select Off instead of On in step 3 above.
S
GB
Menu System
43
Page 46

Other Functions
Sleep Timer Function
The Sleep Timer function allows you to set the TV to switch itself automatically to the standby mode after a specified time
period. You can select the time period from among 30 minutes, 60 minutes, 90 minutes, and 120 minutes.
To set the Sleep Timer function
Press on the remote control repeatedly until the desired time period (“30 min,” “60 min,” “90 min,” or “120 min”) appears on
the screen.
When the Sleep Timer function is on, the (Sleep) indicator on the TV lights up in red.
To cancel the Sleep Timer function
Press repeatedly until “Off” appears on the screen.
• If you switch off the TV and switch it on again, the Sleep Timer function is reset to “Off.”
• The message “Sleep timer will end soon. Power will be turned off.” appears on the screen one minute before the TV
switches to the standby mode.
• If you press / on the remote control, the remaining time in minutes before the TV switches to the standby mode
is displayed on the screen.
Picture Off Function (KE-P42M1 only)
The Picture Off function allows you to listen to the sound from TV or DVDs with the picture on TV screen switched off.
To switch off the picture
Press on the remote control. The picture is switched off and the sound remains unchanged.
When the Picture Off function is on, (picture off) indicator on the TV lights up in blue.
To cancel the Picture Off function
Press any button (except the sound related buttons) on the remote control.
44
Other Functions
Page 47

Screen Memo Function
The Screen Memo function allows you to temporarily freeze and review the picture on the screen. This is useful to check and
make a note of information displayed on the screen, such as a mail address or a recipe.
To use the Screen Memo function
When the picture you want to freeze appears on the screen, press on the remote control. Press again to cancel the Screen
Memo function and return to the normal TV picture.
• If you change the input source or the channel, the Screen Memo function is cancelled.
• When the Screen Memo function is on, the picture remains still on the screen but the sound continues to play.
• When the Screen Memo function is on, the MENU, (Screen format), (Picture mode), (Teletext), and
(NexTView) buttons do not work.
• The Screen Memo function is cancelled after 5 minutes to prevent image retention (KE-P42M1 only).
• The Screen Memo function is cancelled when (picture off) button is pressed during Sc reen Memo (KE-P42M1 only).
GB
Other Functions
45
Page 48

Teletext
Teletext is an information service transmitted by most TV stations. The index page of the Teletext service (usually page 100)
gives you information on how to use the service. To operate Teletext, use the remote control buttons as indicated below.
Make sure you use a channel (TV Broadcast) with a strong signal, otherwise Teletext errors may occur.
To switch on Teletext
After selecting the TV channel which carries the Teletext service you want to view, press .
Each time you press , the screen changes cyclically as follows: Teletext mode t
Teletext Superimpose mode t TV mode t Teletext mode t (repeat).
To select a Teletext page
Input three digits for the page number, using the number buttons.
• If you make a mistake, retype the correct page number.
• If the counter on the screen continues searching, it is because this page is not available. In this case, input another page number.
To access the next or preceding page
Press PROG + () or PROG – ().
To superimpose Teletext on to the TV
Whilst you are viewing Teletext, press . Press it again to cancel the Teletext mode.
To freeze a Teletext page
Some Teletext pages have sub-pages which follow on automatically. To stop them, press / . Press it again to cancel the
freeze.
TELETEXT
TELETEXT
TELETEXT
TELETEXT
TELETEXT
TELETEXT
TELETEXT
TELETEXT
Index
Index
Index
Index
Index
Index
Index
Index
Programme
Programme
Programme
Programme
Programme
Programme
Programme
Programme
News
News
News
News
News
News
News
News
Sport
Sport
Sport
Sport
Sport
Sport
Sport
Sport
Weather
Weather
Weather
Weather
Weather
Weather
Weather
Weather
25
25
25
25
25
25
25
25
153
153
153
153
153
153
153
153
101
101
101
101
101
101
101
101
98
98
98
98
98
98
98
98
To reveal concealed information (e.g. answers to a quiz)
Press / . Press it again to conceal the information.
To select a sub page
A Teletext page may consist of several sub pages. In this case, the page number that appears on the upper left corner will change
from white to green and one or more arrows will appear next to the page number. Repeatedly press or on the remote control
to watch the desired page.
To switch off Teletext
Press .
Fastext
The Fastext service lets you access pages with one push of a button.
Whilst you are in the Teletext mode and Fastext is broadcast, a colour coded menu appears at the bottom of the Teletext page.
Press the colour button (red, green, yellow or blue) to access the corresponding page.
46
Other Functions
Page 49

NexTView*
* Depending on availability of service.
NexTView is an on-screen electronic programme guide, providing you with programme information for different
broadcasters.
When looking for information, you can search by theme (sports, art, etc.) or date.
When you are viewing the NexTView service, wrong characters appear on the screen if the language used in the NexTView
service does not match the language set on your TV. To resolve this problem, select the “Language” option in the “Set Up”
menu and set the same language as that used in the NexTView service. Also select the “Country” option in the “Set Up”
menu and set the country/region in which the NexTView service is provided (see page 40).
Displaying NexTView
1 Select a broadcast channel providing the NexTView service. In this case, the indication “NexTView” is displayed as soon as
data is available.
2 To see the NexTView service, you have two different NexTView interface types, depending on the percentage of available
data.
a)“Programme List” interface
Whilst you are watching TV, and after the indication “NexTView” in orange is displayed on the screen, press on the
remote control to see the “Programme List” interface (see fig. 1 on page 48).
b)“Overview” interface
Whilst you are watching TV, and after more than 50% of NexTView data is available (100% data may not be available
depending on your area), the indication “NexTView” in black is displayed on the screen. Then press on the remote
control to see the “Overview” interface (see fig. 2 on page 48).
As soon as you enter the NexTView service, the lower left corner of the screen will show the percentage of NexTView data
available. Once you have entered this service, the percentage of data available will not increase.
GB
3 To navigate through NexTView:
• Moving right or left, press or .
• Moving up or down, press or .
• Confirming a selection, press OK.
4 To switch off NexTView, press on the remote control.
(continued)
Other Functions
47
Page 50

“Programme List” interface (fig. 1)
1
2
3
01
02
Mon
Tue03Wed04Thu05Fri06Sat07Sun 7 : 07 :
TV1
TV2
TV3
TV4
TV5
TV6
TV7
TV8
Songs from the shows
TV1 00:30 - 01:30 Thursday 04
Programme description
Songs from the shows
00 : 30
Weather forecast informati
01 : 30
A1 news magazine
05 : 30
Arts show
06 : 30
Oclock news
07 : 30
Weather forecast informati
08 : 30
A1 news magazine
09 : 30
Arts show
10 : 30
Record
Remind
01
“Overview” interface (fig. 2)
1
2
3
A Icons for different themes
Refer to “Icon key” on page 49.
B Date
C Programme list
4
01
02
Mon
Tue03Wed04Thu05Fri06Sat07Sun 9 : 15:
TV1
TV2
TV3
TV4
TV5
TV6
TV7
TV8
9 : 00 9 : 30 10 : 00
Magazine
Weather Forecast
Euronews
Home Shopping Europe |Euro Sports
News | Arts show
Larry King's live | Euro Sports
Euro magazine | Euro Sports
Home Shopping Europe | Euronews
Songs from the shows
TV1 00:30 - 01:30 Thursday 04
Programme description
Record Remind
4
5
|
Songs from the shows
|
Fantasy film
Mike's show
|
Magazine
|
5
D Record
This function only works if you have connected a VCR which
supports SmartLink and Timer Programming features.
If you want to record the selected programme, press the red
button on the remote control.
E Remind
If you want to be reminded when the selected programme is broadcast,
press the green button on the remote control. At the time that programme
should be broadcast a reminder message is displayed on the TV.
|
Star Wars
03
• The “Record” and “Remind” options will be shown on the screen as soon as a programme has been selected, but they will
not be shown if you are watching the NexTView service on a TV channel which is not a NexTView provider.
• The “Record” and “Remind” options will not be available if the programme that you have selected has already started.
48
Other Functions
Page 51

Icon key
Full selection list
All the programme information is listed by
time and broadcast channels order.
Entertainment
Children
Arts
Sports Remind list
News
Movies
Music
Channel selection
If the NexTView provider sends information
on more than eight broadcast channels, you
can select eight of them to create a personal
list.
After you have created your personal list, the
default list can be restored. To restore it,
select “Auto B” by pressing on the
remote control.
Shows you a list with all the programmes
(maximum of five programmes) that you
have selected to be reminded about.
GB
Other Functions
49
Page 52

Additional Information
Connecting Optional Equipment
Using the following instructions, you can connect a wide range of optional equipment to your TV. (Connecting cables are
not supplied.)
Connecting to the front of the TV
To open the drop-down panel of your TV, push up the
panel door just under the mark until you hear a click,
then the panel door will open.
TV Front Panel
50
Additional Information
Headphones
(MONO)
L/G/S/I
R/D/D/D
5
S VHS/Hi8/DVC
camcorder
Page 53

C DBA
(MONO)
L/G/S/I
R/D/D/D
5
GB
A i: Headphones jack
S
B 5: AV5 S Video input jack
C 5: AV5 Video input jack
D 5: AV5 Audio input jacks
• To avoid a noisy picture, do not connect external equipment to connectors B and C at the same time.
• Even if headphones are connected to the TV, you can hear the sound from the TV speakers.
(continued)
Additional Information
51
Page 54

Connecting to the rear of the TV
KLV-L32M1
DVD player with
component output
Hi-Fi
4
R/D/D/D
R/D/D/D L/G/S/I
L/G/S/I
Y PB/CBPR/C
R
CENTRE
SPEAKER
IN
180W (6 )
MAX
Compact AV
System/Amplifier
123
(SMARTLINK)
/ /
DVD recorder/player
“PlayStation 2”*
VCR
Decoder
* “PlayStation 2” is a product of Sony Computer Entertainment, Inc.
* “PlayStation” is a trademark of Sony Computer Entertainment, Inc.
Do not connect a Decoder to the Scart connector / 2.
When you connect or disconnect optional equipment such as an audio amplifier, check that it is switched off before
connecting or disconnecting.
52
Additional Information
VCR
Decoder
Page 55

KE-P42M1
DVD player with
component output
///
123 4
(SMARTLINK)
Y
PB/
C
PR/
C
L/G/
S/I
R/D/
D/D
Compact AV
System/Amplifier
GB
L/G/S/I
R/D/D/D
CENTRE SPEAKER
IN
180W (6 ) MAX
B
R
DVD recorder/player
“PlayStation 2”*
Decoder
VCR
VCR
Decoder
* “PlayStation 2” is a product of Sony Computer Entertainment, Inc.
* “PlayStation” is a trademark of Sony Computer Entertainment, Inc.
Do not connect a Decoder to the Scart connector / 2.
When you connect or disconnect optional equipment such as an audio amplifier, check that it is switched off before
connecting or disconnecting.
Additional Information
Hi-Fi
(continued)
53
Page 56

KLV-L32M1
E
F
G
I
4
R/D/D/D
L/G/S/I
Y PB/CBPR/C
R/D/D/D L/G/S/I
123
/ /
(SMARTLINK)
R
CENTRE
SPEAKER
IN
180W (6 )
MAX
L MK
H
J
N
54
Additional Information
Page 57

KE-P42M1
E
F
///
1234
(SMARTLINK)
L/G/
S/I
R/D/
D/D
GB
JH
Y
PB/
C
PR/
C
CENTRE SPEAKER
B
R
L/G/S/I
R/D/D/D
IN
180W (6 ) MAX
K L M G I N
E Connect the supplied mains lead.
F Connect the supplied coaxial cable.
G 4: AV4 Audio input jacks
H 4: AV4 Y P
I : Audio output jacks
Note that some Scart leads may not fit into the connector on the TV.
B/CB PR/CR jacks
J 5 CENTRE SPEAKER IN terminals
K / 1: AV1 Scart connector
AV1 Scart connector outputs the video signal from the
TV tuner.
L / 2: AV2 Scart connector
AV2 Scart connector outputs all the video signals for
the TV (not only from the TV tuner).
M / 3: AV3 Scart connector (Sm artLink)
S
N 0: Auto Startup button
(continued)
Additional Information
55
Page 58

Connecting a VCR
To connect a VCR, refer to “Connecting an Aerial and a VCR” on page 26. We recommend you connect your VCR using a Scart
lead. If you do not have a Scart lead, tune in the VCR test signal to the TV programme number “0” by using the “Manual
Programme Preset” option. For details on how to manually programme these presets, see page 42, step A.
Refer to the instruction manual of your VCR to find out how to find the output channel of your VCR.
Connecting a VCR or a DVD recorder that supports SmartLink
SmartLink is a direct link between the TV and a VCR or a DVD recorder. For more information on SmartLink, refer to the
instruction manual of your VCR or DVD recorder.
If you use a VCR or a DVD recorder that supports SmartLink, please connect the VCR or the DVD recorder using a Scart lead to
the Scart connector / 3 (M).
S
If you connect a DVD recorder to Y, PB/CB, PR/CR jacks of 4 (H)
Some DVD recorders may have component signal format. If you wish to input the component signal connect the DVD recorder to
B/CB, PR/CR jacks of 4 (H) and the audio input jacks 4 (G).
Y, P
Connecting a decoder
If you have connected a decoder to the Scart connector / 3 (M), or through a VCR connected to
this Scart
Select the “Manual Programme Preset” option in the “Set Up” menu and, after entering the “Decoder” option, select “On” (using
or ). Repeat this option for each scrambled signal.
Depending on the country/region you have selected in the “Country” option, this option may not be available (see page 40).
S
Connecting external audio equipment
To listen to the sound from the TV on Hi-Fi equipment
Connect your Hi-Fi equipment to the audio output jacks (I) if you want to amplify the audio output from the TV. Next, using
the menu system, select the “Features” menu and set “Speaker” to “Off” (see page 38).
When you switch on or off your TV, turn down the volume of the Hi-Fi equipment connected to the audio output jacks .
If the volume is set too high, it may damage the Hi-Fi equipment.
How to use the CENTRE SPEAKER IN terminals
You can connect an external amplifier’s centre output to the TV’s CENTRE SPEAKER IN terminals (J). Centre speaker sound,
such as 5.1 ch surround, will then play back through the TV’s speakers. Select the “Features” menu using the menu system and set
“Speaker” to “Centre in” (see page 38).
56
Additional Information
Page 59

Using Optional Equipment
1 Connect your equipment to the designated TV socket, as indicated on pages 50 to 56.
2 Switch on the connected equipment.
3 To watch the picture of the connected equipment, press the / button on the remote control repeatedly until the correct
input symbol appears on the screen.
Symbol Input Signals
1, 2 or 3 • Audio/video input signal through the Scart connector K, L or M.
1 or 2 • RGB input signal through the Scart connector K or L. This symbol appears only
S
3 • S video input signal through the Scart connector M.
4 • Component input signal through the Y, P
5 • Video input signal through the phono jack C and audio input signal through D.
S
5 • S video input signal through the S video input jack B and audio input signal
4 Press the button on the remote control to return to the normal TV picture.
• / 1 Scart connector (K) outputs the video signal from only the TV tuner.
• / 2 Scart connector (L) outputs all the video signals for the TV (not only from the TV tuner).
For mono equipment
Connect the phono plug to the L/G/S/I jack and press / repeatedly until the input symbol 5 or 5 appears on the
screen.
Select the “Sound Adjustment” menu and set “Dual Sound” to “A” (see page 35).
if an RGB source has been connected.
B/CB, PR/CR jacks H and audio input
signal through G.
through D.
S
GB
Additional Information
57
Page 60

Remote Control Configuration for VCR/DVD
This remote control is set by default to operate the basic functions of this Sony TV, most Sony DVDs and Sony VCRs when
batteries are initially installed. To control VCRs and DVDs of other major brands, and certain Sony VCR models, please complete
the following steps:
Before you start, look up the three digit code for you r brand of DVD or VCR from th e list on page59. For those brands that
have more than one code, enter the first code number.
1 Press the Media Selector button on the remote control repeatedly until the required VCR
or DVD green light lights up.
If the Media Selector is in the TV position, code numbers will not be stored.
1
2 Before the green light goes out, press and hold the yellow button for approximately six
seconds until the green light starts flashing.
3 Whilst the green light is flashing, enter all three digits of the code for your brand (see
page 59) using the number buttons on the remote control.
If your selected code is entered correctly, all three green lights will be lit
momentarily.
4 Turn on your VCR or DVD and check that the main functions work.
• If your equipment is not working or some of the functions do not work, please
check to be sure you entered the correct code set or try the next code listed
against the brand (see page 59).
• Your brand codes may be lost if weak batteries are not replaced within a few
minutes. To reset your DVD or VCR code number, please repeat the above steps.
A small label is attached inside the battery cover to allow you to record your
brand codes.
• N ot all brands are covered and not all models of every brand are covered.
3
2
58
Additional Information
Page 61

VCR Brand List DVD Brand List
Brand Code Brand Code
SONY (VHS) 301, 302, 303, 308, 309, 362 SONY 001
SONY (BETA) 303, 307, 310 AIWA* 021
SONY (DV) 304, 305, 306 DENON 018, 027, 020, 002
AIWA* 325, 331, 351 GRUNDIG 009, 028, 023, 024, 016, 003
AKAI 326, 329, 330 HITACHI 025, 026, 015, 004
DAEWOO 342, 343 JVC 006, 017
GRUNDIG 358, 355, 360, 361, 320, 351 KENWOOD 008
HITACHI 327, 333, 334 LG 015, 014
JVC
LG 332, 338 MATSUI 013, 016
LOEWE 358, 355, 360, 361, 320, 351 MICROMEDIA 009
MATSUI 356, 357 MITSUBISHI 010
MITSUBISHI 346, 347 ONKYO 022
ORION 328 OPTINUS 004
PANASONIC 321, 323 PANASONIC 018, 027, 020, 002
PHILIPS
SAMSUNG 339, 340, 341, 345 RCA 005
SANYO 335, 336 SAMSUNG 011, 014
SHARP 324 SANYO 007
THOMSON 319, 350 SHARP 019, 027
TOSHIBA 337 THOMSON 012
314, 315, 322, 344, 352, 353,
354, 348, 349
311, 312, 313, 316, 317, 318,
358, 359
LOEWE 009, 028, 023, 024, 016, 003
MAGNAVOX 009, 028, 023, 024, 016, 003
PHILIPS 009, 028, 023, 024, 016, 003
PIONEER 004
TOSHIBA 003
YAMAHA 018, 027, 020, 002
GB
* If an AIWA VCR or DVD does not work even though
you enter the code for AIWA, enter the code for SONY
instead.
Additional Information
59
Page 62

Specifications
Display Unit:
(KLV-L32M1)
Power Requirement:
Screen Size: 32 inches
Display Resolution:
Power Consumption:
Standby Power Consumption:
Dimensions (w × h × d):
Weight: Approx. 19.7 kg (with stand)
(KE-P42M1)
Power Requirement:
Screen Size: 42 inches
Display Resolution:
Power Consumption:
Standby Power Consumption:
Dimensions (w × h × d):
Weight: Approx. 45 kg (with stand)
Panel System:
(KLV-L32M1)
LCD (Liquid Crystal Display) Panel
(KE-P42M1)
Plasma Display Panel
TV System:
Depending on your country/regio n sel ec t io n:
B/G/H, D/K, L, I
Colour System:
PAL, SECAM
NTSC 3.58, 4.43 (only Video In)
Aerial:
75 ohm external terminal for VHF/UHF
Channel Coverage:
VHF: E2–E12
UHF: E21–E69
CATV: S1–S20
HYPER: S21–S41
D/K: R1–R12, R21–R69
L: F2–F10, B–Q, F21–F69
I: UHF B21–B69
220–240 V AC, 50 Hz
Approx. 80.0 cm measured diagonally
1,366 dots (horizontal) ×
145 W
0.6 W or less
Approx. 835 × 670.5 × 287.5 mm
(with stand)
Approx. 835 × 603.5 × 110 mm (without stand)
Approx. 17.4 kg (without stand)
220–240 V AC, 50 Hz
Approx. 107.4 cm measured diagonally
852 dots (horizontal) × 480 lines (vertical)
365 W
0.6 W or less
Approx. 1,075 × 826 × 312 mm
(with stand)
Approx. 1,075 × 750 × 110 mm (without stand)
Approx. 39.5 kg (without stand)
768 lines (vertical)
Terminals:
/1
21-pin Scart connector (CENELEC standard) including
audio/video input, RGB input, and TV audio/video output.
/2
21-pin Scart connector (CENELEC standard) including
audio/video input, RGB input, and audio/video output.
S
/ 3 (SMARTLINK)
21-pin Scart connector (CENELEC standard) including
audio/video input, S video input, selectable audio/video
output, and SmartLink interface.
4
Y: 1 Vp-p, 75 ohms, 0.3V negative sync
P
B: 0.7 Vp-p, 75 ohms
PR: 0.7 Vp-p, 75 ohms
4
Audio input (phono jacks)
500 mVrms
Impedance: 47 kilo ohms
S
5
S video input (4-pin mini DIN)
5
Video input (phono jack)
5
Audio input (phono jacks)
Audio output (Left/Right) (phono jacks)
i Headphones jack
5 CENTRE SPEAKER IN:
Max. 180 W (6-ohms)
Sound Output:
10.0 W + 10.0 W
Accessories Supplied:
• Remote control
RM-Y1102 (KLV-L32M1) (1)
RM-Y1002 (KE-P42M1) (1)
• Size AA batteries (R6 type) (2)
• Coaxial cable (1)
• Mains lead (Type C-6) (1)
• Mains lead (Type BF) (1)
• Cleaning cloth (KE-P42M1 only) (1)
• Clamp screws (2)
• Plug holder (KE-P42M1 only) (1)
Mains lead Type BF may not be supp lied depending on
the country.
Optional Accessory:
• Wall-Mount Bracket SU-LW1 (KLV-L 32M1 onl y)
• Wall-Mount Bracket SU-PW2 (KE-P42M1 only)
• TV stand SU-PG3
Other Features:
• Teletext, Fastext
• Sleep Timer
• SmartLink (Direct link between your TV and a compatible
VCR or DVD recorder. For more information on SmartLink,
please refer to the instruction manual of your VCR or DVD
recorder.)
• TV system autodetection
• Auto Format
• Screen Memo
• NexTView (depending on availability of service)
• Picture Off (KE-P42M1 only)
60
Additional Information
Page 63

Troubleshooting
Self-diagnosis function
This TV is equipped with a self-diagnosis function. If there is a problem with your TV, the (Power/Standby) indicator will flash
in red repeatedly. Writing down the duration of flashes and interval between flashes he lps you info rm yo ur dealer or Sony service
centre of the TV’s condition.
(Power/Standby) indicator (flashing in red)
1 Measure how long the (Power/Standby) indicator flashes and stops flashing.
For example, the indicator flashes for two seconds, stops flashing for one second, and flashes for two seconds.
2 Press the (Power) switch on the TV to switch it off, disconnect the mains lead, and inform your dealer or Sony service
centre of how the indicator flashes (duration and interval).
Trouble symptoms and remedies
• Here are some simple solutions to problems which may affect the picture and sound.
• If you continue to experience problems, have your TV serviced by qualified service personnel.
Never open the casing yourself.
GB
Problem Possible remedies
No picture
No picture (screen is dark) and no sound • Check the aerial connection.
The TV turns off automatically (the TV enters the
standby mode).
No picture or no menu information from equipment
connected to the Scart connector
• Connect the TV to the mains, and press the (Power) switch on the
TV.
• If the
• Check if the Sleep Timer function is activated (page 44).
• If no signal is received or no oper ation is pe rfor med in the TV mode for
• Check that the optional equipment is on and press / on the
• Check the connection between the optional equipment and the TV.
(Power/Standby) indicato r li gh ts up in r ed, pr es s TV &/ on
the remote control.
10 minutes, the TV automatically switches to the standby mode.
remote control repeatedly until the correct input symbol is displayed on
the screen.
(continued)
Additional Information
61
Page 64

Problem Possible remedies
Poor picture/Unstable picture
Double images or ghosting • Check aerial/cable connections.
Only snow and noise appear on the screen. • Check if the aerial is broken or bent.
Dotted lines or stripes • Keep the TV away from electrical noise sources such as cars,
No colour on colour programmes • Using the menu system, select the “Picture Adjustment” me nu and select
No colour or irregular colour when viewing a signal
from the Y, PB/CB, PR/CR jacks of 4
Some tiny black points and/or bright points on the screen • The picture of a display unit is composed of pixels. Tiny black points
In the screen appears an image retention
(afterimage). (KE-P42M1 only)
The screen flickers when turning on the TV
(KE-P42M1 only).
The picture is too bright. • Using the menu system, select the “Picture Adjustment” menu and select
Picture (stripe) noise • Make sure that the aerial is connected using the supplied coaxial cable.
Poor picture (white saturation) when viewing a signal
from the Scart connector / 3
Distorted picture and noisy sound • Check if any connected optional equipment is installed in front of the TV
Stripe noise during playback/recording of a VCR • Video head interference. Keep your VCR away from the TV.
Poor or no picture (screen is dark), but good sound • Using the menu system, select the “Picture Adjustment” menu and s elect
Noisy picture when viewing a TV channel • Using the menu system, select the “Manual Programme Preset” option
S S
• Check the aerial location and direction.
• Check if the aerial has reached the end of its serviceable life (three to five
years in normal use, one to two years at the seaside).
motorcycles, or hair-dryers .
“Reset” to return to the factory settings (page 33).
• If you set the “Power Saving” option to “Reduce,” picture colours may
become dimmer (page 38).
• Check the connection of the Y, PB/CB, PR/CR jack s of 4.
• Make sure that the Y, PB/CB, PR/CR jacks of 4 are firmly seated in
their respective sockets.
and/or bright points (pixe ls) on t he sc reen do not indi cate a m alfu nction .
• Using the menu system, select the “Screen Saver” option in the
“Features” menu and set the “All White” option to “On” to reduce the
image retention.
• This is inherent in the Plasma Display Panel, and does not indicate a
malfunction.
“Mode.” Then select the desired picture mode (page 33).
• Keep the aerial cable away from other connecting cables.
• Do not use 300-ohm twin lead cables as interference may occur.
• Make sure that the output signal of the equipment connected to the Scart
connector / 3 is not an RGB signal. If it is an RGB signal, please
connect the equipment to the Scart connector / 1 or /
2.
or beside the TV. When installing optional equipment, leave some space
between the optional equipment and the TV.
• Leave a space of 30 cm between your VCR and the TV to avoid noise.
• Avoid installing your VCR in front of the TV or beside the TV.
“Reset” to return to the factory settings (page 33).
• If the (picture off) indicator lights up in blue, press (picture
off) on the remote control (KE-P42M1 only) .
in the “Set Up” menu and adjust “AFT” (Automatic Fine Tuning) to
obtain better picture recept ion (page 43).
• Using the menu system, set the “NR” (Noise Reduction) option in the
“Picture Adjustment” menu to re duce the noise in the picture (page 33).
62
Additional Information
Page 65

Problem Possible remedies
Distorted picture when changing programmes or
selecting Teletext
Wrong characters appear when viewing Teletext.
Wrong characters appear when viewing NexTView.
Some input sources cannot be selected.
• Turn off any equipment connected to the Scart connector on the rear of
the TV.
• Using the menu system, select the “Language” and “Country” options in
the “Set Up” menu and set the language and country/region in which you
view Teletext (page 40). For Cyrillic languages, we recommend that you
select Russia in case your own country/region does not appear in the list.
• Using the menu system, select the “Language” and “Country” options in
the “Set Up” menu and set the language and country/region i n which
NexTView is provided (page 40).
• Using the menu system, select the “AV Preset” option in the “Set Up”
menu and cancel the “Skip” setting of the input source.
No sound/Noisy sound
Good picture, no sound • Press 2 +/– or % (Mute) on the remote control.
Audio noise • Make sure that the aerial is connected using the supplied coaxial cable.
Menu item is not displayed.
• Check that the “Speaker” option is set to “Main” in the “Features” menu
(page 38).
• Keep the aerial cable away from other connecting cables.
• Do not use 300-ohm twin lead cables as interference may occur.
• Some items cannot be selected d epending o n the signal or other set tings.
Refer to the instructions on each menu item.
Strange sound
The TV cabinet creaks. • Changes in room temperature sometimes cause the TV cabinet to expand
The TV ticks. • An electrical circuit inside the TV is activated when the TV is turned on.
The TV buzzes. • There might be a surge sound when turning on the TV. This does not
Remote control does not function. • Check that the remote control is set correctly for the device you are using
The (Power/Standby) indicator on the
TV flashes.
or contract, which can make slight noises. This does not indicate a
malfunction.
This does not indicate a malfunction.
indicate a malfunction.
(VCR, TV, or DVD).
• If the remote control does not operate the VCR or DVD even when the
remote control has been set correctly to VCR or DVD, enter the
necessary code set as explained in “Remote Control Configuration for
VCR/DVD” (page 58).
• Replace the batteries.
• Refer to “Self-diagnosis function” (page 61) and contact your nearest
Sony service centre.
GB
Additional Information
63
Page 66

Television Channel Number Guide for the United Kingdom
Only the main transmitters are listed. Information regarding the regional sub-relay channel numbers can be obtained by contacting
the BBC Engineering Information Dept., Telephone Number 020 7852 5040.
Printed on 100% recycled paper using
VOC (Volatile Organic Compound)-free
vegetable oil based ink.
64
Additional Information
Page 67

Anleitung zur schnellen
Inbetriebnahme
Bedienungsanleitung
DE
1
Page 68

WARNUNG
• Um Feuergefahr und die Gefahr eines elektrischen Schlags zu vermeiden, setzen Sie das Gerät weder Regen noch sonstiger
Feuchtigkeit aus.
• Im Gerät liegen gefährlich hohe Spannungen an. Öffnen Sie das Gehäuse nicht. Überlassen Sie Wartungsarbeiten nur
qualifiziertem Fachpersonal.
Einführung
Vielen Dank, dass Sie sich für dieses Farbfernsehgerät mit LCD-/Plasmabildschirm von Sony entschieden haben.
Lesen Sie diese Anleitung vor Inbetriebnahme des Fernsehgeräts bitte genau durch und bewahren Sie sie zum späteren
Nachschlagen sorgfältig auf.
Symbole in dieser Anleitung
........Wichtige Informationen.
........Informationen zu einer Funktion.
, 2.......... Reihenfolge der auszuführenden Schritte.
......Die Tasten auf der Fernbedienung, die Sie zum
Ausführen der erforderlichen Schritte drücken
müssen, werden grau unterlegt abgebildet.
.........Hier wird kurz das Ergebnis der von Ihnen
ausgeführten Schritte erläutert.
Die Abbildungen in dieser Anleitung zeigen den KLV-L32M1, wenn nicht anders
angegeben.
2
Page 69

Inhaltsverzeichnis
Anleitung zur schnellen Inbetriebnahme.....................................................4
Bedienungsanleitung...............................................................................................................13
Sicherheitsinformationen...................................................... 13
Sicherheitsmaßnahmen.........................................................18
Übersicht
Übersicht über die Bedienelemente und Anzeigen am
Fernsehgerät ..................................................................21
Übersicht über die Bedienelemente auf der
Fernbedienung ............................................................... 23
Installation
Einlegen der Batterien in die Fernbedienung....................... 25
Anschließen einer Antenne und eines Videorecorders.........26
So verhindern Sie, dass das Fernsehgerät herunterfällt........29
Erste Inbetriebnahme
Einschalten des Fernsehgeräts und automatisches Einstellen
von Fernsehkanälen.......................................................30
Menüsystem
Arbeiten mit dem Menüsystem............................................. 32
Bild-Einstellungen................................................................33
Ton-Einstellungen ................................................................34
Bildschirm einstellen ............................................................36
Funktionen............................................................................ 38
Grundeinstellungen...............................................................40
Weitere Funktionen
Der Abschalttimer.................................................................44
Die Bildausblendfunktion (nur KE-P42M1).........................44
Anhalten des Bildes ..............................................................45
Videotext...............................................................................46
NexTView.............................................................................47
Weitere Informationen
Anschließen zusätzlicher Geräte..................................... ... ...50
Verwenden zusätzlicher Geräte ............. ... ............................57
Einstellen der Fernbedienung auf einen Videorecorder bzw.
ein DVD-Gerät................ ... ... .........................................58
Technische Daten..................................................................60
Störungsbehebung.................................................................61
DE
Inhaltsverzeichnis
3
Page 70

Anleitung zur schnellen
Inbetriebnahme
Danke, dass Sie sich für dieses Produkt von Sony entschieden haben.
In dieser schrittweisen Anleitung wird Folgendes erläutert:
– Einlegen von Batterien in die Fernbedienung
– Anschließen einer Antenne, eines Videorecorders und des Netzkabels an das Fernsehgerät
– Auswählen der Sprache für die Menübildschirme
– Auswählen des Landes bzw, G ebiets, in dem das Fernsehgerät verwendet werden sol l
– Einstellen von Fernsehkanälen
– Anordnen der Kanäle in einer anderen Reihenfolge
1
Fernbedienung
RM-Y1102 (KLV-L32M1) (1) oder
RM-Y1002 (KE-P42M1) (1):
Netzkabel
(Typ C-6) (1):
KLV-L32M1
KE-P42M1
Überprüfen des mitgelieferten Zubehörs
Verwenden Sie dieses
Netzkabel, wenn Sie das Gerät
außerhalb Großbritanniens
verwenden.
Batterien der Größe AA
(Typ R6) (2):
Netzkabel
(Typ BF) (1):
KLV-L32M1
KE-P42M1
• Verwenden Sie dieses
Netzkabel, wenn Sie das Gerät
in Großbritannien verwenden.
• Je nach Land werden diese
Kabel nicht immer mitgeliefert.
Koaxialkabel (1):
Die Ferritkerne nicht entfernen.
Reinigungstuch (nur KE-P42M1) (1 )
Schraubklemmen (2)
Steckerhalter (nur KE-P42M1) (1)
4
Anleitung zur schnellen Inbetriebnahme
Page 71

2
Einlegen der Batterien in die Fernbedienung
• Legen Sie die mitgelieferten Batterien unbedingt polaritätsrichtig ein.
• Entsorgen Sie gebrauchte Batterien immer umweltfreundlich.
• Verwenden Sie nicht Batterien verschiedenen Typs oder alte und neue Batterien zusammen.
DE
Anleitung zur schnellen Inbetriebnahme
(Fortsetzung)
Anleitung zur schnellen Inbetriebnahme
5
Page 72

Anschließen einer Antenne, eines Videorecorders
3
Anschließen einer Antenne
und des Netzkabels an das Fernsehgerät
• Verwenden Sie das mitgelieferte Netzkabel (Typ C-6 oder Typ BF, Seite 4).
• Verwenden Sie zum Anschließen der Antenne das mitgelieferte Koaxialkabel.
Schließen Sie das Netzkabel erst an, wenn alle anderen Anschlüsse vorgenommen wurden.
KLV-L32M1
KE-P42M1
Schließen Sie das
mitgelieferte Netzkabel (Typ
C-6 oder Typ BF) an.
Schließen Sie das
mitgelieferte
Koaxialkabel an.
Schließen Sie das
mitgelieferte
Koaxialkabel an.
Schließen Sie das mitgelieferte
Netzkabel (Typ C-6 oder Typ BF, mit
Schutzerdung) an.
6
Anleitung zur schnellen Inbetriebnahme
Page 73

Anschließen eines Videorecorders mit Antenne
KLV-L32M1
Schließen Sie das
mitgelieferte Netzkabel
(Typ C-6 oder Typ BF) an.
(SMARTLINK)
3
/
Videorecorder
OUT IN
Scart-Kabel optional.
KE-P42M1
Videorecorder
OUT IN
/
3
(SMARTLINK)
Scart-Kabel optional.
• Weitere Informationen zum Anschließen eines Videorecorders finden Sie unter „Anschließen zusätzlicher
Geräte“ auf Seite 50.
• Beachten Sie, dass einige Scart-Kabel möglicherweise nicht in den Anschluss am Fernsehgerät passen.
Schließen Sie das
mitgelieferte Netzkabel
(Typ C-6 oder Typ BF,
mit Schutzerdung) an.
DE
Anleitung zur schnellen Inbetriebnahme
(Fortsetzung)
Anleitung zur schnellen Inbetriebnahme
7
Page 74

4
Bündeln Sie das Netzkabel und das Koaxialkabel und sichern Sie
sie mit den Klemmen am Fernsehgerät.
Bündeln der Kabel (nur KLV-L32M1)
Sie können die Kabel an der Rückseite des Fernsehgeräts verstauen.
Wenn Sie das Koaxialkabel anbringen, verlegen Sie es wie
in der Abbildung dargestellt in einer Schleife.
Klemmen
4
Sichern des Netzsteckers (nur KE-P42M1)
Sie müssen den Netzstecker an der Buchse AC IN des Fernsehgeräts sichern.
1 Bringen Sie den Netzsteckerhalter (mitgeliefert) am
Netzkabel an.
Buchse AC IN
(Stromversorgung)
des Fernsehgeräts
2 Schieben Sie den Halter auf die Buchse AC IN, bis er mit
einem Klicken einrastet.
Zum Herausziehen des Netzkabels lösen Sie den
Netzkabelhalter. Drücken Sie dazu von beiden Seiten auf
den Halter und ziehen Sie den Stecker heraus.
Steckerhalter
(mitgeliefert)
Netzkabel
(mitgeliefert)
8
Anleitung zur schnellen Inbetriebnahme
Page 75

5
1 Schließen Sie das Fernsehgerät an das Stromnetz an
2 Schalten Sie das Fernsehgerät mit dem Netzschalter am
Einschalten des Fernsehgeräts
(220–240 V Wechselstrom, 50 Hz).
Gerät ein.
DE
Anleitung zur schnellen Inbetriebnahme
(Fortsetzung)
Anleitung zur schnellen Inbetriebnahme
9
Page 76

Auswählen der Sprache für die Menübildschirme
6
Dieses Fernsehgerät arbeitet mit Menübildschirmen. Gehen Sie nach den Anweisungen unten vor und wählen Sie die gewünschte
Sprache für die Menübildschirme sowie das Land bzw. Gebiet, in dem Sie das Fernsehgerät verwenden wollen.
und des Landes bzw. Gebiets
Language
Select Language
English
Nederlands
Français
Italiano
Deutsch
Türkçe
Ελληνικά
Español
Português
m
Land
Land wählen
–
United Kingdom
Ireland
Nederland
België/Belgique
Luxembourg
France
Italia
Schweiz/Suisse/Svizzera
Deutschland
Österreich
m
Automatisches Abspeichern
jetzt starten?
Ja Nein
Polski
Česky
Magyar
Русский
Бьлгарски
Suomi
Dansk
Svenska
Norsk
Wenn Sie das Fernsehgerät zum ersten Mal einschalten, erscheint
automatisch das Menü Language auf dem Bildschirm (Automatische
Ersteinstellung).
1 Wählen Sie mit / / oder auf der Fernbedienung die
Sprache aus und bestätigen Sie die Auswahl mit OK.
Nun werden alle Menüs in der ausgewählten Sprache angezeigt.
2 Das Menü Land erscheint automatisch auf dem Bildschirm.
Wählen Sie mit oder das Land bzw. Gebiet aus, in dem Sie
das Fernsehgerät verwenden, und bestätigen Sie die Auswahl mit
OK.
Wenn das Land bzw. Gebiet, in dem Sie das Fernsehgerät
verwenden wollen, in der Liste nicht enthalten ist, wählen
Sie „–“ statt eines Landes bzw. Gebiets.
Das Menü Autom. Progr. erscheint automatisch auf dem
Bildschirm.
Wenn die automatische Ersteinstellung später erneut ausgeführt werden soll, drücken Sie 0 auf der Rückseite des
Fernsehgeräts.
KLV-L32M1
(SMARTLINK)
23
/
10
Anleitung zur schnellen Inbetriebnahme
KE-P42M1
Y
PB/
C
PR/
C
L/G/
S/I
R/D/
D/D
CENTRE SPEAKER
B
180W (6 ) MAX
R
L/G/S/I
R/D/D/D
IN
Page 77

7
Automatisches Einstellen von Fernsehkanälen
Sie müssen das Fernsehgerät für den Empfang von Kanälen (Fernsehprogrammen) einstellen. Wenn Sie wie im Folgenden erläutert
vorgehen, sucht das Fernsehgerät automatisch alle verfügbaren Fernsehkanäle und speichert diese.
Automatisches Abspeichern
jetzt starten?
Ja Nein
m
Autom. Progr.
Programm :
TV-System :
Kanal :
m
Programme ordnen
Prog. wählen
01
TVE
02
TVE2
03
TV3
04
C33
05
C27
06
C58
07
S02
08
S06
09
S08
10
S12
11
S14
01
I
C23
Beenden:
Suche
1 Wählen Sie mit OK die Option Ja.
2 Das Fernsehgerät beginnt, alle verfügbaren Kanäle zu suchen und
abzuspeichern.
• Dieser Vorgang kann einige Minuten in Anspruch
nehmen. Bitte haben Sie etwas Geduld und drücken Sie
keine Taste. Andernfalls wird der automatische
Sendersuchlauf nicht ordnungsgemäß abgeschlossen.
• Wenn beim automatischen Sendersuchlauf keine Kanäle
gefunden werden können, erscheint automatisch eine
weitere Meldung auf dem Bildschirm, mit der Sie
aufgefordert werden, die Antenne anzuschließen.
Schließen Sie bitte die Antenne an (Seite 6) und drücken
Sie OK. Der automatische Sendersuchlauf wird erneut
gestartet.
Wenn der automatische Sendersuchlauf abgeschlossen ist, erscheint
automatisch das Menü Programme ordnen auf dem Bildschirm.
MENU
DE
Anleitung zur schnellen Inbetriebnahme
(Fortsetzung)
Anleitung zur schnellen Inbetriebnahme
11
Page 78

8
Ändern der Reihenfolge der Fernsehkanäle
Wenn Sie wie im Folgenden erläutert vorgehen, können Sie die Reihenfolge ändern, in der die Fernsehkanäle auf dem
Fernsehschirm erscheinen.
A) Wenn Sie die Reihenfolge der Fernsehkanäle nicht ändern wollen
Programme ordnen
Prog. wählen
01
TVE
02
TVE2
03
TV3
04
C33
05
C27
06
C58
07
S02
08
S06
09
S08
10
S12
11
S14
Beenden:
MENU
Drücken Sie MENU, um den Vorgang zu beenden. Auf dem
Fernsehschirm erscheint wieder die normale Anzeige.
B) Wenn Sie die Fernsehkanäle in einer anderen Reihenfolge abspeichern wollen
Programme ordnen
Prog. wählen
01
TVE
02
TVE2
03
TV3
04
C33
05
C27
06
C58
07
S02
08
S06
09
S08
10
S12
11
S14
Beenden:
MENU
1 Wählen Sie mit oder die Programmnummer des Kanals aus,
den Sie verschieben wollen, und drücken Sie .
2 Wählen Sie mit oder die neue Programmnummer für den
ausgewählten Kanal und drücken Sie .
Der ausgewählte Kanal wird nun an die neue Programmposition
verschoben und die anderen Kanäle werden entsprechend
verschoben.
m
Programme ordnen
Neue Pos. wählen
TVE
01
TVE2
02
TV3
03
C33
04
C27
05
C58
06
S02
07
S06
08
S08
09
S12
10
S14
11
01 TVE
Beenden:
MENU
3 Wenn Sie die Position weiterer Kanäle ändern wollen, gehen Sie
wie in Schritt 1 und 2 erläutert vor.
4 Drücken Sie MENU, um den Vorgang zu beenden. Auf dem
Fernsehschirm erscheint wieder die normale Anzeige.
12
Anleitung zur schnellen Inbetriebnahme
Das Fernsehgerät ist nun betriebsbereit.
Page 79

Bedienungsanleitung
Sicherheitsinformationen
Sicherheitshinweise
Netzkabel
Ziehen Sie den Netzstecker
aus der Steckdose, wenn S ie
das Gerät umstellen. Stellen
Sie das Gerät nicht um, wenn
das Netzkabel eingesteckt
ist. Andernfalls kann das
Netzkabel beschädigt
werden und es besteht
Feuergefahr und die Gefahr eines elektrischen Schlags. Wenn das
Gerät heruntergefallen ist bzw. beschädigt wurde, lassen Sie es
umgehend von qualifiziertem Fachpersonal überprüfen.
Installation
Wenn das Gerät an einer Wand
installiert werden soll, lassen Sie di e
entsprechenden Arbeiten unbedingt
von qualifiziertem Fachpersonal
ausführen. Bei unsachgemäßer
Installation stellt das Gerät eine
potenzielle Gefahrenquelle dar.
Medizinische Einrichtungen
Stellen Sie dieses Gerät nicht an Orten
wie Krankenhäusern auf, an denen
medizinische Geräte eing esetzt
werden. Dieses Gerät kann
Fehlfunktionen medizinischer Geräte
verursachen.
Transport
• Lösen Sie alle Kabel vom Gerät, bevor
Sie das Gerät transportieren.
• Wenn Sie das Gerät tragen, halten Sie es
wie in der Abbildung rechts dargestellt.
Da sich die hintere Abdeckung leicht
lösen kann, fällt das Gerät
möglicherweise herunter und wird beschädigt oder verursacht
schwere Verletzungen.
• Setzen Sie das Gerät beim Transport keinen Stößen und keinen
starken Erschütterungen aus . Andernfalls kann das Gerät
herunterfallen und beschädigt werden oder schwere
Verletzungen verursachen.
• Wenn Sie das Gerät wegen einer Reparatur oder bei einem
Umzug transportieren müssen, verpacken Sie es mithilfe der
Originalverpackungsmaterialien im Originalkarton.
• Zum Tragen des Geräts sind mindestens zwei Personen
erforderlich.
DE
(Fortsetzung)
Sicherheitsinformationen
13
Page 80

Installation und Transport
Luftzufuhr
Decken Sie auf keinen Fall die
Lüftungsöffnungen im Gehäuse ab.
Andernfalls besteht Feuergefahr aufgrund
einer Überhitzung des Geräts. Ohne
ausreichende Luftzufuhr kann sich auf
und im Gerät Staub und Schmutz ansammeln. Beachten Sie
Folgendes, um eine ausreichende Luftzufuhr zu gewährleisten:
• Installieren Sie das Gerät nicht nach hinten oder seitwärts
geneigt.
• Installieren Sie das Gerät nicht auf dem Kopf oder falsch h erum.
• Installieren Sie das Gerät nicht in einem Regal oder einem
Schrank.
• Stellen Sie das Gerät nicht auf einer Decke oder einem Bett auf.
• Decken Sie das Gerät nicht mit Decken oder Vorhängen ab und
legen Sie keine Gegenstände wie Zeitungen usw. darauf.
Installation in einem Fahrzeug
oder an der Decke
Installieren Sie das Gerät nicht in
einem Fahrzeug. Durch d ie Be weg un g
beim Fahren kann das Gerät
herunterfallen und Verletzungen
verursachen. Installieren Sie das G er ät
auch nicht an der Decke.
Wasser und Feuchtigkeit
Installieren Sie das Gerät nicht in der
Nähe von Wasser, wie z. B. neben einer
Badewanne oder einer Dusche. Schützen
Sie das Gerät außerdem vor Regen,
Feuchtigkeit und Rauch. Andernfalls besteht Feuergefahr und die
Gefahr eines elektrischen Schlags. Verwenden Sie das Gerät nicht
an Orten, an denen die Gefahr besteht, dass Insekten in das G erät
eindringen.
Nutzung im Freien
Installieren Sie das Gerät nich t im
Freien. Wenn das Gerät Regen
ausgesetzt wird, besteht Feuergefa hr
und die Gefahr eines elektrischen
Schlags. Wenn das Gerät direktem
Sonnenlicht ausgesetzt wird, kann es
sich überhitzen und beschädig t werd en.
Boote und andere
Wasserfahrzeuge
Installieren Sie das Gerät nich t in
einem Boot oder einem anderen
Wasserfahrzeug. Wenn das Gerät
Wasser, insbesondere Meerwasser
ausgesetzt wird, besteht Feuergefa hr
und die Gefahr von Schäden am Gerät.
So verhindern Sie ein Herunterfallen des
Geräts
Stellen Sie das Gerät auf einem sicheren, stabilen
Ständer auf. Hängen Sie nichts an das Gerät.
Andernfalls könnte das Gerät vom Ständer oder
von der Wandhalterung herunterfallen und
Sachschäden oder schwere Verletzungen verursachen.
Sorgen Sie dafür, dass Kinder nicht auf das Gerät klettern.
Sonderzubehör
Beachten Sie folgende Hinweise, wenn Sie das
Gerät auf einem Ständer aufstellen oder mithilfe
einer Wandhalterung installieren. Andernfalls
kann das Gerät herunterfallen und schwere
Verletzungen verursachen.
• Befolgen Sie bei der Installation des Geräts unbedingt die mit
dem Ständer oder der Wandhalt erung gel ieferten Anw eisunge n.
• Verwenden Sie unbedingt die mit dem Ständer oder der
Wandhalterung gelieferten Halterungs- und Befestigungsteile.
14
Sicherheitsinformationen
Page 81

Stromquellen
Überlastung der Stromkreise
Dieses Gerät ist ausschließlich auf den
Betrieb an 220–240 V Wechselstrom
ausgelegt. Achten Sie darauf, nicht zu
viele andere Geräte an dieselbe
Netzsteckdose anzuschließen.
Andernfalls besteht Feuergefahr und die Gefahr eines elektrischen
Schlags.
Netzstrom
Verwenden Sie eine Netzsteckdose, in der der
Stecker fest sitzt. Stecken Sie den Stecker ganz in
die Netzsteckdose. Wenn der Stecker lose in der
Steckdose sitzt, kann es zu einem
Lichtbogenüberschlag ko mmen. In diesem Fall
besteht Feuergefahr. Wenden Sie sich
gegebenenfalls an einen qualifizierten Elektriker
und lassen Sie die Netzsteckdose auswechseln.
Feuchtigkeit
Berühren Sie das Netzkabel nicht mit nassen
Händen. Wenn Sie das Netzkabel mit nassen
Händen einstecken/lösen, besteht die Gefahr
eines elektrischen Schlags.
Umgang mit dem Netzkabel
Ziehen Sie immer am Stecker, wenn
Sie das Netzkabel lösen wollen.
Ziehen Sie nicht am Netzkabel selbst.
Verkabelung
Ziehen Sie den Netzstecker aus der Steckdose, wenn Sie Kabel an
das Gerät anschließen. Trennen Sie das Gerät zu Ihrer eigenen
Sicherheit unbedingt vom Netzstrom, wenn Sie Kabel daran
anschließen.
Reinigung
Reinigen Sie den Netzstecker regelmäßig. Wenn
der Stecker verstaubt ist und sich Feuchtigkeit
ablagert, kann die Isolierung leiden und es
besteht Feuergefahr. Lös en Sie den Netz stecke r
und reinigen Sie ihn regelmäßig.
DE
Gewitter
Berühren Sie zu Ihrer eigene n Si che rh ei t
bei einem Gewitter nicht das Gerät, das
Netzkabel oder das Antennenkabel.
Betrieb
Reparaturbedürftige Schäden
Wenn der Bildschirm des Geräts gesprungen ist, trennen Sie
unbedingt sofort das Netzkabel vom Stromnetz. Erst dann dürfen
Sie das Gerät anfassen. Andernfalls besteht die Gefahr eines
elektrischen Schlags.
Wartung
Öffnen Sie das Gehäuse nich t.
Überlassen Sie Wartungsa rbeiten stets
nur qualifiziertem
Kundendienstpersonal.
Lüftungsöffnungen
Führen Sie nichts in die Lüftungsöffnungen ein.
Wenn Metallgegenstände oder brennbare
Gegenstände in diese Öffnungen gelangen,
besteht Feuergefahr und die Gefahr eines
elektrischen Schlags.
Feuchtigkeit und brennbares
Material
• Schützen Sie das Fernsehgerät
vor Feuchtigkeit. Achten Sie
darauf, dass keinerlei Flüss igke it
in das Fernsehgerät gelangt.
Wenn durch die Öffnungen Flüssigkeiten oder Fremdkörper in
das Gerät gelangt sind, dürfen Sie es nicht mehr benutzen.
Andernfalls kann es zu einem elektrischen Schlag kommen und
das Gerät kann beschädigt werden.
Lassen Sie das Fernsehgerät umgehend von qualifiziertem
Kundendienstpersonal überprüfen.
• Um Feuergefahr zu vermeiden, halten Sie bre nnbare Materialien
bzw. offenes Feuer (z. B. Kerzen) vom Gerät fern.
(Fortsetzung)
Sicherheitsinformationen
15
Page 82

Weitere Sicherheitsinformationen
Elektrischer Schlag
Berühren Sie das Gerät nicht m it feuchten Händen. Andernfal ls
besteht die Gefahr eines elektrischen Schlags und von Schäden am
Gerät.
Gesplittertes Glas
Werfen Sie nichts gegen das Gerät. Das Glas
des Bildschirms könnte explodie re n. In
diesem Fall besteht die Gefahr schwerer
Verletzungen.
Installation ohne vorstehende Teile
Installieren Sie das Gerät nicht so, dass einige Teile hervor stehen.
Andernfalls besteht die Gefahr, dass sich Personen an den
vorstehenden Teilen verletzen.
• Installieren Sie das Gerät nicht so, dass es z. B. hinter e iner Säule
hervorragt.
• Installieren Sie das Gerät nicht so, dass eine Person mit dem
Kopf dagegen stoßen könnte.
Aufstellung
Stellen Sie das Gerät nicht in heißer,
feuchter oder übermäßig staubiger
Umgebung auf. Installieren Sie das Gerät
nicht an Orten, an denen die Ge fahr
besteht, dass Insekten in das Gerät
eindringen. Stellen Sie das Fernsehgerät
nicht an Orten auf, an denen es mechanischen Vibrationen
ausgesetzt ist.
Zubehör
Befestigen Sie das Gerät ordnungsgemäß.
Wenn das Gerät nicht sicher befestigt wird, kann es herunterfallen
und Verletzungen verursachen. Verwenden Sie einen Ständer oder
eine Wandhalterung, mit dem bzw. der sich das Gerät sicher
installieren lässt. Befolgen Sie beim Installieren die Anweisungen
in der mit dem Ständer bzw. der Wandhalterung gelieferten
Bedienungsanleitung.
Entsorgen des Geräts (nur KLV-L32M1)
• Entsorgen Sie das Gerät nicht über den Hausmüll.
• Der LCD-Bildschirm enthält kleine Mengen an Flüssigkristall
und Quecksilber. Die Leuchtstoffröhre in diesem Gerät enthält
ebenfalls Quecksilber. Entsorgen Sie das Gerät gemäß den
örtlichen Vorschriften.
Fett
Installieren Sie dieses Gerä t nic ht i n Re stau rants, in dene n vie l Fe tt
verwendet wird. Andernfalls könnte fettgetränkter Staub in das
Gerät eindringen. In diesem Fall besteht die Gefahr von Schäden am
Gerät.
Korrosion
Wenn Sie das Gerät in der Nähe von Meerwasser aufstellen, kann
die salzhaltige Luft Korrosion an den Metallteilen des Geräts
verursachen. Interne Bauteile können beschädigt werden und es
besteht Feuergefahr. Die Lebensdauer des Geräts kann sich
verringern. Ergreifen Sie geeignete Maßnahmen zur Verringerung
der Luftfeuchtigkeit und der Temperatur in dem Raum, in dem das
Gerät aufgestellt ist.
Reinigung
Ziehen Sie den Netzstecker aus der Steckdose, wenn Sie das Gerät
reinigen. Andernfalls besteht die Gefahr eines elektrischen Schlags.
Empfohlener Aufstellungsort
Stellen Sie das Gerät auf eine stabile, ebene
Fläche. Andernfalls kann das Gerät
herunterfallen und Verletzungen verursachen.
16
Sicherheitsinformationen
Page 83

LCD-Bildschirm (nur KLV-L32M1)
• Der LCD-Bildschirm wird in einer Hochpräzisionstechnologie
hergestellt und der Anteil der effektiven Pixel beträgt
mindestens 99,99 %. Trotzdem sind möglicherweise schwarze
Punkte oder helle Lichtpunkte (rot, blau oder grün) permanent
auf dem LCD-Bildschirm zu sehen. Dies ist eine spezifisch e
Eigenschaft von LCD-Bildschirmen. Es handelt sich dabei nicht
um eine Fehlfunktion.
• Setzen Sie den LCD-Bildschirm nicht der Sonne aus.
Andernfalls kann die Bildschirmobe rf l äch e bes ch ädigt werden.
• Stoßen Sie nicht gegen den Filter an der Vorderseite, zerkratzen
Sie ihn nicht und stellen Si e nichts auf dieses Gerät. Das Bild
kann ungleichmäßig werden und der LCD-Bildschirm kann
beschädigt werden.
• Wenn dieses Gerät an einem kalten Ort verwendet wird, kommt
es möglicherweise zu Schmierstreifen im Bild oder das Bild
wird dunkel.
Dabei handelt es sich nicht um eine Fehlfunktion. Diese Effekte
verschwinden, wenn die Temperatur steigt.
• Wenn Standbilder längere Zeit angezeigt werden, kann es zu
Doppelbildern kommen. Dieser Effekt verschwindet
möglicherweise nach einigen Augenbl ic ken.
• Bei Betrieb werden Bildschirm und Gehäuse warm. Dies ist
keine Fehlfunktion.
Leuchtstoffröhre (nur KLV-L32M1)
Bei diesem Gerät wird als Lichtquelle eine spezielle
Leuchtstoffröhre eingesetzt. Wenn die Anzeige auf dem Bildschirm
dunkel wird, flimmert oder gar nicht mehr erscheint, muss die
Leuchtstoffröhre gegen eine neue ausgetauscht werden. Wenden
Sie sich bitte an qualifiziertes Kundendienstpersonal, um die
Leuchtstoffröhre austauschen zu lassen.
Hohe Temperaturen
Berühren Sie nicht die Oberfläche des Geräts. Es bleibt sehr warm,
auch wenn das Gerät bereits einige Zeit ausgeschaltet ist.
Reinigen der Bildschirmoberfläche
Die Bildschirmoberfläche ist mit einer speziellen Beschichtung
versehen, um starke Lichtref lexionen zu vermeiden. Beachten Sie
unbedingt folgende Sicherheitsmaßnahmen, damit die
Beschichtung nicht beschädigt wird.
• Entfernen Sie Staub von der Bildschirmoberfläche vorsichtig
mit einem weichen Tuch. Bei stärkerer Verschmutzung feuchten
Sie ein weiches Tuch leicht mit einer milden Reinigungslösung
an und wischen dann über den Bildschirm. Das Tuch kann
gewaschen und mehrmals verwendet werden.
• Verwenden Sie keine Scheuerschwämme, keine alkalischen/
säurehaltigen Reinigungsmittel, kein Scheuerpulver und keine
starken Lösungsmittel wie Alkohol, Benzin oder Verdünnung.
Netzkabel
Wenn das Netzkabel beschädigt wird,
besteht Feuergefahr und die Ge fahr eines
elektrischen Schlags.
• Klemmen Sie das Netzkabel nicht ein
und biegen und verdrehen Sie das
Kabel nicht übermäßig. Die
Isolierung könnte beschädigt werden,
so dass die blanken Adern im Inneren
des Kabels freiliegen, oder das Kabel
selbst könnte beschädigt werden. In
diesem Fall kann es zu einem
Kurzschluss kommen und es besteht
Feuergefahr bzw. die Gefahr eines elektrischen Schlag s.
• Beschädigen Sie das Netzkabel nicht und nehmen Sie keine
Veränderungen daran vor.
• Stellen Sie keine schweren Gegenstände auf das N etzkabel.
Ziehen Sie nicht am Netzkabel.
• Halten Sie das Netzkabel von Wärmequellen fern.
• Ziehen Sie immer am Stecker, wenn Sie das Netzkabel von der
Steckdose trennen.
Wenn das Netzkabel beschädigt ist, verwenden Sie es nicht weiter.
Lassen Sie es bei Ihrem Händler oder Sony-Kundendienst
austauschen.
Wenn das Gerät nicht benutzt
wird
Zum Schutz der Umwelt und aus
Sicherheitsgründen empfiehlt es
sich, das Gerät auszuschalten,
wenn es nicht benutzt wir d. Lassen
Sie es nicht lange Zeit in den Bereitschaftsmodus geschaltet.
Trennen Sie das Gerät vom Stromnetz.
Verkabelung
Stolpern Sie nicht über die K abel. Andernfalls kann das Gerät
beschädigt werden.
Installation
Stellen Sie zusätzliche Komponenten nicht zu nahe beim Gerät auf.
Lassen Sie mindestens 30 cm Platz zwischen dem Gerät und
zusätzlichen Komponenten. Wenn ein Videorecorder vor oder
neben dem Gerät installiert wird , kann das Bild verzerrt werden.
DE
Sicherheitsinformationen
17
Page 84

Sicherheitsmaßnahmen
Sicherheitsmaßnahmen hinsichtlich der Luftzufuhr
Lassen Sie ausreichend Platz um das Gerät. Andernfalls ist die Luftzufuhr unzureichend und das Gerät kann sich überhitzen. In
diesem Fall besteht Feuergefahr und das Gerät kann beschädigt werden.
Bei Wandinstallation
30 cm
10 cm
10 cm
Bei Installation auf einem Ständer
30 cm
10 cm
Installieren Sie das Gerät auf keinen Fall folgendermaßen:
Die Luftzirkulation wird unterbunden.
10 cm
Lassen Sie mindestens so viel Platz um das Gerät.
10 cm
Lassen Sie mindestens so viel Platz um das Gerät.
Die Luftzirkulation wird unterbunden.
18
Sicherheitsmaßnahmen
Wand
Wand
Page 85

Augenschonendes Fernsehen
• Für ermüdungsfreies Fernsehen sollte die Entfernung zum Gerät das Vier- bis Siebenfache der Bildhöhe betragen.
• Schauen Sie bei gemäßigter Beleuchtung fern. Bei einer falschen Beleuchtung werden die Augen belastet. Auch kontinuierliches
Fernsehen über längere Zeit kann die Augen stark beanspruch en.
Installieren des Geräts
Installieren Sie das Gerät mit der angegebenen Wandhalterung bzw. auf dem angegebenen Ständer.
• Stellen Sie das Gerät nicht an Orten auf, an denen es extremen Temperaturen ausgesetzt ist, z. B. in direktem Sonnenlicht oder
in der Nähe einer Heizung oder eines Warmluftauslasses. Wenn das Gerät extremen Temperaturen ausgesetzt wird, kann es sich
stark erwärmen. In diesem Fall kann sich das Gehäuse verformen oder es kann zu Fehlfunktionen kommen.
• Für eine gute Bildqualität schützen Sie den Bildschirm vor direkter Beleuchtung oder direktem Sonnenlicht. Falls möglich,
bringen Sie eine von der Decke herab gerichtete Punktbeleuchtung an.
• Das Gerät bleibt auch in ausgeschaltetem Zustand mit dem Stromnetz verbunden. Wenn Sie das Gerät ganz vom Netz trennen
wollen, ziehen Sie den Stecker aus der Steckdose.
Einstellen der Lautstärke
• Stellen Sie die Lautstärke so ein, dass Ihre Nachbarn nicht gestört werden. Bei Nacht ist der Ton weit zu hören. Es empfiehlt
sich daher, die Fenster zu schließen oder Kopfhörer zu verwenden.
• Stellen Sie beim Verwenden von Kopfhörern die Lautstärke moderat ein. Andernfalls kann es zu Gehörschäden kommen.
Umgang mit der Fernbedienung
• Gehen Sie sorgfältig mit der Fernbedienung um. Lassen Sie sie nicht fallen und treten Sie nicht darauf. Verschütten Sie auch
keine Flüssigkeiten auf der Fernbedienung.
• Legen Sie die Fernbedienung nicht in die Nähe von Wärmequellen oder an Orte, an denen sie direktem Sonnenlicht oder
Feuchtigkeit ausgesetzt ist.
Pflegen und Reinigen der Bildschirmoberfläche
Um die Qualität des Bildschirms zu erhalten, beachten Sie bitte folgende Ratschläge. Stoßen Sie nicht gegen den Bildschirm,
berühren Sie ihn nicht mit einem harten Gegenstand und werfen Sie nichts gegen d en Bildschirm. Andernfalls kann der Bildschirm
zerkratzt oder beschädigt werden.
• Achten Sie darauf, vor dem Reinigen das Netzkabel des Geräts aus der Netzsteckdose zu ziehen.
• Berühren Sie nicht die Mattscheibe, wenn Sie das Gerät kontinuierlich längere Zeit in Betrieb haben. Die Mattscheibe kann sich
erhitzen.
• Es empfiehlt sich, die Bildschirmoberfläche so wenig wie möglich zu berühren.
• Reinigen Sie den Bildschirm mit einem weichen Tuch.
• Verwenden Sie auf keinen Fall Scheuermittel, Scheuerschwämme oder Lösungsmittel wie Alkohol oder Benzin. Andernfalls
kann die Bildschirmoberfläche beschädigt werden.
Reinigen des Gehäuses
• Achten Sie darauf, vor dem Reinigen des Gehäuses das Netzkabel aus der Netzsteckdose zu ziehen.
• Reinigen Sie das Gehäuse mit einem weichen Tuch.
• Beachten Sie bitte, dass es zu Materialschäden oder zu Schäden an der Bildschirmbeschichtung kommen kann, wenn das Gerät
flüchtigen Lösungsmitteln wie zum Beispiel Alkohol, Verdünnung, Benzin oder Insektiziden ausgesetzt ist oder wenn es längere
Zeit mit Gummi- oder Vinylmaterialien in Berührung kommt.
• In den Lüftungsöffnungen kann sich über einen längeren Zeitraum hinweg Staub ansammeln. Um eine ausreichende Belüftung
sicherzustellen, empfiehlt es sich, den Staub regelmäßig (einmal pro Monat) mit einem Staubsauger abzusaugen.
DE
(Fortsetzung)
Sicherheitsmaßnahmen
19
Page 86

Der Plasmabildschirm (nur KE-P42M1)
Hinweise zum Bildschirm
• Der Plasmabildschirm wird in einer Hochpräzisionstechnologie hergestellt. Trotzdem sind möglicherweise schwarze Punkte
oder helle Lichtpunkte (rot, blau oder grün) permanent auf dem Plasmabildschirm zu sehen und unregelmäßige Far bstreifen oder
helle Bereiche können auf dem Plasmabildschirm erscheinen. Dies ist keine Fehlfunktion.
• Wenn Sie dieses Fernsehgerät ständig im 4:3-Modus verwenden, wird der 4:3-Bildschirmbereich im 16:9-Bildschirmbereich
möglicherweise dunkler. Verwenden Sie den Bildmodus „Smart“, um dieses Problem zu vermeiden (Seite 37).
Hinweise zu Nachbildern
• Wenn die folgenden Bilder längere Zeit unverändert auf dem Bildschirm angezeigt werden, kann es aufgrund der
charakteristischen Merkmale von Plasmabildschirmen in einigen Bildschirmbereichen zu dauerhaften Nachbildern
(Einbrennen) kommen.
– Schwarze Streifen oben und unten bei Videoquellen im Breitbildformat (Letter Box-Bilder)
– Schwarze Streifen links und rechts bei Videoquellen im 4:3-Format (normale Fernsehsendungen)
– Bilder von einer Spielekonsole
– DVD-Bildschirmmenüs
– Bildschirmmenüs, Kanalnummern usw. von angeschlossenen Geräten wie Set-Top-Boxen, Kabelmodems, Videorecordern
usw.
Das Risiko ist größer, wenn das Fernsehgerät im Modus „Live“ oder mit hohem Kontrast betrieben wird. Ein eingebranntes Bild
lässt sich nicht mehr vom Bildschirm entfernen. Um die Gefahr von Nachbildern zu verringern, lassen Sie Bilder bzw.
Programmquellen wie die oben genannten nicht längere Zeit anzeigen, verwenden Sie die Funktion „Bildschirmschoner“
(Seite 39) oder stellen Sie einen niedrigeren Kontrast ein. Auch wenn Sie dasselbe Bild bzw. Programm lange Zeit jeden Tag
anzeigen lassen, kann es zum Einbrennen von Bildern kommen. DAS EINBRENNEN VON BILDERN IST NICHT DURCH
DIE SONY-GARANTIE ABGEDECKT.
• Um Nachbilder zu verringern bzw. ihr Auftreten zu verhindern, ist dieses Fernsehgerät mit der Funktion „Bildschirmschoner“
ausgestattet. Die Standardeinstellung für den Modus „Verschiebung“ der Funktion „Bildschirmschoner“ lautet „Ein“ (Seite 39).
• Die Funktion „Bildschirmschoner“ verhindert bzw. reduziert das Einbrennen von Bildern. Erläuterungen dazu finden Sie auf
Seite 39.
Hinweise zur Betriebshöhe
Wenn der Plasmabildschirm auf einer Höhe von über 1.900 m (Luftdruck unter 800 hPa) verwendet wird, erzeugt er
möglicherweise aufgrund des Unterschieds zwischen Innen- und Außenluftdruck der Glasplatten ein leises Summen. Dies ist keine
Fehlfunktion und fällt daher auch nicht unter die Sony-Garantie. Dieser Summton ist ein charakteristisches Merkmal von
Plasmabildschirmen.
20
Sicherheitsmaßnahmen
Page 87

Übersicht
Übersicht über die Bedienelemente und Anzeigen am Fernsehgerät
Um das aufklappbare Bedienfeld des Fernsehger äts zu
öffnen, drücken Sie von unten an der Markieru ng auf
die Bedienfeldabdeckung, bis ein Klicken zu hören ist.
Daraufhin klappt das Bedienfeld auf.
Fernbedienungssensor
Anzeige (Abschalttimer)
Netzschalter und
Anzeige (Netz/
Bereitschaft)
Vorderes Bedienfeld des Fernsehgeräts
KLV-L32M1
Taste (Eingangswahl)
Tasten 2 (Lautstärke) +/–
DE
Tasten PROG (Kanal) +/–
PROG
Fernbedienungssensor
Anzeige (Abschalttimer)
Anzeige (Bild aus)
Netzschalter und
Anzeige (Netz/
Bereitschaft)
KE-P42M1
(Fortsetzung)
Übersicht
21
Page 88

Status der Anzeigen
(Netz/Bereitschaft): Anzeige leuchtet grün
Das Fernsehgerät ist eingeschaltet.
(Netz/Bereitschaft): Anzeige leuchtet rot
Das Fernsehgerät befindet sich im Bereitschaftsmodus.
(Netz/Bereitschaft): Anzeige blinkt rot
Das Fernsehgerät empfängt Fernbedienungssignale.
(Netz/Bereitschaft): Anzeige blinkt mehrmals rot
Am Fernsehgerät ist ein Fehler aufgetreten. Erläuterungen dazu finden Sie unter „Selbstdiagnose“ auf Seite 61.
(Abschalttimer): Anzeige leuchtet rot
Wenn das Fernsehgerät eingeschaltet ist, ist der Abschalttimer aktiviert. Erläuterungen dazu finden Sie unter „Der Abschalttimer“
auf Seite 44.
(Bild aus): Anzeige leuchtet blau (nur KE-P42M1)
Das Bild ist ausgeschaltet. Dabei wird nur das Bild ausgeblendet. Der Ton ist nach wie vor zu hören. Drücken Sie die Taste erneut,
um die Funktion auszuschalten. Erläuterungen dazu finden Sie unter „Die Bildausblendfunktion (nur KE-P42M1)“ auf Seite 44.
Informationen zu den Anschlüssen an der Rückseite des Fernsehgeräts finden Sie unter „Anschließen zusätzlicher Geräte“
auf Seite 50.
22
Übersicht
Page 89

Übersicht über die Bedienelemente auf der Fernbedienung
a Zum Umschalten des Fernsehgeräts in den Bereitschaftsmodus:
Mit dieser Taste schalten Sie das Fernsehgerät vorübergehend aus und in den
Bereitschaftsmodus (die Anzeige (Netz/Bereitschaft) am Fernsehgerät
leuchtet rot). Wenn Sie die Taste erneut drücken, schalten Sie das Fernsehgerät
*
* Fernbedienung
des KE-P42M1
aus dem Bereitschaftsmodus ein.
Es empfiehlt sich, das Fernsehgerät vollständig auszuschalten, wenn Sie es
nicht benutzen. So können Sie Strom sparen.
Wenn im Fernsehmodus 10 Minuten lang kein Signal eingeht oder
keine Taste gedrückt wird, schaltet das Fernsehgerät automatisch in den
Bereitschaftsmodus.
b Zum Ein-/Ausschalten des Videorecorders oder DVD-Players:
Mit dieser Taste schalten Sie den Videorecorder bzw. den DVD-Player ein
bzw. aus.
c Zum Auswählen von Videorecorder, Fernsehgerät oder DVD-Player
(Medienwählschalter):
Mit dieser Fernbedienung können Sie nicht nur dieses Fernsehgerät bedienen,
sondern auch die wichtigsten Funktionen Ihres Videorecorders oder DVDPlayers ausführen.
Schalten Sie das Gerät ein, das bedient werden soll, und drücken Sie mehrmals
diese Taste, um Videorecorder (VCR), Fernsehgerät (TV) oder DVD-Player
(DVD) auszuwählen. Die grüne Anzeige über dem ausgewählten Gerät
leuchtet kurz auf.
Sie müssen einige Grundeinstellungen vornehmen, um diese
Fernbedienung mit dem Videorecorder oder DVD-Player zu
synchronisieren. Diese Grundeinstellungen hängen vom Hers teller ab.
Erläuterungen dazu finden Sie unter „Einstellen der Fernbedienung auf
einen Videorecorder bzw. ein DVD-Gerät“ auf Seite 58.
d Zum Auswählen der Eingangsquelle:
Drücken Sie diese Taste so oft, bis das Eingangssymbol der gewünschten
Signalquelle auf dem Fernsehschirm angezeigt wird.
e Zum Einschalten des Abschalttimers:
Wenn Sie diese Taste drücken, wird das Fernsehgerät nach einer festgelegten
Zeitdauer automatisch in den Bereitschaftsmodus geschaltet. Erläuterungen
dazu finden Sie unter „Der Abschalttimer“ auf Seite 44.
DE
f Zum Auswählen von Kanälen:
Wählen Sie mit dieser Taste den gewünschten Kanal aus.
Bei zweistelligen Programmnummern müssen Sie die zweite Ziffer innerhalb von 2,5 Sekunden eingeben.
g a) Wenn TV ausgewählt ist:
Wenn Sie diese Taste drücken, ist der zuletzt ausgewählte Kanal (der mindestens fünf Sekunden lang eingestellt war) zu sehen.
b) Wenn der Videorecorder ausgewählt ist:
Für einen Videorecorder von Sony drücken Sie bei zweistelligen Programmnummern, wie z. B. 23, zuerst diese Taste und dann
die Tasten 2 und 3.
h Zum Auswählen eines Bil dschirmformats:
Drücken Sie zum Wechseln des Bildschirmformats diese Taste wiederholt. Erläuterungen dazu finden Sie unter „Bildschirm
einstellen“ auf Seite 36.
i Zum Programmieren der Fe rnbedienung:
Mit dieser Taste stellen Sie die Fernbedienung so ein, dass Sie Ihren Videorecorder oder DVD-Player damit bedienen können.
Erläuterungen dazu finden Sie unter „Einstellen der Fernbedienung auf einen Videorecorder bzw. ein DVD-Gerät“ auf Seite 58.
j Zum Auswählen von Videotext:
Mit dieser Taste schalten Sie den Videotext ein. Erläuterungen dazu finden Sie unter „Videotext“ auf Seite 46.
(Fortsetzung)
Übersicht
23
Page 90

k Tasten ////OK
a) Wenn TV ausgewählt ist:
• Wenn das Menü angezeigt wird, navigieren Sie mit diesen Tasten im Menü. Erläuterungen dazu finden Sie unter „Arbeiten
mit dem Menüsystem“ auf Seite 32.
• Wenn das Menü ausgeblendet ist, lassen Sie mit OK eine Übersicht aller Fernsehkanäle anzeigen. Wählen Sie dann mit
oder den Kanal aus und stellen Sie mit OK den ausgewählten Kanal ein.
b) Wenn der Videorecorder oder DVD-Player ausgewählt ist:
Steuern Sie mit diesen Tasten die wichtigsten Funktionen Ihres Videorecorders bzw. DVD-Players.
l Zum Anzeigen des Menüsy stems:
Rufen Sie mit dieser Taste das Menü auf dem Fernsehschirm auf. Wenn Sie die Taste erneut drücken, wird die Menüanzeige
ausgeblendet.
m Zum Anzeigen von NexTView:
Erläuterungen dazu finden Sie unter „NexTView“ auf Seite 47.
n Zum Auswählen von Kanälen:
Wählen Sie mit diesen Tasten den nächsten bzw. vorherigen Kanal aus.
o Zum Einstellen der Lautstä rke am Fernsehgerät:
Stellen Sie mit diesen Tasten die Lautstärke am Fernsehgerät ein.
p Zum Aufnehmen von Programmen auf dem Videorecorder:
Wenn der Videorecorder ausgewählt ist, können Sie mit dieser Taste Sendungen aufzeichnen.
q Zum Auswählen des Fernsehmodus:
Schalten Sie mit dieser Taste den Videotext bzw. Videoeingang aus.
r Zum Auswählen eines Bildmodus:
Drücken Sie zum Wechseln des Bildmodus diese Taste wiederholt. Erläuterungen dazu finden Sie unter „Bild-Einstellungen“
auf Seite 33.
s Zum Auswählen eines Klangeffekts:
Wenn Sie diese Taste wiederholt drücken, können Sie den vom Fernsehgerät verwendeten Klangtyp wechseln. Weitere
Informationen zu den verfügbaren Typen finden Sie unter „Ton-Einstellungen“ auf Seite 34.
t Zum Anzeigen von Bildschirminformationen:
Rufen Sie mit dieser Taste alle Bildschirmanzeigen auf. Wenn Sie die Taste erneut drücken, werden die Anzeigen ausgeblendet.
u Zum Anhalten des Bildes:
Mit dieser Taste können Sie vorübergehend das Bild auf dem Bildschirm anhalten. Erläuterungen dazu finden Sie unter
„Anhalten des Bildes“ auf Seite 45.
v (KLV-L32M1)
Zum Aktivieren der Energiesparfunktion:
Mit dieser Taste aktivieren Sie die Energiesparfunktion. „Energie sparen“ erscheint ein paar Sekunden lang auf dem
Bildschirm. Drücken Sie diese Taste erneut, um die Funktion auszuschalten. Erläuterungen dazu finden Sie unter „Funktionen“
auf Seite 38.
(KE-P42M1)
Ausblenden des Bildes:
Drücken Sie diese Taste, um das Bild auszublenden. Dabei wird nur das Bild ausgeblendet. Der Ton ist nach wie vor zu hören.
Drücken Sie diese Taste erneut, um die Funktion auszuschalten. Erläuterungen dazu finden Sie unter „Die
Bildausblendfunktion (nur KE-P42M1)“ auf Seite 44.
* Diese Taste ist auf der Fernbedienung des KE-P42M1 mit gekennzeichnet.
w Zum Stummschalten des Tons:
Mit dieser Taste können Sie den Ton vom Fernsehgerät stummschalten. Drücken Sie die Taste nochmals, wenn Sie den Ton
wieder hören wollen.
Zusätzlich zu den Fernsehfunktionen haben die farbigen Tasten (mit Ausnahme der Tasten TV &/ und VIDEO &/) auch
Videotextfunktionen. Die Tasten mit grünen Symbolen (mit Ausnahme der Taste ) werden ebenfalls verwendet.
Erläuterungen dazu finden Sie unter „Videotext“ auf Seite 46.
24
Übersicht
Page 91

Installation
Einlegen der Batterien in die Fernbedienung
• Legen Sie die mitgelieferten Batterien unbedingt polaritätsrichtig ein.
• Entsorgen Sie gebrauchte Batterien immer umweltfreundlich.
• Verwenden Sie nicht Batterien verschiedenen Typs oder alte und neue Batterien zusammen.
DE
Installation
25
Page 92

Anschließen einer Antenne und eines Videorecorders
• Verwenden Sie das mitgelieferte Netzkabel (Typ C-6 oder Typ BF, Seite 4).
• Verwenden Sie zum Anschließen der Antenne das mitgelieferte Koaxialkabel.
Schließen Sie das Netzkabel erst an, wenn alle anderen Anschlüsse vorgenommen wurden.
Anschließen einer Antenne
KLV-L32M1
KE-P42M1
Schließen Sie das
mitgelieferte Netzkabel (Typ
C-6 oder Typ BF) an.
Schließen Sie das
mitgelieferte
Koaxialkabel an.
Schließen Sie das
mitgelieferte
Koaxialkabel an.
Schließen Sie das mitgelieferte
Netzkabel (Typ C-6 oder Typ BF,
mit Schutzerdung) an.
26
Installation
Page 93

Anschließen eines Videorecorders mit Antenne
KLV-L32M1
Schließen Sie das
mitgelieferte Netzkabel
(Typ C-6 oder Typ BF) an.
(SMARTLINK)
3
/
Videorecorder
OUT IN
Scart-Kabel optional.
KE-P42M1
Schließen Sie das
mitgelieferte Netzkabel
(Typ C-6 oder Typ BF,
mit Schutzerdung) an.
Videorecorder
OUT IN
/
3
(SMARTLINK)
Scart-Kabel optional.
• Weitere Informationen zum Anschließen eines Videorecorders finden Sie unter „Anschließen zusätzlicher Geräte“ auf
Seite 50.
• Beachten Sie, dass einige Scart-Kabel möglicherweise nicht in den Anschluss am Fernsehgerät passen.
DE
(Fortsetzung)
Installation
27
Page 94

Bündeln der Kabel (nur KLV-L32M1)
Sie können die Kabel an der Rückseite des Fernsehgeräts verstauen.
Bündeln Sie das Netzkabel und das Koaxialkabel und sichern
Sie sie mit den Klemmen am Fernsehgerät.
Wenn Sie das Koaxialkabel anbringen, verlegen Sie es
wie in der Abbildung dargestellt in einer Schleife.
Sichern des Netzsteckers (nur KE-P42M1)
Sie müssen den Netzstecker an der Buchse AC IN des Fernsehgeräts sichern.
Klemmen
1 Bringen Sie den Netzsteckerhalter (mitgeliefert) am
Netzkabel an.
2 Schieben Sie den Halter auf die Buchse AC IN, bis er mit
einem Klicken einrastet.
Zum Herausziehen des Netzkabels lösen Sie den
Netzkabelhalter. Drücken Sie dazu von beiden Seiten auf
den Halter und ziehen Sie den Stecker heraus.
Buchse AC IN
(Stromversorgung)
des Fernsehgeräts
Netzkabel
(mitgeliefert)
Steckerhalter
(mitgeliefert)
28
Installation
Page 95

So verhindern Sie, dass das Fernsehgerät herunterfällt
Nachdem Sie die Antennen und die übrigen Geräte angeschlossen habe n, müssen Sie die mitgelieferten Schraubklemmen an
der Rückseite des Fernsehgeräts anbringen. Führen Sie ein stabiles Sicherungskabel oder eine stabile Kette hindurch und
befestigen Sie das Kabel bzw. die Kette an einer Wand oder einer Säule.
1 Entfernen Sie eine der zwei Schrauben an der Rückseite des Fernsehgeräts und bringen Sie die mitgelieferte Schraubklemme
an der Bohrung an.
KLV-L32M1
Angebrachte
Schraube
Schraubklemme
(mitgeliefert)
KE-P42M1
2 Bringen Sie die zweite Schraubklemme wie in Schritt 1 erläutert an.
3 Befestigen Sie an jeder Schraubklemme ein stabiles Sicherungs kabel oder ein e sta bile Kette und bringen Sie das andere Ende
des Kabels bzw. der Kette an einer Wand oder einer Säule an.
DE
Installation
29
Page 96

Erste Inbetriebnahme
Einschalten des Fernsehgeräts und automatisches Einstellen von Fernsehkanälen
Wenn Sie das Fernsehgerät zum ersten Mal einschalten, erscheint eine Reihe von Menübildschirmen auf dem Fernsehschirm,
mit denen Sie Folgendes ausführen können: 1) Auswählen der Sprache f ür die Menübildschirme, 2) Auswählen des Landes
bzw. Gebietes, in dem Sie das Fernsehgerät verwenden wollen, 3) Suchen und Speichern aller verfügbaren Kanäle
(Fernsehprogramme) und 4) Ändern der Reihenfolge, in d er die Kanäle (Fernsehprogramme) auf dem Fernsehschirm
angezeigt werden.
Wenn Sie eine dieser Einstellungen zu einem späteren Zeitpunkt än dern m öchten, k önnen Si e die entsprechende Option im
Menü „Grundeinstellungen“ auswählen (Seite 40).
1 Schließen Sie das Fernsehgerät an das Stromnetz an
(220–240 V Wechselstrom, 50 Hz).
2 Schalten Sie das Fernsehgerät mit dem Netzschalter am
Gerät ein.
Wenn Sie das Fernsehgerät zum ersten Mal einschalten,
erscheint automatisch das Menü Language auf dem
Bildschirm (Automatische Ersteinstellung).
Wenn die automatische Ersteinstellung später erneut
ausgeführt werden soll, drücken Sie 0 auf der Rückseite
des Fernsehgeräts.
3 Wählen Sie mit / / oder auf der
Fernbedienung die Sprache aus und bestätigen Sie die
Auswahl mit OK.
Nun werden alle Menüs in der ausgewählten Sprache
angezeigt.
4 Das Menü Land erscheint automatisch auf dem Bildschirm.
Wählen Sie mit oder das Land bzw. Gebiet aus, in
dem Sie das Fernsehgerät verwenden, und bestätigen Sie die
Auswahl mit OK.
Wenn das Land bzw. Gebiet, in dem Sie das Fernsehgerät
verwenden wollen, in der Liste nicht enthalten ist, wählen
Sie „–“ statt eines Landes bzw. Gebiets.
5 Das Menü Autom. Progr. erscheint automatisch auf dem
Bildschirm.
Wählen Sie mit OK die Option Ja.
Language
Select Language
English
Nederlands
Français
Italiano
Deutsch
Türkçe
Ελληνικά
Español
Português
Land
Land wählen
–
United Kingdom
Ireland
Nederland
België/Belgique
Luxembourg
France
Italia
Schweiz/Suisse/Svizzera
Deutschland
Österreich
Automatisches Abspeichern
jetzt starten?
Ja Nein
Polski
Česky
Magyar
Русский
Бьлгарски
Suomi
Dansk
Svenska
Norsk
30
Erste Inbetriebnahme
Page 97

6 Das Fernsehgerät beginnt, alle verfügbaren Kanäle zu
suchen und abzuspeichern.
• Dieser Vorgang kann einige Minuten in Anspruch
nehmen. Bitte haben Sie etwas Geduld und drücken Sie
keine Taste. Andernfalls wird der automatische
Sendersuchlauf nicht ordnungsgemäß abgeschlossen.
• Wenn beim automatischen Sendersuchlauf keine Kanäle
gefunden werden können, erscheint automatisch eine
weitere Meldung auf dem Bildschirm, mit der Sie
aufgefordert werden, die Antenne anzuschließen.
Schließen Sie bitte die Antenne an (Seite 26) und
drücken Sie OK. Der automatische Sendersuchlauf wird
erneut gestartet.
Autom. Progr.
Programm :
TV-System :
Kanal :
Keinen Sender gefunden.
Bitte Antenne anschliessen.
Bestätigen
01
I
C23
Suche
7 Wenn der automatische Sendersuchlauf abgeschlossen ist,
erscheint automatisch das Menü Programme ordnen auf
dem Bildschirm.
A) Wenn Sie die Reihenfolge der Fernsehkanäle nicht
ändern wollen, fahren Sie mit Schritt 8 fort.
B) Wenn Sie die Fernsehkanäle in einer anderen
Reihenfolge abspeichern wollen:
1 Wählen Sie mit oder die Programmnummer
des Kanals aus, den Sie verschieben wollen, und
drücken Sie .
2 Wählen Sie mit oder die neue
Programmnummer für den ausgewählten Kanal und
drücken Sie .
Der ausgewählte Kanal wird nun an die neue
Programmposition verschoben und die
anderen Kanäle werden entsprechend
verschoben.
3 Wenn Sie die Position weiterer Kanäle ändern
wollen, gehen Sie wie in Schritt 1 und 2 erläutert vor.
8 Blenden Sie mit MENU das Menü aus.
Programme ordnen
Prog. wählen
01
TVE
02
TVE2
03
TV3
04
C33
05
C27
06
C58
07
S02
08
S06
09
S08
10
S12
11
S14
Programme ordnen
Neue Pos. wählen
TVE
01
TVE2
02
TV3
03
C33
04
C27
05
C58
06
S02
07
S06
08
S08
09
S12
10
S14
11
Beenden:
01 TVE
Beenden:
MENU
DE
MENU
Das Fernsehgerät ist jetzt betriebsbereit.
Erste Inbetriebnahme
31
Page 98

Menüsystem
Arbeiten mit dem Menüsystem
Bei Ihrem Fernsehgerät werden Sie mithilfe eines Menüsystems auf dem Bildschirm durch die Funktionen geführt.
Navigieren Sie mit den folgenden Tasten auf der Fernbedienung im Menüsystem.
1 Rufen Sie mit MENU das Hauptmenü auf.
2 Gehen Sie zum Navigieren im Menü folgendermaßen vor.
• Zum Hervorheben des gewünschten Menüs oder der gewünschten Option drücken
Sie oder .
• Zum Bestätigen des ausgewählten Menüs bzw. der ausgewählten Option drücken
Sie OK.
• Zum Zurückschalten zum letzten Menü bzw. zur letzten Option drücken Sie .
• Zum Ändern der Einstellung der ausgewählten Option drücken Sie / /
oder .
• Zum Bestätigen Ihrer Auswahl drücken Sie OK.
3 Blenden Sie mit MENU das Menü aus.
32
Menüsystem
Page 99

Bild-Einstellungen
Bild-Einstellungen
Modus :
Kontrast :
Helligkeit :
Farbe :
Farbton :
Bildschärfe :
Ht.Grd.Licht :
Dyn. NR :
Dyn. Bild :
Farbtemperatur :
Normwerte
Wahl: Best.: Aus:
OK
Anwender
50
50
25
0
25
5
Autom.
Ein
Kalt
Bild-Einstellungen
Modus :
Kontrast :
Helligkeit :
Farbe :
Farbton :
,
MENU
Bildschärfe :
Ht.Grd.Licht :
Dyn. NR :
Dyn. Bild :
Farbtemperatur :
Normwerte
Wahl:
Anwender
50
50
25
0
25
5
Autom.
Ein
Kalt
Best.: Zur.:OKAus:
Im Menü „Bild-Einstellungen“ können Sie
Bildeinstellungen vornehmen.
Gehen Sie dazu folgendermaßen vor:
Wenn Sie die zu ändernde Option ausgewählt haben,
drücken Sie OK und dann zum Einstellen mehrmals
MENU
Mit diesem Menü können Sie auch die Bildqualität für
den Modus „Anwender“ auf der Grundlage des
Programms, das Sie ansehen, individuell einstellen.
Modus Live
Für verbesserten Bildkontrast und Bildschärfe.
Film
Für ein Bild mit hoher Detailschärfe.
Anwender
Für individuelle Einstellungen.
Kontrast Mit oder verringern Sie den Bildkontrast.
Mit oder verstärken Sie den Bildkontrast.
Helligkeit Mit oder wird das Bild dunkler.
Mit oder wird das Bild heller.
Farbe Mit oder wird die Farbintensität abgeschwächt.
Mit oder wird die Farbintensität verstärkt.
Farbton Mit oder werden die Grüntöne verringert.
Mit oder werden die Grüntöne betont.
Farbton lässt sich nur bei NTSC-Farbsignalen einstellen (z. B. bei Videokassetten aus den USA).
Bildschärfe Mit oder werden die Bildkonturen weicher.
Mit oder werden die Bildkonturen schärfer.
Ht.Grd.Licht
(nur KLV-L32M1)
Dyn. NR
(Rauschunterdrückung)
Mit oder wird die Hintergrundbeleuchtung dunkler.
Mit oder wird die Hintergrundbeleuchtung heller.
Autom./Aus
Mit dieser Option verringern Sie den Rauschpegel.
Dyn. NR (Rauschunterdrückung) kann bei Eingangssignalen von den Buchsen Y, P
4 nicht eingestellt werden.
Dyn. Bild Ein/Aus
Mit dieser Option können Sie den Bildkontrast optimieren.
Farbtemperatur Kalt/Normal/Warm
Mit dieser Option können Sie den Rotanteil bei hellen Farben erhöhen (die Einstellung
ist einstellbar von Kalt bis Warm).
Normwerte Ende/OK
Mit OK setzen Sie die Bildeinstellungen auf die werkseitig eingestellten Werte zurück.
/ / oder .
DE
B/CB, PR/CR des Eingangs
Nur „Modus“, „Kontrast“ und „Normwerte“ können eingestellt werden, wenn „Modus“ auf „Live“ oder „Film“ gesetzt ist.
Menüsystem
33
Page 100

Ton-Einstellungen
Bild-Einstellungen
Modus :
Kontrast :
Helligkeit :
Farbe :
Farbton :
Bildschärfe :
Ht.Grd.Licht :
Dyn. NR :
Dyn. Bild :
Farbtemperatur :
Normwerte
Wahl: Best.: Aus:
Ton-Einstellungen
Effekt :
Höhen :
Tiefen :
Balance :
Autom.Lautst. :
Zweiton :
Lautst. :
Zweiton :
Normwerte
m
Anwender
50
50
25
0
25
5
Autom.
Ein
Kalt
OK
Dolby Virtual
0
0
0
Ein
Stereo
50
Stereo
MENU
,
Ton-Einstellungen
Effekt :
Höhen :
Tiefen :
Balance :
Autom.Lautst. :
Zweiton :
Lautst. :
Zweiton :
Normwerte
Dolby Virtual
0
0
0
Ein
Stereo
50
Stereo
Im Menü „Ton-Einstellungen“ können Sie
Toneinstellungen vornehmen.
Gehen Sie folgendermaßen vor:
Wenn Sie die zu ändernde Option ausgewählt haben,
drücken Sie OK und dann zum Einstellen mehrmals
// oder .
Wahl: Best.:
Effekt
MENU
OK
Aus:
Wahl:
Best.: Zur.:
Aus
MENU
OK
Aus:
Kein Effekt.
Natürlich
Klarheit, Detailgenauigkeit und Klangwirkung des Tons werden mit dem „BBE High
Definition Sound system“ verstärkt.
Dynamisch
Für eine größere Klangpräzision und naturgetreuere Musikwiedergabe werden Klarheit
und Klangwirkung des Tons durch das „BBE High Definition Sound system“ verstärkt.
*
Dolby Virtual
Die Raumklangeffekte eines Mehrkanalsystems werden über die Fernseh lautsprecher
simuliert.
•Wenn Dolby Virtual ausgewählt ist und Sie „Autom.Lautst.“ auf „Ein“ setzen, wechselt die Option Effekt
automatisch zu Natürlich.
• Wenn Sie die Option Effekt auf Natürlich, Dynamisch oder Dolby Virtual setzen, hat dies keine Auswirkung
auf den über Kopfhörer ausgegebenen Ton.
Lizenziert von BBE Sound, Inc. unter US-Patent 4.638.258, 4.482.866. „BBE“ und das BBE-Symbol sind
Warenzeichen von BBE Sound, Inc.
* Hergestellt unter Lizenz von Dolby Laboratories. „Dolby“, „Pro Logic“ und das Doppel-D-Symbol sind
Warenzeichen von Dolby Laboratories.
Höhen Mit oder werden hochfrequente Töne abgeschwächt.
Mit oder werden hochfrequente Töne verstärkt.
Tiefen Mit oder werden tieffrequente Töne abgeschwächt.
Mit oder werden tieffrequente Töne verstärkt.
Balance Mit oder wird die Betonung auf den linken Lautsprecher verschoben.
Mit oder wird die Betonung auf den rechten Lautsprecher verschoben.
Autom.Lautst. Ein/Aus
Der Lautstärkepegel der Kanäle bleibt unabhängig von den Sendesignalen gleich (z. B.
auch bei Werbespots).
Wenn Sie „Effekt“ auf „Dolby Virtual“ setzen, wird automatisch Aus ausgewählt.
Wenn die Option „Lautsprecher“ im Menü „Funktionen“ auf „Eingang Mitte“ gesetzt ist, können die Optionen im Menü
„Ton-Einstellungen“ nicht eingestellt werden.
34
Menüsystem
 Loading...