

Page 1

4-102-497-11(1)
LCD Colour TV
Quick Start Guide
Operating Instructions
Before operating the TV, please read the “Safety Information” section of this manual.
Retain this manual for futur e re ference.
Anleitung zur schnellen Inbetriebnahme
Bedienungsanleitung
Lesen Sie vor der Inbetriebnahme des Fernsehgeräts bitte den Abschnitt
„Sicherheitsinformationen“ in dieser Anleitung. Bewahren Sie die Anleitung zum
späteren Nachschlagen auf.
GB
DE
Guide de mise en route
Mode d’emploi
Avant d’utiliser le téléviseur, lisez la section « Consignes de sécurité» de ce mode
d’emploi. Conservez ce mode d’emploi pour vous y référer ultérieurement.
Beknopte gebruiksgids
Gebruiksaanwijzing
Lees het hoofdstuk "Veiligheidsinformatie" van deze gebruiksaanwijzing alvorens de TV
in gebruik te nemen. Bewaar deze gebruiksaanwijzi ng zodat u ze achteraf nog kunt
raadplegen.
KLV-26HG2
KLV-21SG2
FR
NL
2003 Sony Corporation
Page 2

Page 3

Quick Start Guide
Operating Instructions
GB
1
Page 4

NOTICE FOR CUSTOMERS IN THE UNITED KINGDOM
A moulded plug comply ing with BS1363 is fitted to this equi pm ent for your safety and conveni ence.
Should the fuse in the plug supplie d nee d t o be re pl aced, a 5 AMP fuse approved by ASTA or BSI t o BS 1362 (i.e. marked with
or ) must be used.
When an alternative type of plug i s used it should be fitted with a 5 AMP FUSE, otherwise the circu it shoul d be protected by a 5
AMP FUSE at the distribution board.
If the plug supplied with this eq ui pm ent has a detachable fuse cover, be sure to at t ac h the fuse cover after you change the fuse.
Never use the plug without the fuse cove r. If you should lose the fuse cover, please contact your nearest Sony service station.
FUSE
How to replace the fuse
Open the fuse compartm en t with a blade screwdriv er , and replace the fuse.
IMPORTANT
If the plug supplied is not suitable for t he soc ke t outlets in your home, it should be cut off and a n appropriate plug fitted in
accordance with the following instructions:
The wires in this mains lead are coloured in accordance with the following code:
Blue Neutral
Brown Live
As the colours of the wires in the ma in s lead of this apparatus may not correspo nd w i th the col oured markings identifying the
terminals in your plug, proceed as fol low s:
The wire which is coloured blue must be connected to the terminal which is marked with the letter N or coloured black. The wire
which is coloured brown must be connected to the terminal which is marked with the letter L or coloured red. Do not connect either
wire to the earth terminal in the plug which is marked by the lett er E or by the safety earth symbol I or coloured green or green
and yellow.
WARNING
• To prevent the risk of electric shock, do not insert the plug cut off from the mains lead into a socket outlet. This plug cannot be
used and should be destroyed .
• To prevent the risk of fire or electric shock, do not expose the unit to rain or moisture.
• Dangerously high volta ge s ar e present inside the unit. Do not open the cabinet. Refer servicing to qualified personnel only.
Introduction
Thank you for choosing this Sony LCD Colour Television.
Before operating the TV, please r ea d this manual thoroughly and retain it for future reference.
Symbols used in the manual
........Important information.
........Information on a feature.
, 2.......... Sequence of instructions.
* The illustrations used in this manual are of the KLV-26HG2 unless ot he rw ise sta te d.
......Shaded bu tt ons on t he re mote control show you the
buttons you have to press to follow the seque nc e of
instructions.
.........Informs you of the result of instructions followed.
2
Page 5

Table of Contents
Quick Start Guide ......................................................................................................................................4
Operating Instructions .......................................................................................................13
Safety Information ...............................................................13
Precautions ........................................................................... 18
Overview
Checking the Accessories Supplied .....................................20
Overview of the TV Buttons and Indicators ........................21
Overview of the Remote Control Buttons ...........................22
Installation
Inserting Batteries into the Remote Control ........................24
Connecting an Aerial and a VCR ........................................ 25
Attaching the Rear Cover ....................................................27
First Time Operation
Switching On the TV and Tuning the TV Au tomatically ...29
Menu System
Introducing and Using the Menu System ............................31
Picture Adjustment ..............................................................32
Sound Adjustment ...............................................................33
Screen Control .....................................................................35
Features ................................................................................ 38
Set Up ..................................................................................39
Other Functions
Sleep Timer Function ..........................................................43
Screen Memo Function ........................................................44
Teletext ................................................................................45
NexTView* .........................................................................46
“Memory Stick”
About the “Memory Stick” Feature ................................ . ... .49
Inserting and Removing a “Memory Stick” ........................52
Using the “Memory Stick” (Memory Stick Home) .............53
Additional Information
Connecting Optional Equipment .........................................61
Using Optional Equipment ............................. .....................64
Remote Control Configuration for VCR/DVD ....................65
Specifications .......................................................................67
Troubleshooting ...................................................................68
Television Channel Number Guide
for the United Kingdom ................................................72
GB
Table of Contents
3
Page 6

Quick Start Guide
Thank you for purchasing this Sony product.
After following this step by step guide you will be able to:
– Insert batteries into the remote control.
– Remove the rear cover.
– Connect an aerial, VCR, a nd m ai ns le a d to your TV.
– Select the language of the me nu screens.
– Select the country/region in which you want to op erate your TV.
– Tune your TV.
– Change the broadcast channels into a different order.
1
Remote Control
RM-Y1103 (1):
Coaxial Cable (1):
Do not remove ferrite cores.
Checking the Accessories Supplied
Size AA Batteries
(R6 Type) (2):
Mains Lead
C-6
(Type
) (1):
Use this mains lead if yo u use the
unit outside the United
Kingdom.
Rear Cover (1):
Mains Lead
(Type BF) (1):
• Use this mains lead if you use
the unit in the United Kingdo m.
• Refer to “NOTIC E F O R
CUSTOMERS IN THE
UNITED KINGDOM” on
page 2 when using this mains
lead.
4
Quick Start Guide
Page 7

2
Inserting Batteries into the Remote Control
• Make sure you insert the supp lied batteries observing the correct pola rit y.
• Always remember to dispose of used batteries in an environmentally fr iendl y w ay.
• Do not use different types of bat teries together or mix old and new batteries.
GB
Quick Start Guide
(continued)
Quick Start Guide
5
Page 8

Connecting an Aerial, VCR, and Mains Lead to the
3
Connecting an aerial
TV
• Use the supplied mains lead (Type C-6 or Typ e BF, see pag e 4).
• Use the supplied coaxial cable for aerial connection.
Do not connect to the mains before all connections are complete.
Connect the supplied
coaxial cable.
Connecting a VCR with an aerial
VCR
OUT IN
Scart lead is optional.
• For more details regarding VC R connection, refer to “Connecti ng O pt ional Equipment” on page 61.
• Note that some Scart leads may not fit into the connector on the TV.
Connect the supplied mains
lead (Type C-6 or Type BF,
with safety earth).
Connect the supplied
mains lead (Type C-6
or Type BF, with safety
earth).
6
Quick Start Guide
Page 9

4
Bundling the Cables
You can store the cables in the back of the TV.
1 Bundle the cables and secure them with the cli p s on bo th
sides of the TV.
2 Put the cables from both sides together and secure them with
the clip at the bottom.
Clips
GB
Quick Start Guide
Clip
• It may not be possible to fasten cables t hat are too
thick with the clips.
• If all the cab les cannot be stor ed in si de , leav e some
of them hanging down on both sides of t he T V .
If the cables are not n eatly stored in the grooves , you
may not be able to attach the rear cover.
(continued)
Quick Start Guide
7
Page 10

5
Attaching the rear cover
Hold the rear cover as illustrated bel ow, fitti ng t he fi ve (KLV-26HG2) or four (KLV-21S G2) de te nt s on the rear cover into the
corresponding holes on the TV, then push the rear cover back onto the TV.
KLV-26HG2 KLV-21SG2
Attaching the Rear Cover
Please attach the rear cover to the TV after connecting the cables.
8
Quick Start Guide
Page 11
6
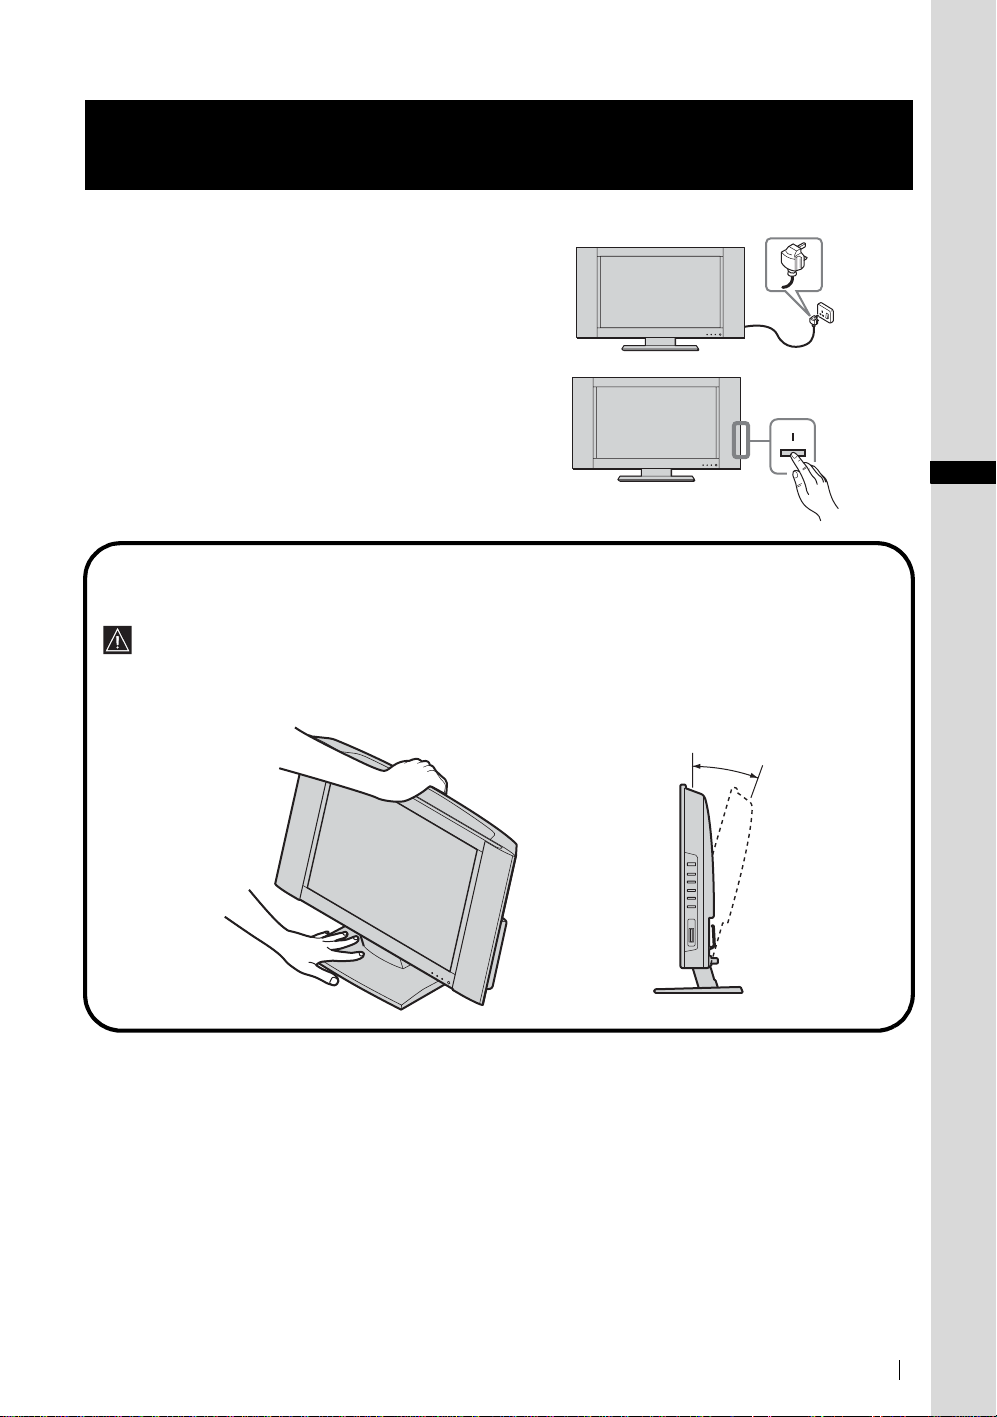
1 Connect the TV to the mains (220–240 V AC, 50 Hz).
2 Pre ss the & (Power) switch on the TV to switch it on.
Adjusting the viewing angle of the TV (KLV-21SG2 only)
You can adjust the angle to avoid the reflection of ligh t and get a better view of the TV .
Switching On the TV
• When you adjust the angle, make sure that the cables are not caught between the TV and the stand. If some of the
cables get caught, divide them into two groups at the clip and pull the m in the opposite direction to free them up.
• When adjusting the angle, hold the stand with your hand so that it does not come loose or fall off. Be careful not to
catch your fingers betwee n the TV and the stand.
15°
GB
Quick Start Guide
(continued)
Quick Start Guide
9
Page 12

Selecting the Language of the Menu Screens and
7
This TV works with menu screens. By following the instructions below, you can select the desired language of the menu screens,
and the country/region in which you want to operate the TV.
the Country/Region
Language
Select language
English
Nederlands
Français
Italiano
Deutsch
Türkçe
Ελληνικά
Español
Português
m
Country
Select country
–
United Kingdom
Ireland
Nederland
België/Belgique
Luxembourg
France
Italia
Schweiz/Suisse/Svizzera
Deutschland
Österreich
m
Do you want to start
automatic tuning ?
Yes No
Polski
Česky
Magyar
Русский
Бьлгарски
Suomi
Dansk
Svenska
Norsk
The first tim e you switch on the TV, the Language menu appears
automatically on the screen (Auto Startup).
1 Press / / or on the remote control to se lect the
language, then press OK to confirm your se lection.
From now on, all the menus wil l ap pear in the selected language.
2 The Country menu appears automatically on the screen.
Press or to select th e country/region in which you wil l
operate the TV, then press OK to confirm your selection.
If the country/region in which you want to use the TV does
not appear in the lis t, select “–” in stead of a coun try/regio n.
The Auto Tuning menu appears automatically on the screen.
To perform Auto Startu p later, p ress 0 on the rear panel of the
TV.
10
Quick Start Guide
Page 13

8
Tuning the TV Automatically
You must tune the TV to receive ch annels (TV Bro adcast). If you follow the inst ructions below, the TV automa tically sea rches and
stores all available broadcast channels.
Do you want to start
automatic tuning ?
Yes No
m
Auto Tuning
Programme :
System :
Channel :
m
No channel found.
Please connect aerial
m
Programme Sorting
Select channel
01
TVE
02
TVE2
03
TV3
04
C33
05
C27
06
C58
07
S02
08
S06
09
S08
10
S12
11
S14
Confirm
01
I
C23
Searching...
1 Press OK to select Yes.
2 The TV starts searching and storing all av ai la ble broadcast
channels.
• This procedure could take so m e m in utes. Plea se be
patient and do not press any buttons, otherwise the auto
tuning will not be comple ted properly.
• If no channels are found during the auto tuning process, a
new menu appears automatically on the screen asking
you to connect the aerial. Please connect the aerial (see
page 6) and press OK. The auto tuning process will start
again.
When the auto tuning is finished, the Programme Sorting menu
appears automatically on the screen.
MENU
Exit:
GB
Quick Start Guide
(continued)(continued)
Quick Start Guide
11
Page 14

Changing the Programme Order of the Broadcast
9
By following the instructions below, you can rearrange the o rde r in which the broadcast channels appear on the screen.
Channels
A) If you want to keep the broadcast channels in th e tun ed order
Programme Sorting
Select channel
B) If you want to store the broadcast channels in a different ord er
Programme Sorting
Select channel
Press MENU to exit and ret ur n to the normal T V screen.
01
TVE
02
TVE2
03
TV3
04
C33
05
C27
06
C58
07
S02
08
S06
09
S08
10
S12
11
S14
MENU
Exit:
1 Press or to select the progra m m e nu mber with the channel
01
TVE
02
TVE2
03
TV3
04
C33
05
C27
06
C58
07
S02
08
S06
09
S08
10
S12
11
S14
MENU
Exit:
you want to rearrange, then pre ss .
2 Pre ss or to select the new programme number position for
your selected channel, then press .
The selected channel now m ove s to its ne w prog ramme position
and the other channel s move accordingly.
m
Programme Sorting
Select channel
TVE
01
TVE2
02
TV3
03
C33
04
C27
05
C58
06
S02
07
S06
08
S08
09
S12
10
S14
11
01 TVE
MENU
Exit:
3 Repeat steps 1 and 2 if you want to change the order of the other
channels.
4 Press MENU to exit and return to the normal TV screen.
12
Quick Start Guide
Your TV is now ready for use.
Page 15

Operating Instructions
Safety Information
For Safety
Mains lead
Unplug the mains lead when moving
the unit. Do not move the unit with the
mains lead plug ged in. It may damage
the mains lead and result in fire or
electric shock. If the unit has been
dropped or damaged, have it checke d
immediately by qualified se rv ice
personnel.
Installation
Installation of the unit on the wall
should be carried out by qualifie d
servicemen. Improper installation may
render the unit unsafe in the event of an
earthquake, etc.
Medical in stitutions
Do not place this unit in a pla ce where
medical equipment is in use. It m ay
cause malfunction of medical
instruments.
Carrying
• Before carrying the unit, disconnect all the
cables from the unit.
• When you carry the unit by hand, hold the
unit as illustrated on the right. Do not hold
the rear cover only. As the rea r cover comes
off easily, the unit may fall and be damaged
or cause serious injury.
• When transporting it, do not subject the unit
to shocks or excessive vibration. The unit
may fall and be damaged or cause se rious injury.
• When you carry the unit in for repair or when you move it, pack
it using the original carton and pac king material.
GB
(continued)
Safety Information
13
Page 16

Installation and Moving
Ventilation
Never cover the ventilation holes in the
cabinet. It may cause overheating and
result in fire. Unless proper ventilation is
provided, the unit may gather dust and get
dirty. For proper ventilation, observe the
following:
• Do not in sta ll the unit turned backwards or sideways.
• Do not in sta ll the unit turned over or upside down.
• Do not in sta ll the unit on a shelf or in a closet.
• Do not place the unit on a rug or bed.
• Do not cover the unit with cloth, such as curtains, or items such
as newspapers, etc.
Vehicle or ceiling
Do not install this unit in a vehicle. The
motion of the vehicle may cause the
unit to fall down and cause injury. Do
not hang this unit from the ceiling.
Water and moisture
Do not use this unit near water – for
example, near a bathtub or shower room.
Also do not expose to rain, moisture or
smoke. This may result in fire or electr i c
shock. Do not use this unit where insect s may ent e r.
Optional accessories
Observe the following wh e n installing the unit
using a stand or wall-mount bracket. If you do not
do so, the unit may fall and cause se ri ous injury.
• Be sure to follow the instructions supplied
with your stand or wall-mount bracket when installing the unit.
• Be sure to attach the brackets supplied with your stan d.
Outdoor use
Do not install this unit outdoors. If the
unit is exposed to rain, it may res ult in
fire or electric shock. If the unit is
exposed to direct sunlight, the unit may
heat up and this may result in damage to
the unit.
Ships and other vessels
Do not install this unit on a ship or
other vessel. If the unit is exposed to
seawater, it may cause fire or dama ge
the unit.
To prevent t h e un it from fallin g
Place the unit on a secure, stable stand. Do not
hang anything on the unit. If you do, the unit may
fall from the stand or wall-mount bracket, causing
damage or serious injury.
Do not allow children to climb on the unit.
14
Safety Information
Page 17

Power Sources
Overloading
This unit is designed to operate on a 220–
240 V AC supply only. Take care not to
connect too many appliances to the same
mains socket as this c ould res ult in fi re or
electric shock.
Mains
Do not use a poor fitting mains socket. Ins ert the
plug fully into the mains. If it is loose, it may cause
arcing and result in fire. Contact your electrician to
have the mains socket changed.
Moisture
Do not touch the mains lead with a wet hand.
If you plug/unplug the mains le ad with a wet
hand, it may cause electric shock.
Lightnin g s torms
For your own safety, do not touch any
part of the unit, mains lead , or aer ial lead
during lightning storms.
Use
Damage requiring service
If the surface of the unit cracks, do not touc h it until you have
unplugged the mains lead. Otherwise electric shock may result.
Mains lead protect ion
Pull out the mains lead by the plug. Do
not pull on the mains lead itself.
Wiring
Unplug the mains lead when wiring cables . Be sure to unplug the
mains lead for your safety, when hook ing up.
Cleaning
Clean the mains plug regularly. If the pl ug is
covered with dust and it picks up moisture, its
insulation may deteriora te and result in fire.
Unplug the mains plug and clean it regula rly.
GB
Ventilation holes
Do not insert anything in the ventilation holes. If
metal or something flammable is inserted in
these holes, it m ay resul t in fire or electri c shock.
Servicing
Do not open the cabinet. Entrust th e
unit to qualified service personnel
only.
Moisture and flammable objects
• Do not let this unit get wet. Never
spill liquid of any kind on the
unit. If any liquid or solid object
does fall through openings in the
cabinet, do not operate the unit. It
may result in electric shock or damage to the unit.
Have it checked immediately by qualified service personnel.
• To prevent fire, keep flammable objects or nake d lig h ts ( e.g .
candles) away from the unit.
(continued)
Safety Information
15
Page 18

Additional Safety Information
Electric shock
Do not touch the unit with wet hands. Doing so may caus e elect r ic
shock or damage the unit.
Protruding location
Do not install the unit in locations whe re it m ay protrude. If you
install the unit in the following locations, it may result in injury.
• Do not install the unit in a location where the unit protrudes, such
as on or behind a pillar.
• Do not install the unit in a location where you might bump your
head on it.
Placement
Never place the unit in hot, humid or
excessively dusty places. Do not inst all the
unit where insects may enter. Do not install
the unit where it may be exposed to
mechanical vibration.
Accessories
Secure the unit properly.
If the unit is not secured properly, it may fall and cause injury. Take
measures to prevent this by using a stand or other apparatus on the
floor or wall in the specified manner, referring to the operating
instructions supplied with your stand.
Disposal of the unit
• Do not dispose of the unit with general household waste.
• The LCD contains a small amount of liquid crystal and mercury.
The fluorescent tube used in this unit also co nta ins me rcury.
Follow your local ordinances and regulations for disposal.
Oils
Do not install this unit in restaurants that use oil. Dust absorbing oil
may enter the unit and damage the u nit.
Corrosion
If you use this unit near the seashore , sa lt may cor r ode me ta l pa r ts
of the unit and cause internal damage or fire. It may also shorten the
life of the unit. Steps should be taken to reduce the humidity and
temperature of the area where the unit is located.
Cleaning
Unplug the mains lead when cleaning this unit. If you do not do so,
it may result in electric shock.
Recommended place for the unit
Place the unit on a stable, level surface.
Otherwise, the unit may fall and cause injury.
16
Safety Information
Page 19

LCD Screen
• Although the LCD screen is made with high-precision
technology and 99.99% or more of the pixels are effective, black
dots may appear or bright points of light (red, blue, or green)
may appear constantly on the LCD scr een . T his is a stru ct u ral
property of the LCD panel and is not a malfunction.
• Do not expose the LCD screen surface to the sun. Doing so may
damage the screen surface.
• Do not push or scratch the front filter, or place objects on top of
this unit. The image may be uneven or the LCD pan el ma y be
damaged.
• If th is unit is used in a cold place, a smear ma y occur in the
picture or the picture may be co me d ark .
This does not indicate a failure . These phen o mena disappear as
the temperature rise s.
• Ghos ting may occur when still pictures are displayed
continuously. It may disappear after a few moments.
• The screen and cabinet get warm when this unit is in use. This is
not a malfunction.
Fluorescent lamp
This unit uses a special fluorescent lamp as its light source. If the
screen image becomes dark, flic ke r s, or doe s not appe a r, the
fluorescent lamp has run down and should be re pla c ed . For
replacement, consult qualified service personnel.
Heat
Do not touch the surface of th e unit. It remains hot, even a ft e r th e
unit has been turned off for some time.
Cleaning the screen surface
The screen surface is finished with a special coating to prevent
strong light reflections. Be sure to obse r ve the following
precautions to avoid damaging the f ini sh.
• To remove dust from the screen surface, wipe gently with a soft
cloth. If dust is persistent, wipe with a soft cloth slightly
moistened with a diluted mild detergent solution. You can wash
and repeatedly use the soft cloth.
• Neve r use an y type of abrasive pad, alkaline/acid cleaner,
scouring powder, or strong solvent such as alcohol, benzine or
thinner.
Adjusting the viewing angle of th e TV (KLV-21SG2 only)
When adjusting the angle, hold the stand with your hand so that it
does not come loose or fall off.
Be careful not to catch your fingers betwee n the TV and the stan d.
Mains lead
If you damage the mains lead, it may
result in fire or electric shock.
• Do not pinch, bend, or twist the mains
lead excessively. The core lines may
be exposed or cut, causing a shortcircuit which may induce fire or
electric shock.
• Do not conve r t or dam a ge th e m ain s
lead.
• Do not put anything heavy on the
mains lead. Do not pull the ma ins
lead.
• Kee p the mains lead away from hea t sources.
• Be sure to grasp the plug when disconnecting the mains lead.
If the mains lead is damaged, stop usi ng it a nd a sk your de al e r or
Sony service centre to excha nge it.
When not in use
For environmental and safety
reasons, it is recommended that the
unit be switched off when not in
use – not left in standby mode.
Disconnect it from the mains.
Cable wiring
Take care not to catch your feet on the cables. It may damag e the
unit.
Installation
Do not install optional components too close to the unit. Keep
optional components at least 30 cm away from the unit. If a VCR is
installed in front of the unit or beside the unit, the picture may
become distorted.
GB
Safety Information
17
Page 20

Precautions
Precautions concerning ventilation
Leave space around th e unit. Otherwise, adequate air-circulation may be block ed causing overheating, whic h m ay cause fire or
damage to the unit.
When installing the unit on the wall
30 cm
10 cm
When installing the unit using a stand
10 cm
Never install the unit as follows:
Air circulation is blocked.
Wall
10 cm
Leave at least this much space.
10 cm
30 cm
10 cm
Leave at least this much space.
Air circulation is blocked.
Wall
18
Precautions
Page 21

Viewing the TV comfort ably
• To view the TV comfortably, the recommended viewing position is from four to seven times the screen’s vertical length away
from the TV.
• View the TV in moderate light , as vie wing the TV in poor light taxes your eyes. Watc hi ng the screen continuously for long
periods of time can also tax your eyes.
Installing the unit
Use the specified wall-mount bracket or stand.
• Do not install the unit in places subject to extreme temperature, for example in direct sunlight, or near a radiator, or heating vent.
If the unit is exposed to extr eme temperature, the un it ma y he at up and this may cause deform ation of the casing or cause the
unit to malfunction.
• To obtain a clear picture, do not expose the screen to direct illumination or direct sunlight. If possible, use spot lighting directed
down from the ceiling.
• The unit is not disconnected from the mains when the unit is switched off. To disconnect the unit completely, pull the plug from
the mains.
Volume adjustment
• Adjust the volume so as not to trouble your neighbours. Sound carries very easily at night time. Therefore, closing the windows
or using headphones is suggested.
• When using headphones, adjust the volume so as to avoid excessive levels, as hearing damage may result.
Handling the remote control
• Handle the remote control with care. Do not drop or step on it , or spil l liqui d of any kind onto it.
• Do not place the remot e control in a location near a he at source, or in a place subject to di rect sunlight, or in a damp room .
Handling an d cleaning the sc reen surface of the unit
To avoid screen degradation, follow the advice given below. Do not push on the screen or scratch it with hard objects, or throw
anything at it. The screen may be dam ag ed .
• Be sure to unplug the mains lead befo re cleaning the unit.
• Do not touch the display pane l af te r ope rating the unit continuously for a lo ng pe ri od as the display panel becomes hot.
• We recommend that the screen surface be touched as little as possible.
• Clean the screen with a soft cloth.
• Never use any type of abrasive pad, scouring powder, or solvent, such as alcohol or benzine. Using such materials may result in
damage to the screen surface.
Cleaning the cabinet
• Be sure to unplug the mains lead before cleaning the cabinet.
• Clean the cabinet with a soft cloth.
• Note that material deteri ora ti on or sc reen coating degradation may occ ur i f the unit is exposed to a volatile solvent, such as
alcohol, thinner, benzine or insecticide, or if prolonged contact is maintained with rubber or vinyl materials.
• The ventilation holes can accumulate dust over a period of time. To ensure proper ventilation, we recommend removing the dust
periodically (once a month) using a vacuum cleaner.
GB
Precautions
19
Page 22

Overview
Checking the Accessories Supplied
Remote Control
RM-Y1103 (1):
Coaxial Cable (1):
Do not remove ferrite cores.
Size AA Batteries
(R6 Type) (2):
Mains Lead
(Type C-6) (1):
Use this mains lead if you use the
unit outside the United Kingdom.
Rear Cover (1):
Mains Lead
(Type BF) (1):
• Use this mains le ad i f you u se the
unit in the United Kingdom.
• Refer to “NOT ICE FOR
CUSTOMERS IN THE UNITED
KINGDOM” on page 2 when
using this mains lead.
20
Overview
Page 23

Overview of the TV Buttons and Indicators
& (Power)
switch
P (Channel)
+/– buttons
2 (Volume)
+/– buttons
(Input Select)
button
(“Memory Stick”)
access lamp
“Memory Stick” slot
GB
(“Memory Stick”)
indicator
/
(Standby/Sleep)
indicator
& (Power)
indicator
Remote
control sensor
Status of the indicators
(“Memory Stick”) indicator and (“Memory Stick”) access lamp lights up or flashes in red
The “Memory Stick” is being accessed.
& (Power) indica tor lights up in green
The power of the TV is on.
/ (Standby/Sleep) indicator lights up in red
The TV is in the standby mode.
The Sleep Timer function is on when the TV is tur ne d on.
/ (Standby/Sleep) indicator flashes in red
The TV is receiving remote control signals.
/ (Standby/Sleep) indicator flashes in red repeatedly and the & (Power) indicator is off
There is a problem with the TV. For more details, refer to “Self-diagnosis function” on page 68.
For the connectors on the rea r panel of the TV, refer to “Connecting Optional Equipme nt ” on page 61.
Overview
21
Page 24

Overview of the Remote Control Buttons
a Switching the TV to the standby mode:
Press this b u tton to tempo r arily turn off the TV and switc h it to the standby
mode (the / (Standby/Sleep) indicator on the TV lights up in red). Press
it again to switch on the TV from the stan dby mode.
To save energy , we r ecommen d switc hing the TV off co mplet ely w hen the T V
is not in use.
If no signal is received or no operation is performed in the TV mode for
10 minutes, the TV autom atically switches to the standby mode.
b Switching the VCR or DVD on/off:
Press this button to switch your VCR or DVD on or off.
c Selecting the VCR, TV or DVD (Media Selector):
With this remote control you can operate not only th is TV but also the main
functions of your VCR or DVD.
Switch on the equipment you want to operate and press this button repeatedly
to select VCR, TV , or DVD. The g reen light just above the s elected equip ment
lights up momentarily.
An initial setup is required to synch roni se t his re mote control to your
VCR or DVD. This setup depends on the manufacturer. For more
details, refer to “Remote Control Configuration for VCR/DVD” on
page 65.
d Selecting the input source:
Press this button repeatedly until the input symbol of the desired source appears
on the screen.
e Turning on the Sleep Timer function:
Press this button to set the TV to automatically switch to the standby mode after
a specified time period. For more d etails, refer to “Sleep Timer Function” on
page 43.
f Selecting channels:
Press this button to select channels .
For double-digit programme numbers, enter the second digit within 2.5 seconds.
g a) If the TV is selecte d:
Press this button to watch t h e last channel se lected (the last channel wa tched for at least five second s ) .
b) If the VCR is select e d:
For Sony’s VCR double-digit progra mme num be rs, e.g. 23 , pr ess th is but to n fir st then press the 2 and 3 buttons.
h Selecting a screen format:
Press this but ton repeated ly to change the screen format. For m ore details, refer to “Screen Control” on pag e 35.
i Programming the remote control:
Use this button to programme the remote control to operate your VCR or DVD. For more details, refer to “Remote Control
Configuration for VCR/DVD” on page 65.
j Selecting Teletext:
Press this button to switch on Teletext. For more de tail s, refe r to “T e lete xt ” on pag e 45.
k / / / /OK buttons
a) If the TV is sele ct ed:
• When the menu is displayed, use these buttons to operate the menu system. For more details, refer to “Introducing and Using
the Menu System” on page 31.
• When the menu is turned of f , pr ess OK to show an overview of all TV cha nnels. Then press or to select the channel
and press OK to watch the selected cha nn el.
b) If the VCR or DVD is selected:
Use these buttons to control the main functions of your VCR or DVD.
l Displaying the menu system:
Press this button to display the menu on the screen. Press it again to remove the menu display from the screen.
m Displaying NexTView:
For more details, refer to “NexTView” on page 46.
22
Overview
Page 25

n Selecting channels:
Press these buttons to select the next or previous channe l.
o Adjusting the TV volume:
Press these b uttons to adjus t the volume of the TV.
p Recording programmes on your VCR:
If the VCR is selected, pres s this button to record programmes.
q Selecting the TV mode:
Press this button to switch off Teletext or video input.
r Selecting a picture mode:
Press this button repeatedly to change the picture mode. For mor e de ta ils, re fe r to “ P icture Adjustment” on page 32.
s Selecting a sound effect:
Press this button repeatedly to change the style of sound used by you r TV. For m ore details on the styles available, refer to
“Sound Adjustment” on page 33.
t Displaying on-screen informat ion:
Press this button to display all on-screen ind ic ators. Press it aga in to cancel.
u Turning on the Screen Memo function:
Press this button to temporarily freeze the picture on the screen. For more details, refer to “Screen Memo Function” on page 44.
v Displaying the Memory Stick Home (“Memory Stick” picture viewer):
Press this button to display the Memory Stick Home (“Memory Stick” picture viewer). For more details, refer to “Using the
“Memory Stick” (Memory Stick Home) ” on pa ge 53.
w Muting the sound:
Press this button to mute the sound from the TV. Press it again to restore the sound.
In addition to th e TV func tions, the co loured bu ttons (e xcept for th e TV &/and VIDEO &/ buttons) are used for Te lete xt
operations. The butto ns wit h green symbols (except for the button) are also used. For more de tails, refer to “Teletext”
on page 45.
GB
Overview
23
Page 26

Installation
Inserting Batteries into the Remote Control
• Make sure you insert the supp lied batteries observing the correct pola rit y.
• Always remember to dispose of used batteries in an environmentally fr iendl y w ay.
• Do not use different types of bat teries together or mix old and new batteries.
24
Installation
Page 27

Connecting an Aerial and a VCR
• Use the supplied mains lead (Type C-6 or Typ e BF, see pag e 20).
• Use the supplied coaxial cable for aerial connection.
Do not connect to the mains before all connections are complete.
Connecting an aerial
Connect the supplied
coaxial cable.
Connecting a VCR with an aerial
VCR
GB
Connect the supplied mains
lead (Type C-6 or Type BF,
with safety earth).
Connect the supplied
mains lead (Type C-6
or Type BF, with
safety ea rth).
OUT IN
Scart lead is optional.
• For more details regarding VCR connection, refer to “Connecting Optional Equip me nt ” on page 61.
• Note that so me Scart leads may not fit into the connecto r on the TV.
(continued)
Installation
25
Page 28

Bundling the cables
You can store the cables in the back of the TV.
1 Bundle the cables and secure them with the cli p s on bo th
sides of the TV.
2 Put the cables from both sides together and secure them with
the clip at the bottom.
Clips
Clip
• It may not be possi ble to fasten ca bles that ar e too thick
with the clips.
• If all the cabl es c an not be s tor ed in side, le ave s ome o f
them hanging down on both sides of th e T V .
If the cables are not neatly stored in the grooves, you may
not be able to a ttach the rear co v er.
26
Installation
Page 29

Attaching the Rear Cover
Please attach the rear cover to the TV after connecting the cables.
Attaching the rear cover
Hold the rear cover as illustrated bel ow, fitti ng t he fi ve (KLV-26HG2) or four (KLV-21S G2) de te nt s on the rear cover into the
corresponding holes on the TV, then push the rear cover back onto the TV.
KLV-26HG2 KLV-21SG2
Removing the rear cover
GB
1 Hold the lower right (or left) corner of the rear cover as
illustrated below an d pull it towards you. In the same way,
detach the lower left (or ri ght ) corner of the rear cover
from the TV.
2 H ol d the rea r cover with both hands as illustrated bel ow,
and pull it t owards you.
(continued)
Installation
27
Page 30

Adjusting the viewing angle of the TV (KLV-21SG2 only)
You can adjust the angl e to avoid the reflection of light and ge t a bet te r vi ew of the TV.
• When you adjust the angle, make sure that the cables are not caught between the TV and the stand. If some of the cables
get caught, divide them int o two groups at the clip and pull them in the opposite direction to free them up .
• When adjusting the angle, hold the stand with your hand so that it does not come loose or fall off. Be careful not to catch
your fingers between the TV a nd the stand.
15°
28
Installation
Page 31

First Time Operation
Switching On the TV and Tuning the TV Automatically
The first time you switch on your TV, a sequence of menu screens appear on the TV enabling you to: 1) choose the language
of the menu screen, 2) choo se the country/region in whic h you want to operate the TV, 3) search and store all available
channels (TV Broadcast), and 4) change the or de r in w hich the channels (TV Broa dcast) appear on the screen.
However, if you need to change any of these settings at a later date, you can do so by selecting the appropriate option in the
“Set Up” menu (see page 39).
1 Connect the TV to the mains (220–240 V AC, 50 Hz).
2 Pre ss the & (Power) switch on the TV to switch it on.
The first time you switch on the TV, the Language menu
appears automatically on t he sc ree n (A uto Startup).
To perform Auto Startup later, press 0 on the rear panel
of the TV.
GB
3 Press / / or on the remote control t o select the
language, then press OK to confirm your selection.
From now on, al l the menus will appear in the selecte d
language.
4 The Country menu appears automatically on the screen.
Press or to select the country/region in which you
will operate the TV, th en press OK to confirm your selection.
If the country/region in which you want to use the TV does
not appear in the li st, s elect “–” in stead of a c ountr y/re gion.
5 The Auto Tuning menu appears aut omatically on t he screen.
Press OK to selec t Yes.
Language
Select language
English
Nederlands
Français
Italiano
Deutsch
Türkçe
Ελληνικά
Español
Português
Country
Select country
–
United Kingdom
Ireland
Nederland
België/Belgique
Luxembourg
France
Italia
Schweiz/Suisse/Svizzera
Deutschland
Österreich
Do you want to start
automatic tuning ?
Yes No
Polski
Česky
Magyar
Русский
Бьлгарски
Suomi
Dansk
Svenska
Norsk
(continued)
First Time Operation
29
Page 32

6 The TV starts searching and storing all available broadca st
channels.
• This procedure could take some minutes . Please be
patient and do not press any buttons, otherwise the auto
tuning will not be completed properly.
• If no channels are found during the auto tuning process,
a new menu appears automatically on the screen asking
you to connect the aeri al. Please connect the aer ial (see
page 25) and press OK. The auto tuning process will
start again.
Auto Tuning
Programme :
System :
Channel :
Please connect aerial
Searching...
No channel found.
Confirm
01
I
C23
7 When the auto tuning is finished, the Programme Sorting
menu appears automatically on the screen.
A) If you want to keep the broadc ast channels in the tuned
order, go to step 8.
B) If you want to store the broadcast channels in a different
order:
1 Press or to select the programme number
with the channel you want to rearrange, then press
.
2 Press or to select the new programme
number position for your selected channel, then press
.
The selected channel now moves to its new
programme position and the other channels
move accordingly.
3 Rep eat steps 1 and 2 if you want to change the order
of the other chan nels.
8 Press MENU to turn off the menu.
Programme Sorting
Select channel
01
TVE
02
TVE2
03
TV3
04
C33
05
C27
06
C58
07
S02
08
S06
09
S08
10
S12
11
S14
Programme Sorting
Select channel
TVE
01
TVE2
02
TV3
03
C33
04
C27
05
C58
06
S02
07
S06
08
S08
09
S12
10
S14
11
01 TVE
MENU
Exit:
MENU
Exit:
Your TV is now ready for use.
30
First TIme Operation
Page 33

Menu System
Introducing and Using the Menu System
Your TV uses an on-screen menu syst em to guide you through the o p erations. Use the following b u ttons on the re mote
control to operate the menu system.
1 Press MENU to switc h the first level menu on.
2 Do the following to operat e th e men u.
• To high li ght the desi re d me nu or option, press or .
• To ent er t he selected menu or option, pres s .
• To return to the last m enu or opt io n, press .
• To alter the settin gs of your selected option, press / / or .
• To conf irm your selection, press OK.
3 Press MENU to turn off the menu.
GB
Menu System
31
Page 34

Picture Adjustment
Picture Adjustment
Mode :
Contrast :
Brightness :
Colour :
Hue :
Sharpness :
Backlight :
NR :
Dynamic Picture :
Colou r Tone :
Reset
Select: Set: End:
OK
Personal
50
50
25
0
3
5
Auto
On
Cool
,
MENU
Picture Adjustment
Mode :
Contrast :
Brightness :
Colour :
Hue :
Sharpness :
Backlight :
NR :
Dynamic Picture :
Colou r Tone :
Reset
Select: Set: Back:OKEnd:
Personal
50
50
25
0
3
5
Auto
On
Cool
Mode Live
For enhanced picture contrast and sha rpne ss.
Movie
For a finely detailed picture.
Personal
For your own custom settings.
Contrast Press or to reduce picture contrast.
Press or to enhance picture cont rast .
Brightness Press or to darken the picture.
Press or to brighten the picture.
Colour Press or to decrease colour int e n s ity.
Press or to increase colour intensity.
Hue Press or to decrease the green tones.
Press or to increase the green ton es .
• Hue can only be adjusted for an NTSC colour signal (e.g. U.S.A. video tapes).
• Hue cannot be adjusted for “Memory Stick” inp ut .
Sharpness Press or to soften the picture.
Press or to sharpen the picture.
Sharpness cannot be adjusted for “Memory Stick” input.
The “Picture Adj ustmen t ” menu allo ws yo u to alte r t he
picture adjustments.
To do this:
After selecting the item you want to alt er , press ,
then press / / or re pe atedly to adjust it.
This menu also allows you to customise the picture
MENU
quality for the “Personal” mode ba sed on the
programme you ar e w a tc hing.
Backlight Press or to darken the backlig ht.
Press or to brighten the backlight .
NR (Noise Reduction) Auto/Off
Select to red u ce the noise le vel.
NR (Noise Reduction) canno t be adj usted for an input signal from the Y, P
3 and “Memory Stick” input.
Dynamic Picture On/Off
Select to enhance the pi c ture contrast.
Dynamic Picture cannot be adjusted for “Memory Stick” input.
Colour Tone Cool/Normal/Warm
Select to give bright colours a red t int (set ti ng is variable from Cool to Warm).
Reset Cancel/OK
Select OK to reset the picture to t he fac tory preset levels.
Only “Mode,” “Contrast,” and “Reset” can be adjusted when “Mode” is set to “Live” or “Movie.”
32
Menu System
B/CB, PR/CR jacks of
Page 35

Sound Adjustment
Picture Adjustment
Mode :
Contrast :
Brightness :
Colour :
Hue :
Sharpness :
Backlight :
NR :
Dynamic Picture :
Colou r Tone :
Reset
Select: Set: End:
OK
Personal
50
50
25
0
3
5
Auto
On
Cool
MENU
m
Sound Adjustment
Effect :
Treble :
Bass :
Balance :
Auto Volume :
Dual Sound :
Volume :
Dual Sound :
Reset
Select: Set: End:
Dolby Virtual
0
0
0
On
Stereo
50
Stereo
OK
,
MENU
Effect
If you set “Auto Volume” to “O n” when Dolby Virtual is selected, the Effect option automatically change s to
Natural.
The “BBE High Definit ion So und system” is manufactured by Son y Corporation under licence fr om BBE
Sound, Inc. It is covered by U.S. Pate nt No . 4,638,258 and No. 4,482,866. Th e w ord “BBE” and BBE
Symbol are trademarks of BBE sound.
* Manufactured under licence from Dolby Laboratories. “Dolby,” “Pro Logic,” and the double-D symbol are
trademarks of Dolby Laboratories.
Treble Press or to decrease higher-frequency sounds.
Bass Press or to decrease lower-frequency sounds.
Balance Press or to emphasise the left speaker.
Auto Volume On/Off
If you set “Effect” to “Dolby Virtu al,” Off is selecte d automatically.
Sound Adjustment
Effect :
Treble :
Bass :
Balance :
Auto Volume :
Dual Sound :
Volume :
Dual Sound :
Reset
Select: Set: Back:OKEnd:
Dolby Virtual
0
0
0
On
Stereo
50
Stereo
Off
No effect.
Natural
Enhances clarity, detail and presence of sound by using the “BBE High Definition
Sound system.”
Dynamic
Intensifies clarity and presence of sound for better intelligibility and musical realism by
using the “BBE High Definition Sound sy stem .”
*
Dolby Virtual
Uses the TV speakers to simulate th e surround effect produced by a mul ti cha nne l
system.
Press or to increase higher-frequency sounds.
Press or to increase lower-frequency sou nds.
Press or to emphasise the right speaker.
Volume level of the channels will stay the same, independent of the broadcast signal
(e.g. in the case of advertise ments).
The “Sound Adjustment” menu allows you to alter the
sound adjustments.
To do this:
After selecting the item you want to alt er , pr ess ,
then press / / or repeatedly to adjust it.
MENU
GB
(continued)
Menu System
33
Page 36

Dual Sound Mono/Stereo
If you select other equipment connected to the TV, set the Dual Sou nd option to Stereo, A, or B.
For a stereo broadcast, select Stereo or Mono.
Mono/A/B
For a bilingual broadcast, select A for sound channel 1, B for sound channel 2, or Mono
for a mono channel, if available.
i Volume Press or to turn the volume of the headphones down.
Even if headphones are connected to the TV, you can hear the sound from the TV speakers.
i Dual Sound Select the “Dual Sound” op tion of the headphones.
If you select other equipment connected to the TV, set the i Dual Sound opt io n to Stereo, A, or B.
Reset Cancel/OK
Only “Treble,” “Bass,” and “Balance” are restored to the factory set ti ngs when you reset the sound.
Press or to turn the volume of the headphones up.
Mono/Stereo
For a stereo broadcast, select Stereo or Mono.
Mono/A/B
For a bilingual broadcast, select A for sound channel 1, B for sound channel 2, or Mono
for a mono channel, if available.
Select OK to reset the sound to the facto ry pre s et .
34
Menu System
Page 37

Screen Control
Picture Adjustment
Mode :
Contrast :
Brightness :
Colour :
Hue :
Sharpness :
Backlight :
NR :
Dynamic Picture :
Colou r Tone :
Reset
Select: Set: End:
m
(KLV-26HG2)
Screen Control
Auto Format :
Screen Format :
Screen Shift
Select: Set: End:
(KLV-21SG2)
Screen Control
Screen Format :
Screen Shift
Select: Set: End:
OK
OK
OK
Personal
50
50
25
0
3
5
Auto
On
Cool
On
Smart
4:3
The “Screen Control” menu allows you to alter th e
screen adjustments.
MENU
Screen Control
Auto Format :
Screen Format :
,
MENU
Screen Shift
Select: Set: Back:OKEnd:
Screen Control
Screen Format :
Screen Shift
On
Smart
4:3
MENU
GB
,
MENU
Select: Set: Back:OKEnd:
MENU
Auto Format
(KLV-26HG2 only)
The “Auto Format” optio n allows you to automaticall y change the aspect ratio of the
screen.
To do this:
1 After selecting this option, press .
2 Press or to select On (if you want the TV t o aut omatica lly sw itch th e scr een
format according to the video input signal) or Off (if you want to kee p your
preference).
• Even if you have selected On or Off in the Auto Format option, you can alwa ys modify the format of the
screen by pressing repeatedly on the remote contr ol.
• Auto Format is available for PAL signal and SECAM signal only.
(continued)(continued)
Menu System
35
Page 38

Screen Format The “Screen Format” option allows you to modify the format of the screen.
To do this (KLV-26HG2):
1 After selecting this option, press .
2 Press or to select the desired screen format and press OK.
Smart
Imitation of the wid e screen effect f or a
4:3 broadcast.
Smart
4:3
Conventional 4:3 picture size, full
picture information.
4:3
14:9
Compromise between 4: 3 and 16:9
picture size.
14:9
Zoom
Wide screen format for letterbox
movies.
Zoom
Wide
For a 16:9 broadcast.
Wide
To do this (K LV-21SG2):
1 After selecting this option, press .
2 Press or to select the desired screen format and press OK.
4:3
Conventional 4:3 picture size.
4:3
16:9
For a 16:9 broadcast.
16:9
• You can adjust the position of the image when Smart, 14:9, or Zoom is selected. If parts of the top and bottom
of the screen are cut off, press or to move the image up or down (e.g. to read subtitles).
• Screen Format cannot be adjusted for “Memory Stick” input .
36
Menu System
Page 39

Screen Shift The “Screen Shift” option allows you to adjust the position of the picture for each screen
• Screen Shift cannot be adjusted for “Memory Sti c k” i nput.
• When “Screen Format” is set to “4:3” or “Wide,” V Shift (Vertical Shift) cannot be adjusted.
format.
To do this:
1 After selecting this option, press .
2 Press or to select the desired option a nd press . Then Press / /
to adjust the p osition of the p icture.
or
V Shift (Vertical Shift) (KLV-26HG2 only)
Press to move the screen up.
Press to move the screen down.
H Shift (Horiz o ntal Shift)
Press to move the screen to the left.
Press to move the screen to the right.
Reset
Select OK to reset to the factory settings.
GB
Menu System
37
Page 40

Features
Picture Adjustment
Mode :
Contrast :
Brightness :
Colour :
Hue :
Sharpness :
Backlight :
NR :
Dynamic Picture :
Colou r Tone :
Reset
Select: Set: End:
OK
Personal
50
50
25
0
3
5
Auto
On
Cool
MENU
m
Features
Power Saving :
Speaker :
AV2 Output :
Menu Colour :
Select: Set: End:
OK
Standard
On
Auto
White
,
MENU
Power Saving The “Power Saving” op ti on allows you to reduce the power consumption of the TV.
If you switch the TV off then on again when the Power Saving option is set to Reduce, the setting remains
unchanged.
Speaker The “Speaker” option allows you to control the sound of the TV speakers when external
AV2 Output The “AV2 Output” opti o n allows you to select the source to be output from the Scart
Features
Power Saving :
Speaker :
AV2 Output :
Menu Colour :
Select: Set: Back:OKEnd:
Standard
On
Auto
White
To do this:
1 After selecting this option, press
2 Press or to select Reduce.
audio equipment is connected.
To do this:
1 After selecting this option, press
2 Press or to select the desired out put.
On
The sound of the TV is output throug h th e T V spea kers.
Off
The sound of the TV is not output through the TV speakers.
connector 2/ 2. You can record from this Scart any signal coming from the TV
S
or from external equipment connect ed to the other connect ors .
If your VCR supports SmartLink, this procedure is not necessary.
The “Features” menu allow s you to alter various
adjustments of the TV.
MENU
.
.
38
Menu System
To do this:
1 After selecting this option, press .
2 Press or to select the desired output signal: Auto, TV, AV1, or AV4.
• If you select Auto, the output signal will always be the same one tha t i s displ ay ed on the screen.
• If you have connected a decoder to the Scart connector 2/ 2 or to a VCR connected to this Scart, please
S
remember to set AV2 Output to Auto for correct unscrambling.
• Even if AV2 Output is set to Auto, signals input through a “Memory Stick” are not output from Scart
connector 2/ 2.
S
Menu Colour The “Menu Colour” option allows you to alter the background colour of the menus.
To do this:
1 After selecting this option, press .
2 Press or to select White or Black.
Page 41

Set Up
Picture Adjustment
Mode :
Contrast :
Brightness :
Colour :
Hue :
Sharpness :
Backlight :
NR :
Dynamic Picture :
Colou r Tone :
Reset
Select: Set: End:
OK
Personal
50
50
25
0
3
5
Auto
On
Cool
MENU
m
Set Up
Language :
Country :
Auto Tuning
Programme Sorting
Programme Labels
AV Preset
Manual Programme Preset
Select: Set: End:
English
–
,
OK
MENU
Language The “Language” opti on allows you to select the langua ge that the menus are displayed
Country The “Country” option al lows you to select the country/region in which you want to
Auto Tuning The “Auto Tuning” option allows you to autom at ic a ll y search and store all availabl e
Programme Sorting The “Programme Sorting” option allows you to change the order in which the channels
Set Up
Language :
Country :
Auto Tuning
Programme Sorting
Programme Labels
AV Preset
Manual Programme Preset
Select: Set: Back:OKEnd:
English
–
in.
To do this:
1 After selecting this option, press
2 Follow step 3 of “Switching O n t he TV and Tuning the TV Automatically” on
page 29.
operate the TV .
To do this:
1 After selecting this option, press
2 Follow step 4 of “Switching O n t he TV and Tuning the TV Automatically” on
page 29.
channels (TV Broadcast).
To do this:
1 After selecting this option, press .
2 Follow steps 5 and 6 of “Switching On the TV and Tuning the TV Automatically”
on page 29.
(TV Broadcast) appear on the screen.
To do this:
1 After selecting this option, press .
2 Follow step 7 B) of “Switching On the TV and Tuning the TV Automatically” on
page 30.
The “Set Up” menu allows you to alter various options
on the TV.
MENU
.
.
GB
(continued)
Menu System
39
Page 42

Programme Labels The “Programme Labels” option allows you to name a channel using up to five
AV Preset The “AV Preset” option allows you to designate a name for any external equipment you
characters (letters or numbers).
To do this:
1 After selecting this option, press
2 Press
3 Press / / or to select the character, then press OK.
4 When you have finished, press / / or to select the word “End” on the
• If you input a wrong character, select the character using or on the screen.
Then press / / or to select the correct character and press OK.
• For a blank, select on the screen and pres s OK.
have connected to th e TV.
To do this:
1 After selecting this option, press .
2 Press or to select the input source you want to name, then press .
3 A label automatically appears in the label column.
a) If you want to use one of the predefined labels, press or
b) If you want to set a different label, select Edit and press OK. Then with the first
• If you input a wrong character, select the character using or on the screen.
Then press / / or to select the correct character and press OK.
• For a blank, select on the screen and pres s OK.
or to select the pro gramme number wit h the channel you want to name,
then press OK.
screen and press OK to exit the character input screen.
desired label: AV1/AV2/AV3/AV4, VIDEO, DVD, CABLE, GAME, CAM or
SAT.
element highlighted, press / / or to select the character, then press
OK.
When you have finished, press / / or to select the word “End” on
the screen and press OK to exit th e character in pu t screen.
.
to select the
40
Menu System
Page 43

Manual Programme Preset The “Manua l Programme Preset” option (A–E) a llow s you to:
A) Preset channel s , one by one, in the programme order of your choice.
To do this:
1 After selecting this option, press .
2 Highlight the Programme option and press .
3 Press or to select a progra mme number for which you want to preset the
channel, then press . If you do no t want to preset other options for the channe l,
press OK instead of and go to step 8.
4 After selecting the System option, press .
Depending on the country/region you have selected in the “Country” option,
this option may not be available (see page 39).
5 Press or to select the TV Broadcast system (B/G for western European
countries/regions, D/K for eastern European coun tries/ re gio ns, I for the United
Kingdom, or L for France), then press . If you do not want to preset other options
for the channel, pr es s OK instead of and go to step 8.
6 After selecting the Channel option, press .
7 Press or to select the type of ch anne l to be tun ed ( S for cable channels or C
for terrestrial chann els), then press .
After that, press t he number buttons to enter the channel num be r of the TV
Broadcast directly. If yo u do not know the channel number, press or to
search for it.
When you have tuned the desired channel, press OK.
8 Highlight the Confirm option and pre ss OK. Then press to select OK and
finally press OK to store your channel selection.
Repeat all the above steps to tune and sto r e ot he r cha nnels.
B) Label a channel using up to five charac ters (letters or numbers).
To do this:
1 Press PROG +/– to select the programme number with the channel you want to
name.
You cannot select the programme num ber set to skip in the “Skip” option
(see step D on page 42).
2 When the programme you want to name appears on the screen, select the Label
option and press .
3 Press / / or to select the first character, then press OK.
4 When you have finished, press / / or to select the word “End” on the
screen and press OK to exit the character input screen.
• If you input a wrong character, select the character using or on the screen.
Then press / / or to select the correct character and press OK.
• For a blank, select
on the screen and press OK.
GB
(continued)
Menu System
41
Page 44

C) Normally the automatic fine tuning (AFT) option will give the best possible picture,
however you can manually fine-tune the TV to obtain a better picture if the picture
is distorted .
To do this:
1 Press PROG +/– to select the programme number with the channel you want to fine-
tune manually.
You cannot select the programme num ber set to skip in the “Skip” option
(see step D on page 42).
2 When the programme you want to fine-tune appear s on the screen, select the AFT
option and press .
3 Press or to adjust the fine tuning be tween –15 and +15 and press OK.
4 Highlight the Confirm option and pre ss OK. Then press to select OK and
finally press OK to store your choice .
To restore automatic fine tuning, sele ct On in step 3 above.
D) Skip any unwanted programme numbers when they are selected with the
PROG +/– buttons.
To do this:
1 Highlight the Programme option and press . Then press or to select the
programme number you wan t to skip.
2 When the programme you want to skip appears on the screen , select th e Skip option
and press .
3 Press or to select Yes and press OK.
4 Highlight the Confirm option and pre ss OK. Then press to select OK and
finally press OK to store your choice .
To cancel this function afterwards, select No instead of Yes in step 3 above.
E) V iew and record scrambled c hannels when using a decoder co nnected to the Scart
connector 2/ 2 either directly or via a VCR.
Depending on the country/region you have selected in the “Country” option, this
option may not be available (see page 39).
To do this:
1 Press PROG +/– to select the programme number with the scra mb led ch annel you
want to view.
You cannot select the programme num ber set to skip in the “Skip” option
(see step D on page 42).
2 When the programme you want to view appears on the scre en, select the Decoder
option and press .
3 Press or to select On and press OK.
4 Highlight the Confirm option and pre ss OK. Then press to select OK and
finally press OK to store your choice .
To cancel this function afterwards, select Off instead of On in step 3 above.
S
42
Menu System
Page 45

Other Functions
Sleep Timer Function
The Sleep Timer functio n a llows you to set the TV to switch it self automatically to th e standby mode after a specif ied time
period. You can select the time peri od from among 30 minutes, 60 minutes, 90 minutes, and 120 minutes.
To set the Slee p Timer function
Press on the re mote cont rol r epea tedl y unt il t he de sire d time per iod (“30 min, ” “60m in, ” “90m in, ” or “1 20mi n”) a ppe ars o n the
screen.
When the Sleep Timer function is on, the / (Standby/Sleep) indicator on the TV l igh ts up i n red.
To cancel the Sleep Timer function
Press repeatedly until “Off” appears on the screen.
• If you switch off the TV and switch it on again, the Sleep Timer function is reset to “Off.”
• The message “Sleep timer will end soon. Power will be turned off.” appears on the screen one minute before the TV
switches to the standby mode.
• If you press / on the remote control, the remaini ng time in minutes before t he TV switches to the standby mo de
is displayed on the screen.
GB
Other Functions
43
Page 46

Screen Memo Function
The Screen Memo function allows you to temporarily freeze and review the picture on the screen. This is useful to check and
make a note of informat io n displayed on the screen, such as a mail address or a recipe.
To use the Screen Memo func tion
When the picture you want to freeze appears on the screen, press on the remote control. Press again to cancel the Screen
Memo function and return to the normal TV picture.
• If you change the input source or the channel, the Screen Memo function is cancelled.
• When the Screen Memo function is on, the picture remains still on the screen but the sound continues to play.
• When the Screen Memo function is on, the MENU, (Screen format), (Picture mode), (Teletext), and
(NexTView) buttons do not work .
44
Other Functions
Page 47

Teletext
Teletext is an information service transmitted by most TV stations. The index page of the Teletext service (usually page 100)
gives you information on how to use the service. To operate Teletext, use the remote control buttons as indicated below.
Make sure you use a channe l (T V Broadcast) with a strong signal, othe rwise Teletext errors may occur.
To switch on Teletext
After selecting the TV chann el wh ich carries the Teletext service you want to view , pre ss .
Each time you press , the screen changes cycl ically as follows: Telet ext mode t
Teletext Superimpose mode t TV mode t Teletext mode t (repeat).
To select a Teletext page
Input three digits for the pag e number, using the number butt ons.
• If you make a mistake, retype the correct page number.
• If the counter on the screen continues searching, it is because this page is not available. In this case, input another page number.
TELETEXT
TELETEXT
TELETEXT
TELETEXT
TELETEXT
TELETEXT
TELETEXT
TELETEXT
Index
Index
Index
Index
Index
Index
Index
Index
Programme
Programme
Programme
Programme
Programme
Programme
Programme
Programme
News
News
News
News
News
News
News
News
Sport
Sport
Sport
Sport
Sport
Sport
Sport
Sport
Weather
Weather
Weather
Weather
Weather
Weather
Weather
Weather
25
25
25
25
25
25
25
25
153
153
153
153
153
153
153
153
101
101
101
101
101
101
101
101
98
98
98
98
98
98
98
98
To access the next or preceding page
Press PROG + ( ) or PROG – ().
To superimpose Teletext on to the TV
Whilst you are viewing Telete xt , pr ess . Press it again to cancel the Te le te xt mo de .
To freeze a Teletext page
Some Teletext pages have sub-pages which follow on automatically. To stop them , pr ess / . Press it again to cancel the
freeze.
To reveal concealed information (e.g. answers to a quiz)
Press / . Press it again to conceal the information.
To select a sub page
A Teletext page may consist of several sub pages. In this case, the page numb er t hat appears on the upper left corner wi ll cha nge
from white to green and one or more arr ows will appear nex t to th e page numb er. Repe atedly press or on the remote co ntrol
to watch the desired page.
To switch off Teletext
Press .
Fastext
The Fastext service lets you access pages with one push of a button.
Whilst you are in the Teletext mode and Fastext is broadcast, a colour coded menu appears at the bottom of the Teletext page.
Press the colour button (re d, gree n, yellow or blue) to access the correspon din g pa ge .
GB
Other Functions
45
Page 48

NexTView*
* D epending on av ailability of s er vice.
NexTView is an on-scre e n el ec tronic programme guide, provi di ng you with programme informat io n for di fferent
broadcasters.
When looking for inform ation, you can search by them e (sports, art, etc.) or date.
When you are viewing the NexTView service, wrong characters appear on the screen if the language used in the NexTView
service does not match the language set on your TV. To resolve this problem, select the “Language” option in the “Set Up”
menu and set the same langua ge as that used in the NexTVie w servi c e. A lso se le ct the “C ountry” option in the “Set Up”
menu and set the country/ region in which the NexTVie w service is provided (see page 39).
Displaying NexTView
1 Select a broadcast channel providing the NexTView service. In this case , th e indication “NexTV iew” is displayed as soon as
data is available.
2 To see the NexTView service, you ha ve two different NexTView in te rfa ce types, depending on the percentage of available
data.
a)“Programme List” interface
Whilst you are watching T V , and after the indication “Nex TV iew” in orange is displayed on the screen, press on the
remote control to see the “Programme List” interface (see fig. 1 on pa ge 47).
b)“Overview” interface
Whilst you are watching TV, a nd a fte r m ore than 50% of NexTView data is avail ab le (100% data may not be available
depending on your area), the indication “NexTView” in black or white is disp la yed on the screen. (The colour of the
indication “NexTView ” may vary depending on the Menu Col our option. See page 38.) Then press on the remote
control to see the “Over v ie w” interface (see fig. 2 on page 47).
As soon as you enter the NexTView service, the lower left corner of the screen will show the percentage of NexTView data
available. Once you have entered this service, the per ce nt age of data available will not increase.
3 To navigate through NexTView:
• Moving ri ght or left, press or .
• Moving up or down, press or .
• Confirm i ng a selec ti on, pre s s OK.
4 To switch off N exTView, pres s on the re mote control.
46
Other Functions
Page 49

“Programme List” interface (fig. 1)
1
2
3
01
02
Mon
Tue03Wed04Thu05Fri06Sat07Sun 7 : 07 :
TV1
TV2
TV3
TV4
TV5
TV6
TV7
TV8
Songs from the shows
TV1 00:30 - 01:30 Thursday 04
Programme description
Songs from the shows
00 : 30
Weather forecast informati
01 : 30
A1 news magazine
05 : 30
Arts show
06 : 30
Oclock news
07 : 30
Weather forecast informati
08 : 30
A1 news magazine
09 : 30
Arts show
10 : 30
Record
Remind
01
“Overview” inte rf ace (fig. 2)
1
2
3
A Icons for different themes
Refer to “Icon key” on pag e 48.
B Date
C Programme list
4
01
02
Mon
Tue03Wed04Thu05Fri06Sat07Sun 9 : 15:
TV1
TV2
TV3
TV4
TV5
TV6
TV7
TV8
9 : 00 9 : 30 10 : 00
Magazine
Weather Forecast | Mike's show
Euronews
Home Shopping Europe |Euro Sports
News | Arts show
Larry King's live | Euro Sports
Euro magazine | Euro Sports
Home Shopping Europe | Euronews
Songs from the shows
TV1 00:30 - 01:30 Thursday 04
Programme description
Record Remind
4
5
|
Songs from the shows
|
Fantasy film
|
Magazine
5
D Record
This function only works if you ha ve connected a VCR which
supports SmartLink and Time r Programming features.
If you want to record the selected programme, press the red
button on th e remote con tr ol.
E Remind
If you want to be reminded when the selected programme is br oadcast,
press the green button on the remo te control. At the tim e that programme
should be broadcast a reminder m essa ge is disp la ye d on the TV.
|
Star Wars
03
GB
• The “Record” and “Remind” options will be shown on the screen as soon as a programme has been selected, but they will
not be shown if you are watching the NexTView service on a TV cha nnel which is not a NexTView pro vider.
• The “Record” and “Remind” options will not be ava ilable if the programme that you ha ve selected has already started.
(continued)
Other Functions
47
Page 50

Icon key
Full selection list
All the programme informati o n is listed by
time and broadcast channels order.
Entertainment
Children
Arts
Sports Remind list
News
Movies
Music
Channel selection
If the NexTView provider sends information
on more than eight broa dca s t c ha nnels, you
can select eight of them to create a personal
list.
After you have created your personal list, the
default list can be restored. To restore i t,
select “Auto B” by pressing on t he
remote control.
Shows you a l ist with all the p rogrammes
(maximum of five programmes) that you
have selected to be reminded about.
48
Other Functions
Page 51

“Memory Stick”
About the “Memory Stick” Feature
The “Memory Stick” feature allows you to view digital images that are stored on “Memory Stick” media on your TV screen.
Picture viewer
This TV’s “Memory Stick” pict ure viewer can display still image data (JPEG) and mov in g im a ge da t a (MPE G 1) store d on a
“Memory Stic k.” Y ou ca n als o ru n a sl idesh ow of thos e imag es, a nd customi se th e f eatur es of the slides how b y se lectin g a utomati c
or manual slideshow.
Digital Camera Mode
This TV’s Digital Camera Mode can display only images us ing the JPEG or MPEG1 for mats, recorded on a DCF-compl iant digita l
camera.
Supported image types
Recorded images must meet the following specifications:
• Still images: JPEG* compressi on format and DCF** compliant folder a nd file names.
• Moving images must be recorde d on a Sony digital camera and use one of the foll owi ng MPEG1*** compression formats:
MPEG MOVIE, MPEG MOVIE AD, MPEG MOVIE EX, MPEG MOVIE HQ, MPEG MOVIE CV, MPEG MOVIE HQX,
MPEG1 (corresponding to VIDE O CD) for VAIO Giga Pocket
* JPEG is a standard technology format for compr essi ng a st il l ima ge (ext ension .jpg). JPEG stands for “Joint Photog raphic
Experts Group,” which is the organization that implemented this format.
** DCF stands for “Design rules for Camera File syste ms,” whic h ha s specifi ca t ion s establ ished by the Japan Electronics and
Information Technology In dust ries A ssoci a ti on (JE IT A ).
*** MPEG is a format for compressi ng a moving image (extension .mpg).
Unsupported image types
• Still images stored in TIFF or any other non-JPEG c om pre ssio n form a t
• Still images recorded using products that are not DCF-compl ia nt , inc luding the following Sony produ ct s
– Digital still cameras DSC-D700, DSC-D770
– Digital video cameras DCR-T RV900/DSR-PD100A
• The following still images stored in JPEG com pression format
– Images that were processed on a computer
– Images in folders that were modified or renamed on a computer
– Images stored in a “Memory Stick” that was form a tt ed on a co mp ut er
– Images less than 16 dots wide or high
– Images more than 4,096 dots wid e or hi gh
Notes on use
• We recommend that you back up important data on the hard disk of your computer. Sony cannot be responsible for any lost or
damaged data.
• Use of some pre-recorded ima ge data except for personal use may be an infringement of copyright .
• The “Memory Stick” application software may be modified or changed by Sony without prior notice.
GB
(continued)
“Memory Stick”
49
Page 52

What is a “Memory Stick”?
A “Memory Stick” is a compact, portable and versatile Integrated Circuit recording medium with a data capacity that exceeds that
of a floppy disk. A “Memory Stic k” is specially designed for exchanging and sharing digital data a mong “Memory Stick”
compatible products. Be cause it is removable, the “M em ory Stick” can also be used for exte rnal data storage.
“Memory Stick” media are available in two sizes: a s tandard size and a compact “Memo ry S tick Duo” size. Once attached to a
Memory Stick Duo adapter, th e “Memory Stick Duo” is physicall y th e sam e size as a standard “Memory Stick” and thus can be
used with products compliant wit h the standard “Memory Stick.”
Notes on “Memory Stick Duo”
• To use a “Memory Stick Duo” with th is uni t, at tach it to the Memory Stick Duo adapter before inserting it into the unit.
• Make sure that you attach the “Memory Stick Duo” to the adapter correctly.
• Make sure that you insert the Me m ory Stick Duo adapter correctly, otherwise the unit may be damaged.
• Do not insert the Memory Stick D uo adapter without a “Memory Sti c k D uo” attached. Doing so may result i n ma l function of
the unit.
50
“Memory Stick”
Page 53

On handling the “Memory Stick”
LOCK
LOCK
Label area
Write-protect switch
• You cannot record or erase im age s when the write-protect switch on the “Me mory Stick” is set to LOCK.
• Image data may be damaged in the following cases:
– If you remove the “Memory Stick,” or turn the power off while the access lamp is lit or flashing.
– If you use the “Memory Stick” near magnets or magnetic fields, such as speakers.
– If you unplu g th e AC power cord w hile the acces s lamp is lit or flashing.
• Avoid touching the termi n a l of “ M em ory Stick” media or coming in contact with a metal object .
• Do not drop, bend, or submit “Memory Stick” media to external shock.
• Do not disassemble or modify “M em ory Stick” media.
• Avoid getting liquid on “Memory Stick” media.
• Apply labels only withi n th e de sig nated label area.
• To avoid permanent damage to digital photo or movie, do not use or sto re “Memory Stick” media in a locat io n subj ect to:
– High temperat ure (such as near a heate r or in s ide a hot car)
– High humidity
– Direct sunlight
– Corrosive substances
– Magnetic fields
– Excessive dust
– Static electricity or ele ctric noise
– Electric surges
• Store and carry “Memory Stick” me di a i n it s orig ina l case to e nsure protection of stored data.
• Save a backup or st o red data.
On formatting the “Memory Stick”
The “Memory Stick” is shi pp ed with an exclusive sta nd ar d fo rmat.
A “Memory Stick” formatted by a computer does not have a gu aranteed compatibility with this TV.
GB
When the access lamp is lit or flashing
When the access lamp is lit or flashing, the “Memory Stick” is re ad ing or writing data. In this case, do not shak e o r strike the TV,
turn the power off, or ejec t t h e “ M em ory Stick,” otherwise the im age data may be damaged.
• “Memory Stick” and are trademarks of Sony Corporation.
• “Memory Stick PRO” and are tradema rks of Sony Corporation.
• “Memory Stick Duo” and are tradem a rks of Sony Corporation.
“Memory Stick”
51
Page 54

Inserting and Removing a “Memory Stick”
Inserting a “Memory Stick”
Insert the “Memory Stick” into the “Memory Stick” slot with the b mark
facing forward as illustrated on the rig ht until it clicks. The (“Memory
Stick”) access lamp flashes, then go es out.
Right side of the TV
• Be sure to insert the “Memo ry Sti ck ” c orre ctly. If the “Memory Stick” is forced i n the wrong way, the “Memory Stick”
or the slot may be damaged.
• Insert only a “Memor y Stick” int o th e “Memory Stick” slot. Attempting to insert other objects into the slot may dam a ge
the TV.
• To use a “Memory Stick Duo,” be sure to attach it to the Memory Stick Duo adapter before inserting it into the “Memory
Stick” slot. Inserting a Memory Stick Duo adapter without a “Memory Stick Duo” may damage the “Memory Stick” slot.
Removing a “Memory Stick”
1 Check that the (“Memory Stick”) access lamp is off, then push the
“Memory Stick” gently into th e “Memory Stick” slot.
The “Memory Stick” is ejected.
The (“Memory Stic k”) in dic ator on th e fr ont panel of t he TV
works in the same manner as the (“Memory Stick”) access
lamp.
Right side of the TV
(“Memory Stick”)
access lamp
2 Pull the “Memory Stick” completely out of the “Memo ry Stic k” sl ot.
• Do not turn the power off whilst the (“Memory Stick”) access lamp is lit or flashing in red.
If you do so, the “Memory Sti ck” may be damaged.
• When removing the “Memory St ic k, ” do not attempt to just pull it from the “Memory Stick” slot . If yo u do so, the
“Memory Stick” or the slot may be damaged.
• There is mechanism in side the Memo ry Stic k slot to pre vent th e “Memory Sti ck” fr om popping o ut. This may preve nt the
“Memory Stick” from coming out smoothly. If this happens, do not pull the “Memory Stick” out forcibly. Pull it out
straight towards you. Otherwise, the “Memory Stick” may be damaged.
• To protect small children from inj ury from “Memory Stick,” remove any “Memory Stick” from the TV’s Memory Stick
slot and store it in a safe location when i t is not in use.
52
“Memory Stick”
Page 55

Using the “Memory Stick” (Memory Stick Home)
The “Memory Stick” feature allows you to display an index of thumbnail images that are on the “Memory Stick.” You can select
an image from those to display on the full screen, playback a moving image, or run a slideshow of those images.
Displaying the Memory Stick Home
The defaul t s etting for “Dig i. Camera Mo de” is “On.”
1 Insert a “Memory Stick” th at contains the images you want to view .
2 Press (“Memory Stick”) on the remote control.
The Memory Stick Home appears on the screen .
The Memory Stick Home displays 20 (KLV-26HG2) or 16 (KLV-21SG2)
thumbnail images.
(“Memory
Stick”)
//
//
OK
Memory Stick
Home mark
Memory Stick Home
Slide Show…
Option…
Select Folder
100MSDCF
Index of thumbnail images contained
in the selected folder
Press / / or to select an
image. The sele cted ima ge is high lighted
in yellow.
GB
No.: 1/1234
Sel: Back: Set: OK
Size: 1024x768
Folder name for the
selected fold er
File: SPJP0001.JPG
Date: 7/15/2002 12:34
Information about the
selected image f ile
Marks indicated in the lower part of an image
: Protected image icon
: Moving image icon
: Related file icon (displayed only when
“Digi. Camera Mode” is set to “On”)
To close the Memory Stick Home, press (“Memory Stick”) again.
(continued)
“Memory Stick”
53
Page 56

Selecting the index menu of the Memory Stick Home
Press or to highlight the menu item, then press OK. The selected opti on is highlighted in yellow.
Option
Slide Show Disp lays a slide s how of i m age s that are on the “Me mory Stick.” For more details, refer to
Option Displays the Option menu. You c an select any of the following options.
Select Folder Allows you to select a specific folder on the “Memory Stick.” For more det ails, refer to
Description
“Using “Memory Stick” Slide Show” on page 59.
File: Displays the following opt ions:
Sort: Sorts the image file accord in g to the file nam e or the renewa l date in ascend in g/
descending order.
Filter: Filters only still images (Still) or moving images (Movie) out from the c o ntent.
To cancel the fi lter, select Off.
The Sort/Filter functions can be activated only when “Digi. Camera Mode” is set
to “Off.” Filter setting information is displayed on the Memory Stick Home.
Memory Stick: Displays the type, the used capacity, and th e capacity of the “Memory
Stick” in use.
“Selecting a folder that you want to view on the “Memory Stic k” ” on page 55.
54
“Memory Stick”
Page 57

Selecting a folder that you want to view on the “Memory Stick”
1 Insert a “Memory Stick” th at contains the images you want to view .
2 Press (“Memory Stick”) on the remote control.
The Memory Stick Home appears on the screen .
3 Press or to highlight Select Folder, then press OK.
The Select Folder menu appears.
Currently se lected folder
Memory Stick Home
Slide Show…
Option…
Filter: Still
Select Folder
100MSDCF
Close
List of folders included in the
currently selected folder
GB
Sel: Back: Set: OK
To upper stage
No.: 1/1234
Size: 1024x768
File: SPJP0001.JPG
Date: 7/15/2002 12:34
First image file contained in the
currently selected folder
4 Pre ss to select the list of contents, and press or to select a folder that you want to view. Then press OK.
An index of thumbnail ima ges of the selected folder appe ars.
To select folder s wh ic h ar e not dis pla ye d on the sc reen , pr ess to select the slider and pres s or . The next or
previous 10 folders appear.
Sorting out image files (Digital Camera Mode)
“Digi. Camera Mode” allows you to sort out image files in JPEG and MPEG compression format that were recorded on digital still
cameras and digital video ca meras which are DCF-complia nt.
In step 4 above, select Digi. Camera Mode. Then press or to select On, and press OK.
• You cannot select Digi. Camera Mode if there are more than 2,000 image files recorded on the “Memory Stick” using a
digital still camera or digita l video camera.
• For an image file recorded with the Voice Memo function of a Sony digital camera, a still image file is displayed.
•When Digi. Camera Mode is set to On, the response to remote control operation may slow dow n, depending on the
number of subfolders in the folder and the number of files in the subfolder. In this case, wait until the “Memory Stick”
access lamp goes off before performing any operations, or set Digi. Camera Mode to Off.
(continued)
“Memory Stick”
55
Page 58

Using the Memory Stick Home
The Memory Stick Home al lows you to display selected image s on the ful l screen and playback a moving im ag e usi ng the index
screen. You can also protect, rot ate, and delete images using the index menu .
1 Insert a “Memory Stick” th at contains the images you want to view .
2 Press (“Memory Stick”) on the remote control.
The Memory Stick Home appears on the screen .
3 Press or to highlight Select Folder, then press OK.
The Select Folder menu appears.
4 Pre ss to select the list of contents, and press or to select a folder that you want to view. Then press OK.
An index of thumbnail i mag e s from the selected folder appears.
5 Press , and press / / or to select an image file that you want to view. Then press OK.
The index menu for a thumbna il im ag e a ppe ars. You can select any of the follo wing options. Press or to select the
option, and press OK.
If the selected fold er cont ains mo re imag e files than ca n be disp laye d on the screen, press , or press to select the
slider and press . The index of subsequent images appears as you scroll the screen.
Index menu for a thumbnail image
Option
Full Screen
(for a still image only)
Movie Player
(for a moving image only)
Slide Show
Protect
Rotate
(for a still image only)
Delete
Close
Description
Displays the still image on the full screen. For more details, refer to “Displaying a still image on the
full screen” on page 57.
Displays Movie Player. For more details, refer to “P laying back a moving imag e (Movie Player)”
on page 58.
Displays a slideshow of images that are on the “Memory Stick.” For more details, refer to “Using
“Memory Stick” Slide Show” on page 59.
Protects the selected image file against being erased. is marked on the protected image.
Rotates only a still image 90 degrees clockwise or anticlockwise. Each time you press OK, the image
rotates 90 degrees.
Deletes the selec ted image file.
Closes the index menu.
• You cannot rotate or delete a pro te ct ed im age ( ).
• You cannot rotate or delete the images on the “Memory Stick” if the write-protect switch is set to LOCK.
• If an image has been rotated, it remains on the “Memory Stick,” and is displayed this way again the next time.
56
“Memory Stick”
Page 59

Displaying a still image on the full screen
Select Full Screen in th e index menu for a thumbnai l image.
• The time that the still image is displayed on the full screen varies according to the image size.
• The TV automatically displays the appropriate image size for eac h ima ge on the f ul l scr een.
No.: 1/1234
Size: 1024x768
File: SPJP0001.JPG
Date: 7/15/2002 12:34
To display the next image
Press .
To display the previous im age
Press .
Index menu for a full sc reen image
Press OK, whilst the image is displayed on t he full screen.
The index menu for a full screen image appears. You can select any of the following options. Press or to select the option,
and press OK.
Option
Return
Information
Protect
Rotate
(for a still image only)
Delete
Close
Description
Returns to the Memory Stick Home.
Displays the information of the selected image fi le.
Protects the selected image file against being erased. is marked on the protected image.
Rotates only a still image 90 degrees clockwise or anticlockwise. Each time you press OK, the image
rotates 90 degrees.
Deletes the selec ted image file.
Closes the index screen.
• You cannot rotate or delete a protected image ( ).
• You cannot rotate or delete the images on the “Memory Stick” if the write-protect switch is set to LOCK.
• If an image has been rotated, it remai ns on t he “Memory Stick,” and is displayed this way aga in the next time.
GB
(continued)
“Memory Stick”
57
Page 60

Playing back a moving image (Movie Player)
Select Mo vie Player in the index menu for a thumbnail image, Movie Player appears on the screen. You can operate Movie Player
as follows. Press or to select the button or the option, and pre ss OK.
Prev.
Next
Full Screen
Menu
Return
File: BASEBALL.MPG
Date: 7/15/2002 12:34
Button/Option
N (Play/Pause)
No.: 1/1234
Size: 320x240
Description
Plays back a moving image. During playback, the button display is changed to the X (Pause) button.
When the playback is finished, pl ayb ack st ops with the first image of the moving image file
displayed.
x (Stop)
Full Screen
Stops playback.
Displays a moving image on the full sc r e en and starts playback automatic al ly. T o retur n to Movie
Player, press
/// or OK.
The TV automatically displays the appropriate image size for each moving image on the full
screen.
Menu
Displays Menu. You can select any of the follo wing opt ions.
Information: Displays the information of the selected image file.
Protect: Protects the selected image file against being erased.
Delete: Deletes the selected i mage file.
Close: Closes Menu.
You cannot delete a protected image ( ).
Return
Returns to the Memory Stick Home.
Guide display
The guide display guides the function of and on the remote control when Movie Player is displayed.
Rew: Rewinds the moving image.
FF : Fast forwards the moving image.
If you are starting a slidesh ow and stop or pause the moving image, the guide display is changed to
Prev. and Next . For more details on the slideshow, refer to “Using “Memory Stick” Slide Show” on page 59.
Prev.: Displays the previous image.
Next : Displays the next image.
58
“Memory Stick”
Page 61

Using “Memory Stick” Slide Show
“Slide Show” allows you to watch a slide show of the images on the “Memory Stick.”
1 Insert a “Memory Stick” th at contains the images you want to view .
2 Press (“Memory Stick”) on the remote control.
The Memory Stick Home appears on the screen .
3 Press or to highlight Select Folder, then press OK.
The Select Folder menu appears.
4 Pre ss to select the list of contents, and press or to select a folder that you want to view. Then press OK.
An index of thumbnail ima ges of the selected folder appe ars.
5 Press or to highlight Slide Show, then press OK.
The index menu for Slide Show appears. You can select any of the following option s. Press or to select the option,
and press OK.
Advan. Slds.: Sets Slide Show to run automatically (Auto) or manually (Manual).
Interval: Selects the period for which one im age is di spla ye d from 5sec, 10sec, 30sec, 1min, 5min, or 10min.
• The time is approximate.
• When Advan. Slds. is set to Manual, the Interval option is not availa ble.
6 Press or to select Start, and press OK.
To start Slide Show
When you set “Ad van. Slds.” t o “A uto”
The images cha ng e automatically. When a moving im ag e file is selec ted, it plays ba ck automatically, and after pl ay back, the next
image file is displayed automatically.
“Movie Player” is not displayed when you set Advan. Slds. to Auto.
GB
When you set “Advan. Slds.” to “Manual”
Press or to change the images displayed.
: Displays the next image.
: Displays the previous image.
When you display a still image on the full screen, you can change the images in the same way as was described above.
When a moving image file is sel ecte d, it does not play back and “Movie Player” is displ ay ed . For more details on using “Movie
Player,” refer to “Playing ba ck a moving image (Movie Player)” on page 58.
To stop Slide Show
If you want to stop Slide Show, do the following to re turn to the Memo ry Stick Home .
If you have set “Advan. Slds.” to “Auto”
Press OK.
If you have set “Advan. Slds.” to “Manual”
Press OK to display the index menu for Slide Show, then press or to select Return and press OK.
(continued)
“Memory Stick”
59
Page 62

Caution displays whilst you are using the “Memory Stick”
If an image file has a problem, the following indicators may appear on the screen. Use the list below to check the meaning of the
caution display.
The image file is in the JPEG or MPEG1 format but is not DCF-compatible.
There is a thumbnail image but it is not DCF-compatible.
There is no sele cted image file.
There is an image file but the th um bn ail image is corrupted.
The image file is corrupted.
Caution messages whilst you are using the “Memory Stick”
Use the list below to check the meaning of the messages.
No Memory Stick Insert the “Memory Stick” into the “Memory St ick” slot correctly.
No file No image files are contained in the currently selected folder.
No movie file No moving image files are contained in the currently selected folder, even though “Filter” is
No still file No still image files are contained in the currently selected folder, even though “Filter” is set
Cannot play Data in the moving image file is corrupted.
Memory Stick locked The write-protect switch on the “Memory Stick” is set to LOCK. R elease the lock.
Memory Stick error • The image file ma y be corrupted.
Memory Stick type error A “Memor y Sti ck ” th at is not com pa ti bl e or cannot be used with the TV has been inserted.
Format error The “Memory Stick” has not been formatted correctly.
File error The selected folder has not been named correctly. Re-enter the name with fewer than 66
Read Only Memory A read-only “Memory Stick” on which image files are recorded has been inserted. You
set to “Movie” in the “Opti o n ” menu.
to “Still” in the “Option” menu.
• The image file may not be s tored in J PEG or MPEG 1 format. Ch eck to s ee if the im age file
can be viewed on other equipment compatible with the “Memory Stick,” such as a digital
camera, etc.
characters, in cluding “/” by displaying the “Sel ect Folder” menu.
cannot record or delete the data on a read-only “Memory Stick.”
60
“Memory Stick”
Page 63

Additional Information
Connecting Optional Equipment
Using the following instructions, you can connect a wide range of optional equipment to your TV. (Connecting cables are
not supplied.)
Decoder
DVD player with
component output
Decoder
Rear panel of the TV
“PlayStation 2”*
GB
VCR
DVD recorder/player
Headphones
S VHS/Hi8/DVC
camcorder
* “PlayStation 2” is a product of Sony Com put er Entertainment, Inc.
* “PlayStation” is a trademark of Sony Computer Entertainment, Inc.
Hi-Fi
(continued)
Additional Information
61
Page 64

A
B
C
E
Y
3
P
B/CB
PR/CR
L/S/G/I
3
R/D/D/D
F
G
0
4
J
4
K
L/G/S/I
MONO
D
4
L
R/D/D/D
M
A Connect the supplied coaxial cable.
B 3: AV3 Y P
B/CB PR/CR jacks
C 3: AV3 Audio input jacks
D : “Memory Stick” slot
E Connect the supplied m ains lead.
F 2/ 2: AV2 Scart connector (SmartLink)
S
G 1/ 1: AV1 Scart connector
H 0: Auto Startup button
• To avoid a noisy picture , do not connect external equipment to connectors J and K at the same time.
• Even if headphones are con nected to the TV, you can hear the sound from the TV speakers.
• Note that so me Scart leads may not fit into the connecto r on the TV.
I : Audio output jacks
S
J 4: AV4 S video input jack
K 4: AV4 Video input jack
L 4: AV4 Audio input jac ks
M i: Headphones jack
H
I
62
Additional Information
Page 65

Connecting a VCR
To connect a VCR, refer to “Connecting an Aerial and a VCR” on page 25. We recommend you connect your VCR using a Scart
lead. If you do not have a Scart le ad, tune in the VCR test signal to the T V programme number “0” by usi ng t he “Manual
Programme Preset” option. For det ails on how to manually programme these pre s et s, see pa ge 41, step A.
Refer to the instruction manual of your VCR to find out how to find the output channel of your VCR .
Connecting a VCR or a DVD recorder that supports SmartLink
SmartLink is a direct link between the TV and a VCR or a DVD recorder. For more information on SmartLink, refer to the
instruction manual of your VCR or DVD recorder.
If you use a VCR or a DVD recorder that supports SmartLink, please connect the VCR or the DVD recorder using a Scart lead to
the Scart connector 2/ 2 (F).
If you connect a DVD rec order to Y, PB/CB, PR/CR jacks of 3
Some DVD recorders may have component signal format. If you wish to input the component signal connect the DVD recorder to
B/CB, PR/CR jacks of 3.
Y, P
S
Connecting a decoder
If you have connected a decoder to the Scart connector 2/ 2 (F), or through a VCR connected to
this Scart
Select the “Manual Programme Preset” option in the “Set Up” menu and, after entering the “Decoder” option, select “On” (using
or ). Repeat this option for each scrambled signal .
Depending on the country/region you have selected in the “Country” option, this option may not be available (see page 39).
S
Connecting external audio equipment
To listen to the sound from the TV on Hi-Fi equipment
Connect your Hi-Fi equipment to the audio output jacks (I) if you want to amplify the audio output from the TV. Next, using
the menu system, select the “Features” menu and set “Speaker” to “Off” (see page 38).
When you switch on or off your TV, turn down the volume of the Hi-Fi equipment connected to the audio output jacks .
If the volume is set too high, it ma y da ma ge the Hi-Fi equipment.
GB
Additional Information
63
Page 66

Using Optional Equipment
1 Connect your equipmen t to the desi gnated TV socket, as indicated on pages 61 to 63.
2 Switch on the connected equipment.
3 To watch the picture of the connected equipment, press the / button on the remote control repeatedly until the correct
input symbol appears on the scre en.
Symbol Input Signals
1 or 2 • Audio/video inp ut signal through the Scart conne ct or G or F.
1 • RGB input signal through the Scart connector G. This symbol appears only if an
S
2 • S video input signal through the Scart connector F.
3 • Component input signal throu gh th e Y , P
4 • Video input signal through the phono jack K and audio inpu t sig na l th rough L.
S
4 • S video input signal through the S video input jack J and audio input signal
4 Press the button on th e remote con trol to return t o th e normal TV picture.
For mono equipment
Connect the phono plug to the L/G/S/I jack and press / repeatedl y unt il the in put symb ol 4 or 4 appears on the
screen.
Select the “Sound Adjustment” menu and set “Dual Sound” t o “A ” (see page 34).
“Memory Stick” input
To view still im ages or moving im ages stored on a “M emory Stick” ins erted into the “Mem ory Stick” slot D, press
(“Memory Stick”) on the remote control.
The “Memory Stick Home” appears on the screen when you press (“Memory Stick”).
For more details on using “Memor y Sti ck ” m ed ia , refe r to “Using the “Memory Stick” (Memo ry Stick Ho m e)” on pa ge 53.
RGB source has been con nected.
B/CB, PR/CR jacks B and Audio input
signal through C.
through L.
S
64
Additional Information
Page 67

Remote Control Configuration for VCR/DVD
This remote control is set by default to operate the basic functions of this Sony TV, most Sony DVDs and Sony VCRs when
batteries are initially installed. To control VCRs and DVDs of other major brands, and certain Sony VCR models, please complete
the following steps:
Before you start, look up the three digit code for your brand of DVD or VCR from the list on page 66. For those brands that
have more than one code, enter the first code number.
1 P r ess the Media S elector butto n on the remote con trol repeated ly until the required VCR
or DVD green light ligh ts up.
If the Media Selector is in the TV po sit io n, code num bers will not be stored.
1
2 Before the green light goes out, press and hold the yellow button for approxi mately six
seconds until the green light star ts fla s hi ng.
3 Whilst the green light is flashing, enter all three digit s of th e co de for your brand (see
page 66) using the num ber buttons on the remote control.
If your selec ted code is ente r ed correctly, all three green lights will be lit
momentarily.
4 Turn on your VCR or DVD and check that the ma in functions wor k .
• If your equipment is not work in g or some of the functions do not work, please
check to be sure you entered the correct code set or try the next code listed
against the brand (see page 66).
• Your brand codes may be lost if weak batteries are not replaced within a few
minutes. To reset your DVD or VCR code number, please repeat the above steps.
A small labe l is attached in s id e the battery co ver to allow yo u to record your
brand codes.
• Not all brands are covered and not all models of every brand are covered.
3
GB
2
(continued)
Additional Information
65
Page 68

VCR Brand List DVD Brand List
Brand Code Brand Code
SONY (VHS) 301, 302, 303, 308, 309, 362 SONY 001
SONY (BETA) 303, 307, 310 AIWA* 021
SONY (DV) 304, 305, 306 DENON 018, 027, 020, 002
AIWA* 325, 331, 351 GRUNDIG 009, 028, 023, 024, 016, 003
AKAI 326, 329, 330 HITACHI 025, 026, 015, 004
DAEWOO 342, 343 JVC 006, 017
GRUNDIG 358, 355, 360, 361, 320, 351 KENWOOD 008
HITACHI 327, 333, 334 LG 015, 014
JVC
LG 332, 338 MATSUI 013, 016
LOEWE 358, 355, 360, 361, 320, 351 MICROMEDIA 009
MATSUI 356, 357 MITSUBISHI 010
MITSUBISHI 346, 347 ONKYO 022
ORION 328 OPTINUS 004
PANASONIC 321, 323 PANASONIC 018, 027, 020, 002
PHILIPS
SAMSUNG 339, 340, 341, 345 RCA 005
SANYO 335, 336 SAMSUNG 011, 014
SHARP 324 SANYO 007
THOMSON 319, 350 SHARP 019, 027
TOSHIBA 337 THOMSON 012
314, 315, 322, 344, 352, 353,
354, 348, 349
311, 312, 313, 316, 317, 318,
358, 359
LOEWE 009, 028, 023, 024, 016, 003
MAGNAVOX 009, 028, 023, 024, 016, 003
PHILIPS 009, 028, 023, 024, 016, 003
PIONEER 004
TOSHIBA 003
YAMAHA 018, 027, 020, 002
* If an AIWA VCR or DVD does not work even though you enter the code for AIWA, enter the code for SONY instead.
66
Additional Information
Page 69

Specifications
Display Unit:
(KLV-26HG2)
Power Requirement:
Screen Size: 26 inches
Display Resolution:
Power Consumption:
Standby Power Consumption:
Dimensions (w × h × d):
Weight: Approx. 18.4 kg (with stand and rear cover)
(KLV-21SG2)
Power Requirement:
Screen Size: 21 inches
Display Resolution:
Power Consumption:
Standby Power Consumption:
Dimensions (w × h × d):
Weight: Approx. 11.3 kg (with stand and rear cover)
Panel System:
LCD (Liquid Crystal Display) Panel
TV System:
Depending on your country/region sele c ti on:
B/G/H, D/K, L, I
Colour System:
PAL, SECAM
NTSC 3.58, 4.43 (only Video In)
Aerial:
75 ohm external terminal for VHF/UHF
Channel Coverage:
VHF: E2–E12
UHF: E21–E69
CATV: S1–S20
HYPER: S21–S41
D/K: R1–R12, R21–R69
L: F2–F10, B–Q, F21–F69
I: UHF B21–B69
220–240 V AC, 50 Hz
Approx. 58.7 cm measured diagonally
1,280 dots (horizontal) ×
109 W
0.8 W or less
Approx. 79.0 × 49.0 × 24.0 cm
(with stand)
Approx. 79.0 × 43.0 × 13.8 cm (without stand )
Approx. 15.2 kg (without stand and rear cover)
220–240 V AC, 50 Hz
Approx. 53.7 cm measured diagonally
1,024 dots (horizontal) ×
94 W
1 W or less
Approx. 63.0 × 46.1 × 24.2 cm
(with stand)
Approx. 63.0 × 40.0 × 12.6 cm (without stand )
Approx. 8.6 kg (without stand and rear cover)
768 lines (vertical)
768 lines (vertical)
Terminals:
1/ 1
21-pin Scart connector (CENELEC standard) including
audio/video input, RGB input, and TV audio/video output.
S
2/ 2 (SMARTLINK)
21-pin Scart connector (CENELEC standard) including
audio/video input, S video input, selectable audio/video
output, and SmartLink inter fac e.
3
Y: 1 Vp-p, 75 ohms, 0.3V negative sync
B: 0.7 Vp-p, 75 ohms
P
R: 0.7 Vp-p, 75 ohms
P
3
audio input (phono jacks)
500 m Vrms (100% modulation),
Impedance: 47 kilo ohms
S
4
S video input (4-pin mini DIN)
4
Video input (phono jack)
4
Audio input (phono jacks)
Audio output (Left/Right) (phono jacks )
i Headphones jack
“Memory Stick” slot
Sound Output:
Full range speaker:
4.0 W + 4.0 W
Accessories Supplied:
• Remote control
RM-Y1103 (1)
• Size AA batteries (R6 type) (2)
• Coaxial cable (1)
• Mains lead (Type C-6) (1)
• Mains lead (Type BF) (1)
• Rear cover (1)
Optional Accessory:
• Wall-Mount Bracket SU-W210 (KLV-21SG2 only)
• Wall-Mount Bracket SU-LW1 (KLV-26HG2 only)
Other Features:
• Teletext, Fastext, TOPt ex t
• Sleep Timer
• SmartLink (Direct lin k bet we en yo ur TV and a com pa tible
VCR or DVD recorder. For more information on SmartLink,
please refer to the instruction manual of your VCR or DVD
recorder.)
• TV system autodetection
• Auto Format (KLV-26HG2 only)
• Screen Memo
• NexTView (depending on availabi li ty of servi ce)
GB
Additional Information
67
Page 70

Troubleshooting
Self-diagnosis function
This TV is equipped with a self-diagnosis function. If there is a problem with your TV, the / (Standby/Sleep) indicator will
flash in red repeatedly. Writ ing dow n t he duration of flashes and interval betwe en flashes helps you inform your deale r or Sony
service centre of the TV’s co ndition.
/ (Standby/Sleep) indicator (fl a s hin g in red)
1 Me asure how long the / (Standby/Sleep) indicator flashes and stops flashin g.
For example, the indicator flash es for two sec onds, stops flashing for one second, and flashe s for two seconds.
2 Press the & (Power) switch on the TV to switch it off, disconnect the mains lead, and inform your dealer or Sony service centre
of how the indicator fla s he s (d uration and interval).
Trouble symptoms and remedies
• Here are some simple solutions to problems which may affect the picture and sound.
• If you continue to experience problems, have your TV serviced by qualified service personnel.
Never open the casing yourself.
Problem Possible remedies
No picture
No picture (screen is dark) and no sound • Check the aerial connection.
The TV turns off automatically (the TV enters the
standby mode).
No picture or no menu information from equipment
connected to the Scart connector
• Connect the TV to the mains, and press the
• If the
• Check if the Sleep Timer function is act iv ated (page 43).
• If no signal is received or no operation is performed in the TV mode for
• Check that the optional equipment is on and press / on the
• Check the connection between the optional equipment and the TV.
/ (Standby/Sleep) indicator lights up in red, press TV &/
on the remote contro l.
10 minutes, the TV automatica ll y sw itc he s to the standby mode.
remote control repeatedly until the correct input symbol is displayed on
the screen.
& (Power) switch on the TV.
68
Additional Information
Page 71

Problem Possible remedies
Poor picture/Unstable picture
Double images or ghosting • Check aerial/cable connections.
• Check the aerial location and direction.
Only snow and noise appear on the screen. • Check if the aerial is broken or bent.
• Check if the aerial has reached the end of its serviceable life (three to five
years in normal use, one to two years at the se as ide ) .
Dotted lines or stripes • Keep the TV away from electrical noise source s such as cars,
motorcycles, or hair-dryers.
No colour on colour programmes • Using the menu system, select the “Picture Adjustment” menu and select
“Reset” to return to the factory settings (p age 32).
• If you set the “Power Saving” option to “Reduce,” picture colours may
become dimmer (page 38).
No colour or irregular colour when viewing a signa l
from the Y, P
B/CB, PR/CR jacks of 3
• Check the connection of the Y, P
• Make sure that the Y, P
B/CB, PR/CR jacks of 3.
B/CB, PR/CR jacks of 3 are firmly seated in
their respective sockets.
Some tiny black points and/or bright points on the screen • The pic ture of a display unit is composed of pixels. Tiny bl ack points
and/or bright points (pixels) on the screen do not indicate a malfunction.
The picture is too bright. • Using the menu system, select the “Picture Adjustment” menu and select
“Mode.” Then select the desired pict ur e mode (page 32).
Picture (stripe) noise • Make sure that the aerial is connected using the supplied coaxial cable.
• Keep the aerial cable away from other connect ing cab les .
• Do not use 300-ohm twin lead cables as interference may occur.
Poor picture (white saturation) when viewing a signal
from the Scart connector 2/ 2
S S
• Make sure that the output signal of the equipment connected to the Scart
connector 2/ 2 is not an RGB signal. If it is an RGB signal,
please connect the equipment to the Sc a r t co nne ct or 1/ 1.
Distorted picture and noisy sound • Check if any connected optional equipment is installed in front of the TV
or beside the TV. When installing optional equipment, leave some space
between the optional equipment and the TV.
Stripe noise during playback/recording of a VCR • Video head interference. Keep your VCR away from the TV.
• Leave a space of 30 cm between your VCR and the TV to avoid noise.
• Avoid installing your VC R in fr ont of the TV or besi de the TV.
Poor or no picture (screen is dark), but good sound • Using the menu system, select the “Picture Adjustment” menu and select
“Reset” to return to the factory settings (p age 32).
Noisy picture when viewing a TV channel • Using the menu system, select the “Manual Programme Preset” option
in the “Set Up” menu and adjust “AFT” (Automatic Fine Tuning) to
obtain better picture reception (page 42).
• Using the menu system, set the “NR” (Noise Reduction) option in the
“Picture Adjustme nt” menu to reduce the no ise in the picture (page 32).
GB
(continued)
Additional Information
69
Page 72

Problem Possible remedies
Distorted picture when changing programmes or
selecting Teletext
Wrong characters appear w hen viewing Teletext.
Wrong characters appear w hen viewing NexTView.
• Turn off any equipment connected to the Scart connector on the rear of
the TV.
• Using the menu system, select the “Language” and “Country” options in
the “Set Up” menu and set the language and country/region in which you
view Teletext (page 39). For Cyrillic languages, we recommend that you
select Russia in case your own country/region does not appear in the list.
• Using the menu system, select the “Language” and “Country” options in
the “Set Up” menu and set the language an d country/region in which
NexTView is provided (page 39).
No sound/Noisy sound
Good picture, no sound • Press 2 +/– or % (Mute) on the remote control.
Audio noise • Make sure that the aerial is connected using the supplied coaxia l c able.
Menu item is not displayed.
• Check that the “Speaker” option is set to “On” in the “Features” menu
(page 38).
• Keep the aerial cable away from other connect ing cab les .
• Do not use 300-ohm twin lead cables as interference may occur.
• Some items cannot be selected depending on the signal or other settings.
Refer to the instructio ns on each men u ite m.
Strange sound
The TV cabinet creaks. • Changes in room temperature someti mes cause the TV cab inet to expand
The TV ticks. • An electrical circuit inside the TV is acti vated wh en the T V is tu rned on.
The TV buzzes. • There might be a surge sound when tu rn ing on the TV. This does not
Remote control does not function. • Check that the remote control is set correctly for the device you are using
The / (Standby/Sleep) indica tor on the TV
flashes.
or contract, which can make slight noises. This does not indicate a
malfunction.
This does not indicate a malfunction.
indicate a malfunction.
(VCR, TV, or DVD).
• If the remote control does not operate the VCR or DVD even when the
remote control has been set correctly to VCR or DVD, enter the
necessary code set as explained in “Remote Control Configuration for
VCR/DVD” (page 65).
• Replace the batteries.
• Refer to “Self-diagnosis function” (page 68) and contact your nearest
Sony service centre.
70
Additional Information
Page 73

“Memory Stick”
Problem Possible remedies
Cannot insert the “Memory Sti ck” into the “Memory
Stick” slot.
Cannot delete a file or all materials.
The still image files in the JPEG format stored in a
“Memory Stick” cannot be displayed.
The moving imag e files in the MPEG1 fo rmat stored in
a “Memory Stick” cannot be displayed.
The image is not displayed and or appears.
• The “Memory Stick” is not facing in the correct direction. Insert the
“Memory Stick” with the
Stick” slot (page 52).
• The write-protect switch on the “Memory Stick” is set to LOCK. Releas e
the lock.
• The image file is prot ected. Release the protection using the index
screen.
• Select “Opt ion” in the Memory Stick Home and select “File.” Then se t
“Filter” to “Still” or “Off” (page 54).
• Select “Opt ion” in the Memory Stick Home and select “File.” Then se t
“Filter” to “Movie” or “Off” (page 54).
• The image f ile is not DCF-compatible.
b mark facing forward into the “Memor y
GB
Additional Information
71
Page 74

Television Channel Number Guide for the United Kingdom
Only the main transmitters are listed. Information regarding the regional sub-relay channel numbers can be obtained by contacting
the BBC Engineering Information Dept., Telephon e N um b e r 020 7852 5040.
72
Additional Information
Page 75

Anleitung zur schnellen
Inbetriebnahme
Bedienungsanleitung
DE
1
Page 76

WARNUNG
• Um Feuergefahr und die Gefahr eines elektrischen Schlags zu vermeiden, setzen Sie das Gerät weder Regen noch sonstiger
Feuchtigkeit aus.
• Im Gerät liegen gefährlich hoh e Spa nnungen an. Öffnen Sie das Gehäuse ni cht. Überlassen Sie Wartungsarbeit en stets nur
qualifiziertem Fachpe rsonal.
Einführung
Vielen Dank, dass Sie sich für dieses Farbfernsehgerät mit LCD-Bildschirm von Sony entschieden haben.
Lesen Sie diese Anleitung vor Inbetriebnahme des Fernsehgeräts bitte genau durch und bewahren Sie sie zum späteren
Nachschlagen s orgfältig auf.
Symbole in dieser Anleitung
........Wichtige Informationen.
........ Informationen zu einer Funktion.
, 2..........Reihenfolge der auszuführenden Schritte.
* Die Abbildungen in dieser Anleitung zeigen den KLV-26HG2, wenn nicht anders angegeben.
......Die T ast en auf der Fernbedienung, die Sie zum
Ausführen der erforderlic he n Schritte drücken
müssen, werden grau unterl egt abgebildet.
.........Hier wi rd kurz das Ergebnis der von Ihnen
ausgeführten Schritte erläutert.
2
Page 77

Inhaltsverzeichnis
Anleitung zur schnellen Inbetriebnahme ...................................................4
Bedienungsanleitung ............................................................................................................13
Sicherheitsinformationen .....................................................13
Sicherheitsmaßnahmen ........................................................18
Übersicht
Überprüfen des mitgelieferten Zubehörs .............................20
Übersicht über di e Bedienelemente und Anzeigen am
Fernsehgerät .................................................................21
Übersicht über di e Be dienelemente auf de r
Fernbedienung ..............................................................22
Installation
Einlegen der Batterien in die Fernbedienung ...................... 24
Anschließen einer Ant en ne und eines Videorecorders ........ 25
Anbringen der hinteren Abdeckung ....................................27
Erste Inbetriebnahme
Einschalten des Fernsehgeräts und automatisches Einstellen
von Fernsehkanälen ......................................................29
Menüsystem
Arbeiten mit dem Menüsystem ............................................31
Bild-Einstellungen ............................................................... 32
Ton-Einstellungen ...............................................................33
Bildschirm einstellen ...........................................................35
Funktionen ........................................................................... 38
Grundeinstellungen ..............................................................39
Weitere Funktionen
Der Abschalttimer ................................................................43
Anhalten des Bildes .............................................................44
Videotext .............................................................................45
NexTView* .........................................................................46
„Memory Stick“
Die „Memory Stick“-Funktion ............................................49
Einsetzen und Herausn ehmen eines „Memory Sticks“ ........52
Verwenden des „ Me m ory Sticks“
(Memory Stick Home) ..................................................53
Weitere Informationen
Anschließen zusätzlicher Geräte ......... .................................61
Verwenden zusätzlicher Geräte ........................................ ...64
Einstellen der Fernbedie nung auf einen Videorecord er bz w .
ein DVD-Gerät ..............................................................65
Technische Daten .................................................................67
Störungsbehebung ...................... ......................................... . 68
DE
Inhaltsverzeichnis
3
Page 78

Anleitung zur schnellen
Inbetriebnahme
Danke, dass Sie sich für dieses Produkt von Sony entschieden haben.
In dieser schrittweisen Anleitung wird Folgendes erläutert:
– Einlegen von Batterien in di e Fe rnbedienung
– Abnehmen der hinteren Abdeckung
– Anschließen einer Anten ne , eines Videorecorders und des Netzka be ls an das Fernsehgerät
– Auswählen der Sprache für die Menübildschirme
– Auswählen des Landes/Gebiets, in dem das Fernsehgerät verwendet werden soll
– Einstellen von Fernsehkanälen
– Anordnen der Kanäle in einer anderen Reihenfolge
1
Fernbedienung
RM-Y1103 (1):
Koaxialkabel (1):
Die Ferritkern e ni cht entfernen.
Überprüfen des mitgelieferten Zubehörs
Batterien der Größe AA
(Typ R6) (2):
Netzkabel
(Typ C-6) (1):
Verwenden Sie dieses
Netzkabel, wenn Sie das Gerät
außerhalb Großbritanniens
verwenden.
Hintere Abdeckung (1):
Netzkabel
(Typ BF) (1):
Verwenden Sie dieses Netz kabel,
wenn Sie das Gerät in
Großbritannien verwenden.
4
Anleitung zur schnellen Inbetriebnahme
Page 79

2
Einlegen der Batterien in die Fernbedienung
• Legen Sie die mitgel ie f erten Batterien unbedingt polaritätsrichtig ein.
• Entsorgen Sie gebraucht e Ba tt erien immer umweltfreundl ic h.
• Verwenden Sie nicht Batterien verschiedenen Typs oder alte und neue Batterien zusammen.
DE
Anleitung zur schnellen Inbetriebnahme
(Fortsetzung)
Anleitung zur schnellen Inbetriebnahme
5
Page 80

Anschließen einer Antenne, eines Videorecorders
3
Anschließen einer Antenne
und des Netzkabels an das Fernsehgerät
• Verwenden Sie das mitgelief erte Netzkabel (Typ C-6 oder Ty p BF , Seite 4).
• Verwenden Sie zum Anschließen der Antenne das mitgelieferte Koaxialkabel.
Schließen Sie das Netzkabel erst an , we nn a lle a nde ren Anschlüsse vorgenommen wurden.
Schließen Sie das mitgeliefe rte
Koaxialkabel an.
Schließen Sie das mitgel ieferte
Netzkabel (Typ C-6 oder Typ
BF, mit Schutzerdung) an.
Anschließen eines Videorecorders mit Antenne
Schließen Sie das
mitgelieferte Ne tzkabel
(Typ C-6 oder Typ BF,
Videorecorder
OUT IN
Scart-Kabel optional.
• Weitere Informationen zum Anschließen eines Videorecorders finden Sie unter „Anschließen zusätzlicher
Geräte“ auf Seite 61.
• Beachten Sie, dass einige Scart-Kabel möglicherweise nicht in den Anschluss am Fernsehgerät passen.
mit Schutzerdung) an.
6
Anleitung zur schnellen Inbetriebnahme
Page 81

4
Bündeln der Kabel
Sie können die Kabel an der Rückseite des Fernsehgeräts ver sta ue n.
1 Bündeln Sie die Kabel und sichern Sie sie mit den Klemmen
an beiden Seit en des Fernsehgeräts.
2 Führen Sie die Kabel von beiden Seiten zusammen und
sichern Sie si e mit der Klemme unten.
• Zu dicke Kabel lassen sich mögli cherweise nicht
mit den Klemmen befestigen.
• Wenn nicht alle Kabel in nen verstaut werden
können, lassen Sie einige da von a n de n Seiten des
Fernsehgeräts herunterhäng en.
Klemmen
Klemme
Wenn die Kabel nicht orde ntlich in den Vertiefungen
liegen, lässt sich die hintere Abde ckung unter
Umständen ni cht anbringen.
DE
Anleitung zur schnellen Inbetriebnahme
(Fortsetzung)
Anleitung zur schnellen Inbetriebnahme
7
Page 82

5
Anbringen der hinteren Abdeckung
Halten Sie die hintere Abdec k ung wie in der Abbildung unten dargestellt und setzen Sie die fünf (KLV-26H G 2) bzw. vier (KLV21SG2) Stifte an der hinteren Abdeckung in die entsprechenden Aussparungen am Fernsehgerät ein. Drücken Sie dann die hintere
Abdeckung auf das Fernsehgerä t.
KLV-26HG2 KLV-21SG2
Anbringen der hinteren Abdeckung
Bringen Sie bitte nach dem A nsc hließen der Kabel die hintere Abdeckung wieder am Fernsehgerät an.
8
Anleitung zur schnellen Inbetriebnahme
Page 83

6
Einschalten des Fernsehgeräts
1 Schließen Sie das Fernse hge rä t an das Strom netz an
(220–240 V Wechselstrom, 50 Hz ).
2 Schalten Sie das Fernsehgerät mit dem Netzschalter & am
Gerät ein.
Einstellen des Sichtwinkels des Fernsehgeräts (nur KLV-21SG2)
Durch das Einstellen des Winkels können Sie Lichtreflexionen vermeiden und das Bild besser sehen.
• Achten Sie beim Einstellen des Winkels darauf, dass die Kabel nicht zwischen dem Fernsehgerät und dem Ständer
eingeklemmt werden. Wenn Kabel eingeklemmt werden, teilen Sie sie an der Klemme in zwei Gruppen und
ziehen Sie sie in entgegengesetzter Richtung, um sie zu lösen.
• Halten Sie beim Eins tellen des Winke ls den Ständer mit einer Han d fes t, damit er sich nicht lö s t oder der
Bildschirm herunterfä ll t. A chten Sie darauf, sich nicht die Finge r zw i s chen dem Fernsehgerät und de m Ständer
einzuklemmen.
DE
Anleitung zur schnellen Inbetriebnahme
15°
(Fortsetzung)
Anleitung zur schnellen Inbetriebnahme
9
Page 84

Auswählen der Sprache für die Menübildschirme
7
Dieses Fernsehgerät arbeitet mit Menübildschirmen. Gehen Sie nach den Anweisungen unten vor und wählen Sie die gewünschte
Sprache für die Menübildschirm e so w ie da s Land bzw. Gebiet, in dem Sie das Fernsehge rä t verw e nden wollen.
und des Landes bzw. Gebiets
Language
Select language
English
Nederlands
Français
Italiano
Deutsch
Türkçe
Ελληνικά
Español
Português
m
Land
Land wählen
–
United Kingdom
Ireland
Nederland
België/Belgique
Luxembourg
France
Italia
Schweiz/Suisse/Svizzera
Deutschland
Österreich
m
Automatisches Abspeichern
jetzt starten?
Ja Nein
Polski
Česky
Magyar
Русский
Бьлгарски
Suomi
Dansk
Svenska
Norsk
Wenn Sie das Ferns ehgerät zum erste n M al einschalten, er sc he int
automatisch das Menü Language auf dem Bildschirm (Automatische
Ersteinstellung).
1 Wählen Sie mit / / oder auf der Fernbedienung die
Sprache aus und bestätigen Sie die A usw a hl mi t OK.
Nun werden alle Menüs in der ausgewählten Sprache angezeigt.
2 Das Menü Land erscheint automatisch auf dem Bi ldschirm.
Wählen Sie mit oder das Land bzw. Gebiet aus, in dem Sie
das Fernsehgerät verwenden, und bestätigen Sie die Auswahl mit
OK.
Wenn das Land bzw. Gebiet, in dem Sie das Fernsehgerä t
verwenden wollen, in der L is te nicht enth alten ist, wählen
Sie „–“ statt eines Landes bzw. Gebiets.
Das Menü Autom. Progr. erscheint automatisch auf dem
Bildschirm.
Wenn die automatische Ersteinstellung später erneut ausgeführt
werden soll, drücken Sie 0 auf der Rückseite des
Fernsehgeräts.
10
Anleitung zur schnellen Inbetriebnahme
Page 85

8
Automatisches Einstellen von Fernsehkanälen
Sie müssen das Fernsehgerät für den Empfang von Kanälen (Fernsehprogrammen) einstellen. Wenn Sie wie im Folgenden erläutert
vorgehen, sucht das Fernsehgerät automatisch alle verfügbar en Fe rnsehkanäle und speichert diese.
Automatisches Abspeichern
jetzt starten?
Ja Nein
m
Autom. Progr.
Programm :
TV-System :
Kanal :
m
Keinen Sender gefunden.
Bitte Antenne anschliessen.
Bestätigen
m
Programme ordnen
Prog. wählen
01
TVE
02
TVE2
03
TV3
04
C33
05
C27
06
C58
07
S02
08
S06
09
S08
10
S12
11
S14
Suche...
01
I
C23
Beenden:
1 Wählen Sie mit OK die Option Ja.
2 Das Fernsehgerät beginnt, alle verfügbaren Kanäle zu suchen und
abzuspeichern.
• Dieser Vorgang kann einige Minuten in Anspruch
nehmen. Bitte haben Sie etwas Geduld und drücken Sie
keine Taste. Andernfalls wird der automatische
Sendersuchlauf nicht ordnungsgemäß abgeschlossen.
• Wenn beim automatischen Sendersuchlauf keine Kanäle
gefunden werden können, erscheint automatisc h eine
weitere Me ld ung auf dem Bildschirm, mit d er Sie
aufgefordert werden, die Antenne anzuschließen.
Schließen Sie bitte die Antenne an (Seite 6) und drücken
Sie OK. Der automatische Sendersuchlauf wird erneut
gestartet.
Wenn der automatische Sendersuchlauf abgeschlossen ist, ersch eint
automatisch das Menü Programme or dnen auf dem Bildschirm.
DE
Anleitung zur schnellen Inbetriebnahme
MENU
(Fortsetzung)(Fortsetzung)
Anleitung zur schnellen Inbetriebnahme
11
Page 86

9
Ändern der Reihenfolge der Fernsehkanäle
Wenn Sie wie im Folgende n erl äutert vorgehen, können Sie di e Rei henfolge ändern, in der die Fern sehkanäle auf dem
Fernsehschirm erscheinen.
A) Wenn Sie die Reihenfolge der Fernsehkanäle nicht ändern wollen
Programme ordnen
Prog. wählen
01
TVE
02
TVE2
03
TV3
04
C33
05
C27
06
C58
07
S02
08
S06
09
S08
10
S12
11
S14
Beenden:
MENU
Drücken Sie MENU, um den Vorgang zu beenden. Auf dem
Fernsehschirm erscheint wieder di e normale Anzeige.
B) Wenn Sie die Fernsehkanäle in einer anderen Reihenf o lge abspeichern wollen
Programme ordnen
Prog. wählen
01
TVE
02
TVE2
03
TV3
04
C33
05
C27
06
C58
07
S02
08
S06
09
S08
10
S12
11
S14
Beenden:
MENU
1 Wählen Sie mit oder die Programmnummer des Kanals aus,
den Sie verschieben wollen, und drücken Sie .
2 Wählen Sie mit oder di e neue Programmnummer für de n
ausgewählten Kanal un d drüc ke n Sie .
Der ausgewählte Kanal wird nun an die neue Programmposition
verschoben und die ande re n K anäle werden entsprechend
verschoben.
m
Programme ordnen
Prog. wählen
TVE
01
TVE2
02
TV3
03
C33
04
C27
05
C58
06
S02
07
S06
08
S08
09
S12
10
S14
11
01 TVE
Beenden:
MENU
3 Wenn Sie die Position weiterer Kanäle ändern wollen, gehen Sie
wie in Schritt 1 und 2 erläutert vor.
4 D rücken Sie MENU, um den Vorgang zu beenden. Auf dem
Fernsehschirm erscheint wieder di e normale Anzeige.
12
Anleitung zur schnellen Inbetriebnahme
Das Fernsehgerät ist nun betriebsbereit.
Page 87

Bedienungsanleitung
Sicherheitsinformationen
Sicherheitshinweise
Netzkabel
Ziehen Sie den Netzstecker aus der
Steckdose, wenn Sie das Gerät
umstellen. Stellen Sie das Gerät nicht
um, wenn das Netzkabel eingesteckt
ist. Andernfalls kann das Netzkab el
beschädigt werden und es besteht
Feuergefahr und die Gefahr eines
elektrischen Schlags. Wenn das Gerät
heruntergefallen ist bzw. beschä digt
wurde, lassen Sie es umgehend von
qualifizierte m F ac h personal
überprüfen.
Installation
Wenn das Gerät an einer Wand
installiert werden soll, lassen Sie die
entsprechenden Arbeiten unbe dingt
von qualifiziertem Fachpersonal
ausführen. Bei unsachgemäß er
Installation stellt das Gerät im Falle
eines Erdbebens usw. eine potenzielle
Gefahrenquelle dar.
Medizinische Einrichtungen
Stellen Sie dieses Gerät nicht an Ort en
wie Krankenhäusern auf, an denen
medizinische Geräte eingesetzt
werden. Dieses Gerät kann
Fehlfunktionen medizinischer Gerät e
verursachen.
Transport
• Lösen Sie alle Kabel vom Gerät, bevor Sie
das Gerät transportieren.
• Wenn Sie das Gerät tragen, halten Sie es
wie in der Abbildung rechts dargestellt.
Fassen Sie es nicht allein an der hinteren
Abdeckung. Da sich die hintere Abdeckung
leicht lösen kann, fällt das Ge rät
möglicherweise herunter und wird
beschädigt oder verursacht schwere
Verletzungen.
• Setzen Si e das Ge rät be im Tr ans por t ke ine n S tößen und keinen
starken Erschütterungen aus. Ande rnf al ls kann da s Ge rät
herunterfallen und beschädigt werden oder schwere
Verletzungen verursachen.
• Wenn Sie da s G erä t we gen einer Re pa ra tur ode r bei e ine m
Umzug transportier en müssen, verpacken Sie es mithilfe d er
Originalverp ackungsmaterialie n im Originalkarton.
DE
(Fortsetzung)
Sicherheitsinformationen
13
Page 88

Installation und Transport
Luftzufuhr
Decken Sie auf keinen Fall die
Lüftungsöffnungen im Gehäuse ab.
Andernfalls besteht Feuergefahr aufgrund
einer Überhitzung des Geräts. Ohne
ausreichende Luftzufuhr kann sich auf
und im Gerät Staub und Schmutz
ansammeln. Beacht e n Si e Folgendes, um
eine ausreichende Luftzufuhr zu
gewährleisten:
• Installieren Sie das Gerät nicht nach hinten oder seitwärts
geneigt.
• Installieren Sie das Gerät nicht auf dem Kopf oder falsch herum.
• Installieren Sie das Gerät nicht in einem Rega l ode r ei ne m
Schrank.
• Stellen Sie das Gerät nicht auf eine r Decke od er ei nem Be tt auf.
• Decken Sie das Gerät nicht mit Decken oder Vorhängen ab und
legen Sie keine Gegenstände wie Zeitu nge n usw. dara uf .
Installation in einem Fahrzeu g
oder an der Decke
Installier en Sie das Gerä t nicht in
einem Fahrzeug. Durch die Bewegung
beim Fahren kann das Gerät
herunterfallen und Verletzungen
verursachen. Installieren Sie das Gerät
auch nicht an der Decke.
Wasser und Feuchtigkeit
Installier en Sie das Gerä t nicht in der
Nähe von Wasser, wie z. B. neben einer
Badewanne oder einer Dusche. Schützen
Sie das Gerät außerdem vor Regen,
Feuchtigkeit und Rauch. Ander nf a lls besteht Feuergefahr und die
Gefahr eines elektrischen Schlags. Verwenden Sie das Gerät nicht
an Orten, an denen die Gefahr besteht, dass Insekten in das Gerät
eindringen.
Sonderzubehör
Beachten Sie folgende Hinweise, wenn Sie das
Gerät auf einem Ständer aufstellen oder mithilfe
einer Wandhalterung insta ll ie ren. Andernfalls
kann das Gerät herunterfallen und schw ere
Verletzungen verursachen.
• Befolgen Sie bei der Installation des Geräts unbedingt die mit
dem Ständer oder der Wandhalterung gelieferten Anweisungen.
• Verwenden Sie unbedingt die mit dem Ständer oder de r
Wandhalterung gelieferten Halterungs- und Befestigungsteile.
Nutzung im Fr eien
Installieren Sie das Gerät nicht im
Freien. Wenn das Gerät Regen
ausgesetzt wird, besteht Feuergefahr
und die Gefahr eines elektrischen
Schlags. Wenn das Gerät direktem
Sonnenlicht ausgesetzt wird, kann es
sich überhitzen und beschädigt werden.
Boote und andere
Wasserfahrzeuge
Installieren Sie das Gerät nicht in
einem Boot oder einem anderen
Wasserfahrzeug. Wenn das Gerät
Seewasser ausgesetzt wird, besteht
Feuergefahr und die Gefahr von
Schäden am Gerät.
So verhindern Sie ein Herunterfallen des
Geräts
Stellen Sie das Gerät au f einem s icheren, s tabilen
Ständer auf. Hängen Sie nichts an das Gerät.
Andernfalls könnte das Gerät vom Stän der ode r
von der Wandhalterung herunterf a lle n und
Sachschäden oder schwere Verletzungen
verursachen.
Sorgen Sie dafür, dass Kinder nicht auf das Gerät
klettern.
14
Sicherheitsinformationen
Page 89

Stromquellen
Überlastung der Str omkreise
Dieses Gerät ist ausschließlich auf den
Betrieb an 220–240 V Wechselstrom
ausgelegt. Achten Sie darauf, nicht zu
viele andere Geräte an dieselbe
Netzsteckdose anzuschließen.
Andernfalls besteht Feuergef ah r und die
Gefahr eines elektrischen Schlags.
Netzstrom
Verwenden Sie eine Netzsteckdose, in der der
Stecker fest sitzt. Steck en Si e de n St ecker ganz in
die Netzsteckdose. Wenn der Steck er lose in der
Steckdose sitzt, kann es zu einem
Lichtbogenüberschlag kom me n. In di es em Fa ll
besteht Feuergefahr. Wenden Sie sich
gegebenenfalls an einen qualifizierten Elektriker
und lassen Sie die Netzsteckdose auswechseln.
Feuchtigkeitskondensation
Berühren Sie das Netzkabel nicht mit nassen
Händen. Wenn Sie das Netzkabel mit nassen
Händen einstecken/lösen, besteht die Gefahr
eines elektrischen Schlags.
Gewitter
Berühren Sie zu Ihrer eigen en Sicherheit
bei einem Gewitter nicht das Gerät, das
Netzkabel oder das Antennenkabel.
Umgang mit dem Netzkabel
Ziehen Sie immer am Stecker, wenn
Sie das Netzkabel lösen wollen.
Ziehen Sie nicht am Netzkabel selbst.
Verkabelung
Ziehen Sie den Netzstecker aus der Steckdose, wenn Sie Kabel an
das Gerät anschließen. Trennen Sie das Gerät z u Ihrer eige ne n
Sicherheit unbedingt vom Netzstrom, wenn Sie Kabel dar an
anschließen.
Reinigung
Reinigen Sie den Netzstecker regelmäßig. Wenn
der Stecker verstaubt ist und sich Feuchtigkeit
ablagert, kann die Isolierung leiden und es besteht
Feuergefahr. Lösen Sie den Netzstecker und
reinigen Sie ihn regelmäßig.
DE
Betrieb
Reparaturbedürftige Schäden
Wenn der Bildschirm des Geräts gesprungen ist, trennen Sie
unbedingt sofort das Netzkabel vom Strom ne tz . Erst da nn dürf e n
Sie das Gerät anfassen. Andernfalls besteht die Gefahr eines
elektrischen Schlag s.
Wartung
Öffnen Sie das Gehäuse nicht.
Überlassen Sie Wartungsarbeiten stets
nur qualifiziertem
Kundendienstpersonal.
Lüftungsöffnungen
Führen Sie nichts in die Lüftungsöffnungen ein.
Wenn Metallgegenstände oder brennbare
Gegenstände in diese Öffnungen gelang en,
besteht Feuergefahr und die Gefahr eines
elektrischen Schlags .
Feuchtigkeit und brennbares
Material
• Schützen Sie das Fernsehgerät
vor Feuchtigkeit. Achten Sie
darauf, dass keinerlei Flüssigkeit
in das Fernsehgerät gelangt.
Wenn durch die Öffnungen Flüssigk eite n ode r Frem dkörper in
das Gerät gelangt sind, dürfen Sie es nicht mehr benutzen.
Andernfalls kann es zu einem elektrischen Schlag kommen und
das Gerät kann beschädigt werden.
Lassen Sie das Fernsehgerät um ge hen d von qua lifiziertem
Kundendienstpersonal überprüfen.
• Um Feuergefahr zu vermeiden, halten Sie brennbare Materialien
bzw. offenes Feuer (z. B. Kerzen) vom Gerät fern.
(Fortsetzung)
Sicherheitsinformationen
15
Page 90

Weitere Sicherheitsinformationen
Elektrischer Schlag
Berühren Sie das Gerät nicht mit feuchten Händen. Andernfalls
besteht die Gefahr eines elektrischen Schlags und von Schäden am
Gerät.
Installation ohne vorstehende Teile
Installieren Sie das Gerät nicht so, das s ei nige Te ile he rv or ste he n .
Andernfalls besteht die Gefahr, das s sich Pe rsonen an den
vorstehenden Teilen verletzen.
• Installieren Sie das Gerät nicht so, dass es z. B. hin ter einer Säule
hervorragt.
• Installieren Sie das Gerät nicht so, dass eine Person mit dem
Kopf dagegen stoßen könnte.
Aufstellung
Stellen Sie das Ger ät nicht in heißer,
feuchter oder übermäßig staubiger
Umgebung auf. Installieren Sie das Gerät
nicht an Orten, an denen die Gefahr
besteht, dass Insekten in das Gerät
eindringen. Stellen Sie das Fernsehgerät
nicht an Orten auf, an denen es
mechanischen Vibrationen ausgesetzt ist.
Zubehör
Befestigen Sie das Gerät ordnungsge mä ß.
Wenn das Gerät nicht sicher befestigt wird, kann es herunterfallen
und Verletzungen verursachen. Verwenden Sie einen Ständer oder
eine Wandhalterung, mit de m bz w. der sic h da s G erä t sic he r
installieren lässt . Befo l g en Sie be im Installieren die Anweisungen
in der mit dem Ständer bzw. der Wandha lte r ung ge lieferten
Bedienungsanleitung.
Entsorgen des Geräts
• Entsor ge n Si e das Ge rät ni ch t übe r den Hausmüll.
• Der LCD-Bi ldschirm enthält kleine Mengen an Flüssigkr ist al l
und Quecksilber. Die Leuchtstoffrö hr e in dies em Gerä t e nthä lt
ebenfalls Quecksilber. Entsorge n Sie das Ge rät ge mäß den
örtlichen Vorschriften.
Fett
Installieren Sie dieses Gerät nicht in Restaurants, in denen viel Fett
verwendet wird. Andernfall s könnt e fettgetränkter Staub in das
Gerät ein drin gen. In diesem Fall be steht die Gefa hr von Schäde n am
Gerät.
Korrosion
Wenn Sie das Gerät in der Nähe von Meerwasser aufstellen, kann
die salzhaltige Luft Kor ro sion an den Metallteilen des Ge räts
verursachen. Interne Bauteile können beschädigt werden und es
besteht Feuergefahr. Die Lebensdauer des Gerä ts ka nn si ch
verringern. Ergreifen Sie geeignete Maßnahmen zur Verringerung
der Luftfeuchtigkeit und der Temperatur in dem Raum, in dem das
Gerät aufgestell t ist.
Reinigung
Ziehen Sie den Netzstecker aus der Steckdose, wenn Sie das Gerät
reinigen. Andernfall s besteht die Gefa hr eines ele ktrischen Schl ags.
Empfohlener Aufstellungsort
Stellen Sie das Gerät auf eine stabi le , ebe n e
Fläche. Andernfalls kann das Gerät
herunterfallen und Verletzungen verursach en.
16
Sicherheitsinformationen
Page 91

LCD-Bildschirm
• Der LCD-Bi ldschirm wird in einer Hochpräzisionste c hnol ogie
hergestellt und der Anteil der effektiven Pixel beträgt
mindestens 99,99 %. Trotzdem si nd möglicherweise schwarze
Punkte oder helle Lichtpunkte (rot, blau oder grün) permanent
auf dem LCD-Bildschirm zu sehen. Dies ist eine spezifische
Eigenschaft von LCD-Bildschirmen. Es handelt sich dabei nicht
um eine Fehlfunktion.
• Setzen Sie den LCD- Bildschirm nicht der Sonne aus.
Andernfalls kann die Bildschirmoberfläche beschädigt werden.
• Stoßen Sie nicht gegen den Filter an der Vorderseite, zerkratzen
Sie ihn nicht und stellen Sie nicht s auf dieses Gerät. Das Bild
kann ungleichmäßig werden und der LCD-Bildschirm kann
beschädigt werden.
• Wenn dieses Gerät an einem kalten Ort verwendet wird, kommt
es möglicherweise zu Schmierstreifen im Bild oder das Bild
wird dunkel.
Dabei handelt es sich nicht um eine Fehlfunktion. Diese Effekte
verschwinden, wenn die Temperatur steigt.
• Wenn Standbilder längere Zeit angezeigt werden , ka nn es zu
Doppelbildern kommen. Dieser Effe kt ve r sc hwindet
möglicherweise nach einigen Auge nbl ic ke n.
• Bei Betrie b werden B ildschirm und Gehäuse warm. Dies ist
keine Fehlfunktion.
Leuchtstoffröhre
Bei diesem Gerät wird als Licht q u ell e eine spezielle
Leuchtstoffröhre eingesetzt. Wenn die Anzeige auf dem Bildschirm
dunkel wird, flimmert oder gar nicht mehr erscheint, muss die
Leuchtstoffröhre gegen eine neue ausg etau sc ht we rd en . Wen de n
Sie sich bitte an qualifiziertes Kundendienstpersonal, um die
Leuchtstoffröhre austauschen zu lassen.
Hohe Temperaturen
Berühren Sie nicht die Oberfläche des Geräts. Es bleibt sehr warm,
auch wenn das Gerät bereits einige Zeit ausgeschaltet ist.
Reinigen der Bildschirmoberfläche
Die Bildschirmoberfläche ist mit einer speziellen Beschichtung
versehen, um starke Lichtreflexionen zu vermeiden. Beachten Sie
unbedingt folgende Sicherheitsmaßnahmen, damit die
Beschichtung nicht beschä di gt wir d .
• Entfer ne n Si e Sta ub von de r Bil dsc hirmoberfläche vorsichtig
mit einem weichen Tuch . Bei stärkerer Verschmut zung feuchten
Sie ein weiches Tuch leicht mit einer milden Reinigungslösung
an und wischen dann über den Bildschirm . Das Tuc h kan n
gewaschen und mehrmals verwendet werden.
• Verwenden Sie keine Scheuerschwämme, keine alkalischen/
säurehaltigen Reinigungsmittel, kein Scheuerpulver und kei ne
starken Lösungsmittel wie Alkohol, Benz in ode r Verdünnung.
Einstellen des Sichtwinkels des Fernsehgeräts (nur KLV21SG2)
Halten Sie beim Einstellen des Winkels den Ständer mit einer Hand
fest, damit er sich nicht löst und der Bildschirm nicht herunterfällt.
Achten Sie darauf, sich nicht die Finger zwischen dem Fernsehgerät
und dem Ständer einzuklemmen.
Netzkabel
Wenn das Netzkabel beschädigt wird,
besteht Feuergefahr und die Gefahr eines
elektrischen Schlags .
• Klemmen Sie das Netzkabel nich t ein
und biegen und verdrehen Sie das
Kabel nicht übermäßig. Die
Isolierung könnte beschädigt werden,
so dass die blanken Adern im Inneren
des Kabels freiliegen, oder das Kabel
selbst könnte beschädigt werden. In
diesem Fall kann es zu einem
Kurzschl uss kommen un d es besteht
Feuergefahr bzw. die Gefahr eines elektrischen Schlags.
• Beschädigen Sie das Netzkabel nicht und nehmen Sie keine
Veränderungen daran vor.
• Stellen Sie keine sc hwe r en Gegenst än de auf da s Net zk abel .
Ziehen Sie nicht am Netzkabel .
• Halten Si e das Netzkabel von Wärmequellen fern.
• Ziehen Si e im me r am St ecke r , wenn Si e das Netz ka be l von de r
Steckdose trennen.
Wenn das Netzkabel beschädigt ist, verwenden Sie es nicht weiter.
Lassen Sie es bei Ihrem Händler oder Sony- Kundendienst
austauschen.
Wenn das Gerät nicht benutzt
wird
Zum Schutz der Umwelt und aus
Sicherheitsgründen empfiehlt es
sich, das Gerät auszuschalten,
wenn es nicht benutzt wird. Lassen
Sie es nicht lange Ze it in den Bereitscha ftsmodus geschaltet.
Trennen Sie das Gerät vom Stromnetz.
Verkabelung
Stolpern Sie nicht über die Kabel. Andernfalls ka nn da s Ge rät
beschädigt werden.
Installation
Stellen Sie zusätzliche Komponenten nicht zu nahe beim Gerät auf.
Lassen Sie mindestens 30 cm Platz zwis ch en dem Gerä t und
zusätzlichen Komponenten. We nn ei n Vide or e co rd er vor ode r
neben dem Gerät installiert wird, kann das B ild ve r z err t werd en .
DE
Sicherheitsinformationen
17
Page 92

Sicherheitsmaßnahmen
Sicherheitsmaßnahmen hinsic htlich der Lu ftzuf uh r
Lassen Sie ausreichend Pla tz um das Ger ät . Andernfalls ist die Luftzufuhr unzureichend und das Gerät kann sich übe rhitzen. In
diesem Fall besteht Feuergefahr und das Gerät kann beschädigt werd en.
Bei Wandinstallation
30 cm
10 cm
10 cm
Bei Installation auf einem Ständer
30 cm
10 cm
Installieren Sie das Gerät auf keinen Fall folgendermaßen:
Die Luftzirkulation wird unterbunden.
Wand
10 cm
Lassen Sie mindestens so viel Plat z um das Gerät.
10 cm
Lassen Sie mindestens so viel Platz um das Gerät.
Die Luftzirkulation wird un te rbu nden.
Wand
18
Sicherheitsmaßnahmen
Page 93

Augenschonendes Fernsehen
• Für ermüdungsfreies Fernse hen sollte die Entfernung zum Gerä t das V ie r- bi s Sieb enfache der Bildhöhe betrag en.
• Schauen Sie bei gemäßigter Beleuchtung fern. Bei einer falschen Beleuchtung werden die Augen belastet. Auch kontinuierliches
Fernsehen über längere Zeit kann die A uge n sta rk be a nspruchen.
Installieren des Geräts
Installieren Sie das Gerät mit der an ge gebenen Wandhalterung bzw. a uf de m ange ge benen Ständer.
• Stellen Sie das Gerät nicht an Orten auf, an denen es extremen Temperaturen ausgesetzt ist, z. B. in direktem Sonnenlicht oder
in der Nähe einer Heizung ode r eines Warmlu ftauslas ses. Wenn das Gerät ex tremen Tempe rature n ausgeset zt wird, kan n es sich
stark erwärmen. In diesem Fall ka nn sic h da s Gehä use verformen oder es kann zu Fehlfunkt io ne n kom men.
• Für eine gute Bildqualität schützen Sie den Bildschirm vor direkter Beleuchtung oder direktem Sonnenlicht. Falls möglich,
bringen Sie eine von der Decke herab geric h t ete Punktbeleuch tung an.
• Das Gerät bleibt auch in ausges c haltetem Zustand mit dem Strom ne tz verbunden. Wenn Sie das Gerät ganz vom N et z trennen
wollen, ziehen Sie den Stecker aus der Steckdose.
Einstellen der Lautstärke
• Stellen Sie die Lautstärke so ein, dass Ihre N achbarn nicht gestört werden. Bei Nacht ist der T on weit zu hören. Es empfiehlt
sich daher, die Fenster zu schließen oder K opfhörer zu verwenden.
• Stellen Si e beim Verwenden von Kopfhörern di e Lautstärke moderat ein. Andern falls kann es zu Ge h örschäden kommen.
Umgang mit der Fernbedienung
• Gehen Sie sorgfältig mit der Fer nbe dienung um. Lassen Sie sie nich t fal l en un d tre te n Si e nicht darauf. Verschütten Sie auch
keine Flüssigkeiten auf der Fern be die nung.
• Legen Sie die Fernbedienung nicht in die Nähe von Wärm e quellen oder an Orte, an denen sie di re ktem Sonnenlicht oder
Feuchtigkeit ausgeset zt ist.
Pflegen und Reinigen der Bildschirmoberfläche
Um die Qualität des Bildschirm s zu e rhalten, beachten Sie bitte folgende Ratschläge. Stoßen Sie nicht gegen den Bildschirm,
berühren Sie ihn nicht mit einem harten Gegenstand und werfen Sie nichts gegen den Bildschirm. Andernfalls kann der Bildschirm
zerkratzt oder beschädigt werden.
• Achten Sie darauf, vor dem Reinige n das N e tz ka be l de s Gerä ts aus der Netzsteckdose zu ziehen.
• Berühren Sie nicht die Mattscheibe, wenn Sie das Gerät kontinuierlich längere Zeit in Betrieb haben. Die Mattscheibe kann sich
erhitzen.
• Es empfiehlt sich, die Bildschirmoberfläche so wenig wie möglich zu berühren.
• Reinigen Sie den Bildsch irm m it ein em weichen Tuch.
• Verwenden Sie auf keinen Fall Sc heuermittel, Scheuerschwämme ode r Lösungsmittel wie Alkohol oder Benzi n. Andernfalls
kann die Bildschirmoberfläche beschädigt werden.
Reinigen des Gehäuses
• Achten Sie darauf, vor dem Reinigen des Gehäuses das Netzkabel aus de r Net zst ec kdose zu ziehen.
• Reinigen Sie das Gehäuse mit einem weichen Tuch.
• Beachten Sie bitte, dass es zu Materialschäden oder zu Schäden an der Bildschirmbeschichtung kommen kann, wenn das Gerät
flüchtigen Lösungsmitteln wie zum Beispiel Alkohol, Verdünnung, Benzin oder Insektiziden ausgesetzt ist oder wenn es längere
Zeit mit Gummi- oder Vinylmaterialien in Berührung kommt.
• In den Lüftungsöffnungen kann sich über einen längeren Zeitraum hinweg Staub ansammeln. Um eine ausreichende Belüftung
sicherzustellen, empfiehlt es sic h, den St aub regelmäßig (einmal pro Monat) mi t eine m Sta ubsa uger abzusaugen.
DE
Sicherheitsmaßnahmen
19
Page 94

Übersicht
Überprüfen des mitgelieferten Zubehörs
Fernbedienung
RM-Y1103 (1):
Koaxialkabel (1):
Die Ferritkern e ni cht entfernen.
Batterien der Größe AA
(Typ R6) (2):
Netzkabel
(Typ C-6) (1):
Verwenden Sie dieses Netzkabe l,
wenn Sie das Gerät außerhalb
Großbritanniens verwen de n.
Hintere A bd eckung (1):
Netzkabel
(Typ BF) (1):
Verwenden S ie dieses Netzkabe l,
wenn Sie da s Gerät in
Großbritannien verwenden.
20
Übersicht
Page 95

Übersicht über die Bedienelemente und Anzeigen am
Fernsehgerät
Netzschalter &
Tasten P
(Kanal) +/–
Lautstärketasten
2 +/–
Taste
(Eingangswahl)
Zugriffsanzeige
(„Memory Stick“)
„Memory Stick“Einschub
Anzeige
(„Memory Stick“)
Anzeige /
(Bereitschaft/
Abschalttimer)
Netzanzeige &
Fernbedienungssensor
Status der Anzeigen
(„Memory Stick“-Anzeige) und („Memory Stick“-Zugriffsanzeige) leuchten auf oder blinke n rot.
Auf den „Memory Stick“ wird gerade zugegriffen.
& (Netz): Anzeige leuchtet grün
Das Fernsehgerät ist eingeschaltet.
/ (Bereitschaft/Abschalttimer): Anzeige leuchtet rot
Das Fernsehgerät befindet sich im Bereitschaftsmodus.
Wenn das Fernsehgerät eingeschaltet ist, ist der Abschalttimer aktiviert.
/ (Bereitschaft/Abschalttimer): Anzeige blinkt rot
Das Fernsehgerät empfängt Fernbedienungssignale.
/ (Bereitschaft/Abschalttimer): Anzeige blinkt mehrmals rot und die Netzanzeige & leuchtet nicht.
Am Fernsehgerät ist ein Fehl er a ufgetreten. Erläuterungen dazu finden Sie unter „Selbstdia gnose“ auf Seite 68.
Informationen zu den Anschlüssen an der Rückseite des Fernsehgeräts finden Sie unter „Anschließen zusätzlicher Geräte“
auf Seite 61.
DE
Übersicht
21
Page 96

Übersicht über die Bedienelemente auf der Fernbedienung
a Zum Umschalten des Fernsehgeräts in den Bereitschaftsmodus:
Mit dieser Taste schalten Sie das Fernse hgerät vorübergehend aus und in den
Bereitschaftsmodus (die Anzeige / (Bereitschaft/Abschalttimer) am
Fernsehgerät leuchtet rot). Wenn Sie die Taste erneut drücken, schalten Sie das
Fernsehgerät aus dem Bereitschaftsmodus ein.
Es empfiehlt sich, das Fernsehgerät vollständig auszuschalten, wenn Sie es
nicht benutzen. So können Sie Strom spare n.
Wenn im Fernsehmodus 10 Minuten lang kein Signal eingeht und keine
Taste gedrückt wird, schaltet das Fernse hgerät automatisch in den
Bereitschaftsmodus.
b Zum Ein-/Ausschalten des Videorecorders oder DVD-Players:
Mit dieser Taste schalten Sie den Videorecorder bzw. den DV D -Pla ye r ei n
bzw. aus.
c Zum Auswählen von Videorecorder, Fernsehgerä t oder DVD-Play er
(Medienwählschalter):
Mit dieser Fernbedienung können Sie nicht nur dieses Fernsehgerät bedienen,
sondern auch die wichtigsten Funktionen Ihres Videorecorders oder DVDPlayers ausfüh ren.
Schalten Sie das Gerät ein, das bedient werden soll, und drücken Sie mehrmals
diese Taste, um Videorecorder (VCR), Fernsehgerät (TV) oder DVD-Player
(DVD) auszuwählen. Die grüne Anzeige über dem ausgewä h l ten Gerät
leuchtet kurz auf.
Sie müssen einige Grundeinstellungen vornehmen, um die s e
Fernbedienung mit dem Videorecorder oder DVD-Player zu
synchronisieren. Diese Grundeinstellungen hängen vom Hersteller ab.
Erläuterungen dazu finden Sie unter „Einstellen der Fernbedienung auf
einen Videorecorder bzw. ein DVD-Gerät“ auf Seite 65.
d Zum Auswählen der Eingangsquelle:
Drücken Sie diese Taste so oft, bis das Eing angssymbol der gewünschten
Signalquelle auf dem Fernsehschirm angezeigt wird.
e Zum Einschalten des Abschalttimers:
Wenn Sie diese Taste drücke n, wird da s Fernsehgerät nach einer festgelegten
Zeitdauer automatisch in den Bereitschaftsmodus geschaltet. Erläuterungen
dazu finden Sie unter „Der Abschalttimer“ auf Seite 43.
f Zum Auswählen von Kanälen:
Wählen Sie mit dieser Ta ste den gewünschten Kanal aus.
Bei zweistelligen Program mn ummern müssen Sie die zweite Ziffer innerhalb von 2,5 Sekunden ei ngeben.
g a) Wenn das Fernsehgerät ausgewählt ist:
Wenn Sie diese Taste drücken, ist der zuletzt ausgewählte Kanal (der mindestens fünf Sekunden lang eingestellt war) zu sehen.
b) Wenn der Videorecorder ausgewählt ist:
Für einen Videorecorder von Sony drücken Sie bei zweistelligen Programmnummern, wie z. B. 23, zuerst diese Taste und dann
die Tasten 2 und 3.
h Zum Auswählen eines Bildschirmf ormats:
Drücken Sie zum Wechseln des Bildschirmformats diese Taste wiederholt. Erläuterungen dazu finden Sie unter „Bildschirm
einstellen“ au f Seite 35.
i Zum Programmieren der Fernbedienung:
Mit dieser Taste stellen Sie die Fernbedienung so ein, dass Sie Ihren Videorecorder oder DVD-Player damit bedienen können.
Erläuterungen dazu finden Sie unter „Einstellen der Fernbedienung auf einen Videorecorder bzw. ein DVD-Gerät“ auf Seite65.
j Zum Auswählen von Videotext:
Mit dieser Taste schalten Sie den Vi deotext ein. Erläuterungen daz u fi nden Sie unter „Videotext“ auf S eite 45.
22
Übersicht
Page 97

k Tasten ////OK
a) Wenn das Fernsehgerät ausgewählt ist:
• Wenn das Menü angezeigt wird, navigieren Sie mit diesen Tasten im Me nü. Erläuterungen dazu finden Sie unter „Arbeiten
mit dem Menüsystem“ auf Seite 31.
• Wenn das Menü ausgeblendet ist, lassen Sie mit OK eine Übersicht aller Fernsehkanäle anzeigen. Wählen Sie dann mit
oder den Kanal aus und stellen Sie mit OK de n ausgewählten Kanal ein.
b) Wenn der Videorecorder oder DVD-Player ausgewählt ist:
Steuern Sie mit diesen Tasten die wichtigsten Funktionen Ihres Videorecorders bzw. DVD-Players.
l Zum Anzeigen des Menüsy s t ems:
Rufen Sie mit dieser Taste das Menü auf dem Fernsehschirm auf. Wenn Si e di e T ast e e rneut drücken, wird die Menüanzeige
ausgeblendet.
m Zum Anzeigen von NexTView:
Erläuterungen dazu find en Sie unter „NexTView“ auf Seite 46.
n Zum Auswählen von Kanälen:
Wählen Sie mit diesen Taste n den nächsten bzw. vorherigen Kanal aus.
o Zum Einstellen der Lautstärke am Fernsehgerät:
Stellen Sie mit diesen Tasten die Lautstärke am Fernsehgerät ein.
p Zum Aufnehmen von Programmen auf dem Videorecorder:
Wenn der Videorecorde r ausgewählt ist, können Sie mit die ser Taste Sendungen aufzeichnen.
q Zum Auswählen des Fernsehmodus:
Schalten Sie mit dieser Taste den Videote xt bzw. Vide oe in ga ng aus.
r Zum Auswählen eines Bildmodus:
Drücken Sie zum Wechseln des Bildmodus diese Taste wiederholt. Erläuterungen dazu finden Sie unter „Bild-Einstellungen“
auf Seite 32.
s Zum Auswählen eines Klangeffekts:
Wenn Sie diese Taste wiederholt drücken, können Sie den vom Fe rnsehgerät verwendeten Klang ty p w echseln. Weitere
Informationen zu den verfügbaren Typen finden Sie unter „Ton-Einstellunge n“ auf Seite 33.
t Zum Anzeigen von Bildschirminformationen:
Rufen Sie mit dieser Taste al le Bild schir manzeigen auf. Wen n Sie di e Taste e rneut drücke n, werd en die Anz eigen au sgeblen det.
u Zum Anhalten des Bildes:
Mit dieser Taste können Sie vorübergehend das Bild auf dem Bildschirm anhalten. Erläuterungen dazu finden Sie unter
„Anhalten des Bildes“ auf Se it e 44.
v Zum Anzeigen der Seite „Memory Stick Home“ („Memory Stick“-Bildbetrachter):
Mit dieser Taste rufen Sie die Seite „Mem ory St ic k H om e “ („Memory Stick“-Bildbetrachter) auf. Erläuterungen daz u fin den
Sie unter „Verwenden des „M em ory Sticks“ (Memory Stick Home)“ auf Sei te 53.
w Zum Stummschalten des Tons:
Mit dieser Taste können Sie den Ton vom Fe rnse hgerät stummschalten. Drücken Sie die T ast e noc hm als, wenn Sie den Ton
wieder hören wollen.
DE
Zusätzlich zu den Fernsehfunktionen haben die farbigen Tasten (mit Ausnahme der Tasten TV &/ und VIDEO &/ ) auch
Videotextfunktione n. Die Tasten mit grünen Symbolen (mit Au sna hm e de r Ta ste ) werden ebenfa lls verwendet.
Erläuterungen dazu fi nden Sie unter „Videotext“ a uf Sei te 45.
Übersicht
23
Page 98

Installation
Einlegen der Batterien in die Fernbedienung
• Legen Sie die mitgelieferten Batterien unbedingt polaritätsrichtig ein.
• Entsorgen Sie gebrauchte Batterien immer umweltf reundlich.
• Verwenden Sie nich t Ba tt erien verschiedenen Typs ode r alte und neue Batterien zusam m en.
24
Installation
Page 99

Anschließen einer Antenne und eines Videorecorders
• Verwenden Sie das mitgelieferte Netzka bel (Typ C-6 oder Ty p BF , Seite 20).
• Verwenden Sie zum Anschließen der Antenne das mitgelieferte Koaxialkabel.
Schließen Sie das Netzkabel erst an , we nn a lle a nde ren Anschlüsse vorgenommen wurden.
Anschließen einer Antenne
Schließen Sie das mitgelieferte
Koaxialkabel an.
Schließen Sie das mitgelieferte
Netzkabel (Typ C-6 oder Typ BF,
mit Schutzerdung) an.
Anschließen eines Videorecorders mit Antenne
Schließen Sie das
mitgelieferte Netzkabel
(Typ C-6 oder Typ BF, mi t
Videorecorder
OUT IN
Scart-Kabel optional.
• Weitere Informationen zum Anschließen eines Videor ecorders finden Sie unter „Anschließen zusätzlicher Geräte“ auf
Seite 61.
• Beachten Sie, da s s einige Scart-Kabel mö glicherweise nicht in den Anschluss am Fernsehgerät passen.
Schutzerdung) an.
DE
(Fortsetzung)
Installation
25
Page 100

Bündeln der Kabel
Sie können die Kabel an der Rüc ksei te de s Fernse hge rä ts ve rsta ue n.
1 Bündeln Sie die Kabel und sichern Sie sie mit den Klemmen
an beiden Seit en des Fernsehgeräts.
2 Führen Sie die Kabel von beiden Seiten zusammen und
sichern Sie si e mit der Klemme unten.
Klemmen
Klemme
• Zu dicke Kabel lassen sich mögli cherweise nicht m it
den Klemmen befestigen.
• Wenn nicht alle Kabel innen verstaut werden können,
lassen Sie einige davon an den Seit en des
Fernsehgeräts herunterhäng en.
Wenn die Kabel nicht ordentlich in den Vertiefungen
liegen, lässt sich die hintere Abdeckung unter Umständen
nicht anbringen.
26
Installation
 Loading...