

Sony KDL-55HX800, KDL-52HX900, KDL-46HX900, KDL-46HX800, KDL-40HX800 User Manual

4-187-886-12(1)
LCD
Digital Colour TV
Operating Instructions
Setting Up
Watching TV
Additional Information
KDL-55HX800 / 52HX900 / 46HX900 / 46HX800 / 40HX800
Introduction
Thank you for choosing this Sony product.
Before operating the TV, please read this
manual thoroughly and retain it for future
reference.
~
• The illustrations of the remote used in
this manual are of the RM-GD016 unless
otherwise stated.
• The illustrations used in thi s manual may
differ depending on your TV model.
Trademark information
is a registered trademark of the DVB
Project
HDMI, the HDMI Logo, and HighDefinition Multimedia Interface are
trademarks or registered trademarks of
HDMI Licensing LLC in the United States
and other countries.
®
, the DLNA Logo and DLNA
DLNA
CERTIFIED
marks, or certification marks of the Digital
Living Network Alliance.
DivX® is a video file compression
technology, developed by DivX, Inc.
DivX, DivX Certified, and associated logos
are trademarks of DivX, Inc. and are used
under license.
ABOUT DIVX VIDEO: DivX® is a digital
video format created by DivX, Inc. This is
an official DivX Certified device that plays
DivX video. Visit www.divx.com for more
information and software tools to convert
your files into DivX video.
ABOUT DIVX VIDEO-ON-DEMAND:
This DivX Certified® device must be
registered in order to play DivX Video-onDemand (VOD) content. To generate the
registration code, locate the DivX VOD
section in the device setup menu. Go to
vod.divx.com with this code to complete
the registration process and learn more
about DivX VOD.
Manufactured under license from Dolby
Laboratories. Dolby and the double-D
symbol are trademarks of Dolby
Laboratories.
“BRAVIA” and are trademarks
of Sony Corporation.
“XMB” and “xross media bar” are
trademarks of Sony Corporation and Sony
Computer Entertainment Inc.
2
GB
®
are trademarks, service
Notes for Australia and
New Zealand model
This product is ENERGY RATING
qualified in the “Home” mode. ENERGY
RATING is a program designed to promote
energy efficient products and practices.
• When the TV is initially set up, it is
designed to meet ENERGY RATING
requirements while maintaining
optimum picture quality.
• Changes to certain features, settings, and
functionalities of this TV (e. g. TV Guide,
Picture/Sound, Eco-Setting) can slightly
change the power consumption.
Depending upon such changed settings
(e.g. “Shop” mode), the power
consumption may vary which possibly
could exceed the stated energy rating.
To reset the TV to ENERGY RATING
qualified settings, select “Home” mode
from the initial set-up procedure in
“Factory Settings” under the “Set-up”
menu.
IMPORTANT
INFORMATION
If a television is not positioned in a
sufficiently stable location, it can be
potentially hazardous due to falling. Many
injuries, particularly to children, can be
avoided by taking simple precautions such
as:
• Using cabinets or stands recommended
by the manufacturer of the television.
• Only using furniture that can safely
support the television.
• Ensuring the television is not
overhanging the edge of the supporting
furniture.
• Not placing the television on tall
furniture (for example, cupboards or
bookcases) without anchoring both the
furniture and the television to a suitable
support.
• Not standing the televisions on cloth or
other materials placed between the
television and supporting furniture.
• Educating children about the dangers of
climbing on furniture to reach the
television or its controls.
Notice for customers in
the South Africa
The Euro/South Africa converter plug
should be fitted as follows.
1 Insert the power
supply or CEE7 plug
in to the converter
plug.
2 Use an appropriate
screwdriver to attach
the screw tightly
without damaging
the screw head.
3 TEST: Grip the
converter plug, and
pull the VDE cord
set/transformer to
ensure it is fully
secure, if not then increase the torque
setting and further tighten.
Re-test.
The converter plug is now ready for
use.
Location of the
identification label
Labels for Model No. and Power Supply
rating (in accordance with applicable
safety regulation) are located on the rear of
the TV.
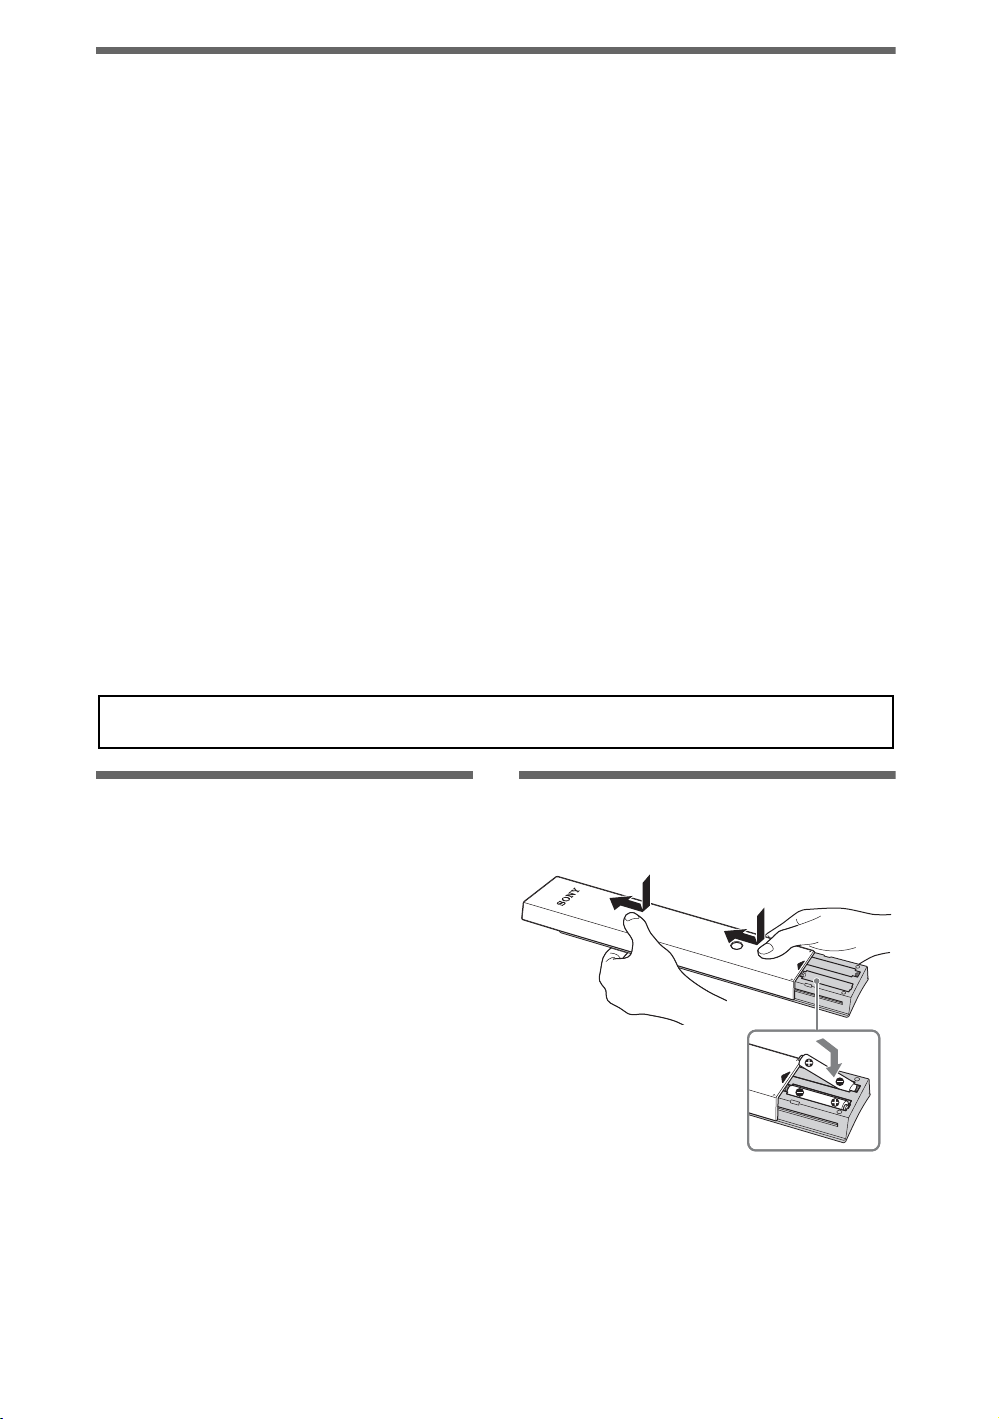
Table of Contents
Checking the accessories.............................................................................................................. 3
Inserting batteries into the remote................................................................................................. 3
Setting Up
Attaching the Table-Top Stand...................................................................................................... 4
Connecting an antenna (aerial)/cable/VCR................................................................................... 5
Preventing the TV from toppling over............................................................................................6
Bundling the cables ....................................................................................................................... 6
Performing the initial set-up........................................................................................................... 7
Detaching the Table-Top Stand from the TV................................................................................. 7
Watching TV
To watch programmes................................................................................................................... 8
To utilise the TV’s features ............................................................................................................ 8
To use i-Manual............................................................................................................................. 9
Additional Information
Troubleshooting........................................................................................................................... 10
Specifications .............................................................................................................................. 11
Installing the Accessories (Wall-Mount Bracket) ......................................................................... 13
Safety Information ....................................................................................................................... 16
Precautions.................................................................................................................................. 17
• Operating instructions are built into your BRAVIA TV. Refer to “To use i-Manual” for operation (page 9).
• Before operating the TV, please read “Safety Information” (page 16). Retain this manual for future reference.
Checking the accessories
AC power cord (mains lead)
Cable holder (1)
Remote (1)
Size AAA batteries (R3 type) (2)
Table-Top Stand (1)*
Fixing screws for Table-Top Stand
(M5 × 16) (4)
Assembling screws for Table-Top
Stand (M5 × 16) (4)
(KDL-40HX800 only)
Stand rear cover (1)*
*1For KDL-40HX800, assemble the Table-Top
Stand with the supplied assembling screws.
Refer to the supplied Table-Top Stand leaflet to
assemble the stand.
2
For KDL-55/46HX800, the stand rear cover is
*
factory-attached to the Table-Top Stand.
1
2
Inserting batteries into the remote
1 Remove the protection sheet.
2 Push and slide the cover upward.
GB
3

Setting Up
Attaching the Table-Top Stand
~
• For best picture quality, do not expose the screen
to direct illumination or sunlight.
• If the TV is brought directly from a cold to a warm
location, or is placed in a very damp room, or is
placed in a room in which heating has just been
turned on, moisture may condense on the surface
or inside the TV. Should this occur, turn off the TV
and leave the TV off until the moisture evaporates,
and then the TV can be used. If you notice
moisture condensation between the glass panel and
the LCD, turn on the TV and the condensation will
evaporate after the TV has warmed up.
1 Refer to the supplied Table-Top Stand
leaflet for proper attachment for some
TV models.
2 Place the TV set on the Table-Top
Stand.
Adjusting the viewing angle of
the TV (KDL-52/46HX900 only)
This TV can be adjusted within the angles
shown below.
6º0º
1
4
3 Fix the TV to the Table-Top Stand
according to the arrow marks that
guide the screw holes using the
supplied screws.
~
• If using an electric screwdriver, set the tightening
torque at approximately 1.5 N·m {15 kgf·cm}.
4 For KDL-52/46HX900 and KDL-
40HX800, after all the screws are
tightened, attach the supplied stand rear
cover to the Table-Top Stand.
Remove screw as
shown.
2
~
• To return to 0°, reverse the above procedure.
Install screw into
the top screw hole
of the Table-Top
Stand.
3
Slide in.Lift up and tilt.
GB
4
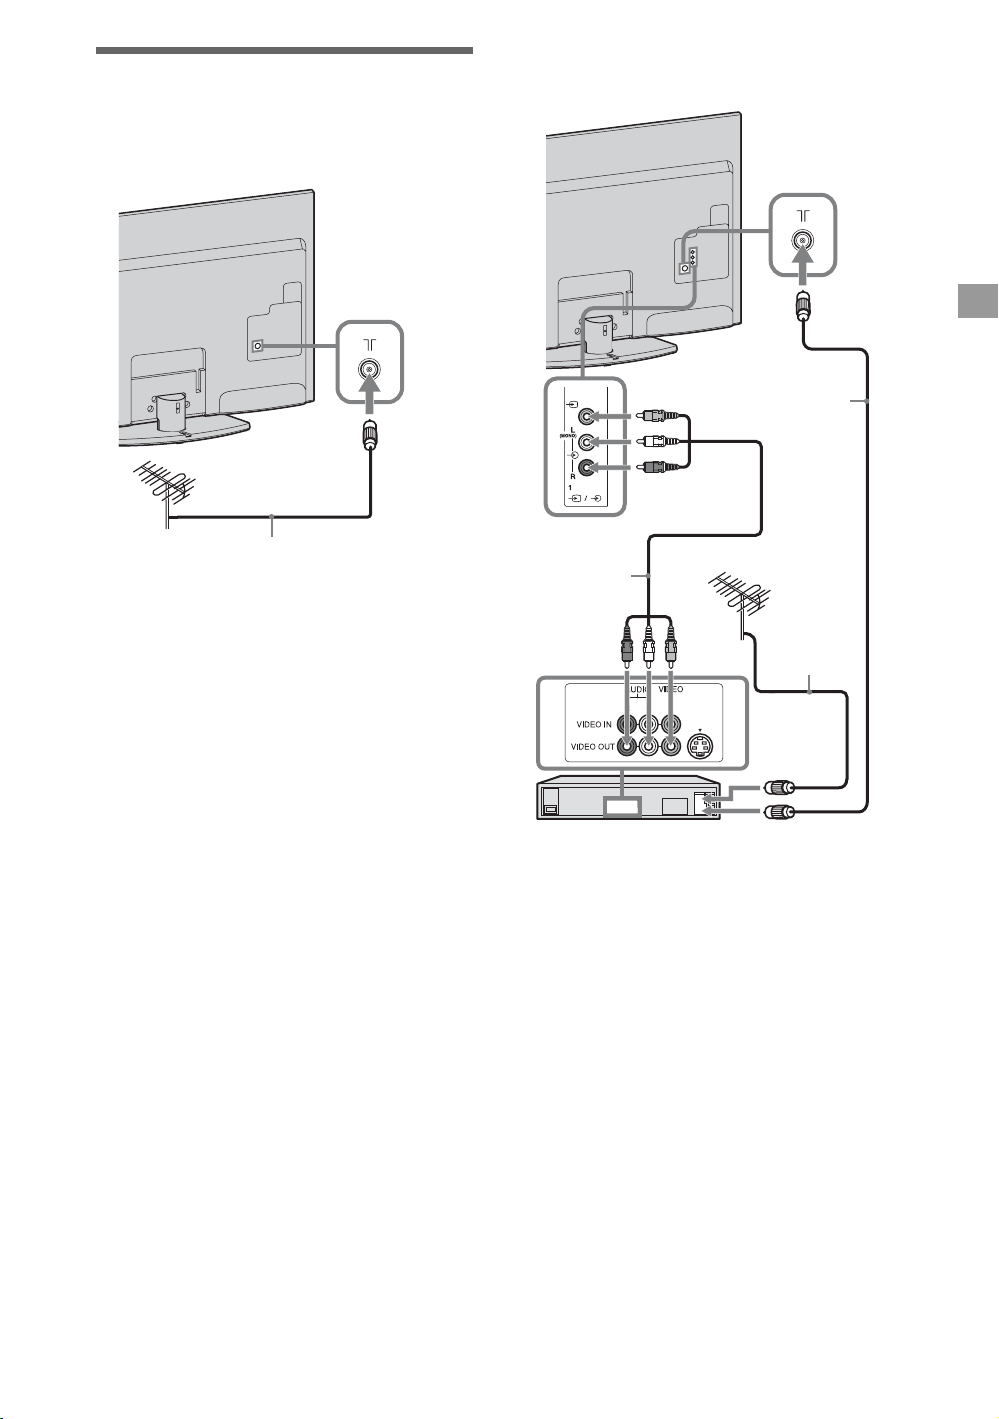
Connecting an antenna (aerial)/cable/VCR
Connecting an antenna (aerial)/cable
Connecting an antenna (aerial)/cable
and VCR
Setting Up
Antenna
(aerial) cable
(not supplied)
Antenna (aerial) cable
(not supplied)
AV cable
(not supplied)
Antenna
(aerial) cable
(not supplied)
VCR
~
• When connecting an antenna (aerial) cable (not
supplied), an adaptor (not supplied) may be
required (Australian model and New Zealand
model only).
GB
5
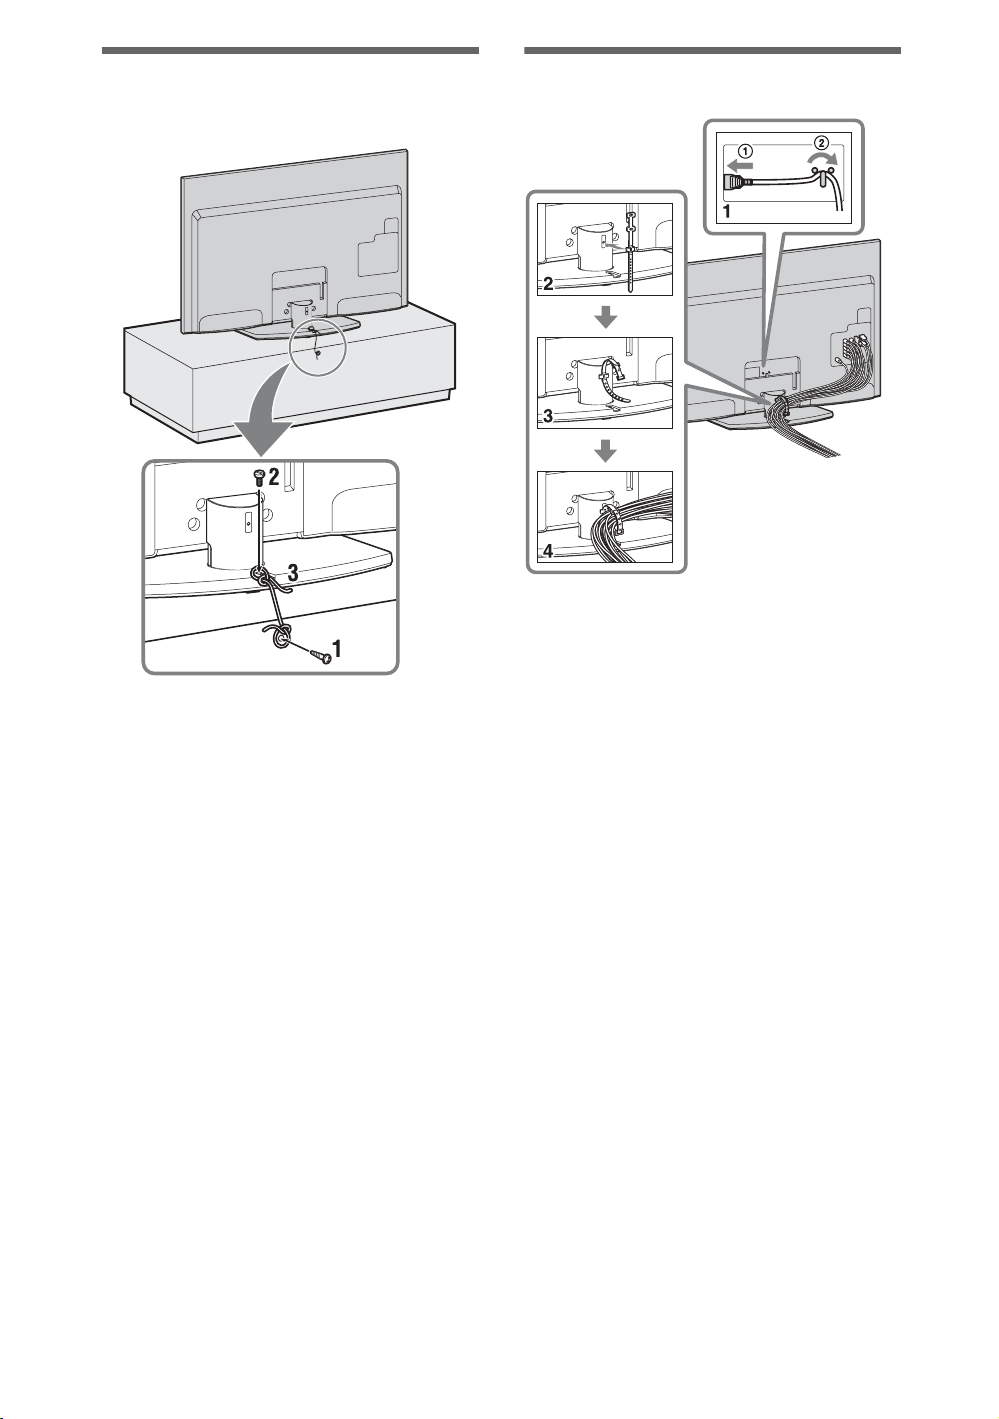
Preventing the TV from toppling over
Bundling the cables
*
~
• Do not bundle the AC power cord (mains lead)
together with other cables.
1 Install a wood screw (4 mm in
diameter, not supplied) in the TV stand.
2 Install a machine screw (M4 × 16, not
supplied) into the screw hole of the TV.
3 Tie the wood screw and the machine
screw with a strong cord (not supplied).
z
• An optional Sony support belt kit is used to secure
the TV. Contact your nearest Sony service centre
to purchase a kit. Have your TV model name
ready for reference.
GB
6
 Loading...