

4-122-742-11(1)
Network Video Receiver
Operating Instructions
DMX-NV1
© 2008 Sony Corporation
(For models KDL-40/46/52WL140)
Register your BRAVIA® Internet Video Link at:
https://internet.sony.tv
The BRAVIA Internet Video Link can be connected to certain video content
providers, including Amazon™ and Yahoo!
®
. To connect these and other
affiliates to your account, register your product at https://internet.sony.tv,
then select the “Content Affiliates” tab when signed in to begin the setup.
Owner’s Record
The model and serial numbers are located at the bottom of the receiver.
Record these numbers in the spaces provided below. Refer to them
whenever you call upon your Sony dealer regarding this product.
Model No.
Serial No.
For Your Convenience
Please contact Sony directly if you:
z
Have questions on the use of your module after reading the Operating Instruction manual
and Quick Setup Guide
z
Experience difficulty operating your module
Contact Sony Customer Support at:
http://esupport.sony.com/bravialink
or to speak with a support representative:
United States
1-866-918-BIVL (2485)
Sony will work to resolve your questions more quickly than your retailer or place of purchase.
Canada
1-877-899-SONY (7669)
Please Do Not Return the Product to the Store
2
WARNING
To reduce the risk of fire or electric shock, do
not expose this receiver to rain or moisture.
CAUTION
RISK OF ELECTRIC SHOCK
DO NOT OPEN
ATTENTION
RISQUE DE CHOC ELECTRIQUE,
NE PAS OUVRIR
PRECAUCION
RIESGO DE CHOQUE ELECTRICO
NO ABRIR
This symbol is intended to
alert the user to the presence
of uninsulated “dangerous
voltage” within the
product’s enclosure that
may be of sufficient
magnitude to constitute a
risk of electric shock to
persons.
This symbol is intended to
alert the user to the presence
of important operating and
maintenance (servicing)
instructions in the literature
accompanying the
appliance.
The receiver shall not be exposed to dripping or
splashing and no objects filled with liquids, such
as vases, shall be placed on the receiver.
CAUTION
To prevent electric shock, do not use this
polarized AC plug with an extension cord,
receptacle or other outlet unless the blades can
be fully inserted to prevent blade exposure.
Declaration of Conformity
Trade Name: SONY
Model: DMX-NV1
Responsible Party: Sony Electronics Inc.
Address: 16530 Via Esprillo
San Diego, CA 92127 U.S.A.
Telephone Number: 858-942-2230
This device complies with part 15 of the FCC
rules. Operation is subject to the following
two conditions: (1) This device may not
cause harmful interference, and (2) this
device must accept any interference received,
including interference that may cause
undesired operation.
NOTIFICATION
This equipment has been tested and found to
comply with the limits for a Class B digital
device, pursuant to Part 15 of the FCC Rules.
These limits are designed to provide reasonable
protection against harmful interference in a
residential installation. This equipment
generates, uses and can radiate radio frequency
energy and, if not installed and used in
accordance with the instructions, may cause
harmful interference to radio communications.
However, there is no guarantee that interference
will not occur in a particular installation. If this
equipment does cause harmful interference to
radio or television reception, which can be
determined by turning the equipment off and on,
the user is encouraged to try to correct the
interference by one or more of the following
measures:
s Reorient or relocate the receiving
antenna.
s Increase the separation between the
equipment and receiver.
s Connect the equipment into an outlet on a
circuit different from that to which the
receiver is connected.
s Consult the dealer or an experienced
radio/TV technician for help.
Pursuant to FCC regulations, you are
cautioned that any changes or modifications
not expressly approved in this manual could
void your authority to operate this
equipment.
CAUTION
Do not attempt to modify this product in any
way without written authorization from Sony
Electronics, Inc. Unauthorized modification
could void the user's authority to operate this
product.
Trademark Information
“BRAVIA” and are trademarks of
Sony Corporation.
“XrossMediaBar” is a trademark of Sony
Corporation. “XMB” is a trademark of Sony
Coproration and Sony Computer Entertainment
Inc.
"PLAYSTATION" is a registered trademark and
"PS3" is a trademark of Sony Computer
Entertainment Inc.
Yahoo! and the Yahoo! logo are registered
trademarks of Yahoo! Inc.
YouTube is a trademark of Google Inc.
Amazon is a trademark of Amazon.com Inc.
CBS and Showtime are registered trademarks of
CBS Broadcasting Inc.
This device incorporates High-Definition
Multimedia Interface (HDMI™) technology.
HDMI, the HDMI logo and High-Definition
Multimedia Interface are trademarks or
registered trademarks of HDMI Licensing, LLC.
This product incorporates copyright protection
technology that is protected by U.S. patents and
other intellectual property rights. Use of this
copyright protection technology must be
authorized by Macrovision corporation, and is
intended for home and other limited consumer
uses only unless otherwise authorized by
Macrovision. Reverse engineering or
disassembly is prohibited.
(Continued)
3
Important
Safety
Instructions
1) Read these instructions.
2) Keep these instructions.
3) Heed all warnings.
4) Follow all instructions.
5) Do not use this apparatus near water.
6) Clean only with dry cloth.
7) Do not block any ventilation openings. Install in
accordance with the manufacturer’s instructions.
8) Do not install near any heat sources such as radiators,
heat registers, stoves, or other apparatus (including
amplifiers) that produce heat.
9) Do not defeat the safety purpose of the polarized or
grounding-type plug. A polarized plug has two blades
with one wider than the other. A grounding type plug
has two blades and a third grounding prong. The wide
blade or the third prong are provided for your safety.
If the provided plug does not fit into your outlet,
consult an electrician for replacement of the obsolete
outlet.
10) Protect the power cord from being walked on or
pinched particularly at plugs, convenience
receptacles, and the point where they exit from the
apparatus.
11) Only use attachments/accessories specified by the
manufacturer.
12) Use only with the cart, stand, tripod, bracket, or table
specified by the manufacturer, or sold with the
apparatus. When a cart is used, use caution when
moving the cart/apparatus combination to avoid
injury from tip-over.
13) Unplug this apparatus during lightning storms or
when unused for long periods of time.
14) Refer all servicing to qualified service personnel.
Servicing is required when the apparatus has been
damaged in any way, such as power-supply cord or
plug is damaged, liquid has been spilled or objects
have fallen into the apparatus, the apparatus has been
exposed to rain or moisture, does not operate
normally, or has been dropped.
USE
AC power cord and other cables
If you damage the AC power cord or other cables, it may result in a fire or
an electric shock. If the AC power cord or other cables is damaged, stop
using it at once and contact the Sony service center.
s Do not place the receiver where the power cord and cables are
subject to wear or abuse.
s Do not pinch, bend, or twist the cord excessively. The core lines may
be bared and cut, and cause a short-circuit, resulting in a fire or an
electric shock.
s Do not convert or damage the power cord and cables.
s Do not allow anything to rest on or roll over the power cord and
cables.
s Do not pull the power cord and cables.
s Do not move the receiver with the power cord and cables plugged in.
s Keep the power cord and cables away from heat sources.
s Be sure to grasp the plug when disconnecting the power cord and
cables.
s Do not expose the AC adapter to excessive heat.
Wall outlet
Do not use a poor fitting outlet.
Insert the plug fully into the outlet. If it is loose, it may
cause arcing and result in a fire.
Contact your electrician to have the outlet changed.
Cable wiring
For your safety, unplug the AC power cord when wiring cables.
Take care not to catch your feet on the cables. It may damage the receiver.
Electric shock
Do not touch the AC power cord or the receiver with
a wet hand. If you plug/unplug the AC power cord
from the receiver with a wet hand, it may cause
electric shock.
Lightning
For added protection for this receiver during a lightning storm, or when it
is left unattended and unused for long periods of time, unplug it from the
wall outlet. This will prevent damage to the receiver due to lightning and
power line surges.
Small accessories
Keep small accessories out of children's reach.
CLEANING
s Clean the AC power plug regularly.
s If the plug is covered with dust and it picks
up moisture, its insulation may deteriorate
and result in a fire.
s Unplug the AC power cord when cleaning
this receiver. If not, it may result in electric
shock.
s Clean the casing of the receiver with a dry
soft cloth. Stubborn stains may be removed
with a cloth slightly moistened with a solution of mild soap and
warm water. Never use strong solvents such as thinner or benzine
for cleaning.
s If using a chemically pretreated cloth, please follow the instruction
provided on the package.
s Dust the ventilation holes with a dry cloth.
4
VENTILATION
The holes on the side of the receiver are provided for necessary ventilation.
To ensure reliable operation of the receiver, and to protect it from
overheating, these ventilation holes must never be blocked or covered.
Unless proper ventilation is provided, the receiver may gather dust and get
dirty. For proper ventilation, observe the following:
s Never block the ventilation holes by placing the receiver on a bed,
sofa, rug or other similar surface.
s Never place the receiver in a confined space, such as a bookcase or
built-in cabinet, unless proper ventilation is provided.
Objects and ventilation holes
Never push objects of any kind into the receiver through the ventilation
holes as they may touch dangerous voltage points or short out parts that
could result in a fire or an electric shock. Never spill liquid of any kind on
the receiver.
Do not place any objects on the receiver.
INSTALLATION
s The receiver should be installed near an easily accessible power
outlet.
s Do not install the receiver in a hot or humid place, or in a place
subject to excessive dust or greasy vapor.
s Avoid operating the receiver at temperature below 41°F (5°C).
s When mounted to the back of TV, do not use the receiver as a han dle
to pick up the TV set.
s Make sure that the cord and connected cables are placed so that
tripping or stumbling may be avoided.
SERVICING
Damage requiring service
If the surface of the receiver cracks, do not touch the receiver until you
unplug the AC power cord.
Otherwise electric shock may result.
Servicing
Do not attempt to service the receiver yourself since opening the cabinet
may expose you to dangerous voltage or other hazards. Refer all servicing
to qualified service personnel.
Replacement parts
When replacement parts are required, be sure to have the
service technician certify in writing that he/she has used
replacement parts specified by the manufacturer that
have the same characteristics as the original parts.
Unauthorized substitutions may result in a fire, an
electric shock or other hazards.
Safety check
Upon completion of any service or repairs to the receiver, ask the service
technician to perform routine safety checks (as specified by the
manufacturer) to determine that the receiver is in safe operating condition,
and to so certify. Should the receiver not be repairable, ask a qualified
service technician to dispose of the receiver.
5
5

This page intentionally left blank.
Contents
Getting Started
Welcome to the World of
A Snapshot of the BRAVIA Internet Video Link ............................................................9
LED Indicators...........................................................................................................10
Setting up the BRAVIA Internet Video Link .................................................................11
Cable Connections....................................................................................................12
Connect to the Internet..............................................................................................13
Confirm Connection...................................................................................................15
Basic Remote Control Instruction................................................................................16
Accessing the Receiver on the XMB
Confirm Network Connection .......................................................................................17
Exiting Your Receiver................................................................................................19
Attaching the Receiver to Your TV ...............................................................................20
Mounting to the Back of Your TV ..............................................................................20
Navigating with Your TV’s Remote Control
Remote Control ..............................................................................................................23
®
............................................................................9
.........................................................................16
™
New Icons on the XMB
Internet Video Menu......................................................................................................25
Video Menu....................................................................................................................25
Network Menu................................................................................................................26
™
Internet Video Link Features
Internet Video Guide......................................................................................................27
Video Playback..........................................................................................................28
My Video Links..............................................................................................................29
Save this Link............................................................................................................29
View My Video Links .................................................................................................29
Remove this Link.......................................................................................................29
My Page...........................................................................................................................30
News .........................................................................................................................30
Messages ........................................................................................................................32
Reading Your Messages...........................................................................................33
Send from PC to TV .......................................................................................................34
Setting up Send from PC to TV.................................................................................34
Using Send from PC to TV........................................................................................35
Other Information
Using the HDMI Input Port.............................................................................................37
Updating the Receiver ...................................................................................................38
Device Information.........................................................................................................39
Optional Network Setup ............................................................................................40
Country and City List.....................................................................................................41
Troubleshooting.............................................................................................................43
Specifications.................................................................................................................45
Index................................................................................................................................47
7

This page intentionally left blank.
Getting Started
Getting Started
Welcome to the World of
®
Thank you for purchasing this Sony BRAVIA Internet Video Link receiver.
This manual is for model DMX-NV1. The packing box contains accessories
that are listed on page 45.
For optimum picture performance, your BRAVIA TV with
(XrossMediaBar) and DMe
x
interface is capable of receiving high definition
programming through your high-speed Internet connection. (Broadband
Internet connection of at least 10 Mbps recommended for HD content.)
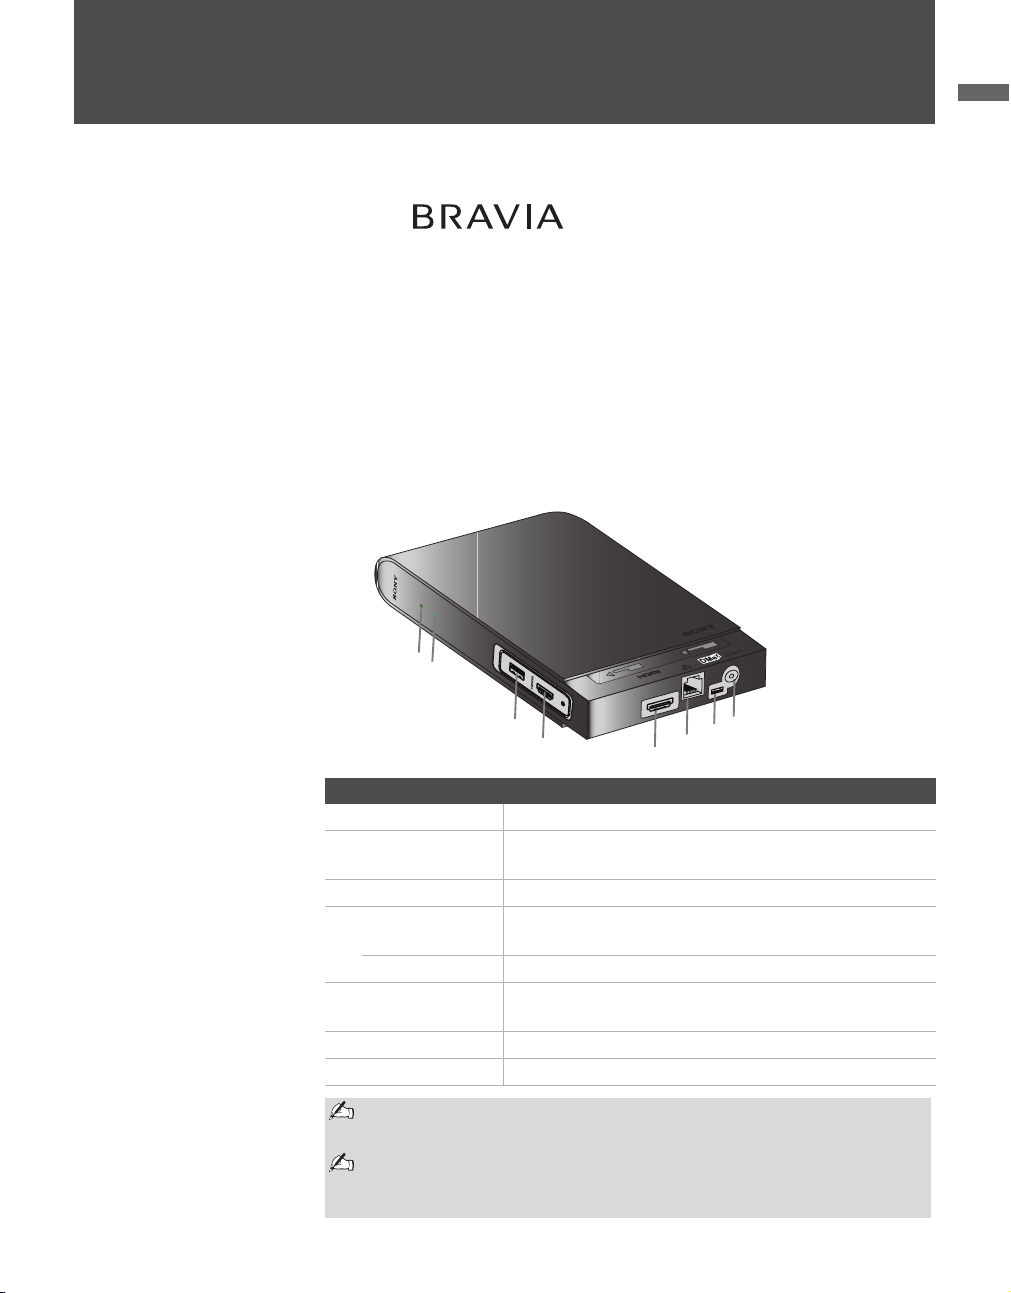
A Snapshot of the BRAVIA Internet Video Link
K
R
WO
T
E
N
T
U
E
P
IC
IN
Item Description
1 POWER LED Indicates the status of the receiver (see page 10).
2
NETWORK LED
3 SERVICE Port For software update and future use.
4 HDMI Input Port Connects to an additional HDMI device (e.g. HD-
5 HDMI OUT Port Connects to any HDMI input on TV.
6
LAN Ethernet Port
x
7 DMe
Port Connects to DMex/SERVICE input on TV.
8 DC IN 9V Connects to the supplied AC adapter with AC cord.
RV
E
S
T
U
O
Indicates network connectivity and activity (see page
10).
DVR) .
Connects to network device (e.g. router, wireless
bridge).
A
L
XMBTM
V
9
IN
C
D
N
HDMI input port 4 works as a pass-through port which allows you to
connect an additional HDMI device (see page 37).
The BRAVIA Internet Video Link cannot be accessed through the TV’s
external inputs. Access it on the XMB
Receiver on the XMB
on page 16.)
TM
. (See Accessing the
TM
9
Getting Started
1
NETWORK
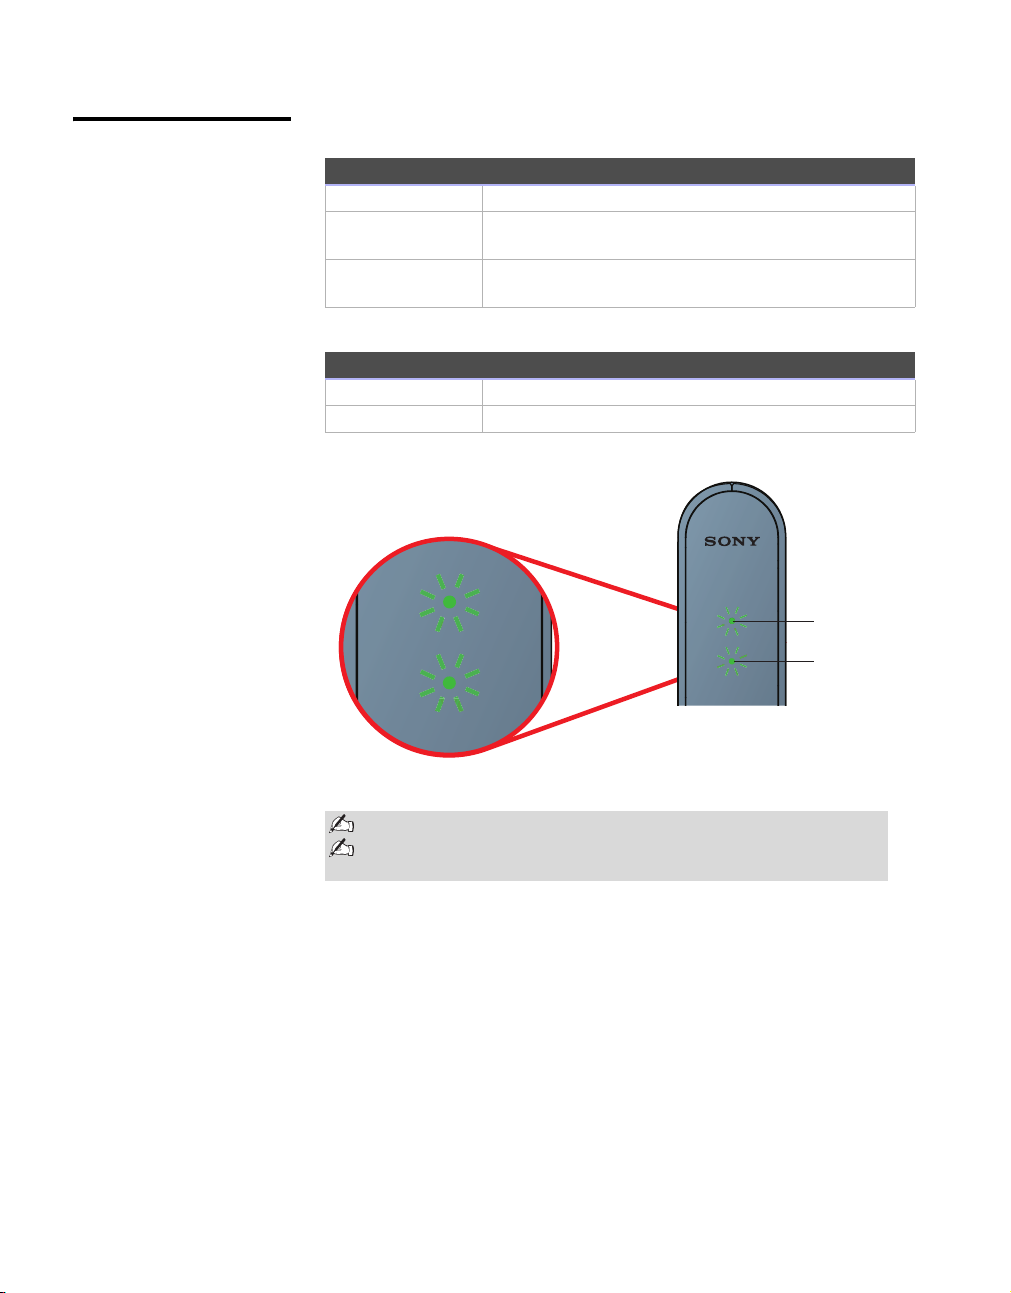
LED Indicators
Power LED Indicators
Green The receiver is powered on.
Orange (Blinking) The receiver is installing new software (do not
disconnect AC power).
Red (Blinking) Unable to connect to TV. Check cable
connections.
Network LED Indicators
Green The receiver is connected to the home network.
Green (Blinking) The receiver has network activity.
1
NETWORK
Power LED
Network LED
Make sure your home network is connected to the Internet.
Check the Troubleshooting section for additional information on
LED indicators.
10
Getting Started
OUT
LAN
DC IN 9V
OUT
LAN
DC IN 9V
Front of
Receiver
Setting up the BRAVIA Internet Video Link
Perform the following simple tasks to setup your receiver: make the cable
connections, connect to the Internet, and attach the receiver to your TV. Be
sure to turn off your TV before making any cable connections.
Refer to the section
Attaching the Receiver
to Your TV on page 20
and the supplied
Attachment Guide for
attachment instructions.
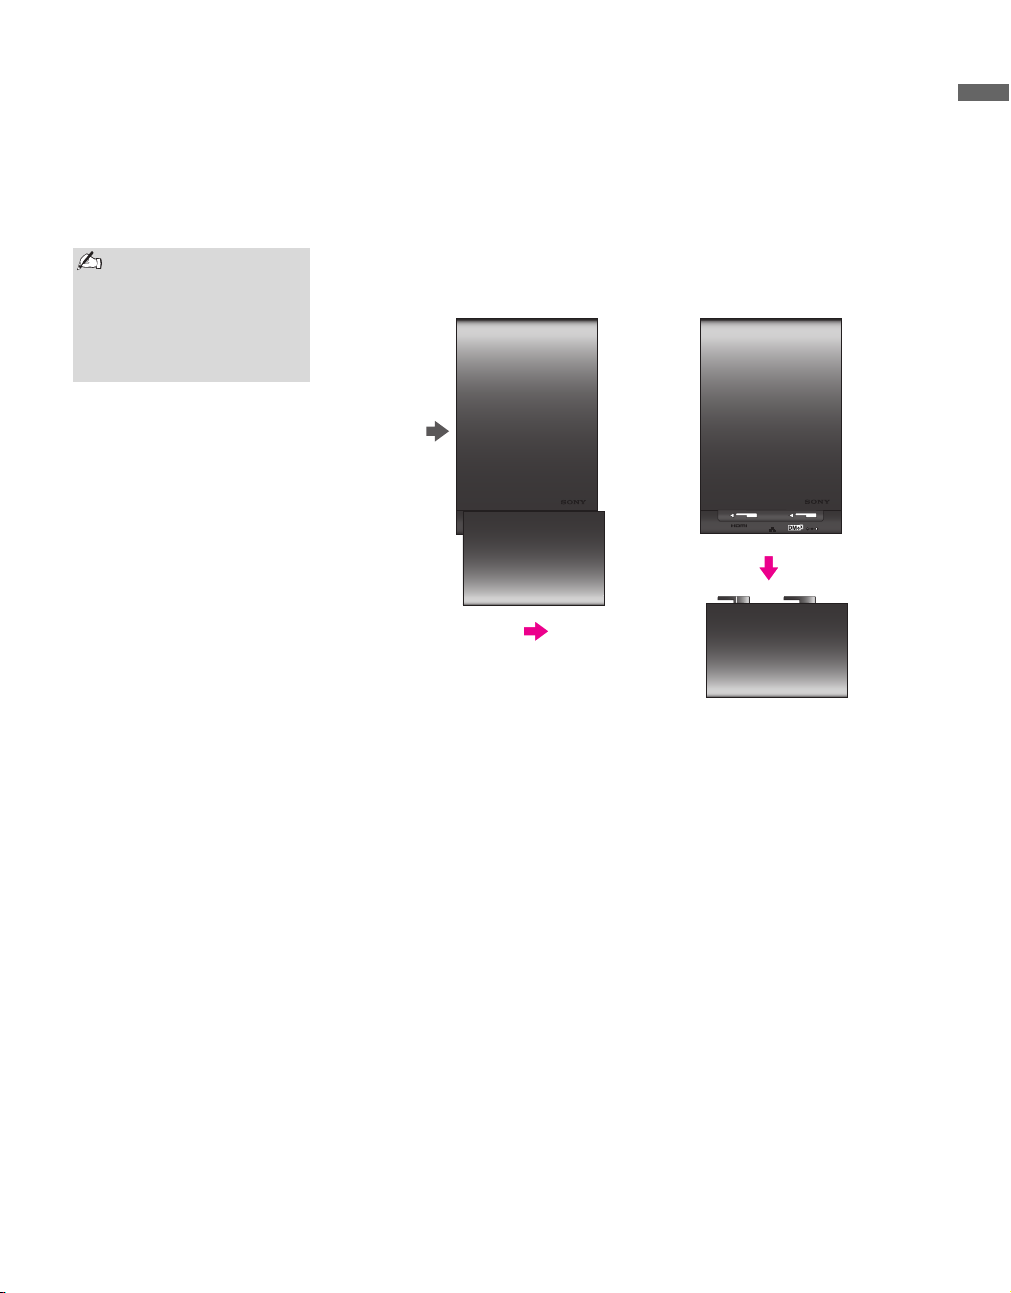
The receiver is packaged with the Cable Cover attached. Begin by removing
the Cable Cover as shown below.
Getting Started
Gently slide the Cable Cover toward the rear side of the receiver, then pull
down.
11
Getting Started
OUT
LAN
DC IN 9V
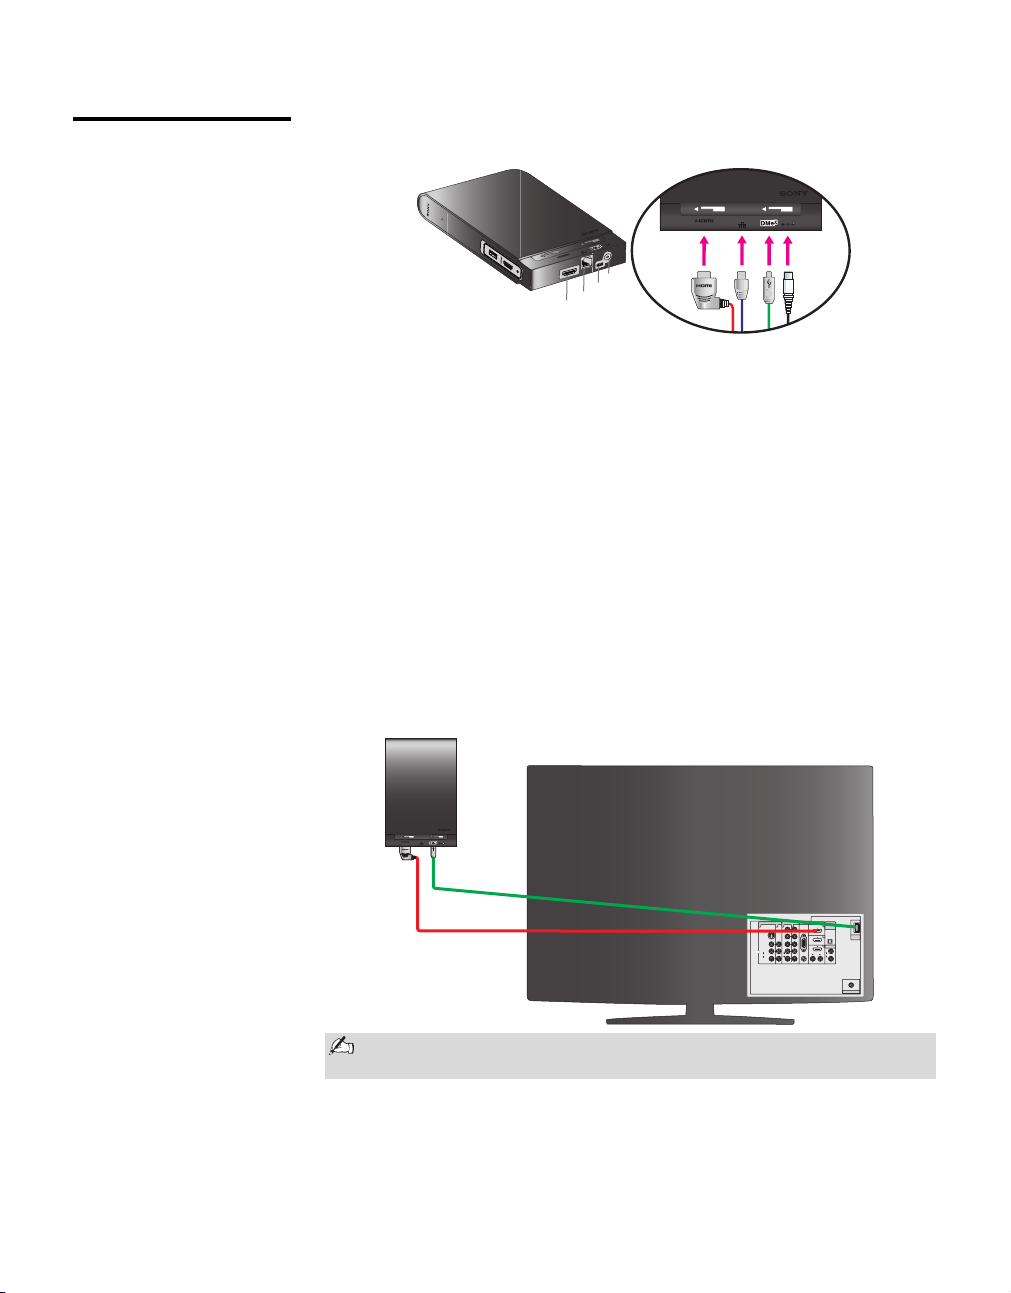
Cable Connections 1 Connect the four cables to your receiver in the order shown below.
K
R
WO
T
NE
T
E
PU
IC
IN
RV
E
S
V
9
IN
C
D
N
A
L
T
U
O
"
#
$
%
%
$ #
"
B
A Connect the AC adapter to the DC IN 9V port on the receiver. Do not
plug into the wall outlet at this time.
B Connect the small (mini B) end of the USB cable to the DMe
x
port on
the receiver.
C Connect one end of an Ethernet cable (not supplied) to the LAN
Ethernet port on the receiver.
D Connect the L-shaped end of the HDMI cable to the HDMI OUT port
on the receiver.
2 Connect the USB and HDMI cables to your TV as illustrated below.
B Connect the large (type A) end of the USB cable to the DMe
port on the TV.
D Connect the straight end of the HDMI cable to any HDMI port on the
TV.
x
/SERVICE
12
DC IN 9V
LAN
OUT
B
x
B
DMe
DIGITAL
VIDEO IN
PC IN
COMPONENT IN
IN
1
Y
P
B
P
R
L
AUDIO
R
(1080p/1080i/720p/480p/480i)
AUDIO
OUT
(OPTICAL)
RGB
x
DMe /
SERVICE
4
AUDIO OUT
L
R
L
AUDIO
AUDIOAUDIO
R
(VAR/FIX)
CABLE / ANTENNA
D
HDMI
1 3 132
S VIDEO
VIDEO
L
(MONO)
AUDIO
R
The rear view and location of the ports as shown may differ from your
TV set.
Connect to the Internet
Getting Started
Getting Started
There are several ways to connect your receiver to the Internet. Find your
connection method in the list below and proceed to that step. Please read and
follow the directions carefully.
Sony Recommended
Connection Speed
Standard
Definition Video
High Definition
Video
Illustrations are not
drawn to scale.
2.5
Mbps
10
Mbps
Option 1 Gaming Adapter as a Wireless Bridge Connection
Option 2 Powerline Ethernet Adapter Connection
Option 3 Direct Router Connection
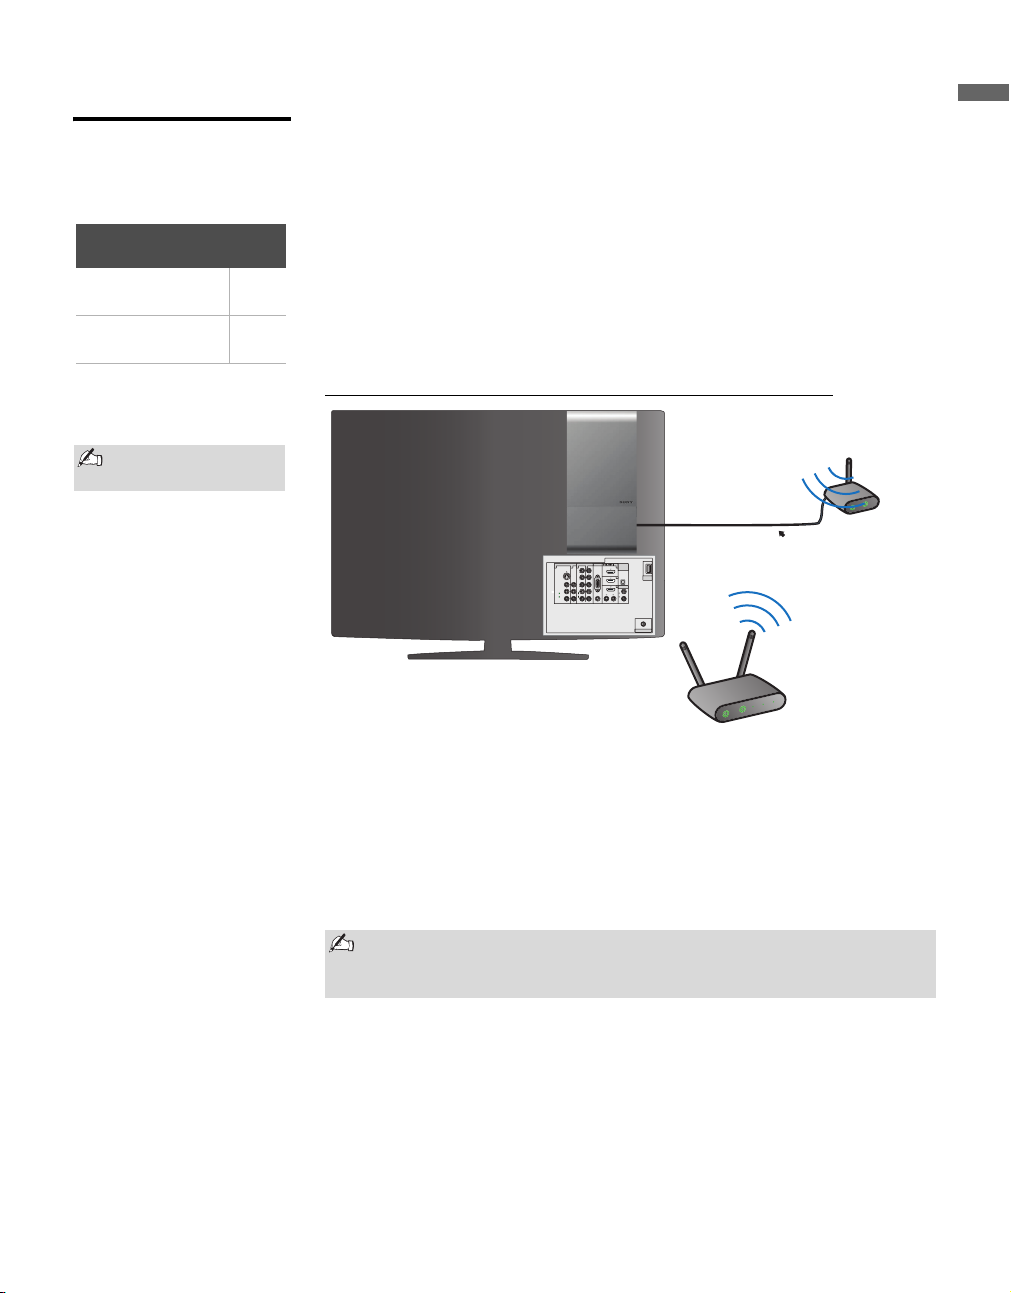
Option 1. Gaming Adapter as a Wireless Bridge Connection
Gaming
Adapter
1
T
R
O
P
R
E
W
O
P
3
T
R
O
P
2
T
R
O
P
1
T
R
O
P
Ethernet Cable
4
T
R
O
P
Wireless Router
VIDEO IN
1 3 132
S VIDEO
VIDEO
L
(MONO)
AUDIO
R
COMPONENT IN
1
Y
P
B
P
R
L
AUDIO
R
(1080p/1080i/720p/480p/480i)
PC IN
RGB
RL
AUDIO
DIGITAL
IN
AUDIO
OUT
(OPTICAL)
x
DMe /
SERVICE
4
AUDIO OUT
L
AUDIOAUDIO
R
(VAR/FIX)
CABLE / ANTENNA
POWER
Requirements: Ethernet cable, wireless router, gaming adapter or other
wireless device serving as a wireless bridge.
1 Ensure that your gaming adapter has an established Internet connection.
2 Connect the Ethernet cable between the receiver and the gaming
adapter.
Proceed to the section Confirm Connection on page 15 to confirm the
connection.
A gaming adapter is used as a wireless bridge in this example. Other
devices could possibly be used as a wireless bridge. Consult your
device’s instructions for more information.
13
Getting Started
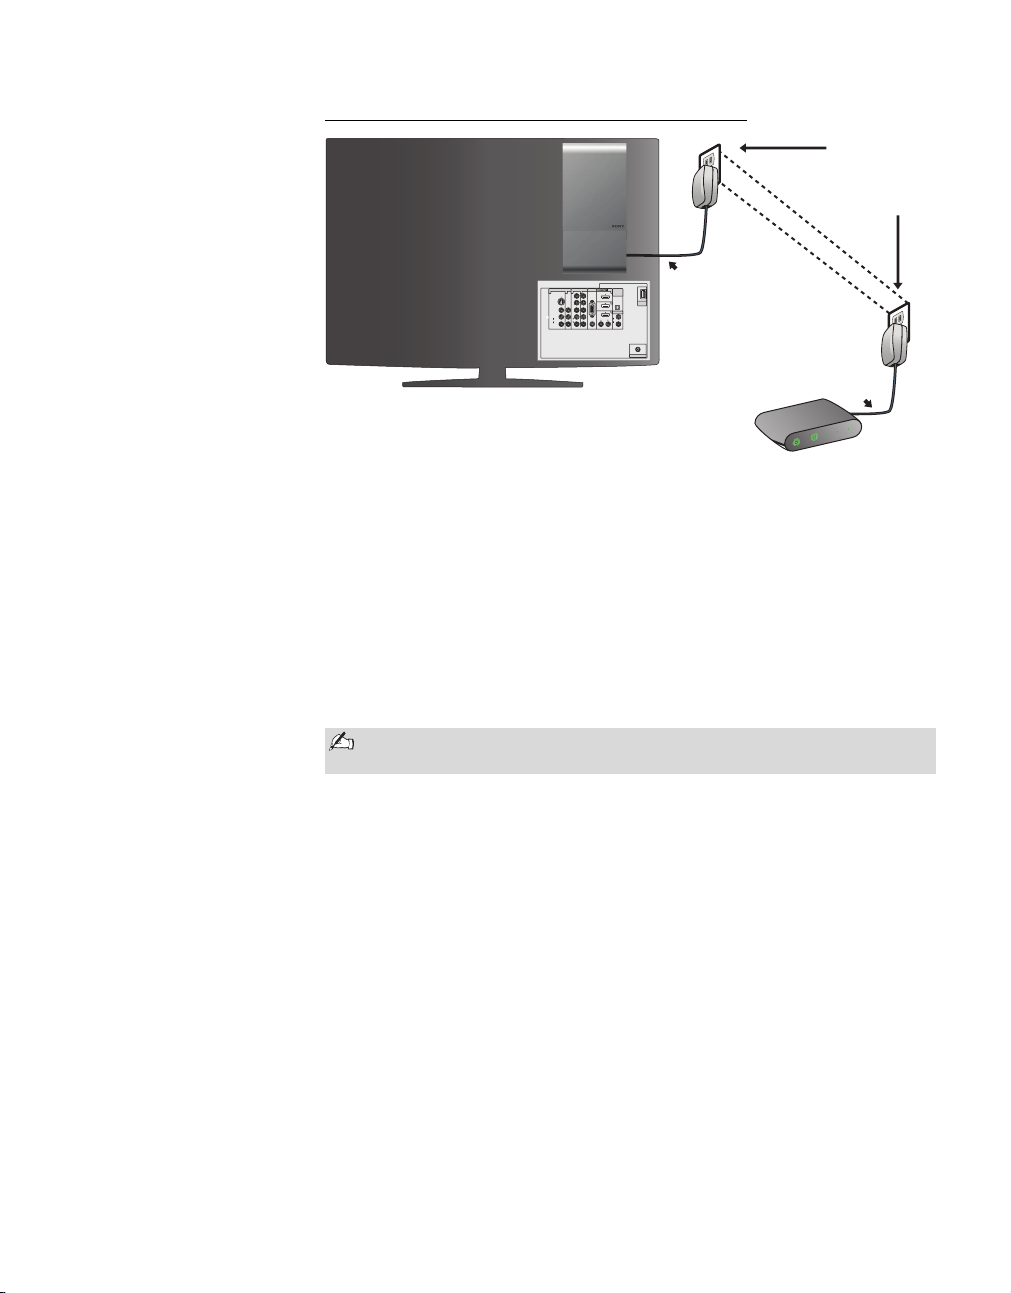
Option 2. Powerline Ethernet Adapter Connection
Powerline
Ex
is
t
ing Electri
Ethernet
Adapter
cal Wiring
DIGITAL
VIDEO IN
PC IN
COMPONENT IN
IN
Ethernet Cable
1
Y
P
B
P
R
L
AUDIO
R
(1080p/1080i/720p/480p/480i)
AUDIO
OUT
(OPTICAL)
RGB
x
DMe /
SERVICE
4
AUDIO OUT
L
RL
AUDIO
AUDIOAUDIO
R
(VAR/FIX)
CABLE / ANTENNA
1 3 132
S VIDEO
VIDEO
L
(MONO)
AUDIO
R
Ethernet Cable
4
T
R
O
P
3
T
R
O
P
2
T
R
O
P
1
T
R
O
P
R
E
W
O
P
Router
Requirements: Ethernet cable, Powerline Ethernet Adapter
1 Plug in a Powerline Ethernet Adapter with an established Internet
connection to the power outlet located closest to the receiver.
2 Connect an Ethernet cable between your receiver and the Powerline
Ethernet Adapter.
Be sure that a second Powerline Ethernet Adapter is connected to your
modem.
3 Proceed to Confirm Connection on page 15 to confirm the
connection.
We recommend that Powerline Ethernet Adapters are not connected to
surge protectors or power strips.
14
Getting Started
1
NETWORK
Option 3. Direct to Router Connection
Requirements: Ethernet cable, router
1 Connect an Ethernet cable between your receiver and the router.
Proceed to the section Confirm Connection below, to confirm the connection.
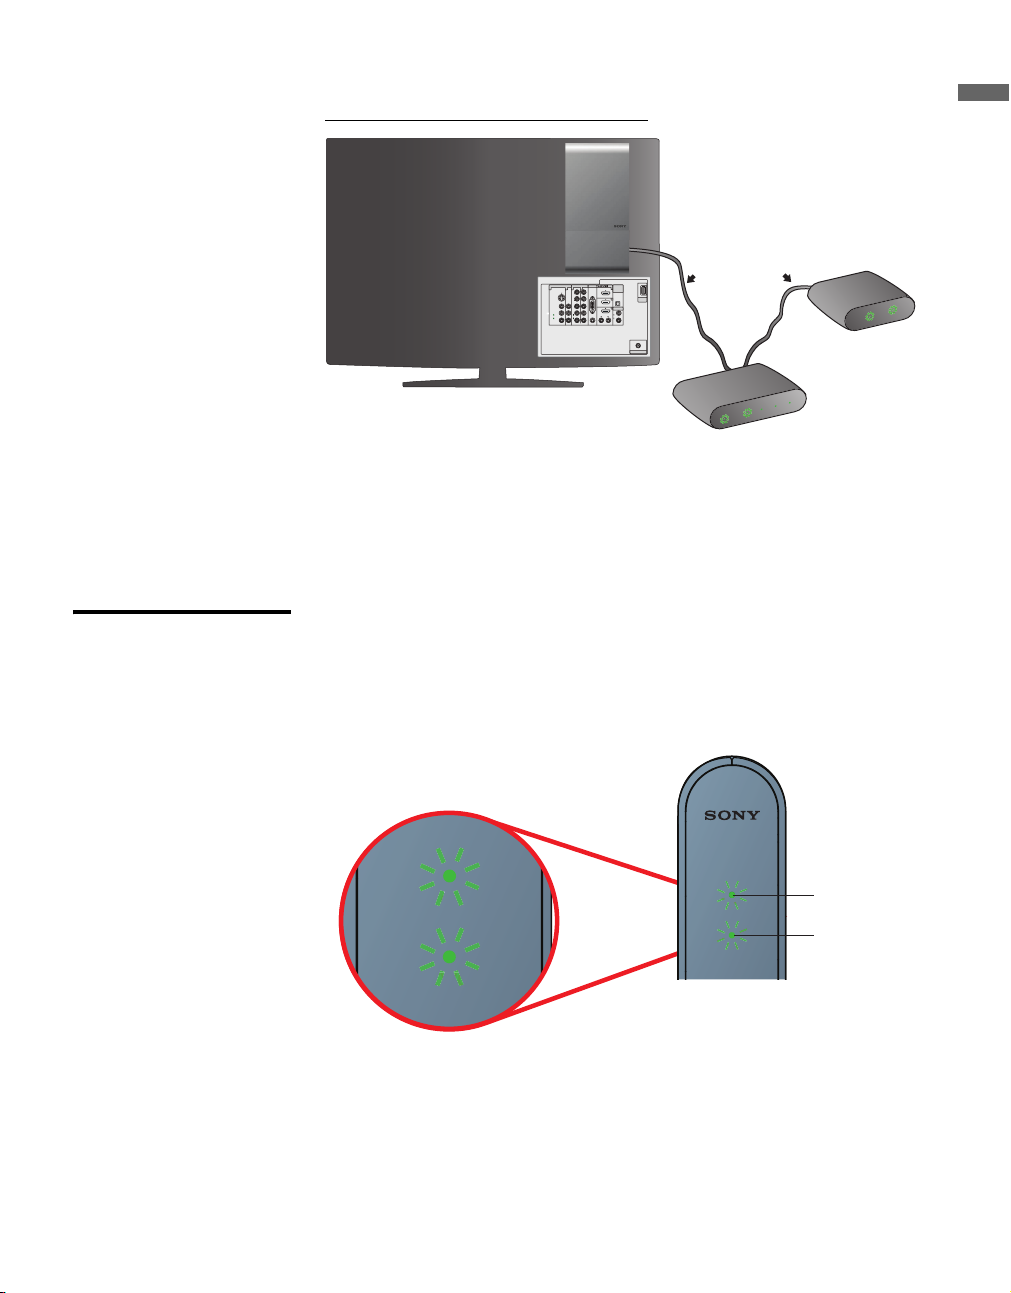
Confirm Connection 1 Plug in the receiver.
2 Power on the TV.
3 Confirm the LED lights are green as shown below.
VIDEO IN
1 3 132
S VIDEO
VIDEO
L
(MONO)
AUDIO
R
COMPONENT IN
1
Y
P
B
P
R
L
AUDIO
R
(1080p/1080i/720p/480p/480i)
Getting Started
x
DMe /
SERVICE
CABLE / ANTENNA
Ethernet Cable
PORT 4
3
PORT
T 2
POR
PORT 1
ER
OW
P
Router
INTERNET
ER
W
PO
Modem
DIGITAL
PC IN
IN
AUDIO
OUT
(OPTICAL)
RGB
4
AUDIO OUT
L
RL
AUDIO
AUDIOAUDIO
R
(VAR/FIX)
1
NETWORK
Power LED
Network LED
See LED Indicators on page 10 for a description of all LED indicator colors.
15

Getting Started
Sync
Basic Remote Control Instruction
1 Press the HOME button on your TV’s remote control to access the
XMB
.
TM
2 Press the V/v/B/b buttons to navigate.
3 Press the button to make selections.
3
2
1
4
4 Press the DMe
Page (see page 30).
x
button to confirm your connection and to access My
Accessing the Receiver on the XMB
The BRAVIA Internet Video Link is fully integrated into the XMBTM
(XrossMediaBar). When the receiver is properly connected to the TV and
has made a successful Internet connection, new icons related to the BRAVIA
Internet Video Link will be available on the XMB
Video Menu
Category
Object Bar
You can only access the BRAVIA Internet Video Link from the XMBTM
or by pressing the DMex button on your TV’s remote control.
The receiver is not accessible by switching external inputs using the
INPUT button on the remote control. See page 37 for more information.
Depending on the TV model, the Media Category Bar may have
additional icons on the XMB
TM
Network Menu
.
TM
(see page 19).
TM
Media
Category
Bar
16

Getting Started
Confirm Network Connection
Follow these instructions to confirm that your Internet Video Link receiver is
properly connected.
1 Press the DMe
connection status.
If “Feature available with DMeX module” appears on the screen, wait a
few moments and try again.
2 The first time the receiver is connected to the Internet, the software may
need to be updated. If the screen below does not appear, proceed to step
3.
Press the button on your TV’s remote control to choose Continue
and install the update. The update may take a few minutes to complete.
x
button on your TV’s remote control to view the
Getting Started
3 To continue the connection, begin Region Setup to enter your region
settings and customize your receiver.
17

Getting Started
The default country is the United States. Press the V/v/B/b and 0-9
buttons to enter your ZIP code.
Press the B button on your TV’s remote control to switch countries if
applicable. Highlight your country and press the button (see page 47
for the Country and City List).
18
4 Once you have setup your region, the receiver will attempt to connect to
the Internet. Upon successful connection to the Internet, you will see the
screen below.

Getting Started
Internet Video
5 Press the
XMBTM (XrossMediaBar)
HOME
button on your TV’s remote control to access the
. These icons associated with the receiver will
appear. New services are available on the Network and Video menus,
and Internet Video Link settings are available on the Internet Video
menu.
Video Menu
Category
Object Bar
IMPORTANT: Do not press the INPUT button on the remote control to
access the BRAVIA Internet Video Link. It is available on the XMBTM.
Network Menu
Media
Category
Bar
Getting Started
Exiting Your Receiver
There are several ways to exit the BRAVIA Internet Video Link and resume
watching your regular TV programming.
● Press the HOME button and scroll to TV. Highlight a channel to watch
and press . OR
● Change the TV’s input by pressing the INPUT button. This will change
the input and exit your receiver. OR
● Press the HOME button and scroll to External Inputs. Selecting any
input will exit your receiver.
● From My Page, press the DMe
To power off the receiver, disconnect the AC adapter with AC cord from
the wall outlet.
x
button to toggle to previous input.
19

Getting Started
Attaching the Receiver to Your TV
Before you begin the attachment, slide the Cable Cover back into place.
Make sure the notches on the Cable Cover align with those indicated on the
receiver.
DC IN 9V
LAN
B
Front of
Receiver
DC IN 9V
OUT
LAN
OUT
Mounting to the Back of Your TV
1 Find the location where you will need to attach the receiver. See the
supplied Attachment Guide for more details.
DIGITAL
VIDEO IN
PC IN
COMPONENT IN
IN
1
Y
P
B
P
R
L
AUDIO
R
(1080p/1080i/720p/480p/480i)
AUDIO
OUT
(OPTICAL)
RGB
x
DMe /
SERVICE
LCD TV Mounting Plastic
4
AUDIO OUT
L
AUDIOAUDIO
R
(VAR/FIX)
CABLE / ANTENNA
Fasteners (Type 1) only
RL
AUDIO
1 3 132
S VIDEO
VIDEO
L
(MONO)
AUDIO
R
20

Getting Started
2 Take the bracket and match the holes on the bracket to the screw holes
on the back of your TV.
The screw holes on the TV are shown with the bracket (holes A and C) for right side
attachment to the LCD TV.
1 Secure the attachment bracket to your TV using the two Plastic
Fasteners (supplied). Press in the head of the fasteners with your finger
until they click. Do not push the head of the fasteners until you have
inserted the fasteners into the holes on the TV.
2 Take the Mounting Knobs and hand twist into place as shown.
Getting Started
Do not over tighten the Mounting Knobs.
3 Place the bottom Mounting Knob into the hole on the bracket, leaving
the top Mounting Knob sitting above the top hole.
21

Getting Started
The bottom Mounting Knob is threaded in the hole while the top Mounting Knob sits on
the groove.
4 Lightly push the receiver down so that both Mounting Knobs are locked
into place.
22
Make sure that cables are organized with the Cable Cover so that the
cables hang out on the same side as the Mounting Knobs and on the
front side of the receiver.
If difficult to mount the receiver, remove the TOP Mounting Knob.
Reposition the receiver to the bracket then tighten with the Mounting
Knob to keep in place.

Navigating with Your TV’s Remote Control
Remote Control
1
Sync
2
3
4
5
6
To operate this Internet Video Link receiver, use your Sony TV's remote
control equipped with the DMe
Button Description
1 Display basic information about the highlighted video or open
the Control Panel when a video is playing
2 Seek backwards during video playback. Press multiple times to
7
8
9
q;
3 Return to the previous screen or save a selection, depending on
4 Display the TV Home Menu/XMB™(XrossMediaBar)
qa
5 Launch My Page
qs
6 Press to erase an entry in the keypad
qd
7 Make or confirm a selection
increase the speed of the seek (B can also be used to seek
backward).
Play a video ( can also be used to play a video)
Stop a video and return to the Internet Video Guide ( can also
be used to stop a video)
Pause a video ( can also be used to pause a video)
Seek forward during video playback. Press multiple times to
increase the speed of the seek (b can also be used to seek
forward)
the screen.
x
button.
Navigating with Your TV’s Remote Control
8 Move up, down, left or right on the screen
9 View Home Category, view additional Categories, Sort By,
Save this Link
q; Enter numbers
-
qa Press to change fields in the keypad
qs Page up or down within an Internet Video Guide
qd Skip ahead to the next video in the queue
23

This page intentionally left blank.

New Icons on the
Internet Video Menu
The main menu of the BRAVIA Internet Video Link is Internet Video,
located in the Settings menu on the XMB
Internet Video icon to access this exclusive menu. The following options
are available from the Internet Video menu.
Option Description
Network Setup Complete network setup.
Region Complete or change your region settings (see page 18).
Software Update Update your software (see page 38).
Restore Default
Settings
Device
Information
Restart Internet
Channels
Video Menu
XMB
™
. Highlight and select the
TM
Change network and region settings to default (see page
44).
Get information about your specific receiver (see page
39).
Refresh the Internet channels provided by the video
content providers.
New Icons on the XMB™
When the receiver is connected to the Internet, the Video icon will appear
on the Media Category Bar.
Option Description
My Video Links Display the saved videos (see page 29).
Internet Channels Select an Internet channel to view available videos (see
page 27).
25

New Icons on the XMB™
Network Menu
The Network menu also appears on the Media Category Bar when the
receiver is connected.
Option Description
My Page Open My Page (see page 30).
Messages Read important messages (see page 32).
26

Internet Video Link Features
Internet Video Guide
Select an Internet channel to view its Internet Video Guide. Videos are
arranged by category.
To display the Internet Video Guide:
1 Press HOME to display the XMB
2 Press B/b to highlight the Video icon.
3 Press V/v to highlight a video content provider and press . You will
The
Parental Lock
function set on the TV will
block video content based
on the appropriate TV or
Movie Rating. See your
TV's Operating Instruction
Manual for information on
activating and using your
Parental Lock
Videos are arranged by
Categories. Find
available Categories on
the Options menu.
.
4 Press the OPTIONS button to select a different category and view
5 Press V/v/B/b to highlight the thumbnail of the video you want to view,
Options Menu
Option Description
Sort By Choose to sort the videos by the options available.
Home Category Choose to return to the Home Category.
List of Categories Choose to view additional categories and videos.
Save this Link Choose to save video to a folder for easy repeat viewing
.
TM
be taken to the channel's Home Category.
additional videos.
then press to play the video.
To view more items on the list, press CH +/– to display the next page.
Press DISPLAY to see more information on the highlighted video.
(see page 29).
Internet Video Link Features
27

Internet Video Link Features
Sync
Video Playback The video playback may take a few moments to load and will start upon
successful connection to the video content provider. The video loading
status is displayed on your screen.
The Control Panel opens when a video begins and closes after five
seconds of non-use.
Seek forward and seek backward
Some video content providers allow you to seek forward or seek backward
while playing a video. Press b to move forward in the video. Press B to
move backward.
The Control Panel will appear with a yellow dot indicating the point at
which the playback will resume. To resume playback, press . See the
illustration below for details.
To increase the speed of the forward or backward seek, press the
corresponding button up to three times.
28
Press the
corresponding
buttons to control
playback.
Control Panel
Playback resume
point
Arrows indicate
fast-forward speed.
Options Menu
Other options are available from the Options menu.
Option Description
Restart Replay the video from the beginning.
Next Skip to the next video.
Control Panel Display the control panel.

Internet Video Link Features
My Video Links
My Video Links is a feature which allows you to save video links from the
Internet Video Guide for easy repeat viewing.
Save this Link 1 Choose an Internet channel’s Internet Video Guide (see page 27).
2 Highlight a video you would like to save.
3 Press OPTIONS.
4 Select Save this Link.
5 You will then be returned to the Internet Video Guide.
This feature may not be available with all video content providers.
Internet Video Link Features
View My Video Links 1 Press the HOME button and highlight the Video icon on the XMB
2 Choose My Video Links and press .
3 The videos are presented as thumbnails. Press V/v/B/b, or CH +/– to
browse.
4 Highlight the video and press to begin video playback.
You can see how many videos you have saved to My Video Links by
looking at the number in the lower right-hand corner of the screen.
Remove this Link 1 Choose My Video Links on the XMB
.
™
2 Press the OPTIONS button.
3 Choose Remove this Link and press .
4 Select Yes to confirm or No to cancel.
A video saved to My Video Links may not be available if the video
content provider moves or deletes it from their server.
™
.
29

Internet Video Link Features
My Page
My Page gives you quick and convenient information with the single click
of a button. It is recommended that you complete Region setup (see page
18) to customize the information to your local area.
Press the DMe
You can also access My Page from the Network menu on the XMB
My Page powered by Yahoo! keeps you up-to-date with local news,
weather, and traffic.
Availability of localized information varies by region.
x
button on your TV’s remote control to access My Page.
.
™
News My Page brings you the latest news from a variety of sources.
1 Press V/v to change the news source.
2 Press B/b to change the news topic.
3 Press to read the current news topic in more detail.
30

Internet Video Link Features
1 Press V/v to read an article longer than one page.
2 Press B/b to view another article in the current topic.
3 Press RETURN to exit the current article and return to My Page.
The numbers after Topic in the lower left-hand corner indicate the
number of articles in the current topic and the total number available.
Internet Video Link Features
31

Internet Video Link Features
Messages
Your Messages Inbox is where you will find important messages about
new features, video content providers, and more.
To access the Messages Inbox:
1 Press the HOME button to display the XMB
.
™
2 Press B/b to highlight the Network icon.
3 Press V/v to highlight the Messages icon.
4 Press to open the Messages Inbox.
32
The Messages Inbox lists several messages on each page. Message
information shown includes the sender, the date sent, and the title of the
message.
Messages will be deleted automatically from the Messages Inbox.

Internet Video Link Features
Reading Your Messages
You can browse through the Messages Inbox or highlight a message to
read in its entirety. Press to open the highlighted message. The message
will open on your screen.
Internet Video Link Features
1 Press V/v to read through a message longer than one page.
2 Press RETURN to go back to the Messages Inbox.
33

Internet Video Link Features
Send from PC to TV
With the Send from PC to TV feature, videos from the Internet can be
viewed on your TV.
Not all file formats are supported for playback.
Setting up Send from PC to TV
Follow the steps below to configure your receiver and PC.
Configuring the BRAVIA Internet Video Link
1 From the Settings menu on the XMB
icon and press .
, highlight the Internet Video
™
2 Highlight Send from PC to TV and press .
3 Highlight Enable and press .
4 Press RETURN to save your selection.
Downloading the utility file
To us e Send from PC to TV, you will have to install a software utility.
Choose an Internet browser to use, then follow the steps below to configure
your PC.
1 Using your computer and an Internet web browser, go to the BRAVIA
Internet Video Link homepage at http://internet.sony.tv and login or
register a new account. From the home page select the link “Software
Utilities.”
2 Follow instructions on the page to download the file associated with
your Internet browser and save it to your computer.
3 Configure your browser by following the instructions for either Internet
Explorer or Firefox below.
34

Internet Video Link Features
Configuration for Internet Explorer
1 Locate the file you just downloaded in step 2 above and run it to install
the utility.
2 Once the utility is installed, select Start from the main Windows menu,
then select Programs.
3 Select Send from PC to TV Configuration
4 Type in your IP address (this can be found on the Device Information
menu; see page 39 for details).
5 Close all browser windows and restart Internet Explorer.
6 Your web-browser is ready. Proceed to “Using Send from PC to TV”
below for usage instructions.
Configuration for Firefox
1 In the Firefox browser, select File from the top menu.
2 Select Open File and browse to the location where you saved the utility
file in step 2 above.
3 Select Install once the option is visible in the browser Add-ons window.
4 Restart the browser when prompted to complete the installation.
5 Once the browser restarts, select the Tools menu.
6 Select Send from PC to TV options.
7 Type in your IP address (this can be found on the Device Information
menu; see page 39 for details).
8 Your web-browser is ready. Proceed to “Using Send from PC to TV”
below for usage instructions.
Internet Video Link Features
Using Send from PC to TV
Playing a Video
1 Make sure the TV is turned on and the receiver is connected.
2 Locate a video link on the Internet that you would like to play.
3 With your mouse, right click the video link to access the Context menu
and select Send from PC to TV Play/Pause to play the video. (See the
table on the next page for other available options.)
4 The video will begin to play on your TV.
35

Internet Video Link Features
Saving a Video to My Video Links
1 When you locate a video link on the Internet that you want to save, use
your mouse to right-click on the file and select Send from PC to TV
Bookmark.
2 Enter a title and description of the video.
Viewing a Video Saved in My Video Links
1 On the TV, select the My Video Links icon from the Video menu on
the XMB
.
™
2 Identify the video to view by highlighting the thumbnail and viewing
the title and description that you entered when saving it.
3 Press to begin playback.
36
Context Menu Options in the Internet Browser
In your selected browser, right-click on any video link to access the
following options for playback on the TV.
Send from PC to TV
Bookmark
Send from PC to TV
Play/Pause
Send from PC to TV
Stop
Not all content found on the Internet will play on the BRAVIA Internet
Video Link.
Select to save the video into My Video Links
Select to Play or Pause the video
Select to Stop the video

Other Information
Using the HDMI Input Port
The HDMI Input port on the front side of the receiver works as a passthrough port. This allows you to connect an external HDMI device to your
TV via the receiver. You can connect a Playstation
Follow the instructions below to use the pass-through port. Turn off your TV
before connecting additional devices.
1 Connect an HDMI cable (you will need to supply your own cable)
between the pass-through port on the front side of the receiver and the
HDMI device as illustrated below.
VIDEO IN
1 3 132
S VIDEO
VIDEO
L
(MONO)
AUDIO
R
COMPONENT IN
1
Y
P
B
P
R
L
AUDIO
R
(1080p/1080i/720p/480p/480i)
Other Information
®
3 or other HDMI device.
HDMI Cable
(not supplied)
DIGITAL
PC IN
IN
AUDIO
OUT
(OPTICAL)
RGB
4
AUDIO OUT
L
R
L
AUDIO
AUDIOAUDIO
R
(VAR/FIX)
CABLE / ANTENNA
HDMI 1
x
DMe /
SERVICE
PS 3
2 Power on the TV and the additional device.
3 Press the INPUT button and toggle to the HDMI input that your
receiver is connected to on the TV. If your receiver is connected to
HDMI 1, then the PS3 (or other external device) can be accessed by
selecting HDMI 1. You can also label this input. See your TV’s
Operating Instruction Manual for further details on labeling inputs.
Some HDMI devices have features which use HDMI-CEC control
signals. Some of these features are not supported by this pass-through
mode.
37

Other Information
Updating the Receiver
Your BRAVIA Internet Video Link may need occasional software updates
for new features and product enhancements. Please check your Messages
Inbox periodically to see if a software update is available.
To update directly through the network
The Power LED is
orange while the
receiver is updating.
Do not unplug the AC
power cord during an
update.
1 Press the HOME button and highlight the Settings icon on the
2 Select Internet Video.
3 Select Software Update.
4 Select YES to confirm software update. You may see a blank screen for
5 Follow the displayed instructions. Agree to the End User License
6 A progress screen will notify you of the update status. When the update
7 Press the HOME button to access the XMB
XMB
.
™
a few moments.
Agreement to install the update (if prompted).
is complete, your receiver will power off and back on automatically.
Please note that the receiver will power up into pass-through mode after
a software update (see page 37 for more information on pass-through).
.
™
38
Normal receiver functions are inaccessible during the update and will
resume once the update is completed.
You may access your TV’s regular programming until the update is
complete.
If power is interrupted during an update, the receiver will power on into
update mode.

Device Information
Other Information
To locate your BRAVIA Internet Video Link’s device information, select the
Internet Video icon from the Settings menu. Then, select Device
Information.
Sony Contact
Information
Model Number
Serial Number
Software Version
IP Address
MAC Address
Other Information
39

Other Information
Custom
Manual
Don’t Use
S
S
ll
Optional Network Setup
The Custom setup allows you to enter your own IP address by selecting
Manual and enter your proxy server settings by selecting Use.
FOR ADVANCED USERS ONLY.
1 Press the HOME button and choose the Settings icon on the XMB
2 Select Internet Video.
3 Select Network Setup.
4 Select Custom.
5 Follow the steps below to complete your Custom setup.
ow the on-screen instructions
Fo
.
™
Upon completing
these steps, return to
the Confirm
Connection section
on page 15 to verify
your successful home
network connection
and complete the
setup.
40
Enter your proxy server settings
etup Information
etup Confirmation
IP address, Subnet Mask, Default Gateway and Primary DNS values
are required when manually entering your address information.
Values between 0 and 255 are possible.
Be sure that your home network is connected to your broadband
Internet service.

Other Information
Country and City List
This is a listing of cities available in Region Setup. For My Page to display the most accurate information,
please choose the city closest to you.
USA
(Enter Zip Code)
Canada
(Enter Postal Code)
Argentina
Buenos Aires
Cordoba
La Plata
Rosario
Barbados
All
Belize
Belize City
Corozal Town
Dangriga
Orange Walk Town
Punta Gorda
Bolivia
Cobija
Cochabamba
La Paz
Oruro
Potosi
Santa Cruz de la Sierra
Sucre
Tarija
Trinidad
Brazil
Belém
Belo Horizonte
Brasília
Campinas
Curitiba
Duque de Caxias
Fortaleza
Goiania
Guarulhos
Maceió
Manaus
Porto Alegre
Recife
Rio de Janeiro
Salvador
São Gonçalo
São Luis
São Paulo
Tere sin a
Chile
Antofagasta
Puente Alto
San Bernardo
Santiago
Talcahuano
Temu co
Va lp ar a í so
Viña del Mar
Colombia
Barranquilla
Bogota
Cali
Cartagena
Medellin
Costa Rica
Alajuela
Cartago
San Jose
Dominican Republic
Santiago de Los Caballeros
Santo Domingo de Guzman
Ecuador
Cuenca
Guayaquil
Machala
Manta
Portoviejo
Quito
Santo Domingo
El Salvador
San Miguel
San Salvador
Santa Ana
Guatemala
Escuintla
Guatemala City
Quetzaltenango
Guyana
Bartica
Georgetown
Linden
New Amsterdam
Skeldon
Haiti
Cap-Haïtien
Port-au-Prince
41

Other Information
Honduras
Tegucigalpa
Mexico
Acapulco
Aguascalientes
Chihuahua
Cuidad Juárez
Ecatepec
León
Mérida
México City
Monterrey
Nezahualcóyotl
Puebla
San Luis Potosí
Tijuana
Tlalnepantla
Nicaragua
Chinandega
Granada
León
Managua
Masaya
Panama
Changuinola
Chitré
Colón
David
La Chorrera
San Miguelito
Santiago
Paraguay
Asunción
Cuidad del Este
San Lorenzo
Peru
Arequipa
Chiclayo
Chimbote
Cusco
Huancayo
Iquitos
Lima
Piura
Trujillo
Puerto Rico
Bayamón
Caguas
Carolina
Ponce
San Juan
Uruguay
Las Piedras
Maldonado
Melo
Montevideo
Paysandú
Rivera
Salto
Tacuarembó
Venezuela
Barquisimeto
Caracas
Cuidad Bolivar
Cuidad Guayana
Maracaibo
Maracay
Va le nc i a
42

Other Information
Troubleshooting
If you have additional questions, service needs, or require technical assistance related to the use of your Sony receiver,
please visit our website or call one of the following numbers:
http://esupport.sony.com/bravialink
1-866-918-BIVL (2485) for US Residents
1-877-899-SONY (7669) for Canadian Residents
Condition Explanation/Solution
No picture
Cannot see video and network
category icons on XMB
Black screen
Video quality
Poor Picture
Small Picture
Black frame appears around the
video.
Certain programs display a loss of
detail, especially during fastmotion or dark scenes.
No sound/Poor sound
Good picture, no sound.
General
Remote control does not operate.
Video saved to My Video Links
does not play.
The receiver's Power LED is
blinking orange.
™
.
❑ Make sure the receiver’s power cord is connected securely.
❑ Turn on the power of the TV.
❑ Check connections to the receiver.
❑ Press HOME to access the XMB
Settings menu. If this icon does not appear, check the connections to your TV
(see page 12).
. Look for the Internet Video icon on the
™
❑ Your receiver may be in pass-through mode. See page 37 for more details on
pass-through.
❑ The quality of the video displayed on your TV depends on the quality of the
video provided by the video content provider as well as your connected
bandwidth. Sony recommends a broadband Internet connection of at least 2.5
Mbps to view content (10 Mbps for HD content).
❑ Press V/v to zoom in and out.
❑ Some videos are filmed in aspect ratios other than 16:9. Your TV will show these
videos surrounded by a black frame. Press V/v to zoom in or out.
❑ Video quality and picture size varies and is dependent upon broadband speed and
delivery by content providers.
❑ Check the volume control.
❑ Press MUTING or VOL + so that “Muting” disappears from the screen.
❑ Disconnect your headphones.
❑ Set Speaker to On in the Setup settings (see your TV’s Operating Instruction
Manual). If it is set to Off, sound is not output from the TV’s speakers regardless
of the TV’s volume control.
❑ Quality depends on content provided by the video content provider as well as
your connected bandwidth.
❑ If your TV is connected to home A/V equipment, check the audio settings on
your TV (see your TV's Operating Instruction Manual).
❑ Due to the nature of Internet video, not all videos will contain sound.
❑ Check the polarity of the batteries or replace the batteries.
❑ Point the remote control at the remote control sensor of the TV.
❑ Florescent lamps can interfere with your remote control operation; try turning
off the florescent lamps.
❑ Keep the remote control sensor area clear from obstacles.
❑ Videos removed by the video content provider may no longer be accessible.
Follow the instructions on page 29 to Remove this Link.
❑ The receiver is writing new software. Do not disconnect AC power.
Other Information
43

Other Information
Condition Explanation/Solution
The receiver's Power LED is
blinking orange and green.
I have Parental Lock enabled,
but it does not block some content.
My receiver is stuck in update
mode.
I do not see many videos in the
Internet Video Guide.
No video playback when using
Send from PC to TV.
How to reset the receiver to default
settings.
❑ Call the Sony Service Center for support.
❑ Parental Lock will block video content based on the appropriate TV or Movie
Rating. See the TV's Operating Instruction Manual for more information.
❑ You must accept an update to use the product.
❑ Press the OPTIONS button and select Categories to view more content.
❑ Check your TV parental ratings, you may be blocking too much content.
❑ Unsupported formats will not play. Supported formats include: .ASF
(WMV9 Video/WMA Audio), .MOV (AVC or H.264 Video/AAC-LC Audio),
and .MP4 (AVC or H.264 Video/AAC-LC Audio).
❑ Press the HOME button to access the XMB
menu, select Internet Video. Next, select Restore Default Settings and
press . Confirm the change by highlighting Yes and pressing . A
confirmation screen will display.
WARNING: This will reset your region and network settings.
on your TV. On the Settings
TM
44

Specifications
Model DMX-NV1
Power Requirements AC 120V 60Hz
Power Consumption 9W
DC Input 9V
Video Signal 1080i fixed output to DTV
Input/Output Ports
Termi nals DC In (9V) x1 (for supplied AC adapter only)
Ethernet (Network) x1 (base)
X
(for connection to
DMe
compatible TV)
USB Host x1 (side, for service use)
HDMI IN x1 (side, HDMI for pass-through)
HDMI Out x1 (base, for use with DMe
Dimensions W x H x D
Receiver Alone 4.1 x 6.4 x 1.3 (in)
Receiver with
Weight 1.1 lbs
Supplied Accessories
HDMI Cable x1 (L-shape connector for DMX-NV1)
USB Cable x1 (A to mini-B)
AC Adapter with AC Cord x1
Mounting Bracket x1
Cable Cover x1
Quick Setup Guide
Attachment Guide
Supplied Screws 1) LCD TV Mounting Plastic Fasteners (Screw Type 1) x2
Cable Cover
x1 (base)
x
compatible TV only)
4.1 x 8.5 x 1.3 (in)
x1
x1
2) Receiver to Mounting Bracket Thumb Screws (Mounting Knobs) x2
Other Information
Other Information
45

This page intentionally left blank.

Index
B
BRAVIA Internet Video Link 9
C
Cable Connections 12
Cable Cover 11, 20
Category Object Bar 16
Control Panel 28
Custom setup 40
D
DC IN 9V 9, 12
default settings 44
Device Information 25, 39
DISPLAY button 23
DMex button 16
DMex port 9, 12
G
Gaming Adapter 13
H
HDMI device 37
HDMI Input Port 9
HDMI OUT 12
HDMI OUT Port 9
HDMI port 12
HOME 16
Home Category 27
I
Internet Channels 25
L
LAN Ethernet Port 9
LED Indicators 10
List of Categories 27
M
Media Category Bar 16
Messages 26
Messages Inbox 32
Mounting Bracket 21
Mounting Knobs 21
My Page 26
My Video Links 25
N
NETWORK LED 9
Network LED Indicators 10
Network Menu 16
Network Setup 25
Next 28
O
Options Menu 27, 28
P, Q
Parental Lock 27
Pass-through port 9, 37
POWER LED 9
Power LED Indicators 10
Powerline Ethernet Adapter 14
TM
PS3
37
R
Recommended Connection Speed 13
Region 25
Reset 44
Restart 28
Restart Internet Channels 25
Restore Default Settings 25
RETURN button 23
Router 15
S
Save this Link 27
SELECT button 16, 23
SERVICE Port 9
Snapshot 9
Software Update 25, 38
Sort By 27
T, U
USB 12
V
Video Menu 16
W, X, Y
Wireless Bridge Connection 13
XMB 19
XrossMediaBar 19
47

For Your Convenience
Please contact Sony directly if you:
z
Have questions on the use of your module after reading the Operating Instruction manual
and Quick Setup Guide
z
Experience difficulty operating your module
Contact Sony Customer Support at:
http://esupport.sony.com/bravialink
or to speak with a support representative:
United States
1-866-918-BIVL (2485)
Sony will work to resolve your questions more quickly than your retailer or place of purchase.
Please Do Not Return the Product to the Store
Canada
1-877-899-SONY (7669)
 Loading...