

Page 1
IC Recorder
Getting Started
Basic Operations
Other Recording Operations
Other Playback Operations
Editing Messages
Listening to the FM Radio
About the Menu Function
Operating Instructions
ICD-UX200/UX300/UX200F/UX300F
Utilizing Your Computer
Additional Information
Troubleshooting
4-156-546-71(2)
© 2009 Sony Corporation
Printed in China
Page 2

Owner's Record
The model number is located at the rear panel and the
serial number is located inside the battery
compartment. Record these numbers in the space
provided below. Refer to these numbers whenever
you call upon your Sony dealer regarding this
product.
Model No. __________________________________
Serial No. __________________________________
FOR UNITED STATES
CUSTOMERS. NOT APPLICABLE
IN CANADA, INCLUDING IN THE
PROVINCE OF QUEBEC.
POUR LES CONSOMMATEURS
AUX ÉTATS-UNIS. NON
APPLICABLE AU CANADA, Y
COMPRIS LA PROVINCE DE
QUÉBEC.
For the customers in the United
States
The following FCC statement applies only to the
version of this model manufactured for sale in the
USA. Other versions may not comply with FCC
technical regulations.
INFORMATION
This equipment has been tested and found to comply
with the limits for a Class B digital device, pursuant to
Part 15 of the FCC Rules. These limits are designed to
provide reasonable protection against harmful
interference in a residential installation. This
equipment generates, uses and can radiate radio
frequency energy and, if not installed and used in
accordance with the instructions, may cause harmful
interference to radio communications.
However, there is no guarantee that interference will
not occur in a particular installation. If this equipment
does cause harmful interference to radio or television
reception, which can be determined by turning the
equipment off and on, the user is encouraged to try to
correct the interference by one or more of the
following measures:
Reorient or relocate the receiving antenna.
Increase the separation between the equipment and
receiver.
Connect the equipment into an outlet on a circuit
different from that to which the receiver is connected.
Consult the dealer or an experienced radio/TV
technician for help.
You are cautioned that any changes or modifications
not expressly approved in this manual could void your
authority to operate this equipment.
If you have any questions about this product, you may
call: Sony Customer Information Service Center 1800-222-7669 or http://www.sony.com/
GB
2
Page 3

Declaration of Conformity
Trade Name : SONY
Model : ICD-UX200/UX300
Responsible Party : Sony Electronics Inc.
Address : 16530 Via Esprillo,
Telephone Number : 858-942-2230
This device complies with part 15 of the FCC
Rules. Operation is subject to the following two
conditions: (1) This device may not cause harmful
interference, and (2) this device must accept any
interference received, including interference that
may cause undesired operation.
San Diego, CA 92127 USA
Notice for the customers in
Canada
This class B digital apparatus complies with Canadian
ICES-003.
For the customers in the USA
and Canada
RECYCLING NICKEL METAL HYDRIDE
BATTERIES
Nickel metal hydride batteries are
recyclable.
You can help preserve our
environment by returning your used
rechargeable batteries to the
collection and recycling location
nearest you.
For more information regarding recycling of
rechargeable batteries, call toll free 1-800-822-8837,
or visit http://www.rbrc.org/.
Caution: Do not handle damaged or leaking nickel
metal hydride batteries.
• The recorded music is limited to private use only.
Use of the music beyond this limit requires
permission of the copyright holders.
• Sony is not responsible for incomplete recording/
downloading or damaged data due to problems of
the IC recorder or computer.
• Depending on the types of the text and characters,
the text shown on the IC recorder may not be
displayed properly on device. This is due to:
– The capacity of the connected IC recorder.
– The IC recorder is not functioning normally.
– Content information is written in the language
or the character that is not supported by the IC
recorder.
GB
3
Page 4

Table of Contents
Getting Started
Step 1: Checking the Contents of the
Package .....................................................7
Index to parts and controls ...................8
Step 2: Recharging the Battery ................. 9
When to charge/replace the battery ....11
Step 3: Turning the IC Recorder On .......12
Turning the power on .........................12
Turning the power off .........................12
Step 4: Setting the Clock ........................ 13
Setting the clock after recharging the
battery .................................................13
Setting the clock using the menu ........13
Step 5: Setting the Language to Be Used
in the Display Window ...........................15
Preventing Accidental Operation
(HOLD) ................................................... 17
Locking the buttons ............................17
Unlocking the buttons ......................... 17
Basic Operations
Recording .......................................18
Listening .........................................22
Erasing ............................................26
GB
4
Other Recording Operations
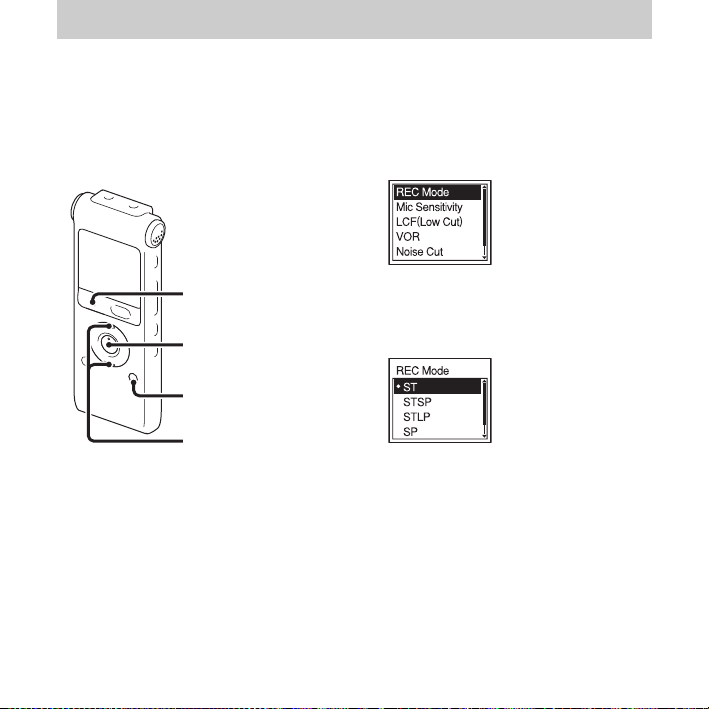
Changing the Recording Settings ............28
Selecting the recording mode .............28
Setting the microphone sensitivity ......29
Cutting out low frequency
– the LCF function ..............................31
Starting to record automatically in
response to sound
– the VOR function .............................32
Operating during Recording ....................34
Monitoring the recording ....................34
Dividing a message during
recording .............................................34
Recording via Other Devices ..................36
Recording with an external
microphone .........................................36
Recording from other equipment ........37
Other Playback Operations
Changing the Playback Method ..............42
Convenient playback methods ............42
Adjusting the playback speed
– the DPC function .............................43
Changing the Playback Settings ..............45
Selecting the playback mode ..............45
Making the human voice clearer
– the noise cut function .......................47
Selecting the sound effect ...................48
Page 5

Playing Back a Message at a Desired
Time with an Alarm ................................ 50
Playback via Other Devices ....................53
Recording with other equipment ........53
Editing Messages
Erasing All Messages in a Folder ...........55
Moving a Message to a Different
Folder ...................................................... 56
Dividing a Message into Two .................58
Listening to the FM Radio
Tuning in an FM Radio Station ..............60
Switching the FM radio output
between speaker and headphones ....... 61
Switching the receiver sensitivity of
the FM radio .......................................62
Recording FM broadcasts ................... 63
Presetting FM Radio Stations
Automatically .........................................64
Switching the scanning sensitivity ..... 65
Presetting FM Radio Stations
Manually .................................................67
Listening to a Preset Radio Station .........68
Erasing Preset FM Radio Stations ..........69
Utilizing Your Computer
Using the IC Recorder with Your
Computer .................................................83
System requirements for your
computer .............................................83
Connecting the IC recorder to your
computer .............................................84
Construction of folders and files .........85
Copying Messages from the IC
Recorder to Your Computer to
Save Them ...............................................87
Copying Music Files from Your
Computer to the IC Recorder and
Playing Them Back .................................88
Copying a music file from your
computer to the IC recorder
(drag and drop) ...................................88
Enjoying the music files more ............90
Using the IC Recorder as USB Memory
– Data Storage Function ..........................91
Using Voice Recognition Software .........92
Introducing the voice recognition
software ...............................................92
Creating a user file adapted to your
recorded speech (Training) .................92
Disconnecting the IC Recorder from
Your Computer .......................................94
About the Menu Function
Making Settings for the Menu ................71
Menu Settings ......................................... 72
Additional Information
Using a USB AC Adaptor
(not supplied) ..........................................95
GB
5
Page 6

Disconnecting the IC recorder from
the AC outlet .......................................96
Precautions ..............................................97
Specifications ..........................................99
System requirements ..........................99
Design and specifications .................100
Battery life ........................................ 103
Troubleshooting
Troubleshooting ....................................105
Error Messages .....................................112
System Limitations ............................... 115
Display Window Guide ........................116
Index .....................................................119
Trademarks ...........................................122
GB
6
Page 7
Getting Started
Step 1: Checking the Contents of the Package
IC Recorder (1)
Remove the film on the display window
before you use the IC recorder.
NH-AAA (size AAA) rechargeable
battery (1)
Stereo headphones (1)
USB connection support cable (1)
If the IC recorder cannot be connected to a
computer directly, use the supplied USB
connection support cable.
Battery case (1)
Operating Instructions
You are cautioned that any changes or
modifications not expressly approved in this
manual could void your authority to operate
this equipment.
Getting Started
GB
7
Page 8
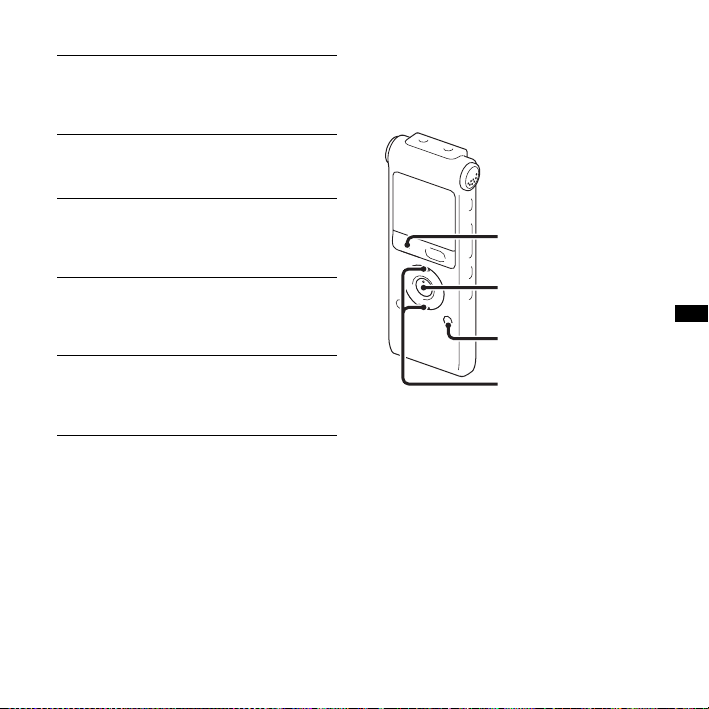
Index to parts and controls
Front
A Operation indicator
B Built-in microphones (stereo)
C Display window
x STOP button
D
z REC (record)/PAUSE button
E
F Control button (
backward),
N (play)/ENT (enter) button*
G
H (folder) button
I MENU button
J m (microphone) jack*
K i (headphone) jack
GB
8
v, V / . (review/fast
> (cue/fast forward))
L ERASE button
M VOL (volume) +*/– button
N (repeat) A-B button
O DIVIDE button
Rear
P Strap hole (A strap is not supplied.)
Q Speaker
R USB slide lever
S HOLD/POWER switch
T DPC (SPEED CTRL) switch
U Battery compartment
* These buttons and the jack have a tactile dot.
Use it as a reference point for operations, or
to identify each terminal.
Page 9
Step 2: Recharging the Battery
Remove the film on the display window
before you use the IC recorder.
Connect the IC recorder to a running
computer, and charge the battery until the
battery indicator indicates “ .”
When you use the IC recorder for the first
time, or after you have not used the IC
recorder for a certain period of time, charge
the battery continuously until “ ” is
displayed.
It takes about 3 hours and 30 minutes to
fully charge exhausted battery.*
You can also charge the battery by using an
AC-U50A USB AC adaptor (not supplied),
etc.
1
1 Insert a rechargeable battery.
Slide and lift the battery compartment
lid, insert one NH-AAA rechargeable
battery with correct polarity, and close
the lid.
2 Insert the USB connector of the IC
recorder into the USB port of a
computer.
Slide the USB lever on the back of the IC
recorder in the direction of the arrow,
and insert the USB connector into the
USB port of a running computer.*
Computer
IC recorder
To USB port
Getting Started
2
GB
9
Page 10
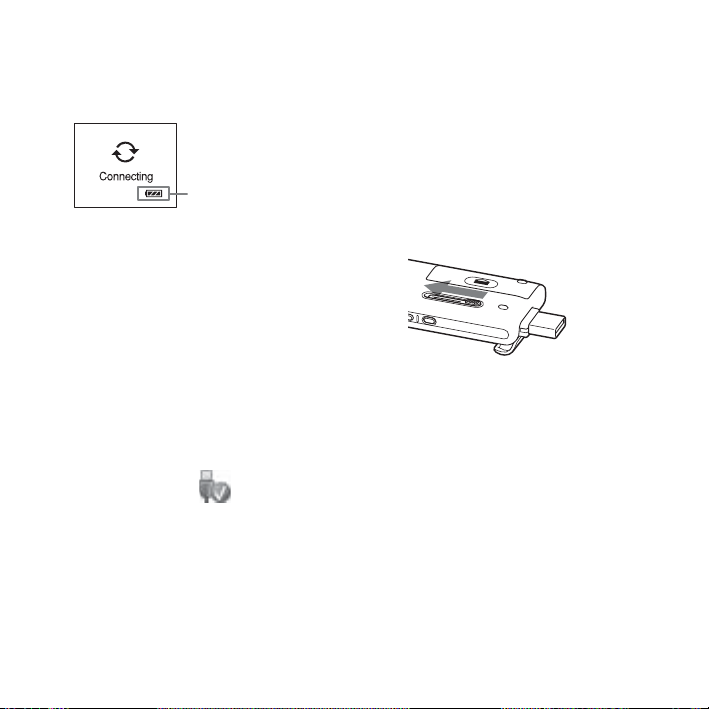
While the battery is charging,
“Connecting” and the battery indicator
are displayed in an animation.
Battery indicator
3 Disconnect the IC recorder from your
computer.
Follow the procedures below; otherwise,
when the IC recorder contains data files,
the files may be damaged or become
unplayable.
1 Perform the following operation on
your computer.
On the Windows screen, left-click the
icon at the bottom of the desktop of
the computer.
t Left-click “Safely remove USB
Mass Storage Device.”
The icon can be different on different
operating systems.
On the Macintosh screen, drag the
“IC RECORDER” on the desktop to
“Trash” and drop it there.
For details on disconnecting the IC
recorder from your computer, refer to
the operating instructions supplied
with your computer.
2 Make sure that the display of the IC
recorder turns off.
3 Disconnect the IC recorder from the
USB port of the computer, and slide
the USB lever in the direction of the
arrow to retract the USB connector.
*1This is an approximation for the time it
takes to charge from no remaining battery
power to full battery power at room
temperature. It varies depending on the
remaining power and the condition of the
battery. It also takes more time if the
temperature of the battery is low, or if the
battery is charged while you are transferring
data to the IC recorder.
2
If the IC recorder cannot be connected to a
*
computer directly, use the supplied USB
connection support cable.
10
GB
Page 11

P Note
If the battery indicator is not displayed in an
animation, charging has not been done
properly. See “Troubleshooting” on page 108.
When using a fully charged
battery or an LR03 (size AAA)
alkaline battery
Follow the step 1.
z Tips
• Do not use manganese battery for this IC
recorder.
• When replacing the battery, messages
recorded or alarm settings are not erased
even when you remove the battery.
• When replacing the battery, the clock
continues moving for about 3 minutes after
you remove the battery.
When to charge/replace the battery
The battery indicator on the display shows
the battery condition.
Battery remain indication
: Charge the rechargeable battery or
replace the old battery with a new
one.
m
: “Low Battery” appears and the IC
recorder will stop operation.
Getting Started
11
GB
Page 12
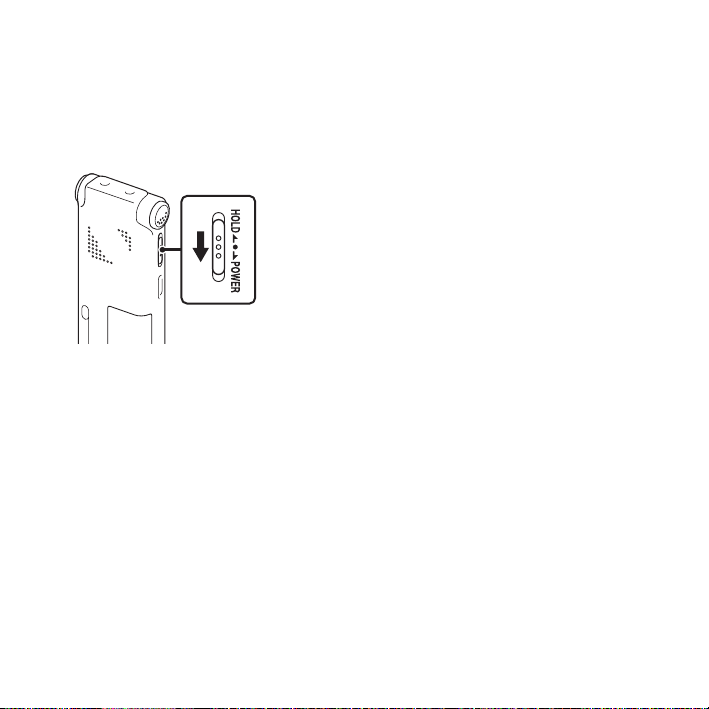
Step 3: Turning the IC Recorder On
Turning the power on
Slide the HOLD/POWER switch in the
direction of “POWER” for more than 1
second. The IC recorder is turned on, and
“Accessing...” is displayed.
Turning the power off
Slide the HOLD/POWER switch in the
direction of “POWER” for more than 2
seconds, and “Power Off” is displayed.
z Tips
• When you are not going to use the IC
recorder for a long time, we recommend to
turn off the IC recorder.
GB
12
• When you leave the IC recorder without
attempting an operation for a certain length
of time, the auto power off function will take
effect. (The length of time before auto power
off is set to “10min” when you purchase the
IC recorder.) You can select the length of
time before auto power off in the menu
(page 81).
Page 13
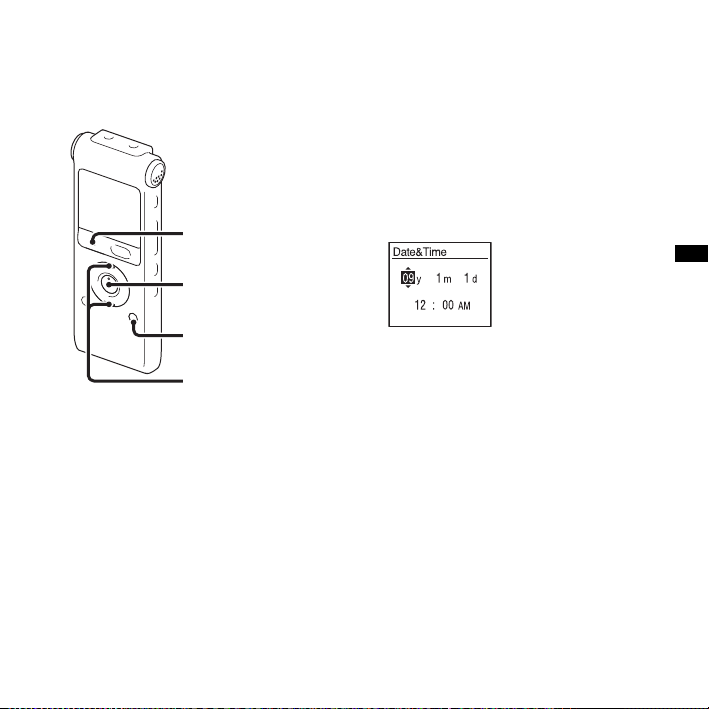
Step 4: Setting the Clock
x STOP
N/ENT
MENU
v, V
You need to set the clock to use the alarm
function or record the date and time.
Clock setting display appears when you
insert battery for the first time, or when you
insert a battery after the IC recorder has
been without battery for more than 3
minutes, “Set Date&Time” appears, and
then the year section flashes in the display
window.
Setting the clock after recharging the battery
1 Press v or V on the control button to set
the year, month, day, hour, and minute in
sequence, and then press
N/ENT.
2 Press x STOP to return to the stop mode
display.
Setting the clock using the menu
While the IC recorder is in the stop mode,
you can set the clock using the menu.
1 Select “Date&Time” in the menu.
1 Press MENU to enter the menu mode.
13
Getting Started
GB
Page 14
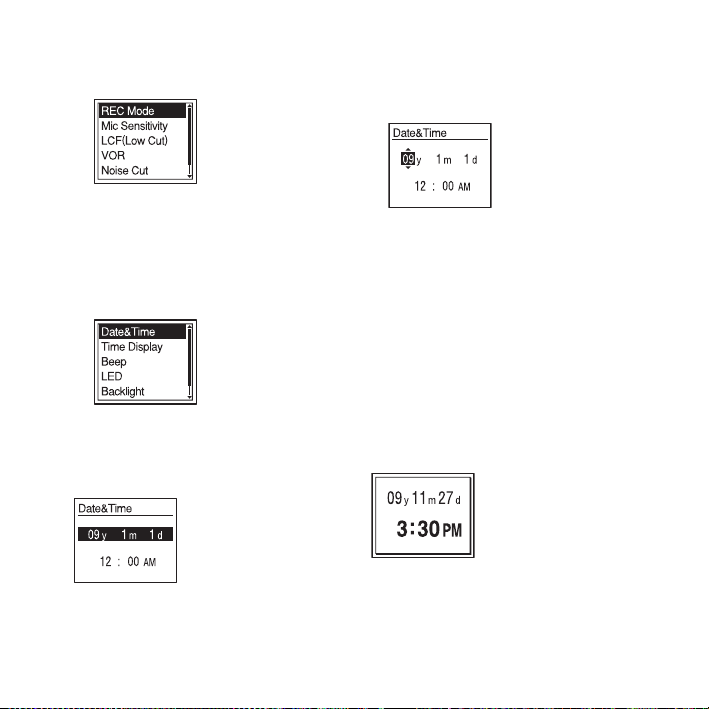
The menu mode window will be
displayed.
2 Press v or V on the control button to
select “Detail Menu,” and then press
N/ENT.
3 Press v or V on the control button to
select “Date&Time,” and then press
N/ENT.
2 Press v or V on the control button to
select “09y1m1d,” and then press
ENT.
N/
3 Press v or V on the control button to set
the year, month, day, hour, and minute in
sequence, and then press
N/ENT.
4 Press x STOP to return to the stop mode
display.
P Note
If you do not press N/ENT within 1 minute
of entering the clock setting data, the clock
setting mode is cancelled and the window will
return to the display of the stop mode.
To display the current date and
time
Press x STOP to display the current date
and time.
14
GB
Page 15
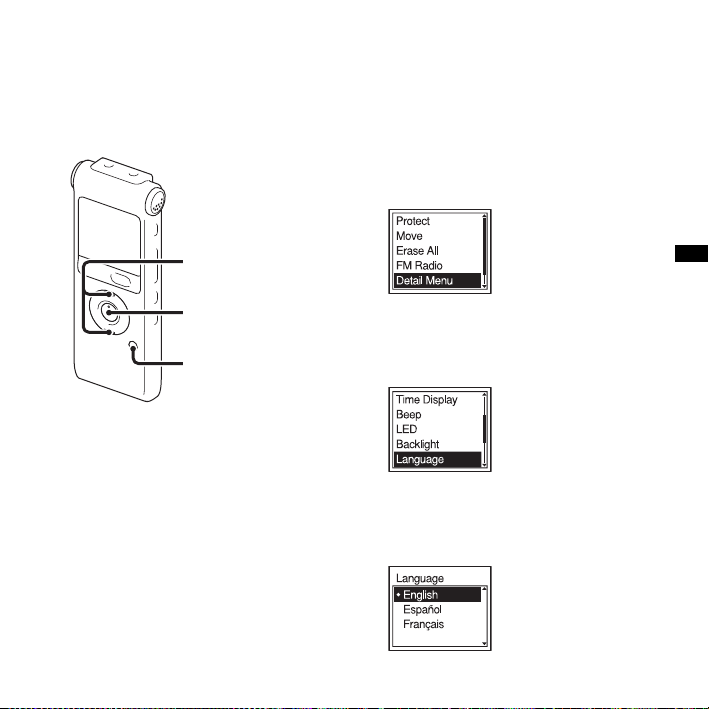
Step 5: Setting the Language to Be Used in the Display Window
v, V
N/ENT
MENU
You can select the language to be used for
messages, menus, folder names, file names,
etc. from 3 languages.
1 Press MENU to enter the menu mode.
The menu mode window will be
displayed.
2 Press v or V on the control button to
select “Detail Menu,” and then press
ENT.
3 Press v or V on the control button to
select “Language,” and then press
ENT.
N/
4 Press v or V on the control button to
select the language that you want to use,
and then press
N/ENT.
N/
15
Getting Started
GB
Page 16

You can select the following languages.
English, Español (Spanish), Français
(French)
16
GB
Page 17
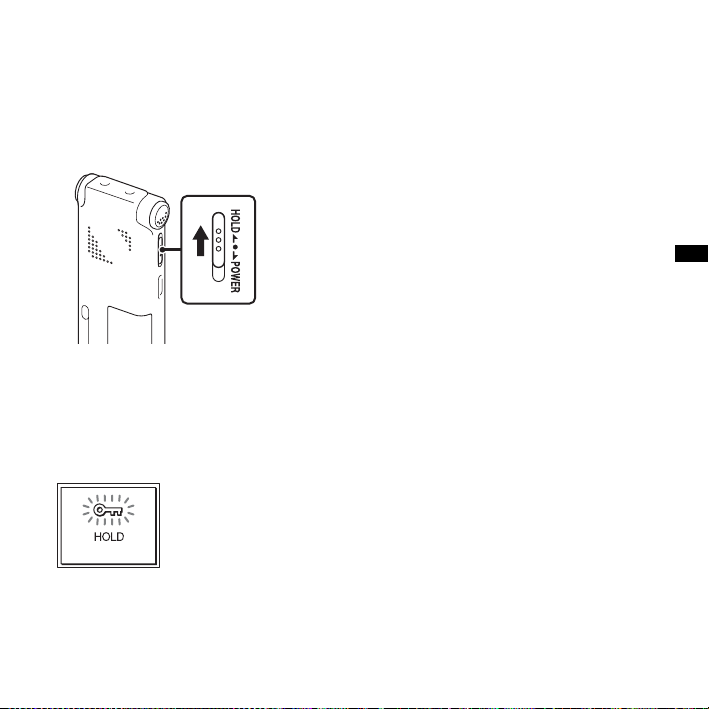
Preventing Accidental Operation (HOLD)
Locking the buttons
Slide the HOLD/POWER switch in the
direction of “HOLD.”
“HOLD” will appear indicating for approx.
3 seconds that all the functions of the
buttons are locked.
Unlocking the buttons
Slide the HOLD/POWER switch towards
the center so that all buttons will be
unlocked.
P Note
When the HOLD function is activated during
recording, all the functions of the buttons are
locked to prevent accidental operation. To stop
recording, cancel the HOLD function first.
Tip
z
Even if the HOLD function is activated, you
can stop the alarm playback by pressing any
button. (You cannot stop normal playback.)
17
Getting Started
GB
Page 18

Basic Operations
Recording
P Note
• Before making a recording, exit HOLD mode and turn on the power.
Selecting a folder
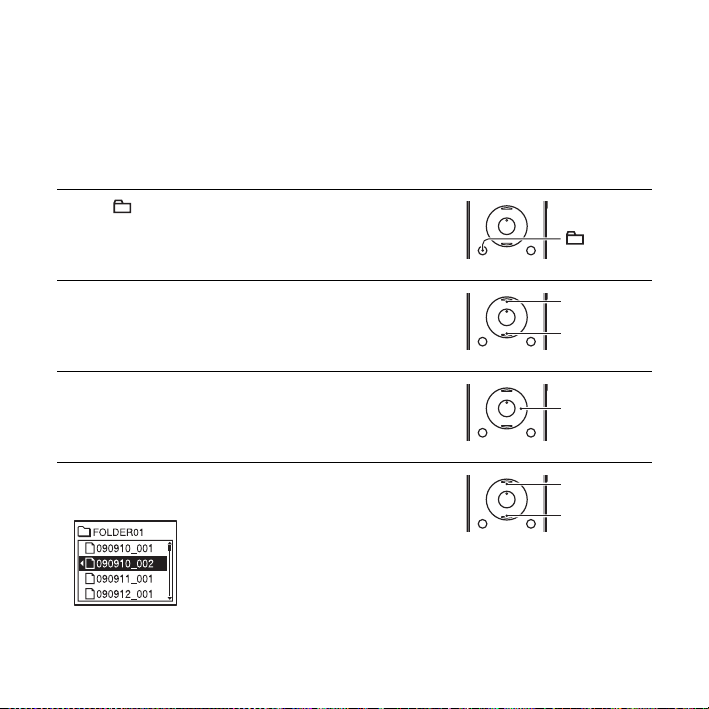
1 Press to display the folder selection window.
2 Press v or V on the control button to select the folder in
which you want to record messages
( FOLDER01-10).
There are 10 folders already available when you
purchase the IC recorder.
3 Press N/ENT.
GB
18
v
V
N/ENT
Page 19
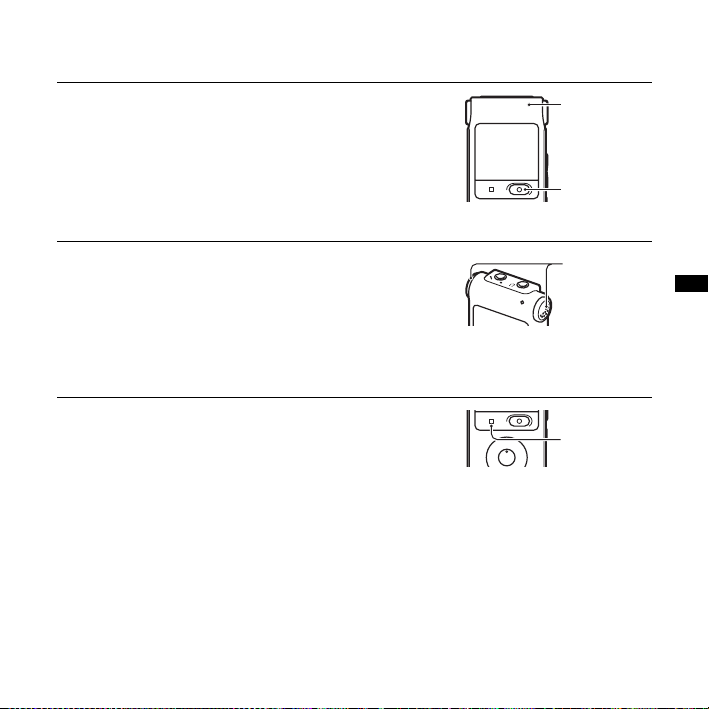
Starting to record
1 Press z REC/PAUSE in the stop mode.
The operation indicator lights in red.
You do not need to press and hold
while recording.
The new message will be automatically recorded after
the last recorded message.
z REC/PAUSE
2 Turn the built-in microphones in the direction of the
source to be recorded.
Operation
indicator
z REC/
PAUSE
Built-in
microphones
To stop recording
1 Press x STOP.
“Accessing...” appears on the display and the IC
recorder stops at the beginning of the current recording.
Note while accessing
The IC recorder is recording data and saving it in memory when “Accessing...” appears on
the display. While the IC recorder is accessing data, do not remove the battery or connect or
disconnect the USB AC adaptor (not supplied). Doing so may damage the data.
x STOP
19
Basic Operations
GB
Page 20
Other operations
pause recording* Press
release pause and resume
recording
review the current
recording instantly
review during recording Press and hold
* 1 hour after you pause recording, recording pause is automatically released and the IC recorder enters
the stop mode.
z Tips
• Messages recorded using this IC recorder will be recorded as MP3 files.
• You can record up to 99 messages in each folder.
• Before you start recording, we recommend you make a trial recording first, or monitor the
recording (page 34).
P Notes
• Noise may be recorded if an object, such as your finger, etc., accidentally rubs or scratches the IC
recorder during recording.
• Before making a recording, be sure to check the battery indicator (page 11).
z REC/PAUSE. During recording pause, the operation
indicator flashes in red and “ ” flashes in the display window.
Press
z REC/PAUSE again. Recording resumes from that point. (To
stop recording after pausing recording, press
N/ENT. Recording stops and playback starts from the
Press
beginning of the message just recorded.
recording pause. Recording stops and you can search backwards
. on the control button during recording or
while listening to fast playback sound. After you release
x STOP.)
. on the
control button, playback starts from that point.
20
GB
Page 21

21
Basic Operations
GB
Page 22
Listening
P Note
• Before playback starts, exit HOLD mode and turn on the power.
To start playback
1 Press .
2 Press v or V on the control button to select the folder.
3 Press > on the control button.
4 Press v or V on the control button to select the message
you want to play.
GB
22
v
V
>
v
V
Page 23

5 Press N/ENT.
Playback will start soon, and the operation indicator
will light in green. (When “LED” is set to “OFF” in the
menu (page 80), the operation indicator does not light.)
6 Press VOL +/– to adjust the volume.
To stop playback
1 Press x STOP.
Operation
indicator
N/ENT
VOL +/–
x STOP
Basic Operations
23
GB
Page 24
Other operations
stop at the current position
(Playback Pause function)
go back to the beginning of
the current message
go back to previous
messages
skip to the next message Press
skip to the succeeding
messages
* These operations are for when “Easy Search” is set to “OFF” (page 76).
Press N/ENT. To resume playback from that point, press N/ENT
again.
Press
. on the control button once.*
Press
. on the control button repeatedly. (During the stop mode,
keep the button pressed to go back the messages continuously.)
> on the control button once.*
> on the control button repeatedly. (During the stop mode,
Press
keep the button pressed to skip the messages continuously.)
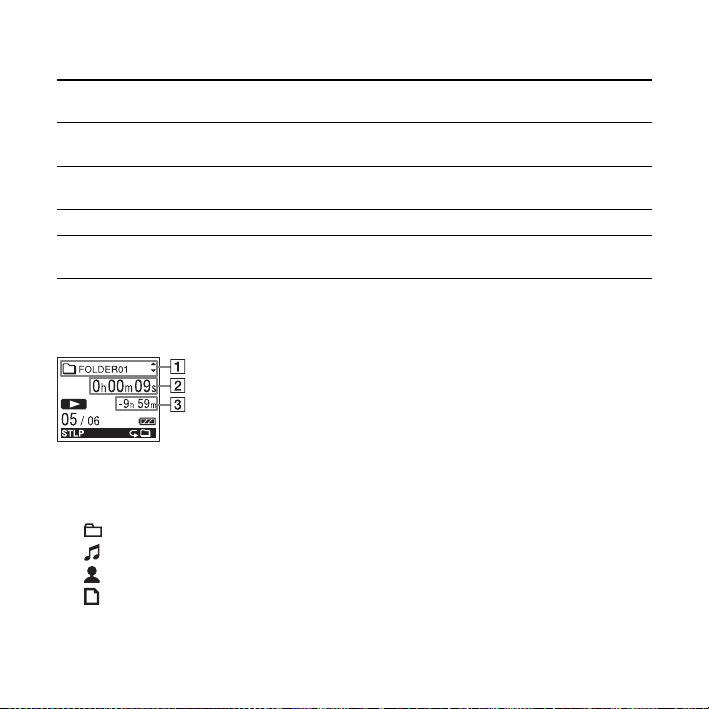
Display when playing back the messages
A File information
v or V on the control button to check the file information during playback.
Press
A message recorded using the IC recorder is displayed as follows.
: Folder name: FOLDER01-FOLDER10
: Title: Date_file number (e.g. 090101_001 or FM_090101_001)
: Artist name: My Recording
: File name: Date_file number (e.g. 090101_001 or FM_090101_001)
You can change the folder name, title, artist name, and/or file name using a computer.
24
GB
Page 25

B Counter information
You can select the display mode in the menu (page 77).
Elapsed time: Elapsed playback time of one message
Remaining time: The remaining time of the message
Recording date: Date recorded
Recording time: Time recorded
C Remaining recording time
Displays the remaining recording time in hours, minutes, and seconds.
If there is more than 10 hours time remaining, the time is displayed in hours.
If there is more than 10 minutes and less than 10 hours time remaining, the time is
displayed in hours and minutes.
If there is less than 10 minutes time remaining, the time is displayed in minutes and
seconds.
Basic Operations
25
GB
Page 26
Erasing
P Notes
• Once a recording has been erased, you cannot retrieve it.
• Before erasing a message, exit HOLD mode and turn on the power.
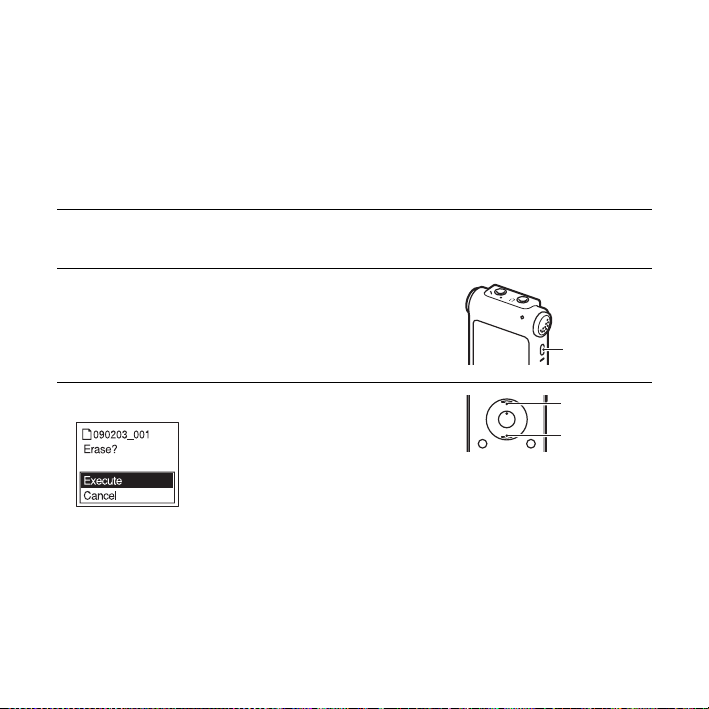
Selecting a message and erasing it
1 Select the message you want to erase when the IC
recorder is in the stop or playback mode.
2 Press ERASE.
“Erase?” appears with the message title.
ERASE
3 Press v or V on the control button to select “Execute.”
GB
26
v
V
Page 27
4 Press N/ENT.
“Erasing...” appears in the display window and the
selected message will be erased.
When a message is erased, the remaining messages will
advance and be renumbered so that there will be no
space between messages.
To cancel erasing
N/ENT
Basic Operations
1 Select “Cancel” in step 3 of “Selecting a message and
erasing it,” and then press
Erasing another message
Proceed with the same steps again from the beginning.
Erasing a part of one message
Divide the message into two messages first (page 58), and then proceed with the same steps
from the beginning.
N/ENT.
N/ENT
27
GB
Page 28
Other Recording Operations
Changing the Recording Settings
Selecting the recording mode
STOP
x
N/ENT
MENU
v, V
You can select the recording mode in the
menu when the IC recorder is in the stop
mode or the FM radio mode.
1 Press MENU to enter the menu mode.
The menu mode window will be
displayed.
GB
28
2 Press v or V on the control button to
select “REC Mode,” and then press
ENT.
3 Press v or V on the control button to
select “ST,” “STSP,” “STLP,” “SP,” or
“LP,” and then press
N/ENT.
4 Press x STOP to exit the menu mode.
N/
Page 29
ST High-quality stereo recording mode
(44.1 kHz/192 kbps)
You can record with stereo
high-quality sound.
STSP Standard play stereo recording mode
(44.1 kHz/128 kbps)
You can record with stereo sound.
STLP Long play stereo recording mode
(22.05 kHz/48 kbps)
You can record for a longer time
with stereo sound.
SP Standard play monaural recording
mode (44.1 kHz/32 kbps)
You can record with standard quality
sound.
LP Long play monaural recording mode
(11.025 kHz/8 kbps)
You can record for a longer time
with monaural sound.
To record with better sound quality, select
the ST or STSP mode.
The recording mode is set to “ST” when
you purchase the IC recorder.
P Note
You cannot set the recording mode while
recording.
Setting the microphone sensitivity
STOP
x
N/ENT
MENU
v, V
You can set the microphone sensitivity in
the menu when the IC recorder is stopped
or is recording.
1 Press MENU to enter the menu mode.
The menu mode window will be
displayed.
Other Recording Operations
29
GB
Page 30
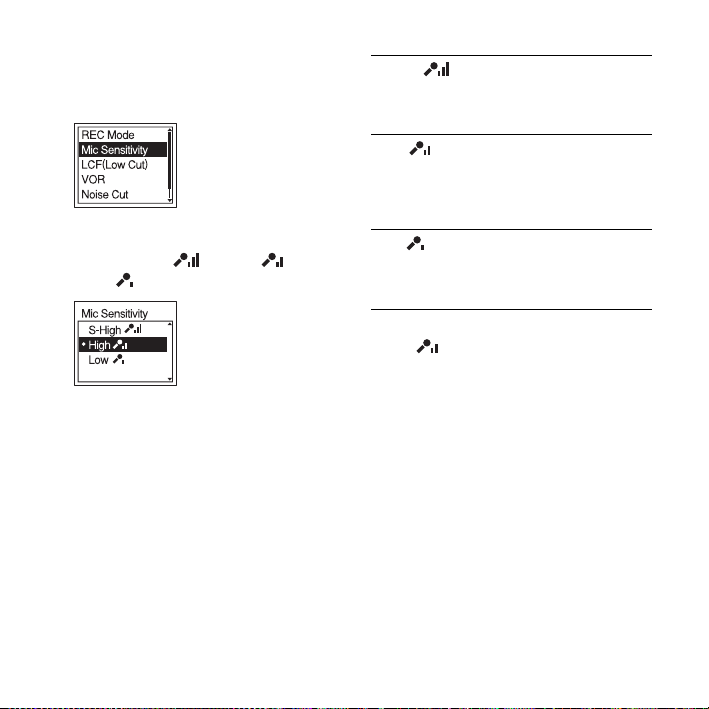
2 Press v or V on the control button to
select “Mic Sensitivity,” and then press
N/ENT.
3 Press v or V on the control button to
select “S-High ,” “High ,”
“Low ,” and then press
N/ENT.
4 Press x STOP to exit the menu mode.
S-High
High
Low
The microphone sensitivity is set to
“High ” when you purchase the IC
recorder.
To record a sound far away
from the IC recorder or a low
sound, such as a recording
made in a spacious room.
To record the sound of a
normal conversation or
meeting, such as a recording
made in a conference room or
during interviews.
To record dictation with a
microphone in front of your
mouth, a sound near the IC
recorder, or a loud sound.
30
GB
Page 31

Cutting out low frequency –
the LCF function
STOP
x
N/ENT
MENU
2 Press v or V on the control button to
select “LCF(Low Cut),” and then press
N/ENT.
3 Press v or V on the control button to
select “ON,” and then press
N/ENT.
Other Recording Operations
v, V
When you set the LCF (Low Cut Filter)
function to “ON” in the stop or recording
mode, you cut out a low frequency to
reduce the roaring noise from wind, etc.;
therefore you can record a message more
clearly.
1 Press MENU to enter the menu mode.
The menu mode window will be
displayed.
The LCF function is set to “OFF” when
you purchase the IC recorder.
4 Press x STOP to exit the menu mode.
To cancel the LCF function
Set “LCF(Low Cut)” to “OFF” in step 3.
31
GB
Page 32

Starting to record
automatically in response to
sound – the VOR function
2 Press v or V on the control button to
select “VOR,” and then press
N/ENT.
x STOP
z REC/PAUSE
N/ENT
MENU
v, V
You can set the VOR (Voice Operated
Recording) function to “ON” when the IC
recorder is stopped or is recording, to make
the IC recorder start recording when the IC
recorder detects sound, and pause when no
sound is heard, eliminating recording
during soundless periods.
1 Press MENU to enter the menu mode.
The menu mode window will be
displayed.
GB
32
3 Press v or V on the control button to
select “ON,” and then press
The VOR function is set to “OFF” when
you purchase the IC recorder.
N/ENT.
4 Press x STOP to exit the menu mode.
5 Press z REC/PAUSE.
“ ” and “ ” appear in the display
window.
The recording pauses when no sound is
detected and “ ” and “ ” flash.
When the IC recorder detects sound again,
the recording starts again.
Page 33

To cancel the VOR function
Set “VOR” to “OFF” in step 3.
P Note
The VOR function is affected by the sound
around you. Set “Mic Sensitivity” in the menu
according to the recording conditions. If
recording is not satisfactory after you have
changed the microphone sensitivity, or for an
important recording, set “VOR” to “OFF” in
the menu.
Other Recording Operations
33
GB
Page 34

Operating during Recording
Monitoring the recording
i (headphone) jack
VOL +/–
If you connect the supplied stereo
headphones to the i (headphone) jack
before you start, you can monitor the
recording. You can adjust the monitoring
volume by pressing VOL +/–, but the
recording level is fixed.
GB
34
Dividing a message during recording
DIVIDE
You can divide a message during recording
so that the message is divided into two
parts, and a new message number is added
to the newer part of the divided message.
Once a message is divided, you cannot
re-combine the divided messages.
Page 35

1 Press DIVIDE during recording.
“Dividing...” appears on the display and
the new message number is added at the
point you pressed the button. The
message will be recorded as two
messages, however recording continues
without stopping.
Message 1 Message 2 Message 3
Message is divided.
Message 2 and Message 3 are
recorded without stopping.
z Tip
You can divide the currently recorded message
during recording pause.
P Note
When you divide a message into two, at the
point of division, the end of the first message
and the beginning of the second message may
be interrupted.
v
Other Recording Operations
35
GB
Page 36

Recording via Other Devices
Recording with an external microphone
Stereo microphone
m (microphone) jack
x STOP
z REC/PAUSE
N/ENT
v, V
1 Connect an external microphone to the
m (microphone) jack when the IC
recorder is in the stop mode.
“Select Input” appears in the display
window.
If “Select Input” is not displayed, set it in
the menu (page 82).
GB
36
2 Press v or V on the control button to
select “MIC IN,” and then press
ENT.
N/
3 Press x STOP to exit the menu mode.
4 Press z REC/PAUSE to start recording.
The built-in microphones are
automatically cut off.
If the input level is not strong enough,
adjust the microphone sensitivity on the
IC recorder.
When a plug in power type microphone
is connected, power is automatically
supplied to the microphone from the IC
recorder.
z Recommended microphones
You can use the Sony ECM-CS10,
ECM-CZ10, ECM-DS70P, ECM-DS30P
electret condenser microphone (not supplied).
Page 37

Recording sound from a
telephone or a cell phone
You can use the ECM-TL1 headphone-type
electret condenser microphone (not
supplied) to record sound from a telephone
or a cell phone.
For details on how to make the connection,
refer to the operating instructions supplied
with the ECM-TL1 microphone.
P Notes
• After you have made the connection, check
the sound quality of the conversation and the
recording level before you start recording.
• If the beep of the telephone or a dial tone is
recorded, the conversation may be recorded
with lower level of sound. In this case, start
recording after the conversation has started.
• The VOR function may not work, depending
on the kind of telephone or the line
condition.
• We assume no responsibility whatsoever for
any inconvenience, even if you cannot
record a conversation using the IC recorder.
Recording from other equipment
External equipment
m (microphone) jack
x STOP
z REC/PAUSE
N/ENT
MENU
v, V
You can make music files without using the
computer by recording the sound from
other equipment connected to the IC
recorder.
z Tips
• Before you start recording, we recommend
you make a trial recording first.
• If the input level is not strong enough,
connect the headphone jack (minijack,
stereo) of other equipment to the
37
Other Recording Operations
GB
Page 38

m (microphone) jack of the IC recorder and
adjust the volume level on the piece of
equipment connected to the IC recorder.
To record using the
synchronized recording function
1 Press MENU to enter the menu mode.
The menu mode window will be
displayed.
2 Press v or V on the control button to
select “Detail Menu,” and then press
ENT.
N/
3 Press v or V on the control button to
select “SYNC REC,” and then press
ENT.
N/
5 Press x STOP to exit the menu mode.
6 Connect other equipment to the IC
recorder when the IC recorder is in the
stop mode.
Connect the audio output connector
(stereo mini-plug) of other equipment to
the m (microphone) jack of the IC
recorder using an audio connecting cable
(page 41)*.
“Select Input” appears in the display
window.
If “Select Input” is not displayed, set it in
the menu (page 82).
7 Press v or V on the control button to
select “Audio IN,” and then press
ENT.
N/
4 Press v or V on the control button to
select “ON,” and then press
GB
38
N/ENT.
Page 39

8 Press x STOP to exit the menu mode.
9 Press z REC/PAUSE to start recording.
“ ” flashes and the IC recorder
enters the recording pause mode.
10 Start playback on the piece of
equipment connected to the IC
recorder.
“ ” appears on the display and
synchronized recording starts.
The synchronized recording pauses when
no sound is detected for more than 2
seconds, and “ ” flashes.
The IC recorder starts recording again as a
new message when sound is detected.
P Notes
• During synchronized recording, you cannot
divide a message (page 34) and you cannot
pause recording (page 20).
• Depending on the piece of equipment
connected to the IC recorder, the
synchronized recording function may not
operate properly due to a difference in the
audio input level.
To record without using the
synchronized recording function
1 Press MENU to enter the menu mode.
The menu mode window will be
displayed.
2 Press v or V on the control button to
select “Detail Menu,” and then press
ENT.
N/
3 Press v or V on the control button to
select “SYNC REC,” and then press
ENT.
N/
Other Recording Operations
39
GB
Page 40

4 Press v or V on the control button to
select “OFF,” and then press
N/ENT.
7 Press v or V on the control button to
select “Audio IN,” and then press
ENT.
N/
5 Press x STOP to exit the menu mode.
6 Connect other equipment to the IC
recorder when the IC recorder is in the
stop mode.
Connect the audio output connector
(stereo mini-plug) of other equipment to
the m (microphone) jack of the IC
recorder using an audio connecting cable
(page 41)*.
“Select Input” appears in the display
window.
If “Select Input” is not displayed, set it in
the menu (page 82).
GB
40
8 Press x STOP to exit the menu mode.
9 Press z REC/PAUSE to start recording.
The built-in microphones are
automatically cut off and the sound from
the connected equipment is recorded.
10 Start playback on the piece of
equipment connected to the IC
recorder.
Page 41

* Optional audio connecting cables
(not supplied)
To the IC
recorder
RK-G139 Stereo
mini-plug
(without
resistor)
RK-G136 Stereo
mini-plug
(without
resistor)
To the other
equipment
Mini-plug
(monaural)
(without
resistor)
Stereo
mini-plug
(without
resistor)
P Note
When recording from other equipment, the
microphone sensitivity cannot be adjusted.
Other Recording Operations
41
GB
Page 42

Other Playback Operations
Changing the Playback Method
Convenient playback methods
Listening with better sound
quality
• To listen with the headphones:
Connect the supplied headphones to the
i (headphone) jack. The built-in speaker
will be automatically disconnected.
• To listen from an external speaker:
Connect an active or passive speaker (not
supplied) to the i (headphone) jack.
Quickly locating the point you
wish to start playback (Easy
Search)
When “Easy Search” is set to “ON”
(page 76) in the menu, you can quickly
locate the point at which you wish to start
playback by pressing
control button repeatedly during playback.
You can go back approx. 3 seconds by
. on the control button once, or
pressing
advance approx. 10 seconds by pressing
> on the control button once. This
function is useful for locating a desired
point in a long recording.
GB
42
> or . on the
Searching forward/backward
during playback (Cue/Review)
• To search forward (Cue):
Press and hold
during playback and release it at the point
you wish to resume playback.
• To search backward (Review):
Press and hold
during playback and release it at the point
you wish to resume playback.
The IC recorder searches at slow speed with
playback sound. This is useful to check one
word forward or back. Then, if you press
and hold the button, the IC recorder starts to
search at higher speed.
z When messages are played back
to the end of the last message
• When you play back or fast play back to the
end of the last message, “MESSAGE END”
lights up for approx. 5 seconds.
• When “MESSAGE END” and the operation
indicator go off, the IC recorder will stop at
the beginning of the last message.
• If you press and hold
button
messages are played back rapidly, and
> on the control button
. on the control button
. on the control
while “MESSAGE END” is lit, the
Page 43

normal playback will start at the point you
release the button.
• If the last message is long and you wish to
start playback at a later part of the message,
press and hold
go to the end of the message, and then press
. on the control button while
“MESSAGE END” is lit to go back to the
desired point.
• For messages other than the last one, go to
the beginning of the next message and play
backward to the desired point.
> on the control button to
Playing back a message
repeatedly
During playback, press and hold N/ENT
until “ 1” appears. The selected message
will be played back repeatedly.
To resume normal playback, press
again.
N/ENT
Adjusting the playback
speed – the DPC function
Rear
Other Playback Operations
Front
v, V
When you set the DPC (Digital Pitch
Control) function to “ON,” you can adjust
the playback speed between +100% and
–50% of normal speed in the menu.
The message is played back in natural tones
thanks to the digital processing function.
43
GB
Page 44

1 Slide the DPC (SPEED CTRL) switch to
“ON.”
2 If you wish to increase the playback
speed, press
when the IC recorder is in the playback
mode.
Every time the button is pressed, you can
increase the speed by 5% for + from
–50% to 0%, and 10% for + between 0%
and 100%.
v on the control button
3 If you wish to decrease the playback
speed, press
when the IC recorder is in the playback
mode.
Every time the button is pressed, you can
decrease the speed by 5% for – from 0%
to –50%, and 10% for – between 100%
and 0%.
To resume normal playback
Slide the DPC (SPEED CTRL) switch to
“OFF.”
P Notes
• You can only adjust the playback speed
between 0% and –50% when messages are
recorded as WMA/AAC-LC files.
• When any one message is played back
repeatedly by pressing and holding
V on the control button
N/ENT
during playback (page 43), or when the
specified A-B section is played back
repeatedly (page 46), you cannot adjust the
playback speed.
44
GB
Page 45

Changing the Playback Settings
Selecting the playback mode
x
STOP
N/ENT
MENU
v, V
You can select the playback mode in the
menu.
1 Press MENU to enter the menu mode
when the IC recorder is in the stop or
playback mode.
The menu mode window will be
displayed.
2 Press v or V on the control button to
select “Play Mode,” and then press
ENT.
N/
3 Press v or V on the control button to
select “1,” “ ,” “ALL,” “ 1,”
“ ,” or “ ALL,” and then press
N/ENT.
4 Press x STOP to exit the menu mode.
45
Other Playback Operations
GB
Page 46

1 A message is played back.
Messages in one folder are played
back continuously.
ALL All the messages are played back
continuously.
1 One message is played back
repeatedly.
Messages in one folder are played
back repeatedly.
ALL All the messages are played back
repeatedly.
Playing back a specified section
repeatedly – A-B Repeat
1 During playback, press (repeat) A-B
to specify the starting point A.
“A-B B?” is displayed.
2 Press (repeat) A-B again to specify
the finishing point B.
“ A-B” is displayed and the specified
section is played back repeatedly.
To resume normal playback:
N/ENT.
Press
To stop A-B Repeat playback:
Press
x STOP.
To change the segment specified for A-B
Repeat playback:
During A-B Repeat playback, press
(repeat) A-B again to specify a new
starting point A. Then specify a new
finishing point B, as in step 2.
P Note
You cannot specify the finishing point B
before the starting point A that has been set.
46
GB
Page 47

Making the human voice
clearer – the noise cut
function
STOP
x
The menu mode window will be
displayed.
2 Press v or V on the control button to
select “Noise Cut,” and then press
ENT.
N/
Other Playback Operations
N/ENT
MENU
v, V
When the noise cut function is set to “ON”
in the menu, the distortion of very low and
high frequencies which are outside the
human voice range is reduced, therefore
you can hear the human voice more clearly.
1 Press MENU to enter the menu mode
when the IC recorder is in the stop or
playback mode.
3 Press v or V on the control button to
select “ON,” and then press
N/ENT.
4 Press x STOP to exit the menu mode.
P Notes
• The effect of the noise cut function may be
different depending on the condition of the
recorded voice.
• When you are using the built-in speaker or
listening to the FM radio, the noise cut
function does not work.
To cancel the noise cut function
Set “Noise Cut” to “OFF” in step 3.
47
GB
Page 48

Selecting the sound effect
x
STOP
v, V
N/ENT
MENU
, >
.
2 Press v or V on the control button to
select “Effect,” and then press
N/ENT.
3 Press v or V on the control button to
select effect you want for the playback,
and then press
N/ENT.
You can set the effect you want for the
playback in the menu.
1 Press MENU to enter the menu mode
when the IC recorder is in the stop or
playback mode.
The menu mode window will be
displayed.
GB
48
4 If you select “Custom,” you can press v
V on the control button to adjust the
or
sound level for each band.
Press
. or > on the control button
to move to the band on the left or right.
5 Press N/ENT to close the custom
setting window.
6 Press x STOP to exit the menu mode.
Page 49

Pop Stresses middle ranges, ideal for
vocals.
Rock Emphasizes high and low ranges for
a powerful sound.
Jazz Emphasizes high ranges for lively
sound.
Bass1 Emphasizes the bass sound.
Bass2 Emphasizes the bass sound even
more.
Custom You can design your own custom
sound level for 5 bands of EQ.
The Effect function does not work.
OFF
P Notes
• When you are using the built-in speaker or
listening to the FM radio, this setting is
invalid.
• When the noise cut function is set to “ON” in
the menu, this setting is invalid.
Other Playback Operations
49
GB
Page 50

Playing Back a Message at a Desired Time with an Alarm
2 Enter the alarm setting mode.
1 Press MENU to enter the menu mode
when the IC recorder is in the stop
mode.
The menu mode window will be
STOP
x
N/ENT
MENU
v, V
You can sound an alarm and start playback
of a selected message at a desired time.
You can have the message played back on a
specified date, once every week, or at the
same time every day.
You can set a maximum of 30 alarms.
1 Select the message you want to play back
with an alarm.
displayed.
2 Press v or V on the control button to
select “Alarm,” and then press
ENT.
3 Press v or V on the control button to
select “New,” and then press
ENT.
N/
N/
50
GB
Page 51

3 Set the alarm date and time.
1 Press v or V on the control button to
select “Date,” a day of the week, or
“Daily,” and then press
2 When you select “Date”:
Set the year, month, day, hour, and
minute in sequence, as described in
“Step 4: Setting the Clock” on
page 13.
“Executing...,” then your settings are
displayed.
When you select a day of the week
or “Daily”:
v or V on the control button to
Press
set the hour, and then press
v or V on the control button to
press
set the minute, and then press
ENT.
N/ENT.
N/ENT,
N/
4 Press x STOP to exit the menu mode.
The setting process is finished and “
(alarm indicator) appears in the display
window.
To change the alarm setting
,”
1 Select “Alarm” - “List” in the menu, then
press
N/ENT.
The alarm list is displayed.
2 Press v or V on the control button to
select the item you want to change, then
N/ENT.
press
3 Press v or V on the control button to
select “Edit,” then press
N/ENT.
4 Select “Date,” a day of the week, or
“Daily,” then press
N/ENT.
5 Set the date and time and press N/ENT.
“Executing...,” then your settings are
displayed.
6 Press x STOP to exit the menu mode.
To cancel the alarm setting
Follow steps 1 and 2 of “To change the
alarm setting.” In step 3, select “Cancel”
and press
displayed. Press
button to select “Execute,” then press
ENT. The alarm will be cancelled and the
alarm indicator will disappear from the
display window.
N/ENT. “Cancel Alarm?” is
v or V on the control
N/
To set the alarm pattern
1 Select “Alarm” - “Pattern” in the menu,
then press
N/ENT.
Other Playback Operations
51
GB
Page 52

2 Press v or V on the control button to
select “Beep&Play,” “Beep” or “Play,”
then press
N/ENT.
3 Press x STOP to exit the menu mode.
When the set date and time
comes
At the set time, “Alarm” is displayed in the
display window and the alarm and the
selected message will be played back using
the selected alarm pattern.
When the playback ends, the IC recorder
will stop automatically. (When the alarm
pattern is set to “Beep&Play” or “Play,” the
IC recorder will stop at the beginning of the
selected message.)
To listen to the same message
again
Press N/ENT, and the same message will
be played back from the beginning.
To stop the alarm playback
Press any button other than VOL +/– while
the alarm sound is heard. If the HOLD
function is activated, you can stop the alarm
playback by pressing any button.
P Notes
• You can set only one alarm each one
message.
GB
52
• When the clock has not been set or no
messages are recorded, you cannot set the
alarm.
• The alarm sounds even if you set “Beep” to
OFF” in the menu (page 80).
“
• If the alarm time comes during recording,
the alarm will sound after the recording is
finished. “,” will flash when the alarm time
comes.
• If the alarm time comes while you are
updating data, the alarm will be cancelled
automatically.
• If more than one alarm time comes, only the
first message will be played back with an
alarm.
• Once the alarm is set, the alarm will not be
cancelled, even after the message is played
back.
• If the alarm time comes while another
message is being played back with an alarm,
the payback stops and the new message will
be played back.
• If you divide a message you have set an
alarm for, the alarm setting remains on only
the first part of the divided message.
• If you delete a message on which you have
set an alarm, that alarm will be also
cancelled.
Page 53

Playback via Other Devices
Recording with other equipment
Tape recorder, etc.
i (headphone) jack
x STOP
N/ENT
You can record the sound of the IC recorder
with other equipment.
Before you start recording, we recommend
you to make trial recording first.
1 Connect the i (headphone) jack of the
IC recorder to the audio input connector
(stereo minijack) of other equipment
using an audio connecting cable*.
2 Press N/ENT to start playback and at
the same time set the connected
equipment to the recording mode.
A message from the IC recorder will be
recorded on the piece of equipment
connected.
3 Press x STOP on the IC recorder and the
connected equipment at the same time to
stop recording.
* Optional audio connecting cables
(not supplied)
To the IC
recorder
RK-G139 Stereo
RK-G136 Stereo
mini-plug
(without
resistor)
mini-plug
(without
resistor)
To the other
equipment
Mini-plug
(monaural)
(without
resistor)
Stereo
mini-plug
(without
resistor)
53
Other Playback Operations
GB
Page 54

P Note
Your dealer may not handle some of the above
listed optional accessories. Please ask the
dealer for detailed information.
54
GB
Page 55

Editing Messages
Erasing All Messages in a Folder
v, V
N/ENT
MENU
P Note
If the selected folder contains a protected
message, you cannot erase the message.
1 Select the folder containing the messages
you want to erase when the IC recorder is
in the stop mode.
2 Press MENU to enter the menu mode.
The menu mode window will be
displayed.
3 Press v or V on the control button to
select “Erase All,” and then press
ENT.
N/
4 Press v or V on the control button to
select “Execute,” and then press
ENT.
“Erasing...” appears in the display
window and all messages in the selected
folder will be erased.
N/
5 Press x STOP to exit the menu mode.
To cancel erasing
Select “Cancel” in step 4, and then press
N/ENT.
55
Editing Messages
GB
Page 56

Moving a Message to a Different Folder
The menu mode window will be
displayed.
x
STOP
N/ENT
MENU
v, V
P Notes
• When “ ” is displayed for the folder
indicator, you cannot move a message
(page 85).
• You cannot move a message to a folder.
1 Select the message you want to move.
2 Press MENU to enter the menu mode
when the IC recorder is in the stop or
playback mode.
GB
56
3 Press v or V on the control button to
select “Move,” and then press
The message to be moved will be played
back.
N/ENT.
4 Press v or V on the control button to
select the folder that you want to move
the message into, and then press
ENT.
“Executing...” is displayed and the
message is moved to the last position in
the destination folder.
N/
Page 57

When you move a message to another
folder, the original message in the
previous folder will be deleted.
5 Press x STOP to exit the menu mode.
To cancel moving the message
Press x STOP before step 4.
57
Editing Messages
GB
Page 58

Dividing a Message into Two
1 Press DIVIDE while you are playing
back the message you want to divide.
“Divide?” appears with the message title.
v, V
N/ENT
DIVIDE
.
, >
You can divide a message during playback,
so that the message is divided into two parts
and a new message number is added to the
newer part of the divided message. By
dividing a message, you can easily find the
point from which you want to play back
when you make a long recording such as at
a meeting. You can divide a message until
the total number of messages in the folder
reaches the maximum number allowed.
GB
58
2 Press v or V on the control button to
select “Execute,” and then press
ENT.
“Dividing...” appears, a new number is
added to the newer part of the divided
message, and the message numbers of
the following messages will be
incremented by one.
Message 1 Message 2 Message 3
f
Message 1
v
A Message is divided.
Message 2 Message 3 Message 4
The message numbers are incremented.
N/
Page 59

P Notes
• You need a certain amount of free space in
the memory to divide a message.
• When you divide a message with a title and
artist name, the newer part has the same title,
artist name, and file name.
• You cannot divide a message other than the
one recorded using the IC recorder (MP3/
WMA/AAC-LC file transferred from a
computer).
• Once a message is divided, you cannot
combine divided messages using the IC
recorder.
• If you divide a message with an alarm
setting, the same alarm setting remains only
with the former message divided.
• You may not be able to divide a message at
the beginning or at the end of the message
because of system limitations.
To play the divided message
Press . or > on the control button to
display the message number, as the divided
messages now each have message numbers.
Editing Messages
59
GB
Page 60

Listening to the FM Radio
Tuning in an FM Radio Station
(for ICD-UX200F/UX300F only)
v, V
N/ENT
MENU
.
, >
The headphone cord is an FM antenna,
therefore, connect the headphone when
listening to the radio.
P Note
During FM reception you cannot charge the
battery.
GB
60
1 Press MENU to enter the menu mode.
The menu mode window will be
displayed.
2 Press v or V on the control button to
select “FM Radio,” and then press
ENT.
The IC recorder enters the FM radio
mode.
N/
3 Press v or V on the control button to
select frequency.
Page 61

4 Press . or > on the control button
repeatedly to tune in a station or press
. or > on the control
and hold
button until the frequency digits begin to
change on the display.
The IC recorder automatically scans the
radio frequencies and stops when it finds
a clear station.
If you cannot tune in a station, press
> on the control button repeatedly
or
to change the frequency step by step.
Display when listening to the FM
radio
.
Switching the FM radio output between speaker and headphones
x
STOP
N/ENT
Listening to the FM Radio
FM indication
Radio frequency
Preset number
Receiver sensitivity
MENU
v, V
During FM reception or FM recording, you
can switch between the sound from the
speaker and the sound from the headphones
using the menu.
1 During FM reception or FM recording,
press MENU to enter the menu mode
when listening to the FM radio.
The menu mode window will be
displayed.
61
GB
Page 62

2 Press v or V on the control button to
select “Audio Output,” and then press
N/ENT.
3 Press v or V on the control button to
select “Headphones” or “Speaker,” and
then press
The FM radio output is set to
“Headphones” when you purchase the IC
recorder.
N/ENT.
4 Press x STOP to exit the menu mode.
Switching the receiver sensitivity of the FM radio
x
STOP
N/ENT
MENU
v, V
You can set the receiver sensitivity when
listening to the FM radio.
1 Press MENU to enter the menu mode
when listening to the FM radio.
The menu mode window will be
displayed.
62
GB
Page 63

2 Press v or V on the control button to
select “DX/LOCAL,” and then press
ENT.
Recording FM broadcasts
N/
x STOP
3 Press v or V on the control button to
select “DX” or “LOCAL,” and then press
N/ENT.
4 Press x STOP to exit the menu mode.
DX Normally, select this setting.
LOCAL When there is interference or
P Note
Select “DX” when the IC recorder reception
status is not good due to a weak signal.
collapsing caused by a intense
electric field around the transmitting
antenna of the broadcasting station,
etc., select this setting.
z REC/PAUSE
1 Tune in the station you want to record.
2 Press z REC/PAUSE to start recording.
3 Press x STOP to stop recording.
63
Listening to the FM Radio
GB
Page 64

Presetting FM Radio Stations Automatically
2 Press v or V on the control button to
select “Auto Preset,” and then press
ENT.
x
STOP
N/
N/ENT
MENU
v, V
You can preset up to 30 FM radio stations
automatically using the preset menu.
1 Press MENU to enter the menu mode
when listening to the FM radio.
The menu mode window will be
displayed.
GB
64
3 Press v or V on the control button to
select “Execute,” and then press
ENT.
The IC recorder automatically scans for
available radio frequencies and the
stations will be stored in memory from
the lower frequencies to the higher ones.
While presetting FM radio stations
automatically, the preset number ready to
be assigned flashes.
N/
Page 65

To stop the automatic presetting
Press x STOP. The preset numbers stored
until you press the
in memory.
x STOP button remain
Switching the scanning sensitivity
x
STOP
N/ENT
MENU
v, V
You can set the scanning sensitivity when
presetting FM radio stations.
1 Press MENU to enter the menu mode
when listening to the FM radio.
The menu mode window will be
displayed.
65
Listening to the FM Radio
GB
Page 66

2 Press v or V on the control button to
select “Scan Sensitivity,” and then press
N/ENT.
3 Press v or V on the control button to
select “High(SCAN H)” or
“Low(SCAN L),” and then press
ENT.
The scanning sensitivity is set to
“High(SCAN H)” when you purchase
the IC recorder.
N/
4 Press x STOP to exit the menu mode.
66
GB
Page 67

Presetting FM Radio Stations Manually
2 Press N/ENT.
The preset number, frequency and “Set?”
will be displayed on the display.
N/ENT
v, V
You can preset up to 30 FM radio stations
in the IC recorder’s memory.
1 Tune in the station you want to preset
and store on the preset number.
When the station you want to tune in is
not a preset station, “P - -” is displayed.
In this case, you can register it with the
new preset number.
3 Press v or V on the control button to
select “Execute,” and then press
ENT.
The station will be stored in memory.
N/
67
Listening to the FM Radio
GB
Page 68

Listening to a Preset Radio Station
The IC recorder enters the FM radio
mode.
x
STOP
v, V
N/ENT
MENU
., >
3 Press v or V on the control button to
1 Press MENU to enter the menu mode
when the IC recorder is stopped.
The menu mode window will be
displayed.
2 Press v or V on the control button to
select “FM Radio,” and then press
ENT.
N/
select preset number.
4 Press . or > on the control button
repeatedly until the preset number you
want is displayed.
When you press and hold
the control button, the preset numbers
change rapidly.
5 Press x STOP to turn the FM radio off.
. or > on
68
GB
Page 69

Erasing Preset FM Radio Stations
The IC recorder enters the FM radio mode.
v, V
N/ENT
MENU
.
, >
The display in the display window may be
different from the actual one in some
regions.
1 Press MENU to enter the menu mode.
The menu mode window will be
displayed.
2 Press v or V on the control button to
select “FM Radio,” and then press
ENT.
N/
3 To tune in a station, press . or >
on the control button repeatedly until the
preset number you want to erase is
displayed.
4 Press N/ENT.
The preset number, frequency and
“Erase?” will be displayed on the
display.
5 Press v or V on the control button
repeatedly to select “Execute,” and then
press
N/ENT.
69
Listening to the FM Radio
GB
Page 70

The preset number will be changed to
“P - -.”
70
GB
Page 71

About the Menu Function
Making Settings for the Menu
x
STOP
v, V
N/ENT
MENU
., >
3 Press v or V on the control button to
select the setting that you want to set,
and then press
N/ENT.
About the Menu Function
1 Press MENU to enter the menu mode.
The menu mode window will be
displayed.
2 Press v or V on the control button to
select the menu item for which you want
to make setting, and then press
N/ENT.
4 Press x STOP to exit the menu mode.
P Note
If you do not press any button for 1 minute, the
menu mode is automatically cancelled and the
window will return to the normal display.
To return to the previous window
Press . on the control button during
menu mode.
To exit the menu mode
Press x STOP or MENU.
71
GB
Page 72

Menu Settings
Menu items Settings Operation mode
a
: the setting can be made/
(
— : the settin g cannot be made)
Stop
mode
REC Mode ST, STSP, STLP, SP, LP
Mic Sensitivity S-High , High , Low
LCF(Low Cut) ON, OFF
VOR ON, OFF
Noise Cut ON, OFF
Effect Pop, Rock, Jazz, Bass1, Bass2,
a
a
a
a
aa
aa
Custom, OFF
Easy Search ON, OFF
Play Mode 1, , ALL, 1, ,
aa
aa
ALL
Display Elapsed Time, Rema in Time,
REC Date, REC Time
Alarm New, List, Pattern
Protect Execute, Cancel
Move (Folder to be moved)
Erase All Execute, Cancel
FM Radio*
Auto Preset * Execute, Ca ncel
DX/LOCAL* DX, LOCAL
aa a
a
a
aa
a
a
—— —
—— —
* for ICD-UX200F/UX300F only
GB
72
Playback
Recording
mode
mode
——
—
a
—
a
—
a
———
———
———
———
—— ——
—— ——
———
—— ——
—— ——
FM radio
FM radio
mode
recording
mode
a
—
——
——
——
—
a
a
—
aa
Page 73

Menu items Settings Operation mode
a
: the setting can be made/
(
— : the settin g cannot be made)
Stop
Playback
mode
mode
Scan Sensitivity* High(SCAN H), Low(SCAN L)
Audio Output* Headphones, Speaker
Detail Menu
Date&Time _ _ y _ _ m _ _ d _ _ : _ _
Time Display 12-Hou r, 24-Hour
Beep ON, OFF
LED ON, OFF
Backlight ON, OFF
Language English, Español (Spanish),
Français (French)
USB Charge ON, OFF
Auto Power Off 5min, 10min, 30min, 60min
Select Input MIC IN, Audio IN
SYNC REC ON, OFF
Format Execute, Cancel
—— —
—— —
a
—— ——
a
—— ——
a
—— ——
a
—— ——
a
—— ——
a
—— ——
a
—— ——
a
—— ——
a
—— ——
a
—— ——
a
—— ——
a
—— ——
* for ICD-UX200F/UX300F only
Recording
mode
FM radio
FM radio
mode
recording
mode
a
—
aa
About the Menu Function
73
GB
Page 74

Menu items Settings (*: Initial setting) See page
REC Mode
Sets the recording mode.
28
ST*:
Stereo high-quality recording mode
STSP:
Stereo standard recording mode
STLP:
Stereo long play recording mode
SP:
Monaural standard play recording mode
LP:
Monaural long play recording mode
Mic Sensitivity
Sets the microphone sensitivity.
S-High :
To record a sound far away from the IC recorder or a low
29
sound, such as a recording made in a spacious room.
High *:
To record the sound of a normal conversation or meeting, such
as a recording made in a conference room or during
interviews.
Low :
To record dictation with a microphone in front of your mouth,
a sound near the IC recorder, or a loud sound.
LCF(Low Cut)
Sets the LCF (Low Cut Filter) function to cut a low frequency to
reduce the roaring noise from wind; therefore you can record a
message more clearly.
31
ON:
The LCF function is activated.
OFF*:
The LCF function is cancelled.
74
GB
Page 75

Menu items Settings (*: Initial setting) See page
VOR
Sets the VOR (Voice Operated Recording) function.
32
ON:
Recording starts when the IC recorder detects sound and
pauses when no sound is heard, eliminating recording during
soundless periods. The VOR function is activated when
z REC/PAUSE is pressed.
OFF*:
The VOR function does not work.
Noise Cut
Sets the noise cut function.
47
ON:
The distortion of very low and high frequencies which are
outside the human voice range is reduced, therefore you can
hear the human voice more clearly.
OFF*:
The noise cut function does not work.
About the Menu Function
75
GB
Page 76

Menu items Settings (*: Initial setting) See page
Effect
Sets the effect you want for the playback in the menu.
48
Pop:
Stresses middle ranges, ideal for vocals.
Rock:
Emphasizes high and low ranges for a powerful sound.
Jazz:
Emphasizes high ranges for a lively sound.
Bass1:
The bass sound is emphasized.
Bass2:
The bass sound is emphasized even more.
Custom:
You can design your own custom sound level for 5 bands of
EQ.
OFF*:
The Effect function does not work.
P Note
When playing back messages using the built-in speaker, listening
to the FM radio, or when the noise cut function is set to “ON” in
the menu, the Effect function does not work.
Easy Search
Sets the easy search function.
ON:
You can go forward for about 10 seconds by pressing
> on
42
the control button and go back for about 3 seconds by pressing
. on the control button. This function is useful when
attempting to locate desired point in a long recording.
OFF*:
The easy search function does not work. When you press
or
> on the control button, a message will be moved
.
forward or backward.
76
GB
Page 77

Menu items Settings (*: Initial setting) See page
Play Mode
Sets the playback mode.
45
1:
A message is played back.
*:
Messages in one folder are played back continuously.
ALL:
All the messages are played back continuously.
1:
One message is played back repeatedly.
:
Messages in one folder are played back repeatedly.
ALL:
All the messages are played back repeatedly.
Display
Changes the display mode.
Elapsed Time*:
–
Elapsed playback time of one message
Remain Time:
During stop or playback, the remaining time of the message
During recording, the available recording time
REC Date:
Date recorded
REC Time:
Time recorded
About the Menu Function
77
GB
Page 78

Menu items Settings (*: Initial setting) See page
Alarm
Sets the alarm.
50
New*:
To set the alarm, select “New” and set the date, time or day of
the week or choose daily for playback.
List:
A list of dates or the days of the week, and times at which the
alarm has already been set will be displayed.
Edit: You can change the selected date or day of the week and
time.
Cancel: You can cancel the alarm setting on the selected date
or on a day of the week.
Pattern:
Sets the alarm sound pattern for all alarm settings.
Beep&Play*: The selected message is played back after the
alarm sounds.
Beep: Only the alarm sounds.
Play: Only the selected message is played back.
Protect
Protect the selected message to prevent the message from being
–
erased, divided, or being moved.
Execute:
Protect the selected message. If you specify a message that has
already been protected, cancel the protection.
Cancel*:
“Set Protection?” or “Erase Protection?” is not executed.
Move
The selected message will be moved to the selected folder.
56
Before attempting to move a message, select the message to be
moved, and then go to the menu window.
Erase All
All messages in the selected folder will be erased.
Press to return to the folder window before erasing the
messages and select a folder from which all messages are to be
55
erased, and then go to the menu window and select “Execute.”
78
GB
Page 79

Menu items Settings (*: Initial setting) See page
FM Radio**
Auto Preset**
The IC recorder enters the FM radio mode. 60
Scans automatically for available frequencies. The stations will
64
be stored in memory.
Execute:
The automatic presetting is activated.
Cancel*:
The automatic presetting is cancelled.
DX/LOCAL**
Sets the receiver sensitivity when listening to the FM radio.
DX*:
Normally, select this setting.
62
LOCAL:
When there is interference or collapsing caused by a intense
electric field around the transmitting antenna of the
broadcasting station, etc., select this setting.
P Note
Select “DX” when the IC recorder reception status is not good
due to a weak signal.
Scan Sensitivity**
Sets the scanning sensitivity when presetting FM radio stations.
High(SCAN H)*:
The scanning sensitivity is set to high.
65
Low(SCAN L):
The scanning sensitivity is set to low.
Audio Output**
During FM reception or FM recording, you can switch between
the sound from the speaker and the sound from the headphones.
61
Headphones*:
The sound comes out from the headphones.
Speaker:
The sound comes out from the speaker(s).
** for ICD-UX200F/UX300F only
About the Menu Function
79
GB
Page 80

Menu items Settings (*: Initial setting) See page
Detail Menu
Date&Time
Sets the clock by setting year, month, day, hour, and minute in
13
sequence.
Time Display
Sets the clock display.
–
12-Hour*:
12:00AM = midnight, 12:00PM = noon
24-Hour:
0:00 = midnight, 12:00 = noon
Beep
Sets whether a beep will be heard or not.
ON*:
A beep will sound to indicate that an operation has been
–
accepted or an error has occurred.
OFF:
No beep sound will be heard.
P Note
The alarm sounds even if you set “Beep” to “OFF” in the menu.
LED
Turns the operation indicator on or off during operation.
ON*:
–
During recording or playback, the operation indicator lights or
flashes.
OFF:
The operation indicator does not light or flash, even during
operation.
P Note
When the IC recorder is connected to a computer, the operation
indicator lights or flashes even if “LED” is set to “OFF.”
80
GB
Page 81

Menu items Settings (*: Initial setting) See page
Backlight
Turns the backlight in the display window on or off.
–
ON*:
The backlight in the display window lights up for approx. 10
seconds.
OFF:
The backlight in the display window does not light, even
during operation.
Language
Sets the language to be used for messages, menus, folder names,
15
file names, etc.
English, Español (Spanish), Français (French)
USB Charge
Sets whether battery will be charged using a USB connection or
not.
ON*:
9
The battery will be charged.
OFF:
The battery will not be charged.
P Note
If you use a USB AC adaptor (not supplied) to connect the IC
recorder to the AC outlet, you can charge battery regardless this
setting.
Auto Power Off
If the IC recorder is on and left for the period you have set, the IC
recorder turns off automatically.
5min:
–
The IC recorder will be turned off after approx. 5 minutes.
10min*:
The IC recorder will be turned off after approx. 10 minutes.
30min:
The IC recorder will be turned off after approx. 30 minutes.
60min:
The IC recorder will be turned off after approx. 60 minutes.
About the Menu Function
81
GB
Page 82

Menu items Settings (*: Initial setting) See page
Select Input
Selects the external input to be recorded that is connected to the
m (microphone) jack.
MIC IN*:
Select when you record messages using an external
36, 37
microphone.
Audio IN:
Select when you record using other equipment.
SYNC REC
When set to “ON,” the IC recorder enters the recording pause
37
mode when no sound is detected for more than 2 seconds, and the
IC recorder starts recording again as a new message when any
sound is detected.
ON:
The synchronized recording function is activated.
OFF*:
The synchronized recording function is cancelled.
Format
Sets the formatting of the drive.
–
Execute:
“Formatting...” appears and the drive will be formatted.
Cancel*:
The drive will not be formatted.
P Notes
• Use the IC recorder formatting function to format the memory.
• When the memory is formatted, all the data stored in the IC
recorder will be erased. Once the memory has been erased, you
cannot retrieve the data that was erased.
82
GB
Page 83

Utilizing Your Computer
Using the IC Recorder with Your Computer
When the IC recorder is connected to your
computer, the IC recorder is recognized by
the computer, and you can transfer data
between them.
Copying messages from the IC
recorder to your computer to
save them (page 87)
You can copy the messages recorded on the
IC recorder to save them.
Copying music files from your
computer to the IC recorder to
play them back (page 88)
You can copy MP3/WMA/AAC-LC files
saved on your computer by a simple drag &
drop operation when you connect the
IC recorder to your computer. You can also
play back the copied files.
Using the IC recorder as USB
memory – data storage function
(page 91)
You can store image data or text data saved
on the computer temporarily in the IC
recorder.
System requirements for your computer
See “System requirements” on page 99.
83
Utilizing Your Computer
GB
Page 84

Connecting the IC recorder to your computer
Computer
IC recorder
To USB port
1 Slide the USB lever on the back of the IC
recorder in the direction of the arrow,
and insert the USB connector into the
USB port of a running computer.
The IC recorder is recognized by the
computer as soon as the connection is
made. While the IC recorder is connected to
the computer, “Connecting” is displayed in
the display window of the IC recorder.
If you cannot insert the USB connector of
the IC recorder into the USB port of a
computer directly, use the supplied USB
connection support cable.
USB connection support
cable (supplied)
2 Make sure the IC recorder has been
recognized properly.
On the Windows screen; open “My
Computer” or “Computer,” and make
sure that “IC RECORDER” has been
recognized.
On the Macintosh screen; make sure that
an “IC RECORDER” drive is displayed
on the desktop.
GB
84
P Notes
• If you connect more than two USB devices
to your computer, normal operation will not
be guaranteed.
• Use of this IC recorder with a USB hub or a
USB connection support cable other than the
supplied cable is not guaranteed.
• A malfunction may occur depending on the
USB devices connected at the same time.
Page 85

• Before connecting the IC recorder to the
computer, make sure that the battery is
inserted in the IC recorder.
• It is recommended that you disconnect the
IC recorder from the computer when you are
not using the IC recorder connected to the
computer.
Construction of folders and files
If you connect the IC recorder to your
computer, you can see the structure of
folders and files on the computer screen.
“IC RECORDER”
Folder for messages
recorded using the IC
VOICE
Conversation
MUSIC
recorder
FOLDER01
FOLDER10
Folder transferred from
your computer
1
*
POP
OLDIES*
3
*
1
2
*
Utilizing Your Computer
85
GB
Page 86

The folders and files are displayed on the
computer screen as shown.
The folder indicators in the display window
of the IC recorder are as follows:
: Folder for messages recorded using
the IC recorder (They have been
already made when you purchase
the IC recorder.)
: Folder transferred from a computer
(They are displayed when music
files have been transferred from a
computer.)
P Note
You can record messages in up to 10 folders
(FOLDER01-10) using the IC recorder.
1
The name of a folder in which music files
*
are stored will be displayed on the IC
recorder as it is, so it is convenient if you
put an easy-to-remember name on the
folder in advance.
Folders shown in the illustration are
examples of folder names.
2
The IC recorder can recognize up to 8 levels
*
of folders copied to the IC recorder.
3
If you copy music files separately, they are
*
classified as being in “No Folder.”
Tips
z
• You can change the folder name, title, artist
name, and/or file name using a computer.
• The title or artist name, etc., registered in the
music files, can be displayed on the IC
recorder. It is useful if you input the ID3 tag
information using the software you use to
make the music files on your computer.
• You can display the information in sequence
by pressing
v or V on the control button
(page 89).
P Notes
• You cannot copy 511 or more folders
(except VOICE folders) or files to the root
directory that is located immediately below
“IC RECORDER” on the computer. This is
due to system limitations (for ICD-UX200/
UX200F only).
• If no title, or artist name has been registered
“Unknown” will be displayed.
86
GB
Page 87

Copying Messages from the IC Recorder to Your Computer to Save Them
z To copy a message or a folder
(Drag and drop)
You can save messages or folders by
copying them from the IC recorder to your
computer.
1 Connect the IC recorder to your
computer (page 84).
2 Copy messages or folders you want to
save to your computer.
Drag and drop the messages or folders
you want from “IC RECORDER” to the
local disc on your computer.
1 Click and hold,
2 drag,
3 and then drop.
3 Disconnect the IC recorder from your
computer (page 94).
If you wish to create a CD, use a
commercially available CD burner software
application, a CD burner software application
installed on your computer, or Windows
Media Player.
For details about operations for the CD burner
software application or Windows Media
Player, refer to the operating instructions
supplied with the software application, or
contact the respective manufacturers.
87
Utilizing Your Computer
GB
Page 88

Copying Music Files from Your Computer to the IC Recorder and Playing Them Back
Copying a music file from your computer to the IC recorder (drag and drop)
1 Connect the IC recorder to your
computer (page 84).
You can copy music or other audio files
(MP3/WMA/AAC-LC*) from your
computer to the IC recorder by dragging
and dropping them, and you can then play
them back on the IC recorder.
You can make an MP3/WMA/AAC-LC file
using a software application, etc., installed
on your computer.
* For the file formats that can be played back
using the IC recorder, see “Specifications”
(page 99).
GB
88
2 Copy the folder in which the music files
are stored to the IC recorder.
On the Windows screen using Explorer,
and on the Macintosh screen using
Finder, drag and drop the folder onto the
IC recorder.
The IC recorder can recognize up to 500
folders. You can copy up to 999 files to
one folder and up to 5,000 files in total.
3 Disconnect the IC recorder from your
computer (page 94).
4 Press .
5 Press v or V on the control button to
select the folder ( ) in which music
files are stored, and then press
the control button.
> on
Page 89

6 Press v or V on the control button to
select the music file you want to play.
7 Press N/ENT to start playback.
8 Press x STOP to stop playback.
The maximum playback time (tracks*),
when playing music files using the IC
recorder, is as follows.
48 kbps 128 kbps 256 kbps
ICD-
89 hr.
UX200/
15 min.
UX200F
(1,338
tracks)
ICD-
178 hr.
UX300/
40 min.
UX300F
(2,680
tracks)
* In the case where MP3 files of 4 minutes
each are transferred to the IC recorder.
P Note
If you have transferred music files using your
computer, those files may not be copied in
order of transfer because of system limitations.
If you copy music files from your computer to
the IC recorder one by one, you can display
and play back the music files in copied order.
33 hr.
25 min.
(501 tracks)
67 hr.
(1,005
tracks)
16 hr.
40 min.
(250 tracks)
33 hr.
25 min.
(501 tracks)
Display when playing back a
music file
Press v or V on the control button to check
the music file information during playback.
: Folder name
: Title
: Artist name
: File name
z Tip
You can change the folder name, title, artist
name, and/or file name using a computer.
Utilizing Your Computer
89
GB
Page 90

Enjoying the music files more
Selecting the playback mode
You can select the playback mode, such as
playback of one music file, continuous
playback of music files in one folder,
continuous playback of all music files,
repeat playback of one music file, repeat
playback of music files in one folder and
repeat playback of all music files, in the
menu.
For details, see page 45.
Adjusting the playback speed –
the DPC (Digital Pitch Control)
function
You can adjust a playback speed between
+100% and –50% of normal speed in the
menu. You can only adjust the playback
speed between 0% and –50% when
messages are recorded as WMA/AAC-LC
files.
For details, see page 43.
Selecting a sound effect
You can cut the noise or set a effect such as
“Pop,” “Rock,” “Jazz,” “Bass1,” “Bass2,”
or “Custom” for the playback item in the
menu.
For details, see page 47 and 48.
GB
90
Playing back a message at a
desired time with an alarm
You can start playback of a selected
message at a desired time.
For details, see page 50.
Page 91

Using the IC Recorder as USB Memory – Data
Storage Function
When the IC recorder is connected to your
computer directly or using a USB
connection support cable, image data or text
data on the computer, as well as messages
or files recorded using the IC recorder can
be temporarily stored in the IC recorder.
Your computer must meet the specified
system requirements to use the IC recorder
as USB memory.
For details on the system requirements, see
page 99.
Utilizing Your Computer
91
GB
Page 92

Using Voice Recognition Software
When voice recognition software (not
supplied) is installed on your computer, you
can transcribe a message into a text file.
Introducing the voice recognition software
Dragon NaturallySpeaking is a speechrecognition software application that allows
you to recognize and transcribe your
recorded voice in a message and convert it
into a text file.
For details on Dragon NaturallySpeaking,
refer to the operating instructions supplied
with Dragon NaturallySpeaking.
For information on using Dragon
NaturallySpeaking, refer to the
documentation supplied with the software.
For the latest version and information on
the availability of Dragon
NaturallySpeaking in each region, please
refer to the following home page:
http://www.nuance.com
P Notes
• You can use the transcribing feature only
when you have installed Dragon
NaturallySpeaking Select or Professional
GB
92
Edition (not supplied) on your computer. To
install Dragon NaturallySpeaking, your
computer should meet the specified system
requirements.
• You can transcribe the following messages
saved in your IC recorder or on your
computer;
– ST, STSP, STLP or SP recording mode
messages (MP3 files)
– 44.1/16/11 kHz 16-bit WAV/AAC-LC
files saved on your computer
• You cannot transcribe a message recording
the voices of more than one person.
Creating a user file adapted to your recorded speech (Training)
What is “Training”?
Before you can transcribe recorded
messages using Dragon NaturallySpeaking,
you must create a user file specifically
adapted to the sound of your recorded
speech. This procedure is called “training.”
When training is complete, Dragon
NaturallySpeaking creates a user speech
file containing information about your
recorded speech.
Page 93

• Refer to the operating instructions or the
help supplied with Dragon
NaturallySpeaking, as some parts of
training are the same as those required for
dictating directly to the computer using a
headset microphone.
• Even if you have already created a user
speech file with a headset microphone,
you should create a separate speech file
for the IC recorder to get better
recognition accuracy.
Tips on using the IC recorder
When transcribing messages recorded using
the IC recorder, the following tips will help
you obtain maximum recognition accuracy.
• Set “REC Mode” to “ST,” “STSP,”
“STLP” or “SP” in the menu.
When creating a user speech file
(training), set “REC Mode” to the mode
you normally use for voice recognition
software.
• Set “Mic Sensitivity” to “Low ” in
the menu.
• Hold the IC recorder firmly and start
recording.
Hold the IC recorder so that the
microphone is about an inch (2 cm 3 cm) from the corner of your mouth, not
directly in front of it. This minimizes the
sound of your breath in the recordings,
enabling maximum recognition accuracy.
P Note
Avoid recording in a noisy place, such as on a
subway platform, in order to obtain maximum
recognition accuracy.
Utilizing Your Computer
93
GB
Page 94

Disconnecting the IC Recorder from Your Computer
Follow the procedures below; otherwise,
data may be damaged.
1 Make sure that the operation indicator
does not light.
2 Perform the following operation on your
computer.
On the Windows screen, left-click the
icon at the bottom of the desktop of the
computer.
t Left-click “Safely remove USB Mass
Storage Device.”
The icon can be different on different
operating systems.
On the Macintosh screen, drag the “IC
RECORDER” on the desktop to “Trash”
and drop it there.
For details on disconnecting the IC
recorder from your computer, refer to the
operating instructions supplied with your
computer.
GB
94
3 Make sure that the display of the IC
recorder turns off.
4 Disconnect the IC recorder from the
USB port of the computer, and slide the
USB lever in the direction of the arrow to
retract the USB connector.
Page 95

Additional Information
Using a USB AC Adaptor (not supplied)
USB connector of the I C recorder
USB AC adaptor
(not supplied)
You can charge the rechargeable battery by
connecting the IC recorder to an AC outlet
using an AC-U50AD (U.S.A. and Canada
only) or an AC-U50A (Latin America only)
USB AC adaptor (not supplied).
You can charge the battery while you are
using the IC recorder, so that it is useful
when you want to record for a long time.
When you use the IC recorder for the first
time, or after you have not used the IC
recorder for a certain time, it is
recommended that you charge the battery
repeatedly until “ ” is displayed.
It takes about 3 hours and 30 minutes to
fully charge exhausted battery.*
P Note
Your dealer may not handle some of the
optional accessories. Please ask the dealer for
detailed information.
1 Connect the USB AC adaptor (not
supplied) to an AC outlet.
2 Slide the USB lever of the IC recorder
and connect the IC recorder to a USB AC
adaptor.
While the battery is charging, the
remaining battery indicator are displayed
in an animation.
Now you can use the IC recorder while
changing the battery.
* This is an approximation for the time it takes
to charge from no remaining battery power
to full battery power at room temperature. It
varies depending on the remaining power
and the condition of the battery. It also takes
more time if the temperature of the battery is
low, or if the battery is charged while you
are transferring data to the IC recorder.
95
Additional Information
GB
Page 96

Disconnecting the IC recorder from the AC outlet
Follow the procedures below; otherwise,
when the IC recorder contains data files, the
files may be damaged or become
unplayable.
1 If you are recording or playing back a
message, press
recorder into the stop mode.
x STOP to put the IC
2 Make sure that the operation indicator
does not light.
3 Disconnect the IC recorder from the
USB AC adaptor, and then disconnect
the USB AC adaptor from the AC outlet.
P Notes
• During recording (the operation indicator
lights or flashes in red) or accessing data (the
operation indicator flashes in orange),
– the IC recorder should not be connected to
or disconnected from the USB AC adaptor
connected to the AC outlet.
– the USB AC adaptor connected to the IC
recorder should not be connected to or
disconnected from the AC outlet.
Doing so may damage the data. If the IC
recorder is required to process a large
amount of data, the start-up window may be
displayed for an extended period of time.
This is not a malfunction of the IC recorder.
Wait until the start-up display disappears
from the display window.
• While a USB AC adaptor (not supplied) is
being used, the remaining battery indicator
does not appear in the display window.
96
GB
Page 97

Precautions
On power
Operate the unit only on 1.5 V or 1.2 V DC.
Use one NH-AAA rechargeable battery or
one LR03 (size AAA) alkaline battery.
On safety
Do not operate the unit while driving,
cycling or operating any motorized vehicle.
On handling
• Do not leave the unit in a location near
heat sources, or in a place subject to direct
sunlight, excessive dust or mechanical
shock.
• Should any solid object or liquid fall into
the unit, remove the battery and have the
unit checked by qualified personnel
before operating it any further.
• Be careful not to allow water to splash on
the unit. The unit is not water-proof. In
particular, be careful in the following
situations.
– When you have the unit in your pocket
and go to the bathroom, etc.
When you bend down, the unit may
drop into the water and may get wet.
– When you use the unit in an
environment where the unit is exposed
to rain, snow, or humidity.
– In circumstances where you get sweaty.
If you touch the unit with wet hands or
if you put the unit in the pocket of
sweaty clothes, the unit may get wet.
• You may feel pain in your ears if you use
the headphones when the ambient air is
very dry. This is not because of a
malfunction of the headphones, but
because of static electricity accumulated
in your body. You can reduce static
electricity by wearing non-synthetic
clothes that prevent the emergence of
static electricity.
On noise
• Noise may be heard when the unit is
placed near an AC power source, a
fluorescent lamp or a mobile phone
during recording or playback.
• Noise may be recorded when an object,
such as your finger, etc., rubs or scratches
the unit during recording.
97
Additional Information
GB
Page 98

On maintenance
To clean the exterior, use a soft cloth
slightly moistened in water. Do not use
alcohol, benzine or thinner.
If you have any questions or problems
concerning your unit, please consult your
nearest Sony dealer.
Backup recommendations
To avoid potential risk of data loss
caused by accidental operation or
malfunction of the IC recorder, we
recommend that you save a backup copy
of your recorded messages on a tape
recorder or to a computer, etc.
98
GB
Page 99

Specifications
System requirements
Operating systems:
– Windows Vista® Ultimate Service Pack 1
or higher
– Windows Vista
or higher
– Windows Vista
Pack 1 or higher
– Windows Vista
Pack 1 or higher
– Windows
2005 Service Pack 3 or higher
– Windows
2004 Service Pack 3 or higher
– Windows
Service Pack 3 or higher
– Windows
3 or higher
– Windows
Pack 3 or higher
– Windows
Pack 4 or higher
– Mac OS X (v10.2.8-v10.5)
– Pre-Installed
P Notes
• Operation is not guaranteed if any operating
system other than those indicated on the left
(Windows
®
Business Service Pack 1
®
Home Premium Service
®
Home Basic Service
®
XP Media Center Edition
®
XP Media Center Edition
®
XP Media Center Edition
®
XP Professional Service Pack
®
XP Home Edition Service
®
2000 Professional Service
®
98 or Linux, etc.) is used.
®
• 64 bit versions of Windows
supported.
• For the latest version information and
compatibility with your operating system,
please access the support home page for the
IC recorder:
U.S.A.:
http://www.sony.com/recordersupport
Canada:
http://www.sony.ca/ElectronicsSupport/
http://fr.sony.ca/ElectronicsSupport/
Latin American areas:
http://www.sony-latin.com/index.crp
XP are not
Hardware environment:
– Port: USB port
– Sound board: Sound cards compatible
with any of the supported Microsoft
®
Windows
operating systems
P Note
• The following systems are not supported:
– Operating systems other than the ones
indicated on the left
– Personally constructed computers or
operating systems
– Upgraded operating systems
– Multi-boot environment
– Multi-monitor environment
®
Additional Information
GB
99
Page 100

When you are using Windows®
2000 Professional
Install the driver using
“SonyRecorder_Driver.exe” in the IC
recorder.
Design and specifications
IC recorder section
Capacity (User available capacity)
ICD-UX200/UX200F: 2 GB
(approx. 1.79 GB = 1,928,822,784 Byte)
ICD-UX300/UX300F: 4 GB
(approx. 3.59 GB = 3,860,922,368 Byte)
A part of the memory capacity is used as a
management area.
Frequency range
• ST: 40 Hz - 20,000 Hz
• STSP: 40 Hz - 15,000 Hz
• STLP: 60 Hz - 7,500 Hz
• SP: 60 Hz - 10,000 Hz
• LP: 60 Hz - 3,400 Hz
Bit rate and sampling frequencies for
MP3 files
Bit rate: 32 kbps - 320 kbps, VBR
Sampling frequencies:
*
GB
100
*1
16/22.05/24/32/44.1/48 kHz
1
The playback of MP3 files recorded using
the IC recorder is also supported. Not all
encoders are supported.
Bit rate and sampling frequencies*2 for
WMA files
Bit rate: 32 kbps - 192 kbps*3, VBR
Sampling frequencies: 44.1 kHz
2
*
WMA Ver. 8 Class2A is compatible,
however, MBR (Multi Bit Rate), Lossless,
Professional, and Voice are not supported.
This IC recorder cannot play back DRM
protected contents. Not all encoders are
supported.
3
The NoiseSubstitution function is not
*
supported, therefore, playback becomes
simple playback with 32 kbps bit rate.
Bit rate and sampling frequencies for
AAC-LC files*
Bit rate: 16 kbps - 320 kbps, VBR
Sampling frequencies:
11.025/12/16/22.05/24/32/44.1/48 kHz
4
Not all encoders are supported.
*
4
FM radio section
Frequency range
87.50 MHz - 108.00 MHz
IF 150 kHz
Antenna
Stereo headphones cord antenna
 Loading...