

Sony HXR-IFR5 Operating Manual

Portable Memory Recorder
Interface Unit
Operating Guide
4-466-489-11(1)
HXR-IFR5

Overview
By connecting this unit to the AXS-R5 portable recorder, signals output from an NEX-FS700
series camcorder can be converted and recorded in the NEX-FS700 series’s RAW image
format to the AXS-R5.
You can also view video recorded in the AXS-R5 using simple playback functionality of this
unit.
Played back movies are output from the AUX-OUT connector of the AXS-R5.
• This unit is designed for use only with the AXS-R5 portable recorder attached.
• The software version of the NEX-FS700 series and the AXS-R5 that can be used with this unit are as
follows.
– NEX-FS700 series: Ver. 3.00 or later
– AXS-R5: Ver. 1.20 or later
About this manual
Operations of the unit with an NEX-FS700 series camcorder, AXS-R5, BNC cable, etc,
connected are described in this manual.
NEX-FS700 series camcorder, AXS-R5, BNC cable, battery pack, DC power cable and AXS
memory card are sold separately.
On trademarks
Product names mentioned herein may be the trademarks or registered trademarks of their
respective companies. Furthermore, ™ and “®” are not mentioned in each case in this manual.
2

Identifying parts and controls
A LCD monitor
B MENU button
Press the MENU button to display the menu
screen.
To end the menu screen, press the MENU
button again.
Press and hold the MENU button to turn the
backlight on/off.
C ./V button
Press the ./V button to display the
previous clip. Press and hold the
button during playback to rewind the current
clip.
./V button to move the cursor
Press the
while the menu screen is displayed.
./V
D x/STOP button
Stop recording or playing clips.
While the menu screen is displayed, pressing
the x/STOP button executes the selected
menu or returns to the previous screen,
depending on the menu.
E POWER ON/OFF switch
Set the POWER ON/OFF switch to turn the
power on/off.
F CAUTION lamp
G N/PLAY/EXEC button
Press the N/PLAY/EXEC button to play a
recorded file.
Press the N/PLAY/EXEC button while the
menu screen is displayed to execute the
selected menu item.
H >/v button
Press the >/v button to view a next clip.
Press and hold the >/v button during
playback to play the current clip at variable
speed.
Press the >/v button to move the cursor
while the menu screen in displayed.
I REC button
Press the two REC buttons simultaneously to
start recording.
J HOLD switch
When you set the HOLD switch toward the
right, no functions other than the POWER
ON/OFF switch can be used.
K Connector
Connect the AXS-R5.
L Handle
The screw holes of the handle are specified
for 1/4-20UNC screws.
M SDI IN(RAW) connector
Connect to the 3G/HD/SD SDI OUT jack on
the NEX-FS700 series by a BNC cable.
Continued ,
3

Identifying parts and controls (Continued)
N Mounting screw hole
Use a tripod with a screw shorter than 5.5 mm
(7/32 in.).
4
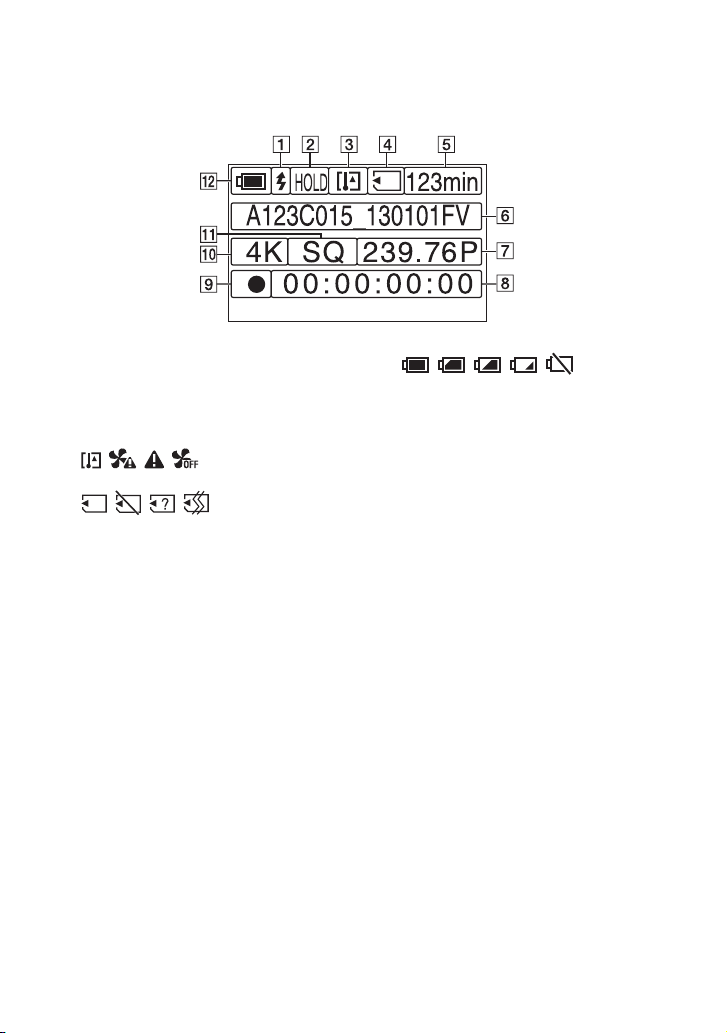
Screen indicators
The numbers in ( ) are reference pages.
A SYNC REC (15)
The REC TRIGGER setting is displayed.
B KEY HOLD
The icon appears on the screen when the
HOLD switch is set to on.
C Warning Indications (17)
D Media
E Remaining space on media.
Remaining space on the recording media is
displayed in minutes.
F Clip name
A clip name consisting of Camera ID, Reel
Number and Shot Number (eight characters in
total) is displayed for the clip being recorded
or to be recorded.
The first 17 characters of the clip name are
displayed for the clip being played or to be
played.
G Frame rate
H Time code
A time code appears during record standby or
while recording.
I Status
The recorder status is displayed.
J REC FORMAT
4K appears on the screen when you set the
image size to 4096 × 2160 and 2K appears
when you set it to 2048 × 1080.
K Encode
The compression method is displayed.
L Power state
Power state is displayed in five levels.
The icon flashes when the battery charge is
low.
5

Table of Contents
Overview .................................................................................................. 2
Identifying parts and controls ...................................................................3
Screen indicators .....................................................................................5
Getting Started
Step 1: Checking bundled items ..............................................................7
Step 2: Connecting the unit to the AXS-R5 and NEX-FS700 series ........ 8
Basic Operation
Recording ............................................................................................... 12
Playing a recorded video .......................................................................13
Using the Menu
Setting the setup menus ........................................................................14
Menu List ...............................................................................................15
Troubleshooting
Troubleshooting .....................................................................................16
Notes and Warning indicators ................................................................ 17
Additional Information
Recording formats and AUX-OUT outputs .............................................18
Clip Naming System ..............................................................................19
Recording time of movies ......................................................................20
About handling of your unit ....................................................................21
Specifications .........................................................................................22
Index ...................................................................................................... 23
6
Getting Started
Step 1: Checking bundled items
Make sure that you have following items
supplied with your unit.
The number in the parentheses indicates the
number of that item supplied.
Portable Memory Recorder Interface Unit
(HXR-IFR5) (1)
CD-ROM (Manuals for Portable Memory
Recorder Interface Unit) (1)
Operating Guide (1)
Warranty (1)
7
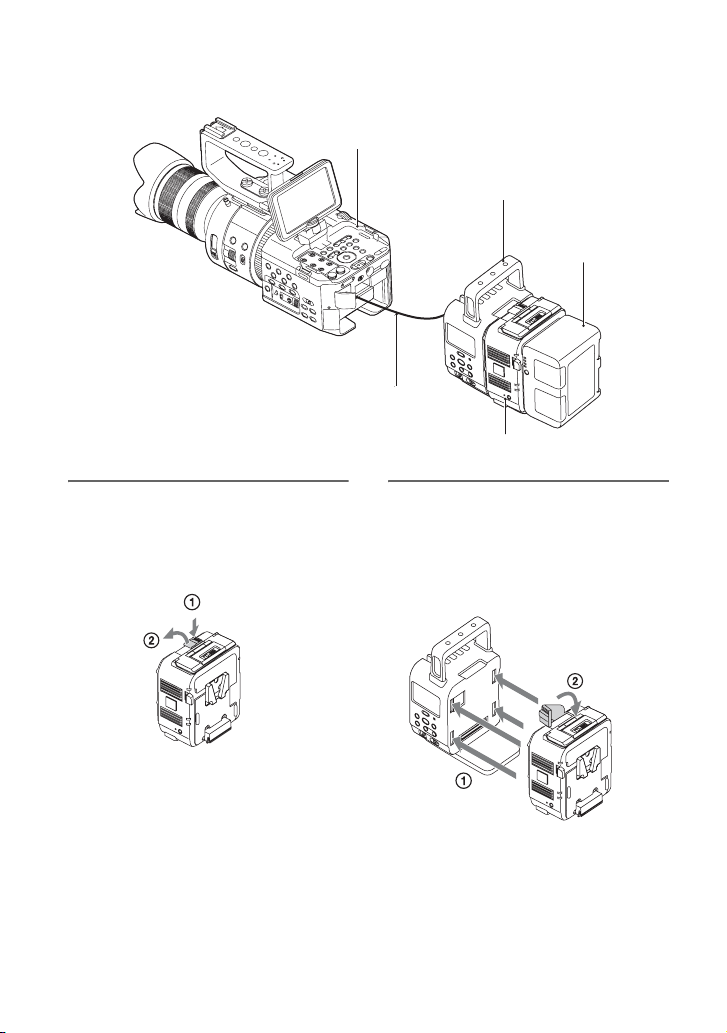
Step 2: Connecting the unit to the AXS-R5 and NEX-FS700 series
NEX-FS700 series
HXR-IFR5 (this unit)
Battery pack
BNC cable
AXS-R5
1 Press the release button (1) of
the AXS-R5 to pop up the ejection
lever, then raise the ejection lever
(2).
8
2 Insert the projection of the AXS-
R5 into the slot on the rear of the
unit (1), then lower the ejection
lever (2).
The unit connects to the AXS-R5.
• Before you connect the unit or the AXS-R5 to
another device, or remove it from another
device, make sure that the battery pack and the
DC power cable of the DC IN connector are
disconnected from the AXS-R5.
 Loading...