

Sony HCD-F50,HCD-F100,HCD-FR1 Service Manual
HCD-F50/F100/FR1
Q
Q
3
7
6
3
1
5
1
5
0
SERVICE MANUAL
Ver. 1.1 2005.02
TEL 13942296513 QQ 376315150 892498299
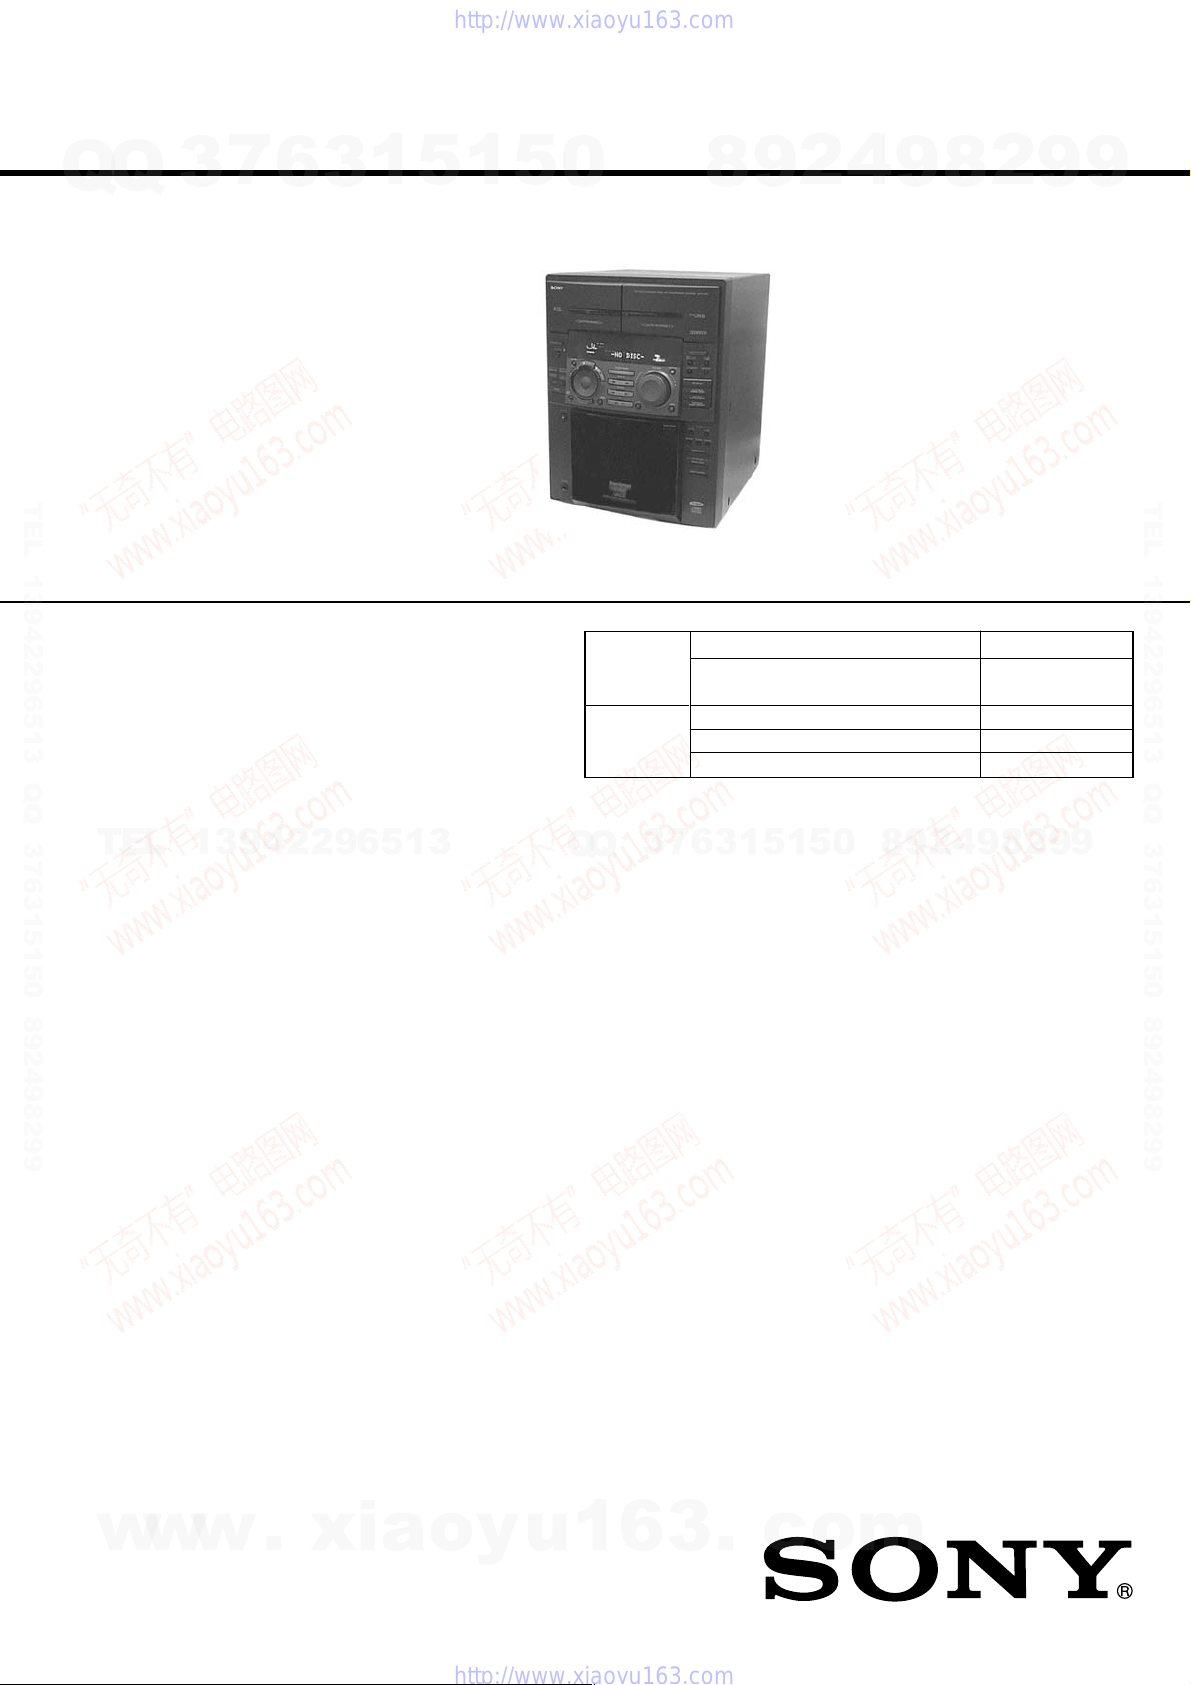
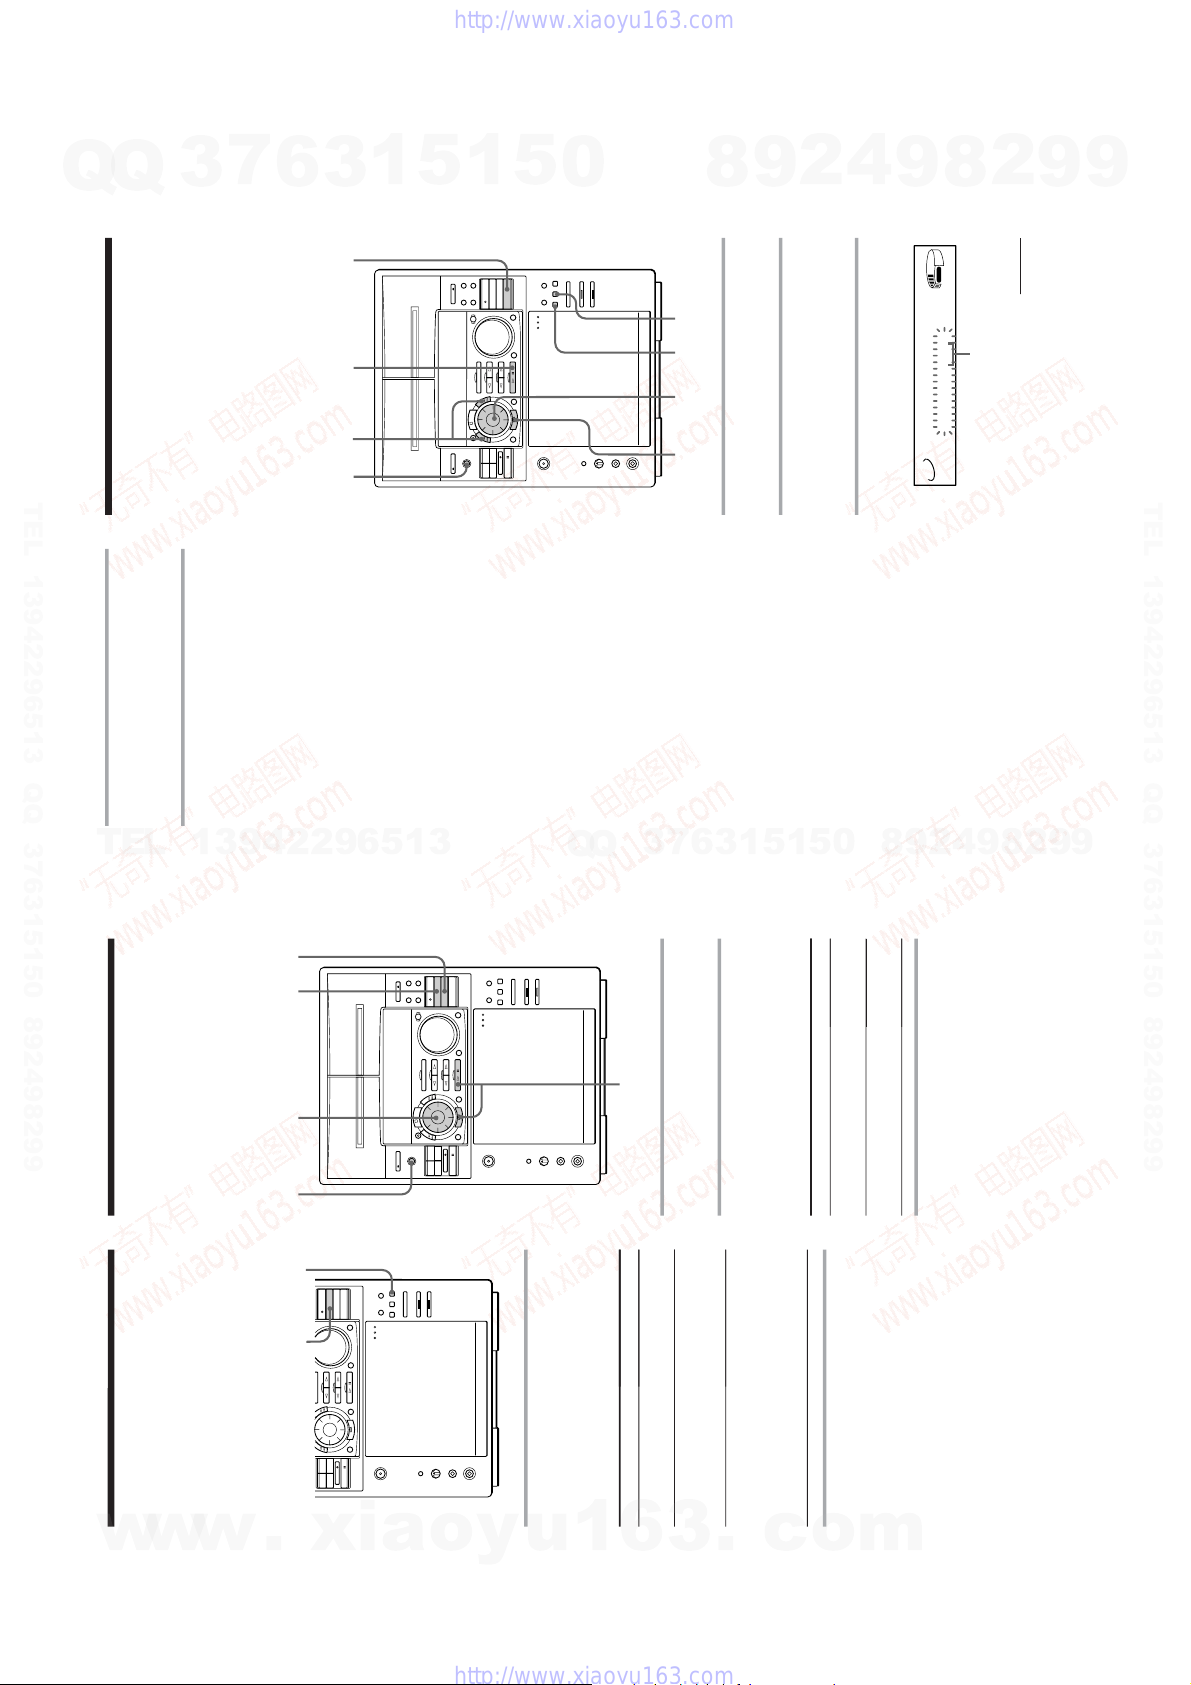
HCD-F50/F100/FR1 is the tuner, deck,
CD and amplifier section in MHC-F50/
F100/FR1.
* Dolby noise reduction manufacrured
under license from Dolby Laboratories
Licensing corporation.
"DOLBY" and the double-D symbol ;
are trademarks of Dolby Laboratories
Licensing Corporation.
Photo: HCD-FR1
CD
Section
Tape deck
Section
8
9
2
4
9
8
2
9
US Model
Canadian Model
HCD-F50/F100
AEP Model
UK Model
E Model
Australian Model
HCD-FR1
Model Name Using Similar Mechanism NEW
CD Mechanism Type
Optical Pick-up Name
Model Name Using
T ape Transport Mechanism T ype TCM-220WR2
Similar Mechanism HCD-D690/XB6
CDM-46B1 (F100/FR1)
CDM-46B2 (F50)
KSS-213B/S-N
9
TEL 13942296513 QQ 376315150 892498299
TEL
13942296513
For the US model
AUDIO POWER SPECIFICATIONS
POWER OUTPUT AND TOTAL
HARMONIC DISTORTION:
With 8 ohm loads, both channels driven, from
70-20,000 Hz; rated 100 watts per channel
minimum RMS power, with no more than
0.9% total harmonic distortion from 250
milliwatts to rated output.
Amplifier section
Continuous RMS power output
Canadian model
100+100 watts
(8 ohms at 1 kHz, 5% THD)
(F100)
60+60 watts
(6 ohms at 1 kHz, 5% THD)
(F50)
Other models 100+100 watts
(8 ohm at 1 kHz, 10% THD)
Peak music power output (EXCEPT US, Canadian) :
1400 watts
SPECIFICATIONS
Q
Inputs VIDEO/MD IN (phono jacks) :
Outputs VIDEO/MD OUT (phono jacks)
3
Q
voltage 250 mV,impedance 47
kilohms
MIX MIC (phone jack)
(Singapore model):
sensitivity 1 mV,
impedance 10 kilohms
: voltage 250 mV impedance
1 kilohms
PHONES (stereo phone jack) :
accepts headphones of 8 ohms or
more.
SPEAKER : accepts impedance of
8 to 16 ohms (F100/FR1)
accepts impedance of 6 to 16 ohms
(F50)
SURROUND SPEAKER
(F100/FR1):
accepts impedance of 16 ohms.
SUPER WOOFER (F100/FR1):
V oltage 1 V, impedance 1 kilo ohm
7
6
3
1
5
1
9
9
2
8
9
4
2
9
8
0
5
CD player section
System Compact disc and digital audio
Laser Semiconductor laser
Laser output Max. 44.6 µW*
Wavelength 780-790 nm
CD OPTICAL DIGITAL OUT
(Square optical connector jack, rear panel)
Wavelength 600 nm
system
(λ=780nm)
Emission duration: continuous
*This output is the value measured at a distance of 200 mm
from the objective lens surface
-on the Optical Pick-up Block
with 7 mm aperture.
– Continued on next page –
w
w
9-960-949-12
2005B05-1
© 2005.02
w
.
xia
Sony Corporation
Audio Group
Published by Sony Engineering Corporation
o
y
u
1
MINI HI-FI COMPONENT SYSTEM
6
3
.
c
o
m
Tape player section
Recording system 4-track 2-channel stereo
Q
Q
Frequency response 60 - 13,000 Hz (±3 dB), using Sony TYPE I cassette
(DOLBY NR OFF) 60 - 14,000 Hz (±3 dB), using Sony TYPE II cassette
Tuner section
FM stereo, FM/AM superheterodyne tuner
FM tuner section
Tuning range 87.5 - 108,0 MHz
Antenna terminals 75 ohm unbalanced
Intermediate frequency 10.7 MHz
AM tuner section
Tuning range
North American model:
TEL 13942296513 QQ 376315150 892498299
Singaporian model: MW 531 - 1,602 kHz
Other models:
Intermediate frequency 450 kHz
Antenna AM loop antenna
General
Power requirements
TEL
North American model: 120 V AC, 60 Hz
Australian model: 220 - 240 V AC, 50/60 Hz
AEP, UK, G models: 220 - 230V AC, 50/60 Hz
Other models: 110 - 120 V or 220 - 240 V AC,
Power consumption
U.S. model: 195 watts (HCD-F100)
Canadian model: 195 watts (HCD-F100)
Other models: 210 watts
Dimensions (w/h/d) Approx. 280×375×450 mm
Mass Approx. 11.5 kg (HCD-F100/FR1)
7
3
6
530 - 1,710 kHz
(with the AM tuning interval set at 10kHz)
531 - 1,710 kHz
(with the AM tuning interval set at 9 kHz)
(with the MW tuning interval set at 9 kHz)
530 - 1,710 kHz
(with the MW tuning interval set at 10 kHz)
SW 5.95 - 17.90 MHz
(with the SW tuning interval set at 5 kHz)
531 - 1,602 kHz
(with the AM tuning interval set at 9 kHz)
530 - 1,710 kHz
(with the AM tuning interval set at 10 kHz)
External antenna terminal
3
1
13942296513
50/60 Hz Adjustable with voltage selector
110 watts (HCD-F50)
120 watts (HCD-F50)
Approx. 10 kg (HCD-F50)
5
1
5
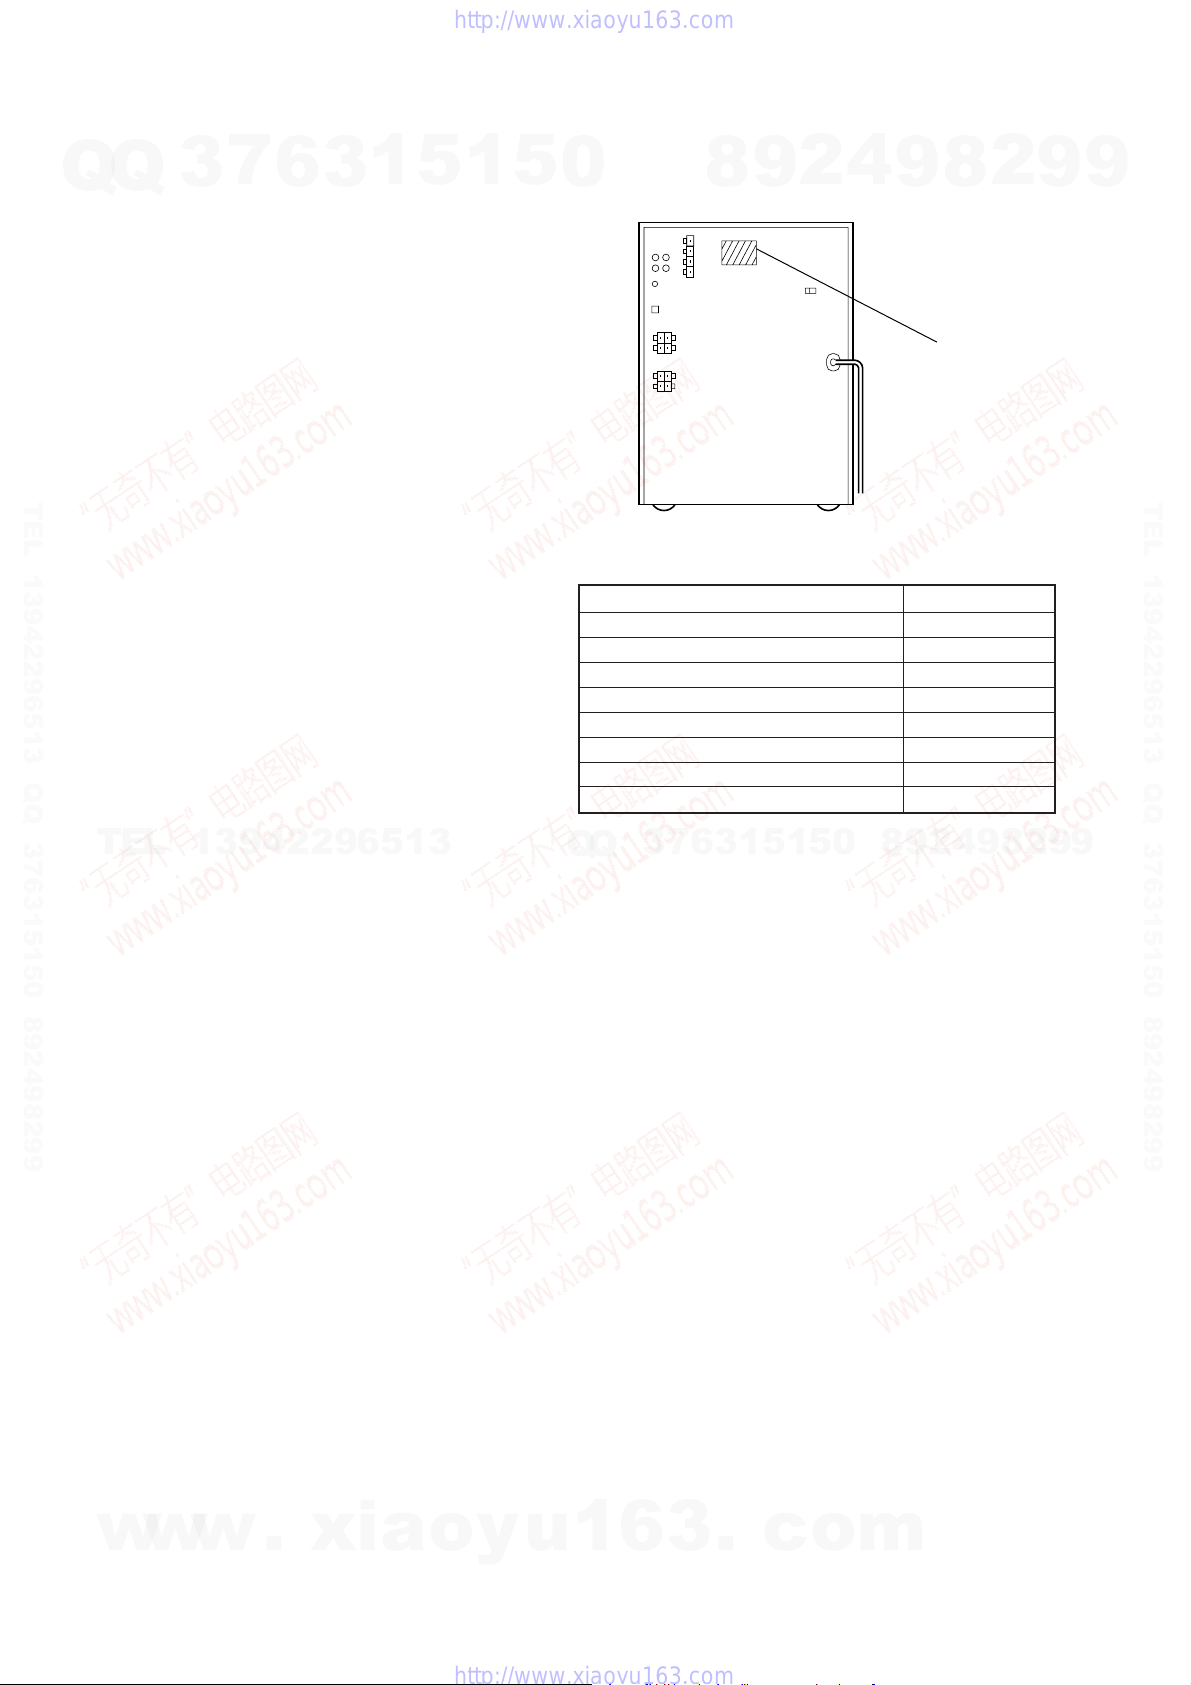
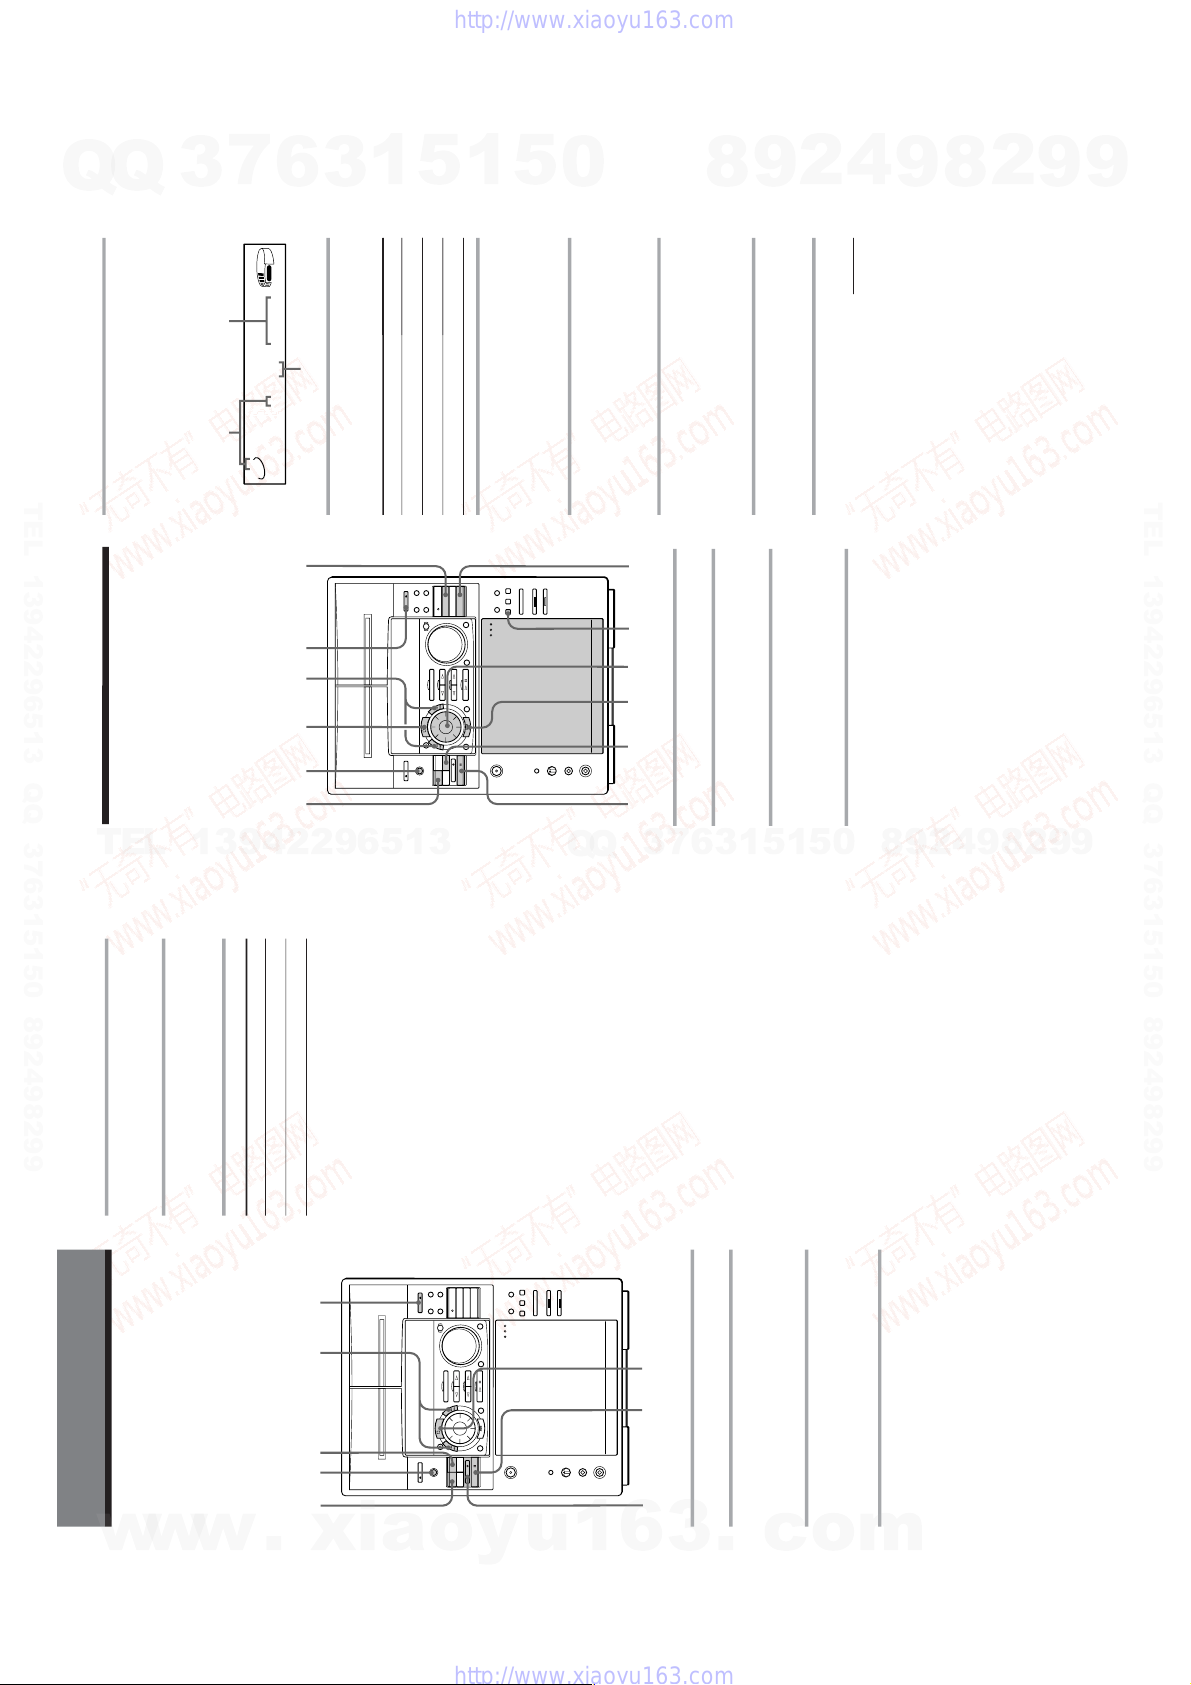
MEDEL IDENTIFICATION
– BACK PANEL –
0
F50 : US model 4-990-400-0π
F50 : Canadeian model 4-990-400-1π
F100 : US model 4-990-364-0π
F100 : Canadian model 4-990-364-1π
FR1 : AEP, UK, German model 4-990-364-2π
FR1 : E model 4-990-364-5π
FR1 : Australian model 4-990-364-6π
FR1 : Singapore model 4-990-364-9π
7
3
Q
Q
4
2
9
8
MODEL PARTS NO.
0
5
1
5
1
3
6
9
8
9
2
2
8
PARTS No.
8
9
4
9
2
9
9
TEL 13942296513 QQ 376315150 892498299
9
Supplied accessories: AM loop antena (1)
Design and specifications are subject to change without notice.
w
w
Remote RM-SF100 (1) (F100/FR1)
Remote RM-SF50 (1) (F50)
Sony SUM-3 (N5)
batteries (2)
FM lead antenna (1)
Speaker coreds (2)
w
.
xia
o
y
u
1
6
3
.
– 2 –
c
o
m
CAUTION
Q
Q
Use of controls or adjustments or performance of
procedures other than those specified herein may
result in hazardous radiation exposure.
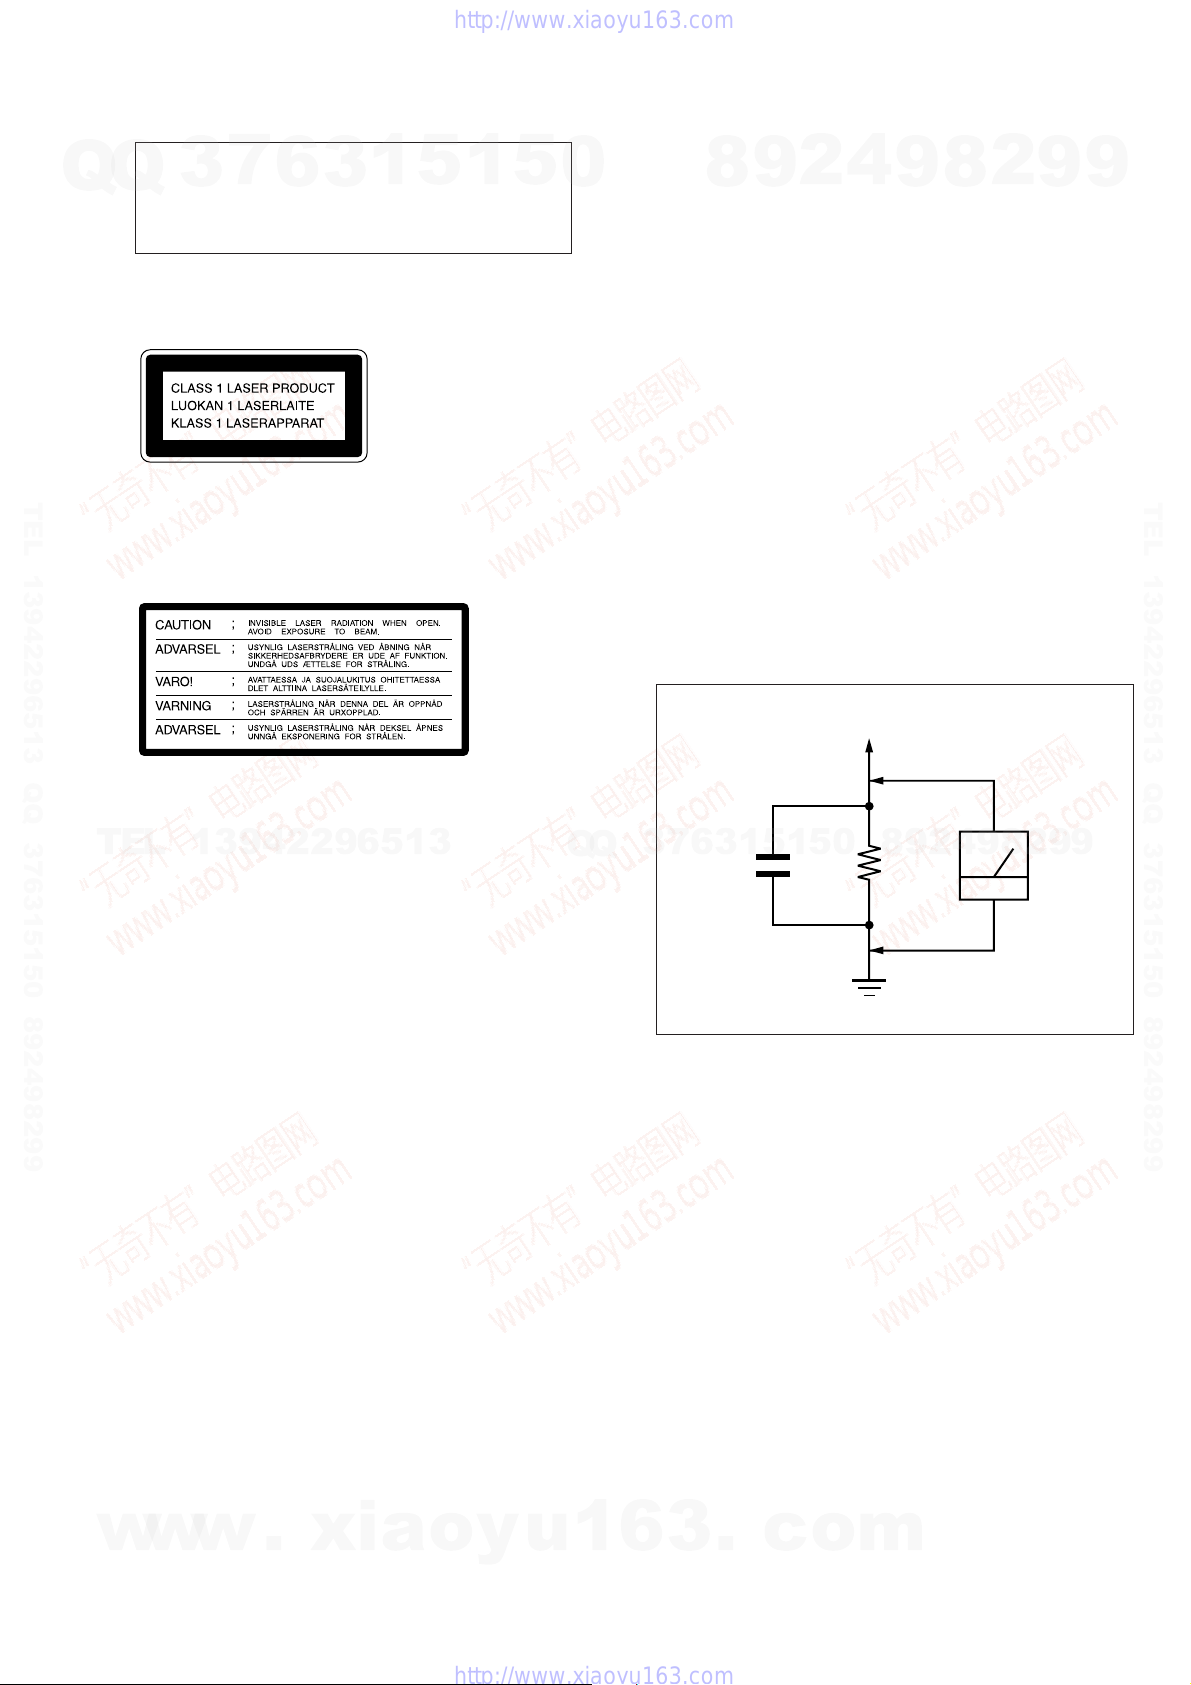
This appliance is classified as a CLASS 1 LASER product.
The CLASS 1 LASER PRODUCT MARKING is located on
the rear exterior.
TEL 13942296513 QQ 376315150 892498299
Laser component in this product is capable of emitting radiation
exceeding the limit for Class 1.
The following caution label is located inside the unit.
3
7
6
3
1
5
1
5
0
After correcting the original service problem, perform the following safety check before releasing the set to the customer:
Check the antenna terminals, metal trim, “metallized” knobs,
screws, and all other exposed metal parts for AC leakage.
Check leakage as described below.
LEAKAGE TEST
The AC leakage from any exposed metal part to earth ground and
from all exposed metal parts to any exposed metal part having a
return to chassis, must not exceed 0.5 mA (500 microampers.).
Leakage current can be measured by any one of three methods.
1. A commercial leakage tester , such as the Simpson 229 or RCA
WT -540A. Follow the manuf acturers’ instructions to use these
instruments.
2. A battery-operated AC milliammeter. The Data Precision 245
digital multimeter is suitable for this job.
3. Measuring the voltage drop across a resistor by means of a
VOM or battery-operated AC voltmeter. The “limit” indication is 0.75 V, so analog meters must have an accurate lowvoltage scale. The Simpson 250 and Sanwa SH-63Tr d are examples of a passive VOM that is suitable. Nearly all battery
operated digital multimeters that have a 2 V A C range are suitable. (See Fig. A)
8
SAFETY CHECK-OUT
4
2
9
To Exposed Metal
Parts on Set
9
8
2
9
9
TEL 13942296513 QQ 376315150 892498299
TEL
13942296513
SAFETY-RELATED COMPONENT WARNING!!
COMPONENTS IDENTIFIED BY MARK ! OR DOTTED
LINE WITH MARK ! ON THE SCHEMA TIC DIAGRAMS
AND IN THE PARTS LIST ARE CRITICAL TO SAFE
OPERATION. REPLACE THESE COMPONENTS WITH
SONY PARTS WHOSE PART NUMBERS APPEAR AS
SHOWN IN THIS MANUAL OR IN SUPPLEMENTS PUBLISHED BY SONY.
Q
Q
3
0.15 µF
Fig. A. Using an AC voltmeter to check AC leakage.
ATTENTION AU COMPOSANT AYANT RAPPORT
À LA SÉCURITÉ!
LES COMPOSANTS IDENTIFIÉS P AR UNE MARQUE !
SUR LES DIAGRAMMES SCHÉMATIQUES ET LA LISTE
DES PIÈCES SONT CRITIQUES POUR LA SÉCURITÉ
DE FONCTIONNEMENT. NE REMPLACER CES COMPOSANTS QUE PAR DES PIÈCES SONY DONT LES
NUMÉROS SONT DONNÉS DANS CE MANUEL OU
DANS LES SUPPLÉMENTS PUBLIÉS PAR SONY.
1.5 k
Ω
Earth Ground
AC
voltmeter
(0.75 V)
2
8
9
4
2
9
8
0
5
1
5
1
3
6
7
9
9
w
w
w
.
xia
o
y
u
1
6
3
– 3 –
.
c
o
m

TABLE OF CONTENTS
7
Q
Q
Servicing Notes ...........................................................................4
1. GENERAL ....................................................................5
2. DISASSEMBLY .........................................................25
3. TEST MODE ..............................................................33
4. MECHANICAL ADJUSTMENTS ........................36
5. ELECTRICAL ADJUSTMENTS
Deck Section.................................................................... 39
TEL 13942296513 QQ 376315150 892498299
Tuner Section...................................................................41
CD Section.......................................................................42
6. DIAGRAMS ................................................................44
6-1. Printed Wiring Board –Tuner Section– ...........................45
6-2. Schematic Diagram –Tuner Section– ..............................46
6-3. Schematic Diagram –CD Section– ..................................48
6-4. Printed Wiring Board –CD Section– ...............................51
6-5. Printed Wiring Boards –CD Motor Section–................... 54
6-6. Schematic Diagram –CD Motor Section– .......................55
6-7. Printed Wiring Boards –Deck Section–...........................57
6-8. Schematic Diagram –Deck Section– ............................... 59
6-9. Schematic Diagram –Main /Power Section– ................... 64
6-10. Printed Wiring Boards –Main /Power Section– ..............69
6-11. Schematic Diagram –Main (3/3) Section– ......................73
6-12. Printed Wiring Boards –Panel Section– .......................... 75
6-13. Schematic Diagram –Panel Section–...............................77
TEL
6-14. IC Pin Function Description ............................................ 85
7. EXPLODED- VIEWS ...............................................95
8. ELECTRICAL PARTS LIST .............................. 104
3
13942296513
6
3
1
5
1
5
0
NOTES ON HANDLING THE OPTICAL PICK-UP
BLOCK OR BASE UNIT
The laser diode in the optical pick-up block may suffer electrostatic break-down because of the potential difference generated
by the charged electrostatic load, etc. on clothing and the human
body.
During repair, pay attention to electrostatic break-down and also
use the procedure in the printed matter which is included in the
repair parts.
The flexible board is easily damaged and should be handled with
care.
NOTES ON LASER DIODE EMISSION CHECK
The laser beam on this model is concentrated so as to be focused
on the disc reflective surface by the objective lens in the optical
pick-up block. Therefore, when checking the laser diode emission,
observe from more than 30 cm away from the objective lens.
LASER DIODE AND FOCUS SEARCH OPERATION
CHECK
Carry out the “S curve check” in “CD section adjustment” and
check that the S curve waveform is output repeatedly.
Notes on chip component replacement
• Never reuse a disconnected chip component.
• Notice that the minus side of a tantalum capacitor may be dam-
aged by heat.
Flexible Circuit Board Repairing
Q
Q
• Keep the temperature of the soldering iron around 270 ˚C dur-
ing repairing.
• Do not touch the soldering iron on the same conductor of the
circuit board (within 3 times).
• Be careful not to apply force on the conductor when soldering
or unsoldering.
3
7
SERVICING NOTES
2
9
8
5
1
5
1
3
6
4
0
9
8
9
8
2
4
2
9
8
9
2
9
9
TEL 13942296513 QQ 376315150 892498299
9
w
w
w
.
xia
o
y
u
1
6
3
– 4 –
.
c
o
m
4
F
M
7
5
A
M
R
+
L
+
–
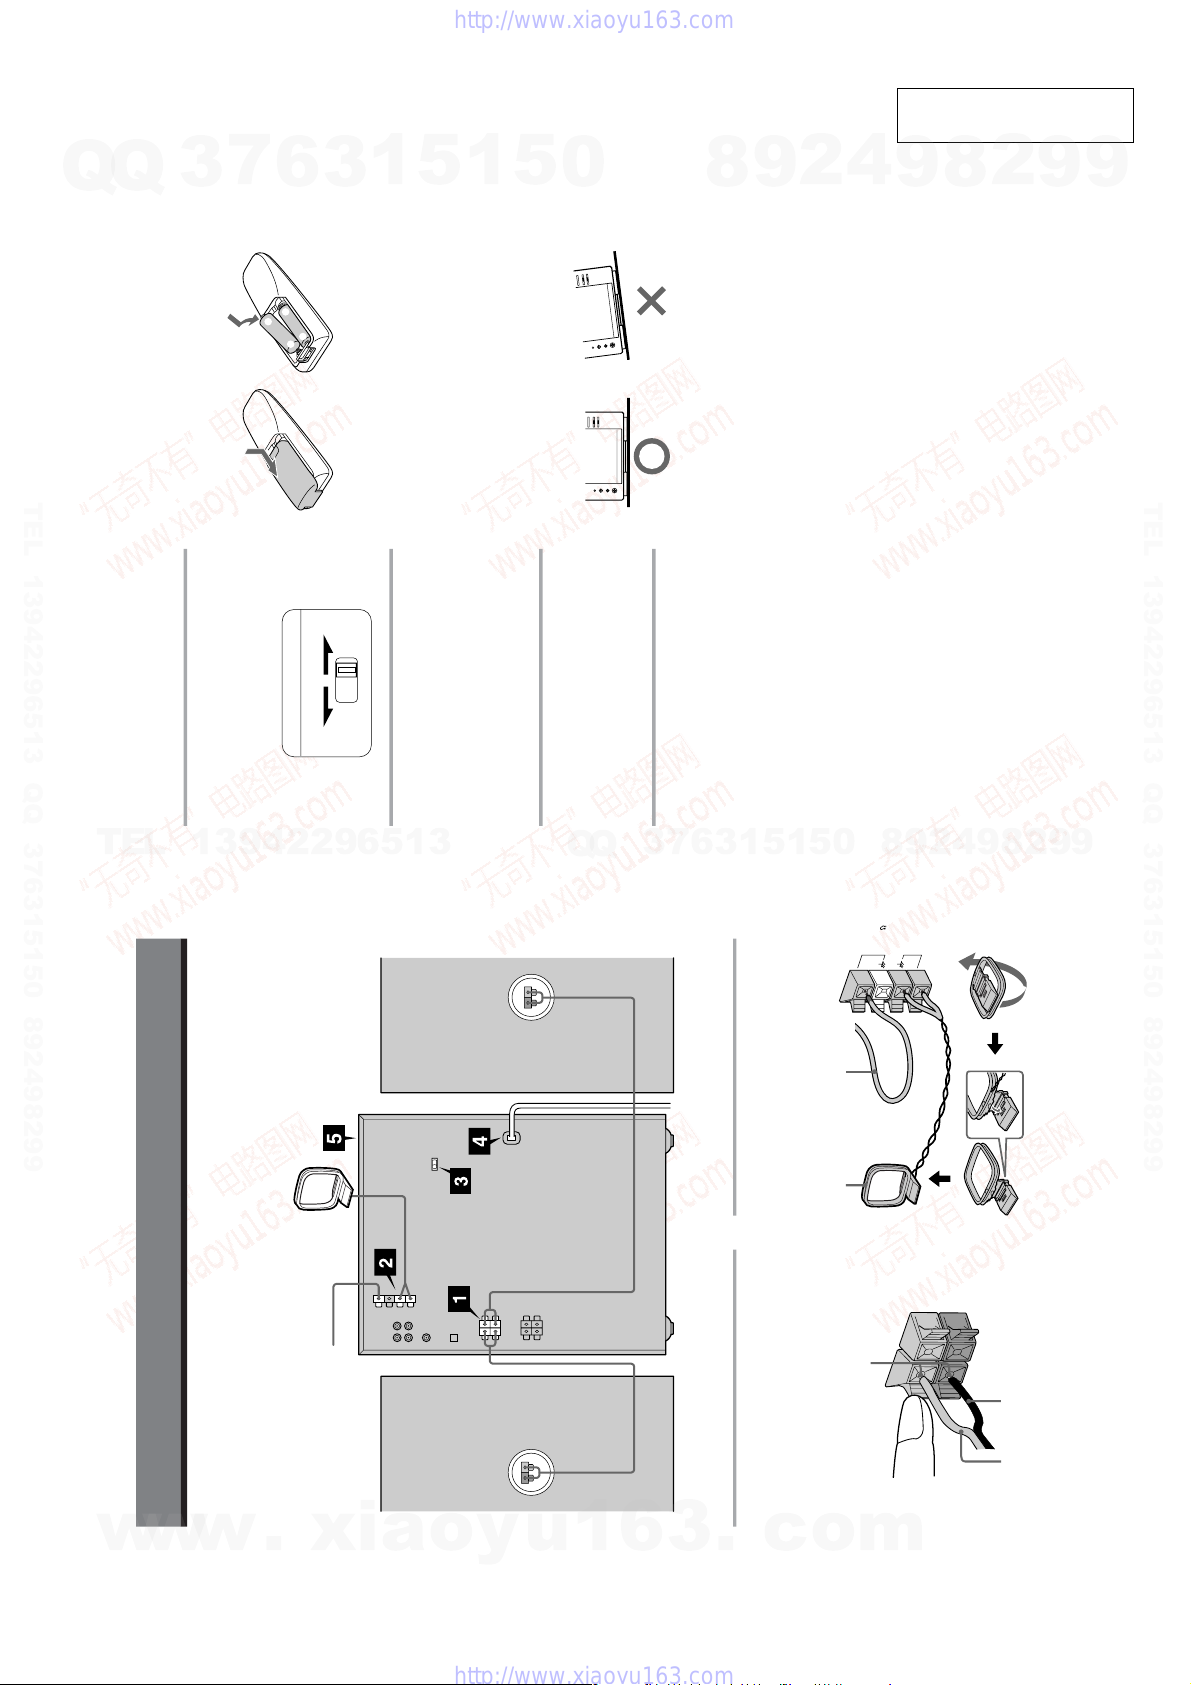
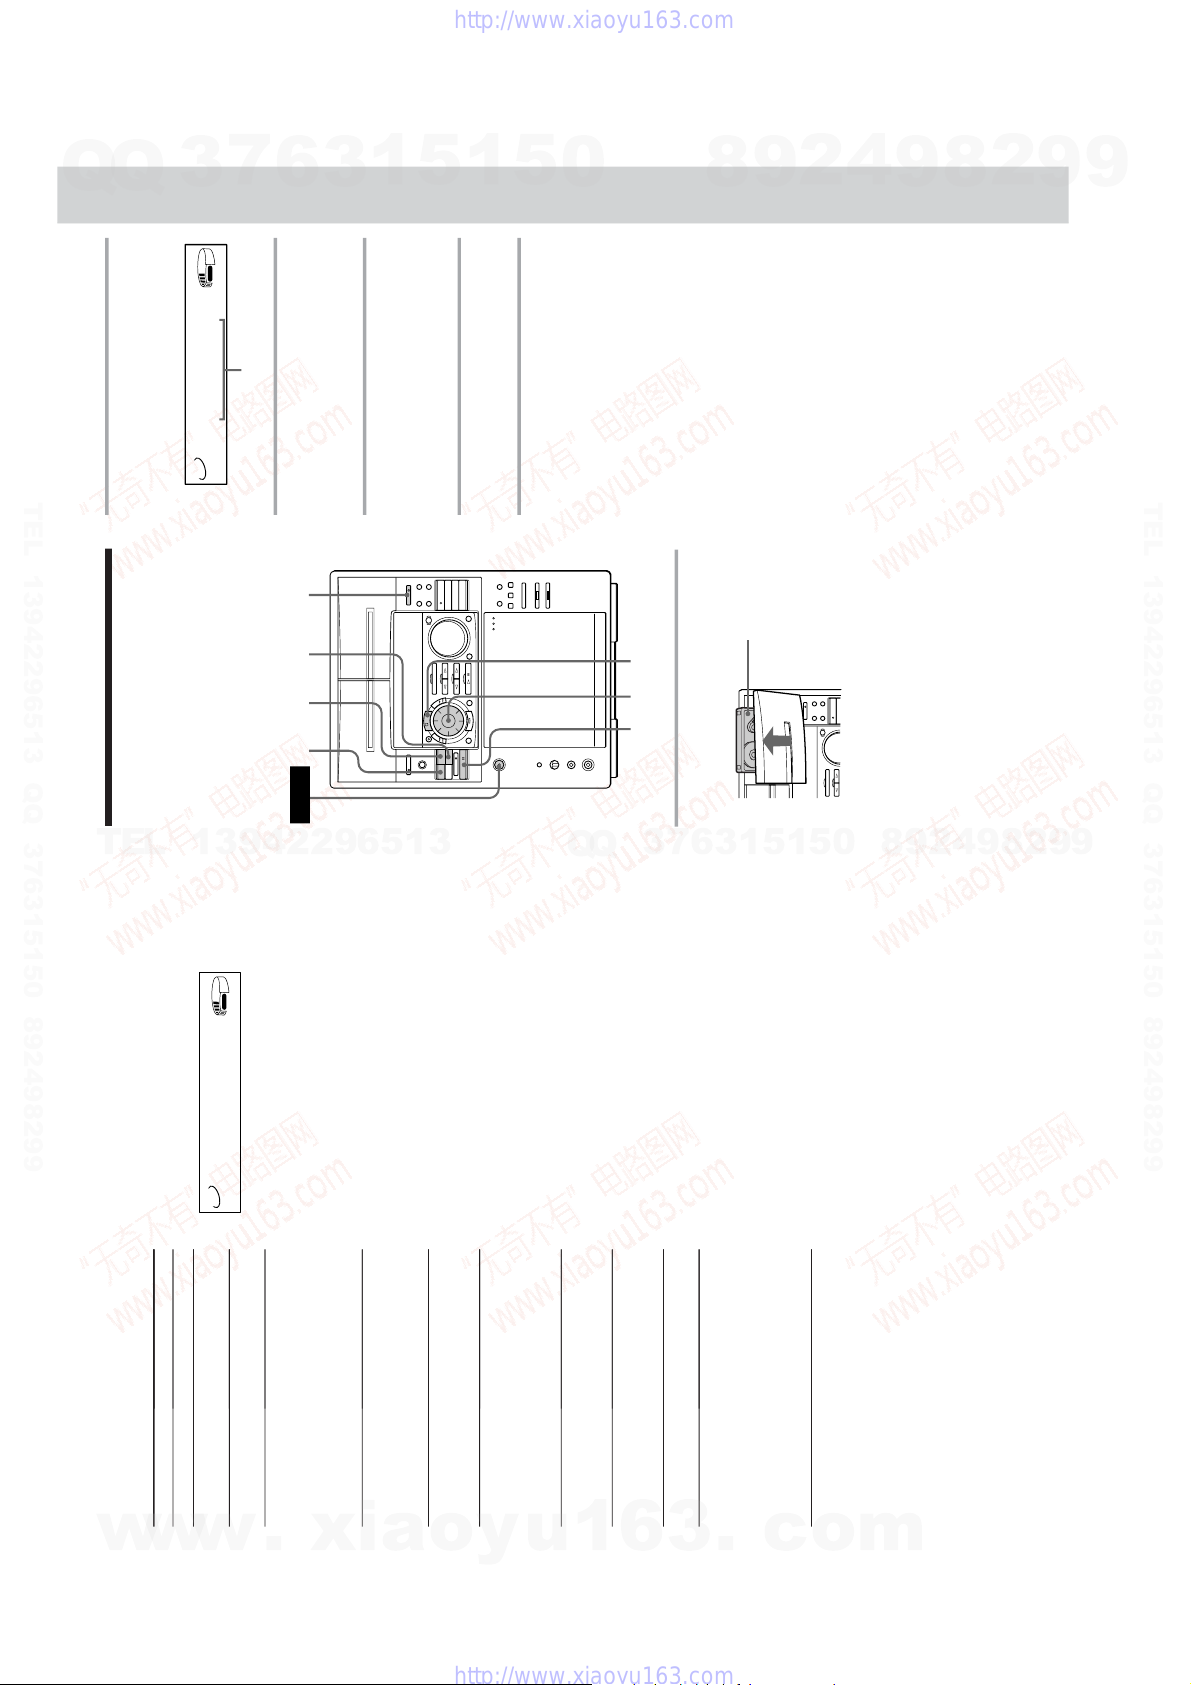
Step 1: Hooking up the system
Connect the FM/AM antennas.
Set up the AM loop antenna, then
connect it.
Connect the speakers.
Connect the speaker cords to the
SPEAKER jacks of the same color.
Keep the speaker cords away from the
antennas to prevent noise.
1
Getting Started
2
AM loop antenna
Extend the FM lead
antenna
horizontally.
AM loop antenna
FM antenna
Left speaker
Right speaker
Do the following procedure 1 to 5 to hook up your system using the supplied cords and
accessories. To complete the setup, do steps 2 and 3 also.
Insert only the stripped portion.
Black (’)Red (‘)
MHC-FR1 is used for illustration purpose.
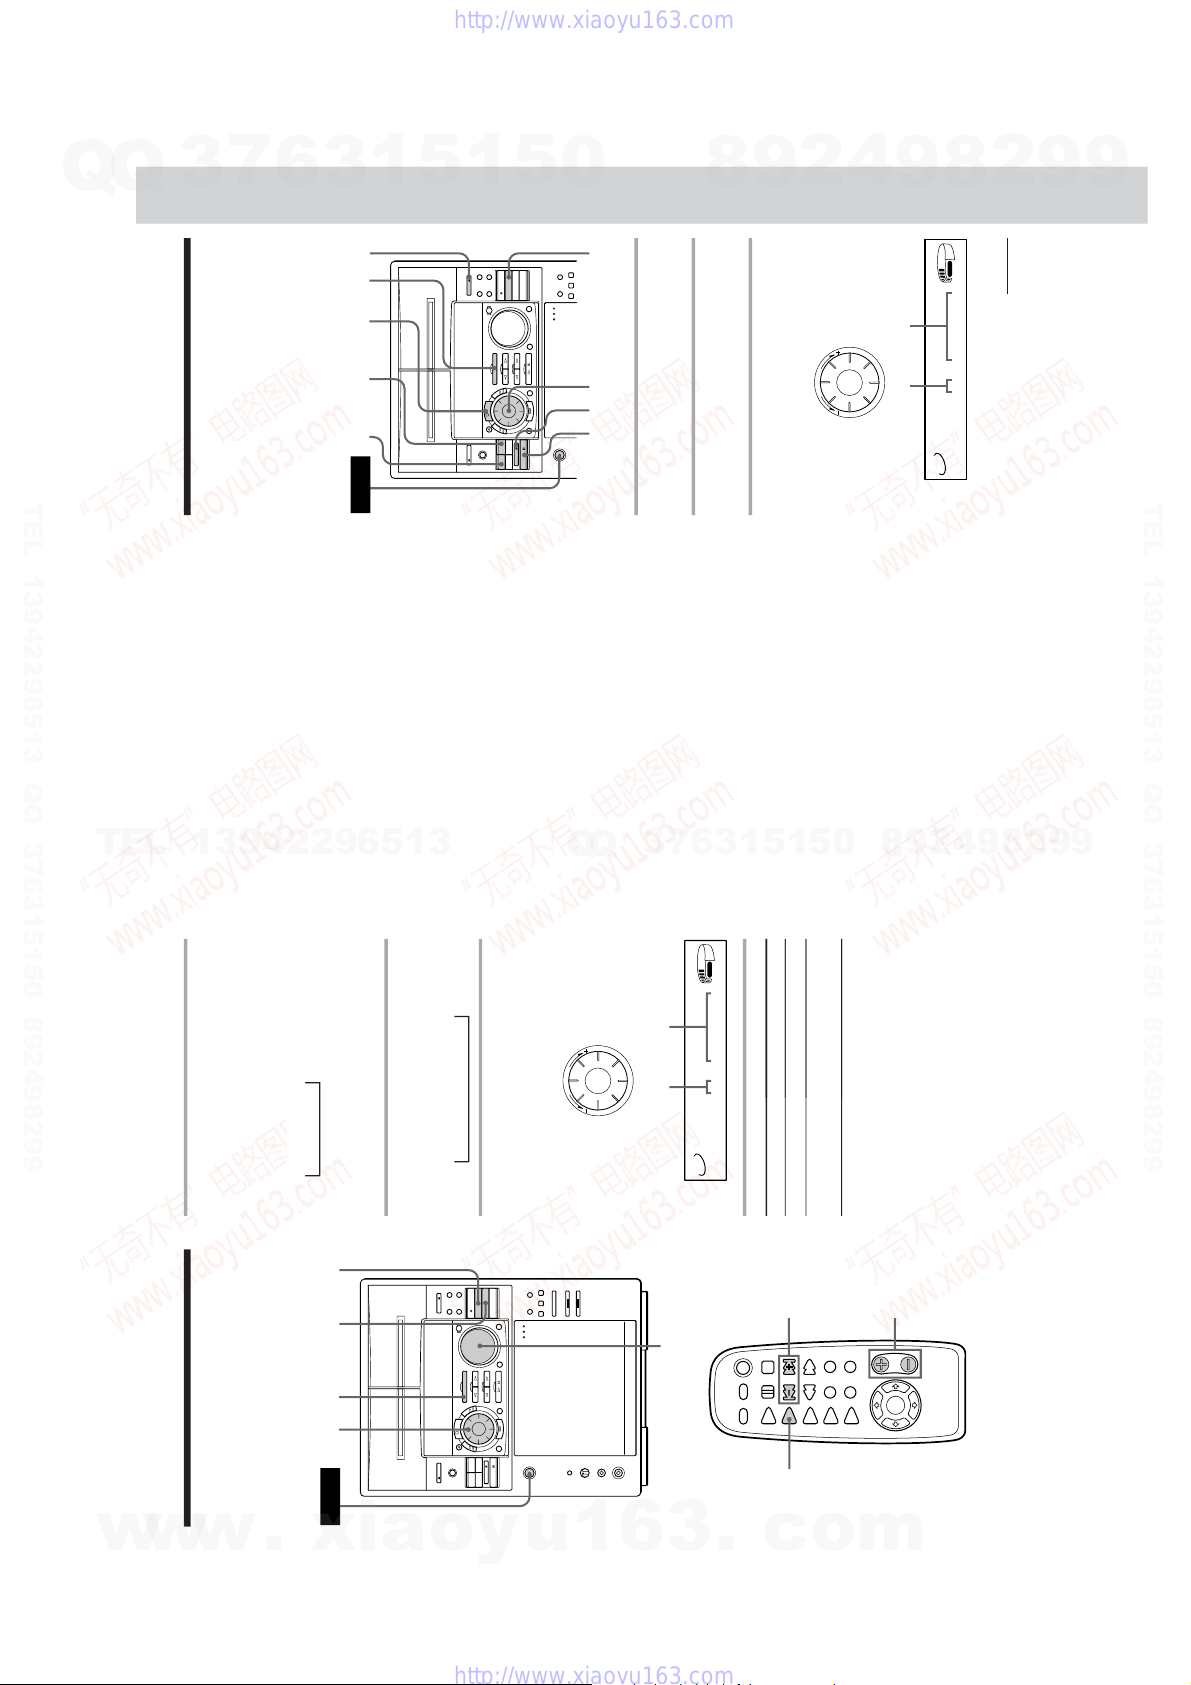
5
Inserting two size AA (R6)
batteries into the remote
Tip
With normal use, the batteries should last for about
six months. When the remote no longer operates
the system, replace both batteries with new ones.
Note
If you do not use the remote for a long period of
time, remove the batteries to avoid possible damage
from battery leakage.
Note on placement
Be sure to place this system on a horizontal place.
If the system is slanted, it may cause malfunction or
damage the system.
Set VOLTAGE SELECTOR to
position of your local power line
voltage (except for North American,
and Australian models).
Connect the power cord to a wall
outlet.
Demo mode appears in the display.
If the plug on this unit does not fit
your wall outlet, detach the supplied
adapter from the plug (only for
Singapore).
Deactivate the demo mode by
pressing DISPLAY/DEMO when
the system power is turned off.
The demo mode is also deactivated
when you set the time.
3
5
4
VOLTAGE SELECTOR
110-120V 220-240V
}
}
]
]
SECTION 1
GENERAL
7
Q
Q
TEL 13942296513 QQ 376315150 892498299
3
6
3
1
5
1
5
0
8
9
2
4
This section is extracted
from instruction manual.
2
9
8
9
Ver. 1.1
9
TEL 13942296513 QQ 376315150 892498299
TEL
13942296513
6
7
3
Q
Q
3
1
9
9
2
8
9
4
2
9
8
0
5
1
5
w
w
w
.
xia
o
y
u
1
6
3
– 5 –
.
c
o
m
Ver. 1.1
6
1
Press t/CLOCK SET.
The hour indication flashes.
2
Turn the jog dial to set the hour.
The clock is on a 12-hour system.
3
Press ENTER.
The minute indication flashes.
Step 2: Setting the
time
You must set the time before using the timer
functions.
4
Turn the jog dial to set the minute.
5
Press ENTER.
The clock starts working.
Tips
• If you’ve made a mistake, start over from step 1.
• Setting the time deactivates the demo mode .
If you want to display the demo mode, press
DISPLAY/DEMO when the power is off.
2,4 3,5 1
12:00 AM
RELAY
TUNED
1
2
REC
SLEEP
DOLBY NR B OFF
STEREO
MONO
SYNC
STEP
REC
kHz
MHz
VOLUME
PLUS
1
7:00 PM
7
n
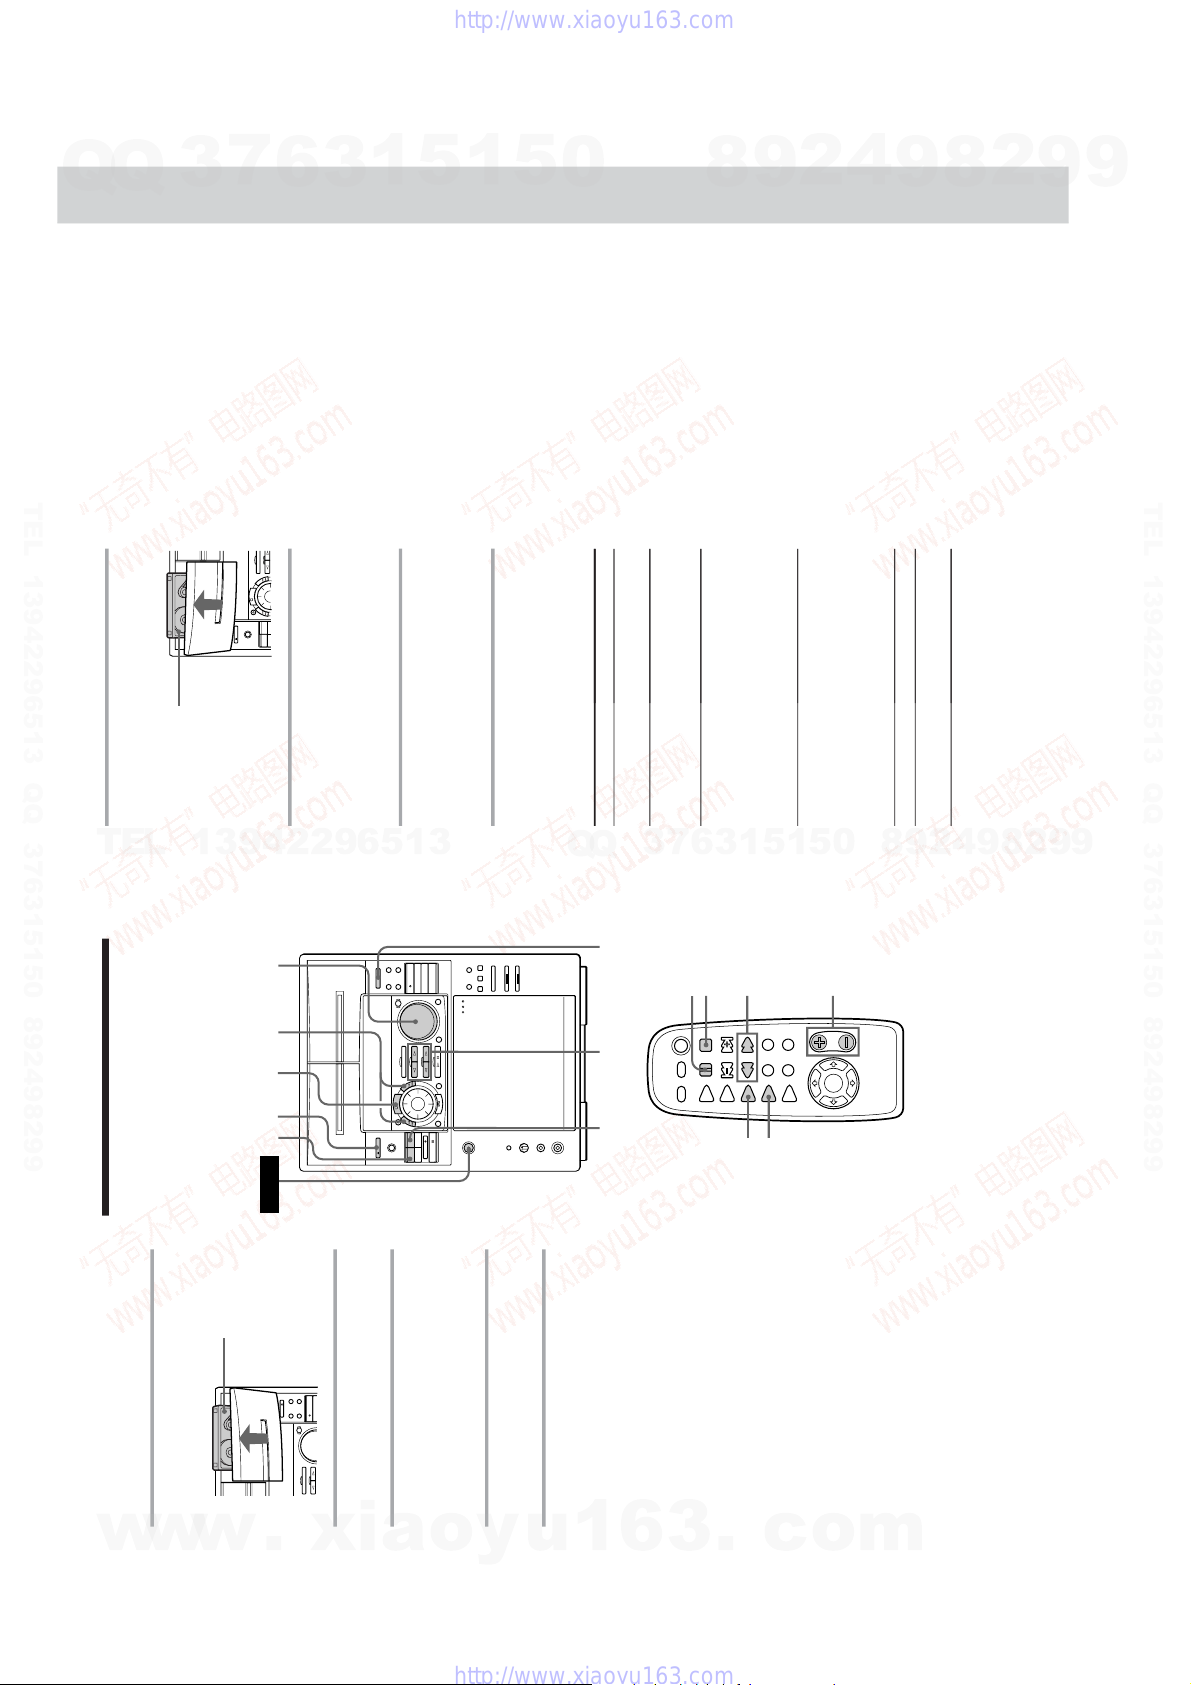
Step 3: Presetting
radio stations
For Singaporian model, you can preset up to
40 stations, 20 for FM, 10 for MW and 10 for
SW. For North and South American and
Australian models, you can preset up to 30
stations, 20 for FM and 10 for AM.
4
Press TUNER MEMORY.
A preset number appears in the display.
5
Turn the jog dial to select the
desired preset number.
6
Press ENTER.
The station is stored.
7
Repeat steps 1 to 6 to store other
stations.
To tune in a station with a weak
signal
Press TUNING MODE repeatedly until
“MANUAL” appears in step 2, then turn the
jog dial to tune in the station.
To change the preset number
Start over from step 1.
To change the AM tuning interval
The AM tuning interval is factory-preset to 10
kHz (9 kHz in some areas). To change the
AM tuning interval, tune in any AM station
first, then turn off the power. While holding
down the ENTER button, turn the power
back on. When you change the interval, AM
preset stations will be erased. To reset the
interval, repeat the same procedure.
Tip
The preset stations are retained for half a day even if
you unplug the power cord or if a power failure
occurs.
1
Press TUNER/BAND repeatedly
until the band you want appears in
the display.
Every time you press this button, the
band changes as follows:
Singaporian models:
FM n MW n SW
North and South American and
Australian models:
FM ˜ AM
2
Press TUNING MODE repeatedly
until “AUTO” appears.
3
Turn the jog dial.
The frequency indication changes and
scanning stops when the system tunes in
a station. “TUNED” and “STEREO” (for
a FM stereo program) appear.
POWER
3,5 6 214
Preset number
AUTO
TUNED
STEREO
VOLUME
MEMORY FM 1?
20
AUTO
TUNED
STEREO
MHz
VOLUME
FM 100.50
20
7
Q
Q
TEL 13942296513 QQ 376315150 892498299
3
6
3
1
5
1
5
0
8
9
2
4
9
8
2
9
9
TEL 13942296513 QQ 376315150 892498299
TEL
13942296513
3
Q
Q
8
0
5
1
5
1
3
6
7
9
9
9
2
8
9
4
2
w
w
.
xia
w
o
y
u
1
6
3
– 6 –
.
c
o
m
8
4
Turn the jog dial until you find the
disc slot where you want to insert a
disc, while checking the disc
number (written beside every slot
and also indicated in the display).
The disc number* or disc title (for
MHC-F100/MHC-FR1 only, see page 26
for details) at the loading position
appears in the display. As you turn the
jog dial, the disc number or the disc title
changes.
* If you have already inserted discs, the disc
number at the playing position appears.
When you turn the jog dial, the displayed
disc number changes to the one at the
loading position.
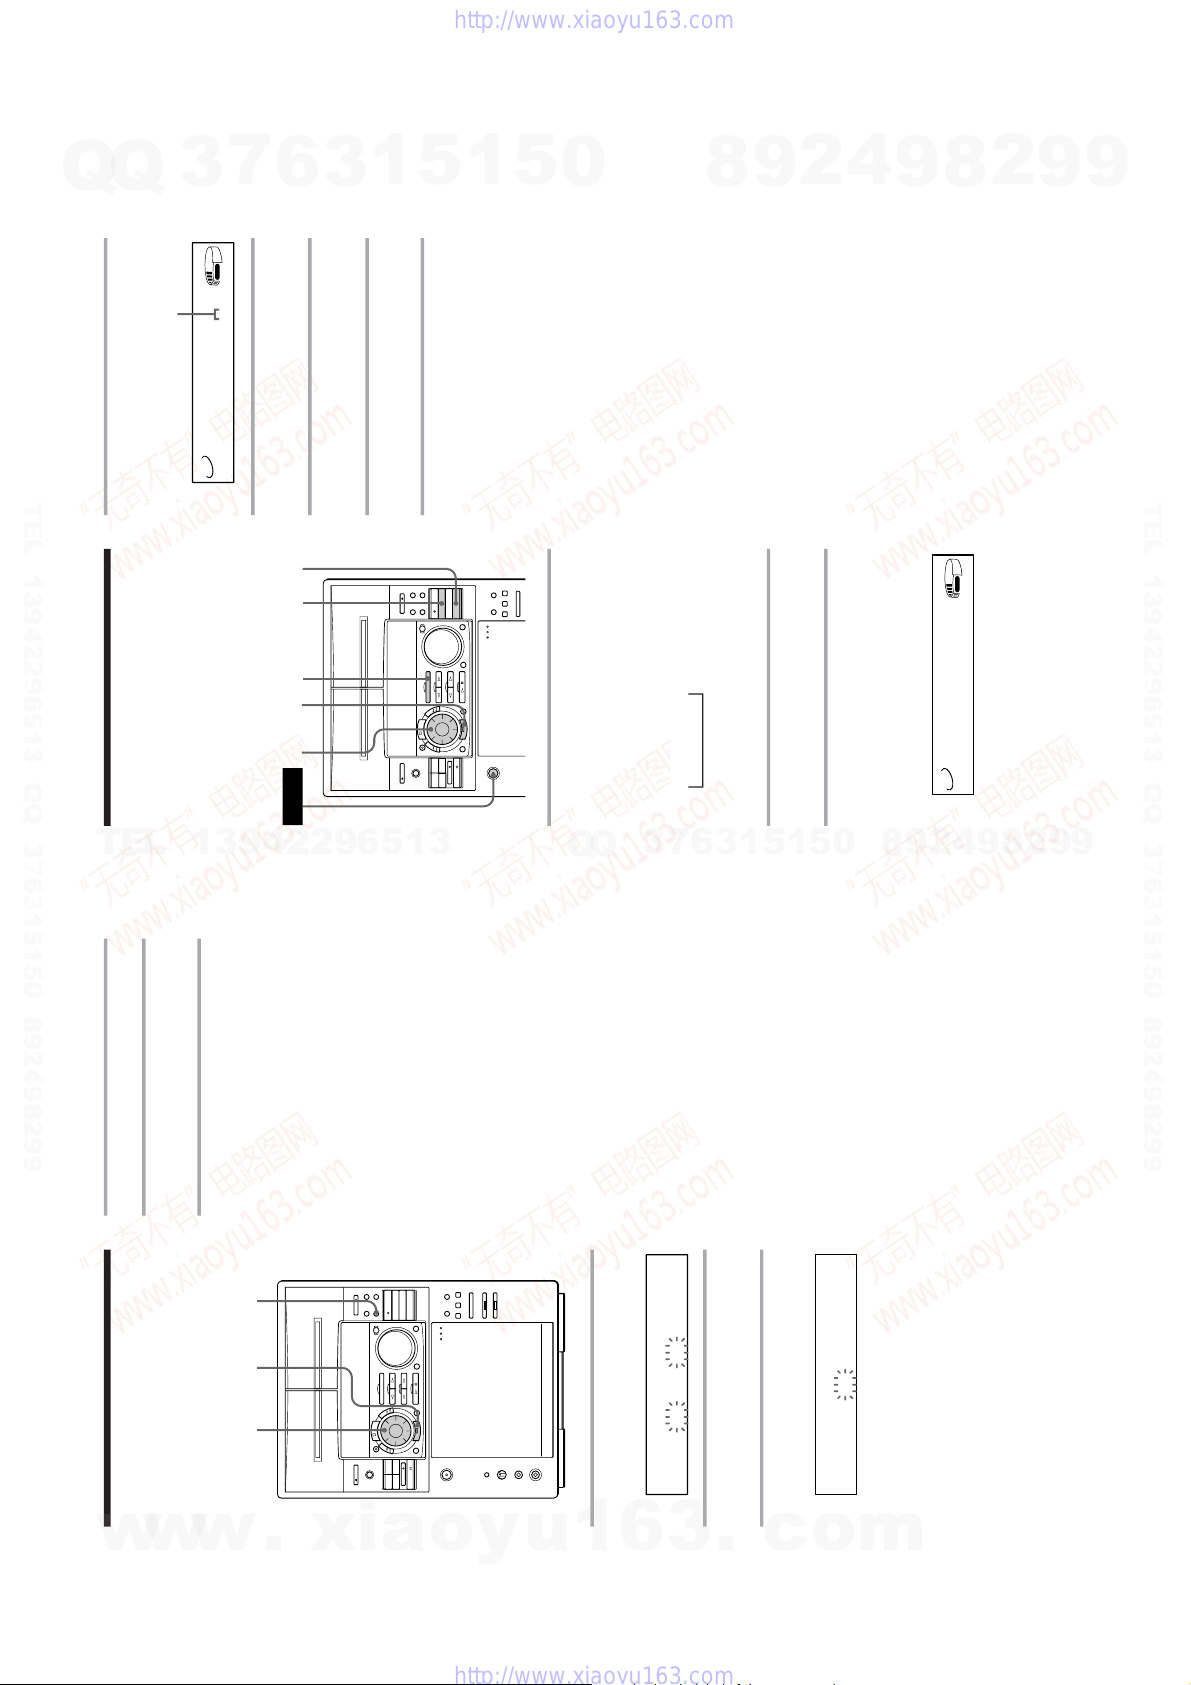
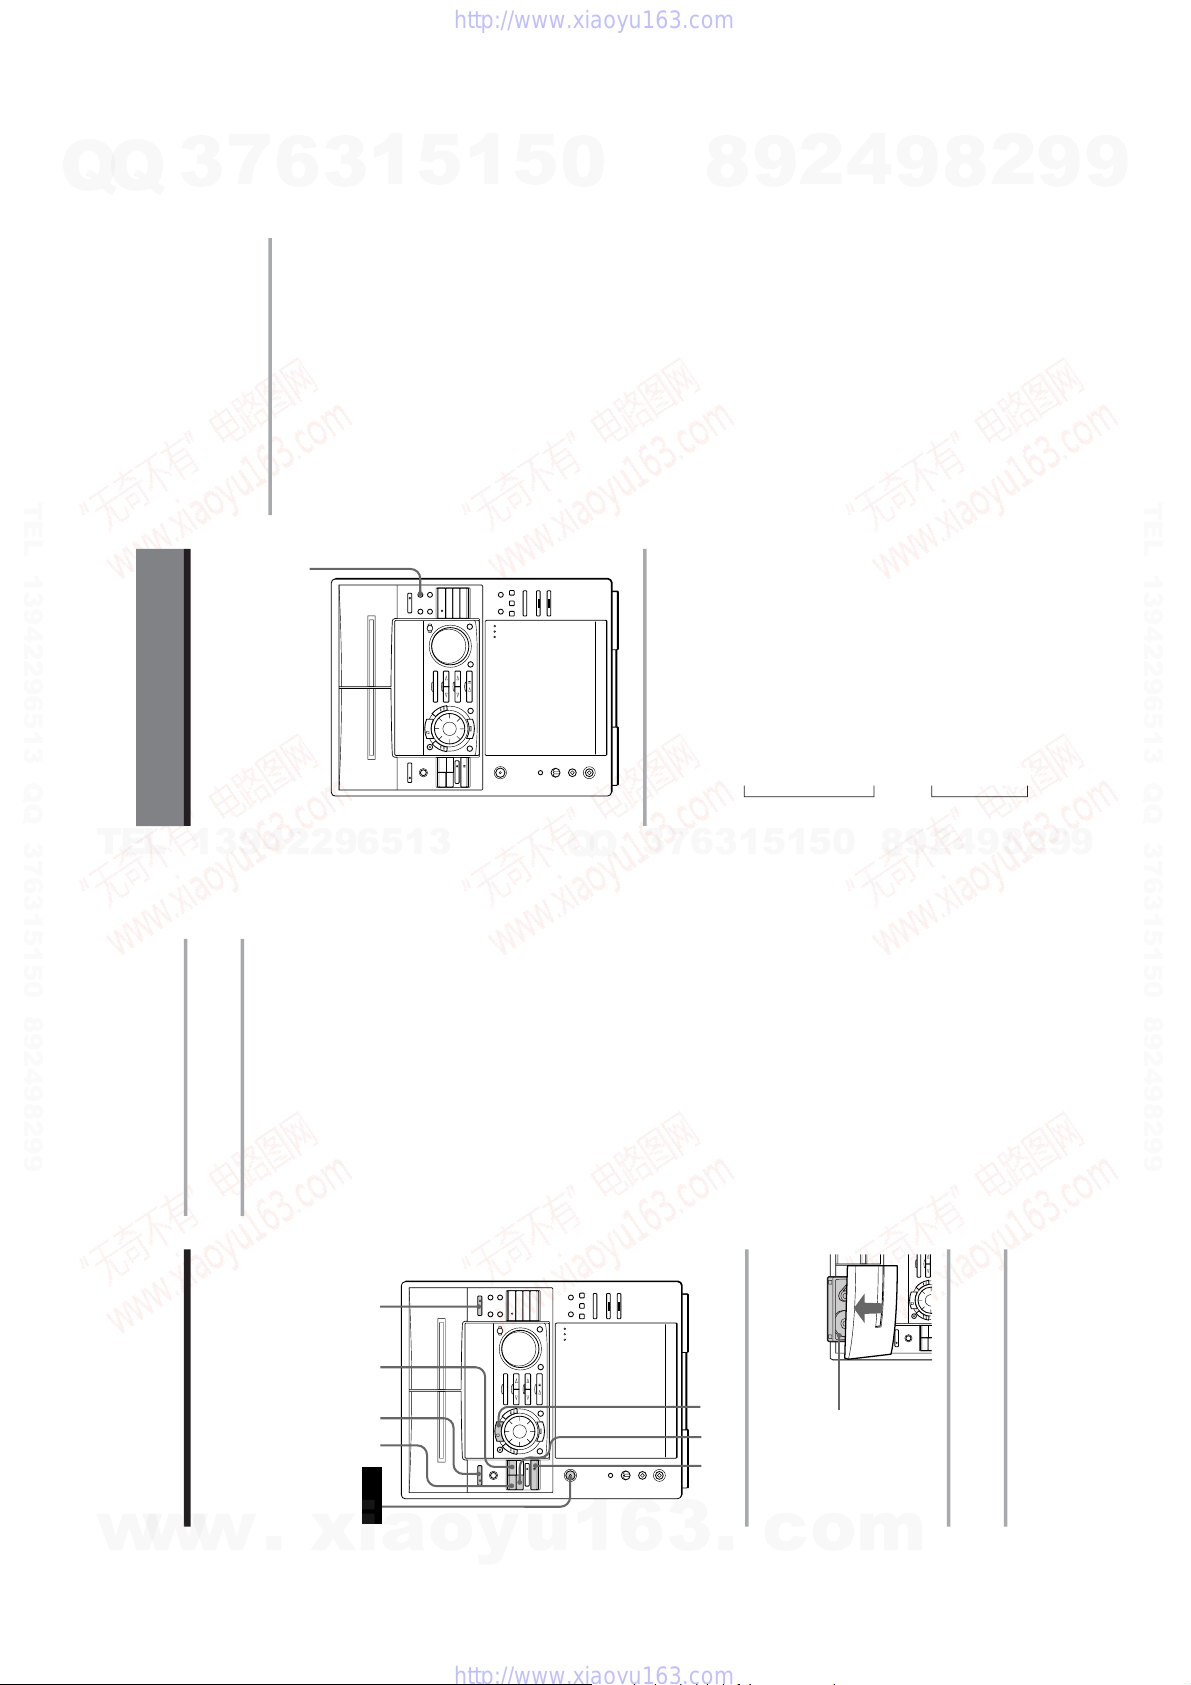
Inserting CDs
You can insert up to 51 discs into this player.
We recommend you use the PLUS ONE slot
for CDs you will be inserting and removing
frequently (see page 25).
3
Open the front cover by pushing the
right edge of the cover.
1
Press POWER to turn on the player.
2
Press FUNCTION repeatedly until
“CD” appears.
Disc slot at the
loading position
Disc number
Front cover
21 3,74
Rotary table
Loading position
Playing position
Disc number or the disc title
TITLE
AUTO
ALL
1
DISC
S TUNED
STEREO
VOLUME
20
*DISC-20*
9
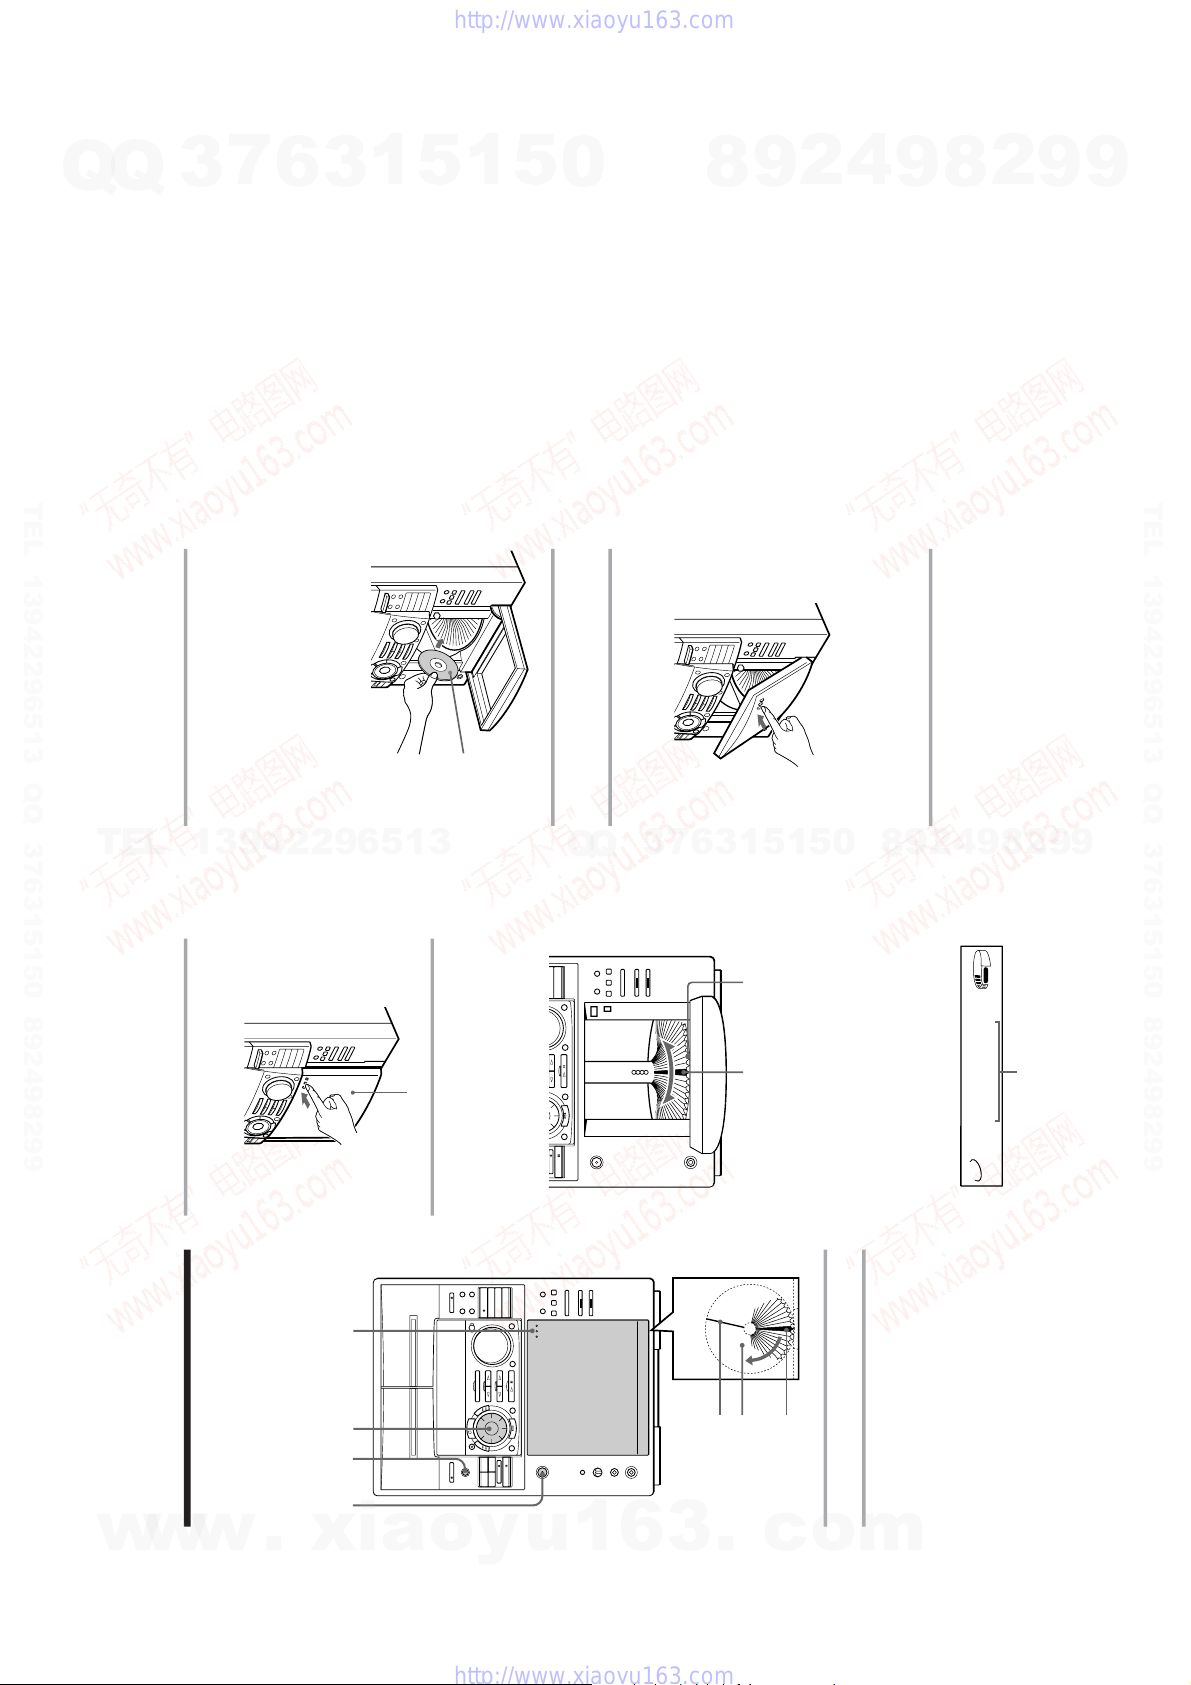
5
Insert a disc with the label side
facing right.
Notes
• Make sure you have inserted the disc into each
slot at a right angle to the rotary table. If the disc
is not put in straight, it may damage the player
or the disc.
• Make sure the rotary table comes to a
complete stop before inserting or removing
discs.
6
Repeat steps 4 and 5 to insert more
discs.
7
Close the front cover by pushing the
right edge of the cover until it clicks.
The rotary table turns and the disc slot at
the loading position is set to the playing
position.
Always close the front cover except
when you insert or remove discs.
With the
label side
facing right
Removing CDs
After following Steps 1 to 3 of “Inserting
CDs” on page 8, remove the discs. Then close
the front cover.
Notes
• Do not insert an empty 8 cm (3-inch) CD adaptor.
It may damage the player.
• Do not attach anything such as seals or sleeves to
CDs. It may damage the player or the disc.
•If you drop a disc into the player and the CD
won‘t go into the slot correctly, consult your
nearest Sony dealer.
• When transporting the player, remove all discs
from the player.
• If you want to remove the disc played, press
ENTER after opening the front cover. The disc
comes to the loading position. Remove the disc
after the rotary table comes to a complete stop.
Tips
• To play the disc you want independently, see
“Playing your favorite disc independently” on
page 25.
• You can display the original disc titles instead of
the disc numbers to locate it easily when you start
playing.
When you select a CD-TEXT disc, the disc title is
displayed instead of the disc number (for MHC-
F100/MHC-FR1 only, see page 26 for details).
Ver. 1.1
7
Q
Q
TEL 13942296513 QQ 376315150 892498299
3
6
3
1
5
1
5
0
8
9
2
4
9
8
2
9
9
TEL 13942296513 QQ 376315150 892498299
TEL
13942296513
3
6
7
3
Q
Q
9
8
0
5
1
5
1
2
4
9
8
2
9
9
w
w
w
.
xia
o
y
u
1
6
3
– 7 –
.
c
o
m
Ver. 1.1
10
Connecting optional
AV components
To enhance your system, you can connect
optional components. Refer to the
instructions of each component.
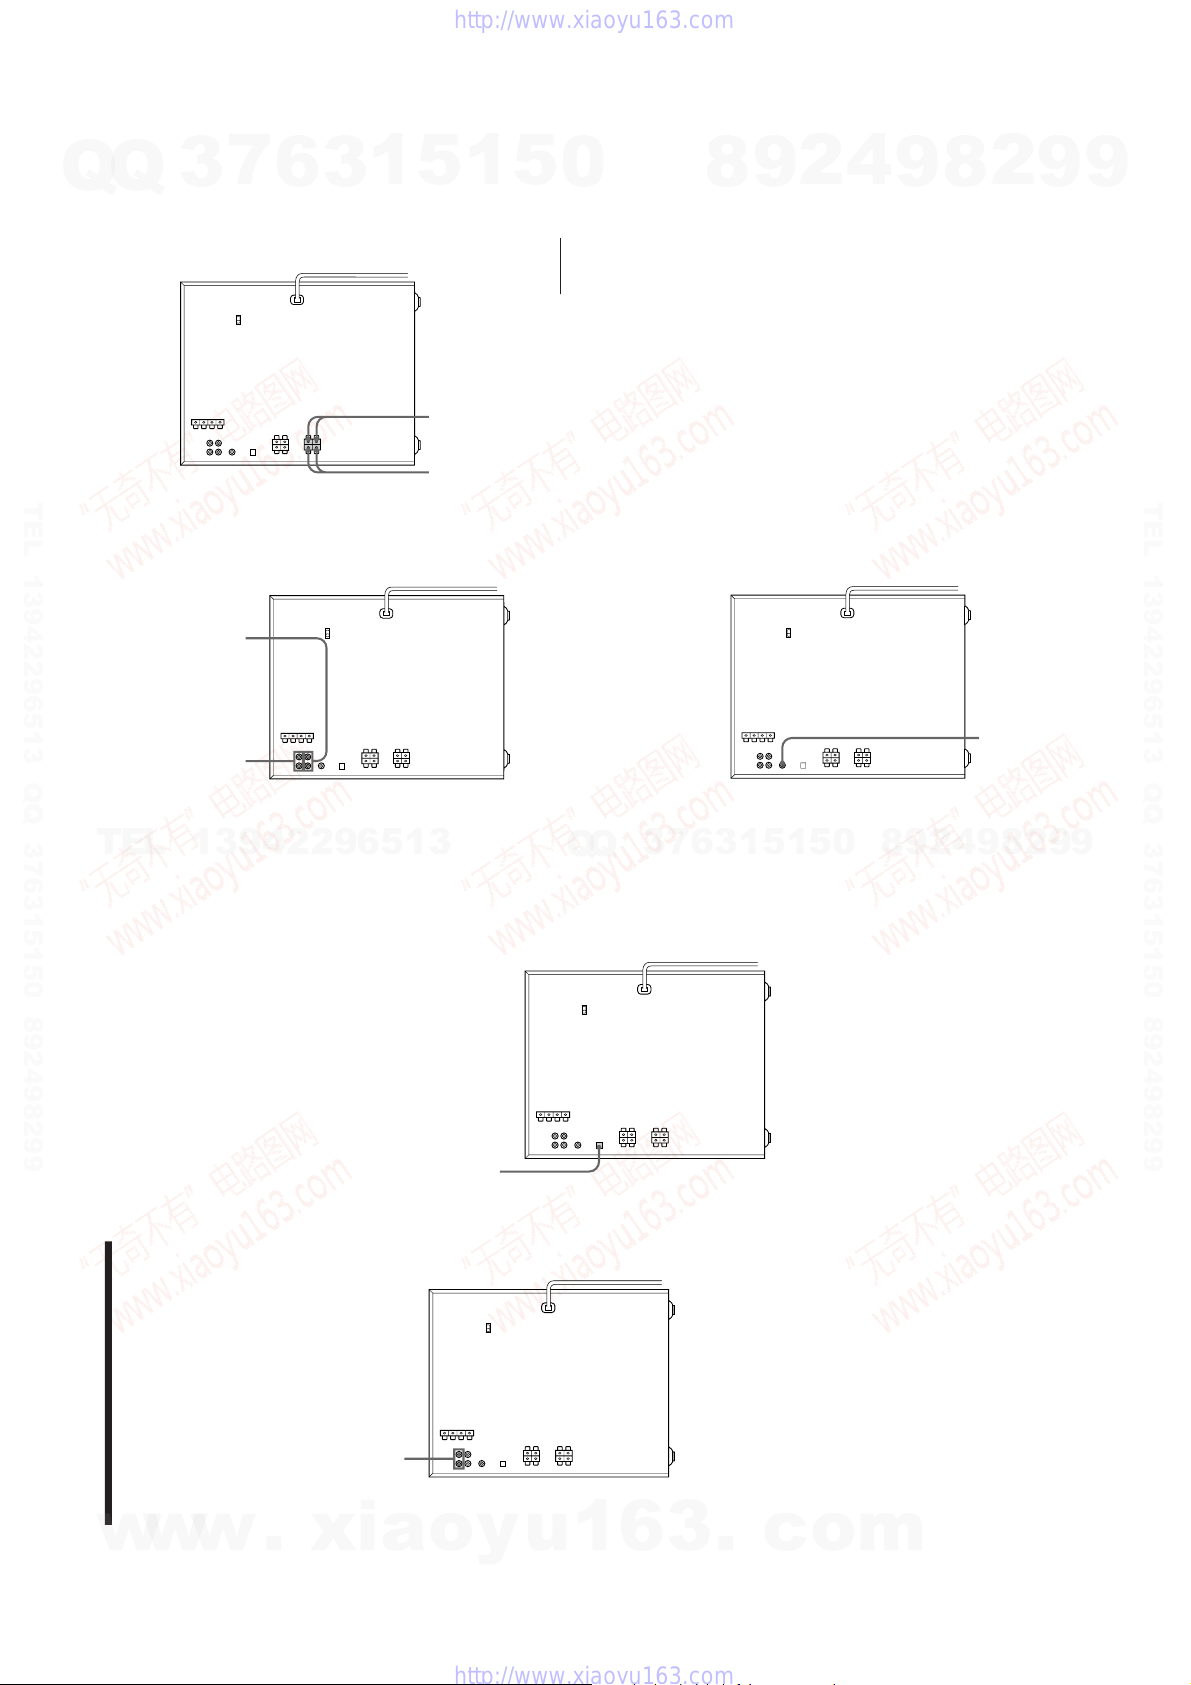
MHC-FR1 is used for illustration purpose.
Connecting a VCR
Make sure to match the color of the plugs and
the connectors. To listen to the sound of the
connected VCR, press FUNCTION repeatedly
until “VIDEO” appears.
Note
If the sound is distorted when selecting “VIDEO”,
switch to “MD” (see “Before connecting an MD
deck” on this page).
Connecting audio
components
Select one of the following two connections,
depending on the equipment to be connected
and method of connecting.
Before connecting an MD deck
Press FUNCTION repeatedly until “MD”
appears on the display.
When the power is off, press POWER while
holding down GROOVE.
“VIDEO” on the display will switch to “MD”.
To return to “VIDEO”, repeat the same step.
Connecting an MD deck for digital
recording
(For MHC-F100/MHC-FR1
only)
You can record from CD into the MD deck
digitally by connecting an optical cable.
To the audio output of the VCR
To the DIGITAL IN jack of the MD deck
11
Connecting surround speakers
(For MHC-F100/MHC-FR1 only)
You can connect an optional surround
speakers.
Note
You need to connect both left and right surround
speakers. Otherwise, the sound will not be heard.
Connecting an MD deck for analog
recording
Make sure to match the color of the plugs and
the connectors. To listen to the sound of the
connected MD deck, press FUNCTION
repeatedly until “MD” appears.
Tip
If you connect a turntable with MM cartridge,
connect it to VIDEO/MD IN using the optional MM
cartridge equalizer and an audio connecting cord.
To listen to the sound, press FUNCTION repeatedly
until “VIDEO” appears.
Connecting a super woofer
speaker
(For MHC-F100/MHC-FR1 only)
You can connect an optional super woofer
speaker.
continued
To the audio input
of the MD deck
To the audio output
of the MD deck
To super woofer
To surround
speaker (R)
To surround
speaker (L)
7
Q
Q
TEL 13942296513 QQ 376315150 892498299
3
6
3
1
5
1
5
0
8
9
2
4
9
8
2
9
9
TEL 13942296513 QQ 376315150 892498299
TEL
13942296513
Q
Q
3
7
6
3
1
5
1
5
0
8
9
2
4
9
8
2
9
9
w
w
w
.
xia
o
y
u
1
6
3
.
– 8 –
c
o
m
12
Connecting optional AV
components (continued)
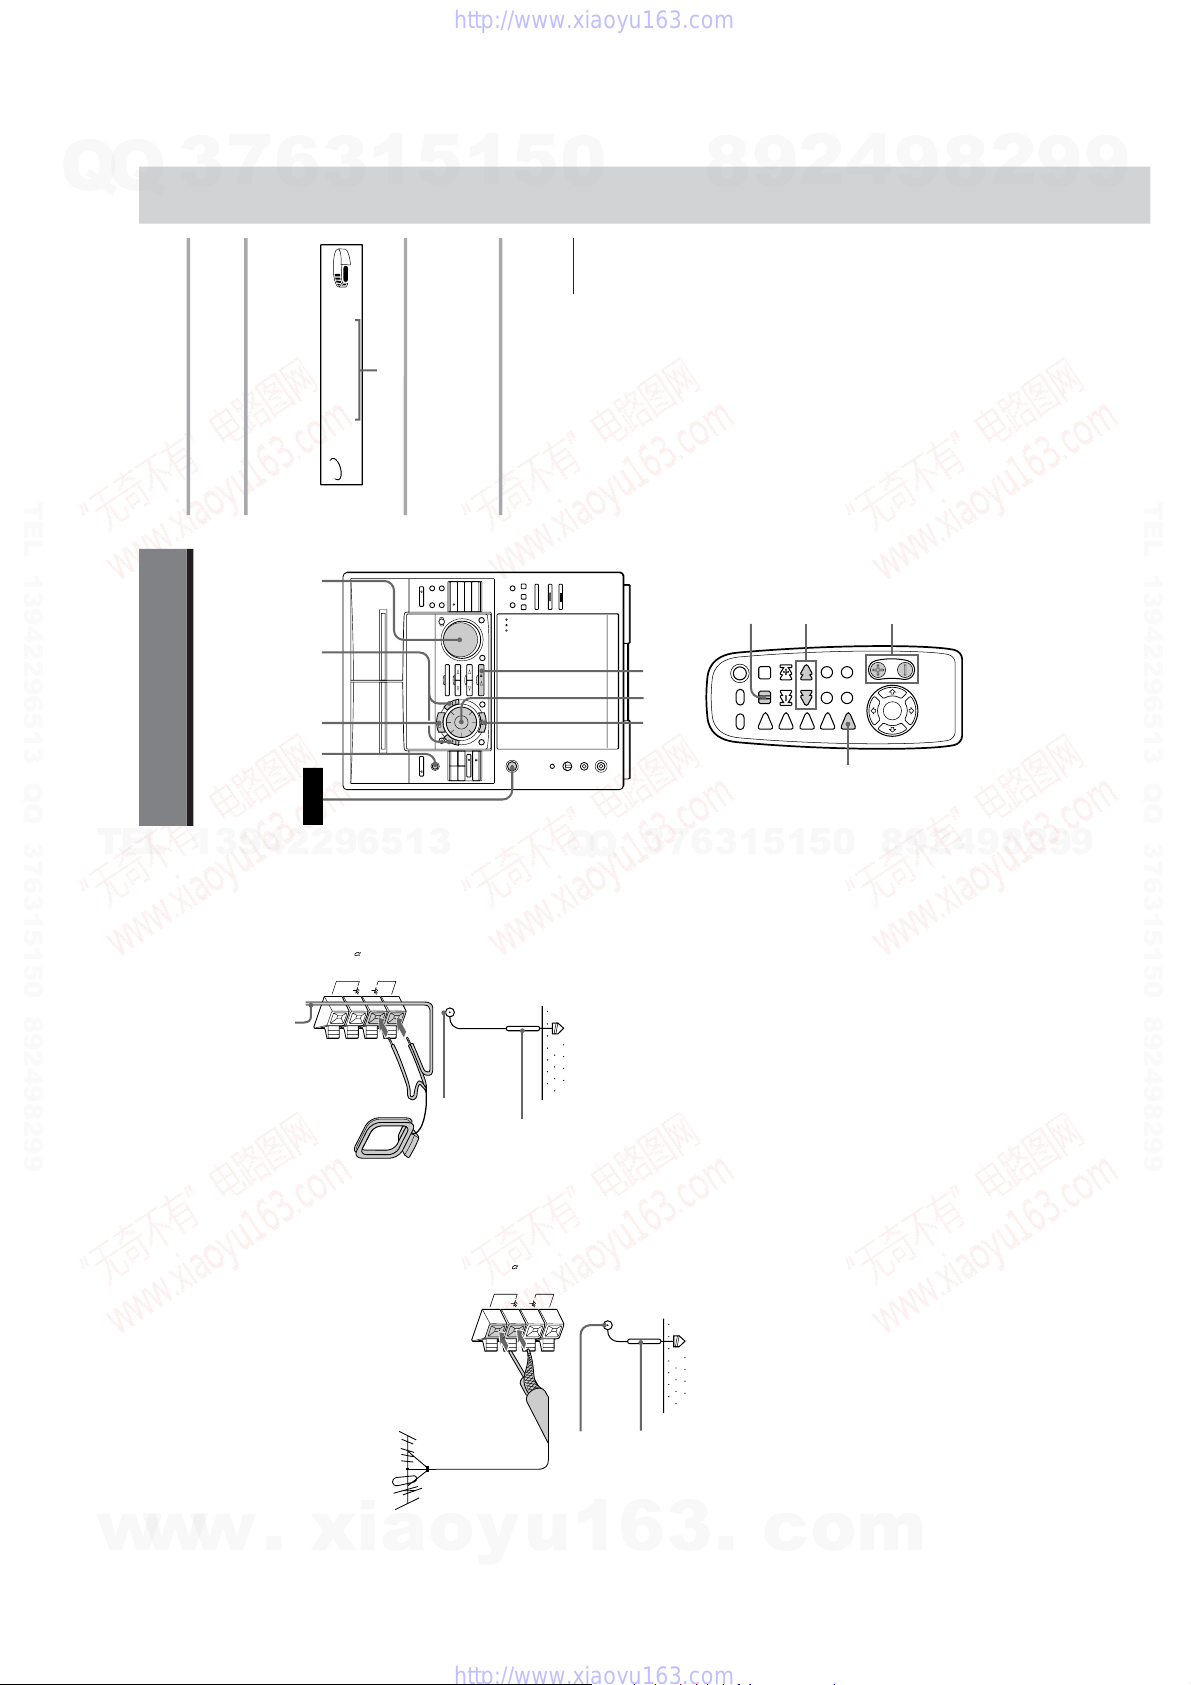
Connecting outdoor
antennas
Connect the outdoor antenna to improve the
reception.
FM antenna
Connect the optional FM outdoor antenna.
You can also use the TV antenna instead.
AM antenna
Connect a 6- to 15- meter (20- to 50- feet)
insulated wire to the AM antenna terminal.
Leave the supplied AM loop antenna
connected.
Important
If you connect an outdoor antenna, ground
from y terminal with the screw clamp. To
prevent a gas explosion, do not connect the
ground wire to a gas pipe.
Screw clamp
Ground wire
(not supplied)
Insulated wire (not supplied)
FM75
AM
y
FM75
AM
y
75-ohm coaxial cable
(not supplied)
Screw clamp
Ground wire
(not supplied)
Basic Operations
13
Playing a CD
— Normal play
1
Press FUNCTION repeatedly until
“CD” appears.
2
Turn the jog dial until the desired
disc number or the disc title*
appears.
3
Press ENTER or CD fl (or CD (
on the remote)
The selected disc is set to the playing
position, and starts playing.
* For MHC-F100/MHC-FR1 only, see page 26 for
details.
Basic Operations
You can play up to 51 CDs in a row.
continued
Disc number or the disc title
1
CDfl
≠/±πSTOP VOLUME
32
POWER
0/)
VOL +/–
CD(
P
TITLE
AUTO
ALL
1
DISC
S TUNED
STEREO
VOLUME
20
*DISC-20*
Ver. 1.1
7
Q
Q
TEL 13942296513 QQ 376315150 892498299
3
6
3
1
5
1
5
0
8
9
2
4
9
8
2
9
9
TEL 13942296513 QQ 376315150 892498299
TEL
13942296513
7
3
Q
Q
6
3
1
1
5
5
0
8
9
2
4
9
8
2
9
9
w
w
w
.
xia
o
y
u
1
6
– 9 –
3
.
c
o
m
Ver. 1.1
14
Playing a CD (continued)
To specify the next CD to play
While playing a disc, turn the jog dial until
the desired disc number (or disc title) and
“NEXT” appears. To skip to the next disc
right away, press ENTER.
To cancel the specified disc, press
CONTINUE twice so that “NEXT”
disappears.
Tips
•Pressing CD ·∏ when the power is off
automatically turns the power on and starts CD
playback if there is a CD in the tray (One Touch
Play).
• You can switch from another source to the CD
player and start playing a CD just by pressing CD
·∏ (Automatic Source Selection).
• If there is no CD in the player, “-NO DISC-”
appears.
To
Stop play
Pause
Resume playing
after pause
Select a CD
Select a track
Advance or return
10 CDs at a time
Find a point of a
track
Play only the CD
you have selected
Play all CDs
Adjust the volume
Stop playing and
remove the disc
You need to
Press π STOP.
Press CD fl (P on the
remote).
Press CD fl (P on the
remote).
Turn the jog dial clockwise
(or press b on the remote)
or counterclockwise (or
press B on the remote) and
release it when you reach
the desired CD.
During play or pause, press
± (to go forward) or ≠
(to go back) until you reach
the desired track.
Press V on the remote (to
move 10 CDs ahead) or v
(to move 10 CDs back).
Press and hold down )
(to go forward) or 0 (to
go back) on the remote
during a play and release it
at the desired point.
Press CONTINUE
repeatedly until “1 DISC”
appears.
Press CONTINUE
repeatedly until “ALL
DISCS” appears.
Turn VOLUME (or press
VOL +/– on the remote).
Open the front cover, then
press ENTER.
The PLUS ONE slot comes
out automatically when the
front cover is opened while
the CD PLUS ONE button
is lit up.
TITLE
AUTO
ALL
DISC
S TUNED
STEREO
NEXT
VOLUME
51
Basic Operations
15
Recording a CD
— CD Synchro Recording
The CD SYNCHRO button lets you record
from a CD to a tape easily. You can use TYPE
I (normal) or TYPE II (CrO
2
) tapes. The
recording level is adjusted automatically.
1
Press § EJECT and insert a blank
tape into deck B.
2
Turn the jog dial until the desired
disc number or the disc title (see
page 26) appears.
3
Press CD SYNCHRO.
Deck B stands by for recording and the
CD player stands by for playback. ·
(for front side) lights up.
4
Press DIRECTION repeatedly to
select A to record on one side.
Select ß (or RELAY) to record on
both sides.
5
Press PAUSE ∏.
Recording starts.
To stop recording
Press π STOP.
Tips
• If you want to record from the reverse side, press
TAPE B ª so that ª (for reverse side) lights up.
• When you record on both sides, be sure to start
from the front side. If you start from the reverse
side, recording stops at the end of the reverse side.
• When you want to reduce the hiss noise in low-
level high-frequency signals, press DOLBY NR so
that “DOLBY NR B” appears after pressing CD
SYNCHRO.
Note
You cannot listen to other sources while recording.
With the side
you want to
record facing
forward
134
πSTOP
DOLBY NR
25
POWER
Disc number or the disc title
TITLE
AUTO
ALL
1
DISC
S TUNED
STEREO
VOLUME
20
*DISC-20*
Q
Q
3
7
6
3
1
5
1
5
0
TEL 13942296513 QQ 376315150 892498299
8
9
2
4
9
8
2
9
9
TEL 13942296513 QQ 376315150 892498299
TEL
13942296513
6
7
3
Q
Q
4
2
9
8
0
5
1
5
1
3
9
8
2
9
9
w
w
w
.
xia
o
y
u
– 10 –
1
6
3
.
c
o
m
16
n
n
Listening to the radio
–– Preset Tuning
Preset radio stations in the tuner's memory
first (see “Step 3: Presetting radio stations”).
1
Press TUNER/BAND repeatedly
until the band you want appears.
Each time you press the button, the band
changes as follows:
Singaporian model:
FM n MW n SW
North and South American and
Australian models:
FM ˜ AM
2
Press TUNING MODE repeatedly
until “PRESET” appears.
MANUAL n AUTO n PRESET
3
Turn the jog dial (or press = or
+ on the remote) to tune in the
desired preset station.
Do this
Press POWER.
Turn VOLUME (or press
VOL +/– on the remote).
To
Turn off the radio
Adjust the volume
STEREO/MONO
3
1
2
VOLUME
POWER
=/+
VOL +/–
TUNER/
BAND
Turn counter-
clockwise
(or press =
on the remote)
for lower preset
numbers.
Turn clockwise
(or press +
on the remote)
for higher
preset numbers.
Preset number Frequency
PRESET
TUNED
STEREO
MHz
VOLUME
FM 3 104.00
20
Basic Operations
17
You can record the radio program on a tape
by calling up a preset station. You can use
TYPE I (normal) or TYPE II (CrO
2
) tapes. The
recording level is automatically adjusted.
continued
To listen to non-preset radio
stations
Press TUNING MODE repeatedly until
“MANUAL” or “AUTO” appears in step 2,
then tune in the station by turning the jog
dial.
Tips
• Pressing TUNER/BAND when the power is off
automatically turns the power on and tunes to the
last received station (One Touch Play).
• You can switch from another source to the radio
just by pressing TUNER/BAND (Automatic
Source Selection).
• When an FM program is noisy, press
STEREO/MONO repeatedly until “MONO”
appears in the display. There will be no stereo
effect, but the reception will improve. Press the
button again to restore the stereo effect.
• To improve broadcast reception, reorient the
supplied antennas.
Recording from the
radio
Turn clockwise
for higher
preset numbers.
Turn counter-
clockwise for
lower preset
numbers.
Preset number Frequency
PRESET
TUNED
STEREO
MHz
VOLUME
FM 3 104.00
20
1
Press TUNER/BAND repeatedly
until the band you want appears.
2
Press TUNING MODE repeatedly
until “PRESET” appears.
3
Turn the jog dial to tune in the
desired preset station.
416
DOLBY NR πSTOP
3275
POWER
Ver. 1.1
7
Q
Q
TEL 13942296513 QQ 376315150 892498299
3
6
3
1
5
1
5
0
8
9
2
4
9
8
2
9
9
TEL 13942296513 QQ 376315150 892498299
TEL
13942296513
3
6
7
3
Q
Q
5
1
0
5
1
8
9
2
4
9
8
2
9
9
w
w
w
.
xia
o
y
u
1
– 11 –
6
3
.
c
o
m
Ver. 1.1
18
Playing a tape
You can use any type of tape, TYPE I
(normal), TYPE II (CrO
2
) or TYPE IV (metal) ,
since the deck automatically detects the tape
type.
4
Press § EJECT and insert a blank
tape into deck B.
5
Press REC ®.
Deck B stands by for recording.
6
Press DIRECTION repeatedly to
select A to record on one side.
Select ß (or RELAY) to record on
both sides.
7
Press PAUSE ∏.
Recording starts.
To stop recording
Press π STOP.
Tips
• If you want to record from the reverse side, press
TAPE B ª so that ª (for reverse side) lights up.
• When you record on both sides, be sure to start
from the front side. If you start from the reverse
side, recording stops at the end of the reverse side.
• You can still rewind or fast-forward Deck B by
pressing the º or ‚ keys on the main unit,
even while using the tuner.
• To record non-preset stations, select “MANUAL”
in step 2, then turn the jog dial to tune in the
desired station.
• When you want to reduce the hiss noise in low-
level high-frequency signals, press DOLBY NR so
that “DOLBY NR B” appears before step 7.
• If noise is heard while recording from the radio,
move the respective antenna to reduce the noise.
Recording from the radio
(continued)
With the side
you want to
record facing
forward
12
DOLBY NR
31
VOLUME
º/‚πSTOP
POWER
0/)
VOL +/–
P
p
TAPE A(
TAPE B(
Basic Operations
19
1
Press § EJECT and insert a
recorded tape in deck A or B.
2
Press DIRECTION repeatedly to
select A to play one side. Select ß*
to play both sides.
To play both decks in succession, select
RELAY (relay play).**
3
Press TAPE A · or TAPE B ·.
Press ª (or TAPE A ( or TAPE B (
on the remote again) to play the reverse
side. The tape starts playing.
* The deck stops automatically after repeating the
sequence five times.
** Relay play always follows the following
sequence:
Deck A (front side), Deck A (reverse side),
Deck B (front side), Deck B (reverse side).
Tips
• Pressing TAPE A ª/· or TAPE B ª/·
when the power is off automatically turns the
power on and starts tape playback if there is a tape
in the deck (One Touch Play).
• You can switch from another source to the tape
deck just by pressing TAPE A ª/· or TAPE B
ª/· (Automatic Source Selection).
• When you play a tape recorded with Dolby NR B,
pressDOLBY NR so that “DOLBY NR B” appears.
To
Stop play
Pause (Deck B only)
Fast-forward
Rewind
Remove the cassette
Adjust the volume
Do this
Press π STOP (or p on the
remote).
Press PAUSE ∏ (or P on
the remote). Press again to
resume play.
Press ‚ while playing
the front side or º while
playing the reverse side.
This fast-forwards the deck
shown on the display
(TAPE A or TAPE B).
Press º while playing
the front side or ‚ while
playing the reverse side.
This rewinds the deck
shown on the display
(TAPE A or TAPE B).
Press § EJECT.
Turn VOLUME (or press
VOL +/– on the remote).
With the side
you want to
play facing
forward
7
Q
Q
TEL 13942296513 QQ 376315150 892498299
3
6
3
1
5
1
5
0
8
9
2
4
9
8
2
9
9
TEL 13942296513 QQ 376315150 892498299
TEL
13942296513
1
3
6
7
3
Q
Q
5
5
1
0
8
9
2
4
9
8
2
9
9
w
w
w
.
xia
o
y
u
1
6
– 12 –
3
.
c
o
m
20
Recording from a
tape
— High-speed Dubbing
4
Press PAUSE ∏.
Dubbing starts.
To stop dubbing
Press π STOP.
Tips
• When you dub on both sides, start recording from
the front side. If you record from the reverse side,
recording stops at the end of the reverse side.
• If you set DIRECTION to ß when the tapes you
use have different lengths, the tape in each deck
reverses independently. If you select RELAY, the
tapes in both decks reverse together.
• When you record a tape recorded with Dolby NR
B in deck A, press DOLBY NR so that “DOLBY
NR B” disappears.
The tape is recorded with Dolby NR B.
You can use TYPE I (normal) or TYPE II
(CrO
2
) tapes. The recording level is
automatically adjusted.
1
Press § EJECT and insert a
recorded tape in deck A and a blank
tape in deck B.
2
Press HI-SPEED DUBBING.
Deck B stands by for recording.
3
Press DIRECTION repeatedly to
select A to record on one side.
Select ß (or RELAY) to record on
both sides.
With the side
you want to
play/record
facing forward
113
πSTOP
DOLBY NR
42
POWER
21
Using the CD display
You can check the remaining time of the
current track or that of the CD.
The CD Player
1)
For labeled CD or CD with CD-TEXT
(For MHC-F100/MHC-FR1 only)
2)
CD with CD text (For MHC-F100/MHC-FR1 only)
3)
TOC = Table of Contents; displays current disc
number, track number, playing time of the track.
/
Press DISPLAY/DEMO.
Each time you press the button, the
display changes as follows:
During the stop
n disc number or disc title
1)
µ
Artist name
2)
µ
TOC display
3)
µ
Clock display (for a few seconds)
µ
Effect (P FILE) name or “EFFECT ON
(OFF)”
During the normal play
n Playing time on the current track
µ
Track title
2)
µ
Clock display (for a few seconds)
µ
Effect (P FILE) name or “EFFECT ON
(OFF)”
DISPLAY/DEMO
Ver. 1.1
7
Q
Q
TEL 13942296513 QQ 376315150 892498299
3
6
3
1
5
1
5
0
8
9
2
4
9
8
2
9
9
TEL 13942296513 QQ 376315150 892498299
TEL
13942296513
Q
Q
3
7
6
3
1
5
1
5
0
8
9
2
4
9
8
2
9
9
w
w
w
.
xia
o
y
u
1
6
– 13 –
3
.
c
o
m
Ver. 1.1
22
Playing the CD tracks
in random order
–– Shuffle Play
You can play all the tracks on one CD or all
CDs in random order.
1
Press FUNCTION repeatedly until
“CD” appears.
2
Press SHUFFLE to select ALL
DISCS or 1 DISC Shuffle Play mode.
Each time you press SHUFFLE, “ALL
DISCS” or “1 DISC” appears.
3
When you want to specify the disc
for 1 DISC Shuffle Play, turn the jog
dial until the desired disc number or
disc title (see page 26) appears.
To play
All tracks on all discs in
random order
All tracks on the specific disc in
random order
Select
ALL DISCS
1DISC
31
CONTINUE
4
2
Playing the CD tracks
repeatedly
–– Repeat Play
This function lets you repeat a single CD or
all CDs in normal play, Shuffle Play and
Program Play.
/
Press REPEAT during play until
“REPEAT” appears.
Repeat play starts. Do the following
procedure.
To cancel Repeat Play
Press REPEAT repeatedly until “REPEAT” or
“REPEAT 1” disappears.
To repeat
All the tracks on the
current CD
All the tracks on all
CDs
Only one track
Press
CONTINUE repeatedly
until “1 DISC” appears.
CONTINUE repeatedly
until “ALL DISCS”
appears.
REPEAT repeatedly
until “REPEAT 1”
appears while playing
the track you want to
repeat.
CONTINUE REPEAT
23
4
Press ENTER or CD ·∏.
“J” appears and then all the tracks play
in random order.
To cancel Shuffle Play
Press CONTINUE.
Tips
• You can start Shuffle Play by pressing SHUFFLE
while playing.
• You can specify the next disc to play during
1DISC Shuffle Play.
Turn the jog dial to specify the next disc. After all
the tracks on the current disc are played in
random order, the next disc starts playing. To skip
to the next disc right away, press ENTER while
playing the current disc.
You cannot specify the next disc to play during
ALL DISCS Shuffle Play.
Note
Even if you press πSTOP or turn off the power
during ALL DISCS Shuffle Play, the player
remembers which discs/tracks were played and
which were not. Therefore, if you want to start ALL
DISCS Shuffle Play again from the beginning, be
sure to repeat the procedure from Step 1.
Programming the CD
tracks
–– Program Play
You can arrange the order of the tracks and/
or discs to create three different programs
and programs are stored automatically.
A program can contain up to 32 “steps” —
one “step” may contain a track or a whole
disc.
14 7
CLEARCHECK
53
2
1
Press FUNCTION repeatedly until
“CD” appears.
2
Press PROGRAM repeatedly until
the desired program number
(PROGRAM 1, 2 or 3) appears.
3
Turn the jog dial until the desired
disc number appears.
continued
Disc number
TITLE
AUTO
ALL
1
DISC
S
PROGRAM
CD TEXT
RELAY
TUNED
1
2
REC
SLEEP
STEREO
MONO
SYNC
VOLUME
PLUS
1
20
*DISC-20*
Q
Q
3
7
6
3
1
5
1
5
0
TEL 13942296513 QQ 376315150 892498299
8
9
2
4
9
8
2
9
9
TEL 13942296513 QQ 376315150 892498299
TEL
13942296513
3
6
7
3
Q
Q
2
9
8
0
5
1
5
1
9
4
8
2
9
9
w
w
w
.
xia
o
y
u
1
6
3
– 14 –
.
c
o
m
24
To
Check the
program
Clear a specific
track or disc
Clear from the
last track or disc
Add tracks or
discs to the end
of the program
Clear a specific
program
You need to
Press CHECK repeatedly.
After the last track, “END”
appears.
Press CHECK until the track
or disc you do not want
appears, then press CLEAR.
Press CLEAR. Each time you
press the button, the last track
or disc will be cleared.
Follow the programming
procedure.
1Press PROGRAM repeatedly
until the program number
you want to clear appears.
2Hold down CLEAR until
“ALL CLEAR” appears.
Programming the CD tracks
(continued)
Tips
• When you press CD fl, you can play the same
program again.
• When you press PROGRAM during Continuous
or Shuffle Play, the program will be played after
the current track.
• If you replace discs, the programmed disc and
track numbers remain until you erase them. So,
the player plays only the existing disc and track
numbers. However, the disc and track numbers
that are not found in the player or on the disc are
deleted from the program, and the rest of the
program is played in the programmed order.
4
To program a whole disc, skip this
step. Press ≠/± until the
desired track number appears.
When the disc you select has a disc title
(For MHC-F100/MHC-FR1 only), it
appears and then switches to the
following display.
5
Press ENTER.
The track is programmed.
6
To program other discs/tracks, do
the following:
7
Press CD fl.
All the tracks play in the order you
selected.
To cancel Program Play
Press CONTINUE.
To program
Other discs
Other tracks on the same disc
Other tracks on other discs
Repeat Steps
3 and 5
4 and 5
3 to 5
Track number
AUTO
ALL
1
DISC
S
PROGRAM
CD TEXT
RELAY
TUNED
1
2
REC
SLEEP
STEREO
MONO
SYNC
STEP
VOLUME
PLUS
1
20
20 3 1
The programmed
disc
Playing order
The programmed track
AUTO
ALL
1
DISC
S
PROGRAM
CD TEXT
RELAY
TUNED
1
2
REC
SLEEP
STEREO
MONO
SYNC
STEP
VOLUME
PLUS
1
20
20 3 1
25
Playing your favorite
CD independently
— Plus One Play
When you insert a disc into the PLUS ONE
slot, you can play the disc independently
from other discs. When using this function,
the player is automatically set to 1 DISC
Continuous Play mode.
1
Open the front cover.
2
Press CD PLUS ONE (or PLUS ONE
on the remote).
The indicator on the CD PLUS ONE
button lights up.
The PLUS ONE slot comes to the loading
position.
3
Insert a disc into the PLUS ONE
slot.
4
Close the front cover.
The player starts playing the disc in the
PLUS ONE slot.
When the disc you select has a disc title
(For MHC-F100/MHC-FR1 only) this is
displayed along with “PLUS1”.
To cancel Plus One Play
Press CD PLUS ONE (or PLUS ONE on the
remote). The indicator on the CD PLUS ONE
button goes off. The disc number in the
display changes to 51 and you can play the
disc as the 51st disc.
PLUS ONE slot
continued
21
P
L
U
S
O
N
E
1
2
3
4
5
6
7
8
9
5
0
49
48
4
7
4
6
4
5
44
4
3
4
2
4
1
TITLE
AUTO
CD TEXT
RELAY
TUNED
1
2
REC
SLEEP
STEREO
MONO
SYNC
VOLUME
PLUS
1
P1
*DISC-PLUS1*
TITLE
AUTO
CD TEXT
RELAY
TUNED
1
2
REC
SLEEP
STEREO
MONO
SYNC
VOLUME
PLUS
1
P1
P1 1 0.35
Ver. 1.1
Q
Q
3
7
6
3
1
5
1
5
0
TEL 13942296513 QQ 376315150 892498299
8
9
2
4
9
8
2
9
9
TEL 13942296513 QQ 376315150 892498299
TEL
13942296513
7
3
Q
Q
6
3
1
9
9
2
8
9
4
2
9
8
0
5
1
5
w
w
w
.
xia
o
y
u
1
6
– 15 –
3
.
c
o
m
Ver. 1.1
26
Labeling a CD
(For MHC-F100/MHC-FR1 only)
— Disc Memo
You can label each disc using up to 12
characters. When you select a CD-TEXT disc,
the first 12 characters of the disc title are
stored as a disc memo. Whenever you load
the labelled CD, the label (disc title) appears
in the display.
Playing Your Favorite CD
Independently (continued)
Tips
• To play a disc already inserted into the PLUS ONE
slot, press CD PLUS ONE while the front cover is
closed.
• You can start Shuffle Play during Plus One Play
by pressing SHUFFLE before step 4.
Notes
•Plus One Play will be canceled if;
— you turn the jog dial or press buttons to specify
the other disc.
— you press PROGRAM, MEMO SCAN or
MEMO SEARCH.
• The PLUS ONE slot comes to the loading position
automatically if you open the front cover during
Plus One Play. Do not put your hand inside the
compartment nor change the disc before the rotary
table comes to a complete stop. If you do, you may
injure your hand or damage the disc.
1
Press FUNCTION repeatedly until
“CD” appears.
2
Turn the jog dial until the disc
number to which you want to label
appears.
When you label a disc with the front
cover closed, the disc number of the disc
at the playing position appears.
When you label a disc with the front
cover open, the disc number at the
loading position appears.
3
Press MEMO INPUT.
The cursor (9) starts flashing.
1 2,4
CLEARLOOP/DELETE
75 3
27
4
Turn the jog dial until the desired
character appears.
The cursor disappears and the first space
for the disc title flashes.
To select characters on the unit
As you turn the jog dial clockwise, the
characters appear in the following order.
Turn the jog dial counterclockwise to go
back to the previous character.
To select characters on the remote
Press V or v until the desired type of
charecter appears, then press B or b until
the desired character appears.
(space) A B C D E F G H I J K L M N O P
Q R S T U V W X Y Z a b c d e f g h i j k l
m n o p q r s t u v w x y z 0 1 2 3 4 5 6 7 8
9 ! " # $ % & ' ( ) ∗ + , – . / : ; < = > ? @ [ \
] ^ _ ` {
} ˜
5
Press ± to select the character.
The cursor shifts rightward and waits for
the input of the next character.
If you have made a mistake
Press LOOP/DELETE. The character 1
space before the cursor disappears and
the cursor flashes. Input the correct
characters.
6
Repeat Steps 4 and 5 to input more
characters.
7
Press ENTER to complete the
labelling procedure.
The disc name lights up in the display.
Repeat Steps 2 to 7 to label other discs.
Note
• The disc title stores the number of the slot in
which the CD was inserted. Rewrite the disc title
when inserting a new CD into that slot.
To erase a disc name
1
Follow Steps 2 and 3 in “Labeling a
CD” on page 26 to select the disc
name you want to erase.
2
Press CLEAR.
The disc title disappears.
3
Press ENTER.
Erasing all titles of all discs
While holding down LOOP/DELETE, press
CLEAR. “ALL ERASE” appears in the
display, and all disc titles will be erased.
Tips
• When you replace a disc with a CD-TEXT disc, the
disc title of the CD-TEXT disc is restored
automatically.
The disc title for the CD-TEXT disc is no longer
stored when the CD is removed.
Note that you cannot change the disc title of the
CD-TEXT disc.
• You can label discs while the front cover is open.
TITLE
AUTO
ALL
1
DISC
S
PROGRAM
CD TEXT
RELAY
TUNED
1
2
REC
SLEEP
STEREO
MONO
SYNC
VOLUME
PLUS
1
P1
S
20
TITLE
AUTO
ALL
1
DISC
S
PROGRAM
CD TEXT
RELAY
TUNED
1
2
REC
SLEEP
STEREO
MONO
SYNC
VOLUME
PLUS
1
P1
S
“
20
TITLE
AUTO
ALL
1
DISC
S
PROGRAM
CD TEXT
RELAY
TUNED
1
2
REC
SLEEP
STEREO
MONO
SYNC
VOLUME
PLUS
1
P1
SONYHITS
20
Q
Q
3
7
6
3
1
5
1
5
0
TEL 13942296513 QQ 376315150 892498299
8
9
2
4
9
8
2
9
9
TEL 13942296513 QQ 376315150 892498299
TEL
13942296513
Q
Q
1
5
1
3
6
7
3
8
9
4
2
9
8
0
5
2
9
9
w
w
w
.
xia
o
y
u
1
6
3
– 16 –
.
c
o
m
28
3
Press ENTER when the disc title of
the disc you want to play appears.
The disc is set to the playing position,
and the player starts playing.
In Program Play mode, the disc will be
added to the end of the program.
Note
If “NO ENTRY” appears, no disc has been labeled.
Try the Memo Scan function again after labeling the
discs.
Locating a disc by
searching a specific disc
title
— Memo Search
You can search and locate a disc you want by
inputting the first character used in the disc
title (see page 26).
1
Press FUNCTION repeatedly until
“CD” appears.
2
Press MEMO SEARCH.
“MEMO SEARCH” appears and the
lamp on the ENTER button flashes.
3
Press ≠/± repeatedly to input
the first character.
Each time you press ≠/±, the
characters appear in the following order.
A B C D E F G H I J K L M N O P Q R S T
U V W X Y Z 0 1 2 3 4 5 6 7 8 9
If “[A] NOT FOUND” appears in the
display while inputting the first
character with the ≠/± buttons, no
disc has been labeled using the input
character.
Notes
• When searching input characters, blanks and
symbols before the first character in the Disc
Memo are ignored.
• When searching input characters, upper and
lower cases cannot be differentiated.
Locating a specific CD
(for MHC-F100/MHC-FR1 only)
Locating a disc by
scanning each disc title
— Memo Scan
You can locate a disc you want to play
quickly by scanning the disc title (see page
26) in the display and start playing.
Note that you cannot use this function in the
ALL DISCS Shuffle Play mode.
1
Press FUNCTION repeatedly until
“CD” appears.
2
Press MEMO SCAN.
“MEMO SCAN” appears, and the lamp
on the ENTER button flashes.
Disc titles will appear in order.
FUNCTION ≠/±
ENTER MEMO
SEARCH
MEMO
SCAN
jog dial
TITLE
AUTO
ALL
1
DISC
S
PROGRAM
CD TEXT
RELAY
TUNED
1
2
REC
SLEEP
STEREO
MONO
SYNC
VOLUME
PLUS
1
P1
SONYHITS
20
29
4
Turn the jog dial to find the disc title
you want.
As you turn the jog dial, the Disc Memos
starting with the input character appear
in the display.
5
Press ENTER to select the disc.
In Program Play mode, the disc will be
added to the end of the program.
To locate a disc on the remote
Press the B or b key on the remote until the
disc title in step 4 that you want appears.
Skip step 5.
To cancel Memo Search
Press MEMO SEARCH again.
Tips
• If there is no more disc title starting with the input
character in Step 4, the input character changes to
the next one when you turn the jog dial.
Playing highlights of
the CD
(for MHC-F100/MHC-FR1 only)
Some CD-TEXT discs have a feature to play
only the highlights of the discs.
HI-LIGHT
=/+
/
Press HI-LIGHT on the remote in
the stop mode.
The indicator on the · button flashes
while playing disc highlights.
Tips
• During play of disc highlights, you can return to
normal play by pressing · or º/‚ on the
remote.
• During play of disc highlights, you can move to an
earlier or later highlight song by pressing≠/
± on the remote.
• During play of disc highlights, you can use Repeat
Play function.
To repeat all the highlight songs, keep pressing
REPEAT until “REPEAT” appears.
To repeat only the current highlight song, keep
pressing REPEAT until “REPEAT 1” appears.
•If you press HI-LIGHT while selecting discs
without this feature, “NO HIGHLIGHT” appears
in the display.
Ver. 1.1
Q
Q
3
7
6
3
1
5
1
5
0
TEL 13942296513 QQ 376315150 892498299
8
9
2
4
9
8
2
9
9
TEL 13942296513 QQ 376315150 892498299
TEL
13942296513
Q
5
1
3
6
7
3
Q
9
4
2
9
8
0
5
1
8
2
9
9
w
w
w
.
xia
o
y
u
1
6
3
– 17 –
.
c
o
m
Ver. 1.1
30
5
Press PAUSE ∏.
Recording starts.
6
Start playing the source to be
recorded.
Tips
• If you want to record from the reverse side, press
TAPE B ª so that ª (for reverse side) lights up.
• When you want to reduce the hiss noise in low-
level high-frequency signals, press DOLBY NR so
that “DOLBY NR B” appears before step 5.
• To skip tracks while recording from a tape, press
‚ or º. Deck B stands by for recording, and
you can skip tracks. To resume dubbing, press ∏.
Note
•Pressing FUNCTION with “TAPE B” selected
starts silent recording (blank recording).
Recording on a tape
manually
You can record from CD, tape, or radio as
you like. For example, you can record just the
songs you want or record from the middle of
the tape. The recording level is adjusted
automatically.
1
Insert a blank tape into deck B.
2
Press FUNCTION repeatedly until
the source you want to record (e.g.,
CD) appears.
3
Press REC ®.
Deck B stands by for recording. · (for
front side) lights up.
4
Press DIRECTION repeatedly to
select A to record on one side.
Select ß (or RELAY) to record on
both sides.
The Tape Deck
º/‚
142
πSTOP
DOLBY NR
53
To Press
Stop recording π STOP
Pause recording PAUSE ∏
31
Recording a CD by
specifying track order
1
Insert a blank tape into deck B.
2
Press FUNCTION repeatedly until
“CD” appears.
3
Press PROGRAM repeatedly until
the program number (PROGRAM 1,
2 or 3) appears.
4
Turn the jog dial until the disc
number you want appears.
You can record tracks from all the CDs in the
order you want. When programming, make
sure the playing times for each side do not
exceed the length of the tape.
5
To program a whole disc, skip this
step.
Press ≠/± until the desired
track appears in the display.
6
Press ENTER or PROGRAM.
The track is programmed.
7
To program additional tracks to be
recorded, repeat steps 4 to 6.
Skip step 4 to select tracks from the same
disc.
8
Press CD SYNCHRO.
Deck B stands by for recording and the
CD player stands by for playback. ·
(for front side) lights up.
9
Press DIRECTION repeatedly to
select A to record on one side.
Select ß (or RELAY) to record on
both sides.
10
Press PAUSE ∏.
Recording starts.
5192
πSTOP CONTINUE
10 3,6684
CHECK
continued
To program
Other discs
Other tracks on the same disc
Other tracks on other discs
Repeat Steps
4 and 6
5 and 6
4 to 6
Total playing time
(including selected track)
Track number
Disc number
TITLE
AUTO
ALL
1
DISC
S
PROGRAM
CD TEXT
RELAY
TUNED
1
2
REC
SLEEP
STEREO
MONO
SYNC
VOLUME
PLUS
1
P1
1 8 2.43
7
Q
Q
TEL 13942296513 QQ 376315150 892498299
3
6
3
1
5
1
5
0
8
9
2
4
9
8
2
9
9
TEL 13942296513 QQ 376315150 892498299
TEL
13942296513
1
3
6
7
3
Q
Q
5
1
5
0
8
9
2
4
9
8
2
9
9
w
w
w
.
xia
o
y
u
1
6
3
.
– 18 –
c
o
m
32
To stop recording
Press π STOP.
To check the order
Press CHECK repeatedly. After the last track,
“END” appears.
To cancel Program Edit
Press CONTINUE.
Tip
If the track cuts off during recording, because the
tape ended while recording on the A side, the track
will automatically be recorded from the beginning
on the B side.
Recording a CD by specifying track
order (continued)
33
Looping part of a CD
— Loop
With the loop function, you can repeat part of
a CD during playback. This lets you create
original recordings.
Flashing part of a CD
— Flash
With the flash function, you can “flash” the
CD sound during playback. This lets you
create original recordings.
DJ Effects
/
Press and hold LOOP/DELETE
during playback at the point you
want to start the Loop function, and
release to resume normal play.
To adjust the loop length
Turn the jog dial while holding LOOP/
DELETE (or press B or b while holding
LOOP/DELETE on the remote) to select
different loop lengths (LOOP 1 – 20).
/
Press and hold FLASH during
playback at the point you want to
start the Flash function, and release
to resume normal play.
To adjust the flash length
Turn the jog dial while holding FLASH to
select different flash lengths (FLASH 1 – 20).
To adjust the flash length on the remote,
press B or b while holding FLASH. (For
MHC-F50 only)
To use LOOP and FLASH together
Press and hold both LOOP and FLASH at the
same time.
Notes
• The loop and flash length cannot be adjusted
during this operation. Adjust the loop and flash
lengths independently beforehand if necessary.
• To record the flash effect, use the analog (VIDEO/
MD OUT) connections or this unit’s tape deck.
FLASH
jog dialjog dial
LOOP/DELETE
Ver. 1.1
7
Q
Q
TEL 13942296513 QQ 376315150 892498299
3
6
3
1
5
1
5
0
8
9
2
4
9
8
2
9
9
TEL 13942296513 QQ 376315150 892498299
TEL
13942296513
7
3
Q
Q
9
8
0
5
1
5
1
3
6
2
4
9
8
2
9
9
w
w
w
.
xia
o
y
u
1
6
3
– 19 –
.
c
o
m
Ver. 1.1
34
n
Sound Adjustment
Notes
•With some songs, the music will sound distorted
when you use the DBFB system with the graphic
equalizer if the bass is too strong. Adjust the bass
slowly while listening to music so that you can
monitor the effect of the adjustment.
• Cancelling GROOVE sets DBFB to “DBFB
”
and flattens the equalizer curve. To cancel the
DBFB level, press DBFB until the indication
disappears. Adjust the equalization to obtain the
effect you desire.
To listen through the headphones
Connect the headphones to PHONES jack. No
sound will come from the speakers.
Note
If you have connected a super woofer, please note
that sound comes from the super woofer even when
the headphones are connected. Turn off the power
of the super woofer when using headphones.
(Except for MHC-F50)
Adjusting the sound
You can reinforce the bass, create a more
powerful sound, and listen with headphones.
To reinforce bass (DBFB)
Press DBFB*.
Each time you press the button, the display
changes as follows:
DBFB
n DBFB n display off
“DBFB
” is more effective than
“DBFB
” .
* DBFB = Dynamic Bass Feedback
For a powerful sound (GROOVE)
Press GROOVE. The volume switches to
power mode, DBFB is automatically set to full
strength, the equalizer curve changes, and the
“GROOVE” button lights up. Press GROOVE
again to return to the previous volume.
DBFBPHONES
GROOVE
35
To cancel the effect
Press EFFECT repeatedly so that “EFFECT
OFF” appears in the display.
Music menu options
“SUR
” appears if you select an effect
with surround effects.
Selecting the audio
emphasis
The audio emphasis menu lets you select the
sound characteristic according to the sound
you are listening to.
The personal file function (see “Making a
personal audio emphasis file”) lets you store
your own effects.
continued
1
Press GEQ FILE on the unit
repeatedly until effect name
appears.
2
Use the jog dial (or press GEQ FILE
for MHC-F100/MHC-FR1 or GEQ
FILE +/– for MHC-F50 on the
remote) to select the desired music
menu.
The preset name appears in the display.
See the chart “Music menu options” on
this page. The last effect chosen from
that menu appears.
3
Press ENTER.
You don’t need to press ENTER when
you use the remote.
Effect
1 ROCK
2 POP
3 JAZZ
4 DANCE
5 SOUL
6 ACTION
7 ROMANCE
8 SF
9 DRAMA
10 SPORTS
11 SHOOTING
12 RACING
13 RPG
14 BATTLE
15 ADVENTURE
P FILE 1 – 5
For
Standard music sources
Soundtracks and special
listening situations
Video games
Personal audio emphasis file
(see page 38)
EFFECT
2
13
7
Q
Q
TEL 13942296513 QQ 376315150 892498299
3
6
3
1
5
1
5
0
8
9
2
4
9
8
2
9
9
TEL 13942296513 QQ 376315150 892498299
TEL
13942296513
Q
Q
3
7
6
3
1
5
1
5
0
8
9
2
4
9
8
2
9
9
w
w
w
.
xia
o
y
u
– 20 –
1
6
3
.
c
o
m
36
To change the equalizer display
Each time you press SPECTRUM
ANALYZER, the equalizer display changes to
show one of the three displays below.
Spectrum analyzer pattern 1
Spectrum analyzer pattern 2
Graphic equalizer curve
Selecting the audio emphasis
(continued)
µ
µ
m
/
Press SUR repeatedly so that “SUR
” appears in the display.
Note
When you choose other sound effects, the surround
effects will be canceled. If you want to memorize
the effect, store it into a personal file (see “Making a
personal audio emphasis file”).
SUR
Adjusting the audio
emphasis
You can adjust the audio emphasis using the
graphic equalizer and surround effect.
Activating the surround
effect
You can enjoy the surround effect.
TITLE
AUTO
ALL
1
DISC
S
PROGRAM
CD TEXT
RELAY
TUNED
1
2
REC
SLEEP
STEREO
MONO
SYNC
VOLUME
PLUS
1
20
TITLE
AUTO
ALL
1
DISC
S
PROGRAM
CD TEXT
RELAY
TUNED
1
2
REC
SLEEP
STEREO
MONO
SYNC
VOLUME
PLUS
1
20
TITLE
AUTO
ALL
1
DISC
S
PROGRAM
CD TEXT
RELAY
TUNED
1
2
REC
SLEEP
STEREO
MONO
SYNC
SUR
VOLUME
PLUS
1
20
37
4
Turn the jog dial to adjust level.
5
Repeat steps 3 and 4.
6
Press ENTER when finished.
Note
If you choose another menu audio emphasis (other
than “EFFECT OFF”) the adjusted sound effect is
lost. To retain the adjusted sound effect for future
use, store it in a personal file. (See “Making a
personal audio emphasis file”.)
Adjusting the graphic
equalizer
You can adjust the sound by raising or
lowering the levels of specific frequency
ranges.
Before operation, first select the audio
emphasis you want for your basic sound.
1
Select the audio emphasis you want
for your basic sound (see “Selecting
the audio emphasis”).
2
Press GEQ FILE on the unit
repeatedly until the graphic
equalizer appears.
3
Press +/– repeatedly to select a
frequency band.
4
26
3
TITLE
AUTO
ALL
1
DISC
S
PROGRAM
CD TEXT
RELAY
TUNED
1
2
REC
SLEEP
STEREO
MONO
SYNC
SUR
VOLUME
PLUS
1
20
1kHz 0dB
TITLE
AUTO
ALL
1
DISC
S
PROGRAM
CD TEXT
RELAY
TUNED
1
2
REC
SLEEP
STEREO
MONO
SYNC
SUR
VOLUME
PLUS
1
20
1kHz +3dB
Ver. 1.1
Q
Q
3
7
6
3
1
5
1
5
0
TEL 13942296513 QQ 376315150 892498299
8
9
2
4
9
8
2
9
9
TEL 13942296513 QQ 376315150 892498299
TEL
13942296513
Q
1
3
6
7
3
Q
5
1
5
9
9
2
8
9
4
2
9
8
0
w
w
w
.
xia
o
y
u
1
6
– 21 –
3
.
c
o
m
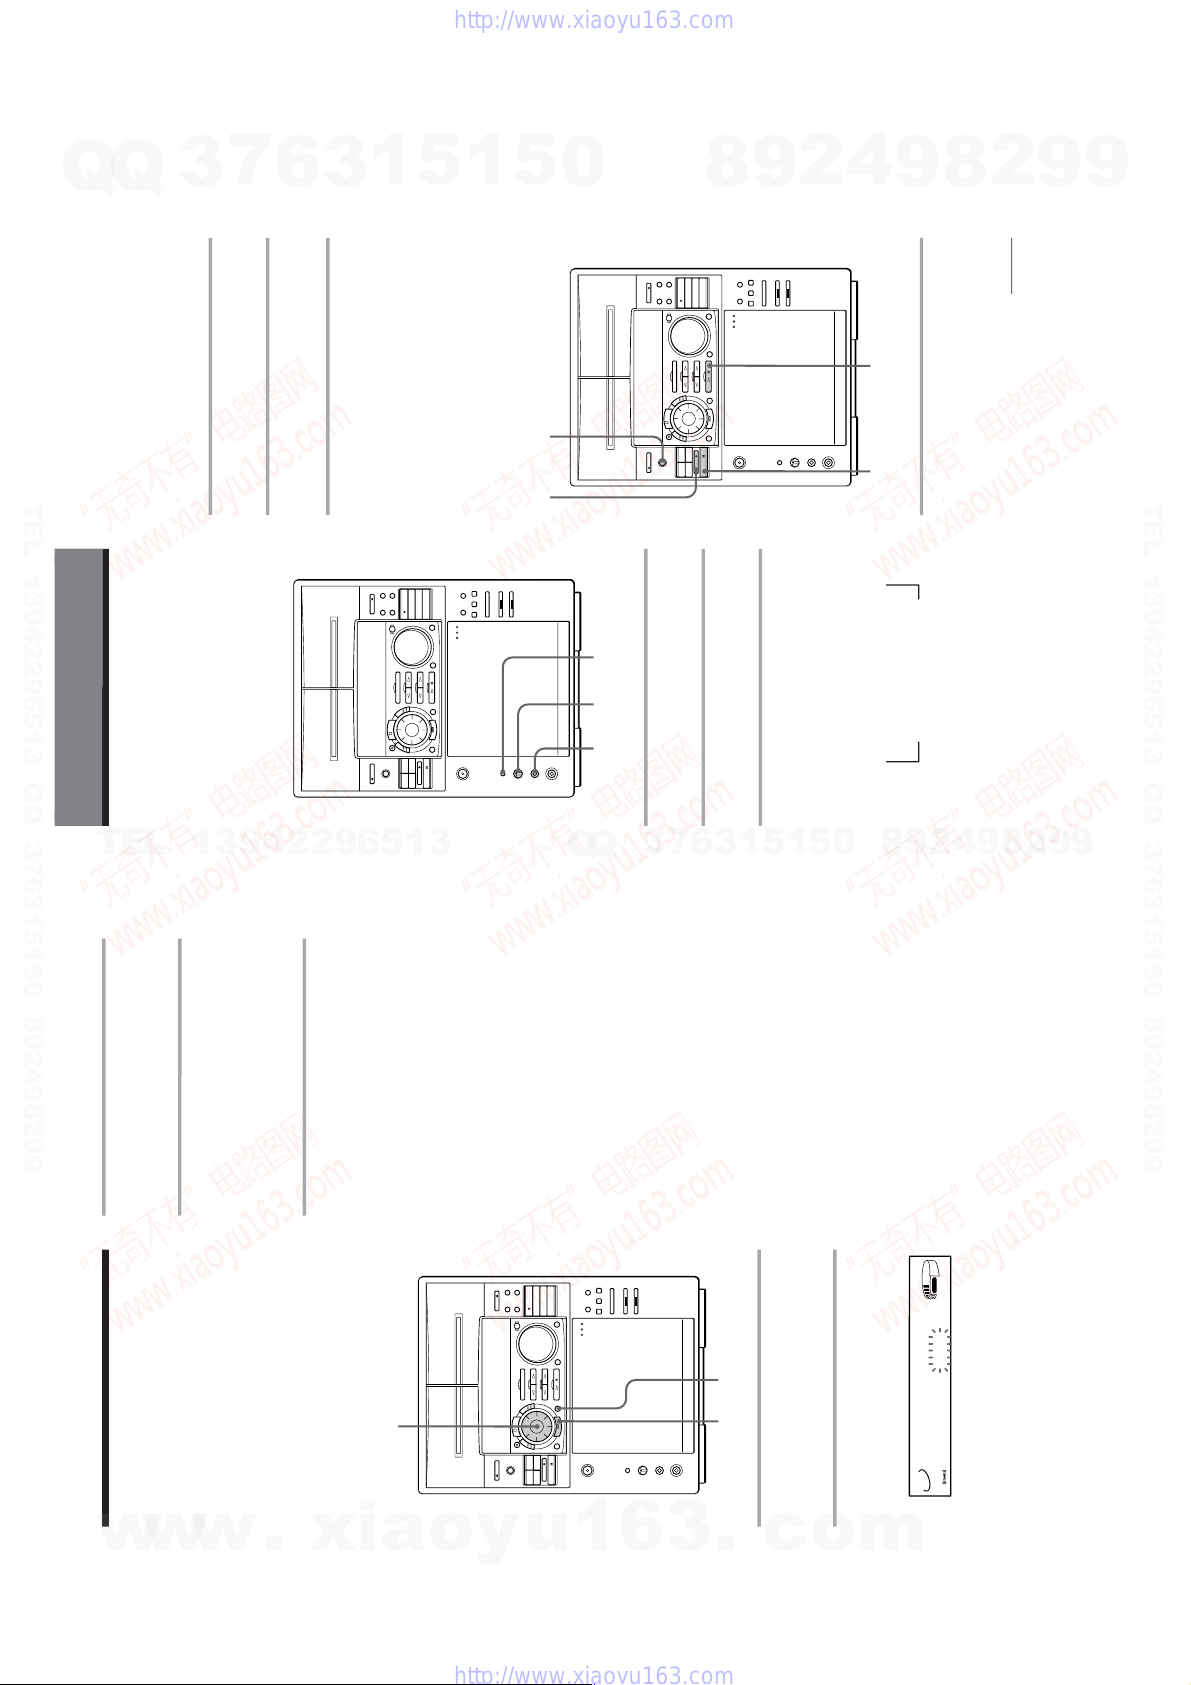
Ver. 1.1
38
Making a personal
audio emphasis file
— Personal file
You can create a personal file of audio
patterns (surround effect and graphic
equalizer) and store them in the memory of
the unit. Later call up an audio pattern to
play a favorite tape, CD, or radio program.
Create up to five audio files.
Before operation, first select the audio
emphasis you want for your basic sound.
1
Obtain the sound effect you want by
using the surround effect (page 36)
and graphic equalizer (page 37).
2
Press GEQ MEMO.
The personal file number appears in the
display.
3
Use the jog dial to select the file
number (FILE 1 – 5) where you
want to store the sound effect.
4
Press ENTER.
The adjusted sound effects are stored
under the selected file number. The
settings previously stored at this
memory location are erased and
replaced by the new settings.
To call up the personal file
1 Press GEQ FILE on the unit to display the
last selected personal file.
2 Use the jog dial (or press GEQ FILE for
MHC-F100/MHC-FR1 or GEQ FILE +/–
for MHC-F50 on the remote) to select the
desired file number (FILE 1 – 5).
3 Press ENTER.
You don’t need to press ENTER when you
use the remote.
42
3
TITLE
AUTO
ALL
1
DISC
S
PROGRAM
CD TEXT
RELAY
TUNED
1
2
REC
SLEEP
STEREO
MONO
SYNC
SUR
VOLUME
PLUS
1
20
MEMORY F-1 ?
39
n
N
Singing along:
Karaoke
(For Singaporian model only)
Other Features
1
Turn MIC LEVEL to 0 to turn down
the microphone control level.
2
Connect an optional microphone to
MIX MIC.
3
Press KARAOKE PON/MPX
repeatedly to obtain the karaoke
effect you desire.
Every time you press the button, the
display changes as follows:
KARAOKE PON n MPX R n MPX L
EFFECT (P FILE) name
or
“EFFECT ON (OFF)”
The h indicator appears in the display
when a karaoke mode is activated.
To sing karaoke with decreasing the
vocal level of a CD, select KARAOKE
PON. To sing karaoke of multiplex CD
or tape, select MPX R or MPX L.
4
Start playing the music and adjust
the volume.
5
Adjust the microphone volume by
turning MIC LEVEL.
When you are done
Turn MIC LEVEL to 0 and disconnect the
microphone from MIX MIC, then press
KARAOKE PON/MPX repeatedly so that
“h” disappears.
Mixing and recording
sounds
continued
You can sing along with any stereo CD or
tape by turning down the singer’s voice. You
need to connect an optional microphone.
1
Do the above steps 1 to 5. Then,
insert a tape in deck B.
1,5 32
4
5
23
7
Q
Q
TEL 13942296513 QQ 376315150 892498299
3
6
3
1
5
1
5
0
8
9
2
4
9
8
2
9
9
TEL 13942296513 QQ 376315150 892498299
TEL
13942296513
Q
Q
3
7
6
3
1
5
1
5
4
2
9
8
0
9
8
2
9
9
w
w
w
.
xia
o
y
u
1
– 22 –
6
3
.
c
o
m
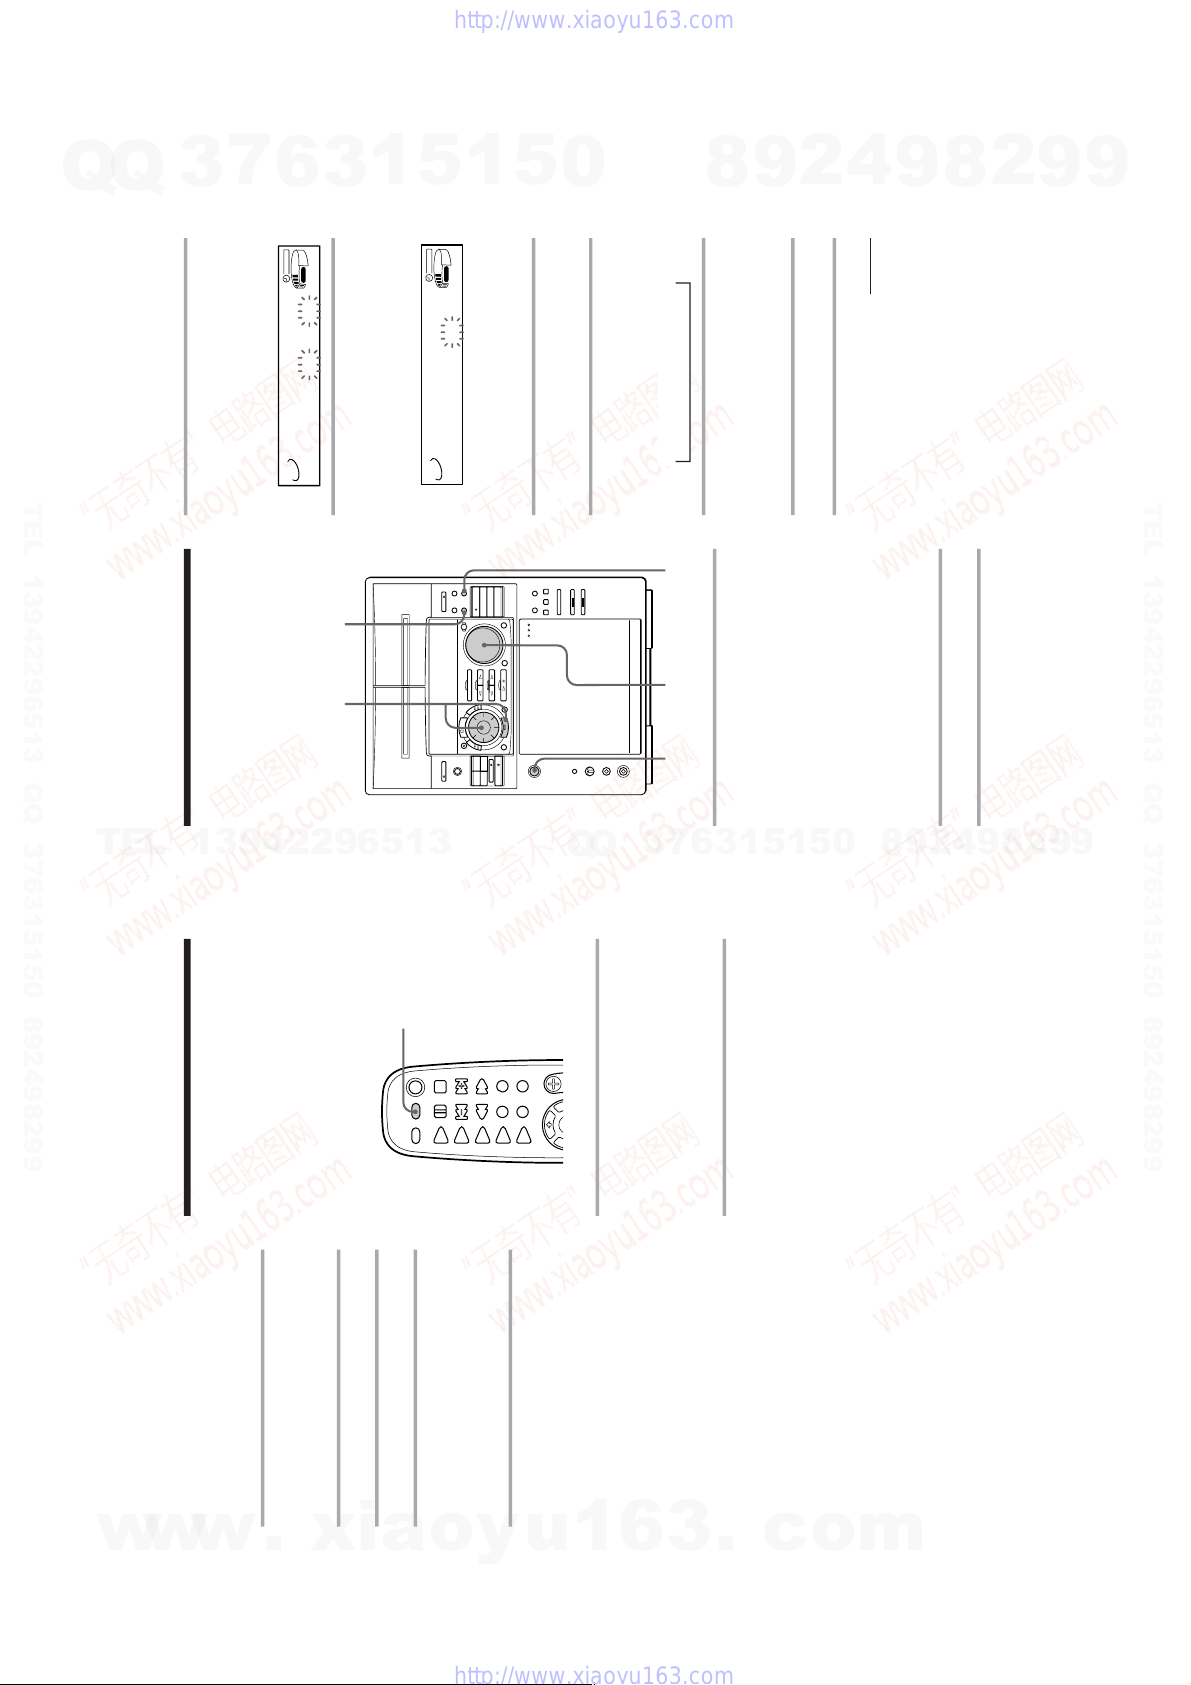
40
/
Press SLEEP on the remote.
Every time you press the button, the
minute display (the turn-off time)
changes as follows:
AUTO n 90min n 80min n 70min
n
…
n 10min n OFF n AUTO
…
When you choose auto
The power turns off when the current CD or
tape finishes playback (for up to 100
minutes).
To check the remaining time
Press SLEEP once.
To change the time to turn off
Select the time you want by pressing SLEEP
repeatedly.
To cancel the Sleep Timer function
Press SLEEP repeatedly until “OFF” appears.
Falling asleep to
music
— Sleep Timer
2
Press FUNCTION repeatedly to
select the source you desire and set
it to pause mode.
3
Press REC ®.
4
Press PAUSE ∏.
5
Press CD · to start playing the CD
player (or TAPE ·).
Playback starts. Start singing along with
the music.
To stop recording
Press π STOP.
Tips
• If acoustic feedback (howling) occurs, move the
microphone away from the speakers or change the
direction of the microphone.
• If you want to record your voice through the
microphone only, you can do so by selecting the
CD function and not playing a CD.
Notes
• Karaoke mode is cancelled if:
—you press EFFECT or a sound effect
—you press FUNCTION
—you turn off the power
• The instrumental sound may be reduced as well as
the singer’s voice when the sound is recorded in
monaural.
• The singer’s voice may not be reduced when:
—only a few instruments are playing
—a duet is being played
—the source has strong echoes or chorus
—the singer’s voice deviates from the center.
—the voice on the source is singing in high
soprano or tenor.
Singing along: Karaoke
(continued)
You can let the system turn off at the preset
time by using the remote, so you can sleep to
the music. You can preset the time to be
turned off by 10 minutes.
SLEEP
41
n
n
4
Turn the jog dial to select DAILY 1
or 2, then press ENTER.
“ON” appears and the hour digits flash
in the display.
5
Set the time to start playback.
Turn the jog dial to set the hour, then
press ENTER.
The minute indication starts flashing.
Turn the jog dial to set the minute, then
press ENTER.
The hour indication flashes again.
6
Set the time to stop playback
following the above procedure.
7
Turn the jog dial until the music
source you want appears.
The indications change as follows:
TUNER ˜ CD PLAY ˜ TAPE PLAY
8
Press ENTER.
The start time, followed by the stop time
and the music source, appears, then the
original display appears.
9
Turn off the power.
Waking up to music
— Wake-up Timer
You can wake up to music at a preset time
every day. Make sure you have set the clock
(see “Step 2: Setting the time”).
1
Prepare the music source you want
to play.
• CD: Insert a CD. To start from a
specific track, make a program (see
“Programming the CD tracks”).
• Tape: Insert an tape with the side you
want to play facing forward.
When both decks A and B have tapes
in them, play will start from deck A.
• Radio: Tune in the preset station you
want (see “Step 3: Presetting radio
stations”).
2
Adjust the volume.
3
Press t/CLOCK SET.
“SET DAILY 1” appears.
continued
9
2
4,5,6,7,8 3
TIMER SELECT
TITLE
AUTO
ALL
1
DISC
S
PROGRAM
CD TEXT
RELAY
TUNED
1
2
REC
SLEEP
STEREO
MONO
SYNC
SUR
VOLUME
PLUS
1
20
ON 12:00AM
TITLE
AUTO
ALL
1
DISC
S
PROGRAM
CD TEXT
RELAY
TUNED
1
2
REC
SLEEP
STEREO
MONO
SYNC
SUR
VOLUME
PLUS
1
20
ON 12:00AM
Ver. 1.1
Q
Q
3
7
6
3
1
5
1
5
0
TEL 13942296513 QQ 376315150 892498299
8
9
2
4
9
8
2
9
9
TEL 13942296513 QQ 376315150 892498299
TEL
13942296513
7
3
Q
Q
8
0
5
1
5
1
3
6
9
2
4
9
8
2
9
9
w
w
w
.
xia
o
y
u
1
– 23 –
6
3
.
c
o
m
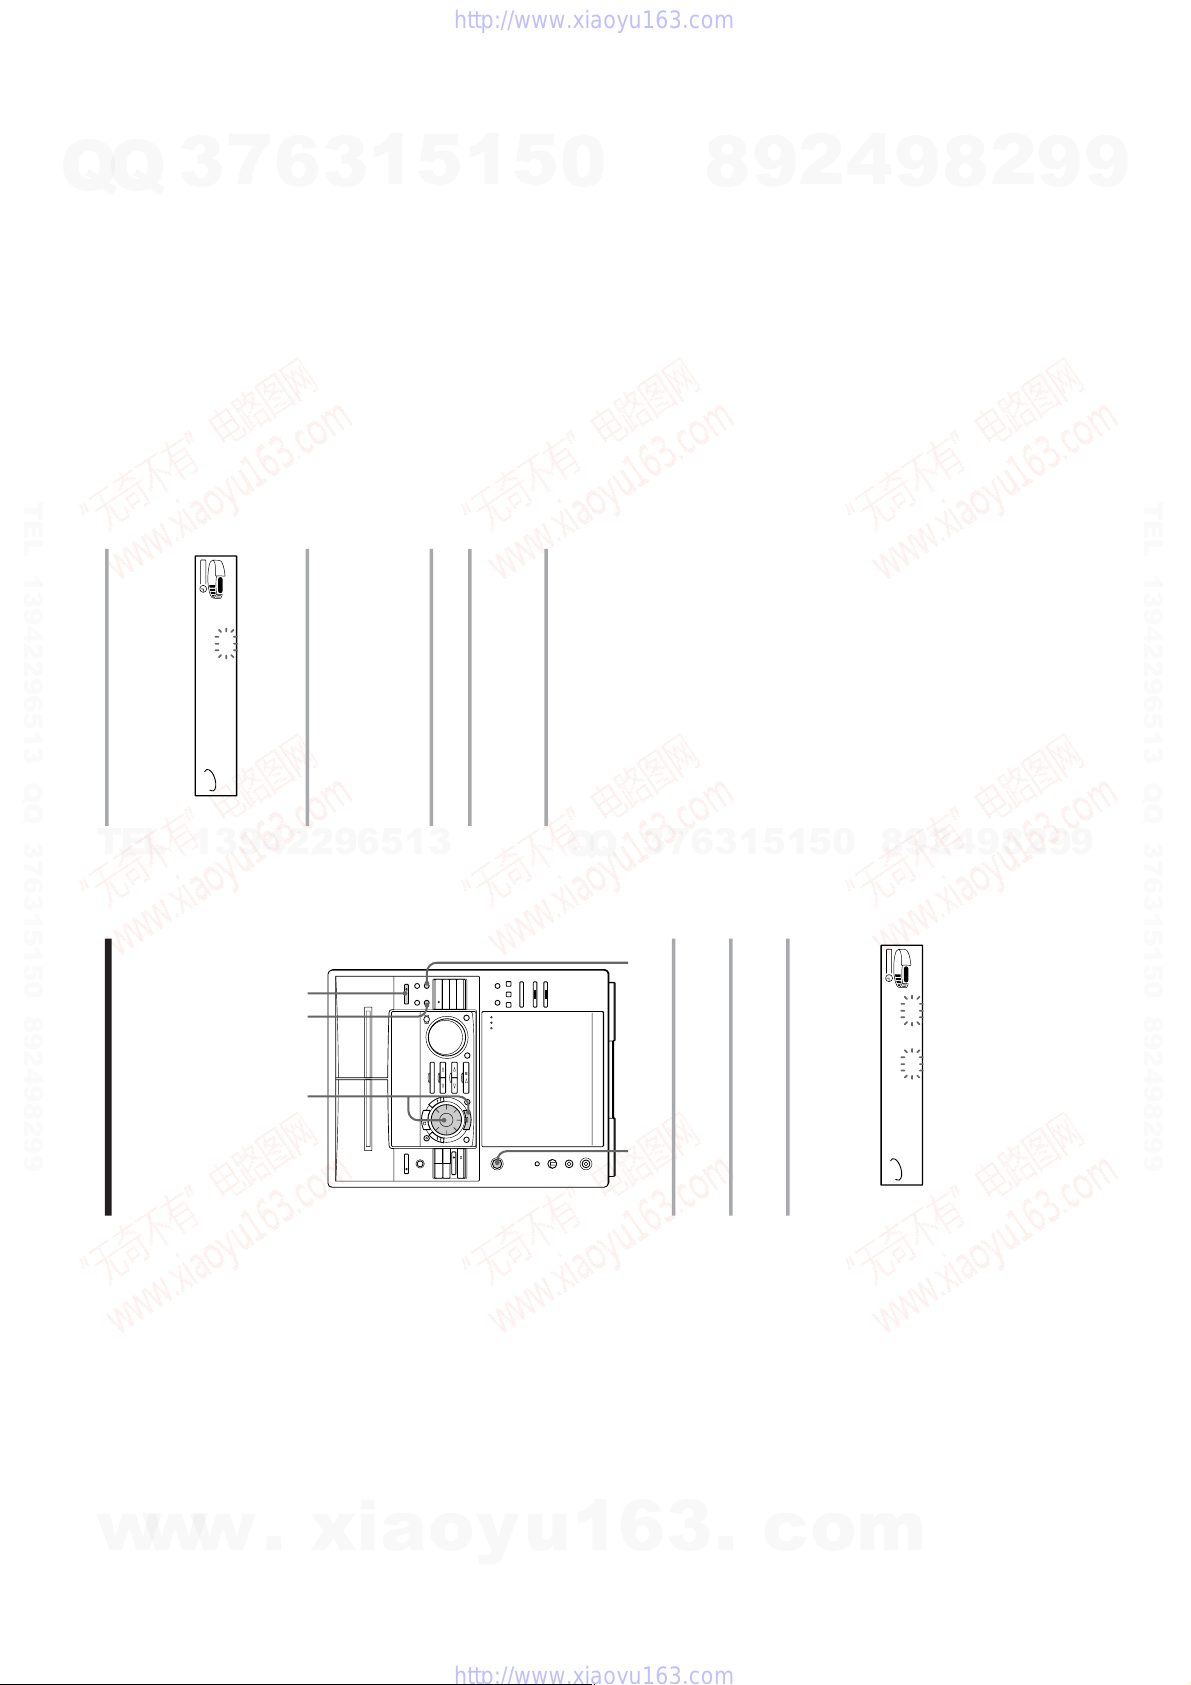
Ver. 1.1
42
To check the setting
Press TIMER SELECT and turn the jog dial to
select the respective mode (DAILY 1 or
DAILY 2), then press ENTER. To change the
setting, start over from step 1.
To cancel the timer operation
Press TIMER SELECT and turn the jog dial to
select “OFF”, then press ENTER.
Tip
The power turns on 15 seconds before the preset
time.
Timer-recording radio
programs
To timer-record, you must preset the radio
station (see “Step 3: Presetting radio
stations”) and set the clock (see “Step 2:
Setting the time”) beforehand.
1
Tune in the preset radio station (see
“Listening to the radio”).
2
Press t/CLOCK SET.
“SET DAILY 1” appears.
3
Turn the jog dial to select REC, then
press ENTER.
“ON” appears and the hour digits flash
in the display.
Waking up to music (continued)
7
3,4,5 2 6
TIMER SELECT
TITLE
AUTO
ALL
1
DISC
S
PROGRAM
CD TEXT
RELAY
TUNED
1
2
REC
SLEEP
STEREO
MONO
SYNC
SUR
VOLUME
PLUS
1
20
ON 12:00AM
43
4
Set the time to start recording.
Turn the jog dial to set the hour, then
press ENTER.
The minute indication starts flashing.
Turn the jog dial to set the minute, then
press ENTER.
The hour indication flashes again.
5
Set the time to stop recording
following the above procedure.
The start time appears, followed by the
stop time, the recording source and the
radio station, then the original display
appears.
6
Insert a blank tape into deck B.
7
Turn off the power.
When the recording starts, the volume
level is set to the minimum.
To check the setting
Press TIMER SELECT and turn the jog dial to
select “REC”, then press ENTER. To change
the setting, start over from step 1.
To cancel the timer operation
Press TIMER SELECT and turn the jog dial to
select “OFF”, then press ENTER.
Note
If the power is on at the preset time, the recording
will not be made.
TITLE
AUTO
ALL
1
DISC
S
PROGRAM
CD TEXT
RELAY
TUNED
1
2
REC
SLEEP
STEREO
MONO
SYNC
SUR
VOLUME
PLUS
1
20
ON 1:00AM
Q
Q
3
7
6
3
1
5
1
5
0
TEL 13942296513 QQ 376315150 892498299
8
9
2
4
9
8
2
9
9
TEL 13942296513 QQ 376315150 892498299
TEL
13942296513
Q
Q
0
5
1
5
1
3
6
7
3
8
9
2
4
9
8
2
9
9
w
w
w
.
xia
o
y
u
1
6
3
.
– 24 –
c
o
m
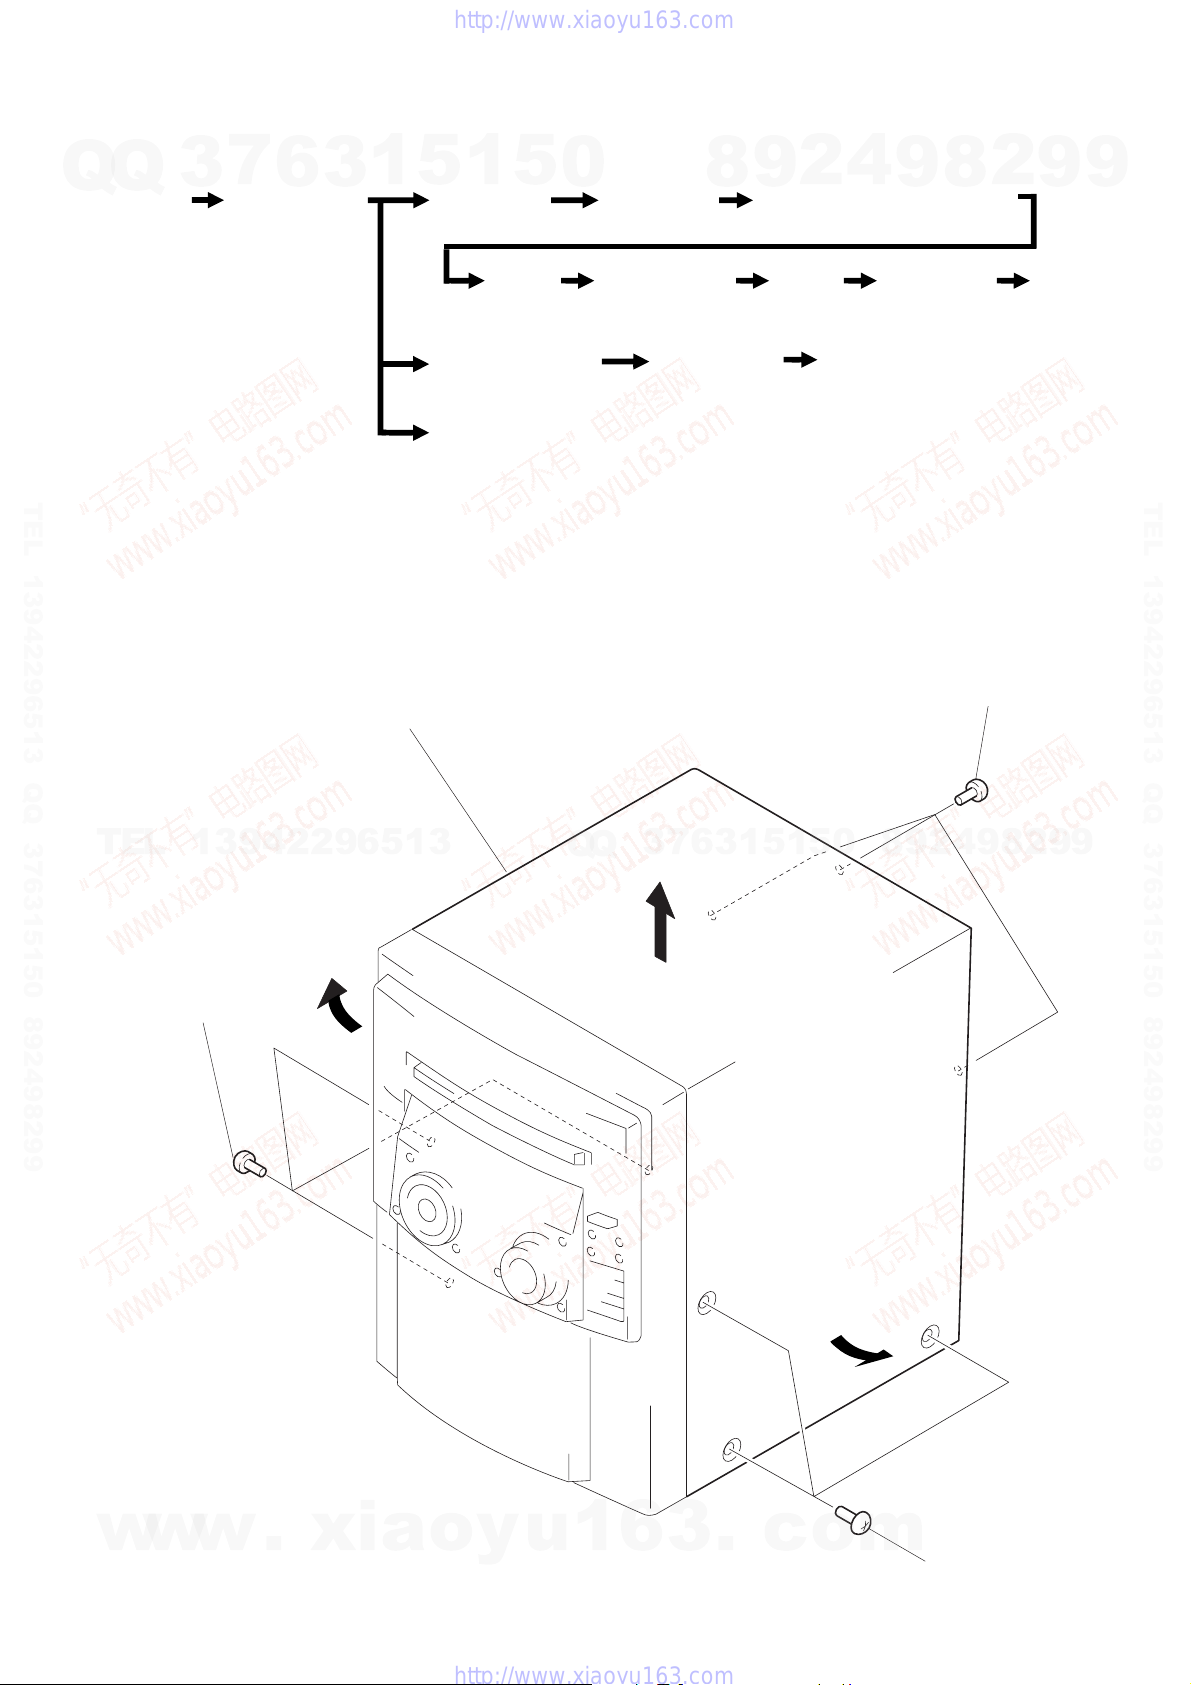
Q
• This set can be disassembled in the order shown below.
Q
CASE
(Page 25)
3
7
6
FRONT PANEL
SECTION
(Page 26)
3
1
5
1
BACK PANEL
(Page 27)
SECTION 2
DISASSEMBLY
5
0
MAIN BOARD
(Page 27)
4
2
9
8
POWER TRANSFORMER (T901)
(Page 28)
9
8
2
9
9
SUB
CHASSIS
(Page 28)
TAPE MECHANISM
DECK SECTION
(Page 31)
DOOR ASS’Y
(Page 26)
TEL 13942296513 QQ 376315150 892498299
• Abbreviation
G : German
SP : Singapore
AUS : Australian
Note: Follow the disassembly procedure in the numerical order given.
CASE
3
case
TEL
13942296513
CD MECHANISM
DECK SECTION
(Page 29)
3
Q
Q
AUDIO BOARD
(Page 31)
7
6
3
1
BASE
UNIT
(Page 29)
CAPSTAN MOTOR (M1)
(Page 32)
0
5
1
5
BD BOARD,
SLED MOTOR
(M102)
(Page 30)
2
three screws
(BVTP 3
9
4
2
9
8
OPTICAL
PICK-UP
(KSS-213B/S-N)
(Page 30)
×
8)
9
9
2
8
TEL 13942296513 QQ 376315150 892498299
1
w
w
three screws
(CASE3 TP2)
w
.
xia
o
y
u
1
6
3
.
c
o
m
1
three screws
(CASE3 TP2)
– 25 –
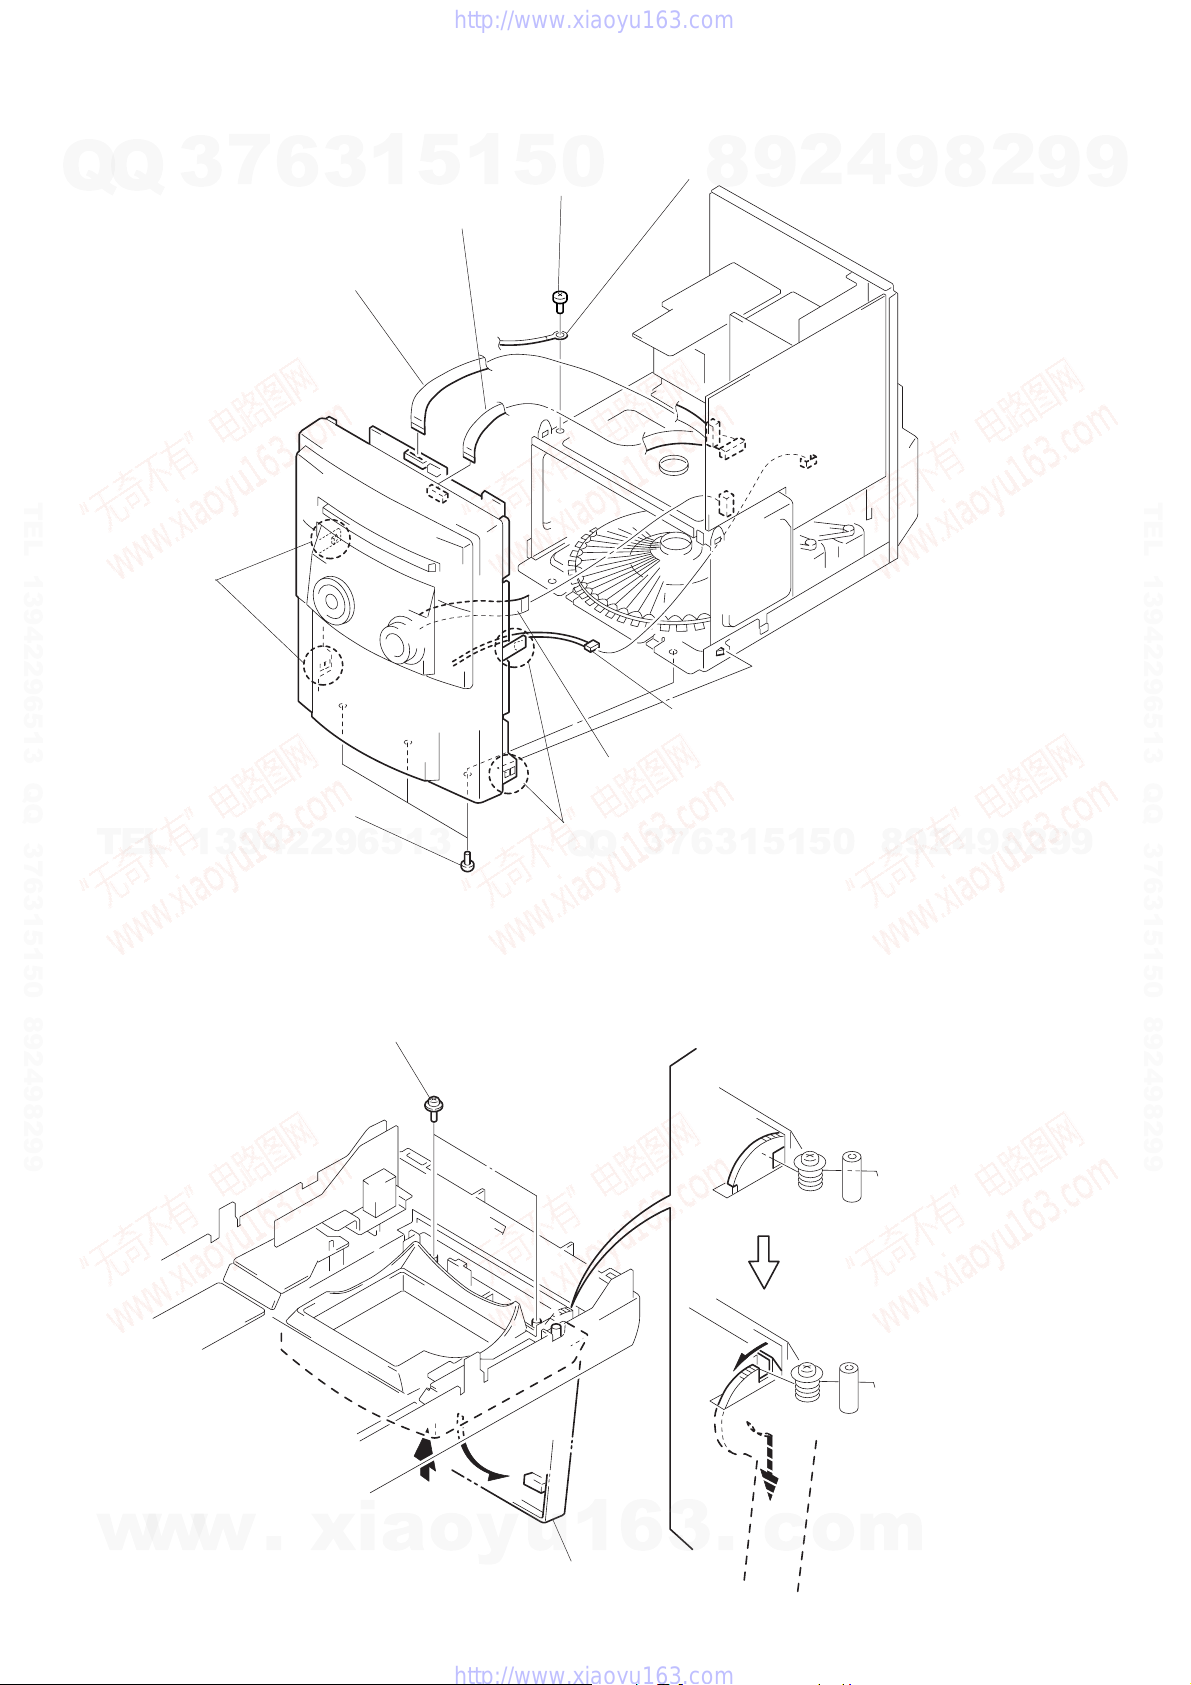
FRONT PANEL SECTION
7
Q
Q
3
6
1
wire (flat type) (21 core)
(CN601)
1
3
2
5
wire (flat type) (11 core)
(CN1001)
6
5
screw (BVTT 3 × 8)
1
5
(FR1: AEP, UK, German)
0
lug
(FR1: AEP, UK, German)
8
9
2
4
9
8
2
9
9
TEL 13942296513 QQ 376315150 892498299
8
two claw
4
3
wire (flat type) (15 core) (EXCEPT FR1: SP)
wire (flat type) (19 core ) (FR1: SP)
(CN102)
two claw
Q
3
7
TEL
DOOR ASS’Y
7
three screws
(BVTP 3
13942296513
×
8)
1
two screws
(PTPWH 2.6
×
6)
8
Q
connector
(CN403)
3
6
1
5
1
5
0
8
9
2
4
9
8
2
9
TEL 13942296513 QQ 376315150 892498299
9
w
w
w
.
xia
o
y
u
1
6
3
2
Open the door ass’y
– 26 –
.
A
c
3
Remove the door ass’y
to direction of the
arrow
o
m
A
.
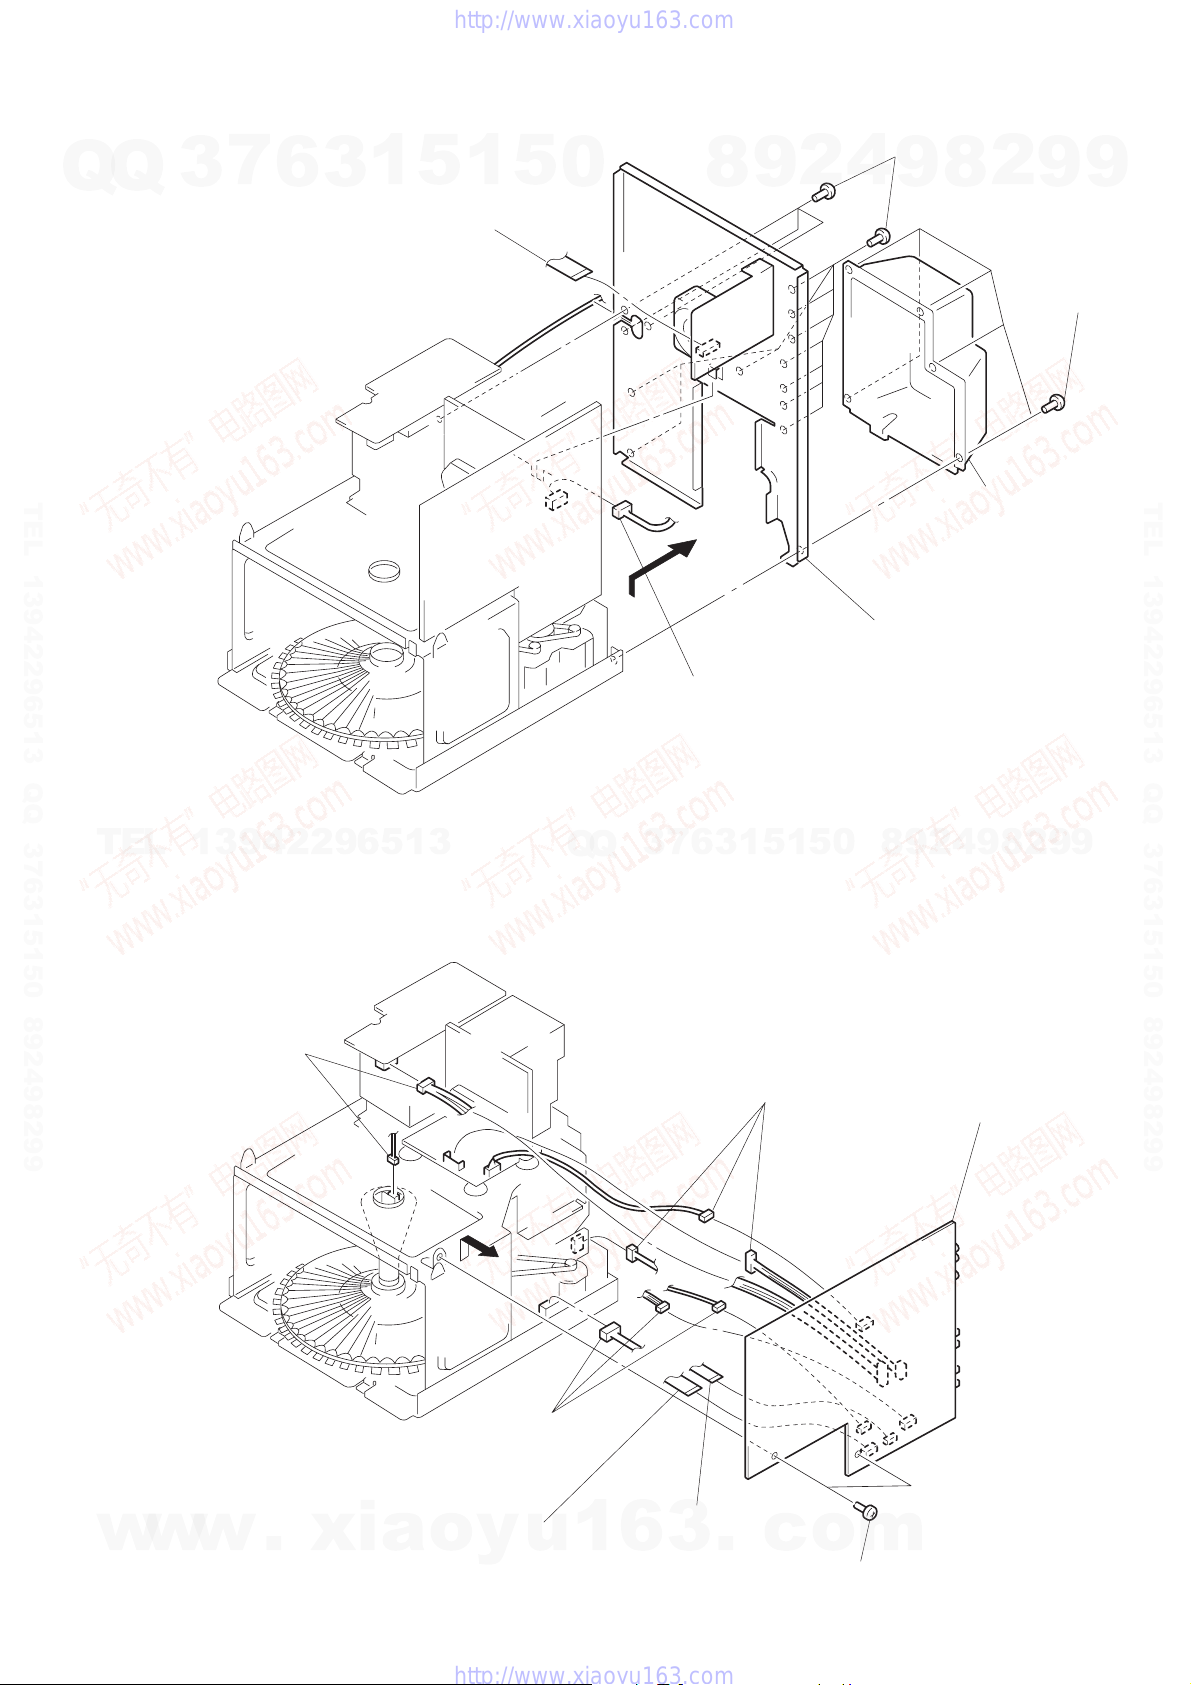
Q
BACK PANEL
Q
3
1
7
wire (flat type) (13 core) (F50/F100/FR1: E, AUS)
wire (flat type) (15 core ) (FR1: AEP, UK, G, SP)
(CN1)
6
3
1
5
1
5
0
8
9
2
4
5
thirteen screws
(BVTP 3
8
9
×
8)
2
9
3
five screws
(BVTP 3
9
×
8)
TEL 13942296513 QQ 376315150 892498299
2
connector
(CN 105)
TEL
13942296513
MAIN BOARD
3
two connectors
(CN901, 904)
Q
Q
3
7
1
3
6
3
threeconnectors
(CN54, 202, 802)
5
6
Remove the back panel
to direction of the arrow.
8
0
5
1
9
2
4
cover
8
9
4
5
Remove the MAIN
board to direction
of the arrow.
2
9
TEL 13942296513 QQ 376315150 892498299
9
w
w
w
.
xia
3
threeconnectors
(CN61, 451, 453)
2
1
wire (flat type) (16 core)
o
y
u
(CN401)
1
wire (flat type) (9 core)
(CN402)
6
3
– 27 –
.
c
o
4
two screws
(BVTP 3
m
×
8)
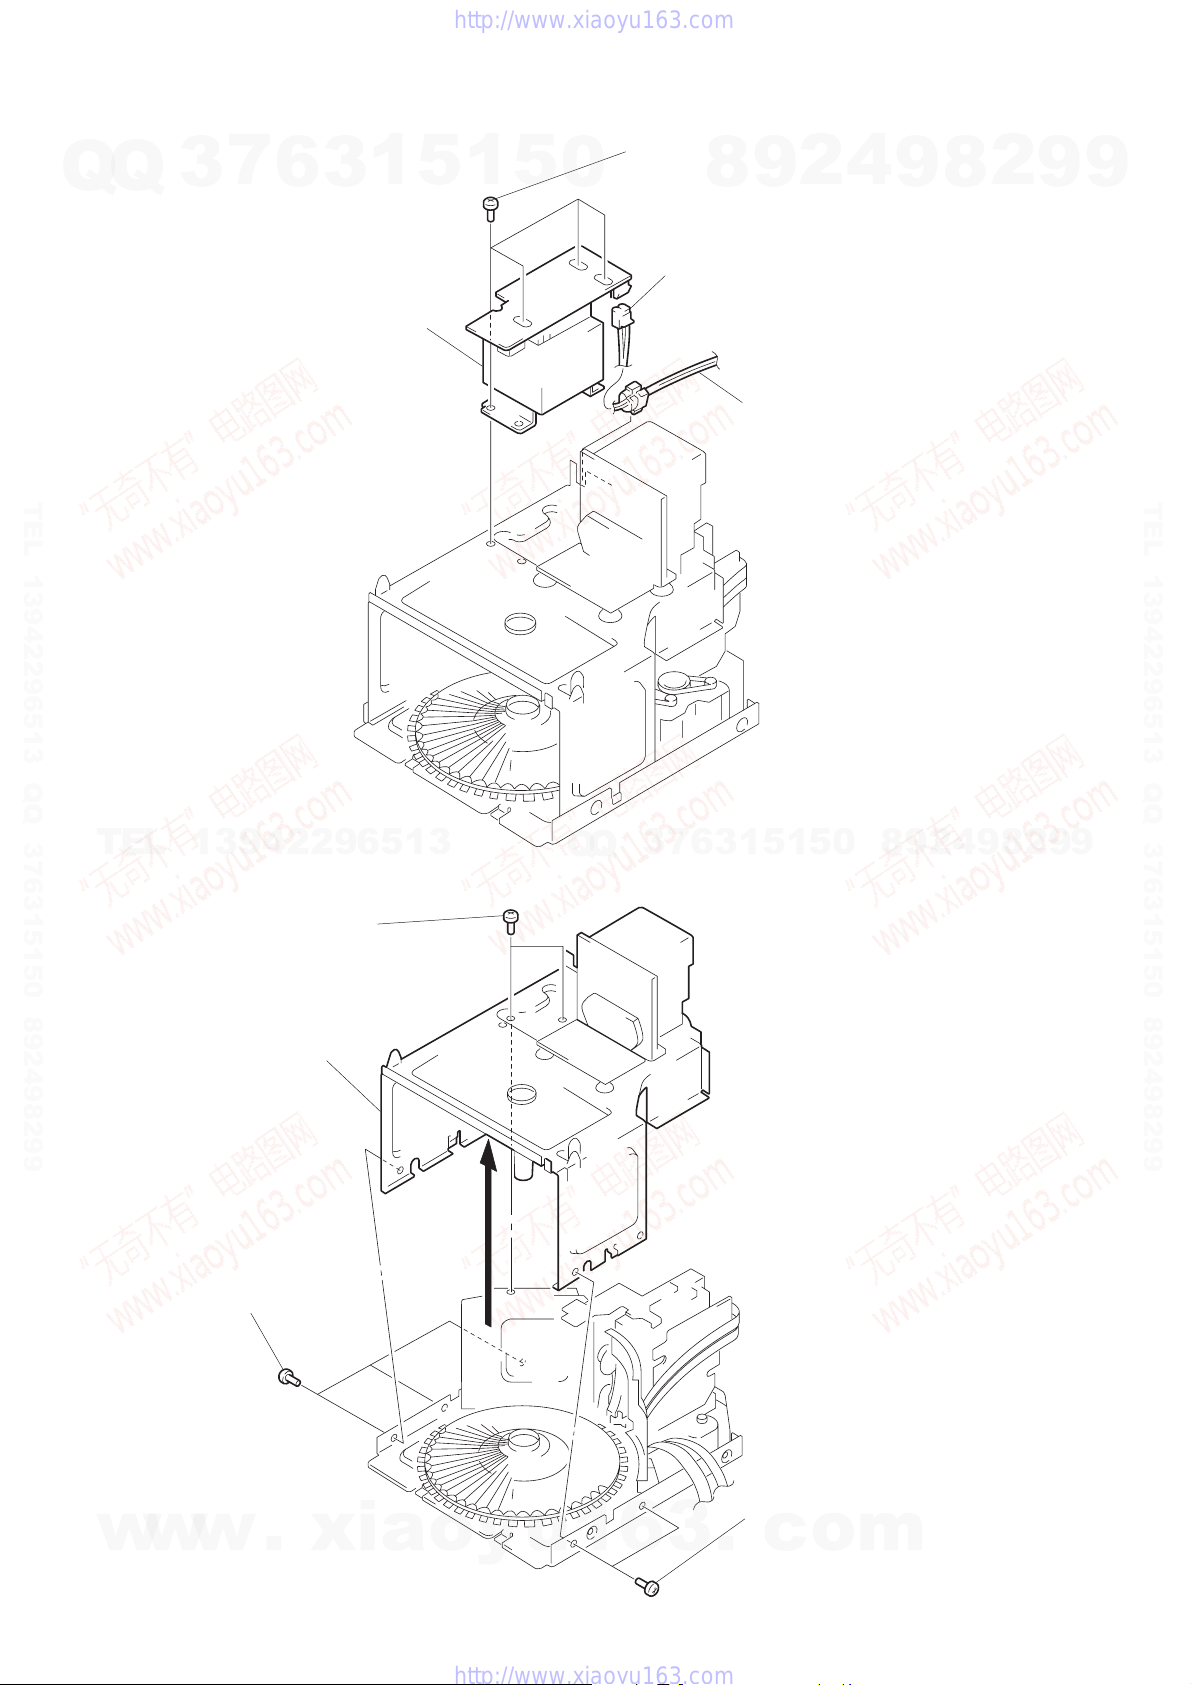
POWER TRANSFORMER (T901)
7
Q
Q
3
6
3
4
power transformer
(T901)
1
3
5
1
5
0
four screws
(BVTT 3
8
1
connector
(CN903)
×
8)
9
2
power cord
2
4
9
8
2
9
9
TEL 13942296513 QQ 376315150 892498299
TEL
SUB CHASSIS
13942296513
1
two screws
3
sub chassis
(BVTT 3
×
8)
Q
Q
3
7
6
3
1
5
1
5
0
8
9
2
4
9
8
2
9
TEL 13942296513 QQ 376315150 892498299
9
w
w
2
three screws
(BVTP 3
w
×
8)
.
xia
o
y
u
1
6
3
– 28 –
.
2
two screws
(BVTP 3
c
×
o
8)
m
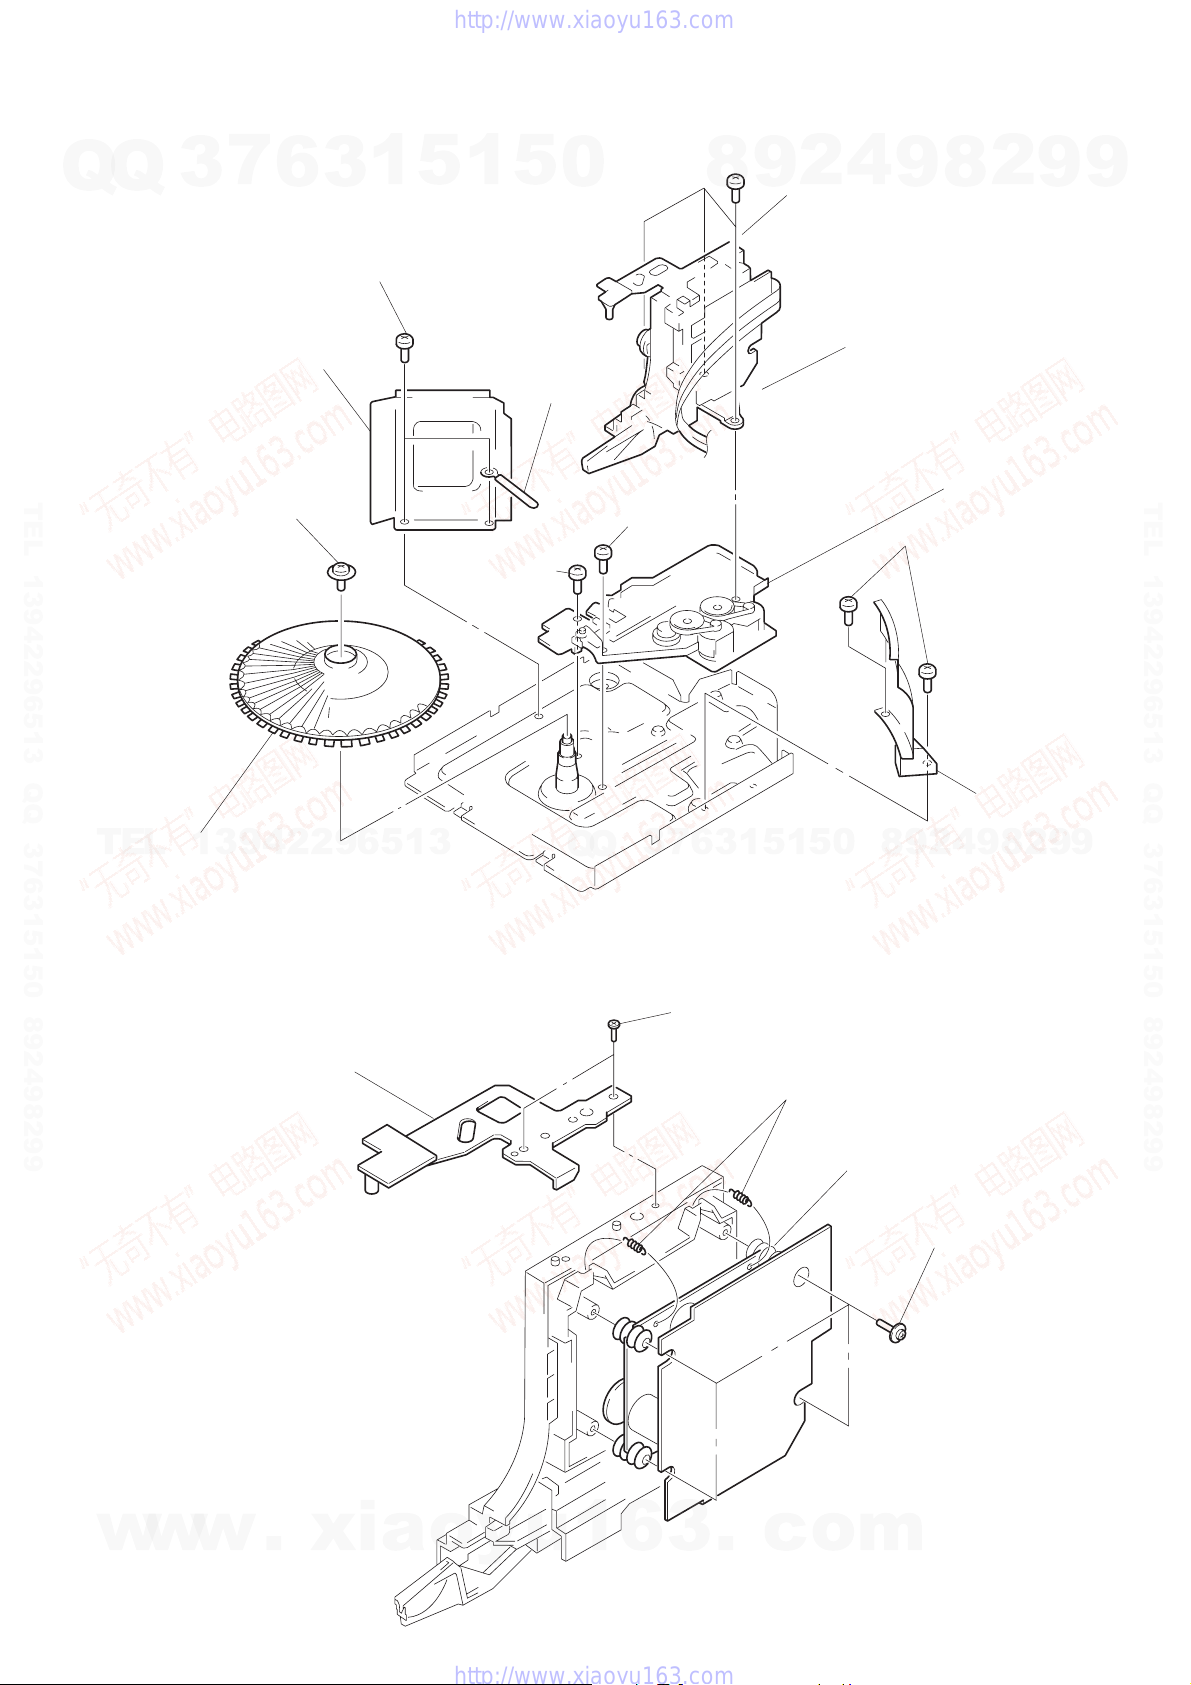
CD MECHANISM DECK SECTION
7
Q
Q
TEL 13942296513 QQ 376315150 892498299
3
1
screw
(PTPWH 2.6
7
6
5
reinforcement
×
8)
1
3
two screws
(BVTT 3
5
1
5
0
×
6)
6
wire holder
!¡
screw
!º
screw
(BVTP 3
×
(BVTT 3
14)
×
10)
8
9
2
8
three screws
(BVTT 3
4
9
×
10)
9
base (LOADING)
3
two screws
(BVTP 3
8
!™
base (CDM)
2
×
8)
9
9
TEL 13942296513 QQ 376315150 892498299
TEL
BASE UNIT
2
table (S0)
13942296513
2
bracket
Q
Q
3
7
6
1
1
3
two screws
(BTP 2.6
0
5
1
5
×
8)
3
two tention springs
5
base unit
8
9
2
4
9
4
4
four screws
(PTPWH 2.6
cover (CD)
9
2
8
×
8)
9
w
w
w
.
xia
o
y
u
1
6
3
– 29 –
.
c
o
m
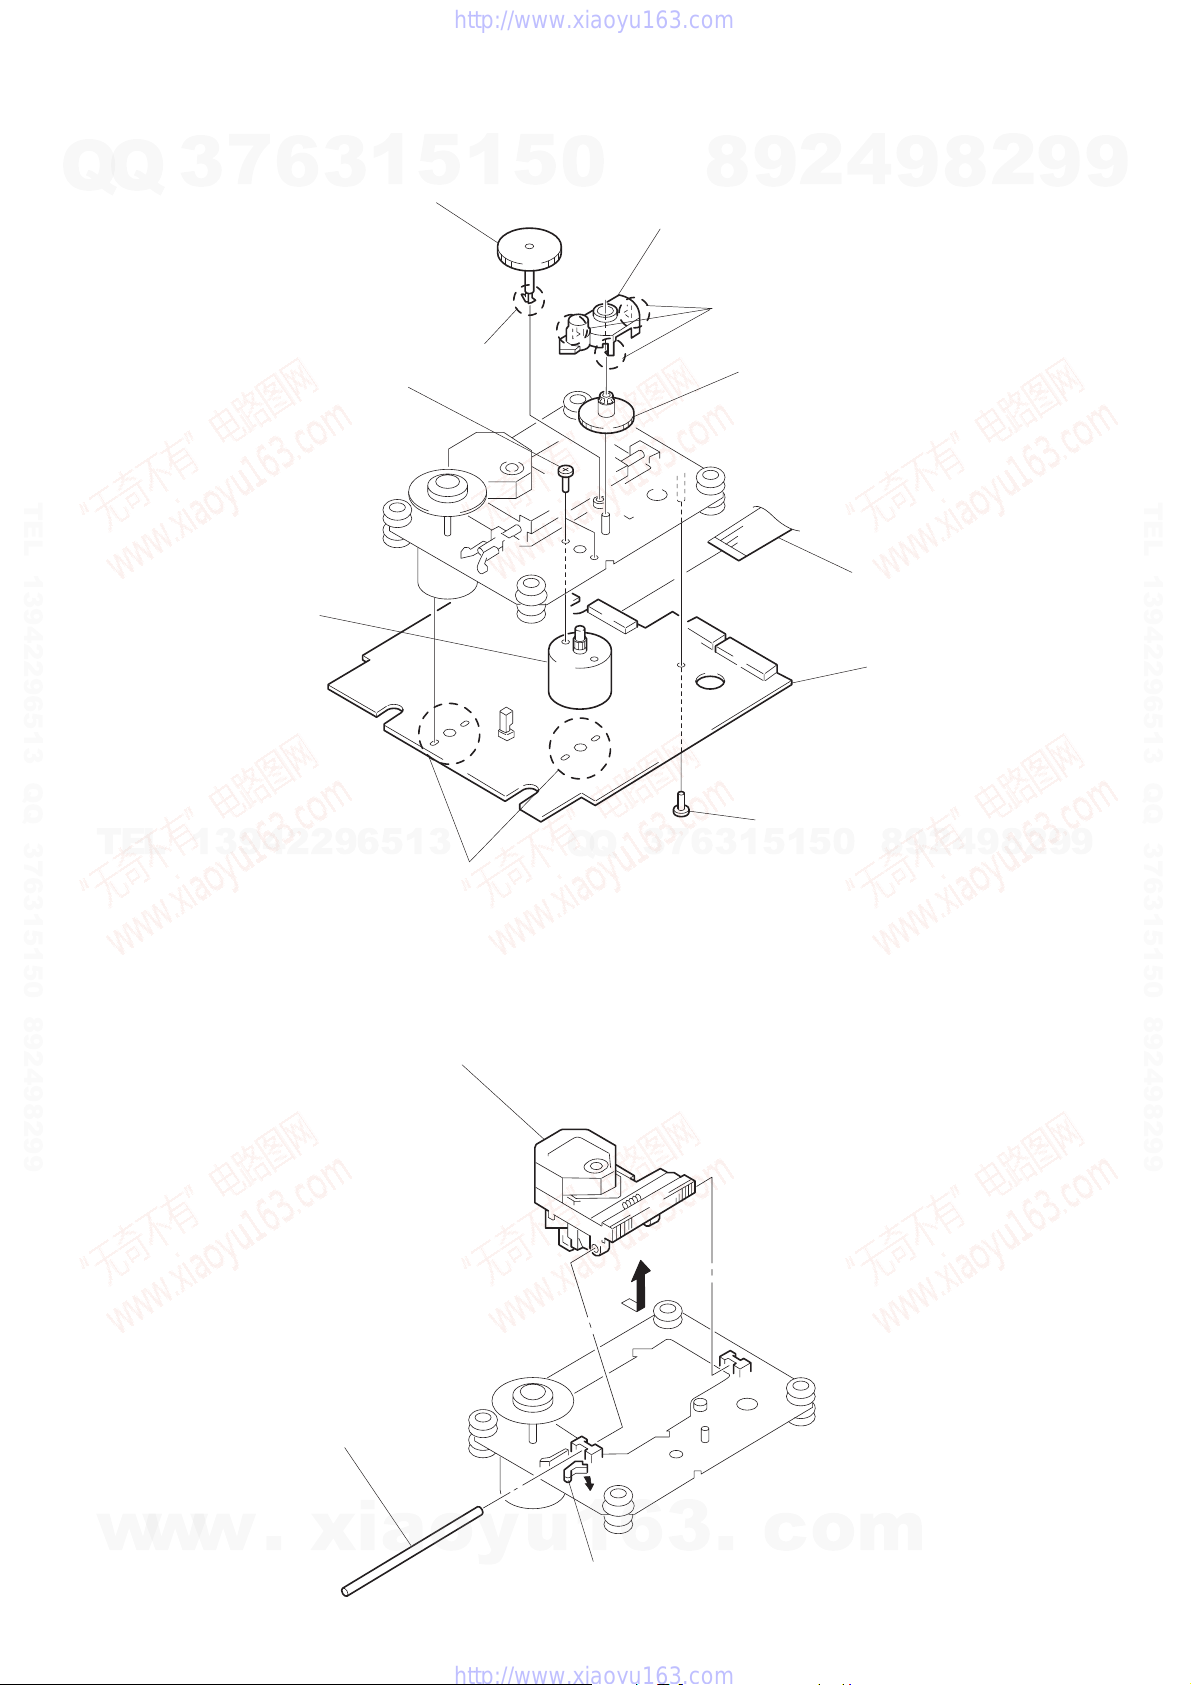
BD BOARD, SLED MOTOR (M102)
7
Q
Q
3
6
!º
3
6
gear (A) (S)
two screws
(2
×
3)
1
5
1
5
0
5
claw
8
gear cover
8
7
2
9
three claws
9
gear (B) (RP)
4
9
8
2
9
9
TEL 13942296513 QQ 376315150 892498299
!¡
sled motor
(M102)
TEL
OPTICAL PICK-UP (KSS-213B/S-N)
13942296513
3
3
Remove the optical
pick-up to direction
of the arrow
A
Removal
four solders.
.
Q
Q
3
7
6
3
1
2
5
screw
(B 2
1
×
5
5)
1
wire (flat type) (16 core)
(CN101)
4
BD board
2
9
8
0
4
9
8
2
9
TEL 13942296513 QQ 376315150 892498299
9
w
w
w
sled shaft
2
.
xia
A
o
y
u
1
6
3
1
claw
– 30 –
.
c
o
m
 Loading...