

Page 1

SONY.
Video TV Recorder
GV-9
Operating Instructions
Before operating the unit, please read this manual thoroughly
and retain it for future reference.
3-750-511-22 (1)
©1989 by Sony Corporation
Page 2
Owner’s Record
The model and serial numbers are located on the bottom. Record the serial number
in the space provided below. Refer to these numbers whenever you call upon your
Sony dealer regarding this product.
Model No. GV-9
Serial No.
WARNING
To prevent fire or shock hazard, do not expose the unit
to rain or moisture.
CAUTION
RISK OF ELECTRIC SHOCK
DO NOT OPEN
CAUTION TO REDUCE THE RISK OF ELECTRIC SHOCK.
DO NOT REMOVE COVER (OR BACK]
NO USER SERVICEABLE PARTS INSIDE
REFER SERVICING TO QUALIFIED SERVICE PERSONNEL
This symbol is intended to alert the user to the presence of
uninsulated “dangerous voltage” within the product’s enclosure that
may be of sufficient magnitude to constitute a risk of electric shock
to persons.
This symbol is intended to alert the user to the presence of
important operating and maintenance (servicing) instructions in the
literature accompanying the appliance.
Page 3

INFORMATION
This equipment generates and uses radio frequency energy and if not installed and
used properly, that is, in strict accordance with the manufacturer’s instructions, may
cause interference to radio and television reception. It has been type tested and
found to comply with the limits for a Class B computing device In accordance with
the specifications in Subpart J of Part 15 of FCC Rules, which are designed to
provide reasonable protection against such interference in a residential installation.
However, there is no guarantee that interference will not occur in a particular
installation. If this equipment does cause interference to radio or television
reception, which can be determined by turning the equipment off and on, the user is
encouraged to try to correct the interference by one or more of the following
measures:
Reorient the receiving antenna
Relocate the equipment with respect to the receiver
Move the equipment away from the receiver
Plug the equipment Into a different outlet so that equipment and receiver are on
different branch circuits.
If necessary, the user should consult the dealer or an experienced radio/television
technician for additional suggestions. The user may find the following booklet
prepared by the Federal Communications Commission helpful;
“How to Identify and Resolve Radio-TV Interference Problems". This booklet Is
available from the U.S. Government Printing Office, Washington, DC 20402, Stock
No. 004-000-00345-4.
Page 4

Table of Contents
Features.............................................................................................................................. 5
Location of parts and controls............................................................................................ 6
I Getting Ready |
Power sources...................................................................................................................10
Setting the clock................................................................................................................18
I Basic Operation |
Watching TV programs......................................................................................................22
Inserting the cassette........................................................................................................28
Recording TV programs....................................................................................................30
Playing back the recorded tapes.......................................................................................34
To start recording at the desired time................................................................................38
I Connections with Optional Equipment 1
Connecting an outdoor antenna........................................................................................43
Using as a monitor of the 8mm video camera recorder
Recording pictures with a video camera...........................................................................46
To connect another TV or color monitor............................................................................47
Tape editing.......................................................................................................................49
Connecting to the existing system.....................................................................................50
Precautions..................................................................................................................... 51
Notes on moisture condensation.......................................................................................52
Using your recorder abroad...............................................................................................53
Specifications....................................................................................................................54
List of recommended accessories.....................................................................................56
Troubleshooting.................................................................................................................57
Quick reference on timer setting...........................................................................back cover
....................................................
45
Page 5

Features
For details, refer to the pages indicated in •.
With Sony GV-9 video TV recorder, you can;
— view playback picture of 8mm video tapes. ©
— view TV programs. @
— record TV programs. ®
In addition, if you connect an optional video camera to this unit, you can record
pictures through the camera and view them immediately. ©
Compact and lightweight design allows you the outdoor use.
Other features
— Timer recording ©
— Sleep timer turns the power off automatically ©
— Picture can be muted when it is not necessary: e.g. when viewing pictures with
another TV/monitor which is connected to this unit or when listening only to the
sound. ©
This unit uses 8mm video format cassettes. It records in the SP mode
(approximately 1.43 cm/second) and the LP mode (approximately 0.72 cm/second)
and can play back in the SP mode and LP mode.
The quality of the playback picture in the LP mode, however, will not be as good as
that in the SP mode.
Television programs, films, video tapes and other materials may be copyrighted.
Unauthorized recording of such material may be contrary to the provisions of the
copyright laws.
PCM recording/playback is not possible with this unit. The PCM sound recorded
with another recorder cannot be played back with this unit.
For using the recorder abroad, see page 53.
Page 6
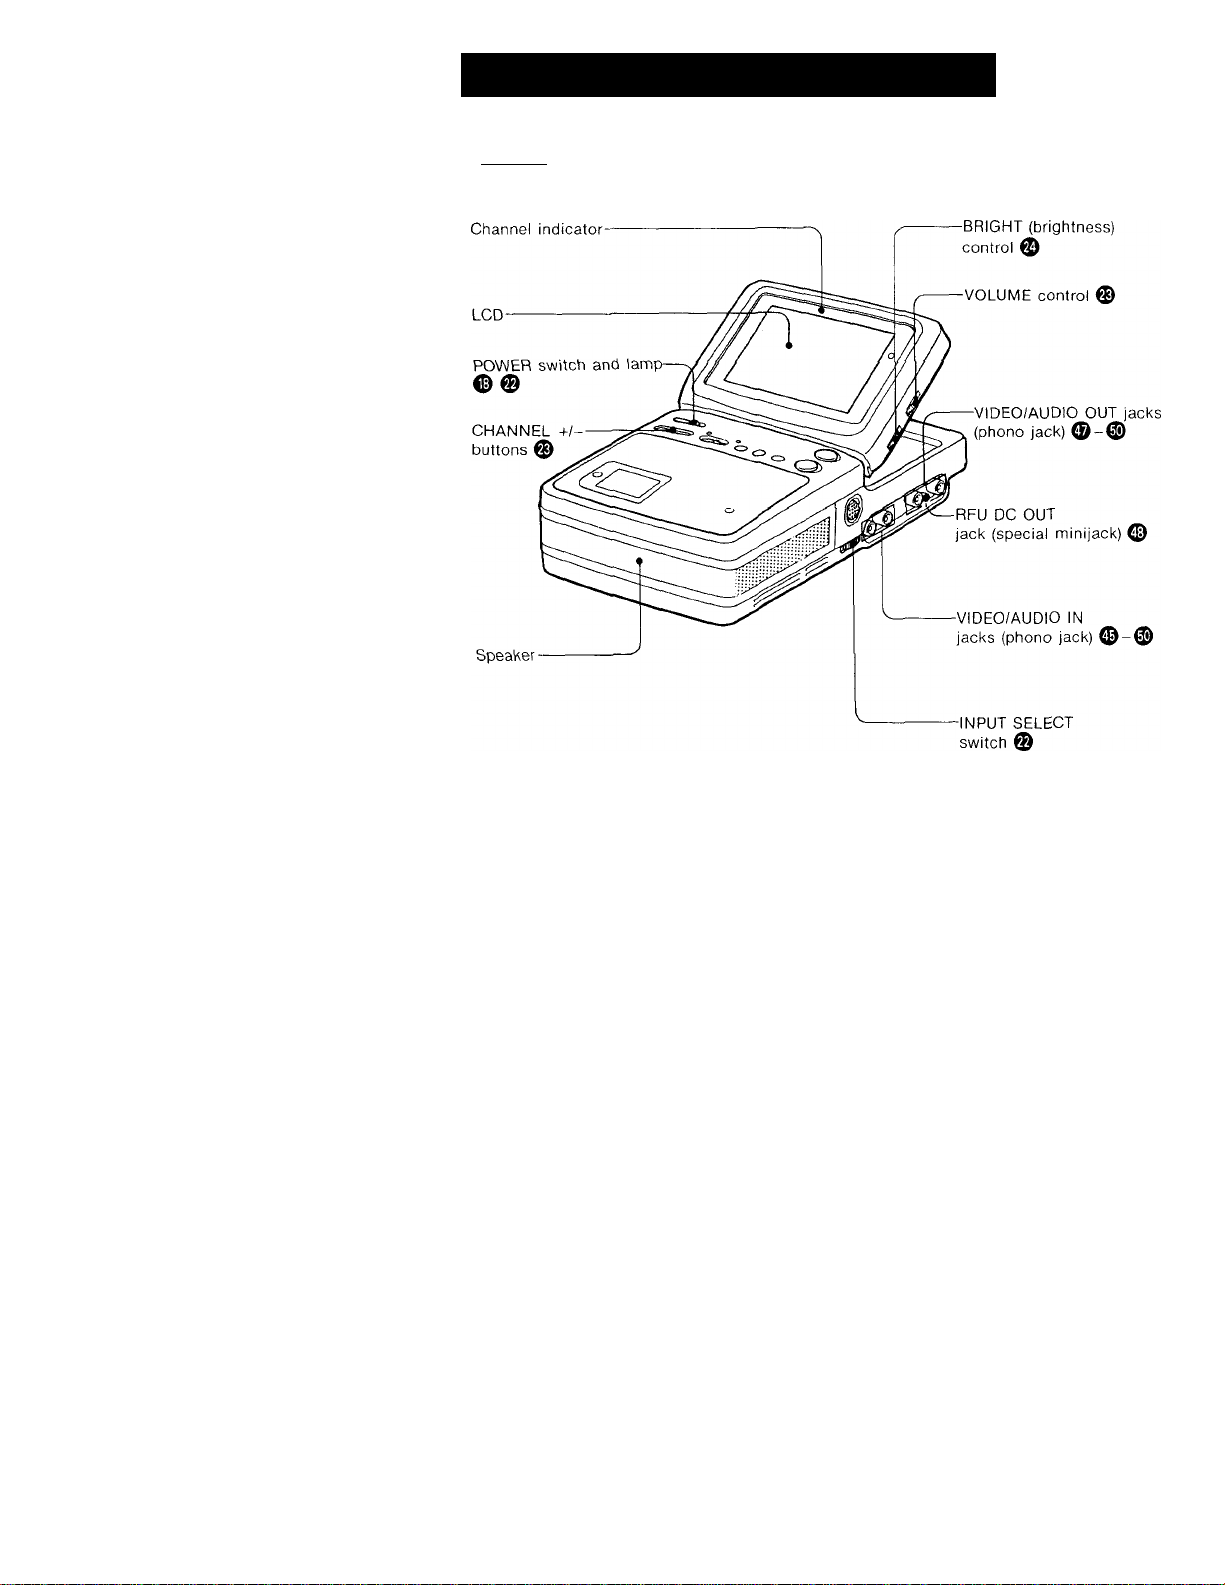
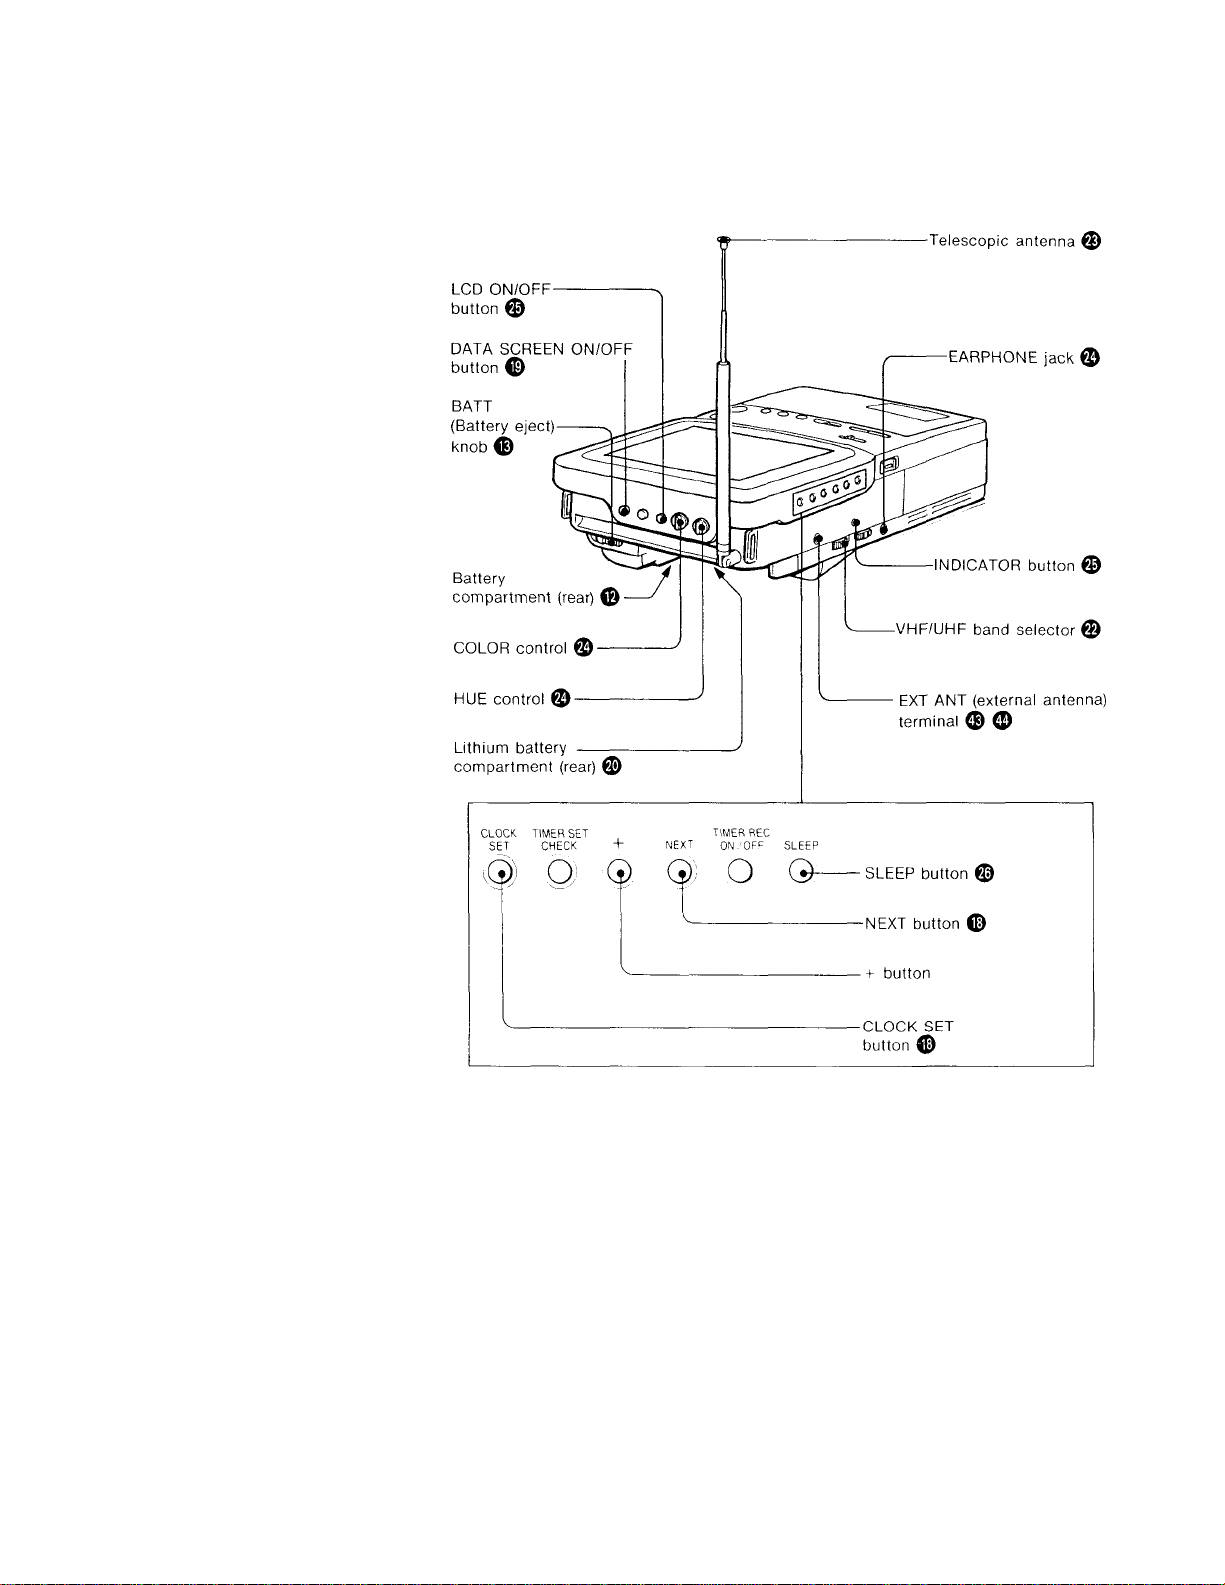
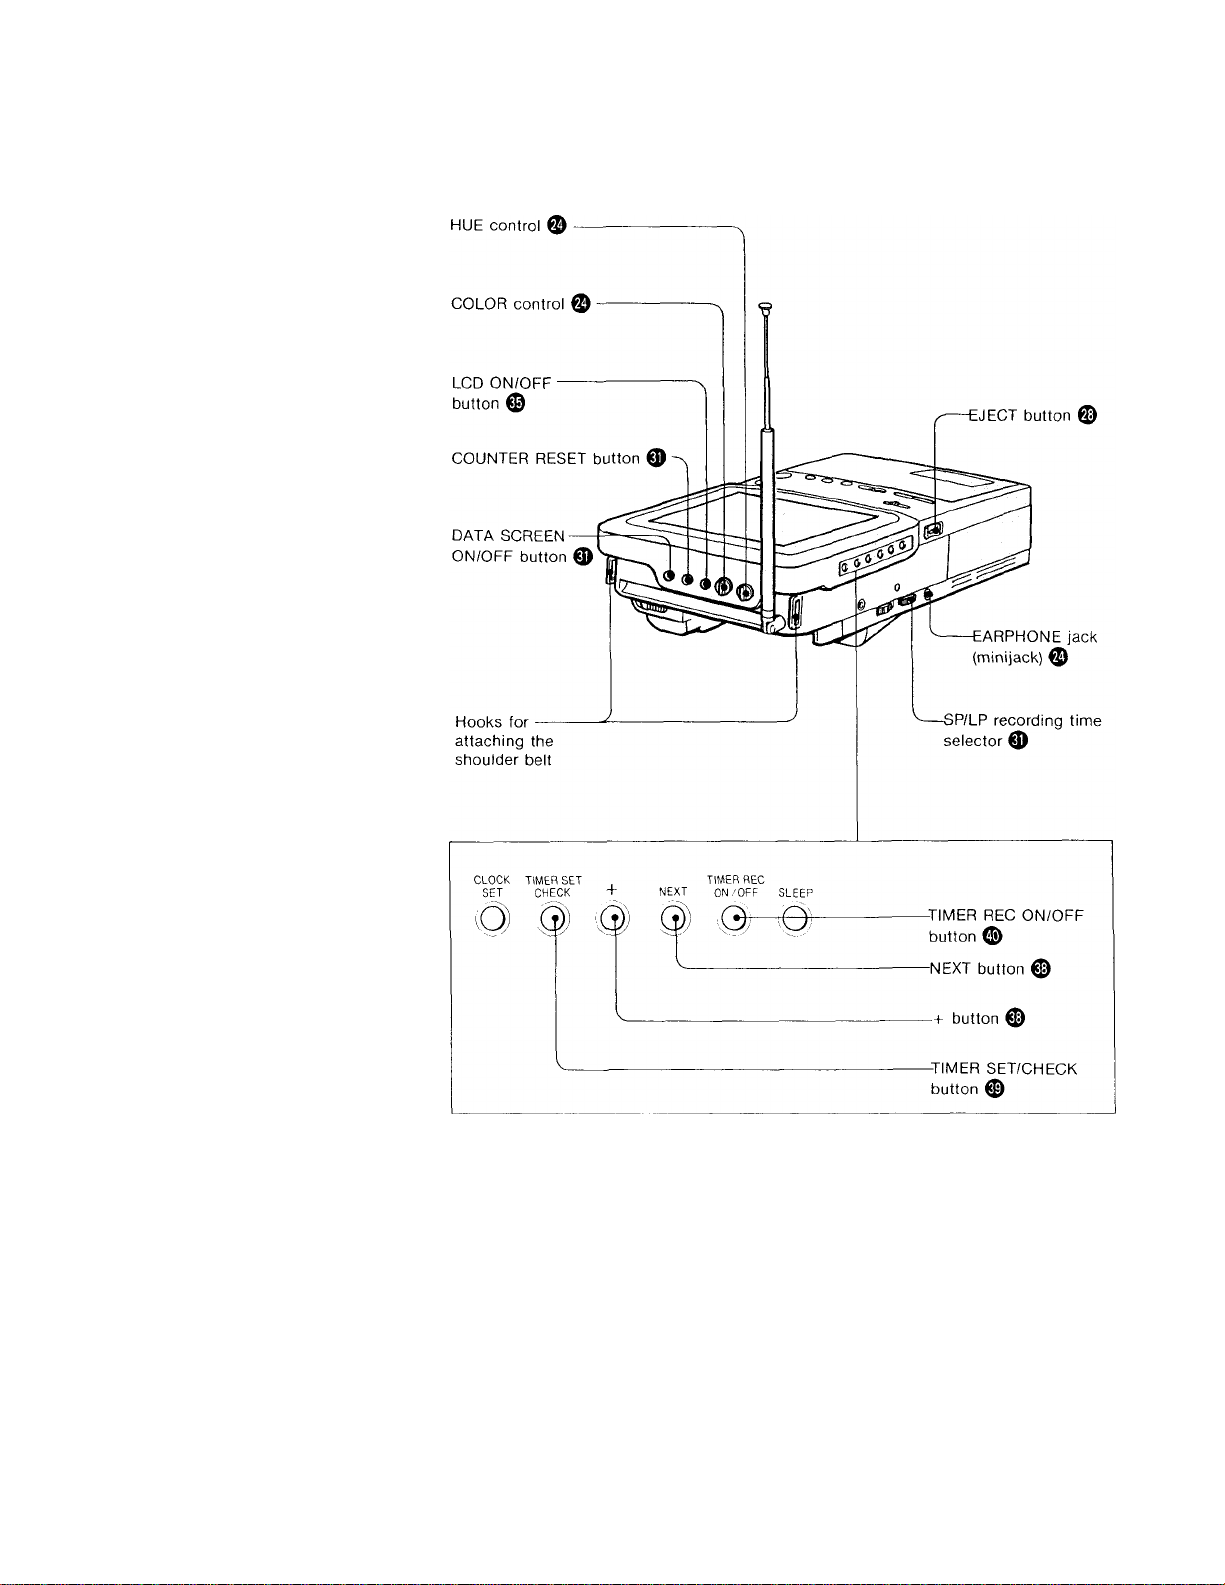
Location of Parts and Controls
Parts for watching TV programs
Page 7
Page 8
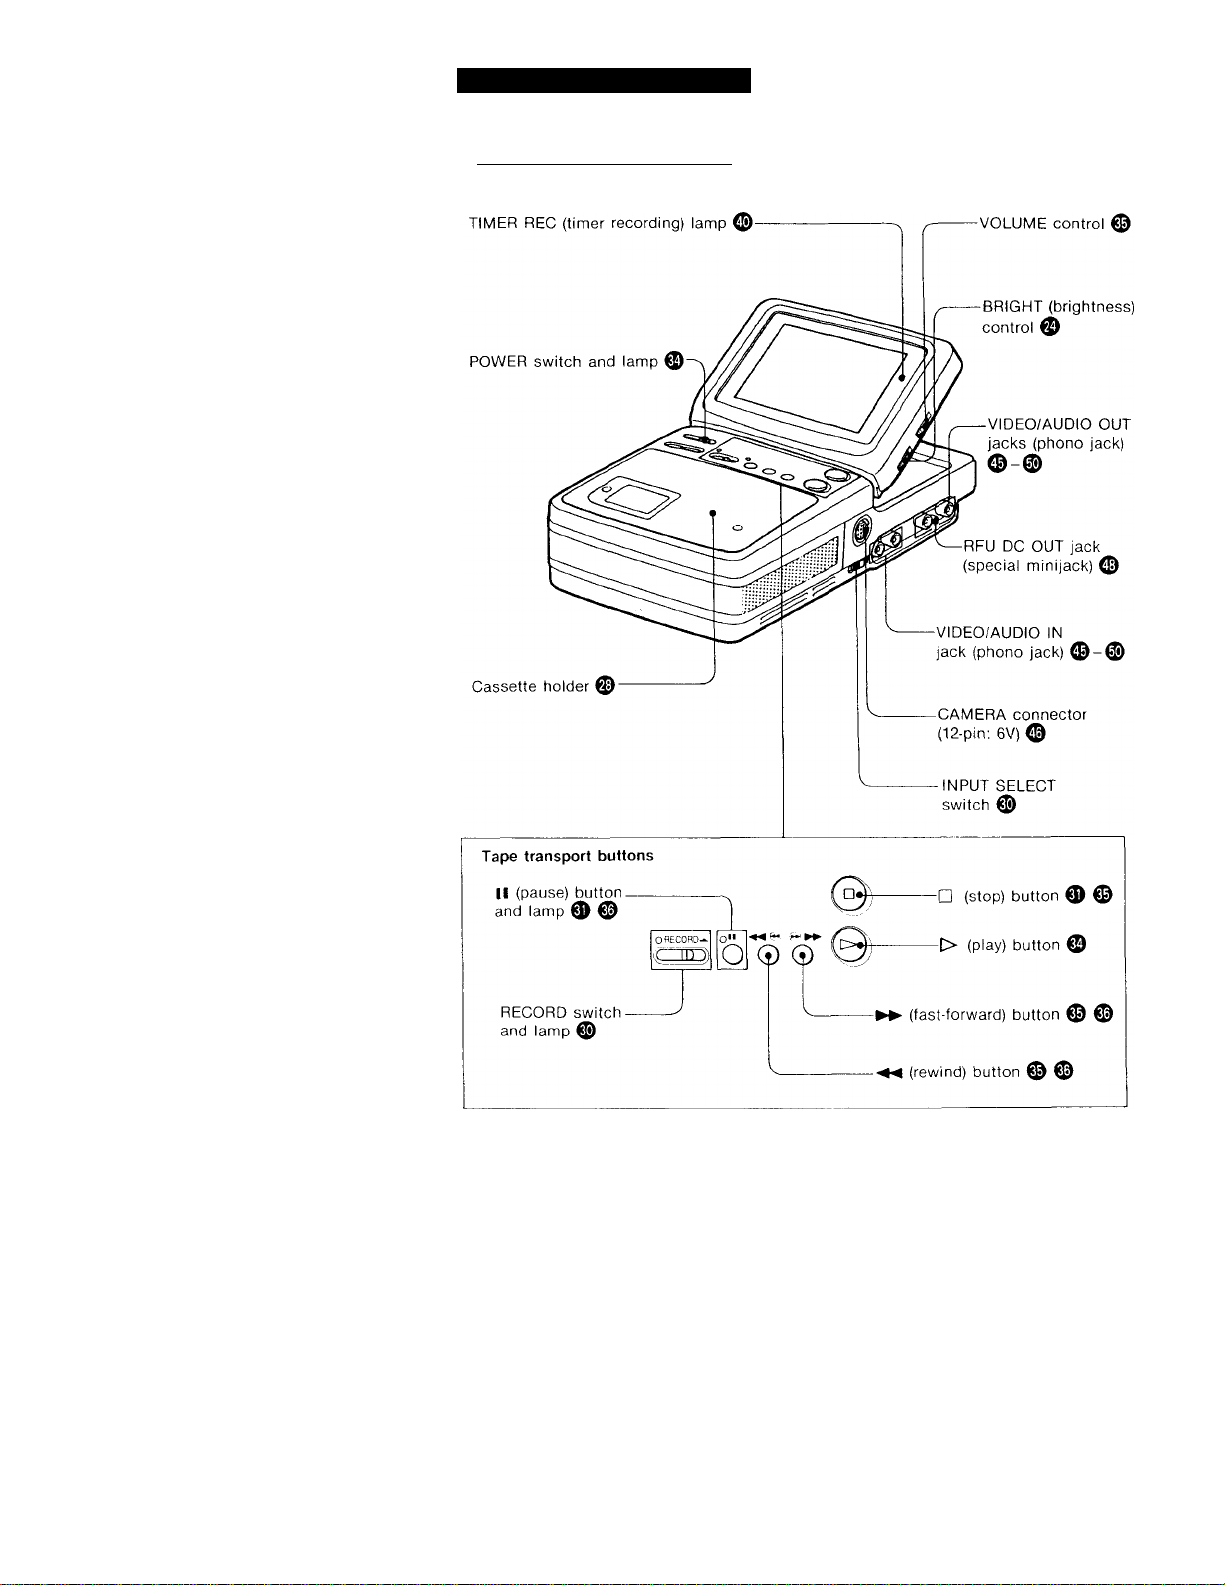
Location of Parts and Controls
Parts (or VCR playback/recording
8
Page 9
Page 10
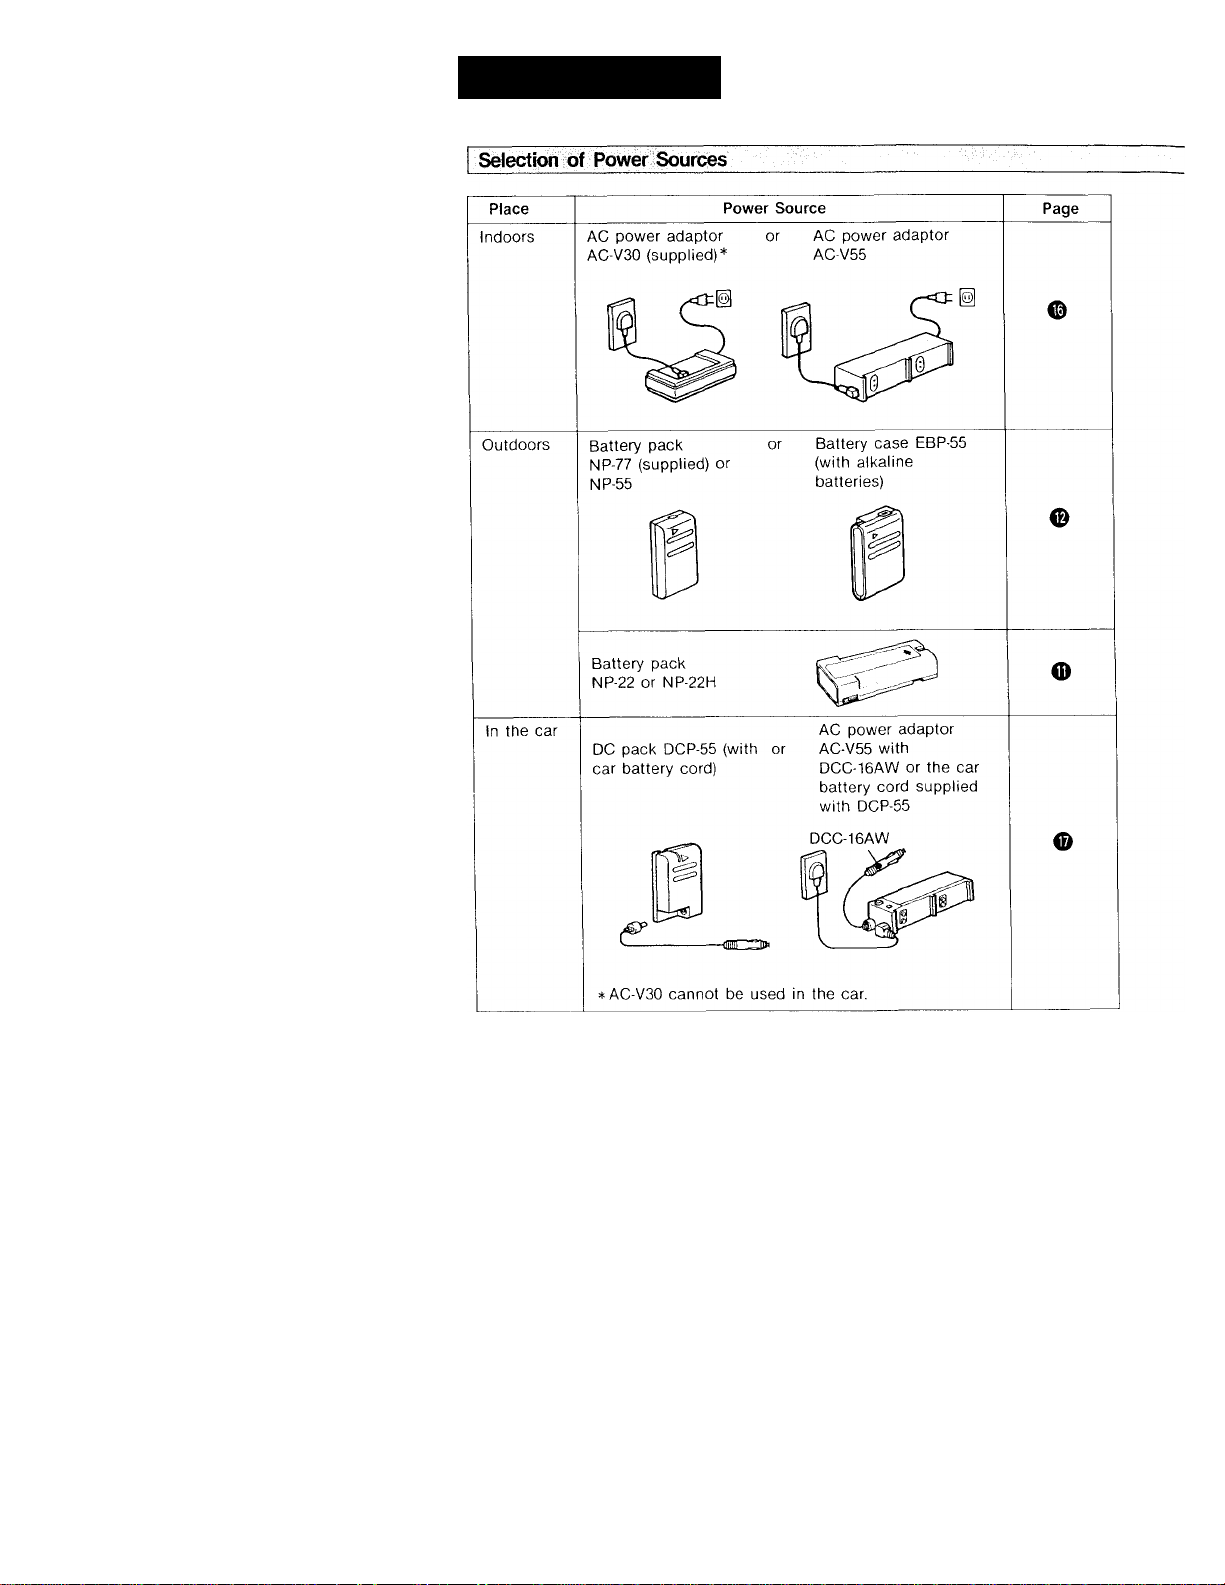
Power Sources
All above accessories except the AC-V30 and the NP-77 are optional.
10
Page 11

Disconnecting the power source during recording or playback may damage the
inserted cassette tape.
It this is done by accident, supply the power again immediately and turn the
power on.
Notes
___________________________________________________
•To use the NP-22 or NP-22H battery pack, use the optional NPA-22 battery
adaptor.
• VCV-GV9 Video Walkman Hood (optional) is available.
_______
11
Page 12
Using with Battery Pack — NP-77 or NP-55
First, charge the battery pack.
1
Use the supplied AC-V30 AC power adaptor.
(D
Connect the AC-V30 to a wall outlet.
©
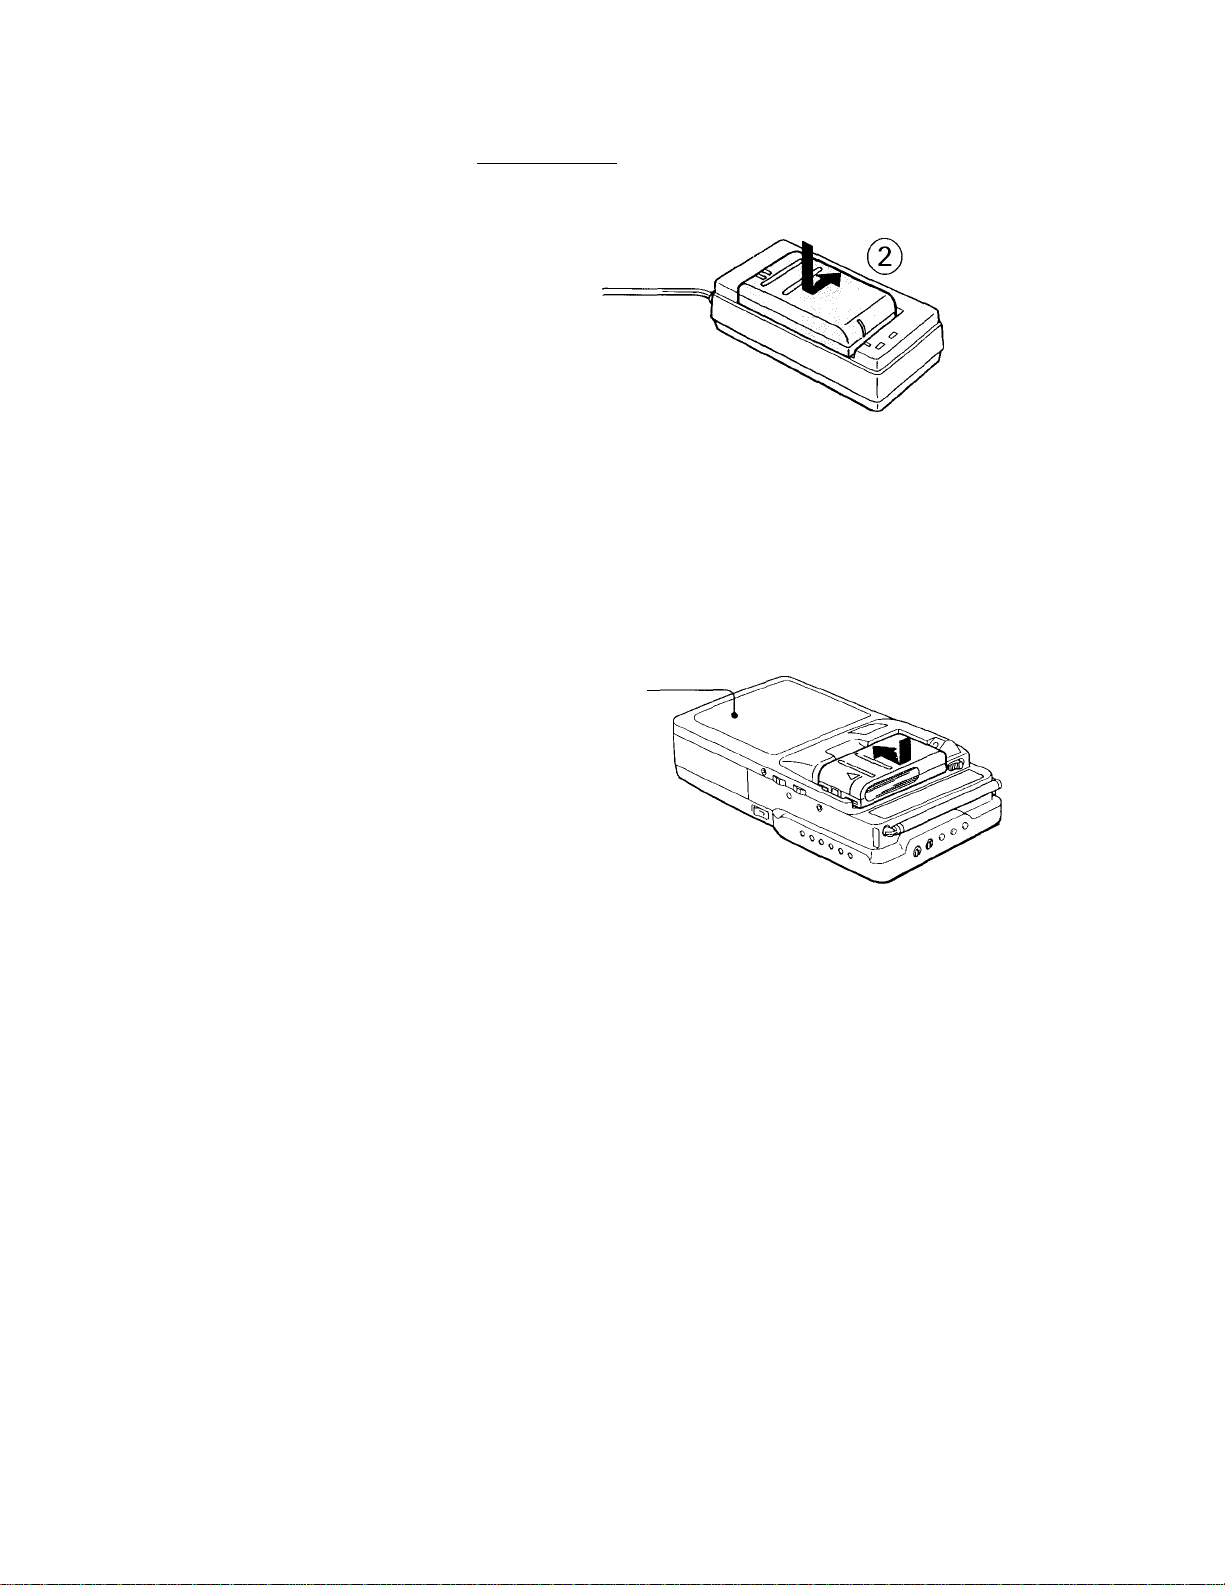
Install the battery pack.
©
Align the !► marks, then while pressing the battery pack, slide the battery
pack in the direction of the arrow.
The POWER lamp (green) and the CHARGE lamp (orange) on the AC-V30 will
light up. The charging will begin.
When the charging is completed, the CHARGE lamp goes out.
Unplug the AC power adaptor and the POWER lamp will go out.
Attach the battery pack to the video TV recorder.
Align the metal projection of the battery pack to the mounting surface of the
unit, and slide the battery pack.
Bottom
The charging time is about 1 hour for an NP-55 battery pack, or about 2 hours for
an NP-77.
When you attach two battery packs to the AC-V55 AC power adaptor, first the
charging of the battery 1 will be made, then the battery 2 will follow.
The unit cannot be operated with the AC power adaptor when it is used for
charging a battery pack, and the battery pack cannot be charged when the AC
power adaptor is used to operate the unit,
' An NP-77 or an NP-55 can also be charged with the BC-55 battery charger.
12
Page 13
How to Use the Rechargeable Battery Pack
Battery life
A fully-charged NP-77 or NP-55 battery pack can operate this unit as follows:
NP-77
Watching TV programs Approx. 120 min.
Playback of VCR
TV program recording
Camera recording*
*When the optional CCD-G1 color video camera is connected.
Prepare battery packs of double or triple capacity of planned operating time
to be on the safe side.
The “operating time” described in the catalogs and operating instructions of the
video TV recorder is the time during which the unit can be used continuously
indoors with fully charged battery pack.
Fast winding or rewinding operation of the tape consumes much more battery
power than normal tape transport operation. Consequently, battery life becomes
shorter when fast winding or rewinding is performed frequently.
The battery life becomes shorter in a cold place.
Battery packs run out more quickly in low temperature.
Approx. 90 min.
Approx. 80 min.
Approx. 60 min.
NP-55
Approx. 60 min.
Approx. 45 min.
Approx. 40 min.
Approx. 30 min.
13
Page 14

Charging of the battery pack
The battery pack you have purchased is not charged. Fully charge the battery pack
before use.
Recharge the battery pack when it is exhausted.
• If the operation is completed before BATTERY DOWN is indicated, it is
recommended that you discharge the battery pack by playing back or recording
on another tape until the BATTERY DOWN indication blinks rapidly.
• Do not recharge the battery pack before it has been discharged. Repeated
charging while some battery capacity remains will reduce the battery capacity.
i Notes on the battery pack
Battery pack care
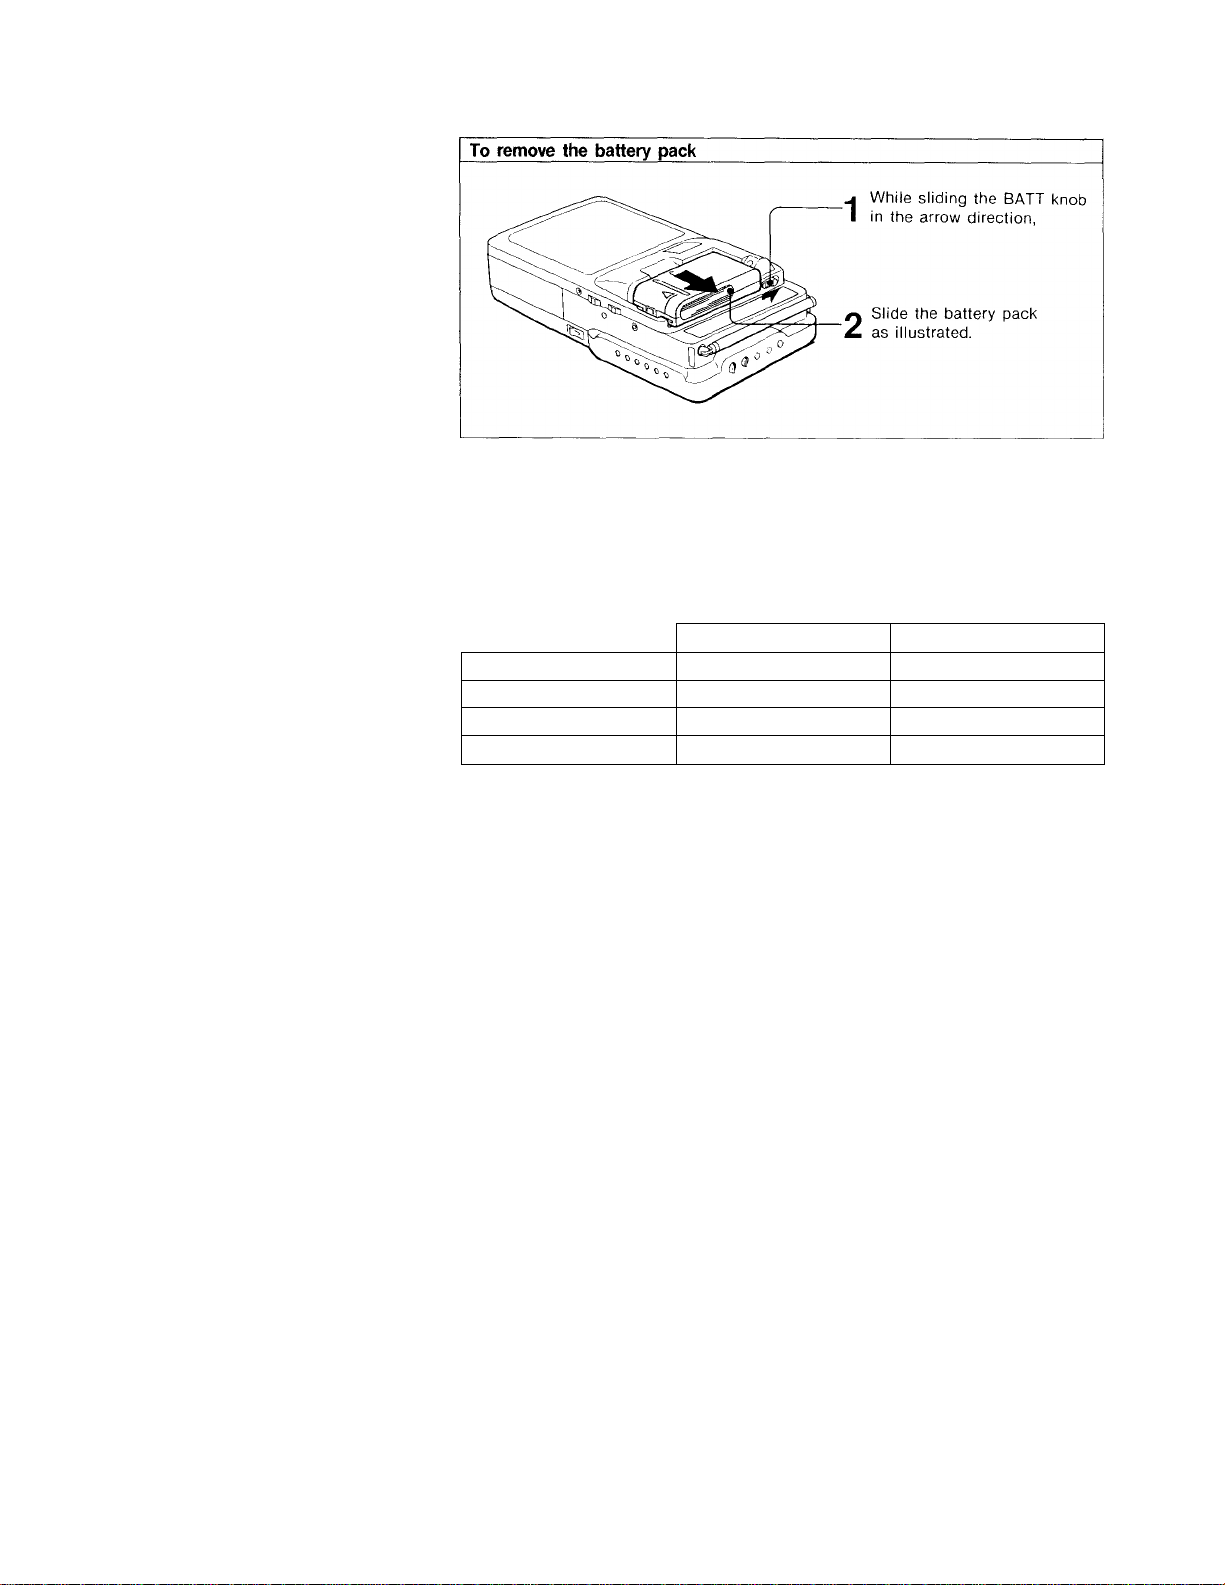
• Remove the battery pack from the video TV recorder after use, and keep it in a
cool place.
When the battery pack is installed on a video TV recorder, a slight amount of
current flows to the recorder even though the POWER switch is turned off. It
causes overdischarge and shortens the battery life.
• The battery pack is always discharging — even when it is not in use.
Thus, the battery should be charged before each use.
How to use the switch on the battery pack
Use this switch to indicate the charging condition. Set the p- Switch
switch to the “no mark” position when the charging is
completed. Set the switch to the “red mark” position when
the battery has been discharged.
How many times can the battery pack be recharged?
The battery pack can be recharged more than 500 times provided that it is fully
charged and exhausted at each operation.
If the BATTERY DOWN indication blinks rapidly after turning on the recorder even
though a fully charged battery pack is installed, the battery pack should be replaced
with a brand new one.
Charging temperature
The battery pack should be charged
in a temperature ranging from 10°C to 30°C
(5°F to 85°F).
The battery pack will be warm after charging or using.
While the battery pack is charged or used, a chemical change which generates
electric energy occurs inside the battery pack. Therefore, the battery pack becomes
warm, and this is normal.
When the charging is completed, remove the battery pack from the charger.
Within 24 hours after charging, remove the battery pack from the charger.
Otherwise, overcharging may occur as a slight amount of current flows from the
charger to the battery pack.
Be sure to put the battery pack in the case to carry.
If the + and - terminals are short-circuited with a metal piece, the battery will be
abnormally heated. This is very dangerous. Never put an uncovered battery pack in
I 4 a pocket together with a key holder, etc.
Page 15

Using With Battery Case — EBP-55
6 size AA (R6) n
alkaline batteries /
Attach or remove the battery case to the unit in the same way as the battery
pack.
For playing back, continuous power for 35 minutes can be provided.
You cannot use normal batteries. Use only alkaline batteries.
If you use the battery case in a cold place, its operating time becomes shorter.
When you use the battery case to operate the video TV recorder, occasionally
the displays on the screen may not blink.
If you cannot remove the cassette from the unit, replace the batteries with new
ones.
Replacing the battery
Replace the battery just when the POWER lamp and
I
- BATTERY DOWN —
I
Fast blinking
BATTERY DOWN on the screen changes from slow
blinking to fast blinking.
Turn off the power of the video TV recorder before
replacing the battery. While replacing the battery, keep
the cassette inside the cassette holder. Recording can
be resumed smoothly without any picture distortion.
Charging temperature
The temperature range tor charging is 5°C to 35°C (41°F to 95°F).
However, to provide maximum battery efficiency, the recommended temperature
range when charging is 10°C to 30°C (50°F to 86°F).
Keep the battery terminals clean.
If the terminals are soiled, the battery life will become shorter.
When the terminals are soiled, or the battery pack or case has not been used for
a long time, repeat attaching and removing it several times. This will improve the
contact of the battery pack or case and the video TV recorder.
Also, wipe the + and - terminals with a soft cloth or paper.
15
Page 16
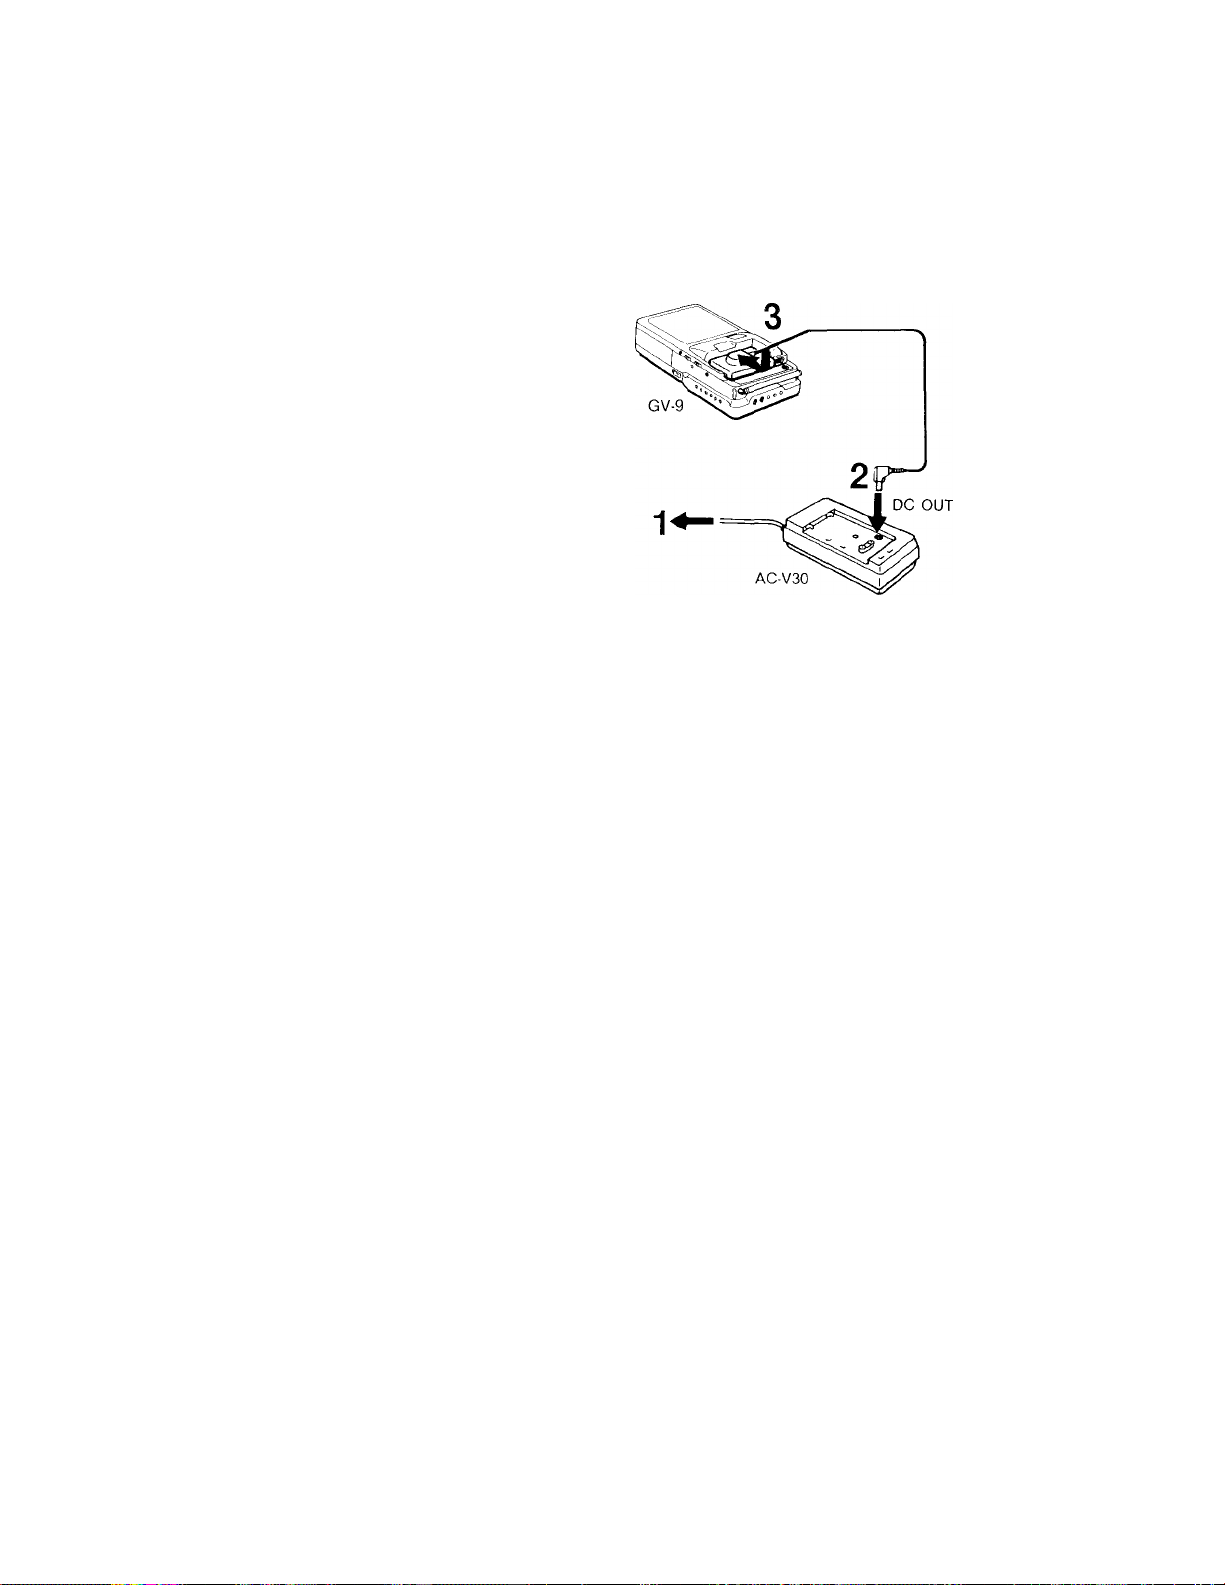
Using with AC Power Adaptor — AC-V30
1 Connect the AC power adaptor to a wall outlet.
2 Insert into the DC OUT jack.
3 Install the other side of the connecting cord to the video TV recorder.
The optional AC-V55 can also be used.
Attach or remove the AC power adaptor In the same way as the battery pack.
When disconnecting, do not pull the cord.
CAUTION
TO PREVENT ELECTRIC SHOCK, DO NOT USE THIS POLARIZED AC PLUG WITH
AN EXTENSION CORD, RECEPTACLE OR OTHER OUTLET UNLESS THE BLADES
CAN BE FULLY INSERTED TO PREVENT BLADE EXPOSURE.
• The unit Is not disconnected from the AC power source as long as It is
connected to the wall outlet.
• One blade of the plug is wider than the other for the purpose of safety and will fit
into the wall outlet only one way. If you are unable to insert the plug fully into
the outlet, contact your dealer.
• While the unit is in use, particularly during charging, keep it away from AM
receivers and video equipment because it will disturb AM reception and video
operation.
16
Page 17
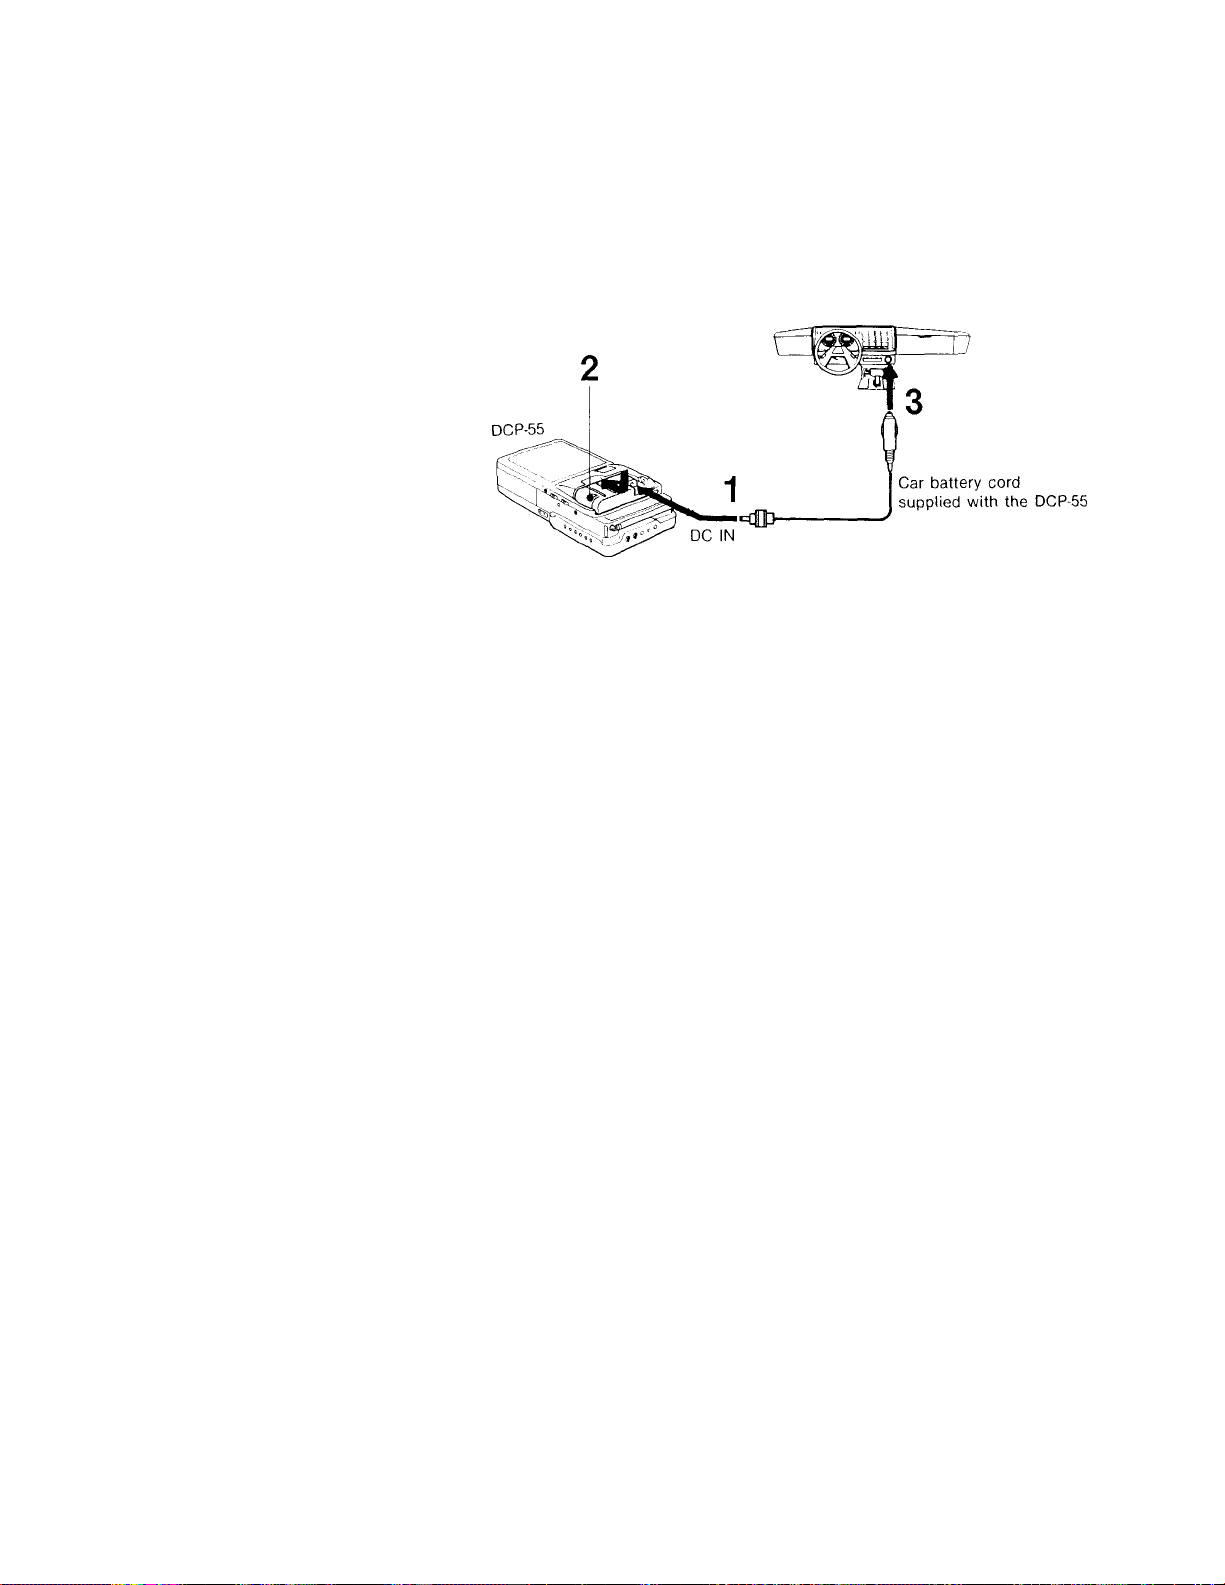
Using with Car Battery — DCP-55
1 Insert into the DC IN jack of the DC pack.
2 Attach to the video TV recorder.
3 Connect to the cigarette lighter socket.
12V or 24 V car battery
The optional AC-V55 or the NP-4000 (battery pack) can also be used to operate
this unit. In this case, connect it to the cigarette lighter socket of the car with
the optional DCC-16AW car battery cord. The AC-V30 cannot be used in a car.
Attach or remove the DC pack in the same way as the battery pack.
Notes
• Be careful not to let any metal object touch the metal projection on the battery
pack or the AC power adaptor. When the battery pack is not used, keep it in
its case.
• Keep the video TV recorder away from the power source. If not, noise may
appear on the screen.
Notes on the use of the GV-9 in a car
• When you use the DCP-55 or AC-V55, connect them only to the cars with
negative ground 12V or 24V car battery.
• For your safety, do not watch the TV or operate the controls while driving.
• Avoid leaving the unit in a place with very high temperature. If you do, it may
cause distortion of the cabinet or malfunction of the unit.
• If you use this unit white your car is not in use, the car battery will be
consumed.
Avoid using this unit in such condition over 12 hours.
17
Page 18

Setting the Clock
Note on time indication
PM 12:00 = midnight, AM 12:00 = noon
Example: Set to PM 1:15
■I Slide POWER to the right and release to turn
on the unit.
The POWER lamp lights up.
\ i /
-•j»0WER —^
t' II) )
Press CLOCK SET.
The screen becomes dark.
/ I \
The next item to be
set blinks.
Set the hour.
Press repeatedly until you get the correct setting.
—pn 1_Q0
/ I ^
NEXT
When you press and immediately release the + button, the indication will
advance by one. If you keep the button pressed, the indication will advance
continuously.
18
...
\
Pn-p 00 -
P I s
Page 19

* If the time indication was not displayed on the screen when you started setting
the clock, the display goes off as the setting is completed. But, it the time
indication was displayed by pressing DATA SCREEN ON/OFF when you started
the setting, the display remains on the screen. To make the display disappear,
press DATA SCREEN ON/OFF.
19
Page 20

20
Page 21

Lithium battery life
Approximately 1 year in normal operation.
If the lithium battery becomes weak, the time indication will blink on the screen
for several seconds when the power is turned on. In this case, replace the
battery with a Sony CR2032 lithium battery.
Use of a battery other than Sony CR2032 lithium battery may present a risk of
fire or explosion.
After replacing the battery, the clock display becomes AM 12:00. Reset the clock.
Notes on lithium battery
• Keep the lithium battery out of the reach of children.
Should the battery be swallowed, immediately consult a doctor.
• Wipe the battery with a dry cloth to assure a good contact.
• Be sure to observe the correct polarity when installing the battery.
• Do not hold the battery with metallic tweezers, otherwise a short-circuit may
occur.
• Do not break up the battery nor throw it into a fire, which might cause it to
explode. Carefully dispose of the used batteries.
WARNING
Battery may explode if mistreated. Do not recharge, disassemble or dispose of it in
fire.
21
Page 22

Watching TV Programs
22
Page 23

5 Select the desired channel.
A vertical line (VHF: green,
UHF: red) appears and moves
while the unit is searching for
the channel and stops when
the channel is tuned in.
Press + for higher-numbered channels and - for lower-numbered channels.
The channels will appear in numerical sequence. Press CHANNEL +1-
repeatedly until you get the desired channel on the screen.
The vertical line
disappears after
several seconds.
0 Adjust the antenna for the best reception.
Pull out the base
of the antenna
Y Adjust the volume.
To increase
volume.
To turn off the TV
“•tower —»-
w
To decrease
volume.
Slide POWER to the right and
release. The lamp goes off.
23
Page 24

Watching TV Programs
To listen with headphones
Connect the supplied headphones to the EARPHONE jack.
The sound from the speaker will be cut off.
The supplied headphones are of stereo type, but the sound will be heard through
both right and left sides in monaural.
To Adjust the Picture
Adjust the above controls to your preference.
Adjust the
angle of the
LCD to your
preference.
24
Page 25

To know the channel you are watching
VHF
Press INDICATOR.
INDICATOR
If the vertical line is
green, you are watching
a VHF channnel.
If it is red,
you are watching a UHF
channel.
green
You know that you are
watching VHF channel 6.
To mute the picture
LCD
ON/OFF Press LCD ON/OFF.
The picture will be muted.
It is recommended that you mute the picture when you view the playback picture
of this recorder with another TV or monitor.
Battery life will be longer if you use the unit with the picture turned oft.
“Last channel” memory function
While you are watching the TV, if the power source is disconnected or the
battery pack becomes exhausted, the unit turns off with the last channel being
memorized.
When you turn on the unit again, the last channel will appear on the screen.
The same thing occurs when the TV signal is cut off, for example when you go
through a tunnel.
Note
When no picture is displayed, if the sound is set to a low volume, or the head
phones are connected, the unit seems to be turned off though it is not.
Be sure to turn off the unit with the POWER switch when it is not used.
25
Page 26

Watching TV Programs
To Have the Unit Turned off AutomaticaHy — SLEEP Timer
You can set the unit to turn off automatically after a certain time between 30
minutes and 5 hours while viewing a TV program or video playback , or while
recording.
Each time you press the SLEEP button, the display changes as follows:
t
5:00
t
4:30
Example: To turn off the TV after 2 hours
“\ Make sure the clock is set correctly (page 18).
Press SLEEP while watching the TV, etc.
SLEEP
30
4:00
1:00 1:30
3:30
3 Select the desired time interval by pressing SLEEP.
SLEEP
The TV will be turned off automatically after 2 hours.
2:00
1
2:30
*
3:00
The screen becomes
dark.
The screen goes back
to the normal brightness
after several seconds.
The operation will be the same for the tape playback and recording.
The tape will stop running after the selected time interval.
26
Page 27

To check the remaining time
Press SLEEP once.
1 52*4-The remaining time is displayed.
Note
When you use the unit with rechargeable batteries, the unit may be turned off
before the selected time because the batteries are exhausted.
To stop the SLEEP timer
Press SLEEP repeatedly until you have the “
You can also stop the SLEEP timer by turning off the unit with the POWER switch.
display.
27
Page 28

Inserting the Cassette
Make sure that the power source is connected to the unit.
"I EJECT
^ Open the cassette holder with the EJECT button.
EJECT -J-
While pressing,
slide to the right.
Insert the cassette with the window side up.
Close the cassette holder.
When you slide the EJECT button, the power will be supplied and the cassette
holder will be opened even If the power is turned off. When the cassette holder
opens, the power will be turned off automatically. Press POWER if you want to
continue the operation after closing the cassette holder.
To eject a cassette
Use the EJECT button. Make sure the tape is not running.
Note'
Do not open the cassette holder while the unit is in the vertical position. If you
do, the cassette may fall out of the holder and the cassette can be damaged.
28
Page 29

To Prevent Accidental Erasure
When a new recording is made on a
previously recorded tape, the previous
recording is automatically erased. To
protect a recording, slide the safety tab
out to cover the opening.
Notes
When opening and closing the cassette holder, do not push the cover of the
holder forcibly.
When you have made a recording with this unit on a tape from its beginning, and
if you play back this tape with another VCR, the beginning of the tape may not be
played back.
Also, by using the same tape for recording, the previously recorded pictures can
remain although vou record the new oictures.
To avoid these cases, advance the tape for about 15 seconds before recording
with this unit.
btore cassettes in their cases when they are not to be used and keep them in an
upright position to prevent intrusion of dust and uneven winding.
Always insert the cassette in the right position.
Never insert anything in the small holes on the rear of the cassette.
r ^
i
Recording Recording can
cannot be made. be made.
□
\
29
Page 30

Recording TV programs
30
Page 31

4 Select the recording mode, SP or LP (see page 33).
SP« »LP
IBH)
5 Slide RECORD to the right and release to start recording.
"•'RPC0RD->-
(Tj^ •
The RECORD lamp
lights up.
To stop
recording for a
moment
To stop
recording
When the tape is
recorded to the
end
To Index the tape
Use the counter display on the screen.
Keep the counter displayed by pressing DATA SCREEN ON/OFF.
Press II. The lamp lights up.
Press again to resume recording.
(The pause mode will be released
after about 5 minutes to protect the
video heads and recording will
stop.)
Press □ (STOP).
The RECORD lamp goes off.
The tape stops.
The unit is not turned off.
Counter display
1 lollop [oqIJ
Hour J L Seconds
Minutes
Press COUNTER RESET to reset the counter to 0:00:00 at the beginning of the tape.
Note the counter reading at the desired points. Refer to these readings to locate the
desired points later. 31
Page 32

Recording TV programs
About the recorded sound
The VOLUME control setting has no effect on the recording level.
To change the channel during recording
Set the unit in the recording pause mode by pressing II and then select another
channel.
You cannot watch another program while recording.
Are you having trouble?
Symptom
“CASSETTE” indication is
displayed when you slide
Possible cause
The safety tab on the
cassette is slid out.
Correction
Slide the tab in or use a
new cassette.
the RECORD switch.
The tape is at its end.
Rewind the tape or use
a new cassette.
- CRSSETTE-
-'/I x''
No cassette is
Insert a cassette.
inserted.
To stop recording at the desired time — Quick timer
Press the SLEEP button during recording. You can leave the unit function when you
go to bed or when you go out, etc.
The unit will be turned off automatically at the preset time. For operation, see page
26.
I
About the INPUT SELECT switch ]
Set to the appropriate position according to the source to be watched or to be
recorded.
To watch or record TV
programs
Set to TV.
To watch or record
signals from the
equipment connected
to the VIDEO/AUDIO IN
jacks
Set to LINE.
To watch or record
signals from a video
camera connected to
the CAMERA
connector
Set to CAMERA.
32
INPUT SELECT
■ ■ ■
TV CAMERA LINE
INPUT SELECT
■ ■ ■
TV CAMERA LINE
INPUT SELECT
TV CAMERA LINE
Page 33

Recording/playback time
Two tape speeds can be selected with the SP/LP selector.
The recording time in the LP mode is twice as long as that in the SP mode. For
better picture and sound, recording in the SP mode is recommended. During
playback, the mode in which the tape was recorded is selected automatically.
Cassettes and their recording time
There are two formats tor 8 mm video recording, NTSC and PAL. Video cassette
tapes are made to correspond to the respective formats. Use NTSC format cassette
tapes for GV-9. You will find “P6” on the package of the cassette.
In some countries, however, only PAL format cassette tapes with “P5” on the
packages are available. If a PAL format cassette is used with this unit, the actual
recording time may differ from the standard recording time indicated on the
cassette.
For your reference, the recording times for NTSC and PAL format cassettes are as
follows:
NTSC cassettes
Recording time
Cassette
P6-15
P6-30 30 min.
P6-60 60 min. 120 min. P5-60
P6-90 90 min. 180 min. P5-90
P6-120 120 min. 240 min.
Note
If you record with this unit on a tape which has been recorded in the PCM mode,
and if you piay back this tape by using a VCR with PCM function, occasionaily the
sound may be cut off. In this case, set the audio monitor switch of the VCR to the
standard position.
SP mode
15 min. 30 min. P5-15
LP mode SP mode
60 min. P5-30
Cassette
PAL cassettes
Recording time
22 min. 44 min.
43 min. 86 min.
84 min. 168 min.
126 min.
LP mode
252 min.
33
Page 34

Playing Back the Recorded Tapes
34
Page 35

To mute the picture
Press LCD ON/OFF,
To adjust the picture
Adjust the BRIGHT, COLOR, and HUE controls (page 24).
I
To stop the playback at the desired time
Use the SLEEP function.
You can have the unit turned off at the preset time. See page 26.
To stop playback Press □ .
To rewind the tape
and play it back
automatically —
Auto play
When the tape is
piayed to the end
To advance the tape
rapidly
Keep pressed and press ^.
The tape stops.
The unit is not turned off.
Press
_____________________
On-screen display
—
AUTO PLAY
—
[>0
To rewind the tape
Press
<K1
35
Page 36

Playing Back the Recorded Tapes
Various Playback Modes
To stop the tape
for a moment —
Still picture
To locate a
particular point
while viewing the
picture — Picture
search
— 0)
.“"S
e
-mU
The lamp lights up.
To rewind
To advance
To resume normal
playback, press II
again, or press >.
The pause mode
will be auto
matically released
after about 5
minutes and
playback will
resume.
When you release
the button, the
unit will return to
the previous
mode.
si
36
To view the
picture at high
speed — FR
picture search
Page 37

Notes
_____________________________________________________________
» In the still picture, picture search or picture at high speed, streaks wiii appear and
the sound wiii be muted.
• Picture noise will increase when you piay back a tape recorded in the SP mode.
• If you make the picture search or the FR picture search with another TV or
monitor, the picture may be in biack and white, or the picture may shake
verticaiiy, also, streaks will be larger than those that appear in the pictures viewed
on this unit.
I
37
Page 38

To Start Recording at the Desired Time
A TV program within 24 hours can be preset for automatic recording.
Before setting the timer
Make sure that the power is supplied: is the battery pack fully charged? (For
long recording, using the AC power source is recommended.)
Set the clock (Page 18).
Insert a cassette (Page 28). Make sure that the safety tab is slid in.
Select the recording mode, SP or LP.
Set the INPUT SELECT switch to the appropriate position. To record TV
programs, set to TV.
Select the desired channel for TV program recording.
For better recording of picture and sound, using an external antenna is
recommended. See page 43.
38
Page 39

' Timer-activated recording
Example: To record the program from 8:30 pm to 9:45 pm
■f Press TIMER SET/CHECK.
The screen becomes dark.
- Current time
Recording mode
■ Ending time
Set the hour.
01^ T^ME
NEXT
-PM 81-- -
/ I ^
ON /
Each time you press the
+ button, the hour
indication increases by
one.
If you keep the button
pressed, the indication
will increase continuously.
PM 8^20-
V ^1^
ON TIME, ^
PM 8-30 -
/ I \
ON TIME
PM 8:30
Each time you press the
+ button, the minute
indication increases by
one. If you keep the
button pressed, the
indication will increase
continuously.
QPP JIME
-PM 8- —
/ I \
39
Page 40

To Start Recording at the Desired Time
Recording starts at the preset starting time and the power is turned off at the
ending time.
If the safety tab on the cassette is slid out or if no cassette is inserted when you press the
TIMER REC ON/OFF button, “CASSETTE" indication will appear.
40
Page 41

Note_______________________________________________________________
Be sure to press the TIMER REC ON/OFF button only after you have finished the
timer settings. If you press it while presetting, the power turns off at this point and
the preset program is erased.
During timer recording, both picture and sound will be muted. To listen to the sound
and watch the picture, press LCD ON/OFF.
When the TIMER REC lamp is lit, any buttons except for the TIMER REC ON/OFF
button and the TIMER SET/CFIECK button do not function.
To stop the timer recording
Press TIMER REC ON/OFF again.
If a power interruption occurs when the unit is connected to the AC power source
Recording will stop. The power will not be turned on even when the interruption
ends.
I
To set the timer while the tape is running
You can set the timer during playback or recording.
In this case, advance or rewind the tape to the desired position before pressing the
TIMER REC ON/OFF button in step 6.
To check the setting
Press TIMER SET/CHECK while the
TIMER REC lamp is lit.
The power is turned on and the turn-on
and turn-off times will be displayed.
OH TIHE
Pn 8 30
OFF TIME
PM 9 d5
Pn 7 00
__
I
SP
)
If you have made a mistake in timer setting
Press TIMER REC ON/OFF to cancel the timer recording, then turn the unit on and
set the timer again.
If the turn-on and turn-off times are the same
You can record to the end of the tape.
If the tape ends before the turn-off time, recording will stop and the power will be
turned off.
41
Page 42

To Start Recotxling at the Desired Time
Note
• The timer recording cannot be made on AC power when the AC power adaptor is
used for charging a battery pack. Before setting the timer, finish charging the
battery pack.
• When using the unit with the optional AC-V55 AC power adaptor, timer recording
can be made after charging has been completed (see fig. 1). However, if the
charging time overlaps the time set for timer recording, the timer recording will
not start (see fig. 2). Set the timer so that charging will finish before the timer
recording ON TIME.
Fig.1
Charging
time
ON
TIME
Timer
-recording starts
here.
Fig. 2
Charging
time
ON
TIME
Timer recording
does not start.
42
Page 43

Connecting an Outdoor Antenna
If you cannot obtain satisfactory reception with an indoor antenna, or when
recording TV programs, use an outdoor antenna.
Using the Supplied Signal Splitter
UHF antenna
(Channel 14-69)
To EXT ANT
1 y
VHF antenna
(Channel 2-13)
ŒD
t-Tfn) lAfl-j (g)
Note to CATV system installer:
This reminder is provided to call the CATV system installer’s attention to Article
820-22 of the NEC that provides guidelines for proper grounding and, in partiular,
specifies that the cable ground shall be connected to the grounding system of the
building, as close to the point of cable entry as practical.
43
Page 44

Connecting an Outdoor Antenna
Other Connections
UHF antenna
(Channel 14-69)
To connect only to
the GV-9
EAC-40
(optional)
CCD-6M
(optional)
Mini
iplug ^
Mixer
CCD-6M
(optional)
Miniplug y
O O 0 o o o
1
i °
--------
------------------1 III li II 111 f
VHF antenna
(Channel 2-13)
To connect to the GV-9 and |
another TV I
EAC-45
(optional)
/ To antenna
CCD-2 terminal
(optional) ^ “
CSD
Notes
• Before connecting the antennas, turn off the unit.
• Make connections firmly. A loose connecfion may cause a distorted picture.
• When using the unit in a car, use the optional VCA-3W or VCA-4E car antenna,
etc. For details, refer to the instruction manual of the car antenna.
44
Page 45

Usi ng a s a M oni t or o f th e 8m m Vi de o C am er a Re co rd er
With the following connection, you can view pictures being recorded by the
connected video camera recorder. Also you can view the playback pictures from
the video camera recorder on this unit.
*The optional VMC-710M/720M connecting cord can be used in place of the
supplied cord.
45
Page 46

Recording Pictures with a Video Camera
Notes
If you record while monitoring the pictures and sound being recorded, lower the
volume or connect the headphones. Otherwise, the sound from the speakers will
be re-recorded by the microphone of the video camera which will cause “howling”
When connecting the CCD-G1, the display disappears during fast fonward and
rewinding. The display appears again when fast forward and rewinding is
completed or stopped.
When you record pictures with CCD-G1 using EBP-55, it is recommended to mute
the picture by pressing LCD ON/OFF. Please note that the battery life of EBP-55
46
is short.
Page 47

To Connect Another TV or Color Monitor
47
Page 48

To Connect Another TV or Color Monitor
To Connect a TV with Only the Antenna Terminals
Use the optional RFU-89UCKA RFU kit.
GV-9
To view video
pictures:
set to VTR
To view the
TV programs;
set ANT
b=i: Signal flow
Press LCD ON/OFF on the GV-9 so that the picture is muted.
About the optional RFU-89UCKA RFU kit
The RFU-89UCKA includes the following accessories.
— RFU adaptor (1)
— Antenna selector (1)
— Antenna selector adaptor (1)
Channel for VTR
To view the playback picture of this unit, set the antenna selector of the RFU kit to
3 or 4 channel whichever channel is not active in your area and select the same
channel on the connected TV.
a in RFU adaptor
______
Antenna
selector
supplied
to the
RFU-89UCKA.
VHF antenna
VvA
UHF antenna
To view the
video picture,
select the
channel for the
VTR.
To connect the RFU adaptor
to AUDIO OUT if
to VIDEO OUT
48
RF OUT connector
---------------------------
f/ If the VHF input terminal of your TV
/ is a 300-ohm twin-lead plug, use the
^ antenna selector adaptor supplied
aniQjQl^^^ to your TV/monitor
with the RFU kit.
Page 49

Tape Editing
Tapes can be edited when another VCR (8 mm, R3 or Ivijs! format) equipped with
video/audio inputs is connected.
To Edit from Another VCR to This Unit
VCR
*lf another VCR has stereo outputs, use the optional VMC-910MS/920MS
connecting cord.
To Edit from This Unit to Another VCR
input
*lf another VCR has stereo inputs, use the VMC-910MS/920MS connecting cord.i.
49
Page 50

Connecting to the Existing System
TV with video/audio inputs
SB-V1 edit selector
(optional)
By switching the selectors on the SB-V1, you can view the playback picture of
the GV-9 with another TV or view the playback picture of another VCR with the
GV-9, etc. Also, tapes can be easily edited between the GV-9 and the connected
VCR.
For details, refer to the instruction manual of the SB-V1.
50
Page 51

Precautions
Operation
Operate the unit on 6-8.5V DC.
For DC or AC opration, use the accessories recommended in this manual.
Should any solid object or liquid fall into the cabinet, unplug the unit and have it
checked by qualified personnel before operating it any further.
Avoid rough handling or mechanical shock to the unit.
Do not apply excessive force to the LCD.
Remove and store video cassettes after recording or playback.
Do not wrap up the unit and operate it because heat may build up internally.
Avoid using and storing the recorder in the following locations.
— Locations susceptible to vibration.
— Locations exposed to strong magnetic fields.
— Locations near TV or radio transmitters where strong radio waves are
generated.
Do not put the unit on the sand.
Care
When the unit will not be used for a long period of time, periodically turn on the
power, operate the recorder and play back a tape for about three minutes.
Clean the recorder body with a dry, soft cloth, or a soft cloth lightly moistened
with a mild detergent solution. Do not use any type of solvent which may damage
the finish.
51
Page 52

Notes on Moisture Condensation
If the unit is brought directly from a cold to a warm location, moisture may
condense inside the unit. In this condition, the tape may adhere to the head
drum and be damaged or the unit may not operate correctly. To prevent possible
damage under these circumstances, the unit is furnished with moisture sensors.
It moisture is present inside the unit, the DEW
\ I /
- DEW —
/ I ^
Eject the cassette and turn oft the unit and leave it with the cassette holder
open at least for one hour.
The unit can be used again if the DEW indication does not appear when a tape
transport button is pressed.
indication flashes on the screen when you press
a tape transport button.
Only the EJECT button functions at this time.
(Watching TV is possible.)
52
Page 53

Using Your Recorder Abroad
If you prepare fully charged battery packs and the supplied AC power adaptor
(which can be used in all areas with the local power supply of 100V-240V,) you can
use your recorder in any country.
Each country has special TV color broadcast and electricity systems.
This unit is designed to record and play back using the NTSC color video signals.
Recording and playback of video sources based on other color systems cannot be
guaranteed.
NTSC system countries
Bahama Islands, Canada, Central America, Japan, Korea, Mexico, Taiwan, the
Phillipines, U.S.A., etc.
53
Page 54

Specifications
System 1
Video recording system
Audio recording system
Video signal
Usable cassettes
Tape speed
Recording time
Playback time
Fast forward/rewinding time
LCD section
Picture
On-screen display
Rotary two-head helical scanning FM system
Rotary head, FM system
EIA standard, NTSC color
8 mm video format cassettes
SP: approx. 1.43 cm/sec.
LP: approx. 0.72 cm/sec.
SP mode: 2 hours
LP mode: 4 hours (with Sony P6-120 cassette)
SP mode: 2 hours
LP mode: 4 hours (with Sony P6-120 cassette)
Approx. 6 minutes (with Sony P6-120 cassette)
4 inches measured diagonally
8.19 X 6.18 cm (3'/4 X 2V2 inches)
TN LCD/TFT active matrix method
Total picture-element number: 112,086
Effective picture-element ratio: more than 99.9%
1 Tuner section
Channel coverage
Antenna input
Inputs/outputs
Video input
Video output
Audio input
Audio output
Speakers
Timer section
Clock
Time indication
Timer setting
54
1
VHF: 2-13 channels
UHF: 14-69 channels
75-ohm minijack for VHF/UFIF
Phono jack, 1 Vp-p, 75 ohms, unbalanced, sync
negative
Phono jack, 1 Vp-p, 75 ohms, unbalanced, sync
negative
Phono jack, -10 dBs (0 dBs = 0.775 Vrms), input
impedance more than 47 kilohms
Phono jack, -10 dBs (250 mV) at load impedance 47
kilohms, output impedance less than 10 kilohms
8 ohms, 250 mW
Crystal lock
12-hour cycle
Only for recording, 1 event/24 hours
Page 55

General
Power requirements
Power consumption 6.9W (for continuous playback)
Operating temperature 0°C to 40°C (32° F to 104°F)
Storage temperature
Dimensions
Weight Approx. 1.35 kg (2 lb 14 oz) not incl. battery pack
Accessories supplied Fleadphones (1)
1 AC-V30
Power consumption
Power requirements
Output voltage
Operating temperature 0°C to 40°C (32°F to 104°F)
Storage temperature -20°C to +60°C (-4°F to +140°F)
Dimensions Approx. 67x39x138 mm (w/h/d)
Weight
Design and specifications subject to change without notice.
6'x,g V
-20°C to +60°C (-4°F to 140°F)
137.5x67x234 mm (w/h/d)
(5V2 X 23/4 X 9V4 inches)
Signal splitter (1)
Carrying case (1)
Battery pack NP-77 (1)
AC power adaptor AC-V30 (1)
Connecting cord (1)
Lithium battery (1)
20 W
100-240 V AC, 50/60 Hz
DC OUT: 7.5 V, 1.6 A in operating mode
Battery charge terminal; 10 V, 1.3 A in charge mode
(23/4 X l3/8 X 5V2 inches)
including projecting parts and controls
Approx. 310 g (11 oz)
f
55
Page 56

List of Recommended Accessories
Battery pack
Battery adaptor
Battery charger
AC power adaptor
DC pack
Battery case
Car battery cord
Color video camera CCD-G1
Antenna connector
Signal splitter
Antenna cord
Car antenna
Edit selector
Connecting cord
NP-77
NP-55
NP-22 or NP-22H
N PA-22
BC-55
AC-V30
AC-V55
DCP-55
EBP-55
DCC-16AW
EAC-40
EAC-45
CCD-6M 0
CCD-2
VCA-3W 0
VCA-4E
SB-V1 @
VMC-910MS/920MS (1m/2m)
VMC-710M/720M (1m/2m) 0
VMC-810S/820S (1m/2m) 0
Page
0
0
0
0
0
0
0
0
0
0
0
o
0
0
0
0-0
Video V\/alkman hood
Car connecting pack
(connect to the AUDIO
OUT terminal so that
you can listen to the
sound with the oar
stereo)
56
VCV-GV9 j
CPA-2
Page 57

Troubleshooting
If you think you have a problem, double-check before calling the serviceman.
You may have overiooked something reiatively simple!
Symptom
The unit is not operable even if
the POWER switch is turned on.
0)
1
Power turns off automatically
a.
during operation.
The battery pack is quickiy
discharged.
The ciock blinks showing “PM
o
12:00”.
o
O
The playback picture is not
ciear.
o
<0
During recording, the picture is
n
>»
not clear.
(0
Q.
Recording cannot be made. • The safety tab on the cassette is siid
■D
C
(0
O)
c
The tape does not run even if
"e
o
the tape transport button is
o
0)
pressed.
oc
The camera recording cannot be
made.
The cassette cannot be ejected.
Possible causes and corrections
• No battery pack is attached.
• The battery pack is exhausted.
-► Charge it. (page 12)
• AC power adaptor or car battery cord
is disconnected.
• The battery pack is exhausted.
• The SLEEP timer has been set.
• The ambient temperature is too low.
• The battery pack has not been
charged fully.
If the lithium battery has been changed,
reset the ciock (page 18), and if
necessary, reset the timer recording.
• The video heads may be
contaminated, Ciean the heads using
the Sony V8-25CL cieaning cassette
(optional). For details on cleaning,
refer to the instructions furnished
with the cleaning cassette.
• The video heads may be damaged.
TV signal is too weak. Adjust the indoor
antenna or connect an external antenna.
out.
• Moisture condensation has occured.
• Timer setting has been made.
Press the TIMER REC CN/CFF button
and turn on the unit again.
• Moisture condensation has occured.
The camera is not connected correctly,
(page 46)
• No power is supplied to the unit.
• The battery pack is exhausted.
Use the charged battery, (page 12)
57
Page 58

Symptom
Picture is muted. LCD ON/OFF button has been pressed.
Both picture and sound are
muted.
Picture appears but no sound
No color Adjust COLOR, (page 24)
Snow and noise appear. Check the external antenna.
Possible causes and corrections
Press it again.
The unit is in the timer recording mode.
Press LCD ON/OFF.
• Adjust the VOLUME control.
• Disconnect the headphones.
Dotted lines or stripes This is often caused by local
Double Images or ghosts
Interference, (e.g. cars, neon signs, hair
dryers, etc)
Adjust antenna for minimum
interference.
Reflections from nearby mountains or
buildings often cause this problem.
A highly directional antenna may
Improve the picture.
^Ui'
The timer setting display does
not appear.
A timer recording has not been
U)
made.
c
E
o
o
2
0)
E
(-
Set the clock (page 18).
• The safety tab on the cassette was
slid out. (page 29)
• The tape was not long enough.
• The TIMER REC ON/OFF button has
not been pressed.
• The clock was not set correctly.
• The battery pack was exhausted.
• There has been a power interruption
(for AC operation).
• Moisture condensation has occured.
(page 52)
58
Page 59

Quick Referenc on Timer Setting
To stop the timer recording
Press TIMER REC ON/OFF again.
To check the setting
Press TIMER SET/CHECK while the TIMER REC lamp is lit. The power is turned on
and the turn-on and the turn-off times will be displayed.
If you have made a mistake in timer setting
Press TIMER REC ON/OFF to cancel the timer recording, then turn the unit on and
set the timer again.
I
To monitor the sound and picture being recorded
Press LCD ON/OFF.
59
Page 60

Quick Reference on Timer Setting
Refer to page 38 of this manual for details.
Sony Corporation Printed in Japan
o
CTJ
O
 Loading...