

Page 1
AIBO Energy Station Core
Operation Instructions
ERA-301P2
4-657-257-11(1)
English
English
Français
Français
Deutsch
Deutsch
© 2001 Sony Corporation
Page 2

For Customers in the U.S.A. and Canada
Safety Information
Owner’s Record
The model number and serial number are located on the bottom of the station
core. Record the serial number in the space provided below. Refer to the model
and serial number whenever you call upon your Sony AIBO Customer Link.
Model No. ERA-301P2
Serial No. ___________
For the Sony AIBO Customer Link, call 1-800-427-2988 in the U.S. or contact
via email at aibosupprt@info.sel.sony.com
Warning
• To prevent fire or shock hazard, do not expose the unit to rain or moisture.
• To avoid electrical shock, do not open the enclosure. Refer servicing to
qualified personnel only. (Contact the AIBO Customer Link on page 6.)
• Periodically examine the AC adapter for conditions that may result in the
risk of fire, electrical shock, or injury to persons (such as damage to the
cords, blades, housing) and in the event of such conditions, the AC adapter
should not be used until properly repaired or replaced.
• Not intended for children under 8.
• ERA-301P2 Energy Station Core is only for use with the AIBO ERS-3××
Series System and should be powered only by the ERA-201P1 AC Adapter
to charge the ERS-3×× Series Aibo Robot. (Refer to the operating
instructions supplied with the AC Adapter.)
• Vérifiez périodiquement si l’adaptateur secteur ne présente pas des
conditions susceptibles de provoquer un incendie, des décharges électriques
ou des blessures aux personnes (comme des dommages aux câbles, aux
lames ou au boîtier) et, en présence de telles conditions, l’adaptateur secteur
ne peut plus être utilisé avant sa réparation ou son remplacement.
• Cet appareil n’est pas destiné aux enfants de moins de 8 ans.
2
Page 3

• La station d’alimentation centrale ERA-301P2 ne peut être utilisée qu’avec
le système AIBO en série ERS-3×× et doit être alimentée uniquement par
l’adaptateur secteur ERA-201P1 afin de recharger le robot AIBO de série
ERS-3××. (Consultez les instructions de fonctionnement fournies avec
l’adaptateur secteur.)
Regulatory Information
This equipment has been tested and found to comply with the limits for a Class
B digital device, pursuant to Part 15 of the FCC Rules. These limits are
designed to provide reasonable protection against harmful interference in a
residential installation. This equipment generates, uses, and can radiate radio
frequency energy and, if not installed and used in accordance with the
instructions, may cause harmful interference to radio communications.
However, there is no guarantee that interference will not occur in a particular
installation. If this equipment does cause harmful interference to radio or
television reception, which can be determined by turning the equipment off
and on, the user is encouraged to try to correct the interference by one or more
of the following measures:
• Reorient or relocate the receiving antenna.
• Increase the separation between the equipment and receiver.
• Connect the equipment into an outlet on a circuit different from that to
which the receiver is connected.
• Consult the dealer or an experienced radio/TV technician for help.
You are cautioned that any changes or modifications not expressly approved in
this manual could void your authority to operate this equipment.
The shielded interface cable recommended in this manual must be used with
this equipment in order to comply with the limits for a digital device pursuant
to Subpart B of Part 15 of FCC Rules.
En
3
Page 4

For Customers in Europe and
Australia
Safety Information
WARNING
• To prevent fire or shock hazard, do not expose the unit to rain or moisture.
• To avoid electrical shock, do not open the enclosure. Refer servicing to
qualified personnel only. (Contact the AIBO Customer Link on page 6.)
• Periodically examine the AC adapter for conditions that may result in the
risk of fire, electric shock, or injury to persons (such as damage to the cords,
blades, housing) and in the event of such conditions, the AC adapter should
not be used until properly repaired or replaced.
• Not intended for children under 8 when this unit is used with AIBO.
• Caution! Only allow children at least 8 years old to use the Energy Station
Core.
Explain that the Energy Station Core is not a toy and must not be played
with. Give sufficient instruction so that the child is able to use the Energy
Station Core in a safe way.
• See also your AIBO’s Operating Instructions.
4
Page 5

Regulatory Information
This product has been tested and found to conform to the following Safety
Standards.
EMC Directive 89/336/EEC
EMI EN55022/98, EN55014/93 + A1/97+A2/99, EN50081-1/92
EMS : EN55024/98, EN55014-2/97, EN50082-1/97
The Energy Station Core has been tested all together as a system and found to
conform to the following Safety Standards.
EN60335-1/94 + A11/95 + A12/98 + A14/98
EN60335-2-29/96
CE (EMC) Marking Conformity Remarks
a)
This equipment complies with EN55022 Class B digital for use in the following areas :
residential, business, and light-industrial.
b) This product conforms with the following European Directive: 89/336/EEC (EMC
directive)
5
Page 6
Customer Support
How can you contact the AIBO Customer Link?
In the United States and Canada:
1-800-427-2988 (U.S.A.)
Email address: aibosupport@info.sel.sony.com
In Europe:
English line: +44(0)-20-7365-2937
German line: +49(0)-69-9508-6309
French line: +33(0)-1-5569-5117
Email address: aibo@sonystyle-europe.com
In Australia:
+1300-36-2426 (toll free within Australia)
Email address: cicci@ap.sony.com
In Hong Kong:
+852-2345-2966
Email address: aibo_helpdesk@shk.sony.com.hk
In Singapore:
+65-473-8500
Email address: AIBO.Link@ap.sony.com
©2001 Sony Corporation. Reproduction in whole or in part without written
permission is prohibited. All rights reserved.
6
Page 7

“OPEN-R” is the standard interface for the entertainment robot
system that Sony is actively promoting. This interface expands
the capability of the entertainment robot through a flexible
combination of hardware and interchangeable software to suit
various applications. AIBO ERS-3×× Series and Energy Station
Core ERA-301P2 conform to the OPEN-R version 1.1.1.
• “AIBO” and the AIBO logo, “OPEN-R,” and the OPEN-R logo are
registered trademarks of Sony Corporation.
• “Memory Stick,” “
Corporation.
• All other systems and product names are trademarks of their respective
holders. In this manual, “” and “” are omitted.
http://www.aibo.com/
,” and “ ” are trademarks of Sony
7
Page 8
8910
Page 9
Page 10
Page 11

Table of Contents
Features of the Energy Station Core .............................................. 12
Index to parts and controls .............................................................13
Attaching the Energy Station Core to the Stand ............................ 15
Charging AIBO’s internal battery pack .......................................... 17
Checking AIBO’s settings ..............................................................21
Making various settings ................................................................. 23
Setting the date and time ......................................................... 24
Setting the time zone ............................................................... 26
Setting the volume level .......................................................... 27
On handling the Energy Station Core ............................................ 28
On cleaning .............................................................................. 28
Limited warranty ............................................................................ 29
Service procedure ........................................................................... 32
Troubleshooting ............................................................................. 33
Specifications .................................................................................35
Time zone table ..............................................................................36
11
Page 12
Features of the Energy Station Core
The Energy Station Core ERA-301P2 (referred to as the “station core”
hereafter) is an AIBO ERS-3×× series-dedicated charging station core. The
station core is used attached to the stand supplied with AIBO. (The set thus
constituted by the station core and the stand is referred to as the “station”
hereafter.)
The station provides the following functions:
• Charges AIBO’s internal battery pack whenever you place AIBO on the
station.
• Provides a display panel that allows you to make various AIBO settings
without removing AIBO’s extremities.
• Provides a backlight for the display panel that allows the battery charging
level or the current time to be viewed under dark conditions.
• ERA-301P2 Energy Station Core is only for use with the AIBO ERS-3××
Series System and should be powered only by the ERA-201P1 AC Adapter
to charge the ERS-3×× Series Aibo Robot. (Refer to the operating
instructions supplied with the AC Adapter.)
Station core
Station
Stand
12
Page 13
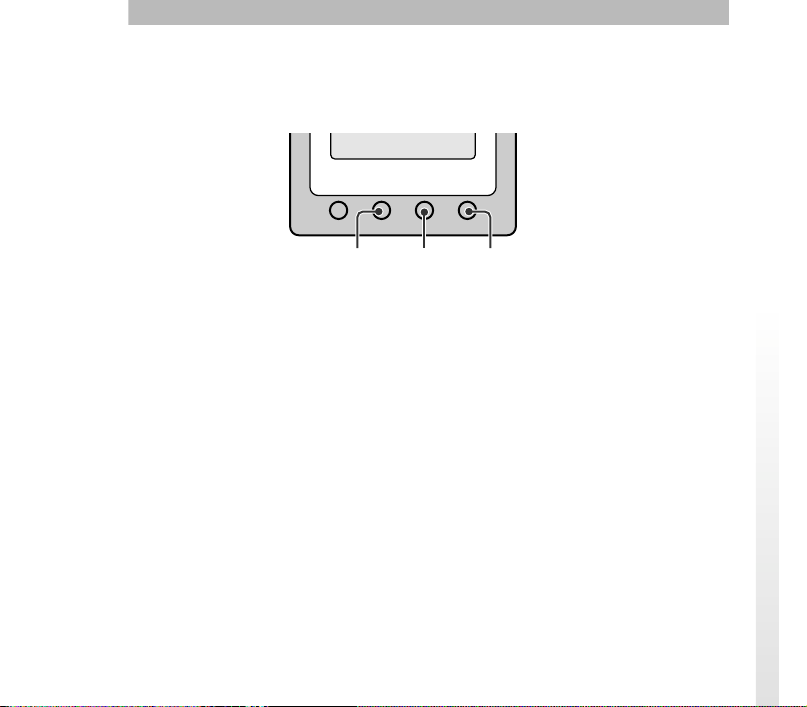
Index to parts and controls
Top/rear
Display panel
13
Page 14

1 Charging terminals
Charge AIBO’s internal battery pack
whenever AIBO is placed on the
station. Makes contact with terminals
on AIBO’s stomach.
2 SET/CANCEL button
Press to put the station core into
setting mode to make or cancel a
setting. Press again to return to
normal mode.
3 MODE/NEXT button
Press to change the indication in the
display panel. In setting mode,
pressing this button changes the
setting item.
5 LIGHT/+ (plus) button
In normal mode, press to turn on the
backlight.
In setting mode, each press of the
button increases the value to a next
greater one. Holding down the button
increases the value continuously.
6 AC Adapter terminal (on the
rear of the station core)
Connect the AC adapter supplied
with the AIBO or an optional AC
adapter to this terminal.
7 Placement detection switch
Detects when AIBO is placed on the
station.
4 DISPLAY/– (minus) button
When the date or time indication is
displayed, pressing this button
changes the display format.
In setting mode, each press of the
button decreases the value to a next
smaller one. Holding down the
button decreases the value
continuously.
14
8 Fixing screw (supplied)
Used to fix the station core to the
stand (supplied with the AIBO).
9 Date / time / time zone / volume
level indication
q; Battery indicator
Indicates the charging level of
AIBO’s internal battery pack.
Page 15
Attaching the Energy Station Core to the Stand
You can attach the station core to the stand supplied with AIBO as follows.
For ERS-3×× Series
1
Remove the decoration plate from the stand.
Decoration plate
Note
To place the decoration plate back into the stand, match the projections on the plate
with the grooves and push the plate into the stand.
15
Page 16
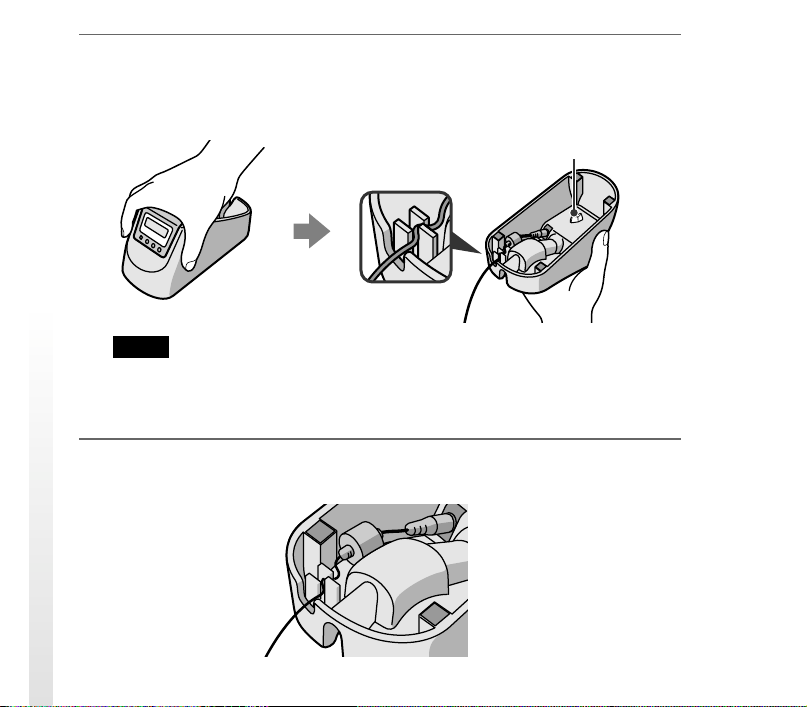
2
Place the station core on the stand. Firmly grasp the set of station
core and stand as illustrated, and turn it upside down. Fasten
together the station core and the stand with the fixing screw.
Fixing screw
Notes
• The surfaces of the station core and stand are very smooth. Be careful not to
drop them while handling.
• Do not tighten the fixing screw to an excessive degree.
3
Connect the AC adapter (supplied with AIBO) to the station core,
and pass the cord as illustrated.
16
Page 17

Charging AIBO’s internal battery pack
You can charge AIBO’s internal battery pack by placing AIBO on top of the
station after opening the charging terminal shutter on the cover of AIBO. It is
recommended that you recharge the battery pack at room temperature (10° C
to 30° C (50° F to 86° F)).
Note
Battery charging starts automatically when AIBO is put into a particular mode or state
on top of the station. This particular mode or state differs with the model of AIBO and
the AIBO-ware used.
1
Connect the AC adapter to a wall outlet.
17
Page 18
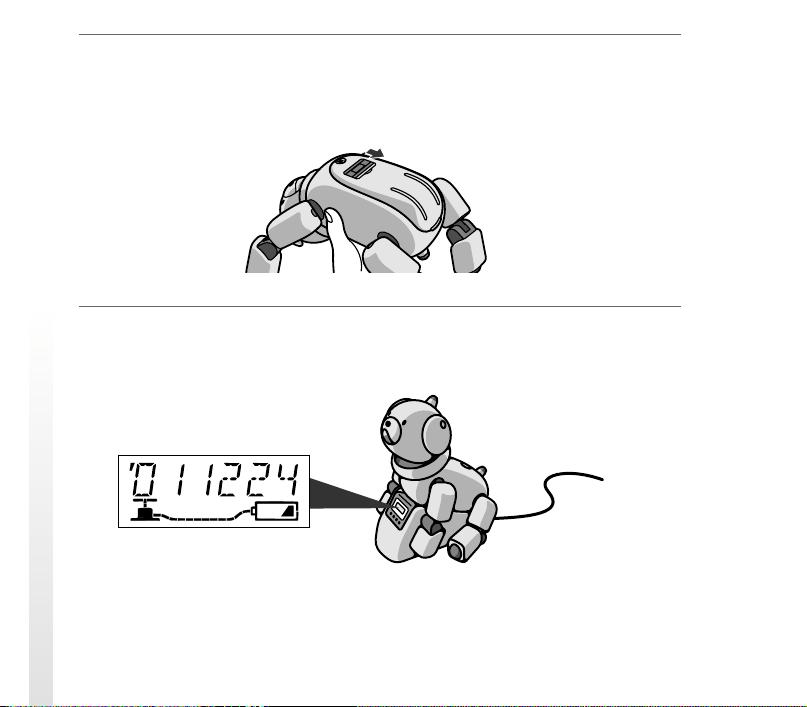
2
After putting AIBO into pause mode (by pressing the pause button
to turn off the back light) or putting it into charging posture, open
the charging terminal shutter on the cover.
3
Place AIBO on top of the station.
The time indication appears in the display panel of the station core.
18
Page 19
Notes
• You do not need to use the supplied AC adapter conversion plug.
• For details on AIBO’s charging posture, refer to the User’s Guide for the
respective AIBO-ware.
• The AIBO charging posture may not be displayed by certain AIBO-ware.
• When AIBO is not on top of the station, no information is displayed in the
display panel.
If in that state you attempt to display information, the LCD display flashes for
several seconds to indicate that AIBO is not on the station.
• If the battery pack is not set in AIBO, the battery indicator does not appear.
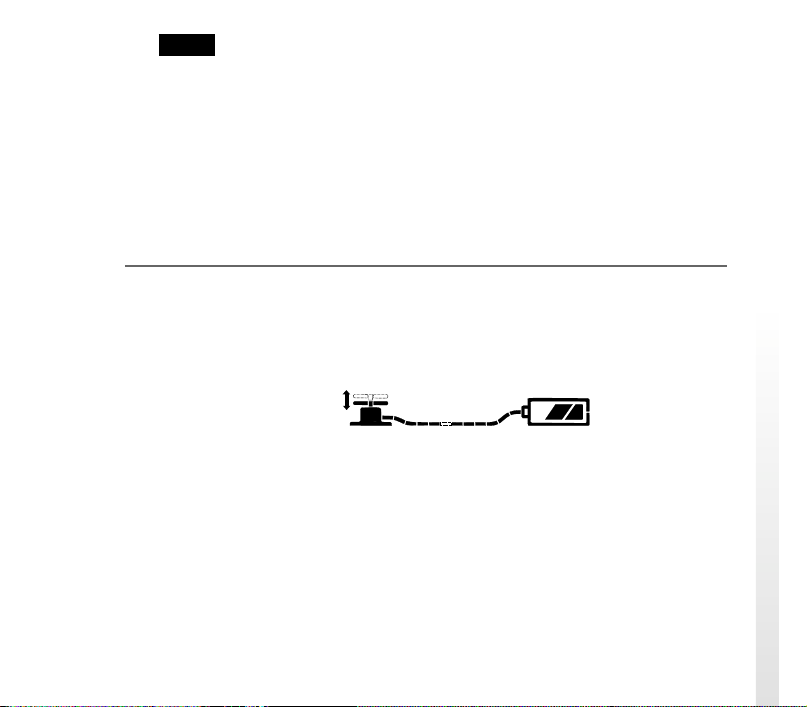
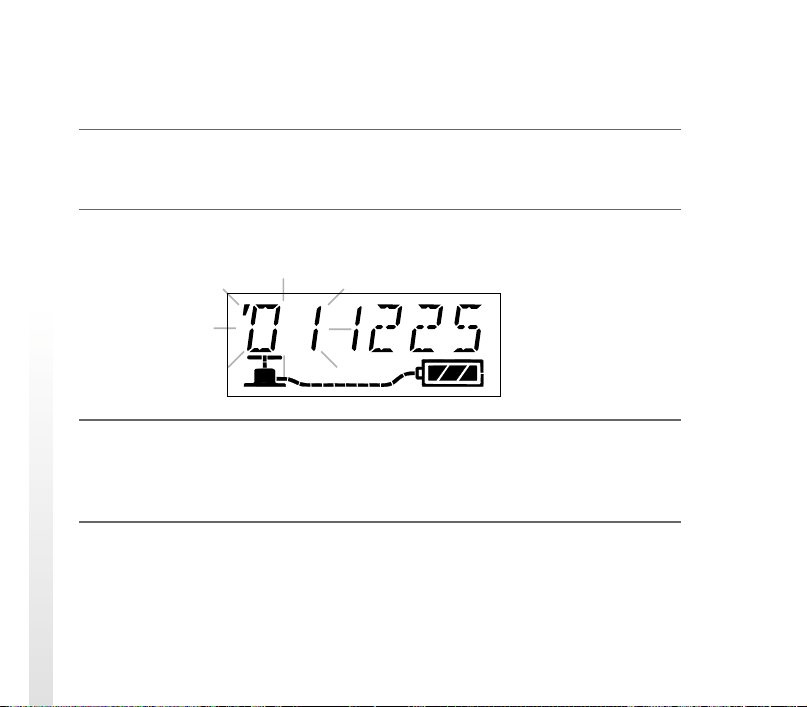
While charging is taking place
The handle of the pump indication in the display panel moves up and down.
The battery indicator indicates the charging level.
The handle moves up
and down.
Pump
Hose
Battery indicator
19
Page 20
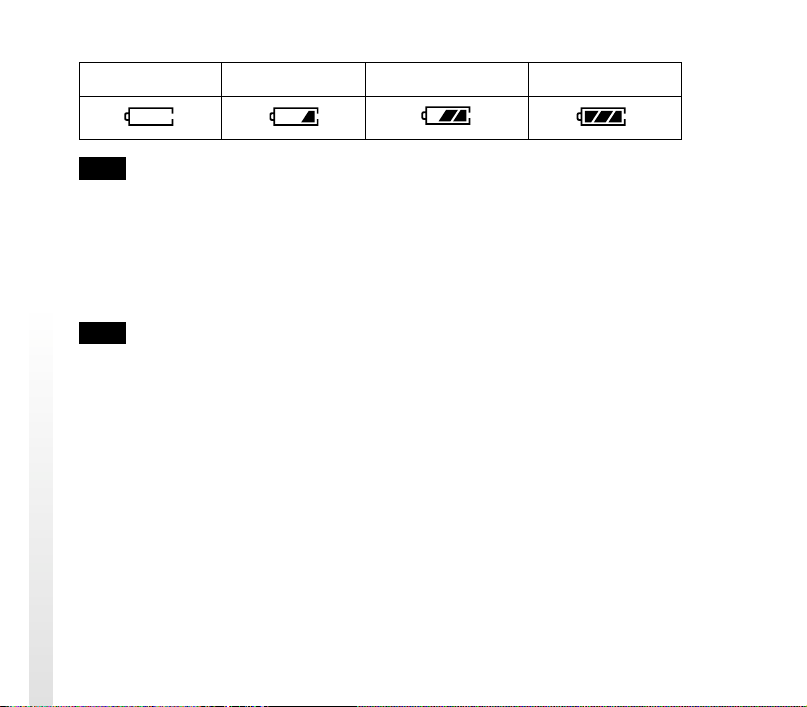
Charging level
Nearly empty Half full Almost full Full
Note
If the pump hose stays unlit, it indicates that charging is not taking place.
When AIBO’s battery is fully charged
The handle of the pump indication in the display panel stops moving, and the
whole length of the hose becomes lit.
Note
If all the charging level bars flash simultaneously, it means the battery pack is not
charging properly. If this occurs, check that the battery pack is inserted correctly. If the
flashing continues, the battery pack may be defective. Stop charging the battery pack
immediately and contact the AIBO Customer Link.
20
Page 21
Checking AIBO’s settings
While AIBO is on top of the station, use the MODE/NEXT button to check its
settings.
MODE/
NEXT
DISPLAY/–LIGHT/
+
To change the information display
Press the MODE/NEXT button. Each press of the button changes the display
as follows.
date t time t time zone t volume level
To change the date and time display formats
With the date or time indication being displayed, press the DISPLAY/– button.
Each press of the button changes the display format as follows.
• Date: “YYMMDD” (year, month, day) t “MMDDYY” t “DDMMYY”
• Time: 12-hour clock t 24-hour clock
21
Page 22

Notes
• The date and time formats return to their default settings when the station core is
disconnected from the wall outlet. Set the formats again when you connect the
station to a wall outlet again.
• The default setting for the date format is “year, month, day”. The default setting for
the time format is 12-hour clock.
To turn on the display panel backlight
Press the LIGHT/+ button. The backlight stays on for about 60 seconds when
AIBO is on the station, and for about four seconds when not.
22
Page 23

Making various settings
When AIBO is on top of the station, you can set various items, such as the
clock and volume level.
SET/
MODE/
CANCEL
Notes
• To cancel the setting operation before finished, press the SET/CANCEL button. The
display returns to the state before starting the setting operation.
• When AIBO is not on the station, you cannot change the settings. If you attempt to
change the settings, the LCD display will flash for several seconds to indicate that
AIBO is not on the station.
DISPLAY/–LIGHT/
NEXT
+
23
Page 24
Setting the date and time
Note that the following description assumes that the date display format is
“YYMMDD” (year, month, day).
1
Press the MODE/NEXT button repeatedly until the date and time
indication appears.
2
Press the SET/CANCEL button.
The year indication starts to flash.
3
Use the DISPLAY/– or LIGHT/+ buttons to set the year. Then
press the MODE/NEXT button.
The month indication starts to flash.
4
Use the DISPLAY/– or LIGHT/+ buttons to set the month. Then
press the MODE/NEXT button.
The day indication starts to flash.
24
Page 25
5
Use the DISPLAY/– or LIGHT/+ buttons to set the day. Then
press the MODE/NEXT button.
The hour indication starts to flash.
6
Use the DISPLAY/– or LIGHT/+ buttons to set the hour. Then
press the MODE/NEXT button.
The minute indication starts to flash.
7
Use the DISPLAY/– or LIGHT/+ buttons to set the minute. Then
press the MODE/NEXT button.
The setting is entered and the date and time indication resumes.
25
Page 26
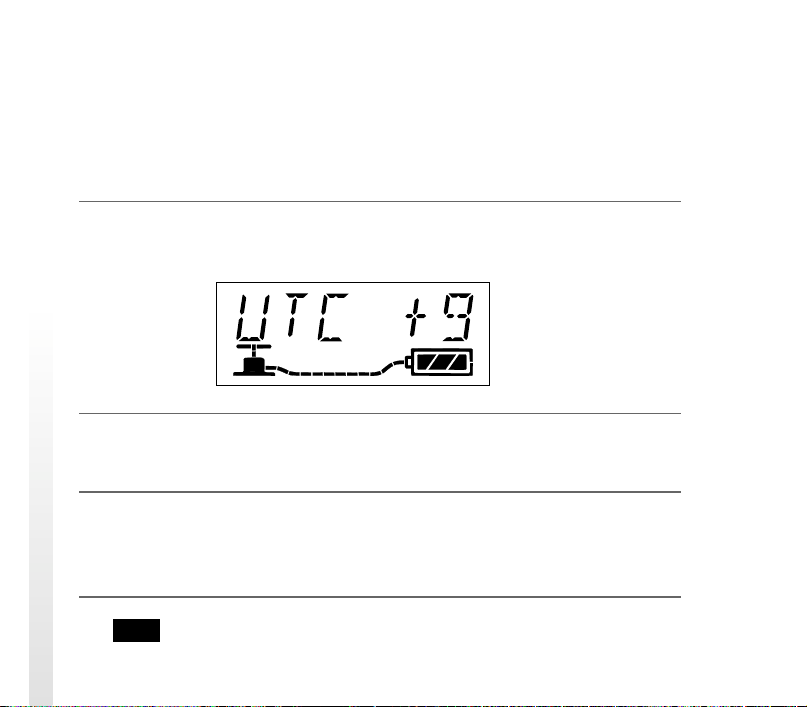
Setting the time zone
By setting the time zone, you specify the difference in hours from the time at
the current location and the UTC (Universal Time Coordinated) time. The
difference is expressed as a whole number from –12 to +12. For example, the
time zone for Japan is +9. For details on the time zones of the world, see
“Time zone table” on pages 36 and 37.
1
Press the MODE/NEXT button repeatedly until the time zone
indication appears.
2
Press the SET/CANCEL button.
The time zone indication starts to flash.
3
Use the DISPLAY/– or LIGHT/+ buttons to change the time zone.
Then press the MODE/NEXT button.
The setting is entered and the time zone indication resumes.
26
Note
The time zone function does not support daylight savings.
Page 27

Setting the volume level
1
Press the MODE/NEXT button repeatedly until the volume level
indication appears.
2
Press the SET/CANCEL button.
The current volume level setting starts to flash.
3
Use the DISPLAY/– or LIGHT/+ buttons to change the volume
level. Then press the MODE/NEXT button.
The setting is entered and the volume level indication resumes. The volume
level can be set to four levels. If you select “0,” AIBO’s musical tone is
muted.
27
Page 28

On handling the Energy Station Core
• While AIBO is on top of the station, do not place any object near it that
might interfere with its movements.
• Do not touch the charging terminal directly with your hand. Doing so may
soil the terminal and cause poor contact.
• Do not press down hard on the station core with your hand or elbow.
• Do not drop or shake the station core as this may damage it.
• Do not leave the station core in very hot places, such as a car parked in the
sun, as this may deform or damage it.
• Do not allow the station core to get wet.
• For details on the battery pack or the AC adapter supplied with AIBO, refer
to the operating instructions supplied with AIBO.
On cleaning
• Clean the station core with a dry, soft cloth.
• Do not use volatile solvents that may damage the station core’s surface
finish.
• If you are using a chemical dustcloth or the like, follow the instructions for
its usage.
28
Page 29

For the customers in the U.S.A.
Limited warranty
SONY ELECTRONICS INC. (“SONY”) warrants this Product and its accessories
against defects in material or workmanship as follows:
1. PRODUCTS: For a period of one (1) year from the date of purchase, SONY will, at
its option, either repair or replace the defective parts and/or the Product (i.e., Energy
Station) with new or rebuilt replacements. After this one (1) year period, you must pay
all parts and labor charges.
2. ACCESSORIES: For a period of thirty (30) days from the date of purchase, SONY
will, at its option, either repair or replace defective parts and/or accessories (i.e., AC
adapter and battery pack) with new or rebuilt replacements. After this thirty (30) day
period, you must pay all parts and labor charges.
3. REPAIRS: For a period equal to the longer of (a) the remainder of the original
limited warranty period on the original Product or accessory, or (b) for 90 days after the
date of repair/replacement of Products or for 30 days after the date of repair/
replacement of accessories, SONY will repair or replace defective parts, accessories
and/or Products used in the repair or replacement of Products or accessories under this
Limited Warranty with new or rebuilt replacements.
29
Page 30

To obtain warranty service, you must first obtain an event number from AIBO Customer
Link (page 6). You will need to return the Product and all accessories to SONY in the
original carton, using the original packaging materials. All supplied accessories must be
returned with the Product. SONY is not responsible for any damage during shipment
arising from the failure to properly pack the Product or accessory being returned to
SONY or for any damage caused by or resulting from the carrier’s handling. For
information on returning your Product or accessories for warranty repair, please contact
the AIBO Customer Link.
This warranty does not cover customer instruction, installation or set up adjustments.
This warranty does not cover the cost of removal or reinstallation, cosmetic damage or
damage due to acts of God, accident, misuse, abuse, negligence of, or to any part of the
Product. This warranty does not cover lost profits, lost sales, loss of use of the Product,
or other consequential loss or damage due to improper operation or maintenance,
installation, connection to improper voltage supply, or attempted repair by anyone other
than a facility authorized by SONY to service the Product. This warranty does not
cover Products sold AS IS or WITH ALL FAULTS, or consumables (such as fuses).
This warranty does not apply when the malfunction results from use of the Product in
conjunction with accessories, products or ancillary or peripheral equipment not
manufactured by SONY, and where it is determined by SONY that there is no fault with
the Product itself.
SONY will pay shipping charges for all in-warranty service. However, if no trouble is
found with the Product or accessory, if the trouble is from a non-covered charge or if it
is determined that the warranty period has expired, you will be billed for the cost of
shipping and handling.
This warranty is valid only in the United States.
Proof of purchase in the form of a bill of sale or receipted invoice which is evidence that
the unit is within the Limited Warranty period must be presented to obtain warranty
service.
30
Page 31

This warranty is invalid if the factory applied serial number has been altered or removed
from the Product.
REPAIR OR REPLACEMENT AS PROVIDED UNDER THIS WARRANTY IS THE
EXCLUSIVE REMEDY OF THE CONSUMER. SONY SHALL NOT BE LIABLE
FOR ANY INCIDENTAL OR CONSEQUENTIAL DAMAGES FOR BREACH OF
ANY EXPRESSED OR IMPLIED WARRANTY ON THIS PRODUCT. EXCEPT TO
THE EXTENT PROHIBITED BY APPLICABLE LAW, ANY IMPLIED WARRANTY
OF MERCHANTABILITY OR FITNESS FOR A PARTICULAR PURPOSE ON THIS
PRODUCT IS LIMITED IN DURATION TO THE DURATION OF THIS LIMITED
WARRANTY.
Some states do not allow the exclusion or limitation of incidental or consequential
damages, or allow limitations on how long an implied warranty lasts, so the above
limitations or exclusions may not apply to you. This warranty gives you specific legal
rights, and you may have other rights which vary from state to state.
For your convenience, SONY ELECTRONICS INC. has established telephone numbers
for product information regarding the Entertainment Robot. Please call:
AIBO CUSTOMER LINK
1-800-427-2988
or write to: aibosupport@info.sel.sony.com
Other information about AIBO is also available on the internet site at:
www.aibo.com/
31
Page 32

For customers in the U.S.A.
Service procedure
1. Contact the AIBO Customer Link. The E-mail address is
aibosupport@info.sel.sony.com and its toll free number is 1-800-427-2988.
2. If the AIBO Customer Link determines that your unit needs repair, follow the
procedure described below.
a. The AIBO Customer Link will give you the event number, which is valid for ten
days.
b. Following the procedure described on the label attached to the box, put AIBO or
the designated accessories into the original box. If you did not keep the original
box, the AIBO Customer Link will send a new box to you free of charge within the
warranty period. Shipping and material cost will be charged to you if the warranty
period has expired.
c. Mark your event number on the top of the box and send it to the designated
address. The AIBO Customer Link will designate the shipping method and pay the
shipping charges within the warranty period; after the warranty period, you must
pre-pay the shipping charges.
d. As soon as the repair is completed, your AIBO or the accessories will be sent back
to you. After the warranty period has expired, the actual shipping cost will be
charged to you together with the repair cost.
3. Please understand that the AIBO Customer Link only accepts credit cards for all the
charges of repair, shipping and material after the warranty period has expired.
User registration
All users are registered based on information from the purchaser.
If a different person takes over this unit, please inform the “AIBO Customer Link”
of the change.
32
Page 33

Troubleshooting
If you experience any of the following difficulties, use this troubleshooting
guide to remedy the problem. Should the problem persist, contact the AIBO
Customer Link (page 6).
Symptom Cause/Remedy
The AIBO icon in the
display panel flashes
when you press a button
on the station core.
AIBO is not placed on the station correctly.
c Place AIBO on the station correctly (page 17).
The display panel does
not light up even when
AIBO is on the station.
All of the charging level
bars of AIBO icon flash
simultaneously.
All of the charging level
bars of the Battery
indicator flash
simultaneously.
The connection between the station core, AC
adapter, and the wall outlet is not correct.
c Reconnect these items properly (page 15).
The battery pack is not inserted into AIBO.
c Insert the battery pack and place AIBO on the
station (page 17).
The battery pack has not been charged properly.
c Make sure that the battery pack is correctly
set in AIBO’s body. If the symptom persists,
contact the AIBO Customer Link immediately.
33
Page 34

Symptom Cause/Remedy
Charging does not start
even when AIBO is
placed on the station.
• Heat may have built up in the battery pack.
c Wait for a while until the battery pack
becomes cool.
• Battery charging starts automatically when
AIBO is put into a particular mode or state on
top of the station. This particular mode or
state differs with the model of AIBO and the
AIBO-ware used.
c For details, refer to the User’s Guide for the
AIBO-ware used.
34
Page 35

Specifications
Power requirements
16 V DC
Power consumption
30 W
Output voltage
1.5 A at 16 V DC (for
charging AIBO’s internal
battery pack)
Charging time
Approx.2 hours* (for
charging AIBO’s internal
battery pack) (page 15)
Display LCD with back-lighting
Size: Approx. 15 × 40 mm
(19/32 × 1 5/8 in.)
Dimensions Approx. 65 × 45 × 75 mm
(2 5/8 × 1 13/16 × 3 in.) (w/h/d)
Mass Approx. 90 g (3 oz)
Operating temperature
5 to 35°C (41 to 95°F)
Operating humidity
20 to 80%
Storage temperature
–20 to 60°C (–4 to 140°F)
Storage humidity
10 to 90%
Supplied accessories
Operating Instructions
Fixing screw
* The charging time may depend on
AIBO’s conditions, ambient
temperature, and so on.
Design and specifications are subject
to change without notice.
35
Page 36

Time zone table
Use this table to enter the
appropriate time zone.
36
Page 37

37
Page 38

Pour les clients en Europe et
en Australie
Informations de sécurité
AVERTISSEMENT
• Pour prévenir tout risque d’incendie ou d’électrocution, ne pas exposer cet
appareil à la pluie ou à l’humidité.
• Pour prévenir tout risque de décharge électrique, ne pas ouvrir le boîtier.
Confier l’entretien de cet appareil exclusivement au personnel qualifié.
(Contactez le service consommateur AIBO - voir page 4)
• Vérifier périodiquement si l’adaptateur secteur ne présente pas des
conditions susceptibles de provoquer un incendie, des décharges électriques
ou des blessures aux personnes (comme des dommages aux câbles, aux
lames ou au boîtier) et, en présence de telles conditions, l’adaptateur secteur
ne doit plus être utilisé avant sa réparation ou son remplacement.
• Cet appareil n’est pas destiné aux enfants de moins de 8 ans lorsqu’il est
utilisé avec AIBO.
• Attention ! Seuls les enfants âgés de 8 ans sont autorisés à utiliser la station
d’alimentation centrale. Expliquez à l’enfant que la station d’alimentation
centrale n’est pas un jouet et qu’on ne doit donc pas jouer avec. Donnez-lui
suffisamment d’instructions pour qu’il puisse utiliser la station
d’alimentation centrale en toute sécurité.
• Reportez-vous également au mode d’emploi de votre AIBO.
2
Page 39

Informations sur les réglementations
Ce produit a été testé et jugé conforme aux normes de sécurité suivantes.
Directive EMC 89/336/EEC
EMI EN55022/98, EN55014/93 + A1/97 + A2/99, EN50081-1/92
EMS : EN55024/98, EN55014-2/97, EN50082-1/97
La station d’alimentation centrale a été testée en tant que système et s’est
révélée conforme aux normes de sécurité suivantes :
EN60335-1/94 + A11/95 + A12/98 + A14/98
EN60335-2-29/96
Remarques concernant la conformité du marquage CE (EMC)
a) Cet appareil est conforme à EN55022 Classe B numérique pour une utilisation dans
les zones suivantes : résidentielle, commerciale et industriel légère.
b) Ce produit est conforme à la Directive européenne suivante :
89/336/EEC (Directive EMC)
Fr
3
Page 40

Assistance clientèle
Comment contacter le service consommateur AIBO ?
Aux États-Unis et au Canada:
1-800-427-2988 (U.S.A.)
Courrier électronique : aibosupport@info.sel.sony.com
En Europe :
Contact en France : +33(0)-1-5569-5117
Contact en Grande-Bretagne : +44(0)-20-7365-2937
Contact en Allemagne: +49(0)-69-9508-6309
Courrier électronique : aibo@sonystyle-europe.com
En Australie :
+1300-36-2426 (appel gratuit en Australie)
Courrier électronique: cicci@ap.sony.com
À Hongkong :
+852-2345-2966
Courrier électronique : aibo_helpdesk@shk.sony.com.hk
À Singapour:
+65-473-8500
Courrier électronique : AIBO.Link@ap.sony.com
©2001 Sony Corporation. Toute reproduction totale ou partielle sans
autorisation écrite préalable est interdite. Tous droits réservés.
4
Page 41

“OPEN-R” est l’interface standard du robot de compagnie pour
lequel Sony mène une campagne de promotion active. Cette
interface étend les capacités du robot de compagnie grâce à une
combinaison tuyan de matériel et de logiciels interchangeables
adaptés à différentes applications. L’AIBO de série ERS-3×× et
la station d’alimentation centrale ERA-301P2 sont conformes à
la version 1.1.1 OPEN-R.
• “AIBO”, le logo AIBO, “OPEN-R” et le logo OPEN-R sont des marques
déposées de Sony Corporation.
• “Memory Stick”,“
Corporation.
• Tous les autres systèmes et noms de produits sont des marques
commerciales de leurs propriétaires respectifs. “” et “” ne sont pas
utilisés dans le présent manuel.
http://www.aibo.com/
,” et “ ” sont des marques de Sony
5
Page 42

Table des matières
Caractéristiques de la station d’alimentation centrale ...................... 8
Index des composants et des commandes ........................................9
Montage de la station d’alimentation centrale sur le support ........11
Mise en charge de la batterie interne d’AIBO ...............................13
Vérification des réglages d’AIBO .................................................. 17
Effectuer différents réglages .......................................................... 19
Réglage de la date et de l’heure ............................................... 20
Réglage du fuseau horaire ....................................................... 22
Réglage du niveau sonore ........................................................ 23
Manipulation de la station d’alimentation centrale ........................ 24
A propos du nettoyage ............................................................. 24
Dépannage ...................................................................................... 25
Spécifications .................................................................................27
Tableau des fuseaux horaires ......................................................... 28
6
Page 43

7
Page 44

Caractéristiques de la station d’alimentation centrale
La station d’alimentation centrale ERA-301P2 (appelée “station centrale” dans
la suite de ce document) est destinée à l’AIBO de série ERS-3××. La station
centrale s’utilise fixée sur le support fourni avec l’AIBO. (L’ensemble station
centrale – support ainsi constitué est appelé “station” par la suite.)
Station centrale
Station
Support
La station présente les fonctions suivantes:
• Charge de la batterie interne d’AIBO dès que vous le placez sur la station.
• Panneau d’affichage vous permettant d’effectuer différents réglages AIBO
sans retirer les extrémités d’AIBO.
• Le panneau d’affichage est équipé d’un rétro-éclairage, permettant de
visualiser le niveau de charge de la batterie ou l’heure, dans la pénombre.
• La station d’alimentation centrale ERA-301P2 ne peut être utilisée qu’avec
le système AIBO en série ERS-3×× et doit être alimentée uniquement par
l’adaptateur secteur ERA-201P1 afin de recharger le robot AIBO de série
ERS-3××. (Consultez les instructions de fonctionnement fournies avec
l’adaptateur secteur.)
8
Page 45

Index des composants et des commandes
Côtés supérieur/arrière
Panneau d’affichage
9
Page 46

1 Borne de charge
Charge la batterie interne d’AIBO
dès que celui-ci est placé sur la
station. Entre en contact avec les
bornes situées sur l’estomac d’AIBO.
2 Touche SET/CANCEL
Appuyez pour mettre la station
centrale en mode de réglage pour
effectuer ou annuler un réglage.
Appuyez à nouveau pour revenir au
mode normal.
3 Touche MODE/NEXT
Appuyez pour modifier l’indication
du panneau d’affichage. En mode de
réglage, la pression de cette touche
change l’élément affiché.
4 Touche DISPLAY/– (moins)
Quand l’indication de date ou
d’heure est affichée, la pression de
cette touche modifie le format
d’affichage.
En mode de réglage, chaque pression
de cette touche diminue la valeur à la
valeur inférieure suivante.
Maintenir la touche enfoncée
diminue la valeur en continu.
10
5 Touche LIGHT/+ (plus)
En mode normal, appuyez pour
allumer l’éclairage à contrejour.
En mode de réglage, chaque pression
de cette touche augmente la valeur à
la valeur supérieure suivante.
Maintenir la touche enfoncée
augmente la valeur en continu.
6 Borne adaptateur secteur
(située sur le côté arrière de la
station centrale)
Reliez l’adaptateur secteur fourni
avec AIBO ou un adaptateur secteur
en option à cette borne.
7 Commutateur de
positionnement
Détecte quand l’AIBO est placé sur
la station.
8 Vis de montage (fournie avec
l’AIBO)
Sert à monter la station centrale sur
le support (fourni avec l’AIBO).
9 Indication de date/heure/fuseau
horaire/volume sonore
q; Témoin de batterie
Indique le niveau de charge de la
batterie interne d’AIBO.
Page 47

Montage de la station d’alimentation centrale sur le support
Procédez comme suit pour monter la station centrale sur le support fourni avec
l’AIBO.
Pour la série ERS-3××
1
Retirez la plaque décorative du support.
Plaque décorative
Remarque
Pour remettre la plaque décorative sur le support, alignez les projections sur la
plaque sur les rainures et poussez la plaque dans le support.
11
Page 48

2
Placez la station centrale sur le support. Saisissez fermement
l’ensemble station centrale – support comme indiqué sur
l’illustration, retournez-le, puis fixez-le avec la vis de montage.
Vis de montage
Remarques
• Les surfaces de la station centrale et du support sont très lisses. Prenez garde de
ne pas les faire tomber en les manipulant.
• Ne serrez pas excessivement la vis de montage.
3
Raccordez l’adaptateur secteur (fourni avec l’AIBO) à la station
centrale, et passez le cordon comme indiqué sur l’illustration.
12
Page 49

Mise en charge de la batterie interne d’AIBO
Il suffit de placer AIBO sur la station pour charger sa batterie interne après
ouverture de la porte de charge sur le couvercle de l’AIBO. Il est recommandé
de recharger la batterie à température ambiante (10° C à 30° C (50° F à 86°
F)).
Remarque
L’état de l’AIBO quand il est placé sur la station au démarrage de la charge de la
batterie varie selon le modèle AIBO et le AIBO-ware utilisé.
1
Raccordez l’adaptateur secteur à une prise secteur.
13
Page 50

2
Mettez l’AIBO en mode pause (en appuyant sur le bouton de
pause pour éteindre le rétro-éclairage) ou en position de charge,
puis ouvrez la porte de charge sur le couvercle.
3
Mettez AIBO sur la station.
L’indication de temps apparaît sur le panneau d’affichage de la station
centrale.
14
Page 51

Remarques
• L’emploi de la fiche de conversion d’adaptateur secteur fournie est inutile.
• Pour des détails sur la position de charge d’AIBO, reportez-vous au “Guide
d’utilisateur” pour les AIBO-ware respectifs.
• La position de charge peut ne pas être indiquée pour certains AIBO-ware.
• Quand l’AIBO n’est pas sur la station, aucune information n’apparaît sur le
panneau d’affichage.
Si vous essayez d’afficher des informations dans cette situation, l’affichage à
cristanx liqnides clignote quelques secondes pour indiquer que l’AIBO n’est pas
sur la station.
• Si la batterie n’est pas insérée dans l’AIBO, l’indicateur de batterie n’apparaît
pas.
Au cours du chargement
Le manche de l’indication de la pompe sur le panneau d’affichage se déplace
verticalement.
L’indicateur de batterie indique le niveau de charge.
Le manche se déplace
verticalement.
Pompe
Tuyau
Indicateur de batterie
15
Page 52

Niveau de charge
Presque vide A moitié pleine Presque pleine Pleine
Remarque
Si le tuyau de la pompe reste éteint, cela signifie que le chargement ne s’effectue pas.
Lorsque la batterie d’AIBO est complètement chargée
Le manche de l’indication de la pompe s’arrête de bouger sur le panneau
d’affichage, et toute la longueur du tuyau s’allume.
Remarque
Si toutes les barres de niveau de chargement clignotent simultanément, cela signifie que
la batterie n’est pas chargée correctement. Si cela se produit, vérifiez que la batterie est
insérée correctement. Si les barres continuent à clignoter, la batterie peut être
défectueuse. Arrêtez immédiatement le chargement et contactez le service
consommateur AIBO.
16
Page 53

Vérification des réglages d’AIBO
Lorsqu’AIBO se trouve sur la station, vérifiez ses réglages à l’aide de la
touche MODE/NEXT.
MODE/
NEXT
DISPLAY/–LIGHT/
+
Pour modifier l’affichage des informations
Appuyez sur la touche MODE/NEXT. Chaque pression de la touche modifie
l’affichage comme suit:
date t heure t fuseau horaire t volume sonore
Pour modifier les formats d’affichage de la date et de l’heure
Pour que la date ou l’heure soient affichées, appuyez sur la touche
DISPLAY/–. Chaque pression de la touche modifie le format d’affichage
comme suit:
• Date: “YYMMDD” (année, mois, jour) t “MMDDYY” t “DDMMYY”
• Heure: indication 12 heures t indication 24 heures
17
Page 54

Remarques
• Les formats de la date et de l’heure reviennent aux paramétrages par défaut lorsque la
station est débranchée de la prise murale. Réglez à nouveau les formats quand vous
branchez la station centrale à une prise murale.
• Le paramétrage par défaut du format de la date est l’année, le mois, le jour. Le
paramétrage par défaut pour le format horaire est basé sur 12 heures.
Pour allumer le rétro-éclairage du panneau d’affichage
Appuyez sur la touche LIGHT/+. Le rétro-éclairage reste allumé environ 60
secondes quand l’AIBO est sur la station, et sinon, quatre secondes.
18
Page 55

Effectuer différents réglages
Quand AIBO est sur la station, vous pouvez définir différents éléments comme
l’heure et le niveau sonore.
SET/
MODE/
CANCEL
Remarques
• Pour annuler l’opération de réglage avant sa fin, appuyez sur la touche SET/
CANCEL. L’affichage revient à l’état initial de l’opération de réglage.
• Le changement de réglage est impossible quand l’AIBO n’est pas sur la station. Si
vous essayez de faire un changement, l’affichage à cristaux liquides clignotera
quelques secondes pour indiquer que l’AIBO n’est pas sur la station.
DISPLAY/–LIGHT/
NEXT
+
19
Page 56

Réglage de la date et de l’heure
Notez que la description suivante présuppose le format d’affichage de la date
“YYMMDD” (année, mois, jour).
1
Appuyez à plusieurs reprises sur la touche MODE/NEXT, jusqu’à
ce que la date et l’heure s’affichent.
2
Appuyez sur la touche SET/CANCEL.
L’indication de l’année se met à clignoter.
3
Réglez l’année à l’aide des touches DISPLAY/– ou LIGHT/+.
Appuyez ensuite sur la touche MODE/NEXT.
L’indication du mois se met à clignoter.
4
Réglez le mois à l’aide des touches DISPLAY/– ou LIGHT/+.
Appuyez ensuite sur la touche MODE/NEXT.
L’indication du jour se met à clignoter.
20
Page 57

5
Réglez le jour à l’aide des touches DISPLAY/– ou LIGHT/+.
Appuyez ensuite sur la touche MODE/NEXT.
L’indication de l’heure se met à clignoter.
6
Réglez l’heure à l’aide des touches DISPLAY/– ou LIGHT/+.
Appuyez ensuite sur la touche MODE/NEXT.
L’indication des minutes se met à clignoter.
7
Réglez les minutes à l’aide des touches DISPLAY/– ou LIGHT/+.
Appuyez ensuite sur la touche MODE/NEXT.
La configuration est enregistrée et l’indication de la date et de l’heure
réapparaît.
21
Page 58

Réglage du fuseau horaire
En réglant le fuseau horaire, vous spécifiez la différence en heures, entre
l’heure locale et l’heure du temps universal unifié (UTC). Cette différence est
exprimée en nombre entier compris entre –12 et +12. Par exemple, le fuseau
horaire du Japon est +9. Pour plus d’informations sur les fuseaux horaires du
monde, consultez le “Tableau des fuseaux horaires”, pages 28 et 29.
1
Appuyez à plusieurs reprises sur la touche MODE/NEXT, jusqu’à
ce que l’indication du fuseau horaire s’affiche.
2
Appuyez sur la touche SET/CANCEL.
L’indication du fuseau horaire se met à clignoter.
3
Modifiez le fuseau horaire à l’aide des touches DISPLAY/– ou
LIGHT/+. Appuyez ensuite sur la touche MODE/NEXT.
La configuration est enregistrée et l’indication du fuseau horaire réapparaît.
22
Remarque
La fonction fuseau horaire ne permet pas d’économiser de lumière.
Page 59

Réglage du niveau sonore
1
Appuyez à plusieurs reprises sur la touche MODE/NEXT, jusqu’à
ce que l’indication du niveau sonore s’affiche.
2
Appuyez sur la touche SET/CANCEL.
Le réglage du niveau sonore actuel se met à clignoter.
3
Modifiez le niveau sonore à l’aide des touches DISPLAY/– ou
LIGHT/+. Appuyez ensuite sur la touche MODE/NEXT.
La configuration est enregistrée et l’indication du niveau sonore réapparaît.
Vous disposez de quatre niveaux de réglage pour le niveau sonore. Si vous
sélectionnez “0,” les tonalités musicales d’AIBO sont inaudibles.
23
Page 60

Manipulation de la station d’alimentation centrale
• Pendant qu’AIBO se trouve sur la station, ne placez aucun objet susceptible
d’entraver ses mouvements à proximité de celle-ci.
• Ne touchez pas la borne de charge directement avec vos mains. Ceci pourrait
souiller la borne et entraîner des faux contacts.
• N’appuyez pas sur la station centrale avec vos mains ou vos coudes.
• Ne faites pas tomber la station centrale et ne la secouez pas. Ceci pourrait
l’endommager.
• Ne laissez pas la station centrale dans des endroits très chauds comme une
voiture garée au soleil. Ceci pourrait la déformer ou l’endommager.
• Faites en sorte que la station centrale ne soit pas mouillée.
• Pour plus d’informations sur la batterie ou sur l’adaptateur secteur fourni
avec AIBO, référez-vous au mode d’emploi fourni avec AIBO.
A propos du nettoyage
• Nettoyez la station centrale avec un chiffon doux sec.
• N’utilisez pas de solvants volatils susceptibles d’endommager le revêtement
de surface de la station centrale.
• Si vous utilisez un chiffon à traitement chimique ou similaire, suivez les
instructions pour son usage.
24
Page 61

Dépannage
Si vous avez des problèmes, utilisez ce guide pour y remédier. Si le problème
persiste, contactez le service consommateur AIBO (page 4).
Symptôme Cause/Remède
L’icône AIBO du panneau
d’affichage clignote
lorsque vous appuyez sur
une touche de la station
noyau.
Le panneau d’affichage ne
s’allume pas même si
AIBO se trouve sur la
station.
Toutes les barres de
niveau de charge de
l’icône AIBO clignotent
simultanément.
Toutes les barres de
niveau de charge de
l’indicateur de batterie
clignotent simultanément.
AIBO n’est pas correctement installé sur la
station.
c Placez AIBO correctement sur la station (page
13).
Le raccordement entre la station noyau,
l’adaptateur secteur et la prise murale n’est pas
correct.
c Rebranchez ces éléments correctement (page
11).
La batterie n’est pas insérée dans AIBO.
c Insérez la batterie et placez AIBO sur la
station (page 13).
La batterie est mal chargée.
c Vérifiez que la batterie est insérée
correctement dans le corps de l’AIBO. Si le
symptôme persiste, contactez immédiatement
le service consommateur AIBO.
25
Page 62

Symptôme Cause/Remède
Le chargement ne
commence pas, même si
AIBO se trouve sur la
station.
• De la chaleur peut s’accumuler dans la
batterie.
c Attendez un moment que la batterie
refroidisse.
• L’état de l’AIBO quand il est placé sur la
station au démarrage de la charge de la
batterie varie selon le modèle AIBO et le
AIBO-ware utilisé.
c Pour les détails, reportez-vous au guide de
l’utilisateur du AIBO-ware utilisé.
26
Page 63

Spécifications
Branchement électrique
16 V DC
Consommation électrique
30 W
Tension de sortie
1,5 A à 16 V DC (pour le
chargement de la batterie
interne d’AIBO)
Durée de chargement
Environ 2 heures* (pour le
chargement de la batterie
interne AIBO) (page 11)
Affichage à cristaux liquides (CL) avec
Dimensions 65 × 45 × 75 mm (2 5/8 ×
Poids 90 g (3 oz) environ
Température de fonctionnement
Humidité de fonctionnement
rétro-éclairage
Taille : 15 × 40 mm (19/32 ×
1 5/8 po.) environ
1 13/
× 3 po.) (l/h/p) environ
16
5 à 35°C (41 à 95°F)
20 à 80 %
Température de stockage
–20 à 60°C (–4 à 140°F)
Humidité de stockage
10 à 90 %
Accessoires fournis
Mode d’emploi
Vis de montage
* Le temps de charge dépend de l’état de
l’AIBO, de la température ambiante et
ainsi de suite.
Le concept et les spécifications sont
sujets à modification sans préavis.
27
Page 64

Tableau des fuseaux horaires
Utilisez ce tableau pour régler les
fuseaux horaires appropriés.
28
Page 65

29
Page 66

Sicherheitsinformationen
ACHTUNG
• Um Feuergefahr und die Gefahr eines elektrischen Schlags zu vermeiden,
setzen Sie das Gerät weder Regen noch sonstiger Feuchtigkeit aus.
• Um einen elektrischen Schlag zu vermeiden, öffnen Sie das Gehäuse nicht.
Überlassen Sie Wartungsarbeiten stets nur qualifiziertem Fachpersonal.
Wenden Sie sich bitte an die AIBO-Kundendienst-Hotline (Seite 4).
• Überprüfen Sie den Netzadapter bitte regelmäßig auf Defekte, wie zum
Beispiel Beschädigungen an den Kabeln, den Stiften oder am Gehäuse.
Solche Beschädigungen können zu Feuergefahr, der Gefahr eines
elektrischen Schlags oder Verletzungen führen. Ist der Netzadapter
beschädigt, darf er nicht mehr benutzt und muss ausgetauscht werden.
• Dieses Gerät ist für Kinder unter 8 Jahren nicht geeignet.
• Vorsicht! Achten Sie darauf, dass Kinder unter 8 Jahren die Energiestation
nicht benutzen.
Erklären Sie einem Kind gegebenenfalls, dass es sich bei dem
Energiestationskern nicht um ein Spielzeug handelt und dass mit dem
Energiestationskern daher nicht gespielt werden darf. Erläutern Sie einem
Kind ausführlich den Umgang mit der Energiestation, so dass es den
Energiestationskern benutzen kann, ohne sich damit in Gefahr zu bringen.
• Machen Sie sich bitte ebenfalls mit der Bedienungsanleitung Ihres AIBO
vertraut.
2
Page 67

Gesetzliche Vorschriften
Dieses Gerät wurde geprüft und erfüllt folgende Sicherheitsstandards:
EMV-Richtlinie 89/336/EWG
EMI EN55022/98, EN55014/93 + A1/97+A2/99, EN50081-1/92
EMS: EN55024/98, EN55014-2/97, EN50082-1/97
Der Energiestationskern wurde als Gesamtsystem geprüft und erfüllt folgende
Sicherheitsstandards:
EN60335-1/94 + A11/95 + A12/98 + A14/98
EN60335-2-29/96
Hinweise zur Konformität mit dem CE-Zeichen (EMV)
a) Dieses Gerät entspricht der europäischen Norm EN55022 Klasse B (digital) für die
Verwendung in folgenden Gebieten: Wohngebiete, Gewerbegebiete und
Leichtindustriegebiete.
b) Dieses Gerät erfüllt die folgende europäische Richtlinie:
89/336/EWG (EMV-Richtlinie)
De
3
3
Page 68

Kundendienst
Wie können Sie die AIBO-Kundendienst-Hotline erreichen?
Für Deutschland: +49(0)-69-9508-6309
Für Großbritannien: +44(0)-20-7365-2937
Für Frankreich: +33(0)-1-5569-5117
E-Mail-Adresse: aibo@sonystyle-europe.com
©2001 Sony Corporation. Die Reproduktion ganz oder auszugsweise ist
ohne schriftliche Genehmigung untersagt. Alle Rechte vorbehalten.
4
Page 69

„OPEN-R“ ist die Standardschnittstelle für ein
Spielrobotersystem, das Sony aktiv unterstützt. Ziel dieser
Schnittstelle ist es, die Funktionen und Merkmale von
Spielrobotern mit Hilfe einer flexiblen Kombination von
Hardware und austauschbarer Software für unterschiedliche
Anwendungsmöglichkeiten zu erweitern. AIBOs der Serie
ERS-3×× und die Energy Station Core ERA-301P2 entsprechen
der OPEN-R-Version 1.1.1.
• „AIBO“, das AIBO-Logo, „OPEN-R“ und das OPEN-R-Logo sind
eingetragene Marken der Sony Corporation.
• „Memory Stick“, „
Corporation.
• Alle anderen System- und Produktnamen sind Marken der jeweiligen
Eigentümer. In diesem Handbuch sind Marken und urheberrechtlich
geschützte Materialien nicht mit „“ oder „“ gekennzeichnet.
http://www.aibo.com/
,“ und „ “ sind Marken der Sony
5
Page 70

6
Page 71

Inhalt
Sicherheitsinformationen ................................................................. 2
Funktionen und Merkmale des Energiestationskerns.......................8
Lage und Funktion der Teile und Bedienelemente...........................9
Anbringen des Stationskerns am Ständer.......................................11
Laden des Akkus in AIBO .............................................................13
Überprüfen von AIBOs Einstellungen ........................................... 17
Vornehmen verschiedener Einstellungen ....................................... 19
Einstellen von Datum und Uhrzeit .......................................... 20
Einstellen der Zeitzone ............................................................ 22
Einstellen des Lautstärkepegels ............................................... 23
Umgang mit dem Energiestationskern ...........................................24
Reinigung ................................................................................ 24
Störungsbehebung ..........................................................................25
Technische Daten ........................................................................... 27
Tabelle der Zeitzonen .....................................................................28
7
Page 72

Funktionen und Merkmale des Energiestationskerns
Der Energiestationskern ERA-301P2 (im Folgenden einfach „Stationskern“
genannt) ist eine Ladestation für AIBOs der Serie ERS-3××. Der Betrieb
erfolgt unter Anbringung an den Ständer, der zum Lieferumfang von AIBO
gehört. (Die Kombination von Stationskern und Ständer wird innerhalb dieses
Handbuchs als „Station“ bezeichnet.)
Stationskern
Station
Ständer
Die Station verfügt über die folgenden Funktionen:
• Laden des Akkus in AIBO, während AIBO auf der Station sitzt.
• Ermöglicht die Vornahme von Einstellungen an AIBO über das Display,
ohne dazu AIBOs Körperteile abnehmen zu müssen.
• Hintergrundbeleuchtung für das Display, um auch bei Dunkelheit das
Ablesen des Ladezustands des Akkus oder der aktuellen Zeit zu
ermöglichen.
• Der Energiestationskern ERA-301P2 ist ausschließlich mit AIBOs der Serie
ERS-3×× zu verwende. Er darf nur über den Netzadapter ERA-201P1 mit
Strom versorgt werden und nur zum Laden von AIBOs der Serie ERS-3××
8
verwendet werden. (Siehe auch die Gebrauchsanleitung des Netzadapters.)
Page 73

Lage und Funktion der Teile und Bedienelemente
Rück- und Oberseite
Display
9
Page 74

1 Ladekontakte
Über diese Kontakte wird der Akku
in AIBO geladen, während AIBO auf
der Station sitzt. Diese Kontakte
berühren die Ladekontakte an AIBOs
Bauch.
2 Taste SET/CANCEL
Drücken, um den Stationskern in den
Einstellmodus zu schalten oder eine
Einstellung zu annullieren. Erneut
drücken, um in den normalen
Betriebsmodus zurückzukehren.
3 Taste MODE/NEXT
Drücken, um die Anzeige im Display
zu ändern. Im Einstellmodus wird
bei Drücken dieser Taste der
Einstellparameter geändert.
4 Taste DISPLAY/– (Minus)
Bei Datums- oder Zeitanzeige wird
bei Drücken dieser Taste das
Anzeigeformat gewechselt.
Im Einstellmodus verkleinert sich
mit jedem Drücken dieser Taste der
Wert .
Bei Gedrückthalten wird der Wert
kontinuierlich verkleinert.
10
5 Taste LIGHT/+ (Plus)
Im normalen Betriebsmodus wird bei
Drücken dieser Taste die
Hintergrundbeleuchtung
eingeschaltet.
Im Einstellmodus vergrößert sich mit
jedem Drücken dieser Taste der Wert.
Bei Gedrückthalten wird der Wert
kontinuierlich vergrößert.
6 Netzteilanschluss (an der
Rückseite des Stationskerns)
Verbinden Sie den Netzadapter (im
Lieferumfang des AIBO) oder einen
optionalen Netzadapter mit diesem
Anschluss.
7 Detektionsschalter
Erkennt, wenn AIBO auf der Station
sitzt.
8 Sicherungsschraube
(mitgeliefert)
Zum Anschrauben des Stationskerns
auf den Ständer (im Lieferumfang
des AIBO).
9 Anzeige von Datum / Uhrzeit /
Zeitzone / Lautstärkepegel
0 Akkuanzeige
Hier können Sie den Ladezustand
des Akkus in AIBO ablesen.
Page 75

Anbringen des Stationskerns am Ständer
Zum Anbringen des Stationskerns am Ständer, der zum Lieferumfang des
AIBO gehört, verfahren Sie wie folgt.
Für die Serie ERS-3××
1
Entfernen Sie die Dekorationsscheibe vom Ständer.
Dekorationsscheibe
Hinweis
Zum Wiederanbringen der Dekorationsscheibe deren Laschen mit der Aussparung
im Ständer fluchten und in Stellung drücken.
11
Page 76

2
Den Stationskern auf den Ständer setzen. Stationskern und
Ständer wie in der Abbildung gezeigt in die Hand nehmen und auf
den Kopf stellen. Stationskern und Ständer mit der
Sicherungsschraube zusammenschrauben.
Sicherungsschraube
Hinweise
• Die Außenflächen von Stationskern und Ständer sind besonders glatt. Nicht
fallen lassen.
• Die Sicherungsschraube nicht mit Gewalt festziehen.
3
Schließen Sie den Netzadapter (im Lieferumfang des AIBO) an
den Stationskern an, und führen Sie das Kabel wie in der
Abbildung gezeigt.
12
Page 77

Laden des Akkus in AIBO
Um den Akku in AIBOs Innerem aufzuladen, setzen Sie AIBO einfach auf die
Station, nachdem Sie die Ladeklappe im Bauch von AIBO geöffnet haben. Es
empfiehlt sich, den Akku bei Zimmertemperatur (10 °C bis 30 °C) aufzuladen.
Hinweis
Der Ladevorgang startet automatisch, wenn AIBO in einen bestimmten Modus oder
Zustand geschaltet wird, wenn er auf der Station sitzt. Dieser Modus bzw. Zustand ist
abhängig vom jeweiligen AIBO-Modell und der verwendeten AIBO-Ware.
1
Schließen Sie den Netzadapter an eine Wandsteckdose an.
13
Page 78

2
Schalten Sie AIBO auf Pause (Pause-Taste drücken, um
Hintergrundbeleuchtung auszuschalten) oder stellen Sie AIBO in
Ladehaltung, und öffnen Sie dann die verschlussklappe im Bauch
von AIBO.
3
Setzen Sie AIBO auf die Station.
Im Display des Stationskerns wird die Zeit angezeigt.
14
Page 79

Hinweise
• Der Gebrauch des mitgelieferten Steckeradapters für den Netzadapter ist
optional.
• Erläuterungen zu AIBOs Ladehaltung finden Sie im „Benutzerhandbuch“ zur
jeweiligen AIBO-Ware.
• Die Ladehaltung für AIBO steht nicht in jeder AIBO-Ware zur Verfügung.
• Wenn AIBO nicht auf der Station sitzt, bleibt das Display leer.
Wenn Sie trotzdem Informationen im Display anzeigen wollen, blinkt das LCDFeld mehrere Sekunden lang, um darauf hinzuweisen, dass AIBO nicht auf der
Station sitzt.
• Wenn kein Akku in AIBO eingesetzt ist, erscheint auch keine Akkuanzeige.
Während des Ladens
Der Schwengel der Pumpenanzeige im Display bewegt sich auf und ab.
Die Akkuanzeige gibt Auskunft über den Ladezustand.
Der Schwengel bewegt
sich auf und ab.
Pumpe
Schlauch
Akkuanzeige
15
Page 80

Ladezustand
Fast leer
Hinweis
Wenn der Schlauch nicht leuchtet, bedeutet dies, dass keine Ladung erfolgt.
Zur Hälfte geladen
Fast voll Voll
Wenn der Akku in AIBO vollständig geladen ist
Die Bewegung des Schwengels der Pumpenanzeige stoppt, und die gesamte
Länge des Schlauchs leuchtet.
Hinweis
Wenn alle Balken zur Anzeige des Ladezustands gleichzeitig blinken, wird der Akku
nicht ordnungsgemäß geladen. Überprüfen Sie in diesem Fall, ob der Akku korrekt
eingesetzt ist. Wenn die Balken noch immer blinken, ist möglicherweise der Akku
defekt. Beenden Sie sofort den Ladevorgang und wenden Sie sich an die AIBOKundendienst-Hotline.
16
Page 81

Überprüfen von AIBOs Einstellungen
Wenn AIBO auf der Station sitzt, können Sie mit der Taste MODE/NEXT
seine Einstellungen anzeigen lassen.
MODE/
NEXT
DISPLAY/–LIGHT/
+
Ändern der Informationsanzeige
Drücken Sie MODE/NEXT. Bei jedem Drücken wird zyklisch wie folgt
weitergeschaltet:
Datum t Uhrzeit t Zeitzone t Lautstärke
Ändern der Anzeigeformate von Datum und Uhrzeit
Drücken Sie bei Anzeige von Datum oder Uhrzeit die Taste DISPLAY/–. Bei
jedem Drücken wird zyklisch wie folgt weitergeschaltet:
• Datum: YYMMDD (Jahr, Monat, Tag) t MMDDYY (Monat, Tag, Jahr)
t DDMMYY (Tag, Monat, Jahr)
• Uhrzeit: 12-Stunden-Anzeige t 24-Stunden-Anzeige
17
Page 82

Hinweise
• Datum- und Uhrzeitformate werden auf die Standardeinstellungen zurückgesetzt,
wenn Sie die Station von der Netzsteckdose trennen. Sie müssen diese Formate also
erneut einstellen, wenn Sie die Station wieder mit einer Netzsteckdose verbinden.
• Die Standardeinstellung für das Datumsformat lautet „Jahr, Monat, Tag“. Die
Standardeinstellung für das Uhrzeitformat ist das 12-Stunden-Format.
Einschalten der Display-Hintergrundbeleuchtung
Drücken Sie LIGHT/+. Wenn AIBO auf der Station sitzt, bleibt die
Hintergrundbeleuchtung 60 Sekunden lang eingeschaltet; andernfalls nur 4
Sekunden.
18
Page 83

Vornehmen verschiedener Einstellungen
Wenn AIBO auf der Station sitzt, können Sie verschiedene Einstellungen
vornehmen, zum Beispiel die Uhrzeit oder den Lautstärkepegel.
SET/
MODE/
CANCEL
Hinweise
• Zum Abbrechen des Einstellverfahrens drücken Sie SET/CANCEL. Die Anzeige
kehrt daraufhin in den Modus zurück, der vor dem Starten des Einstellverfahrens galt.
• Wenn AIBO nicht auf der Station sitzt, ist keine Einstellung möglich. Wird dies
trotzdem versucht, blinkt das LCD-Feld mehrere Sekunden lang, um darauf
hinzuweisen, dass AIBO nicht auf der Station sitzt.
DISPLAY/–LIGHT/
NEXT
+
19
Page 84

Einstellen von Datum und Uhrzeit
Die folgenden Erklärungen gehen davon aus, dass das Datumsformat auf
YYMMDD (Jahr, Monat, Tag) eingestellt ist.
1
Drücken Sie MODE/NEXT so oft, bis Datum und Uhrzeit
angezeigt werden.
2
Drücken Sie SET/CANCEL.
Die Jahresangabe beginnt zu blinken.
3
Stellen Sie mit den Tasten DISPLAY/– oder LIGHT/+ das Jahr
ein. Drücken Sie dann die Taste MODE/NEXT.
Die Monatsangabe beginnt zu blinken.
4
Stellen Sie mit den Tasten DISPLAY/– oder LIGHT/+ den Monat
ein. Drücken Sie dann die Taste MODE/NEXT.
Die Tagesangabe beginnt zu blinken.
20
Page 85

5
Stellen Sie mit den Tasten DISPLAY/– oder LIGHT/+ den Tag ein.
Drücken Sie dann die Taste MODE/NEXT.
Die Stundenangabe beginnt zu blinken.
6
Stellen Sie mit den Tasten DISPLAY/– oder LIGHT/+ die Stunden
ein. Drücken Sie dann die Taste MODE/NEXT.
Die Minutenangabe beginnt zu blinken.
7
Stellen Sie mit den Tasten DISPLAY/– oder LIGHT/+ die Minuten
ein. Drücken Sie dann die Taste MODE/NEXT.
Damit haben Sie die Einstellung vorgenommen und Datum und Uhrzeit
werden wieder angezeigt.
21
Page 86

Einstellen der Zeitzone
Durch die Einstellung der Zeitzone geben Sie den Zeitunterschied (in Stunden)
zwischen Ihrem aktuellen Aufenthaltsort und der Weltzeit (Greenwich-Zeit,
Universal Time Coordinated = UTC) an. Dieser Unterschied wird als ganze
Zahl zwischen –12 und +12 ausgedrückt. Die Zeitzone für Japan wird zum
Beispiel als +9 angegeben. Eine Auflistung der Zeitzonen der Welt finden Sie
unter „Tabelle der Zeitzonen“ auf Seite 28 und 29.
1
Drücken Sie MODE/NEXT so oft, bis die Zeitzone angezeigt wird.
2
Drücken Sie SET/CANCEL.
Die Zeitzonenangabe beginnt zu blinken.
3
Stellen Sie mit den Tasten DISPLAY/– oder LIGHT/+ die Zeitzone
ein. Drücken Sie dann die Taste MODE/NEXT.
Damit haben Sie die Einstellung vorgenommen und die Zeitzone wird wieder
angezeigt.
22
Hinweis
Bei der Zeitzonenfunktion wird die Sommerzeit nicht berücksichtigt.
Page 87

Einstellen des Lautstärkepegels
1
Drücken Sie MODE/NEXT so oft, bis der Lautstärkepegel
angezeigt wird.
2
Drücken Sie SET/CANCEL.
Die aktuelle Einstellung des Lautstärkepegels beginnt zu blinken.
3
Ändern Sie mit den Tasten DISPLAY/– oder LIGHT/+ den
Lautstärkepegel. Drücken Sie dann die Taste MODE/NEXT.
Damit haben Sie die Einstellung vorgenommen und der Lautstärkepegel wird
wieder angezeigt. Die Lautstärke ist in vier Stufen einstellbar. In Stellung „0“
erfolgt keinerlei Tonabgabe.
23
Page 88

Umgang mit dem Energiestationskern
• Wenn AIBO auf der Station sitzt, achten Sie darauf, dass keine Gegenstände
in seiner Nähe ihn in seinen Bewegungen behindern.
• Berühren Sie den Ladekontakt nicht mit der Hand. Andernfalls könnte der
Kontakt verschmutzt werden, was zu einer Beeinträchtigung der Verbindung
führt.
• Drücken Sie mit der Hand oder dem Ellenbogen nicht zu fest auf den
Stationskern.
• Lassen Sie den Stationskern nicht fallen und schütteln Sie ihn nicht.
Andernfalls könnte er beschädigt werden.
• Setzen Sie den Stationskern keinen sehr hohen Temperaturen aus, wie sie
zum Beispiel in einem in der Sonne geparkten Auto entstehen können.
Andernfalls könnte er sich verformen oder anderweitig beschädigt werden.
• Schützen Sie den Stationskern vor Feuchtigkeit.
• Erläuterungen zu dem Akku und dem Netzadapter, die mit AIBO geliefert
werden, finden Sie in der Bedienungsanleitung zu AIBO.
Reinigung
• Reinigen Sie den Stationskern mit einem trockenen, weichen Tuch.
• Verwenden Sie keine flüchtigen Lösungsmittel. Diese könnten die
Oberfläche des Stationskerns angreifen.
• Bei Verwendung eines chemisch präparierten Staubtuchs befolgen Sie
dessen Gebrauchsanleitung.
24
Page 89

Störungsbehebung
Sollte eine der folgenden Störungen auftreten, versuchen Sie, diese anhand der
folgenden Checkliste zu beheben. Sollte sich das Problem auf diese Weise
nicht lösen lassen, wenden Sie sich bitte an die AIBO-Kundendienst-Hotline
(Seite 4).
Symptom Ursache/Abhilfe
Das AIBO-Symbol im
Display blinkt, wenn Sie
eine Taste auf dem
Stationskern drücken.
AIBO sitzt nicht richtig auf der Station.
c Setzen Sie AIBO richtig auf die Station (Seite
13).
Das Display leuchtet
nicht, obwohl AIBO auf
der Station sitzt.
Alle Balken zur Anzeige
des Ladezustands im
AIBO-Symbol blinken
gleichzeitig.
Alle Balken zur Anzeige
des Ladezustands in der
Ladeanzeige blinken
gleichzeitig.
Die Verbindung zwischen Station, Netzadapter
und Netzsteckdose ist nicht korrekt.
c Verbinden Sie diese Komponenten richtig
(Seite 11).
In AIBO befindet sich kein Akku.
c Setzen Sie den Akku ein und setzen Sie AIBO
auf die Station (Seite 13).
Der Akku wurde nicht korrekt geladen.
c Sicherstellen, dass der Akku korrekt in AIBO
eingesetzt ist. Wenn dies keine Abhilfe bringt,
die AIBO-Kundendienst-Hotline
kontaktieren.
25
Page 90

Symptom Ursache/Abhilfe
Der Ladevorgang beginnt
nicht, auch wenn Sie
AIBO auf die Station
setzen.
•Der Akku ist zu heiss.
c Warten, bis der Akku abgekühlt ist.
• Der Ladevorgang startet automatisch, wenn
AIBO in einen bestimmten Modus oder
Zustand geschaltet wird, wenn er auf der
Station sitzt. Dieser Modus bzw. Zustand ist
abhängig vom jeweiligen AIBO-Modell und
der verwendeten AIBO-Ware.
c Einzelheiten entnehmen Sie bitte den
Anleitungen der jeweiligen AIBO-Ware.
26
Page 91

Technische Daten
Betriebsspannung
16 V Gleichstrom
Leistungsaufnahme
30 W
Ausgangsspannung
1,5 A bei 16 V Gleichstrom
(beim Laden des Akkus in
AIBO)
Ladedauer ca. 2 Stunden* (beim Laden
des Akkus in AIBO) (Seite
13)
Display LCD-Display mit
Hintergrundbeleuchtung
Größe: ca. 15 × 40 mm
Abmessungen
ca. 65 × 45 × 75 mm (B/H/T)
Gewicht ca. 90 g
Betriebstemperatur
5 bis 35 °C
Luftfeuchtigkeit bei Betrieb
20 bis 80 %
Lagertemperatur
–20 bis 60 °C
Luftfeuchtigkeit bei Lagerung
10 bis 90 %
Mitgeliefertes Zubehör
Bedienungsanleitung
Sicherungsschraube
* Die tatsächliche Ladedauer ist u.a.
abhängig vom Zustand von AIBO und
der Umgebungstemperatur.
Änderungen, die dem technischen
Fortschritt dienen, bleiben vorbehalten.
27
Page 92

Tabelle der Zeitzonen
Geben Sie anhand dieser Tabelle die
richtige Zeitzone ein.
28
Page 93

29
Page 94

Printed on recycled paper
Printed in Japan
*465209211
(1)
*
 Loading...