

Page 1

AIBO Wireless LAN Card
Operating Instructions
ERA-201D1
4-652-247-21(1)
GB
FR
DE
© 2000 Sony Corporation
Page 2

Safety Information
WARNING
Changes or modifications not expressly approved by the party responsible for
compliance could void the user’s authority to operate the equipment.
Regulatory information
This product has been tested and found to conform to the following standards.
ETS300-328
ETS300-826
EN60950/92+A1/93+A2/95+A4/97+A11/97
We, Sony Corporation, hereby declare that AIBO Wireless LAN Card, model
ERA-201D1 is in compliance with the essential requirements and other
relevant provisions of Directive 1999/5/EC.
Owner’s Record
The model number and serial number are located on the card. Record the
serial number in the space provided below. Refer to the model and serial
number whenever you call upon your Sony dealer.
Model No. ERA-201D1
Serial No. ___________
2
Page 3

Customer Support
How can you contact the AIBO Customer Link?
In the United States:
1-800-427-2988
Email address: aibosupport@info.sel.sony.com
In Europe:
English line: +44(0)-20-7365-2938
German line: +49(0)-69-9508-6310
French line: +33(0)-1-5569-5118
Email address: aibo@sonystyle-europe.com
“AIBO,” the AIBO logo, “OPEN-R,” and the OPEN-R logo are registered
trademarks of Sony Corporation.
“Memory Stick,” “
Corporation. In this manual, the “” mark and “” mark have been omitted.
,” and “ ” are trademarks of Sony
http://www.aibo.com/
Reproduction in whole or in part without written permission is prohibited.
All rights reserved.
GB
3
Page 4

Table of Contents
Overview ..........................................................................................5
System requirements ................................................................. 6
Installing the LAN card into AIBO ..................................................7
Making network settings ................................................................12
Network setting procedure ...................................................... 12
Network configuration and settings......................................... 13
AIBO’s network settings ......................................................... 19
Changing AIBO’s network settings ......................................... 20
Precautions .....................................................................................23
Safety ....................................................................................... 23
Installation ............................................................................... 23
Moisture condensation............................................................. 24
Cleaning................................................................................... 24
Troubleshooting .............................................................................25
Specifications .................................................................................27
Glossary .........................................................................................28
4
Page 5

Overview
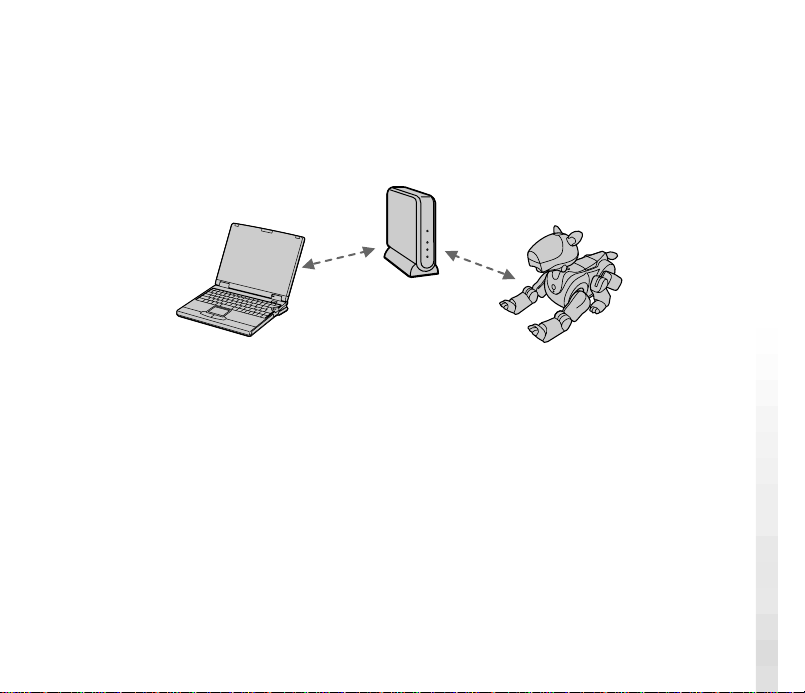
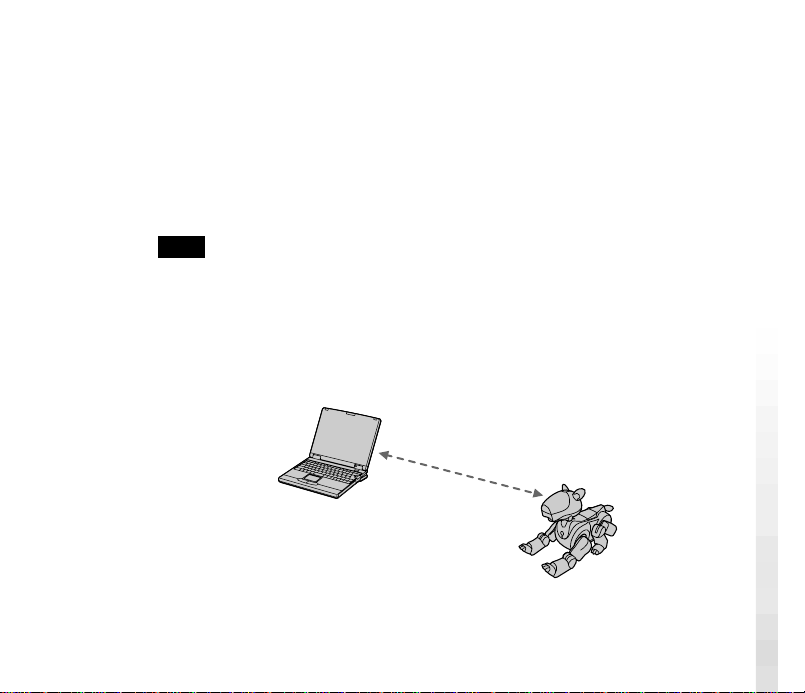
The AIBO Wireless LAN Card ERA-201D1 (referred to as the “LAN card”
hereafter), when installed in the AIBO ERS-210, enables AIBO to
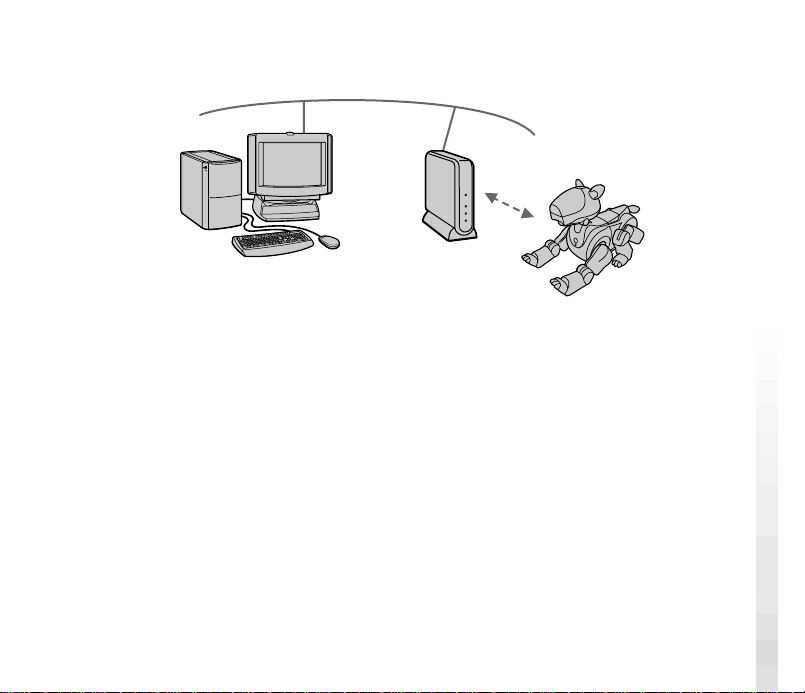
communicate with a PC equipped with a wireless LAN card. When a wireless
LAN access point is used, communication with AIBO is possible from a PC
connected to a wired LAN network.
<When an access point is used>
Wired LAN
PC
PC
Access point
PC
Wireless LAN
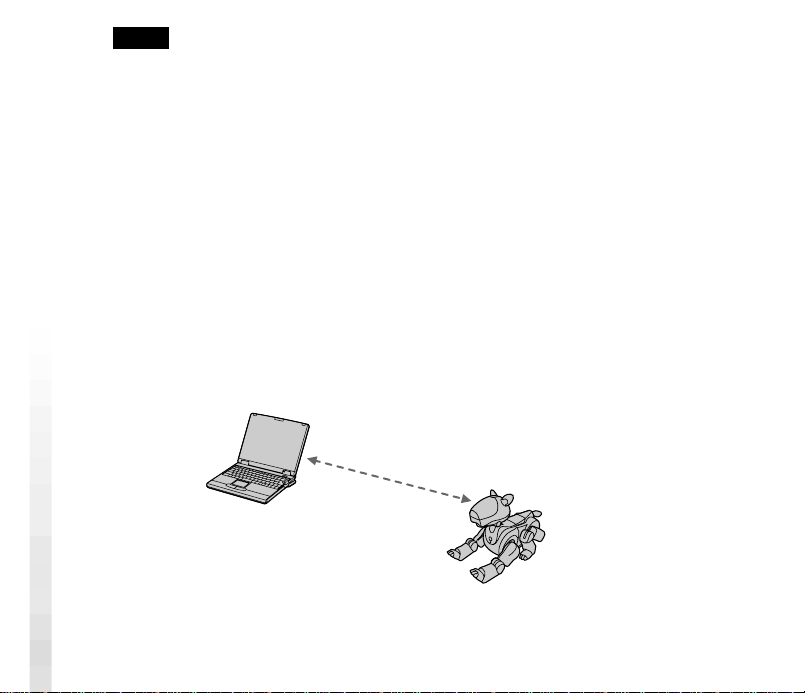
<When an access point is not used>
5
Page 6

The concurrent use of AIBO-dedicated wireless LAN applications on the PC
and AIBO-ware* “Memory Stick” in AIBO makes it possible to enjoy AIBO to
its full potential through wireless LAN communication.
* AIBO-ware is a programme which is capable of running AIBO and is
manufactured by Sony Corporation or other third parties.
System requirements
The wireless LAN card must be used in conjunction with the following:
• “AIBO” ERS-210
• AIBO-ware “Memory Stick” for wireless LAN communication
• AIBO-dedicated wireless LAN application software for operation on the PC
• A personal computer running AIBO-dedicated PC application software and
capable of being connectable to a wireless LAN
• An IEEE802.11b-compatible wireless LAN card or an IEEE802.11bcompatible access point (to allow wireless communication from a PC
connected to a wired LAN)
• A Web browser (installed on the PC for changing AIBO’s network settings)
6
Page 7
Installing the LAN card into AIBO
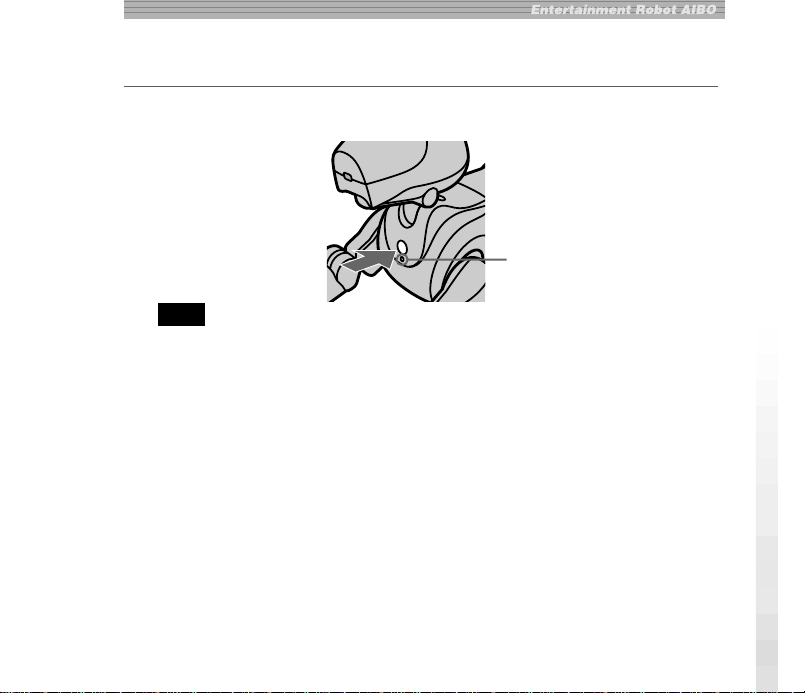
1
Press the pause button on AIBO’s chest to make it pause.
Chest light
Note
While AIBO is accessing the “Memory Stick,” the battery pack lock indicator
appears red. Do not remove the “Memory Stick” during this time to prevent
damaging AIBO. The battery pack is locked until the data-saving procedure is
complete. Removing it forcibly may damage AIBO.
7
Page 8
2
Grasp AIBO by the body, turn it upside down, and then open its
stomach cover.
Notes
• Lift AIBO by the body, and not by its extremities.
• Do not touch the charging terminal with your hand. Doing so may soil the
terminal and cause poor contact.
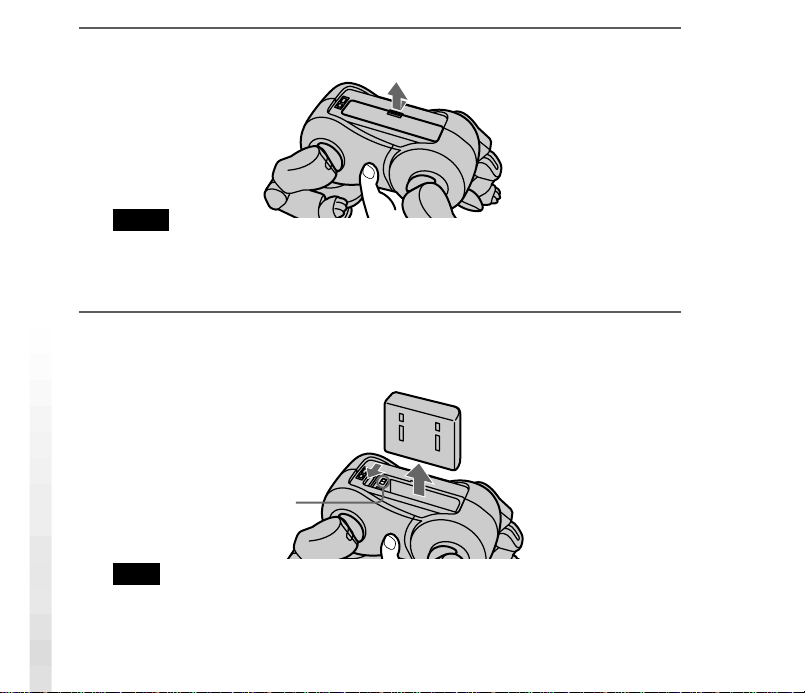
3
Slide the lock lever and remove the battery pack.
Check that the battery pack lock indicator appears white.
Lock lever
Note
When the battery pack lock indicator appears red, the battery pack is locked.
Removing it forcibly at this time may damage AIBO.
8
Page 9

4
Insert and press the pin supplied with AIBO into the release holes
for AIBO’s left front and left hind legs, and remove them.
The PC card insertion slot appears.
This side
5
With the aerial on the LAN card oriented towards the right, push
the LAN card firmly into the slot.
Note
When you insert the LAN card, push the base of the aerial or both ends of the card.
Pushing the projecting part of the aerial may damage it.
9
Page 10
6
Fold down the ejection button so that it is flat against the core unit
of AIBO.
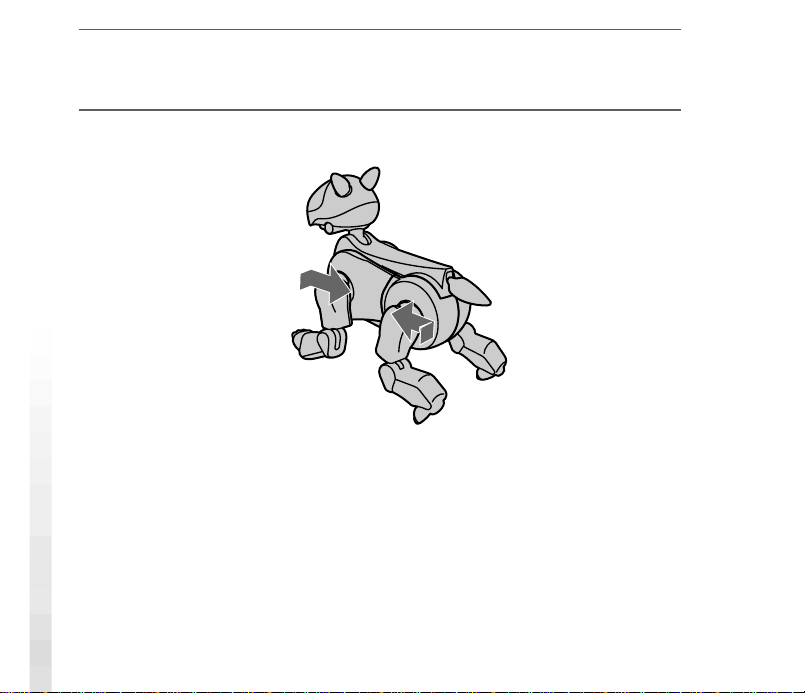
7
Replace the left front and left hind legs.
10
Page 11
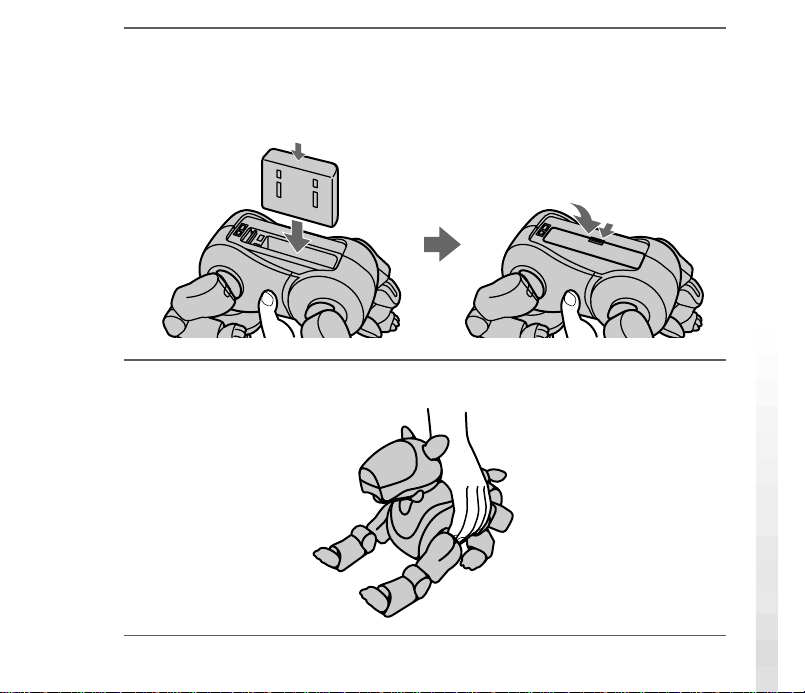
8
Re-insert the battery pack until it clicks into place, and close the
stomach cover.
Press the point
indicated by an arrow.
9
Place AIBO on the floor as shown below.
11
Page 12
Making network settings
For explanation of network-related terms, see “Glossary” on page 28.
Network setting procedure
The procedure outline of network settings for AIBO is as follows:
Check your network configuration (page 13)
m
Change the network settings of the devices within the network except AIBO so
that they can communicate with AIBO in its settings before change (page 13)
mm
To restore the previous network
settings
m
Change AIBO’s network settings
using the Web browser on the PC
(page 20)
m
Restore the network settings of all
devices except AIBO
m
Check the connection of AIBO and
other devices
m
End
To use the new network settings
m
Check the connection of AIBO and
the PC
m
End
12
Page 13
Network configuration and settings
Depending on the devices within the network, select one of the following four
types of wireless LAN network configuration and make settings accordingly.
a) There is an access point and communication is conducted
through the access point from a wireless LAN-enabled PC
PC
Access point
AIBO and the PC can communicate with each other through the access point.
Settings for the access point
Set the following items for the access point so that it can communicate with AIBO
in its default settings.
SSID: AIBONET
WEP key: AIBO2
Wireless channel: any channel between 1 and 11
LAN address: 10.0.1.1
LAN subnet mask: 255.255.255.0
DHCP server function: ON (whenever possible)
13
Page 14

Settings for the PC
Set the following items for the PC.
SSID: AIBONET
WEP key: AIBO2
Communication mode: infrastructure mode (access point mode)
IP address: When the DHCP server is available, set this item to “Acquire the
IP address automatically.” Otherwise, set it to “10.0.1.101”.
Subnet mask: 255.255.255.0
Note
You may find it impossible to set the SSID for some access points currently
available in market. When you use one of these, first change the LAN network
configuration as described in c) or d) below so that communication is conducted
through the access point from a PC and AIBO, then change AIBO’s network
settings so that they correspond with the settings on the access point. And then,
restore the previous LAN network configuration.
14
Page 15
b) There is an access point and communication is conducted
through the access point from a PC connected to the wired LAN
network and devices within the wireless LAN network
PC
AIBO and the PC can communicate with each other through the access point.
Access
point
Wired LAN
Settings for the access point
Set the following items for the access point so that it can communicate with AIBO
in its default settings.
Operation mode: Bridged mode or ISDN router mode
SSID: AIBONET
WEP key: AIBO2
Wireless channel: any channel between 1 and 11
IP address: 10.0.1.1
Subnet mask: 255.255.255.0
Settings for the PC
Set the following items for the PC.
IP address: 10.0.1.101
Subnet mask: 255.255.255.0
15
Page 16
Notes
• You may find it impossible to set the SSID for some access points currently
available in market. When you use one of these, you cannot change the settings
for AIBO through a PC connected to the wired LAN network. Use a PC which
is connectable to the wireless LAN network.
• Changing the settings for the access point or the PC connected to the wired LAN
network may affect other operating devices connected to the same network. In
such case, disconnect the access point and the PC to which the settings are
made, then change AIBO’s network settings. And then, restore the previous
LAN network configuration.
c) An access point is not used, all personal computers are equipped
with wireless LAN cards, and at least one of the PCs is set to IBSS
Peer-to-Peer mode.
To confirm that the PC is properly set to IBSS Peer-to-Peer mode, refer to the
operation manual supplied with the wireless LAN card for the personal computer.
PC (IBSS Peer-toPeer mode)
16
Page 17
Settings for the PC
Set the following items for the PC in IBSS Peer-to-Peer mode so that it can
communicate with AIBO in its default settings.
SSID: AIBONET
WEP key: AIBO2
Wireless channel: any channel between 1 and 11
IP address: 10.0.1.101
Subnet mask: 255.255.255.0
Communication mode: IBSS Peer-to-Peer mode
Note
The settings above can be changed after you change the settings for AIBO.
d) An access point is not used, all personal computers are equipped
with wireless LAN cards, and none of the PCs is set to IBSS Peerto-Peer mode
Set AIBO and the PC to ad hoc demo mode.
PC (ad hoc
demo mode)
17
Page 18

Settings for the PC
Set the following items for the PC in ad hoc demo mode so that it can communicate
with AIBO in its default settings.
WEP key: AIBO2
Wireless channel: 3
IP address: 10.0.1.101
Subnet mask: 255.255.255.0
Communication mode: ad hoc demo mode
Note
The settings above can be changed after you change the settings for AIBO.
18
Page 19

AIBO’s network settings
Settings must be made for AIBO on the following items. Once the
communication has been established, you can change the settings according to
your network environment. For the explanation on items below, see
“Glossary” on page 28.
Item Description Default setting
Hostname
IP Address IP address 10.0.1.100
Subnet Mask Subnet mask value 255.255.255.0
IP Gateway Gateway address 10.0.1.1
The name of AIBO to be used for
wireless LAN communication. Up
to 8 alphanumeric characters can
be entered.
AIBO
SSID The name of the wireless LAN
network to be used. Up to 32
alphanumeric characters can be
entered.
WEP key The character string to be used as
the key for encrypting data
transmitted over the wireless LAN.
Input five alphanumeric characters.
Do not enter if data need not be
encrypted.
AIBONET
AIBO2
19
Page 20

Item Description Default setting
Operating mode
Specify infrastructure mode or ad
hoc demo mode.
See below*.
Wireless channel Specify this item when ad hoc demo
* First, AIBO searches for an access point whose SSID and WEP key settings are
identical with those on AIBO. If an applicable access point is found, AIBO
starts up in infrastructure mode. If not, AIBO starts up in ad hoc demo mode.
mode is selected. A number from 1
to 11 can be entered for this LAN
card.
Changing AIBO’s network settings
You will need a PC installed with a Web browser and capable of being
connected to a wireless LAN network to change AIBO’s wireless LAN
settings.
1
Set up the access point and the personal computer.
For details on how to make the respective settings, refer to the operation
manual supplied with each product.
For details on the settings a) to d), see pages 13 to 18.
20
3
Page 21

2
Insert AIBO-ware “Memory Stick” for wireless LAN
communication into AIBO and press the pause button on its chest
to start it.
For details on how to insert a “Memory Stick” into AIBO, refer to the
operating instructions supplied with AIBO.
3
Start up the Web browser on the personal computer and open the
following URL for setting AIBO.
http://10.0.1.100/SETUP.HTM
4
Set the network-related items for AIBO (page 19, 20).
5
Click the “Change Settings” button.
Once you click the button, all settings made in step 4 are entered. Be sure to
check each setting before you click the “Change Settings” button. If you
made a mistake, reset the items (page 22) and repeat steps 1 to 5 to enter the
correct settings.
21
Page 22

6
Press the pause button on AIBO’s chest to pause AIBO.
The settings made will be applied next time you start up AIBO.
7
Restore the previous network environment.
8
Verify that you can communicate with AIBO from the PC.
If you made a mistake on the settings/
If AIBO does not operate after you have changed the settings
Press AIBO’s pause button to make it pause, remove the wireless LAN card from
AIBO, and then start up AIBO again.
When you start up AIBO without the LAN card, all network-related settings are
reset. Do the procedure again to re-enter the settings.
22
Page 23

Precautions
Safety
Do not drop or cause a mechanical shock to the wireless LAN card, as this
may damage the card.
Installation
Do not place the wireless LAN card where it will be exposed to the following
conditions:
• Direct sunlight or extreme heat. (Use this LAN card within 5°C and 35°C.)
• In the car parked in the sun or on the dashboard of a car, especially in
summer.
• Magnetic location (near magnet, speaker, or TV).
• Excessive dust.
• Unstable or inclined surface.
• Location subject to severe vibrations.
• High humidity or poor ventilation.
• Near obstacles which may block radio waves, such as metal or concrete
walls.
23
Page 24

Moisture condensation
If the LAN card is brought directly from a cold place to a warm place,
moisture may condense inside or on outside surface of the card, causing
damage. If moisture condensation has occurred, wait for a few hours before
using the LAN card.
Cleaning
Clean the casing with a soft cloth, lightly moistened with water or a mild
detergent solution. Do not use any type of abrasive pad, scouring powder or
solvent such as alcohol or benzine as it may damage the finish of the casing.
24
Page 25
Troubleshooting
If you experience any of the following difficulties, use this troubleshooting
guide to remedy the problem. Should the problem persist, contact the dealer
from whom you purchased the card or the AIBO Customer Link (refer to the
“AIBO” ERS-210 Operating Instructions).
x Wireless communication
Symptom Cause/Remedy
The PC cannot
communicate with AIBO.
The wireless LAN card is not inserted into AIBO
correctly.
c Check that the wireless LAN card is inserted
correctly (page 7).
The network settings are incorrect.
c Make network settings again (page 12).
Data transmission is slow. There is radio interference from another access
You have forgotten the
WEP key.
point or a wireless LAN device.
c Change the wireless channel setting.
There are too many clients logging through the
access point.
c Try accessing later.
There is no way to find out the current WEP
key.
c Remove the LAN card from AIBO and restart
it to restore the default network settings, then
make the network settings again (page 22).
25
Page 26

Symptom Cause/Remedy
No communication
occurs even when the
access point (or the PC
with the wireless LAN
card) is located within 50
meters of AIBO.
The effective communication distance depends
on the location and the surrounding conditions.
c Move AIBO and the PC closer to the access
point.
x AIBO
Symptom Cause/Remedy
AIBO does not turn on
after you insert the
wireless LAN card.
The wireless LAN card is not inserted into
AIBO correctly.
c Check that the LAN card is inserted correctly
(page 7).
26
AIBO does not operate. The wireless LAN card is not inserted into
AIBO correctly.
c Change the wireless channel setting (page 20).
AIBO’s internal battery pack is drained.
c The inserted LAN card consumes certain
amount of the power of AIBO’s internal
battery pack. Charge the battery pack.
Page 27

Specifications
Power requirements
3.3 V
Power consumption
330 mA (max. during
transmission), 240 mA (max.
during reception)
Connector Type-II PC card slot
Dimensions Approx. 90 × 12 × 53 mm
(w/h/d)
Mass Approx. 35 g
Protocol TCP/IP
Standards IEEE802.11b/IEEE802.11
Frequency band
2.4 GHz
Wireless channels
1 to 11
Modulation method
DS-SS (conforming to
IEEE802.11)
Operating temperature
5°C and 35°C (without
condensation)
Storage temperature
–20°C and 60°C (without
condensation)
Supplied accessories
Operating Instructions
Design and specifications are subject to
change without notice.
27
Page 28

Glossary
Access point
A networking device with both wireless
communication interface and telephone
line or Ethernet interface, which bridges
across the wireless LAN and wired LAN.
For wireless communication, SSID,
wireless channels to be used, and WEP
key must be specified for the access
point.
Ad hoc demo mode
A transmission method for devices
equipped with a wireless LAN card (for
example, a PC and AIBO), which does
not require the access point. In ad hoc
demo mode, you must specify wireless
channel and WEP key for both AIBO and
a personal computer. When you select
ad hoc demo mode, you cannot specify
SSID.
DHCP (Dynamic Host
Configuration Protocol) server
When you construct a network using
TCP/IP, an IP address must be specified
for all the devices within the network.
28
When a DHCP server is included within
the network, it assigns an IP address
automatically for all devices. The access
point or Windows NT/2000 server can
serve as the DHCP server.
IBSS (Independent Basic Service
Set) Peer-to-Peer mode
When you set at least one PC within the
wireless LAN network to IBSS Peer-toPeer mode, all devices within the
network can communicate with each
other without an access point. The only
difference between IBSS Peer-to-Peer
mode and ad hoc demo mode is that
SSID can be specified for the IBSS Peerto-Peer mode while it cannot be specified
for the ad hoc demo mode. When there
is no access point within the network, at
least one personal computer must be set
to IBBS Peer-to-Peer mode and the rest
of the personal computer and the wired
LAN devices must be set to infrastructure
mode.
Page 29

IEEE802.11b
A standard for wireless LAN network
which uses the 2.4 GHz band for
communication. Maximum transmission
rate is 11 Mbps. This LAN card
conforms to IEEE802.11b.
Infrastructure mode
Also referred to as “Access point mode.”
This mode is used when a device
equipped with a wireless LAN card
communicates with the access point. In
this mode, the wireless channel specified
by the access point is used for
communication. For AIBO, you must
specify SSID and WEP key which
matches those on the access point.
IP address
Number used for identifying the device
within the TCP/IP network. An IP
address consists of four numbers each of
which is from 0 to 255.
Example: 192.168.1.1
10.0.1.1
LAN (Local Area network)
A relatively small network usually
constructed using the Ethernet, with
transmission rate from 10 Mbps to
100 Mbps. When an access point is used,
a wireless LAN and wired LAN can be
connected.
SSID (Service Set ID)
Also referred to as “access point ID” or
“group name.” The SSID is specified
through the access point or the personal
computer which is set to IBSS Peer-toPeer mode, and is used for
communication within wireless LAN
network as the network name.
The SSID can be entered using up to 32
alphanumeric characters.
Subnet mask
An IP address consists of four numbers
each of which is from 0 to 255 (see IP
address). For more efficient operation,
an IP address is divided into two
components: network component and
host component. The subnet mask is the
value set for dividing the IP address into
the network segment and host segment.
In subnet mask, the digits specified as
“1” (in binary code) determines network
component.
29
Page 30

Example: The network component and
host component of the device whose IP
address is 192.168.1.2 when the subnet
mask is 255.255.255.0
192.168.1: network component
2: host component
TCP/IP (Transmission Control
Protocol/Internet Protocol)
A protocol which the personal computer
within the network uses for
communication. TCP/IP is used in
Internet and is used the most world wide.
This LAN card uses TCP/IP for
communication. In order to
communicate using TCP/IP, a device
requires the IP address which works as
ID number.
WEP (Wired Equivalent Privacy)
WEP encrypts data transmit through the
wireless LAN to prevent tapping of
information.
To activate WEP, characters to be used as
the key for encrypting the data being
transmit using the wireless LAN must be
specified. Input five alphanumeric
characters.
Wireless channel
In IEEE802.11b wireless LAN standard,
2.4 GHz band is divided into 14
channels. To prevent an RF interference,
separate channels can be specified for
different wireless networks which are
close to each other. This LAN card can
use channels 1 to 11. In infrastructure
mode, a channel specified by the access
point is used by all the devices within the
network. In ad hoc mode, the channel
must be specified by all the devices
within the network.
30
Page 31

Page 32

Informations relatives à la sécurité
AVERTISSEMENT
Toute modification ou déréglage de cet appareil non explicitement approuvé
par le fabricant, responsable de la conformité, peut faire perdre à l’autorité de
l’utilisateur à le droit d’utiliser cet appareil.
Informations relatives aux
réglementations
Ce produit a été testé et s’est avéré conforme aux normes suivantes.
ETS300-328
ETS300-826
EN60950/92+A1/93+A2/95+A4/97+A11/97
Nous, Sony Corporation, déclarons par la présente que la carte LAN
radiophonique AIBO, modèle ERA-201D1, est conforme aux exigences
fondamentales et aux autres dispositions de la Directive 1999/5/CE.
2
Page 33

Références utilisateur
Le numéro du modèle et le numéro de série sont placés à l’intérieur du capot
situé sur l’estomac d’Aibo. Notez le numéro de série dans l’espace prévu à cet
effet, ci-dessous. Faites référence au numéro du modèle et de série chaque fois
que vous contactez votre revendeur Sony.
No. du modèle ERA-201D1
No. de série ___________
Assistance clientèle
Comment contacter le service clientèle AIBO?
Aux Etats-Unis :
1-800-427-2988
Adresse Email : aibosupport@info.sel.sony.com
En Europe :
Contact anglais : +44(0)-20-7365-2938
Contact allemand : +49(0)-69-9508-6310
Contact français : +33(0)-1-5569-5118
Adresse E-mail : aibo@sonystyle-europe.com
FR
3
Page 34

“AIBO,” le AIBO logo, “OPEN-R,” et le logo OPEN-R sont des marques
déposées de Sony Corporation.
“Memory Stick,” “
commerciales de Sony Corporation. Le symbole “” n’a pas été utilisé dans
le présent manuel.
http://www.aibo.com/
Toute reproduction totale ou partielle sans autorisation écrite préalable est
interdite. Tous droits réservés.
,” et “ ” sont des marques
4
Page 35

Table des matières
Aperçu ..............................................................................................6
Exigences du système................................................................ 7
Installation de la carte LAN dans AIBO ..........................................8
Effectuer des réglages réseau .........................................................13
Procédure de paramétrage du réseau ....................................... 13
Réglages et configuration réseau............................................. 14
Réglages réseau d’AIBO ......................................................... 20
Modification des paramètres réseau d’AIBO .......................... 21
Précautions .....................................................................................24
Sécurité .................................................................................... 24
Installation ............................................................................... 24
Condensation d’humidité......................................................... 25
Nettoyage................................................................................. 25
Dépannage......................................................................................26
Spécifications .................................................................................28
Glossaire.........................................................................................29
5
Page 36

Aperçu
Lorsque la carte LAN radiophonique AIBO ERA-201D1 (désignée par “carte
LAN” dans la suite de ce document) est installée dans l’AIBO ERS-210, elle
lui permet de communiquer avec un PC équipé d’une carte LAN
radiophonique. Lorsqu’un point d’accès LAN radiophonique est utilisé, il est
possible de communiquer avec AIBO via un PC relié à un réseau LAN câblé.
<Lorsqu’un point d’accès est utilisé>
Réseau LAN câblé
PC
Point d’accès
PC
Réseau LAN
radiophonique
<Lorsqu’aucun point d’accès
n’est utilisé>
PC
6
Page 37

L’utilisation simultanée d’applications LAN radiophoniques dédiées à AIBO
sur le PC et du “Memory Stick” de l’AIBO-ware* dans AIBO permet
d’exploiter pleinement le potentiel d’AIBO grâce à la communication LAN
radiophonique.
* L’AIBO-ware est un programme capable d’activer AIBO et fabriqué par Sony
Corporation ou des tiers.
Exigences du système
La carte LAN radiophonique doit être utilisée avec les éléments suivants :
• “AIBO” ERS-210
• “Memory Stick” de l’AIBO-ware permettant une communication LAN
radiophonique
• Logiciel d’application LAN radiophonique dédié à AIBO permettant
l’utilisation du PC
• Un ordinateur équipé du logiciel d’application PC dédié à AIBO et pouvant
être relié à un réseau LAN radiophonique.
• Une carte LAN radiophonique (compatible IEEE802.11b) ou un point
d’accès (compatible IEEE802.11b) (pour permette la communication
radiophonique depuis un ordinateur raccordé à un réseau LAN câblé).
• Un navigateur Web (installé sur l’ordinateur afin de modifier les paramètres
réseau de AIBO).
7
Page 38

Installation de la carte LAN dans
AIBO
1
Appuyez sur la touche pause située sur la poitrine d’AIBO afin de
le mettre en mode pause.
Témoin de poitrine
Remarque
Lorsqu’AIBO lit le “Memory Stick”, le témoin d’accès de la batterie est rouge.
Dans ce cas, ne retirez pas le “Memory Stick” afin d’éviter toute détérioration
d’AIBO. La batterie est verrouillée jusqu’à ce que la procédure de sauvegarde des
données soit terminée. Ne tentez pas de la retirer de force, ceci pourrait
endommager AIBO.
8
Page 39

2
Saisissez AIBO par le corps, retournez-le puis ouvrez le capot situé
sur son estomac.
Remarques
• Soulevez AIBO par le corps et non par ses extrémités.
• Ne touchez pas la borne de charge avec vos mains. Ceci pourrait souiller la
borner et entraîner des faux-contacts.
3
Faites glisser le bouton de verrouillage et retirez le bloc batterie.
Vérifiez que le témoin d’accès de la batterie est blanc.
Bouton de
verrouillage
Remarque
Lorsque le témoin d’accès de la batterie est rouge, celle-ci est verrouillée. Ne
tentez pas de la retirer de force, ceci pourrait endommager AIBO.
9
Page 40

10
4
Insérez l’épingle fournie avec AIBO dans l’orifice de séparation
des pattes avant et arrière gauche d’AIBO et appuyez afin de
retirer les pattes.
La fente d’insertion de la carte PC apparaît.
Ce côté
5
Poussez la carte LAN fermement dans la fente, en orientant son
antenne vers la droite.
Remarque
Lorsque vous insérez la carte LAN, poussez la base de l’antenne ou les deux
extrémités de la carte. Ne poussez pas la partie saillante de l’antenne sous peine de
l’endommager.
Page 41

6
Repliez le bouton d’éjection de sorte qu’il soit aplati contre la
partie centrale d’AIBO.
7
Replacez la patte arrière gauche.
8
Ré-insérez la batterie jusqu’au déclic indiquant qu’elle est en
place puis fermez le capot situé sur l’estomac.
Appuyez à
l’endroit repéré
par une flèche.
11
Page 42

9
Placez AIBO sur le sol, comme représenté ci-dessous.
12
Page 43

Effectuer des réglages réseau
Consultez le “Glossaire” en page 29 pour l’explication des termes liés au
réseau.
Procédure de paramétrage du réseau
Le déroulement de la procédure de paramétrage du réseau pour AIBO est le
suivant :
Vérifiez votre configuration réseau (page 14)
m
Modifiez les réglages réseau des dispositifs du réseau à l’exception d’AIBO de
sorte qu’ils puissent communiquer avec lui, avec ses réglages avant
mm
Pour restaurer les réglages
réseau précédents
m
Modifiez les paramètres réseau
d’AIBO à l’aide du navigateur Web de
l’ordinateur (page 21)
m
Restaurez les paramètres réseau
de tous les périphériques à
l’exception d’AIBO.
m
Vérifiez les connexions d’AIBO et
des autres dieplsitifs
m
Fin
modification (page 14)
Pour utiliser les nouveaux réglages
réseau
m
Vérifiez le connexion d’AIBO et de
l’ordinateur
m
Fin
13
Page 44

Réglages et configuration réseau
Selon les dispositifs du réseau, sélectionnez l’un des quatre types de
configuration réseau LAN radiophonique et effectuez les réglages
correspondants.
a) Il existe un point d’accès et la communication passe par celui-ci,
depuis un PC équipé d’un LAN radiophonique
14
PC
Point d’accès
AIBO et le PC peuvent communiquer via le point d’accès.
Réglages du point d’accès
Réglez les éléments suivants de sorte que le point d’accès puisse communiquer
avec AIBO lorsque celui-ci est réglé par défaut.
SSID: AIBONET
WEP key (critère d’identification WEP): AIBO2
Wireless channel (canal radiophonique) : canal compris entre 1 et 11
LAN address (adresse LAN) : 10.0.1.1
LAN subnet mask (masque sous-réseau LAN) : 255.255.255.0
DHCP server function (fonction serveur DHCP) : ON (si possible)
Page 45

Réglages du PC
Réglez les éléments suivants sur le PC.
SSID: AIBONET
WEP key (critère d’identification WEP): AIBO2
Communication mode (mode de communication) : mode infrastructure
(mode point d’accès)
IP address (adresse IP) : Réglez cet élément sur “Aquire the IP address
automatically (Acquérir automatiquement l’adresse IP)” lorsque le serveur”
DHCP est disponible. Sinon, réglez-le sur “10.0.1.101”.
Subnet mask (masque sous-réseau) : 255.255.255.0
Remarque
Il peut s’avérer impossible de régler la SSID pour certains points d’accès
actuellement commercialisés. Lorsque vous utilisez l’un de ces points d’accès,
modifiez la configuration du réseau LAN comme décrit en c) ou d) ci-dessous de
sorte que la communication passe par le point d’accès, depuis un PC et AIBO.
Modifiez ensuite les réglages réseau d’AIBO de sorte qu’ils correspondent aux
réglages du point d’accès. Enfin, restaurez la configuration de réseau LAN
précédente.
15
Page 46

b) Il existe un point d’accès et la communication passe par le point
d’accès, depuis un PC raccordé au réseau LAN câblé et des
dispositifs du réseau LAN radiophonique
16
PC
Point d’accès
AIBO et le PC peuvent communiquer via le point d’accès.
Réseau LAN câblé
Réglages du point d’accès
Réglez les éléments suivants de sorte que le point d’accès puisse communiquer
avec AIBO lorsque celui est réglé par défaut.
Operation mode (mode de fonctionnement) : mode ponté ou mode
routeur RNIS
SSID : AIBONET
WEP key (critère d’identification WEP) : AIBO2
Wireless channel (canal radiophonique) : canal compris entre 1 et 11
IP address (adresse IP) : 10.0.1.1
Subnet mask (masque sous-réseau) : 255.255.255.0
Réglages du PC
Réglez les éléments suivants sur le PC.
IP address (adresse IP): 10.0.1.101
Subnet mask (masque sous-réseau) : 255.255.255.0
Page 47

Remarques
• Il peut s’avérer impossible de régler la SSID pour certains points d’accès
actuellement commercialisés. Lorsque vous utilisez l’un de ces points, il est
impossible de modifier les réglages d’AIBO via un PC raccordé à un réseau
LAN câblé. Utilisez un PC pouvant être raccordé au réseau LAN radiophonique.
• Une modification des réglages du point d’accès ou du PC raccordé au réseau
LAN câblé peut affecter d’autres dispositifs en cours d’utilisation, raccordés au
même réseau. Dans ce cas, déconnectez le point d’accès et le PC sur lequel les
réglages sont effectués, puis modifiez les réglages réseau d’AIBO. Restaurez
ensuite la configuration de réseau LAN précédente.
c) Aucun point d’accès n’est utilisé, tous les ordinateurs sont
équipés de cartes LAN radiophoniques et au moins un des PC est
réglé en mode IBSS Peer-to-Peer
Afin de vous assurer que l’ordinateur est bien réglé en mode IBSS Peer-to-Peer,
reportez-vous au mode d’emploi fourni avec la carte LAN radiophonique de
l’ordinateur.
PC (mode IBSS
Peer-to-Peer)
17
Page 48

Réglages du PC
Réglez les éléments suivants sur le PC en mode IBSS Peer-to-Peer, de sorte qu’il
puisse communiquer avec AIBO lorsque celui-ci est réglé par défaut.
SSID : AIBONET
WEP key (critère d’identification WEP) : AIBO2
Wireless channel (canal radiophonique) : canal compris entre 1 et 11
IP address (adresse IP) : 10.0.1.101
Subnet mask (masque sous-réseau) : 255.255.255.0
Communication mode (mode de communication) : mode IBSS Peer-to-
Peer
Remarque
Les réglages ci-dessus peuvent être modifiés après avoir modifié les réglages
d’AIBO.
d) Aucun point d’accès n’est utilisé, tous les ordinateurs sont
équipés de cartes LAN radiophoniques et aucun PC n’est réglé en
mode IBSS Peer-to-Peer
Réglez AIBO et le PC en mode ad hoc démo.
PC (mode ad
hoc démo)
18
Page 49

Réglages du PC
Réglez les éléments suivants sur le PC en mode ad hoc démo de sorte qu’il puisse
communiquer avec AIBO lorsque celui-ci est réglé par défaut.
WEP key (critère d’identification WEP) : AIBO2
Wireless channel (canal radiophonique) : 3
IP address (adresse IP) : 10.0.1.101
Subnet mask (masque sous-réseau) : 255.255.255.0
Communication mode (mode de communication) : mode ad hoc démo
Remarque
Après la modification des réglages d’AIBO, les réglages ci-dessus peuvent être
modifiés.
19
Page 50

Réglages réseau d’AIBO
Il convient de régler les éléments suivants sur AIBO. Lorsque la
communication a été établie, vous pouvez modifier les réglages selon votre
environnement réseau. Pour obtenir des explications sur les éléments cidessous, reportez-vous au “Glossaire” page 29.
20
Elément Description
Hostname
IP Address Adresse IP 10.0.1.100
Subnet Mask Valeur du masque sous-réseau 255.255.255.0
IP Gateway Adresse du point d’accès 10.0.1.1
SSID Nom du réseau LAN
WEP key Chaîne de caractères utilisée
Nom d’AIBO à utiliser pour la
communication LAN
radiophonique. Vous pouvez utiliser
jusqu’à 8 caractères
alphanumériques.
radiophonique à utiliser. Vous
pouvez utiliser jusqu’à 32
caractères alphanumériques.
comme critère d’identification pour
coder les données transmises sur le
LAN radiophonique. Saisissez cinq
caractères alphnumériques. Ne
saisissez rien si les données ne
nécessitent pas de codage.
Réglage par défaut
AIBO
AIBONET
AIBO2
Page 51

Elément Description
Operating mode
Spécifiez le mode infrastructure ou
le mode ad hoc démo.
Réglage par défaut
Voir ci-dessous*.
Wireless channel Spécifiez cet élément lorsque le
mode ad hoc démo est sélectionné.
Un nombre compris entre 1 et 11
peut être saisi pour cette carte LAN.
* AIBO commence par rechercher un point d’accès dont les paramètres SSID et
WEP key sont identiques aux siens. Si un point d’accès correct est trouvé, AIBO
démarre en mode infrastructure. Si ce n’est pas le cas, AIBO démarre en mode
démo ad hoc.
3
Modification des paramètres réseau d’AIBO
Pour modifier les paramètres réseau LAN radiophonique d’AIBO, vous avez
besoin d’un ordinateur équipé d’un navigateur Web et pouvant être relié à un
réseau LAN radiophonique.
1
Configurez le point d’accès et l’ordinateur.
Voir les pages 14 à 19 pour plus de détails sur les réglages a) à d).
21
Page 52

2
Insérez le “Memory Stick” de l’AIBO-ware concernant la
communication LAN radiophonique dans AIBO et appuyez sur la
touche pause située sur sa poitrine afin de l’activer.
Pour plus de détails sur l’insertion d’un “Memory Stick” dans AIBO, référezvous au mode d’emploi fourni avec AIBO.
3
Démarrez le navigateur Web sur l’ordinateur et ouvrez l’URL
suivant afin de configurer AIBO.
http://10.0.1.100/SETUP.HTM
4
Réglez les éléments d’AIBO associés au réseau (page 20, 21).
5
Cliquez sur le bouton “Change Settings”.
Tous les réglages effectués à l’étape 4 sont validés lorsque vous cliquez sur ce
bouton. Vérifiez chaque réglage avant de cliquer sur le bouton “Change
Settings”. Si vous vous êtes trompé, réinitialisez les éléments concernés (page
23) et recommencez les étapes 1 à 4 pour saisir les réglages corrects.
22
Page 53

6
Appuyez sur la touche pause située sur la poitrine d’AIBO puis
appuyez de nouveau sur cette touche pour démarrer AIBO.
Les réglages effectués seront appliqués la prochaine fois qu’AIBO sera activé.
7
Restaurez l’environnement réseau précédent.
8
Vérifiez que vous pouvez communiquer avec AIBO depuis
l’ordinateur.
Si vous avez commis une erreur lors des réglages/
Si AIBO ne fonctionne pas après avoir modifié les réglages
Appuyez sur la touche pause d’AIBO afin de le mettre en mode pause, retirez la
carte LAN radiophonique d’AIBO, puis redémarrez-le.
Lorsque vous démarrez AIBO sans la carte LAN , tous les réglages réseau sont
réinitialisés.
23
Page 54

Précautions
Sécurité
Ne faites pas tomber et ne causez pas de choc mécanique à la carte LAN
radiophonique car ceci pourrait l’endommager.
Installation
Ne placez pas la carte LAN radiophonique à un endroit présentant les
conditions suivantes :
• en plein soleil ou à des températures extrêmes (utilisez cette carte LAN
entre 5°C et 35°C).
• dans un véhicule stationné en plein soleil ou sur le tableau de bord,
particulièrement en été.
• près d’appareils dégageant un champ magnétique (à proximité d’aimant,
d’enceintes ou d’un téléviseur).
• poussière excessive.
• surface instable ou inclinée.
• endroit soumis à de fortes vibrations.
• humidité élevée ou endroit peu aéré.
• à proximité d’obstacles qui pourraient bloquer les ondes radio comme des
murs métalliques ou en béton.
24
Page 55

Condensation d’humidité
Si la carte LAN passe directement d’un endroit froid à un endroit chaud, de
l’humidité peut se former dans la carte ou à l’extérieur de la surface de la carte
ce qui peut l’endommager. Si de la condensation s’est formée, attendez
quelques heures avant d’utiliser la carte LAN.
Nettoyage
Nettoyez le boîtier avec un tissu doux, légèrement imbibé de produit de
nettoyage non agressif. N’utilisez pas de tampon abrasif, de poudre à récurer
ni de solvant comme l’alcool ou le benzène car ceci pourrait endommager le
revêtement du boîtier.
25
Page 56

Dépannage
Si vous rencontrez l’une des difficultés énoncées ci-après, utilisez ce guide de
dépannage pour résoudre le problème. Si le problème persiste, contactez le
vendeur auprès duquel vous vous êtes procuré la carte ou le centre d’assistance
clientèle de AIBO (reportez-vous au mode d’emploi “AIBO” ERS-210).
x Communication radiophonique
Symptôme Cause/Remède
Le PC ne peut pas
communiquer avec
AIBO.
La carte LAN radiophonique n’est pas insérée
correctement dans AIBO.
c Vérifiez que la carte LAN radiophonique est bien
insérée (page 8).
Les réglages réseau sont incorrects.
c Recommencez les réglages réseau (page 13).
26
La transmission des
données est lente.
Vous avez oublié le
critère d’identification
WEP.
Présence d’une interférence radio provenant d’un
autre point d’accès ou d’un dispositif LAN
radiophonique.
c Modifiez le réglage du canal radiophonique.
Le nombre d’utilisateurs se connectant via le point
d’accès est trop important.
c Essayez ultérieurement.
Il est impossible de retrouver le critère
d’identification WEP actuel.
c Retirez la carte LAN d’AIBO et redémarrez-le
pour restaurer les paramètres réseau par défaut,
puis redéfinissez les paramètres réseau (page 23).
Page 57

Symptôme Cause/Remède
Aucune communication
n’est obtenue même
lorsque le point d’accès
(ou l’ordinateur contenant
la carte LAN
radiophonique) est situé
dans un rayon de 50
mètres par rapport à
AIBO.
La distance de communication réelle dépend de
l’emplacement et de l’environnement.
c Rapprochez AIBO et l’ordinateur du point
d’accès.
x AIBO
Symptôme Cause/Remède
AIBO ne se met pas sous
tension après avoir inséré
la carte LAN
radiophonique.
La carte LAN radiophonique n’est pas insérée
correctement dans AIBO.
c Vérifiez que la carte LAN est insérée
correctement (page 8).
AIBO ne fonctionne pas. La carte LAN radiophonique n’est pas insérée
correctement dans AIBO.
c Modifiez le réglage du canal radiophonique
(page 21).
La batterie interne d’AIBO est vide.
c La carte LAN insérée consomme une certaine
quantité d’énergie fournie par la batterie
interne d’AIBO. Chargez la batterie.
27
Page 58

Spécifications
Puissance nécessaire
3,3 V
Consommation électrique
330 mA (max. pendant une
transmission), 240 mA (max.
pendant une réception)
Connecteur Fente pour carte PC de type-
Dimensions Env. 90 × 12 × 53 mm (l/h/p)
Masse Env. 35 g
Protocole TCP/IP
Normes IEEE802.11b/IEEE802.11
Bande de fréquence
Méthode de modulation
Température de service
Température de stockage
Accessoires fournis
28
II
2,4 GHz
DS-SS (conformément à
l’IEEE802.11)
55°C et 35°C (sans
condensation)
–20°C et 60°C (sans
condensation)
Mode d’emploi
La conception et les spécification sont
sujettes à modification sans préavis.
Page 59

Glossaire
Adresse IP
Numéro utilisé pour identifier le
dispositif dans le réseau TCP/IP. Une
adress IP comporte quatre nombres
compris chacun entre 0 et 255.
Exemple : 192.168.1.1
10.0.1.1
Canal radiophonique
Selon la norme LAN radiophonique
IEEE802.11b, une bande 2,4 GHz est
divisée en 14 canaux. Pour éviter les
interférences RF, des canaux séparés
peuvent être spécifiés pour différents
réseaux radiophoniques situés à
proximité les uns des autres. Cette carte
LAN peut utiliser les canaux 1 à 11. En
mode infrastructure, un canal spécifié par
le point d’accès est utilisé par tous les
dispositifs du réseau. En mode ad hoc, le
canal doit être spécifié par tous les
dispositifs dans le réseau.Point d’accès
Dispositif en réseau possédant à la fois
une interface de communication
radiophonique et une ligne téléphonique
ou une interface Ethernet qui relie le
LAN radiophonique et le LAN câblé.
Pour une communication radiophonique,
le point d’accès requière l’ESSID
(identification du LAN), un canal
radiophonique utilisé par le point d’accès
et un critère d’identification WEP pour
coder les données à transmettre.
IEEE802.11b
Norme de réseau LAN radiophonique
utilisant une bande 2,4 GHz pour la
communication. Le vitesse de
transmission maximale est égale à 11
Mbps. Cette carte LAN est conforme à
l’IEEE802.11b.
LAN (Local Area network, réseau
local)
Réseau de taille relativement réduite
généralement basé sur Ethernet et ayant
une vitesse de transmission comprise
entre 10 Mbps et 100 Mbps. Lorsqu’un
point d’accès est utilisé, un LAN
radiophonique et un LAN câblé peuvent
être connectés.
29
Page 60

Masque sous-réseau
Une adresse IP comporte quatre
nombres, compris chacun entre 0 et 255
(voir l’adresse IP). Pour un
fonctionnement optimal, une adresse IP
est divisée en deux composants : le
composant réseau et le composant hôte.
Le masque sous-réseau est la valeur
définie pour diviser l’adresse IP en un
segment réseau et un segment hôte. Dans
le masque sous-réseau, les chiffres “1”
(en code binaire) déterminent le
composant réseau.
Exemple : le composant réseau et le
composant hôte du dispositif dont
l’adresse IP est 192.168.1.2 sont les
suivants, lorsque le masque sousréseau est 255.255.255.0
192.168.1 : composant réseau
2 : composant hôte
30
Mode ad hoc démo
Méthode de transmission pour les
dispositifs équipés d’une carte LAN
radiophonique (par exemple, un PC et
AIBO) ne nécessitant aucun point
d’accès. En mode ad hoc démo, vous
devez spécifier un canal radiophonique et
un critère d’identification WEP pour
AIBO et l’ordinateur.
Lorsque vous sélectionnez le mode ad
hoc démo, vous ne pouvez pas spécifier
la SSID.
Mode IBSS (Independent Basic
Service Set, réglage du service de
base indépendant) Peer-to-Peer
Lorsque vous réglez au moins un PC du
réseau LAN radiophonique en mode
IBSS Peer-to-Peer, tous les dispositifs du
réseau peuvent communiquer entre eux
sans point d’accès. La seule différence
entre le mode IBSS Peer-to-Peer et le
mode ad hoc démo réside dans le fait que
la SSID peut être spécifiée pour le mode
IBSS Peer-to-Peer et ne peut pas l’être
pour le mode ad hoc démo. Lorsque le
réseau ne comporte aucun point d’accès,
au moins un ordinateur doit être réglé en
mode IBBS Peer-to-Peer et les autres
ordinateurs et dispositifs LAN câblés
doivent être réglés en mode
infrastructure.
Page 61

Mode Infrastructure
Egalement désigné par “Mode access
point”. Ce mode est utilisé lorsqu’un
dispositif équipé d’un carte LAN
radiophonique communique avec le point
d’accès. Dans ce mode, le canal
radiophonique spécifié par le point
d’accès est utilisé pour la
communication. L’ESSID et le critère
d’identification WEP que vous spécifiez
pour AIBO doivent correspondre à ceux
du point d’accès.
Point d’accès
Dispositif en réseau possédant à la fois
une interface de communication
radiophonique et une ligne téléphonique
ou une interface Ethernet qui relie le
LAN radiophonique et le LAN câblé.
Pour la communication radiophonique, la
SSID, les canaux radiophoniques à
utiliser et la WEP key doivent être
spécifiés pour le point d’accès.
Serveur DHCP (Dynamic Host
Configuration Protocol, protocole
de configuration hôte dynamique)
Lorsque vous mettez un réseau en place
en utilisant le protocole TCP/IP, une
adresse IP doit être spécifiée pour tous
les dispositifs du réseau. Lorsque le
réseau comporte un serveur DHCP, celuici attribue automatiquement une adresse
IP à tous les dispositifs.
Le point d’accès ou le serveur sous
Windows NT/2000 peut être utilisé
comme serveur DHCP.
SSID (Service Set ID, ID réglée
pour le service)
Egalement appelée “access point ID”
(identification du point d’accès) ou
“group name” (nom de groupe). La SSID
est spécifiée via le point d’accès ou
l’ordinateur réglé en mode IBSS Peer-toPeer et est utilisée comme nom de réseau
pour la communication dans le réseau
LAN radiophonique.
Vous pouvez utiliser jusqu’à 32
caractères alphanumériques pour saisir la
SSID.
31
Page 62

TCP/IP (Transmission Control
Protocol/Internet Protocol,
protocole de contrôle de la
transmission/protocole internet)
Protocole utilisé par l’ordinateur pour la
communication sur le réseau. Le TCP/IP
est utilisé sur Internet et dans le monde
entier. Cette carte LAN utilise le
protocole TCP/IP pour la
communication. Pour communiquer avec
le protocole TCP/IP, un dispositif
nécessite l’adresse IP qui sert de numéro
ID.
WEP (Wired Equivalent Privacy,
codage pour transmission)
WEP code les données transmises par le
LAN radiophonique afin d’éviter une
exploitation non autorisée des
informations.
Pour activer le WEP, les caractères à
utiliser comme critère d’identification
pour le codage des données transmises
avec le LAN radiophonique doivent être
spécifiés. Vous pouvez utiliser maximum
cinq caractères alphanumériques.
32
Page 63

Page 64

Sicherheitsinformationen
WARNUNG
Alle Änderungen oder Einstellungen an diesem Gerät, die ohne die
ausdrückliche Genehmigung des Herstellers durchgeführt wurden, können
dazu führen, dass die Genehmigung zur Inbetriebnahme dieses Geräts erlischt.
Gesetzliche Vorschriften
Dieses Gerät wurde geprüft und erfüllt folgende Standards:
ETS300-328
ETS300-826
EN60950/92+A1/93+A2/95+A4/97+A11/97
Hiermit erklärt die Sony Corporation, dass die drahtlose LAN-Karte für AIBO,
Modell ERA-201D1, die grundlegenden Anforderungen und sonstigen
relevanten Bestimmungen der Richtlinie 1999/5/EU erfüllt.
2
Page 65

Modell- und Seriennummer
Die Modell- und die Seriennummer befinden sich unter der Bauchklappe des
Geräts. Notieren Sie hier die Seriennummer. Geben Sie Modell- und
Seriennummer an, wenn Sie sich an Ihren Sony-Händler wenden.
Modellnr. ERA-201D1
Seriennr. ___________
Kundendienst
Europa:
Für Großbritannien: +44(0)-20-7365-2938
Für Deutschland: +49(0)-69-9508-6310
Für Frankreich: +33(0)-1-5569-5118
E-Mail-Adresse: aibo@sonystyle-europe.com
DE
3
Page 66

„AIBO“, das AIBO-Logo, „OPEN-R“ und das OPEN-R-Logo sind
eingetragene Marken der Sony Corporation.
„Memory Stick“, „
Corporation. In diesem Handbuch sind die Marken nicht mit dem Zeichen „“
markiert.
http://www.aibo.com/
Die Reproduktion ganz oder auszugsweise ist ohne schriftliche
Genehmigung untersagt. Alle Rechte vorbehalten.
“, und „ “ sind Marken der Sony
4
Page 67

Inhalt
Einführung .......................................................................................6
Systemvoraussetzungen............................................................. 7
Installieren der LAN-Karte in AIBO................................................8
Vornehmen von Netzwerkeinstellungen.........................................13
Vorgehen beim Vornehmen von Netzwerkeinstellungen ......... 13
Netzwerkkonfiguration und -einstellungen ............................. 14
AIBOs Netzwerkeinstellungen ................................................ 20
Ändern von AIBOs Netzwerkeinstellungen ............................ 21
Sicherheitsmaßnahmen ..................................................................25
Sicherheit ................................................................................. 25
Umgebungsbedingungen ......................................................... 25
Feuchtigkeitskondensation ...................................................... 26
Reinigung ................................................................................ 26
Störungsbehebung ..........................................................................27
Technische Daten ...........................................................................29
Glossar ...........................................................................................30
5
Page 68

Einführung
Wenn die drahtlose LAN-Karte ERA-201D1 für AIBO (im folgenden der
Einfachheit halber als „LAN-Karte“ bezeichnet) im AIBO ERS-210 installiert
wird, kann AIBO mit einem PC kommunizieren, der mit einer drahtlosen
LAN-Karte ausgestattet ist. Wenn ein drahtloser LAN-Zugriffspunkt
verwendet wird, ist die Kommunikation mit AIBO von einem PC aus möglich,
der an ein verkabeltes LAN angeschlossen ist.
<Wenn ein Zugriffspunkt verwendet wird>
Verkabeltes LAN
PC
Zugriffspunkt
PC
Drahtloses LAN
<Wenn kein Zugriffspunkt
verwendet wird>
6
Page 69

Wenn Sie gleichzeitig spezielle AIBO-Anwendungen im drahtlosen LAN auf
dem PC und AIBO-ware auf einem „Memory Stick“ in AIBO verwenden,
können Sie die Funktionen von AIBO über die drahtlose LAN-Kommunikation
in vollem Umfang ausschöpfen.
* AIBO-ware ist ein Softwareprogramm zum Betrieb von AIBO. Es wird von
der Sony Corporation oder Drittherstellern produziert.
Systemvoraussetzungen
Die drahtlose LAN-Karte kann nur in Kombination mit folgenden
Komponenten verwendet werden:
• „AIBO“ ERS-210
• „Memory Stick“ mit AIBO-ware für die drahtlose LAN-Kommunikation
• AIBO-spezifische drahtlose LAN-Anwendungssoftware für den PC
• PC, auf dem eine AIBO-spezifische PC-Anwendungssoftware läuft und der
an ein drahtloses LAN angeschlossen werden kann.
• Eine IEEE802.11b-kompatible drahtlose LAN-Karte oder ein IEEE802.11bkompatibler Zugriffspunkt (für die drahtlose Kommunikation von einem PC
aus, der an ein verkabeltes LAN angeschlossen ist)
• Ein Web-Browser (auf dem PC installiert, zum Ändern der
Netzwerkeinstellungen von AIBO)
7
Page 70

Installieren der LAN-Karte in AIBO
1
Drücken Sie die Pausetaste auf AIBOs Brust, um ihn so in den
Pausemodus zu schalten.
Brustlampe
Hinweis
Während AIBO auf den „Memory Stick“ zugreift, ist die
Verriegelungsanzeige für den Akku rot. Nehmen Sie den „Memory Stick“
während dieser Zeit nicht heraus. Andernfalls könnte AIBO beschädigt
werden. Der Akku ist verriegelt, bis der Speichervorgang abgeschlossen ist.
Wenn Sie versuchen, ihn gewaltsam zu entnehmen, kann es zu Schäden an
AIBO kommen.
8
Page 71

2
Fassen Sie AIBO um den Körper, drehen Sie ihn um und öffnen
Sie die Bauchklappe.
Hinweise
• Wenn Sie AIBO anheben, fassen Sie ihn immer um den Körper und nicht
an den Körperteilen.
• Berühren Sie den Ladekontakt nicht mit der Hand. Andernfalls könnte der
Kontakt verschmutzt werden, was zu einer Beeinträchtigung der
Verbindung führt.
3
Verschieben Sie den Verriegelungshebel und nehmen Sie den Akku
heraus.
Vergewissern Sie sich, dass die Verriegelungsanzeige für den Akku weiß ist.
Verriegelungshebel
Hinweis
Wenn die Verriegelungsanzeige für den Akku rot ist, darf der Akku nicht
herausgenommen werden. Wenn Sie in diesem Fall versuchen, den Akku
gewaltsam zu entnehmen, kann es zu Schäden an AIBO kommen.
9
Page 72

10
4
Drücken Sie den mit AIBO gelieferten Stift in die
Entriegelungsöffnungen für AIBOs linkes Vorder- und Hinterbein
und nehmen Sie die Beine ab.
Der PC-Karteneinschub ist nun zu sehen.
Diese Seite
5
Achten Sie darauf, dass die Antenne an der LAN-Karte nach
rechts weist und schieben Sie die LAN-Karte fest in den Einschub
hinein.
Hinweis
Drücken Sie beim Einsetzen der LAN-Karte auf die Antennenbasis oder auf
beide Kartenenden. Drücken Sie nicht auf den vorstehenden Teil der Antenne.
Andernfalls könnte die Antenne beschädigt werden.
Page 73

6
Drücken Sie die Auswurftaste nach unten, so dass sie flach an
AIBOs Rumpf anliegt.
7
Bringen Sie das linke Vorder- und das linke Hinterbein wieder an.
8
Setzen Sie den Akku wieder ein, so dass er mit einem Klicken
einrastet, und schließen Sie die Bauchklappe.
Drücken Sie auf die mit
dem Pfeil markierte
Stelle.
11
Page 74

9
Setzen Sie AIBO auf den Boden, wie unten gezeigt.
12
Page 75

Vornehmen von Netzwerkeinstellungen
Erläuterungen zu Begriffen im Zusammenhang mit Netzwerken finden Sie im
Glossar auf Seite 30.
Vorgehen beim Vornehmen von
Netzwerkeinstellungen
Das folgende Diagramm zeigt schematisch das Vorgehen beim Vornehmen von
Netzwerkeinstellungen für AIBO:
Überprüfen Sie Ihre Netzwerkkonfiguration (Seite 14)
Ändern Sie die Netzwerkeinstellungen der Geräte im Netzwerk mit Ausnahme
von AIBO so, dass diese mit AIBO vor der Änderung von dessen
Einstellungen kommunizieren können (Seite 14).
mm
So stellen Sie die ursprünglichen
Netzwerkeinstellungen wieder her
m
Ändern Sie AIBOs
Netzwerkeinstellungen mit dem Web-
Browser auf dem PC (Seite 21).
m
Stellen Sie die
Netzwerkeinstellungen aller Geräte
außer von AIBO wieder her.
m
Überprüfen Sie die Verbindung von
AIBO und den anderen Geräten.
m
Ende
m
So verwenden Sie die neuen
Netzwerkeinstellungen
m
Überprüfen Sie die Verbindung von
AIBO und dem PC
m
Ende
13
Page 76

Netzwerkkonfiguration und -einstellungen
Wählen Sie je nach den Geräten im Netzwerk einen der folgenden
Konfigurationstypen für drahtlose LANs und nehmen Sie die entsprechenden
Einstellungen vor.
a) Ein Zugriffspunkt ist vorhanden und die Kommunikation erfolgt
über den Zugriffspunkt von einem PC in einem drahtlosen LAN.
14
PC
Zugriffspunkt
AIBO und der PC kommunizieren miteinander über den Zugriffspunkt.
Einstellungen für den Zugriffspunkt
Nehmen Sie für den Zugriffspunkt folgende Einstellungen vor. Diese
Einstellungen ermöglichen eine Kommunikation zwischen dem Zugriffspunkt
und AIBO mit seinen Standardeinstellungen.
SSID: AIBONET
WEP-Schlüssel: AIBO2
Drahtloser Kanal: beliebiger Kanal zwischen 1 und 11
LAN-Adresse: 10.0.1.1
LAN-Teilnetzmaske: 255.255.255.0
DHCP-Serverfunktion: Ein (wann immer möglich)
Page 77

Einstellungen für den PC
Nehmen Sie für den PC folgende Einstellungen vor.
SSID: AIBONET
WEP-Schlüssel: AIBO2
Kommunikationsmodus: Infrastrukturmodus (Zugriffspunktmodus)
IP-Adresse: Wenn ein DHCP-Server zur Verfügung steht, setzen Sie
diese Option auf “Acquire the IP address automatically”. Andernfalls
setzen Sie sie auf “10.0.1.101”.
Teilnetzmaske: 255.255.255.0
Hinweis
Bei einigen zur Zeit erhältlichen Zugriffspunkten ist die Einstellung der SSID
nicht möglich. Wenn Sie einen dieser Zugriffspunkte verwenden, ändern Sie
erst die LAN-Konfiguration, wie im Folgenden unter c) oder d) beschrieben,
so dass die Kommunikation über den Zugriffspunkt von einem PC oder AIBO
aus erfolgt. Ändern Sie dann AIBOs Netzwerkeinstellungen so, dass sie mit
den Einstellungen des Zugriffspunkts übereinstimmen. Stellen Sie dann die
vorherige LAN-Konfiguration wieder her.
15
Page 78

b) Ein Zugriffspunkt ist vorhanden und die Kommunikation erfolgt
über den Zugriffspunkt von einem PC in einem verkabelten LAN
und Geräten im drahtlosen LAN aus.
16
PC
AIBO und der PC kommunizieren miteinander über den Zugriffspunkt.
Zugriffspunkt
Verkabeltes
LAN
Einstellungen für den Zugriffspunkt
Nehmen Sie für den Zugriffspunkt folgende Einstellungen vor. Diese
Einstellungen ermöglichen eine Kommunikation zwischen dem Zugriffspunkt
und AIBO mit seinen Standardeinstellungen.
Modus: Bridge-Modus oder ISDN-Router-Modus
SSID: AIBONET
WEP-Schlüssel: AIBO2
Drahtloser Kanal: beliebiger Kanal zwischen 1 und 11
IP-Adresse: 10.0.1.1
Teilnetzmaske: 255.255.255.0
Einstellungen für den PC
Nehmen Sie für den PC folgende Einstellungen vor.
IP-Adresse: 10.0.1.101
Teilnetzmaske: 255.255.255.0
Page 79

Hinweise
• Bei einigen zur Zeit erhältlichen Zugriffspunkten ist die Einstellung der
SSID nicht möglich. Wenn Sie einen solchen Zugriffspunkt verwenden,
können Sie die Einstellungen für AIBO nicht über einen PC am verkabelten
LAN ändern. Verwenden Sie einen PC am drahtlosen LAN.
• Die Änderung der Einstellungen für den Zugriffspunkt oder den PC am
verkabelten LAN kann sich auf andere Geräte am gleichen Netzwerk
auswirken. Trennen Sie in diesem Fall den Zugriffspunkt und den PC, für
die die Einstellungen geändert wurden, vom Netzwerk und ändern Sie dann
die Netzwerkeinstellungen für AIBO. Stellen Sie anschließend die
vorherige LAN-Konfiguration wieder her.
c) Ein Zugriffspunkt ist nicht vorhanden, alle PCs sind mit
drahtlosen LAN-Karten ausgestattet und mindestens ein PC
befindet sich im IBSS-Peer-to-Peer-Modus
Wenn Sie sich vergewissern wollen, dass der PC richtig in den IBSS-Peer-toPeer-Modus geschaltet wurde, schlagen Sie in der mit der drahtlosen LANKarte für den PC gelieferten Bedienungsanleitung nach.
PC (IBSS-Peer-toPeer-Modus)
17
Page 80

Einstellungen für den PC
Nehmen Sie für den PC im IBSS-Peer-to-Peer-Modus folgende Einstellungen
vor. Diese Einstellungen ermöglichen eine Kommunikation zwischen dem PC
und AIBO mit seinen Standardeinstellungen.
SSID: AIBONET
WEP-Schlüssel: AIBO2
Drahtloser Kanal: beliebiger Kanal zwischen 1 und 11
IP-Adresse: 10.0.1.101
Teilnetzmaske: 255.255.255.0
Kommunikationsmodus: IBSS-Peer-to-Peer-Modus
Hinweis
Die Einstellungen oben können Sie ändern, nachdem Sie die Einstellungen für
AIBO geändert haben.
d) Ein Zugriffspunkt ist nicht vorhanden, alle PCs sind mit
drahtlosen LAN-Karten ausgestattet und kein PC befindet sich im
IBSS-Peer-to-Peer-Modus
Schalten Sie AIBO und den PC in den Ad-Hoc-Demomodus.
PC (Ad-HocDemomodus)
18
Page 81

Einstellungen für den PC
Nehmen Sie für den PC im Ad-Hoc-Demomodus folgende Einstellungen vor.
Diese Einstellungen ermöglichen eine Kommunikation zwischen dem PC und
AIBO mit seinen Standardeinstellungen.
WEP-Schlüssel: AIBO2
Drahtloser Kanal: 3
IP-Adresse: 10.0.1.101
Teilnetzmaske: 255.255.255.0
Kommunikationsmodus: Ad-Hoc-Demomodus
Hinweis
Die Einstellungen oben können Sie ändern, nachdem Sie die Einstellungen für
AIBO geändert haben.
19
Page 82

AIBOs Netzwerkeinstellungen
Folgende Optionen müssen für AIBO definiert werden. Wenn eine
Kommunikationsverbindung hergestellt wurde, können Sie die folgenden
Optionen je nach Ihrer Netzwerkumgebung ändern. Eine Erläuterung der
Begriffe unten finden Sie im Glossar auf Seite 29.
20
Option Beschreibung
Hostname
IP Address IP-Adresse 10.0.1.100
Subnet Mask Teilnetzmaske 255.255.255.0
IP Gateway Gateway-Adresse 10.0.1.1
SSID Name des drahtlosen LAN, das
WEP key Zeichenfolge, die als Schlüssel zum
Name des AIBO, der für die
Kommunikation im drahtlosen
LAN verwendet werden soll. Der
Name kann aus bis zu 8
alphanumerischen Zeichen
bestehen.
verwendet wird. Der Name kann
aus bis zu 32 alphanumerischen
Zeichen bestehen.
Verschlüsseln der im drahtlosen
LAN übertragenen Daten verwendet
werden soll. Geben Sie fünf
alphanumerische Zeichen ein. Geben
Sie nichts ein, wenn die Daten nicht
verschlüsselt werden müssen.
Standardeinstellung
AIBO
AIBONET
AIBO2
Page 83

Option Beschreibung
Operating mode
Geben Sie den den
Infrastrukturmodus oder den AdHoc-Demomodus an.
Standardeinstellung
Siehe unten*.
Wireless channel Geben Sie hier etwas ein, wenn der
Ad-Hoc-Demomodus ausgewählt
wurde. Für diese LAN-Karte
können Sie eine Zahl zwischen 1
und 11 eingeben.
* Zunächst sucht AIBO nach einem Zugriffspunkt, dessen SSID- und WEP-
Schlüsseleinstellungen mit denen AIBOs identisch sind. Findet AIBO einen
geeigneten Zugriffspunkt, startet er im Infrastrukturmodus. Andernfalls
startet AIBO im Ad-Hoc-Demomodus.
3
Ändern von AIBOs Netzwerkeinstellungen
Um AIBOs drahtlose LAN-Einstellungen zu ändern, benötigen Sie einen PC,
auf dem ein Web-Browser installiert ist und der an ein drahtloses LAN
angeschlossen werden kann.
1
Konfigurieren Sie den Zugriffspunkt und den PC.
Wie Sie die entsprechenden Einstellungen vornehmen, schlagen Sie bitte in
den Bedienungsanleitungen zu den Geräten nach.
Erläuterungen zu den Einstellungen a) bis d) finden Sie auf Seite 14 bis 19.
21
Page 84

2
Setzen Sie den “Memory Stick” mit der AIBO-ware für
Kommunikation im drahtlosen LAN in AIBO ein und drücken Sie
die Pausetaste auf seiner Brust, um ihn einzuschalten.
Erläuterungen zum Einsetzen eines “Memory Sticks” in AIBO finden Sie in
der Bedienungsanleitung zu AIBO.
3
Rufen Sie den Web-Browser auf dem PC auf, und öffnen Sie zum
Einstellen von AIBO folgenden URL.
http://10.0.1.100/SETUP.HTM
4
Stellen Sie die das Netzwerk betreffenden Optionen für AIBO ein
(Seite 20, 21).
22
Page 85

5
Klicken Sie auf die Schaltfläche „Change Settings“.
Wenn Sie auf die Schaltfläche klicken, werden alle in Schritt 4
vorgenommenen Einstellungen eingegeben. Achten Sie darauf, jede
Einstellung nochmals zu überprüfen, bevor Sie auf die Schaltfläche „Change
Settings“ klicken. Wenn Sie einen Fehler gemacht haben, setzen Sie die
Optionen zurück (Seite 19) und gehen Sie wie in Schritt 1 bis 5 erläutert vor,
um die korrekten Einstellungen einzugeben.
6
Drücken Sie die Pausetaste auf AIBOs Brust, um ihn in den
Pausemodus zu schalten, und drücken Sie anschließend die
Pausetaste erneut, um AIBO einzuschalten.
Die Einstellungen werden wirksam, wenn Sie AIBO das nächste Mal
einschalten.
7
Stellen Sie die ursprüngliche Netzwerkumgebung wieder her.
8
Überprüfen Sie, ob Sie vom PC aus mit AIBO kommunizieren
können.
23
Page 86

Wenn Sie bei den Einstellungen einen Fehler gemacht haben oder
AIBO nach dem Ändern der Einstellungen nicht mehr funktioniert
Drücken Sie AIBOs Pausetaste, um ihn in den Pausemodus zu schalten, nehmen
Sie die drahtlose LAN-Karte aus AIBO und schalten Sie AIBO dann wieder ein.
Wenn Sie AIBO ohne die LAN-Karte einschalten, werden alle das Netzwerk
betreffenden Einstellungen zurückgesetzt.
24
Page 87

Sicherheitsmaßnahmen
Sicherheit
Lassen Sie die drahtlose LAN-Karte nicht fallen und schützen Sie sie vor
Stößen. Andernfalls kann die Karte beschädigt werden.
Umgebungsbedingungen
Verwenden oder lassen Sie die drahtlose LAN-Karte nicht an einem Ort, an
dem sie folgenden Bedingungen ausgesetzt ist:
• direktem Sonnenlicht oder großer Hitze (geeignete Umgebungstemperatur
für diese LAN-Karte: 5 bis 35 °C)
• in einem in der Sonne geparkten Auto oder auf dem Armaturenbrett eines
Autos, insbesondere im Sommer
• Magnetfeldern (in der Nähe von Magneten, Lautsprechern oder einem
Fernsehgerät)
• übermäßig viel Staub
• auf einer instabilen oder geneigten Oberfläche
• starken V ibrationen
• hoher Luftfeuchtigkeit oder ungenügender Luftzufuhr
• nahe bei Hindernissen, die für Radiowellen nicht durchlässig sind, zum
Beispiel Metallgegenständen oder Betonwänden
25
Page 88

Feuchtigkeitskondensation
Wird die LAN-Karte direkt von einem kalten an einen warmen Ort gebracht,
kann sich im Inneren oder an der Außenseite der Karte Feuchtigkeit
niederschlagen und zu Beschädigungen führen. Hat sich Feuchtigkeit
niedergeschlagen, warten Sie einige Stunden, bevor Sie die LAN-Karte wieder
benutzen.
Reinigung
Reinigen Sie das Gehäuse mit einem weichen Tuch, das Sie leicht mit Wasser
oder einer milden Reinigungslösung angefeuchtet haben. Verwenden Sie keine
Scheuerschwämme, Scheuermittel oder Lösungsmittel wie Alkohol oder
Benzin. Diese könnten das Gehäuse angreifen.
26
Page 89

Störungsbehebung
Sollte eine der folgenden Störungen auftreten, versuchen Sie, diese anhand der
folgenden Checkliste zu beheben. Sollte sich das Problem auf diese Weise
nicht lösen lassen, wenden Sie sich bitte an den Händler, bei dem Sie die Karte
erworben haben, oder an die AIBO-Kundendienst-Hotline (siehe die
Bedienungsanleitung zum „AIBO“ ERS-210).
x Drahtlose Kommunikation
Symptom Ursache/Abhilfe
Eine Kommunikation
zwischen dem PC und
AIBO ist nicht möglich.
Die drahtlose LAN-Karte wurde nicht richtig in
AIBO eingesetzt.
c Sehen Sie nach, ob die drahtlose LAN-Karte
richtig eingesetzt wurde (Seite 8).
Die Netzwerkeinstellungen sind falsch.
c Nehmen Sie die Netzwerkeinstellungen
erneut vor (Seite 13).
Die Datenübertragung ist
langsam.
Radio-Interferenz von einem anderen
Zugriffspunkt oder einem drahtlosen LANGerät tritt auf.
c Ändern sie die Einstellung für den Kanal.
Zu viele Clients sind über den Zugriffspunkt
verbunden.
c Versuchen Sie es später noch einmal.
27
Page 90

Symptom Ursache/Abhilfe
28
Sie haben den WEPSchlüssel vergessen.
Keine Kommunikation ist
möglich, obwohl sich der
Zugriffspunkt (bzw. der PC
mit der drahtlosen LANKarte) innerhalb von 50 m
Entfernung von AIBO
befindet.
Es gibt keine Möglichkeit, den aktuellen WEPSchlüssel herauszufinden.
c Nehmen Sie die LAN-Karte aus AIBO heraus
und starten Sie ihn neu, um die
Standardnetzwerkeinstellungen
wiederherzustellen. Nehmen Sie dann die
Netzwerkeinstellungen erneut vor (Seite 24).
Die effektive Kommunikationsreichweite hängt
vom Standort und den
Umgebungsbedingungen ab.
c Stellen Sie AIBO und den PC näher an den
Zugriffspunkt.
x AIBO
Symptom Ursache/Abhilfe
AIBO lässt sich nicht
einschalten, nachdem Sie
die drahtlose LAN-Karte
eingesetzt haben.
AIBO funktioniert nicht.
Die drahtlose LAN-Karte wurde nicht richtig in
AIBO eingesetzt.
c Sehen Sie nach, ob die LAN-Karte richtig
eingesetzt wurde (Seite 8).
Die drahtlose LAN-Karte wurde nicht richtig in
AIBO eingesetzt.
c Ändern sie die Einstellung für den Kanal (Seite 21).
AIBOs interner Akku ist leer.
c Die LAN-Karte in AIBO entzieht dem Akku
in AIBO eine gewisse Menge Strom. Laden
Sie den Akku.
Page 91

Technische Daten
Betriebsspannung
3,3 V
Leistungsaufnahme
max. 330 mA (bei
Übertragung), max. 240 mA
(beim Empfang)
Anschluss PC-Karteneinschub vom
Typ II
Abmessungen
ca. 90 ×12 × 53 mm (B/H/T)
Gewicht ca. 35 g
Protokoll TCP/IP
Standards IEEE802.11b/IEEE802.11
Frequenzbereich
2,4 GHz
Modulationsmethode
DS-SS (entspricht
IEEE802.11)
Betriebstemperatur
5 °C bis 35 °C (nicht
kondensierend)
Lagertemperatur
–20 °C bis 60 °C (nicht
kondensierend)
Mitgeliefertes Zubehör
Handbuch
Änderungen, die dem technischen
Fortschritt dienen, bleiben vorbehalten.
29
Page 92

Glossar
Ad-Hoc-Demomodus
Übertragungsmethode für Geräte, die mit
einer drahtlosen LAN-Karte ausgestattet
sind (z. B. ein PC und AIBO). Bei dieser
Methode ist kein Zugriffspunkt
erforderlich. Im Ad-Hoc-Demomodus
müssen Sie den drahtlosen Kanal und
den WEP-Schlüssel für AIBO und den
PC angeben. Wenn Sie den Ad-HocDemomodus auswählen, kann keine
SSID angegeben werden.
DHCP-Server (Dynamic Host
Configuration Protocol)
Wenn Sie über TCP/IP ein Netzwerk
aufbauen, muss für alle Geräte im
Netzwerk eine IP-Adresse angegeben
werden. Wenn ein DHCP-Server in das
Netzwerk integriert ist, weist er allen
Geräten automatisch eine IP-Adresse zu.
Der Zugriffspunkt oder ein Windows NT/
2000-Server kann als DHCP-Server
fungieren.
30
Drahtloser Kanal
Beim Standard IEEE802.11b für
drahtlose LANs wird der 2,4-GHzFrequenzbereich in 14 Kanäle unterteilt.
Um HF-Interferenzen zu verhindern,
können getrennte Kanäle für
verschiedene drahtlose Netzwerke
angegeben werden, die sich nahe
beieinander befinden. Diese LAN-Karte
kann mit den Kanälen 1 bis 11 arbeiten.
Im Infrastrukturmodus wird ein vom
Zugriffspunkt definierter Kanal von allen
Geräten im Netzwerk verwendet. Im AdHoc-Modus muss der Kanal von allen
Geräten im Netzwerk definiert werden.
Page 93

IBSS-Peer-to-Peer-Modus (IBSS =
Independent Basic Service Set)
Wenn Sie mindestens einen PC im
drahtlosen LAN in den IBSS-Peer-toPeer-Modus schalten, können alle Geräte
im Netzwerk miteinander
kommunizieren, ohne dass ein
Zugriffspunkt erforderlich ist. Der
einzige Unterschied zwischen IBSSPeer-to-Peer-Modus und Ad-HocDemomodus besteht darin, dass für den
IBSS-Peer-to-Peer-Modus eine SSID
angegeben werden kann, nicht jedoch für
den Ad-Hoc-Demomodus. Wenn im
Netzwerk kein Zugriffspunkt vorhanden
ist, muss sich mindestens ein PC im
IBSS-Peer-to-Peer-Modus befinden und
die übrigen PCs und die Geräte im
verkabelten LAN müssen in den
Infrastrukturmodus geschaltet werden.
IEEE802.11b
Ein Standard für drahtlose LANs, die
einen Frequenzbereich von 2,4 GHz für
die Kommunikation verwenden. Die
maximale Übertragungsrate liegt bei 11
Mbps. Diese LAN-Karte entspricht dem
Standard IEEE802.11b.
Infrastrukturmodus
Wird auch als „Zugriffspunktmodus“
bezeichnet. Dieser Modus wird
verwendet, wenn ein Gerät, das mit einer
drahtlosen LAN-Karte ausgestattet ist,
mit dem Zugriffspunkt kommuniziert. In
diesem Modus wird der vom
Zugriffspunkt angegebene drahtlose
Kanal für die Kommunikation verwendet.
Für AIBO müssen Sie eine ESSID und
einen WEP-Schlüssel angeben, die mit
denen des Zugriffspunkts
übereinstimmen.
IP-Adresse
Eine Nummer zum Identifizieren des
Geräts innerhalb eines TCP/IPNetzwerks. Eine IP-Adresse besteht aus
vier Zahlen, die alle zwischen 0 und 255
liegen.
Beispiel: 192.168.1.1
10.0.1.1
LAN (Local Area Network)
Ein relativ kleines Netzwerk, das in der
Regel über Ethernet hergestellt wird, mit
einer Übertragungsrate zwischen 10
Mbps und 100 Mbps. Wenn ein
Zugriffspunkt verwendet wird, können
ein drahtloses LAN und ein verkabeltes
LAN miteinander verbunden werden.
31
Page 94

SSID (Service Set ID)
Wird auch als “Zugriffspunkt-ID” oder
“Gruppenname” bezeichnet. Die SSID
wird über den Zugriffspunkt oder einen
PC im IBSS Peer-to-Peer-Modus
angegeben und dient als Netzwerkname
für die Kommunikation in einem
drahtlosen LAN.
Für die SSID können bis zu 32
alphanumerische Zeichen eingegeben
werden.
TCP/IP (Transmission Control
Protocol/Internet Protocol)
Ein Protokoll, das der PC innerhalb des
Netzwerks für die Kommunikation
benötigt. TCP/IP wird im Internet und
weltweit am häufigsten verwendet. Diese
LAN-Karte verwendet für die
Kommunikation ebenfalls TCP/IP. Um
über TCP/IP kommunizieren zu können,
benötigt ein Gerät eine IP-Adresse, die
als ID fungiert.
32
Teilnetzmaske
Eine IP-Adresse besteht aus vier Zahlen,
die alle zwischen 0 und 255 liegen (siehe
IP-Adresse). Der Betrieb wird effizienter,
wenn eine IP-Adresse in zwei
Komponenten unterteilt wird: eine
Netzwerk- und eine Host-Komponente.
Die Teilnetzmaske ist der Wert, der zum
Unterteilen der IP-Adresse in ein
Netzwerk- und ein Hostsegment definiert
wird. In Teilnetzmasken legen die als „1“
(im Binärcode) spezifizierten Ziffern die
Netzwerkkomponente fest.
Beispiel: Die Netzwerk- und die
Hostkomponente des Geräts mit der
IP-Adresse 192.168.1.2 bei einer
Teilnetzmaske von 255.255.255.0
192.168.1: Netzwerkkomponente
2: Hostkomponente
WEP (Wired Equivalent Privacy)
Mit WEP werden Daten verschlüsselt,
die im drahtlosen LAN übertragen
werden, damit die Daten nicht angezapft
werden können.
Zum Aktivieren von WEP müssen
Zeichen eingegeben werden, die als
Schlüssel für die Verschlüsselung der im
drahtlosen LAN zu übertragenden Daten
verwendet werden. Sie können dazu bis
zu fünf alphanumerische Zeichen
eingeben.
Page 95

Zugriffspunkt
Ein Netzwerkgerät mit einer Schnittstelle
für drahtlose Kommunikation und einer
Schnittstelle für den Anschluss an eine
Telefonleitung oder einer EthernetSchnittstelle. Ein Zugriffspunkt stellt die
Verbindung zwischen drahtlosem und
verkabeltem LAN her. Für eine drahtlose
Kommunikation müssen die SSID, die zu
verwendenden drahtlosen Kanäle und der
WEP-Schlüssel für den Zugriffspunkt
spezifiziert werden.
33
Page 96

Printed in Japan
Printed in Japan
*465224721
(1)
*
 Loading...