

SONY DVX-100S User Manual
3-244-519-11 (1)
DVD Changer
Installation/Connections
安裝線路之連接
1
1
5
× 2 × 4× 6× 4
9
× 4
qd
× 2
qj ql
q; qa qs
qf qhqg
qk
2
A
Example 1
32
4
例 1
Light green
綠燈
20 cm
5 m
w;
876
20 cm
× 2
20 cm
VIDEO OUTPUT FRONT
Yellow
黃色
VIDEO OUTPUT REAR
Yellow
黃色
Red
紅色
qk
6 m
A
White
白色
20 cm
Light green
綠燈
Monitor*
顯示器*
To parking brake swich cord*
至停車制動開關導線*
2
2
wa
1
1
RCA pin cord*
RCA 針形插頭電線*
BUS CONTROL INPUT
Monitor*
顯示器*
1
1
Sony bus compatible master
unit or Source Selector
Sony 總線相容主機或設備源選擇器
1
1
VIDEO INVIDEO IN
when connecting second
monitor for the rear seat
在後座連接第二個監視器時
BUS AUDIO INPUT
Remote control
5 m5 m
sensor
遙控感應器
qj ql
B
w;
Side of the DVD changer
DVD 換碟器的側面
30 cm
10 cm
ws Connection adaptor
XA-118
連接配接器 XA-118
BUS CONTROL OUTPUT
15 cm
BUS AUDIO OUTPUT
3
*
wd
5 m
DVX-100S
Sony Corporation 2002 Printed in Japan
Mounting example
安裝示例
Remote control sensor
遙控傳感器
Wireless remote commander
無線遙控器
Monitor (not supplied)
顯示器(非附送)
DVD changer
DVD 換碟器
Connection adaptor
連接配接器
wa
ws
Caution
•This unit is designed for negative earth 12 V DC
operation only.
•Before making connections, turn the car ignition
off to avoid short circuits.
•For your safety, the monitor connected to the
VIDEO OUTPUT FRONT cable can only be
viewed when the car is stopped and the parking
brake is applied.
Be sure to connect parking cord w; to the car’s
parking brake switch cord.
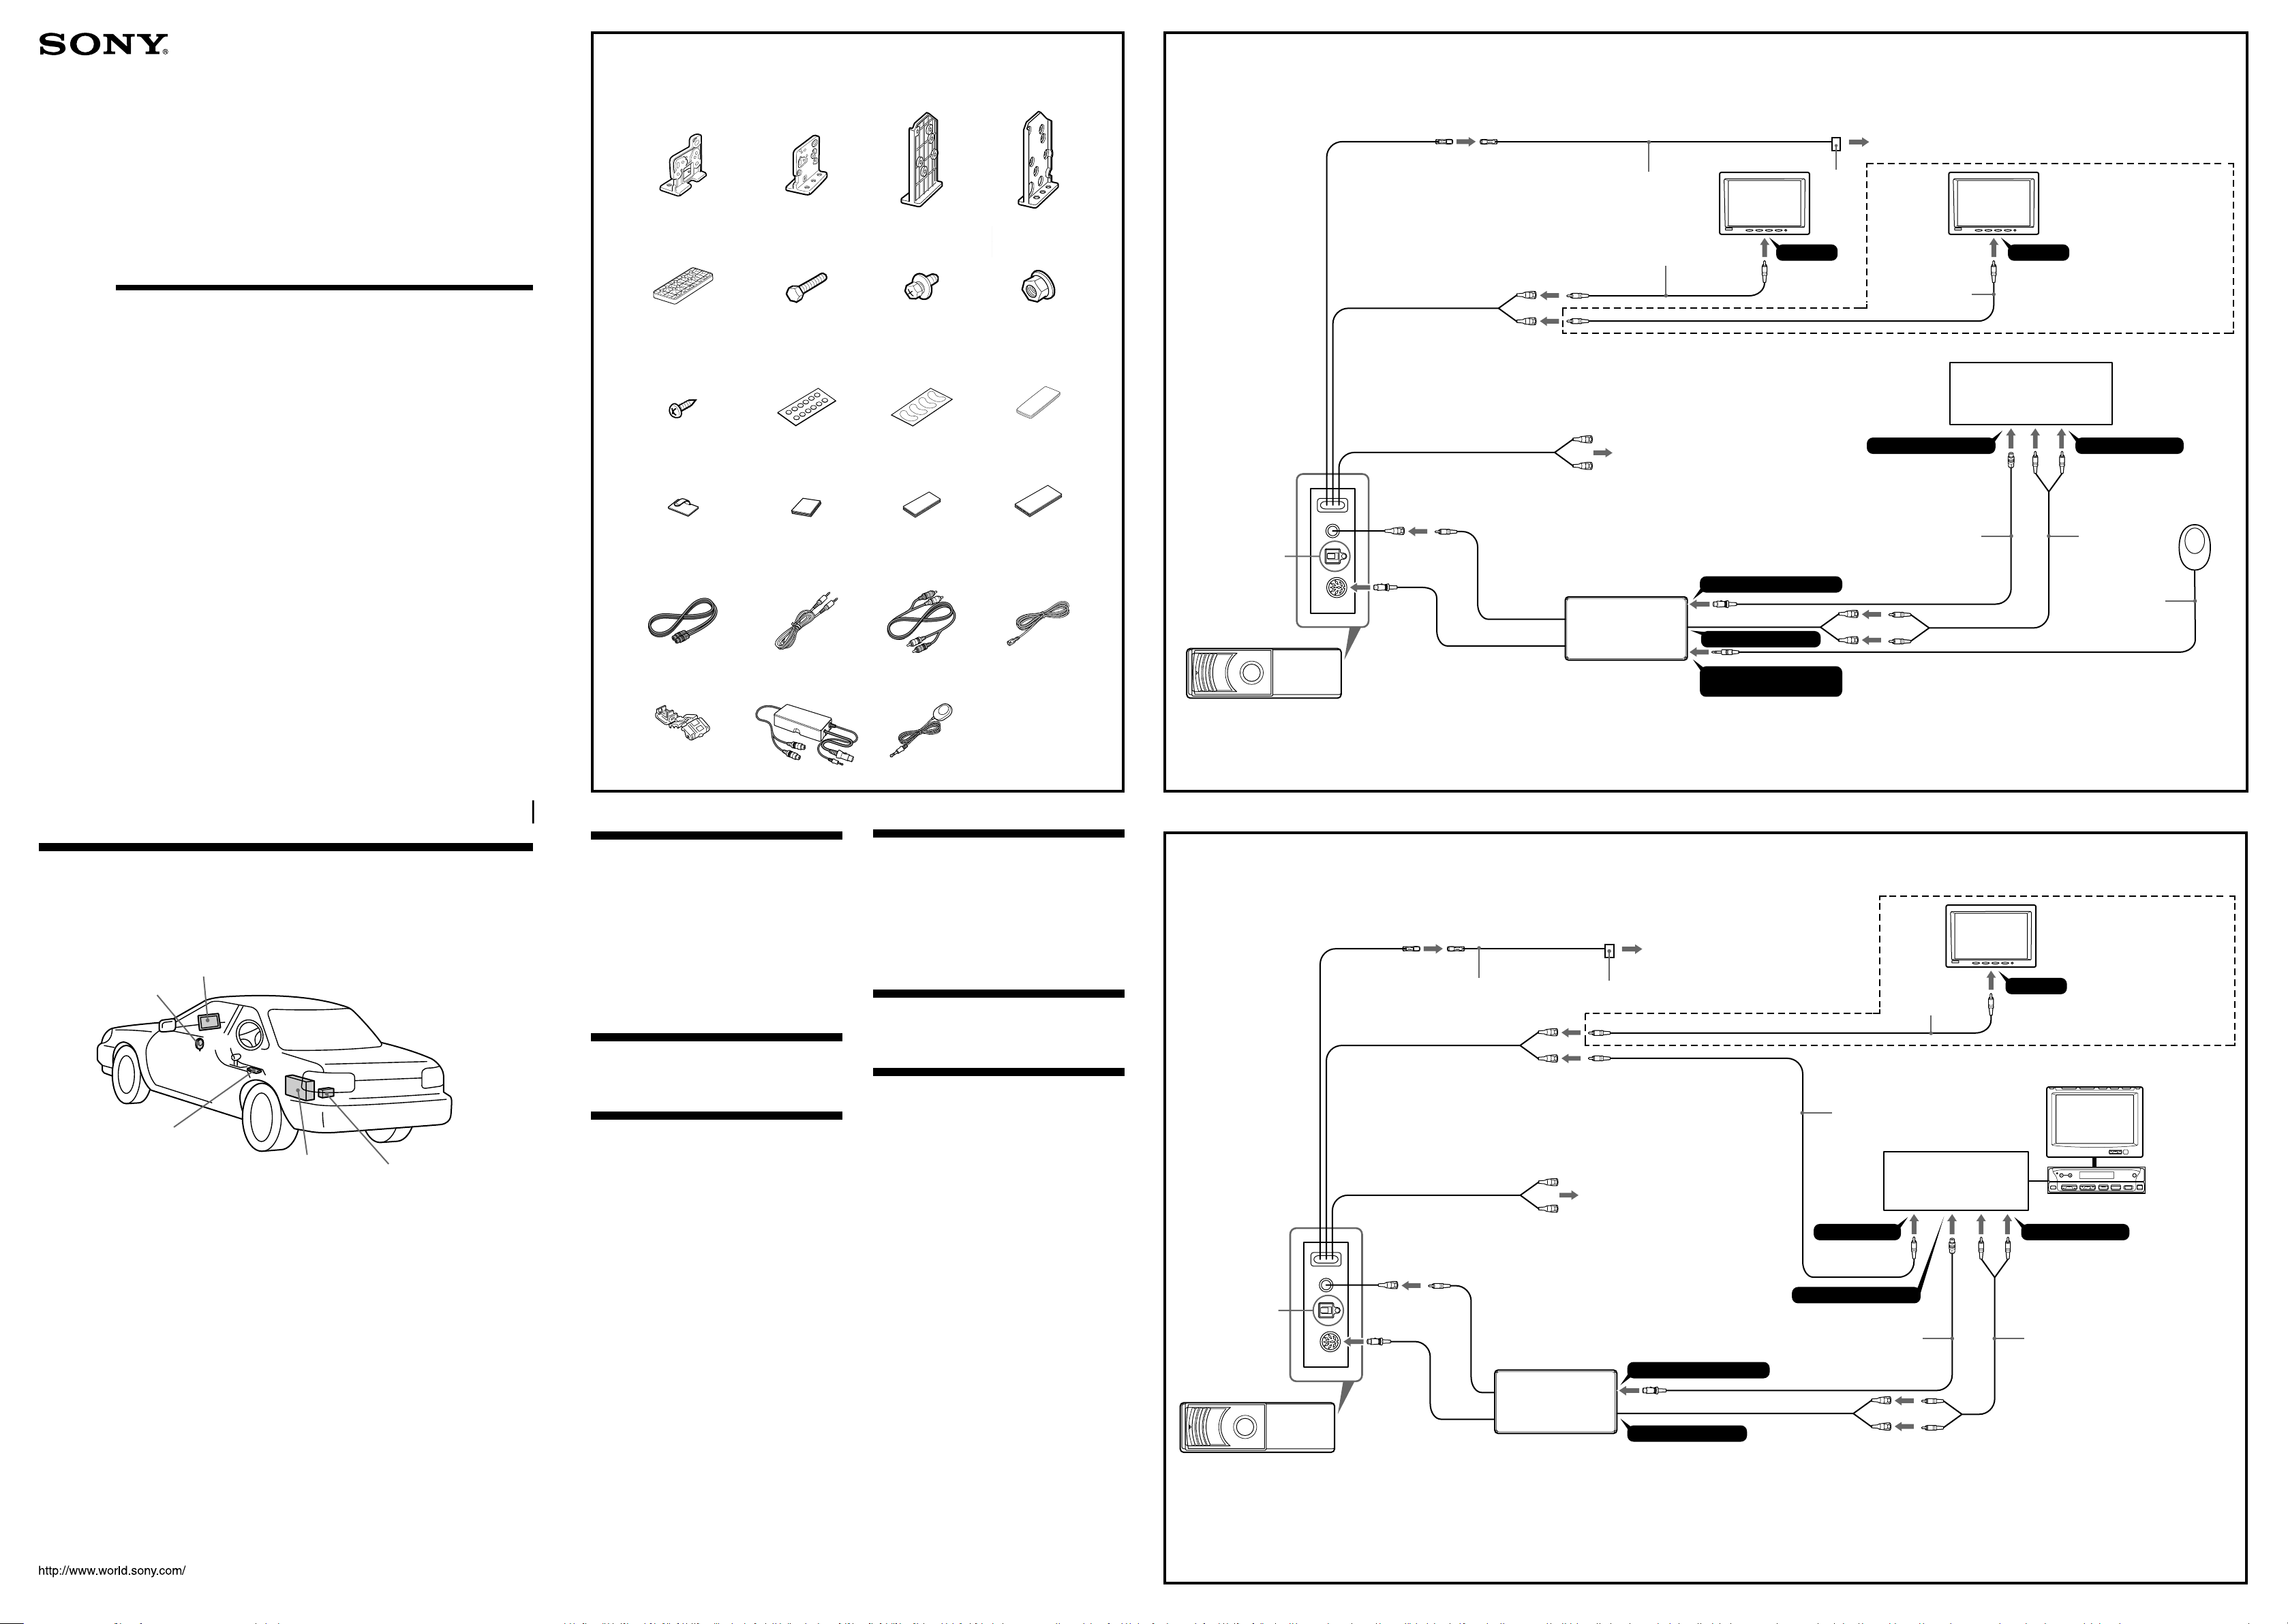
Parts list (1)
The numbers in the list are keyed to those in the
instructions.
Connection diagram (2 A and B)
The audio out connections on this unit can be
configured several ways. Refer to the
corresponding number illustration above.
A For audio out from TV/monitor speakers.
Connect RCA pin cord to the TV/monitor audio
input.
B For audio out from digital amplifier or audio device
Connect optical cable RC-97/98 (optional) etc. to a
digital amplifier or audio device equipped with a
Dolby digital decoder.
•When making connections, be sure to connect
each cable securely.
•When wishing to connect another CD/MD
changer, use the Sony Source Selector XA-C30
(available separately). (2 A/B)
•The signals from the remote commander of this
unit can be received by the sensor of the A/V
center. (2 B)
• The supplied remote control sensor is not used in
the connection example 2. (2 B)
If the supplied remote control sensor wd is
connected to the connection adaptor, the A/V
center cannot receive signals from the remote
commander of this unit. (2 B)
wd
注意
•本機只能使用負極接地 12 V DC 電源。
•連接線路之前,關閉汽車點火裝置以免引起短路。
•為了安全,您只能在停車時並使用了停車製動後,
才能觀看連接在 VIDEO OUTPUT FRONT 電纜上的監
視器。
請確信將停車制動導線 w; 連接至汽車的停車製動
開關導線。
零件一覽表(1)
圖示數字與說明書中的數字是一致的。
線路連接圖(2 A 和 B)
本裝置的音頻輸出連接有以下幾種方式。請參見上面
對應號碼的圖示。
A
從電視監視器揚聲器輸出。
將 RCA 針形導線連接至電視監視器音頻輸入端子。
B
從數碼放大器或音頻裝置輸出。
將光纜 RC-97/98(選購件)等連接到數碼放大器或帶杜
比數碼解碼器的音頻裝置。
•進行連接時,務必牢固連接每根電纜。
•當希望連接另一臺 CD/MD 換碟機時,請使用 Sony
設備源選擇器 XA-C30(另購)。(2 A/B)
•來自本機遙控器的信號可以被 A/V 中心的感應器
接收。(2 B)
•連接示例 2 中沒有使用附帶的遙控感應器。(2
B)
如果附帶的遙控感應器 (23) 連接到連接配接器
上,則 A/V 中心無法接收來自本機遙控器的信
號。(2 B)
DVD changer
DVD 換碟器
2
B
Example 2
例 2
B
Side of the DVD changer
DVD 換碟器的側面
DVD changer
DVD 換碟器
Light green
綠燈
20 cm
20 cm
20 cm
20 cm
30 cm
5 m
w;
VIDEO OUTPUT REAR
Yellow
黃色
VIDEO OUTPUT FRONT
Yellow
黃色
10 cm
ws Connection adaptor
XA-118
連接配接器 XA-118
Red
紅色
White
白色
Light green
綠燈
wa
A
Remote SENSOR input
遙控感應器輸入
To parking brake swich cord*
至停車制動開關導線*
BUS CONTROL OUTPUT
15 cm
BUS AUDIO OUTPUT
2
2
qk
6 m
VIDEO INPUT
BUS CONTROL INPUT
3
*
1 Not supplied
*
2 See “Connecting the parking brake cord” on the reverse side for details.
*
3 Match the v mark of the bus cable with the V mark of the connection adaptor.
*
1 非附送
*
2 詳細情況請參見反面“連接停車制動導線”。
*
3 讓總線電纜的 v 標記與連接配接器的 V 標記對準。
*
1 Not supplied
*
2 See “Connecting the parking brake cord” on the reverse side for details.
*
3 Match the v mark of the bus cable with the V mark of the connection adaptor.
*
1 非附送
*
2 詳細情況請參見反面“連接停車制動導線”。
*
3 讓總線電纜的 v 標記與連接配接器的 V 標記對準。
*
RCA pin cord*
RCA 針形插頭電線*
1
Second
monitor*
顯示器*
1
1
VIDEO IN
1
when connecting second
monitor for the rear seat
在後座連接第二個監視器時
A/V center
A/V 中心
Connection box
連接盒
5 m 5 m
DISC
.>
SEEK
VOL
BUS AUDIO INPUT
SOURCE MODE ATT
OFF
OPEN/
CLOSE
qj ql
Printed on recycled paper
3
4
Foot brake type
腳(踏)剎車型
Hand brake type
手(拉)剎車型
Using the tap
使用分接頭
5
6
7
0
8
A
H
°
4
5
V
7
qg
Light sensor
傳感器燈
Light sensor
傳感器燈
15º
15º
Almost 3 m
約 3 米
Suspended installation
8
C-1
懸掛安裝
7
1
77
C-2 C-3
ø3.5 mm
ø3.5 厘米
Wireless remote
commander
無線遙控器
7
2
Remote control sensor
遙控傳感器 wd
c
wd
qf
4
7
qh
ws
45º installation
45
°安裝
8
7
3
7
B-5
qh
5
6
7
Example: Horizontal installation
示例:水平安裝
Back of the wireless remote commander
無線遙控器的背面
8
4
5
6
Parking brake switch cord
停車制動開關導線
c
w;
Vertical installation
垂直安裝
8
7
3
8
Horizontal installation: “H”
水平安裝:"H"
H
4
°
5
V
0
Parking brake switch
cord
停車制動開關導線
Parking brake switch cord
停車制動開關導線
wa
Horizontal installation
8
B-1
水平安裝
8
V
°
5
H
4
°
5
H
4
Vertical installation: “V”
垂直安裝:"V"
V
7
8
7
1
2
5
6
H
H
V
45°
45º installation: “45º”
°
V
45
45
°安裝: "45°"
x
H
4
°
5
H
V
4
°
5
V
Suspended installation: “H”
懸掛安裝:"H"
B-2
7
Example: Horizontal installation
示例:水平安裝
7
Carpet
地毯
5
6
B-3
7
Example: Horizontal installation
示例:水平安裝
6
5
5
6
7
B-4
8
qa
8
1
8
8
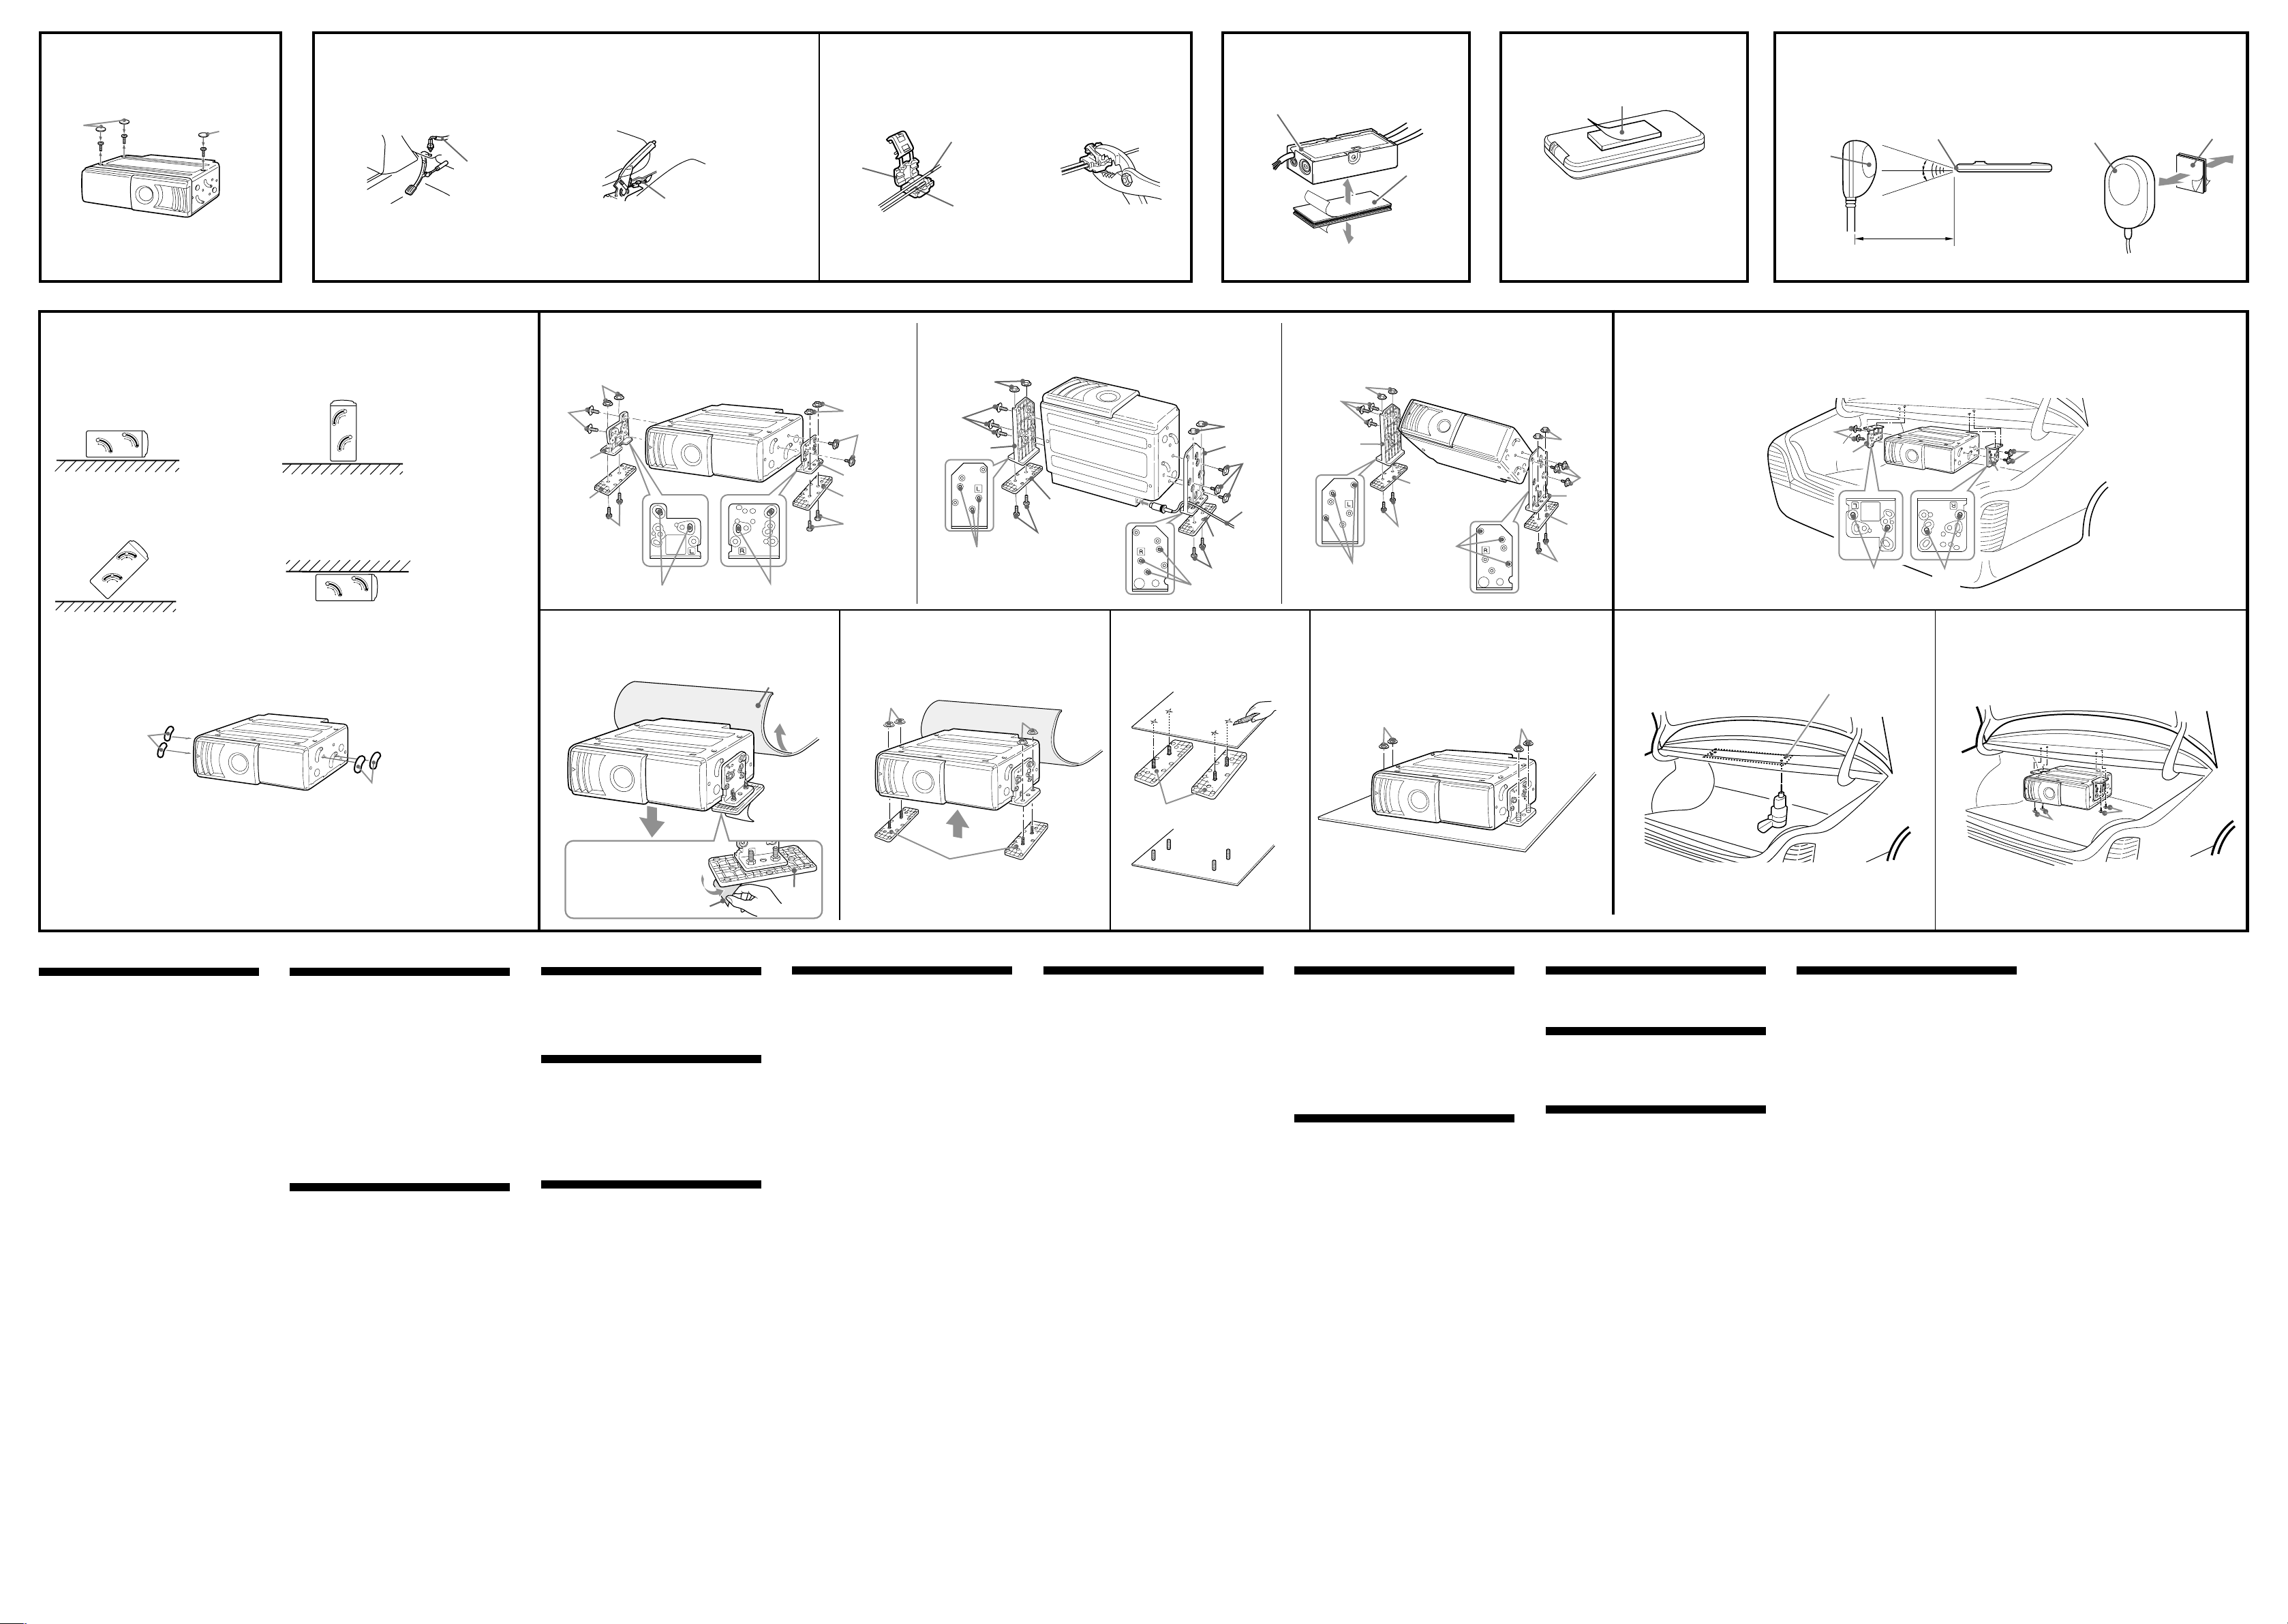
Precaution
• Choose the mounting location carefully,
observing the following:
— Do not install the unit where;
• the ambient temperature exceeds
55 °C.
• it will be exposed to direct sunlight or
hot air from a heater.
• it will be exposed to rain, water, or
high humidity.
• it will be exposed to a lot of dust.
• it will be subject to excessive
vibration.
— The fuel tank should not be damaged
by the tapping screws.
— There should be no wire harnesses or
pipelines under the place where you are
going to install the unit.
— The spare tyre, tools or other equipment
in or under the trunk should not be
interfered with or damaged by the
screws or the unit itself.
Notes
• Be sure to use only the supplied mounting
hardware for a safe and secure installation.
• Make holes of ø3.5 mm only after making sure
there is nothing on the other side of the
mounting surface.
qa
Removing the screws (3)
• On the bottom of this unit are three screws
for shipping purpose only. Be sure to
remove them before installing.
• Place the seals 0 over any holes not used
for installation and the three screws used
for shipping. These seals help to prevent
dust building up, which could cause a
malfunction.
Note
Keep the three screws for shipping purpose. Do
not lose them.
Connecting the parking brake
cord (4)
Be sure to connect the parking cord w; (light
green) to the parking brake switch cord. The
mounting position of the parking brake
switch cord depends on your car. Please
consult your car dealer or your nearest Sony
dealer for further details.
Using the tap
Attach the tap wa to the end of the parking
cord w; (light green) and the parking brake
switch cord.
Note
If the parking brake switch cord is too thin, it
may cause loose connection.
3
2
Place the seal qs.
粘上封貼 qs。
qs
Connection adaptor (5)
Wipe the installation surface clean and use
surface fastener qh to attach the unit.
Wireless remote commander
(6)
Wipe the installation surface clean and attach
surface fastener qg. Be sure to install it in a
position that will not interfere with driving.
Remote control sensor (7)
•Before installing the remote control sensor,
confirm the maximum signal distance of
remote control. The remote control can be
used up to approximately 3 m from the
light sensor, in a conical area spreading
roughly 15º from the light sensor.
•Wipe the installation surface clean and
attach surface fastener qf. Be sure to install
it in a position that will not interfere with
driving.
•If necessary, secure the remote control
sensor cord with the cord clamp qd.
5
x
R
9
9
5
5
How to install the DVD
changer (8)
When you install the DVD changer, be
careful not to damage wiring or equipment
on the other side of the mounting surface.
Before installing the DVD changer (8
A)
•Before installing this unit, set the built-in
anti-vibration board as illustrated,
depending on the angle.
•After setting the angle, place the seals qa
over any holes on the side of this unit.
These seals help to prevent dust building
up, which could cause a malfunction.
Note for vertical installation (8 B-1)
Before installing in the vertical position, pass
the cable of ws through the hole at the lower
left of the bracket 4.
When the unit is to be installed under
the rear tray or in the trunk, observe
the following. (8 C)
•Choose the mounting location carefully so
that the unit can be installed horizontally.
•Make sure the unit does not hinder the
action of the torsion bar spring, hinge, etc.
of the deck lid.
Note
Make installation holes in the rear dash, after
making sure there is nothing obstructing.
Remove the DVD changer.
拆卸 DVD 換碟器。
使用前注意事項
•請注意下列各點仔細選擇合適的安裝位置:
— 不要把機器安裝在:
• 周圍溫度超過 55 ℃ 的地方。
• 直接照射到陽光的地方或暴露在加熱器
的熱氣中。
• 暴露於雨中、水中、或高濕處。
• 極多塵埃的地方。
• 會受到過大震動的地方。
— 不可讓攻絲螺釘傷到油箱。
— 要安裝機器的位置底下,不可有配電線或
配管。
— 螺絲釘或機器本身切勿傷及或妨礙行李箱
裡或下面的備用輪胎、工具或其他裝置。
註
•
安裝時,只可以使用附帶的零件以確保安全和穩固
的安裝。
•
在確認安裝面反側無其他導線等物後,方可鑽開數
個直徑為 3.5 mm 的小孔。
卸下螺絲 (3)
•本裝置底部的三個螺絲僅為運輸之用,安裝
前應先將其拆下。
•用封貼 q; 將所有安裝中不需要的孔和用於
運輸的三個螺絲孔封住。封貼可以防止灰塵
進入而造成故障。
註
將三個用於運輸的螺絲保存好,不要遺失。
連接停車制動導線 (4)
務必將停車導線 w;(綠燈)連接至停車制動
開關導線上。停車制動開關導線的安裝位置視
您的汽車而定。詳細情況請向您的汽車經銷商
或就近向 Sony 經銷商咨詢。
使用分接頭
用分接頭 wa 連接停車導線 w;(綠燈)的末
端和停車制動開關導線。
註
如果停車制動開關導線太細,則可能導致連接鬆動。
連接配接器 (5)
擦乾淨安裝表面,用粘扣帶 qh 固定本機。
無線遙控器 (6)
擦乾淨安裝表面並貼上粘扣帶 qg。請確信安
裝位置不會影響駕駛。
遙控傳感器 (7)
•在安裝遙控傳感器前,請先確認最大遙控訊
號距離。遙控器最遠可在距傳感器燈約 3
米,從傳感器燈起以大約 15°角圓錐形發
散的區域內使用。
•擦乾淨安裝表面並貼上粘扣帶 qf。
•如有需要,可用導線夾 qd 將遙控傳感器導
線固定住。
如何安裝 DVD 換碟器 (8)
安裝 DVD 換碟器時,不可傷及安裝處反面的配
電線或其他設備。
安裝 DVD 換碟器前 (8 A)
•安裝本裝置前,請根據角度,按照圖示安置
內置防震板。
•設定角度後,用封貼 qa 將本裝置側面的所
有孔封住。這些封貼能防止灰塵進入裝置而
造成故障。
垂直安裝注意事項 (8 B-1)
在垂直安裝之前,請將電纜 ws 穿過位於支架
4 左下方的孔。
要把本機安裝在行李箱中或後支架下面
時﹐請注意下列事項。 (8 C)
•仔細選擇安裝位置,以使本機能保持水平安
裝。
•請確認本機器不會妨礙車箱蓋的扭桿彈簧、
鉸鏈等的動作。
註
在確信沒有任何障礙物後,在汽車後隔板內鑽安裝
孔。
 Loading...