

Page 1

DIGITAL VIDEOCASSETTE RECORDER
DVW-250/250P
Page 2

Chapter 1 Overview
1 Features........................................................... 1-1
1-1-1 Features of the DVW-250/250P............. 1-1
1-1-2 Digital Betacam Format........................ 1-1
2 System Configuration .................................... 1-2
3 Getting the Best Performance from the Unit
.......................................................................... 1-3
Chapter 2 Location and Function of
Parts
1 Front Panel ..................................................... 2-1
2-1-1 Operating Controls ................................ 2-2
2-1-2 Status Indications................................... 2-4
2-1-3
Adjustment
2-1-4 Time Code Setting Controls .................. 2-8
2 Connector Panel........................................... 2-10
2-2-1 Audio Connectors and Controls .......... 2-11
2-2-2 Video Connectors and Controls........... 2-13
2-2-3 Power Supply and Miscellaneous........ 2-15
Controls
..............................
2-6
Chapter 3 Getting Started
3-1 Power Supply.................................................. 3-1
3-1-1 Using a Battery Pack
3-1-2 Using an AC Power Supply................... 3-3
3-1-3 Powering On and Off............................. 3-4
3-1-4 Checking the Remaining Battery
Capacity
3-2
Cassettes..........................................................
3-2-1 Cassette Types ....................................... 3-5
3-2-2 Preventing Accidental Erasure of
Recordings ............................................. 3-5
3-2-3 Loading and Unloading Cassettes ......... 3-5
3-2-4 Checking the Remaining Tape............... 3-7
3-3 Adjusting the Display and Indicator
Brightness........................................................ 3-8
.................................................
.............................
3-1
3-4
3-5
4-1-5 Selecting the Monitoring Mode for
Recording............................................... 4-7
4-1-6 Setting Time Values
4-1-7 Locking the Time Code Generator to an
External Signal..................................... 4-11
4-2 Procedures for Recording............................ 4-13
4-2-1 Preventing Inadvertent Operations During
Recording............................................. 4-13
4-2-2
Recording
4-2-3 Audio Dubbing on the Cue Track........ 4-15
Video
..............................
and Audio
................
4-7
4-13
Chapter 5 Playback
5-1 Preparations for Playback............................. 5-1
5-1-1 Selecting the Sound to Be Monitored .... 5-1
5-1-2 Monitoring with a Television Without
Video Input Connections ....................... 5-1
5-1 -3 Using a Field Pickup Unit for Signal
Transmission ........................................... 5-2
5-1-4 Playback Synchronized to an Exemal
Signal .....................................................5-2
5-2 Procedures for Playback................................ 5-3
5-2-1 Normal Speed Playback......................... 5-3
5-2-2 High Speed Searching ........................... 5-3
5-3 Reading and Displaying Time Code and User
Bits ................................................................... 5-5
Chapter 6 Setup Operations
6-1 Setup Menu Organization ............................. 6-1
6-2 Basic Setup Procedure ................................... 6-2
6-3 Setup Menu Settings ...................................... 6-3
Chapter 7 Editing System
Configuration
7-1 When Not Using an Editor ............................ 7-1
7-2 Using an Editor............................................... 7-2
Chapter 4 Recording
4-1 Preparations for Recording........................... 4-1
4-1-1 Connecting Digital Equipment.............. 4-1
4-1-2
Connecting
4-1-3 Making Video Input Settings................. 4-3
4-1-4
Making
Analog
Audio
Equipment
Input
Settings
.............
................
4-2
4-5
Appendixes
Warning Indications............................................. A-l
Using the Carrying Case...................................... A-2
Specifications......................................................... A-3
Index ........................................................................ I-1
Table of Contents 1
Page 3
The DVW-250/250P is a portable videocassette
recorder in the Digital Betacam series. It allows
recording and playback of sound and picture in the
Digital Betacam format.
The following are some of the features of the DVW-
250/250P.
Flexible input/output interfaces
The unit is designed to accept either analog video
(component/composite) and audio signals, or Dl
format serial digital video/audio signals. It is therefore
highly suitable for use not only in analog systems but
also in all-digital systems.
Analog input signals pass through the built-in A/D
converter, and are converted to 10-bit digital video
signals and 20-bit digital audio signals. Similarly,
both digital and analog output signals are provided, for
flexible support of mixed analog-digital systems.
Simple system configuration using the serial
digital interface
The serial digital inputs to the SDI (Serial Digital
Interface) connector provide for one video signal and
four audio channels through a single BNC connector.
When connected to other digital equipment, this makes
setting up and transporting, for example on outside
assignments, extremely straightforward.
High quality digital recording
This unit records both sound and vision on the tape in
the Digital Betacam format (see the figure at the end of
this page). Since all internal processing is digital,
signal outputs are stable, and reproduction is very
accurate.
Designed for field operations
The unit is compact and lightweight (main unit
approximately 6.6 kg or 14 Ib 8 oz), making it ideal for
carrying and operating in the field. The power
consumption while recording is about 26 W (with the
MODE switch in the SAVE position and the CONFI
switch in the OFF position), and the optional battery
pack provides about two hours of continuous
recording.
color playback signal is available at 24 times normal
speed, making tape cuing both fast and accurate.
Two LCD units for ease of operation
The front panel includes two LCDs: the smaller shows
the unit status and time indications, and the larger
displays the audio level meters, the video level meters,
or the setup menu.
By switching the display mode, it is possible to change
the audio level indications for fine adjustment in a
narrower range.
Backlighting is provided to make the displays easier to
read in gloomy conditions.
Overview
The Digital Betacam format is based on the
conventional Betacam and Betacam SP formats, and
allows high-performance digital recording and
playback.
One of the features of the Digital Betacam format is
the introduction of a new technique known as
"coefficient recording," which allows the data rate of
the video signal to be reduced to approximately half.
This makes 120 minutes or more of recording possible
with an "L" size cassette.
The compressed video signal includes error-correcting
codes (ECC), which correct the signal on playback.
This powerful error-correcting system provides the
improved signal reliability which is another feature of
the Digital Betacam format.
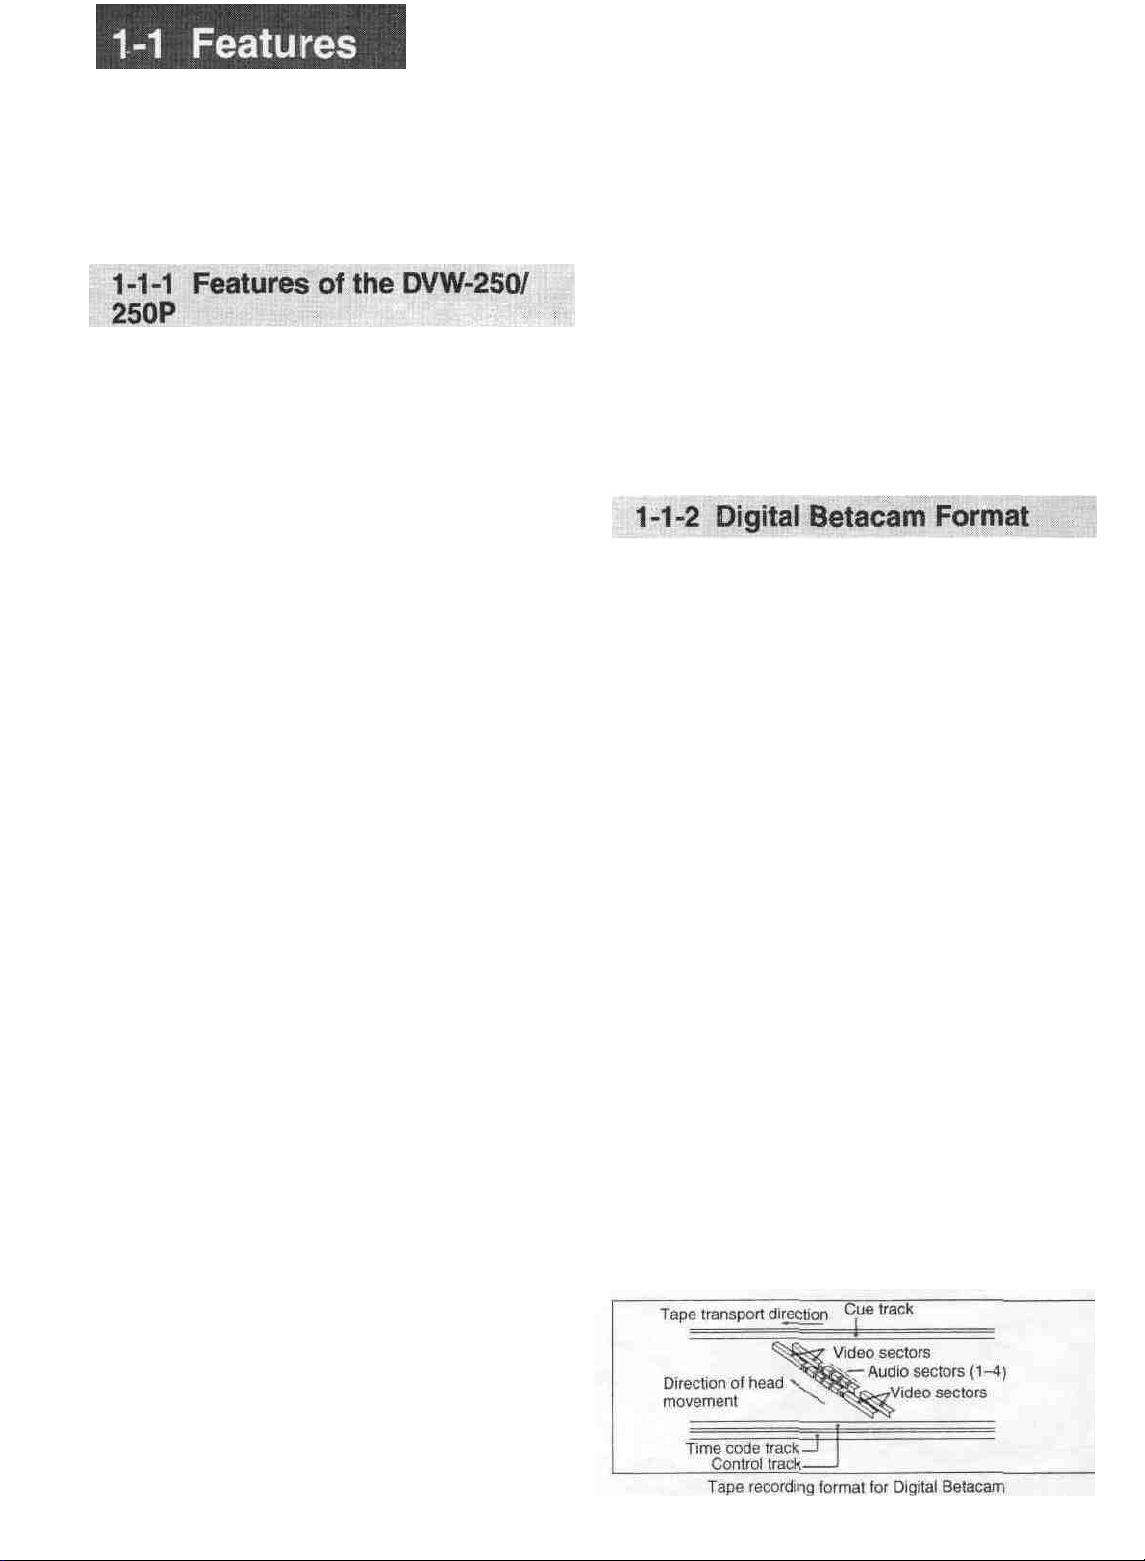
Recording format
The processing of the Digital Betacam video signal
conforms to the Dl 4:2:2 component digital format,
with digitization according to ITU-R BT. 601.
The following figure shows schematically the Digital
Betacam recording format on the tape. A set of six
diagonal tracks contains one field of video and four
channels of audio information.
High speed search with color picture
The search speed can be set to 2 times, 5 times or 8
times normal speed. Using rewind or fast forward, a
Chapter 1 Overview I- I
Page 4
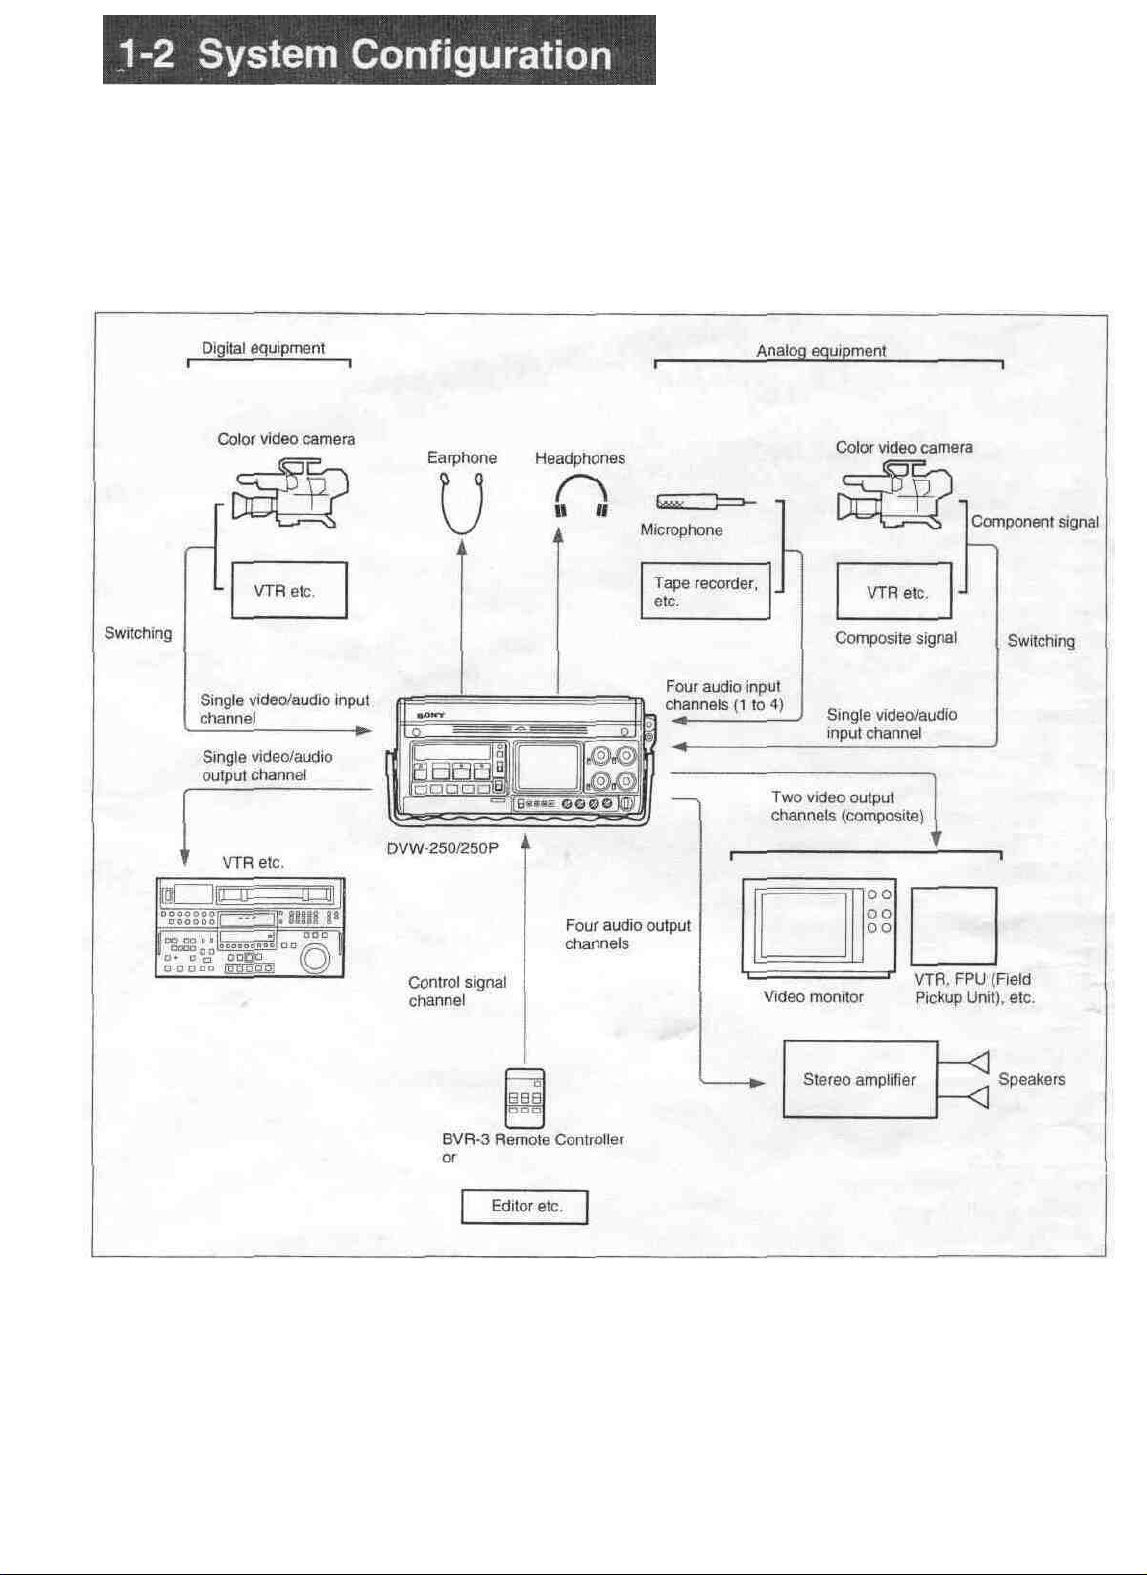
The following figure shows the configuration of a
typical system centered on the DVW-250/250P.
For details, such as the connector names, see Section 4-1-1
"Connecting Digital Equipment" (page 4-1) and Section 4-
1-2 "Connecting Analog Equipment" (page 4-2).
Typical DVW-250/250P system configuration
Page 5

Notes on operation and storage
Cleaning the video heads
Protect the unit from violent shocks
It is possible to damage the internal circuitry and
mechanism or spoil the external finish.
After use
Turn the power switch off.
When not using the unit for a long period
Remove the cassette and batteries.
Operating and storage locations
Store the unit in a level place which is well ventilated.
Avoid operation or storage in the following locations:
• In extremely hot or extremely cold conditions
• In extremely dusty conditions
• In very high humidity
•Where the unit will be subjected to severe vibration
•Close to strong magnetic fields
• Exposed to direct sunlight for long periods, or close
to heating equipment
Condensation
Use the Sony BCT-5CLN or BCT-D12CL Cleaning
Cassette for cleaning the audio and video heads.
Follow the instructions with the cleaning cassette.
Related manuals
In addition to this Operation Manual, the following
manuals are available.
These should be consulted as necessary.
• Maintenance Manual Part 1 (supplied)
Describes the maintenance of this unit.
• Maintenance Manual Part 2 (option)
Contains circuit diagrams and adjustment procedures
required for the maintenance of this unit.
If you move the unit suddenly from a cold place to a
warm place, or use it in a very humid location,
condensation may form on the head drum. If the unit
is operated in this state, the tape may adhere to the
drum, and cause a failure or even permanent damage.
Take the following steps to prevent this from
happening:
• Remove the cassette before operating the unit in
conditions where condensation is likely to form.
•If the HUMID indication is showing, condensation is
present: wait until the HUMID indication disappears,
and then insert a cassette.
• Do not load a cassette on which condensation has
formed into the unit.
Chapter 1 Overview 1 -3
Page 6
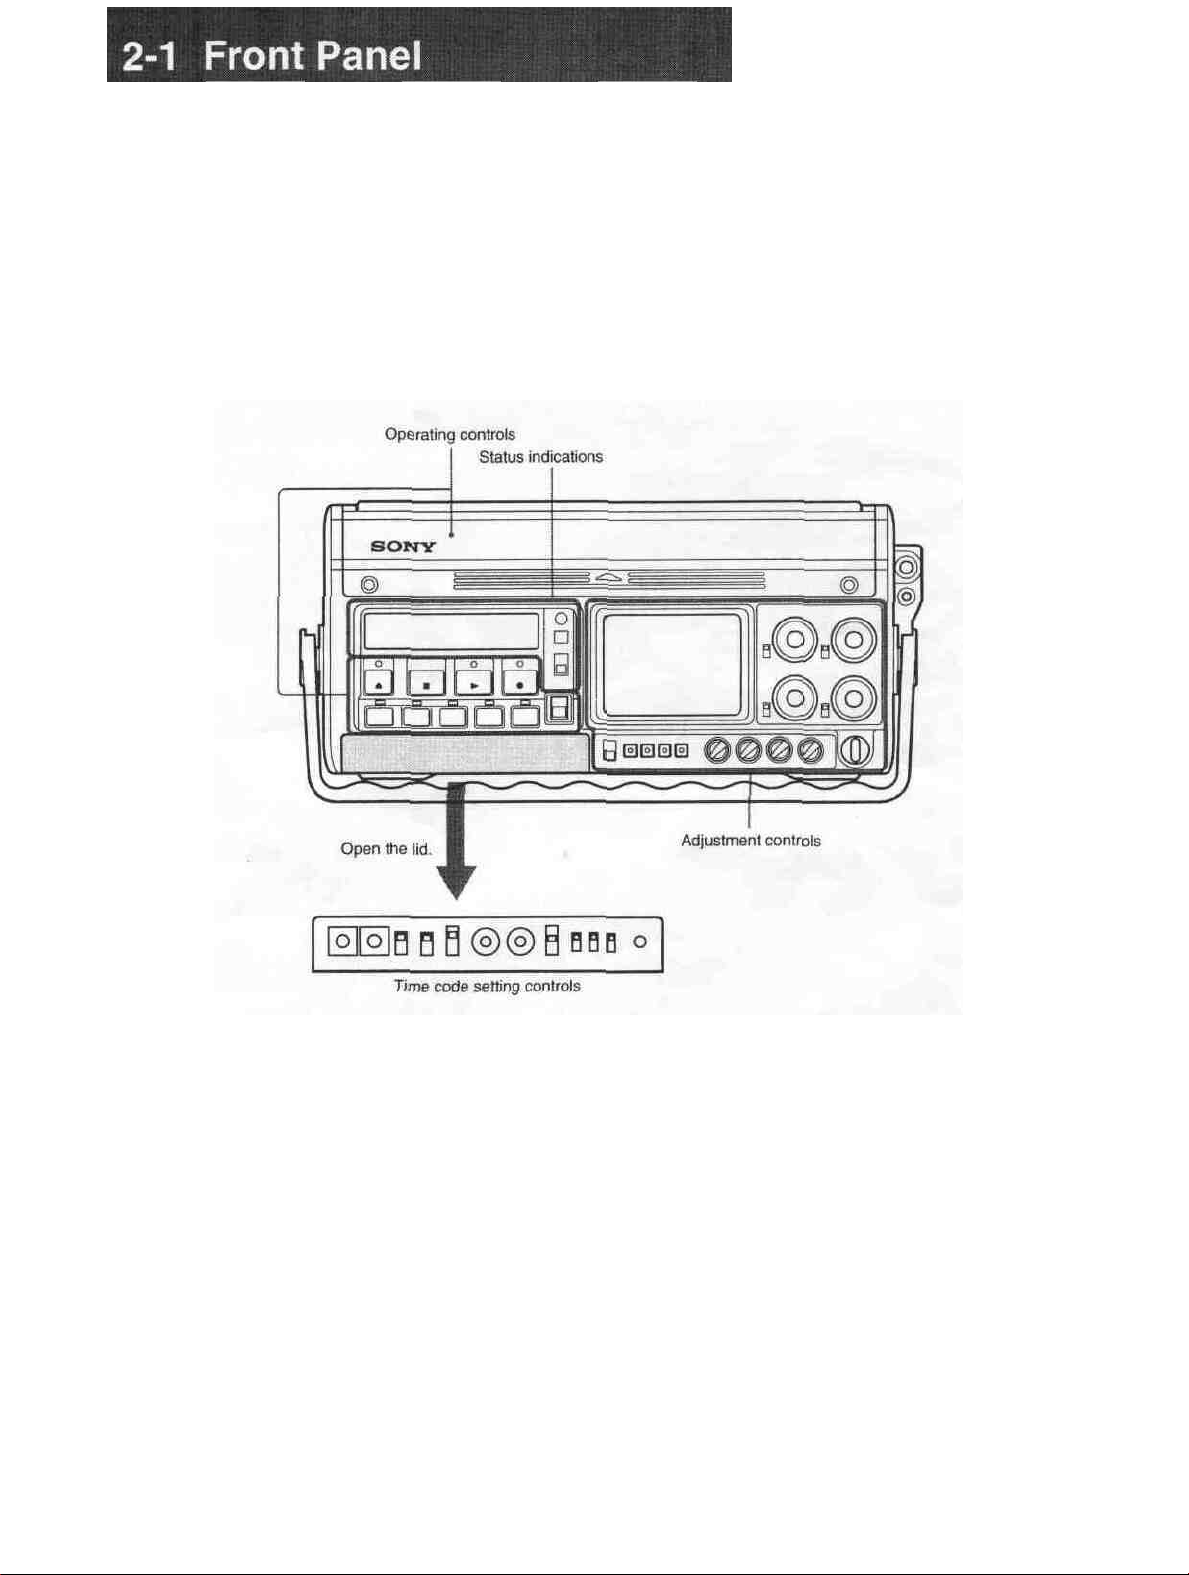
The front panel is divided into four sections as follows:
• Operating controls
• Status indications
• Adjustment controls
• Time code setting controls
Of these, the controls for time code settings are
normally covered by a hinged lid.
Front panel
Chapter 2 Location and Function of Parts 2-1
Page 7
2-1 Front Panel
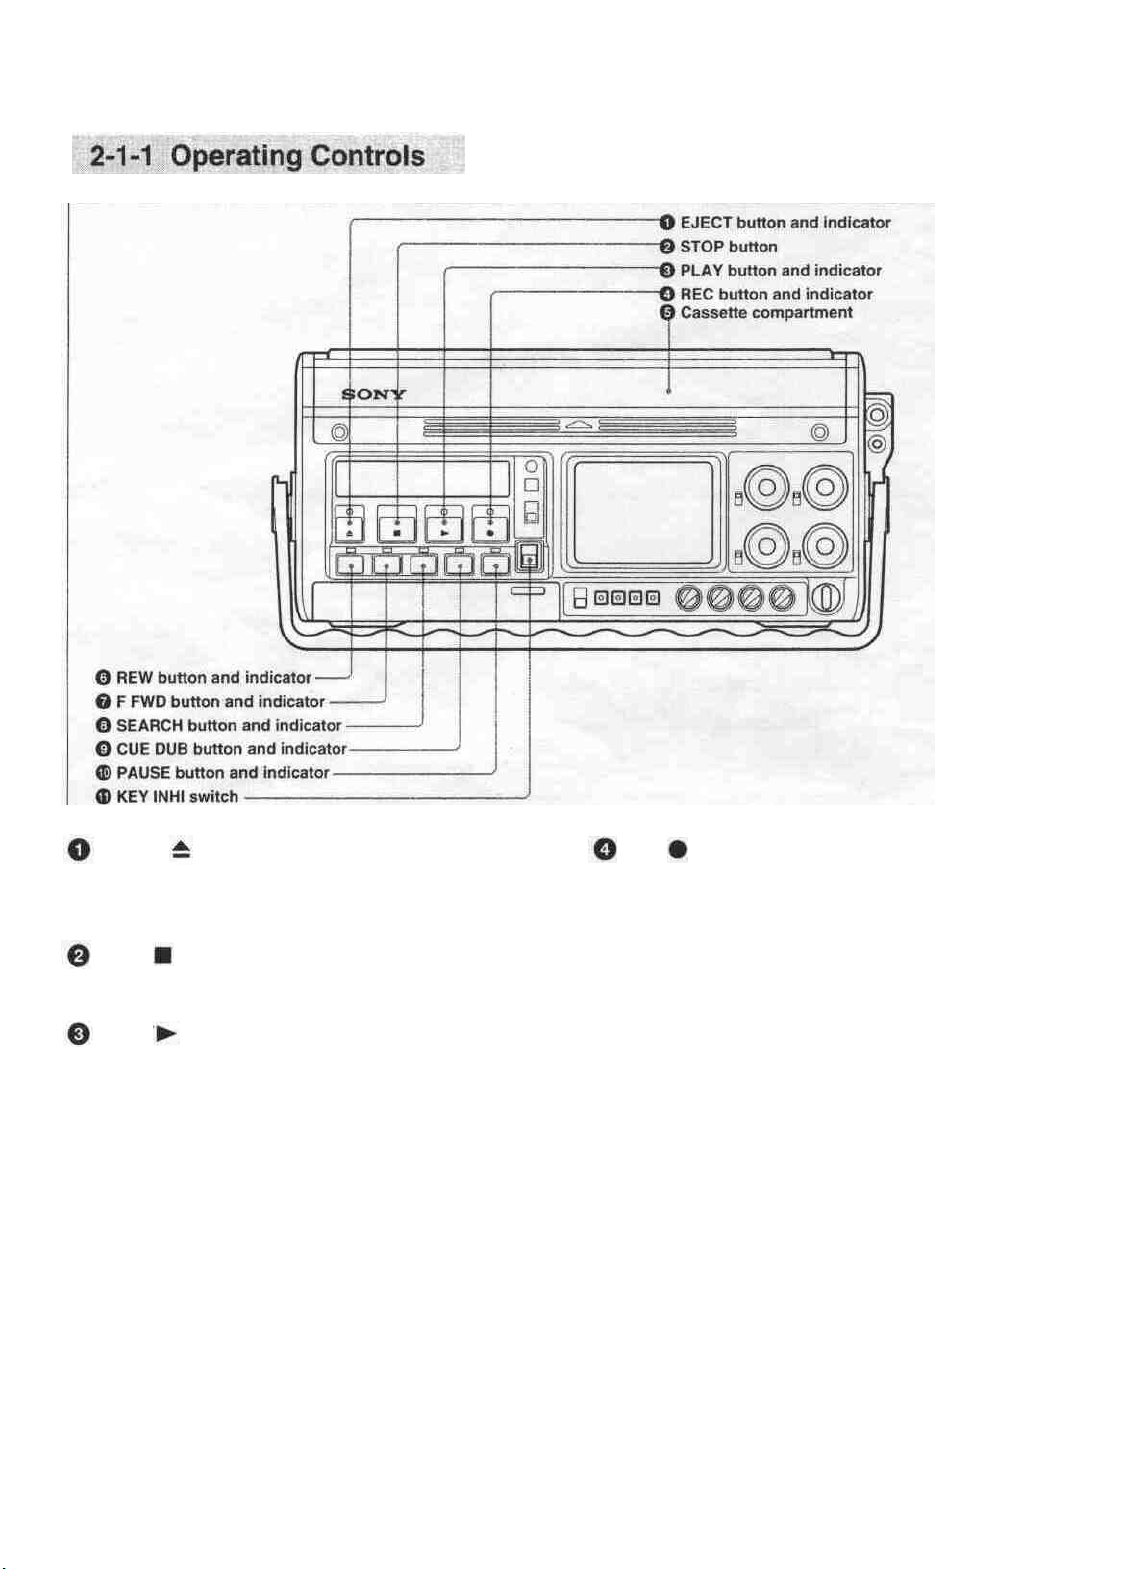
Operating controls
EJECT
Press this button to eject the cassette. The indicator
lights while the cassette is being ejected.
STOP button
Press this button to stop the tape transport.
PLAY button and indicator
Press this button to play back the tape. To start
recording, press this button and the REC button
simultaneously. For audio dubbing, press this button
and the CUE DUB button simultaneously.
The indicator lights during playback, recording, or
audio dubbing.
1) E-E signal
Abbreviation of "Electric-to-Electric signal," meaning
that the signal passes through internal electric circuits,
but not through magnetic conversion circuits such as
heads and tapes.
button and indicator
REC
To start recording, press this button and the PLAY
button simultaneously. The indicator flashes during
recording.
By pressing this button alone while the tape transport
is stopped, or during fast forward, rewind or playback,
it is possible to monitor an E-E signal".
Pressing this button alone while no cassette is loaded
switches the unit to E-E mode21.
Consecutive recording
When making consecutive recordings, using the
PAUSE button to stop recording ensures that
successive takes are joined without picture breakup.
If you press the STOP button to stop recording, then
restart by holding down the REC button then pressing
the PLAY button, the later recording will overlap the
previous one by a few frames, but there will again be
no picture breakup. On the other hand, it you hold
2) E-E mode
Abbrevialion of "EIectric-to-Electric mode," meaning
the stale of the unit in which it is possible to monitor an
E-E signal. This mode is used for confirming input
signals heiorc recording.
(record) button and indicator
2-2 Chapter 2 Location and Function of Parts
Page 8

down the PLAY button then press the REC button,
recording starts immediately, but there may be picture
breakup.
However, once a cassette has been removed and
reinserted, even pressing the REC button then the
PLAY button may sometimes not result in a proper
join.
Cassette compartment
Raise the lid in the direction indicated
and insert
the cassette.
REW (rewind) button and indicator
Press this button to rewind the tape. Pressing this
button after pressing the SEARCH button starts a
search of the tape in the reverse direction at a
maximum 8 times normal speed (selectable from 2
times, 5 times and 8 times). The indicator lights
during the rewind operation, and goes off when it is
completed.
FFWD (fast forward) button and indicator
Press this button to fast forward the tape. Pressing this
button after pressing the SEARCH button starts a
search of the tape in the forward direction at a
maximum 8 times normal speed (selectable from 2
times, 5 times and 8 times). The indicator lights
during the fast forward operation, and goes off when it
is completed.
CUE DUB button and indicator
Hold this button down, then press the PLAY button to
record analog sound on the cue track of the tape (see
page 1-1). This records the channel 4 audio.
Pressing this button alone allows the channel 4 audio
to be monitored in E-E mode.
The indicator flashes during recording, and lights
continuously during monitoring.
PAUSE button and indicator
Press this button to pause the tape movement during
recording or playback. While paused, the indicator
flashes. Pressing the button again turns the indicator
off, and ends the paused state.
KEY INHI (inhibit) switch
When this switch is in the ON position, all operation
buttons are disabled, thus preventing a possible
inadvertent operation.
To release this lock, return the switch to the OFF
position.
When the KEY INHI switch is in the OFF position,
only the STOP button and PAUSE button operate
during recording, but at all other times, all buttons
operate.
SEARCH button and indicator
Press this button to play back at high speed. After
pressing this button, press the F FWD button to play
back in the forward direction or the REW button to
play back in the reverse direction. The speed can be 2
times, 5 times or 8 times normal speed, and this is
selectable by a setup operation.
The indicator lights during the search operation.
Pressing the button again turns the indicator off, and
ends the search function.
Chapter 2 Location and Function of Pans 2-3
Page 9
2-1 Front Panel
Status indications
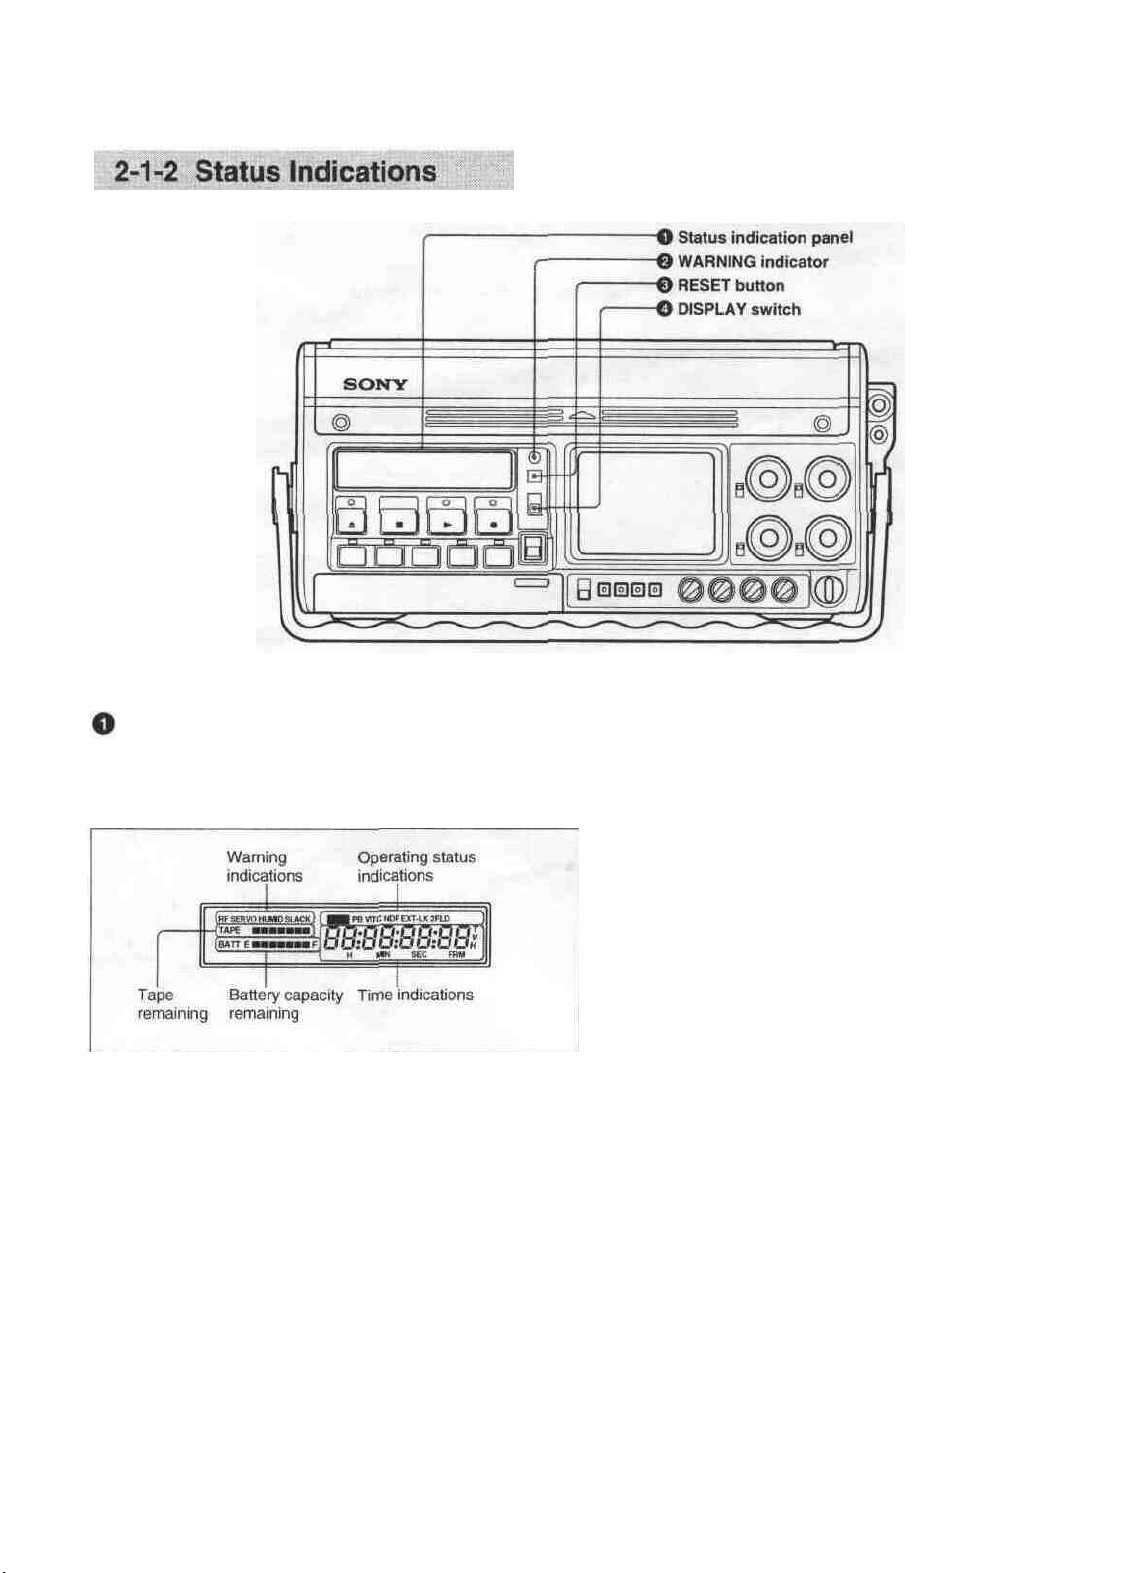
Status indication panel
This displays warnings, the tape remaining, the battery
capacity remaining, the operating status, and time
indications.
Status indication panel
The details of these indications are as follows:
Warning indications
The following indications appear in the event of a fault
in the unit:
RF: Recording or playback is not possible because
the video heads are clogged, or there is a fault in
the circuit.
SERVO: The drum servo or capstan servo lock is
lost.
HUMID: There is condensation on the head drum.
Alternatively, the humidity is high.
SLACK: The tape winding is not correct.
For more details, see the section "Warning Indications"
(page A-1).
Operating status indications
These show the operating status of the unit, as follows:
DIAG: in diagnosis mode
PB: when the playback time code is displayed.
VITC: when the time code displayed is the VITC
(Vertical Interval Time Code)
NDF: in non-drop frame mode (DVW-250 only) (see
the footnotes on page 4-9)
EXT-LK: when the time code on this unit is locked
to the time code on an external unit
2FLD: when the internal time code generator is not
color frame locked"
1) Color frame lock
This forces the time code frame number to be even for information in the input video signal and the time code is
the first and second color fields and odd for the third and not locked to an external time code, then in the F-RUN
fourth color fields. When there is color frame mode the color frame lock is automatically applied.
2~4 Chapter 2 Location and Function of Parts
Page 10

Time indications
This display shows the value selected by the
DISPLAY switch from CTL (control track running
time), time code, or user bits. However, if the REAL
TIME record/set switch (see page 2-9) in the time code
setting controls is in the SET position, the real time
appears here, regardless of the DISPLAY switch
setting.
Tape remaining indication
This shows the length of the remaining tape. Each
segment corresponds to 5 minutes of remaining tape,
but if 30 minutes of tape or more remains, all seven
segments show.
For details of the segment indications and remaining tape
times, see Section 3-2-4 "Checking the Remaining Tape
(page 3-7).
When the remaining tape time is approximately two
minutes, the leftmost segment and the "TAPE"
indication flash, and simultaneously the WARNING
indicator flashes, accompanied by an intermittent
warning tone. At the end of the tape, the WARNING
indicator stays on, and the warning tone becomes
continuous.
Battery capacity remaining indication
This shows the remaining battery capacity. When the
battery pack is fully charged, all seven segments show.
As the battery capacity decreases, the segments
disappear in turn from the right.
For details of the segment indications and remaining battery
capacity, see Section 3-1-4 "Checking the Remaining
Battery Capacity (page 3-4).
RESET button
This resets the time display.
When the CTL value (control track running time) is
displayed, it is reset to "0:00:00:00". When one of the
time code, or user bit value or real time is displayed, it
is reset to "00:00:00:00".
DISPLAY switch
This selects the time value displayed.
CTL: Displays the tape running time in hours,
minutes, seconds and frames.
TC: Displays a time code.
U-BIT: Displays the user bits.
Note that when the user bits are displayed, no
colons appear.
However, the value displayed is not totally determined
by the setting of the DISPLAY switch. The REAL
TIME record/set switch (see page 2-9) takes
precedence, followed by the F-RUN/R-RUN switch
(see page 2-9), and finally the DISPLAY switch
setting.
Switch settings and time value displayed
REAL TIME
record/set
switch
position
SET
REC
ON
OFF
or
F-RUN/
R-RUN
switch
position
Ignored
SET
F-RUN or R-
RUN
DISPLAY
switch
position
Ignored
TC or CTL
U-BIT
CTL
TC
U-BIT
Value
displayed
Real time
Time code
User bits
CTL
Time code
User bits
When the battery pack is almost exhausted, the
leftmost segment and the "BATT" and "E" indications
flash, and simultaneously the WARNING indicator
flashes, accompanied by an intermittent warning tone.
When the battery pack is completely exhausted, the
WARNING indicator stays on, and the warning tone
becomes continuous.
WARNING indicator
This lights or flashes when the battery pack is nearly
exhausted, there is less than two minutes of tape left,
or there is a fault in the unit.
For more details, see the section " Warning Indications "
(page A-l).
Chapter 2 Location and Function of Parts 2-5
Page 11
2-1 Front Panel
Adjustment controls
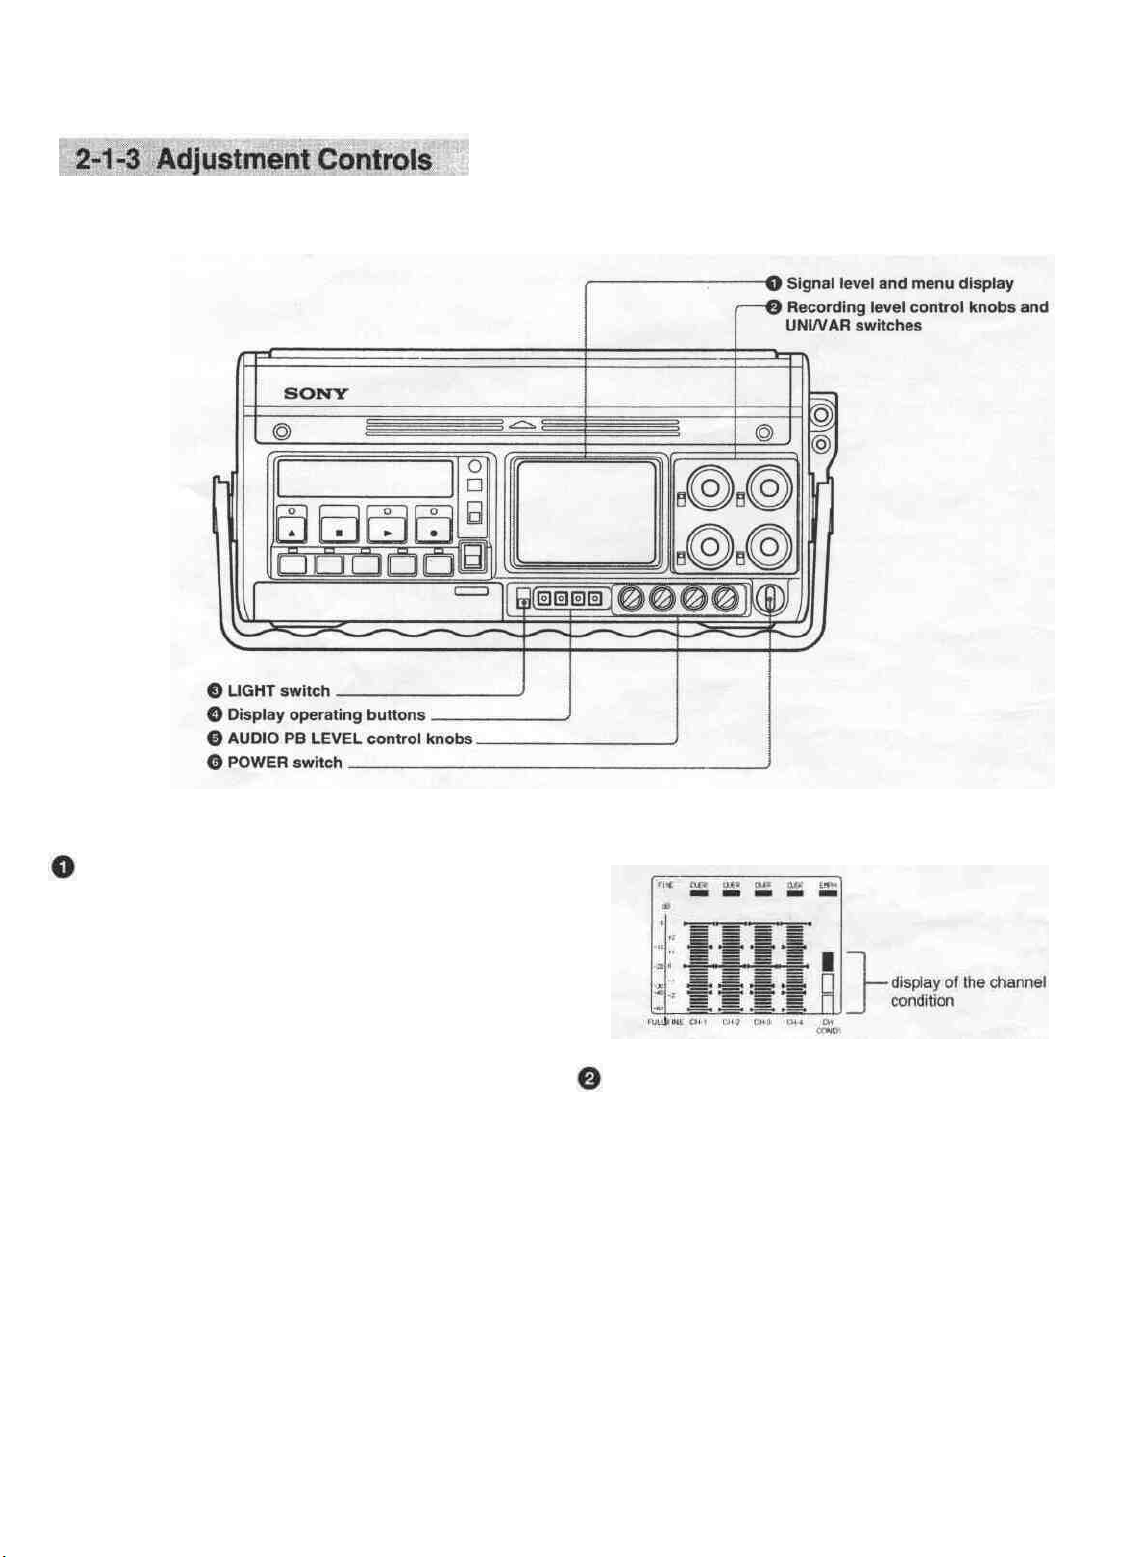
Signal level and menu display
Pressing the DISPLAY button in the display operating
buttons cycles this display through the audio level
meters, video level meters, and setup menus.
When the unit is powered on, and whenever five
minutes elapse without an operation, the display
reverts to the audio level meters.
When the display is showing the audio level meters,
the indication "CH CONDI" (channel condition)
appears. One of the three segments above it appears,
to indicate the status of the playback signal.
Top segment: The playback signal is normal.
Middle segment: The playback signal is somewhat
degraded, but adequate.
Bottom segment: The playback signal is degraded.
If this segment appears continuously, head
cleaning or an internal servicing is required.
Recording level control knobs and UNI/VAR
(unity/variable) switches
When the audio inputs are analog, these knobs can be
used to adjust the recording level on each of the four
channels, while watching the audio level meters.
Below and to the left of each knob is a UNI/VAR
(unity/variable) switch, and the position of this switch
affects the recording level as follows:
UNI: The input signal is recorded without changing
its level, regardless of the position of the control
knob.
VAR: The position of the control knob determines
the recording level.
2-6 Chapters Location and Function of Parts
Page 12

LIGHT switch AUDIO PB (playback) LEVEL control knobs
This switches on and off the illumination of the status
indication panel (see page 2-4) and signal level and
These adjust the playback levels for each separate
channel of analog audio output.
menu display, and also controls the brightness of the
indicators for the operating buttons.
ON: Turns the display illumination on.
OFF: Turns the display illumination off.
BRT: Turns the display illumination off, and
increases the brightness of the indicators. This
makes the indicators easier to see outdoors, for
example.
POWER switch
This powers the unit on and off.
This switch also controls the power supply to a
camera connected to the CAMERA connector on the
connector panel (see page 2-13), a remote controller
connected to the DC OUT connector (see page 2-15),
and an RF modulator connected to the RFU OUT
connectors (see page 2-15).
Display operating buttons
There are four buttons, and their functions depend on
Note that the time code circuits continue to operate
when the unit is powered off.
the current state of the signal level and menu display,
as shown in the following table.
Functions of display operating buttons
Display
state
Operating
button
DISPLAY
UP
FREEZE/DOWN
FINE/SET
Audio level
meters
Switch to
video level
meters
(No
function)
Freeze
playback
frame or
end freeze
Toggle
display
mode
(FULL/
PINE)
Video
level
meters
Switch to
setup
menu
(No
function)
(No
function)
(No
function)
Setup menu
Switch to
audio level
meters
Move cursor
(*)up
Move cursor
(*) down
Select item
indicated by
cursor (*)
Chapter 2 Location and Function of Parts 2-7
Page 13
2-1 Front Panel
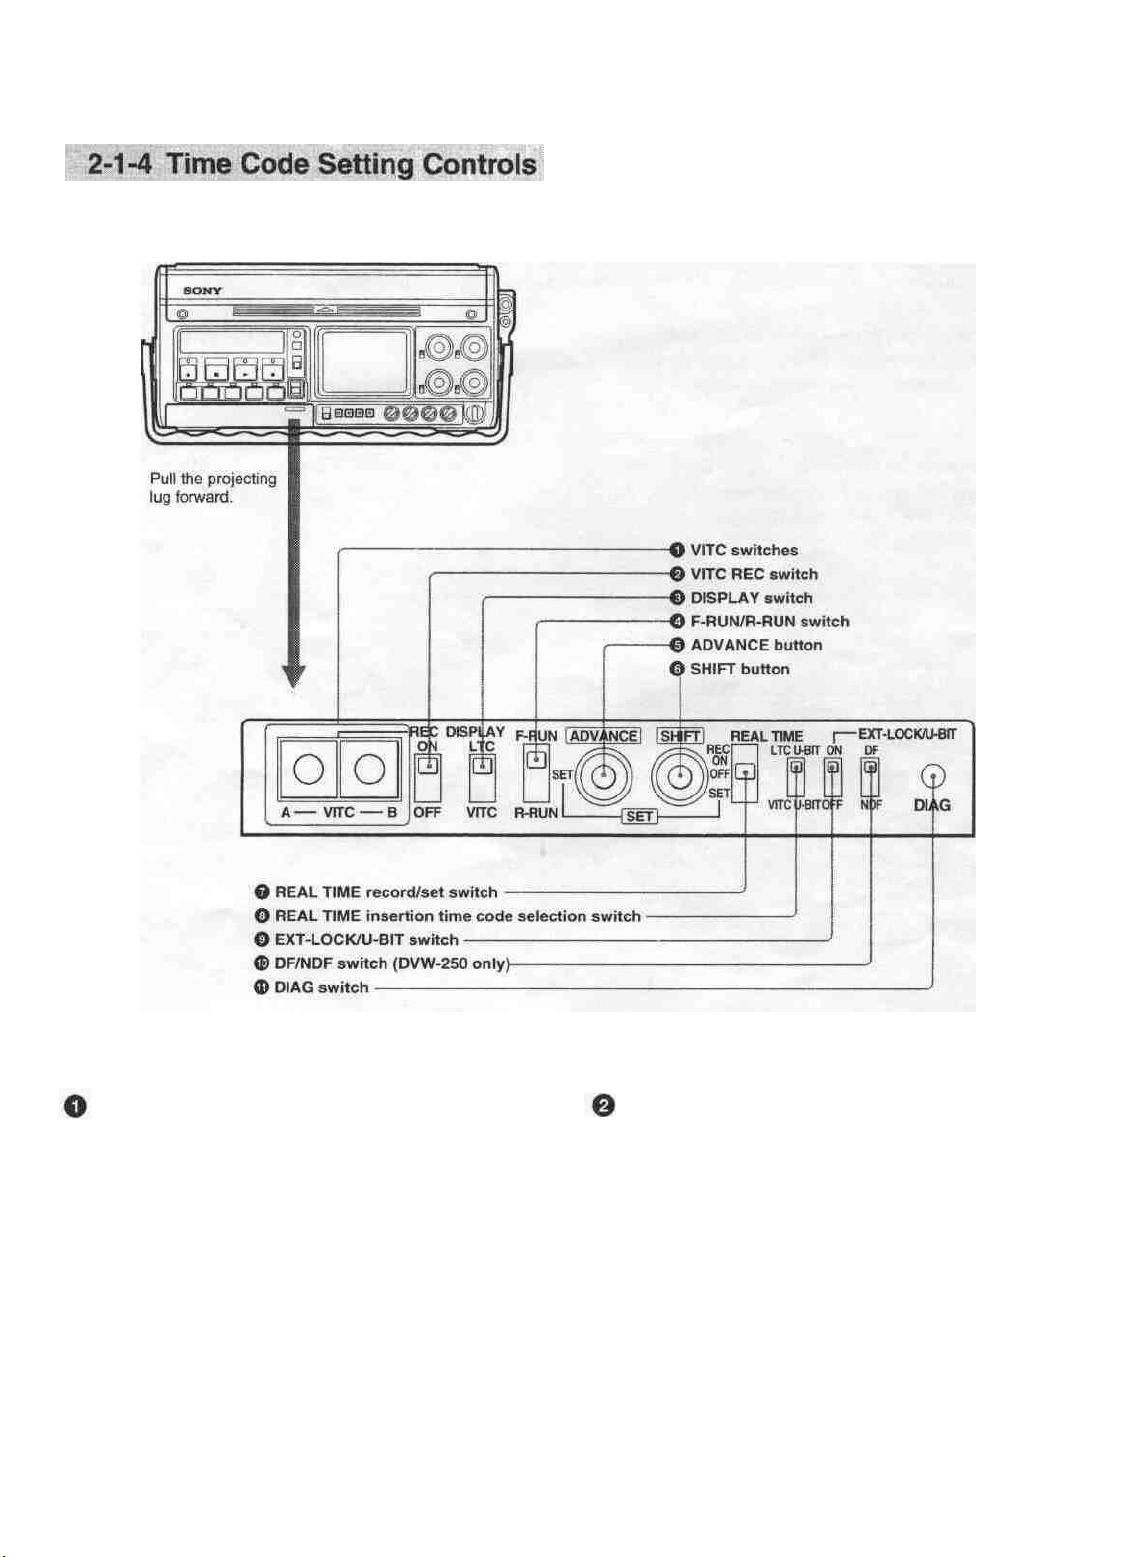
Time code setting controls
VITC switches VITC REC (record) switch
These determine the lines in the vertical blanking
interval in which the VITC" is recorded.
For the DVW-250, the factory default is for switch A
This selects whether or not to record the VITC.
ON: Record the VITC.
OFF: Do not record the VITC.
to be in position 6 (line 16) and switch B in position 8
(line 18).
For the DVW-250P, the factory default is for switch A
to be in position C (line 19) and switch B in position E
(line 21).
For details of the relation between the switch positions and
the line numbers, see page 4-10.
1) VITC (Vertical Interval Time Code)
This time code signal is inserted in two lines of the
2-8 Chapter 2 Location and Function of Parts
vertical blanking interval. This allows the time code to
be read even at very slow playback speeds.
Page 14

DISPLAY switch
This selects which time code is displayed in the status
indication panel (see page 2-4). This switch is only
effective when the DISPLAY switch by the status
indication panel (see page 2-5) is set to the TC or UBIT position.
LTC: Display the LTC (Longitudinal Time Code).
VITC: Display the VITC.
F-RUN/R-RUN (free-run/record-run) switch
This selects the operating mode of the internal time
code generator.
F-RUN: The time code generator keeps running,
regardless of the operating state of the unit. Use
this position when setting the time code to real
time or synchronizing it to an external time code.
SET: Move the switch to this position when setting
the time code or user bits value.
R-RUN: The time code generator runs only while
recording. This produces a tape with consecutive
time code values, even when shot intermittently.
ADVANCE button
When setting the time code or user bits value,
pressing this button increments the digit which is
flashing.
This button is effective only when the F-RUN/RRUN switch or REAL TIME record/set switch is in
the SET position.
EXT-LOCK/U-BIT switch
This selects whether or not to lock the user bit data to
external user bit data.
ON: The user bit value is locked to the user bit value
inserted in the external time code.
OFF: The user bit value set on this unit is used.
DF/NDF switch (DVW-250 only)
This selects whether to use drop frame mode or nondrop frame mode.
For an explanation of the significance of these modes, see
the footnotes on page 4-9.
DF: drop frame mode
NDF: non-drop frame mode
DIAG (diagnosis) switch
Press this switch to carry out diagnosis on the unit.
For details, refer to the supplied Maintenance Manual Part
1.
SHIFT button
When setting the time code or user bits value,
pressing this button cycles through the digits, flashing
the one which can be changed. This button is
effective only when the F-RUN/R-RUN switch or
REAL TIME record/set switch is in the SET position.
REAL TIME record/set switch
This selects whether or not to record the real time as
user bit data. It is also used for setting the real time.
REC ON: Record the real time as user bit data.
OFF: Do not record the real time as user bit data.
SET: Set the real time.
REAL TIME insertion time code selection
switch
This selects whether to insert the real time as user bit
data in the LTC or VITC.
LTC U.BIT: Insert the user bit value in the LTC.
VITC U-BIT: Insert the user bit value in the VITC.
Chapter 2 Location and Function of Parts 2-9
Page 15
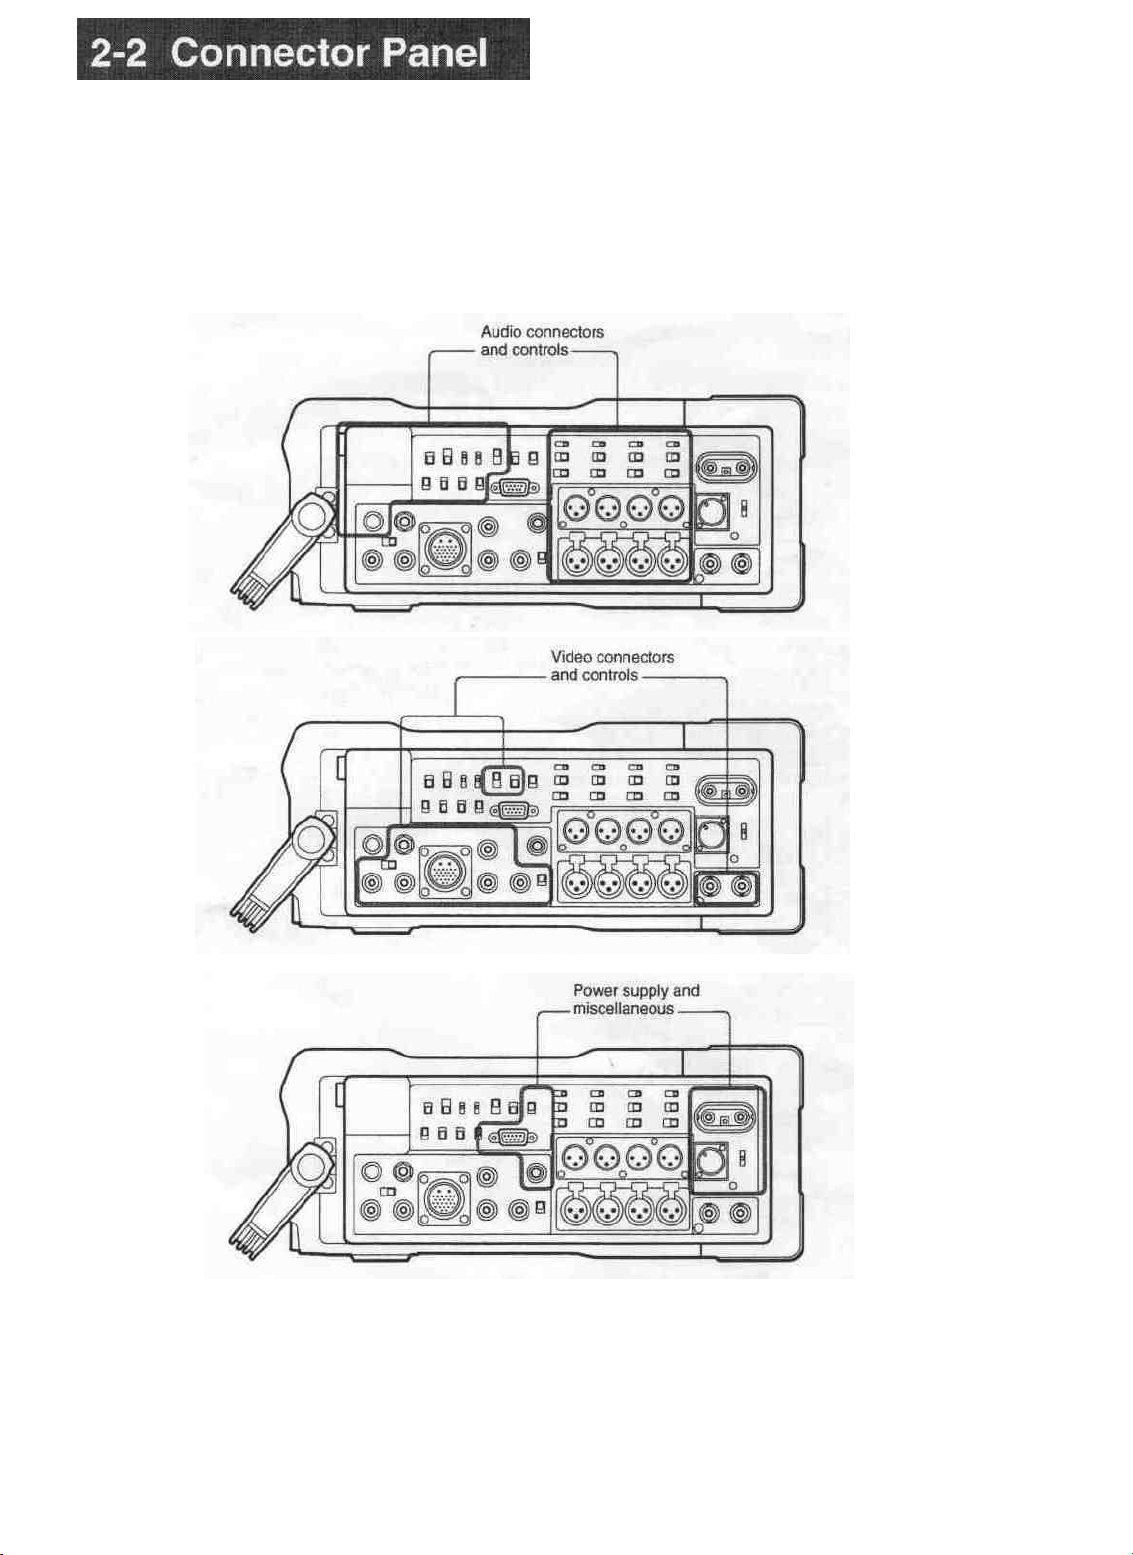
This section describes the connector panel under the
following three headings:
• Audio connectors and controls
• Video connectors and controls
• Power supply and miscellaneous
2-1 0 Chapter 2 Location and Function of Parts
Connector panel
Page 16
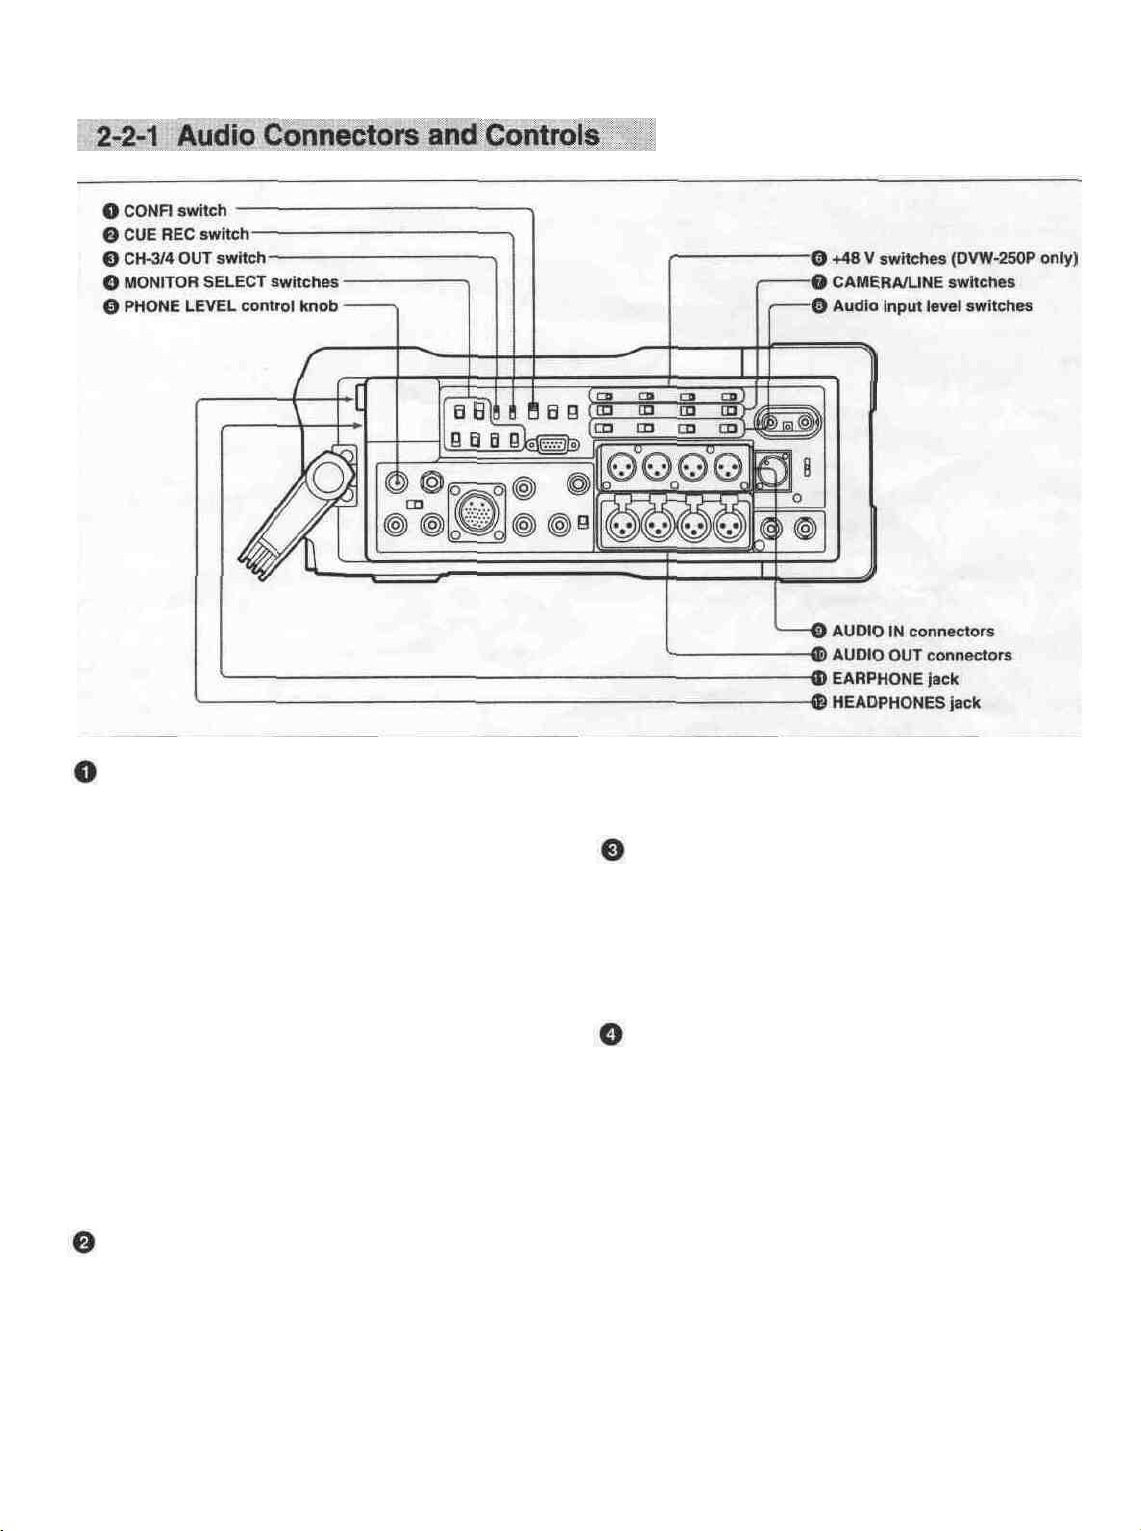
Audio connectors and controls
CONFI (confidence) switch
This selects the mode for monitoring during recording.
Note that this switch applies to both video and audio.
ON: Monitor the simultaneous playback of the
recorded signals from the confidence heads.
ECC (Error Correcting Codes): Monitor the input
signals unchanged (in E-E mode). If a serious
error is detected while recording the signals, a
warning indication is given.
OFF: Monitor the input signals unchanged (in E-E
mode). The RF envelope is monitored during
recording, and if a fault occurs a warning
indication is given.
The ON setting results in the highest power
consumption, and the OFF setting the lowest. When
using the unit with a battery pack, set the CONFI
switch to the ECC or OFF position.
CUE REC (record) switch
It is possible to mix the analog audio input signals and
record them on the analog cue track on the tape. This
switch determines whether or not to record on the cue
track during normal recording. When this switch is in
the ON position, channels 1 to 4 of the analog audio
input are mixed and recorded on the cue track.
When using the CUE DUB button on the front panel
(see page 2-3) for cue dubbing, the audio signal is
:ors ana controls
recorded on the cue track regardless of the position of
this switch.
CH-3/4 (channels 3 and 4) OUT switch
This selects the output from channels 3 and 4 of the
AUDIO OUT connectors.
MON: the signals selected by the MONITOR
SELECT switches
LINE: the signals of audio channels 3 and 4
MONITOR SELECT switches
These select the audio signals which can be monitored
using the EARPHONE jack, HEADPHONES jack,
and RFU OUT connector. When the CH-3/4 OUT
switch is in the MON position, these switches also
select the audio output from channels 3 and 4 of the
AUDIO OUT connectors.
CUE: the audio from the cue track
DA: Use the channels selected by the switch to the
right.
1/2: audio channels 1 and 2
3/4: audio channels 3 and 4
MIX: A mix of those of the four channels for
which the corresponding switches below are
in the ON position.
Chapter 2 Location and Function of Parts 2~1 I
Page 17

2-2 Connector Panel
PHONE LEVEL control knob
This adjusts the level of audio output to the
EARPHONE and HEADPHONES jacks.
AUDIO IN connectors (XLR in)
These input up to four analog audio signals from
external microphones or other equipment.
+48 V switches (DVW-250P only) AUDIO OUT connectors
For each of the four channels, these turn on or off the
48 V microphone phantom power supply to the
These output analog audio signals for the four
channels to external equipment.
corresponding AUDIO IN connector. These switches
are only effective when the following selections are
made:
CAMERA/LINE switch: CAMERA position
Audio input level switch: -60 dB position
EARPHONE jack (stereo minijack)
Connect an earphone or stereo headphones equipped
with a stereo miniplug.
The MONITOR SELECT switches determine the
audio output.
CAMERA/LINE switches
For each of the four audio channels, these select the
When the WARNING indicator (see page 2-5) lights
or flashes, a warning sound is sent to the earphone.
input.
CAMERA: the audio input to the CAMERA
connector (see next page)
LINE: the audio input to the corresponding AUDIO
IN connector
HEADPHONES jack (stereo standard jack)
Connect stereo headphones with an impedance of 8
ohms.
The MONITOR SELECT switches determine the
audio output.
Audio input level switches
For each of the four channels, these select the audio
When the WARNING indicator (see page 2-5) lights
or flashes, a warning sound is sent to the headphones.
input level. There are three settings: -60, -20 and
+4 dBu.
2-1 2 Chapter 2 Location and Function o( Parts
Page 18
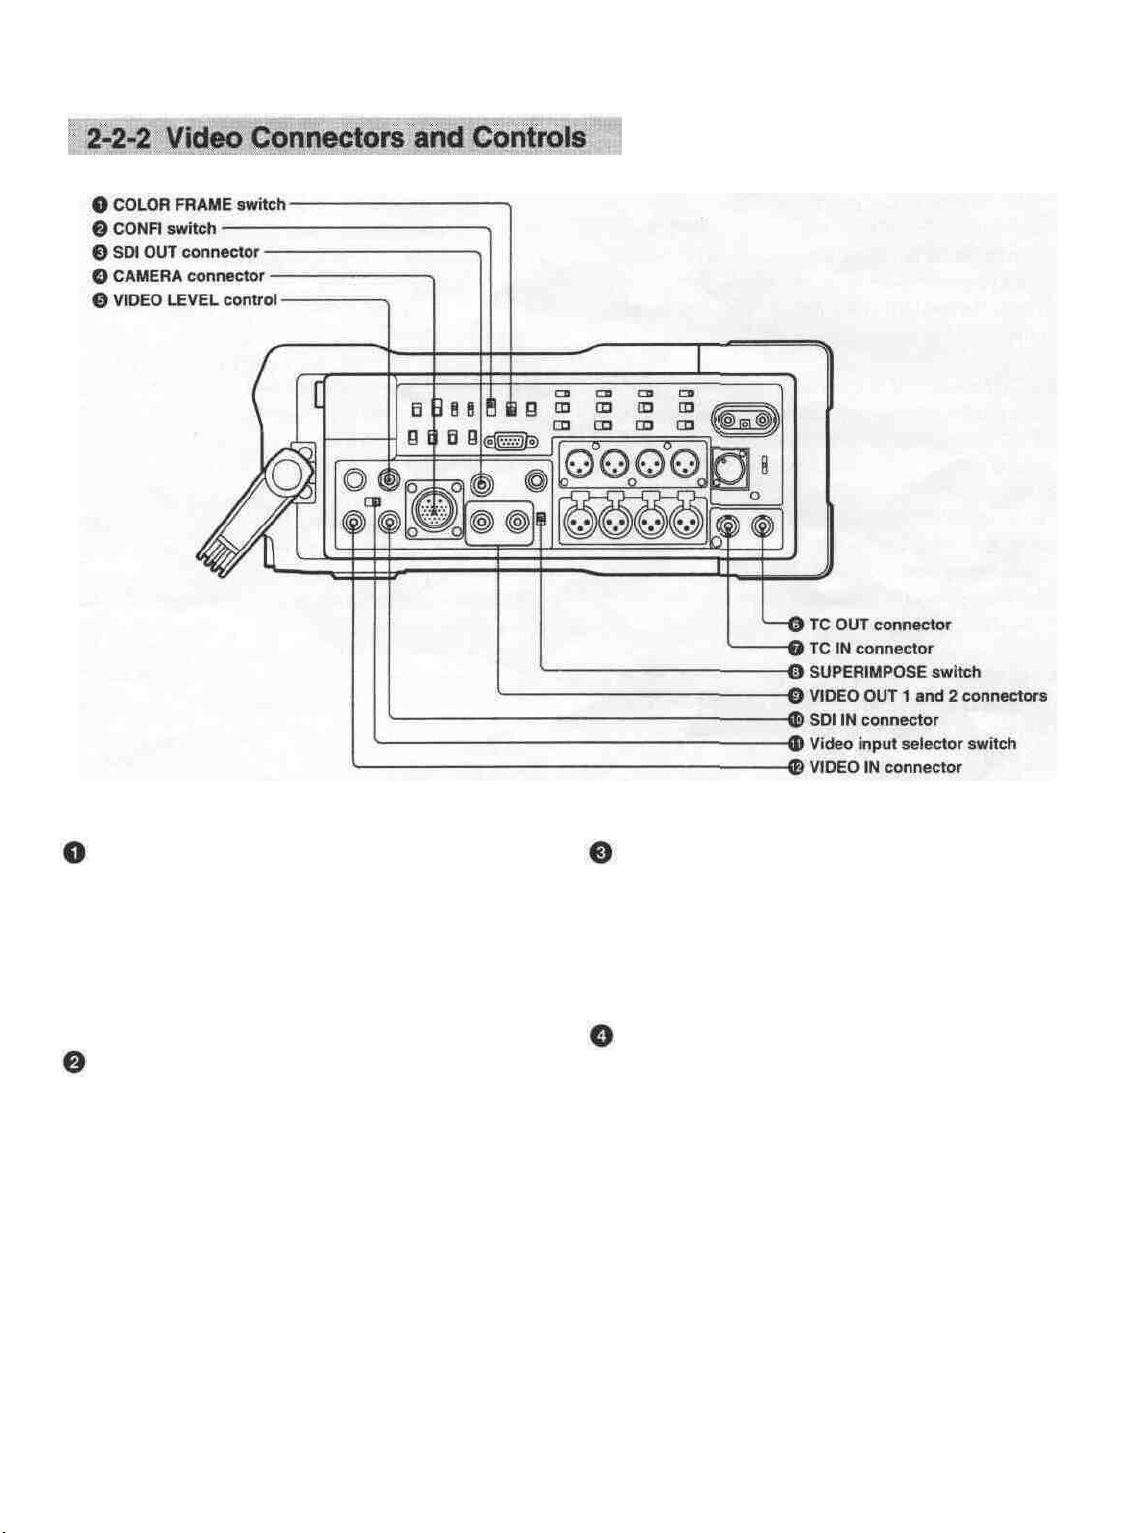
Video connectors and controls
COLOR FRAME switch SDI (Serial Digital Interface) OUT connector
This selects whether or not to enable color framing
during editing or playback.
ON: Enable color framing. Playback is always in
units of four (NTSC) or eight (PAL) fields.
OFF: Disable color framing. Playback is in units of
(BNC)
This outputs serial digital video and audio signals in
Dl format.
It is possible to switch this output on or off using item
"SDI OUT" in the <VIDEO 2> menu (see page 6-3).
two fields.
CAMERA connector (26-pin)
CONFI (confidence) switch
This selects the mode for monitoring during recording
Note that this switch applies to both video and audio.
ON: Monitor the simultaneously playback of the
recorded signals from the confidence heads.
ECC (Error Correcting Codes): Monitor the input
signals unchanged (in E-E mode). If a serious
error is detected while recording the signals, a
warning indication is given.
OFF: Monitor the input signals unchanged (in E-E
mode). The RF envelope is monitored during
recording, and if a fault occurs a warning
Connect this to the multi-pin connector on the camera.
This interface carries video, audio and control signals
between the camera and the unit, and also supplies
power to the camera.
When the video input selector switch is in the
CAMERA position, the signals supplied to this
connector form the video input to the unit. When item
"CAMERA" in the <VIDEO 1> menu is set to
"AUTO" (see page 6-3), it is possible to input either
analog component video signals or Dl format serial
digital video and audio signals, depending on the type
of camera connected.
indication is given.
The ON setting results in the highest power
consumption, and the OFF setting the lowest. When
using the unit with a battery pack, set the CONFI
switch to the ECC or OFF position.
Chapter 2 Location and Function of Parts 2-13
Page 19

2-2 Connector Panel
VIDEO LEVEL control VIDEO OUT 1 and 2 connectors (BNC)
If the composite signal input level to the VIDEO IN
connector is not a 1 Vp-p signal, use a screwdriver to
turn this control and adjust the input level. The range
of adjustment is ±3 dB. Normally leave this control at
the center detent position.
It is not possible to adjust the input level for
component signals or serial digital video and audio
signals.
TC (time code) OUT connector (BNC)
Connect to the time code input connector of an
external device such as a time code reader or VTR.
The time code output depends on the operating state of
the unit, as follows:
Playback: playback time code
Recording: time code generated by the built-in time
code generator. When the time code on this unit
is locked to an external time code, the external
time code is output.
TC (time code) IN connector
Connect to the time code output connector of an
external device such as a time code generator or VTR.
Use this when locking the built-in time code generator
to the external time code.
SUPERIMPOSE switch
This selects whether or not to superimpose information
about the state of the unit (PLAY, FF, etc.) and time
code values on the composite video signal output from
the VIDEO OUT 2 connector.
ON: Superimpose information.
OFF: Do not superimpose information.
These connectors provide analog, composite video
outputs. When the SUPERIMPOSE switch is in the
ON position, information about the state of the unit
and time code values are superimposed on the signal
output from the VIDEO OUT 2 connector.
SDI IN connector
Input serial digital video and audio signals in Dl
format. When the video input selector switch is in the
SDI IN position, the signals supplied to this connector
form the video input to the unit.
Video input selector switch
The position of this switch determines the video input
to the unit.
VIDEO IN: composite video signal input to the
VIDEO IN connector
CAMERA: component video signal or serial digital
video signal input to the CAMERA connector
SDI IN: serial digital video signal input to the SDI
IN connector
The playback signal from this unit is synchronized to
the signal selected by this switch.
VIDEO IN connector (BNC)
Input an analog composite video signal. When the
video input selector switch is in the VIDEO IN
position, the signals supplied to this connector form
the video input to the unit.
2-14 Chapter 2 Location and Function of Parts
Page 20
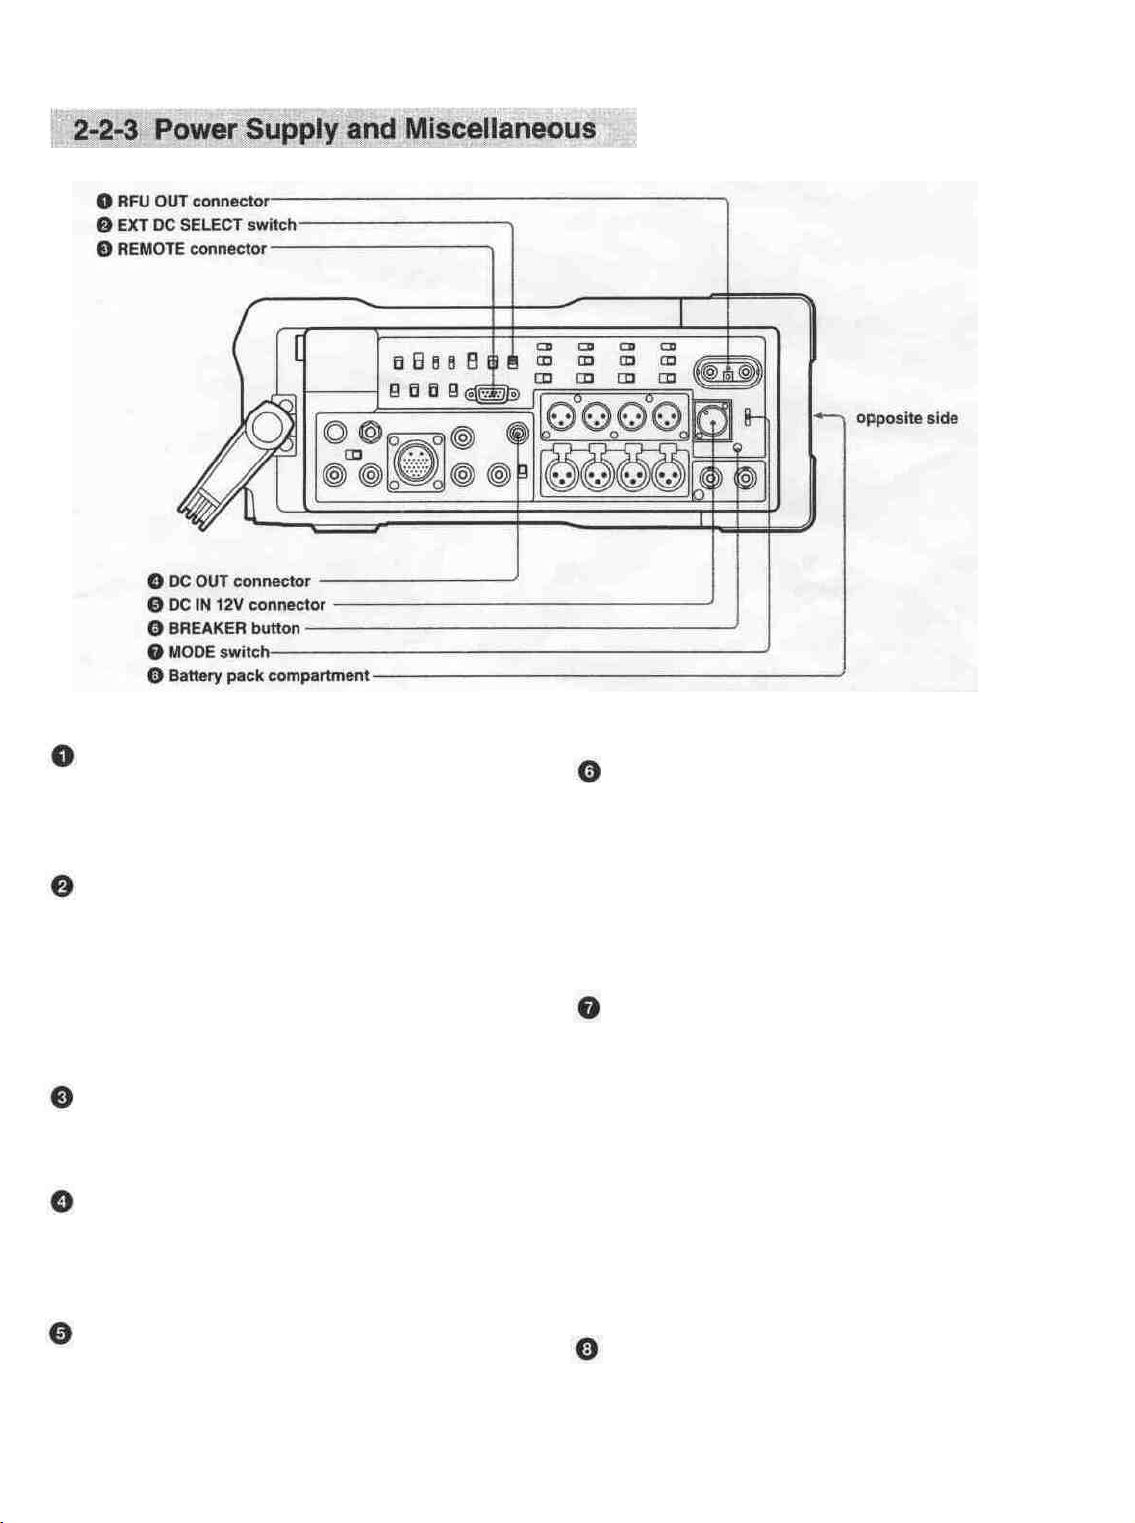
Power supply and miscellaneous
RFU OUT connector
This outputs video and audio signals and a power
supply to an RF modulator such as an RFU-95UC.
Connect to the input connector of the RF modulator.
EXT (external) DC SELECT switch
This selects the way in which the external power
supply (to the DC IN 12V connector) is used.
AUTO: The external power supply is normally used,
but if the voltage drops, the unit switches
automatically to the internal battery pack.
FIX; The external power supply is always used.
REMOTE connector (9-pin)
Connect to an external device to remote-control the
unit, as required.
DC OUT connector
Connect the DC power cable of the BVR-3 Remote
Controller. This provides a 12 V DC power supply to
the remote controller.
DC IN 12V connector (XLR 4-pin, male)
When using an AC-550/550CE AC Adaptor to connect
to an AC power supply, connect the DC cable of the
adaptor to this connector.
BREAKER button
If an excess current flows within the unit, the breaker
operates to shut off the power, and this button jumps
out.
Check the internal circuitry of the unit, and check that
there is no persisting fault. Then press in this button.
If the system is able to operate normally, the power
will be restored.
MODE switch
This controls the operating mode, making it possible to
control the power consumption.
SAVE: The power consumption is considerably
reduced. Use this mode when operating with a
battery pack.
PB/EE: When the tape is stopped, and while fast
forwarding and rewinding, signals are output in EE mode.
PB: Even when the tape is stopped, and during fast
forward and rewind operations, the video and
audio signals recorded on the tape are output.
Battery pack compartment
Insert the battery pack (BP-90A or BP-L60). The
battery pack compartment is behind the cover on the
opposite side from the connector panel.
Chapter 2 Location and Function of Parts 2-1 5
Page 21

This unit can operate from any of the following power
sources:
• BP-90A nickel-cadmium battery pack
• BP-L60 lithium ion battery pack
• Supply to the DC IN 12V connector, for example
using an AC-550/550CE AC Adaptor.
Using a BP-90A Battery Pack
A BP-90A Battery Pack provides about two hours of
' continuous recording (when the unit is operated with
the MODE switch in the SAVE position, the CONFI
switch in the OFF position, and the setup menu item
"SDI OUT" set to "OFF").
Before use, charge the battery pack using a BC-410/
410CE Battery Charger. Charging takes about two
hours thirty minutes.
For details of charging, see the instructions provided with
theBC-410/410CE.
1 Open the cover of the battery
pack compartment.
Inserting the BP-90A Battery Pack
Use the following procedure.
The adhesive label bound into the end of this book
gives directions for replacing the battery pack. You
can attach it to the cover of the battery pack
compartment for reference.
2 Fold down the upper and lower
divider grids inside the battery
compartment
by
pulling
the upper one, then insert the
battery pack with the end with
the lead attached toward you.
3 Plug the lead into the
connector inside the battery
pack compartment, and tuck
the lead completely into the
compartment.
4 Close the cover of the battery
pack compartment.
down
Chapter 3 Getting Started 3-1
Page 22

3-1 Power Supply
Using a BP-L60 Battery Pack
A BP-L60 Battery Ppack provides about two hours of
continuous recording (when the unit is operated with
the MODE switch in the SAVE position, the CONFI
switch in the OFF position, and the setup menu item
"SDI OUT" set to "OFF').
Before use, charge the battery pack using a BC-L100/
L100CE battery charger. Charging takes about two
hours thirty minutes.
For details of charging, see the instructions provided with
the BC-L100/L100CE.
1 Open the cover of the battery
pack compartment.
Inserting the BP-L60 Battery Pack
Use the following procedure.
The adhesive label bound into the end of this book
gives directions for replacing the battery pack. You
can attach it to the cover of the battery pack
compartment for reference.
2 Pull up the internal divider
grids.
3 Insert the battery pack with its
reverse side on the inside, and
push until it clicks into place.
When the battery pack is
inserted correctly, the catch
automatically engages to lock
it in place.
4 Close the cover of the battery
pack compartment.
3-2 Chapter 3 Getting Started
Page 23

Use the following procedure to power the unit from an
AC supply.
Using an AC power supply
1 Turn the POWER switch of the DVW-250/250P
off.
2 Connect the DC IN 12V connector of the DVW-
250/250P to an AC supply through the AC-550/
550CE AC Adaptor, as shown in the figure.
3 Set the EXT DC SELECT switch according to the
way in which you wish to use the AC supply.
AUTO: If the voltage of the AC supply drops, the
unit switches automatically to the internal
battery pack.
FIX: Only the external power supply is used.
4 Turn the POWER switch of the AC adaptor on.
While an AC power supply is connected, then
regardless of the state of the POWER switch on the
DVW-250/250P the time code circuits continue to
operate, consuming some power. If not using the unit
for a considerable time, disconnect the power cord
between the DVW-250/250P and the AC-550/550CE.
Chapter 3 Getting Started 3-3
Page 24

3-1 Power Supply
Powering on and off
Powering on and off
Use the POWER switch on the front panel to power
the unit on and off.
Check the remaining battery capacity in the status
indication panel.
When the battery pack is fully charged (supply voltage
at least 13 V for the BP-90A or 16 V for the BP-L60),
all seven display segments appear.
The relation between the number of displayed
segments and the battery pack voltage is shown in the
following figure.
Starting recording automatically at power on
In the SYSTEM 1 setup menu, set the P-ON REC item
to ON to start recording automatically at power on.
For details, see page 6-4.
Display segments and battery pack voltage
(Using BP-90A or external power supply)
Display segments and battery pack voltage (Using BP-L60)
As the battery capacity is used up, the segments
disappear in turn from the right.
When the battery pack is almost exhausted, the
leftmost segment and the "BATT" and "E" indications
flash, and simultaneously the WARNING indicator
flashes, accompanied by an intermittent warning tone.
When the battery pack is completely exhausted, the
WARNING indicator stays on, and the warning tone
becomes continuous.
3-4 Chapter 3 Getting Started
Page 25

This section lists the cassettes which can be used, and
provides guidance on their handling.
This unit uses Digital Betacam cassettes with a 1/2inch tape width for playback and recording. The
following are the type numbers of the cassettes you
can use.
Checking that there is no slack in the tape
Before loading a cassette, press in the reels with your
fingers, and turn gently in the directions shown by the
arrows. If the reels do not turn, there is no slack.
Small cassettes
BCT-D6
BCT-D12
BCT-D22
BCT-D32
BCT-D40 —
Large cassettes
BCT-D34L
BCT-D64L
BCT-D94L
BCT-D124L
To prevent a tape from being erased, press in the red
erase-protect plug on the reverse side of the cassette.
Return this plug to its original position to be able to
record on the tape again.
Checking for slack in the tape
Preventing accidental erasure
Chapter 3 Getting Started 3-5
Page 26

3-2 Cassettes
Loading a cassette Ejecting a cassette
It is not possible to load a cassette unless the unit is
powered on.
Ejecting a cassette
Loading a cassette
1 Turn the POWER switch on.
2 Raise the lid of the cassette compartment.
3 Check that the "HUMID" indication is not
showing in the status indication panel, then insert
the cassette.
For details of the procedure when the "HUMID"
indication is showing, see the section "Warning
Indications " (page A-l).
When the cassette is fully inserted, the lid of the
cassette compartment closes automatically.
1 Check that the unit is powered on.
2 Press the EJECT button.
This ejects the cassette.
3 Remove the cassette.
4 Close the lid of the cassette compartment
manually.
Ejecting a cassette when the unit cannot be
powered on
When there is no power supply, for example because
the battery pack is exhausted, to eject a cassette
manually refer to the supplied Maintenance Manual
Part 1.
3-6 Chapter 3 Getting Started
Page 27

When a tape is loaded, the "TAPE" indication appears
in the status indication panel, and the seven segments
flash.
When the tape transport starts, the display continues to
flash for several seconds, then the segments switch to
displaying the amount of tape remaining. When this is
30 minutes or more all seven segments appear. When
less tape remains, each segment corresponds to 5
minutes of remaining tape.
The relation between the number of displayed
segments and the tape remaining is shown in the
following figure.
Display segments and remaining tape time
When the remaining tape time is approximately two
minutes, the leftmost segment and the "TAPE"
indication flash, and simultaneously the WARNING
indicator flashes, accompanied by an intermittent
warning tone. At the end of the tape, the WARNING
indicator stays on, and the warning tone becomes
continuous.
Chapter 3 Getting Started 3-7
Page 28

Depending on the environmental conditions, it is
possible to adjust the brightness of the display panels
and indicators.
Adjusting the brightness of the display panels and indicators
In a dark environment
If the displays and indicators are hard to see because of
low lighting conditions, move the LIGHT switch on
the front panel to the ON position to switch on the
backlighting.
In a bright environment
If the indicators in the operating buttons are hard to see
because the lighting is too bright, set the LIGHT
switch to the BRT position. This increases the
intensity of the indicators.
Unless lighting conditions require either of these
settings, leave the LIGHT switch in the OFF position.
3-8 Chapter 3 Getting Started
Page 29

This section describes the connections and adjustments
necessary before actually carrying out recording.
The following figure shows an example of the
connections required when using this unit with a
camera, VTR, video monitor and other equipment
fitted with digital inputs and outputs in the SDI (Serial
Digital Interface) format.
Connecting digital equipment
Chapter 4 Recording 4-1
Page 30

4-1 Preparations for Recording
The following figure shows an example of the
connections required when using this unit with a
camera, VTR, video monitor and other equipment
fitted with analog inputs and outputs.
4~2 Chapter 4 Recording
Connecting analog equipment
Page 31

Displaying and adjusting the video input
levels
Selecting the input video signal
This unit accepts three different types of video input
signals, selected by the video input selector switch as
follows:
• To select a composite video signal input to the
VIDEO IN connector, select the left position (VIDEO
. IN).
• To select the signal input to the CAMERA (26-pin)
connector, select the center position (CAMERA).
There is a setup menu operation to select between
using analog (Y/R-Y/B-Y) or digital signals. It is
also possible to set the unit to determine the type
automatically from the type of camera connected.
For details of the setup menu operation, see Section 6-3
"Setup Menu Settings, " item "CAMERA" in the <VIDEO
1> menu (page 6-3).
• To select serial digital video and audio signals input
to the SDI IN connector, select the right position
(SDI IN).
The SDI format includes audio signals, but there is a
setup menu operation to determine whether to use
these as the audio input, or to use separate analog
inputs.
It is possible to check the video input levels, using the
level meters.
I——————————————————————————————
Displaying and adjusting the video input levels
For details of the setup menu operation, see Section 6-3
"Setup Menu Settings, " items "INPUT 1/2" and "INPUT
3/4 " in the
<AUDIO>
menu
Selecting the input video signal
(page 6-4).
1 Press the REC button.
The unit switches to the E-E mode.
2 Press the DISPLAY button in the adjustment
controls.
Pressing the DISPLAY button cycles the display
through the audio level meters, video level meters,
and setup menus.
If the display is showing the video level meters or
setup menus, and five minutes elapse without an
operation, the display automatically reverts to the
audio level meters.
(Continued)
Chapter 4 Recording 4-3
Page 32

4-1 Preparations for Recording
• When the input signal is component video, the meters
indicate the Y, R-Y, and B-Y levels. The maximum
values for R-Y and B-Y correspond to a 75 % color
bar signal.
•When the input signal is analog composite video, the
meter indicates the sync signal level.
3 If the input level of a composite signal is not 1 Vp-
p signal, use a screwdriver to turn the VIDEO
LEVEL control to adjust the input level.
It is not possible to adjust the input level of signals
other than composite video.
• When the input signal is digital in SDI format, the
display indicates whether or not a signal is present.
Signal input to CAMERA connector
Signal input to SDI IN connector
4-4 Chapter 4 Recording
Page 33

Recording the same audio signals on
channels 3 and 4 as on channels 1 and 2
Selecting the input audio signals
Select the input audio signals as follows:
When the video input is digital
When the video input signal is digital in SDI format, it
is possible to select in a setup menu whether to use the
audio signals included in the SDI signal, or analog
signals input to the AUDIO IN or CAMERA
connectors. The settings for channels 1 and 2 and for
channels 3 and 4 are independent.
For details of the setup menu operation, see Section 6-3
"Setup Menu
4" in the <AUDIO> menu (page 6-4).
When the "ANALOG" setting is selected, choose the
audio input signal in the same way as for analog video
input signals.
When the video input is analog
If the video input is analog, regardless of the setup
menu settings, the audio input is also analog. Use the
CAMERA/LINE switches to select the analog signals
for the audio input.
• To select the audio signal input to the CAMERA
connector, move the switch to the CAMERA
position.
• To select the audio signal input to an AUDIO IN
connector, move the switch to the LINE position.
Settings, " items "INPUT 1/2" and
"INPUT
3/
By means of a setup menu setting, it is possible to
record the same audio signals on channels 3 and 4 and
channels 1 and 2.
For details of the setup menu operation, see Section 6-3
"Setup Menu Settings," item "DOUBLE REC" in the
<AUDIO> menu (page 6-4).
Adjusting the recording levels
For analog audio inputs, it is possible to adjust the
recording level.
Selecting the input audio signals
Adjusting the recording levels
1 Set the audio input level switches to correspond
with the input levels.
2 Press the REC button.
The unit switches to the E-E mode.
(Continued)
Chapter 4 Recording 4-5
Page 34

4-1 Preparations for Recording
3 If the display is not showing the audio level
meters, press the DISPLAY button in the
adjustment controls until the audio level meters
appear.
Pressing the DISPLAY button cycles the display
through the audio level meters, video level meters,
and setup menus. If the display is showing the
video level meters or setup menus, and five
minutes elapse without an operation, the display
automatically reverts to the audio level meters.
4 Select the level meter display range.
There are two ranges for the audio level meter
display, "FULL" (-60 to 0 dB) and "FINE" (-20 ±
2 dB), and pressing the SET button in the
adjustment controls toggles between them. The
selected mode is shown in the top left comer: in
the "FINE" mode, a black block appears below the
"FINE" indication; in the "FULL" mode the space
below "FINE" is blank.
Select the "FULL" mode first, to make a coarse
adjustment.
5 Set the UNI/VAR switch for the channel to be
adjusted to the UNI position.
The input level appears.
6 Switch the UNI/VAR switch to the VAR position.
It is now possible to adjust the audio recording
level, while watching the level meter.
7 Turn the recording level control knob to adjust the
level.
Using the emphasis function
By means of a setup menu setting it is possible to
record with emphasis added to the signals input to the
AUDIO IN connectors. When emphasis is added, in
the audio level meter display a black block
appears below the "EMPH" indication.
For details of the setup menu operation, see Section 6-3
"Setup Menu Settings," item "EMPHASIS" in the
<AUDIO> menu (page 6-4).
Display in "FULL" mode
Display in "FINE" mode
4-6 Chapter 4 Recording
Page 35

This selection determines the way in which monitoring
will be carried out during recording.
This section describes how to set user bit values, time
code values and the real time.
Open the lid covering the time code setting controls as
shown in the following figure.
Selecting the monitoring mode for recording
Use the CONFI switch on the connector panel to select
the monitored signal.
• To monitor the simultaneous playback of the
recorded video and audio signals from the confidence
heads, using a video monitor or other equipment
connected to the VIDEO OUT connector, set the
CONFI switch to the ON position.
• To carry out error detection by means of ECC
without direct monitoring of the recorded signals, set
the CONFI switch to the ECC position. In this case
the monitor output during recording is an E-E signal.
• To carry out no direct monitoring of the recorded
signals, and only RF envelope monitoring, set the
CONFI switch to the OFF position.
• The OFF setting results in the lowest power
consumption, and the ON setting the highest. When
using the unit with a battery pack, set the CONFI
switch to the ECC or OFF position.
Opening the lid covering the time code setting controls
Setting a constant user bit value
The user bit values recorded on the time code track
provide for eight hexadecimal digits, which can be
used to hold the date, time, scene number or other
information.
Setting the user bit value
1 Set the DISPLAY switch by the status indication
panel to U-BIT.
2 Set the F-RUN/R-RUN switch to SET.
3 Set the REAL TIME record/set switch to REC ON
or
OFF.
Chapter 4 Recording 4-7
Page 36

4-1 Preparations for Recording
4 Use the SHIFT button and ADVANCE button to
set the user bit value.
SHIFT button: Cycles through the digits, flashing
the digit to be changed.
ADVANCE button: Increments the value of the
flashing digit.
Hexadecimal digits A to F appear in the sevensegment display as follows:
5 Set the F-RUN/R-RUN switch to F-RUN or R-
RUN.
Setting the user bits to reflect the real time
With this setting you can record the real time on the
tape.
• Set the REAL TIME record/set switch to REC ON
or
OFF.
REC ON: During recording, the real time is
recorded in the user bits.
OFF: The real time is not, in fact, recorded in the
user bits, but the internal clock continues to
operate, keeping the value in step with real
time.
Checking the real time
1 Set the DISPLAY switch by the status indication
panel to U-BIT.
2 Set the REAL TIME record/set switch to REC ON.
3 Set the DISPLAY switch in the time code setting
controls to LTC or VITC.
Whether the real time is being inserted into the
LTC or VITC depends on the setting made in step
2 of the procedure for setting the user bits to reflect
the real time on the previous page.
Setting the user bits to reflect the real time
1 Set the REAL TIME record/set switch to SET.
2 Use the REAL TIME insertion time code selection
switch to select which time code to insert the real
time user bit value in.
LTC U-BIT: Insert the user bit value in the LTC.
VITC U-BIT: Insert the user bit value in the
VITC.
3 Use the SHIFT button and ADVANCE button to
set the real time value.
SHIFT button: Cycles through the digits, flashing
the digit to be changed.
ADVANCE button: Increments the value of the
flashing digit.
Setting the time code value
Setting the time code value
1 Set the DISPLAY switch by the status indication
panel to TC.
2 Set the F-RUN/R-RUN switch to SET.
4-8 Chapter 4 Recording
Page 37

3 Set the REAL TIME record/set switch to REC ON
or
OFF.
Recording time code and user bits
4 Use the SHIFT button and ADVANCE button to
set the time code value. The range of values is
from 00:00:00:00 to 23:59:59:29 (for NTSC) or
23:59:59:24 (for PAL).
SHIFT button: cycles through the digits, flashing
the digit to be changed.
ADVANCE button: increments the value of the
flashing digit.
5 On an NTSC system, set the DF/NDF switch
appropriately.
DF: Advance the time code in drop frame mode."
NDF: Advance the time code in non-drop frame
mode.2'
6 Set the F-RUN/R-RUN switch to F-RUN or R-
RUN.
F-RUN (free-run): The time code advances
continuously, regardless of the operating state
of the unit. When you select this position, the
time code starts advancing immediately.
R-RUN (record-run): The time code advances
only during recording. When you select this
position, the time code starts advancing only
when you start recording.
With the R-RUN selection, the "REC RUN"
setting in the <SYSTEM 2> menu (see page 6-
4) determines whether the time code recorded
on the tape is taken from the time code
generator or continues from the value
previously recorded on the tape.
Time codes and battery pack replacement
Recording VITC
Use the following procedure to record VITC, including
the user bits.
Recording VITC
1 Set the VITC switches in the time code setting
controls to select the lines in which the VITC is
inserted.
Insert the tip of a fine screwdriver into the arrowshaped slot to turn the switch to the required
hexadecimal digit (see table on next page).
You can select the two lines where the time code is
to be inserted with the A and B switches.
VITC switches
(Continued)
This unit has an internal battery which provides a
backup power supply to the time code generator. The
time code generator can, therefore continuing running
while you change the battery pack. The backup
battery lasts for about five years.
1) Drop frame mode
In the NTSC system, the actual frame rate is 29.97
frames per second. There is therefore a cumulative
discrepancy between the actual frame rate and the 30
frames per second rate on which time code is based.
Drop frame operation refers to the technique of skipping
frame numbers at appropriate intervals, to keep the time
code values in step with actual elapsed time.
2) Non-drop frame mode
Non-drop frame time code operation means that the
discrepancy between actual elapsed time and 30 frames
per second time code values is not corrected.
Chapter 4 Recording 4-9
Page 38

4-1 Preparations for Recording
The relationship between the switch position and
the line represented is shown in the following
table. The factory default positions are 6 and 8
(for NTSC) and C and E (for PAL) for switches A
and B respectively.
Switch position
0
1
2
3
4
5
6
7
8
9
A
B
C
D
E
F
VITC insertion line No.
NTSC
10
10
12
13
14
15
16
17
18
19
20
—
—
—
—
—
PAL
—
—
9
10
11
12
13
14
15
16
17
18
19
20
21
22
Checking the VITC
1 Set the DISPLAY switch by the status indication
panel to TC.
2 Set the DISPLAY switch in the time code setting
controls to VITC.
The status indication panel shows the VITC value.
Inserting the real time in VITC
Follow the procedure under "Setting the user bits to
reflect the real time" (see page 4-8), selecting VITC UBIT in step 2, and setting the REAL TIME record/set
switch to REC ON in step 4.
Recording LTC
The LTC (Longitudial Time Code), including user bits,
is automatically recorded together with the video and
audio signals. No switch settings are required.
Checking the time code and user bits
See Section 5-3 "Reading and Displaying Time Code and
User Bits" (page 5-5).
• Switch positions 0 and I are not effective for the
DVW-250P (PAL).
• Switch positions B to F are not effective for the
DVW-250 (NTSC).
•Select lines for the VITC which are not occupied
by VITS (Vertical Interval Test Signal) or VIRS
(Vertical Interval Reference Signal).
• It is not possible to use line 11 (NTSC) or 8
(PAL) because these carry the reference
subcarrier signal.
2 Set the VITC REC switch to ON.
The VITC will be recorded on the tape with the
video signals. Note that LTC is always recorded.
4-10 Chapter 4 Recording
Page 39

It is possible to lock this unit to an external time code
generator, or alternatively to lock an external device to
the time code generator in this unit.
• Once the unit is locked to an external time code, color
framing is disabled. To apply the color frame lock,
first switch the F-RUN/R-RUN switch to R-RUN,
then return it to the F-RUN position.
For an explanation of the color frame lock, see the
footnote on page 2-4.
Locking this unit to an external time code
1 Turn the POWER switch off.
2 Connect the time code output from the external
device to the TC IN connector of this unit, and the
video output to the VIDEO IN connector.
See the connections for the first DVW-250/250P in
the figure "Example connections for time code
locking" (page 4-12).
3 Set the F-RUN/R-RUN switch on this unit to F-
RUN.
This locks the time code generator in this unit to
the external time code signal.
Once the time code generator has been locked, the
time code continues in sync even if the signal is
disconnected from the TC IN connector. In this
case the accuracy of time code synchronization is
determined by the accuracy of the generator of the
sync signal for the input video signal. If the signal
is then disconnected from the VIDEO IN
connector, the accuracy is that of the internal time
code generator.
Notes on external locking of the time code
generator
• The effect of carrying out steps 2 and 3 of the above
procedure with the POWER switch on and a cassette
loaded depends on the setting of the MODE switch,
as follows:
SAVE: The external lock applies when the tape
transport is stopped, recording is paused, and
during recording.
PB/EE or PB: The external lock applies only during
recording. To apply the external lock at other
times, either carry out step 1 above, or press the
REC button, putting the unit into E-E mode.
Locking the user bit value to an external
signal
First lock the unit to an external time code source, then
set the EXT-LOCK/U-BIT switch to ON. This locks
the user bit values on this unit to the user bit values
included in the external time code.
When the EXT-LOCK/U-BIT switch is set to OFF, the
user bit values are not affected by the external signal.
Settings for the output from the TC OUT
Connector
The following setup menu items affect the output from
the TC OUT connector.
For details of setup menu operations, see Section 6-3 "Setup
Menu Settings, " <SYSTEM 2> menu (page 6-4).
"TC OUT" item
This selects either of the following as the output from
the TC OUT connector:
GEN: the signal output by the time code generator
AUTO: the signal output by the time code generator
during recording or in E-E mode, and the LTC
signal from the tape during playback
"TC DELAY" item
This selects the LTC phase correction for the output
from the TC OUT connector as follows:
OFF: the signal selected by the "TC OUT" item
without correction
AUTO: the LTC signal adjusted to correspond to the
video output
Chapter 4 Recording 4-11
Page 40

4-1 Preparations for Recording
Time Code Locking of Two or More DVW-
250/250P Units
Connect the DVW-250/250P units as shown in the
figure below.
In this case, on each of the DVW-250/250P units, set
the F-RUN/R-RUN switch to F-RUN and the CONFI
switch to ECC or OFF.
Then set the first DVW-250/250P so that it outputs the
time code generator signal from the TC OUT
connector. For example, when the "TC OUT" item is
set to "AUTO" (see previous page), the unit must be in
the E-E mode.
4-12 Chapter 4 Recording
Example connections for time code locking
Page 41
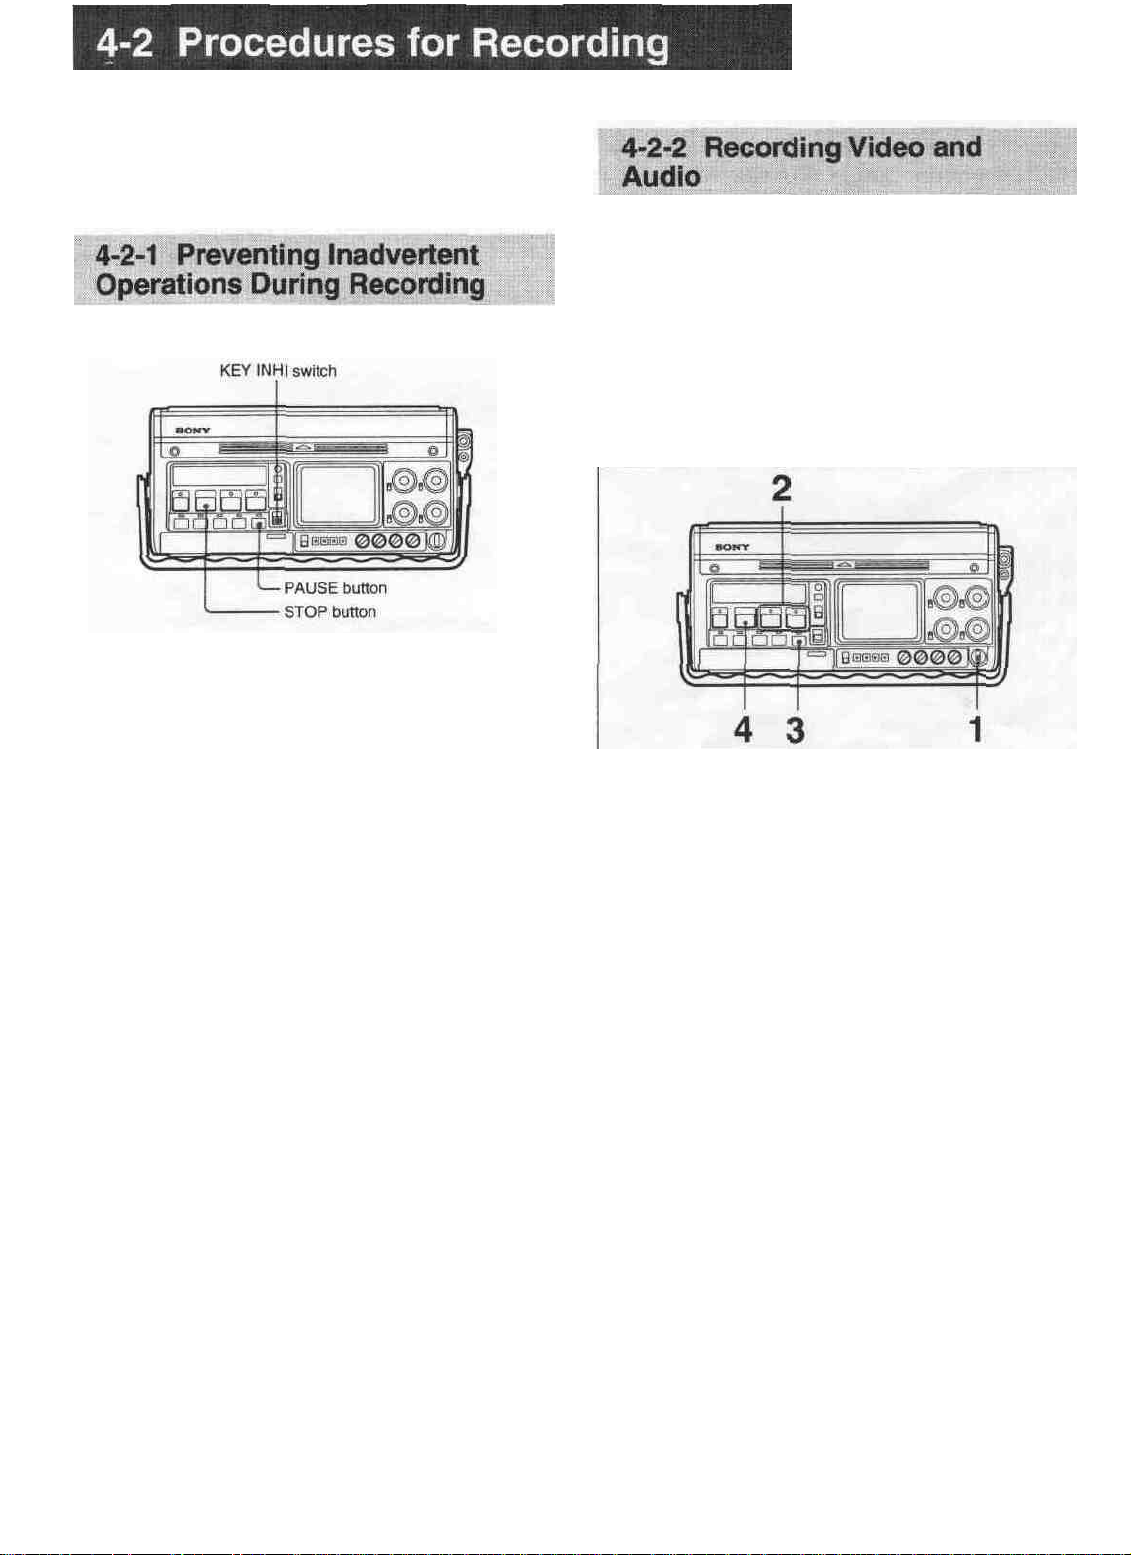
This section describes how to prevent inadvertent
operations during recording, and how to carry out the
actual recording.
Preventing inadvertent operations
To prevent an unintended operation from affecting the
unit, during recording normally the operation of all
controls except the STOP and PAUSE buttons is
inhibited.
To prevent even the STOP and PAUSE buttons from
operating, switch the KEY INHI switch to ON after
starting recording.
At the end of recording, return the KEY INHI switch
to OFF, then press the STOP button.
The recording procedure depends on whether or not
the CAMERA connector was selected in the procedure
described in the section "Selecting the input video
signal" (page 4-3).
Recording the input signals from the
CAMERA connector
Recording video and audio
(signals input from the CAMERA connector)
1 Switch the POWER switch on, and load a cassette.
2 Hold down the REC button, and press the PLAY
button.
3 Press the PAUSE button on the DVW-250/250P or
the VTR START button on the camera.
Recording starts.
4 To end recording, press the STOP button.
Pausing recording
• After starting recording with the VTR START
button on the camera: press the VTR START
button on the camera once more. In this case the
PAUSE button on the DVW-250/250P does not
operate.
• After starting recording with the PAUSE button
on the DVW-250/250P: press the PAUSE button or
the VTR START button on the camera. In either case
the PAUSE indicator flashes, and the DVW-250/
250P enters the paused state. To restart recording,
press the VTR START button on the camera or the
PAUSE button on the DVW-250/250P.
Chapter 4 Recording 4-13
Page 42

4-2 Procedures for Recording
Recording the input signals from the
VIDEO IN connector or SDI IN connector
1 Switch the POWER switch on, and load a cassette.
2 Hold down the REC button, and press the PLAY
button.
Recording starts, except that if there is no video
signal input to the VIDEO IN connector or SDI IN
connector recording does not start.
3 To end recording, press the STOP button.
Pausing recording
Press the PAUSE button. To restart recording, press
the PAUSE button once more.
If the unit remains in the paused state for thirty
minutes, the paused state is automatically ended to
protect the tape, and the state is the same as after
pressing the STOP button.
When the tape does not move
If no video signal is input, or if there is an input but the
level is extremely low, the tape will not move. Check
the video input level, referring to the section
"Displaying and adjusting the video input levels"
(page 4-3).
4-14 Chapter 4 Recording
Page 43

Connections and settings for audio
dubbing
In the Digital Betacam format, in addition to the digital
audio channels recorded on the diagonal tracks, there
is also a longitudinal track, referred to as the cue track,
which can record a single analog audio channel.
The cue track can be used when adding an audio
channel to an already recorded tape.
Connect the microphone or other audio source to the
AUDIO IN connectors. In audio dubbing, the input to
channel 4 is recorded on the cue track.
Connections and settings for audio dubbing
Chapter 4 Recording 4-15
Page 44

4-2 Procedures for Recording
Audio dubbing
Audio dubbing on the cue track
1 Switch the POWER switch on, and load a cassette.
2 Adjust the recording level of the audio source to be
recorded on the cue track.
For details, see the section "Adjusting the recording
levels " (page 4-5).
3 Press the PLAY button to play back the tape, then
press the PAUSE button at the point from which
you wish to dub the audio.
This pauses the tape transport.
4 Press the CUE DUB button.
The indicator lights.
5 Press the PAUSE button once more.
This ends the pause, and starts the audio dubbing.
6 To end the audio dubbing, press the STOP button.
In place of steps 3 to 5 above, pressing the PLAY
button and CUE DUB button simultaneously also
starts the audio dubbing.
4-16 Chapter 4 Recording
Page 45

Use the MONITOR SELECT switches to select the
audio signals output from the EARPHONE jack and
HEADPHONES jack during playback. When the CH3/4 OUT switch is in the MON position, these
switches also select the audio output from channels 3
and 4 of the AUDIO OUT connectors.
Selecting the outputs from channels 3 and 4
of the AUDIO OUT connectors
Set the CH-3/4 OUT switch as follows: to select the
outputs from channels 3 and 4 of the AUDIO OUT
connectors.
MON: the signals selected by the MONITOR
SELECT switches
LINE: the signals of audio channels 3 and 4
Connect the input connectors of an RF modulator to
the RF signal output connectors (RFU DC OUT,
VIDEO OUT and AUDIO OUT) on the connector
panel.
For details of channels and antenna selector switching,
refer to the operating instructions supplied with the RF
modulator.
1 Of the MONITOR SELECT switches, first select
the position of the CUE/DA switch.
CUE: Monitor the audio from the cue track.
DA: Monitor the channels selected from the
digital audio recorded on the tape.
2 If you selected the DA position in step 1, set the
next MONITOR SELECT switch to choose the
channels monitored.
1/2: Audio channels 1 and 2
3/4: Audio channels 3 and 4
MIX: A mix of those of the four channels for
which the corresponding switches below are in
the ON position.
3 If you selected the MIX position in step 2, set the
switches on for the channels to be monitored.
4 Turn the PHONE LEVEL control knob to adjust
the audio level of the output to the EARPHONE
and HEADPHONES jacks.
Connections to an RF modulator
Chapters Playback 5-1
Page 46

5-1 Preparations for Playback
An FPU (Field Pickup Unit) allows the playback
signal from this unit to be radioed back to a
broadcasting station.
MODE switch
The MODE switch must be in the PB/EE position.
Audio signals
Audio signals from the DVW-250/250P to the FPU are
output through channels 3 and 4 of the AUDIO OUT
connectors.
Connections and settings
The following figure illustrates example connections
for transmitting the playback signals by means of an
FPU.
Example connections for transmitting the playback signals via an FPU
Connect the synchronizing input signal to the VIDEO
IN or SDI IN connector, and select the corresponding
connector with the video input selector switch. This
synchronizes playback on this unit to the input signal.
5-2 Chapter SPIayback
Page 47

Playback at normal speed
1 Switch the POWER switch on, and load a cassette.
2 Press the PLAY button.
Video and audio playback starts.
3 Turn the AUDIO PB LEVEL control knobs to
adjust the audio playback levels.
4 To end playback, press the STOP button.
Pausing playback
Press the PAUSE button.
The PAUSE indicator flashes, and a color still picture
appears on the video monitor.
To restart playback, press the PAUSE button once
more.
If the unit remains in the paused state for eight
minutes, the paused state is automatically ended to
protect the tape, and the state is the same as after
pressing the STOP button.
High speed searching
1 Press the SEARCH button.
The SEARCH indicator flashes, and a color still
picture appears on the video monitor.
2 • To search forward, press the F FWD button.
• To search back, press the REW button.
This starts a color picture playback at the speed
selected in a setup menu item (approximately 2
times, 5 times or 8 times normal speed).
For details of the setup menu operation, see Section 6-3
"Setup Menu Settings," item "SEARCH" in the
<SYSTEM ]> menu (page 6-4).
3 Press the SEARCH button once more.
The SEARCH indicator goes off, and the DVW250/250P switches to fast forward or rewind mode.
At this point, if the MODE switch on the connector
panel is set to PB, color playback is provided up to
a maximum speed of approximately 24 times
normal. If the MODE switch is set to PB/EE, an
E-E signal is output to the monitor, when the
MODE switch is set to SAVE, there is no video
output.
(Continued)
Chapter 5 Playback 5-3
Page 48

5-2 Procedures for Playback
4 To end the search operation, press the STOP
button.
Automatic ending of the search operation
If the tape transport is not operated for eight minutes
after pressing the SEARCH button, the search
operation is automatically ended to protect the tape.
5-4 Chapter 5 Playback
Page 49

During playback, the internal time code reader reads
the time code and user bits recorded on the tape. You
can display the time code values read in the status
indication panel.
Displaying time code or user bit values in
the status indication panel
Displaying time code or user bit values in the status indication panel
Displaying time code and user bit values
on the monitor screen
Displaying time code and user bit values on the monitor screen
With a time code or user bit value displayed in the
status indication panel, connect the video monitor
input connector to the VIDEO OUT 2 connector, and
set the SUPERIMPOSE switch to ON.
To select the values displayed, set the two DISPLAY
switches, by the status indication panel and in the time
code setting controls, as shown in the following table.
Values
displayed
Time code
User bits
LTC
VITC
LTC
VITC
DISPLAY switch
by the status
indication panel
TC
U-BIT
DISPLAY switch
in the time code
setting controls
LTC
VITC
LTC
VITC
This displays the same value on the monitor screen as
in the status indication panel.
Outputting the playback time code from
the TC OUT connector
By means of a setup menu setting, it is possible to
select the signal from the TC OUT connector to be the
time code from the tape during playback.
For details of the setup menu operation, see Section 6-3
"Setup Menu Settings, " item "TC OUT" in the <SYSTEM
2> menu (page 6-4).
Chapter 5 Playback 5-5
Page 50

The initial setup menu (referred to as the top menu)
gives access to seven submenus. Each of these is used
to display and change the settings of various items. In
some cases there are also further nested submenus.
The following diagram shows the tree structure of the
menus. Items enclosed in angle brackets are
submenus.
Chapter 6 Setup Operations 6-1
Page 51

Making setup menu settings
Making setup menu settings
1 Press the DISPLAY button in the adjustment
controls once or twice until the setup menu appears
in the display.
Pressing the DISPLAY button cycles the display
through the video level meters, setup menus, and
audio level meters. If the display is showing the
video level meters or setup menus, and five
minutes elapse without an operation, the display
automatically reverts to the audio level meters.
Example: <VIDEO 1> menu
4 Press the UP or DOWN button to align the asterisk
cursor (^) with the required item.
5 Press the SET button.
This allows the value for the selected item to be
changed.
In cases where there are further nested submenus,
repeat steps 4 and 5 as required.
Example: <SETUP LEVEL> menu
2 Press the UP or DOWN button in the adjustment
controls to align the asterisk cursor (^) with the
required item (submenu).
Example: Top menu
3 Press the SET button.
This displays the selected submenu. Further
submenus are enclosed in angle brackets (<SETUP
LEVEL> in the following example).
6 Press the UP or DOWN button to change the
setting.
7 When the required value is displayed, press the
SET button.
This confirms the new setting. To continue by
changing another setting, repeat from step 4.
Returning to the parent menu
Select the "EXIT" item, and press the SET button, or
press the DISPLAY button.
6-2 Chapter 6 Setup Operations
Page 52

Setup menu settings
Top menu
item
<VIDEO 1>
<VIDEO 2>
<'
Submenu items (nested
submenus in angle brackets)
<SETUP LEVEL>
(DVW-250 only)
<Y/C SEP MODE>
<BLANKING>
CAMERA
STD/NSTD
EXIT
FREEZE MODE
VIDEO LEVEL
<SYSTEM PHASE>
EE DELAY
VIDEO DATA
SDI OUT
VPROC
EXIT
MASTER
LEVEL
INPUT
LEVEL
V BLANK
RM
OUTPUT
LEVEL
EXIT
LINE 12. 20
(DVW-250)
LINE 9 -22
(DVW-250P)
EXIT
LINE 12...20
(DVW-250)
LINE 9 .22
(DVW-250P)
EXIT
SYNC
PHASE
SC
PHASE
EXIT
Function
Master level
Setup level of input signal
Setup elimination in vertical
blanking interval
Setup level of output signal
Return to <VIDEO 1> menu
Toggle Y/C separation for each
line.
Return to <VIDEO 1> menu.
Toggle blanking for each input
line
Return to <VIDEO 1> menu.
Select input signal from camera
Select standard/nonstandard
composite input signal.
Return to top menu.
Select freeze mode
Set the video output level.
Adjust the phase of the sync
signal
Adjust the subcarner phase of
the sync signal
Return to <VIDEO 2> menu
Select the sync phase in E-E
mode
Set the word length for digital
video output signals
Toggle serial digital output on
and off.
When the color framing
information in a recorded signal
is not continuous, select whether
or not to suppress the picture
shift.
Return to top menu.
Setting values
0.0 % to 10.0 % in 0.5 % steps
0.0 % to 10.0 % in 0.5 % steps
MST. same value as master level
OFF: no setup elimination
ON: Carry out setup elimination
0.0 % to 10 0 % in 0 5 % steps
MST: same value as master level
—
BPF- Carry out Y/C separation.
B/W: no Y/C separation, treat as Y
signal.
—
THRU no blanking
BLNK- blank input line
—
ANA: Y/R-Y/B-Y signal
DIGI: digital signal
AUTO: Select automatically,
depend'ng on whether camera ^s
output! ng a digital signal
AUTO Select automatically, depending
on whether luminance and
chrominance signals are interleaved.
STD Always use standard signal.
NSTD Always use nonstandard signal.
If the color framing of the input video
signal is unstable, select NSTD.
—
FLD Freeze single field
FRM- Freeze frame.
-3 dB to +3 dB in 0.1 dB steps
-8 to +8 in 1 sc steps (DVW-250)
-9 to +9 in 1 sc steps (DVW-250P)
0 to 965 in 0.29 nsec steps (DVW-250)
0 to 779 in 0.29 nsec steps (DVW-250P)
—
SYNC: output in phase with playback.
VID: in phase with E-E signal
8 or 10 bits
ON: output
OFF no output
OFF: Picture will not shift by processing
the output video
ON: Picture shifts if recorded color
framing is not continuous.
—
(Continued)
Chapter 6 Setup Operations 6-3
Page 53

Setup menu settings (Continued)
Top menu
item
<AUDIO>
<SYSTEM1>
<SYSTEM 2>
Submenu items (nested
submenus in angle brackets)
INPUT 1/2
INPUT 3/4
EMPHASIS
DOUBLE REC
EXIT
PREROLL
POSTROLL
SEARCH
P-ON
REC
EXIT
TCOUT
TC DELAY
REC
RUN
EXIT
Function
Select audio input for channels 1
and 2 when digital video input is
selected
Select audio input for channels 3
and 4 when digital video input is
selected
Toggle emphasis on analog audio
input
Toggle simultaneous recording of
audio channels 1 and 2 on
channels 3 and 4
Return to top menu
Set the preroll time for editing
using the REMOTE connector
Set the postroll time for editing
using the REMOTE connector
Select the tape speed in search
operations
Select whether to start recording
automatically at power on
Return to top menu
Select the signal output from the
TC OUT connector
Toggle the LTC phase correction
for the output from the TC OUT
connector
Select time code recorded when
F-RUN/R-RUN switch set to RRUN
Return to top menu
Setting values
ANA analog audio input
DIGI digital audio input
ANA analog audio input
DIG! digital audio input
OFF no emphasis
ON Apply emphasis
OFF Record separate signals on
channels 1/2 and 3/4
ON Record same signals on channels
1/2 and 3/4
—
0 to 10 seconds in 1 second steps
0 to 10 seconds in 1 second steps
(Both forward and reverse)
X2 2 times normal speed
X5 5 times normal speed
X8 8 times normal speed
OFF Do not start recording
ON Start recording
—
GEN time code produced by the time
code generator
AUTO during recording (including E-E
mode), the time code produced by
the time code generator, during
playback, the LTC signal from the
tape
OFF no phase correction to LTC signal
AUTO Adjust phase of LTC signal to
correspond to the video output
INT time code produced by time code
generator
TAPE time code played back from
tape
—
(Continued)
6-4 Chapters Setup Operations
Page 54

Setup menu settings (Continued)
Top menu
item
<SYSTEM 3>
<TRACKING>
Submenu items {nested
submenus in angle brackets)
<BANK>
<ISR>
AUTO TR
AUTO EQ
EXIT
LOAD
SAVE
EXIT
ISR
SPEED
EXIT
Function
Select one of the bank numbers
then
press the SET
in the setup data from a memory
bank.
Select a bank number, then press
the SET button to save the
current setup data in a memory
bank.
Return to <SYSTEM 3> menu.
Select whether to use REMOTE
connector for ISR (Interactive
Status Reporting).
Set data transmission speed in
ISR mode.
Return to <SYSTEM 3> menu.
Select whether to carry out outo
tracking.
Select whether to activate the
auto equalizer.
Return to top menu.
button
to
read
Setting values
0: factory default setup data.
1: setup data from bank 1.
2: setup data from bank 2.
3: setup data from bank 3.
1: save in bank 1.
2: save in bank 2.
3: save in bank 3.
—
OFF: no ISR; use as Sony 9-pin
protocol interface.
ON: use as ISR interface.
19200, 9600, 4800, 2400 or 1200 bps
—
OFF: no auto tracking
ONE- auto tracking once, when tape is
loaded
ON: continual auto tracking
OFF: no auto equalizer
ON: activate auto equalizer
—
Chapter 6 Setup Operations 6"5
Page 55

The following figure shows connections for using the
DVW-250/250P as player and a DVW-A500/500/
A500P/500P Digital Videocassette Recorder as
recorder.
Example configuration not using an editor
Chapter 7 Editing
System
Configuration
7-1
Page 56

Example 1
The following figure shows connections for using the
DVW-250/250P as player, a DVW-A500/500/A500P/
500P Digital Videocassette Recorder as recorder, and
a BVE-series editing control unit.
7-2 Chapter 7 Editing System Configuration
Example configuration using an editor (1)
Page 57

Example 2
The following figure shows connections for using two
DVW-250/250P units as recorder and player, with a
BVE-series editing control unit.
If you use a DVW-250/250P as recorder, only
assemble editing is possible.
Example configuration using an editor (2)
Chapter 7 Editing System Configuration 7-3
Page 58

If a fault occurs during operation, a warning is given
by an indication in the status indication panel, and the
WARNING indicator lights or flashes. If you are
monitoring the audio with headphones or an earphone,
there is also an audible warning tone.
If a warning is given, use the following table to
determine the appropriate measures to be taken.
Appendixes A-1
Page 59

Fitting the shoulder strap
Fitting the optional carrying case
(BKDW-250)
1 Remove the carrying case from its packing, and
insert the cushioning material to give the case its
shape.
2 Insert the DVW-250/250P in the carrying case.
3 Do up the side fasteners, and fasten with the
buckle.
Adjusting the length of the shoulder strap
Fitting the optional carrying case
In the following environments, if the unit is operated
continuously in the carrying case it may become hot.
• In direct sunlight
• In a car on a hot sunny day
• Near heating appliances
In such cases avoid removing the unit from the
carrying case, as this may result in bums or injury.
A-2 Appendixes
Adjusting the length of the carrying case strap
Page 60

General
Video characteristics
Power requirements 12 V DC+5.0 V/-1.0V
Power consumption Approx. 28 W (with CONFI
switch at OFF, SDI OUT
setting at OFF)
39 W maximum
Operating temperature
0 °C
to
40 °C
(32°Fto 104°F)
Storage temperature -20 °C to +60 °C
(-4°Fto 140°F)
Operating relative humidity
25 %to85 %
Mass Unit alone: approx. 6.6 kg
(141b8oz)
With battery pack and small
cassette: approx.
7.7 kg
(16
Ib
15
oz)
Maximum external dimensions (w/h/d)
317 x 140x349 mm
(12
Vs x 5'Vs x 13-V4
inches)
Recording format Digital Betacam
Tape speed Approx. 96.7 mm/s
Recording/playback time
Using BCT-D124L: maximum
124 minutes
Using BCT-D40: maximum
40 minutes
Fast forward/rewind time
Maximum 390 seconds
minutes (using BCTD124L)
Maximum 160 seconds
minutes (using BCT-D40)
Fast forward/rewind speed
Approx. 24 times normal
speed
Search speed Maximum 8 times normal
speed
(selectable x2, x5, x8)
Servo lock time Maximum 1 seconds (from
paused state)
Loading/unloading time
Maximum 4.5 seconds
Battery pack used BP-90A (nickel-cadmium) or
BP-L60 (lithium ion)
Cassette tapes used BCT-D6/D 12/D22/D32/D40
BCT-D34L/D64L/D94L/
D124L
Sampling frequency Y: 13.5MHz
R-Y/B-Y: 6.75 MHz
Quantization 10 bits/sample
Error correcting codes
Reed-Solomon
Error concealment Adaptive three-dimensional
Compression Coefficient recording system
Channel coding S-NRZI PR-IV
Digital input to analog component output
(Reference playback)
Frequency bands Y: 0.5 to 5.75 MHz ±0.5 dB
R-Y/B-Y: 0.5 to 2.75 MHz
±0.5 dB
Signal/noise ratio 62 dB minimum
K factor (2T pulse) 1 % or less
Analog component input to analog
component output (Reference playback)
A/D quantization 10 bits/sample
Frequency bands Y: 0.5 to 5.75 MHz +0.5/-0.7
dB
R-Y/B-Y: 0.5 to 2.75 MHz
+0.5/-0.7 dB
Signal/noise ratio 60 dB minimum
K factor (2T pulse) 1 % or less
LF nonlinearity 2% or less
Analog composite input to analog composite
output
A/D quantization 10 bits/sample
Frequency band 0 to 5.5 MHz ±0.7 dB
Signal/noise ratio 56 dB minimum
Differential gain 2% or less
Differential phase 2% or less
Y/C delay 15 ns or less
K factor (2T pulse) 1 % or less
Appendixes A-3
Page 61

Specifications
Audio system
Sampling frequency 48 kHz (video sync)
Quantization 20 bits/sample
Input A/D quantization
20 bits/sample
Output D/A quantization
18 bits/sample
Frequency response 20 Hz to 20 kHz +0.5 dB/
-1.0 dB (reference level)
Dynamic range 95 dB minimum (1 kHz,
emphasis on)
Distortion 0.04% or less (1 kHz.
emphasis on, reference
level)
Crosstalk -80 dB or less (! kHz,
between channels)
Wow and flutter Below measurable limit
Headroom 20dB(18dB)
Emphasis Tl = 50 [is, T2 = 15 us (on/off
selectable in recording
mode)
Camera interface
CAMERA (26-pinxl)
Analog component video
incut
Y: 1.0 V p-p, 75 (negative
sync)
R-Y/B-Y: 0.7 V p-p, 75
Serial digital component input (including 4 audio
channels)
Analog audio input -60/-20/+4 dB switchable
High impedance, balanced
Video interface
VIDEO IN (BNCxl)
Analog composite video input
1.0
V p-p, 75
VIDEO OUT (BNCx2)
Analog composite video
output
1.0 V p-p, 75 selectable
text superimposition on
output 2 only
(Using 20-bit D/A reference playback)
Frequency response 20 Hz to 20 kHz (0.5 dB/-l .0
dB (reference level)
Dynamic range 100 dB minimum (1 kHz,
emphasis on)
Distortion 0.03% or less (1 kHz,
emphasis on, reference
level)
Crosstalk -80 dB or less (1 kHz,
between channels)
Wow and flutter Below measurable limit
Inputs and outputs
Serial digital interface
SMPTE-259M/ITU-R BT.656
SDI IN (BNCxl) Serial digital component inpul
(including 4 audio
channels)
SDI OUT (BNCxl) Serial digital component
output (including 4 audio
channels)
Audio interface
AUDIO IN (XLRx4)Analog audio input
-60/-20/+4 dB switchable
High impedance, balanced
AUDIO OUT (XLRx4)
Analog audio output
+4 dBm (0 dBm)
Low impedance, balanced
HEADPHONES (stereo standard jack xl)
-)7dBu
EARPHONE (stereo minijack xl)
-17dBu
Time code interface
TC IN (BNC xl) Time code input
0.5 to 18 V p-p, impedance
10
k,
10%
TC OUT (BNCxl) Time code output
1.0 V p-p (75 2.2 V p-p
(10k
Miscellaneous
REMOTE (9-pinxl)
Sony 9-pin protocol or RS-
232C interface
(switchable)
DC IN 12V(XLRxl)
Power supply from AC-550/
550CE AC Adaptor
A-4 Appendixes
Page 62

DC OUT (miniature 4-pin xl)
Power supply to BVR-3
Remote Controller
RFU DC OUT, VIDEO OUT, AUDIO OUT
Interface for RF modulator
Processor adjustment ranges
Video input and output adjustment ranges
±3dB
System sync phase ±2 us
Supplied accessories
Shoulder strap (1)
Operation Manual (1)
Maintenance Manual Part 1(1)
Recommended equipment
BKDW-250 Carrying Case
DVW-A500/500/A500P/500P
Digital Videocassette Recorder
BP-90A and BP-L60 Battery Packs
BC-L 100/L 1 OOCE and BC-410/41 OCE
Battery Chargers
AC-550/550CE AC Adaptor
BVR-3 Remote Controller
RF Modulator RFU-95UC (U.S.A.and
Canada)
RFU-99E (Europe)
RFU-90AS (Australia)
RFU-95CH (China)
Mainteance Manual Part 2
Design and specifications are subject to change
without notice.
Appendixes A-5
Page 63

A
AC power supply 3-3
AC-550/550CE AC Adaptor 3-3
Adjustment controls 2-6
ADVANCE button 2-9
Analog equipment
connecting 4-2
system configuration 1-2
Audio
adjusting the recording levels 4-5
dubbing on the cue track 4-15
input settings 4-5
level meters 4-6
recording 4-13
<AUD10> 6-4
Audio connectors and controls 2-11
AUDIO IN connectors 2-12
Audio
input
AUDIO OUT connectors 2-12
AUDIO PB LEVEL control knobs 2-7
AUTOTR 6-5
level switches 2-12
B
<BANK> 6-5
Battery capacity remaining indication 2-5
Battery pack
BP-90A 3-1
BP-L60 3-2
Battery pack compartment 2-15
BKDW-250 (Optional carrying case) A-2
<BLANKING> 6-3
BP-90A 3-1
BP-L60 3-2
BREAKER button 2-15
Brightness, adjusting 3-8
BVR-3 Remote Controller 1-2
c
CAMERA connector 2-13
CAMERA/LINE switches 2-12
CAMERA 6-3
Carrying case A-2
Cassette compartment 2-2
Cassettes 3-5
ejecting 3-6
loading 3-6
remaining tape 3-7
types 3-5
CH-3/4 OUT switch 2-11
Cleaning the video heads 1-3
Color frame lock 2-4
COLOR FRAME switch 2-13
Condensation 1-3
CONFI switch
audio 2-11
video 2-13
Connecting
analog equipment 4-2
digital equipment 4-1
Connector panel 2-10
Control track 1-1
CUE DUB button and indicator 2-3
CUE REC switch 2-11
Cue track 1-1
D
DC IN 12V connector 2-15
DC OUT connector 2-15
DF/NDF switch (DVW-250 only) 2-9
DIAG switch 2-9
Digital Betacam format 1-1
Digital equipment
connecting 4-1
system configuration 1 -2
Display operating buttons 2-7
DISPLAY switch
status indications 2-5
time code setting controls 2-9
DOUBLE REC 4-5, 6-4
DVW-A500/500/A500P/500P
not using an editor 7-1
using an editor 7-2
E
EARPHONE jack 2-12
EE DELAY 6-3
E-Emode 2-2
E-E signal 2-2
Editing system configuration 7-1
not using an editor 7-1
using an editor 7-2
EJECT button and indicator 2-2
EMPHASIS 6-4
Emphasis function 4-6
Erasure of recordings, preventing 3-5
EXT DC SELECT switch 2-15
EXT-LOCK/U-B1T switch 2-9
F
Features of the DVW-250/250P 1-1
F FWD button and indicator 2-3
"FINE" mode 4-6
FPU(Field Pickup Unit) 5-2
FREEZE MODE 6-3
Front pane! 2-1
F-RUN/R-RUN switch 2-9
"FULL" mode 4-6
H
HEADPHONES jack 2-12
I
INPUT 1/2 6-4
INPUT 3/4 6-4
INPUT LEVEL 6-3
<1SR> 6-5
K
KEY 1NHI switch 2-3
L
LIGHT switch 2-6
Locking the time code generator to an
external signal 4-10
LTC
4-10
M
MASTER LEVEL 6-3
Menu display 2-6
MODE switch 2-15
MONITOR SELECT switches 2-11
Monitoring mode for recording 4-7
Monitoring with a television without video
input connections 5-1
o
Operating controls 2-2
Operating status indications 2-4
OUTPUT LEVEL 6-3
P
PAUSE button and indicator 2-3
PHONE LEVEL control knob 2-12
PLAY button and indicator 2-2
Playback
high speed searching 5-3
normal speed 5-3
preparations 5-1
procedures 5-3
Selecting the sound to be monitored 5-1
time code and user bits 5-5
+48 V switches (DVW-250P only) 2-12
P-ON REC
POSTROLL 6-4
Power supply 3-1
AC power supply 3-3
Power supply and miscellaneous 2-15
POWER switch 2-7
Powering on and off 3-4
PREROLL 6-4
6-4
Index 1-1
Page 64

Index
R
Reading and displaying time code and user
bits 5-5
REAL TIME insertion time code selection
switch 2-9
REAL TIME record/set switch 2-9
REC button and indicator 2-2
RECRUN 6-4
Recording
LTC
4-10
monitoring mode for recording 4-7
preparations 4-1
procedures 4-13
tape recordi ng format 1 -1
time code and user bits 4-9
Recording level control knobs and UNI/
VAR switches 2-6
Remaining battery capacity, checking 3-4
Remaining tape, checking 3-7
REMOTE connector 2-15
RESET button 2-5
REW button and indicator 2-3
RFU OUT connector 2-15
s
SC PHASE 6-3
SDI IN connector 2-14
SDI
OUT 6-3
SDI OUT connector 2-13
SEARCH 6-4
SEARCH button and indicator 2-3
Searching 5-3
Setup operations
basic procedure 6-2
menu organization 6-1
menu settings 6-3
<SETUP LEVEL> ,6-3
SHIFT button 2-9
Shoulder strap A-2
Signal level and menu display 2-6
Specifications A-3
Status indication panel 2-4
STD/NSTD 6-3
STOP button 2-2
SUPERIMPOSE switch 2-14
SYNC PHASE 6-3
<SYSTEM 1> 6-4
<SYSTEM 2> 6-4
<SYSTEM 3> 6-5
System configuration 1-2
<SYSTEM PHASE> 6-3
T
Tape recording format 1-1
Tape remaining indication 2-5
TC DELAY
item 6-4
settings for the output from the
connector 4-11
TC IN connector 2-14
TCOUT
connector 2-14
item 6-4
settings for the output from the
connector 4-11
Time code generator 4-11
Time code setting controls 2-8
Time code track 1-1
Time code value
locking of two or more DVW-250/250P
Units 4-12
locking to an external time code 4-11
LTC 4-10
recording 4-9
setting 4-8
VITC 4-9
Time indications 2-5
Time values 4-7
<TRACKING> 6-5
U
UNI/VAR switches 2-6
User bit value
locking to an external signal 4-11
recording 4-9
setting 4-7
setting to reflect the real time 4-8
v
V BLANK RM 6-3
Video
input settings 4-3
level meters 4-4
recording 4-13
Video connectors and controls 2-13
VIDEO DATA 6-3
Video head cleaning 1-3
VIDEO IN connector 2-14
Video input selector switch 2-14
VIDEO LEVEL 6-3
VIDEO LEVEL control 2-14
VIDEO OUT 1 and 2 connectors 2-14
<VIDEO 1> 6-3
<VIDE02> 6-3
VITC
insertion line No. 4-10
recording 4-9
VITC REC switch 2-8
VITC switches 2-8
w
Warning indications
status indication panel 2-4
system A-l
WARNING indicator 2-5
Y
<Y/C SEP MODE> 6-3
I-2 Index
Page 65

 Loading...