

Sony DVP-NS775V User Manual
2-059-561-11(1)
CD/DVD
Player
Operating Inst ructions
For customers in the U.S.A
Owner’s Record
The model and serial numbers are located at the rear of the unit.
Record the serial number in the space provided below. Refer to them
whenever you call upon your Sony dealer regarding this product.
Model No. DVP-NS775V
Serial No.______________
For Customers in Canada
If this product is not working properly, please call 1-877-602-2008 for
Peace of Mind Warranty Replacement service.
For other product related questions please contact our Customer
Information Service Centre at 1-877-899-7669 or write to us at:
Customer Information Service 115 Gordon Baker Road, Toronto,
Ontario, M2H 3R6
DVP-NS775V
© 2004 Sony Corporation
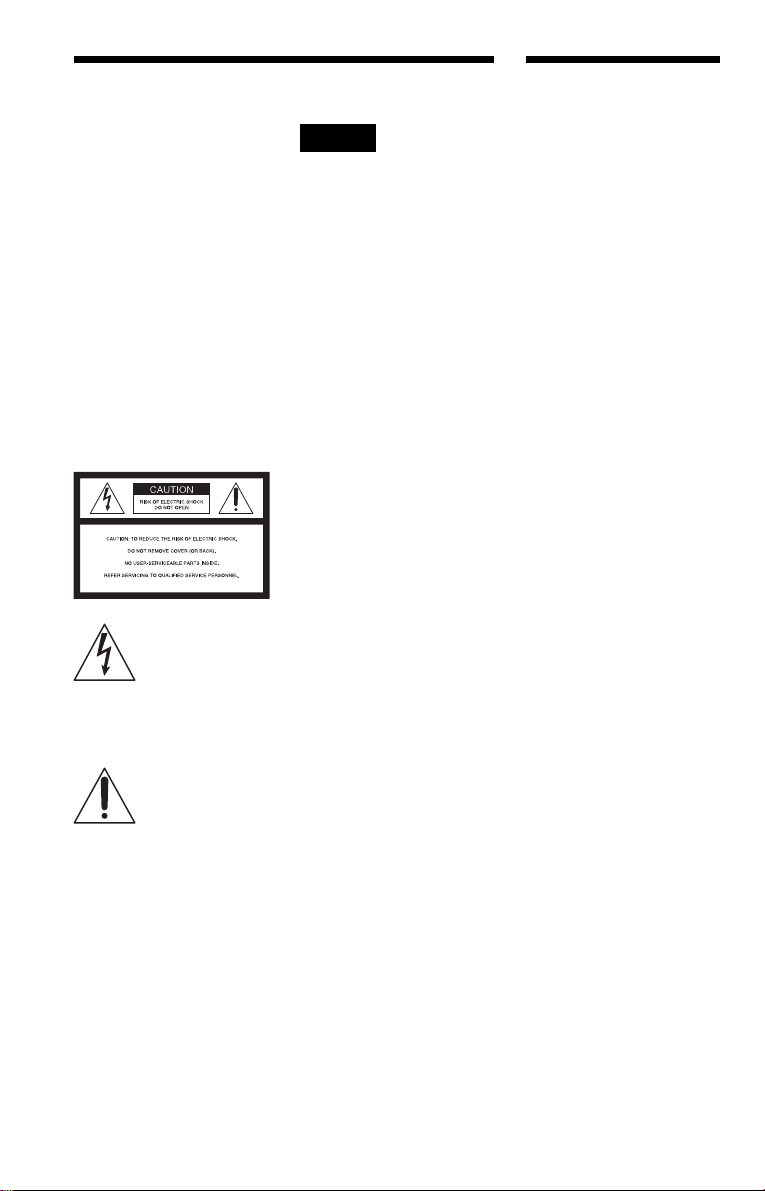
WARNING
To prevent fire or shock
hazard, do not expose the
unit to rain or moisture.
To avoid electrical shock, do
not open the cabinet. Refer
servicing to qualified
personnel only.
The AC power cord must be
changed only at a qualified
service shop.
CAUTION
The use of optical instruments with
this product will increase eye
hazard. As the laser beam used in
this CD/DVD player is harmful to
eyes, do not attempt to disassemble
the cabinet.
Refer servicing to qualified
personnel only.
This symbol is
intended to alert the
user to the presence
of uninsulated
within the product’s enclosure that
may be of sufficient magnitude to
constitute a risk of electric shock to
persons.
maintenance (servicing)
instructions in the literature
accompanying the appliance.
CAUTION
You are cautioned that any change
or modifications not expressly
approved in this manual could void
your authority to operate this
equipment.
“dangerous voltage”
This symbol is
intended to alert the
user to the presence
of important
operating and
Note
This equipment has been tested
and found to comply with the
limits for a Class B digital device,
pursuant to Part 15 of the FCC
Rules. These limits are designed to
provide reasonable protection
against harmful interference in a
residential installation. This
equipment generates, uses, and can
radiate radio frequency energy
and, if not installed and used in
accordance with the instructions,
may cause harmful interference to
radio communications. However,
there is no guarantee that
interference will not occur in a
particular installation. If this
equipment does cause harmful
interference to radio or television
reception, which can be
determined by turning the
equipment off and on, the user is
encouraged to try to correct the
interference by one or more of the
following measures:
– Reorient or relocate the
receiving antenna.
– Increase the separation
between the equipment and
receiver.
– Connect the equipment into an
outlet on a circuit different
from that to which the receiver
is connected.
– Consult the dealer or an
experienced radio/TV
technician for help.
Welcome!
Thank you for purchasing this
Sony CD/DVD Player. Before
operating this player, please read
this manual thoroughly and retain
it for future reference.
2

Important Safeguards
For your protection, please read these safety
instructions completely before operating the appliance,
and keep this manual for future reference.
Carefully observe all warnings, precautions and
instructions on the appliance, or the one described in
the operating instructions and adhere to them.
Use
Power sources
This set should be operated only
from the type of power source
indicated on the marking label. If
you are not sure of the type of
electrical power supplied to your
home, consult your dealer or local power company.
For those sets designed to operate from battery power,
or other sources, refer to the operating instructions.
Grounding or Polarization
This set is equipped with a polarized ac power cord
plug (a plug having one blade wider than the other), or
with a three-wire grounding type plug (a plug having a
third pin for grounding). Follow the instructions
below:
For the set with a polarized AC power
cord plug:
This plug will fit into the power
outlet only one way. This is a
safety feature. If you are unable to
insert the plug fully into the outlet, try reversing the
plug. If the plug should still fail to fit, contact your
electrician to have a suitable outlet installed. Do not
defeat the safety purpose of the polarized plug by
forcing it in.
For the set with a three-wire grounding
type AC plug:
This plug will only fit into a
grounding-type power outlet. This
is a safety feature. If you are
unable to insert the plug into the
outlet, contact your electrician to have a suitable outlet
installed. Do not defeat the safety purpose of the
grounding plug.
Overloading
Do not overload wall outlets,
extension cords or convenience
receptacles beyond their capacity,
since this can result in fire or
electric shock.
Object and Liquid Entry
Never push objects of any kind into
the set through openings as they
may touch dangerous voltage points
or short out parts that could result in
a fire or electric shock. Never spill
liquid of any kind on the set.
Attachments
Do not use attachments not
recommended by the manufacturer, as
they may cause hazards.
Cleaning
Unplug the set from the wall outlet
before cleaning or polishing it. Do
not use liquid cleaners or aerosol
cleaners. Use a cloth lightly
dampened with water for cleaning
the exterior of the set.
Installation
Water and Moisture
Do not use power-line operated sets
near water - for example, near a
bathtub, washbowl, kitchen sink, or
laundry tub, in a wet basement, or
near a swimming pool, etc.
Power-Cord Protection
Route the power cord so that it is
not likely to be walked on or
pinched by items placed upon or
against them, paying particular
attention to the plugs, receptacles, and the point where
the cord exits from the appliance.
Accessories
Do not place the set on an
unstable cart, stand, tripod,
bracket, or table. The set may
fall, causing serious injury to a
child or an adult, and serious damage to the set. Use
only a cart stand tripod, bracket, or table recommended
by the manufacturer.
An appliance and cart combination
should be moved with care. Quick
stops, excessive force, and uneven
surfaces may cause the appliance
and cart combination to overturn.
S3125A
Ventilation
The slots and openings in the cabinet are provided for
necessary ven tila tion. To ensure reliable operation of
the set, and to protec t it from overheating, these slots
and openings must never be blocked or covered.
• Never cov er the slots and
openings with a cloth or
other materials.
• Never block the slots and
openings by placing the set
on a bed, sofa, rug or other
similar surface.
,continued
3
• Never place the set in a
confined space, such as a
bookcase, or built-in
cabinet, unless proper
ventilation is provided.
• Do not place the set near or
over a radiator or heat
register, or where it is
exposed to direct sunlight.
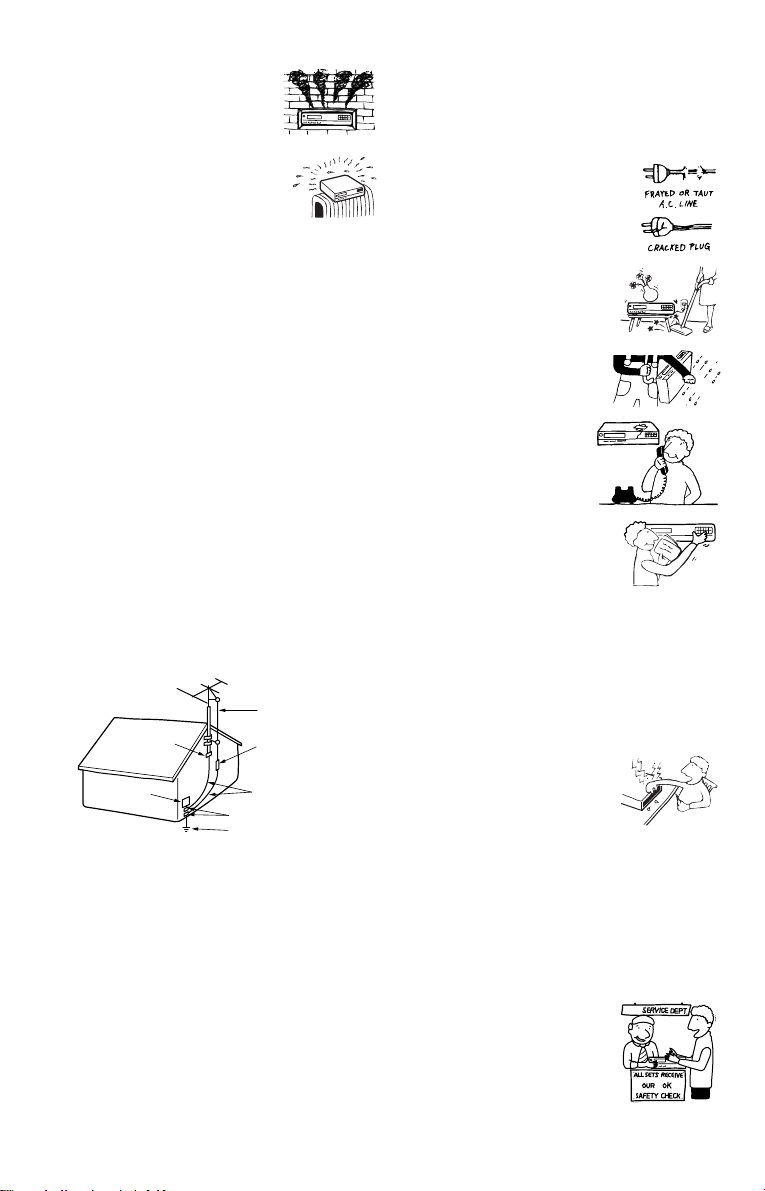
Antennas
Outdoor antenna grounding
If an outdoor antenna or cable system is installed,
follow the precautions below.
An outdoor antenna system should not be located in the
vicinity of overhead power lines or other electric light
or power circuits, or where it can come in contact with
such power lines or circuits.
WHEN INSTALLING AN OUTDOOR ANTENNA
SYSTEM, EXTREME CARE SHOULD BE TAKEN
TO KEEP FROM CONTACTING SUCH POWER
LINES OR CIRCUITS AS CONTACT WITH THEM
IS ALMOST INVARIABLY FATAL.
Be sure the antenna system is grounded so as to provide
some protection aga inst voltage surges and built-up static
charges. Section 810 of the National E lectrical Code
provides information with respect to proper groun ding of
the mast and supporting structure, grounding o f the lead-in
wire to an antenn a disc ha rge unit, size of grounding
conductors, location of antenn a-discharge unit, connection
to grounding electrodes, a nd requirements for the
grounding electrode.
Antenna Grounding According to the
National Electrical Code
Antenna Lead in Wire
Ground Clamp
Electric Service
Equipment
NEC-NATIONAL ELECTRICAL CODE
Lightning
For added protection for this set during a lightning
storm, or when it is left unattended and unused for long
periods of time, unplug it from the wall outlet and
disconnect the antenna or cable system. This will
prevent damage to the set due to lightning and powerline surges.
Antenna Discharge unit
(NEC Section 810-20)
Grounding Conductors
(NEC Section 810-21)
Ground Clamps
Power Service Grounding
Electrode System
(NEC Art 250 Part H)
Service
Damage Requiring Service
Unplug the set from the wall outlet and refer servicing
to qualified service personnel under the following
conditions:
• When the power cord or plug is
damaged or fraye d.
• If liquid has been spilled or
objects have fallen into the
set.
• If the set has been exposed
to rain or water.
• If the set has been
subject to excessive
shock by being
dropped, or the cabinet
has been damage d.
• If the set does not operate
normally when following
the operating instructions.
Adjust only those controls
that are specified in the
operating in structions. Improper ad justment
of other contro ls may result in damage and
will often require extensive work by a
qualified technician to restore the set to normal
operation.
• When the set exhibits a distinct change in
performance - this indicates a need for service.
Servicing
Do not attempt to service the set
yourself as opening or removing
covers may expose you to
dangerous voltage or other
hazards.
Refer all servicing to qualified service personnel.
Replacement parts
When replacement parts are required, be sure the
service technician has used replacement parts specified
by the manufacturer that have the same characteristics
as the original parts.
Unauthorized substitutions may result in fire, electric
shock, or other hazards.
Safety Che ck
Upon completion of any service or
repairs to the set, ask the service
technician to perform routine
safety checks (as specified by the
manufacturer) to determine that
the set is in safe operating
condition.
4

Precautions
On safety
• To prevent fire or shock hazard, do not
place objects filled with liquids, such as
vases, on the app aratus.
• Should any solid object or liquid fall into
the cabinet, unplu g the player and have it
checked by quali f ie d personnel before
operating it any further.
On power sources
• The player is not disconne cted fro m the AC
power source as long as it is connected to
the wall outlet, even if the player itself has
been turned off.
• I f you are not going to use the player for a
long time, be sure to disconnect the pla yer
from the wall outlet. To disconnect the AC
power cord, grasp the plug itself; never pull
the cord.
On placement
• Place the player in a l oc at ion wi th ade quat e
ventilation to prevent heat build-up in the
player.
• Do not place the player on a soft surface
such as a rug.
• Do not place the player in a location near
heat sources, or in a place subject to direct
sunlight, excessive dust, or mechanical
shock.
• Do not install the player in an inclined
position. It is des i gned to be operated in a
horizontal position only.
• Keep the player and the discs away from
equipment with st rong magnets, such as
microwave ovens, or large louds peakers.
• Do not place heavy objects on t he player.
On adjusting volume
Do not turn up the volume while listening to
a section with very low level inputs or no
audio signals. If you do, the speakers may be
damaged when a pe ak l eve l se cti on is pl ay ed.
On cleaning
Clean the cabinet, panel, and controls with a
soft cloth slightly moistened with a mild
detergent solution. Do not use any type of
abrasive pad, scouring powder or solvent
such as alcohol or benzine.
On cleaning discs
Do not use a commercially available cleaning
disc. It may cause a malfunction.
IMPORTANT NOTICE
Caution: This player is capable of holding a
still video image or on-screen display image
on your television screen indefinite ly . I f
you leave the still video image or on-screen
display ima ge displayed on your TV for an
extended period of time you risk permanent
damage to your te levision screen. Pl asma
display panel televisions and projection
televisions are susceptible to this.
If you have any questi ons or problems
concerning your player, please consult your
nearest Sony dealer.
On operation
• If the player is brought directly from a cold
to a warm location, or is placed in a very
damp room, moisture may condense on the
lenses inside the player. Should this occur,
the player may not oper at e pr ope rl y. In thi s
case, remove the disc and leave the player
turned on for about hal f an hour until the
moisture evaporates.
• When you move the p la yer, take out any
discs. If you don’t, the di sc may be
damaged.
5

Table of Contents
WARNING . . . . . . . . . . . . . . . . . . . . . . . . . . . . . . . . . . . . . . . . . . . . . . . . . . . . 2
Welcome! . . . . . . . . . . . . . . . . . . . . . . . . . . . . . . . . . . . . . . . . . . . . . . . . . . . . 2
Important Safeguards . . . . . . . . . . . . . . . . . . . . . . . . . . . . . . . . . . . . . . . . . . . 3
Precautions . . . . . . . . . . . . . . . . . . . . . . . . . . . . . . . . . . . . . . . . . . . . . . . . . . . 5
About This Manual . . . . . . . . . . . . . . . . . . . . . . . . . . . . . . . . . . . . . . . . . . . . . 8
This Player Can Play the Following Discs . . . . . . . . . . . . . . . . . . . . . . . . . . . 8
Notes About the Discs . . . . . . . . . . . . . . . . . . . . . . . . . . . . . . . . . . . . . . . . . 10
Index to Parts and Controls . . . . . . . . . . . . . . . . . . . . . . . . . . . . . . . . . . . . . 11
Guide to the Control Menu Display . . . . . . . . . . . . . . . . . . . . . . . . . . . . . . . . 15
Hookups . . . . . . . . . . . . . . . . . . . . . . . . . . . . . . . . . . . . . . . . . 18
Hooking Up the Player . . . . . . . . . . . . . . . . . . . . . . . . . . . . . . . . . . . . . . . . . 18
Step 1: Unpacking . . . . . . . . . . . . . . . . . . . . . . . . . . . . . . . . . . . . . . . . . . . . . 18
Step 2: Inserting Batteries Into the Remote . . . . . . . . . . . . . . . . . . . . . . . . . 18
Step 3: Connecting the Video Cords . . . . . . . . . . . . . . . . . . . . . . . . . . . . . . . 19
Step 4: Connecting the Audio Cords . . . . . . . . . . . . . . . . . . . . . . . . . . . . . . . 23
Step 5: Connecting the Power Cord . . . . . . . . . . . . . . . . . . . . . . . . . . . . . . . 30
Step 6: Quick Setup . . . . . . . . . . . . . . . . . . . . . . . . . . . . . . . . . . . . . . . . . . . 30
Playing Discs . . . . . . . . . . . . . . . . . . . . . . . . . . . . . . . . . . . . . . 34
Playing Discs . . . . . . . . . . . . . . . . . . . . . . . . . . . . . . . . . . . . . . . . . . . . . . . . 34
Resuming Playback Fro m the Poi nt Where You Stopped the Disc
(Multi-disc Resume) . . . . . . . . . . . . . . . . . . . . . . . . . . . . . . . . . . . . . . . . 36
Using the DVD’s Menu . . . . . . . . . . . . . . . . . . . . . . . . . . . . . . . . . . . . . . . . . 37
Selecting “ORIGINAL” or “PLAY LIST” on a DVD-RW . . . . . . . . . . . . . . . . . 37
Selecting a Playback Area for a Super Audio CD . . . . . . . . . . . . . . . . . . . . . 38
Playing VIDEO CDs With PBC Functions (PBC Playback) . . . . . . . . . . . . . 39
Various Play Mode Functions
(Program Play, Shuffle Play, R epeat Play, A-B Repeat Play) . . . . . . . . 40
Searching for a Scene . . . . . . . . . . . . . . . . . . . . . . . . . . . . . . . . 45
Searching for a Particular Poin t on a Disc
(Search, Scan, Slow-motion Play, Freeze Frame) . . . . . . . . . . . . . . . . . 45
Searching for a Title/Chap t er/Tr ac k/ Scene, etc. (Search mode) . . . . . . . . . 46
Searching by Scene (PICTURE NAVIGATION) . . . . . . . . . . . . . . . . . . . . . . 48
Viewing Information About the Disc . . . . . . . . . . . . . . . . . . . . . . . 49
Checking the Playing Time and Remaining Time . . . . . . . . . . . . . . . . . . . . . 49
Sound Adjustments . . . . . . . . . . . . . . . . . . . . . . . . . . . . . . . . . . 52
Changing the Sound . . . . . . . . . . . . . . . . . . . . . . . . . . . . . . . . . . . . . . . . . . . 52
Surround Mode Settings . . . . . . . . . . . . . . . . . . . . . . . . . . . . . . . . . . . . . . . . 53
6

Enjoying Mo vies . . . . . . . . . . . . . . . . . . . . . . . . . . . . . . . . . . . . 57
Changing the Angles . . . . . . . . . . . . . . . . . . . . . . . . . . . . . . . . . . . . . . . . . . . 57
Displaying the Subtitles . . . . . . . . . . . . . . . . . . . . . . . . . . . . . . . . . . . . . . . . . 57
Adjusting the Playback Picture (CUSTOM PICTURE MODE) . . . . . . . . . . . 58
Sharpening the Pictures (SHARPNESS) . . . . . . . . . . . . . . . . . . . . . . . . . . . 59
Enjoying MP3 Audio and JPEG Images . . . . . . . . . . . . . . . . . . . . . 61
About MP3 Audio Tracks and JPEG Image Files . . . . . . . . . . . . . . . . . . . . . 61
Playing MP3 Audio Tracks or JPEG Image Files . . . . . . . . . . . . . . . . . . . . . 62
Enjoying JPEG Images as a Slide Show . . . . . . . . . . . . . . . . . . . . . . . . . . . 65
Using Various Additional Functions . . . . . . . . . . . . . . . . . . . . . . . 69
Locking Discs
(CUSTOM PARENTAL CONTROL, PARENTAL CONTROL) . . . . . . . . 69
Controlling Your TV or AV Amplifier (Receiver) With
the Supplied Remote . . . . . . . . . . . . . . . . . . . . . . . . . . . . . . . . . . . . . . . 73
Settings and Adjustments . . . . . . . . . . . . . . . . . . . . . . . . . . . . . . 76
Using the Setup Display . . . . . . . . . . . . . . . . . . . . . . . . . . . . . . . . . . . . . . . . 76
Setting the Display or Sound Tra ck Language (LANGUAGE SETUP) . . . . . 77
Settings for the Display (SCREEN SETUP) . . . . . . . . . . . . . . . . . . . . . . . . . 78
Custom Settings (CUSTOM SETUP) . . . . . . . . . . . . . . . . . . . . . . . . . . . . . . 79
Settings for the Sound (AUDIO SETUP) . . . . . . . . . . . . . . . . . . . . . . . . . . . . 80
Settings for the Speakers (SPEAKER SETUP) . . . . . . . . . . . . . . . . . . . . . . 82
Additional Information . . . . . . . . . . . . . . . . . . . . . . . . . . . . . . . . 85
Troubleshooting . . . . . . . . . . . . . . . . . . . . . . . . . . . . . . . . . . . . . . . . . . . . . . 85
Self-diagnosis Functio n (W hen letters/numbers appear in the display) . . . . 88
Glossary . . . . . . . . . . . . . . . . . . . . . . . . . . . . . . . . . . . . . . . . . . . . . . . . . . . . 88
Specifications . . . . . . . . . . . . . . . . . . . . . . . . . . . . . . . . . . . . . . . . . . . . . . . . 91
Language Code List . . . . . . . . . . . . . . . . . . . . . . . . . . . . . . . . . . . . . . . . . . . 92
Index . . . . . . . . . . . . . . . . . . . . . . . . . . . . . . . . . . . . . . . . . . . . . . . . . . . . . . . 93
7
About This Manual
This Player Can Play the
• Instructions in this manual describe the
controls on the remote. You can also use the
controls on the player if they hav e the same
or similar names as those on the remote.
• “ DVD” may be used as a general term for
DVD VIDEOs, DVD+RWs/DVD+Rs and
DVD-RWs/DVD-Rs.
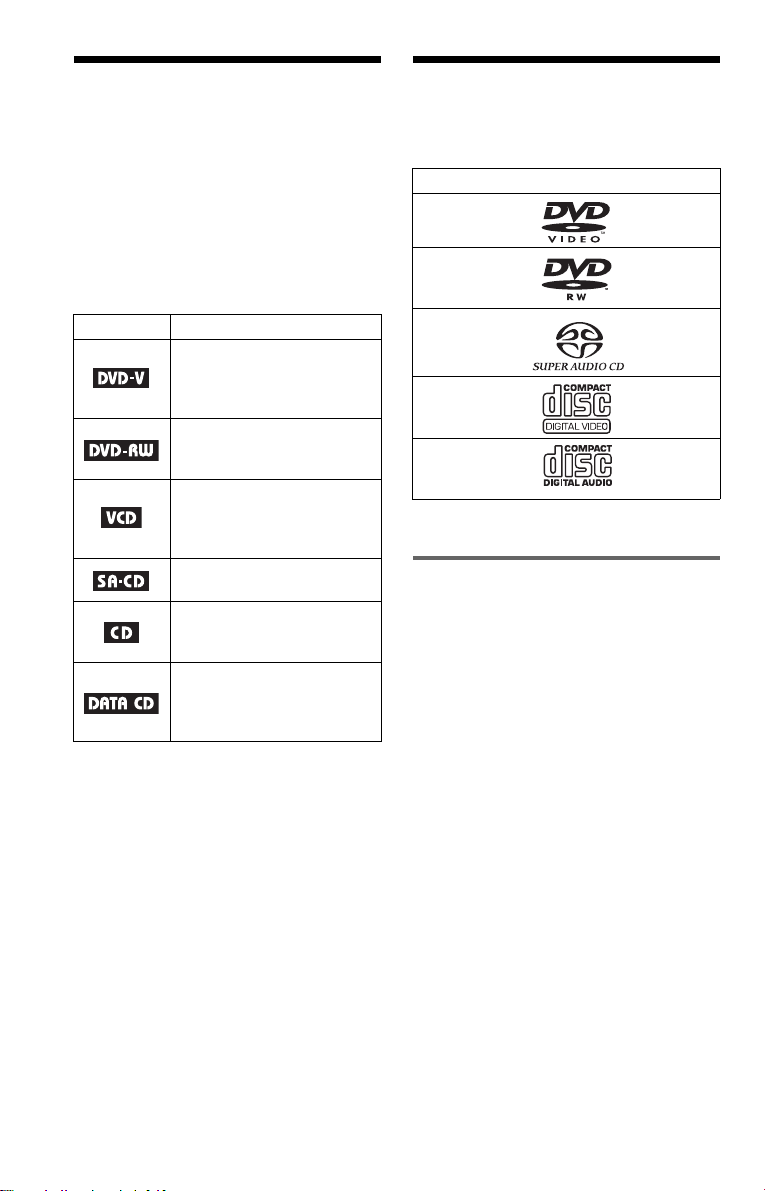
• Th e meaning of the icons used in this
manual is described below:
Icons Meanings
Functions available for DVD
VIDEOs and DVD+RWs/
DVD+Rs or DVD-RWs/DVDRs in video mode
Functions available for DVDRWs in VR (Video Recording)
mode
Functions available for VIDEO
CDs (including Super VCDs or
CD-Rs/CD-RWs in video CD
format or Super VCD format)
Functions available for Super
Audio CDs
Functions available for music
CDs or CD-Rs/CD-RWs in
music CD format
Functions available for DATA
CDs (CD-ROMs/CD-Rs/CDRWs containing MP3* audio
tracks, and JPEG image files)
* MP3 (MPEG1 Audio Layer 3) is a standard
format defined by ISO (International
Organization for Standardization)/MPEG which
compresses audio data.
Following Discs
Format of discs
DVD VIDEO
(page 88)
DVD-RW
(page 88)
Super Audio
CD (page 88)
VIDEO CD
Music CD
“DVD VIDEO” and “DVD-RW” are
trademarks.
Note about CDs
The player can pl ay CD-ROMs/CD-Rs/CDRWs recorded in the following formats:
–music CD format
–video CD format
–MP3 audio tracks and JPEG image files of
format conforming to ISO 9660* Level 1/
Level 2, or its extended format, Joliet
–KODAK Picture CD format
* A logical format of files and folders on CD-
ROMs, defined by ISO (International
Organization for Standardization).
8
Example of discs that the player
cannot play
The player cannot play the following dis cs :
• CD-ROMs/CD-Rs/CD-RWs other than
those recorded in the formats listed on the
previous page.
• CD-ROMs recorded in PHOTO CD format.
• Data part of CD-Extras.
• DVD-ROMs.
• DVD Audios.
Also, the player cannot play the following
discs:
• A DVD VIDEO with a different region
code.
• A disc recorded in a color system other than
NTSC, such as PAL or SECAM (this player
conforms to the NTSC color system).
• A disc that has a no n- st andard shape (e.g.,
card, heart).
• A disc with paper or stickers on it.
• A disc that has the ad hesive of cellophane
tape or a sticker still left on it.
Notes
• Notes about DVD+RWs/DVD+Rs, DVD-RWs/
DVD-Rs or CD-Rs/CD-RWs
Some DVD+RWs/DVD+Rs, DVD-RWs/DVDRs, or CD-Rs/CD-RWs cannot be played on this
player due to the recording quality or physical
condition of the disc, or th e cha racteristics of the
recording device and authoring softwa re .
The disc will not play if it has not bee n corr e ct ly
finalized. For more information, refer to the
operating instructions for the reco rd ing de vice.
Note that some playback functions may not work
with some DVD+RWs/DVD+Rs, even if they
have been correctly finalized. In this case, view
the disc by normal playback. Also some DATA
CDs created in Packet Write format cannot be
played.
• Music discs encoded with copyright protecti on
technologies
This product is designed to playback discs that
conform to the Compact Disc (CD) standard.
Recently, various music dis cs encode d wit h
copyright protection technologies are marketed
by some record companies. Please be aware that
among those discs, there are some that do not
conform to the CD standard and may not be
playable by this product.
Region code
Your player has a region code printed on the
back of the unit and onl y w ill play DVD
VIDEOs (playback only) labeled with
identical region codes. This sys tem is used to
protect copyrig ht s.
X
ALL
Region code
DVD VIDEOs labeled will also play on
this player.
If you try to play any other DVD VIDEO, the
message “Pla yback prohibited by area
limitations.” will appear on the TV screen.
Depending on the DVD VIDEO, there may
be no region code indi cation, even though
playing the DVD VIDEO is prohibited by
area restrictions.
00V 00Hz
NO.
DVP–XXXX
00W
0-000-000-00
Note on playback operations of
DVDs and VIDEO CDs
Some playback operations of DVDs and
VIDEO CDs may be intentionally set by
software producers. Since this play er pla y s
DVDs and VIDEO CDs according to the disc
contents the software producers desi gned,
some playback features may not be available.
Also, refer to the instructions supplied with
the DVDs or VIDEO CDs.
,continued
9
Copyrights
This product i ncorporates copyright
protection technology that is protected by
U.S. patents and other intellectual property
rights. Us e of this copyright protection
technology must be authorized by
Macrovision, and is intended for home and
other limited viewing uses only unle ss
otherwise author ized by Macrovision.
Reverse engineer in g or disassembly is
prohibited.
Notes About the D i scs
• To keep the disc clean, handle the disc by its
edge. Do not touch the surface.
• Do not expose the disc to direct sunlight or
heat sources such as hot air ducts, or leave it
in a car parked in direct sunlight as the
temperature may rise considerably inside
the car.
• After playing, st or e the disc in its case.
• Clean the disc with a cleaning cloth.
Wipe the disc from the center out.
• Do not use solvents s uch as benzine,
thinner, co mmerciall y available cl eaners, or
anti-static spra y in t ended for vinyl LPs.
• If you have printed the disc's label, dry the
label before playing.
10
Index to Parts an d Controls
For more information, see the pages indicated in parentheses.
Front panel
A [/1 (on/standby) button (34)
B SUPER AUDIO CD indicator (38, 90)
Lights up when:
–playing an HD (High Density) layer of
Super Audio CDs.
–no disc is inserted.
C MULTI CHANNEL indicator (38, 90)
Lights up when:
–playing a disc that contains multiple
audio signal channels.
–no disc is inserted.
D Disc tray (34)
E A (open/close) button (35)
F H (play) button (34)
G X (pause) button (35)
H x (stop) button (35)
I ./> (previous/next) buttons (45)
J PROGRESSIVE button/indicator (21)
Lights up when the player outputs
progressive signals.
K Front panel display (12)
L (remote sensor) (18)
,continued
11
Front panel display
When playing back a DVD VIDEO/DVD-RW
Disc type
Lights up during
Repeat Play (43)
Playing status
Current audio signal (53)
Lights up when you can change the angle (57)
Current title/chapter or playing
time (49)
When playing back a VIDEO CD with Pl ayback Control (PBC) (39)
Disc type
Playing status
Lights up during A-B Repeat Play (44)
Current scene or playing ti me (49)
When playing back a Super Audio CD, CD, DATA CD (MP3 audio), or VIDEO CD (without
PBC)
Playing status
Lights up dur i ng
Repeat Play (43)
Current track (49)
Disc type*
* When playing the HD layer of Super Audio CDs, the disc type is not displayed.
z Hint
You can adjust the lighting of the front pan el
display by setting “DIMMER” in “ CUSTOM
SETUP.” (page 79)
Lights up when playing MP3 audio tracks (61)
12
Playing time (49)

Rear panel
OPTICAL FRONTCOAXIAL
PCM/DTS/
DOLBY DIGITAL
DIGITAL OUT 5.1CH OUTPUT
REAR CENTER
R-AUDIO-L
L
R
WOOFER
VIDEO Y
LINE OUT
S VIDEO
OUT
PRPB
COMPONENT VIDEO OUT
A DIGITAL OUT (COAXIAL) jack (26)
(27) (28)
B DIGITAL OUT (OPTICAL) jack (26)
(27) (28)
C 5.1CH OUTPUT jacks (28)
D LINE OUT L/R (AUDIO) jacks (25)
(26) (27)
E LINE OUT (VIDEO) jack (19)
F S VIDEO OUT jack (19)
G COMP ONEN T VIDEO OUT (Y, P
R) jacks (19)
P
B,
,continued
13
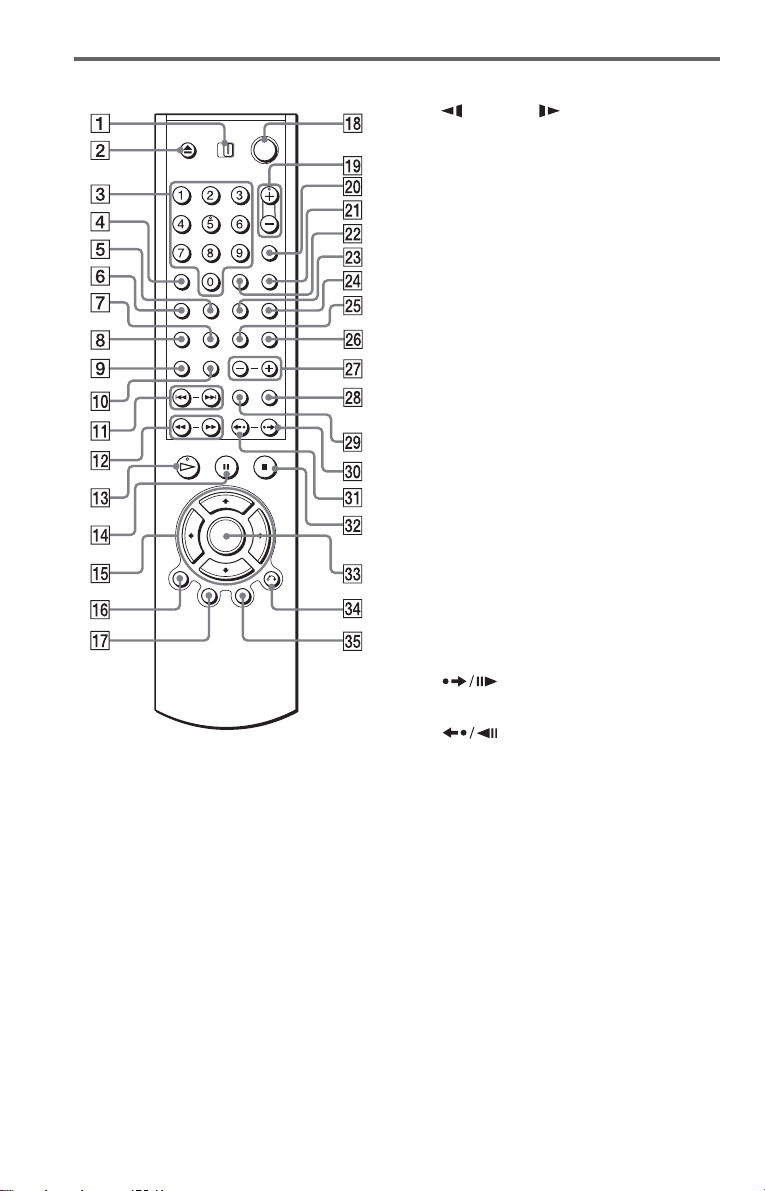
Remote
A TV/DVD switch (74)
Z OPEN/CLOSE button (35)
B
C Number buttons (37)
The number 5 button has a tactile dot.*
D CLEAR button (40)
E SUBTITLE button (57)
F AUDIO button (52)
G REPEAT button (43)
H SHUFFLE button (42)
I SA- CD MULTI/2CH butto n (38)
J SA-CD/CD button (38)
K ./> PREV/NEXT (previous/
next) buttons ( 35)
L m/M SCAN/SLOW
buttons (46)
M H PLAY button (34)
The H button has a t actile dot.*
N X PAUSE button (35)
O C/X/x/c buttons (37)
P DISPLAY button (15)
Q TOP MENU button (37)
R [/1 (on/standby) button (34 )
S VOL (volume) +/– buttons (74)
The + button has a t actile dot.*
T TV/VIDEO/TIME/TEXT button (49)
U PICTURE MODE button (58)
V ENTER button (73)
W ANGLE button (57)
X SUR (surround) button (53)
Y A-B button (44)
Z SEARCH MODE button (46)
wj ALBUM +/– button (35, 63)
wk PICTURE NAVI button (48, 64)
wl ZOOM button (35, 64)
e; INSTANT ADVANCE/STEP
button (35, 46 )
ea INSTANT REPLAY/STEP
button (35, 46 )
es x STOP button (35)
ed ENTER button (30)
ef O RETURN button (35)
eg MENU button (37) (62)
* Use the tactile dot as a refere n ce when operating
the player.
14
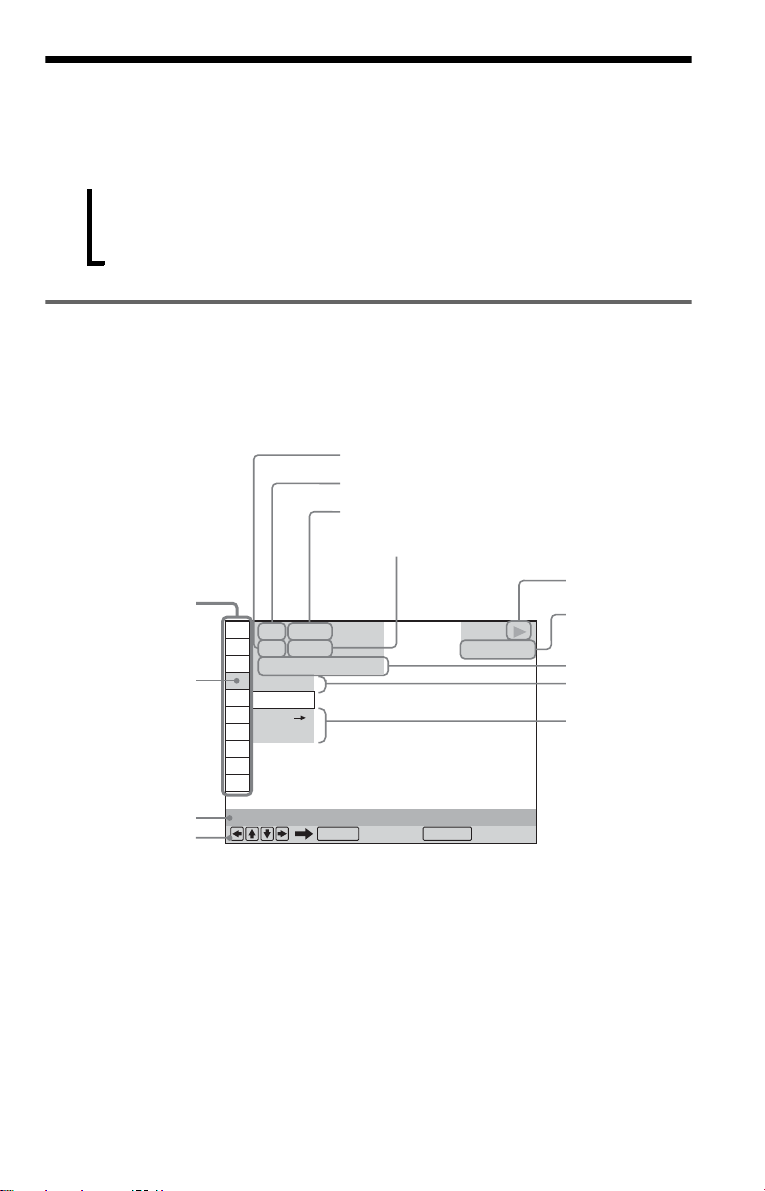
Guide to the Control Menu Display
Use the Control Menu to select a function and to view related information. Press DISPLAY
repeatedly to turn on or change the Contro l M enu display as follows:
Control Menu display 1
,
Control Menu display
The Control Menu display 1 and 2 will show di fferent items depend ing on the disc type. For
details about each item, see the pages in parent heses.
Example: Control Menu display 1 when playing a DVD VIDEO.
m
Control Menu display 2 (DATA CDs only)
m
Control Menu display off
Control Menu items
1 2 ( 2 7
1 8 ( 3 4
T
Selected item
Function name of
selected Control
Menu item
Operation message
*1Displays the scene number for VIDEO CDs
(PBC is on), track number for VIDEO CDs/
Super Audio CDs/CDs, album number for
DATA CDs.
2
Displays the index number for VIDEO CDs/
*
Super Audio CDs, MP3 audio track number or
JPEG image file number for DATA CDs.
3
Displays Super VCD as “SVCD.”
*
4
Displays the da te for JPEG files.
*
PROGRAM
1 : 3 2 : 5 5
OFF
OFF
SET
ON
Currently playing chapter number*
Currently playing title number *
Total number of titles*
Total number of chapters*
)
)
ENTER DISPLAY
Quit:
1
PLAY
DVD VIDEO
1
2
2
Playback status
(N Playback,
X Pause,
x Stop, etc.)
Type of disc
being played*
Playing time*
Current setting
Options
3
4
To turn off the display
Press DISPLAY.
,continued
15
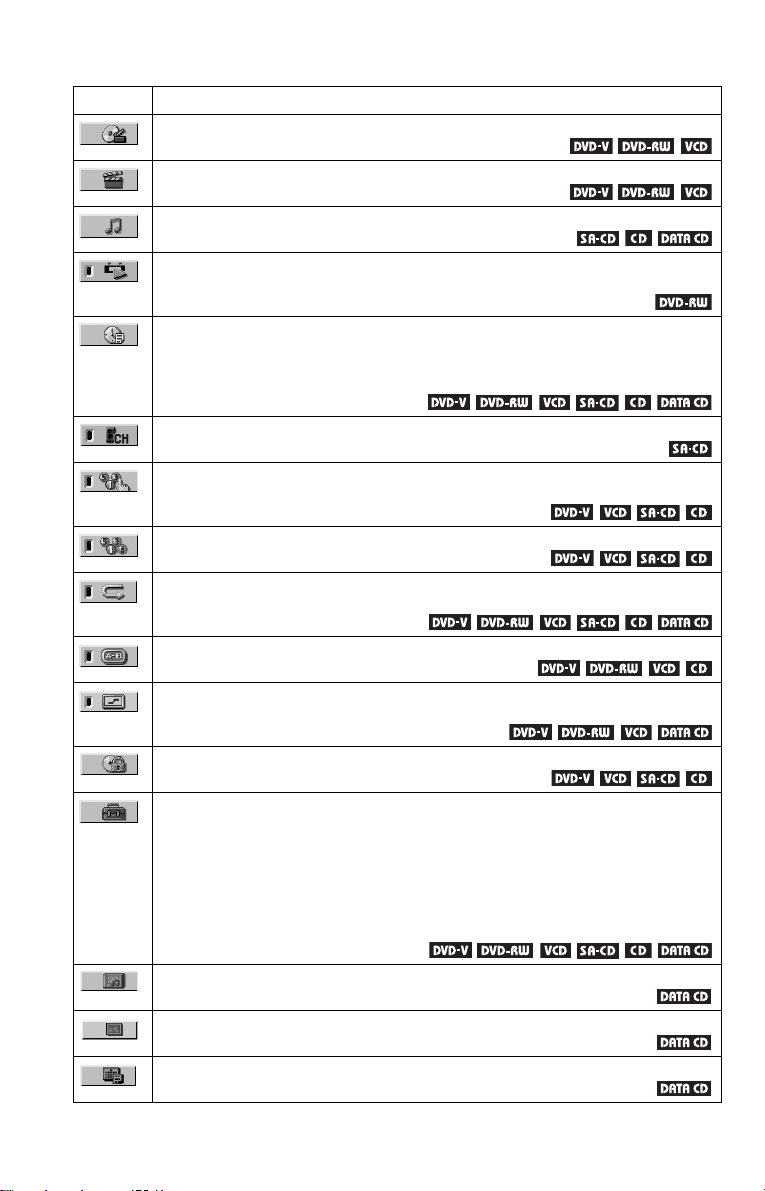
List of Control Menu items
Item Item Name, Function, Relevant Disc Type
TITLE (page 46)/SCENE (page 46)/TRACK (page 46)
Selects the title, scene, or track to be played.
CHAPTER (page 46)/INDEX (page 46)
Selects the chapter or index to be played.
TRACK (page 46)
Selects the track to be played.
ORIGINAL/PLAY LIST (page 37)
Selects the type of titles (DVD-RW) to be played, the ORIGINAL one, or an edited
PLAY LIST.
TIME/TEXT (page 46)
Checks the elapsed time and the remaining playback time.
Input the time code for picture and music searching.
Displays the DVD/Super Audio CD/CD text, or the DATA CD track name.
MULTI/2CH (page 38)
Selects the playback area on Super Audio CDs when available.
PROGRAM (page 40)
Selects the title, chapte r, or trac k t o pla y in the order you want.
SHUFFLE (page 42)
Plays the title, chapter, or track in random order.
REPEAT (page 43)
Plays the entire disc (all titles/all tracks/all albums) repeatedly or one title/chapter/track/
album repeated ly .
A-B REPEAT (page 44)
Specifies the parts you want to pla y re peatedly.
SHARPNESS (page 59)
Exaggerates the outline of the image to produce a sharper picture.
PARENTAL CONTROL (page 69)
Set to prohibit playback on this player.
SETUP (page 76)
QUICK Setup (page 30)
Use Quick Setup to choose the desired language of the on-screen display, the aspect ratio
of the TV, the audio output signal, an d the size of t he spea ke rs your a re usi ng.
CUSTOM Setup
In addition to the Quick Setup settin g, you can adj u st va ri o us oth er sett in gs.
RESET
Returns the settings in “SETUP” to the default setting.
ALBUM (page 61)
Selects the al bum to be played.
FILE (page 46)
Selects the JPEG image file to be played.
DATE (page 64)
Displays the date the picture w as take n by a digital camera.
16

INTERVAL (page 67)
Specifies the duration for which the slides are displayed on the screen.
EFFECT (page 67)
Selects the effects to be used for changing slides during a slide show.
MODE (MP3, JPEG) (page 64)
Selects the data type; MP3 audio track (AUDIO), JPEG image file (IMAGE) or both
(AUTO) to be played when playing a DATA CD.
z Hint
The Control Menu icon indicator lights up in green
t
except “OFF” (“PROGRAM,” “SHUFFLE,”
“REPEAT,” “A-B REPEAT,” “SHARPNESS”
only). The “ORIGINAL/PLAY LIST” indicator
lights up in green when you select “PLAY LIST”
(default setting). The “MULTI/2CH” indicator
lights up in green when you select the multi-channel
playback area on a Super Audio CD.
when you select any item
17
Hookups
Hooking Up the Player
Follow steps 1 to 6 to hoo k up and adjust the settings of the player.
Notes
• Plug cords securely to prevent unwanted noise.
• Refer to the instructions supplied with the components to be connected.
• You cannot conn ect this player to a TV that does not have a video input jack.
• Be sure to disconne c t the powe r cor d of each compone nt before connecting.
Step 1: Unpacking
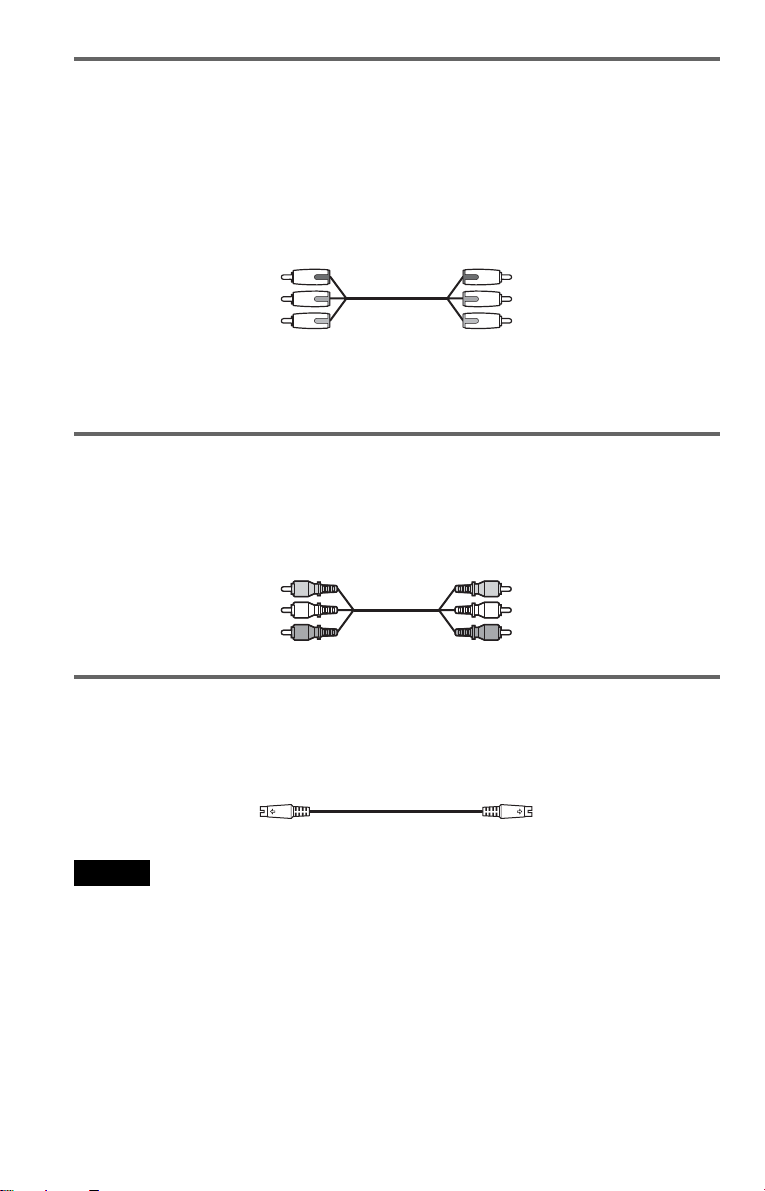
Check that you have the following items:
• Au dio/Video cord (pinplug × 3 y pinplug × 3) (1)
• Remote commander (remote) (1)
• Size AA (R6) batteries (2)
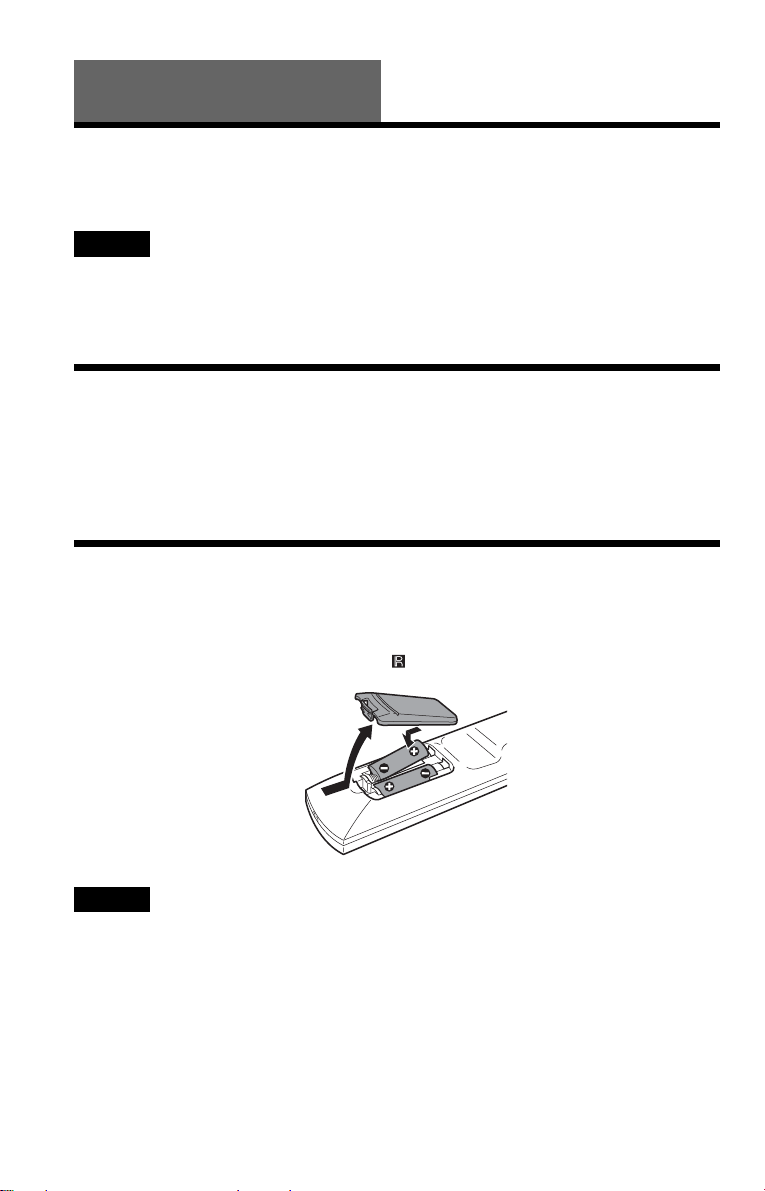
Step 2: Inserting Batteries Into the Remote
You can control the player using the supplied remote. Insert two Size AA (R6) batteries by
matching the 3 and # ends on the batteries to the markings inside the compartment. When
using the remote, point it at the remote sensor on the player.
Notes
• Do not leave the remote in an extremely hot or humid place.
• Do not drop any foreign object into the remote casing, particularly when replacing the batteries.
• Do not expose the remote sensor to direct light from the sun or a lighting apparatus. Doing so may cause a
malfunction.
• If you do not use the remote for an extended period of time, remove the batteries to avoid possible damage
from battery leakage and corrosion.
18
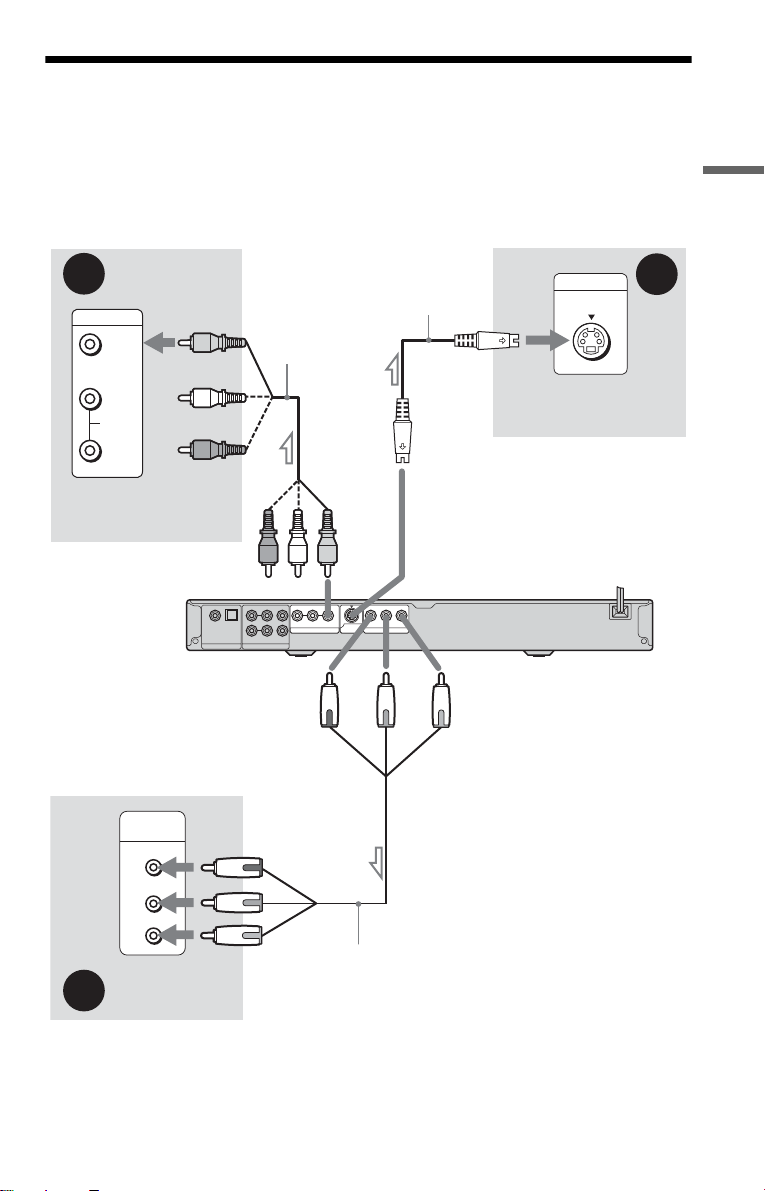
Step 3: Connecting the Video Cords
Connect th is player to your TV moni tor, pr ojector, or AV ampl ifier ( receive r) using a video cord.
Select one of the patter ns A through C, according to the inp ut jack on yo ur TV moni tor,
projector, or AV amplifier (receiver).
In order to view p rogr essi ve si gnal (480 p) pi ctur es wi th a c ompat ible TV, proje ctor , or moni tor,
you must use pattern A.
Hookups
B
INPUT
VIDEO
L
AUDIO
R
TV, projector, or AV
amplifier (receiver)
to LINE OUT (VIDEO)
to COMPONENT
VIDEO OUT
COMPONENT
VIDEO IN
(green)
(blue)
(red)
A
l : Signal flow
Y
P
B
P
R
TV, projector, or AV
amplifier (receiver)
Audio/video
cord (supplied)
OPTICAL FRONTCOAXIAL
REAR CENTER
L
R
PCM/DTS/
DOLBY DIGITAL
DIGITAL OUT 5.1CH OUTPUT
(yellow)
R-AUDIO-L
VIDEO Y
S VIDEO
OUT
LINE OUT
WOOFER
(green)
(blue)
Component video
cord (not supplied)
S VIDEO cord
(not suppli e d)
to S VIDEO OUT
PRPB
COMPONENT VIDEO OUT
(red)
INPUT
S VIDEO
TV, projector, or AV
amplifier (receiver)
CD/DVD player
C
,continued
19
A If you are connecting to a monitor, projector, or AV amplifier
(receiver) having component video input jacks (Y, P
Connect the component via the COMPONENT VIDEO OUT jacks us in g a component video
cord (not suppl ie d) or three video cords (not supplied) of th e same kind and length. You will
enjoy accurate col or reproduction and high quality images.
If your TV accepts progressive 480p format signals, use this connection and pres s the
PROGRESSIVE button on the front panel to output progressive signals. For details, see “Using
the PROGRESSIVE button” (page 21).
B, PR)
Green
Blue
Red
Green
Blue
Red
When connecting to a wide scree n TV
Depending on the disc, the image may not fit your TV screen. To change the aspect ratio, see
page 78.
B If you are connecting to a video input jack
Connect the yellow plug of an audio/video cord (supplied) to the yellow (video) jack. You will
enjoy standard quality images.
With this connection, select “NORMAL (INTERLACE)” (default) by pressing the
PROGRESSIVE button on t he front panel.
Yellow
White (L)
Red (R)
Yellow
White (L)
Red (R)
C If you are connecting to an S VIDEO input jack
Connect an S VIDEO cord (not supplied). You will enjoy high quality images.
With this connection, select “NORMAL (INTERLACE)” (default) by pressing the
PROGRESSIVE button on t he front panel.
Notes
• Do not connect a VCR, etc., between your TV and the player. If you pass th e play er si g n al s via th e VCR,
you may not receive a clear image on the TV screen. If you r TV has only one audio/video input jack,
connect the player to this jack.
20

VCR
CD/DVD player
Connect
directly
• Consumers should note that not all high definition television sets are fully compatible with this product and
may cause artifacts to be displa ye d in the picture. In case of 480 progressive scan pi ct ur e probl e ms, it is
recommended that the user switch the connection to the ‘standard definition’ output. If there are questions
regarding your TV set compatibility with this 480p DVD player model, please contact our customer service
center.
TV
Using the PROGRESSIVE button
By using the PROGRESSIVE button on the front panel, you can select the signal format in
which the player outputs video signals (Progressive or Interlace), and the conversion method for
progressive signal s. The PROGRESSIVE i ndi cator lights up when the player outputs
progressive signals.
Each time you press PROGRESSIVE, th e di splay changes as fo llows:
PROGRESSIVE AUTO
PROGRESSIVE VIDEO
NORMAL (INTERLACE)
◆PROGRESSIVE AUTO
Select th is setting when:
–your TV accepts progressive s ig nals, and,
–the TV is connected to the COMPONENT VIDEO OUT jacks.
Normally select this under the above condition . This automatically detects the software type, and
selects the approp r i ate conversion method.
Note that the picture will not be clea r or no pictu re will a ppear if yo u select these se ttings whe n
either of the above conditions is not met.
m
m
Hookups
◆PROGRESSIVE VIDEO
Select th is setting when:
–your TV accepts progressive s ig nals, and,
–the TV is connected to the COMPONENT VIDEO OUT jacks, and,
–you want to fix the conversion method to PROGRESSIVE VIDEO for video-based software.
Select this if the im a ge is not cle ar when you select PR OGRESSI VE AUTO.
Note that the picture will not be clear or no picture will appear if you select these settings when
either of the above conditions is not met.
◆NORMAL (INTERLACE)
Select th is setting when:
–your TV does not accept progressive signals, or,
–your TV is connected to jacks other than the COMPONENT VIDEO OUT jacks (LI NE OUT
(VIDEO) or S VIDEO OUT).
,continued
21

About DVD software types and the conver sion method
DVD software can be divided into two types: film-based software and video based software.
Video-based software is derived from TV, such as dramas and sit-coms, and displays images at
30 frames/60 fields per seco nd. Film-based softwar e is derived fro m film and displays images at
24 frames per seco nd. Some DVD softw ar e contains both video and film.
In order for the se images to appear natural on your scr een when output in pr ogressive form at,
the progressive signals need to be converted to match the type of DVD software that you are
watching.
Note
When you play video-based software in pr ogre ssive signal format, sections of some type s of im ag es ma y
appear unnatural due to the conversion process when output through the COMPONENT VIDEO OUT jacks.
Images from the S VIDEO OUT and LINE OUT (VIDEO) jacks are unaffected as they are output in the
normal (interlace) format.
22
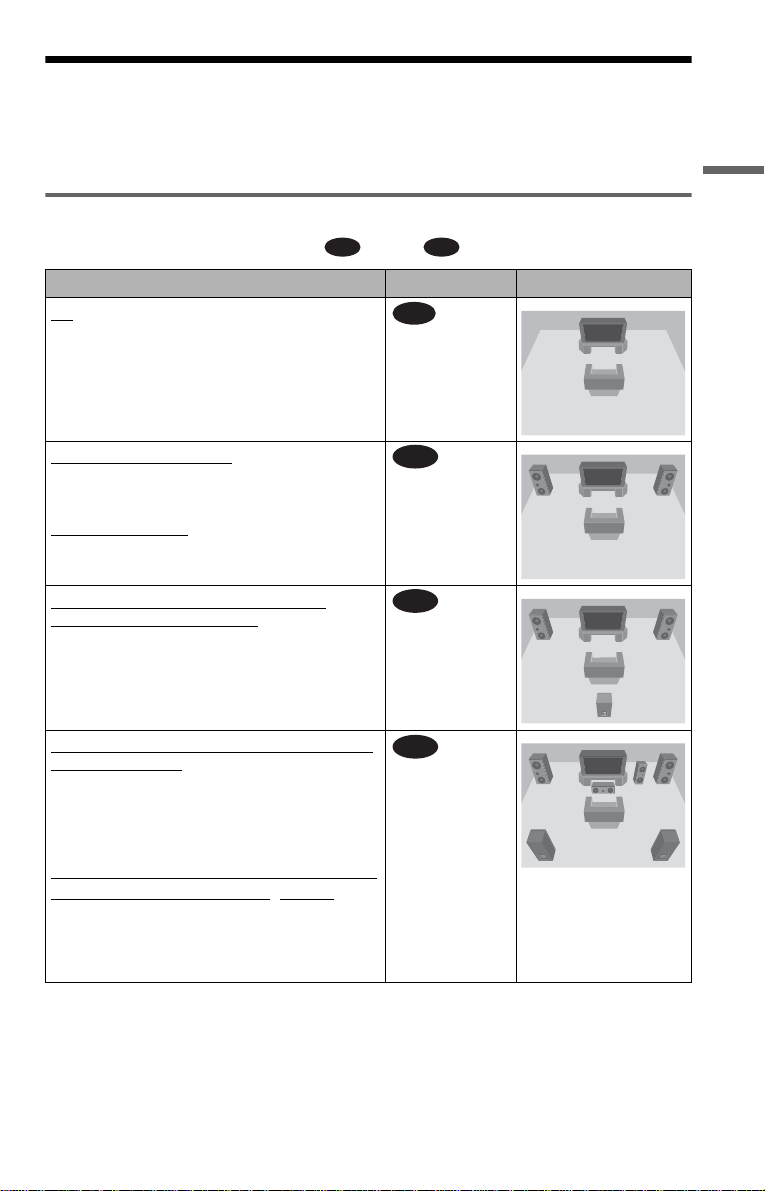
Step 4: Connecting the Audio Cords
Refer to the chart bel ow to select th e connectio n that be st suits your syst em. Be sure to also rea d
the instructions for the components you wish to connect.
Select a connection
Select one of the follow i ng connections, through .
Components to be connected Connection Your setup (example)
TV
• Surround effects:
– TVS DYNAMIC (page 53)
– TVS WIDE (page 53)
A D
A
(page 25)
Hookups
Stereo amplifier (receiver)
• Surround effects:
– TVS STANDARD (page 53)
or
MD deck/DAT deck
• Surround effects:
– TVS STANDARD (page 53)
AV amplifier (receiver ) having a Dolby
Surround (Pro Logic) decoder
speakers
• Surround effects:
– Dolby Surround (Pro Logic) (page 88)
AV amplifier (receiver) with 5.1 ch input jacks
and 4 to 6 speakers
• Surround effects:
– Dolby Digital (5.1 ch) (page 88)
– DTS (5.1 ch) (page88)
– Super Audio CD Multi channel (page 88)
or
AV amplifier (receiver) with digital input jacks
having a Do lby Digital, or DT S*2 decoder and 6
speakers
• Surround effects:
– Dolby Digital (5.1 ch) (page 88)
– DTS (5.1 ch) (page 88)
and two speakers
*1
and 3 to 6
B
C
D
(page 26)
(page 27)
(page 28)
,continued
23

z Hint
If you connect an AV amplifier (receiver) that
conforms to the 96 kHz sampling frequency, use
connection .
1
Manufactured under license fr om Dol by
*
Laboratories. “Dolby,” “Pro Logic,” and the
double-D symbol are trademarks of Dolb y
Laboratories.
2
Manufactured under license from Digital
*
Theater Systems, Inc. U.S. Pat. No’s.
5,451,942; 5,956,674; 5,974,380; 5,978,762;
6,226,616; 6,487,535 and other U.S. and worldwide patents issued and pending. “DT S” an d
“DTS Digital Surround” are registered
trademarks of Digital Theater Systems, Inc.
Copyright 1996, 2003 Digital Theater Systems,
Inc. All Rights Reserved.
D
24
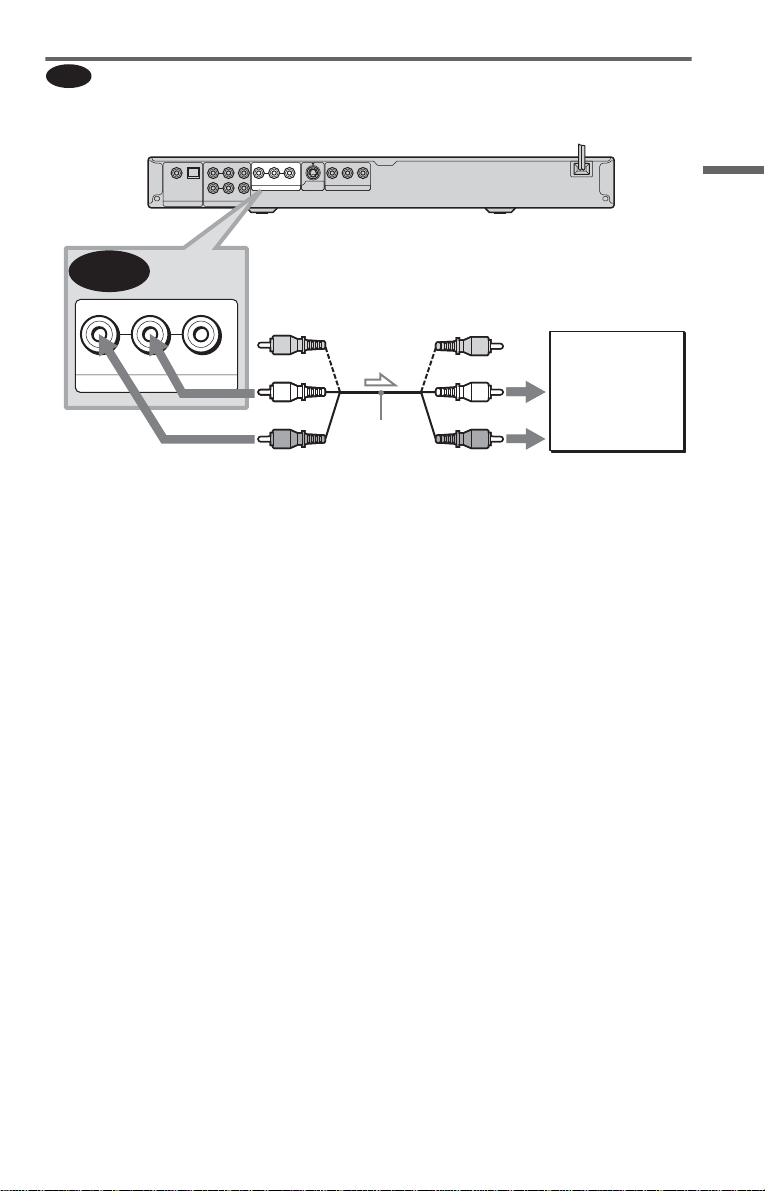
A
Connecting to your TV
This connection w i ll use your TV’s spea ker s for sound.
CD/DVD player
OPTICAL FRONTCOAXIAL
REAR CENTER
R-AUDIO-L
L
R
PCM/DTS/
DOLBY DIGITAL
DIGITAL OUT 5.1CH OUTPUT
VIDEO Y
LINE OUT
WOOFER
S VIDEO
OUT
PRPB
COMPONENT VIDEO OUT
A
R-AUDIO-L
VIDEO
(yellow)*
(yellow)*
Hookups
TV
LINE OUT
(white)
to LINE OUT
(red)
L/R (AUDIO)
l: Signal flow
* The yellow plug is used for video signals (pa ge
19).
z Hint
When connecting to a monaural TV, use a stereomono conversion cord (not supp li ed). Connect the
LINE OUT L/R (AUDIO) jacks to the TV’s audio
input jack.
Audio/video
cord (supplied)
(white)
(red)
to audio input
,continued
25
B
Connecting to a stereo amplifier ( receiver) and 2 speakers/C onnecting to
an MD deck or DAT deck
If the stereo amplifier (receiver) has audio input jacks L and R only, use . If the amplifier
(receiver) has a digital input jack, or when connecting to an MD deck or DAT deck, use .
In this case, you can also connect the player directly to the MD deck or DAT deck without using
your stereo amplifier (receiver).
CD/DVD player
OPTICAL FRONTCOAXIAL
REAR CENTER
R-AUDIO-L
PCM/DTS/
DOLBY DIGITAL
DIGITAL OUT 5.1CH OUTPUT
B-2
OPTICALCOAXIAL
PCM/DTS/
DOLBY DIGITAL
DIGITAL OUT
to DIGITAL OUT
(COAXIAL or OPTICAL)
Coaxial digital cord
(not supplied)
L
R
VIDEO Y
LINE OUT
WOOFER
Optical dig ital cord
(not suppli e d)
Remove jack cap
before connecting
or
S VIDEO
OUT
PRPB
COMPONENT VIDEO OUT
(red)
or
(white)
Stereo audio cord
(not supplied)
B-1
B-2
B-1
R-AUDIO-L
LINE OUT
to LINE OUT L/R (AUDIO)
VIDEO
to coaxial or optical digital input
[Speakers]
Stereo amplifier (receiver)
Front (L)
Front (R)
l: Signal flow
Note
Super Audio CD audio signals are not output from
the DIGITAL OUT jacks.
26
(white)
(red)
to audio input
MD deck/DAT deck
C
Connecting to an AV amplifier (receiver) having a Dolby Surround (Pro
Logic) decoder and 3 to 6 speakers
You can enjoy Dolby Surround effects only when playing Dolby Surround audio or multichannel audio (D ol by D igital) discs.
If your amplifier (receiver) has L and R audio input jacks onl y, use . If you r amplifier
(receiver) has a di gital input jack, use .
CD/DVD player
OPTICAL FRONTCOAXIAL
REAR CENTER
L
R
PCM/DTS/
DOLBY DIGITAL
DIGITAL OUT 5.1CH OUTPUT
C-2
OPTICALCOAXIAL
PCM/DTS/
DOLBY DIGITAL
DIGITAL OUT
to DIGITAL OUT
(COAXIAL or OPTICAL)
Coaxial digital cord
(not supplied)
WOOFER
Optical digital cord
(not suppli e d)
Remove jack cap
before connecting
R-AUDIO-L
LINE OUT
C-2
VIDEO Y
S VIDEO
or
OUT
COMPONENT VIDEO OUT
PRPB
(red)
or
(white)
Stereo audio cord
(not supplied)
C-1
C-1
R-AUDIO-L
to LINE OUT L/R (AUDIO)
VIDEO
LINE OUT
Hookups
to coaxial or optical digital input
[Speakers]
Amplifier (receiver) with Dolby
Surround decoder
Rear (L)
Rear (R)
Subwoofer
Center
l: Signal flow
Notes
• When connecting 6 speakers, replace the
monaural rear speaker with a center spea ke r, 2
rear speakers and a subwoofer.
• Super Audio CD audio signals are not output from
the DIGITAL OUT jacks.
(white)
(red)
to audio input
Rear (mono)
[Speakers]
Front (R)Front (L)
,continued
27
D
Connecting to a n AV amplifier (receiver) w ith 5.1 ch input j acks and/o r a
digital input jack and 4 to 6 speakers
If your AV ampli fier (receiver) has 5. 1 channel inputs, use .
If you want to u se t he Do lb y Di gi tal , o r DTS d ec ode r fu nc tio n on y our AV a mpli fi er (r ecei ve r),
connect to its digital jack using . With the fo llowing connection s, you can enjoy a more
D-2
realistic audio presence in the comfort of your own home.
CD/DVD player
OPTICAL FRONTCOAXIAL
REAR CENTER
R-AUDIO-L
D-2
PCM/DTS/
DOLBY DIGITAL
DIGITAL OUT
L
R
PCM/DTS/
DOLBY DIGITAL
DIGITAL OUT 5.1CH OUTPUT
OPTICALCOAXIAL
VIDEO Y
LINE OUT
WOOFER
to DIGITAL OUT
(COAXIAL or OPTICAL)
Optical digital cord
(not supplied)
Remove jack cap
before connecting
PRPB
S VIDEO
OUT
COMPONENT VIDEO OUT
Stereo audio cord
(not supplied)
to 5.1CH
OUTPUT
D-1
FRONT
REAR CENTER
L
R
5.1CH OUTPUT
D-1
WOOFER
Center
l: Signal flow
28
Coaxial digital cord
(not supplied)
to coaxial or optical
digital input
[Speakers]
Subwoofer
or
or
AV amplifier (receiver) havi ng
5.1ch inputs or/and a decoder
Monaural audio cord
(not supplied)
to audio input
[Speakers]
Front (L)
Front (R)
Rear (L)
Rear (R)

: Connecting to the 5.1ch input jack s
D-1
You can enjoy 5.1ch surround sound using
the inter n al Dolby Digital, DTS, or Supe r
Audio CD Multi decoder of this player.
: Connecting to a DIGITAL OUT jack
D-2
This connection will allow you to use the
Dolby Digital, or D T S decoder function of
your AV amplifier (receiver). You are not
able to enjoy the surround sound effects of
this player.
z Hints
• For connection
For correct speaker lo cation, refer to the operating
instructions of the connected components.
• To enhance the so und pe rfo rm a nc e:
– Use high-performance speaker s.
– Use front, rear, and center speakers of the same
size and performance .
– Place the subwoofer between the left and right
front speakers.
D-2
Notes
For connection
• After you have completed the connection, be sure
to set “DOLBY DIGITAL” to “DOLBY
DIGITAL” and “DTS” to “DTS” in Quick Setup
(page 30).
• When you connect an amplifier (receiver) that
conforms to the 96 kHz sampling frequency, se t
“48kHz/96kHz PCM” in “AUDIO SETUP” to
“96kHz/24bit” (page 82).
• Super Audio CD audio signals are not output from
the DIGITAL OUT jack.
D-2
Hookups
29
 Loading...