

Page 1
2-663-710-11(2)
High Definition
Digital Receiver
DST-HD500
OK
Operating Guide
MENU
© 2005 Sony Corporation
Page 2
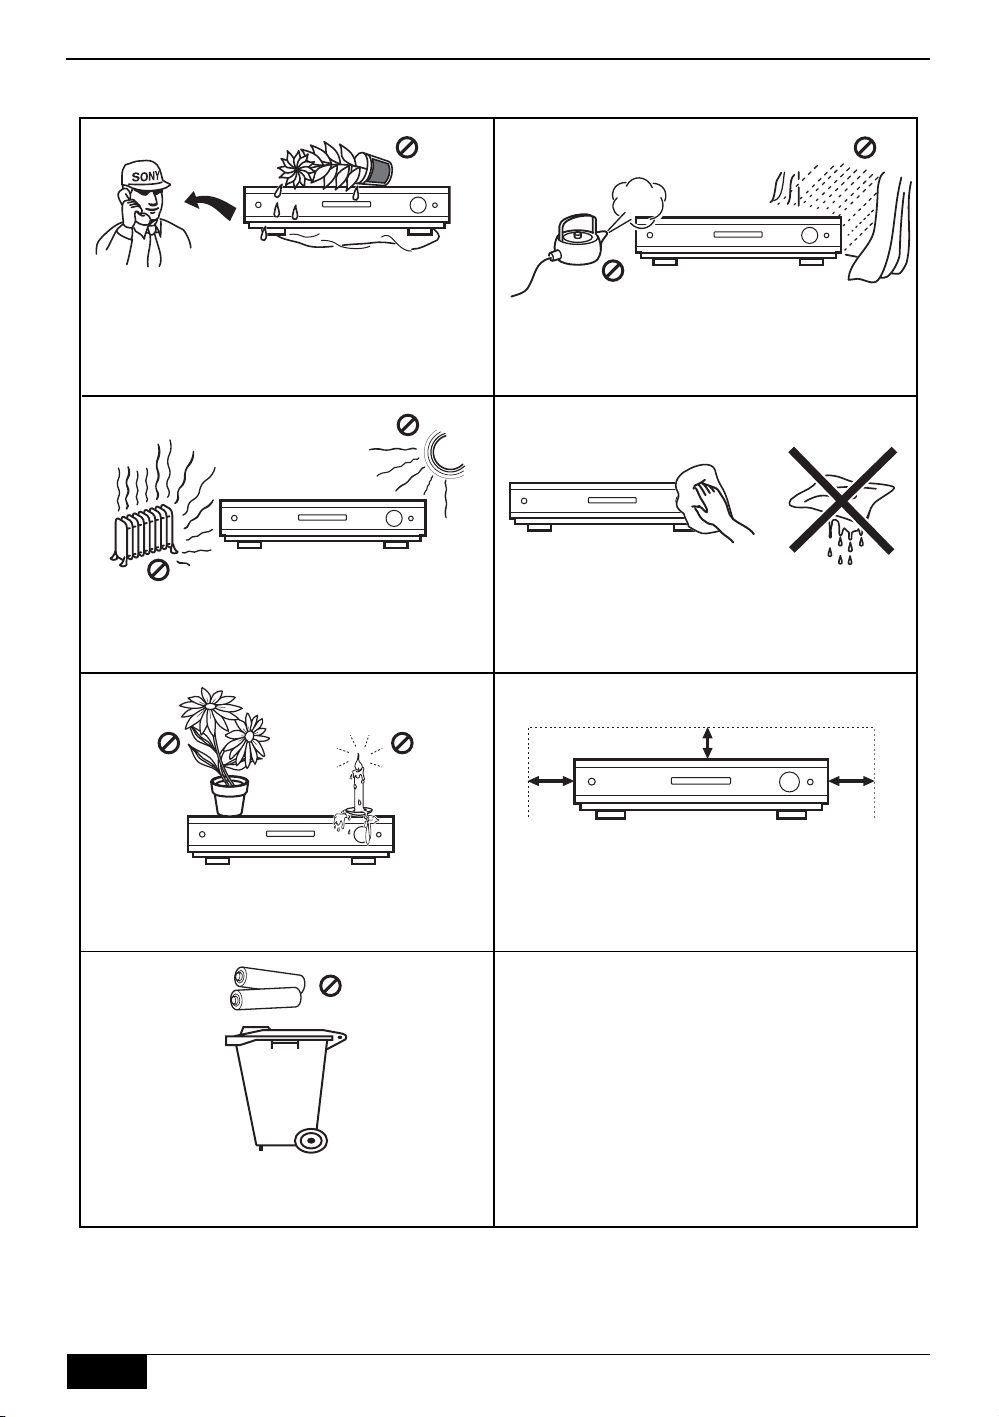
Safety Information
Please follow the precautions below to ensure the safety of your receiver is not compromised in any way.
Never push objects of any kind into the receiver
as this could result in a fire or electric shock.
Never spill liquid of any kind onto the receiver. If
any liquid or solid object does get into the
receiver, switch off immediately and have it
checked by qualified personnel.
To prevent fire or shock hazard, do not expose
the receiver to rain or moisture.
Never place the receiver in hot, humid or
excessively dusty places. Do not install the
receiver where it may be exposed to mechanical
vibrations or electromagnetic radiation.
Do not place any objects on top of the receiver.
To prevent fire, keep inflammable objects or
naked flames (e.g. candles) away from the
receiver.
Remember to dispose of batteries in an
environmentally friendly manner. Do not dispose
in domestic waste containers.
Clean the receiver with a soft, lightly dampened
cloth. Do not use any type of abrasive pad,
alkaline cleaner, scouring powder or solvent
such as alcohol or benzine.
10cm
10cm
Do not cover the ventilation openings of the
receiver with newspapers or curtains etc. For
ventilation, leave a space of at least 10cm all
around the receiver.
10cm
2
Safety Information
Page 3

Table of contents
Thank you for choosing this Sony product.
Before operating the receiver, please read this instruction manual
thoroughly and retain it for future reference.
Safety information- - - - - - - - - - - - - - - - - - - - - - - - - - - - - - - - - - - - - - 2
Accessories supplied - - - - - - - - - - - - - - - - - - - - - - - - - - - - - - - - - - - 4
Overview of the remote control - - - - - - - - - - - - - - - - - - - - - - - - - - - - 5
Overview of the receiver - - - - - - - - - - - - - - - - - - - - - - - - - - - - - - - - - 6
Getting started - - - - - - - - - - - - - - - - - - - - - - - - - - - - - - - - - - - - - - - - 7
Connecting the receiver to a TV/display screen - - - - - - - - - - - - - - - - - - - - 7
Inserting batteries into the remote control - - - - - - - - - - - - - - - - - - - - - - - - 11
Easy Setup procedure - - - - - - - - - - - - - - - - - - - - - - - - - - - - - - - - - - - - - - 11
Using the menu system- - - - - - - - - - - - - - - - - - - - - - - - - - - - - - - - - - 12
General operation - - - - - - - - - - - - - - - - - - - - - - - - - - - - - - - - - - - - - - - - - 12
Program List - - - - - - - - - - - - - - - - - - - - - - - - - - - - - - - - - - - - - - - - - - - - 12
Favorite List - - - - - - - - - - - - - - - - - - - - - - - - - - - - - - - - - - - - - - - - - - - - - 12
Install menu - - - - - - - - - - - - - - - - - - - - - - - - - - - - - - - - - - - - - - - - - - - - - 13
Setup menu - - - - - - - - - - - - - - - - - - - - - - - - - - - - - - - - - - - - - - - - - - - - - 15
Other Features - - - - - - - - - - - - - - - - - - - - - - - - - - - - - - - - - - - - - - - - 17
Teletext- - - - - - - - - - - - - - - - - - - - - - - - - - - - - - - - - - - - - - - - - - - - - - - - - 17
Picture In Picture (PIP)- - - - - - - - - - - - - - - - - - - - - - - - - - - - - - - - - - - - - - 17
Picture Freeze- - - - - - - - - - - - - - - - - - - - - - - - - - - - - - - - - - - - - - - - - - - - 17
Audio Select - - - - - - - - - - - - - - - - - - - - - - - - - - - - - - - - - - - - - - - - - - - - - 17
i-Plate display - - - - - - - - - - - - - - - - - - - - - - - - - - - - - - - - - - - - - - - - - - - - 17
Additional information- - - - - - - - - - - - - - - - - - - - - - - - - - - - - - - - - - - 18
Connecting a VCR/DVD recorder - - - - - - - - - - - - - - - - - - - - - - - - - - - - - - 18
Connecting a Hi-Fi, Home Theatre, etc.- - - - - - - - - - - - - - - - - - - - - - - - - - 20
Using the remote control to operate other TVs - - - - - - - - - - - - - - - - - - - - - 21
Specifications - - - - - - - - - - - - - - - - - - - - - - - - - - - - - - - - - - - - - - - - - - - - 22
Channels Available (as of July 2004) - - - - - - - - - - - - - - - - - - - - - - - - - - - - 23
Troubleshooting- - - - - - - - - - - - - - - - - - - - - - - - - - - - - - - - - - - - - - - - - - - 24
Index - - - - - - - - - - - - - - - - - - - - - - - - - - - - - - - - - - - - - - - - - - - - - - - - - - 25
Should you experience a problem with this receiver, please refer to the troubleshooting section on page 24. If
you are unable to rectify the problem, contact the Sony Australia Helpline on 1300 13 SONY (7669).
Please ensure you have the following information before calling the helpline:
Date of purchase:
Serial number:
Model number: DST-HD500
Post code:
Detailed fault description:
Hardware version:
Software version:
Note:You can check the Hardware and Software versions by using the menu system of this receiver. Page 12
explains how to access the menu, page 15 explains how to access the ‘Setup’ menu and page 16 explains
how to display the Hardware and Software versions. (Information option).
The serial number is located on the rear of the receiver.
Table of contents
3
Page 4
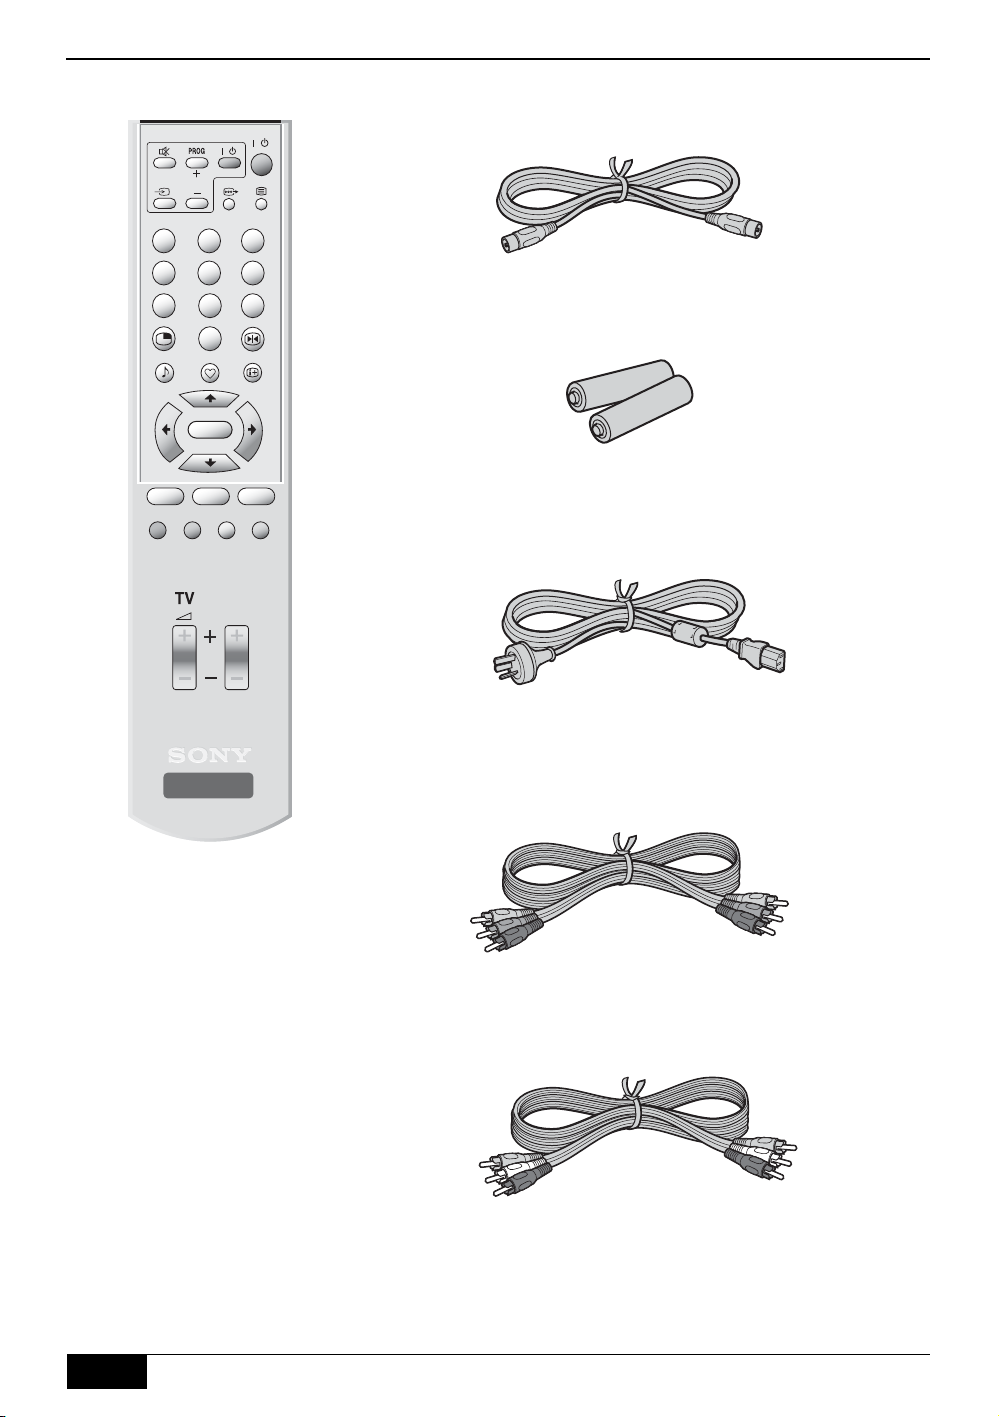
Accessories supplied
TV
/
231
564
8
7
9
0
OK
RETURN
LIST MENU
PROG
/
RF cable
Batteries
DIGITAL TERRESTRIAL
RECEIVER
RM-X1022
Remote control
AC Cord
Y/Pb/Pr Cable
AV C a ble
4
Accessories supplied
Page 5
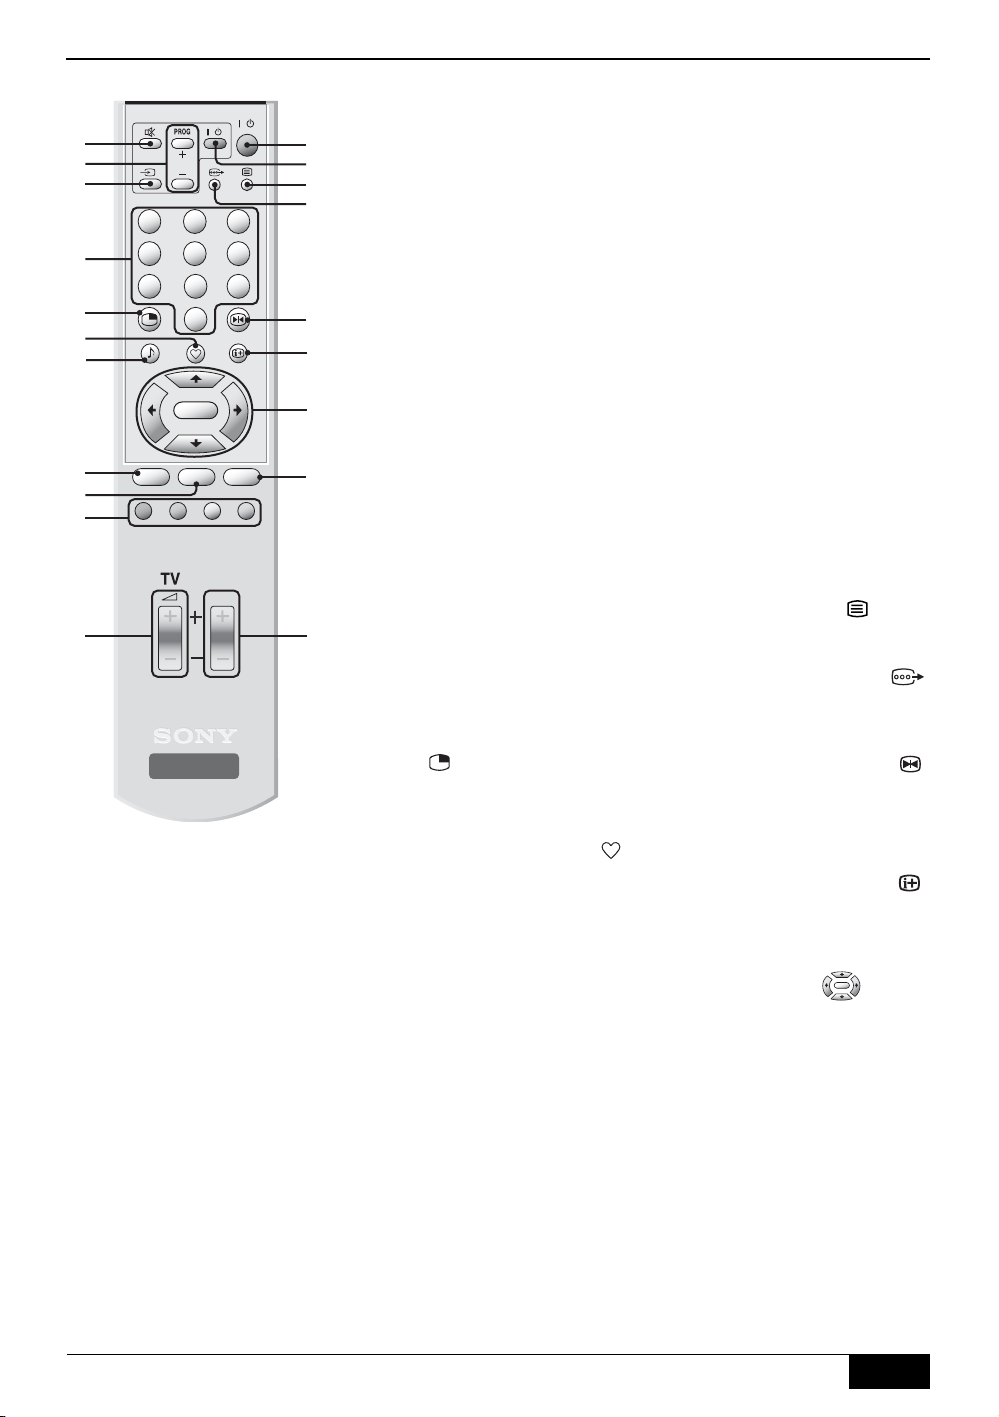
Overview of the remote control
1
2
3
4
5
6
7
8
9
0
qa
TV
/
231
564
8
7
LIST MENU
DIGITAL TERRESTRIAL
RECEIVER
RM-X1022
9
0
OK
RETURN
PROG
/
qs
qd
qf
qg
1 Mute button %
Press to mute the sound on
your TV. Press again to
restore.
Note:This button will only work
once you have configured the
remote control to operate your
brand of TV (refer to page 21).
2 TV PROG +/- buttons
Press to select the next or
previous channel.
qh
qj
Note:This button will only work
once you have configured the
remote control to operate your
brand of TV (refer to page 21).
3 Video Input button t
qk
ql
Press to select signals
from equipment connected
to the TV set.
Note:This button will only work
once you have configured the
remote control to operate your
brand of TV (refer to page 21)
and may not be compatible
with some Sony plasma
displays.
4 Numbered Buttons
Press to enter a channel
w;
number, your password or
a numeric entry in a menu.
Note:For channel numbers 10
and above, enter the
remaining digits within 2
seconds.
5 Picture In Picture button
qa Volume +/- button 2
Press to increase/decrease
the TV volume level.
Note:These buttons only work
once you have configured the
remote control to operate your
brand of TV (refer to page 21).
qs Standby button l/1
Press to switch off your
receiver temporarily. Press
again to resume normal
operation.
Note:
When the receiver is
turned on, it takes a few
seconds for the system to warm
up. During this interval,
HD500’ will be displayed in the
front panel. Please wait until the
image shows up on the screen.
‘
DST-
qd TV standby button l/1
Press to switch off your TV
temporarily. Press again to
resume normal operation.
Note:This button will only work
once you have configured the
remote control to operate your
brand of TV (refer to page 21).
qf Teletext button
Press to display teletext
(refer to page 17).
qg Video Format button
Press to select the video
format that best suits your
display (refer to page 15).
qh Picture Freeze button
Press to display the ‘PIP
Program’ menu (refer to
page 17).
6 Favorite List button
Press to display the
Favorite List (refer to
page 12).
7 Audio button 9
Press to display the
present audio status you
are listening to, and press
again to change to another
audio output (refer to
page 17).
8 LIST button
Press to display the
Program List (refer to
page 12).
9 RETURN button
Press this button to cancel
a selection or to go back
one step in a menu.
0 Coloured buttons
These buttons are used to
select the coloured options
available in some text
displays.
Press to freeze the picture.
Press again to cancel the
freeze. (refer to page 17).
Note:
Sound will be muted
when using the freeze function.
qj i-Plate display button
Press this button to display
information about the
current channel and
program (refer to page 17).
qk Control pad
OK
Use the V, v, B, b and OK
buttons to navigate through
the menu system and store
any changes you make.
ql MENU button
Press to enter the main
menu.
w; PROG +/- button
Press to select the next or
previous channel stored on
your receiver.
Note:
Once you have used the
Favorite List to select and view a
channel, pressing PROG +/buttons will select only channels
from your Favorite List. To
cancel this, select a different
channel using the Program List.
Overview of the remote control
5
Page 6
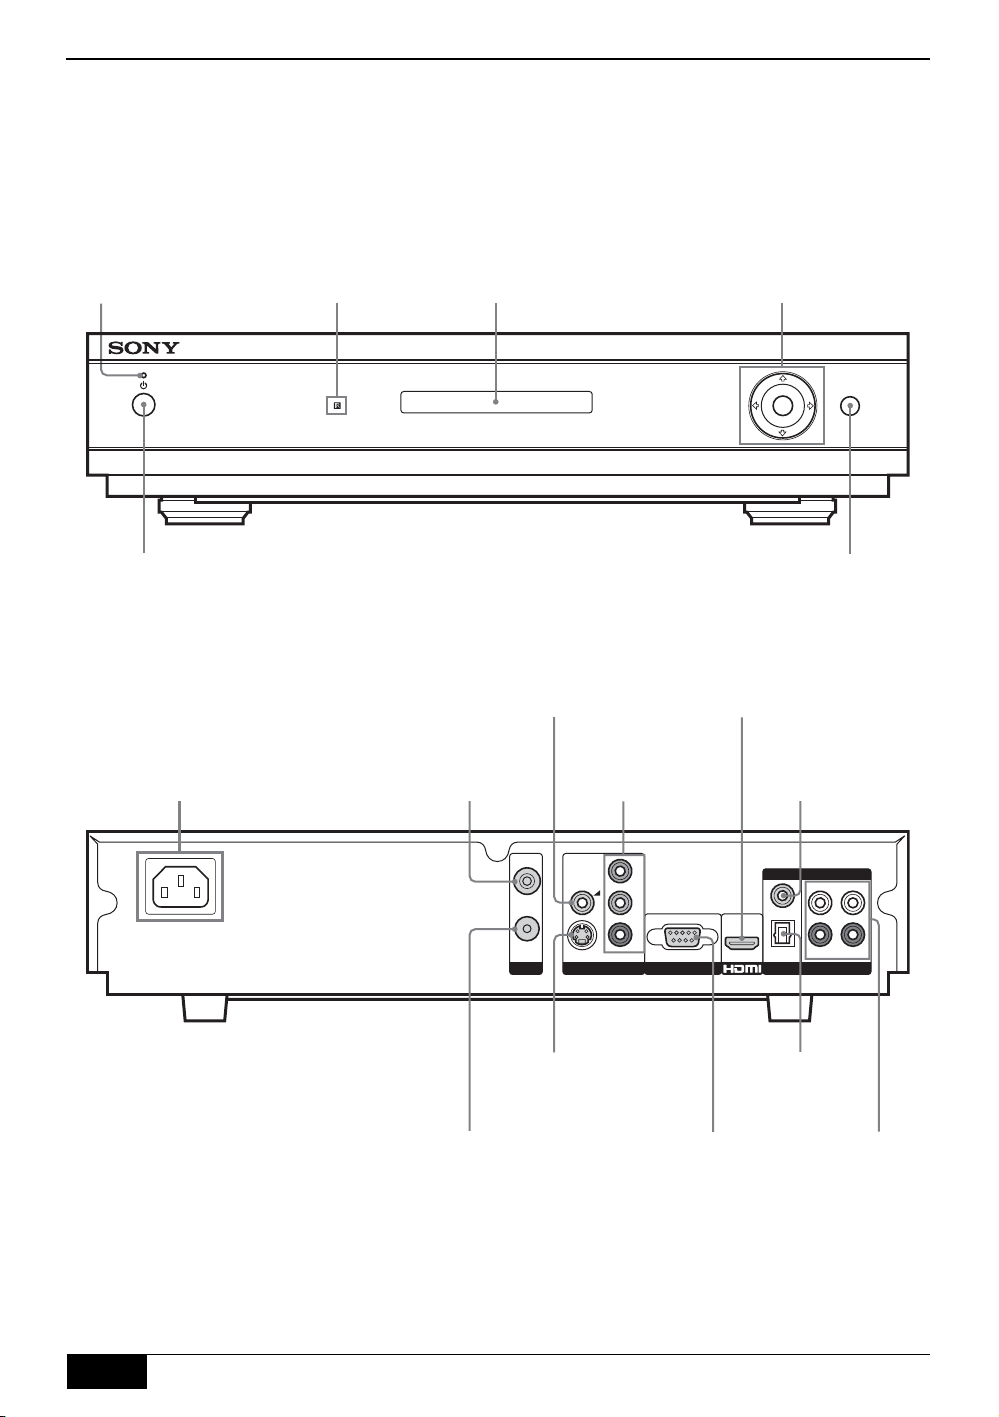
Overview of the receiver
Front View
1 (Power)
indicator
Remote control
sensor
Channel
information
1 (Power) button
Note:When the receiver is turned on, it takes a few seconds for the system
to warm up. During this interval,
‘
DST-HD500’ will be displayed in the front
panel. Please wait until the image shows up on the screen.
Rear View
Composite
video output
Power
External AC IN
(100-240V, 50-60Hz)
RF input
V (PROG+), v (PROG-), B, b and OK buttons
Control pad
MENU
OK
MENU
button
HDMI output
HD/Component
output
Audio Digital
Coaxial output
RF output
RF IN
RF OUT
S-VIDEO
ANT.
VIDEO OUTPUT RS-232
S-Video output
Y
CVBS
b
P
P
r
For connection to a
Audio Digital
Optical output
RS-232
PC (for software
DIGITAL ANALOG
LRL
COAX.
OPTICAL
AUDIO OUTPUT
Audio Analog
L/R output (x2)
R
upgrade)
6
Overview of the receiver
Page 7
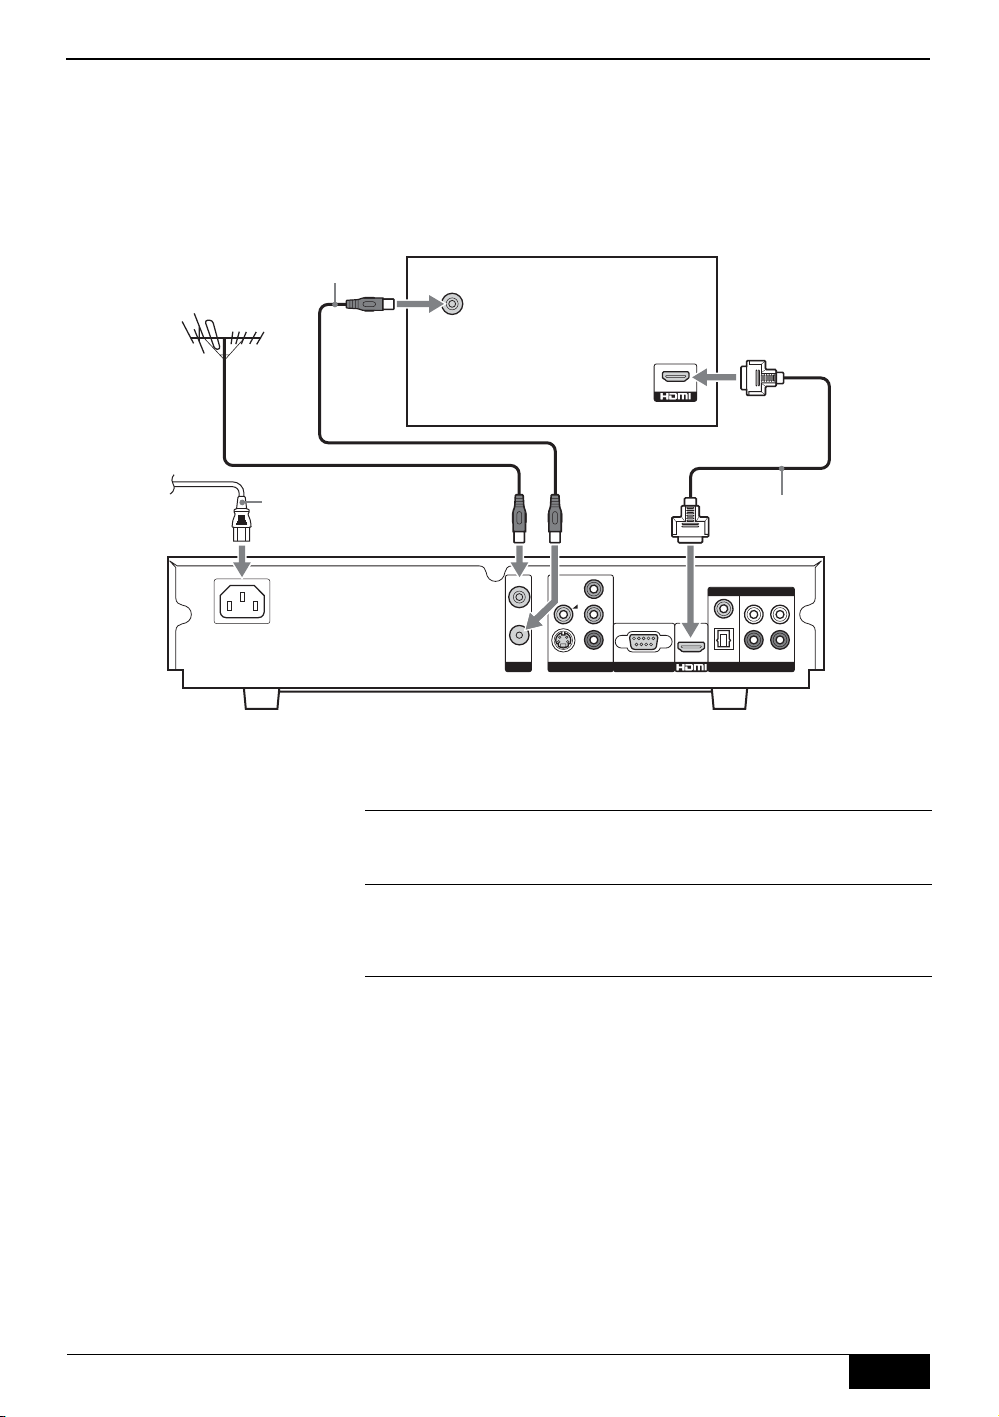
Connecting the receiver to a TV/display screen
Note:Before connecting, ensure all equipment is disconnected from the mains supply.
Connecting to an HD TV/display screen via HDMI
Rear of TV/display screen (with HDMI input)
RF cable (supplied)
RF IN
Getting Started
To m a i n s
AC Cord (supplied)
HDMI cable
RF IN
RF OUT
ANT.
Connect your aerial cable to the socket labelled RF IN on the
1
rear of the receiver.
Connect the supplied RF cable from the socket labelled RF
2
OUT on the rear of the receiver to the aerial socket on your
Y
CVBS
P
b
P
r
S-VIDEO
VIDEO OUTPUT RS-232
DIGITAL ANALOG
LRL
COAX.
OPTICAL
AUDIO OUTPUT
R
TV/display screen.
Connect an HDMI cable (not supplied) from the socket labelled
3
HDMI on the rear of the receiver to the HDMI input socket on
your TV/display screen. (When using an HDMI connection, it is
not necessary to connect the AV cable.)
Connect the supplied AC cord from the AC IN socket on the
4
rear of the receiver to your mains socket (100 - 240V AC,
50/60Hz).
Getting Started
7
Page 8
Getting Started
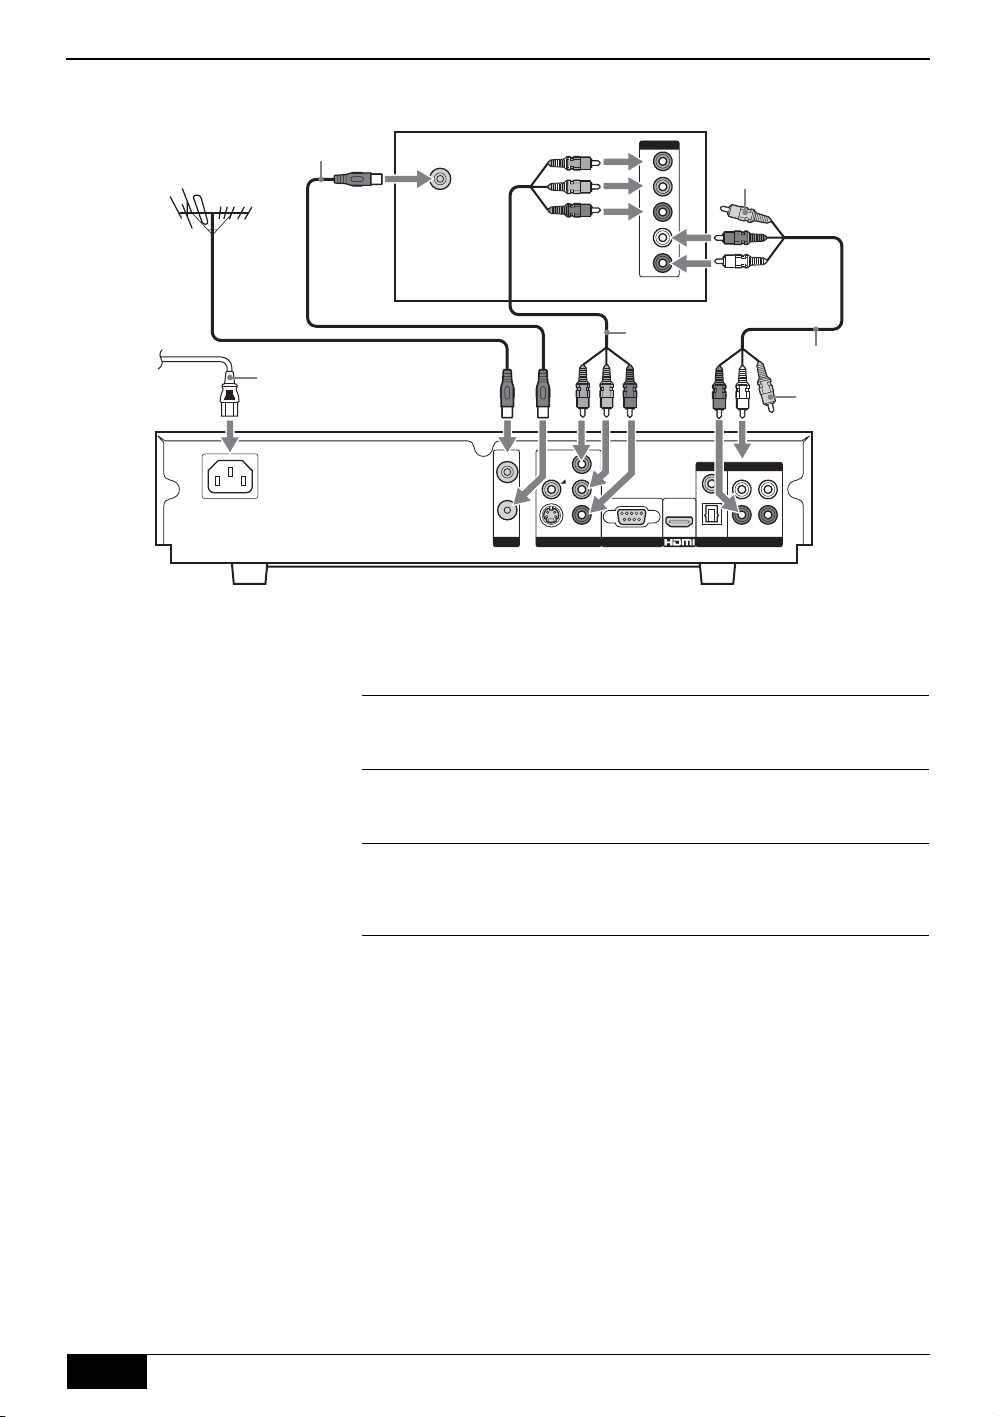
Connecting to an HD TV/display screen via Component output
Rear of TV/display screen
RF cable (supplied)
To m ai n s
AC Cord
(supplied)
RF IN
Y/Pb/Pr
cable
(supplied)
HD IN
Y
b
P
P
r
L
R
Video jack
(not required)
AV cable (supplied)
Video jack
(not required)
RF IN
RF OUT
ANT.
Connect your aerial cable to the socket labelled RF IN on the
1
rear of the receiver.
Connect the supplied RF cable from the socket labelled RF
2
OUT on the rear of the receiver to the aerial socket on your
Y
CVBS
b
P
P
r
S-VIDEO
VIDEO OUTPUT RS-232
DIGITAL ANALOG
LRL
COAX.
OPTICAL
AUDIO OUTPUT
R
TV/display screen.
Connect the supplied Y/Pb/Pr cable from the sockets labelled
3
Y, PB and PR on the rear of the receiver to the component input
sockets on your TV/display screen.
Connect the supplied AV cable from the sockets labelled L, and
4
R on the rear of the receiver to the audio input sockets on your
TV/display screen. (The yellow video jack does not need to be
connected.)
Connect the supplied AC cord from the AC IN socket on the
5
rear of the receiver to your mains socket (100 - 240V AC,
50/60Hz).
8
Getting Started
Page 9
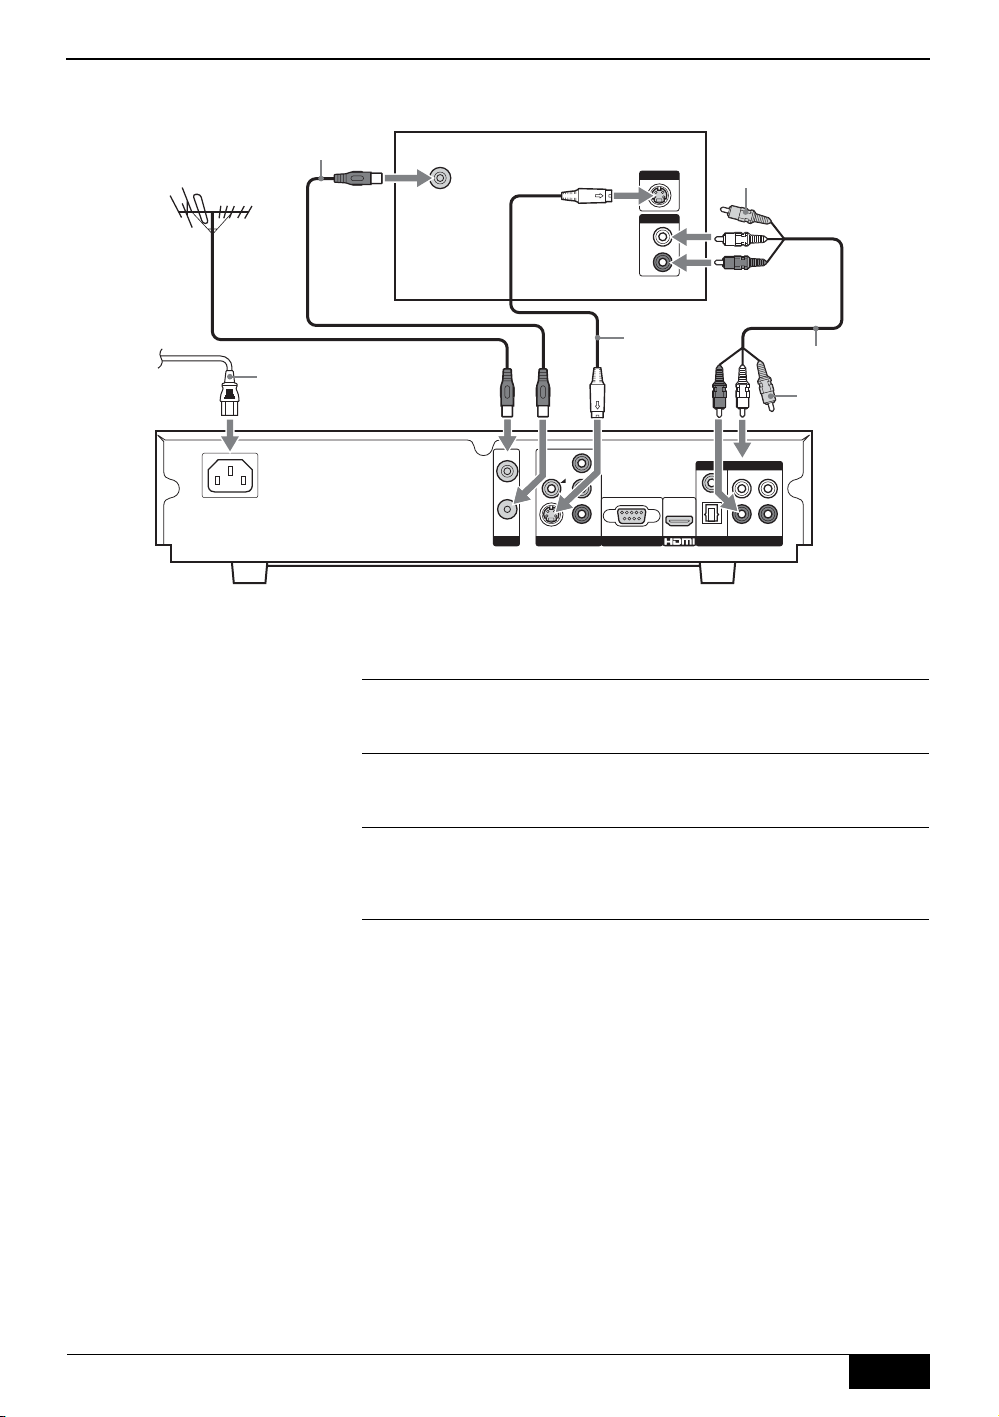
Connecting to an SD TV/display screen via S-Video
Rear of TV/display screen
RF cable (supplied)
To m a i n s
AC Cord
(supplied)
RF IN
S-VIDEO
AUDIO
L
R
S-Video
cable (not
supplied)
Getting Started
Video jack (not required)
AV cable (supplied)
Video jack
(not required)
RF IN
RF OUT
ANT.
Connect your aerial cable to the socket labelled RF IN on the
1
rear of the receiver.
Connect the supplied RF cable from the socket labelled RF
2
OUT on the rear of the receiver to the aerial socket on your
Y
CVBS
b
P
P
r
S-VIDEO
VIDEO OUTPUT RS-232
DIGITAL ANALOG
LRL
COAX.
OPTICAL
AUDIO OUTPUT
R
TV/display screen.
Connect an S-Video cable (not supplied) from the socket
3
labelled S-VIDEO on the rear of the receiver to the S-Video
input sockets on your TV/display screen.
Connect the supplied AV cable from the sockets labelled L, and
4
R on the rear of the receiver to the audio input sockets on your
TV/display screen. (The yellow video jack does not need to be
connected.)
Connect the supplied AC cord from the AC IN socket on the
5
rear of the receiver to your mains socket (100 - 240V AC,
50/60Hz).
Getting Started
9
Page 10

Getting Started
Connecting to an SD TV/display screen via Composite Video
Rear of TV/display screen
RF cable (supplied)
RF IN
AV IN
V
L
R
To m ai n s
AC Cord
(supplied)
AV cable (supplied)
RF IN
RF OUT
ANT.
Connect your aerial cable to the socket labelled RF IN on the
1
rear of the receiver.
Connect the supplied RF cable from the socket labelled RF
2
OUT on the rear of the receiver to the aerial socket on your
Y
CVBS
P
b
P
r
S-VIDEO
VIDEO OUTPUT RS-232
DIGITAL ANALOG
LRL
COAX.
OPTICAL
AUDIO OUTPUT
R
TV/display screen.
Connect the supplied AV cable from the sockets labelled
3
CVBS, L, and R on the rear of the receiver to the audio/video
input sockets on your TV/display screen.
Connect the supplied AC cord from the AC IN socket on the
4
rear of the receiver to your mains socket (100 - 240V AC,
50/60Hz).
10
Getting Started
Page 11

Inserting batteries into the remote control
1 2
Getting Started
Push and lift up the release clip to remove the battery cover.
Easy Setup procedure
Easy Setup screen
Easy Setup
Time Setup
Full Scan
Quick Scan
Select your State / Region.
Select : Confirm : Exit :
VIC
Insert the supplied batteries as indicated inside the battery compartment.
Press the 1 (Power) button on the front of the receiver. When
1
the receiver is switched on for the first time, the ‘Easy Setup’
screen is displayed.
With the Time Setup option highlighted, press the b or OK
2
button. Then press the V or v buttons to select your state/region.
Note:This option allows you to set the time zone in which you are using
the receiver. This will ensure that the time displayed on the i-Plate is
correct.
Press the V or v buttons to highlight Full Scan or Quick Scan
3
to preset channels.
‘Full Scan’ All available channels are tuned and stored. This
‘Quick Scan’ All expected channels in your area are tuned and
Press the OK button to begin the autotune procedure. A display
appears showing a tuning progress bar and the channels found.
When autotune procedure has finished, the Program List is
4
displayed, showing all the available channels.
procedure may take up to 15 minutes.
stored. You will need to select your nearest city to
help speed up this procedure.
Press the OK button to remove the Program List and view the
first channel captured.
Alternatively, press the v button to select a different channel.
Press the OK button to remove the Program List and view the
selected channel.
If no channels are found
If no channels have been captured and stored, a message
1
appears on screen to inform you.
Check your aerial cable is connected, then press the MENU
2
button and select Install menu to repeat the autotune
procedure.
If you are still unable to receive signals, please have your aerial
3
checked by an aerial installation company.
Getting Started
11
Page 12

Using the menu system
General operation
All the menus of this receiver are accessed by pressing the MENU button on the remote control or the front
panel.
Use the following buttons to operate the menu:
1
- Press the V or v button to highlight the required option.
- Press the OK or b button to enter the option.
- Press the V, v, B and b buttons to alter settings.
- Press the OK button to store each change you make,
- or press the RETURN button to cancel.
Press the RETURN button to go back one step or press the
2
MENU button to return to normal operation.
Most menu screens will automatically disappear after 90 seconds with
no buttons being pressed.
Program List
Program List
Program List
Ten HD 06-0012
Ten Digital 06-0013
Ten Digital 06-0014
Ten Digital 06-0015
Ten Digital 06-0016
Ten Digital 06-0017
Select : Confirm : EXIT :
Favorite List
Favor ite List
Favorite List 1
Digital ABC 07-0018
Digital SBS 08-1008
Digital 10 04-0032
Select : Confirm : EXIT :
The Program List is a list of the available channels.
Press the MENU button to display the menu system.
1
With the symbol highlighted, press the b or OK button to
2
display the Program List.
Press the V or v buttons to highlight the required channel.
3
Press the OK button to exit the Program List and display the
4
selected channel.
Alternatively, in normal operation, press the LIST button on the remote
control to display the ‘Program List’.
The Favorite List allows you to store your favorite channels in a list for
easy access.
To watch a Favorite channel
Press the MENU button to display the menu system.
1
With the symbol highlighted, press the V or v buttons to
2
highlight Favorite List 1 or Favorite List 2. Press the b or OK
buttons to display the Favorite List.
Press the V or v buttons to highlight your favorite channel.
3
Press the OK button to exit the Favorite List and display the
4
selected channel.
Once you have used the Favorite List to select and view a channel,
pressing the PROG +/- buttons will select only channels from your
Favorite List. To cancel this, select a different channel using the
Program List.
12
Alternatively, in normal operation, press the button on the remote
control to cycle through ‘Favorite List 1’, ‘Favorite List 2’ and exit from
the Favorite List.
Using the menu system
Page 13

Install menu
Install menu
Install
Full Scan
Quick Scan
Manual Scan
Program Edit
Favorite Preset
Searches all available channels, but takes a longer time.
Select : Confirm : EXIT :BACK :
Using the menu system
The Install menu allows you to tune in new channels automatically or
manually, and set a parental rating for programs.
Press the MENU button to display the menu system.
1
Press the v button to highlight the symbol. Press the b or OK
2
button to display the Install menu.
Full Scan
All the available channels were captured and stored when the
receiver was first installed. This option allows you to repeat that
process, searching for all available channels.
With the Full Scan option highlighted, press the b or OK button to
scan. For further instructions, please refer to the ‘Easy Setup
procedure’ on page 11.
Quick Scan
All the available channels were captured and stored when the
receiver was first installed. This option allows you to repeat that
process, searching for all the expected channels in your area.
With the Quick Scan option highlighted, press the b or OK button to
scan. For further instructions, please refer to the ‘Easy Setup
procedure’ on page 11.
Manual Scan
This option allows you to manually capture and store channels. Due
to the technical nature of the settings, it is recommended that only
experienced service personnel use this option.
Program Edit
This option allows you to edit the program list.
With the Program Edit option highlighted, press the b or OK button
to confirm. Press the V or v button to highlight the required setting
(refer to table below). Press the OK button to confirm.
Skip This option allows you to skip unwanted
programs as you move through the channels by
pressing PROG +/- buttons.
With the Skip option highlighted, press the b or
OK button to confirm. Press the V or v buttons to
highlight the program to be skipped, then press
the OK button. Press the V or v button to ‘On’. To
cancel the skip channel, set it back to ‘Off’. Press
the OK button to confirm.
Program Sorting This option allows you to set the program list
sequence to your preference.
With the Program Sorting option highlighted,
press the b or OK button to confirm. Press the V
or v buttons to highlight the program you want to
move and press the OK button. Press the V or v
buttons to shift it to the new position. Press the
OK button to confirm.
Favorite Preset
This option allows you to preset Favorite List 1 and Favorite List 2.
With the Favorite Preset option highlighted, press the b or OK
button. Press the V or v button to choose Favorite List 1 or Favorite
List 2.
Setting favorite programs will give you easier access to the programs
you view most often.
In Favorite List 1 or Favorite List 2, press the V or v buttons to
highlight the desired number, and then press the OK button. Press
the V or v buttons to choose the program you want to allocate. Press
the OK button to confirm.
Using the menu system
continued...
13
Page 14

Using the menu system
Install
Quick Scan
Manual Scan
Program Edit
Favorite Preset
Parental Control
Sets a parental rating and changes password.
Select : Confirm : EXIT :BACK :
Parental Control
This option allows you to set a parental guidance level. Programs that
exceed the set level can only be viewed after entering the correct
password.
With the Parental Control option highlighted, press the b or OK
button. You will need to enter your password to access this menu. The
password is initially set to ‘0000’. For better security, the password
can be changed in the ‘Change Password’ option. Enter your
password as requested using the Numbered buttons on the remote
control. Press the V or v buttons to highlight the required setting (refer
to the following options). Press the OK button to confirm.
Parental Rating
With the Parental Rating option highlighted, press the b or OK
button to adjust. Press the V or v buttons to highlight the required
setting (refer to the table below). Press the OK button to confirm.
Block All All programs need a password to view.
Block G and above To lock ‘General’ and above programs.
Block PG and above To lock ‘Parental Guidance’ and above
programs.
Block M and above To lock ‘Mature’ and above programs.
Block MA and above To lock ‘Mature Adult’ and above programs.
Block AV and above To lock ‘Adult/Violence’ and above programs.
Block R and above To lock ‘Restricted’ and above programs.
No Block (default setting)
No programs need a password to view.
Change Password
This option allows you to change the default password (0000) to a
more memorable one.
With the Change Password option highlighted, press the b or OK
button to adjust. Enter the new password using the Numbered
buttons on the remote control. Enter the new password again.
14
Using the menu system
Page 15

Setup menu
Setup menu
Setup
Video / Audio Setup
Time Setup
Restore to Default
S/W Update
Information
Select : Confirm : EXIT :BACK :
16:9 (Full Screen)
4:3 (Full Screen Crop)
NSW/ACT
Using the menu system
The Setup menu allows you change various settings.
Press the MENU button to display the menu system.
1
Press the v button to highlight the symbol. Press the b or
2
OK button to display the Setup menu.
Video/Audio Setup
This option enables you to enjoy video and audio in various
environments.
With the Video/Audio Setup option highlighted, press the b or OK
button to adjust. Press the V or v buttons to highlight the required
setting (refer to table below). Press the OK button to adjust.
Video Format This option allows you to set the picture quality.
With the Video Format option highlighted, press
the b or OK button to adjust. Press the V or v
buttons to ‘1080i’, ‘720p’, ‘576p’ or ‘576i’. Press
the OK button to confirm.
Note: If you have a high definition screen we
recommend that you select the ‘1080i’ setting. If you
have a standard definition screen it is likely that the
‘576i’ setting is the only setting suitable for your display.
Please check the specification of your TV or display
screen by referring to the manufacturer’s instruction
manual.
Alternatively, in normal operation, press the
button on the remote control to cycle through all
the settings until the best quality display is seen.
Note:When the video format is changed, the picture
might be slightly disturbed during the transition between
video formats. This does not indicate a malfunction.
Aspect Ratio This option allows you to set the aspect ratio.
4:3 (Letter Box)
Audio Output
Control
MPEG Volume
Control
With the Aspect Ratio option highlighted, press
the b or OK button to adjust. Press the V or v
buttons to ‘16:9 (Full Screen)’, ‘4:3 (Full Screen
Crop)’, or ‘4:3 (Letter Box)’. Press the OK button
to confirm.
Note: ‘16:9 (Full Screen)’ is for use with a widescreen
TV/display screen.
‘4:3 (Full Screen Crop) is for use with a non-widescreen
TV/display screen. The picture is stretched to fill the
screen. As a result, some of the picture may not be
visible.
‘4:3 (Letter Box) is for use with a non-widescreen TV/
display screen. The full picture is shown with black bars
at the top and bottom of the picture.
This option allows you to set the priority for audio
output (when Dolby Digital and MPEG audio are
available).
With the Audio Output Control option
highlighted, press the b or OK button to adjust.
Press the V or v buttons to ‘Dolby Digital’, or
‘MPEG’. Press the OK button to confirm.
This option allows you to adjust MPEG audio
level to Dolby Digital audio level.
With the MPEG Volume Control option
highlighted, press the b or OK button. Press the
B or b buttons to adjust the audio level. Press the
OK button to confirm.
Using the menu system
continued...
15
Page 16

Using the menu system
Time Setup
This option allows you to set the time zone in which you are using the
receiver. This will ensure that the time displayed on the i-Plate is
correct.
With the Time Setup option highlighted, press the b or OK button to
adjust. Press the V or v buttons to highlight the required setting. Press
the OK button to confirm.
Restore to Default
This option allows you to reset all the settings to factory default. It is
recommended that you only use this option when you move to a new
area.
With the Restore to Default option highlighted, press the b or OK
button to adjust. Press the B or b buttons to highlight ‘Yes’. Press the
OK button to confirm. Once the receiver has restarted, you will need to
perform the initial tuning setup procedure (refer to page 11).
S/W Update
This option allows the software in your receiver to be upgraded. It is
recommended that this is performed ONLY by experienced Sony
service personnel. Please contact your local Sony service centre for
details on this option.
Information
This option displays the receiver’s current hardware and software
versions. You may be asked to quote these details when contacting
your local Sony service centre.
With the Information option highlighted, press the b or OK button to
display the current hardware and software versions. Press the
RETURN button to cancel.
16
Using the menu system
Page 17

i-Plate display
i-Plate
Sports Update
Ten HD 06-0012
May 27,2005 18:55 - 1925
Detail
A Japanese venture recently announced
that they have developed a new style of
beef called Bright Smarty Extreme (BSE).
They are row ready to export it North
America.
Next Program :
Current Program
Picture
576i
Audio
MPEG En
Exit : Time : 19:35
Other Features
Teletext
If the broadcast program contains teletext, the icon is displayed on
the i-Plate display (see below). Press the button to display the
teletext. You can now use the teletext service in the same way as if
using a traditional analogue TV.
Picture In Picture (PIP)
This feature allows you to view a different sub-channel in a window and
also access multiview services (when available from broadcaster, e.g
different camera angles).
Press the button to display the PIP menu. Press the V or v buttons
to select the required channel/multiview service. Press the OK button to
confirm.
Note:Depending on the broadcast signal, the image displayed on the PIP sub
screen may be smaller than its frame size.
To remove the PIP:
Press the button to display the PIP menu. Press the V or v buttons
to select ‘PIP OFF’. Press the OK button to confirm.
Picture Freeze
This feature allows you to freeze the screen (e.g. to make a note of a
telephone number). Press the button to freeze the picture. Press
again to cancel the freeze (the picture quickly catches up with the
broadcast).
Note:Sound will be muted when using the freeze function.
Audio Select
This feature allows you to select which language or audio type to listen
to (when available from broadcaster). Press the 9 button to display the
present audio status you are listening and press the 9 button again to
change other audio output.
i-Plate display
This feature gives you information on the current channel and also the
current and next programs. Press the button to display the i-Plate.
This shows the date, time, whether the channel has teletext, whether
multi (MPEG and Dolby Digital) audio program available and whether
the picture is available in high definition or standard definition (HD or SD
is displayed).
Press the b button to display information on the following program.
Press the button again (or the MENU button) to return to normal
operation.
The following icons may be displayed on the i-Plate display according to
the program.
: SD (or HD) : Parental rating : multi audio program
: Teletext
Note:The code coming after MPEG determines the language type.
Code Language Code Language Code Language Code Language
Af Afrikaans El Greek Ita Italian Spa Spanish
Afr Afrikaans Ell Greek Jpn Japanese Tam Tamil
Ar Arabic En English Kan Kannada Tel Telugu
Ara Arabic Eng English Kor Korean Zho Chinese
Aus Australian Fr French Mal Malayalam U1 Unknown 1
Ben Bengali Fra French Nl Dutch U2 Unknown 2
Bn Bengali Fre French Nld Dutch
Chi Chinese Gem German Pan Panjabi
De German Ger German Por Portuguese
Deu German Gre Greek Raj Rajasthani
Dut Dutch Hi Hindi Rus Russian
Egy Egyptian Hin Hindi San Sanskrit
Other Features
17
Page 18

Additional Information
Connecting a VCR/DVD recorder
Note: Before connecting, ensure all equipment is disconnected from the mains supply.
Connecting to an HD VCR/DVD recorder
RF cable
IN
To T V
OUT
aerial socket
Rear of VCR/DVD recorder
Connecting to an S-Video VCR/DVD recorder
RF IN
RF OUT
ANT.
Y
CVBS
P
b
P
r
S-VIDEO
VIDEO OUTPUT RS-232
DIGITAL ANALOG
L
COAX.
OPTICAL
R
AUDIO OUTPUT
L
R
Video jack
Y/Pb/Pr
cable
(not required)
Video jack
AV c a ble
(not required)
V
L
R
YPbP
r
aerial socket
18
RF cable
To T V
Additional Information
IN
OUT
Rear of VCR/DVD recorder
RF IN
RF OUT
S-VIDEO
ANT.
VIDEO OUTPUT RS-232
S-VIDEO
Y
CVBS
b
P
P
r
Video jack (not required)
S-Video
cable
Video jack
(not required)
V
L
R
DIGITAL ANALOG
L
COAX.
OPTICAL
R
AUDIO OUTPUT
AV c a ble
L
R
Page 19

Connecting to a Composite VCR/DVD recorder
Additional Information
To T V
aerial socket
RF cable
IN
OUT
Rear of VCR/DVD recorder
RF IN
RF OUT
S-VIDEO
ANT.
VIDEO OUTPUT RS-232
CVBS
Y
b
P
P
r
DIGITAL ANALOG
L
COAX.
OPTICAL
R
AUDIO OUTPUT
L
R
AV c a ble
V
L
R
Additional Information
19
Page 20

Additional Information
Connecting a Hi-Fi, Home Theatre, etc.
Notes on connecting Hi-Fi equipment: This receiver can be connected to your Hi-Fi using either a digital optical cable or
Connecting to a Hi-Fi, Home Theatre, etc. via Optical output or Coaxial output
an audio cable (stereo/mono).
Before connecting, ensure all equipment is disconnected from the mains supply.
RF IN
CVBS
RF OUT
S-VIDEO
ANT.
VIDEO OUTPUT RS-232
Digital coaxial cable
COAXIAL
OPTICAL
Rear of Hi-Fi, Home Theatre, etc.
Connecting to a Hi-Fi, Home Theatre, etc. via audio cable
RF IN
CVBS
RF OUT
S-VIDEO
ANT.
VIDEO OUTPUT RS-232
Y
b
P
P
r
DIGITAL ANALOG
LRL
COAX.
OPTICAL
AUDIO OUTPUT
R
Digital optical cable
or
Y
b
P
P
r
DIGITAL ANALOG
L
COAX.
OPTICAL
R
AUDIO OUTPUT
L
R
20
Audio cable
L
R
Rear of Hi-Fi, Home Theatre, etc.
Additional Information
Page 21

Using the remote control to operate other TVs
The remote control supplied with your receiver can be programmed to operate
TVs made by other manufacturers. The following instructions guide you
TV l/1 button
TV
231
564
8
7
0
/
/
9
through the set up procedure.
Find the three-digit code for your brand of TV from the list below.
1
Whilst holding down the TV l/1 button on the remote control, enter the
2
three-digit code using the Numbered buttons.
Press the OK button to store, then release the TV l/1 button.
3
Turn on your TV and check that the remote control operates the main
4
functions. If not, repeat steps 2 - 3 and enter the next three-digit code
allocated to your brand of TV.
Notes: If your TV is not listed below it is not supported by this remote control.
The brand code you set may be lost if weak batteries are not replaced
immediately. Should this happen, use the above procedure to re-enter the code.
Even if your TV is listed in the table below, in some instances you may not be
able to operate all of the available TV functions.
Additional Information
OK
RETURN
LIST MENU
PROG
DIGITAL TERRESTRIAL
RECEIVER
RM-X1022
Brand Code Brand Code
Aiwa 036, 055 Mitsubishi 045
Akai 059, 060, 062, 063, 064,
Beijing 022 NEC 020, 053, 058, 063, 094,
Blaupunkt 071 Noblex 022
CGE 046, 106 Nokia 031, 059, 097
Daewoo 017, 037, 069 Onwa 023, 024, 025
Ferguson 027, 061, 073 Panasonic 011, 098, 099
Finlux 030 Peony 034, 038, 039
Funai 032, 054, 056, 057, 120 Philco 010, 017, 021, 115
Goldstar 018, 063, 068, 075 Philips 046, 078, 097, 100
Gradiente 015, 020 Pioneer 052, 119, 158, 159
Grundig 019, 071, 072, 076, 106 Saba 061
Hitachi 010, 047. 058, 064, 075,
ITT 028, 059, 107, 083 Sanyo 013, 016, 049, 050, 059,
Jinxing 038 Sears 013
JVC 007, 023, 024, 025, 042,
Konka 040, 037, 088, 093, 095 Sony 001, 002, 003
LG 018, 063, 068, 075, 121 TCL 041
Loewe 084 Thomson 026, 061
Magnavox 046, 081 Toshiba 008, 014, 048, 058, 062,
Matsui 058, 059, 060, 061, 062,
Matsushita 043, 044
065, 066, 067, 068
077, 078, 079, 080, 082
058, 060, 065, 073
063, 064, 071, 076, 086,
087, 089, 090, 091, 092,
096
Mivar 029, 106
097
Samsung 012, 033, 034, 035, 059,
063, 064, 067, 121
063, 067, 118
Sharp 006, 051, 058
072, 104, 118
Zenith 009
Additional Information
21
Page 22

Additional Information
Specifications
Compliant Standard
DVB-T, MPEG-2
RF Input
Frequency: 51-858MHz
Loop Through: 51-858MHz
Bandwidth: 6/7/8 MHz
Connector: IEC-Female
Demodulator: COFDM
FFT Mode: 2K,8K
Constellation: QPSK, 16QAM, 64QAM
Guard Interval: 1/4,1/8,1/16,1/32
Inner Coding Rate: 1/2,2/3,3/4,5/6,7/8
Video
Formats: MP@ML, MP@HL
Aspect Ratio: 4:3, 16:9
Picture Resolution: 1920 x 1080i, 1280 x 720p, 720 x 576p, PAL: 720 x 576i
Output Connector
Composite: RCA jack
Component (Y/Pb/Pr): RCA jacks
S-Video: Mini Din
HDMI HDMI jack
Audio
Formats: Dolby Digital, MPEG (I and II)
Output Connector: SPDIF, Coaxial Digital, RCA jacks
Data
Serial Data Port: RS-232
OSD
Number of Colours: >256
Application System Resources
CPU: 306MIPS
RAM Memory: 64 MB SDRAM
Flash Memory: 2 MB
Power Supply
Input Voltage: 100-240V AC, 50/60Hz
Consumption (max.): 18W
Dimensions
Size (W x D x H): Approx. 360 x 270 x 80mm
Weight: Approx. 2.8kg
Environmental Data
Operating Temperature: 5 - 40ºC
Storage Temperature: -40 - 65ºC
Supplied Accessories
Remote Control, type RM-X1022 (1)
AA size batteries (2)
RF Cable (1)
AC Cord (1)
AV Cable (1)
Y/Pb/Pr Cable (1)
Design and specifications are subject to change without notice
22
Additional Information
Page 23

Additional Information
Channels Available (as of July 2004)
For updated information, please refer to www.dba.org.au or contact you local Sony service centre.
City Identifier Channel and
Adelaide Digital 7
Digital 9
Digital 10
Digital ABC
Digital SBS
Brisbane Digital 7
Digital 9
Digital 10
Digital ABC
Digital SBS
Melbourne Digital 7
Digital 9
Digital 10
Digital ABC
Digital SBS
Perth Digital 7
Digital 9
Digital 10
Digital ABC
Digital SBS
Sydney Digital 7
Digital 9
Digital 10
Digital ABC
Digital SBS
Batchelor QQQ -51
SBS -54
ABD -69
NTD -60
TND -63
IMP -66
Canberra CTC -7
ABC -9
WIN -31
CBN -34
SBS -28
Darwin SBS -28
ABD -6
NTD -8
TND -34
Newcastle NBN -3
NEN -54
NRN -57
ABHN -5A/4B
SBS -45
Wollongong WIN -59
CTC -62
CBN -65
ABWN -56
SBS -53
Middle Frequency
VHF 6 - 177.5MHz
VHF 8 - 191.625MHz
VHF 11 - 219.5MHz
VHF 12 - 226.5MHz
UHF 33 - 564.5MHz
VHF 6 - 177.5MHz
VHF 8 - 191.625MHz
VHF 11 - 219.5MHz
VHF 12 - 226.5MHz
UHF 36 - 585.5MHz
VHF 6 - 177.5MHz
VHF 8 - 191.625MHz
VHF 11 - 219.5MHz
VHF 12 - 226.5MHz
UHF 29 - 536.5MHz
VHF 6 - 177.5MHz
VHF 8 - 191.625MHz
VHF 11 - 219.5MHz
VHF 12 - 226.5MHz
UHF 29 - 536.5MHz
VHF 6 - 177.5MHz
VHF 8 - 191.625MHz
VHF 11 - 219.5MHz
VHF 12 - 226.5MHz
UHF 34 - 571.5MHz
UHF 50 - 683.5MHz
UHF 53 - 704.5MHz
UHF 56 - 725.5MHz
UHF 59 - 746.5MHz
UHF 62 - 767.5MHz
UHF 65 - 788.5MHz
VHF 6 -177.5MHz
VHF 9A - 205.5MHz
VHF 11 - 219.5MHz
VHF 12 - 226.5MHz
VHF 30 - 543.5MHz
UHF 29 - 536.5MHz
UHF 30 - 543.5MHz
UHF 31 - 550.5MHz
UHF 32 - 557.5MHz
UHF 36 - 585.5MHz
UHF 53 - 704.5MHz
UHF 51 - 690.5MHz
UHF 37 - 592.5MHz
UHF 38 - 599.5MHz
UHF 36 - 585.5MHz
UHF 37 - 592.5MHz
UHF 38 - 599.5MHz
UHF 51 - 690.5MHz
UHF 54 - 711.625MHz
Transmitter Location Start Date
Mt Lofty
Main Transmitter - Mt Lofty
Main Transmitter - Mt Lofty
Main Transmitter - Crafers
Main Transmitter - Mt Lofty
Main Transmitter - Mt Coot-tha
Main Transmitter - Mt Coot-tha
Main Transmitter - Mt Coot-tha
Main Transmitter - Mt Coot-tha
Main Transmitter - Mt Coot-tha
Main Transmitter - Mt Dandenong
Main Transmitter - Mt Dandenong
Main Transmitter - Mt Dandenong
Main Transmitter - Mt Dandenong
Main Transmitter - Mt Dandenong
Main Transmitter - Bickley
Main Transmitter - Walliston
Main Transmitter - Carmel
Main Transmitter - Bickley
Main Transmitter - Bickley
Main Transmitter - Artarmon
Main Transmitter - Willoughby
Main Transmitter - Artarmon
Main Transmitter - Gore Hill
Main Transmitter - Gore Hill
Telstra Tower Black Mountain
Telstra Tower Black Mountain
Telstra Tower Black Mountain
Telstra Tower Black Mountain
Telstra Tower Black Mountain
Deloraine Rd
Deloraine Rd
Deloraine Rd
Deloraine Rd
Mt Sugarloaf
Broadcast Site Mt Sugarloaf Range
Broadcast Site Mt Sugarloaf Range
Mt Sugarloaf
Mt Sugarloaf
WIN Tower Knights Hill
NTL Tower Knights Hill
WIN Tower Knights Hill
NTL Tower Knights Hill
NTL Tower Knights Hill
1/1/2001
1/1/2001
1/1/2001
1/1/2001
1/1/2001
1/1/2001
1/1/2001
1/1/2001
1/1/2001
1/1/2001
1/1/2001
1/1/2001
1/1/2001
1/1/2001
1/1/2001
1/1/2001
1/1/2001
1/1/2001
1/1/2001
1/1/2001
1/1/2001
1/1/2001
1/1/2001
1/1/2001
1/1/2001
30/6/2002
30/6/2002
30/6/2002
30/6/2002
30/6/2002
30/6/2002
30/6/2002
30/6/2002
30/6/2002
30/6/2001
30/6/2001
30/6/2001
30/6/2001
30/6/2001
30/6/2002
30/6/2002
30/6/2002
30/6/2002
Additional Information
23
Page 24

Additional Information
Troubleshooting
Problem Solution
(1) The receiver front panel power indicator doesn’t
light up, and no message on the front panel.
(2) Has message on the front panel but no picture
on your TV screen.
(3) Poor picture quality. (a)
(4) No audio service. (a)
(5) No video service. If there is a music banner being displayed, then there
(6) Does not have all the channels available after
using ‘Auto Scan’ when installing the receiver.
(7) Cannot lock signal by using ‘Manual Setup’. (a)
(8) No Teletext. (a)
(9) Cannot receive channels after moving the
receiver between cities (e.g. from Melbourne to
Sydney).
(a)
Check the mains lead and make sure it is
connected to a stable power outlet.
(b)
Check if the set top box is in ‘Standby’ mode by
pressing the I/1 (Standby) button on the remote
control.
(a)
Press the MENU button on the remote control or
front panel to call up the On Screen Display.
(b)
Make sure the connector type between the set
top box and your TV set matches each other.
(c)
Check the brightness level of your TV screen.
Check the antenna and make sure it is aligned
to the correct direction. Use receiver’s ‘Manual
Scan’ option to check the signal’s BER and RF
Level when aligning the antenna.
(b)
If you use any kind of amplifier to boost the
signal level, please check that it is functioning
adequately.
(c)
Refer to solutions in item (2) above.
Check the receiver and your TV’s volume are
properly set and not in ‘mute’ mode.
(b)
Check the audio connectors are correctly and
firmly connected.
(c)
Make sure the receiver switch is set to the
correct Audio mode: Dolby Digital or PCM
(MPEG).
(d)
Check the left and right audio channel.
Sometimes the preferred audio service is set in
the left or right channel only. Please refer to
‘Audio Select’.
is ONLY audio available on this channel (for example,
a radio channel).
(a)
Try ‘Full Scan’ to scan the missing channels
instead of ‘Quick Scan’. Some new channels
may be available in your area.
(b)
Try getting your aerial installation checked for
good quality reception.
Check the frequency you enter is exactly the
centre frequency of the required channel.
(b)
Refer to solutions in item (3) above.
Make sure the channel you are watching
provides a teletext service.
(b)
Press the button on the remote control again
to confirm there is not teletext service.
Enter the Setup menu and use the ‘Restore to
default’ option to clear the channel memory, then
enter the Install menu and use ‘Full Scan’ or ‘Quick
Scan’ for your new area to scan through all the
channels again.
On Screen Error Message
Message Solution
(1) Bad Signal. (a)
(2) Database is empty
Press menu for installation.
24
Additional Information
Press the MENU button to call up OSD menu for
channel search.
Check the antenna is connected correctly to the
tuner input (ANT. RF IN) of the receiver.
(b)
Refer to solutions in item (3) above.
Page 25

Index
Additional Information
16:9 (Full Screen), 15
4:3 (Full Screen Crop), 15
4:3 (Letter Box), 15
A, B
Accessories, supplied, 4
Aspect Ratio, 15
Audio Output Control, 15
Audio Select, 17
Batteries, inserting into the remote control, 11
C, D
Change Password, 14
Channels Available, 23
Connecting,
to a DVD recorder, 18
to a Hi-Fi, Home Theatre, 20
to a TV, 7
to a VCR, 18
E, F
Easy Setup procedure, 11
Favorite List, 12
Favorite Preset, 13
Full Scan, 13
G, H, I, J, K
Information, 16
Install menu, 13
i-Plate display, 17
L, M, N
Manual Scan, 13
Menu system, general operation, 12
MPEG Volume Control, 15
O
Overview,
receiver, 6
remote control, 5
P, Q
Parental Contorol, 14
Parental Rating, 14
Picture Freeze, 17
Picture In Picture (PIP), 17
Program Edit, 13
Program List, 12
Program Sorting, 13
Quick Scan, 13
R
Receiver overview, 6
Remote control of TV, 21
Remote control overview, 5
Restore to Default, 16
S
Safety information, 2
Setup menu, 15
Skip, 13
Specifications, 22
S/W Update, 16
T
Table of contents, 3
Teletext, 17
Time Setup, 16
Troubleshooting, 24
U, V, W, X, Y, Z
Video Format, 15
Video/Audio Setup, 15
Additional Information
25
Page 26

Page 27

Page 28

DST-HD500
Sony Corporation Printed in Taiwan
Sony Corporation Printed in Taiwan
Recyclable
 Loading...