

Sony DSS SAT-A1, SAT-A1 Operating Instructions Manual
3-800-356-21 (1)
Digital Satellite
Receiver
Operating Instructions
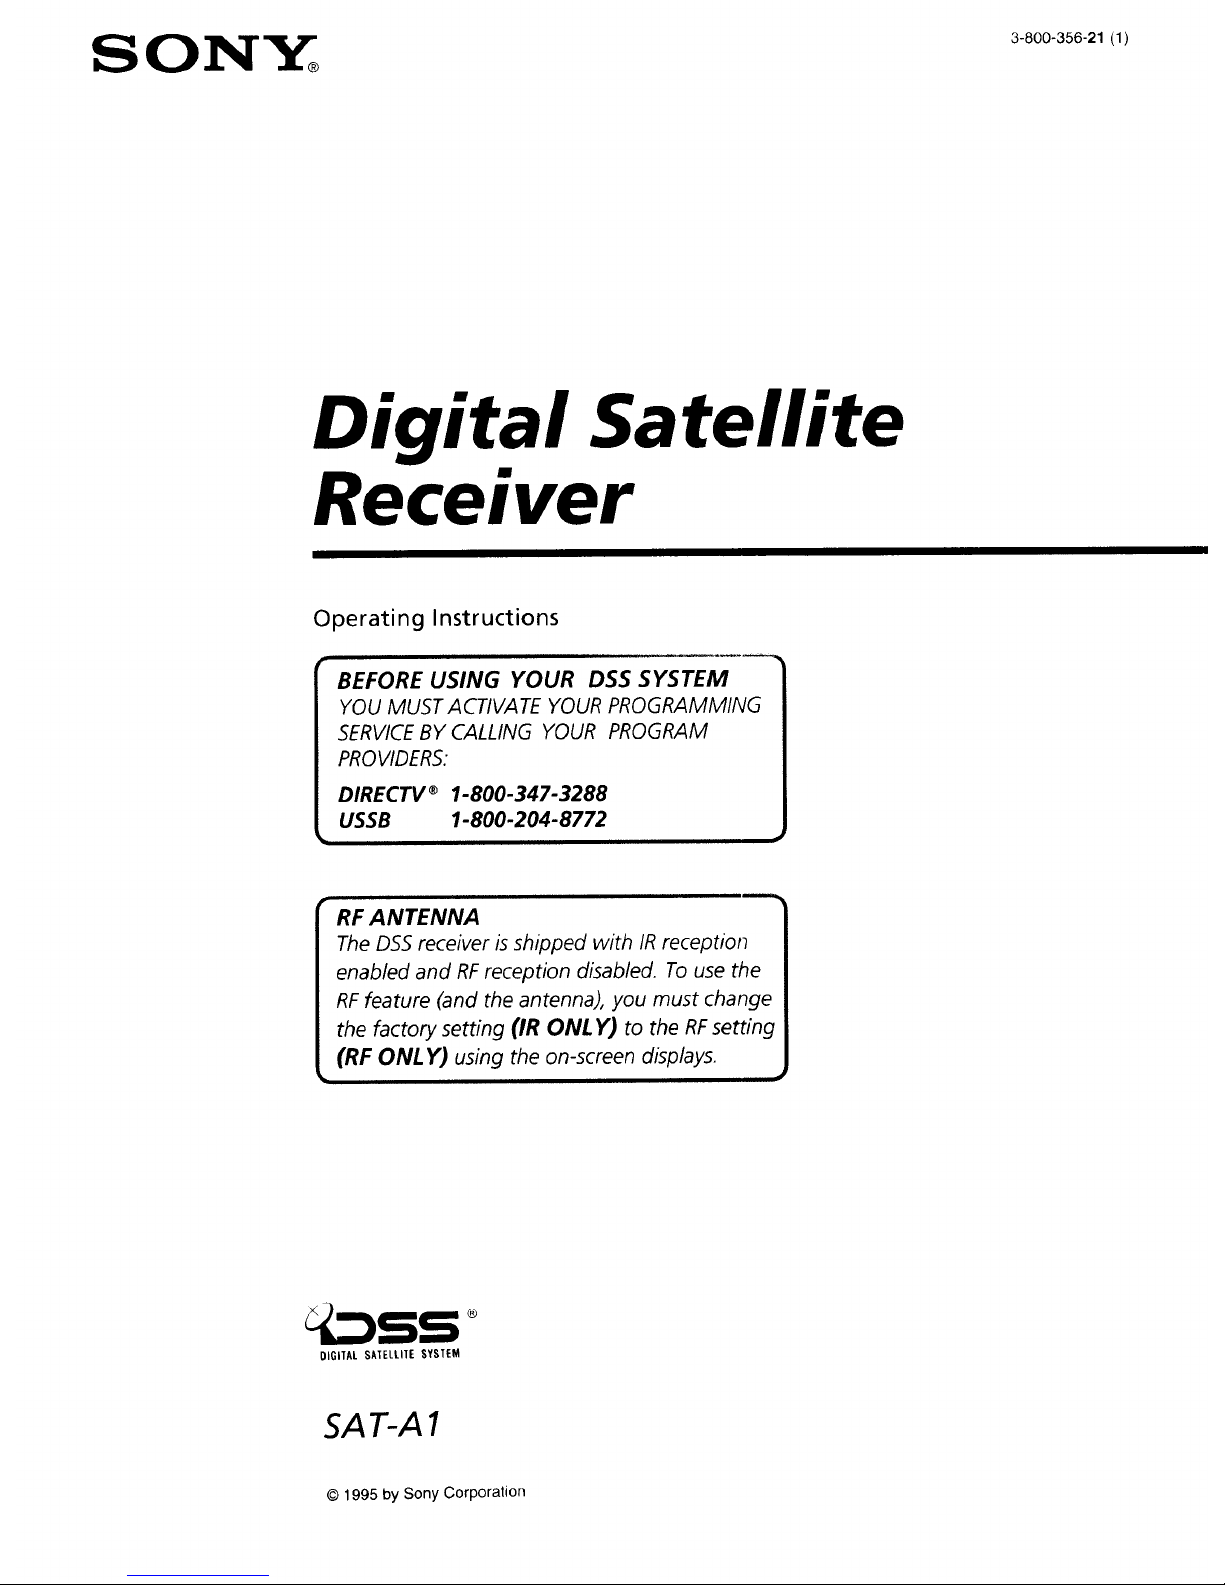
BEFORE USING YOUR DSS SYSTEM
YOU MUST ACTIVATE YOUR PROGRAMMING
SERVICEBY CALLING YOUR PROGRAM
PROVIDERS:
DIRECTV ® 1-800-347-3288
USSB 1-800-204-8772
RF ANTENNA
The DSS receiver is shipped with IR reception
enabled and RF reception disabled. To use the
RF feature (and the antenna), you must change
the factory setting (IR ONL Y) to the RFsetting
(RF ONL Y) using the on-screen displays.
®
OIGITAL SATELLITESYSTEM
SAT-A1
© 1995 by Sony Corporation

WARNING Owner's Record
To prevent fire or shock hazard, do not expose the unit to rain or
moisture.
L;AU [ ION I 0 HEDUGL I t _L Hl_ _)t LLLU I t_lU _H_)q_k,
DO NOT REMOVE COVER (OR BACK).
NO USER-SERVICEABLE PARTS INSIDE.
REFER SERVICING TO QUALIFIED SERVICE PERSONNEL.
I his bymbol is intended to alert the user to
the presence of uninsulated "dangerous
voltage" within the product's enclosure that
may he of significant magnitude to
constitute a risk of electric shock to persons.
This symbol is intended to alert the user to
the presence of important operating and
maintenance (servicing) instructions in the
literature accompanying the appliance.
Caution
To prevent electric shock, do not use this polarized plug with an
extension cord, receptacle, or other outlet unless the blades can be
fully inserted to prevent blade exposure.
Note to the CATV Installer
This reminder is provided to call the CATV system installer's
attention to Article 820-40 of the NEC that provides guidelines for
proper grounding and, in particular, specifies that the cable
ground shall be connected to the grounding system of the building
as close to the point of cable entry as practical.
Note to the DSS®Satellite Dish Installer
This reminder is provided to call the DSS satellite dish installer's
attention to Article 810 and in particular Article 810-15 of the NEC,
which covers proper installation and grounding of television
receiving equipment, as well as to Article 820-40 of the NEC,
which specifies that the satellite dish cable ground shall be
connected to the grounding system of the building as close to the
point of cable entry as practical.
TelephoneLineInterruption
Periodically, information on your DirecTicket and Pay-Per-View
selections is sent, free of charge, via your telephone line to an 800
number. During the time the information is being forwarded, you
cannot use your telephone and you will hear static noise for
approximately 30 seconds. If you would like to use your telephone
while the information is being sent, you can interrupt the sending
of this information at any time by unplugging the phone line to
the receiver.
The model and serial numbers are located on the back ot
the receiver. The number for the access card is on the front
of the card and on the carton label. Record these numbers
in the space provided below. Refer to these numbers
whenever you need to call your sales or service
representative regarding this product.
Model Number: SAT-A1
Serial Number:
Access Card Number:
Customer Support
ForDSSProgramming
For subscription information, or to resolve problems
related to DSS programming, call:
DIRECTV® at 1-800-DIRECTV (347-3288) or
USSB at 1-800-204-USSB (8772).
For DSS Hardware and Installation
To arrange for the installation of your DSS system, call the
dealer from whom you purchased your system.
For general information, or to resolve problems related to
the operation of your satellite receiver or antenna, please
contact your Sony brand DSS dealer. If your dealer or
installer is unable to answer your questions, call the Sony
DSS Customer Support line at 1-800-838-7669.
Trademark and Copyrights
Express Navigator is a trademark of Sony Corporation. DIRECTV
and DSS are registered trademarks of DIRECTV, Inc., a unit of
Hughes Electronics. USSB and USSB Entertainment Plus are
official service marks of the United States Satellite Broadcasting
Company, Inc. HBO is a registered trademark of Time Warner
Entertainment Company, L.P. Showtime is a service mark of
Showtime. MTV: Music Television is a registered trademark of
MTV Networks, a division of Viacom International Inc. Comedy
Central is a registered trademark of Comedy Partners.
Macrovision Information
This product incorporates copyright protection technology that is
protected by U.S. patents and other intellectual property rights.
Use of this copyright protection technology is granted by
Macrovision for home and other limited DSS IRD pay-per-view
uses only. Reverse engineering or disassembly is prohibited.
Note on Recording Programming
Programming may be taped for home viewing only. All other
taping is expressly prohibited. Some programming may not be
taped. An additional taping fee may be applied. Call your
program providers for details.
StarSight Licensed
The manufacture and sale of the television schedule feature of this
product was licensed under one or more of the following patents
of StarSight Telecast, Inc.: U.S. Patent Nos. 4,706,121; 4,977,455;
5,151,789; and 5,353,121; with use rights reserved.
2
Contents
Introducing the DSS System
5 DSS Features
6 Unpacking
7 Inserting Batteries into the Remote Control
Using Basic Functions
10 Using the Master Guide
11 Using the Station Index
Connecting Your System
13 Overview
14 TV Only
16 TV and VCR
18 Hi-Fi TV, Hi-Fi VCR, Audio Receiver
20 Home Entertainment System
(Hi-Fi TV, Hi-Fi VCR, Audio/Video Receiver)
22 Setting Up the RF Antenna
23 Setting Up Your DSS System
Using the System Features
25 Overview
26 Before You Get Started ...
27 Using the On-Screen Displays: Highlight and Select
28 Displaying the Master Guide
29 Features of the Master Guide
30 Moving Through the Master Guide
32 Selecting a Program from the Guide
33 Selecting Program Guides and Lists By Category
35 Selecting the Custom Guide
36 Using the Station Index
38 Selecting the Favorite Station Guide
39 Selecting Other (Program Provider) Guides
40 Using DISPLAY and JUMP
41 Selecting Alternate Audio
42 Canceling Purchases
43 Checking Your Purchase Record
44 Setting Up the Timer
47 Reading Your Messages
3

Using the Custom Setup Menu
49 Overview
50 Displaying the Custom Setup Menu
51 Setting Up a Favorite Station Guide
53 Setting a Default Language
54 Setting Locks and Limits
59 Setting Up a List of Custom Stations
61 Selecting Data Services
Using the Installation Menu
63 Overview
64 Displaying the Installation Menu
65 Setting Up the Satellite Antenna
66 Replacing Your Access Card
68 Setting the Aspect Ratio
69 Setting Up the Remote Control
72 Running a System Test
Other Information
74 Location and Function of Controls
76 Using the Remote Control
79 Programming the Remote
82 Using the Learn Function
83 Troubleshooting
86 Precautions
87 FCC Regulations and Information
88 Limited Warranty
89 Specifications
90 Index
4 Contents
Introducing the DSS System
Welcome to the Sony brand DSS (Digital Satellite System), the ultimate
digital entertainment experience. Read this chapter for an overview of
the features of the system and to check the carton contents of the DSS
receiver. This chapter also describes how to insert batteries into the
remote control.
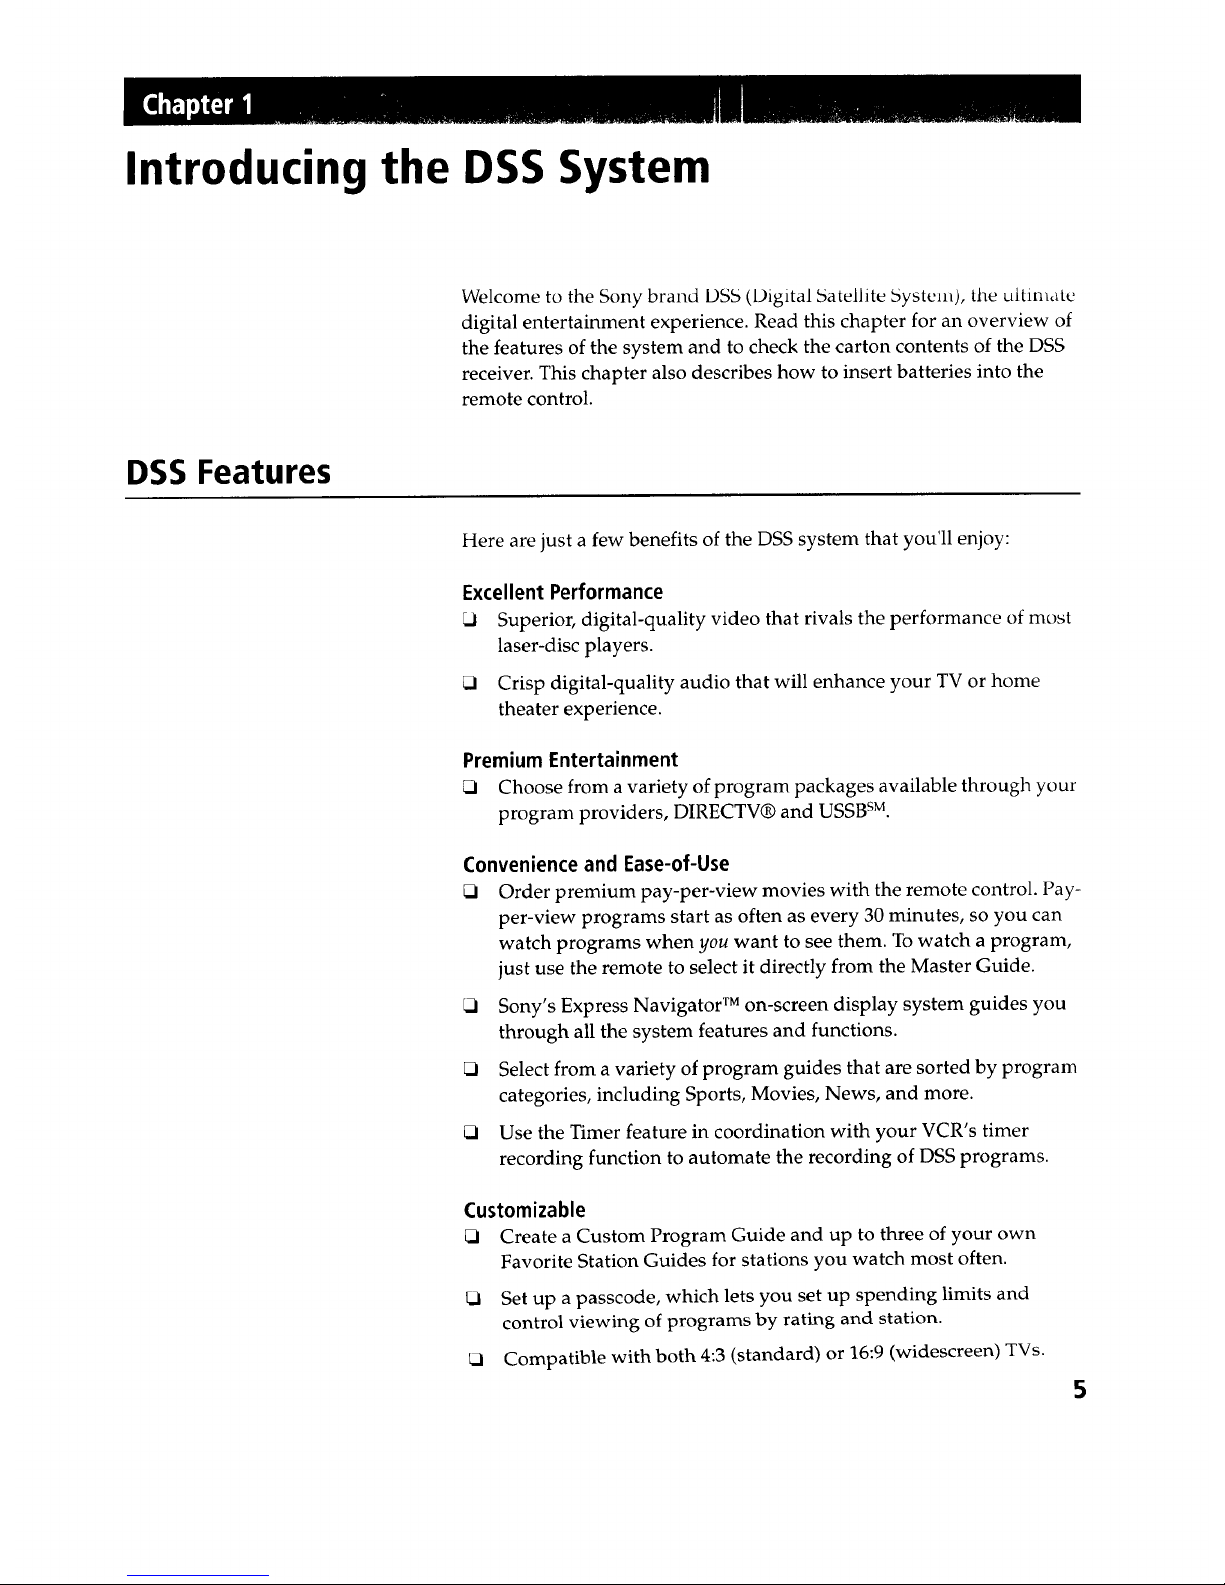
DSS Features
Here are just a few benefits of the DSS system that you'll enjoy:
Excellent Performance
Li Superior, digital-quality video that rivals the performance of most
laser-disc players.
_i Crisp digital-quality audio that will enhance your TV or home
theater experience.
Premium Entertainment
Choose from a variety of program packages available through your
program providers, DIRECTV® and USSB sM.
Convenience and Ease-of-Use
Order premium pay-per-view movies with the remote control. Pay-
per-view programs start as often as every 30 minutes, so you can
watch programs when you want to see them. To watch a program,
just use the remote to select it directly from the Master Guide.
_1 Sony's Express Navigator TM on-screen display system guides you
through all the system features and functions.
Select from a variety of program guides that are sorted by program
categories, including Sports, Movies, News, and more.
Use the Timer feature in coordination with your VCR's timer
recording function to automate the recording of DSS programs.
Customizable
Create a Custom Program Guide and up to three of your own
Favorite Station Guides for stations you watch most often.
Set up a passcode, which lets you set up spending limits and
control viewing of programs by rating and station.
Compatible with both 4:3 (standard) or 16:9 (widescreen) TVs.
5
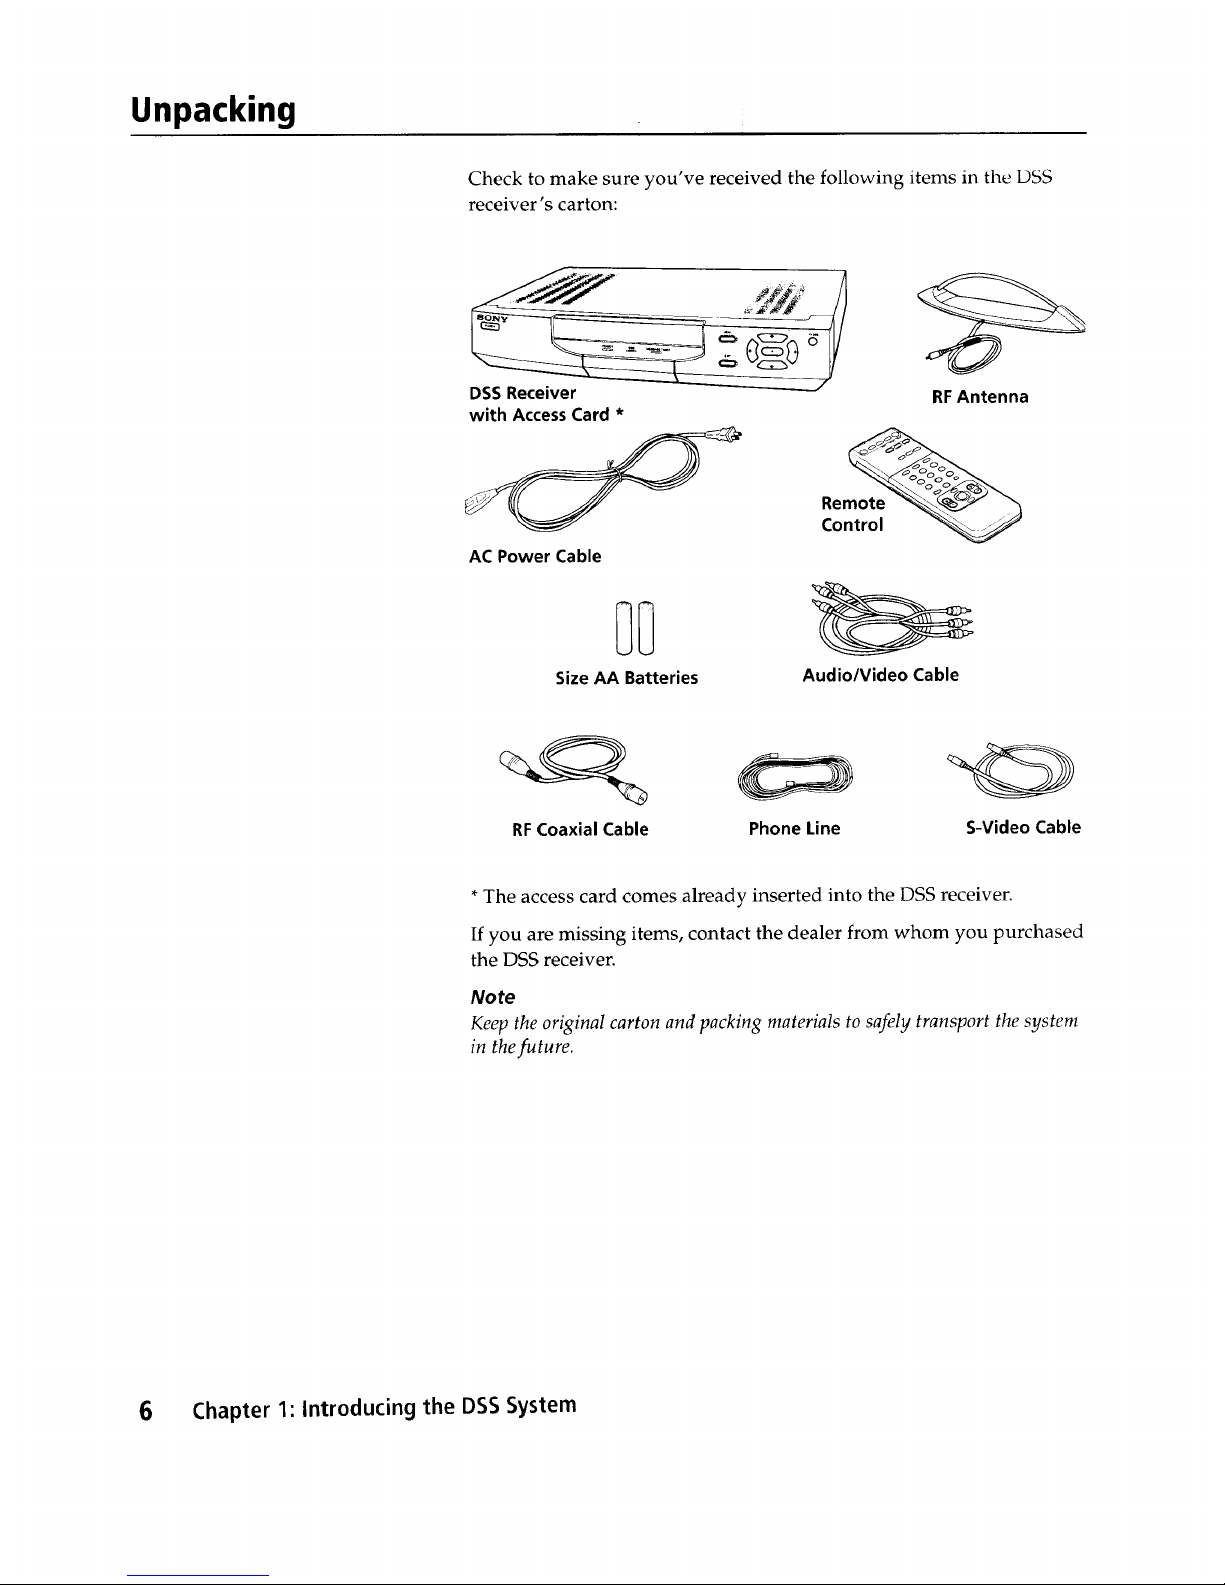
Unpacking
Check to make sure you've received the following items in the DSS
receiver's carton:
DSSReceiver
with AccessCard*
AC Power Cable
@@
Size AA Batteries
RFAntenna
Audio/Video Cable
RFCoaxial Cable PhoneLine
S-VideoCable
*The access card comes already inserted into the DSS receiver.
If you are missing items, contact the dealer from whom you purchased
the DSS receiver.
Note
Keep the original carton and packing materials to safely transport the system
in the future.
6 Chapter 1: Introducing the DSS System
inserting Batteries into the Remote Control
Before you can use the remote control, you must first insert the
supplied batteries. If you want to use this remote control to operate
your TV, cable box, VCR, or laser-disc player, you must also program
the remote, as described in the Appendix on page 79.
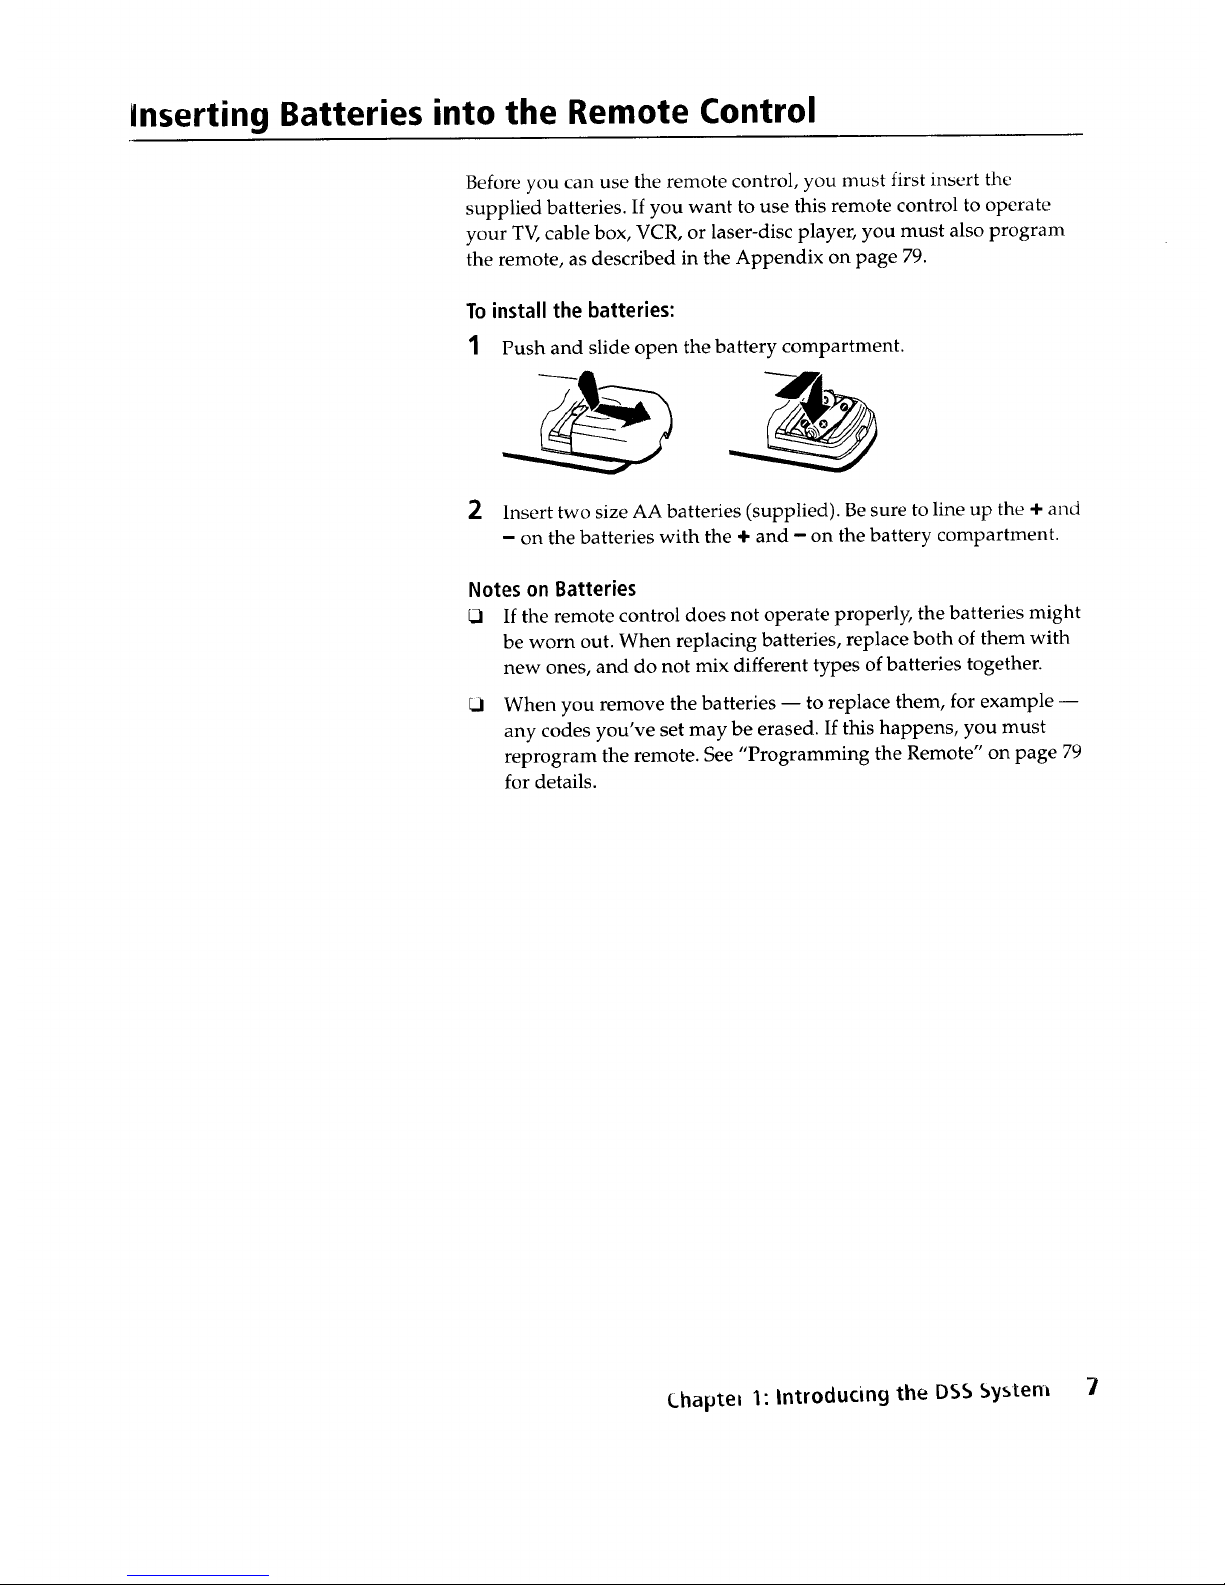
To install the batteries:
1 Push and slide open the battery compartment.
2 Insert two size AA batteries (supplied). Be sure to line up the ÷ and
- on the batteries with the ÷ and - on the battery compartment.
Notes on Batteries
El If the remote control does not operate properly, the batteries might
be worn out. When replacing batteries, replace both of them with
new ones, and do not mix different types of batteries together.
When you remove the batteries -- to replace them, for example --
any codes you've set may be erased. If this happens, you must
reprogram the remote. See "Programming the Remote" on page 79
for details.
(.hap_el 1: introducing the DSS System 7

8 (.hapter 1" Introducing the DSS _>ystet_
Using Basic Functions
_'" POWE R
MUTING sLEeP CABL_ TV .dmlltL ]
FUNCTION --
ALTERNATE
AUDIO FAVORITE GUIDE
_) c2) tin,--
TV/VIDEO 1_/ID$S JUMP
O C2) C2)
®®®
®®®
ENTER
DISPLAY(_ (_
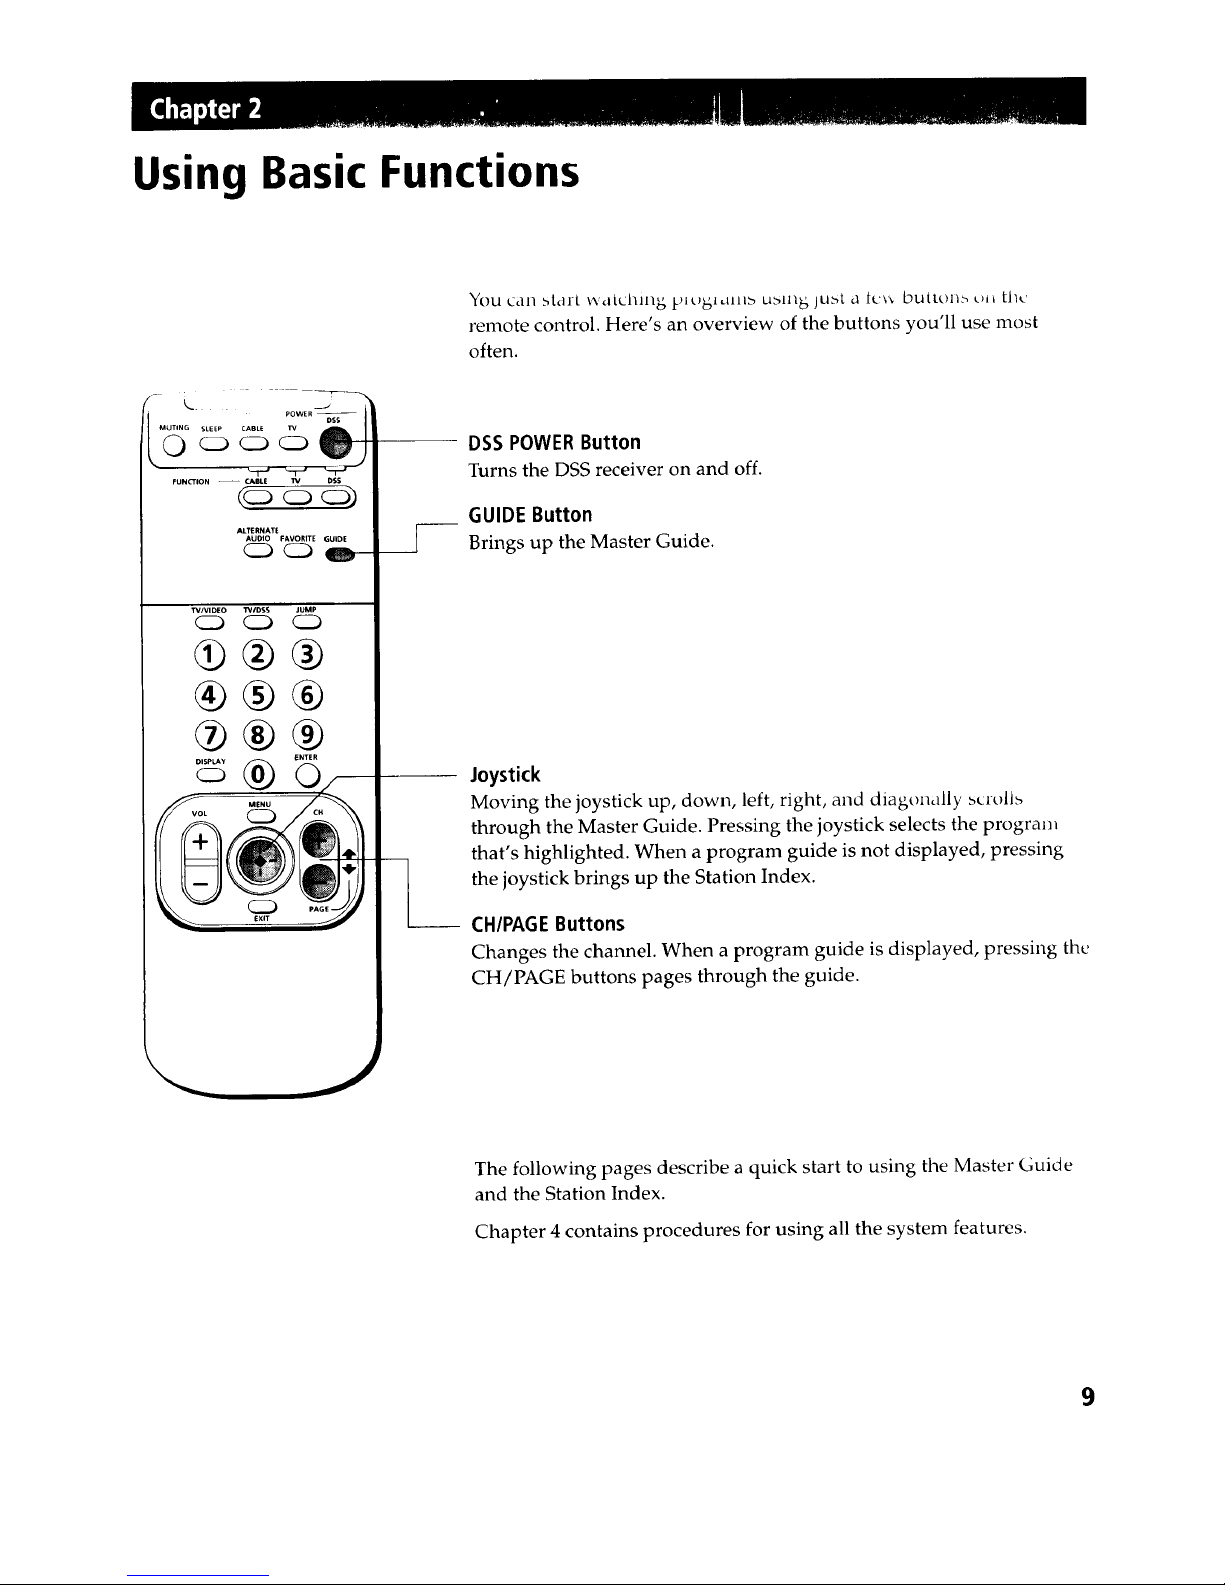
You can Mart Wdtchm_ [__l_)_l,_lll_ ul_lz_juat a tcv_ buttozia t)J_ the
remote control. Here's an overview of the buttons you'll use most
often.
DSS POWER Button
Turns the DSS receiver on and off.
GUIDE Button
Brings up the Master Guide.
Joystick
Moving the joystick up, down, left, right, and diagonally scrolls
through the Master Guide. Pressing the joystick selects the program
that's highlighted. When a program guide is not displayed, pressing
the joystick brings up the Station Index.
-- CH/PAGE Buttons
Changes the channel. When a program guide is displayed, pressing the
CH/PAGE buttons pages through the guide.
The following pages describe a quick start to using the Master Guide
and the Station Index.
Chapter 4 contains procedures for using all the system features.
9
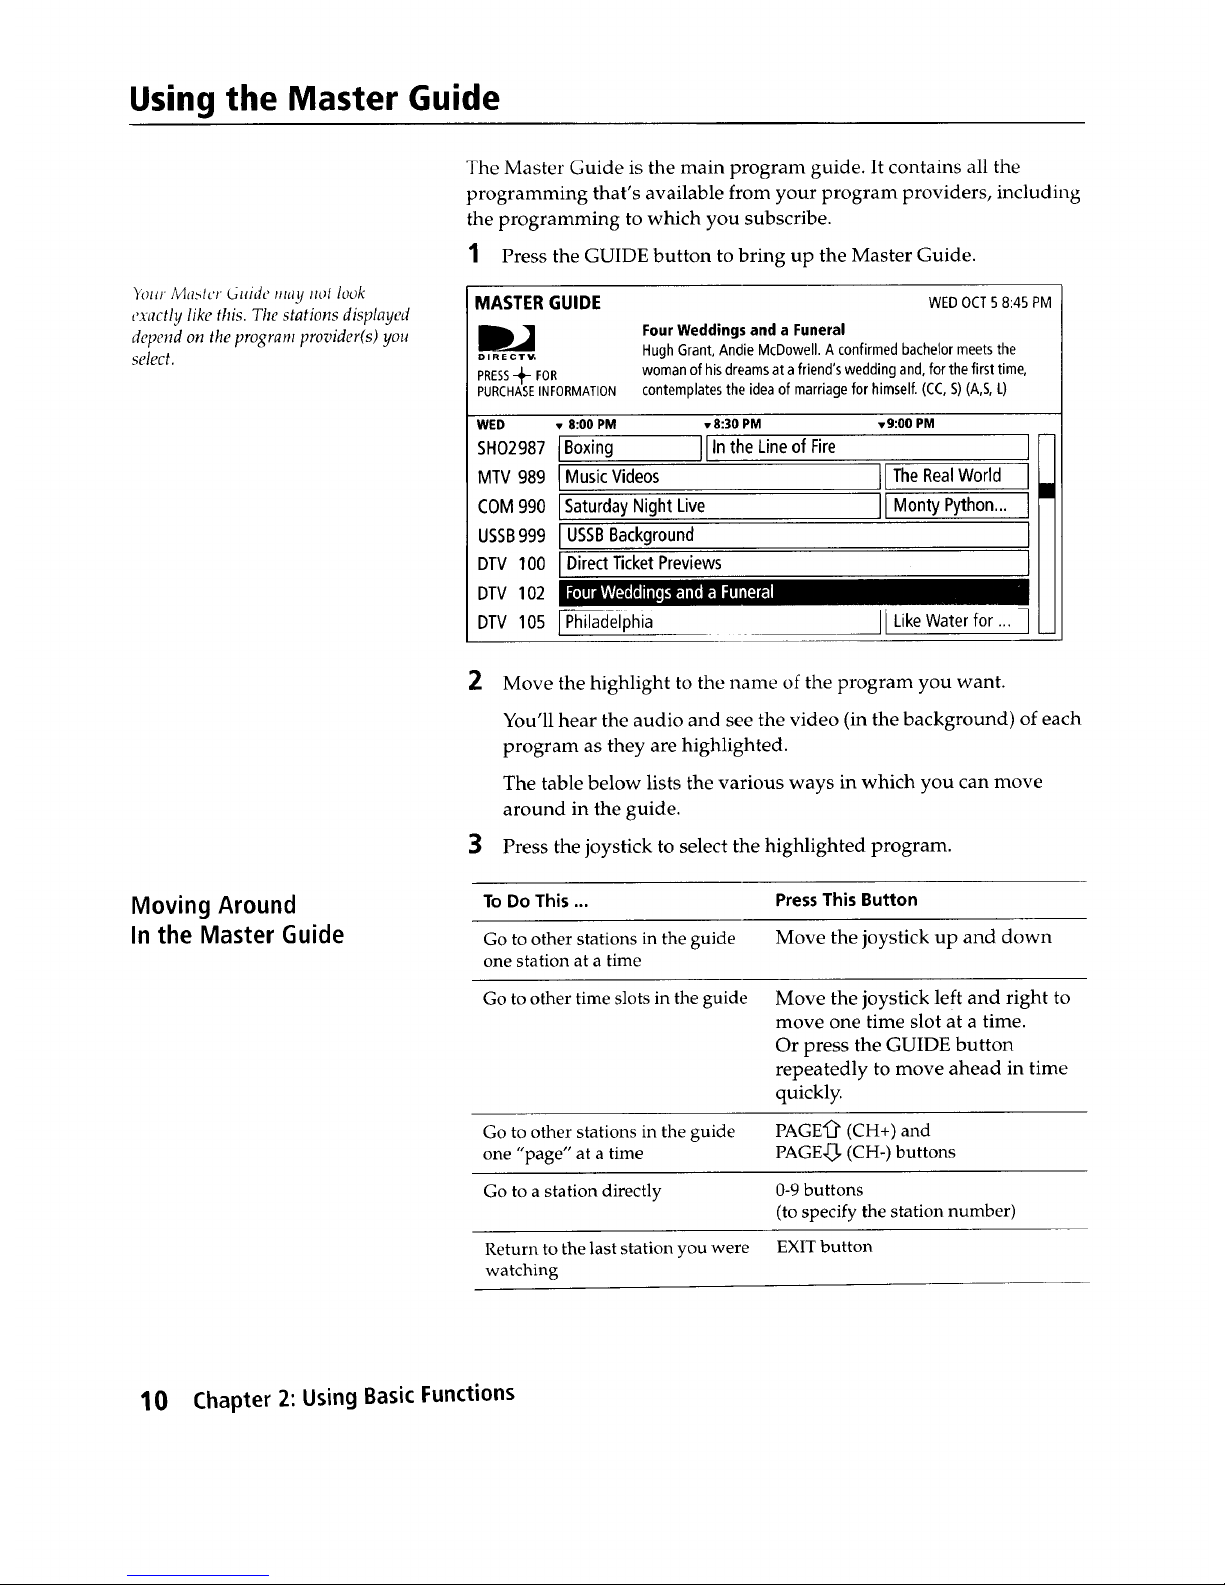
Using the Master Guide
Your Ma,<cr Guide may Jtot took
exactly like this. The stations displayed
depend on the program provider(s) you
select.
The Master Guide is the main program guide. It contains all the
programming that's available from your program providers, including
the programming to which you subscribe.
1 Press the GUIDE button to bring up the Master Guide.
MASTER GUIDE
/J
DIRECTV,
PRESS_ FOR
PURCHASEINFORMATION
WEDOCT5 8:45PM
Four Weddings and a Funeral
HughGrant,Andie McDowell. A confirmedbachelormeetsthe
womanofhis dreamsat afriend'swedding and,forthefirsttime,
contemplatesthe ideaof marriageforhimself.(CC,S)(A,S,L)
WED , 8:00 PM v8:30 PM vg:00 PM
SH02987 IBoxing Illn the Line of Fire ]
MTV 989 I MusicVideos IIThe RealWorld I
COM 990 ISaturday Night Live IIMontyPythoo...]
USSB999 I USSBBackground ]
DTV 100 I Direct Ticket Previews ]
DTV 102 ' "" ' • ', ".
DTV 105 _deiphia 11Likewaterf°r ''' ]
2 Move the highlight to the name of the program you want.
You'll hear the audio and see the video (in the background) of each
program as they are highlighted.
The table below lists the various ways in which you can move
around in the guide.
3 Press the joystick to select the highlighted program.
Moving Around
In the Master Guide
ToDo This... PressThisButton
Go to other stations in the guide Move the joystick up and down
one station at a time
Go to other time slots in the guide Move the joystick left and right to
move one time slot at a time.
Or press the GUIDE button
repeatedly to move ahead in time
quickly.
Go to other stations in the guide PAGE'_ (CH+) and
one "page" at a time PAGE,_, (CH-) buttons
Go to a station directly 0-9 buttons
(to specify the station number)
Return to the last station you were EXIT button
watching
I0 Chapter 2: Using Basic Functions
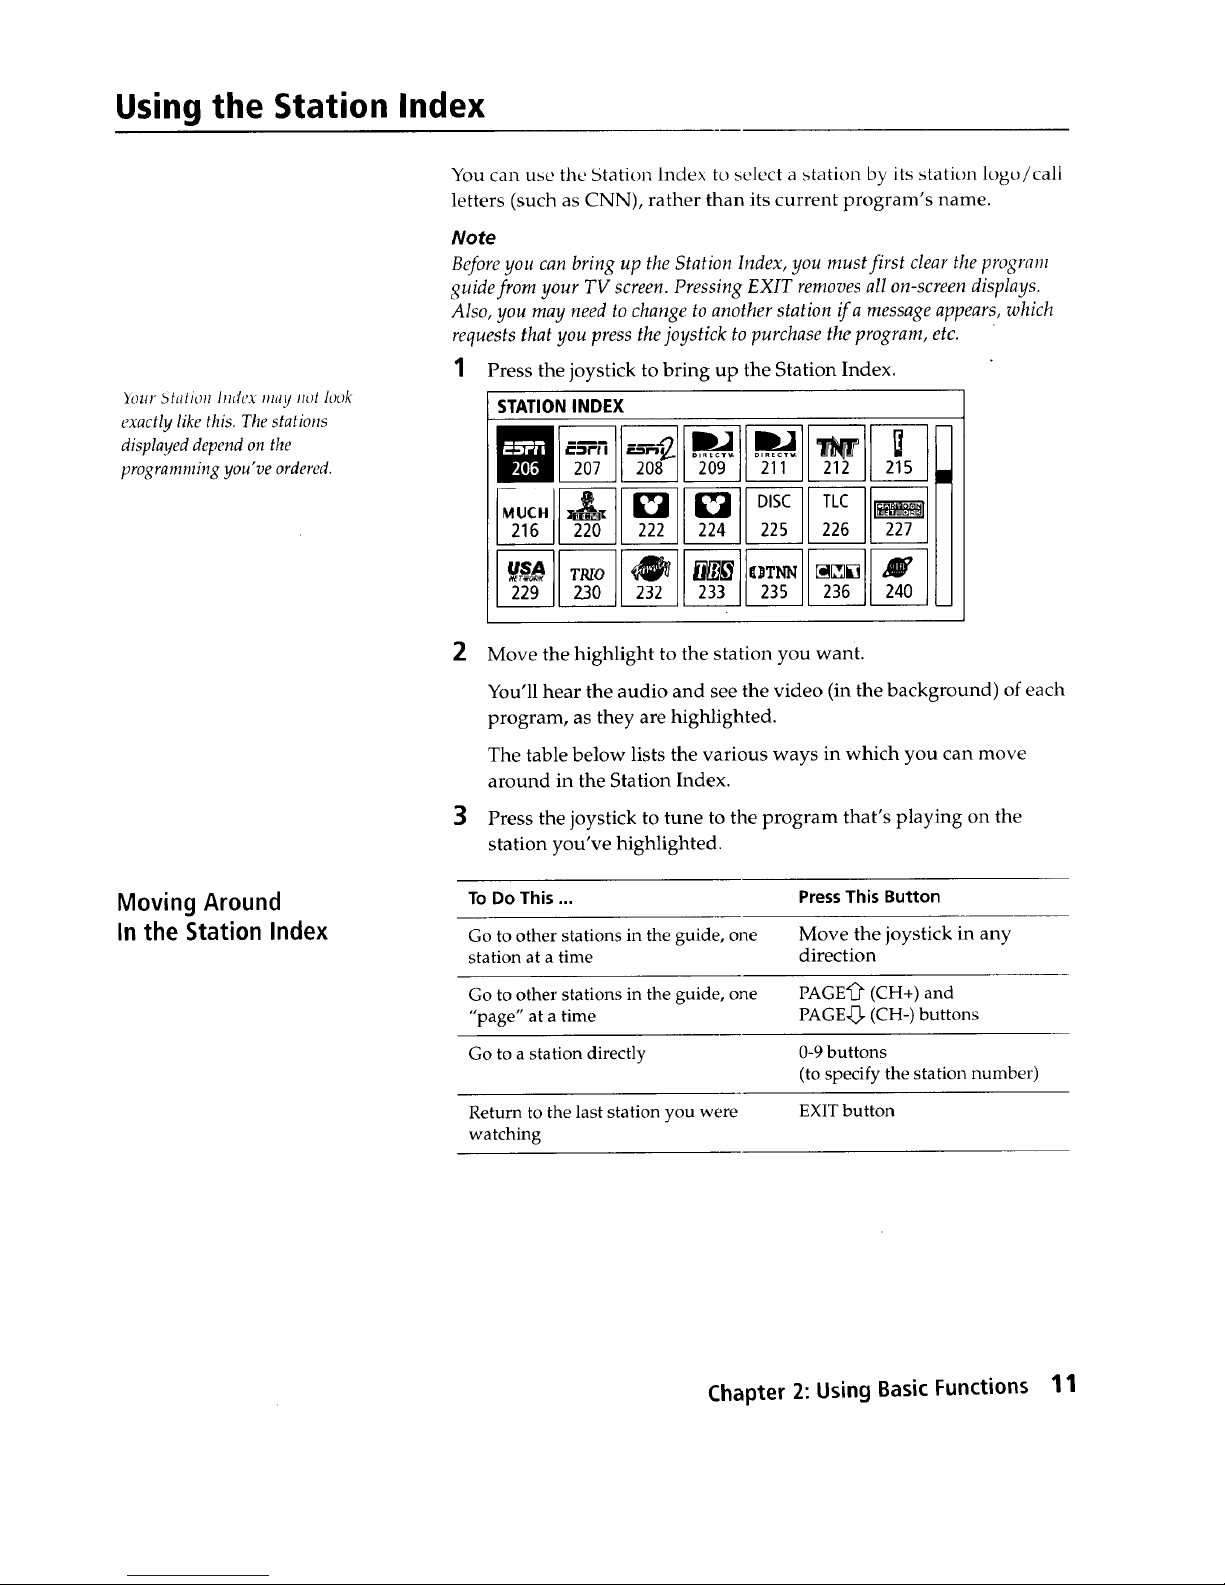
Using the Station Index
)R)ltr 5h_[lOll ]tldex IHt_y Ilol look
exactly like this. The stations
displayeddepend on the
programming you've ordered.
You can use the Station Index to select a station by its station logo/call
letters (such as CNN), rather than its current program's name.
Note
Before you can bring up the Station Index, you must first clear the program
guide from your TV screen. Pressing EXIT removes all on-screen displays.
Also, you may need to change to another station ira message appears, which
requests that you press the joystick to purchase the program, etc.
1 Press the joystick to bring up the Station Index.
STATION INDEX
m
220 222 224 225 226 227
229 23o 232 233 23s 236 24o
2
3
Move the highlight to the station you want.
You'll hear the audio and see the video (in the background) of each
program, as they are highlighted.
The table below lists the various ways m which you can move
around in the Station Index.
Press the joystick to tune to the program that's playing on the
station you've highlighted.
Moving Around
in the Station Index
To Do This ... PressThis Button
Go to other stations in the guide, one Move the joystick in any
station at a time direction
Go to other stations in the guide, one PAGE'_ (CH+) and
"page" at a time PAGE,_ (CH-) buttons
Go to a station directly 0-9 buttons
(to specify the station number)
Return to the last station you were EXIT button
watching
Chapter 2: Using Basic Functions 11

12 Chapter 2: Using Basic Functions
Connecting Your System
Read this chapter to set up your D55 receive_ it)r thw in'st time, t_J to)
add or remove audio or video components comlected to your system.
Overview
General Recommendations
Control-5 is disabh'd when receiver
is in RF ONLY mode.
You can connect the DSS receiver in a variety of configurations. The
answers to the following questions will determine how you hook up
and operate your DSS receiver. For example:
_1 Do you have cable TV or a broadcast (terrestrial) TV antenna?
What type of connectors do your TV and VCR have: S-VIDEO,
A/V (RCA-type), or RF coaxial?
Do you plan to integrate your DSS receiver with your audio or
video system?
Detailed hookup instructions are provided on the pages that follow.
For optimum audio and video performance, follow these general
recommendations as much as possible when hooking up your
components:
If you have an audio or audio/video system, consider integrating
the DSS receiver into a home entertainment configuration to take
advantage of your hi-fi system's audio capabilities.
If your TV has an S-VIDEO jack, use it to connect your TV to the
DSS receiver. An S-Video connection provides a better picture than
RCA-type video or RF connections.
If your TV doesn't have an S-VIDEO jack, use your TV's A/V
connectors to connect your components. An A/V connection
provides a better picture and audio when compared to an RF
connection.
If you have other Sony components that include CONTROL-S
jacks, you can connect these components via their CONTROL-S
jacks in order to pass remote control signals between the DSS
receiver and these components. This allows you to hide
components behind cabinet doors.
13
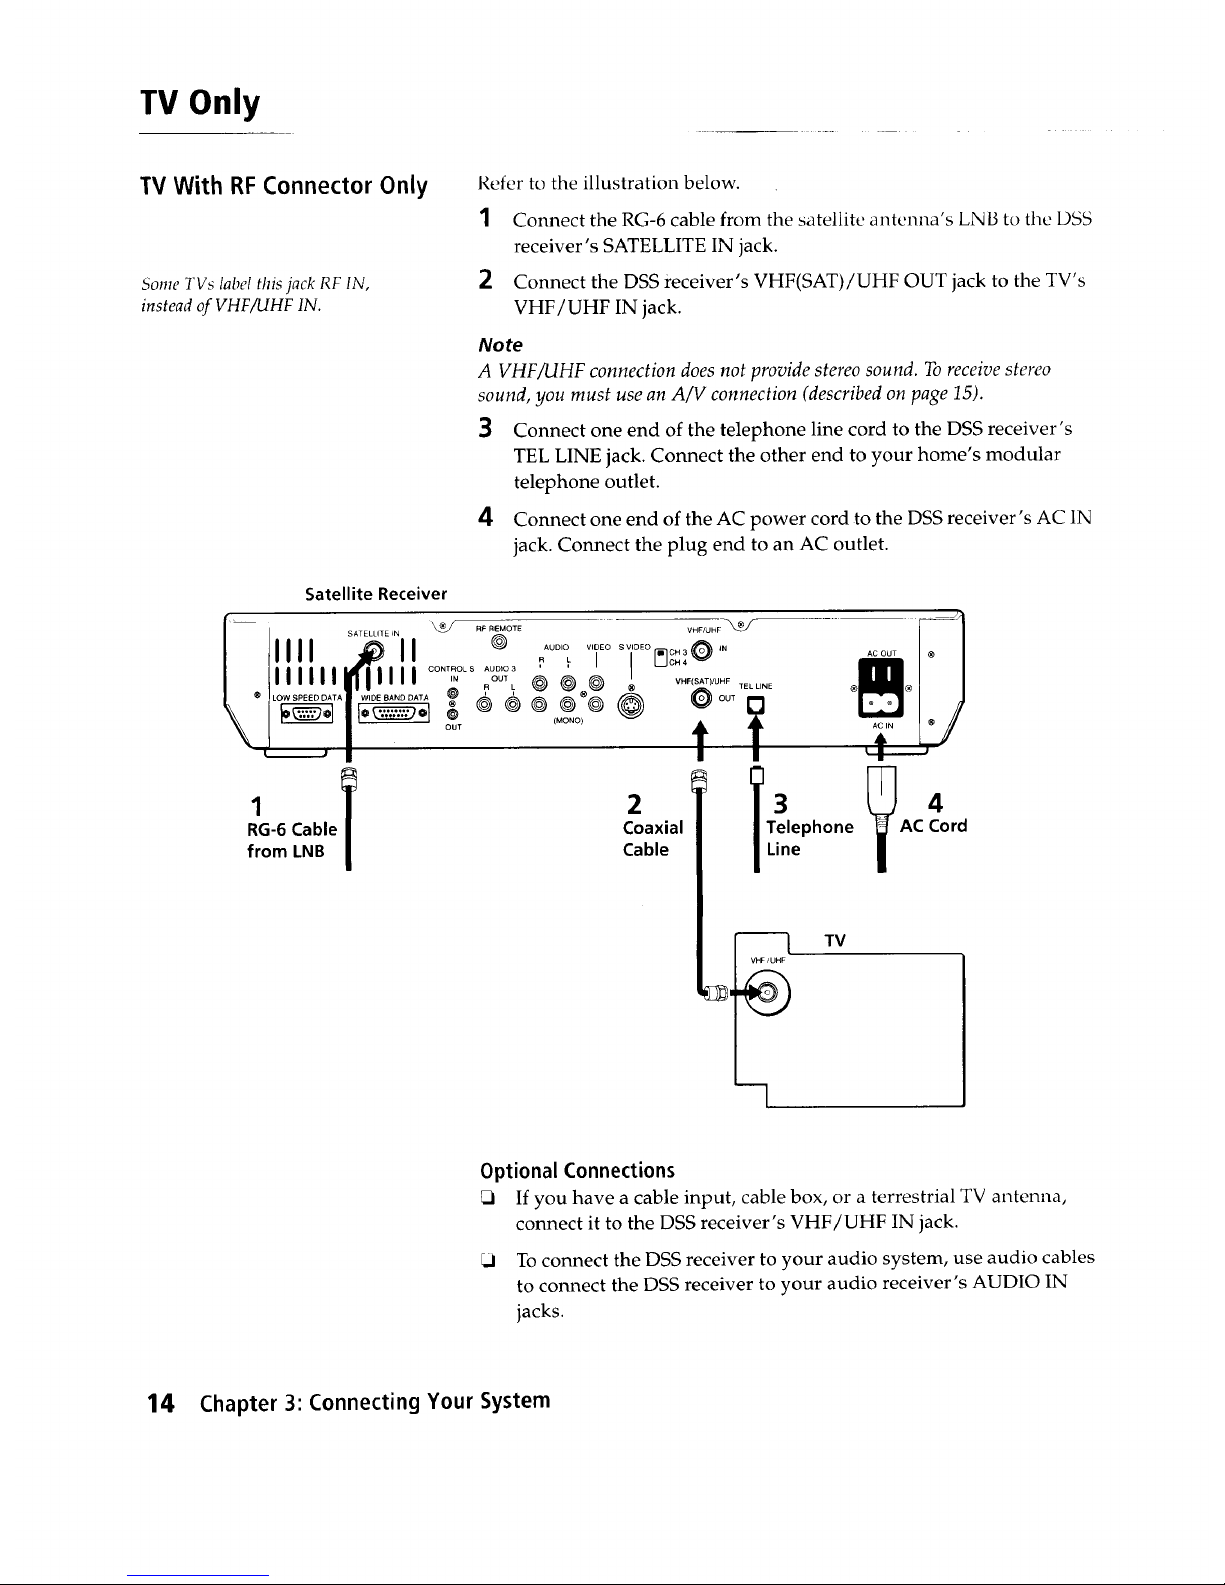
TV Only
W With RF Connector Only
Some TVs label this jack RF IN,
instead of VHFiUHF IN.
Refer to the illustration below.
1 Connect the RG-6 cable from the satellite antenna's LNB to the DSS
receiver's SATELLITE IN jack.
2 Connect the DSS receiver's VHF(SAT)/UHF OUT jack to the TV's
VHF/UHF IN jack.
Note
A VHF/UHF connection does not provide stereo sound. To receive stereo
sound, you must use an A/V connection (described on page 15).
3 Connect one end of the telephone line cord to the DSS receiver's
TEL LINE jack. Connect the other end to your home's modular
telephone outlet.
4 Connect one end of the AC power cord to the DSS receiver's AC IN
jack. Connect the plug end to an AC outlet.
III
Satellite Receiver
RG-6 Cable
from LNB
2
Coaxial
Cable
ACOUT _1
Telephone AC Cord
Line
---1
"VHF / UHF
TV
--I
Optional Connections
_i If you have a cable input, cable box, or a terrestrial TV antenna,
connect it to the DSS receiver's VHF/UHF IN jack.
_i To connect the DSS receiver to your audio system, use audio cables
to connect the DSS receiver to your audio receiver's AUDIO IN
jacks.
14 Chapter 3: Connecting Your System
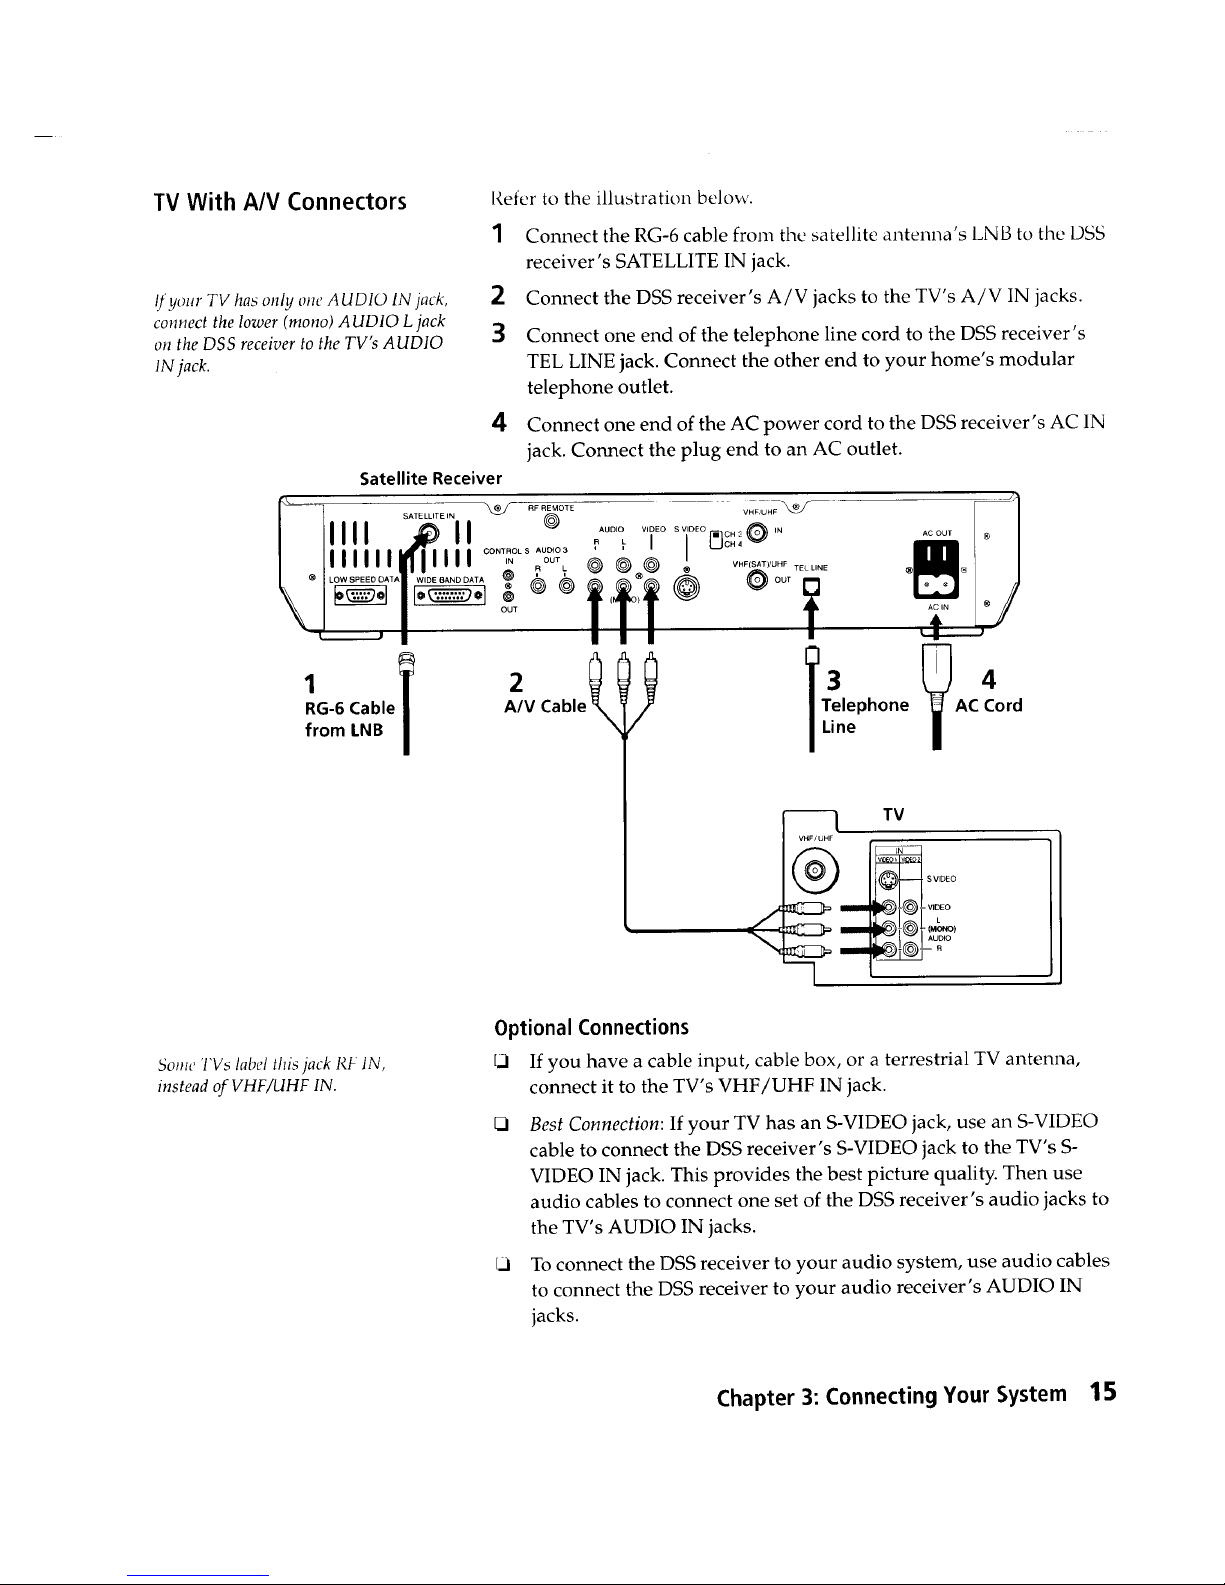
TV With A/V Connectors
If your TV has only one AUDIO IN jack,
connect the lower (mono) AUDIO L jack
on the DSS receiver to the TV's AUDIO
lN jack.
Refer to the illustration below.
IIII
RG-6 Cable
from LNB
1 Connect the RG-6 cable from the satellite antenna's LNB to the DSS
receiver's SATELLITE IN jack.
2 Connect the DSS receiver's A/V jacks to the TV's A/V IN jacks.
3 Connect one end of the telephone line cord to the DSS receiver's
TEL LINE jack. Connect the other end to your home's modular
telephone outlet.
4 Connect one end of the AC power cord to the DSS receiver's AC IN
jack. Connect the plug end to an AC outlet.
Satellite Receiver
2
A/V Cablel
v+(_.+>v"+'°+x'_.... + _1
_AUDIOL VIDEOI S VIDEO [_ cH_QCH_ IN _AC OUl
(_®@ ® ...... ® ®
lff+
( } J _ ac IN
A
I I "4"--"-J
1 ,
Telephone
Line
4
AC Cord
TV
VHF/UHF
_L(_5_L VIDEO
LL
Some TVs label this jack RF IN,
instead of VHF/UHF IN.
Optional Connections
L] If you have a cable input, cable box, or a terrestrial TV antenna,
connect it to the TV's VHF/UHF IN jack.
Best Connection: If your TV has an S-VIDEO jack, use an S-VIDEO
cable to connect the DSS receiver's S-VIDEO jack to the TV's S-
VIDEO IN jack. This provides the best picture quality. Then use
audio cables to connect one set of the DSS receiver's audio jacks to
the TV's AUDIO IN jacks.
To connect the DSS receiver to your audio system, use audio cables
to connect the DSS receiver to your audio receiver's AUDIO IN
jacks.
Chapter 3: Connecting Your System 15

TV and VCR
5ome V_Rs lind I V_label lhi_jack Rt
IN, instead of VHF/UHF IN.
Reter to the illustration on the opposite page.
Connect the RG-6 cable from the satellite antenna's LN B to the DSS
receiver's SATELLITE IN jack.
2 Connect the DSS receiver's A/V jacks to the A/V IN jacks on the
the TV and VCR. If your VCR has only one AUDIO IN jack
(monoaural VCR), connect it to the lower (mono) AUDIO L jack on
the DSS receiver.
3 Connect the DSS receiver's VHF(SAT)/UHF OUT jack to the VCR's
VHF/UHF IN jack.
4 Complete one of the following to connect the VCR to the TV:
Better Connection: If both your TV and VCR have A/V jacks,
connect the VCR's A/V OUT jacks to the TV's A/V IN jacks.
5
6
Q Good Connection: If your TV or VCR has only an RF jack,
connect the VCR's VHF/UHF OUT jack to the TV's VHF/UHF
IN jack.
Connect one end of the telephone line cord to the DSS receiver's
TEL LINE jack. Connect the other end to your home's modular
telephone outlet.
Connect one end of the AC power cord to the DSS receiver's AC IN
jack. Connect the plug end to an AC outlet.
Optional Connections
If you have a cable input, cable box, or a terrestrial TV antenna,
connect it to the DSS receiver's VHF/UHF IN jack.
Best Connection: If your TV has an S-VIDEO jack, use an S-VIDEO
cable to connect the DSS receiver's S-VIDEO jack to the TV's
S-VIDEO IN jack. This provides the best picture quality. Then use
audio cables to connect one set of the DSS receiver's audio jacks to
the TV's AUDIO IN jacks.
To connect the DSS receiver to your audio system, use audio cables
to connect the DSS receiver to your audio receiver's AUDIO IN
jacks.
Note
When watching a program that is protected by Macrovision, turn the VCR _(f
to ensure a quality picture.
16 Chapter 3: Connecting Your System
RG-6Cable
from LNB
2
Chapter 3: Connecting Your System 17
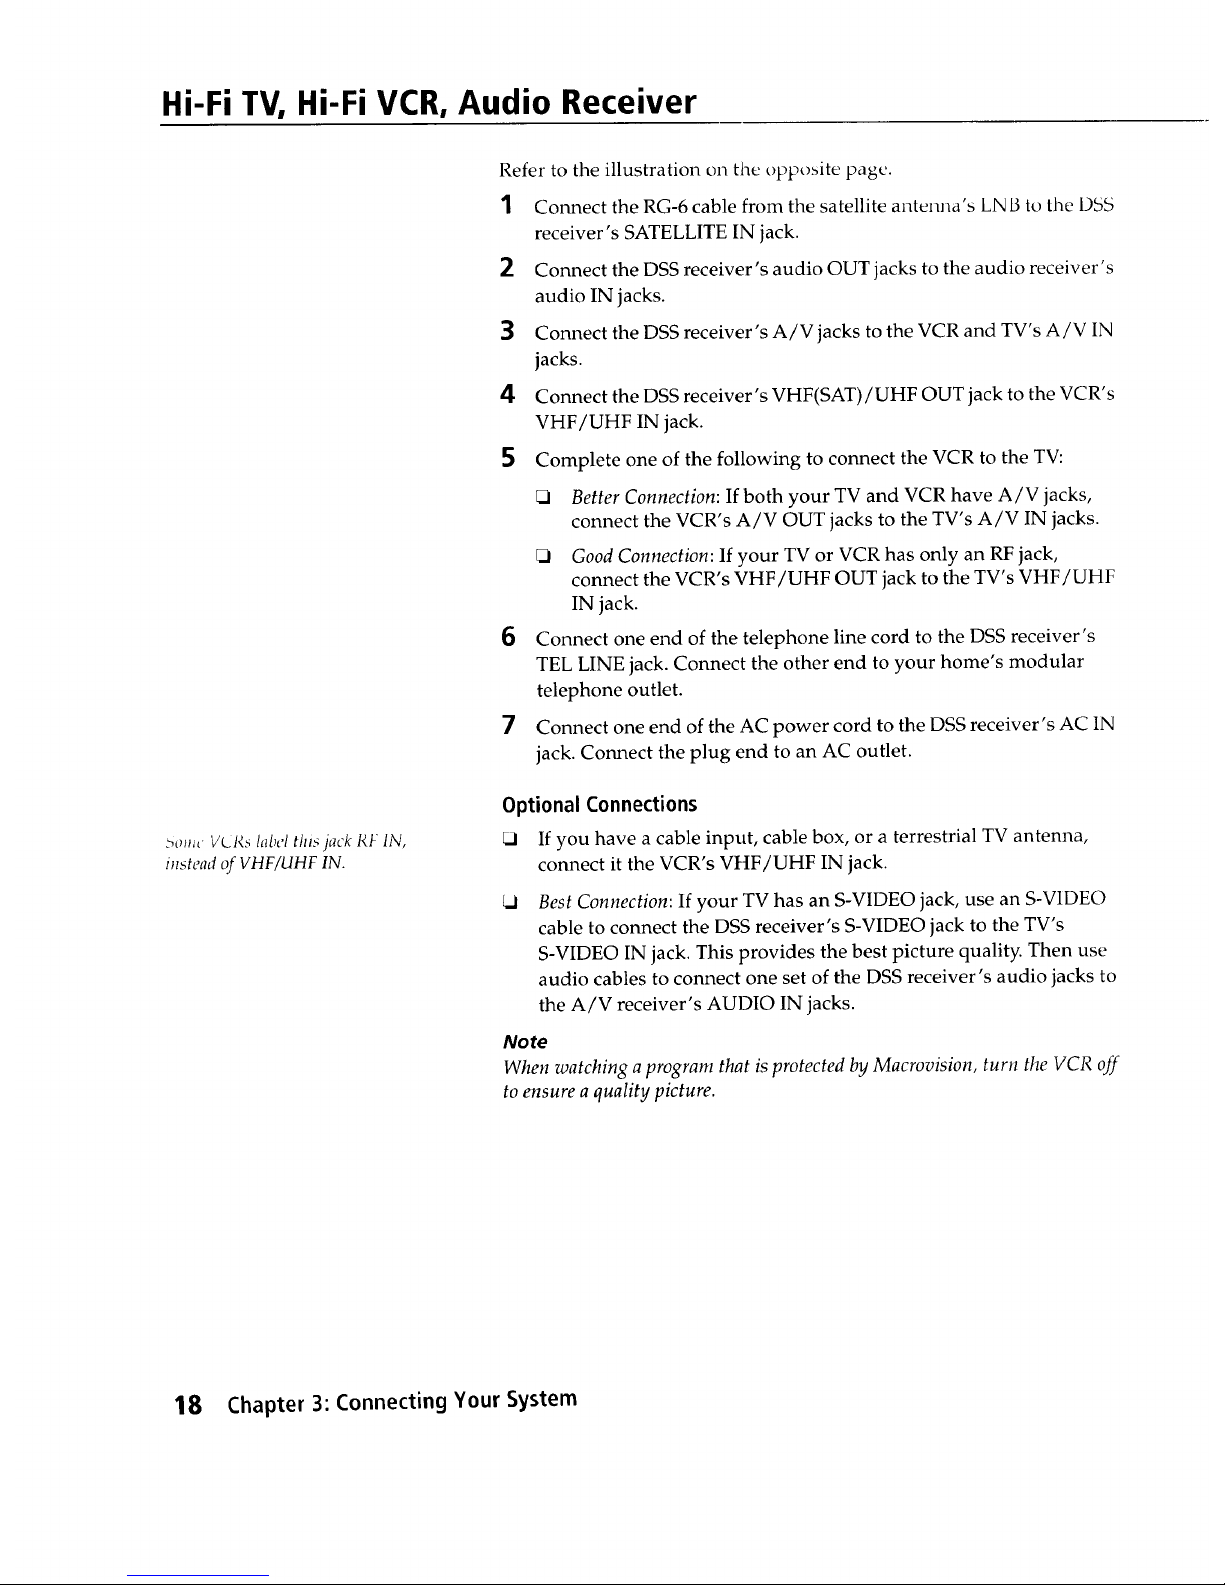
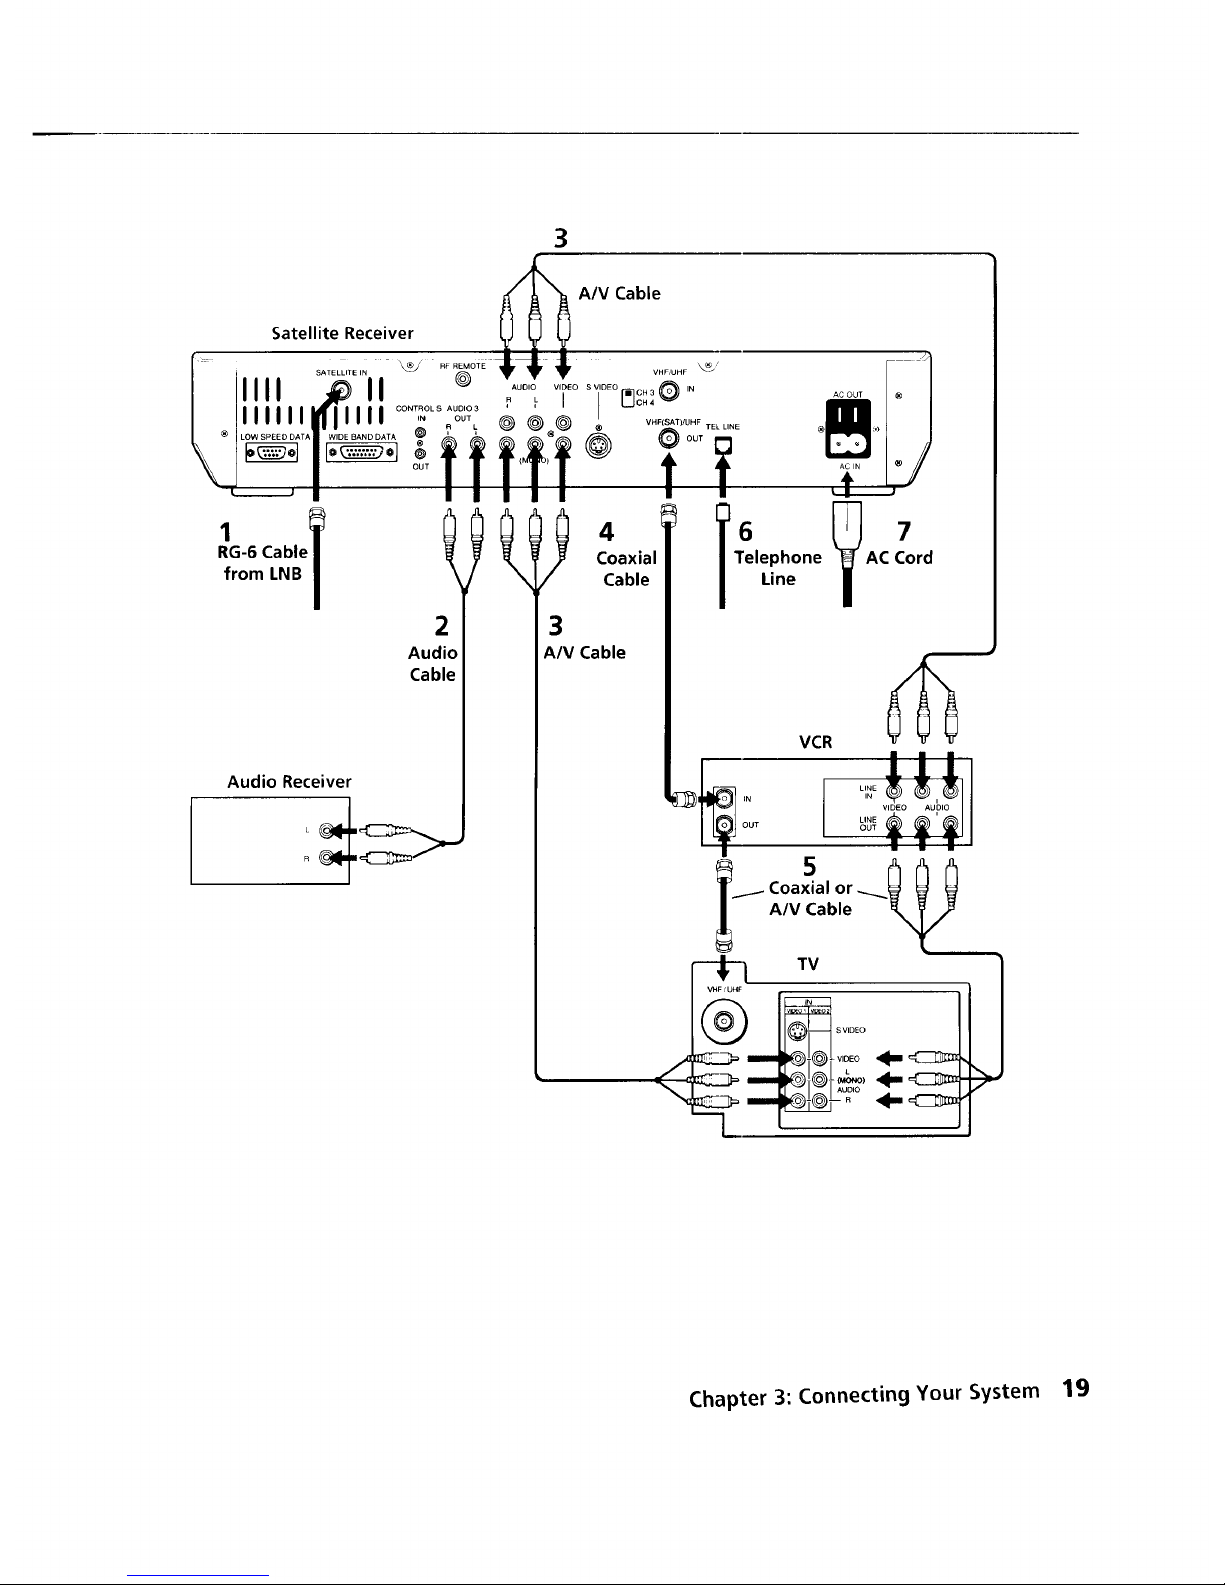
Hi-Fi TV, Hi-Fi VCR, Audio Receiver
>o,lc V_I_s label tltis jack RF IN,
instead of VHF/UHF IN.
Refer to the illustration on the opposite page.
1 Connect the RG-6 cable from the satellite antenna's LN B to the DSS
receiver's SATELLITE IN jack.
2 Connect the DSS receiver's audio OUT jacks to the audio receiver's
audio IN jacks.
3 Connect the DSS receiver's A/V jacks to the VCR and TV's A/V IN
jacks.
4 Connect the DSS receiver's VHF(SAT)/UHF OUT jack to the VCR's
VHF/UHF IN jack.
Complete one of the following to connect the VCR to the TV:
Better Connection: If both your TV and VCR have A/V jacks,
connect the VCR's A/V OUT jacks to the TV's A/V IN jacks.
Good Connection: If your TV or VCR has only an RF jack,
connect the VCR's VHF/UHF OUT jack to the TV's VHF/UHF
IN jack.
Connect one end of the telephone line cord to the DSS receiver's
TEL LINE jack. Connect the other end to your home's modular
telephone outlet.
Connect one end of the AC power cord to the DSS receiver's AC 1N
jack. Connect the plug end to an AC outlet.
Optional Connections
If you have a cable input, cable box, or a terrestrial TV antenna,
connect it the VCR's VItF/UHF IN jack.
Best Connection: If your TV has an S-VIDEO jack, use an S-VIDEO
cable to connect the DSS receiver's S-VIDEO jack to the TV's
S-VIDEO IN jack. This provides the best picture quality. Then use
audio cables to connect one set of the DSS receiver's audio jacks to
the A/V receiver's AUDIO IN jacks.
Note
When watching a program that is protected by Macrovision, turn the VCR off
to ensure a quality picture.
18 Chapter 3: Connecting Your System
IIII
R1G. Cable_i_
from LNB i
3
A/V Cable
Satellite Receiver _ _ _
® RF REMOTE _,_[L t VHF/UHF
S VIDEO OH 3 IN
II _ :uo,ov,i,o! _OH,O
rlllll .... '_NOL S : UCUTO2 _ _ * VHF(SAT)/UHF T ......
_-_ _'1'1'TiT* ,ou,
4 6 7
Coaxial Telephone AC Cord
Cable Line
Au _,/V Cable
Cable
VCR
OUT
N w •
Coaxial or
A/V Cable
-!-1 TV
VHF /UHF
Audio Receiver
R
Chapter 3: Connecting Your System 19
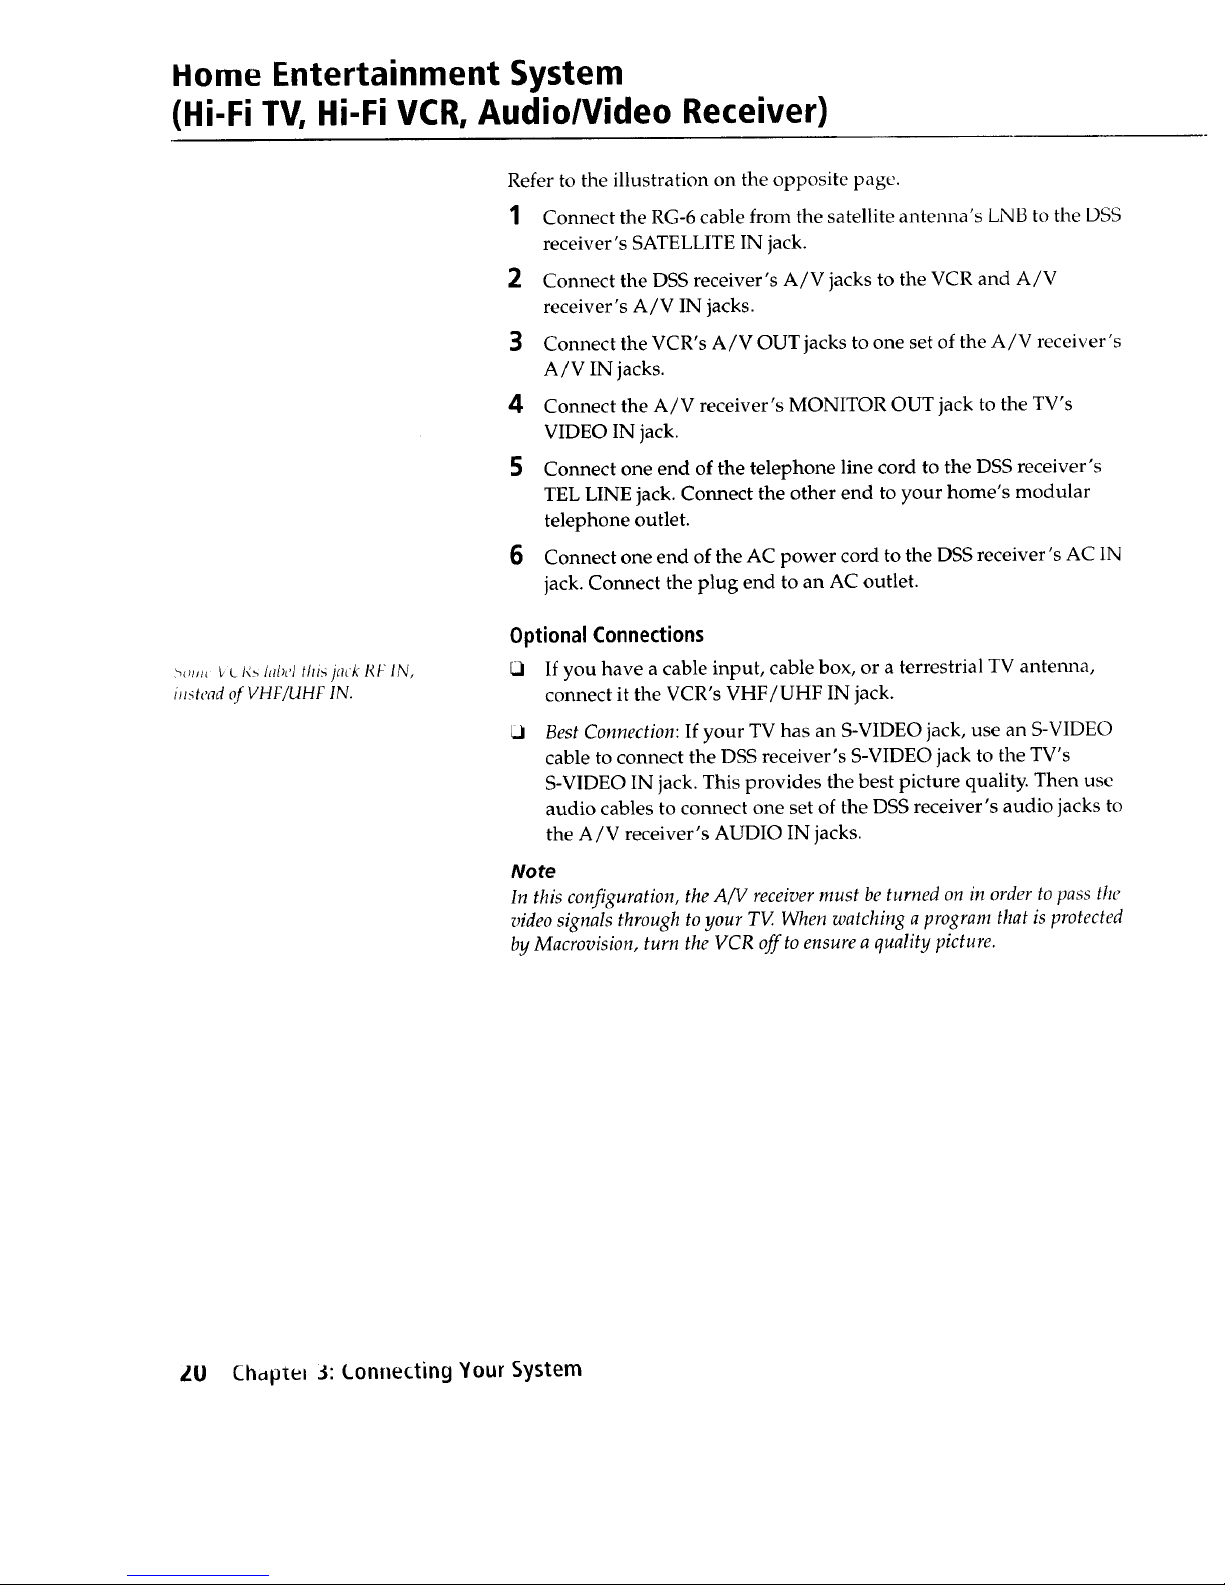
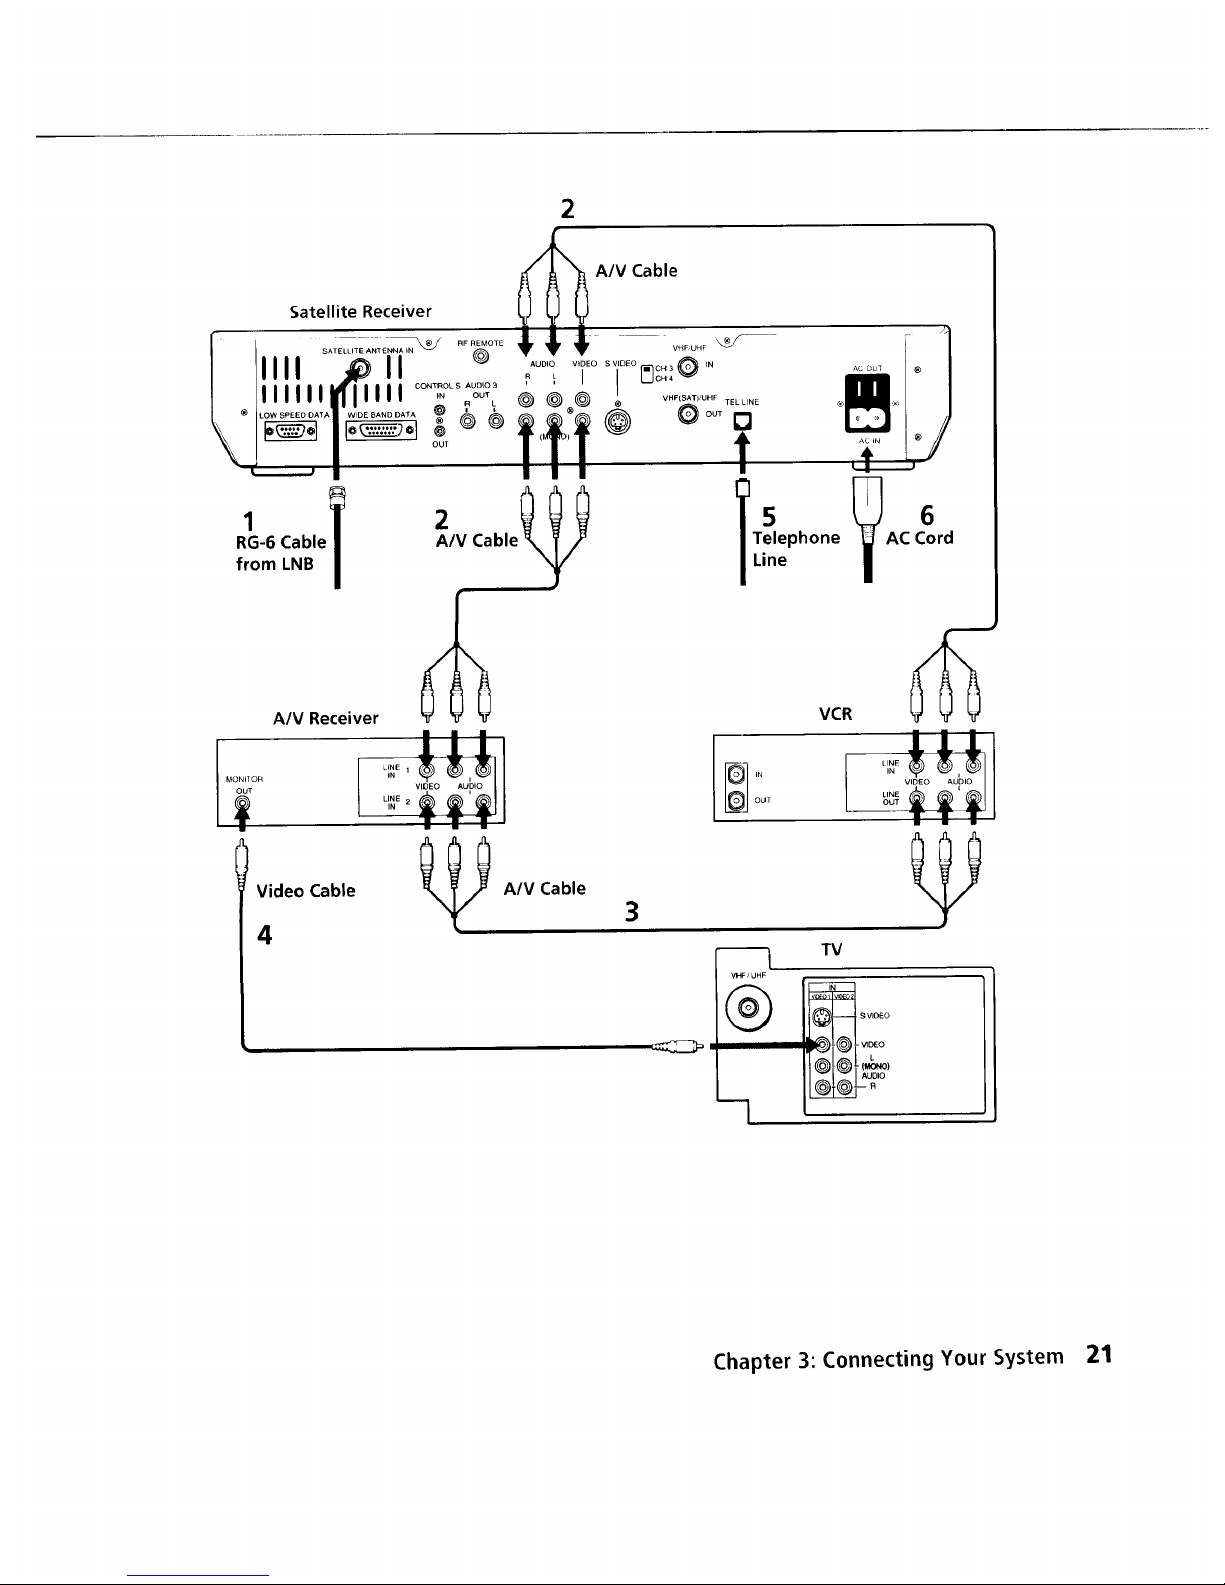
Home Entertainment System
(Hi-Fi TV, Hi-Fi VCR, Audio/Video Receiver)
>_;;/;_ _ t_1_ label t/tis jack RF IN,
i;zstead of VHF/UHF IN.
Refer to the illustration on the opposite page.
1 Connect the RG-6 cable from the satellite antenna's LNB to the DSS
receiver's SATELLITE IN jack.
2 Connect the DSS receiver's A/V jacks to the VCR and A/V
receiver's A/V IN jacks.
3 Connect the VCR's A/V OUT jacks to one set of the A/V receiver's
A/V IN jacks.
4 Connect the A/V receiver's MONITOR OUT jack to the TV's
VIDEO IN jack.
5 Connect one end of the telephone line cord to the DSS receiver's
TEL LINE jack. Connect the other end to your home's modular
telephone outlet.
6 Connect one end of the AC power cord to the DSS receiver's AC IN
jack. Connect the plug end to an AC outlet.
Optional Connections
If you have a cable input, cable box, or a terrestrial TV antenna,
connect it the VCR's VHF/UHF IN jack.
Best Connection: If your TV has an S-VIDEO jack, use an S-VIDEO
cable to connect the DSS receiver's S-VIDEO jack to the TV's
S-VIDEO IN jack. This provides the best picture quality. Then use
audio cables to connect one set of the DSS receiver's audio jacks to
the A/V receiver's AUDIO IN jacks.
Note
In this configuration, the A/V receiver must be turned on in order to pass tile
video signals through to your TV. When watching a program that is protected
by Macrovision, turn the VCR off to ensure a quality picture.
ZU {2hupteh ._: Lonnecting Your System
I MOI_IIOR
OUT
2
A/V Receiver
Video Cable A/V Cable
4
• • •
VIDEO Aup,o
3
OLJT
VCR
-----1 TV
VHF/UHF
® o
__ I_'_
Chapter 3: Connecting Your System 21
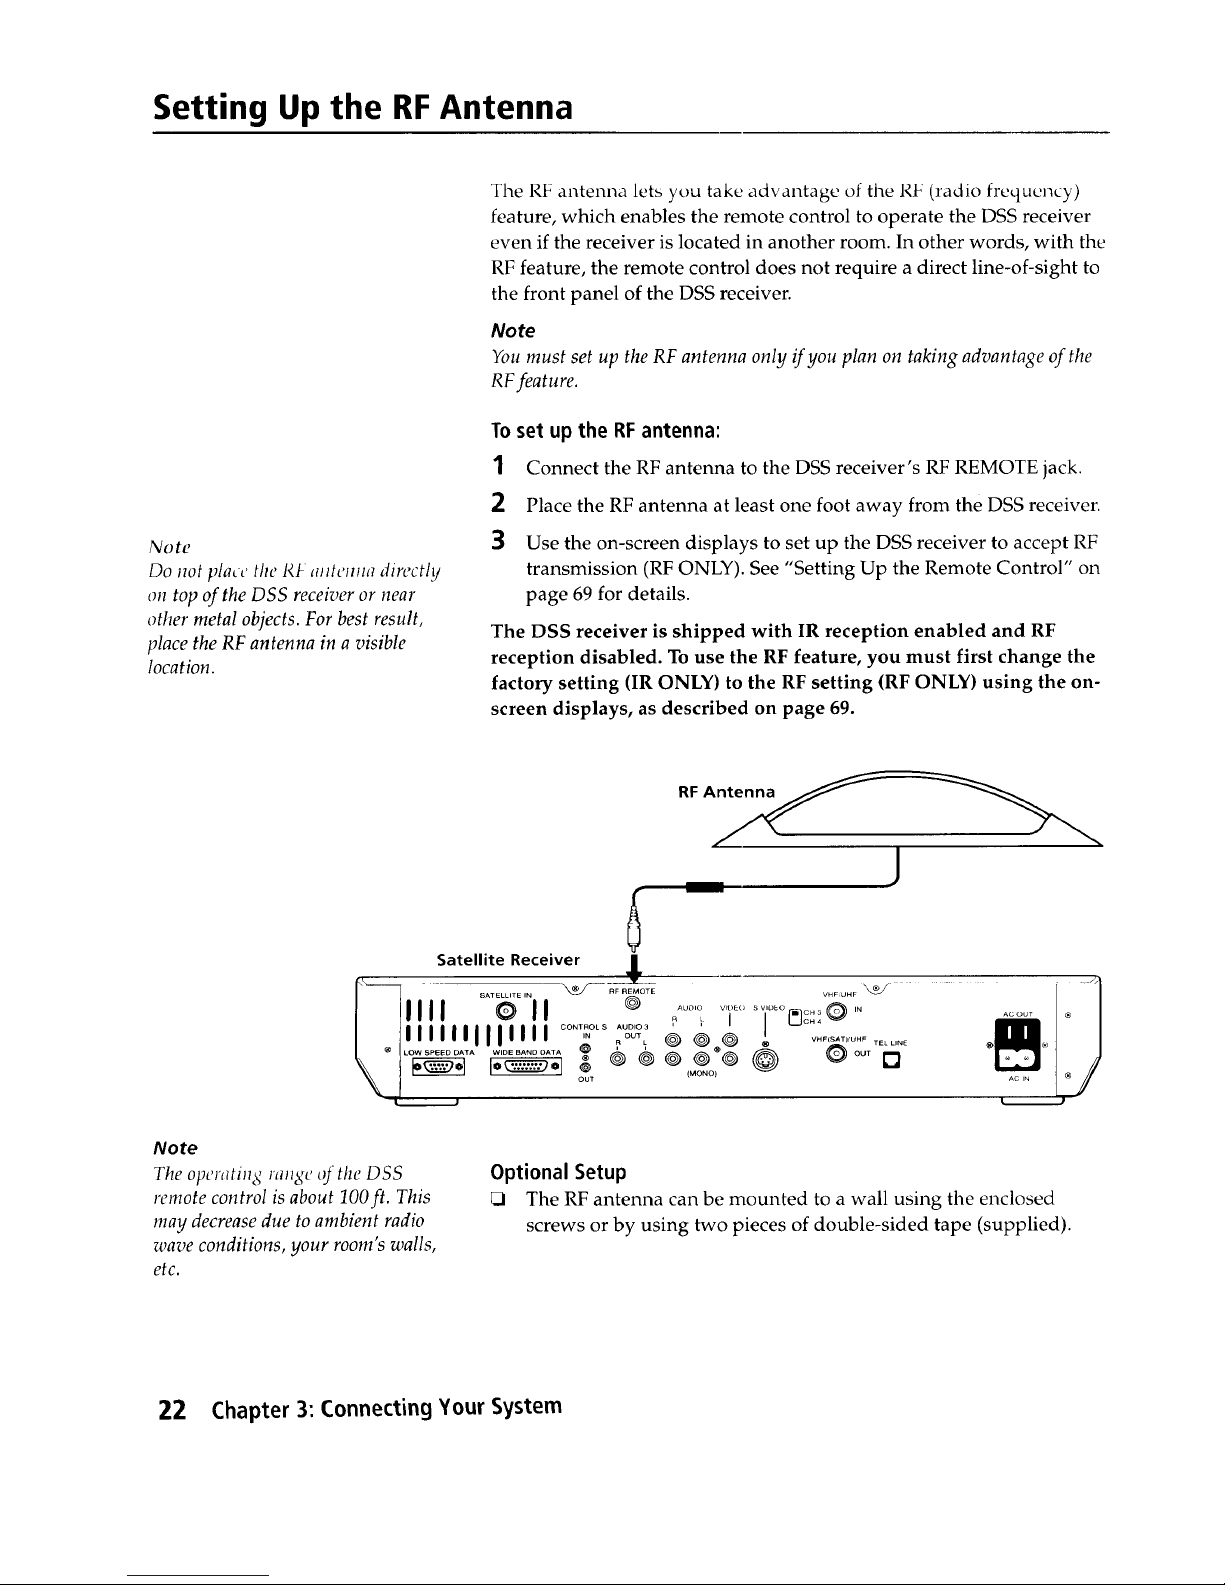
Setting Up the RF Antenna
Note
Do not place the RJ- antemta directly
on top of the DSS receiver or near
other metal objects. For best result,
place the RF antenna in a visible
location.
The RF antenna lets you take advantage of the RF (radio frequency)
feature, which enables the remote control to operate the DSS receiver
even if the receiver is located in another room. In other words, with the
RF feature, the remote control does not require a direct line-of-sight to
the front panel of the DSS receiver.
Note
You must set up the RF antenna only if you plan on taking advantage of the
RF feature.
To set up the RF antenna:
1 Connect the RF antenna to the DSS receiver's RF REMOTE jack.
2 Place the RF antenna at least one foot away from the DSS receiver.
3 Use the on-screen displays to set up the DSS receiver to accept RF
transmission (RF ONLY). See "Setting Up the Remote Control" on
page 69 for details.
The DSS receiver is shipped with IR reception enabled and RF
reception disabled. To use the RF feature, you must first change the
factory setting (IR ONLY) to the RF setting (RF ONLY) using the on-
screen displays, as described on page 69.
J
Satellite Receiver 1!_
II %0 o []o.,@
AUDIO VrDEO S VIOkO CH 3 IN AC OUT ®
I ] I I I I ' I i I I 0 1 0 1 .... ,%OLS :_:*: $ *'* [ ............ T ......
Note
TheopenztinS range_gthe DSS
remote control is about lOOft. This
may decrease due to ambient radio
wave conditions, your room's walls,
etc.
Optional Setup
_J The RF antenna can be mounted to a wall using the enclosed
screws or by using two pieces of double-sided tape (supplied).
22 Chapter 3: Connecting Your System
Setting Up Your DSS System
Viewing Satellite Programs
2
Turn on the TV, and then set the 1V's line input to the DSS receiver.
(For example, set the TV to channel 3 or 4, if you used an RF
connection; or set to VIDEO1, etc., if you used an A/V connection.)
Turn on the VCR and A/V receiver, if you connected these
components. Then set their output switches accordingly.
3 Turn on the DSS receiver and select a station.
Viewing Cable or
Off-Air Programs
Note
Thefollowing instructions apply only if you connected your cable TV or
terrestrial antenna to your DSS receiver.
1 Turn off your DSS receiver, or press the TV/DSS button to set the
DSS receiver to TV mode (DSS indicator on the front panel is off).
2 Turn on the TV and then:
_3
_3
If you have a cable box, turn it on and then tune the TV to the
output channel of your cable box, usually channel 3 or 4.
If you don't have a cable box, just tune your TV to the station
you want to watch.
Recording Satellite
Programs While Watching
Cable or Off-Air Programs
Note
The following instructions apply only if you connected your cable TV o1"
terrestrial antenna to your DSS receiver.
1 Turn on the TV and then:
_3
_3
If you have a cable box, turn it on and then tune the TV to the
output channel of your cable box, usually channel 3 or 4.
If you don't have a cable box, tune your TV to the station you
want to watch.
2 Turn on the DSS receiver, and tune to the program you want to
record. Then set the VCR to line input, and start recording,
according to your VCR's instruction manual.
3 Press the TV/DSS button to set the DSS receiver to TV (DSS
indicator on the front panel is off).
The DSS receiver's signal is sent to the VCR, while the off-air signal is
sent to your TV for you to watch.
Note
For information on using the DSS receiver's automatic timer, see "Setting Up
the Timer" on page 44.
Note
You cannot record one satellite program while watching another satellite
program (unless you have a second DSS receiver). When watching a progr,*_,_
that is protected by Macrovision, turn the VCR off to ensure a quality picture.
Chapter 3: Connecting Your System 23

24 Chapter3:ConnectingYourSystem
Using the System Features
Read this chapter to learn how tu u>c ,sy>Lenl leatmc> illcludin_ rile
Master program guide, Station Index, Favorite Station Guide, and the
ordering of pay-per-view programs.
Overview
This chapter provides detailed instructions for using most of the
features of your DSS receiver. Topics include:
Checking to make sure your system is completely set up and ready
to be used (page 26).
Ca Using Highlight and Select, the simple, two-step process for
operating all the on-screen displays (page 27).
Displaying and navigating through the Master Guide (page 28).
[3 Selecting subscription and pay-per-view programs from the
program guides (page 32).
L.I Choosing from the two program guide formats, Guide and List,
and selecting special program guides sorted by category and
subcategory (page 33).
Using the Custom Guide (page 35).
_1 Using the Station Index (page 36).
Using the three Favorite Station Guides (page 38).
[3 Using other (program provider) guides (page 39).
Displaying the Program Banner and using the JUMP feature
(page 40).
Selecting an alternate audio track for the program you're currently
watching (page 41).
Canceling pay-per-view programs you've ordered (page 42).
Checking your pay-per-view purchase record (page 43).
Setting the automatic timer (page 44).
Reading mail messages sent to your DSS receiver (page 47).
25
Before You Get Started ...
If Your System Is Not
Completely Installed ...
Make sure you (or your DSS system installer) have completed the
following procedures before you start using your DSS receiver:
1 Install the satellite antenna, as described in the Satellite Antemla
Installation Manual.
Note
Make certain that you (or your DSS system installer) have optimized the
signal strength. If the signal is not optimized, you may experience losses in
audio or video, especially during rain, snow, or other conditions that tend to
degrade signal performance. See the Satellite Antenna Installation Manual for
details on pointing the dish and optimizing the antenna's signal strength.
2 Connect the satellite antenna to your DSS receiver. Then connect
the receiver to your television and telephone line. (See Chapter 3.)
Note
Your phone line must be connected to the DSS receiver in order for you to
purchase a pay-per-view program with the DSS remote control.
3 Make sure the access card is inserted into the DSS receiver. The
receiver comes with the card already inserted. (See page 66 for
details on inserting the access card.)
4 Call your program providers (DIRECTV and USSB) to activate
your service. You'll need to provide information, including the
model and serial numbers of your DSS receiver and the access card
number.
DIRECTV® 1-800-DIRECTV (347-3288)
USSB 1-800-204-USSB (8772)
See the manual that came with the satellite antenna and Chapter 3 of
this manual for complete installation instructions. Or, see your DSS
dealer to arrange for a professional installation or the purchase of the
Sony-brand DSS Installation Kit.
_.6 C.hagte[ 4: Using the S_jstem Features
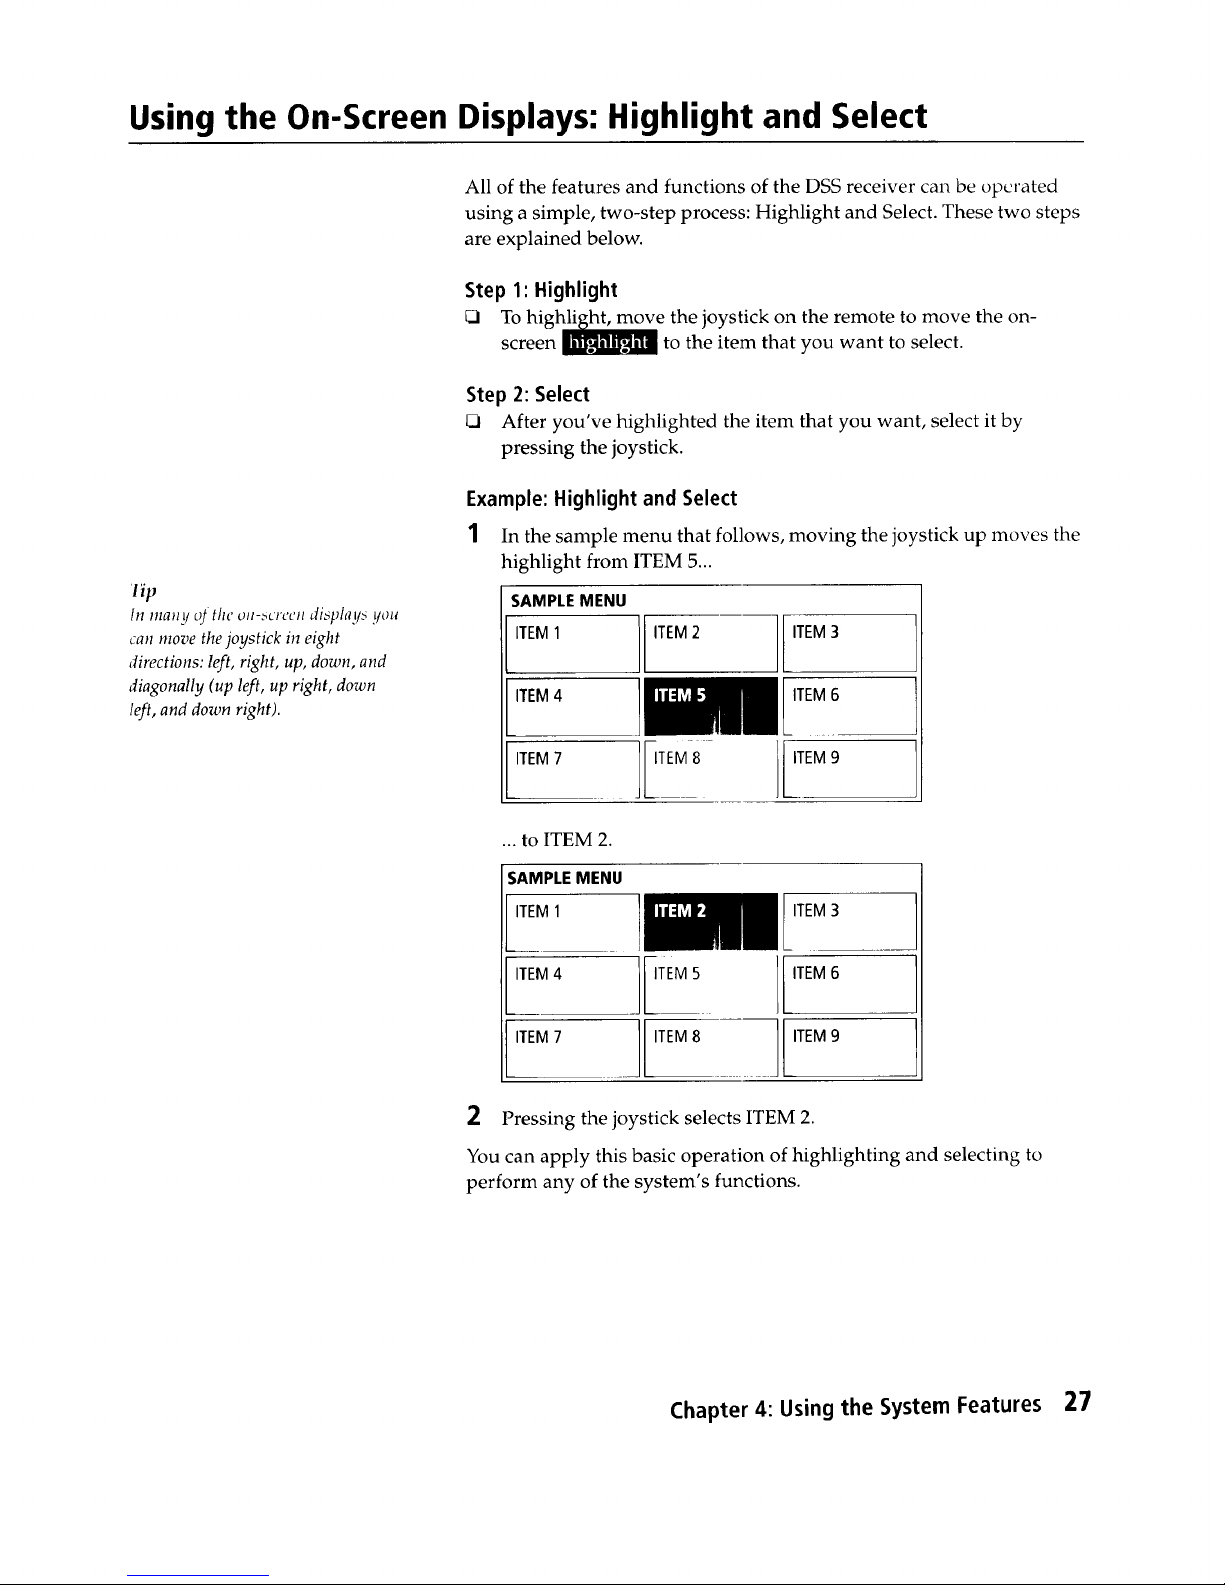
Using the On-Screen Displays: Highlight and Select
'1lp
In ma.y o) the o,-_creen displays you
can move the joystick in eight
directions: left, right, up, down, and
diagonally (up left, up right, down
left, and down right).
All of the features and functions of the DSS receiver can be operated
using a simple, two-step process: Highlight and Select. These two steps
are explained below.
Step 1: Highlight
Q To high_e the joystick on the remote to move the on-
screen _ to the item that you want to select.
Step 2: Select
I21 After you've highlighted the item that you want, select it by
pressing the joystick.
Example: Highlight and Select
1 In the sample menu that follows, moving the joystick up moves the
highlight from ITEM 5...
SAMPLEMENU
ITEM1 ITEM2 ITEM3
ITEM4
ITEM7
iiiilll!
]
ITEM8 ITEM9
... to ITEM 2.
SAMPLE MENU
I ITEM1
ITEM4
ITEM7 ITEM8
ITEM3
ITEM6
ITEM9
2 Pressing the joystick selects ITEM 2.
You can apply this basic operation of highlighting and selecting to
perform any of the system's functions.
Chapter 4: Using the System Features 27
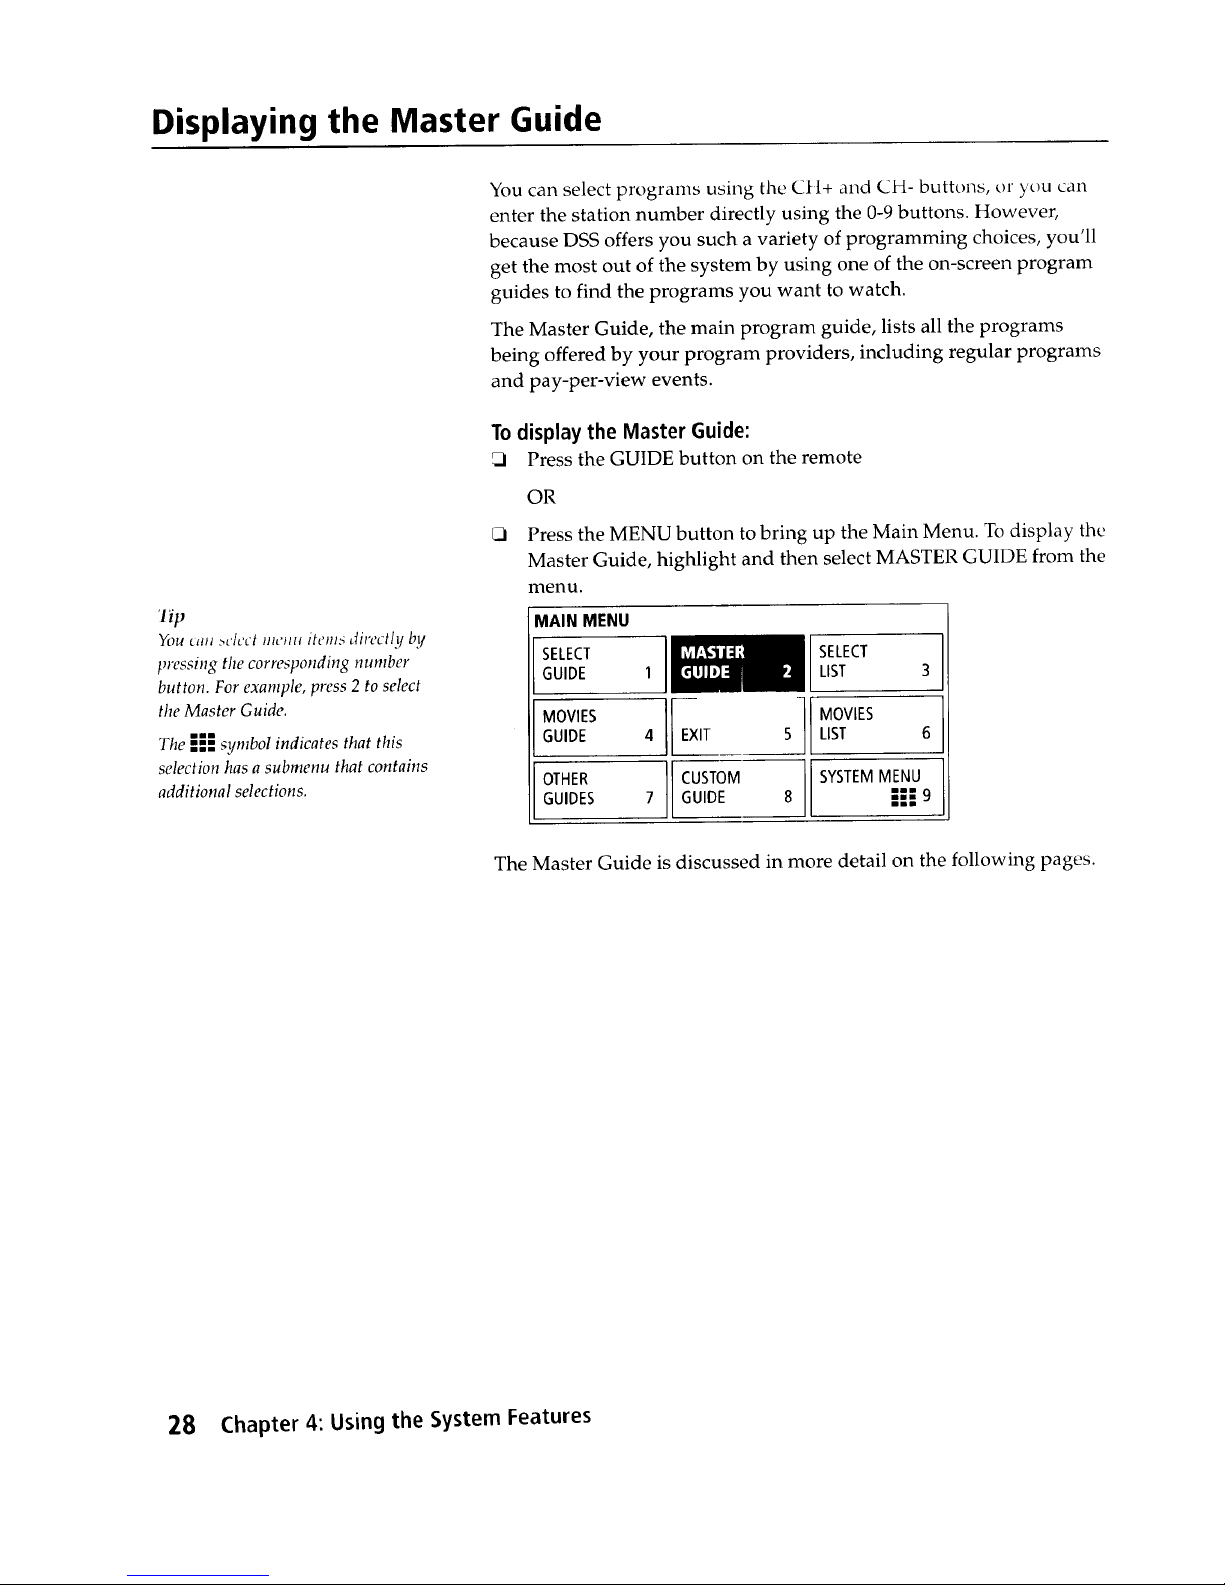
Displaying the Master Guide
lip
_4_u_a_t>dcci na'Hu items di_vclly by
tnvssing tile corresponding number
button. For example, press 2 to select
the Master Guide.
The E;; symbol indicates that this
selection has a submenu that contains
additional selections.
You can select programs using the Ctt+ and CH- buttons, or you can
enter the station number directly using the 0-9 buttons. However,
because DSS offers you such a variety of programming choices, you'll
get the most out of the system by using one of the on-screen program
guides to find the programs you want to watch.
The Master Guide, the main program guide, lists all the programs
being offered by your program providers, including regular programs
and pay-per-view events.
To display the Master Guide:
Press the GUIDE button on the remote
OR
Press the MENU button to bring up the Main Menu. To display the
Master Guide, highlight and then select MASTER GUIDE from the
menu.
MAIN MENU
SELECT
GUIDE
I_l SELECT
1 LIST
MOVIES MOVIES
GUIDE 4 EXIT 5 LIST
OTHER CUSTOM SYSTEMMENU
GUIDES 7 GUIDE 8 ,,--""9
mmm
The Master Guide is discussed in more detail on the following pages.
28 Chapter 4: Using the System Features
 Loading...