

Sony DR-260USB User Manual [bg]
3-249-678-15(1)
Stereo Headset
Operating Instructions
Mode d’emploi
Manual de instrucciones
DR-260USB
©2003 Sony Corporation Printed in Malaysia
English
WARNING
To prevent fire or shock hazard, do not
expose the unit to rain or moisture.
To prevent fire or shock hazard, do not place objects
filled with liquids, such as vases, on the apparatus.
To avoid electrical shock, do not open the cabinet.
Refer servicing to qualified personnel only.
CE mark
The validity of the CE marking is restricted to only
those countries when it is legally enforced, mainly in
the countries EEA (European Economic Area).
For the customers in the U.S.A.
NOTE
This equipment has been tested and found to comply
with the limits for a Class B digital device, pursuant to
Part 15 of the FCC Rules. These limits are designed to
provide reasonable protection against harmful
interference in a residential installation. This
equipment generates, uses, and can radiate radio
frequency energy and, if not installed and used in
accordance with the instructions, may cause harmful
interference to radio communications. However, there
is no guarantee that interference will not occur in a
particular installation. If this equipment does cause
harmful interference to radio or television reception,
which can be determined by turning the equipment
off and on, the user is encouraged to try to correct the
interference by one or more of the following
measures:
– Reorient or relocate the receiving antenna.
– Increase the separation between the equipment and
receiver.
– Connect the equipment into an outlet on a circuit
different from that to which the receiver is
connected.
– Consult the dealer or an experienced radio/TV
technician for help.
You are cautioned that any changes or modifications
not expressly approved in this manual could void
your authority to operate this equipment.
If you have any questions about this product, you may
call:
Sony Customer Information Services Center 1-800222-7669
or http://www.sony.com/
Declaration of Conformity
Trade Name : SONY
Model Name : UAB-260 (USB Audio Box)
Responsible Party : Sony Electronics Inc.
Address : 16530 Via Esprillo, San Diego, CA
92127 USA
Telephone No. : 858-942-2230
This device complies with Part 15 of the FCC
Rules. Operation is subject to the following two
conditions. (1) This device may not cause harmful
interference, and (2) this device must accept any
interference received, including interference that
may cause undesired operation.
• Microsoft and Windows are registered trademarks
or trademarks of Microsoft Corporation in the
United States and / or other countries.
• IBM and PC/AT are registered trademarks of
International Business Machines Corporation.
• Pentium is a trademark or registered trademark of
Intel Corporation.
• In this manual, Microsoft
®
Windows® XP Home
Edition and Microsoft® Windows® XP Professional
are referred to as Windows XP.
• In this manual, Microsoft® Windows® 2000
Professional is referred to as Windows 2000.
• In this manual, Microsoft® Windows® Millennium
Edition is referred to as Windows Me.
• In this manual, Microsoft® Windows® 98 Second
Edition is referred to as Windows 98SE.
• All other names of systems and products are
trademarks or registered trademarks of their
respective owners.TM and ® marks are omitted in
this manual.
*1 IEC (International Electronic Committee) tested.
*2 The USB Audio Box supports USB 2.0. (previously USB 1.1 )
Design and specifications are subject to change
without notice.
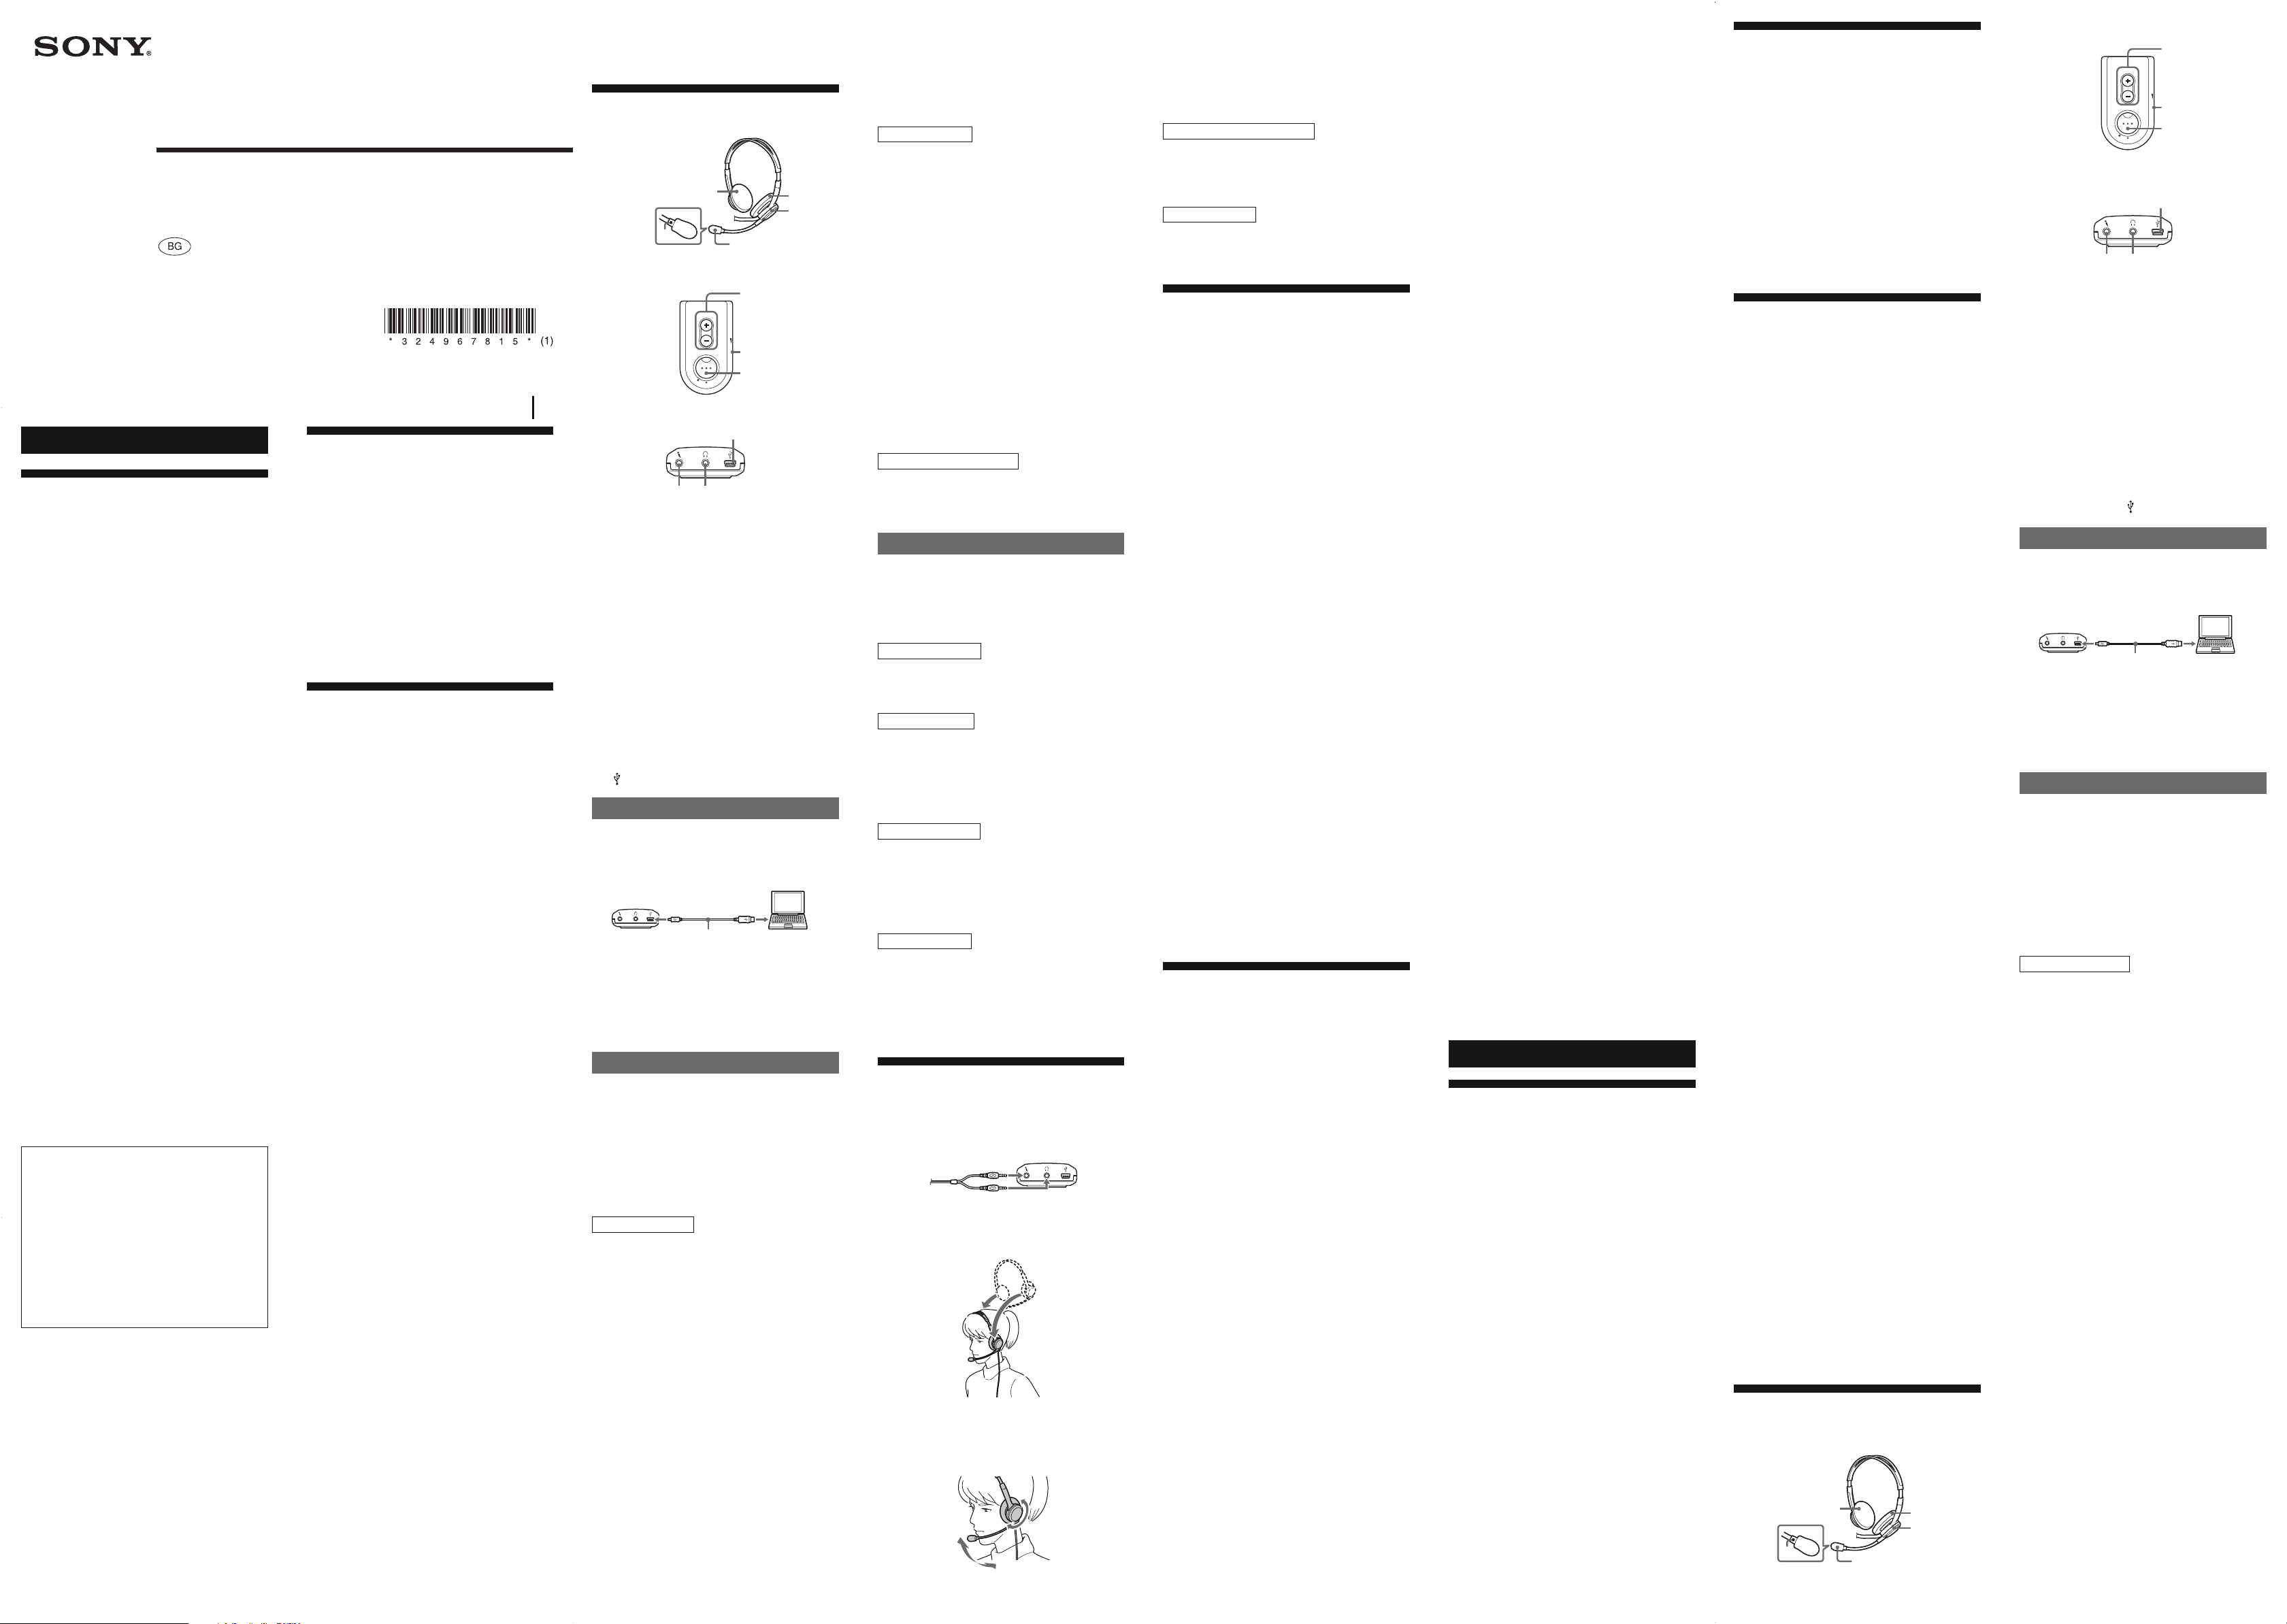
Identifying parts
Step 1 : Connection
Connect your USB Audio box and computer with the
supplied USB cable.
dedicated USB cable
Notes
• The headset supports the USB 2.0 version
( previously USB 1.1 version. )
• The headset is not guaranteed to operate with a USB
hub or USB extension cable. Use the dedicated USB
cable.
Step 2 : Installing the USB driver
USB drivers are included in operating systems if you
are using Windows 98SE, Me, 2000, and XP. USB
drivers will be installed when the system is connected
to the computer for the first time. Follow the on-screen
instructions to install. For details, refer to the manual
of your computer.
Note
When connecting to different USB ports, you may
have to install USB drivers.
For Windows 98SE
When the system is connected to the computer, [Add
New Hardware Wizard] is displayed and the
installation of the device driver automatically starts.
USB Composite Device, USB Human Interface Device
and USB Audio Device are installed.
Install each USB driver following the on-screen
instructions.
You may need the Windows 98SE CD-ROM to install
the drivers.
The following explains the steps of installing the USB
Composite Device as an example. Install the USB
Human Interface Device and USB Audio Device in the
same way.
1 Check that the [USB Composite Device] is
displayed in the [This wizard searches for
new drivers for:] window, and click [Next].
2 Check that the [Search for the best driver for
your device. (Recommended).]check box is
selected, and click [Next].
3 [Windows will search for new drivers in its
driver database on your hard drive, and in
any of the following selected locations.] is
displayed, and click [Next].
If the Windows 98SE CD-ROM is required, insert it in
the CD-ROM drive and select CD-ROM drive.
Headset DR-260DP
USB Audio Box UAB-260
USB Audio Box connection parts
1
2
4
3
5
6
7
8
90
4 [Windows driver file search for the device:]
is displayed. check that [USB Composite
Device] is displayed, and click [Next].
5 When [USB Composite Device Windows has
finished installing the software that your
new hardware device requires.] is displayed,
click [Finish].
For Windows Me
When the system is connected to the computer, [Add
New Hardware Wizard] is displayed and the
installation of the device driver automatically starts.
USB Composite Device, USB Human Interface Device
and USB Audio Device are installed.
Install each USB driver following the on-screen
instructions.
The USB Composite Device and USB Human Interface
Device are installed automatically. Install the USB
Audio Device following the steps below.
1 Check that the [USB Audio Device] is
displayed in [Windows has found the
following new hardware:] window, and
check that the [Automatic search for a better
driver (Recommended)] check box is selected
and click [Next].
2 The USB Audio device is installed.
3 When [USB Audio Device Windows has
finished installing the new hardware
device.] is displayed, click [Finish].
For Windows 2000 and XP
When the system is connected to the computer, the
USB Composite Device, USB Human Interface Device
and USB Audio Device are installed automatically.
Setting of music CD replay
This setting is necessary when playing back a music
CD in the CD-ROM drive.
Follow the instructions below according to your
operating system and click the check box of [Enable
digital CD audio for this CD-ROM device].
For Windows 98SE
Click the [Start] menu and select [Settings],
[Control Panel], [Multimedia], and [CD Music].
For Windows Me
Click the [Start] menu and select [Settings],
[Control Panel], [System] and [Device Manager].
Then double-click [CD-ROM] to select the
CD-ROM drive for replaying the music and click
[Properties], and then click [Properties] again.
For Windows 2000
Click the [Start] menu and select [Settings],
[Control Panel], [Sounds and Multimedia], and
[Hardware]. Then select the CD-ROM drive for
replaying the music and click [Properties], and
then click [Properties] again.
For Windows XP
Click the [start] menu and select [Control Panel],
[Sounds, Speech, and Audio Devices], [Sounds
and Audio Devices], and [Hardware]. Then select
the CD-ROM drive for replaying the music and
click [Properties], and then click [Properties]
again.
How to use
1 Connect the headphone plug ( black ) to the
headphone jack and connect the
microphone plug ( pink ) to the microphone
jack.
2 Wear the headset marked R on your right
ear and the one marked L on your left ear.
3 Position the microphone in front of your
mouth by turning the Microphone adjuster.
Welcome!
Thank you for purchasing the Sony
DR-260USB Stereo Headset. Before operating the unit,
please read this manual thoroughly and retain it for
future reference.
Some features are:
• Designed for comfortable, long term use.
• Digital transmission via USB connection preventing
noise from your computer.
• Handy operation via USB Audio Box functions, such
as headphone volume, microphone volume, and
muting.
• Flexible Boom microphone design for reduced noise
and easy adjustment and positioning in front of your
mouth.
• Practical long cord for both headphone and
Dedicated USB cable for use anywhere regardless of
your computer’s location.
Specifications
Stereo Headset DR-260DP
Cord 3 m (9 ft. 10 1/8 in.)
Plug Gold plated stereo mini plug (for
headphone)
Gold plated mini plug (for microphone)
Mass Approx. 90 g (3.18 oz.) (without cord)
Receiver
Type Open air dynamic
Driver unit 30 mm (1
3
/16 in.) (CCAW Voice Coil),
dome type
Maximum input power
1,000 mW (IEC*
1
)
Impedance 24 Ω at 1 kHz
Sensitivity 100 dB/mW
Reproduction frequency range
40 - 20, 000 Hz
Microphone
Design Flexible Boom microphone
Type Electret condenser
Open circuit voltage level
-40 dB (0 dB = 1 V/Pa)
Effective frequency rage
20 - 20, 000 Hz
USB Audio Box UAB-260
Frequency range
20 - 20,000 Hz (headphone)
100 - 10,000 Hz (microphone)
Input / Output jacks
Output for headphone (mini jack/stereo)
Impedance load : 16 - 40 Ω
Input for microphone (mini jack/monaural)
Plug-in-power system
Dedicated USB jack
Power supply USB bus power compliant (5 V, 100 mA)
Dimensions (excluding projection)
Approx. 53×20×92 mm (w/h/d)
(2
1
/8 ×3/4 × 3 5/8 in.)
Mass Approx. 40 g (1.4 oz.)
Operating environment
Compliant computer :
IBM PC/AT or compatible computers
Compliant OS :
Windows 98 Second Edition/Windows
2000 Professional/Windows
Millennium Edition/ Windows XP
Home Edition/Windows XP
Professional (manufacturer installed)
CPU: Pentium II 266 MHz or better
USB port*
2
Supplied accessories
Dedicated USB cable (1)
Operating instructions (1)
• For the operating environment mentioned above, the
headset is not guaranteed to operate with all
computers.
• The headset is not guaranteed to operate with home
built computers, operating systems that are
personally up-graded or multiple operating systems.
• The headset is not guaranteed to operate with
functions such as system suspend, sleep and
hibernation, on all computers.
Adjusting the MIC LEVEL
Check the level of MIC LEVEL after recording with
the [Sound Recorder] software pre-installed in your
Windows.
Adjust MIC LEVEL of the USB Audio Box when the
volume level is too high or too low.
For Windows 98SE/Me/2000
Click the [Start] menu, select [Programs],
[Accessories], [Entertainment], and click [Sound
Recorder].
For Windows XP
Click the [Start] menu, select [All Programs],
[Accessories], [Entertainment], and click [Sound
Recorder].
Precautions
On Safety
• Listening with the headphones at high volume may
affect your hearing. For traffic safety, do not use
while driving or cycling.
• Be careful not to use the headphone at too loud a
volume level. Otherwise, you may have audio
feedback (a howling effect) as the microphone picks
up the loud sound from the headphone unit.
• Do not drop your headset or subject it to external
shock, as it may cause a malfunction.
• Do not disassemble or attempt to open any parts of
the system.
• Grasp the plug part of the dedicated USB cable or
headset cord when you disconnect from the
connectors or jacks.
• After operating the headset with the dedicated USB
cable or headset cord, disconnect the USB cable from
the computer if the headset is not to be used for an
extended period.
• Do not use alcohol, benzene, or thinner to clean the
cabinet.
Do not place the system in any of the
following locations.
• Do not leave the system in a location near heat
sources, or in a place subject to direct sunlight,
excessive dust, moisture, rain or mechanical shock.
• Bathroom or other high-humidity locations
• Although this system is magnetically shielded, do
not leave recorded tapes, watches, personal credit
cards or floppy disks using magnetic coding in front
of the system for an extended period of time.
On headset
Act considerately
When the volume is too high, the sound leaks outside
the headset. Be careful not to raise the volume too
high that it bothers people around you. There is a
tendency to raise the volume when using in noisy
places. However, the volume should be kept at a level
where you can respond when called while listening to
the headset.
On ear pads and wind screen
The ear pads and wind screen are replaceable. Replace
them when they are worn out. To replace the ear pads
and wind screen, consult your nearest Sony dealer.
If you have any questions or problems concerning
your system that are not covered in this manual,
please consult your nearest Sony dealer.
Troubleshooting
Sound of the headphone is low.
❒ The headphone plug is not connected to the jack
properly.
c Connect the headphone plug properly.
❒ The Volume Control of your computer or the
volume level of the music playback software is
turned down.
c Adjust the Volume Control.
c Turn up the volume level of the music playback
software.
There is no sound from the headphone.
❒ The dedicated USB cable is not connected to your
computer.
c Connect the dedicated USB cable to your
computer.
❒ The headphone plug is not connected to the
headphone jack.
c Connect the headphone plug to the headphone
jack.
❒ The system is connected while music software is
being replayed.
c Stop playback of the music software and start
again.
❒ The audio replaying device of your computer is
not set correctly.
c For Windows 98SE
Select [Audio] in [Multimedia Properties], and
select [USB Audio Device] for [Preferred
device] in the Playback menu.
c For Windows Me
Select [Audio] in [Sounds and Multimedia
Properties], and select [USB Audio Device] for
[Preferred device] in the Sound Playback menu.
c For Windows 2000
Select [Audio] in [Sounds and Multimedia
Properties], and select [USB Audio Device] for
[Preferred device] in the Sound Playback menu.
c For Windows XP
Select [Audio] in [Sounds and Audio Devices
Properties], and select [USB Audio CODEC] for
[Default device] in the Sound playback menu.
❒ The Volume Control of your computer or the
music playback software etc, is set to MUTE.
c Unset MUTE.
❒ Your computer does not recognize the headset as
a USB device.
c Restart your computer.
❒ The CD-ROM drive of your computer does not
support the digital play function of WDM.
c Use a CD-ROM drive that supports the digital
play function of WDM.
Sound of the headphone and recorded
sound are disrupted.
❒ The CPU of your computer is overloaded.
c Exit other applications.
❒ Other USB devices are connected to your
computer and being operated simultaneously.
c Quit operating other USB devices.
You cannot record sound from the
microphone.
❒ The microphone plug is not connected to the
microphone jack.
c Connect the microphone plug to the microphone
jack.
❒ The MIC MUTING button is set to Muting mode.
c Set the MIC MUTING button to TALK mode.
❒ The audio recording device of your computer is
not set correctly.
c For Windows 98SE
Select [Audio] in [Multimedia Properties], and
select [USB Audio Device] for [Preferred
device] in the Recording menu.
c For Windows Me
Select [Audio] in [Sounds and Multimedia
Properties], and select [USB Audio Device] for
[Preferred device] in the Sound Recording
menu.
c For Windows 2000
Select [Audio] in [Sounds and Multimedia
Properties], and select [USB Audio Device] for
[Preferred device] in the Sound Recording
menu.
c For Windows XP
Select [Audio] in [Sounds and Audio Devices
Properties], and select [USB Audio CODEC] for
[Default device] in the Sound recording menu.
Recorded sound is low.
❒ The microphone plug is not connected to the
microphone jack properly.
c Connect the microphone plug properly.
❒ The microphone is away from your mouth.
c Position the microphone in front of your mouth.
❒ MIC LEVEL is turned down.
c Turn up MIC LEVEL.
There is noise in recorded sound.
❒ There are electrical wires, fluorescent lights or
mobile phones near the headset (especially the
microphone.)
c Move away from any possible sources of
electromagnetic interference.
Recorded sound is distorted.
❒ MIC LEVEL is set too high.
c Decrease the level of MIC LEVEL.
For details on the operation of your computer, refer to
the operating instructions of your computer.
There can be some breakdowns that cannot be solved
even with Troubleshooting. In such cases, contact
your nearest Sony dealer.
qa
Français
AVERTISSEMENT
Afin d’éviter les risques d’incendie ou
d’électrocution, ne pas exposer cet
appareil à la pluie ou à l’humidité.
Pour éviter les risques d’incendie ou d’électrocution,
ne pas poser de récipients remplis d’eau (p. ex. des
vases) sur l’appareil.
Afin d’écarter les risques d’électrocution, ne pas
ouvrir le boîtier. Ne confier l’entretien de l’appareil
qu’à un personnel qualifié.
Marque CE
La marque CE est valable uniquement dans les pays
où elle a force de loi, c’est-à-dire principalement dans
les pays de l’EEE (Espace Economique Européen).
• Microsoft et Windows sont des marques déposées
ou des marques commerciales de Microsoft
Corporation aux Etats-Unis et / ou dans d’autres
pays.
• IBM et PC/AT sont des marques déposées
d’International Business Machines Corporation.
• Pentium est une marque commerciale ou une
marque déposée d’Intel Corporation.
• Dans ce manuel, Windows XP fait référence à
Microsoft
®
Windows® XP Edition Familiale et
Microsoft® Windows® XP Professionnel.
• Dans ce manuel, Windows 2000 fait référence à
Microsoft® Windows® 2000 Professionnel.
• Dans ce manuel, Windows Me fait référence à
Microsoft
®
Windows® Millenium Edition.
• Dans ce manuel, Windows 98SE fait référence à
Microsoft® Windows® 98 Deuxième Edition.
• Tous les autres noms de systèmes et de produits
sont des marques commerciales ou des marques
déposées de leurs propriétaires respectifs. Les
symbolesTM et ® ne sont pas utilisés dans ce manuel.
Bienvenue !
Nous vous remercions d’avoir fait l’acquisition du
casque stéréo DR-260USB de Sony. Avant d’utiliser cet
appareil, lisez attentivement le présent mode d’emploi
et conservez-le pour toute référence ultérieure.
Le casque offre les fonctions suivantes :
• conception pour une utilisation prolongée
confortable.
• la transmission numérique via la connexion USB
réduit les parasites générés par votre ordinateur.
• une utilisation facile, via les fonctions Boîtier Audio
USB, telles que le volume du casque, le volume du
micro et la fonction de coupure du son.
• conception de micro monté sur tige flexible pour une
réduction des bruits parasites ainsi qu’un réglage et
une mise en place aisés devant la bouche.
• cordon long pratique pour le casque et pour le câble
USB dédié pour une utilisation partout quel que soit
l’emplacement de votre ordinateur.
Spécifications
Casque stéréo DR-260DP
Cordon 3 m
Fiche Mini-fiche stéréo plaquée or (pour le
casque)
Mini-fiche plaquée or (pour le micro)
Masse Environ 90 g (3,18 on.) (sans cordon)
Récepteur
Type Ouvert dynamique
Transducteurs
30 mm (1
3
/16 po.) (Bobine acoustique
CCAW), type dôme
Puissance maximale en entrée
1 000 mW (IEC*
1
)
Impédance 24 Ω à 1 kHz
Sensibilité 100 dB/mW
Gamme de fréquence de reproduction
40 à 20 000 Hz
Micro
Conception Micro monté sur tige flexible
Type Condensateur électret
Niveau de tension de circuit ouvert
-40 dB (0 dB = 1 V/Pa)
Gamme de fréquence utile
20 à 20 000 Hz
Boîtier Audio USB UAB-260
Plage de fréquences
20 à 20 000 Hz (casque)
100 à 10 000 Hz (micro)
Prises entrée/sortie
Sortie de casque (miniprise/stéréo)
Charge d’impédance : 16 - 40 Ω
Entrée de micro (miniprise, mono)
Système PIP (plug-in-power)
Prise USB dédiée
Alimentation électrique
Conforme pour alimentation par bus USB
(5 V, 100 mA)
Dimensions (sauf parties saillantes)
Environ 53 × 20 × 92 mm (l/h/p)
(2
1
/8 ×3/4 × 3 5/8 po.)
Masse Environ 40 g
Configuration requise
Ordinateur compatible :
PC/AT IBM ou ordinateurs
compatibles
Systèmes d’exploitation compatibles :
Windows 98 Deuxième Edition/
Windows 2000 Professionnel/Windows
Millennium Edition/ Windows XP
Edition Familiale/Windows XP
Professionnel (installation par défaut)
Unité centrale : Pentium II 266 MHz ou
plus rapide
port USB*
2
Accessoires fournis
Câble USB dédié (1)
Mode d’emploi (1)
• Pour les configurations citées ci-dessus, nous ne
pouvons pas garantir le fonctionnement du casque
avec tous les ordinateurs.
• Nous ne pouvons pas garantir le fonctionnement du
casque avec les ordinateurs montés sur mesure, les
systèmes d’exploitation mis à niveau ou les systèmes
d’exploitation multiples.
• Nous ne pouvons pas garantir le fonctionnement du
casque avec des fonctions telles que suspension de
système, veille et mise en hibernation, sur tous les
ordinateurs.
*1 Testé par la IEC (Commission Electrotechnique Internationale
(CEI))
*2 le Boîtier Audio USB prend en charge l’USB 2.0. (précédemment
USB 1.1)
La conception et les spécifications sont sujettes à
modification sans préavis.
Identification des pièces
Casque DR-260DP
Boîtier Audio USB UAB-260
Pièces de raccordement du Boîtier Audio
USB
1 Oreillette (droite)
2 Oreillette (gauche)
3 Dispositif de réglage du micro
Réglez la position du micro en tournant le
dispositif de réglage.
4 Micro à écran anti-vent
5 Marque a
6 Touche PHONE VOLUME +/- (pour casque)
Réglez le volume du casque.
7 MIC LEVEL (pour micro)
Réglez le volume du micro.
8 Touche MIC MUTING
TALK 4 : Le micro est réglé en mode TALK.
MUTING $ : Le micro est réglé en mode
MUTING.
9 Prise micro m (système PIP)
0 Prise casque i
qa Prise USB dédiée
Etape 1 : Raccordement
Raccordez votre Boîtier Audio USB et votre ordinateur
à l’aide du câble USB fourni.
câble USB dédié
Remarques
• Le casque prend en charge la version USB 2.0
(précédemment version USB 1.1.)
• Nous ne pouvons pas garantir le fonctionnement de
ce casque avec un concentrateur USB ou une
rallonge USB. Utilisez le câble USB dédié.
Etape 2 : Installation du pilote USB
Les pilotes USB sont compris dans les systèmes
d’exploitation Windows 98SE, Me, 2000 et XP. Les
pilotes USB sont installés lorsque le système est
raccordé à l’ordinateur pour la première fois. Suivez
les instructions à l’écran pour procéder à l’installation.
Pour de plus amples informations, reportez-vous au
mode d’emploi de votre ordinateur.
Remarque
Lors du raccordement à des ports USB différents, il est
possible que vous deviez installer les pilotes USB.
Pour Windows 98SE
Lorsque le système est raccordé à l’ordinateur,
[Assistant Ajout de nouveau matériel] s’affiche et
l’installation du pilote de l’appareil est lancée
automatiquement.
Les Périphérique USB composite, Périphérique
d’interface utilisateur USB et Périphérique audio USB
sont installés.
Installez chaque pilote USB en suivant les instructions
à l’écran.
Il est possible que vous ayez besoin du CD-ROM
Windows 98SE pour installer les pilotes.
La section suivante présente comme exemple les
étapes d’installation du pilote Périphérique USB
composite. Installez les pilotes Périphérique
d’interface utilisateur USB et Périphérique audio USB
de la même façon.
1 Vérifiez que le [Périphérique USB composite]
est affiché dans la fenêtre [Cet Assistant
recherche de nouveaux pilotes pour :] et
cliquez sur [Suivant].
2 Assurez-vous que la case [Rechercher le
meilleur pilote pour votre périphérique.
(Recommandé).] est cochée, puis cliquez sur
[Suivant].
3 [Windows va rechercher des nouveaux
pilotes dans sa base de données, sur votre
disque dur et dans les endroits
sélectionnés.] s’affiche, puis cliquez sur
[Suivant].
Si vous devez utiliser le CD-ROM Windows 98SE,
insérez-le dans le lecteur de CD-ROM et sélectionnez
le Lecteur de CD-ROM.
4 [Windows recherche les fichiers du pilote
pour ce périphérique :] s’affiche. Vérifiez que
[Périphérique USB composite] est affiché,
puis cliquez sur [Suivant].
5 Lorsque [Périphérique USB composite
Windows a terminé l’installation du logiciel
nécessaire à votre nouveau périphérique
matériel.] s’affiche, cliquez sur [Terminer].
(Suite à la page suivante)
vers la prise
USB dédiée
to the dedicated
USB jack
vers le port USB
1 Ear pad ( Right )
2 Ear pad ( Left )
3 Microphone adjuster
Adjust the position of the microphone by
turning the adjuster.
4 Microphone with wind screen
5 a mark
6 PHONE VOLUME + / - button ( for
headphone )
Adjust the volume level of the headphone.
7 MIC LEVEL ( for microphone )
Adjust the volume level of the microphone.
8 MIC MUTING button
4 TALK : The microphone is set to TALK
mode.
$ MUTING : The microphone is set to
MUTING mode.
9 m
Microphone jack ( Plug-in-power system )
0 i Headphone jack
qa Dedicated USB jack
to the USB port
MIC
MUTING
VOLUME
MIC LEVEL
T
A
L
K
M
U
T
I
N
G
1
2
4
3
5
9
0
qa
6
7
8
MIC
MUTING
VOLUME
MIC LEVEL
T
A
L
K
M
U
T
I
N
G
Стерео слушалки
Operating Instructions
Mo
de d’emploi
Ръководство за експлоатация
DR -260US B
2003 Sony Corporation Printed in Czech Republic (EU)
3-249-678-15(1)

Pour Windows Me
Lorsque le système est raccordé à l’ordinateur,
[Assistant Ajout de nouveau matériel] s’affiche et
l’installation du pilote de l’appareil est lancée
automatiquement.
Les Périphérique USB composite, Périphérique
d’interface utilisateur USB et Périphérique audio USB
sont installés.
Installez chaque pilote USB en suivant les instructions
à l’écran.
Les pilotes Périphérique USB composite et
Périphérique d’interface utilisateur USB sont installés
automatiquement. Installez le pilote Périphérique
audio USB en suivant les étapes ci-dessous.
1 Vérifiez que le [Périphérique audio USB] est
affiché dans la fenêtre [Windows a détecté le
nouveau matériel suivant :] et vérifiez que la
case [Rechercher automat. un meilleur pilote
(recommandé)] est cochée et cliquez sur
[Suivant].
2 Le pilote Périphérique audio USB est installé.
3 Lorsque le message [Périphérique audio USB
Windows a terminé l’installation de votre
nouveau périphérique matériel.] s’affiche,
cliquez sur [Terminer].
Pour Windows 2000 et XP
Lorsque le système est raccordé à l’ordinateur, les
Périphérique USB composite, Périphérique d’interface
utilisateur USB et Périphérique audio USB sont
installés automatiquement.
Réglage de la lecture de CD audio
Ce réglage est nécessaire pour lire des CD audio dans
le lecteur de CD-ROM.
Suivez les instructions suivantes en fonction de votre
système d’exploitation et cochez la case [Lecture
numérique pour les CD audio sur ce lecteur CD-ROM].
Pour Windows 98SE
Cliquez sur le menu [Démarrer] et sélectionnez
[Paramètres], [Panneau de configuration],
[Multimédia] et [CD audio].
Pour Windows Me
Cliquez sur le menu [Démarrer] et sélectionnez
[Paramètres], [Panneau de configuration],
[Système] et [Gestionnaire de périphériques].
Double-cliquez sur [CD-ROM] pour sélectionner le
lecteur de CD-ROM qui sera utilisé pour lire de la
musique et cliquez sur [Propriétés], puis cliquez
de nouveau sur [Propriétés].
Pour Windows 2000
Cliquez sur le menu [Démarrer] et sélectionnez
[Paramètres], [Panneau de configuration], [Sons
et multimédia] et [Matériel]. Sélectionnez ensuite
le lecteur de CD-ROM destinés à la lecture de
musique, puis cliquez sur [Propriétés], puis
cliquez de nouveau sur [Propriétés].
Pour Windows XP
Cliquez sur le menu [démarrer] et sélectionnez
[Panneau de configuration], [Sons, voix et
périphériques audio], [Sons et périphériques
audio] et [Matériel]. Sélectionnez ensuite le lecteur
de CD-ROM destiné à la lecture de musique, puis
cliquez sur [Propriétés], puis cliquez de nouveau
sur [Propriétés].
Utilisation
1 Raccordez la fiche du casque (noire) à la
prise de casque et raccordez la fiche du
micro (rose) à la prise de micro.
2 Placez l’auriculaire marqué d’un R sur
l’oreille droite et celui marqué d’un L sur
l’oreille gauche.
3 Placez le micro devant votre bouche en
tournant le dispositif de réglage de micro.
Réglage du MIC LEVEL
Vérifiez le niveau du MIC LEVEL après un
enregistrement avec le logiciel [Magnétophone]
préinstallé dans Windows.
Réglez le MIC LEVEL du Boîtier Audio USB lorsque le
niveau de volume est trop élevé ou trop faible.
Pour Windows 98SE, Me et 2000
Cliquez sur le menu [Démarrer] et sélectionnez
[Programmes], [Accessoires], [Divertissement],
puis cliquez sur [Magnétophone].
Pour Windows XP
Cliquez sur le menu [Démarrer] et sélectionnez
[Tous les programmes], [Accessoires],
[Divertissement], puis cliquez sur
[Magnétophone].
Précautions
A propos de la sécurité
• Si vous utilisez les écouteurs à un niveau sonore
élevé, vous risquez d'endommager votre ouïe. Pour
des raisons de sécurité, n’utilisez pas les écouteurs
lorsque vous conduisez une voiture ou une
bicyclette.
• Veillez à ne pas utiliser le casque à un niveau sonore
trop élevé. En effet, vous risquez d’obtenir un retour
audio (hurlement), si le microphone capte la sonorité
élevée des écouteurs.
• Ne laissez pas tomber votre casque et ne le
soumettez pas à des chocs externes, car cela pourrait
conduire à un mauvais fonctionnement.
• Ne démontez pas le système et n’essayez pas d’en
ouvrir quelque partie que ce soit.
• Saisissez la partie fiche du câble USB dédié ou du
cordon du casque lorsque vous les débranchez des
connecteurs ou des prises.
• Lorsque vous avez terminé d’utiliser le casque avec
le câble USB dédié ou le cordon de casque,
débranchez le câble USB de l’ordinateur si vous
prévoyez de ne pas utiliser le casque pendant une
période prolongée.
• Pour nettoyer le boîtier, n’utilisez pas d’alcool, de
benzine ni de diluant.
N’entreposez pas le système
• A proximité de sources de chaleur ni dans un
endroit poussiéreux, humide ou soumis à la pluie,
aux rayons directs du soleil ou à des chocs
mécaniques.
• Dans des endroits très humides, par exemple une
salle de bain.
• Bien que cet appareil soit doté d’un écran
magnétique, ne laissez pas de cassettes enregistrées,
de montres, de cartes bancaires, de disquettes ou
tout autre objet utilisant un système d’encodage
magnétique devant l’appareil pendant une période
prolongée.
A propos du casque
Respectez votre entourage
Lorsque le volume est trop élevé, le son est audible
même pour ceux qui ne portent pas le casque. Ne
montez pas trop le volume afin de ne pas déranger les
gens qui se trouvent autour de vous. Dans des
endroits bruyants, la première réaction est
généralement d’augmenter le volume. Cependant,
maintenez le volume à un niveau auquel, pendant que
vous portez le casque, vous pouvez entendre lorsque
vous êtes appelé.
A propos des oreillettes et de l’écran
anti-vent
Les oreillettes et l’écran anti-vent sont remplaçables.
Remplacez-les lorsqu’ils sont usés. Pour obtenir des
oreillettes et un écran anti-vent de rechange, consultez
votre revendeur Sony.
Si vous avez des questions ou des problèmes
concernant le fonctionnement de cet appareil, qui ne
sont pas abordés dans ce mode d’emploi, consultez
votre revendeur Sony le plus proche.
Dépannage
Le volume du casque est faible.
❒ La fiche du casque n’est pas raccordée
correctement à la prise.
c Raccordez la fiche du casque correctement.
❒ La Contrôle du volume de votre ordinateur ou le
volume du logiciel de lecture de musique est
baissé.
c Réglez le Contrôle du volume.
c Augmentez le volume du logiciel de lecture de
musique.
Aucun son n’est émis par le casque.
❒ Le câble USB dédié n’est pas raccordé à votre
ordinateur.
c Raccordez le câble USB dédié à votre ordinateur.
❒ La fiche du casque n’est pas raccordée à la prise
de casque.
c Raccordez la fiche du casque à la prise de
casque.
❒ Le système est raccordé alors que le logiciel de
musique est en cours de lecture.
c Interrompez la lecture du logiciel de musique et
recommencez.
❒ L’appareil de lecture audio de votre ordinateur
n’est pas réglé correctement.
c Pour Windows 98SE
Sélectionnez [Audio] sous [Propriétés de
Multimédia], puis sélectionnez le pilote
[Périphérique audio USB] pour [Périphérique
par défault] dans le menu Lecture.
c Pour Windows Me
Sélectionnez [Audio] sous [Propriétés de Sons
et multimédia], puis sélectionnez le pilote
[Périphérique audio USB] pour [Périphérique
par défault] dans le menu Lecture des sons.
c Pour Windows 2000
Sélectionnez [Audio] sous [Propriétés de Sons
et multimédia], puis sélectionnez le pilote
[Périphérique audio USB] pour [Périphérique
par défault] dans le menu Lecture des sons.
c Pour Windows XP
Sélectionnez [Audio] sous [Propriétés de Sons
et périphériques audio], puis sélectionnez le
pilote [USB Audio CODEC] pour [Unité par
défault] dans le menu Lecture audio.
❒ La Contrôle du volume de votre ordinateur ou le
logiciel de musique est réglé sur MUTE.
c Désactivez le réglage MUTE.
❒ Votre ordinateur ne reconnaît pas le casque
comme un appareil USB.
c Redémarrez votre ordinateur.
❒ Le lecteur de CD-ROM de votre ordinateur ne
prend pas en charge la fonction de lecture
numérique de WDM.
c Utilisez un lecteur de CD-ROM qui prend en
charge la fonction de lecture numérique de
WDM.
Le son du casque et le son enregistré sont
interrompus.
❒ L’unité centrale de votre ordinateur est
surchargée.
c Quittez les autres applications.
❒ D’autres appareils USB sont raccordés à votre
ordinateur et sont utilisés simultanément.
c Cessez d’utiliser les appareils USB autres que
celui-ci.
Il est impossible d’enregistrer des sons
depuis le micro.
❒ La fiche du micro n’est pas raccordée à la prise de
micro.
c Raccordez la fiche du micro à la prise de micro.
❒ La touche MIC MUTING est réglée en mode
Muting (coupure de son).
c Réglez la touche MIC MUTING en mode TALK.
❒ L’appareil d’enregistrement audio de votre
ordinateur n’est pas réglé correctement.
c Pour Windows 98SE
Sélectionnez [Audio] sous [Propriétés de
Multimédia], puis sélectionnez le pilote
[Périphérique audio USB] pour [Périphérique
par défault] dans le menu Enregistrement.
c Pour Windows Me
Sélectionnez [Audio] sous [Propriétés de Sons
et multimédia], puis sélectionnez le pilote
[Périphérique audio USB] pour [Périphérique
par défault] dans le menu Enregistrement des
sons.
c Pour Windows 2000
Sélectionnez [Audio] sous [Propriétés de Sons
et multimédia], puis sélectionnez le pilote
[Périphérique audio USB] pour [Périphérique
par défault] dans le menu Enregistrement des
sons.
c Pour Windows XP
Sélectionnez [Audio] sous [Propriétés de Sons
et périphériques audio], puis sélectionnez le
pilote [USB Audio CODEC] pour [Unité par
défault] dans le menu Enregistrement audio.
Le son enregistré est faible.
❒ La fiche du micro n’est pas raccordée
correctement à la prise de micro.
c Raccordez la fiche du micro correctement.
❒ Le micro est éloigné de votre bouche.
c Placez le micro devant votre bouche.
❒ Le MIC LEVEL est abaissé.
c Augmentez le MIC LEVEL.
Il y a des parasites sur le son enregistré.
❒ Des fils électriques, des lumières fluorescentes ou
des téléphones portables sont à proximité du
casque (en particulier du micro.)
c Eloignez-vous de toutes les sources susceptibles
de créer des interférences électromagnétiques.
Une distorsion du son enregistré se
produit.
❒ Le MIC LEVEL est trop élevé.
c Abaissez le niveau du MIC LEVEL.
Pour plus de détails sur le fonctionnement de votre
ordinateur, reportez-vous au mode d’emploi de votre
ordinateur.
Vous pouvez rencontrer des pannes qui ne peuvent
pas être résolues avec la section Dépannage. Dans ce
cas, consultez votre revendeur Sony le plus proche.
Español
ADVERTENCIA
Para evitar el riesgo de incendios o
descargas eléctricas, no exponga la unidad
a la lluvia ni a la humedad.
Para evitar el riesgo de incendios o descargas
eléctricas, no coloque sobre el aparato objetos que
contengan líquidos como, por ejemplo, un jarrón.
Para evitar descargas eléctricas, no abra la unidad. En
caso de avería, solicite los servicios de personal
cualificado.
Marca CE
La validez de la marca CE se limita únicamente a
aquellos países en los que la legislación la impone,
especialmente los países de la EEA (Espacio
económico europeo).
Български
ПРЕДУПРЕЖДЕНИЕ
За да предотвратите пожар или токов удар, не
излагайте устройството на дъжд или влага.
За да предотвратите пожар или токов удар, не
поставяйте предмети, пълни с течности (като
например вази), върху устройството.
За да избегнете токов удар, не отваряйте корпуса.
За сервиз се обръщайте само към квалифициран
персонал.
Маркировка СЕ
Действието на маркировката СЕ е ограничено само
в онези страни, в които тя е наложена от закона,
основно това са страните от ЕЕА (Европейската
Икономическа Общност).
• Microso и Windows са запазени търговски марки
или търговски марки на Microso Corporation в САЩ
и/или други страни.
• IBM и PC/AT са запазени търговски марки на International Business Machines Corporation.
• Pentium е търговска марка или запазена търговска
марка на Intel Corporation.
• В това ръководство Microso Windows XP Home
Edition и Microso
използват под общото наименование Windows XP.
• В това ръководство Microso Windows 2000 Professional се използва с наименованието Windows 2000.
• В това ръководство Microso Windows Millennium
Edition се използва с наименованието Windows Ме.
• В това ръководство Microso Windows 98 Second
Edition се използва с наименованието Windows 98SE.
• Всички други наименования на системи и продукти
са търговски марки или запазени търговски марки
на техните съответни собственици. Марките и са
пропуснати в това ръководство.
Windows XP Professional се
Добре дошли!
Благодарим ви за покупката на тези Sony DR260USB стерео слушалки. Преди да започнете
работа с устройството, моля, прочетете изцяло това
ръководство и го запазете за бъдещи справки.
Някои от характеристиките на устройството са:
• Слушалките са проектирани за комфортна
продължителна употреба.
• Цифров пренос на данни посредством USB връзка с
оглед предотвратяване на шума от вашия компютър.
• Ръчни операции посредством USB Audio Box
функции, като например регулиране силата на звука
на слушалките, на микрофона и заглушаване на звука.
• Микрофон с гъвкаво рамо с оглед редуциране
на шума и лесно регулиране и позициониране на
микрофона пред устата ви.
• Удобен дълъг кабел за слушалките и обслужващ USB
кабел за употребата им навсякъде, без значение на
местоположението на вашия компютър.
Спецификации
Стерео слушалки DR-260DP
Кабел 3 m
Щекер Стерео мини щекер със златно
покритие (за слушалките)
Мини щекер със златно покритие
(за микрофона)
Тегло Прибл. 90 g (без кабела)
Приемник
Тип Отворен, динамичен
Мембрани 30 mm (CCAW Voice Coil), куполен
тип
Максимална входна мощност
1000 mW (IEC*1)
Импеданс 24 ома при 1 kHz
Чувствителност 100 dB/mW
Честотен обхват при възпроизвеждане
40 - 20000 Hz
Микрофон
Дизайн Микрофон с гъвкаво рамо
Тип Електретно кондензаторен
Ниво на напрежението при отворена електрическа верига:
-40 dB (0 dB = 1 V/Pa)
Ефективен честотен обхват
20 - 20000 Hz
USB Audio Box UAB-260
Честотен обхват
20 - 20000 Hz (слушалки)
100 - 10000 Hz (микрофон)
Входни / Изходни жакове
Изходен жак за слушалки (мини
жак/стерео)
Импедансен товар: 16 - 40 ома
Входен жак за микрофона (мини
жак/моно)
Система за захранване
посредством включване на
щекер в жак
Обслужващ USB жак
Захранване
Размери (без издадените части)
Прибл. 53х20х92 mm (ш/в/д)
Тегло Прибл. 40 g
Работна среда
Съвместим компютър:
IBM PC/AT или други
съвместими компютри
Съвместима операционна
система:
Windows 98 Second
Edition/Windows 2000 Profes
sional/Windows
Millennium Edition/Windows XP
Home Edition/Windows XP
Professional (инсталирани от
производителя)
Процесор: Pentium II 266 MHz
или по-бърз
USB порт*2
Приложени аксесоари
Обслужващ USB кабел (1)
Ръководство за експлоатация (1)
• Относно споменатата по-горе работна среда, не е
гарантирано, че слушалките ще работят с всички
компютри.
• Не е гарантирано, че слушалките ще работят
със сглобени в домашни условия компютри,
операционни системи, които сами сте
актуализирали или с няколко операционни системи
едновременно.
• Не е гарантирано, че слушалките ще работят
с определени функции на компютрите, като
например състояние на готовност, сън или
хибернация на системата.
*1 Тествано от IEC (Международен Комитет по Електроника).
*2 USB Audio Box поддържа USB версия 2.0 (предишната USB версия 1.1)
Дизайнът и спецификациите подлежат на промяна
без предупреждение.
Посредством USB връзка (5 V, 100 mA)
Части на устройството
Слушалки DR-260DP
USB Audio Box UAB-260
Части за свързване на USB Audio Box
1 Слушалка (Дясна)
2 Слушалка (Лява)
3 Регулатор за микрофона
Настройте позицията на микрофона като завъртите
регулатора.
4
Микрофон с дунапренче за защита от вятър
Маркировка a
5
6
Бутон PHONE VOLUME +/- (за слушалките)
Регулира силата на звука на слушалките.
7 MIC LEVEL (за микрофона)
Регулира силата на звука на микрофона.
8 Бутона MIC MUTING
4 TALK: Микрофонът е зададен в режим
TALK (разговор).
$ MUTING: Микрофонът е зададен в режим
MUTING (без звук).
9 m Жак за микрофона (Система за захранване
посредством включване на щекер в жак)
0 i Жак за слушалките
Обслужващ USB жак
Стъпка 1: Свързване
Свържете вашия USB Audio Box с компютър
посредством приложения USB кабел.
към обслужващия
USB жак
обслужващ USB кабел
Забележки
• Слушалките поддържат USB версия 2.0 (предишната
USB версия 1.1.)
• Не е гарантирано, че слушалките ще работят с USB
хъб или USB удължител. Използвайте обслужващия
USB кабел.
Стъпка 2: Инсталиране на USB драйвера
Ако използвате някоя от операционните системи
Windows 98SE, Me, 2000 или XP, в тях се съдържат USB
драйвери. Когато системата бъде свързана за първи
път към компютър, автоматично ще се инсталират
USB драйвери. Инсталирайте драйверите, като
следвате инструкциите на екрана. За подробности
вижте ръководството за експлоатация на вашия
компютър.
Забележка
Възможно е когато свързвате слушалките към
различни USB портове, да се наложи да инсталирате
USB драйвери.
За операционна система Windows 98SE
Когато свържете системата към компютър, се извежда
съобщение [Add New Hardware Wizard], след което
автоматично започва инсталацията на драйвера за
устройството. Инсталират се USB Composite Device,
USB Human Interface Device и USB Audio Device.
Инсталирайте всеки USB драйвер, като следвате
инструкциите на екрана.
За да инсталирате драйверите може да ви е необходим
Windows 98SE CD-ROM.
Следващите обяснения описват като пример стъпките
за инсталиране на USB Composite Device. По същия
начин можете да инсталирате USB Human Interface
Device и USB
1 Проверете дали в прозореца [This wizard search-
es for new drivers for:] е изведена индикация
[USB Composite Device], след което щракнете
върху [Next].
2 Проверете дали е избрана отметката [Search for
the best driver for your device (Recommended).],
след което щракнете върху [Next].
3 Извежда се съобщение [Windows will search for
new drivers in its driver database on your hard
drive, and in any of the following selected locations.], след което щракнете върху [Next].
Ако се изисква Windows 98SE CD-ROM, поставете
диска в отделението за дискове на компютъра и
изберете CD-ROM устройството.
4 Извежда се съобщение [Windows driver le
search for the device:]. Проверете дали е
изведена индикация [USB Composite Device],
след което щракнете върху [Next].
Audio Device.
към USB порта
5 Когато се изведе съобщение [USB Composite
Device Windows has nished installing the software that your new hardware device requires.],
щракнете
върху [Finish].
За операционна система Windows Ме
Когато свържете системата към компютър, се извежда
съобщение [Add New Hardware Wizard], след което
автоматично започва инсталацията на драйвера за
устройството. Инсталират се USB Composite Device,
USB Human Interface Device и USB Audio Device.
Инсталирайте всеки USB драйвер, като следвате
инструкциите на екрана.
USB Composite Device и USB Human Interface Device
се инсталират автоматично. Инсталирайте USB Audio
Device, като следвате описаните по-долу стъпки.
1 Проверете дали в прозореца [Windows has found
the following new hardware:] е изведена индикация
[USB Audio Device] и вижте дали е избрана
отметката [Automatic search for a better driver (Recommended).], след което щракнете върху [Next].
2 USB Audio device се инсталира.
3 Когато се изведе съобщение [USB Audio Device
Windows has nished installing the new hardware
device.], щракнете върху [Finish].
За операционни системи Windows 2000 и XP
Когато свържете системата към компютър, USB Composite Device, USB Human Interface Device и USB Audio
Device се инсталират автоматично.
Настройка за възпроизвеждане на CD с
музика
Тази настройка е необходима, когато възпроизвеждате
CD с музика в CD-ROM устройството на компютъра.
Следвайте описаните по-долу инструкции в
зависимост от операционната система на вашия
компютър и щракнете върху отметката [Enable digital
CD audio for this CD-ROM device].
За операционна система Windows 98SE
Щракнете върху менюто [Start] и изберете [Settings],
[Control Panel], [Multimedia] и [CD Music].
За операционна система Windows Ме
Щракнете върху менюто [Start] и изберете [Settings],
[Control Panel], [System] и [Device Manager]. След
това щракнете бързо два пъти върху [CD-ROM], за да
изберете CD-ROM устройството за възпроизвеждане
на музика и щракнете върху [Properties], след което
щракнете отново върху [Properties].
За операционна система Windows 2000
Щракнете върху менюто [Start] и изберете [Settings],
[Control Panel], [Sounds and Multimedia] и [Hardware]. След това изберете CD-ROM устройството за
възпроизвеждане на музика и щракнете върху [Properties], след което щракнете отново върху [Properties].
За операционна система Windows XP
Щракнете върху менюто [Start] и изберете [Control
Panel], [Sounds, Speech, and Audio Devices] и [Hardware]. След това изберете CD-ROM устройството за
възпроизвеждане на музика и щракнете върху [Properties], след което щракнете отново върху [Properties].
Употреба
1 Свържете щекера на слушалките (черен) към
жака за слушалките, а щекера на микрофона
(розов) към жака за микрофона.
2 Поставете слушалката с маркировката R на
дясното ухо, а слушалката с маркировката L на
лявото ухо.
3 Позиционирайте микрофона пред устата си,
като завъртите регулатора на микрофона.
Настройка на MIC LEVEL
Проверете нивото на MIC LEVEL, след като направите
запис със софтуера [Sound Recorder], който е
предварително инсталиран във вашата операционна
система Windows.
Настройте MIC LEVEL на USB Audio Box, когато
силата на звука е прекалено висока или твърде ниска.
За операционни системи Windows 98SE/Ме/2000
Щракнете върху менюто [Start], изберете [Programs],
[Accessories], [Entertainment], след което щракнете
върху [Sound Recorder].
За операционна система Windows ХР
Щракнете върху менюто [Start], изберете
[All Programs], [Accessories], [Entertainment], след което
щракнете върху [Sound Recorder].
Предпазни мерки
Безопасност
• Използването на слушалките при прекомерно
увеличен звук може да увреди слуха ви. За поголяма безопасност на движението, не използвайте
слушалките, докато шофирате или карате мотор или
велосипед.
• Не използвайте слушалките при прекалено висока
сила на звука. В противен случай може да се получи
ехо (или виене), ако микрофонът улови високия звук
от слушалките.
• Не изпускайте слушалките и не ги подлагайте на
удари, тъй като това може да причини неизправност.
• Не разглобявайте и не се опитвайте да отворите
която и да е от частите на системата.
• Когато разкачвате системата от конекторите или
жаковете, хващайте обслужващия USB кабел или
кабела на слушалките за щекера, не дърпайте самия
кабел.
• След като приключите с използването на системата,
свързана с обслужващия USB кабел или кабела на
слушалките, разкачете USB кабела от компютъра,
ако няма да използвате системата дълго време.
• Когато почиствате корпуса, не използвайте алкохол,
бензин или разтворител.
Не оставяйте системата на никое от
изброените по-долу места.
• Не оставяйте системата на места близо до източници
на топлина или на места, изложени на директна
слънчева светлина, прах, влага, дъжд или механични
удари.
• В баня или на други места с висока влажност.
• Въпреки че системата е екранирана, не оставяйте
за дълго време до нея касети със запис, часовници,
лични кредитни карти или дискети, използващи
магнитна технология за кодиране.
Относно слушалките
Действайте внимателно
Когато силата на звука е прекалено висока, звукът
ще се чува и извън слушалките. Внимавайте да не
увеличавате прекомерно звука, за да не пречите
на хората около вас. Наблюдава се тенденция да се
увеличава звука, когато слушалките се използват на
шумни места. Въпреки това обаче, силата на звука
трябва да бъде на ниво, при което ще можете да
реагирате, когато някой се обърне към вас, докато
използвате слушалките.
Относно дунапренчето на слушалките и на
микрофона за защита от вятър
Дунапренчето на слушалките и на микрофона може
да бъде сменен. Подменете го, когато се износи. Как да
смените дунапренчето
на слушалките и на микрофона, консултирайте се с
най-близкия доставчик на Sony.
Ако имате някакви въпроси или възникнат проблеми,
свързани с вашата система, които не са описани в това
ръководство, моля, консултирайте се с най-близкия
доставчик на Sony.
Отстраняване на проблеми
Звукът, който се чува от слушалките, е слаб.
Щекерът на слушалките не е свързан правилно с
жака.
c Свържете правилно щекера на слушалките.
Volume Control на вашия компютър или силата на
звука на софтуера за възпроизвеждане на музика са
намалени.
c Регулирайте Volume Control.
c Увеличете силата на звука на софтуера за
възпроизвеждане на музика.
От слушалките не се извежда звук.
Обслужващият USB кабел не е свързан към
компютъра.
c Свържете обслужващия USB кабел към вашия
компютър.
Щекерът на слушалките не е свързан към жака за
слушалки.
c Свържете щекера на слушалките към жака за
слушалки.
Системата е свързана, докато работи софтуерът за
възпроизвеждане на музика.
c Спрете възпроизвеждането на музиката, след
което стартирайте отново софтуера.
Устройството за аудио възпроизвеждане на вашия
компютър не е настроено правилно.
c За операционна система Windows 98SE
Изберете [Audio] в [Multimedia Properties], след
което изберете [USB Audio Device] за [Preferred
device] в менюто Playback.
c За операционна система Windows Ме
Изберете [Audio] в [Sounds and Multimedia Proper-
ties], след което изберете [USB Audio Device] за
[Preferred device] в менюто Sound Playback.
c За операционна система Windows 2000
Изберете [Audio] в [S
ties], след което изберете [USB Audio Device] за
[Preferred device] в менюто Sound Playback.
c За операционна система Windows XP
Изберете [Audio] в [Sounds and Audio Devices Prop-
erties], след което изберете [USB Audio CODEC] за
[Default device] в менюто Sound playback.
Volume Control на вашия компютър или софтуерът
за възпроизвеждане на музика и т.н. са в положение
MUTE.
c Отменете MUTE.
Вашият компютър не разпознава слушалките като
USB устройство.
c Рестартирайте компютъра.
ounds and Multimedia Proper-
CD-ROM устройството на вашия компютър няма
функция за цифрово възпроизвеждане на WDM.
c Използвайте CD-ROM устройство, което има
функция за цифрово възпроизвеждане на WDM.
Звукът от слушалките и записаният звук
прекъсват.
Процесорът на вашия компютър е претоварен.
c Затворете другите програми.
Към вашия компютър са свързани други USB
устройства, които работят едновременно.
c Прекратете работата с другите USB устройства.
Не можете да записвате звука от микрофона.
Щекерът на микрофона не е свързан към жака за
микрофона.
c Свържете щекера на микрофона към жака за
микрофона.
Бутонът MIC MUTING е зададен в режим Muting
(без звук).
c Задайте бутона MIC MUTING в режим TALK
(разговор).
Устройството за аудио запис на вашия компютър не
е настроено правилно.
c За операционна система Windows 98SE
Изберете [Audio] в [Multimedia Properties], след
което изберете [USB Audio Device] за [Preferred
device] в менюто Recording.
c За операционна система Windows Ме
Изберете [Audio] в [Sounds and Multimedia Proper-
ties], след което изберете [USB Audio Device] за
[Preferred device] в менюто Sound Recording.
c За операционна система Windows 2000
Изберете [Audio] в [Sounds and Multimedia Proper-
ties], след което изберете [USB Audio Device] за
[Preferred device] в менюто Sound Recording.
c За операционна система Windows XP
Изберете [Audio] в [Sounds and Audio Devices Prop-
erties], след което изберете [USB Audio CODEC] за
[Default device] в менюто Sound recording.
Звукът на записа е слаб.
Щекерът на микрофона не е свързан правилно към
жака за микрофона.
c Свържете правилно щекера на микрофона.
Микрофонът е далеч от устата ви.
c Позиционирайте микрофона пред устата си.
Силата на звука на микрофона MIC LEVEL е
намалена.
c Увеличете MIC LEVEL.
Звукът на записа съдържа смущения.
Близо до слушалките (и най-вече до микрофона)
има електрически кабели, флуоресцентни лампи
или мобилни телефони.
c Отдалечете се от всички възможни източници на
електромагнитно влияние.
Звукът на записа прекъсва.
Силата на звука на микрофона MIC LEVEL е
прекомерно увеличена.
c Намалете нивото на MIC LEVEL.
За подробности относно работата с вашия компютър
вижте приложеното към него ръководство за
експлоатация.
Възможно е да възникнат повреди, които не могат да
бъдат разрешени дори с инструкциите за отстраняване
на проблеми. В такива случаи се консултирайте с найблизкия доставчик на Sony.
 Loading...