

Sony DPP-SV55 Operating manual
Editing, Setting, and Saving Images
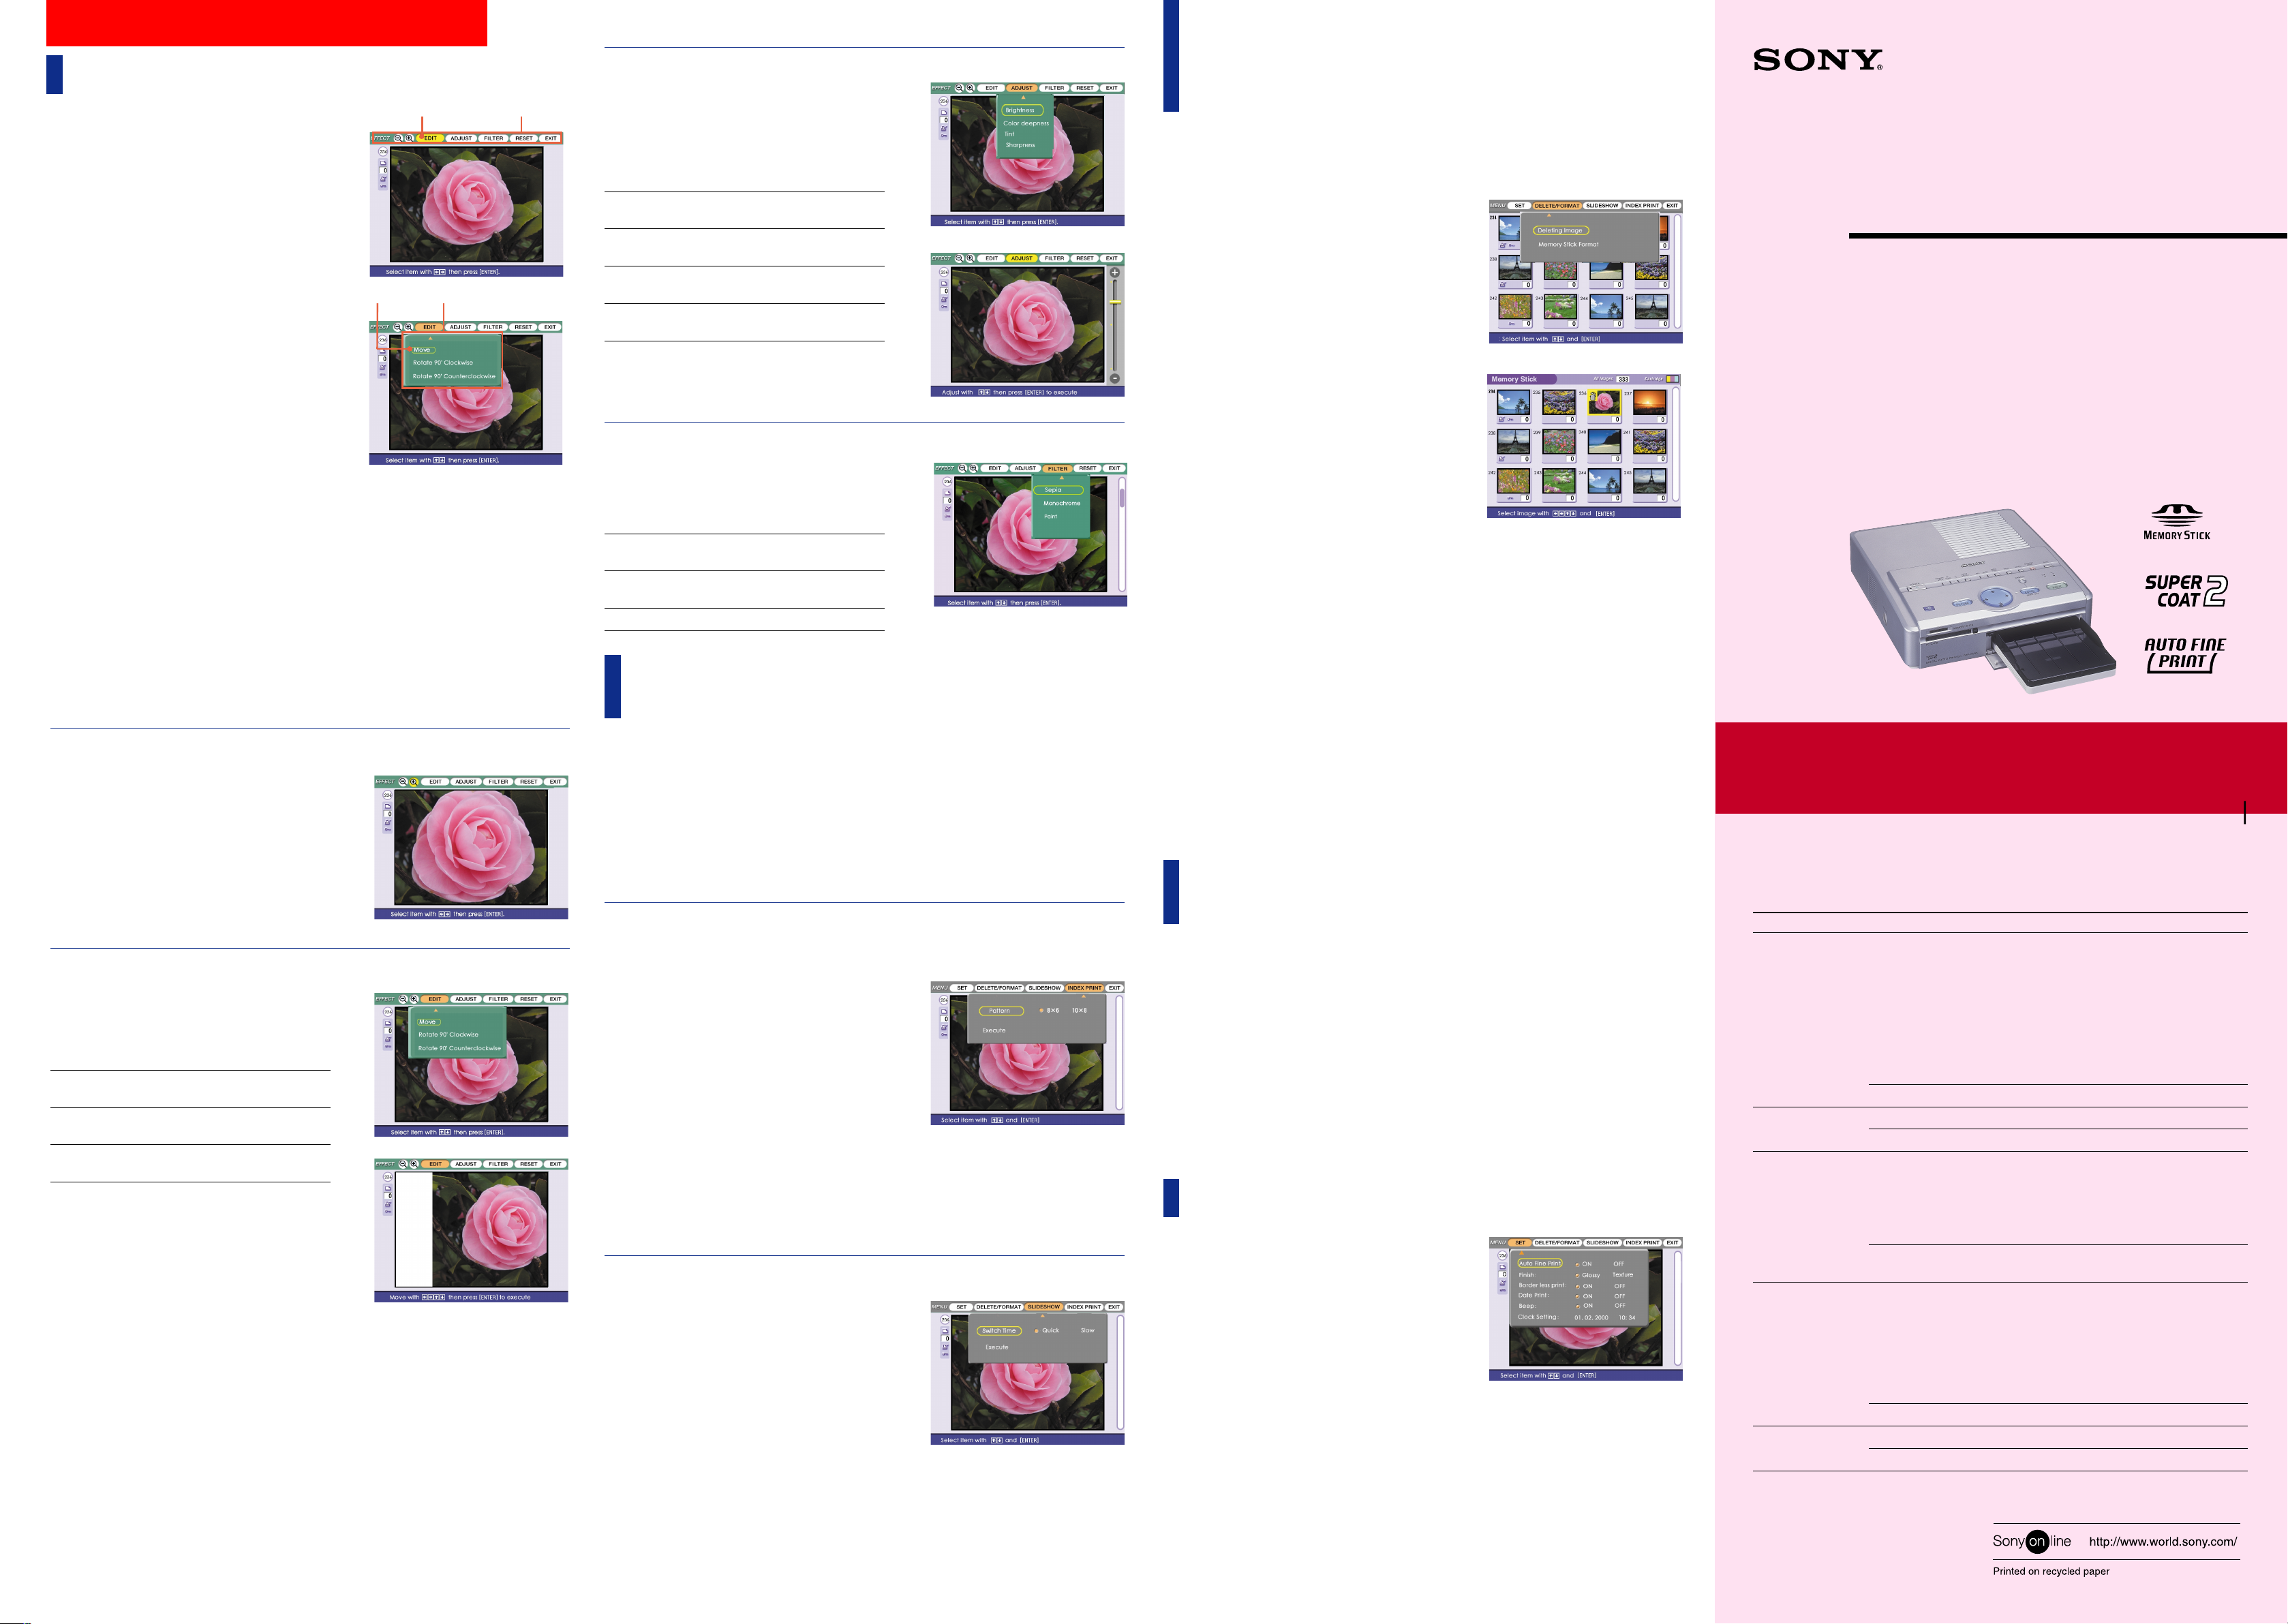
Editing an image
By using the EFFECT menu, you can edit and
adjust an image. The basic operations for the
EFFECT menu follow:
1 Select the image to be edited in the thumbnail list
or press PICTURE to display the preview of the
image to be edited.
2 Press EFFECT.
The preview image and the EFFECT menu bar are
displayed.
3 Press B/b to move the cursor to the desired item
on the menu bar and press ENTER.
The cursor moves to the sub menu.
4 Press V/v to move the cursor to the desired sub
menu item and press ENTER.
The selected sub menu item is displayed. When
adjustments or settings are required, follow the
guide message on the screen.
When editing ends...
To print the edited image: Press PRINT.
To return to the previous screen: Press EFFECT.
To perform other editing: Repeat steps 3 and 4.
To save an edited image: Press SAVE to save the
edited image in the “Memory Stick” or PC card.
To reset to the previous image settings
Press B/b to select RESET and press ENTER. When
a confirmation dialog box appears, press B/b to
select “Yes” and press ENTER.
To cancel operation
Press CANCEL to return to the screen of the
preceding procedure.
To display another sub menu
Press V until the current sub menu disappears.
Then repeat steps 3 and 4 to display and work in a
sub menu of another menu item.
Notes
•It may take longer to process an edited image after
you press PRINT.
•Do not remove “Memory Stick” or PC card during
the EFFECT mode. If you do, the EFFECT mode
ends forcibly and any editions you have done are
canceled.
Enlarging/Reducing an image
To enlarge an image, select “+” on the menu bar
with B/b.
To reduce an image, select “–” with B/b.
Then press ENTER. Each time you press ENTER,
the image is enlarged or reduced:
•–: up to 60%
•+: up to 200%
Note
The picture quality of an enlarged image may be
deteriorated depending on its size.
Changing an image position
Press B/b to move the cursor to “EDIT” on the
menu bar and press ENTER. Then press V/v to
move the cursor to the desired item on the EDIT
sub menu and press ENTER:
Move Move the picture with
B/b/V/v, then press ENTER.
Rotate 90° The image rotates 90°
Clockwise clockwise.
Rotate 90° The image rotates 90° counterCounterclockwise clockwise.
Cursor
Cursor
Sub menu
Image moves
Effect menu bar
m
m
Adjusting the pictures
Press B/b to move the cursor to “ADJUST” on the
menu bar and press ENTER. Then press V/v to
move the cursor to the desired adjustment item
and press ENTER. The adjustment slider appears
in the right on the screen. Adjust the level as
follows and press ENTER.
Brightness Press V to brighten the picture or
v to darken it.
Color deepness Press V to deepen the colors or v
to lighten the colors.
Tint Press V to make the picture
reddish or v to make it bluish.
Sharpness Press V to sharpen the outlines or
v to reset them.
Note
The picture quality of the image being displayed on
the screen may differ from that of the printed image.
m
Adding a special filter to an image
Press B/b to move the cursor to “FILTER” on the
menu bar and press ENTER. Then press V/v to
move the cursor to the desired filter you want to
add to the image then press ENTER:
Sepia Makes the image like an old
photograph with faded colors.
Monochrome
Paint
Makes the image into a monochrome
picture.
Makes the image like a painted picture.
Viewing the “Memory
Stick” or PC card images
You can make an index list of the images saved in a “Memory Stick” or PC card (Index Print),
or perform the slide show of the images. When you want to search for an image, you can find it
easily with these functions.
Note
Before you begin, make sure that either ALL or DPOF
indicator of AUTO PRINT button does not light.
To return to the previous image
Press B/b to select “Exit” and press ENTER. Or
press MENU.
Making an index print of “Memory Stick” or
PC card images
1 Press INPUT SELECT to light on “MEMORY
STICK” or PC CARD indicator.
2 Press MENU.
The MENU bar is displayed.
3 Press B/b to move the cursor to “INDEX PRINT”
and press ENTER.
4 Press B/b to move the cursor to the desired split
pattern and press ENTER.
5 Press the arrow (B/b/V/v) button to move the
cursor to “Execute,” then press ENTER.
The index list of the “Memory Stick” or PC card
images is printed with each image in the selected
pattern. Each thumbnail has a corresponding image
number. When the “Date Print” is selected, the shot
date (year, month and day) is also printed.
Viewing the slideshow
1 Press INPUT SELECT to light on “MEMORY
STICK” or PC CARD indicator.
2 Press MENU.
The MENU bar is displayed.
3 Press B/b to move the cursor to “SLIDESHOW”
and press ENTER.
4 Press B/b to move the cursor to the desired
switch time of images and press ENTER.
5 Press the arrow (B/b/V/v) button to move the
cursor to “Execute,” then press ENTER.
The images in the “Memory Stick” or PC card are
displayed one after another in the selected switch
time like a slideshow.
To stop slideshow
Press CANCEL.
To display another sub menu
Press V until the current sub menu disappears. Then
press B/b to move the cursor to the desired item on
the menu bar and press ENTER.
Notes
•You cannot make an index print during
the CREATIVE PRINT or EDIT mode.
•An image which is not displayed because
it is damaged or has some kind of trouble
will not be printed.
Notes
•Depending on the image, it may take time
to be displayed.
•You cannot view the slideshow during the
CREATIVE PRINT or EDIT mode.
Deleting images of a
“Memory Stick” or PC card
You can delete the selected images on a “Memory
Stick” or PC card.
1 Press INPUT SELECT to light on “MEMORY
STICK” or PC CARD indicator.
2 Press MENU.
The MENU bar is displayed.
3 Press B/b to move the cursor to “DELETE/
FORMAT” and press ENTER.
The cursor moves to the sub menu.
4 Press V/v to move the cursor to “Deleting Image”
and press ENTER.
The thumbnail list is displayed. When you
displayed a preview image in step 1, the trash
icon is attached to that image.
m
5 Press the arrow (B/b/V/v) button to move the
trash icon to the image you want to delete, then
press ENTER.
6 Press ENTER.
A confirmation dialog box is displayed.
7 Press the arrow (B/b) button to select “Yes” and
press ENTER.
The selected image is deleted. You cannot delete
an image protected or preset by DPOF.
To delete other images, repeat steps 5 through 7.
To return to the preceding procedure, press
CANCEL.
Formatting a “Memory Stick”
You can format a “Memory Stick.” In step 4, select
“Memory Stick Format” and press ENTER. When the
confirmation dialog box is displayed, press the arrow
(B/b) button to select “Yes” and press ENTER. The
“Memory Stick” is formatted and all the image files
and other files are deleted at one time.
Notes
•If the “Memory Stick” or PC card is in write
protect status, you cannot delete images or format
the “Memory Stick.”
•During deleting or formatting, do not turn off the
power or remove the “Memory Stick” or PC card
Note
You cannot delete an image during the
CREATIVE PRINT or EDIT mode.
from the insertion slot. The “Memory Stick” or PC
card may be damaged.
•An image, once deleted, will be lost forever. Before
deleting an image, double-check that it is the right
one.
•When formatting a “Memory Stick,” all the files
except for the image files will be deleted.
Saving an image to a
“Memory Stick” or PC card
You can save the image being edited by the EFFECT menu, or processed by the CREATIVE
PRINT menu onto a “Memory Stick” or PC card.
1 Press SAVE.
When either “Memory Stick” or PC card is inserted, a confirmation dialog box is displayed.
When both “Memory Stick” and PC card are inserted, a dialog box to select the destination is
displayed.
2 Press the arrow (B/b/V/v) button to select “Yes” or the destination (“Memory Stick” or PC
card) and press ENTER.
The image is saved.
Notes
•If the “Memory Stick” or PC card is in write
protect status, you cannot save an image on the
“Memory Stick” or PC card.
•During saving the image, do not turn off the power
or remove the “Memory Stick” or PC card from the
insertion slot. The “Memory Stick” or PC card
may be damaged.
Changing the printer settings
You can change the printer settings using the SET
menu as follows:
1 Press MENU.
The MENU bar is displayed.
2 Press B/b to move the cursor to “SET” and press
ENTER.
The cursor moves to the SET sub menu.
3 Press V/v to move the cursor to the desired
setting item and press B/b and ENTER to change
the setting.
For detailed settings, see “Setting items.”
4 After finishing setting, press MENU.
The settings become effective and the previous
screen is displayed.
The settings remain effective even after you turn off
the printer until they are changed.
To cancel operation
Press CANCEL while the cursor is in the SET sub
menu. The settings will be reverted.
Note
The items which cannot be changed are
displayed in gray and cannot be selected.
To display another sub menu
Press V until the current sub menu disappears. Then
press B/b to move the cursor to the desired item on
the menu bar and press ENTER.
3-205-184-12(1)
Digital Photo Printer
Operating Instructions – Advanced Operations
Before operating this printer, please read this manual
thoroughly and retain it for future reference.
This manual explains advanced operations for the
printer including:
– Editing and adjusting an image
– Adding a special effect to an image
–
Making a variety of prints such as split-images, calendar,
card, and sticker
– Changing printer settings
– Viewing, deleting, or saving images in a “Memory
Stick” or PC card
Before reading this manual, read “Operating Instructions
– Basic Operations.” Also refer to “Operating
Instructions – Software Guide/Additional Information.”
DPP-SV55
2000 Sony Corporation
Setting items
Items Settings Contents
Auto Fine Print ON Adjusts an image automatically for printing in
better picture quality. Auto Fine Print function is
especially effective to adjust a dark and lowcontrast image.
Notes
• The image displayed on the screen is not adjusted.
• When printing from a computer, the Auto Fine Print
function does not work.
• You cannot change the setting during the CREATIVE
PRINT mode.
OFF Prints an image without making adjustments.
Finish Glossy Prints an image vividly with glossy finish.
Texture Prints an image softly with uniform uneven finish.
Border less print ON Prints an image without borders around the image.
Notes
• You cannot make borderless print with Small Size print
paper.
• When printing 4:3 picture, the upper and bottom ends
of the image are cut and printed in a 3:2 picture.
OFF Prints an image with borders around the image.
(Both 4:3 and 3:2 pictures will not be cut off.)
Date Print ON Prints an image with the date recorded together
with the image shot with your digital still camera.
Notes
• You can print the date only when the image’s date data
is recorded in the DCF (Design rule for Camera File
system) format.
• You cannot change the setting during the CREATIVE
PRINT mode.
OFF Prints an image without the data.
Beep ON The warning and operation sound beeps.
OFF The warning and operation sound does not beep.
Printed in Japan
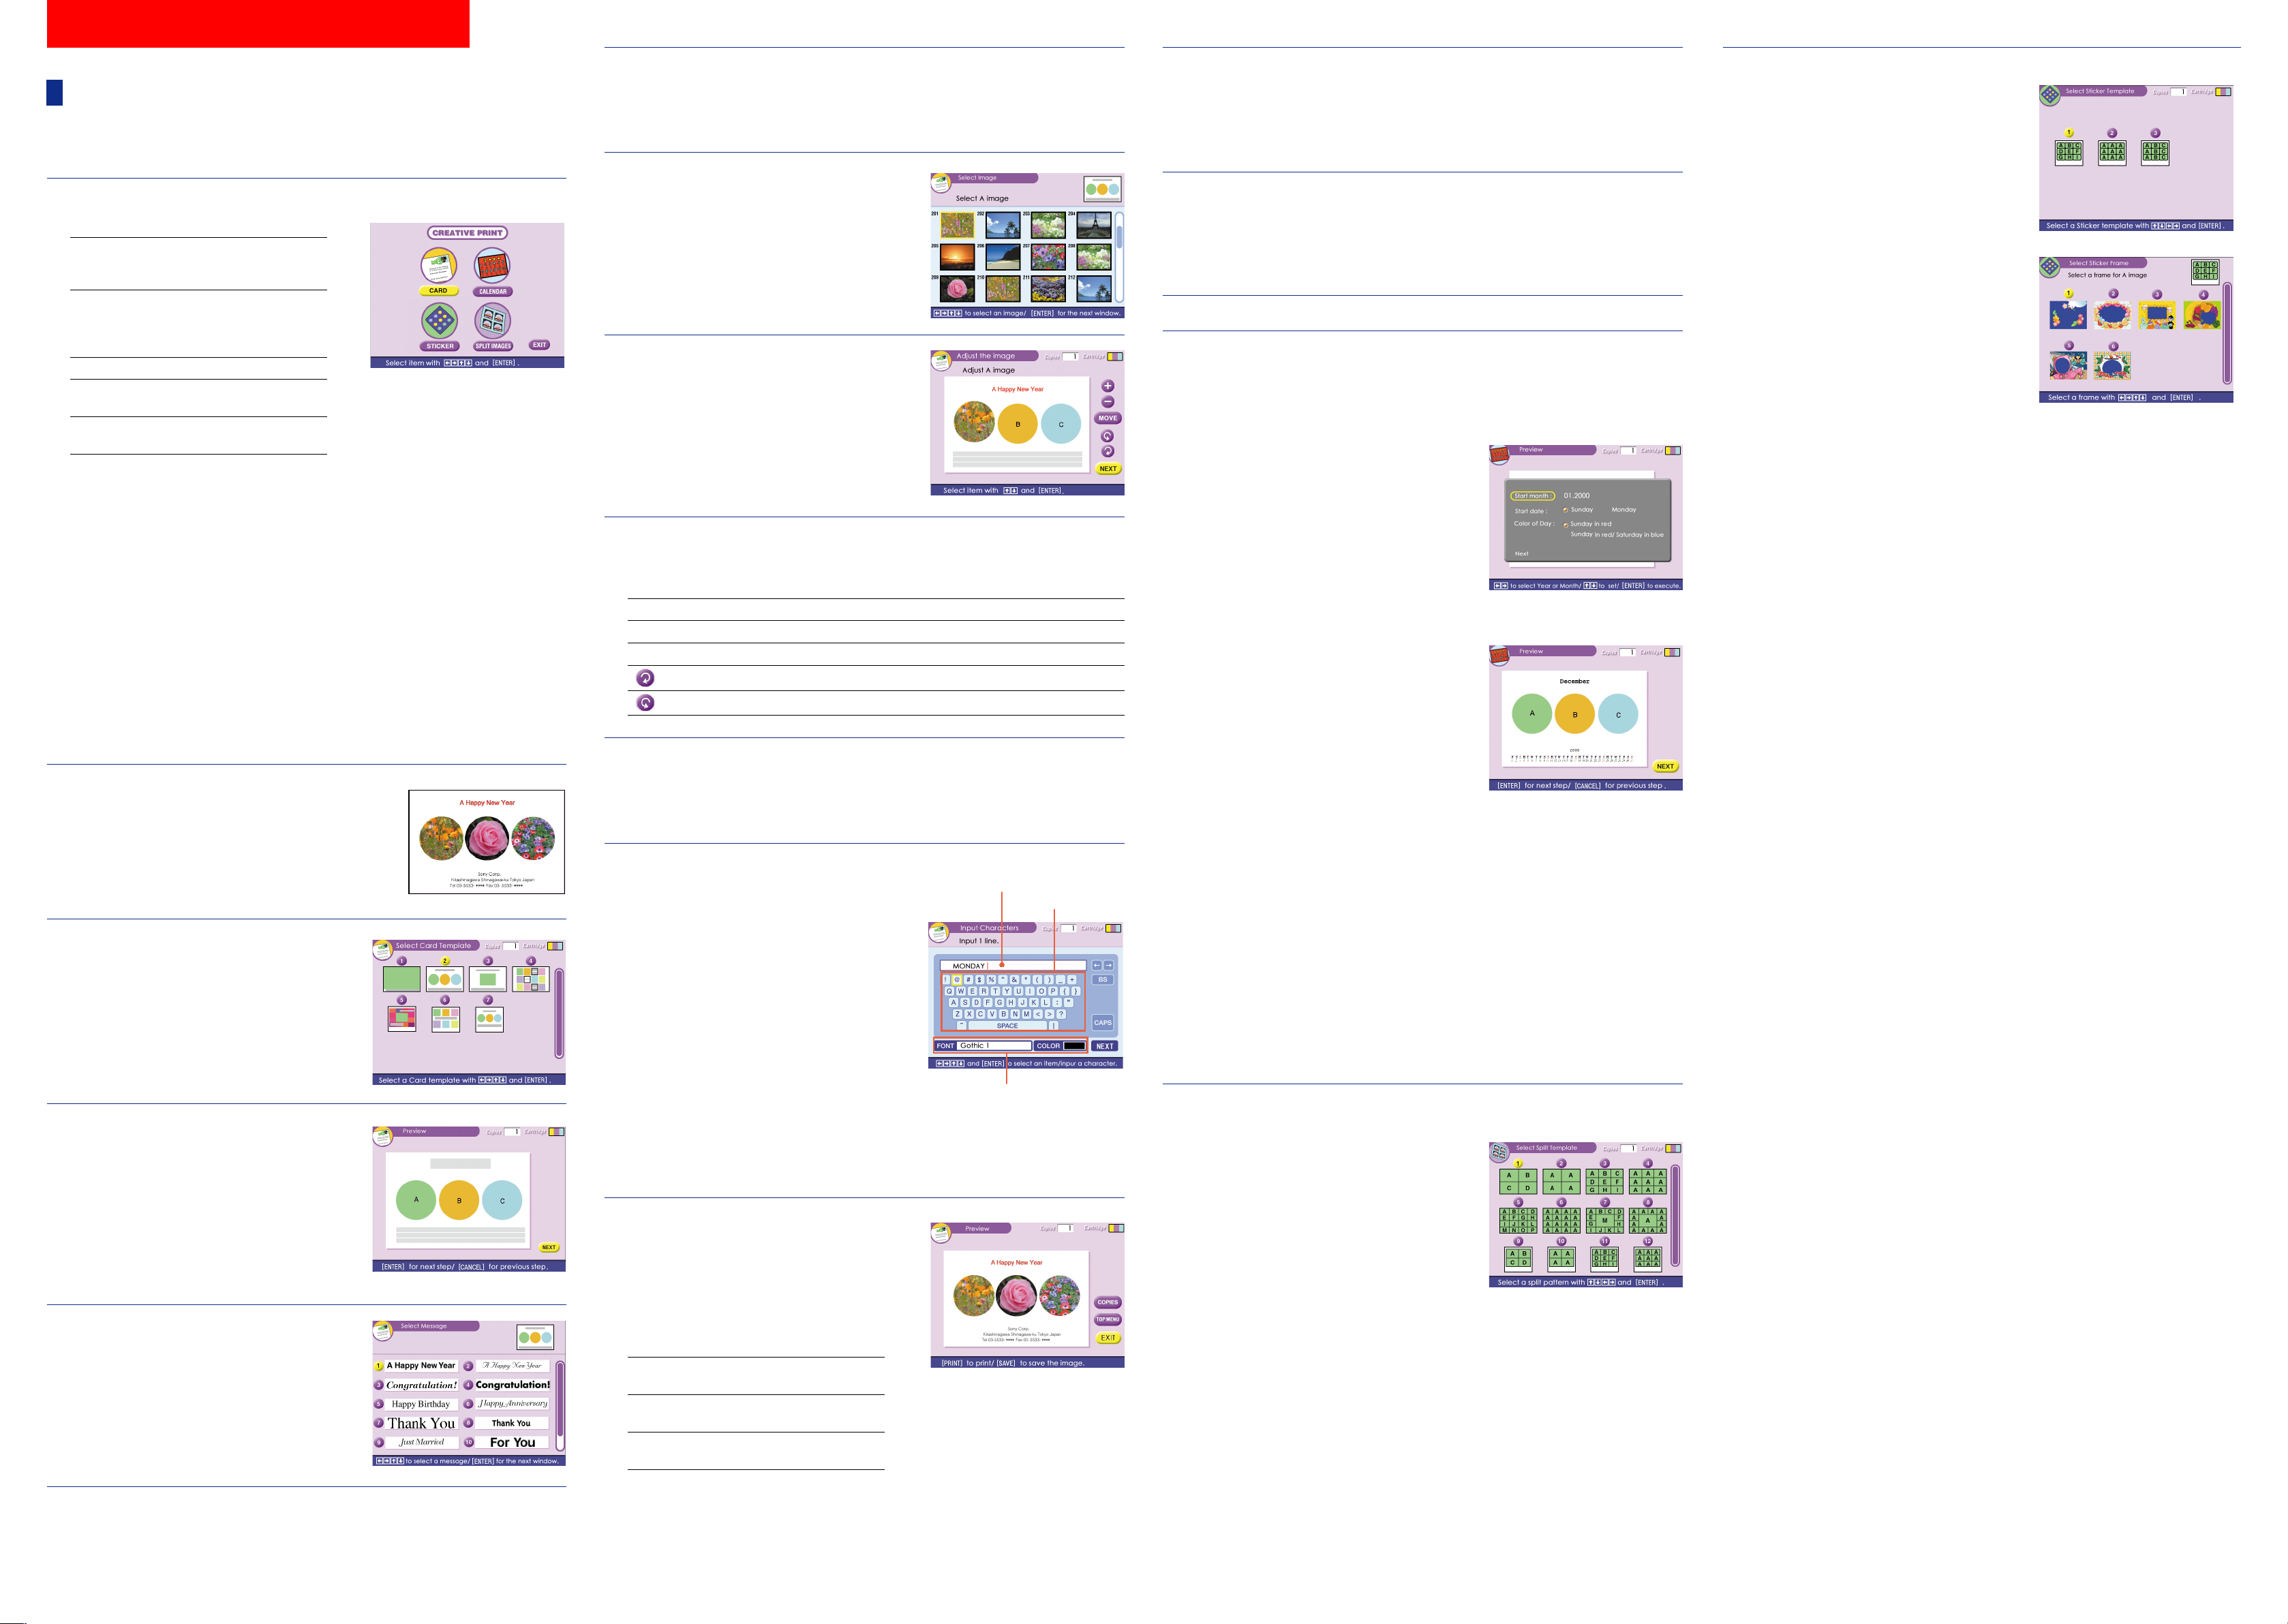
Using CREATIVE PRINT Functions
Making various prints
You can use CREATIVE PRINT button to make various prints. The messages displayed on the
screen will guide you to complete a print.
1 Press CREATIVE PRINT.
The CREATIVE PRINT top menu is displayed.
CARD Adds a selected greeting and
your input message to make
an original card.
CALENDAR Add a calendar of selected
month(s) to an image or
images to make an original
calendar.
STICKER Makes 9-split images sticker.
SPLIT IMAGES
EXIT Exits the CREATIVE PRINT
To cancel and restart operations midway
Press CANCEL. The screen returns to the
preceding procedure; do the procedure again.
If it is difficult to return to the preceding
procedure, the dialog box to return to the top
menu is displayed. If this occurs, start from the
beginning.
Note
When you cancel operation or exit the CREATIVE
PRINT menu without pressing SAVE to save the
created image, the created image will be deleted.
To change the printer settings midway
You can press MENU and change “Finish” and
“Beep” settings during the CREATIVE PRINT menu.
You cannot change the remaining items including
“Auto Fine Print.” The settings before the CREATIVE
PRINT is selected are effective for those items.
Making a card
You can add a greeting and your message to
images and make an original card like the one
shown to the right.
2 Press the arrow (B/b/V/v) button
to move the cursor to “CARD”,
then press ENTER.
The Card templates are displayed.
3 Press the arrow (B/b/V/v) button
to move the cursor to the desired
template (2), then press ENTER.
The preview of the selected template (2) is
displayed. The preview allows you to check the
preceding procedures.
To cancel operation
Press CANCEL to return to the screen of the
preceding procedure.
4 Press ENTER.
The window for selecting a greeting is displayed.
Makes 4-split or 9-split
images print.
menu.
6 Press the arrow (B/b/V/v) button to move the cursor to the
desired color, then press ENTER.
The preview reflecting your selections up to the preceding step is displayed.
The greeting is displayed in the selected color.
7 Insert the “Memory Stick” or PC
card into the printer and press
ENTER.
The thumbnail list for selecting an image is
displayed.
8 Press the arrow (B/b/V/v) button
to move the cursor to the desired
image, then press ENTER.
The window to adjust the image position is
displayed.
9 Press the arrow (V/v) button to move the cursor to the desired
adjustment item, then press ENTER.
To make multiple adjustments, repeat this step.
+ Each time you press ENTER, the image is enlarged.
– Each time you press ENTER, the image is reduced.
Move Move the picture with B/b/V/v, then press ENTER.
Each time you press ENTER, the image rotates 90° clockwise.
Each time you press ENTER, the image rotates 90° counterclockwise.
10Press the arrow (V/v) button to move the cursor to “NEXT,”
then press ENTER.
Repeat steps 8 through 10 until you select and adjust the remaining images and then
character input window is displayed.
11Input characters.
Press the arrow (B/b/V/v) button to move the
cursor to the desired item, then press ENTER to
input a character.
1 Select the font in the “FONT” box and the
color in the “COLOR” box.
2 Select a character in the character table.
The selected character is input in the selected
font and color in the input box.
To correct an input character
Select “B” or “b” on the screen to move the
cursor in the input box after the character you
want to delete. Then select “BS.” The character
before the cursor is deleted. Input the new
character.
Note
You cannot apply different colors or fonts to a single
line.
Character input box
Character table
font (5 fonts available)
and color boxes
12Press the arrow (B/b/V/v) button
to move the cursor to “NEXT,” then
press ENTER.
Repeat steps 11 and 12 to input the remaining
lines. When you finish, the preview of the
created print is displayed.
By selecting the following button in the window,
you can do:
COPIES Press ENTER to set the printing
quantity.
TOP MENU
EXIT Exits the CREATIVE PRINT
Returns to the CREATIVE PRINT
top menu.
menu.
13Press PRINT.
Printing starts.
To stop printing
Press CANCEL. When multiple copies are being printed, the printing from the next print
will be canceled.
14Press the arrow (B/b/V/v) button to move the cursor to “EXIT,”
then press ENTER.
The CREATIVE PRINT menu disappears.
Note
The created CARD image that is not saved with the SAVE button will be deleted.
Making a calendar
When you select “CALENDAR” in the CREATIVE
PRINT menu, you can add a selected calendar to
an image or images to make an original calendar.
1 Do the following steps in “Making a card” to
select a template. In step 2, select “CALENDAR” .
1 c 2 c 3 c 4
The window for setting a calendar is displayed.
2 Set the first month and the year starting the
calendar.
Press V/v to select “Start month” and press B/b
to move the cursor to the year. To set the number,
press V/v. In the same way, set the month. Then
press ENTER.
Set the month and day for a calendar
3 Set the day starting the week (placed to the most
left in a calendar).
Press V/v to select “Start date” and press B/b to
move the cursor to “Sunday” or “Monday.”
Then press ENTER.
Some templates do not have the “Start date”
setting.
4 Set the color of days.
Press V/v to select “Color of Day” and press B/b
to move the cursor to “Sunday in red” or “Sunday
in red/Saturday in blue.”
Then press ENTER.
Preview of your calendar selections
5 Press the arrow (B/b/V/v) button to move the
cursor to “NEXT,” and press ENTER.
The preview of the created calendar is displayed.
6 Do the following steps in “Making a card” to
select and adjust an image, and print the
calendar:
7 c 8 c 9 c 10 c 13 c 14
To save the CREATIVE PRINT image
Press SAVE before you exit the CREATIVE PRINT
menu. The created image is saved in the “Memory
Stick” or PC card.
Note
A created image that is not saved with the SAVE
button will be deleted.
Making a split print
When you select “SPLIT IMAGES” in the
CREATIVE PRINT menu, you can make a print
with 4-split, 9-split, or 16-split images.
Do the following steps in “Making a card” to select
a template, select and adjust images for all the split
planes, and print the created split images. In step
2, select “SPLIT IMAGES.”
1 c 2 c 3 c 4c 8 c 9 c 10 c 13 c 14
To save the CREATIVE PRINT image
Press SAVE before you exit the CREATIVE PRINT
menu. The created image is saved in the “Memory
Stick” or PC card.
Note
A created image that is not saved with the SAVE
button will be deleted.
Making a sticker
When you select “STICKER” in the CREATIVE
PRINT menu, you can add a frame to each 9-split
image to make a 9-split images sticker.
1 Do the following steps in “Making a card” to
select a template. In step 2, select “STICKER.”
1 c 2 c 3 c 4
The window for selecting a frame is displayed.
2 Press the arrow (B/b/V/v) button to move the
cursor to the desired frame, and press ENTER.
The thumbnail list for selecting an image is
displayed.
3 Press the arrow (B/b/V/v) button to select an
image, and press ENTER.
The preview is displayed. The selected image is
inset in the selected frame.
4 Do the following steps in “Making a card” to
adjust the image position and print the framed
image:
9 c 10 c 13 c 14
To save the CREATIVE PRINT image
Press SAVE before you exit the CREATIVE PRINT
menu. The created image is saved in the “Memory
Stick” or PC card.
Note
A created image that is not saved with the SAVE
button will be deleted.
9-split sticker with framed images
5 Press the arrow (B/b/V/v) button to move the cursor to the
desired greeting (1), then press ENTER.
The color selection window for the greeting (1) is displayed.
Note
A created image that is not saved with the SAVE
button will be deleted.
 Loading...