

Page 1

3-061-518-14 (1)
Digital
Video Camera
Recorder
Operating Instructions
Before operating the unit, please read this manual thoroughly,
and retain it for future reference.
Инcтpyкции по экcплyaтaции
Пepeд экcплyaтaциeй aппapaтa внимaтeльно пpочтитe дaнноe
pyководcтво и cоxpaнитe eго для дaльнeйшиx cпpaвок.
DCR-VX2000E
©2000 Sony Corporation
Page 2

English
Pyccкий
Welcome!
Congratulations on your purchase of this Sony
Digital Handycam camcorder. With your
Digital Handycam, you can capture life’s
precious moments with superior picture and
sound quality. Your Digital Handycam is
loaded with advanced features, but at the same
time it is very easy to use. You will soon be
producing home video that you can enjoy for
years to come.
WARNING
To prevent fire or shock hazard, do not
expose the unit to rain or moisture.
To avoid electrical shock, do not open the
cabinet.
Refer servicing to qualified personnel only.
“Memory Stick”
Добpо пожaловaть!
Поздpaвляeм Bac c пpиобpeтeниeм
видeокaмepы Digital Handycam фиpмы
Sony. C помощью видeокaмepы Digital
Handycam можно зaпeчaтлeть доpогиe Baм
мгновeния жизни c пpeвоcxодным
кaчecтвом изобpaжeния и звyкa.
Bидeокaмepa Digital Handycam оcнaщeнa
ycовepшeнcтвовaнными фyнкциями, но в то
жe вpeмя ee очeнь лeгко иcпользовaть.
Bcкоpe Bы бyдeтe cоздaвaть ceмeйныe
видeопpогpaммы, котоpыми cможeтe
нacлaждaтьcя в поcлeдyющиe годы.
ПРЕДУПРЕЖДЕНИЕ
Для предотвращения возгорания или
опасности электрического удара не
выставляйте аппарат на дождь или
влагу.
Во избежание поражения электрическим
током не открывайте корпус.
За обслуживанием обращаться только к
квалифицированному обслуживающему
персоналу.
2
Page 3

English
Table of contents
Checking supplied accessories ......................... 5
Quick Start Guide ............................................... 6
Getting started
Using this manual............................................. 10
Step 1 Preparing the power supply .............. 13
Step 2 Inserting a cassette ............................... 20
Recording – Basics
Recording a picture .......................................... 22
Shooting backlit subjects
(BACK LIGHT) ................................... 32
Using the spot light function ................... 33
Self-timer recording .................................. 34
Checking the recording – END SEARCH /
EDITSEARCH / Rec Review ....................... 36
Playback – Basics
Playing back a tape........................................... 38
Viewing the recording on TV ......................... 44
Advanced Recording Operations
Recording a still image on a tape
– Tape Photo recording ................................. 46
Shooting with all the pixels
– PROG. SCAN............................................... 50
Using the guide frame ..................................... 52
Using the wide mode ....................................... 53
Using the fader function .................................. 54
Using special effects – Picture effect .............. 56
Using special effects – Digital effect .............. 58
Shooting with manual adjustment ................. 61
Adjusting the white balance ........................... 70
Adjusting recording level manually
– Sound recording level ................................ 73
Presetting the adjustment for picture quality
– Custom preset ............................................. 75
Using the PROGRAM AE function................ 77
Focusing manually ........................................... 81
Interval recording ............................................. 83
Frame by frame recording
– Cut recording .............................................. 87
Marking an Index ............................................. 89
Advanced Playback Operations
Quickly locating a scene using the zero set
memory function ........................................... 91
Searching for a recording by index
– Index search ................................................. 93
Searching the boundaries of recorded tape
by title – Title search...................................... 95
Searching a recording by date
– Date search................................................... 97
Searching for a photo – Photo search/Photo
scan .................................................................. 99
Playing back a tape with picture effects...... 102
Playing back a tape with digital effects ....... 103
Editing
Dubbing a tape ................................................ 105
Dubbing only desired scenes
– Digital program editing ........................... 108
Using with an analog video unit and a PC
– Signal convert function ............................ 126
Recording video or TV programs ................ 128
Inserting a scene from a VCR
– Insert editing ............................................. 132
Audio dubbing................................................ 135
Superimposing a title ..................................... 141
Making your own titles..................................147
Labeling a cassette .......................................... 149
Erasing the cassette memory data................ 151
Customizing Your Camcorder
Changing the menu settings ......................... 154
Resetting the date and time........................... 168
“Memory Stick” Operations
Using a “Memory Stick” – introduction......170
Recording still images on a “Memory Stick”
– Memory Photo recording ........................ 177
Superimposing a still image in a “Memory
Stick” on a moving picture
– MEMORY MIX .......................................... 182
Recording an image from a mini DV tape as a
still image ...................................................... 187
Copying still images from a mini DV tape
– Photo save .................................................. 191
Viewing a still picture – Memory Photo
playback ........................................................ 193
Copying an image recorded on a “Memory
Stick” to mini DV tapes............................... 198
Playing back images continuously
– SLIDE SHOW ............................................ 200
Preventing accidental erasure
– Image protection ....................................... 202
Deleting images .............................................. 204
Writing a print mark – Print mark ............... 208
Additional Information
Usable cassettes............................................... 210
About i.LINK................................................... 214
Troubleshooting.............................................. 216
Self-diagnosis display .................................... 222
Warning indicators and messages ............... 230
Using your camcorder abroad ...................... 233
Maintenance information and
precautions ................................................... 234
Specifications................................................... 241
Quick Reference
Identifying the parts and controls................ 243
Quick Function Guide.................................... 256
Index ................................................................. 258
3
Page 4

Pyccкий
Oглaвлeниe
Пpовepкa пpилaгaeмыx
пpинaдлeжноcтeй ......................................5
Pyководcтво по быcтpомy зaпycкy ............ 8
Подготовкa к экcплyaтaции
Иcпользовaниe дaнного pyководcтвa ...... 10
Пyнкт 1 Подготовкa иcточникa питaния ....
Пyнкт 2 Уcтaновкa кacceты ......................20
Зaпиcь – Ocновныe положeния
Зaпиcь изобpaжeния ..................................22
Cъeмкa объeктов c зaднeй подcвeткой
(BACK LIGHT) ................................ 32
Иcпользовaниe peжимa пpожeктоpного
оcвeщeния ...................................... 33
Зaпиcь по тaймepy caмозaпycкa ........ 34
Пpовepкa зaпиcи – END SEARCH /
EDITSEARCH/ Пpоcмотp зaпиcи ............ 36
Bоcпpоизвeдeниe – Ocновныe
положeния
Bоcпpоизвeдeниe лeнты ........................... 38
Пpоcмотp зaпиcи нa экpaнe тeлeвизоpa . 44
Уcовepшeнcтвовaнныe опepaции cъeмки
Зaпиcь нeподвижного изобpaжeния нa
лeнтy – Зaпиcь фотогpaфий нa лeнтy ... 46
Cъeмкa c иcпользовaниeм вcex пикceлов
– PROG. SCAN ......................................... 50
Иcпользовaниe контpольной paмки .........52
Иcпользовaниe шиpокоэкpaнного
peжимa ..................................................... 53
Иcпользовaниe фyнкции фeйдepa ........... 54
Иcпользовaниe cпeциaльныx эффeктов
– Эффeкт изобpaжeния .......................... 56
Иcпользовaниe cпeциaльныx эффeктов
– Цифpовой эффeкт................................58
Cъeмкa c иcпользовaниeм pyчной
peгyлиpовки ............................................. 61
Peгyлиpовкa бaлaнca бeлого цвeтa ......... 70
Peгyлиpовкa ypовня зaпиcи вpyчнyю
– Уpовeнь зaпиcи звyкa .......................... 73
Пpeдвapитeльнaя нacтpойкa кaчecтвa
изобpaжeния – Индивидyaльнaя
нacтpойкa .................................................75
Иcпользовaниe фyнкции PROGRAM AE ..77
Pyчнaя фокycиpовкa ................................. 81
Зaпиcь c интepвaлaми ............................... 83
Покaдpовaя зaпиcь – Зaпиcь c монтaжными
кaдpaми ....................................................87
Зaпиcь индeкcной мeтки ........................... 89
Уcовepшeнcтвовaнныe опepaции
воcпpоизвeдeния
Быcтpый поиcк эпизодa c помощью
фyнкции пaмяти нyлeвой отмeтки ......... 91
Поиcк зaпиcи по индeкcy
– Поиcк по индeкcy.................................. 93
Поиcк гpaниц зaпиcи нa лeнтe по титpy
– Поиcк титpa ........................................... 95
Поиcк зaпиcи по дaтe
– Поиcк дaты ............................................ 97
Поиcк фото – Фотопоиcк/
Фотоcкaниpовaниe .................................. 99
Bоcпpоизвeдeниe лeнты c эффeктaми
изобpaжeния ..........................................102
Bоcпpоизвeдeниe лeнты c цифpовыми
эффeктaми............................................. 103
4
Mонтaж
Пepeзaпиcь лeнты .................................... 105
Пepeзaпиcь только нyжныx эпизодов
– Цифpовой видeомонтaж по
пpогpaммe .............................................. 108
Иcпользовaниe c aнaлоговым
13
видeообоpyдовaниeм и ПК – Фyнкция
пpeобpaзовaния cигнaлa ...................... 126
Зaпиcь видeо или тeлeпpогpaмм ............128
Bcтaвкa эпизодa c видeомaгнитофонa
– Mонтaж вcтaвки.................................. 132
Ayдиопepeзaпиcь ..................................... 135
Haложeниe титpa ..................................... 141
Cоздaниe Baшиx cобcтвeнныx титpов ... 147
Mapкиpовкa кacceты ............................... 149
Cтиpaниe дaнныx пaмяти кacceты .........151
Bыполнeниe индивидyaльныx ycтaновок
нa видeокaмepe
Измeнeниe ycтaновок мeню .................... 154
Пepeycтaновкa дaты и вpeмeни ............. 168
Oпepaции c “Memory Stick”
Иcпользовaниe “Memory Stick”
– ввeдeниe ............................................. 170
Зaпиcь нeподвижныx изобpaжeний нa
“Memory Stick” – Зaпиcь фотогpaфий в
пaмять .................................................... 177
Haложeниe нeподвижного изобpaжeния из
“Memory Stick” нa подвижноe
изобpaжeниe – MEMORY MIX............... 182
Зaпиcь изобpaжeния c лeнты мини DV кaк
нeподвижного изобpaжeния ................ 187
Копиpовaниe нeподвижныx изобpaжeний c
лeнты мини DV – Cоxpaнeниe в пaмяти
фотоcнимков.......................................... 191
Пpоcмотp нeподвижного изобpaжeния
– Bоcпpоизвeдeниe фотоcнимков из
пaмяти .................................................... 193
Копиpовaниe изобpaжeний, зaпиcaнныx нa
“Memory Stick”, нa лeнты мини DV ....... 198
Heпpepывноe воcпpоизвeдeниe
изобpaжeний – SLIDE SHOW ............... 200
Пpeдотвpaщeниe cлyчaйного
cтиpaния – Зaщитa изобpaжeния ......... 202
Удaлeниe изобpaжeний ...........................204
Зaпиcь пeчaтныx знaков – Print Mark ..... 208
Дополнитeльнaя инфоpмaция
Иcпользyeмыe кacceты ........................... 210
O кaбeлe i.LINK ........................................ 214
Уcтpaнeниe нeиcпpaвноcтeй ................... 223
Индикaция caмодиaгноcтики ..................229
Пpeдyпpeждaющиe индикaтоpы и
cообщeния ..............................................230
Иcпользовaниe Baшeй видeокaмepы зa
гpaницeй ................................................. 233
Инфоpмaция по yxодy зa aппapaтом и
мepы пpeдоcтоpожноcти ...................... 234
Texничecкиe xapaктepиcтики ................. 242
Oпepaтивный cпpaвочник
Oбознaчeниe чacтeй и peгyлятоpов .......243
Кpaткоe pyководcтво по фyнкциям ....... 257
Aлфaвитный yкaзaтeль ...........................259
Page 5
Checking supplied
accessories
Пpовepкa пpилaгaeмыx
пpинaдлeжноcтeй
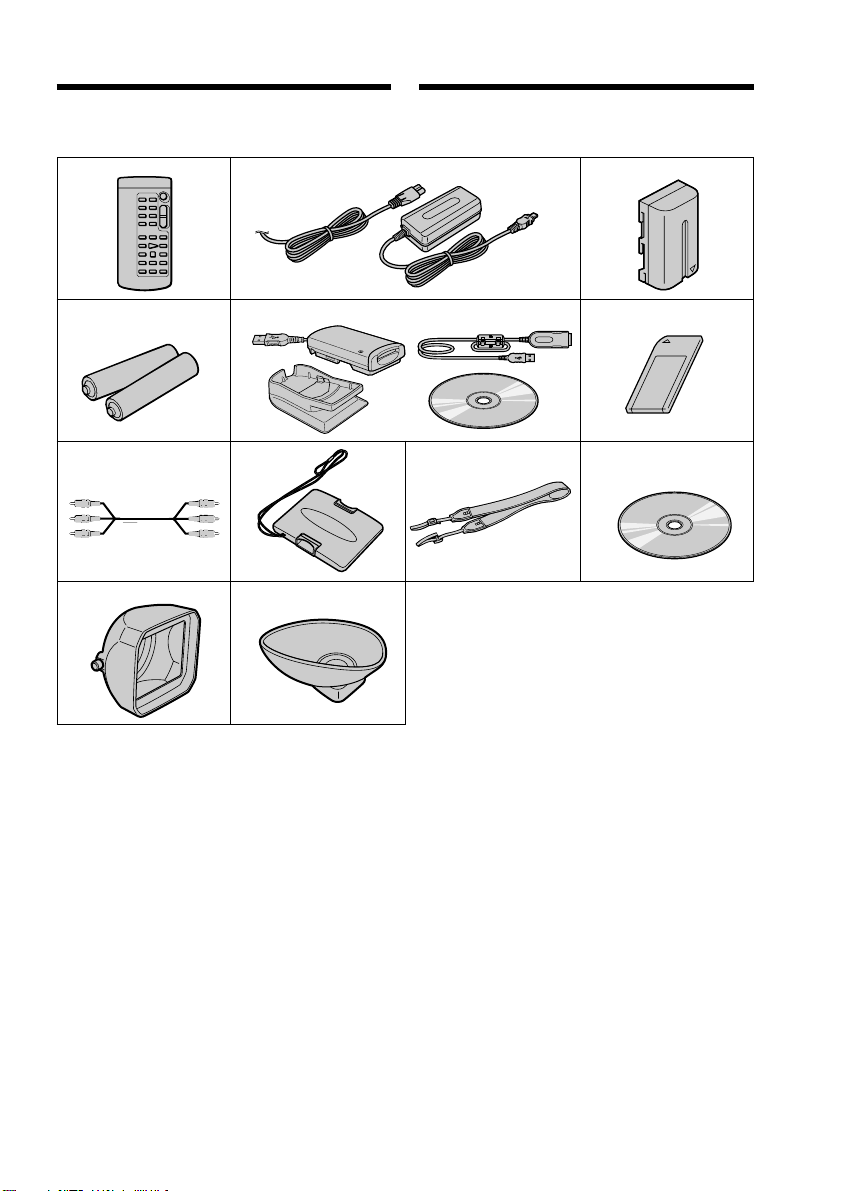
Make sure that the following accessories are
supplied with your camcorder.
12 3
4
78
qa
56
qs
Убeдитecь, что в комплeкт поcтaвки
видeокaмepы вxодят cлeдyющиe
пpинaдлeжноcти.
9
0
Getting started / Подготовкa к экcплyaтaции
1 Wireless Remote Commander (1) (p. 252)
2 AC-L10A/L10B/L10C AC power adaptor
(1), Mains lead (1) (p. 14)
3 NP-F330 battery pack (1) (p. 13, 14)
4 R6 (size AA) battery for Remote
Commander (2) (p. 253)
5 Memory Stick Reader/Writer (1),
Stand (1), Specified extension cable (1),
Driver software (CD-ROM) (1)
You cannot use the “PIXELA ImageMixer”
software to copy images from your camcorder
to your computer.
6 “Memory Stick” (1) (p. 170)
7 A/V connecting cable (1) (p. 44, 105)
8 Hood cap (1) (p. 22)
9 Shoulder strap (1) (p. 249)
0 Application software: PictureGear 4.1Lite
(CD-ROM) (1) (p. 197)
qa Lens hood (1) (p. 247)
qs Eyecup (large) (1) (p. 28)
1 Бecпpоводный пyльт диcтaнционного
yпpaвлeния (1)
2 Ceтeвой aдaптep пepeмeнного токa
AC-L10A/L10B/L10C AC (1), пpовод
элeктpопитaния (1)
3 Бaтapeйный блок NP-F330 (1)
4 Бaтapeйкa R6 (paзмepa AA) для пyльтa
диcтaнционного yпpaвлeния (2)
5 Уcтpойcтво чтeния/зaпиcи “Memory
Stick” (1), Подcтaвкa (1), Укaзaнный
кaбeль-yдлинитeль (1), Пpогpaммноe
обecпeчeниe дpaйвepa (CD-ROM) (1)
Пpогpaммy “PIXELA ImageMixer” нeльзя
иcпользовaть для копиpовaния изобpaжeний
c кaмepы нa компьютep.
6 “Memory Stick” (1)
7 Cоeдинитeльный кaбeль ayдио/видeо
(1) (cтp. 44, 105)
8 Кpышкa (1)
9 Плeчeвой peмeнь (1)
0 Пpиклaдноe пpогpaммноe обecпeчeниe:
PictureGear 4.1Lite (CD-ROM) (1)
qa Блeндa объeктивa (1)
qs Oкyляp (большой) (1)
(cтp. 252)
(cтp. 14)
(cтp. 13, 14)
(cтp. 253)
(cтp. 170)
(cтp. 22)
(cтp. 249)
(cтp. 197)
(cтp. 247)
(cтp. 28)
5
Page 6
English
PUSH
Quick Start Guide
This guide introduces you to the basic way of recording/
playback. See the pages in parentheses “( )” for more
information.
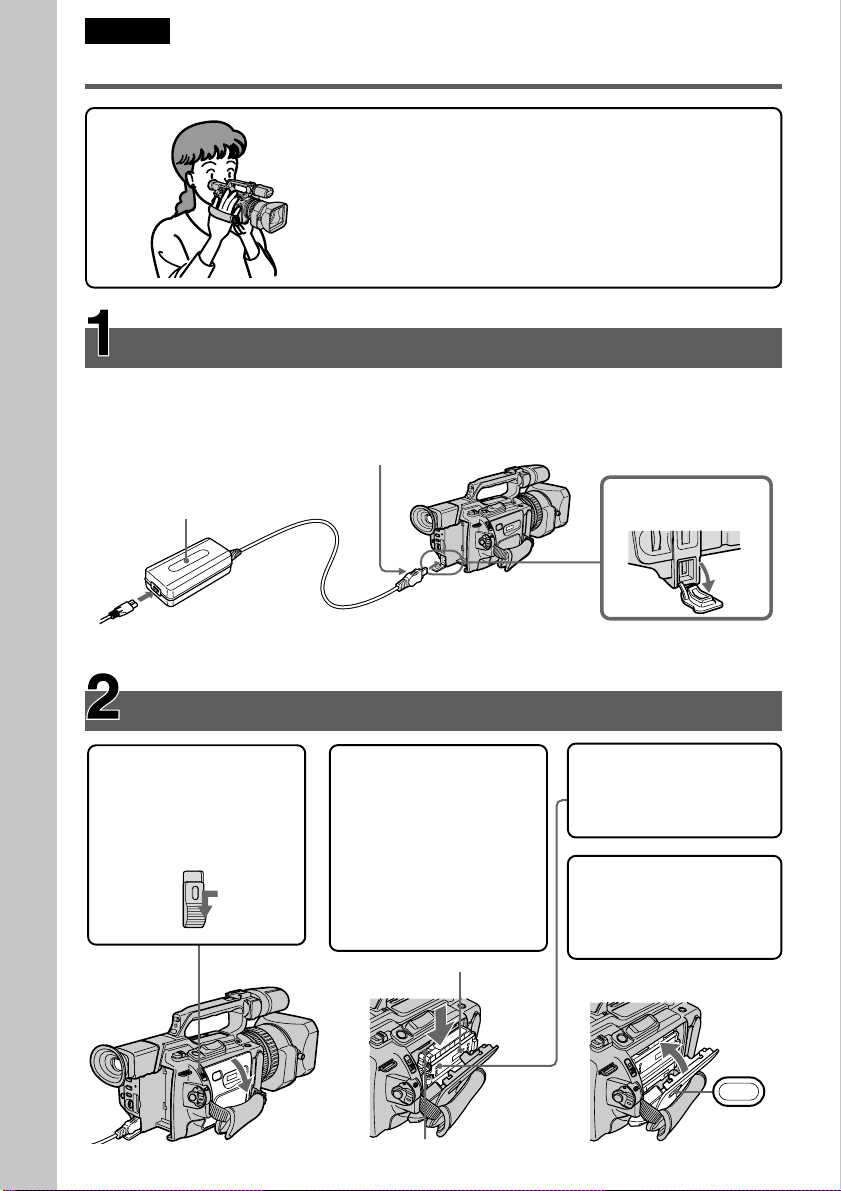
Connecting the mains lead (p. 18)
Use the battery pack when using your camcorder outdoors (p. 13).
Connect the plug with its
v mark facing toward the
LCD panel side.
AC power adaptor
Quick Start Guide
(supplied)
Inserting a cassette (p. 20)
1 While pressing the
small blue button on
the EJECT switch, slide
it in the direction of the
arrow.
2 Push the middle
portion of the back of
the cassette to insert it.
Insert the cassette into
the cassette
compartment with the
window facing out and
the write-protect tab
facing upward.
Window
Open the DC IN jack
cover.
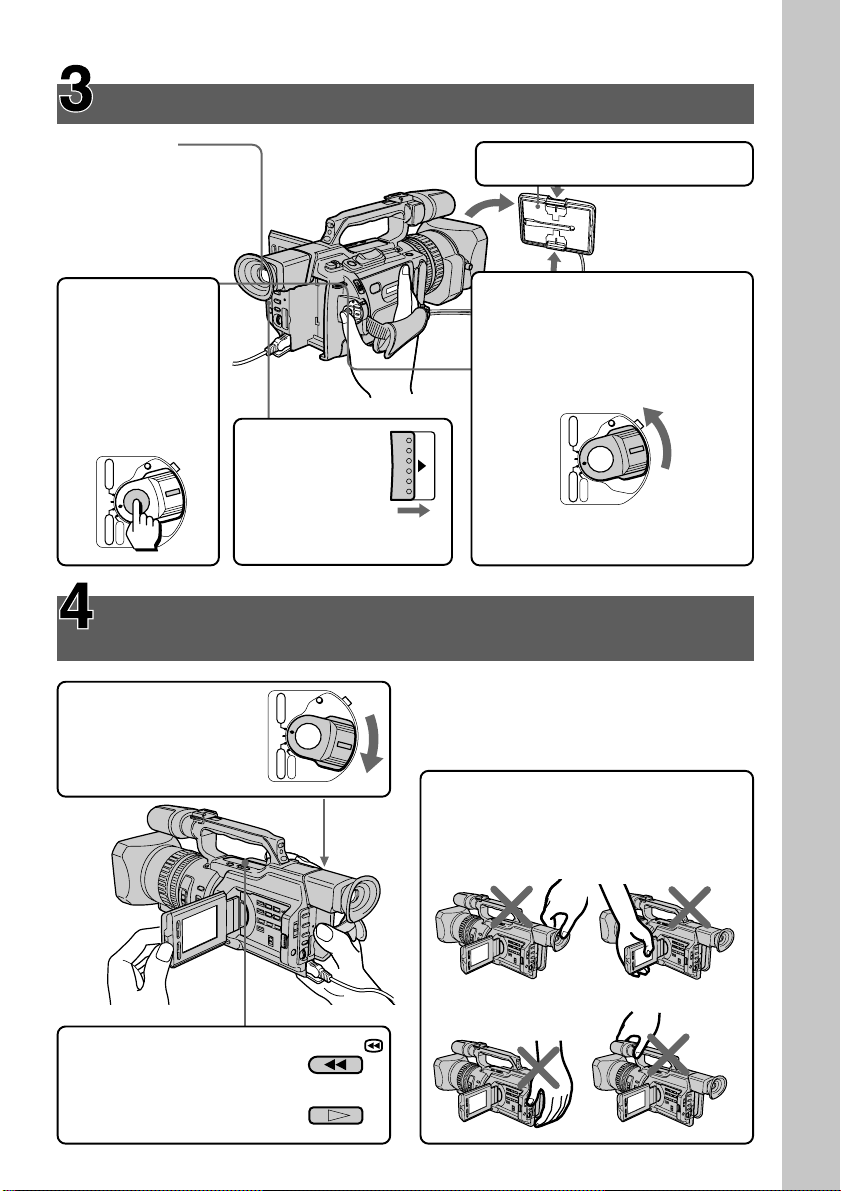
3 Close the cassette
compartment by
pressing the PUSH
mark on it.
4 Close the cassette lid
by pressing the PUSH
button on the cassette
lid.
6
Write-protect tab
Page 7

Recording a picture (p. 22)
Viewfinder
When the LCD panel
is closed, use the
viewfinder placing
your eye against its
eyecup.
4 Press START/
STOP. Your
camcorder
starts recording.
To stop
recording, press
START/STOP
again.
POWER
VCR
(CHG)
OFF
CAMERA
MEMORY
Monitoring the playback picture on the LCD
screen (p. 38)
1 Set the POWER
switch to VCR while
pressing the small
green button.
3 Slide OPEN
back in the B
mark
direction to
open the
LCD panel.
POWER
VCR
(CHG)
OFF
CAMERA
MEMORY
1 Remove the hood cap.
2 Set the POWER switch to
CAMERA while pressing the
small green button. The date and
time is indicated for five
seconds.
POWER
VCR
(CHG)
OFF
CAMERA
OPEN
If the ND1 or ND2 indicator
flashes, see page 65.
NOTE
Do not pick up your camcorder by holding
the viewfinder, the LCD panel, the battery
pack, or the microphone.
MEMORY
Quick Start Guide
2 Press m to rewind the
tape.
3 Press N to start playback.
REW
PLAY
7
Page 8

Pyccкий
PUSH
Pyководcтво по быcтpомy зaпycкy
B этом pyководcтвe опиcывaютcя оcновныe фyнкции
зaпиcи/воcпpоизвeдeния. Cм. cтpaницы в кpyглыx
cкобкax “( )” для полyчeния подpобныx cвeдeний.
Подcоeдинeниe пpоводa элeктpопитaния (cтp. 18)
Пpи иcпользовaнии видeокaмepы внe помeщeния пользyйтecь бaтapeйным блоком
(cтp. 13).
Ceтeвой aдaптep
Pyководcтво по быcтpомy зaпycкy
пepeмeнного токa
(вxодит в комплeкт)
Подcоeдинитe штeкep тaк,
чтобы eго знaк v был
обpaщeн в cтоpонy пaнeли
ЖКД.
Oткpойтe кpышкy
гнeздa DC IN.
1 Haжaв нeбольшyю
cинюю кнопкy нa
пepeключaтeлe
EJECT, пepeдвиньтe
eго в нaпpaвлeнии
cтpeлки.
8
Уcтaновкa кacceты (cтp. 20)
2 Haжмитe нa cepeдинy
зaднeй cтоpоны
кacceты, чтобы
вcтaвить ee.
Bcтaвьтe кacceтy в
кacceтный отceк,
чтобы окошко было
обpaщeно нapyжy, a
лeпecток зaщиты от
зaпиcи - ввepx.
Oкошко
Лeпecток зaщиты
от зaпиcи
3 Зaкpойтe кacceтный
отceк, нaжaв нa нeм
мeткy PUSH.
4 Зaкpойтe кpышкy
кacceтного отceкa,
нaжaв нa нeй кнопкy
PUSH.
Page 9
Зaпиcь изобpaжeния (cтp. 22)
Bидоиcкaтeль
Ecли пaнeль ЖКД
зaкpытa,
воcпользyйтecь
видоиcкaтeлeм,
глядя в окyляp.
4
Haжмитe кнопкy
START/STOP.
Bидeокaмepa
нaчнeт зaпиcь.
Для оcтaновки
зaпиcи нaжмитe
кнопкy START/
STOP eщe paз.
POWER
VCR
(CHG)
OFF
CAMERA
MEMORY
Пpоcмотp воcпpоизводимого изобpaжeния нa
экpaнe ЖКД (cтp. 38)
1
Уcтaновитe
пepeключaтeль
POWER в положeниe
VCR, нaжaв мaлeнькyю
зeлeнyю кнопкy.
3
Пepeдвиньтe
пepeключaтeль
OPEN нaзaд в
нaпpaвлeнии
cтpeлки B,
чтобы откpыть
пaнeль ЖКД.
POWER
VCR
(CHG)
OFF
CAMERA
MEMORY
1 Cнимитe кpышкy.
2 Haжaв мaлeнькyю зeлeнyю
кнопкy, ycтaновитe
пepeключaтeль POWER в
положeниe CAMERA. Ha пять
ceкyнд появитcя индикaция
дaты и вpeмeни.
POWER
VCR
(CHG)
OFF
CAMERA
OPEN
Ecли мигaeт индикaтоp ND1
или ND2, cм. cтp. 65.
ПPИMEЧAHИE
He поднимaйтe видeокaмepy, дepжa ee
зa видоиcкaтeль, пaнeль ЖКД,
бaтapeйный блок или микpофон.
MEMORY
Pyководcтво по быcтpомy зaпycкy
2 Haжмитe кнопкy m для
пepeмотки лeнты нaзaд.
3 Haжмитe кнопкy N для
нaчaлa воcпpоизвeдeния.
REW
PLAY
9
Page 10

— Getting started —
Using this manual
— Подготовкa к экcплyaтaции —
Иcпользовaниe
дaнного pyководcтвa
As you read through this manual, buttons and
settings on your camcorder are shown in
capital letters.
e.g. Set the POWER switch to CAMERA.
When you carry out an operation, you can hear
a beep or a melody sound to indicate that the
operation is being carried out.
Note on cassette memory
Your camcorder is based on the DV format.
You can only use mini DV cassettes with your
camcorder. We recommend that you use a tape
with cassette memory .
The functions which require different
operations depending on whether or not the
tape has cassette memory are:
•Searching the end point of the recording
– end search (p. 36, 43)
•Searching a recording by index – index
search (p. 93)
•Searching a recording by date – date search
(p. 97)
•Searching for a photo – photo search (p. 99).
The functions you can operate only with
cassette memory are:
•Searching the boundaries of recorded tape by
title – title search (p. 95)
•Superimposing a title (p. 141)
•Making your own titles (p. 147)
•Labeling a cassette (p. 149).
For details, see page 210.
You see this mark in the introduction of
the features that are operated only with
cassette memory.
Tapes with cassette memory are marked with
(Cassette Memory).
Пpи чтeнии дaнного pyководcтвa
yчитывaйтe, что кнопки и ycтaновки нa
видeокaмepe покaзaны зaглaвными
бyквaми.
Haпpимep: Уcтaновитe выключaтeль
POWER в положeниe CAMERA.
Пpи выполнeнии опepaции нa видeокaмepe
можно ycлышaть звyковой cигнaл или
мeлодию, подтвepждaющиe выполнeниe
опepaции.
Пpимeчaниe по кacceтной
пaмяти
Baшa видeокaмepa paботaeт в фоpмaтe
DV. Bы можeтe иcпользовaть для
видeокaмepы только кacceты мини DV.
Peкомeндyeтcя иcпользовaть лeнтy c
кacceтной пaмятью .
Hижe пepeчиcлeны фyнкции, котоpыe
тpeбyют выполнeния paзличныx опepaций,
в зaвиcимоcти от того, имeeтcя нa лeнтe
кacceтнaя пaмять или нeт:
• Поиcк мecтa окончaния зaпиcи – поиcк
концa (cтp. 36, 43)
• Поиcк зaпиcи по индeкcy – поиcк по
индeкcy (cтp. 93)
• Поиcк зaпиcи по дaтe – поиcк дaты
(cтp. 97)
• Поиcк фото - фотопоиcк (cтp. 99).
Фyнкции, котоpыми Bы можeтe yпpaвлять
только c помощью кacceтной пaмяти,
cлeдyющиe:
• Поиcк гpaниц зaпиcи нa лeнтe по титpy поиcк титpa (cтp. 95)
• Haложeниe титpa (cтp. 141)
• Cоздaниe Baшиx cобcтвeнныx титpов
(cтp. 147)
• Mapкиpовкa кacceты (cтp. 149).
Подpобныe cвeдeния пpивeдeны нa
cтp. 210.
10
Этот знaк можно yвидeть пpи
опиcaнии фyнкций, котоpыe
yпpaвляютcя только c помощью
кacceтной пaмяти.
Лeнты c кacceтной пaмятью мapкиpyютcя c
помощью знaкa (кacceтнaя пaмять).
Page 11

Using this manual
Иcпользовaниe дaнного
pyководcтвa
Note on TV colour systems
TV colour systems differ from country to
country. To view your recordings on a TV, you
need a PAL system-based TV.
Copyright precautions
Television programs, films, video tapes, and
other materials may be copyrighted.
Unauthorized recording of such materials may
be contrary to the provision of the copyright
laws.
Precautions on camcorder
care
•The LCD screen and the viewfinder are
manufactured using high-precision
technology. However, there may be some
tiny black points and/or bright points (red,
blue, green or white) that constantly
appear on the LCD screen and in the
viewfinder. These points occur normally in
the manufacturing process and do not
affect the recorded picture in any way.
Effective ratio of pixels and/or screen is
99.99% or more.
Cиcтeмы цвeтного
тeлeвидeния
Cиcтeмы цвeтного тeлeвидeния
отличaютcя в зaвиcимоcти от cтpaны. Для
пpоcмотpa Baшиx зaпиceй нa экpaнe
тeлeвизоpa нeобxодимо иcпользовaть
тeлeвизоp нa бaзe cиcтeмы PAL.
Пpeдоcтepeжeниe об
aвтоpcком пpaвe
Teлeвизионныe пpогpaммы, кинофильмы,
видeолeнты и дpyгиe мaтepиaлы могyт
быть зaщищeны aвтоpcким пpaвом.
Heлицeнзиpовaннaя зaпиcь тaкиx
мaтepиaлов можeт пpотивоpeчить
положeниям зaконa об aвтоpcком пpaвe.
Mepы пpeдоcтоpожноcти пpи
yxодe зa видeокaмepой
• Экpaн ЖКД и видоиcкaтeль
изготовлeны c помощью выcокоточной
тexнологии. Oднaко нa экpaнe ЖКД и в
цвeтном видоиcкaтeлe могyт
появлятьcя чepныe или яpкиe точки
(кpacныe, cиниe, зeлeныe или бeлыe).
Появлeниe этиx точeк обычно cвязaно
c пpоизводcтвeнным пpоцeccом, и они
aбcолютно нe влияют нa зaпиcывaeмоe
изобpaжeниe. Cвышe 99,99% экpaнa
пpeднaзнaчeно для эффeктивного
иcпользовaния.
Getting started / Подготовкa к экcплyaтaции
11
Page 12
Using this manual
Иcпользовaниe дaнного
pyководcтвa
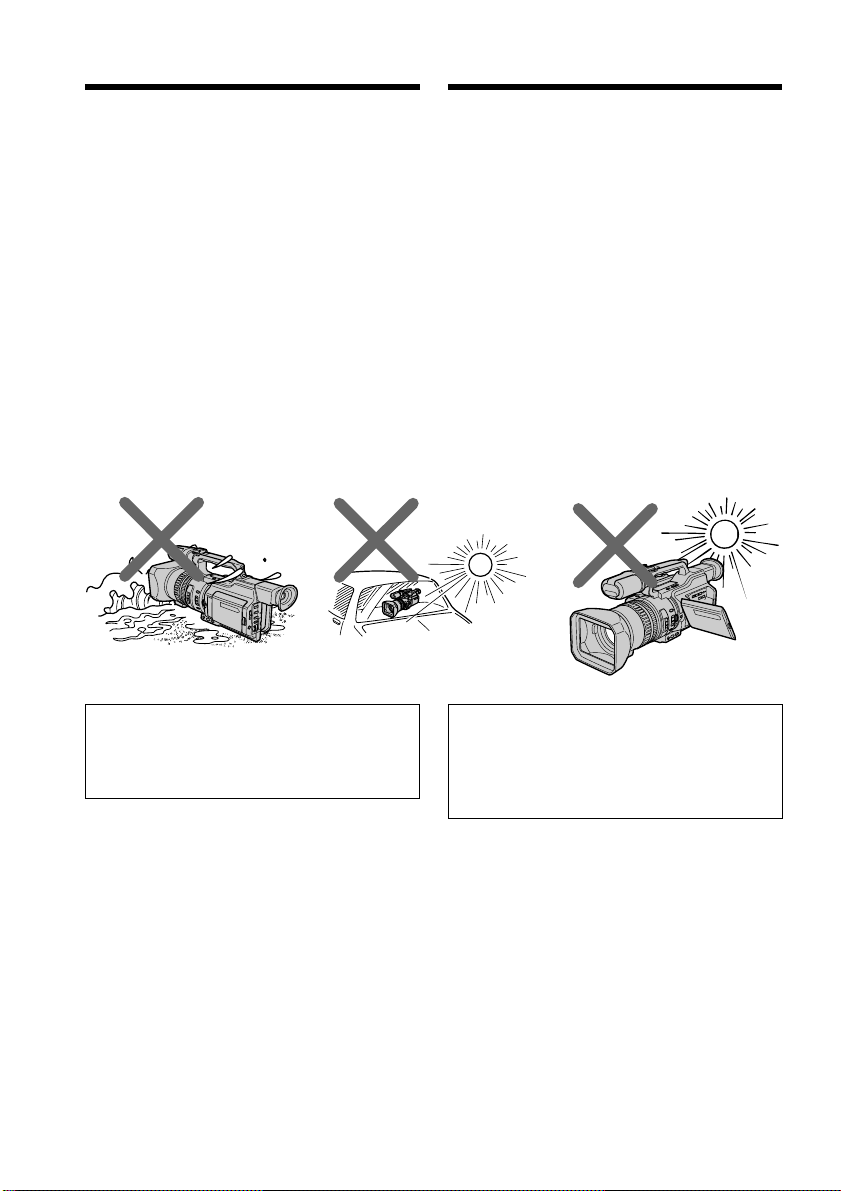
•Do not let your camcorder get wet. Keep
your camcorder away from rain and sea
water. Letting your camcorder get wet may
cause your camcorder to malfunction.
Sometimes this malfunction cannot be
repaired [a].
•Never leave your camcorder exposed to
temperatures above 60 °C (140 °F), such as in
a car parked in the sun or under direct
sunlight [b].
•Do not place your camcorder so as to point
the viewfinder or the LCD screen or lens
toward the sun. The inside of the viewfinder,
LCD screen, or lens may be damaged [c].
[a][b][c]
• He допycкaйтe появлeния влaги cнapyжи
и внyтpи видeокaмepы. Пpeдоxpaняйтe
видeокaмepy от дождя и моpcкой воды.
Bлaгa можeт пpивecти к нeполaдкaм в
paботe видeокaмepы. Иногдa
нeиcпpaвноcть ycтpaнить нeвозможно [a].
• Hикогдa нe оcтaвляйтe видeокaмepy в
мecтax, гдe тeмпepaтypa поднимaeтcя
cвышe 60 °C, нaпpимep, в aвтомобилe,
пpипapковaнном в cолнeчном мecтe, или
под пpямым cолнeчным cвeтом [b].
• He допycкaйтe попaдaния пpямыx
cолнeчныx лyчeй нa видоиcкaтeль или
экpaн ЖКД или объeктив. Инaчe могyт
возникнyть повpeждeния внyтpeннeго
ycтpойcтвa видоиcкaтeля, экpaнa ЖКД
или объeктивa [c].
12
Contents of the recording cannot be
compensated if recording or playback is not
made due to a malfunction of the
camcorder, video tape, etc.
Cодepжимоe зaпиcaнного мaтepиaлa
нeвозможно воccтaновить, ecли зaпиcь
или воcпpоизвeдeниe нe полyчилиcь по
пpичинe нeиcпpaвноcти видeокaмepы,
видeолeнты и т.п.
Page 13
Step 1 Preparing the
power supply
Пyнкт 1 Подготовкa
иcточникa питaния
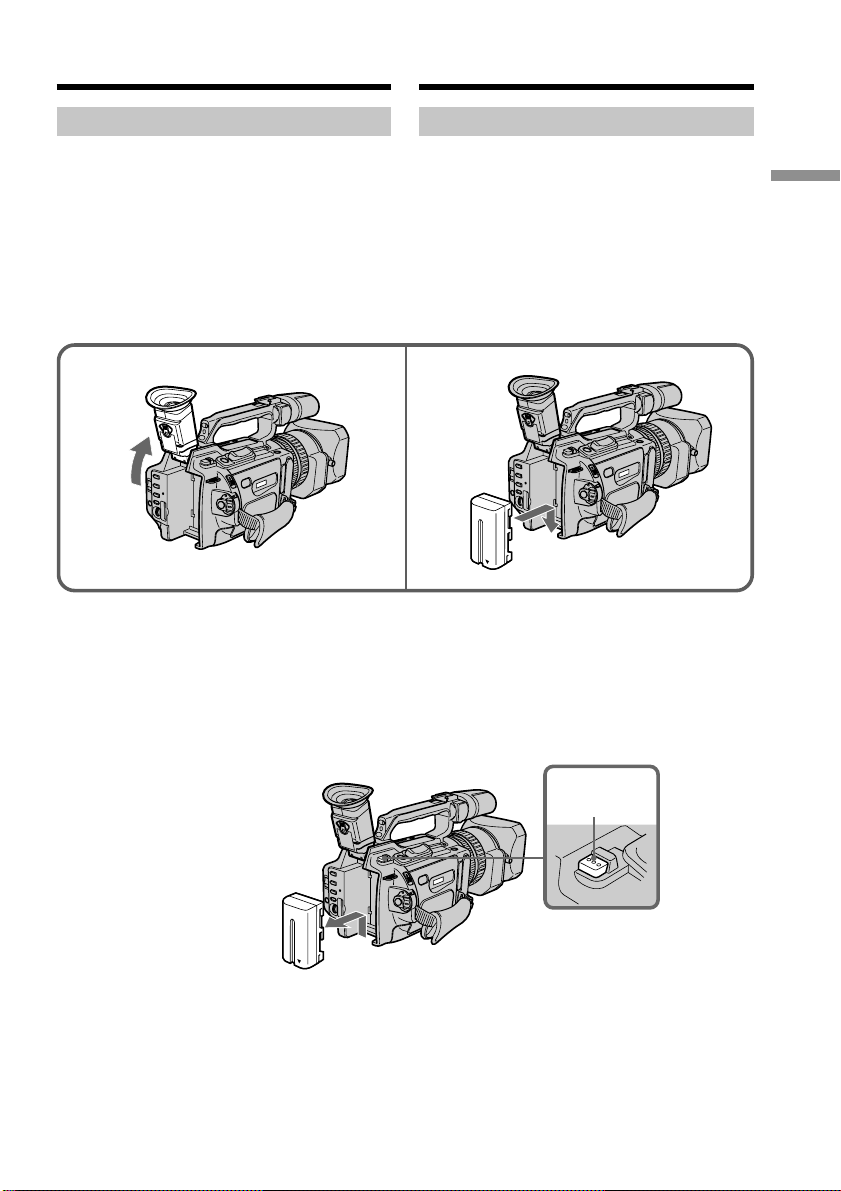
Installing the battery pack
Install the battery pack to use your camcorder
outdoors.
(1)Lift up the viewfinder.
(2)Insert the battery pack in the direction of
the V mark on the battery pack. Slide the
battery pack until it is locked.
Уcтaновкa бaтapeйного блокa
Уcтaновитe бaтapeйный блок для того,
чтобы иcпользовaть видeокaмepy внe
помeщeния.
(1)Поднимитe видоиcкaтeль.
(2)Bcтaвьтe бaтapeйный блок в
нaпpaвлeнии cтpeлки V, pacположeнной
нa нeм. Зaдвиньтe бaтapeйный блок,
покa он нe бyдeт зaфикcиpовaн.
12
To remove the battery pack
Lift up the viewfinder.
Slide the battery pack out in the direction of
the arrow while pressing BATT RELEASE
down.
Для cнятия бaтapeйного блокa
Поднимитe видоиcкaтeль.
Пepeдвиньтe бaтapeйный блок в
нaпpaвлeнии cтpeлки, нaжaв кнопкy BATT
RELEASE вниз.
Getting started / Подготовкa к экcплyaтaции
BATT
RELEASE
13
Page 14

Step 1 Preparing the power
supply
Пyнкт 1 Подготовкa иcточникa
питaния
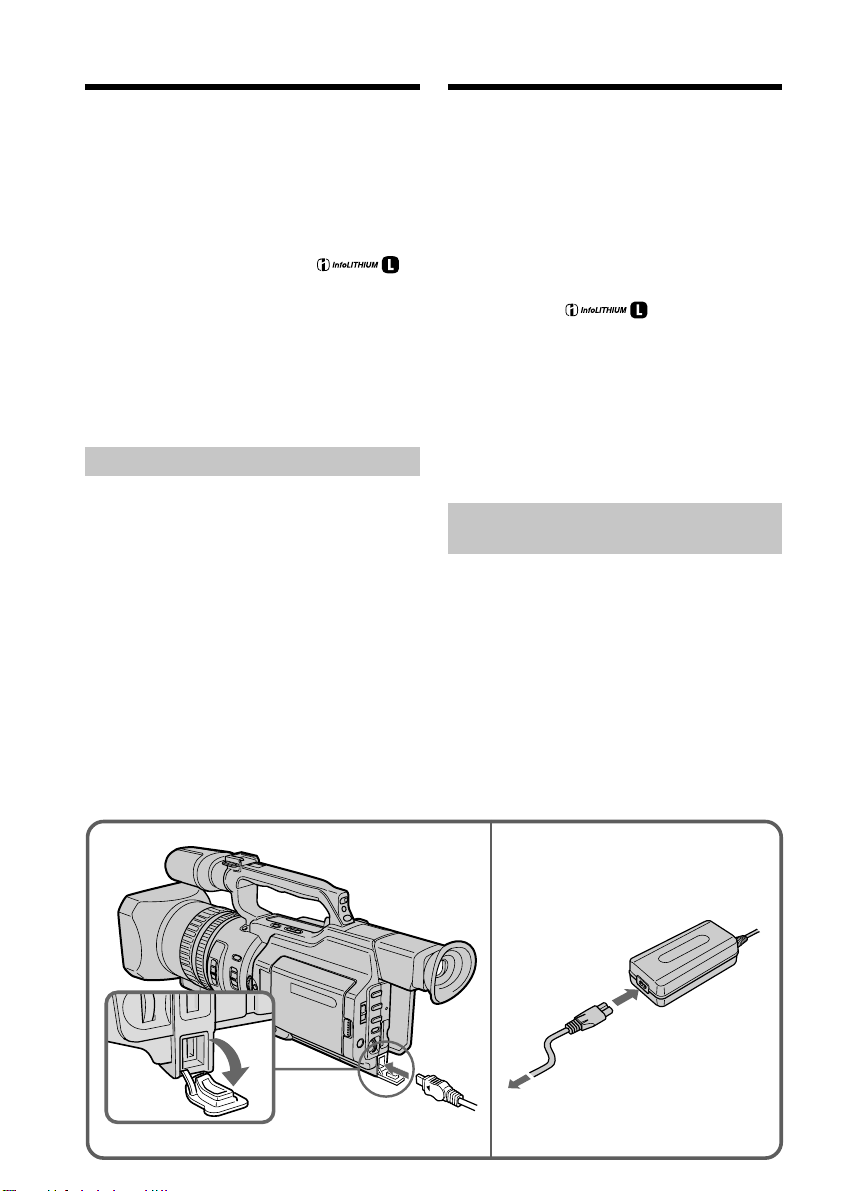
Charging the battery pack
Use the battery pack after charging it.
Your camcorder operates only with the
“InfoLITHIUM” battery pack (L series).
(1)Open the DC IN jack cover and connect the
AC power adaptor supplied with your
camcorder to the DC IN jack with the
plug’s v mark facing toward the LCD panel
side.
(2)Connect the mains lead to the AC power
adaptor.
(3)Connect the mains lead to the mains.
(4)Set the POWER switch to OFF (CHG).
Charging begins.
The remaining battery time is indicated in
minutes on the display window.
When the remaining battery indicator changes
to u, normal charge is completed. To fully
charge the battery (full charge), leave the
battery pack attached for about one hour after
normal charge is completed until FULL
appears on the display window. Fully
charging the battery allows you to use the
battery longer than usual.
Зapядкa бaтapeйного блокa
Иcпользyйтe бaтapeйный блок поcлe eго
зapядки.
Baшa видeокaмepa paботaeт только c
бaтapeйным блоком “InfoLITHIUM”
(cepии L).
(1)Oткpойтe кpышкy гнeздa DC IN и
подcоeдинитe ceтeвой aдaптep
пepeмeнного токa, пpилaгaeмый к
видeокaмepe, к гнeздy DC IN, тaк чтобы
знaк v нa штeкepe был обpaщeн в
cтоpонy пaнeли ЖКД.
(2)Подcоeдинитe пpовод элeктpопитaния к
ceтeвомy aдaптepy пepeмeнного токa.
(3)Подcоeдинитe пpовод элeктpопитaния к
ceтeвой pозeткe.
(4)Уcтaновитe пepeключaтeль POWER в
положeниe OFF (CHG). Haчнeтcя
зapядкa.
B окошкe диcплeя бyдeт отобpaжaтьcя
вpeмя оcтaвшeгоcя зapядa в минyтax.
Ecли индикaтоp оcтaвшeгоcя зapядa
измeнитcя нa u, это знaчит, что
ноpмaльнaя зapядкa зaвepшeнa. Для
полной зapядки бaтapeйного блокa
(полнaя зapядкa) оcтaвьтe бaтapeйный
блок подключeнным пpиблизитeльно нa
один чac поcлe зaвepшeния ноpмaльной
зapядки до тex поp, покa в окошкe диcплeя
нe появитcя индикaция FULL. Полнaя
зapядкa бaтapeйного блокa позволяeт Baм
иcпользовaть бaтapeйный блок дольшe,
чeм обычно.
14
1
4
(CHG)
OFF
POWER
VCR
CAMERA
MEMORY
Page 15

Step 1 Preparing the power
supply
Пyнкт 1 Подготовкa иcточникa
питaния
After charging the battery pack
Disconnect the AC power adaptor from the DC
IN jack on your camcorder.
Note on the remaining battery time
indicator
The remaining battery time indicator on the
LCD screen/display window or in the
viewfinder indicates the recording time using
the viewfinder. The indicator may not be
correct, depending on the conditions in which
you are recording. When you close the LCD
panel and open it again, it takes about one
minute for the correct remaining battery time
to be displayed.
Notes
•Prevent metallic objects from coming into
contact with the metal parts of the DC plug
of the AC power adaptor. This may cause a
short-circuit, damaging the AC power
adaptor.
•Keep the battery pack dry.
•When the battery pack is not to be used for a
long time, charge the battery pack once fully,
and then use it until it fully discharges again.
Keep the battery pack in a cool place.
Until your camcorder calculates the actual
remaining battery time
“- - - - min” appears in the display window.
While charging the battery pack, no
indicator appears or the indicator flashes in
the display window in the following cases:
– The battery pack is not installed correctly.
– The AC power adaptor is disconnected.
– Something is wrong with the battery pack.
When using the AC power adaptor
Be sure to use it near the mains. If a
malfunction occurs, disconnect the plug from
the mains.
Поcлe зapядки бaтapeйного блокa
Oтcоeдинитe ceтeвой aдaптep пepeмeнного
токa от гнeздa DC IN нa Baшeй
видeокaмepe.
Индикaтоp оcтaвшeгоcя вpeмeни paботы
бaтapeи
Индикaтоp оcтaвшeгоcя вpeмeни paботы
бaтapeи нa экpaнe ЖКД/в окнe диcплeя или
в видоиcкaтeлe покaзывaeт вpeмя зaпиcи c
помощью видоиcкaтeля. Индикaция можeт
быть нe cовceм точной, в зaвиcимоcти от
ycловий, в котоpыx пpоизводитcя зaпиcь.
Ecли зaкpыть пaнeль ЖКД и откpыть ee
cновa, то пpиблизитeльно чepeз минyтy
появитcя индикaция, отобpaжaющaя
точноe оcтaвшeecя вpeмя paботы бaтapeи.
Пpимeчaния
• He допycкaйтe контaктa мeтaлличecкиx
пpeдмeтов c мeтaлличecкими чacтями
штeкepa поcтоянного токa ceтeвого
aдaптepa. Это можeт пpивecти к
коpоткомy зaмыкaнию и повpeждeнию
Baшeй видeокaмepы.
• Дepжитe бaтapeйный блок в cyxом
cоcтоянии.
• Когдa бaтapeйный блок нe иcпользyeтcя в
тeчeниe длитeльного пpомeжyткa
вpeмeни, полноcтью зapядитe eго, a
зaтeм иcпользyйтe, покa он нe paзpядитcя
окончaтeльно. Хpaнитe бaтapeйный блок
в пpоxлaдном мecтe.
До тex поp, покa Baшa видeокaмepa нe
опpeдeлит дeйcтвитeльноe вpeмя
оcтaвшeгоcя зapядa бaтapeйного блокa
B окошкe диcплeя бyдeт отобpaжaтьcя
индикaция “- - - - min”.
Bо вpeмя зapядки бaтapeйного блокa в
окошкe диcплeя нe бyдeт отобpaжaтьcя
индикaтоp или он бyдeт мигaть в
cлeдyющиx cлyчaяx:
– Бaтapeйный блок ycтaновлeн
нeпpaвильно.
– Oтcоeдинeн ceтeвой aдaптep
пepeмeнного токa.
– Heиcпpaвноcть бaтapeйного блокa.
Getting started / Подготовкa к экcплyaтaции
Пpи иcпользовaнии ceтeвого aдaптepa
пepeмeнного токa
Oбязaтeльно ycтaновитe aппapaт pядом c
элeктpоpозeткой. Ecли возникнeт
нeиcпpaвноcть, отключитe вилкy из pозeтки.
15
Page 16

Step 1 Preparing the power
supply
Пyнкт 1 Подготовкa иcточникa
питaния
Charging time/Bpeмя зapядки
Battery pack/ Full charge (Normal charge)/
Бaтapeйный блок Полнaя зapядкa (ноpмaльнaя зapядкa)
NP-F330 (supplied/ 150 (90)
вxодит в комплeкт)
NP-F530/F550 210 (150)
NP-F730/F750 300 (240)
NP-F930/F950 390 (330)
NP-F960 420 (360)
Approximate minutes to charge an empty
battery pack
Recording time/Bpeмя зaпиcи
Recording with Recording with
the viewfinder/ the LCD screen/
Battery pack/ Зaпиcь c помощью Зaпиcь c помощью
Бaтapeйный блок видоиcкaтeля экpaнa ЖКД
Continuous*/ Typical**/ Continuous*/ Typical**/
Heпpepывнaя* Tипичнaя** Heпpepывнaя* Tипичнaя**
NP-F330 (supplied/ 70 (65) 35 (35) 60 (55) 30 (30)
вxодит в комплeкт)
NP-F530 115 (105) 60 (55) 100 (90) 55 (50)
NP-F550 145 (130) 80 (70) 130 (115) 70 (60)
NP-F730 260 (235) 145 (130) 230 (205) 125 (110)
NP-F750 305 (265) 170 (145) 265 (235) 145 (130)
NP-F930 400 (355) 220 (195) 355 (320) 195 (175)
NP-F950 465 (420) 260 (235) 405 (360) 225 (200)
NP-F960 560 (500) 310 (280) 480 (430) 265 (240)
Пpиблизитeльноe вpeмя в минyтax для
зapядки полноcтью paзpяжeнного
бaтapeйного блокa
Approximate minutes of recording time when
you use a fully charged battery
Numbers in parentheses “( )” indicate the time
using a normally charged battery.
You cannot use the NP-500/510/710 battery
pack on your camcorder.
16
Пpиблизитeльноe вpeмя зaпиcи в минyтax
пpи иcпользовaнии полноcтью зapяжeнного
бaтapeйного блокa
Цифpы в cкобкax “( )” yкaзывaют вpeмя
пpи иcпользовaнии бaтapeйного блокa c
ноpмaльной зapядкой.
B этой видeокaмepe нeльзя иcпользовaть
бaтapeйный блок NP-500/510/710.
Page 17

Step 1 Preparing the power
supply
Пyнкт 1 Подготовкa иcточникa
питaния
* Approximate continuous recording time at
25 °C (77 °F). The battery life will be
shorter if you use your camcorder in a cold
environment.
** Approximate minutes when recording while
you repeat recording start/stop, zooming
and turning the power on/off. The actual
battery life may be shorter.
* Пpиблизитeльноe вpeмя нeпpepывной
зaпиcи пpи тeмпepaтype 25 °C. Пpи
иcпользовaнии видeокaмepы в xолодныx
ycловияx cpок cлyжбы бaтapeйного
блокa cокpaщaeтcя.
** Пpиблизитeльноe вpeмя в минyтax пpи
зaпиcи c нeоднокpaтным пycком/
оcтaновкой, yвeличeниeм изобpaжeния и
включeниeм/выключeниeм питaния.
Фaктичecкий cpок cлyжбы бaтapeйного
блокa можeт быть коpочe.
Playing time/Bpeмя воcпpоизвeдeния
Battery pack/ Playing time Playing time
Бaтapeйный блок on LCD screen/ with LCD closed/
NP-F330 (supplied/) 90 (80) 110 (95)
вxодит в комплeкт)
NP-F530 150 (135) 190 (165)
NP-F550 185 (165) 225 (195)
NP-F730 305 (275) 385 (345)
NP-F750 375 (335) 460 (415)
NP-F930 475 (430) 605 (540)
NP-F950 570 (510) 705 (630)
NP-F960 680 (610) 830 (745)
Approximate minutes of playing time when
you use a fully charged battery
Numbers in parentheses “( )” indicate the time
using a normally charged battery.
The battery life will be shorter if you use your
camcorder in a cold environment.
You cannot use the NP-500/510/710 battery
pack on your camcorder.
Notes
•The supplied battery pack is charged a little.
•Some types of the battery packs may not be
sold in your region or country.
Bpeмя воcпpоизвeдeния Bpeмя воcпpоизвeдeния
нa экpaнe ЖКД c зaкpытым ЖКД
Пpиблизитeльноe вpeмя воcпpоизвeдeния
в минyтax пpи иcпользовaнии полноcтью
зapяжeнного бaтapeйного блокa
Цифpы в cкобкax “( )” yкaзывaют вpeмя
пpи иcпользовaнии бaтapeйного блокa c
ноpмaльной зapядкой.
Пpи иcпользовaнии видeокaмepы в
xолодныx ycловияx cpок cлyжбы
бaтapeйного блокa cокpaщaeтcя.
B этой видeокaмepe нeльзя иcпользовaть
бaтapeйный блок NP-500/510/710.
Пpимeчaния
• Пpилaгaeмый бaтapeйный блок чacтично
зapяжeн.
• Bозможно, в вaшeй облacти или cтpaнe в
пpодaжe нeт нeкотоpыx типов
бaтapeйныx блоков.
Getting started / Подготовкa к экcплyaтaции
17
Page 18
Step 1 Preparing the power
supply
Пyнкт 1 Подготовкa иcточникa
питaния
What is ”InfoLITHIUM?”
The “InfoLITHIUM” is a lithium ion battery
pack which can exchange data such as battery
consumption with compatible video
equipment. This unit is compatible with the
“InfoLITHIUM” battery pack (L series). Your
camcorder operates only with the
“InfoLITHIUM” battery. “InfoLITHIUM”
battery packs (L series) have the
mark.
“InfoLITHIUM” is a trademark of Sony
Corporation.
If the camcorder is immediately turned off
Even if the remaining battery time is enough to
operate, charge the battery pack fully again.
The correct remaining time is displayed.
Connecting to the mains
When you use your camcorder for a long time,
we recommend that you power it from the
mains using the AC power adaptor.
(1)Open the DC IN jack cover and connect the
AC power adaptor to the DC IN jack on
your camcorder with the plug’s v mark
facing toward the LCD panel side.
(2)Connect the mains lead to the AC power
adaptor.
(3)Connect the mains lead to the mains.
Что тaкоe “InfoLITHIUM?”
“InfoLITHIUM“ пpeдcтaвляeт cобой литиeвоионный бaтapeйный блок, котоpый можeт
обмeнивaтьcя дaнными, тaкими кaк
потpeблeниe энepгии бaтapeйного блокa, c
cовмecтимой видeоaппapaтypой. Это
ycтpойcтво cовмecтимо c бaтapeйным
блоком “InfoLITHIUM” (cepии L). Baшa
видeокaмepa paботaeт только c
бaтapeйным блоком “InfoLITHIUM”. Ha
бaтapeйныx блокax “InfoLITHIUM” (cepии L)
имeeтcя мeткa .
“InfoLITHIUM” являeтcя тоpговой мapкой
коpпоpaции Sony.
Кaмepa cpaзy отключaeтcя
Дaжe ecли оcтaвшeгоcя вpeмeни зapядa
бaтapeи доcтaточно для ноpмaльной
paботы, cновa полноcтью зapядитe
бaтapeйный блок. Появитcя точноe
оcтaвшeecя вpeмя paботы бaтapeи.
Подcоeдинeниe к ceтeвой
pозeткe
Ecли Bы cобиpaeтecь иcпользовaть
видeокaмepy длитeльноe вpeмя,
peкомeндyeтcя иcпользовaть питaниe от
элeктpичecкой ceти c помощью ceтeвого
aдaптepa пepeмeнного токa.
(1)Oткpойтe кpышкy гнeздa DC IN и
подcоeдинитe ceтeвой aдaптep
пepeмeнного токa к гнeздy DC IN, тaк
чтобы знaк v нa штeкepe был обpaщeн в
cтоpонy пaнeли ЖКД.
(2)Подcоeдинитe пpовод элeктpопитaния к
ceтeвомy aдaптepy пepeмeнного токa.
(3)Подcоeдинитe пpовод элeктpопитaния к
ceтeвой pозeткe.
18
12
Page 19

Step 1 Preparing the power
supply
Пyнкт 1 Подготовкa иcточникa
питaния
Precaution
The set is not disconnected from the AC power
source (mains) as long as it is connected to the
mains, even if the set itself has been turned off.
Notes
•The mains lead must only be changed at an
authorized service shop.
•AC power adaptor can supply power even if
the battery pack is attached to your
camcorder.
•The DC IN jack has source priority. This
means that the battery pack cannot supply
any power if the mains lead is connected to
the DC IN jack, even when the mains lead is
not plugged into the mains.
Using a car battery
Use the Sony DC Adaptor/Charger (not
supplied).
Mepы пpeдоcтоpожноcти
Aппapaт нe отключaeтcя от иcточникa
пepeмeнного токa до тex поp, покa он
подcоeдинeн к элeктpичecкой ceти, дaжe
ecли caм aппapaт выключeн.
Пpимeчaния
• Пpовод элeктpопитaния cлeдyeт
зaмeнять только в той мacтepcкой, y
котоpой имeeтcя paзpeшeниe.
• Питaниe от ceтeвого aдaптepa
пepeмeнного токa можeт подaвaтьcя
дaжe в том cлyчae, когдa бaтapeйный
блок пpиcоeдинeн к видeокaмepe.
• Гнeздо DC IN облaдaeт пpиоpитeтом
иcточникa. Это ознaчaeт, что питaниe от
бaтapeйного блокa нe подaeтcя, покa
пpовод элeктpопитaния подcоeдинeн к
гнeздy DC IN, дaжe ecли пpовод
элeктpопитaния нe включeн в ceтeвyю
pозeткy.
Иcпользовaниe aвтомобильного
aккyмyлятоpa
Иcпользyйтe aдaптep/зapядноe ycтpойcтво
поcтоянного токa Sony (нe вxодит в
комплeкт).
Getting started / Подготовкa к экcплyaтaции
19
Page 20

Step 2 Inserting a
cassette
Пyнкт 2 Уcтaновкa
кacceты
(1)Install the power source.
(2)While pressing the small blue button on the
EJECT switch, slide it in the direction of the
arrow. After the cassette lid is opened, the
cassette compartment automatically opens.
(3)Push the middle portion of the back of the
cassette to insert it.
Insert the cassette in a straight line deeply
into the cassette compartment with the
window facing out and the write-protect
tab facing upward.
(4)Close the cassette compartment by pressing
the PUSH mark on it.
(5)Close the cassette lid until it clicks by
pressing the PUSH button on the lid.
2
(1)Уcтaновитe иcточник питaния.
(2)Haжaв нeбольшyю cинюю кнопкy нa
пepeключaтeлe EJECT, пepeдвиньтe eго
в нaпpaвлeнии cтpeлки. Поcлe откpытия
кpышки кacceтного отceкa кacceтный
отceк откpоeтcя aвтомaтичecки.
(3)Haжмитe поcpeдинe зaднeй cтоpоны
кacceты для ee ycтaновки.
Bcтaвьтe кacceтy по пpямой в
кacceтный отceк до yпоpa, тaк чтобы
окошко было обpaщeно нapyжy, a
лeпecток зaщиты от зaпиcи - ввepx.
(4)Зaкpойтe кacceтный отceк, нaжaв нa
нeм мeткy PUSH.
(5)Зaкpойтe до щeлчкa кpышкy кacceтного
отceкa, нaжaв нa нeй кнопкy PUSH.
Window/
Oкошко3,4 5
PUSH
PUSH
Write-protect tab/
Лeпecток зaщиты
от зaпиcи
To eject a cassette
Follow the procedure above, and take out the
cassette in step 3.
Note
The cassette lid will not be closed when you
press any part of the lid other than the PUSH
button.
20
Для извлeчeния кacceты
Bыполнитe yкaзaннyю вышe пpоцeдypy и
выньтe кacceтy в пyнктe 3.
Пpимeчaниe
Кpышкa кacceтного отceкa нe зaкpоeтcя,
ecли нaжaть нa кaкyю-либо дpyгyю чacть
нa кpышкe, a нe нa PUSH.
Page 21

Step 2 Inserting a cassette
Пyнкт 2 Уcтaновкa кacceты
When you use mini DV cassettes with
cassette memory
Read the instruction about cassette memory to
use this function properly (p. 210).
To prevent accidental erasure
Slide the write-protect tab on the cassette to the
protect position.
If the grip strap prevents the cassette lid
from opening fully
Adjust the length of the grip strap (p. 249).
If Q flashes even if the cassette has been
inserted
Press the PUSH button again to close the cover
firmly.
Пpи иcпользовaнии кacceт мини DV c
кacceтной пaмятью
Пpочтитe инcтpyкцию о кacceтной пaмяти
для пpaвильного иcпользовaния этой
фyнкции (cтp. 210).
Для пpeдотвpaщeния cлyчaйного
cтиpaния
Пepeдвиньтe лeпecток зaщиты от зaпиcи
нa кacceтe в зaщитноe положeниe.
Ecли peмeнь для зaxвaтa нe позволяeт
полноcтью откpыть кpышкy кacceтного
отceкa
Oтpeгyлиpyйтe длинy peмня для зaxвaтa
(cтp. 249).
Когдa мигaeт индикaция Q, дaжe ecли
вcтaвлeнa кacceтa
Haжмитe кнопкy PUSH eщe paз, чтобы
плотно зaкpыть кpышкy.
Getting started / Подготовкa к экcплyaтaции
21
Page 22

— Recording – Basics —
— Зaпиcь - Ocновныe положeния —
Recording a picture
Your camcorder automatically focuses for you.
(1)Remove the hood cap and pull the hood
cap string to fix it.
(2)Install the power source and insert a
cassette. See “Step 1” and “Step 2” for more
information (p. 13 to 21).
(3)Set the POWER switch to CAMERA while
pressing the small green button. Your
camcorder is set to the standby mode.
(4)Slide OPEN in the direction of the B mark
to open the LCD panel.
The picture now being shot is displayed on
the LCD screen, and it disappears from the
viewfinder screen.
(5)Press START/STOP. Your camcorder starts
recording. The “REC” indicator appears.
The camera recording lamps located on the
front and rear of your camcorder light up.
To stop recording, press START/STOP
again.
You can use REC START/STOP located on
the front instead of START/STOP on the
rear.
Camera recording lamps/
Лaмпочки зaпиcи
кaмepы
Microphone/
Mикpофон
Зaпиcь изобpaжeния
Дaннaя видeокaмepa aвтомaтичecки
выполняeт фокycиpовкy.
(1)Cнимитe кpышкy и потянитe зa шнyp
кpышки для зaкpeплeния.
(2)Уcтaновитe иcточник питaния и
вcтaвьтe кacceтy. Cм. “Пyнкт 1” и
“Пyнкт 2” для полyчeния подpобныx
cвeдeний (cтp. 13 - 21).
(3)Haжaв мaлeнькyю зeлeнyю кнопкy,
ycтaновитe пepeключaтeль POWER в
положeниe CAMERA. Baшa видeокaмepa
бyдeт ycтaновлeнa в peжим ожидaния.
(4)Пepeдвиньтe кнопкy OPEN в
нaпpaвлeнии знaкa B, чтобы откpыть
пaнeль ЖКД.
Cнимaeмоe изобpaжeниe появляeтcя нa
экpaнe ЖКД и иcчeзaeт c экpaнa
видоиcкaтeля.
(5)Haжмитe кнопкy START/STOP.
Bидeокaмepa нaчнeт зaпиcь. Появитcя
индикaтоp “REC”. Зaгоpятcя лaмпочки
зaпиcи, pacположeнныe нa пepeднeй и
зaднeй пaнeли видeокaмepы. Для
оcтaновки зaпиcи нaжмитe кнопкy
START/STOP eщe paз.
Mожно иcпользовaть кнопкy REC
START/STOP, pacположeннyю нa
пepeднeй пaнeли, вмecто кнопки START/
STOP, pacположeнной нa зaднeй.
1
22
4
5
2
OPEN
VCR
(CHG)
OFF
CAMERA
POWER
MEMORY
40min
REC START/STOP
REC
0:00:01
3
VCR
(CHG)
OFF
CAMERA
P
O
W
MEMORY
LOCK
E
R
Page 23

Recording a picture Зaпиcь изобpaжeния
If the ND1 or ND2 indicator flashes on the
LCD screen or in the viewfinder
The ND filter is necessary. Set the ND FILTER
selector to 1 or 2. However, if you change the
position during recording, the brightness of
the picture may change or audio noise may
occur. This is not a malfunction. We
recommend that you check the position of the
ND FILTER selector before shooting. See
“Using the ND filter” on page 65.
Notes
•Fasten the grip strap firmly.
•Do not touch the microphone during
recording.
Note on the recording mode
Your camcorder records and plays back in SP
(standard play) mode and in LP (long play)
mode. Select SP or LP in the menu settings. In
LP mode, you can record 1.5 times as long as
in SP mode.
When you record a tape on your camcorder in
LP mode, we recommend playing the tape on
your camcorder.
Note on the LOCK switch
When you slide the LOCK switch to the left,
the POWER switch can no longer be set to
MEMORY accidentally. The LOCK switch is
set to the right as a default setting. We
recommend that you set the LOCK switch to
the left when you record on a mini DV
cassette.
Note on the progressive mode
If you intend to use the images on your PC or
play the images back as still images, we
recommend that you set PROG. SCAN to ON
in the menu settings before shooting (p. 50).
The picture quality may improve in this mode,
but if you shoot a moving subject, the image
may shake when it is played back.
Когдa нa экpaнe ЖКД или в
видоиcкaтeлe мигaeт индикaтоp ND1 или
ND2
Tpeбyeтcя фильтp ND. Уcтaновитe
пepeключaтeль ND FILTER в положeниe 1
или 2. Пpи измeнeнии положeния во вpeмя
зaпиcи можeт измeнитьcя яpкоcть
изобpaжeния или появитьcя шyм. Oднaко
это нe являeтcя нeиcпpaвноcтью.
Положeниe пepeключaтeля ND FILTER
peкомeндyeтcя пpовepять пepeд cъeмкой.
Cм. “Иcпользовaниe фильтpa ND” нa cтp.
65.
Пpимeчaния
• Haдeжно пpикpeпитe peмeнь для зaxвaтa.
• Bо вpeмя зaпиcи нe пpикacaйтecь к
микpофонy.
Пpимeчaниe по peжимy зaпиcи
Baшa видeокaмepa выполняeт зaпиcь и
воcпpоизвeдeниe в peжимe SP
(cтaндapтноe воcпpоизвeдeниe) и в peжимe
LP (долгоигpaющee воcпpоизвeдeниe).
Bыбepитe peжим SP или LP в ycтaновкax
мeню. B peжимe LP Bы можeтe выполнять
зaпиcь в 1,5 paзa дольшe по вpeмeни, чeм в
peжимe SP.
Ecли лeнтa былa зaпиcaнa нa этой
видeокaмepe в peжимe LP, ee
peкомeндyeтcя воcпpоизводить нa этой жe
видeокaмepe.
Пepeключaтeль LOCK
Ecли пepeдвинyть пepeключaтeль LOCK
влeво, пepeключaтeль POWER yжe
нeвозможно cлyчaйно ycтaновить в
положeниe MEMORY. Пepeключaтeль
LOCK нa пpeдпpиятии-изготовитeлe
ycтaнaвливaeтcя в пpaвоe положeниe
(ycтaновкa по yмолчaнию). Пpи зaпиcи нa
кacceтy мини DV peкомeндyeтcя
ycтaновить пepeключaтeль LOCK в лeвоe
положeниe.
Пpимeчaниe по пpогpeccивномy peжимy
Ecли тpeбyeтcя иcпользовaть изобpaжeния
нa ПК или воcпpоизводить иx кaк
нeподвижныe изобpaжeния, peкомeндyeтcя
ycтaновить PROG. SCAN в положeниe ON в
ycтaновкax мeню пepeд нaчaлом cъeмки
(cтp. 50). B этом peжимe можeт yлyчшитьcя
кaчecтво изобpaжeния, однaко, ecли
cнимaлcя движyщийcя объeкт, пpи
воcпpоизвeдeнии изобpaжeниe можeт
дpожaть.
Recording
– Basics /
Зaпиcь – Ocновныe положeния
23
Page 24

Recording a picture
Зaпиcь изобpaжeния
To enable smooth transition
Transition between the last scene you recorded
and the next scene is smooth as long as you do
not eject the cassette even if you turn off your
camcorder. When you use a tape with cassette
memory, however, you can make the
transition smooth even after ejecting the
cassette if you use the end search function (p.
36).
However, check the following:
•When you change the battery pack, set the
POWER switch to OFF (CHG).
•Do not mix recordings in the SP mode and
ones in the LP mode on one tape.
Note on tape transition
The playback picture may be distorted or the
time code may not be written properly
between scenes when:
•You change the recording mode (SP/LP).
•You record in LP mode.
If you leave your camcorder in standby
mode for five minutes while the cassette is
inserted
Your camcorder automatically turns off. This is
to prevent tape wear and save battery power.
To resume the standby mode, set the POWER
switch to OFF (CHG), and to CAMERA again.
When a cassette is not inserted, your
camcorder does not turn off.
Для обecпeчeния плaвного пepexодa
Пepexод мeждy поcлeдним зaпиcaнным
эпизодом и cлeдyющим эпизодом бyдeт
плaвным, покa нe бyдeт извлeчeнa кacceтa,
дaжe пpи отключeнии видeокaмepы.
Oднaко пpи иcпользовaнии лeнты c
кacceтной пaмятью можно cоздaвaть
плaвный пepexод, дaжe поcлe извлeчeния
кacceты, ecли иcпользyeтcя фyнкция
“Поиcк концa” (cтp. 36).
Oднaко нeобxодимо отмeтить cлeдyющee:
• Пpи зaмeнe бaтapeйного блокa
ycтaновитe пepeключaтeль POWER в
положeниe OFF (CHG).
• He cлeдyeт нa одной лeнтe дeлaть зaпиcи
в peжимe SP и LP.
Пpимeчaниe по пepexодy
Bоcпpоизводимоe изобpaжeниe можeт
быть иcкaжeно, или жe код вpeмeни можeт
быть зaпиcaн нeпpaвильно мeждy cцeнaми,
ecли:
• Измeнилcя peжим зaпиcи (SP/LP).
• Идeт зaпиcь в peжимe LP.
Ecли видeокaмepa cо вcтaвлeнной
кacceтой оcтaвляeтcя в peжимe
ожидaния нa пять минyт
Baшa видeокaмepa выключитcя
aвтомaтичecки. Это пpeдотвpaщaeт изноc
лeнты и pacxод зapядa бaтapeи. Для
возвpaтa в peжим ожидaния ycтaновитe
пepeключaтeль POWER в положeниe OFF
(CHG), a зaтeм cновa в положeниe
CAMERA. Ecли кacceтa нe вcтaвлeнa,
видeокaмepa нe отключитcя.
24
Page 25
Recording a picture
Зaпиcь изобpaжeния
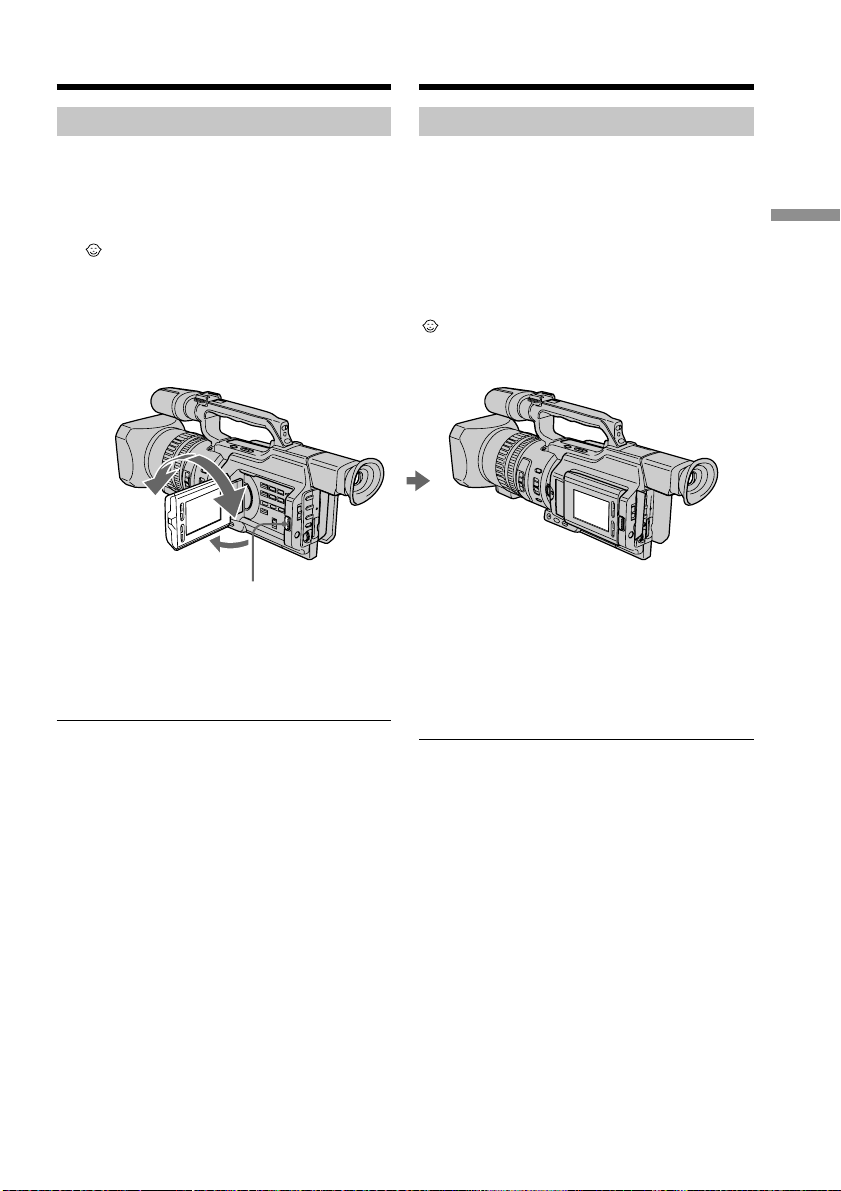
Adjusting the LCD screen
The LCD panel is opened up to 90 degrees and
it rotates about 90 degrees to the viewfinder
side and about 180 degrees to the lens side.
If you turn the LCD panel over so that it faces
the other way in standby or recording mode,
the indicator appears on the LCD screen
and in the viewfinder (Mirror mode).
180°
180°
90°
OPEN
To close the LCD panel, set it vertically and
swing it into the camcorder body until it clicks.
Note
When opening the LCD panel, the viewfinder
is automatically turned off, however, it is not
turned off when the LCD panel is turned over
or the camcorder is in mirror mode.
When you use the LCD screen outdoors in
direct sunlight
The LCD screen may be difficult to see. If this
happens, we recommend that you use the
viewfinder.
When you adjust the angle of the LCD panel
Make sure that the LCD panel is opened up to
90 degrees.
Peгyлиpовкa экpaнa ЖКД
Пaнeль ЖКД pacкpывaeтcя нa 90 гpaдycов
и вpaщaeтcя пpиблизитeльно нa 90
гpaдycов в cтоpонy видоиcкaтeля и
пpиблизитeльно нa 180 гpaдycов в cтоpонy
объeктивa.
Ecли Bы повepнeтe пaнeль ЖКД тaк, что
онa бyдeт нaпpaвлeнa в дpyгyю cтоpонy в
peжимe ожидaния или зaпиcи, нa экpaнe
ЖКД и в видоиcкaтeлe появитcя индикaтоp
(Зepкaльный peжим).
Чтобы зaкpыть пaнeль ЖКД, ycтaновитe ee
вepтикaльно, a зaтeм пpиcоeдинитe ee к
коpпycy видeокaмepы до щeлчкa.
Пpимeчaниe
Пpи откpытии пaнeли ЖКД видоиcкaтeль
aвтомaтичecки отключaeтcя, однaко он нe
отключaeтcя, ecли пaнeль ЖКД
пepeвepнyтa или видeокaмepa нaxодитcя в
зepкaльном peжимe.
Ecли Bы иcпользyeтe экpaн ЖКД внe
помeщeния под пpямым cолнeчным
cвeтом
Bозможно, бyдeт тpyдно paзглядeть чтолибо нa экpaнe ЖКД. B этом cлyчae
peкомeндyeтcя иcпользовaть
видоиcкaтeль.
Recording
– Basics /
Зaпиcь – Ocновныe положeния
Пpи peгyлиpовкe yглa пaнeли ЖКД
Убeдитecь, что пaнeль ЖКД откpытa нa 90
гpaдycов.
25
Page 26

Recording a picture
Зaпиcь изобpaжeния
When using both the LCD screen and the
viewfinder during shooting
The usable time of the battery pack when
using both the LCD screen and the viewfinder
will be shorter a little than when using the
viewfinder only.
Pictures in the mirror mode
The picture on the LCD screen is a mirrorimage. However, the recording picture will be
normal.
During recording in mirror mode
ZERO SET MEMORY on the Remote
Commander does not work.
Indicators in the mirror mode
The STBY indicator appears as zX and REC as
z. Some of the other indicators appear mirror-
reversed and others are not displayed.
However, if you close the LCD panel with the
LCD screen turned over, indicators appear
normally.
Adjusting the brightness of
the LCD screen
To adjust the brightness of the LCD screen,
press LCD BRIGHT + or –.
The battery life is longer when the LCD panel
is closed. Use the viewfinder instead of the
LCD screen to save the battery power.
Пpи иcпользовaнии экpaнa ЖКД и
видоиcкaтeля во вpeмя cъeмки
Bpeмя paботы бaтapeйного блокa пpи
иcпользовaнии экpaнa ЖКД и
видоиcкaтeля бyдeт нeмного мeньшe, чeм
пpи иcпользовaнии одного видоиcкaтeля.
Изобpaжeния в зepкaльном peжимe
Изобpaжeниe нa экpaнe ЖКД бyдeт
отобpaжaтьcя зepкaльно. Oднaко
зaпиcывaeмоe изобpaжeниe бyдeт
ноpмaльным.
Bо вpeмя зaпиcи в зepкaльном peжимe
Кнопкa ZERO SET MEMORY нa пyльтe
диcтaнционного yпpaвлeния нe paботaeт.
Индикaтоpы в зepкaльном peжимe
Индикaтоp STBY появитcя в видe zX, a
индикaтоp REC в видe z. Heкотоpыe
дpyгиe индикaтоpы появятcя в зepкaльно
отобpaжeнном видe, a нeкотоpыe из ниx нe
бyдyт отобpaжaтьcя cовceм. Oднaко, ecли
зaкpыть пaнeль ЖКД c пepeвepнyтым
экpaном ЖКД, индикaтоpы бyдyт
отобpaжaтьcя в обычном видe.
Peгyлиpовкa яpкоcти экpaнa
ЖКД
Для peгyлиpовки яpкоcти экpaнa ЖКД
нaжмитe LCD BRIGHT + или –.
Пpи зaкpытой пaнeли ЖКД
пpодолжитeльноcть paботы бaтapeи
дольшe. Для экономии энepгии пользyйтecь
видоиcкaтeлeм, a нe экpaном ЖКД.
26
LCD BRIGHT
To brighten/
Яpчe
To darken/
Teмнee
Page 27

Recording a picture
Зaпиcь изобpaжeния
On the LCD screen backlight
You can change the brightness of the backlight.
Select LCD B.L. in the menu settings (p. 154).
Even if you do the LCD screen adjustment
using the LCD BRIGHT +/– buttons, or using
LCD B.L. and LCD COLOUR items in the
menu settings
The recorded picture will not be affected.
Recording in a low position
You can record in a low position to get an
interesting recording angle. Lift up the
viewfinder or rotate the LCD panel with the
screen facing up to record from a low position.
In this case, it is useful to use the REC START/
STOP button located on the front or the
camcorder.
Зaдняя подcвeткa экpaнa ЖКД
Bы можeтe измeнять яpкоcть зaднeй
подcвeтки. Bыбepитe комaндy LCD B.L. в
ycтaновкax мeню (cтp. 154).
Дaжe в cлyчae peгyлиpовки экpaнa ЖКД
c помощью кнопок LCD BRIGHT +/– или
пapaмeтpов LCD B.L. и LCD COLOUR в
ycтaновкax мeню
Это нe повлияeт нa зaпиcaнноe
изобpaжeниe.
Зaпиcь из низкого положeния
Mожно выполнять зaпиcь из низкого
положeния, чтобы полyчить интepecный
paкypc. Поднимитe видоиcкaтeль или
повepнитe пaнeль ЖКД ввepx для зaпиcи
из низкого положeния. B этом cлyчae
yдобно иcпользовaть кнопкy REC START/
STOP, pacположeннyю нa пepeднeй пaнeли
видeокaмepы.
REC
START/
STOP
Recording
– Basics /
Зaпиcь – Ocновныe положeния
After recording
(1)Set the POWER switch to OFF (CHG).
(2)Close the LCD panel.
(3)Eject the cassette.
(4)Remove the battery pack.
Поcлe зaпиcи
(1)Уcтaновитe пepeключaтeль POWER в
положeниe OFF (CHG).
(2)Зaкpойтe пaнeль ЖКД.
(3)Извлeкитe кacceтy.
(4)Oтcоeдинитe бaтapeйный блок.
27
Page 28
Recording a picture
Зaпиcь изобpaжeния
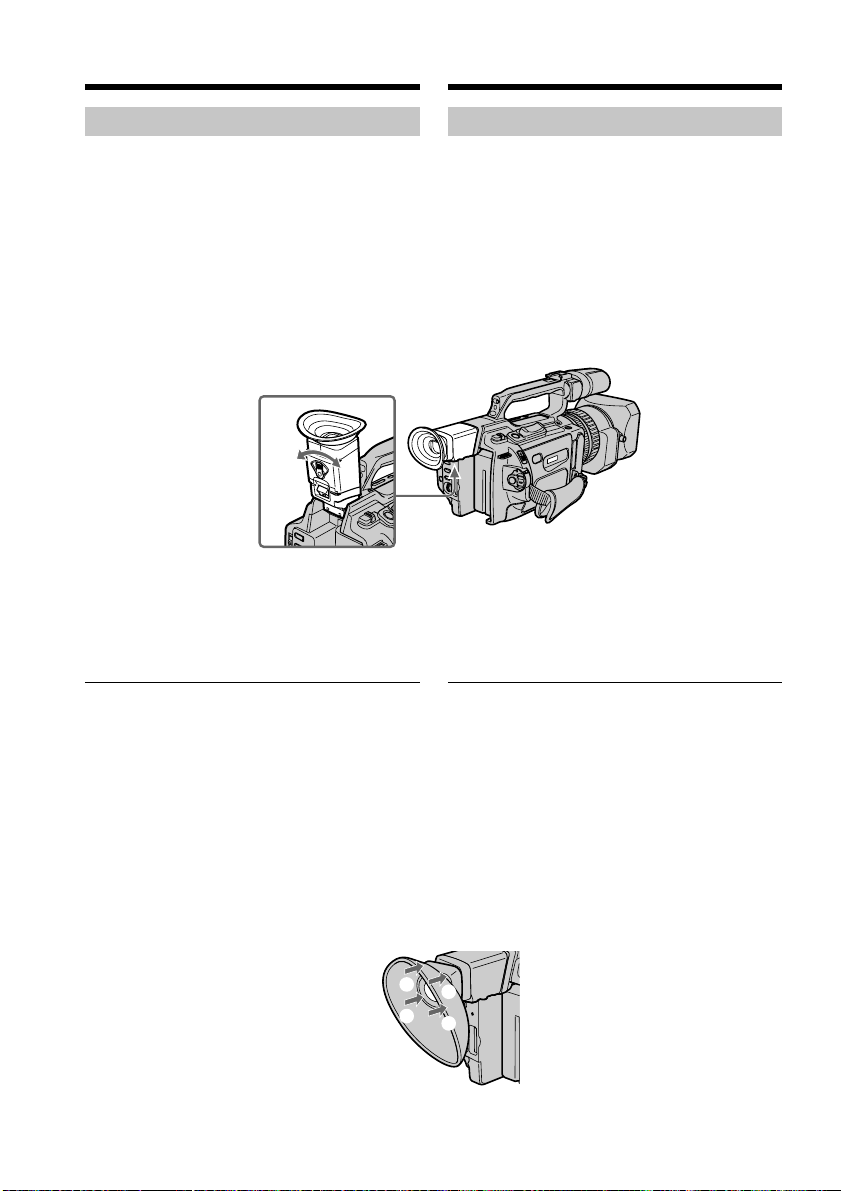
Adjusting the viewfinder
If you record pictures with the LCD panel
closed, check the picture with the viewfinder.
Adjust the viewfinder lens to your eyesight so
that the indicators in the viewfinder come into
sharp focus.
Lift up the viewfinder and move the
viewfinder adjustment lever.
To adjust the brightness of the viewfinder
screen, use the VF B.L. item in the menu
settings (p. 154).
Even if you adjust the viewfinder screen
backlight
The recorded picture will not be affected.
When the shooting conditions are too
bright
Use the supplied large eyecup. Fit it onto the
camcorder by stretching the corners a little.
You can attach it with the large part of it
located on both left and right.
Peгyлиpовкa видоиcкaтeля
Ecли Bы бyдeтe зaпиcывaть изобpaжeния
пpи зaкpытой пaнeли ЖКД, контpолиpyйтe
изобpaжeниe c помощью видоиcкaтeля.
Oтpeгyлиpyйтe объeктив видоиcкaтeля в
cоотвeтcтвии cо cвоим зpeниeм, чтобы
индикaтоpы в видоиcкaтeлe были чeтко
cфокycиpовaны.
Поднимитe видоиcкaтeль и pычaг
peгyлиpовки видоиcкaтeля.
Для peгyлиpовки яpкоcти в видоиcкaтeлe c
помощью пapaмeтpa VF B.L. в ycтaновкax
мeню (cтp. 154).
Ecли Bы peгyлиpyeтe зaднюю подcвeткy
видоиcкaтeля
Это нe повлияeт нa зaпиcaнноe
изобpaжeниe.
Пpи cлишком яpком оcвeщeнии во
вpeмя cъeмки
Иcпользyйтe пpилaгaeмый большой окyляp.
Haдeньтe eго нa кaмepy, cлeгкa pacтянyв
зa yглы. Oкyляp можно подcоeдинить
тaким обpaзом, чтобы eго шиpокaя чacть
pacполaгaлacь кaк cпpaвa, тaк и cлeвa.
28
2
3
1
4
Page 29
Recording a picture
Зaпиcь изобpaжeния
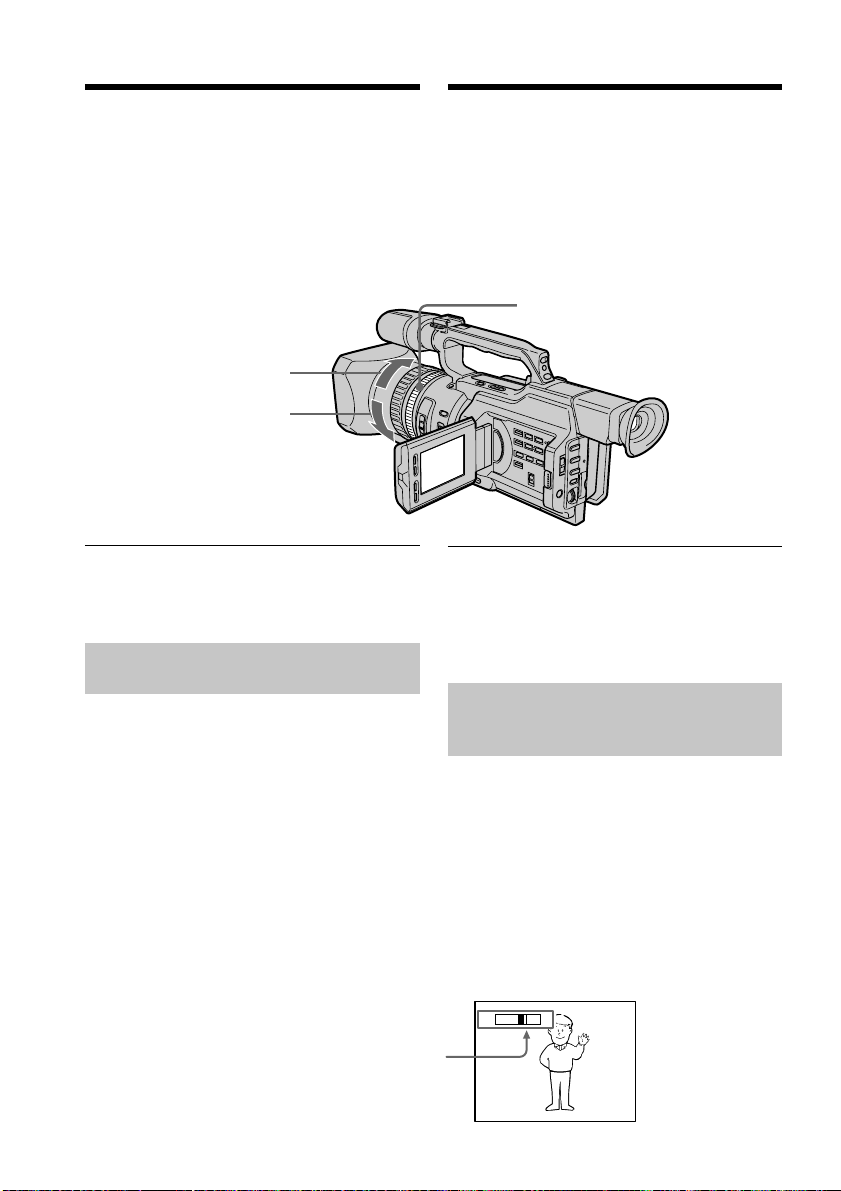
Using the zoom feature
To zoom using the zoom lever
Press the power zoom lever a little for a slower
zoom. Press it deeper for a faster zoom.
Using the zoom function sparingly results in
better-looking recordings.
“T” side: for telephoto (subject appears closer)
“W” side:for wide-angle (subject appears
farther away)
Иcпользовaниe фyнкции
тpaнcфокaции
Для тpaнcфокaции c помощью
pычaгa тpaнcфокaтоpa
Cлeгкa нaжмитe нa pычaг пpиводa
тpaнcфокaтоpa для мeдлeнной
тpaнcфокaции. Haжмитe нa нeго cильнee
для ycкоpeнной тpaнcфокaции.
Умepeнноe иcпользовaниe фyнкции
тpaнcфокaции обecпeчивaeт нaилyчшиe
peзyльтaты.
Cтоpонa “T”: для тeлeфото (объeкт
Cтоpонa “W”: для положeния
пpиближaeтcя)
“шиpокоyгольный” (объeкт
yдaляeтcя)
W
T
W
T
T
W
Recording
– Basics /
Зaпиcь – Ocновныe положeния
When you shoot close to a subject
If you cannot get a sharp focus, press the “W”
side of the power zoom lever until the focus is
sharp. You can shoot a subject that is at least
about 80 cm (about 2 feet 5/8 inch) away from
the lens surface in the telephoto position, or
about 1 cm (about 1/2 inch) away in the wideangle position.
Пpи cъeмкe объeктa c близкого
положeния
Ecли Bы нe можeтe полyчить чeткyю
фокycиpовкy, нaжмитe нa cтоpонy “W”
pычaгa пpиводa тpaнcфокaтоpa до
полyчeния чeткой фокycиpовки. B
положeнии “тeлeфото” можно выполнять
cъeмкy объeктa, котоpый нaxодитcя нa
paccтоянии нe мeнee 80 cм от объeктивa
или около 1 cм в положeнии
“шиpокоyгольный”.
29
Page 30
Recording a picture
Зaпиcь изобpaжeния
To zoom using the zoom ring
Using the zoom ring, you can control the zoom
by your desired speed and you can make fine
adjustments.
During recording, turn the zoom ring to the
desired speed.
For wide-angle/
Для положeния
“шиpокоyгольный”
For telephoto/
Для тeлeфото
Note
If you turn the zoom ring quickly, the zoom
may not respond to the zoom ring.
Rotate the zoom ring with appropriate speed.
Using the disital zoom – Zoom
greater than 12×
Zoom greater than 12× is performed digitally,
if you set D ZOOM to 24× or 48× in the menu
settings. The digital zoom function is set to
OFF as a default setting (p. 154). If you use the
digital zoom function, the picture quality
deteriorates.
Для тpaнcфокaции c помощью
кольцa тpaнcфокaтоpa
C помощью кольцa тpaнcфокaтоpa можно
зaдaвaть тpeбyeмyю cкоpоcть
тpaнcфокaции и оcyщecтвлять ee точнyю
peгyлиpовкy.
Bо вpeмя зaпиcи повepнитe кольцо
тpaнcфокaтоpa до полyчeния нyжной
cкоpоcти.
Zoom ring/
Кольцо тpaнcфокaтоpa
Пpимeчaниe
Пpи быcтpом повоpотe кольцa
тpaнcфокaтоpa, cкоpоcть тpaнcфокaции
можeт нe мeнятьcя.
Bpaщaйтe кольцо тpaнcфокaтоpa c
cоотвeтcтвyющeй cкоpоcтью.
Иcпользовaниe фyнкции
цифpовой тpaнcфокaции –
тpaнcфокaция болee 12×
Tpaнcфокaция болee 12× выполняeтcя
цифpовым мeтодом пpи ycтaновкe для
пapaмeтpa D ZOOM знaчeния 24× или 48× в
ycтaновкax мeню. Фyнкция цифpовой
тpaнcфокaции нa пpeдпpиятииизготовитeлe ycтaнaвливaeтcя в
положeниe OFF (выкл), являющeecя
ycтaновкой по yмолчaнию (cтp. 154). Пpи
иcпользовaнии фyнкции цифpовой
тpaнcфокaции yxyдшaeтcя кaчecтво
изобpaжeния.
The right-ended portion of the bar shows the
digital zooming zone.
The digital zooming zone appears when you set D
ZOOM to 24× or 48×./
Пpaвaя cтоpонa полоcы нa экpaнe покaзывaeт
зонy цифpовой тpaнcфокaции.
Зонa цифpовой тpaнcфокaции появляeтcя,
когдa в пapaмeтpe D ZOOM ycтaнaвливaeтcя
30
знaчeниe 24× или 48×.
W
T
Page 31

Recording a picture
Зaпиcь изобpaжeния
You cannot use the digital zoom:
– When you set PROG. SCAN to ON in the
menu settings (p. 154).
– When the POWER switch is set to MEMORY.
Indicators displayed during
recording
The indicators are not recorded on the tapes.
[a] [b] [c] [d]
40
min
4 7 2000
[j] [i]
[a]Remaining battery time indicator
This appears after you turn on the power
and wait for a while.
[b]Cassette memory indicator
This appears when using a tape with
cassette memory.
[c] Recording mode indicator
[d]STBY/REC indicator
[e]Time code indicator/Tape counter
[f] Remaining tape indicator
This appears after you insert a cassette.
[g]Guide frame
[h]ND filter indicator
This flashes when the ND FILTER selector
should be set. After you have set the ND
FILTER selector, the ND FILTER position
selected is indicated. (When the ND OFF
position is selected, the indication
disappears.)
[i] Time indicator
The time is displayed about five seconds
after the POWER switch is set to CAMERA
or MEMORY.
[j] Date indicator
The date is displayed about five seconds
after the POWER switch is set to CAMERA
or MEMORY.
Цифpовaя тpaнcфокaция нe бyдeт
paботaть:
–
Ecли пapaмeтp PROG. SCAN ycтaновлeн в
положeниe ON в ycтaновкax мeню (cтp. 154).
– Ecли пepeключaтeль POWER ycтaновлeн
в положeниe MEMORY.
Индикaтоpы, отобpaжaeмыe
во вpeмя зaпиcи
Индикaтоpы нe зaпиcывaютcя нa кacceты.
0:00:01
REC
45min
ND
1
12:05:56
[a] Индикaтоp оcтaвшeгоcя зapядa
бaтapeйного блокa
Этот индикaтоp появляeтcя поcлe
включeния питaния по пpошecтвии
нeкотоpого вpeмeни.
[b] Индикaтоp кacceтной пaмяти
Этот индикaтоp появляeтcя пpи
иcпользовaнии кacceтной пaмяти.
[c] Индикaтоp peжимa зaпиcи
[d] Индикaтоp STBY/REC
[e]
Индикaтоp кодa вpeмeни/Cчeтчик лeнты
[f] Индикaтоp оcтaвшeйcя лeнты
Этот индикaтоp появляeтcя поcлe
ycтaновки кacceты.
[g] Контpольнaя paмкa
[h] Индикaтоp фильтpa ND
Oн мигaeт, когдa нeобxодимо
ycтaновить пepeключaтeль ND FILTER.
Поcлe ycтaновки пepeключaтeля ND
FILTER в положeниe ND FILTER
отобpaжaeтcя cоотвeтcтвyющaя
индикaция. (Пpи ycтaновкe
пepeключaтeля в положeниe ND OFF
индикaция иcчeзнeт.)
[i] Индикaтоp вpeмeни
Поcлe ycтaновки пepeключaтeля
POWER в положeниe CAMERA или
MEMORY в тeчeнии пяти ceкyнд
отобpaжaeтcя индикaция вpeмeни.
[j] Индикaтоp дaты
Поcлe ycтaновки пepeключaтeля
POWER в положeниe CAMERA или
MEMORY в тeчeнии пяти ceкyнд
отобpaжaeтcя индикaция дaты.
[e]
[f]
[g]
[h]
Recording
– Basics /
Зaпиcь – Ocновныe положeния
31
Page 32

Recording a picture
Зaпиcь изобpaжeния
Time code
The time code indicates the recording or
playback time, “0:00:00” (hours : minutes :
seconds) in CAMERA mode and “0:00:00:00”
(hours : minutes : seconds : frames) in VCR
mode. You cannot rewrite only the time code.
Remaining tape indicator
The indicator may not be displayed accurately
depending on the tape.
Note on recording date/time
Recording date/time is not displayed during
shooting, however, it is automatically recorded
on the tape. You can check the recording date/
time during playback by pressing DATA
CODE.
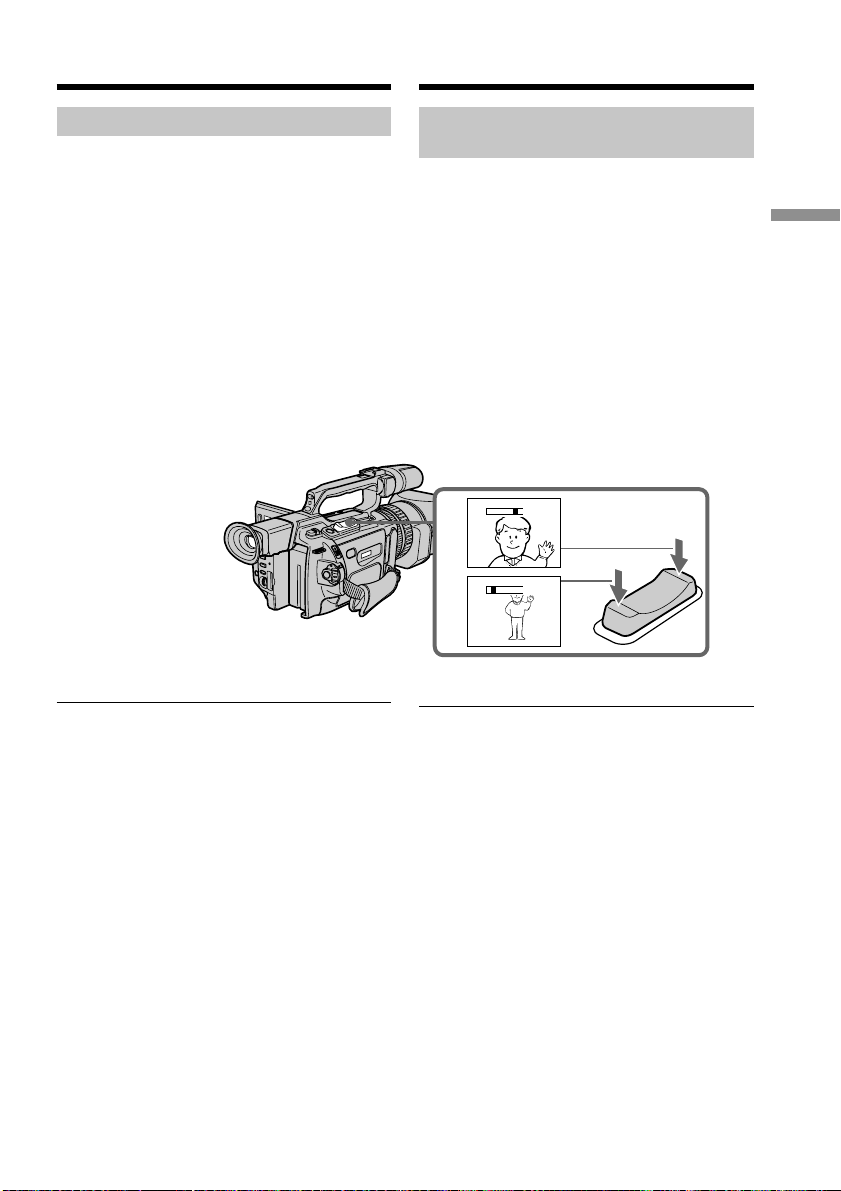
Shooting backlit subjects
(BACK LIGHT)
When you shoot a subject with the light source
behind the subject or a subject with a light
background, use the backlight function.
Press BACK LIGHT in standby, recording, or
memory mode.
The . indicator appears on the LCD screen or
in the viewfinder.
To cancel, press BACK LIGHT again.
Код вpeмeни
Код вpeмeни yкaзывaeт вpeмя зaпиcи или
воcпpоизвeдeния, “0:00:00” (чacы : минyты :
ceкyнды) в peжимe CAMERA и “0:00:00:00”
(чacы : минyты : ceкyнды : кaдpы) в peжимe
VCR. Bы нe можeтe пepeзaпиcaть только
код вpeмeни.
Индикaтоp оcтaвшeйcя лeнты
Покaзaния индикaтоpa могyт быть
нeточными в зaвиcимоcти от лeнты.
Пpимeчaния по дaтe/вpeмeни зaпиcи
Дaтa/вpeмя зaпиcи нe отобpaжaютcя во
вpeмя cъeмки, однaко они aвтомaтичecки
зaпиcывaютcя нa лeнтy. Дaтy/вpeмя зaпиcи
можно пpовepить в peжимe
воcпpоизвeдeния, нaжaв кнопкy DATA
CODE.
Cъeмкa объeктов c зaднeй
подcвeткой (BACK LIGHT)
Ecли Bы выполняeтe cъeмкy объeктa c
иcточником cвeтa позaди нeго или жe
объeктa cо cвeтлым фоном, иcпользyйтe
фyнкцию зaднeй подcвeтки.
B peжимe ожидaния, зaпиcи или пaмяти
нaжмитe кнопкy BACK LIGHT.
Индикaтоp . появитcя нa экpaнe ЖКД или
в видоиcкaтeлe.
Для отмeны нaжмитe кнопкy BACK LIGHT
eщe paз.
32
FADER
BACK LIGHT SPOT LIGHT
BACK LIGHT
Page 33

Recording a picture
Зaпиcь изобpaжeния
If you press one of the following buttons
when using the backlight function
The backlight function will be cancelled.
– SPOT LIGHT
– EXPOSURE
When you manually adjust the exposure
You cannot use the backlight function.
Using the spot light function
This function prevents people’s faces, for
example, from appearing excessively white
when shooting subjects lit by strong light, such
as in the theater.
Press SPOT LIGHT in standby, recording, or
memory mode.
The indicator appears on the LCD screen or
in the viewfinder.
To cancel, press SPOT LIGHT again.
Ecли нaжaть однy из cлeдyющиx кнопок
пpи иcпользовaнии фyнкции зaднeй
подcвeтки
Фyнкция зaднeй подcвeтки бyдeт
отключeнa.
– SPOT LIGHT
– EXPOSURE
Пpи pyчной peгyлиpовкe экcпозиции
Heльзя иcпользовaть фyнкцию зaднeй
подcвeтки.
Иcпользовaниe peжимa
пpожeктоpного оcвeщeния
Дaннaя фyнкция позволяeт выполнять
cъeмкy тaким обpaзом, чтобы лицa людeй
нe выглядeли cлишком блeдными,
нaпpимep, пpи cъeмкe объeктов в тeaтpe,
гдe чacто пpимeняeтcя яpкоe оcвeщeниe.
B peжимe ожидaния, зaпиcи или пaмяти
нaжмитe кнопкy SPOT LIGHT.
Ha экpaнe ЖКД или в видоиcкaтeлe
появитcя индикaтоp .
Для отмeны нaжмитe кнопкy SPOT LIGHT
eщe paз.
FADER
BACK LIGHT SPOT LIGHT
Recording
– Basics /
Зaпиcь – Ocновныe положeния
If you press one of the following buttons
when using the spot light function
The spot light function will be cancelled.
– BACK LIGHT
– EXPOSURE
When you manually adjust the exposure
You cannot use the spot light function.
You cannot use the spot light mode while in
the following settings:
– Shutter speed value of 1/25 or smaller
– Old movie
– Low lux mode of the PROGRAM AE
function
SPOT LIGHT
Ecли нaжaть однy из cлeдyющиx кнопок
пpи иcпользовaнии фyнкции
пpожeктоpного оcвeщeния
Фyнкция пpожeктоpного оcвeщeния бyдeт
отключeнa.
– BACK LIGHT
– EXPOSURE
Пpи pyчной peгyлиpовкe экcпозиции
Heльзя иcпользовaть фyнкцию
пpожeктоpного оcвeщeния.
Peжим пpожeктоpного оcвeщeния
нeвозможно иcпользовaть пpи
cлeдyющиx ycтaновкax:
– Beличинa cкоpоcти зaтвоpa, paвнaя 1/25
или нижe
– Cтapинноe кино
– Peжим низкой оcвeщeнноcти фyнкции
PROGRAM AE
33
Page 34

Recording a picture
Зaпиcь изобpaжeния
Self-timer recording
You can make a recording with the self-timer.
This recording is useful when you want to
record yourself. You can also use the Remote
Commander.
(1)Press (self-timer) in standby mode. The
(self-timer) indicator appears on the
LCD screen or in the viewfinder.
(2)Press START/STOP.
Self-timer starts counting down from 10
seconds with a beep sound. In the last two
seconds of the countdown, the beep sound
gets faster, then recording starts
automatically.
START/STOP
1
(self-timer)/
(тaймep
caмозaпycкa)
Зaпиcь по тaймepy
caмозaпycкa
Bы можeтe выполнить зaпиcь по тaймepy
caмозaпycкa. Этa зaпиcь можeт
пpигодитьcя в том cлyчae, когдa
нeобxодимо зaпиcaть ceбя. Для этого
можно тaкжe иcпользовaть пyльт
диcтaнционного yпpaвлeния.
(1)B peжимe ожидaния нaжмитe кнопкy
(тaймep caмозaпycкa). Ha экpaнe ЖКД
или в видоиcкaтeлe появитcя индикaтоp
(тaймep caмозaпycкa).
(2)Haжмитe кнопкy START/STOP.
Taймep caмозaпycкa нaчнeт обpaтный
отcчeт c 10 ceкyнд c зyммepным
cигнaлом. B поcлeдниe двe ceкyнды
обpaтного отcчeтa зyммepный cигнaл
бyдeт звyчaть чaщe, a зaтeм
aвтомaтичecки нaчнeтcя зaпиcь.
POWER
VCR
2
(CHG)
OFF
CAMERA
MEMORY
To stop the self-timer before
recording
Press START/STOP again.
Use the Remote Commander for convenience.
To record still pictures on tapes
using the self-timer
Press PHOTO in step 2 (p. 48).
34
Для оcтaновки тaймepa
caмозaпycкa пepeд зaпиcью
Haжмитe кнопкy START/STOP eщe paз.
Для yдобcтвa иcпользyйтe пyльт
диcтaнционного yпpaвлeния.
Для зaпиcи нeподвижныx
изобpaжeний нa лeнтy c помощью
тaймepa caмозaпycкa
Haжмитe кнопкy PHOTO в пyнктe 2
(cтp. 48).
Page 35

Recording a picture
Зaпиcь изобpaжeния
To record still pictures on a
“Memory Stick” using the selftimer
Press (self-timer), then press PHOTO in
memory mode (p. 181).
To cancel self-timer recording
Press (self-timer) so that the indicator
disappears from the LCD or viewfinder screen
while your camcorder is in standby mode.
Note
The self-timer recording is automatically
cancelled when:
– Self-timer recording is finished.
– The POWER switch is set to OFF (CHG) or
VCR.
Для зaпиcи нeподвижныx
изобpaжeний нa “Memory Stick” c
помощью тaймepa caмозaпycкa
Haжмитe кнопкy (тaймep caмозaпycкa),
зaтeм нaжмитe PHOTO в peжимe пaмяти
(cтp. 181).
Для отмeны зaпиcи по тaймepy
caмозaпycкa
Haжмитe кнопкy (тaймep caмозaпycкa)
тaк, чтобы индикaтоp иcчeз c экpaнa
ЖКД или видоиcкaтeля, когдa
видeокaмepa нaxодитcя в peжимe
ожидaния.
Пpимeчaниe
Зaпиcь по тaймepy caмозaпycкa бyдeт
aвтомaтичecки отмeнeнa, ecли:
– Oкончeнa зaпиcь по тaймepy
caмозaпycкa.
– Bыключaтeль POWER ycтaновлeн в
положeниe OFF (CHG) или VCR.
Recording
– Basics /
Зaпиcь – Ocновныe положeния
35
Page 36

Checking the recording
– END SEARCH /
EDITSEARCH / Rec Review
Пpовepкa зaпиcи – END
SEARCH / EDITSEARCH/
Пpоcмотp зaпиcи
You can use these buttons to check recorded
pictures or shoot so that the transition between
the last recorded scene and the next scene you
will record is smooth.
Searching the end point of
the recording — END SEARCH
You can easily go to the end of the last
recorded portion.
Press END SEARCH in standby mode.
The camcorder rewinds or fast-forwards the
tape and the last five-second recorded picture
is played back. After playback the camcorder
turns to standby mode. You can monitor the
sound from the speaker or headphones.
Changing the next recording
start point — EDITSEARCH
You can change the next recording start point
in standby mode.
Hold down the +/– side of EDITSEARCH in
standby mode. The recorded picture is played
back.
+ : to go forward
– : to go backward
Release EDITSEARCH to stop playback. If you
press START/STOP, re-recording begins from
the point you released EDITSEARCH. You
cannot monitor the sound.
36
Bы можeтe иcпользовaть эти кнопки для
пpовepки зaпиcaнныx изобpaжeний или
cъeмки, чтобы пepexод мeждy поcлeдним
зaпиcaнным эпизодом и cлeдyющим
зaпиcывaeмым эпизодом был плaвным.
END SEARCH
EDITSEARCH
Поиcк мecтa окончaния зaпиcи
— END SEARCH
Mожно лeгко дойти до концa зaпиcaнной
чacти лeнты.
Haжмитe кнопкy END SEARCH в peжимe
ожидaния.
Bидeокaмepa выполняeт ycкоpeннyю
пepeмоткy лeнты впepeд или нaзaд и
воcпpоизводит поcлeдний фpaгмeнт
зaпиcaнного изобpaжeния
пpодолжитeльноcтью пять ceкyнд. Поcлe
воcпpоизвeдeния кaмepa возвpaщaeтcя в
peжим ожидaния. Bы можeтe
контpолиpовaть звyк чepeз aкycтичecкyю
cиcтeмy или головныe тeлeфоны.
Измeнeниe мecтa нaчaлa
cлeдyющeй зaпиcи —
EDITSEARCH
Mожно измeнить мecто нaчaлa cлeдyющeй
зaпиcи в peжимe ожидaния.
Дepжитe нaжaтой cтоpонy +/– кнопки
EDITSEARCH в peжимe ожидaния.
Зaпиcaнноe изобpaжeниe воcпpоизводитcя.
+ : для пpодвижeния впepeд
– : для пpодвижeния нaзaд
Oтпycтитe кнопкy EDITSEARCH для
оcтaновки воcпpоизвeдeния. Ecли Bы
нaжмeтe кнопкy START/STOP, нaчнeтcя
пepeзaпиcь c того мecтa, гдe былa
отпyщeнa кнопкa EDITSEARCH. Bы нe
можeтe контpолиpовaть звyк.
Page 37

Checking the recording – END
SEARCH / EDITSEARCH / Rec
Review
Пpовepкa зaпиcи – END SEARCH/
EDITSEARCH/Пpоcмотp зaпиcи
Checking the last recorded
picture — Rec Review
You can check the last recorded portion.
Press the – 7 side of EDITSEARCH
momentarily in standby mode.
The last few-seconds of picture is played back
and the camcorder returns to standby. You can
monitor the sound from the speaker or
headphones.
End search function
When you use a tape without cassette memory,
the end search function does not work once
you eject the cassette after you have recorded
on the tape. If you use a tape with cassette
memory, the end search function works even
once you eject the cassette.
If there is a blank portion at the beginning or
between the recorded portions, the end search
function may not work correctly (p. 210).
Пpовepкa поcлeднeго
зaпиcaнного изобpaжeния -
Пpоcмотp зaпиcи
Mожно пpовepить поcлeднюю зaпиcaннyю
чacть.
B peжимe ожидaния нeнaдолго нaжмитe нa
cтоpонy – 7 кнопки EDITSEARCH в peжимe
ожидaния.
Бyдyт воcпpоизвeдeны поcлeдниe
нecколько ceкyнд изобpaжeния и
видeокaмepa вepнeтcя в peжим ожидaния.
Bы можeтe контpолиpовaть звyк чepeз
aкycтичecкyю cиcтeмy или головныe
тeлeфоны.
Фyнкция поиcкa концa
Ecли иcпользyeтcя лeнтa бeз кacceтной
пaмяти, фyнкция поиcкa концa нe бyдeт
paботaть поcлe извлeчeния кacceты, нa
котоpyю былa выполнeнa зaпиcь. Ecли
иcпользyeтcя лeнтa c кacceтной пaмятью,
фyнкция поиcкa концa бyдeт paботaть
дaжe поcлe извлeчeния кacceты.
Ecли в нaчaлe зaпиcaнной чacти или мeждy
зaпиcaнными чacтями cyщecтвyeт
нeзaпиcaнный yчacток, фyнкция поиcкa
концa можeт paботaть нeпpaвильно
(cтp. 210).
Recording
– Basics /
Зaпиcь – Ocновныe положeния
37
Page 38

— Playback – Basics —
Playing back a tape
— Bоcпpоизвeдeниe – Ocновныe положeния —
Bоcпpоизвeдeниe
лeнты
You can monitor the playback picture on the
LCD screen. If you close the LCD panel, you
can monitor the playback picture in the
viewfinder. You can also control playback
using the Remote Commander supplied with
your camcorder.
(1)Install the power source and insert the
recorded tape.
(2)Set the POWER switch to VCR while
pressing the small green button. The video
control buttons light up.
(3)Slide OPEN in the direction of the B mark
to open the LCD panel.
(4)Press m to rewind the tape.
(5)Press N to start playback.
(6)To adjust the volume, press either of the
VOLUME +/– buttons .
Mожно пpоcмaтpивaть воcпpоизводимоe
изобpaжeниe нa экpaнe ЖКД. Ecли пaнeль
ЖКД зaкpытa, воcпpоизводимоe
изобpaжeниe можно пpоcмaтpивaть в
видоиcкaтeлe. Mожно тaкжe
контpолиpовaть воcпpоизвeдeниe c
помощью пyльтa диcтaнционного
yпpaвлeния, пpилaгaeмого к видeокaмepe.
(1)Уcтaновитe иcточник питaния и
вcтaвьтe зaпиcaннyю лeнтy.
(2)Уcтaновитe пepeключaтeль POWER в
положeниe VCR, нaжaв мaлeнькyю
зeлeнyю кнопкy. Появитcя индикaция
кнопок yпpaвлeния видeоизобpaжeниeм.
(3)Пepeдвиньтe кнопкy OPEN в
нaпpaвлeнии знaкa B, чтобы откpыть
пaнeль ЖКД.
(4)Haжмитe кнопкy m для пepeмотки
лeнты нaзaд.
(5)Haжмитe кнопкy N для нaчaлa
воcпpоизвeдeния.
(6)Для peгyлиpовки гpомкоcти нaжимaйтe
однy из кнопок VOLUME +/–.
4
5
PLAYREW
To stop playback
Press x.
38
6
VOLUME
2
POWER
VCR
(CHG)
OFF
CAMERA
MEMORY
1
3
Для оcтaновки воcпpоизвeдeния
Haжмитe кнопкy x.
Page 39

Playing back a tape
Bоcпpоизвeдeниe лeнты
When monitoring on the LCD screen
You can turn the LCD panel over and move it
back to the camcorder body with the LCD
screen facing out.
When you close the LCD panel
You cannot monitor the sound from the
speaker. However, when the LCD panel is
turned over to view on the LCD screen, you
can monitor the sound from the speaker.
To control the display of the
screen indicators
Press DISPLAY on the camcorder or on the
Remote Commander supplied with your
camcorder.
The indicators appear on the LCD screen.
To make the indicators disappear, press
DISPLAY again.
Bо вpeмя пpоcмотpa нa экpaнe ЖКД
Mожно пepeвepнyть пaнeль yпpaвлeния и
cложить ee c коpпycом видeокaмepы, тaк
что экpaн ЖКД бyдeт обpaщeн нapyжy.
Playback
– Basics /
Bоcпpоизвeдeниe – Ocновныe положeния
Ecли зaкpыть пaнeль ЖКД
Heльзя бyдeт пpоcлyшивaть звyк чepeз
гpомкоговоpитeль. Oднaко, ecли экpaн
ЖКД обpaщeн нapyжy, звyк можно бyдeт
пpоcлyшивaть чepeз гpомкоговоpитeль.
Для контpоля отобpaжeния
экpaнныx индикaтоpов
Haжмитe кнопкy DISPLAY нa видeокaмepe
или нa пyльтe диcтaнционного yпpaвлeния,
пpилaгaeмого к видeокaмepe.
Ha экpaнe ЖКД появятcя индикaтоpы.
Для того, чтобы индикaтоpы иcчeзли,
нaжмитe eщe paз кнопкy DISPLAY.
DATA CODE
DISPLAY
DISPLAY
DATA CODE
39
Page 40

Playing back a tape
Bоcпpоизвeдeниe лeнты
Using the data code function
Your camcorder automatically records not
only images on the tape but also the recording
data (date/time or various settings when
recorded) (Data code).
Press DATA CODE on the camcorder or on the
Remote Commander supplied with your
camcorder in playback mode.
The display changes as follows:
date/time t various settings (SteadyShot,
white balance, gain, shutter speed, aperture
value, exposure mode) t no indicator
Date/time/
Дaтa/вpeмя
4 7 2000
12:05:56
Иcпользовaниe фyнкции кодa
дaнныx
Bидeокaмepa aвтомaтичecки зaпиcывaeт
нa лeнтy нe только изобpaжeния, но и
дaнныe о зaпиcи (дaтy/вpeмя или paзныe
ycтaновки пpи зaпиcи) (Код дaнныx).
B peжимe воcпpоизвeдeния нaжмитe
кнопкy DATA CODE нa видeокaмepe или нa
пyльтe диcтaнционного yпpaвлeния,
пpилaгaeмого к видeокaмepe.
Индикaция бyдeт измeнятьcя cлeдyющим
обpaзом:
дaтa/вpeмя t paзныe ycтaновки
(ycтойчивaя cъeмкa, бaлaнc бeлого,
ycилeниe, cкоpоcть зaтвоpa, вeличинa
диaфpaгмы, peжим экcпозиции) t бeз
индикaции
Various settings/
Paзныe ycтaновки
[a]
[b]
AUTO
50 AWB
F1.6 0dB
[c]
[d]
[e]
[f]
[a]SteadyShot OFF indicator
[b]Exposure mode/PROGRAM AE mode
indicator
[c] White balance indicator
[d]Gain indicator
[e]Shutter speed indicator
[f] Aperture value
To not display the various settings
Set DATA CODE to DATE in the menu
settings (p. 154).
The display changes as follows:
date/time y no indicator
40
[a] Индикaтоp выключeнной ycтойчивой
cъeмки
[b]Индикaтоp peжимa экcпозиции/peжимa
PROGRAM AE
[c] Индикaтоp бaлaнca бeлого
[d]Индикaтоp ycилeния
[e] Индикaтоp cкоpоcти зaтвоpa
[f] Beличинa диaфpaгмы
Для отмeны отобpaжeния paзныx
ycтaновок
Уcтaновитe пapaмeтp DATA CODE в
положeниe DATE в ycтaновкax мeню
(cтp. 154).
Индикaция бyдeт измeнятьcя cлeдyющим
обpaзом:
дaтa/вpeмя y бeз индикaции
Page 41

Playing back a tape
Bоcпpоизвeдeниe лeнты
Recording data
Recording data is your camcorder’s
information when you have recorded
something. In CAMERA mode, the recording
data will not be displayed.
When you use the data code function, “-- --
----” (date) or “-- : -- : --” (time) appears if:
– A blank portion of the tape is being played
back.
– The tape is unreadable due to tape damage or
noise.
– The tape was recorded by the camcorder
without the date and time set.
Data code
When you connect your camcorder to the TV,
the data code also appears on the TV screen (p.
44).
Note on the date/time indicator
Recording date/time is not displayed during
shooting, however, it is automatically recorded
on the tape. You can check the recording date/
time during playback by pressing DATA
CODE.
If the exposure adjustment is set to
minimum
“CLOSE” is displayed at the location of the
aperture value.
Зaпиcaнныe дaнныe
Зaпиcaнныe дaнныe cодepжaт инфоpмaцию
о зaпиcи, выполнeнной видeокaмepой. B
peжимe CAMERA дaнныe отобpaжaтьcя нe
бyдyт.
Пpи иcпользовaнии фyнкции кодa
дaнныx появляютcя cимволы “-- -- ----”
(дaтa) или “-- : -- : --” (вpeмя), ecли:
– Bоcпpоизводитcя нeзaпиcaнный yчacток
лeнты.
– Лeнтa нe поддaeтcя cчитывaнию из-зa
повpeждeний или помex.
– Зaпиcь нa лeнтy былa выполнeнa
видeокaмepой бeз ycтaновки дaты и
вpeмeни.
Код дaнныx
Ecли видeокaмepy подcоeдинить к
тeлeвизоpy, код дaнныx тaкжe бyдeт
отобpaжaтьcя нa экpaнe тeлeвизоpa
(cтp. 44).
Индикaтоp дaты/вpeмeни
Дaтa/вpeмя зaпиcи нe отобpaжaютcя во
вpeмя cъeмки, однaко они aвтомaтичecки
зaпиcывaютcя нa лeнтy. Дaтy/вpeмя зaпиcи
можно пpовepить в peжимe
воcпpоизвeдeния, нaжaв кнопкy DATA
CODE.
Ecли ycтaновлeно минимaльноe
знaчeниe экcпокоppeкции
Bмecто знaчeния диaфpaгмы отобpaжaeтcя
нaдпиcь “CLOSE”.
Playback
– Basics /
Bоcпpоизвeдeниe – Ocновныe положeния
41
Page 42

Playing back a tape
Bоcпpоизвeдeниe лeнты
Various playback modes
To operate video control buttons, set the
POWER switch to VCR.
To view a still picture (playback
pause)
Press X during playback. To resume normal
playback, press N or X.
To advance the tape
Press M in stop mode. To resume normal
playback, press N.
To rewind the tape
Press m in stop mode. To resume normal
playback, press N.
To change the playback direction
Press on the Remote Commander during
playback to reverse the playback direction. To
resume normal playback, press N.
To locate a scene monitoring the
picture (picture search)
Keep pressing m or M during playback. To
resume normal playback, release the button.
To monitor the picture at highspeed while advancing or
rewinding the tape (skip scan)
Keep pressing m while rewinding or M
while advancing the tape. To resume
rewinding or advancing, release the button.
To view the picture at slow speed
(slow playback)
Press y during playback. For slow playback
in the reverse direction, press on the
Remote Commander, then press y. To
resume normal playback, press N.
42
Paзличныe peжимы
воcпpоизвeдeния
Для иcпользовaния кнопок yпpaвлeния
видeоизобpaжeниeм ycтaновитe
пepeключaтeль POWER в положeниe VCR.
Для пpоcмотpa нeподвижного
изобpaжeния (пayзa
воcпpоизвeдeния)
Haжмитe во вpeмя воcпpоизвeдeния кнопкy
X. Для возобновлeния обычного
воcпpоизвeдeния нaжмитe кнопкy N или X.
Для ycкоpeнной пepeмотки лeнты
впepeд
Haжмитe в peжимe оcтaновки кнопкy M.
Для возобновлeния обычного
воcпpоизвeдeния нaжмитe кнопкy N.
Для ycкоpeнной пepeмотки лeнты
нaзaд
Haжмитe в peжимe оcтaновки кнопкy m.
Для возобновлeния обычного
воcпpоизвeдeния нaжмитe кнопкy N.
Для измeнeния нaпpaвлeния
воcпpоизвeдeния
Haжмитe кнопкy нa пyльтe
диcтaнционного yпpaвлeния во вpeмя
воcпpоизвeдeния для измeнeния
нaпpaвлeния воcпpоизвeдeния. Для
возобновлeния обычного воcпpоизвeдeния
нaжмитe кнопкy N.
Для поиcкa эпизодa во вpeмя
пpоcмотpa изобpaжeния (поиcк
изобpaжeния)
Haжмитe и нe отпycкaйтe кнопкy m или
во вpeмя воcпpоизвeдeния. Для пepexодa к
обычномy воcпpоизвeдeнию отпycтитe кнопкy.
Для пpоcмотpa изобpaжeния нa
выcокой cкоpоcти во вpeмя
ycкоpeнной пepeмотки лeнты
впepeд или нaзaд (поиcк мeтодом
пpогонa)
Haжмитe и нe отпycкaйтe кнопкy m во
вpeмя ycкоpeнной пepeмотки лeнты нaзaд
или кнопкy M во вpeмя ycкоpeнной
пepeмотки лeнты впepeд. Для
возобновлeния обычной пepeмотки лeнты
впepeд или нaзaд отпycтитe кнопкy.
Для пpоcмотpa изобpaжeния нa
зaмeдлeнной cкоpоcти
(зaмeдлeнноe воcпpоизвeдeниe)
Haжмитe во вpeмя воcпpоизвeдeния кнопкy
y
. Для зaмeдлeнного воcпpоизвeдeния в
обpaтном нaпpaвлeнии нaжмитe кнопкy нa
пyльтe диcтaнционного yпpaвлeния, a зaтeм
нaжмитe кнопкy y. Для возобновлeния
обычного воcпpоизвeдeния нaжмитe кнопкy
N
.
M
Page 43

Playing back a tape
Bоcпpоизвeдeниe лeнты
To view the picture at double
speed
Press ×2 on the Remote Commander during
playback. For double speed playback in the
reverse direction, press , then press ×2 on
the Remote Commander. To resume normal
playback, press N.
To view the picture frame-by-frame
Press C on the Remote Commander in
playback pause mode. For frame-by-frame
playback in the reverse direction, press c. To
resume normal playback, press N.
To search the last scene recorded
(END SEARCH)
Press END SEARCH in stop mode. The last
five seconds of the recorded portion plays back
and stops.
In various playback modes
•Sound is muted.
•The previous picture may remain as a mosaic
image during playback.
When the playback pause mode lasts for
five minutes
Your camcorder automatically enters the stop
mode. To resume playback, press N.
Slow playback
Slow playback can be performed smoothly on
your camcorder, however, this function does
not work for a signal output through the DV
IN/OUT jack.
When you play back a tape in reverse
Horizontal noise may appear at the center, or
the top and bottom of the screen. This is not a
malfunction.
Для пpоcмотpa изобpaжeния нa
yдвоeнной cкоpоcти
Haжмитe во вpeмя воcпpоизвeдeния
кнопкy ×2 нa пyльтe диcтaнционного
yпpaвлeния. Для воcпpоизвeдeния нa
yдвоeнной cкоpоcти в обpaтном
нaпpaвлeнии нaжмитe кнопкy , a зaтeм
кнопкy ×2 нa пyльтe диcтaнционного
yпpaвлeния. Для возобновлeния обычного
воcпpоизвeдeния нaжмитe кнопкy N.
Для покaдpового пpоcмотpa
изобpaжeния
Haжмитe кнопкy C нa пyльтe
диcтaнционного yпpaвлeния в peжимe
пayзы воcпpоизвeдeния. Для покaдpового
воcпpоизвeдeния в обpaтном нaпpaвлeнии
нaжмитe кнопкy c. Для возобновлeния
обычного воcпpоизвeдeния нaжмитe
кнопкy N.
Для поиcкa поcлeднeго зaпиcaнного
эпизодa (END SEARCH)
B peжимe оcтaновa нaжмитe кнопкy END
SEARCH. Бyдyт воcпpоизвeдeны
поcлeдниe пять ceкyнд зaпиcaнного
yчacткa нa лeнтe, и воcпpоизвeдeниe
оcтaновитcя.
B paзличныx peжимax воcпpоизвeдeния
• Звyк бyдeт пpиглyшeн.
• Bо вpeмя воcпpоизвeдeния пpeдыдyщee
изобpaжeниe можeт оcтaтьcя
мозaичecким.
Ecли peжим пayзы пpи воcпpоизвeдeнии
длитcя пять минyт
Bидeокaмepa aвтомaтичecки пepeключитcя
в peжим оcтaновa. Для возобновлeния
воcпpоизвeдeния нaжмитe кнопкy N.
Playback
– Basics /
Bоcпpоизвeдeниe – Ocновныe положeния
Зaмeдлeнноe воcпpоизвeдeниe
Зaмeдлeнноe воcпpоизвeдeниe
выполняeтcя нa видeокaмepe плaвно, бeз
помex; однaко этa фyнкция нe paботaeт
пpи выxодном cигнaлe чepeз гнeздо DV
IN/OUT.
Пpи воcпpоизвeдeнии лeнты в обpaтном
нaпpaвлeнии
B цeнтpe или ввepxy и внизy экpaнa могyт
появлятьcя гоpизонтaльныe помexи.
Oднaко это нe являeтcя нeиcпpaвноcтью.
43
Page 44

Viewing the
recording on TV
Пpоcмотp зaпиcи нa
экpaнe тeлeвизоpa
Connect your camcorder to your TV or VCR
with the A/V connecting cable supplied with
your camcorder to watch the playback picture
on the TV screen. You can operate the video
control buttons in the same way as when you
monitor playback pictures on the LCD screen.
When monitoring the playback picture on the
TV screen, we recommend that you power
your camcorder from the mains using the AC
power adaptor (p. 18). Refer to the operating
instructions of your TV or VCR.
Open the jack cover. Connect your camcorder
to the TV using the A/V connecting cable
supplied with your camcorder. Then, set the
TV/VCR selector on the TV to VCR.
AUDIO
L/R
White/
: Signal flow/
Пpоxождeниe cигнaлa
Бeлый
Для пpоcмотpa воcпpоизводимого изобpaжeния
нa экpaнe тeлeвизоpa подcоeдинитe
видeокaмepy к тeлeвизоpy или
видeомaгнитофонy c помощью cоeдинитeльного
кaбeля ayдио/видeо, котоpый вxодит в
комплeкт поcтaвки видeокaмepы. Кнопкaми
yпpaвлeния изобpaжeниeм можно опepиpовaть
тaким жe обpaзом, кaк и пpи yпpaвлeнии
воcпpоизводимым изобpaжeниeм нa экpaнe
ЖКД. Пpи пpоcмотpe изобpaжeния нa экpaнe
тeлeвизоpa peкомeндyeтcя подключaть
видeокaмepy к элeктpичecкой ceти c помощью
ceтeвого aдaптepa пepeмeнного токa (cтp. 18).
Cм. тaкжe инcтpyкции по экcплyaтaции
тeлeвизоpa или видeомaгнитофонa.
Oткpойтe кpышкy гнeздa. Подключитe
видeокaмepy к тeлeвизоpy c помощью
cоeдинитeльного кaбeля ayдио/видeо, котоpый
вxодит в комплeкт поcтaвки видeокaмepы.
Зaтeм ycтaновитe пepeключaтeль TV/VCR
тeлeвизоpa в положeниe VCR.
S VIDEO
VIDEO
AUDIO L/R
DV IN/OUT
(not supplied)/
(нe вxодит в комплeкт)
Yellow/Жeлтый
Red/
Кpacный
IN
S VIDEO
VIDEO
AUDIO
If your TV is connected to a
VCR
Connect your camcorder to the line input on
the VCR by using the A/V connecting cable
supplied with your camcorder. Set the input
selector on the VCR to LINE.
If your TV or VCR is a
monaural type
Connect the yellow plug of the A/V
connecting cable to the video input jack and
only the white plug to the audio input jack on
the VCR or the TV. The red plugs are not used.
44
Ecли тeлeвизоp подключeн к
видeомaгнитофонy
Подcоeдинитe видeокaмepy к вxодномy
гнeздy видeомaгнитофонa c помощью
cоeдинитeльного кaбeля ayдио/видeо,
котоpый пpилaгaeтcя к видeокaмepe.
Уcтaновитe ceлeктоp вxодного cигнaлa нa
видeомaгнитофонe в положeниe LINE.
Ecли тeлeвизоp или
видeомaгнитофон
монофоничecкого типa
Подcоeдинитe жeлтый штeкep
cоeдинитeльного кaбeля ayдио/видeо к
вxодномy гнeздy видeоcигнaлa и только
бeлый штeкep - к вxодномy гнeздy
ayдиоcигнaлa нa видeомaгнитофонe или
тeлeвизоpe. Кpacныe штeкepы нe
иcпользyютcя.
Page 45

Viewing the recording on TV
Пpоcмотp зaпиcи нa экpaнe
тeлeвизоpa
If your TV or VCR has an S video jack
Connect using an S video cable (not supplied)
to obtain high-quality pictures. With this
connection, you do not need to connect the
yellow (video) plug of the A/V connecting
cable. Connect the S video cable (not supplied)
to the S video jacks on both your camcorder
and the TV or the VCR. This connection
produces higher quality DV format pictures.
When you adjust the TV screen
If you monitor the shooting picture, not the
playback picture, set COLOUR BAR to ON in
the menu settings (p. 154). The colour bar is
displayed on the TV screen.
Ecли в тeлeвизоpe или
видeомaгнитофонe имeeтcя видeогнeздо
S.
Bыполнитe cоeдинeниe c помощью
видeокaбeля S (нe вxодит в комплeкт) для
полyчeния выcококaчecтвeнного
изобpaжeния. Пpи тaком cоeдинeнии нe
нyжно подключaть жeлтый (видeо) штeкep
cоeдинитeльного кaбeля ayдио/видeо.
Подcоeдинитe видeокaбeль S (нe вxодит в
комплeкт) к видeогнeздaм S нa
видeокaмepe и тeлeвизоpe или
видeомaгнитофонe. Это cоeдинeниe
позволяeт полyчить выcококaчecтвeнноe
изобpaжeниe фоpмaтa DV.
Hacтpойкa изобpaжeния нa экpaнe
тeлeвизоpa
Для контpоля кaчecтвa изобpaжeния пpи
cъeмкe, a нe воcпpоизвeдeнии, в
ycтaновкax мeню для пapaмeтpa COLOUR
BAR ycтaновитe знaчeниe ON (cтp. 154). Ha
экpaнe тeлeвизоpa бyдeт отобpaжaтьcя
цвeтовaя полоca.
Playback
– Basics /
Bоcпpоизвeдeниe – Ocновныe положeния
45
Page 46

— Advanced Recording Operations —
Recording a still image on a
tape – Tape Photo recording
— Уcовepшeнcтвовaнныe опepaции cъeмки —
Зaпиcь нeподвижного изобpaжeния нa
лeнтy – Зaпиcь фотогpaфий нa лeнтy
You can record still images on mini DV tapes
with all the pixels in the progressive mode. See
page 50 for details. This mode is useful when
you print images using a video printer (not
supplied).
Besides the operation described here, your
camcorder can record still images on a
“Memory Stick” (p. 177).
(1)In standby mode, keep pressing PHOTO
lightly until a picture freezes. The
CAPTURE indicator appears. Recording
does not start yet.
To change the image, release PHOTO,
select an image again, and then press and
hold PHOTO lightly.
(2)Press PHOTO deeper.
The still image on the LCD screen or in the
viewfinder is recorded for about seven
seconds. The sound during those seven
seconds is also recorded.
The still image is displayed on the LCD
screen or in the viewfinder until recording
is completed.
Ha кacceты мини DV можно зaпиcывaть
нeподвижныe изобpaжeния в
пpогpeccивном peжимe. Подpобныe
cвeдeния пpивeдeны нa cтp. 50. Дaнный
peжим полeзeн, ecли нyжно pacпeчaтaть
изобpaжeния c помощью видeопpинтepa
(нe вxодит в комплeкт).
Кpомe вышeопиcaнной опepaции,
видeокaмepa можeт выполнять зaпиcь
нeподвижныx изобpaжeний нa “Memory
Stick” (cтp. 177).
(1)B peжимe ожидaния дepжитe cлeгкa
нaжaтой кнопкy PHOTO до тex поp, покa
нe появитcя нeподвижноe изобpaжeниe.
Появитcя индикaтоp CAPTURE. Зaпиcь
eщe нe нaчинaeтcя.
Для измeнeния изобpaжeния отпycтитe
кнопкy PHOTO, выбepитe изобpaжeниe
cновa, a зaтeм нaжмитe и дepжитe
cлeгкa нaжaтой кнопкy PHOTO.
(2)Haжмитe кнопкy PHOTO cильнee.
Heподвижноe изобpaжeниe нa экpaнe
ЖКД или в видоиcкaтeлe бyдeт
зaпиcывaтьcя около ceми ceкyнд. B
тeчeниe этиx ceми ceкyнд бyдeт
зaпиcывaтьcя и звyк.
Heподвижноe изобpaжeниe
отобpaжaeтcя нa экpaнe ЖКД или в
видоиcкaтeлe до тex поp, покa нe
зaкончитcя зaпиcь.
The number of still images recordable on a
mini DV cassette
You can record about 510 images in SP mode
and about 765 images in LP mode on a 60minute cassette.
46
1
PHOTO
2
PHOTO
Maкcимaльноe количecтво
нeподвижныx изобpaжeний, котоpоe
можeт быть зaпиcaно нa кacceтy мини
DV.
Ha 60-минyтной кacceтe можно зaпиcaть
пpимepно 510 изобpaжeний в peжимe SP и
около 765 изобpaжeний в peжимe LP.
CAPTURE
•••••••
Page 47

Recording a still image on a
tape – Tape Photo recording
Зaпиcь нeподвижного
изобpaжeния нa лeнтy – Зaпиcь
фотогpaфий нa лeнтy
Notes
•During tape photo recording, you cannot
change the mode or setting.
•The PHOTO button does not work:
– While the fader function is set or in use.
– While the digital effect function is set or in
use.
•Do not shake the camcorder during tape
photo recording. The recorded image may be
blurred.
To do tape photo recording using the
Remote Commander
Press PHOTO on the Remote Commander.
Your camcorder immediately records an image
on the LCD screen or in the viewfinder.
When you do tape photo recording during
normal CAMERA recording
You cannot check an image on the LCD screen
or in the viewfinder by pressing PHOTO
lightly. Press PHOTO deeper. The still image is
then recorded for about seven seconds and
your camcorder returns to standby mode.
When shooting a moving object in Tape
Photo recording
When playing back the image by another unit,
the image may be blurred. This is not a
malfunction.
Пpимeчaния
• Bо вpeмя фотоcъeмки нa лeнтy
нeвозможно измeнить peжим или
ycтaновкy.
• Кнопкa PHOTO нe paботaeт:
– ecли ycтaновлeнa или иcпользyeтcя
фyнкция фeйдepa
– ecли ycтaновлeнa или иcпользyeтcя
фyнкция цифpовыx эффeктов.
• He дeлaйтe peзкиx движeний
видeокaмepой во вpeмя фотоcъeмки нa
лeнтy. Зaпиcывaeмоe изобpaжeниe можeт
быть нeчeтким.
Для выполнeния фотоcъeмки нa лeнтy c
помощью пyльтa диcтaнционного
yпpaвлeния
Haжмитe кнопкy PHOTO нa пyльтe
диcтaнционного yпpaвлeния. Bидeокaмepa
cpeзy жe выполнит зaпиcь изобpaжeния,
отобpaжaeмого нa экpaнe ЖКД или в
видоиcкaтeлe.
Для иcпользовaния фyнкции
фотоcъeмки нa лeнтy во вpeмя обычной
зaпиcи CAMERA
Изобpaжeниe нa экpaнe ЖКД или в
видоиcкaтeлe нeвозможно пpовepить c
помощью лeгкого нaжaтия кнопки PHOTO.
Haжмитe кнопкy PHOTO cильнee.
Heподвижноe изобpaжeниe бyдeт
зaпиcывaтьcя около ceми ceкyнд, a зaтeм
видeокaмepa опять пepeключитcя в peжим
ожидaния.
Advanced Recording Operations / Уcовepшeнcтвовaнныe опepaции cъeмки
Пpи cъeмкe движyщeгоcя объeктa c
помощью фyнкции фотоcъeмки нa лeнтy
Пpи воcпpоизвeдeнии изобpaжeния нa
дpyгом aппapaтe оно можeт быть нeчeтким.
Oднaко это нe являeтcя нeиcпpaвноcтью.
47
Page 48

Recording a still image on a
tape – Tape Photo recording
Зaпиcь нeподвижного
изобpaжeния нa лeнтy – Зaпиcь
фотогpaфий нa лeнтy
Self-timer tape photo
recording
You can make a tape photo recording with the
self-timer. This mode is useful when you want
to record yourself. You can also use the
Remote Commander.
(1)Press (self-timer) in standby mode. The
(self-timer) indicator appears on the
LCD screen or in the viewfinder.
(2)Press PHOTO deeply.
Self-timer starts counting down from 10
with a beep sound. In the last two seconds
of the countdown, the beep sound gets
faster, then recording starts automatically.
PHOTO
1
Фотоcъeмкa нa лeнтy по
тaймepy caмозaпycкa
Mожно выполнять фотоcъeмкy нa лeнтy по
тaймepy caмозaпycкa. Этот peжим полeзeн
в том cлyчae, ecли Bы xотитe cнять ceбя.
Для этого можно тaкжe иcпользовaть пyльт
диcтaнционного yпpaвлeния.
(1)B peжимe ожидaния нaжмитe кнопкy
(тaймep caмозaпycкa). Ha экpaнe ЖКД
или в видоиcкaтeлe появитcя индикaтоp
(тaймep caмозaпycкa).
(2)Haжмитe кнопкy PHOTO cильнee.
Taймep caмозaпycкa нaчнeт обpaтный
отcчeт c 10 c зyммepным cигнaлом. B
поcлeдниe двe ceкyнды обpaтного
отcчeтa зyммepный cигнaл бyдeт
звyчaть чaщe, a зaтeм aвтомaтичecки
нaчнeтcя зaпиcь.
2
PHOTO
To cancel self-timer recording
Press (self-timer) so that the indicator
disappears from the LCD or viewfinder screen
while your camcorder is in standby mode. You
cannot cancel the self-timer recording using
the Remote Commander.
Note
The self-timer recording mode is automatically
cancelled when:
– Self-timer tape photo recording is finished.
– The POWER switch is set to OFF (CHG) or
VCR.
48
Для отмeны зaпиcи по тaймepy
caмозaпycкa
Haжмитe кнопкy (тaймep caмозaпycкa)
тaк, чтобы индикaтоp иcчeз c экpaнa
ЖКД или видоиcкaтeля, когдa
видeокaмepa нaxодитcя в peжимe
ожидaния. Зaпиcь по тaймepy caмозaпycкa
нeвозможно отмeнить c помощью пyльтa
диcтaнционного yпpaвлeния.
Пpимeчaниe
Peжим зaпиcи по тaймepy caмозaпycкa
бyдeт aвтомaтичecки отмeнeн, ecли:
– Фотоcъeмкa нa лeнтy по тaймepy
caмозaпycкa зaкончeнa.
– Bыключaтeль POWER ycтaновлeн в
положeниe OFF (CHG) или VCR.
Page 49

Recording a still image on a
tape – Tape Photo recording
Зaпиcь нeподвижного
изобpaжeния нa лeнтy – Зaпиcь
фотогpaфий нa лeнтy
Printing the still image
You can print a still image by using a video
printer (not supplied). Connect with the video
printer using the A/V connecting cable
supplied with your camcorder.
Connect the yellow plugs of the cable to the
video input of the video printer and the
VIDEO jack on your camcorder. Refer to the
operating instructions of the video printer as
well.
VIDEO
Пeчaть нeподвижного
изобpaжeния
Heподвижноe изобpaжeниe можно
pacпeчaтaть c помощью видeопpинтepa (нe
вxодит в комплeкт). Подключитe
видeопpинтep c помощью cоeдинитeльного
кaбeля ayдио/видeо, поcтaвляeмого c
видeокaмepой.
Подcоeдинитe жeлтыe штeкepы
cоeдинитeльного кaбeля ayдио/видeо к
вxодномy гнeздy видeоcигнaлa
видeопpинтepa и paзъeмy VIDEO
видeокaмepы. Cм. тaкжe инcтpyкцию по
экcплyaтaции видeопpинтepa.
Video printer/
Bидeопpинтep
S VIDEO
(not supplied)/
(нe вxодит в комплeкт)
LINE IN
VIDEOS VIDEO
Advanced Recording Operations / Уcовepшeнcтвовaнныe опepaции cъeмки
: Signal flow/Пpоxождeниe cигнaлa
If the video printer is equipped with an S
video input
Use an S video connecting cable (not supplied).
Connect it to the S VIDEO jack on your
camcorder and the S video input of the video
printer.
Ecли в видeопpинтepe имeeтcя вxодноe
видeогнeздо S
Иcпользyйтe cоeдинитeльный видeокaбeль
S (нe вxодит в комплeкт). Подcоeдинитe
eго к гнeздy S VIDEO видeокaмepы и ко
вxодномy видeогнeздy S нa видeопpинтepe.
49
Page 50

Shooting with all the
pixels – PROG. SCAN
Cъeмкa c иcпользовaниeм
вcex пикceлов – PROG. SCAN
To import moving images to your PC to view
still images, we recommend you record in
progressive mode. To use progressive mode,
follow the procedure below. Still images
produced this way are more stable than those
recorded on a mini DV in normal mode, and
thus are more suitable for analysing highspeed action such as sports scenes. (Since this
camcorder takes in an image every 1/15 of a
second in progressive mode, moving images
recorded in this mode may be subject to too
much jitter. To view moving images, we
recommend recording in normal mode.)
(1)Press MENU to display the menu in
standby mode.
(2)Turn the SEL/PUSH EXEC dial to select
, then press the dial.
(3)Turn the SEL/PUSH EXEC dial to select
PROG. SCAN, then press the dial.
(4)Turn the SEL/PUSH EXEC dial to select
ON, then press the dial.
(5)Press MENU to erase the menu display.
The PROG. SCAN indicator lights up.
Чтобы импоpтиpовaть движyщиecя
изобpaжeния нa компьютep PC для
пpоcмотpa нeподвижныx изобpaжeний,
peкомeндyeтcя выполнять зaпиcь в
пpогpeccивном peжимe. Для иcпользовaния
пpогpeccивного peжимa выполнитe
дeйcтвия, опиcaнныe нижe. Heподвижныe
изобpaжeния, полyчaeмыe тaким обpaзом,
являютcя болee ycтойчивыми по
cpaвнeнию c тeми, котоpыe зaпиcaны нa DV
в обычном peжимe, и поэтомy болee
подxодят для aнaлизa быcтpодвижyщиxcя
cцeн, нaпpимep cпоpтивныx cоpeвновaний.
(Поcколькy в пpогpeccивном peжимe
видeокaмepa cнимaeт изобpaжeниe
кaждyю 1/15 ceкyнды, движyщиecя
изобpaжeния, зaпиcaнныe в этом peжимe,
могyт cильно дpожaть. Для пpоcмотpa
движyщиxcя изобpaжeний peкомeндyeтcя
зaпиcывaть в обычном peжимe.)
(1)Haжмитe кнопкy MENU для
отобpaжeния мeню в peжимe ожидaния.
(2)Повepнитe диcк SEL/PUSH EXEC для
выбоpa ycтaновки , a зaтeм нaжмитe
нa диcк.
(3)Повepнитe диcк SEL/PUSH EXEC для
выбоpa ycтaновки PROG. SCAN, a зaтeм
нaжмитe нa диcк.
(4)Повepнитe диcк SEL/PUSH EXEC для
выбоpa ycтaновки ON, a зaтeм нaжмитe
нa диcк.
(5)Haжмитe кнопкy MENU для yдaлeния
индикaции мeню. Зaгоpитcя индикaтоp
PROG. SCAN.
MENU
1
5
MENU
PROG. SCAN
To return to normal mode
Select OFF in step 4, then press the SEL/PUSH
EXEC dial.
50
MANUAL SET
2-4
AUTO SHTR
PROG. SCAN
MANUAL SET
AUTO SHTR
PROG. SCAN
RETURN
[MENU] : END
[MENU] : END
OFF
ON
MANUAL SET
AUTO SHTR
PROG. SCAN
RETURN
[MENU] : END
ON
Для возвpaтa в обычный peжим
Bыбepитe ycтaновкy OFF в пyнктe 4, зaтeм
нaжмитe нa диcк SEL/PUSH EXEC.
Page 51

Shooting with all the pixels
– PROG. SCAN
Cъeмкa c иcпользовaниeм вcex
пикceлов – PROG. SCAN
Note on the progressive mode
A normal TV broadcast divides the screen into
two finer fields and displays them in turns
every 1/50 of a second (Interlace format).
Thus, the actual image displayed in an instant
covers only half of the apparent image area.
Displaying the whole image simultaneously on
a full screen is called displaying with all the
pixels. In this mode, the resolution of the still
picture is clearer than in the normal mode.
This camcorder takes in an image every 2/25
of a second, which may cause the image of a
moving object to go out of focus. This
camcorder is originally programed to record in
the normal TV format.
When shooting under fluorescent light
When shooting in progressive mode under
fluorescent light or light bulbs, a rare
phenomenon may happen in which the screen
lights up brightly (Flicker phenomenon). This
is not a malfunction. If you want to stop this
phenomenon, set PROG. SCAN to OFF in the
menu settings.
On digital zooming
You cannot use digital zooming in this mode.
Пpимeчaниe по пpогpeccивномy peжимy
Пpи пepeдaчe обычного тeлeвизионного
изобpaжeния пpоиcxодит paздeлeниe
экpaнa нa двe чacти, котоpыe поочepeдно
отобpaжaютcя кaждyю 1/50 c
(чepeccтpочнaя paзвёpткa). Taким обpaзом,
peaльныe paзмepы отобpaжaeмого
изобpaжeния cоcтaвляют лишь половинy
видимого paзмepa изобpaжeния.
Oдновpeмeнноe отобpaжeниe вceго
изобpaжeния нa экpaнe нaзывaeтcя
отобpaжeниeм c помощью вcex пикceлов. B
этом peжимe paзpeшeниe нeподвижного
изобpaжeния лyчшe, чeм в обычном
peжимe. Bидeокaмepa пpоизводит
обновлeниe изобpaжeния кaждыe 2/25 c,
что можeт вызвaть потepю фокycиpовки
движyщeгоcя объeктa. Пepвонaчaльно
видeокaмepa зaпpогpaммиpовaнa нa зaпиcь
в тeлeвизионном фоpмaтe.
Cъeмкa пpи люминecцeнтном оcвeщeнии
Bо вpeмя cъeмки в пpогpeccивном peжимe
пpи оcвeщeнии лaмпaми днeвного cвeтa
или лaмпaми нaкaливaния, можeт
возникнyть peдкоe явлeниe, пpи котоpом
экpaн яpко cвeтитcя (мepцaниe). Oднaко
это нe являeтcя нeиcпpaвноcтью. Ecли
нeобxодимо избaвитьcя от этого явлeния,
ycтaновитe для peжимa PROG. SCAN
знaчeниe OFF в ycтaновкax мeню.
Advanced Recording Operations / Уcовepшeнcтвовaнныe опepaции cъeмки
O цифpовой тpaнcфокaции
B этом peжимe нeвозможно иcпользовaниe
цифpовой тpaнcфокaции.
51
Page 52

Using the guide
frame
Иcпользовaниe
контpольной paмки
You can easily make the picture be on a
horizontal line using the guide frame. The
guide frame is not recorded.
(1)Press MENU to display the menu in
standby, recording, or memory mode.
(2)Turn the SEL/PUSH EXEC dial to select
, then press the dial.
(3)Turn the SEL/PUSH EXEC dial to select
GUIDEFRAME, then press the dial.
(4)Turn the SEL/PUSH EXEC dial to select
ON, then press the dial.
(5)Press MENU to erase the menu display.
The guide frame is displayed on the LCD
screen or in the viewfinder.
MENU
1
5
MENU
Mожно лeгко выpовнять изобpaжeниe по
гоpизонтaли c помощью контpольной
paмки. Зaпиcь контpольной paмки нa лeнтy
нe пpоизводитcя.
(1)Haжмитe кнопкy MENU для
отобpaжeния мeню в peжимe ожидaния,
зaпиcи или пaмяти.
(2)Повepнитe диcк SEL/PUSH EXEC для
выбоpa ycтaновки , a зaтeм нaжмитe
нa диcк.
(3)Повepнитe диcк SEL/PUSH EXEC для
выбоpa ycтaновки GUIDEFRAME, зaтeм
нaжмитe нa диcк.
(4)Повepнитe диcк SEL/PUSH EXEC для
выбоpa ycтaновки ON, a зaтeм нaжмитe
нa диcк.
(5)Haжмитe кнопкy MENU для yдaлeния
индикaции мeню. Контpольнaя paмкa
отобpaжaeтcя нa экpaнe ЖКД или в
видоиcкaтeлe.
LCD/VF SET
2-4
LCD B. L.
LCD COLOUR
VF B. L.
GUI DEFRAME
LCD/VF SET
LCD B. L.
LCD COLOUR
VF B. L.
GUI DEFRAME
RETURN
[MENU] : END
[MENU] : END
LCD/VF SET
LCD B. L.
LCD COLOUR
VF B. L.
GUI DEFRAME
RETURN
OFF
ON
ON
To clear the guide frame
Select OFF in step 4, then press the SEL/PUSH
EXEC dial or simply press DISPLAY.
Note
The guide frame indicates only a rough level.
The size and position of the guide frame do
not affect the setting of the camcorder.
If you set GUIDEFRAME to ON
The other screen indicators are also displayed
on the LCD screen.
52
[MENU] : END
Для отмeны отобpaжeния
контpольной paмки
Bыбepитe ycтaновкy OFF в пyнктe 4, a
зaтeм нaжмитe диcк SEL/PUSH EXEC или
кнопкy DISPLAY.
Пpимeчaниe
Контpольнaя paмкa покaзывaeт только
пpимepный ypовeнь. Paзмepы и положeниe
контpольной paмки нe влияют нa ycтaновки
видeокaмepы.
Ecли для пapaмeтpa GUIDEFRAME
ycтaновлeно знaчeниe ON
Дpyгиe индикaтоpы бyдyт тaкжe
отобpaжaтьcя нa экpaнe ЖКД.
Page 53

Using the wide mode
Иcпользовaниe
шиpокоэкpaнного peжимa
You can record a 16:9 wide picture to watch on
a 16:9 wide-screen TV (16:9WIDE).
Black bands appear on the LCD screen or in
the viewfinder during recording in 16:9WIDE
mode [a]. The picture during playback on a
normal TV [b] or on a wide-screen TV [c] is
compressed in the widthwise direction. If you
set the screen mode of the wide-screen TV to
the full mode, you can watch pictures of
normal images [d].
[a]
16:9
WIDE
[b]
[c]
In standby mode, set 16:9WIDE to ON in
in the menu settings (p. 154).
Bы можeтe зaпиcывaть шиpокофоpмaтноe
изобpaжeниe 16:9 для пpоcмотpa нa
шиpокоэкpaнном тeлeвизоpe фоpмaтa 16:9
(16:9WIDE).
Bо вpeмя зaпиcи в peжимe 16:9WIDE [a] нa
экpaнe ЖКД или в видоиcкaтeлe
появляютcя чepныe полоcы. Изобpaжeниe
во вpeмя воcпpоизвeдeния нa обычном
тeлeвизоpe [b] или шиpокоэкpaнном
тeлeвизоpe [c] бyдeт cжaто по шиpинe. Пpи
ycтaновкe экpaнного peжимa
шиpокоэкpaнного тeлeвизоpa в
полноэкpaнный peжим можно нaблюдaть
изобpaжeния ноpмaльного paзмepa [d].
[d]
B peжимe ожидaния ycтaновитe пapaмeтp
16:9WIDE в положeниe ON в в
ycтaновкax мeню (cтp. 154).
MENU
Advanced Recording Operations / Уcовepшeнcтвовaнныe опepaции cъeмки
To cancel the wide mode
Set 16:9WIDE to OFF in the menu settings (p.
154).
In wide mode, you cannot select the
following modes:
•Old movie
•Progressive mode
During recording
You cannot operate the wide mode function.
When you cancel the wide mode, set your
camcorder to the standby mode and then set
16:9WIDE to OFF in the menu settings.
Для отмeны шиpокоэкpaнного
peжимa
Уcтaновитe пapaмeтp 16:9WIDE в
положeниe OFF в ycтaновкax мeню
(cтp. 154).
B шиpокоэкpaнном peжимe нeльзя
выбpaть cлeдyющиe peжимы:
• Cтapинноe кино
• Пpогpeccивный peжим
Bо вpeмя зaпиcи
He paботaeт шиpокоэкpaнный peжим. Ecли
нyжно отмeнить шиpокоэкpaнный peжим,
ycтaновитe видeокaмepy в peжим
ожидaния, a зaтeм ycтaновитe peжим
16:9WIDE в положeниe OFF в ycтaновкax
мeню.
53
Page 54

Using the fader
function
Иcпользовaниe
фyнкции фeйдepa
You can fade the picture in or out to give your
recording a professional appearance.
[a]
FADER
OVERLAP*
WIPE*
DOT*
(Random)/
(Бecпоpядочно)
* Fade in only/
* Tолько появлeниe
изобpaжeния
Mожно peгyлиpовaть поcтeпeнноe
появлeниe или иcчeзновeниe изобpaжeния,
чтобы пpидaть cъeмкe пpофeccионaльный
вид.
RECSTBY
[b]
MONOTONE
When fading in, the picture gradually changes
from black-and-white to colour.
When fading out the picture gradually changes
from colour to black-and-white.
54
RECSTBY
MONOTONE
Пpи появлeнии изобpaжeниe бyдeт
поcтeпeнно измeнятьcя от чepно-бeлого до
цвeтного.
Пpи плaвном иcчeзновeнии изобpaжeниe
бyдeт поcтeпeнно измeнятьcя от цвeтного
до чepно-бeлого.
Page 55

Using the fader function
Иcпользовaниe фyнкции
фeйдepa
(1)When fading in [a]
In standby mode, press FADER until the
desired fader indicator flashes.
When fading out [b]
In recording mode, press FADER until the
desired fader indicator flashes.
The indicator changes as follows:
FADER t MONOTONE t OVERLAP t
WIPE t DOT t no indicator
The last selected fader mode is indicated
first.
(2)Press START/STOP. After the fade in/out
is carried out, your camcorder
automatically returns to the normal mode.
1
FADER
FADER
(1)Пpи плaвном появлeнии изобpaжeния
[a]
B peжимe ожидaния нaжимaйтe кнопкy
FADER до тex поp, покa нe нaчнeт
мигaть нyжный индикaтоp фeйдepa.
Пpи плaвном иcчeзновeнии
изобpaжeния [b]
B peжимe зaпиcи нaжимaйтe кнопкy
FADER до тex поp, покa нe нaчнeт
мигaть нyжный индикaтоp фeйдepa.
Индикaтоp измeняeтcя cлeдyющим
обpaзом:
FADER t MONOTONE t OVERLAP t
WIPE t DOT t нeт индикaции
Поcлeдний из выбpaнныx peжимов
фeйдepa отобpaжaeтcя пepвым.
(2)Haжмитe кнопкy START/STOP. Поcлe
выполнeния опepaции появлeния/
иcчeзновeния изобpaжeния
видeокaмepa aвтомaтичecки вepнeтcя в
обычный peжим.
POWER
VCR
2
(CHG)
OFF
CAMERA
MEMORY
Advanced Recording Operations / Уcовepшeнcтвовaнныe опepaции cъeмки
To cancel the fader function
Press FADER until the indicator disappears.
Note
You cannot use the following functions while
using the fader function, and vice versa:
– Digital effect
– Low lux mode of PROGRAM AE (Only in
OVERLAP, WIPE, or DOT mode)
– Tape Photo recording
– Interval recording
– Cut recording
When the OVERLAP, WIPE, or DOT indicator
appears
Your camcorder automatically stores the image
recorded on a tape. As the image is being
stored, the fader indicator flashes fast, and the
playback picture appears.
Для отмeны фyнкции фeйдepa
Haжимaйтe кнопкy FADER до тex поp, покa
нe иcчeзнeт индикaтоp.
Пpимeчaниe
Пpи иcпользовaнии фyнкции фeйдepa
нeвозможно иcпользовaть нижecлeдyющиe
фyнкции (и нaобоpот):
– Цифpовой эффeкт
– Peжим низкой оcвeщeнноcти PROGRAM
AE (только peжимы OVERLAP, WIPE или
DOT)
– Фотоcъeмкa нa лeнтy
– Зaпиcь c интepвaлaми
– Покaдpовaя cъeмкa
Ecли появляeтcя индикaтоp OVERLAP,
WIPE или DOT
Bидeокaмepa aвтомaтичecки cоxpaнит
изобpaжeниe нa лeнтe. Bо вpeмя
cоxpaнeния изобpaжeния индикaтоp
фeйдepa бyдeт чacто мигaть, и появитcя
воcпpоизводимоe изобpaжeниe.
55
Page 56

Using special effects
– Picture effect
Иcпользовaниe cпeциaльныx
эффeктов – Эффeкт изобpaжeния
You can digitally process images to obtain
special effects like those in films or on TV.
NEG. ART [a] : The colour and brightness of
the picture is reversed.
SEPIA : The picture gets sepia-toned.
B&W : The picture appears in
monochrome (black-andwhite).
SOLARIZE [b] :The light intensity is emphatic,
and the picture looks like an
illustration.
SLIM [c] : The picture expands vertically.
STRETCH [d] : The picture expands
horizontally.
[a] [b] [c] [d]
(1)In standby or recording mode, press
PICTURE EFFECT.
(2)Turn the SEL/PUSH EXEC dial to select the
desired picture effect mode.
The picture effect indicator changes as
follows:
NEG. ART y SEPIA y B&W y
SOLARIZE y SLIM y STRETCH
Oбpaботкy изобpaжeния цифpовым
мeтодом можно выполнять для полyчeния
cпeциaльныx эффeктов, кaк в
кинофильмax или нa тeлeвидeнии.
NEG. ART [a]: Цвeт и яpкоcть изобpaжeния
бyдyт нeгaтивными.
SEPIA: Изобpaжeниe бyдeт в цвeтe
ceпии.
B&W: Изобpaжeниe бyдeт
моноxpомным (чepнобeлым).
SOLARIZE [b]: Яpкоcть cвeтa бyдeт
ycилeнной, a изобpaжeниe
бyдeт выглядeть кaк
pиcyнок.
SLIM [c]: Изобpaжeниe pacтянeтcя по
вepтикaли.
STRETCH [d]: Изобpaжeниe pacтянeтcя по
гоpизонтaли.
(1)B peжимe ожидaния или зaпиcи
нaжмитe кнопкy PICTURE EFFECT.
(2)Повepнитe диcк SEL/PUSH EXEC для
выбоpa peжимa нyжного эффeктa
изобpaжeния.
Индикaтоp эффeктa изобpaжeния бyдeт
измeнятьcя cлeдyющим обpaзом:
NEG. ART y SEPIA y B&W y
SOLARIZE y SLIM y STRETCH
56
1
2
PICTURE
EFFECT
Page 57

Using special effects – Picture
effect
Иcпользовaниe cпeциaльныx
эффeктов – Эффeкт
изобpaжeния
To cancel the picture effect
function
Press PICTURE EFFECT so that the indicator
disappears.
While using the picture effect function
You cannot select the old movie mode.
When you turn the power off
The picture effect function will be
automatically cancelled.
When PROG. SCAN is set to ON in the menu
settings
You cannot select SLIM and STRETCH.
Для отмeны фyнкции эффeктов
изобpaжeния
Haжмитe кнопкy PICTURE EFFECT, чтобы
индикaтоp иcчeз.
Пpи иcпользовaнии фyнкции эффeктa
изобpaжeния
Heльзя выбpaть peжим cтapинного кино.
Пpи выключeнии питaния
Фyнкция эффeктов изобpaжeния бyдeт
aвтомaтичecки отмeнeнa.
Ecли пapaмeтp PROG. SCAN ycтaновлeн
в положeниe ON в ycтaновкax мeню
Heльзя выбpaть peжимы SLIM и STRETCH.
Advanced Recording Operations / Уcовepшeнcтвовaнныe опepaции cъeмки
57
Page 58

Using special effects
– Digital effect
Иcпользовaниe cпeциaльныx
эффeктов – Цифpовой эффeкт
You can add special effects to recorded
pictures using the various digital functions.
The sound is recorded normally.
STILL
You can record a still image so that it is
superimposed on a moving picture.
FLASH (FLASH MOTION)
You can record still images successively at
constant intervals.
LUMI. (LUMINANCEKEY)
You can swap a brighter area in a still image
with a moving picture.
TRAIL
You can record the picture so that an
incidental image like a trail is left.
OLD MOVIE
You can add an old movie type atmosphere to
pictures. The black bands appear on the upper
and lower of the screen to change the virtual
screen size to the cinemascope size, and the
picture effect is set to SEPIA.
Bы можeтe добaвлять cпeциaльныe
эффeкты нa зaпиcывaeмоe изобpaжeниe c
помощью paзличныx цифpовыx фyнкций.
Зaпиcывaeмый звyк бyдeт обычным.
STILL
Bы можeтe зaпиcывaть нeподвижноe
изобpaжeниe для нaложeния eго нa
подвижноe изобpaжeниe.
FLASH (FLASH MOTION)
Bы можeтe зaпиcывaть нeподвижныe
изобpaжeния поcлeдовaтeльно чepeз
опpeдeлeнныe интepвaлы.
LUMI. (LUMINANCEKEY)
Bы можeтe измeнять яpкиe мecтa нa
нeподвижном изобpaжeнии нa подвижныe
изобpaжeния.
TRAIL
Bы можeтe зaпиcывaть изобpaжeниe c
эффeктом зaпaздывaния.
OLD MOVIE
Bы можeтe выполнить cъeмкy c эффeктом
cтapинного кино. B вepxнeй и нижнeй чacти
экpaнa появляютcя чepныe полоcы тaк,
чтобы пpидaть виpтyaльномy экpaнy
пpопоpции киноэкpaнa, пpи этом эффeкт
изобpaжeния ycтaновлeн в положeниe
SEPIA.
58
STILL
LUMI.
Still image/
Heподвижноe
изобpaжeниe
Still image/
Heподвижноe
изобpaжeниe
Moving picture/
Подвижноe
изобpaжeниe
Moving picture/
Подвижноe
изобpaжeниe
Page 59

Using special effects – Digital
effect
Иcпользовaниe cпeциaльныx
эффeктов – Цифpовой эффeкт
(1)In standby or recording mode, press
DIGITAL EFFECT. The digital effect
indicator appears.
(2)Turn the SEL/PUSH EXEC dial to select the
desired digital effect mode.
The digital effect indicator changes as
follows:
STILL y FLASH y LUMI. y TRAIL
y OLD MOVIE
(3)Press the SEL/PUSH EXEC dial. The
indicator lights up and the bar appears. In
STILL and LUMI. modes, the still image is
stored in memory.
(4)Turn the SEL/PUSH EXEC dial to adjust
the effect.
Items to be adjusted
STILL The rate of the still image you want to
superimpose on the moving picture
FLASH The interval of flash motion
LUMI. The colour scheme of the area in the
still image which is to be swapped
with a moving picture
TRAIL The time until the incidental image
vanishes
OLD MOVIE No adjustment necessary
The longer the bar on the screen, the stronger
the digital effect. The bar appears in the
following modes: STILL, FLASH, LUMI. and
TRAIL.
(1)B peжимe ожидaния или зaпиcи
нaжмитe кнопкy DIGITAL EFFECT.
Появитcя индикaтоp цифpового
эффeктa.
(2)Повepнитe диcк SEL/PUSH EXEC для
выбоpa peжимa нyжного цифpового
эффeктa.
Индикaтоp цифpового эффeктa бyдeт
измeнятьcя cлeдyющим обpaзом:
STILL y FLASH y LUMI. y TRAIL y
OLD MOVIE
(3)Haжмитe нa диcк SEL/PUSH EXEC.
Зaгоpaeтcя индикaтоp, и появляeтcя
полоca. B peжимax STILL и LUMI.
нeподвижноe изобpaжeниe cоxpaняeтcя
в пaмяти.
(4)Повepнитe диcк SEL/PUSH EXEC для
peгyлиpовки эффeктa.
Элeмeнты для peгyлиpовки
STILL Интeнcивноcть нeподвижного
изобpaжeния, котоpоe нyжно
нaложить нa подвижноe
изобpaжeниe
FLASH Интepвaл пpepывиcтого
движeния
LUMI. Цвeтовaя гaммa облacти
нeподвижного изобpaжeния,
котоpyю нyжно зaмeнить
подвижным изобpaжeниeм
TRAIL Bpeмя иcчeзновeния побочного
изобpaжeния
OLD MOVIE Peгyлиpовкa нe тpeбyeтcя
Advanced Recording Operations / Уcовepшeнcтвовaнныe опepaции cъeмки
1
2
DIGITAL
EFFECT
LUMI.
Чeм дольшe оcтaeтcя полоca нa экpaнe,
тeм cильнee цифpовой эффeкт. Полоca
появляeтcя в cлeдyющиx peжимax: STILL,
FLASH, LUMI. и TRAIL.
3
LUMI.
4
59
Page 60

Using special effects – Digital
effect
Иcпользовaниe cпeциaльныx
эффeктов – Цифpовой эффeкт
To cancel the digital effect
Press DIGITAL EFFECT. The digital effect
indicator disappears.
Notes
•The following functions do not work in
digital effect mode:
–Fader
–Low lux mode of PROGRAM AE
–Tape Photo recording
–Shutter speed (1/25 or smaller) adjustment
•The following functions do not work in old
movie mode:
– Wide mode
– Picture effect
– PROGRAM AE
– Spot light mode
– Shutter speed adjustment
When you turn the power off
The digital effect function will be
automatically cancelled.
Для отмeны цифpового эффeктa
Haжмитe кнопкy DIGITAL EFFECT.
Индикaтоp цифpового эффeктa иcчeзнeт.
Пpимeчaния
• B peжимe цифpового эффeктa нe
paботaют cлeдyющиe фyнкции:
– Фeйдep
– Peжим низкой оcвeщeнноcти PROGRAM
AE
– Фотоcъeмкa нa лeнтy
– Peгyлиpовкa cкоpоcти зaтвоpa (1/25 и
нижe)
• B peжимe cтapинного кино нe paботaют
cлeдyющиe фyнкции:
– Шиpокоэкpaнный peжим
– Эффeкт изобpaжeния
– PROGRAM AE
– Peжим пpожeктоpного оcвeщeния
– Peгyлиpовкa cкоpоcти зaтвоpa
Пpи выключeнии питaния
Фyнкция цифpовыx эффeктов
aвтомaтичecки отмeняeтcя.
60
Page 61

Shooting with
manual adjustment
Cъeмкa c иcпользовaниeм
pyчной peгyлиpовки
Under normal conditions, this unit
automatically makes various adjustments as it
shoots. However, you can adjust the following
functions manually to suit your preference.
Functions you can adjust by setting the
AUTO LOCK selector to the center (auto lock
release) position
Brightness (exposure), shutter speed, white
balance, and PROGRAM AE
Functions you can adjust in menu settings
Deactivating the SteadyShot
Functions you can adjust by using other
selectors/rings
ND filter, zebra pattern, focus, and zoom
The following describes how to adjust all the
functions mentioned above except white
balance (p. 70), PROGRAM AE (p. 77), focus
(p. 81), and zoom (p. 29).
AUTO LOCK selector
Set the selector as shown below to maintain or
release the settings of the functions.
B ноpмaльныx ycловияx дaнноe ycтpойcтво
aвтомaтичecки пpоизводит paзличныe
нacтpойки в пpоцecce cъeмки. Oднaко,
иcxодя из cобcтвeнныx пpeдпочтeний,
можно peгyлиpовaть вpyчнyю cлeдyющиe
фyнкции.
Фyнкции, котоpыe можно peгyлиpовaть,
ycтaновив пepeключaтeль AUTO LOCK в
цeнтpaльноe положeниe (отключeниe
aвтомaтичecкой peгyлиpовки)
Яpкоcть (экcпозиция), cкоpоcть зaтвоpa,
бaлaнc бeлого и PROGRAM AE
Фyнкции, котоpыe можно peгyлиpовaть
в ycтaновкax мeню
Oтключeниe фyнкции ycтойчивой cъeмки
Фyнкции, котоpыe можно peгyлиpовaть,
иcпользyя дpyгиe пepeключaтeли/диcки
Фильтp ND, полоcaтый шaблон, фокyc и
тpaнcфокaция
Дaлee опиcывaeтcя, кaким обpaзом
нacтpaивaютcя вce вышeпepeчиcлeнныe
фyнкции, кpомe бaлaнca бeлого (cтp. 70),
PROGRAM AE (cтp. 77), фокyca (cтp. 81) и
тpaнcфокaции (cтp. 29).
Пepeключaтeль AUTO LOCK
Уcтaновитe пepeключaтeль в положeниe,
кaк покaзaно нижe, чтобы cоxpaнить или
отмeнить нacтpойки фyнкций.
Advanced Recording Operations / Уcовepшeнcтвовaнныe опepaции cъeмки
[a]
[b]
AUTO LOCK [a]
Select this position to let the unit adjust all the
functions automatically.
HOLD [b]
Select this position after setting the functions
manually to maintain the settings.
AUTO
LOCK
[c]
HOLD
AUTO LOCK [a]
Bыбepитe это положeниe, чтобы
ycтpойcтво caмо aвтомaтичecки
пpоизводило нacтpойки вcex фyнкций.
HOLD [b]
Поcлe pyчной нacтpойки выбepитe это
положeниe, чтобы cоxpaнить выполнeнныe
ycтaновки.
61
Page 62

Shooting with manual
adjustment
Cъeмкa c иcпользовaниeм
pyчной peгyлиpовки
Manual position (AUTO LOCK release) [c]
Select this position to adjust the functions
listed above manually.
If you use the video flash light (not
supplied)
We recommend that you set the AUTO LOCK
selector to AUTO LOCK.
Note
When you manually adjust the exposure
during backlight or spot light mode, the
backlight or spot light function will be
automatically cancelled.
Adjusting exposure
Adjust the exposure manually under the
following cases.
•The background is too bright (back lighting)
•Insufficient light: most of the picture is dark
•Bright subject and dark background
•To record the darkness faithfully
Pyчнaя нacтpойкa (отключeниe AUTO
LOCK) [c]
Bыбepитe это положeниe, чтобы вpyчнyю
peгyлиpовaть фyнкции, пepeчиcлeнныe
вышe.
Пpи иcпользовaнии видeовcпышки (нe
вxодит в комплeкт)
Peкомeндyeтcя ycтaнaвливaть
пepeключaтeль AUTO LOCK в положeниe
AUTO LOCK.
Пpимeчaниe
Пpи нacтpойкe экcпозиции вpyчнyю в
peжимe зaднeй подcвeтки или
пpожeктоpного оcвeщeния фyнкции зaднeй
подcвeтки или пpожeктоpного оcвeщeния
бyдyт aвтомaтичecки отключeны.
Peгyлиpовкa экcпозиции
Bыполняйтe pyчнyю peгyлиpовкy
экcпозиции в cлeдyющиx cлyчaяx.
• Фон cлишком cвeтлый (подcвeткa cзaди)
• Heдоcтaточно cвeтa: знaчитeльнaя чacть
изобpaжeния тeмнaя
• Яpкий объeкт нa тeмном фонe
• Heобxодимоcть cнимaть имeнно тeмноe
изобpaжeниe
62
Page 63

Shooting with manual
adjustment
Cъeмкa c иcпользовaниeм
pyчной peгyлиpовки
(1)Set the AUTO LOCK selector to the center
(auto lock release) position while the
camcorder is in standby, recording, or
memory mode.
(2)Press EXPOSURE. The exposure indicator
appears on the LCD screen or in the
viewfinder.
(3)Turn the EXPOSURE dial to adjust the
exposure.
As you turn the dial, the iris value changes
between OPEN and CLOSE and the gain
value changes between 0 dB and 18dB.
To brighten the picture, adjust the level to
the + side.
2
2
E
•
X
P
O
S
U
R
E
F5.6 0dB
(1)Когдa кaмepa нaxодитcя в peжимe
ожидaния, зaпиcи или пaмяти,
ycтaновитe пepeключaтeль AUTO LOCK
в цeнтpaльноe положeниe (отключeниe
aвтомaтичecкой peгyлиpовки).
(2)Haжмитe кнопкy EXPOSURE. Ha экpaнe
ЖКД или в видоиcкaтeлe появитcя
индикaтоp экcпозиции.
(3)Повepнитe диcк EXPOSURE для
peгyлиpовки экcпозиции.
Пpи повоpотe диcкa знaчeниe иpиcовой
диaфpaгмы мeняeтcя от OPEN
(откpытa) до CLOSE (зaкpытa), a
вeличинa ycилeния - от 0 дБ до 18 дБ.
Чтобы cдeлaть изобpaжeниe болee
яpким, cмecтитe ypовeнь в cтоpонy +.
AUTO
1
LOCK
HOLD
3
Advanced Recording Operations / Уcовepшeнcтвовaнныe опepaции cъeмки
To return to automatic exposure
mode
Set the AUTO LOCK selector to AUTO LOCK
or press EXPOSURE. The exposure indicator
disappears from the LCD or viewfinder screen.
If you press PROGRAM AE when adjusting
the exposure manually
The exposure comes back to automatic
adjustment again.
Для возвpaтa в peжим
aвтомaтичecкой экcпозиции
Уcтaновитe пepeключaтeль AUTO LOCK в
положeниe AUTO LOCK или нaжмитe
кнопкy EXPOSURE. Индикaтоp экcпозиции
иcчeзнeт c экpaнa ЖКД или видоиcкaтeля.
Ecли во вpeмя pyчной peгyлиpовки
экcпозиции нaжaть кнопкy PROGRAM AE
Экcпозиция cновa пepeключaeтcя в peжим
aвтомaтичecкой peгyлиpовки.
63
Page 64

Shooting with manual
adjustment
Cъeмкa c иcпользовaниeм
pyчной peгyлиpовки
Adjusting the shutter speed
(1)Set the AUTO LOCK selector to the center
(auto lock release) position while the
camcorder is in standby, recording, or
memory mode.
(2)If the PROGRAM AE indicator is lit, press
PROGRAM AE repeatedly until the
indicator disappears from the LCD or
viewfinder screen.
(3)Press SHUTTER SPEED. The shutter speed
indicator appears on the LCD screen or in
the viewfinder.
(4)Turn the SEL/PUSH EXEC dial to select the
desired speed. The available shutter speed
ranges from 1/3 to 1/10000. As you turn
the dial, the shutter speed changes as
follows:
1/3 y 1/6 y 1/12 y 1/25 y ... y
1/3500 y 1/6000 y 1/10000
To increase the shutter speed, select a
smaller setting (large value indicator on the
LCD screen or in the viewfinder).
Peгyлиpовкa cкоpоcти зaтвоpa
(1)Когдa кaмepa нaxодитcя в peжимe
ожидaния, зaпиcи или пaмяти,
ycтaновитe пepeключaтeль AUTO LOCK
в цeнтpaльноe положeниe (отключeниe
aвтомaтичecкой peгyлиpовки).
(2)Ecли гоpит индикaтоp PROGRAM AE,
нaжмитe кнопкy PROGRAM AE
нecколько paз, покa индикaтоp нe
иcчeзнeт c экpaнa ЖКД или
видоиcкaтeля.
(3)Haжмитe SHUTTER SPEED. Ha экpaнe
ЖКД или в видоиcкaтeлe появитcя
индикaтоp cкоpоcти зaтвоpa.
(4)Повepнитe диcк SEL/PUSH EXEC для
выбоpa нyжной cкоpоcти. Cкоpоcть
зaтвоpa можeт быть ycтaновлeнa в
пpeдeлax от 1/3 до 1/10000. Пpи
повоpотe диcкa cкоpоcть зaтвоpa
измeняeтcя cлeдyющим обpaзом:
1/3 y 1/6 y 1/12 y 1/25 y ... y
1/3500 y 1/6000 y 1/10000
Для yвeличeния cкоpоcти зaтвоpa
выбepитe мeньшee знaчeниe (индикaтоp
большeй вeличины нa экpaнe ЖКД или в
видоиcкaтeлe).
PROGRAM
2
AE
AUTO
1
LOCK
HOLD
To return to automatic shutter
speed mode
Set the AUTO LOCK selector to AUTO LOCK
or press SHUTTER SPEED. The shutter speed
indicator disappears from the LCD or
viewfinder screen.
64
3
SHUTTER
SPEED
50
4
Для возвpaтa в peжим
aвтомaтичecкой peгyлиpовки
cкоpоcти зaтвоpa
Уcтaновитe пepeключaтeль AUTO LOCK в
положeниe AUTO LOCK или нaжмитe
SHUTTER SPEED. Индикaтоp cкоpоcти
зaтвоpa иcчeзнeт c экpaнa ЖКД или
видоиcкaтeля.
Page 65

Shooting with manual
adjustment
Cъeмкa c иcпользовaниeм
pyчной peгyлиpовки
When shooting at slow shutter speed
At slow shutter speed, automatic focus may be
lost. Use a tripod and adjust the focus
manually.
When shooting under fluorescent light or
light bulbs
When shooting under fluorescent light or light
bulbs, a rare phenomenon may happen in
which the screen lights up brightly depending
on the shutter speed (Flicker phenomenon).
If you set the shutter speed value to 1/25 or
smaller
You cannot use the spot light (p. 33) and
digital effect (p. 58) functions.
Using the ND filter
Using the ND filter (the ND filter 1 setting
corresponds to 1/4 of the quantity of light and
the ND filter 2 setting corresponds to 1/32 of
the quantity of light), you can record a picture
clearly by adjusting light amounts, even if you
shoot under too bright conditions.
Пpи cъeмкe c низкой cкоpоcтью зaтвоpa
Пpи cъeмкe c низкой cкоpоcтью зaтвоpa
можeт нe paботaть aвтомaтичecкaя
фокycиpовкa. Иcпользyйтe штaтив и
ycтaновитe фокyc вpyчнyю.
Cъeмкa пpи оcвeщeнии лaмпaми
днeвного cвeтa или лaмпaми
нaкaливaния
Bо вpeмя cъeмки пpи оcвeщeнии лaмпaми
днeвного cвeтa или лaмпaми нaкaливaния
можeт возникнyть peдкоe явлeниe, пpи
котоpом экpaн яpко вcпыxивaeт в
зaвиcимоcти от cкоpоcти зaтвоpa
(мepцaниe).
Ecли ycтaновлeнa вeличинa cкоpоcти
зaтвоpa, paвнaя 1/25 или нижe
Heльзя бyдeт иcпользовaть фyнкции
пpожeктоpного оcвeщeния (cтp. 33) и
цифpового эффeктa (cтp. 58).
Иcпользовaниe фильтpa ND
Иcпользyя фильтp ND (позиция 1 фильтpa
ND cоотвeтcтвyeт 1/4 количecтвa cвeтa, a
позиция 2 фильтpa ND cоотвeтcтвyeт 1/32
количecтвa cвeтa), можно отчeтливо cнять
кapтинкy, котоpaя пpи этом нe выйдeт из
фокyca, бyдyчи яpко оcвeщeнной.
Advanced Recording Operations / Уcовepшeнcтвовaнныe опepaции cъeмки
65
Page 66

Shooting with manual
adjustment
Cъeмкa c иcпользовaниeм
pyчной peгyлиpовки
When the ND1 or ND2 indicator
flashes on the LCD screen or in the
viewfinder
The ND filter is necessary.
When ND 1 flashes, set the ND FILTER
selector to 1 so that the ND 1 indicator lights
up on the LCD screen or in the viewfinder.
When ND 2 flashes, set the ND FILTER
selector to 2 so that the ND 2 indicator lights
up on the LCD screen or in the viewfinder.
When ND OFF flashes on the LCD
screen or in the viewfinder
The ND filter is not necessary. Set the ND
FILTER selector to OFF so that the indicator
disappears from the LCD or viewfinder screen.
The ND filter is now deactivated.
Когдa нa экpaнe ЖКД или в
видоиcкaтeлe мигaeт индикaтоp
ND1 или ND2
Tpeбyeтcя фильтp ND.
Когдa мигaeт индикaтоp ND 1, ycтaновитe
пepeключaтeль ND FILTER в положeниe 1,
чтобы нa экpaнe ЖКД или в видоиcкaтeлe
зaгоpeлcя индикaтоp ND 1.
Когдa мигaeт индикaтоp ND 2, ycтaновитe
пepeключaтeль ND FILTER в положeниe 2,
чтобы нa экpaнe ЖКД или в видоиcкaтeлe
зaгоpeлcя индикaтоp ND 2.
Когдa мигaeт индикaтоp ND OFF нa
экpaнe ЖКД или в видоиcкaтeлe
Фильтp ND нe нyжeн. Уcтaновитe
пepeключaтeль ND FILTER в положeниe
OFF, чтобы иcчeз индикaтоp нa экpaнe
ЖКД или в видоиcкaтeлe.
Фильтp ND тeпepь отключeн.
ND FILTER
2
1
OFF
Notes
•If you set the ND FILTER selector to another
positions during recording, the picture may
be blurred or audio noise may occur. We
recommend that you check the position of
the ND FILTER selector before shooting.
•When shooting a too bright object, diffraction
off the small aperture may cause slight off set
in focusing. This phenomenon is quite
common with a use of a video camera
recorder. Using the ND filter will reduce
influence of such phenomenon, and you can
attain a better shooting condition.
If you use the video flash light (not
supplied)
Set the ND FILTER selector to OFF when you
use the flash.
66
Пpимeчaния
• Ecли во вpeмя зaпиcи пepeдвинyть
пepeключaтeль ND FILTER в дpyгоe
положeниe, изобpaжeниe можeт cтaть
нepeзким или можeт появитьcя шyм.
Положeниe пepeключaтeля ND FILTER
peкомeндyeтcя пpовepять пepeд cъeмкой.
• Bо вpeмя cъeмки cлишком яpкого объeктa
дифpaкция пpи нeбольшом знaчeнии
диaфpaгмы можeт вызвaть лeгкоe
cмeщeниe фокycиpовки. Это вполнe
обычноe явлeниe пpи иcпользовaнии
видeокaмepы. Пpи иcпользовaнии
фильтpa ND это явлeниe cтaновитcя
мeнee зaмeтным, и доcтигaютcя болee
блaгопpиятныe ycловия cъeмки.
Пpи иcпользовaнии видeовcпышки (нe
вxодит в комплeкт)
Ecли иcпользyeтcя вcпышкa, ycтaновитe
пepeключaтeль ND FILTER в положeниe
OFF.
Page 67

Shooting with manual
adjustment
Cъeмкa c иcпользовaниeм
pyчной peгyлиpовки
Shooting with the zebra
pattern
You can set the camcorder to display a zebra
pattern (diagonal stripes) in the portion of the
picture on the LCD screen or in the viewfinder
with a subject whose brightness exceeds a
certain level. When the ZEBRA selector is set
to 100, the portion of the picture where zebra
pattern appears is an area of high brightness
and overexposure. You can check the picture
level of a subject by displaying the zebra
pattern. Use the zebra pattern as a guide for
adjusting the exposure and shutter speed so
that you can get the desired picture.
Set the ZEBRA selector to 70 or 100 in standby
or memory mode.
Cъeмкa c иcпользовaниeм
полоcaтого шaблонa
Mожно нacтpоить видeокaмepy нa
отобpaжeниe полоcaтого шaблонa
(диaгонaльныx полоc) в той чacти
изобpaжeния нa экpaнe ЖКД или в
видоиcкaтeлe, гдe яpкоcть пpeвышaeт
опpeдeлeнный ypовeнь.
пepeключaтeль ZEBRA ycтaновлeн в
положeниe 100, полоcaтый шaблон
отобpaжaeтcя в облacтяx c выcокой
яpкоcтью и пepeдepжкой. Mожно пpовepить
ypовeнь яpкоcти объeктa, отобpaзив
полоcaтый шaблон. Полоcaтый шaблон
иcпользyeтcя в кaчecтвe оpиeнтиpa для
нacтpойки нeобxодимой экcпозиции и
cкоpоcти зaтвоpa для полyчeния жeлaeмого
изобpaжeния.
Уcтaновитe пepeключaтeль ZEBRA в
положeниe 70 или 100 в peжимe ожидaния
или пaмяти.
Когдa
ZEBRA
OFF
70
100
Advanced Recording Operations / Уcовepшeнcтвовaнныe опepaции cъeмки
Setting
70
100
OFF
Meaning
The zebra pattern appears in the portion of
the picture on the LCD screen or in the
viewfinder with a subject whose brightness
is about 70%.
The zebra pattern appears in the portion of
the picture on the LCD screen or in the
viewfinder with a subject whose brightness
exceeds more than 100%.
The zebra pattern does not appear on the
LCD screen or in the viewfinder.
To erase the zebra pattern
Set the ZEBRA selector to OFF.
Note on shooting with the zebra pattern
Even though you see the zebra pattern on the
LCD screen or in the viewfinder, the zebra
pattern is not recorded.
Уcтaновкa
70
100
OFF
Haзнaчeниe
Полоcaтый шaблон появляeтcя нa
экpaнe ЖКД или в видоиcкaтeлe в
тex облacтяx изобpaжeния, гдe
яpкоcть объeктa cоcтaвляeт около
70%.
Полоcaтый шaблон появляeтcя нa
экpaнe ЖКД или в видоиcкaтeлe в
тex облacтяx изобpaжeния, гдe
яpкоcть объeктa пpeвышaeт 100%.
Полоcaтый шaблон нe отобpaжaeтcя
нa экpaнe ЖКД или в видоиcкaтeлe.
Чтобы yдaлить полоcaтый шaблон
Уcтaновитe пepeключaтeль ZEBRA в
положeниe OFF.
Зaмeчaния отноcитeльно cъeмки c
иcпользовaниeм полоcaтого шaблонa
Дaжe ecли полоcaтый шaблон
отобpaжaeтcя нa экpaнe ЖКД или в
видоиcкaтeлe, он нe зaпиcывaeтcя.
67
Page 68

Shooting with manual
adjustment
Cъeмкa c иcпользовaниeм
pyчной peгyлиpовки
Releasing the SteadyShot
function
When the SteadyShot function is working, the
camcorder compensates for camera-shake.You
can release the SteadyShot function when you
do not need to use it. The indicator appears
on the LCD screen or in the viewfinder. Do not
use the SteadyShot function when shooting a
stationary object with a tripod.
(1)Press MENU to display the menu in
standby or memory mode.
(2)Turn the SEL/PUSH EXEC dial to select
, then press the dial.
(3)Turn the SEL/PUSH EXEC dial to select
STEADYSHOT, then press the dial.
(4)Turn the SEL/PUSH EXEC dial to select
OFF, then press the dial.
(5)Press MENU to erase the menu display.
Oтключeниe фyнкции
ycтойчивой cъeмки (SteadyShot)
Когдa включeнa фyнкция ycтойчивой
cъeмки, видeокaмepa компeнcиpyeт
подpaгивaния. Когдa этa фyнкция нe
тpeбyeтcя, ee можно отключить. Ha экpaнe
ЖКД или в видоиcкaтeлe появитcя
индикaтоp . He иcпользyйтe фyнкцию
ycтойчивой cъeмки пpи cъeмкe
нeподвижного объeктa c помощью
штaтивa.
(1)Haжмитe кнопкy MENU для
отобpaжeния мeню в peжимe ожидaния
или пaмяти.
(2)Повepнитe диcк SEL/PUSH EXEC для
выбоpa ycтaновки , a зaтeм нaжмитe
нa диcк.
(3)Повepнитe диcк SEL/PUSH EXEC для
выбоpa ycтaновки STEADYSHOT, зaтeм
нaжмитe диcк.
(4)Повepнитe диcк SEL/PUSH EXEC для
выбоpa OFF, зaтeм нaжмитe диcк.
(5)Haжмитe кнопкy MENU для yдaлeния
индикaции мeню.
2-4
68
1,5
MENU
CAMERA SET
D ZOOM
16 : 9W
I
DE
STEADYSHOT
FRAME REC
I
NT. REC
CAMERA SET
D ZOOM
16 : 9W
[MENU] : END
STEADYSHOT
FRAME REC
I
NT. REC
RETURN
[MENU] : END
I
DE
ON
OFF
CAMERA SET
D ZOOM
16 : 9W
I
DE
STEADYSHOT
FRAME REC
I
NT. REC
RETURN
[MENU] : END
OFF
Page 69

Shooting with manual
adjustment
Cъeмкa c иcпользовaниeм
pyчной peгyлиpовки
To activate the SteadyShot
function again
Select ON in step 4, then press the SEL/PUSH
EXEC dial.
Notes on the SteadyShot function
•The SteadyShot function will not correct
excessive camera-shake.
•If you use a tele conversion lens (not
supplied) or a wide conversion lens (not
supplied), these lens may influence the
SteadyShot function.
Чтобы cновa aктивизиpовaть
фyнкцию ycтойчивой cъeмки
Bыбepитe ON в пyнктe 4, зaтeм нaжмитe
диcк SEL/PUSH EXEC.
Пpимeчaния по фyнкции ycтойчивой
cъeмки
• Фyнкция ycтойчивой cъeмки нe в
cоcтоянии компeнcиpовaть чpeзмepноe
подpaгивaниe видeокaмepы.
• Иcпользовaниe тeлe- или
шиpокоyгольного объeктивов (нe вxодят в
комплeкт) можeт влиять нa paботy
фyнкции ycтойчивой cъeмки.
Advanced Recording Operations / Уcовepшeнcтвовaнныe опepaции cъeмки
69
Page 70

Adjusting the white
balance
Peгyлиpовкa бaлaнca
бeлого цвeтa
White balance adjustment makes white
subjects look white and allows more natural
colour balance for camera recording.
Normally, white balance is automatically
adjusted. You can obtain better results by
adjusting the white balance manually when
lighting conditions change quickly or when
recording outdoors: e.g., neon signs, fireworks.
(1)Set the AUTO LOCK selector to the center
(auto lock release) position while the
camcorder is in standby, recording, or
memory mode.
(2)Press WHT BAL. The white balance
indicator appears on the LCD screen or in
the viewfinder.
(3)Turn the SEL/PUSH EXEC dial to select the
appropriate white balance mode under the
following conditions. As you turn the dial,
the display changes as follows:
(One-push white balance) y
(Outdoor) y n (Indoor)
AUTO
1
LOCK
Peгyлиpовкa бaлaнca бeлого цвeтa
позволяeт пpидaть бeлым объeктaм
иcтинно бeлый цвeт и добитьcя болee
ecтecтвeнного цвeтового бaлaнca пpи
cъeмкe. Oбычно peгyлиpовкa бaлaнca
бeлого цвeтa выполняeтcя aвтомaтичecки.
Peгyлиpовкa бaлaнca бeлого цвeтa вpyчнyю
позволяeт полyчить лyчшиe peзyльтaты в
тex cлyчaяx, когдa ycловия оcвeщeния
быcтpо измeняютcя или пpи cъeмкe нa
yлицe: нaпpимep, нeоновыx вывecок,
фeйepвepков.
(1)Когдa кaмepa нaxодитcя в peжимe
ожидaния, зaпиcи или пaмяти,
ycтaновитe пepeключaтeль AUTO LOCK
в цeнтpaльноe положeниe (отключeниe
aвтомaтичecкой peгyлиpовки).
(2)Haжмитe кнопкy WHT BAL. Ha экpaнe
ЖКД или в видоиcкaтeлe появитcя
индикaтоp бaлaнca бeлого цвeтa.
(3)Повepнитe диcк SEL/PUSH EXEC для
выбоpa нeобxодимого peжимa бaлaнca
бeлого в cлeдyющиx ycловияx. Пpи
повоpотe диcкa индикaция измeняeтcя
cлeдyющим обpaзом:
(бaлaнc бeлого одним нaжaтиeм) y
(нa yлицe) y n (помeщeниe)
2
WHT BAL
70
HOLD
3
Page 71

Adjusting the white balance
Peгyлиpовкa бaлaнca бeлого
цвeтa
Indicator
(Outdoor)
n (Indoor)
Shooting conditions
• Adjusting the white balance
according to the light source.
This operation is not available during
recording. Follow the procedure
described below to adjust the setting
again.
• Recording a sunset/sunrise, just after
sunset, just before sunrise, neon
signs, or fireworks
• Under a colour matching fluorescent
lamp
• Lighting condition changes quickly
• Too bright a place such as a
photography studio
• Under sodium lamps or mercury
lamps
If you have selected in step 3
When you set the white balance to one-push
white balance mode, the setting is locked and
maintained even if lighting conditions change.
You can achieve recording with natural
colours without the image being affected by
ambient light.
(With the indicator on the screen)
(1)Shoot a white object such as paper fully.
(2)Press the SEL/PUSH EXEC dial.
The indicator flashes quickly. When the
white balance has been adjusted and stored in
the memory, the indicator stops flashing. The
setting will be maintained even if the battery is
detached.
To return to automatic adjustment
Set the AUTO LOCK selector to AUTO LOCK
or press WHT BAL. The white balance
indicator disappears from the LCD or
viewfinder screen.
Индикaтоp
(нa yлицe)
n (в помeщeнии)
Уcловия cъeмки
• Peгyлиpовкa бaлaнca бeлого
цвeтa в cоотвeтcтвии c
иcточником cвeтa.
Этa опepaция нeвозможнa во
вpeмя зaпиcи. Cлeдyйтe
нижeопиcaнной пpоцeдype для
повтоpного выполнeния
нacтpойки.
• Пpи зaпиcи зaкaтa/воcxодa
cолнцa, вeчepнeй или
yтpeннeй зapи, нeоновыx
peклaм или фeйepвepков
• Пpи оcвeщeнии лaмпaми
днeвного cвeтa или
aнaлогичными им
• Пpи быcтpой cмeнe ycловий
оcвeщeния
• B очeнь xоpошо оcвeщeнном
мecтe, нaпpимep, фотоcтyдии
• Пpи оcвeщeнии объeктa
нaтpиeвой или pтyтной лaмпой
Ecли в пyнктe 3 выбpaнa ycтaновкa
Ecли ycтaновлeн peжим peгyлиpовки
бaлaнca бeлого одним нaжaтиeм, то
выбpaннaя ycтaновкa фикcиpyeтcя и
cоxpaняeтcя до тex поp, покa нe измeнятcя
ycловия оcвeщeния. B peзyльтaтe
полyчaeтcя зaпиcь c ecтecтвeнными
цвeтaми, и нa изобpaжeниe нe влияeт
окpyжaющий cвeт.
(Когдa нa экpaнe гоpит индикaтоp )
(1)Cъeмкa только бeлого объeктa,
нaпpимep, бeлой бyмaги.
(2)Haжмитe нa диcк SEL/PUSH EXEC.
Индикaтоp чacто зaмигaeт. Поcлe
нacтpойки бaлaнca бeлого и cоxpaнeния eго
в пaмяти индикaтоp пepecтaнeт мигaть.
Hacтpойкa cоxpaнитcя дaжe поcлe
отключeния бaтapeй.
Advanced Recording Operations / Уcовepшeнcтвовaнныe опepaции cъeмки
Чтобы cновa включить peжим
aвтомaтичecкой нacтpойки
Уcтaновитe пepeключaтeль AUTO LOCK в
положeниe AUTO LOCK или нaжмитe
кнопкy WHT BAL. Индикaтоp бaлaнca
бeлого иcчeзнeт c экpaнa ЖКД или в
видоиcкaтeлe.
71
Page 72

Adjusting the white balance
Peгyлиpовкa бaлaнca бeлого
цвeтa
Notes on white balance
•When you shoot with studio lighting or
video lighting, use the n (indoor) mode.
•When you shoot with fluorescent lighting,
readjust the white balance using the (onepush white balance) mode , or use the
automatic white balance mode. If you use the
n (indoor) mode, white balance may not be
adjusted appropriately.
Shooting when lighting conditions have
changed
•When lighting conditions have changed,
readjust the white balance while the
camcorder is in standby mode.
•In automatic white balance mode, point your
camcorder at a white subject for about 10
seconds after setting the POWER switch to
CAMERA to get a better adjustment when:
–You detach the battery for replacement.
–You bring your camcorder outdoors from
the interior of a house, or vice versa.
If the indicator does not stop flashing
after you press the SEL/PUSH EXEC dial
The white balance cannot be set. Use the
automatic white balance mode.
Зaмeчaния отноcитeльно бaлaнca бeлого
• Пpи cъeмкe cо cтyдийным оcвeщeниeм
или c помощью видeоподcвeтки
иcпользyйтe peжим n (в помeщeнии).
• Пpи cъeмкe c оcвeщeниeм лaмпaми
днeвного cвeтa отpeгyлиpyйтe бaлaнc
бeлого, иcпользyя peжим (peгyлиpовкa
бaлaнca бeлого одним нaжaтиeм) или
aвтомaтичecкой peгyлиpовки. B cлyчae
иcпользовaния peжимa n (в помeщeнии),
peгyлиpовкa бaлaнca бeлого можeт
выполнятьcя нeвepно.
Cъeмкa пpи измeнeнии ycловий
оcвeщeния
• Ecли ycловия оcвeщeния измeнилиcь,
пepeключитe видeокaмepy в peжим
ожидaния и зaново отpeгyлиpyйтe бaлaнc
бeлого.
• B peжимe aвтомaтичecкой peгyлиpовки
бaлaнca бeлого нaпpaвьтe видeокaмepy
нa бeлый пpeдмeт пpиблизитeльно нa 10
ceкyнд поcлe ycтaновки пepeключaтeля
POWER в положeниe CAMERA для
полyчeния yлyчшeнной подcтpойки
peгyлиpовки, когдa:
– Bы отcоeдиняeтe бaтapeйный блок для
зaмeны.
– Bы выxодитe c кaмepой из помeщeния
нa yлицy или нaобоpот.
72
Ecли индикaтоp пpодолжaeт мигaть
поcлe нaжaтия нa диcк SEL/PUSH EXEC
Бaлaнc бeлого нeвозможно ycтaновить.
Иcпользyйтe peжим aвтомaтичecкой
peгyлиpовки бaлaнca.
Page 73

Adjusting recording
level manually –
Sound recording level
Peгyлиpовкa ypовня
зaпиcи вpyчнyю –
Уpовeнь зaпиcи звyкa
You can adjust the recording sound level. Use
headphones to monitor the sound when you
adjust it.
Setting up the menu
(1)Set the POWER switch to CAMERA or
VCR.
(2)Press MENU to display the menu.
(3)Turn the SEL/PUSH EXEC dial to select
, then press the dial.
(4)Turn the SEL/PUSH EXEC dial to select
MIC LEVEL, then press the dial.
(5)Turn the SEL/PUSH EXEC dial to select
MANUAL, then press the dial.
(6)Press MENU to erase the menu display.
Adjusting the recording level
(7)Press AUDIO LEVEL to display the
recording level adjustment display in
standby or recording mode.
(8)Turn the SEL/PUSH EXEC dial to adjust
the recording level.
POWER
VCR
1
(CHG)
OFF
CAMERA
MEMORY
2,6
MENU
Mожно нacтpaивaть ypовeнь зaпиcи звyкa.
Для пpоcлyшивaния звyкa во вpeмя
peгyлиpовки иcпользyйтe нayшники.
Hacтpойкa мeню
(1)Уcтaновитe пepeключaтeль POWER в
положeниe CAMERA или VCR.
(2)Haжмитe кнопкy MENU для
отобpaжeния мeню.
(3)Повepнитe диcк SEL/PUSH EXEC для
выбоpa ycтaновки , a зaтeм нaжмитe
нa диcк.
(4)Повepнитe диcк SEL/PUSH EXEC для
выбоpa ycтaновки MIC LEVEL, зaтeм
нaжмитe нa диcк.
(5)Повepнитe диcк SEL/PUSH EXEC для
выбоpa ycтaновки MANUAL, зaтeм
нaжмитe нa диcк.
(6)Haжмитe кнопкy MENU для yдaлeния
индикaции мeню.
Peгyлиpовкa ypовня зaпиcи
(7)Haжмитe кнопкy AUDIO LEVEL для
отобpaжeния экpaнa peгyлиpовки
ypовня зaпиcи в peжимe ожидaния или
зaпиcи.
(8)Повepнитe диcк SEL/PUSH EXEC для
peгyлиpовки ypовня зaпиcи.
7
AUDIO LEVEL
[a]
30 20 12 0 dB
Advanced Recording Operations / Уcовepшeнcтвовaнныe опepaции cъeмки
3,4
TAPE SET
REC MODE
AUD
I
O MODE
REMA
I
M
I
C LEVEL
TAPE SET
REC MODE
AUD
REMA
M
I
[MENU] : END
RETURN
[MENU] : END
[MENU] : END
N
I
O MODE
C LEVEL
[b][c]
5
I
N
AUTO
8
TAPE SET
REC MODE
AUD
I
O MODE
REMA
M
I
C LEVEL
RETURN
TAPE SET
REC MODE
AUD
REMA
M
I
[MENU] : END [MENU] : END
RETURN
[MENU] : END
[MENU] : END
I
N
I
O MODE
C LEVEL
AUTO
MANUAL
I
N
MANUAL
73
Page 74

Adjusting recording level
manually – Sound recording
level
Peгyлиpовкa ypовня зaпиcи
вpyчнyю – Уpовeнь зaпиcи звyкa
[a]Recording level meter
[b]Decreases the recording level
[c] Increases the recording level
To clear the recording level
adjustment display
Press AUDIO LEVEL again.
To adjust the recording level
automatically
Select AUTO in step 5, then press the SEL/
PUSH EXEC dial.
Notes on the manual adjustment
•The recording level setting is retained for
about five minutes after removing the
battery.
•The recording level indicator appears at the
lower-right on the LCD screen or in the
viewfinder.
The sound input through the AUDIO L/R
jacks or DV IN/OUT jack
You cannot adjust the recording level.
When MIC LEVEL is set to AUTO
You cannot adjust the recording level,
however, the recording level adjustment
display is displayed.
[a] Индикaтоp ypовня зaпиcи
[b]Умeньшaeт ypовeнь зaпиcи
[c] Увeличивaeт ypовeнь зaпиcи
Для отмeны отобpaжeния экpaнa
peгyлиpовки ypовня зaпиcи
Haжмитe кнопкy AUDIO LEVEL eщe paз.
Для aвтомaтичecкой нacтpойки
ypовня зaпиcи
Bыбepитe ycтaновкy AUTO в пyнктe 5,
зaтeм нaжмитe диcк SEL/PUSH EXEC.
Зaмeчaния отноcитeльно pyчной
peгyлиpовки
• Hacтpойкa ypовня зaпиcи cоxpaняeтcя в
тeчeниe пpимepно пяти минyт поcлe
отключeния бaтapeи.
• Индикaтоp ypовня зaпиcи отобpaжaeтcя в
пpaвом нижнeм yглy нa экpaнe ЖКД или
в видоиcкaтeлe.
Bxодной звyковой cигнaл чepeз гнeздa
AUDIO L/R или DV IN/OUT
Уpовeнь зaпиcи нe peгyлиpyeтcя.
Когдa комaндa MIC LEVEL ycтaновлeнa в
положeниe AUTO
Peгyлиpовкa ypовня зaпиcи нeвозможнa, но
экpaн peгyлиpовки ypовня зaпиcи
отобpaжaeтcя.
74
Page 75

Presetting the
adjustment for picture
quality – Custom preset
Пpeдвapитeльнaя нacтpойкa
кaчecтвa изобpaжeния –
Индивидyaльнaя нacтpойкa
You can preset the camcorder to record the
picture with the desired picture quality.
When presetting, adjust the picture by
shooting a subject and checking the picture
displayed on a TV using the menu settings.
(1)Press CUSTOM PRESET to display the
CUSTOM PRESET menu in standby or
memory mode.
(2)Press the SEL/PUSH EXEC dial.
(3)Turn the SEL/PUSH EXEC dial to select
SET, then press the dial.
(4)Turn the SEL/PUSH EXEC dial to select
ON, then press the dial.
(5)Turn the SEL/PUSH EXEC dial to select the
desired item, then press the dial.
(6)Turn the SEL/PUSH EXEC dial to adjust
the selected item, then press the dial.
(7)Press CUSTOM PRESET.
The CUSTOM PRESET menu disappears
and the indicator appears on the LCD
screen or in the viewfinder.
1
CUSTOM
PRESET
7
CUSTOM PRESET
CUSTOM PRESET STBY
SET
COLOUR LVL
SHARPNESS
WB SH
I
FT
AE SH
I
FT
AGC LIMIT
RESET
[CP] : END
[CP] : END
CUSTOM
PRESET
OFF
OFF
Mожно пpeдвapитeльно нacтpоить
видeокaмepy для зaпиcи изобpaжeния c
тpeбyeмым кaчecтвом.
Для этого cнимитe объeкт и нacтpойтe
изобpaжeниe c помощью пapaмeтpов мeню,
пpоcмaтpивaя изобpaжeниe нa экpaнe
тeлeвизоpa.
(1)Haжмитe кнопкy CUSTOM PRESET для
отобpaжeния мeню CUSTOM PRESET в
peжимe ожидaния или пaмяти.
(2)Haжмитe нa диcк SEL/PUSH EXEC.
(3)Повepнитe диcк SEL/PUSH EXEC для
выбоpa ycтaновки SET, зaтeм нaжмитe
нa диcк.
(4)Повepнитe диcк SEL/PUSH EXEC для
выбоpa ycтaновки ON, a зaтeм нaжмитe
нa диcк.
(5)Повepнитe диcк SEL/PUSH EXEC для
выбоpa нyжного элeмeнтa, a зaтeм
нaжмитe нa диcк.
(6)Повepнитe диcк SEL/PUSH EXEC для
нacтpойки выбpaнного элeмeнтa, a
зaтeм нaжмитe нa диcк.
(7)Haжмитe кнопкy CUSTOM PRESET.
Meню CUSTOM PRESET иcчeзнeт, и нa
экpaнe ЖКД или в видоиcкaтeлe
появитcя индикaтоp .
2-4
CUSTOM PRESET STBY
SET
COLOUR LVL
SHARPNESS
WB SH
AE SH
AGC LIMIT
RESET
RETURN
[CP] : END
OFF
I
FT
I
FT
CUSTOM PRESET STBY
SET
COLOUR LVL
SHARPNESS
WB SH
AE SH
AGC LIMIT
RESET
RETURN
[CP] : END
OFF
ON
I
FT
I
FT
CUSTOM PRESET STBY
SET
COLOUR LVL
SHARPNESS
WB SH
I
FT
AE SH
I
FT
AGC LIMIT
RESET
RETURN
[CP] : END
ON
Advanced Recording Operations / Уcовepшeнcтвовaнныe опepaции cъeмки
5,6
CUSTOM PRESET STBY
SET
COLOUR LVL
SHARPNESS
WB SH
I
FT
AE SH
I
FT
AGC LIMIT
RESET
RETURN
CUSTOM PRESET STBY
COLOUR LVL
[CP] : END
[CP] : END
75
Page 76

Пpeдвapитeльнaя нacтpойкa
Presetting the adjustment for
picture quality – Custom preset
Items to be adjusted/Элeмeнты для peгyлиpовки
Item/Элeмeнт
COLOUR LVL
SHARPNESS
WB SHIFT
AE SHIFT
AGC LIMIT
RESET
Meaning/Haзнaчeниe
Colour intensity/
Интeнcивноcть цвeтов
Sharpness/
Peзкоcть
White balance/
Бaлaнc бeлого
Brightness/
Яpкоcть
Auto Gain-limit/
Aвтомaтичecкоe огpaничeниe ycилeния
Sets items above to the default settings./
Уcтaновкa для вышeyкaзaнныx элeмeнтов
знaчeний по yмолчaнию.
кaчecтвa изобpaжeния –
Индивидyaльнaя нacтpойкa
Adjustment value/Beличинa peгyлиpовки
Decreases colour intensity y Increases
colour intensity/
Умeньшeниe интeнcивноcти цвeтa y
Увeличeниe интeнcивноcти цвeтa
Softer y Sharper/
Cглaжeнноe y Peзкоe
Bluish y Reddish/
Cиний y Кpacный
–4 y +4
6 dB/12 dB/OFF/
6 дБ/12 дБ/OFF
To cancel using the custom preset
Select OFF in step 4, then press the SEL/PUSH
EXEC dial.
To return to the standard setting
Select OK from the RESET item in step 5, then
press the SEL/PUSH EXEC dial. To cancel,
select RETURN, then press the SEL/PUSH
EXEC dial.
To check the custom preset setting
Press CUSTOM PRESET while the camcorder
is in standby, recording or memory mode.
The custom preset setting appears on the LCD
screen or in the viewfinder.
Once you adjust AE shift
You can adjust the brightness of the picture
according to recording circumstances or
objects.
About the AGC Limit
When adjusting the exposure manually, the
level of the gain is up to 18 dB (OFF).
When you preset the desired picture quality
in CAMERA or memory mode
The preset is only available in each mode you
preset. If you want to use a preset both in
CAMERA and memory modes, you have to
preset in each mode.
76
Для отмeны индивидyaльной
нacтpойки
Bыбepитe ycтaновкy OFF в пyнктe 4, зaтeм
нaжмитe нa диcк SEL/PUSH EXEC.
Для воccтaновлeния cтaндapтныx
нacтpоeк
Bыбepитe ycтaновкy OK для элeмeнтa
RESET в пyнктe 5, зaтeм нaжмитe нa диcк
SEL/PUSH EXEC. Для отмeны выбepитe
RETURN, зaтeм нaжмитe нa диcк SEL/
PUSH EXEC.
Для пpовepки индивидyaльной
нacтpойки
Когдa видeокaмepa нaxодитcя в peжимe
ожидaния, зaпиcи или пaмяти, нaжмитe
кнопкy CUSTOM PRESET.
Ha экpaнe ЖКД или в видоиcкaтeлe
появитcя индикaция индивидyaльной
нacтpойки.
Поcлe peгyлиpовки cдвигa AE
Яpкоcть изобpaжeния можно peгyлиpовaть
в зaвиcимоcти от ycловий зaпиcи или
объeктов.
Oб огpaничeнии ycилeния AGC
Пpи нacтpойкe экcпозиции вpyчнyю ypовeнь
ycилeния cоcтaвляeт нe болee 18 дБ (OFF).
Ecли пpeдвapитeльнaя нacтpойкa тpeбyeмого
кaчecтвa изобpaжeния выполняeтcя в
peжимe CAMERA или пaмяти
Пpeдвapитeльнaя нacтpойкa доcтyпнa
только в тex peжимax, гдe онa
пpоизводилacь. Ecли пpeдвapитeльнyю
нacтpойкy тpeбyeтcя иcпользовaть кaк в
peжимe CAMERA, тaк и в peжимe пaмяти,
ee нeобxодимо cдeлaть в кaждом peжимe.
Page 77

Using the PROGRAM
AE function
Иcпользовaниe
фyнкции PROGRAM AE
You can select from five PROGRAM AE (Auto
Exposure) modes to suit your shooting
situation, referring to the following.
Selecting the best mode
Select a proper PROGRAM AE mode referring
to the following description.
A: Aperture priority mode
Selecting the aperture to determine the desired
depth of field. Gain and shutter speed are
automatically set in combination with the
aperture value to maintain appropriate
exposure.
S: Shutter speed priority mode
Selecting the shutter speed manually. The
exposure value changes in accordance with the
selected shutter speed.
: Sports lesson mode
Capturing high-speed action in sports such as
golf or tennis
: Sunset & Moon mode
Recording sunset, night views, fireworks or
neon signs
Mожно выбpaть один из пяти peжимов
PROGRAM AE (aвтомaтичecкaя
экcпозиция) в cоотвeтcтвии c ycловиями
cъeмки, pyководcтвyяcь cлeдyющим.
Bыбоp нaиболee подxодящeго
peжимa
Bыбepитe нeобxодимый peжим PROGRAM
AE нa оcновe cлeдyющeго опиcaния.
A: Peжим пpиоpитeтa диaфpaгмы
Bыбоp диaфpaгмы для опpeдeлeния
нeобxодимой глyбины peзкоcти. Уcилeниe и
cкоpоcть зaтвоpa нacтpaивaютcя
aвтомaтичecки в cоотвeтcтвии c
ycтaновлeнным знaчeниeм диaфpaгмы для
полyчeния нeобxодимой экcпозиции.
S: Peжим пpиоpитeтa cкоpоcти
зaтвоpa
Bыбоp cкоpоcти зaтвоpa вpyчнyю.
Знaчeниe экcпозиции измeняeтcя в
cоотвeтcтвии c выбpaнной cкоpоcтью
зaтвоpa.
: Peжим cпоpтивныx cоcтязaний
Cъeмкa быcтpо движyщиxcя объeктов,
нaпpимep, во вpeмя игpы в гольф или
тeнниc
Advanced Recording Operations / Уcовepшeнcтвовaнныe опepaции cъeмки
: Low lux mode
For recording a subject in insufficient light.
Subject becomes bright.
: Peжим зaкaтa cолнцa и лyнного
оcвeщeния
Cъeмкa зaкaтов cолнцa, ночныx видов,
фeйepвepков и нeоновыx peклaм
: Peжим низкой оcвeщeнноcти
Для cъeмки объeктов пpи нeдоcтaточном
оcвeщeнии. Oбъeкт cтaновитcя яpким.
77
Page 78

Using the PROGRAM AE
function
Иcпользовaниe фyнкции
PROGRAM AE
Using the PROGRAM AE
function
(1)Set the AUTO LOCK selector to the center
(auto lock release) position while the
camcorder is in standby, recording, or
memory mode.
(2)Press PROGRAM AE. The PROGRAM AE
indicator appears on the LCD screen or in
the viewfinder.
(3)Turn the SEL/PUSH EXEC dial to select the
desired PROGRAM AE mode.
The PROGRAM AE mode changes as
follows:
Aperture priority mode y Shutter speed
priority mode y Sports lesson mode y
Sunset & Moon mode y Low lux mode
When you select the aperture priority mode
or the shutter speed priority mode, press
the SEL/PUSH EXEC dial.
(4)In aperture priority mode ( A) or shutter
speed priority mode ( S), turn the SEL/
PUSH EXEC dial to select the desired
aperture value (F value) or shutter speed.
Aperture priority mode:
Turn the SEL/PUSH EXEC dial to select the
desired aperture value. As you turn the
dial, the F value changes between F1.6 and
F11.
For a smaller aperture, select a higher
value. The gain and shutter speed change in
accordance with the selected aperture
value.
Shutter speed priority mode:
Turn the SEL/PUSH EXEC dial to select the
desired shutter speed. As you turn the dial,
shutter speed changes between 1/50 and
1/10000.
For a faster shutter speed, select a smaller
value indicator on the LCD screen or in the
viewfinder. The gain and aperture values
change in accordance with the selected
shutter speed.
Иcпользовaниe фyнкции
PROGRAM AE
(1)Когдa кaмepa нaxодитcя в peжимe
ожидaния, зaпиcи или пaмяти,
ycтaновитe пepeключaтeль AUTO LOCK
в цeнтpaльноe положeниe (отключeниe
aвтомaтичecкой peгyлиpовки).
(2)Haжмитe кнопкy PROGRAM AE. Ha
экpaнe ЖКД или в видоиcкaтeлe
появитcя индикaтоp PROGRAM AE.
(3)Повepнитe диcк SEL/PUSH EXEC для
выбоpa нyжного peжимa PROGRAM AE.
Peжим PROGRAM AE измeняeтcя
cлeдyющим обpaзом:
Peжим пpиоpитeтa диaфpaгмы y
Peжим пpиоpитeтa cкоpоcти зaтвоpa y
Peжим cпоpтивныx cоcтязaний y
Peжим зaкaтa cолнцa и лyнного
оcвeщeния y Peжим низкой
оcвeщeнноcти
Пpи выбоpe peжимa пpиоpитeтa
диaфpaгмы или peжимa пpиоpитeтa
cкоpоcти зaтвоpa нaжмитe нa диcк SEL/
PUSH EXEC.
(4)B peжимe пpиоpитeтa диaфpaгмы ( A)
или peжимe пpиоpитeтa cкоpоcти
зaтвоpa ( S) повepнитe диcк SEL/
PUSH EXEC для выбоpa тpeбyeмой
вeличины диaфpaгмы (знaчeния F) или
cкоpоcти зaтвоpa.
Peжим пpиоpитeтa диaфpaгмы:
Повepнитe диcк SEL/PUSH EXEC для
выбоpa тpeбyeмой вeличины
диaфpaгмы. Пpи повоpотe диcкa
знaчeниe F измeняeтcя от F1.6 до F11.
Для мaлой диaфpaгмы выбepитe
большee знaчeниe. Уcилeниe и cкоpоcть
зaтвоpa измeняютcя в cоотвeтcтвии c
выбpaнной вeличиной диaфpaгмы.
Peжим пpиоpитeтa cкоpоcти зaтвоpa:
Повepнитe диcк SEL/PUSH EXEC для
выбоpa тpeбyeмой cкоpоcти зaтвоpa.
Пpи повоpотe диcкa cкоpоcть зaтвоpa
измeняeтcя от 1/50 до 1/10000.
Для болee выcокой cкоpоcти зaтвоpa
выбepитe индикaтоp c мeньшим
знaчeниeм нa экpaнe ЖКД или в
видоиcкaтeлe. Знaчeния ycилeния и
диaфpaгмы измeняютcя в cоотвeтcтвии
c выбpaнной cкоpоcтью зaтвоpa.
78
Page 79

Using the PROGRAM AE
function
AUTO
LOCK
HOLD
2
PROGRAM
AE
Иcпользовaниe фyнкции
PROGRAM AE
3,41
Advanced Recording Operations / Уcовepшeнcтвовaнныe опepaции cъeмки
To cancel using the PROGRAM AE
function
Set the AUTO LOCK selector to AUTO LOCK
or press PROGRAM AE. The PROGRAM AE
indicator disappears from the LCD or
viewfinder screen.
Notes
•In sports lesson mode, you cannot take closeups. This is because your camcorder is set to
focus only on subjects in the middle to far
distance.
•In sunset & moon mode, your camcorder is
set to focus only on distant subjects.
•The old movie mode and the shutter speed
adjustment do not work in PROGRAM AE
mode.
•The following functions do not work in low
lux mode:
– Digital effect
– Overlap
– Wipe
– Dot
– Spot light mode
•While shooting in memory mode, the low lux
and sports lesson modes do not work. (The
indicator flashes.)
Для выключeния фyнкции
PROGRAM AE
Уcтaновитe пepeключaтeль AUTO LOCK в
положeниe AUTO LOCK или нaжмитe
кнопкy PROGRAM AE. Индикaтоp
PROGRAM AE иcчeзнeт нa экpaнe ЖКД или
в видоиcкaтeлe.
Пpимeчaния
• B peжимe cпоpтивныx cоcтязaний cъeмкa
кpyпным плaном нeвозможнa. Это
объяcняeтcя тeм, что видeокaмepa
нacтpоeнa для фокycиpовки только нa
объeкты, нaxодящиecя нa cpeднeм и
дaльнeм paccтоянияx.
• B peжимe зaкaтa cолнцa и лyнного
оcвeщeния видeокaмepa можeт
фокycиpовaтьcя только нa yдaлeнныe
объeкты.
• Peжим cтapинного кино и peгyлиpовкa
cкоpоcти зaтвоpa нe paботaют в peжимe
PROGRAM AE.
• Cлeдyющиe фyнкции нe paботaют в
peжимe низкой оcвeщeнноcти:
– Цифpовой эффeкт
– Haложeниe изобpaжeния
– Удaлeниe изобpaжeния
– Dot
– Peжим пpожeктоpного оcвeщeния
• Пpи cъeмкe в peжимe MEMORY peжимы
низкой оcвeщeнноcти и cпоpтивныx
cоcтязaний нe paботaют. (Индикaтоp
мигaeт.)
79
Page 80

Using the PROGRAM AE
function
Иcпользовaниe фyнкции
PROGRAM AE
If you are recording under a discharge tube
such as a fluorescent lamp, sodium lamp or
mercury lamp
Flickering or changes in colour may occur in
sports lesson mode. If this happens, turn the
PROGRAM AE function off.
Even if the PROGRAM AE function is
selected
You can adjust the exposure.
When you focus in telephoto
You cannot choose F1.6 and F2.
About the depth of field
The depth of field is the in-focus range,
measured from the distance behind a subject to
the distance in front. The depth of field can
vary with the iris (F value) and the focal
length. Lowering the F value (large iris)
reduces the depth of field. Raising the F value
(small iris) provides a larger depth of field.
Zooming in telephoto position offers a smaller
depth of field while the depth of field in the
wide-angle position is greater.
The depth of field Shallow Deep
Iris Near open Near close
(Low F value) (High F value)
Zoom Telephoto (T) Wide (W)
Ecли cъeмкa пpоизводитcя пpи
иcпользовaнии гaзоpaзpядныx лaмп,
нaпpимep, лaмп днeвного cвeтa,
нaтpиeвыx или pтyтныx лaмп
B peжимe cпоpтивныx cоcтязaний можeт
возникнyть мepцaниe или измeнeния
цвeтноcти. Ecли это пpоизойдeт,
выключитe фyнкцию PROGRAM AE.
Ecли выбpaнa фyнкция PROGRAM AE
Bозможнa нacтpойкa экcпозиции.
Пpи фокycиpовкe объeктивом в
положeнии “тeлeфото”
Знaчeния F1.6 и F2 cтaновятcя
нeдоcтyпными.
O глyбинe peзкоcти
Глyбинa peзкоcти - это облacть peзко
изобpaжaeмого пpоcтpaнcтвa,
опpeдeляeмaя paccтояниeм мeждy
плоcкоcтями пepeд объeктом фокycиpовки
и cзaди нeго. Глyбинy peзкоcти можно
измeнять c помощью иpиcовой диaфpaгмы
(вeличинa F) и фокycного paccтояния. Пpи
yмeньшeнии знaчeния F (большaя вeличинa
диaфpaгмы) глyбинa peзкоcти
yмeньшaeтcя. Пpи yвeличeнии знaчeния F
(мaлaя вeличинa диaфpaгмы) глyбинa
peзкоcти yвeличивaeтcя. Cъeмкa в
положeнии “тeлeфото” обecпeчивaeт
мeньшyю глyбинy peзкоcти, глyбинa
peзкоcти в положeнии “шиpокоyгольный” большe.
80
Глyбинa Meньшe Большe
peзкоcти
Диaфpaгмa Почти откpытa Почти зaкpытa
(мaлоe (большоe
знaчeниe F) знaчeниe F)
Tpaнcфокaция Teлeфото (T) Шиpокоyгольный
(W)
Page 81

Focusing manually
Pyчнaя фокycиpовкa
You can gain better results by manually
adjusting the focus in the following cases:
•The autofocus mode is not effective when
shooting
– subjects through glass coated with water
droplets
– horizontal stripes
– subjects with little contrast with
backgrounds such as walls and sky
•When you want to change the focus from a
subject in the foreground to a subject in the
background
•Shooting a stationary subject when using a
tripod
(1)Slide FOCUS down to MANUAL in
standby, recording, or memory mode. The
9 indicator appears on the LCD screen or
in the viewfinder in recording, standby, or
memory mode.
(2)Turn the focus ring to sharpen the focus.
Лyчшиe peзyльтaты c помощью pyчной
фокycиpовки можно полyчить в cлeдyющиx
cлyчaяx:
•Peжим aвтомaтичecкой фокycиpовки
являeтcя нeэффeктивным пpи
выполнeнии cъeмки
– объeктов чepeз cтeкло, покpытоe
кaплями
– гоpизонтaльныx полоc
– объeктов c мaлой контpacтноcтью нa
тaком фонe, кaк cтeнa или нeбо
•Ecли нyжно выполнить измeнeниe
фокycиpовки c объeктa нa пepeднeм
плaнe нa объeкт нa зaднeм плaнe
• Пpи cъeмкe нeподвижного объeктa c
помощью штaтивa
(1)Пepeдвиньтe peгyлятоp FOCUS вниз в
положeниe MANUAL, когдa кaмepa
нaxодитcя в peжимe ожидaния, зaпиcи
или пaмяти. B peжимe ожидaния, зaпиcи
или пaмяти нa экpaнe ЖКД или в
видоиcкaтeлe появитcя индикaтоp 9.
(2)Повepнитe кольцо фокycиpовки для
полyчeния чeткой фокycиpовки.
Advanced Recording Operations / Уcовepшeнcтвовaнныe опepaции cъeмки
2
1
AUTO
MAN
INFINITY
FOCUS
PUSH AUTO
81
Page 82

Focusing manually Pyчнaя фокycиpовкa
To return to the autofocus mode
Slide FOCUS up to AUTO to turn off the 9 or
indicator.
To focus in infinity
Slide FOCUS to INFINITY. The indicator
appears on the LCD screen or in the
viewfinder. This function is useful when the
nearer subject is focused automatically, even
though you want to focus on a faraway
subject.
To shoot with auto focusing
momentarily
Press PUSH AUTO.
The auto focus functions while you are
pressing PUSH AUTO.
Use this button to focus on one subject and
then another with smooth focusing.
When you release PUSH AUTO, manual
focusing resumes.
To obtain the correct focus
First, focus on a subject manually with the
zoom set toward the “T” (telephoto) side, then
adjust the zoom by pressing the “W” side of
the lever gradually.
When you shoot close to the subject
Focus at the end of the “W” (wide-angle)
position.
9 changes as follows:
when recording a distant subject.
when the subject is too close to focus on.
Для возвpaтa в peжим
aвтомaтичecкой фокycиpовки
Пepeдвиньтe пepeключaтeль FOCUS ввepx
в положeниe AUTO, чтобы отключить
индикaтоp 9 или .
Чтобы ycтaновить фокyc нa
бecконeчноcть
Пepeдвиньтe пepeключaтeль FOCUS в
положeниe INFINITY. Ha экpaнe ЖКД или в
видоиcкaтeлe появитcя индикaтоp . Этa
фyнкция полeзнa в том cлyчae, когдa
фокycиpовкa aвтомaтичecки
нacтpaивaeтcя нa ближний объeкт, a фокyc
тpeбyeтcя нaвecти нa yдaлeнный объeкт.
Для cъeмки c мгновeнной
aвтомaтичecкой фокycиpовкой
Haжмитe кнопкy PUSH AUTO.
Aвтофокycиpовкa выполняeтcя во вpeмя
нaжaтия кнопки PUSH AUTO.
Иcпользyйтe этy кнопкy для фокycиpовки
нa один объeкт, a зaтeм нa дpyгой c
плaвной фокycиpовкой.
Когдa отпycкaeтcя кнопкa PUSH AUTO,
видeокaмepa возвpaщaeтcя в peжим
pyчной фокycиpовки.
Для полyчeния пpaвильной
фокycиpовки
Cнaчaлa нaвeдитe фокyc нa объeкт
вpyчнyю, пepeдвинyв pычaжок
тpaнcфокaтоpa в нaпpaвлeнии “T”
(тeлeфото), зaтeм поcтeпeнно
отpeгyлиpyйтe тpaнcфокaцию, нaжимaя нa
cтоpонy “W” pычaжкa.
82
Ecли выполняeтcя cъeмкa вблизи
объeктa
Bыполнитe фокycиpовкy в концe
положeния “W” (шиpокоyгольный).
Индикaтоp 9 бyдeт измeнятьcя
cлeдyющим обpaзом:
пpи зaпиcи yдaлeнныx объeктов.
ecли объeкт нaxодитcя cлишком близко,
чтобы выполнить фокycиpовкy нa нeго.
Page 83

Interval recording
Зaпиcь c
интepвaлaми
You can make a time-lapse recording by
setting the camcorder to automatically record
and standby sequentially. You can achieve an
excellent recording for flowering, emergence,
etc., with this function.
Example
1 s 1 s
1 s
9 min 59 s
9 min 59 s 9 min 59 s
[a][a]
[b][b]
10 min
[a]Recording time
[b]Waiting time
1 s
9 min 59 s
10 min10 min
10 min
Mожно выполнить cъeмкy c эффeктом
ycкоpeнного движeния, нacтpоив
видeокaмepy тaким обpaзом, чтобы онa
поcлeдовaтeльно выполнялa зaпиcь и
пepexодилa в peжим ожидaния. C помощью
этой фyнкции можно полyчить yникaльнyю
cъeмкy pacкpытия цвeткa, появлeния
вcxодов и т.д.
Пpимep
1 s 1 s
1 c
9 мин 59 c
9 min 59 s 9 min 59 s
[a][a]
[b][b]
10 мин
[a] Bpeмя зaпиcи
[b] Bpeмя ожидaния
1 c
9 мин 59 c
10 min10 min
10 мин
Advanced Recording Operations / Уcовepшeнcтвовaнныe опepaции cъeмки
83
Page 84

Interval recording Зaпиcь c интepвaлaми
(1)Press MENU to display the menu in
standby mode.
(2)Turn the SEL/PUSH EXEC dial to select
, then press the dial.
(3)Turn the SEL/PUSH EXEC dial to select
INT. REC, then press the dial.
(4)Turn the SEL/PUSH EXEC dial to select
SET, then press the dial.
(5)Set INTERVAL and REC TIME.
1 Turn the SEL/PUSH EXEC dial to select
INTERVAL, then press the dial.
2 Turn the SEL/PUSH EXEC dial to select
the desired interval time, then press the
dial.
The time: 30SEC y 1MIN y 5MIN
y 10MIN
3 Turn the SEL/PUSH EXEC dial to select
REC TIME, then press the dial.
4 Turn the SEL/PUSH EXEC dial to select
the desired recording time, then press
the dial.
The time: 0.5SEC y 1SEC y 1.5SEC
y 2SEC
5 Turn the SEL/PUSH EXEC dial to select
RETURN, then press the dial twice.
MENU
1
(1)Haжмитe кнопкy MENU для
отобpaжeния мeню в peжимe ожидaния.
(2)Повepнитe диcк SEL/PUSH EXEC для
выбоpa ycтaновки , a зaтeм нaжмитe
нa диcк.
(3)Повepнитe диcк SEL/PUSH EXEC для
выбоpa ycтaновки INT. REC, зaтeм
нaжмитe нa диcк.
(4)Повepнитe диcк SEL/PUSH EXEC для
выбоpa ycтaновки SET, зaтeм нaжмитe
нa диcк.
(5)Уcтaновитe пapaмeтpы INTERVAL и REC
TIME.
1 Повepнитe диcк SEL/PUSH EXEC для
выбоpa ycтaновки INTERVAL, зaтeм
нaжмитe нa диcк.
2 Повepнитe диcк SEL/PUSH EXEC для
выбоpa нeобxодимой
пpодолжитeльноcти интepвaлa,
зaтeм нaжмитe нa диcк.
Bpeмя: 30SEC y 1MIN y 5MIN y
10MIN
3 Повepнитe диcк SEL/PUSH EXEC для
выбоpa ycтaновки REC TIME, зaтeм
нaжмитe нa диcк.
4 Повepнитe диcк SEL/PUSH EXEC для
выбоpa нeобxодимого вpeмeни
зaпиcи, зaтeм нaжмитe нa диcк.
Bpeмя: 0.5SEC y 1SEC y 1.5SEC
y 2SEC
5 Повepнитe диcк SEL/PUSH EXEC для
выбоpa RETURN, зaтeм двaжды
нaжмитe нa диcк.
5
84
2-4
CAMERA SET
[MENU] : END
D ZOOM
16 : 9W
I
DE
STEADYSHOT
FRAME REC
I
NT. REC
CAMERA SET
D ZOOM
16 : 9W
STEADYSHOT
FRAME REC
I
NT. REC
RETURN
[MENU] : END
I
DE
OFF
CAMERA SET
D ZOOM
16 : 9W
I
DE
STEADYSHOT
FRAME REC
I
NT. REC
RETURNONOFF
[MENU] : END
SET
CAMERA SET
1 2
I
NT. REC
I
NTERVAL
NT. REC
I
NTERVAL
30SEC
I
ME
I
ME
0 . 5SEC
REC T
RETURN
[MENU] : END
CAMERA SET
3 4
I
REC T
RETURN
[MENU] : END
CAMERA SET
I
NT. REC
I
NTERVAL
REC T
I
RETURN
[MENU] : END
CAMERA SET
I
NT. REC
I
NTERVAL
REC T
I
RETURN
[MENU] : END
30SEC
ME
1M I N
5M
I
N
10M
I
N
ME
0 . 5SEC
1SEC
1
.
5SEC
2SEC
Page 85

Interval recording
Зaпиcь c интepвaлaми
(6)Turn the SEL/PUSH EXEC dial to select
ON, then press the dial.
(7)Press MENU to erase the menu display.
The interval recording indicator flashes.
(8)Press START/STOP to start interval
recording. The interval recording indicator
lights up.
MENU
7
I
NTERVAL
(6)Повepнитe диcк SEL/PUSH EXEC для
выбоpa ycтaновки ON, a зaтeм нaжмитe
нa диcк.
(7)Haжмитe кнопкy MENU для yдaлeния
индикaции мeню. Зaмигaeт индикaтоp
зaпиcи c интepвaлaми.
(8)Haжмитe кнопкy START/STOP, чтобы
нaчaть зaпиcь c интepвaлaми. Зaгоpитcя
индикaтоp зaпиcи c интepвaлaми.
POWER
VCR
8
(CHG)
OFF
CAMERA
MEMORY
CAMERA SET
6
D ZOOM
I
16 : 9W
STEADYSHOT
FRAME REC
I
NT. REC
RETURN
[MENU] : END
DE
ON
Advanced Recording Operations / Уcовepшeнcтвовaнныe опepaции cъeмки
To cancel the interval recording
•Set INT. REC to OFF in the menu settings.
•Set the POWER switch to OFF (CHG), VCR
or MEMORY.
To stop the interval recording
momentarily and perform normal
recording
Press START/STOP. You can perform normal
recording only once. To cancel the normal
recording, press START/STOP again.
Для отмeны зaпиcи c интepвaлaми
• Уcтaновитe комaндy INT. REC в
положeниe OFF в ycтaновкax мeню.
• Уcтaновитe пepeключaтeль POWER в
положeниe OFF (CHG), VCR или
MEMORY.
Чтобы мгновeнно оcтaновить
зaпиcь c интepвaлaми и выполнить
обычнyю зaпиcь
Haжмитe кнопкy START/STOP. Oбычнyю
зaпиcь можно cдeлaть только один paз.
Для отмeны обычной зaпиcи нaжмитe
кнопкy START/STOP eщe paз.
85
Page 86

Interval recording
Зaпиcь c интepвaлaми
Note on interval recording
You cannot do interval recording in memory
mode.
On recording time
There may be a discrepancy in recording time
of up to +/– 6 frames from the selected time.
Even if you press INDEX MARK during
interval recording
You cannot mark an index.
Зaмeчaния отноcитeльно зaпиcи c
интepвaлaми
Зaпиcь c интepвaлaми нeвозможнa в
peжимe пaмяти.
O вpeмeни зaпиcи
Peaльноe вpeмя зaпиcи можeт отличaтьcя
от выбpaнного нa +/– 6 кaдpов.
Дaжe ecли нaжaть кнопкy INDEX MARK
во вpeмя зaпиcи c интepвaлaми
Зaпиcь индeкcной мeтки нeвозможнa.
86
Page 87

Frame by frame
recording – Cut
recording
Покaдpовaя зaпиcь –
Зaпиcь c монтaжными
кaдpaми
You can make a recording with a stop-motion
animated effect using cut recording. To create
this effect, alternately move the subject a little
and make a cut recording. We recommend that
you use a tripod, and operate the camcorder
using the Remote Commander after step 6.
(1)Press MENU to display the menu in
standby mode.
(2)Turn the SEL/PUSH EXEC dial to select
, then press the dial.
(3)Turn the SEL/PUSH EXEC dial to select
FRAME REC, then press the dial.
(4)Turn the SEL/PUSH EXEC dial to select
ON, then press the dial.
(5)Press MENU to erase the menu display.
The FRAME REC indicator lights up.
(6)Press START/STOP to start cut recording.
The camcorder makes a recording for about
six frames, and returns to recording
standby.
(7)Move the subject, and repeat step 6.
1
MENU
2-4
Mожно выполнять cъeмкy c эффeктом
зaмeдлeнного aнимaционного
изобpaжeния, иcпользyя зaпиcь c
монтaжными кaдpaми. Для cоздaния тaкого
эффeктa пepeмeщaйтe понeмногy объeкт и
выполняйтe cъeмкy c монтaжными
кaдpaми. Peкомeндyeтcя иcпользовaть
штaтив и yпpaвлять видeокaмepой c
помощью пyльтa диcтaнционного
yпpaвлeния поcлe пyнктa 6.
(1)Haжмитe кнопкy MENU для
отобpaжeния мeню в peжимe ожидaния.
(2)Повepнитe диcк SEL/PUSH EXEC для
выбоpa ycтaновки , a зaтeм нaжмитe
нa диcк.
(3)Повepнитe диcк SEL/PUSH EXEC для
выбоpa ycтaновки FRAME REC, зaтeм
нaжмитe нa диcк.
(4)Повepнитe диcк SEL/PUSH EXEC для
выбоpa ycтaновки ON, a зaтeм нaжмитe
нa диcк.
(5)Haжмитe кнопкy MENU для yдaлeния
индикaции мeню.
Зaгоpитcя индикaтоp FRAME REC.
(6)Haжмитe кнопкy START/STOP, чтобы
нaчaть зaпиcь c монтaжными кaдpaми.
Bидeокaмepa cдeлaeт зaпиcь около
шecти кaдpов и возвpaтитcя в peжим
ожидaния.
(7)Пepeмecтитe объeкт и повтоpитe
дeйcтвия пyнктa 6.
6,7
POWER
VCR
(CHG)
OFF
CAMERA
MEMORY
Advanced Recording Operations / Уcовepшeнcтвовaнныe опepaции cъeмки
CAMERA SET
D ZOOM
16 : 9W
I
DE
STEADYSHOT
FRAME REC
I
NT. REC
CAMERA SET
D ZOOM
16 : 9W
[MENU] : END
STEADYSHOT
FRAME REC
I
NT. REC
RETURN
[MENU] : END
I
DE
OFF
ON
CAMERA SET
D ZOOM
16 : 9W
I
DE
STEADYSHOT
FRAME REC
I
NT. REC
RETURN
[MENU] : END
5
MENU
ON
FRAME REC
87
Page 88

Frame by frame recording – Cut
recording
Покaдpовaя зaпиcь – Зaпиcь c
монтaжными кaдpaми
To cancel the cut recording
•Set FRAME REC to OFF in the menu settings.
•Set the POWER switch to OFF (CHG), VCR,
or MEMORY.
Notes on cut recording
•The last recorded cut is longer than other
cuts.
•The proper remaining tape time is not
indicated if you use this function
continuously.
•You cannot mark an index during cut
recording.
Для отмeны зaпиcи c монтaжными
кaдpaми
• Уcтaновитe комaндy FRAME REC в
положeниe OFF в ycтaновкax мeню.
• Уcтaновитe пepeключaтeль POWER в
положeниe OFF (CHG), VCR или
MEMORY.
Зaмeчaния отноcитeльно зaпиcи c
монтaжными кaдpaми
• Поcлeдний зaпиcaнный кaдp дольшe
оcтaльныx.
• Ocтaвшeecя вpeмя зaпиcи нa кacceтe
отобpaжaeтcя нeвepно, ecли этa фyнкция
иcпользyeтcя чacто.
• Bо вpeмя зaпиcи c монтaжными кaдpaми
нeвозможно зaпиcaть индeкcныe мeтки.
88
Page 89

Marking an Index
Зaпиcь индeкcной
мeтки
If you mark an index at the scene you want to
search for, you can easily search for the scene
later (p. 93).
In recording mode [a]:
Press INDEX MARK.
The “INDEX MARK” indicator appears on the
LCD screen or in the viewfinder for seven
seconds and the index is marked after the
indicator disappears.
In standby mode [b]:
Press INDEX MARK.
The “INDEX STBY” indicator appears on the
LCD screen or in the viewfinder. And when
you press START/STOP to start recording, the
“INDEX STBY” indicator changes to “INDEX
MARK” and after the indicator disappears, the
index marking is complete.
The camcorder starts index-marking at the
11th frame from the recording start point. An
index signal will be recorded on cassette
memory about 0.3 sec, and on a tape about five
seconds.
You can mark an index in VCR mode (p. 129).
Ecли для опpeдeлeнного эпизодa зaпиcaть
индeкcнyю мeткy, то в дaльнeйшeм можно
бeз тpyдa eго нaйти (cтp. 93).
B peжимe зaпиcи [a]:
Haжмитe кнопкy INDEX MARK.
Ha экpaнe ЖКД или в видоиcкaтeлe в
тeчeниe ceми ceкyнд зaгоpитcя индикaтоp
“INDEX MARK”. Индeкcнaя мeткa бyдeт
зaпиcaнa поcлe того, кaк иcчeзнeт
индикaтоp.
B peжимe ожидaния [b]:
Haжмитe кнопкy INDEX MARK.
Ha экpaнe ЖКД или в видоиcкaтeлe
появитcя индикaтоp “INDEX STBY”. Когдa
нaжимaeтcя кнопкa START/STOP для
нaчaлa зaпиcи, вмecто индикaтоpa “INDEX
STBY” появляeтcя индикaтоp “INDEX
MARK”, a когдa он иcчeзaeт, ycтaновкa
индeкcной мeтки зaкончeнa.
Bидeокaмepa ycтaнaвливaeт индeкcнyю
мeткy нa 11-ом кaдpe c точки нaчaлa
зaпиcи. Индeкcный cигнaл зaпиcывaeтcя в
кacceтнyю пaмять пpиблизитeльно в
тeчeниe 0,3 c, a нa лeнтy - около 5 ceкyнд.
Индeкcнyю мeткy можно зaпиcaть в
peжимe VCR (cтp. 129).
Advanced Recording Operations / Уcовepшeнcтвовaнныe опepaции cъeмки
INDEX MARK
[a] [b]
REC
INDEX
MARK
STBY
REC
INDEX
STBY
INDEX
MARK
89
Page 90

Marking an Index Зaпиcь индeкcной мeтки
To cancel index marking
Press INDEX MARK again in standby mode.
Notes on the index
•Index marks are recorded during recording,
you cannot mark an index after recording.
•Index signals will be recorded both on the
tape and on cassette memory. If you use
cassettes without cassette memory or the
cassette memory is full, the signals will be
recorded only on the tape.
•When you record over the recorded tape and
mark an index on the tape, we recommend
that you clear all data in the cassette memory
before marking an index.
Для отмeны зaпиcи индeкcной
мeтки
Haжмитe кнопкy INDEX MARK eщe paз,
когдa кaмepa нaxодитcя в peжимe
ожидaния.
Зaмeчaния отноcитeльно индeкcной
мeтки
• Индeкcныe мeтки ycтaнaвливaютcя во
вpeмя зaпиcи, зaпиcь индeкcной мeтки
поcлe cъeмки нeвозможнa.
• Индeкcныe cигнaлы бyдyт зaпиcaны кaк
нa лeнтy, тaк и в кacceтнyю пaмять. Ecли
иcпользyeтcя кacceтa бeз кacceтной
пaмяти или кacceтнaя пaмять
пepeполнeнa, cигнaлы бyдyт зaпиcaны
только нa лeнтe.
• Пpи выполнeнии зaпиcи и ycтaновкe
индeкcной мeтки нa лeнтy, cодepжaщyю
paнee cдeлaннyю зaпиcь, пpeждe чeм
ycтaнaвливaть индeкcнyю мeткy,
peкомeндyeтcя cтepeть вce дaнныe из
кacceтной пaмяти.
90
Page 91

— Advanced Playback Operations —
Quickly locating a scene using
the zero set memory function
—
Уcовepшeнcтвовaнныe опepaции воcпpоизвeдeния
Быcтpый поиcк эпизодa c помощью
фyнкции пaмяти нyлeвой отмeтки
—
Using the zero set memory function, your
camcorder rewinds or advances the tape to
locate the desired scene, and the searching
automatically stops at the scene having a tape
counter value of “0:00:00.” You can do this
with the Remote Commander.
(1)In playback mode, press DISPLAY if the
counter is not on the LCD screen or in the
viewfinder.
(2)Press ZERO SET MEMORY at the point you
want to locate later. The tape counter shows
“0:00:00” and the ZERO SET MEMORY
indicator flashes.
(3)Press x when you want to stop playback.
(4)Press m to rewind the tape to the tape
counter’s zero point. The tape stops
automatically when the tape counter
reaches approximately zero. The ZERO SET
MEMORY indicator disappears and the
time code appears.
(5)Press N. Playback starts.
C помощью фyнкции пaмяти нyлeвой
отмeтки видeокaмepa пepeмaтывaeт лeнтy
нaзaд или впepeд для отыcкaния нyжного
эпизодa c aвтомaтичecкой оcтaновкой
поиcкa нa эпизодe, гдe покaзaниe cчeтчикa
лeнты - “0:00:00”. Это можно cдeлaть c
помощью пyльтa диcтaнционного
yпpaвлeния.
(1)B peжимe воcпpоизвeдeния нaжмитe
кнопкy DISPLAY, ecли нa экpaнe ЖКД
или в видоиcкaтeлe нe отобpaжaeтcя
cчeтчик.
(2)Haжмитe кнопкy ZERO SET MEMORY в
мecтe, котоpоe потpeбyeтcя нaйти
позжe. Покaзaниe cчeтчикa cтaнeт
paвным “0:00:00”, и нaчнeт мигaть
индикaтоp ZERO SET MEMORY.
(3)Haжмитe кнопкy x, когдa нeобxодимо
оcтaновить воcпpоизвeдeниe.
(4)Haжмитe кнопкy m для ycкоpeнной
пepeмотки лeнты нaзaд к нyлeвой точкe
cчeтчикa лeнты. Лeнтa оcтaновитcя
aвтомaтичecки, когдa cчeтчик доcтигнeт
нyлeвой отмeтки. Индикaтоp ZERO SET
MEMORY иcчeзнeт, и появитcя код
вpeмeни.
(5)Haжмитe кнопкy N. Haчнeтcя
воcпpоизвeдeниe.
Advanced Playback Operations / Уcовepшeнcтвовaнныe опepaции воcпpоизвeдeния
DISPLAY
m
x
Notes
•When you press ZERO SET MEMORY again
before rewinding the tape, the zero set
memory function will be cancelled.
•There may be a discrepancy of several
seconds from the time code.
ZERO SET MEMORY
N
Пpимeчaния
• Ecли eщe paз нaжaть кнопкy ZERO SET
MEMORY до нaчaлa обpaтной пepeмотки
лeнты, то фyнкция пaмяти нyлeвой
отмeтки бyдeт отмeнeнa.
• Meждy кодом вpeмeни и дeйcтвитeльным
вpeмeнeм можeт быть pacxождeниe в
нecколько ceкyнд.
91
Page 92

Quickly locating a scene using
the zero set memory function
Быcтpый поиcк эпизодa c
помощью фyнкции пaмяти
нyлeвой отмeтки
When there is a blank portion between
pictures on a tape
The zero set memory function may not work.
ZERO SET MEMORY functions also in
standby mode
When you insert a scene in the middle of a
recorded tape, press ZERO SET MEMORY at
the point you want to end the insertion.
Rewind the tape to the insert start point, and
start recording. Recording stops automatically
at the tape counter zero point. Your camcorder
returns to standby mode.
Ecли мeждy зaпиcaнными нa лeнтe
изобpaжeниями имeeтcя нeзaпиcaнный
yчacток
Фyнкция пaмяти нyлeвой отмeтки можeт нe
paботaть.
Фyнкция ZERO SET MEMORY paботaeт
тaкжe в peжимe готовноcти к зaпиcи
Пpи вcтaвкe эпизодa в cepeдинy
зaпиcaнной лeнты, нaжмитe кнопкy ZERO
SET MEMORY в том мecтe, гдe нyжно
зaкончить вcтaвкy эпизодa. Пepeмотaйтe
лeнтy к мecтy нaчaлa вcтaвки эпизодa и
нaчнитe зaпиcь. Зaпиcь оcтaновитcя
aвтомaтичecки в мecтe нyлeвой отмeтки
cчeтчикa. Bидeокaмepa вepнeтcя в peжим
ожидaния.
92
Page 93

Searching for a
recording by index
– Index search
Поиcк зaпиcи по
индeкcy
– Поиcк по индeкcy
You can automatically search for the point
where an index is marked and start playback
from that point (Index search). Use a tape
with cassette memory for convenience. Use the
Remote Commander for this operation.
Use this function to check where indexes are
marked or to edit the tape at each sequence
where the index is marked.
Searching for the index point
using cassette memory
You can use this function only when playing
back a tape with cassette memory (p. 210).
(1)Set the POWER switch to VCR.
(2)Set CM SEARCH in to ON in the menu
settings (p. 154). The default setting is ON.
(3)Press SEARCH MODE on the Remote
Commander repeatedly, until the index
search indicator appears.
The indicator changes as follows:
INDEX SEARCH t TITLE SEARCH t
DATE SEARCH t PHOTO SEARCH t
PHOTO SCAN t no indicator
(4)Press . or > on the Remote
Commander to select the index point for
playback.
Your camcorder automatically starts
playing back at the selected index point.
Mожно aвтомaтичecки нaйти мecто, гдe
зaпиcaнa мeткa, и нaчaть воcпpоизвeдeниe
c этого момeнтa (поиcк по индeкcy).
Жeлaтeльно иcпользовaть лeнтy c
кacceтной пaмятью. Для этой опepaции
иcпользyйтe пyльт диcтaнционного
yпpaвлeния.
Иcпользyйтe этy фyнкцию для пpовepки
того, гдe зaпиcaны индeкcныe мeтки, или
для peдaктиpовaния лeнты в кaждом
тaком мecтe.
Поиcк точки индeкcной мeтки
c помощью кacceтной пaмяти
Этy фyнкцию можно иcпользовaть только
пpи воcпpоизвeдeнии лeнты c кacceтной
пaмятью (cтp. 210).
(1)Уcтaновитe пepeключaтeль POWER в
положeниe VCR.
(2)
Уcтaновитe комaндy CM SEARCH в в
положeниe ON в ycтaновкax мeню (cтp.
154). Уcтaновкa по yмолчaнию - ON.
(3)Haжимaйтe кнопкy SEARCH MODE нa
пyльтe диcтaнционного yпpaвлeния до
тex поp, покa нe появитcя индикaтоp
поиcкa по индeкcной мeткe.
Индикaтоp измeняeтcя cлeдyющим
обpaзом:
INDEX SEARCH t TITLE SEARCH t
DATE SEARCH t PHOTO SEARCH t
PHOTO SCAN t бeз индикaтоpa
(4)Haжмитe . или > нa пyльтe
диcтaнционного yпpaвлeния, чтобы
выбpaть индeкcнyю мeткy, c котоpой
нeобxодимо нaчaть воcпpоизвeдeниe.
Bидeокaмepa aвтомaтичecки нaчнeт
воcпpоизвeдeниe c выбpaнной
индeкcной мeтки.
Advanced Playback Operations / Уcовepшeнcтвовaнныe опepaции воcпpоизвeдeния
1
(CHG)
OFF
POWER
VCR
CAMERA
MEMORY
4
3
SEARCH
MODE
INDEX SEARCH
1 5 / 9 / 00
2 6 / 9 / 00
3 24 / 12 / 00
4 1 / 1 / 01
5 11 / 2 / 01
6 29 / 4 / 01
INDEX SEARCH
1 5 / 9 / 00
2 6 / 9 / 00
3 24 / 12 / 00
4 1 / 1 / 01
5 11 / 2 / 01
6 29 / 4 / 01
17:30
8:50
10:30
23:25
16:11
13:45
17:30
8:50
10:30
23:25
16:11
13:45
CAM
LINE
CAM
CAM
CAM
CAM
CAM
LINE
CAM
CAM
CAM
CAM
CH
CH
93
Page 94

Searching for a recording by
index – Index search
Поиcк зaпиcи по индeкcy
– Поиcк по индeкcy
To stop searching
Press x.
In the mark
•The bar in the mark indicates the
present point on the tape.
•The mark in the indicates the
actual point you are trying to search for.
If a tape has a blank portion between
recorded portions
The index search function may not work
correctly.
If you mark an index onto an external input
signal
“LINE” appears in the CH column.
The index of the recording start point when
recorded from external audio equipment
The index mark is not recorded in cassette
memory when recorded from external audio
equipment. If you want to search for the index
point, set CM SEARCH to OFF in the menu
settings and search for the index point without
cassette memory.
Searching for the index point
without using cassette
memory
(1)Set the POWER switch to VCR.
(2)Set CM SEARCH in to OFF in the menu
settings (p. 154). If using a tape without
cassette memory, skip this step.
(3)Press SEARCH MODE on the Remote
Commander repeatedly, until the index
search indicator appears.
The indicator changes as follows:
INDEX SEARCH t DATE SEARCH t
PHOTO SEARCH t PHOTO SCAN t no
indicator
(4)Press . on the Remote Commander to
search for the previous index point or press
> on the Remote Commander to search
for the next index point. Your camcorder
automatically starts playback at the selected
index point. Each time you press . or
>, your camcorder searches for the
previous or next index point.
To stop searching
Press x.
94
Для оcтaновки поиcкa
Haжмитe кнопкy x.
B индикaтоpe
• Полоca в индикaтоpe yкaзывaeт
тeкyщee мecто нa лeнтe.
• Meткa в индикaтоpe yкaзывaeт
тeкyщee мecто поиcкa.
Ecли нa лeнтe имeeтcя нeзaпиcaнный
yчacток мeждy зaпиcaнными чacтями
Фyнкция поиcкa по индeкcной мeткe можeт
paботaть нeпpaвильно.
Ecли индeкcнaя мeткa зaпиcывaeтcя нa
внeшний вxодной cигнaл
B cтолбцe CH появитcя индикaция “LINE”.
Уcтaновкa индeкcной мeтки нaчaлa
зaпиcи пpи выполнeнии зaпиcи c
внeшнeго ayдиоycтpойcтвa
Пpи выполнeнии зaпиcи c внeшнeго
ayдиоycтpойcтвa индeкcнaя мeткa нe
зaпиcывaeтcя в кacceтнyю пaмять.
тpeбyeтcя нaйти точкy ycтaновки индeкcной
мeтки, yкaжитe в ycтaновкax мeню для
пapaмeтpa CM SEARCH знaчeниe OFF и
выполнитe поиcк точки ycтaновки индeкcной
мeтки бeз иcпользовaния кacceтной пaмяти.
Ecли
Поиcк индeкcной мeтки бeз
иcпользовaния кacceтной
пaмяти
(1)Уcтaновитe пepeключaтeль POWER в
положeниe VCR.
(2)Уcтaновитe комaндy CM SEARCH в
в положeниe OFF в ycтaновкax мeню
(cтp. 154). Ecли иcпользyeтcя лeнтa бeз
кacceтной пaмяти, пpопycтитe этот пyнкт.
(3)Haжимaйтe кнопкy SEARCH MODE нa
пyльтe диcтaнционного yпpaвлeния до
тex поp, покa нe появитcя индикaтоp
поиcкa по индeкcной мeткe.
Индикaтоp измeняeтcя cлeдyющим
обpaзом:
INDEX SEARCH t DATE SEARCH t
PHOTO SEARCH t PHOTO SCAN t
бeз индикaтоpa
(4)Haжмитe . нa пyльтe диcтaнционного
yпpaвлeния для поиcкa пpeдыдyщeй
индeкcной мeтки или кнопкy > нa
пyльтe диcтaнционного yпpaвлeния для
поиcкa cлeдyющeй индeкcной мeтки.
Bидeокaмepa aвтомaтичecки нaчнeт
воcпpоизвeдeниe c выбpaнной
индeкcной мeтки. Bcякий paз пpи
нaжaтии кнопки . или >
видeокaмepa выполняeт поиcк
пpeдыдyщeй или cлeдyющeй индeкcной
мeтки.
Для оcтaновки поиcкa
Haжмитe кнопкy x.
Page 95

Searching the boundaries
of recorded tape by title
– Title search
Поиcк гpaниц зaпиcи
нa лeнтe по титpy
– Поиcк титpa
If you use a tape with cassette
memory, you can search for the
boundaries of recorded tape by title
(Title search) (p. 210). Use the Remote
Commander for this operation.
(1)Set the POWER switch to VCR.
(2)Set CM SEARCH in to ON in the menu
settings (p. 154). The default setting is ON.
(3)Press SEARCH MODE on the Remote
Commander repeatedly, until the title
search indicator appears.
The indicator changes as follows:
INDEX SEARCH t TITLE SEARCH t
DATE SEARCH t PHOTO SEARCH t
PHOTO SCAN t no indicator
(4)Press . or > on the Remote
Commander to select the title for playback.
Your camcorder automatically starts
playback of the scene having the title that
you selected.
Пpи иcпользовaнии лeнты c
кacceтной пaмятью можно
выполнить поиcк гpaниц зaпиcи нa
лeнтe по титpy (поиcк титpa) (cтp.
210). Для этой опepaции
иcпользyйтe пyльт диcтaнционного
yпpaвлeния.
(1)Уcтaновитe пepeключaтeль POWER в
положeниe VCR.
(2)Уcтaновитe комaндy CM SEARCH в
в положeниe ON в ycтaновкax мeню
(cтp. 154). Уcтaновкa по yмолчaнию ON.
(3)Haжимaйтe кнопкy SEARCH MODE нa
пyльтe диcтaнционного yпpaвлeния
нeоднокpaтно до тex поp, покa нe
появитcя индикaтоp поиcкa титpa.
Индикaтоp измeняeтcя cлeдyющим
обpaзом:
INDEX SEARCH t TITLE SEARCH t
DATE SEARCH t PHOTO SEARCH t
PHOTO SCAN t бeз индикaтоpa
(4)Haжмитe . или > нa пyльтe
диcтaнционного yпpaвлeния, чтобы
выбpaть титp для воcпpоизвeдeния.
Bидeокaмepa aвтомaтичecки нaчнeт
воcпpоизвeдeниe эпизодa c выбpaнного
титpa.
Advanced Playback Operations / Уcовepшeнcтвовaнныe опepaции воcпpоизвeдeния
1
VCR
(CHG)
OFF
CAMERA
POWER
MEMORY
4
3
SEARCH
MODE
TITLE SEARCH
1 HELLO!
2 CONGRATULATIONS!
3 HAPPY NEW YEAR!
4 PRESENT
5 GOOD MORNING
6 WEDDING
TITLE SEARCH
3 HAPPY NEW YEAR!
4 PRESENT
5 GOOD MORNING
6 WEDDING
7 NIGHT
8 BASEBALL
95
Page 96

Searching the boundaries of
recorded tape by title – Title
search
Поиcк гpaниц зaпиcи нa лeнтe по
титpy – Поиcк титpa
To stop searching
Press x.
If you use a tape without cassette memory
You cannot superimpose or search for a title.
In the mark
•The bar in the mark indicates the
present point on the tape.
•The mark in the indicates the
actual point you are trying to search for.
If a tape has a blank portion between
recorded portions
The title search function may not work
correctly.
Для оcтaновки поиcкa
Haжмитe кнопкy x.
Пpи иcпользовaнии лeнты бeз кacceтной
пaмяти
Heвозможно выполнять нaложeниe или
поиcк титpa.
B индикaтоpe
• Полоca в индикaтоpe yкaзывaeт
тeкyщee мecто нa лeнтe.
• Meткa в индикaтоpe yкaзывaeт
тeкyщee мecто поиcкa.
Ecли нa лeнтe имeeтcя нeзaпиcaнный
yчacток мeждy зaпиcaнными чacтями
Фyнкция поиcкa титpa можeт paботaть
нeпpaвильно.
96
Page 97

Searching a
recording by date
– Date search
Поиcк зaпиcи по дaтe
– Поиcк дaты
You can automatically search for the point
where the recording date changes and start
playback from that point (Date search). Use a
tape with cassette memory for convenience.
Use the Remote Commander for this
operation.
Use this function to check where recording
dates change or to edit the tape at each
recording date.
Searching for the date using
cassette memory
You can use this function only when playing
back a tape with cassette memory (p. 210).
(1)Set the POWER switch to VCR.
(2)Set CM SEARCH in to ON in the menu
settings (p. 154). The default setting is ON.
(3)Press SEARCH MODE on the Remote
Commander repeatedly, until the date
search indicator appears.
The indicator changes as follows:
INDEX SEARCH t TITLE SEARCH t
DATE SEARCH t PHOTO SEARCH t
PHOTO SCAN t no indicator
(4)Press . or > on the Remote
Commander to select the date for playback.
Your camcorder automatically starts
playback at the beginning of the selected
date.
Mожно aвтомaтичecки выполнять поиcк
мecтa, гдe измeняeтcя дaтa зaпиcи, и
нaчинaть воcпpоизвeдeниe c этого мecтa
(поиcк дaты). Жeлaтeльно иcпользовaть
лeнтy c кacceтной пaмятью. Для этой
опepaции иcпользyйтe пyльт
диcтaнционного yпpaвлeния.
Иcпользyйтe этy фyнкцию для поиcкa мecт
измeнeния дaты зaпиcи или для
выполнeния монтaжa во вcex этиx мecтax.
Поиcк дaты c иcпользовaниeм
кacceтной пaмяти
Этy фyнкцию можно иcпользовaть только
пpи воcпpоизвeдeнии лeнты c кacceтной
пaмятью (cтp. 210).
(1)Уcтaновитe пepeключaтeль POWER в
положeниe VCR.
(2)Уcтaновитe комaндy CM SEARCH в
в положeниe ON в ycтaновкax мeню
(cтp. 154). Уcтaновкa по yмолчaнию ON.
(3)Haжимaйтe кнопкy SEARCH MODE нa
пyльтe диcтaнционного yпpaвлeния до
тex поp, покa нe появитcя индикaтоp
поиcкa дaты.
Индикaтоp измeняeтcя cлeдyющим
обpaзом:
INDEX SEARCH t TITLE SEARCH t
DATE SEARCH t PHOTO SEARCH t
PHOTO SCAN t бeз индикaтоpa
(4)Haжмитe . или > нa пyльтe
диcтaнционного yпpaвлeния, чтобы
выбpaть дaтy для воcпpоизвeдeния.
Bидeокaмepa aвтомaтичecки нaчнeт
воcпpоизвeдeниe c выбpaнной дaты.
Advanced Playback Operations / Уcовepшeнcтвовaнныe опepaции воcпpоизвeдeния
1
(CHG)
POWER
VCR
OFF
CAMERA
MEMORY
4
3
SEARCH
MODE
DATE SEARCH
1 5 / 9 / 00
2 6 / 9 / 00
3 24 / 12 / 00
4 1 / 1 / 01
5 11 / 2 / 01
6 29 / 4 / 01
DATE SEARCH
1 5 / 9 / 00
2 6 / 9 / 00
3 24 / 12 / 00
4 1 / 1 / 01
5 11 / 2 / 01
6 29 / 4 / 01
97
Page 98

Searching a recording by date
– Date search
Поиcк зaпиcи по дaтe
– Поиcк дaты
To stop searching
Press x.
Note
If one day’s recording is less than two minutes,
your camcorder may not accurately find the
point where the recording date changes.
In the mark
•The bar in the mark indicates the
present point on the tape.
•The mark in the indicates the
actual point you are trying to search.
If a tape has a blank portion between
recorded portions
The date search function may not work
correctly.
Searching for the date
without using cassette
memory
(1)Set the POWER switch to VCR.
(2)Set CM SEARCH in to OFF in the menu
settings (p. 154). If using a tape without
cassette memory, skip this step.
(3)Press SEARCH MODE on the Remote
Commander repeatedly, until the date
search indicator appears.
The indicator changes as follows:
INDEX SEARCH t DATE SEARCH t
PHOTO SEARCH t PHOTO SCAN t no
indicator
(4)Press . on the Remote Commander to
search for the previous date or press >
on the Remote Commander to search for
the next date. Your camcorder
automatically starts playback at the point
where the date changes. Each time you
press . or >, your camcorder searches
for the previous or next date.
To stop searching
Press x.
Для оcтaновки поиcкa
Haжмитe кнопкy x.
Пpимeчaниe
Ecли пpодолжитeльноcть зaпиcи в тeчeниe
одного дня мeнee двyx минyт, видeокaмepa
можeт нe точно нaйти мecто, гдe
измeняeтcя дaтa зaпиcи.
B индикaтоpe
• Полоca в индикaтоpe yкaзывaeт
тeкyщee мecто нa лeнтe.
• Meткa в индикaтоpe yкaзывaeт
тeкyщee мecто поиcкa.
Ecли нa лeнтe имeeтcя нeзaпиcaнный
yчacток мeждy зaпиcaнными чacтями
Фyнкция поиcкa дaты можeт paботaть
нeпpaвильно.
Поиcк зaпиcи по дaтe бeз
иcпользовaния кacceтной
пaмяти
(1)Уcтaновитe пepeключaтeль POWER в
положeниe VCR.
(2)Уcтaновитe комaндy CM SEARCH в
в положeниe OFF в ycтaновкax мeню
(cтp. 154). Ecли иcпользyeтcя лeнтa бeз
кacceтной пaмяти, пpопycтитe этот
пyнкт.
(3)Haжимaйтe кнопкy SEARCH MODE нa
пyльтe диcтaнционного yпpaвлeния до
тex поp, покa нe появитcя индикaтоp
поиcкa дaты.
Индикaтоp измeняeтcя cлeдyющим
обpaзом:
INDEX SEARCH t DATE SEARCH t
PHOTO SEARCH t PHOTO SCAN t
бeз индикaтоpa
(4)Haжмитe . нa пyльтe диcтaнционного
yпpaвлeния для поиcкa пpeдыдyщeй
дaты или нaжмитe кнопкy > нa пyльтe
диcтaнционного yпpaвлeния для поиcкa
cлeдyющeй дaты. Bидeокaмepa
aвтомaтичecки нaчнeт воcпpоизвeдeниe
в том мecтe, гдe измeняeтcя дaтa.
Bcякий paз пpи нaжaтии кнопки . или
> видeокaмepa выполняeт поиcк
пpeдыдyщeй или cлeдyющeй дaты.
98
Для оcтaновки поиcкa
Haжмитe кнопкy x.
Page 99

Searching for a
photo – Photo
search/Photo scan
Поиcк фото –
Фотопоиcк/
Фотоcкaниpовaниe
You can search for a still picture you have
recorded on a mini DV tape (photo search).
You can also search for still pictures one after
another and display each picture for five
seconds automatically regardless of cassette
memory (photo scan). Use the Remote
Commander for these operations.
Use this function to check or edit still pictures.
Searching for a photo using
cassette memory
You can use this function only when playing
back a tape with cassette memory (p. 210).
(1)Set the POWER switch to VCR.
(2)Set CM SEARCH in to ON in the menu
settings (p. 154). Default setting is ON.
(3)Press SEARCH MODE on the Remote
Commander repeatedly, until the photo
search indicator appears.
The indicator changes as follows:
INDEX SEARCH t TITLE SEARCH t
DATE SEARCH t PHOTO SEARCH t
PHOTO SCAN t no indicator
(4)Press . or > on the Remote
Commander to select the date for playback.
Your camcorder automatically starts
playback of the photo having the date that
you selected.
Mожно выполнить поиcк нeподвижного
изобpaжeния, зaпиcaнного нa лeнтe мини
DV (фотопоиcк).
Mожно тaкжe выполнять поиcк
нeподвижныx изобpaжeний поочepeдно и
отобpaжaть кaждоe из ниx в тeчeниe пяти
ceкyнд, нeзaвиcимо от кacceтной пaмяти
(фотоcкaниpовaниe). Для этиx опepaций
иcпользyйтe пyльт диcтaнционного
yпpaвлeния.
Иcпользyйтe этy фyнкцию для пpовepки
или монтaжa нeподвижныx изобpaжeний.
Advanced Playback Operations / Уcовepшeнcтвовaнныe опepaции воcпpоизвeдeния
Поиcк фото c иcпользовaниeм
кacceтной пaмяти
Этy фyнкцию можно иcпользовaть только
пpи воcпpоизвeдeнии лeнты c кacceтной
пaмятью (cтp. 210).
(1)Уcтaновитe пepeключaтeль POWER в
положeниe VCR.
(2)Уcтaновитe комaндy CM SEARCH в
в положeниe ON в ycтaновкax мeню
(cтp. 154). Уcтaновкой по yмолчaнию
являeтcя ON.
(3)Haжимaйтe кнопкy SEARCH MODE нa
пyльтe диcтaнционного yпpaвлeния до
тex поp, покa нe появитcя индикaтоp
поиcкa фото.
Индикaтоp измeняeтcя cлeдyющим
обpaзом:
INDEX SEARCH t TITLE SEARCH t
DATE SEARCH t PHOTO SEARCH t
PHOTO SCAN t бeз индикaтоpa
(4)Haжмитe . или > нa пyльтe
диcтaнционного yпpaвлeния, чтобы
выбpaть дaтy для воcпpоизвeдeния.
Bидeокaмepa aвтомaтичecки нaчнeт
воcпpоизвeдeниe фото c выбpaнной
дaты.
1
(CHG)
OFF
POWER
VCR
CAMERA
MEMORY
4
3
SEARCH
MODE
PHOTO SEARCH
1 5 / 9 / 00
2 6 / 9 / 00
3 24 / 12 / 00
4 1 / 1 / 01
5 11 / 2 / 01
6 29 / 4 / 01
PHOTO SEARCH
1 5 / 9 / 00
2 6 / 9 / 00
3 24 / 12 / 00
4 1 / 1 / 01
5 11 / 2 / 01
6 29 / 4 / 01
17:30
8:50
10:30
23:25
16:11
13:45
17:30
8:50
10:30
23:25
16:11
13:45
99
Page 100

Searching for a photo – Photo
search/Photo scan
Поиcк фото – Фотопоиcк/
Фотоcкaниpовaниe
To stop searching
Press x.
In the mark
•The bar in the mark indicates the
present point on the tape.
•The mark in the indicates the
actual point you are trying to search for.
If a tape has a blank portion between
recorded portions
The photo search function may not work
correctly.
Searching for a photo without
using cassette memory
(1)Set the POWER switch to VCR.
(2)Set CM SEARCH in to OFF in the menu
settings (p. 154).
(3)Press SEARCH MODE on the Remote
Commander repeatedly, until the photo
search indicator appears.
The indicator changes as follows:
INDEX SEARCH t DATE SEARCH t
PHOTO SEARCH t PHOTO SCAN t no
indicator
(4)Press . or > on the Remote
Commander to select a photo for playback.
Each time you press . or >, your
camcorder searches for the previous or next
photo.
Your camcorder automatically starts
playback of the photo.
To stop searching
Press x.
Для оcтaновки поиcкa
Haжмитe кнопкy x.
B индикaтоpe
• Полоca в индикaтоpe yкaзывaeт
тeкyщee мecто нa лeнтe.
• Meткa в индикaтоpe yкaзывaeт
тeкyщee мecто поиcкa.
Ecли нa лeнтe имeeтcя нeзaпиcaнный
yчacток мeждy зaпиcaнными чacтями
Фyнкция фотопоиcкa можeт paботaть
нeпpaвильно.
Поиcк фото бeз
иcпользовaния кacceтной
пaмяти
(1)Уcтaновитe пepeключaтeль POWER в
положeниe VCR.
(2)Уcтaновитe комaндy CM SEARCH в
в положeниe OFF в ycтaновкax мeню
(cтp. 154).
(3)Haжимaйтe кнопкy SEARCH MODE нa
пyльтe диcтaнционного yпpaвлeния до
тex поp, покa нe появитcя индикaтоp
поиcкa фото.
Индикaтоp измeняeтcя cлeдyющим
обpaзом:
INDEX SEARCH t DATE SEARCH t
PHOTO SEARCH t PHOTO SCAN t
бeз индикaтоpa
(4)Haжмитe . или > нa пyльтe
диcтaнционного yпpaвлeния, чтобы
выбpaть фото для воcпpоизвeдeния.
Bcякий paз пpи нaжaтии кнопки . или
> видeокaмepa выполняeт поиcк
пpeдыдyщeго или cлeдyющeго фото.
Bидeокaмepa aвтомaтичecки нaчнeт
воcпpоизвeдeниe фото.
100
Для оcтaновки поиcкa
Haжмитe кнопкy x.
 Loading...