

Page 1

3-080-163-12(1)
Digital
Video Camera
Recorder
Operating Instructions
Before operating the unit, please read this manual thoroughly,
and retain it for future reference.
Mode d’emploi
Avant la mise en service de cet appareil, prière de lire attentivement
le mode d’emploi et de le conserver pour toute référence future.
DCR-TRV80E
DCR-TRV75E/TRV80E
©2003 Sony Corporation
TM
SERIES
Page 2
English
Français
Welcome!
Congratulations on your purchase of this Sony
Handycam. With your Handycam, you can
capture life’s precious moments with superior
picture and sound quality. Your Handycam is
loaded with advanced features, but at the same
time it is very easy to use. You will soon be
producing home video that you can enjoy for
years to come.
WARNING
To prevent fire or shock hazard, do not expose
the unit to rain or moisture.
To avoid electrical shock, do not open the
cabinet.
Refer servicing to qualified personnel only.
DCR-TRV80E only
Hereby, Sony Corporation, declares that this
Handycam is in compliance with the essential
requirements and other relevant provisions of the
Directive 1999/5/EC. For details, please access
the followingURL:
http://www.compliance.sony.de/
Bienvenue!
Nous vous félicitons pour l’achat de ce
caméscope Handycam de Sony. Avec votre
Handycam, vous pouvez saisir les moments
précieux de la vie avec une qualité d’image et de
son exceptionnelle.
Votre Handycam présente de nombreuses
fonctions élaborées, très faciles à utiliser. Vous
parviendrez rapidement à réaliser des films
vidéo que vous regarderez avec plaisir pendant
de longues années.
AVERTISSEMENT
Pour éviter tout risque d’incendie ou
d’électrocution, n’exposez pas cet appareil à la
pluie ni à l’humidité.
Pour éviter tout risque d’électrocution,
n’ouvrez pas le châssis de l’appareil.
Confiez l’entretien exclusivement à un
personnel qualifié.
Pour la clientèle en Europe
You can only use the Bluetooth wireless
connection function in the country or area where
you purchase the devices.
For details, refer to the separate Network
Function/Application Operating Instructions.
“Memory Stick”
N50
2
ATTENTION
Les champs électromagnétiques à des fréquences
spécifiques risquent d’altérer l’image et le son de
ce caméscope umnérique.
Ce produit a été testé et déclaré conforme aux
limites énoncées dans la réglementation EMC
relatives aux câbles de moins de 3 mètres.
Avis
Si de l’électricité statique ou de
l’électromagnétisme interrompt le transfert de
données, redémarrez l’application ou débranchez
et rebranchez le câble USB.
Page 3

NOTICE ON THE SUPPLIED AC POWER
ADAPTOR FOR CUSTOMERS IN THE
UNITED KINGDOM
A moulded plug complying with BS1363 is fitted
to this equipment for your safety and
convenience.
Should the fuse in the plug supplied need to
be replaced, a 5 AMP fuse approved by ASTA
or BSI to BS1362 (i.e., marked with or
mark) must be used.
If the plug supplied with this equipment has a
detachable fuse cover, be sure to attach the
fuse cover after you change the fuse. Never
use the plug without the fuse cover. If you
should lose the fuse cover, please contact
your nearest Sony service station.
For the customers in Europe
ATTENTION
The electromagnetic field at the specific
frequencies may influence the picture and sound
of this camcorder.
DCR-TRV80E seulement
Par la présente Sony Corporation déclare que
l’appareil Handycam est conforme aux exigences
essentielles et aux autres dispositions pertinentes
de la directive 1999/5/CE. Pour le détail, accédez
au site suivant :
http://www.compliance.sony.de/
Vous ne pouvez utiliser la connexion sans fil
Bluetooth que dans le pays ou la région où les
périphériques sont commercialisés.
Pour le détail sur la fonction/application Réseau,
reportez-vous au mode d’emploi séparé.
This product has been tested and found
compliant with the limits set out in the EMC
regulation for using connection cables shorter
than 3 meters. (9.8 feet)
Notice
If static electricity or electromagnetism causes
data transfer to discontinue midway (fail), restart
the application or disconnect and connect the
USB cable again.
3
Page 4
English
Main Features
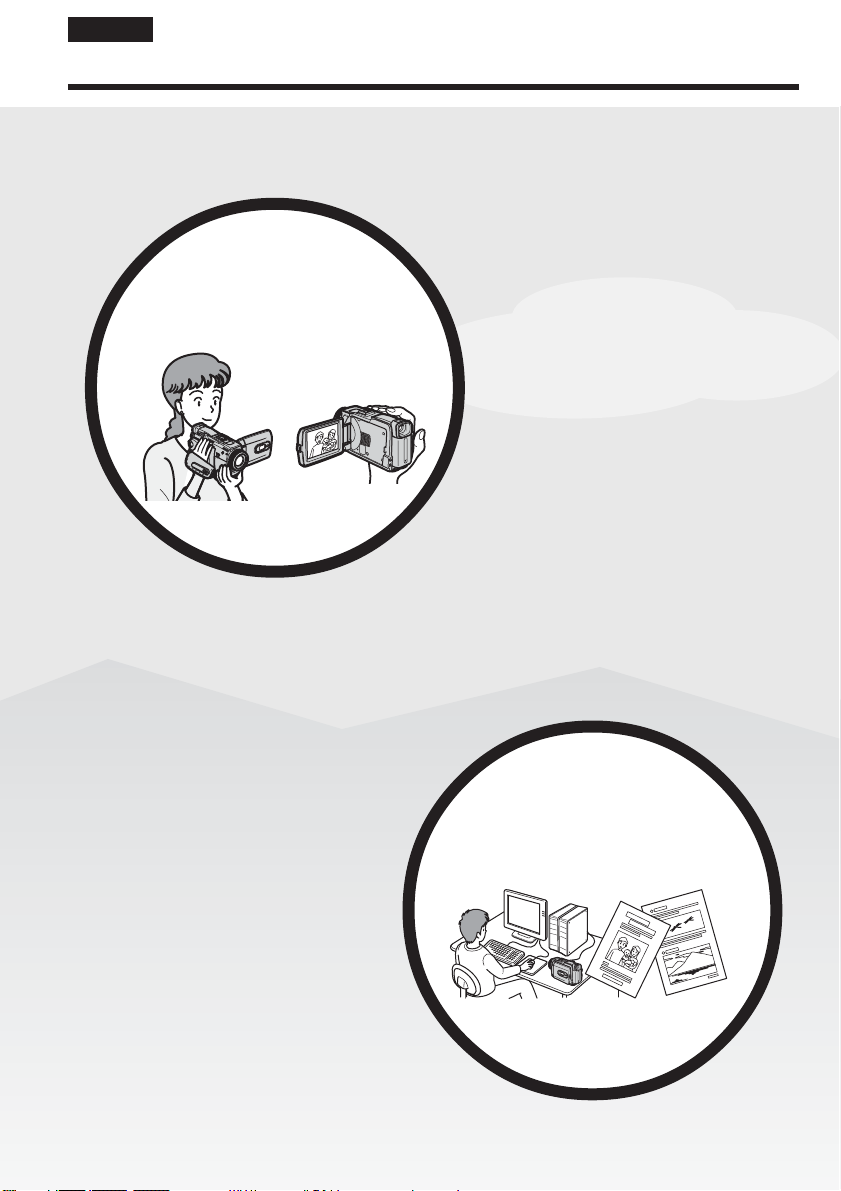
Recording moving pictures
or still images, and playing
them back
Main Features
•Viewing moving pictures recorded on
the tape using the USB cable (p. 199)
•Viewing images recorded on the
“Memory Stick” using the USB cable
(p. 208, 216)
•Capturing images on the computer
from your camcorder using the USB
cable (p. 201)
•Converting an analog signal into
digital to capture images onto the
computer (p. 218)
•Recording moving pictures on the
tape (p. 36)
•Playing back the tape (p. 52)
•Recording still images on the
“Memory Stick” (p. 60, 139)
•Recording moving pictures on the
“Memory Stick” (p. 155)
•Viewing still images recorded on
the “Memory Stick” (p. 166)
•Viewing moving pictures recorded
on the “Memory Stick” (p. 169)
Capturing images on the
computer
4
4
Page 5

Main Features
Accessing the network and
using BIP
(DCR-TRV80E only)
Other uses
Functions for adjusting exposure during recording
•Back light function (p. 46)
•NightShot/Super NightShot/Colour Slow Shutter (p. 47)
•PROGRAM AE (p. 75)
•Manual exposure (p. 77)
•Flexible Spot Meter (p. 78)
•Recording images with the flash (p. 143)
Functions for giving images more impact
•Digital zoom (p. 45)
The default setting is OFF. (To zoom greater than 10×,
select the digital zoom power in D ZOOM in the menu settings.)
•Fader (p. 68)
•Picture effect (p. 71)
•Digital effect (p. 72)
•Title (p. 123)
•MEMORY MIX (p. 149)
Functions for giving a natural appearance to your recordings
•PROGRAM AE (p. 75)
– SPORTS
– LANDSCAPE
•Manual focus (p. 79)
•Expanded focus (p. 80)
•Spot Focus (p. 81)
Functions for using after recording
•End search/Edit search/Rec Review (p. 50)
•Data code (p. 53)
•Tape PB ZOOM/Memory PB ZOOM (p. 91, 173)
•Zero set memory (p. 93)
•Title search (p. 94)
•Digital program editing (p. 100, 161)
•You can access the Internet using
a Bluetooth device (optional) or a
dedicated accessory that serves
as a USB Network Adaptor
(optional) etc.
•You can use the following
functions by connecting to a
Bluetooth device (optional) using
BIP.
– Remote Camera
– Image Transport
For details, refer to the Network
Function/Application
Operating Instructions supplied
with your camcorder. (DCRTRV80E only) (p. 220)
Main Features
5
5
Page 6

Français
Principales caractéristiques
Enregistrement et lecture
d’images animées ou fixes
Principales caractéristiques
•Enregistrement d’images animées
sur la cassette (p. 36)
•Lecture de la cassette (p. 52)
•Enregistrement d’images fixes sur
le « Memory Stick » (p. 60, 139)
•Enregistrement d’images animées
sur le « Memory Stick » (p. 155)
•Visionnage d’images fixes
enregistrées sur le « Memory
Stick » (p. 166)
•Visionnage d’images animées
enregistrées sur le « Memory
Stick » (p. 169)
•Visionnage des images animées
enregistrées sur la cassette avec le
câble USB (p. 199)
•Visionnage des images enregistrées
sur le « Memory Stick » avec le câble
USB (p. 208, 216)
•Saisie d’images du caméscope sur
un ordinateur avec le câble USB
(p. 201)
•Conversion d’un signal analogique
en signal numérique pour la saisie
d’images sur un ordinateur (p. 218)
6
6
Saisie d’images sur un
ordinateur
Page 7

Principales caractéristiques
Accès au réseau et
utilisation du BIP
(DCR-TRV80E seulement)
Autres fonctions
Fonctions servant à régler l’exposition pendant l’enregistrement
•Compensation de contre-jour (p. 46)
•Fonctions NightShot/Super NightShot/Colour Slow Shutter (p. 47)
•PROGRAM AE (p. 75)
•Exposition manuelle (p. 77)
•Spotmètre flexible (p. 78)
•Enregistrement d’images au flash (p. 143)
Fonctions servant à accroître l’impact de l’image
•Zoom numérique (p. 45)
Le réglage par défaut est OFF. (Pour un rapport de zoom supérieur à 10×,
sélectionnez le zoom numérique dans D ZOOM des paramètres du menu.)
•Transitions en fondu (p. 68)
•Effets d’image (p. 71)
•Effets numérique (p. 72)
•Titres (p. 123)
•MEMORY MIX (p. 149)
Fonctions permettant d’obtenir des films plus naturels
•PROGRAM AE (p. 75)
– SPORTS
– LANDSCAPE
•Mise au point manuelle (p. 79)
•Mise au point élargie (p. 80)
•Mise au point ponctuelle (p. 81)
Fonctions utiles après l’enregistrement
•Recherche de fin d’enregistrement/Recherche de point de montage/
Revue d’enregistrement (p. 50)
•Code de données (p. 53)
•PB ZOOM cassette/PB ZOOM mémoire (p. 91, 173)
•Remise à zéro de la mémoire (p. 93)
•Recherche de titres (p. 94)
•Montage numérique de séquences programmées (p. 100, 161)
•Vous pouvez accéder à Internet en
utilisant un périphérique Bluetooth
(en option) ou un accessoire spécial
servant d’adaptateur réseau USB
(en option).
•Vous pouvez utiliser les fonctions
suivantes en connectant un
périphérique Bluetooth (en option)
par le BIP.
– Commande à distance du
caméscope
– Transport d’images
Pour le détail à ce sujet, voir la
fonction/application Réseau.
Le mode d’emploi est fourni avec le
caméscope. (DCR-TRV80E
seulement) (p. 220)
Principales caractéristiques
7
7
Page 8

English
Table of contents
Main Features.......................................... 4
Quick Start Guide
– Recording on tape .................................. 12
– Recording on “Memory Stick” ............. 14
Getting Started
Using this manual ..................................... 20
Checking supplied accessories ................ 23
Step 1 Preparing the power source......... 24
Installing the battery pack................. 24
Charging the battery pack ................. 25
Connecting to a wall socket .............. 29
Step 2 Setting the date and time ............. 30
Step 3 Using the touch panel ................... 33
Recording – Basics
Recording a picture ................................... 36
Shooting backlit subjects
– Back light function .................... 46
Shooting in the dark
– NightShot/Super NightShot/
Colour Slow Shutter .................... 47
Checking recordings – End search/Edit
search/Rec Review ............................ 50
Playback – Basics
Playing back tape ...................................... 52
To display the screen indicators
– Display function ....................... 53
Viewing a recording on TV ..................... 58
Advanced Recording Operations
Recording still images on “Memory
Stick” during tape recording
standby or tape recording ................. 60
Self-timer recording .................................. 62
Adjusting the white balance manually
............................................................... 64
Using the wide mode ............................... 66
Using the fader function .......................... 68
Using special effects – Picture effect ...... 71
8
Using special effects – Digital effect ....... 72
Using PROGRAM AE .............................. 75
Adjusting the exposure manually .......... 77
Using spot light-metering function
– Flexible Spot Meter ......................... 78
Focusing manually .................................... 79
Using spot focus function
– Spot Focus ........................................ 81
Interval Recording .................................... 82
Frame by frame recording
– Frame recording .............................. 84
Recording with all the pixels
– Progressive Recording Mode ........ 85
Using the viewfinder ................................ 87
Advanced Playback Operations
Playing back tape with picture effect ..... 89
Playing back tape with digital effect ...... 90
Enlarging images recorded on tape
– Tape PB ZOOM ............................... 91
Quickly locating a scene
– Zero set memory ............................. 93
Searching the boundaries of recorded
tape by title – Title search ................. 94
Searching a recording by date
– Date search ....................................... 95
Editing
Dubbing tape ............................................. 97
Dubbing only desired scenes – Digital
program editing (on tape) ............... 100
Recording video or TV programmes ... 111
Inserting a scene from a VCR
– Insert editing .................................. 115
Audio dubbing ........................................ 117
Superimposing a title on a cassette
with Cassette Memory ..................... 123
Making your own titles .......................... 126
Labelling a cassette on a cassette with
Cassette Memory .............................. 128
Erasing all the data in Cassette
Memory ............................................. 129
“Memory Stick” Operations
Using “Memory Stick”
– Introduction ................................... 130
Page 9

Table of contents
Selecting the quality and size of image
data ..................................................... 135
Recording still images on
“Memory Stick”
– Memory Photo recording ............. 139
Recording an image from tape as a still
image .................................................. 147
Superimposing a still image in
“Memory Stick” on an image
– MEMORY MIX .............................. 149
Interval Photo Recording ....................... 154
Recording moving pictures on
“Memory Stick”
– MPEG MOVIE recording ............. 155
Self-timer recording ................................ 157
Recording a picture from tape as a
moving picture ................................. 159
Recording edited pictures from tape as
a moving picture
– Digital program editing
(on “Memory Stick”) ........................ 161
Changing the recording folder .............. 164
Viewing a still image
– Memory Photo playback .............. 166
Viewing a moving picture
– MPEG MOVIE playback .............. 169
Choosing playback folder ...................... 172
Enlarging still images recorded on
“Memory Stick”
– Memory PB ZOOM ....................... 173
Playing back images continuously
– Slide show ...................................... 175
Preventing accidental erasure
– Image protection............................ 176
Deleting images – DELETE ................... 177
Changing image size – Resize ............... 180
Writing a print mark – Print mark ....... 181
Viewing images with a
computer
Viewing images with a computer
– Introduction ................................... 182
Connecting your camcorder to a
computer using the USB cable
(For Windows users) ........................ 186
Viewing pictures recorded on tape on a
computer – USB Streaming
(For Windows users) ........................ 199
Viewing images recorded on
“Memory Stick” on a computer
(For Windows users) ........................ 208
Connecting your camcorder to a
computer using the USB cable
(For Macintosh users) ...................... 213
Viewing images recorded on
“Memory Stick” on a computer
(For Macintosh users) ...................... 216
Capturing images from an analog
video unit on a computer
– Signal convert function................. 218
Using the Network function
(DCR-TRV80E only)
For details, refer to the Network Function/
Application Operating Instructions supplied
with your camcorder.
Accessing the network ........................... 220
Using applications .................................. 222
Customising Your Camcorder
Changing the menu settings .................. 223
Troubleshooting
Types of trouble and how to correct
trouble ................................................ 245
Self-diagnosis display............................. 253
Warning indicators ................................. 254
Warning messages .................................. 255
Additional Information
Usable cassettes ....................................... 267
About the “InfoLITHIUM” battery
pack .................................................... 271
About i.LINK ........................................... 274
Using your camcorder abroad .............. 276
Maintenance information and
precautions ........................................ 277
Specifications ........................................... 285
Quick Reference
Identifying parts and controls ............... 289
Index ......................................................... 298
9
Page 10

Français
Table des matières
Principales caractéristiques ........ 6
Guide de démarrage rapide
– Enregistrement sur la cassette .............. 16
– Enregistrement sur le
« Memory Stick » ................................ 18
Préparatifs
Utilisation de ce manuel .......................... 20
Vérification des accessoires ..................... 23
e
1
étape Préparation de la source
d’alimentation ..................................... 24
Mise en place de la batterie ............... 24
Recharge de la batterie ...................... 25
Raccordement du caméscope à une
prise secteur .................................. 29
e
2
étape Réglage de la date et de l’heure
............................................................... 30
e
3
étape Utilisation de l’écran tactile ...... 33
Enregistrement
– Opérations de base
Enregistrement d’une image ................... 36
Prise de vues de sujets à contre-jour
– Compensation de contre-jour
........................................................ 46
Prise de vues dans l’obscurité
– NightShot/Super NightShot/
Colour Slow Shutter .................... 47
Contrôle de l’enregistrement
– Recherche de fin d’enregistrement/
Recherche de point de montage/
Revue d’enregistrement .................... 50
Lecture – Opérations de base
Lecture d’une cassette .............................. 52
Affichage des indicateurs sur l’écran
– Fonction d’affichage ................. 53
Visionnage d’un enregistrement sur un
téléviseur ............................................. 58
Enregistrement
– Opérations avancées
Enregistrement d’images fixes sur un
« Memory Stick » pendant l’attente
d’enregistrement ou
l’enregistrement sur cassette ............ 60
Enregistrement avec le retardateur ........ 62
Réglage manuel de la balance des
blancs .................................................... 64
Utilisation du mode grand écran ............ 66
10
Transitions en fondu................................. 68
Utilisation d’effets spéciaux
– Effet d’image .................................... 71
Utilisation d’effets spéciaux
– Effet numérique ............................... 72
Utilisation de la fonction
PROGRAM AE ................................... 75
Réglage manuel de l’exposition .............. 77
Utilisation de la mesure ponctuelle de
l’exposition – Spotmètre flexible ...... 78
Mise au point manuelle ............................ 79
Utilisation de la mesure ponctuelle de
l’exposition
– Mise au point ponctuelle ................ 81
Enregistrement échelonné ....................... 82
Enregistrement image par image
– Enregistrement d’images figées .... 84
Enregistrement avec tous les pixels
– Mode d’enregistrement progressif
............................................................... 85
Utilisation du viseur ................................. 87
Lecture – Opérations avancées
Lecture d’une cassette avec effet
d’image ................................................ 89
Lecture d’une cassette avec effet
numérique ........................................... 90
Agrandissement d’images enregistrées
sur une cassette
– PB ZOOM cassette .......................... 91
Localisation rapide d’une scène
– Remise à zéro de la mémoire ......... 93
Recherche d’une séquence d’après le
titre – Recherche de titre .................... 94
Recherche d’une séquence d’après la
date – Recherche de date ................... 95
Montage
Copie d’une cassette ................................. 97
Copie de séquences précises
– Montage numérique de séquences
programmées (sur cassette) ............ 100
Enregistrement de cassettes vidéo ou
d’émissions de télévision ................ 111
Insertion d’une séquence depuis un
magnétoscope
– Montage à insertion ...................... 115
Doublage du son ..................................... 117
Incrustation d’un titre sur une cassette
avec Cassette Memory ..................... 123
Création de titres personnalisés ............ 126
Titrage d’une cassette avec Cassette
Memory ............................................. 128
Effacement de toutes les données de la
Cassette Memory .............................. 129
Page 11

Table des matières
Fonctionnement du
« Memory Stick »
Utilisation du « Memory Stick »
– Introduction ................................... 130
Sélection de la qualité et de la taille des
images ................................................ 135
Enregistrement d’images fixes sur un
« Memory Stick » – Enregistrement
de photos dans la mémoire ............. 139
Enregistrement d’images d’une cassette
sous forme d’images fixes ............... 147
Incrustation d’une image fixe du
« Memory Stick » sur une autre
image – MEMORY MIX ................... 149
Enregistrement échelonné de photos ... 154
Enregistrement d’images animées sur
un « Memory Stick »
– Enregistrement MPEG MOVIE ... 155
Enregistrement avec le retardateur ...... 157
Enregistrement d’images d’une
cassette sous formes d’images
animées .............................................. 159
Copie de séquences d’une cassette sous
forme d’images animées
– Montage numérique de séquences
programmées
(sur un « Memory Stick ») ............... 161
Changement du dossier
d’enregistrement .............................. 164
Visionnage d’images fixes
– Lecture des photos du
« Memory Stick » .............................. 166
Visionnage d’images animées
– Lecture MPEG MOVIE ................. 169
Sélection du dossier de lecture .............. 172
Agrandissement d’images fixes
enregistrées sur un
« Memory Stick »
– PB ZOOM mémoire ...................... 173
Lecture d’images en diaporama
– SLIDE SHOW ................................. 175
Prévention d’un effacement accidentel
– Protection d’images ...................... 176
Suppression d’images – DELETE ......... 177
Changement de la taille des images
– RESIZE ............................................ 180
Inscription de marques d’impression
– PRINT MARK ................................ 181
Visionnage d’images sur un
ordinateur
Visionnage d’images sur un ordinateur
– Introduction ................................... 182
Raccordement du caméscope à un
ordinateur par le câble USB
(Utilisateurs de Windows) .............. 186
Visionnage sur un ordinateur d’images
enregistrées sur une cassette
– USB Streaming (Utilisateurs de
Windows) .......................................... 199
Visionnage sur un ordinateur d’images
enregistrées sur un
« Memory Stick »
(Utilisateurs de Windows) .............. 208
Raccordement du caméscope à un
ordinateur par le câble USB
(Utilisateurs de Macintosh) ............. 213
Visionnage sur un ordinateur d’images
enregistrées sur un
« Memory Stick »
(Utilisateurs de Macintosh) ............. 216
Saisie d’images d’un appareil vidéo
analogique sur un ordinateur
– Fonction de conversion du signal
............................................................. 218
Utilisation de la fonction
Network
(DCR-TRV80E seulement)
Pour le détail, consultez le mode d’emploi de la
fonction/application Réseau fourni avec le
caméscope.
Accès au réseau ....................................... 220
Utilisation des applications ................... 222
Personnalisation du
caméscope
Changement des réglages des
paramètres des menus ..................... 223
Guide de dépannage
Types de problèmes et leurs solutions
............................................................. 256
Affichage d’autodiagnostic ................... 264
Indicateurs d’avertissement .................. 265
Messages d’avertissement ..................... 266
Autres informations
Cassettes utilisables ................................ 267
A propos de la batterie
« InfoLITHIUM » .............................. 271
A propos de la norme i.LINK................ 274
Utilisation du caméscope à l’étranger
............................................................. 276
Entretien et précautions ......................... 277
Spécifications ........................................... 287
Réference rapide
Nomenclature .......................................... 289
Index ......................................................... 299
11
Page 12
English
Quick Start Guide – Recording on tape
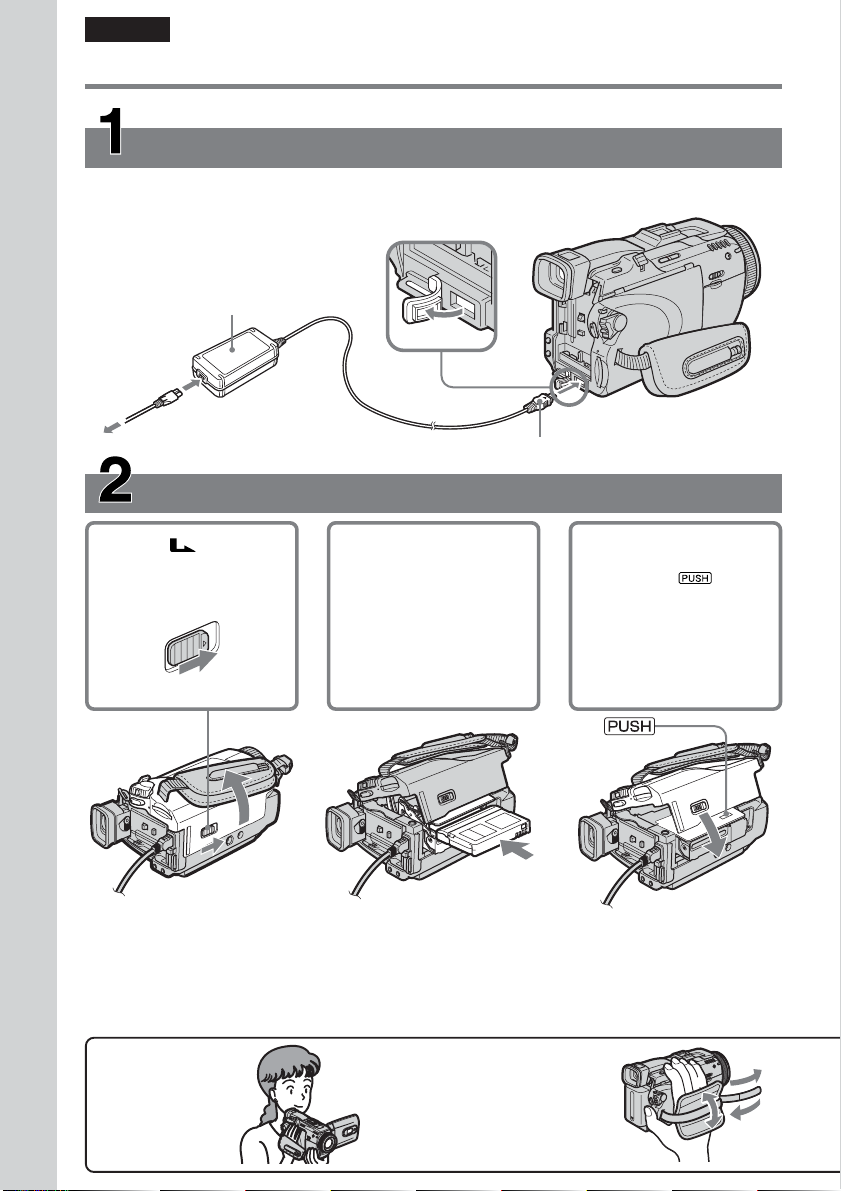
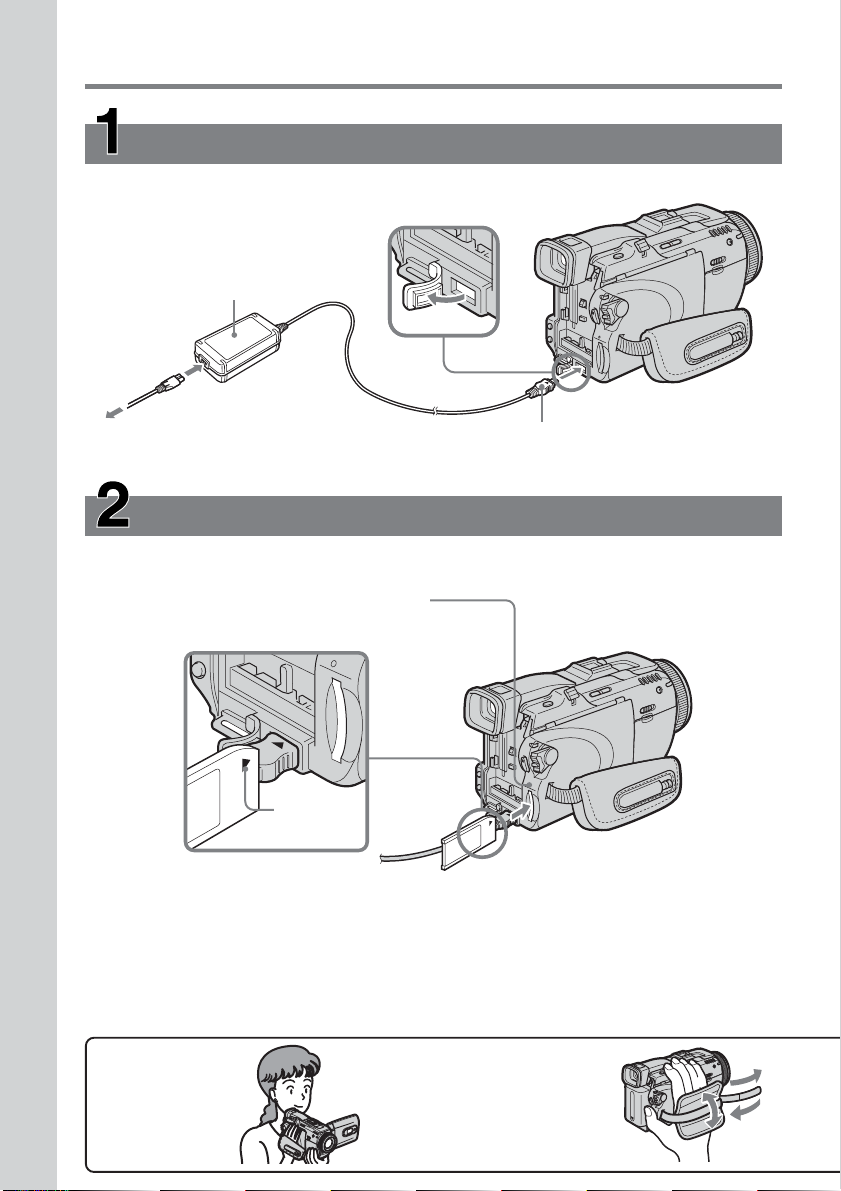
Connecting the mains lead
Use the battery pack when using your camcorder outdoors (p. 24).
Open the DC IN jack cover.
AC Adaptor (supplied)
Connect the plug with its v mark facing up.
Quick Start Guide
Inserting the cassette
1 Slide OPEN/
EJECT in the
direction of the arrow
and open the lid.
2 Push the centre of the
cassette back to insert
the cassette. Insert the
cassette straight as far
as possible into the
cassette compartment
with the window
facing up.
3 Close the cassette
To eject the cassette
Follow the procedures above, and take out the cassette after the cassette compartment opens
completely in step 3.
Note
Do not press the cassette compartment down forcibly. Doing so may cause a malfunction.
How to hold
your camcorder
Fastening the grip belt
Fasten the grip belt firmly.
12
compartment by
pressing
cassette
compartment.
After the cassette
compartment goes
down completely,
close the lid until it
clicks.
on the
1
4
2
3
Page 13
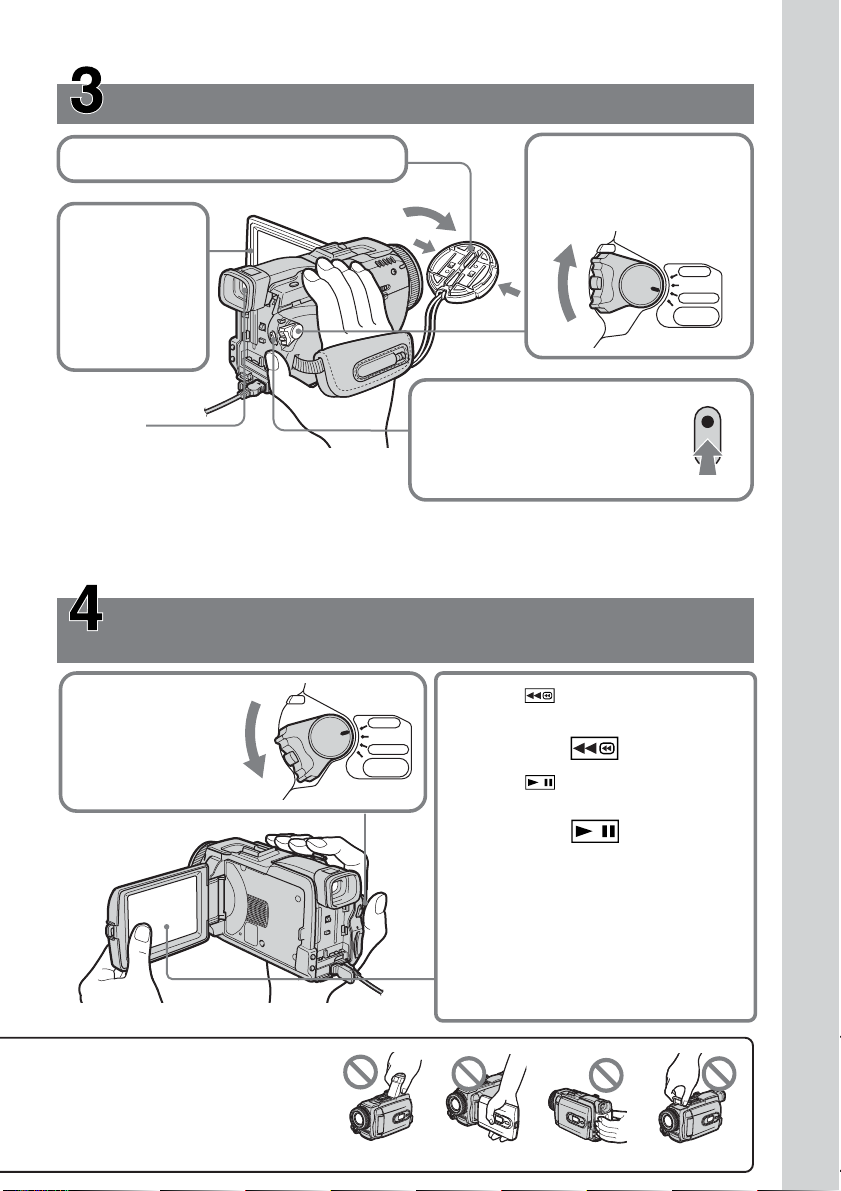
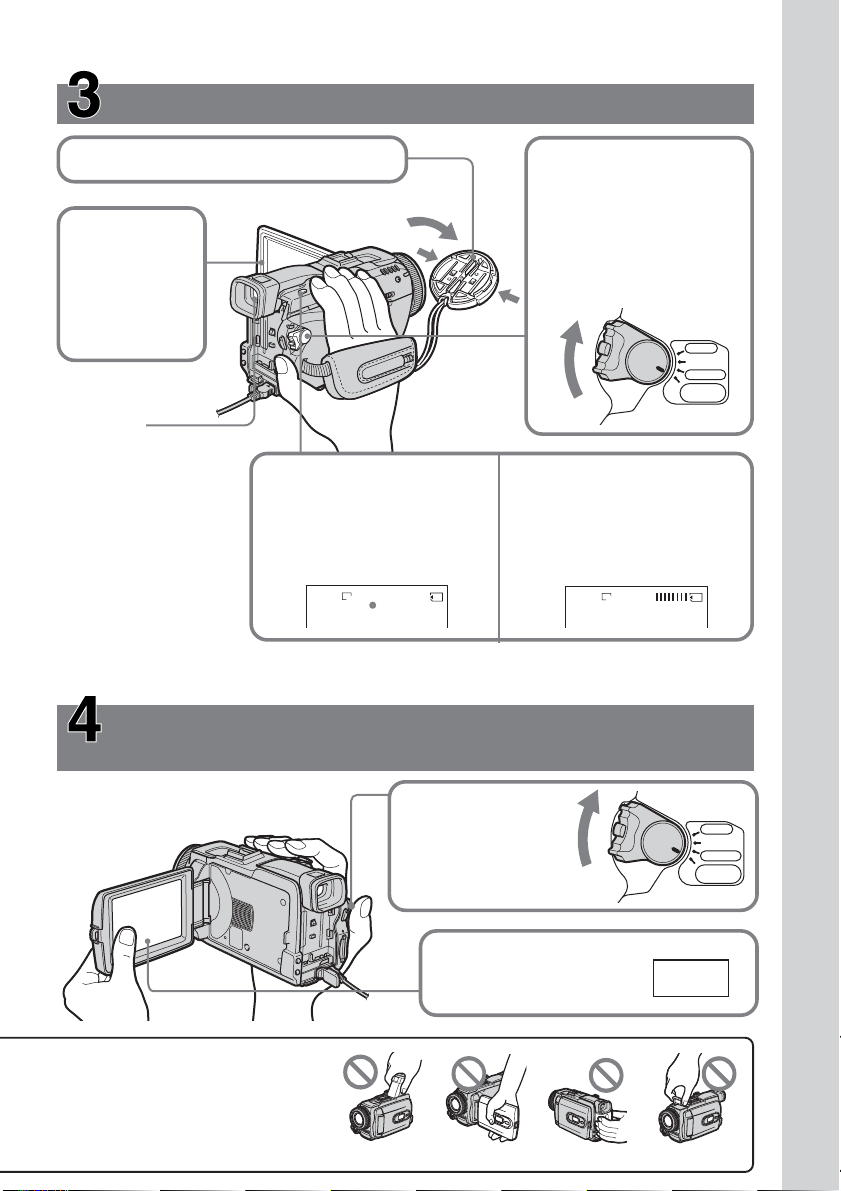
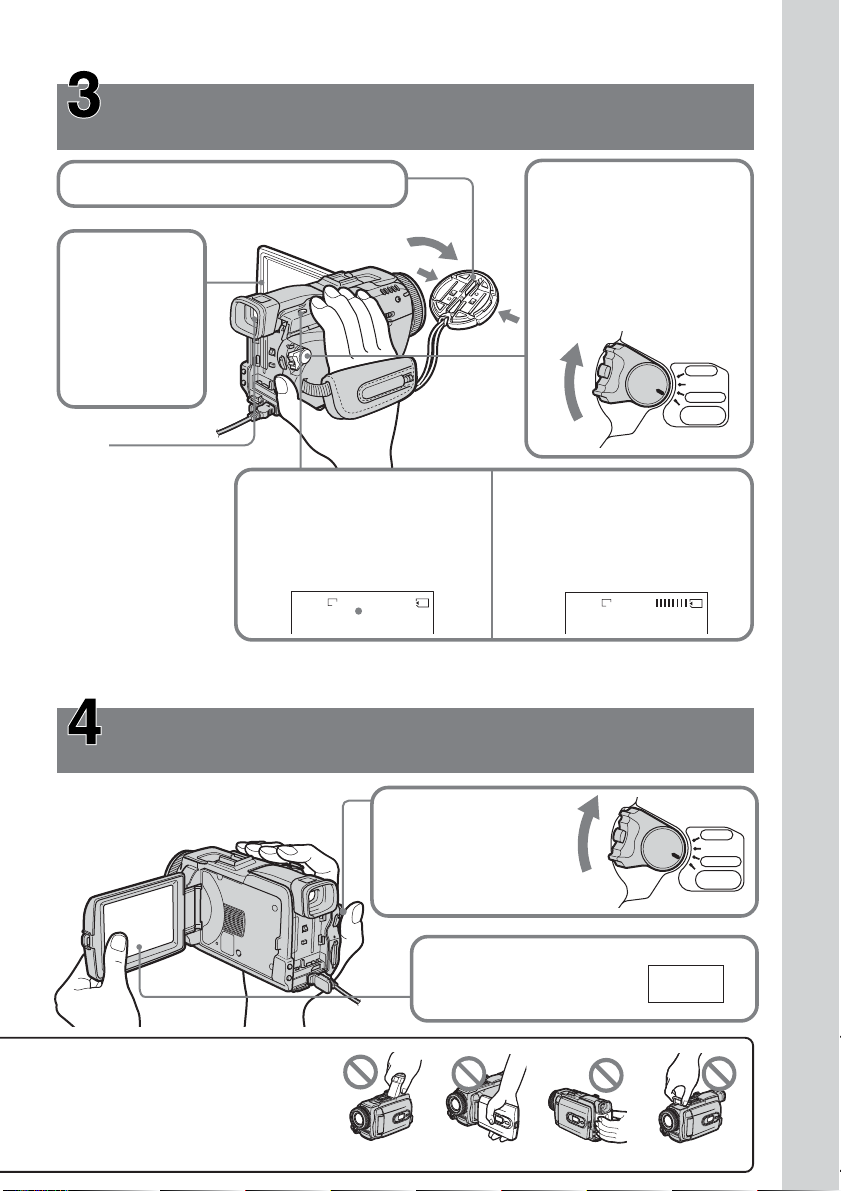
Recording a picture on the tape (p. 36)
1Remove the lens cap.
2Set the POWER switch
to CAMERA while
pressing the small
green button.
3Press OPEN
to open the
LCD panel.
POWER
The picture
appears on
the screen.
Viewfinder
When the LCD panel is closed,
use the viewfinder with your eye against the
eyecup.
4Press START/STOP. Your
camcorder starts recording. To
stop recording, press START/
STOP again.
Adjust the viewfinder lens to your eyesight
(p. 43).
When you purchase your camcorder, the clock setting is set to off. If you want to record the date
and time for a picture, set the clock setting before recording (p. 30).
VCR
OFF(CHG)
CAMERA
MEMORY/
NETWORK
Monitoring the playback picture on the LCD
screen (p. 52)
2Press of the touch panel to
1Set the POWER
switch to VCR
while pressing the
small green button.
VCR
OFF(CHG)
R
E
W
PO
CAMERA
MEMORY/
NETWORK
rewind the tape.
3Press of the touch panel to
start playback.
Quick Start Guide
Do not pick up your camcorder
by holding parts as illustrated.
Note
When using the touch panel, press
operation buttons lightly with your
finger or the supplied stylus (DCRTRV80E only) supporting the LCD
panel from the back side of it. Do not
press the LCD screen with sharp objects
other than the supplied stylus (DCRTRV80E only).
Viewfinder FlashLCD panel Battery pack
13
Page 14
Quick Start Guide – Recording on “Memory Stick”
Connecting the mains lead
Use the battery pack when using your camcorder outdoors (p. 24).
Open the DC IN
jack cover.
AC Adaptor (supplied)
Connect the plug with its v
mark facing up.
Quick Start Guide
While the access lamp is lit or flashing
Do not shake or strike your camcorder because your camcorder is reading the data from the
“Memory Stick” or recording the data on the “Memory Stick.” Do not turn the power off, eject the
“Memory Stick” or remove the battery pack. Otherwise, image data breakdown may occur.
Inserting the “Memory Stick” (p. 134)
Insert the “Memory Stick” in the “Memory Stick” slot as far as it can go with the B mark
facing up as illustrated.
Access lamp
B mark
Press the “Memory Stick”
once lightly to eject it.
How to hold
your camcorder
Fastening the grip belt
Fasten the grip belt firmly.
14
2
1
3
4
Page 15
Recording still images on the “Memory Stick”
(p. 139)
1Remove the lens cap (p. 36).
2Set the POWER switch
to MEMORY while
pressing the small green
button.
3Press OPEN
to open the
LCD panel.
The picture
Make sure that the
LOCK switch is set to
the left (unlock)
position.
appears on
the screen.
PO
VCR
W
E
OFF(CHG)
R
CAMERA
MEMORY/
NETWORK
Viewfinder
When the LCD panel is
closed, use the
viewfinder with your
eye against the eyecup.
Adjust the viewfinder
lens to your eyesight
(p. 43).
4Press PHOTO lightly.
When the green ● mark
stops flashing, then lights
up, you can record a still
image.
FINE
640
12
5Press PHOTO deeply.
The image when you
pressed PHOTO deeply will
be recorded on the “Memory
Stick.”
FINE
640
When you purchase your camcorder, the clock setting is set to off. If you want to record the date
and time for a picture, set the clock setting before recording (p. 30).
Monitoring the playback still image on the LCD
screen (p. 166)
Quick Start Guide
Do not pick up your camcorder
by holding parts as illustrated.
1Set the POWER
switch to MEMORY
while pressing the
small green button.
2Press PLAY. The last
recorded image is
displayed.
Viewfinder FlashLCD panel Battery pack
POWER
PLAY
VCR
OFF(CHG)
CAMERA
MEMORY/
NETWORK
15
Page 16

Français
Guide de démarrage rapide – Enregistrement sur la cassette
Raccordement du cordon d’alimentation
Pour filmer en extérieur, utilisez la batterie (p. 24).
Ouvrez le cache de la prise
DC IN.
Adaptateur secteur (fourni)
Branchez la fiche en dirigeant la marque v vers le haut.
Guide de démarrage rapide
Mise en place de la cassette
1 Faites glisser
OPEN/EJECT dans le
sens de la flèche et
ouvrez le couvercle.
2 Appuyez au centre
du dos de la cassette
pour insérer la
cassette. Insérez-la
tout droit et à fond
dans son logement
avec la fenêtre
tournée vers le haut.
3 Fermez le logement de
cassette en appuyant
sur l’indication
inscrite sur le
logement.
Quand le logement est
abaissé, fermez le
couvercle de sorte qu’il
s’encliquette.
Pour éjecter la cassette
Procédez comme indiqué ci-dessus et sortez la cassette lorsque le logement est complètement
ouvert à l’étape 3.
Remarque
Ne pas appuyer trop fort sur le logement de la cassette. Il risque d’être endommagé.
Prise en main
du caméscope
Fixation de la sangle
Attachez bien la sangle.
16
2
1
3
4
Page 17

Enregistrement d’images sur la cassette (p. 36)
1Enlevez le capuchon d’objectif.
2Réglez le commutateur
POWER sur CAMERA
tout en appuyant sur le
3Appuyez sur
petit bouton vert.
OPEN pour
ouvrir le
panneau
LCD.
L’image
POWER
VCR
OFF(CHG)
CAMERA
MEMORY/
NETWORK
apparaît à
l’écran.
Viseur
Regardez par le viseur en
appliquant l’œil contre l’œilleton
lorsque le panneau LCD est fermé.
4Appuyez sur START/STOP.
L’enregistrement commence.
Pour l’arrêter, appuyez une
nouvelle fois sur START/STOP.
Réglez le viseur à votre vue (p. 43).
Le réglage de l’horloge a été désactivé en usine. Si vous voulez enregistrer la date et l’heure sur
vos films, vous devez régler l’horloge avant de filmer (p. 30).
Contrôle des images sur l’écran LCD après
l’enregistrement (p. 52)
1Réglez le
commutateur
POWER sur
VCR tout en
appuyant sur
le petit bouton
vert.
PO
CAMERA
MEMORY/
NETWORK
VCR
OFF(CHG)
R
E
W
2Appuyez sur de l’écran tactile
pour rembobiner la bande.
3Appuyez sur de l’écran tactile
pour commencer la lecture.
Guide de démarrage rapide
Ne prenez pas le caméscope par
les parties suivantes.
Remarque
Lorsque vous utilisez l’écran tactile,
appuyez légèrement sur les touches avec le
doigt ou le stylet fourni (DCR-TRV80E
seulement) tout en soutenant le panneau
LCD par l’arrière. N’appuyez pas sur
l’écran LCD avec un objet pointu autre que
le stylet fourni (DCR-TRV80E seulement).
Viseur Flash
Panneau LCD
Batterie
17
Page 18

Guide de démarrage rapide
– Enregistrement sur le « Memory Stick »
Raccordement du cordon d’alimentation
Pour filmer en extérieur, utilisez la batterie (p. 24).
Ouvrez le cache de la
prise DC IN.
Adaptateur secteur (fourni)
Branchez la fiche en dirigeant la marque v
vers le haut.
Guide de démarrage rapide
Lorsque le témoin d’accès est allumé ou clignote
Ne secouez et ne cognez pas le caméscope parce qu’il est en train de lire ou d’inscrire des données
sur le « Memory Stick ». N’éteignez pas le caméscope, n’éjectez pas le « Memory Stick » et
n’enlevez pas la batterie. Les données d’images pourraient sinon être détruites.
Mise en place du « Memory Stick » (p. 134)
Insérez à fond le « Memory Stick » dans la fente de « Memory Stick » avec la marque B
orientée vers le haut, comme sur l’illustration.
Témoin d’accès
Repère B
Appuyez une fois brièvement
sur le « Memory Stick » pour
l’éjecter.
Prise en main
du caméscope
Fixation de la sangle
Attachez bien la sangle.
18
2
1
3
4
Page 19
Enregistrement d’images fixes sur le
« Memory Stick » (p. 139)
1Enlevez le capuchon d’objectif (p. 36).
2Réglez le commutateur
POWER sur MEMORY
tout en appuyant sur le
3Appuyez sur
OPEN pour
ouvrir le
panneau
LCD.
petit bouton vert.
Assurez-vous que le
commutateur LOCK est
bien à gauche (position
de déverrouillage).
L’image
apparaît à
l’écran.
PO
VCR
W
E
OFF(CHG)
R
CAMERA
MEMORY/
NETWORK
Viseur
Regardez par le
viseur en
appliquant l’œil
contre l’œilleton
lorsque le
panneau LCD est
fermé.
Réglez le viseur à
votre vue (p. 43).
4Appuyez légèrement sur
PHOTO.
Lorsque la marque verte ●
cesse de clignoter, puis
s’allume, l’image fixe peut
être enregistrée.
FINE
640
12
5Appuyez à fond sur PHOTO.
L’image affichée s’enregistre
sur le « Memory Stick »
lorsque vous appuyez à fond
sur PHOTO.
FINE
640
Le réglage de l’horloge a été désactivé en usine. Si vous voulez enregistrer la date et l’heure sur
vos images, vous devez régler l’horloge avant de filmer (p. 30).
Contrôle des images fixes sur l’écran LCD après
l’enregistrement (p. 166)
Guide de démarrage rapide
Ne prenez pas le caméscope par
les parties indiquées sur
l’illustration.
1Réglez le
commutateur POWER
sur MEMORY tout en
appuyant sur le petit
bouton vert.
2Appuyez sur PLAY. La
dernière image
enregistrée apparaît.
Viseur FlashPanneau LCD Batterie
POWER
PLAY
VCR
OFF(CHG)
CAMERA
MEMORY/
NETWORK
19
Page 20
— Getting Started —
Using this manual
— Préparatifs —
Utilisation de ce
manuel
The instructions in this manual are for the two
models listed in the table below. Before you start
reading this manual and operating your
camcorder, check the model number by looking
at the bottom of your camcorder. The DCRTRV80E is the model used for illustration
purposes. Otherwise, the model name is
indicated in the illustrations. Any differences in
operation are clearly indicated in the text, for
example, “DCR-TRV80E only.”
As you read through this manual, buttons and
settings on your camcorder are shown in capital
letters.
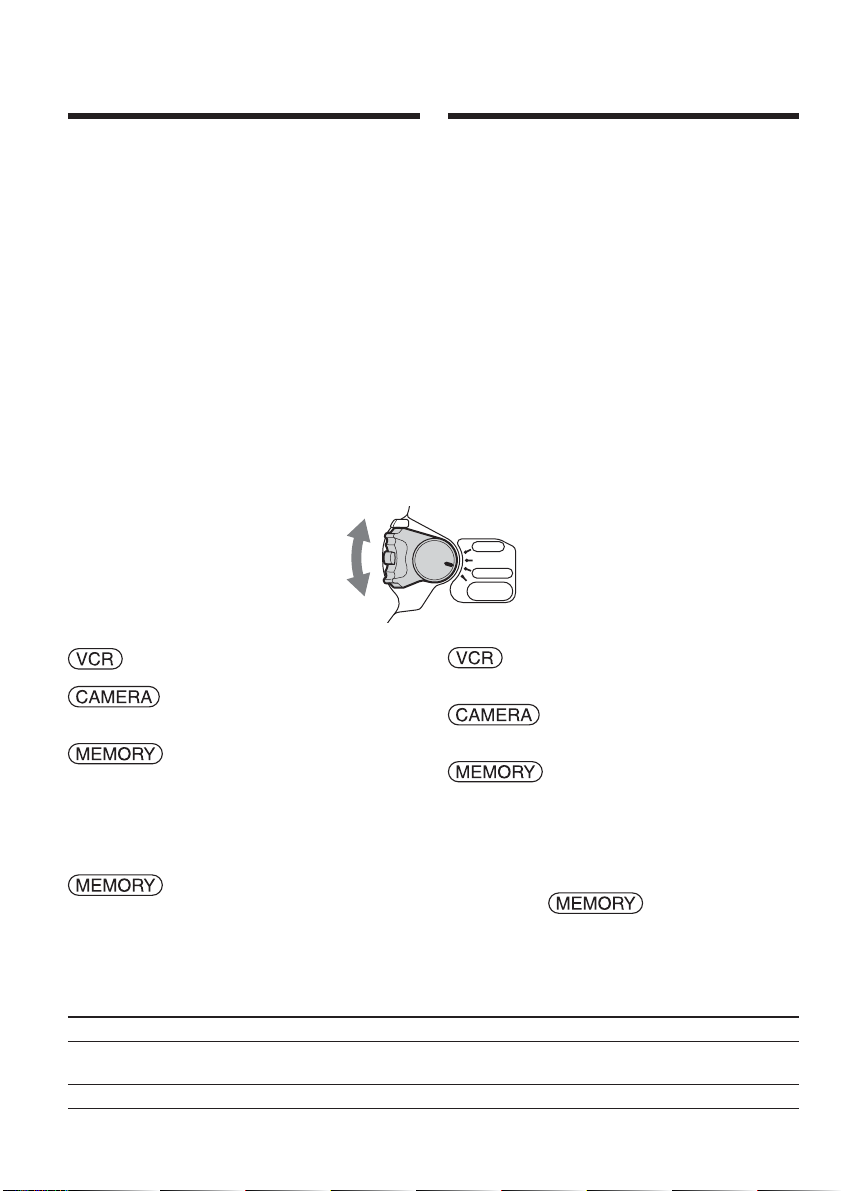
After “Advanced Recording Operations” section
of this manual, position of the POWER switch is
shown by the icons below.
: Set the POWER switch to VCR.
: Set the POWER switch to
CAMERA.
: Set the POWER switch to
MEMORY/NETWORK (DCRTRV80E only).
DCR-TRV80E only
The MEMORY/NETWORK position of the
POWER switch is shown as MEMORY or
in this manual.
When you carry out an operation, you can hear a
beep to indicate that the operation is being
carried out.
Les instructions de ce mode d’emploi sont
destinées aux deux modèles indiqués ci-dessous.
Avant de lire ce mode d’emploi et de filmer,
vérifiez le numéro de votre modèle sous votre
caméscope. Les illustrations du mode d’emploi
représentent le DCR-TRV80E, sauf mention
contraire. Toute différence de fonctionnement est
clairement signalée dans le texte, par exemple,
« DCR-TRV80E seulement ».
Dans ce mode d’emploi, les touches et les
réglages sont toujours indiqués en majuscules.
A partir de la section « Enregistrement –
Opérations d’enregistrement avancées » de ce
manuel, la position du commutateur POWER est
indiquée par les icônes suivantes.
POWER
VCR
OFF(CHG)
CAMERA
MEMORY/
NETWORK
: Réglez le commutateur POWER
sur VCR.
: Réglez le commutateur POWER
sur CAMERA.
: Réglez le commutateur POWER
sur MEMORY/NETWORK
(DCR-TRV80E seulement).
DCR-TRV80E seulement
La position MEMORY/NETWORK du
commutateur POWER est indiquée par
MEMORY ou dans ce manuel.
Chaque opération effectuée est confirmée par un
signal sonore.
Types of differences/Différences entre les modèles
DCR- TRV75E TRV80E
Mark on the POWER switch/
Indication autour du commutateur POWER
Network function/Fonction Réseau — z
z Provided/Présent
20
— Not provided/Absent
MEMORY MEMORY/NETWORK
Page 21

Using this manual Utilisation de ce manuel
Note on Cassette Memory
Your camcorder is based on the DV format. You
can use only mini DV cassettes with your
camcorder. We recommend that you use a
cassette with Cassette Memory .
Cassettes with Cassette Memory have the
(Cassette Memory) mark.
Note on TV colour systems
TV colour systems differ depending on the
country or area. To view your recordings on a
TV, you need a PAL system-based TV.
Copyright precautions
Television programmes, films, video tapes, and
other materials may be copyrighted.
Unauthorised recording of such materials may be
contrary to the copyright laws.
Note on connecting to other
devices
If you connect your camcorder to a VCR or
computer using the USB cable or the i.LINK
cable, make sure that the jack is connected in the
right direction. Pushing it forcibly may damage
the jack or cause your camcorder to malfunction.
Remarque sur les cassettes à
Cassette Memory
Ce caméscope emploie le format DV. Vous ne
pouvez utiliser que des minicassettes DV avec ce
caméscope. Il est conseillé d’utiliser les cassettes
à Cassette Memory (cassette à puce).
Ces cassettes portent la marque (Cassette
Memory).
Remarque sur les standards de
télévision couleur
Les standards de télévision couleur sont
différents d’un pays à l’autre. Pour regarder vos
films sur un téléviseur, vous devrez utiliser un
téléviseur de standard PAL.
Précautions concernant les
droits d’auteur
Les émissions de télévision, les films, les cassettes
vidéo et autres enregistrements peuvent être
protégés par des droits d’auteur. La duplication
non autorisée de ces enregistrements peut être
contraire aux lois sur la propriété artistique.
Remarque sur le raccordement
à d’autres appareils
Si vous raccordez votre caméscope à un
magnétoscope ou un ordinateur par le câble USB
ou un câble i.LINK, assurez-vous que la fiche est
insérée dans le bon sens. Ne forcez pas pour ne
pas endommager la prise ou le caméscope.
Getting Started Préparatifs
21
Page 22

Using this manual
Utilisation de ce manuel
Precautions on camcorder care
Lens and LCD screen/finder (on
mounted models only)
•The LCD screen and the finder are
manufactured using extremely highprecision technology, so over 99.99% of the
pixels are operational for effective use.
However, there may be some tiny black
points and/or bright points (white, red, blue
or green in colour) that constantly appear on
the LCD screen and the finder. These points
are normal in the manufacturing process and
do not affect the recording in any way.
•Do not let your camcorder get wet. Keep your
camcorder away from rain and sea water.
Letting your camcorder get wet may cause your
camcorder to malfunction. Sometimes this
malfunction cannot be repaired [a].
•Never leave your camcorder exposed to
temperatures above 60°C (140°F), such as in a
car parked in the sun or under direct sunlight
[b].
•Be careful when placing the camera near a
window or outdoors. Exposing the LCD screen,
the finder or the lens to direct sunlight for long
periods may cause malfunctions [c].
•Do not directly shoot the sun. Doing so might
cause your camcorder to malfunction. Take
pictures of the sun in low light conditions such
as dusk [d].
Précautions concernant le
caméscope
Objectif et écran LCD/viseur (sur les
appareils concernés)
•L’écran LCD et le viseur sont le produit d’une
technologie pointue et plus de 99,99% des
pixels sont opérationnels. Cependant, on
peut constater de très petits points noirs et/
ou lumineux (blancs, rouges, bleus ou verts)
apparaissant en permanence sur l’écran LCD
et dans le viseur. Ces points sont normaux et
proviennent du processus de fabrication ; ils
n’affectent en aucun cas l’image enregistrée.
•Evitez de mouiller le caméscope. Protégez le
caméscope de la pluie ou de l’eau de mer. La
pluie et l’eau de mer peuvent provoquer des
dégâts parfois irréparables [a].
•N’exposez jamais le caméscope à des
températures supérieures à 60°C, comme en
plein soleil ou dans une voiture garée au soleil
[b].
•Veillez à ne pas poser le caméscope trop
longtemps près d’une fenêtre ou à l’extérieur.
L’exposition de l’écran LCD, du viseur ou de
l’objectif au soleil peut causer une panne [c].
•Ne filmez pas directement le soleil. La chaleur
peut causer une panne. Filmez le soleil lorsque
la lumière est faible, par exemple en soirée [d].
22
[a][b]
[c][d]
Page 23

Checking supplied
accessories
Vérification des
accessoires
Make sure that the following accessories are
supplied with your camcorder.
1
4
9
qf qg
1 AC-L15A/L15B AC Adaptor (1), Mains lead
(1) (p. 25)
2 NP-FM50 rechargeable battery pack (1)
(p. 24, 25)
3 A/V connecting cable (1) (p. 58)
4 Wireless Remote Commander (1) (p. 294)
5 R6 (Size AA) battery for Remote
Commander (2) (p. 295)
6 Shoulder strap (1)
7 Lens cap (1) (p. 36)
8 Lens hood (1) (p. 44)
9 “Memory Stick” (1) (p. 130)
0 USB cable (1) (p. 182)
qa CD-ROM (SPVD-010 USB Driver) (1) (p. 189)
qs Cleaning cloth (1) (p. 279)
qd Stylus (1) (DCR-TRV80E only) (p. 221)
qf Shoe cover (1) (p. 118)
qg 21-pin adaptor* (1) (p. 59)
* The models with mark printed on their
bottom surfaces only.
Contents of the recording cannot be
compensated if recording or playback is not
made due to a malfunction of the camcorder,
storage media, etc.
5
q;
6
qa
Vérifiez si tous les accessoires suivants sont
fournis avec le caméscope.
2
7
qs
1 Adaptateur AC-L15A/L15B (1), Cordon
d’alimentation (1) (p. 25)
2 Batterie rechargeable NP-FM50 (1) (p. 24, 25)
3 Cordon de liaison audio/vidéo (1) (p. 58)
4 Télécommande sans fil (1) (p. 294)
5 R6 (Piles AA) pour la télécommande (2)
(p. 295)
6 Bandoulière (1)
7 Capuchon d’objectif (1) (p. 36)
8 Pare-soleil (1) (p. 44)
9 « Memory Stick » (1) (p. 130)
0 Câble USB (1) (p. 182)
qa CD-ROM (pilote SPVD-010 USB) (1) (p. 189)
qs Tissu de nettoyage (1) (p. 279)
qd Stylet (1) (DCR-TRV80E seulement) (p. 221)
qf Cache-griffe (1) (p. 118)
qg Adaptateur 21 broches* (1) (p. 59)
* Seulement pour les modèles portant la
marque sous le caméscope.
Aucune compensation ne peut être accordée si
la lecture ou l’enregistrement ont été
impossibles en raison d’un mauvais
fonctionnement du caméscope, du support
d’enregistrement ou d’un autre problème.
3
8
qd
Getting Started Préparatifs
23
Page 24

Step 1 Preparing the
power source
1e étape Préparation de
la source
d’alimentation
Installing the battery pack
(1)Lift up the viewfinder.
(2)Slide the battery pack down until it clicks.
To remove the battery pack
(1)Lift up the viewfinder.
(2)Slide the battery pack out in the direction of
the arrow while pressing BATT down.
Mise en place de la batterie
(1)Relevez le viseur.
(2)Faites glisser la batterie vers le bas jusqu’au
déclic.
1
2
Pour enlever la batterie
(1)Relevez le viseur.
(2)Faites glisser la batterie dans le sens de la
flèche tout en appuyant sur BATT.
1
2
BATT release
button/
Bouton de
libération de la
batterie BATT
2
If you use the large capacity battery pack
If you install the NP-FM70/QM71/QM71D/
FM91/QM91/QM91D battery pack on your
camcorder, extend its viewfinder.
24
Si vous utilisez une batterie de grande
capacité
Si vous installez une batterie NP-FM70/QM71/
QM71D/FM91/QM91/QM91D sur le
caméscope, tirez le viseur.
Page 25

Step 1 Preparing the power
source
1e étape Préparation de la source
d’alimentation
Charging the battery pack
Use the battery pack after charging it for your
camcorder.
Your camcorder operates only with the
“InfoLITHIUM” battery pack (M series).
See page 271 for details of “InfoLITHIUM”
battery pack.
(1)Install the battery pack on your camcorder.
(2)Connect the AC Adaptor supplied with your
camcorder to the DC IN jack with the DC
plug’s v mark facing up.
(3)Connect the mains lead to the AC Adaptor.
(4)Connect the mains lead to a wall socket.
(5)Set the POWER switch to OFF (CHG).
Charging begins. The remaining battery time
is indicated in minutes in the display window.
When the remaining battery time indicator
changes to , normal charge is complete. To
fully charge the battery pack (full charge), leave
the battery pack attached for about one hour after
normal charge is complete until the FULL
indicator appears in the display window. Fully
charging the battery pack allows you to use the
battery pack longer than usual.
Recharge de la batterie
Chargez la batterie avant d’utiliser le caméscope.
Ce caméscope ne fonctionne qu’avec une batterie
de type « InfoLITHIUM » (modèle M).
Voir page 271 pour le détail sur les batteries
« InfoLITHIUM ».
(1)Installez la batterie sur votre caméscope.
(2)Raccordez l’adaptateur secteur fourni avec le
caméscope à la prise DC IN avec le repère v
sur la fiche DC orienté vers le haut.
(3)Raccordez le cordon d’alimentation à
l’adaptateur secteur.
(4)Raccordez le cordon d’alimentation à une
prise secteur.
(5)Réglez le commutateur POWER sur OFF
(CHG). La recharge commence. L’autonomie
de la batterie est indiquée en minutes sur
l’afficheur.
Lorsque l’indicateur d’autonomie devient , la
recharge normale est terminée. Pour une
recharge complète, laissez la batterie une heure
de plus environ sur le caméscope après la
recharge normale et l’affichage de l’indicateur
FULL sur l’afficheur. Après une recharge
complète, la batterie peut être utilisée plus
longtemps.
Getting Started Préparatifs
3
2
5
POWER
VCR
OFF(CHG)
CAMERA
MEMORY/
NETWORK
25
Page 26

Step 1 Preparing the power
source
1e étape Préparation de la source
d’alimentation
After charging the battery pack
Disconnect the AC Adaptor from the DC IN jack
on your camcorder.
Note
Prevent metallic objects from coming into contact
with the metal parts of the DC plug of the AC
Adaptor. This may cause a short-circuit,
damaging the AC Adaptor.
When you use the AC Adaptor
Place the AC Adaptor near a wall socket. While
using the AC Adaptor if any trouble occurs with
this unit, disconnect the plug from a wall socket
as soon as possible to cut off the power.
Remaining battery time indicator
The remaining battery time indicator in the
display window indicates the approximate
recording time when recording with the
viewfinder.
Until your camcorder calculates the actual
remaining battery time
“---- min” appears in the display window.
Charging time/Temps de recharge
Battery pack/ Full charge (Normal charge)/
Batterie Recharge complète (Recharge normale)
NP-FM50 (supplied)/(fournie) 150 (90)
NP-FM70 240 (180)
NP-QM71/QM71D 260 (200)
NP-FM91/QM91/QM91D 360 (300)
Après la recharge de la batterie
Débranchez l’adaptateur secteur de la prise DC
IN du caméscope.
Remarque
Les parties métalliques de la fiche CC de
l’adaptateur secteur ne doivent pas toucher
d’objets métalliques. Sinon un court-circuit peut
endommager l’adaptateur secteur.
Lorsque vous utilisez l’adaptateur secteur
Placez l’adaptateur secteur près d’une prise
secteur. En cas de problème, débranchez
immédiatement la fiche de l’adaptateur secteur
de la prise pour couper l’alimentation.
Indicateur d’autonomie de la batterie
L’indicateur d’autonomie de la batterie indique
approximativement le temps d’enregistrement
disponible avec le viseur.
Pendant le calcul de l’autonomie de la batterie
« ---- min » apparaît sur l’afficheur.
Approximate minutes at 25°C (77°F) to charge an
empty battery pack
The charging time may increase if the battery’s
temperature is extremely high or low because of
the ambient temperature.
26
Temps approximatif indiqué en minutes pour
recharger une batterie vide à 25°C
Le temps de recharge peut être plus long si la
batterie devient extrêmement chaude ou froide à
cause de la température ambiante.
Page 27

Step 1 Preparing the power
source
Recording time/Temps d’enregistrement
Recording with the viewfinder/ Recording with the LCD screen/
Battery pack/
Batterie Continuous/ Typical*/ Continuous/ Typical*/
NP-FM50 (supplied)/
(fournie)
NP-FM70 265 155 205 120
NP-QM71/QM71D 305 175 240 140
NP-FM91/QM91/QM91D 465 270 365 215
Enregistrement avec le viseur Enregistrement avec l’écran LCD
Continu Normal* Continu Normal*
125 70 95 55
1e étape Préparation de la source
d’alimentation
Getting Started Préparatifs
Approximate minutes when you use a fully
charged battery pack
* Approximate number of minutes when
recording while you repeat recording start/
stop, zooming and turning the power on/off.
The actual battery life may be shorter.
Playing time/Temps de lecture
Battery pack/ the LCD panel closed/ the LCD screen/
Batterie Temps de lecture Temps de lecture
avec l’écran LCD fermé avec l’écran LCD ouvert
NP-FM50 (supplied)/(fournie) 200 140
NP-FM70 415 295
NP-QM71/QM71D 485 340
NP-FM91/QM91/QM91D 725 520
Approximate minutes when you use a fully
charged battery pack
Note
Approximate recording time and continuous
playing time at 25°C (77°F). The battery life will
be shorter if you use your camcorder in a cold
environment.
Temps approximatif indiqué en minutes
lorsqu’une batterie complètement chargée est
utilisée
* Temps approximatif d’enregistrement en
minutes avec marche/arrêt d’enregistrement,
zooming et mise sous et hors tension répétés.
L’autonomie réelle de la batterie peut être
inférieure.
Playing time with Playing time on
Temps approximatif indiqué en minutes
lorsqu’une batterie complètement chargée est
utilisée
Remarque
Temps approximatif d’enregistrement et de
lecture continus à 25°C. L’autonomie de la
batterie sera plus courte si vous utilisez le
caméscope dans un lieu froid.
27
Page 28

Step 1 Preparing the power
source
1e étape Préparation de la source
d’alimentation
Checking status of battery pack
– Battery Info
(1)Set the POWER switch to OFF (CHG).
(2)Press OPEN to open the LCD panel.
(3)Press DISPLAY/BATTERY INFO.
The battery charge level (the percentage of
remaining battery time) and remaining
battery time when using the LCD screen or
viewfinder are displayed for about seven
seconds.
If you keep pressing DISPLAY/BATTERY
INFO, the Battery Info is displayed for up to
about 20 seconds.
3
BATTERY CHARGE LEVEL
0% 50%
DISPLAY/
BATTERY INFO
REC TIME AVAILABLE
LCD SCREEN
VIEWFINDER::76100
During charging/
Pendant la recharge
BATTERY INFO
Vérification de l’état de la
batterie – Infos de la batterie
(1)Réglez le commutateur POWER sur OFF
(CHG).
(2)Appuyez sur OPEN pour ouvrir le panneau
LCD.
(3)Appuyez sur DISPLAY/BATTERY INFO.
Le niveau de charge de la batterie (le
pourcentage de temps restant) et l’autonomie
(le temps restant) sont indiqués pendant sept
secondes environ sur l’écran LCD ou le
viseur.
Si vous maintenez la pression sur DISPLAY/
BATTERY INFO, les infos de la batterie
apparaissent pendant 20 secondes environ.
BATTERY INFO
100%
min
min
BATTERY CHARGE LEVEL
0% 50% 100%
REC TIME AVAILABLE
LCD SCREEN
VIEWFINDER::95125
min
min
Fully charged/
Recharge complète
Note
The BATTERY INFO indicator is not displayed in
the following cases:
– The battery pack is not properly installed.
– Something is wrong with the battery pack.
– The battery pack is fully discharged.
Battery Info
The number displayed as Battery Info is the
approximate recording time.
While the remaining battery time is being
calculated
“CALCULATING BATTERY INFO...” is
28
displayed.
Remarque
L’indicateur BATTERY INFO n’apparaît pas dans
les cas suivants :
– La batterie n’est pas installée correctement.
– La batterie ne fonctionne pas correctement.
– La batterie est complètement déchargée.
Infos de la batterie
Le nombre indique le temps approximatif
d’enregistrement.
Pendant le calcul de l’autonomie de la batterie
« CALCULATING BATTERY INFO... » apparaît.
Page 29

Step 1 Preparing the power
source
1e étape Préparation de la source
d’alimentation
Connecting to a wall socket
Connect in the same way as when charging the
battery pack (p. 25).
PRECAUTION
The set is not disconnected from the AC power
source (mains) as long as it is connected to the
wall socket, even if the set itself has been turned
off.
Notes
•The AC Adaptor can supply power from a wall
socket even if the battery pack is attached to
your camcorder.
•The DC IN jack has “source priority.” This
means that the battery pack cannot supply any
power if the mains lead is connected to the DC
IN jack, even when the mains lead is not
plugged into a wall socket.
Raccordement du caméscope à
une prise secteur
Raccordez le caméscope de la même manière que
lorsque vous rechargez la batterie (p. 25).
PRÉCAUTION
L’appareil n’est pas déconnecté de la source
d’alimentation secteur (le courant domestique)
tant qu’il est raccordé à la prise secteur, même s’il
est éteint.
Remarques
•Le caméscope peut être alimenté par le courant
secteur via l’adaptateur secteur même lorsque
la batterie lui est rattachée.
•La prise DC IN est la « source prioritaire ».
C’est-à-dire que la batterie ne fournira pas
l’alimentation si le cordon d’alimentation est
raccordé à la prise DC IN, même s’il n’est pas
raccordé à une prise secteur.
Getting Started Préparatifs
29
Page 30

Step 2 Setting the
date and time
2e étape Réglage de la
date et de
l’heure
Set the date and time when you use your
camcorder for the first time. The “CLOCK SET”
indicator will appear each time you set the
POWER switch to CAMERA or MEMORY unless
you set the date and time settings.
If you do not set the date and time, “-- -- ----” and
“--:--:--” are recorded on the tape or the “Memory
Stick” as the data code.
If you do not use your camcorder for about
three months, the date and time settings may be
released (bars may appear) because the built-in
rechargeable battery installed in your camcorder
will have been discharged (p. 279). In this case,
charge the built-in rechargeable battery, then set
your area, the summer time, the year, the month,
the day, the hour and the minute.
(1) Set the POWER switch to CAMERA or
MEMORY.
(2) Press FN (Function) to display PAGE1
(p. 33).
(3) Press MENU to display the menu.
(4) Press r/R to select , then press EXEC.
(5) Press r/R to select CLOCK SET, then press
EXEC.
(6) Press r/R to select your area, then press
EXEC.
(7) Press r/R to select whether your area is in
the summer time or not, then press EXEC.
(8) Press r/R to select a desired year, then press
EXEC.
(9) Set the month, day and hour with the same
procedure as step 8.
(10) Press r/R to set the minute, then press EXEC
by the time signal. The clock starts to move.
Réglez la date et l’heure la première fois que
vous utilisez le caméscope. Si vous ne le faites
pas, l’indicateur « CLOCK SET » s’affichera
chaque fois que vous mettrez le commutateur
POWER sur CAMERA ou MEMORY.
Si vous ne réglez pas la date et l’heure,
« -- -- ---- » et « -- : -- : -- » sont enregistrés sur la
cassette ou le « Memory Stick » à la place du code
de données.
Si vous n’utilisez pas votre caméscope pendant
trois mois environ, la date et l’heure seront
effacées (des tirets apparaissent à la place) parce
que la pile installée dans le caméscope est
déchargée (p. 279). Dans ce cas, rechargez la pile
interne et réglez le fuseau, l’heure d’été, l’année,
le mois, le jour, les heures et enfin les minutes.
(1) Réglez le commutateur POWER sur
CAMERA ou MEMORY.
(2) Appuyez sur FN (Fonction) pour afficher la
PAGE1 (p. 33).
(3) Appuyez sur MENU pour afficher le menu.
(4) Appuyez sur r/R pour sélectionner , puis
appuyez sur EXEC.
(5) Appuyez sur r/R pour sélectionner CLOCK
SET, puis appuyez sur EXEC.
(6) Appuyez sur r/R pour sélectionner le
fuseau, puis appuyez sur EXEC.
(7) Appuyez sur r/R pour sélectionner l’heure
d’été ou l’heure d’hiver, puis appuyez sur
EXEC.
(8) Appuyez sur r/R pour sélectionner l’année,
puis appuyez sur EXEC.
(9) Réglez le mois, le jour et l’heure en
procédant comme à l’étape 8.
(10) Appuyez sur r/R pour régler les minutes,
puis appuyez sur EXEC au top horaire.
L’horloge se met en marche.
30
Page 31

Step 2 Setting the date and time
2e étape Réglage de la date et de
l’heure
4
6
2
FN
To return to FN (Function)
Press EXIT.
When using your camcorder abroad
Set the clock to the local time (p. 32).
If you use your camcorder in an area where
summer time is used
Set SUMMERTIME in to ON in the menu
settings.
Note on the time indicator
The internal clock of your camcorder operates on
a 24-hour cycle.
8
SETUP MENU
CLOCK SET
USB STREAM
LANGUAGE
DEMO MODE
Rr
EXEC
CLOCK SET
AREA 2
Berlin, Paris
SUMMERTIME OFF
ON
DATE Y M D
– – – – – – – – – – : – –
Rr
EXEC
CLOCK SET
AREA 2
Berlin, Paris
OFF
SUMMERTIME
DATE Y M D
2003
1 12 : 00
1
Rr
EXEC
EXIT
––:––:––
RET.
EXIT
GMT +1.0
EXIT
GMT +1.0
RRR RR
rrRrrrr
5
CLOCK SET
AREA 1
SUMMERTIME OFF
DATE Y M D
7
CLOCK SET
AREA 2
SUMMERTIME
DATE Y M D
10
SETUP MENU
CLOCK SET
USB STREAM
LANGUAGE
DEMO MODE
Lisbon, London
– – – – – – – – – – : – –
Rr
Berlin, Paris
RRR RR
2003
1
rrr rr
Rr
Rr
R
GMT +0.0
r
EXEC
GMT +1.0
OFF
1 12 : 00
EXEC
4 7 2003
17:30:00
EXEC
EXIT
EXIT
EXIT
RET.
Pour revenir à FN (Fonction)
Appuyez sur EXIT.
Lorsque vous utilisez le caméscope à
l’étranger
Réglez l’horloge sur l’heure locale (p. 32).
Si vous utilisez le caméscope à un endroit où
l’heure d’été est utilisée
Réglez SUMMERTIME sur ON dans des
paramètres du menu.
Remarque sur l’indication de l’heure
L’horloge interne du caméscope fonctionne selon
un cycle de 24 heures.
Getting Started Préparatifs
31
Page 32

Step 2 Setting the date and time
2e étape Réglage de la date et de
l’heure
Simple setting of clock by time
difference
You can easily set the clock to the local time by
setting a time difference. Select AREA SET and
SUMMERTIME in in the menu settings.
See page 233 for details.
World time difference
192021 2223 2425 2627293031 1 2346810121314161718
Area
Time-zone
code/
differences/ Area setting/
Code
Décalage Réglage de fuseau
de
horaire
fuseau
1
GMT
2
+01:00
3
+02:00
4
+03:00
5
+03:30
6
+04:00
7
+04:30
8
+05:00
9
+05:30
10
+06:00
11
+06:30
12
+07:00
13
+08:00
14
+09:00
15
+09:30
16
+10:00
Lisbon, London
Berlin, Paris
Helsinki, Cairo
Moscow, Nairobi
Tehran
Abu Dhabi, Baku
Kabul
Karachi, Islamabad
Calcutta, New Delhi
Almaty, Dhaka
Rangoon
Bangkok, Jakarta
HongKong, Singapore
Seoul, Tokyo
Adelaide, Darwin
Melbourne, Sydney
32
Réglage de l’heure par le
décalage horaire
Vous pouvez facilement régler l’heure locale en
spécifiant le décalage horaire. Sélectionnez AREA
SET et SUMMERTIME dans des paramètres
du menu.
Voir page 243 pour le détail.
Décalage horaire
Area
Time-zone
code/
differences/ Area setting/
Code
Décalage Réglage de fuseau
de
horaire
fuseau
17
+11:00
+12:00
18
–12:00
19
–11:00
20
–10:00
21
–09:00
22
–08:00
23
–07:00
24
–06:00
25
–05:00
26
–04:00
27
–03:30
28
–03:00
29
–02:00
30
–01:00
31
Solomon Is
Fiji, Wellington
Eniwetok, Kwajalein
Midway Is., Samoa
Hawaii
Alaska
LosAngeles, Tijuana
Denver, Arizona
Chicago, MexicoCity
New York, Bogota
Santiago
St. John’s
Brasilia, Montevideo
Fernando de Noronha
Azores
Page 33

Step 3 Using the
touch panel
3e étape Utilisation de
l’écran tactile
Your camcorder has operation buttons on the
LCD screen.
Touch the LCD screen directly with your finger
or the supplied stylus (DCR-TRV80E only) to
operate each function.
(1)Press OPEN to open the LCD panel.
(2)Set the POWER switch to CAMERA to record,
VCR to play back or MEMORY to use the
“Memory Stick.”
(3)Press FN. Operation buttons on PAGE1 are
displayed on the LCD screen.
(4)Press PAGE2/PAGE3 to display PAGE2/
PAGE3. Operation buttons on PAGE2/
PAGE3 are displayed on the LCD screen.
(5)Press a desired operation item. See relevant
pages of this manual for each function.
When the POWER switch
3
is set to CAMERA/
Lorsque le commutateur
POWER est réglé sur
CAMERA
PAGE1 PAGE2
PAGE3
L’écran LCD du caméscope contient des touches
d’exploitation.
Touchez directement l’écran LCD avec le doigt
ou le stylet fourni (DCR-TRV80E seulement)
pour activer les différentes fonctions.
(1)Appuyez sur OPEN pour ouvrir le panneau
LCD.
(2)Réglez le commutateur POWER sur
CAMERA pour filmer, sur VCR pour revoir le
film ou sur MEMORY pour utiliser le
« Memory Stick ».
(3)Appuyez sur FN. Les touches d’exploitation
de la PAGE1 apparaissent sur l’écran LCD.
(4)Appuyez sur PAGE2/PAGE3 pour afficher la
PAGE2/PAGE3. Les touches d’exploitation
de la PAGE2/PAGE3 apparaissent sur l’écran
LCD.
(5)Appuyez sur la fonction souhaitée. Pour
chaque fonction, reportez-vous aux pages
correspondantes dans ce manuel.
EXIT
Getting Started Préparatifs
1
SPOT
FOCUS
MENU
FADER
END
SCH
SPOT
METER
EXPO-
SURE
33
Page 34

Step 3 Using the touch panel
3e étape Utilisation de l’écran
tactile
To return to FN
Press EXIT.
To execute settings
Press OK. The display returns to PAGE1/
PAGE2/PAGE3.
To cancel settings
Press OFF. The display returns to PAGE1/
PAGE2/PAGE3.
To make screen indicators disappear
Press DISPLAY/BATTERY INFO.
Operation buttons on each
display
When the POWER switch is set to CAMERA
PAGE1 SPOT FOCUS, MENU, FADER,
END SCH, SPOT METER,
EXPOSURE
PAGE2 SELFTIMER, DIG EFFT, LCD BRT,
VOL, MEM MIX
PAGE3 SUPER NS, COLR SLW S,
PRGRE REC, RMT CAM*
When the POWER switch is set to VCR
PAGE1 MENU, LCD BRT, VOL, END SCH
PAGE2 PB ZOOM, DIG EFFT, DATA CODE
PAGE3 V SPD PLAY, A DUB CTRL,
REC CTRL
* DCR-TRV80E only
Pour revenir à FN
Appuyez sur EXIT.
Pour valider des réglages
Appuyez sur OK. L’écran de la PAGE1/
PAGE2/PAGE3 réapparaît.
Pour annuler des réglages
Appuyez sur OFF. L’écran de la PAGE1/
PAGE2/PAGE3 réapparaît.
Pour éteindre les indicateurs
Appuyez sur DISPLAY/BATTERY INFO.
Touches d’exploitation de
chaque affichage
Lorsque le commutateur POWER est en
position CAMERA
PAGE1 SPOT FOCUS, MENU, FADER,
END SCH, SPOT METER,
EXPOSURE
PAGE2 SELFTIMER, DIG EFFT, LCD BRT,
VOL, MEM MIX
PAGE3 SUPER NS, COLR SLW S,
PRGRE REC, RMT CAM*
Lorsque le commutateur POWER est en
position VCR
PAGE1 MENU, LCD BRT, VOL, END SCH
PAGE2 PB ZOOM, DIG EFFT, DATA CODE
PAGE3 V SPD PLAY, A DUB CTRL,
REC CTRL
34
* DCR-TRV80E seulement
Page 35

Step 3 Using the touch panel
3e étape Utilisation de l’écran
tactile
When the POWER switch is set to MEMORY
During memory camera
PAGE1 SPOT FOCUS, MENU, PLAY,
PB FOLDR, SPOT METER,
EXPOSURE
PAGE2 SELFTIMER, PLAY, MEM MIX
PAGE3 LCD BRT, PLAY, IMAGE TRANS*,
VOL
During memory playback
PAGE1 MENU, CAM, PB FOLDR, DEL
PAGE2 PB ZOOM, CAM, RESIZE, DATA
CODE
PAGE3 LCD BRT, CAM, IMAGE TRANS*,
VOL
* DCR-TRV80E only
Notes
•When using the touch panel, press operation
buttons lightly with your finger or the supplied
stylus (DCR-TRV80E only) supporting the LCD
panel from the back side of it.
•Do not press the LCD screen with sharp objects
other than the supplied stylus. (DCR-TRV80E
only)
•Do not press the LCD screen too hard.
•Do not touch the LCD screen with wet hands.
•If FN is not on the LCD screen, touch the LCD
screen lightly to make it appear. You can
control the display with DISPLAY/BATTERY
INFO on your camcorder.
When executing each item
The green bar appears above the item.
Lorsque le commutateur POWER est en
position MEMORY
Pendant la prise de vues sur un « Memory Stick »
PAGE1 SPOT FOCUS, MENU, PLAY,
PB FOLDR, SPOT METER,
EXPOSURE
PAGE2 SELFTIMER, PLAY, MEM MIX
PAGE3 LCD BRT, PLAY, IMAGE TRANS*,
VOL
Pendant la lecture d’un « Memory Stick »
PAGE1 MENU, CAM, PB FOLDR, DEL
PAGE2 PB ZOOM, CAM, RESIZE, DATA
CODE
PAGE3 LCD BRT, CAM, IMAGE TRANS*,
VOL
* DCR-TRV80E seulement
Remarques
•Lorsque vous utilisez l’écran tactile, appuyez
légèrement sur les touches avec le doigt ou le
stylet fourni (DCR-TRV80E seulement) tout en
soutenant le panneau LCD par l’arrière.
•N’appuyez pas sur l’écran LCD avec un objet
pointu autre que le stylet fourni. (DCR-TRV80E
seulement)
•N’appuyez par trop fort sur l’écran LCD.
•Ne pas toucher l’écran LCD avec des mains
mouillées.
•Si FN n’apparaît pas sur l’écran LCD, touchez
légèrement l’écran LCD pour faire apparaître
cette touche. Vous pouvez faire apparaître ou
dégager l’affichage en utilisant la touche
DISPLAY/BATTERY INFO du caméscope.
Getting Started Préparatifs
If the items are not available
The colour of the items changes to grey.
Touch panel
You can operate with the touch panel using the
viewfinder (p. 87).
Lorsque vous validez une fonction
Une barre verte apparaît au-dessus de cette
fonction.
Si une fonction n’est pas disponible
Elle devient grise.
Ecran tactile
Vous pouvez utiliser l’écran tactile tout en
regardant dans le viseur (p. 87).
35
Page 36

— Recording – Basics —
Recording a picture
— Enregistrement – Opérations de base —
Enregistrement d’une
image
See relevant “Step 1” and “Step 2.”
(1)Remove the lens cap and pull the lens cap
string to fix it.
(2)Prepare the power source (p. 24 to 29) and
insert the cassette (p. 12).
(3)Set the POWER switch to CAMERA while
pressing the small green button. This sets
your camcorder to standby.
(4)Press OPEN to open the LCD panel. The
picture appears on the screen.
(5)Press START/STOP. Your camcorder starts
recording. The REC indicator appears. The
camera recording lamp located on the front of
your camcorder lights up. To stop recording,
press START/STOP again.
LOCK switch/
3
Commutateur LOCK
PO
VCR
W
E
OFF(CHG)
R
CAMERA
MEMORY/
NETWORK
4
Voir aussi « 1e étape » et « 2e étape ».
(1)Enlevez le capuchon d’objectif et tirez la
cordelette pour le fixer.
(2)Installez la source d’alimentation (p. 24 à 29)
et insérez la cassette (p. 16).
(3)Réglez le commutateur POWER sur
CAMERA tout en appuyant sur le petit
bouton vert. Le caméscope se met en attente.
(4)Appuyez sur OPEN pour ouvrir le panneau
LCD. L’image apparaît sur l’écran.
(5)Appuyez sur START/STOP. L’enregistrement
commence. L’indicateur REC apparaît. Le
témoin de tournage à l’avant du caméscope
s’allume. Pour arrêter l’enregistrement,
appuyez une nouvelle fois sur START/STOP.
1
Microphone
36
5
2
50min
REC
Camera recording
lamp/
Témoin de tournage
0:00:01
Page 37

Recording a picture
Enregistrement d’une image
Note on recording
Your camcorder records and plays back in the SP
(standard play) mode and in the LP (long play)
mode. Select SP or LP in the menu settings
(p. 231). In the LP mode, you can record 1.5
times as long as in the SP mode.
When you record the tape in the LP mode on
your camcorder, we recommend playing back
the tape on your camcorder.
To enable smooth transition
Transition between the last scene you recorded
and the next scene is smooth as long as you do
not eject the cassette even if you turn off your
camcorder.
However, check the following:
– Do not mix recordings in the SP and LP modes
on one tape.
– When you change the battery pack, set the
POWER switch to OFF (CHG).
Self-timer recording
You can record images on the tape with the selftimer. See page 62 for details.
Note
The recording data (date/time or various settings
when recorded) do not appear during recording.
However, they are recorded automatically on the
tape. To display the recording data, press DATA
CODE during playback. You can also use the
Remote Commander for this operation (p. 53).
If you leave your camcorder during standby
for five minutes while the cassette is inserted
Your camcorder automatically turns off. This is
to save battery power and to prevent battery
pack and tape wear. To return to standby, set the
POWER switch to OFF (CHG) and then back to
CAMERA. However, your camcorder does not
turn off automatically while the cassette is not
inserted.
Remarque sur l’enregistrement
Le caméscope peut enregistrer et lire les
enregistrements dans les modes SP (lecture
normale) et LP (lecture longue durée).
Sélectionnez SP ou LP dans les paramètres du
menu (p. 241). Dans le mode LP, vous pouvez
filmer 1,5 fois plus longtemps que dans le mode
SP.
Si vous enregistrez une cassette en mode LP sur
ce caméscope, il est conseillé de la lire ensuite sur
ce caméscope.
Pour obtenir des transitions plus douces
Vous obtiendrez des transitions plus douces
entre la dernière séquence enregistrée et la
suivante si vous n’éjectez pas la cassette après
avoir éteint le caméscope.
Toutefois, attention aux points suivants :
– Ne mélangez pas les enregistrements en modes
SP et LP sur une même cassette.
– Si vous changez de batterie en cours de
tournage, réglez le commutateur POWER sur
OFF (CHG).
Enregistrement avec le retardateur
Vous pouvez enregistrer des images sur la
cassette en utilisant le retardateur. Voir page 62
pour le détail.
Remarque
Les données d’enregistrement (date/heure ou
divers réglages valides lors de l’enregistrement)
n’apparaissent pas pendant l’enregistrement.
Toutefois elles sont enregistrées sur la cassette.
Pour les afficher, appuyez sur DATA CODE lors
de la lecture. Vous pouvez aussi utiliser la
télécommande pour cette opération (p. 53).
Si vous laissez le caméscope plus de cinq
minutes en attente avec une cassette à
l’intérieur
Le caméscope s’éteint automatiquement. Cette
fonction a pour but d’économiser l’énergie de la
batterie et de préserver la batterie et la cassette de
l’usure. Pour revenir au mode d’attente, réglez le
commutateur POWER sur OFF (CHG) puis de
nouveau sur CAMERA. Le caméscope ne s’éteint
pas automatiquement s’il ne contient pas de
cassette.
Recording – Basics Enregistrement – Opérations de base
37
Page 38

Recording a picture Enregistrement d’une image
When you record in the SP and LP modes on
one tape or you record in the LP mode
•The transition between scenes may not be
smooth.
•The playback picture may be distorted or the
time code may not be written properly between
scenes.
Note on the LOCK switch
When you slide the LOCK switch to the right, the
POWER switch can no longer be set to MEMORY
accidentally. The LOCK switch is set to the left as
the default setting.
Indicators displayed during
recording
Indicators are not recorded on the tape.
Remaining battery time/Autonomie de la batterie
Cassette Memory/Cassette Memory (Puce avec mémoire de cassette)
This appears when using the cassette with Cassette Memory./
Cette indication apparaît lorsqu’une Cassette Memory est utilisée.
Recording mode/Mode d’enregistrement
STBY/REC/STBY/REC (attente/enregistrement)
50
min
4 7 2003
REC
0:00:01
60min
12:05:56
Time code/Tape counter/Code temporel/Compteur de bande
Remaining tape/Autonomie de la bande
This appears after you insert the cassette./
L’autonome apparaît après l’insertion de la cassette.
FN
FN button/Touche FN
Press this button to display operation buttons on the LCD screen./
Cette touche sert à afficher les touches d’exploitation sur l’écran LCD.
Time/Temps
The time appears about five seconds after the power is turned on./
Le temps apparaît pendant cinq secondes après la mise sous tension
du caméscope.
Date
The date appears about five seconds after the power is turned on./
La date apparaît pendant cinq secondes après la mise sous tension
du caméscope.
Si vous enregistrez dans les modes SP et LP
sur une même cassette, ou bien si vous
enregistrez dans le mode LP
•La transition entre les séquences peut être
brusque.
•De la distorsion peut apparaître lors de la
lecture, ou bien le code temporel peut ne pas
s’inscrire correctement entre les séquences.
Remarque sur le commutateur LOCK
Si vous mettez le commutateur LOCK en position
de verrouillage à droite, le commutateur POWER
ne pourra pas être mis en position MEMORY par
inadvertance. Le commutateur LOCK a été réglé
à gauche en usine.
Indicateurs apparaissant
pendant l’enregistrement
Ces indicateurs ne sont pas enregistrés sur la
cassette.
38
Page 39

Recording a picture Enregistrement d’une image
Remaining battery time indicator during
recording
The remaining battery time indicator roughly
indicates the continuous recording time. The
indicator may not be correct, depending on the
conditions in which you are recording. When you
close the LCD panel and open it again, it takes
about one minute for the correct remaining
battery time in minutes to be displayed.
Time code
The time code indicates the recording or
playback time, “0:00:00” (hours : minutes :
seconds) in CAMERA and “0:00:00:00” (hours :
minutes : seconds : frames) in VCR.
You cannot rewrite only the time code.
Recording data
The recording data (date/time or various settings
when recorded) are not displayed during
recording. However, they are recorded
automatically on the tape. To display the
recording data, press DATA CODE during
playback. You can also use the Remote
Commander for this operation (p. 53).
After recording
(1)Set the POWER switch to OFF (CHG).
(2)Close the LCD panel.
(3)Eject the cassette.
(4)Remove the power source.
Indicateur d’autonomie restante pendant
l’enregistrement
Cet indicateur n’est pas très exact. Le temps
indiqué est approximatif et dépend des
conditions de tournage. Lorsque vous fermez le
panneau LCD puis le rouvrez, il faut environ une
minute pour que l’autonomie de la batterie soit
indiquée correctement.
Code temporel
Le code temporel indique le temps
d’enregistrement ou de lecture par « 0:00:00 »
(heures : minutes : secondes) en mode CAMERA
et « 0:00:00:00 » (heures : minutes : secondes :
images) en mode VCR.
Le code temporel ne peut pas être inscrit
ultérieurement.
Données d’enregistrement
Les données d’enregistrement (date/heure ou
divers réglages valides lors de l’enregistrement)
n’apparaissent pas pendant l’enregistrement.
Toutefois elles sont enregistrées sur la cassette.
Pour les afficher, appuyez sur DATA CODE lors
de la lecture. Vous pouvez aussi utiliser la
télécommande pour cette opération (p. 53).
Après l’enregistrement
(1)Réglez le commutateur POWER sur OFF
(CHG).
(2)Fermez le panneau LCD.
(3)Ejectez la cassette.
(4)Enlevez la source d’alimentation.
Recording – Basics Enregistrement – Opérations de base
39
Page 40

Recording a picture Enregistrement d’une image
Adjusting the LCD screen
180°
90°
When you adjust the LCD panel, make sure if the
LCD panel is opened up to 90 degrees.
Note
When using the LCD screen except in the mirror
mode, the viewfinder automatically turns off.
When monitoring on the LCD screen
You can turn the LCD panel over and move it
back to your camcorder body with the LCD
screen facing out.
Réglage de l’écran LCD
Avant d’incliner le panneau LCD, assurez-vous
qu’il est bien ouvert à 90 degrés.
Remarque
Lorsque vous utilisez l’écran LCD, sauf dans le
mode Miroir, le viseur s’éteint automatiquement.
Lorsque vous contrôlez l’image sur l’écran LCD
Vous pouvez tourner complètement l’écran LCD
et le rabattre contre le caméscope avec l’écran
LCD orienté vers l’extérieur.
40
Page 41

Recording a picture Enregistrement d’une image
Shooting with the mirror mode
This feature allows the camera subject to view
him-or herself on the LCD screen.
The subject uses this feature to check his or her
own image on the LCD screen while you look at
the subject in the viewfinder.
(1)Set the POWER switch to CAMERA or
MEMORY.
(2)Rotate the LCD panel 180 degrees.
Picture in the mirror mode
The picture on the LCD screen is a mirror-image.
However, the picture will be normal when
recorded.
Prise de vues en mode Miroir
Cette fonction permet au sujet de se voir sur
l’écran LCD.
Le sujet peut ainsi vérifier sa propre image tandis
que vous le filmez en regardant dans le viseur.
(1)Réglez le commutateur POWER sur
CAMERA ou MEMORY.
(2)Tournez le panneau LCD de 180 degrés.
Image en mode miroir
L’image affichée sur l’écran LCD est inversée
mais elle s’enregistre normalement.
Recording – Basics Enregistrement – Opérations de base
41
Page 42

Recording a picture Enregistrement d’une image
Adjusting the brightness of the
LCD screen
(1)When the POWER switch is set to CAMERA,
press FN and select PAGE2.
When the POWER switch is set to VCR, press
FN to display PAGE1.
When the POWER switch is set to MEMORY,
press FN and select PAGE3.
(2)Press LCD BRT. The screen to adjust the
brightness of the LCD screen appears.
(3)Adjust the brightness of the LCD screen using
– (to dim)/+ (to brighten).
(4)Press OK to return to PAGE1/PAGE2/
PAGE3 in step 1.
Réglage de la luminosité de
l’écran LCD
(1)Lorsque le commutateur POWER est en
position CAMERA, appuyez sur FN et
sélectionnez la PAGE2.
Lorsque le commutateur POWER est en
position VCR, appuyez sur FN et sélectionnez
la PAGE1.
Lorsque le commutateur POWER est en
position MEMORY, appuyez sur FN et
sélectionnez la PAGE3.
(2)Appuyez sur LCD BRT. L’écran de réglage de
la luminosité de l’écran LCD apparaît.
(3)Ajustez la luminosité de l’écran LCD avec
– (assombrissement)/+ (éclaircissement).
(4)Appuyez sur OK pour revenir à la
PAGE1/PAGE2/PAGE3 à l’étape 1.
2,3
LCD
BRT
LCD BRT
–+
The bar indicator/
Indicateur à barres
OK
To return to FN
Press EXIT.
LCD screen backlight
You can change the brightness of the backlight.
Select LCD B.L. in in the menu settings when
using the battery pack (p. 227).
Even if you adjust LCD BRT or LCD B.L.
The recorded picture will not be affected.
42
Pour revenir à FN
Appuyez sur EXIT.
Rétroéclairage de l’écran LCD
La luminosité du rétroéclairage de l’écran LCD
peut être ajustée. Sélectionnez LCD B.L. dans
des paramètres du menu lorsque la batterie est
utilisée (p. 237).
Lorsque vous réglez LCD BRT ou LCD B.L.
L’image enregistrée n’est pas affectée par ces
réglages.
Page 43

Recording a picture Enregistrement d’une image
Adjusting the viewfinder
If you record pictures with the LCD panel closed,
check the picture with the viewfinder. Adjust the
viewfinder lens to your eyesight so that the
images in the viewfinder come into sharp focus.
Lift up the viewfinder and move the viewfinder
lens adjustment lever.
Viewfinder backlight
You can change the brightness of the backlight.
Select VF B.L. in in the menu settings when
using the battery pack (p. 227).
Even if you adjust VF B.L.
The recorded picture will not be affected.
Réglage dioptrique
Lorsque vous laissez le panneau LCD fermé,
vous pouvez filmer en regardant dans le viseur.
Dans ce cas, ajustez la dioptrie à votre vue de
sorte que les indicateurs soient nets dans le
viseur.
Relevez le viseur et bougez le bouton de réglage
dioptrique jusqu’à ce que les indicateurs soient
nets.
The viewfinder lens
adjustment lever/
Bouton de réglage
dioptrique
Rétroéclairage du viseur
La luminosité du rétroéclairage du viseur peut
être ajustée. Sélectionnez VF B.L. dans des
paramètres du menu lorsque la batterie est
utilisée (p. 237).
Lorsque vous ajustez VF B.L.
L’image enregistrée n’est pas affectée par ce
réglage.
Recording – Basics Enregistrement – Opérations de base
43
Page 44

Recording a picture Enregistrement d’une image
Attaching the supplied lens
hood
To record fine pictures under strong light, we
recommend attaching the lens hood. Also the
lens cap can be attached even with the lens hood
on.
Note
You cannot attach filters or other objects onto the
lens hood.
If you forcibly attach these objects onto the lens
hood, you will no longer be able to remove filters
or other objects from the hood.
When you use the filter (optional)
The shadow of the lens hood may appear in the
corners of the screen.
Fixation du pare-soleil fourni
Pour enregistrer des images plus détaillées sous
un éclairage puissant, il est conseillé de mettre le
pare-soleil. Le capuchon d’objectif peut être fixé
sur le pare-soleil.
Remarque
Il n’est pas possible de fixer de filtres, ou d’autres
objets, sur le pare-soleil.
Si vous essayez d’en fixer un en forçant, vous
risquez de ne plus pouvoir le retirer du paresoleil.
Lorsque vous utilisez un filtre (en option)
L’ombre du pare-soleil peut apparaître dans les
angles de l’écran.
44
Page 45

Recording a picture Enregistrement d’une image
Using the zoom feature
Move the power zoom lever a little for a slower
zoom. Move it further for a faster zoom.
Using the zoom sparingly results in betterlooking recordings.
W: Wide-angle (subject appears farther away)
T: Telephoto (subject appears closer)
To use zoom greater than 10×
Zoom greater than 10× is performed digitally.
Digital zoom can be set to 20× or 120×.
To activate digital zoom, select the digital zoom
power in D ZOOM in in the menu settings
(p. 226). The digital zoom is set to OFF as a
default setting.
Utilisation du zoom
Poussez légèrement le bouton de zoom pour un
zooming lent. Poussez-le plus fort pour un
zooming rapide.
Utilisez le zoom avec parcimonie pour obtenir
des films d’aspect professionnel.
W: Grand angle (le sujet s’éloigne)
T: Téléobjectif (le sujet se rapproche)
W
T
W
Zooming supérieur à 10×
Un zooming supérieur à 10× s’effectue
numériquement. Le zoom numérique peut être
réglé sur 20× ou 120×.
Pour activer le zoom numérique, sélectionnez-le
dans D ZOOM dans des paramètres du menu
(p. 236). Le zoom numérique a été réglé sur OFF
en usine.
W
T
T
Recording – Basics Enregistrement – Opérations de base
The right side of the bar shows the digital zooming
zone.
The digital zooming zone appears when you select
the digital zoom power in the menu settings./
Le côté à la droite de la barre correspond à la zone de
zoom numérique.
La zone de zoom numérique apparaît lorsque vous
sélectionnez le zoom numérique dans les paramètres
du menu.
WT
45
Page 46

Recording a picture Enregistrement d’une image
When you shoot close to a subject
If you cannot get a sharp focus, move the power
zoom lever to the “W” side until the focus is
sharp. You can shoot a subject that is at least
about 80 cm (about 2 5/8 feet) away from the
lens surface in the telephoto position, or about 1
cm (about 1/2 inch) away in the wide-angle
position.
Note on digital zoom
The picture quality deteriorates as you move the
power zoom lever towards the “T” side.
When the POWER switch is set to MEMORY
You cannot use the digital zoom.
Shooting backlit subjects
– Back light function
When you shoot a subject with the light source
behind the subject or a subject with a light
background, use the back light function.
(1)Set the POWER switch to CAMERA or
MEMORY.
(2)Press BACK LIGHT.
The . indicator appears on the screen.
Lorsque vous filmez un sujet rapproché
Si vous n’obtenez pas une image nette, poussez le
bouton de zoom vers « W » jusqu’à ce que
l’image soit nette. Vous pouvez filmer un sujet à
80 cm environ de la surface de l’objectif en
position téléobjectif ou à 1 cm environ en position
grand angle.
Remarque sur le zoom numérique
La qualité de l’image diminue lorsque vous
poussez le bouton de zoom vers le côté « T ».
Lorsque le commutateur POWER est en
position MEMORY
Le zoom numérique ne peut pas être utilisé.
Prise de vues de sujets à contrejour
– Compensation de contre-jour
Utilisez la fonction de compensation de contrejour pour filmer un sujet se trouvant devant une
source de lumière ou un arrière-plan clair.
(1)Réglez le commutateur POWER sur
CAMERA ou MEMORY.
(2)Appuyez sur BACK LIGHT.
L’indicateur . apparaît à l’écran.
To cancel the back light function
Press BACK LIGHT again.
When shooting backlit subjects
If you press MANUAL of EXPOSURE (p. 77) or
SPOT METER (p. 78), the back light function will
be cancelled.
46
BACK LIGHT
Pour annuler la compensation de
contre-jour
Appuyez de nouveau sur BACK LIGHT.
Pendant la prise de vues d’un sujet à contrejour
La fonction se désactive si vous appuyez sur
MANUAL dans EXPOSURE (p. 77) ou SPOT
METER (p. 78).
Page 47

Recording a picture Enregistrement d’une image
Shooting in the dark
– NightShot/Super NightShot/
Colour Slow Shutter
Using NightShot
NightShot enables you to shoot a subject in the
night or in a dark place.
When recording with NightShot, the picture may
be recorded in incorrect or unnatural colours.
(1)Set the POWER switch to CAMERA or
MEMORY.
(2)Slide NIGHTSHOT to ON.
The and ”NIGHTSHOT” indicators flash
on the screen.
Prise de vues dans l’obscurité
– NightShot/Super NightShot/
Colour Slow Shutter
Utilisation de NightShot
La fonction NightShot permet de filmer un sujet
la nuit ou dans un lieu sombre.
Lorsque vous filmez avec l’éclairage NightShot,
les couleurs de l’image peuvent être mauvaises
ou artificielles.
(1)Réglez le commutateur POWER sur
CAMERA ou MEMORY.
(2)Réglez NIGHTSHOT sur ON.
Les indicateurs et ”NIGHTSHOT”
clignotent sur l’écran.
NIGHTSHOT
OFF ON
NightShot Light emitter/
Emetteur NightShot
Recording – Basics Enregistrement – Opérations de base
To cancel NightShot
Slide NIGHTSHOT to OFF.
Using Super NightShot
Super NightShot makes subjects more than 16
times brighter than those recorded in NightShot.
(1)Set the POWER switch to CAMERA.
(2)Slide NIGHTSHOT to ON.
The and ”NIGHTSHOT” indicators flash
on the screen.
(3)Press FN and select PAGE3.
(4)Press SUPER NS.
The indicator lights up on the screen.
(5)Press EXIT to return to FN.
To cancel Super NightShot
Press SUPER NS again to return to NightShot.
Pour désactiver la fonction NightShot
Réglez NIGHTSHOT sur OFF.
Utilisation de Super NightShot
La fonction Super NightShot rend les sujets
filmés dans l’obscurité 16 fois plus lumineux que
ceux filmés avec NightShot.
(1)Réglez le commutateur POWER sur
CAMERA.
(2)Réglez NIGHTSHOT sur ON.
Les indicateurs et ”NIGHTSHOT”
clignotent sur l’écran.
(3)Appuyez sur FN et sélectionnez PAGE3.
(4)Appuyez sur SUPER NS.
L’indicateur apparaît à l’écran.
(5)Appuyez sur EXIT pour revenir à FN.
Pour désactiver la fonction Super NightShot
Appuyez de nouveau sur SUPER NS pour
revenir à NightShot.
47
Page 48

Recording a picture Enregistrement d’une image
Using the NightShot Light
The picture will be clearer with the NightShot
Light on. To enable the NightShot Light, set N.S.
LIGHT in to ON in the menu settings. (The
default setting is ON.)
Using Colour Slow Shutter
Colour Slow Shutter enables you to record colour
images in a dim place.
OFF ON
(1)Set the POWER switch to CAMERA.
(2)Slide NIGHTSHOT to OFF.
(3)Press FN and select PAGE3.
(4)Press COLR SLW S.
The
(5)Press EXIT to return to FN.
To cancel Colour Slow Shutter
Press COLR SLW S again to make the
indicator disappear.
Notes
•Do not use NightShot in bright places (e.g. the
outdoors in the daytime). This may cause a
malfunction.
•If focusing is difficult during recording with
NightShot, focus manually.
While using NightShot, you cannot use the
following functions:
– White balance
– PROGRAM AE
– Manual exposure
– Flexible Spot Meter
– HOLOGRAM AF
While using Super NightShot or Colour Slow
Shutter
The shutter speed is automatically adjusted
depending on the brightness. At this time, the
motion of the picture may slow down.
indicator lights up on the screen.
Utilisation de l’éclairage NightShot
L’image sera plus claire si la fonction NightShot
est validée. Pour valider cette fonction, réglez
N.S. LIGHT sur ON dans des paramètres du
menu. (Le réglage par défaut est ON.)
Utilisation de Colour Slow Shutter
La fonction Colour Slow Shutter permet
d’enregistrer des images couleur dans des lieux
sombres avec une obturation lente.
NIGHTSHOT
(1)Réglez le commutateur POWER sur
CAMERA.
(2)Réglez NIGHTSHOT sur OFF.
(3)Appuyez sur FN et sélectionnez la PAGE3.
(4)Appuyez sur COLR SLW S.
L’indicateur
(5)Appuyez sur EXIT pour revenir à FN.
Pour annuler la fonction Colour Slow Shutter
Appuyez de nouveau sur COLR SLW S pour
éteindre l’indicateur
Remarques
•N’utilisez pas la fonction NightShot dans des
lieux bien éclairés (par ex. à l’extérieur le jour).
Le caméscope fonctionnera mal.
•Si la mise au point est difficile pendant la prise
de vues avec NightShot, faites vous-même la
mise au point.
Lorsque vous utilisez la fonction NightShot,
les fonctions suivantes sont inopérantes :
– Balance des blancs
– PROGRAM AE
– Exposition manuelle
– Spotmètre flexible
– HOLOGRAM AF
Lorsque vous utilisez la fonction Super
NightShot ou Colour Slow Shutter
La vitesse d’obturation s’ajuste automatiquement
selon la luminosité. A ce moment, le mouvement
de l’image animée peut être plus lent.
apparaît à l’écran.
.
48
Page 49

Recording a picture Enregistrement d’une image
While using Super NightShot, you cannot use
the following functions:
– White balance
– Fader
– Digital effect
– PROGRAM AE
– Manual exposure
– Flexible Spot Meter
– Progressive Recording Mode
– Recording with the flash
When the POWER switch is set to MEMORY
You cannot use the following functions:
– Super NightShot
– Colour Slow Shutter
NightShot Light
The NightShot Light rays are infrared and so are
invisible. The maximum shooting distance using
the NightShot Light is about 3 m (10 feet).
While using Colour Slow Shutter, you cannot
use the following functions:
– Fader
– Digital effect
– PROGRAM AE
– Manual exposure
– Flexible Spot Meter
– Progressive Recording Mode
– Recording with the flash
In total darkness
Colour Slow Shutter may not work normally.
Lorsque vous utilisez la fonction Super
NightShot, les fonctions suivantes sont
inopérantes :
– Balance des blancs
– Transitions en fondu
– Effet numérique
– PROGRAM AE
– Exposition manuelle
– Spotmètre flexible
– En mode d’enregistrement progressif
– Enregistrement au flash
Lorsque le commutateur POWER est en
position MEMORY
Les fonctions suivantes sont inopérantes :
– Super NightSthot
– Colour Slow Shutter
Eclairage NightShot
L’éclairage NightShot émet des rayons
infrarouges qui ne sont pas visibles. La portée
maximale de l’éclairage NightShot est de 3 m
environ.
Lorsque vous utilisez la fonction Colour Slow
Shutter, les fonctions suivantes sont
inopérantes :
– Transitions en fondu
– Effet numérique
– PROGRAM AE
– Exposition manuelle
– Spotmètre flexible
– En mode d’enregistrement progressif
– Enregistrement au flash
Recording – Basics Enregistrement – Opérations de base
Dans l’obscurité totale
Colour Slow Shutter ne fonctionne pas
normalement.
49
Page 50

Checking recordings
– End search/Edit
search/Rec Review
Contrôle de l’enregistrement – Recherche
de fin d’enregistrement/Recherche de
point de montage/Revue d’enregistrement
You can use these buttons to check the recorded
picture or shoot so that the transition between the
last recorded scene and the next scene you record
is smooth.
FN
End search
You can go to the end of the recorded section
after you record.
(1)Set the POWER switch to CAMERA.
(2)Press FN to display PAGE1.
(3)Press END SCH.
The last five seconds of the recorded section
are played back and your camcorder returns
to standby.
To return to FN
Press EXIT.
To cancel end search
Press END SCH again.
End search
When you use the cassette without Cassette
Memory, end search does not work once you
eject the cassette after you have recorded on the
tape. If you use a cassette with Cassette Memory,
end search works even once you eject the
cassette.
If the tape has a blank portion between
recorded portions
End search may not work correctly.
50
Vous pouvez utiliser les touches suivantes pour
rechercher une image ou une séquence et obtenir
une bonne transition entre la dernière séquence
enregistrée et la suivante.
EDITSEARCH
Recherche de fin
d’enregistrement
Cette fonction permet de localiser la fin de la
séquence enregistrée juste après l’enregistrement.
(1)Réglez le commutateur POWER sur
CAMERA.
(2)Appuyez sur FN pour afficher la PAGE1.
(3)Appuyez sur END SCH.
Les cinq dernières secondes de la séquence
enregistrée sont reproduites puis le
caméscope se remet en attente.
Pour revenir à FN
Appuyez sur EXIT.
Pour annuler la recherche de fin
d’enregistrement
Appuyez de nouveau sur END SCH.
Recherche de fin d’enregistrement
Si vous utilisez une cassette sans Cassette
Memory (puce), cette fonction n’agit pas si vous
éjectez la cassette après l’enregistrement. Par
contre, si vous utilisez une cassette à avec
Cassette Memory, cette fonction agit même après
l’éjection de la cassette.
Si la cassette contient un passage vierge entre
deux séquences
La recherche de fin d’enregistrement ne
fonctionnera pas correctement.
Page 51

Checking recordings
– End search/Edit search/Rec
Review
Contrôle de l’enregistrement
– Recherche de fin d’enregistrement/
Recherche de point de montage/
Revue d’enregistrement
Edit search
You can search for the next recording start point.
You cannot monitor the sound.
(1)Set the POWER switch to CAMERA.
(2)Hold down the EDITSEARCH. The recorded
portion is played back.
Release EDITSEARCH to stop playback. If
you press START/STOP, recording begins
from the point you released EDITSEARCH.
7 – : To go backwards
+:To go forwards
Rec Review
You can check the last recorded section.
(1)Set the POWER switch to CAMERA.
(2)Press the 7 – side of EDITSEARCH
momentarily.
The section you have stopped most recently
will be played back for a few seconds, and
then your camcorder will return to standby.
Recherche de point de montage
Cette fonction permet de rechercher le point de
départ du prochain enregistrement. Pendant la
recherche, vous ne pouvez pas écouter le son.
(1)Réglez le commutateur POWER sur
CAMERA.
(2)Appuyez en continu sur EDITSEARCH. La
séquence enregistrée est lue.
Relâchez EDITSEARCH pour arrêter la
lecture. Lorsque vous appuyez sur START/
STOP, l’enregistrement commence à partir du
point où vous avez relâché EDITSEARCH.
7 – : Recherche arrière
+:Recherche avant
Revue d’enregistrement
Cette fonction permet de revoir le dernier
passage enregistré.
(1)Réglez le commutateur POWER sur
CAMERA.
(2)Appuyez un instant sur le côté 7 – de la
touche EDITSEARCH.
Les dernières secondes du passage sur lequel
vous vous êtes arrêté en dernier sont
reproduites, puis le caméscope se remet en
attente.
Recording – Basics Enregistrement – Opérations de base
51
Page 52
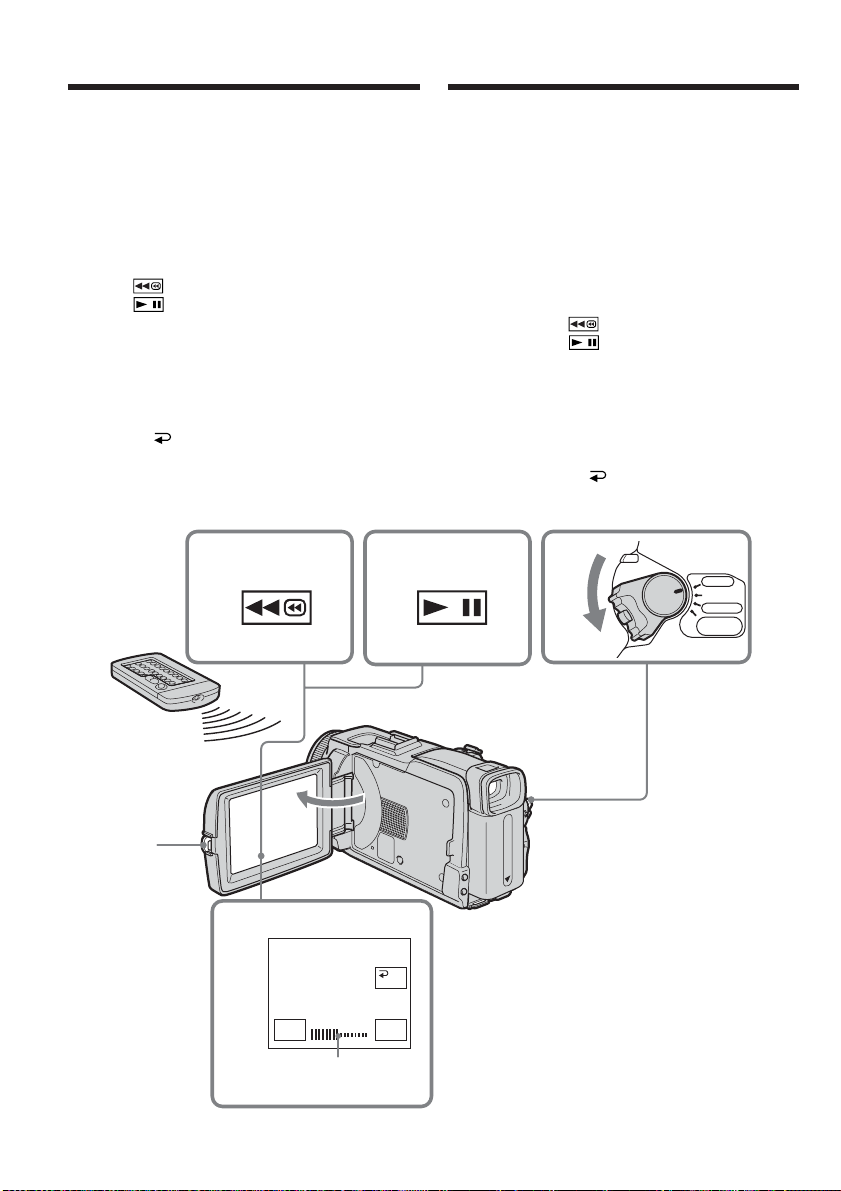
— Playback – Basics —
— Lecture – Opérations de base —
Playing back tape
You can monitor the recorded tape on the LCD
screen. If you close the LCD panel, you can
monitor the playback picture in the viewfinder.
You can also control playback using the Remote
Commander supplied with your camcorder.
(1)Press the POWER switch to VCR while
pressing the small green button.
(2)Press OPEN to open the LCD panel.
(3)Press to rewind the tape.
(4)Press to start playback.
(5)Adjust the volume following the steps below.
1 Press FN to display PAGE1.
2 Press VOL. The screen to adjust volume
appears.
3 Press – (to turn down the volume)/+ (to
turn up the volume).
4 Press OK to return to PAGE1.
3
4
Lecture d’une cassette
Vous pouvez revoir la cassette enregistrée sur
l’écran LCD. Si vous fermez le panneau LCD
vous pourrez la revoir dans le viseur. Pour les
différentes opérations de lecture, vous pouvez
utiliser la télécommande fournie avec le
caméscope.
(1)Réglez le commutateur POWER sur VCR tout
en appuyant sur le petit bouton vert.
(2)Appuyez sur OPEN pour ouvrir le panneau
LCD.
(3)Appuyez sur pour rembobiner la bande.
(4)Appuyez sur pour commencer la lecture.
(5)Réglez le volume de la façon suivante.
1 Appuyez sur FN pour afficher la PAGE1.
2 Appuyez sur VOL. L’écran de réglage du
volume apparaît.
3 Appuyez sur – pour réduire le volume et
sur + pour l’augmenter.
4 Appuyez sur OK pour revenir à la
PAGE1.
1
VCR
OFF(CHG)
POWER
CAMERA
MEMORY/
NETWORK
52
2
5
–+
The bar indicator/
Indicateur à barres
OK
VOL
Page 53

Playing back tape Lecture d’une cassette
To return to FN
Press EXIT.
To cancel playback
Press .
To rewind the tape
Press during playback stop.
To fastforward the tape
Press during playback stop.
To view a still image (playback
pause)
Press during playback. To resume playback,
press again.
If you leave the power on for a long time
Your camcorder gets warm. This is not a
malfunction.
To display the screen indicators
– Display function
Press DISPLAY/BATTERY INFO on your
camcorder or DISPLAY on the Remote
Commander supplied with your camcorder.
The indicators disappear from the screen.
To make the indicators appear, press DISPLAY/
BATTERY INFO or DISPLAY on the Remote
Commander again.
Pour revenir à FN
Appuyez sur EXIT.
Pour annuler la lecture
Appuyez sur .
Pour rembobiner la bande
Appuyez sur en mode d’arrêt.
Pour avancer rapidement la bande
Appuyez sur en mode d’arrêt.
Pour faire un arrêt sur image (pause
de la lecture)
Appuyez sur pendant la lecture. Pour
poursuivre la lecture, appuyez une nouvelle fois
sur .
Si vous laissez le caméscope longtemps allumé
Il devient chaud. C’est normal.
Affichage des indicateurs sur
l’écran – Fonction d’affichage
Appuyez sur DISPLAY/BATTERY INFO sur le
caméscope ou sur DISPLAY sur la télécommande
fournie avec le caméscope.
Les indicateurs disparaissent de l’écran.
Pour faire réapparaître les indicateurs, appuyez
de nouveau sur DISPLAY/BATTERY INFO ou
sur DISPLAY sur la télécommande.
Playback – Basics Lecture – Opérations de base
DATA CODE
DISPLAY
Note
Even if you press DISPLAY on the Remote
Commander with the POWER switch set to OFF
(CHG), the BATTERY INFO indicator is not
displayed.
DISPLAY/
BATTERY INFO
Remarque
L’indicateur BATTERY INFO n’apparaît pas si
vous appuyez sur DISPLAY de la télécommande
lorsque le commutateur POWER est réglé sur
OFF (CHG).
53
Page 54

Playing back tape Lecture d’une cassette
About date/time and various settings
Your camcorder automatically records not only
images on the tape but also the recording data
(date/time or various settings when recorded)
(Data code).
Follow the steps below to display the data code
using the touch panel or the Remote
Commander.
Using the touch panel
(1)Set the POWER switch to VCR, then play back
the tape.
(2)During playback, press FN and select PAGE2.
(3)Press DATA CODE.
(4)Select CAM DATA or DATE DATA, then
press OK.
(5)Press EXIT.
Date/time/
Date/Heure
50min
472003
12:05:56
0:00:23:01
A propos de la date/heure et des
divers réglages
Le caméscope enregistre non seulement des
images sur la cassette mais aussi d’autres
données concernant l’enregistrement (date/heure
ou divers réglages valides lors de
l’enregistrement) (Code de données).
Pour afficher le code de données à l’aide de
l’écran tactile ou de la télécommande, effectuez
les opérations suivantes.
Utilisation de l’écran tactile
(1)Réglez le commutateur POWER sur VCR,
puis reproduisez la cassette.
(2)Pendant la lecture, appuyez sur FN et
sélectionnez PAGE2.
(3)Appuyez sur DATA CODE.
(4)Sélectionnez CAM DATA ou DATE DATA,
puis appuyez sur OK.
(5)Appuyez sur EXIT.
Various settings/
Divers réglages
50min
AUTO
5 0 AWB
9 dB
F1.8
0:00:23:01
[a]
[b]
[c]
[d]
[e]
[f]
[g]
[a] Tape counter
[b] SteadyShot off
[c] Exposure
[d] White balance
[e] Gain
[f] Shutter speed
[g] Aperture value
Using the Remote Commander
Press DATA CODE on the Remote Commander
during playback.
The display changes as follows:
date/time t various settings (SteadyShot off,
exposure, white balance, gain, shutter speed,
aperture value) t (no indicator)
54
[a] Compteur de bande
[b] Stabilisateur débrayé
[c] Exposition
[d] Balance des blancs
[e] Gain
[f] Vitesse d’obturation
[g] Indice du diaphragme
Utilisation de la télécommande
Appuyez sur DATA CODE de la télécommande
pendant la lecture.
L’affichage change de la façon suivante :
date/heure t divers réglages (stabilisateur
débrayé, exposition, balance des blancs, gain,
vitesse d’obturation, indice du diaphragme) t
(pas d’indicateur)
Page 55

Playing back tape Lecture d’une cassette
Various settings
Various settings shows your camcorder’s
recording information at the time of recording.
During tape recording standby, the various
settings will not be displayed.
When you use data code, bars (-- -- --) appear
if:
–A blank portion of the tape is being played
back.
– The tape is unreadable due to tape damage or
noise.
– The tape was recorded by a camcorder without
the date and time set.
Data code
When you connect your camcorder to a TV, the
data code also appears on the TV screen.
Various playback modes
To operate video control buttons, set the POWER
switch to VCR.
Using the touch panel
(1)Press FN and select PAGE3.
(2)Press V SPD PLAY to display video control
buttons.
To change the playback direction
Press during playback to reverse the
playback direction.
To locate a scene while monitoring
the picture (picture search)
Keep pressing or during playback. To
resume normal playback, release the button.
To monitor the high-speed picture
while fastforwarding or rewinding
the tape (skip scan)
Keep pressing while fastforwarding or
while rewinding the tape. To resume
fastforwarding or rewinding, release the button.
To view the picture at slow speed
(slow playback)
Press during playback. For slow playback in
the reverse direction, press , then press
1)
.
1)
Divers réglages
Les divers réglages sont les réglages du
caméscope valides au moment de
l’enregistrement. Pendant l’enregistrement
proprement dit ils n’apparaissent pas.
Lorsque vous utilisez le code de données, des
tirets (-- -- --) apparaissent si :
– Un passage vierge de la cassette est reproduit.
– La cassette ne peut pas être lue parce qu’elle est
parasitée ou endommagée.
– La cassette a été enregistrée avec un caméscope
sur lequel la date et l’heure n’avaient pas été
réglées.
Code de données
Lorsque vous raccordez votre caméscope à un
téléviseur, le code de données apparaît sur
l’écran du téléviseur.
Divers modes de lecture
Pour utiliser les touches de commande vidéo,
réglez le commutateur POWER sur VCR.
Utilisation de l’écran tactile
(1)Appuyez sur FN et sélectionnez la PAGE3.
(2)Appuyez sur V SPD PLAY pour afficher les
touches de commande vidéo.
Pour changer le sens de la lecture
Appuyez sur pendant la lecture pour
inverser le sens de la lecture.
Pour localiser une scène en
regardant l’image (recherche
visuelle)
Appuyez sur ou pendant la lecture et
maintenez la pression. Pour revenir à la lecture
normale, relâchez la touche.
Pour contrôler l’image pendant
l’avance rapide ou le rembobinage
(recherche rapide)
Appuyez et maintenez la pression sur
pendant l’avance ou sur pendant le
rembobinage. Pour revenir à l’avance rapide ou
au rembobinage, relâchez la touche.
Pour regarder l’image au ralenti
(lecture au ralenti)
Appuyez sur pendant la lecture. Pour la
lecture au ralenti en sens inverse, appuyez sur
, puis sur .
1)
1)
Playback – Basics Lecture – Opérations de base
55
Page 56

Playing back tape Lecture d’une cassette
To view the picture at double speed
Press during playback. For double speed
playback in the reverse direction, press ,
then press .
To view the picture frame-by-frame
Press during playback pause.
For frame-by-frame playback in the reverse
direction, press .
1)
2)
2)
To search the last scene recorded
(END SEARCH)
Press END SCH on PAGE1 during stop. The last
five seconds of the recorded section are played
back then your camcorder stops.
1)
Press to pause playback. Press to
resume normal playback.
2)
Press to resume normal playback.
Video control buttons
Marks on your camcorder are different from
those on the Remote Commander supplied with
your camcorder.
On your camcorder:
To play back or pause the tape
To stop the tape
To rewind the tape
To fastforward the tape
To play back the tape slowly
To forward one frame at a time
To rewind one frame at a time
To play back the tape at double speed
On the Remote Commander:
N To play back the tape
X To pause the tape
x To stop the tape
m To rewind the tape
M To fastforward the tape
y To play back the tape slowly
C To forward one frame at a time
c To rewind one frame at a time
×2 To play back the tape at double speed
In the various playback modes
•Sound is muted.
•The previous picture may remain as a mosaic
image during playback.
Pour regarder les images à double
vitesse
Appuyez sur pendant la lecture. Pour la
lecture à double vitesse en sens inverse, appuyez
sur , puis sur .
1)
Pour regarder les images une à une
Appuyez sur pendant la pause de la
2)
lecture.
Pour la lecture image par image en sens inverse,
appuyez sur .
2)
Pour localiser la dernière séquence
enregistrée (END SEARCH)
Appuyez sur END SCH sur la PAGE1 pendant
l’arrêt. Les cinq dernières secondes de la
séquence enregistrée sont reproduites puis le
caméscope s’arrête.
1)
Appuyez sur pour suspendre la lecture.
Appuyez sur pour reprendre la lecture
normale.
2)
Appuyez sur pour reprendre la lecture
normale.
Touches de commande vidéo
Les indications sur le caméscope sont différentes
de celles de la télécommande fournie avec le
caméscope.
Sur le caméscope :
Lecture ou pause de la lecture
Arrêt de la lecture
Rembobinage de la bande
Avance rapide de la bande
Lecture au ralenti
Recherche avant image par image
Recherche arrière image par image
Lecture à double vitesse
Sur la télécommande :
N Lecture de la cassette
X Pause de la lecture
x Arrêt de la lecture
m Rembobinage de la bande
M Avance rapide de la bande
y Lecture au ralenti
C Recherche avant image par image
c Recherche arrière image par image
×2 Lecture à double vitesse
56
Dans tous ces modes de lecture
•Le son est coupé.
•L’image précédente peut apparaître en
mosaïque pendant la lecture.
Page 57

Playing back tape Lecture d’une cassette
When playback pause lasts for five minutes
Your camcorder automatically enters the stop
mode. To resume playback, press .
When you play back the tape in reverse
Horizontal noise may appear at the centre, or the
top and bottom of the screen. This is not a
malfunction.
Slow playback
Slow playback can be performed smoothly on
your camcorder. However, this function does not
work for an output signal from the DV
Interface.
Si la pause de lecture dure plus de cinq
minutes
Le caméscope s’arrête automatiquement. Pour
poursuivre la lecture, appuyez sur
.
Lors de la lecture d’une cassette en sens
inverse
Des bandes horizontales peuvent apparaître au
centre et dans les parties supérieure et inférieure
de l’écran. C’est normal.
Lecture au ralenti
La lecture au ralenti s’effectue en douceur sur ce
caméscope. Toutefois elle n’est pas possible pour
les signaux transmis par l’interface DV.
Playback – Basics Lecture – Opérations de base
57
Page 58

Viewing a recording
on TV
Visionnage d’un
enregistrement sur un
téléviseur
Connect your camcorder to a TV with the A/V
connecting cable supplied with your camcorder
to watch the playback pictures on the TV screen.
You can operate the playback control buttons in
the same way as when you view playback
pictures on the LCD screen.
When viewing the playback picture on the TV
screen, we recommend that you power your
camcorder from a wall socket using the AC
Adaptor. Refer to the operating instructions of
your TV.
Open the jack cover. Connect your camcorder to
the TV with the A/V connecting cable. Then set
the TV/VCR selector on the TV to VCR to be able
to view images from your camcorder.
S VIDEO
AUDIO/
VIDEO
Raccordez votre caméscope à un téléviseur avec
le cordon de liaison audio/vidéo fourni avec le
caméscope pour regarder vos films sur l’écran
d’un téléviseur. Pour ce faire, vous utiliserez les
mêmes touches de commande vidéo que pour le
visionnage sur l’écran LCD du caméscope.
Il est conseillé de raccorder l’adaptateur secteur
pour alimenter le caméscope par une prise
secteur lorsque vous regardez vos films sur un
téléviseur. Consultez le mode d’emploi du
téléviseur pour le détail.
Ouvrez le cache-prises et raccordez le caméscope
au téléviseur à l’aide du cordon de liaison audio/
vidéo. Réglez ensuite le sélecteur Téléviseur/
Magnétoscope du téléviseur ou du magnétoscope
sur Magnétoscope pour voir les images du
caméscope.
Yellow/
Jaune
IN
S VIDEO
TV
: Signal flow/
Sens du signal
A/V connecting cable
(supplied)/
Cordon de liaison
audio/vidéo (fourni)
If your TV is already connected
to the VCR
Connect your camcorder to the LINE IN input on
the VCR with the A/V connecting cable supplied
with your camcorder. Set the input selector on
the VCR to LINE.
58
VIDEO
AUDIO
Red/
Rouge
White/
Blanc
Si votre téléviseur est déjà
raccordé à un magnétoscope
Raccordez le caméscope à l’entrée LINE IN du
magnétoscope en utilisant le cordon de liaison
audio/vidéo fourni avec le caméscope. Réglez le
sélecteur d’entrée du magnétoscope sur LINE.
Page 59

Viewing a recording on TV
Visionnage d’un enregistrement
sur un téléviseur
If your TV or VCR is a monaural
type
Connect the yellow plug of the A/V connecting
cable to the video input jack and the white or the
red plug to the audio input jack on the VCR or
the TV.
If you connect the white plug, the sound is L
(left) signal. If you connect the red plug, the
sound is R (right) signal.
If your TV/VCR has a 21-pin
connector (EUROCONNECTOR)
Use the 21-pin adaptor supplied with your
camcorder.
This adaptor is exclusive to an output.
The models with mark printed on their
bottoms surfaces only.
Si votre téléviseur ou
magnétoscope est
monophonique
Raccordez la fiche jaune du cordon de liaison
audio/vidéo à la prise d’entrée vidéo et la fiche
blanche ou la fiche rouge à la prise d’entrée
audio du magnétoscope ou du téléviseur.
Si vous raccordez la fiche blanche, vous
entendrez le son du canal gauche (L). Si vous
raccordez la fiche rouge, vous entendrez le son
du canal droit (R).
Si votre téléviseur ou
magnétoscope a un connecteur
à 21 broches (EUROCONNECTOR)
Utilisez l’adaptateur à 21 broches fourni avec le
caméscope.
Cet adaptateur se branche sur une sortie
seulement.
TV
Seulement pour les modèles portant la marque
sous le caméscope.
Playback – Basics Lecture – Opérations de base
If the device you want to connect to has an S
video jack
•Pictures can be reproduced more faithfully by
using an S video cable (optional). With this
connection, you do not need to connect the
yellow (video) plug of the A/V connecting
cable.
Connect the S video cable (optional) to the S
video jacks on both your camcorder and the
device you want to connect to.
This connection produces higher quality DV
format pictures.
•There is no sound output when connecting only
with an S video cable (optional).
To display the screen indicators on TV
Set DISPLAY to V-OUT/LCD in in the menu
settings (p. 233). To make the screen indicators
disappear, press DISPLAY/BATTERY INFO on
your camcorder.
Si l’appareil à raccorder est muni d’une prise
S-vidéo
•Reliez cette prise à celle du caméscope à l’aide
d’un câble S-vidéo (en option) pour obtenir des
images de plus grande qualité. Avec cette
liaison, vous n’avez pas besoin de brancher la
fiche jaune (vidéo) du cordon de liaison audio/
vidéo.
Raccordez le câble S-vidéo (en option) aux
prises S-vidéo du caméscope et de l’appareil
qui doit être raccordé.
Cette liaison permet d’obtenir des images au
format DV de très grande qualité.
•Si vous ne raccordez que le câble S-vidéo (en
option) aucun son ne sera fourni.
Pour afficher les indicateurs sur le téléviseur
Réglez DISPLAY sur V-OUT/LCD dans des
paramètres du menu (p. 243). Pour éteindre les
indicateurs, appuyez sur DISPLAY/BATTERY
INFO sur le caméscope.
59
Page 60

— Advanced Recording Operations —
Recording still images on “Memory
Stick” during tape recording
standby or tape recording
—
Enregistrement – Opérations avancées
—
Enregistrement d’images fixes sur un « Memory
Stick » pendant l’attente d’enregistrement ou
l’enregistrement sur cassette
During tape recording standby
The POWER switch should be set to
.
(1)Keep pressing PHOTO lightly until a still
image appears. The CAPTURE indicator
appears. Recording does not start yet. To
change the still image, release PHOTO, select
a still image again, then press and hold
PHOTO lightly.
(2)Press PHOTO deeply.
Recording is complete when the bar scroll
indicator disappears.
The image displayed on the screen when you
pressed PHOTO deeply will be recorded on
the “Memory Stick.”
Pendant l’attente
d’enregistrement
Le commutateur POWER doit être en position
(1)Maintenez la pression sur PHOTO jusqu’à ce
qu’une image apparaisse. L’indicateur
CAPTURE apparaît. L’enregistrement ne
commence pas encore à ce moment. Pour
changer d’image, relâchez PHOTO,
sélectionnez une autre image, appuyez
légèrement sur PHOTO et maintenez la
pression.
(2)Appuyez à fond sur PHOTO.
L’enregistrement est terminé lorsque
l’indicateur à barres disparaît.
L’image affichée s’enregistre sur le « Memory
Stick » lorsque vous appuyez à fond sur
PHOTO.
1
2
.
FINE
640
640
FINE
12
CAPTURE
101
During tape recording
The POWER switch should be set to
.
Press PHOTO deeply.
The image displayed on the screen when you
pressed PHOTO deeply will be recorded on the
“Memory Stick.”
Recording on the “Memory Stick” is complete
when the bar scroll indicator disappears.
60
101
Pendant l’enregistrement sur la
cassette
Le commutateur POWER doit être en position
.
Appuyez à fond sur PHOTO.
L’image affichée s’enregistre sur le « Memory
Stick » lorsque vous appuyez à fond sur PHOTO.
L’enregistrement sur le « Memory Stick » est
terminé lorsque l’indicateur à barres disparaît.
Page 61

Recording still images on
“Memory Stick” during tape
recording standby or tape
recording
Enregistrement d’images fixes
sur un « Memory Stick » pendant
l’attente d’enregistrement ou
l’enregistrement sur cassette
Note
You cannot record still images on the “Memory
Stick” during following operations
(The indicator flashes):
– End search
– Wide mode
– During fading in with BOUNCE
– Progressive Recording Mode
– MEMORY MIX
“Memory Stick”
See page 130 for details.
Still images
•The image size will be 640 × 480.
•If the POWER switch is set to CAMERA, image
quality cannot be changed. Images will be
recorded with image quality as set when the
POWER switch is set to MEMORY.
•When recording with higher image quality, use
of Memory Photo recording is recommended
(p. 139).
During and after recording still images on the
“Memory Stick”
Your camcorder continues recording on the tape.
When you press PHOTO on the Remote
Commander
Your camcorder immediately records the image
that is on the screen when you press the button.
To record still images on the “Memory Stick”
during tape recording
You cannot check an image on the screen by
pressing PHOTO lightly. The image when you
press PHOTO deeply will be recorded on the
“Memory Stick.”
Title
You cannot record the titles.
Self-timer recording
During recording standby, you can record still
images on the “Memory Stick” with the selftimer. See page 62 for details.
Recording with the flash
During recording standby, you can record still
images on the “Memory Stick” with the flash. See
page 143 for details.
Remarque
Il n’est pas possible d’enregistrer d’images fixes
sur le « Memory Stick » lorsque les fonctions
suivantes sont utilisées (L’indicateur
clignote.) :
– Recherche de fin d’enregistrement
– Mode Grand écran
– Pendant un fondu avec BOUNCE
– En mode d’enregistrement progressif
– MEMORY MIX
« Memory Stick »
Voir page 130 pour le détail.
Images fixes
•La taille des images est 640 × 480.
•Lorsque le commutateur POWER est en
position CAMERA, la qualité de l’image ne
peut pas être changée. Les images sont
enregistrées dans la qualité spécifiée lorsque le
commutateur POWER a été réglé sur
MEMORY.
•Il est conseillé d’enregistrer les photos sur un
« Memory Stick » lorsqu’une qualité d’image
élevée est sélectionnée (p. 139).
Pendant et après l’enregistrement d’images
fixes sur le « Memory Stick »
L’enregistrement continue sur la cassette.
Lorsque vous appuyez sur PHOTO de la
télécommande
L’image qui apparaît à l’écran au moment où
vous appuyez sur cette touche est
immédiatement enregistrée.
Lorsque vous enregistrez une image fixe sur le
« Memory Stick » pendant l’enregistrement
sur la cassette
Il n’est pas possible de vérifier l’image au
préalable en appuyant légèrement sur PHOTO.
L’image affichée au moment où vous appuyez à
fond sur PHOTO est enregistrée sur le « Memory
Stick ».
Titres
Il n’est pas possible d’enregistrer les titres.
Enregistrement avec le retardateur
Pendant l’attente d’enregistrement, vous pouvez
enregistrer des images fixes sur le « Memory
Stick » avec le retardateur. Voir page 62 pour le
détail.
Enregistrement au flash
Pendant l’attente d’enregistrement, vous pouvez
enregistrer des images fixes sur le « Memory
Stick » avec le flash. Voir page 143 pour le détail.
Advanced Recording Operations Enregistrement – Opérations avancées
61
Page 62

Self-timer recording
Enregistrement avec
le retardateur
START/STOP
Recording on the tape
The POWER switch should be set to
.
Operate by touching the panel.
(1)During standby, press FN and select PAGE2.
(2)Press SELFTIMER.
The (self-timer) indicator appears on the
screen.
(3)Press EXIT to return to FN.
(4)Press START/STOP.
The self-timer starts counting down from
about 10 while beeping. In the last two
seconds of the countdown, the beep gets
faster, then recording starts automatically.
Recording still images on the
“Memory Stick” during
recording standby
The POWER switch should be set to
.
Operate by touching the panel.
(1)Follow the step 1 to 3 in “Recording on the
tape.”
(2)Press PHOTO deeply.
The self-timer starts counting down from
about 10 while beeping. In the last two
seconds of the countdown, the beep gets
faster, then the recording starts automatically.
START/STOP
PHOTO
PHOTO
Enregistrement sur la cassette
Le commutateur POWER doit être en position
Utilisez les touches de l’écran tactile.
(1)Pendant l’attente, appuyez sur FN et
sélectionnez la PAGE2.
(2)Appuyez sur SELFTIMER.
L’indicateur (retardateur) apparaît sur
l’écran.
(3)Appuyez sur EXIT pour revenir à FN.
(4)Appuyez sur START/STOP.
La minuterie du retardateur se met en marche
à compter de 10 et pendant ce temps des bips
sont audibles. Les deux dernières secondes,
les bips deviennent plus rapides, puis
l’enregistrement commence.
.
Enregistrement d’images fixes
sur le « Memory Stick » pendant
l’attente d’enregistrement
Le commutateur POWER doit être en position
Utilisez les touches de l’écran tactile.
(1)Effectuez les étapes 1 à 3 de « Enregistrement
sur la cassette ».
(2)Appuyez à fond sur PHOTO.
La minuterie du retardateur se met en marche
à compter de 10 et pendant ce temps des bips
sont audibles. Les deux dernières secondes,
les bips deviennent plus rapides, puis
l’enregistrement commence.
.
62
Page 63

Self-timer recording
Enregistrement avec le
retardateur
To stop the countdown for recording
on the tape
Press START/STOP. To restart the countdown,
press START/STOP again.
To cancel the self-timer
With your camcorder during standby, press
SELFTIMER and the (self-timer) indicator
disappears from the screen. You cannot cancel
the self-timer using the Remote Commander.
Notes
•The self-timer recording is automatically
cancelled when self-timer recording is finished.
•You can record using the self-timer only during
recording standby.
When the POWER switch is set to MEMORY
You can also record still images onto the
“Memory Stick” with the self-timer (p. 157).
Pour arrêter le compte à rebours lors
de l’enregistrement sur la cassette
Appuyez sur START/STOP. Pour remettre en
marche le compte à rebours, appuyez une
nouvelle fois sur START/STOP.
Pour annuler le retardateur
Lorsque le caméscope est en attente, appuyez sur
SELFTIMER de sorte que l’indicateur
(retardateur) disparaisse de l’écran. Le
retardateur ne peut pas être annulé par la
télécommande.
Remarques
•Le mode d’enregistrement avec le retardateur
se désactive lorsque l’enregistrement est
terminé.
•Vous ne pouvez utiliser le retardateur que
pendant l’attente d’enregistrement.
Lorsque le commutateur POWER est en
position MEMORY
Vous pouvez enregistrer des images fixes sur le
« Memory Stick » avec le retardateur (p. 157).
Advanced Recording Operations Enregistrement – Opérations avancées
63
Page 64

Adjusting the white
balance manually
Réglage manuel de la
balance des blancs
Normally white balance is automatically
adjusted.
The POWER switch should be set to
or .
Operate by touching the panel.
(1)Press FN to display PAGE1.
(2)Press MENU to display the menu.
(3)Select WHT BAL in , then press EXEC
(p. 225).
(4)Select a desired mode, then press EXEC.
HOLD:
When recording a single-coloured subject or
background
OUTDOOR ( ):
•When recording a sunset/sunrise, just after
sunset, just before sunrise, neon signs, or
fireworks
•Under a colour matching fluorescent lamp
INDOOR (n):
•When lighting conditions change quickly
•In too bright places such as photography
studios
•Under sodium lamps or mercury lamps
To return to FN
Press EXIT.
MANUAL SET
PROGRAM AE
P EFFECT
RED EYE R
FLASH LVL
WHT BAL
SHARPNESS
AUTO SHTR
Normalement la balance des blancs se règle
automatiquement.
Le commutateur POWER doit être en position
ou .
Utilisez les touches de l’écran tactile.
(1)Appuyez sur FN pour afficher la PAGE1.
(2)Appuyez sur MENU pour afficher le menu.
(3)Sélectionnez WHT BAL dans , puis
appuyez sur EXEC (p. 235).
EXIT
AUTO
HOLD
OUTDOOR
INDOOR
RET.
EXEC
(4)Sélectionnez un mode, puis appuyez sur
EXEC.
HOLD :
Prise de vues d’un sujet ou d’une surface
monochrome
OUTDOOR ( ) :
•Prise de vues d’enseignes lumineuses, de feux
d’artifices, d’un coucher/lever du soleil, juste
après le coucher ou le lever du soleil
•Prise de vues sous une lampe fluorescente
INDOOR (n) :
•Prise de vues sous un éclairage changeant
rapidement
•Prise de vues sous un éclairage trop lumineux
comme dans un studio photographique
•Prise de vues sous un éclairage au sodium ou
au mercure
To return to the automatic white
balance
Set WHT BAL to AUTO in the menu settings.
64
Pour revenir à FN
Appuyez sur EXIT.
Pour revenir au réglage automatique
de la balance des blancs
Réglez WHT BAL sur AUTO dans les paramètres
du menu.
Page 65

Adjusting the white balance
manually
Réglage manuel de la balance
des blancs
If the picture is being taken in a studio lit by
TV lighting
We recommend that you record in the INDOOR
mode.
When you record under fluorescent lighting
Select AUTO or HOLD.
Your camcorder may not adjust the white
balance correctly in the INDOOR mode.
In the AUTO mode
Point your camcorder at the white subject for
about 10 seconds after setting the POWER switch
to CAMERA to get better adjustment when:
– You remove the battery pack for replacement.
– You bring your camcorder from indoors to
outdoors holding the exposure, or vice versa.
In the HOLD mode
Set WHT BAL to AUTO and reset to HOLD after
few seconds when:
– You change the mode of PROGRAM AE.
– You bring your camcorder from indoors to
outdoors, or vice versa.
Lors de la prise de vues dans une pièce
éclairée par la lumière d’un téléviseur
Il est conseillé d’utiliser le mode INDOOR.
Lors de la prise de vues sous un éclairage
fluorescent
Sélectionnez AUTO ou HOLD.
La balance des blancs ne se réglera peut-être pas
correctement si vous utilisez le mode INDOOR.
En mode AUTO
Dirigez le caméscope vers une surface blanche
pendant 10 secondes environ après avoir mis le
commutateur POWER sur CAMERA pour
obtenir une meilleure balance des blancs
lorsque :
– Vous avez détaché la batterie du caméscope.
– Vous avez apporté votre caméscope de
l’intérieur à l’extérieur d’un bâtiment ou vice
versa sans changer l’exposition.
En mode HOLD
Réglez WHT BAL sur AUTO et revenez à HOLD
quelques secondes plus tard si :
– Vous avez changé le mode PROGRAM AE.
– Vous avez apporté votre caméscope de
l’intérieur à l’extérieur d’un bâtiment ou vice
versa.
Advanced Recording Operations Enregistrement – Opérations avancées
65
Page 66

Using the wide mode
Utilisation du mode
grand écran
If you move the power zoom lever to “W” side,
you can record with a wider angles than normal
tape recording.
You can record a 16:9 wide picture to watch on
the 16:9 wide-screen TV (16:9WIDE).
Black bands appear on the screen during
recording in the 16:9WIDE mode [a]. The picture
during playing back in the 4:3 mode on a widescreen TV [b] or a normal TV [c]* are
compressed in the widthwise direction. If you set
the screen mode of the wide-screen TV to the full
mode, you can watch pictures of normal images
[d].
* The picture played back in the wide mode on a
normal TV appears the same as the picture
played back in the wide mode on your
camcorder [a].
[a]
16:9
WIDE
[b]
[c]
The POWER switch should be set to
Operate by touching the panel.
.
Si vous poussez le bouton de zoom vers le côté
« W », vous pourrez filmer sous un plus grand
angle de vue.
Vous pouvez enregistrer en format 16:9 pour
regarder vos films sur un téléviseur grand écran
(16:9WIDE).
Des bandes noires apparaîtront à l’écran pendant
l’enregistrement en mode 16:9WIDE [a]. L’image
sera comprimée horizontalement pendant la
lecture en mode 4:3 sur un téléviseur grand-écran
[b] ou sur un téléviseur normal [c].* Si vous
sélectionnez le mode grand écran sur un
téléviseur grand écran, l’image sera normale [d].
* L’image affichée en mode grand écran sur un
téléviseur normal a le même aspect que l’image
affichée sur le caméscope en mode grand écran
[a].
[d]
Le commutateur POWER doit être en position
.
Utilisez les touches de l’écran tactile.
(1)During recording standby, press FN to
display PAGE1.
(2)Press MENU to display the menu.
(3)Select 16:9WIDE in , then press EXEC
(p. 226).
(4)Select ON, then press EXEC.
To return to FN
Press EXIT.
To cancel the wide mode
Set 16:9WIDE to OFF in the menu settings.
66
CAMERA SET
D ZOOM
16:9WIDE
STEADYSHOT
N. S. LIGHT
RMTCAM SET
(1)Pendant l’attente d’enregistrement, appuyez
sur FN pour afficher la PAGE1.
(2)Appuyez sur MENU pour afficher le menu.
(3)Sélectionnez 16:9WIDE dans , puis
appuyez sur EXEC (p. 236).
(4)Sélectionnez ON, puis appuyez sur EXEC.
EXIT
ON
RET.
EXEC
Pour revenir à FN
Appuyez sur EXIT.
Pour annuler le mode grand écran
Réglez 16:9WIDE sur OFF dans les paramètres
du menu.
Page 67

Using the wide mode
Utilisation du mode grand écran
Notes
•In the wide mode, you cannot operate the
following functions:
– Recording still images on the “Memory Stick”
during tape recording or tape recording
standby
– BOUNCE
– OLD MOVIE
– Progressive Recording Mode
•Pictures recorded on the tape in wide mode
cannot be returned to normal size.
Remarques
•Dans le mode grand écran, vous ne pouvez pas
sélectionner les fonctions suivantes :
– Enregistrement d’images fixes sur un
« Memory Stick » pendant l’enregistrement ou
l’attente d’enregistrement sur cassette
– BOUNCE
– OLD MOVIE
– En mode d’enregistrement progressif
•La taille normale des images enregistrées sur la
cassette en mode grand écran ne peut pas être
rétablie.
Advanced Recording Operations Enregistrement – Opérations avancées
67
Page 68

Using the fader
function
Transitions en fondu
You can fade in or out to give your recording a
professional appearance.
[a]
NORM. FADER
(normal)
MOSC. FADER
(mosaic)/
(mosaïque)
BOUNCE
OVERLAP
WIPE
1) 2)
2)
2)
Vous pouvez faire des entrées ou sorties en
fondu pour donner un aspect professionnel à vos
films.
RECSTBY
2)
DOT
[b]
MONOTONE
When fading in, the picture gradually changes
from black-and-white to colour.
When fading out, the picture gradually changes
from colour to black-and-white.
1)
You can use BOUNCE when D ZOOM in is
set to OFF in the menu settings.
2)
You can fade in only.
68
RECSTBY
MONOTONE
Pendant l’entrée en fondu, l’image en blanc et
noir apparaît lentement en couleur.
Pendant la sortie en fondu, l’image en couleur
apparaît lentement en blanc et noir.
1)
Vous pouvez utiliser la fonction BOUNCE
lorsque D ZOOM est réglé sur OFF dans
des paramètres du menu.
2)
Entrée en fondu seulement.
Page 69

Using the fader function
Transitions en fondu
The POWER switch should be set to
.
Operate by touching the panel.
(1)When fading in [a]
Press FN to display PAGE1 during recording
standby.
When fading out [b]
Press FN to display PAGE1 during recording.
(2)Press FADER. The screen to select the fader
mode appears.
(3)Press a desired mode.
(4)Press OK to return to PAGE1.
(5)Press EXIT to return to FN.
The fader indicator you selected flashes.
(6)Press START/STOP.
After the fade in/out is carried out, your
camcorder automatically returns to the
normal mode.
2
FADER
FADER
OFF OK
MOSC.
FADER
OVER–
LAP
BOUN–
CE
NORM.
FADER
MONO–
TONE
DOTW I PE
Le commutateur POWER doit être en position
.
Utilisez les touches de l’écran tactile.
(1)Pendant l’entrée en fondu [a]
Appuyez sur FN pour afficher la PAGE1
pendant l’attente d’enregistrement.
Pendant la sortie en fondu [b]
Appuyez sur FN pour afficher la PAGE1
pendant l’enregistrement.
(2)Appuyez sur FADER. L’écran de sélection de
transition apparaît.
(3)Appuyez sur un mode.
(4)Appuyez sur OK pour revenir à la PAGE1.
(5)Appuyez sur EXIT pour revenir à FN.
L’indicateur du fondu sélectionné clignote.
(6)Appuyez sur START/STOP.
Après la transition en fondu, le caméscope
revient automatiquement au mode normal.
START/STOP
Advanced Recording Operations Enregistrement – Opérations avancées
To cancel the fade in/out
Before pressing START/STOP, press OFF to
return to PAGE1.
Note
You cannot use the following functions while
using fader. Also, you cannot use fader while
using following functions:
– Super NightShot
– Colour Slow Shutter
– Digital effect
– Interval Recording
– Frame recording
– Recording with the flash
Pour annuler la fonction de fondu
Avant d’appuyer sur START/STOP, appuyez sur
OFF pour revenir à la PAGE1.
Remarque
Les fonctions suivantes ne peuvent pas être
utilisées avec le fondu. Vous ne pouvez pas non
plus faire de transitions en fondu lorsque vous
utilisez les fonctions suivantes :
– Super NightSthot
– Colour Slow Shutter
– Effet numérique
– Enregistrement échelonné
– Enregistrement image par image
– Enregistrement au flash
69
Page 70

Using the fader function
Transitions en fondu
When you select OVERLAP, WIPE or DOT
Your camcorder automatically stores the image
recorded on the tape. As the image is being
stored, the indicator becomes fast flashing, then
the playback picture disappears.
During fading in with BOUNCE, you cannot
use the following functions:
– Zoom
– Recording still images on the “Memory Stick”
– Picture effect
– PROGRAM AE
– Manual exposure
– Flexible Spot Meter
– Manual focus
Note on the BOUNCE mode
You cannot select BOUNCE in the followings:
–D ZOOM is activated in the menu settings
– Wide mode
– Picture effect
– PROGRAM AE
– Progressive Recording Mode
Lorsque vous sélectionnez OVERLAP, WIPE ou
DOT
Le caméscope mémorise d’abord l’image
enregistrée sur la bande. Lorsque celle-ci est
mémorisée, l’indicateur clignote rapidement,
puis l’image disparaît.
Lorsque vous faites une transition en fondu
avec BOUNCE, vous ne pouvez pas utiliser les
fonctions suivantes :
– Zoom
– Enregistrement d’images fixes sur le « Memory
Stick »
– Effet d’image
– PROGRAM AE
– Exposition manuelle
– Spotmètre flexible
– Mise au point manuelle
Remarque sur le mode BOUNCE
Vous ne pouvez pas sélectionner BOUNCE dans
les cas suivants :
–D ZOOM est activé dans les paramètres du
menu
– Mode Grand écran
– Effet d’image
– PROGRAM AE
– Mode d’enregistrement progressif
70
Page 71

Using special effects
– Picture effect
Utilisation d’effets
spéciaux
– Effet d’image
NEG. ART [a] : The colour and brightness of the
picture are reversed.
SEPIA : The picture is sepia.
B&W : The picture is monochrome
(black-and-white).
SOLARIZE [b] : The picture looks like an
illustration with a strong
contrast.
PASTEL [c] : The picture looks like a pale
pastel drawing.
MOSAIC [d] : The picture is mosaic.
[a] [b] [c]
The POWER switch should be set to
.
Operate by touching the panel.
(1)Press FN to display PAGE1.
(2)Press MENU to display the menu.
(3)Select P EFFECT in , then press EXEC
(p. 225).
MANUAL SET
PROGRAM AE
P EFFECT
RED EYE R
FLASH LVL
WHT BAL
SHARPNESS
AUTO SHTR
NEG. ART [a] : La couleur et la luminosité de
l’image sont inversées.
SEPIA : L’image est de couleur sépia,
comme les photos anciennes.
B&W : L’image devient monochrome
(noir et blanc).
SOLARIZE [b] : L’intensité lumineuse est plus
grande et l’image ressemble à
une illustration.
PASTEL [c] : L’image prend la couleur d’un
dessin pastel.
MOSAIC [d] : L’image est en mosaïque.
[d]
Le commutateur POWER doit être en position
.
Utilisez les touches de l’écran tactile.
(1)Appuyez sur FN pour afficher la PAGE1.
(2)Appuyez sur MENU pour afficher le menu.
(3)Sélectionnez P EFFECT dans , puis
appuyez sur EXEC (p. 235).
EXIT
OFF
NEG. ART
SEPIA
B&W
SOLARIZE
PASTEL
MOSAIC
RET.
EXEC
Advanced Recording Operations Enregistrement – Opérations avancées
(4)Select a desired mode, then press EXEC.
To return to FN
Press EXIT.
To cancel picture effect
Set P EFFECT to OFF in the menu settings.
Note
While using picture effect, you cannot use
following functions:
– BOUNCE
– OLD MOVIE
(4)Sélectionnez un mode, puis appuyez sur
EXEC.
Pour revenir à FN
Appuyez sur EXIT.
Pour annuler l’effet d’image
Réglez P EFFECT sur OFF dans les paramètres
du menu.
Remarque
Lorsque vous utilisez un effet d’image, vous ne
pouvez pas utiliser les fonctions suivantes :
– BOUNCE
– OLD MOVIE
71
Page 72

Using special effects
– Digital effect
Utilisation d’effets
spéciaux
– Effet numérique
STILL
You can record a still image so that it is
superimposed on a moving picture.
FLASH (flash motion)
You can record still images successively at
regular intervals.
LUMI. (luminance key)
You can swap the brighter area in a still image
with a moving picture.
TRAIL
You can record a picture so that an incidental
image like a trail is left.
SLOW SHTR (slow shutter)
You can slow down the shutter speed. The SLOW
SHTR mode is good for recording dark pictures
more brightly.
OLD MOVIE
You can add an old movie type atmosphere to
pictures. Your camcorder automatically sets the
16:9WIDE mode, picture effect to SEPIA, and the
appropriate shutter speed.
Still image/ Moving picture/
Image fixe Image animée
STILL
Permet de superposer une image fixe à une
image animée.
FLASH (mouvement stroboscopique)
Permet d’enregistrer des images fixes à
intervalles constants pour créer un effet
stroboscopique.
LUMI. (incrustation en luminance)
Permet d’incruster une image animée dans une
partie lumineuse d’une image fixe.
TRAIL
Permet d’obtenir un effet de traînée avec une
image rémanente.
SLOW SHTR (obturation lente)
Permet de ralentir la vitesse d’obturation. Le
mode SLOW SHTR permet d’enregistrer des
images plus lumineuses dans l’obscurité.
OLD MOVIE
Permet de restituer l’atmosphère d’un vieux film.
Le caméscope se règle automatiquement sur le
mode 16:9WIDE, l’effet SEPIA et la vitesse
d’obturation appropriée.
72
STILL
Still image/ Moving picture/
Image fixe Image animée
LUMI.
Page 73

Using special effects
– Digital effect
Utilisation d’effets spéciaux
– Effet numérique
The POWER switch should be set to
.
Operate by touching the panel.
(1)Press FN and select PAGE2.
(2)Press DIG EFFT. The screen to select a digital
effect is displayed.
(3)Press a desired mode. When you select STILL
or LUMI., the still image is stored in memory.
(4)Press – (to decrease the effect)/+ (to increase
the effect) to adjust the effect.
Items to adjust
STILL The rate of the still image you
want to superimpose on the
moving picture
FLASH The interval of flash motion
LUMI. The colour scheme of the area in
the still image which is to be
swapped with a moving picture
TRAIL The vanishing time of the
incidental image
SLOW SHTR Shutter speed. The larger the
shutter speed number, the slower
the shutter speed.
OLD MOVIE No adjustment necessary
(5)Press OK to return to PAGE2.
Le commutateur POWER doit être en position
.
Utilisez les touches de l’écran tactile.
(1)Appuyez sur FN et sélectionnez la PAGE2.
(2)Appuyez sur DIG EFFT. L’écran de sélection
de l’effet numérique apparaît.
(3)Appuyez sur un mode. Lorsque vous
sélectionnez STILL ou LUMI., l’image fixe
sélectionnée est enregistrée dans la mémoire.
(4)Appuyez sur – pour réduire de l’effet ou sur
+ pour intensifier l’effet.
Réglage à effectuer
STILL Réglage de l’intensité de l’image
fixe qui doit être incrustée dans
l’image animée.
FLASH Réglage de l’intervalle
d’enregistrement des images.
LUMI. Réglage de la couleur de la partie
de l’image fixe qui sera
remplacée par une image animée.
TRAIL Réglage de la durée de
rémanence de l’image.
SLOW SHTR Réglage de la vitesse
d’obturation. Plus le nombre est
grand plus la vitesse est lente.
OLD MOVIE Aucun réglage nécessaire.
Advanced Recording Operations Enregistrement – Opérations avancées
(5)Appuyez sur OK pour revenir à la PAGE2.
24
DIG
EFFT
DIG EFFT
OFF OK
SLOW
OLD
SHTR
MOVIE
STILL
LUMI.FLASH TRAIL
[a] The bar appears when setting following digital effect modes: STILL,
FLASH, LUMI., TRAIL./
Les barres apparaissent dans les modes suivants : STILL, FLASH, LUMI.,
TRAIL.
DIG EFFT
OFF
LUMI.
–+
OK
[a]
73
Page 74

Using special effects
– Digital effect
Utilisation d’effets spéciaux
– Effet numérique
To return to FN
Press EXIT.
To cancel digital effect
Press OFF to return to PAGE2.
Notes
•While using digital effect, you cannot use the
following functions:
– Super NightShot
– Colour Slow Shutter
– Fader
•PROGRAM AE does not work in the SLOW
SHTR mode.
•The following functions do not work in the
OLD MOVIE mode:
– Wide mode
– Picture effect
– PROGRAM AE
When recording in the SLOW SHTR mode
Auto focus may not be effective. Focus manually
using a tripod.
Shutter speed
Shutter speed number Shutter speed
SLOW SHTR 1 1/25
SLOW SHTR 2 1/12
SLOW SHTR 3 1/6
SLOW SHTR 4 1/3
Pour revenir à FN
Appuyez sur EXIT.
Pour annuler l’effet numérique
Appuyez sur OFF pour revenir à la PAGE2.
Remarques
•Lorsque vous utilisez un effet numérique, les
fonctions suivantes sont inopérantes :
– Super NightSthot
– Colour Slow Shutter
– Transitions en fondu
•La fonction PROGRAM AE n’agit pas en mode
SLOW SHTR.
•Les fonctions suivantes n’agissent pas en mode
OLD MOVIE :
– Mode Grand écran
– Effet d’image
– PROGRAM AE
Pendant l’enregistrement en mode SLOW
SHTR
Il se peut que l’autofocus ne soit pas très efficace.
Essayez de faire la mise au point manuellement
en utilisant un pied photographique.
Vitesse d’obturation
Indicateur de vitesse
d’obturation
SLOW SHTR 1 1/25
SLOW SHTR 2 1/12
SLOW SHTR 3 1/6
SLOW SHTR 4 1/3
Vitesse d’obturation
74
Page 75

Using PROGRAM AE
Utilisation de la
fonction PROGRAM AE
SPOTLIGHT
1)
This mode prevents people’s faces, for example,
from appearing excessively white when shooting
subjects lit by strong light in the theatre.
PORTRAIT (soft portrait)
This mode brings out the subject while creating a
soft background for subjects such as people or
flowers.
SPORTS (sports lesson)
1)
This mode minimises shake on fast-moving
subjects such as in tennis or golf.
BEACH&SKI
1)
This mode prevents people’s faces from
appearing dark in strong light or reflected light,
such as at a beach in midsummer or on a ski
slope.
SUNSETMOON (sunset & moon)
2)
This mode allows you to maintain atmosphere
when you are recording sunsets, general night
views, fireworks displays and neon signs.
LANDSCAPE
2)
This mode is for when you record distant
subjects such as mountains. Also it prevents your
camcorder from focusing on glass or metal mesh
in windows when you record a subject behind
glass or a screen.
SPOTLIGHT
1)
Ce mode empêche que les personnes filmées sous
un projecteur, par exemple au théâtre, aient des
visages trop blancs.
PORTRAIT (fond doux)
Ce mode permet de bien faire ressortir le sujet
sur un fond doux. Il est tout indiqué pour filmer
des personnes ou des fleurs.
SPORTS (leçon de sports)
1)
Ce mode réduit le bougé lors de la prise de vue
de sujets aux mouvements rapides, comme au
golf ou au tennis.
BEACH&SKI
1)
Ce mode empêche que les visages des personnes
apparaissent trop sombres sous une lumière
intense ou une lumière réfléchie, en particulier à
la plage en été ou sur les pistes de ski.
SUNSETMOON (coucher du soleil &
crépuscule)
2)
Ce mode permet d’obtenir une meilleure
atmosphère lors de la prise de vue de couchers
du soleil, de scènes nocturnes, de feux d’artifice
et d’enseignes lumineuses.
LANDSCAPE
2)
Ce mode doit être utilisé pour filmer des sujets
lointains, comme des montagnes. Il empêche le
caméscope de faire la mise au point sur le
maillage métallique d’une vitre, par exemple,
lorsque vous filmez un sujet derrière une vitre.
Advanced Recording Operations Enregistrement – Opérations avancées
1)
Your camcorder focuses only on subjects in the
middle to far distance.
2)
Your camcorder focuses only distant subject.
1)
Le caméscope fait la mise au point sur les sujets
à distance moyenne ou lointains.
2)
Le caméscope ne fait la mise au point que sur
les sujets lointains.
75
Page 76

Using PROGRAM AE
Utilisation de la fonction
PROGRAM AE
The POWER switch should be set to
or .
Operate by touching the panel.
(1)Press FN to display PAGE1.
(2)Press MENU to display the menu.
(3)Select PROGRAM AE in , then press EXEC
(p. 225).
MANUAL SET
PROGRAM AE
P EFFECT
RED EYE R
FLASH LVL
WHT BAL
SHARPNESS
AUTO SHTR
(4)Select a desired mode, then press EXEC.
To return to FN
Press EXIT.
To cancel PROGRAM AE
Set PROGRAM AE to AUTO in the menu
settings.
Notes
•The following functions do not work in
PROGRAM AE:
– Colour Slow Shutter
– During fading in with BOUNCE
– SLOW SHTR
– OLD MOVIE
– Spot Focus
•PROGRAM AE does not work in the following
cases (The indicator flashes):
– NightShot
– When the POWER switch is set to MEMORY,
you use MEMORY MIX.
•When you set the POWER switch to MEMORY,
the SPORTS mode does not work. (The
indicator flashes.)
Le commutateur POWER doit être en position
ou .
Utilisez les touches de l’écran tactile.
(1)Appuyez sur FN pour afficher la PAGE1.
(2)Appuyez sur MENU pour afficher le menu.
(3)Sélectionnez PROGRAM AE dans , puis
appuyez sur EXEC (p. 235).
EXIT
AUTO
SPOTLIGHT
PORTRAIT
SPORTS
BEACH&SKI
SUNSETMOON
LANDSCAPE
RET.
EXEC
(4)Sélectionnez un mode, puis appuyez sur
EXEC.
Pour revenir à FN
Appuyez sur EXIT.
Pour annuler la fonction PROGRAM
AE
Réglez PROGRAM AE sur AUTO dans les
paramètres du menu.
Remarques
•Les fonctions suivantes n’agissent pas avec
PROGRAM AE :
– Colour Slow Shutter
– Fondu avec BOUNCE
– SLOW SHTR
– OLD MOVIE
– Mise au point ponctuelle
•La fonction PROGRAM AE n’agit pas dans les
cas suivants (L’indicateur clignote.) :
– NightShot
– Vous utilisez MEMORY MIX lorsque le
commutateur POWER est en position
MEMORY.
•Lorsque le commutateur POWER est en
position MEMORY, le mode SPORTS n’agit
pas. (L’indicateur clignote.)
76
Page 77

Adjusting the
exposure manually
Réglage manuel de
l’exposition
We recommend adjusting the exposure manually
in the following cases:
– When the subject is backlit
– When the subject is too bright against the
background
– When recording dark pictures (e.g. night
scenes) faithfully
The POWER switch should be set to
or .
Operate by touching the panel.
(1)Press FN to display PAGE1.
(2)Press EXPOSURE. The screen to adjust the
exposure appears.
(3)Press MANUAL.
(4)Adjust the exposure using – (to dim)/+ (to
brighten).
(5)Press OK to return to PAGE1.
24
EXPO–
SURE
AUTO
MANU–
AL
EXPOSURE
Il est conseiller d’ajuster soi-même l’exposition
dans les cas suivants :
– Le sujet est à contre-jour
– Le sujet est lumineux et le fond sombre
– Vous voulez obtenir une image fidèle de sujets
sombres (scènes nocturnes)
Le commutateur POWER doit être en position
Utilisez les touches de l’écran tactile.
(1)Appuyez sur FN pour afficher la PAGE1.
(2)Appuyez sur EXPOSURE. L’écran de réglage
de l’exposition apparaît.
(3)Appuyez sur MANUAL.
(4)Ajustez l’exposition en utilisant – pour
l’assombrir ou + pour l’éclaircir.
(5)Appuyez sur OK pour revenir à la PAGE1.
OK
ou .
AUTO
MANU–
AL
EXPOSURE
–+
–+
OK
Advanced Recording Operations Enregistrement – Opérations avancées
To return to FN
Press EXIT.
To return to the automatic exposure
Press AUTO to return to PAGE1.
Note
When you adjust the exposure manually, the
following functions do not work:
– Back light function
– Colour Slow Shutter
Pour revenir à FN
Appuyez sur EXIT.
Pour revenir au réglage automatique
de l’exposition
Appuyez sur AUTO pour revenir à la
PAGE1.
Remarque
Lorsque vous ajustez vous-même l’exposition, les
fonctions suivantes n’agissent pas :
– Compensation de contre-jour
– Colour Slow Shutter
77
Page 78

Using spot lightmetering function
– Flexible Spot Meter
Utilisation de la mesure
ponctuelle de l’exposition
– Spotmètre flexible
You can take a picture with the appropriate
exposure automatically for just the point you
want to focus on and with its exposure fixed.
Use Flexible Spot Meter in the following cases:
– The subject is backlit.
– When there is strong contrast between the
subject and background such as with a subject
that is on stage and lit by a spotlight.
The POWER switch should be set to
or .
Operate by touching the panel.
(1)Press FN to display PAGE1.
(2)Press SPOT METER. The SPOT METER screen
appears.
(3)Press the desired area in the frame.
The SPOT METER indicator flashes on the
screen. The exposure of the point you selected
is adjusted.
(4)Press OK to return to PAGE1.
2
SPOT
METER
Avec le spotmètre flexible, la mise au point se fait
automatiquement sur un point précis du sujet
visé, et reste ensuite fixe.
Utilisez le spotmètre flexible dans les situations
suivantes :
– Le sujet est à contre-jour.
– Le contraste entre le sujet et l’arrière-plan est
extrêmement marqué, par exemple une
personne sur une scène est éclairée par des
projecteurs.
Le commutateur POWER doit être en position
ou .
Utilisez les touches de l’écran tactile.
(1)Appuyez sur FN pour afficher la PAGE1.
(2)Appuyez sur SPOT METER. L’écran SPOT
METER apparaît.
(3)Appuyez sur la partie souhaitée dans le cadre.
L’indicateur SPOT METER clignote sur
l’écran. L’exposition du point sélectionné est
ajustée.
(4)Appuyez sur OK pour revenir à la PAGE1.
SPOT METER
To return to FN
Press EXIT.
To return to the automatic exposure
Press AUTO to return to PAGE1.
Note
The following functions do not work during
Flexible Spot Meter:
– Back light function
– Colour Slow Shutter
– Spot Focus
78
AUTO
OK
Pour revenir à FN
Appuyez sur EXIT.
Pour revenir au réglage automatique
de l’exposition
Appuyez sur AUTO pour revenir à la
PAGE1.
Remarque
Les fonctions suivantes n’agissent pas avec le
spotmètre flexible :
– Compensation de contre-jour
– Colour Slow Shutter
– Mise au point ponctuelle
Page 79

Focusing manually
Mise au point
manuelle
You can gain better results by manually adjusting
the focus in the following cases. Normally, focus
is automatically adjusted.
When the POWER switch is set to MEMORY,
you can adjust the focus manually with the
image enlarged to twice the size (Expanded
focus).
•The autofocus mode is not effective when
shooting:
– Subjects through glass coated with water
droplets
– Horizontal stripes
– Subjects with little contrast with backgrounds
such as walls or the sky
•When you want to change the focus from a
subject in the foreground to a subject in the
background
•Shooting a stationary subject when using a
tripod
The POWER switch should be set to
or .
Vous obtiendrez de meilleurs résultats avec la
mise au point manuelle dans les situations
suivantes. Normalement, la mise au point est
automatique.
Lorsque vous réglez le commutateur POWER sur
MEMORY, vous pouvez faire la mise au point
sur une image deux fois plus grande (mise au
point agrandie).
•La mise au point automatique n’est pas possible
pendant la prise de vues de :
– Sujets derrière une vitre couverte de
gouttelettes d’eau
– Sujets derrière des rayures horizontales
– Sujets faiblement contrastés, comme un mur
ou le ciel
•Lorsque vous voulez faire la mise au point sur
un sujet en arrière plan après l’avoir faite sur un
sujet au premier plan.
•Lorsque vous filmez un sujet stationnaire avec
un pied photographique.
Le commutateur POWER doit être en position
ou .
Advanced Recording Operations Enregistrement – Opérations avancées
(1)Press FOCUS.
The 9 (focus) indicator appears on the
screen.
(2)Turn the focus ring to sharpen focus.
2
Focus ring/
Bague de mise au
point
To return to the autofocus
Press FOCUS to turn off the 9, or
indicator.
(1)Appuyez sur FOCUS.
L’indicateur 9 (mise au point) apparaît à
l’écran.
(2)Tournez la bague de mise au point pour
obtenir une image nette.
FOCUS
Pour revenir à la mise au point
automatique
Appuyez sur FOCUS pour éteindre l’indicateur
9, ou .
79
Page 80

Focusing manually
Mise au point manuelle
About expanded focus
If you set EXPANDED F in to ON in the
menu settings (p. 226) when the POWER switch
is set to MEMORY, the
indicator appears when the focus ring is turned
and the image will be enlarged to twice its size.
The focal distance information is also displayed.
Adjustment is complete, the image returns to its
original size automatically.
To focus precisely
It is easier to focus on the subject if you adjust the
zoom to shoot at the “W” (wide-angle) position
after focusing at the “T” (telephoto) position.
When you shoot close to the subject
Focus at the end of the “W” (wide-angle)
position.
9 changes as follows:
when recording a distant subject
when the subject is too close to focus on
Focal distance information is displayed for
about three seconds on the LCD screen in the
following cases:
– When switching the focus adjustment mode
from autofocus to manual
– When turning the focus ring
Focal distance information
You cannot get correct information if you have
attached a conversion lens (optional) to your
camcorder.
(expanded focus)
A propos de la mise au point
agrandie
Si EXPANDED F est réglé sur ON dans des
paramètres du menu (p. 236) et le commutateur
POWER est réglé sur MEMORY, l’indicateur
(mise au point agrandie) apparaît lorsque vous
tournez la bague de mise au point, et l’image
double de taille. La longueur focale est également
indiquée. Lorsque le réglage est terminé, l’image
reprend sa taille normale.
Pour obtenir une image plus nette
Effectuez d’abord la mise au point en position
« T » (téléobjectif) et ajustez ensuite le zoom pour
filmer en position « W » (grand angle).
Si vous filmez tout près du sujet
Faites la mise au point en position « W » (grand
angle).
9 change de la façon suivante :
lorsque vous filmez un sujet très éloigné.
lorsque le sujet est trop près pour que la mise
au point soit nette.
La longueur focale est indiquée pendant trois
secondes environ sur l’écran LCD dans les cas
suivants :
– Lorsque vous passez du mode autofocus au
mode de mise au point manuelle.
– Lorsque vous tournez la bague de mise au
point.
Indication de la longueur focale
L’indication ne sera pas correcte, si vous fixez un
convertisseur (en option) sur l’objectif.
80
Page 81

Using spot focus
function – Spot Focus
Utilisation de la mesure
ponctuelle de l’exposition
– Mise au point ponctuelle
You can take a picture with the appropriate focus
automatically for just the point you want to focus
on and with its focus fixed.
The POWER switch should be set to
or .
Operate by touching the panel.
(1)Press FN to display PAGE1.
(2)Press SPOT FOCUS. The SPOT FOCUS screen
appears.
(3)Press the desired area in the frame.
The SPOT FOCUS indicator flashes on the
screen. The focus of the point you selected is
adjusted.
(4)Press OK to return to PAGE1.
2
SPOT
FOCUS
To return to FN
Press EXIT.
Avec la mesure ponctuelle de l’exposition, la
mise au point se fait automatiquement sur un
point précis du sujet visé, et reste ensuite fixe.
Le commutateur POWER doit être en position
Utilisez les touches de l’écran tactile.
(1)Appuyez sur FN pour afficher la PAGE1.
(2)Appuyez sur SPOT FOCUS. L’écran SPOT
FOCUS apparaît.
(3)Appuyez sur la partie souhaitée dans le cadre.
L’indicateur SPOT FOCUS clignote sur
l’écran. L’exposition du point sélectionné est
ajustée.
(4)Appuyez sur OK pour revenir à la PAGE1.
SPOT FOCUS
AUTO
ou .
OK
Pour revenir à FN
Appuyez sur EXIT.
Advanced Recording Operations Enregistrement – Opérations avancées
To return to the autofocus
Press AUTO to return to PAGE1.
Note
The back light function does not work during
Spot Focus.
Focal distance information
It is not displayed on the screen.
Pour revenir à la mise au point
automatique
Appuyez sur AUTO pour revenir à la
PAGE1.
Remarque
La compensation de contre-jour n’agit pas
pendant la mesure ponctuelle de l’exposition.
Indication de la longueur focale
La longueur focale n’est pas indiquée sur l’écran.
81
Page 82

Interval Recording
Enregistrement
échelonné
You can make a time-lapse recording by setting
your camcorder to automatically record and
standby sequentially. You can achieve an
excellent recording for flowering, emergence, etc.
with this function.
Example/Exemple
1 s 1 s
9 min 59 s 9 min 59 s
[a][a]
[b][b]
10 min 10 min
[a] REC TIME/REC TIME (durée de l’enregistrement)
[b] INTERVAL/INTERVAL (pause)
There may be a discrepancy in recording time of
up to +/– six frames from the selected time.
The POWER switch should be set to
Operate by touching the panel.
(1) Press FN to display PAGE1.
(2) Press MENU to display the menu.
(3) Select INT. REC in , then press EXEC
(4) Select SET, then press EXEC.
(5) Select INTERVAL, then press EXEC.
(6) Select a desired interval time, then press
(7) Select REC TIME, then press EXEC.
(8) Select a desired recording time, then press
(9) Press RET.
(10) Set INT. REC to ON, then press EXEC.
(11) Press EXIT to return to FN.
(12) Press START/STOP to start Interval
.
(p. 231).
EXEC.
The time: 30SEC y 1MIN y 5MIN y
10MIN
EXEC.
The time: 0.5SEC y 1SEC y 1.5SEC y
2SEC
The INTERVAL TAPE indicator flashes on
the screen.
Recording.
The INTERVAL TAPE indicator lights up
during Interval Recording.
Vous pouvez faire un enregistrement échelonné
dans le temps en réglant le caméscope pour qu’il
se mette successivement en marche et à l’arrêt.
Ceci vous permettra de photographier ou de
filmer la floraison et le bourgeonnement de
plantes, par exemple.
Il peut y avoir un décalage de +/– six images par
rapport à la durée d’enregistrement spécifiée.
Le commutateur POWER doit être en position
.
Utilisez les touches de l’écran tactile.
(1) Appuyez sur FN pour afficher la PAGE1.
(2) Appuyez sur MENU pour afficher le menu.
(3) Sélectionnez INT. REC dans , puis
appuyez sur EXEC (p. 241).
(4) Sélectionnez SET, puis appuyez sur EXEC.
(5) Sélectionnez INTERVAL, puis appuyez sur
EXEC.
(6) Sélectionnez la durée de l’intervalle, puis
appuyez sur EXEC.
Durée : 30SEC y 1MIN y 5MIN y
10MIN
(7) Sélectionnez REC TIME, puis appuyez sur
EXEC.
(8) Sélectionnez la durée d’enregistrement, puis
appuyez sur EXEC.
Durée : 0.5SEC y 1SEC y 1.5SEC y
2SEC
(9) Appuyez sur RET.
(10) Réglez INT. REC sur ON, puis appuyez sur
EXEC.
(11) Appuyez sur EXIT pour revenir à FN.
L’indicateur INTERVAL TAPE clignote sur
l’écran.
(12) Appuyez sur START/STOP pour activer
l’enregistrement échelonné.
L’indicateur INTERVAL TAPE s’allume
pendant l’enregistrement échelonné.
82
Page 83

Interval Recording
Enregistrement échelonné
457
TAPE SET
I
NT. REC
I
NTERVAL
REC T
EXIT
30SEC
I
ME
RET.
EXEC
TAPE SET
I
NT. REC
I
NTERVAL
REC T
EXIT
30SEC
1M
I
ME
I
N
I
N
5M
I
N
10M
RET.
EXEC
TAPE SET
I
NT. REC
I
NTERVAL
REC T
I
ME 0 . 5SEC
EXEC
1SEC
1
.
5SEC
2SEC
EXIT
RET.
To cancel Interval Recording
Set INT. REC to OFF in the menu settings.
Pour annuler l’enregistrement
échelonné
Réglez INT. REC sur OFF dans les paramètres du
menu.
Advanced Recording Operations Enregistrement – Opérations avancées
83
Page 84

Frame by frame
recording
– Frame recording
Enregistrement image par
image – Enregistrement
d’images figées
You can make a recording with a stop-motion
animated effect using frame recording. To create
this effect, alternately move the subject a little
and make frame recording. We recommend that
you use a tripod, and operate your camcorder
using the Remote Commander after step 6.
The POWER switch should be set to
Operate by touching the panel.
(1)Press FN to display PAGE1.
(2)Press MENU to display the menu.
(3)Select FRAME REC in , then press EXEC
(p. 231).
(4)Select ON, then press EXEC.
(5)Press EXIT to return to FN.
The FRAME REC indicator lights up.
(6)Press START/STOP to start frame recording.
Your camcorder makes a recording for about
six frames, and returns to recording standby.
(7)Move the subject, and repeat step 6.
.
TAPE SET
REC MODE
AUDI O MODE
REMAIN
FRAME REC
I NT. REC
To cancel frame recording
Set FRAME REC to OFF in the menu settings.
Note
The proper remaining tape time is not indicated
if you use frame recording continuously.
When using frame recording
The last recorded frame is longer than other
frames.
Vous pouvez obtenir un effet animé de marchearrêt en utilisant cette fonction. Pour ce faire,
déplacez chaque fois un peu le sujet avant de
reprendre l’enregistrement. Il est conseillé
d’utiliser un pied photographique et de faire
fonctionner le caméscope avec la télécommande
après l’étape 6.
Le commutateur POWER doit être en position
Utilisez les touches de l’écran tactile.
(1)Appuyez sur FN pour afficher la PAGE1.
(2)Appuyez sur MENU pour afficher le menu.
(3)Sélectionnez FRAME REC dans , puis
appuyez sur EXEC (p. 241).
EXIT
OFF
ON
EXEC
(4)Sélectionnez ON, puis appuyez sur EXEC.
(5)Appuyez sur EXIT pour revenir à FN.
L’indicateur FRAME REC s’allume.
(6)Appuyez sur START/STOP pour activer
l’enregistrement image par image. Le
caméscope enregistre six images environ puis
se met en attente d’enregistrement.
(7)Déplacez le sujet et répétez l’étape 6.
.
RET.
Pour annuler l’enregistrement image
par image
Réglez FRAME REC sur OFF dans les paramètres
du menu.
Remarque
L’autonomie de la bande ne sera pas indiquée
correctement si vous utilisez continuellement
cette fonction.
84
Lorsque vous utilisez l’enregistrement image
par image
La dernière séquence enregistrée est plus longue
que les autres.
Page 85

Recording with all the
pixels – Progressive
Recording Mode
Enregistrement avec tous
les pixels – Mode
d’enregistrement progressif
To import moving pictures to a computer to view
still images, we recommend you record in
Progressive Recording Mode. To use Progressive
Recording Mode, follow the procedure below.
Still images produced this way are more stable
than those recorded in normal mode, and thus
are more suitable for analysing high-speed action
such as sports scenes. (Since your camcorder
takes in an image every 1/25 of a second in
Progressive Recording Mode, moving pictures
recorded in this mode may be subject to too
much jitter. To view moving pictures, we
recommend recording in normal mode.)
The POWER switch should be set to
.
Operate by touching the panel.
(1)Press FN and select PAGE3.
(2)Press PRGRE REC.
To cancel Progressive Recording
Mode
Press PRGRE REC again.
To return to FN
Press EXIT.
Il est conseillé d’utiliser le mode
d’enregistrement progressif lorsqu’on veut
importer des images animées sur un ordinateur
pour les voir sous forme d’images fixes. Pour
utiliser le mode d’enregistrement progressif,
procédez de la façon suivante. Les images fixes
ainsi obtenues sont plus stables que celles
enregistrées en mode normal et peuvent être
mieux analysées, surtout si le sujet est très rapide
comme dans les scènes sportives. (Comme le
caméscope prend une image toutes les 1/25es de
seconde en mode d’enregistrement progressif, les
images animées enregistrées dans ce mode
peuvent avoir tendance à sautiller. Pour voir des
images animées, il est conseillé d’enregistrer en
mode normal.)
Le commutateur POWER doit être en position
.
Utilisez les touches de l’écran tactile.
(1)Appuyez sur FN et sélectionnez la PAGE3.
(2)Appuyez sur PRGRE REC.
Pour annuler le mode
d’enregistrement progressif
Appuyez de nouveau sur PRGRE REC.
Pour revenir à FN
Appuyez sur EXIT.
Advanced Recording Operations Enregistrement – Opérations avancées
Note on Progressive Recording Mode
The normal TV broadcast divides the screen into
two finer fields and displays them in turns every
1/50 of a second. Thus, the actual image
displayed in an instant covers only half of the
apparent image area. Displaying the whole
image simultaneously on a full screen is called
displaying with all the pixels. In this function the
picture is clearer than one in normal function, but
moving objects appear jerky since the picture is
read/output every about 1/25 second.
Remarque sur le mode d’enregistrement
progressif
Lors d’une émission télévisée ordinaire, l’image
se divise en deux trames plus fines qui s’affichent
successivement toutes les 1/50es de seconde.
L’image affichée ne recouvre donc que la moitié
de l’écran. L’affichage de l’image complète (des
deux trames) est ce qu’on appelle affichage de
tous les pixels. L’image ainsi obtenue est plus
nette qu’une image normale, mais elle a tendance
à sautiller dans le cas de sujets en mouvement,
puisqu’elle ne change que toutes les 1/25es de
seconde.
85
Page 86

Recording with all the pixels
– Progressive Recording Mode
Enregistrement avec tous les
pixels – Mode d’enregistrement
progressif
When recording under fluorescent light
When recording in Progressive Recording Mode
under fluorescent light or light bulb, a rare
phenomenon may happen in which the screen
lights up brightly (Flicker phenomenon). This is
not a malfunction. If you want to stop this
phenomenon, cancel Progressive Recording
Mode.
When you record with Progressive Recording
Mode
The angle of view is slightly larger than normal
recording.
During Progressive Recording Mode, you
cannot use the following functions:
– Digital zoom
– Recording still images on the “Memory Stick”
during tape recording or tape recording
standby
– Wide mode
– BOUNCE
– SLOW SHTR
– OLD MOVIE
– SteadyShot
Enregistrement sous une lampe fluorescente
Pendant l’enregistrement sous une lampe
fluorescente ou une lampe à ampoule en mode
progressif, un phénomène rare peut se produire,
et dans ce cas une lumière vive (un scintillement)
peut apparaître à l’écran. C’est normal. Pour que
ce phénomène cesse, annulez le mode
d’enregistrement progressif.
Pendant l’enregistrement en mode progressif
L’angle de vue est légèrement plus grand que
pendant de l’enregistrement normal.
Pendant l’enregistrement progressif, vous ne
pouvez pas utiliser les fonctions suivantes :
– Zoom numérique
– Enregistrement d’images fixes sur un
« Memory Stick » pendant l’enregistrement ou
l’attente d’enregistrement sur cassette
– Mode Grand écran
– BOUNCE
– SLOW SHTR
– OLD MOVIE
– Stabilisateur
86
Page 87
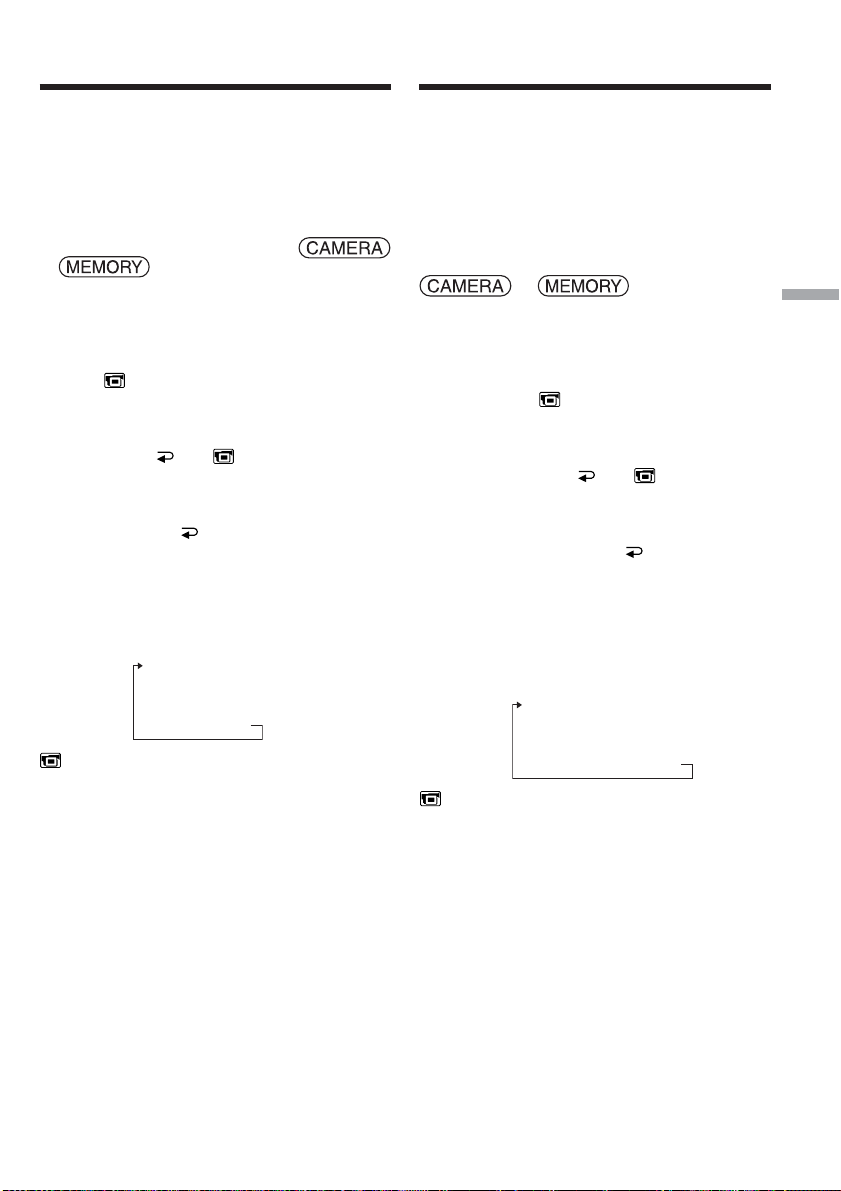
Using the viewfinder
Utilisation du viseur
Turn the LCD panel over and move it back to
your camcorder body with the LCD screen facing
out. You can operate with the touch panel using
the viewfinder.
Use the viewfinder when operating camera
brightness and fader on the touch panel.
The POWER switch should be set to
or .
Operate by touching the panel.
(1)Turn the LCD panel over and move it back to
your camcorder body with the LCD screen
facing out.
(2)Press OFF. The PANEL OFF indicator
appears on the screen.
(3)Press OK. The LCD screen is turned off.
(4)Using the viewfinder, press the LCD screen.
EXPOSURE, OK, ON and FADER
(only when the POWER switch is set to
CAMERA) appear.
(5)Press the LCD screen and select a desired
item, then press OK.
EXPOSURE: Adjust the exposure by pressing
–/+.
FADER: Press FADER until a desired fader
mode appears.
The indicator changes as follows:
FADER t M. FADER t
BOUNCE t MONOTONE t
OVERLAP t WIPE t DOT t
(no indicator)
ON: The LCD screen lights up.
Vous pouvez tourner complètement l’écran LCD
et le rabattre contre le caméscope avec l’écran
LCD orienté vers l’extérieur. Vous pouvez
utiliser ainsi l’écran tactile tout en regardant dans
le viseur.
Utilisez le viseur pendant le réglage de la
luminosité et du fondu sur l’écran tactile.
Le commutateur POWER doit être en position
ou .
Utilisez les touches de l’écran tactile.
(1)Tournez l’écran LCD et rabattez-le contre le
caméscope avec l’écran LCD orienté vers
l’extérieur.
(2)Appuyez sur OFF. L’indicateur PANEL
OFF apparaît sur l’écran.
(3)Appuyez sur OK. L’écran LCD s’éteint.
(4)Tout en utilisant le viseur, appuyez sur l’écran
LCD. EXPOSURE, OK, ON et FADER
(seulement lorsque le commutateur POWER
est en position CAMERA) apparaissent.
(5)Appuyez sur l’écran LCD et sélectionnez une
option, puis appuyez sur OK.
EXPOSURE : Ajustez l’exposition en appuyant
sur –/+.
FADER : Appuyez sur FADER jusqu’à ce que
le mode de transition souhaité
apparaisse.
L’indicateur change comme suit :
FADER t M. FADER t
BOUNCE t MONOTONE t
OVERLAP t WIPE t DOT t
(pas d’indicateur)
Advanced Recording Operations Enregistrement – Opérations avancées
ON : L’écran LCD s’allume.
87
Page 88

Using the viewfinder
Utilisation du viseur
4
When the POWER
switch is set to CAMERA/
Lorsque le commutateur
POWER est réglé sur CAMERA
EXPO–
SURE
ON FADER
OK
When the POWER
switch is set to MEMORY/
Lorsque le commutateur
POWER est réglé sur MEMORY
EXPO–
SURE
ON
OK
To make the buttons on the LCD
screen disappear
Press OK.
Note
When the POWER switch is set to VCR or during
memory playback, you cannot operate with the
touch panel using the viewfinder.
To operate the items that do not appear
Set the LCD panel back to the previous position.
Operate the items using the LCD screen.
Available recording time
This is the time when you record pictures using
the viewfinder (p. 27).
Viewfinder/
Viseur
Pour dégager les touches de l’écran
LCD
Appuyez sur OK.
Remarque
Lorsque le commutateur POWER est réglé sur
VCR ou pendant la lecture de « Memory Stick »,
vous ne pouvez pas utiliser l’écran tactile en
même temps que le viseur.
Pour utiliser les options qui n’apparaissent pas
Remettez le panneau LCD dans la position
antérieure. Sélectionnez les options sur l’écran
LCD.
Temps d’enregistrement disponible
C’est le temps de tournage dont vous disposez
lorsque vous utilisez le viseur (p. 27).
88
Page 89

— Advanced Playback Operations —
— Lecture – Opérations avancées —
Playing back tape
with picture effect
The POWER switch should be set to .
Operate by touching the panel.
(1)During playback or playback pause, press FN
to display PAGE1.
(2)Press MENU to display the menu.
(3)Select P EFFECT in , then press EXEC
(p. 225).
MANUAL SET
P EFFECT
(4)Select a desired mode, then press EXEC.
You can use NEG. ART, SEPIA, B&W and
SOLARIZE.
See page 71 for details of each mode.
To return to FN
Press EXIT.
To cancel picture effect
Set P EFFECT to OFF in the menu settings.
Notes
•You cannot process externally input scenes
using picture effect.
•You cannot record images on the tape on your
camcorder while you are processing the image
using picture effect. Record images on the
“Memory Stick” (p. 147, 159), or on a VCR
using your camcorder as a player.
Pictures processed by picture effect
Pictures processed by picture effect are not
output through the DV Interface.
Lecture d’une cassette
avec effet d’image
Le commutateur POWER doit être en position
.
Utilisez les touches de l’écran tactile.
(1)Pendant la lecture ou la pause, appuyez sur
FN pour afficher la PAGE1.
(2)Appuyez sur MENU pour afficher le menu.
(3)Sélectionnez P EFFECT dans , puis
appuyez sur EXEC (p. 235).
EXIT
OFF
NEG. ART
SEPIA
B&W
SOLARIZE
RET.
EXEC
(4)Sélectionnez un mode, puis appuyez sur
EXEC.
Vous pouvez utiliser NEG. ART, SEPIA, B&W
et SOLARIZE.
Voir page 71 pour le détail sur chaque mode.
Pour revenir à FN
Appuyez sur EXIT.
Pour annuler l’effet d’image
Réglez P EFFECT sur OFF dans les paramètres
du menu.
Remarques
•Vous ne pouvez pas utiliser les effets d’image
pour truquer des images fournies par un autre
appareil.
•Les images truquées avec un effet d’image ne
peuvent pas être enregistrées sur la cassette
avec le caméscope. Vous pouvez les enregistrer
sur le « Memory Stick » (p. 147, 159) ou sur un
magnétoscope en utilisant votre caméscope
comme lecteur.
Advanced Playback Operations Lecture – Opérations avancées
Images truquées avec un effet d’image
Les images auxquelles un effet d’image a été
appliqué ne sont pas transmises par l’interface
DV.
89
Page 90

Playing back tape
with digital effect
Lecture d’une cassette
avec effet numérique
The POWER switch should be set to .
Operate by touching the panel.
(1)During playback or playback pause, press FN
and select PAGE2.
(2)Press DIG EFFT. The screen to select a digital
effect is displayed.
(3)Select a desired mode. You can use STILL,
FLASH, LUMI. and TRAIL. See page 72 for
details of the each mode.
When you select STILL or LUMI., the picture
that you select the mode to is stored in
memory as a still image.
(4)Press –/+ to adjust the effect.
(5)Press OK to return to PAGE2.
2
DIG
EFFT
To return to FN
Press EXIT.
Le commutateur POWER doit être en position
.
Utilisez les touches de l’écran tactile.
(1)Pendant la lecture ou la pause, appuyez sur
FN et sélectionnez la PAGE2.
(2)Appuyez sur DIG EFFT. L’écran de sélection
de l’effet numérique apparaît.
(3)Sélectionnez un mode. Vous pouvez utiliser
STILL, FLASH, LUMI. et TRAIL. Voir page 72
pour le détail sur chaque mode.
Lorsque vous sélectionnez STILL ou LUMI.
l’image sélectionnée est enregistrée dans la
mémoire sous forme d’image fixe.
(4)Appuyez sur –/+ pour ajuster l’effet.
(5)Appuyez sur OK pour revenir à la PAGE2.
DIG EFFT
STILL FLASH
OKOFF
LUMI. TRAIL
Pour revenir à FN
Appuyez sur EXIT.
To cancel digital effect
Press OFF to return to PAGE2.
Notes
•You cannot process externally input scenes
using digital effect.
•You cannot record images on the tape on your
camcorder while you are processing the image
using digital effect. Record images on the
“Memory Stick” (p. 147, 159), or on a VCR
using your camcorder as a player.
Pictures processed by digital effect
Pictures processed by digital effect are not output
through the DV Interface.
90
Pour annuler l’effet numérique
Appuyez sur OFF pour revenir à la PAGE2.
Remarques
•Vous ne pouvez pas utiliser les effets
numériques pour truquer des images fournies
par un autre appareil.
•Les images truquées avec un effet numérique
ne peuvent pas être enregistrées sur la cassette
avec le caméscope. Vous pouvez les enregistrer
sur le « Memory Stick » (p. 147, 159) ou sur un
magnétoscope en utilisant votre caméscope
comme lecteur.
Images truquées avec un effet numérique
Les images auxquelles un effet numérique a été
appliqué ne sont pas transmises par l’interface
DV.
Page 91

Enlarging images
recorded on tape
– Tape PB ZOOM
Agrandissement d’images
enregistrées sur une
cassette – PB ZOOM cassette
Besides the operation described here, your
camcorder can enlarge still images recorded on
the “Memory Stick” (p. 173).
The POWER switch should be set to .
Operate by touching the panel.
(1)During playback or playback pause, press FN
and select PAGE2.
(2)Press PB ZOOM. The PB ZOOM screen
appears.
(3)Press the area you want to enlarge in the
frame.
The area you pressed moves to the centre of
the screen, and the playback image is
enlarged to about twice the size. If you then
press another area, that area moves to the
centre of the screen.
(4)Adjust the zoom ratio by the power zoom
lever.
You can select the zoom ratio from
approximately 1.1 times up to 5 times its size.
W:Decrease the zoom ratio.
T:Increase the zoom ratio.
2
PB ZOOM
PB
ZOOM
Les images fixes enregistrées sur un « Memory
Stick » peuvent aussi être agrandies (p. 173).
Le commutateur POWER doit être en position
.
Utilisez les touches de l’écran tactile.
(1)Pendant la lecture ou la pause, appuyez sur
FN et sélectionnez la PAGE2.
(2)Appuyez sur PB ZOOM. L’écran PB ZOOM
apparaît.
(3)Appuyez dans le cadre sur la partie que vous
voulez agrandir.
La partie où vous avez appuyé va au centre
de l’écran et l’image affichée devient deux fois
plus grande. Si vous appuyez à un autre
endroit, la partie correspondante va au centre
de l’écran.
(4)Réglez le facteur d’agrandissement avec le
bouton de zoom.
L’image peut être agrandie de 1,1 fois à 5 fois
sa taille approximativement.
W:Réduction du facteur d’agrandissement
T:Augmentation du facteur
d’agrandissement
END
Advanced Playback Operations Lecture – Opérations avancées
To cancel tape PB ZOOM
Press END.
Power zoom lever/
Bouton de zoom
Pour annuler la fonction PB ZOOM
cassette
Appuyez sur END.
91
Page 92

Enlarging images recorded on
tape – Tape PB ZOOM
Agrandissement d’images
enregistrées sur une cassette
– PB ZOOM cassette
Notes
•You cannot process externally input scenes
using tape PB ZOOM with your camcorder.
•You cannot record images on the tape on your
camcorder while you are processing the image
using tape PB ZOOM. However, you can record
images on the “Memory Stick” (p. 147), or on a
VCR using your camcorder as a player.
•You cannot record moving pictures on the
“Memory Stick” on your camcorder when you
have processed the picture using tape PB
ZOOM.
Images in tape PB ZOOM
Images in tape PB ZOOM are not output through
the DV Interface.
In tape PB ZOOM
If you press DISPLAY/BATTERY INFO, the
frame on the PB ZOOM screen disappears. You
cannot move the part you pressed to the centre of
the screen.
Edge of the enlarged image
The edge of the enlarged image cannot be
displayed at the centre of the screen.
Remarques
•Vous ne pouvez pas utiliser la fonction PB
ZOOM pour agrandir des images fournies par
un autre appareil.
•Les images agrandies avec la fonction PB
ZOOM ne peuvent pas être enregistrées sur la
cassette avec le caméscope. Vous pouvez
toutefois les enregistrer sur le « Memory Stick »
(p. 147) ou sur un magnétoscope en utilisant
votre caméscope comme lecteur.
•Les images animées agrandies avec la fonction
PB ZOOM cassette ne peuvent pas être
enregistrées sur le « Memory Stick » avec le
caméscope.
Images agrandies avec la fonction PB ZOOM
cassette
Les images agrandies avec la fonction PB ZOOM
cassette ne peuvent pas être transmises par
l’interface DV.
Dans le mode PB ZOOM cassette
Si vous appuyez sur DISPLAY/BATTERY INFO,
le cadre sur l’écran PB ZOOM disparaît. Vous ne
pouvez plus déplacer l’image pour en agrandir
une partie.
Pourtour de l’image agrandie
Le pourtour de l’image agrandie ne peut pas
apparaître au centre de l’écran.
92
Page 93

Quickly locating a
scene
– Zero set memory
Localisation rapide
d’une scène – Remise
à zéro de la mémoire
Your camcorder automatically searches for a
desired scene having the tape counter value of
“0:00:00.” Use the Remote Commander for this
operation.
The POWER switch should be set to .
(1)During playback, press ZERO SET MEMORY
on the Remote Commander at the point you
want to locate later. The tape counter shows
“0:00:00,” then starts counting. If the
indicators do not appear, press DISPLAY. The
ZERO SET MEMORY indicator flashes.
(2)Press x when you want to stop playback.
(3)Press m to rewind the tape to the tape
counter’s zero point. The tape stops
automatically when the tape counter reaches
approximately zero.
(4)Press N. Playback starts from the counter’s
zero point.
DISPLAY
Lorsque vous utilisez cette fonction, le
caméscope recherche automatiquement le
passage correspondant à la valeur « 0:00:00 » du
compteur. Pour cette opération, utilisez la
télécommande.
Le commutateur POWER doit être en position
.
(1)Pendant la lecture, appuyez sur ZERO SET
MEMORY de la télécommande au point que
vous voulez localiser par la suite. Le
compteur indique « 0:00:00 » et se met en
marche. Si l’indicateur n’apparaît pas,
appuyez sur DISPLAY. L’indicateur ZERO
SET MEMORY clignote.
(2)Appuyez sur x à l’endroit où vous voulez
arrêter la lecture.
(3)Appuyez sur m pour rembobiner la bande
jusqu’au point zéro du compteur. La bande
s’arrête automatiquement quand le compteur
atteint approximativement zéro.
(4)Appuyez sur N. La lecture commence
ensuite à partir du point zéro du compteur.
ZERO SET MEMORY
Advanced Playback Operations Lecture – Opérations avancées
m
x
Notes
•When you press ZERO SET MEMORY before
rewinding the tape, the zero set memory
function will be cancelled.
•There may be a discrepancy of several seconds
between the time code and the tape counter.
•The ZERO SET MEMORY indicator disappears
when you press FN.
If the tape has a blank portion in the recorded
portions
The zero set memory function may not work
correctly.
N
Remarques
•Le point zéro du compteur est effacé si vous
appuyez une nouvelle fois sur ZERO SET
MEMORY avant de rembobiner la bande.
•Il peut y avoir un décalage de quelques
secondes entre le code temporel et le compteur
de bande.
•L’indicateur ZERO SET MEMORY disparaît
lorsque vous appuyez sur FN.
Si la cassette contient un passage vierge entre
deux séquences
La fonction de remise à zéro du compteur n’agira
pas correctement.
93
Page 94

Searching the boundaries
of recorded tape by title
– Title search
Recherche d’une
séquence d’après le titre
– Recherche de titre
Use the cassette with Cassette Memory for this
operation.
Use the Remote Commander for this operation.
Before operation
Set CM SEARCH in to ON in the menu
settings. (The default setting is ON.)
The POWER switch should be set to .
(1)Press SEARCH MODE on the Remote
Commander repeatedly, until the TITLE
SEARCH indicator appears.
The title search screen appears.
The indicator changes as follows:
TITLE SEARCH t DATE SEARCH
(2)Press . or > on the Remote Commander
to select the title for playback.
Your camcorder automatically starts playback
of the scene having the title that you selected.
(no indicator)
1
SEARCH
MODE
Pour rechercher le titre d’une séquence, utilisez
une cassette à Cassette Memory (à puce).
Pour cette opération, utilisez la télécommande.
Avant de commencer
Réglez CM SEARCH sur ON dans des
paramètres du menu. (Le réglage par défaut est
ON.)
Le commutateur POWER doit être en position
.
(1)Appuyez de façon répétée sur SEARCH
MODE de la télécommande jusqu’à ce que
l’indicateur TITLE SEARCH apparaisse.
L’écran de recherche de titre apparaît.
L’indicateur change comme suit :
TITLE SEARCH t DATE SEARCH
(pas d’indicateur)
(2)Appuyez sur . ou > de la
télécommande pour sélectionner le titre pour
la lecture.
La lecture commence automatiquement à la
scène désignée par ce titre.
2
[a] Actual point you are trying to search for
[b] Present point on the tape
To cancel searching
Press x on the Remote Commander.
If the tape has a blank portion between
recorded portions
Title search may not work correctly.
To superimpose a title
See page 123.
94
TITLE SEARCH
3 HAPPY NEW YEAR!
4 PRESENT
5 GOOD MORNING
6 WEDDING
7 NIGHT
8 BASEBALL
[b]
[a]
[a] Point recherché
[b] Point actuel sur la bande
Pour annuler la recherche
Appuyez sur x de la télécommande.
Si la cassette contient un passage vierge entre
deux séquences
La recherche de titre ne fonctionnera pas
correctement.
Pour incruster un titre
Voir page 123.
Page 95

Searching a recording
by date – Date search
Recherche d’une
séquence d’après la date
– Recherche de date
•DATE SEARCH by using Cassette Memory
c Cue by selecting the recording date on the
screen
•DATE SEARCH without using Cassette
Memory
c Cue to changing point of recording date
Use the Remote Commander for this operation.
Searching for the date by using
Cassette Memory
Before operation
•You can use this function only when playing
back the cassette with Cassette Memory.
•Set CM SEARCH in to ON in the menu
settings. (The default setting is ON.)
The POWER switch should be set to .
Operate by touching the panel.
(1)Press SEARCH MODE on the Remote
Commander repeatedly, until the DATE
SEARCH indicator appears.
The date search screen appears.
The indicator changes as follows:
TITLE SEARCH t DATE SEARCH
(2)Press . or > on the Remote Commander
to select the date for playback.
Your camcorder automatically starts playback
at the beginning of the selected date.
(no indicator)
1
SEARCH
MODE
•Recherche de date en utilisant la Cassette
Memory
c Localisez la date après l’avoir sélectionnée sur
l’écran.
•Recherche de date sans utiliser la Cassette
Memory
c Localisez un point où la date change.
Pour ces opérations, utilisez la télécommande.
Recherche de date en utilisant
la Cassette Memory
Avant de commencer
•Vous ne pouvez utiliser cette fonction que lors
de la lecture d’une cassette avec Cassette
Memory.
•Réglez CM SEARCH sur ON dans des
paramètres du menu. (Le réglage par défaut est
ON.)
Le commutateur POWER doit être en position
.
Utilisez les touches de l’écran tactile.
(1)Appuyez de façon répétée sur SEARCH
MODE de la télécommande jusqu’à ce que
l’indicateur DATE SEARCH apparaisse.
L’écran de recherche de date apparaît.
L’indicateur change comme suit :
TITLE SEARCH t DATE SEARCH
(pas d’indicateur)
(2)Appuyez sur . ou > de la
télécommande pour sélectionner la date pour
la lecture.
La lecture commence automatiquement à la
date sélectionnée.
Advanced Playback Operations Lecture – Opérations avancées
2
[a] Actual point you are trying to search for
[b] Present point on the tape
DATE SEARCH
To cancel searching
Press x on the Remote Commander.
1 5 / 9 / 03
2 6 / 9 / 03
3 24 / 12 / 03
4 1 / 1 / 04
5 11 / 2 / 04
6 29 / 4 / 04
[b][a]
[a] Point recherché
[b] Point actuel sur la bande
Pour annuler la recherche
Appuyez sur x de la télécommande.
95
Page 96

Searching a recording by date
– Date search
Recherche d’une séquence
d’après la date
– Recherche de date
Searching for the date without
using Cassette Memory
The POWER switch should be set to .
Operate by touching the panel.
(1)Press FN to display PAGE1.
(2)Press MENU to display the menu.
(3)Select CM SEARCH in , then press EXEC
(p. 230).
CM SET
TITLE
TITLEERASE
TITLE DSPL
CM SEARCH
TAPE TITLE
ERASE ALL
(4)Select OFF, then press EXEC.
(5)Press SEARCH MODE on the Remote
Commander, until the DATE SEARCH
indicator appears.
(6)Press . on the Remote Commander to
search for the previous date or press > on
the Remote Commander to search for the next
date. Your camcorder automatically starts
playback at the point where the date changes.
Each time you press . or >, your
camcorder searches for the previous or next
date.
To cancel searching
Press x on the Remote Commander or on
your camcorder.
Note
If one day’s recording is less than two minutes,
your camcorder may not accurately find the
point where the recording date changes.
Recherche de date sans utiliser
la Cassette Memory
Le commutateur POWER doit être en position
.
Utilisez les touches de l’écran tactile.
(1)Appuyez sur FN pour afficher la PAGE1.
(2)Appuyez sur MENU pour afficher le menu.
(3)Sélectionnez CM SEARCH dans , puis
appuyez sur EXEC (p. 240).
EXIT
ON
OFF
RET.
EXEC
(4)Sélectionnez OFF, puis appuyez sur EXEC.
(5)Appuyez sur SEARCH MODE de la
télécommande jusqu’à ce que l’indicateur
DATE SEARCH apparaisse.
(6)Appuyez sur . de la télécommande pour
spécifier la date précédente, ou sur > pour
spécifier la date suivante. La lecture
commence automatiquement à l’endroit où la
date change. A chaque pression de . ou
>, la date précédente ou suivante est
localisée.
Pour annuler la recherche
Appuyez sur x sur la télécommande ou sur
sur le caméscope.
Remarque
Si l’enregistrement effectué en une journée est
inférieur à deux minutes, le caméscope ne pourra
vraisemblablement pas localiser précisément le
point où la date change.
If the tape has a blank portion between
recorded portions
Date search may not work correctly.
Cassette Memory
The cassette with Cassette Memory can hold six
recording date data. If you search the date among
seven or more data, see “Searching for the date
without using Cassette Memory.”
96
Si la cassette contient un passage vierge entre
deux séquences
La recherche de date ne fonctionnera pas
correctement.
Cassette Memory
Les cassettes munis d’une Cassette Memory (une
puce) contiennent six dates d’enregistrement.
Pour rechercher une date à partir de la septième
date, procédez comme indiqué dans « Recherche
de date sans utiliser la Cassette Memory ».
Page 97

— Editing —
— Montage —
Dubbing tape
You can dub or edit on the VCR connected to
your camcorder using your camcorder as a
player.
You can connect either the A/V connecting cable
(supplied) or i.LINK cable (optional).
If you connect with the i.LINK cable (optional),
video and audio signals are transmitted in digital
form for high-quality editing.
Titles, screen indicators, Cassette Memory
contents, and “Memory Stick” index screen
lettering cannot be recorded.
Connecting to the VCR
You can edit on VCRs that support the
following systems:
8 mm , Hi8 , Digital8 , VHS ,
S-VHS , VHSC , S-VHSC ,
Betamax , mini DV , DV or
MICROMV
Connecting with the A/V connecting
cable
Copie d’une cassette
Vous pouvez faire des copies ou des montages en
raccordant votre magnétoscope au caméscope et
en utilisant votre caméscope comme lecteur.
Le caméscope peut être raccordé au
magnétoscope avec le cordon de liaison audio/
vidéo (fourni) ou un câble i.LINK (en option).
Si vous utilisez un câble i.LINK (en option), les
signaux vidéo et audio seront transmis sous
forme numérique et permettront d’effectuer des
montages de grande qualité.
Les titres, les indicateurs affichés, le contenu de
la Cassette Memory et le texte sur l’écran d’index
d’un « Memory Stick » ne peuvent pas être
enregistrés.
Editing Montage
Raccordement au
magnétoscope
Vous pouvez faire des copies sur les types de
magnétoscopes suivants :
8 mm , Hi8 , Digital8 , VHS ,
S-VHS , VHSC , S-VHSC ,
Betamax , mini DV , DV ou MICROMV
.
Raccordement avec le cordon de
liaison audio/vidéo
: Signal flow/
Sens du signal
White/Blanc
S VIDEO
AUDIO/
VIDEO
Red/Rouge
A/V connecting cable (supplied)/
Cordon de liaison audio/vidéo (fourni)
Yellow/
Jaune
IN
S VIDEO
VIDEO
AUDIO
VCR
97
Page 98

Dubbing tape Copie d’une cassette
Connecting with the i.LINK cable
: Signal flow/
Sens du signal
Dubbing a tape
Before operation for connecting with the A/V
connecting cable
•Set DISPLAY in to LCD in the menu
settings. (The default setting is LCD.)
•Press the following buttons to make the
indicator disappear so that they will not be
superimposed on the edited tape:
On your camcorder:
DISPLAY/BATTERY INFO, DATA CODE
On the Remote Commander:
DISPLAY, DATA CODE, SEARCH MODE
The POWER switch should be set to .
(1)Insert the blank tape (or the tape you want to
record over) into the VCR, and insert the
recorded tape into your camcorder.
(2)Prepare the VCR for recording. If the VCR has
an input selector, set it to input mode.
Refer to the operating instructions of the VCR.
(3)Play back the recorded tape on your
camcorder.
(4)Start recording on the VCR.
Refer to the operating instructions of your
VCR.
98
Raccordement avec le câble i.LINK
i.LINK
DV Interface/
Interface DV
i.LINK cable (optional)/
Câble i.LINK (en option)
Copie d’une cassette
Avant la copie avec le cordon de liaison audio/
vidéo
•Réglez DISPLAY sur LCD dans des
paramètres du menu. (Le réglage par défaut est
LCD.)
•Appuyez sur les touches suivantes pour
dégager les indicateurs sinon ils se
superposeront au montage.
Sur le caméscope :
DISPLAY/BATTERY INFO, DATA CODE
Sur la télécommande :
DISPLAY, DATA CODE, SEARCH MODE
Le commutateur POWER doit être en position
.
(1)Insérez une cassette vierge (ou une cassette
que vous voulez réenregistrer) dans le
magnétoscope et une cassette enregistrée dans
le caméscope.
(2)Préparez le magnétoscope pour
l’enregistrement. Si le magnétoscope a un
sélecteur d’entrée, réglez-le sur le mode
d’entrée.
Consultez le mode d’emploi du magnétoscope
pour le détail.
(3)Reproduisez la cassette enregistrée sur le
caméscope.
(4)Commencez l’enregistrement sur le
magnétoscope.
Consultez le mode d’emploi du magnétoscope
pour le détail.
Page 99

Dubbing tape
Copie d’une cassette
When you have finished dubbing the
tape
Press x on both your camcorder and the VCR.
If your VCR is a monaural type
Connect the yellow plug of the A/V connecting
cable to the video input jack and the white or the
red plug to the audio input jack on the VCR or
the TV. When the white plug is connected, the
left channel audio is output, and when the red
plug is connected, the right channel audio is
output.
If your VCR has an S video jack
See page 59 for details.
About i.LINK
See page 274 for details.
Pictures processed by picture effect, digital
effect or PB ZOOM
These are not output through the DV Interface.
If you record a paused playback picture
•The recorded picture becomes rough with the
DV Interface.
•The picture may jitter when you play back the
picture using other video equipment.
If you connect with the i.LINK cable
Recording of only the picture or sound cannot be
done.
Lorsque la copie est terminée
Appuyez sur x du caméscope et du
magnétoscope.
Si votre magnétoscope est de type
monophonique
Raccordez la fiche jaune du cordon de liaison
audio/vidéo à la prise d’entrée vidéo et la fiche
blanche ou la fiche rouge à la prise d’entrée
audio du magnétoscope ou du téléviseur.
Lorsque la fiche blanche est raccordée, le son du
canal gauche est fourni et lorsque la fiche rouge
est raccordée, le son du canal droit est fourni.
Si votre magnétoscope est pourvu d’une prise
S-vidéo
Voir page 59 pour le détail.
A propos de i.LINK
Voir page 274 pour le détail.
Images truquées avec un effet d’image ou un
effet numérique, ou agrandies avec la
fonction PB ZOOM
Ces images ne peuvent pas être transmises par
l’interface DV.
Si vous enregistrez un arrêt sur image
•L’image enregistrée n’est pas très détaillée
lorsqu’elle est enregistrée par l’interface DV.
•Si vous reproduisez l’image sur un autre
appareil vidéo, elle sera probablement instable.
Editing Montage
Si vous raccordez les deux appareils par un
câble i.LINK
Il n’est pas possible d’enregistrer seulement
l’image ou le son.
99
Page 100

Dubbing only desired
scenes – Digital program
editing (on tape)
Copie de séquences précises
– Montage numérique de séquences
programmées (sur cassette)
You can duplicate selected scenes (programmes)
for editing onto the tape without operating the
VCR.
Scenes can be selected by frame. You can set up
to 20 programmes.
Your camcorder can dub on the “Memory Stick.”
See page 161 for details.
Unwanted
scene/
Séquence inutile
Unwanted
scene/
Séquence inutile
Switch the order/
Changement d’ordre
Before operating Digital program
editing on the tape recorded on
other equipment
Step 1 Connecting to the VCR (p. 101).
Step 2 Setting the VCR to operate (p. 101).
Step 3 Adjusting the synchronisation of the VCR
(p. 105).
When you dub using the same VCR again, you
can skip step 2 and 3.
Using Digital program editing on the
tape recorded on other equipment
Operation 1 Making a programme (p. 107).
Operation 2 Performing Digital program editing
Note
When editing digital video, the operation signals
to the VCR cannot be sent with LANC jack.
(Dubbing the tape) (p. 109).
Vous pouvez copier des séquences précises,
sélectionnées au préalable (programmes), sur une
cassette sans avoir à effectuer d’opérations sur le
magnétoscope.
Les séquences peuvent être sélectionnées à
l’image près. Vous pouvez ainsi programmer 20
séquences.
Vous pouvez aussi copier des séquences sur un
« Memory Stick ». Voir page 161 pour le détail.
Avant le montage numérique sur une
cassette enregistrée sur un autre
appareil
1e étape Raccordement au magnétoscope
(p. 101)
2e étape Préparation du magnétoscope (p. 101)
3e étape Synchronisation du magnétoscope
(p. 105)
Si vous faites une copie avec le même
magnétoscope, les 2e et 3e étapes sont superflues.
Montage numérique sur une cassette
enregistrée sur un autre appareil
1e opération Création d’un programme (p. 107)
2e opération Exécution du montage numérique
(Copie sur une cassette) (p. 109)
Remarque
Pendant le montage vidéo numérique, le signaux
de commande ne peuvent pas être transmis au
magnétoscope par la prise LANC.
100
 Loading...