


4-290-840-21(1)
Digital Video Camera
Recorder/
Caméscope numérique
Operating Guide US
Mode d’emploi FR
DCR-PJ5/SR21/SX21

US
2

Owner’s Record
The model and serial numbers are located
on the bottom. Record the serial number
in the space provided below. Refer to these
numbers whenever you call your Sony
dealer regarding this product.
Model No. DCRSerial No.
Model No. ACSerial No.
WARNING
To reduce fire or shock hazard, do not
expose the unit to rain or moisture.
Do not expose the batteries to
excessive heat such as sunshine, fire or
the like.
This symbol is intended
to alert the user to the
presence of important
operating and maintenance
(servicing) instructions in
the literature accompanying
the appliance.
US
This symbol is intended
to alert the user to the
presence of uninsulated
“dangerous voltage” within
the product’s enclosure
that may be of sufficient
magnitude to constitute
a risk of electric shock to
persons.
US
3

IMPORTANT SAFETY INSTRUCTIONS
SAVE THESE INSTRUCTIONS.
DANGER - TO REDUCE THE RISK OF FIRE
OR ELECTRIC SHOCK,
CAREFULLY FOLLOW THESE
INSTRUCTIONS.
Read these instructions.
Keep these instructions.
Heed all warnings.
Follow all instructions.
Do not use this apparatus near water.
Clean only with dry cloth.
Do not block any ventilation openings. Install in accordance with the manufacturer’s
instructions.
Do not install near any heat sources such as radiators, heat registers, stoves, or other
apparatus (including amplifiers) that produce heat.
Do not defeat the safety purpose of the polarized or grounding-type plug. A polarized plug
has two blades with one wider than the other. A grounding type plug has two blades and a
third grounding prong. The wide blade or the third prong are provided for your safety. If
the provided plug does not fit into your outlet, consult an electrician for replacement of the
obsolete outlet.
Protect the power cord from being walked on or pinched particularly at plugs, convenience
receptacles, and the point where they exit from the apparatus.
Only use attachments/accessories specified by the manufacturer.
Use only with the cart, stand, tripod, bracket, or table specified by the manufacturer, or
sold with the apparatus. When a cart is used, use caution when moving the cart/apparatus
combination to avoid injury from tip-over.
Unplug this apparatus during lightning storms or when unused for long periods of time.
Refer all servicing to qualified service personnel. Servicing is required when the apparatus
has been damaged in any way, such as power-supply cord or plug is damaged, liquid has
been spilled or objects have fallen into the apparatus, the apparatus has been exposed to
rain or moisture, does not operate normally, or has been dropped.
If the shape of the plug does not fit the power outlet, use an attachment plug adaptor of the
proper configuration for the power outlet.
US
4

Representative plug of power supply cord of countries/regions around the world.
A Type
(American
Type)
B Type
(British Type)
BF Type
(British Type)
B3 Type
(British Type)
C Type
(CEE Type)
SE Type
(CEE Type)
O Type
(Ocean Type)
The representative supply voltage and plug type are described in this chart.
Depend on an area, Different type of plug and supply voltage are used.
Attention: Power cord meeting demands from each country shall be used.
For only the United States
Use a UL Listed, 1.5-3 m (5-10 ft.), Type SPT-2 or NISPT-2, AWG no. 18 power supply
cord, rated for 125 V 7 A, with a NEMA 1-15P plug rated for 125 V 15 A.”
Europe
Countries/regions Voltage Frequency (Hz) Plug type
Austria 230 50 C
Belgium 230 50 C
Czech 220 50 C
Denmark 230 50 C
Finland 230 50 C
France 230 50 C
Germany 230 50 C
Greece 220 50 C
Hungary 220 50 C
Iceland 230 50 C
Ireland 230 50 C/BF
Italy 220 50 C
Luxemburg 230 50 C
Netherlands 230 50 C
Norway 230 50 C
Poland 220 50 C
Portugal 230 50 C
Romania 220 50 C
Russia 220 50 C
Slovak 220 50 C
Spain 127/230 50 C
Sweden 230 50 C
Switzerland 230 50 C
UK 240 50 BF
Asia
Countries/regions Voltage Frequency (Hz) Plug type
China 220 50 A
Hong Kong 200/220 50 BF
India 230/240 50 C
Indonesia 127/230 50 C
Japan 100 50/60 A
Korea (rep) 220 60 C
Malaysia 240 50 BF
Philippines 220/230 60 A/C
Singapore 230 50 BF
Taiwan 110 60 A
Thailand 220 50 C/BF
US
5

Countries/regions Voltage Frequency (Hz) Plug type
Vietnam 220 50 A/C
Oceania
Countries/regions Voltage Frequency (Hz) Plug type
Australia 240 50 O
New Zealand 230/240 50 O
North America
Countries/regions Voltage Frequency (Hz) Plug type
Canada 120 60 A
USA 120 60 A
Central America
Countries/regions Voltage Frequency (Hz) Plug type
Bahamas 120/240 60 A
Costa Rica 110 60 A
Cuba 110/220 60 A/C
Dominican (rep) 110 60 A
El Salvador 110 60 A
Guatemala 120 60 A
Honduras 110 60 A
Jamaica 110 50 A
Mexico 120/127 60 A
Nicaragua 120/240 60 A
Panama 110/220 60 A
South America
Countries/regions Voltage Frequency (Hz) Plug type
Argentina 220 50 C/BF/O
Brazil 127/220 60 A/C
Chile 220 50 C
Colombia 120 60 A
Peru 220 60 A/C
Venezuela 120 60 A
Middle East
Countries/regions Voltage Frequency (Hz) Plug type
Iran 220 50 C/BF
Iraq 220 50 C/BF
Israel 230 50 C
Saudi Arabia 127/220 50 A/C/BF
Turkey 220 50 C
UAE 240 50 C/BF
Africa
Countries/regions Voltage Frequency (Hz) Plug type
Algeria 127/220 50 C
Congo (dem) 220 50 C
Egypt 220 50 C
Ethiopia 220 50 C
Kenya 240 50 C/BF
Nigeria 230 50 C/BF
South Africa 220/230 50 C/BF
Tanzania 230 50 C/BF
Tunisia 220 50 C
US
6

Read this first
Before operating the unit, please read this
manual thoroughly, and retain it for future
reference.
CAUTION
Battery pack
If the battery pack is mishandled, the
battery pack can burst, cause a fire or even
chemical burns. Observe the following
cautions.
Do not disassemble.
Do not crush and do not expose the battery
pack to any shock or force such as hammering,
dropping or stepping on it.
Do not short circuit and do not allow metal
objects to come into contact with the battery
terminals.
Do not expose to high temperature above 60°C
(140 °F) such as in direct sunlight or in a car
parked in the sun.
Do not incinerate or dispose of in fire.
Do not handle damaged or leaking lithium ion
batteries.
Be sure to charge the battery pack using a
genuine Sony battery charger or a device that
can charge the battery pack.
Keep the battery pack out of the reach of small
children.
Keep the battery pack dry.
Replace only with the same or equivalent type
recommended by Sony.
Dispose of used battery packs promptly as
described in the instructions.
Replace the battery with the specified type
only. Otherwise, fire or injury may result.
AC Adaptor
Do not use the AC Adaptor placed in a
narrow space, such as between a wall and
furniture.
socket) immediately if any malfunction
occurs while using your camcorder.
Even if your camcorder is turned off, AC
power source (mains) is still supplied to
it while connected to the wall outlet (wall
socket) via the AC Adaptor.
For customers in the U.S.A. and CANADA
RECYCLING LITHIUM-ION BATTERIES
Lithium-Ion batteries are
recyclable.
You can help preserve our
environment by returning
your used rechargeable
batteries to the collection and
recycling location nearest you.
For more information
regarding recycling of
rechargeable batteries, call toll
free 1-800-822- 8837, or visit
http://www.rbrc.org/
Caution: Do not handle
damaged or leaking LithiumIon batteries.
Battery pack
This device complies with Part 15 of the
FCC Rules. Operation is subject to the
following two conditions: (1) This device
may not cause harmful interference, and
(2) this device must accept any interference
received, including interference that may
cause undesired operation.
This Class B digital apparatus complies
with Canadian ICES-003.
Use the nearby wall outlet (wall socket)
when using the AC Adaptor. Disconnect
the AC Adaptor from the wall outlet (wall
US
7

8
US
For the customers in the U.S.A.
UL is an internationally recognized safety
organization.
The UL Mark on the product means it has
been UL Listed.
If you have any questions about this
product, you may call:
Sony Customer Information Center 1-800222-SONY (7669).
The number below is for the FCC related
matters only.
Regulatory Information
Declaration of Conformity
Trade Name: SONY
Model No.: DCR-SR21
Responsible Party: Sony Electronics Inc.
Address: 16530 Via Esprillo, San Diego,
CA 92127 U.S.A.
Telephone No.: 858-942-2230
This device complies with Part 15 of the
FCC Rules. Operation is subject to the
following two conditions: (1) This device
may not cause harmful interference,
and (2) this device must accept any
interference received, including
interference that may cause undesired
operation.
Declaration of Conformity
Trade Name: SONY
Model No.: DCR-SX21
Responsible Party: Sony Electronics Inc.
Address: 16530 Via Esprillo, San Diego,
CA 92127 U.S.A.
Telephone No.: 858-942-2230
This device complies with Part 15 of the
FCC Rules. Operation is subject to the
following two conditions: (1) This device
may not cause harmful interference,
and (2) this device must accept any
interference received, including
interference that may cause undesired
operation.
CAUTION
You are cautioned that any changes or
modifications not expressly approved in
this manual could void your authority to
operate this equipment.
Note
This equipment has been tested and found
to comply with the limits for a Class B
digital device, pursuant to Part 15 of the
FCC Rules.
These limits are designed to provide
reasonable protection against harmful
interference in a residential installation.
This equipment generates, uses, and
can radiate radio frequency energy and,
if not installed and used in accordance
with the instructions, may cause harmful
interference to radio communications.
However, there is no guarantee that
interference will not occur in a particular
installation. If this equipment does cause
harmful interference to radio or television
reception, which can be determined by
turning the equipment off and on, the
user is encouraged to try to correct the
interference by one or more of the following
measures:
Reorient or relocate the receiving antenna.
Increase the separation between the
equipment and receiver.
Connect the equipment into an outlet on
a circuit different from that to which the
receiver is connected.
Consult the dealer or an experienced radio/
TV technician for help.
The supplied interface cable must be used
with the equipment in order to comply with
the limits for a digital device pursuant to
Subpart B of Part 15 of FCC Rules.

To select a MENU item
You can use the multi-selector to select/
decide the items in the MENU.
Select a button by placing an orange
frame over it using /// of the
multi-selector.
ress the center of the multi-selector to
P
confirm your selection.
To change the language setting
The on-screen displays in each local language
are used for illustrating the operating
procedures. Change the screen language before
using your camcorder if necessary.
[Show others] [CLOCK/
LANG] (under [GENERAL SET]
category) [
desired language
.
LANGUAGE SET] a
“PMB” (software, including “PMB Help”)
“Handycam” Handbook (PDF)
“Operating Guide” (This manual) (1)
Supplied items
The numbers in ( ) are the supplied
quantity.
AC Adaptor (1)
Power cord (Mains lead) (1)
A/V connecting cable (1)
USB cable (1)
Rechargeable battery pack NP-FV30 (1)
CD-ROM “Handycam” Application
Software (1)
US
9
Everyday as unforgettable moment with “Handycam”
Capturing
Page 16 (Recording)
10
US
Sharing
Page 25 (Creating a disc)
Sharing now
Page 22 (Projector)
DCR-PJ5 Only
US
11

Table of contents
IMPORTANT SAFETY INSTRUCTIONS . . . .. . . . . . .. . . . . . .. . . .. . .. . . .. . . . . . .. . . . . . .. . . .. . .. . . .. . . . . . 4
Read this first . .. . . . . . .. . . .. . .. . . .. . . . . . .. . . . . . .. . . .. . .. . . .. . . . . . .. . . . . . .. . . .. . .. . . .. . . . . . .. . . . . . .. . . .. 7
Everyday as unforgettable moment with “Handycam” . . . . . . .. . . . . . .. . . . . . .. . . .. . . . . . .. . . . 10
Preparation
Charging .. . . . . . .. . . . . . .. . . .. . . . . . .. . . . . . .. . . . . . .. . . .. . . . . . .. . . . . . .. . . . . . .. . . .. . . . . . .. . . . . . .. . . . . . .. . 13
Setting . . . . . .. . . . . . .. . . .. . .. . . .. . . . . . .. . . . . . .. . . .. . .. . . .. . . . . . .. . . . . . .. . . .. . .. . . .. . . . . . .. . . . . . .. . . .. . . 14
Recording/Playback
Recording . . . . .. . . .. . . . . . .. . . . . . .. . . . . . .. . . .. . . . . . .. . . . . . .. . . . . . .. . . .. . . . . . .. . . . . . .. . . . . . .. . . .. . . . . . . 16
Playback on the camcorder .. . . .. . . . . . .. . . . . . .. . . .. . .. . . .. . . . . . .. . . . . . .. . . .. . .. . . .. . . . . . .. . . . . . . 18
Deleting movies and photos . .. . . . . . .. . . . . . .. . . .. . .. . . .. . . . . . .. . . . . . .. . . .. . .. . . .. . . . . . .. . . . . . .. . 20
Playing back images through the built-in projector (DCR-PJ5) . .. . . .. . .. . . .. . . . . . .. . . . . . 22
Playing images on a TV . . . .. . . . . . .. . . .. . .. . . .. . . . . . .. . . . . . .. . . .. . .. . . .. . . . . . .. . . . . . .. . . .. . .. . . .. . 24
Saving movies and photos
Saving images on a disc . . . .. . . . . . .. . . .. . . . . . .. . . . . . .. . . . . . .. . . .. . . . . . .. . . . . . .. . . . . . .. . . .. . . . . . .. 25
Saving images in external media (DIRECT COPY) . . .. . .. . . . . . .. . . .. . .. . . .. . . . . . .. . . . . . .. . . .. 30
Using a computer
Useful functions available if you connect the camcorder to a computer . . . . . . .. . . . . . . 32
Preparing a computer . . .. . . . . . .. . . . . . .. . . .. . .. . . .. . . . . . .. . . . . . .. . . .. . .. . . .. . . . . . .. . . . . . .. . . .. . .. . 33
Starting PMB (Picture Motion Browser) . . . .. . .. . . .. . . . . . .. . . . . . .. . . .. . .. . . .. . . . . . .. . . . . . .. . . .. 35
Using “PMB Portable” . . . . .. . . .. . .. . . .. . . . . . .. . . . . . .. . . .. . .. . . .. . . . . . .. . . . . . .. . . .. . .. . . .. . . . . . .. . . . 36
Customizing your camcorder
Using menus . . . .. . . . . . .. . . .. . .. . . .. . . . . . .. . . . . . .. . . .. . .. . . .. . . . . . .. . . . . . .. . . .. . .. . . .. . . . . . .. . . . . . .. 37
Dividing a movie . .. . .. . . . . . .. . . .. . .. . . .. . . . . . .. . . . . . .. . . .. . .. . . .. . . . . . .. . . . . . .. . . .. . .. . . .. . . . . . .. . 42
Getting detailed information from the “Handycam” Handbook . . . .. . . . . . .. . . .. . .. . . .. . . 42
Additional Information
Screen indicators . . .. . . . . . .. . . . . . .. . . .. . . . . . .. . . . . . .. . . . . . .. . . .. . . . . . .. . . . . . .. . . . . . .. . . .. . . . . . .. . . . 43
Parts and controls . . .. . . . . . .. . . . . . .. . . . . . .. . . .. . . . . . .. . . . . . .. . . . . . .. . . .. . . . . . .. . . . . . .. . . . . . .. . . .. . . 44
Troubleshooting . . . .. . .. . . .. . .. . . .. . . . . . .. . . . . . .. . . .. . .. . . .. . . . . . .. . . . . . .. . . .. . .. . . .. . . . . . .. . . . 46
Specifications . . . .. . . . . . .. . . . . . .. . . .. . . . . . .. . . . . . .. . . . . . .. . . .. . . . . . .. . . . . . .. . . . . . .. . . .. . . . . . .. . . . . . . 48
Precautions . . . .. . . . . . .. . . .. . . . . . .. . . . . . .. . . . . . .. . . .. . . . . . .. . . . . . .. . . . . . .. . . .. . . . . . .. . . . . . .. . . . . . .. . . 51
Index . . . .. . .. . . .. . . . . . .. . . . . . .. . . .. . .. . . .. . . . . . .. . . . . . .. . . .. . .. . . .. . . . . . .. . . . . . .. . . .. . .. . . .. . . . . . .. . . . 56
US
12
Preparation
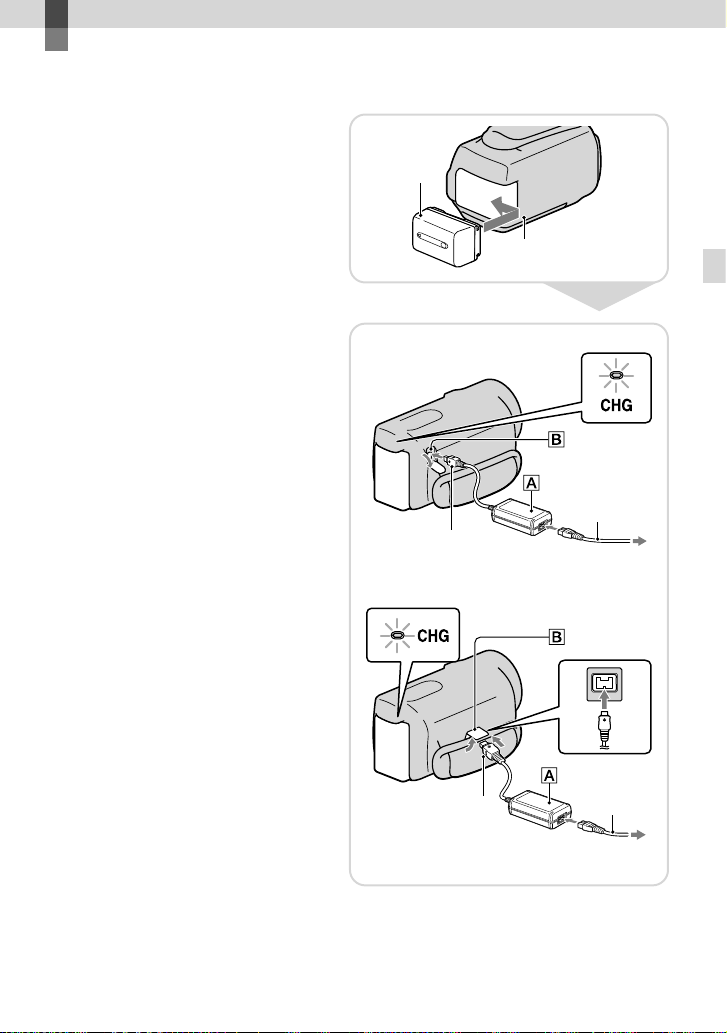
Charging
Attach the battery pack.
1
To remove the battery pack
Close the LCD screen. Slide the BATT
(battery) release lever and remove the
battery pack.
Battery pack
BATT (battery) release lever
Preparation
Connect the AC Adaptor to
2
the DC IN jack and the wall
outlet (wall socket).
DCR-SR21
DC plug
DCR-PJ5/SX21
DC plug
Power cord
(Mains lead)
To the wall outlet
(wall socket)
Power cord
(Mains lead)
To the wall outlet
(wall socket)
US
13
14
US
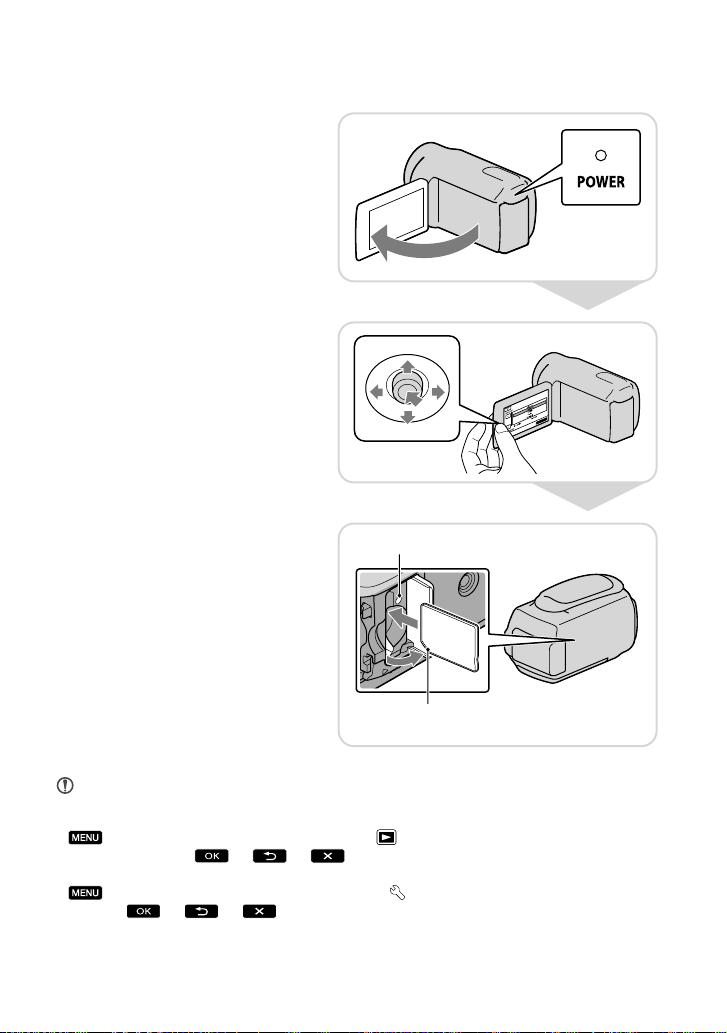
Setting
Open the LCD screen to turn
1
on your camcorder.
To turn off the power
Close the LCD screen.
Set the geographical area and
2
the time using the multiselector.
Insert the memory card into
3
the memory card slot.
To eject the memory card
Lightly push the memory card in once.
Notes
The date and time are automatically recorded on the recording media, and can be displayed during
playback.
[Show others] [PLAYBACK SET] (under [PLAYBACK] category) [DATA CODE]
[DATE/TIME]
You can turn off the operation beeps.
[Show others] [SOUND/DISP SET] (under [GENERAL SET] category) [BEEP]
[OFF]
.
.
Access lamp
Note direction of notched corner.

Changing the recording media (DCR-SR21)
In the default setting, both movies and photos are recorded on the internal hard disk. You can
change the recording media to Memory card.
[Show others] [MEDIA SETTINGS] (under [MANAGE MEDIA] category)
[MOVIE MEDIA SET] or [PHOTO MEDIA SET] desired recording media [YES]
.
Preparation
US
15

Recording/Playback
Recording
Open the lens cover.
1
Select a mode (Movie/Photo).
2
Movie:
Photo:
Movie:
3
Press START/STOP.
Photo:
Press PHOTO.
Notes
If you close the LCD screen while recording movies, the camcorder stops recording.
The maximum continuous recordable time of movies is about 13 hours.
When a movie file exceeds 2 GB, the next movie file is created automatically.
You can check the recordable time, estimated remaining capacity, etc.
[Show others] [MEDIA INFO] (under [MANAGE MEDIA] category).
MODE
16
US

Recording in a dimly-lit place
You can turn on the LED VIDEO LIGHT by pressing LIGHT.
Zooming
You can magnify images up to 67 times the original size with the power zoom lever.
Displaying the icons and indicators again
You can display the icons and indicators by pressing the multi-selector if they are not shown.
Recording/Playback
US
17

Playback on the camcorder
Press (VIEW IMAGES) to
1
display the VISUAL INDEX
screen.
Movie:
2
Select
Photo:
Select
Select the desired image.
3
(Movie).
(Photo).
(VIEW IMAGES)
18
US

Movie playback screen
Volume adjustment
Previous
Next
To stop
To fast-reverse
You can adjust the volume.
adjust with / .
Photo playback screen
Previous
To the VISUAL INDEX
screen
OPTION
To fast-forward
To pause/play
To start/stop slide
show
Next
OPTION
Recording/Playback
US
19
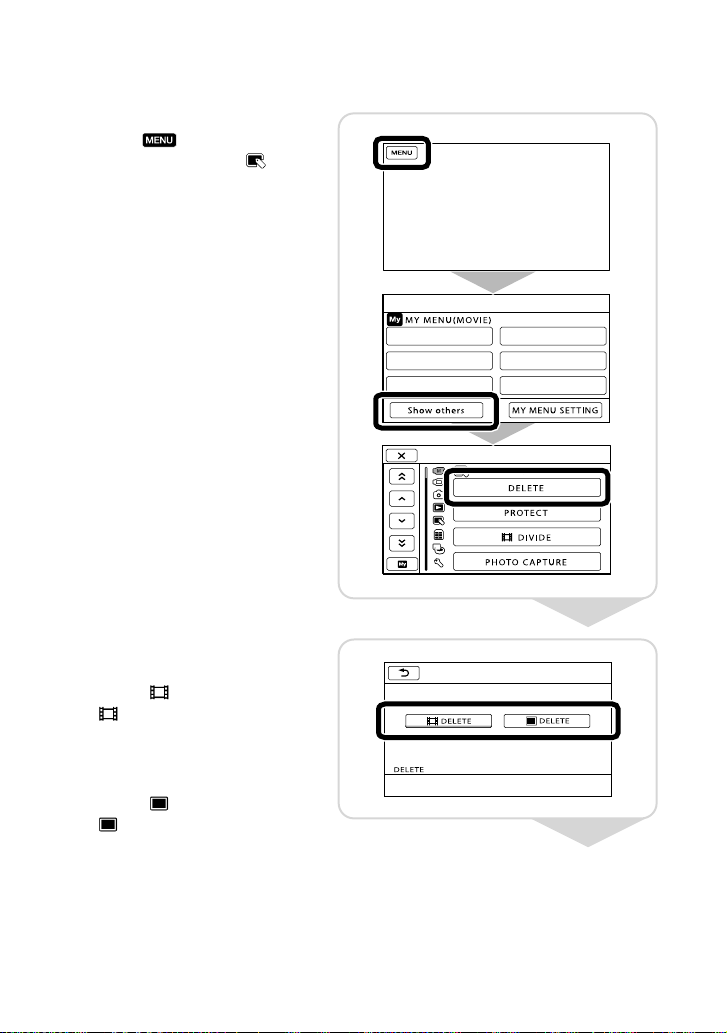
Deleting movies and photos
ED IT
Select [Show others]
1
[DELETE] (under
category).
[EDIT]
20
Movie:
2
Select [
[
Photo:
Select [
[
US
DELETE]
DELETE].
DELETE]
DELETE].

Select the images to be
3
deleted.
The mark appears.
Select [YES]
4
Notes
You cannot restore images once they are deleted. Save important movies and photos in advance.
Do not remove the battery pack or the AC Adaptor from your camcorder while deleting the images. It
may damage the recording media.
.
Recording/Playback
US
21

Playing back images through
the built-in projector (DCRPJ5)
Press PROJECTOR.
1
Adjust the projected image.
2
Select the image you want to
3
project.
Notes
Be careful of the following operations or situations while using the projector.
Make sure not to project images towards the eyes.
Make sure not to touch the projector lens.
The LCD screen and the projector lens become hot while in use.
Using the projector shortens battery life.
If you connect the camcorder to a TV and use the projector function, sound will be output from the
TV; however, no image will be output.
US
22

Viewing images recorded on other devices, using the projector
[Show others] [PROJECTOR] (under [OTHERS] category) [SOURCE]
[PROJECTOR INPUT]
Connect your camcorder to the other device with the A/V connecting cable.
.
Output
Signal flow
IN
VIDEO
(Yellow)
Press PROJECTOR.
Sound of other devices cannot be input to the camcorder.
Operation buttons are not displayed on images projected when [PROJECTOR INPUT] is set. If the
camcorder is not connected to another device, a blank blue screen will be projected.
Perform the following operations when you want to project images on the camcorder.
Firstly, press PROJECTOR to stop projecting. Select
[OTHERS] category) [SOURCE] [MEMORY CARD] , and then press
(under
PROJECTOR again.
Turn the power of the camcorder off, then on again, and then press PROJECTOR.
[Show others] [PROJECTOR]
Changing the aspect ratio of the image
You can change the aspect ratio of the image projected by the projector according to the recorded
image size.
Select [Show others] [PROJECTOR] (under [OTHERS] category).
elect [SCREEN FORMAT] [16:9 WIDE] or [4:3].
S
Recording/Playback
US
23
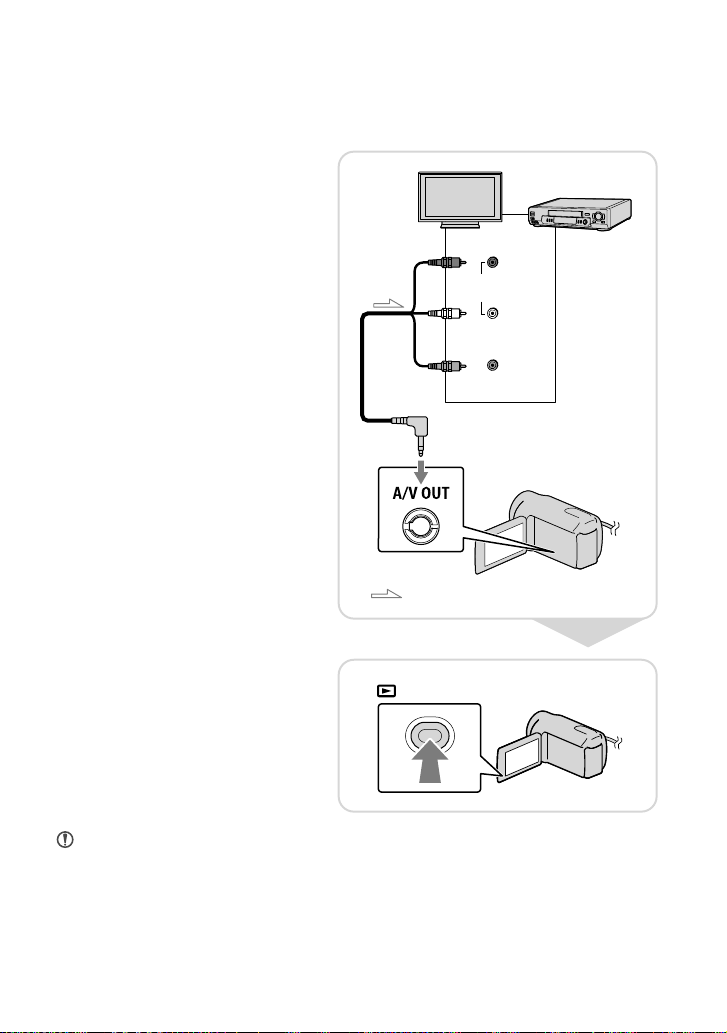
Playing images on a TV
Set the input selector of the TV to the input your camcorder will be connected to.
Connect your camcorder to a
1
TV with the A/V connecting
cable (supplied).
Play back movies and photos
2
on your camcorder.
TVs
IN
Signal flow
(VIEW IMAGES)
VCRs
(Red)
AUDIO
(White)
VIDEO
(Yellow)
Notes
For details, refer to the instruction manuals supplied with the TV.
US
24

Saving movies and photos
Saving images on a disc
Connect the AC Adaptor and the power cord (mains lead) to the DC IN jack of your
camcorder and the wall outlet (wall socket).
Using DVDirect Express
Connect the DVD writer to the
1
(USB) jack of your camcorder
with the USB cable of the DVD
writer.
Insert an unused disc into the
2
DVD writer.
Press (DISC BURN) on the
3
DVD writer.
Select [END]
4
[EJECT DISC]
Notes
Refer also to the instruction manual supplied with the DVD writer.
Only unused discs of the following types can be used:
12cm DVD-R/12cm DVD+R
The device does not support two-layered discs.
DVDirect Express is referred to as “DVD writer” in this section.
Do not do any of the following when creating a disc.
Turn off the camcorder
Disconnect the USB cable or the AC Adaptor
Subject the camcorder to mechanical shock or vibration
Eject the memory card from the camcorder
Play the created disc to make sure dubbing was performed correctly before deleting the movies on your
camcorder.
.
Saving movies and photos
US
25

26
US
If [Failed.] or [DISC BURN failed.] appears on the screen, insert another disc into the DVD writer and
perform the DISC BURN operation again.
If the total memory size of movies to be burnt by the DISC BURN operation exceeds that of the disc, disc
creation stops when the limit is reached. The last movie on the disc may be cut off.
Disc creation time to dub movies to the limit of the disc is about 20 minutes to 60 minutes. It may take
more time depending on the recording mode or the number of scenes.
Customizing a disc with DISC BURN OPTION
Perform this operation in the following cases:
When dubbing a desired image
When creating multiple copies of the same disc
When dubbing images in the memory card (DCR-SR21)
Select [DISC BURN OPTION] on the screen in step 3.
elect the recording media containing the movie(s) you want to save (DCR-SR21).
S
elect the movie you want to burn on the disc.
S
Remaining Disc capacity
Select [YES] on the camcorder screen.
fter the operation is completed, select [EXIT] [END].
A
Playing back a disc on the DVD writer
When play back movies on the TV screen, connect the camcorder to a TV.
nsert a created disc into the DVD writer.
I
ress the play button on the DVD writer.
P
elect [END] [EJECT DISC] on the screen and remove the disc after the operation is
S
completed.
If you cannot play back created discs on any DVD player, connect the camcorder to the DVD writer, and
then play back.
Using a DVD writer, etc., other than DVDirect Express
Connect a DVD writer, etc.,
1
to the (USB) jack of your
camcorder with the USB cable
(supplied).
Select the recording media
2
that contains the images on
the camcorder screen.
[ USB CONNECT]: Internal hard disk
(DCR-SR21)
USB CONNECT]: Memory card
[
Record images on the
3
connected device.
Select [END] [YES] after the
4
operation is completed.
Saving movies and photos
Notes
Refer also to the instruction manuals supplied with devices to be connected.
Sony DVD writer may not be available in some countries/regions.
US
27

28
US
Using a recorder, etc.
Insert the recording media
1
into the recording device (a
disc recorder, etc.).
Connect your camcorder to
2
the recording device with
the A/V connecting cable
(supplied).
Start playback on your
3
camcorder, and record it on
the recording device.
Input
VIDEO
(Yellow)
(White)
AUDIO
(Red)
Signal flow
(VIEW IMAGES)
When dubbing is finished,
4
stop the recording device, and
then your camcorder.

Notes
Since dubbing is performed via analog data transfer, the image quality may deteriorate.
You can hide the screen indicators (such as a counter, etc.) on the screen of the monitor device connected.
[Show others] [OUTPUT SETTINGS] (under [GENERAL SET] category) [DISP
OUTPUT] [LCD PANEL] (the default setting)
You can record the date/time or camera settings data.
.
[Show others] [PLAYBACK SET] (under [PLAYBACK] category) [DATA CODE]
a desired setting
.
[Show others] [OUTPUT SETTINGS] (under [GENERAL SET] category) [DISP
OUTPUT] [V-OUT/PANEL]
You can change the aspect ratio according to the screen size of display devices (TV, etc.).
.
[Show others] [OUTPUT SETTINGS] (under [GENERAL SET] category) [TV
TYPE] [4:3]
When you connect a monaural device, connect the yellow plug of the A/V connecting cable to the video
.
input jack, and the white (left channel) or the red (right channel) plug to the audio input jack on the
device.
Saving movies and photos
US
29

30
US
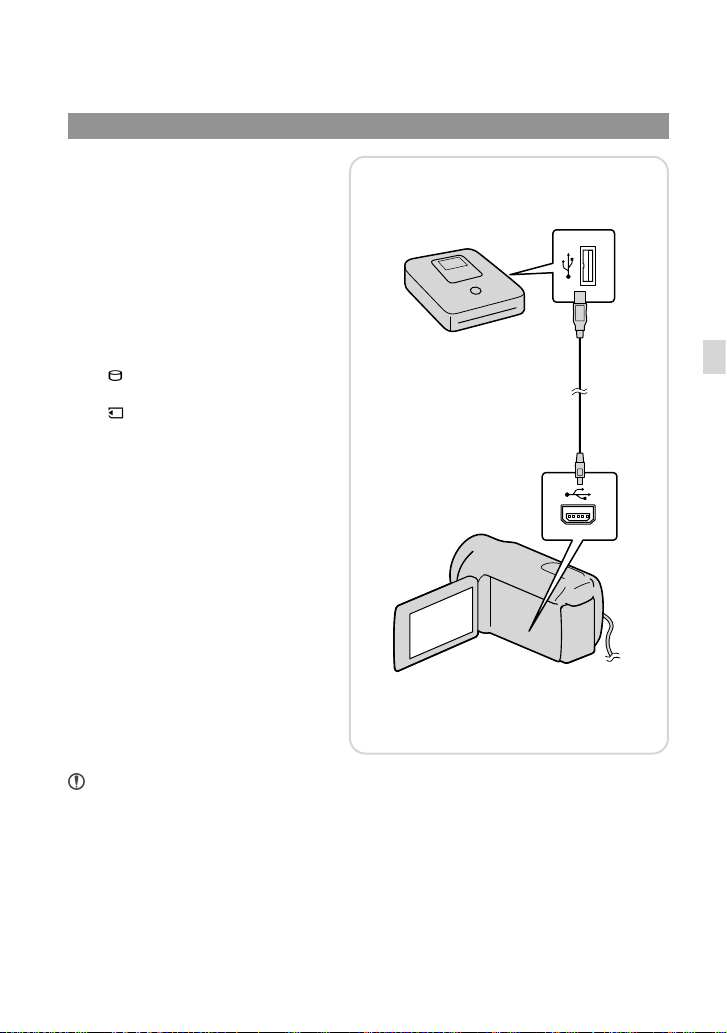
Saving images in external media (DIRECT COPY)
Connect the AC Adaptor and the power cord (mains lead) to the DC IN jack of your
camcorder and the wall outlet (wall socket).
If the external media has the
1
AC power cable, connect it to
the wall outlet (wall socket).
Connect the external
2
media to the (USB) jack
of your camcorder with the
USB Adaptor Cable (sold
separately).
To the wall outlet (wall
socket)
Select [Copy.].
3
Select after the operation
4
is completed.
Notes
For this operation, you need the USB Adaptor Cable VMC-UAM1 (sold separately).
The USB Adaptor Cable VMC-UAM1 may not be available in some countries/regions.
The number of scenes you can save on the external media are as follows.
Movies: 9,999 movies
Photos: 9,999 frames × 899 folders
The number of scenes may be smaller depending on the type of images recorded.

Viewing images recorded on external media, with your
camcorder
Select [Play without copying.] in step 4 above.
The VISUAL INDEX screen of the external media is displayed.
lay back the image.
P
You can also view images on a TV connected to your camcorder.
Saving movies and photos
US
31

Using a computer
Useful functions available if you connect the camcorder to a computer
The software PMB stored in the CD-ROM (supplied) includes functions that enable you to do
more with the images recorded with the camcorder. (Windows)
View
Calendar
Save on a disc
DVD
Upload
Network services
Edit
Joining image files
Easy uploading when away from home
With PMB Portable, which is pre-installed on the camcorder, you can play back or upload
your images to the Web by connecting your camcorder to a computer away from home.
US
32

Preparing a computer
Step 1 Checking the computer
system
Windows
1
OS*
Microsoft Windows XP SP3*2/Windows Vista
3
SP2
*
/Windows 7 SP1
4
*
CPU
Intel Pentium III 1 GHz or faster
Application
PMB/PMB Portable
Memory
256 MB or more
Other system requirements for OS should
be met.
Hard disk
Disk volume required for installation:
Approximately 500 MB (5 GB or more may
be necessary when creating DVD discs.)
Display
Minimum 1,024 dots × 768 dots
Others
USB port (this must be provided as standard,
Hi-Speed USB (USB 2.0 compatible)), DVD
burner (CD-ROM drive is necessary for
installation)
Macintosh
OS
PMB Portable: Mac OS X
1
*
Standard installation is required. Operation is
not assured if the OS has been upgraded or in a
multi-boot environment.
2
*
64-bit editions and Starter (Edition) are not
supported. Windows Image Mastering API
(IMAPI) Ver.2.0 or newer is required to use disc
creation function, etc.
3
*
Starter (Edition) is not supported.
4
*
Faster processor is recommended.
5
*
Macintosh equipped with Intel processor
Notes
Operation with all computer environments is
not assured.
5
*
(v10.5-v10.6)
When using a Macintosh
The supplied software “PMB” is not
supported by Macintosh computers. To
import the movies and photos to the
computer, please contact Apple Inc..
Step 2 Installing the supplied
software “PMB”
Install “PMB” before connecting your
camcorder to a computer.
Notes
If a version of “PMB” under 5.0.00 has been
installed on your computer, you may be unable
to use some functions of those “PMB” when
installing the “PMB” from the supplied CDROM. Also, “PMB Launcher” is installed from
the supplied CD-ROM and you can start “PMB”
or other software by using the “PMB Launcher.”
Double-click the “PMB Launcher” short-cut
icon on the computer screen to start “PMB
Launcher.”
Confirm that your camcorder is
not connected to the computer.
Turn on the computer.
Log on as an Administrator for
installation.
Close all applications running on the
computer before installing the software.
Place the supplied CD-ROM in
the disc drive of your computer.
The installation screen appears.
If the screen does not appear, click
[Start] [Computer] (in Windows
XP, [My Computer]), then double-click
[SONYPMB (E:)] (CD-ROM)
*.
Using a computer
US
33

* Drive names (such as (E:)) may vary
depending on the computer.
Click [Install].
Select the country or region.
Select the language for the
application to be installed, then
proceed to the next screen.
Read the terms of the license
agreement carefully. If you agree
to the terms, change
to , and
then click [Next] [Install].
Turn on your camcorder, then
connect the camcorder to the
computer using the supplied USB
cable.
displayed on the screen to make
the computer recognize your
camcorder.
[ USB CONNECT]: Internal hard
disk (DCR-SR21)
USB CONNECT]: Memory card
[
If the [USB SELECT] screen does not
appear, select
[USB CONNECT] (under
category).
[Show others]
[OTHERS]
Click [Continue] on the computer
screen.
Follow the on-screen instructions
to install the software.
Depending on the computer, you may
need to install third party software. If
the installation screen appears, follow
the instructions to install the required
software.
Restart the computer if required to
complete the installation.
When the installation is completed,
following icons will appear.
Remove the CD-ROM from your
computer.
The [USB SELECT] screen appears on
the camcorder screen automatically.
Select the one of the media types
US
34
: Starts “PMB.”
: Displays “PMB Help.”
: Displays “PMB Launcher.” “PMB
Launcher” enables you to start “PMB”
or other software, or to open web sites.
Other icons may appear.
No icon may appear depending on the
installation procedure.

Starting PMB (Picture
Motion Browser)
To disconnect your camcorder from the
computer
Click the icon at the bottom right of the
desktop of the computer [Safely remove
USB Mass Storage Device].
Select [END] [YES] on the camcorder
screen.
Disconnect the USB cable.
Notes
Do not format the media of your camcorder
from a computer. Your camcorder may not
operate correctly.
Access from the computer using the supplied
software “PMB.” Do not modify the files or
folders on the camcorder from the computer.
The image files may be destroyed or may not be
played back.
Operation is not guaranteed, if you perform the
above operation.
Double-click the “PMB” short-cut icon on
the computer screen.
Notes
If the icon is not displayed on the computer
screen, click [Start] [All Programs] [
PMB] to start “PMB.”
Reading “PMB Help”
For details on how to use “PMB,” read the
“PMB Help.” Double-click the “PMB Help”
short-cut icon on the computer screen to
open the “PMB Help.”
Notes
If the icon is not displayed on the computer
screen, click [Start] [All Programs]
[PMB] [PMB Help]. You can also open the
“PMB Help” from [Help] of “PMB.”
Using a computer
US
35

Using “PMB Portable”
“PMB Portable” which allows you to easily
upload images to a network service starts
up by connecting your camcorder to a
computer.
You can see the detailed usage when you
click the help button in the upper right after
starting “PMB Portable.”
1
Turn on your camcorder, then
connect it to a computer with the
USB cable.
The [USB SELECT] screen appears on
the LCD of your camcorder.
2
Select the recording media for
which you wish to use “PMB
Portable.”
[ USB CONNECT]: Internal hard
disk (DCR-SR21)
USB CONNECT]: Memory card
[
If the [USB SELECT] screen does not
appear,
[USB CONNECT] (under
category).
3
Click “PMB Portable.”
The User Agreement screen appears.
4
Configure the settings, following
the instructions on the screen.
“PMB Portable” starts up.
[Show others]
[OTHERS]
For more details on “PMB Portable,” see the
“PMB Portable” help.
US
36

Customizing your camcorder
Using menus
Using the menus, you can perform useful functions and change various settings. If you make
good use of menu operations, you can enjoy using your camcorder.
The camcorder has various menu items under each of eight menu categories.
MANUAL SETTINGS (Items to adjust for scene condition) p. 39
SHOOTING SET (Items for customized shooting) p. 39
PHOTO SETTINGS (Items for recording photos) p. 39
PLAYBACK (Items for playback) p. 39
EDIT (Items for editing) p. 39
OTHERS (Items for other settings) p. 40
MANAGE MEDIA (Items for recording media) p. 40
GENERAL SET (Other setup items) p. 41
Operating menus
Multi-selector
Select with /// and press the center of the multi-selector to confirm your selection.
An orange frame appears on the selected item.
: To finish setting the menu.
/ : The menu list moves from category to category.
/ : The menu list moves through 4 items at once.
: To return to the [MY MENU].
Customizing your camcorder
US
37

38
US
Select .
elect [Show others] on the [MY MENU] screen.
S
elect the menu item to be changed.
S
fter changing the setting, select .
A
To finish setting the menu, select
To return to the previous menu screen, select
may not be displayed depending on the menu item.
Notes
You may not be able to set some menu items, depending on the recording or playback conditions.
.
.
Using the OPTION MENU
The OPTION MENU appears just like the pop-up window that appears when you right-click
the mouse on a computer. When
the OPTION MENU. You select
appear.
Select (OPTION).
elect the desired tab the item to change the setting.
S
fter completing the setting, select .
A
Notes
Grayed out menu items or settings are not available.
When the item you want is not on the screen, select another tab. (There may be no tab.)
The tabs and items that appear on the screen depend on the recording/playback status of your camcorder
at the time.
is displayed at bottom-right of the screen, you can use
, and the menu items you can change in the context
Menu item
Tab
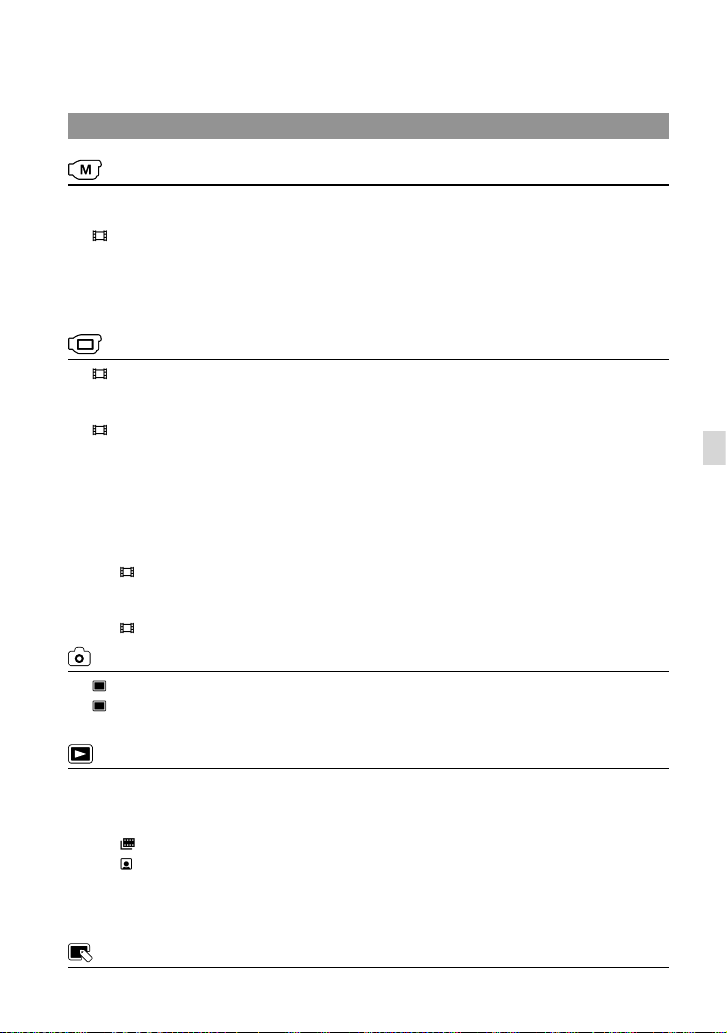
Menu lists
(MANUAL SETTINGS) category
SCENE SELECTION ..................Selects an appropriate recording setting according to the type of scene,
such as night view or beach.
FADER ....................................Fades scenes in or out.
WHITE BAL. ................................ Adjusts the color balance to the brightness of the recording environment.
EXPOSURE .................................Adjusts the brightness of movies and photos.
FOCUS ......................................... Focuses manually.
TELE MACRO ............................. Shoots a subject in focus with, the background out of focus.
(SHOOTING SET) category
REC MODE ...........................Sets the mode to record movies. When recording fast moving subject, a
high image quality is recommended.
GUIDEFRAME ............................ Displays the frame to make sure the subject is horizontal or vertical.
STEADYSHOT ...................... Sets the SteadyShot function when recording movies.
AUTO SLW SHUTTR ................ Adjusts the shutter speed automatically.
FACE DETECTION .................... Adjusts the image quality of the face(s) automatically.
AUDIO REC SET
BLT-IN ZOOM MIC .......... Records movies with vivid sound appropriate to the zoom position.
MICREF LEVEL ................. Sets the microphone level.
OTHER REC SET
DIGITAL ZOOM .........Sets the maximum zoom level of the digital zoom that exceeds the zoom
level of the optical zoom.
BACK LIGHT ..................... Adjusts the exposure for backlit subjects.
WIDE SELECT ............. Sets the horizontal to vertical ratio when recording movies.
(PHOTO SETTINGS) category
SELF-TIMER .......................... Sets the self-timer when your camcorder is in photo recording mode.
IMAGE SIZE .......................... Sets the photo size.
FILE NO. ...................................... Sets how to assign the file number.
(PLAYBACK) category
VISUAL INDEX ...........................Displays recording images as thumbnails (p. 18).
VIEW IMAGES
DATE INDEX ..................... Enables searching for desired images by date.
FILM ROLL .................. Displays and plays the scenes by a certain interval.
FACE .............................. Displays and plays the face scenes.
PLAYLIST..................................... Displays and plays the playlist of movies.
PLAYBACK SET
DATA CODE ...................... Displays the detailed recording data during playback.
(EDIT) category
Customizing your camcorder
US
39

40
US
DELETE
DELETE ........................Deletes movies.
DELETE ........................Deletes photos.
PROTECT
PROTECT ..................... Protects movies to avoid deleting.
PROTECT ..................... Protects photos to avoid deleting.
DIVIDE ................................... Divides movies.
PHOTO CAPTURE .................... Captures photos from desired scenes of movies.
MOVIE DUB
1
*
DUB by select .................Selects movies and dub.
DUB by date .................... Dubs all movies of a specified date.
DUB ALL ....................... Dubs all saved movies in a playlist.
1
PHOTO COPY
*
COPY by select ............... Selects photos and copy.
COPY by date .................. Copies all photos of a specified date.
PLAYLIST EDIT
ADD .............................. Adds movies in a playlist.
ADD by date .............. Adds movies recorded on a same day at one time in a playlist.
ERASE ...........................Erases movies from a playlist.
ERASE ALL ................... Erases all movies from a playlist.
MOVE ............................ Changes the order of movies in a playlist.
(OTHERS) category
PROJECTOR*
USB CONNECT
BATTERY INFO .......................... Displays the battery information.
2
SOURCE.............................Projects the images recorded on other devices (p. 23).
SCREEN FORMAT ........... C
hanges the aspect ratio of the projected images (p. 23).
USB CONNECT*1 ....... Connects the internal hard disk via USB.
USB CONNECT .......... Connects the memory card via USB.
DISC BURN ....................... A
llows you to save images onto discs (p. 25).
(MANAGE MEDIA) category
MEDIA SETTINGS*
MOVIE MEDIA SET ......... Sets the media for recording movies (p. 15).
PHOTO MEDIA SET ........ S
MEDIA INFO .............................. Displays information on the recording media, such as free space.
MEDIA FORMAT
HDD
MEMORY CARD .............. Deletes all data on the memory card.
REPAIR IMG.DB F.
HDD
MEMORY CARD .............. R
1
ets the media for recording photos (p. 15).
1
*
................................Deletes all data on the internal hard disk.
1
*
................................Repairs the image database file on the internal hard disk (p. 48).
epairs the image database file on the memory card (p. 48).

(GENERAL SET) category
SOUND/DISP SET
VOLUME ............................ A
BEEP ...................................Sets whether the camcorder sounds operation beeps or not.
LCD BRIGHT ..................... Adjusts the brightness of the LCD screen.
LCD BL LEVEL .................. Adjusts the backlight of the LCD screen.
LCD COLOR ...................... Adjusts the color intensity of the LCD screen.
DISPLAY SET .................... Sets the duration that icons or indicators are displayed on the LCD screen.
OUTPUT SETTINGS
TV TYPE ............................. C
DISP OUTPUT .................. Sets whether the on-screen displays appears on the TV screen or not.
LANG
CLOCK/
CLOCK SET .......................Sets the date and time.
AREA SET .......................... Adjusts for a time difference without stopping the clock.
DST SET/SUMMERTIME Sets the summertime.
LANGUAGE SET ......... Sets the display language (p. 9).
POWER SETTINGS
A.SHUT OFF ..................... Changes the [A.SHUT OFF] setting.
OTHER SETTINGS
DEMO MODE...................Sets whether the demonstration appears or not.
USB LUN SETTING .........Sets the compatibility when using a USB connection.
DROP SENSOR*
1
*
DCR-SR21
2
*
DCR-PJ5
djusts the volume of playback sound (p. 19).
onverts the signal depending on the TV connected (p. 24).
1
............. Activates or deactivates the drop sensor.
Customizing your camcorder
US
41

Dividing a movie
1
Select [Show others]
[ DIVIDE] (under [EDIT]
category).
2
Select the movie to be divided.
3
Select at the point where
you want to divide the movie into
scenes.
The movie pauses. Play and pause
toggles as you press
Adjusts the dividing point with more
precision after you selected the dividing
point with
Returns to the beginning of the selected
movie
.
.
Getting detailed information from the “Handycam” Handbook
For details on advanced operations, please
read “Handycam” Handbook, on the CDROM (supplied) using a computer.
1
To install the “Handycam”
Handbook on a Windows
computer, place the supplied
CD-ROM in the disc drive of your
computer.
2
Click [Handbook].
3
Select the desired language
and the model name of your
camcorder, then click [Install].
The model name of your camcorder is
printed on its bottom surface.
To view the “Handycam” Handbook,
double-click the short-cut icon on the
computer screen.
4
Select
Notes
You cannot restore movies once they are
divided.
Tips
You can divide a movie on the playback screen
from
You can combine divided movies using the
supplied “PMB”. Refer to “PMB Help” (p
for details.
US
[YES] .
OPTION MENU.
42
. 35)
When using a Macintosh, open the [Handbook]
– [US] folder in the CD-ROM, then copy
[Handbook.pdf].
You need Adobe Reader to read “Handycam”
Handbook. If it is not installed on your
computer, you can download it from the Adobe
Systems web page:
http://www.adobe.com/
Additional Information
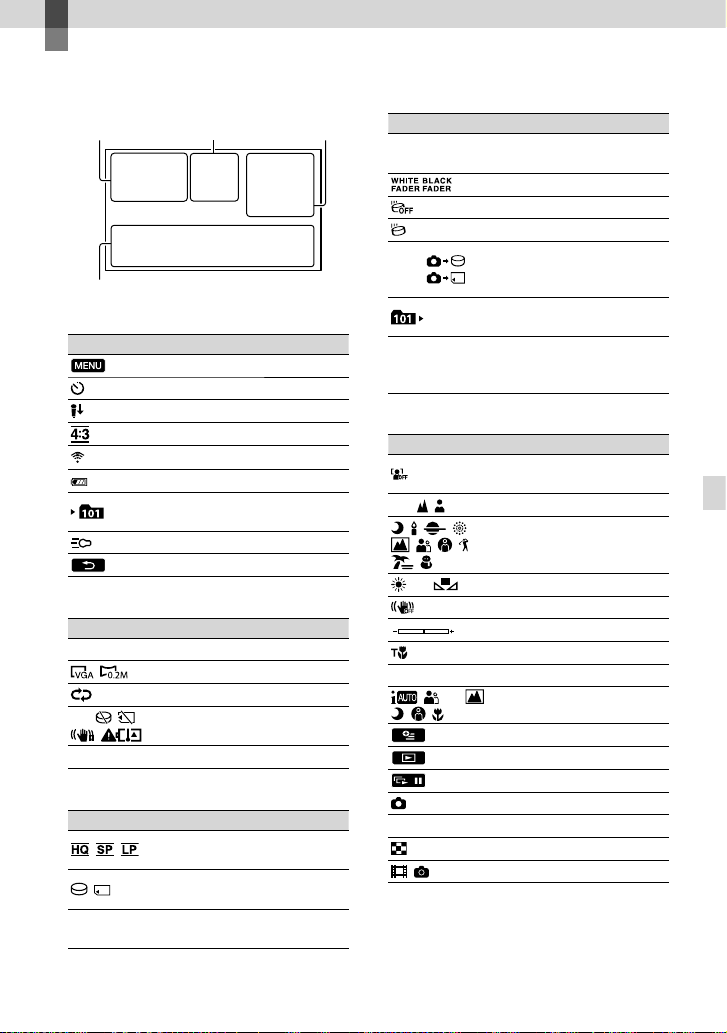
Screen indicators
Upper left Center Upper right
Bottom
Upper left
Indicator Meaning
MENU button
Self-timer recording
MICREF LEVEL low
WIDE SELECT
BLT-IN ZOOM MIC
60 min Remaining battery
Recording folder of
memory card
VIDEO LIGHT
Return button
Center
Indicator Meaning
[STBY]/[REC] Recording status
Photo size
Slide show set
Warning
Playback mode
Upper right
Indicator Meaning
0:00:00
Recording mode (HQ/
SP/LP)
Recording/playback/
editing media
Counter (hour:minute:
second)
Indicator Meaning
[00min]
9999
9999
100/112
Estimated recording
remaining time
FADER
Drop sensor off
Drop sensor activated
Approximate number of
recordable photos and
recording media
Playback folder of
memory card
Current playing movie or
photo/Number of total
recorded movies or photos
Bottom
Indicator Meaning
[FACE DETECTION] set
to [OFF]
101-0005
Indicators and their positions are approximate
and may differ from what you actually see.
Some indicators may not appear, depending on
your camcorder model.
Manual focus
SCENE SELECTION
White balance
SteadyShot off
EXPOSURE
TELE MACRO
BACK LIGHT
INTELLIGENT AUTO
OPTION button
VIEW IMAGES button
Slide show button
Data file name
Protected image
Index button
Movie mode/photo mode
Additional Information
US
43

44
US
Parts and controls
Figures in ( ) are reference pages.
Speaker (DCR-PJ5)
Lens
LENS COVER switch
Built-in microphone
LED VIDEO LIGHT (17)
DCR-SR21/SX21
LCD screen
LIGHT button (17)
Multi-selector (9)
(VIEW IMAGES) button (18, 24, 28)
PROJECTOR button (22)
Projector lens
PROJECTOR FOCUS lever
LCD screen
LIGHT button (17)
Multi-selector (9)
(VIEW IMAGES) button (18, 24, 28)
DCR-PJ5
Speaker (DCR-SR21/SX21)
(USB) jack (25, 27, 30, 34)
A/V OUT jack (24, 28)
PROJECTOR IN jack (DCR-PJ5) (23)
MODE button (16)
(INTELLIGENT AUTO) button
RESET button (46)

DCR-PJ5/SX21
Power zoom lever
PHOTO button (16)
POWER lamp
START/STOP button (16)
Battery pack (13)
CHG (charge) lamp (13)
Grip belt
DC IN jack (13)
Access lamp (memory card) (14)
BATT (battery) release lever (13)
Tripod receptacle
Memory card slot (14)
DCR-SR21
Power zoom lever
PHOTO button (16)
POWER lamp
CHG (charge) lamp (13)
Battery pack (13)
START/STOP button (16)
DC IN jack (13)
Grip belt
Hook for a shoulder belt
Access lamp (memory card) (14)
BATT (battery) release lever (13)
Tripod receptacle
Memory card slot (14)
Fastening the grip belt
Additional Information
US
45

46
US
Troubleshooting
If you run into any problems using your
camcorder, follow the steps below.
Check the list (p. 46 to 48), and
inspect your camcorder.
Remove the power source, attach
the power source again after about 1
minute, and turn the camcorder on.
Press RESET (p. 44) using a pointed
object, and turn the camcorder on.
If you press RESET, all settings,
including the clock setting, are reset.
RESET button
Contact your Sony dealer or local
authorized Sony service facility.
Your camcorder may be required to initialize or
change the current internal recording media of
your camcorder, depending on the problem. In
the event of this, the data stored on the internal
recording media will be deleted. Be sure to
save the data on the internal recording media
on other media (backup) before sending your
camcorder for repair. We will not compensate
you for any loss of internal recording media
data.
During repair, we may check a minimum
amount of data stored on the internal recording
media in order to investigate the problem.
However, your Sony dealer will neither copy
nor retain your data.
The power does not turn on.
Attach a charged battery pack to the
camcorder (p. 13).
Connect the plug of the AC Adaptor to the
wall outlet (wall socket).
The camcorder does not operate even
when the power is set to on.
It takes a few seconds for your camcorder to
be ready to shoot after the power is turned on.
This is not a malfunction.
Disconnect the AC Adaptor from the wall
outlet (wall socket) or remove the battery
pack, then reconnect it after about 1 minute.
If your camcorder still does not work, press
RESET (p
. 44) using a pointed object. (If you
press RESET, all settings, including the clock
setting, are reset.)
The temperature of your camcorder is
extremely high. Turn off the camcorder and
leave it for a while in a cool place.
The temperature of your camcorder is
extremely low. Leave the camcorder with the
power turned on. If you still cannot operate
your camcorder, turn off the camcorder and
take it to a warm place. Leave the camcorder
there for a while, then turn on the camcorder.
Your camcorder gets warm.
Your camcorder may become warm during
operation. This is not a malfunction.
The power abruptly turns off.
Use the AC Adaptor.
Turn on the power again.
C
harge the battery pack (p. 13).
In the default setting, the power turns off
automatically if you leave your camcorder
without any operation for about 5 minutes, to
save battery power ([A.SHUT OFF]).
Pressing START/STOP or PHOTO does not
record images.
Press MODE to display the (Movie) or
(Photo) icons.
Your camcorder is recording the image you
have just shot on the recording media. You
cannot make any new recordings during this
period.
The recording media is full. Delete

unnecessary images (p. 20).
Total number of movie scenes or photos has
exceeded the recordable capacity of your
c
amcorder. Delete unnecessary images (p. 20).
The recording stops.
The temperature of your camcorder is
extremely high/low. Turn off your camcorder
and leave it for a while in a cool/warm place.
“PMB” cannot be installed.
Check the computer environment or
installation procedure required to install
“PMB” (p
. 33).
“PMB” does not work correctly.
Quit “PMB” and restart your computer.
The camcorder is not recognized by the
computer.
Disconnect devices from the USB jack of the
computer other than the keyboard, mouse,
and your camcorder.
Disconnect the USB cable from the computer
and your camcorder, and restart the computer,
then connect the computer and your
camcorder again in an orderly manner.
battery pack (V series).
Connect the DC plug of the AC Adaptor to
y
our camcorder securely (p. 13).
C:06:
The battery pack temperature is high. Change
the battery pack or place it in a cool place.
C:13: / C:32:
Remove the power source. Reconnect it and
operate your camcorder again.
E::
Follow the steps from to on page 46.
The indicator flashes when the internal hard
disk of your camcorder becomes full. Delete
unn
ecessary images (p. 20), or format the
in
ternal hard disk (p. 54) after storing the
images on other media.
An error may have occurred with the internal
hard disk of your camcorder.
Battery power is low.
Additional Information
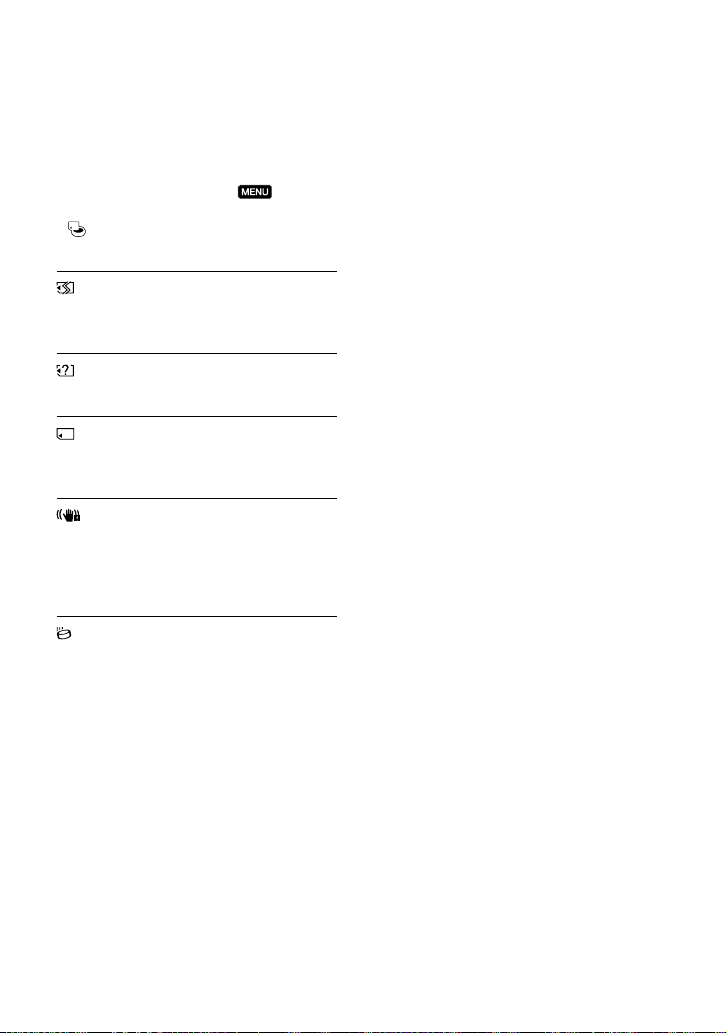
Self-diagnosis display/Warning
indicators
If indicators appear on the LCD screen,
check the following.
If the problem persists even after you
have tried to fix a couple of times, contact
your Sony dealer or local authorized Sony
service facility. In this case, when you
contact them, give them all the numbers of
the error code beginning with C or E.
C:04:
The battery pack is not an “InfoLITHIUM”
battery pack V series. Use an “InfoLITHIUM”
The battery pack temperature is high. Change
the battery pack or place it in a cool place.
The temperature of your camcorder is getting
high. Turn off your camcorder and leave it in
a cool place.
The temperature of your camcorder is low.
Make the camcorder warm.
No memory card is inserted (p. 14).
The indicator flashes when the memory card
US
47
48
US
Specifications
becomes full. Delete unnecessary images
(p. 20), o
r format the memory card (p. 54)
after storing the images on other media.
The Image Database File is damaged. Check
the data base file by selecting
[Show
others] [REPAIR IMG.DB F.] (under
[MANAGE MEDIA] category) the
recording medium (DCR-SR21).
The memory card is damaged. Format the
memory card with your camcorder (p. 54).
Incompatible memory card is inserted (p. 54).
Access to the memory card was restricted on
another device.
The camcorder is unsteady. Hold the camcorder
steady with both hands. However, note that
the camera-shake warning indicator does not
disappear.
The drop sensor function is activated. You
may not be able to record nor play back
images.
System
Signal format: NTSC color, EIA standards
Movie recording format:
Video: MPEG-2 PS
Audio recording system:
Dolby Digital 2ch
Dolby Digital Stereo Creator
Photo file format
: DCF Ver.2.0 Compatible
: Exif Ver.2.21 Compatible
: MPF Baseline Compatible
Recording media (Movie/Photo)
Internal hard disk
DCR-SR21: 80
“Memory Stick PRO Duo” media
SD memory card (Class 2 or faster)
hen measuring media capacity, 1 GB equals
W
1 billion bytes, a portion of which is used for
system management and/or application files.
The capacity that a user can use is
approximately 79.3 GB.
Image device
2.25
Device)
ross: Approx. 800 000 pixels
G
Effective (Movie, 16:9): Approx.
000 pixels
490
Effective (Photo, 16:9): A
Effective (Photo, 4:3): A
Lens
57
(Optical), 67 (Extended), 1 800
(Digital)
F1.8 ~ F5.7
Focal length:
f=1.8
When converted to a 35 mm still camera
or movies: 39 mm ~ 2 223 mm (1 9/16 in. ~
F
87 5/8 in.) (16:9)
or photos: 44 mm ~ 2 508 mm (1 3/4 in. ~
F
98 3/4 in.) (4:3)
Color temperature: [AUTO], [ONE PUSH],
[INDOOR] (3
(5 800 K)
Minimum illumination
3
lx (lux) ([AUTO SLW SHUTTR] is set to [ON],
shutter speed 1/30 second)
GB
mm (1/8 type) CCD (Charge Coupled
pprox. 490 000 pixels
pprox. 490 000 pixels
mm ~ 102.6 mm (3/32 in. ~ 4 1/8 in.)
200 K), [OUTDOOR]
Input/Output connectors
A/V OUT jack: Video/audio output jack
USB jack: mini-AB

LCD screen
Picture: 6.7 cm (2.7 type, aspect ratio 16:9)
Total number of pixels: 230 400 (960
240)
Projector (DCR-PJ5)
Projection type: DLP
Light source: LED (R/G/B)
Focus: Manual
Image size: 10 type ~ 60 type
Throw Distance: Approx. 0.5 m ~ 3.0 m (1.6 feet
~ 9.8 feet)
Color repeatability: Approx. 16 700 000
Brightness
*: Max. 10 lumens
Contrast ratio: 1500:1
Resolution (output): nHD (640 × 360)
Continuous projection time (when using the
supplied battery pack): Approx. 1.0 h
* The specification of the brightness given here
is the average value for this camcorder at the
time of shipment and is indicated in the format
specified in JIS X 6911:2003 for data projectors.
The measurement method and conditions are
based on Appendix 2 of the standard.
General
Power requirements: DC 6.8 V/7.2 V (battery
pack) DC 8.4 V (AC Adaptor)
Average power consumption: During camera
recording, using LCD screen at normal
brightness:
DCR-SR21
Internal hard disk: 2.1W
Memory card: 1.9W
DCR-PJ5/SX21: 1.9W
perating temperature: 0
O
104 °F)
torage temperature: –20
S
+140 °F)
Dimensions (approx.)
DCR-PJ5:
58.5
mm × 55.5 mm × 113.5 mm (2 3/8 in.
× 2 1/4 in. × 4 1/2 in.) (w/h/d) including the
projecting parts
mm × 55.5 mm × 124.5 mm (2 3/8
58.5
in. × 2 1/4 in. × 5 in.) (w/h/d) including
the projecting parts, and the supplied
rechargeable battery pack attached
DCR-SR21:
mm × 64.5 mm × 113.5 mm (2 3/8 in. ×
59
2 5/8 in. × 4 1/2 in.) (w/h/d) including the
projecting parts
C to 40 C (32 °F to
C to + 60 C (-4 °F to
mm × 64.5 mm × 124.5 mm (2 3/8
59
in. × 2 5/8 in. × 5 in.) (w/h/d) including
the projecting parts, and the supplied
rechargeable battery pack attached
DCR-SX21:
mm × 55.5 mm × 113.5 mm (2 1/4 in. ×
54
2 1/4 in. × 4 1/2 in.) (w/h/d) including the
projecting parts
mm × 55.5 mm × 124.5 mm (2 1/4
54
in. × 2 1/4 in. × 5 in.) (w/h/d) including
the projecting parts, and the supplied
rechargeable battery pack attached
Mass (approx.)
DCR-PJ5:
230 g (8.0 oz) main unit only
270 g (9.0 oz) including the supplied
rechargeable battery pack and memory card
DCR-SR21:
g (9.0 oz) main unit only
270
g (10.0 oz) including the supplied
310
rechargeable battery pack
DCR-SX21:
g (6.0 oz) main unit only
195
g (8.0 oz) including the supplied
240
rechargeable battery pack and memory card
AC Adaptor AC-L200C/AC-L200D
Power requirements: AC 100 V - 240 V,
50 Hz/60 Hz
Current consumption: 0.35 A - 0.18 A
Power consumption: 18
utput voltage: DC 8.4 V
O
Operating temperature: 0 C to 40 C (32 °F to
104 °F)
torage temperature: –20
S
+140 °F)
ensions (approx.): 48 mm
Dim
(1 15/16 in. × 1 3/16 in. × 3 1/4 in.) (w/h/d)
excluding the projecting parts
ass (approx.): 170 g (6.0 oz) excluding the
M
power cord (mains lead)
* See the label on the AC Adaptor for other
specifications.
W
*
C to + 60 C (-4 °F to
29 mm 81 mm
Rechargeable battery pack NP-FV30
Maximum output voltage: DC 8.4 V
Output voltage: DC 7.2 V
Maximum charge voltage: DC 8.4 V
Maximum charge current: 2.12 A
Capacity
t
ypical: 3.6 Wh (500 mAh)
minimum: 3.6 Wh (500 mAh)
Additional Information
US
49

50
US
Type: Li-ion
Design and specifications of your camcorder and
accessories are subject to change without notice.
Manufactured under license from Dolby
Laboratories.
Expected charging and running times
for the supplied battery pack (in
minutes)
These tables show the approximate
available running times when you use a
fully charged battery pack.
DCR-SR21
Recording media
Charging time
(full charge)
Continuous
recording time
Typical
recording time
Playback time 125 145
Each recording time is measured when the
REC MODE] is set to SP.
[
Typical recording time shows the time when
Internal
hard disk
95 105
45 50
you repeat recording start/stop, switching the
movie or photo mode, and zooming.
When using a Sony memory card.
Times measured when using the camcorder at
C (77 °F). 10 C to 30 C (50 °F to 86 °F) is
25
recommended.
The recording and playback time will be
shorter when you use your camcorder in low
temperatures.
The recording and playback time will be shorter
depending on the conditions under which you
use your camcorder.
The maximum recording time of movies and
the number of photos that can be recorded, are
splayed on the screen (p. 43)
di
The recordable time may vary depending on
the recording and subject conditions, [
MODE].
DCRSX21
Memory card
115
DCR-PJ5
REC
On trademarks
“Handycam” and are
registered trademarks of Sony Corporation.
“Memory Stick,” “
“
Duo,” “
“Memory Stick PRO-HG Duo,”
“
Micro,” “MagicGate,” “
“MagicGate Memory Stick” and “MagicGate
Memory Stick Duo” are trademarks or
registered trademarks of Sony Corporation.
“InfoLITHIUM” is a trademark of Sony
Corporation.
“DVDirect” is a trademark of Sony
Corporation.
Dolby and the double-D symbol are trademarks
of Dolby Laboratories.
Microsoft, Windows, Windows Vista, and
DirectX are either registered trademarks or
trademarks of Microsoft Corporation in the
United States and/or other countries.
Macintosh and Mac OS are registered
trademarks of Apple Inc. in the U.S. and other
countries.
Intel, Intel Core, and Pentium are trademarks
or registered trademarks of Intel Corporation
or its subsidiaries in the United States and other
countries.
Adobe, the Adobe logo, and Adobe Acrobat
are either registered trademarks or trademarks
of Adobe Systems Incorporated in the United
States and/or other countries.
SDXC logo is a trademark of SD-3C, LLC.
MultiMediaCard is a trademark of
MultiMediaCard Association.
All other product names mentioned herein may
be the trademarks or registered trademarks of
their respective companies. Furthermore,
are not mentioned in each case in this manual.
,” “Memory Stick Duo,”
,” “Memory Stick PRO
,”
,” “Memory Stick
,”
and

Precautions
Recording
When you use a memory card with your
camcorder for the first time, formatting the
emory card with your camcorder (p. 54) is
m
recommended for stable operation.
All data recorded on the memory card will
be deleted when it is formatted, and cannot
be recovered. Save important data to your
computer, etc., beforehand.
Before starting to record, test the recording
function to make sure that the image and sound
are recorded without any problems.
Compensation for the contents of recordings
cannot be provided, even if recording or
playback is not possible due to a malfunction of
the camcorder, storage media, etc.
TV color systems differ depending on the
country/region. To view your recordings on a
TV, you need an NTSC system-based TV.
Television programs, films, video tapes,
and other materials may be copyrighted.
Unauthorized recording of such materials may
be contrary to copyright laws.
The following states will be indicated if
data is still being written onto the recording
media after recording has finished. During
this time, do not apply shock or vibration to
the camcorder, or remove the battery or AC
Adaptor.
ccess lamp (p. 14) is lit or flashing
A
The media icon in the upper right of the LCD
screen is flashing
Note on playback
Images recorded on your camcorder may not
play correctly on other devices.
Conversely, images recorded on other devices
may not play correctly on this camcorder.
Movies recorded on SD memory cards
cannot be played on A/V equipment of other
manufacturers.
About images, illustrations, and screen
displays of this manual
The example images used in this manual for
illustration purposes are captured using a
digital still camera, and therefore may appear
different from images and screen indicators that
actually appear on your camcorder. And, the
illustrations of your camcorder and its screen
indication are exaggerated or simplified for
understandability.
In this manual, the internal hard disk (DCRSR21) of your camcorder and memory card are
called “recording media.”
Design and specifications of your camcorder
and accessories are subject to change without
notice.
Confirm the model name of your
camcorder
The model name is shown in this manual when
there is a difference in specification between
models. Confirm the model name on the
bottom of your camcorder.
The main differences in specification of this
series are as follows.
Recording
media
Capacity
of internal
Projector
recording
media
DCRSR21
Internal
hard
80 GB
disk +
memory
card
DCRSX21
Memory
card
DCRPJ5
On use and care
The camcorder is not dustproofed, dripproofed
or waterproofed.
Do not use or store the camcorder and
accessories in the following locations:
Anywhere extremely hot, cold or humid.
Never leave them exposed to temperatures
C (140 °F), such as under direct
bove 60
a
sunlight, near heaters or in a car parked in
the sun. They may malfunction or become
deformed.
Near strong magnetic fields or mechanical
Additional Information
US
51

52
US
vibration. The camcorder may malfunction.
Near strong radio waves or radiation. The
camcorder may not be able to record properly.
Near AM receivers and video equipment.
Noise may occur.
On a sandy beach or anywhere dusty. If
sand or dust gets in your camcorder, it may
malfunction. Sometimes this malfunction
cannot be repaired.
Near windows or outdoors, where the LCD
screen or the lens may be exposed to direct
sunlight. This damages the inside of the LCD
screen.
Operate your camcorder on DC 6.8 V/7.2 V
(battery pack) or DC 8.4 V (AC Adaptor).
For DC or AC operation, use the accessories
recommended in these operating instructions.
Do not let your camcorder get wet, for example,
from rain or sea water. If your camcorder
gets wet, it may malfunction. Sometimes this
malfunction cannot be repaired.
If any solid object or liquid gets inside the
casing, unplug your camcorder and have it
checked by a Sony dealer before operating it
any further.
Avoid rough handling, disassembling,
modifying, physical shock, or impact such
as hammering, dropping or stepping on the
product. Be particularly careful of the lens.
Keep the camcorder turning off when you are
not using your camcorder.
Do not wrap your camcorder with a towel, for
example, and operate it. Doing so might cause
heat to build up inside.
When disconnecting the power cord (mains
lead), pull it by the plug and not the cord (lead).
Do not damage the power cord (mains lead)
such as by placing anything heavy on it.
Do not use a deformed or damaged battery
pack.
Keep metal contacts clean.
If the battery electrolytic liquid has leaked:
Consult your local authorized Sony service
facility.
Wash off any liquid that may have contacted
your skin.
If any liquid gets in your eyes, wash with
plenty of water and consult a doctor.
When not using your camcorder for a
long time
To keep your camcorder in optimum state for a
long time, turn it on and let it run by recording
and playing back images about once a month.
Use up the battery pack completely before
storing it.
LCD screen
Do not exert excessive pressure on the LCD
screen, as it may cause damage.
If your camcorder is used in a cold place, a
residual image may appear on the LCD screen.
This is not a malfunction.
While using your camcorder, the back of
he LCD screen may heat up. This is not a
t
malfunction.
To clean the LCD screen
If fingerprints or dust make the LCD screen
dirty, it is recommended that you use a soft
cloth to clean it. When you use the LCD
Cleaning Kit (sold separately), do not apply the
cleaning liquid directly to the LCD screen. Use
cleaning paper moistened with the liquid.
To clean the projector lens (DCR-PJ5)
Wipe the lens gently with a soft cloth such as a
cleaning cloth or glass cleaning cloth.
Stubborn stains may be removed with a soft
cloth such as a cleaning cloth or glass cleaning
cloth lightly dampened with water.
Never use a solvent such as alcohol, benzene or
thinner; acid, alkaline or abrasive detergent; or
a chemical cleaning cloth, as they will damage
the lens surface.
On handling the casing
If the casing is soiled, clean the camcorder body
with a soft cloth lightly moistened with water,
and then wipe the casing with a dry soft cloth.
Avoid the following to avoid damage to the
finish:
Using chemicals such as thinner, benzine,
alcohol, chemical cloths, repellent, insecticide

and sunscreen
Handling the camcorder with above
substances on your hands
Leaving the casing in contact with rubber or
vinyl objects for a long period of time
About care and storage of the lens
Wipe the surface of the lens clean with a soft
cloth in the following instances:
When there are fingerprints on the lens
surface
In hot or humid locations
When the lens is exposed to salty air such as
at the seaside
Store in a well-ventilated location subject to
little dirt or dust.
To prevent mold, periodically clean the lens as
described above.
On charging the pre-installed
rechargeable battery
Your camcorder has a pre-installed rechargeable
battery to retain the date, time, and other settings
even when the camcorder is turned off. The preinstalled rechargeable battery is always charged
while your camcorder is connected to the wall
outlet (wall socket) via the AC Adaptor or while
the battery pack is attached. The rechargeable
battery will be fully discharged in about 3 months
if you do not use your camcorder at all. Use
your camcorder after charging the pre-installed
rechargeable battery. However, even if the preinstalled rechargeable battery is not charged, the
camcorder operation will not be affected as long
as you are not recording the date.
Procedures
Connect your camcorder to a wall outlet (wall
socket) using the supplied AC Adaptor, and leave
it with the LCD screen closed for more than 24
hours.
Note on disposal/transfer of the
camcorder (DCR-SR21)
Even if you delete all movies and still images, or
perform [MEDIA FORMAT], data on the internal
recording media may not be completely erased.
When you transfer the camcorder, it is
recommended that you perform [EMPTY]
(See “Getting detailed information from the
“Handycam” Handbook” on page 42.) to prevent
the recovery of your data. Also, when you dispose
of the camcorder, it is recommended that you
destroy the actual body of the camcorder.
Battery pack
When you remove the battery pack or
disconnect the AC Adaptor, close the LCD
screen and make sure that the POWER lamp
he access lamp (p. 14) are turned off.
. 14), t
(p
The CHG (charge) lamp flashes during charging
under the following conditions:
The battery pack is not attached correctly.
The battery pack is damaged.
The temperature of the battery pack is low.
Remove the battery pack from your
camcorder and put it in a warm place.
The temperature of the battery pack is high.
Remove the battery pack from your
camcorder and put it in a cool place.
AC Adaptor
Use the nearby wall outlet (wall socket) when
using the AC Adaptor. Disconnect the AC
Adaptor from the wall outlet (wall socket)
immediately if any malfunction occurs while
using your camcorder.
Do not use the AC Adaptor placed in a narrow
space, such as between a wall and furniture.
Do not short-circuit the DC plug of the AC
Adaptor or battery terminal with any metallic
objects. This may cause a malfunction.
Memory card
Set the recording medium to [MEMORY
CARD] to record movies and/or photos on a
memory card (DCR-SR21).
Types of memory card you can use with your
camcorder
Only “Memory Stick PRO Duo” media,
“Memory Stick PRO-HG Duo” media, SD
memory cards (Class 2 or faster), SDHC
memory cards (Class 2 or faster) and SDXC
memory cards (Class 2 or faster) can be
used with this camcorder. Operation with all
Additional Information
US
53

54
US
memory cards is not assured.
“Memory Stick PRO Duo” media of up to
32 GB and SD memory cards of up to 64 GB
have been tested and proven to operate with
your camcorder.
For recording movies on “Memory Stick PRO
Duo” media, it is recommended that you use
“Memory Stick PRO Duo” media of 512 MB
or larger.
In this manual, “Memory Stick PRO Duo”
media and “Memory Stick PRO-HG Duo”
media are called “Memory Stick PRO Duo”
media and SD memory cards, SDHC memory
cards and SDXC memory cards are called SD
memory cards.
MultiMediaCard cannot be used.
Images recorded on SDXC memory
cards cannot be played back or imported
on non-exFAT
*-compatible computers,
AV components, etc., connected to this
camcorder by USB cable. Check that the
connected devices are compatible with exFAT
beforehand. If you connect a device that is
not compatible with exFAT, the screen for
initialization may appear. Never execute
initialization, otherwise all recorded contents
will be lost.
* exFAT is the file system used in SDXC
memory cards.
Size of memory cards that can be used with
your camcorder
Only “Memory Stick Duo” media that is about
a half the size of the standard “Memory Stick”
media, and standard-sized SD memory cards
can be used.
Do not attach a label, etc., to a memory card
or memory card adaptor. Doing so may cause
a malfunction.
Menu items
A menu item that is grayed out is not available
under the current recording or playback
conditions.
Save all your recorded image data
To prevent your image data from being lost,
save all your recorded images on external media
periodically. It is recommended that you save
the image data on a disc such as a DVD-R using
your computer. Also, you can save your image
data using a VCR or a DVD/HDD recorder,
c. (p. 25).
et
Note on the camcorder/battery pack
temperature
When the temperature of the camcorder
or battery pack becomes extremely high or
extremely low, you may not be able to record
or play back on the camcorder, due to the
protection features of the camcorder being
activated in such situations. In this case, an
indicator appears on the LCD screen.
When the camcorder is connected to a
computer or accessories
Do not try to format the recording media of the
camcorder using a computer. If you do so, your
camcorder may not operate correctly.
When connecting your camcorder to another
device with a cable, be sure to insert the
connector plug in the correct way. Pushing the
plug forcibly into the terminal will damage the
terminal and may result in a malfunction of
your camcorder.
If you cannot record/play back images,
perform [MEDIA FORMAT]
If you repeat recording/deleting images for
a long time, fragmentation of data occurs on
the recording media. Images cannot be saved
or recorded. In such a case, save your images
on some type of external media first, and then
perform [MEDIA FORMAT] by selecting
[Show others] [MEDIA FORMAT]
[MANAGE MEDIA] category)
(under
the desired medium (DCR-SR21) [YES]
[YES]
.

Notes on use
Do not do any of the following, otherwise, the
recording media may be damaged, recorded
images may be impossible to play back or may
be lost, or other malfunctions could occur.
Eject the memory card when the access lamp
. 14) is lit or flashing
(p
Remove the battery pack or AC Adaptor from
the camcorder, or subject the camcorder to
shock or vibration when the POWER lamp
r the access lamp (p. 14) are lit or
. 14) o
(p
flashing
Do not use your camcorder in very loud areas
(DCR-SR21).
On the drop sensor (DCR-SR21)
To protect the internal hard disk from shock
by dropping, the camcorder has a drop sensor
function. When a drop occurs, or under a nongravity condition, the block noise made when
this function is activated by the camcorder may
also be recorded. If the drop sensor catches a
drop repeatedly, recording/playback may be
stopped.
Note on using the camcorder at high
altitudes (DCR-SR21)
Do not turn on the camcorder in a low-pressure
area, where the altitude is more than 5,000
meters (16,000 feet). Doing so may damage the
internal hard disk drive of your camcorder.
Additional Information
US
55

Index
A
A/V connecting cable.... 23, 24, 28
Altitude ........................................55
B
battery pack .................................13
C
Care ..............................................51
Charging and running times .....50
Charging the battery pack .........13
CLOCK SET ................................14
Computer.....................................33
Computer system ........................33
D
DATA CODE ..............................14
DATE/TIME................................14
DELETE .......................................20
Disc recorder ...............................28
Dividing a movie ........................42
DVDirect Express .......................25
DVD writer..................................27
E
External media ............................30
H
“Handycam” Handbook .............42
I
Install ............................................33
Internal hard disk .......................15
L
LANGUAGE SET .........................9
M
Macintosh ....................................33
Maintenance ................................51
MEDIA SETTINGS ....................15
Memory card ...............................53
“Memory Stick” media ...............53
“Memory Stick PRO-HG Duo”
media ............................................53
“Memory Stick PRO Duo” media
.......................................................53
US
56
Menus .....................................37, 39
MOVIE MEDIA SET ................. 15
Movies ..........................................16
MY MENU ..................................37
MY MENU SETTING ...............37
O
Operation beeps..........................14
OPTION MENU ........................38
P
PHOTO MEDIA SET ................15
Photos ..........................................16
Playback .......................................18
PMB (Picture Motion Browser)
.......................................................35
PMB Help ....................................35
Power on ......................................14
Precautions ..................................51
R
Recording ....................................16
Recording media.........................15
Repair ...........................................46
RESET ..........................................44
S
Saving images in external media
.......................................................30
Saving images on a disc .............25
Screen indicators ........................43
Self-diagnosis display .................47
Setting the date and time ...........14
Software .......................................33
Specifications ..............................48
Supplied items ...............................9
T
Tripod...........................................45
Troubleshooting ..........................46
Turning the power on ................14
TV .................................................24
U
USB cable ...............................25, 27
USB CONNECT ...................25, 27
V
VIDEO LIGHT ...........................17
VIEW IMAGES ..........................18
VISUAL INDEX .........................18
Volume .........................................19
W
Wall outlet (wall socket) ............13
Warning indicators .....................47
Windows ......................................33
Z
Zoom ............................................45
You will find the menu lists
on pages 39 to 41.

Aide-mémoire
Les numéros de modèle et de série se
situent sous l’appareil. Prendre en note le
numéro de série dans l’espace prévu cidessous. Se reporter à ces numéros lors des
communications avec le détaillant Sony au
sujet de ce produit.
Modèle no DCRNo de série
Modèle no ACNo de série
AVERTISSEMENT
Pour réduire les risques d’incendie ou
d’électrocution, tenir cet appareil à
l’abri de la pluie et de l’humidité.
N’exposez pas les piles à une chaleur
excessive, notamment aux rayons
directs du soleil, à une flamme, etc.
Ce symbole avise
l’utilisateur de la
présence d’instructions
importantes concernant
le fonctionnement et
l’entretien (la réparation)
de l’appareil dans
la documentation
accompagnant celui-ci.
Ce symbole avise
l’utilisateur de la présence
de pièces « sous tension
dangereuse » non
isolées à l’intérieur du
boîtier de l’appareil; leur
tension est suffisante pour
représenter un risque
d’électrocution pour les
personnes.
FR
2

CONSIGNES DE SÉCURITÉ IMPORTANTES
CONSERVEZ CES INSTRUCTIONS.
DANGER - AFIN DE RÉDUIRE LES RISQUES
D’INCENDIE OU DE CHOC ÉLECTRIQUE,
SUIVEZ SCRUPULEUSEMENT CES
INSTRUCTIONS.
Lisez ces instructions.
Conservez ces instructions.
Respectez tous les avertissements.
Suivez toutes les instructions.
N’utilisez pas cet appareil à proximité de l’eau.
Nettoyez-le uniquement avec un chiffon sec.
N’obstruez pas les orifices de ventilation. Installez-le conformément aux instructions du
fabricant.
Ne placez pas l’appareil à proximité d’une source de chaleur, telle qu’un radiateur, registre
de chaleur, une cuisinière ou tout autre appareil (y compris un amplificateur) qui produit de
la chaleur.
Ne désactivez pas le dispositif de sécurité de la fiche polarisée ou dotée d’une broche de
mise à la terre. Une fiche polarisée dispose de deux broches dont l’une est plus large que
l’autre. Une broche de mise à la terre dispose de deux broches et d’une troisième pour la
mise à la terre. Cette broche plus large ou cette troisième broche visent à assurer votre
sécurité. Si la fiche fournie ne s’adapte pas à votre prise murale, consultez un électricien afin
de remplacer la prise obsolète.
Faites en sorte que le cordon d’alimentation ne puisse être ni piétiné, ni pincé, surtout au
niveau des fiches, de la prise de courant et à l’endroit où il sort de l’appareil.
N’utilisez que les accessoires/fixations spécifiés par le fabricant.
Utilisez uniquement le chariot, le support, le trépied, la fixation ou la table spécifié(e) par
le fabricant ou vendu avec l’appareil. Si vous utilisez un chariot, déplacez l’ensemble avec
précaution afin d’éviter toute blessure si l’appareil bascule.
FR
Débranchez l’appareil pendant les orages ou si vous ne l’utilisez pas pendant une longue
période.
FR
3

Pour toute réparation, adressez-vous à un technicien qualifié. Un travail de réparation est
nécessaire lorsque l’appareil a été endommagé de quelque manière que ce soit, par exemple
si le cordon d’alimentation ou la fiche est endommagé(e), si du liquide ou des objets ont
pénétré à l’intérieur de l’appareil, si ce dernier a été exposé à la pluie ou à l’humidité, s’il ne
fonctionne pas correctement ou s’il a été échappé.
Si la forme de la fiche ne correspond pas à la prise de courant, utilisez un adaptateur de
fiche de branchement de configuration adéquate.
Représentation des fiches des cordons d’alimentation CA des pays ou régions du
monde
Type A
(américain)
Type B
(anglais)
Type BF
(anglais)
Type B3
(anglais)
Type C
(CEE)
Type SE
(CEE)
Type O
(océanien)
La tension d’alimentation et le type de fiche représentatifs sont décrits dans le tableau suivant.
Il est possible que plusieurs types de fiches et tensions d’alimentation soient utilisés dans une
région.
Attention : il convient d’utiliser un cordon d’alimentation satisfaisant aux exigences de chaque
pays.
Pour les États-Unis uniquement
Utilisez, dans la liste UL, un cordon d’alimentation de 1,5 à 3 m (5 à 10 pieds), type SPT-2
ou NISPT-2, AWG n° 18, pour une tension nominale de 125 V 7 A, avec une fiche 1-15P
NEMA pour une tension nominale de 125 V 15 A.
Europe
Pays/régions Tension Fréquence (Hz) Type de fiche
Autriche 230 50 C
Belgique 230 50 C
République tchèque 220 50 C
Danemark 230 50 C
Finlande 230 50 C
France 230 50 C
Allemagne 230 50 C
Grèce 220 50 C
Hongrie 220 50 C
Islande 230 50 C
Irlande 230 50 C/BF
Italie 220 50 C
Luxembourg 230 50 C
Pays-Bas 230 50 C
Norvège 230 50 C
Pologne 220 50 C
Portugal 230 50 C
Roumanie 220 50 C
Russie 220 50 C
Slovaquie 220 50 C
Espagne 127/230 50 C
Suède 230 50 C
Suisse 230 50 C
FR
4

Pays/régions Tension Fréquence (Hz) Type de fiche
Royaume-Uni 240 50 BF
Asie
Pays/régions Tension Fréquence (Hz) Type de fiche
Chine 220 50 A
Hong Kong 200/220 50 BF
Inde 230/240 50 C
Indonésie 127/230 50 C
Japon 100 50/60 A
République de Corée 220 60 C
Malaisie 240 50 BF
Philippines 220/230 60 A/C
Singapour 230 50 BF
Taïwan 110 60 A
Thaïlande 220 50 C/BF
Vietnam 220 50 A/C
Océanie
Pays/régions Tension Fréquence (Hz) Type de fiche
Australie 240 50 O
Nouvelle-Zélande 230/240 50 O
Amérique du nord
Pays/régions Tension Fréquence (Hz) Type de fiche
Canada 120 60 A
États-Unis 120 60 A
Amérique centrale
Pays/régions Tension Fréquence (Hz) Type de fiche
Bahamas 120/240 60 A
Costa Rica 110 60 A
Cuba 110/220 60 A/C
République dominicaine 110 60 A
El Salvador 110 60 A
Guatemala 120 60 A
Honduras 110 60 A
Jamaïque 110 50 A
Mexique 120/127 60 A
Nicaragua 120/240 60 A
Panama 110/220 60 A
Amérique du sud
Pays/régions Tension Fréquence (Hz) Type de fiche
Argentine 220 50 C/BF/O
Brésil 127/220 60 A/C
Chili 220 50 C
Colombie 120 60 A
Pérou 220 60 A/C
Venezuela 120 60 A
FR
5

Moyen-Orient
Pays/régions Tension Fréquence (Hz) Type de fiche
Iran 220 50 C/BF
Irak 220 50 C/BF
Israël 230 50 C
Arabie saoudite 127/220 50 A/C/BF
Turquie 220 50 C
EAU 240 50 C/BF
Afrique
Pays/régions Tension Fréquence (Hz) Type de fiche
Algérie 127/220 50 C
République démocratique
du Congo
Egypte 220 50 C
Ethiopie 220 50 C
Kenya 240 50 C/BF
Nigéria 230 50 C/BF
Afrique du Sud 220/230 50 C/BF
Tanzanie 230 50 C/BF
Tunisie 220 50 C
220 50 C
FR
6

À lire avant d’utiliser le caméscope
Avant d’utiliser l’appareil, lisez
attentivement ce mode d’emploi et
conservez-le pour toute référence
ultérieure.
ATTENTION
Batterie
Toute erreur de manipulation de la batterie
peut provoquer son explosion, entraîner
un incendie, voire même des brûlures
de substances chimiques. Respectez les
précautions suivantes :
Ne démontez pas la batterie.
N’écrasez et n’exposez pas la batterie à des chocs
ou à une force extérieure. Vous ne devez pas la
frapper avec un marteau, la laisser tomber ou
marcher dessus.
Ne court-circuitez pas les bornes de la batterie
et maintenez-les à l’écart de tout contact avec
des objets métalliques.
N’exposez pas la batterie à des températures
supérieures à 60 °C (140 °F), notamment les
rayons directs du soleil ou l’habitacle d’un
véhicule garé au soleil.
N’incinérez pas la batterie et ne la jetez pas au
feu.
Ne manipulez jamais des batteries lithium ion
qui sont endommagées ou présentent une fuite.
Veillez à recharger la batterie à l’aide d’un
chargeur Sony authentique ou d’un appareil
capable de la recharger.
Tenez la batterie hors de la portée des petits
enfants.
Gardez la batterie au sec.
Remplacez-la uniquement par une batterie
de même type ou d’un type équivalent
recommandé par Sony.
Mettez les batteries au rebut sans attendre, de la
manière décrite dans les instructions.
Remplacez la batterie par une batterie
du type spécifié uniquement. Sinon vous
risquez de provoquer un incendie ou des
blessures.
Remarques sur l’adaptateur CA
N’utilisez pas l’adaptateur CA dans un
espace étroit (entre un mur et un meuble
par exemple).
Branchez l’adaptateur CA à une
prise murale proche. Débranchez
immédiatement l’adaptateur CA de la prise
murale si un problème de fonctionnement
survient lors de l’utilisation de votre
caméscope.
Même si votre caméscope est hors tension,
il est alimenté tant qu’il est raccordé à la
prise CA (électricité domestique) à l’aide de
l’adaptateur CA.
Pour les utilisateurs au Canada
RECYCLAGE DES ACCUMULATEURS AUX IONS
DE LITHIUM
Les accumulateurs aux ions de
lithium sont recyclables. Vous
pouvez contribuer à préserver
l’environnement en rapportant
les piles usagées dans un point
de collecte et de recyclage le
plus proche.
Pour plus d’informations sur le
recyclage des accumulateurs,
téléphonez au numéro gratuit
1-800-822-8837 (Etats-Unis
et Canada uniquement), ou
visitez http://www.rbrc.org/
Avertissement : Ne pas utiliser des
accumulateurs aux ions de lithium qui sont
endommagés ou qui fuient.
Bloc-piles
Cet appareil est conforme à la section 15
des règlements FCC. Son fonctionnement
est soumis aux deux conditions suivantes :
(1) cet appareil ne doit pas provoquer
d’interférences nuisibles, (2) cet appareil
doit accepter toute interférence, y compris
celles susceptibles de provoquer son
fonctionnement indésirable.
Cet appareil numérique de la classe B est
conforme à la norme NMB-003 du Canada.
FR
7

8
FR
À l’intention des clients aux É.- U.
UL est une organisation de sécurité
reconnue internationalement.
La marque UL sur le produit signifie que
celui-ci est listé par UL.
Pour toute question au sujet de cet appareil,
appeler :
Sony Centre d’information à la clientèle
1-800-222-SONY (7669).
Le numéro ci-dessous concerne seulement
les questions relevant de la Commission
fédérale des communications des ÉtatsUnis (FCC).
Information réglementaire
Déclaration de conformité
Nom commercial : SONY
No de modèle : DCR-SR21
Responsable : Sony Electronics Inc.
Adresse : 16530 Via Esprillo, San Diego,
CA 92127 É.-U.
No de téléphone : 858-942-2230
Cet appareil est conforme à la Partie 15
de la réglementation de la FCC des ÉtatsUnis. Son utilisation est sujette aux deux
conditions suivantes : (1) Cet appareil ne
doit pas générer d’interférences nuisibles
et (2) il doit être en mesure d’accepter
toute interférence reçue, y compris
les interférences pouvant générer un
fonctionnement indésirable.
Déclaration de conformité
Nom commercial : SONY
No de modèle : DCR-SX21
Responsable : Sony Electronics Inc.
Adresse : 16530 Via Esprillo, San Diego,
CA 92127 É.-U.
No de téléphone : 858-942-2230
Cet appareil est conforme à la Partie 15
de la réglementation de la FCC des ÉtatsUnis. Son utilisation est sujette aux deux
conditions suivantes : (1) Cet appareil ne
doit pas générer d’interférences nuisibles
et (2) il doit être en mesure d’accepter
toute interférence reçue, y compris
les interférences pouvant générer un
fonctionnement indésirable.
AVERTISSEMENT
Par la présente, vous êtes avisé du fait que
tout changement ou toute modification
ne faisant pas l’objet d’une autorisation
expresse dans le présent manuel pourrait
annuler votre droit d’utiliser l’appareil.
Note
L’appareil a été testé et est conforme aux
exigences d’un appareil numérique de
Classe B, conformément à la Partie 15 de la
réglementation de la FCC.
Ces critères sont conçus pour fournir
une protection raisonnable contre
les interférences nuisibles dans un
environnement résidentiel. L’appareil
génère, utilise et peut émettre des
fréquences radio; s’il n’est pas installé et
utilisé conformément aux instructions,
il pourrait provoquer des interférences
nuisibles aux communications radio.
Cependant, il n’est pas possible de garantir
que des interférences ne seront pas
provoquées dans certaines conditions
particulières. Si l’appareil devait provoquer
des interférences nuisibles à la réception
radio ou à la télévision, ce qui peut
être démontré en allumant et éteignant
l’appareil, il est recommandé à l’utilisateur
d’essayer de corriger cette situation par l’une

ou l’autre des mesures suivantes :
Réorienter ou déplacer l’antenne réceptrice.
Augmenter la distance entre l’appareil et le
récepteur.
Brancher l’appareil dans une prise ou sur
un circuit différent de celui sur lequel le
récepteur est branché.
Consulter le détaillant ou un technicien
expérimenté en radio/téléviseurs.
Le câble d’interface fourni doit être utilisé
avec l’appareil pour que celui-ci soit
conforme aux critères régissant les appareils
numériques, conformément à la sous-partie
B de la Partie 15 de la réglementation de
la FCC.
Pour sélectionner une option de MENU
Vous pouvez utiliser le multi-sélecteur pour
sélectionner/choisir les options dans le
MENU.
Modification du réglage de langue
Des affichages à l’écran dans chaque langue
locale sont utilisés pour illustrer les procédures
d’utilisation. Si nécessaire, modifiez la langue
affichée à l’écran avant d’utiliser le caméscope.
[Afficher autres] [RÉG.
LAN.] (sous la catégorie [RÉGL.
HOR./
GÉNÉRAUX]) [
langue voulue
RÉGL.LANGUE] une
.
Accessoires fournis
Les chiffres entre parenthèses ( ) indiquent
les quantités fournies.
Adaptateur CA (1)
Cordon d’alimentation (1)
Câble de raccordement A/V (1)
Câble USB (1)
Bloc-piles rechargeable NP-FV30 (1)
CD-ROM « Handycam » Application
Software (1)
« PMB » (logiciel, comprenant « Aide PMB »)
Guide pratique de « Handycam » (PDF)
« Mode d’emploi » (Ce mode d’emploi)
(1)
Sélectionnez une touche en plaçant un
cadre orange sur celle-ci avec // /
du multi-sélecteur.
ppuyez au centre du multi-sélecteur
A
pour confirmer votre sélection.
FR
9
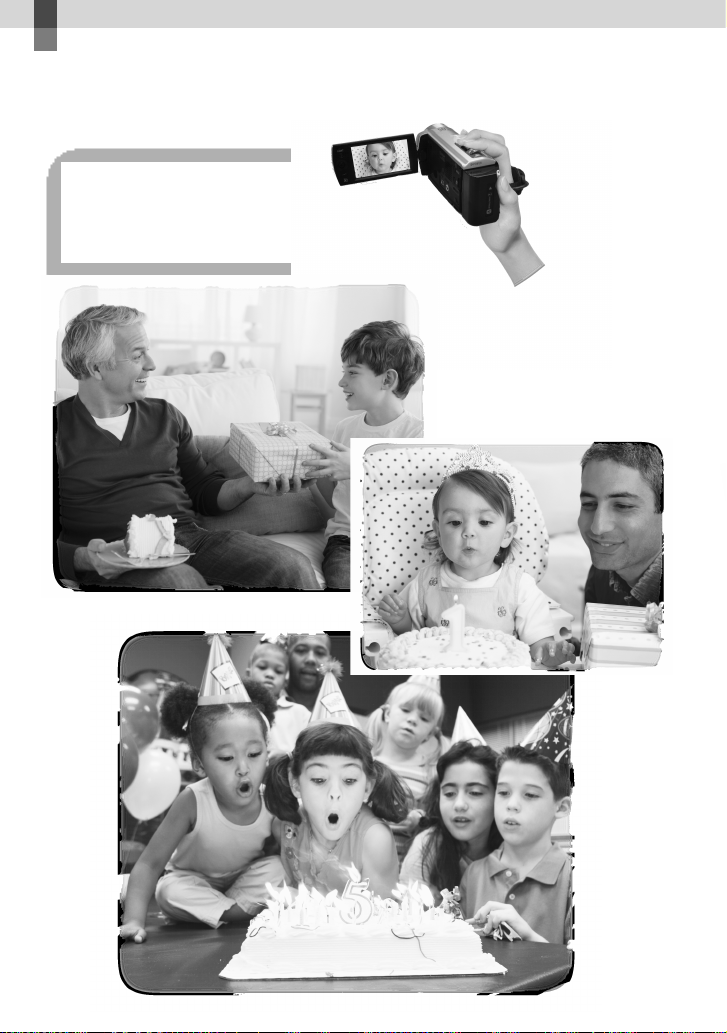
Des moments inoubliables à tous les jours grâce au « Handycam »
Capture
Page 16 (Enregistrement)
10
FR

Partage
Page 25 (Créer un disque)
Partage immédiat
Page 22 (Projecteur)
DCR-PJ5 uniquement
FR
11

Table des matières
CONSIGNES DE SÉCURITÉ IMPORTANTES . . . .. . .. . . .. . . . . . .. . . . . . .. . . .. . .. . . .. . . . . . .. . . . . . .. . . . 3
À lire avant d’utiliser le caméscope . .. . . .. . . . . . .. . . . . . .. . . .. . .. . . .. . . . . . .. . . . . . .. . . .. . .. . . .. . . . . . 7
es moments inoubliables à tous les jours grâce au « Handycam » . . . . .. . . . . . .. . . .. . .. 10
D
Préparation
Chargement . . .. . .. . . . . . .. . . . . . .. . . .. . . . . . .. . . . . . .. . . . . . .. . . .. . . . . . .. . . . . . .. . . . . . .. . . .. . . . . . .. . . . . . . 13
Réglage . . . . . . .. . . .. . .. . . .. . . . . . .. . . . . . .. . . .. . .. . . .. . . . . . .. . . . . . .. . . .. . .. . . .. . . . . . .. . . . . . .. . . .. . .. . . . 14
Enregistrement/Lecture
Enregistrement .. . . . . . .. . . . . . .. . . .. . .. . . .. . . . . . .. . . . . . .. . . .. . .. . . .. . . . . . .. . . . . . .. . . .. . .. . . .. . . . . . .. 16
Lecture avec le caméscope . . .. . .. . . . . . .. . . .. . .. . . .. . . . . . .. . . . . . .. . . .. . .. . . .. . . . . . .. . . . . . .. . . .. . . 18
Suppression de films et de photos . . . .. . . . . . .. . . . . . .. . . .. . .. . . .. . . . . . .. . . . . . .. . . .. . .. . . .. . . . . . 20
Lecture des images à l’aide du projecteur intégré (DCR-PJ5). . .. . . . . . .. . . .. . . . . . .. . . . . . .. 22
Lecture des images sur un téléviseur . . . . .. . .. . . .. . . . . . .. . . . . . .. . . .. . .. . . .. . . . . . .. . . . . . .. . . .. . 24
Sauvegarde de films et de photos
Sauvegarde des images sur un disque . .. . .. . . .. . .. . . .. . . . . . .. . . . . . .. . . .. . .. . . .. . . . . . .. . . . . . .. 25
Sauvegarde d’images sur un support externe (COPIE DIRECTE) . . . .. . .. . . . . . .. . . . . . .. . . . 30
Utilisation d’un ordinateur
Fonctions utiles disponibles si vous raccordez le caméscope à un ordinateur . .. . . .. 32
Préparation d’un ordinateur .. . . .. . . . . . .. . . . . . .. . . .. . .. . . .. . . . . . .. . . . . . .. . . .. . .. . . .. . . . . . .. . . . . . 33
Lancement de PMB (Picture Motion Browser) . .. . .. . . .. . .. . . .. . . . . . .. . . . . . .. . . .. . .. . . .. . . . . . 35
tilisation de « PMB Portable » .. . . . . . .. . . . . . .. . . .. . .. . . .. . . . . . .. . . . . . .. . . .. . .. . . .. . . . . . .. . . . . . . 36
U
Personnalisation de votre caméscope
Utilisation des menus . . . . . .. . . .. . . . . . .. . . . . . .. . . . . . .. . . .. . . . . . .. . . . . . .. . . . . . .. . . .. . . . . . .. . . . . . .. . 37
Division d’un film. .. . .. . . .. . . . . . .. . . . . . .. . . .. . .. . . .. . . . . . .. . . . . . .. . . .. . .. . . .. . . . . . .. . . . . . .. . . .. . .. . 42
nformation détaillée provenant du Guide pratique de « Handycam » .. . .. . . .. . . . . . .. . 43
I
Informations complémentaires
Icônes d’écran . . . . .. . . .. . . . . . .. . . . . . .. . . . . . .. . . .. . . . . . .. . . . . . .. . . . . . .. . . .. . . . . . .. . . . . . .. . . . . . .. . . .. . 44
Pièces et contrôles . . . . .. . .. . . .. . . . . . .. . . . . . .. . . .. . .. . . .. . . . . . .. . . . . . .. . . .. . .. . . .. . . . . . .. . . . . . .. . . . 45
Dépannage . . .. . . . . . .. . . .. . .. . . .. . . . . . .. . . . . . .. . . .. . .. . . .. . . . . . .. . . . . . .. . . .. . .. . . .. . . . . . .. . . . . . . 47
Spécifications . . . .. . . . . . .. . . . . . .. . . .. . . . . . .. . . . . . .. . . . . . .. . . .. . . . . . .. . . . . . .. . . . . . .. . . .. . . . . . .. . . . . . . 50
Précautions . . . .. . . . . . .. . . .. . . . . . .. . . . . . .. . . . . . .. . . .. . . . . . .. . . . . . .. . . . . . .. . . .. . . . . . .. . . . . . .. . . . . . .. . . 53
Index . . . .. . .. . . .. . . . . . .. . . . . . .. . . .. . .. . . .. . . . . . .. . . . . . .. . . .. . .. . . .. . . . . . .. . . . . . .. . . .. . .. . . .. . . . . . .. . . . 59
FR
12

Préparation
Chargement
Fixez le bloc-piles.
1
Pour retirer le bloc-piles
Fermez l’écran LCD. Faites glisser le levier
de dégagement BATT (bloc-piles), puis
retirez le bloc-piles.
Bloc-piles
Levier de dégagement
BATT (bloc-piles)
Préparation
Branchez l’adaptateur CA
2
à la prise DC IN et à la prise
murale.
DCR-SR21
Fiche CC
DCR-PJ5/SX21
Fiche CC
Cordon
d’alimentation
Vers la prise murale
Cordon
d’alimentation
Vers la prise murale
FR
13

14
FR
Réglage
Ouvrez l’écran LCD de votre
1
caméscope pour le mettre en
marche.
Pour éteindre l’appareil
Fermez l’écran LCD.
Réglez la zone géographique
2
et l’heure à l’aide du multisélecteur.
Insérez la carte mémoire dans
3
la fente pour carte mémoire.
Pour éjecter la carte mémoire
Appuyez une fois légèrement sur la carte
mémoire.
Remarques
La date et l’heure sont sauvegardées automatiquement sur le support d’enregistrement et peuvent être
affichées pendant la lecture.
[Afficher autres] [RÉGL.DE LECTURE] (sous la catégorie [LECTURE]) [CODE
DONNÉES] [DATE/HEURE]
Vous pouvez désactiver les bips.
[Afficher autres] [RÉGL.SON/AFF.] (sous la catégorie [RÉGL.GÉNÉRAUX]) [BIP]
[ARRÊT]
.
Témoin d’accès
Notez la position du coin entaillé.
.

Changement de support d’enregistrement (DCR-SR21)
Par défaut, les films et les photos sont enregistrés sur le disque dur interne. Vous pouvez changer
le support d’enregistrement pour utiliser la carte mémoire.
[Afficher autres] [RÉGLAGE SUPPORT] (sous la catégorie [GÉRER
SUPPORT]) [RÉG.SUPP.FILM] ou [RÉG.SUPP.PHOTO] support d’enregistrement
souhaité [OUI]
.
Préparation
FR
15

Enregistrement/Lecture
Enregistrement
Ouvrez le capuchon d’objectif.
1
Sélectionnez un mode (Film/
2
Photo).
ilm :
F
Photo :
Film :
3
Appuyez sur START/STOP.
hoto :
P
Appuyez sur PHOTO.
Remarques
Lorsque vous fermez l’écran LCD pendant l’enregistrement des films, le caméscope arrête d’enregistrer.
La durée d’enregistrement maximale de films est d’environ 13 heures.
orsque la taille d’un fichier de film dépasse 2 Go, le fichier de film suivant est créé automatiquement.
L
Vous pouvez vérifier la durée d’enregistrement, la capacité restante, etc.
[Afficher autres] [INFOS SUR SUPP.] (sous la catégorie [GÉRER SUPPORT]).
MODE
16
FR

Enregistrement dans un endroit peu éclairé
Vous pouvez allumer le témoin à DEL VIDEO LIGHT en appuyant sur LIGHT.
Zoom
Il est possible de grossir des images fixes jusqu’à 67 fois leur taille d’origine grâce à la manette de
zoom motorisé.
Affichage des icônes et indicateurs de nouveau
Vous pouvez afficher les icônes et indicateurs en appuyant sur le multi-sélecteur s’ils ne
s’affichent pas.
Enregistrement/Lecture
FR
17
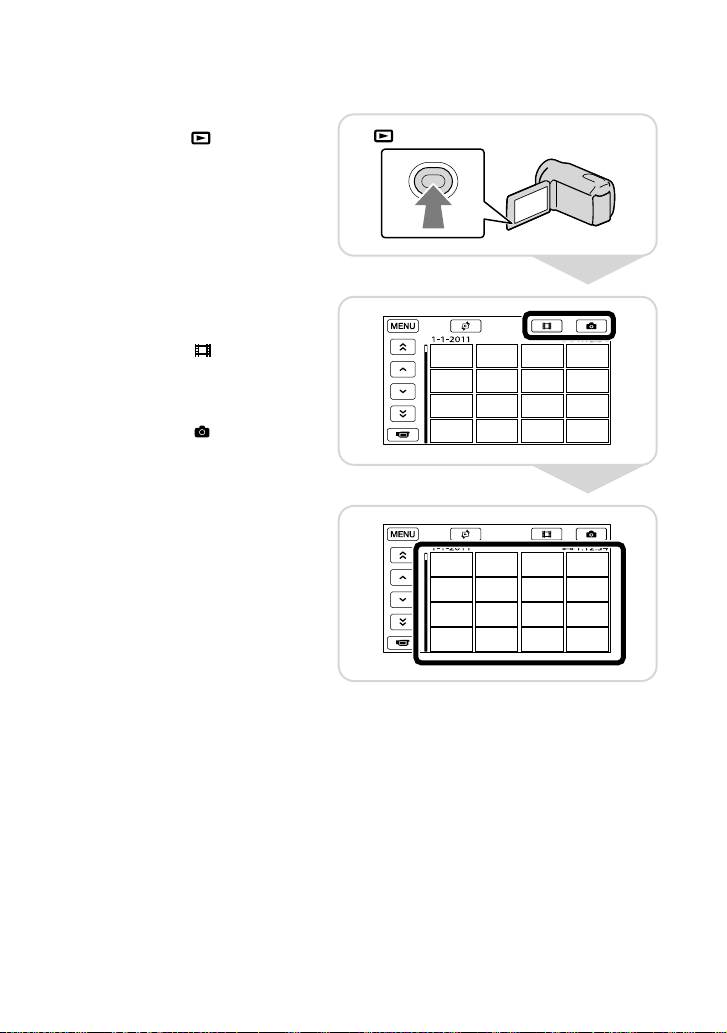
Lecture avec le caméscope
Appuyez sur (AFFICHER LES
1
IMAGES) pour afficher l’écran
VISUAL INDEX.
Film :
2
Sélectionnez
Photo :
Sélectionnez
Sélectionnez l’image
3
souhaitée.
(Film).
(Photo).
(AFFICHER LES IMAGES)
18
FR

Écran de lecture de film
Réglage du volume
Précédent
Suivant
Arrêt
Retour rapide
Vous pouvez régler le volume.
réglez avec / .
Écran de lecture de photo
Précédente
Vers l’écran VISUAL
INDEX
OPTION
Avance rapide
Pause/lecture
Pour lancer/arrêter un
diaporama
Suivante
OPTION
Enregistrement/Lecture
FR
19

Suppression de films et de photos
Sélectionnez [Afficher
1
autres] [SUPPRIMER] (sous
la catégorie
[MONT]).
20
2
FR
Film :
Sélectionnez [
SUPPRIMER].
[
Photo :
Sélectionnez [
SUPPRIMER].
[
SUPPRIMER]
SUPPRIMER]
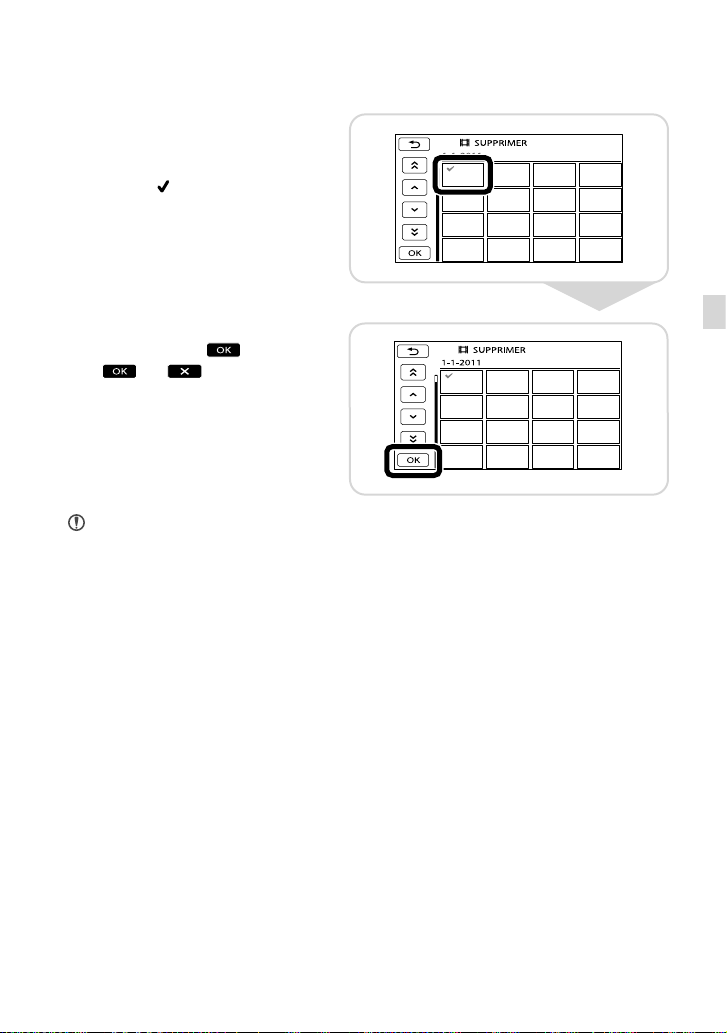
Sélectionnez les images à
3
supprimer.
Le repère s’affiche.
Sélectionnez [OUI]
4
.
Remarques
Vous ne pouvez pas récupérer les images qui ont été supprimées. Sauvegardez vos films et photos
importants à l’avance.
e retirez pas le bloc-piles ni l’adaptateur CA du caméscope pendant la suppression d’images. Cela
N
risquerait d’endommager le support d’enregistrement.
Enregistrement/Lecture
FR
21
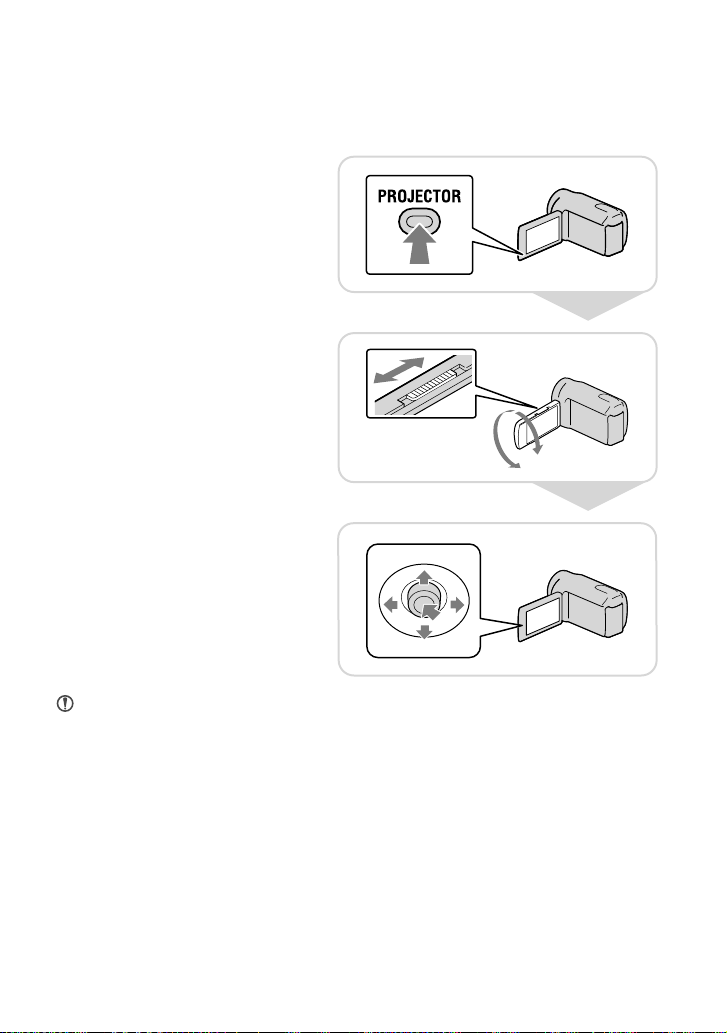
Lecture des images à l’aide du projecteur intégré (DCR-PJ5)
Appuyez sur PROJECTOR.
1
Ajustez l’image projetée.
2
Sélectionnez l’image que vous
3
souhaitez projeter.
Remarques
Veuillez porter une attention particulière aux opérations ou situations suivantes lors de l’utilisation du
projecteur.
Assurez-vous de ne pas projeter les images vers les yeux.
Assurez-vous de ne pas toucher l’objectif du projecteur.
L’écran LCD et l’objectif du projecteur produisent de la chaleur pendant l’utilisation.
L’utilisation du projecteur réduit l’autonomie du bloc-piles.
Si vous raccordez le caméscope à un téléviseur et que vous utilisez la fonction de projecteur, le son sera
émis par le téléviseur; toutefois, aucune image n’apparaîtra.
FR
22
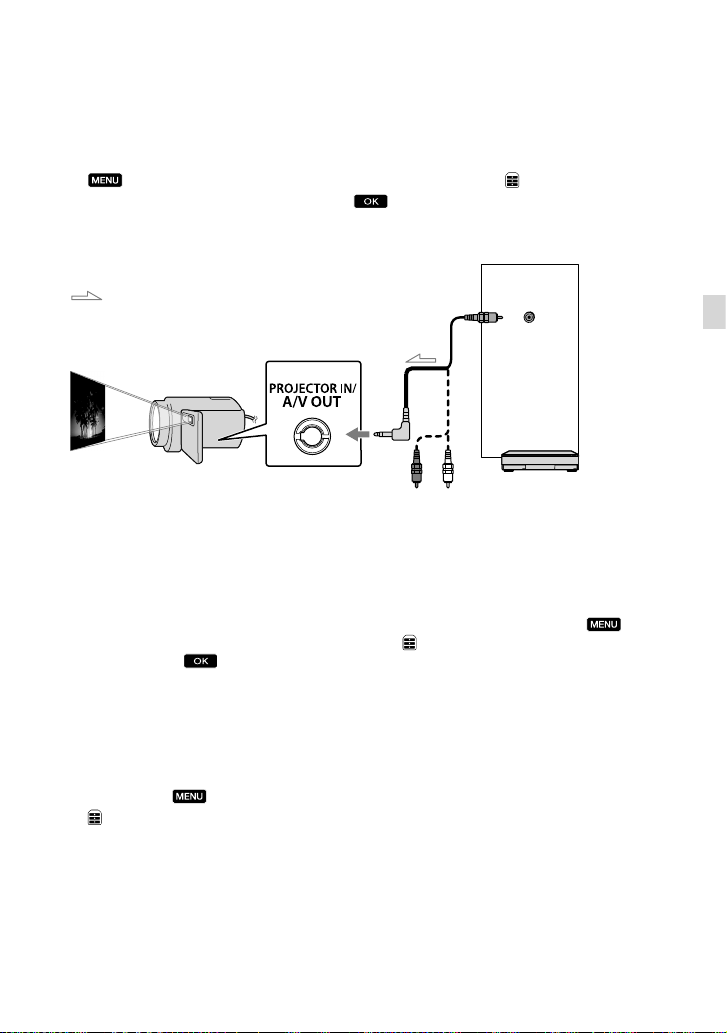
Visionnement d’images enregistrées sur d’autres appareils à
l’aide du projecteur
[Afficher autres] [PROJECTEUR] (sous la catégorie [AUTRES])
[SOURCE] [ENTRÉE PROJECT.]
Raccordez votre caméscope à l’autre appareil en utilisant le câble de raccordement A/V.
.
Sortie
Trajet de signal
IN
VIDEO
(Jaune)
Appuyez sur PROJECTOR.
Le son des autres appareils ne peut pas être acheminé vers le caméscope.
Les touches de commande ne s’affichent pas sur les images projetées lorsque l’option [ENTRÉE
PROJECT.] est sélectionnée. Si le caméscope n’est pas raccordé à un autre appareil, un écran bleu sera
projeté.
Effectuez les opérations suivantes lorsque vous souhaitez projeter les images du caméscope.
Commencez par appuyer sur PROJECTOR pour interrompre la projection. Sélectionnez
[Afficher autres] [PROJECTEUR] (sous la catégorie
MÉMOIRE]
Éteignez le caméscope, remettez-le en marche, puis appuyez sur PROJECTOR.
, puis appuyez sur PROJECTOR de nouveau.
[AUTRES]) [SOURCE] [CARTE
Modification du format de l’image
Vous pouvez modifier le format de l’image projetée par le projecteur en fonction de la taille de
l’image enregistrée.
Sélectionnez [Afficher autres] [PROJECTEUR] (sous la catégorie
[AUTRES]).
électionnez [FORMAT ÉCRAN] [GRAND ÉCRAN 16:9] ou [4:3].
S
Enregistrement/Lecture
FR
23

Lecture des images sur un téléviseur
Réglez le sélecteur d’entrée du téléviseur à l’entrée à laquelle sera raccordé votre caméscope.
Connectez votre caméscope
1
au téléviseur au moyen du
câble de raccordement A/V
(fourni).
Visionnez des films ou des
2
photos sur votre caméscope.
Téléviseurs
IN
Trajet de signal
(AFFICHER LES IMAGES)
Magnétoscopes
(Rouge)
AUDIO
(Blanc)
VIDEO
(Jaune)
Remarques
Consultez également le mode d’emploi fourni avec le téléviseur pour avoir plus de détails.
FR
24
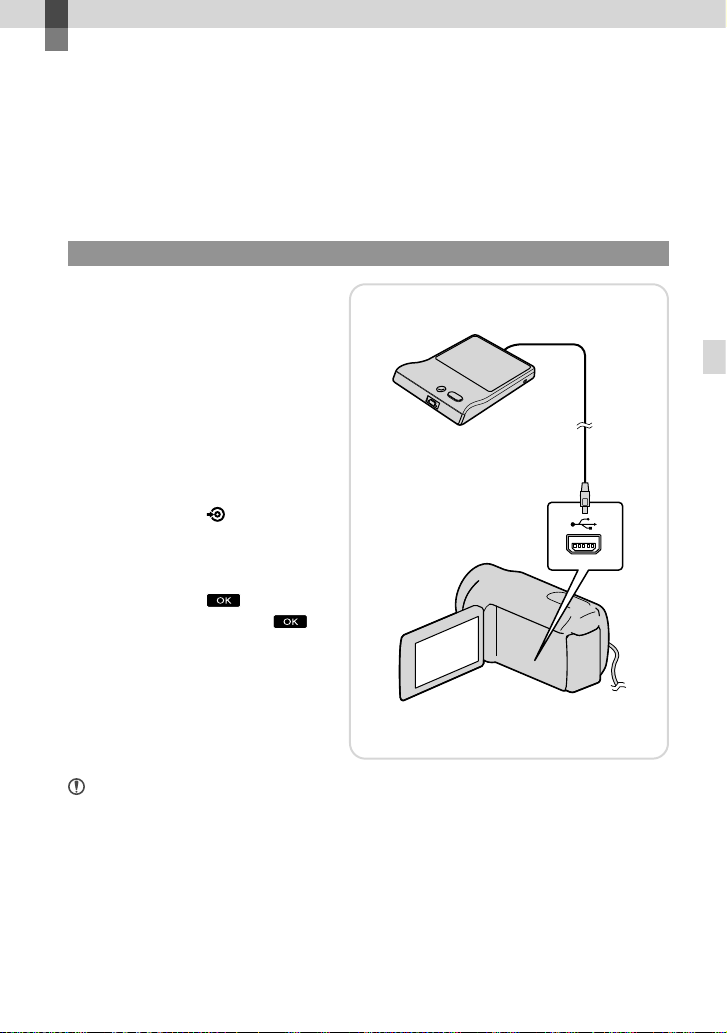
Sauvegarde de films et de photos
Sauvegarde des images sur un disque
Branchez l’adaptateur CA et le cordon d’alimentation dans la prise DC IN de votre caméscope
et dans la prise murale.
Utilisation de DVDirect Express
Raccordez le graveur DVD
1
à la prise (USB) de votre
caméscope en utilisant le
câble USB du graveur DVD.
Insérez un disque inutilisé
2
dans le graveur DVD.
Appuyez sur (DISC BURN)
3
sur le graveur DVD.
Sélectionnez [FIN]
4
[ÉJECTER DISQUE]
.
Sauvegarde de films et de photos
Remarques
Consultez également le mode d’emploi fourni avec le graveur DVD.
euls des disques inutilisés des types suivants peuvent être utilisés :
S
DVD-R de 12 cm/DVD+R de 12 cm
L’appareil ne prend pas en charge les disques double couche.
D
ans cette section, DVDirect Express est appelé « graveur DVD ».
Ne faites pas ce qui suit pendant la création d’un disque.
Mettre le caméscope hors tension
Débrancher le câble USB ou l’adaptateur CA
Soumettre le caméscope à des chocs ou des vibrations
Éjecter la carte mémoire du caméscope
FR
25

26
FR
Avant de supprimer les films du caméscope, lisez le disque créé pour vous assurer que la copie a été
effectuée correctement.
Si [Échec.] ou [Échec GRAVURE DISQUE.] s’affiche à l’écran, insérez un autre disque dans le graveur
DVD et exécutez la fonction DISC BURN à nouveau.
Si la taille totale des films à graver avec la fonction DISC BURN excède celle du disque, l’opération
s’arrêtera une fois la limite atteinte. Le dernier film gravé sur le disque pourrait être coupé.
Le temps de création du disque et de copie des films jusqu’à la limite du disque peut varier entre
minutes et 60 minutes. Cela peut aussi prendre plus de temps, selon le mode d’enregistrement choisi
20
ou le nombre de scènes.
Personnalisation d’un disque avec OPT.GRAVURE DIS.
Effectuez cette opération dans les cas suivants :
Pour copier une image souhaitée
Pour créer plusieurs copies du même disque
Lorsque vous dupliquez des images dans la carte mémoire (DCR-SR21)
Sélectionnez [OPT.GRAVURE DIS.] sur l’écran à l’étape 3.
électionnez le support d’enregistrement contenant le ou les film(s) que vous voulez
S
enregistrer (DCR-SR21).
électionnez le film que vous voulez graver sur le disque.
S
Capacité restante du disque
Sélectionnez [OUI] sur l’écran du caméscope.
ne fois l’opération terminée, sélectionnez [QUITTER] [FIN].
U
Lecture d’un disque sur le graveur DVD
Pendant la lecture des films sur l’écran du téléviseur, raccordez le caméscope au téléviseur.
nsérez le disque créé dans le graveur DVD.
I
ppuyez sur le bouton de lecture du graveur DVD.
A
électionnez [FIN] [ÉJECTER DISQUE] sur l’écran et retirez le disque une fois
S
l’opération terminée.
Si vous ne pouvez pas lire les disques créés sur un lecteur DVD quelconque, raccordez le caméscope à un
graveur DVD et lisez-les ensuite.

Utilisation d’un graveur DVD, etc., autre qu’un graveur DVDirect Express
Raccordez un graveur DVD,
1
etc., à la prise (USB) de votre
caméscope en utilisant le
câble USB (fourni).
Sélectionnez le support
2
d’enregistrement qui contient
les images sur l’écran du
caméscope.
[ CONNEXION USB] : Disque dur
interne (DCR-SR21)
CONNEXION USB] : Carte mémoire
[
Enregistrez les images sur
3
l’appareil raccordé.
Sélectionnez [FIN] [OUI]
4
une fois l’opération terminée.
Sauvegarde de films et de photos
Remarques
Consultez également les modes d’emploi fournis avec les appareils à raccorder.
Le graveur DVD de Sony peut ne pas être disponible dans votre pays/région.
FR
27

28
FR
Utilisation d’un enregistreur, etc.
Insérez le support
1
d’enregistrement dans
l’appareil d’enregistrement (un
enregistreur de disque, etc.).
Raccordez votre caméscope
2
à l’appareil d’enregistrement
en utilisant le câble de
raccordement A/V (fourni).
Démarrez la lecture sur votre
3
caméscope et enregistrez
le contenu sur l’appareil
d’enregistrement.
Entrée
VIDEO
(Jaune)
(Blanc)
AUDIO
(Rouge)
Trajet de signal
(AFFICHER LES IMAGES)
Lorsque la duplication est
4
terminée, arrêtez l’appareil
d’enregistrement, puis le
caméscope.

Remarques
La reproduction étant effectuée par transfert de données analogiques, la qualité d’image peut se
détériorer.
Vous pouvez masquer les témoins d’écran (comme le compteur, etc.) sur le dispositif d’affichage de
l’appareil raccordé.
[Afficher autres] [RÉGLAGES SORTIE] (sous la catégorie [RÉGL.GÉNÉRAUX])
[SORTIE AFF.] [LCD] (le réglage par défaut)
Vous pouvez enregistrer la date/l’heure ou les données de réglage de la caméra.
.
[Afficher autres] [RÉGL.DE LECTURE] (sous la catégorie [LECTURE]) [CODE
DONNÉES] un réglage souhaité
.
[Afficher autres] [RÉGLAGES SORTIE] (sous la catégorie [RÉGL.GÉNÉRAUX])
[SORTIE AFF.] [SOR.-V/LCD]
Vous pouvez modifier le format en fonction de la taille d’écran des dispositifs d’affichage (téléviseur, etc.).
.
[Afficher autres] [RÉGLAGES SORTIE] (sous la catégorie [RÉGL.GÉNÉRAUX])
[FORMAT TV] [4:3]
Lorsque vous raccordez votre caméscope à un appareil monophonique, branchez la fiche jaune du câble
.
de raccordement A/V à la prise d’entrée vidéo, et la fiche blanche (canal gauche) ou rouge (canal droit) à
la prise d’entrée audio de l’appareil.
Sauvegarde de films et de photos
FR
29

30
FR
Sauvegarde d’images sur un support externe (COPIE DIRECTE)
Branchez l’adaptateur CA et le cordon d’alimentation dans la prise DC IN de votre caméscope
et dans la prise murale.
Si le support d’enregistrement
1
amovible possède le câble
d’alimentation CA, raccordezle à la prise murale.
Raccordez le support externe
2
à la prise (USB) de votre
caméscope en utilisant le
câble adaptateur USB (vendu
séparément).
Vers la prise murale
Sélectionnez [Copier.].
3
Sélectionnez une fois
4
l’opération terminée.
Remarques
Dans ce cas, vous avez besoin du câble adaptateur USB VMC-UAM1 (vendu séparément).
Le câble adaptateur USB VMC-UAM1 peut ne pas être disponible dans votre pays/région.

Le nombre de scènes qu’il est possible de sauvegarder sur un support externe est le suivant.
Films : 9 999 films
Photos : 9 999 images × 899 dossiers
Le nombre de scènes peut être moindre et varie selon le type d’images enregistrées.
Visionnement d’images enregistrées sur un support externe à
l’aide de votre caméscope
Sélectionnez [Lire sans copier.] à l’étape 4 ci-dessus.
L’écran VISUAL INDEX du support externe est affiché.
isionnez l’image.
V
Vous pouvez également regarder des images sur un téléviseur raccordé à votre caméscope.
Sauvegarde de films et de photos
FR
31

Utilisation d’un ordinateur
Fonctions utiles disponibles si vous raccordez le caméscope à un ordinateur
Le logiciel PMB offert sur le CD-ROM (fourni) comprend des fonctions qui vous permettent
d’effectuer des opérations supplémentaires avec les images enregistrées à l’aide du caméscope.
(Windows)
Visionnement
Calendrier
Sauvegarde sur
Transfert
un disque
DVD
Services de réseau
Montage
Joindre des fichiers d’image
Transfert en toute simplicité lorsque vous êtes hors de votre domicile
Grâce à PMB Portable, qui est pré-installé sur le caméscope, vous pouvez lire ou transférer
vos images sur le Web en raccordant votre caméscope à un ordinateur en dehors de votre
domicile.
FR
32

Préparation d’un ordinateur
Étape 1 Vérification de l’ordinateur
Windows
1
SE*
Microsoft Windows XP SP3*2/Windows Vista
3
SP2
*
/Windows 7 SP1
4
*
UC
Intel Pentium III 1 GHz ou plus rapide
Application
PMB/PMB Portable
Mémoire
256 Mo ou plus
Se conformer aux autres exigences système
pour le système d’exploitation.
Disque dur
V
olume disque nécessaire pour l’installation :
environ 500 Mo (5 Go ou plus peuvent être
nécessaires lors de la création de disques
DVD.)
Affichage
u minimum 1 024 points × 768 points
A
Autres
Port USB (doit être fourni en standard, HiSpeed USB (compatible USB 2.0)), graveur
DVD (un lecteur CD-ROM est nécessaire
pour l’installation)
Macintosh
SE
PMB Portable : Mac OS X
1
*
Une installation standard est nécessaire. Le
bon fonctionnement n’est pas garanti si le
système d’exploitation est une mise à niveau
ou s’il se trouve dans un environnement à
multi-amorçage.
2
*
Les éditions 64-bits et Starter (Edition) ne sont
pas prises en charge. Windows Image Mastering
API (IMAPI) Ver.2.0 ou plus récente est
nécessaire pour utiliser la fonction de création
de disque, etc.
3
*
L’édition Starter (Edition) n’est pas prise en
charge.
4
*
Un processeur plus rapide est recommandé.
5
*
Macintosh doté d’un processeur Intel
5
*
(v10.5 à v10.6)
Remarques
Le fonctionnement sous toutes les conditions
informatiques n’est pas garanti.
Utilisation d’un Macintosh
Le logiciel « PMB » fourni n’est pas pris
en charge par les ordinateurs Macintosh.
Pour importer des films et des photos sur
l’ordinateur, veuillez consulter Apple Inc.
Étape 2 Installation du logiciel
« PMB » fourni
Installez « PMB » avant de raccorder votre
caméscope à un ordinateur.
Remarques
Si une version de « PMB » antérieure à
la version 5.0.00 a été installée sur votre
ordinateur, vous serez peut-être dans
l’impossibilité d’utiliser certaines fonctions
u « PMB » lors de l’installation de « PMB »
d
à partir du CD-ROM fourni. De plus, « PMB
Launcher » est installé à partir du CD-ROM
fourni et vous pouvez démarrer « PMB » ou un
autre logiciel en utilisant « PMB Launcher ».
Cliquez deux fois sur l’icône du raccourci de
«
PMB Launcher » sur l’écran de l’ordinateur
pour lancer « PMB Launcher ».
Confirmez que le caméscope
n’est pas raccordé à l’ordinateur.
Mettez l’ordinateur sous tension.
Pour l’installation, se connecter en tant
qu’administrateur.
Fermez toutes les applications en cours
d’exécution sur l’ordinateur avant de
procéder à l’installation du logiciel.
Utilisation d’un ordinateur
FR
33
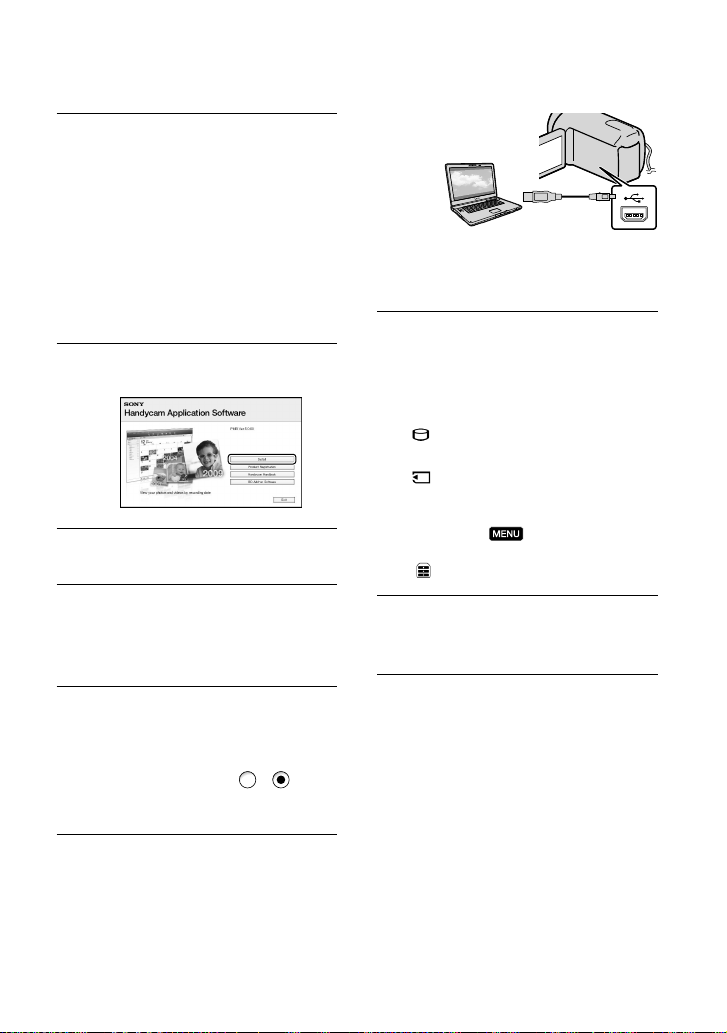
Placez le CD-ROM fourni dans le
lecteur de l’ordinateur.
L’écran d’installation s’affiche.
Si l’écran ne s’affiche pas, cliquez sur
[Démarrer] [Ordinateur] (dans
Windows XP, [Poste de travail]), puis
cliquez deux fois sur [SONYPMB (E:)]
(CD-ROM)
* Les noms des lecteurs (comme (E:))
peuvent varier selon l’ordinateur.
*.
Cliquez sur [Installer].
Sélectionnez le pays ou la région.
Sélectionnez la langue
d’installation de l’application,
puis passez à l’écran suivant.
Lisez attentivement les
conditions de l’accord de licence.
Si vous êtes d’accord avec les
conditions, changez
à , puis
cliquez sur [Suivant] [Installer].
Mettez le caméscope sous
tension puis raccordez ce dernier
à l’ordinateur à l’aide du câble
USB fourni.
L’écran [SÉLECT.USB] s’affiche
alors automatiquement à l’écran du
caméscope.
Sélectionnez l’un des types de
supports affichés à l’écran pour
que l’ordinateur reconnaisse
votre caméscope.
[ CONNEXION USB] : Disque dur
interne (DCR-SR21)
CONNEXION USB] : Carte
[
mémoire
Si l’écran [SÉLECT.USB] ne s’affiche pas,
sélectionnez
[CONNEXION USB] (sous la catégorie
[AUTRES]).
[Afficher autres]
Cliquez sur [Continuer] sur l’écran
de l’ordinateur.
Suivez les instructions à l’écran
pour installer le logiciel.
Selon l’ordinateur, il peut être nécessaire
d’installer un logiciel d’une tierce partie.
Si l’écran d’installation s’affiche, suivez
les instructions pour installer le logiciel
nécessaire.
Au besoin, redémarrez l’ordinateur pour
terminer l’installation.
Lorsque l’installation est terminée, les
icônes suivantes s’affichent.
Retirez le CD-ROM de l’ordinateur.
34
FR

: Lance « PMB ».
: Affiche « Aide PMB ».
: Affiche « PMB Launcher ».
« PMB Launcher » vous permet de
lancer « PMB » ou un autre logiciel ou
d’ouvrir des sites Web.
D’autres icônes peuvent s’afficher.
Selon la procédure d’installation, aucune
icône peut s’afficher.
Pour débrancher le caméscope de
l’ordinateur
Cliquez sur l’icône au coin inférieur
droit du bureau de l’ordinateur [Retirer
Périphérique de stockage de masse USB en
toute sécurité].
Lancement de PMB
(Picture Motion Browser)
Cliquez deux fois sur l’icône du raccourci
de « PMB » sur l’écran de l’ordinateur.
Remarques
Si l’icône n’est pas affichée à l’écran de
l’ordinateur, cliquez sur [Démarrer] [Tous
les programmes] [
« PMB ».
Lecture de « Aide PMB »
Pour des détails sur la façon d’utiliser
« PMB », lisez « Aide PMB ». Cliquez deux
fois sur l’icône du raccourci de « Aide
PMB
» sur l’écran de l’ordinateur pour
ouvrir « Aide PMB ».
PMB] pour lancer
Utilisation d’un ordinateur
Sélectionnez [FIN] [OUI] sur l’écran du
caméscope.
Débranchez le câble USB.
Remarques
Ne formatez pas le support du caméscope à
l’aide d’un ordinateur. Le caméscope pourrait ne
pas fonctionner correctement.
Accédez au caméscope à partir de l’ordinateur
à l’aide du logiciel « PMB » fourni. Ne modifiez
pas les fichiers ou les dossiers sur le caméscope
à partir de l’ordinateur. Les fichiers d’images
risqueraient d’être détruits ou de devenir
illisibles.
Le fonctionnement de l’opération ci-dessus n’est
pas garanti.
Remarques
Si l’icône n’est pas affichée à l’écran de
l’ordinateur, cliquez sur [Démarrer] [Tous
les programmes] [PMB] [Aide PMB].
Vous pouvez aussi ouvrir « Aide PMB » à partir
de [Aide] du « PMB ».
FR
35

Utilisation de « PMB Portable »
« PMB Portable », qui vous permet de
transférer facilement des images sur un
service de réseau, commence par connecter
votre caméscope à un ordinateur.
Vous pouvez afficher l’usage détaillé en
cliquant sur la touche d’aide située dans le
coin supérieur droit après le lancement de
PMB Portable ».
«
1
Mettez votre caméscope en
marche, puis raccordez-le à un
ordinateur à l’aide du câble USB.
L’écran [SÉLECT.USB] s’affiche alors
sur l’écran LCD de votre caméscope.
2
Sélectionnez le support
d’enregistrement pour lequel
vous souhaitez utiliser « PMB
Portable ».
[ CONNEXION USB] : Disque dur
interne (DCR-SR21)
CONNEXION USB] : Carte
[
mémoire
Si l’écran [SÉLECT.USB] ne s’affiche
3
Cliquez sur « PMB Portable ».
L’écran des conditions d’utilisation
apparaît.
4
Configurez les réglages en
suivant les instructions à l’écran.
« PMB Portable » démarre.
[Afficher autres]
pas,
[CONNEXION USB] (sous la catégorie
[AUTRES]).
Pour plus de détails sur « PMB Portable »,
consultez l’aide de « PMB Portable ».
FR
36
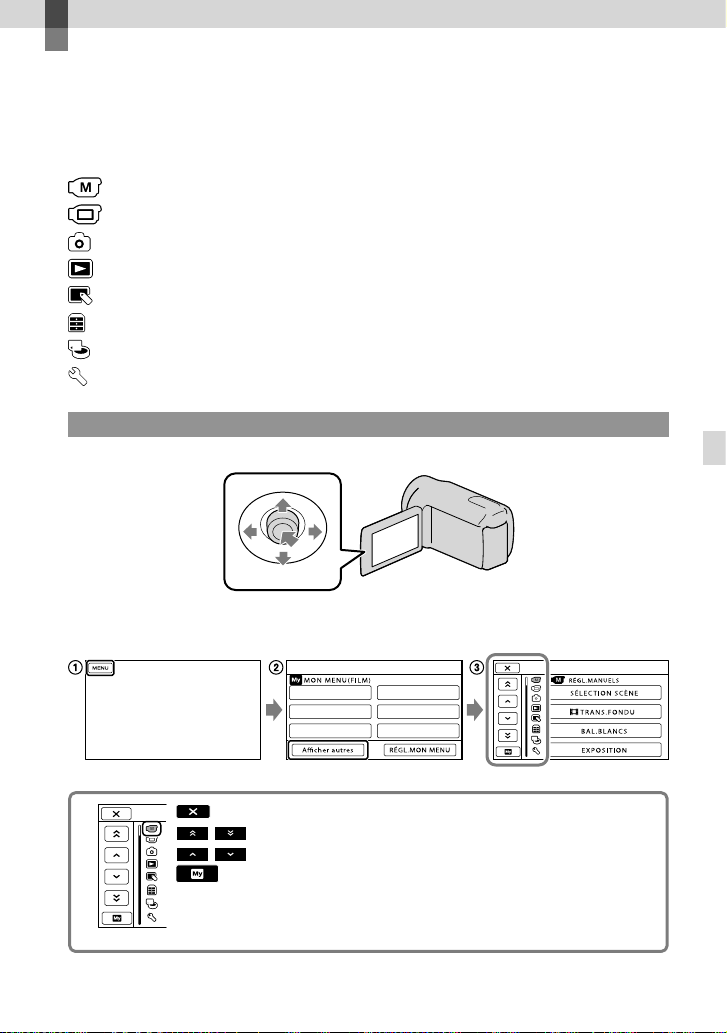
Personnalisation de votre caméscope
Utilisation des menus
Vous pouvez exécuter des fonctions utiles et modifier divers réglages à l’aide des menus. En
utilisant bien les menus, vous pouvez profiter de votre caméscope.
Le caméscope possède divers éléments de menu dans chacune des huit catégories.
RÉGL.MANUELS (Options à régler pour les conditions de la scène) p. 39
RÉG.PRISE DE VUE (Options pour prises de vue personnalisées) p. 39
RÉGL.PHOTO APP. (Options pour l’enregistrement de photos) p. 39
LECTURE (Options pour la lecture) p. 39
MONT (Options pour l’édition) p. 40
AUTRES (Options pour autres réglages) p. 40
GÉRER SUPPORT (Options pour support d’enregistrement) p. 40
RÉGL.GÉNÉRAUX (Autres options de réglage) p. 41
Menus de fonctionnement
Multi-sélecteur
Sélectionnez avec /// et appuyez au centre du multi-sélecteur pour confirmer votre sélection.
Un cadre orange s’affiche sur l’option sélectionnée.
: pour terminer le réglage du menu.
/ : la liste des menus se déplace de catégorie en catégorie.
/ : la liste des menus se déplace de 4 éléments à la fois.
: pour retourner à l’écran [MON MENU].
Personnalisation de votre caméscope
FR
37
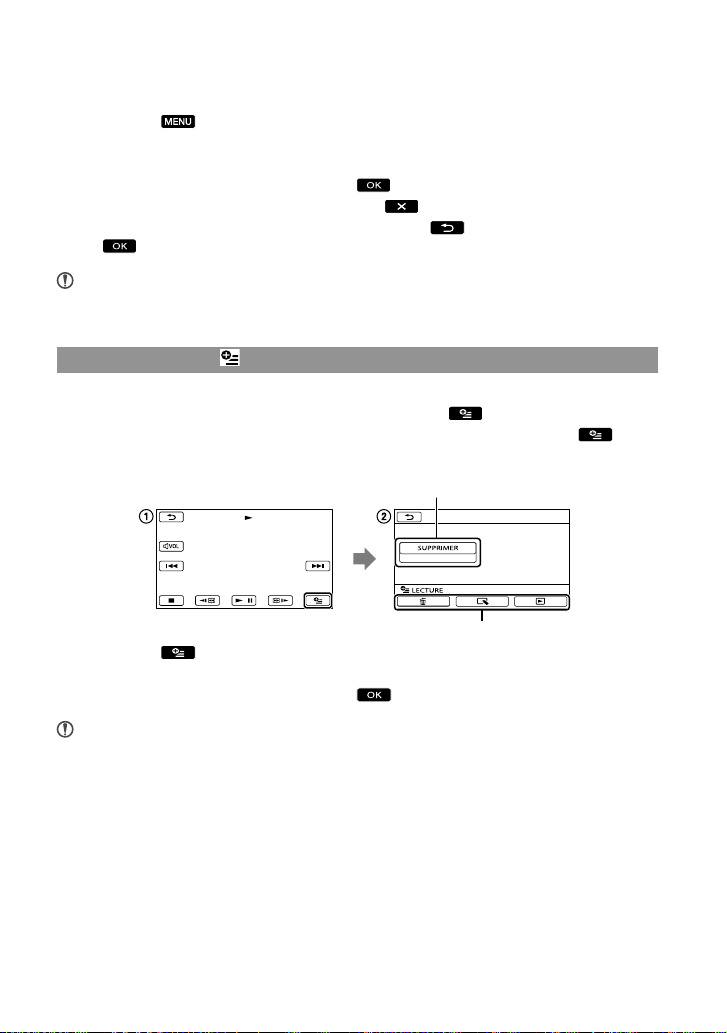
38
FR
Sélectionnez .
électionnez [Afficher autres] sur l’écran [MON MENU].
S
électionnez l’élément de menu à modifier.
S
près avoir modifié le réglage, sélectionnez .
A
Pour terminer le réglage du menu, sélectionnez
Pour revenir à l’écran de menu précédent, sélectionnez
peut ne pas s’afficher, selon l’élément de menu.
Remarques
Vous pourriez ne pas être en mesure de régler certaines options de menu, selon les conditions
d’enregistrement et de lecture.
.
.
Utilisation du menu OPTION MENU
Le menu OPTION MENU s’affiche comme la fenêtre contextuelle qui apparaît lorsque vous
cliquez sur le bouton droit d’une souris d’ordinateur. Lorsque
droit de l’écran, vous pouvez utiliser le menu OPTION MENU. Vous sélectionnez
options du menu que vous pouvez modifier dans le présent contexte s’affichent.
Option de menu
Sélectionnez (OPTION).
électionnez l’onglet souhaité l’option dont le réglage doit être modifié.
S
près avoir terminé le réglage, sélectionnez .
A
Remarques
Les options de menu ou les réglages en grisé ne sont pas disponibles.
Lorsque l’option souhaitée n’apparaît pas à l’écran, sélectionnez un autre onglet. (Il peut ne pas y avoir
d’onglet.)
Les onglets et les options qui apparaissent à l’écran dépendent de l’état d’enregistrement/de lecture du
caméscope à ce moment.
s’affiche au coin inférieur
, et les
Onglet
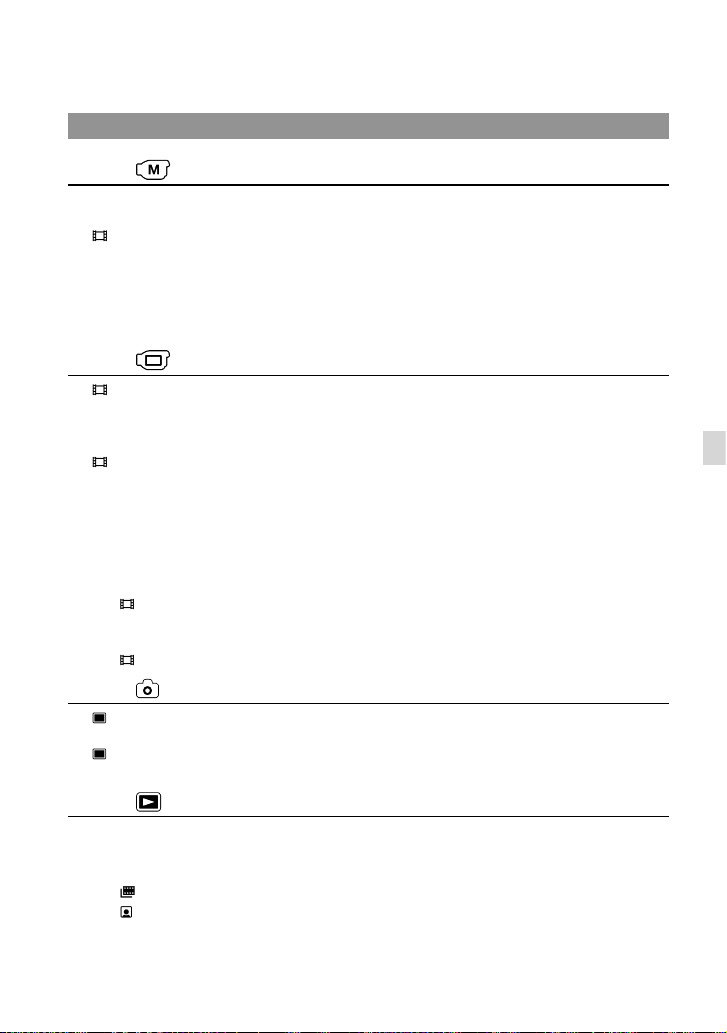
Listes des menus
Catégorie (RÉGL.MANUELS)
SÉLECTION SCÈNE ..................Sélectionne une configuration d’enregistrement adéquate en fonction du
type de scène, comme pour une prise de vue de nuit ou sur une plage.
TRANS.FONDU ...................Effectue des ouvertures et des sorties en fondu de scènes.
BAL.BLANCS .............................. Règle l’équilibre des couleurs en fonction de la luminosité de
l’environnement d’enregistrement.
EXPOSITION .............................. Règle la luminosité des films et des photos.
MISE AU PT. ............................... Effectue la mise au point manuelle.
TÉLÉ MACRO ............................. Effectue la prise de vue d’un sujet mis au point avec arrière-plan en flou.
Catégorie (RÉG.PRISE DE VUE)
MODE ENR. .......................... Règle le mode d’enregistrement de films. Pour enregistrer un objet en
déplacement rapide, il est recommandé d’utiliser une qualité d’image
élevée.
IMAGE GUIDE ...........................Affiche l’image pour s’assurer que le sujet est horizontal ou vertical.
STEADYSHOT ...................... Règle la fonction SteadyShot lors de l’enregistrement de films.
OBT.LENTE AUTO..................... Règle la vitesse de l’obturateur automatiquement.
DÉTECT.VISAGES ..................... Règle automatiquement la qualité d’image des visages.
RÉGL.ENR.AUDIO
MIC ZOOM INTÉG. ......... Enregistre des films avec un son vif adapté à la position du zoom.
NIV.RÉF.MIC. ..................... Règle le niveau du microphone.
RÉGL.ENR.AUTRE
ZOOM NUM. .............. Règle le niveau de zoom maximum du zoom numérique qui dépasse le
niveau de zoom du zoom optique.
CONTRE-JOUR ................Règle l’exposition dans le cas de sujets en contre-jour.
SÉL.GD FRMAT .......... Règle le rapport horizontal à vertical lors de l’enregistrement de films.
Catégorie (RÉGL.PHOTO APP.)
RETARDATEUR ....................Règle le retardateur lorsque le caméscope est en mode d’enregistrement de
photos.
TAIL.IMAGE ..........................Règle la taille de la photo.
N° FICHIER .................................Règle la façon d’attribuer un numéro de fichier.
Catégorie (LECTURE)
VISUAL INDEX ...........................Affiche les images enregistrées sous forme de vignettes (p. 18).
VISUALIS.IMAGES
INDEX DES DATES..........Permet de rechercher les images voulues par date.
PELLICULE .................. Affiche et lit les scènes selon un certain intervalle.
VISAGE..........................Affiche et lit les scènes de visages.
LISTE DE LECTURE ..................Affiche et lit les listes de lecture de films.
RÉGL.DE LECTURE
CODE DONNÉES ............Affiche les données d’enregistrement détaillées au cours de la lecture.
Personnalisation de votre caméscope
FR
39

40
FR
Catégorie (MONT)
SUPPRIMER
SUPPRIMER ................ Supprime les films.
SUPPRIMER ................ Supprime les photos.
PROTECTION
PROTECTION
PROTECTION
............. Protège les films pour éviter leur suppression.
.............Protège les photos pour éviter leur suppression.
DIVISER .................................Divise les films.
CAPTURE PHOTO .................... Capture les photos des scènes voulues de films.
DUPLIQUER FILM
1
*
DUPLIQUER en sél. ........ Sélectionne les films et les duplique.
DUPLIQUER / date ......... Duplique tous les films qui correspondent à la date spécifiée.
DUPLIQUER TT. .......... Duplique tous les films sauvegardés dans une liste de lecture.
1
COPIER PHOTO
*
COPIER en sélect. ........... Sélectionne des photos et les copie.
COPIER/date .................... Copie toutes les photos qui correspondent à une date spécifiée.
ÉDITER LISTE LECT.
AJOUTER..................... Ajoute des films à une liste de lecture.
AJOUTER/date .......... Ajoute des films enregistrés un même jour à un moment donné dans une
liste de lecture.
SUPPRIMER ................. Efface des films d’une liste de lecture.
SUPPR.TOUT ............... Efface tous les films d’une liste de lecture.
DÉPLACER ................... Modifie l’ordre des films dans une liste de lecture.
Catégorie (AUTRES)
PROJECTEUR*
CONNEXION USB
INFOS BATTERIE .......................Affiche l’information du bloc-piles.
2
SOURCE.............................Projette les images enregistrées sur d’autres appareils (p. 23).
FORMAT ÉCRAN ............. M
CONNEXION USB*
odifie le format des images projetées (p. 23).
1
.............................................Raccorde le disque dur interne au moyen d’un câble USB.
CONNEXION USB ..... Raccorde la carte mémoire au moyen d’un câble USB.
GRAVURE DISQUE ......... P
ermet de sauvegarder des images sur des disques (p. 25).
Catégorie (GÉRER SUPPORT)
RÉGLAGE SUPPORT*
RÉG.SUPP.FILM ............... Sélectionne le support d’enregistrement pour les films (p. 15).
RÉG.SUPP.PHOTO........... S
INFOS SUR SUPP. ..................... Affiche l’information, comme l’espace libre, sur le support
1
électionne le support d’enregistrement pour les photos (p. 15).
d’enregistrement.

FORMAT.SUPPORT
1
*
................................Supprime toutes les données sur le disque dur interne.
HDD
CARTE MÉMOIRE ...........Supprime toutes les données sur la carte mémoire.
RÉPAR.F.BD.IM.
1
*
................................Répare le fichier de base de données d’images sur le disque dur interne
HDD
CARTE MÉMOIRE ...........R
(p. 49).
épare le fichier de base de données d’images sur la carte mémoire (p. 49).
Catégorie (RÉGL.GÉNÉRAUX)
RÉGL.SON/AFF.
VOLUME ............................ R
BIP ....................................... Règle les bips de fonctionnement du caméscope.
LUMI.LCD ..........................Règle la luminosité de l’écran LCD.
NIV.ÉCL.LCD .....................Règle le rétroéclairage de l’écran LCD.
COULEUR LCD ................Règle l’intensité des couleurs de l’écran LCD.
RÉGL.AFFICH. .................. Règle la durée d’affichage des icônes ou des indicateurs à l’écran LCD.
RÉGLAGES SORTIE
FORMAT TV ......................C
SORTIE AFF. ......................Règle si l’affichage à l’écran sur le téléviseur est activé ou non.
RÉG.HOR./
LAN.
RÉGL.HORLOGE .............. Règle la date et l’heure.
RÉGL.ZONE ......................Règle un décalage horaire sans arrêter l’horloge.
HEURE D’ÉTÉ ................... Règle l’heure avancée.
RÉGL.LANGUE ............ Règle la langue d’affichage (p. 9).
RÉGL.MISE TENS.
ARRÊT AUTO ....................Modifie le réglage [ARRÊT AUTO].
AUTRES RÉGLAGES
MODE DÉMO. .................. Règle l’affichage ou non de la démonstration.
RÉGLAGE USB LUN ........ Règle la compatibilité lors de l’utilisation d’un raccordement USB.
CAPT.CHUTE*
1
*
DCR-SR21
2
*
DCR-PJ5
1
ègle le volume du son à la lecture (p. 19).
onvertit le signal en fonction du téléviseur raccordé (p. 24).
................Active ou désactive le capteur de chute.
Personnalisation de votre caméscope
FR
41

42
FR
Division d’un film
1
Sélectionnez [Afficher
autres] [ DIVISER] (sous la
catégorie [MONT]).
2
Sélectionnez le film à diviser.
3
Sélectionnez à l’endroit où
vous souhaitez diviser le film en
scènes.
Le film se met alors en mode pause.
Pour alterner entre les modes lecture et
pause, appuyez sur
Ajustez le point de division de manière
plus précise après l’avoir sélectionné à
l’aide de
.
.
Vous pouvez combiner les films divisés en
utilisant le logiciel « PMB » fourni. Consultez
« Aide PMB » (p.
35) pour des détails.
Permet de retourner au début du film
sélectionné
4
Sélectionnez [OUI]
.
Remarques
Il est impossible de restaurer les films qui ont
été divisés.
Conseils
Vous pouvez diviser un film sur l’écran de
lecture à partir du menu
MENU.
OPTION

Information détaillée
provenant du
Guide pratique de
Handycam »
«
Pour des détails sur les opérations avancées,
veuillez consulter le Guide pratique de
Handycam » sur le CD-ROM (fourni) en
«
utilisant un ordinateur.
1
Pour installer le Guide pratique
de « Handycam » sur un
ordinateur Windows, placez le
CD-ROM fourni dans le lecteur de
disque de votre ordinateur.
2
Cliquez sur [Guide pratique].
3
Sélectionnez la langue voulue
et le nom de modèle de votre
caméscope, puis cliquez sur
[Installation].
Le nom de modèle de votre caméscope est
imprimé sur la surface inférieure.
Vous avez besoin du logiciel Adobe Reader
pour consulter le manuel Guide pratique de
« Handycam ». S’il n’est pas installé sur votre
ordinateur, téléchargez-le à partir de la page
Web d’Adobe Systems au :
http://www.adobe.com/
Personnalisation de votre caméscope
Pour regarder le manuel Guide pratique de
« Handycam », cliquez deux fois sur l’icône
de raccourci sur l’écran de l’ordinateur.
Lors de l’utilisation d’un Macintosh, ouvrez le
dossier [Handbook] – [FRCA] sur le CD-ROM,
puis copiez [Handbook.pdf].
FR
43
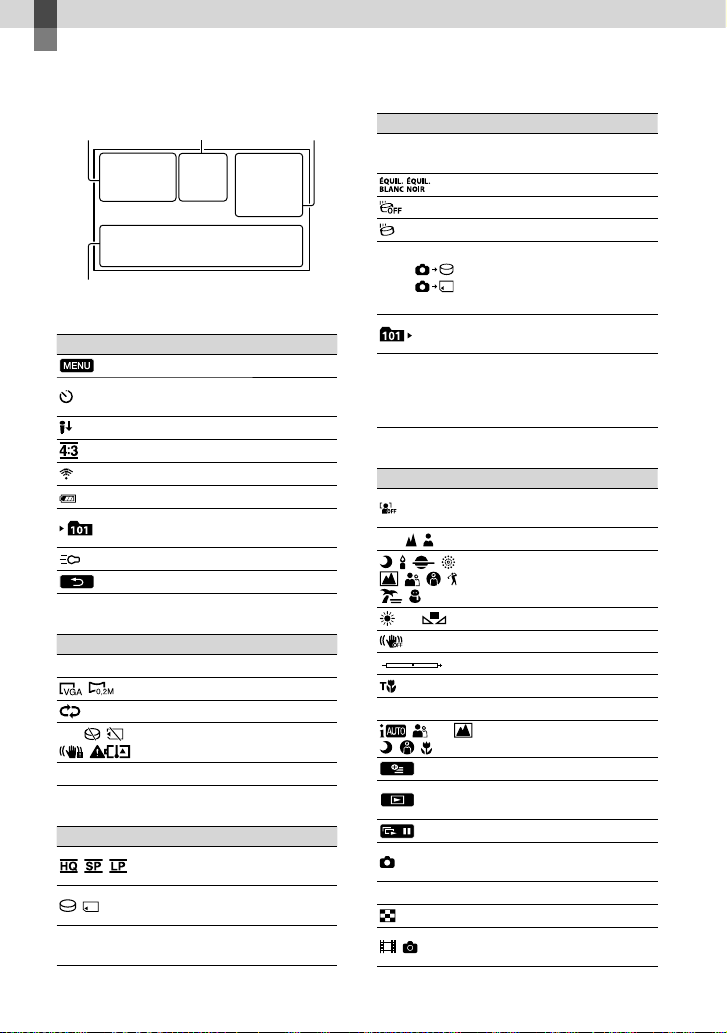
Informations complémentaires
Icônes d’écran
En haut à
gauche Au centre
En bas
En haut à gauche
Icône Signification
Touche MENU
Enregistrement avec le
retardateur
NIV.RÉF.MIC. bas
SÉL.GD FRMAT
MIC ZOOM INTÉG.
60 min Autonomie restante
Dossier d’enregistrement
de carte mémoire
VIDEO LIGHT
Touche de retour
Au centre
Icône Signification
[VEILLE]/[ENR.] État de l’enregistrement
En haut à droite
Icône Signification
0:00:00
FR
44
Taille de la photo
Réglage du diaporama
Avertissement
Mode de lecture
Mode d’enregistrement
(HQ/SP/LP)
Support d’enregistrement/
de lecture/d’édition
Compteur (heures:
minutes:secondes)
En haut à
droite
Icône Signification
[00min]
9999
9999
100/112
Durée d’enregistrement
restante prévue
TRANS.FONDU
Capteur de chute désactivé
Capteur de chute activé
Nombre approximatif
de photos pouvant être
enregistrées et support
d’enregistrement
Dossier de lecture de la
carte mémoire
Film ou photo en cours
de lecture/Nombre total
de films ou de photos
enregistrés
En bas
Icône Signification
[DÉTECT.VISAGES] est
réglée à [ARRÊT]
101-0005
Mise au point manuelle
SÉLECTION SCÈNE
Équilibre des blancs
SteadyShot désactivée
EXPOSITION
TÉLÉ MACRO
CONTRE-JOUR
AUTO INTELLIGENT
Touche OPTION
Touche AFFICHER LES
IMAGES
Touche de diaporama
Nom du fichier de
données
Image protégée
Touche d’index
Mode de film/mode de
photo
 Loading...